15 Things to Embed to Make Content Easier to Access!
Embedding apps is a great way to keep your content organized, but more importantly, it can help keep your students focused when working on tasks. The option to embed from apps is becoming increasingly more popular, and you may even be able to embed some of the apps you’re using right now! Here are 15 different ways we love to embed!

Embedding apps is a great way to keep your content organized, but more importantly, it can help keep your students focused when working on tasks. The option to embed from apps is becoming increasingly more popular, and you may even be able to embed some of the apps you’re using right now! Here are 15 different ways we love to embed!
Please note: This blog post was hand-crafted and was not created using AI.
(click on any subheading to jump to that section)


What does it mean to embed something?
According to BigCommerce.com, Embedding refers to the integration of links, images, videos, gifs and other content into social media posts or other web media. Embedded content appears as part of a post and supplies a visual element that encourages increased click through and engagement. The key takeaway here is that your embedded content appears to be a part where you are posting it. In other words, it’s being housed by wherever you are placing it.
Embedding & Hyperlinking
So why embed over hyperlink? By embedding your content, your students will not have to leave one app to visit another to complete a task. Everything is organized and in one place. Hyperlinking your content is not a bad thing, it just adds another step for students. Embedding creates a streamlined experience. So, let’s take a look at what some of our favorite embedding combos look like!

Padlet Embedded into Canvas
Take your Padlet boards and place them right into a Canvas page! Here’s how:


Create or find the Padlet board that you’d like to share, then click on the share icon.
Click on Embed in your blog or website.
Click Copy Padlet embed code.
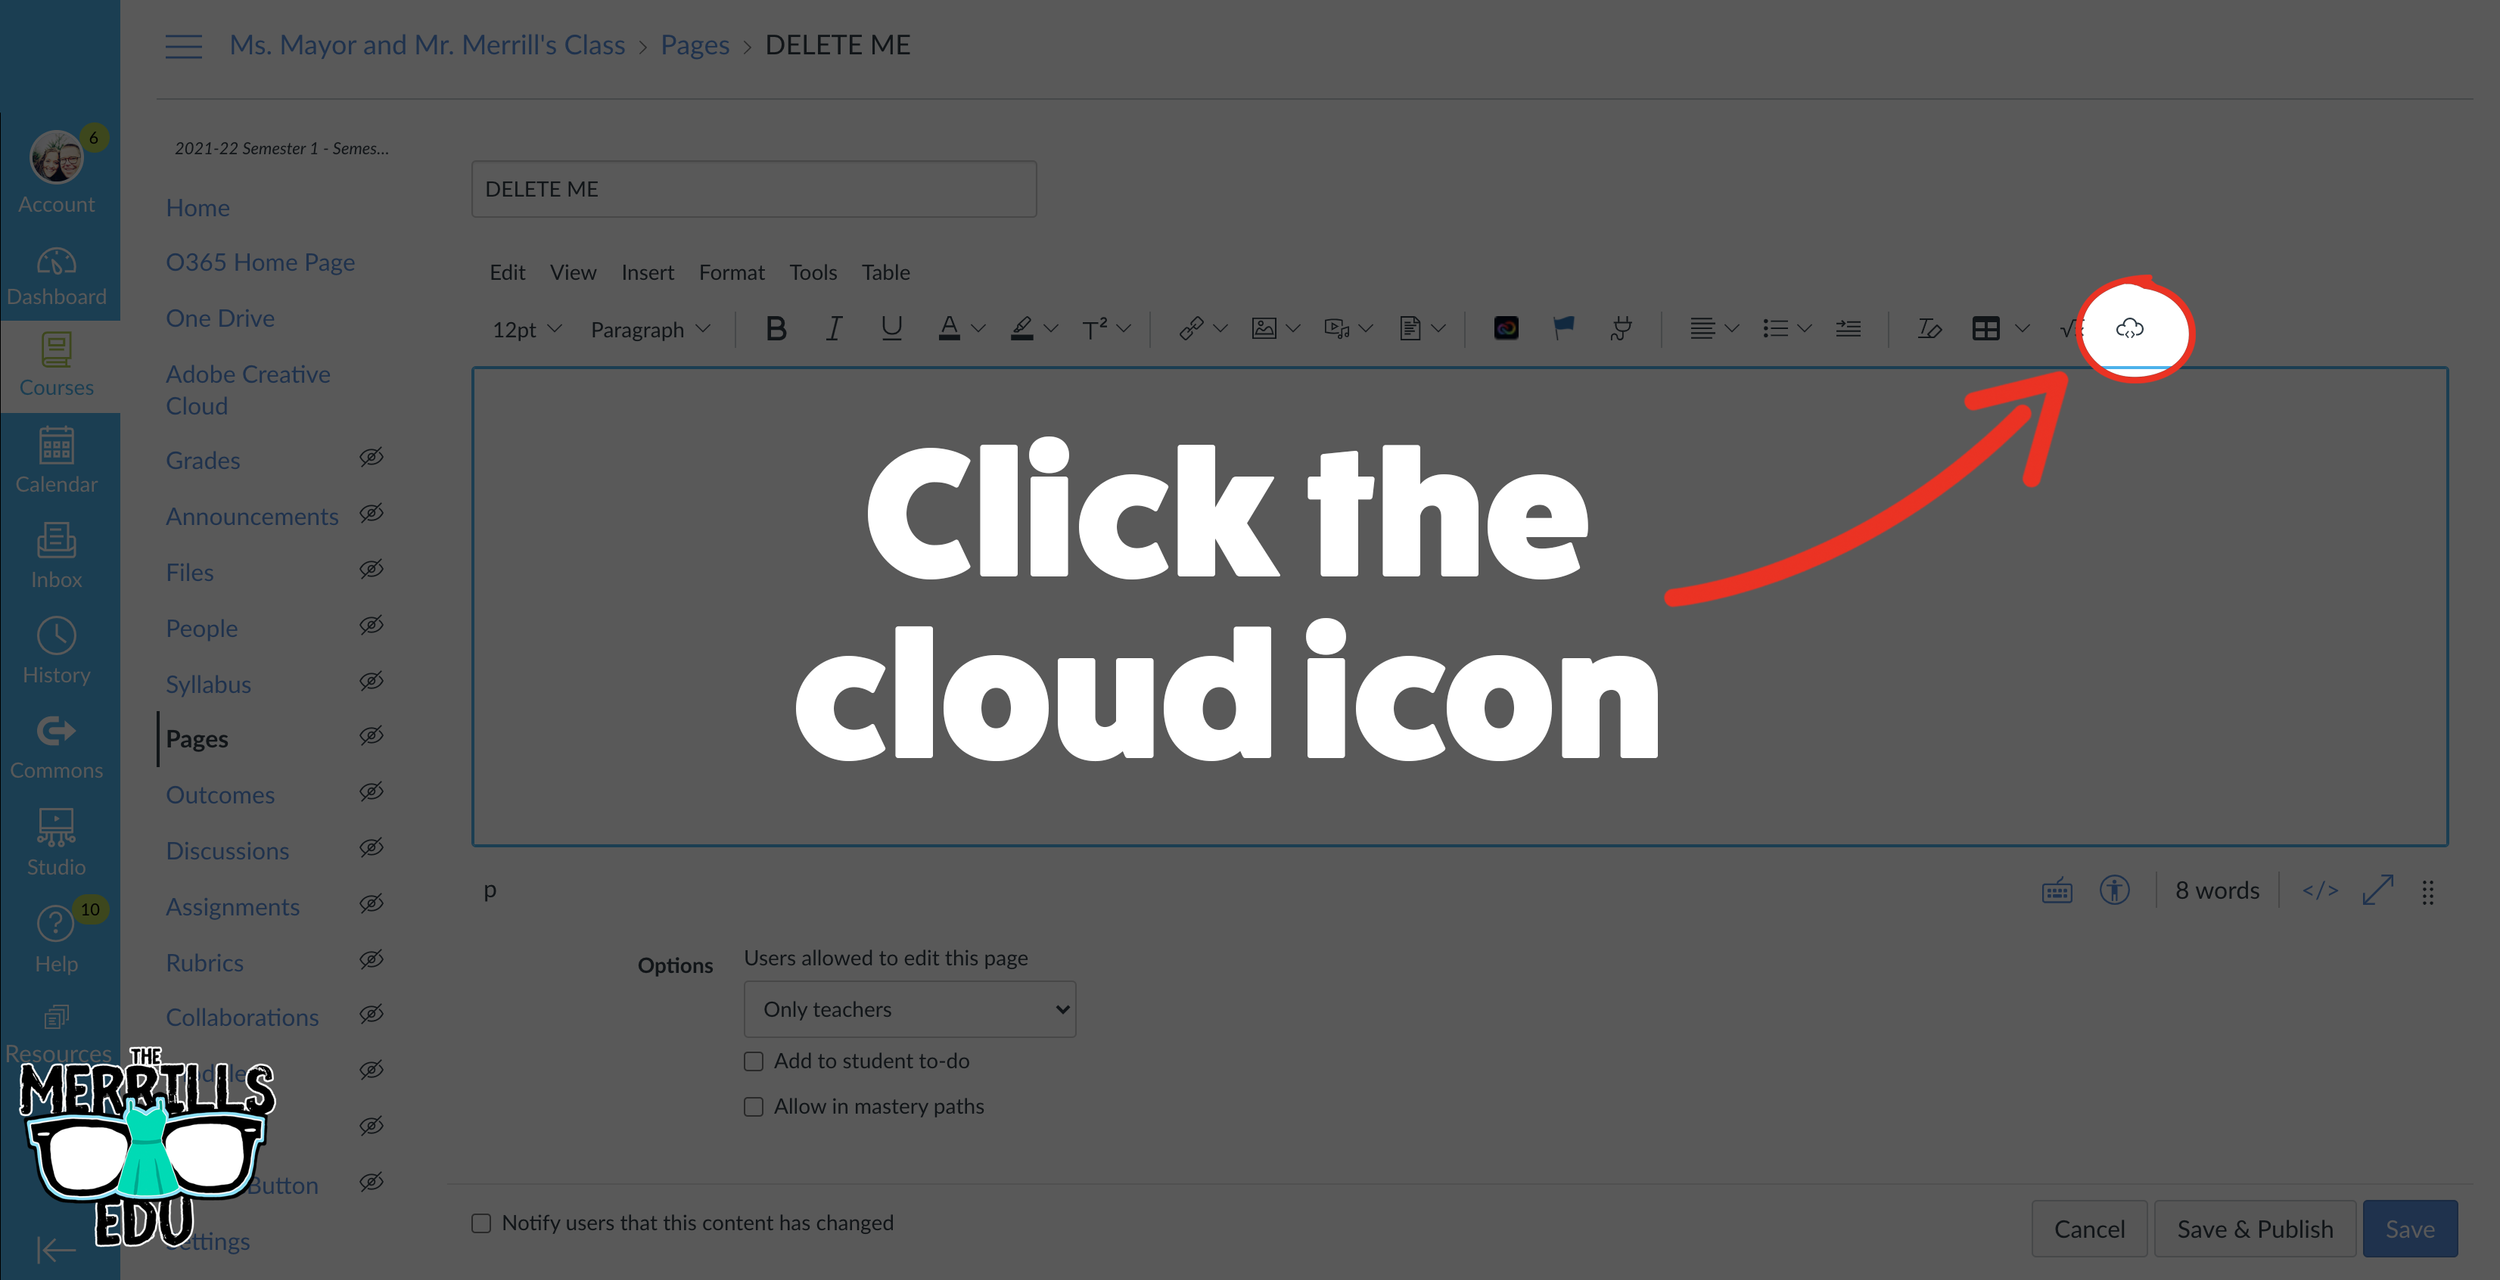
4. In the Canvas page, click the cloud icon (if you don’t see a cloud icon, click the three dots to expand the toolbar).

5. In the pop up window, paste the copied embed code from Padlet then click the blue “Submit” button.
6. Your Padlet board is now embedded into your Canvas page! Click “Save” to keep the changes.

Padlet Embedded into Book Creator
Adding your Padlet boards into Book Creator can help keep track of student work. Here’s how!


Create or find the Padlet board that you’d like to share, then click on the share icon.
Click on Embed in your blog or website.
Click Copy Padlet embed code.
4. Log into Book Creator, then open or start a new book. In the book, click on the + icon, followed by “More.” Scroll down until you see “Embed,” then click it.
5. Paste the copied embed code from Padlet, then click “Confirm.”
6. The Padlet board is now embedded into the book.
This embed is only a hyperlink out to the Padlet board. While it will not allow students to interact with the Padlet content directly in the book, it will provide an organized way to revisit your Padlet boards.

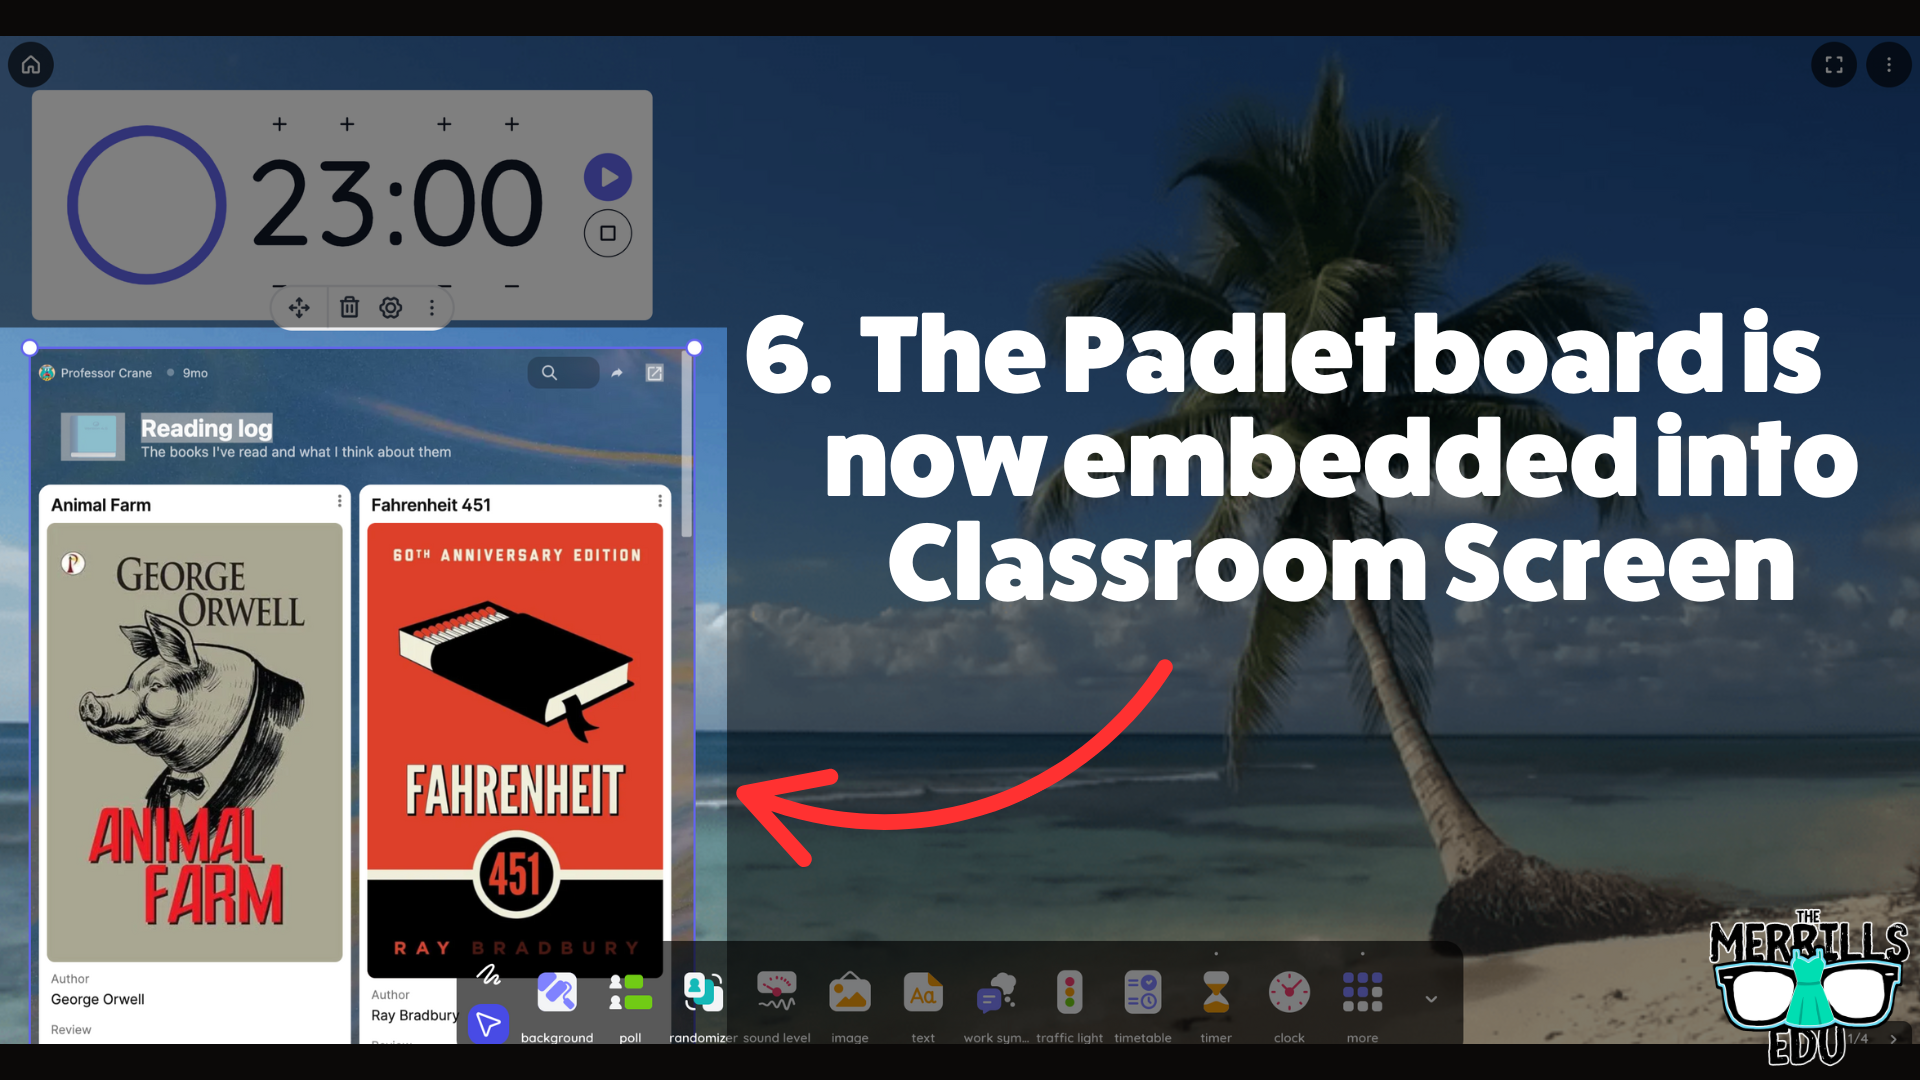
Padlet Embedded into Classroom Screen
What is Classroom Screen?
Classroom Screen is a free tool (with a paid option) that educators can use to project in front of the class. Users can pick a background to be projected from a collection of images, animated gifs, or upload their own image. Classroom Screen provides many options to add to your background such as: a timer, random name generator, sound level alarms, and our personal favorite - embedding.
With Classroom Screen, you can set a class timer to give students time to create, then give them additional time to respond. This alleviates stress that students may face when trying to finish their work. With Classroom Screen’s embed feature, you can add a Padlet board right into your Classroom Screen. Here’s how it works:


Open the Padlet board that you want to embed, then click the share icon.
Click on Embed in your blog or website.
Click Copy Padlet embed code.
Launch Classroomscreen, then click More located on the bottom toolbar. Then, click Embed.
Paste the embed code, then click Run Code.
Now, the Padlet board is embedded into the Classroomscreen workspace.
This is a true embed - meaning users can interact with it in real time. So, educators can embed this into a Classroomscreen workspace, start a timer, and then the embed will refresh itself so that every time new content gets added, it appears on the screen.

Nearpod Embedded into Canvas
(Note: this requires a paid Nearpod account and the use of Student Paced lessons. It will not work with “Live participation” lessons)
Nearpod users can now expedite the login procedure for their students by embedding lessons right into Canvas. Doing so will eliminate the need for a join code. Here’s how it all works:
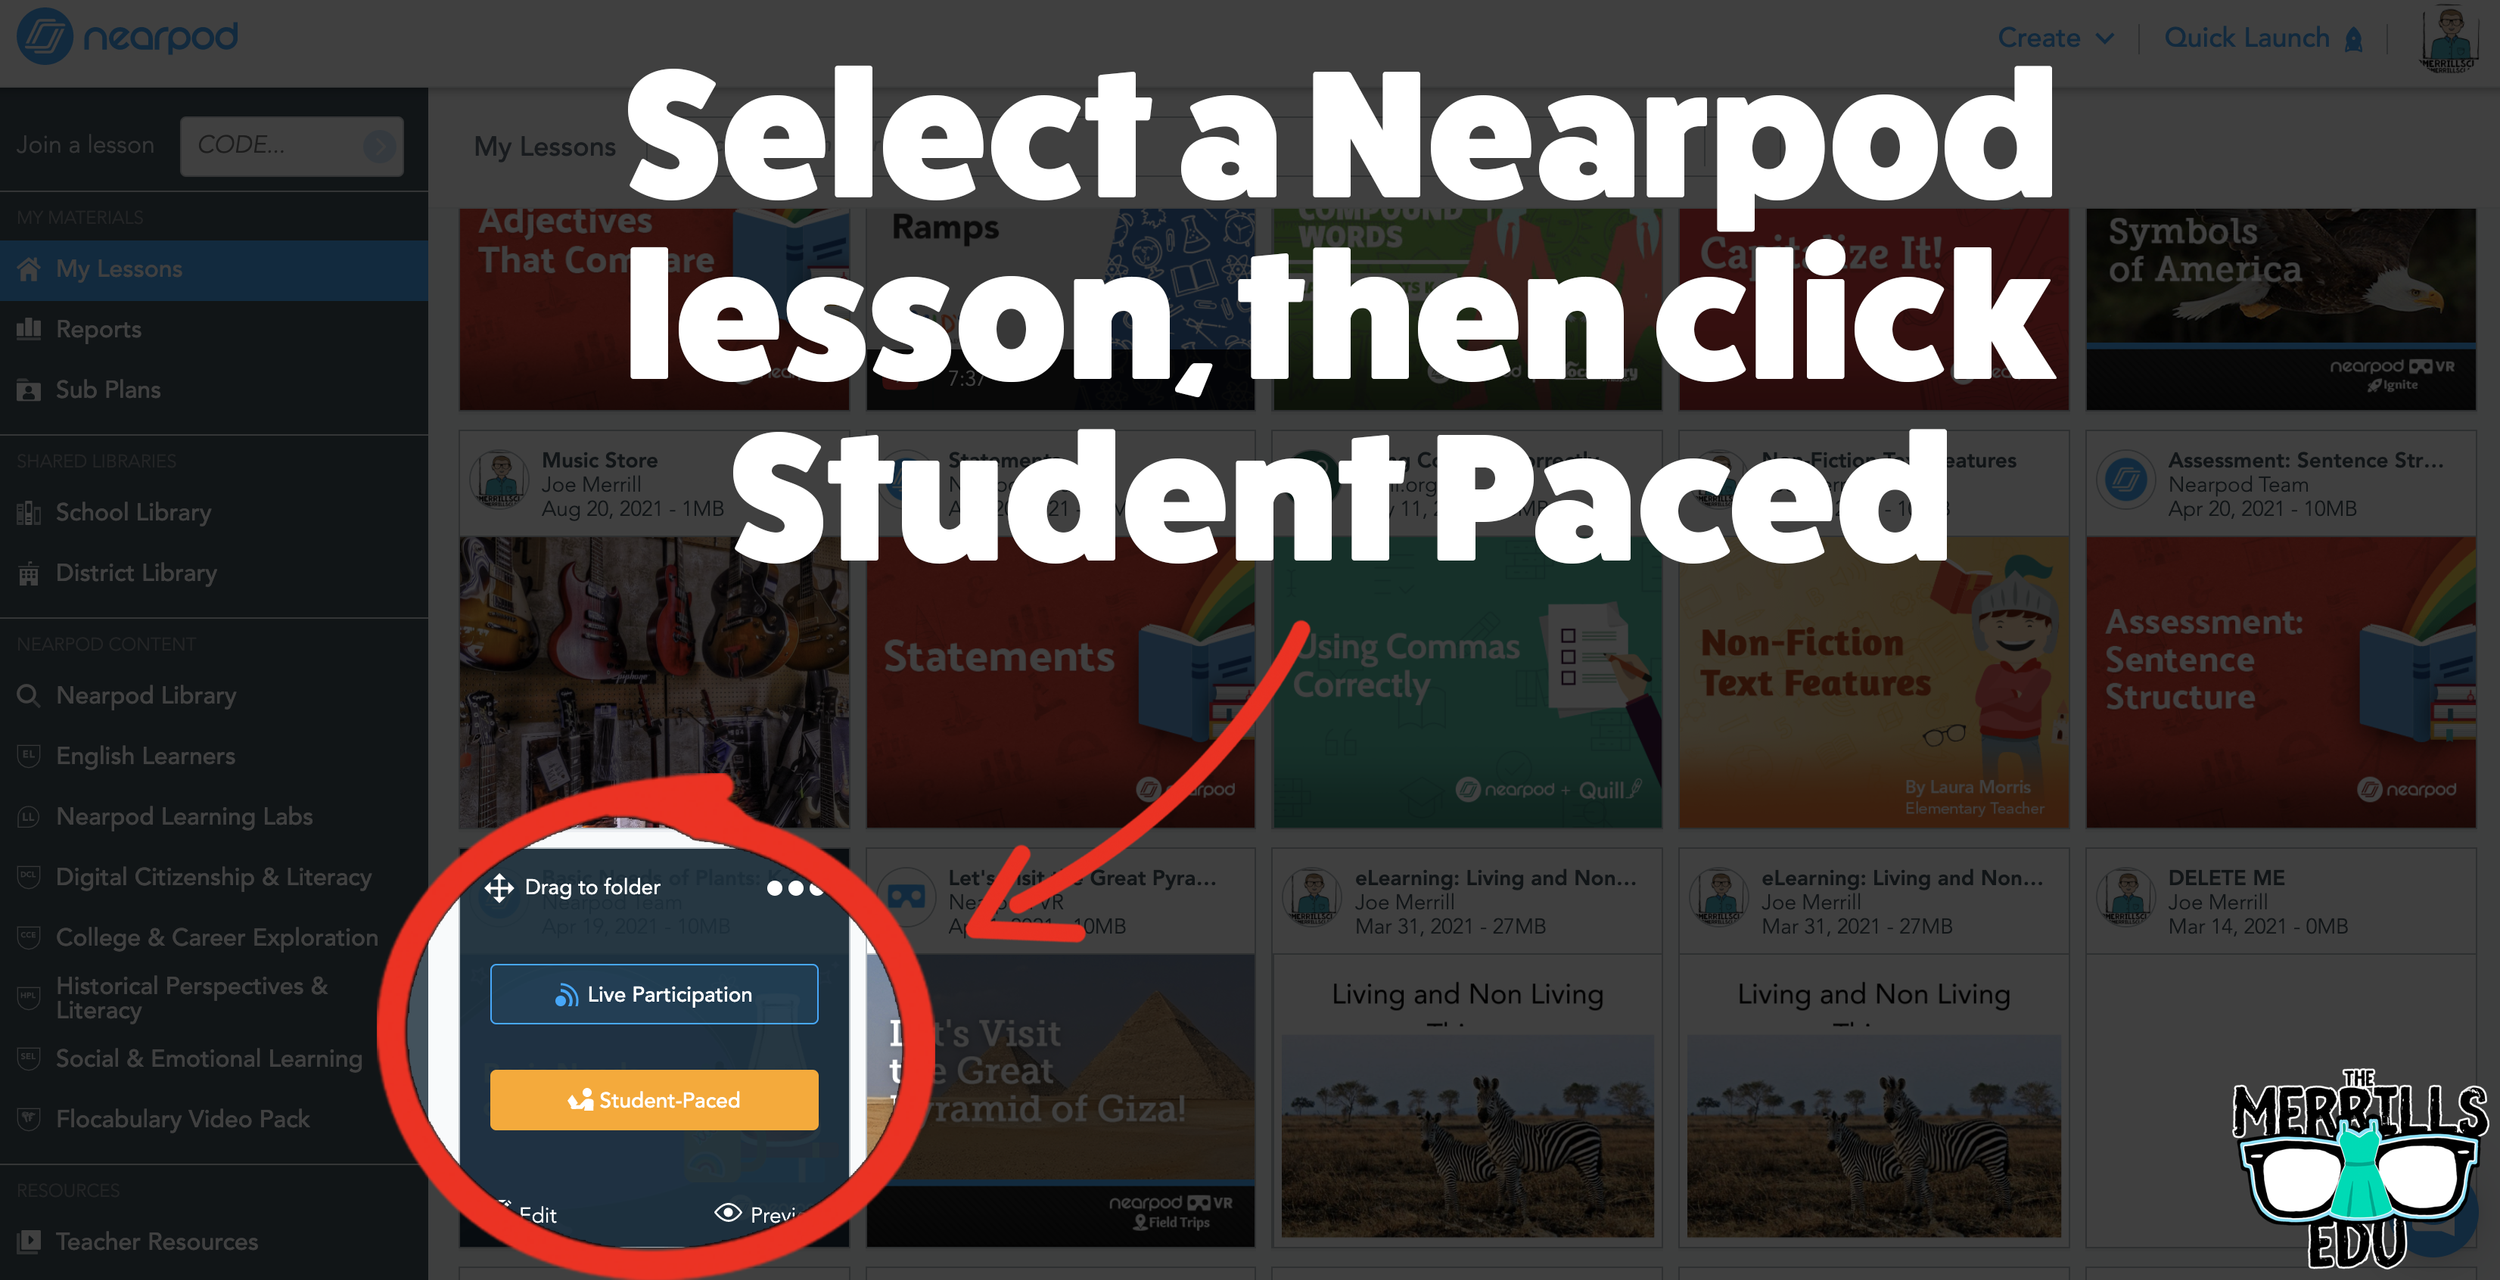


Open the desired Nearpod lesson that you would like to embed into Canvas.
Click on “Student-Paced.”
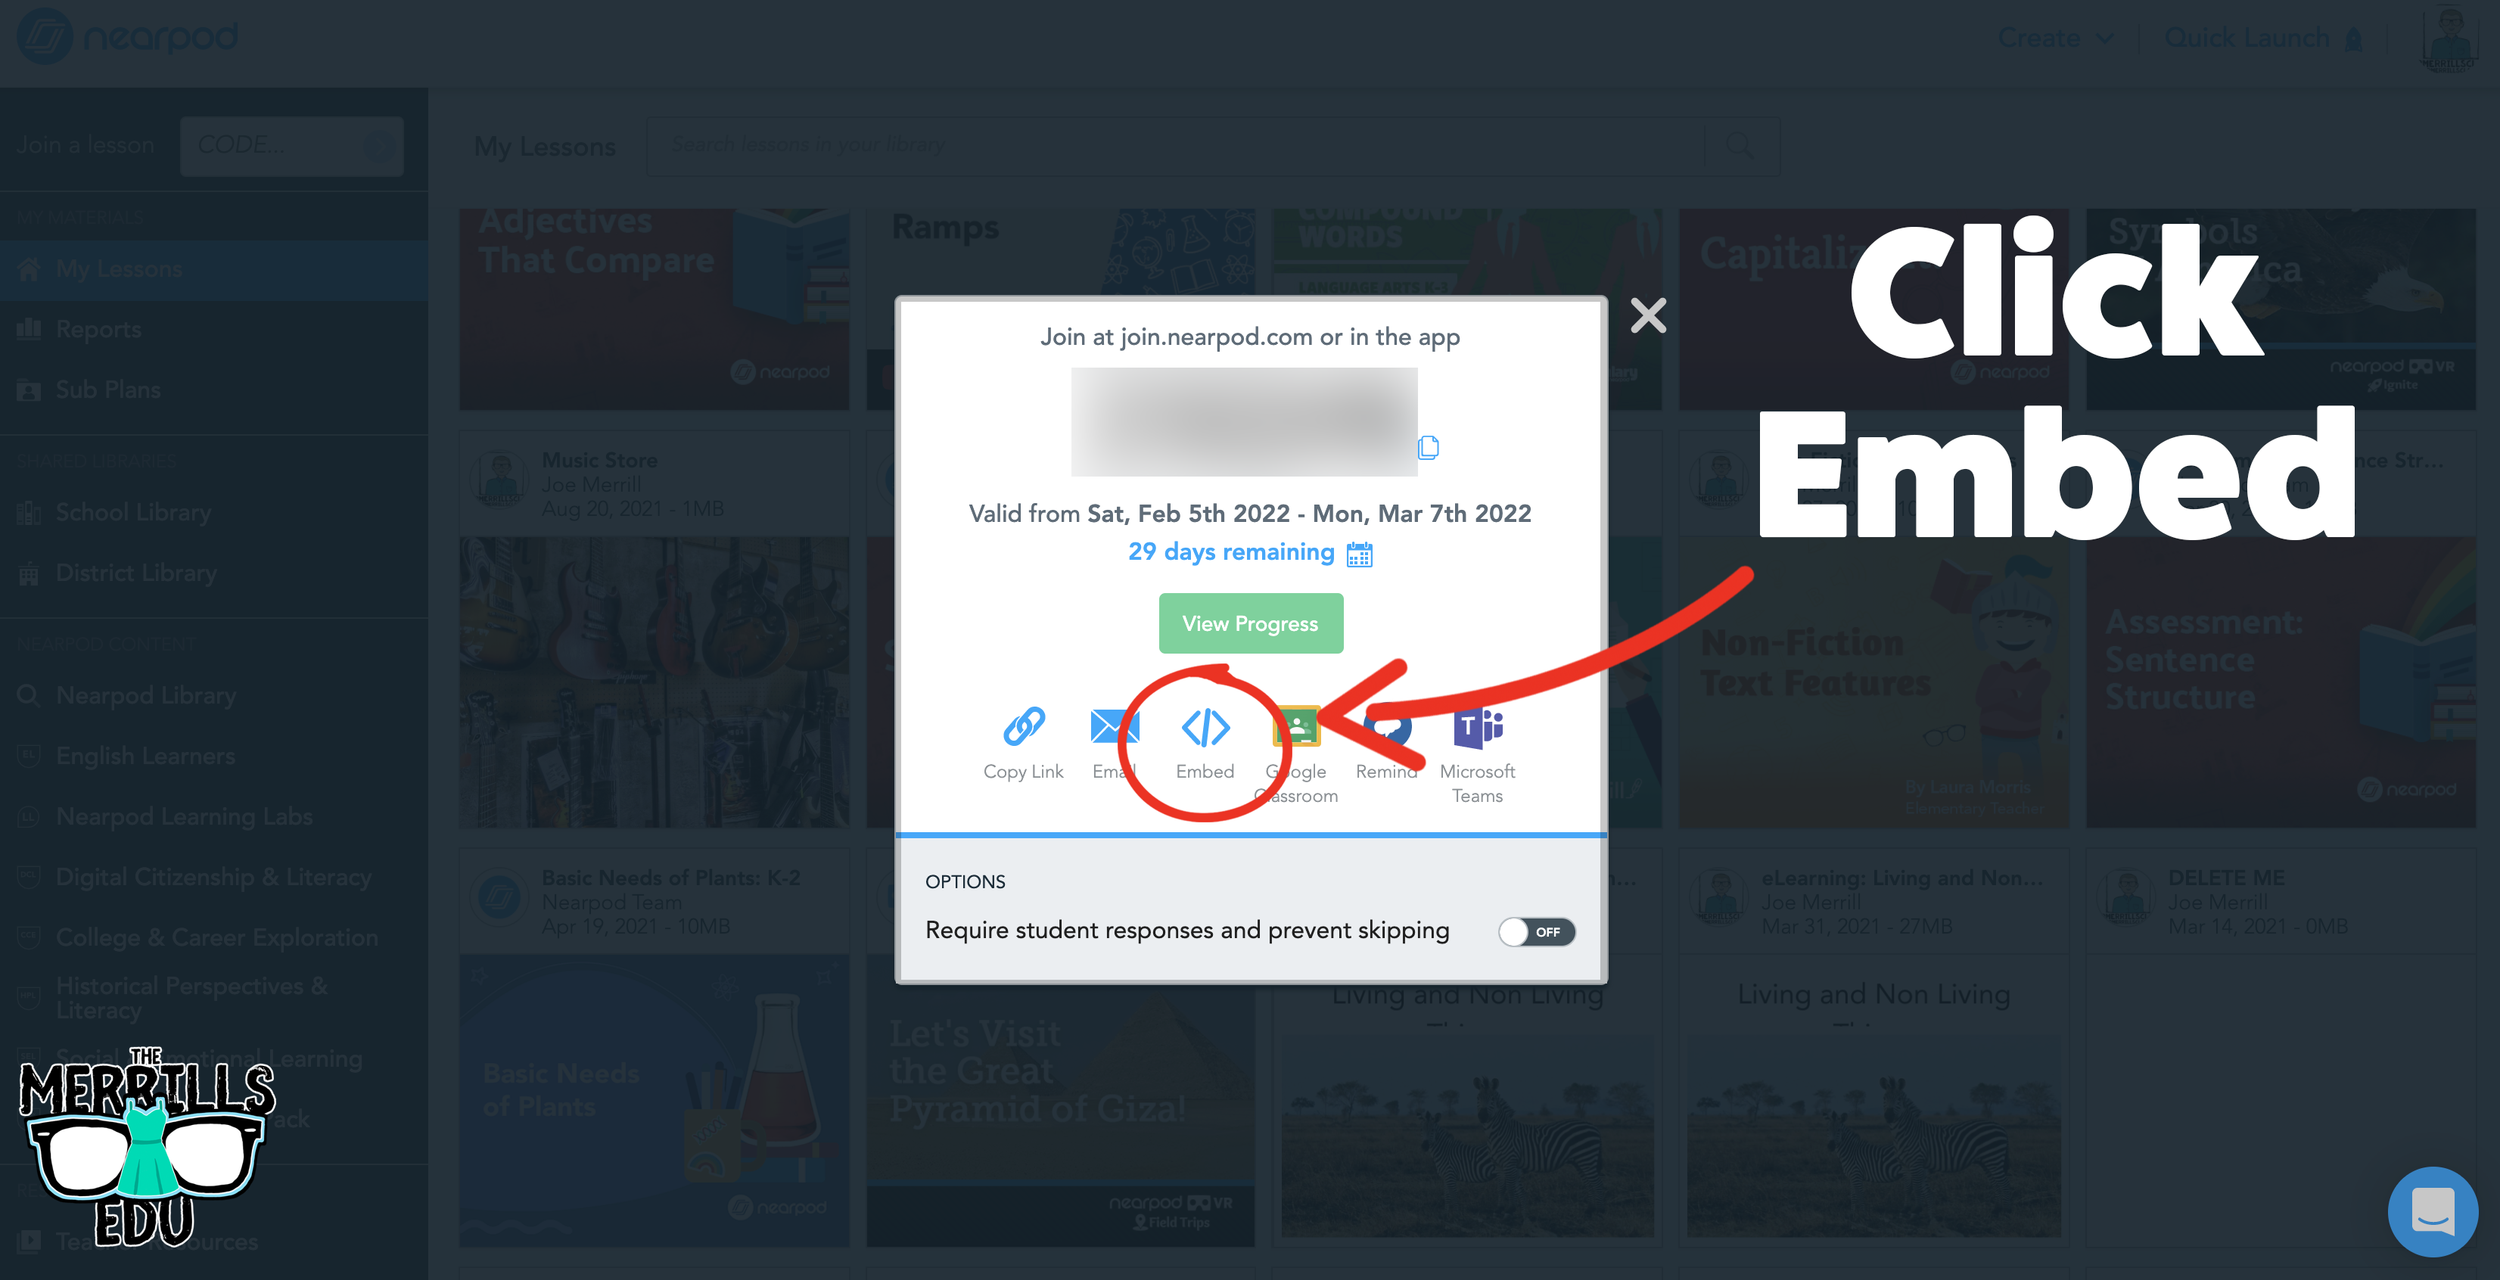
On the next window, click the Embed icon.
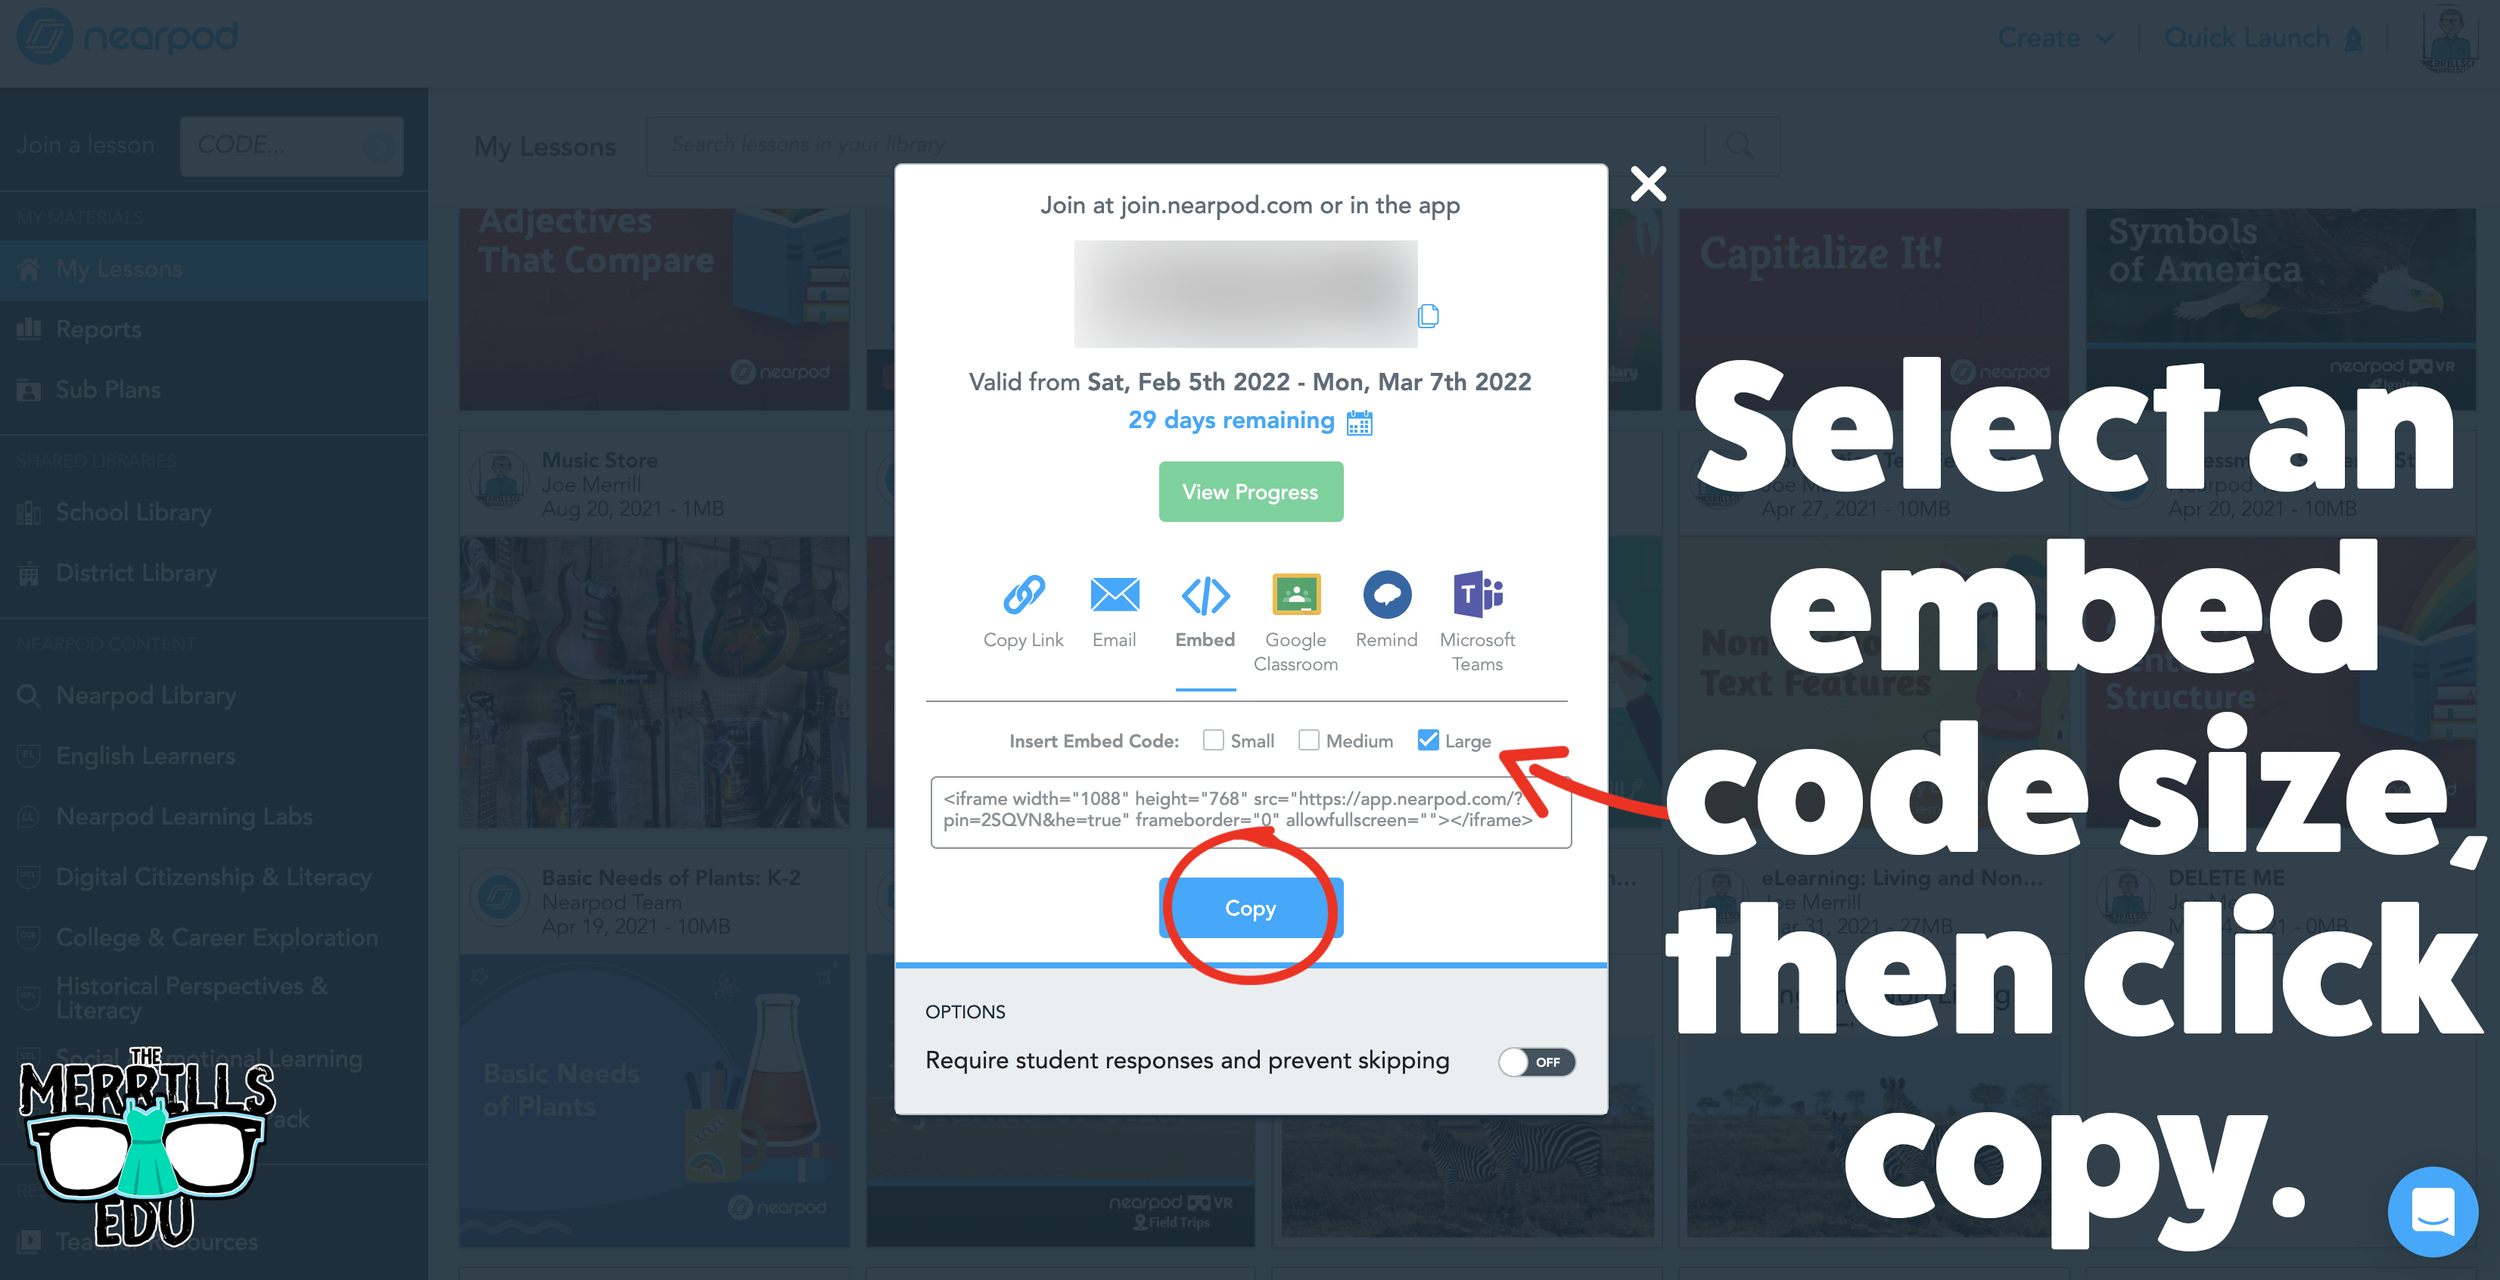
In the Embed window, select a preferred embed code size. We recommend large. Then, click copy.
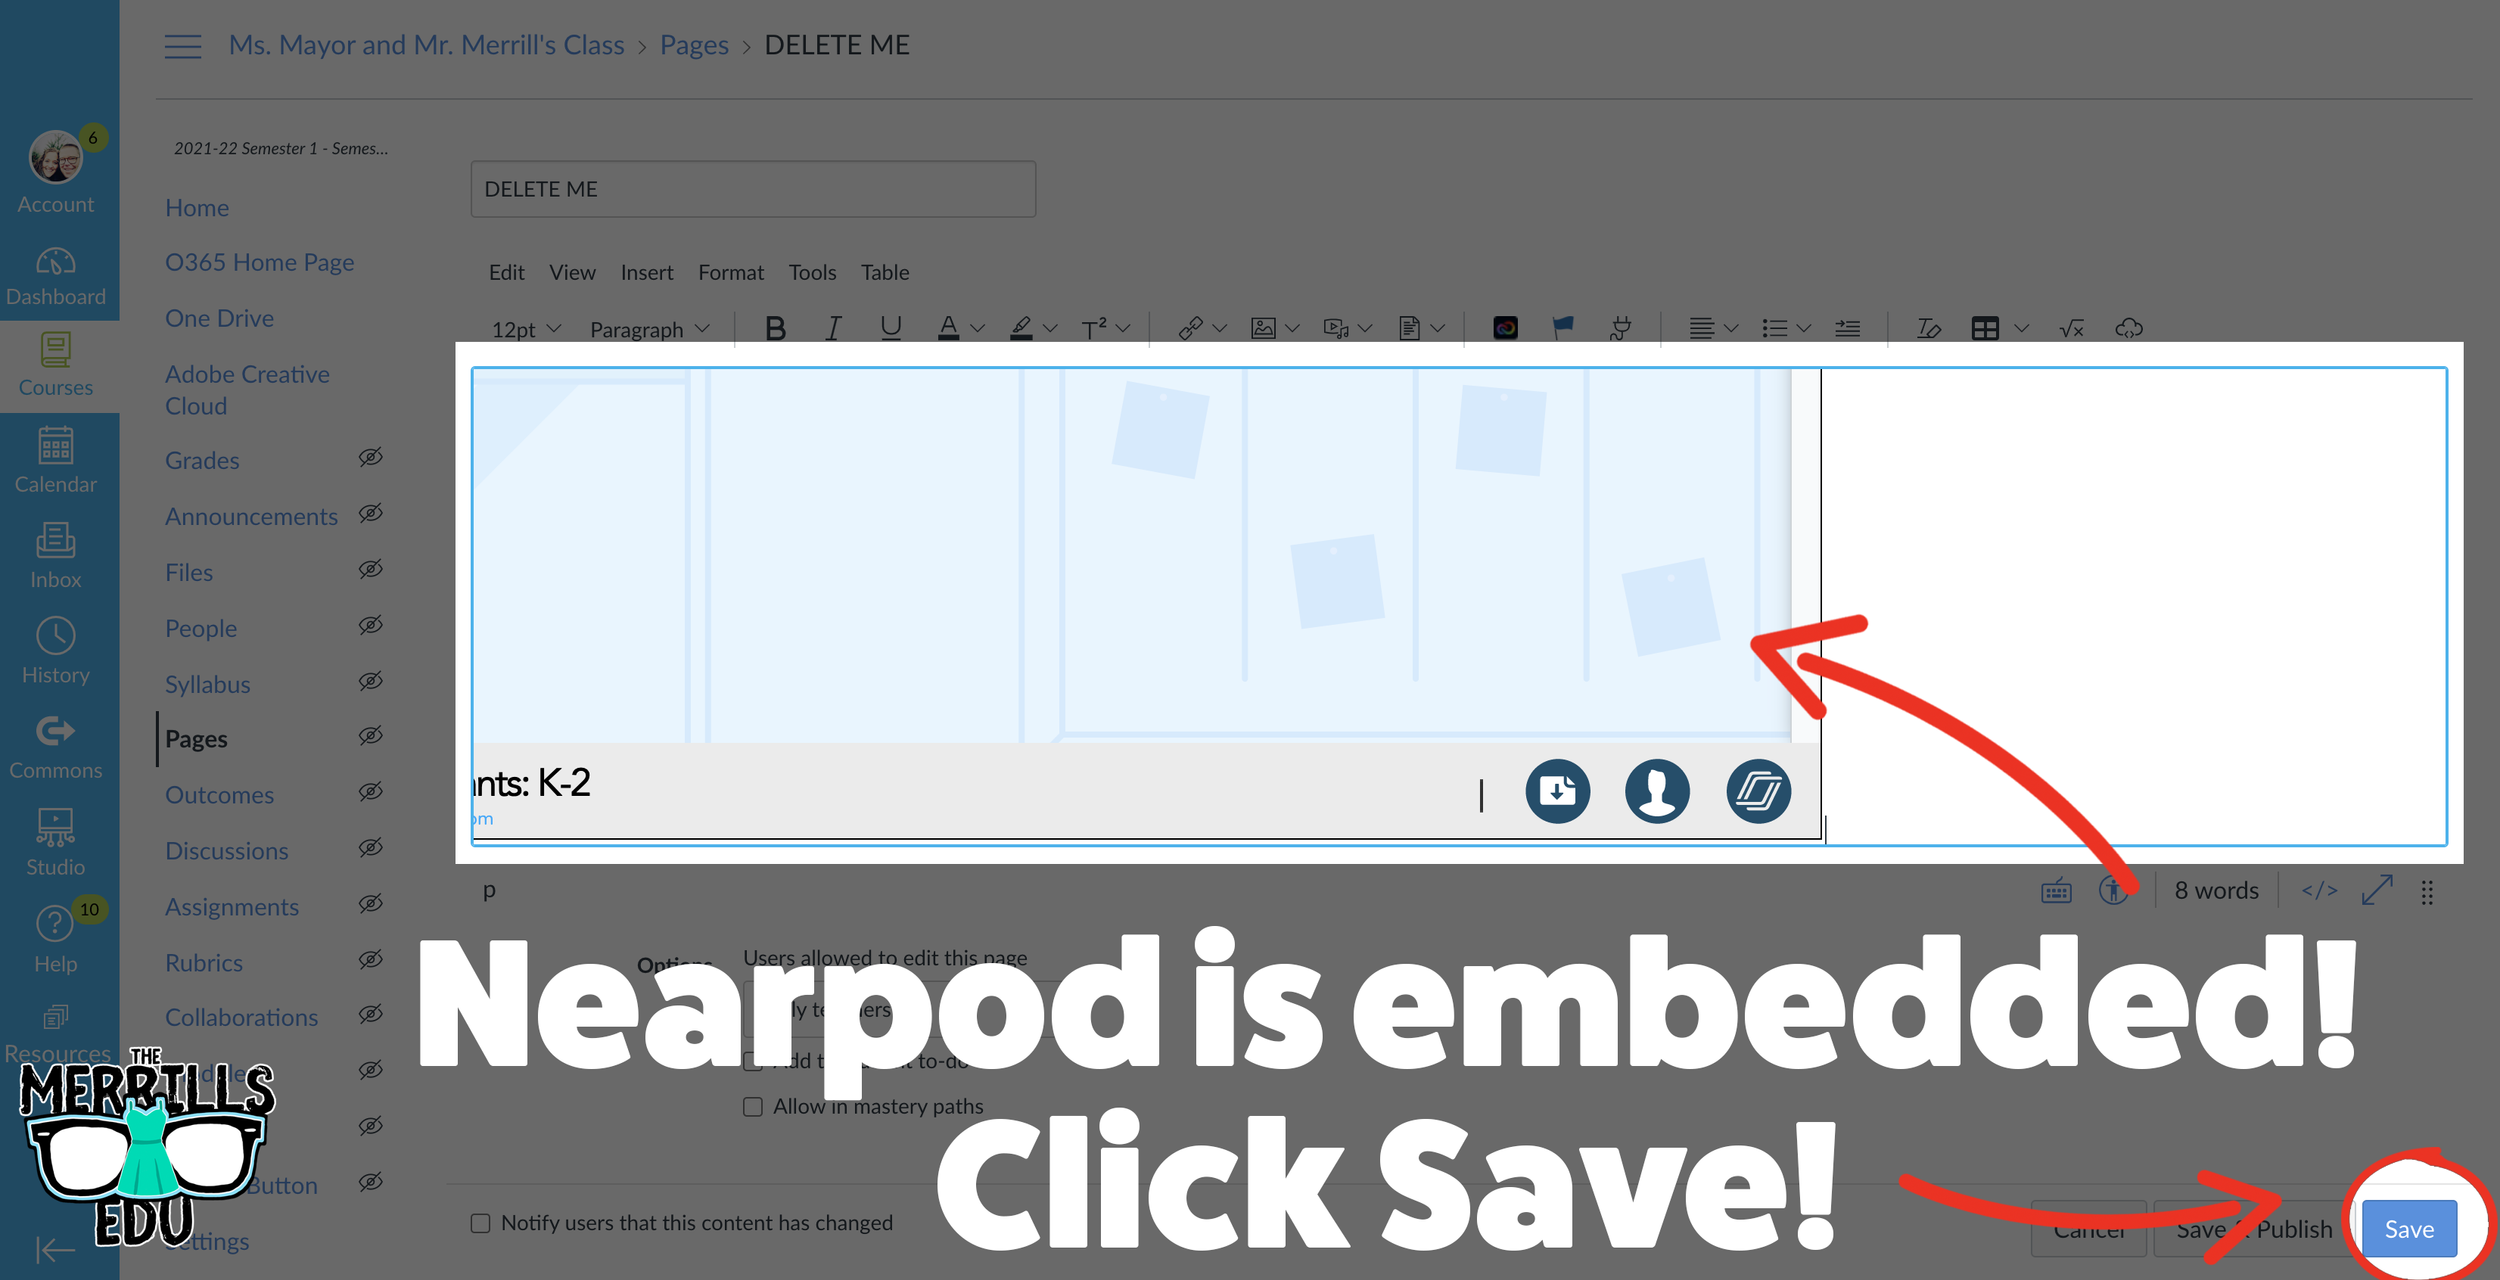
In a separate tab, open the Canvas page that you would like to embed the Nearpod lesson into.
Click on the cloud icon which will open the embed menu (if you don’t see the cloud icon, click on the three dots to the right of the menu bar).
Paste your copied embed code into the box, then click “Submit.”
Your Nearpod lesson will now be embedded into Canvas. Click “Save” to update the changes.
Now, the lesson will be available for your students via Canvas!
Wakelet Embedded into Canvas
Share your Wakelet Collections right within Canvas! This live embed will allow students to make changes to the Wakelet collection without having to re-embed it afterwards. In other words, changes will be available as they are made - without having to go through this process again. Here’s how it all works:

(Note: Your Wakelet Collection must be set to “Public” in order for you to embed it)
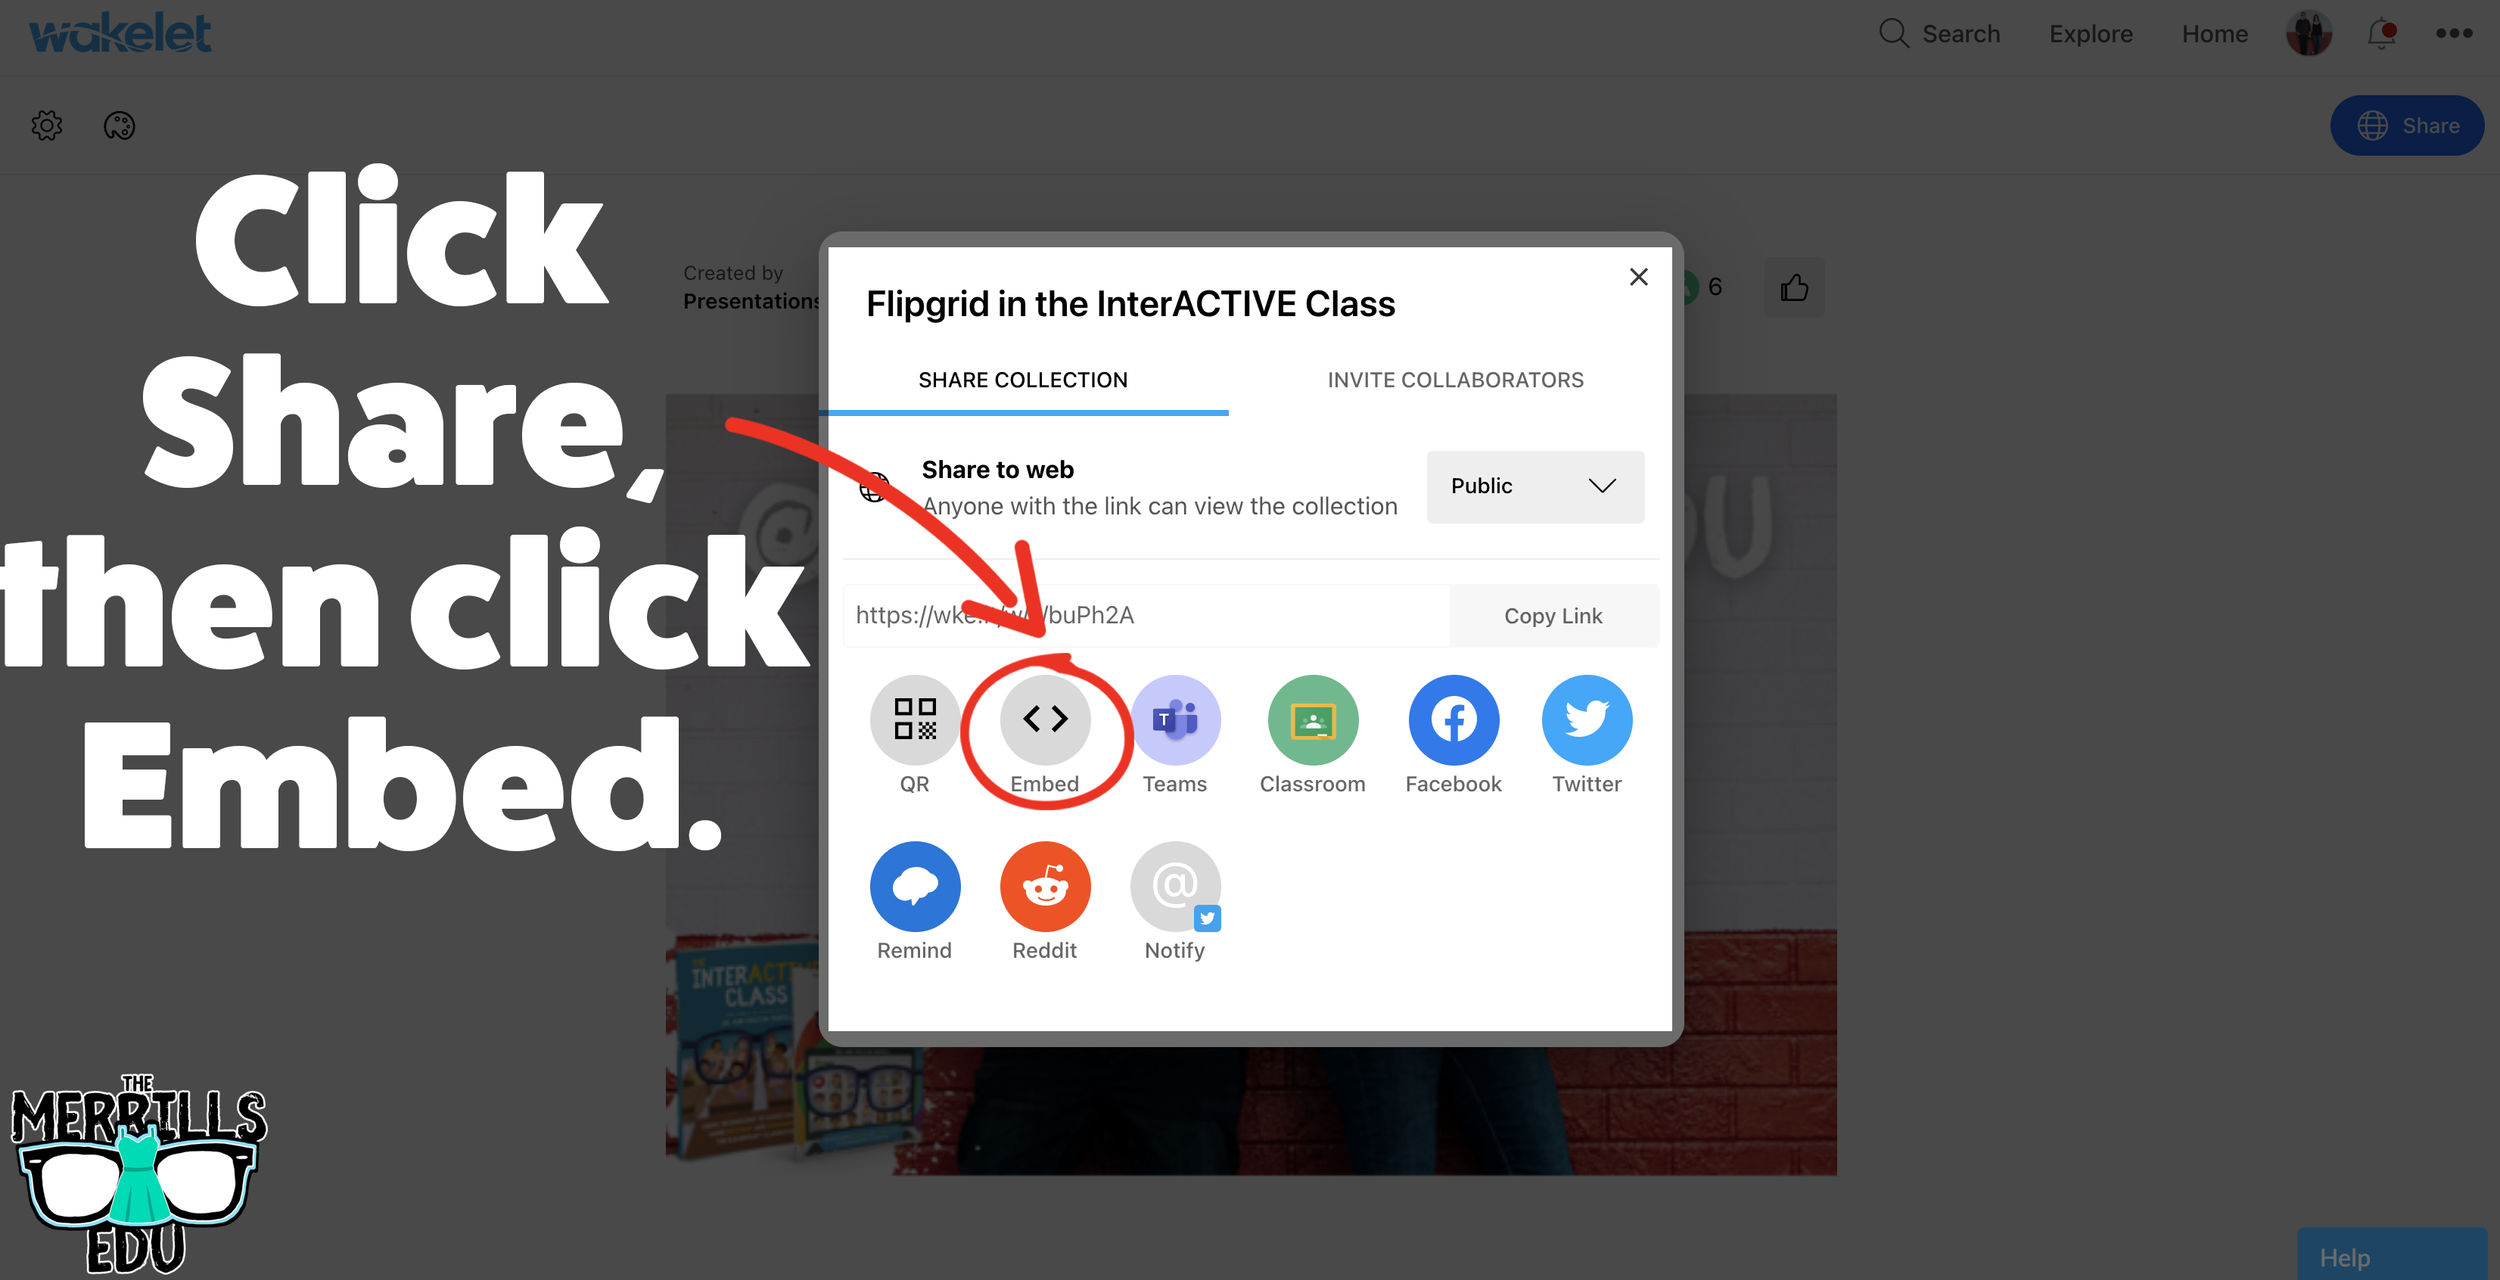
In a Wakelet Collection, click the “Share” button, then click “Embed.”
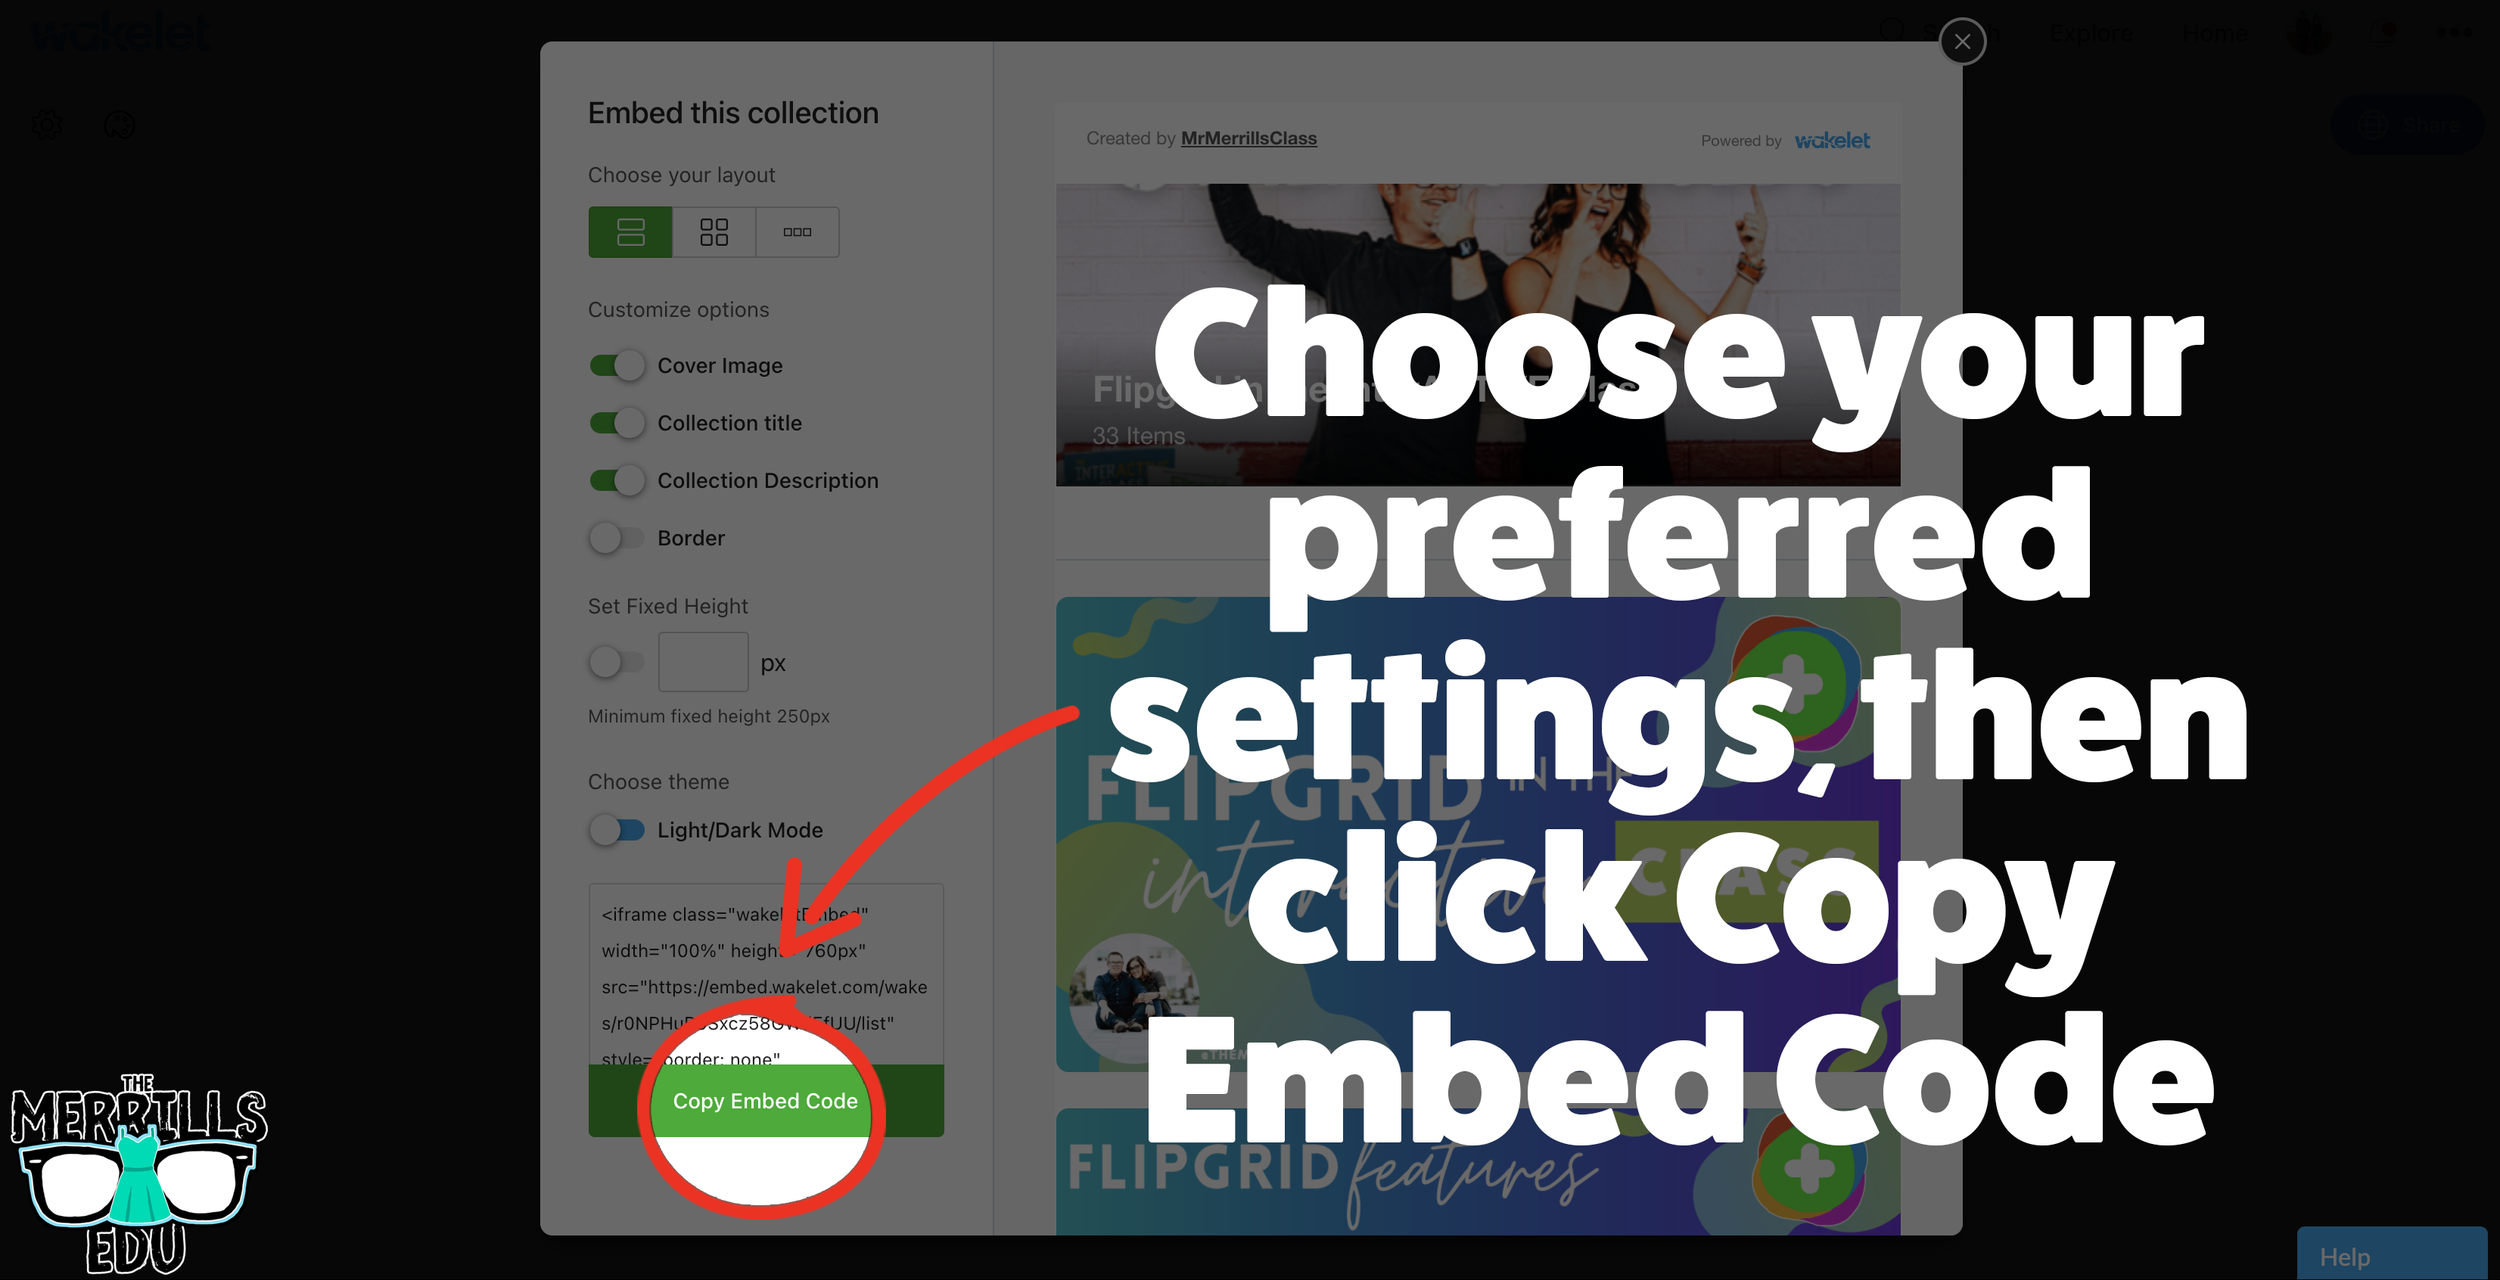
Chose your preferred settings, then click “Copy Embed Code.”
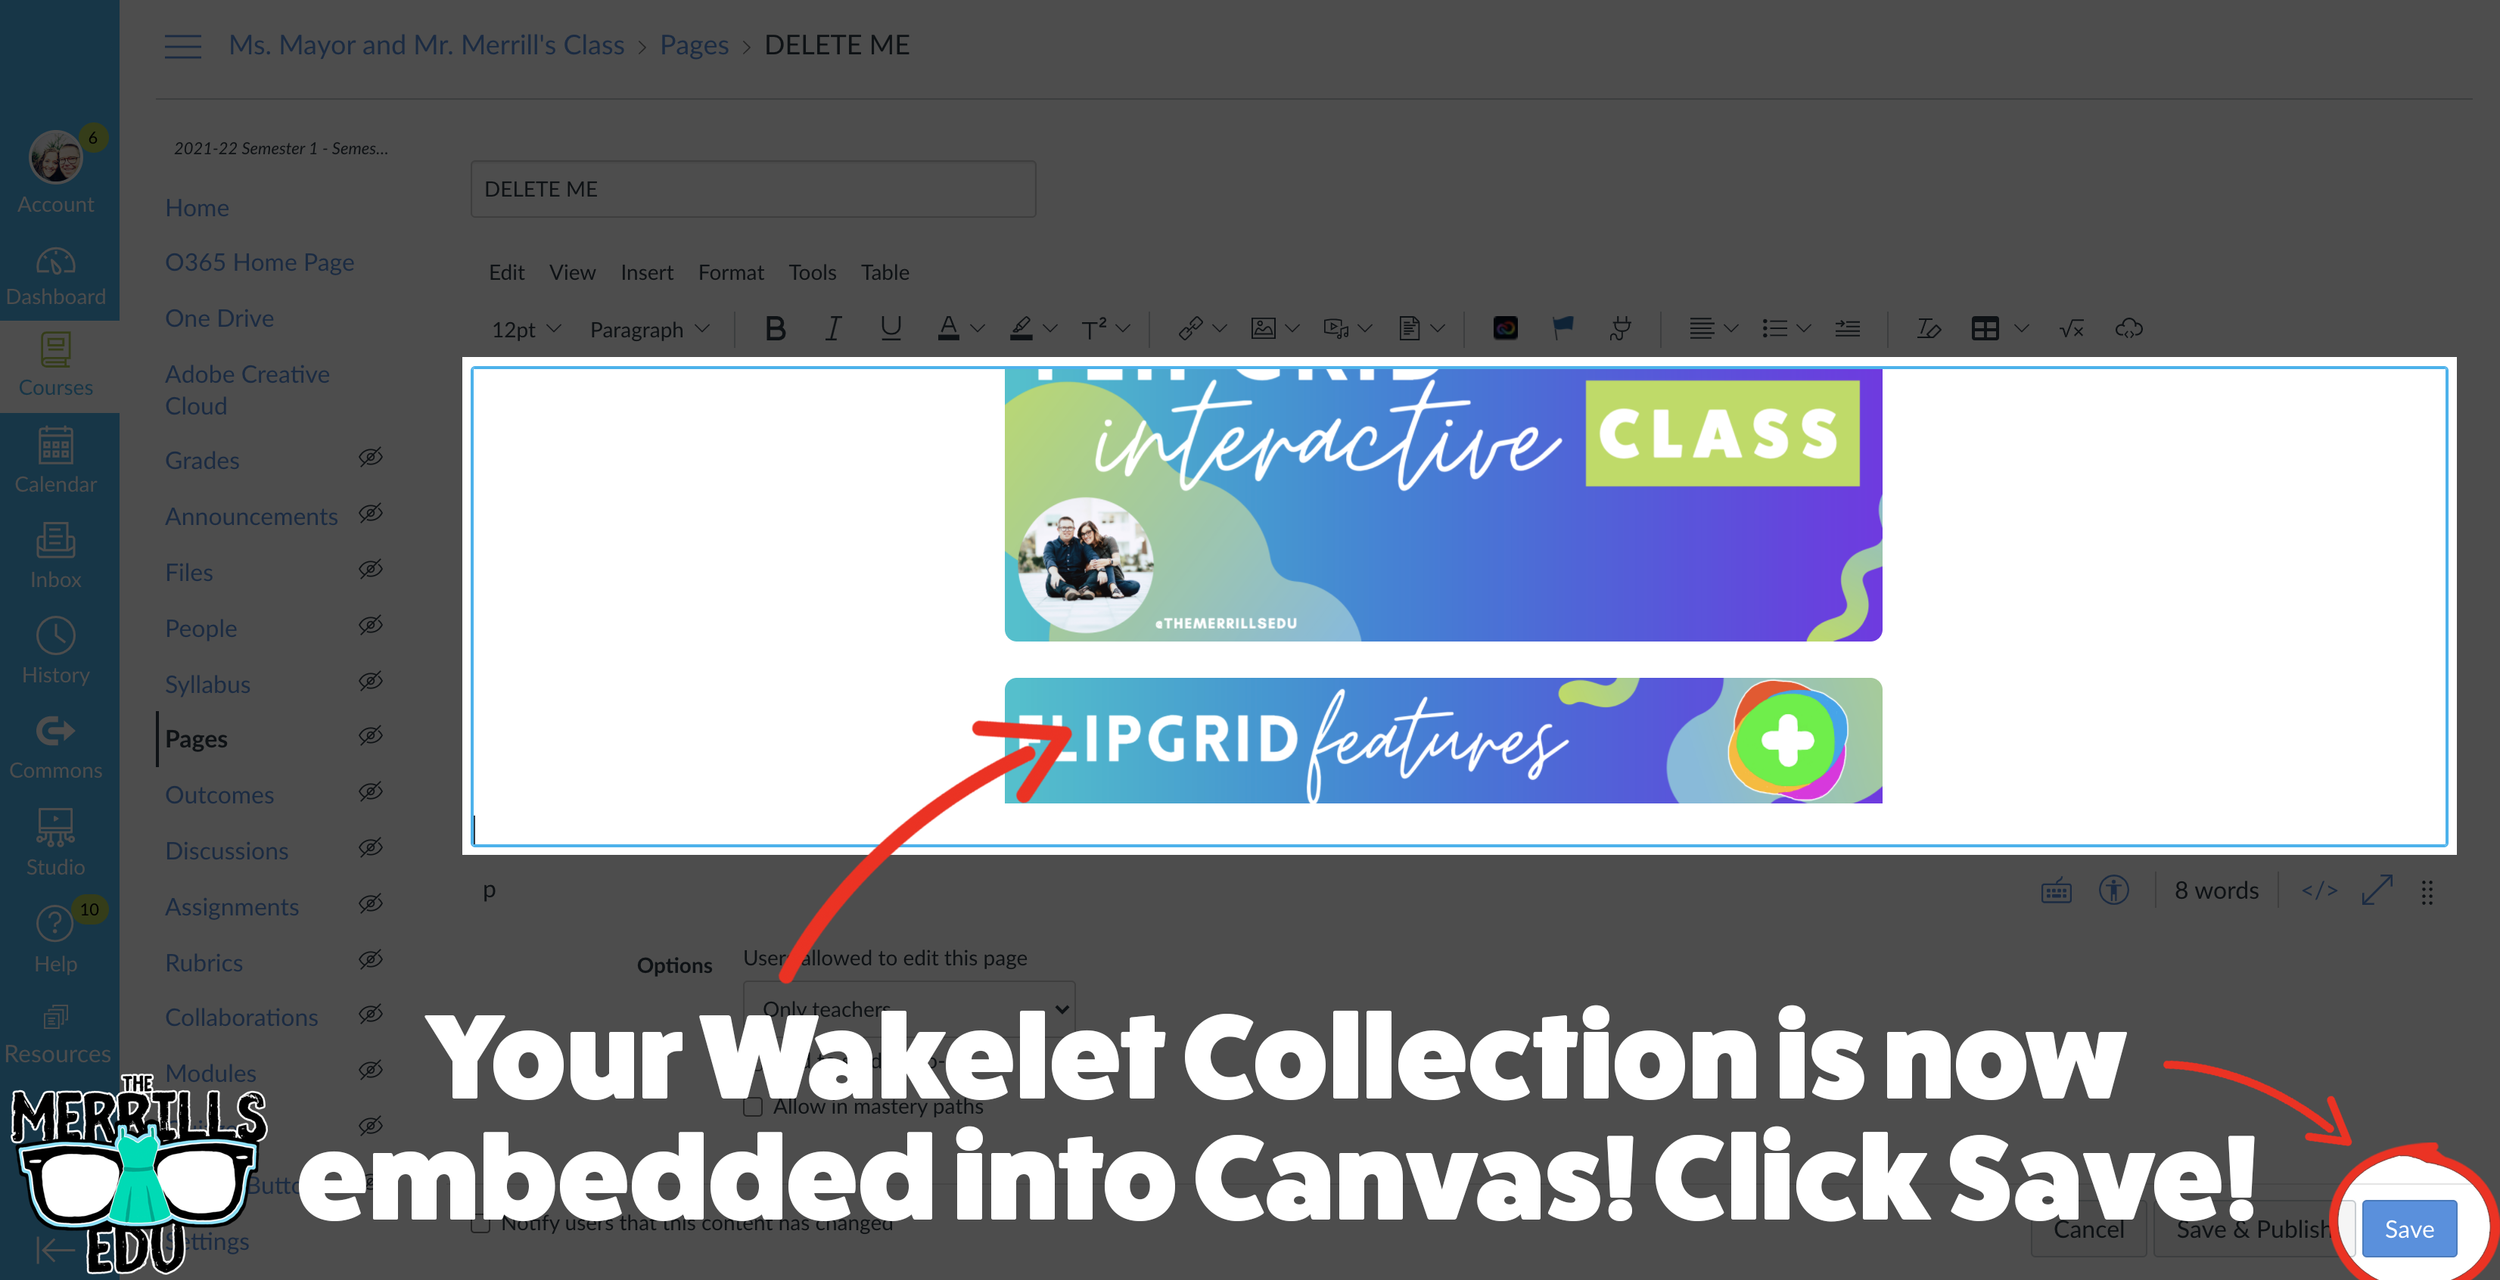
In a separate tab, open the Canvas page that you would like to add the Wakelet Collection to. Then, click on the cloud icon.
In the embed window, paste your copied code from Wakelet. Then, click submit.
Your Wakelet collection is now embedded into the Canvas page! Click on “Save” to update the changes.

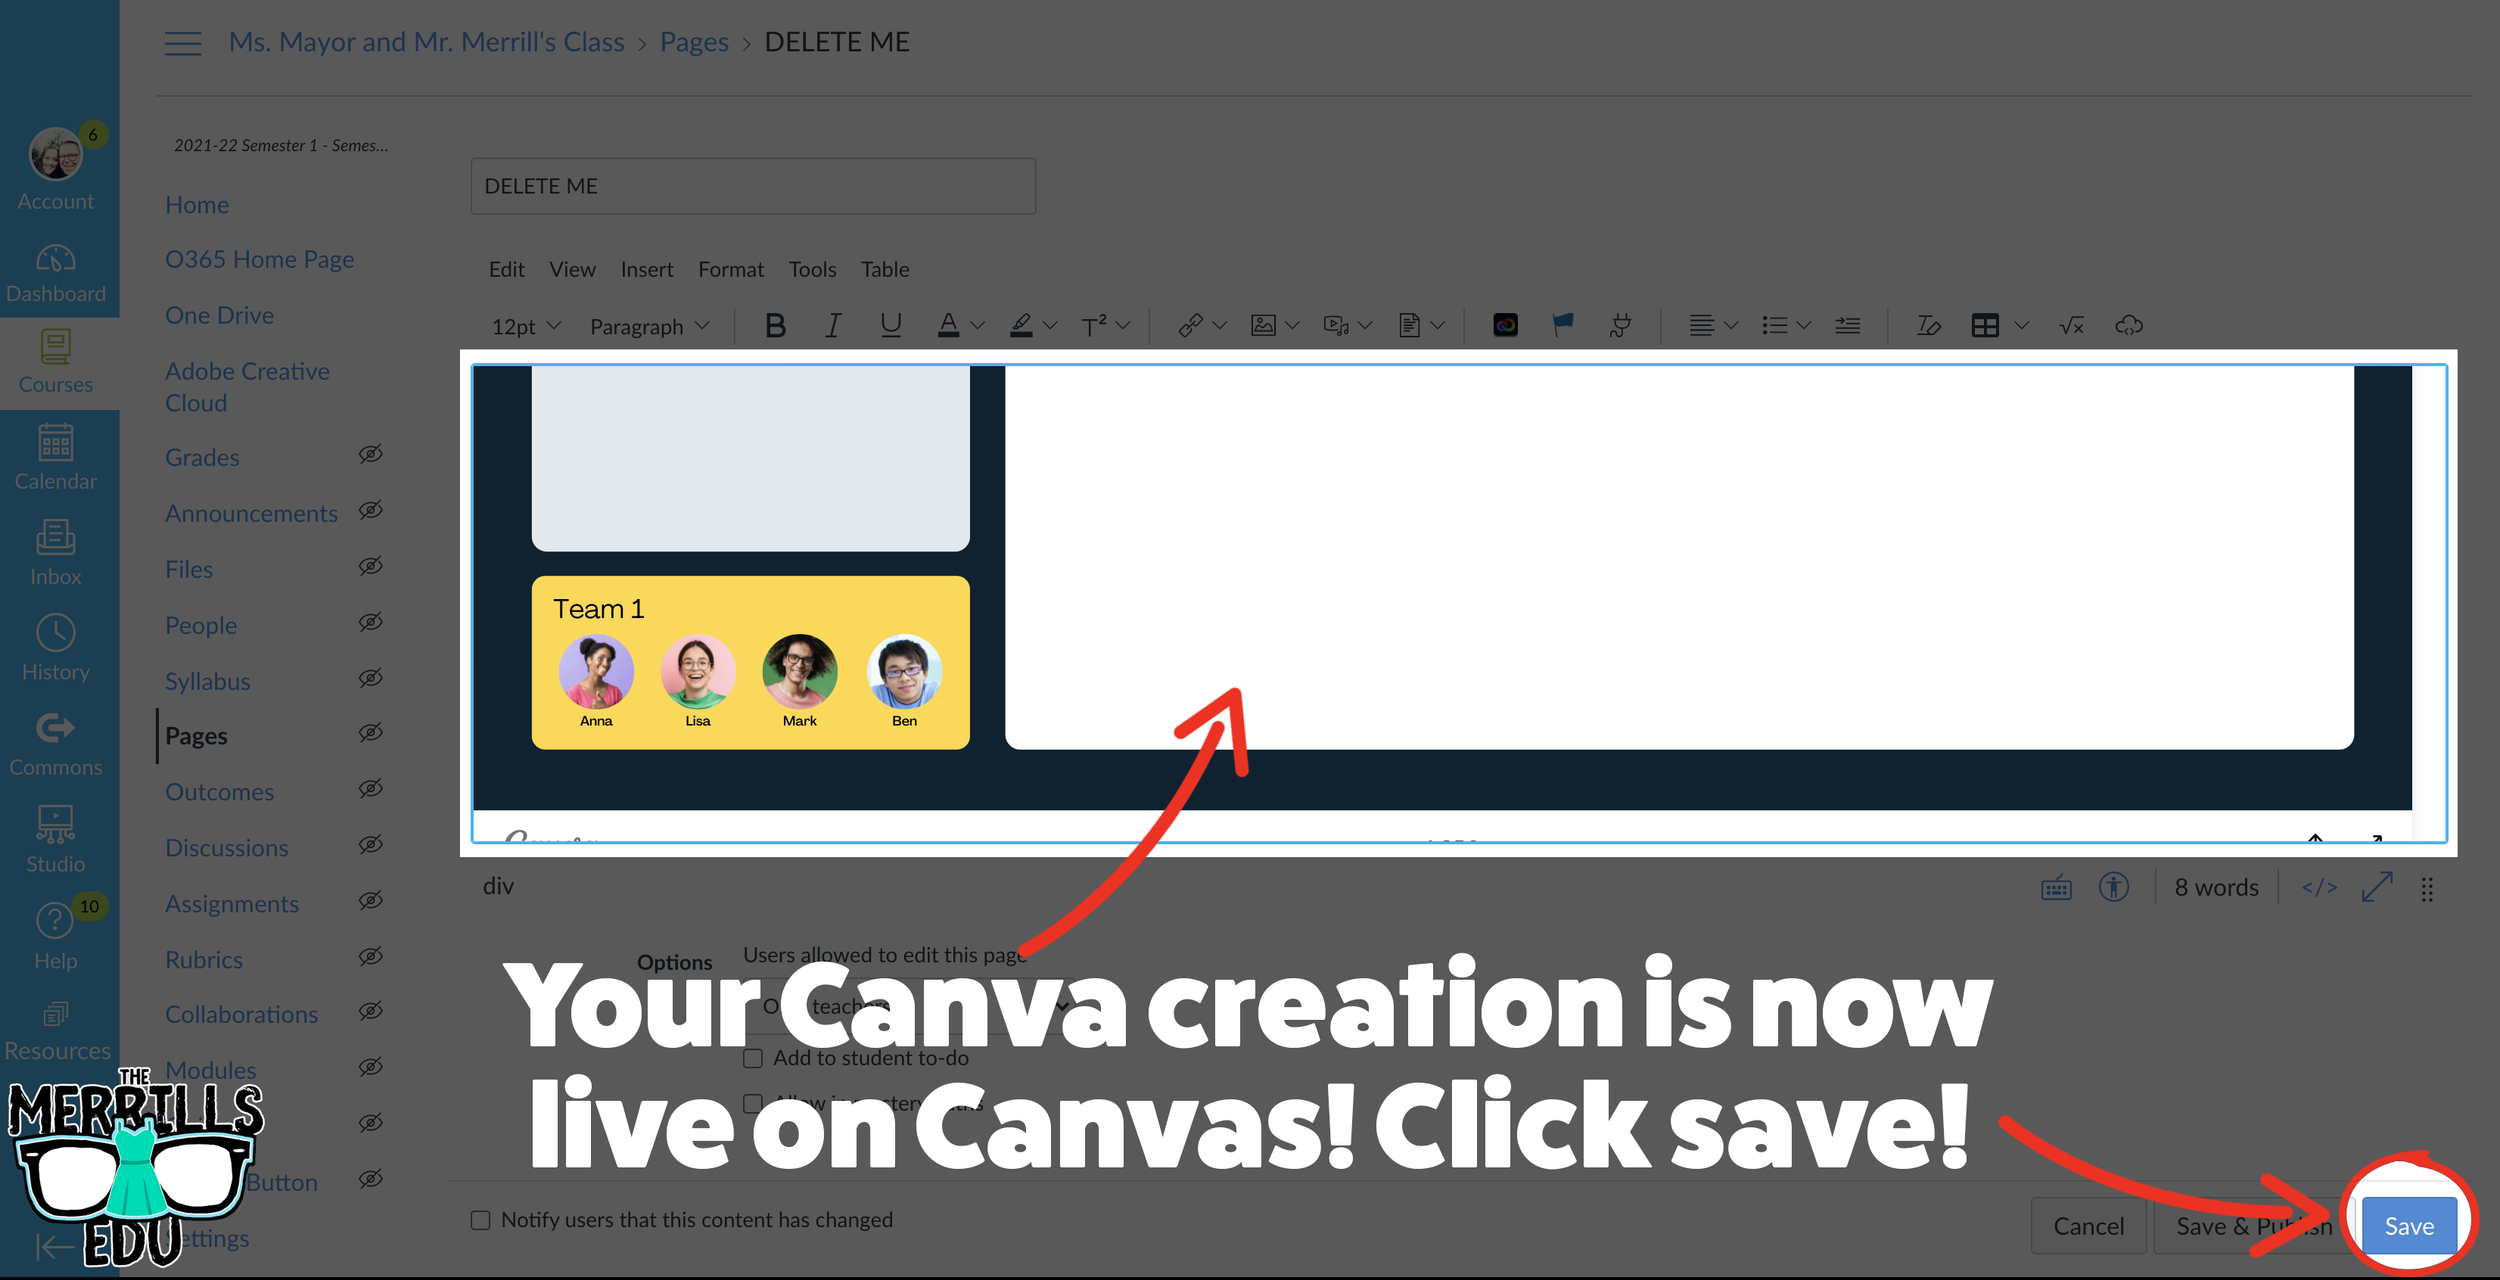
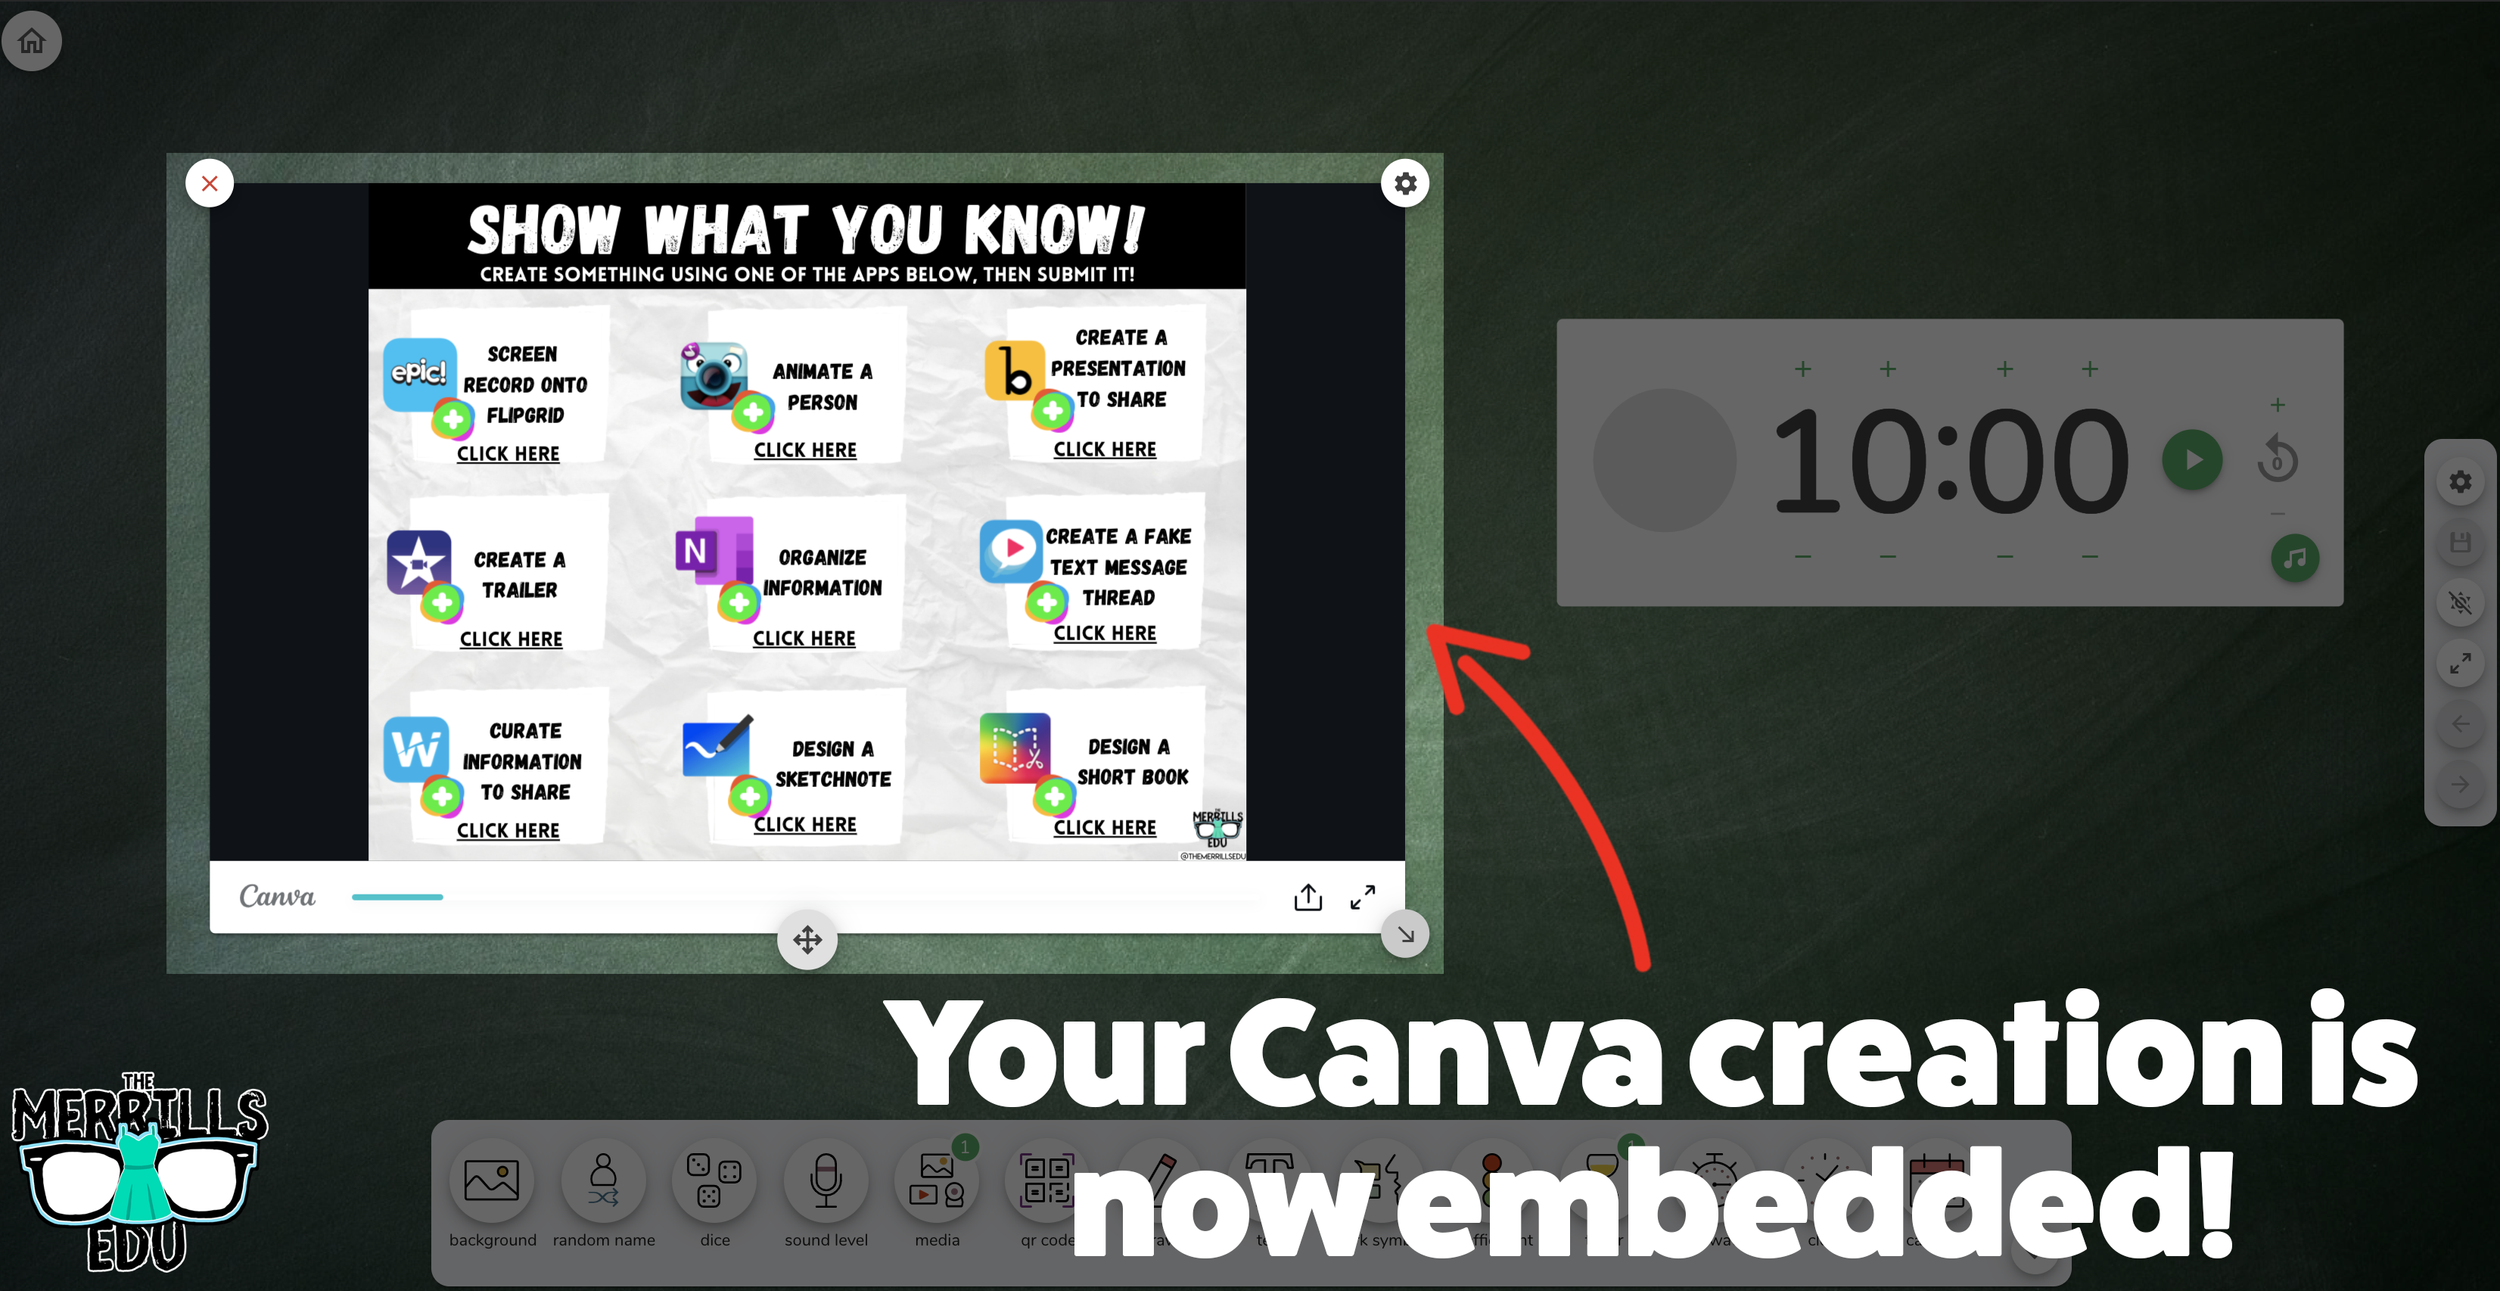
Canva Embedded into Canvas
Embedding Canva into Canvas will take your Canva creations live on any Canvas page! This live embed means that anything that you update on the Canva end will automatically update on the Canvas end. So, if you make changes to the Canva creation, you won’t have to worry about re-embedding it! Here’s how it all works:
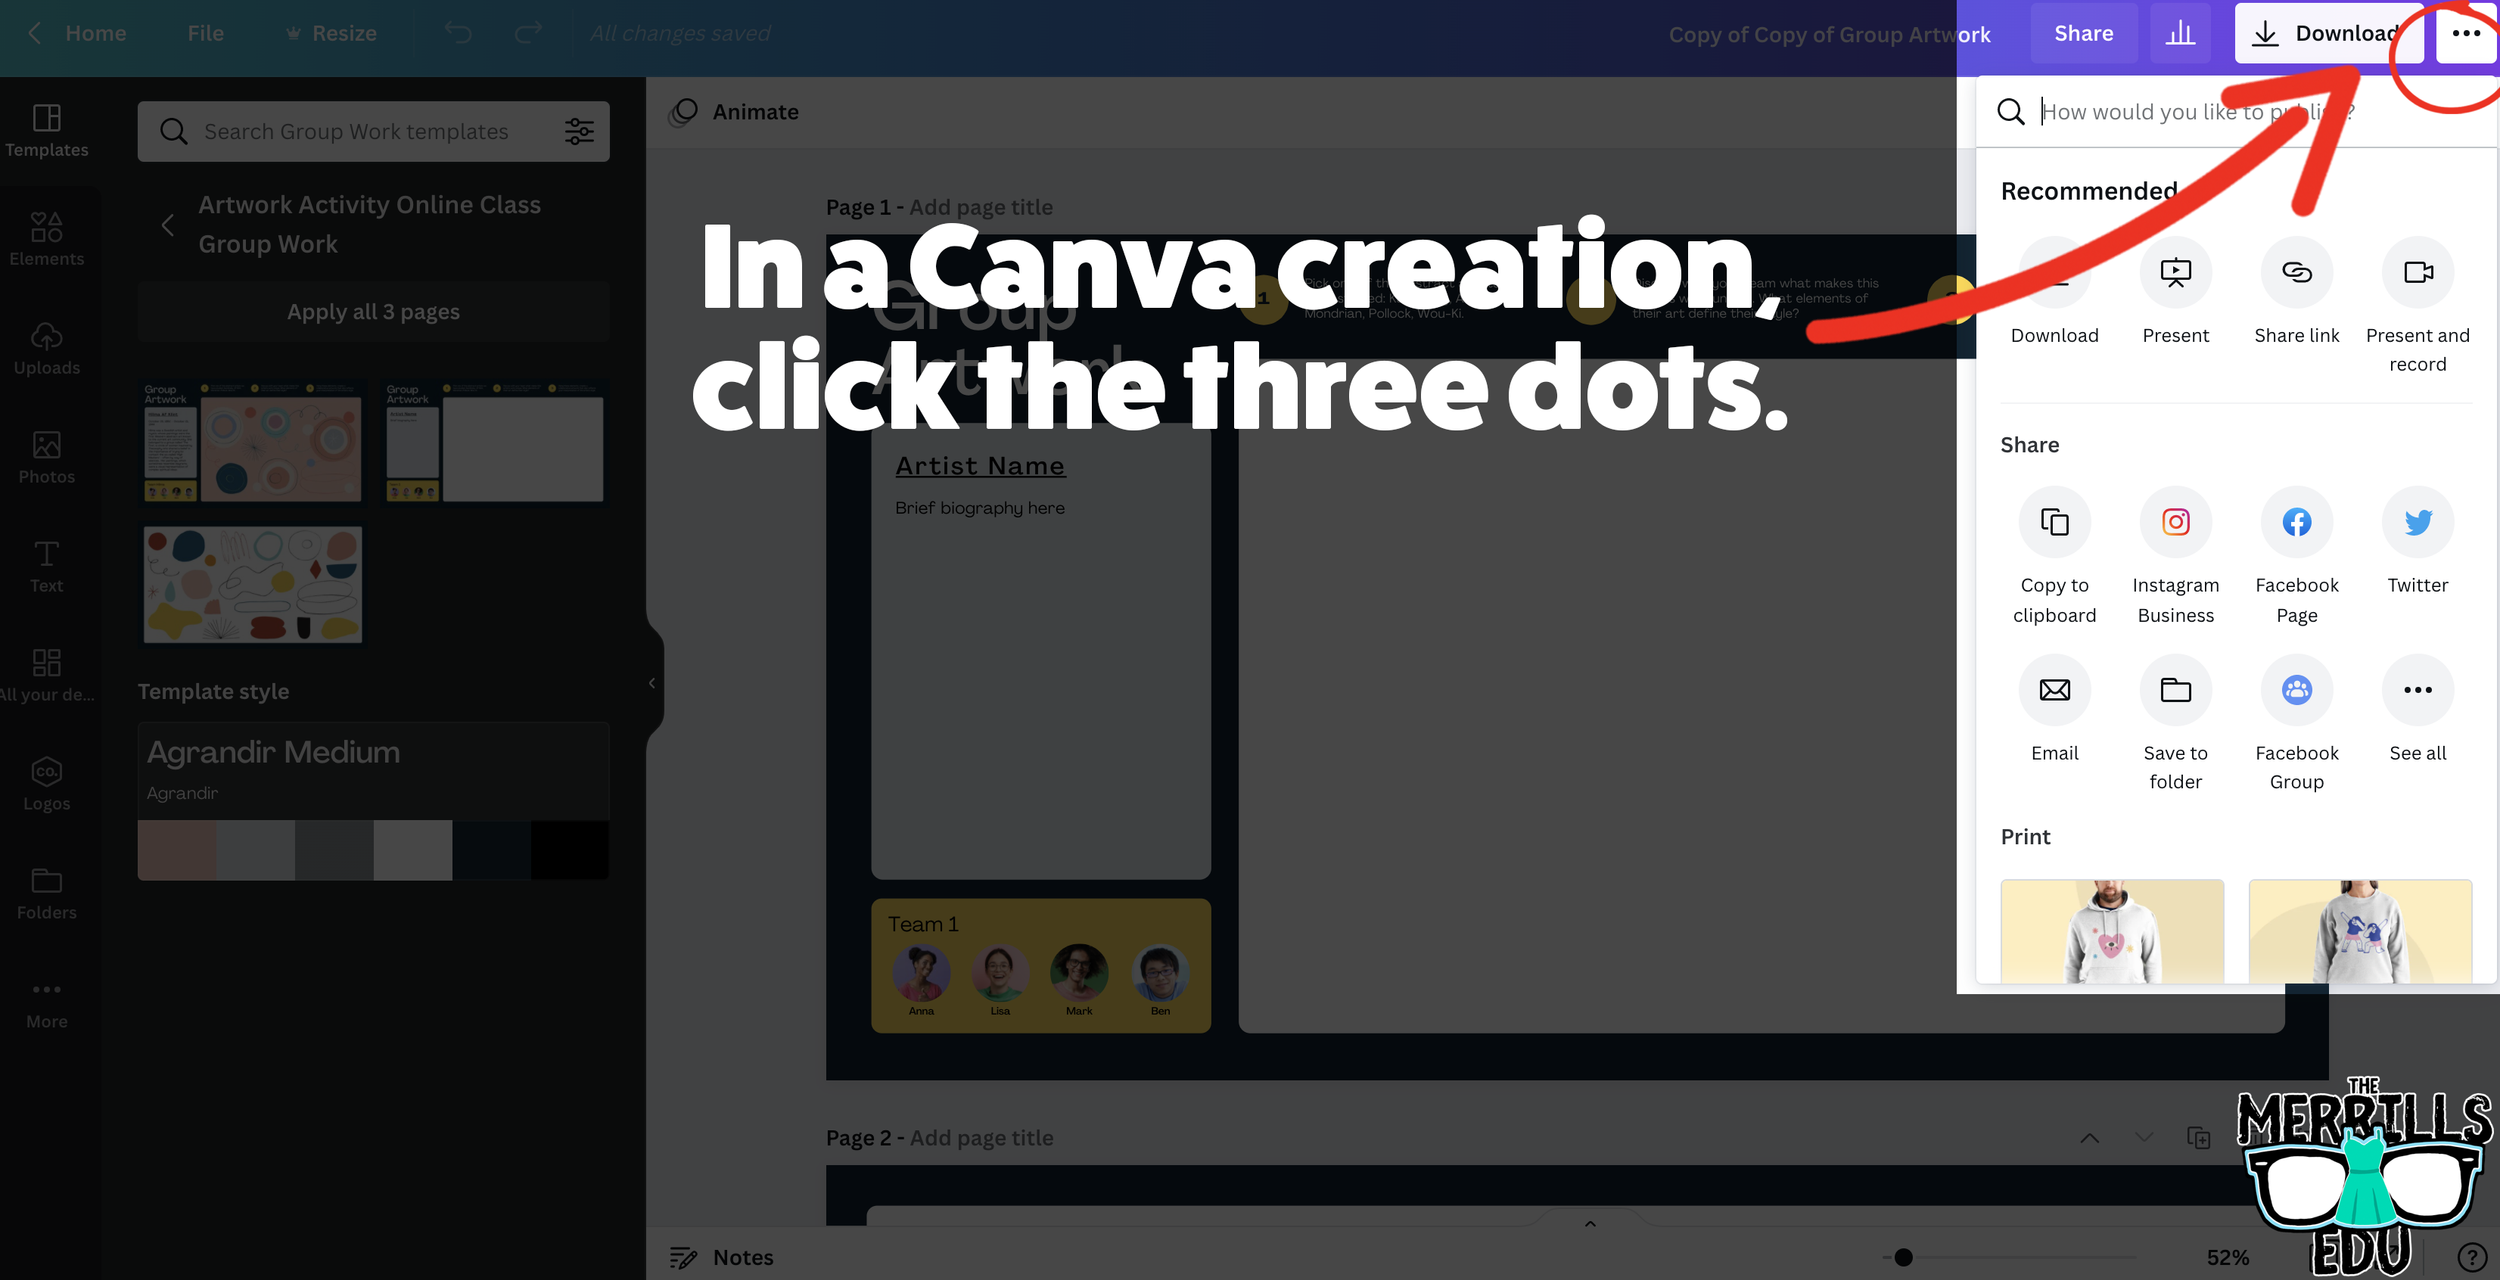
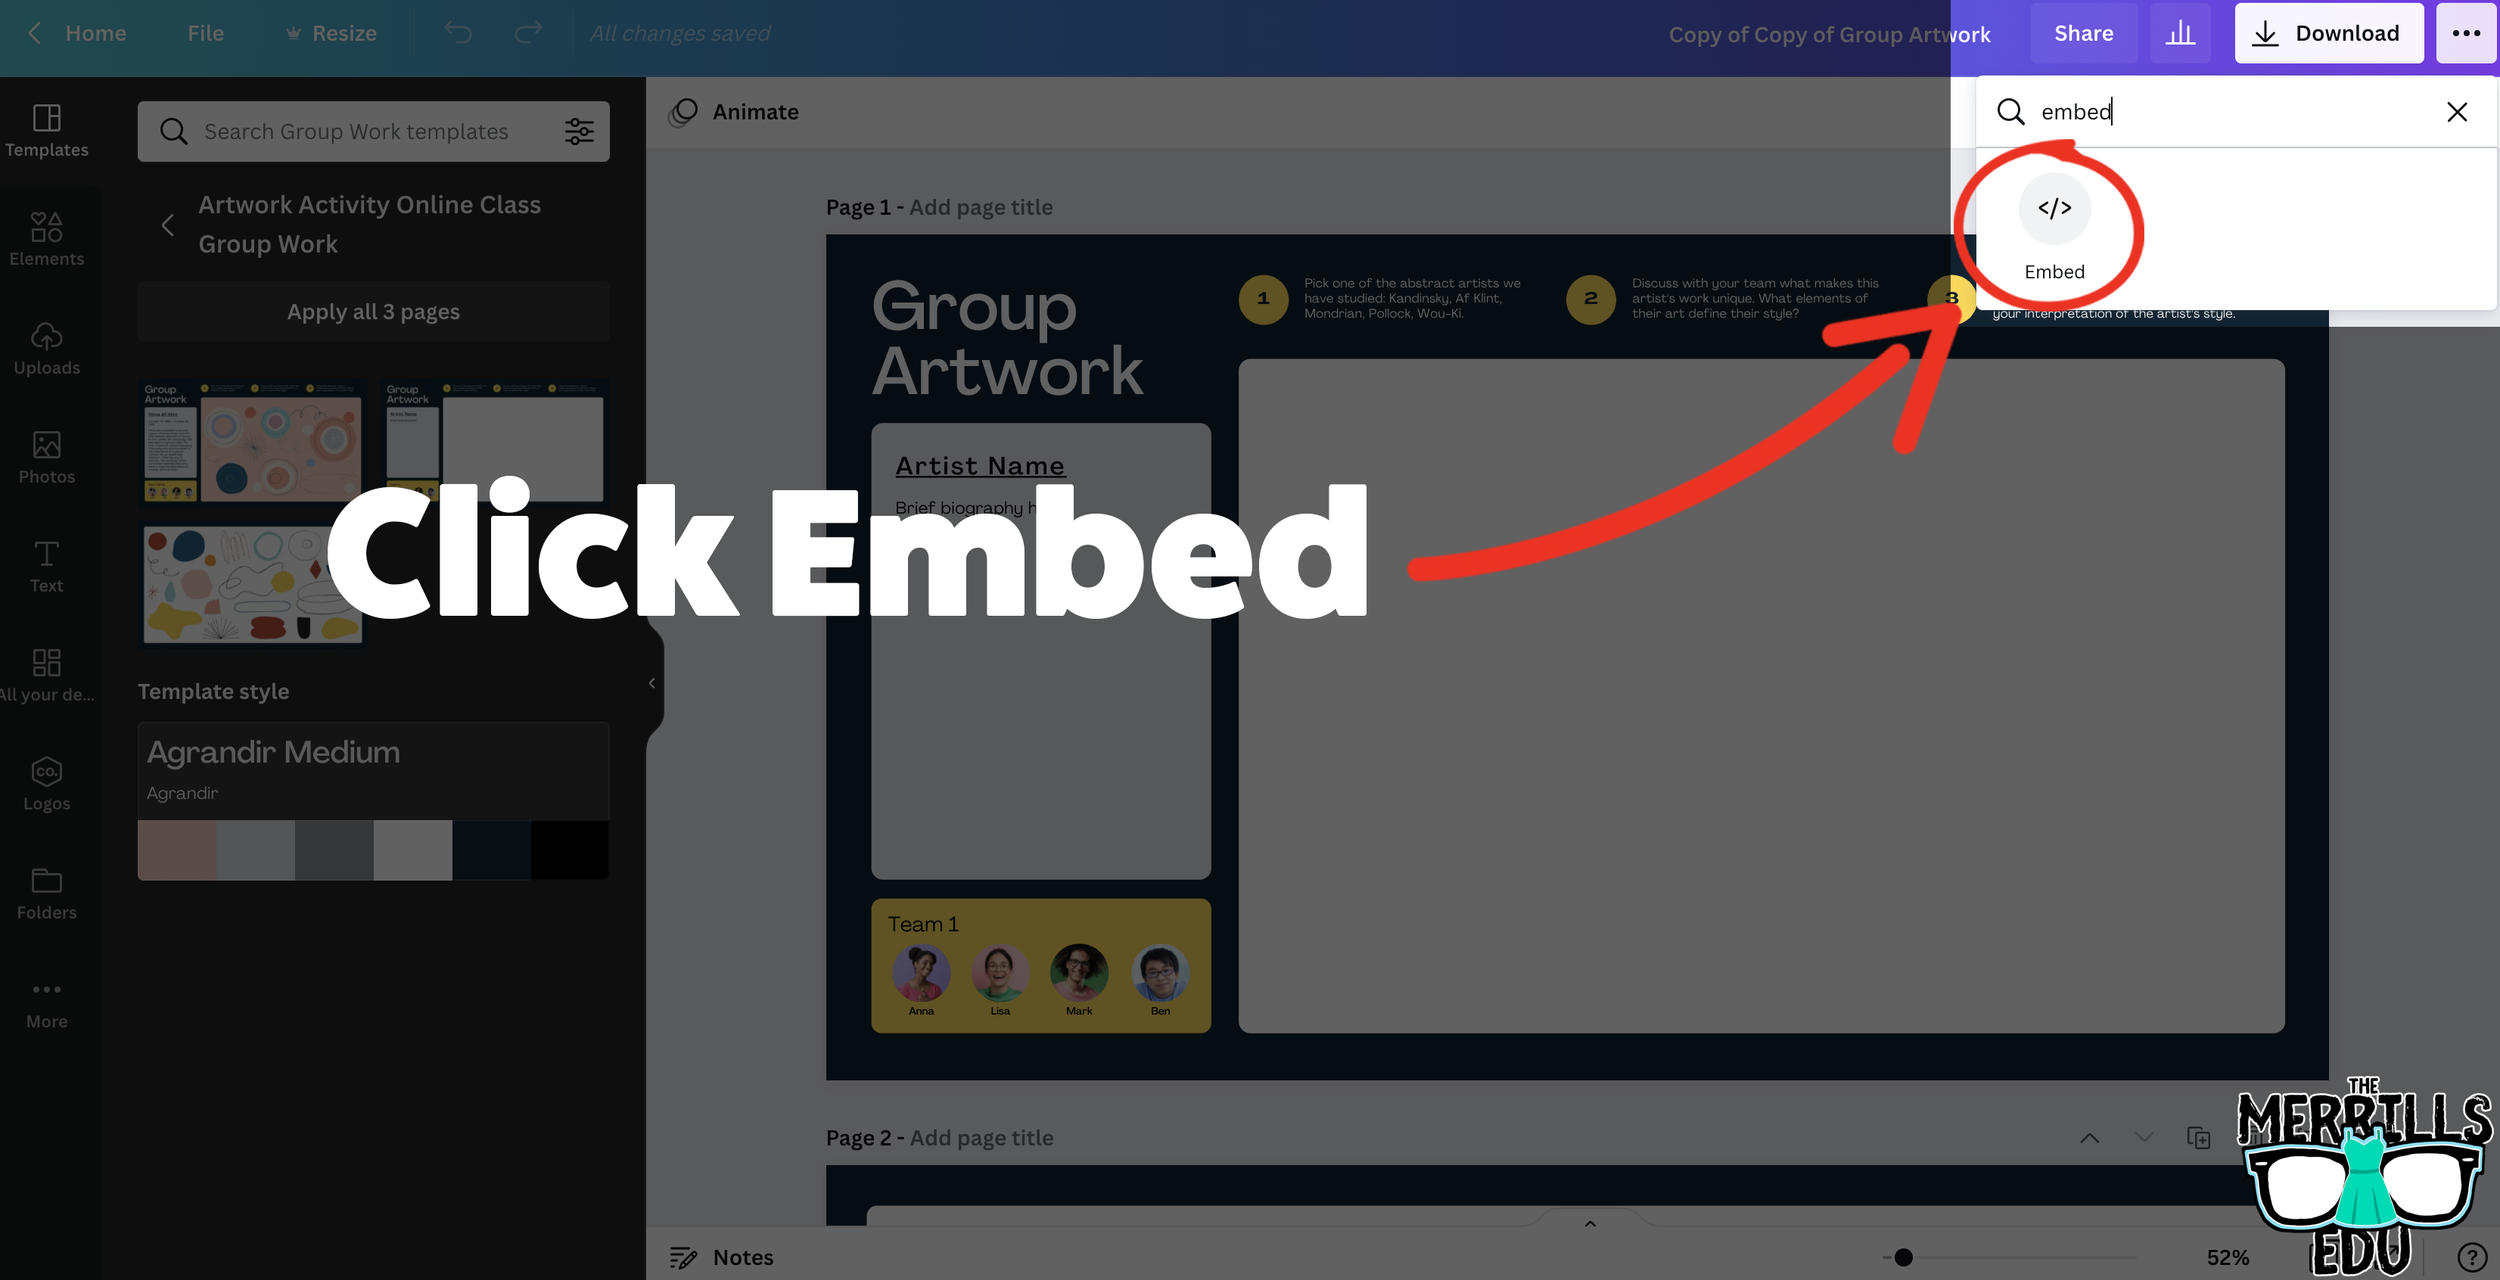

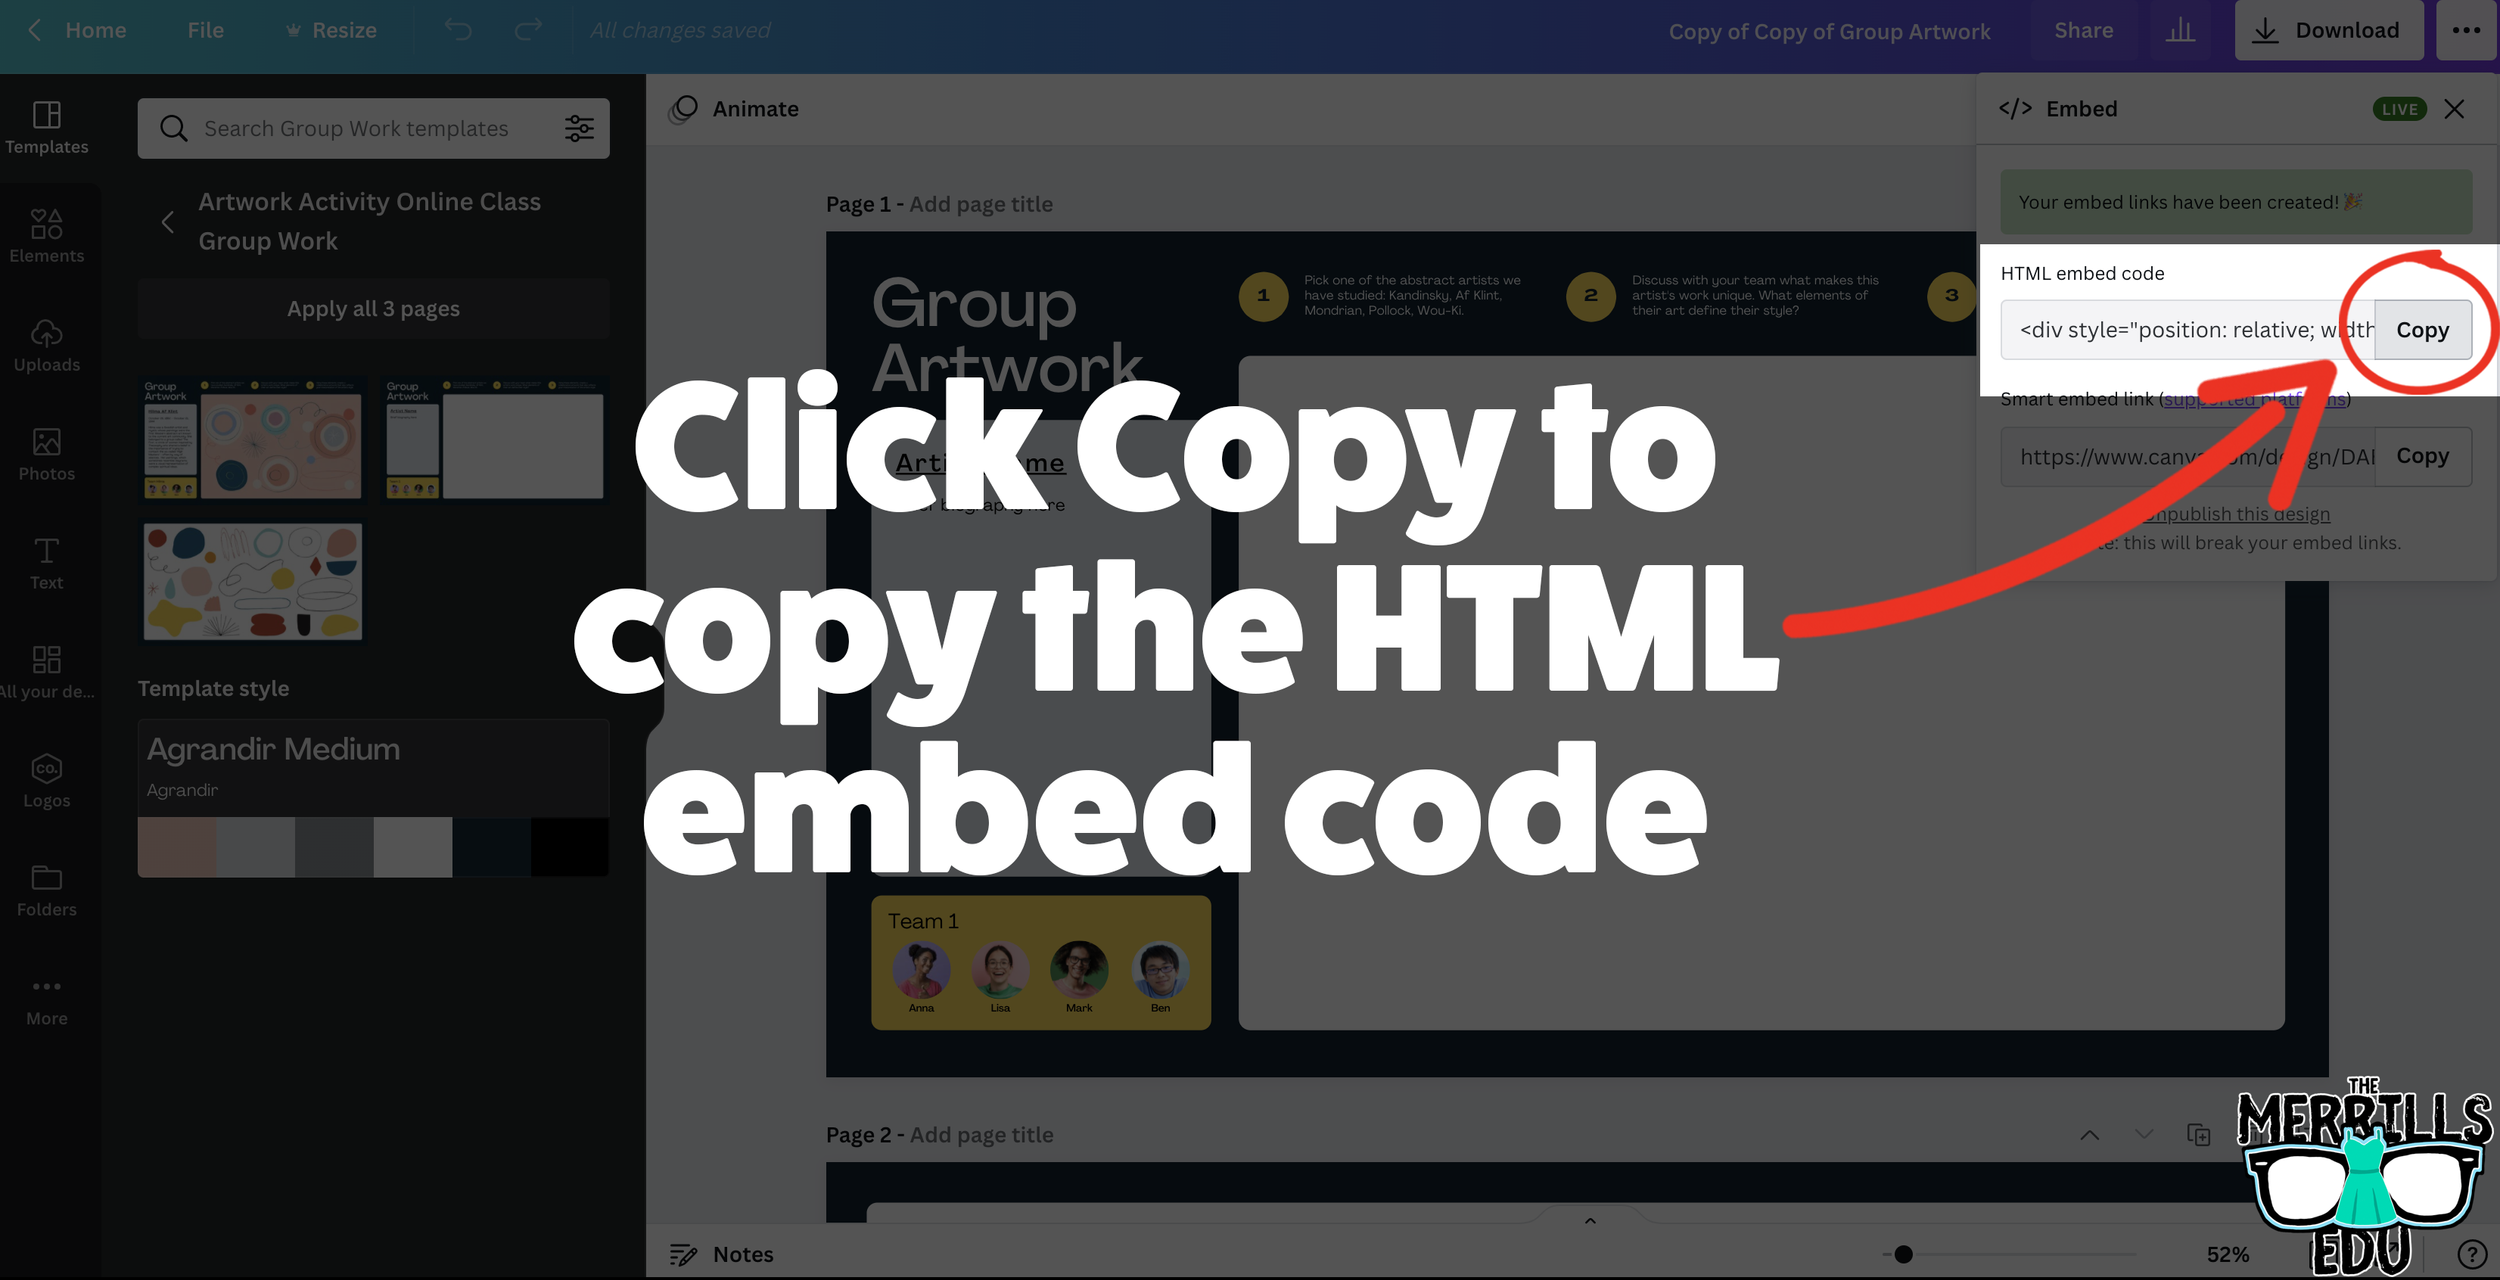


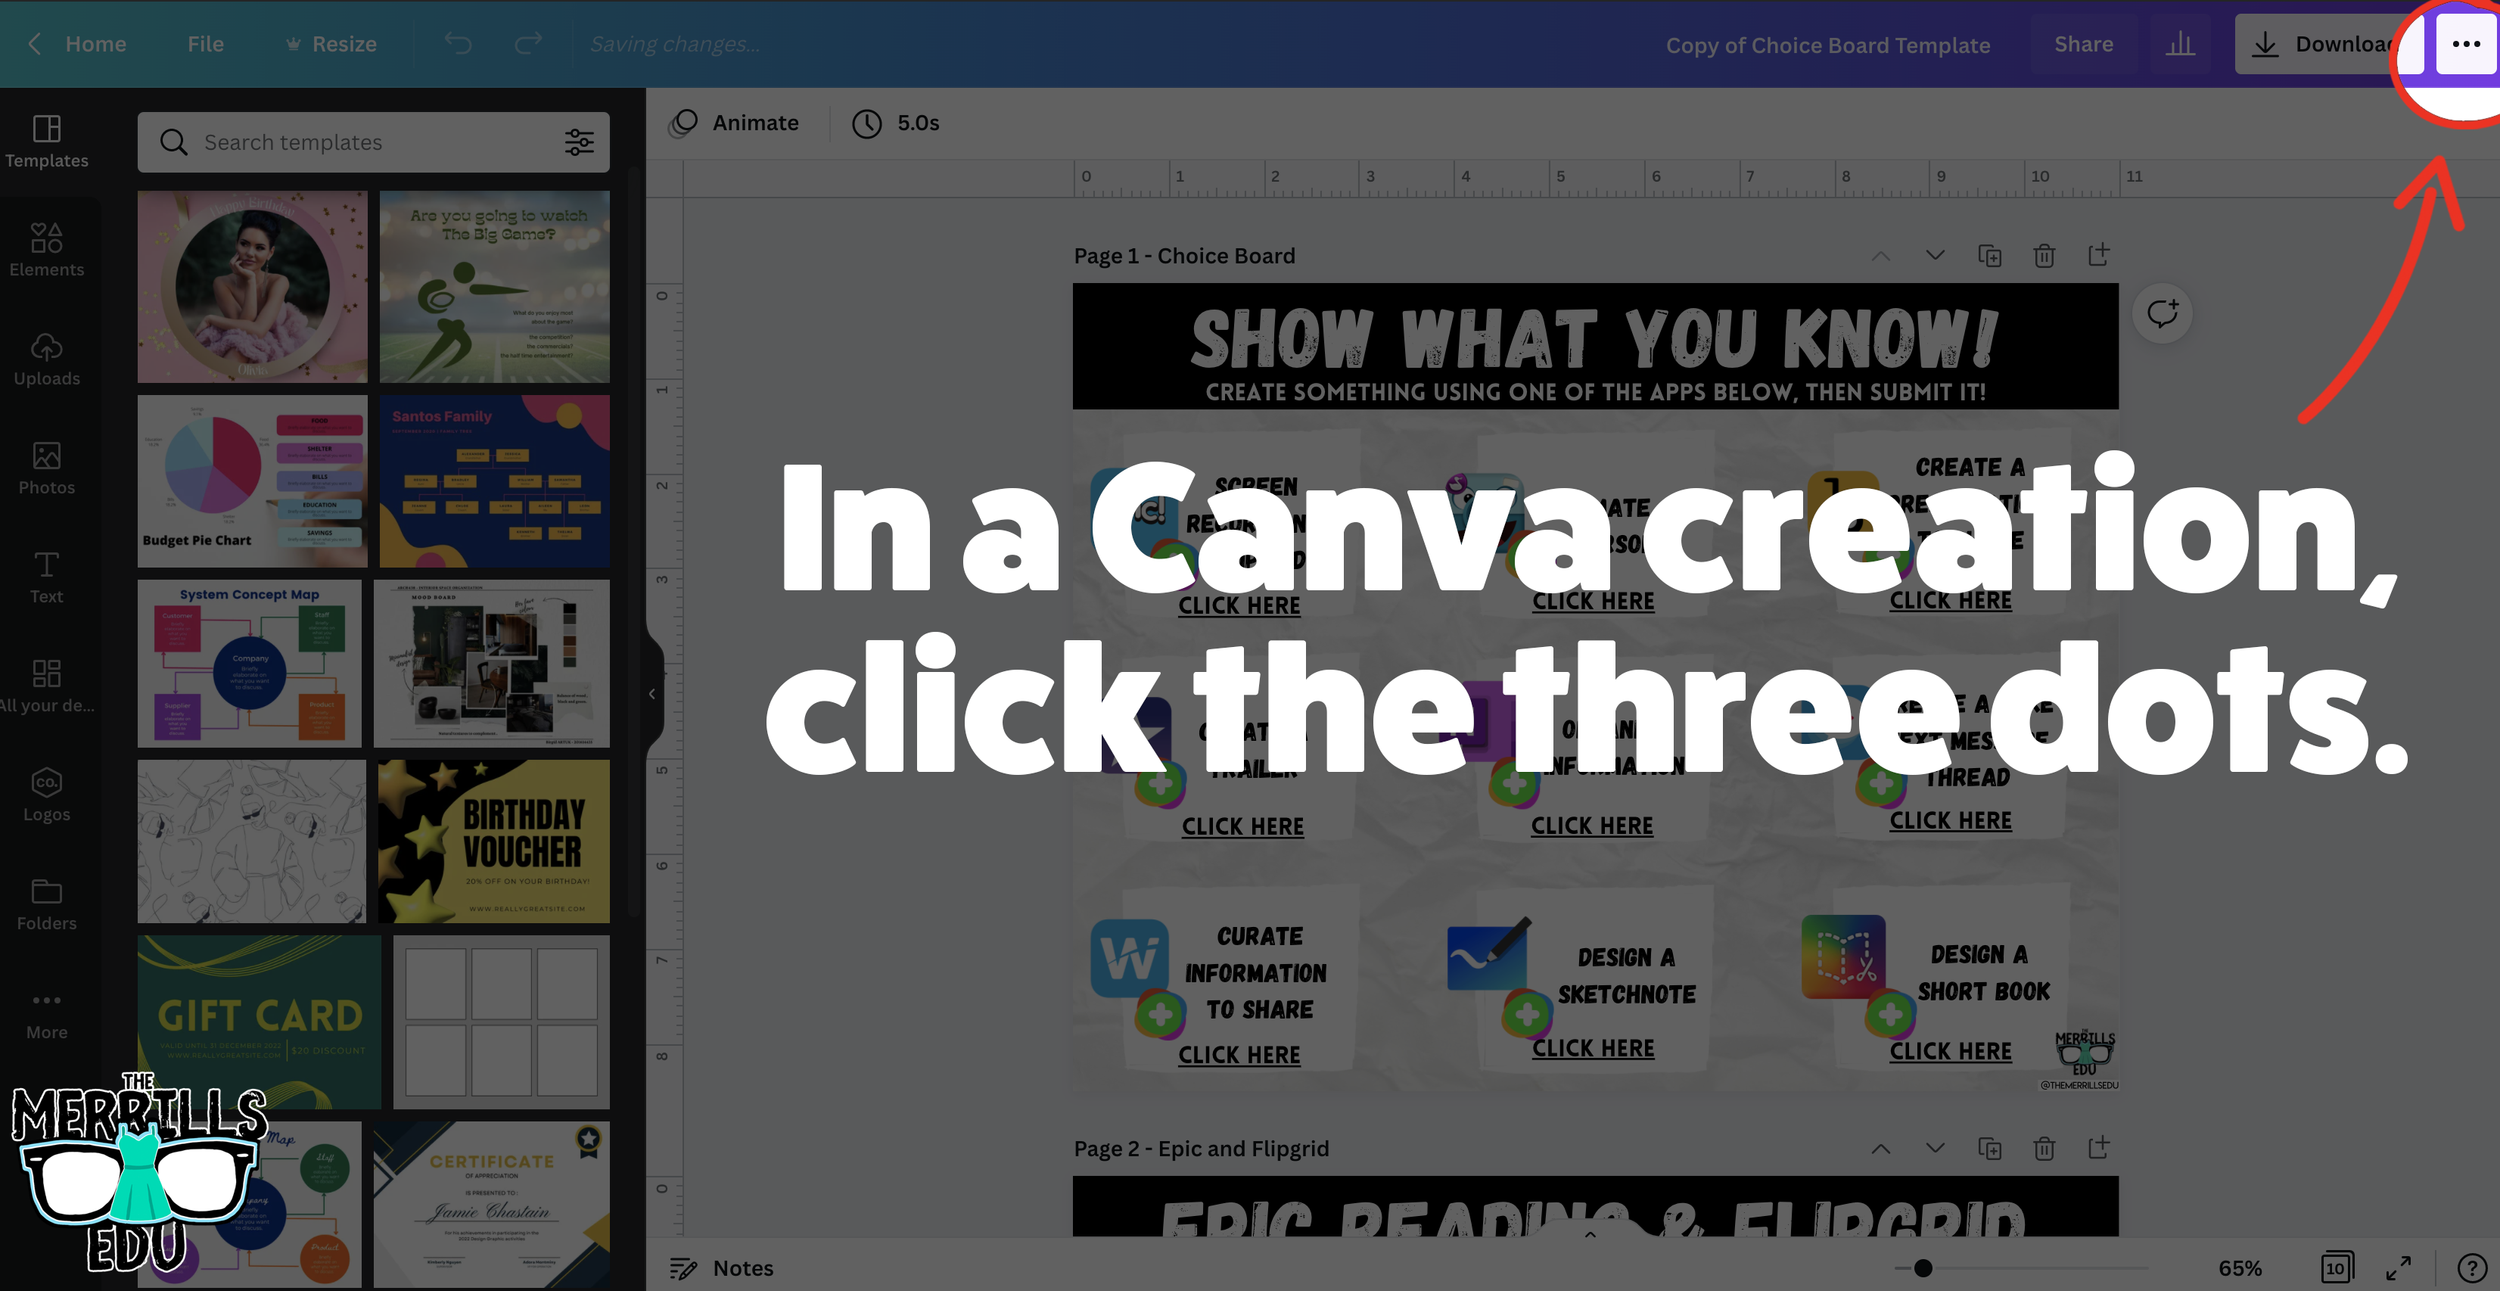
Open a Canva creation, then click on the three dots located on the top right side of the screen.
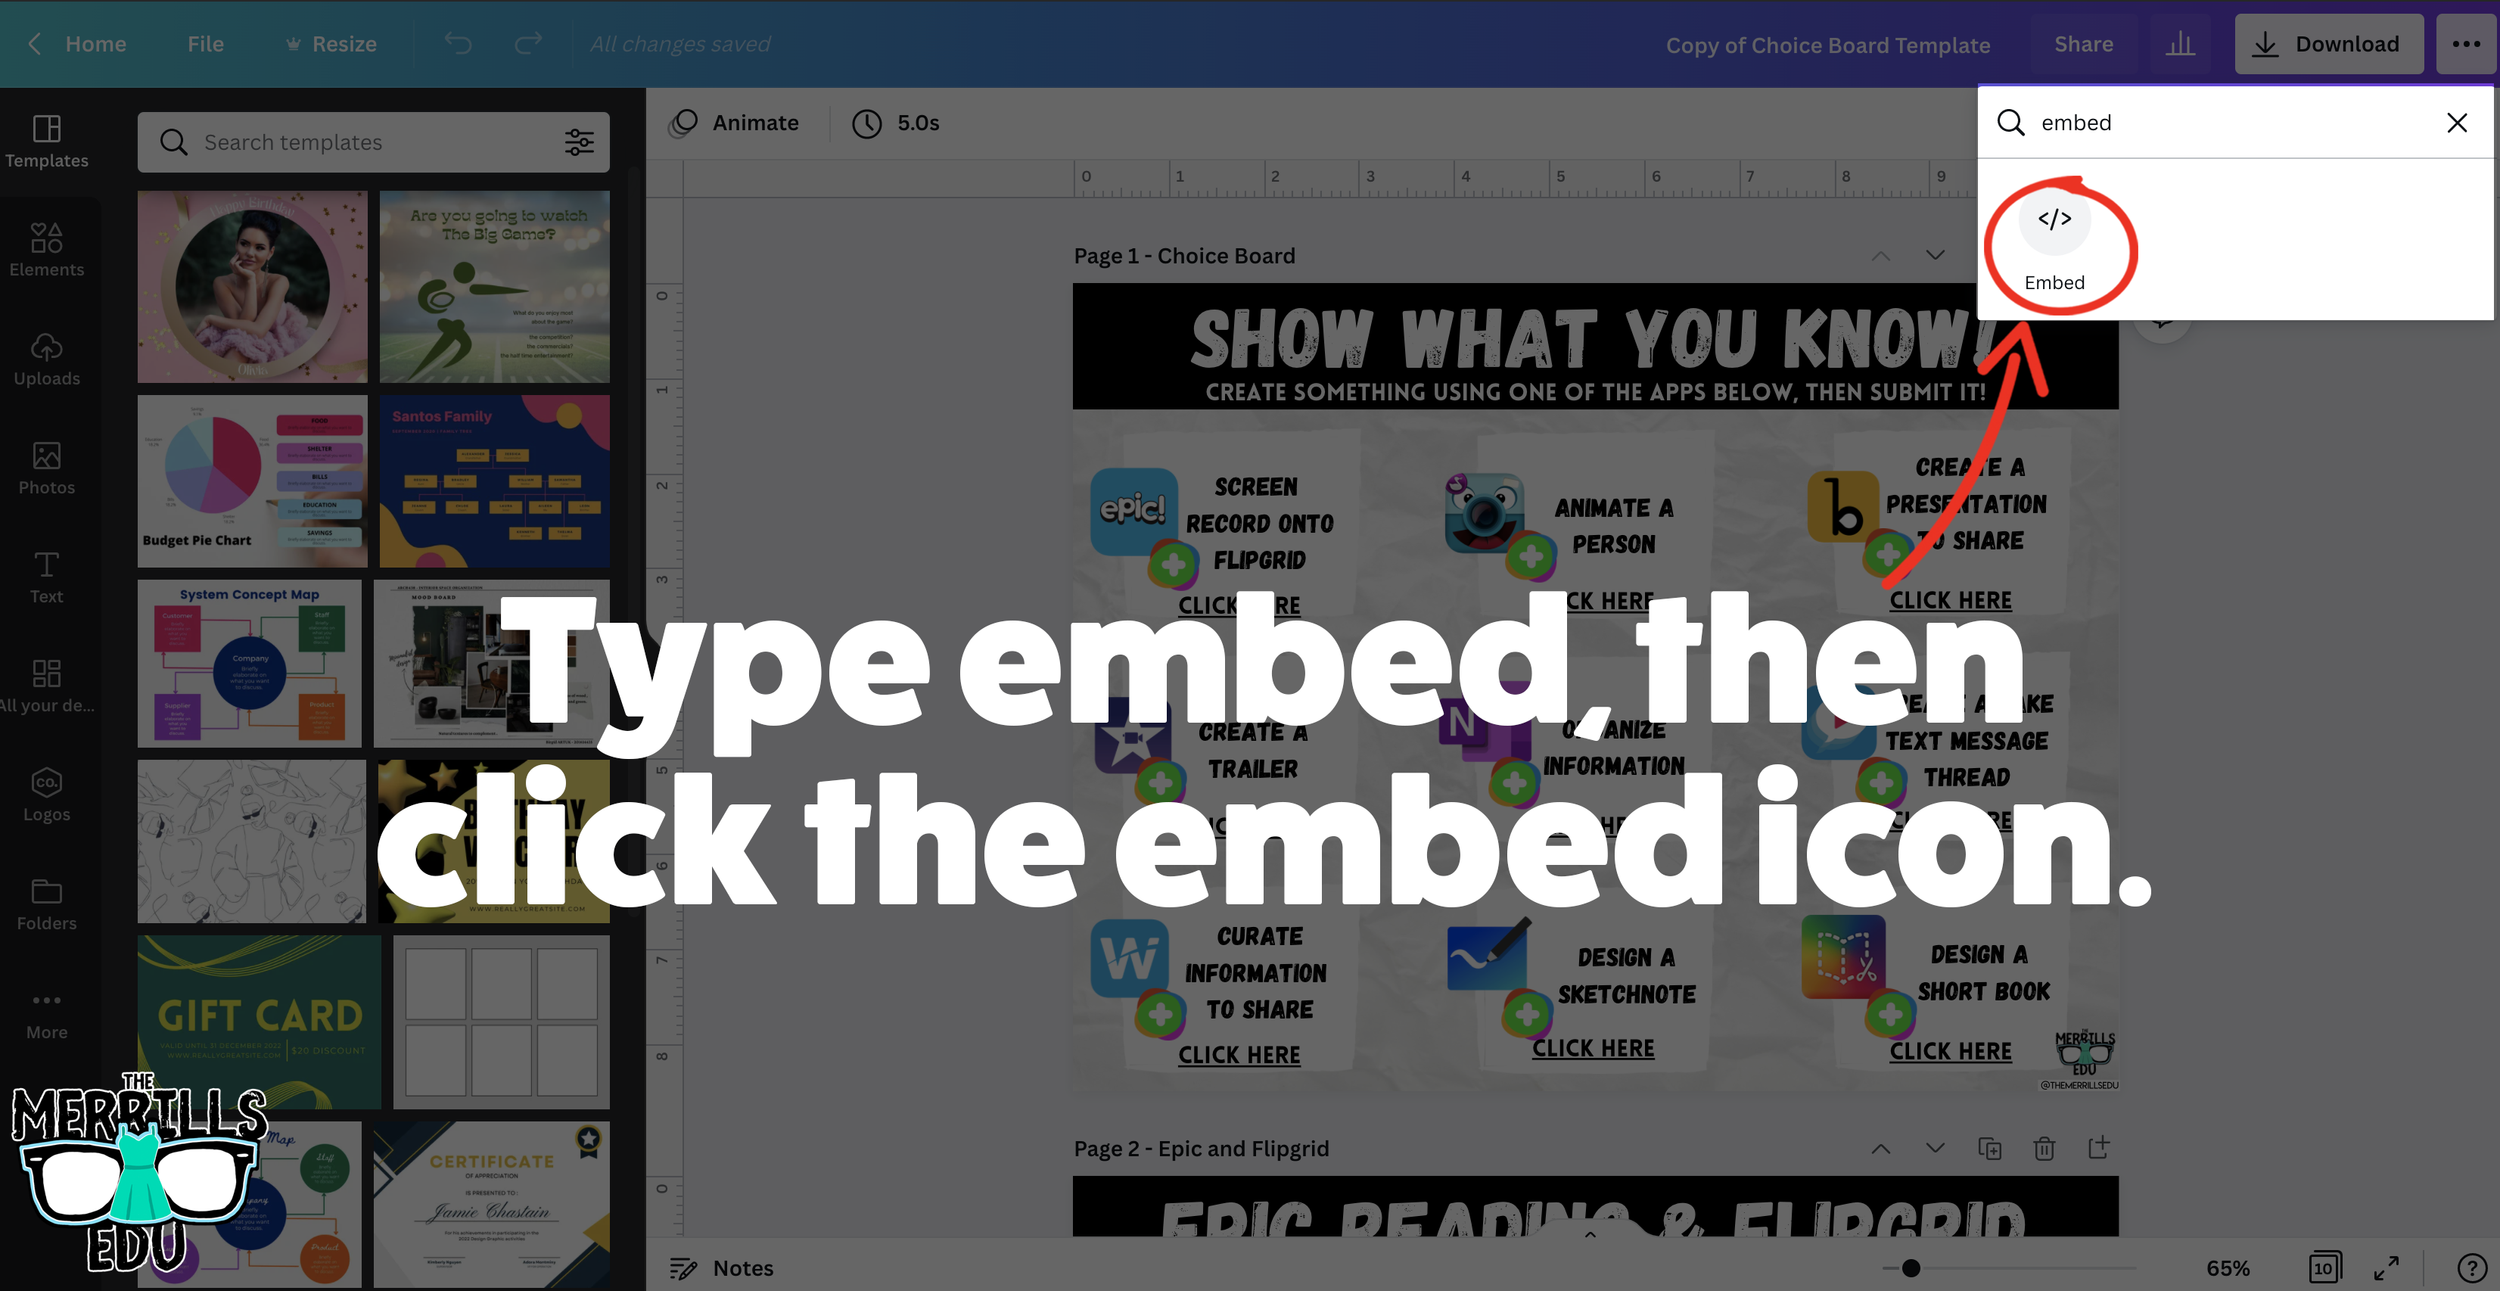
In the search bar, type “embed,” then click the embed icon.
In the next window, click “Embed” to take the creation live.
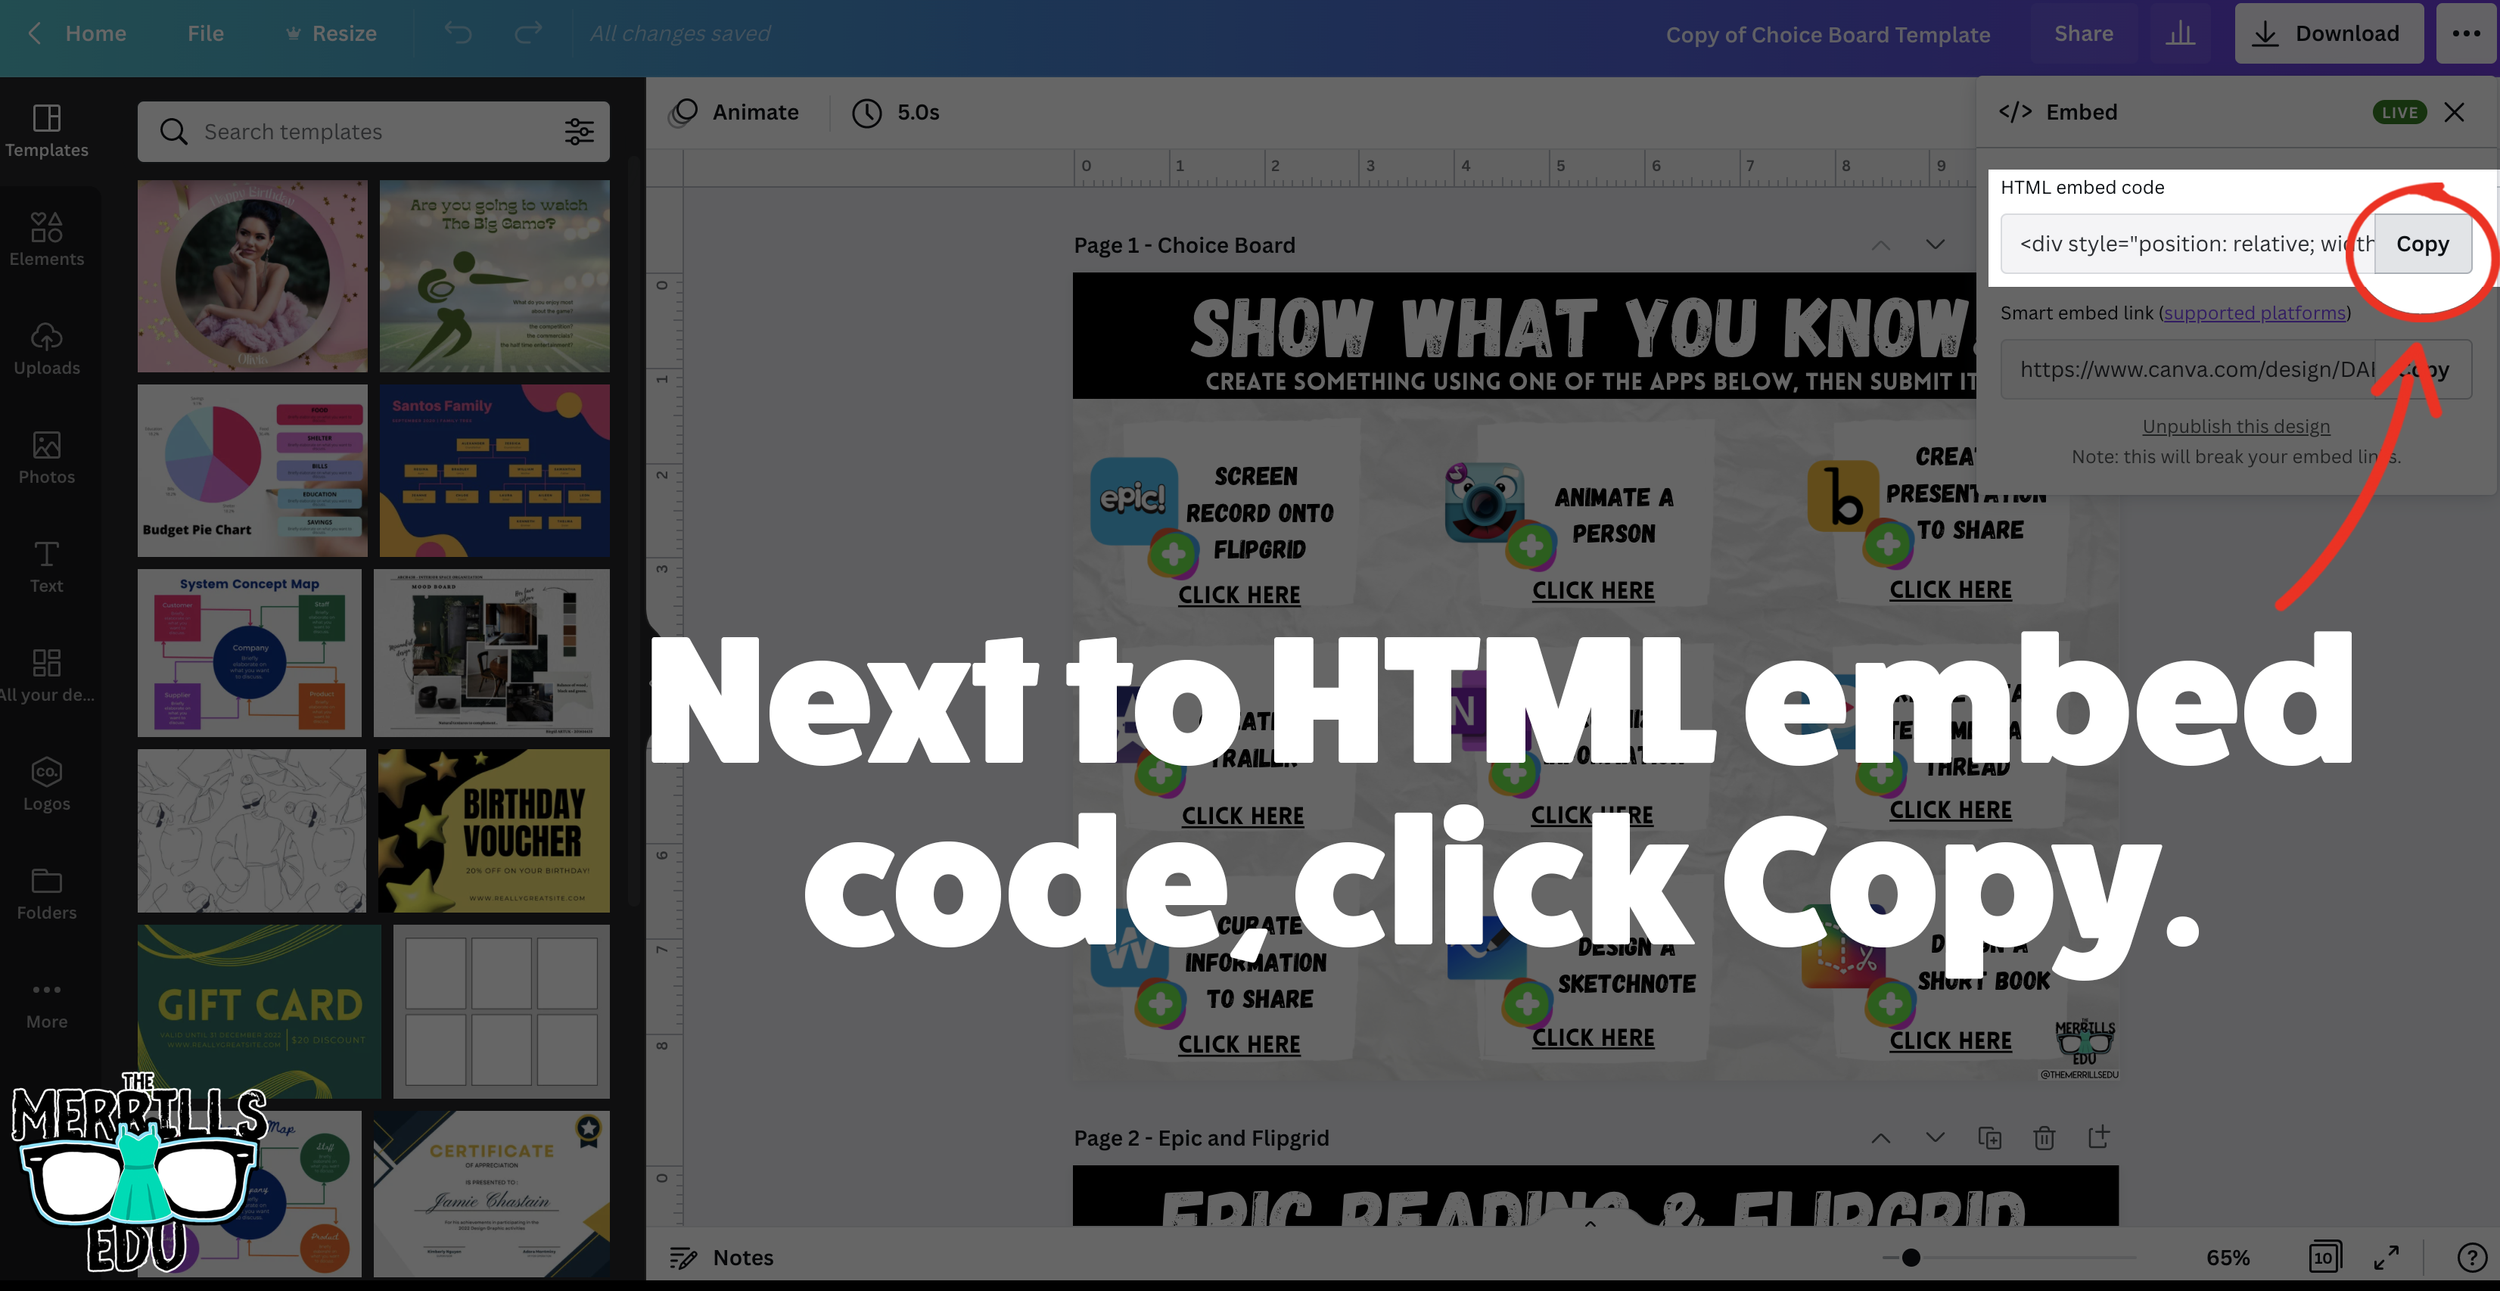
A few options will open up on the next window. Click and copy the HTML embed code (the smart embed will only work on selected platforms, so the HTML code is a safer route).
In a separate tab, open the Canvas page that you would like to add the Canva creation to. Then, click on the cloud icon (if you don’t see the Cloud icon, click the three dots to expand the menu bar).
In the embed window, paste your copied code from Canva. Then, click submit.
Your Canva creation is now embedded into the Canvas page! Click on “Save” to update the changes.

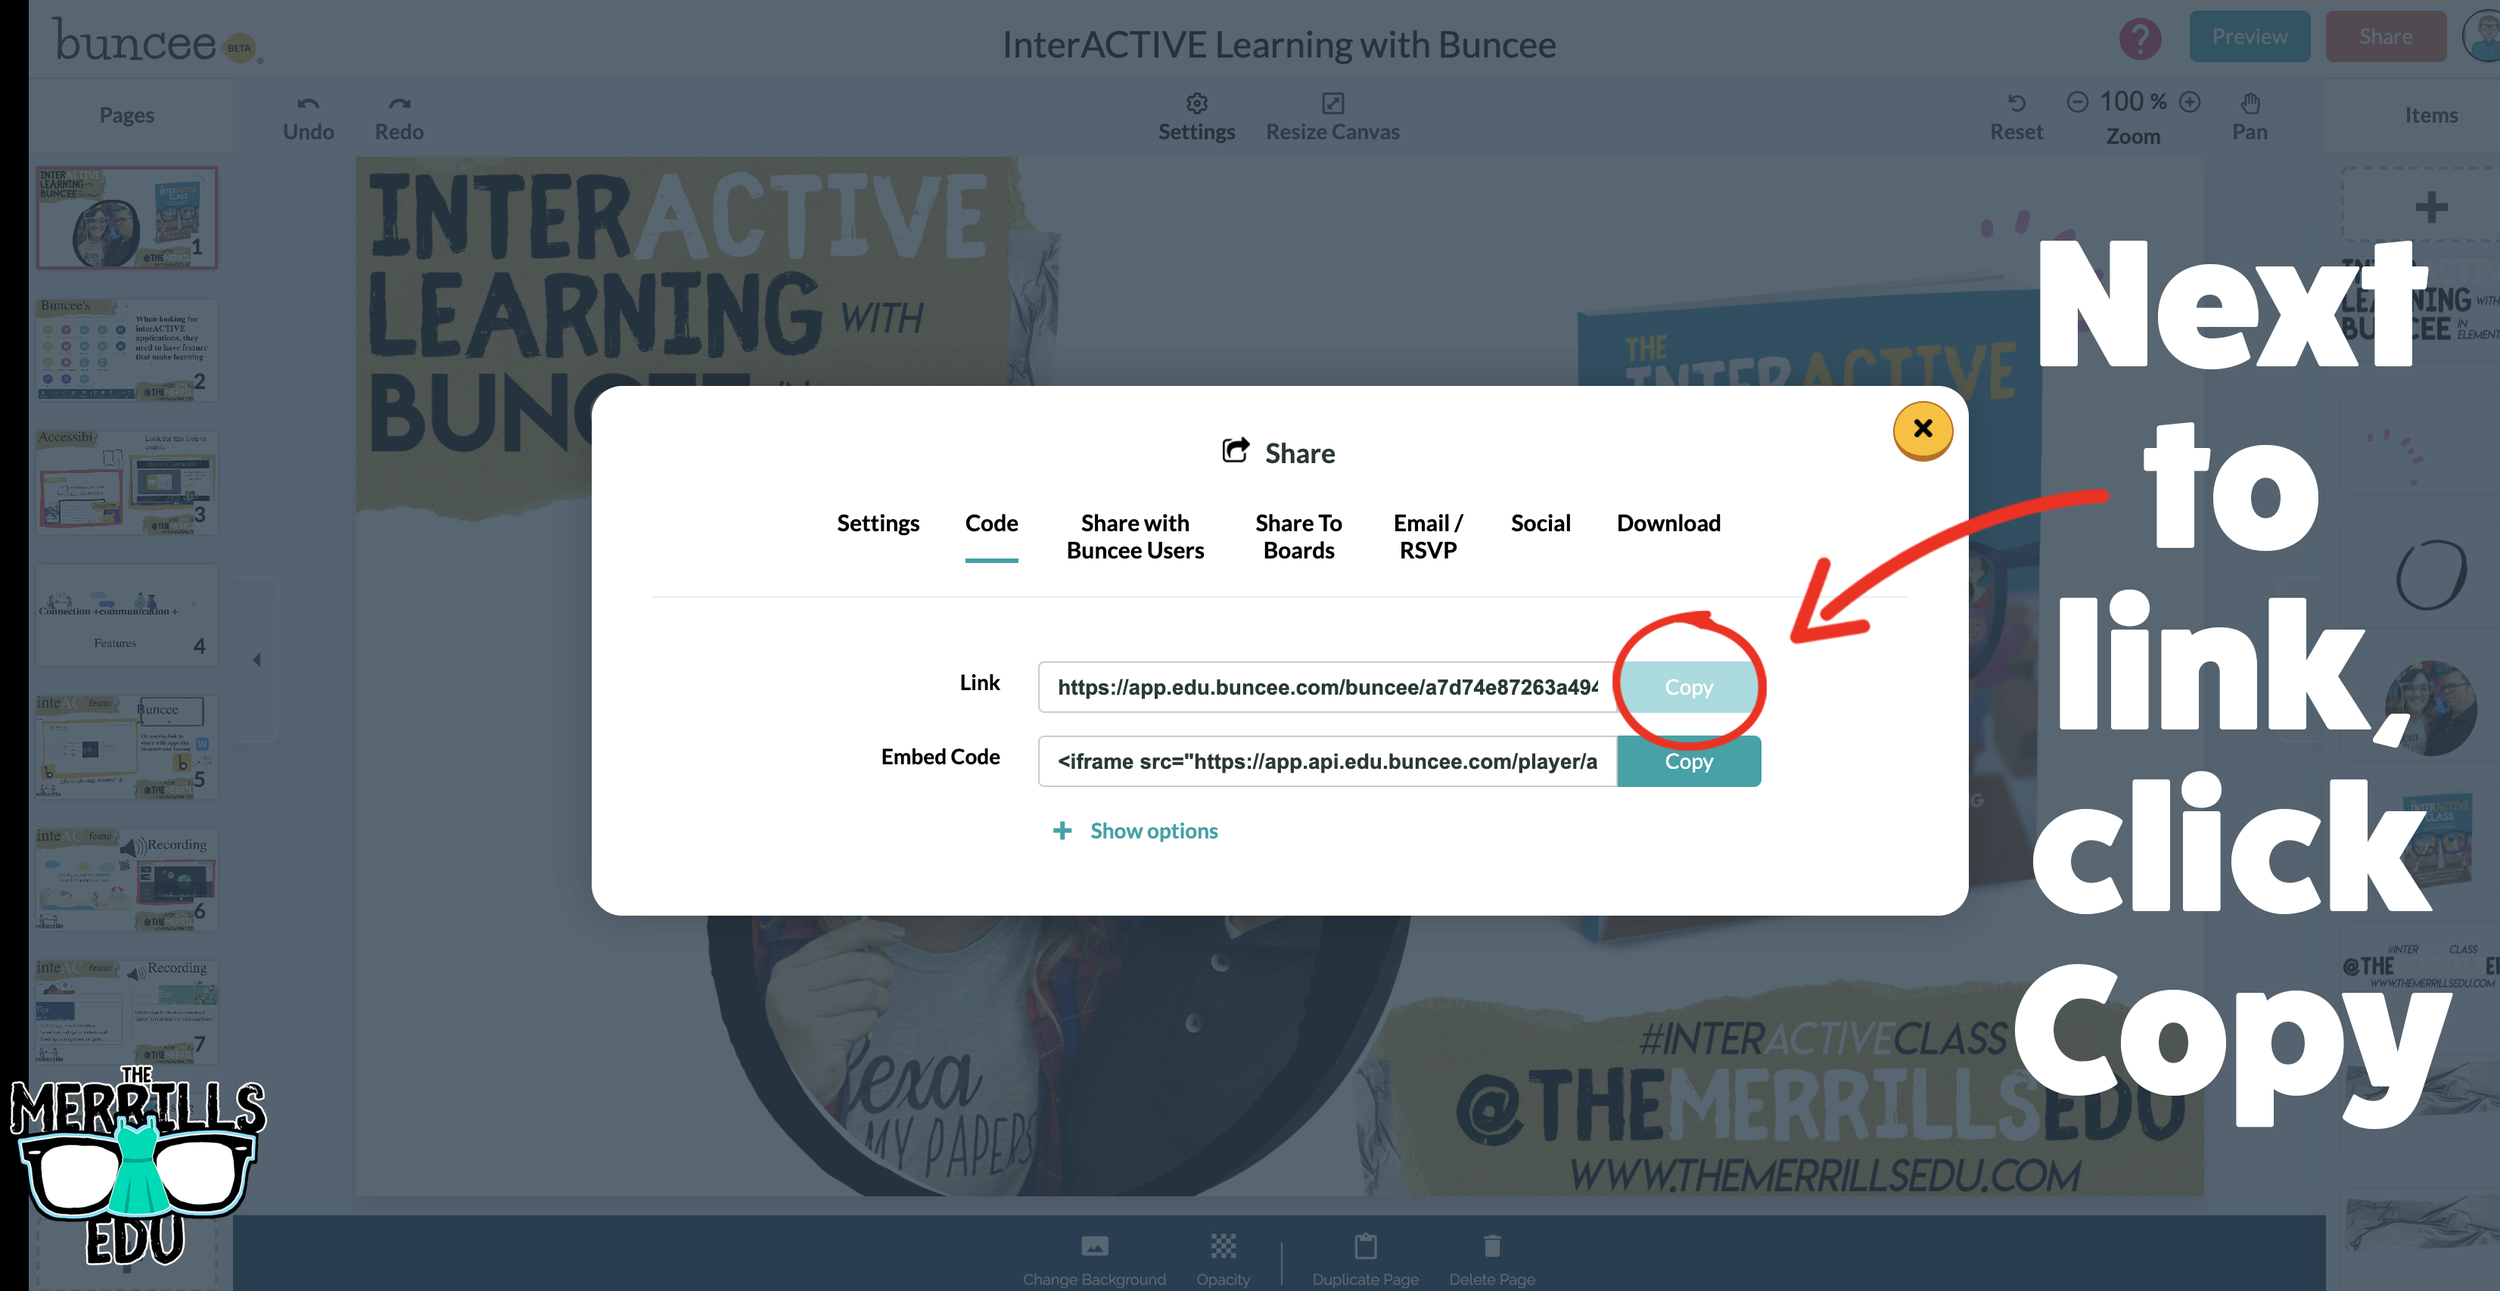
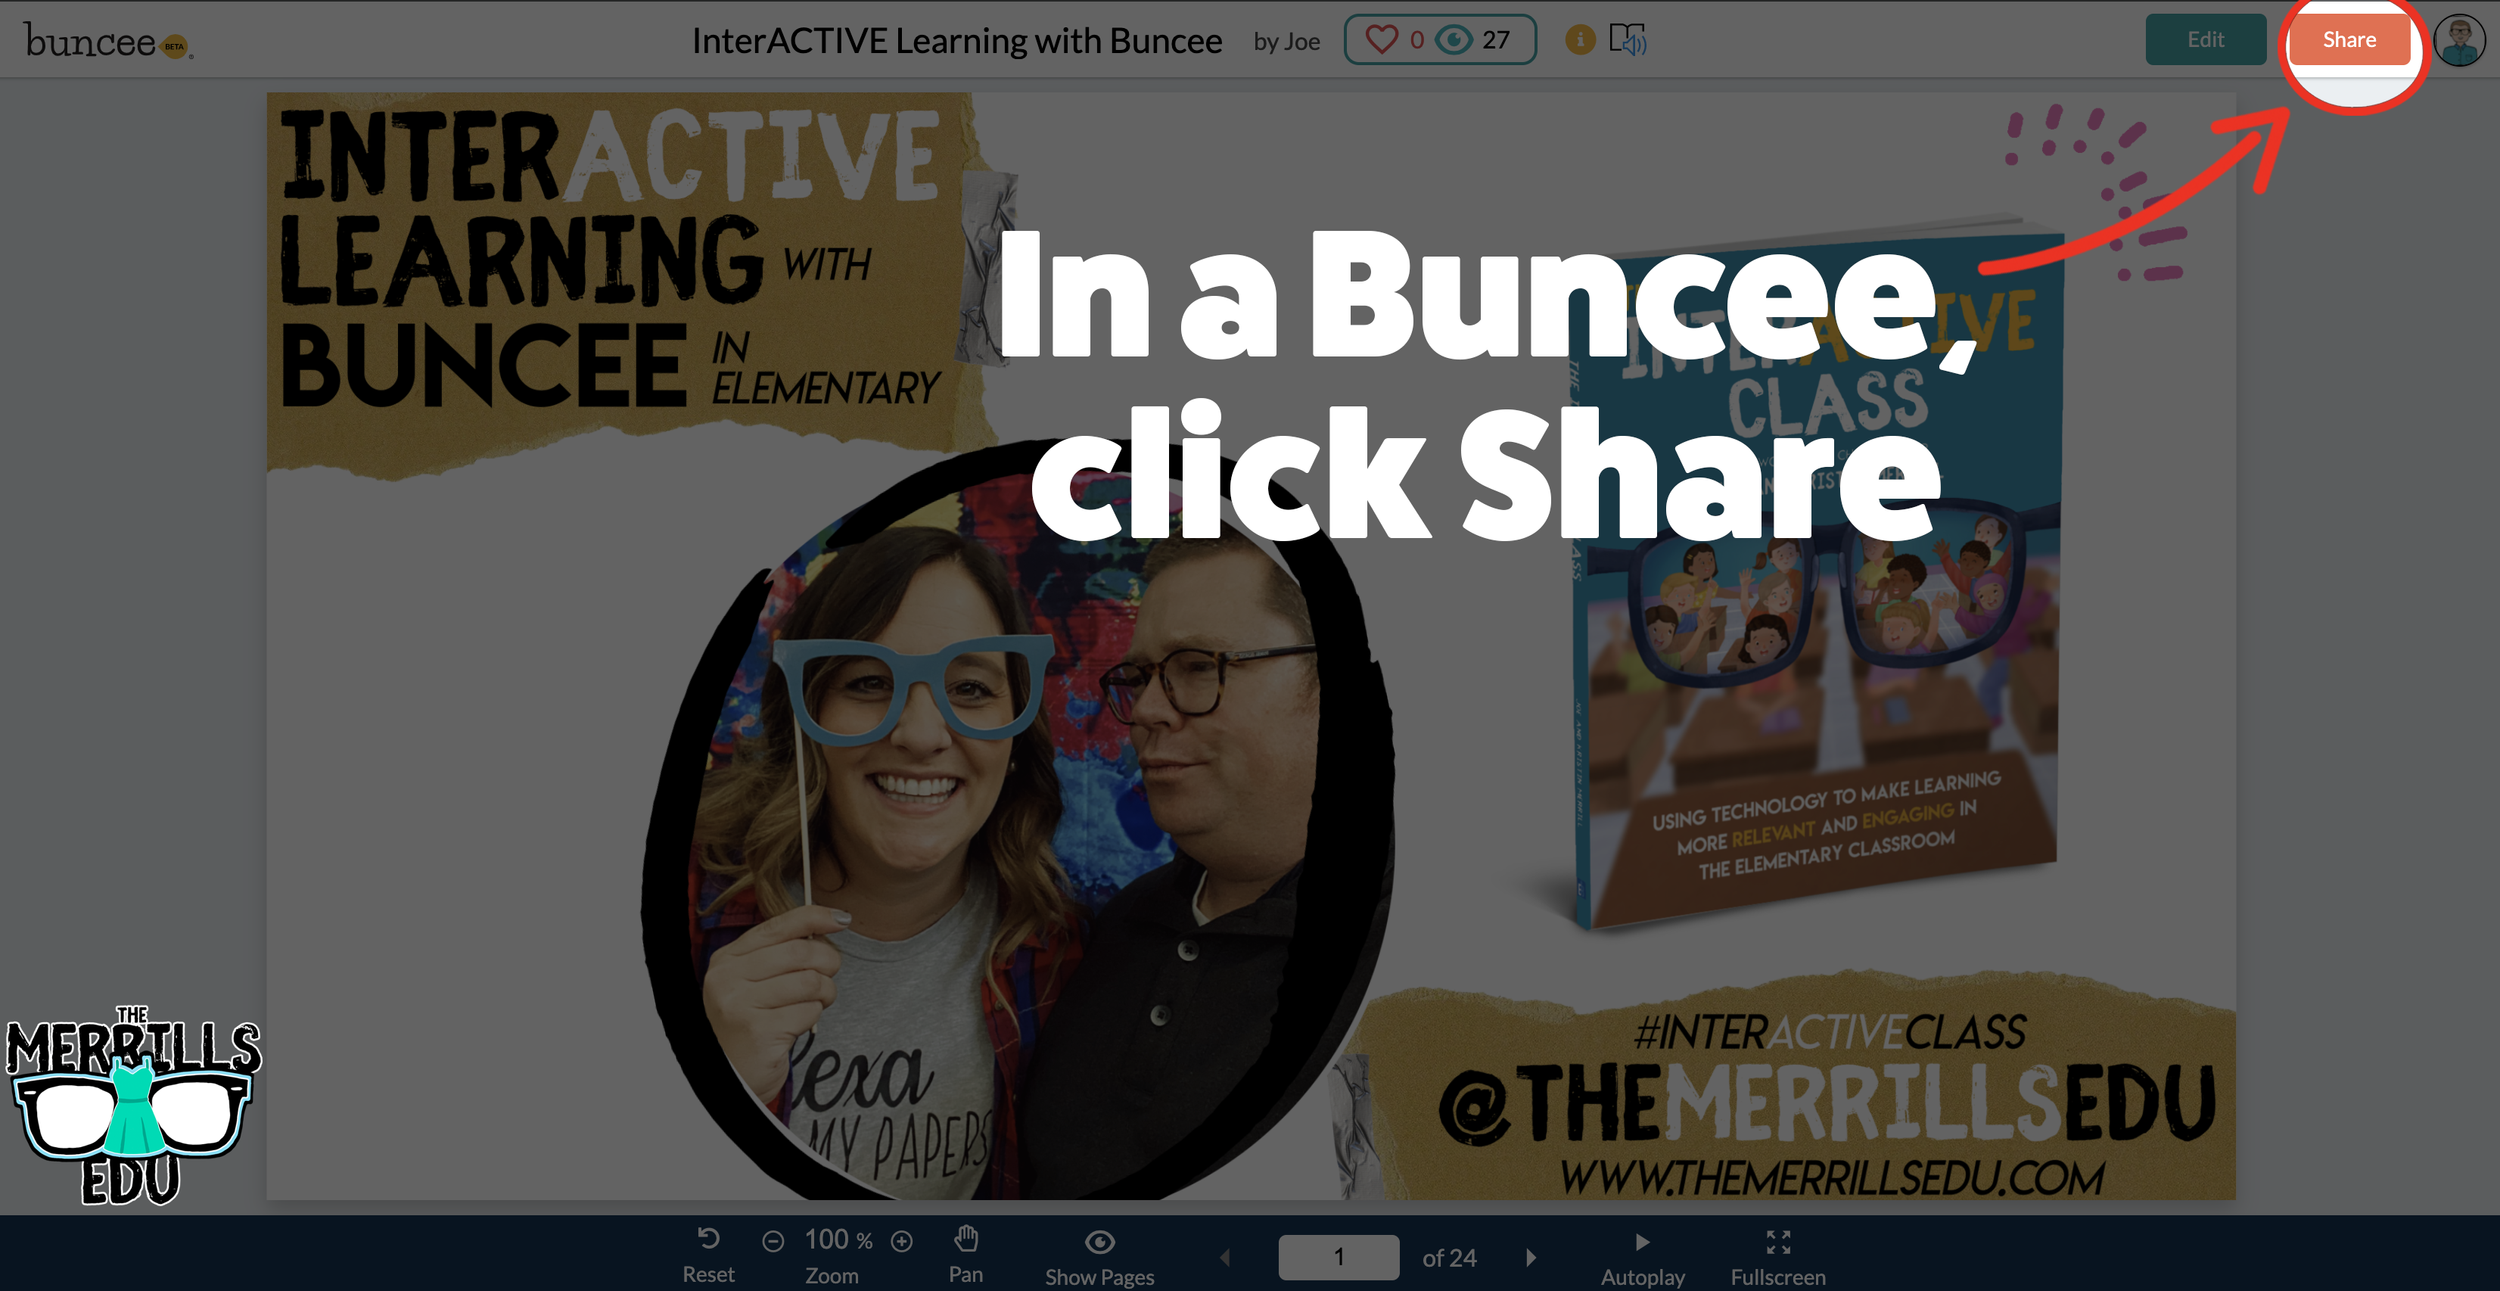
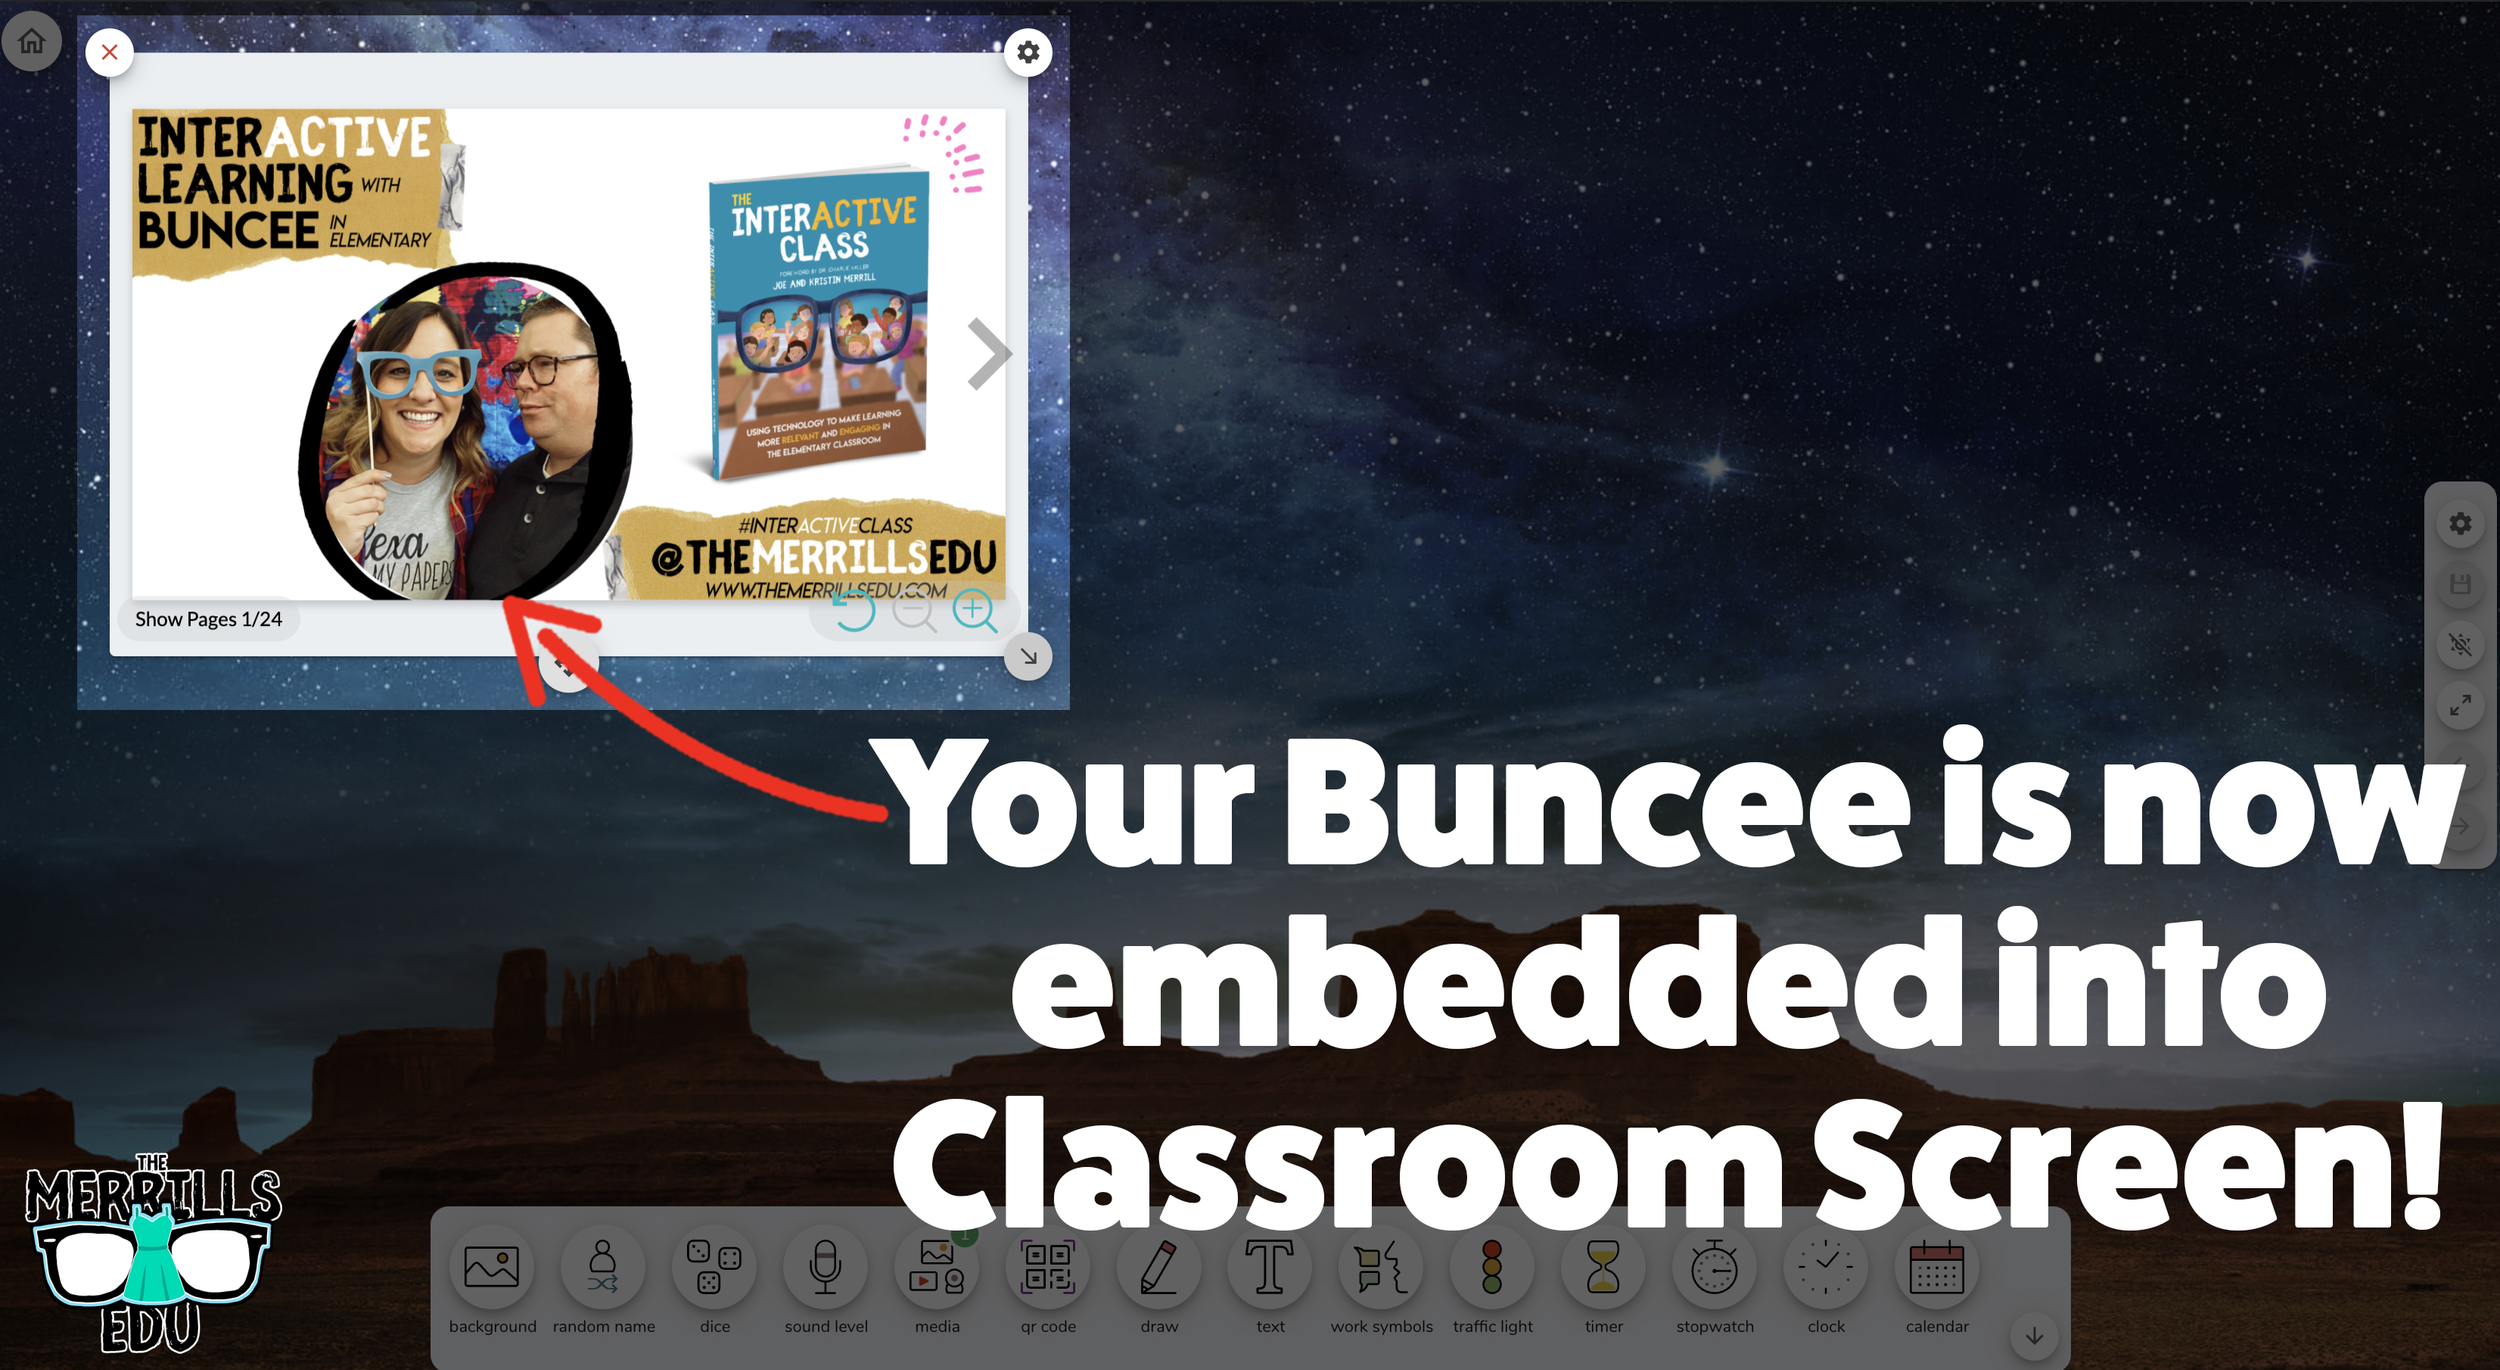
Buncee Embedded into Canvas
Buncee creations can be added to Canvas, too! There’s a lot of embed options (which we love!), so you have complete control of how things look and work. Options include autoplay and dimensions of the embed. Here’s how it all works:
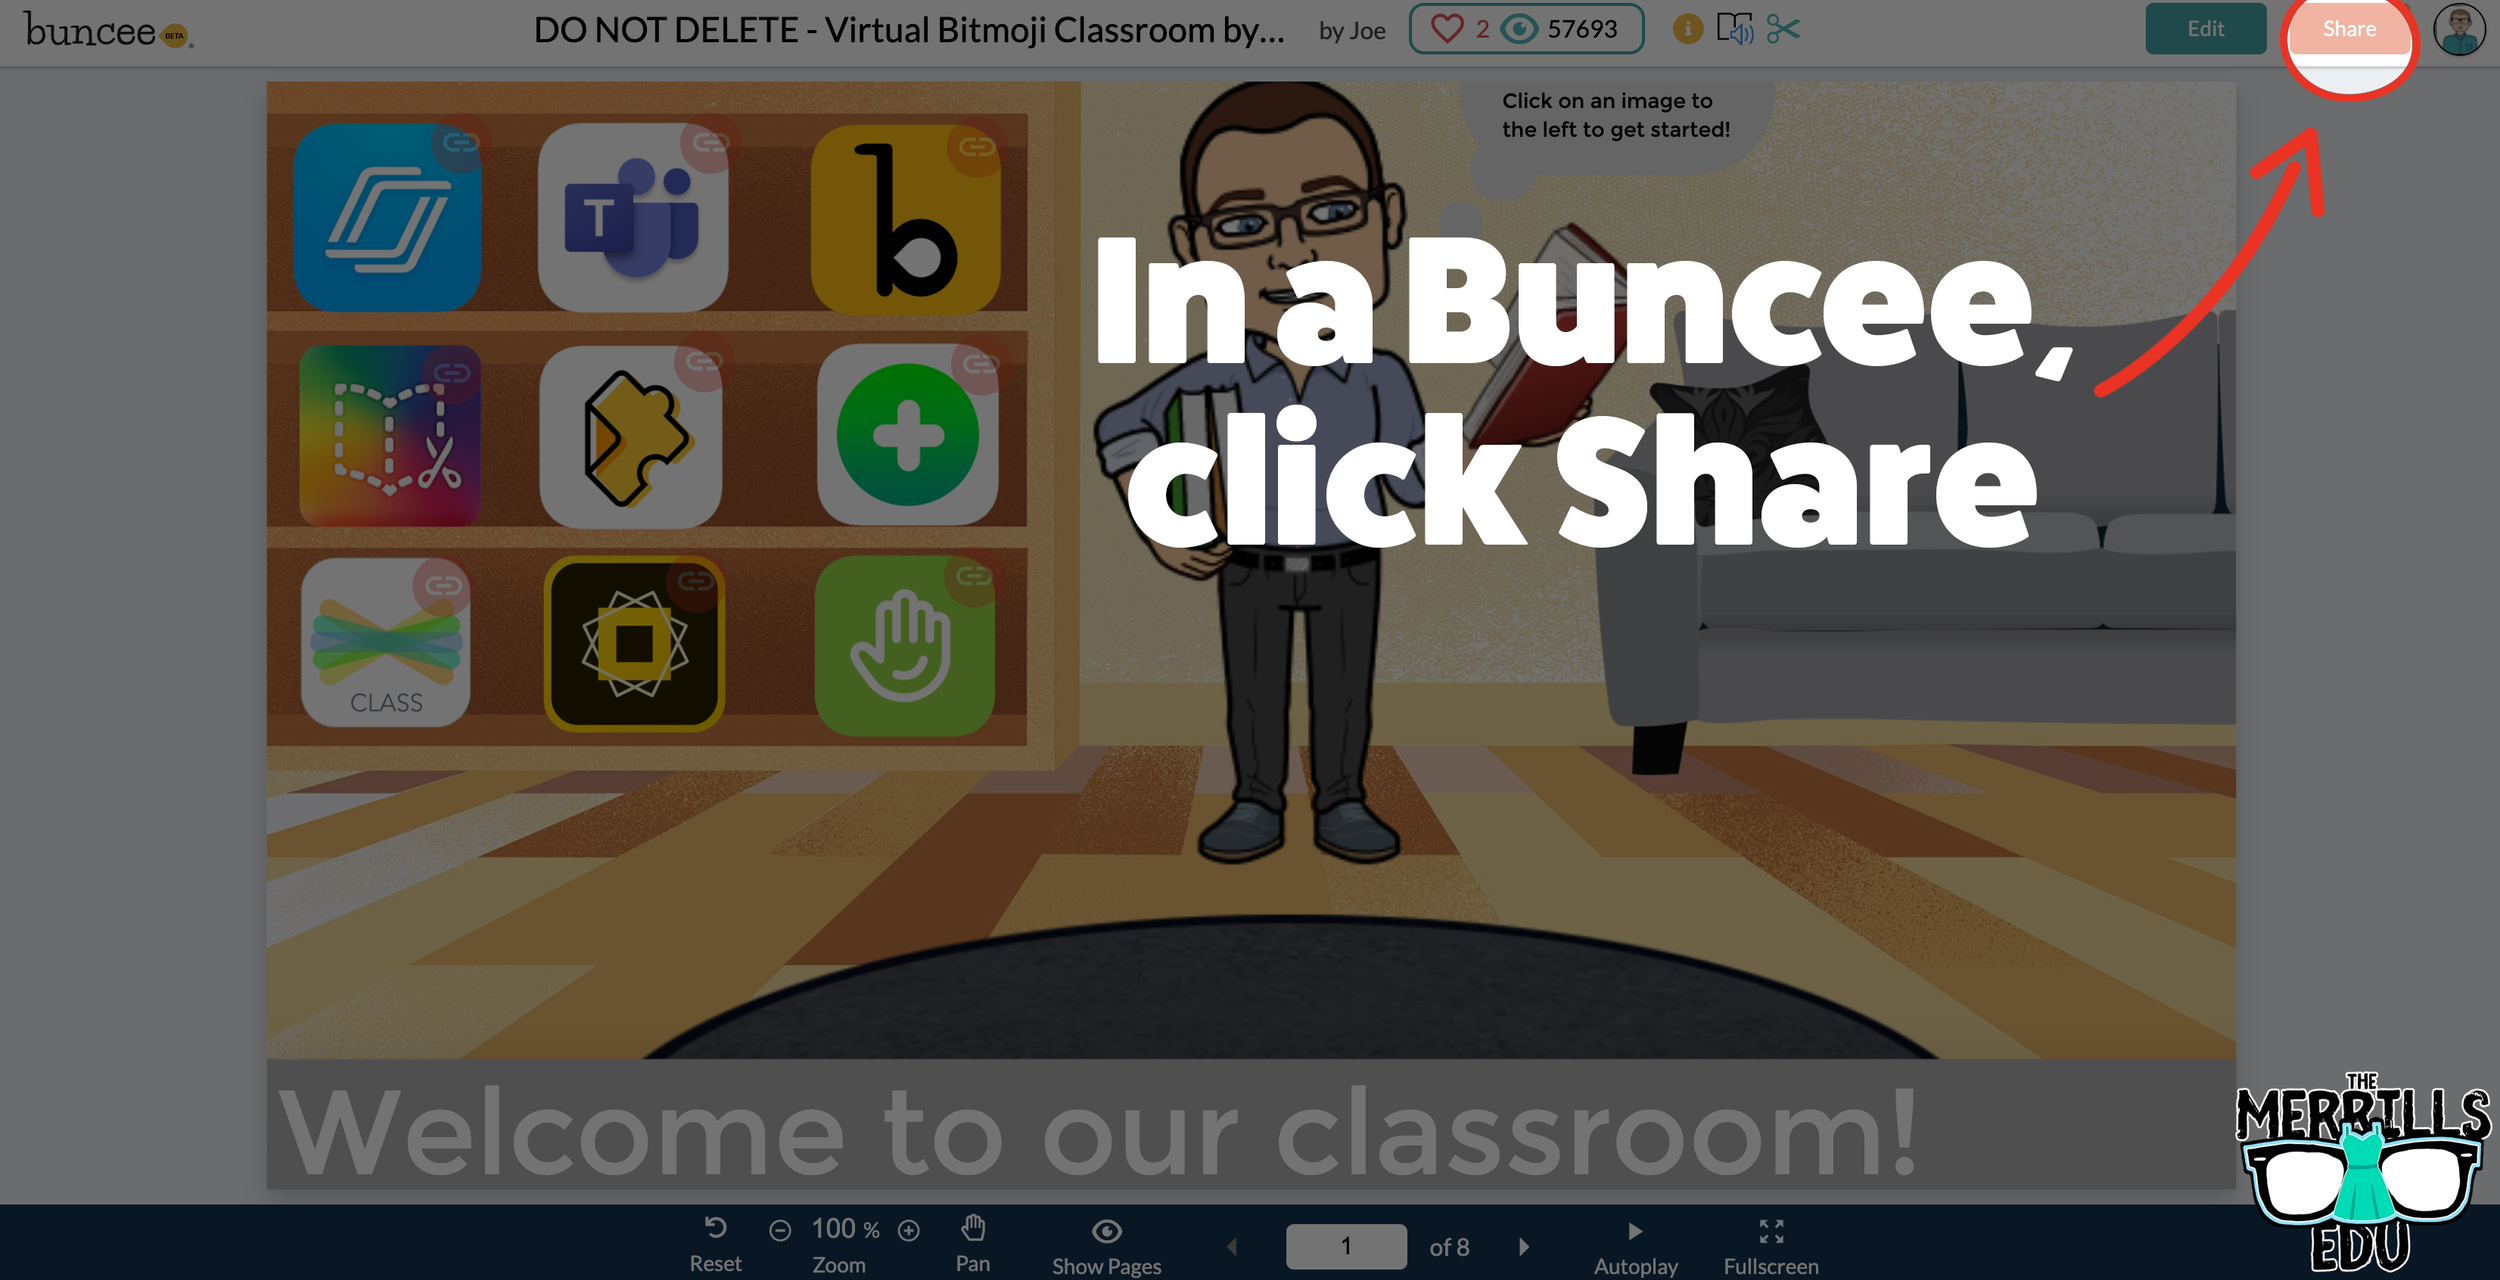
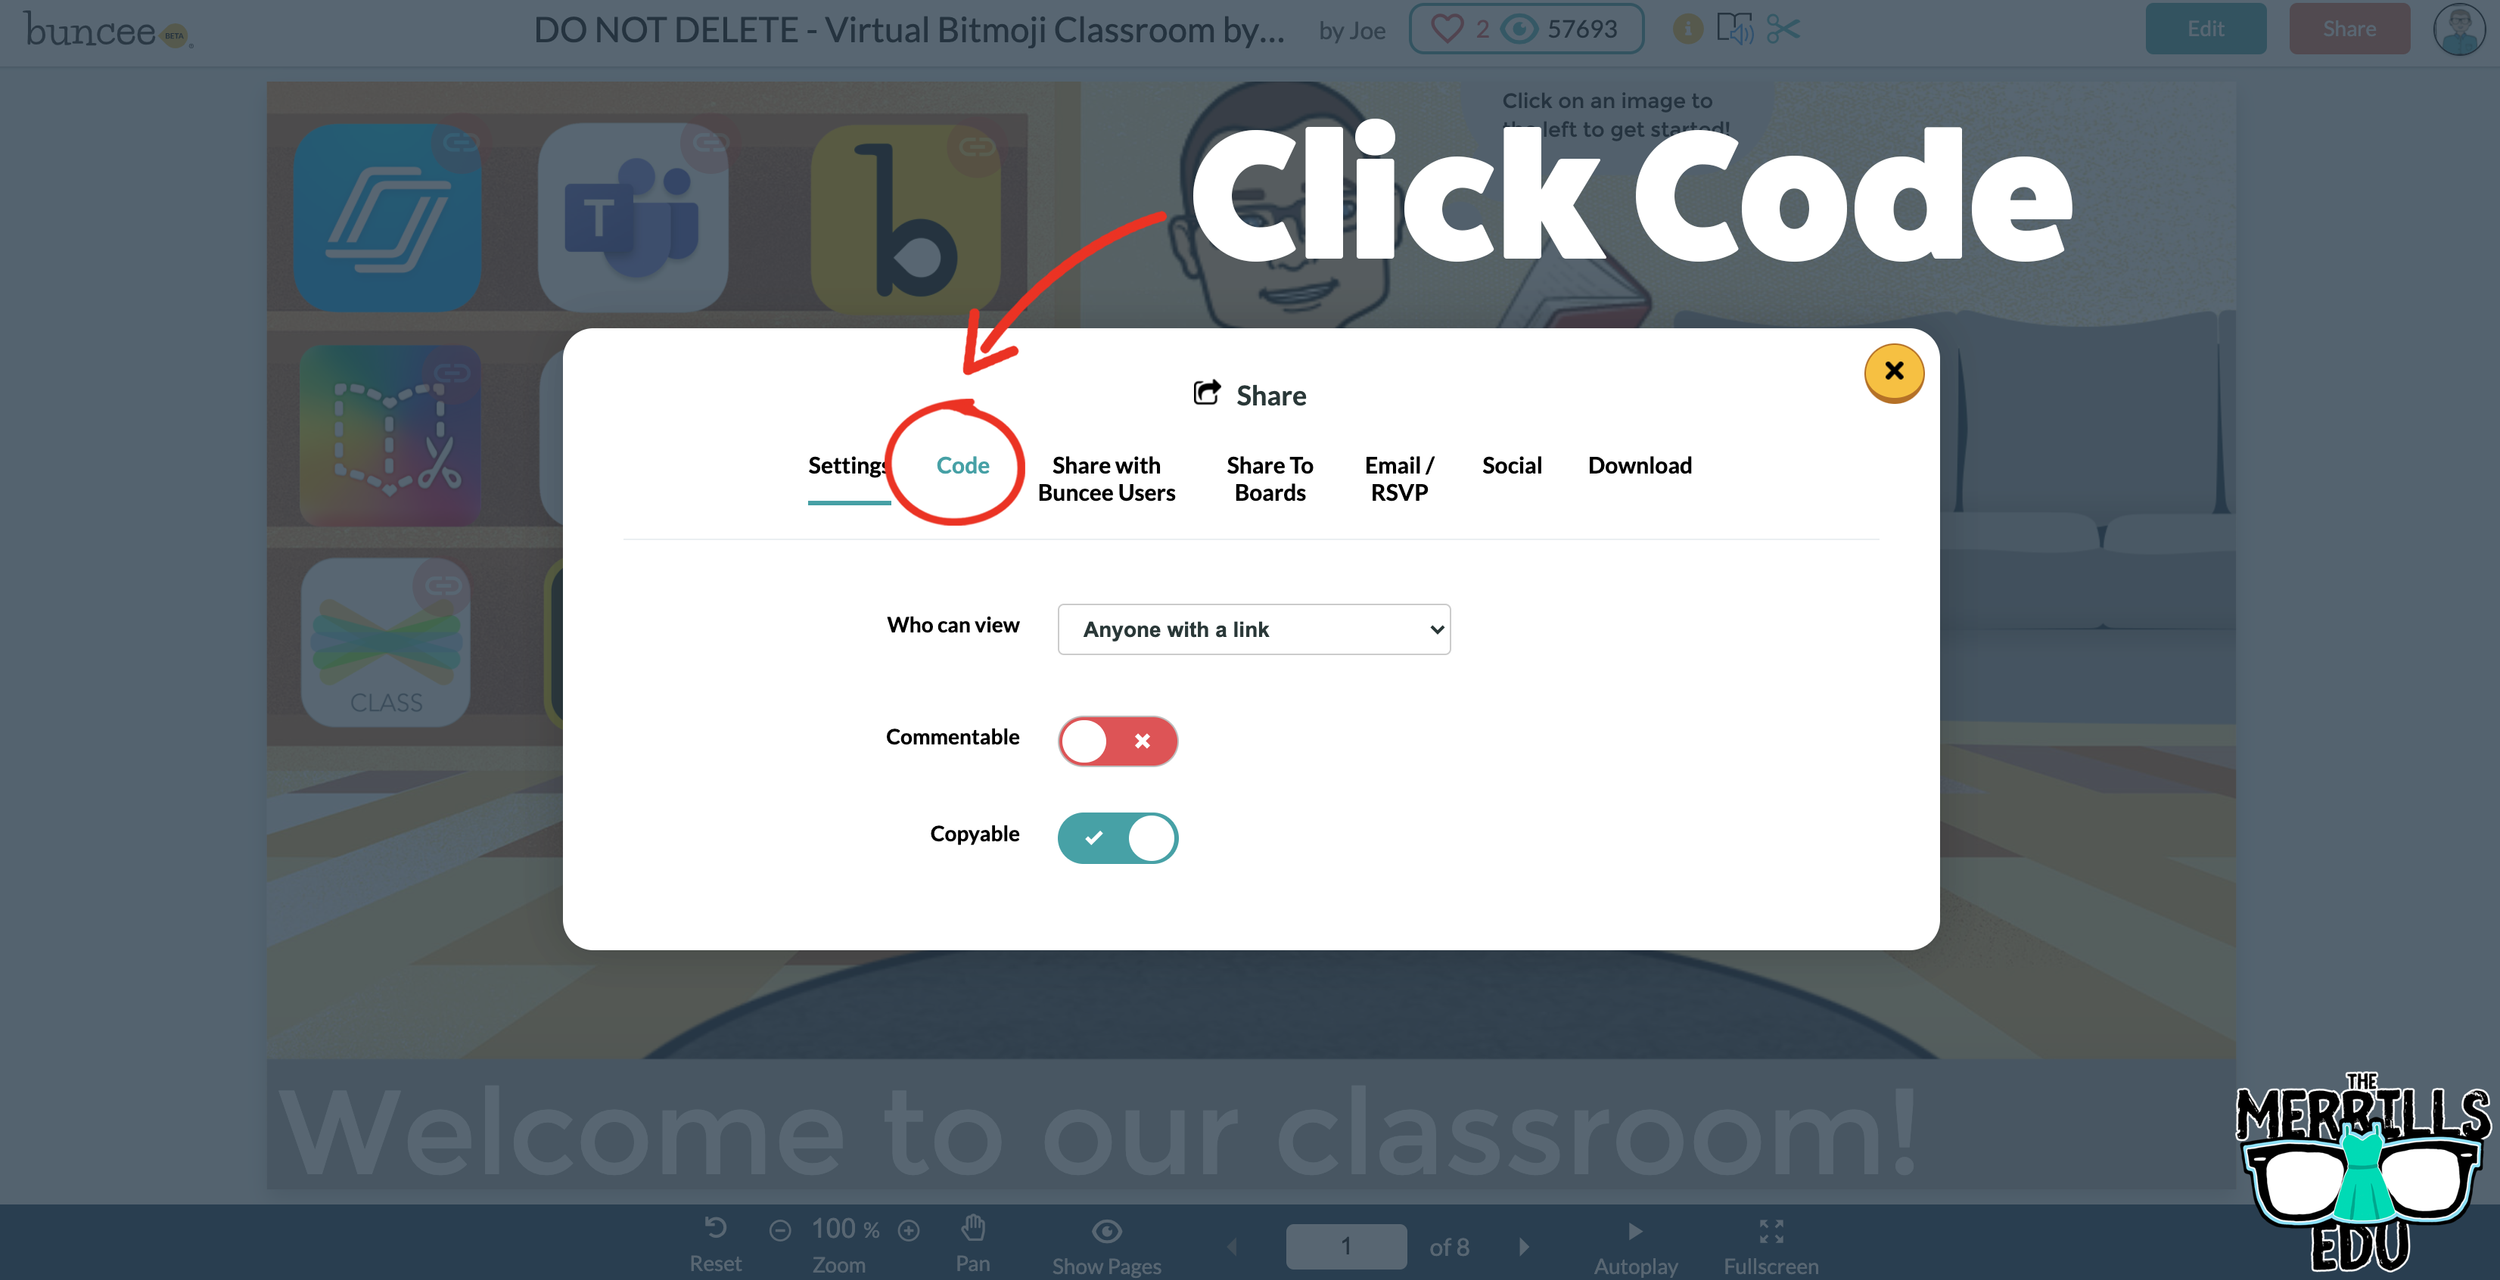

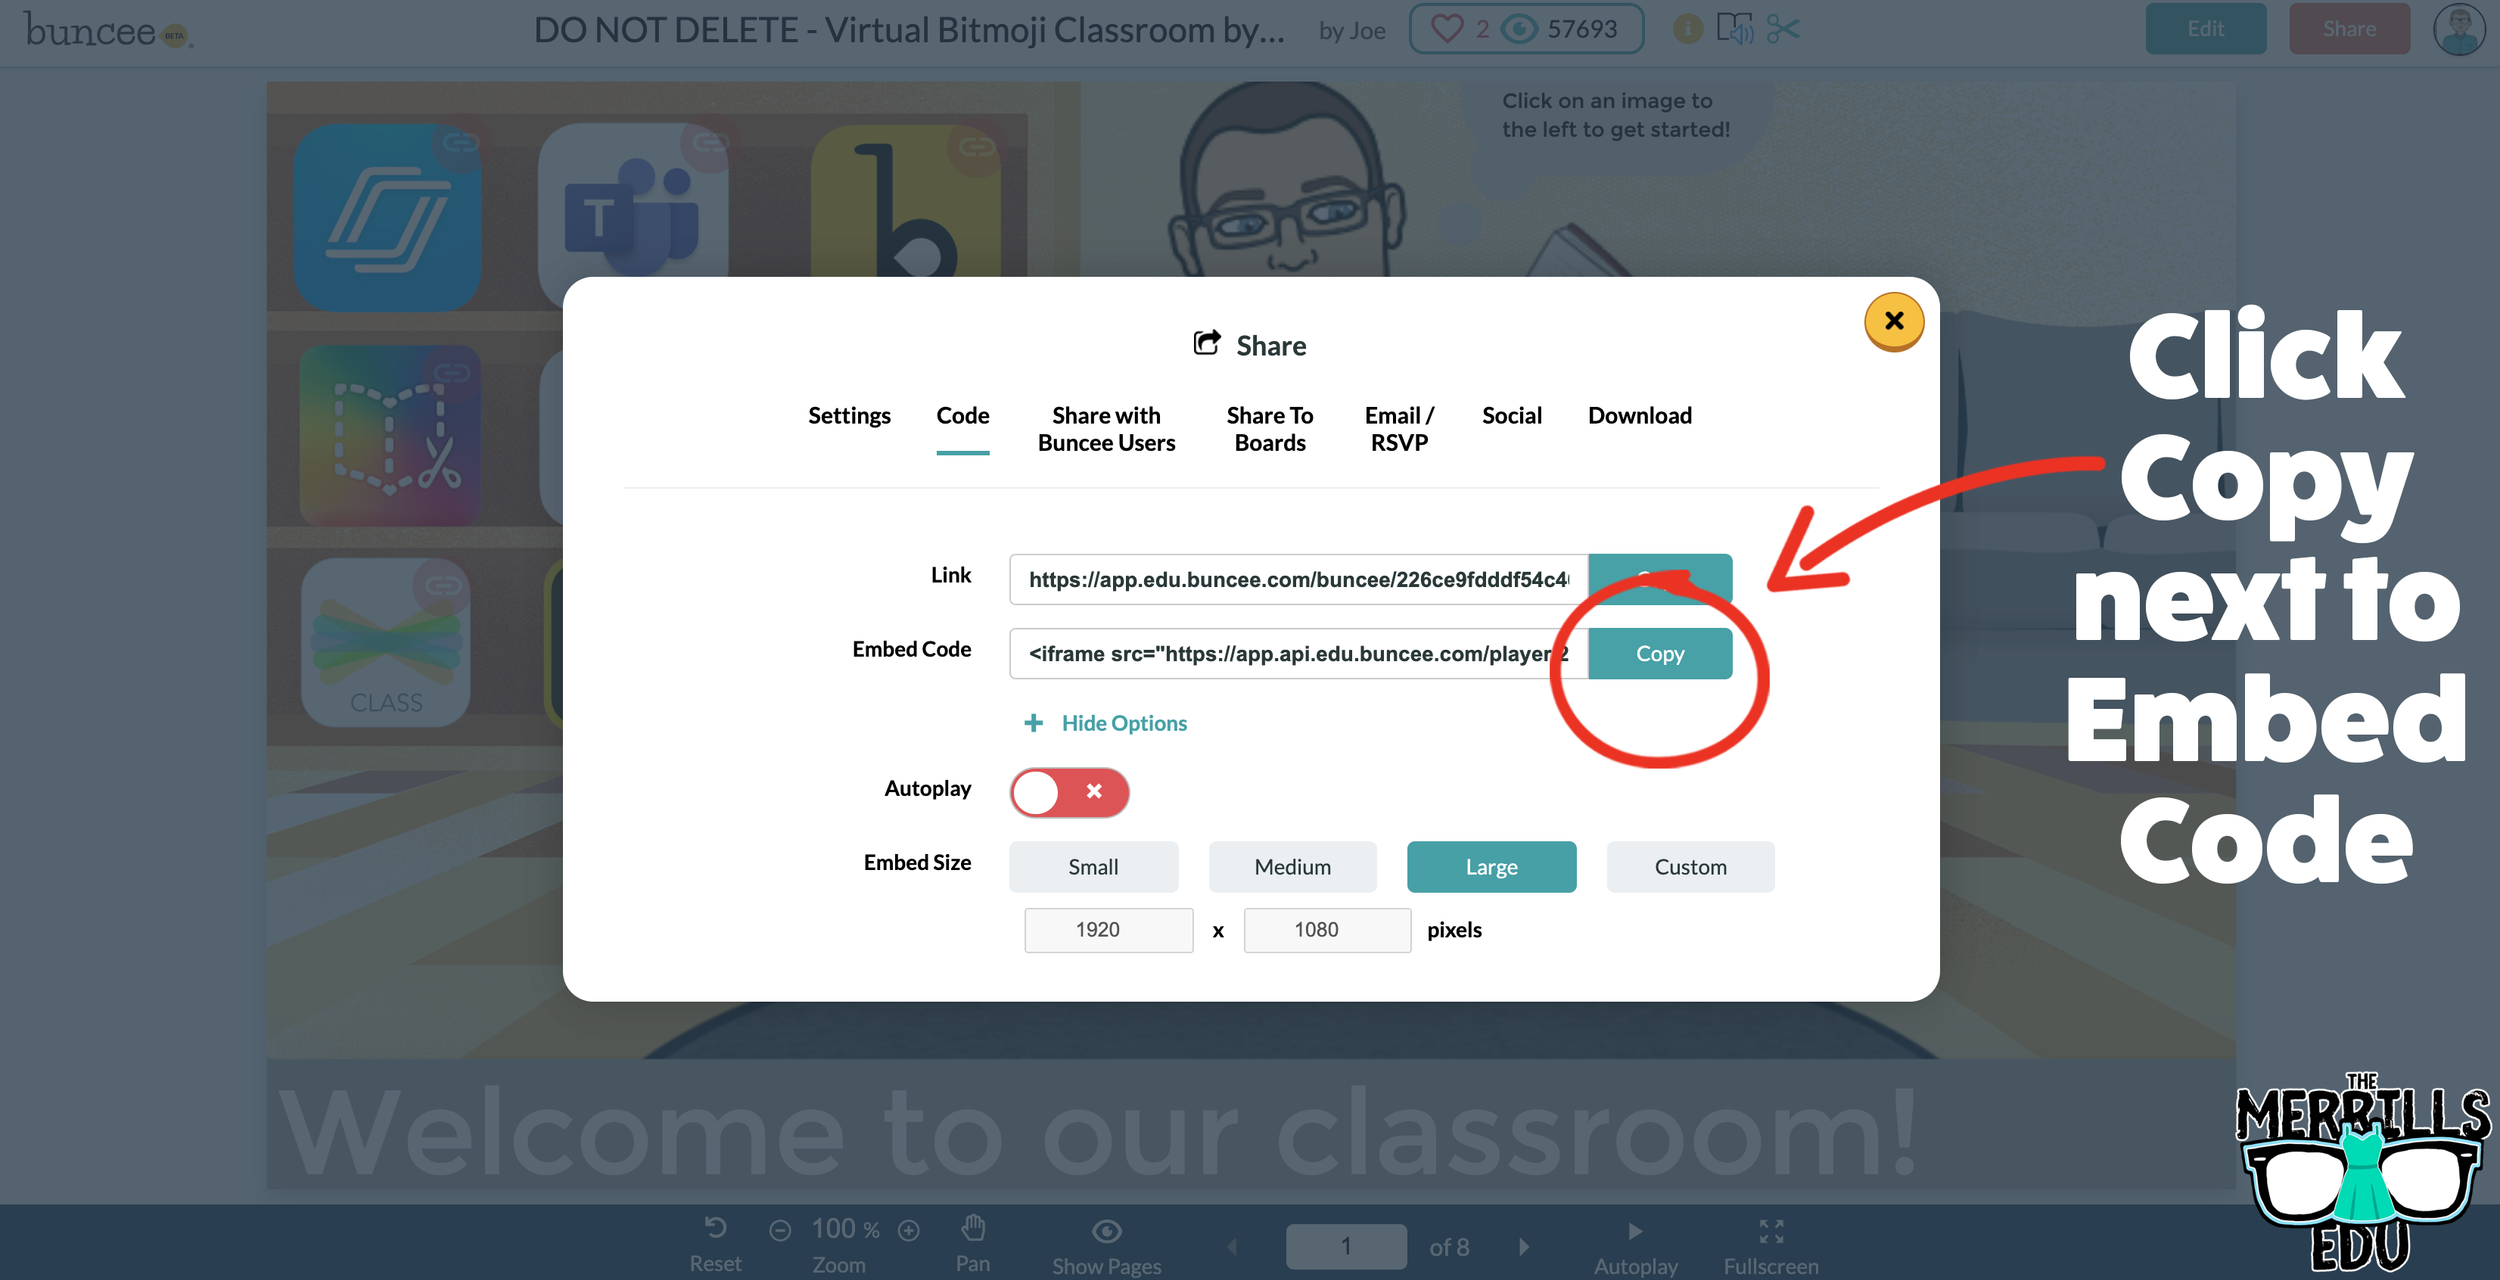


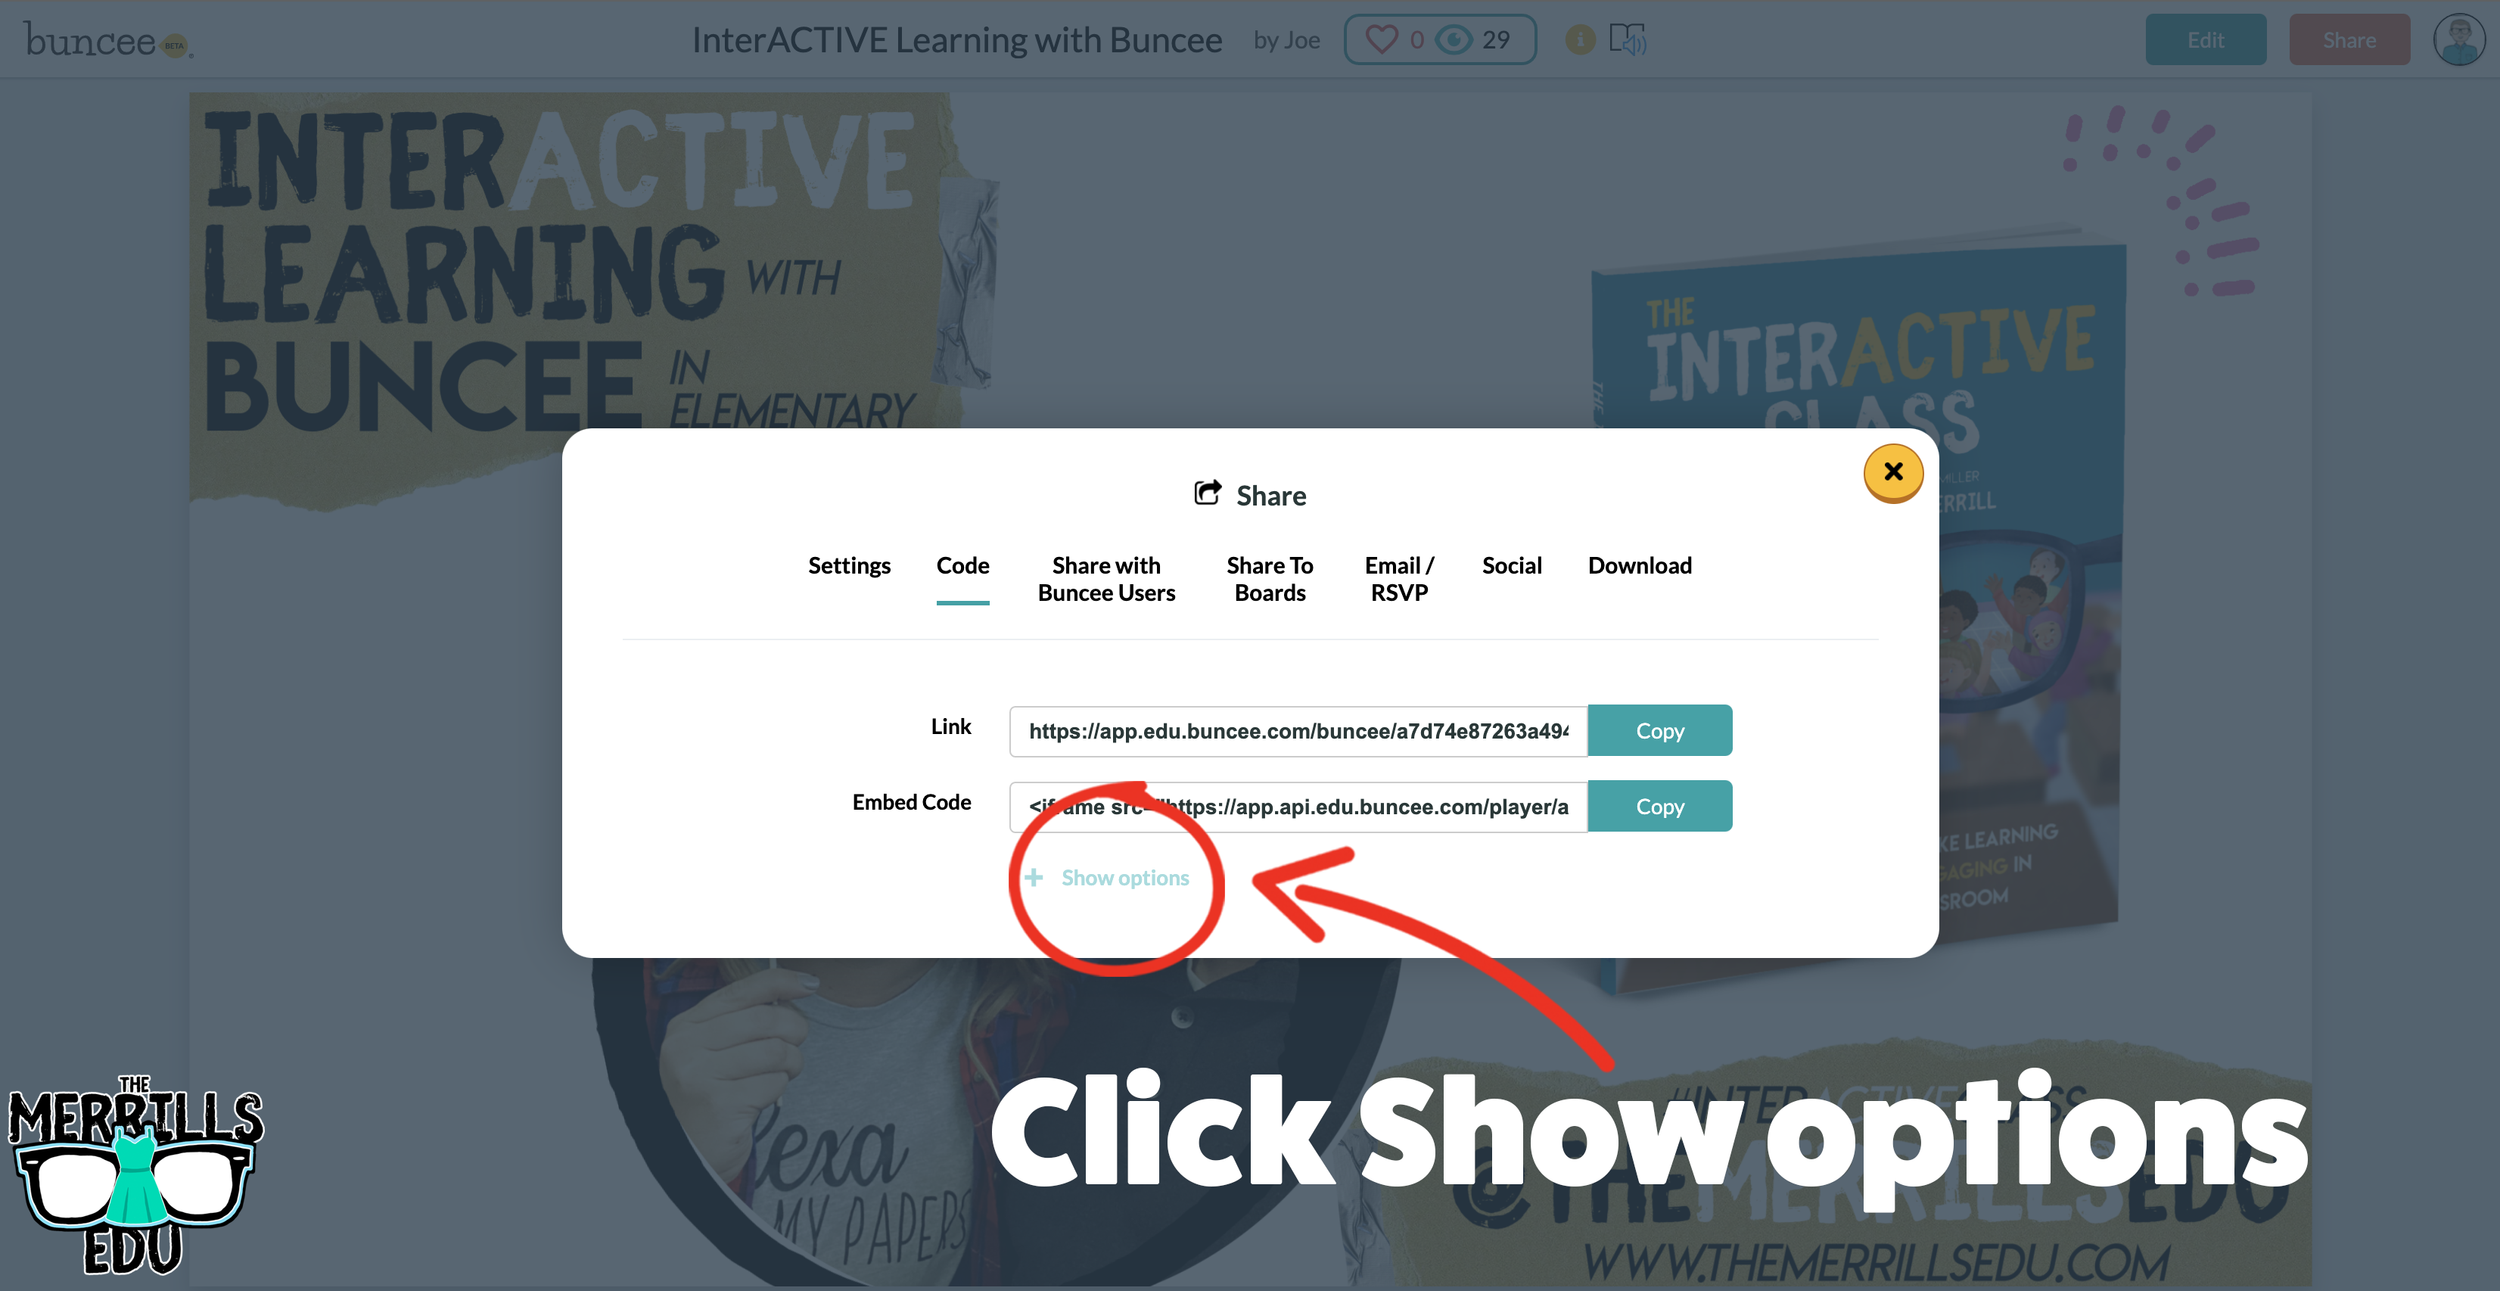
Open a Buncee, then click the “Share” button located in the upper right side of the screen.
A new window will pop up. Click on “Code.”
Under “Code” click “+ Show Options.”
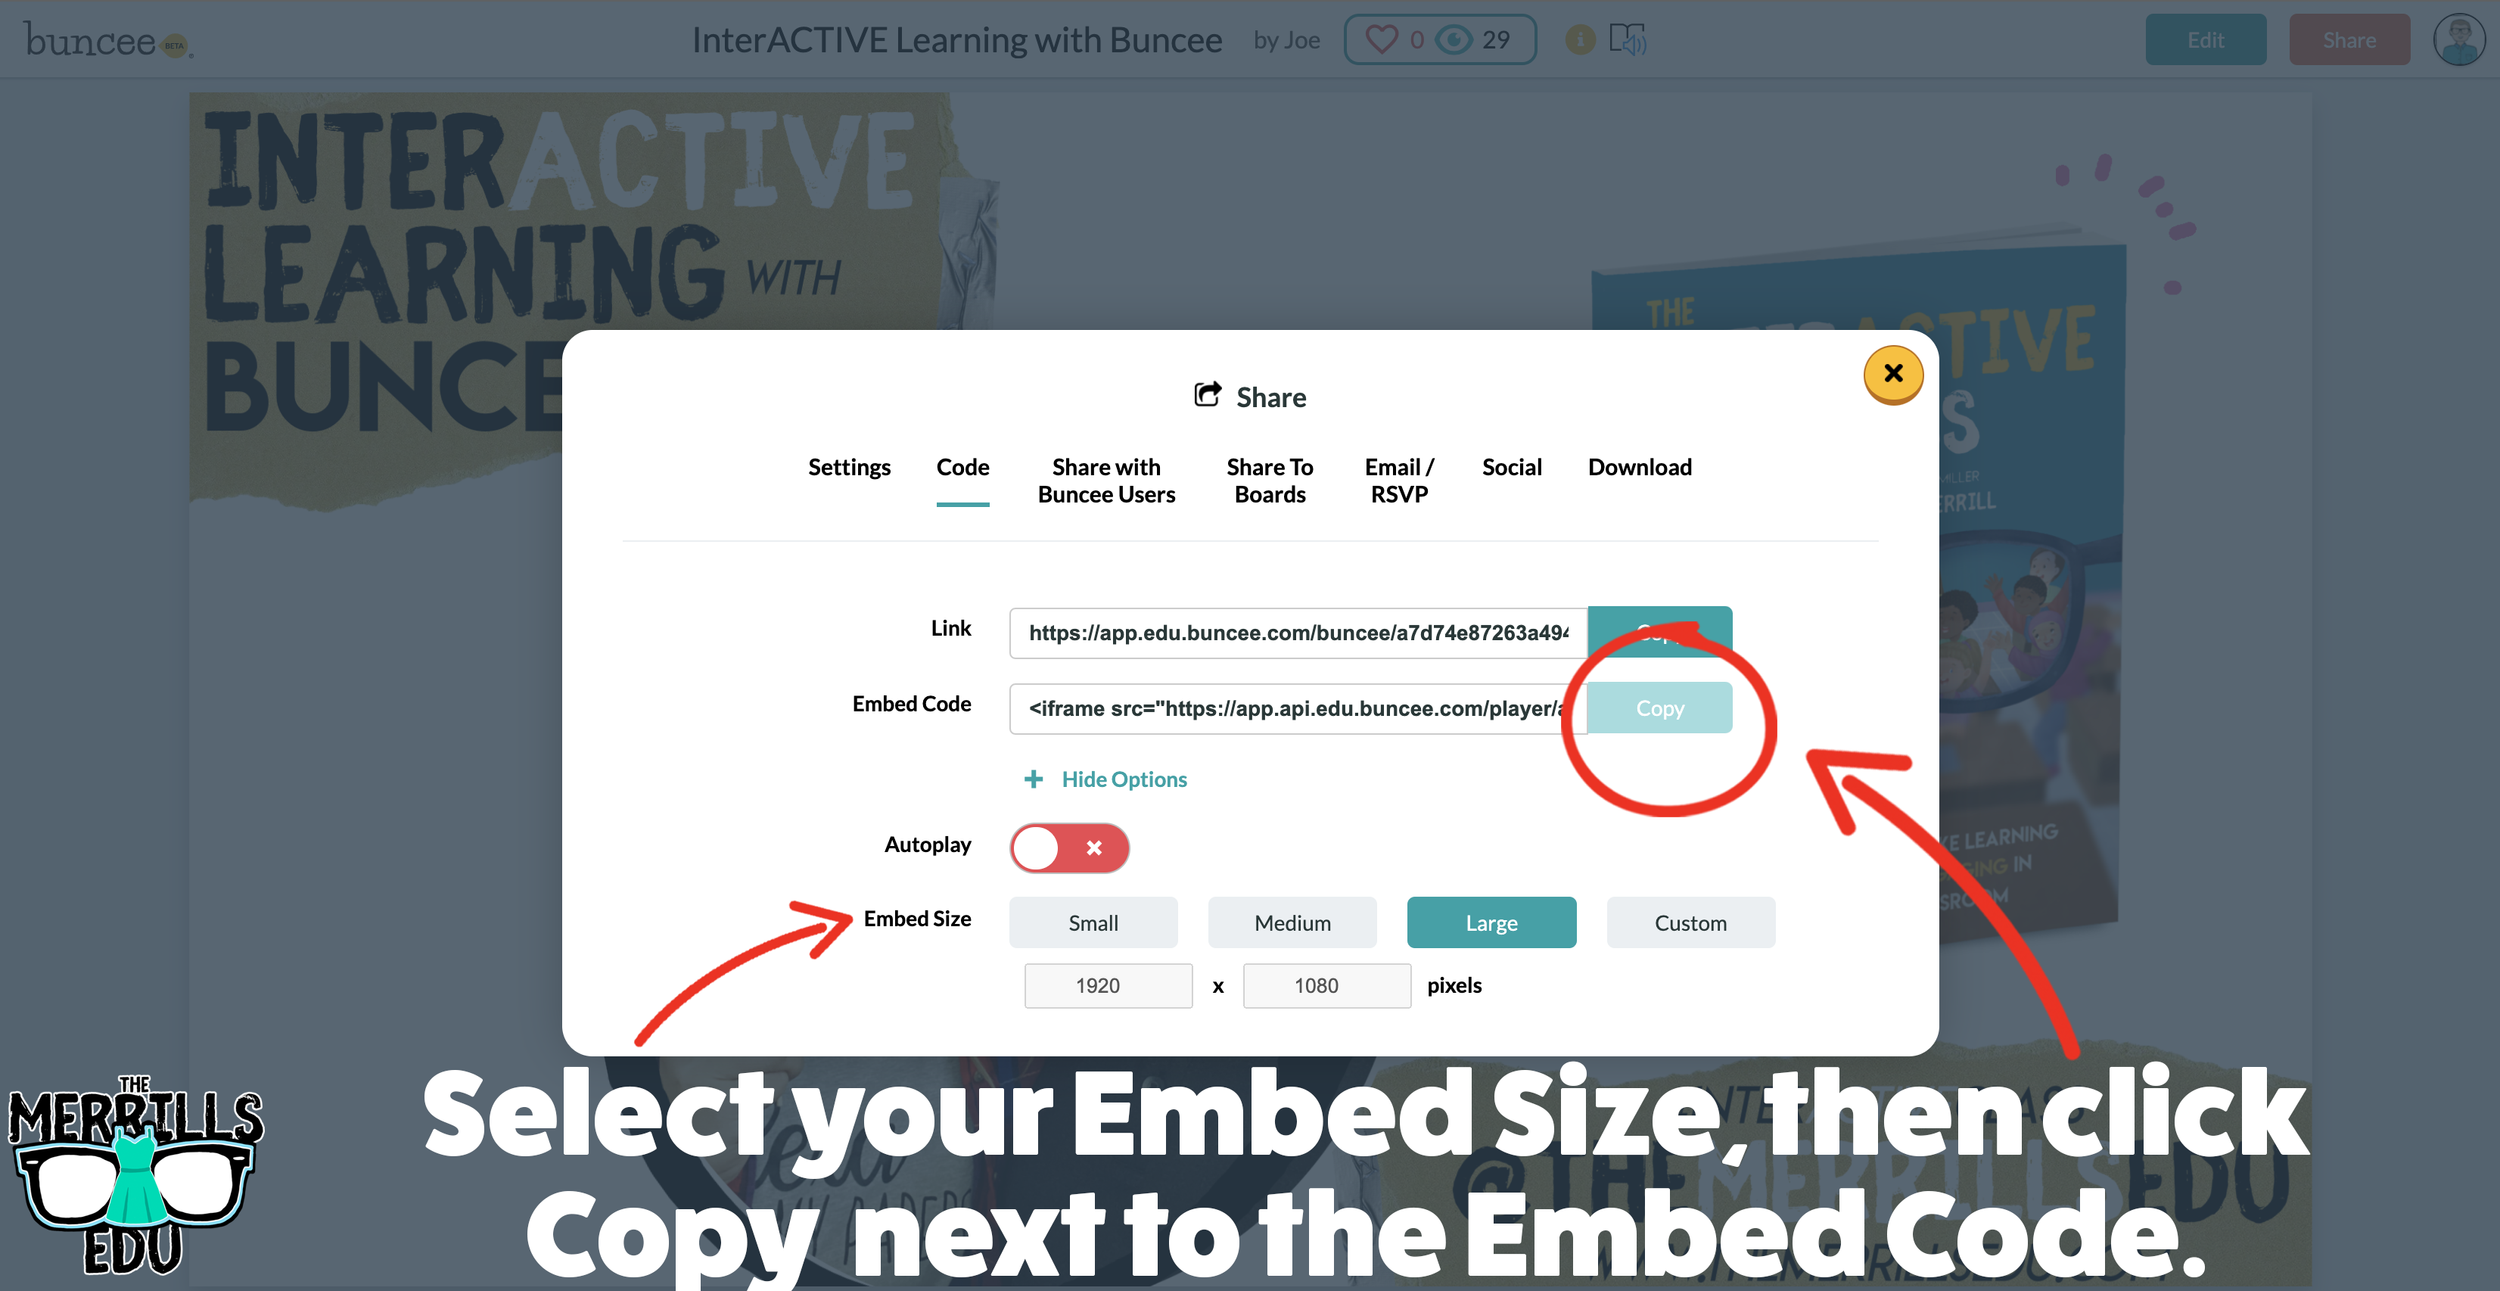
Select your preferred embed size (there are also options to autoplay the Buncee).
Then, in the same window, click “Copy” next to the Embed Code bar.
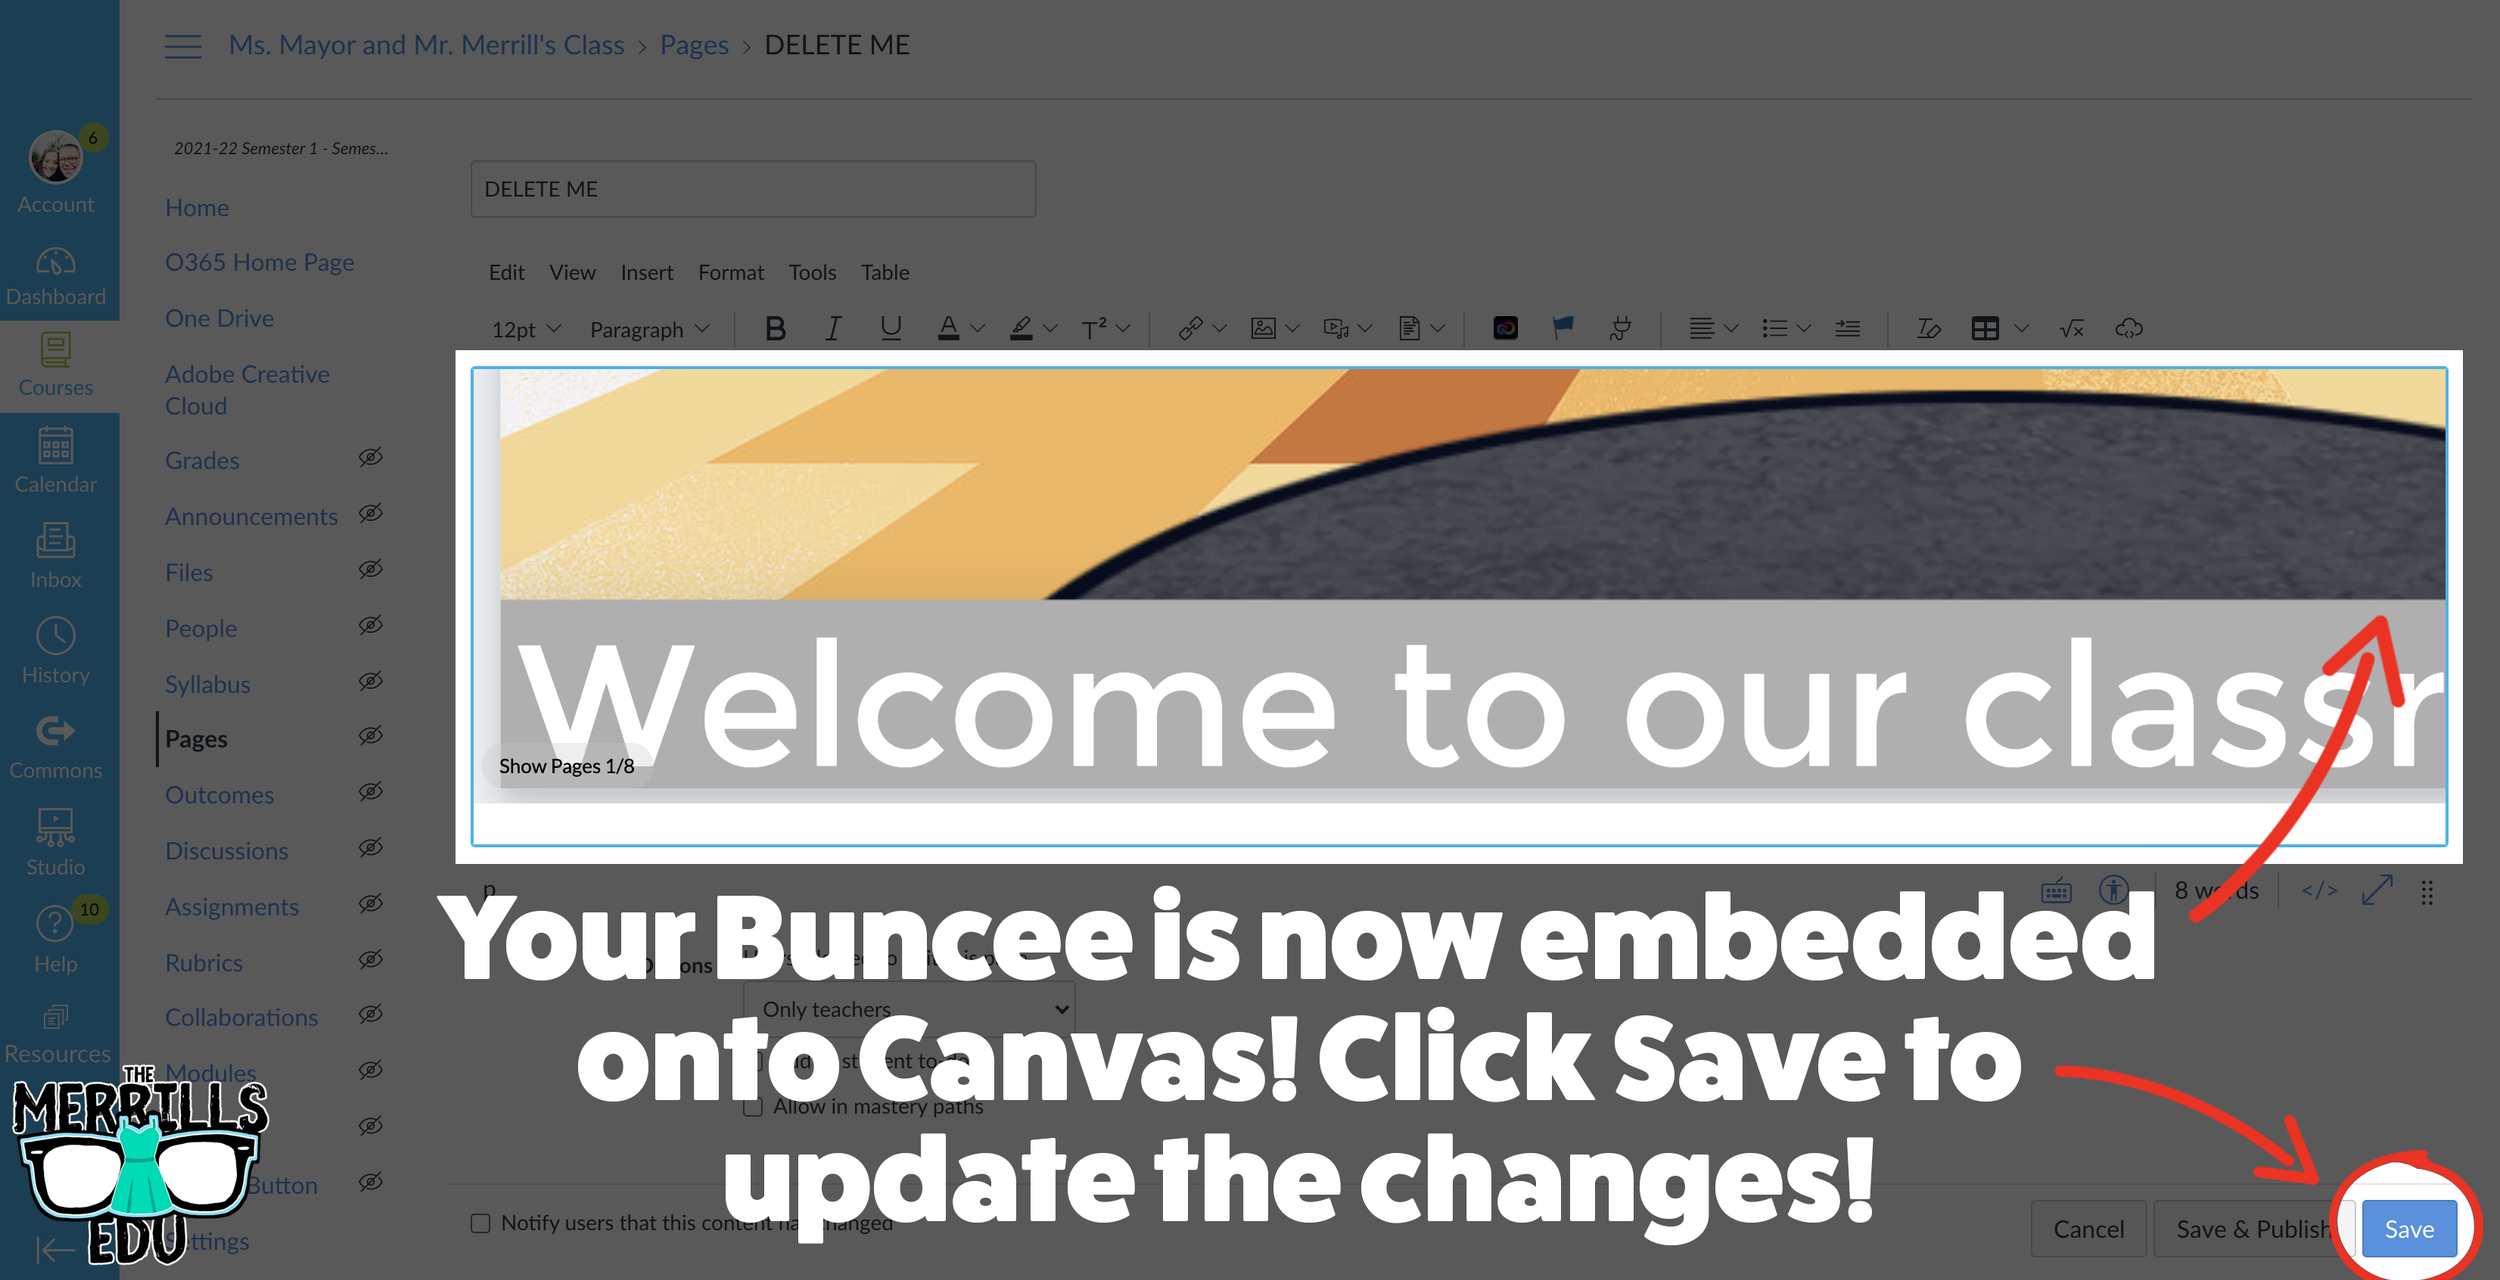
In a separate tab, open the Canvas page that you would like to add the Buncee creation to. Then, click on the cloud icon (if you don’t see the Cloud icon, click the three dots to expand the menu bar).
In the embed window, paste your copied code from Buncee. Then, click submit.
Your Buncee creation is now embedded into the Canvas page! Click on “Save” to update the changes.

Ed Puzzle Embedded into Canvas
Ed Puzzle is a video assessment platform tool that allows teachers to find or create videos and then generate questions that go along with the video. The result is an engaging formative assessment that your students will actually like! Keeping Ed Puzzle embedded into Canvas will help keep everything organized in the same place. Here’s how it all works:


(note: You will need to set up a class in Ed Puzzle prior to the steps below)
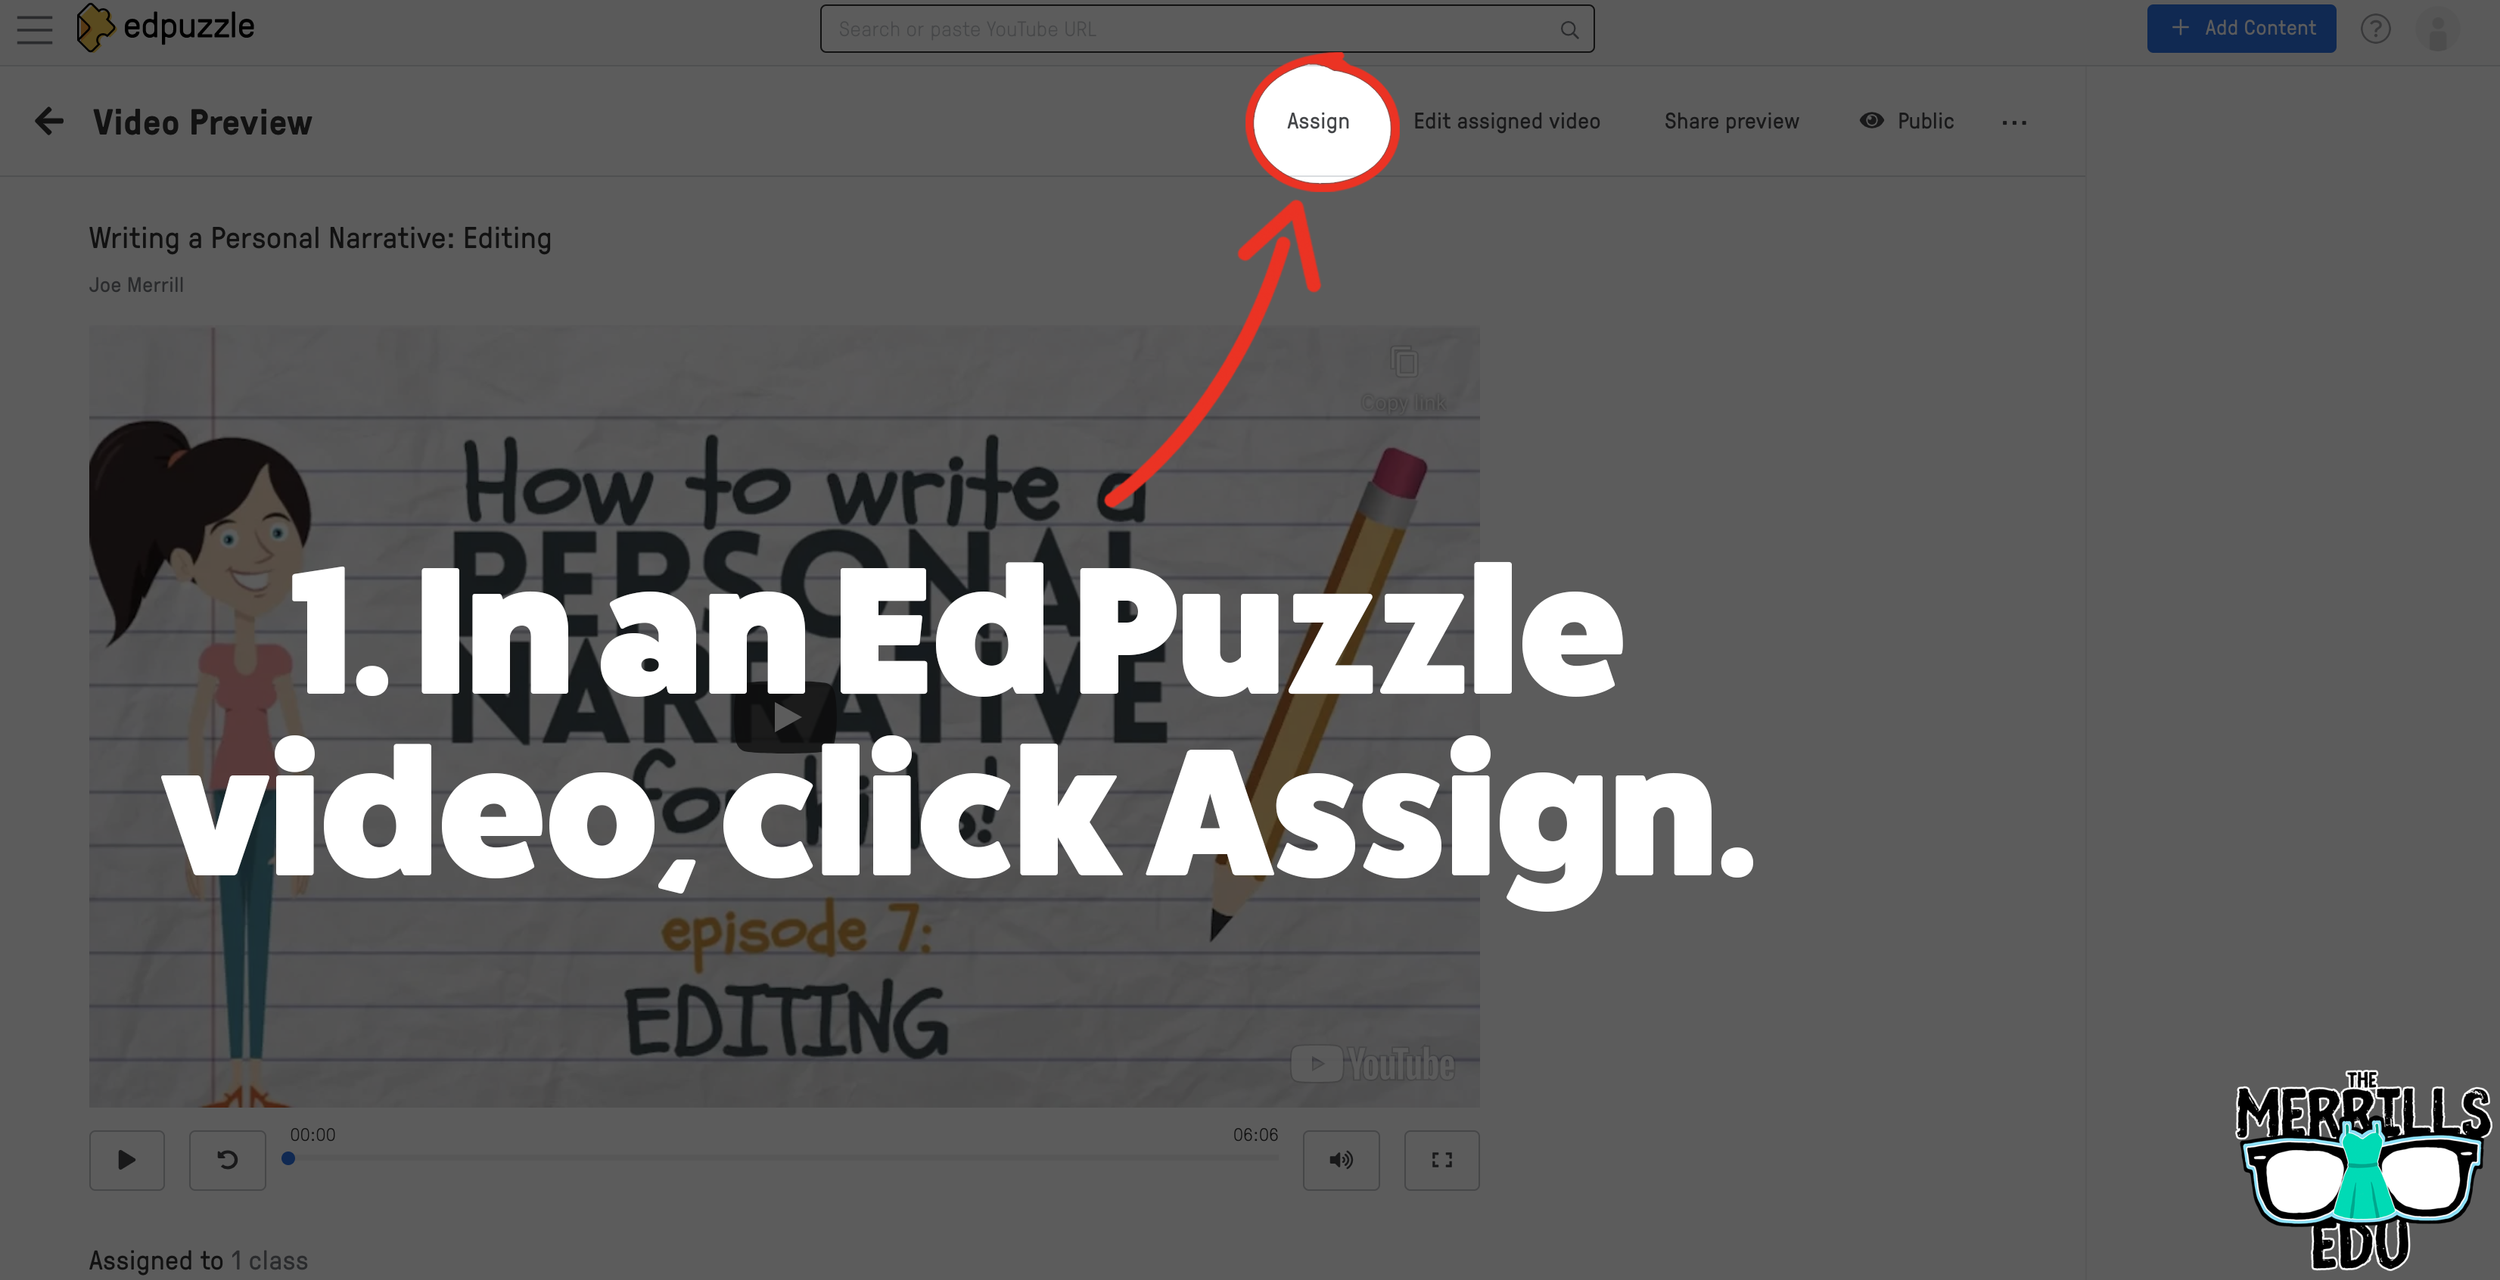
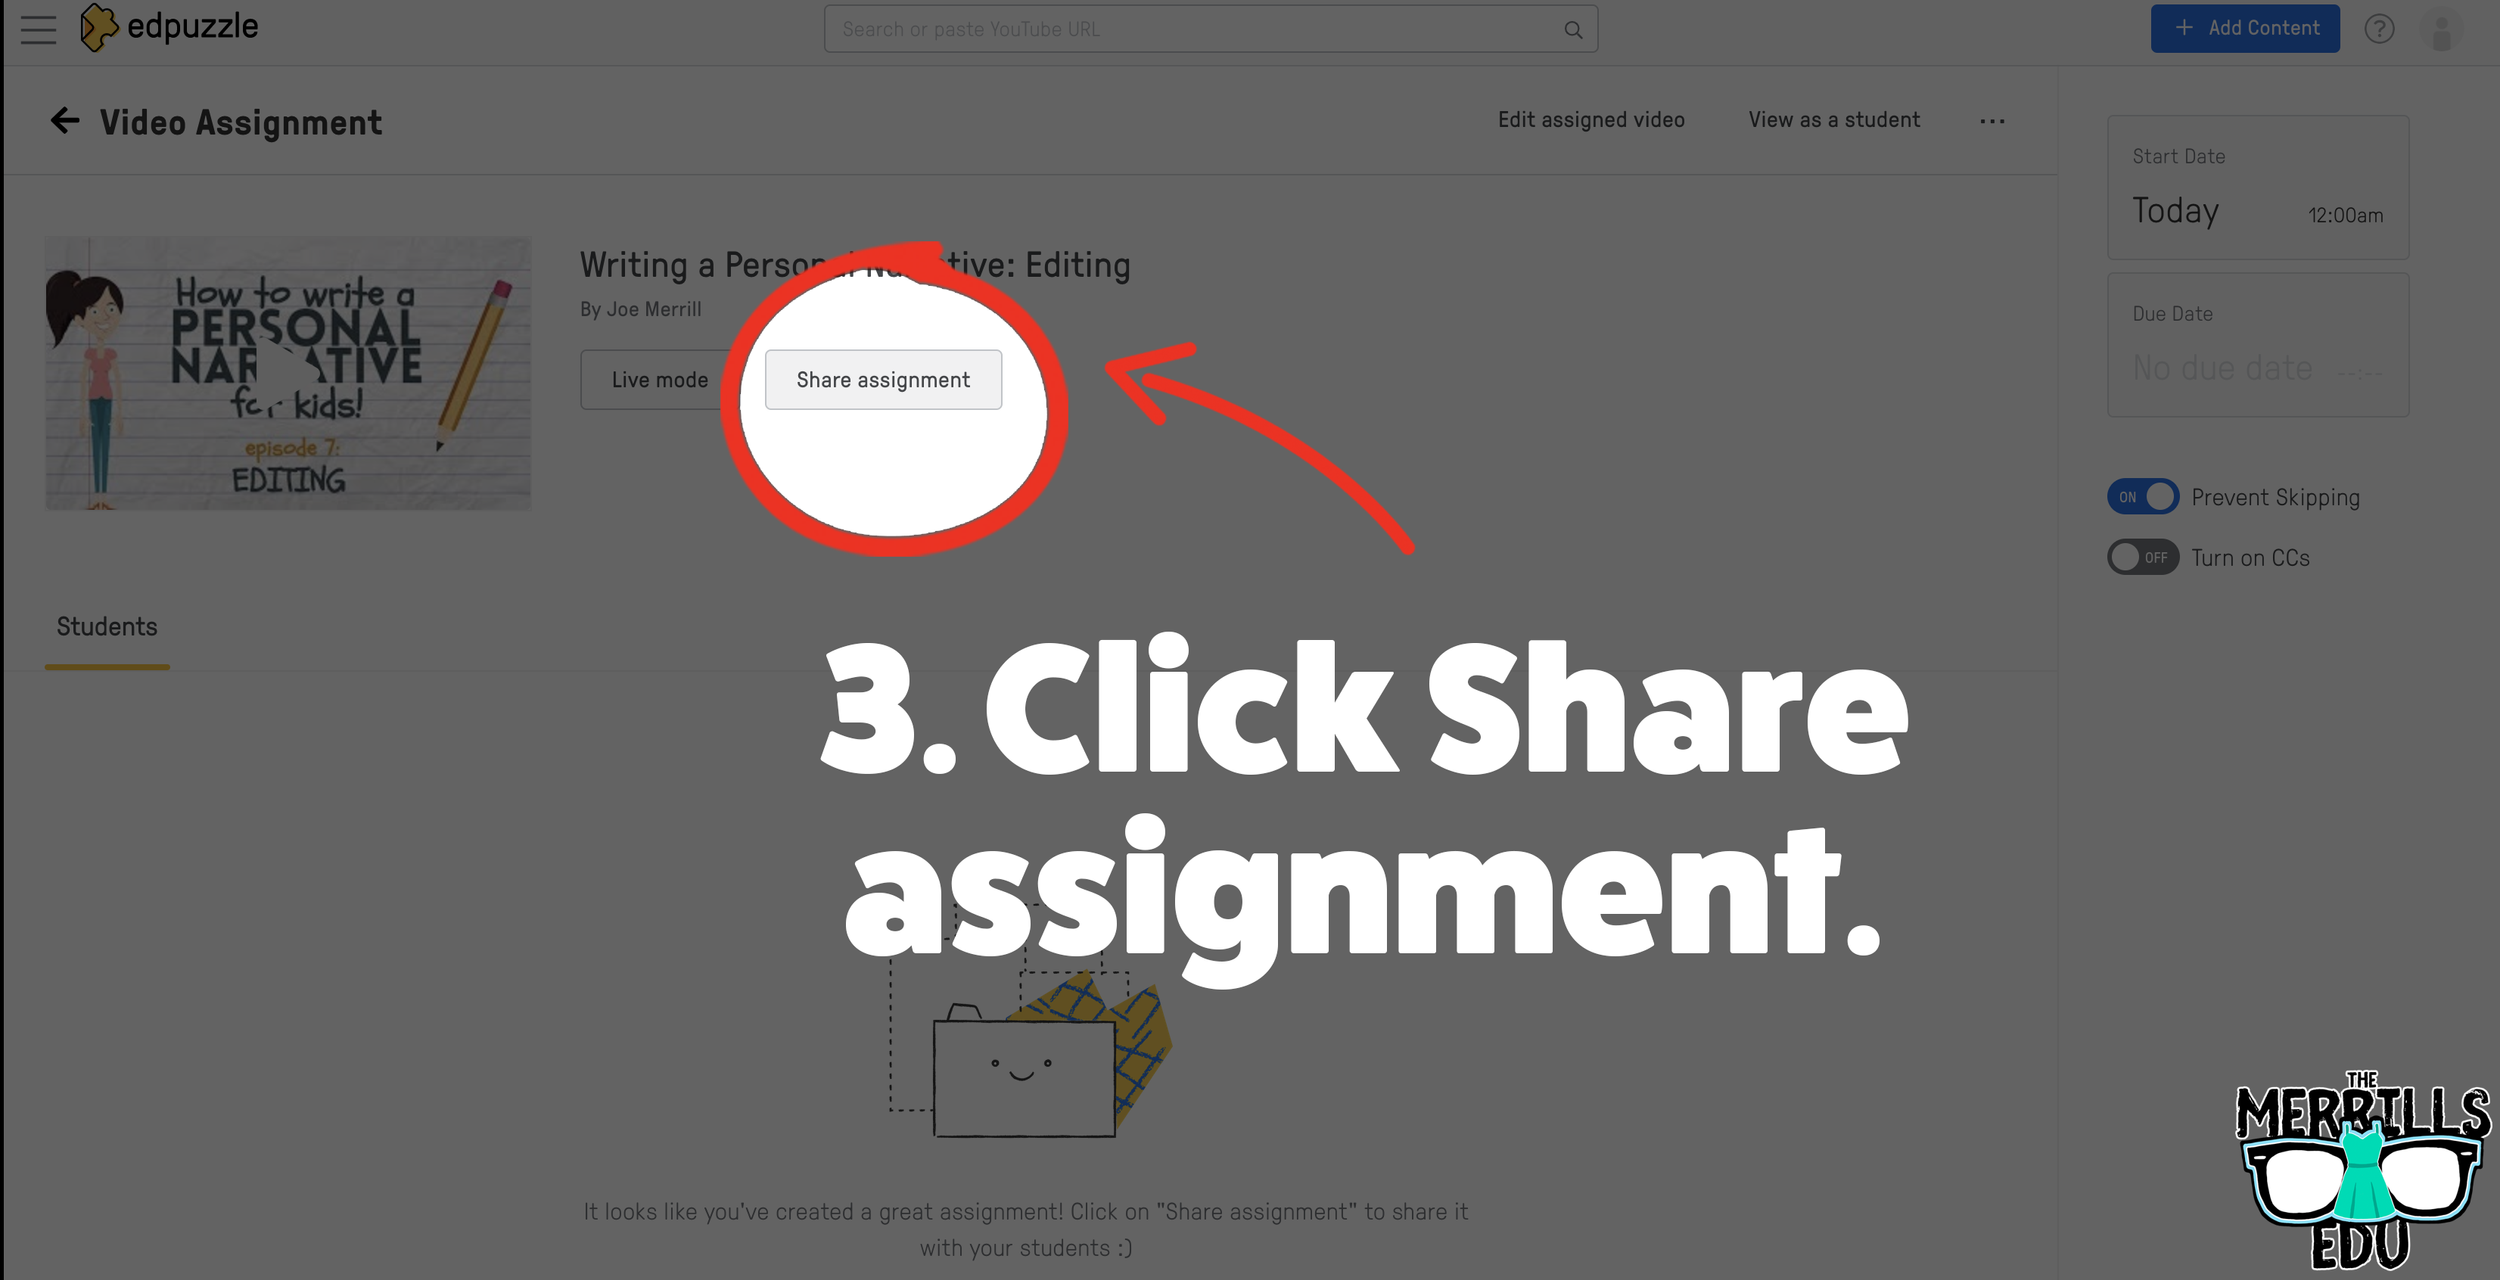
Select. the video that you would like to embed from Ed Puzzle.
Click “Assign”
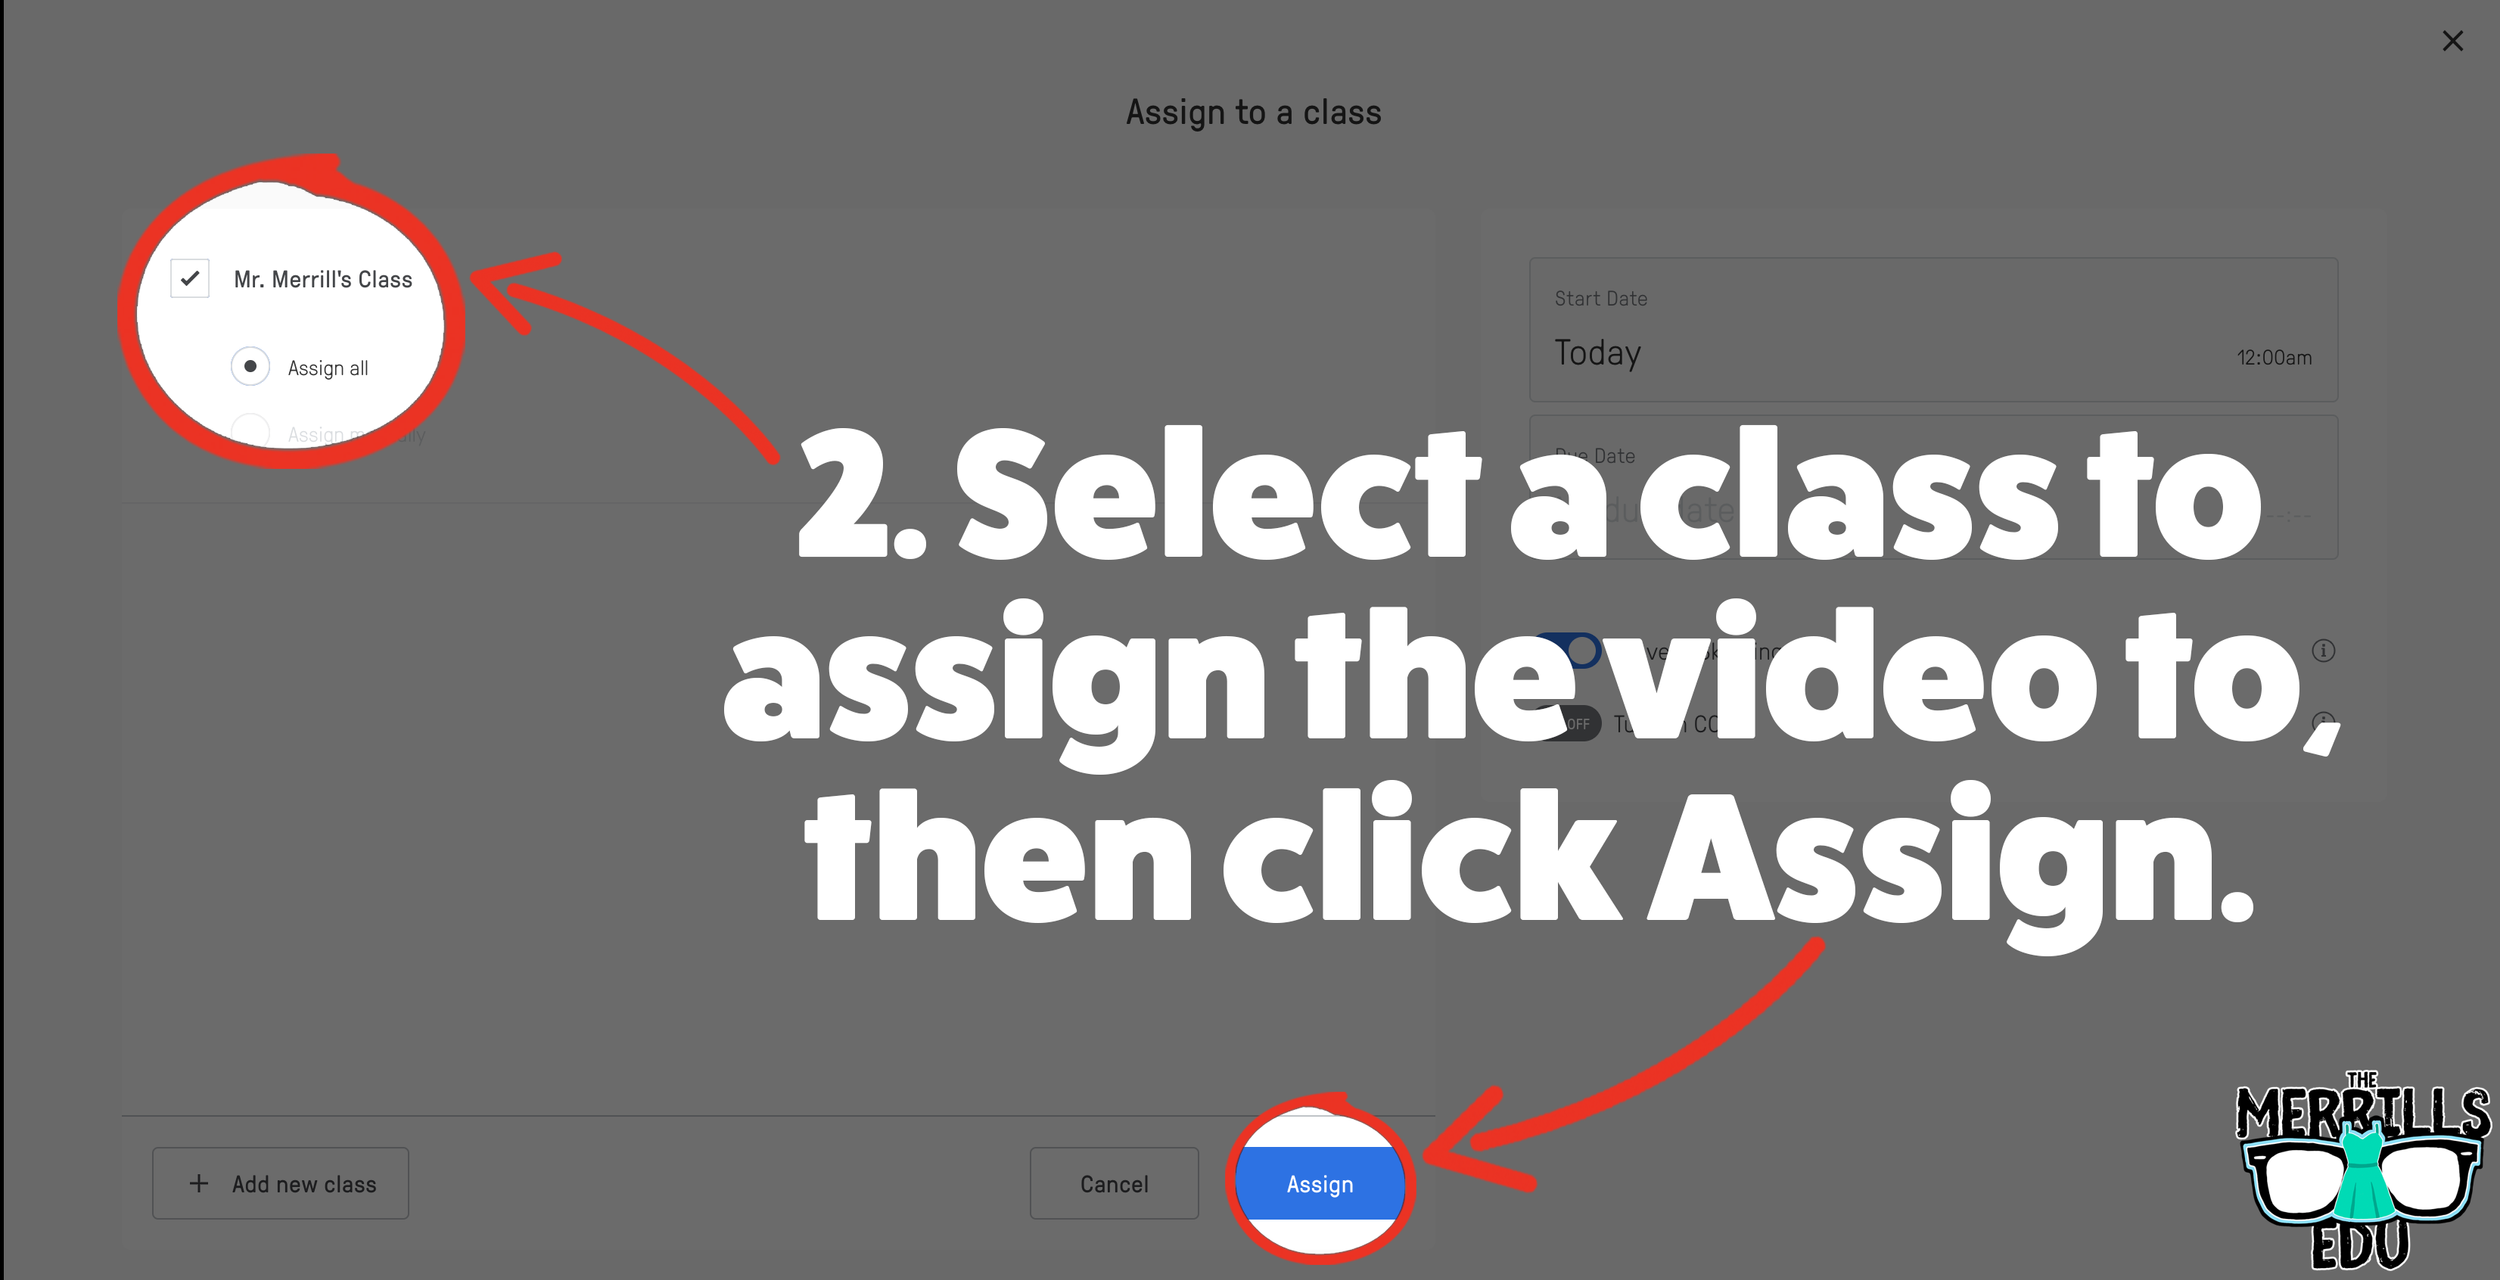
Select the class that you would like to assign the video to, then click “Assign.”
On the next screen, click “Share assignment.”
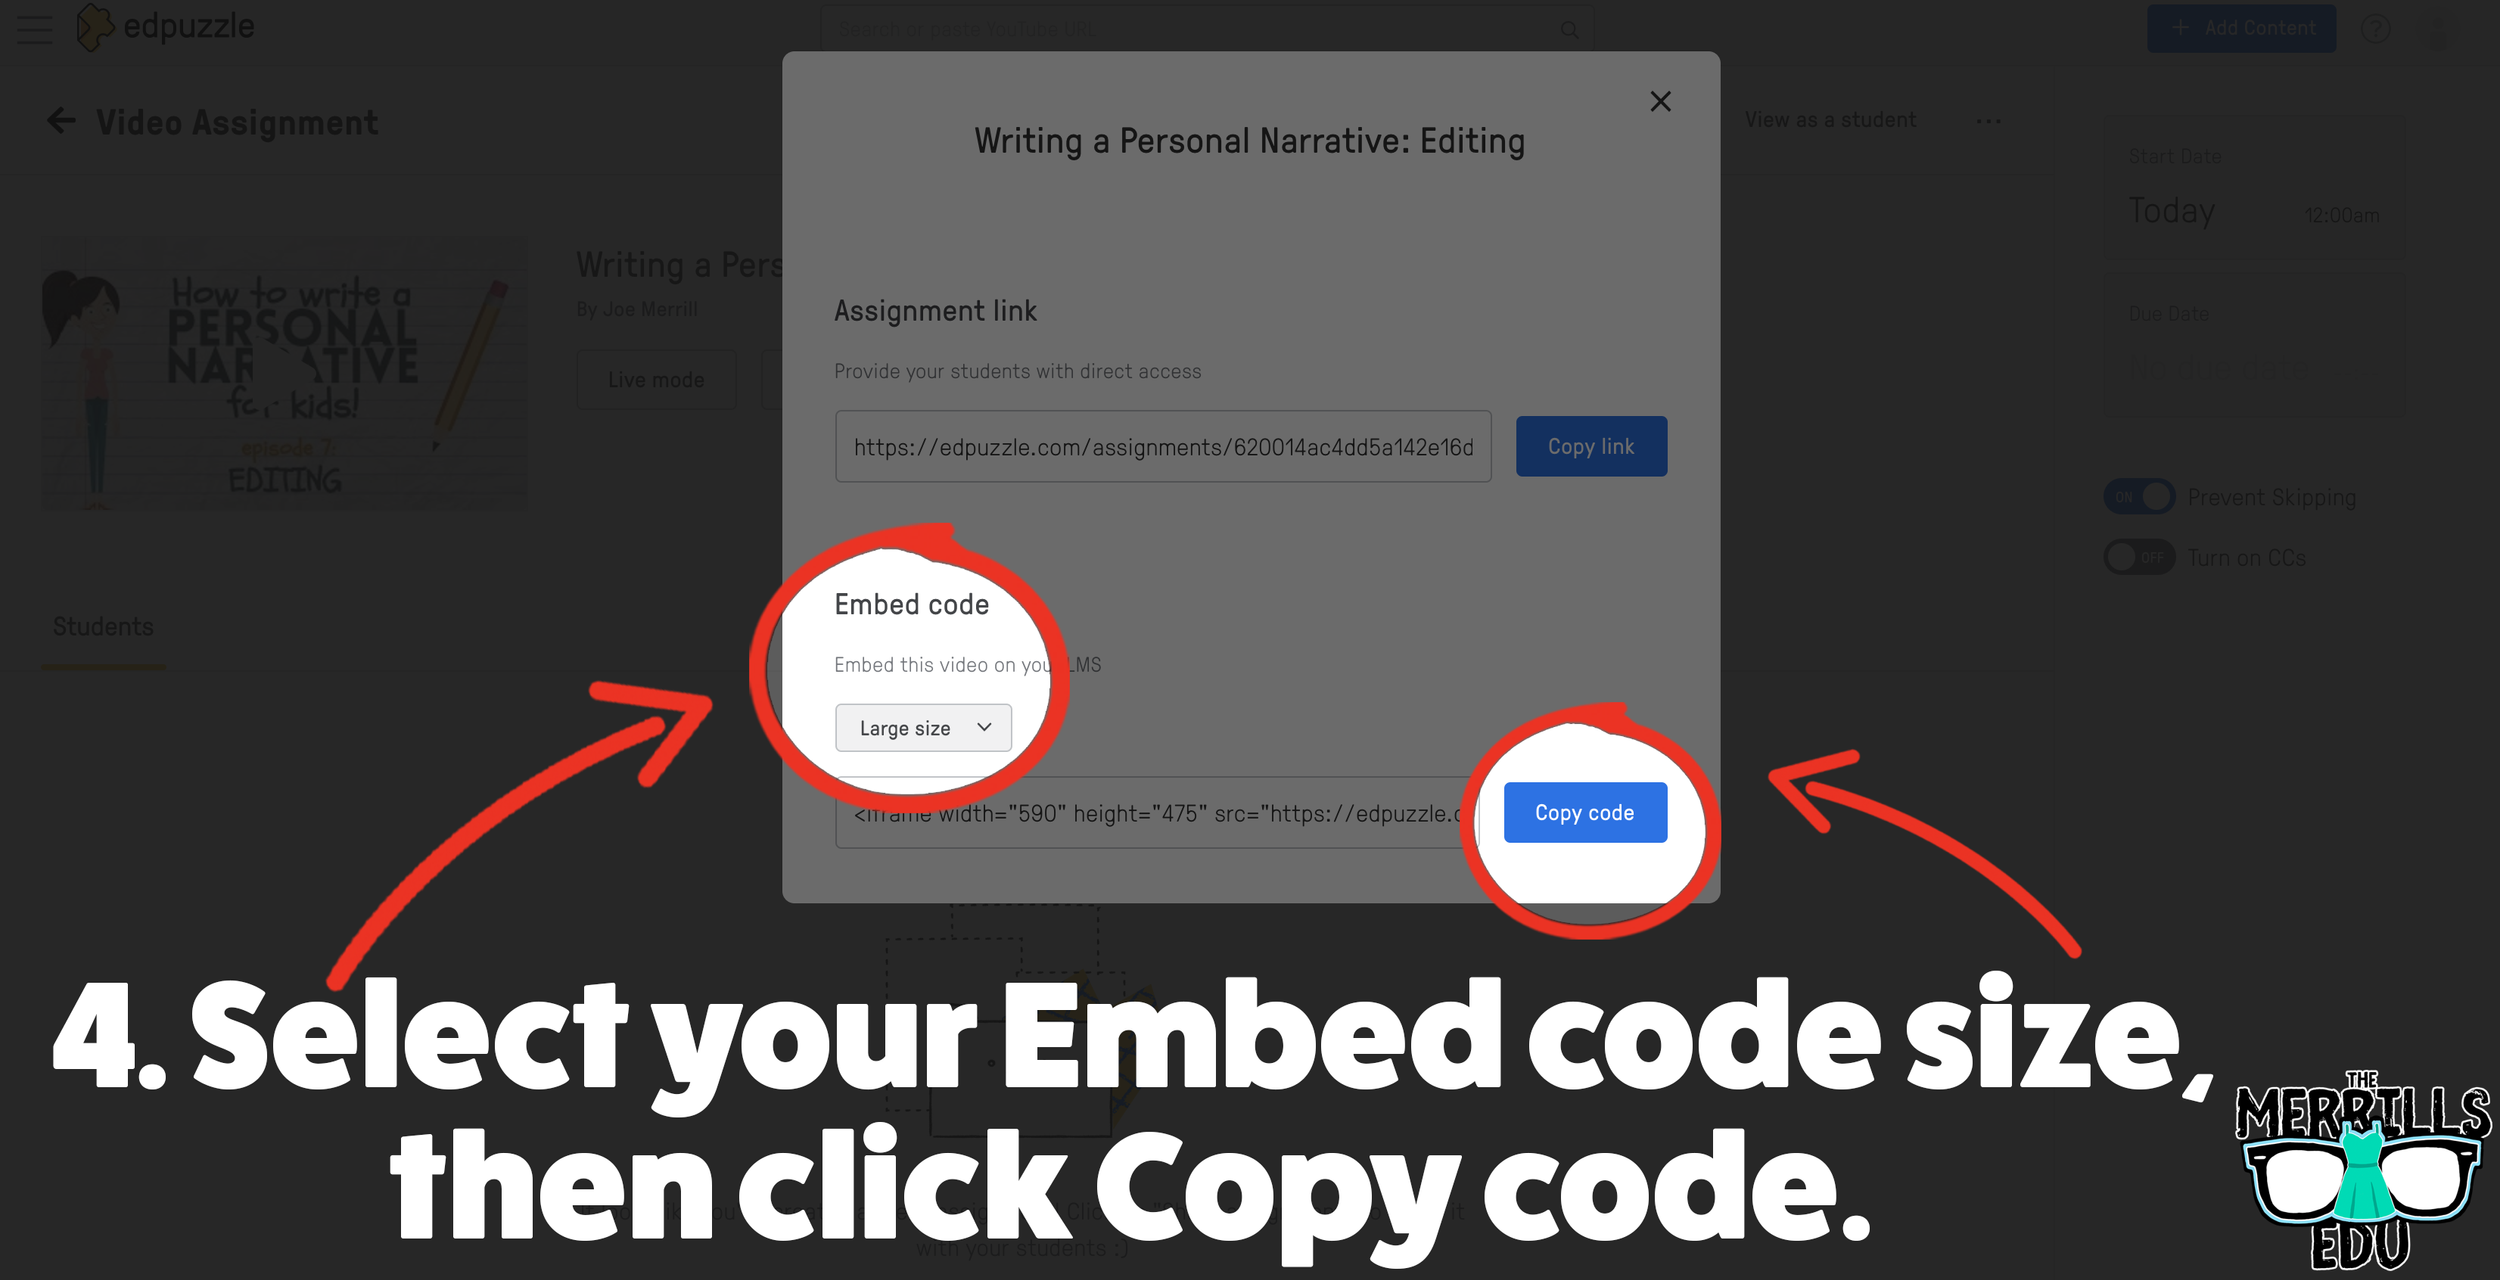
(Optional: We recommend changing the embed code size to large) Under Embed Code, click “Copy code.”
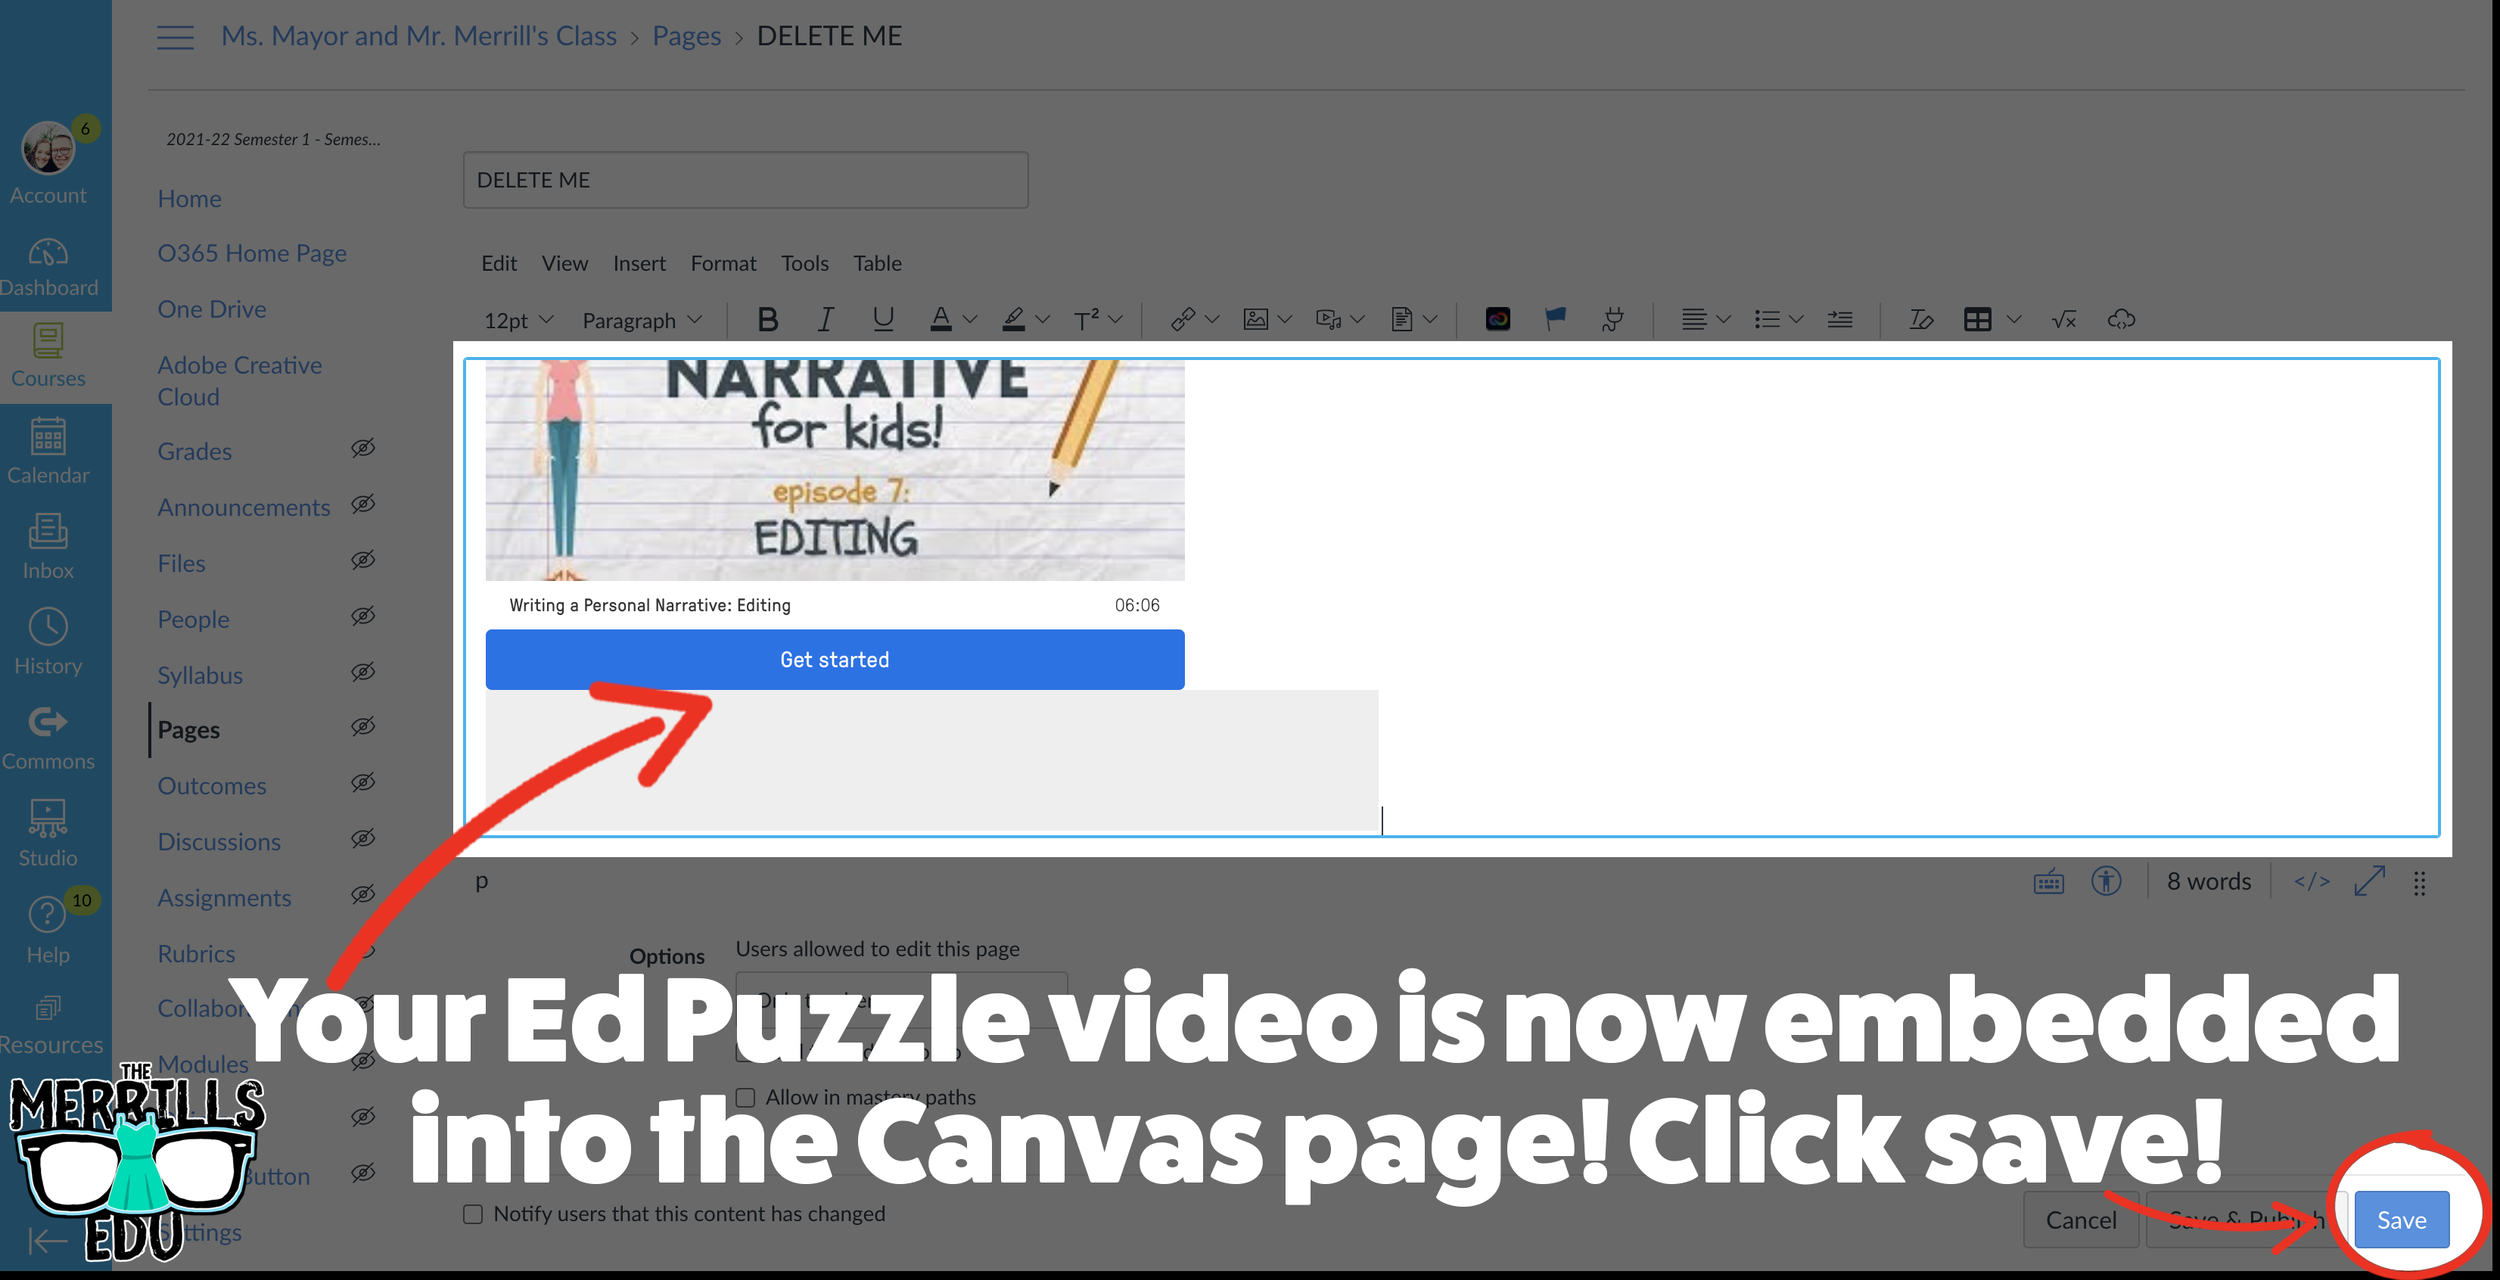
In a separate tab, open the Canvas page that you would like to add the EdPuzzle video to. Then, click on the cloud icon (if you don’t see the Cloud icon, click the three dots to expand the menu bar).
In the embed window, paste your copied code from Ed Puzzle. Then, click submit.
Your Ed Puzzle video is now embedded into the Canvas page! Click on “Save” to update the changes.

PowerPoint Embedded into Canvas
Do you have a PowerPoint deck that you’d like to give your students so that they can follow along? Embedding it into your LMS is the perfect way to deliver that content while keeping everything organized. Here’s how to embed PowerPoint decks into Canvas:

(Note: You will need to use PowerPoint Online (a Microsoft 365 account) to use this embed. You may also need to adjust your share settings for this to work correctly)
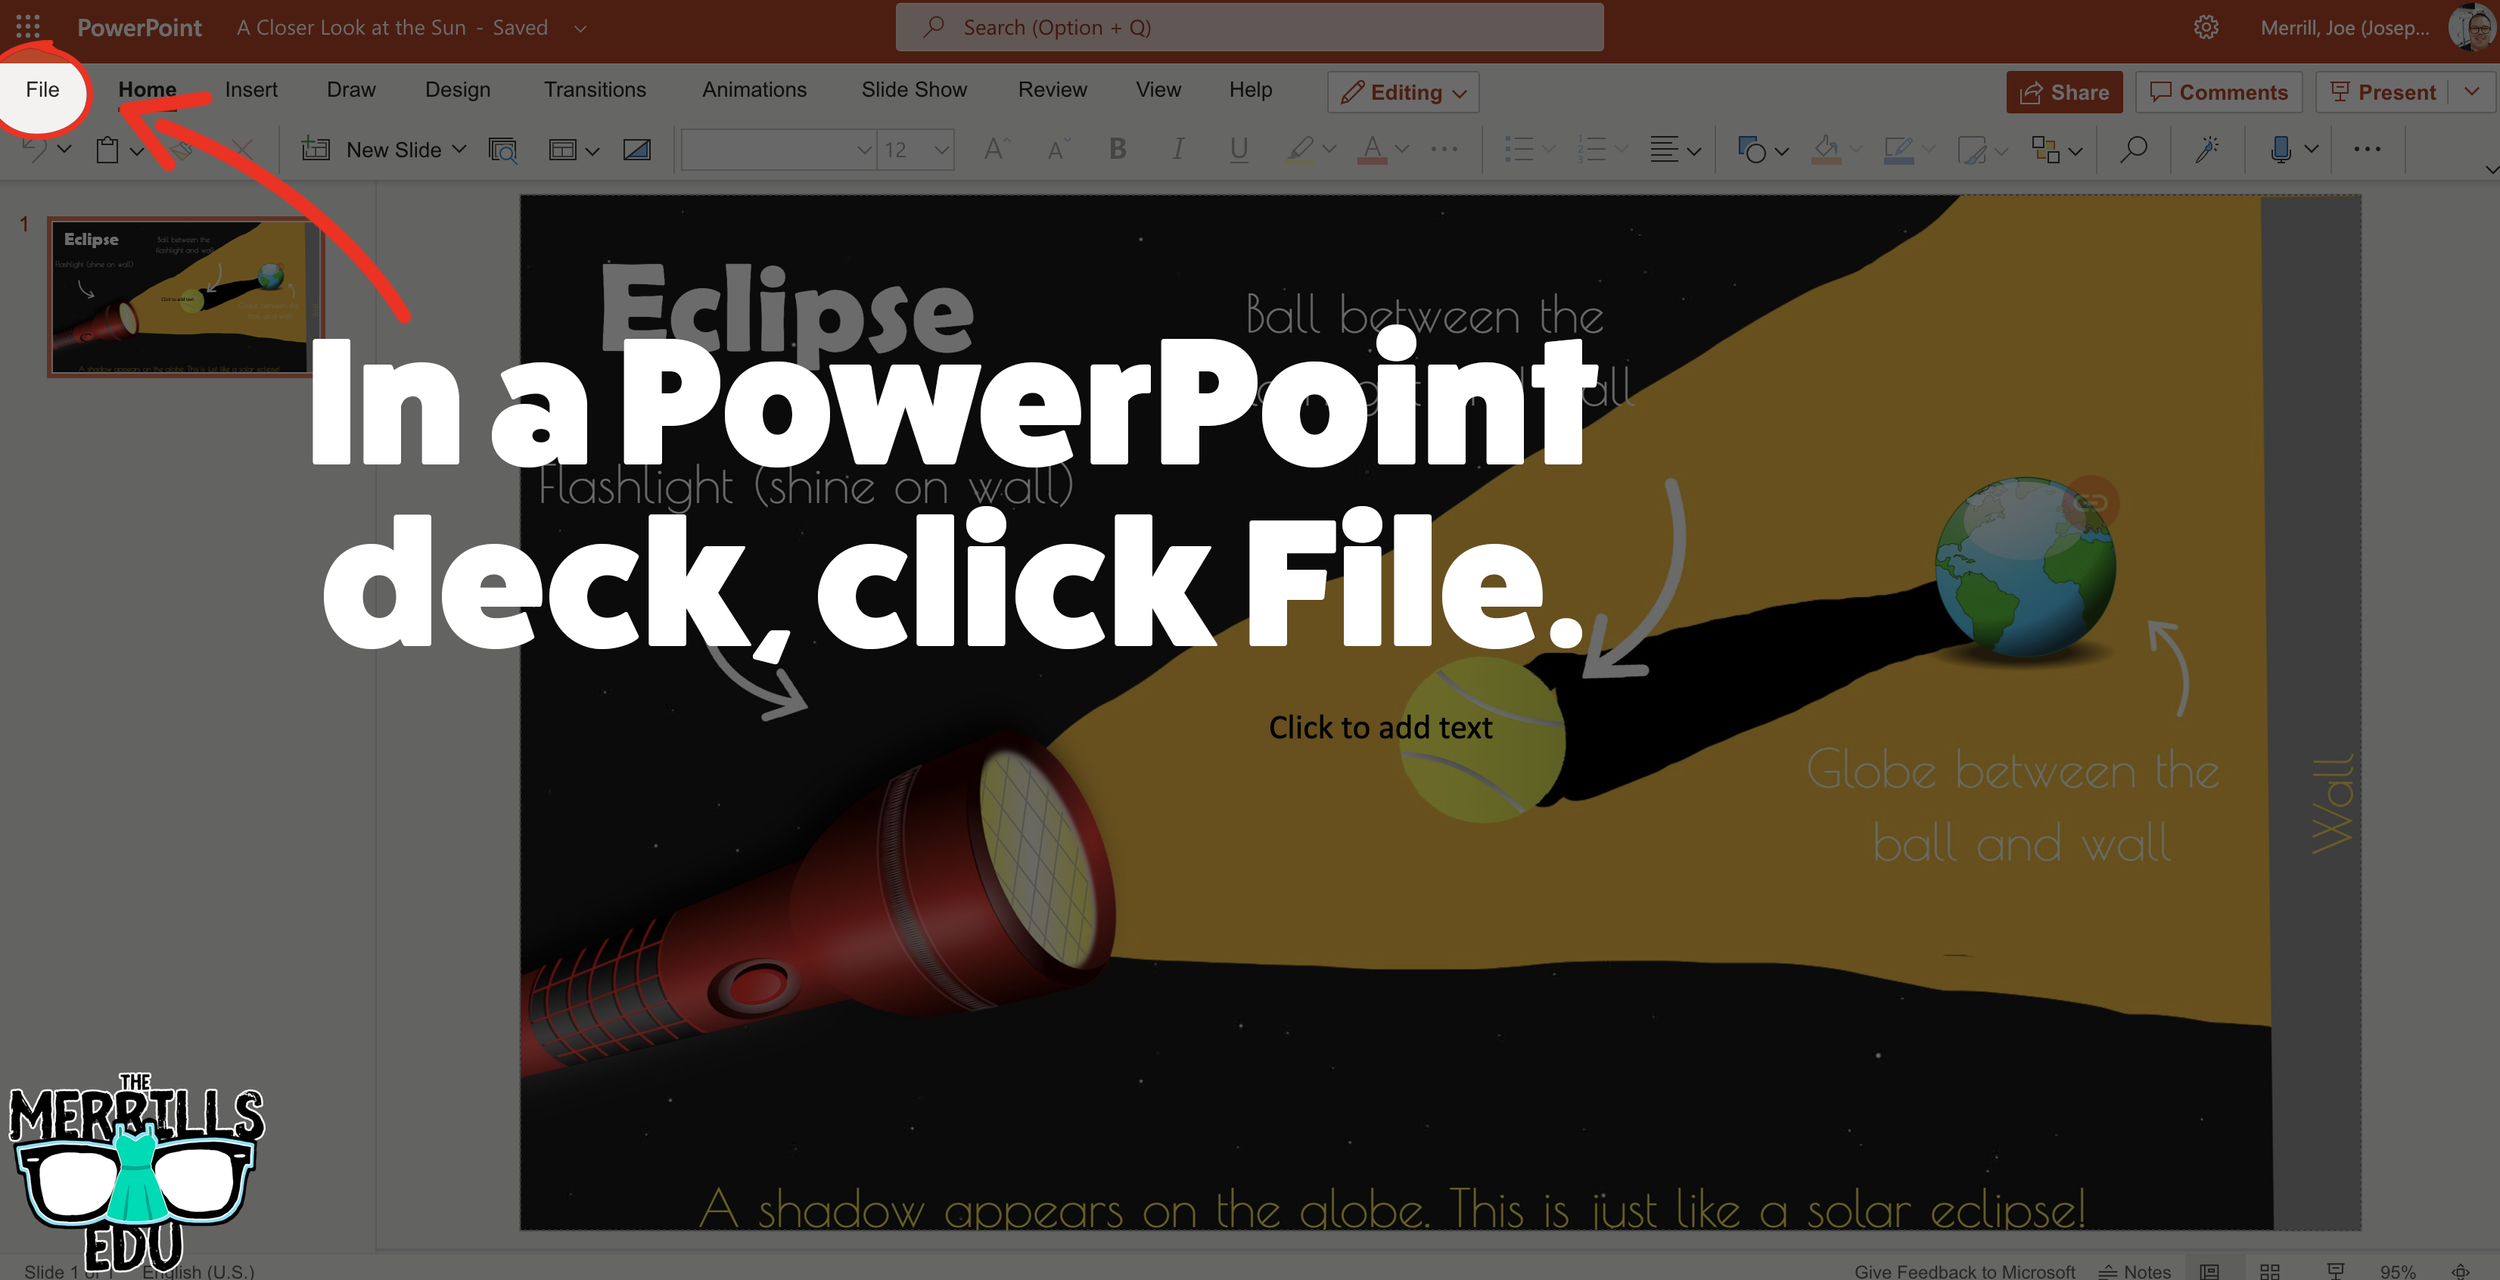
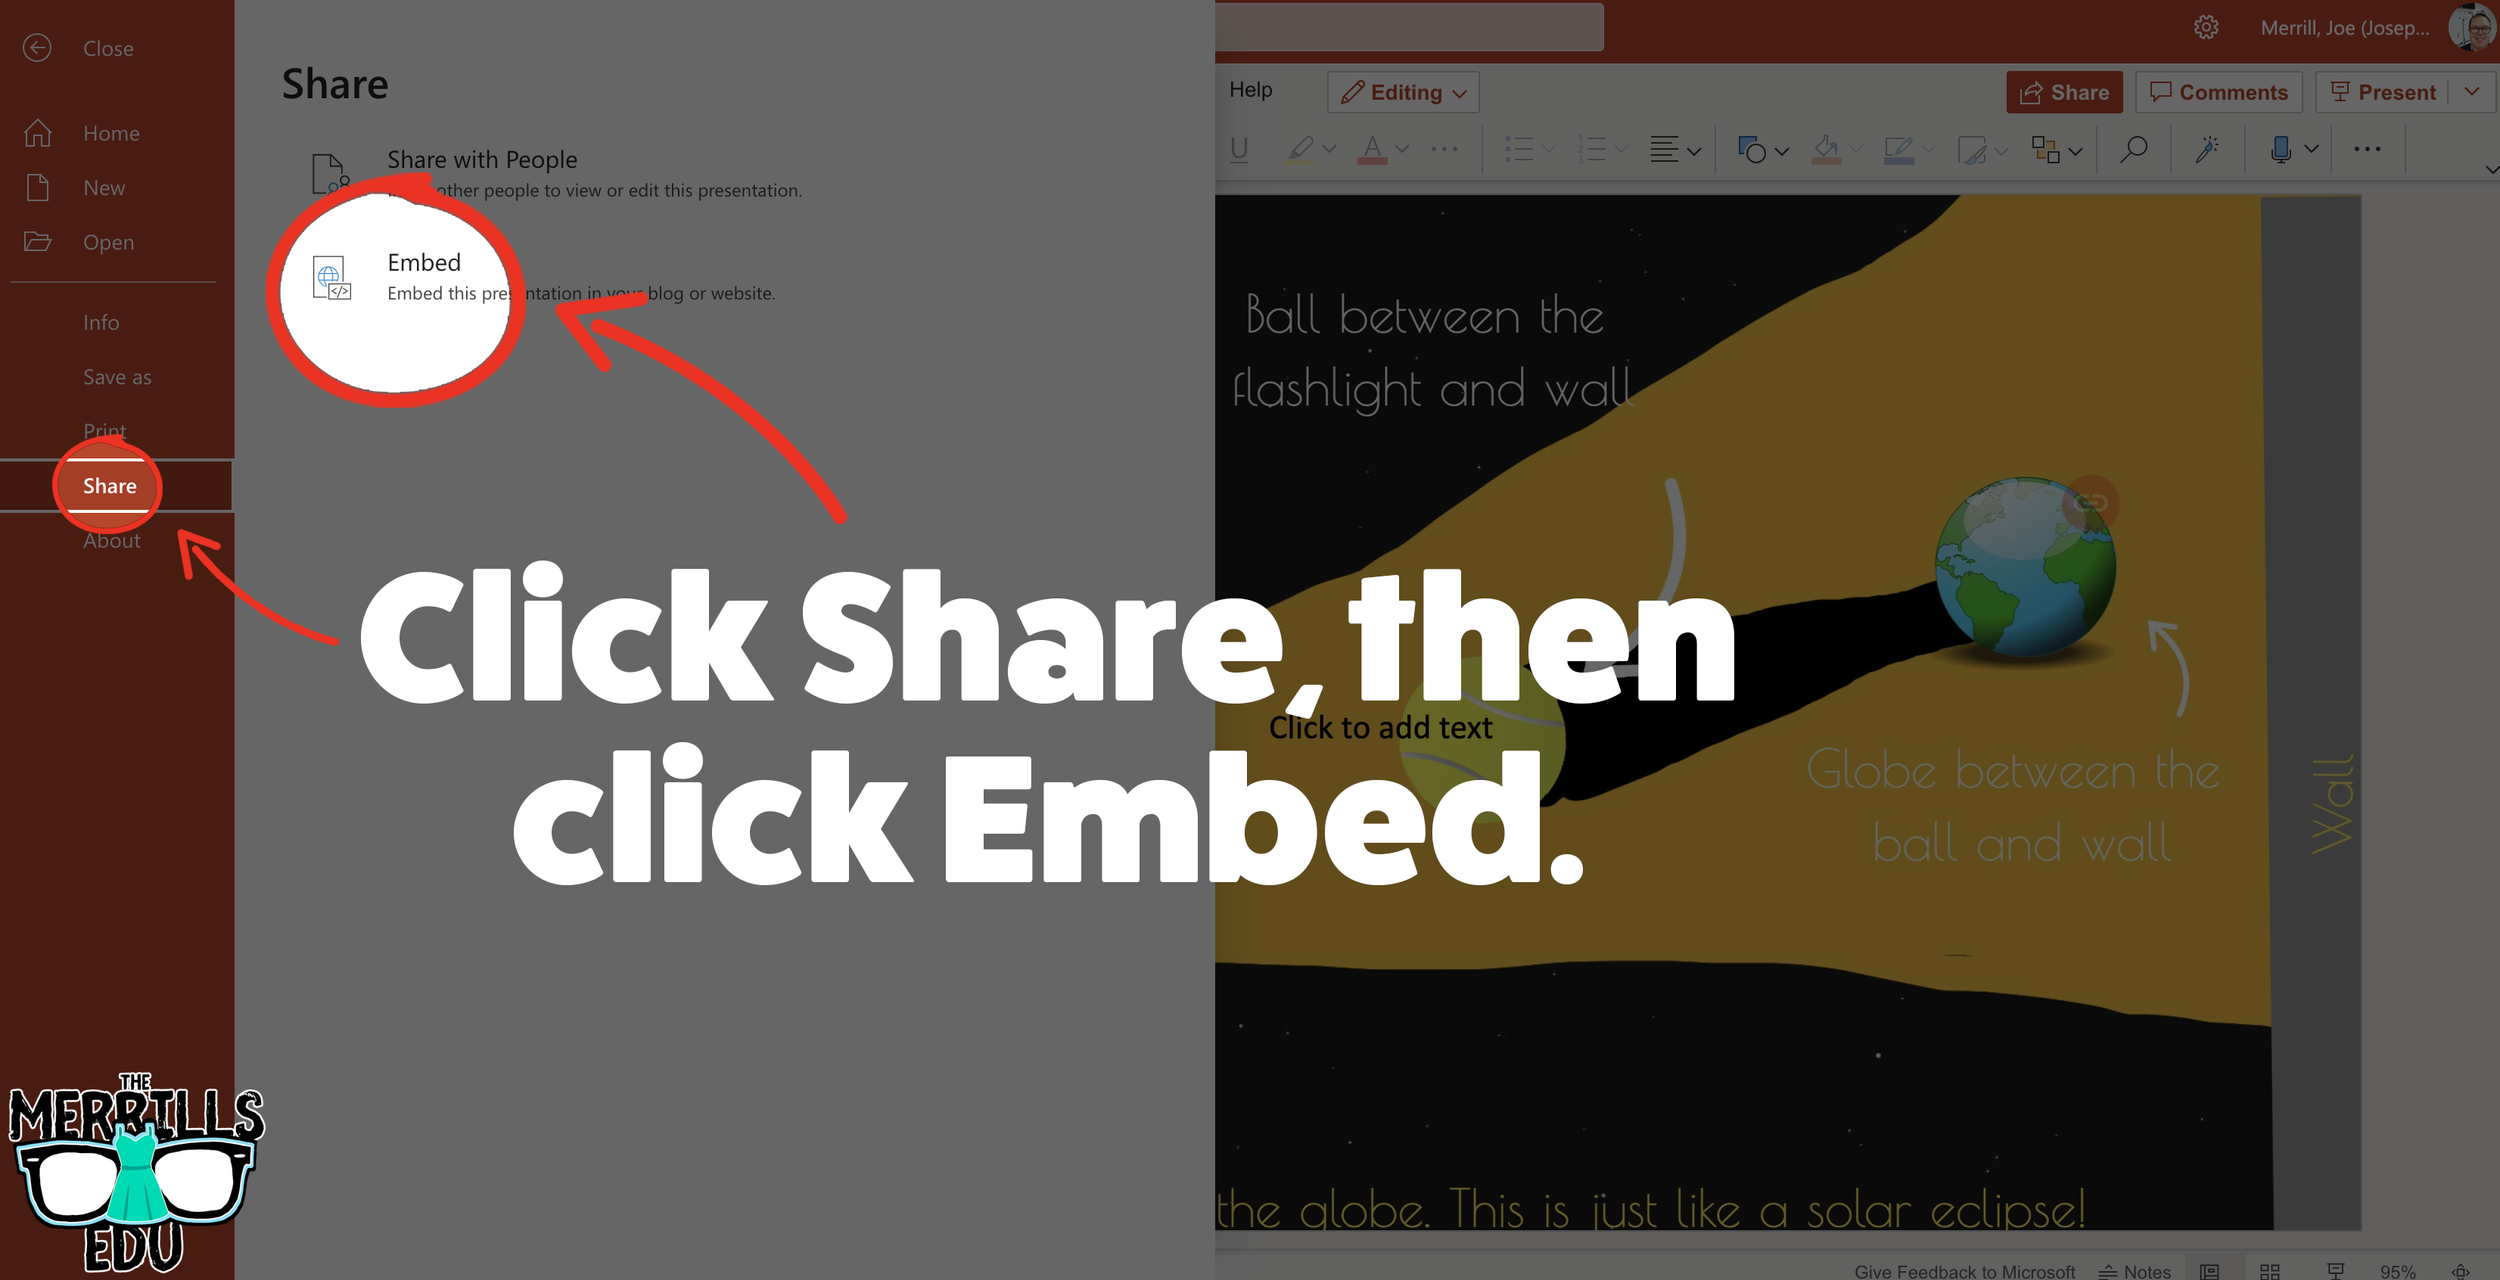
In your PowerPoint online deck, click File.
Next, click “Share” then click “Embed.”
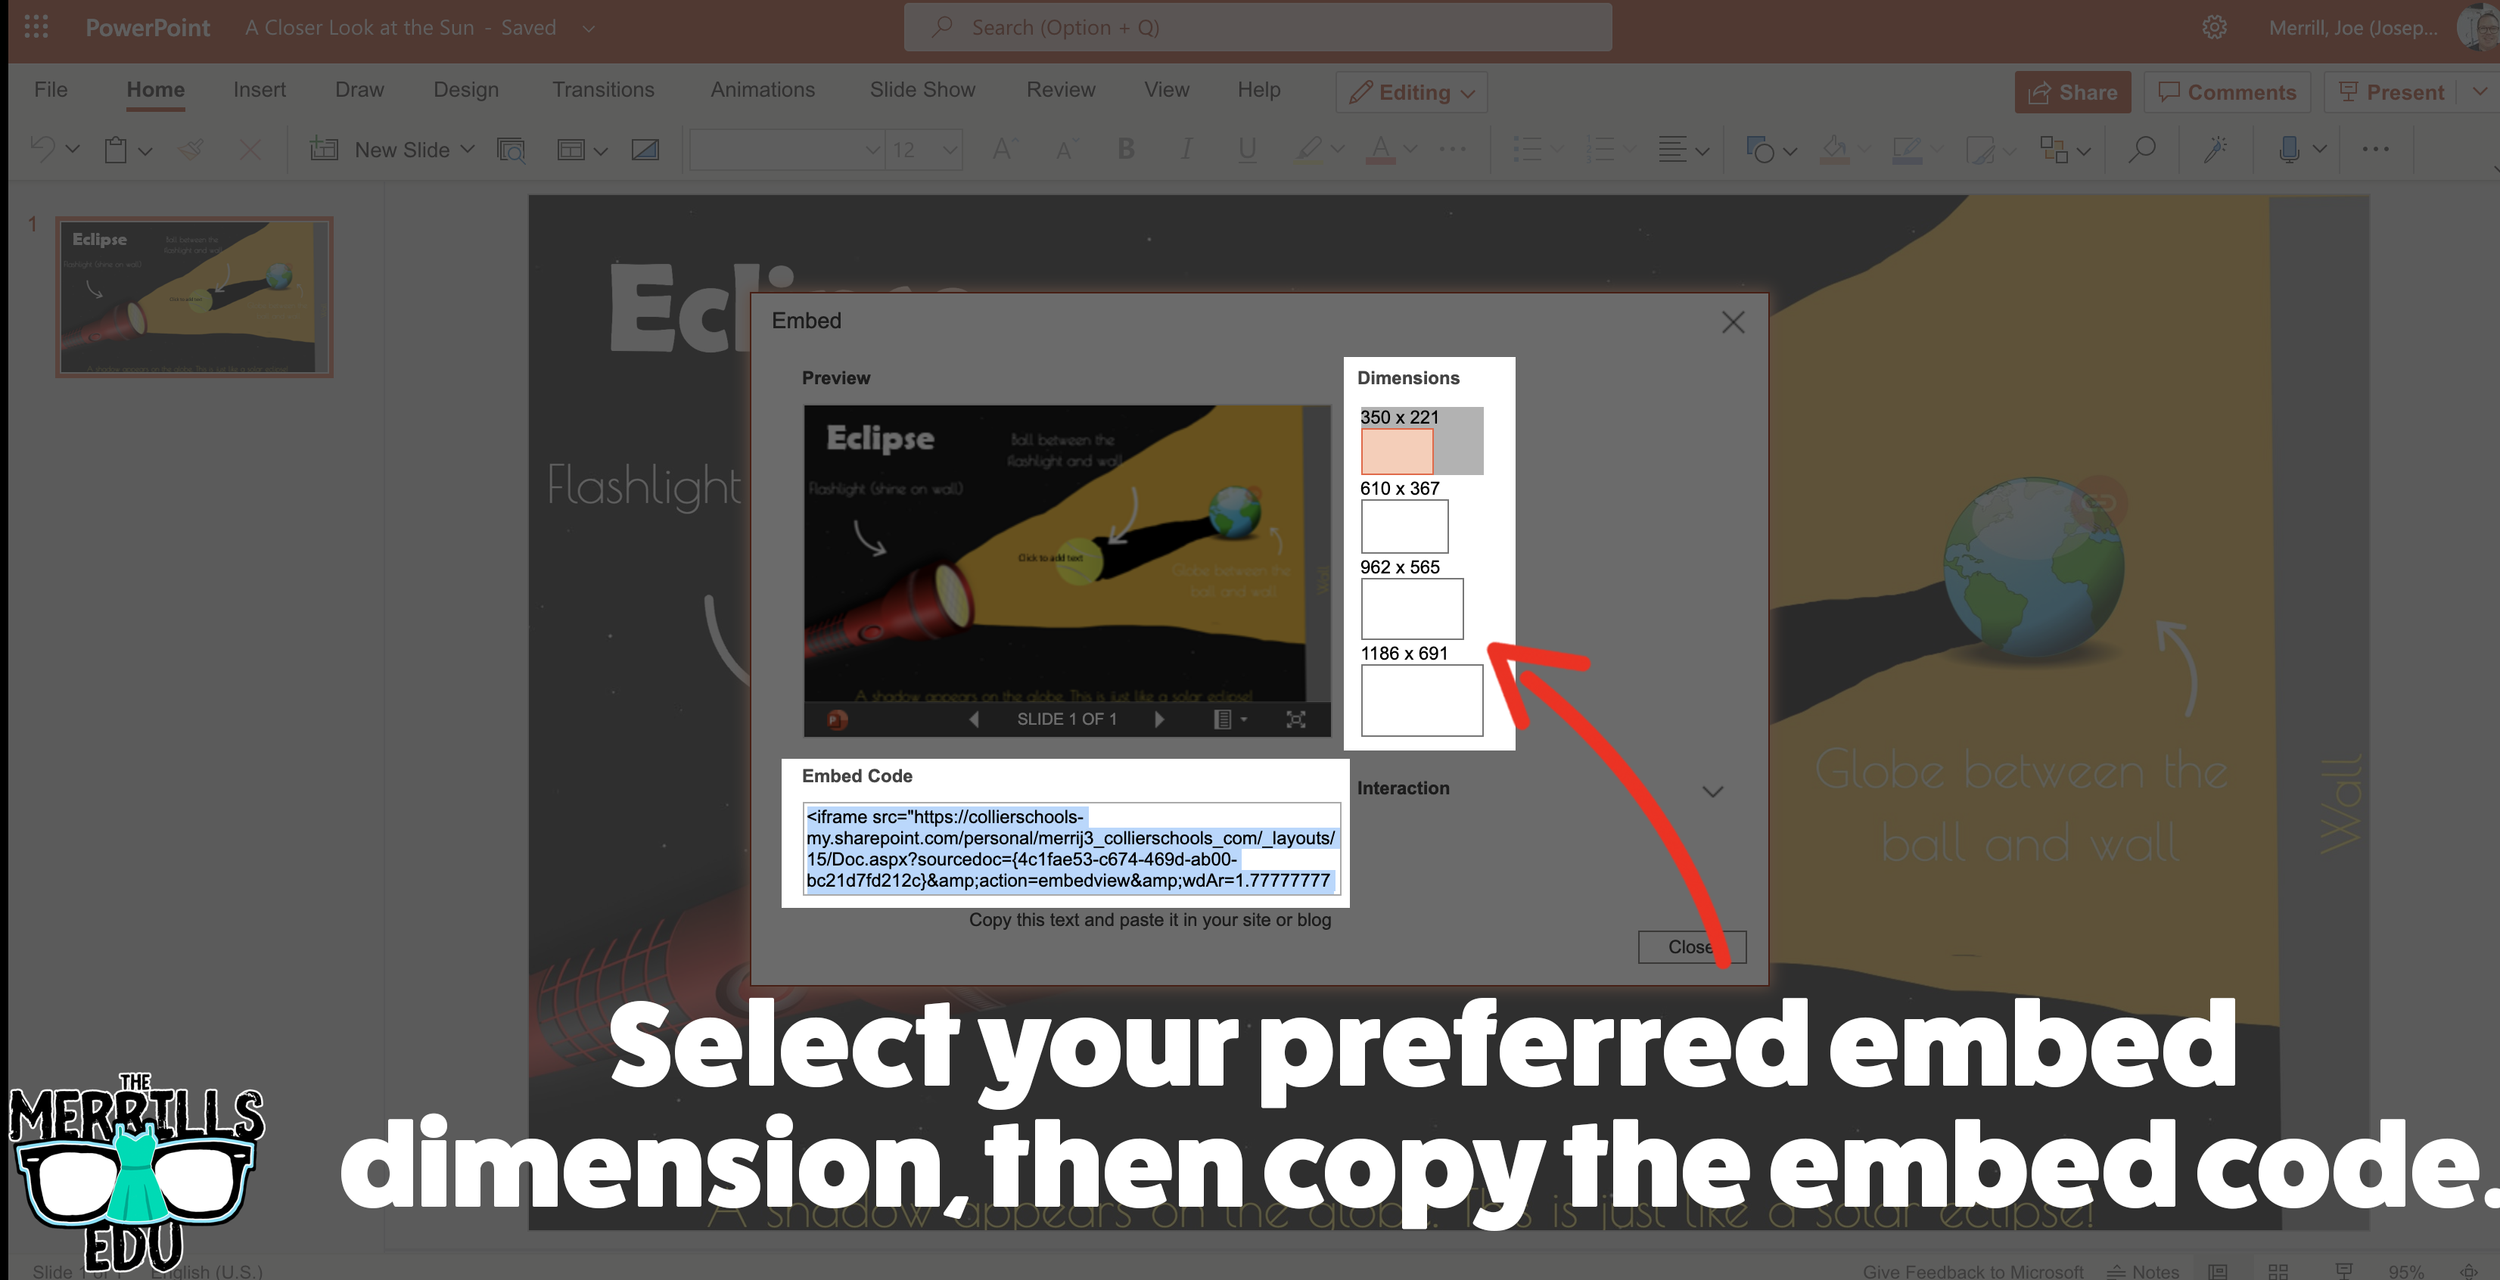
On the next screen, select your preferred embed size. Then, copy the Embed code.
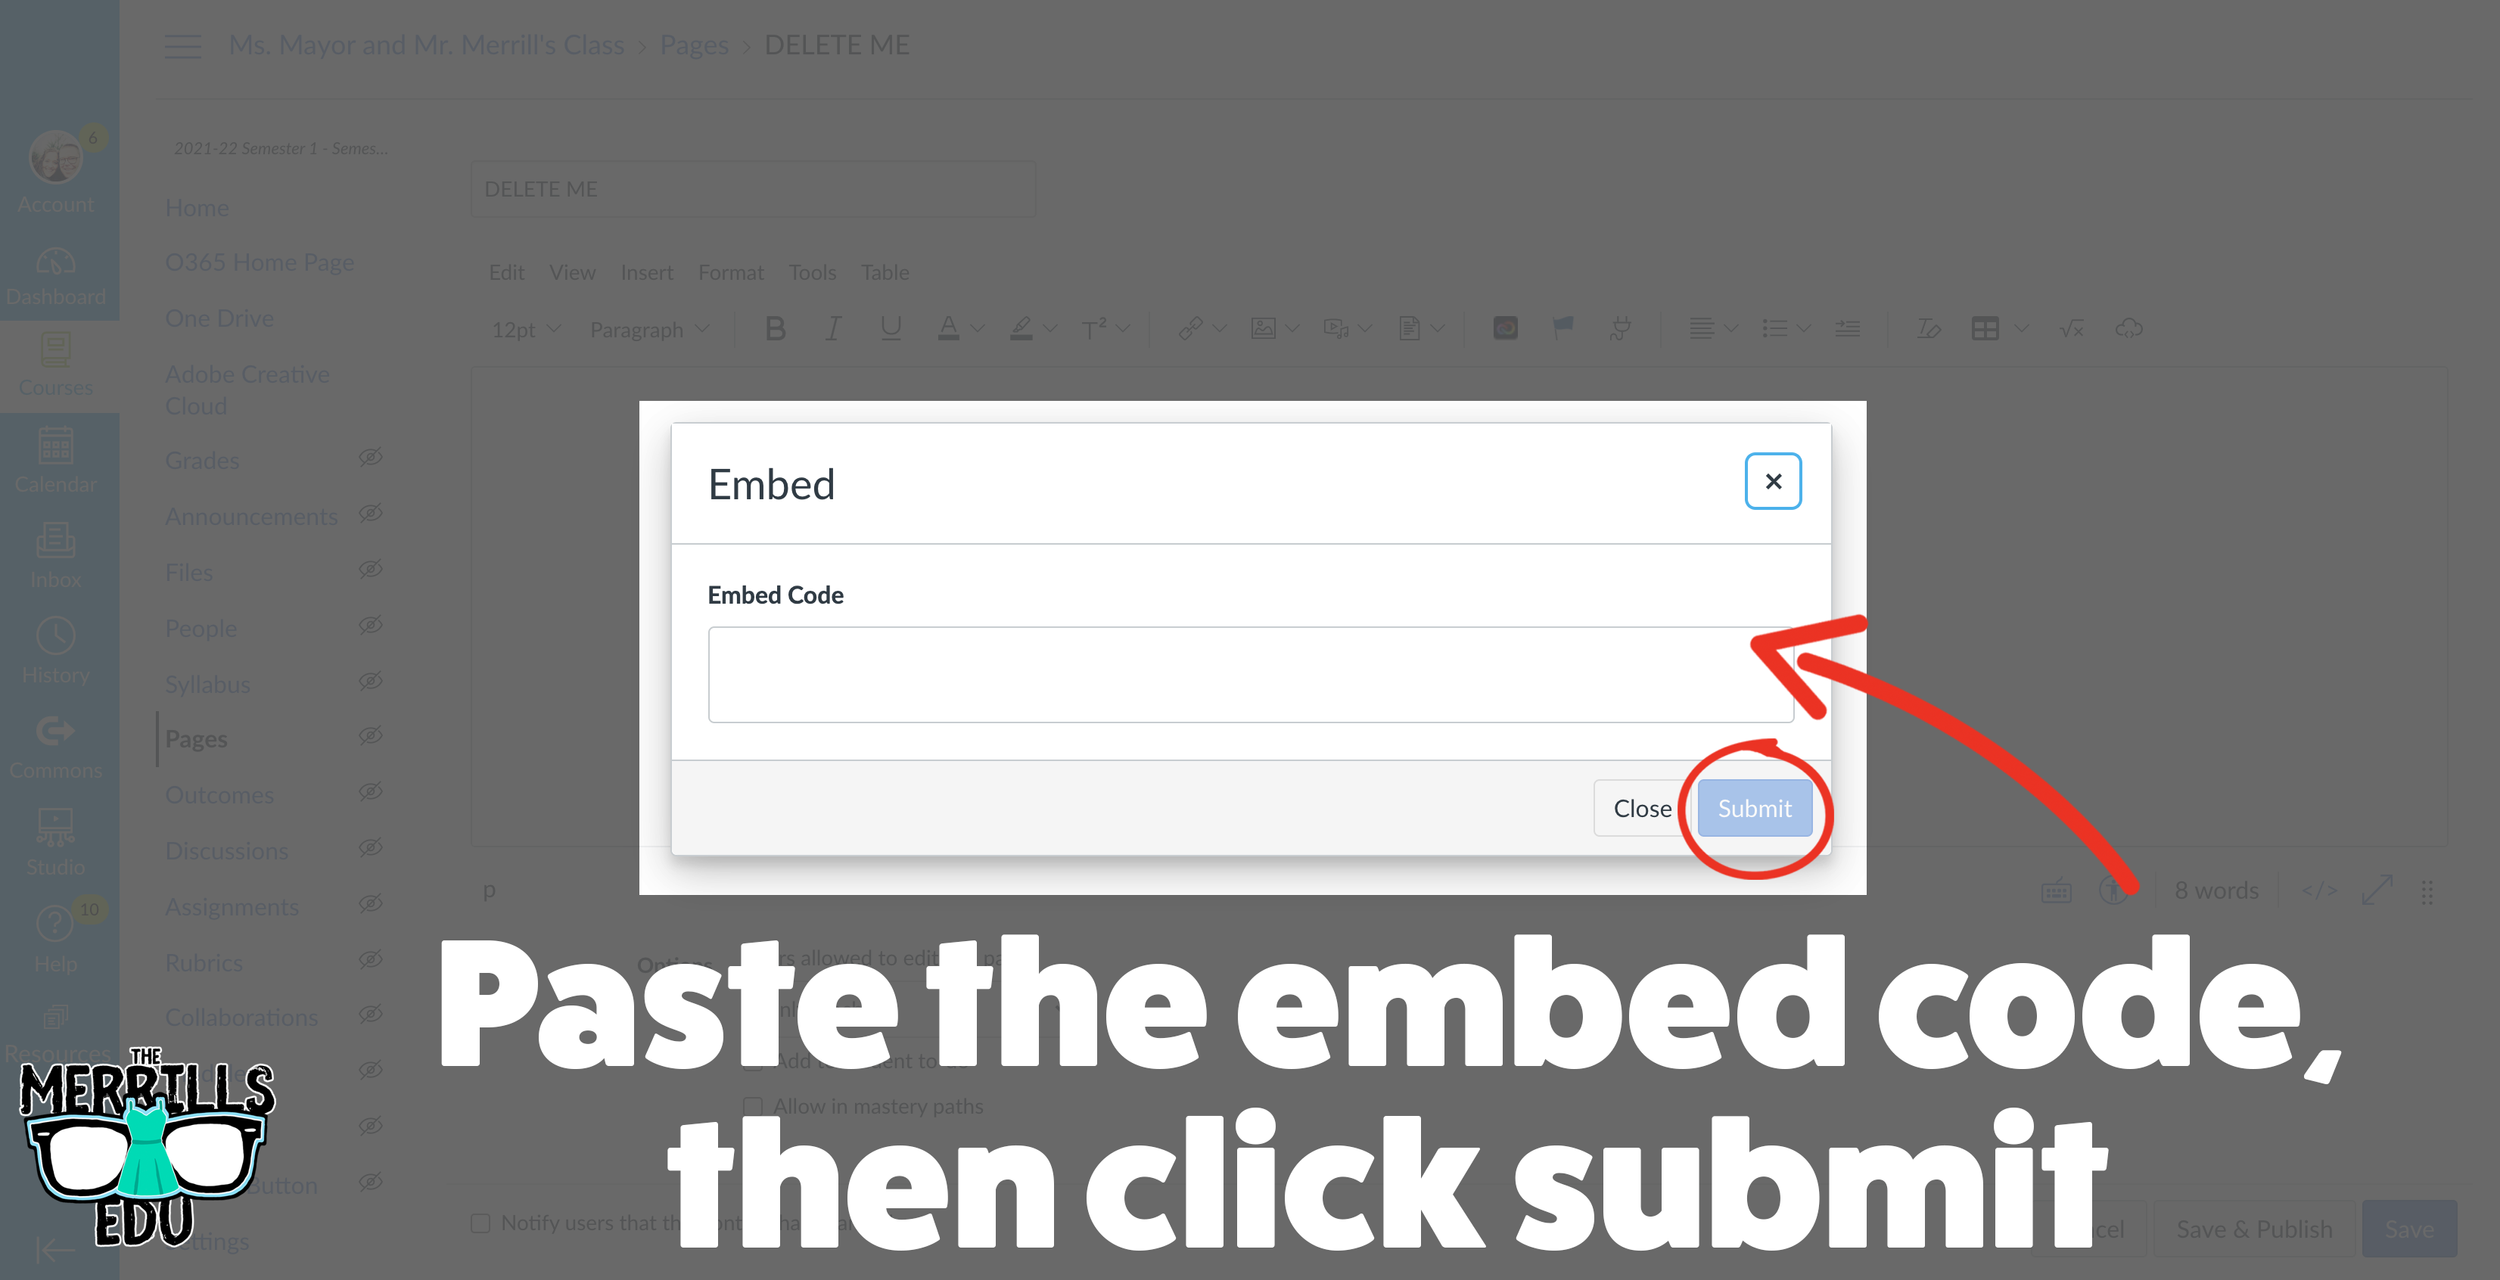
In a separate tab, open the Canvas page that you would like to add the PowerPoint deck to. Then, click on the cloud icon (if you don’t see the Cloud icon, click the three dots to expand the menu bar).
In the embed window, paste your copied code from PowerPoint Online. Then, click submit.
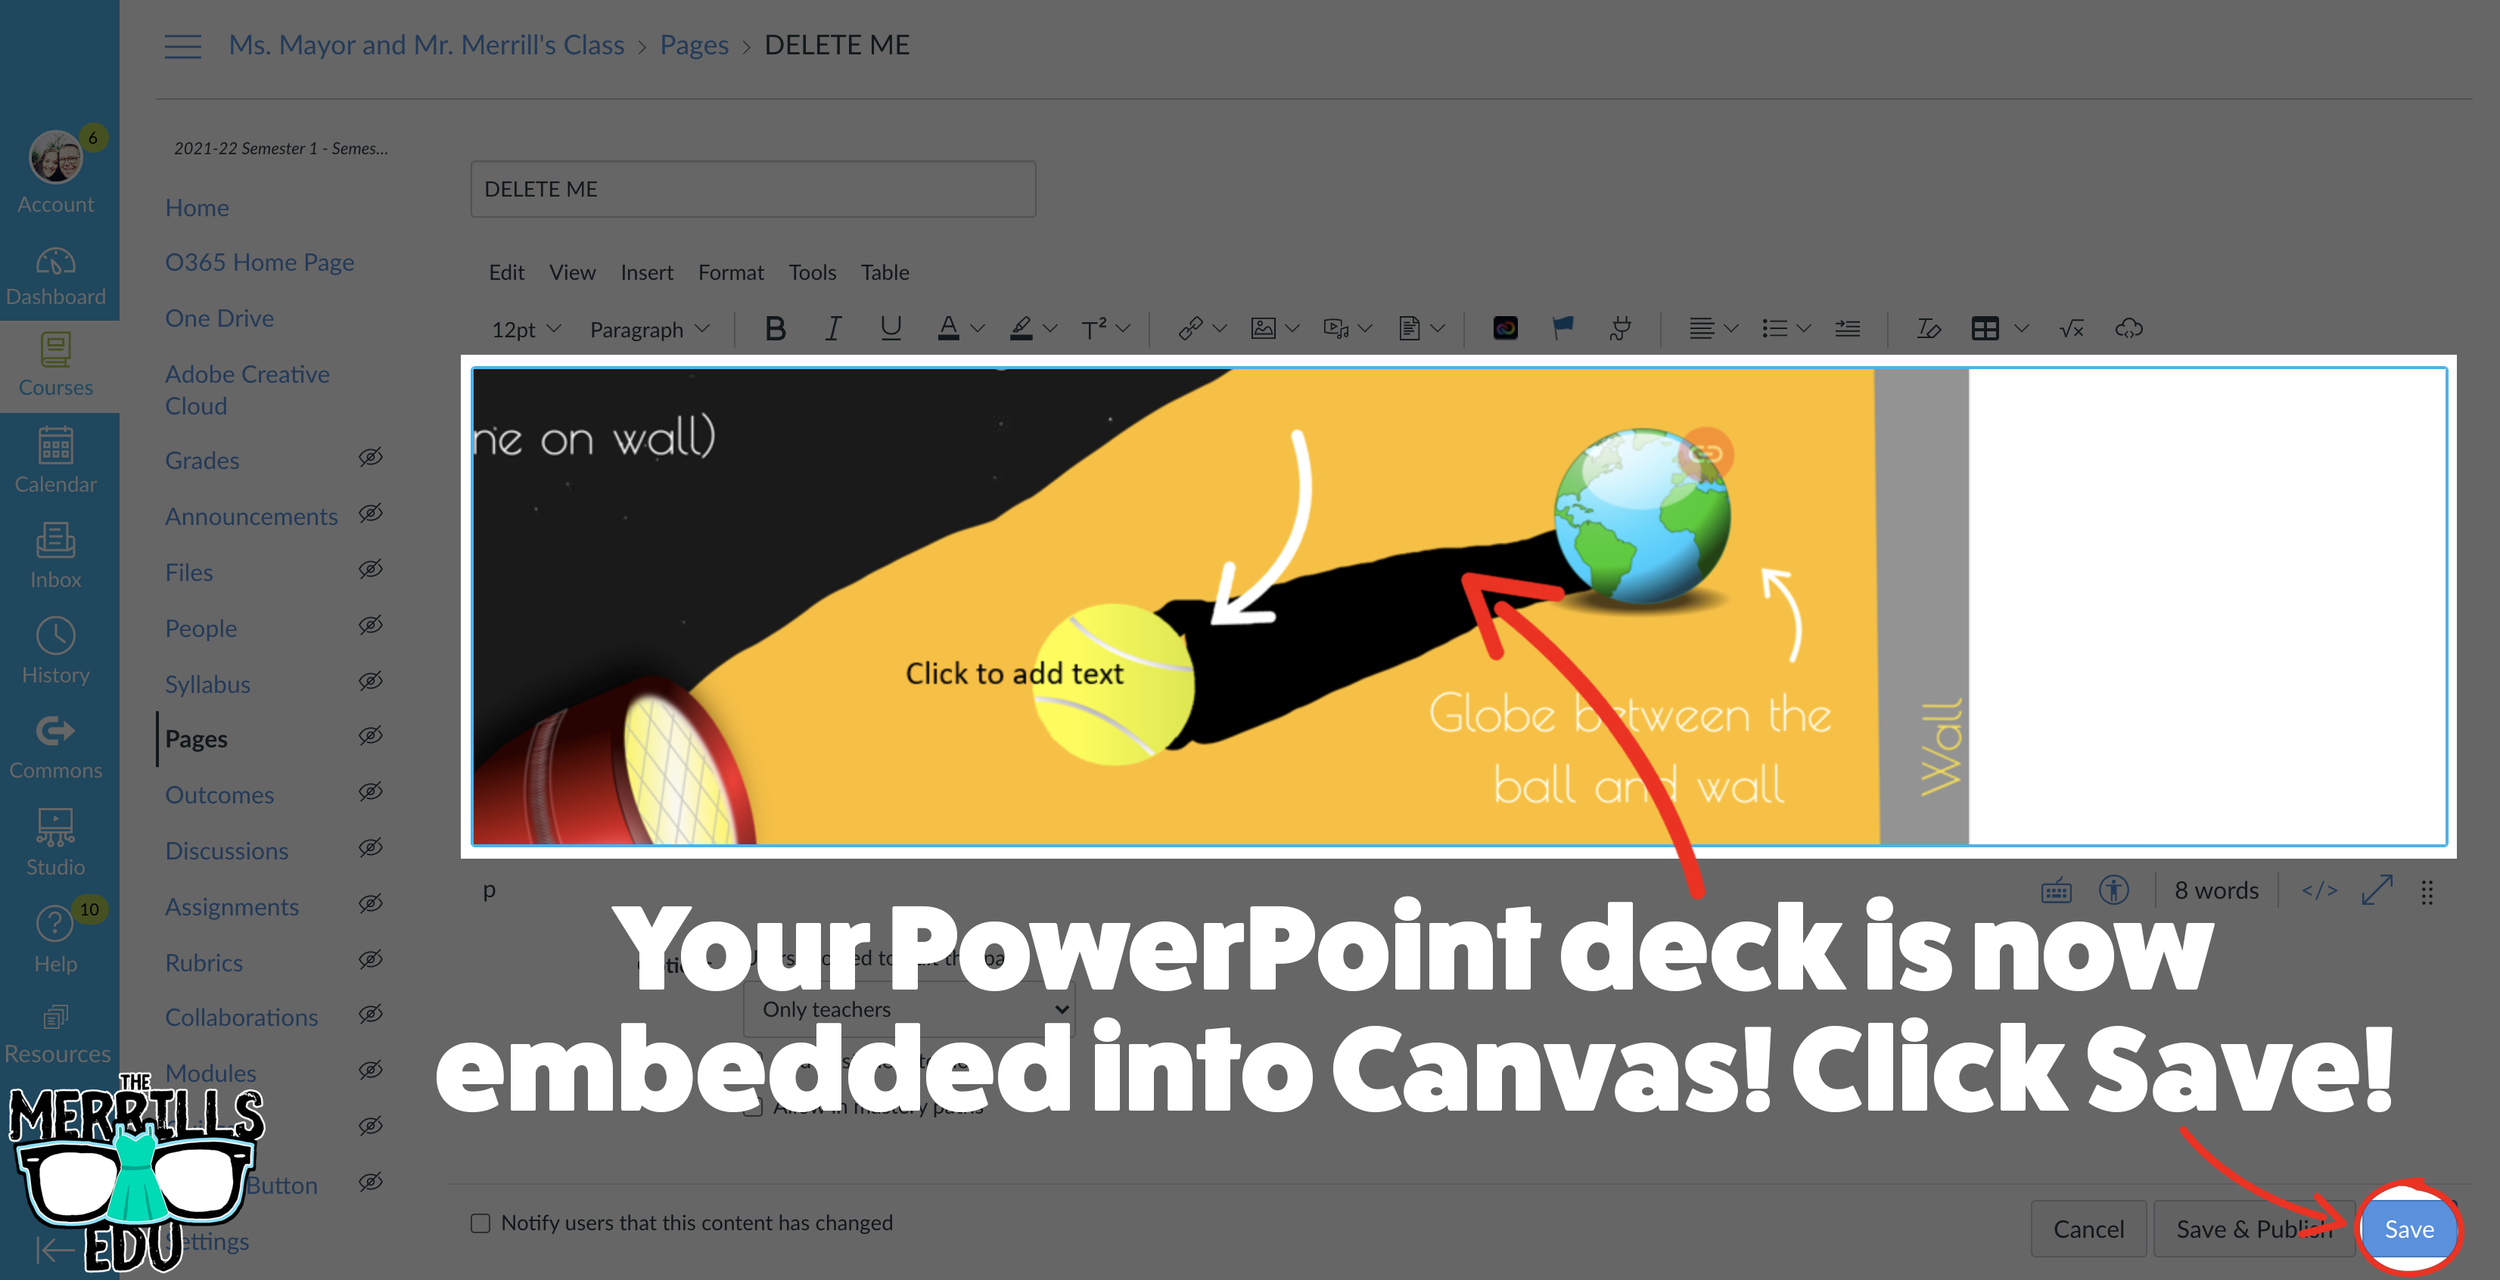
Your PowerPoint deck is now embedded into the Canvas page! Click on “Save” to update the changes.

Google Slides Embedded into Canvas
Google Slides users can get in on the embedding fun, too! In just several clicks, you can take your Google Slides deck and embed them into Canvas. Here’s how:
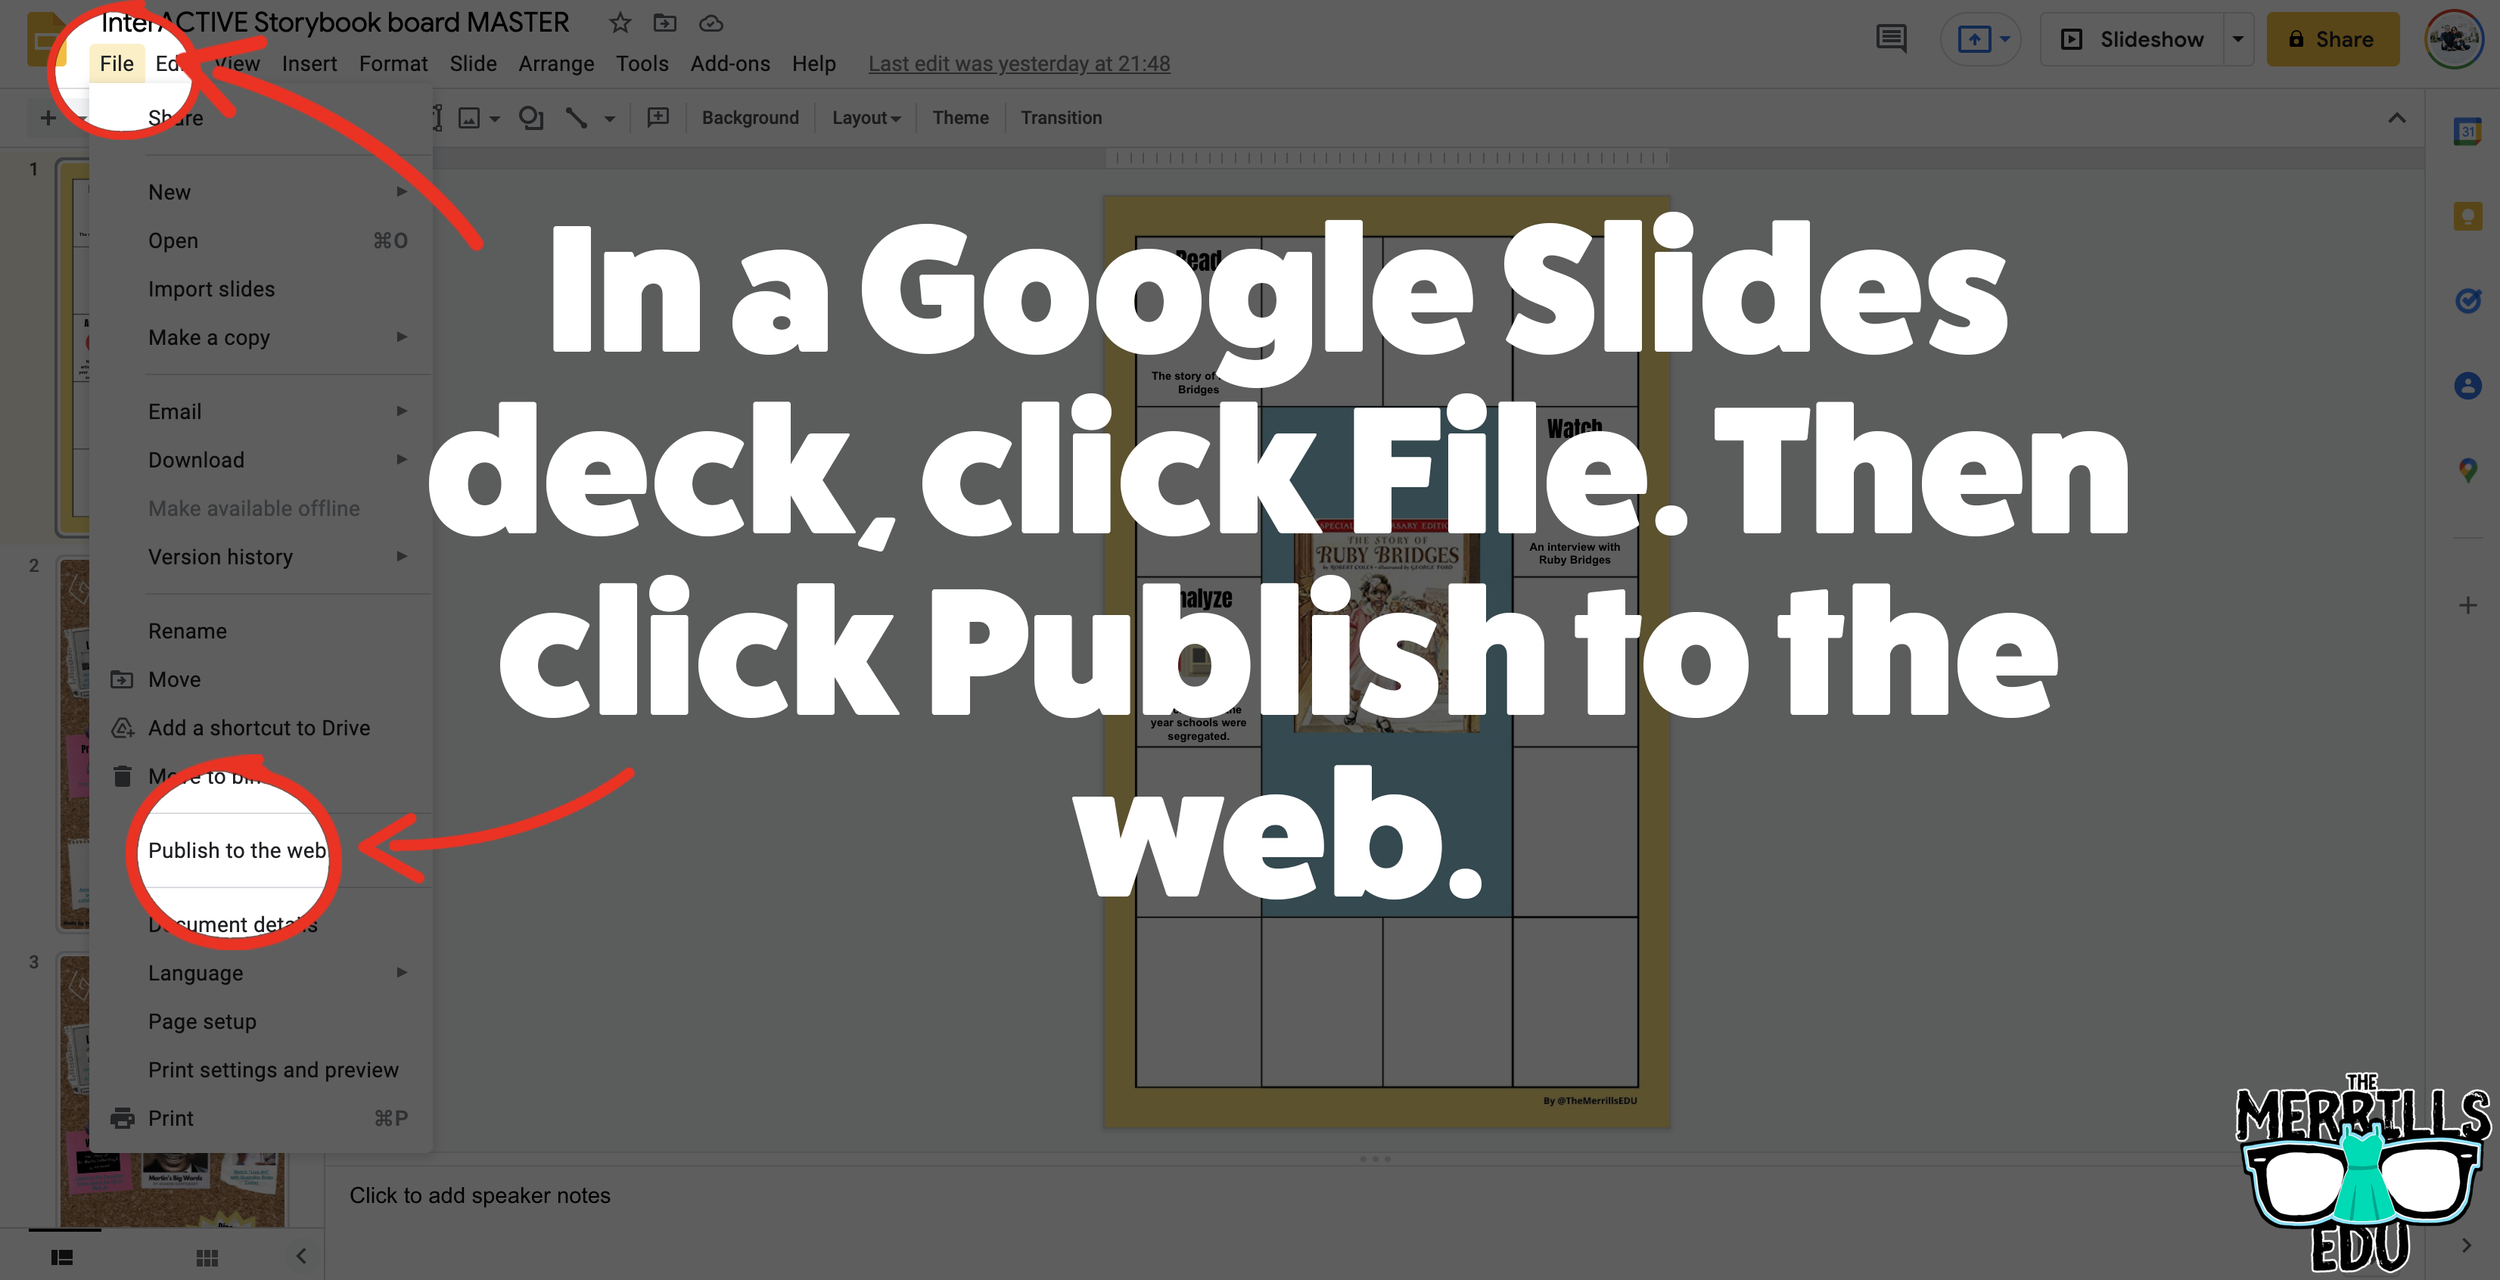


In your Google Slide deck, click “File,” then click “Publish to the web.’
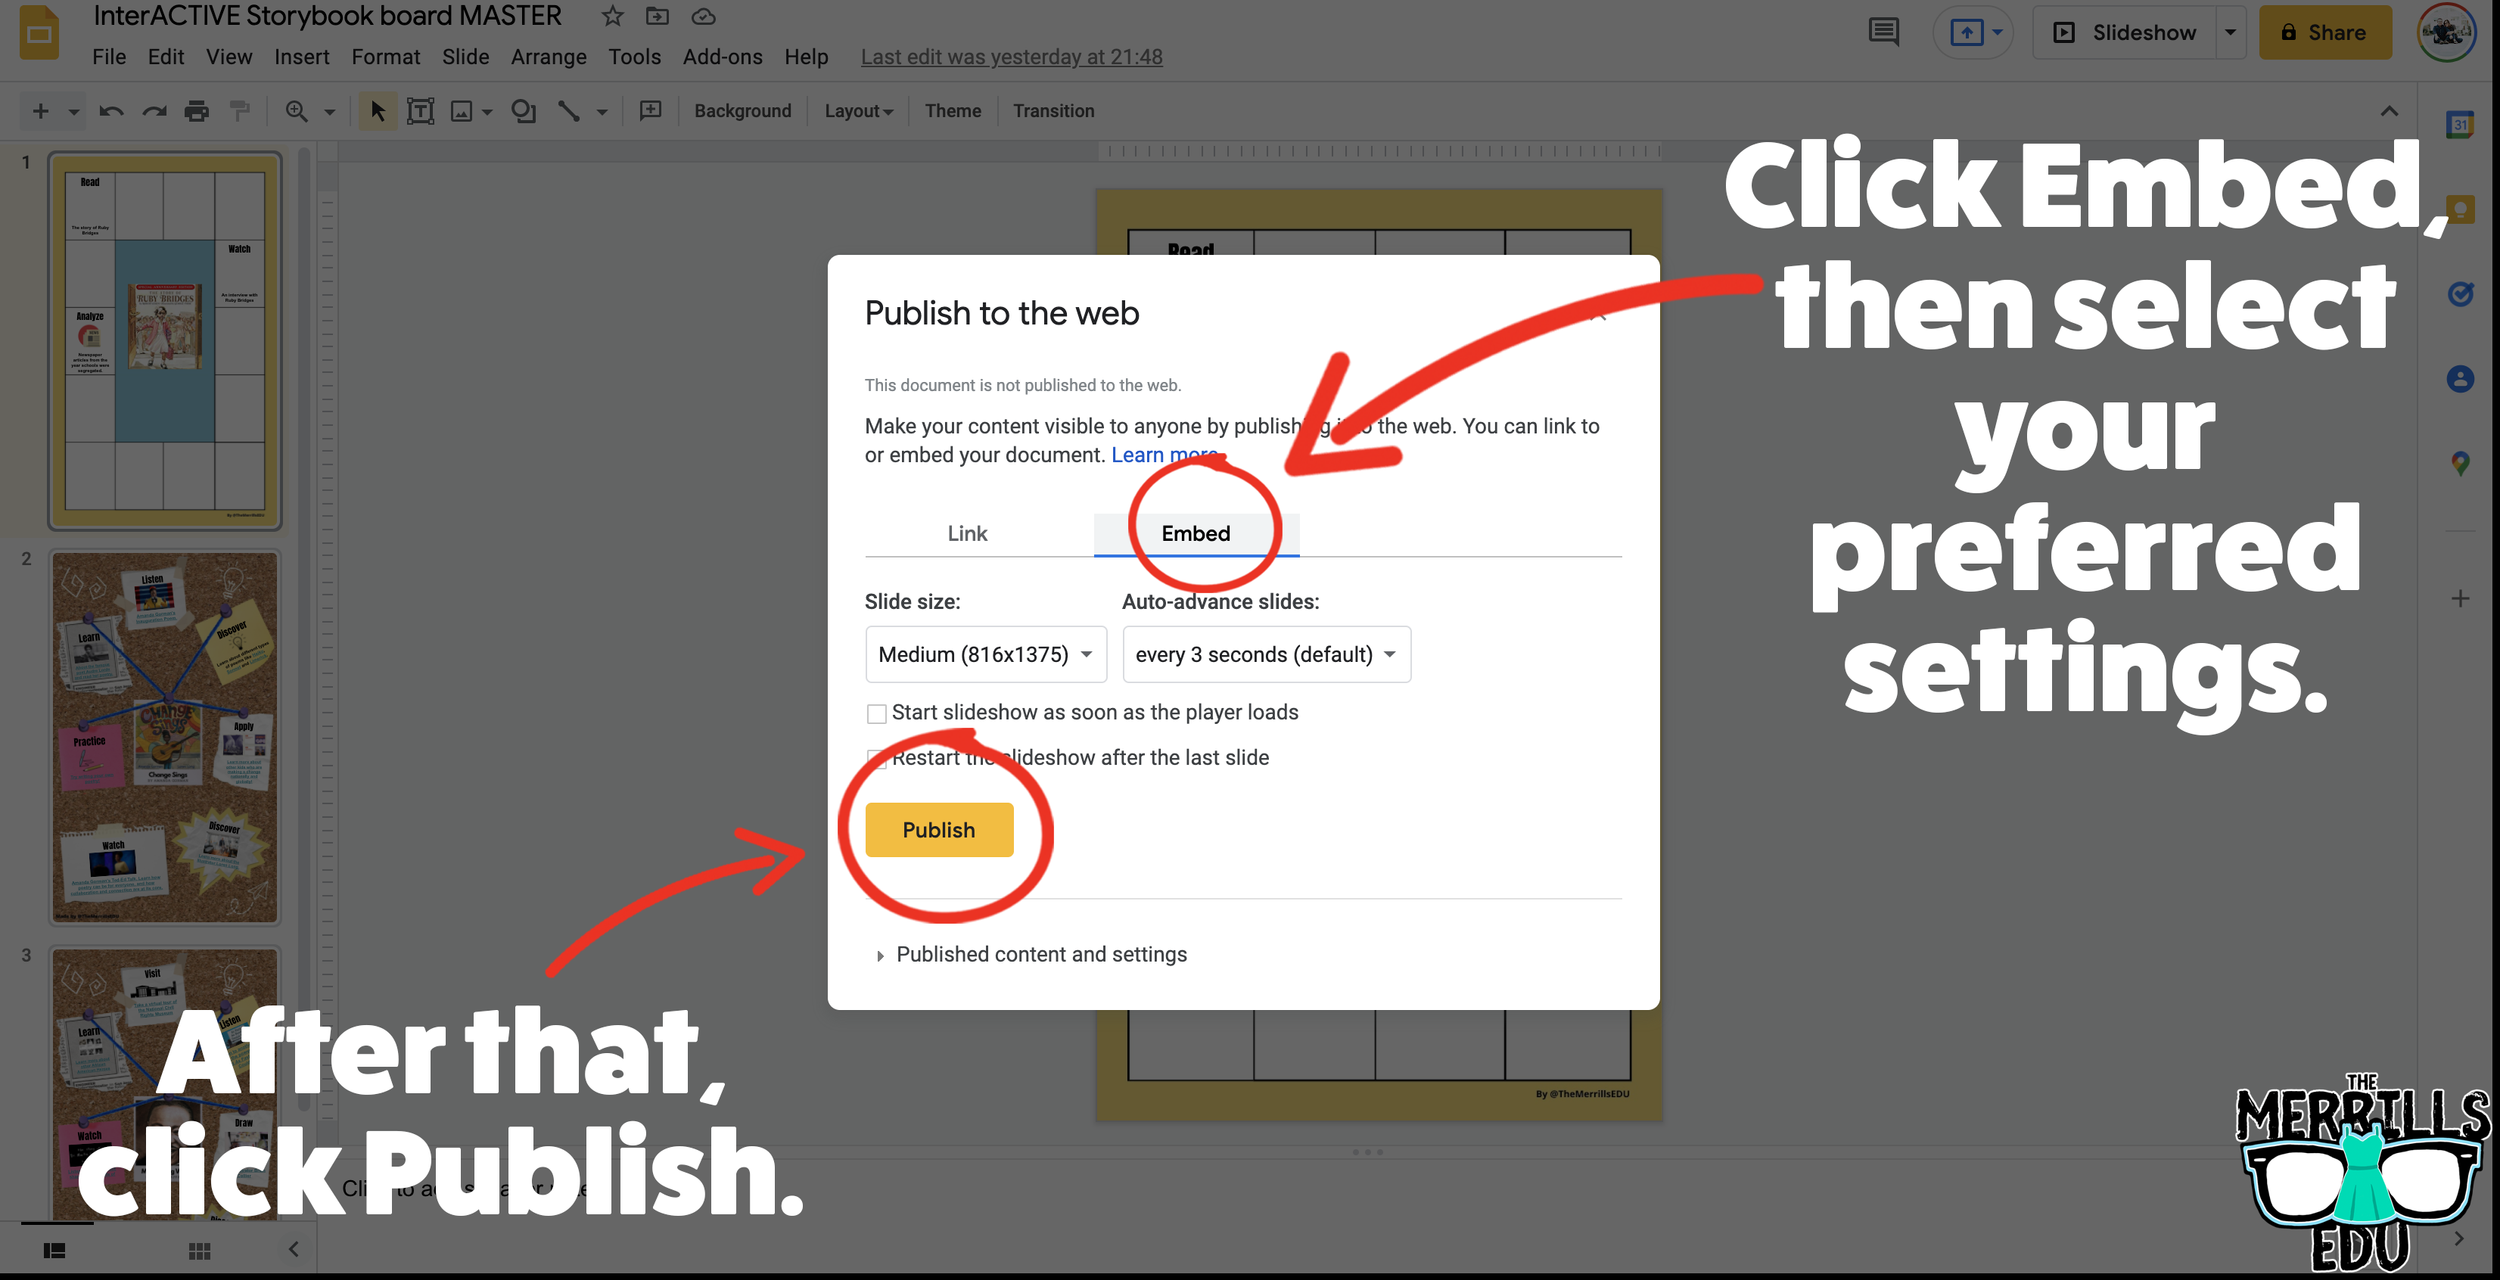
Click on Embed, then select your preferred settings. Once you have everything set, click “Publish.” (If you’re asked if you are sure you want to publish, say “yes or ok.”)
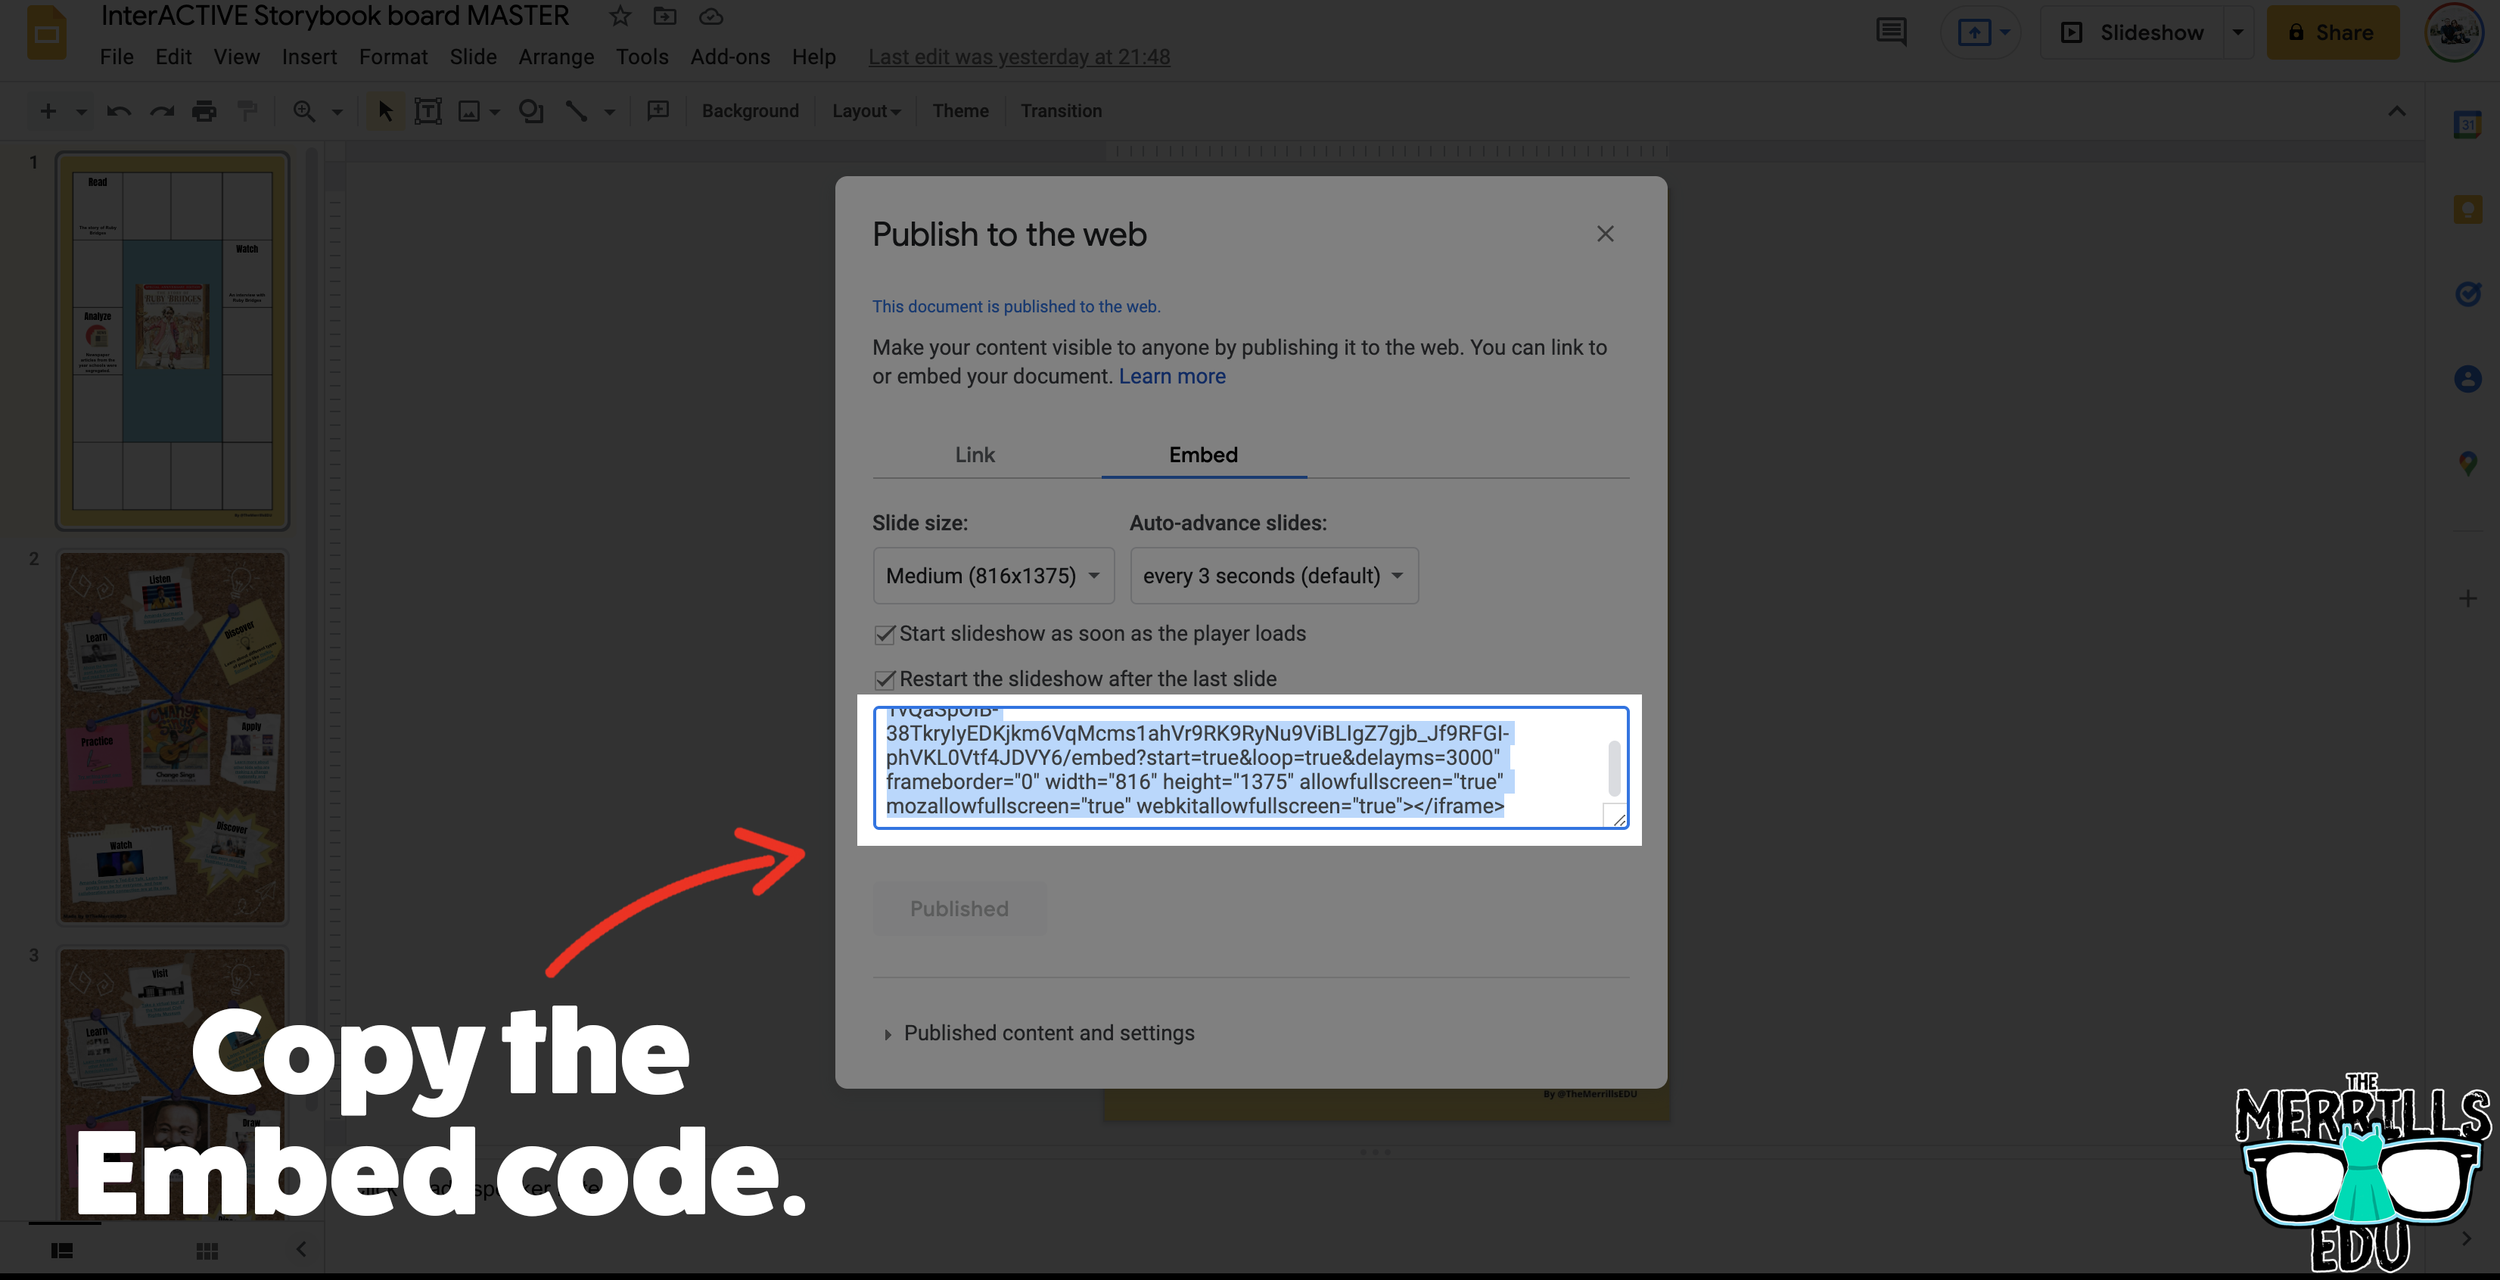
On the next screen, copy your embed code.
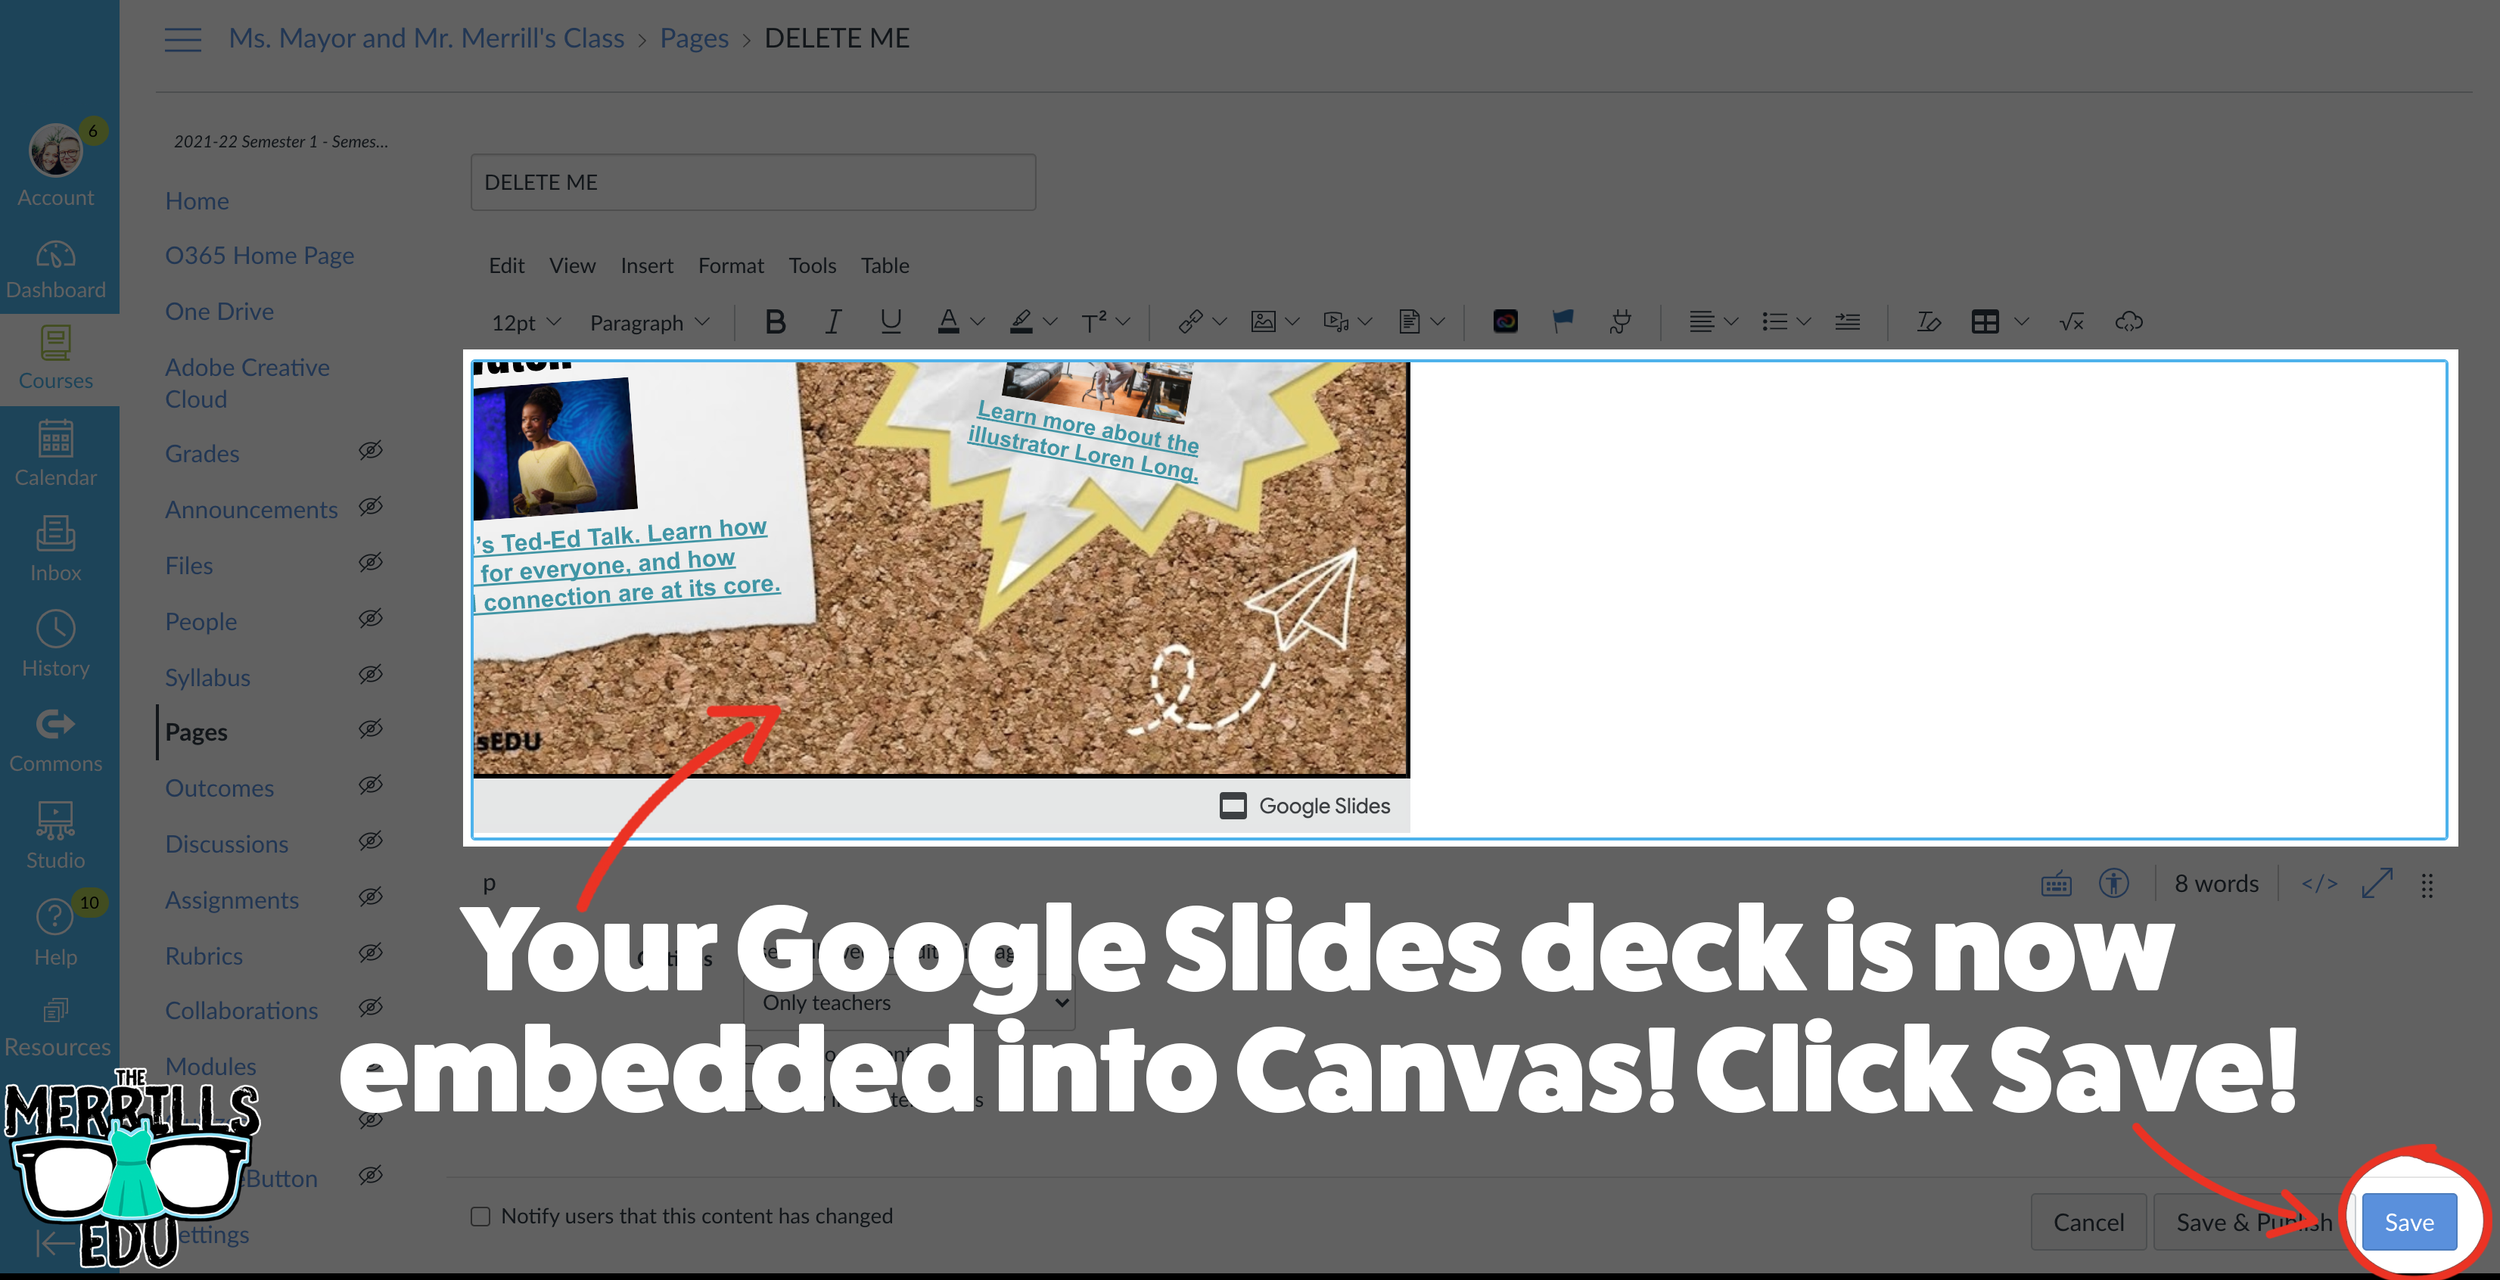
In a separate tab, open the Canvas page that you would like to add the Google Slides deck to. Then, click on the cloud icon (if you don’t see the Cloud icon, click the three dots to expand the menu bar).
In the embed window, paste your copied code from Google Slides. Then, click submit.
Your Google Slides deck is now embedded into the Canvas page! Click on “Save” to update the changes.

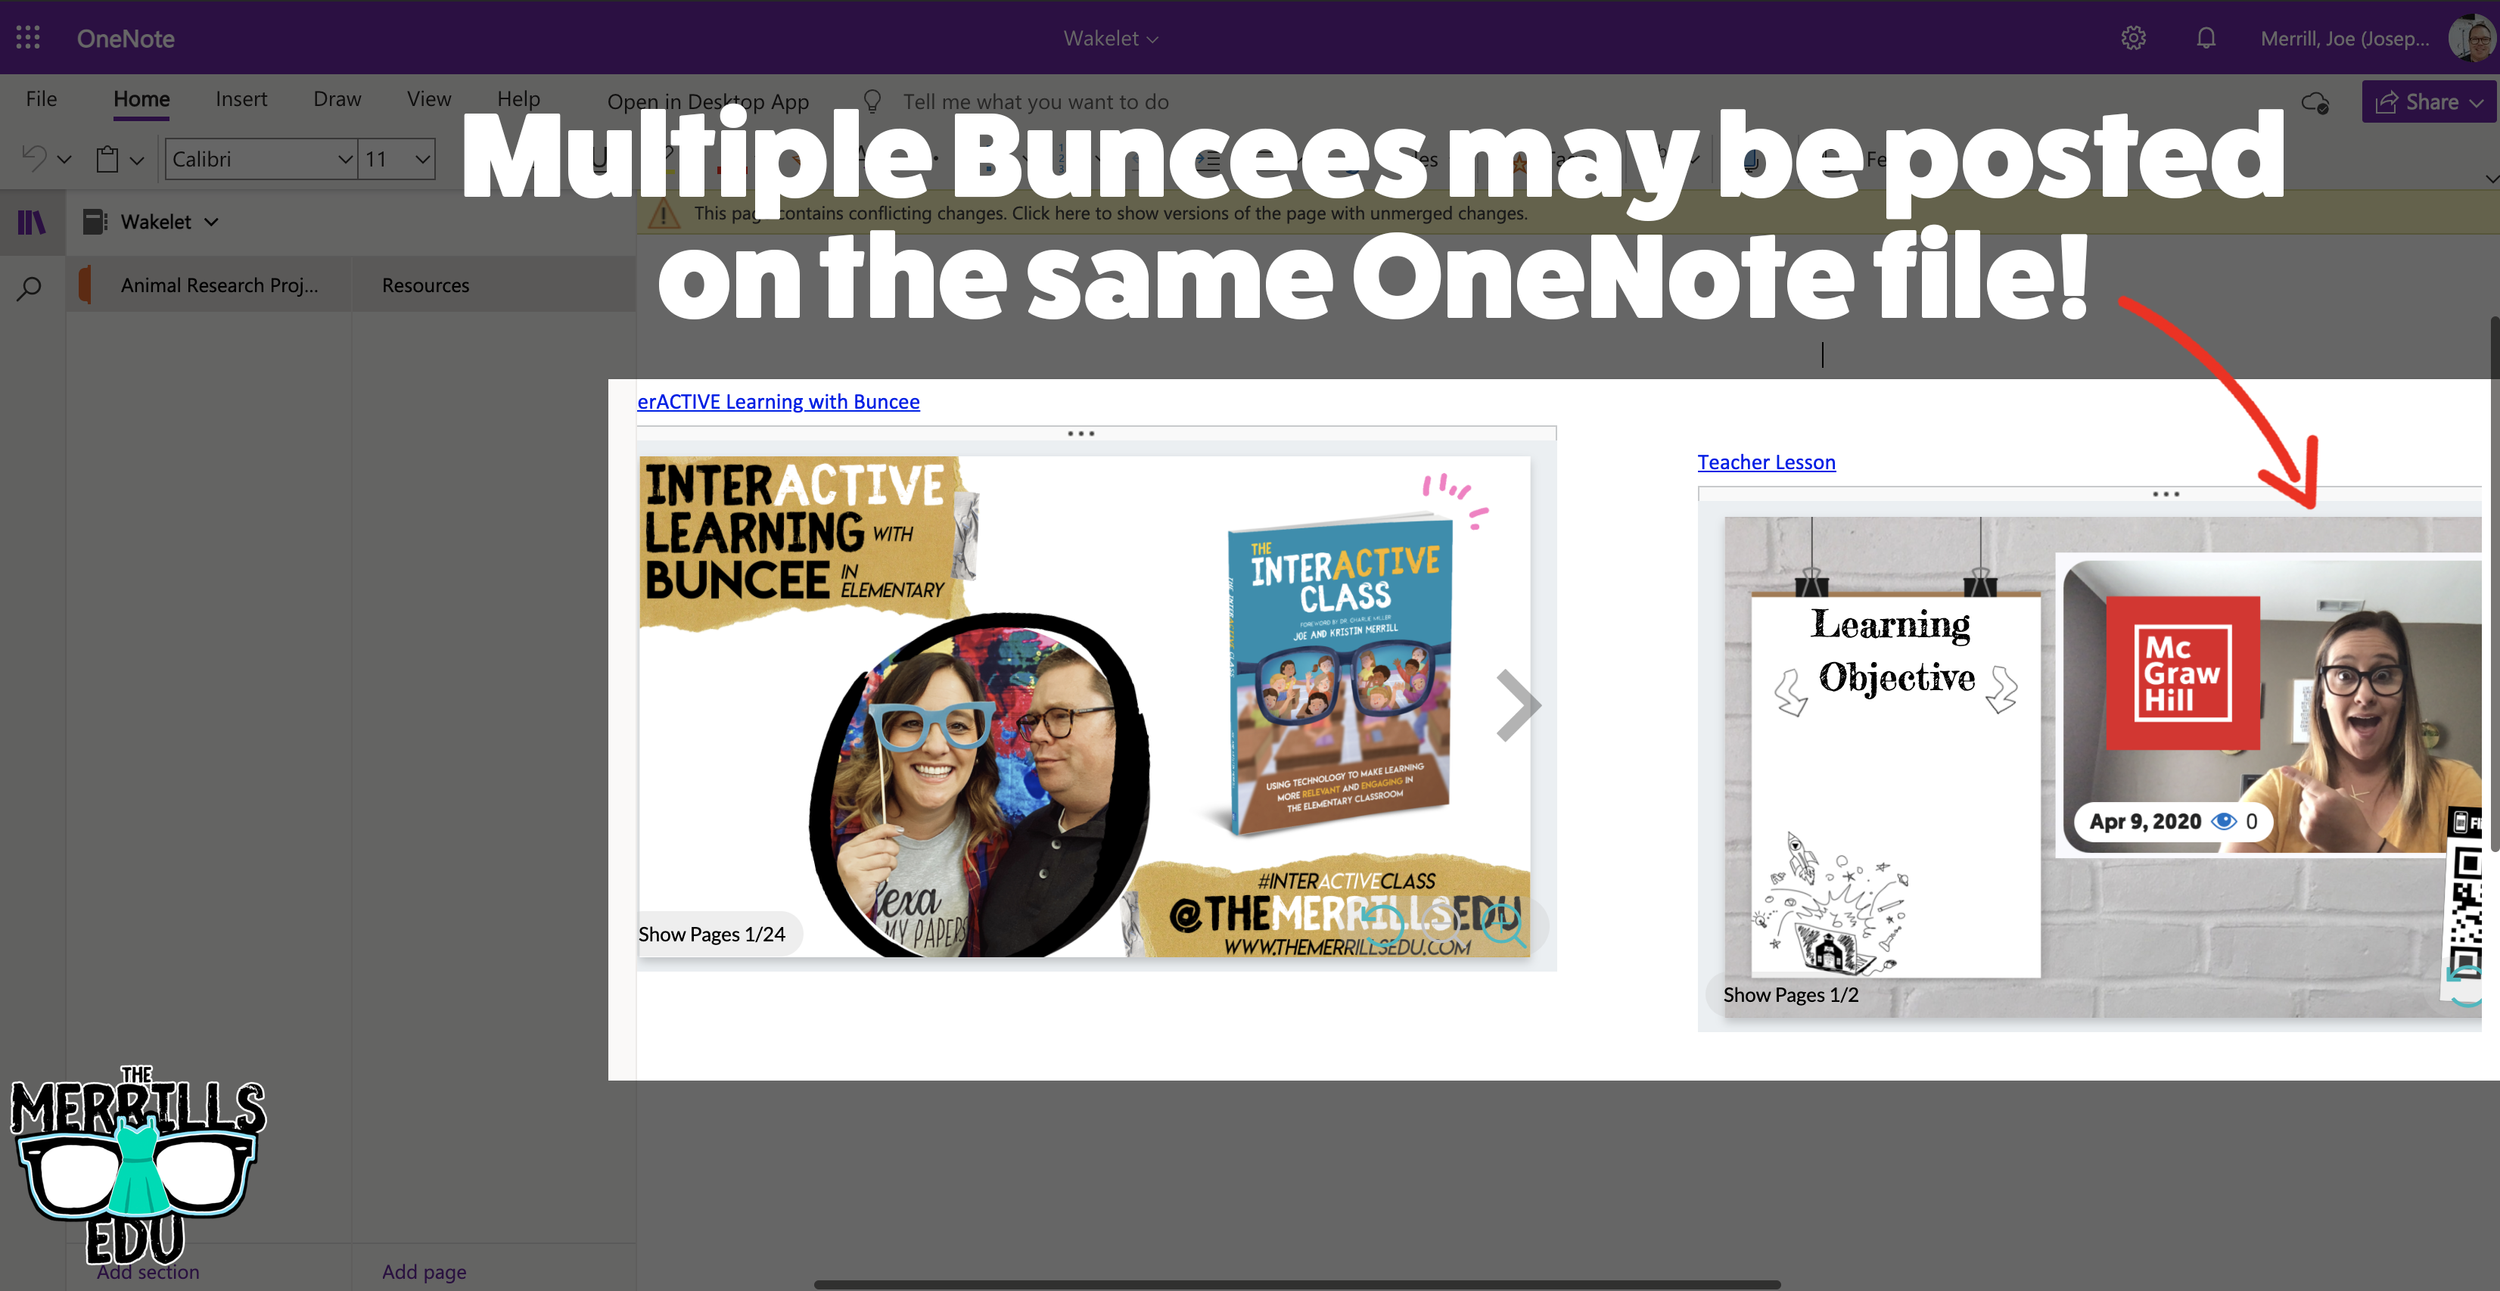
Wakelet Embedded into OneNote
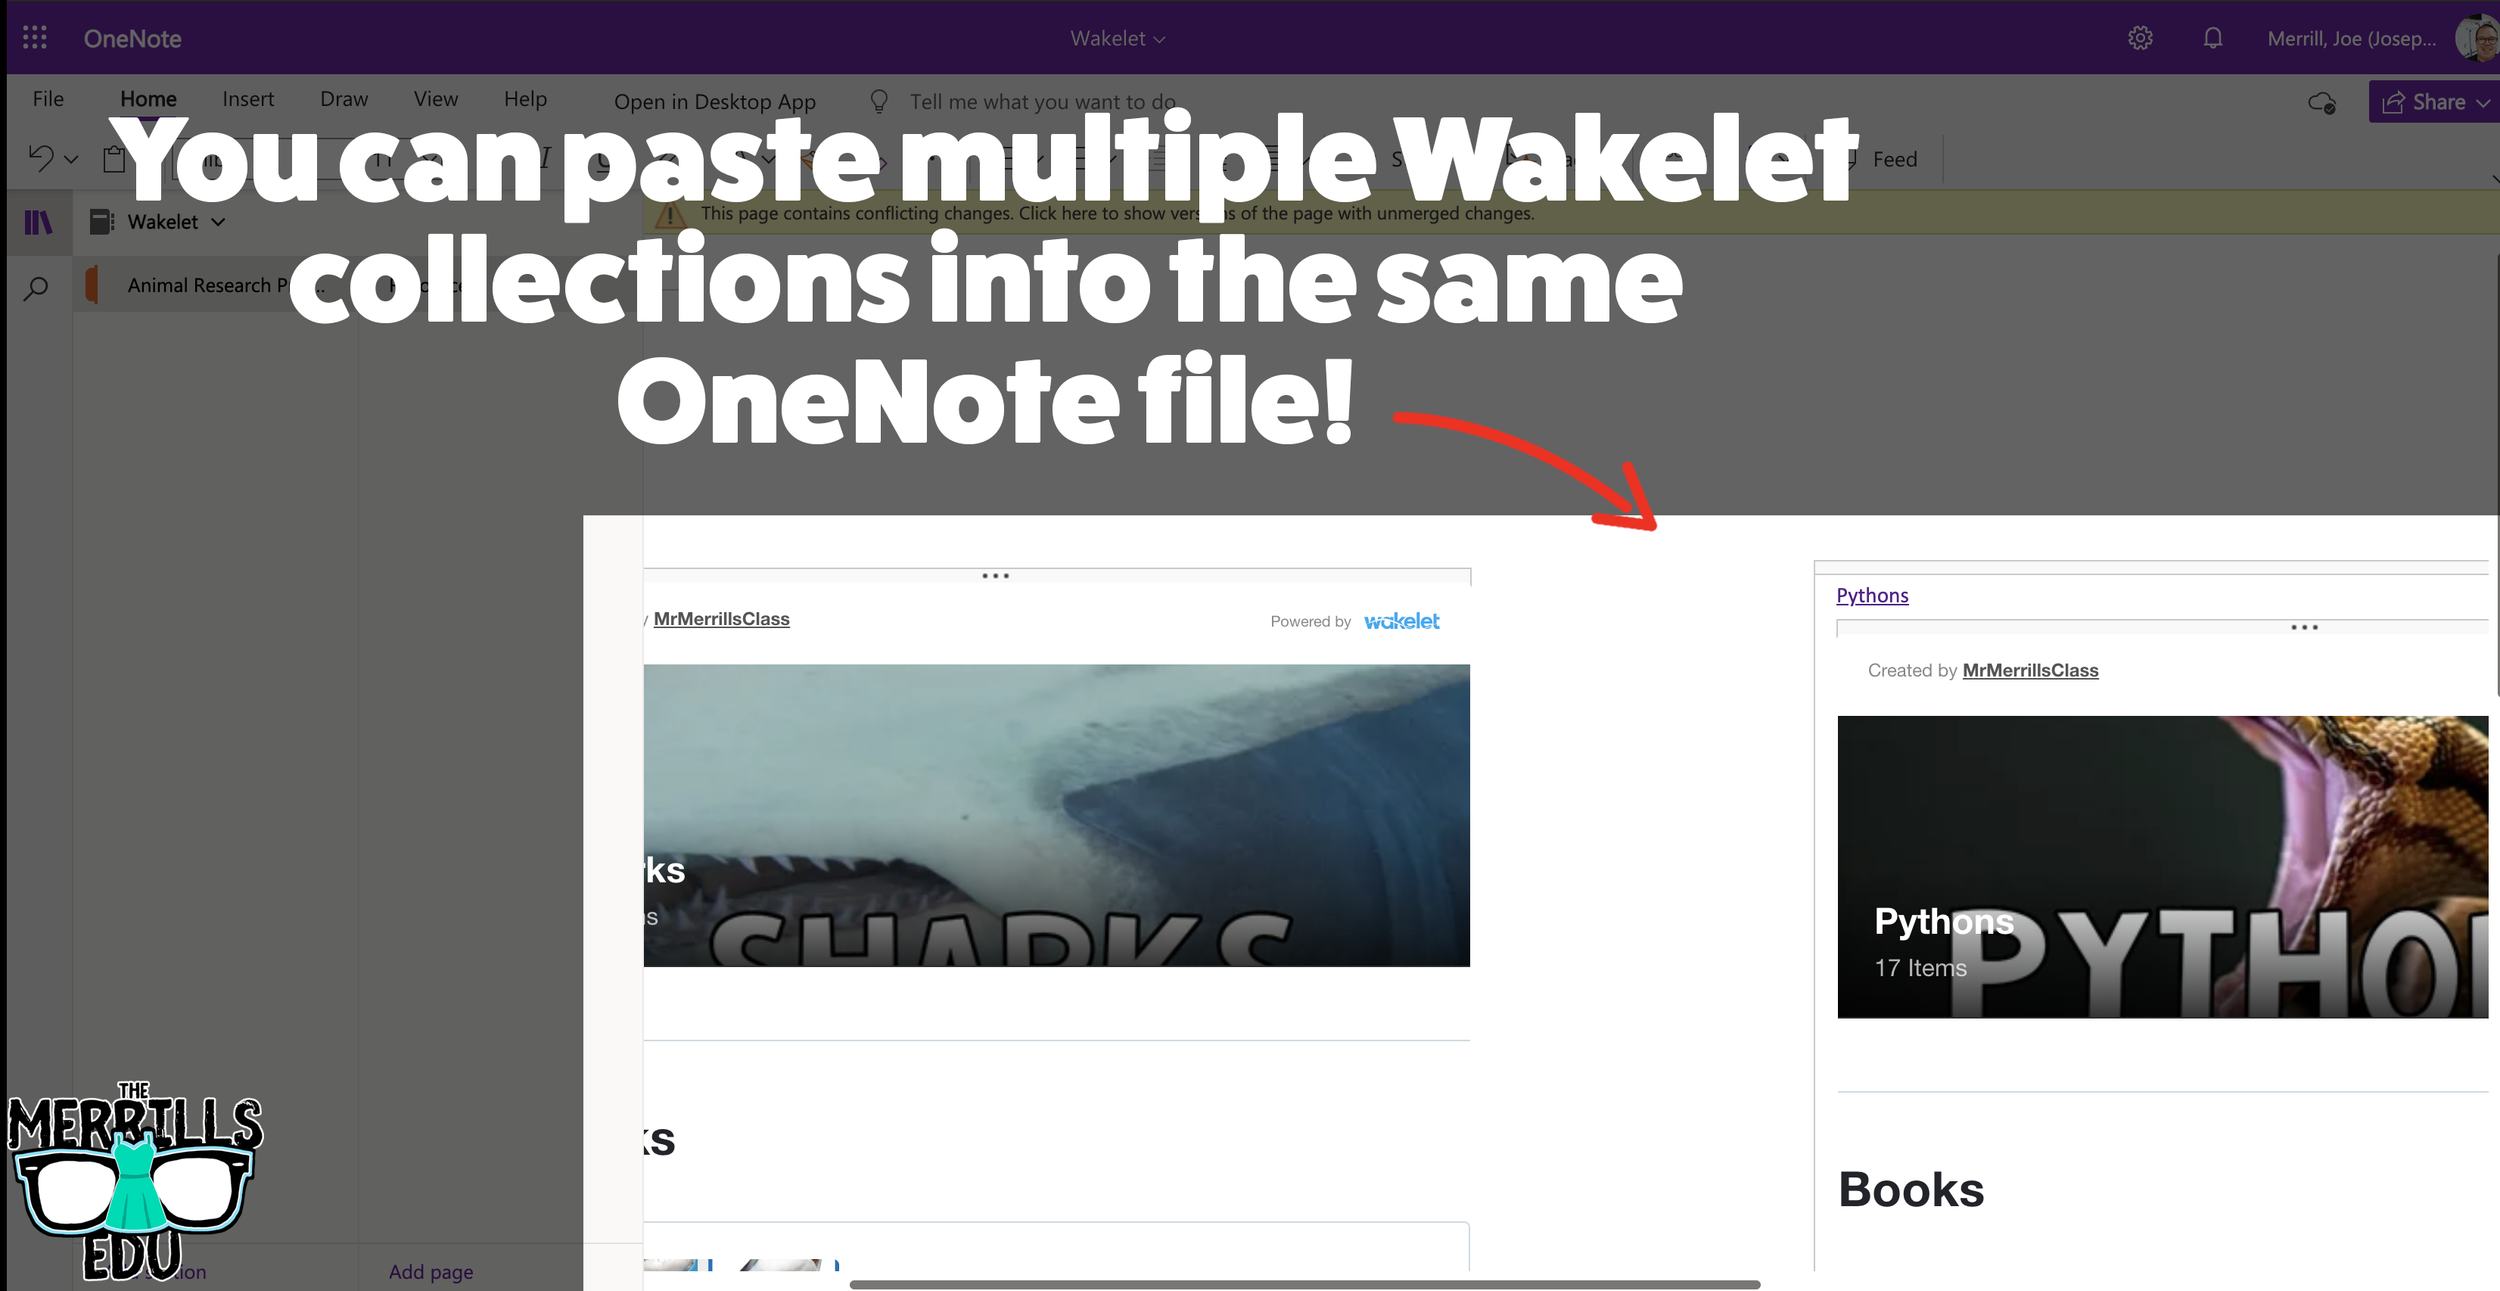
You don’t need an LMS (learning management system) to embed apps. If you’re a Microsoft user, you can embed Wakelet collections right into a OneNote file. The best part of all - this is a ⚡️LIVE⚡️ embed, meaning that any changes made to the Wakelet collection will automatically change in the OneNote file. Additionally, you can embed multiple Wakelet collections into one - OneNote file. Here’s how it all works:
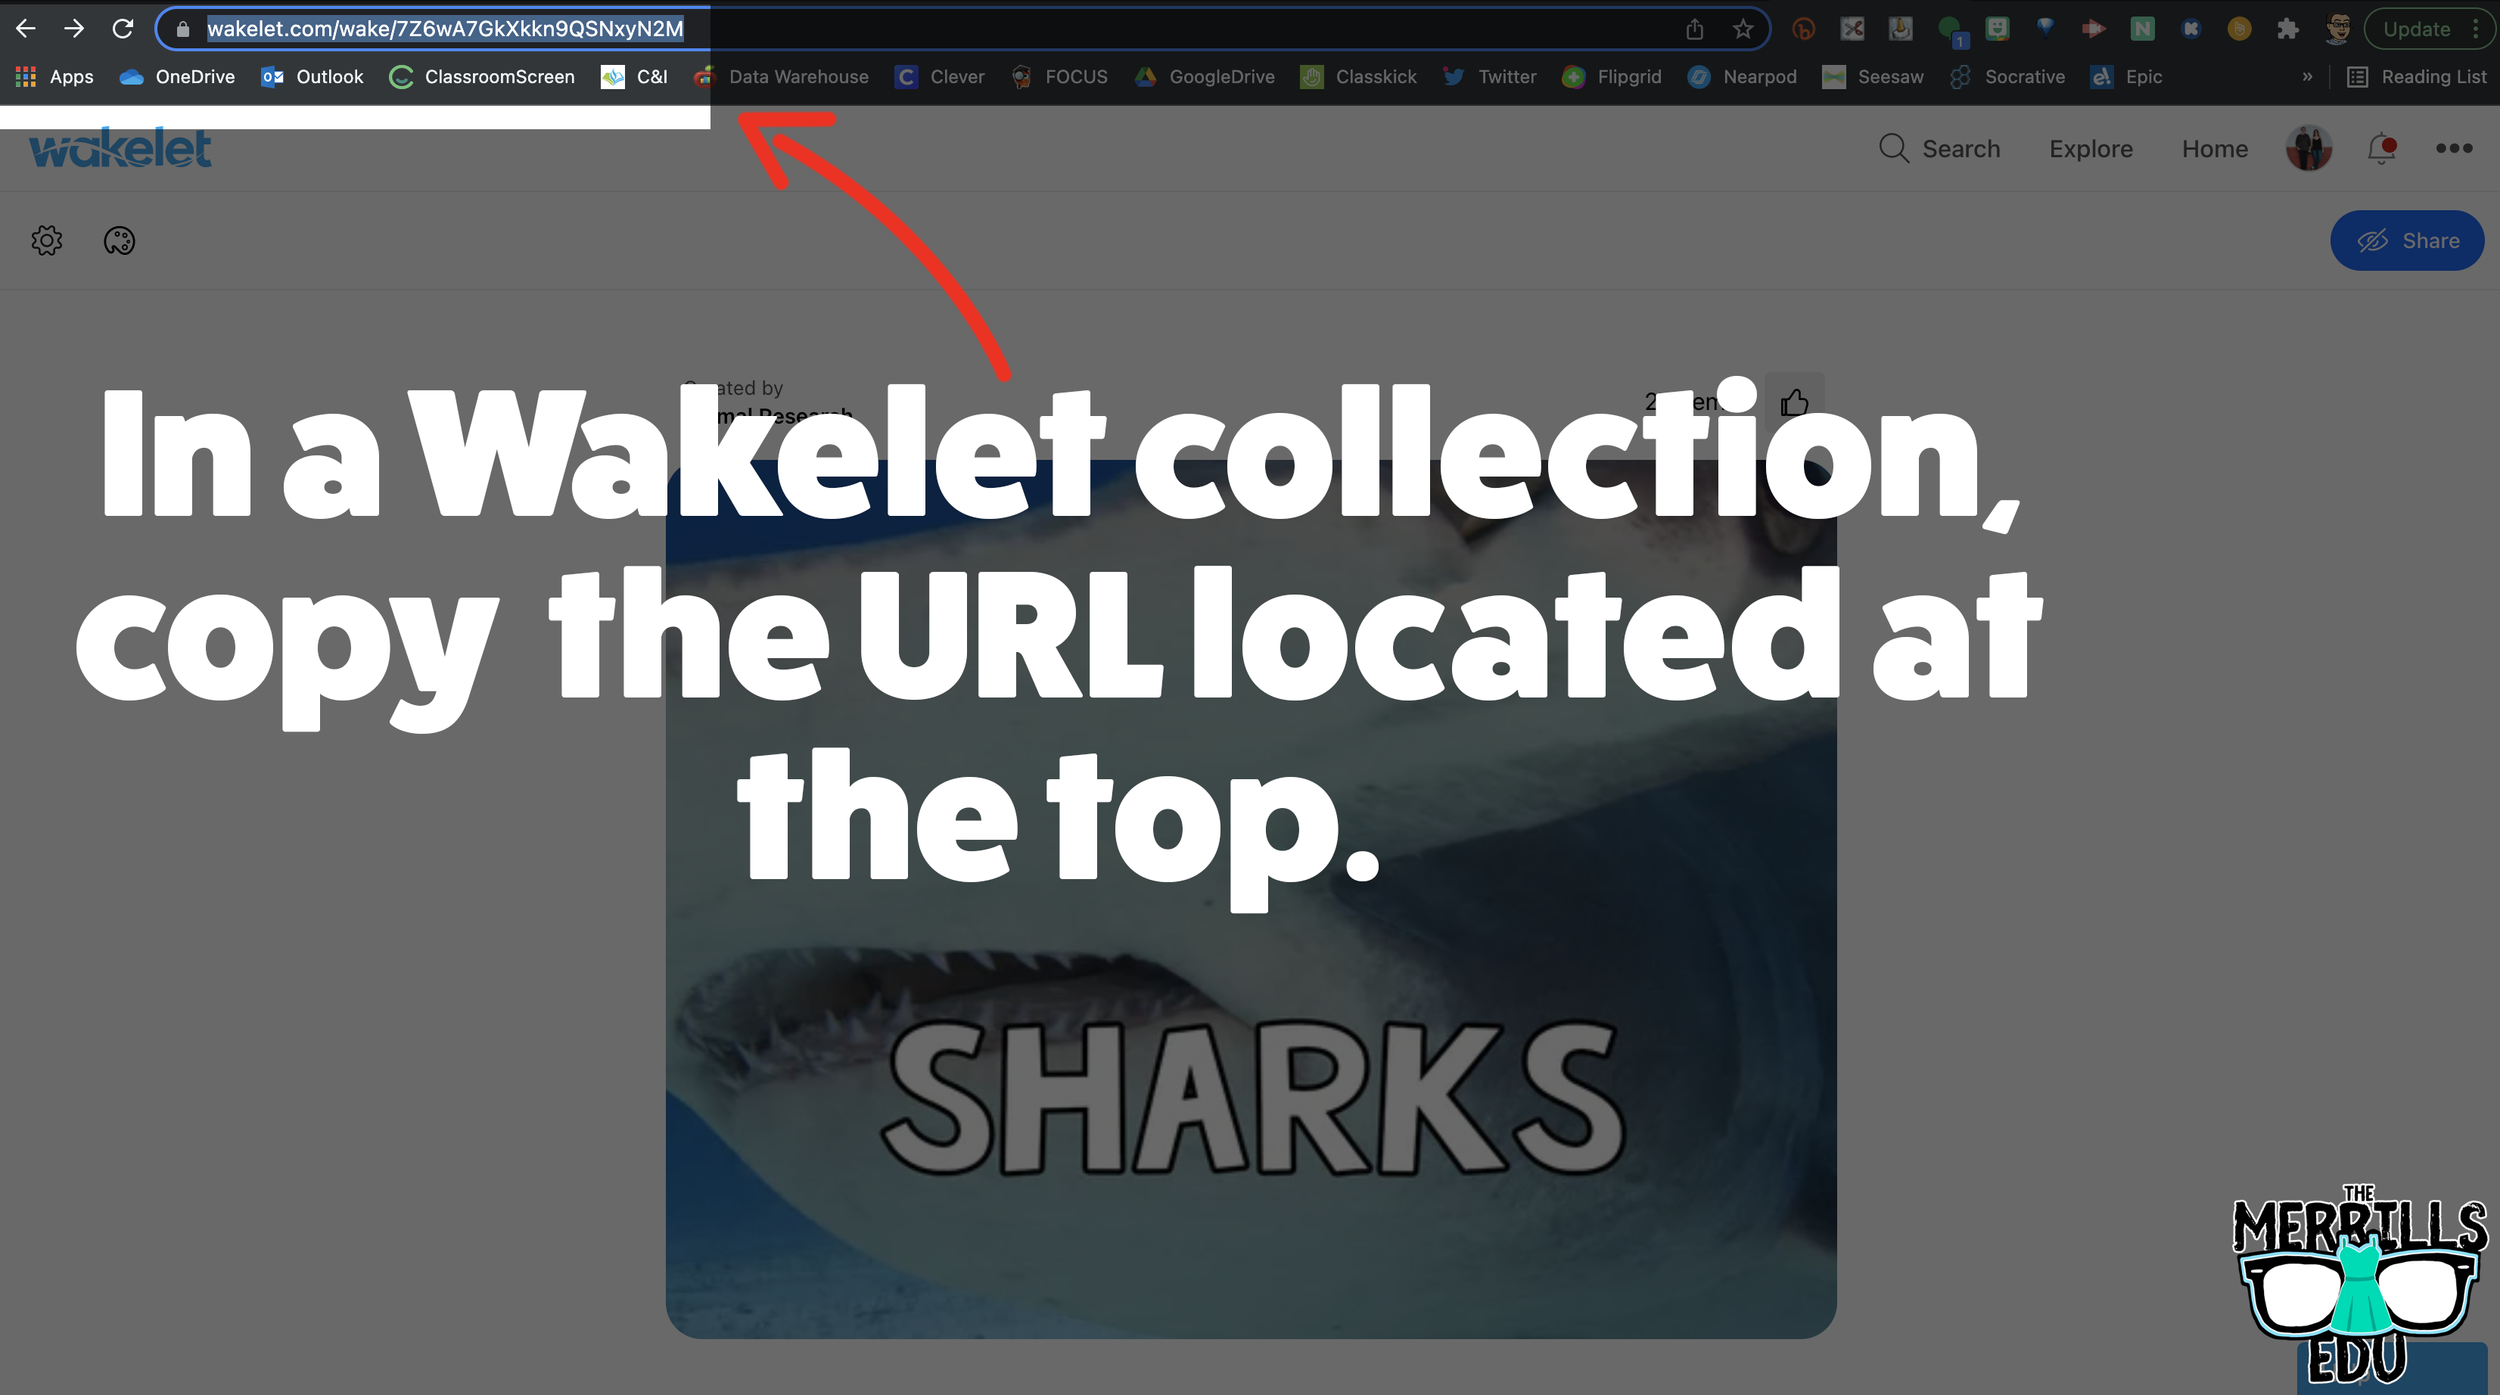
In a Wakelet Collection, copy the URL located at the top.
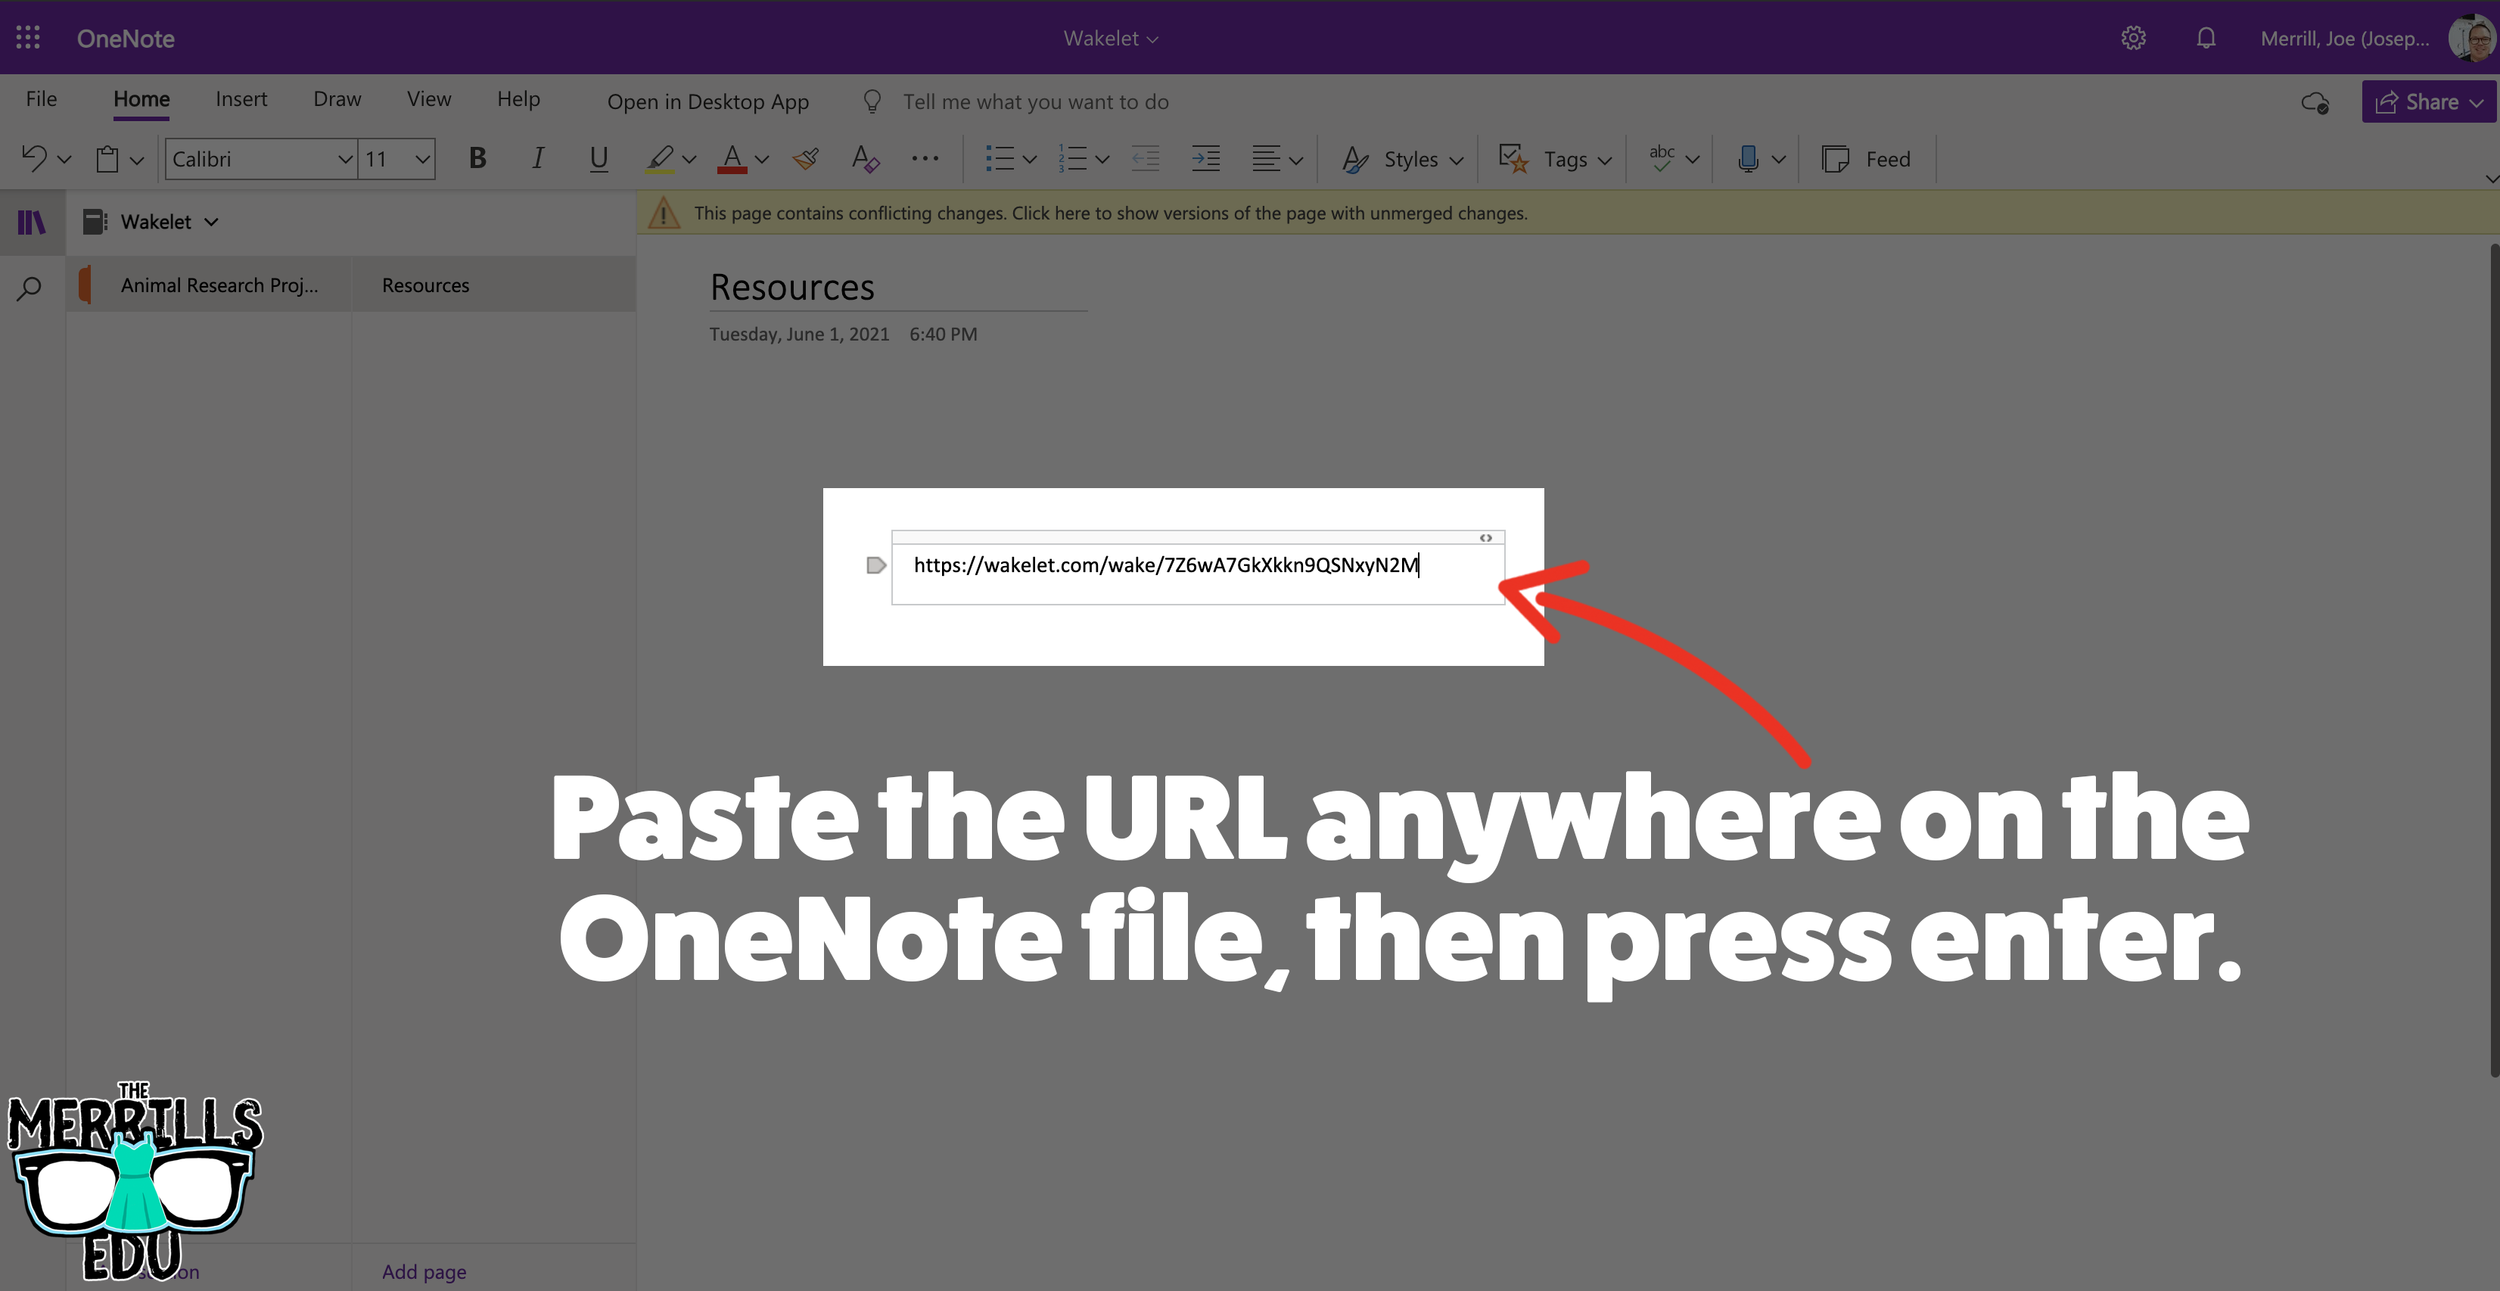
In a separate tab, open the OneNote file that you would like to add the Wakelet Collection to. Then, paste the URL anywhere on the OneNote file.
Press enter to start the live embed.
Repeat this process to add additional collections to the OneNote file.

Buncee Embedded into OneNote
This embed takes the cake as the most creative! Most embedding is done on the educators end, but not this one (although educators can definitely do it, too). With the Buncee and OneNote embed, students have the ability to take their Buncee creations and share them in one central location for others to see. Here’s how it all works:

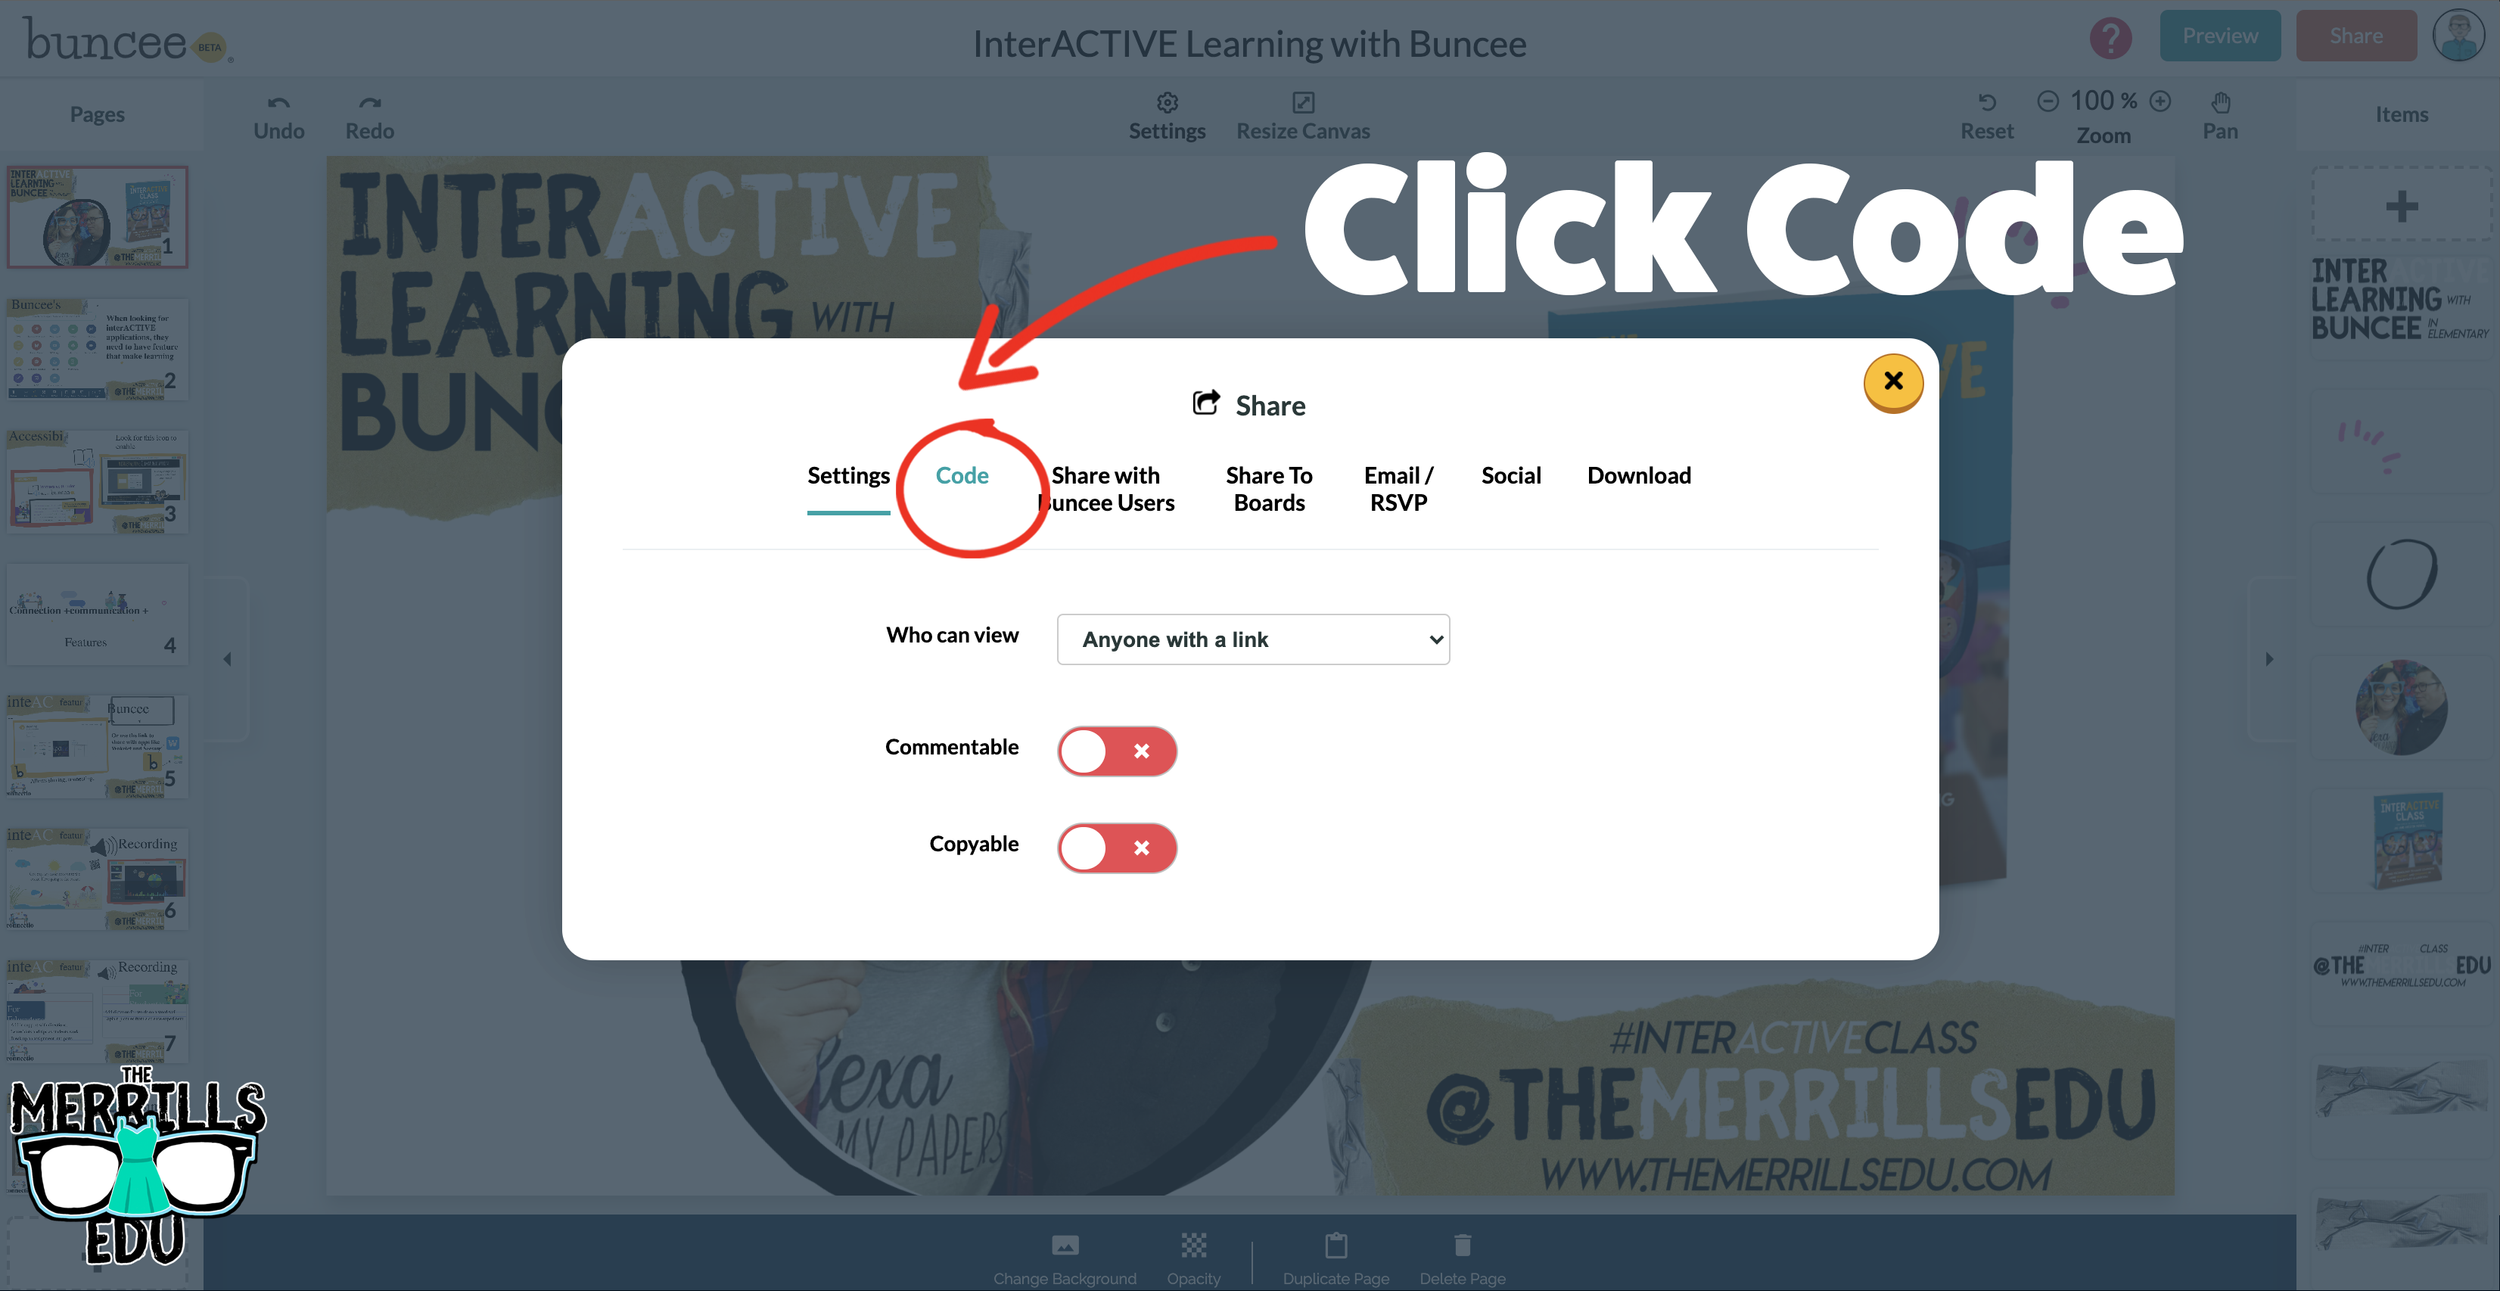
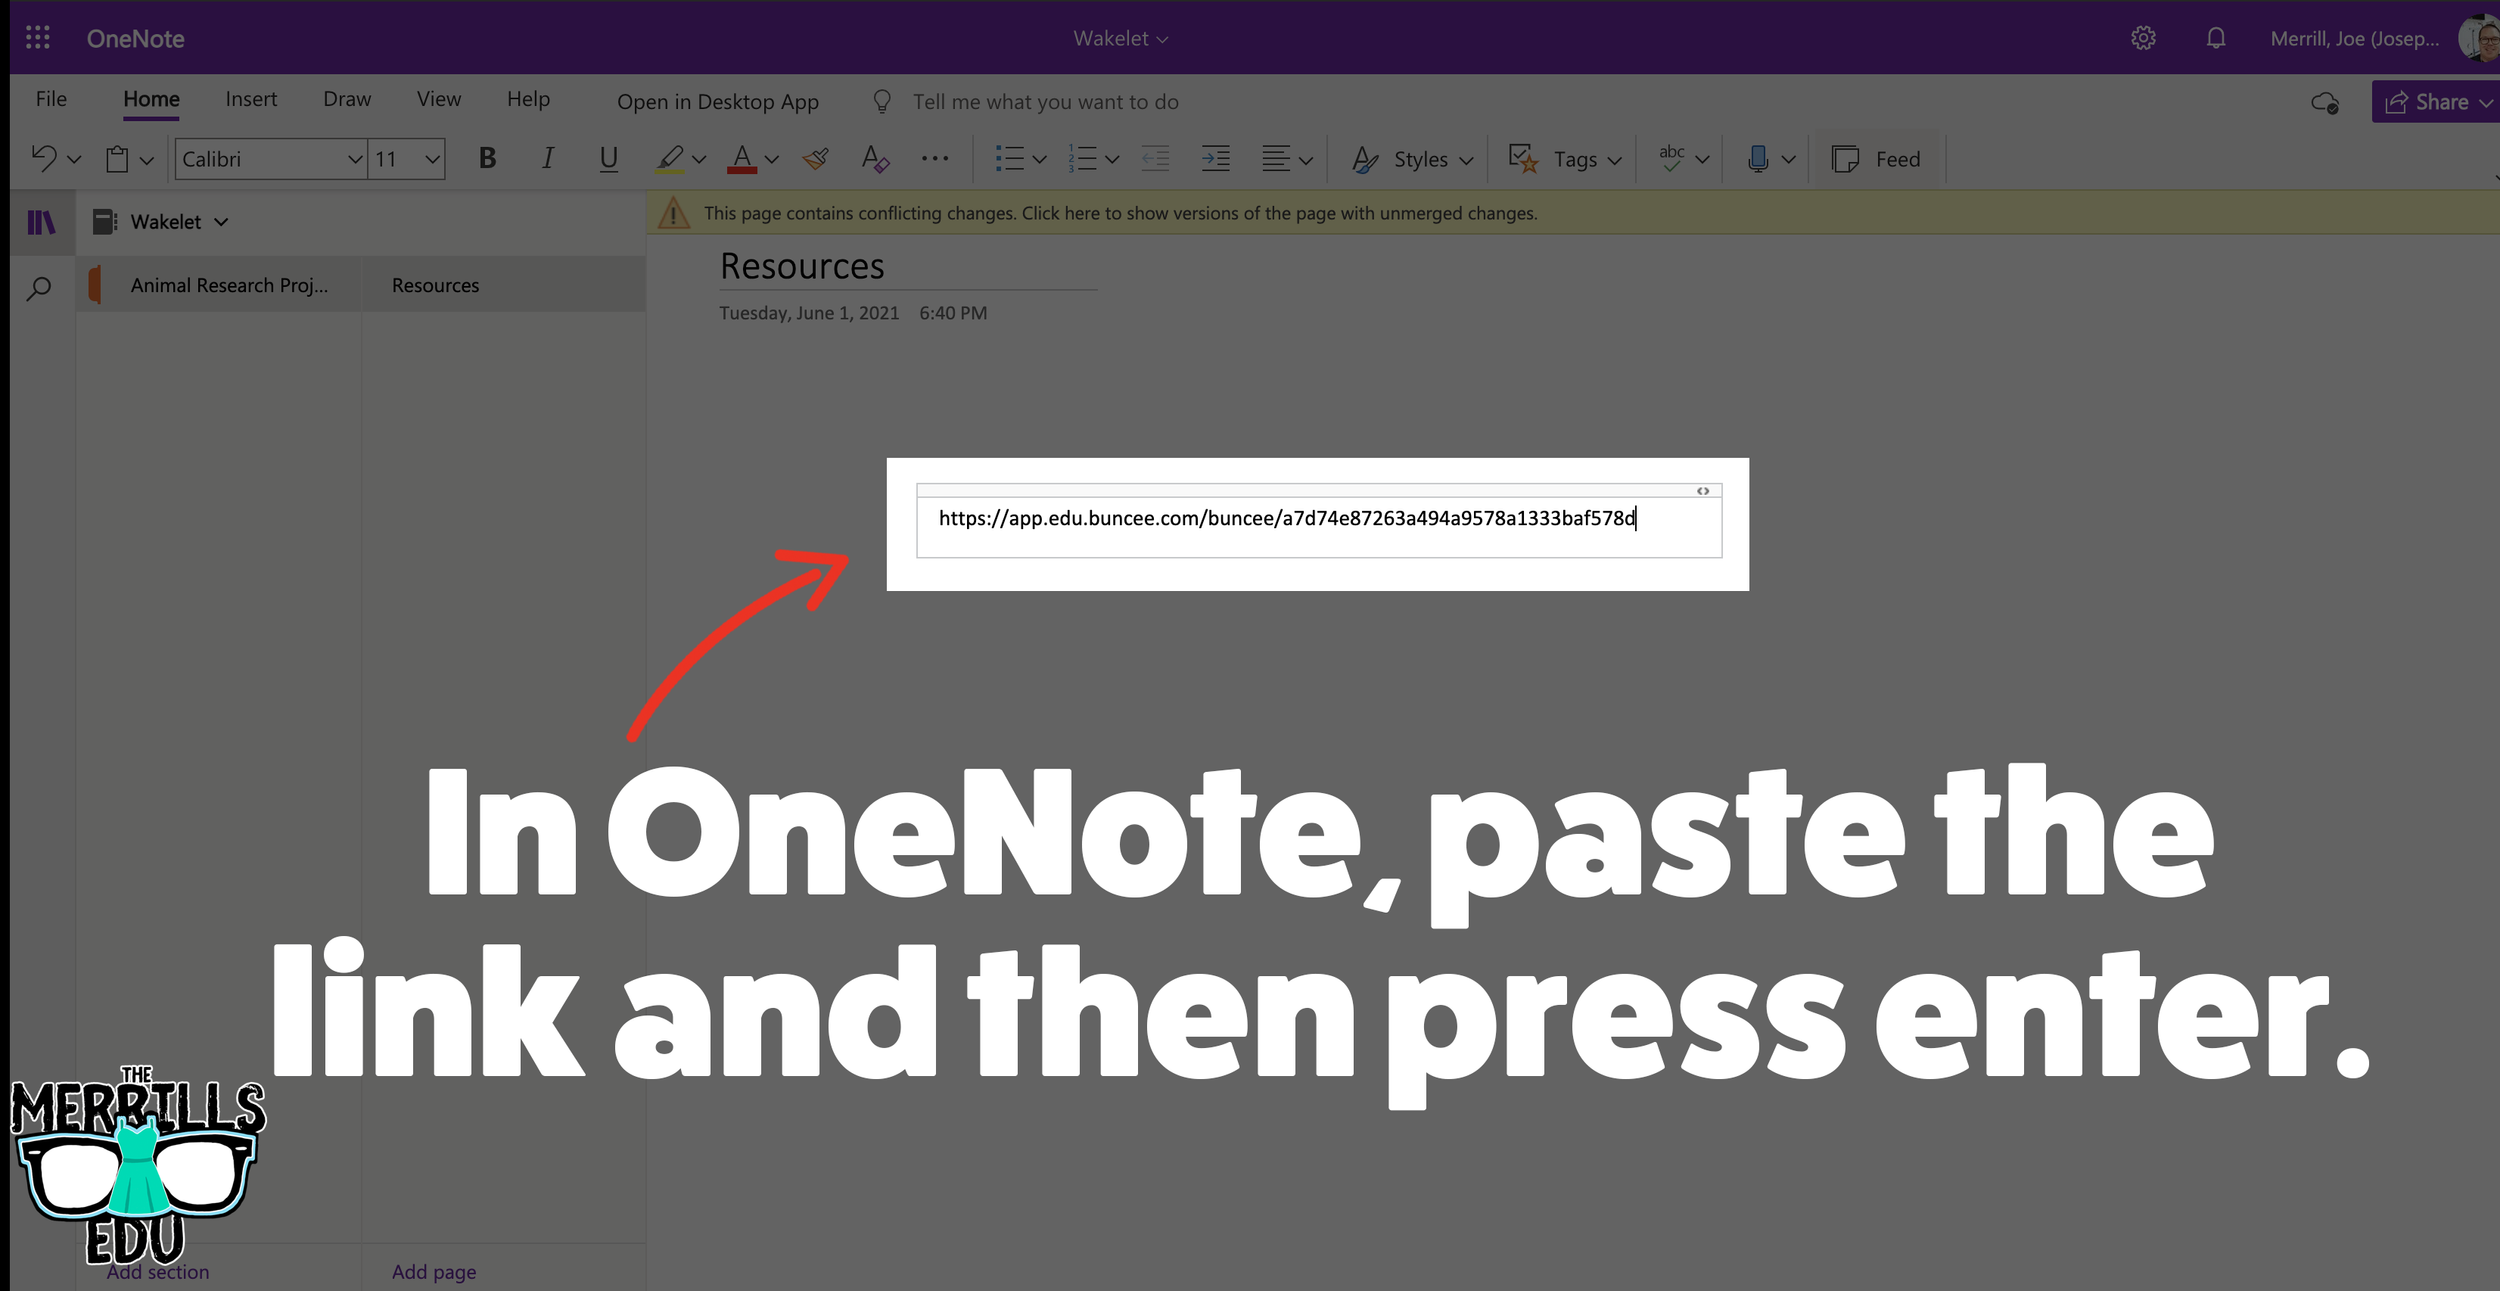
Open a Buncee, then click the “Share” button located in the upper right side of the screen.
A new window will pop up. Click on “Code.”
Under “Code” and next to Link, click “Copy.”
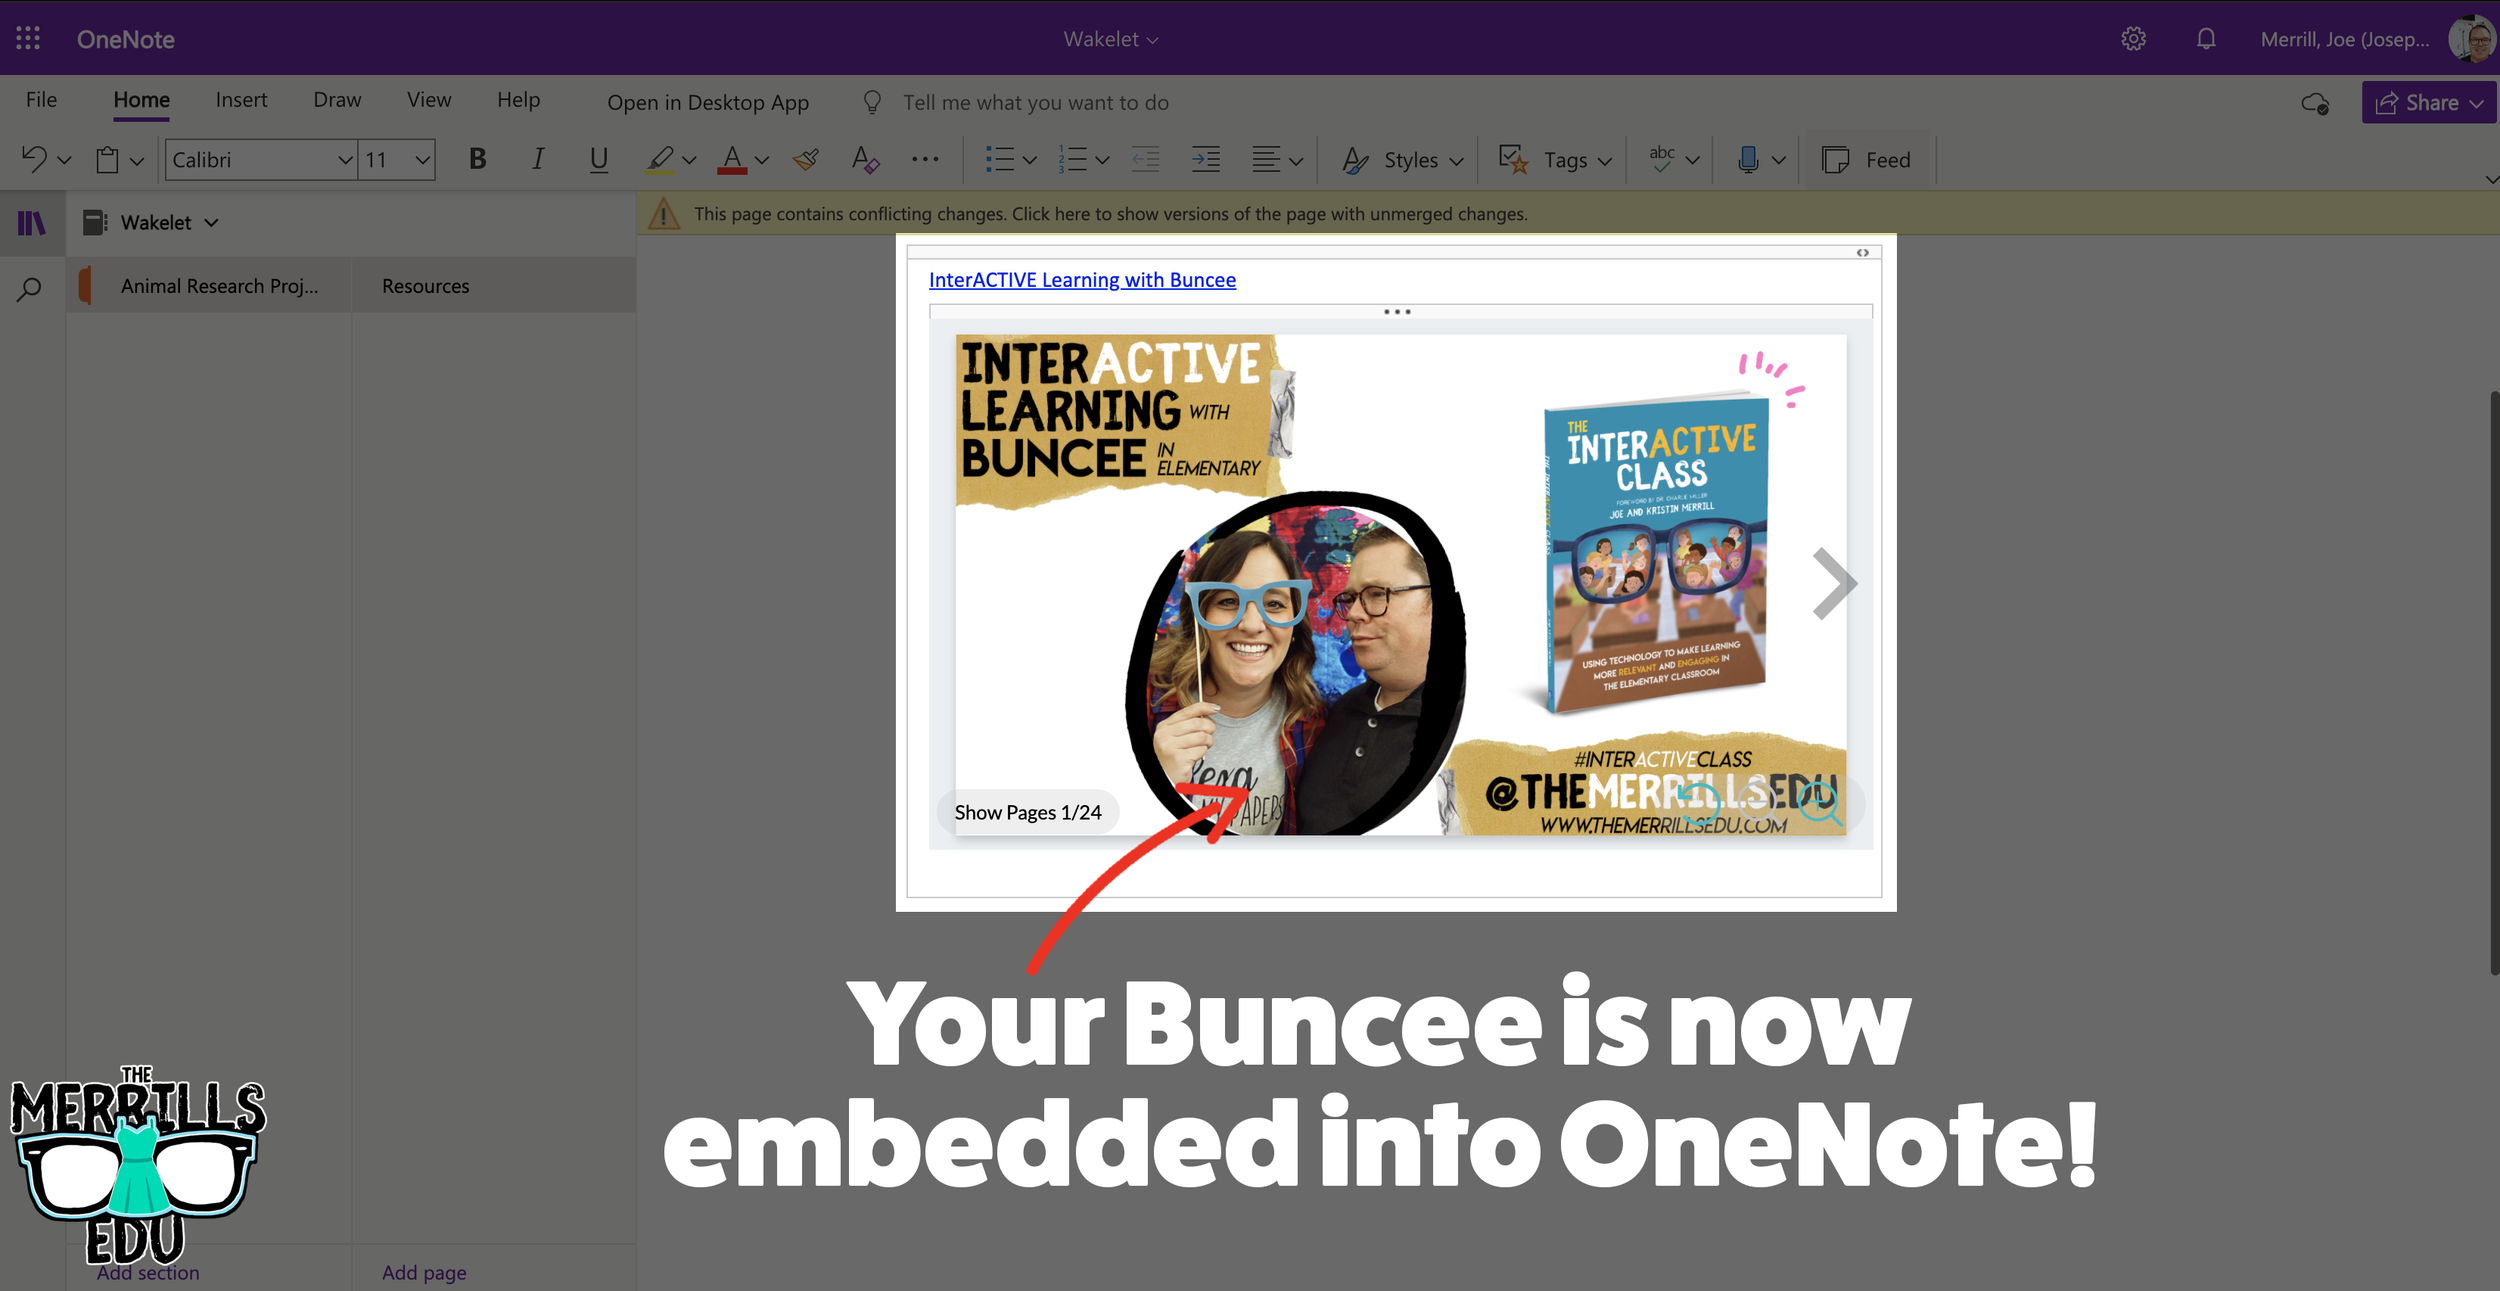
In a separate tab, open the OneNote file that you would like to add the Buncee creation to. Then, paste the URL anywhere on the OneNote file.
Press enter to start the live embed.
Repeat this process to add additional Buncees to the OneNote file.

Canva Embedded into Classroom Screen
Need to post your directions on the board? Perhaps you need a timer to go along with it? This embed will be your saving grace! Embed your Canva creations right into Classroom Screen. Here’s how:
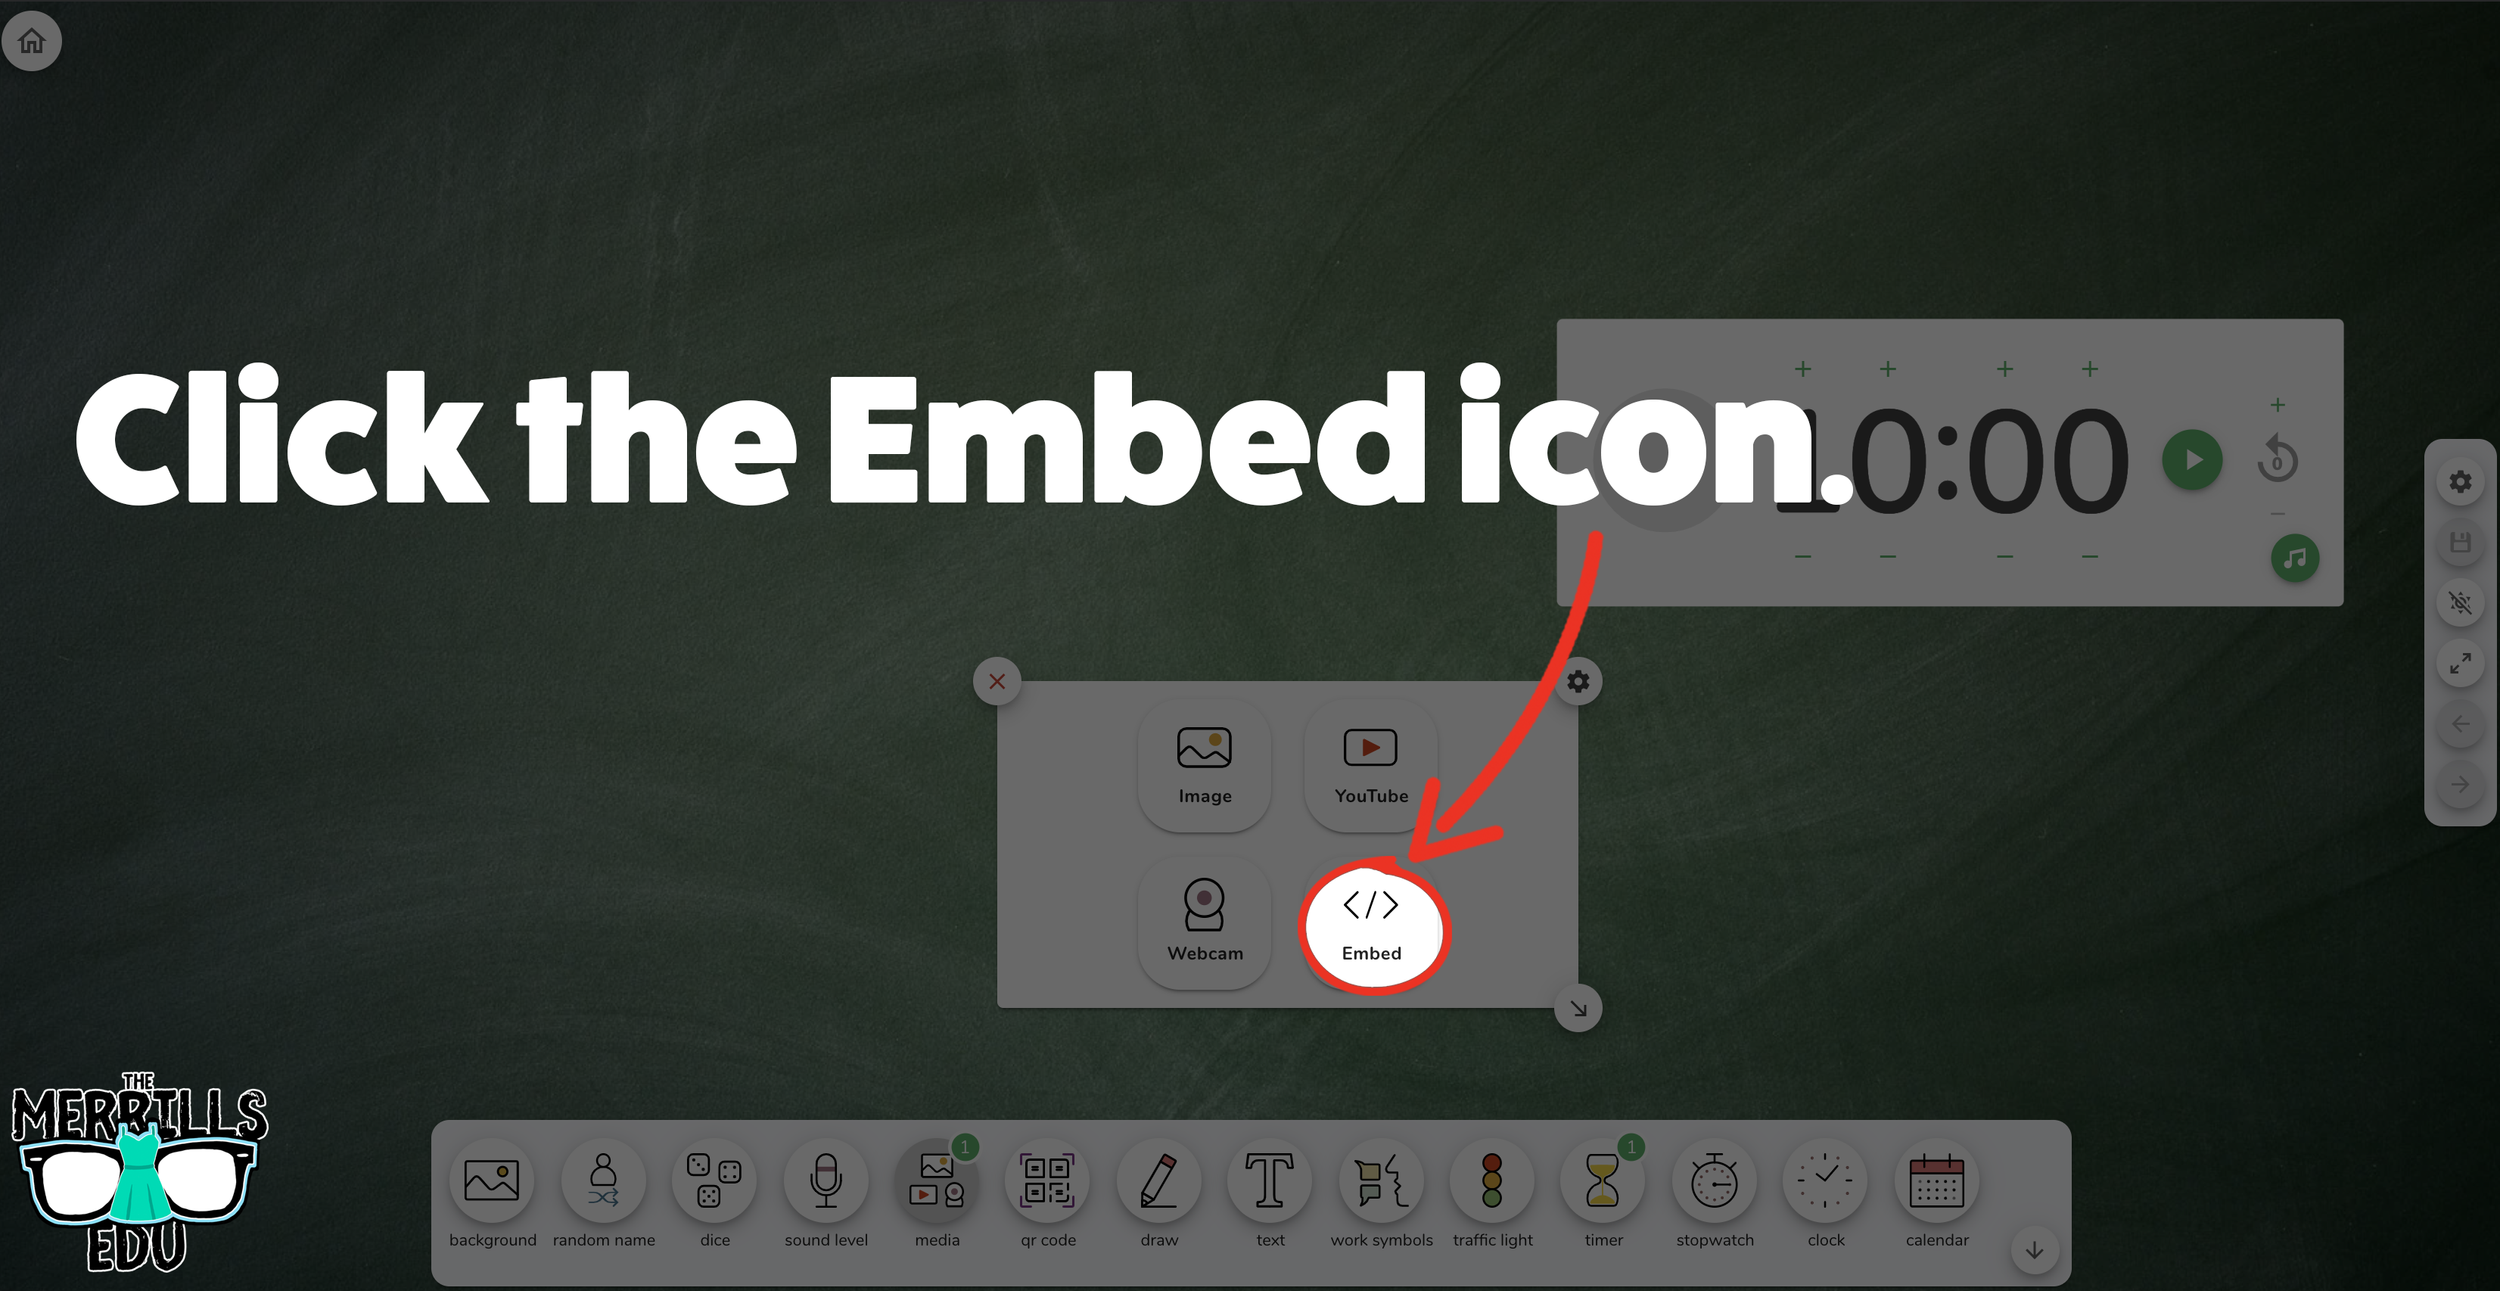
Open a Canva creation, then click the three dots.
In the drop down, type “embed.”
Click the “Embed” icon.
On the next frame, click the “Embed” button. This will take your creation “live.”
Now, next to HTML Embed Code, click “Copy.”
In a separate tab, head over to ClassroomScreen.com and start a new screen (or open an old one).
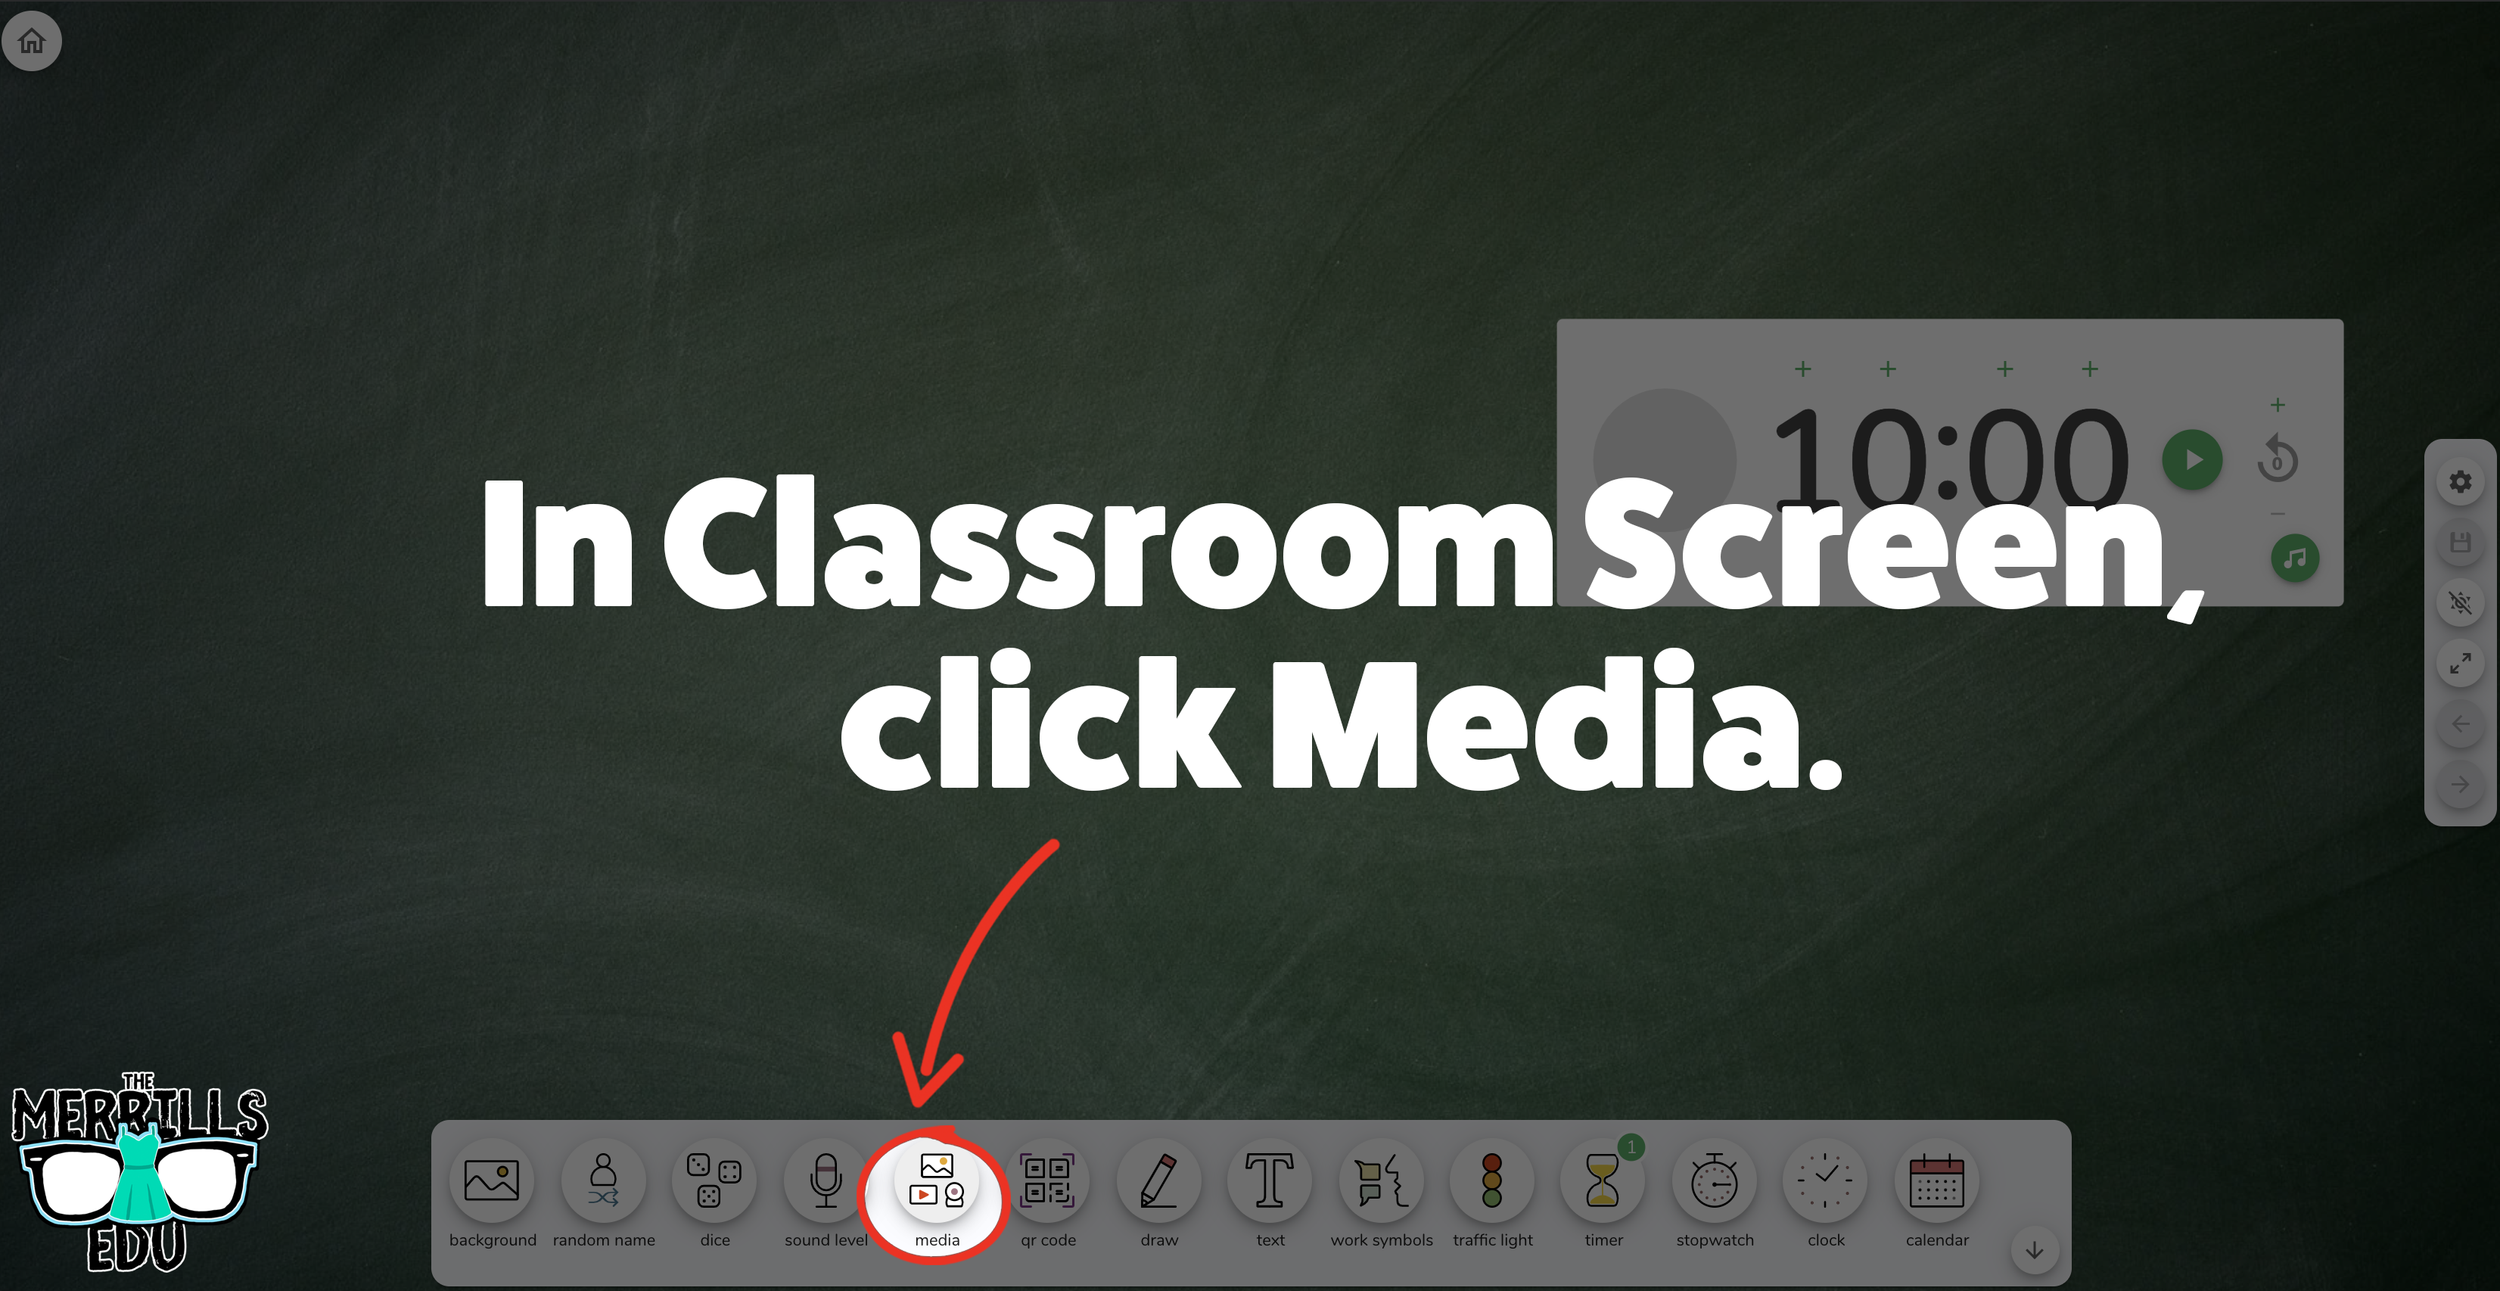
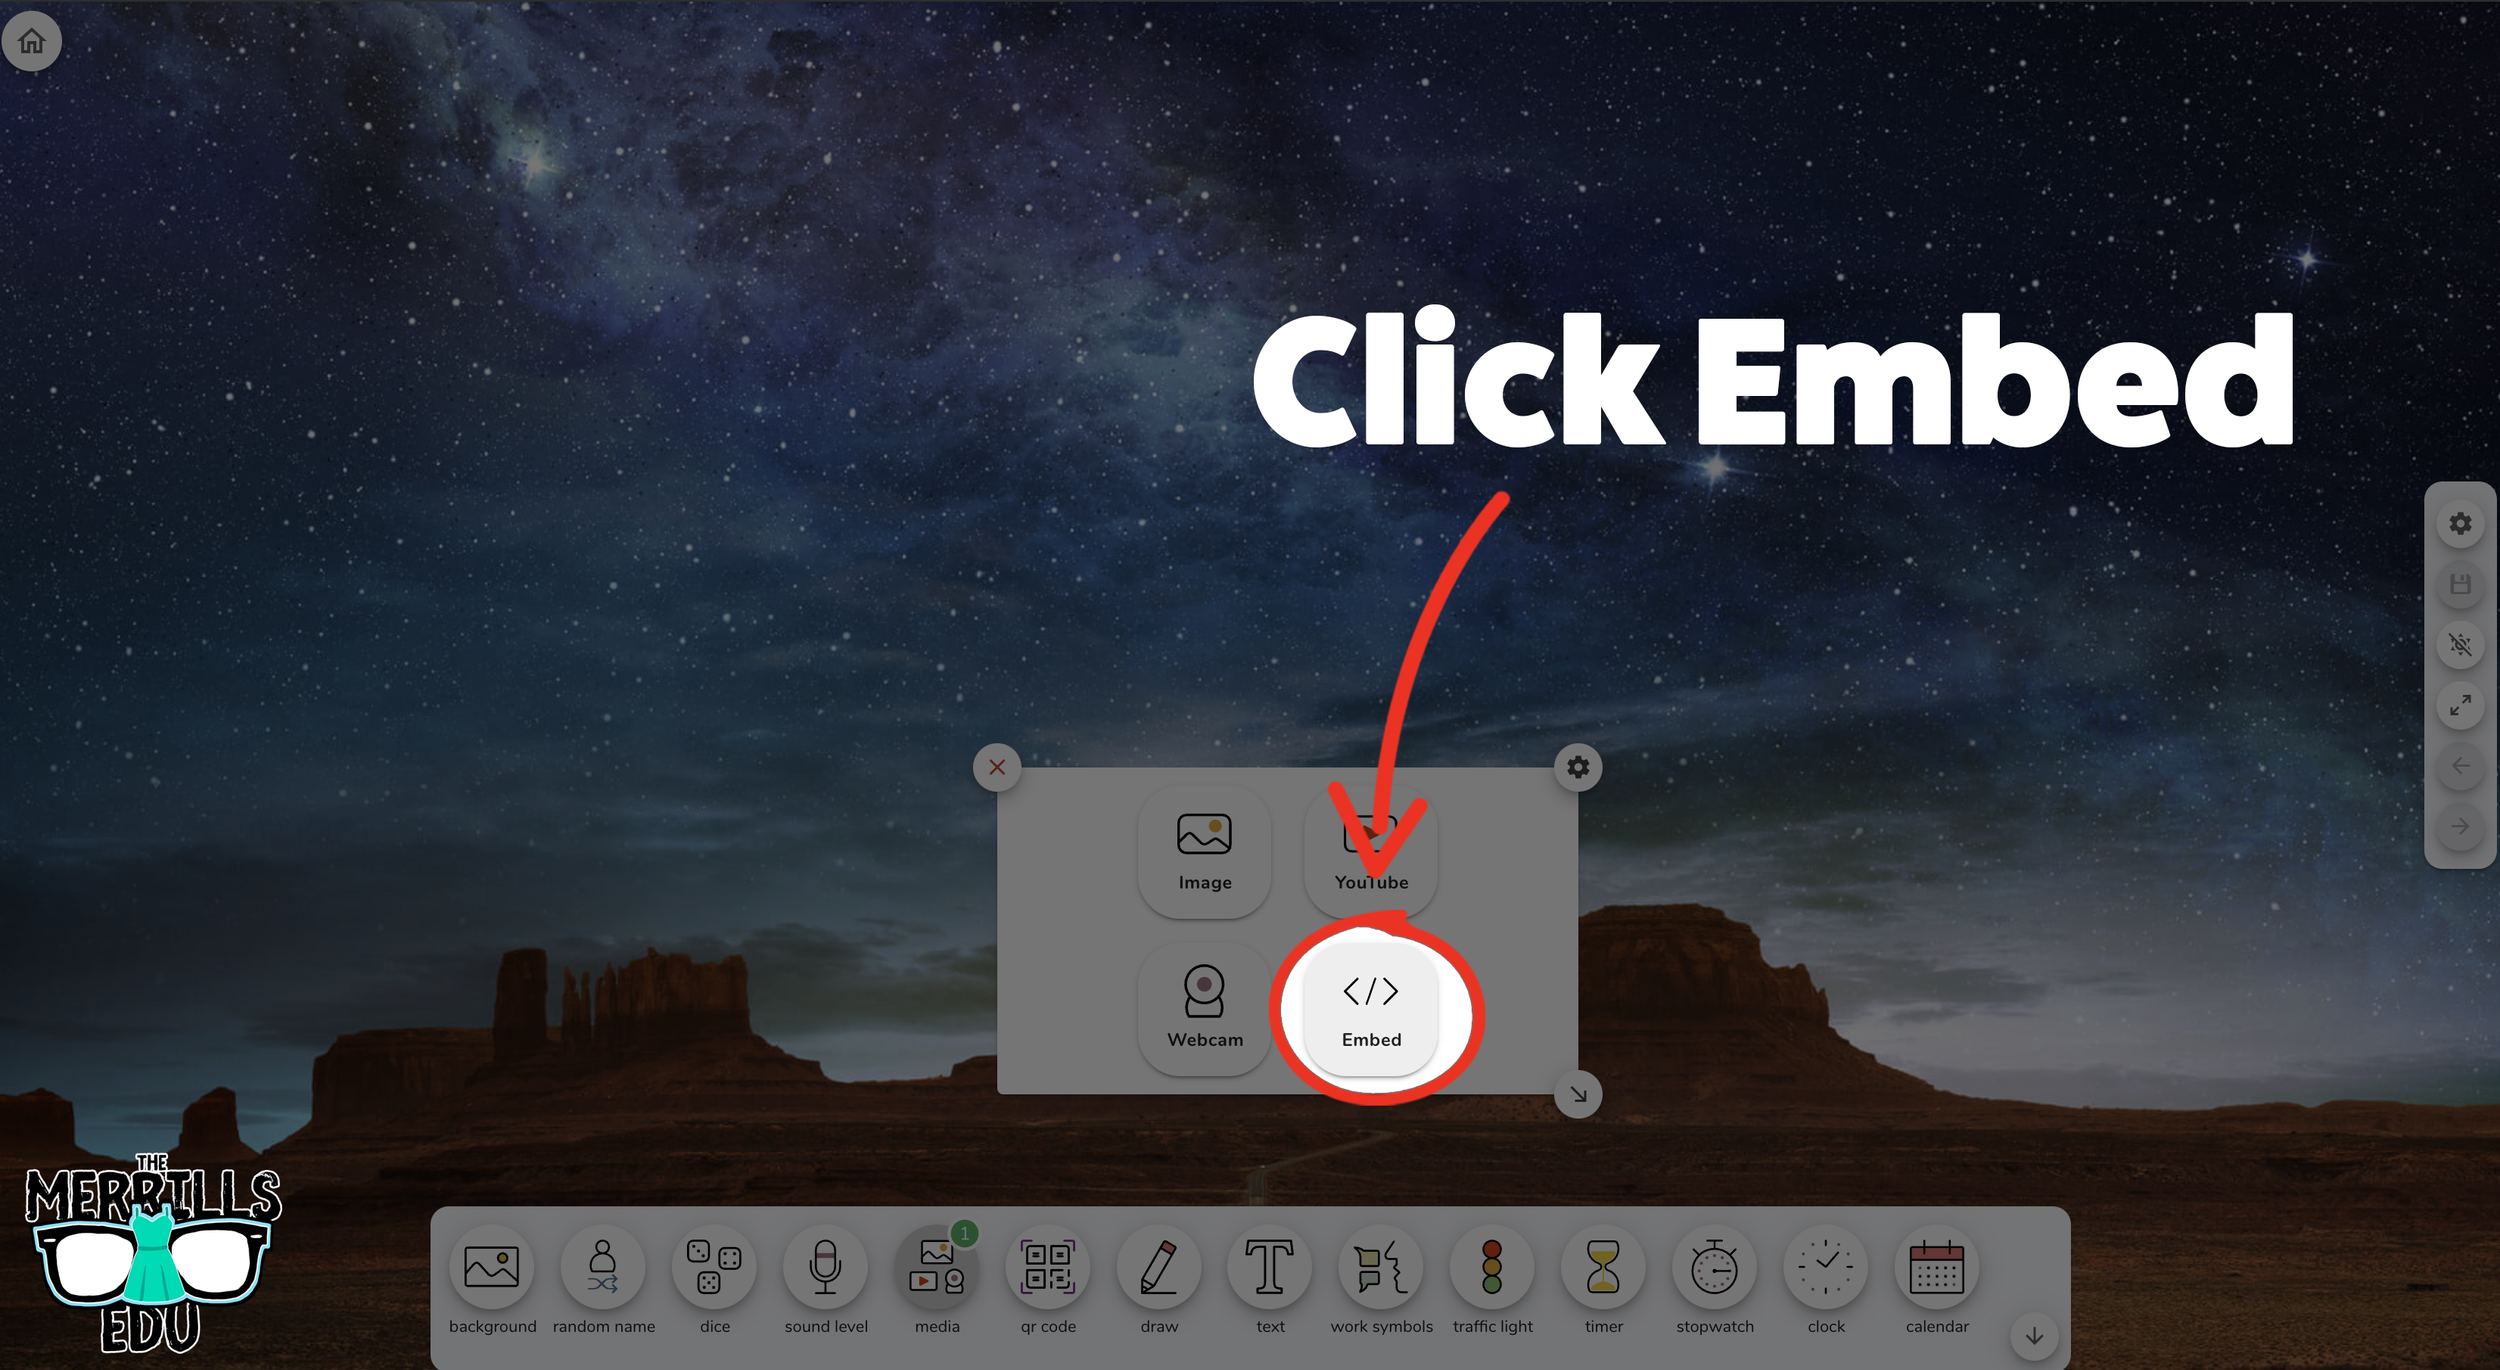
With your Classroom Screen open, click on “Media” from the menu options running along the bottom of the screen.
A new window will open. Click “Embed.”
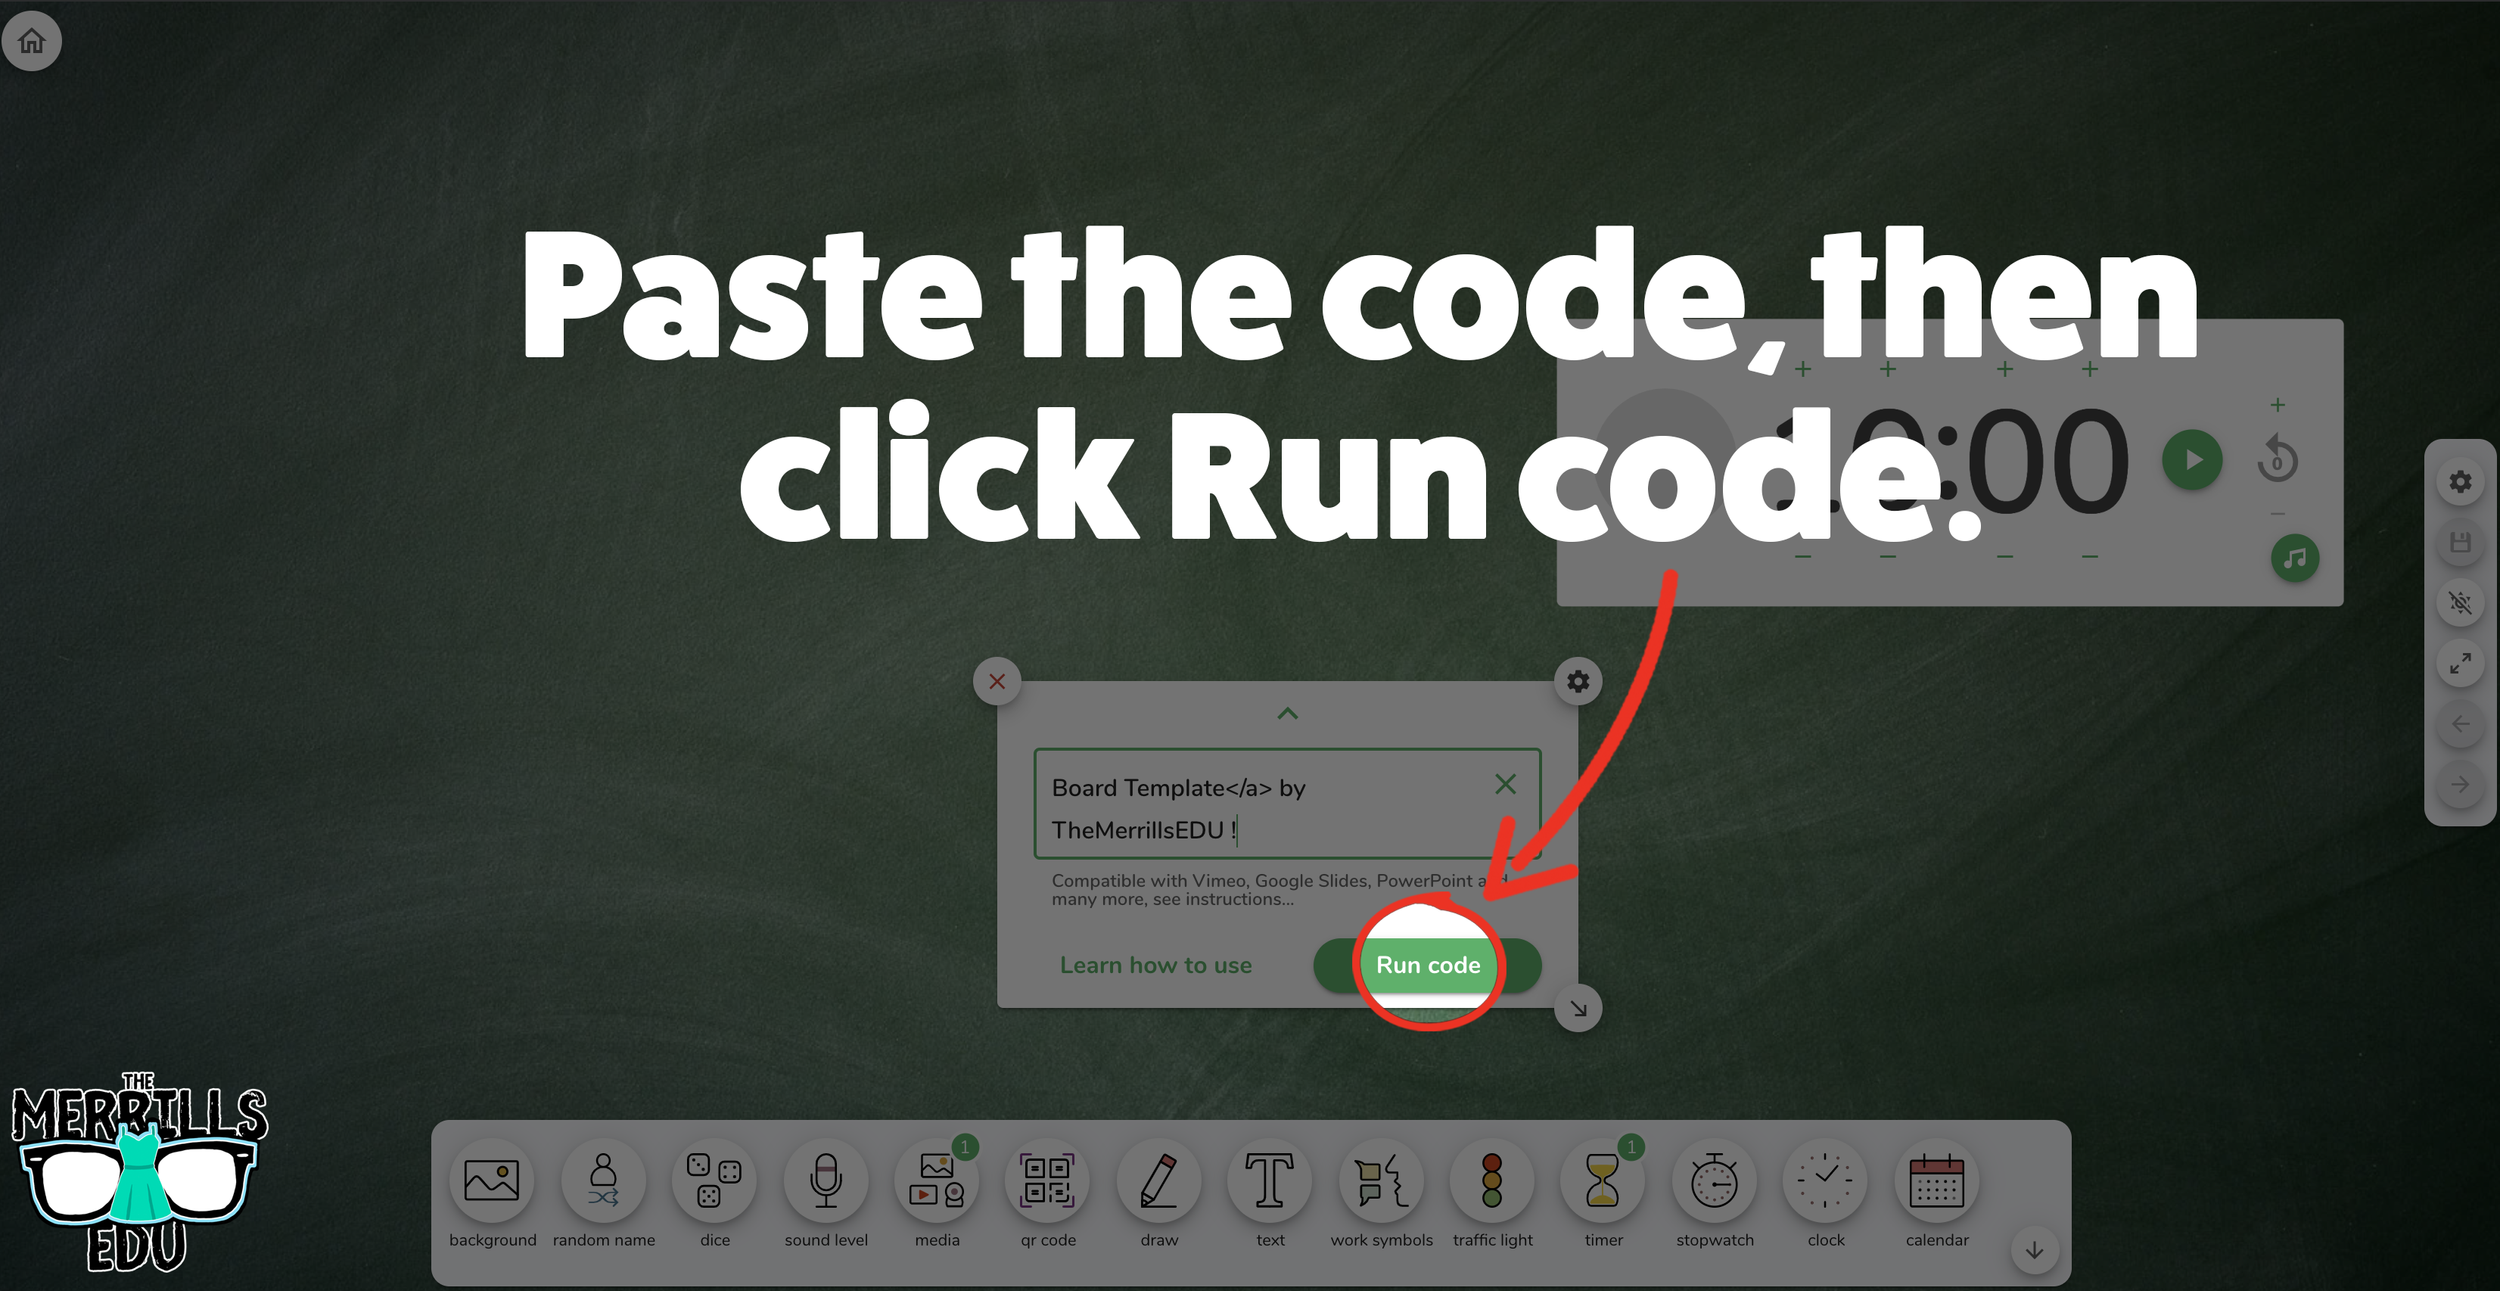
Click inside the embed area and paste your Canva code.
With the code pasted, click on “Run code.”
Your Canva creation will now appear! You can move the Canva creation around by clicking on the arrows (located at the bottom), or stretch the creation out by clicking the arrow on the bottom right - then dragging it to the desired location.
Now, Canva is embedded into Classroom Screen!

Buncee Embedded into Classroom Screen
Buncee creations can also be embedded into Classroom Screen! This is great if you have different tasks that you share for your student to perform daily. For example, if you have different tasks for multiple groups, you can create a Buncee and then share it on the Classroom Screen background. Here’s how it all works:


Open the Buncee creation that you want to embed, then click “Share.”
In the pop-up, click “Code.”
Click “+Show Options” and then select your preferred size.
Once you have selected your size, click “Copy” next to the Embed Code bar.
In a separate tab, head over to ClassroomScreen.com and start a new screen (or open an old one).
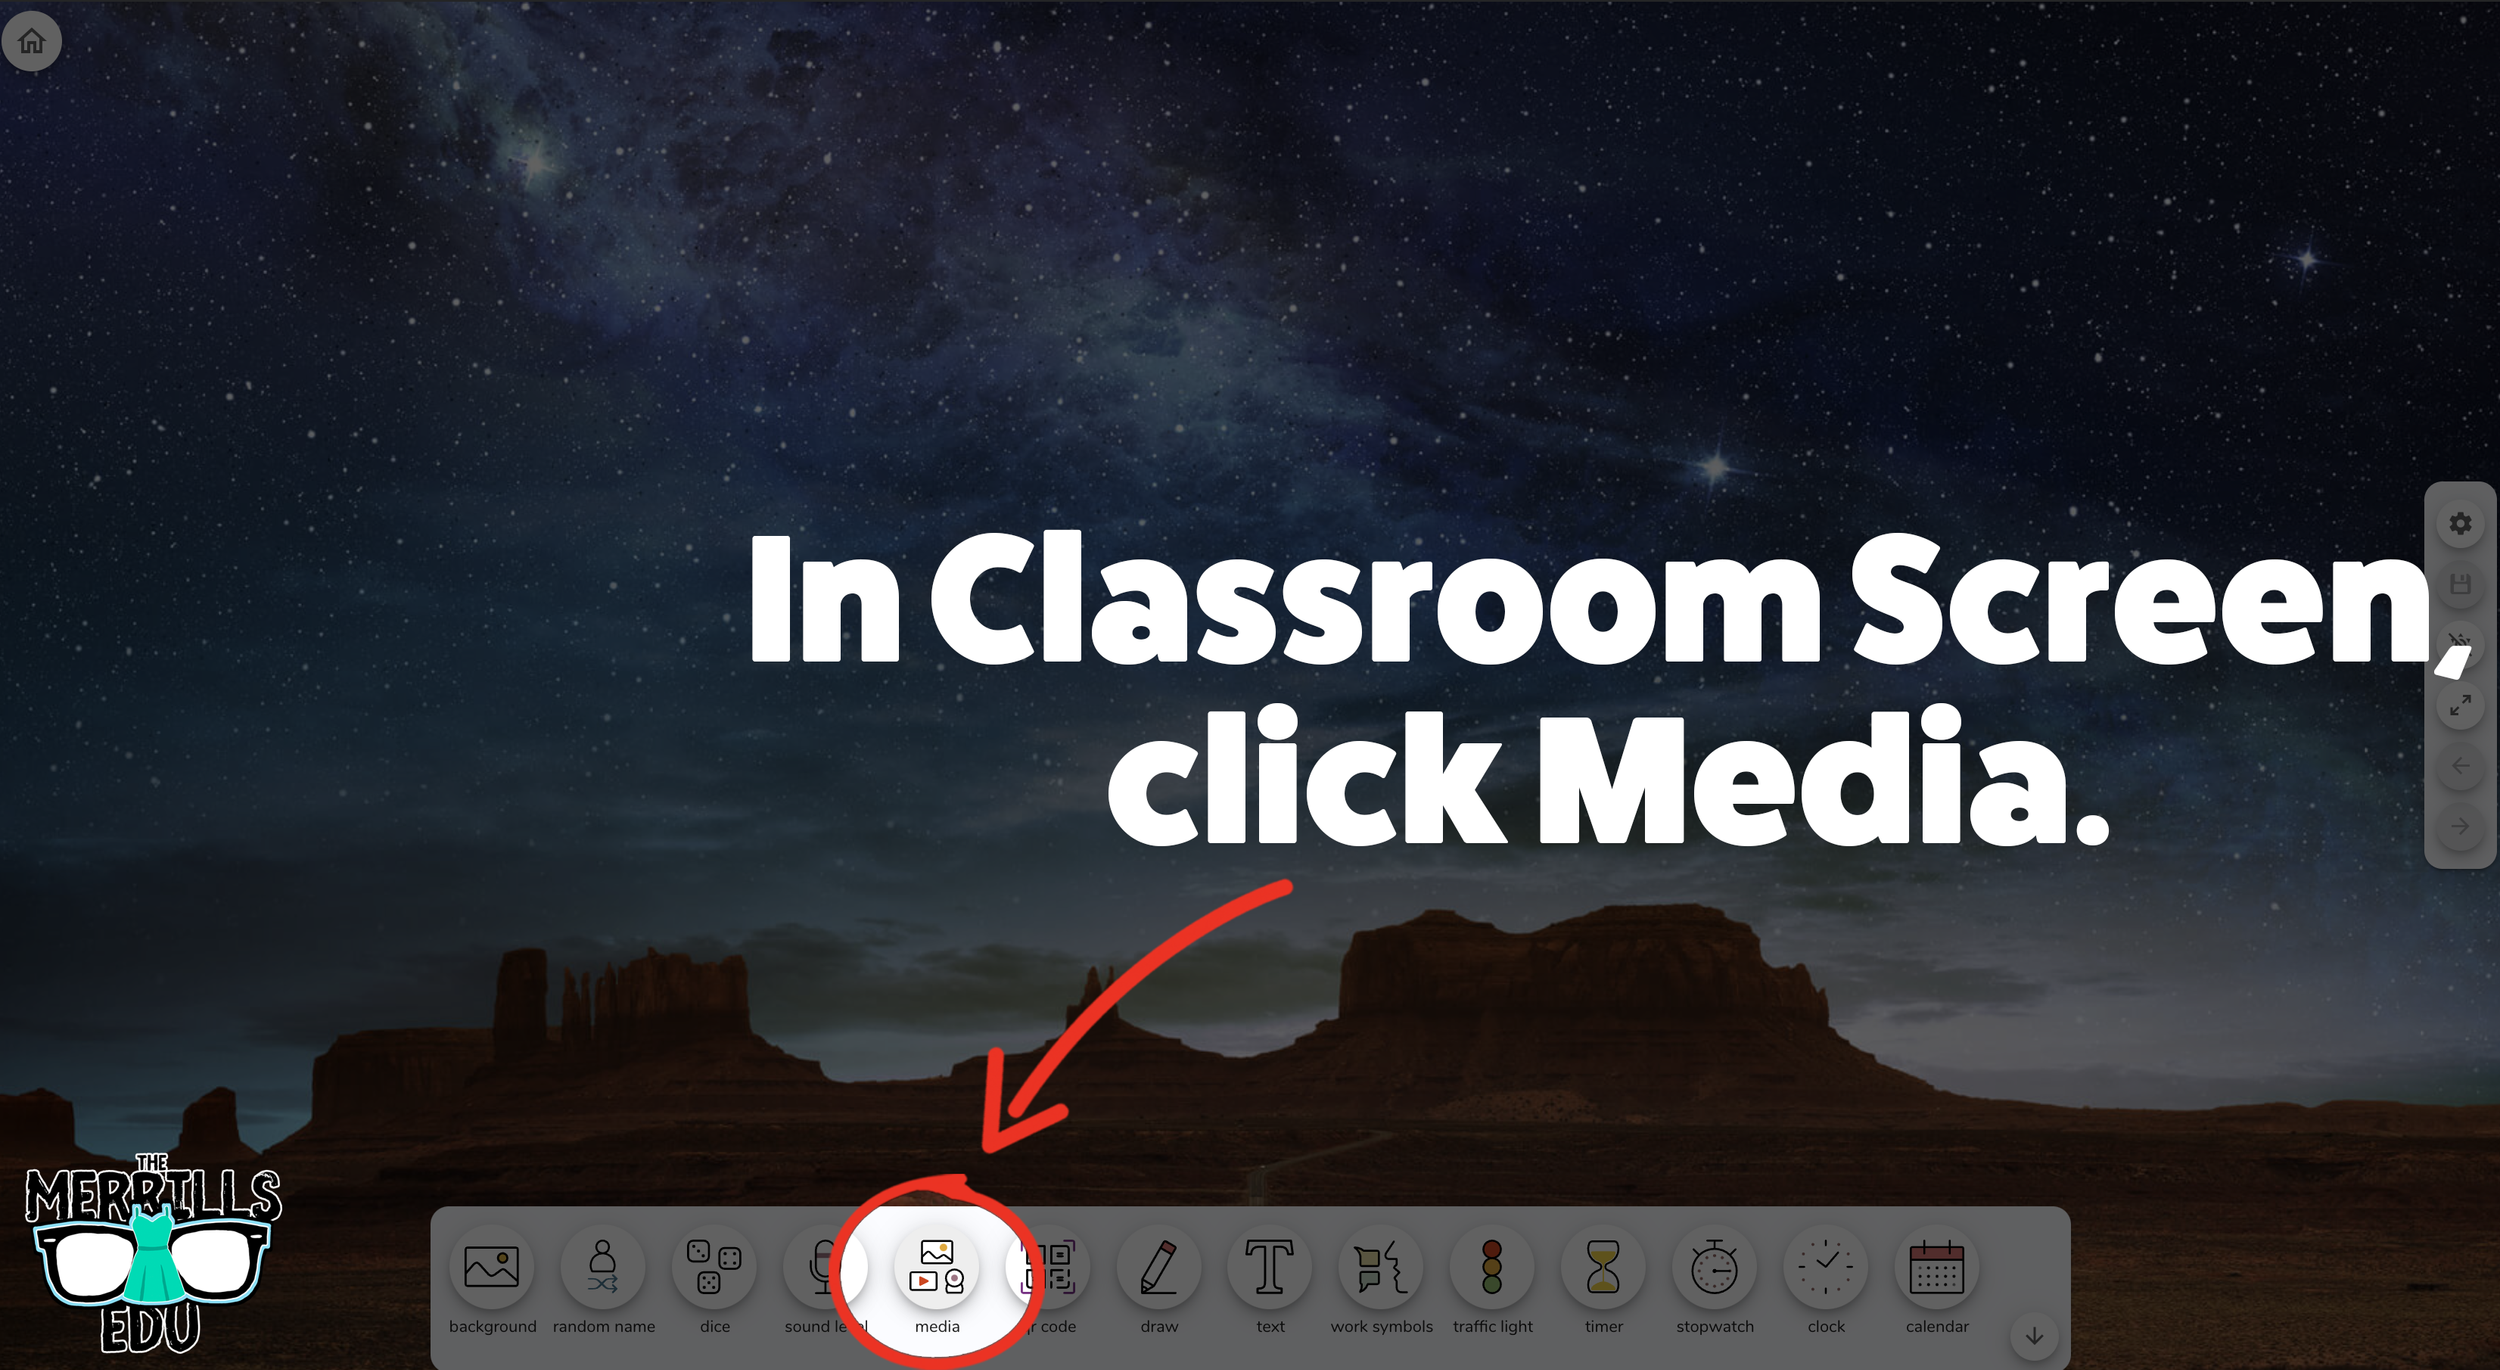
With your Classroom Screen open, click on “Media” from the menu options running along the bottom of the screen.
A new window will open. Click “Embed.”
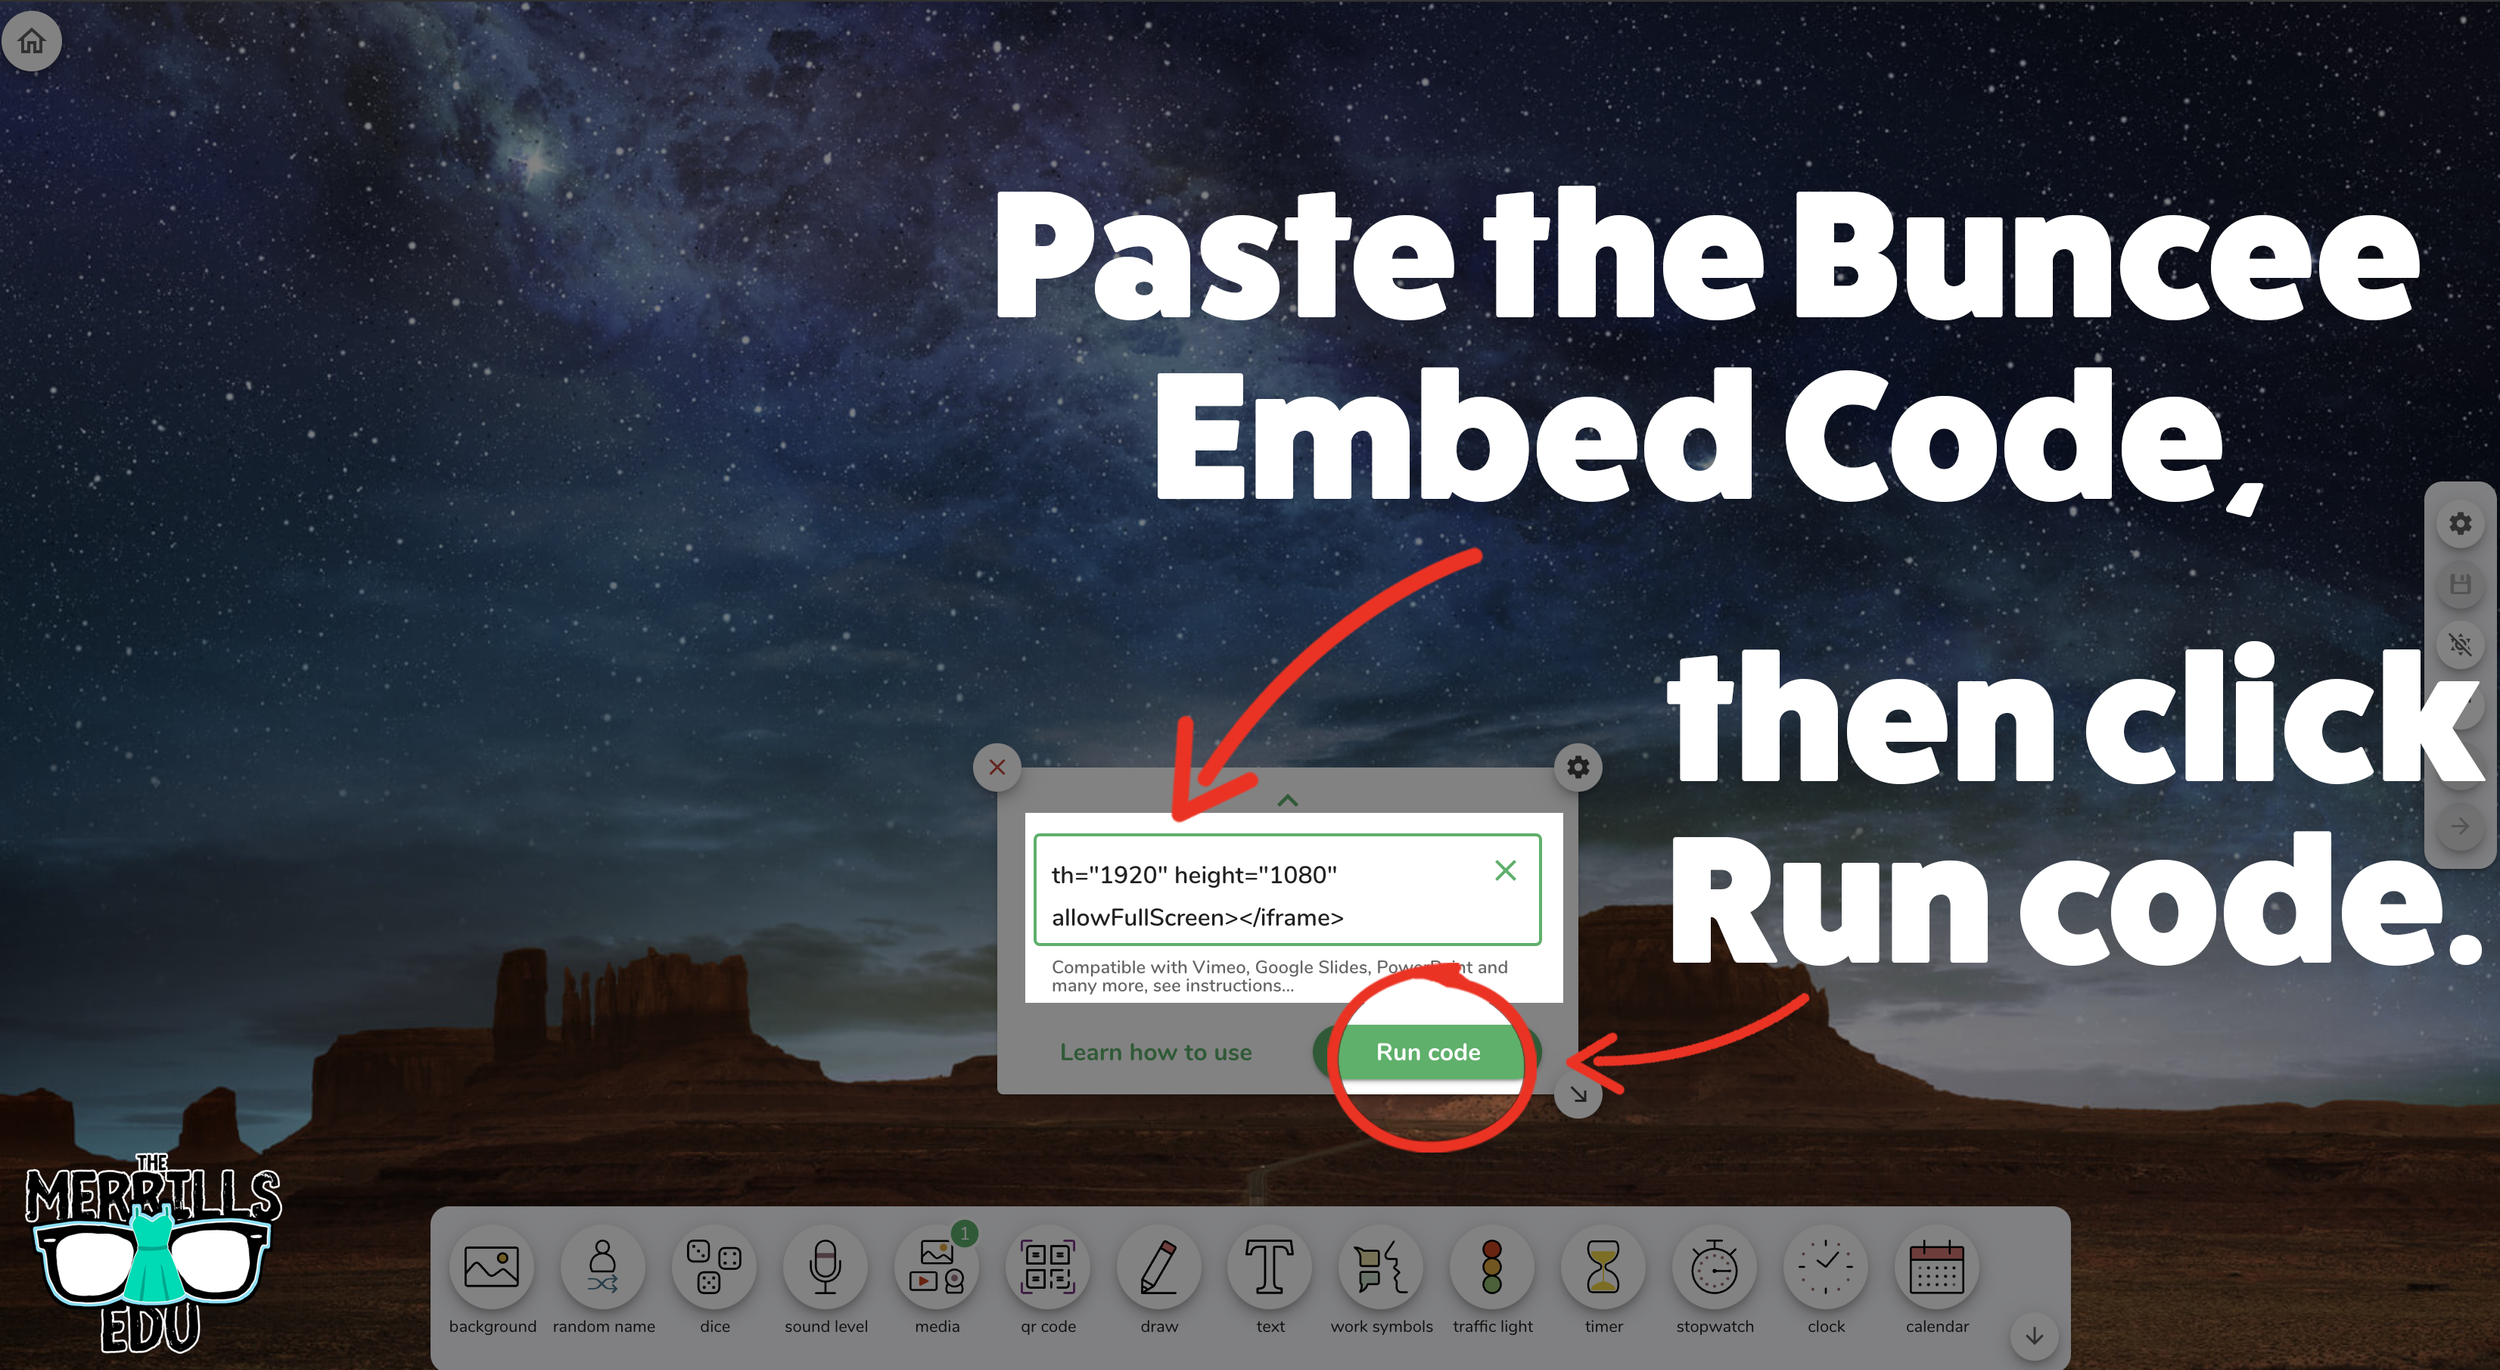
Click inside the embed area and paste your Buncee code.
With the code pasted, click on “Run code.”
Your Canva creation will now appear! You can move the Buncee creation around by clicking on the arrows (located at the bottom), or stretch the creation out by clicking the arrow on the bottom right - then dragging it to the desired location.
Now, Buncee is embedded into Classroom Screen!

Wakelet Embedded into Classroom Screen
This embed is great if you need to post several different Wakelet collections in the same place. For example, you could group your students and then provide differentiated tasks on Wakelet - all of which are embedded onto Classroom Screen. Here’s how it all works:
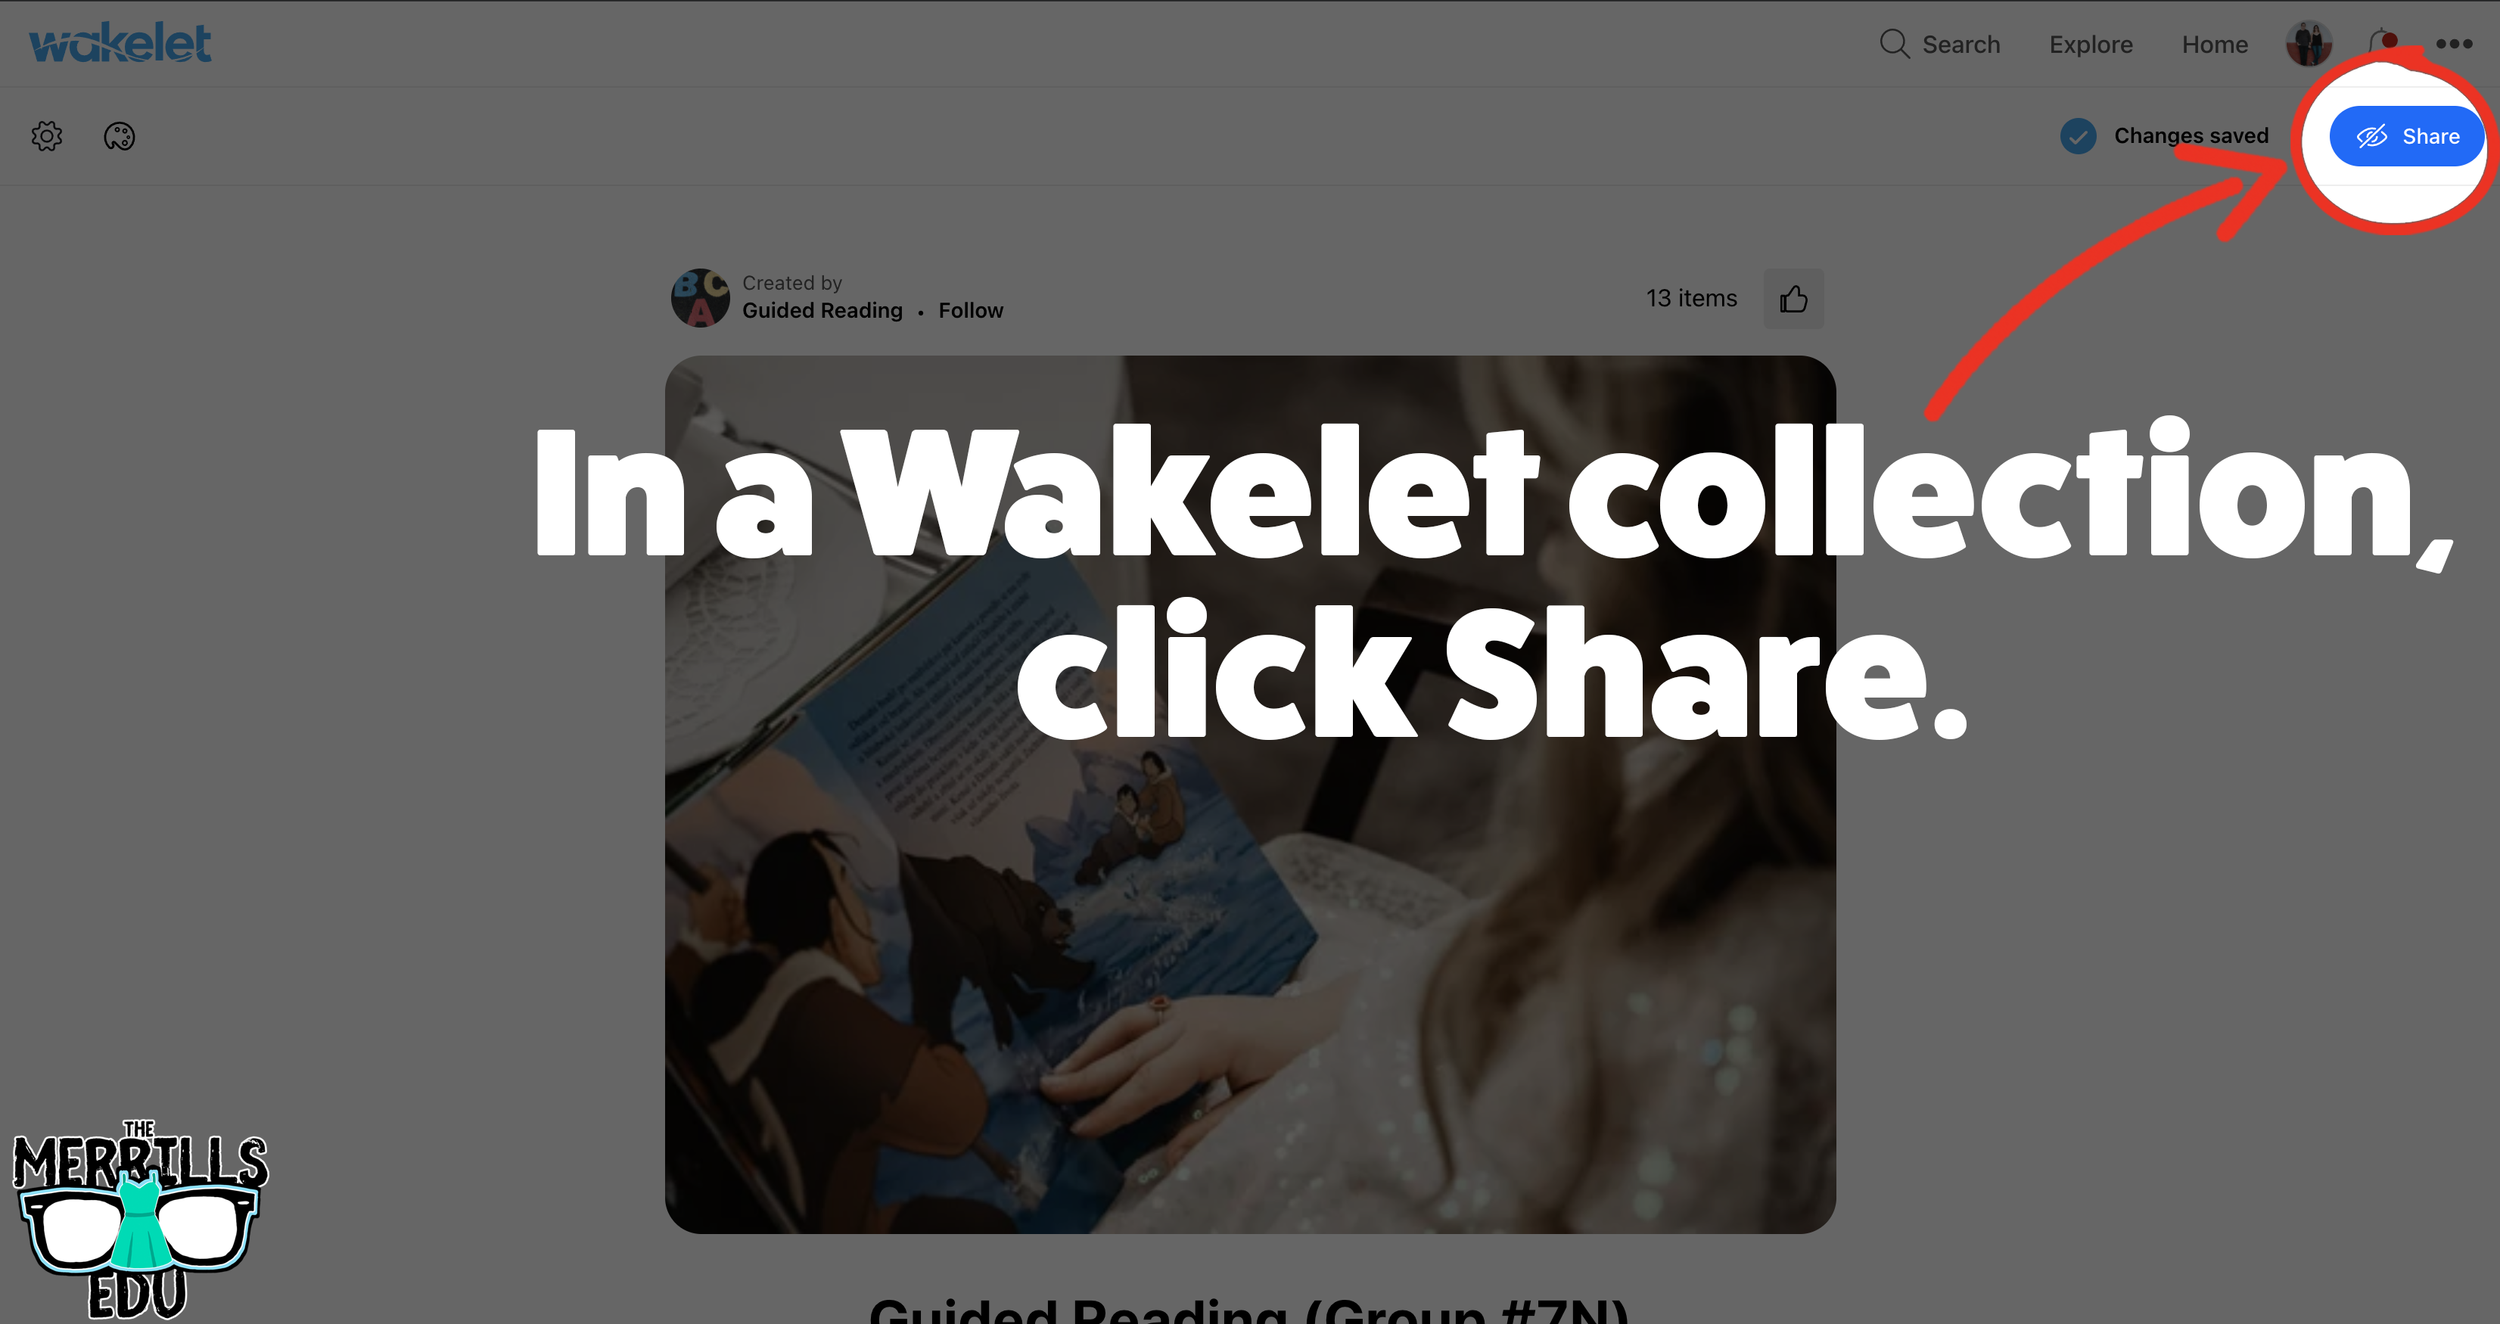


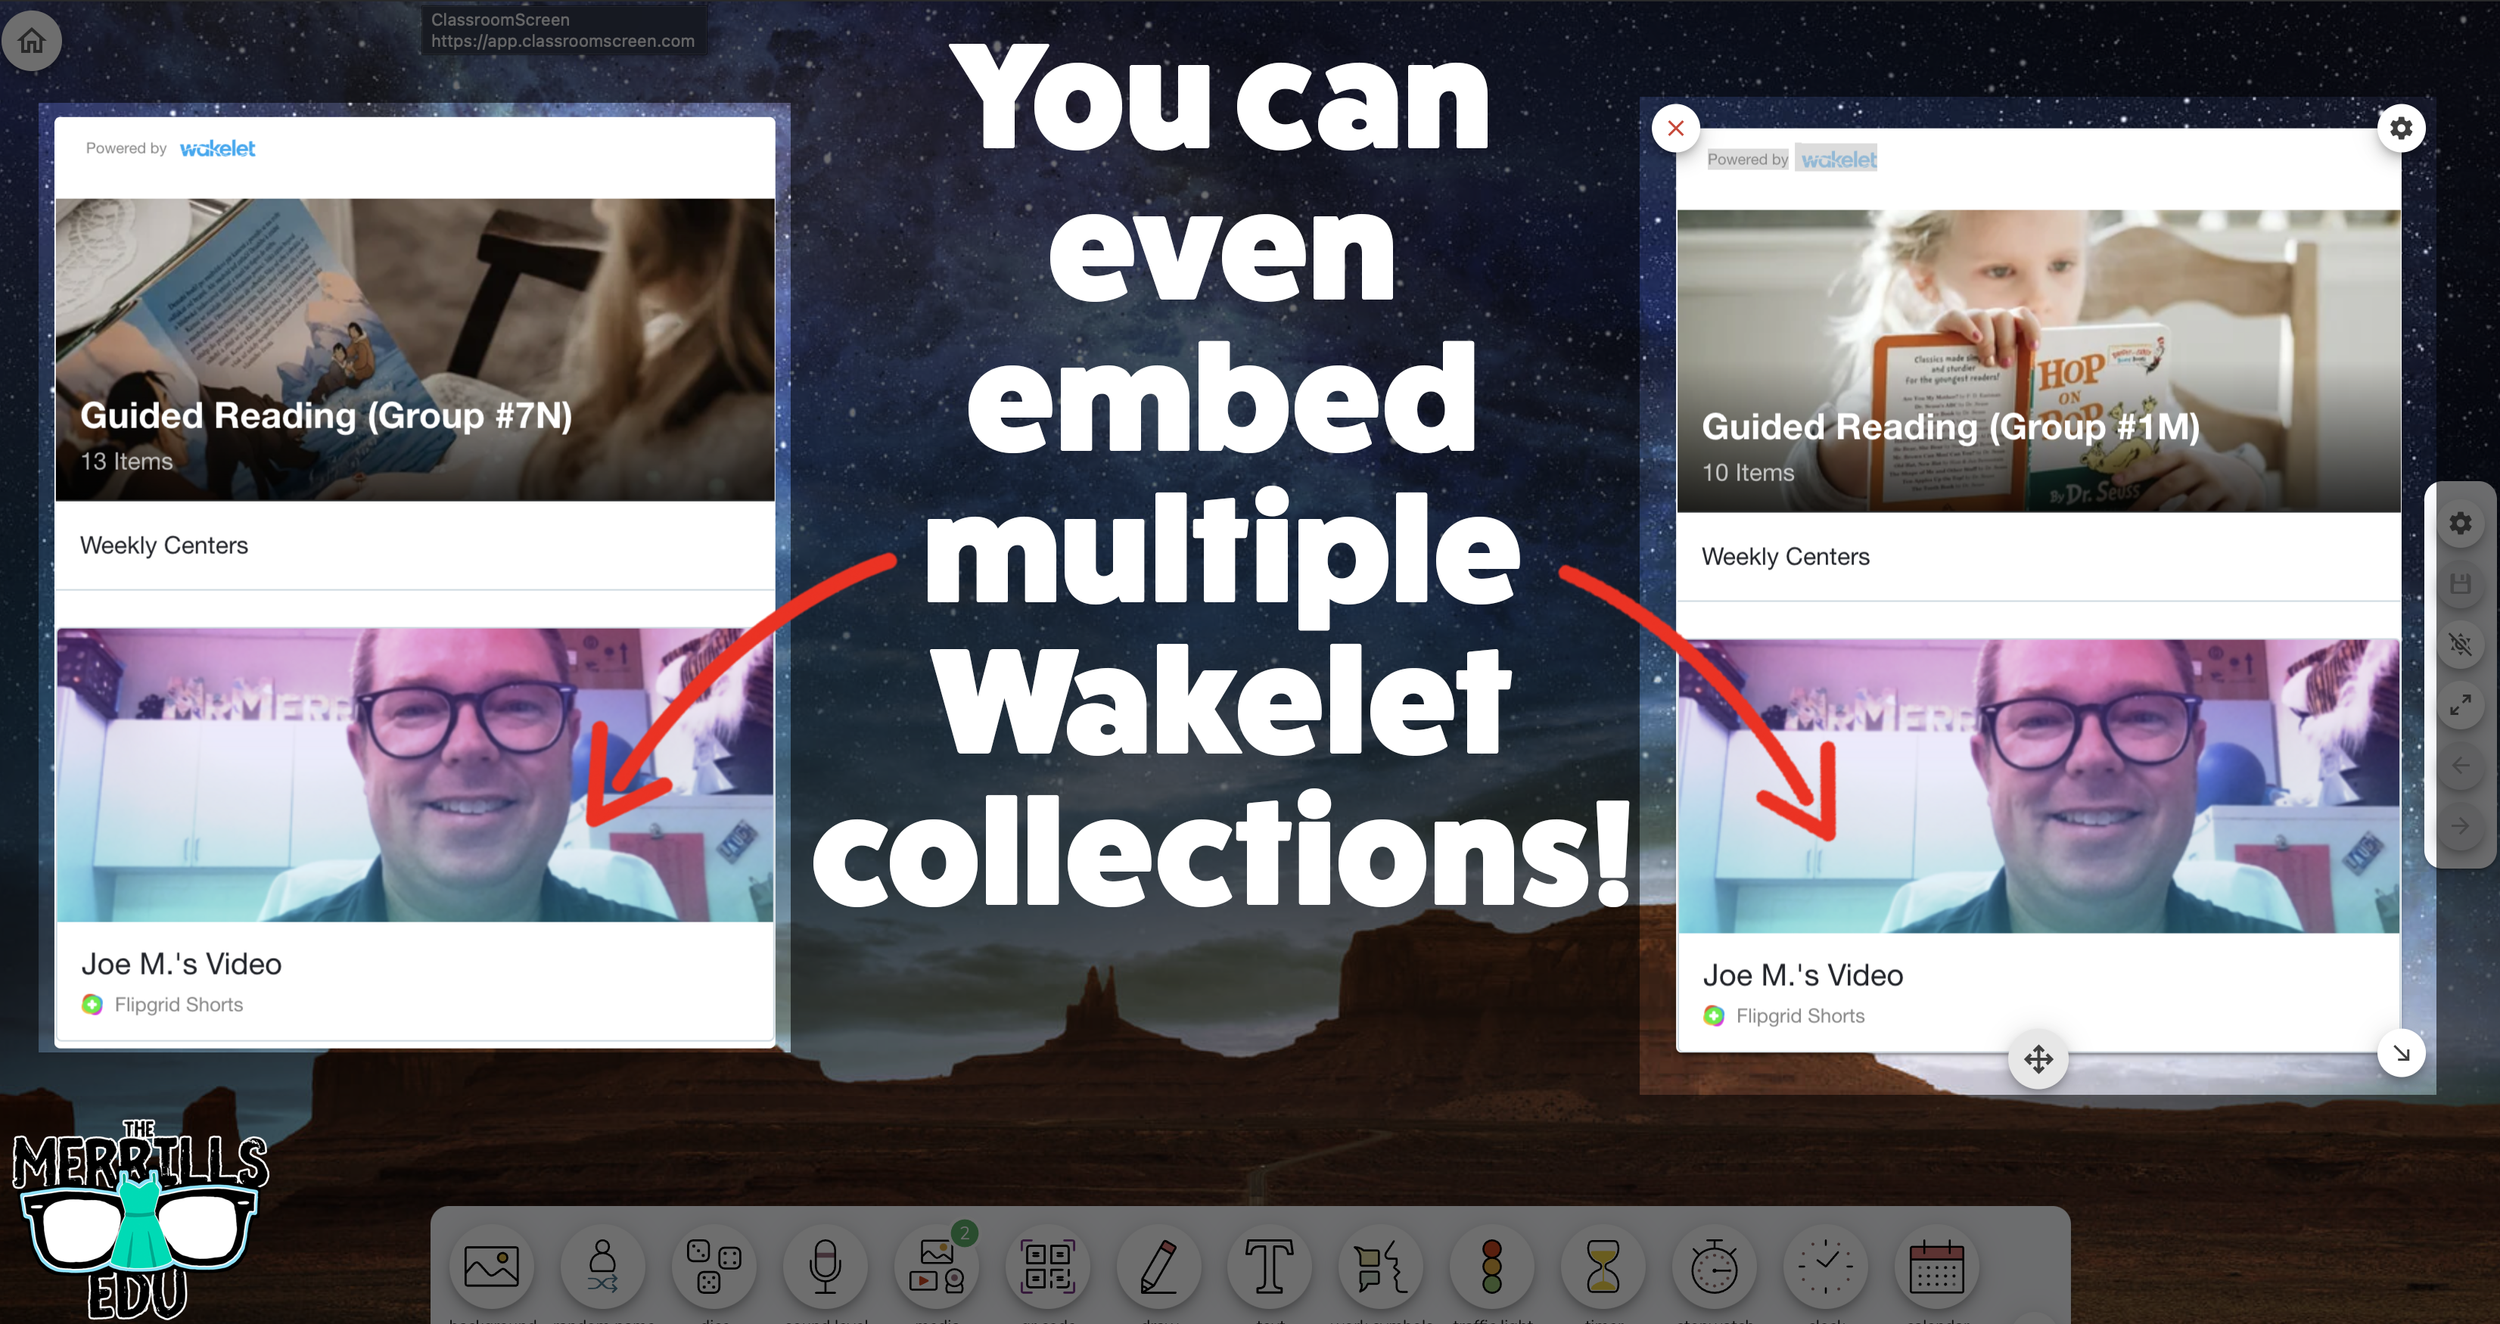
(Note: you will need to make your Wakelet collection either Public or Unlisted for this to work)
In a Wakelet collection, click the “Share” button.
In the pop-up window, click “Embed.”
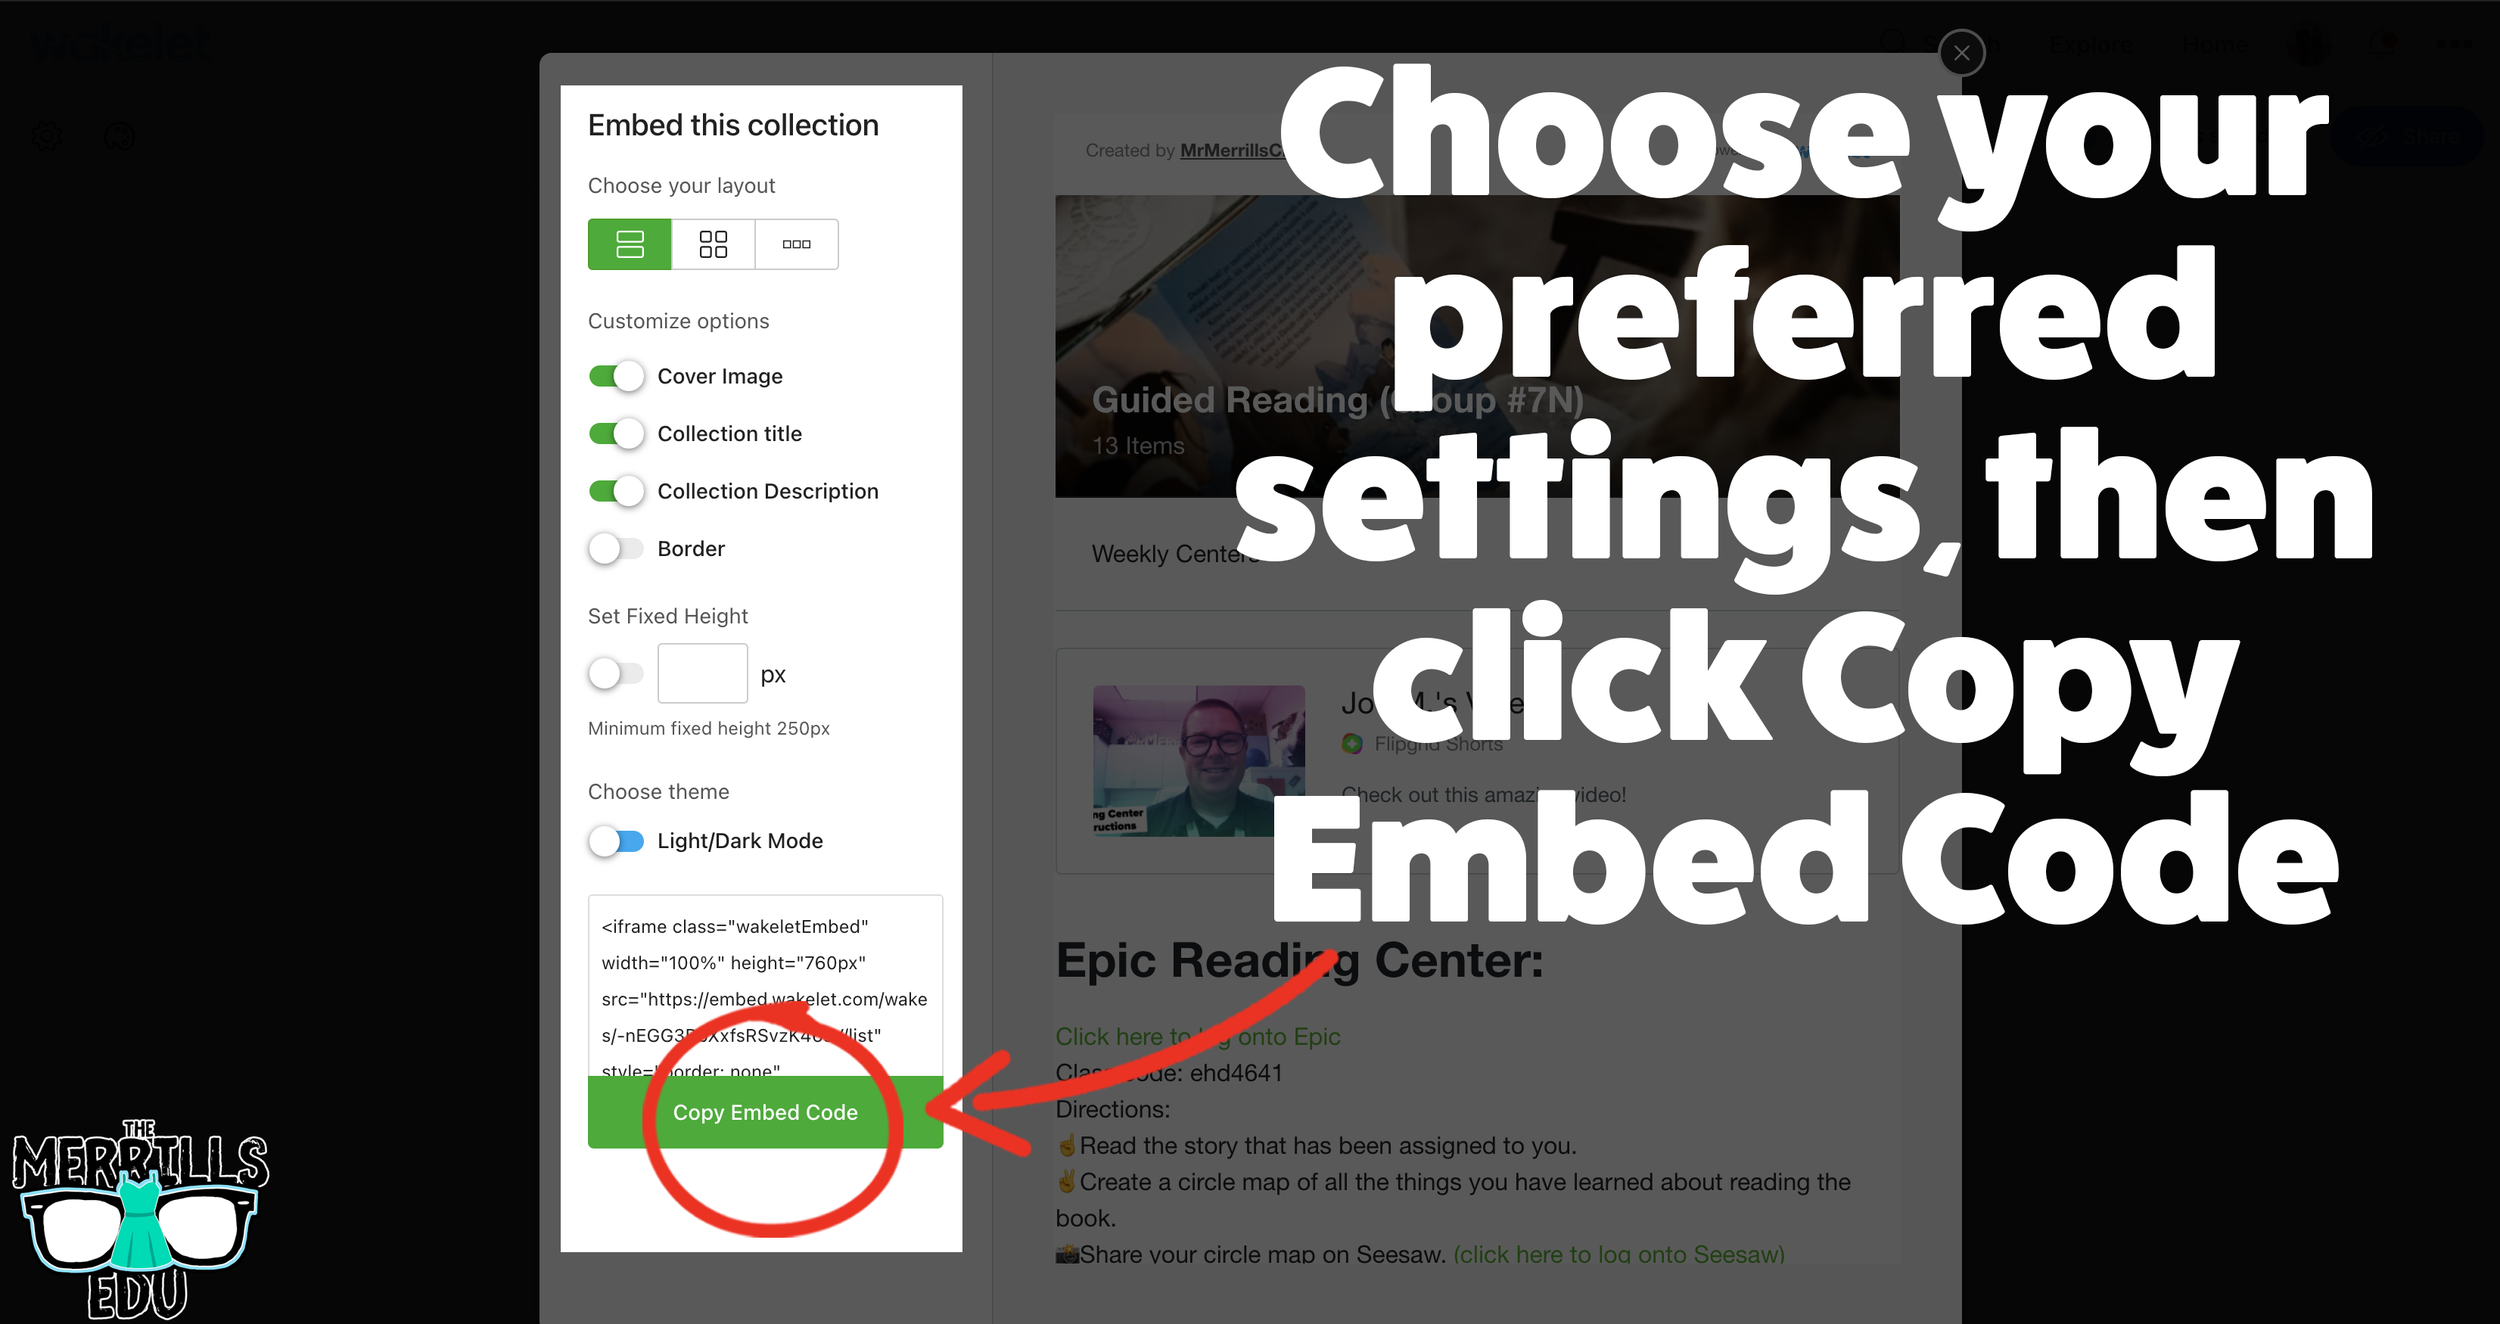
Select your preferred settings, then click “Copy Embed Code.”
In a separate tab, head over to ClassroomScreen.com and start a new screen (or open an old one).
With your Classroom Screen open, click on “Media” from the menu options running along the bottom of the screen.
A new window will open. Click “Embed.”
Click inside the embed area and paste your Wakelet code.
With the code pasted, click on “Run code.”
Your Wakelet collection will now appear! You can move the Wakelet collection around by clicking on the arrows (located at the bottom), or stretch the collection out by clicking the arrow on the bottom right - then dragging it to the desired location.
Now, Wakelet is embedded into Classroom Screen!
BONUS: You can add multiple Wakelet embeds onto the same Classroom Screen!
-- Let us know if you’re using any of these ideas in your classroom! Be sure to follow us on social media (@TheMerrillsEDU everywhere) and tag us! 👓👗
For more tips, tricks and lesson ideas for making learning more interACTIVE, check out our books The InterACTIVE Class and Flipgrid in the InterACTIVE Class on Amazon!


20 Activities for Halloween!
@TheMerrillsEDU share 20 different activities to celebrate Halloween! Try turning yourself into a ghost that visits your classroom, become a character from the text and much more. We’ve included a list of our top 20 favorite Halloween themed books!

Halloween is a “spooktacular” time of the year, but it can be “frightful” for educators! Trying to keep students motivated during such exciting times can be challenging, but check out these 20 “thrilling” activities to keep the engagement “creeping” around your classroom!
Please note: This blog post was hand-crafted and was not created using AI.
(click on any subheading to jump to that section)
Updated: Sept. 2025


20 Halloween Themed Books for Elementary Students!


“Creepy Carrots”
Jasper Rabbit loves carrots—especially Crackenhopper Field carrots. He eats them on the way to school. He eats them going to Little League. He eats them walking home. Until the day the carrots start following him...or are they?
“Creepy Pair of Underwear”
Jasper Rabbit is NOT a little bunny anymore. He’s not afraid of the dark, and he’s definitely not afraid of something as silly as underwear. But when the lights go out, suddenly his new big rabbit underwear glows in the dark. A ghoulish, greenish glow. If Jasper didn’t know any better he’d say his undies were a little, well, creepy. Jasper’s not scared obviously, he’s just done with creepy underwear. But after trying everything to get rid of them, they keep coming back!


“The Bad Seed: The Good,
The Bad and The Spooky”
Halloween is the Bad Seed’s favorite holiday of the year. But what’s a seed to do when he can’t find a show-stopping costume for the big night? Postpone trick-or-treating for everyone, of course! Can he get a costume together in time? Or will this seed return to his baaaaaaaaad ways?

“The Adventures of Beekle:
The Unimaginary Friend”
This magical story begins on an island far away where an imaginary friend is born. He patiently waits his turn to be chosen by a real child, but when he is overlooked time and again, he sets off on an incredible journey to the bustling city, where he finally meets his perfect match and--at long last--is given his special name: Beekle.


“Bonaparte Falls Apart”
Bonaparte is having a tough time. It’s hard for this young skeleton to just hang loose when he can’t keep hold of himself. When he plays catch, his throwing arm literally takes a flyer. Eating lunch can be a real jaw-dropping occasion. How can he start school when he has so many screws loose? Luckily, Bonaparte hit the bone-anza when it came to his friends. Franky Stein, Blacky Widow, and Mummicula all have some bonehead ideas to help pull him together. But will it be enough to boost his confidence and get him ready for the first day of school?
“Crankenstein”
BEWARE OF CRANKENSTEIN! He's a little monster of crankiness that no one can destroy! MEHHRRRR!!! He may look like any ordinary boy, but when faced with a rainy day, a melting popsicle, or an early bedtime, one little boy transforms into a mumbling, grumbling Crankenstein. When Crankenstein meets his match in a fellow Crankenstein, the results could be catastrophic--or they could be just what he needs to brighten his day! This hilarious and relatable tale of grumpiness gone awry will turn toddler tantrums to giggles in no time.


“Ghost Afraid of the Dark”
Follow Boo the Ghost as he celebrates his first Halloween with all his Monster friends! He is a shy little ghost and quickly realizes he is afraid of many things. Read as Boo discovers to be brave in this adorable, spooky story! With charming illustrations and a glow-in-the-dark cover, makes this the perfect bedtime read
“The Hallo-Wiener”
Oscar is a little dog with a big problem -- he gets more tricks than treats because other dogs tease him all the time. But one brave act on Halloween makes Oscar a Grade-A hero, proving that a little wiener can be a real winner!


“Leo: A Ghost Story”
You would like being friends with Leo. He likes to draw, he makes delicious snacks, and most people can't even see him. Because Leo is also a ghost. When a new family moves into his home and Leo's efforts to welcome them are misunderstood, Leo decides it is time to leave and see the world. That is how he meets Jane, a kid with a tremendous imagination and an open position for a worthy knight. That is how Leo and Jane become friends. And that is when their adventures begin.
“How to Make Friends With a Ghost”
What do you do when you meet a ghost? One: Provide the ghost with some of its favorite snacks, like mud tarts and earwax truffles. Two: Tell your ghost bedtime stories (ghosts love to be read to). Three: Make sure no one mistakes your ghost for whipped cream or a marshmallow when you aren't looking! If you follow these few simple steps and the rest of the essential tips in How to Make Friends with a Ghost, you'll see how a ghost friend will lovingly grow up and grow old with you.


“Even Monsters Need Haircuts”
Just before midnight, on the night of a full moon, a young barber stays out past his bedtime to go to work. Although his customers are mostly regulars, they are anything but normal - after all, even monsters need haircuts. Business is steady all night, and this barber is prepared for anything with his scissors, rotting tonic, horn polish, and stink wax. It's a tough job, but someone's got to help these creatures maintain their ghoulish good looks.
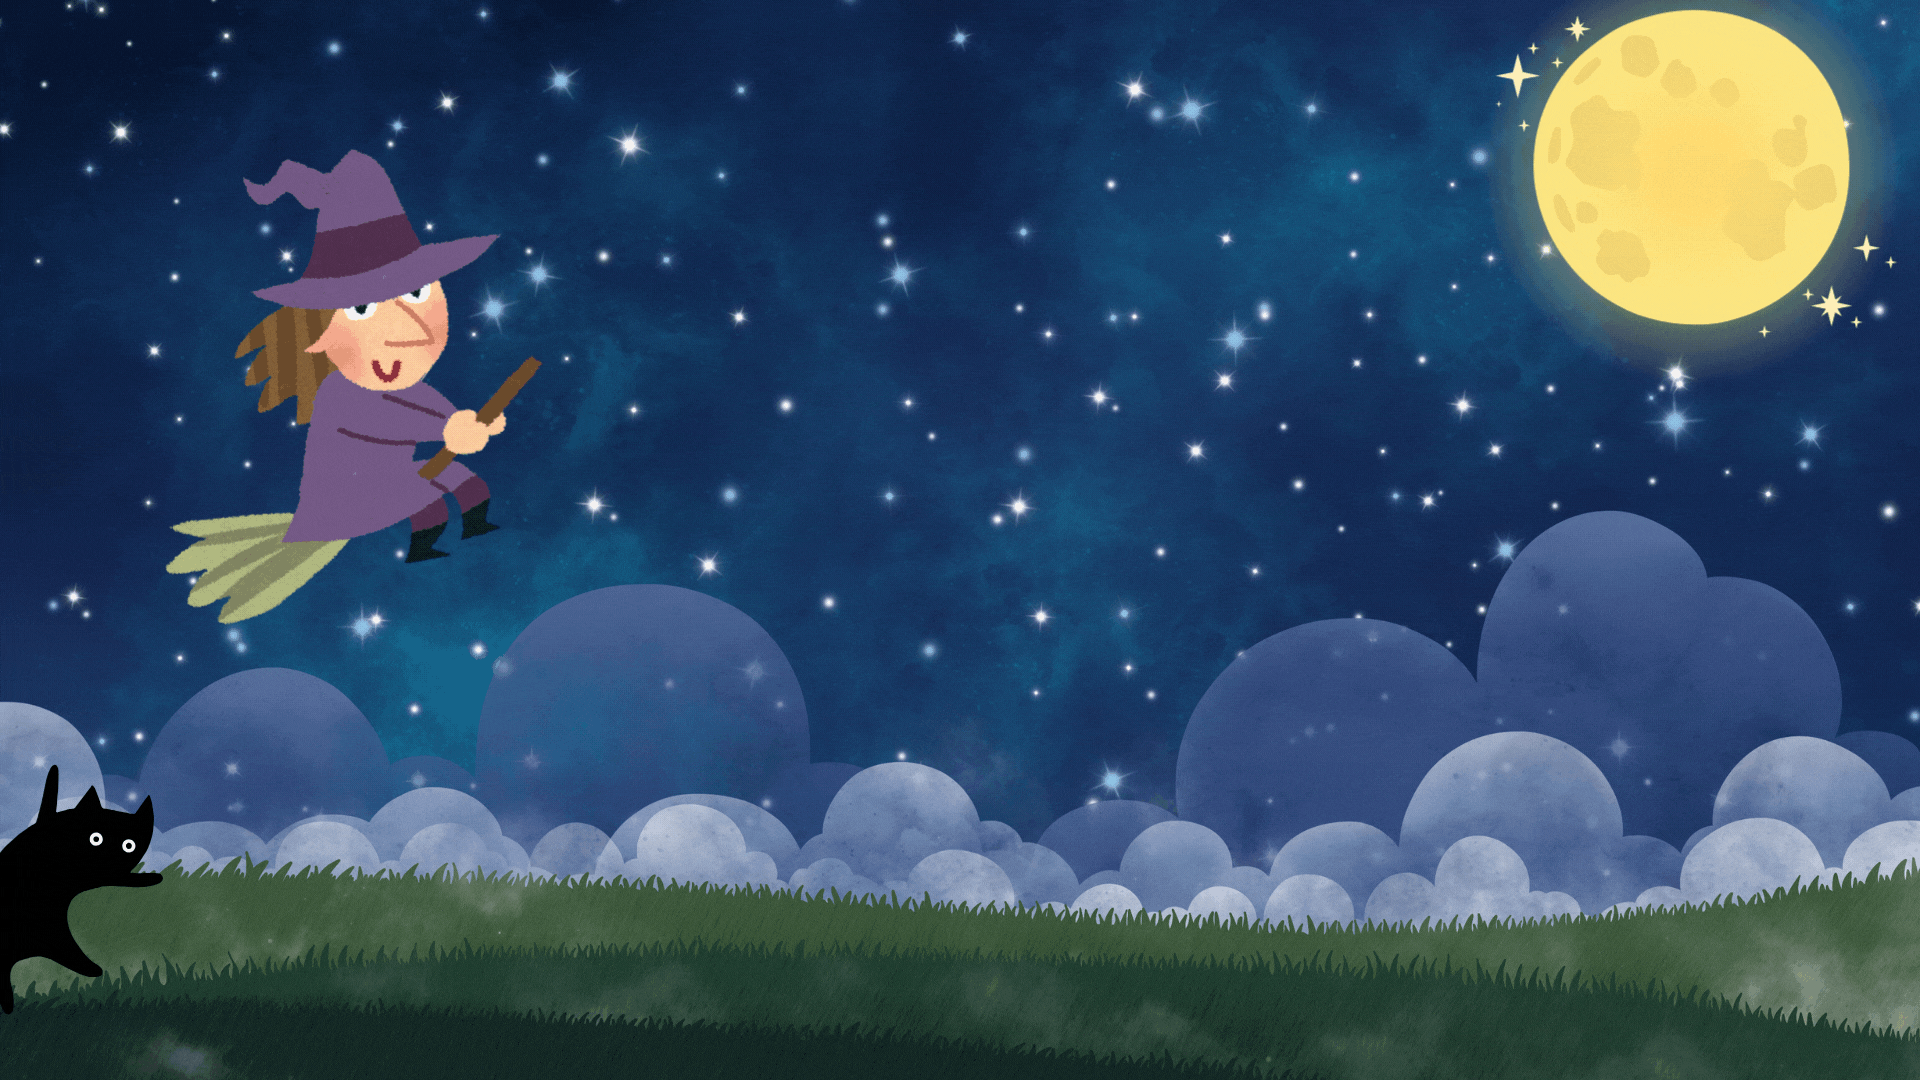
“Room on the Broom”
The witch and her cat are happily flying through the sky on a broomstick when the wind picks up and blows away the witch's hat, then her bow, and then her wand! Luckily, three helpful animals find the missing items, and all they want in return is a ride on the broom. But is there room on the broom for so many friends? And when disaster strikes, will they be able to save the witch from a hungry dragon?


“Stumpkin”
Stumpkin is the most handsome pumpkin on the block. He’s as orange as a traffic cone! Twice as round as a basketball! He has no bad side! He’s perfect choice for a Halloween jack-o-lantern. There’s just one problem—Stumpkin has a stump, not a stem. And no one seems to want a stemless jack-o-lantern for their window.
“The Dark”
Laszlo is afraid of the dark. The dark lives in the same house as Laszlo. Mostly, though, the dark stays in the basement and doesn't come into Lazslo's room. But one night, it does. This is the story of how Laszlo stops being afraid of the dark.


“The Little Ghost Who was a Quilt”
When you're a quilt instead of a sheet, being a ghost is hard! Ghosts are supposed to be sheets, light as air and able to whirl and twirl and float and soar. But the little ghost who is a quilt can't whirl or twirl at all, and when he flies, he gets very hot. He doesn't know why he's a quilt. His parents are both sheets, and so are all of his friends. (His great-grandmother was a lace curtain, but that doesn't really help cheer him up.) He feels sad and left out when his friends are zooming around and he can't keep up.
But one Halloween, everything changes. The little ghost who was a quilt has an experience that no other ghost could have, an experience that only happens because he's a quilt . . . and he realizes that it's OK to be different.
“Stellaluna”
Knocked from her mother’s safe embrace by an attacking owl, Stellaluna lands headfirst in a bird’s nest. This adorable baby fruit bat’s world is literally turned upside down when she is adopted by the occupants of the nest and adapts to their peculiar bird habits.


“Snowmen at Halloween”
After an early snowfall, a few kids build some snowmen before going trick-or-treating. And when the kids go off to bed, the snowmen have their own Halloween festival! There's candy and apple-bobbing and costume contests and all sorts of autumn activities. When the kids wake up the next morning, the snowmen are gone... but they've left a very special message behind.
“The Little Kitten”
Ollie and her cat Pumpkin are out frolicking on a beautiful fall day when they come upon a tiny kitten shivering in a pile of fallen leaves. Ollie warms the kitten up and the three become fast friends, but when Ollie sees “Lost Kitten” posters hanging on the trees in the forest, she knows she has to help her new friend get home. As Halloween draws nearer, magic is afoot, and Ollie’s good deed is rewarded in an unexpected way.


“Gustavo - The Shy Ghost”
Gustavo is good at doing all sorts of ghostly things: walking through walls, making objects fly, and glowing in the dark. And he loves almost nothing more than playing beautiful music on his violin. But Gustavo is shy, and some things are harder for him to do, like getting in a line to buy eye scream or making friends with other monsters. Whenever he tries getting close to them, he realizes they just can’t see him. Now that the Day of the Dead is fast approaching, what can he do to make them notice him and to share with them something he loves?
“Ghosts in the House!”
At the edge of town lives a clever girl with a spooky problem: Her house is haunted! Luckily, she happens to be a witch and knows a little something about taking care of ghosts. She catches them, puts them in the washing machine, airs them out to dry, and gives them new lives as sofa covers, table cloths, and, of course, bed sheets to cozy up under. Fresh and charming illustrations in dynamic orange, black and white bring this resourceful heroine and these spooky ghosts to life.


Turn yourself into a Ghost
That Visits Your Classroom!
Here’s a “spooktacular” way to keep your students engaged during the Halloween season! Try “ghosting” yourself into your classroom! Here’s how:
Take a picture of your empty classroom.
Hang a green table cloth on a wall.
Use a green shirt and wrap it around your head (of just don’t put your head all the way through).
Put sunglasses or glasses (even a hair bun through the top of the shirt) and wear them over the shirt.
Record yourself in the app Do Ink Green Screen.
Export the video and save!
For a step-by-step tutorial of how this works, check out our book, “The InterACTIVE Class!” Click here or below to purchase!


Creepy Carrots: Become a Ghost and
Place Yourself in the Text!
In this activity, your students will become ghosts that appear right in the text! We used the text Creepy Carrots and had the students trace the main character Jasper’s emotions throughout the text. Then, we put ourselves “in” the text using Do Ink’s Green Screen app! Here’s How:
Take a photo of a page from the book
Hang a green table cloth on a wall and stand in front of it
Open Do Ink’s Green Screen app and insert the photo from the book on the bottom layer
Add a video to the top layer - which will be you! (tip: for a more “ghostly” effect, drop the opacity of your video)

Creepy Pair of Underwear
(Design a Pair of Underwear!)
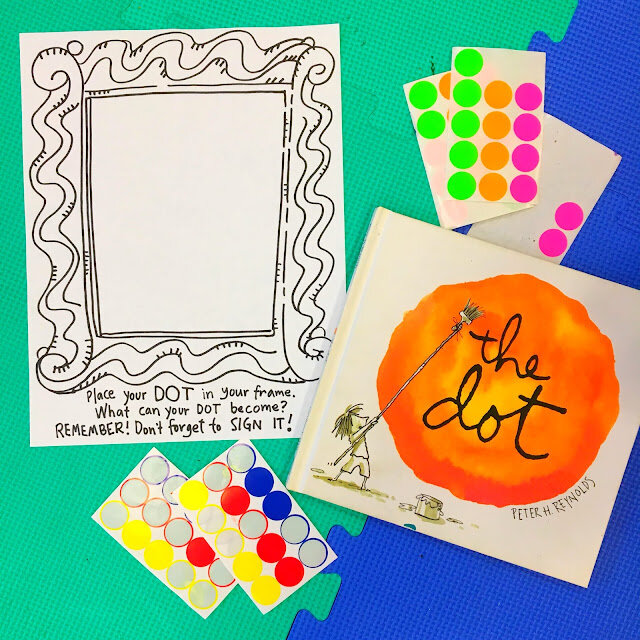
Aaron Reynolds & Peter Brown’s “Creepy Pair of Underwear” is a classroom favorite! For this activity, students can design their own creepy pair of underwear, then share why they think Jasper would be afraid of them on Microsoft Flip! Follow these steps:

Download the Creepy Pair of Underwear Template by clicking here (or the image)
Print / copy for your class
Students design a creepy pair of underwear using crayons or markers
Students hold up the creepy pair of underwear and share their designs in a video, explaining why they think Jasper would be afraid of them.
Level up: Upload the template into Canva or Adobe Express and then save th creation as a PNG. Students can then use the file to create a video!


The Bad Seed Presents:
The Good, The Bad and the Spooky
(Design a Costume for the Bad Seed)
The Bad Seed is back and right in time for Halloween! When we last left The Bad Seed, he was committed to doing acts of kindness. But what’s a seed to do when he can’t find a show-stopping costume for the big night? Postpone trick-or-treating for everyone, of course! In this activity, your students can use Canva or Adobe Express to help design a costume to save both The Bad Seed and Halloween! Act quickly, though, or will this seed return to his baaaaaaaaad ways! Here’s how:

Download the Bad Seed sticker (click here or the image)
Open a blank presentation template in Canva or Adobe Express and upload the Bad Seed sticker.
Use elements to decorate the Bad Seed’s costume.
Download the file as a PNG to share it, or create a video with a voice over explaining thinking.

Hallo-wiener: Design a Costume for Oscar
Similar to the activity above, Oscar has a problem. He desperately needs a costume for Halloween! All the other dogs tease him, so it’s your (students) job to create another costume that will work for him (other than the hot dog costume)! Here’s how:


Download the Oscar media sticker by clicking here or the image above.
Open a blank presentation template in Canva or Adobe Express and upload the Oscar sticker.
Use elements to decorate Oscar’s costume.
Download the file as a PNG to share it, or create a video with a voice over explaining thinking.

Room on the Broom:
Retell the Story using Canva or Adobe Express
Room on the Broom is a classroom favorite and being able to retell the story is an important skill for all students to have. With Canva or Adobe Express, students can easily retell the entire story without ever having to leave the app. Here’s how:
Read Room on the Broom
We recommend pausing as you read to have students maintain some type of flow map (click here to see an example) so that they are able to recall the events of the story.
After you have read the story, have the students use Canva or Adobe Express to create a blank video template. Students can use Elements to retell the story, but we also recommend animating the elements for more engagement.
Once finished, students may download and share their videos on Padlet or Wakelet, where they can watch each other’s videos to see if they sequenced everything correctly.

Stellaluna: Retelling the Story
Here’s another interACTIVE way to get your students retelling the story Stellaluna! After reading, have your students use Canva or Adobe Express elements to retell the events. Our example below used Flipgrid (RIP), but this activity can be easily completed in other platforms. Check it out below!

Stumpkin: Halloween from Stumpkin’s Point of View
In the book Stumpkin, Stumpkin is the most handsome pumpkin on the block. He’s as orange as a traffic cone! Twice as round as a basketball! He has no bad side! He’s perfect choice for a Halloween jack-o-lantern. There’s just one problem—Stumpkin has a stump, not a stem. And no one seems to want a stemless jack-o-lantern for their window. In this activity, your students will put themselves into Stumpkin’s perspective by becoming Stumpkin and explaining his point-of-view. Why is Stumpkin feeling the way that he does? How does he feel throughout the story? What about the end? Here’s how it all works:


Read Stumpkin and download the Stumpkin stickers to the left.
Launch a blank video template in Adobe Express or Canva and then upload the city building. Stretch it across the screen to make it become a background.
Next, add jack-o-lanterns in the city building’s windows.
After that, upload the Stumpkin sticker to the left. Resize the image so that it goes well beyond the frame of the screen (make it really big, trust us! It helps to zoom WAY out).
Animate the Stumpkin POV sticker around the screen to see the city building through Stumpkin’s eyes.
Duplicate the page and repeat as necessary! To add more or less jack-o-lanterns, just move the Stumpkin POV sticker off the view of the screen (but not all the way - otherwise you’ll have to add it again).

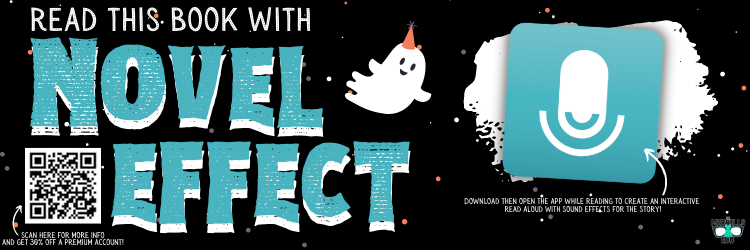
Crankenstein: InterACTIVE Read
Aloud with Novel Effect
Crankenstein's favorite day of all—Halloween—has gone rotten! With problem after problem, today is bound to go down as the worst Halloween in history!
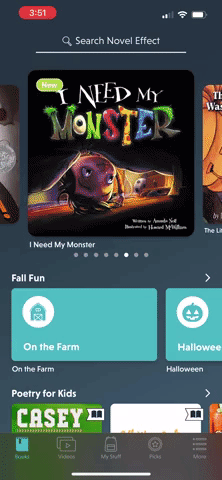
Kids love this book, but they’ll love it even more if you read it while using the app Novel Effect. Novel Effect uses your devices’ microphone to detect when and where you are reading in the book. It will then add sound effects as you read - all of which match the mood of the story! Novel Effect offers both free and premium versions, and you can find Crankenstein in the library now!

Even Monsters Need Haircuts: Design
a Monster’s Haircut
In Even Monsters Need Haircuts, the main character’s father owns a barber shop. At night, the main character volunteers to cut monsters hair, because no one else would. In this activity, your students can give a monster a haircut and use evidence from the text (rotting tonic, horn polish, stink wax, etc.) to explain what they used to “style” their monster’s hair. Here’s how:
Download the Even Monsters Canva template by clicking here or the image below.
Share the template with your students.
Students can use Canva’s drawing tools or elements to give the monster a haircut.
Have the students download their work as a PNG file.
Students can share their work with their classmates on Wakelet or Padlet.


Bonaparte: Read aloud & STEM Project
Bonaparte Falls Apart is a humorous story of a skeleton who “just can’t keep it together.” Luckily for him, his friends help him out. That’s exactly what your students will do in this activity!
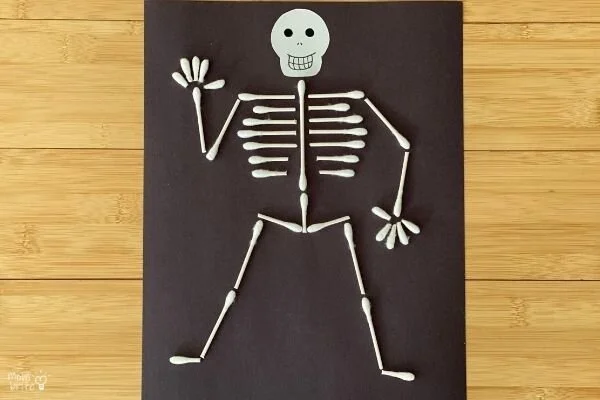
Image courtesy of: Mombrite.com
After reading Bonaparte Falls Apart, Give group students into pairs (this can also be done individually)
Give each group / student a black piece of construction paper and a handful of q-tips.
Have the students use glue to make Bonaparte’s skeleton. Groups / Students may cut the q-tips to better fit their skeleton if they see fit.
Last, give each student a half-piece of white printer paper. Students will use this to make the Bonaparte’s skull.
For a detailed step-by-step tutorial on this, check out this post from Betty!

How to Make Friends With a Ghost: A How-to Guide

In How to Make Friends with a Ghost, you’ll learn the basics of what to do in order to befriend a ghost For example, you’ll need to provide the ghost with some of its favorite snacks, like mud tarts and earwax truffles. In this activity, your students will add a ghost to a video and explain what they would do in order to become friends with a ghost. Here’s how:


Download the Ghost sticker by clicking here or the image above.
Open a blank video template in Canva or Adobe Express.
Students record the video of themselves and explain how they can be friends with a ghost.
Then, students can upload the Ghost sticker to their video and then animate it to appear while watching the video (see our example above).
Students can then download their videos and share them on either Wakelet or Padlet.

Ghost Afraid of the Dark: Read Aloud on
Vooks & Guide to Being Brave
Boo the ghost is getting ready for his first Halloween with all his monster friends. There’s just one problem…He’s a little shy and is afraid of many things. But have no fear, your students will bravely be able to fly through this activity! Here’s how:

Read or watch Ghost Afraid of the Dark using the book or the app Vooks (click here to download) - or do both!
Think about how Boo needed to be brave as he went through the story. What did he do to show bravery?
Download the Boo sticker here (or click the image).
Open Canva or Adobe Express and launch a blank video template.
Add a background and then upload the Boo sticker.
Add some other elements and text.
Click on the different elements and animate them so that they move around.
Download the video and then share it to Wakelet or Padlet.

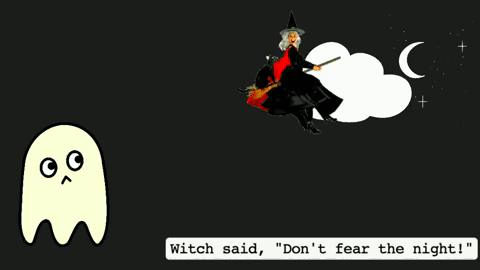
The Dark: InterACTIVE Read Aloud
& Add “The Dark” to Your Video
The Dark is a book that all kids (and let’s face it, some adults, too) can relate to. In The Dark, the main character, Laszlo is afraid of the dark. “The dark” lives in the same house as Laszlo. Mostly, though, the dark stays in the basement and doesn't come into Lazslo's room. But one night, it does…
This is a great book to pair with Ghost Afraid of the Dark, as both deal with being a little nervous at night. For this activity, your students can download a sticker of “The Dark” and add it to a Flip video. Check it out:


Read The Dark using Novel Effect. This will create an interACTIVE read aloud!
Download The Dark sticker here (or click the image).
Open Canva or Adobe Express and launch a blank video template.
Record upload a video explaining what areas make you nervous. Why? How are you brave?
Now, upload The Dark sticker and resize it so that it goes beyond the screen to make sure that itt covers the entire area (see our video example above)
Download the video and share it to Wakelet or Padlet so that others can see.

Steve Spangler Halloween Science Kits!
Steve Spangler always brings the fun and his Halloween Science kits do not disappoint. If your students are into things like Vampire Slime, Ghost eggs, Invisible paper and much more. Check out the experiments and products to purchase below!


Halloween BreakoutEDU Kits
BreakoutEDU kits always keep students thinking. Luckily for educators, BreakoutEDU has uploaded 43 different games to help us get through the Halloween holiday. Everything from a pumpkin design party to tricks and treats. Check them all out by clicking here or the image below!


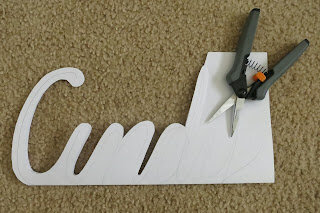
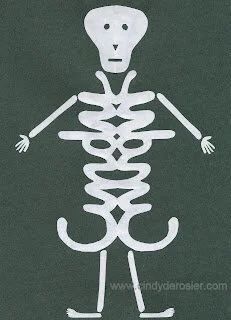
Name Skeletons: Create a Skeleton Our of Your Name
This fabulous idea comes from Cindy deRosier. Create a skeleton body using your name! Learn how to do it on Cindy’s blog post by clicking here or the images below!

Halloween on Wonderopolis
Do your students have big questions when it comes to Halloween? For example, maybe they’re wondering if other countries celebrate Halloween? Perhaps they’re curious about when candy was invented? Wonderopolis has you covered! Check out the entire Halloween themed list of topics by clicking here or the image below!


Halloween on Nearpod
The Nearpod Library is a great place to find resources. Educators can find plenty of content on Halloween here, too! Everything from stories to the actual history of Halloween. Check out the collection by searching “Halloween” in the Nearpod library, or click here or the image below!

-- Let us know if you’re using any of these ideas in your classroom! Be sure to follow us on social media (@TheMerrillsEDU everywhere) and tag us! 👓👗
For more tips, tricks and lesson ideas for making learning more interACTIVE, check out our books The InterACTIVE Class and Flipgrid in the InterACTIVE Class on Amazon!


20 Activities for International Dot Day!
@TheMerrillsEDU share 20 different activities to celebrate International Dot Day, the day dedicated to the book “The Dot” by Peter Reynolds.

UPDATED: August 2025
Please note: This blog post was hand-crafted and does not include the use of AI.
Peter Reynolds’ “The Dot” has become an instant classic in classrooms around the globe. Students need to feel self confidence now more than ever, and “The Dot” does a perfect job fulfilling that feeling. Traditionally, “Dot Day” is around September 15th(ish). Below are some of our favorite “Dot Day” activities!
(click on any subheading to jump to that section)


Celebrate International Dot Day with Peter Reynolds!
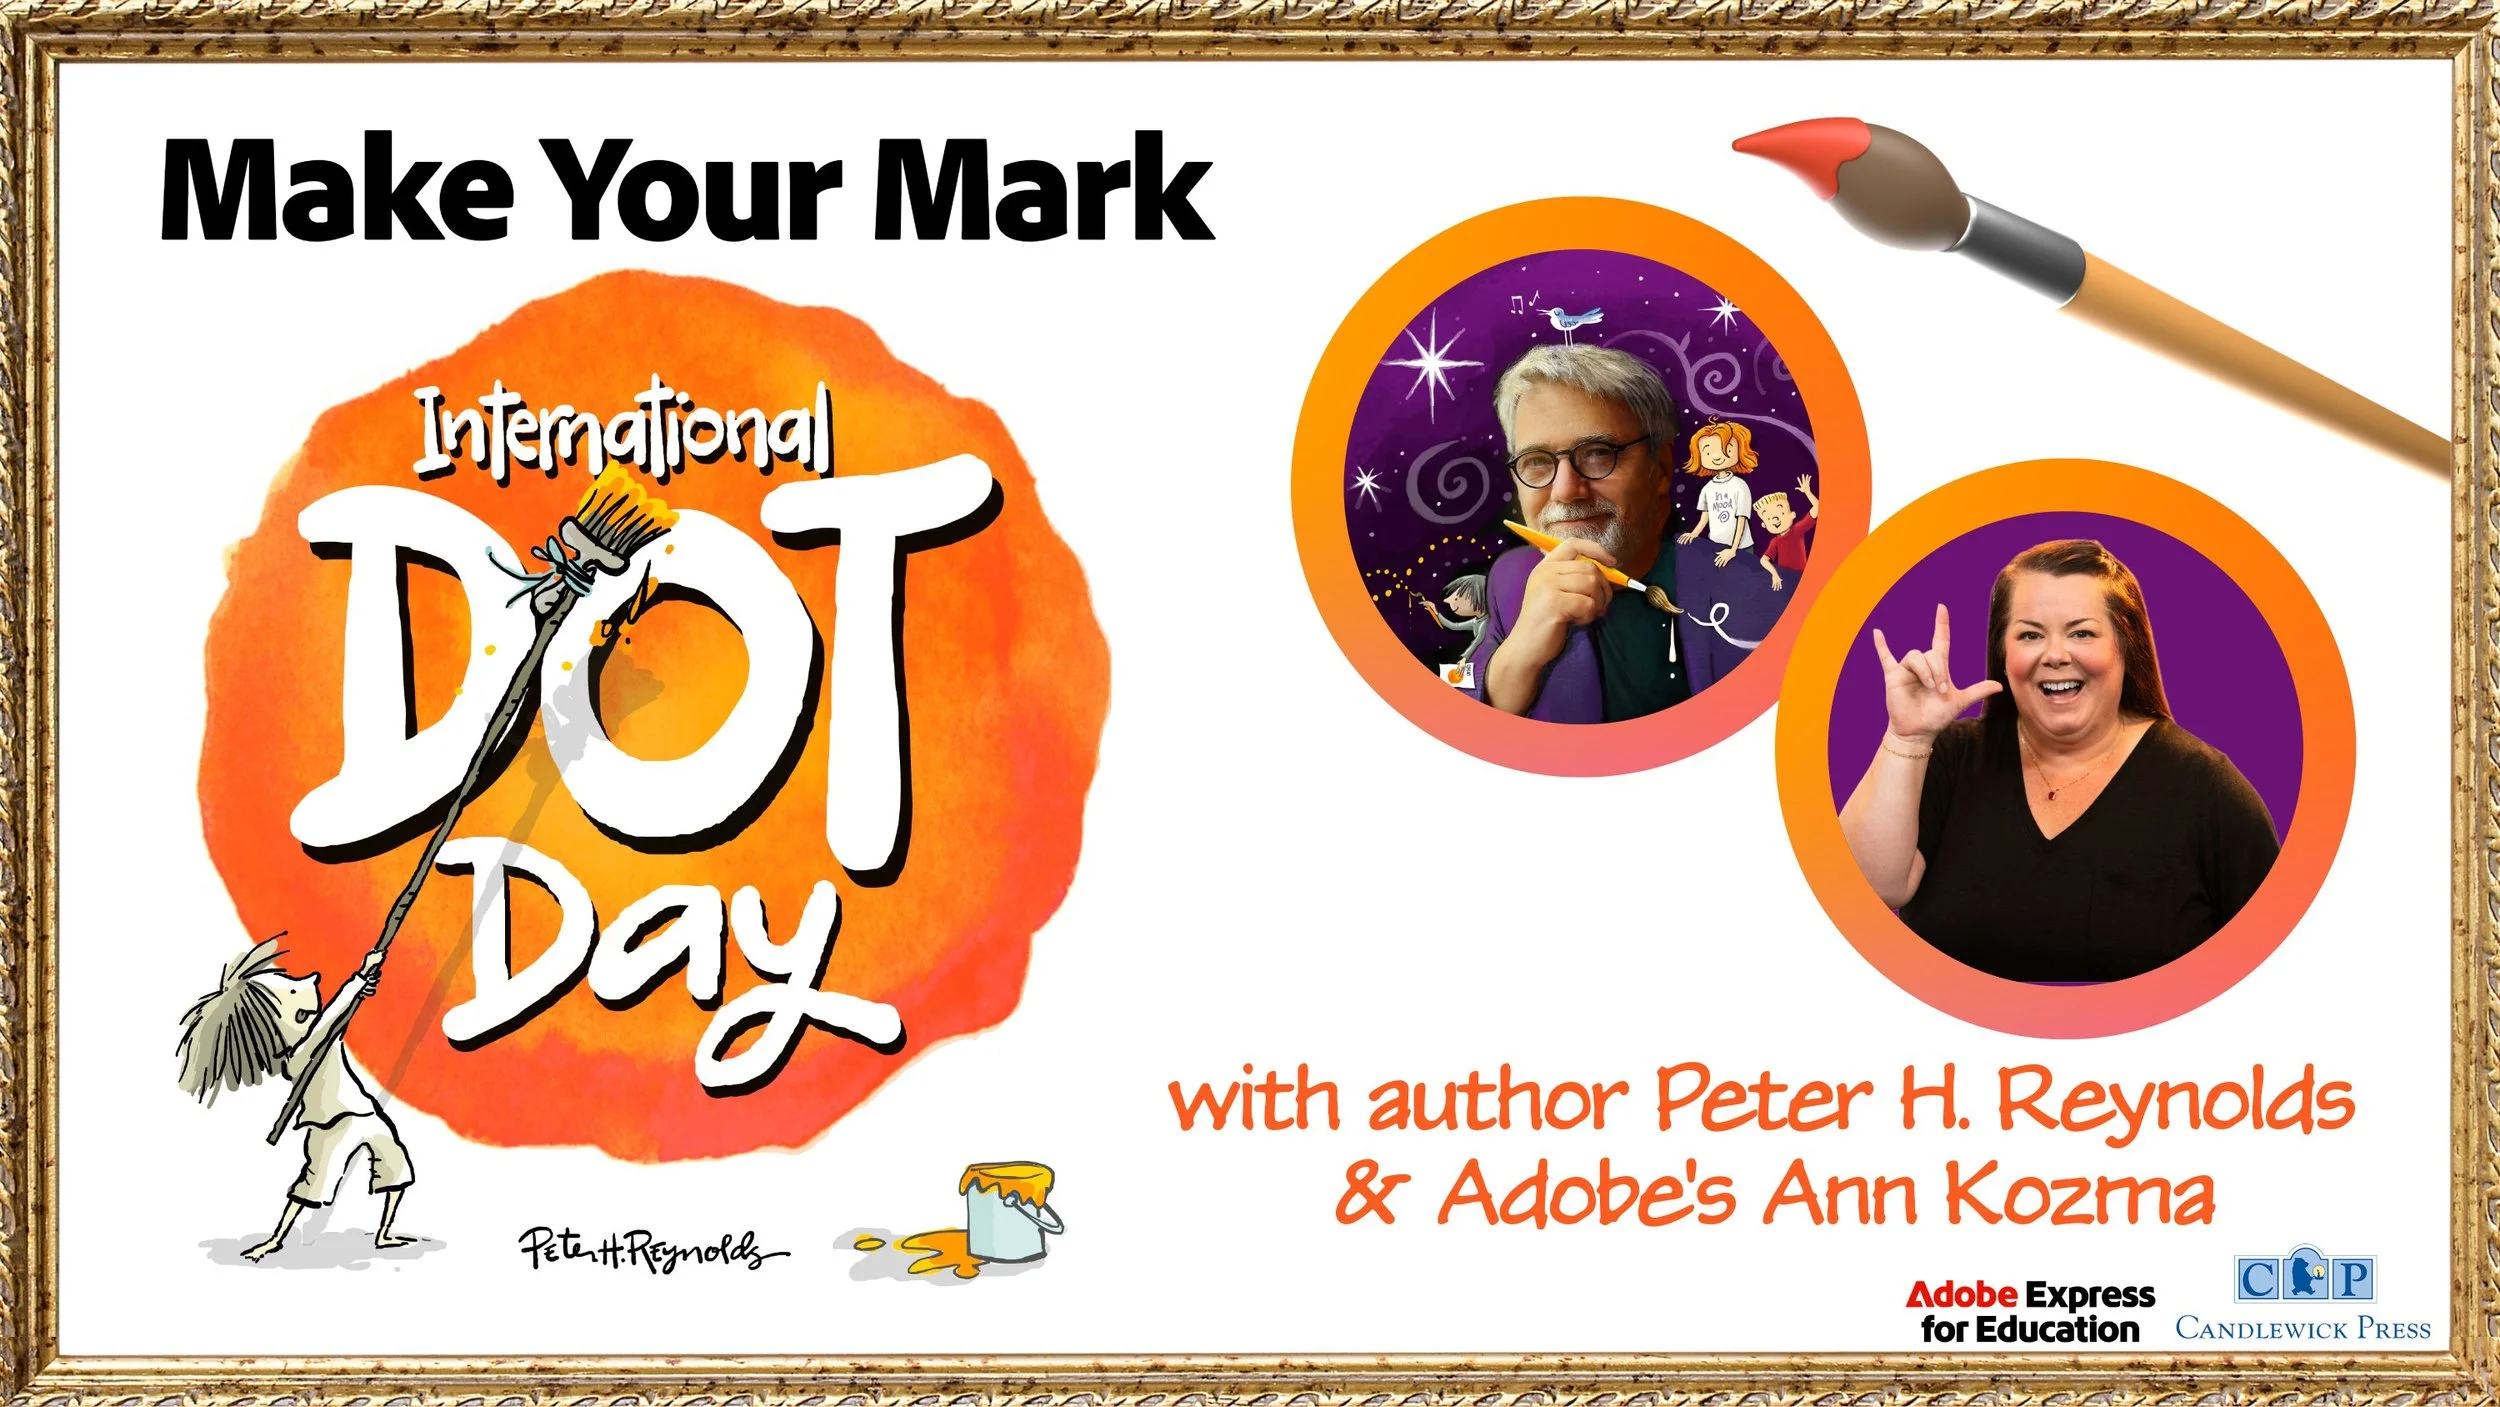
Join FableVision, Reynolds Center TLC, and Candlewick Press in a VIRTUAL global celebration of creativity, courage, and collaboration: International Dot Day!! In this event, students will meet Peter H. Reynolds–New York Times best-selling author and illustrator of The Dot–and his twin brother Paul A. Reynolds who will challenge everyone to believe in themselves and find the courage to “make their mark.”
Heads up: If you’re registering, you’ll need to register for the upcoming Adobe Express events (but you’ll receive a notification once it gets closer to Dot Day.)
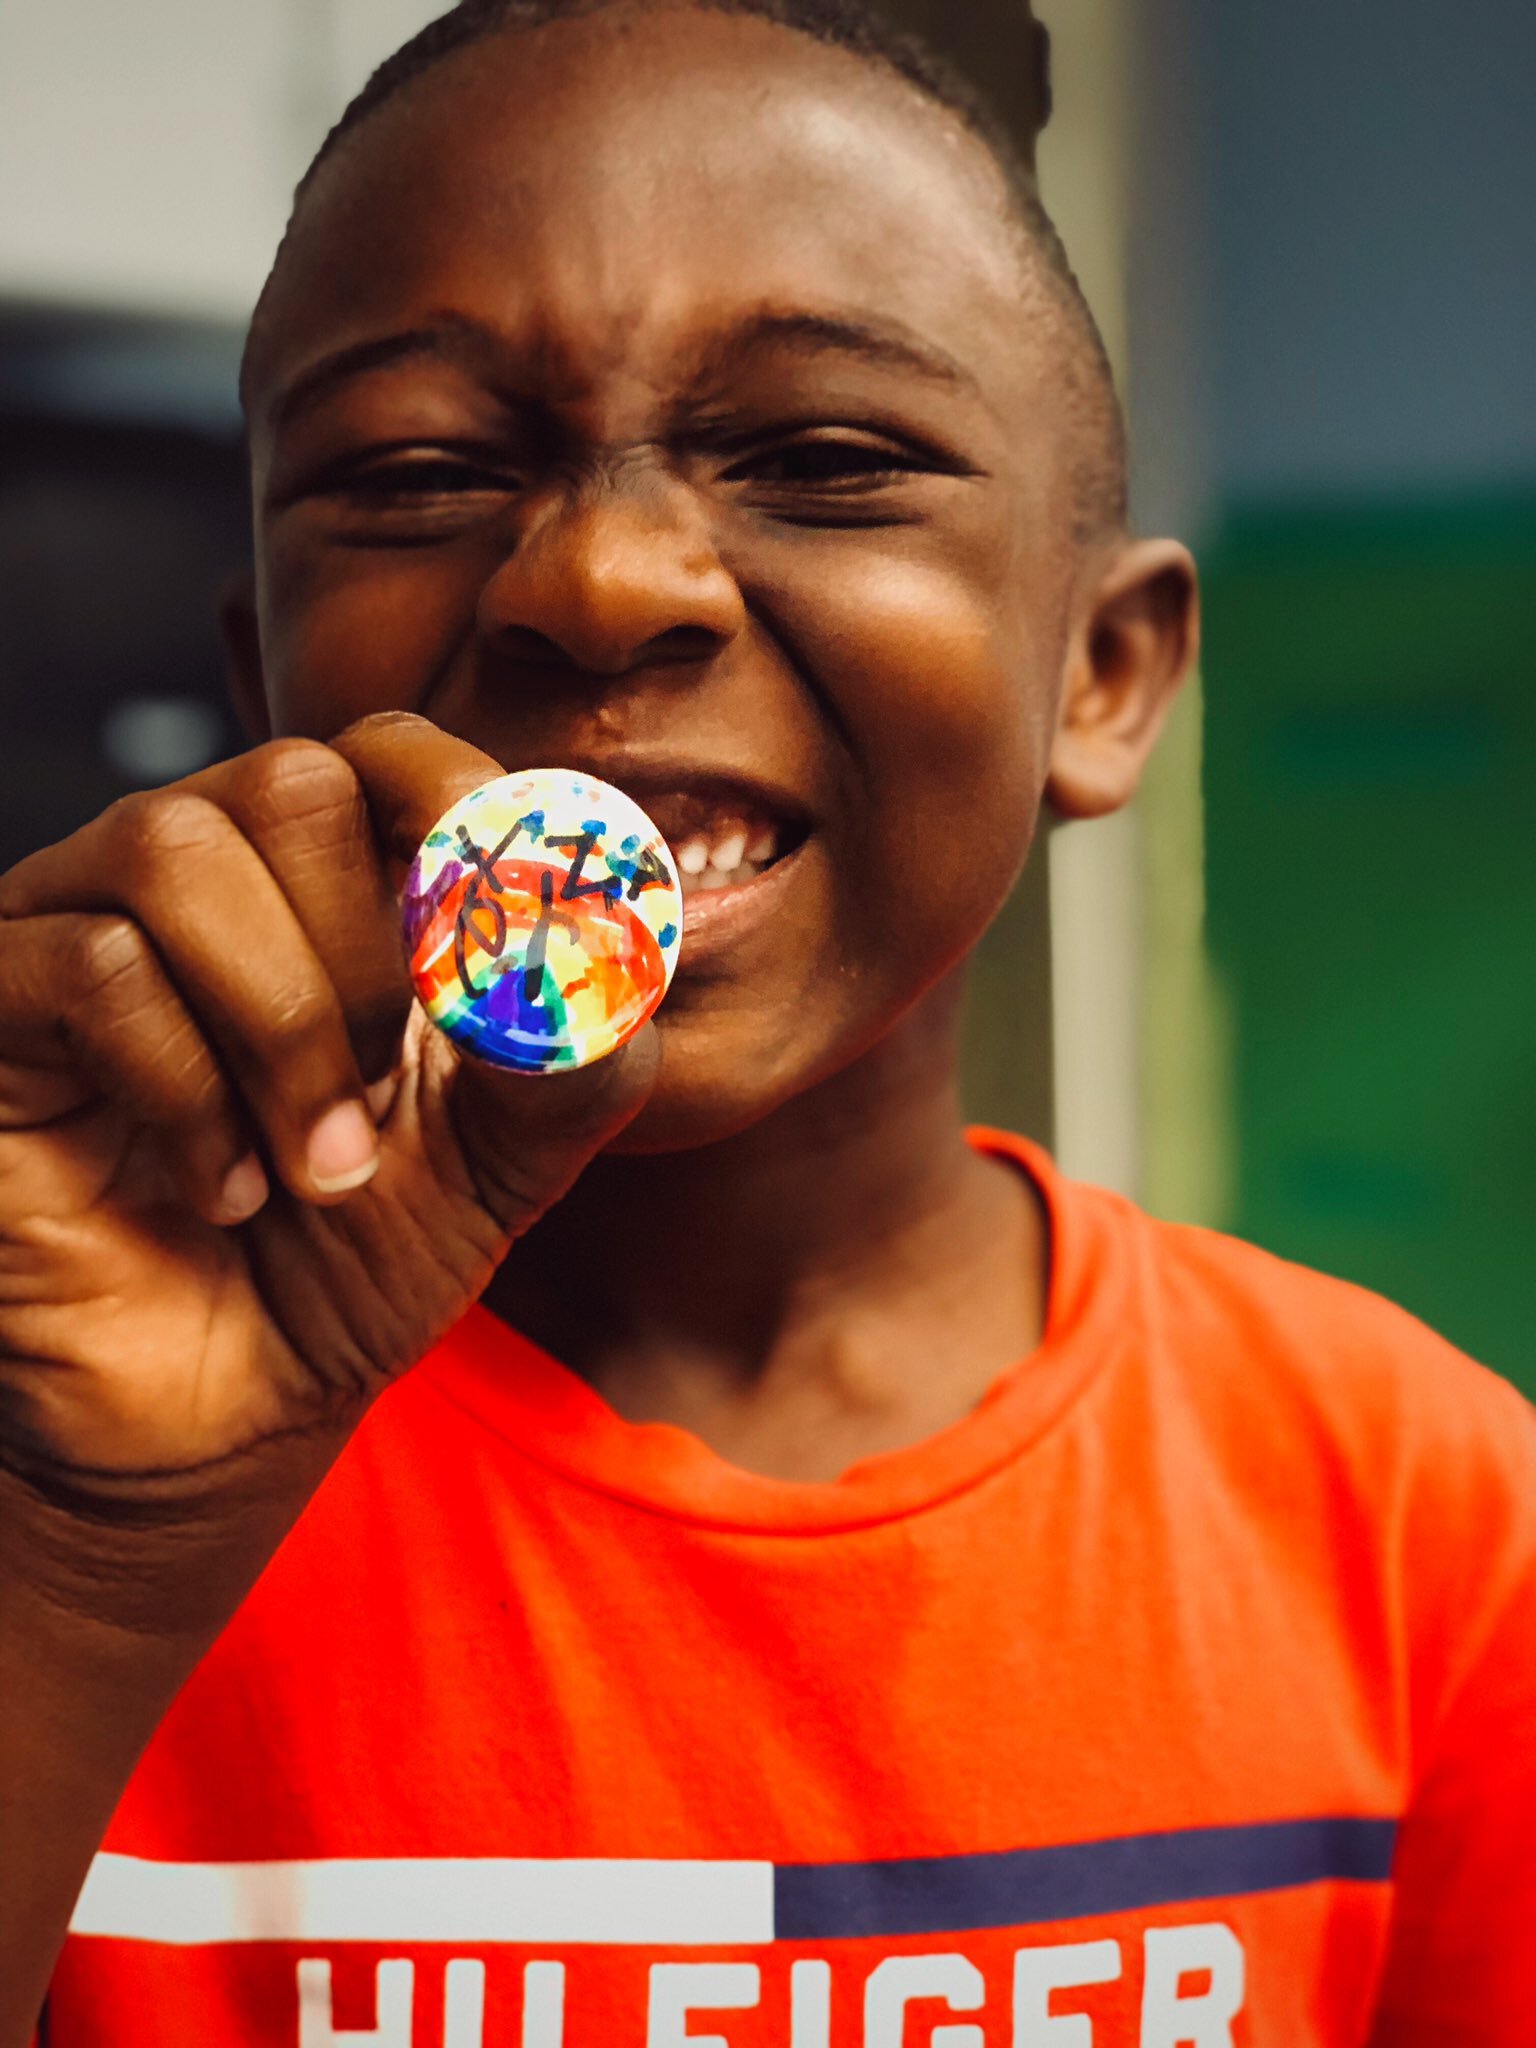
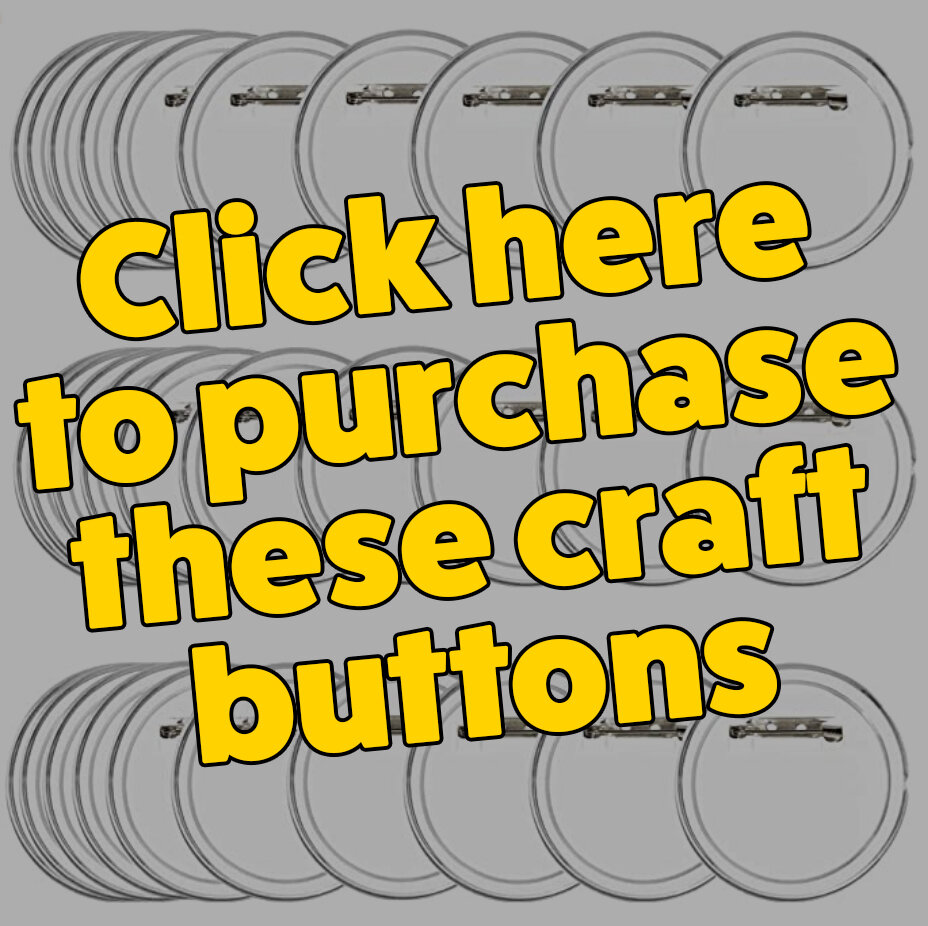
Dot Day Buttons!
A few years ago we purchased a button maker. Now, every year we use it on Dot Day! The kids can use dots to design their buttons (a large dot!). If you don’t have a button maker - no worries! You can find relatively cheap craft buttons on Amazon. Click here for the link!

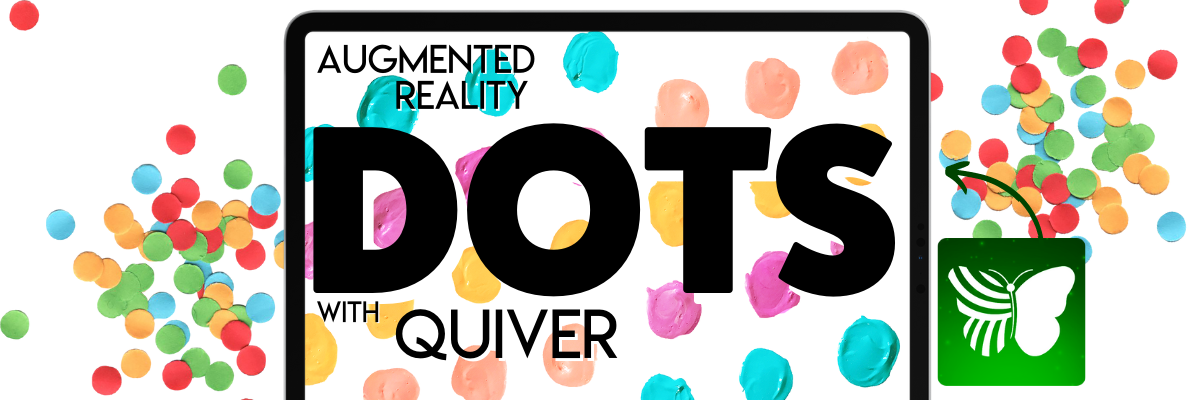
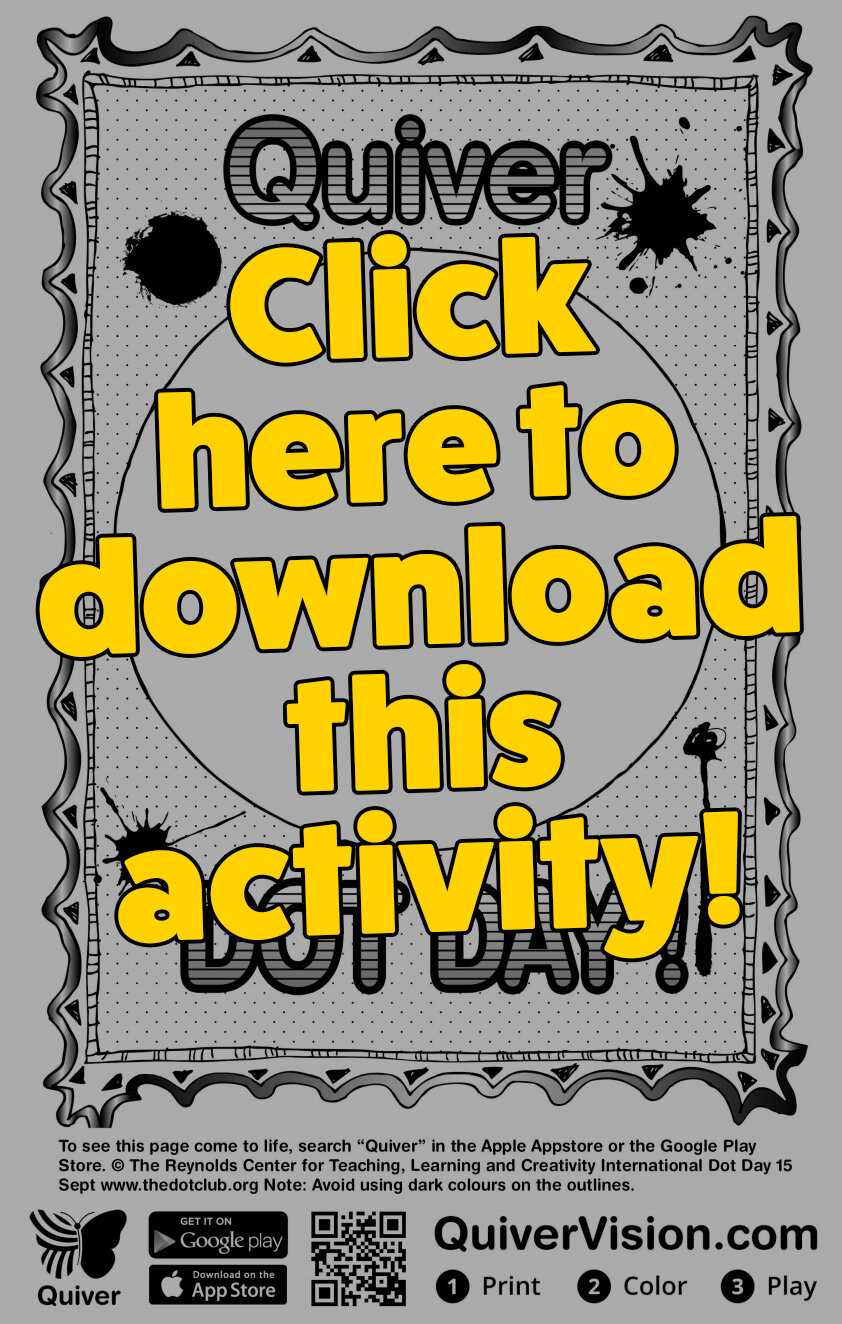
Augmented Reality Dots with Quiver!

Quiver is an awesome (and easy to use) Augmented Reality app that is available through the iOS App Store and Google Play. For this activity, you’ll need to download and print the worksheet linked here (or click on the picture). Once printed, have your students draw their dot design on the sheet. When they’re finished, have them launch the Quiver app and scan the paper. When Quiver recognizes the sheet, it will automatically create an AR version of the dot. The kids can even “hold it in their hands!” Check it out below!
Dot Day Science Experiment
Tie Dot Day into your science lessons! This Steve Spangler “Sharpie Pen Color” science experiment is great for Observable Properties and the Practice of Science. Check out the “how to” below! For a complete set of instructions, click here.

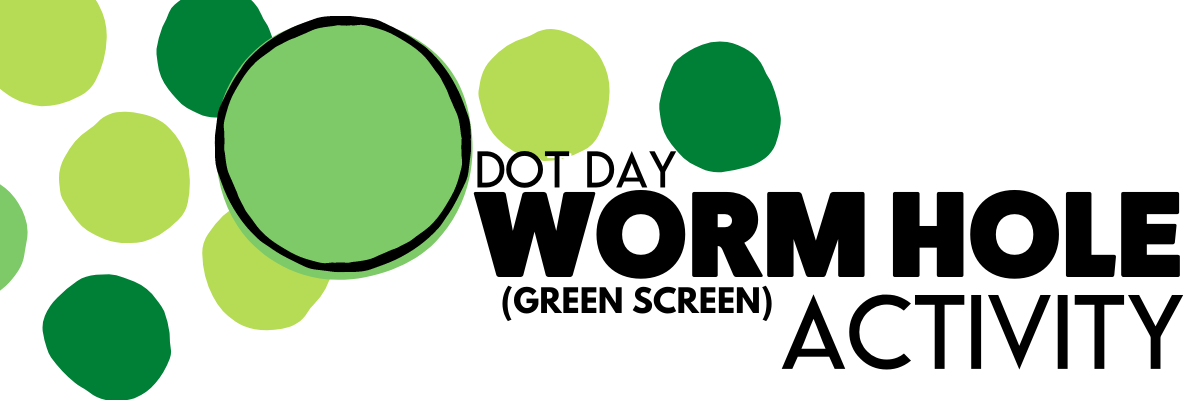
Dot Day Wormhole (Green Screen) Activity
A few years ago, our friend Erin Flanagan shared this creative way to celebrate Dot Day: A Wormhole! It looks more complicated than it actually is. The trick…Create layers with an illustration and a green circle. For a step-by-step tutorial, watch below! Be sure to check out Erin’s website here and follow her on social media @Erintegration!
Dot Day BreakoutEDU Activity
Get your student’s thinking with this BreakoutEDU activity! Click here (or the image) to learn more and read what it’s all about below:
“It’s time to make your mark! You have the talent, you are something special, and the world wants to see what only you can do! The only problem is the Eraser was in the classroom last night and thinks he locked all of our creativity and inspiration in the Breakout EDU box. He believes without it, we will not be able to make our mark! Work together to figure out the combinations and break out our Creativity!”
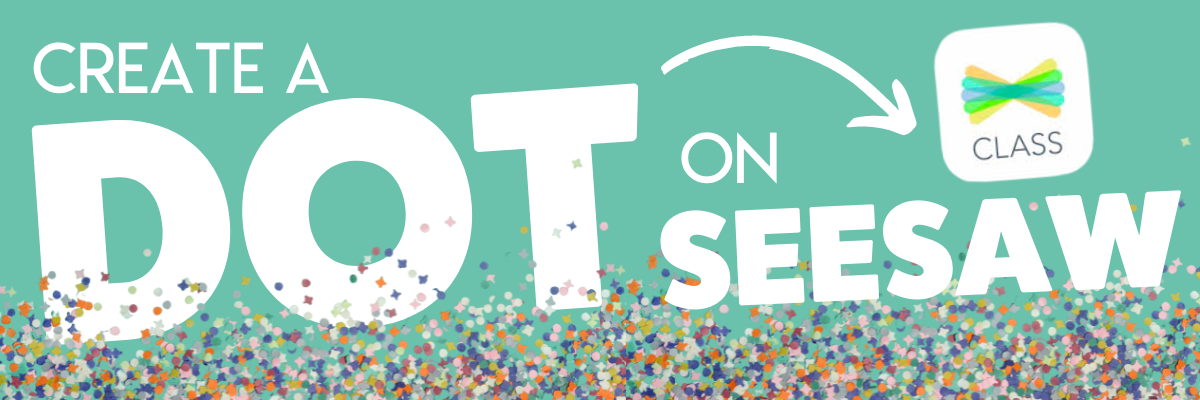
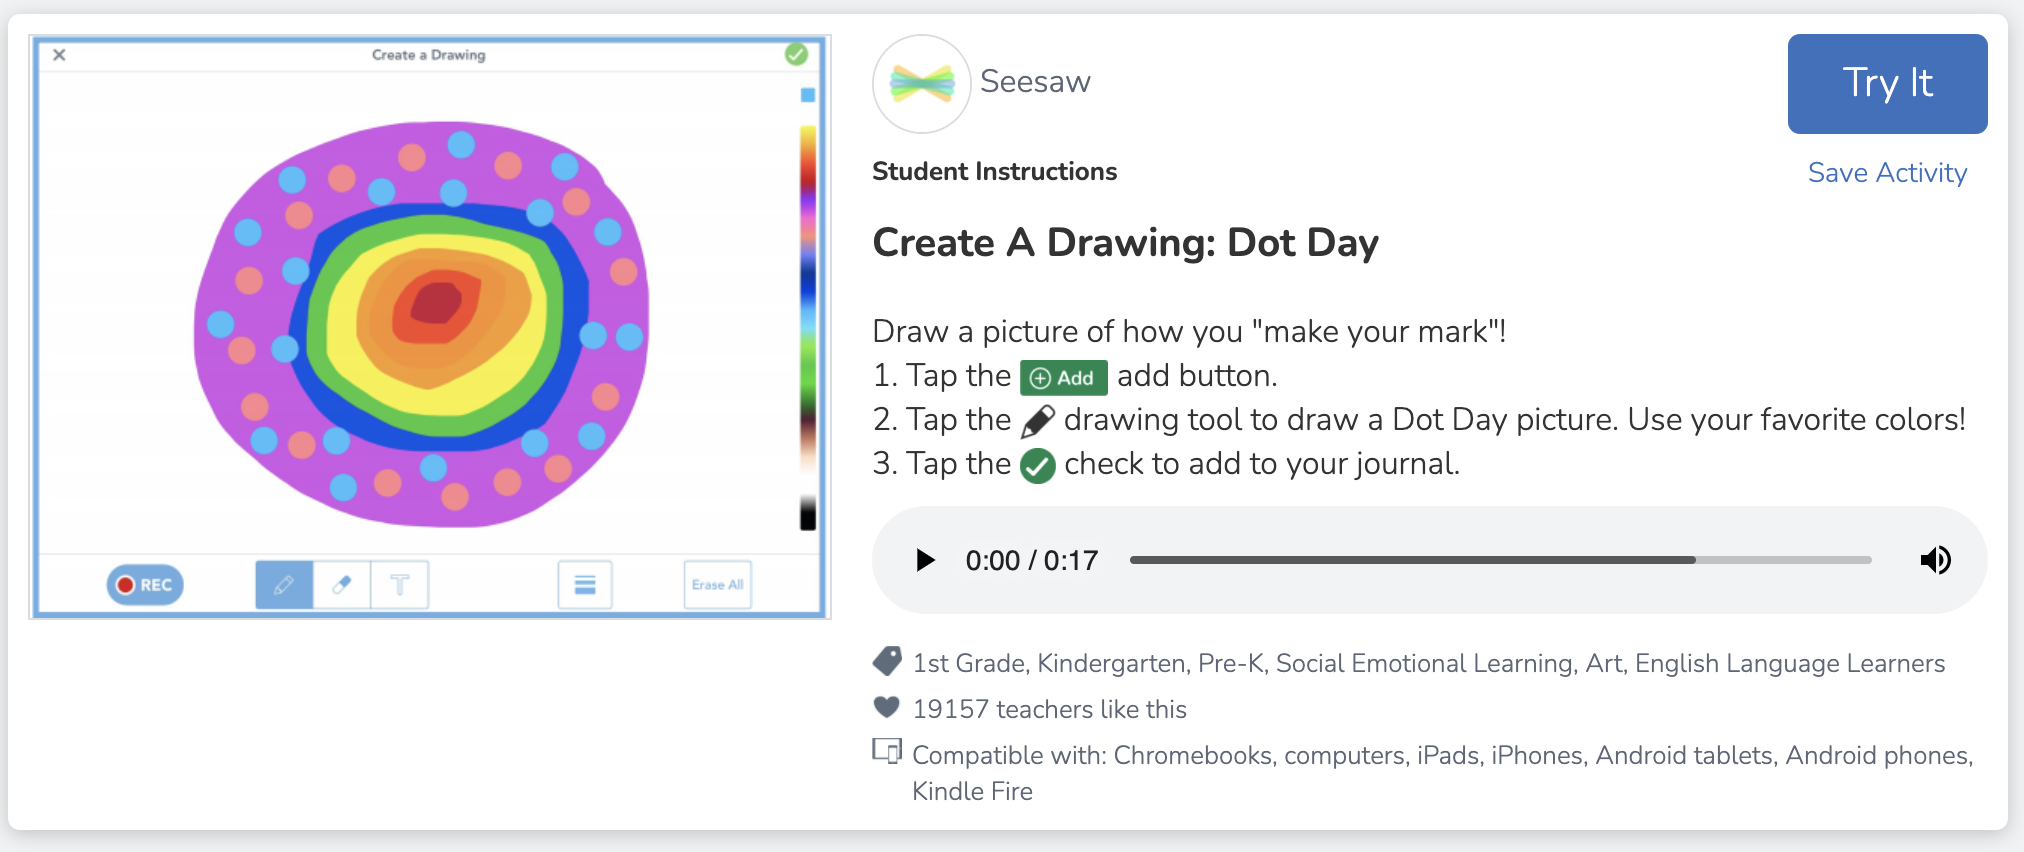
Create a Dot for Dot Day on Seesaw (Activity Included)!
Seesaw users can get in on the fun of Dot Day with this activity! Use the Seesaw tools to design a dot, then record an explanation sharing why you used the colors that you did. Teachers can share out the responses as a whole group for the class to share! Click here (or the image) to access the activity! (note: this requires a free Seesaw account)
Dot Day STEM Challenge
Looking to build up some collaboration and team work within your class? This STEM challenge will make that happen! Using only notecards and circle (dot!) stickers, students must work together to create a tower. Give the class a set amount of time and then start the timer. The tallest tower still standing after the time runs out wins!
You’ll see how students quickly realize that they must work together to make the tower stand and collaborate on how to keep the structure going!

(image taken pre-COVID)
Animate a Dot for Dot Day!

What if we told you that you could take your dot creations for Dot Day and animate them? It’s possible and actually not that complicated at all! We recommend using an app like Chatterpix Kids on iOS or Google Play. Create your dot art, then launch Chatterpix Kids. Snap a photo of your art, then add a talking mouth. You now have 30 seconds of recording time to talk about your dot!
Level up - option #1: Save the Chatterpix Kids video onto your camera roll, then upload it to a Flipgrid Topic for the entire class to see!
Level up - option #2: Save the Chatterpix Kids video onto your camera roll, then upload it to Seesaw so that families at home can see!
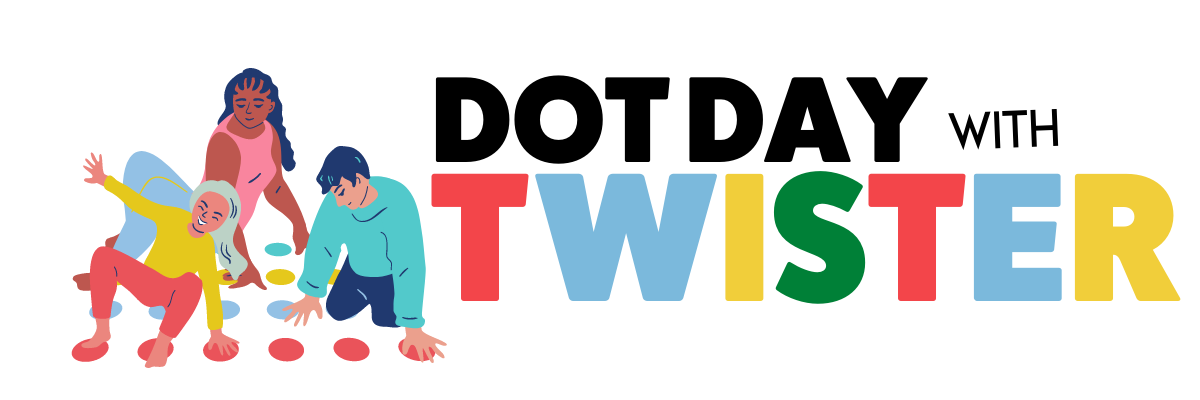
Dot Day Twister Activity (Wormhole)!
This activity is similar to the wormhole activity above, only this time you need a Twister mat! The green dots on the twister mat will eventually reveal a secret background once you upload it into iMovie (and go through a bit of editing). Check out how it works from Beverly Babbage below and be sure to follow her on Twitter by clicking here!

“What is International Dot Day?”
(A Wonderopolis Article)

If your students are new to the Dot Day experience, they may have questions about it. Look no further as Wonderopolis has you covered! This article does a great job of covering what International Dot Day is, how did it get started and how you can make your mark. To view the article, click here or the image!
International Dot Day Song
(with movements)
Emily Arrow and Peter Reynolds teamed up to make this video that features a Dot Day song and dance moves. The video goes through each motion and would be a great challenge to integrate with Flipgrid. “Show me the Dot Day dance!” and turn your classroom into a dance challenge! Check out the video for more!
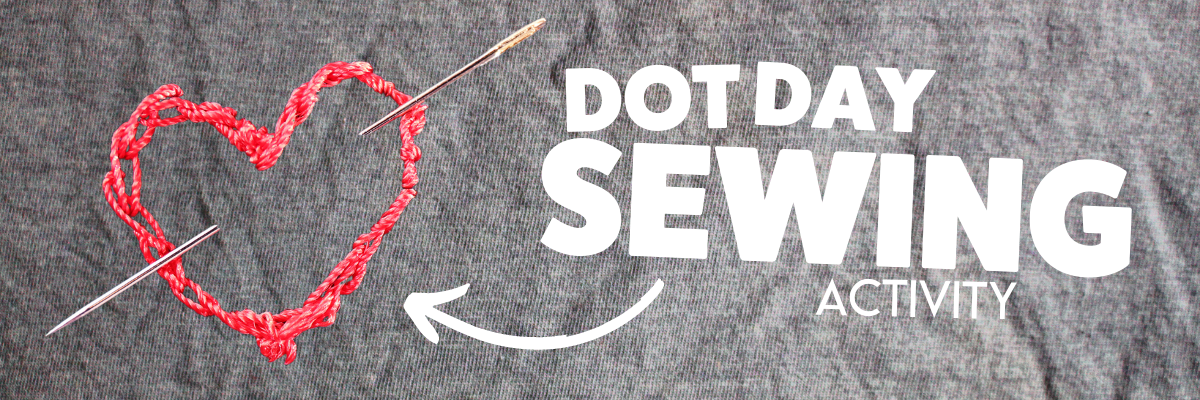
Dot Day Sewing Craft
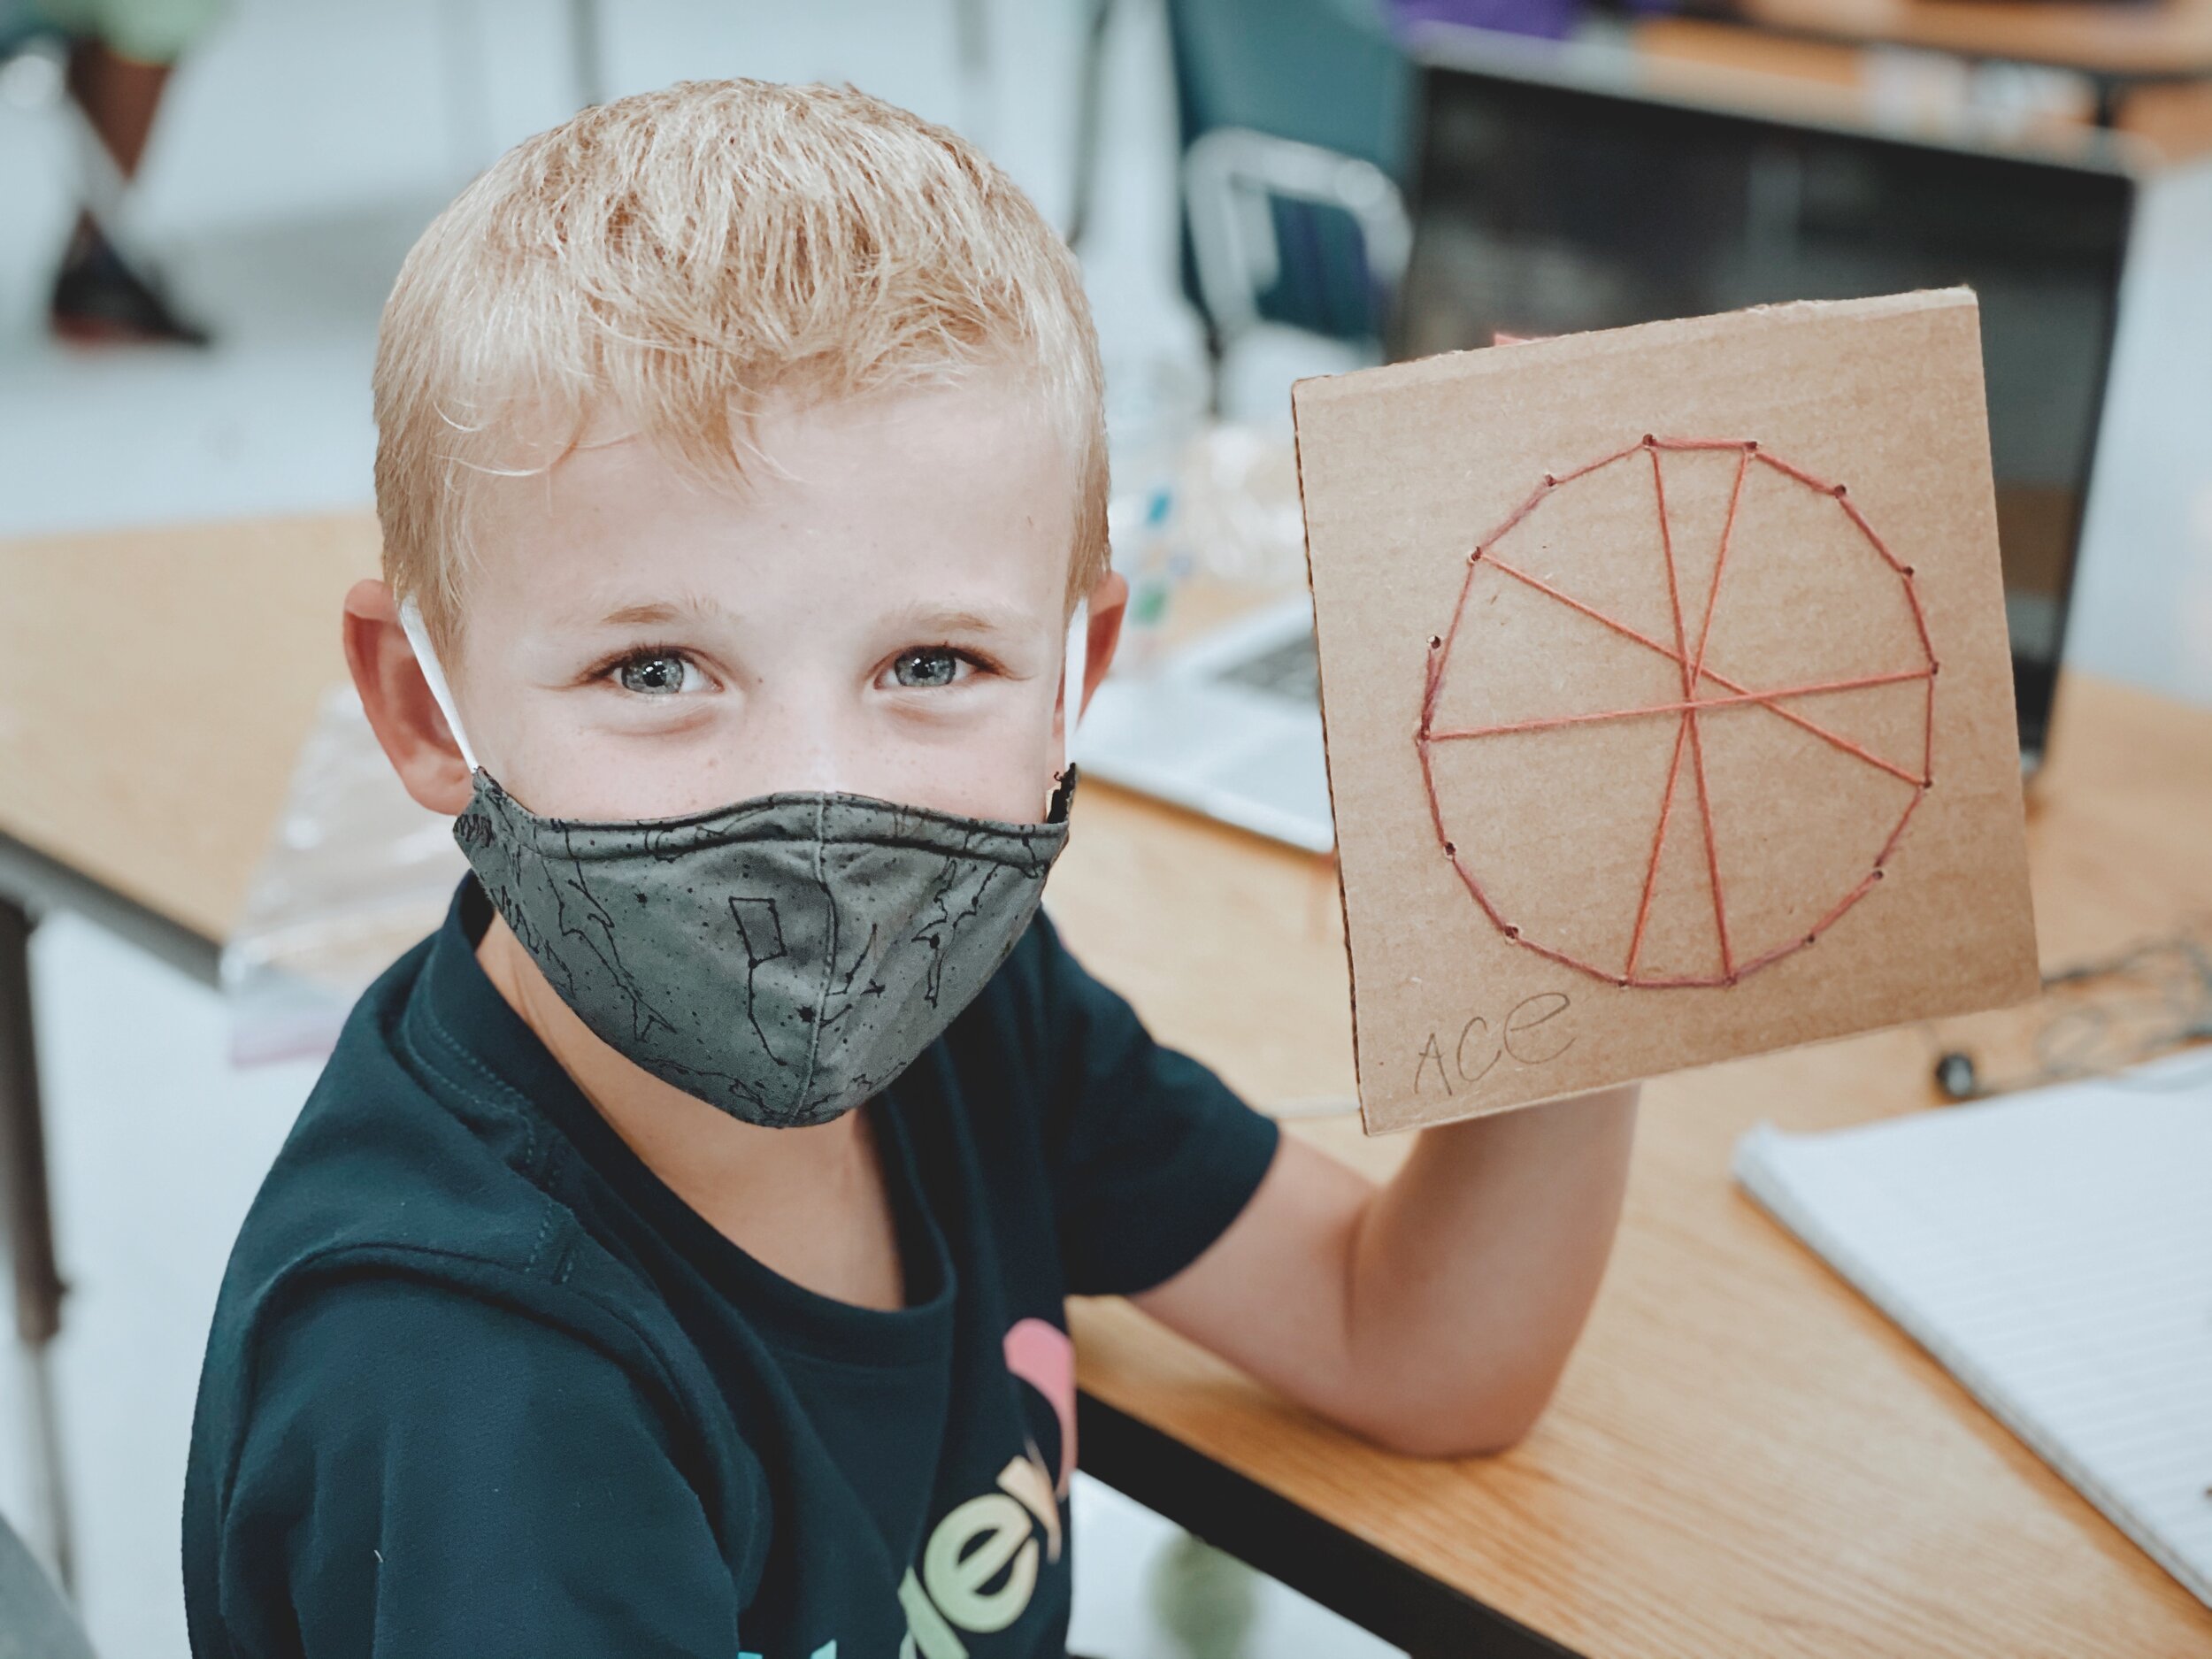
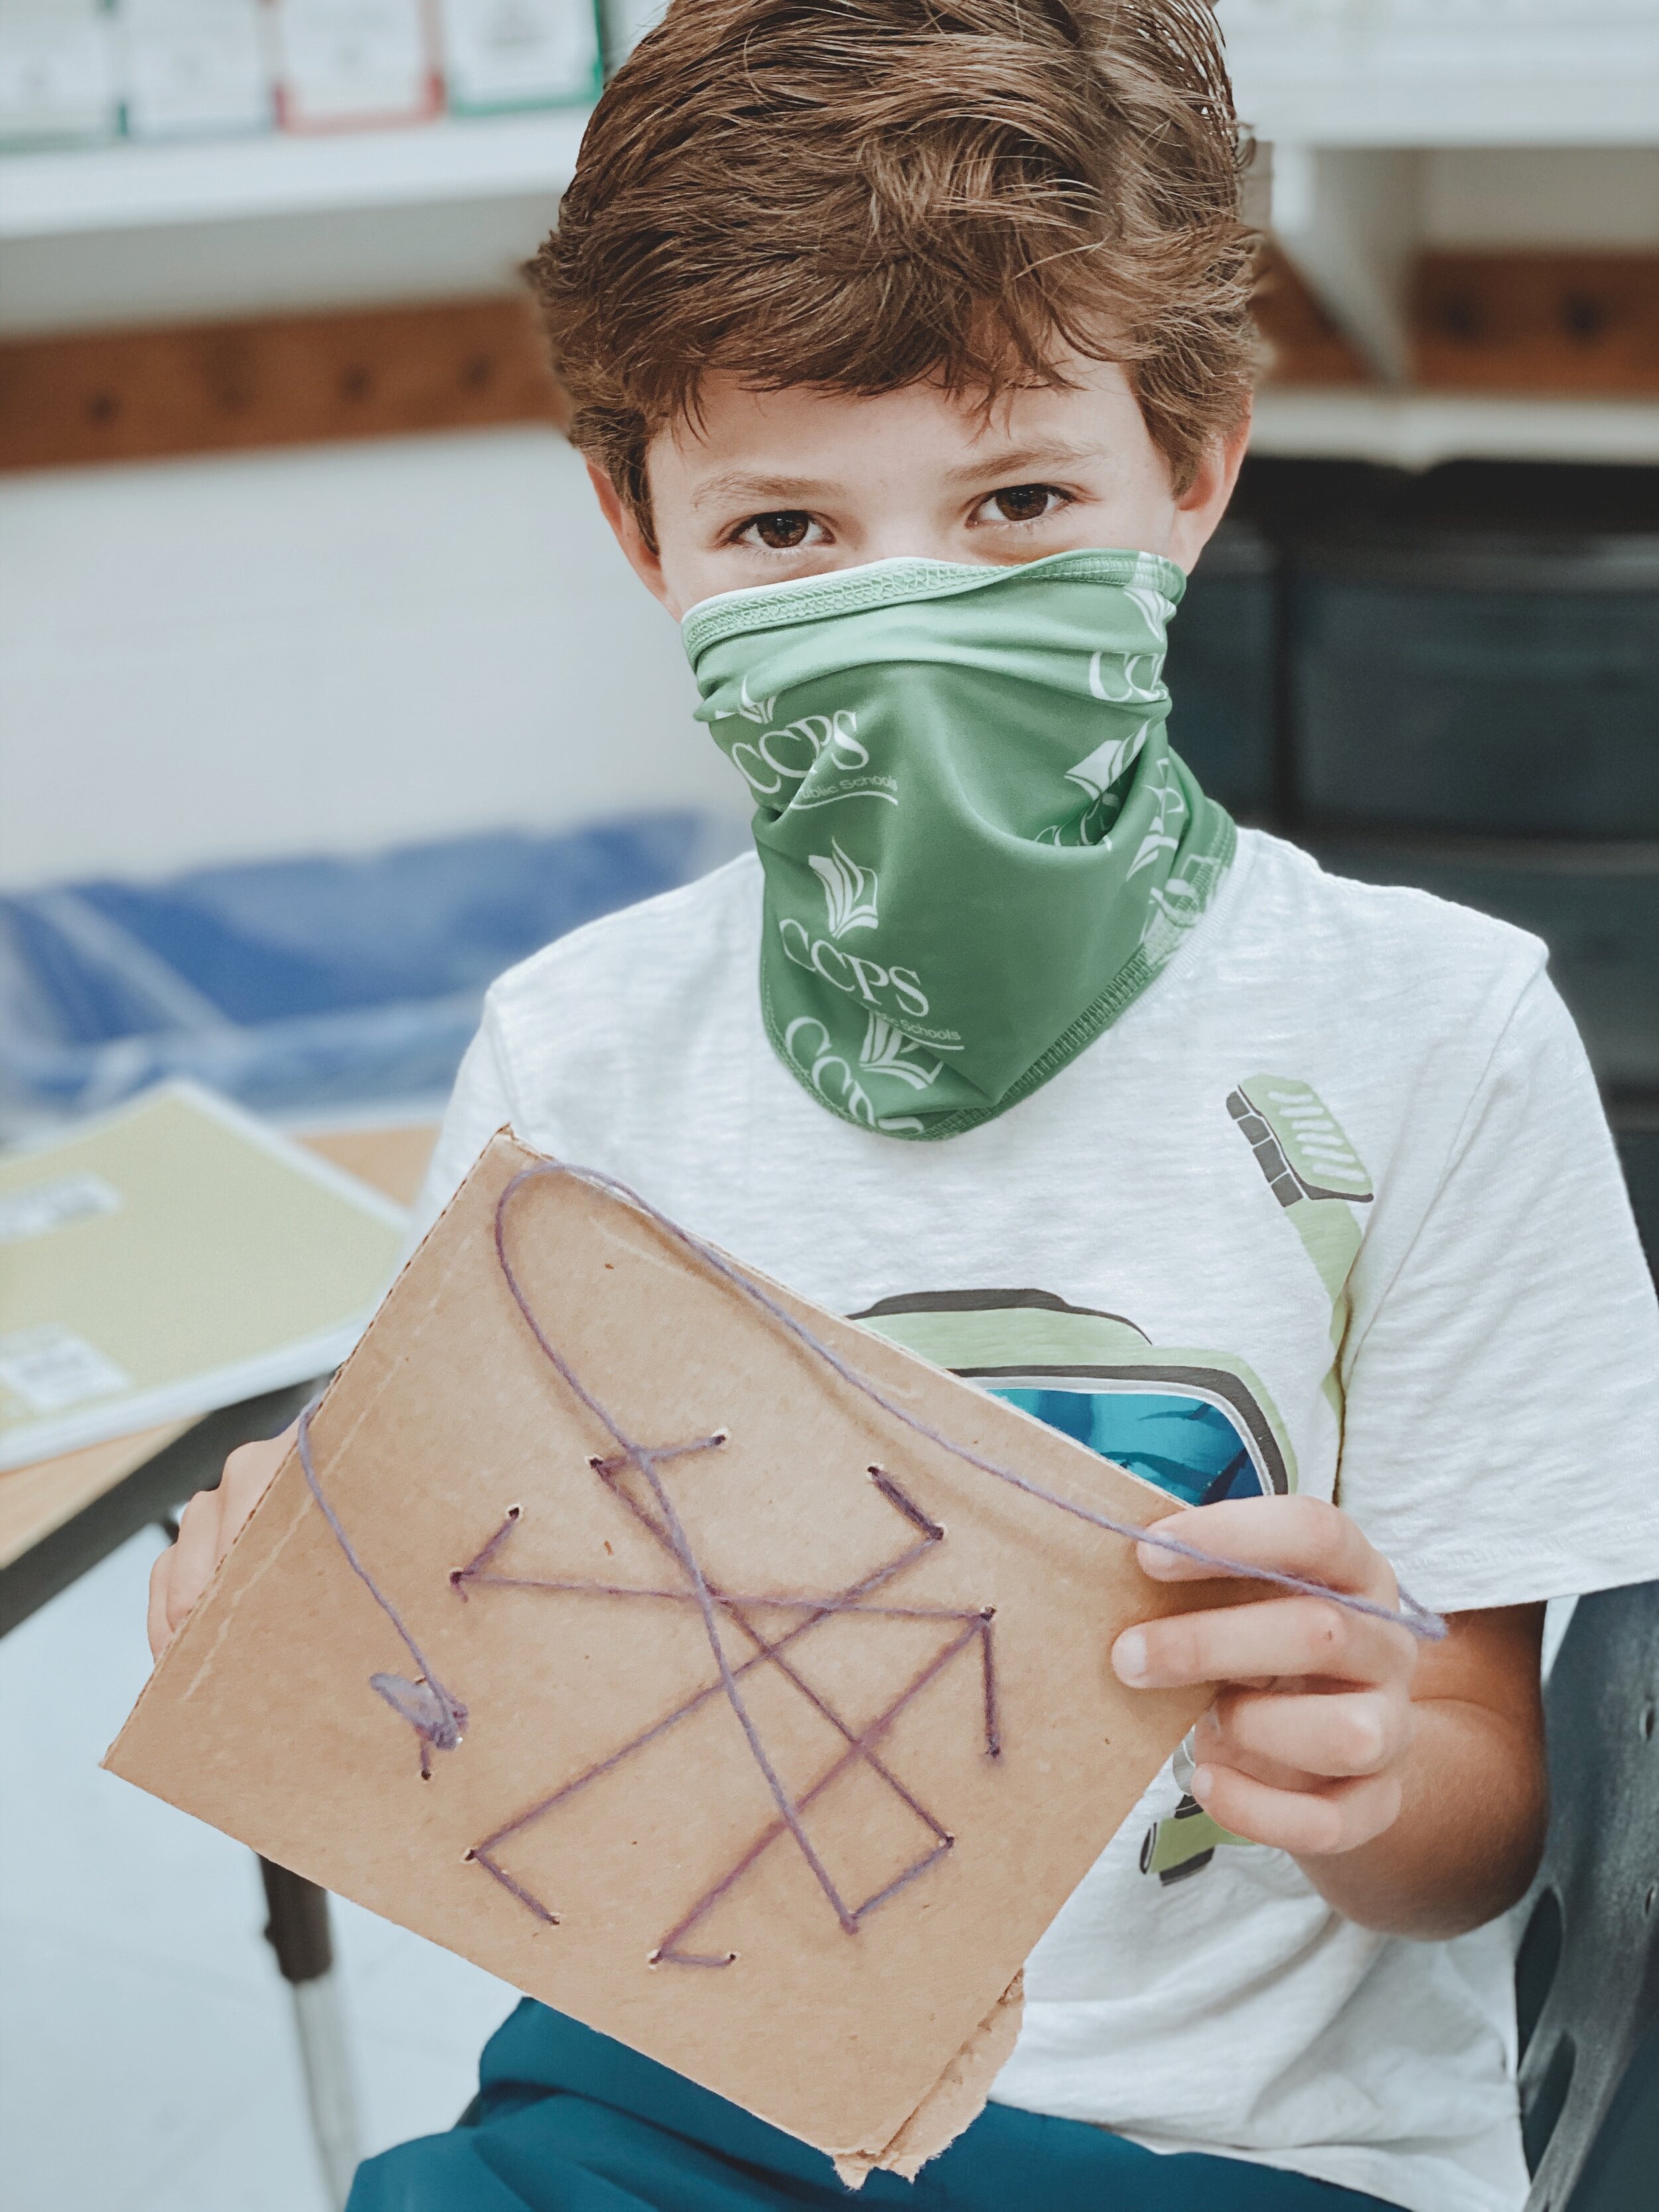
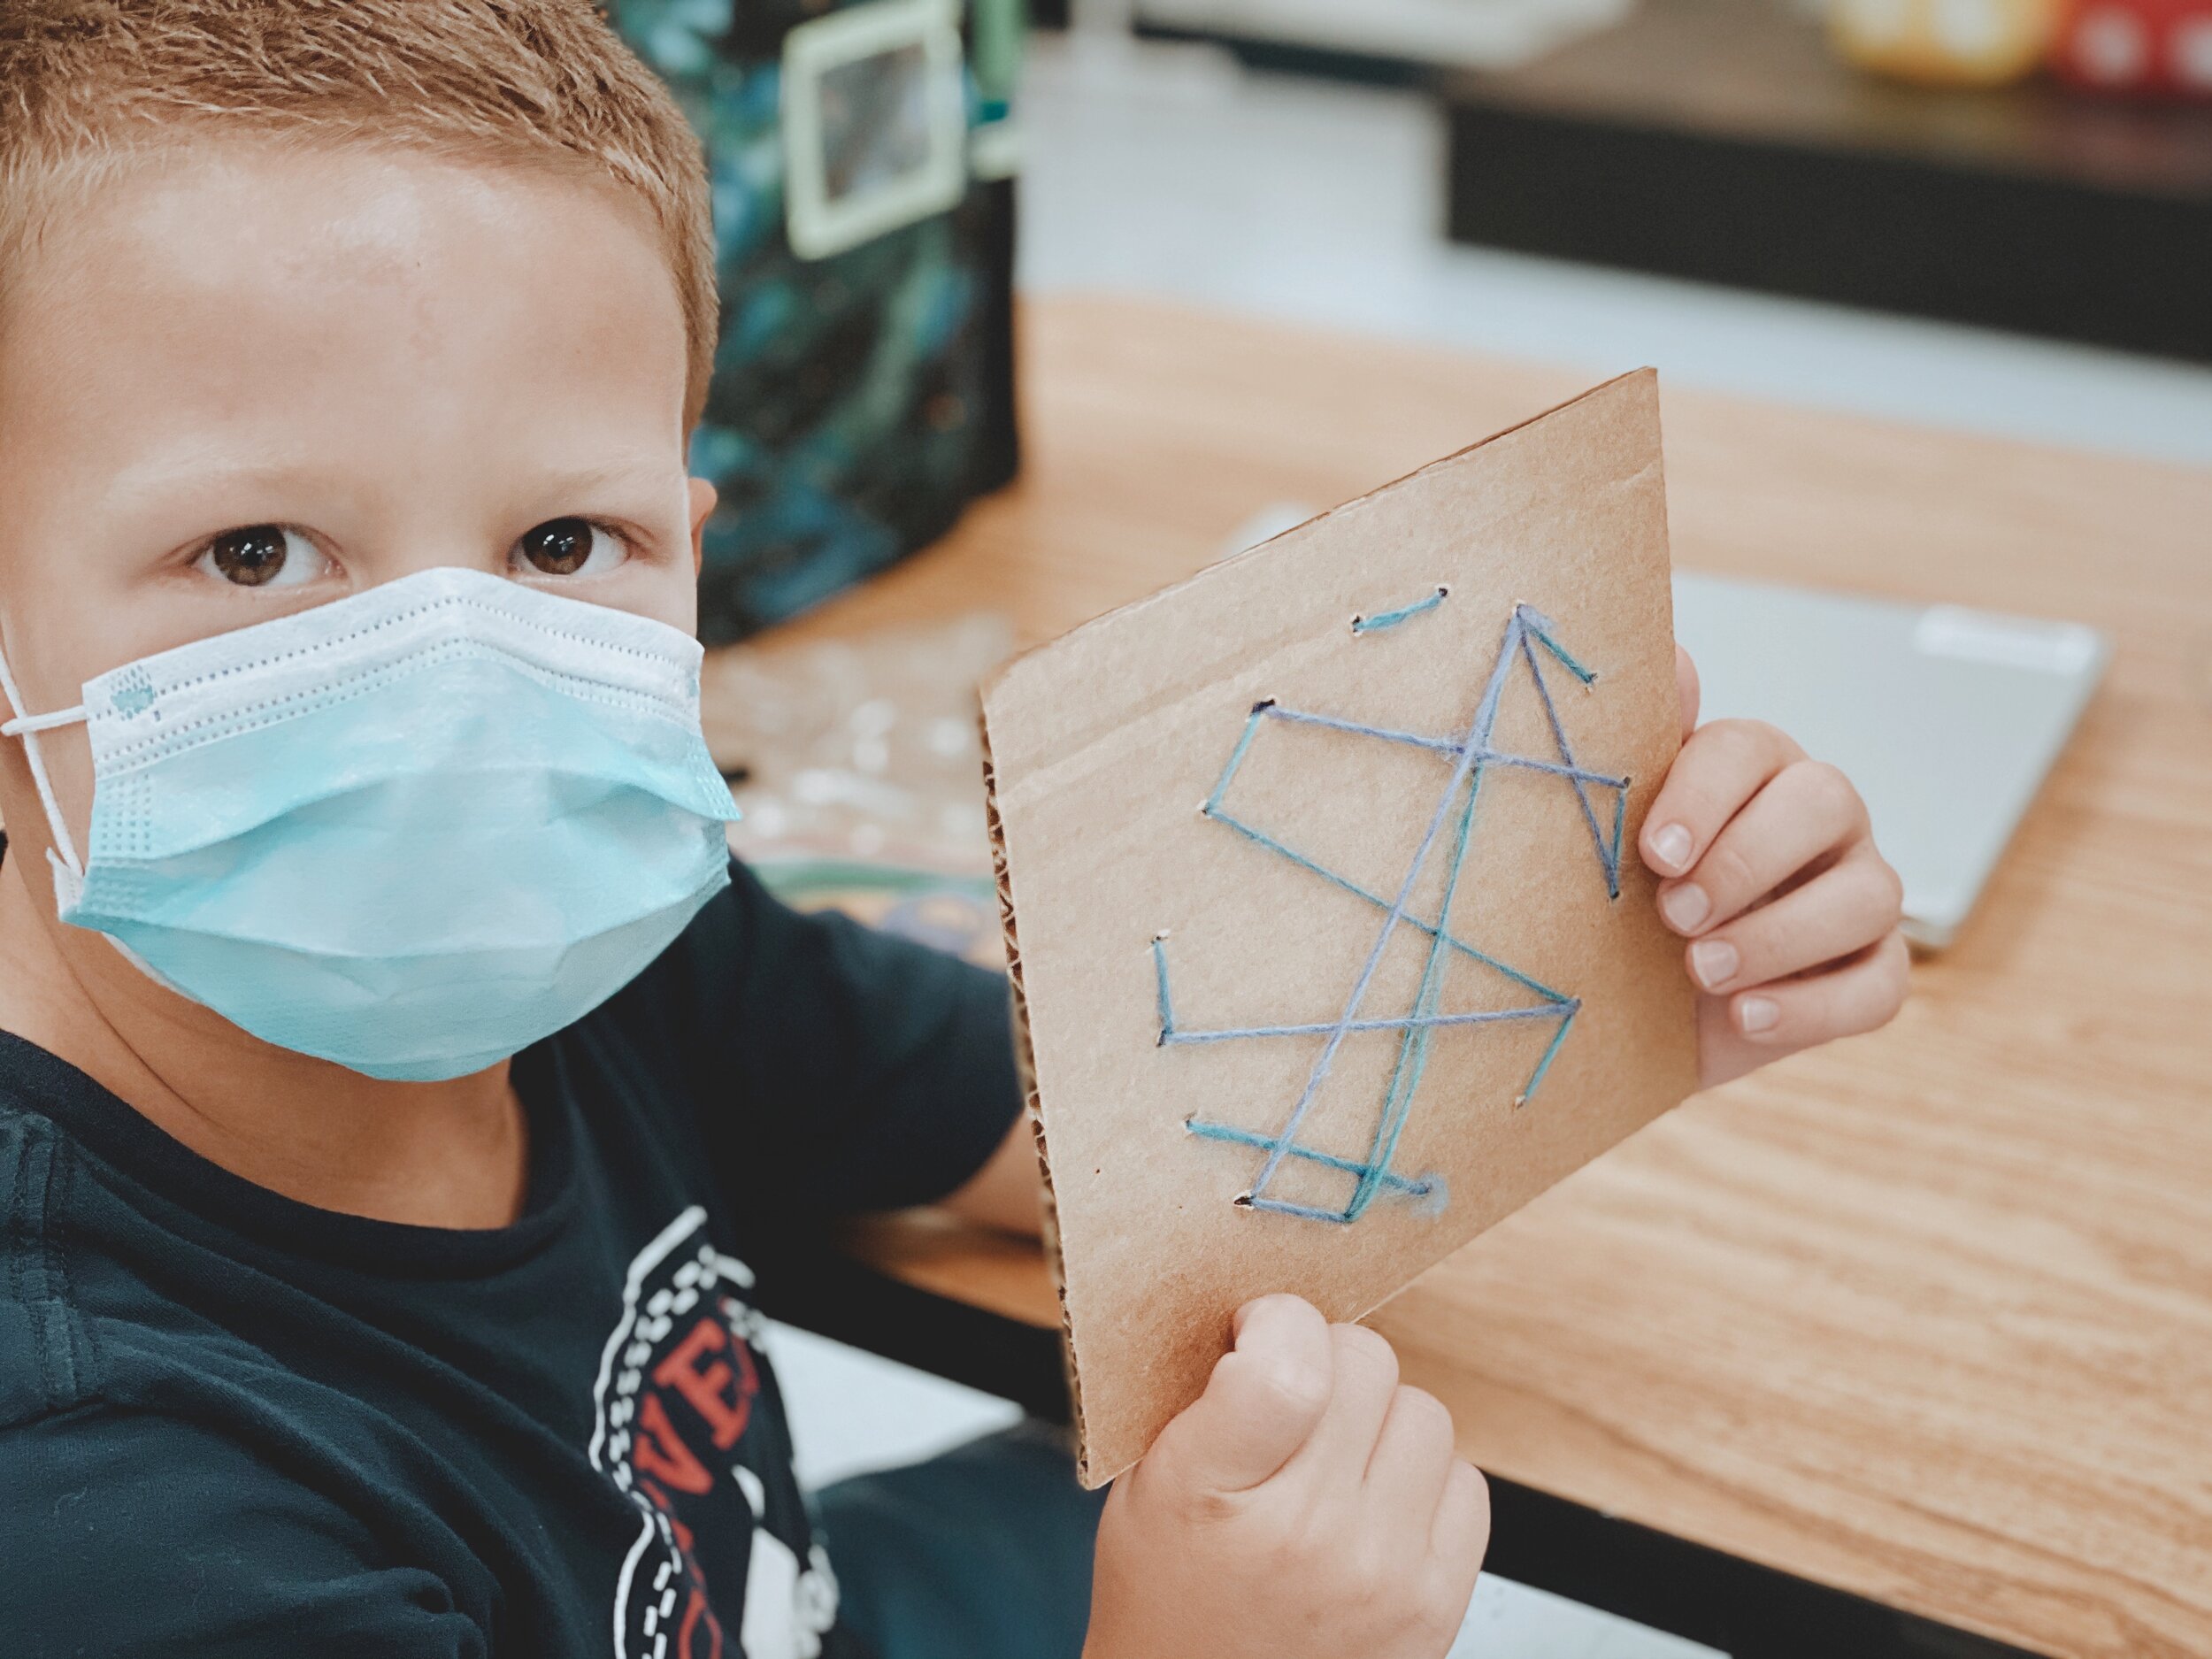
This one takes a bit more patience and skill…Prepare a class set of cardboard and then outline a circle. Using a skewer, puncture holes (dots!) around the outline of the circle. Then, use yard and large sewing needles to start weaving around the cardboard circle. This will create a unique design…that all started with a dot!
Dot Day Twins
(Dress up for Dot Day)!
This one is easy! Just tell your students to wear something with polka dots on it for Dot Day! You an also purchase a set of blank T-shirts and use permanent marker to create a unique design. This can be done on Dot Day and then students can wear their shirts. It’s a great way to boost classroom community!

(image taken pre-COVID)
Dot Day Missions of Kindness (Community Building)
Dot Day is all about making your mark and what better way to do that than to spread a little bit of kindness? We shared special messages (with a little treat - see below for info) around our campus to leave our mark on our related arts teachers, media specialists and more!
(image taken pre-COVID)
Dot Day Treats (Dot Candy)
This is definitely one of Kristin’s favorite things to do on Dot Day…Dot candy! You ay remember these treats from your youth. You know, the dots attached to the paper that you have to bite off? What kid wouldn’t love that? You can find them in bulk by clicking right here on Amazon. You can also use the “Dots” candy. Click here or the image below to buy those!

This pairs well with the activity above (Dot Day Missions). Attach a sheet or two of these onto a message and leave them around your campus for others!

(image taken pre-COVID)

(image taken pre-COVID)
Dot Day Buncee Activity
We love the creative possibilities with Buncee and your students will love this Dot Day activity! Using the Buncee tools, students drag and drop dots to create something new (it all started with a dot!). The best part of all is that this template (which can also be found in the ideas lab) is completely editable! Just share or assign it to your class and they’re ready to go! To access this activity, click here or on the image!

Dot Day Read Aloud with Novel Effect!

We all know how great the book “The Dot” is, but have you tried pairing this book up with the app Novel Effect? Novel Effect uses your devices microphone to bring stories to life! As you read, various sound effects and background music will be played. The coolest part is that you don’t have to feel pressured to speed read through the book. Novel Effect intelligently changes as you read, recognizing the words and phrases of the book. Click here to view this app on iOS and Google Play.
The Perfect Dot (For Littles)!
This activity from @zosia_majstruje on Instagram is the perfect activity for all of your perfectionist littles (or all ages)! Use paper towel or toilet paper rolls with paint. Have the students place the paint brushes into the roll(s) to paint the “perfect” shaped dot! Be sure to follow @zosia_majstruje on Instagram by clicking here!

Dot Day for Reluctant Learners
Not everyone knows where to start with Dot Day. In fact, many students feel just like Vashti. Sometimes we need a little inspiration to get the creative juices flowing. This activity from Cassie Stephens is the perfect way to keep everyone engaged. Use dot/circle stickers with Cassie’s PDF template. Have the students place a dot/circle sticker anywhere inside the frame. Then, let them use any art tools that they would like to continue their illustration!
Click here to view Cassie’s blog post
Click here to download Cassie’s template
Click here to follow Cassie on Instagram
-- Stay tuned for more Dot Day ideas that you can use in your classroom! Be sure to follow us on social media (@TheMerrillsEDU everywhere) for more! 👓👗
For more tips, tricks and lesson ideas for making learning more interACTIVE, check out our books The InterACTIVE Class and Flipgrid in the InterACTIVE Class on Amazon!

Create Your Own Breakout Game Using Wakelet, Buncee and Flipgrid!
Bring the engagement of breakout games into your classroom with this Wakelet, Buncee and Flipgrid idea! This post walks you through the process of setting up the breakout OR simply downloading our Wakelet collection templates for yourself!

What does Wakelet, Flipgrid and Buncee all have to do with each other? The answer is alot! But, in this post, you’ll learn how to connect all of these tools to create a truly unique experience for your students: A Breakout!
In this blog post you’ll learn:
(Click on any subheading to jump to that section)
How to Set Up Wakelet for Branching
The key to setting up your Wakelet / Buncee / Flipgrid challenge is using branching, which allows you to send users to different questions depending on their previous answers. For example, if you have a multiple choice question, the correct answer will take you on a different path then the incorrect answers. This is how the Wakelet collections need to be set up.

Start off by mapping out how you want your branching to work. Where will your students go when they answer correctly? Where will they end up if they answer incorrectly? Here’s an example of the beginning stages of what ours looked like (this obviously evolves as you go on).
Once you have your branching and mapping figured out, it’s time to start building the Wakelet collections. Start off by building your first collection by calling it, “Challenge 1.” On Challenge 1, students are given a question and four different answer choices. We recommend keeping the first challenge relatively easy, this was your students feel confident and remain engaged early on.
Before you save everything, be sure to click on the settings icon located on the top left. Make sure you have toggled the Collaboration feature on. Doing so will allow your students to leave work for others to see. This is handy if you have students that might struggle and could use a helping hand from their friends.

When we toggle this feature on, we ask that our students share their strategies - but do NOT share their final answers (for example, they work out that 2+2 = a mystery number - never giving away the answer). This step is completely optional, and you may decide that you don’t want this feature enabled. It’s totally up to you!


Now that you have your first challenge created, you will need to create two additional Wakelet collections - one for the correct answer and one for the incorrect answer. When creating the incorrect collection, be sure to provide a link back to the previous challenge (so that your students can try again). When setting up the correct response, you will want to include the next challenge below the “correct” answer. This is also where your students can be tipped off on what is to come (the first letter of the term “Flipgrid” changes color - indicating that they will need to answer the challenges correctly in order to change the color of each letter in the word. Now they are ready to move onto the next challenge. Repeat the steps above as needed!
How to Add Buncee into Your Wakelet Collection

One of the best integrations with Wakelet is with Buncee. Educators (or students) can post a “live” Buncee into a Wakelet collection. So, in this example we have placed a Buncee project right into Wakelet (copy the share link from Buncee clicking “code”). The students use the hyperlinked items from Buncee to click and find the correct answer. In our example, we chose the books as the correct answer. But, we made the challenge a little more interesting…most students thought the correct answer was “books,” but it was actually the number 8. So, when the students got to the final step, they weren’t able to get in unless they figured out that there was 8 books and needed to use the number 8 instead of the term “books.” This may not have been obvious to them at first, because clicking on the books lead them to the next challenge - indicating that they had the correct response. It was just a fun little twist to throw at them! See if you can figure it out below! 😜
Someone has come into the classroom and left a mess! There are clues everywhere! See if you can solve this puzzle:
I have letters and numbers but I’m not a computer keyboard
I’m sometimes stored in a case but I’m not a cellphone
I contain paper but I’m not a ring binder
I have a cover but I’m not a pillow
Lunch? No thanks. We already eight.
Click on the image that you think is the correct answer. Be careful!
Setting Up Flipgrid for a Wakelet Student Breakout Game
Once you have all of your Wakelet collections / challenges set up, you’ll need to set up a new Group on Flipgrid. From the educators dashboard, slide the toggle button onto Groups. Then, click the blue “Create a Group” button. Enter the information accordingly, then under permissions select Student Username. For the first and last name use something generic like Winner Winner. The next step is important! For the username, enter all of the numbers of the Wakelet challenges. So, if you used 2+2 for challenge 1, 3+3 for challenge 2 and 4+4 for challenge 3, you would enter: 468 (and so on). Set your preferred notifications, then click the blue “Create Group” button.


In your new group, create a new Topic by clicking on the blue “Create a Topic” button. This will be where your students will end up once they crack the code. In our example, we had the students do something fun - show us a victory dance! It was a fun way for us to see who was able to successfully complete the challenge and add some more engagement.

Another tip: you will want to either delete or hide the auto generated Flipgrid Topic that gets created when you start a new Group. Deleting or hiding this topic will guarantee that your students land on the appropriate Topic (since there will only be one Topic in the group). Once you have this set up, you are ready to share your challenge with your students!
Download the 🔥FREE🔥 Wakelet Collections
A bit confused about the above? Short on time? We’ve got you! You can download ALL of the Wakelet collections by clicking here or the image below! Tip: You will need to edit the link to the final Flipgrid challenge with the link to your own Flipgrid Group.
Also, this is a live collection. Please do not add any content, as it could mess up the experience for others.

See it in Action: Classroom images and video from the Wakelet, Buncee and Flipgrid Breakout Challenge


-- Stay tuned for more on how to use Wakelet breakout activities in your classroom! Planning on trying this out? We’d love to see how you’re using it! 👓👗
For more tips, tricks and lesson ideas for making learning more interACTIVE, check out our books The InterACTIVE Class and Flipgrid in the InterACTIVE Class on Amazon!


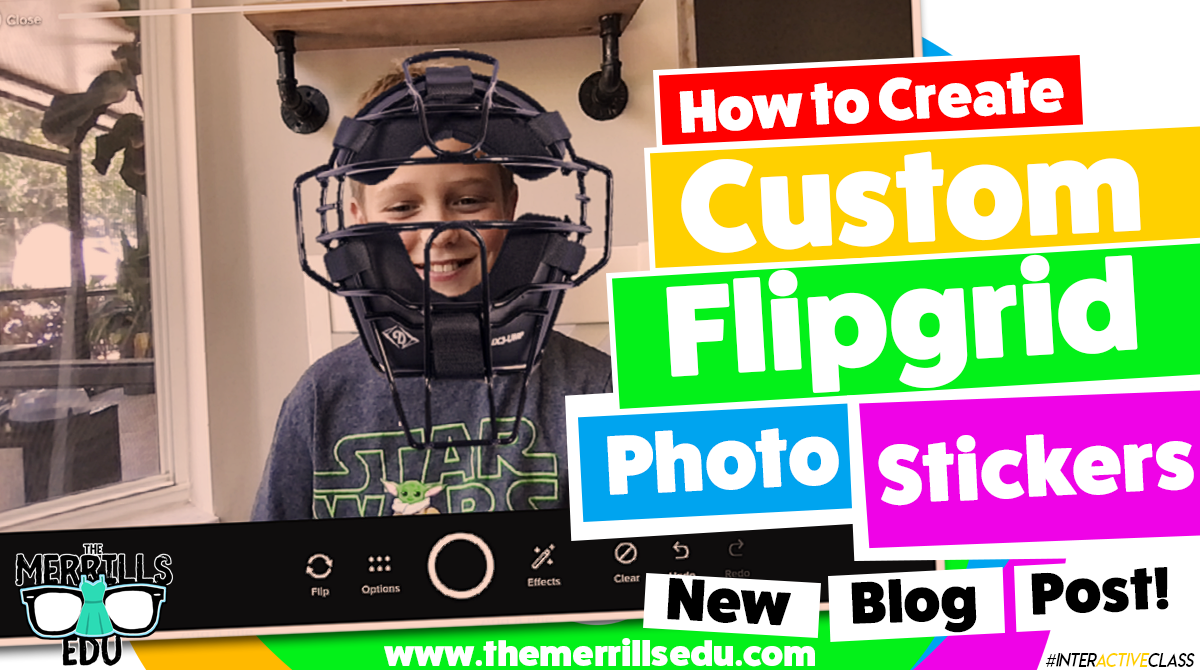
How to Create a Flipgrid Photo Sticker
@TheMerrillsEDU explain how to create your own stickers to use in Flipgrid videos! These can easily be added right from within the Flipgrid Shorts Camera. In this post, you’ll also find links to books that work with the stickers!

Flipgrid photo stickers are images with transparent backgrounds that may be placed on top of your Flipgrid videos. There are tons of already created options within the Flipgrid camera, but sometimes you need something specific. In this blog post you’ll learn:
(click on any subheading to jump to that section)
It’s important to note that this is only possible on desktop right now. Check back here for updates as to when this will be available for mobile users.
How to Make a Flipgrid Photo Sticker in Adobe Spark

Start off by creating a custom sized image. Set the dimensions to: 13.33 (width) x 7.5 (height), or download our template by clicking here.
Next, use icons or design assets to find an appropriate image for your Flipgrid Photo Sticker. Resize the icon (or asset) to make it larger on the canvas. It should take up the majority of the canvas, leaving a small border all around (if you don’t leave the border, the image will sometimes get cut off).
Now that you’ve created the sticker, it’s time to save it. Please follow these instructions carefully as failure to do so will result in the sticker not functioning properly. Follow these steps:
Click the “Download” button on the top right of the screen.
Make sure that “PNG” is selected, then click “Start Download.”
A Window will appear asking to choose a background type. Be sure to select Transparent (PNG). This will remove the white background, changing it to transparent.


It’s time to put your sticker to the test! Here’s how to get what you created onto your Flipgrid video:
Open up your Flipgrid Topic (or Shorts Camera).
Once the camera opens, click “Effects.” This opens several options.
Click “Photo.”
Upload your Spark file that you created.
Once it appears in the Flipgrid Shorts camera, resize it appropriately. Now you’re ready to record!
How to Make a Flipgrid Photo Sticker in PowerPoint
Open a new / blank presentation. By default, PowerPoint will open a widescreen 13.33 x 7.5 presentation. If it doesn’t open in this size, you’ll need to adjust it to fit those dimensions or click here to download a blank template. Now that you have your canvas ready, add an image or icon. If your image has a background, you can remove it by following these steps:

Click on the image that has background you want to remove.
On the Format tab, click Remove Background.
PowerPoint will automatically select the part of the image to be kept.
Adjust the selection to cover the area of the image that you want to keep.
On the Background Removal Tool tab, click Mark Areas to Remove and select any other area that you want to remove.
When you’re finished, click Keep Changes.
If you’re looking for icons, the website Freeicons.io has some good options. The icons can be saved as SVG or PNG files. Check out the site by clicking here.
Now that your image has a transparent background, it’s time to save it as a PNG file. Tip: if you have more than one object that you would like to appear in your Flipgrid Photo Sticker, group the images so that they are flattened down to one image. Right click the image on the PowerPoint slide, then select “Save As Picture.” This will allow you to export that image from the PowerPoint slide with the transparent background. Tip: Don’t try to save it as you normally would in PowerPoint. If you do, the image will lose the transparent background.


It’s time to put your sticker to the test! Here’s how to get what you created onto your Flipgrid video:
Open up your Flipgrid Topic (or Shorts Camera).
Once the camera opens, click “Effects.” This opens several options.
Click “Photo.”
Upload your Spark file that you created.
Once it appears in the Flipgrid Shorts camera, resize it appropriately. Now you’re ready to record!
How to Make a Flipgrid Photo Sticker in Canva
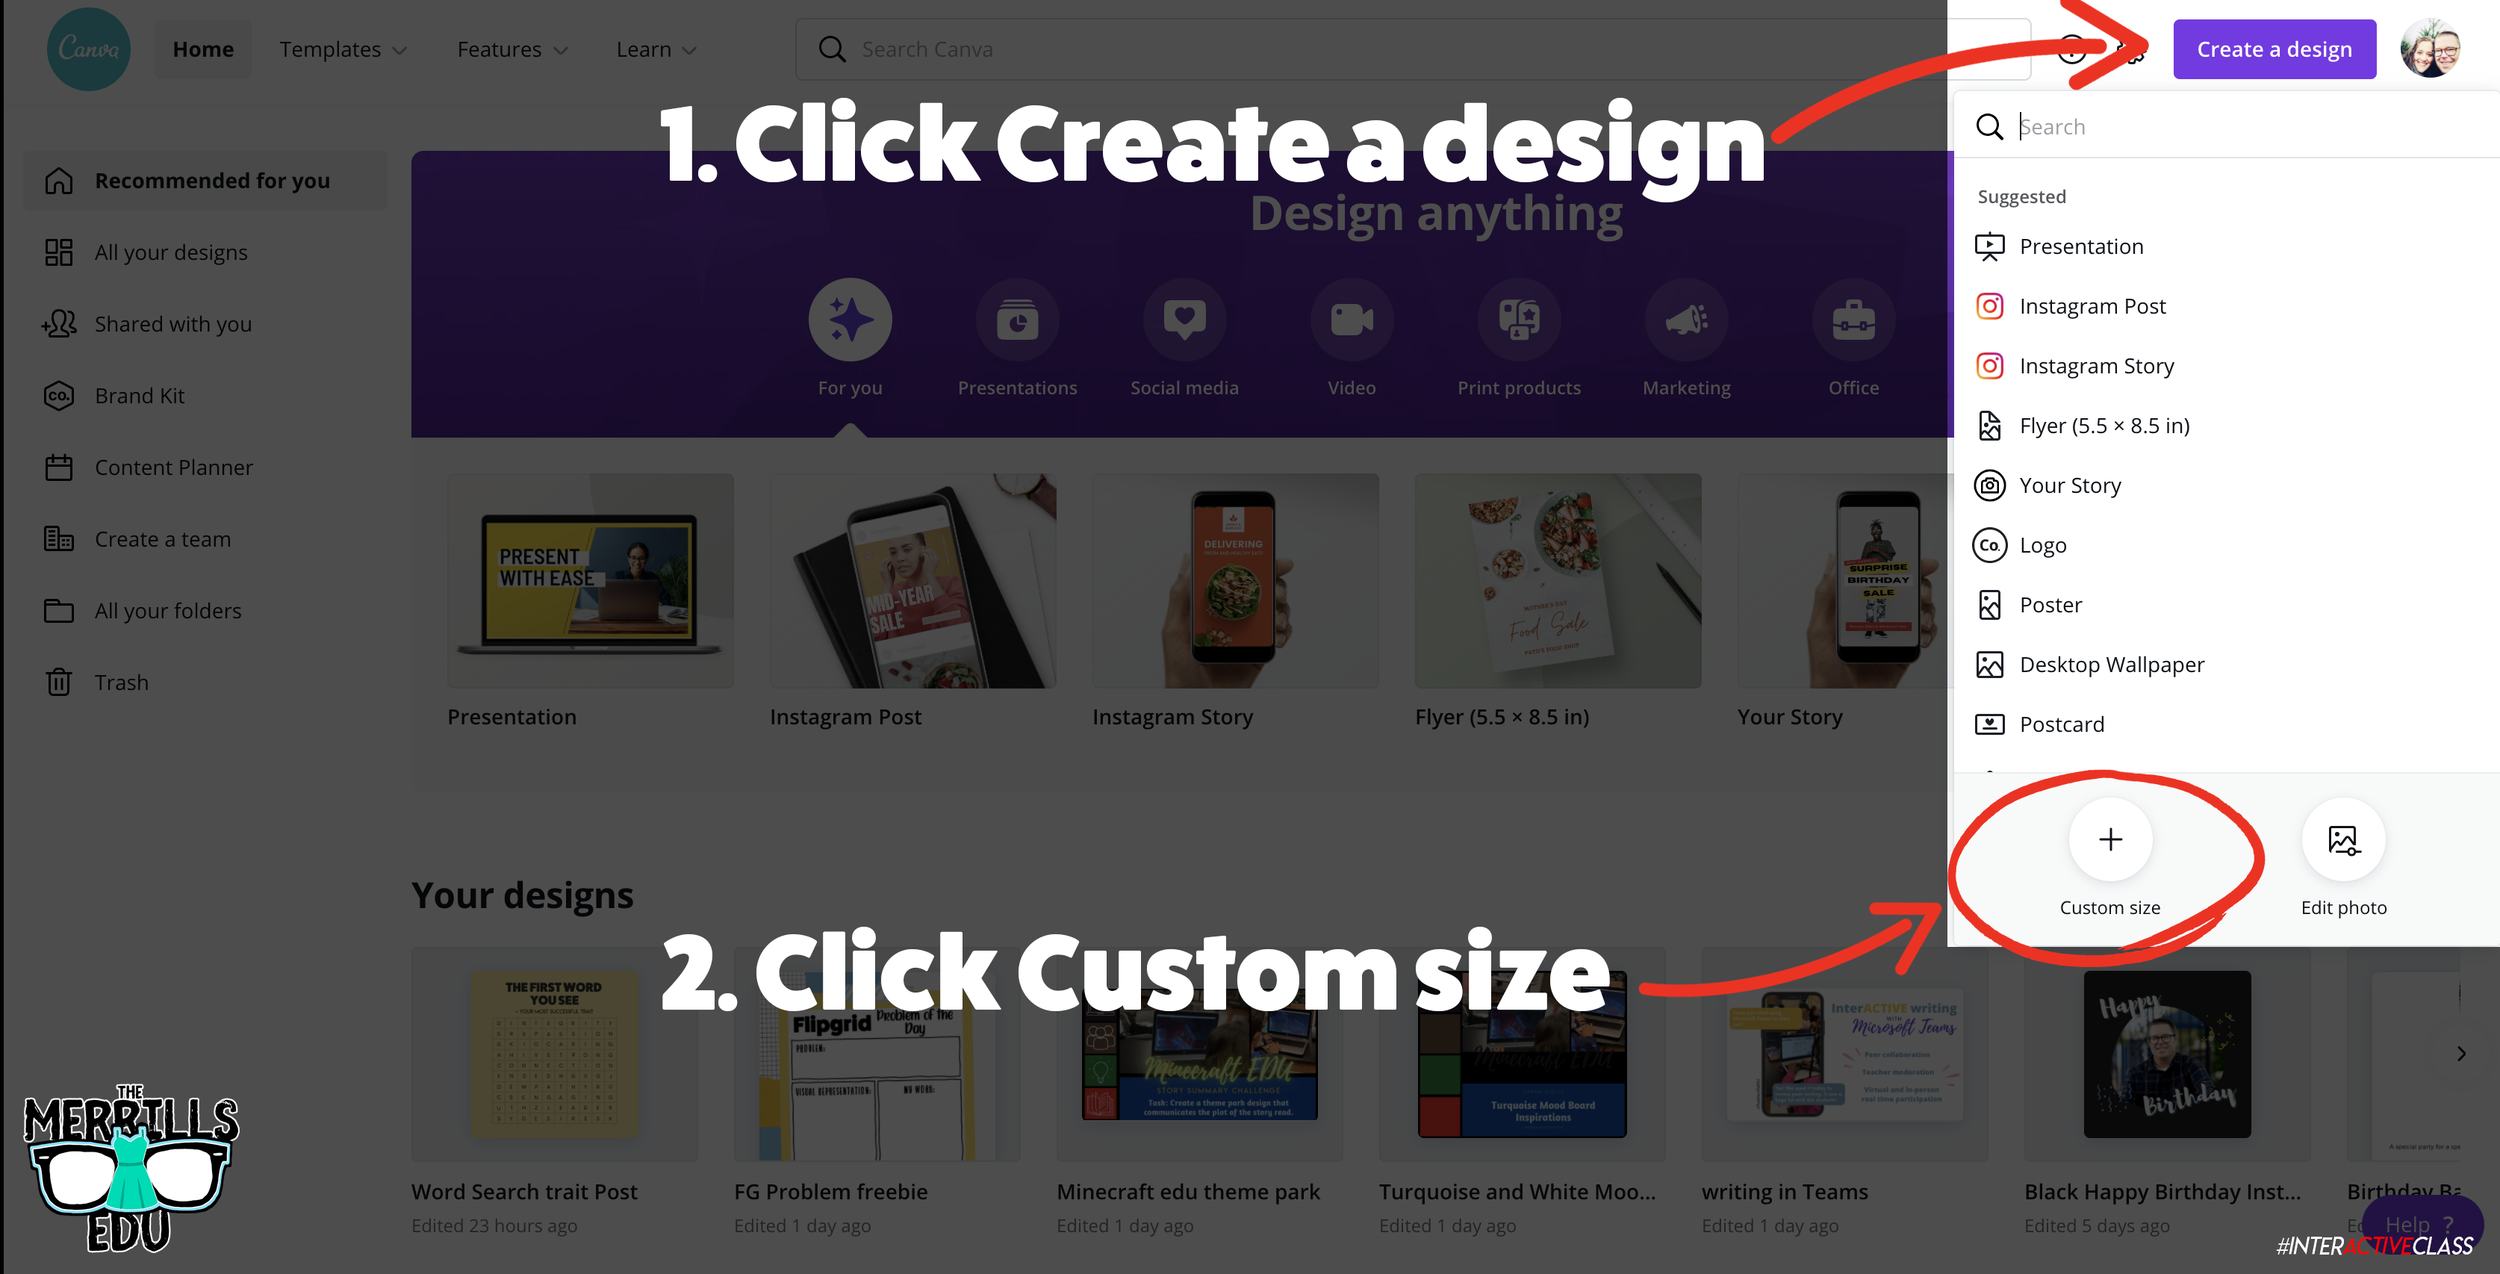
If you already have a Canva account, you can download our Flipgrid Photo Sticker template by clicking here. If you’re starting from scratch, log onto the Canva dashboard and. create a custom size graphic by clicking on the “Create a Design” button located on the upper right side of the screen. Change the dimensions to: 13.33 in x 7.5 in (note: Canva defaults to pixels, so you’ll need to change the dimensions from pixels to inches), then click “Create new design.” A new window will open with your project ready.
Once you have the project ready, it’s time to start adding the item(s) that you would like to appear as your Flipgrid Photo Sticker. Search through Canva’s Elements to find the item or items you wish to add. Tip: if you’re adding more than one item, you can group them. Once you have your design ready, follow these steps to download it (Tip: follow each of these steps! Failure to do so could result in your Photo Sticker not working properly.):
Click the “Download” button on the top right side of the dashboard.
Make sure that the file type is listed as PNG.
Click the box next to “Transparent background.”
Then click “Download” to save your Flipgrid Photo Sticker!


It’s time to put your sticker to the test! Here’s how to get what you created onto your Flipgrid video:
Open up your Flipgrid Topic (or Shorts Camera).
Once the camera opens, click “Effects.” This opens several options.
Click “Photo.”
Upload your Spark file that you created.
Once it appears in the Flipgrid Shorts camera, resize it appropriately. Now you’re ready to record!
Examples of Flipgrid Photo Stickers in action!
Curious how academics fit into all of this? Our Flipgrid Photo Stickers can be used for any texts that fit the images. But, here’s a breakdown of how we have been using our them and what books we’re tying into the lessons.
Character Point of View

Tie in these books:

Stuck

Sam and Dave Dig a Hole
This is probably one of our favorite ways to use the Flipgrid Photo Stickers. Flip the camera, and have your students explain the point of view from one of the characters in the text.
For example, your students can look through the eyes of one of the story’s characters and explain how they would see the story unfold. Or, perhaps they would see something completely different than the main character?

Social Studies: Tourism in Florida
Tie in any disney related text
Here we had students explain Florida’s tourism by giving them what every kid wants: Mickey and Minnie Mouse ears! Incorporate Disney into almost any nonfictional standard to give your students a magical day!
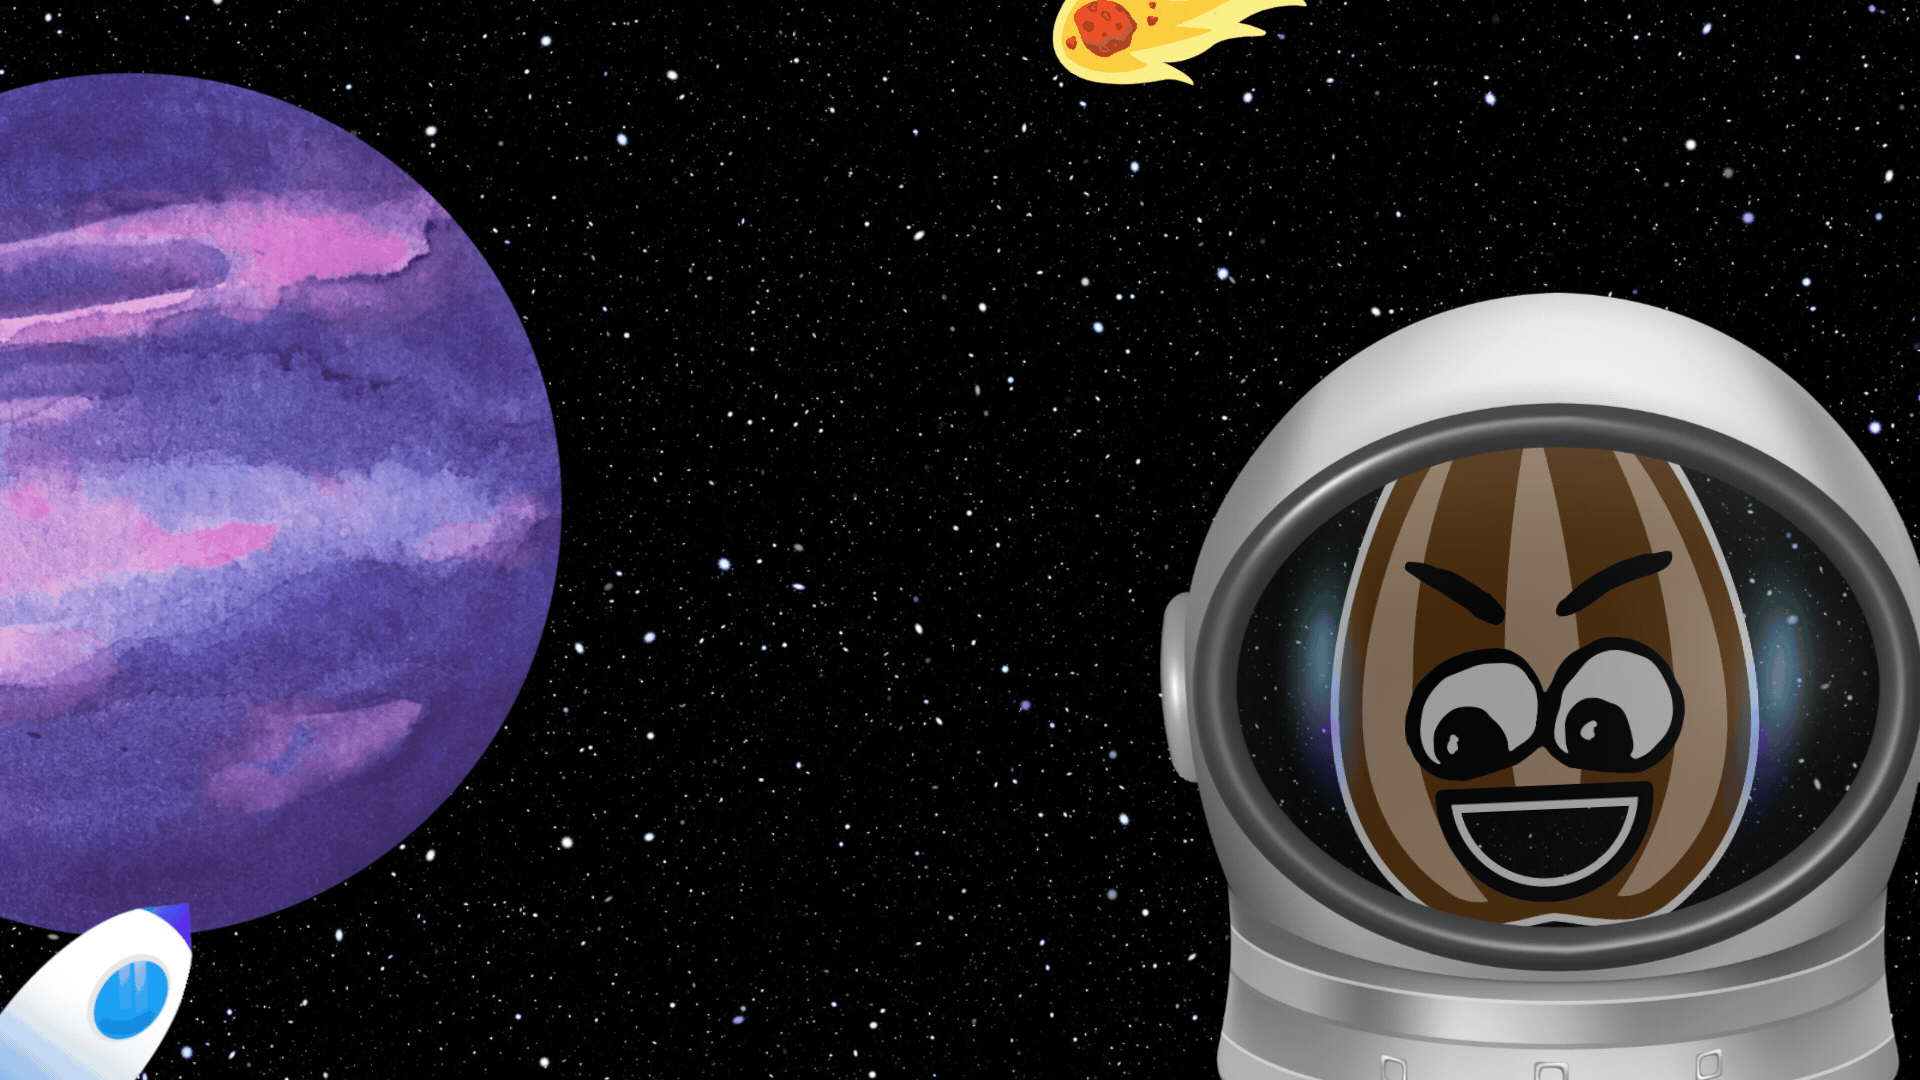
Science: Becoming an Astronaut

Tie in this book:

Mae Among the Stars
Have your students blast off on an out of this world adventure by becoming an astronaut! Have them give a guided tour of the solar system and explain facts to their friends!
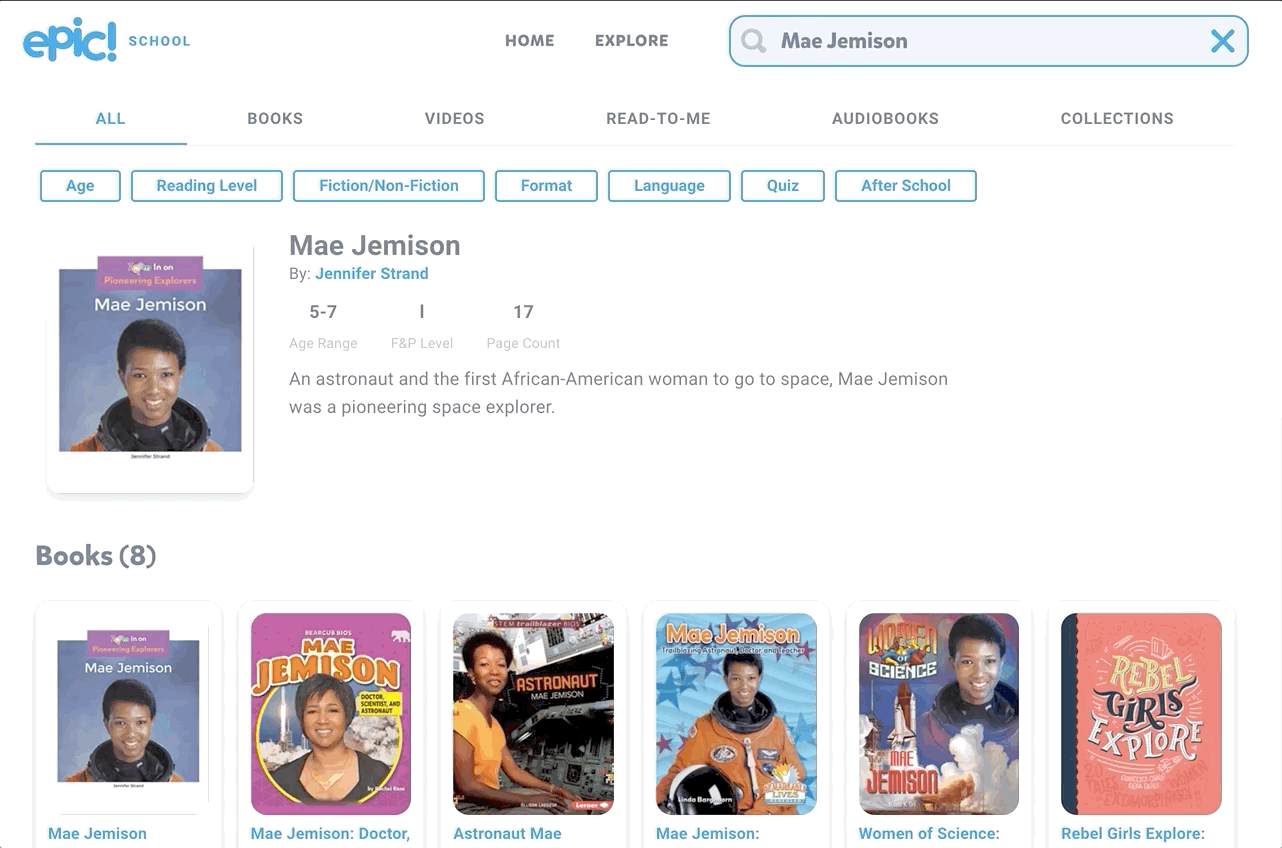
Social Studies: Historical Figures

Tie in this book (or any other on Earhart):

Amelia Earhart
(download requires an Epic Kids account)
Take your students on an early journey around the world as they work to uncover clues about Amelia Earhart! Students can even use the Flipgrid Emojis behind the custom Photo Stickers for an added effect.
Sequencing Events

Tie in this book:

Lost and Found
Have your students explain the sequence of events by turning into one of the characters. Encourage your students to take advantage of the Flipgrid Shorts Camera’s “pause” feature. Have them explain what happens first, click pause, then collect their thoughts before moving on. Repeat as necessary!
Character Emotions
Have your students explain what emotions the character(s) are feeling. How do they feel in the beginning? Middle? End? Students can even compare / contrast characters by using the Flipgrid Shorts Camera “Pause” feature. Here are several recommendations:


Grumpy Monkey


The Bad Seed

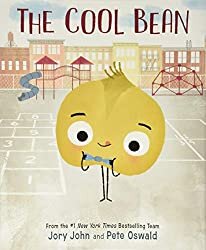
The Cool Bean


The Couch Potato
Explain the perspective from a Villain!

Tie in this book: Extra Yarn

Extra Yarn
Villains always hav a different perspective of what is happening in the story. Have your students take on the challenge of becoming the evil character and explain the story from their point-of-view.
Download our⚡️FREE ⚡️Flipgrid Photo Sticker Bundle Pack
Interested in any or all of the Photo Stickers above? You can download them all for free below!


-- Please follow us on social media and tag us with how you’re using Flipgrid Photo Stickers into your classroom! 👓👗
For more tips, tricks and lesson ideas for making learning more interACTIVE, check out our books The InterACTIVE Class and Flipgrid in the InterACTIVE Class on Amazon!


InterACTIVE Activities for The Day the Crayons Quit
The Day the Crayons Quit and The Day the Crayons Came Home are two classroom essentials! @TheMerrillsEDU share interACTIVE activities featuring: Google Jamboard, Novel Effect, Chatterpix Kids, Flipgrid and more!
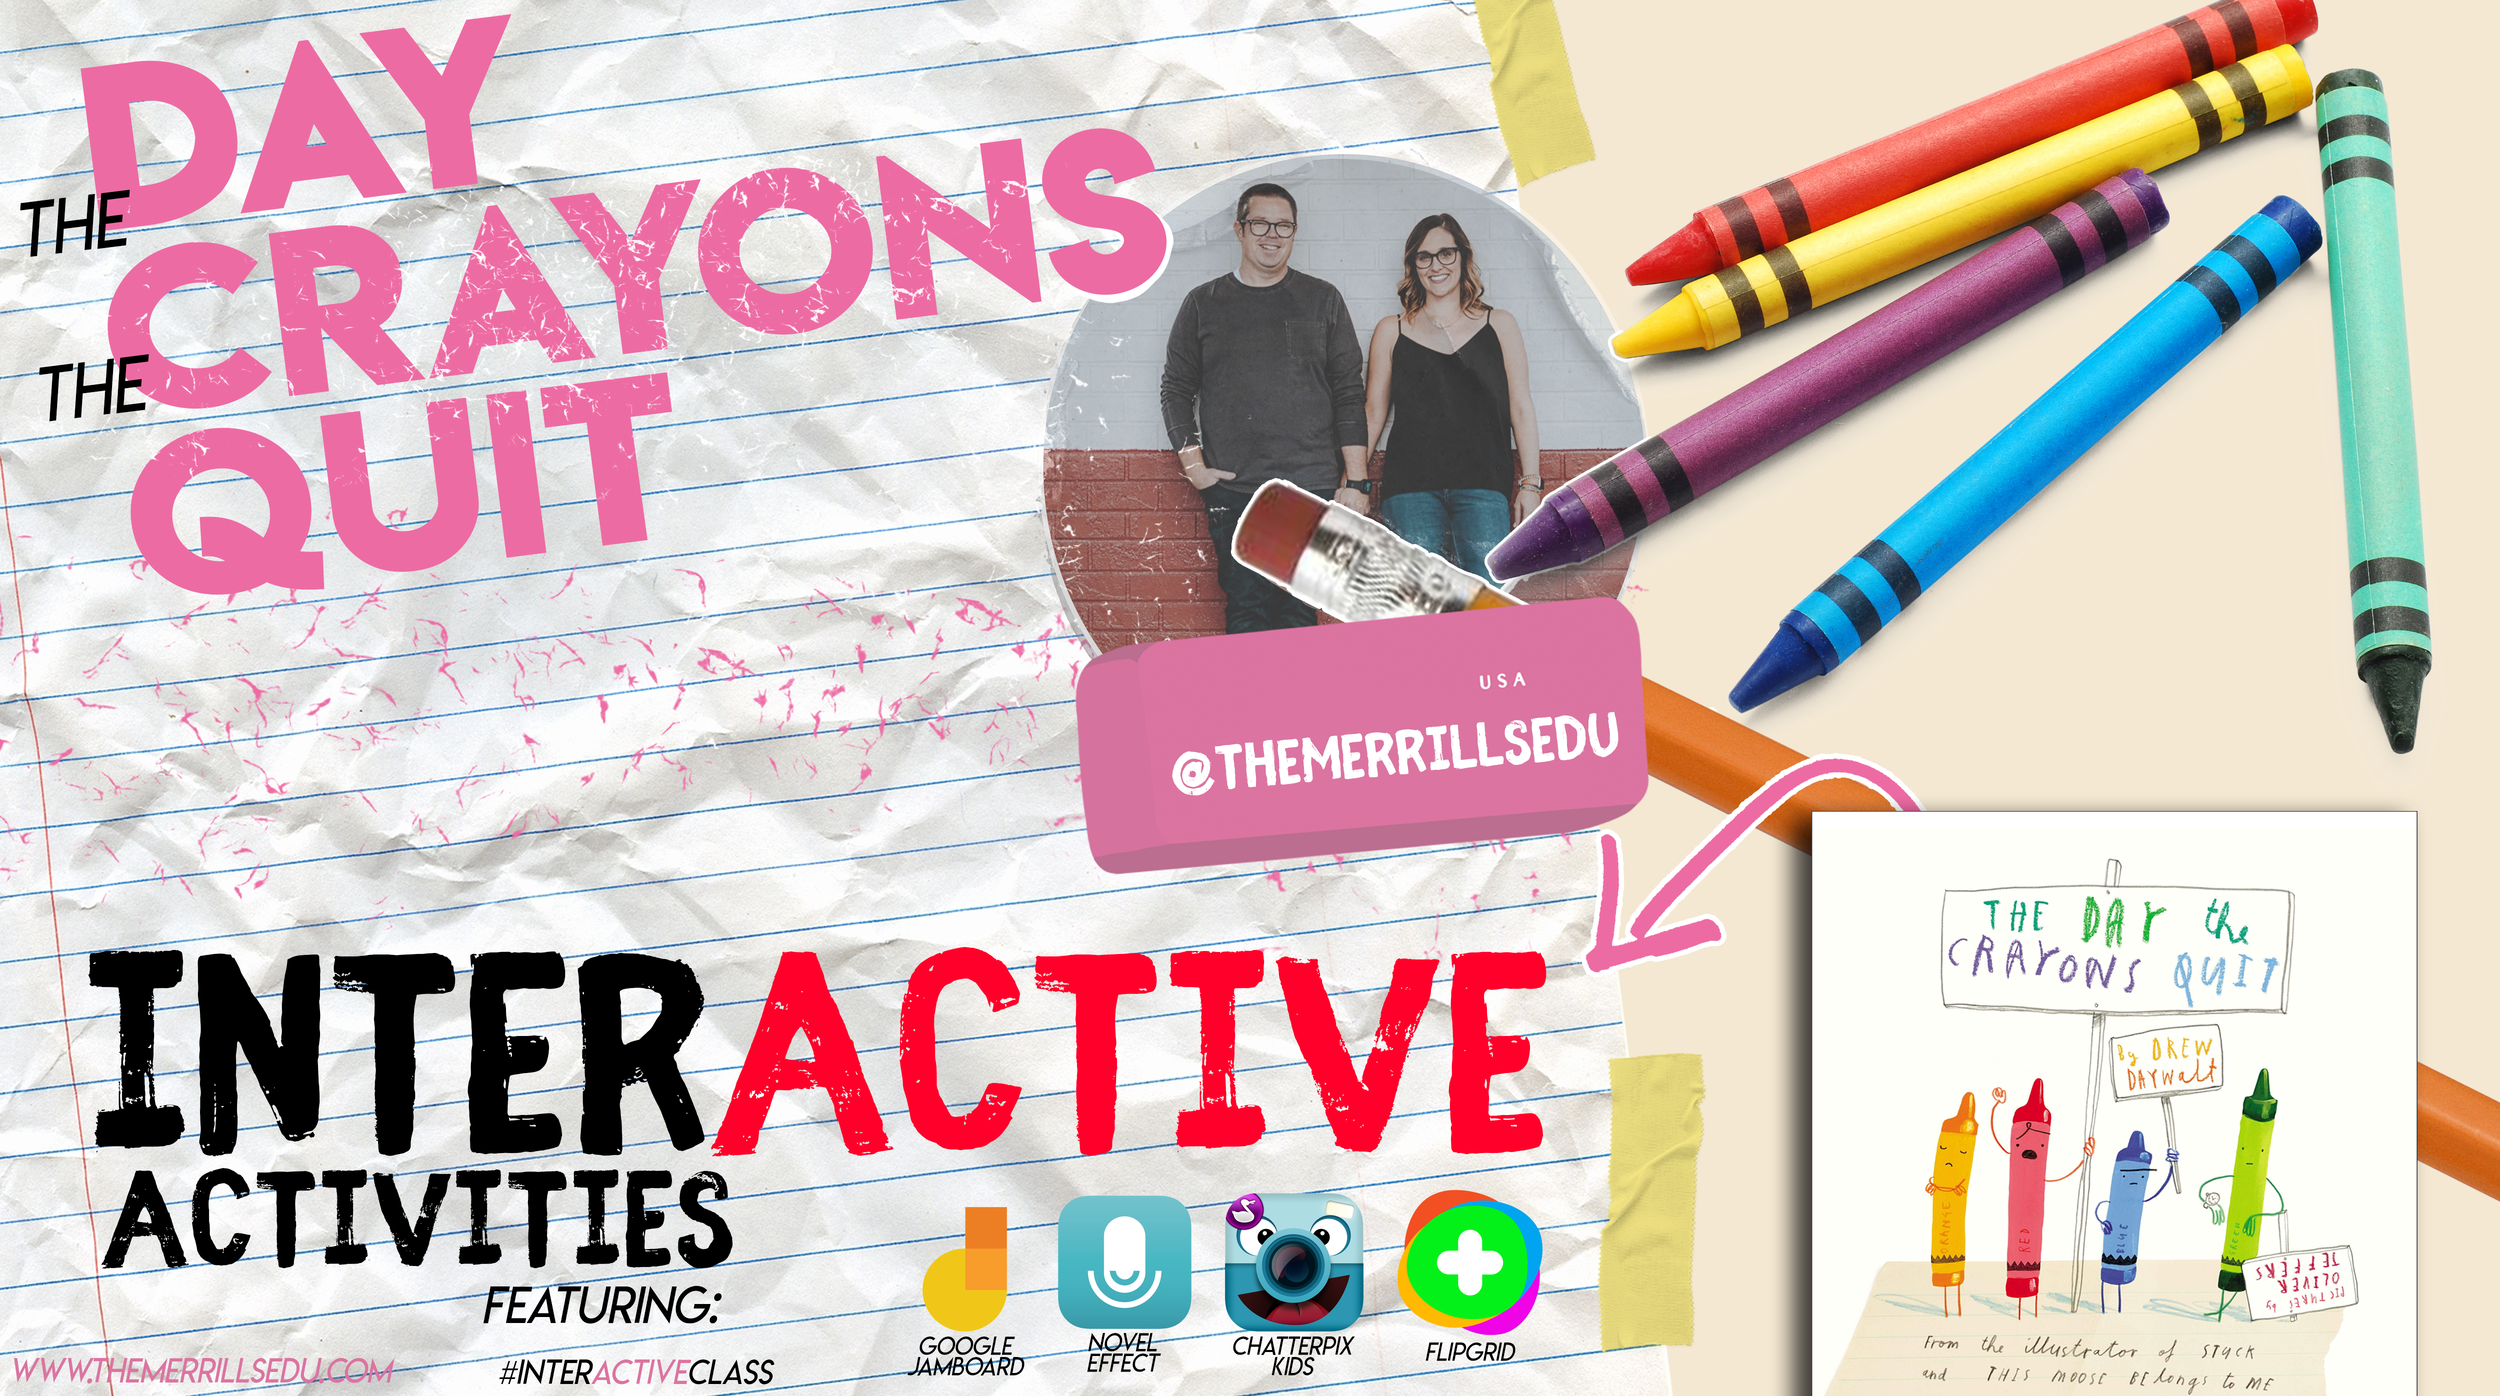
The Day the Crayons Quit and The Day the Crayons Came Home are two essential books required for any classroom. With giggle-inducing text from Drew Daywalt and bold and bright illustrations from Oliver Jeffers, The Day the Crayons Quit and The Day the Crayons Came Home are two perfect additions to any classroom library. If you’re a fan of Don't Let the Pigeon Drive the Bus by Mo Willems and The True Story of the Three Little Pigs by Jon Sciezka and Lane Smith, then this book is for you!
If these books are in your plans, you can easily transform any classroom Crayons activity to make it interACTIVE! Learn how below!
(click on any subheading to jump to that section)
Adding Sound Effects While You Read with Novel Effect

Novel Effect is an app that adds a little magic to books you know and love. Read aloud with your favorite print books and this free, award-winning app follows along playing music, sound effects, and character voices at just the right moment. There are lots of titles in the Novel Effect library, including The Day the Crayons Quit. Furthermore, you can also find the Spanish translation, El Dia Que Los Crayones Renunciaron.
Purchase The Day the Crayons Quit here
Download the Novel Effect app for iOS here
Download the Novel Effect app on Google Play here
Download The Day the Crayons Quit on Novel Effect here
Download El Dia Que Los Crayones Renunciaron on Novel Effect here
Animating Crayons with
Chatterpix Kids


Chatterpix Kids is an app that allows you to bring anything to life! Simply take any photo, draw a line to make a mouth, and record your voice. Then share your video onto a platform like Flipgrid or Seesaw. Getting started is easy, just follow these steps to get started:
Download the Chatterpix Kids app
Open Chatterpix Kids, then tap on “Take Photo”
Using the camera built into the Chatterpix Kids app, snap a photo of a crayon (or any other image) by tapping the orange camera button
Next, tap and hold your finger on the screen and then drag your finger across the screen to make a mouth on the image.
If you don’t like where the mouth is positioned, you can reposition it as you see fit.
Once you’re happy with where the mouth is, click on the red microphone icon to begin recording (tip: you will want to teach your students that they will need to be prepared with what they will say in their video. They only have 30 seconds!)
After you have recorded the audio, click the green play button to see how everything looks. If you’re happy with the way it is, click the orange Next button on the top right. If you’d like to re-record the audio, you can do so by tapping the red microphone.
(Optional) You can add filters, stickers, frames and text. Once you’re satisfied, tap the orange Next button on the top right.
To save your video, tap on the Export button located on the bottom right. Tapping this will save the video to your devices camera roll.

Google’s new Jamboard is a collaborative digital whiteboard. Students can work as a whole group, or assignments can be shared individually. In this activity, you’ll find a board that looks like it is just blank / black. Students will use the eraser tool to erase the black from the board. Doing so will reveal a rainbow color! Students can erase in the shape of a crayon and make their own crayon color. Have them name their color, then click download the frame as an image. To do so, click the three dots in the top right. Then select, “Save frame as image.” This file may then be uploaded to places like Seesaw or Flipgrid to share out accordingly!


Opinion Writing with Flipgrid
Generally, teachers think of Flipgrid as the destination that houses student learning and their content. However, Flipgrid can also be used to launch ideas, spark new ones and take learning to a whole new level. For example, after reading The Day the Crayons Quit, have your students think about which crayon they feel is overworked. Then, have them brainstorm several ideas that back their opinion on a sheet of paper. Next, instruct the students to log onto Flipgrid and explain which color is most tired and why (listing the ideas from the paper). After they have finished, they can watch their classmates’ responses to see how they feel - and possibly pick up some new ideas (or change their mind all together). Students can take this information and create / publish a writing piece that ties into the The Day the Crayons Quit!

Fun with Flipgrid Photo Stickers
If you’re in a hurry and want to hear which crayon your students think is the most overworked, they can do so quickly by explaining their thinking and using our Flipgrid Photo Sticker (see below). This frame may also be used to retell the sequence of events, or compare / contrast both stories.
Click here or below to download our free
Flipgrid Photo Sticker


Adding Augmented Reality to the Crayons series
This is a great activity if your students are learning about describing characters, making connections or comparing / contrasting characters. Start off by reading The Day the Crayons Quit or The Day the Crayons Came Home. After you read, revisit each crayon and think about how you would describe each one. We recommend using something like a bubble map to help organize student thoughts on each crayon. Once the class is ready to move on, have the students log onto Flipgrid. Give the students time to record a video where they describe the first character.
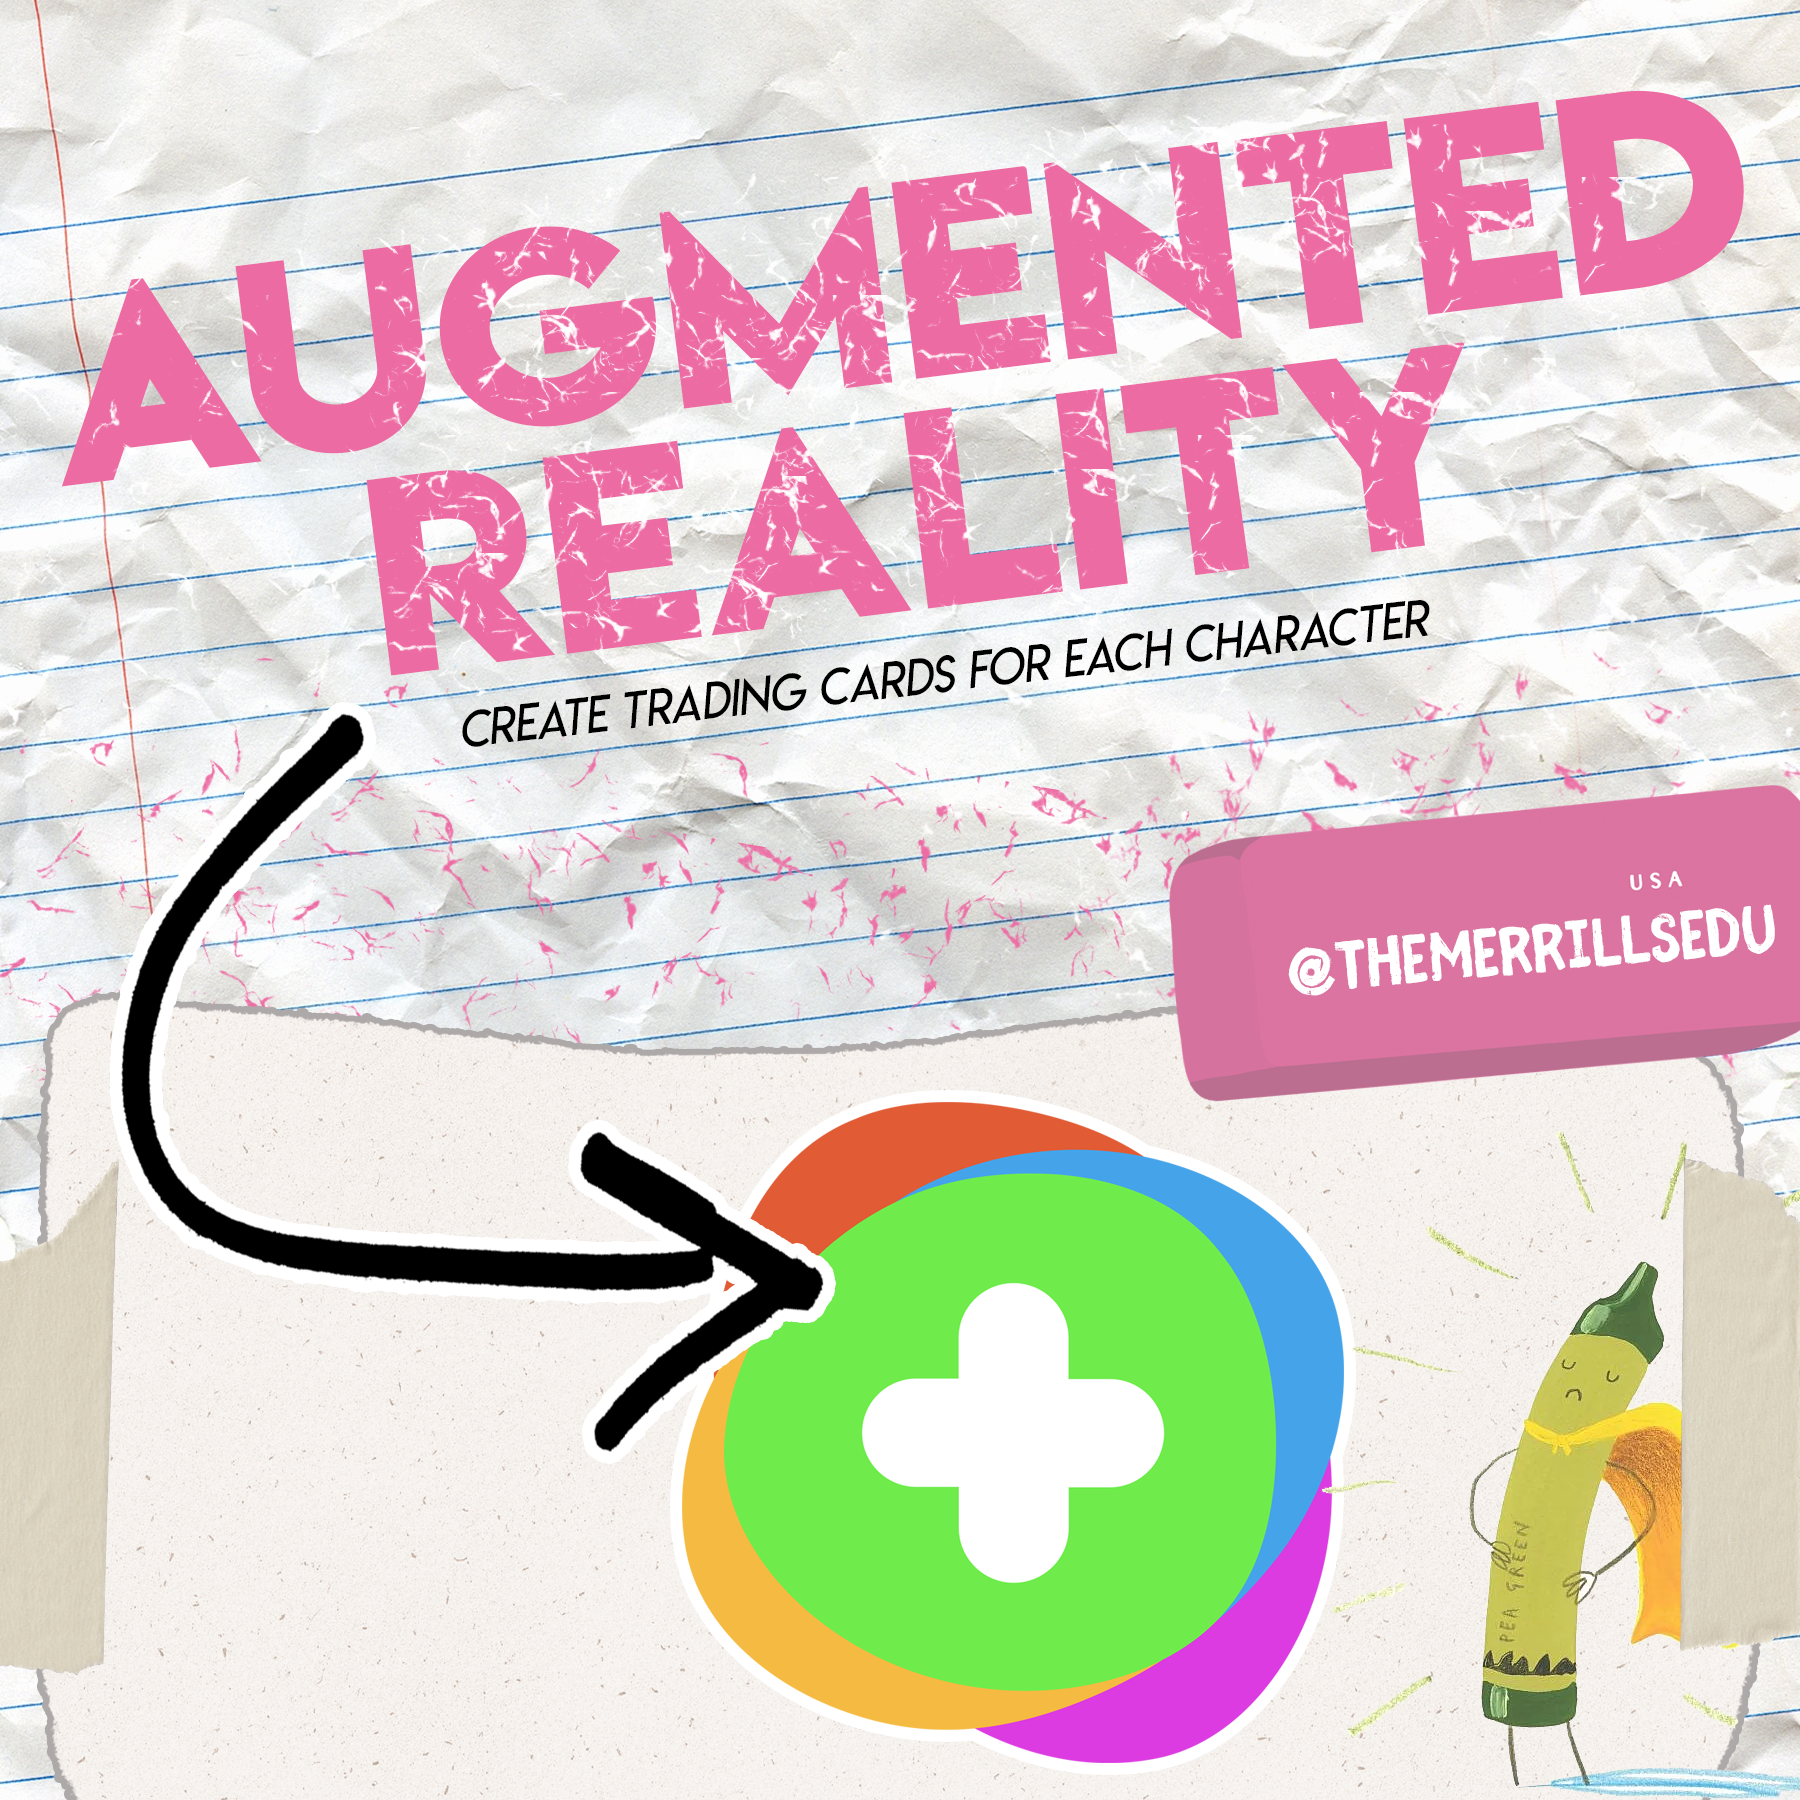
After they have submitted the first character, instruct them to view their own video. Once they are logged on watching their own video, have the students add a video comment to themselves describing the next character. Students will repeat this step as many times as necessary to describe all of the characters your class has discussed. Doing so will create an organize thread where only that particular student’s videos will be posted (other classmates will not respond to each other - yet 😜).
Now that you have all student responses, it’s time to take things to the next level! Have your students work on cutting out the trading cards resource (see image or click here to download). While they are cutting them, take a moment to print / download the Flipgrid video response QR codes. This can be done quickly from a topic on the educators dashboard and clicking the open square (next to “Actions”), selecting the appropriate videos (or select all) and then clicking “Print QR Codes.” Tip: These QR codes may be resized in a program like PowerPoint or Google Slides. You will want to resize the QR codes a bit for the next part.


Now that you have the QR codes printed, give each student their QR codes to cut out. The QR codes then get glued to the Trading Card template. Students can illustrate the back of the cards with the appropriate crayon they are referring to. Now, with the QR code printed on the card - have the students open the Flipgrid app (mobile devices only). Instead of logging onto their Group, instruct the students to tap the orange / red “Scan Flipgrid QR” button. This launches Flipgrid’s QR code reader. Students are now able to scan their trading card QR codes with the Flipgrid app. The best part - their responses will open in augmented reality! Now that the cards are completed, it’s time to trade them! Students can now scan the code(s), watch the video(s) and respond to one another accordingly - or just trade with each other for fun. See how this all works in our video below!
More lesson ideas tied to the Crayons series
Here are some other ideas you can tie into the Crayons series:
The Power of Protest: Explain the meaning of a peaceful protest (as in The Day the Crayons Quit). Then, have students create a protest poster / flyer (it can be paper sized) for the crayon that they feel is the most overworked. Share their poster / flyer on Flipgrid, then have the students watch each other’s videos. Lastly, poll the students one last time to see if anyone’s opinion has changed after watching their friends.
Persuasive Letters: Have your students pick a crayon and then pretend that they are the character that they have picked. As the crayon, write a letter to the rest of the class explaining why you feel as though you are overworked, or why your vacation was the best. Then, share the letter on Flipgrid.
Science Integration: Collect all the old crayons from the classroom. Then, use a hair dryer to experiment with melting the crayons. Do new colors form when melting them together? Student hypothesis can be recorded and shared in Flipgrid!
Color Spectrum: Discuss the way light reflects and the color spectrum. How does this help when manufacturers are making crayon colors?
Inquiry Learning with Wonderopolis: Have you ever wondered where crayons were first made? Or maybe what the first crayon color was in the United States? Read this Wonderopolis article to tie in some history!
Planning a Day the Crayons Quit lesson or unit? Download our slide templates below!


-- Please follow us on social media and tag us with how you’re using The Day the Crayons Quit and The Day the Crayons Came Home into your classroom! 👓👗
For more tips, tricks and lesson ideas for making learning more interACTIVE, check out our books The InterACTIVE Class and Flipgrid in the InterACTIVE Class on Amazon!


InterACTIVE Activities for Mae Among the Stars
“Mae Among the Stars” is a beautiful picture book for sharing and marking special occasions such as graduation, inspired by the life of the first African American woman to travel in space, Mae Jemison. It has quickly become a “must read” in many elementary classrooms - including our own! So, here are some ways we are using it!

“Mae Among the Stars” is a beautiful picture book for sharing and marking special occasions such as graduation, inspired by the life of the first African American woman to travel in space, Mae Jemison. It has quickly become a “must read” in many elementary classrooms - including our own! So, here are some ways we are using it!
In this blog post you’ll learn:
(click on any subheading to jump to that section)

Where to buy
Mae Among the Stars
You can find Mae Among the Stars at your favorite book store. If you need it in a hurry, Amazon is always an option. You can find it by clicking on the image below!

InterACTIVE apps to use with Mae Among the Stars, and Mae Jemison
Here are some of our favorite apps to use when reading about Mae Jemison and Mae Among the Stars!


Novel Effect:
Bring Read Alouds
to Life!
Novel Effect is an app that you use while reading your books. Read aloud with your favorite print books and the app follows along playing music, sound effects, and character voices at just the right moment. You can find lots of different titles, including Mae Among the Stars! There's a free version and a paid version of the app, which you can check out below!
You can download Novel Effect for iOS here and for Android here.
You can find the book, Mae Among the Stars on Novel Effect by clicking here!

Learn More About
Mae Jemison with the Epic Reading App!
You can find lots of additional resources to tie into Mae Among the Stars by logging onto Epic! Epic is a the Netflix of kids books. The best part of all - it’s FREE for educators! Teachers can easily create a class and differentiate their instruction by assigning different books to different students, all with just a few clicks! Epic is available on all platforms and devices!
Check out the Epic website by clicking here!


Explore the solar system with a Merge Cube
Merge Cubes are a simple and easy way to bring augmented reality into your classroom. If you’re looking to tie the solar system into Mae Among the Stars, you can do so with Merge’s Galactic Explorer. Just scan a merge cube with the Galactic Explorer app to launch the experience. Students can explore the solar system as a whole, or dive into one of the planets!
Merge Cubes can be purchased or educators can print out a paper version to share with their students. Check out the paper template below!

Purchase a Merge Cube by clicking here
Download a paper template of a Merge Cube by clicking here
Learn more about Merge Cube apps by clicking here
Become an Astronaut in Flipgrid
Depending on the standard and your learning goal, you may want your students to retell the story or point out important details. There is no better way to do this than with Flipgrid! To make it even more engaging, have your students use our Astronaut frame to become an astronaut!


You can download the Astronaut frame by clicking the image below or here
(please note: this frame will not work on mobile devices)


Explore the Solar System, Compare Planets and more!
Take a tour of space to learn more about the planets with Tinybop’s iOS app, Space ($2.99). In Space, students travel into space and visit tiny Mercury, fierce Venus, friendly Earth, dusty Mars, stormy Jupiter, elegant Saturn, hazy Uranus, and mysterious Neptune. Students can study each planet’s characteristics, throw meteorites at each planet to test their atmospheres and gravity, see how big and massive each planet and the sun are by comparing them side-by-side and much more.
Check out an example below and click here to download (iOS only - $2.99).

InterACTIVE Activities and Ideas to Use with Mae Among the Stars and the Planets
Here are some interACTIVE activities that go along with Mae Among the Stars:
Fiction or Non-fiction?
After reading Mae Among the Stars, use Flipgrid to have your students answer the question of, “Do you think this story is fiction or non-fiction?Inquiry / Critical Thinking Ideas
Have your students answer the following question on Flipgrid: “Why do you think Mae’s dream seemed impossible? What would you have done if you were in her shoes?”Paired Texts (Day #1)
Select this National Geographic magazine from Epic, and read it with the entire class (whole group). After reading, have your students answer the following question on Flipgrid: After reading together, what questions do you still have about the planets? (they ask one question per video, asking as many as they can). Be sure to have them add a searchable hashtag to their video response (see image below)

Paired Texts (Day #2)
The next day, download and assign this Epic collection to your students. Have them go back the the previous days Flipgrid topic and have them look for answers to their friends questions by using the books from the Epic collection. Once students have found the answers to their friends questions, they can leave them a video comment. Encourage your students to use specifics in their video comments back to their friends. For example: “I read on page 22 that Saturn is the sixth planet from the sun.”Planet Research
Have your students research all of the planets (you can find a collection of all the planets on Epic by clicking here). Then, have your students create a Flipgrid video where they travel to several planets, listing 3-5 facts about each. Bonus: Have them use our astronaut frame above or the Board, Sticker, and Ink feature built into the Flipgrid camera to personalize their video.Learn more about the solar system with this 3D model website from NASA! Zoom in and out, visit planets and even hop on a comet! Check out the site below or click here to visit the website.
Star Constellations in Flipgrid
Have your students create a constellation using the board and sticker features in Flipgrid. Once they have their design created, have them use the ink tool to connect the stars!

-- Stay tuned for more on how you can use Mae Among the Stars into your classroom! 👓👗
For more tips, tricks and lesson ideas for making learning more interACTIVE, check out our books The InterACTIVE Class and Flipgrid in the InterACTIVE Class on Amazon!


How to Record Collaborative Videos in Flipgrid with Multiple Users
How can you allow multiple students to appear in the same Flipgrid video? @TheMerrillsEDU walk you through how to add a new element of collaboration to your lessons!

Remote Learning has challenged how educators can successfully implement collaboration within and outside of the classroom. The ability for students to work together and remain six feet apart, or even work together remotely has spawned numerous creative ideas, but this idea from our friend Adam may be our favorite: “Collaborative Videos in Flipgrid: Record with Friends, From Anywhere.” Check out his tweet:
So…How does this work? It’s actually not as difficult as it might sound! In this post we’ll walk you through each step.
(NOTE: this will not work on mobile devices at this time)
Click on any subheading to jump to that section:
🚀 Launch a ⚡LIVE⚡ Zoom / Google Meet / Teams / WebEx call with Breakout Rooms
(Click your preferred platform to jump to that section)
Microsoft Teams | Zoom | WebEx | Google Meet
🚀 Launch a ⚡LIVE⚡ Zoom / Google Hangout / Teams call
Step #1: Launching a collaborative chat session
It doesn’t matter what you’re using for this step - all the platforms will work! Start off by launching a new meeting / call. If you’re using one of the aforementioned platforms to conduct a class call, you can always generate breakout rooms to properly group your students.
How to Launch Breakout Rooms on Microsoft Teams
Start a new meeting. Then once in the meeting, look for the “Breakout Room” button located at the top right hand side of the screen. Click here to open new options.
After you have clicked the “Breakout Room” icon, you will have several options. Start off by selecting how many rooms you need. Then, select how you prefer to assign the participants (automatically or manually).
For more information on Breakout Rooms in Teams, click here.
Click here to move onto Step #2


How to Launch Breakout Rooms on Zoom
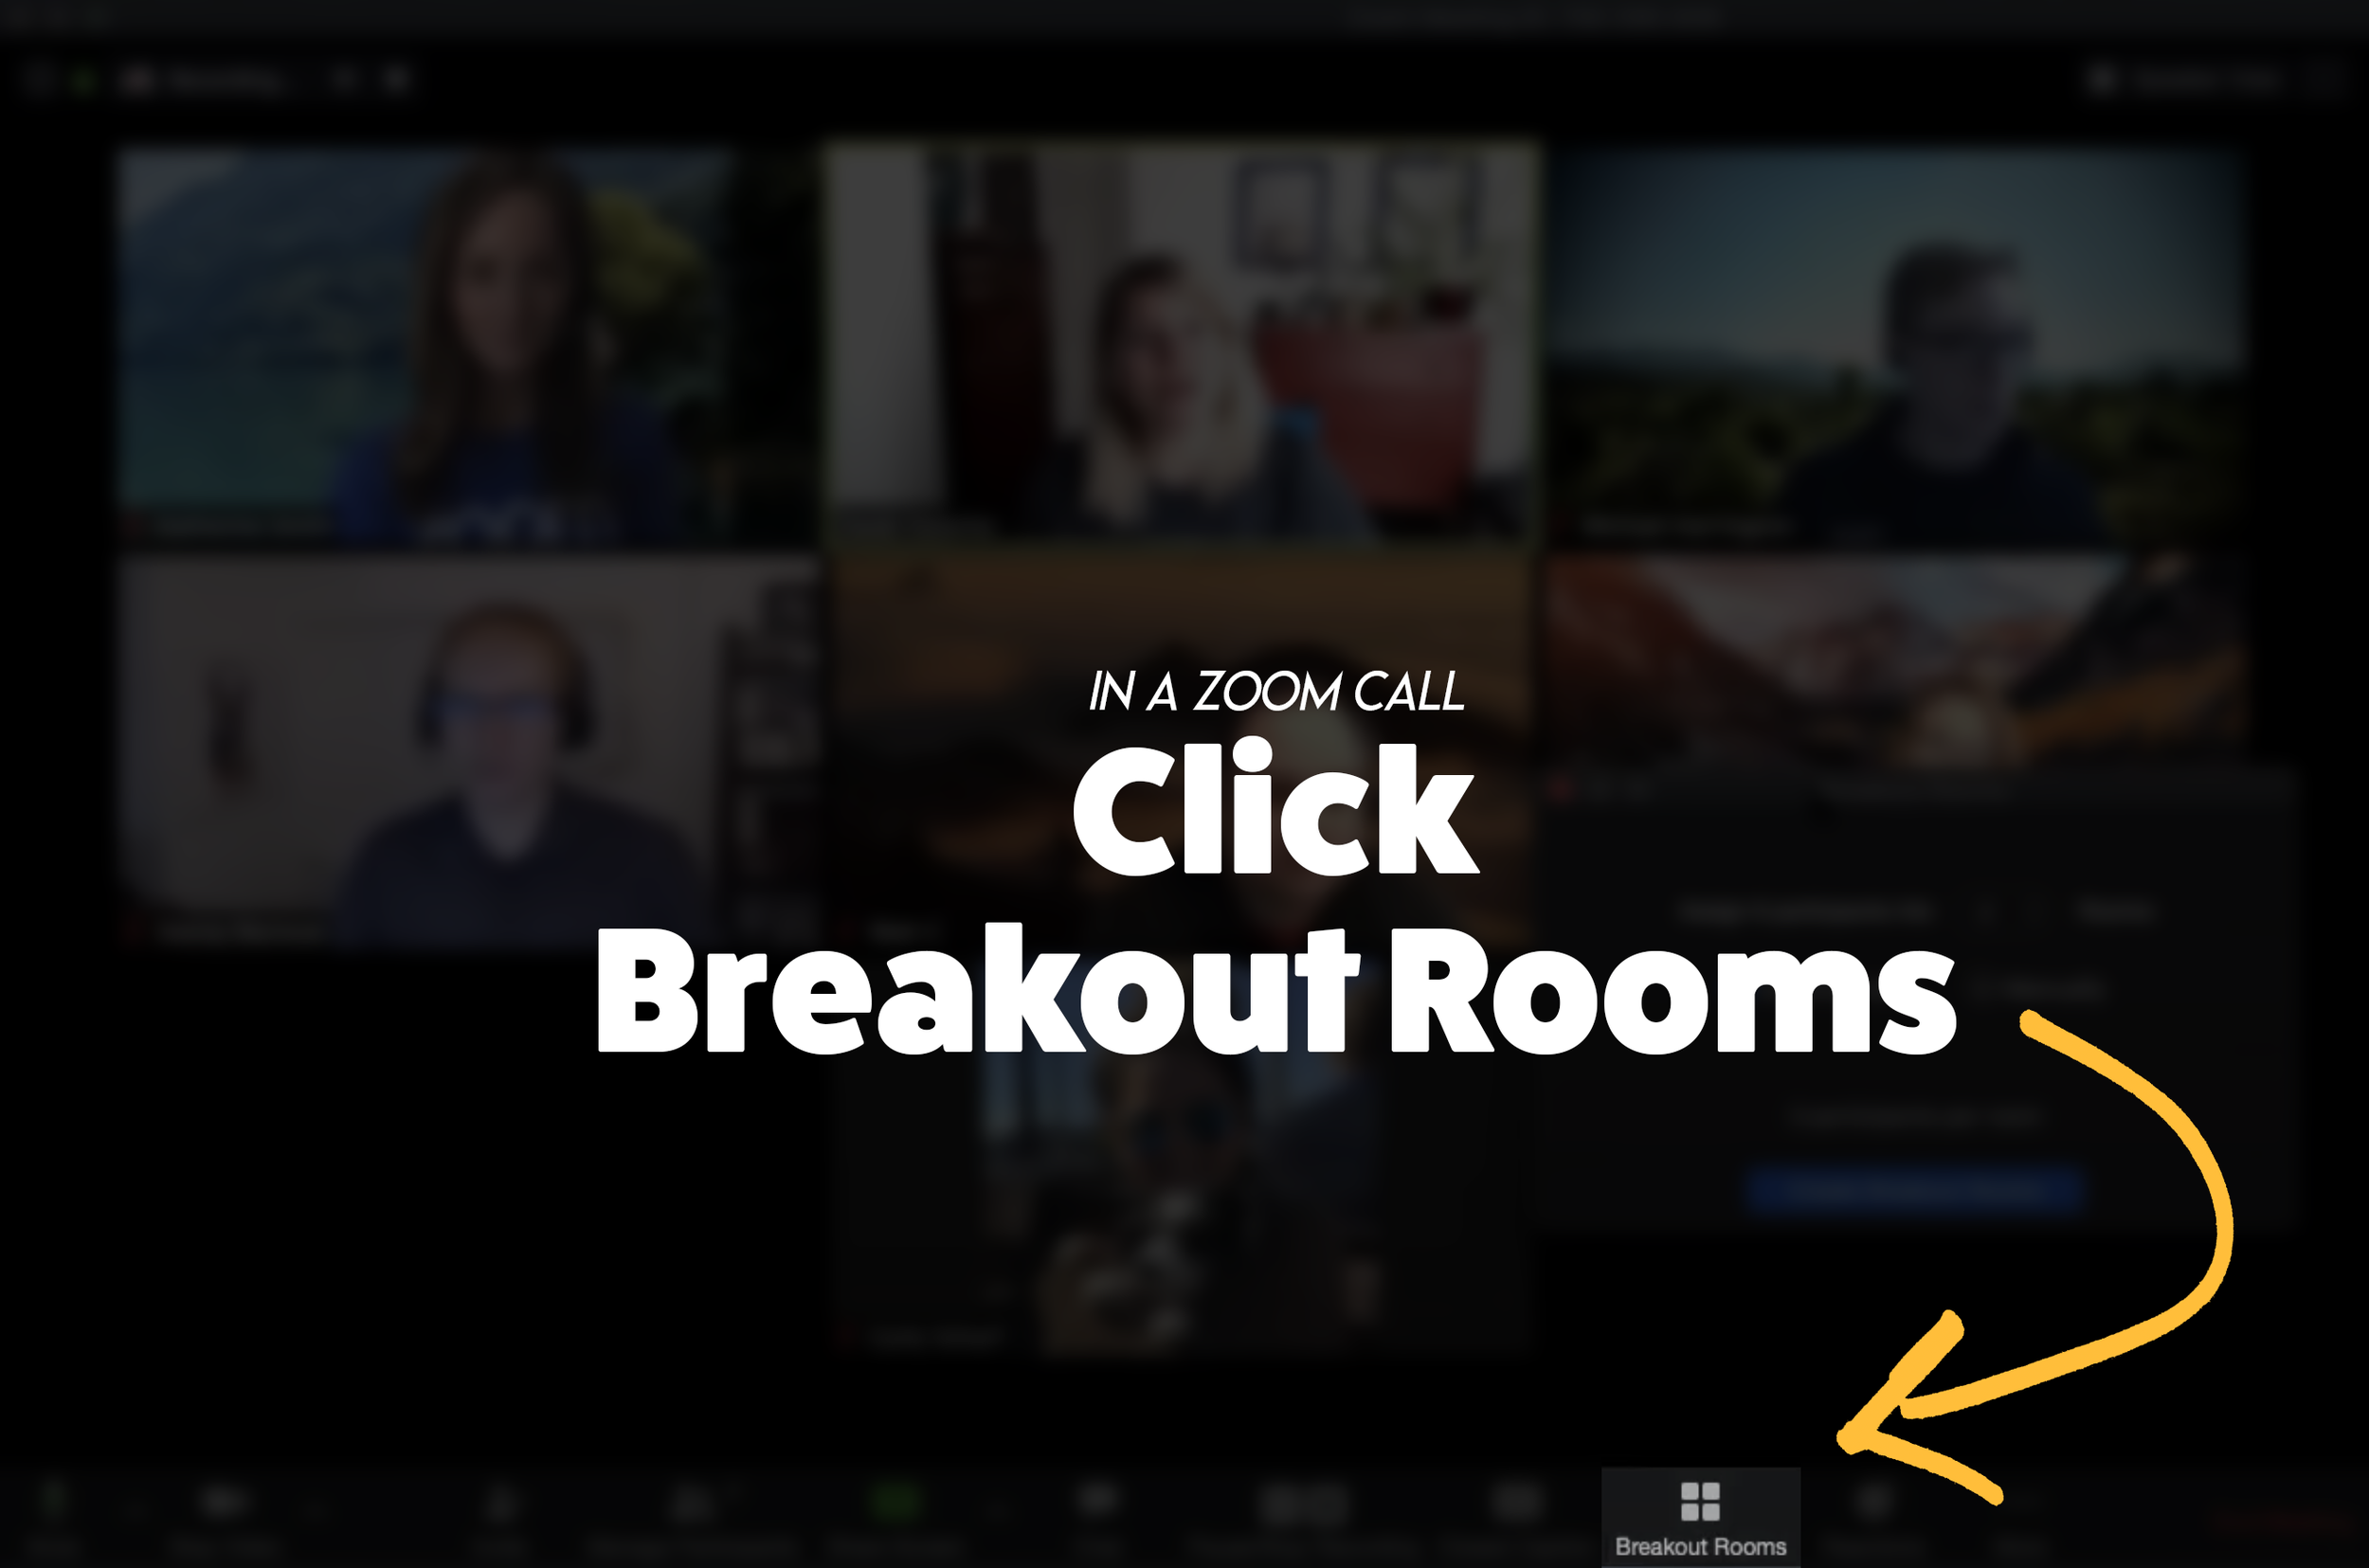
From a Zoom Call, click the “Breakout Room” icon. Then, follow the prompts to select the number or rooms and how to assign participants. If you need to enable Breakout Rooms on Zoom, follow these steps (or click here for more info):

Sign in to the Zoom web portal as an administrator with the privilege to edit account settings.
In the navigation menu, click Account Management then Account Settings.
Navigate to the Breakout Room option on the Meeting tab and verify that the setting is enabled.
If the setting is disabled, click the toggle to enable it. If a verification dialog displays, choose Turn On to verify the change.(Optional) Click the checkbox to allow meeting hosts to pre-assign participants to breakout rooms.
(Optional) If you want to make this setting mandatory for all users in your account, click the lock icon, and then click Lock to confirm the setting.
Click here to move onto Step #2


Launch a WebEx meeting, then select “Breakout Rooms” from the lower portion of the window. Next, select the Breakout tab and choose “Enable Breakout Session.”
Once enabled, “Enable Breakout Session” will appear with a checkmark and the button will appear at the bottom of the menu bar.
Click the “Breakout Session” button and then follow the prompts to set up your breakout rooms.
Click here to move onto Step #2
How to Launch a Breakout Room on Google Meet
For more info on Breakout Rooms in Google Meet, click here.

Breakout Rooms is currently available to users with G Suite Business, Workspace Essentials, Business Standard, Business Plus, Enterprise Essentials, Enterprise Standard, and Enterprise Plus editions. This is also available to users with G Suite Enterprise for Education license and permissions to create meetings.
On your computer, start a video call.
In the top right, click Activities Breakout rooms.
Tip: To prevent students from having the ability to create breakout rooms, admins should ensure Meet creation privileges are reserved for faculty/staff organizational units only.
In the Breakout rooms panel, choose the number of breakout rooms. You can create up to 100 breakout rooms in a call.
Call participants are then distributed across the rooms. To manually move people into different rooms, you can:
Enter the participant’s name directly into a breakout room.
Click the participant’s name. Hold down the mouse, drag the name, and then drop it into another breakout room.
To randomly mix up the groups again, click Shuffle .
In the bottom right, click Open rooms.
Click here to move onto Step #2
Step #2: Launch the Flipgrid Screen Recorder in a Topic Response

Now that you are live in your Breakout room, head over to Flipgrid and access the Topic you wish to collaborate on. Once you’re logged into the Topic, click the add a response button or the red record button. When the Flipgrid camera opens, click on the “Options” icon. Then click on “Screen Recorder.” Now, with your screen shared, you can capture yourself and all the others on your web call / meeting!
Step #3: Sharing Screens
You can get creative with this! The user who initiates the Flipgrid response doesn’t have to be the only one who shares their screen. Have students take turns sharing screens by having the Flipgrid camera screen record the web meeting / call. Students can share each others’ screens through the call platform, allowing for everyone to share.
Tip: Use the pause button between students to save recording time and engagement.
Now, your students have collaborated in the same Flipgrid response!
Stay #interACTIVE!
-👗➕🕶️
For more tips, tricks and lesson ideas for making learning more interACTIVE, check out our books The InterACTIVE Class and Flipgrid in the InterACTIVE Class on Amazon!


How to Introduce Students to Flipgrid
You’re ready to give Flipgrid a try, but not sure where to start? We’ve got you covered! In this blog post you’ll learn how to set up Groups / Topics, what a student sees, tips for getting started, and even free recommended lessons.

Depending on how your district technology runs, you have several options when introducing your students to Flipgrid. In this post, you’ll learn (click on any subheading to jump to that section):
How to Set Up Your Class on Flipgrid
If you’re new to Flipgrid, it’s important to understand the verb-age. The two key terms that you’re immediately introduced to are: Groups and Topics. Groups are where Topics (or questions) are stored. If you were a high-school teacher, you may want to create a group for each of your periods (unless you want the students in different periods collaborating with one another). For example, you could create a group for Period #1, Period #2, etc. Topics are the question prompts you ask your students to complete. When you create a question / task for your students, you would create a Topic on Flipgrid for them. Students log onto the Topic and complete the assignment. When creating your class, we recommend staying organized from the get-go, as it will save you trouble later on.

Follow these steps to start setting up your class:
From the educator’s dashboard, click on the blue “Create a Group” button.
Give your new Group a name
Optional: Customize the Group’s join code. We recommend doing this because this personalizes how your students log onto Flipgrid. Try changing the join code to your last name, or something memorable.
Choosing How Your Students Will Log On:
Flipgrid offers several ways for your students to access assignments. When building your class, it’s important to make decision here, so let’s discuss what each of the permissions mean. If your students have access to email addresses, you can set up your class to where they use them to log in. You would set your class up as “Student Email” (note: this requires a Google or Microsoft email account). If your students don’t have access to email addresses, then they will need to log on using a Student ID. This can be a lunch number, birthdate, or something familiar to the student.
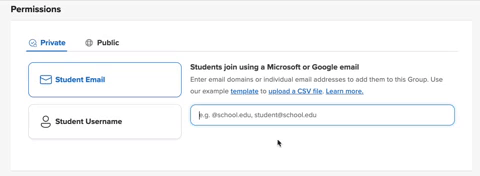
How to Set Up a Student Email Group:
Be sure that you have the Student Email option selected when creating your new Group.
Add the domain of your school’s email addresses (example: @school.com)
How to Set Up a Student Username Group:
Be sure that you have the Student Email option selected when creating your new Group.
Enter in the first name, last name, and student ID of your students. Note: If you have access to a CSV file of your class list, you can upload the entire class list at once.

Once you have selected how your students will log on, you can add a personal touch selecting or uploading an image for the Group cover. After you’re satisfied, click the blue “Create Group” button. Now you’re ready to start adding Topics into the Group.

How to Create a Topic in Flipgrid
Now that you have your Group set up, it will be easy to keep things organized from here on out. To add a Topic (or question that you would like your students to answer) to a Group, start in the Flipgrid Educator’s Dashboard. Click on the Group that you wish to assign the Topic to. Next, click the blue “Add Topic” button. On the next screen, enter a Topic title and prompt (or directions). You also have the option to add additional media to your Topic, such as: a video, image, GIF, YouTube, etc. This will place the media into the Topic so that your students will be able to see it once they log on. Just underneath the Media section is an area where you can adjust the Permissions and Essentials (adjust recording length, moderate the responses, toggle on/off video and text comments and include captions on videos). Once you’re happy, click the blue “Create Topic” button to launch the Topic.

How Students Log Onto Flipgrid
Depending on how you have set up your Group, your students will log onto Flipgrid using either their email address or student ID. Here’s what it will look like from a student’s perspective.

If Students Log on Using Email Addresses:
If your students are logging on using email addresses, they will go to: http://www.flipgrid.com or open the Flipgrid app. They will need to enter your Group Join Code (remember how we recommended customizing it? This is why!), then they will be prompted to log in using their Google or Microsoft email accounts. Once they do this, they will be logged into your class Flipgrid Group.
If Students Log on Using a Student ID:
If your students are logging on a student ID, they will go to: http://www.flipgrid.com or open the Flipgrid app. They will need to enter your Group Join Code (remember how we recommended customizing it? This is why!), then they will be prompted to log in using their student ID. Once they do this, they will be logged into your class Flipgrid Group.

Ideas for Introducing Your Students to Flipgrid
When first introducing Flipgrid to your students, we recommend starting off with something simple - like an ice breaker. This gets your students familiar with how the platform works, and once they’re comfortable - then you can things to the next level. Here are a few ideas from the Flipgrid Discovery Library to help you (and your students) get started. Click on any image to open and save it to your Flipgrid collection!
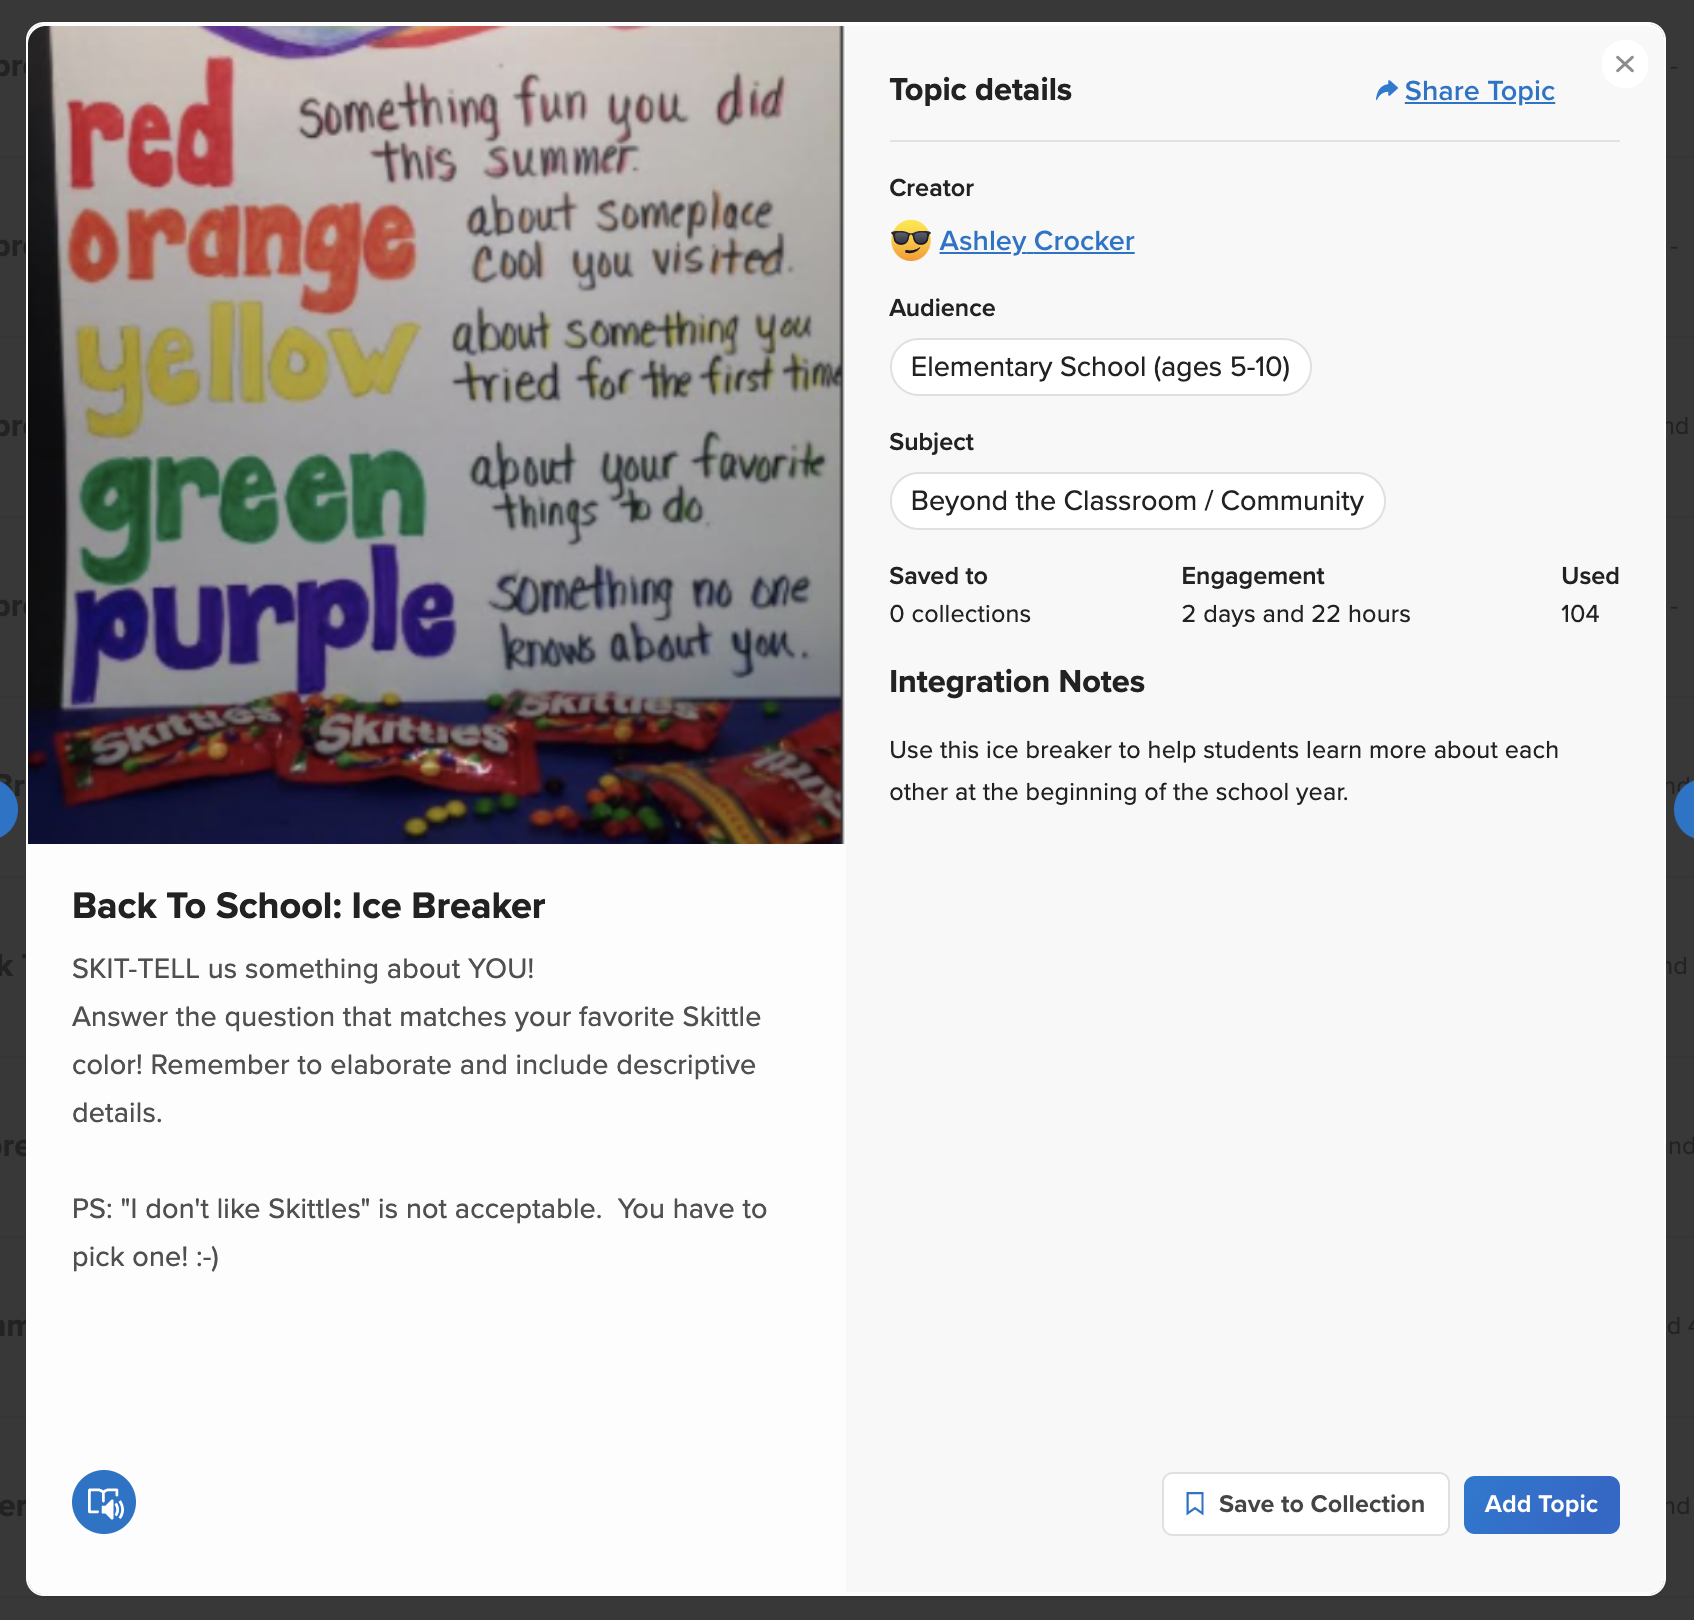
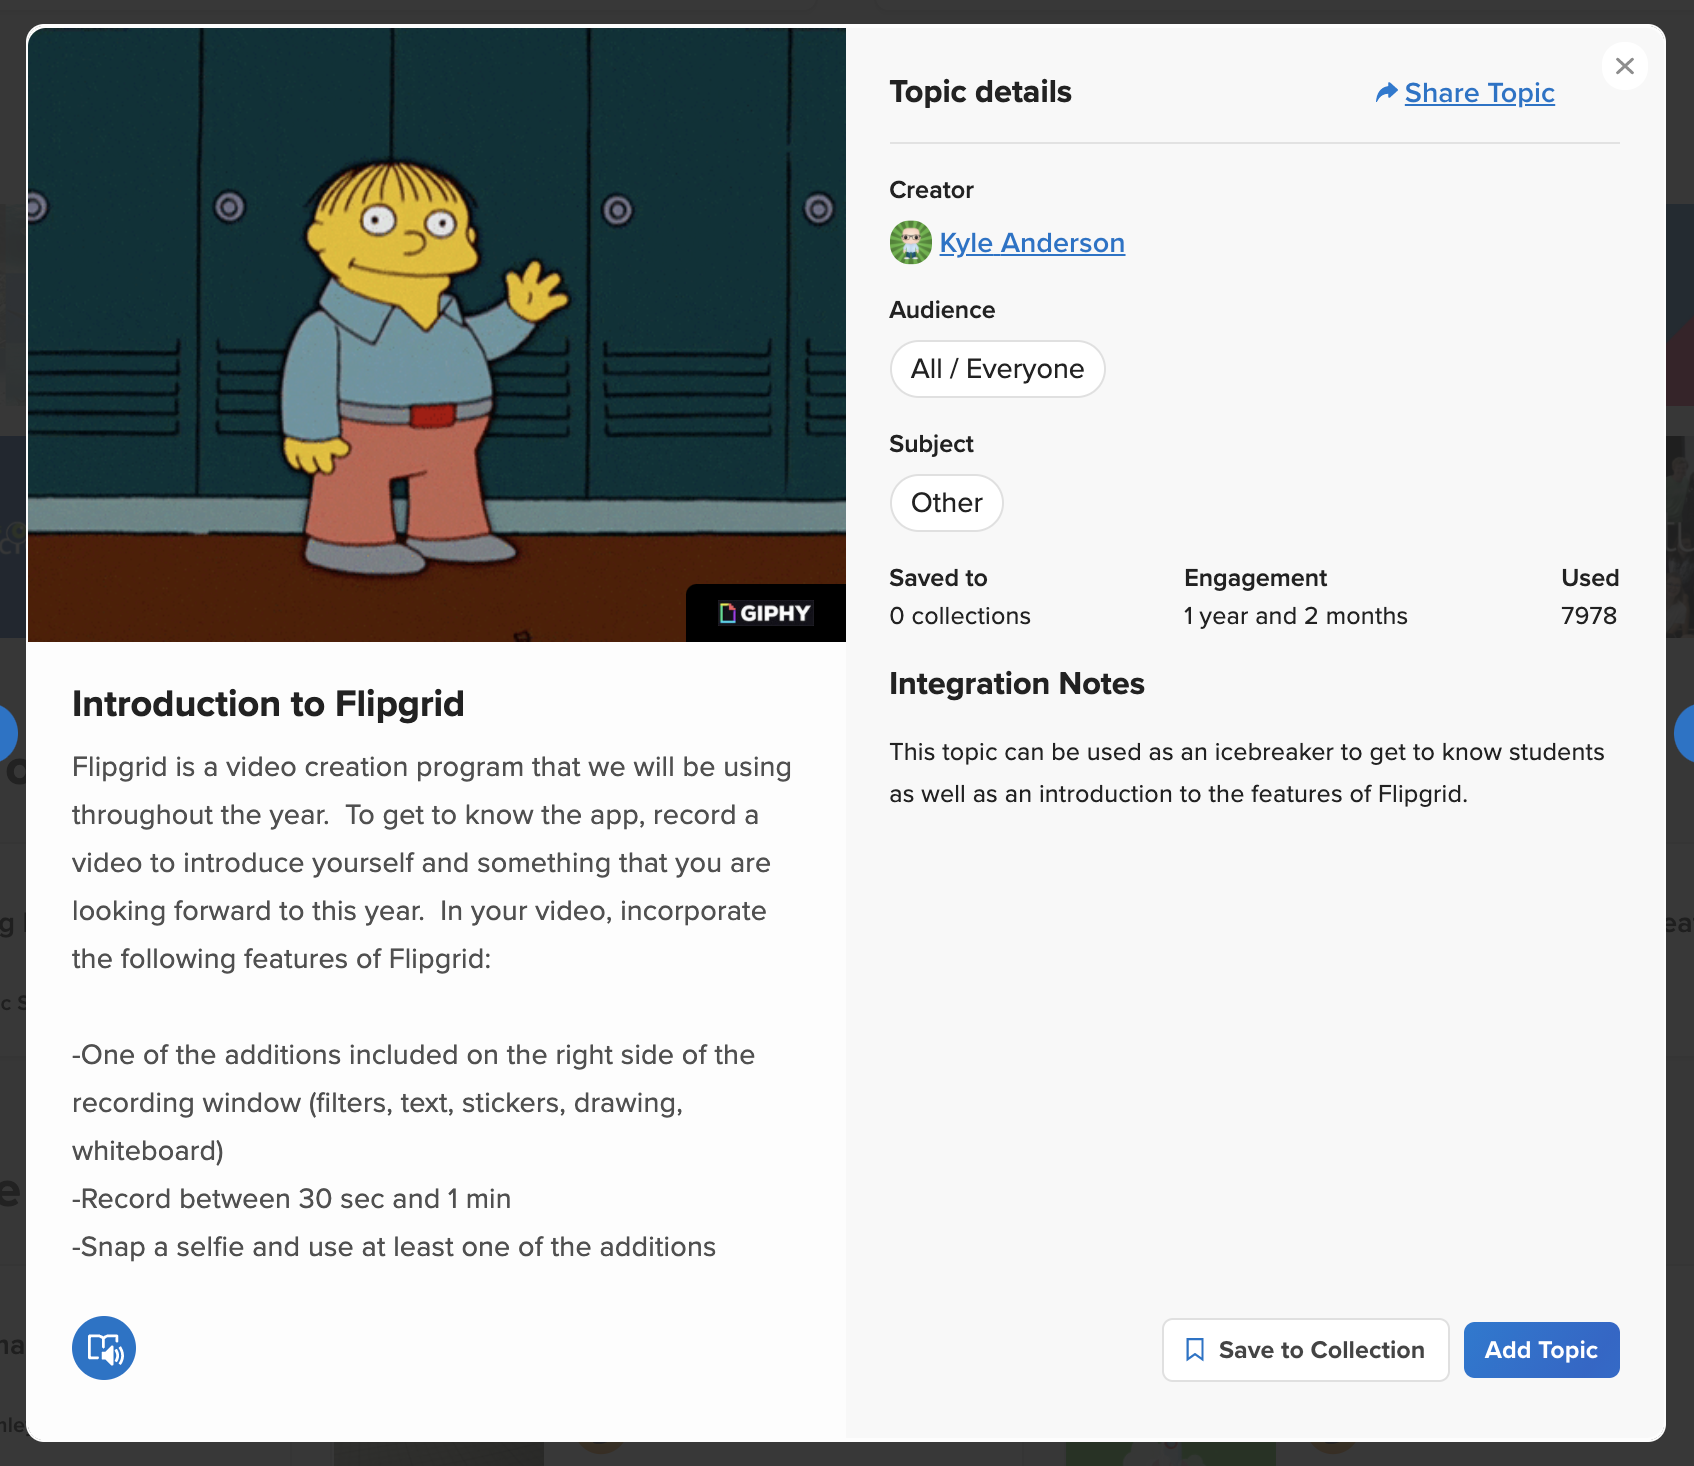
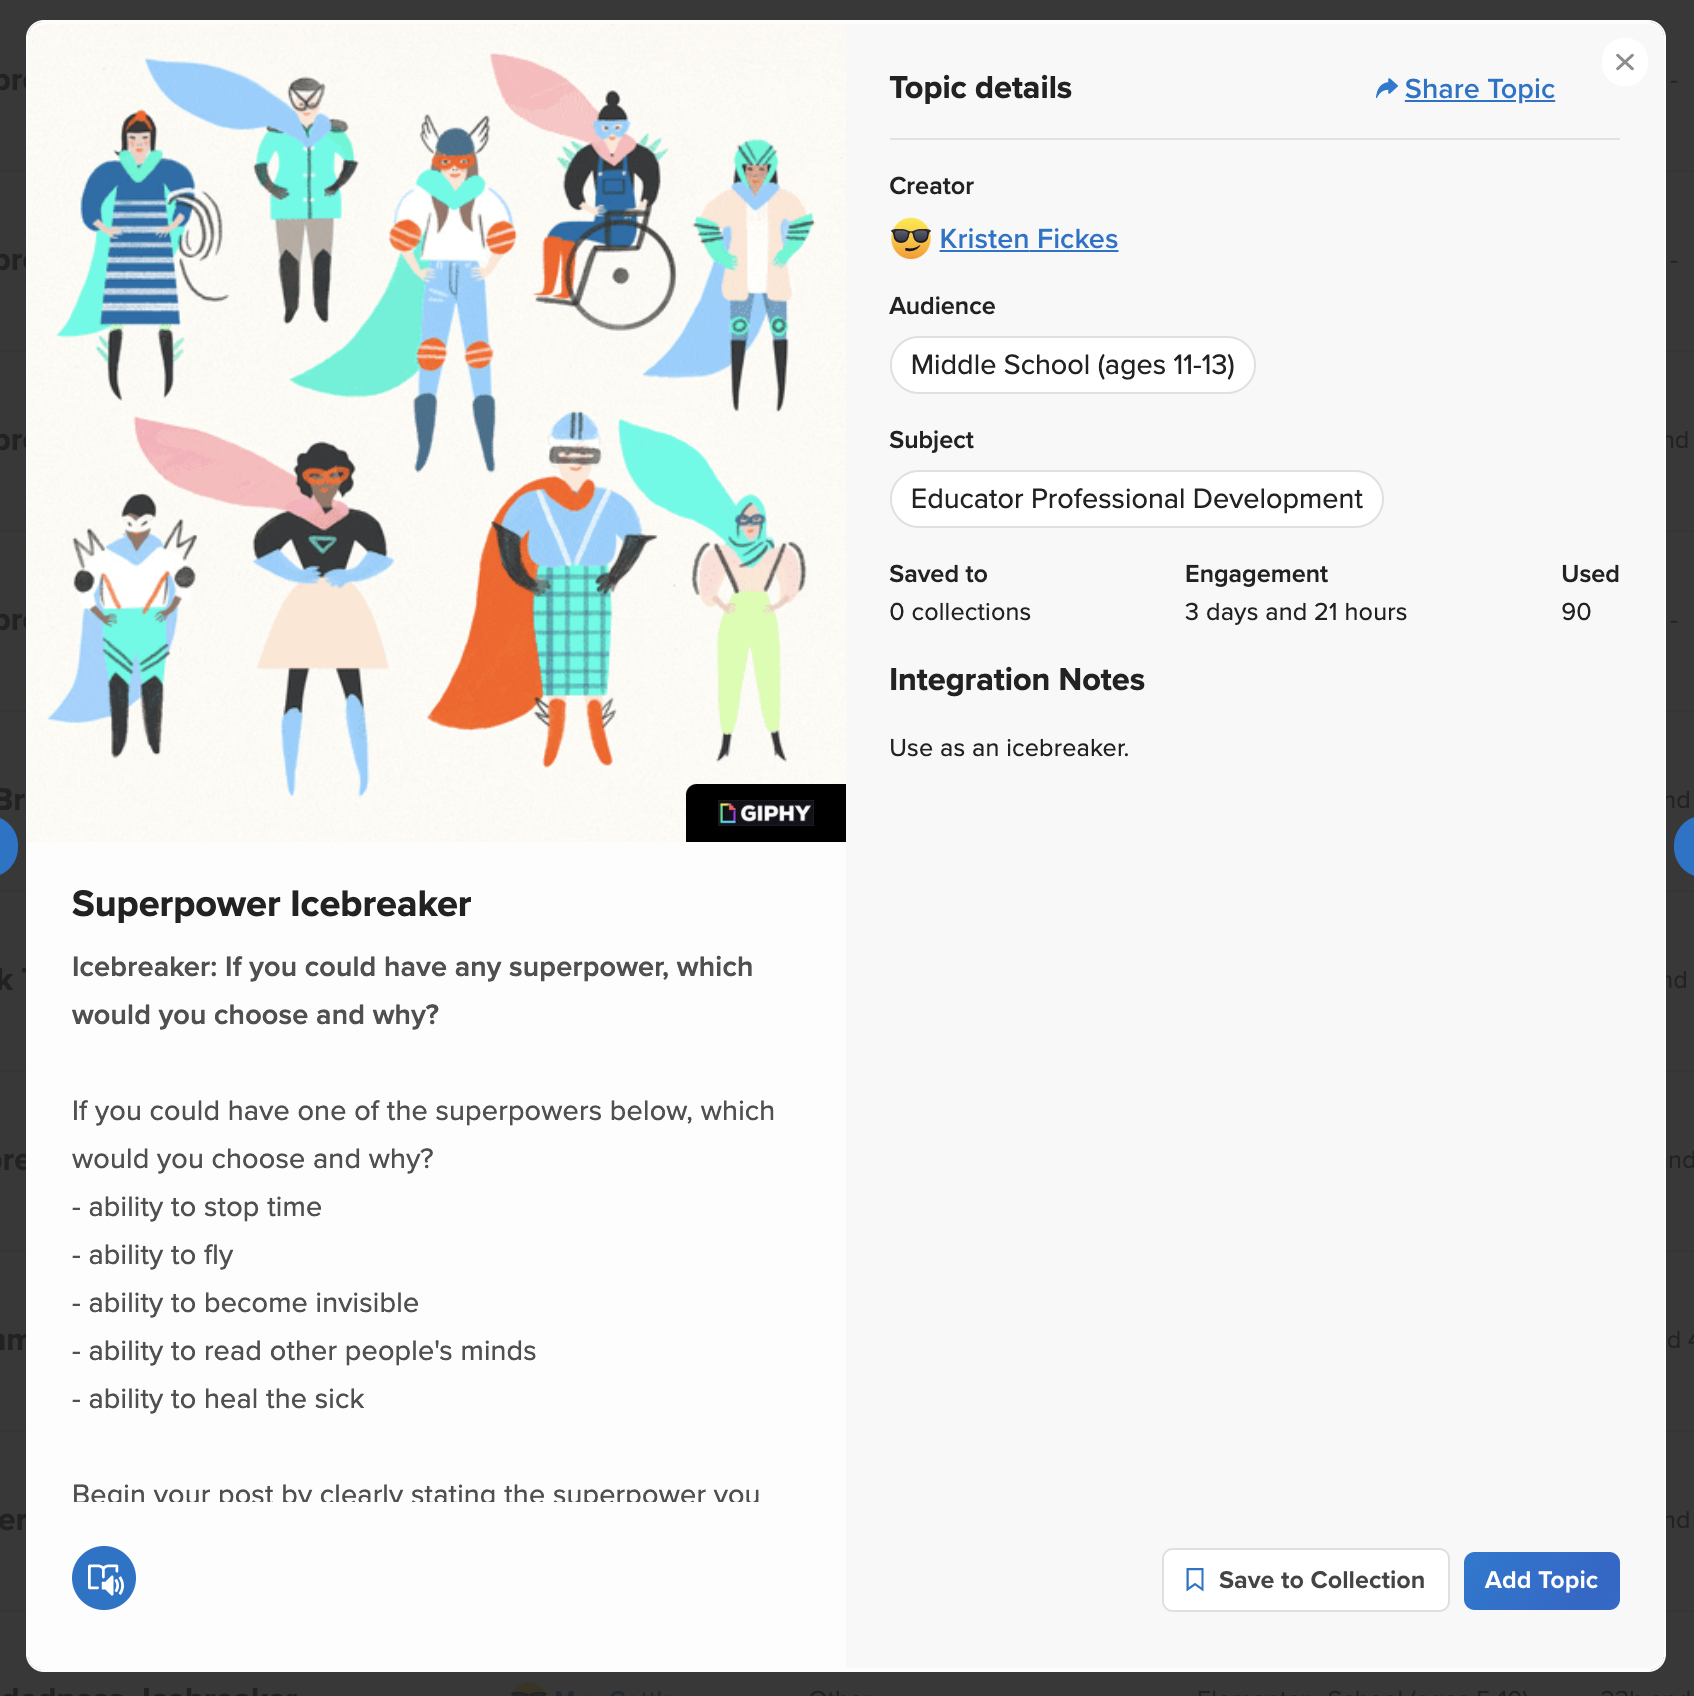

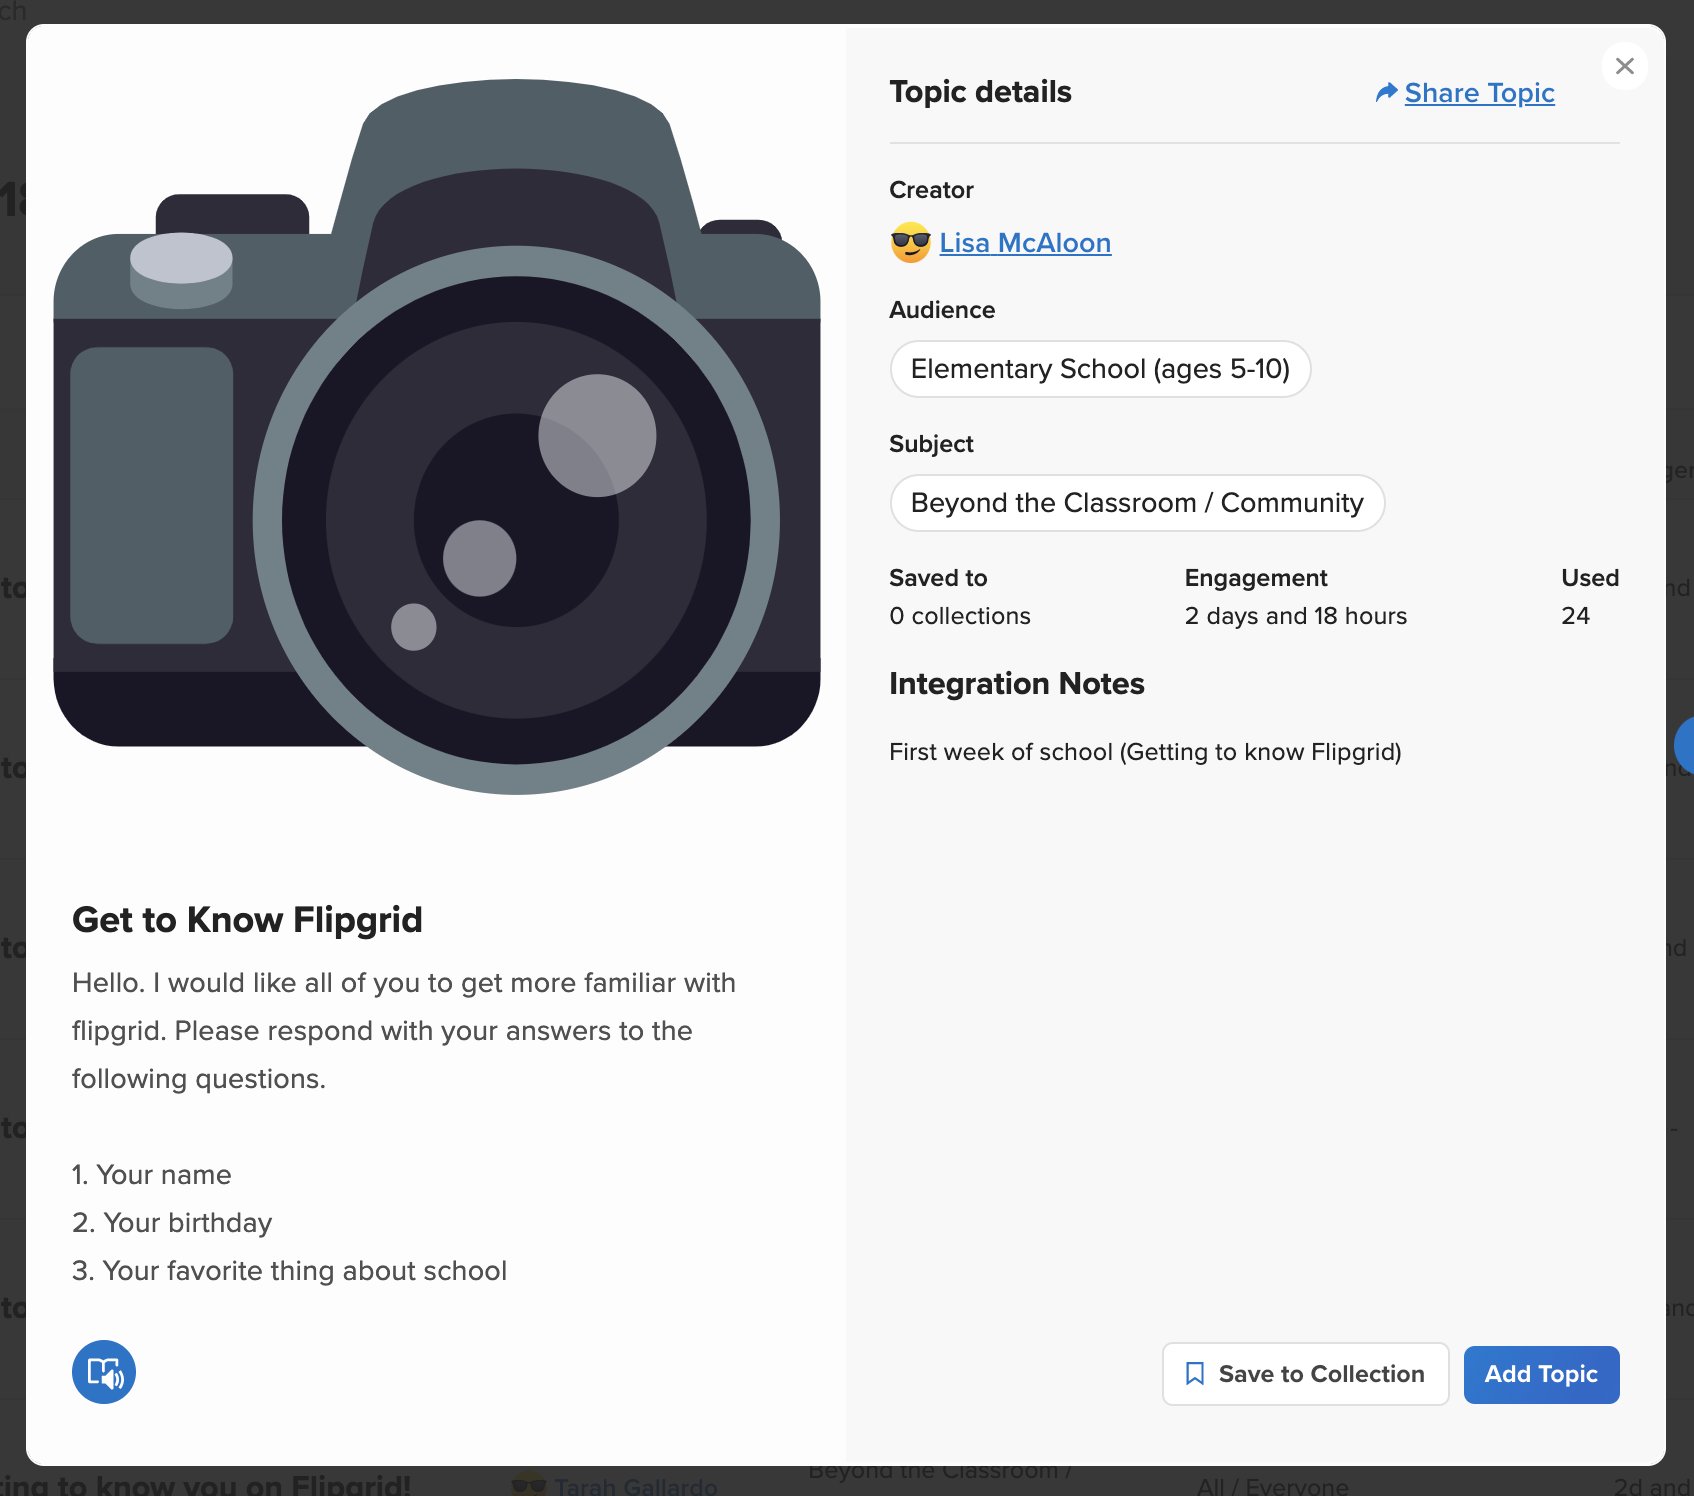
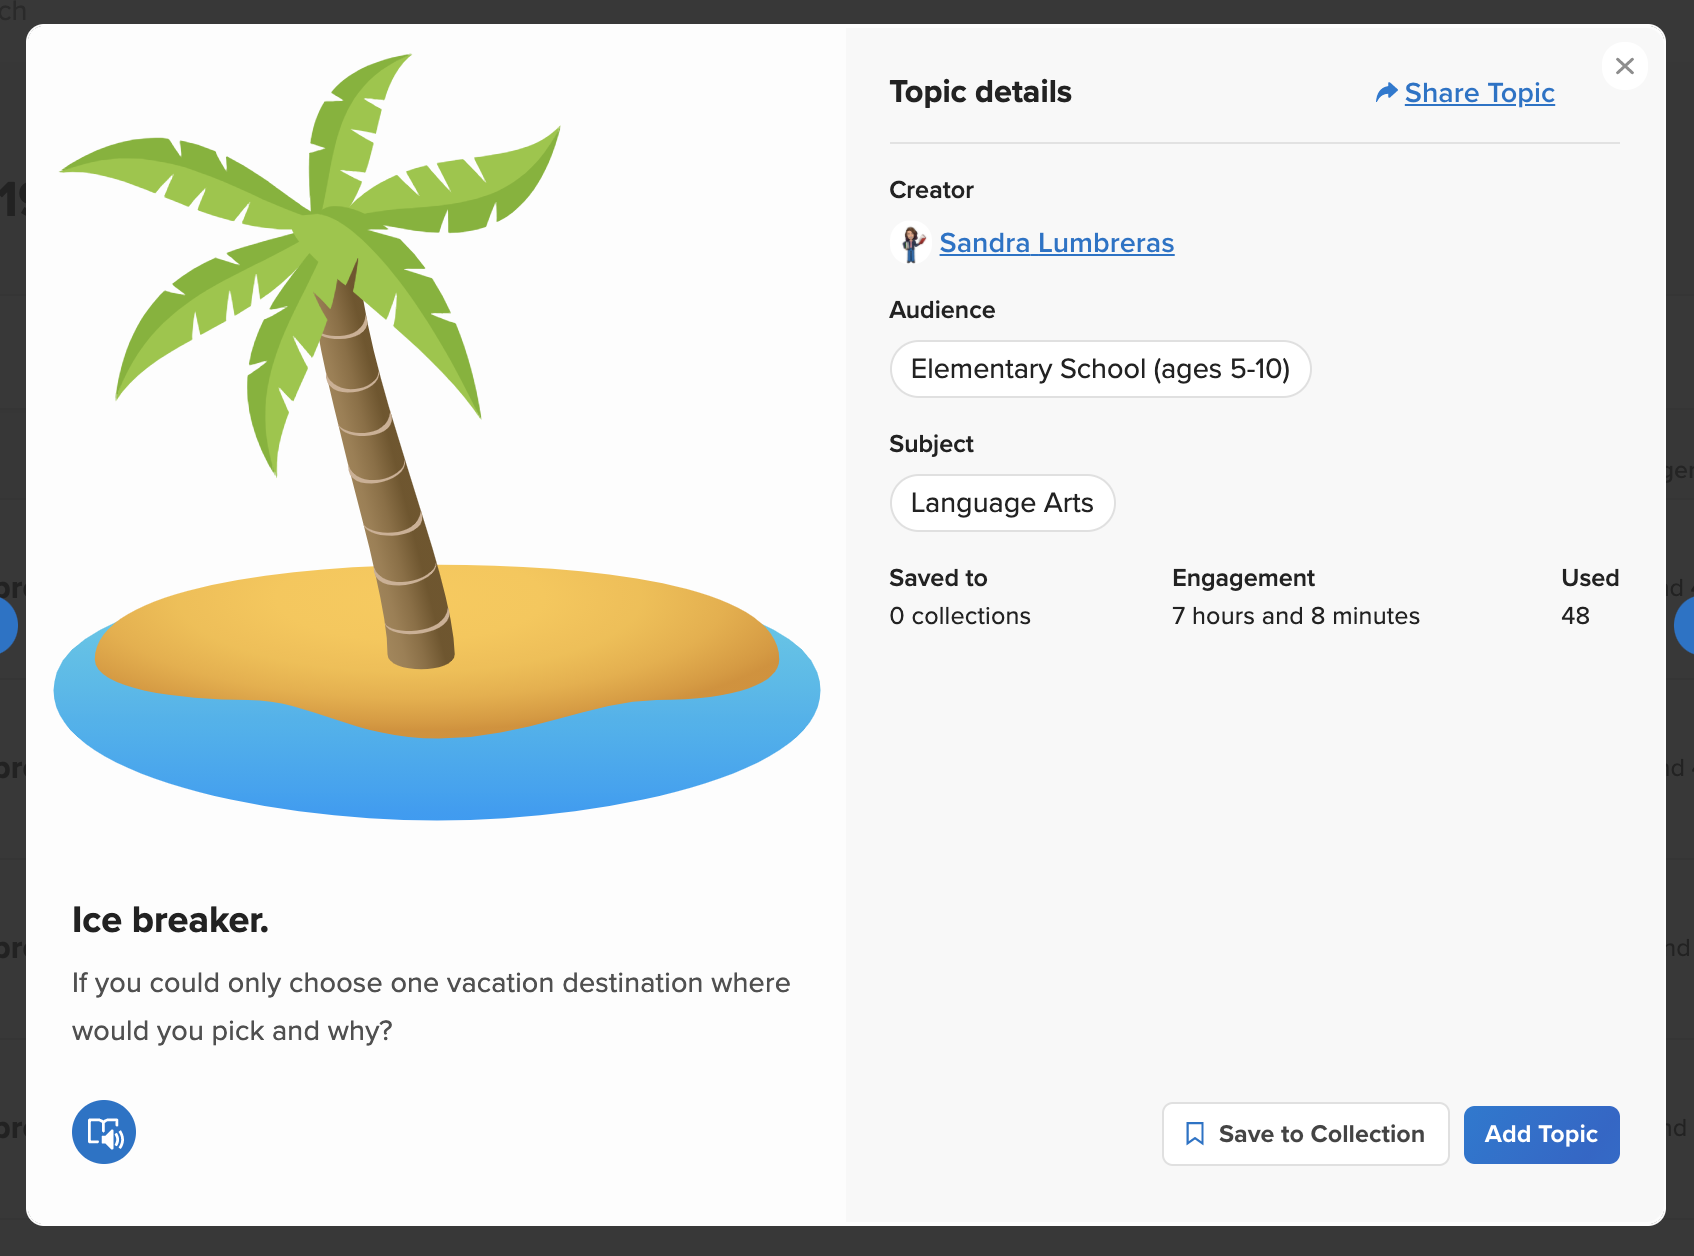
Video Tutorial
Still not quite sure how it all works? Mrs. Merrill has you covered! Check out her video on how to get started below!
Stay #interACTIVE!
-👗➕🕶️
For more tips, tricks and lesson ideas for making learning more interACTIVE, check out our books The InterACTIVE Class and Flipgrid in the InterACTIVE Class on Amazon!


Top Five (FREE) Apps of 2020!
2020 was a wild year - especially for educators. We experienced the world’s greatest PD event, but which apps / websites proved to be the most resourceful? We’ll walk you through five of the ones that we find ourselves using the most in our own classrooms.
Teaching in 2020 was like brushing your teeth while eating Oreos. It was like shoveling snow while it’s still snowing. Or maybe it was like being a chameleon stuck inside a bag of skittles. But educators are resilient and before we threw up our hands and said that it’s “forget this o’clock,” we tapered down for the world’s largest PD event. We became familiar with websites and apps that we had never heard of. We quickly realized the importance of the “mute” button, and that most of our “staff meetings” really could be sent out in an email. But, now that we’ve had almost a year of this under our belt, we can confidently say that some apps have proven to be essential throughout remote learning and our gradual return back into the classroom. So, without further-ado, these are our top five (FREE) most commonly used apps of 2020. These apps are compatible on any device. Click on any subheading to learn more about the app and how we have been using it in our classrooms.
5. Gimkit (Gamification in the Classroom)
4. Classkick (Instant Feedback / Monitoring)
3. Nearpod (Classroom Management / Content Delivery)
2. Seesaw (Student Portfolios / Where Everything “Lives”)
1. Flipgrid (Student Creation / Social Learning)

5. Gimkit
Gamification in the classroom
Link 👉 http://www.gimkit.com
Gimkit is a live quiz learning platform where students answer questions and can earn “money” for power-ups. It was developed by a high school student who built a game that he wanted to play in class. The free version allows educators to create and edit content as much as they need. However, games can only be hosted with 5 players or fewer and new assignments cannot be created while on Gimkit Basic. We highly recommend upgrading!
How To Use it in the Classroom:
Have your students develop their own questions in the “Collab” mode. Then launch the kit and see how they perform!
Math fluency review
Use Gimkit as a way for students to go back into a text and find the answers to the questions
TIP: The more questions that you have in each “kit,” the better!

4. Classkick
Instant Feedback and Monitoring
Link 👉 https://classkick.com/
Classkick is a free app that students work on and get help instantly from their teacher and peers. Students may receive assistance from teachers (and peers) instantly. Teachers create assignments, see all their students’ work in real-time, and give LOTS of student feedback. Best of all, students can help each other anonymously.


How to Use Classkick in the Classroom:
Create assignments that students can work home regardless of where they are
Save your Powerpoint files as JPEG’s, then upload them to a new Classkick assignment
Use Classkick for Number Talks / Number of the Day
TIP: Create an assignment titled, “White Boards,” and use them as daily digital white boards. Students can erase the white boards after daily use, and return to the same link / code the next day.

3. Nearpod
Classroom Management and Content Delivery
Link 👉 http://www.nearpod.com
Nearpod is a student engagement platform built to make teaching with technology easy. With Nearpod you can control what your students see and get feedback in real-time. With a free account, you have the ability to share assignments with your students and then transition what they see from slide-to-slide. For example, if you upload an assignment from Google Slides or PowerPoint, Nearpod will convert it into an assignment. Teachers have control of the assignment, and when they move to the next slide, it will automatically change on all devices logged onto that presentation.
How to Use Nearpod in the Classroom:
Upload an assignment from Google Slides or PowerPoint, then add a virtual reality field trip! (Click: Add slide > Virtual Field Trip)
Add an activity for your students to complete while in the lesson. Activities include: Draw It, Quiz, Poll, Collaboration Board, and more!
Differentiate by duplicating assignments and adjusting as necessary. Share the appropriate login codes with the assigned students.
You may also like:
How to Integrate Flipgrid into Nearpod
How to Embed Nearpod Presentations into Microsoft Teams

2. Seesaw
Student Portfolios and Where all of Your Content Can “Live”
Link 👉 http://seesaw.me
Seesaw is a platform where students share their learning in their Seesaw portfolio, giving teachers and families valuable insights into what the students know. Assignments can be easily created, differentiated, and shared - think of it as a “house” for all of your content. The best part of all: every time a student adds an artifact to their portfolio, it notifies their connected family member(s) so that they may be kept in the loop with their child’s learning.


How to Use Seesaw in the Classroom:
Create assignments and select the students that you would like to complete them (easy differentiation)
Allow students to add content on their own (let them take a photo, then annotate over the photo)
Keep families at home in the loop with what is happening in class
You may also like:
What’s New in Seesaw (2020)
Flipgrid
Student Creation and Social Learning Platform
Link 👉 http://www.flipgrid.comFlipgrid is a video based social learning platform. Educators pose a question or assignment, then students respond in the form of a video. Once the conversation starts, other classmates may view their friends’ videos and respond to them. This creates a web of discussion, which automatically elevates the overall curricular level of the classroom.
How to Use Flipgrid in the Classroom:
Allow students to explain their thinking by holding up a whiteboard or their writing
Sequence the events of a text or historical time period
Use the Flipgrid Camera to record your own lessons - even create digital anchor charts
You may also like:
How to Play Among Us on Flipgrid
Using the Draw Tool on Flipgrid
Creating Student Podcasts on Flipgrid

Stay #interACTIVE!
-👗➕🕶️
For more tips, tricks and lesson ideas for making learning more interACTIVE, check out our book The InterACTIVE Class on Amazon!
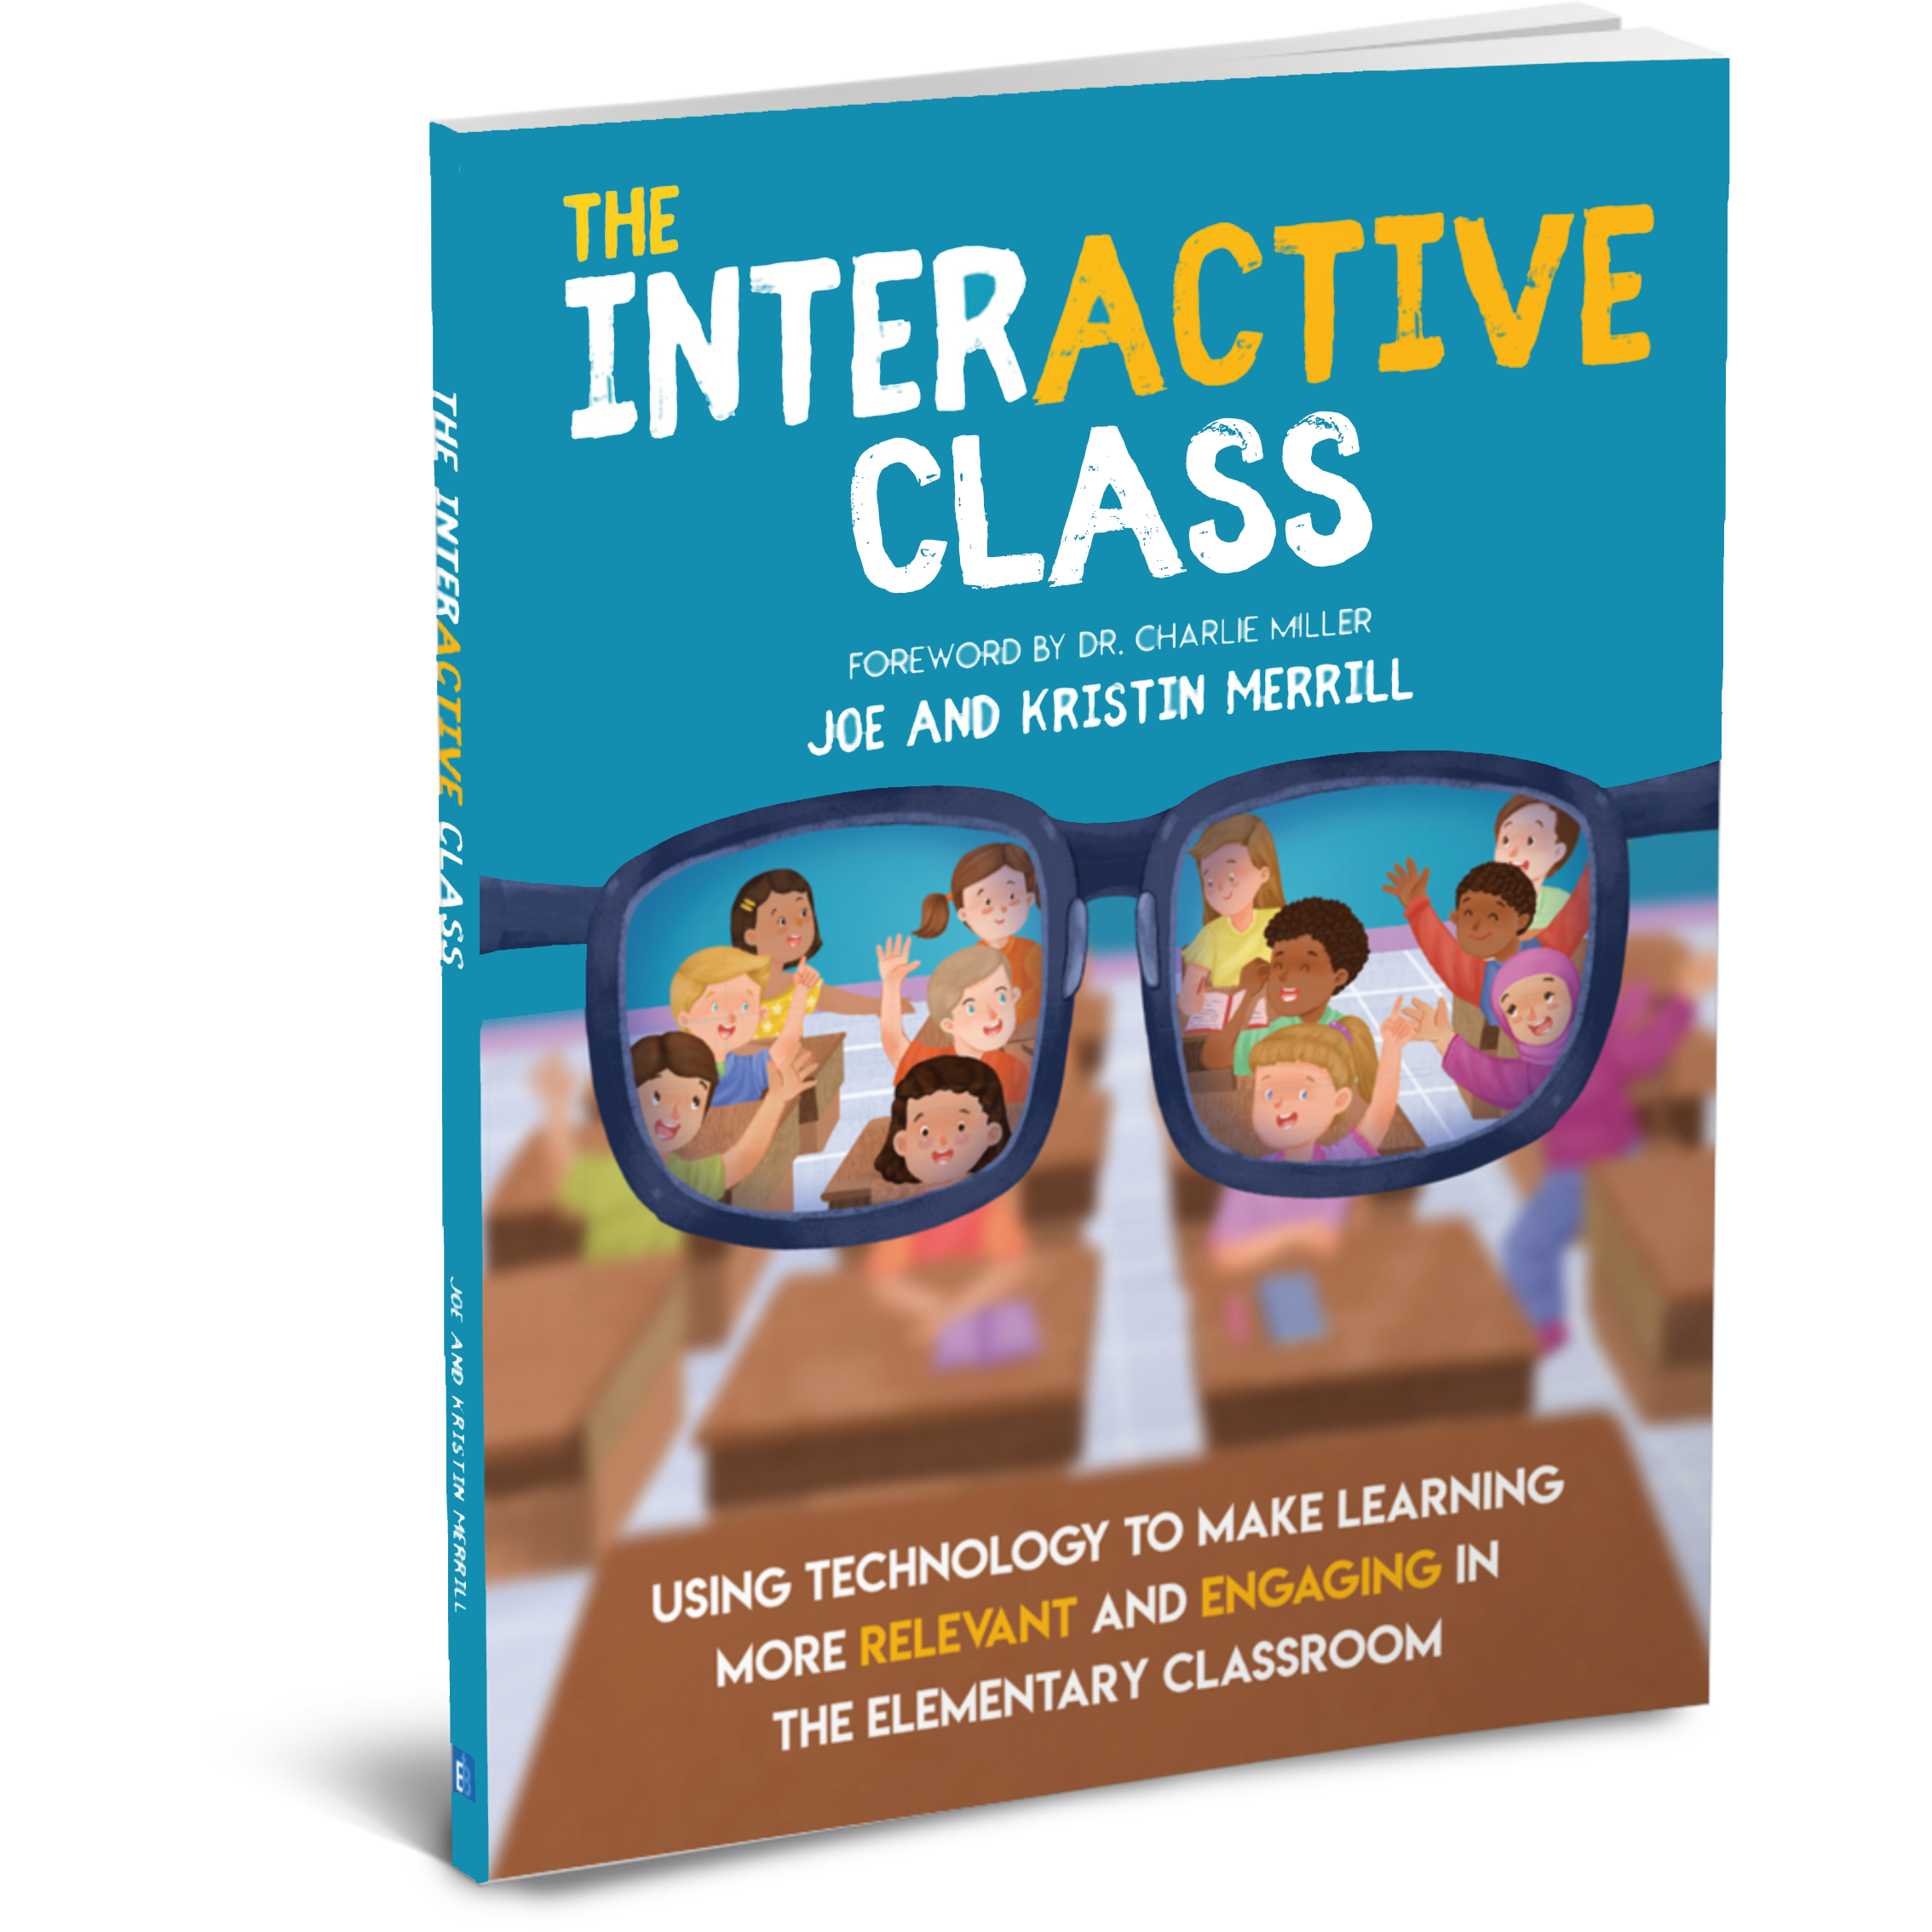


12 Days of Reading
The weeks after Thanksgiving that lead up to Christmas are always the hardest for teachers. Students are out of the normal routine after the extended fall break and are now excited and eager for Christmas to follow in the weeks to come. It can be hard to keep students focused and get all the planned curriculum and lessons in efficiently.

The weeks after Thanksgiving that lead up to Christmas are always the hardest for teachers. Students are out of the normal routine after the extended fall break and are now excited and eager for Christmas to follow in the weeks to come. It can be hard to keep students focused and get all the planned curriculum and lessons in efficiently.
In our own classrooms we do not overtly promote Christmas, although it is the holiday we personally celebrate in our own homes. We do not have elves that visit, or trees lit up all month long. There is not enough time in the month to adequately cover all the different holidays equitably, and it can be dicey trying to determine the personal beliefs and religions of each and every individual student. But nevertheless, Christmas is always the predominant holiday students anticipate, and that excitement spills over with each new day that nears.
As educators we know that student excitement is the key to engagement, and that when students are engaged they are more likely to try new things or stick with hard tasks. Using this excitement and incorporating it into the normal and routine academic activities is an easy way to keep learning alive throughout the holiday season. Thus the 12 Days of Reading was created with one simple goal in mind—keep reading lessons exciting while balancing all that comes along with the holiday sprit. The name is a spin off of the well-known song “12 Days of Christmas” and it is meant to compliment the reading already being done each day. Whether this is reading that must be done from a textbook, or independent reading that students have free choice over.
Day 1- Graffiti Wall

For this activity, students create a word splash to illustrate the book or selection of text they are reading. The words can summarize an event, convey an emotion, describe a character or person, etc. Students can either doodle, draw or sketch these words and phrases on paper or create their painted wall digitally on Flipgrid. If working to create on Flipgrid, you can grab the digital activity and brick wall images right from the Discovery library.
Day 2- Social Media Post

Taking on the persona of someone else and creating a social media page is a fun way for students to summarize, story tell, and take on a different perspective. Teachers can be creative with what students create profiles for—famous historical people, book characters, an inanimate object or even something outside of the box like an element from the periodic table!
The following templates are some of our favorites that we have found over time created by fellow designers, educators and colleagues.
Pinterest Template Created by TEachingTechnix

YouTube Template created by Paula Martinez

Netflix Created by Nick LaFave

Facebook by Ryan O’Donnell

Instagram by TechingTechNix

Twitter by TeachingTechNix

Day 3- Comic Cartoon

Creating Comics are a fun way to review plot, practice summarization and practice matching visuals with text in a story. If working in person, have students draw out a specific part or memorable event in the story, or have students work digitally through Book Creator. Students can either collaborate together in one book, or each create their own comic independently.
Day 4- Lego Character

Some of the most engaging lessons for students aren’t because they are elaborate or even because they use technology, but often because they are targeted around the students’ interests. Legos are a classic toy that students often related to so why not incorporate them into a reading lesson? Have students take the basic blank lego character outline and then design an outfit fitting for the person they are describing. This again could be a person from a book, a famous historical person or maybe to represent the main idea of a selection of text read. Students can decorate on paper with basic art supplies, or you can take the image and embed it into other programs like PowerPoint, Adobe Post and many other to design digitally. When finished, regardless of how they design, students can always share their work on Flipgrid.
Day 5- Draw a Scene

Illustrating a scene is a simple, yet powerful way for students to show what they comprehend while reading. By giving them the freedom to draw, they can then structure their drawing into what they envision. A great platform to take this idea and turn it digital is Buncee. Students can create slides representing different scenes in their books, add in characters, background settings, live animations and more!
The garden from the well known novel The Secret Garden brought to life in Buncee!
Day 7- Alpha Boxes

This activity is a great way to get students talking about text while brainstorming words associated with a story or article. Each box is filled with a word, emoji or picture that starts with the letter and explains some part, feeling, characteristic, etc. of the story. Level up this activity by creating a book on Book Creator for students to collaborate on. They could all share their various words and images together in the same place and create one giant, collaged page for each letter.

Grab the template to use today!
Day 8- Character Award

This activity is fun and lets students be creative with how they would describe the main person or character from their reading. After brainstorming a list of character traits, they then can infer what type of award their main character would most likely received. These awards can be realistic—for example, one might be awarded “most courageous” for fighting peer pressure, another awarded “wisest” for the guidance given to another character—or they can be silly, creative and made up.

Grab the template to use!
Day 9- Dream Vacation
It’s five o’clock somewhere, right? Everyone can relate to the idea of getting away and going on vacation, but the destination is where opinions may vary. With this activity, students take on the persona of a person in their reading and plan a dream vacation based on the interests, likes and personality of that person. They pick a spot, describe it, and explain why he or she would want to go there. Depending on the amount of time you have and the age of the learners, you could even take it a step further and have them make up an itinerary of what they would do and when based on the length of the vacation.
Level Up: This would be fun to use Buncee to create. Students would not only create their itinerary of where to go while on vacation, but also illustrate it using animations, photographs sticker and much more!
Day 10- Letter to Santa

Write a letter from the point of view of one character explaining what they want for Christmas. This is a great review for our digital learners and gives them a chance to practice formal writing other than a text, tweet or tok.

Level Up: Infuse some math into this lesson by giving students time to browse through store circular ads and calculate the total amount it would cost to buy all the items on their list.
Day 11- Character Scrapbook
Image your character were to journal or keep track of important events and memories from their life in a scrapbook. Have students create and design the scrapbook using programs like Buncee and have them share their project link with classmates using Flipgrid, Wakelet or Seesaw.

Download this template to get students started!
Level Up: Instead of creating a scrapbook, have students use Adobe Spark Video to create a video or “home movie” of the character’s memories.
Day 12- Adobe Creative Bundle!
Adobe has curated the most amazing activities for teachers to use over the holiday season and we were honored to help create some of the templates for teachers! Check out the many awesome ideas here!
Check back in tomorrow for the last new reading activity!

Creating Custom Frames in Flipgrid
With all of the new Frames being added we thought of a fun activity you can use for both students in class and those learning remotely— First Day of school photos! Learn how to create custom frames to fit any Flipgrid lesson!
With the new school year starting we are so excited for the new Flipgrid platform to launch on August 5th! (If you missed what’s coming check out the Flipgrid LIVE release here!) One of the new features coming to Flipgrid is the addition of Frames.


With all of the new Frames being added we thought of a fun activity you can use for both students in class and those learning remotely— First Day of school photos! We all know the iconic photos parents and teachers alike take on the first day of school welcoming students to the new grade level while documenting their first day in their new class. There are so many ways you can incorporate first day photo frames within Flipgrid but we would suggest pairing them with some sort of First Day/Get to Know You activity like 2 Truths and a Lie or All About Me. (Both of which you can find in Flipgrid’s Discovery Library)
How to Create Custom Flipgrid Frames
(Note: At this time, this will only work on the web version of Flipgrid - not mobile devices)
To create custom frames, we suggest designing in a program like Adobe Spark, due to the ability to save creations with a transparent background. When designing, keep in mind the orientation students may be recording in depending on their device and be sure to keep enough space open to leave room for the person recording the video to be seen. After your frame has been designed, save the image as a PNG file. Be sure to select “transparent background.” This will take any of the white from the background layer and make it transparent.
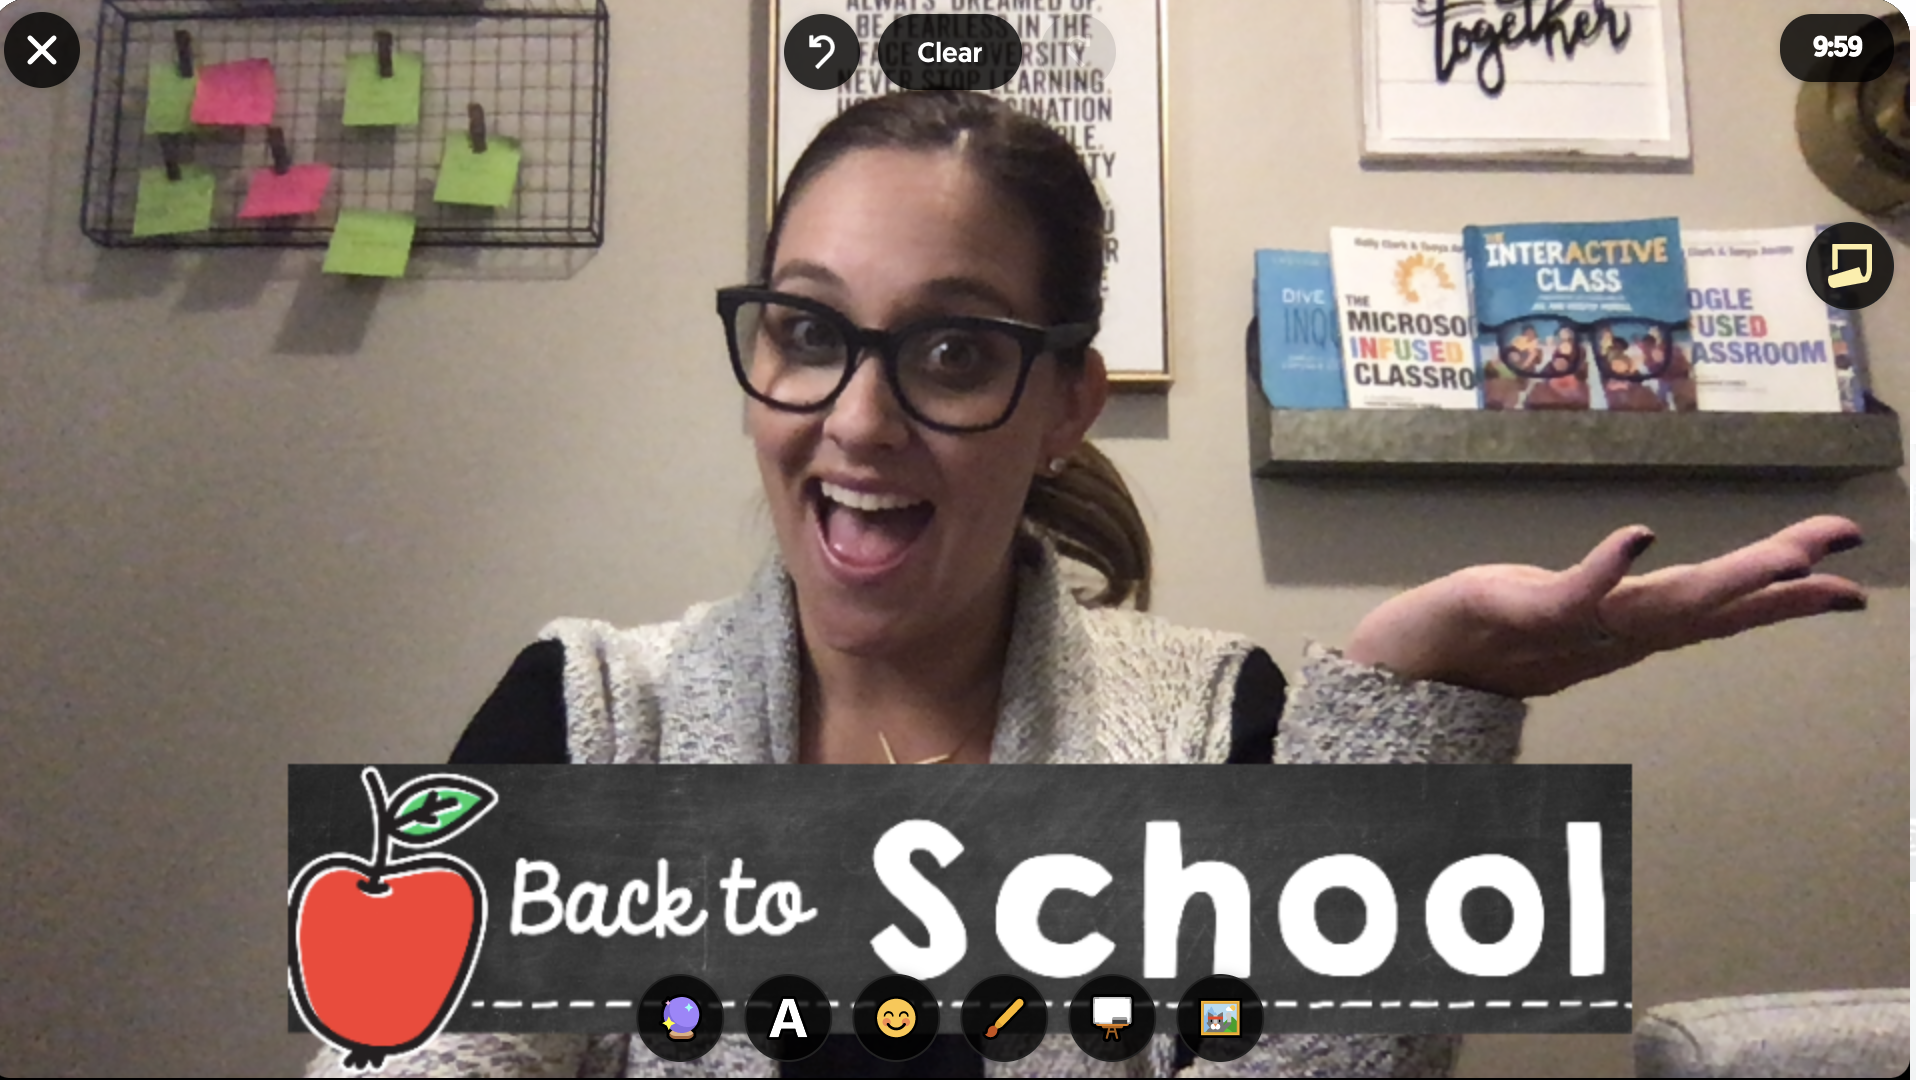
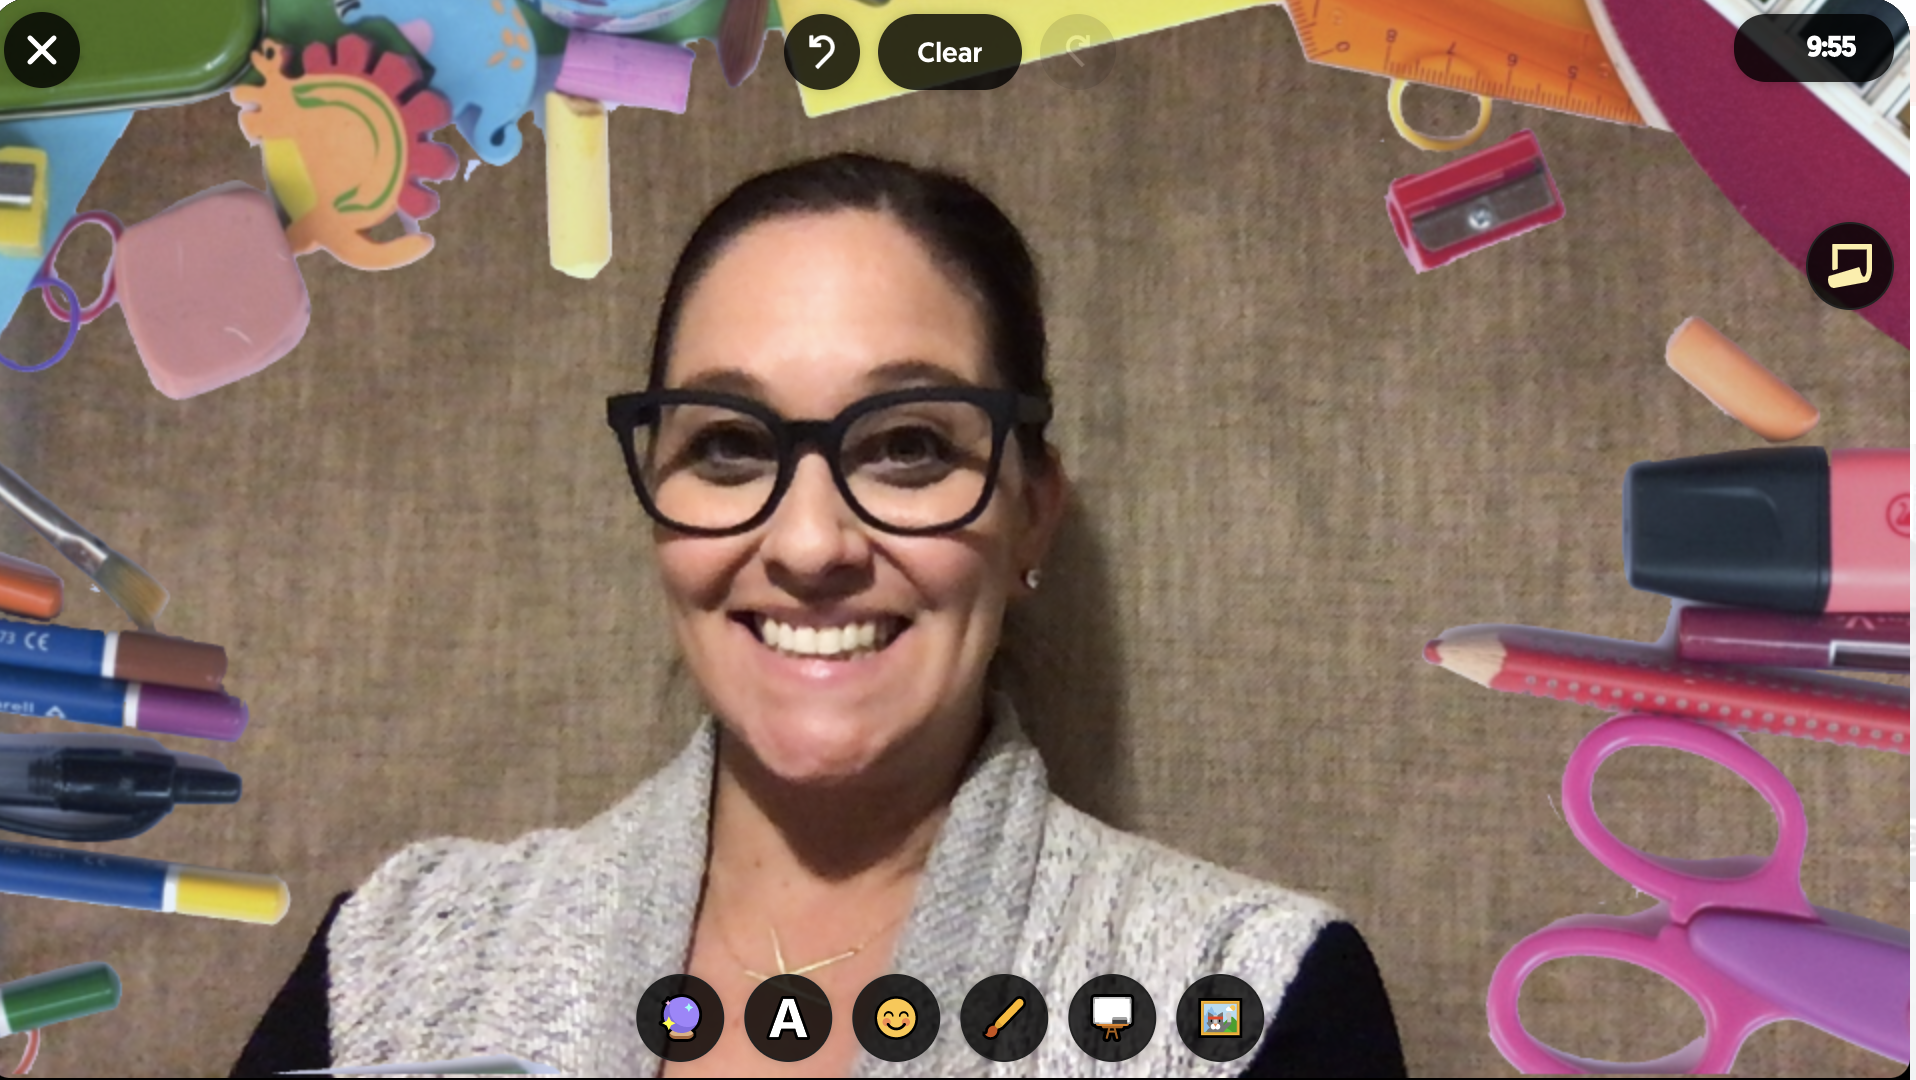
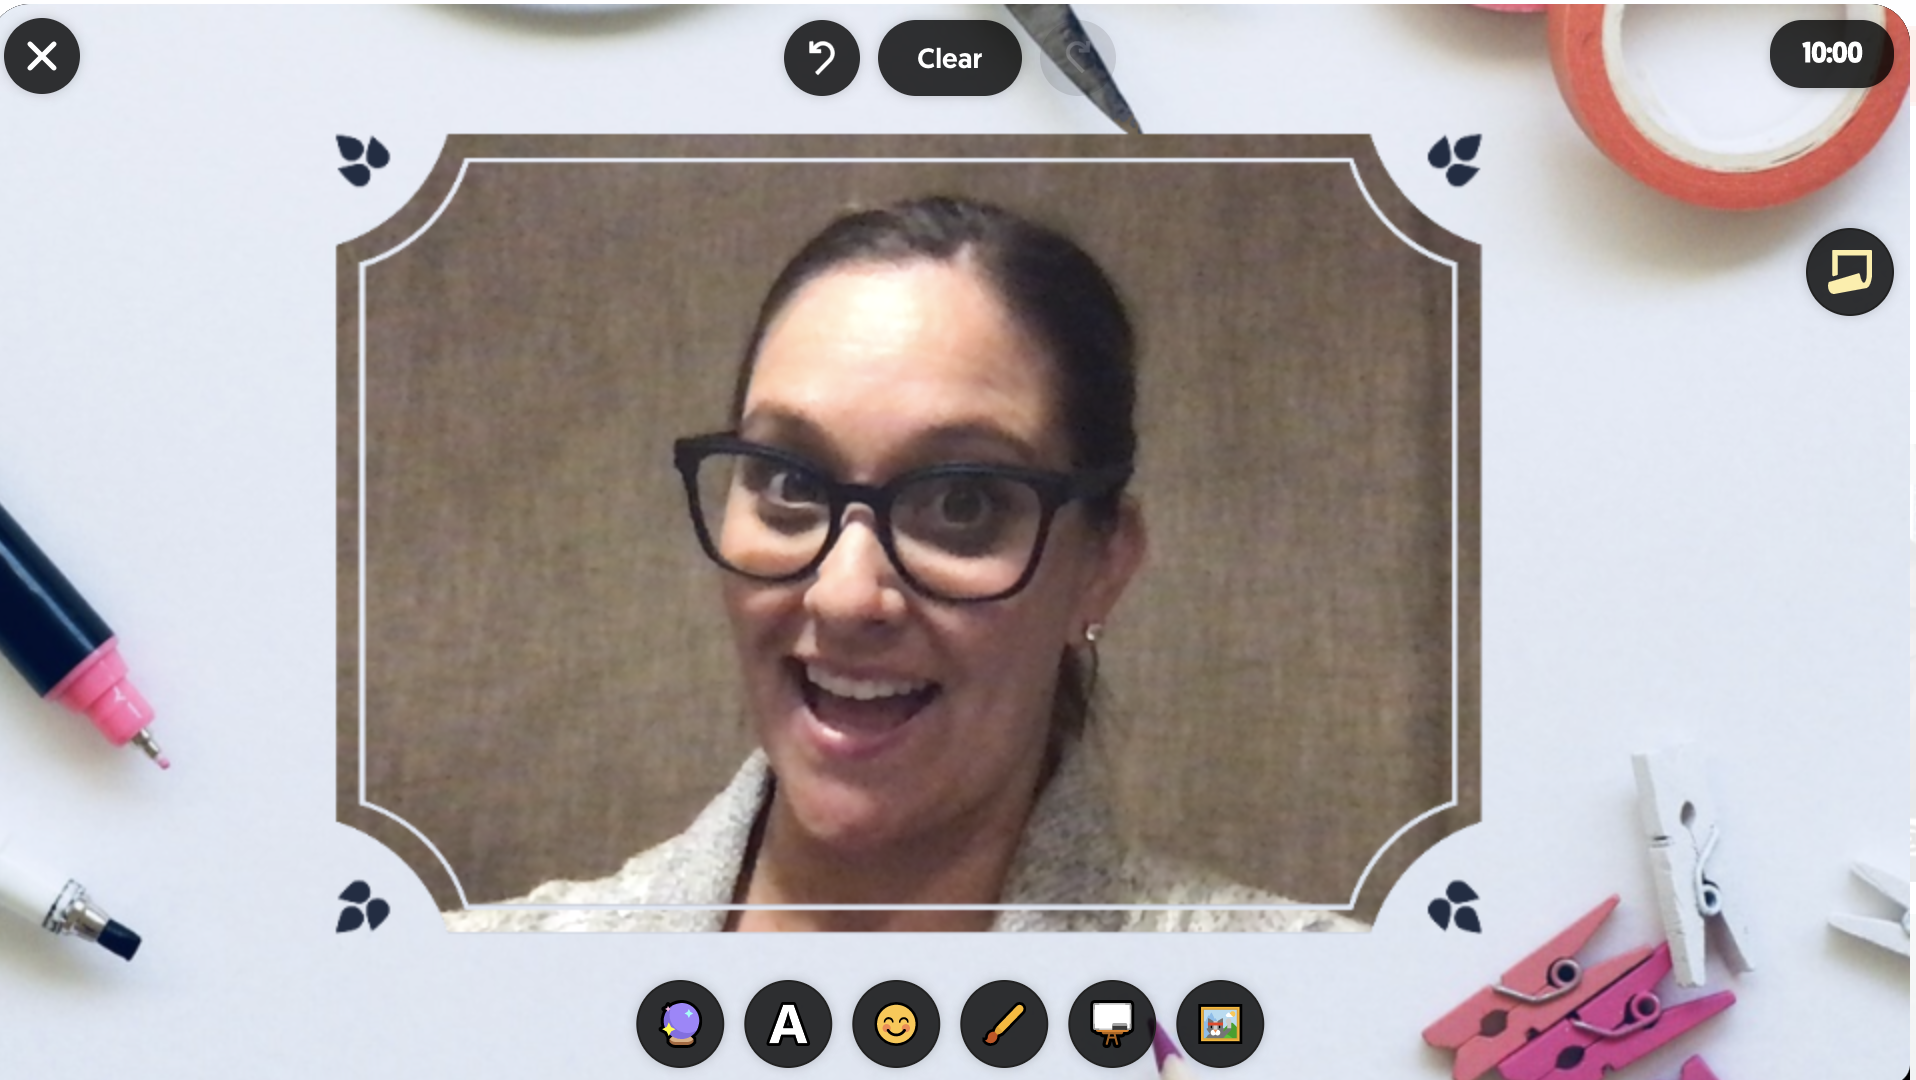
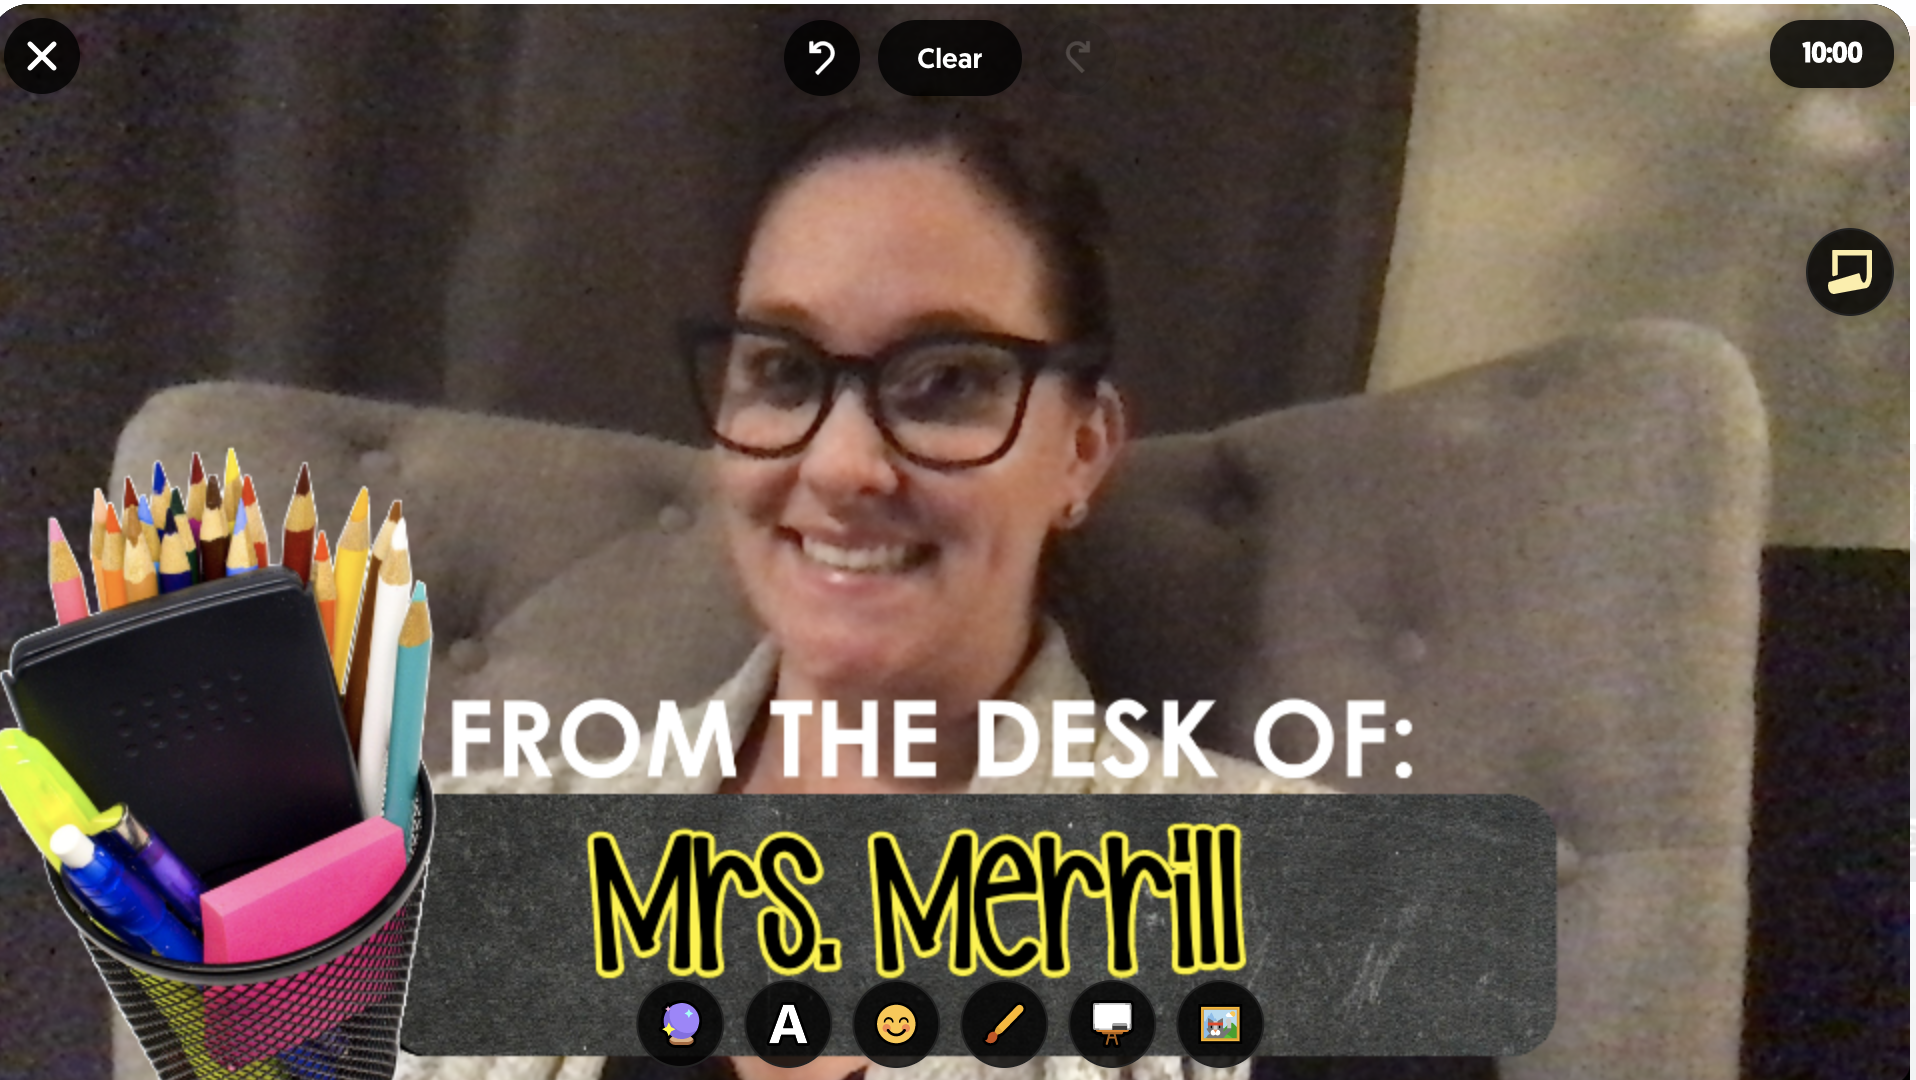
Now you are ready to set up your Back to School Selfie Topic! Simply attach the PNG images to the Topic (you can attach up to 10!) making it easy for students to access the frames independently. Don’t forget to leave clear directions for students in the Topic Focus and then sit back and leave the recording, creativity and sharing up to them!

If you would like some of the free frames we used to start building your own Topic with, just click here! We can’t wait to see how you take this idea to build community in your classroom in the first weeks using Flipgrid!
If you want to learn more about Flipgrid, check out other posts like these!
Creating Digital BreakOuts with Flipgrid (click here)
Digital Anchor Charts in Flipgrid (click here)
Creating Flipgrid BookTalks (click here)
Stay #interACTIVE!
-👗➕👓
If you’d like to learn more about interACTIVE teaching and learning, check out our book The InterACTIVE Class today!


Creating Digital Breakouts with Flipgrid
The thrill of escaping from a level and breaking out of a lesson is appealing to many students and teaching and learning through games is just one of the many ways you can create #interACTIVE learning environments and lessons—especially when teaching digitally through remote learning.

Being as versatile as it is, it should come as no surprise that Flipgrid can be used to “gamify” the classroom. One of our most asked about lessons from our book, The InterACTIVE Class, continues to be “My Teacher Stuck in a Video Game.” The thrill of escaping from a level and breaking out of a lesson is appealing to many students and teaching and learning through games is just one of the many ways you can create #interACTIVE learning environments and lessons—especially when teaching digitally through remote learning.
Creating a BreakOut Game with Flipgrid
Before creating your breakout grid, you need to plan ahead and create the problems your students will be working through. You will need the answers to input into your Flipgrid portion of the breakout as they will become the codes students enter as they try to unlock the Grid and Topic.
To begin, start by creating a new Grid. This can be done by clicking the Add New Grid button in the upper lefthand corner of your Educator Dashboard. When creating your new grid, you are going to choose the Student ID option. Normally this option is used for schools where students are without emails, but for the purpose of our breakout lesson this type of grid will allow you to “lock” your grid with an answer.

Make sure to give your grid a name familiar to the lesson so students can easily find it. At the bottom of the grid creation window you will be asked if you want to customize your Flipcode. This is the code that students use to access the grid. The Flipcode is the answer you would like to have for your breakout and this should be thought out before creating your grid. You need to know what you want the answer to be for students to use to unlock the grid and what problem you want them to work through in order to get that answer. Flipcodes can only be numbers or letters so your answer needs to be one or the other or a combination of both. You may have to play around until you find an unused Flipcode, so be patient and creative with your combinations.
Once your grid is created and “locked” with your custom Flipcode answer, the next thing to do is set up the student ID portion of the grid. Normally, this is where you would enter in all students from the class and assign them their own unique passcode to gain entry to the Grid. But when creating a Brekaout Grid, you don’t need to enter in all the students. You are only going to have one student entered—and this entry will be the answer or code to unlock the grid.

You cannot leave the field for student name blank, so you can put a period in both boxes, or create a fun entry like Awesome Student. (We like this second option because once students break into the Grid and go to record an answer to the topic(s) this is the identifier that will appear in the box for their name. Students can then change their name when recording, but it adds a personalized, fun touch. Regardless of how you fill in the name boxes, the student ID box is the important box because this is where your second answer is put to unlock the grid. Again, this ID can be number, or letters so your answer can be made up of either.
Preparing the Topic
Once students have solved and completed 2 problems they will now be logged into your Grid and ready to record a Topic. You can make this topic related to the subject and concept being taught or something fun and reflective. You can extend the game and add various topics with challenges for students to complete. Maybe incorporate a Fliphunt. You can even make it more advanced by linking another grid to the topic by embedding the link in the Topic Essentials. (ie directions window)

Flipgrid Disco Library
In addition to creating your own BreakOut activities in Flipgrid, BreakoutEDU (one of our favorites!) is a partner in the Flipgrid Disco Library. You can find dozens of digital breakout games straight from the BreakoutEDU platform free to use. You can just click and copy the activities right into your own personal Grid.
Read more about using Flipgrid to create #interACTIVE lessons for students:
For more #interACTIVE lesson plans and ideas using Flipgrid, check out our book The InterACTIVE Class on Amazon!


Creating Digital Anchor Charts in Flipgrid
Flipgrid is by far one of our favorite educational apps to use both in the classroom and even more now during this period of remote learning. It has many useful features for teachers to use when creating lessons, one of these being the photo sticker tool.
Flipgrid is by far one of our favorite educational apps to use both in the classroom and even more now during this period of remote learning. It has many useful features for teachers to use when creating lessons, one of these being the photo sticker tool.

Using the Photo Sticker Tool to Create Anchor Charts
To create a virtual lesson on Flipgrid with an “anchor char” start by heading to the top bar in the educator dashboard and click on the Shorts tab.

You can use the Flipgrid features in any recording screen in Topics, when recording a response and a reply, but we suggest using the standalone Shorts camera option so all your teaching videos are saved and stored in the same place. To begin recording a video, simply click on the orange-pink button in the top, right hand corner labeled Record a Short.

Once in the Shorts recording window, begin by clicking on the photo sticker tool icon. This is the icon on the far right of the tool bar—the one that looks like a framed photo.

It will ask you to drop in or upload a photo from your device in either PNG or JPG format. Once your photo has been uploaded, it will become a free floating image on top of the recording screen. To create your anchor chart, simple size the image as large as you can so you still have enough room to be in the screen beside it. Now you are ready to record!
While recording your lesson with your anchor chart, try using some of the other Flipgrid tools simultaneously:
Pause feature: Once recording has begun, the record button turns into a pause button. Use this to switch between various anchor charts in the same lesson. You can also use the pause feature to add multiple images at once.


Draw tool: Use the draw tool to live ink on an anchor chart to highlight a specific part of the chart or you can draw attention by circling text evidence. You can even use it to match two things together on the “page” or to take notes off to the side.
Text tool: Try using the text tool to “write” directly on top of your anchor chart. This is a great way for teachers to model their thinking for students and to work through problems “together”.
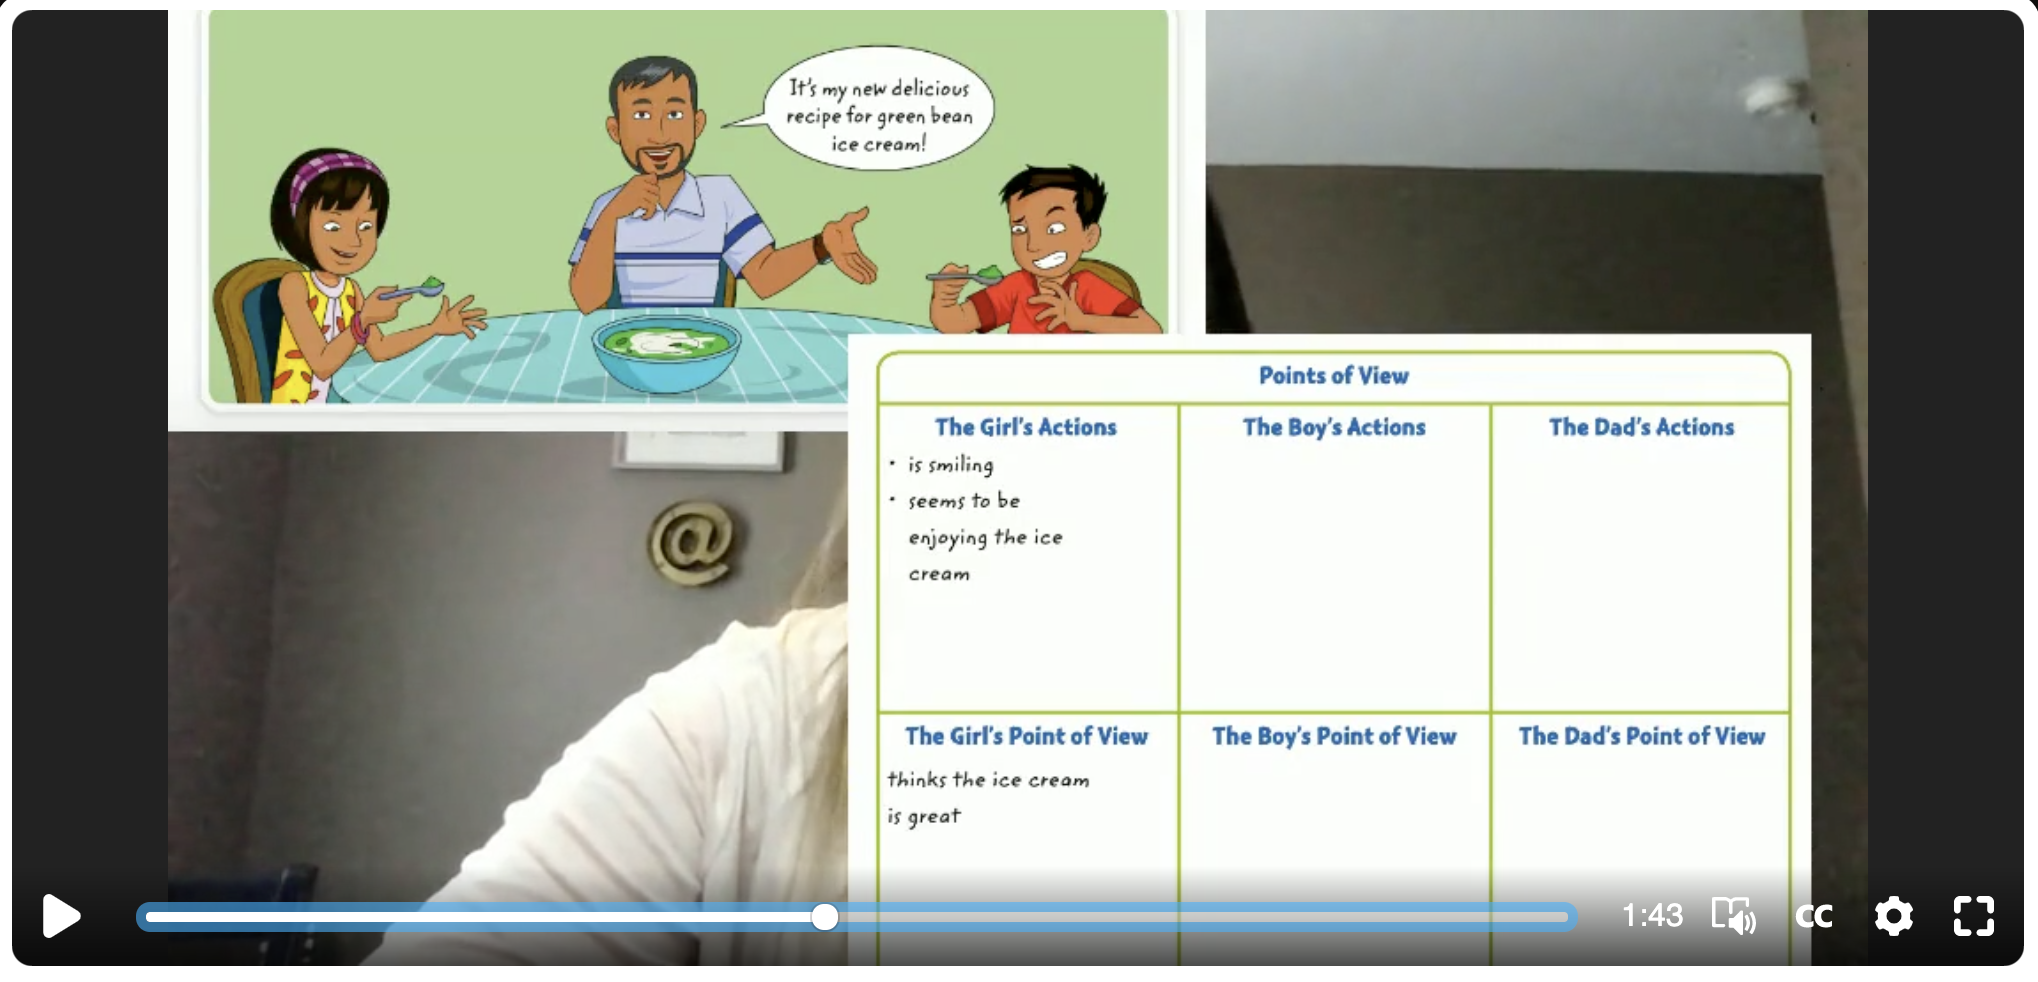
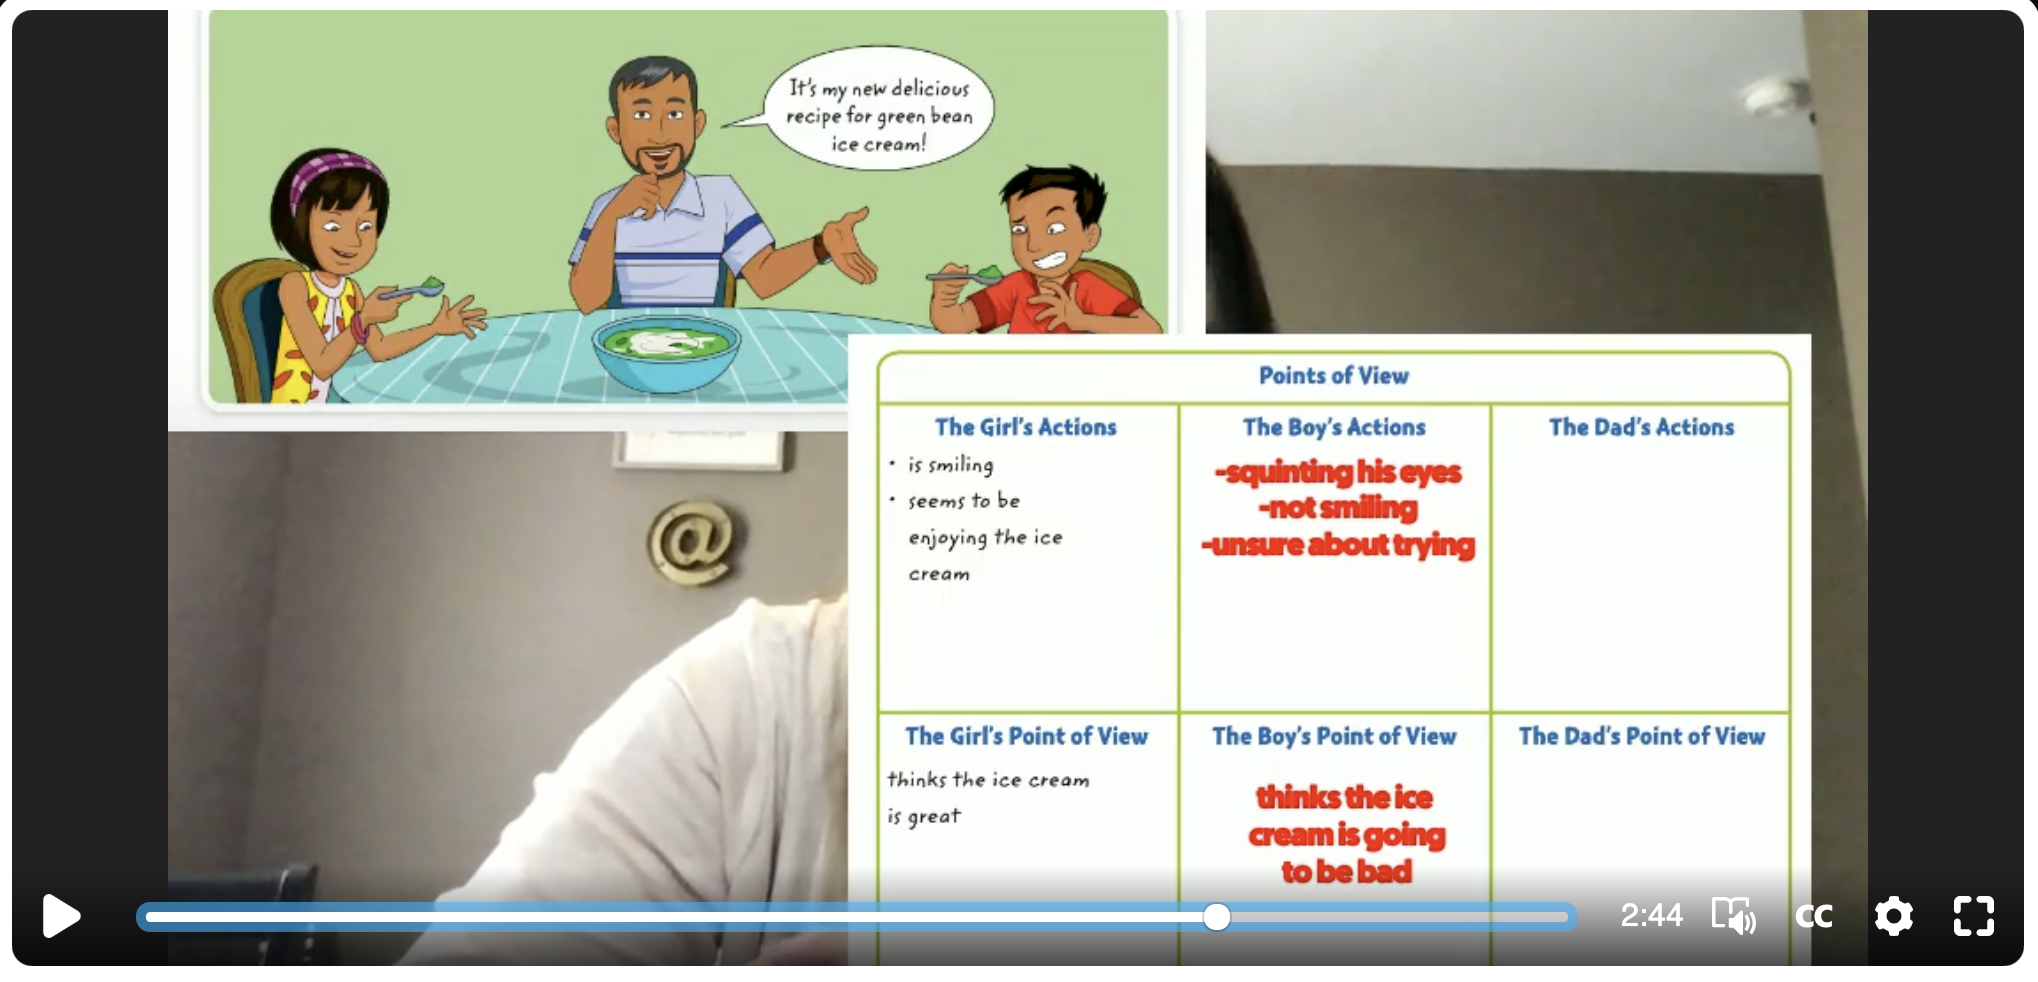
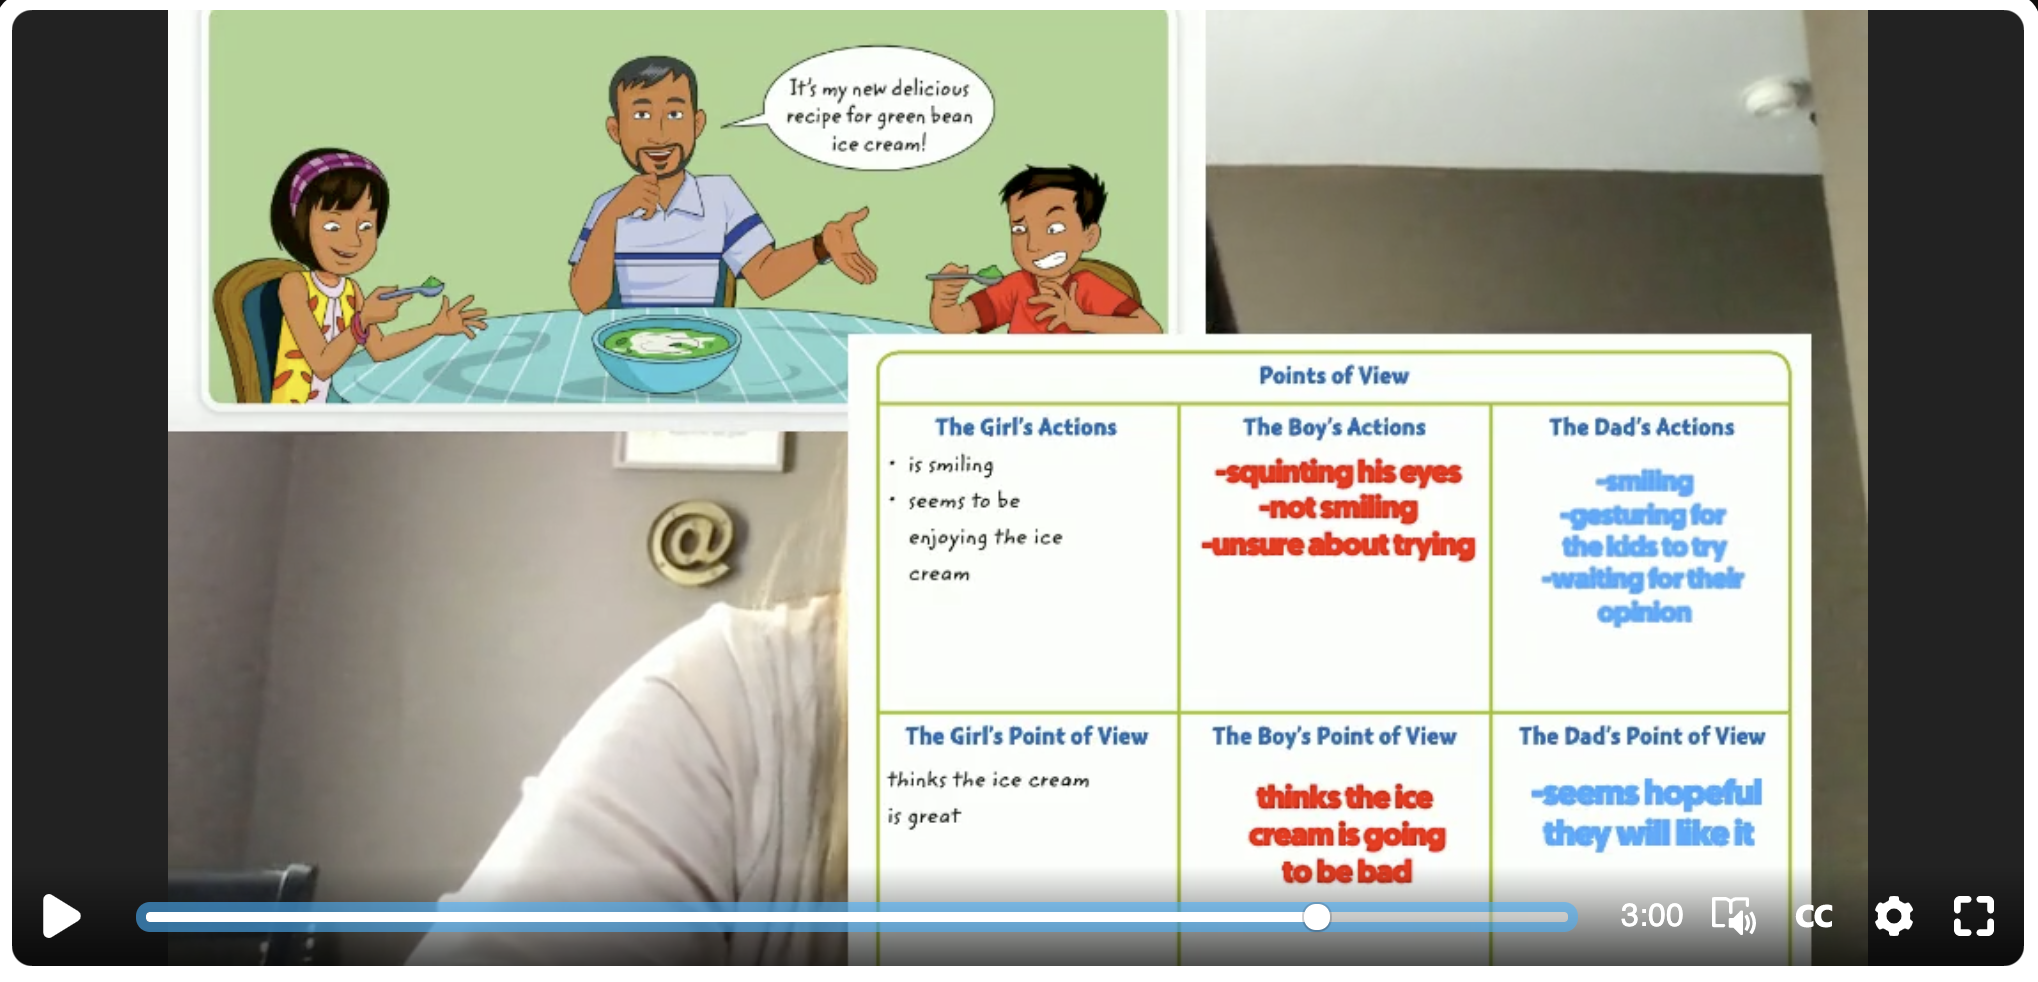
Looking for more resources on creating anchor charts? Watch our live tutorial here!

Flipgrid is such a versatile tool and one that we use daily during our own remote learning instruction. Interested in learning more about Flipgrid?
Click here to learn more about Using the Draw Tool in Flipgrid
Click here to learn more about Going Live on Flipgrid
Click here to learn more about Using Flipgrid for Inquiry
Click here to learn more about Creating Student Podcasts in Flipgrid
For more #interACTIVE lesson ideas using Flipgrid, check out our book The InterACTIVE Class on Amazon!


AR Flipgrid Trading Cards
Describing the characters from a text has never been this fun! Check out how to create your own augmented reality character trading cards!
Describing characters has never been this much fun! Joe’s first graders spent some time going through a text, creating trading cards for each character, and then adding an AR (augmented reality) flare to it all.

Drew Daywalt and Oliver Jeffers’ “The Day the Crayons Quit” has become a loved book amongst teachers, parents, and students. In this highly entertaining book, the crayons write letters to a young boy named Duncan, as they are fed up with how they are being treated. To make the read aloud interACTIVE, you can download the Novel Effect app. This app uses the microphone built into your smart phone to listen as you read. When you read certain words along the way, sound effects and music is played.
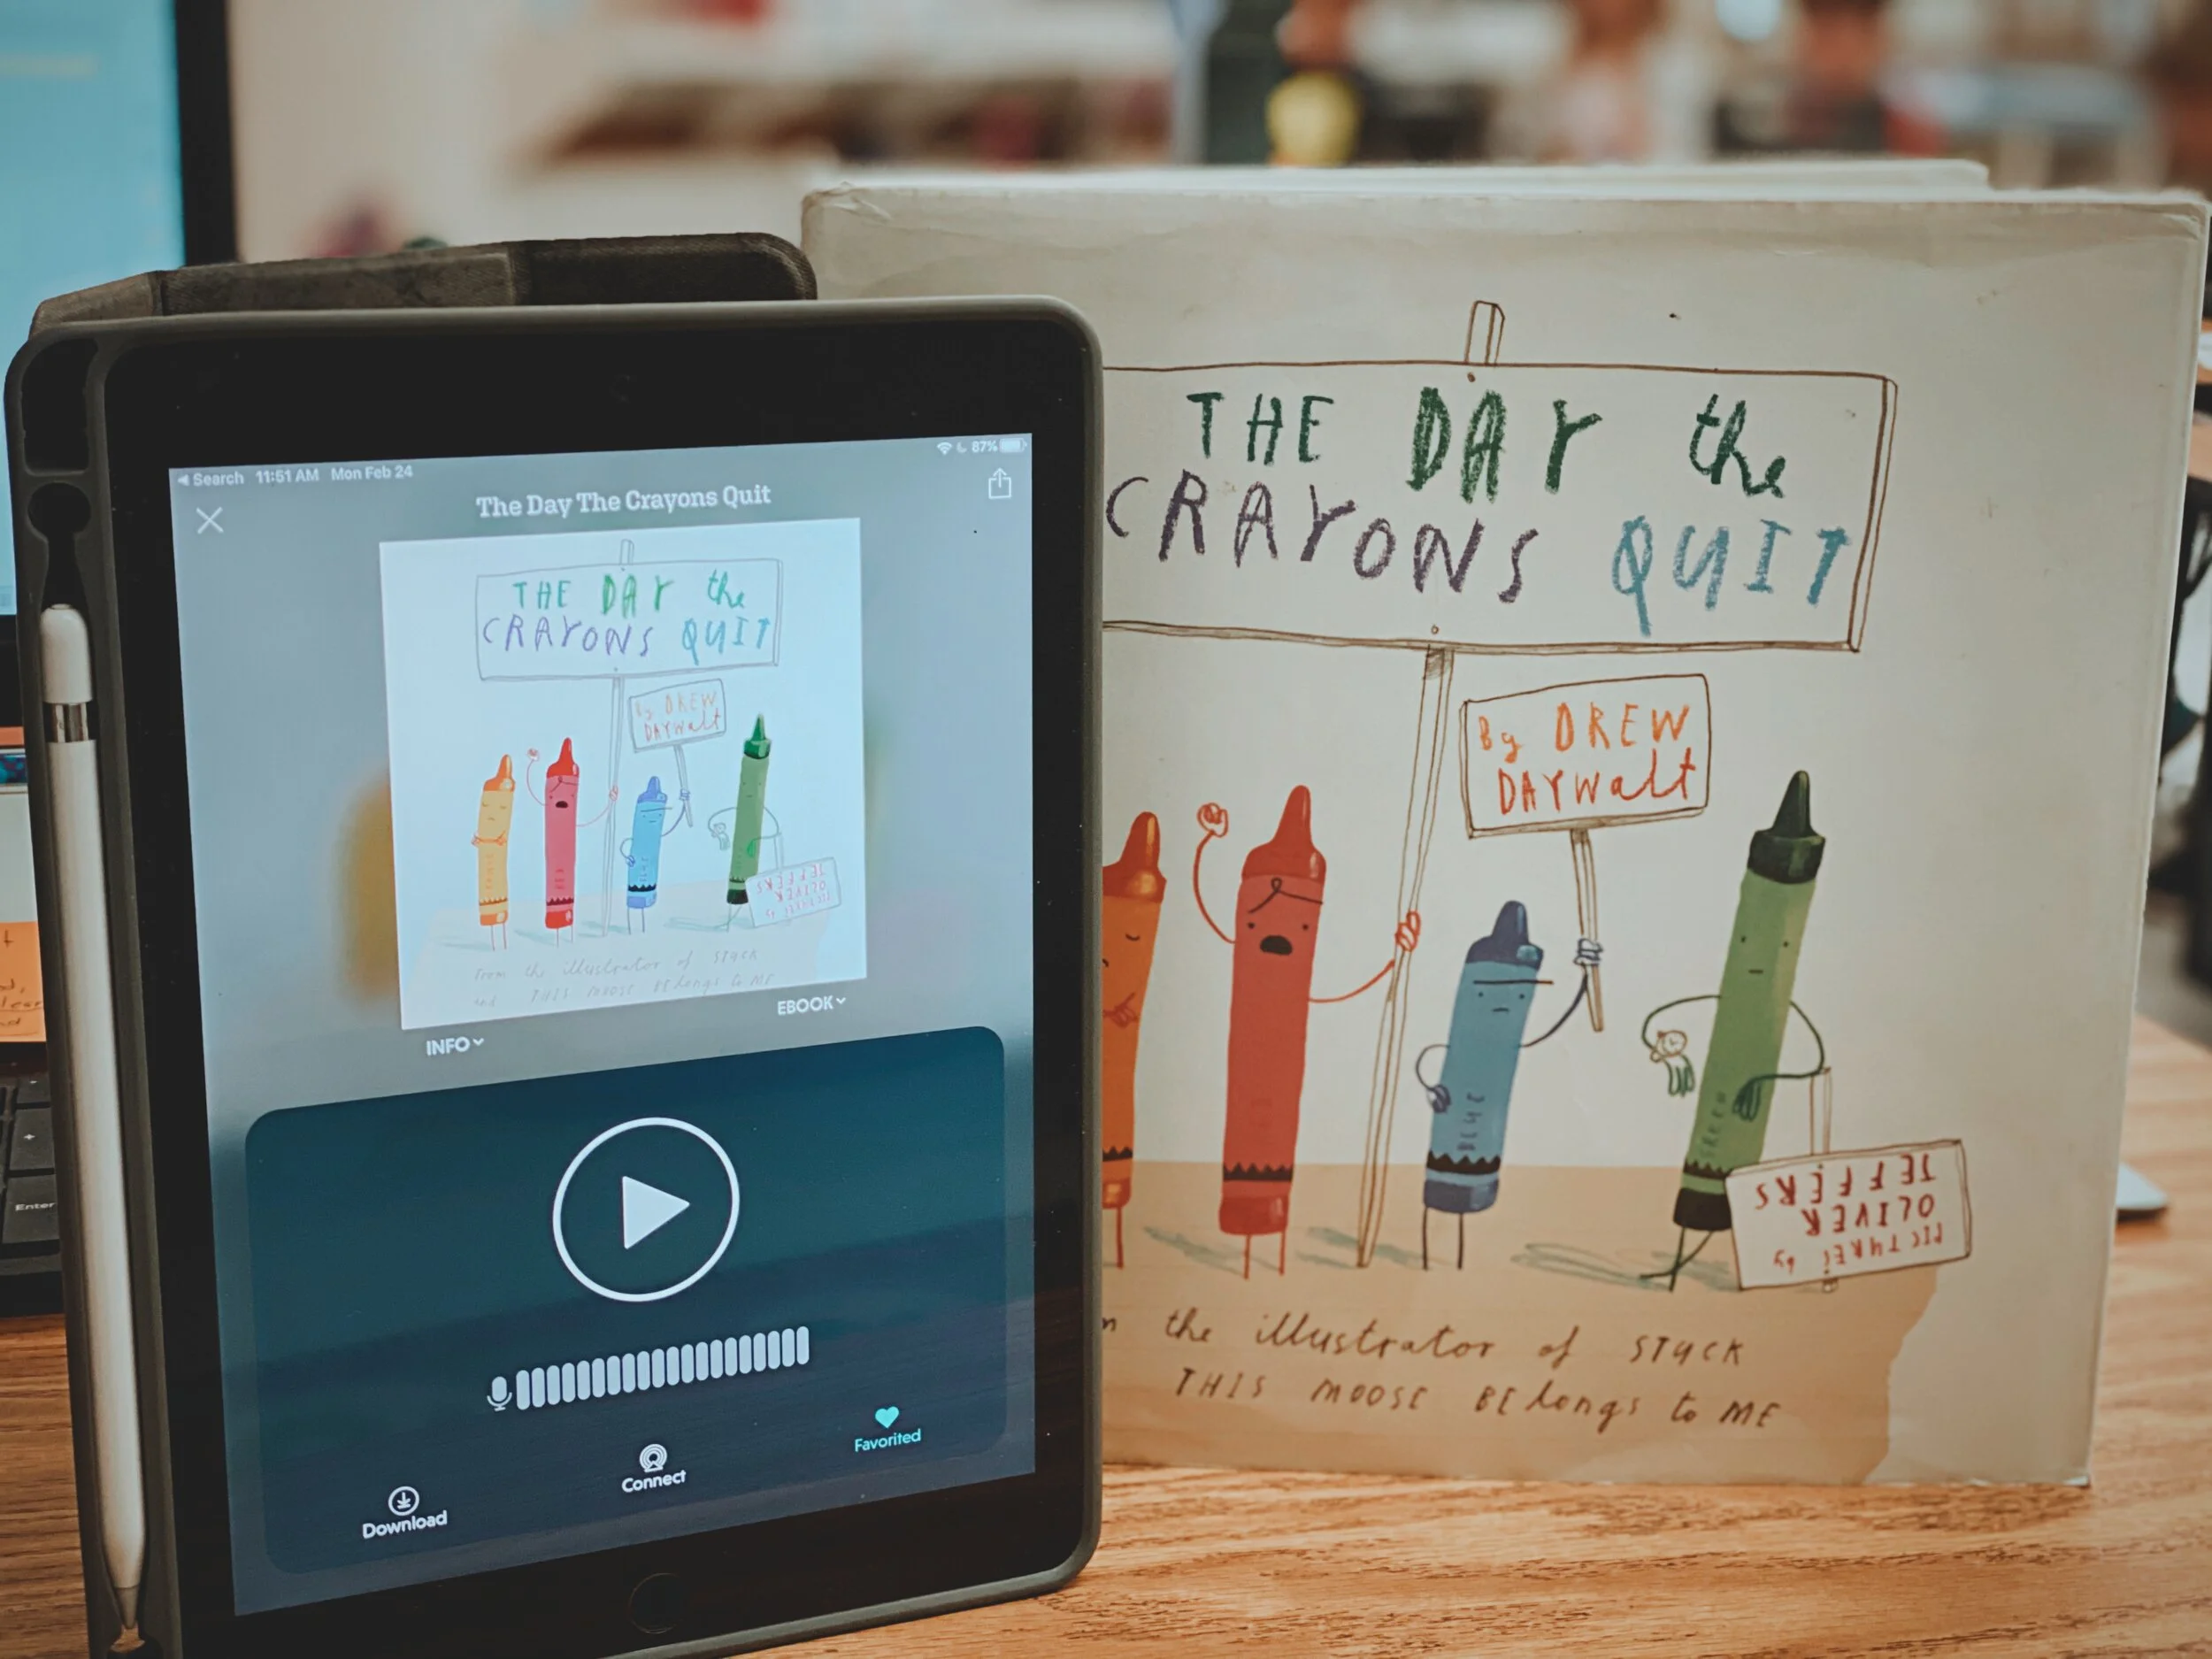
After reading, we moved on to describing the characters. We did this by using a Bubble Map, which includes only adjectives. We revisited each character, creating a trading card for each.
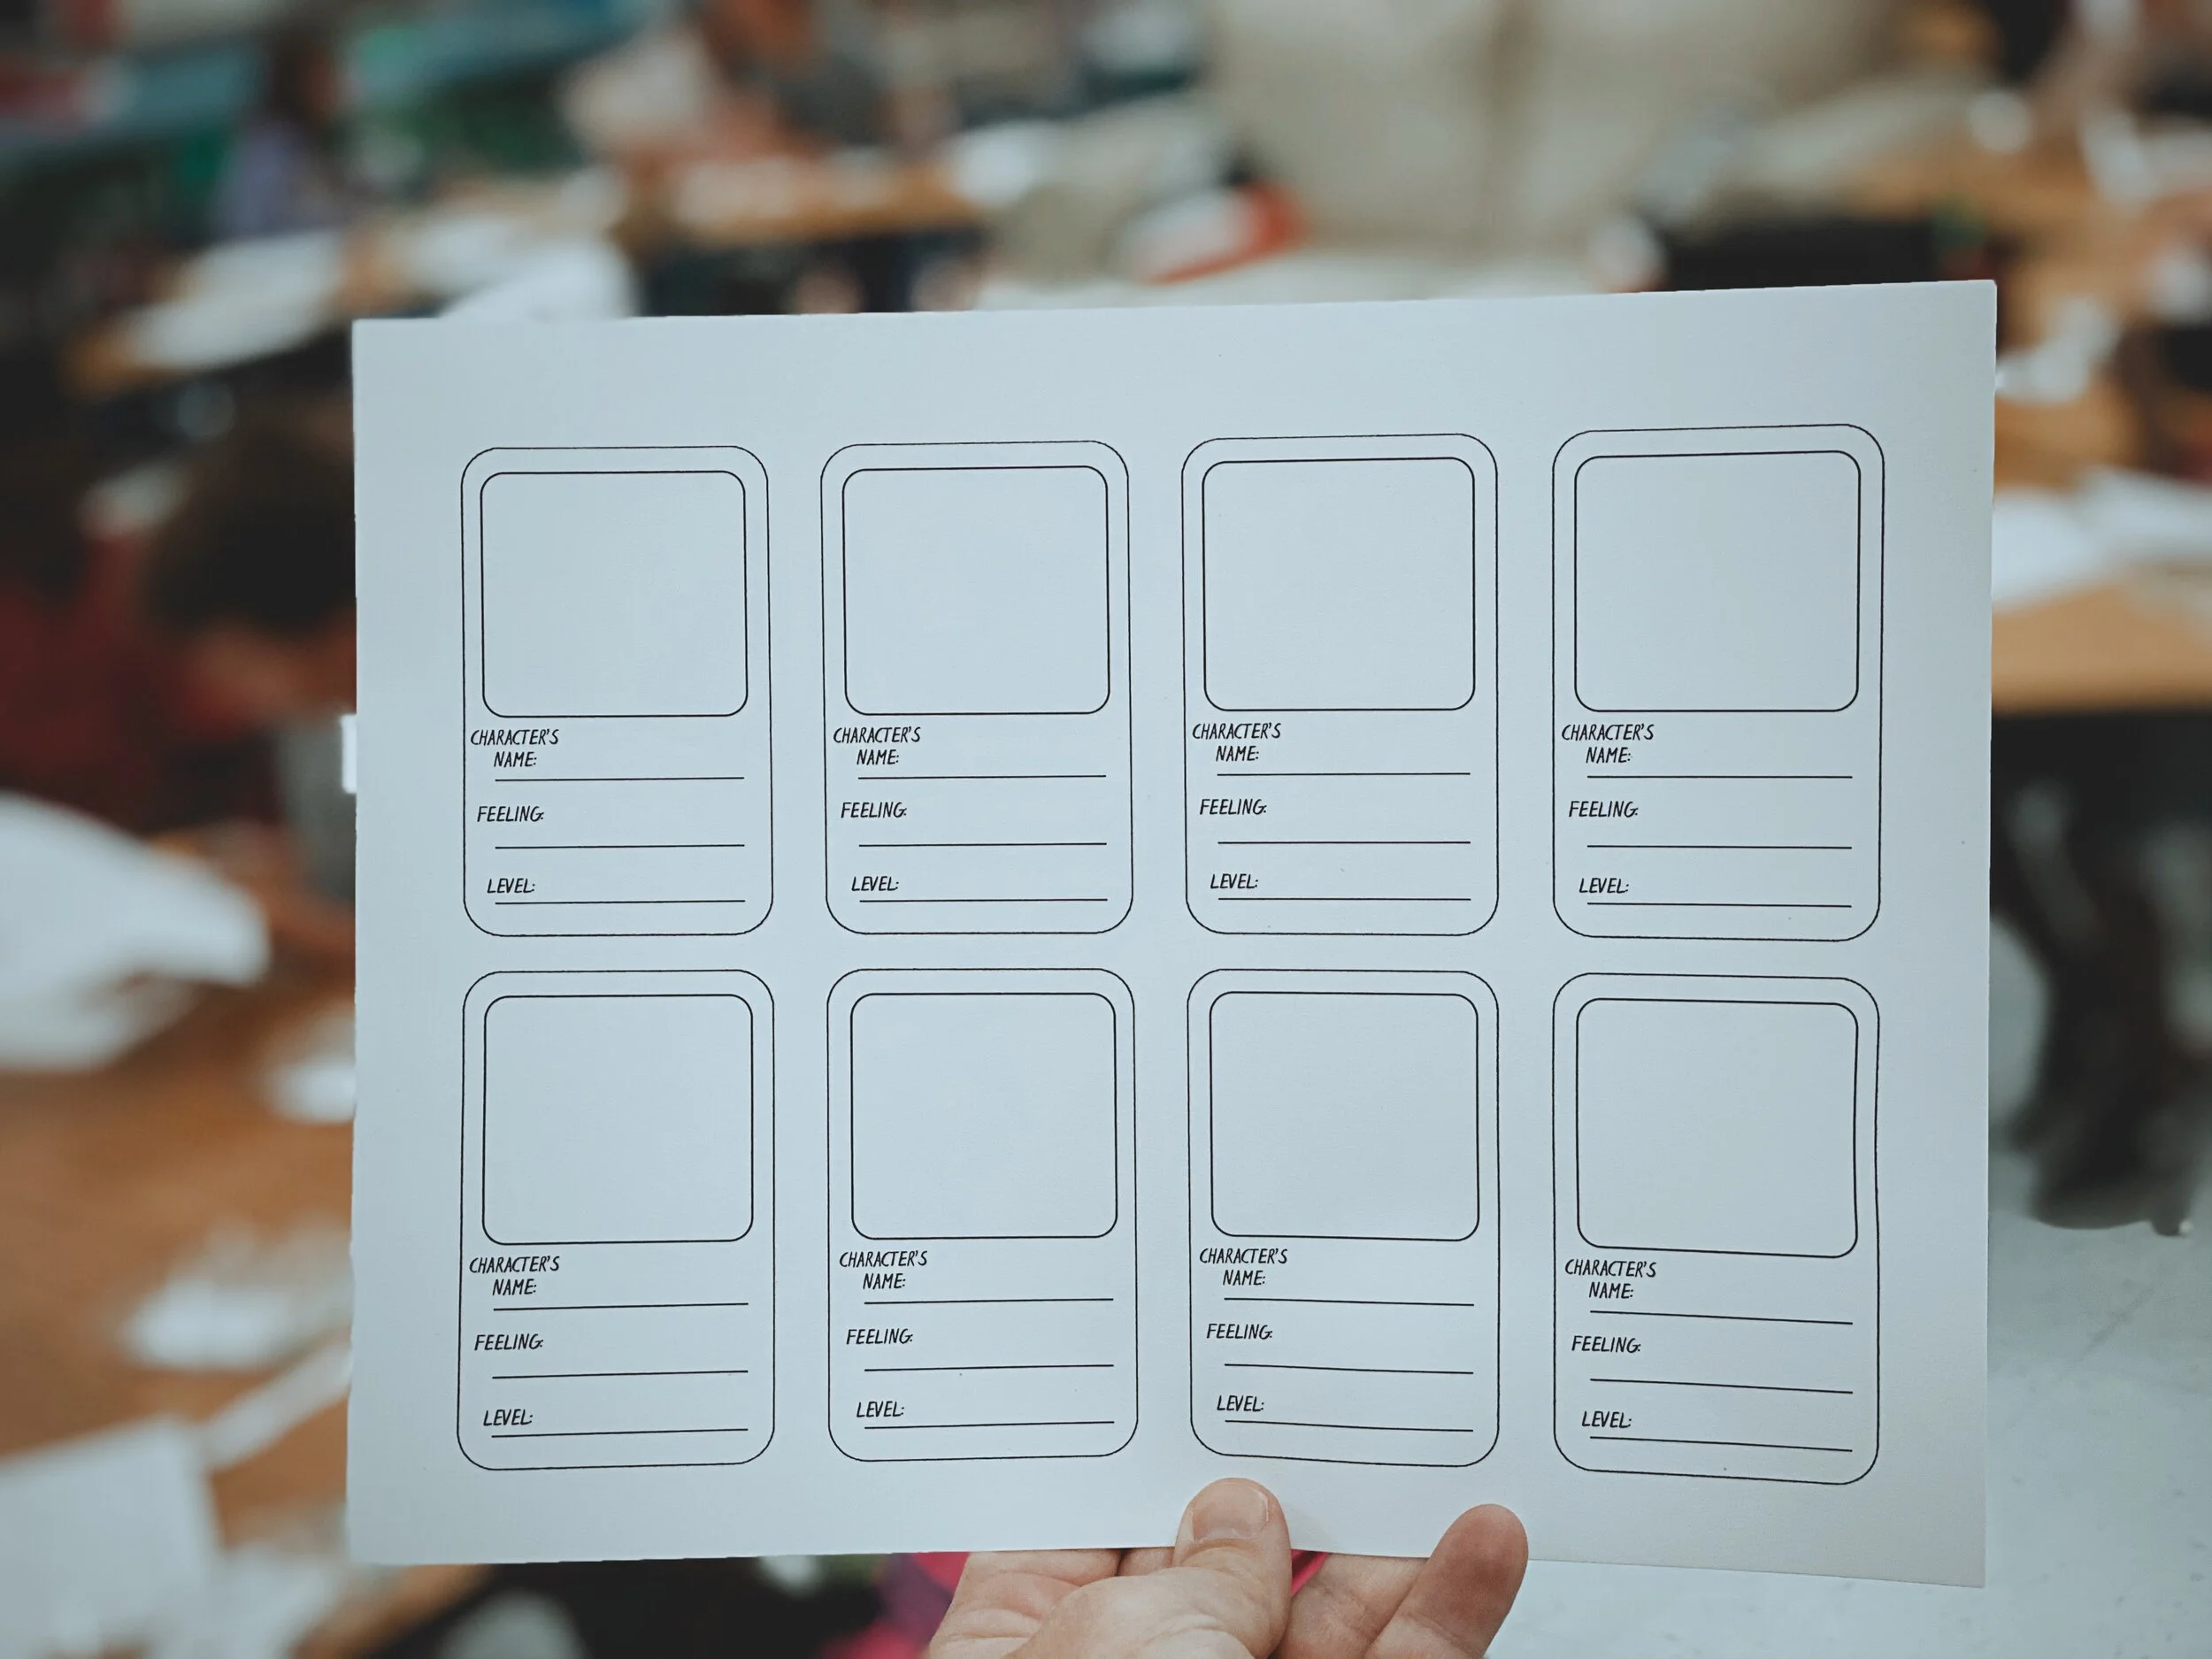

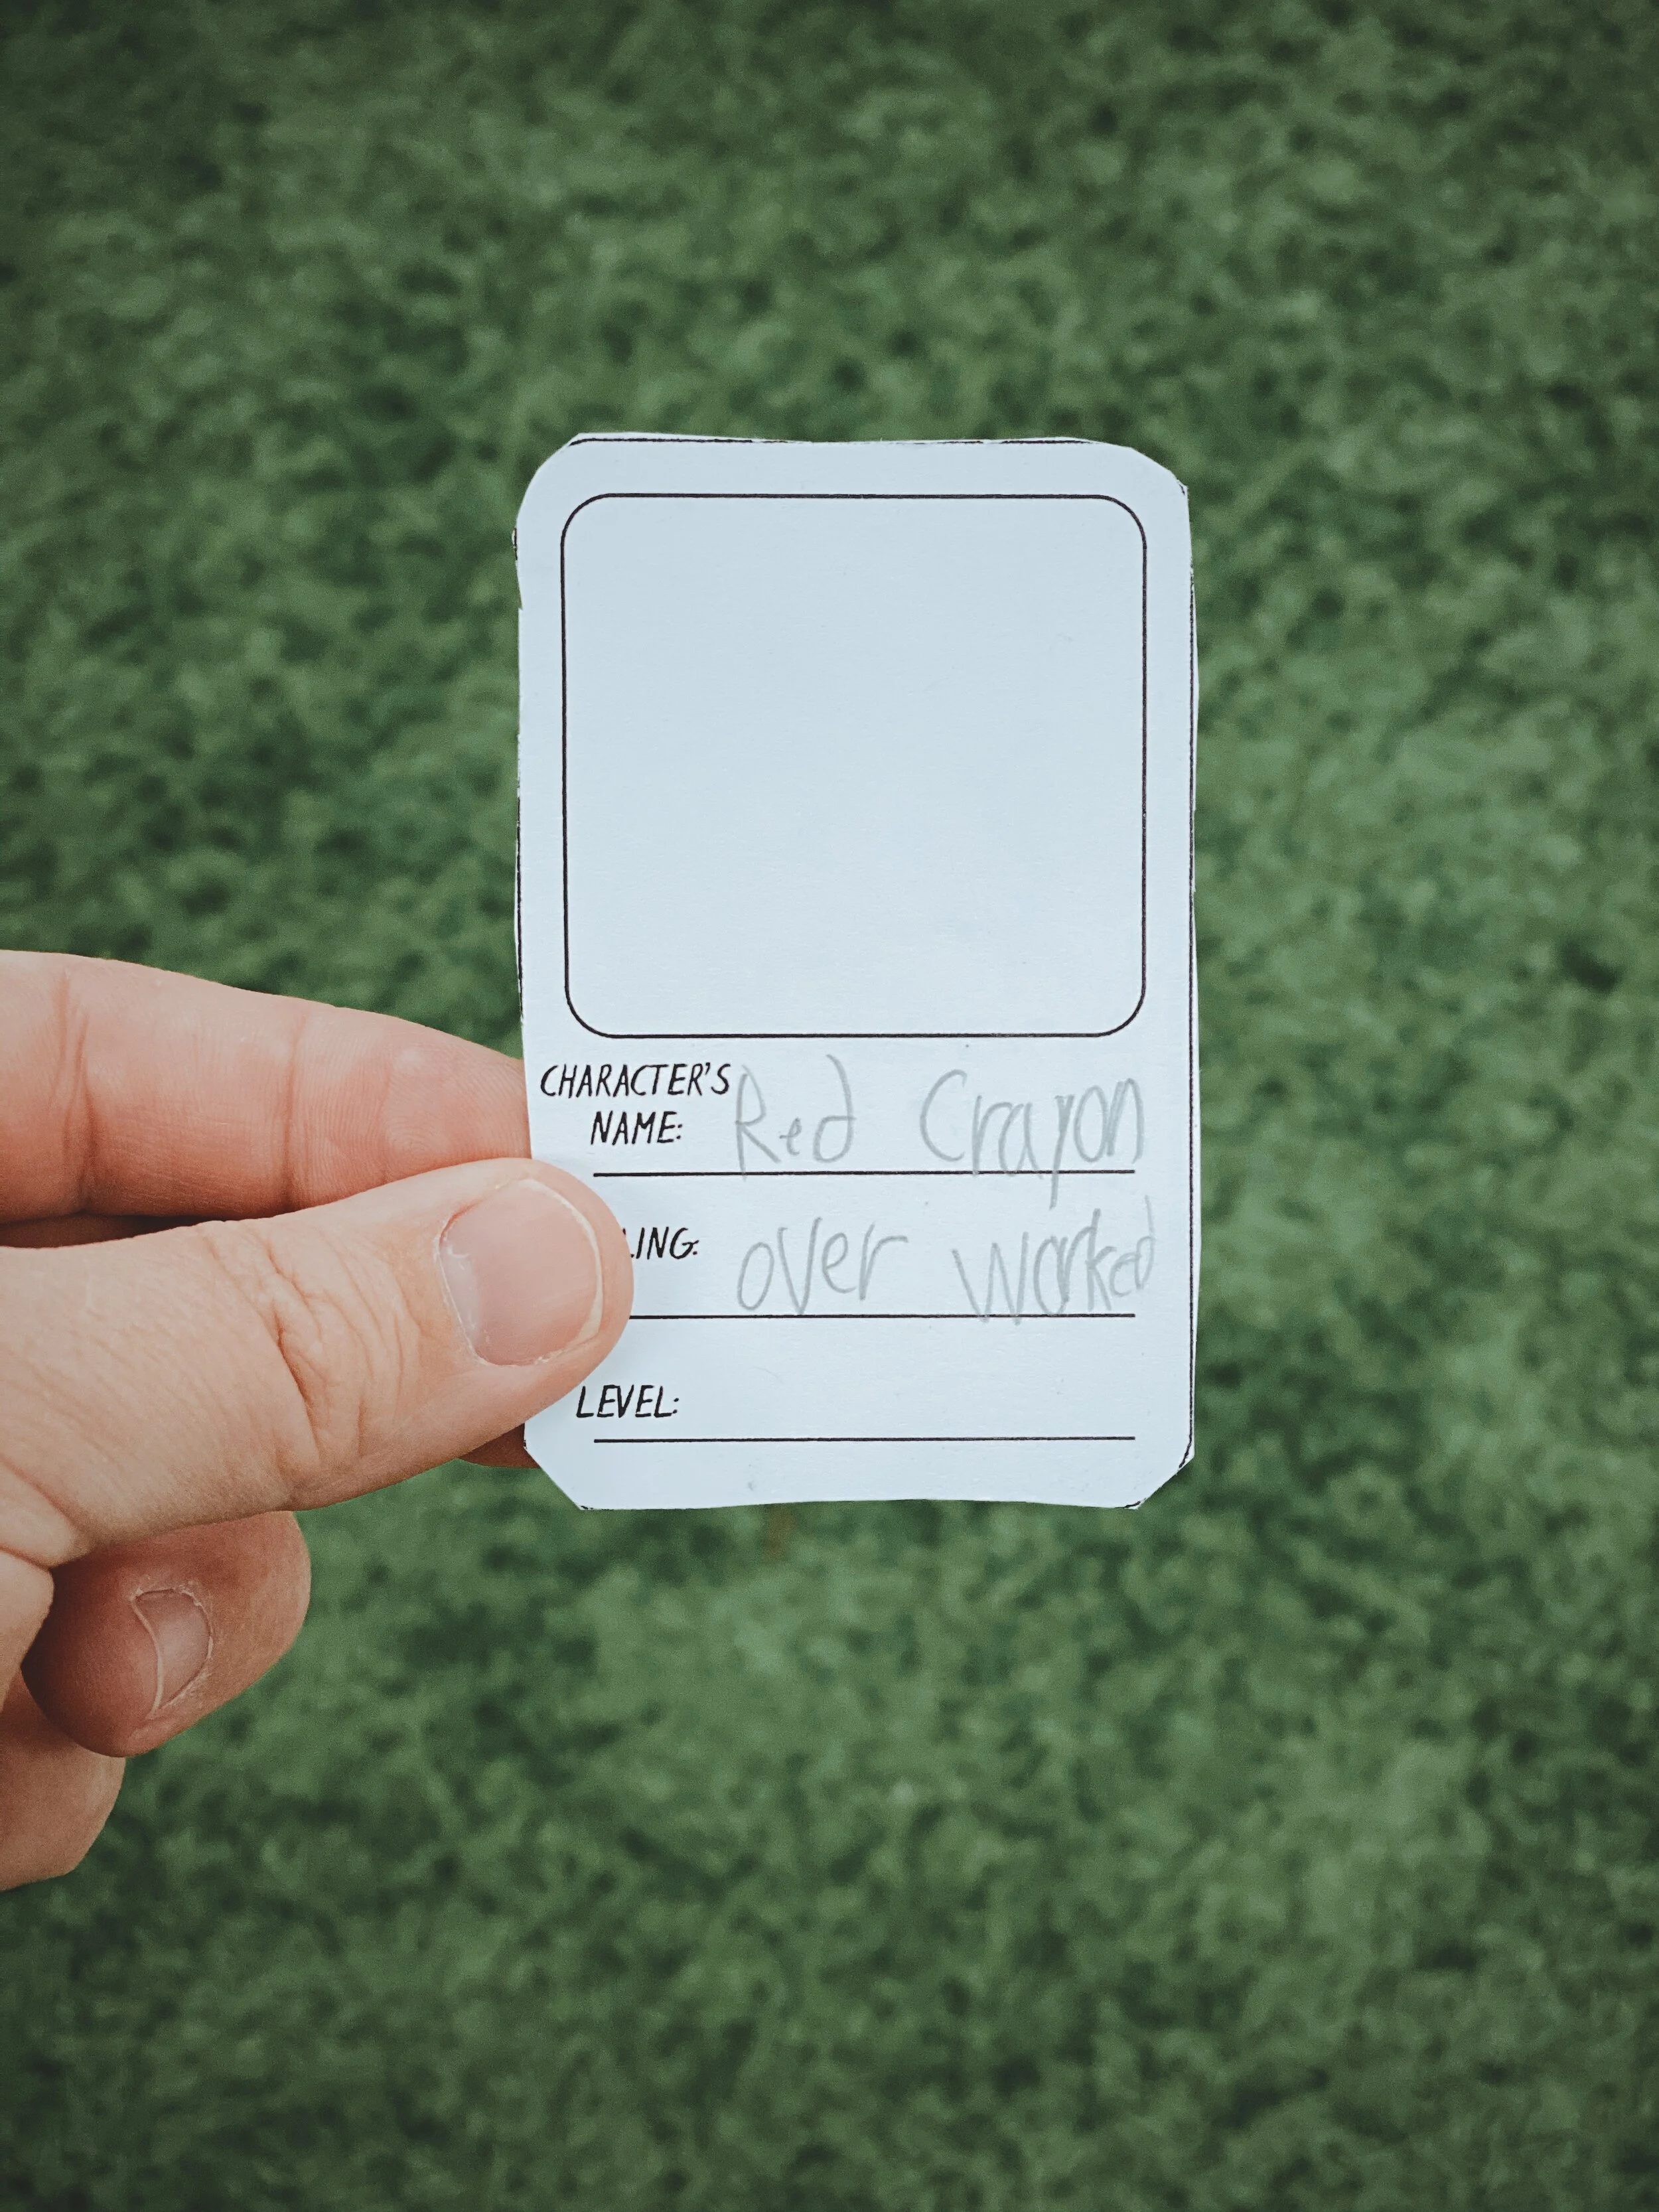
Next, we used the app Chatterpix Kids to “animate” the illustrations, which later became the AR videos. Chatterpix Kids is a primary friendly (but fun for all ages) app that allows you to draw a mouth over a still image, and give it the appearance that it is talking. We repeated this process for each of the characters.
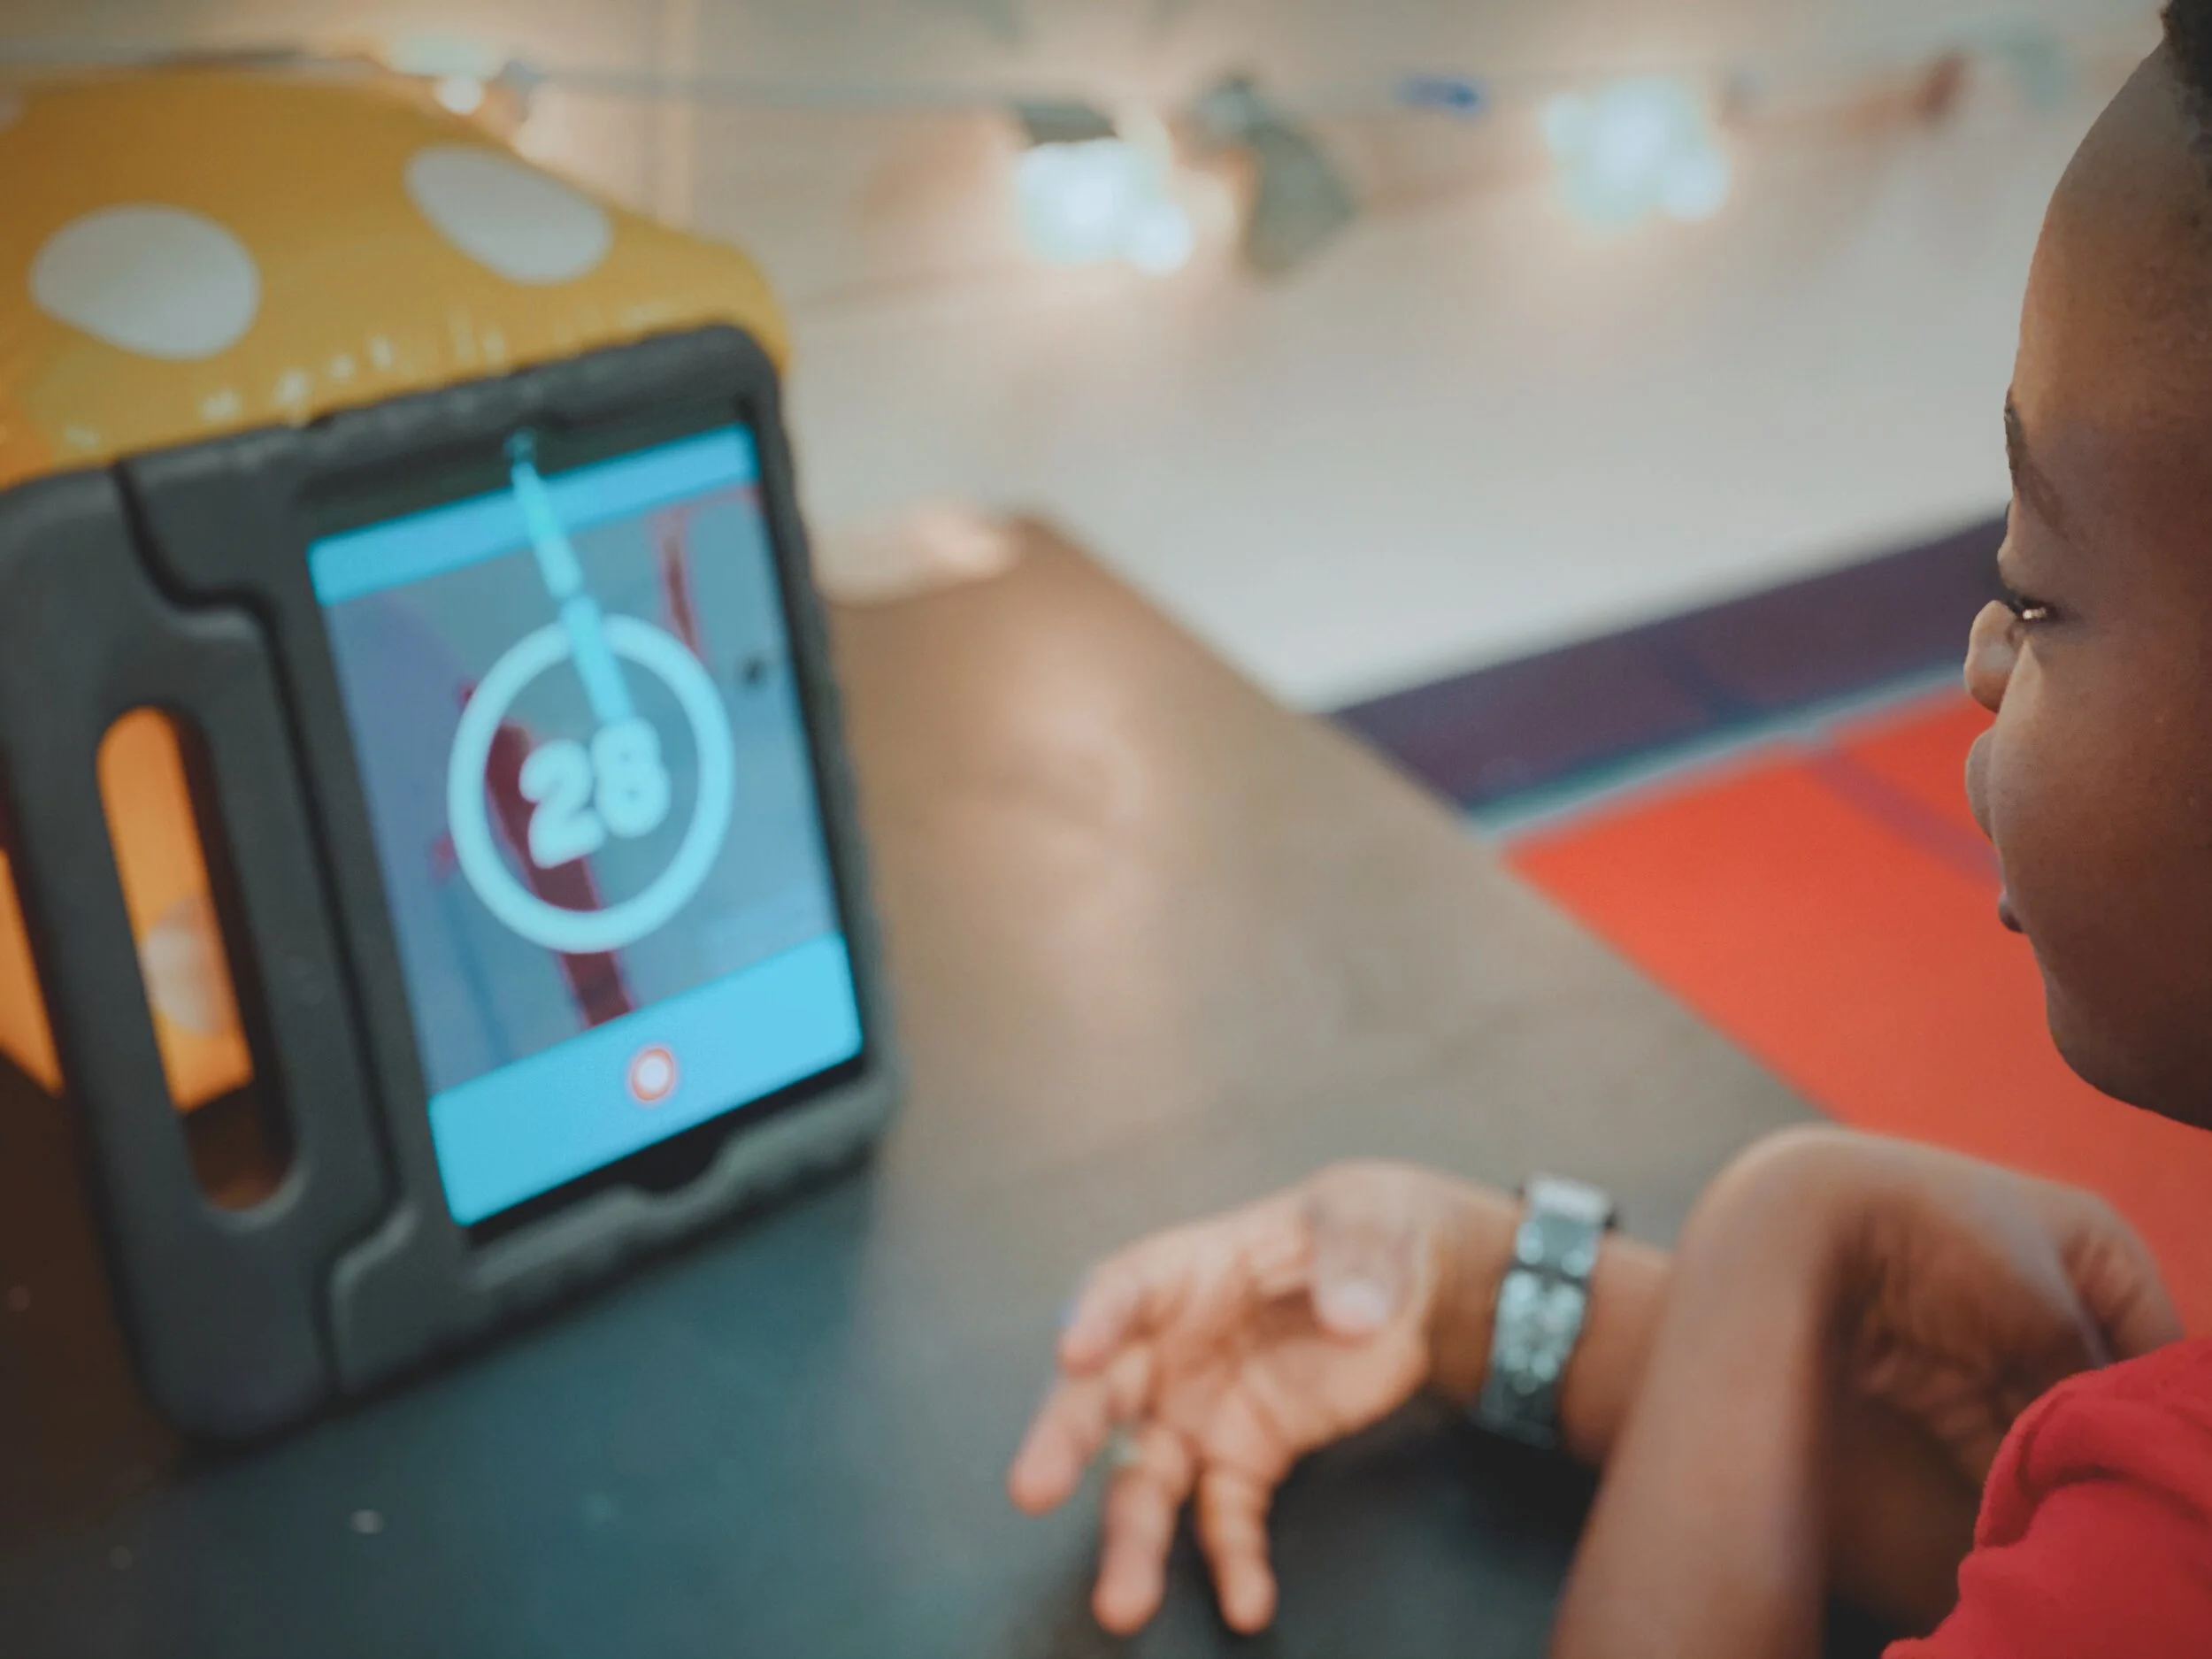
After we recorded on Chatterpix, we exported the files and saved them to the device’s camera roll. From there, we “app smashed,” or uploaded, the videos into Flipgrid. Each student submitted an initial response, but then they responded to themselves. Once completed, we printed out each video response’s QR code. This code was then glued to the trading cards. When scanned with the Flipgrid QR code reader, it will open in AR!
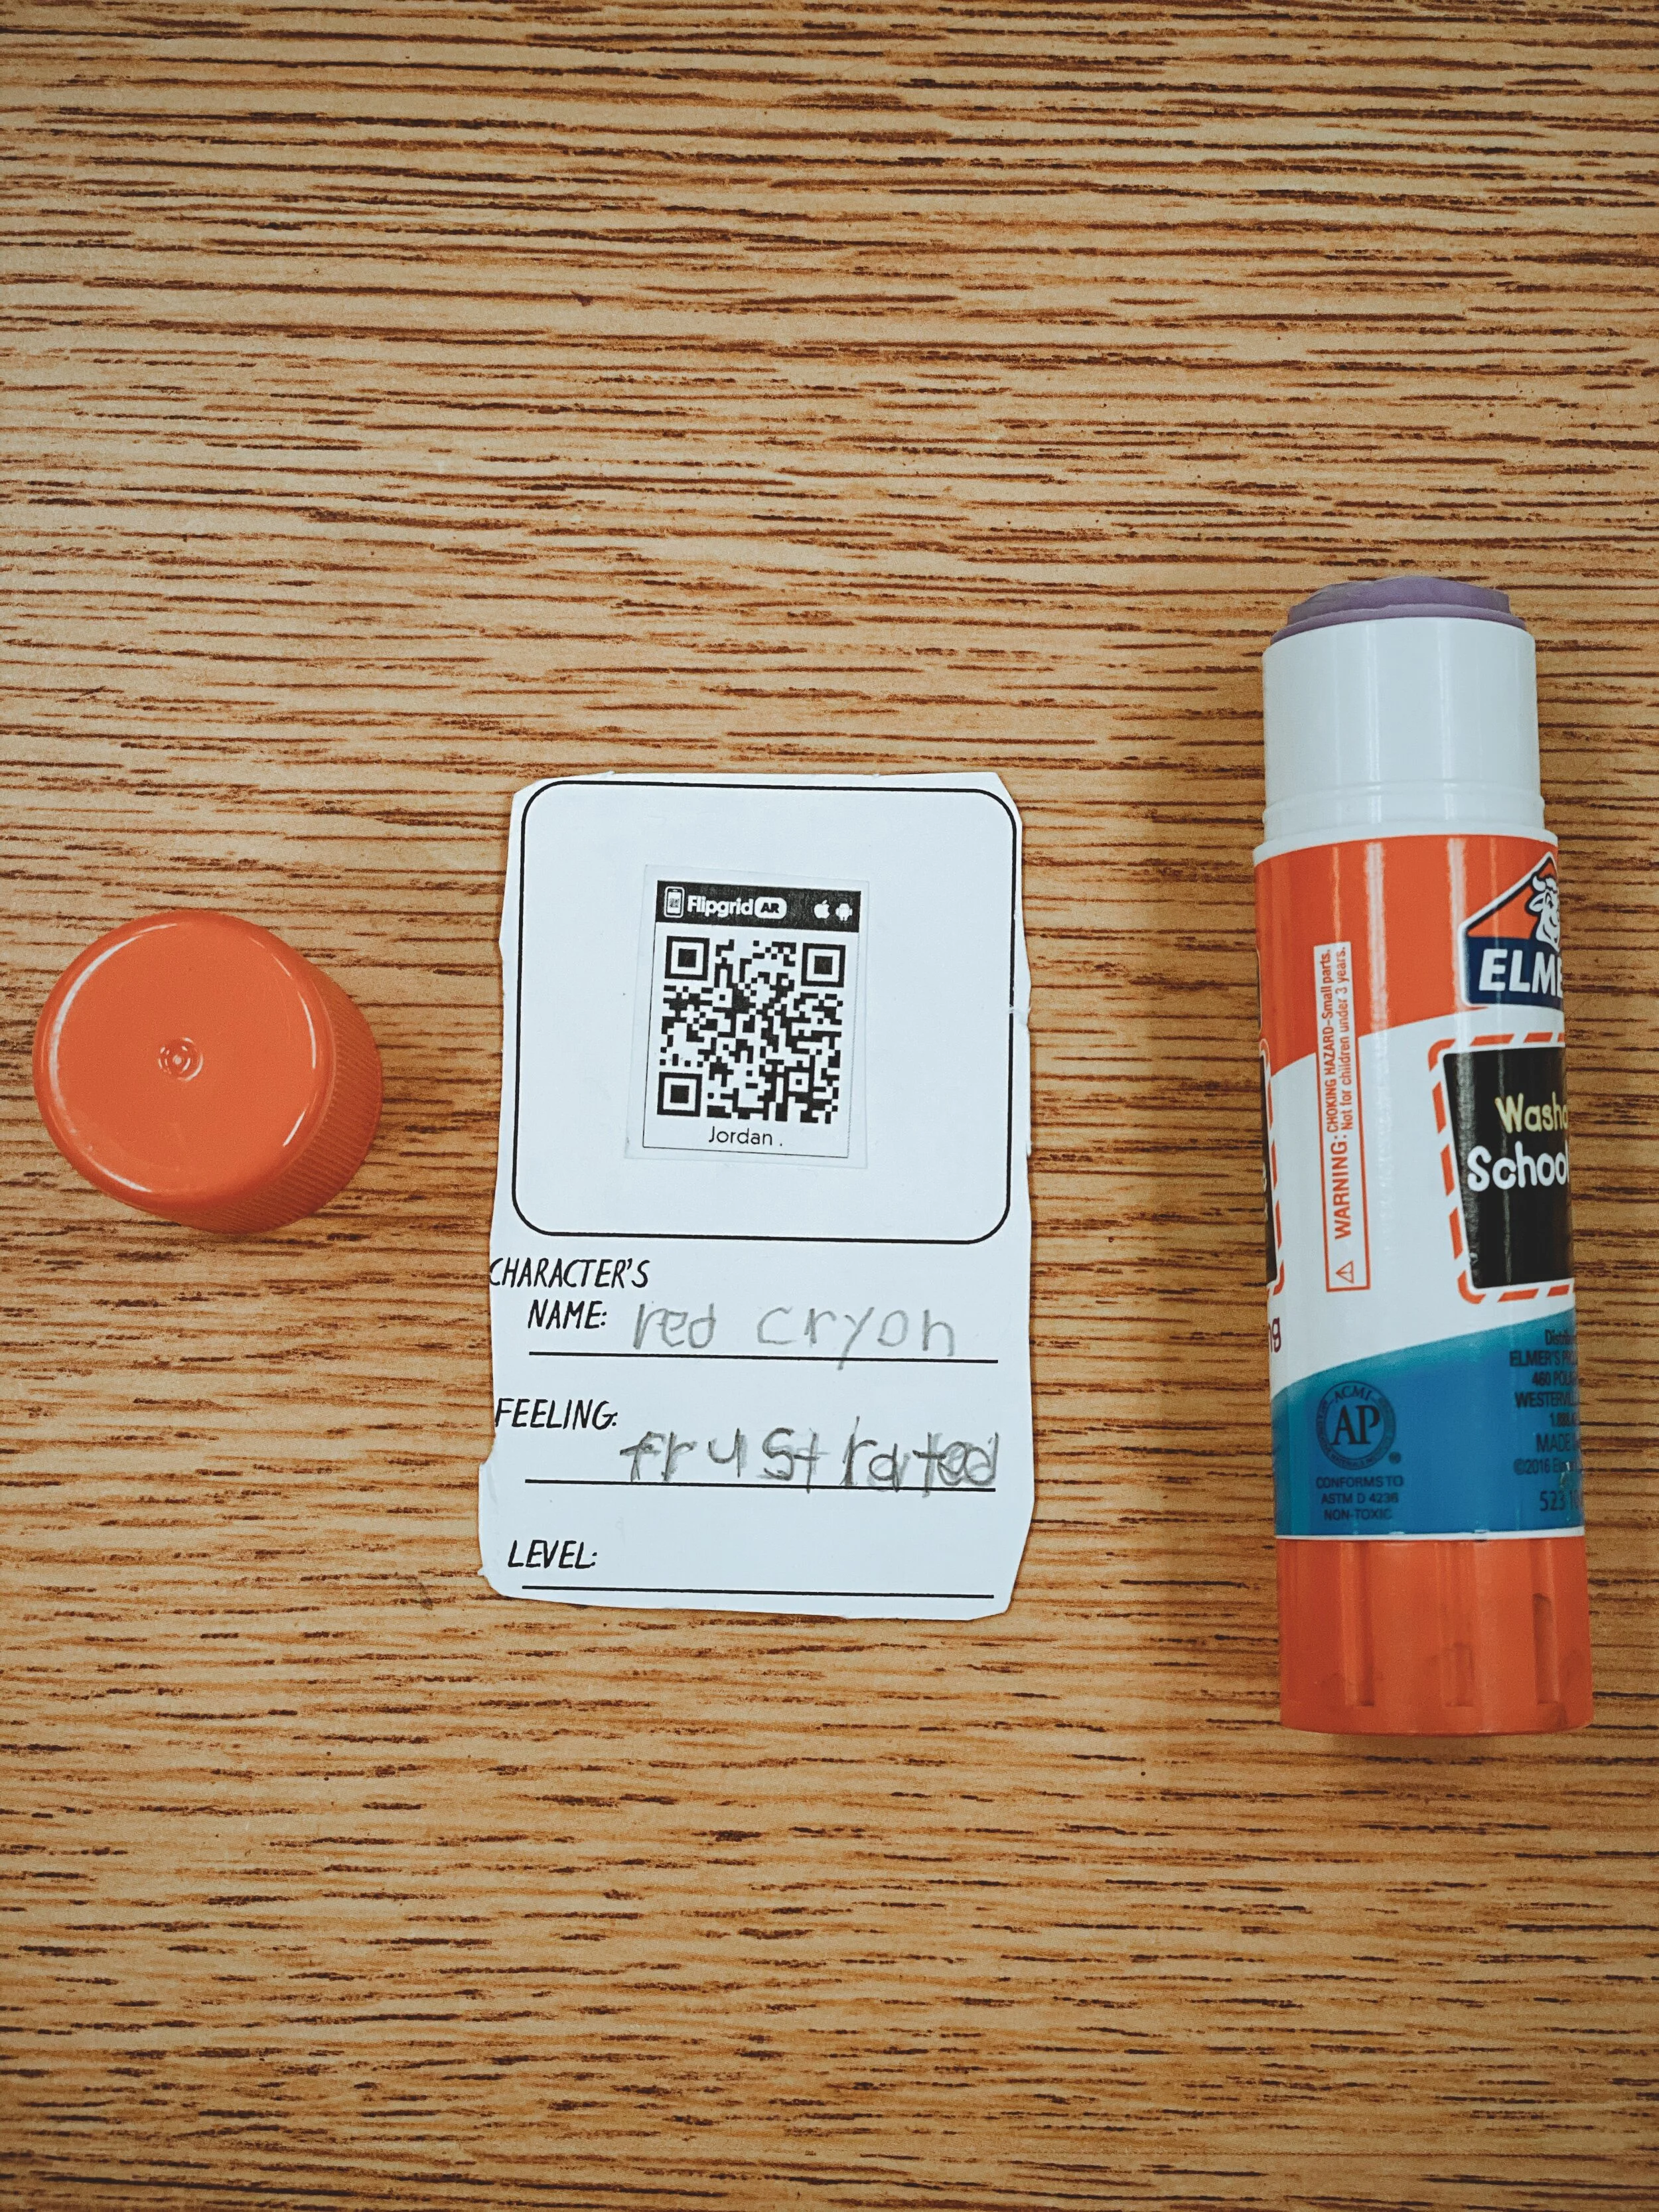
I also gave the students the opportunity to illustrate the back of the cards. As an added bonus, I had the students “level” the characters based on how much they thought the crayons effected Dunkin’s thinking. We’ve been working with tens and ones in math recently, so this fit right in! Each student “leveled” the characters on a scale from 10-100, with a 100 being the character that has the biggest impact. Once the activity was completed, we added up the total of the lvels for a grand total. Check out the entire video tutorial below!
Interested in trying this out in your classroom?
Here’s all the resources you need:
The Day the Crayons Quit book
Novel Effect app
Trading Card Template
Chatterpix Kids app
Flipgrid app
Be sure to tag us on social media! We’d love to see how you’re using this in your classroom!
For more #interACTIVE lesson ideas using Flipgrid, check out our book The InterACTIVE Class on Amazon!


Flipgrid and Wakelet Integration!
Learn how to embed Flipgrid videos directly into your Wakelet collections in just five steps!

Back @ ISTE, Flipgrid announced a massive round of updates. Most of which came on 8/1, but the fine folks over at Flipgrid and Wakelet have a back-to-school gift for us all!
Now, you can record Flipgrid videos right into your Wakelet collections! Flipgrid has placed their new app, the Shorts Camera, right into Wakelet. This game changer allows educators to flip the classroom easily, and provide resources to your students. You can even open up the collection to be edited by your students, so that they can add content, too. To learn how to set up your first Flipgrid / Wakelet integration, check out the tutorial below!