How to Use Reading Progress to Automatically Grade Sight Words
Learn how you can use Microsoft’s Reading Progress to automatically grade Sight Words! If you’re a primary teacher, this is a must see and an absolute time saver!

This past summer, Microsoft released its Reading Progress app, that enables students to independently read aloud, record themselves, and grow their reading skills while allowing educators to better support students' progression. It has been a game-changer for running records, which now can be done independently through the app. For a full breakdown on Reading Progress and it’s potential, check out our blog post here.
Other than running records, another time consuming task is assessing sight words. Sitting down with students and going through the list of words is a daunting task and can take up a lot of time. But, can we use Reading Progress to automatically grade a list of sight words? The answer is: YES! In this blog post you’ll learn:
(click on any subheading to jump to that section)
How Can Reading Progress Automatically Assess Sight Words?
How Does it Look When Reading Progress Assesses Sight Words?
How Do I set Up Reading Progress to Automatically Grade Sight Words?
I get it! So…What do I need to know? Any troubleshooting steps?
Download Free Sight Word Templates (made for Reading Progress)
See it in action! Assessing Sight Words Using Reading Progress
How Can Reading Progress Automatically Assess Sight Words?
Reading Progress is a ⚡️FREE⚡️ tool that can be found within Microsoft Teams. Imagine if the developers of the Flipgrid Shorts Camera, Immersive Reader and Microsoft Teams all sat down at a table and collaborated on what to do next. Reading Progress uses the technology from the Flipgrid Shorts Camera to record a video of students as they read. The same type of technology that is used in Microsoft’s Immersive Reader then takes the video and intelligently looks for errors, mispronunciations, miscues and more - AUTOMATICALLY. You read that right. The technology does all the work. A full report is provided to the educator, who can go back and view the recorded video and listen back to how the student performed. If the technology marks a student as reading a word correct / incorrect, the educator has the ability to change it on their end.


But how does this look when it comes to sight words? Reading Progress takes the text and listens for errors when being read aloud. So, technically you don’t need to have a full paragraph or even sentence for it to start working. Whatever words appear in the document is what the program will look for. If you put the words: red, yellow, me, and see, it will expect to hear those words read in that order. You don’t even need to put commas in between the words!
How Does it Look When Reading Progress Assesses Sight Words?

Giving Sight Word assessments through Reading Progress is best performed when you assess 10-20 words at-a-time. This makes for a quick turnaround from your students, who can easily get in and read off the words efficiently. Once your students log onto Teams and click on “Assignments,” they are able to select the appropriate Sight Word list and then start reciting them. Here’s how it looks from the student’s perspective.
To the student, the focus is on the words. Once they read through them, they click the “I’m done” button, then “Turn in.” The recording is uploaded as a video and can be watched back by the teacher.
The uploaded video will also produce a full report, only available to the educator. This report will indicate any incorrect words. Educators have the ability to watch back the recording of the student reading off the words. If a word is marked incorrectly, it can easily be changed from the drop down menu. This is also a great place to “jump to a word,” or listen to a specific word that the student missed.
Since we give our students 10 words at-a-time, we can easily grade them with a /10 score. These short assessments are just-right for the students to get through confidently - and it makes listening back to them easier for me!
How Do I set Up Reading Progress to Automatically Grade Sight Words?
Setting up Sight Word Assessments using Reading Progress can be done in several clicks. Follow these steps to get your students started, or click here for a video tutorial:
Launch Microsoft Teams, then click on “Assignments.”
Click on “Create” and then select “Assignment.”
Select the Team that you wish to assign the assignment to, then click “Next.”
Enter an appropriate title for the assignment. For example: “Sight Words 1-10.”
Under “Instructions,” click on attach. Then, select Reading Progress from the drop down menu.
On the next screen, click “Upload Word or PDF” (for a free download of all 220 sight word templates, click here).
Upload your sight word assessment, then take a look at the information on the right. You won’t need to enter a reading level, but you may want to limit the number of attempts your students have per sight word list (see the troubleshooting section below). Change this to fit your preferences, then click “Next.”
The due date defaults to the same day, so adjust it to appropriately give your students time to complete the task. Once you do, select “Assign.”
Your students will receive a notification that the assignment is ready. Now, sit back and wait for them to start submitting it! Once they do, go in through the educators dashboard and view their work! Need to actually “see” how this is done? Check out the tutorial below!
I get it! So…What do I need to know? Any troubleshooting steps?
So this sounds great, but…what could go wrong? What should I look out for? Any tips?
Now that we’ve done this for a while, here are our two most important takeaways:
1. When creating your sight word lists, only use the words that you want the students to recognize. For example, do not add a title to the body of the document. Just list the words. Otherwise, the students will need to read and recognize them when recording. IF they say something wrong, it will mark them wrong.
Takeaway: Just keep it simple! Add only the words!

2. When creating the assignment, change the number of attempts to 1. You don’t want students submitting more than one attempt at the sight words, so be sure to change that setting from the defaulted “unlimited” to “1.”
Takeaway: Explain to the students that they will only have one attempt and that they will need to do their best. If they make a mistake, encourage them to restate the words in their original video. If they stop, they will NOT be able to upload another video (if you have the attempts set to 1).
Download Free Sight Word Templates
(made for Reading Progress)
We’ve made things even easier for you with these sight word templates! This is a direct link to download the entire folder of all the Word documents containing ten words per list (for a total of 22). Just download them, then upload them as your assignment(s) on Teams! 🙌🏻

See it in action!
Coming soon!
-- Stay tuned for more Sight Word ideas that you can use in your classroom! Be sure to follow us on social media (@TheMerrillsEDU everywhere) for more! 👓👗
For more tips, tricks and lesson ideas for making learning more interACTIVE, check out our books The InterACTIVE Class and Flipgrid in the InterACTIVE Class on Amazon!


How to Record Collaborative Videos in Flipgrid with Multiple Users
How can you allow multiple students to appear in the same Flipgrid video? @TheMerrillsEDU walk you through how to add a new element of collaboration to your lessons!

Remote Learning has challenged how educators can successfully implement collaboration within and outside of the classroom. The ability for students to work together and remain six feet apart, or even work together remotely has spawned numerous creative ideas, but this idea from our friend Adam may be our favorite: “Collaborative Videos in Flipgrid: Record with Friends, From Anywhere.” Check out his tweet:
So…How does this work? It’s actually not as difficult as it might sound! In this post we’ll walk you through each step.
(NOTE: this will not work on mobile devices at this time)
Click on any subheading to jump to that section:
🚀 Launch a ⚡LIVE⚡ Zoom / Google Meet / Teams / WebEx call with Breakout Rooms
(Click your preferred platform to jump to that section)
Microsoft Teams | Zoom | WebEx | Google Meet
🚀 Launch a ⚡LIVE⚡ Zoom / Google Hangout / Teams call
Step #1: Launching a collaborative chat session
It doesn’t matter what you’re using for this step - all the platforms will work! Start off by launching a new meeting / call. If you’re using one of the aforementioned platforms to conduct a class call, you can always generate breakout rooms to properly group your students.
How to Launch Breakout Rooms on Microsoft Teams
Start a new meeting. Then once in the meeting, look for the “Breakout Room” button located at the top right hand side of the screen. Click here to open new options.
After you have clicked the “Breakout Room” icon, you will have several options. Start off by selecting how many rooms you need. Then, select how you prefer to assign the participants (automatically or manually).
For more information on Breakout Rooms in Teams, click here.
Click here to move onto Step #2


How to Launch Breakout Rooms on Zoom
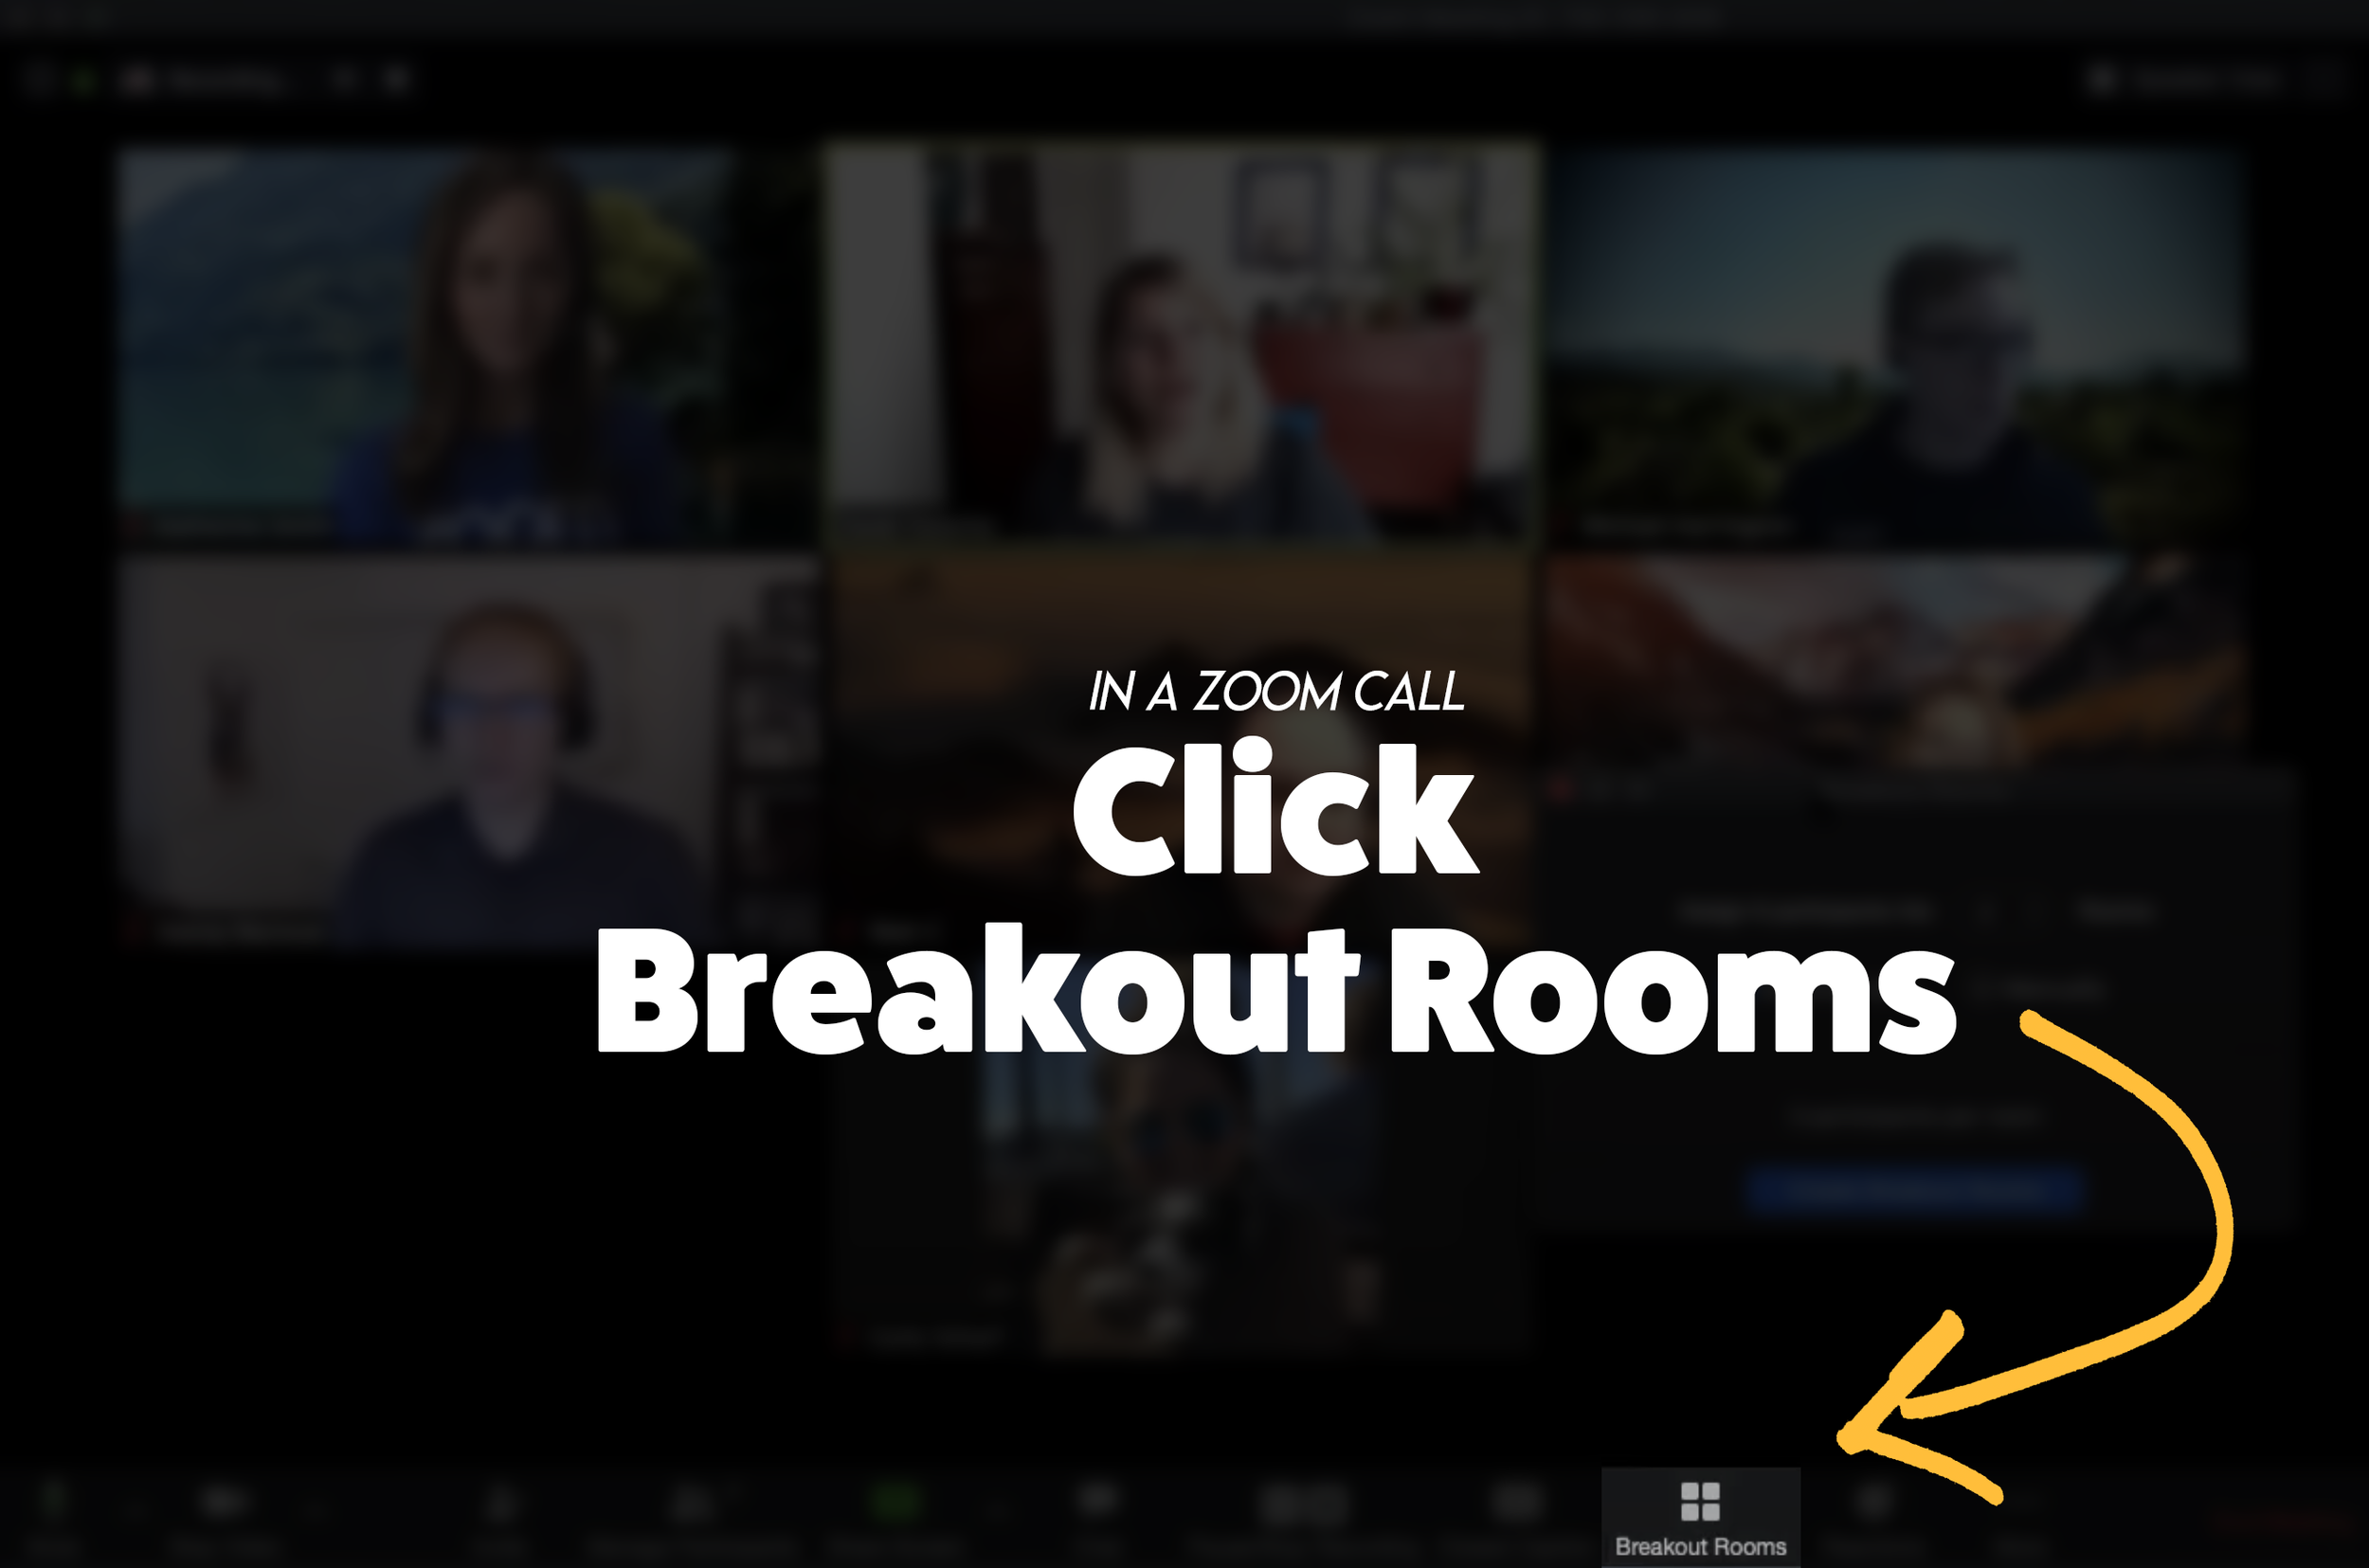
From a Zoom Call, click the “Breakout Room” icon. Then, follow the prompts to select the number or rooms and how to assign participants. If you need to enable Breakout Rooms on Zoom, follow these steps (or click here for more info):

Sign in to the Zoom web portal as an administrator with the privilege to edit account settings.
In the navigation menu, click Account Management then Account Settings.
Navigate to the Breakout Room option on the Meeting tab and verify that the setting is enabled.
If the setting is disabled, click the toggle to enable it. If a verification dialog displays, choose Turn On to verify the change.(Optional) Click the checkbox to allow meeting hosts to pre-assign participants to breakout rooms.
(Optional) If you want to make this setting mandatory for all users in your account, click the lock icon, and then click Lock to confirm the setting.
Click here to move onto Step #2


Launch a WebEx meeting, then select “Breakout Rooms” from the lower portion of the window. Next, select the Breakout tab and choose “Enable Breakout Session.”
Once enabled, “Enable Breakout Session” will appear with a checkmark and the button will appear at the bottom of the menu bar.
Click the “Breakout Session” button and then follow the prompts to set up your breakout rooms.
Click here to move onto Step #2
How to Launch a Breakout Room on Google Meet
For more info on Breakout Rooms in Google Meet, click here.

Breakout Rooms is currently available to users with G Suite Business, Workspace Essentials, Business Standard, Business Plus, Enterprise Essentials, Enterprise Standard, and Enterprise Plus editions. This is also available to users with G Suite Enterprise for Education license and permissions to create meetings.
On your computer, start a video call.
In the top right, click Activities Breakout rooms.
Tip: To prevent students from having the ability to create breakout rooms, admins should ensure Meet creation privileges are reserved for faculty/staff organizational units only.
In the Breakout rooms panel, choose the number of breakout rooms. You can create up to 100 breakout rooms in a call.
Call participants are then distributed across the rooms. To manually move people into different rooms, you can:
Enter the participant’s name directly into a breakout room.
Click the participant’s name. Hold down the mouse, drag the name, and then drop it into another breakout room.
To randomly mix up the groups again, click Shuffle .
In the bottom right, click Open rooms.
Click here to move onto Step #2
Step #2: Launch the Flipgrid Screen Recorder in a Topic Response

Now that you are live in your Breakout room, head over to Flipgrid and access the Topic you wish to collaborate on. Once you’re logged into the Topic, click the add a response button or the red record button. When the Flipgrid camera opens, click on the “Options” icon. Then click on “Screen Recorder.” Now, with your screen shared, you can capture yourself and all the others on your web call / meeting!
Step #3: Sharing Screens
You can get creative with this! The user who initiates the Flipgrid response doesn’t have to be the only one who shares their screen. Have students take turns sharing screens by having the Flipgrid camera screen record the web meeting / call. Students can share each others’ screens through the call platform, allowing for everyone to share.
Tip: Use the pause button between students to save recording time and engagement.
Now, your students have collaborated in the same Flipgrid response!
Stay #interACTIVE!
-👗➕🕶️
For more tips, tricks and lesson ideas for making learning more interACTIVE, check out our books The InterACTIVE Class and Flipgrid in the InterACTIVE Class on Amazon!


Creating a Virtual Classroom with Microsoft Teams
With so much unknown right now in education, one thing we can do as educators is focus on meeting the needs of our students the best we can while remote learning. We may have lost the sense of security and safety our physical classrooms gave us, but with the help of Microsoft Teams we can expand those four walls and bring our students into a different type of interACTIVE learning environment.
With so much unknown right now in education, one thing we can do as educators is focus on meeting the needs of our students the best we can while remote learning. We may have lost the sense of security and safety our physical classrooms gave us, but with the help of Microsoft Teams we can expand those four walls and bring our students into a different type of interACTIVE learning environment.
Microsoft Teams has worked hard and listened to the needs of educators to make the platform as versatile and streamlined as possible. With integrations and features such as announcements, OneNote class notebook, Tabs and Assignments, and chat—Teams provides teachers with options tailored for teaching and learning.

Conversations in Teams
Being able to connect and keep in touch with students while out of the classroom is so important and channel posts makes this so easy to do in Teams. Create classroom announcements and posts that can be edit to get your students' attention. You can also control who replies to a post, change the importance of a post to draw students’ attention to something specific, and post across multiple channels at the same time.
Once a post is sent in a channel, the conversation is organized by date and then threaded. Find the thread you want to reply to, then click Reply. Add your thoughts and click Send. When replying you can also @mention someone to get their attention and to have them see a post sooner. Students (and teachers!) can also have fun by posting and replying with emojis, memes and GIFS using the buttons under the reply bar.
Creating Assignments in Teams
When creating assignments, teachers have the ability to customize each and every assignment to meet the needs of their students. Add grading rubrics for students to reference while working and for you as the teacher to use laster when evaluating their work. Customize every assignment by adding or attaching resources. This can be content from OneDrive, your device, links, and more. Once an assignment is creating you can distributed it to multiple classes or personalize the assignment by assigning it to individual students. Finally, when creating, you can customize all the dates and times that are important to the assignment. you have the ability to edit due dates and close dates, in addition to scheduling assignments to appear on a later date.
Keeping student work in order and easy to find can be challenging during remote learning, making the organization of Teams so beneficial. Teams lets you as the teacher create learning activities for students with integrated Office applications while also giving you the ability to leave feedback for students. You can also grade and track student progress by using the Grades tab. View both upcoming and turned in assignments by class, or view them across all your classes. Selecting an assignment will allow you to turn it in or view feedback and scores.
Holding Online Meetings in Teams
Microsoft Teams is a great platform to connect with students virtually and gives you as the teacher control of the meeting. You can speak and share video, mute and remove participants, share content and your screen, and privately view a PowerPoint presentation all while participating in a live meeting. The organizer also has the option to start and stop recording of the meeting which allows for asynchronous learning by proving content to learners on their own time. Students can also share their screen and view PowerPoint presentations during a chat, but the other features are for presenters only.

Simply click Meet now under the message box to start a live meeting in a channel. If you click Reply to a message, then the meeting will be attached to that conversation. You can select Meet now to start the meeting right away or Schedule a meeting to schedule the meeting for the future. Members of the channel will see an invitation for the meeting in their calendar if you decide to schedule it for later.
Content and Collaboration in Teams
Content can be shared in multiple ways when using Microsoft Teams. Teachers can add Tabs within a channel to centralize where students are going and keeping the workflow in Teams. Click + by the tabs at the top of the channel, click the app you want, and then follow the prompts. Use Search if you don’t see the app you want. Apps like Flipgrid, Buncee, Peardeck and Wakelet are just a few of the many different options available!
You can also share content directly in channel posts. Click Attach under the box where you type messages, select the file location and then the file you want. Depending on the location of the file, you’ll get options for uploading a copy, sharing a link, or other ways to share.

Collaborating in Teams has never been easier with the integration of the OneNote class notebook. OneNote notebooks are a digital binder that can be used in your class or with your staff to take notes and collaborate. OneNote Class Notebooks have a personal workspace for every student, a Content Library for handouts, and a Collaboration Space for lessons and creative activities.

We way not be able to close out the year with our students, but let’s make distance learning as familiar and comforting to our students as we can! By working in Microsoft Teams we can continue to encourage and engage students from the walls of our “virtual classroom.”
Stay #interACTIVE!
-👗➕👓
For more on using Microsoft Teams in the classroom check out the following post:
For more ideas on how to create relevant and engaging digital lessons, check out our book The InterACTIVE Class out now on Amazon!