

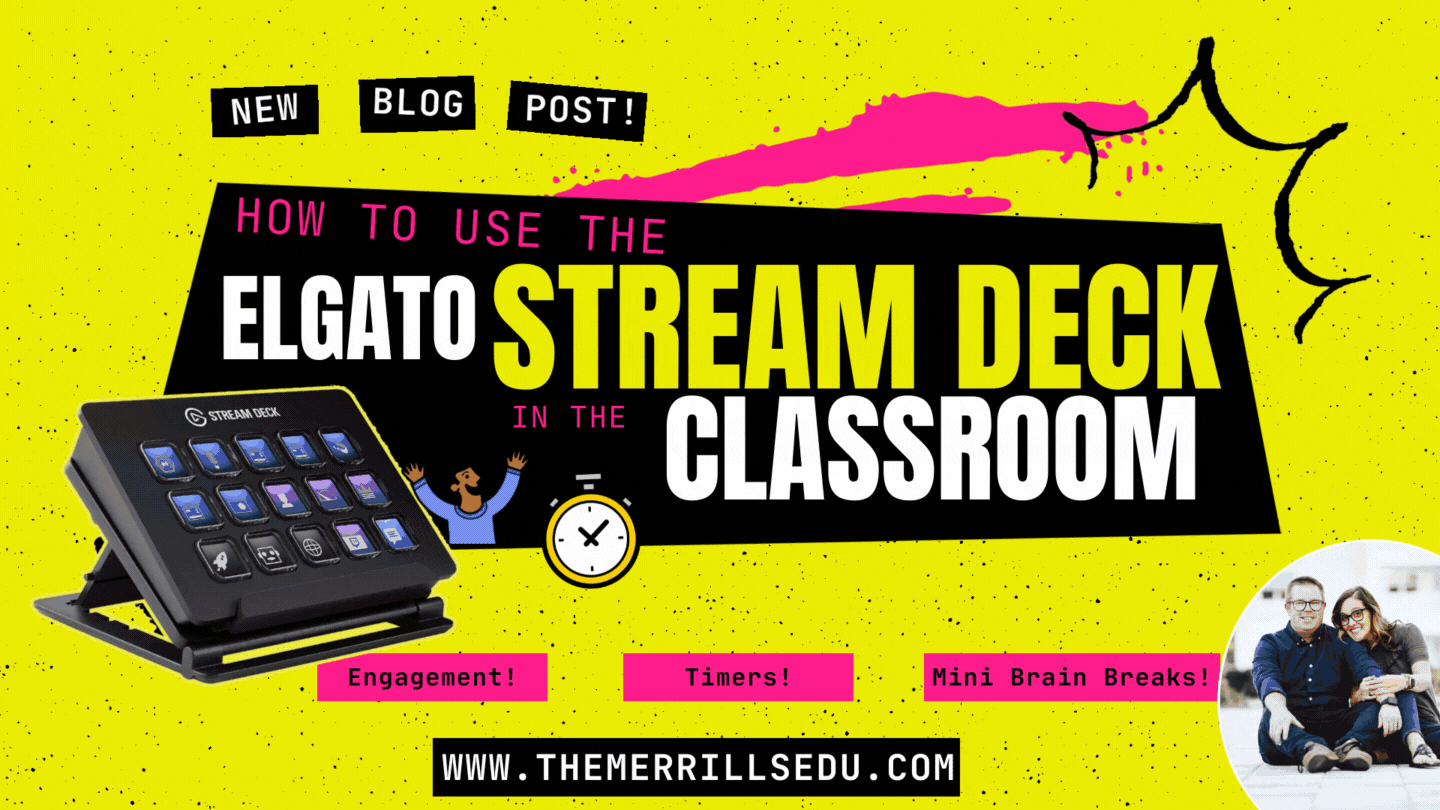
How to Use the Elgato Stream Deck in the Classroom
Elgato’s Stream Deck is a simple and powerful tool that commits an action once a button is pressed. Quickly play a sound effect, animated GIF and much more! Introducing this into the classroom is can take your engagement through the roof. Learn how it all works in this blog post!

Elgato’s Stream Deck is a tool that streamlines productivity. Coming in as many as 32 and as little as 6 buttons, users can efficiently launch apps, play sounds, mute / unmute, trigger GIF’s and videos and much more - all with just one press of a button. This all sounds fantastic - if you’re a gamer or streamer. But, what about teachers? How can we integrate this tool into our classrooms? Learn how more below!
(click on any subheading to jump to that section)
Which Stream Deck is best for me?
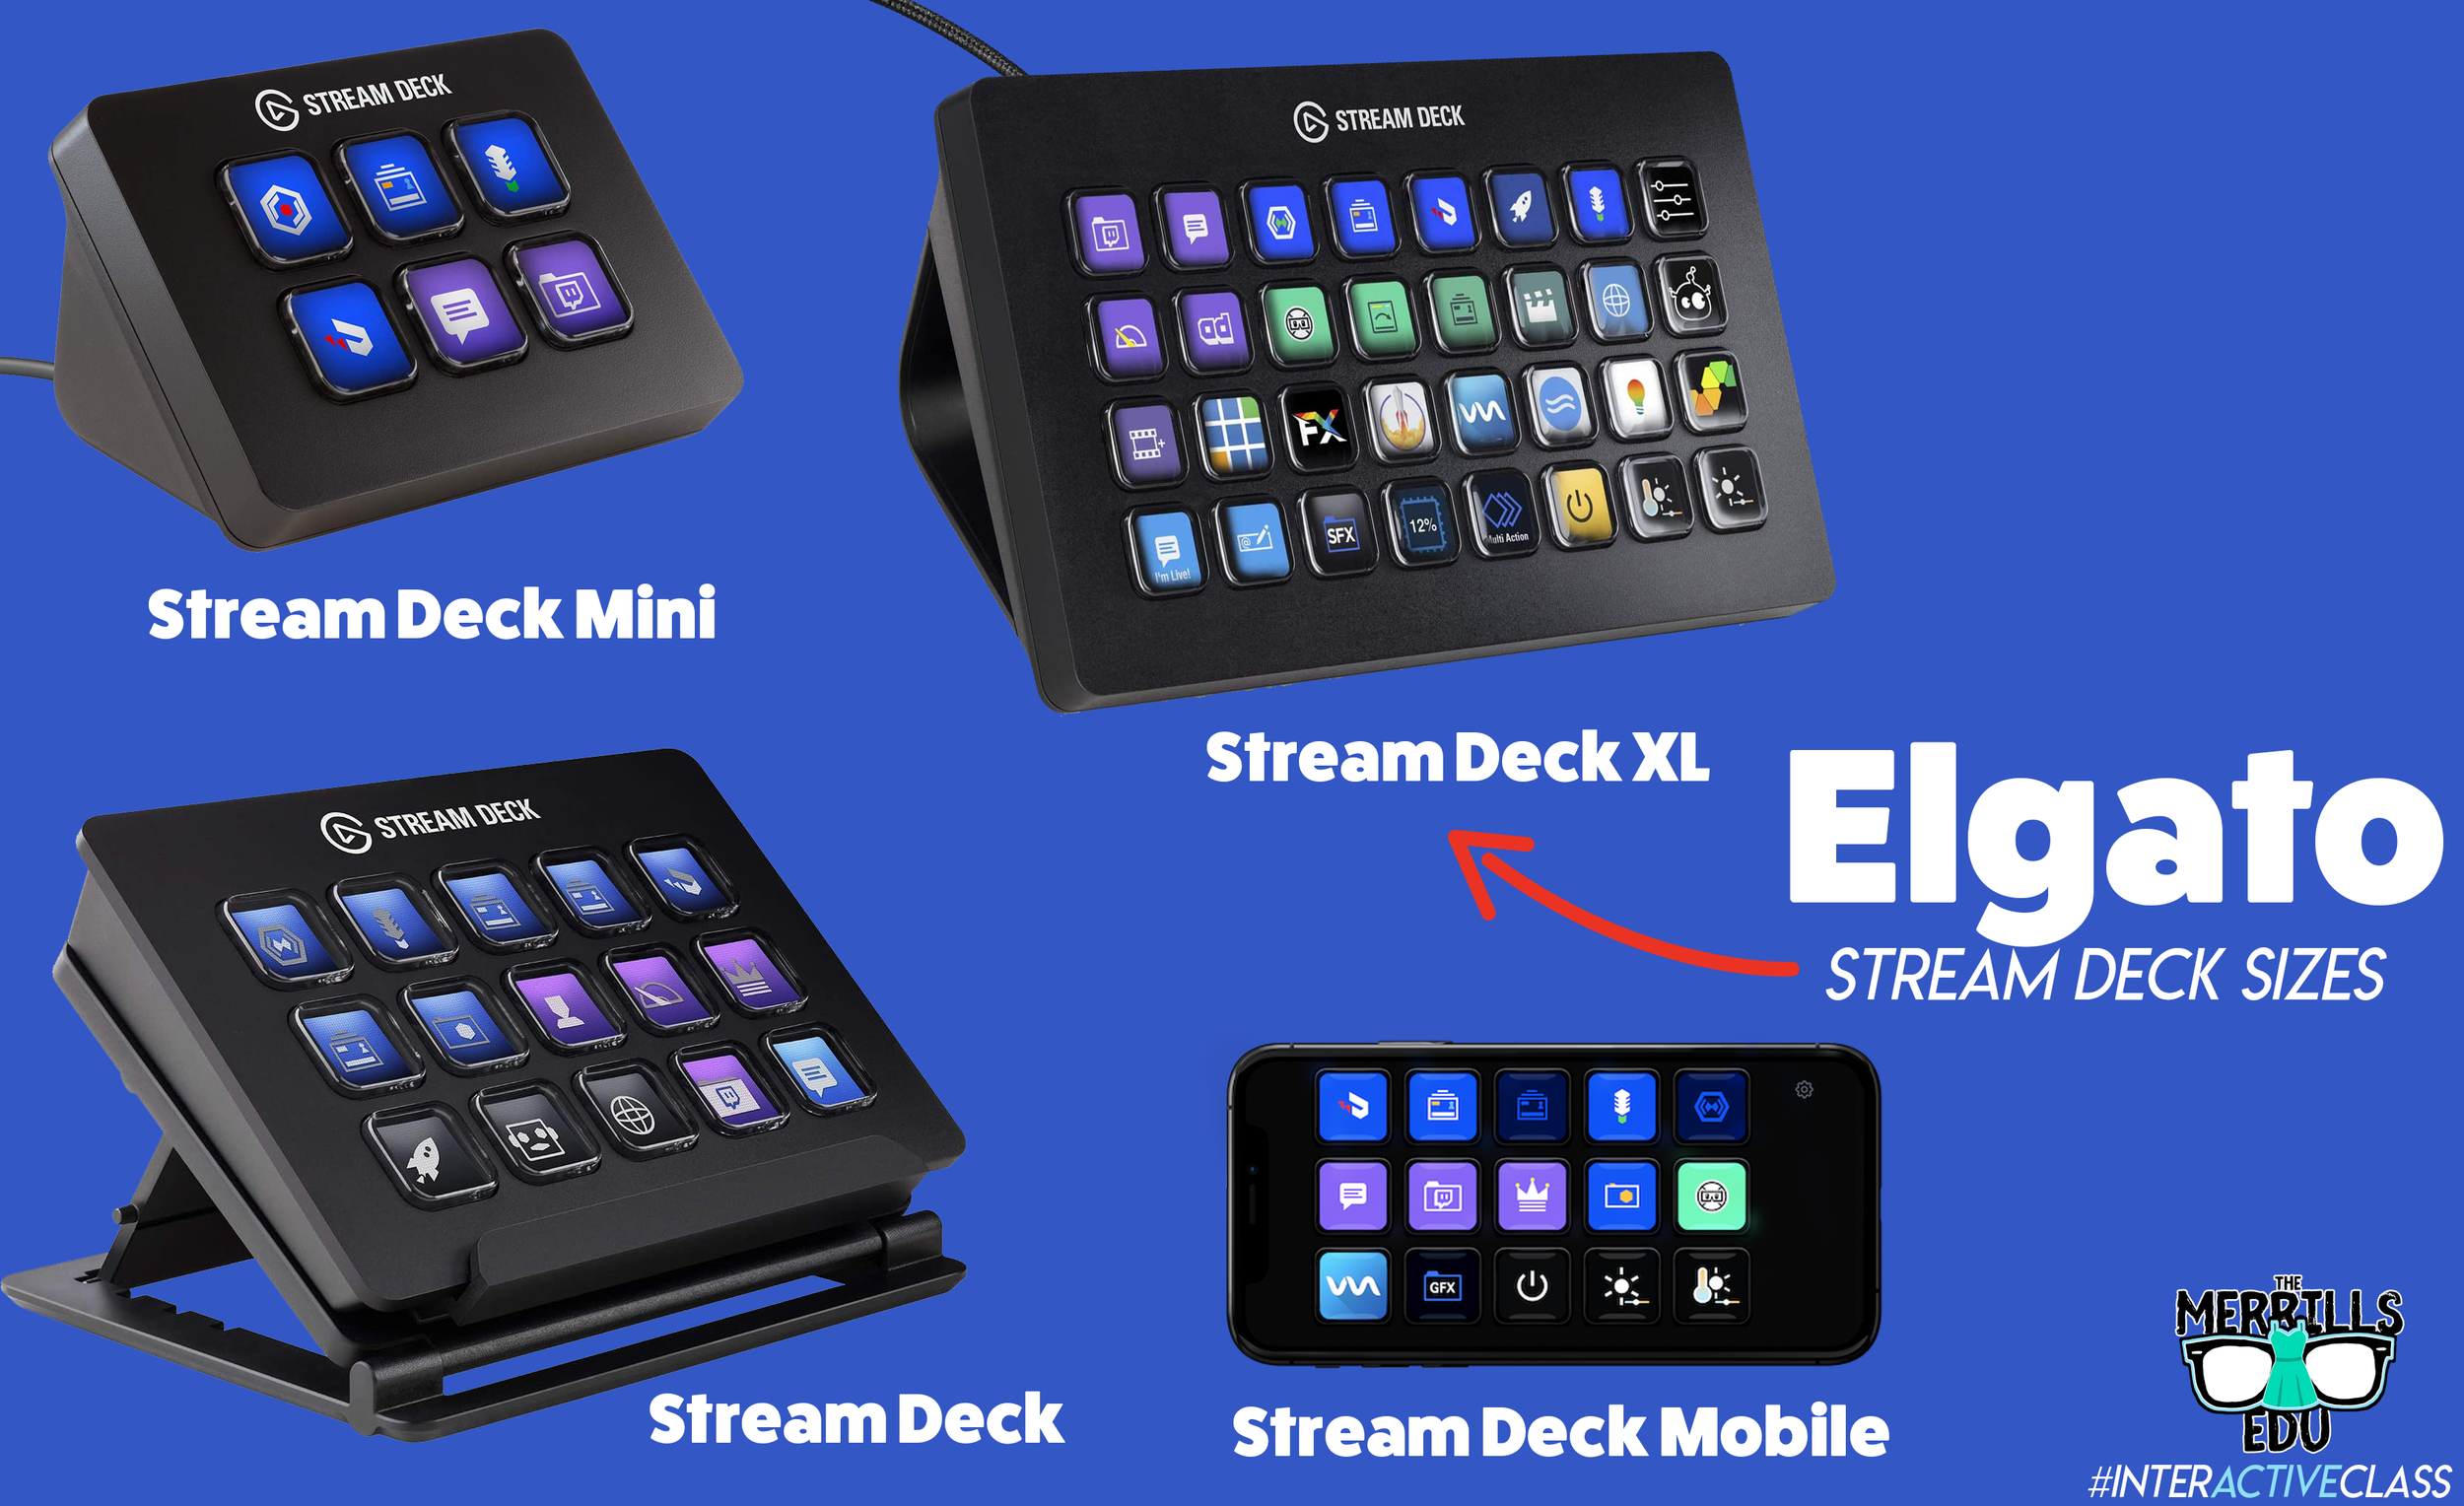
Elgato’s Stream Deck comes in several different sizes: 32 buttons, 15 buttons and 6 buttons. The prices range from $250 (32 buttons) to $80 (6 buttons). There’s also an option to turn your mobile device into a Stream Deck using Elgato’s app.
When deciding which is best for you, it’s important to note that there are an infinite number of actions that can be assigned to each stream deck. For example, if you’re working with the 6 button stream deck, users can create folders inside of folders to organize their actions. This features is available on every Stream Deck, so there’s always room for more!
So, which one is best for me? That depends…If you’re looking for more control, you’ll definitely want a bigger deck. More buttons = more options. If you’re looking for something small (pocket sized) and see yourself using the same actions all the time, then the Mini may be right for you. Speaking from experience, we prefer the larger sizes because you don’t have to assign actions to all the keys if you don’t want to - but at least they’re there if you do! Click below to purchase:
Elgato Stream Deck Mini (6 Buttons)
Elgato Stream Deck (15 Buttons)
Elgato Stream Deck (32 Buttons)
Elgato Stream Deck Mobile (app w/ 15 Buttons)
Once you’ve decided on which stream deck is right for you, check out Elgato’s starter guide right here!

Where Can I Find Sound Effects and GIF’s for my Elgato Stream Deck?
So, you’ve got your deck and you understand how the software works. But, where can you find sound effects and GIF’s to use? Here are a few places we recommend!

SuperLuigiBros.com
Looking for video game sound effects? Check out SuperLuigiBros.com for a collection of Mario Kart effects. No account required!

Free SFX
Free SFX requires you to sign up for a free account. But, once you’ve created your account, you can easily access tons of free sound effects that can be downloaded directly to your device.

Free Sound
Free sound also requires you to create an account before you can download, but doing so will give you access to tons of free sound effects!

Zapsplat
Zapsplat doesn’t require an account to download files. Users can select a sound effect, then Zapsplat generates a file link to download.

Giphy
Giphy is home to countless GIF’s, all of which are available to use for free. GIF’s can be downloaded (right click, save image as), but the true magic comes from making your own. This can be done right within the site. We also recommend checking out Giphy’s stickers - which have transparent backgrounds.

Tenor
Another fantastic website that features countless GIF’s! Like Giphy, users can create their own GIF’s in Tenor by uploading content and using the sites GIF creator tools.
How Can I Use the Elgato Stream Deck in My Classroom?
This all sounds awesome - but how does this translate into the classroom? How can this benefit my students and their learning experience? Like with the Stream Deck, the possibilities are endless. But, here are a few ways that we’re using it in our classrooms:
Engagement

Kids today are able to process information in a much quicker pace than ever before. They are also able to take in information for multiple resources and know exactly what to do with it. This means our students are excellent multitaskers! In a world where sound effects appear right on top of videos that they’re watching, kids need engagement. So, try using the Stream Deck to load up some sound effects. Create buttons for things like “oh, no” or “oops.” Maybe even create one for “money” (when something good happens) or “kerching” (for when something great happens). Then, when those situations arise, be quick with your buttons and press the appropriate one!
Timers
The Stream Deck can play short sound effects and long songs. So, program your Stream Deck with a timer - or song. We try to keep ours at 1 min and 30 seconds. We use this same song for all transitions, clean up, etc. Playing the same song gets the kids familiar with it, so they know exactly how much time they have until the timer / song runs out.


Mini Brain Breaks
Sometimes your students are a bit ansy. If your students have a case of the wiggles, keep them on their toes with the Stream Deck! Teach the kids that when a sound effect or song is played, they can get up and dance. The trick is that they must be back working and on-task once the sound effect of song is over! Check out our example below!
-- Stay tuned for more on how to use Elgato’s Stream Deck in your classroom! Already own one? We’d love to see how you’re using it! 👓👗
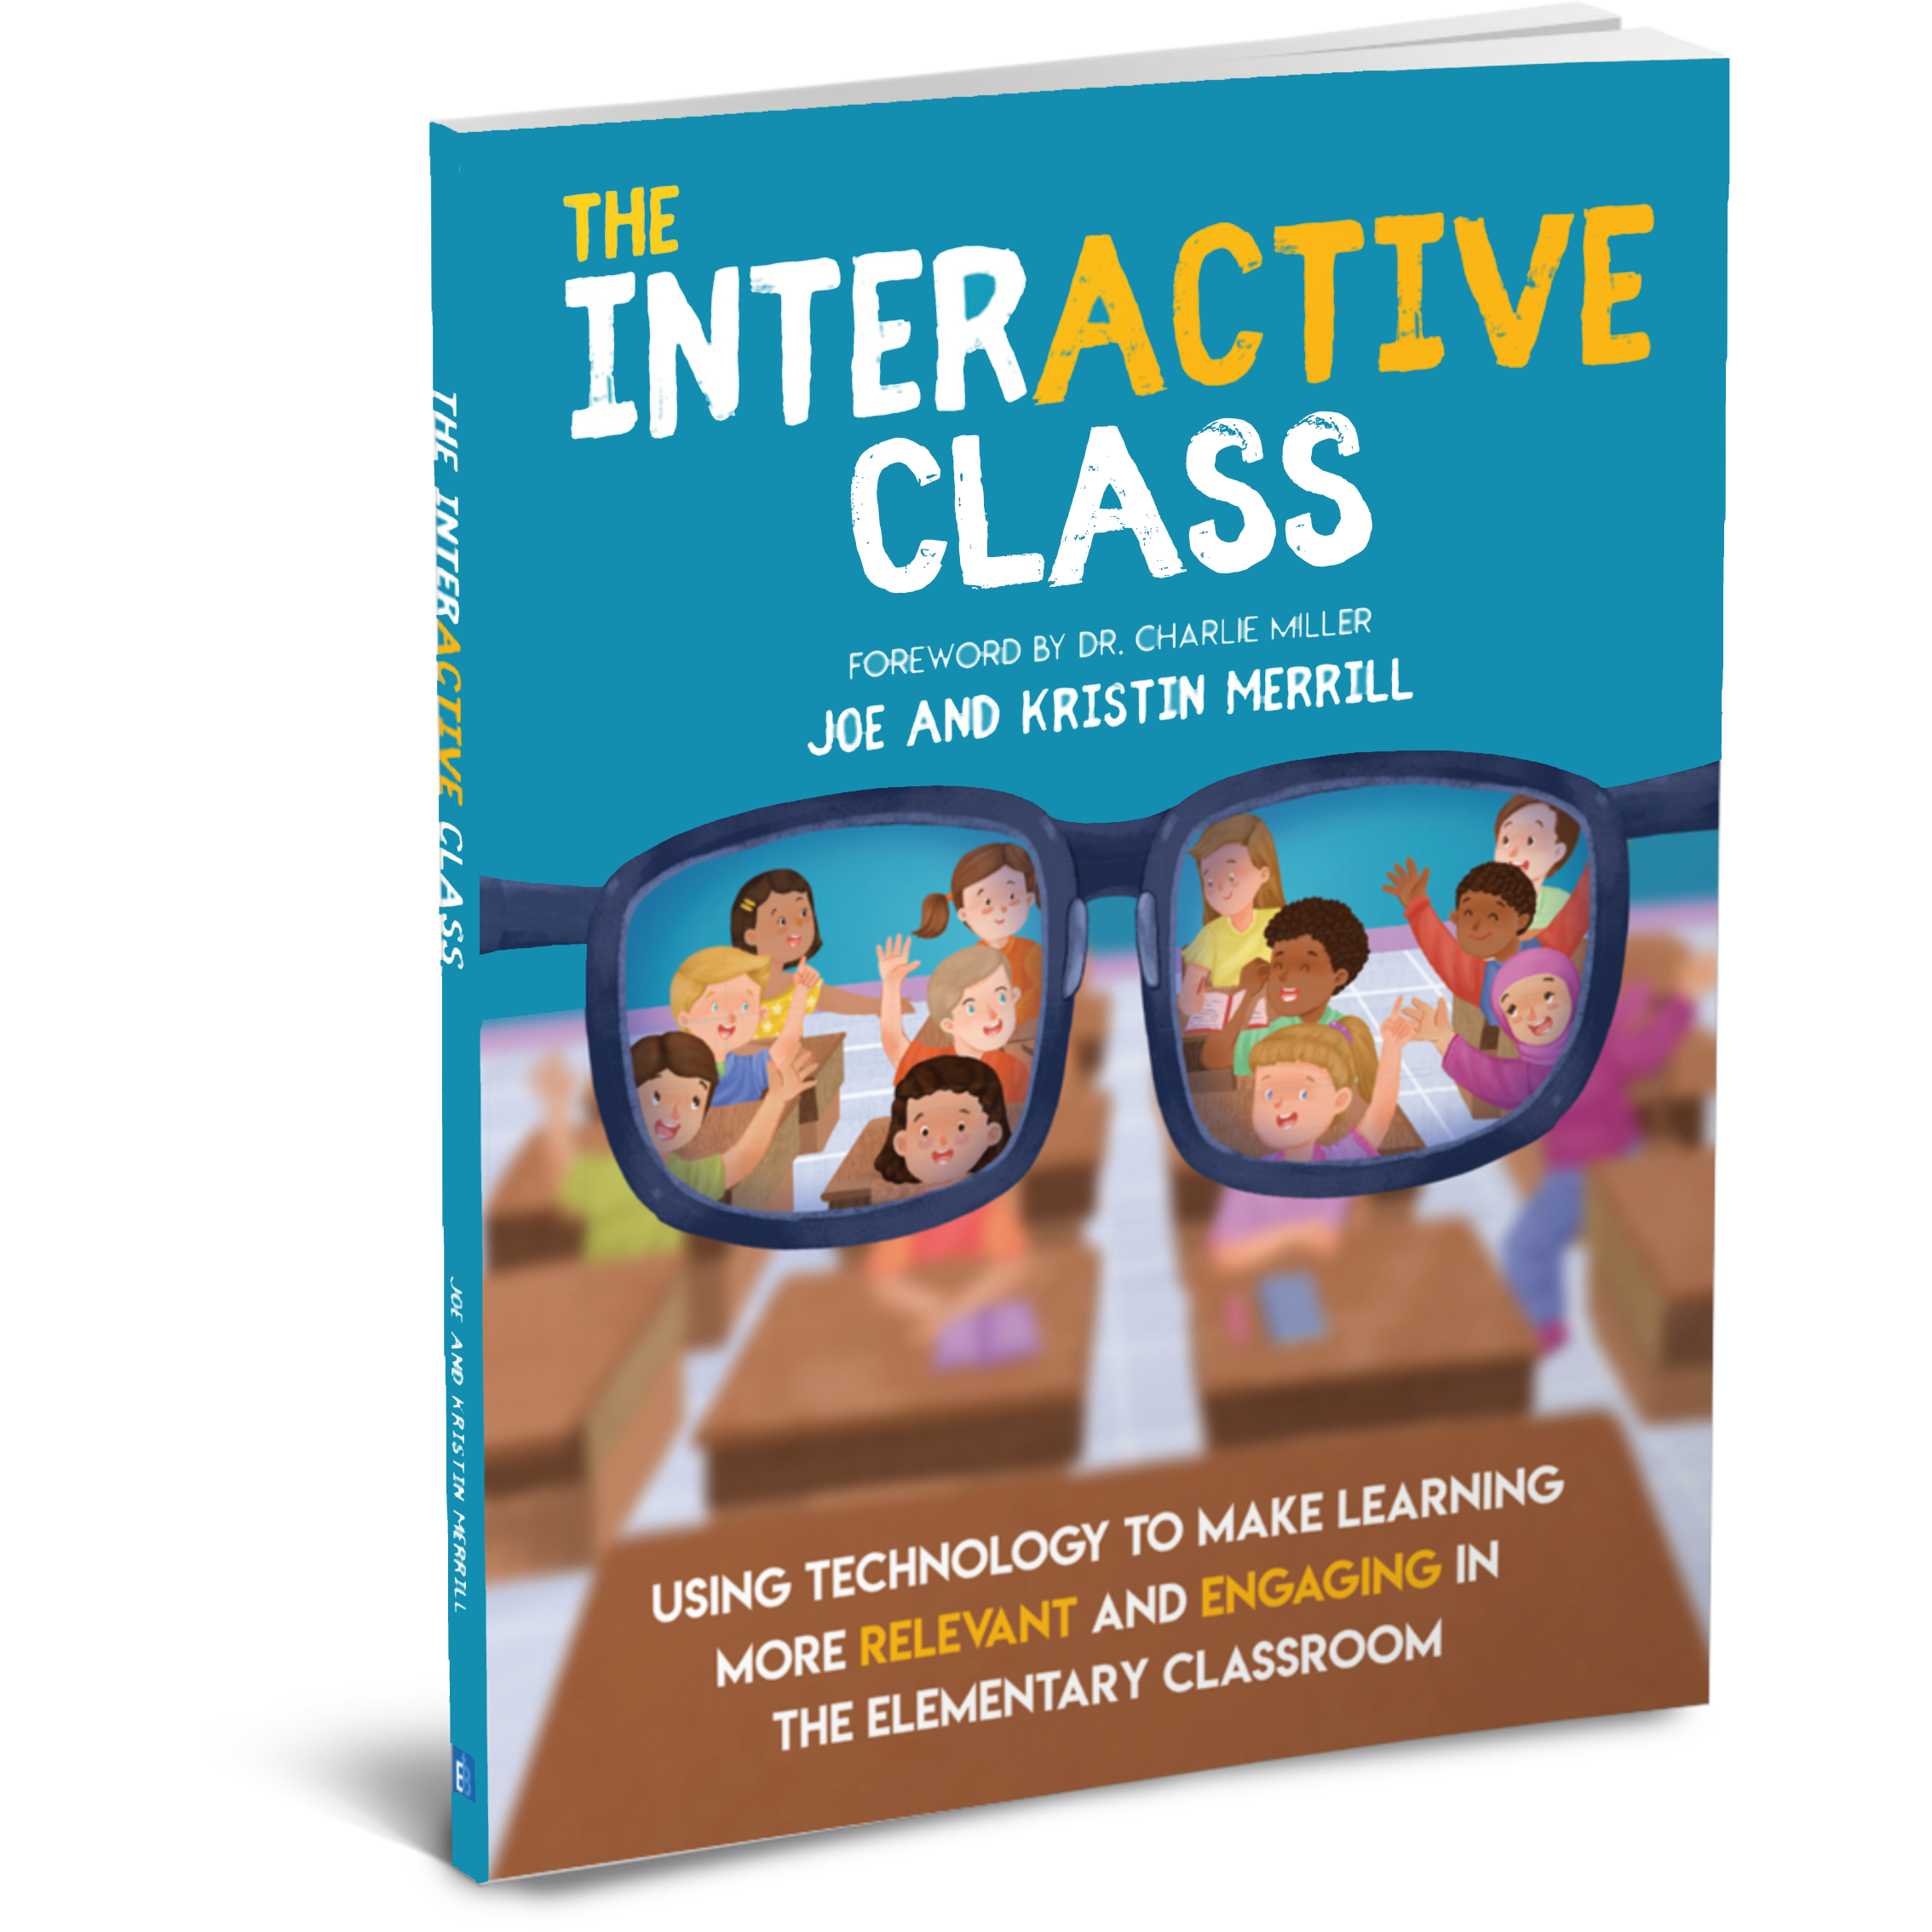
For more tips, tricks and lesson ideas for making learning more interACTIVE, check out our books The InterACTIVE Class and Flipgrid in the InterACTIVE Class on Amazon!


How to Use Gimkit Ink
@theMerrillsEDU “unpack” how to use Gimkit’s latest tool: Ink. In this blog post you’ll learn: what Gimkit Ink is, how to launch it for your students and how students can publish their work and share it with their classmates!

Gimkit is notorious for building engagement and with Ink, Gimkit delivers on a whole new level. Ink creates a refreshing take on writing, storytelling and much more. In this blogpost, you’ll learn:
(click on any subheading to jump directly to that section)
✏️What is Gimkit Ink and How Does It Work?
⚡Quick Start Guide:⚡
🚀 Launch a Project
💪 Having Students Add Content
📚 Publishing Student Work
👀 Viewing Other Students Work
💡What are The Paper and Time Machine Features?
What is Gimkit Ink?

Gimkit Ink is a fresh take on how writing should look in 2021. Instead of turning in documents or PDF’s, Gimkit Ink allows students to publish their work online and share them directly back to the educator, classmates and beyond (if they chose to do so). Students may be reluctant to share their writing, so Gimkit Ink provides them with several key elements to help. For example, students who submit their writing can share directly to the teacher or with the entire class. But, if they are nervous about sharing with the class, they may post their work under a pseudonym. The key here is that the students understand that they are creating for a broader audience them just themselves. With this understanding, they will likely place more effort into the quality of their work (since they know it will be shared).
Gimkit Ink is available to all users! However, the free version of Ink is limited. Teachers can create 10 projects on the Gimkit Basic plan. There are no other restrictions at this time.

Quick Start Guide
Step #1: Launch a Project

Educators can launch Gimkit Ink tasks from their Gimkit Hub (or login page). Click “Gimkit Ink",” which will take you to the educators dashboard. To get started immediately, click on “New Project” under Projects. Fill out the information on the next page, then select your privacy settings. Once everything looks good, click the blue “Start Project” button. Doing so will launch a live link / webpage where content will be shared and delivered. Share this link with your students to have them start adding content. This link is important, as it also acts as the “house” where all of the content submitted will “live” or be posted. Students will be able to return to this link to view content from their peers after they have submitted their own work.
Step #2: Having Students Add Content

After you have shared the link with your students, they are ready to start adding content. Have them click the blue “+ Create New Post” button. This opens several options for them: create a new article or story.

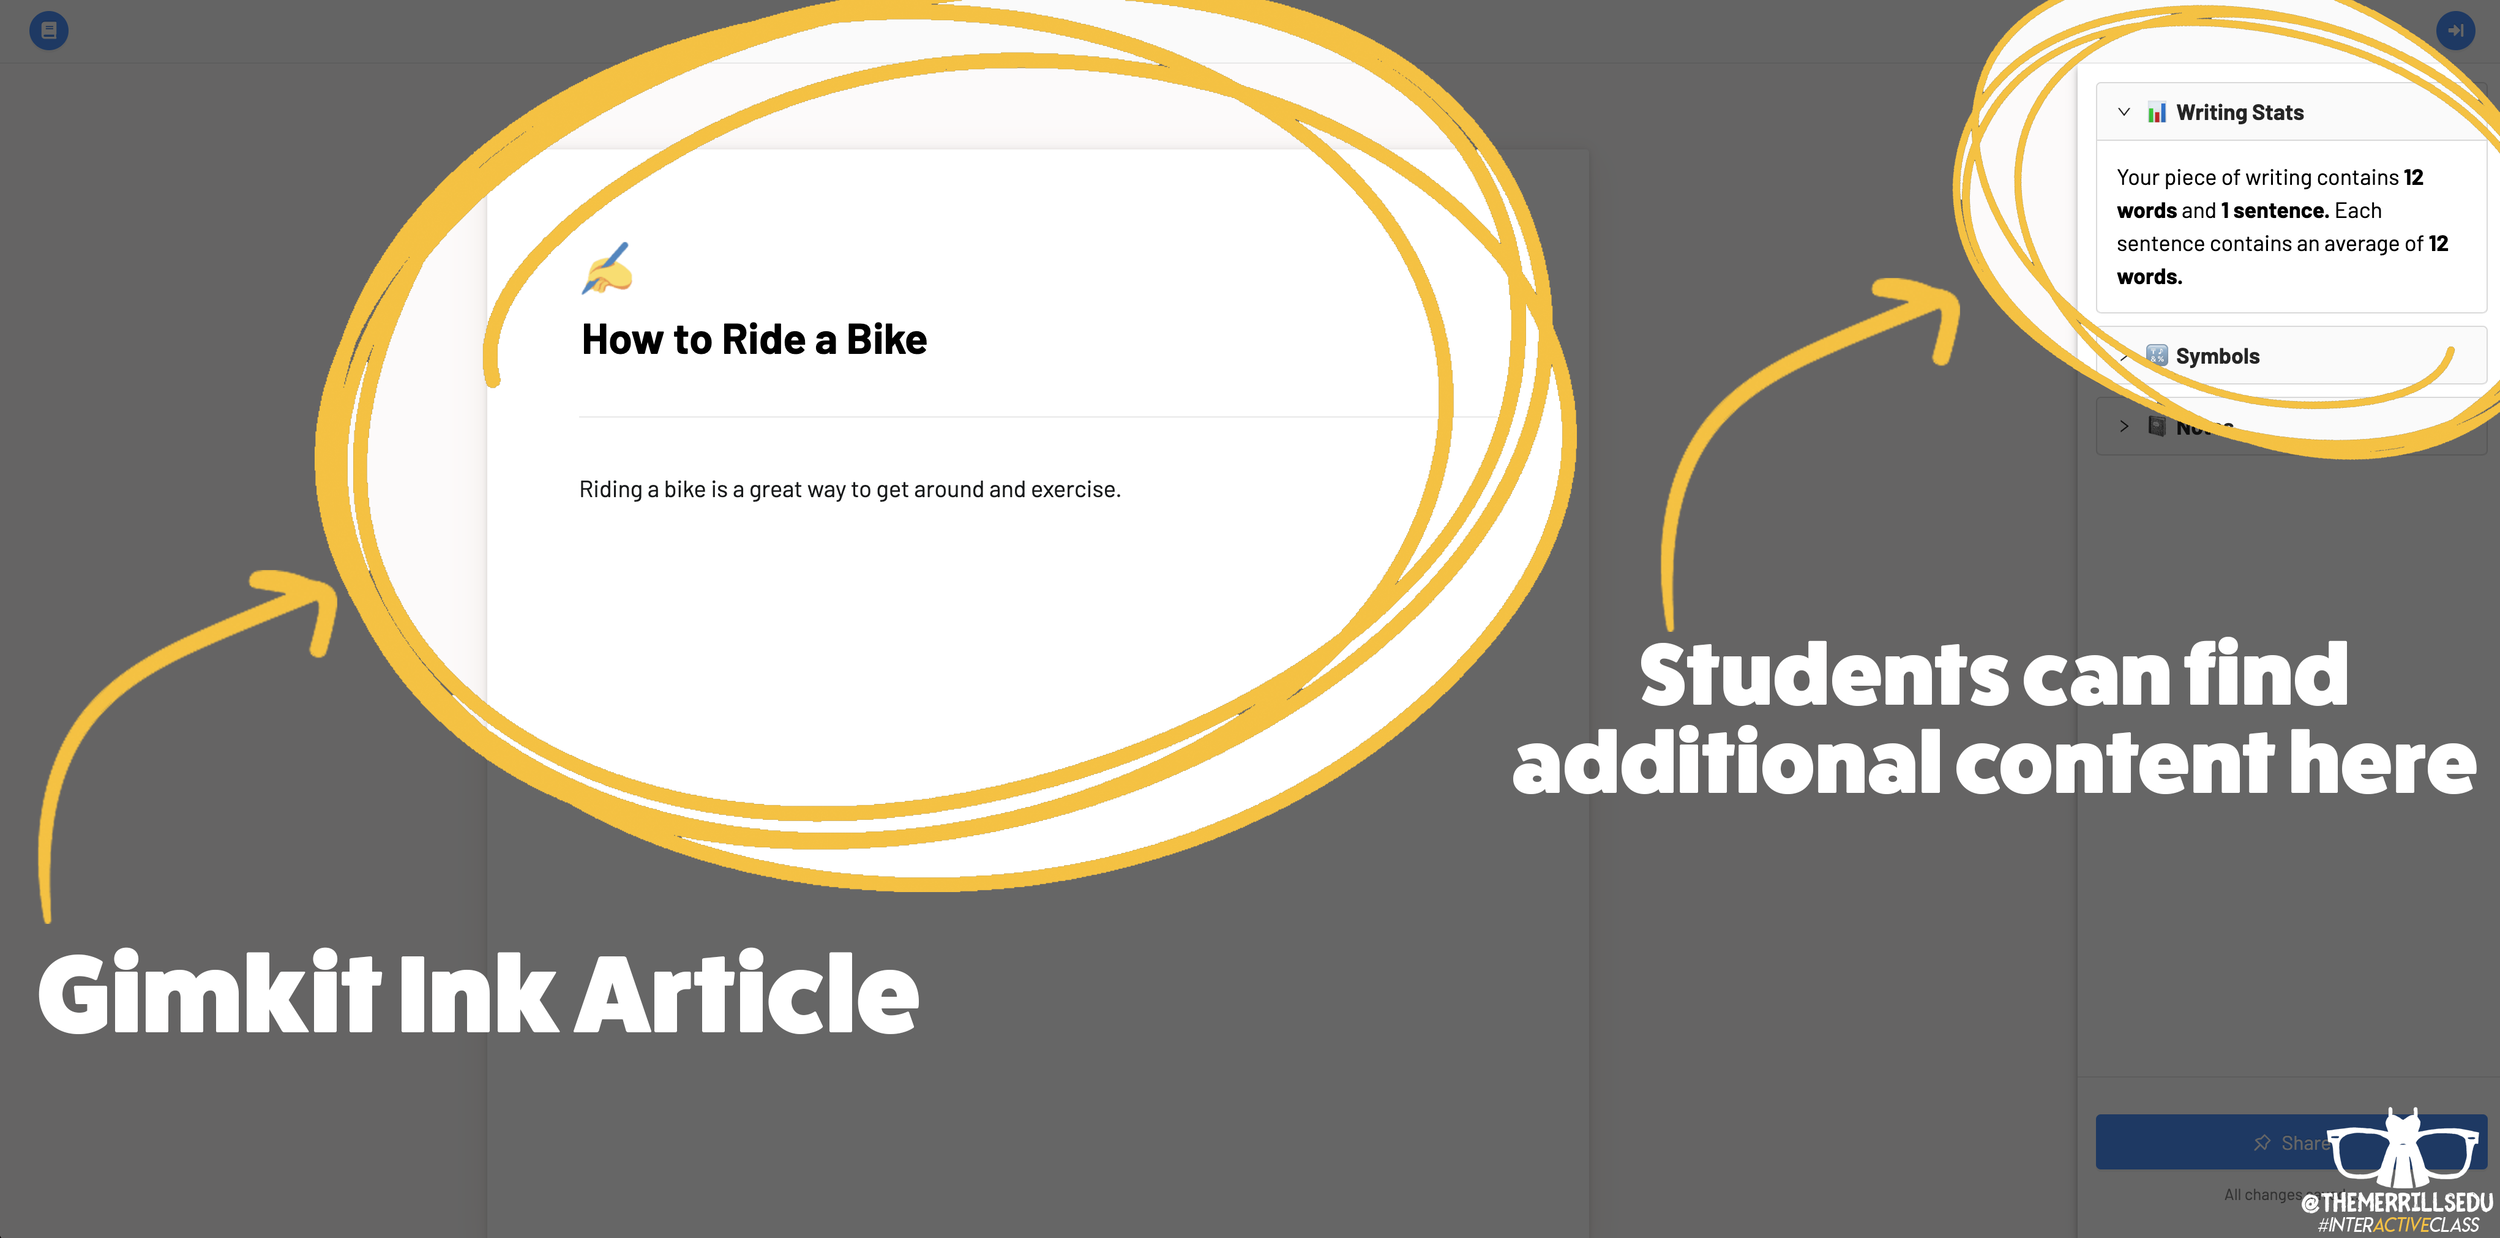
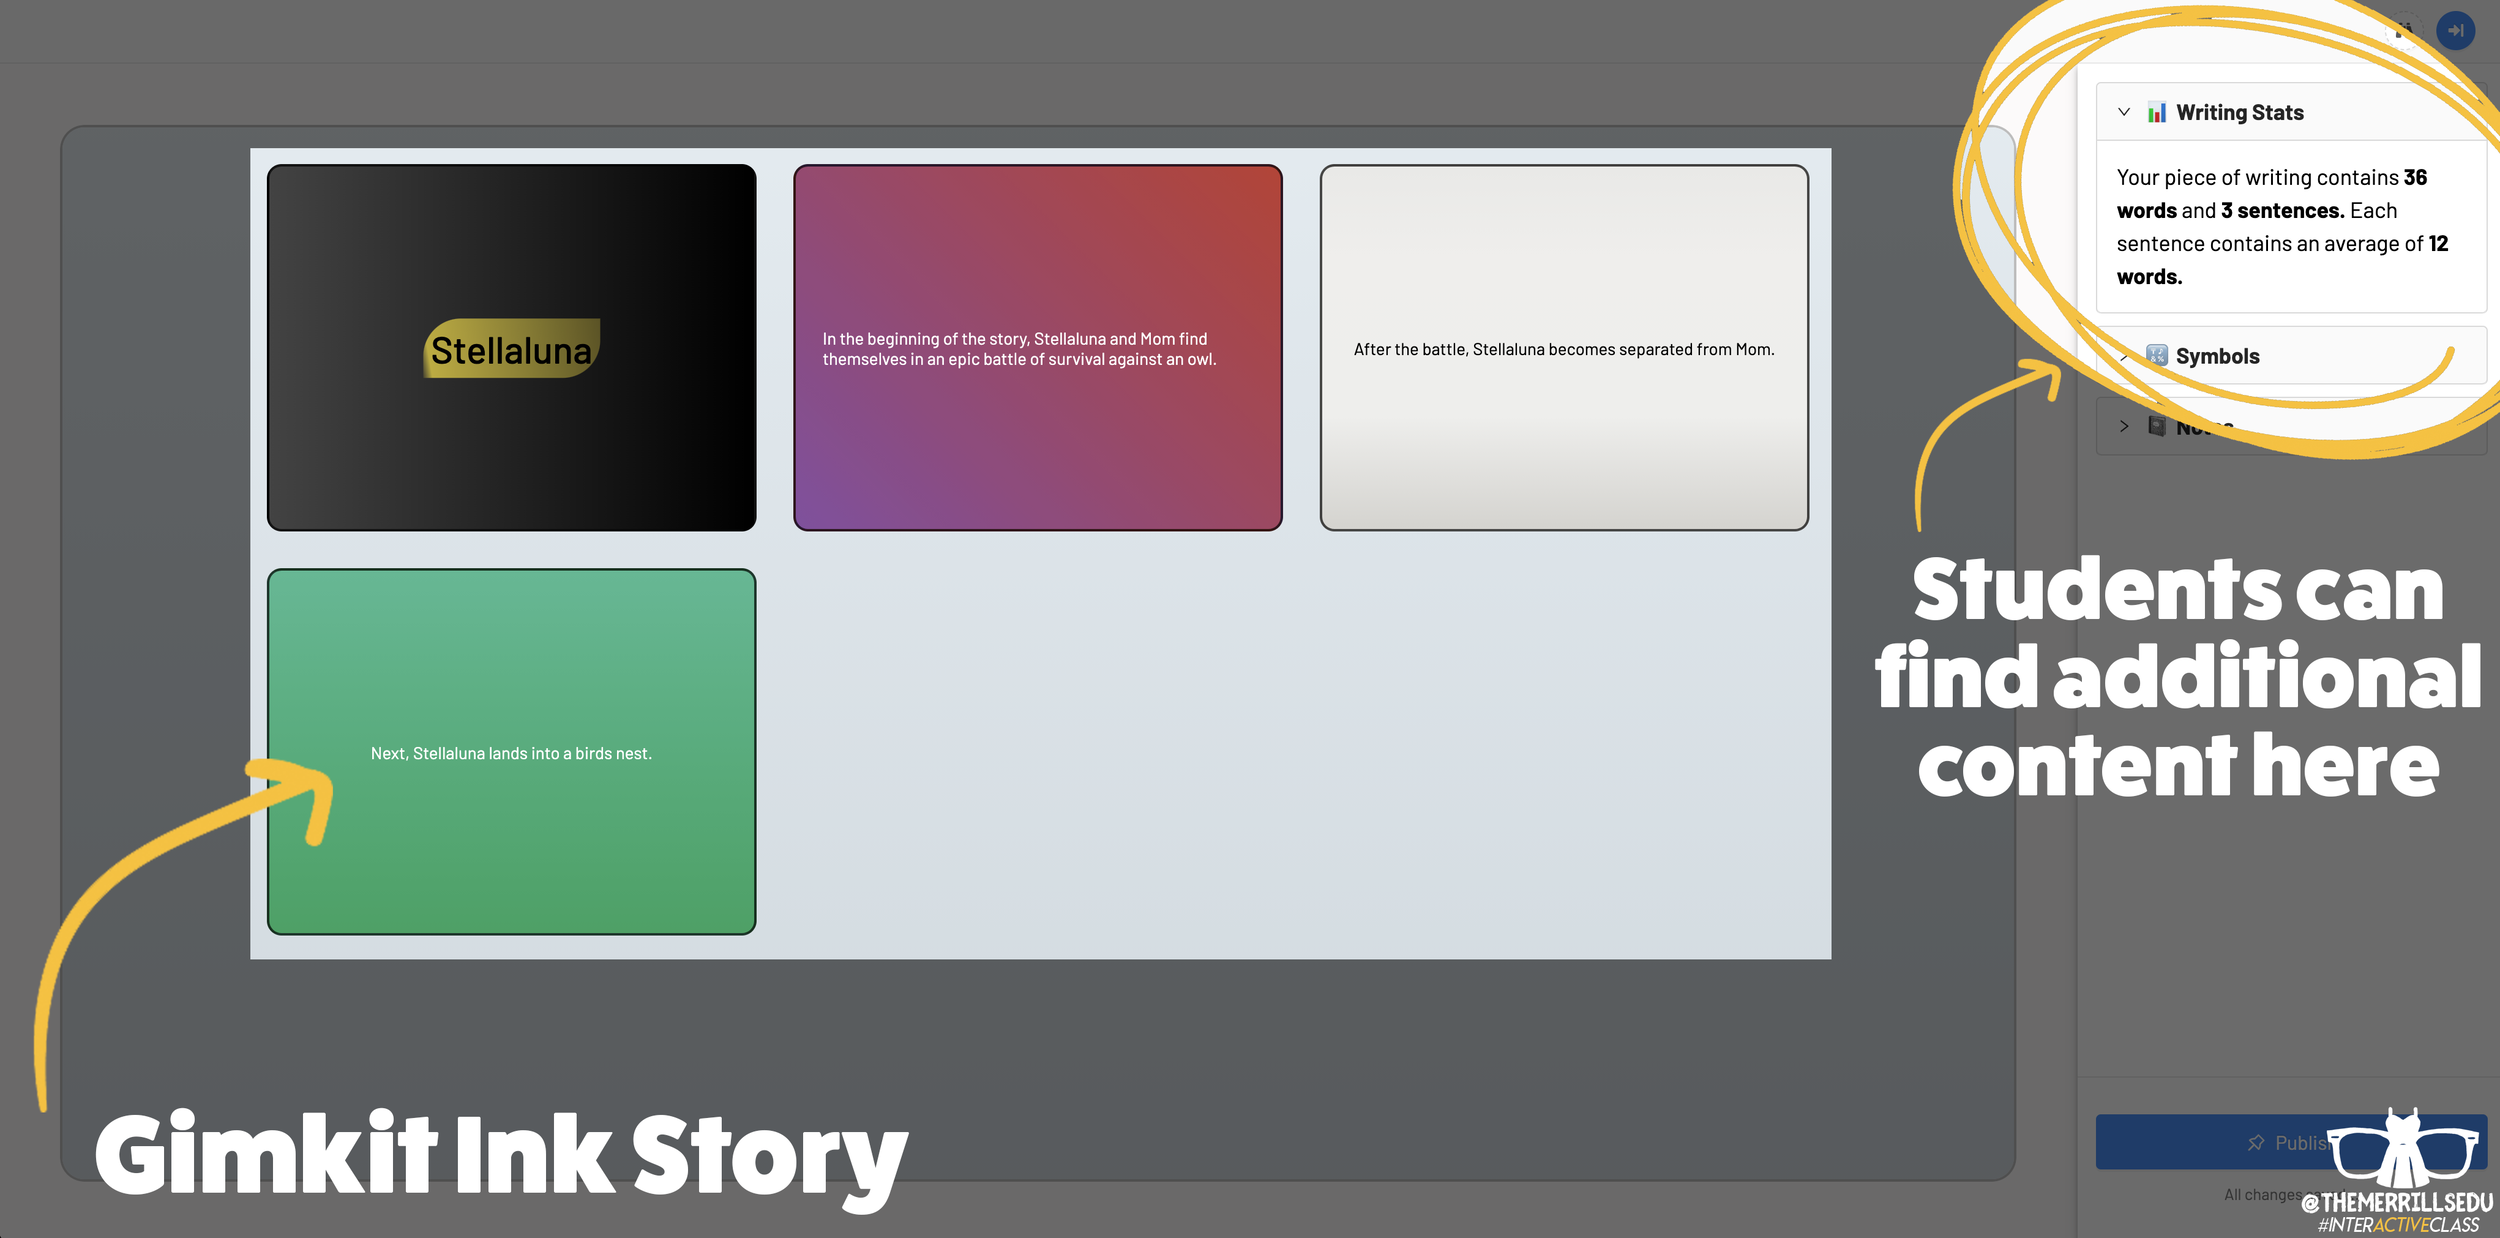

Writing an article on Gimkit Ink provides an editable document where your students can add titles, subtitles, text and more. This is perfect for sharing an idea - similar to a newspaper, blog post, etc. Adding a story gives students options to generate a storyboard or mind map experience to generate their writing. It’s more visual and allows the writer to control the pace. This is ideal when working to tell a story, and can be extremely powerful for young learners who are trying to organize their thoughts. In a Story, students have the capability to add features such as: images, YouTube videos, Desmos Graphs, Flipgrid Shorts recordings, Scratch projects, Google slides / sheets / docs, Anchor podcasts and Codepen. Students can add additional frames to their story, creating an easy to follow flow map - but Gimkit intelligently permits students to move their frames around (in case something gets placed out of order, just move it around!). This allows for easy editing and correction.

Step #3: Publishing Student Work
Once Your students have completed adding their information, they are ready to publish their work. To do so, they click the blue “Publish” button. It will prompt them to check their work - are you ready to publish or should you go back and edit? Once they are sure everything looks good, have them click the blue “Ready to Publish” button. The next screen asks your students to enter a title for their work and to select an emoji that they would like associated with it. After entering this info, students are to click the blue “Continue” button. Next, they must pick who can read their work: anyone or just the teacher. After making the first selection, Gimkit asks if they would like to share their name. Students may choose anyone or just the teacher. From here, they are to click the blue “Publish” button. Now, their work is live and ready to be viewed. Note: each student post has it’s own unique URL. So, this may be shared with families at home through other apps like Seesaw, Microsoft Teams, Google Classroom, etc.
Step #4: Viewing Other Students Work

Once your students have published their own work, they are prompted with a screen that shares their own personal URL to their project. Additionally, they have the option to “Open the Project,” which will take them back to the original landing page that you the educator created (“the house!”). Now your students can see everything that is and has been shared. If enabled, students can leave emoji reactions for quick peer-to-peer feedback. It’s a great way to provide an outlet for your students to share content with their friends!

The Paper and Time Machine
The Paper is Gimkit Ink’s workflow that shares all of the latest post from across all of your projects. This is helpful if you have multiple projects going at the same time and need to bounce back and forth efficiently. Your posts can also be found by clicking on “Time Machine” from the Gimkit Ink dashboard.
-- Stay tuned for more on how you can embed Gimkit’s Ink into your classroom! 👓👗
For more tips, tricks and lesson ideas for making learning more interACTIVE, check out our books The InterACTIVE Class and Flipgrid in the InterACTIVE Class on Amazon!


How to Use Flipgrid During Remote Learning
Remote learning is challenging, but infusing technology can help make tasks easier. Flipgrid gives both educators and students opportunities to share content in creative and unique ways. In this blog post you’ll learn about some of our favorite ways to use Flipgrid throughout remote learning.

Remote learning is challenging, but infusing technology can help make tasks easier. Flipgrid gives both educators and students opportunities to share content in creative and unique ways. In this blog post you’ll learn about some of our favorite ways to use Flipgrid throughout remote learning.
Click on any subheading to jump to that section:


Educator Ideas
Here are some ways that educators can use Flipgrid throughout remote learning (and beyond!)

Use the Shorts Camera!
From the Flipgrid educators dashboard, locate the “Shorts” tab from the top. Clicking on it will give you access to the Flipgrid Shorts camera. Use the Flipgrid Shorts camera to record lessons, launch lessons, or simply teach to a specific target. Educators have a maximum of ten minutes of recording time.
Embed a Flipgrid Topic / Group into your LMS
If you’re currently using an LMS (Learning Management Software), you can easily embed a Flipgrid Topic or Group right into it. From a Flipgrid Topic or Group, click the blue “Share” button. Then click the embed icon (</>). It will appear as though nothing happens, but your device has just copied the embed code. Simply paste it into your LMS’s embed editor. Now, your Topic / Group will appear right in the LMS.
Flipgrid and YouTube LIVE Hack
Educators can launch a live YouTube lesson right within a Flipgrid Topic! To do so, launch a live YouTube video and then create a new Topic. Next, click on YouTube in the Topic’s media section. Paste the link to your YouTube live video. You are now live in the Flipgrid Topic!
Virtual Office for Parents / Video Voicemail
Allow parents (or students) to reach out with questions any time and respond when its convenient for you! Set up a Topic and share the Join Code or QR Code with families.
Fluency Checks
Set up a Topic for your students to monitor their fluency. Assign a reading passage in the Topic (or attach a link) and select a recording time for your students. Students open the passage and hit record!
Anchor Charts
Use the Flipgrid Shorts Camera to create digital anchor charts. Add resources as Photo Stickers, then resize / move as needed.
For a full tutorial on how this works, click here.

Send Home Messages with the AR (Augmented Reality) Feature
Use the Flipgrid Shorts Camera to record a message for your students. Share the message by downloading the Flipgrid AR QR code. Send out the QR code and then have your students open the message using the Flipgrid app. Doing so will open the video up in augmented reality.
Modeled Science Experiments
Use the Flipgrid Shorts Camera to record the guided steps of a Science experiment. This will allow students to start / stop the video to follow along.

Virtual Field Trips
The pandemic has eliominated any changes of taking your class on a “real” field trip, but that doesn’t mean that you can’t give them a similar experience a virtual field trip! Record a video of yourself at a preferred destination. Then, set up a Flipgrid Topic and upload the video. Have your students log onto the Flipgrid Topic and then either answer questions, or leave questions!
Click here or the image to visit The Met on Flipgrid’s Discovery Library
Student Ideas
Here are some recommended activities for using Flipgrid throughout remote learning - and even in-person!
Share Critical Thinking Skills
One of the easiest ways to use Flipgrid is to have your students explain their work. For example, after working out a math problem on a whiteboard, have your students explain their thinking in a Flipgrid video. This strategy then is seen by all the other students in the class - who theoretically are acting as young teachers themselves. Even the incorrect responses can teach us!


Whiteboard
Flipgrid’s Whiteboard feature is built directly into the Shorts camera. Have your students quickly turn their screen into a digital whiteboard where they can annotate over it.
Mic Only Mode
Mic Only Mode is a friendly way for camera shy students to share their voice. In Mic Only Mode, the students voice is recorded, but not the video. There are many creative uses for Mic Only Mode, but this Tweet from Ann Kozma (@annkozma723) is one of our favorites!

Text Comments
Like Mic Only Mode, this feature is ideal for students with low-bandwidth. Adding a text comment allows students to comment on videos without having to upload lots of data.
Opinion Writing
Working on Writing throughout remote learning is difficult. But, using Flipgrid to help students organize their thinking can improve their results. For example, students can use Flipgrid to debate the pros and cons of a topic prior to writing to generate their thinking.


Book Clubs
Educators can easily differentiate reading instruction on Flipgrid. By assigning students reading tasks, students can participate in Book Clubs where they exchange thoughts about what they are reading. This could also be an activity associated with Literature Circles.
Three Truths and a Lie
(with Non-Fiction Texts)
After reading a non-fiction text, have your students complete a Three Truths and a Lie video. This is where students give three facts about what they learned, and one lie. Other students watch the video to see if they can pinpoint which one isn’t true.


Main Idea Summarization
Have your students use the built in Flipgrid Frames feature to add the “breaking news” frame around their video response. Then, students explain what they believe the main idea of the text was.
Character Illustrations
Use the built in emoji stickers in the Flipgrid Shorts Camera to have your students retell the beginning, middle and ending of the story. Check out our example Tweet!

Emoji Math
Have students use the built in Flipgrid emoji stickers as math manipulatives when working with the digital whiteboard. Or, as an educator, make a math challenge that substitutes the numbers with emojis. Then, your students must guess what numbers the emojis represent.
Math Collaboration
Have your students design their own math challenges by recording a prompt on Flipgrid, then sharing it with their classmates. Their classmates must attempt to solve, and the creator checks their work!

Stay #interACTIVE!
-👗➕🕶️
For more tips, tricks and lesson ideas for making learning more interACTIVE, check out our book The InterACTIVE Class and Flipgrid in the InterACTIVE Class on Amazon!


How to Introduce Students to Flipgrid
You’re ready to give Flipgrid a try, but not sure where to start? We’ve got you covered! In this blog post you’ll learn how to set up Groups / Topics, what a student sees, tips for getting started, and even free recommended lessons.

Depending on how your district technology runs, you have several options when introducing your students to Flipgrid. In this post, you’ll learn (click on any subheading to jump to that section):
How to Set Up Your Class on Flipgrid
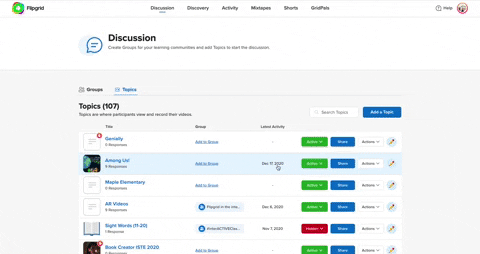
If you’re new to Flipgrid, it’s important to understand the verb-age. The two key terms that you’re immediately introduced to are: Groups and Topics. Groups are where Topics (or questions) are stored. If you were a high-school teacher, you may want to create a group for each of your periods (unless you want the students in different periods collaborating with one another). For example, you could create a group for Period #1, Period #2, etc. Topics are the question prompts you ask your students to complete. When you create a question / task for your students, you would create a Topic on Flipgrid for them. Students log onto the Topic and complete the assignment. When creating your class, we recommend staying organized from the get-go, as it will save you trouble later on.

Follow these steps to start setting up your class:
From the educator’s dashboard, click on the blue “Create a Group” button.
Give your new Group a name
Optional: Customize the Group’s join code. We recommend doing this because this personalizes how your students log onto Flipgrid. Try changing the join code to your last name, or something memorable.
Choosing How Your Students Will Log On:
Flipgrid offers several ways for your students to access assignments. When building your class, it’s important to make decision here, so let’s discuss what each of the permissions mean. If your students have access to email addresses, you can set up your class to where they use them to log in. You would set your class up as “Student Email” (note: this requires a Google or Microsoft email account). If your students don’t have access to email addresses, then they will need to log on using a Student ID. This can be a lunch number, birthdate, or something familiar to the student.
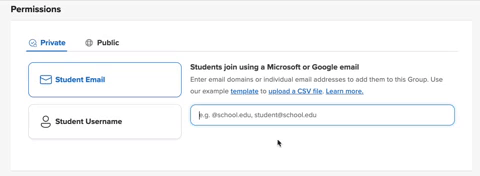
How to Set Up a Student Email Group:
Be sure that you have the Student Email option selected when creating your new Group.
Add the domain of your school’s email addresses (example: @school.com)
How to Set Up a Student Username Group:
Be sure that you have the Student Email option selected when creating your new Group.
Enter in the first name, last name, and student ID of your students. Note: If you have access to a CSV file of your class list, you can upload the entire class list at once.

Once you have selected how your students will log on, you can add a personal touch selecting or uploading an image for the Group cover. After you’re satisfied, click the blue “Create Group” button. Now you’re ready to start adding Topics into the Group.

How to Create a Topic in Flipgrid
Now that you have your Group set up, it will be easy to keep things organized from here on out. To add a Topic (or question that you would like your students to answer) to a Group, start in the Flipgrid Educator’s Dashboard. Click on the Group that you wish to assign the Topic to. Next, click the blue “Add Topic” button. On the next screen, enter a Topic title and prompt (or directions). You also have the option to add additional media to your Topic, such as: a video, image, GIF, YouTube, etc. This will place the media into the Topic so that your students will be able to see it once they log on. Just underneath the Media section is an area where you can adjust the Permissions and Essentials (adjust recording length, moderate the responses, toggle on/off video and text comments and include captions on videos). Once you’re happy, click the blue “Create Topic” button to launch the Topic.

How Students Log Onto Flipgrid
Depending on how you have set up your Group, your students will log onto Flipgrid using either their email address or student ID. Here’s what it will look like from a student’s perspective.

If Students Log on Using Email Addresses:
If your students are logging on using email addresses, they will go to: http://www.flipgrid.com or open the Flipgrid app. They will need to enter your Group Join Code (remember how we recommended customizing it? This is why!), then they will be prompted to log in using their Google or Microsoft email accounts. Once they do this, they will be logged into your class Flipgrid Group.
If Students Log on Using a Student ID:
If your students are logging on a student ID, they will go to: http://www.flipgrid.com or open the Flipgrid app. They will need to enter your Group Join Code (remember how we recommended customizing it? This is why!), then they will be prompted to log in using their student ID. Once they do this, they will be logged into your class Flipgrid Group.

Ideas for Introducing Your Students to Flipgrid
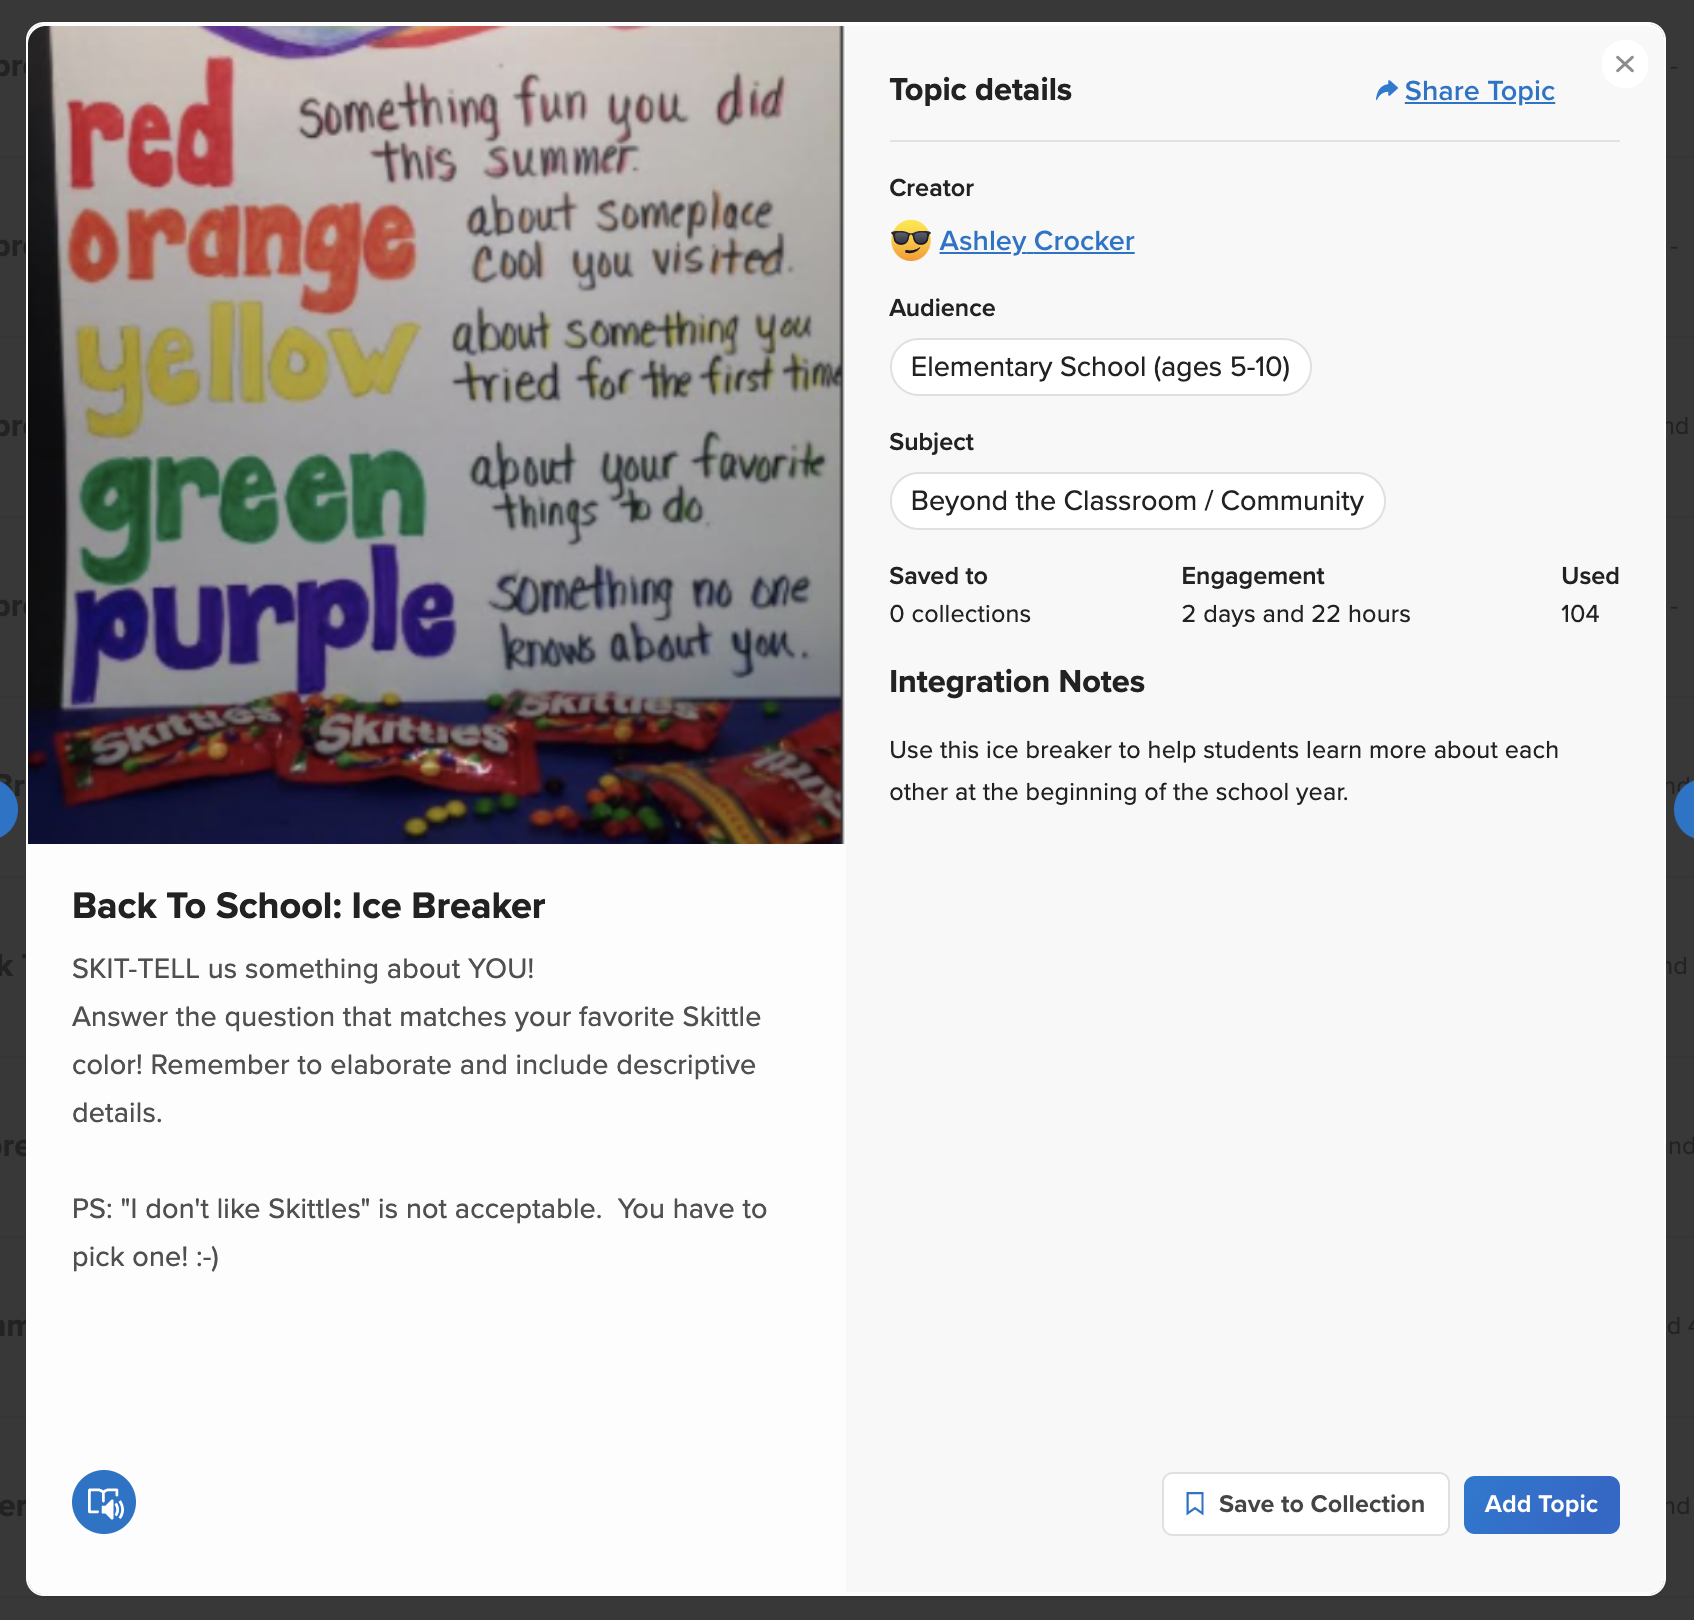
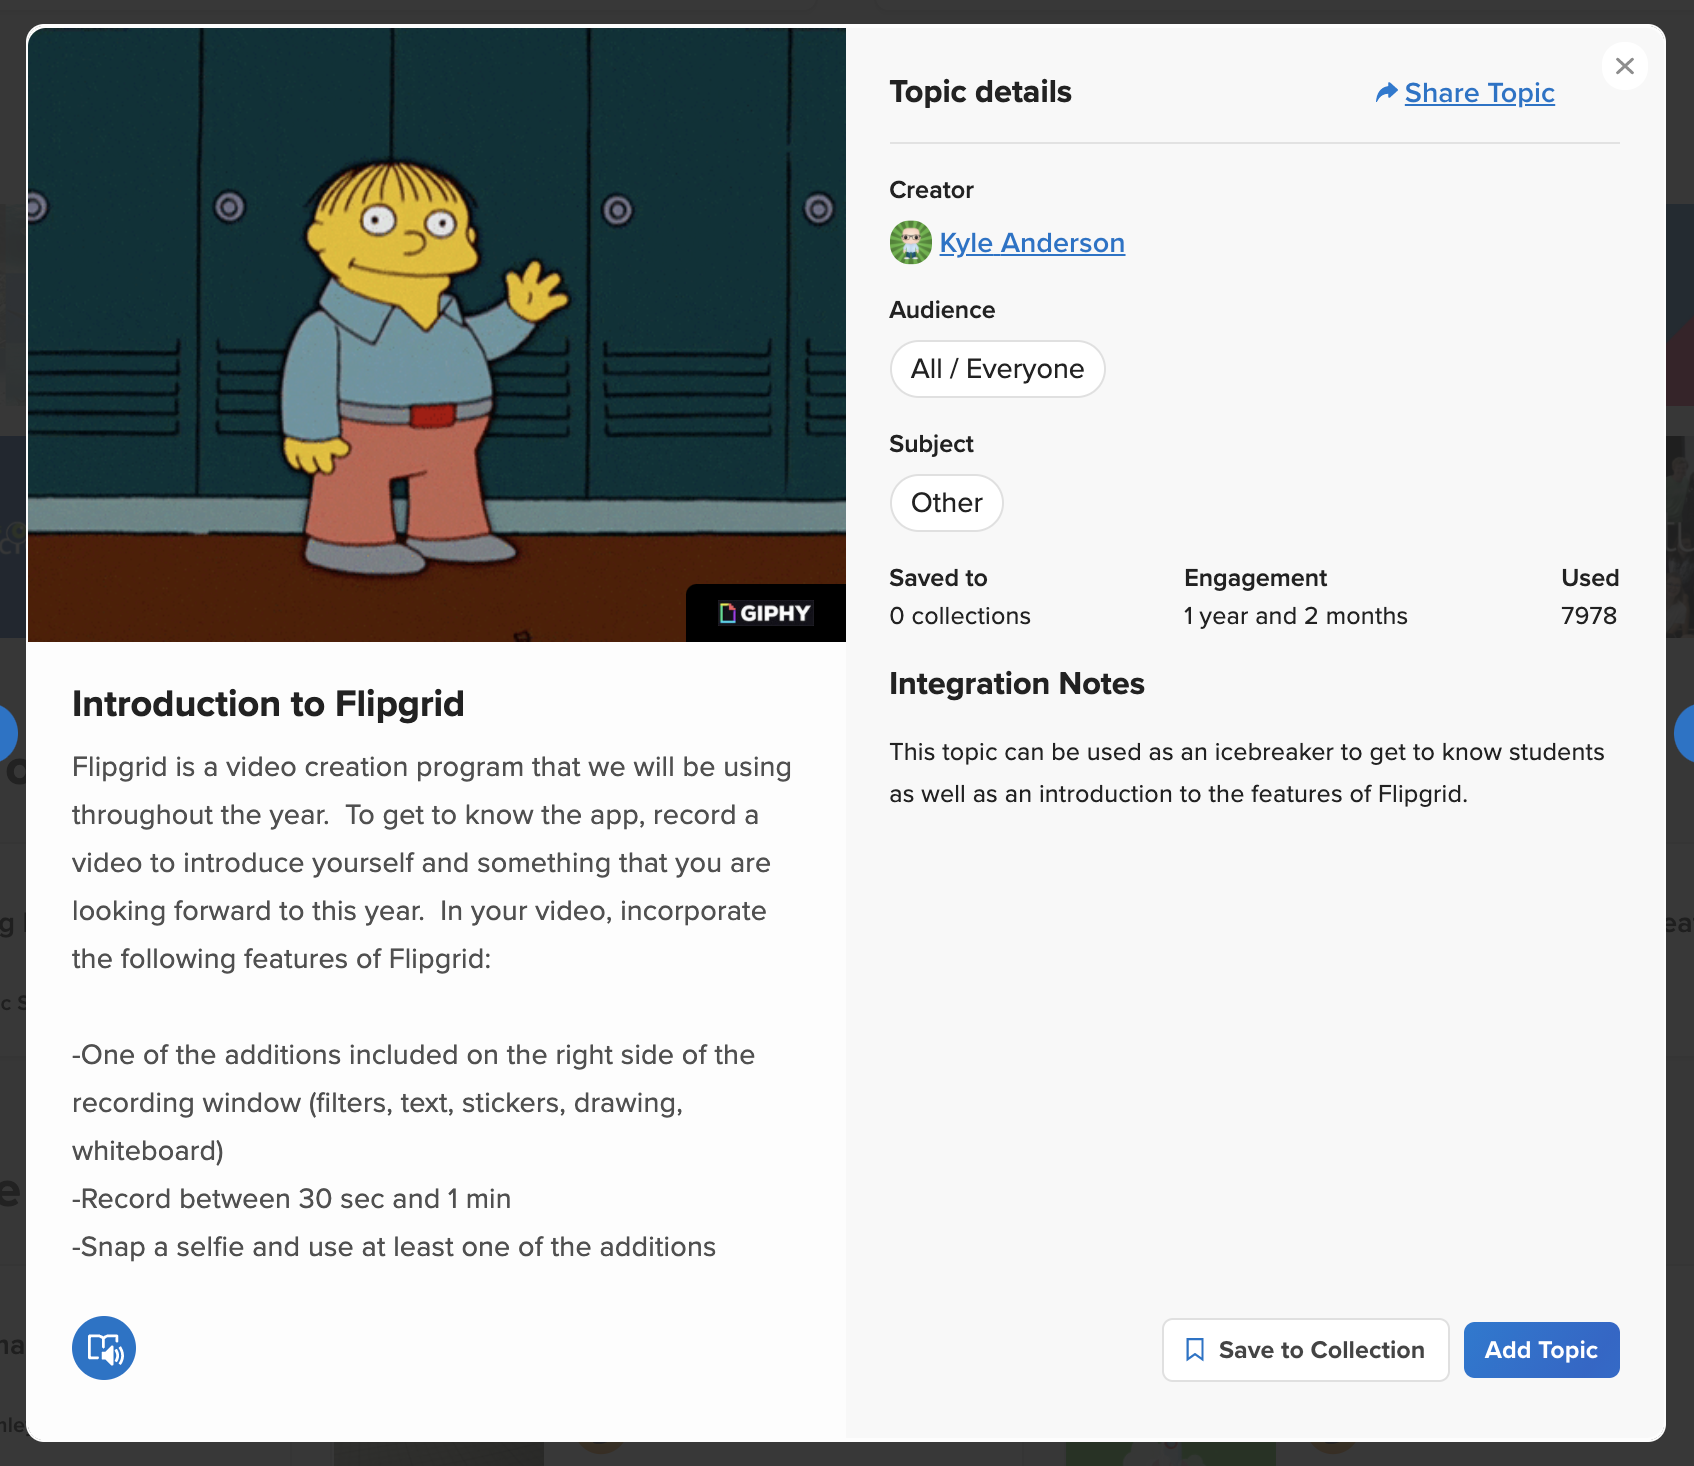
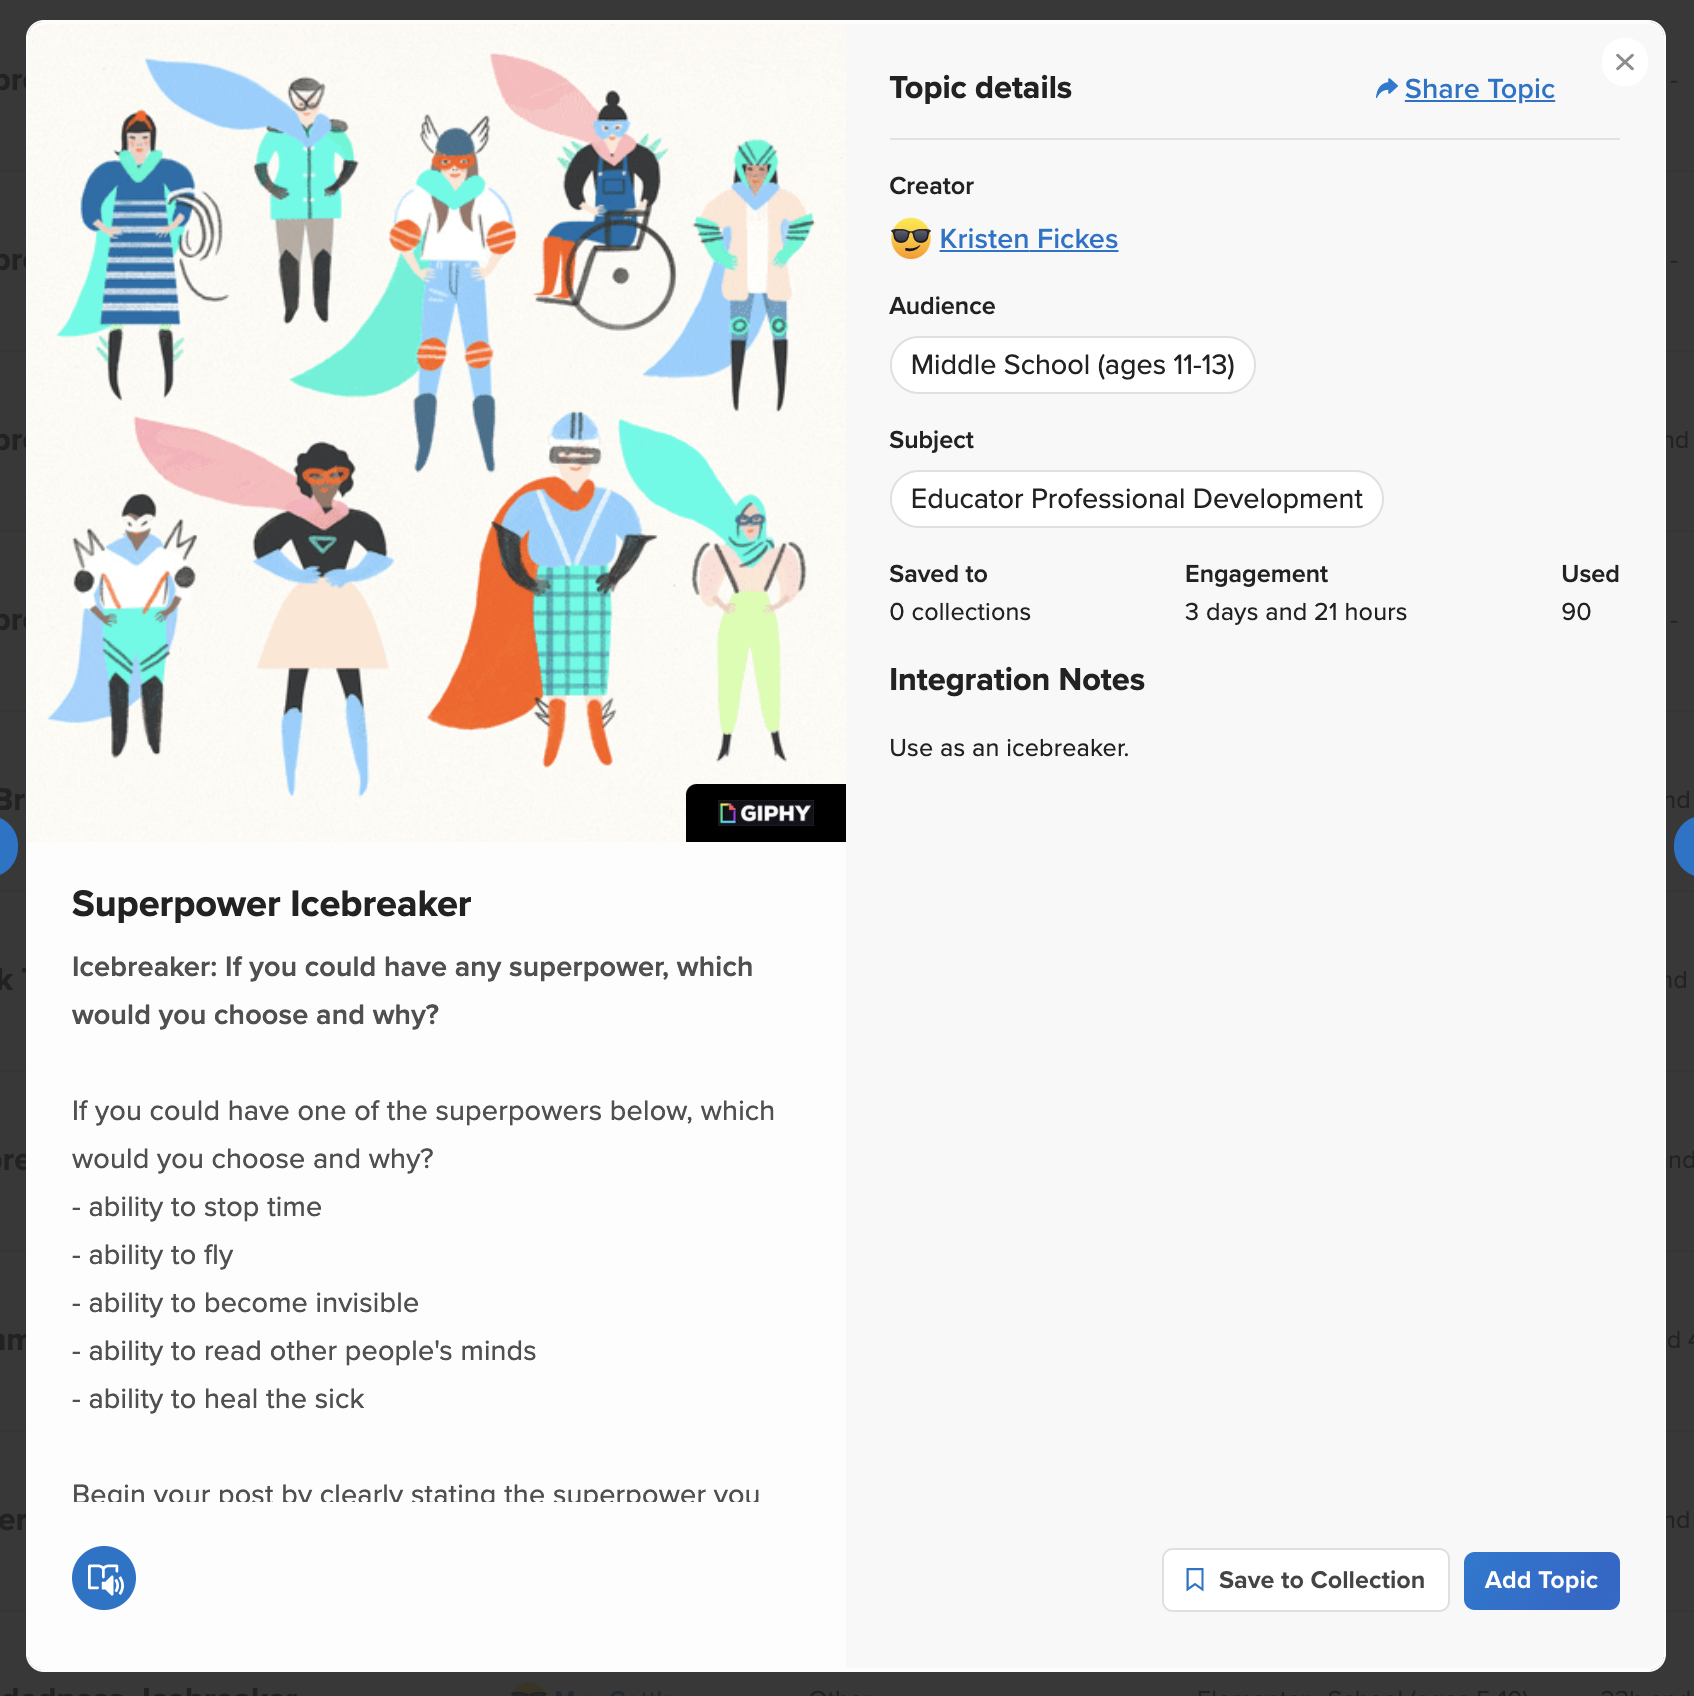
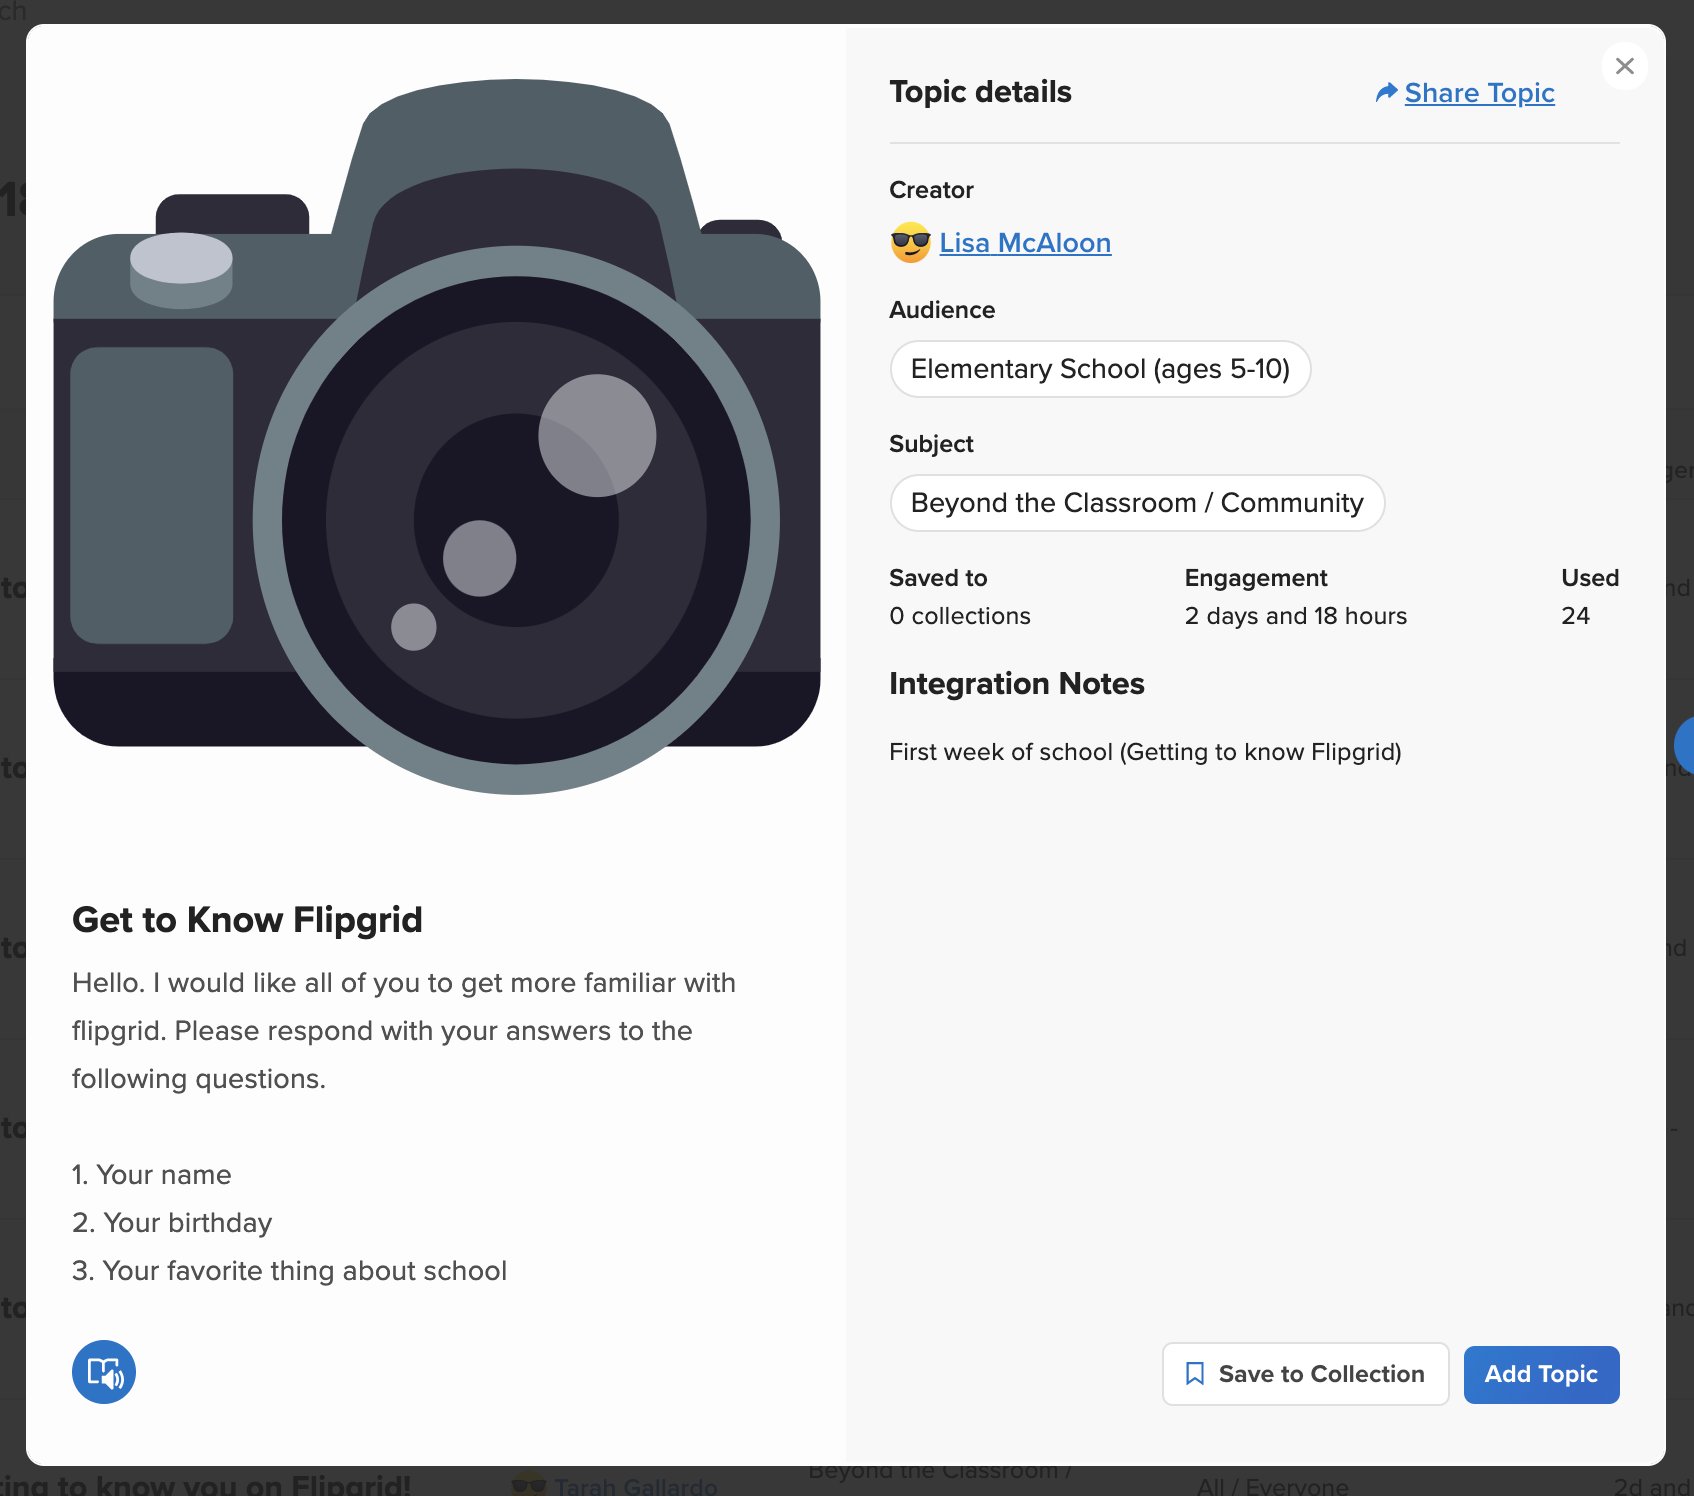
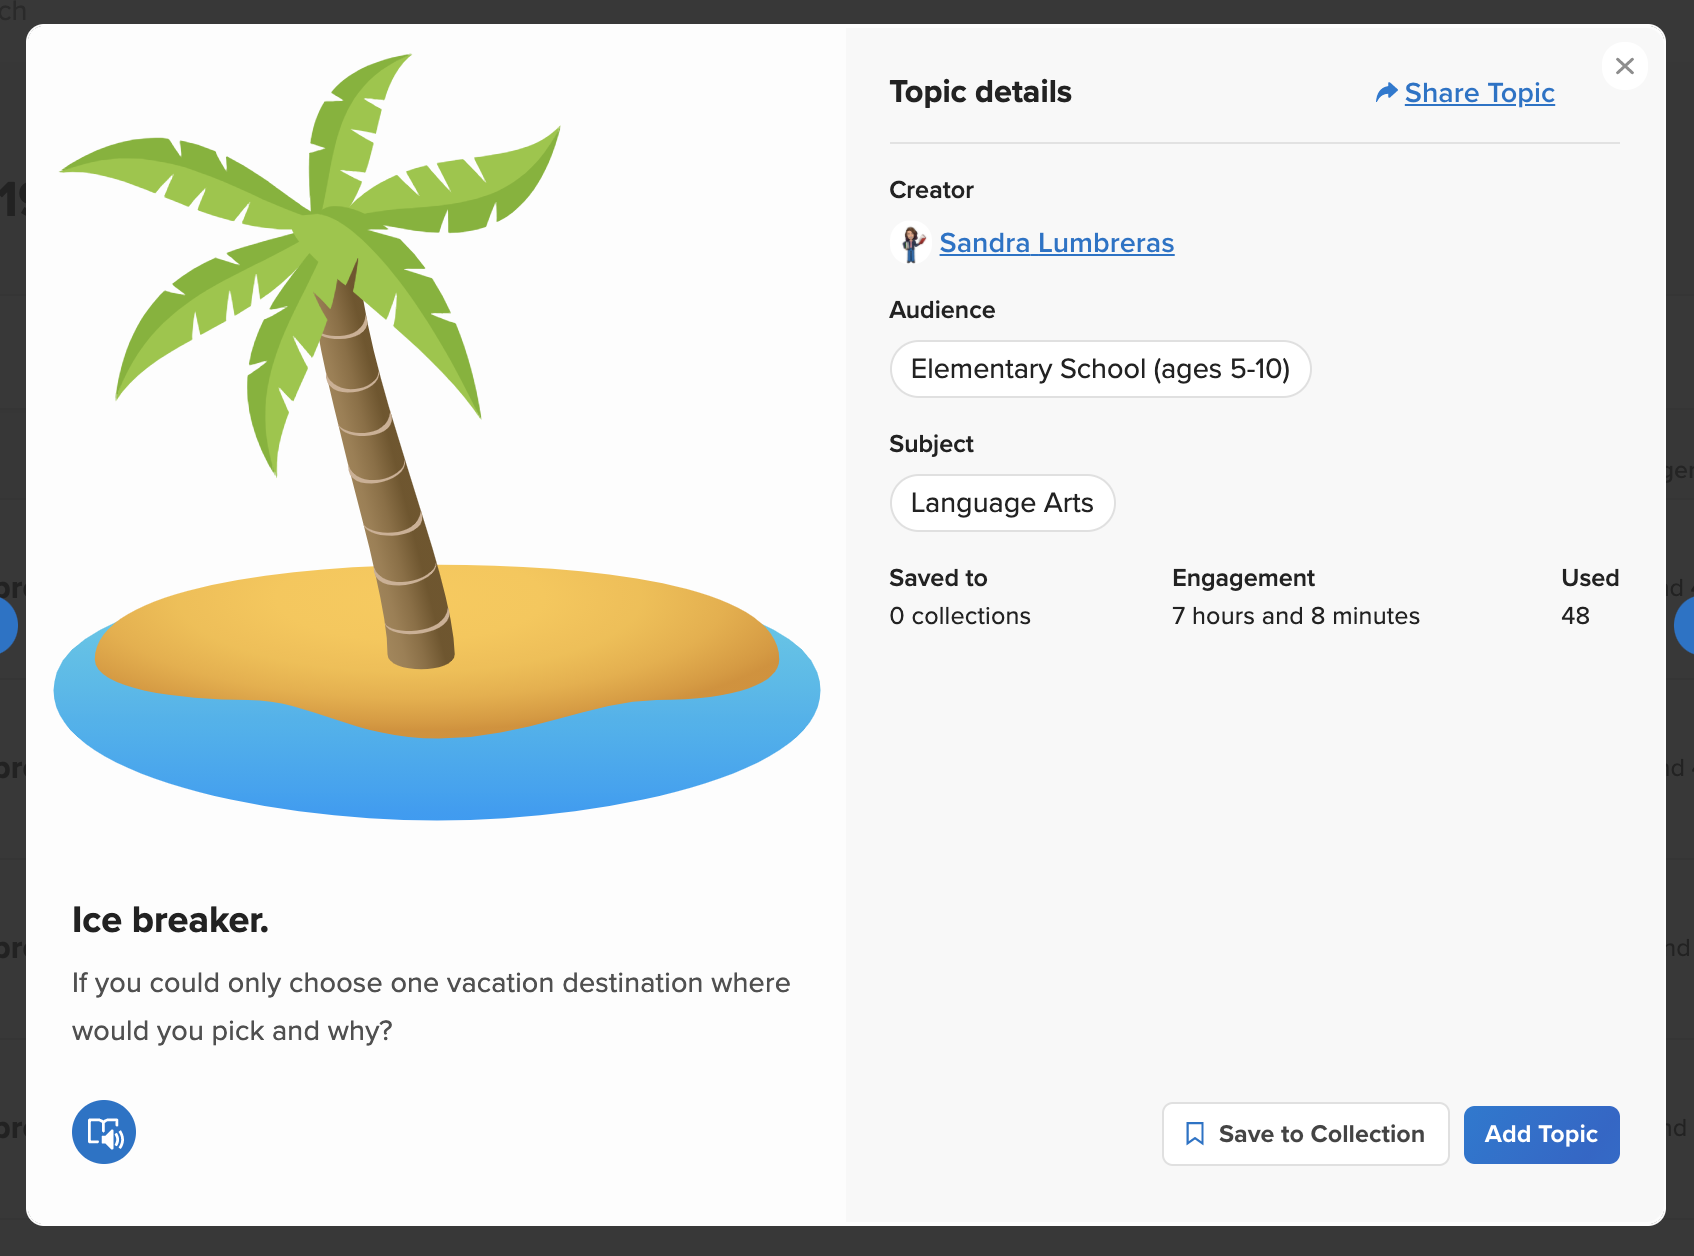
When first introducing Flipgrid to your students, we recommend starting off with something simple - like an ice breaker. This gets your students familiar with how the platform works, and once they’re comfortable - then you can things to the next level. Here are a few ideas from the Flipgrid Discovery Library to help you (and your students) get started. Click on any image to open and save it to your Flipgrid collection!

Video Tutorial
Still not quite sure how it all works? Mrs. Merrill has you covered! Check out her video on how to get started below!
Stay #interACTIVE!
-👗➕🕶️
For more tips, tricks and lesson ideas for making learning more interACTIVE, check out our books The InterACTIVE Class and Flipgrid in the InterACTIVE Class on Amazon!


Top Five (FREE) Apps of 2020!
2020 was a wild year - especially for educators. We experienced the world’s greatest PD event, but which apps / websites proved to be the most resourceful? We’ll walk you through five of the ones that we find ourselves using the most in our own classrooms.
Teaching in 2020 was like brushing your teeth while eating Oreos. It was like shoveling snow while it’s still snowing. Or maybe it was like being a chameleon stuck inside a bag of skittles. But educators are resilient and before we threw up our hands and said that it’s “forget this o’clock,” we tapered down for the world’s largest PD event. We became familiar with websites and apps that we had never heard of. We quickly realized the importance of the “mute” button, and that most of our “staff meetings” really could be sent out in an email. But, now that we’ve had almost a year of this under our belt, we can confidently say that some apps have proven to be essential throughout remote learning and our gradual return back into the classroom. So, without further-ado, these are our top five (FREE) most commonly used apps of 2020. These apps are compatible on any device. Click on any subheading to learn more about the app and how we have been using it in our classrooms.
5. Gimkit (Gamification in the Classroom)
4. Classkick (Instant Feedback / Monitoring)
3. Nearpod (Classroom Management / Content Delivery)
2. Seesaw (Student Portfolios / Where Everything “Lives”)
1. Flipgrid (Student Creation / Social Learning)

5. Gimkit
Gamification in the classroom
Link 👉 http://www.gimkit.com
Gimkit is a live quiz learning platform where students answer questions and can earn “money” for power-ups. It was developed by a high school student who built a game that he wanted to play in class. The free version allows educators to create and edit content as much as they need. However, games can only be hosted with 5 players or fewer and new assignments cannot be created while on Gimkit Basic. We highly recommend upgrading!
How To Use it in the Classroom:
Have your students develop their own questions in the “Collab” mode. Then launch the kit and see how they perform!
Math fluency review
Use Gimkit as a way for students to go back into a text and find the answers to the questions
TIP: The more questions that you have in each “kit,” the better!

4. Classkick
Instant Feedback and Monitoring
Link 👉 https://classkick.com/
Classkick is a free app that students work on and get help instantly from their teacher and peers. Students may receive assistance from teachers (and peers) instantly. Teachers create assignments, see all their students’ work in real-time, and give LOTS of student feedback. Best of all, students can help each other anonymously.


How to Use Classkick in the Classroom:
Create assignments that students can work home regardless of where they are
Save your Powerpoint files as JPEG’s, then upload them to a new Classkick assignment
Use Classkick for Number Talks / Number of the Day
TIP: Create an assignment titled, “White Boards,” and use them as daily digital white boards. Students can erase the white boards after daily use, and return to the same link / code the next day.

3. Nearpod
Classroom Management and Content Delivery
Link 👉 http://www.nearpod.com
Nearpod is a student engagement platform built to make teaching with technology easy. With Nearpod you can control what your students see and get feedback in real-time. With a free account, you have the ability to share assignments with your students and then transition what they see from slide-to-slide. For example, if you upload an assignment from Google Slides or PowerPoint, Nearpod will convert it into an assignment. Teachers have control of the assignment, and when they move to the next slide, it will automatically change on all devices logged onto that presentation.
How to Use Nearpod in the Classroom:
Upload an assignment from Google Slides or PowerPoint, then add a virtual reality field trip! (Click: Add slide > Virtual Field Trip)
Add an activity for your students to complete while in the lesson. Activities include: Draw It, Quiz, Poll, Collaboration Board, and more!
Differentiate by duplicating assignments and adjusting as necessary. Share the appropriate login codes with the assigned students.
You may also like:
How to Integrate Flipgrid into Nearpod
How to Embed Nearpod Presentations into Microsoft Teams

2. Seesaw
Student Portfolios and Where all of Your Content Can “Live”
Link 👉 http://seesaw.me
Seesaw is a platform where students share their learning in their Seesaw portfolio, giving teachers and families valuable insights into what the students know. Assignments can be easily created, differentiated, and shared - think of it as a “house” for all of your content. The best part of all: every time a student adds an artifact to their portfolio, it notifies their connected family member(s) so that they may be kept in the loop with their child’s learning.


How to Use Seesaw in the Classroom:
Create assignments and select the students that you would like to complete them (easy differentiation)
Allow students to add content on their own (let them take a photo, then annotate over the photo)
Keep families at home in the loop with what is happening in class
You may also like:
What’s New in Seesaw (2020)
Flipgrid
Student Creation and Social Learning Platform
Link 👉 http://www.flipgrid.comFlipgrid is a video based social learning platform. Educators pose a question or assignment, then students respond in the form of a video. Once the conversation starts, other classmates may view their friends’ videos and respond to them. This creates a web of discussion, which automatically elevates the overall curricular level of the classroom.
How to Use Flipgrid in the Classroom:
Allow students to explain their thinking by holding up a whiteboard or their writing
Sequence the events of a text or historical time period
Use the Flipgrid Camera to record your own lessons - even create digital anchor charts
You may also like:
How to Play Among Us on Flipgrid
Using the Draw Tool on Flipgrid
Creating Student Podcasts on Flipgrid

Stay #interACTIVE!
-👗➕🕶️
For more tips, tricks and lesson ideas for making learning more interACTIVE, check out our book The InterACTIVE Class on Amazon!


InterACTIVE Activities for Remote Learning in Book Creator
Book Creator is an incredibly valuable tool that may be used whether you are teaching remotely or in-person. But, we understand that everyone is incredibly busy. So, we’ve decided to share three of our favorite ways to use it with you! Download them inside now!
Book Creator is an incredibly valuable tool that may be used whether you are teaching remotely or in-person. But, we understand that everyone is incredibly busy. So, we’ve decided to share three of our favorite ways to use it with you! You can download all three books by clicking here, or individually below. Something to note: these templates will work whether you are logging on via iPad or desktop.
In this blog post, you’ll gain free access to the following templates (click any one to immediately scroll down to it):
Feel free to download the template to use for yourself! We can’t wait to see what you create with them!
InterACTIVE Science Journal 🥽 🧪
Use this template to document your class’ science experiments. The pages can be duplicated so that you and your students can continue to add content. This is extremely beneficial in a remote or in-person learning environments, as it generates a digital journal that students may access from anywhere (no more “I left my notebook at home!”).

Above is a screen shot of the inside. The text boxes may be edited, as well as the image. Students can use the right side to illustrate their observations using the drawing tool. We recommend taking advantage of the “auto draw” which uses AI (artificial intelligence) to transform the illustrations into icons.
InterACTIVE
Word Wall ✏️
Word Walls have many uses, but a digital word wall opens the door to new opportunities. With a digital word wall, your students have the ability to record audio of the word / definition, and collaborate with one another to continue to add content.


You can even create one book for the entire class, then add all students as collaborators. Now, you have one book to maintain and everyone adds content. Tip: you may want to enable / disable the collaboration feature as needed (that way it limits the possibility of a student accidentally messing things up). We also highly recommend making a copy of the book to back it up periodically.

Mathematical Inferences! 🧮
Our Mathematical Inferences book provides a way for students to demonstrate their thinking by utilizing the Book Creator Draw tool and Text boxes.

Educators can easily add their own text boxes and images to the template above. Students use the right side to work out their strategies and prepare their thinking. If you choose to do so, you can even embed a Flipgrid Topic into Book Creator. So, now the students (who just worked out the problem on Book Creator) can explain their thinking on Flipgrid. More importantly, now they’re exposed to multiple different strategies from their peers.
Stay #interACTIVE!
-👗➕🕶️
For more tips, tricks and lesson ideas for making learning more interACTIVE, check out our book The InterACTIVE Class on Amazon!


Using Wonderopolis for Remote Learning
Remote learning has definitely posed some. new challenges for teachers looking to finish the year virtually. One of these is the ability to monitor, differentiate and provide scaffolding for student learners. Wonderopolis is a great resource for teachers looking to provide meaningful content to students to use for learning, while also being sensitive to the various learning situations student have at home.
Remote learning has definitely posed some. new challenges for teachers looking to finish the year virtually. One of these is the ability to monitor, differentiate and provide scaffolding for student learners. Wonderopolis is a great resource for teachers looking to provide meaningful content to students to use for learning, while also being sensitive to the various learning situations student have at home.
How Can Wonderopolis Be Used in Remote Learning?
Wonderopolis is a great resource to use during remote learning because it is founded on children’s’ innate curiosity and during this time of distance learning it is more important than ever to keep our instruction and content as relevant and responsive as possible. Learning, discovery, and curiosity, as well as the concept of sharing the experience with family members, are strongly encouraged throughout the site and with students learning while at home the more involved the family can be the better.
Remote Learning Features of Wonderopolis
There are many features already built in to Wonderopolis that are very useful for teachers and students to take advantage of during remote learning. These are features that have always been a part of the Wonderopolis platform, but now with teachers having to teach the remainder of the year remotely, they are great to add to distance learning lessons.
Wonder Lengths
The articles, referred to as “wonders” remind me of the fairy tale Goldilocks and the 3 Bears—they aren’t too long, they aren’t too short—they are just right! Every Wonder is numbered making them easy to find, and they are a reasonable length for students who may be working independently.
Immersive Reader
Speaking of working independently, another feature found in every Wonder article is Microsoft’s Immersive Reader. Immersive Reader is an embedded tool that will benefit students in two ways. First, it will read aloud all the text found on the page. This is great for primary students who may be more accustomed to having text read aloud to them, benefits students who may be doing more of their work independently without adult help available, and for students who may read below the reading level of the selected text. The second benefit of Immersive Reader is its ability to translate the text on the page. Students can choose over 50+ different languages to have the Wonder article translated to. This can be a great advantage for our learners of other languages.
Vocabulary Assistance
When reading through the Wonder article, students will find various words highlighted. These are words pre-identified as words the readers may not know, and when you hover over them, a short kid-friendly definition will pop up. Wonderopolis doesn’t offer Wonder articles in various reading levels, so a feature like this, paired with Immersive Reader, helps students who may be reading at a lower level than that of the Wonder article.
Try it Out
At the end of each Wonder article is the Try It Out section. This is a great resources for teachers and often lists various activities or projects to try related to the Wonder. These suggestions range from discussion questions, STEM activities, creative writing prompts and much more!
Flipgrid Partnership
In addition to all the features Wonderopolis offers on its website, it has an amazing partnership with Flipgrid. Wonderopolis is one of the many featured partners that can be found in the Disco Library. The Flipgrid Disco Library is full of already made Flipgrid topics that educators can take and use right away with their students.

Simply click on the Wonderopolis icon and search through the already created Flipgrid topics. Students will be able to read the article on Wonderopolis and then participate in a class discussion with one another on Flipgrid.


12 Ways to Use Wakelet Spaces!
Wakelet’s new feature “Spaces” is here! Learn how it works and twelve ideas to get you started now!

“Spaces” is here and we are REALLY excited about it! “Spaces” is Wakelet’s brand new organization and collaboration feature. In this blog post you’ll learn:
(click on any subheading to jump to that section)
💥What are Wakelet’s “Spaces?”
💥How to Create a Space on Wakelet
💥How to Add Members / Contributors to Spaces
💥 12 Ways to Use Wakelet Spaces
💥What are Wakelet’s “Spaces?”💥
Wakelet’s “Spaces” is an organization and collaboration feature that is built directly into the Wakelet platform. With just several clicks, users can create a “space” to house content to be shared. Now users with lots of collections in their Wakelet accounts can move content around into a Space that is applicable, keeping everything tidy and clean. Collections can be moved into a Space by hovering over the collection icon and clicking the three dots, then “Move Collection.”
💥How to Create a Space on Wakelet💥


Creating a “Space” on Wakelet is simple and can be done in just several clicks. To get started, follow these simple steps:
Log onto your Wakelet account
On the left hand panel, click the “+” sign located under your profile picture.
Edit / change the image and the name, then click “Create”
Your Space is now visible on the left hand panel under your profile picture
💥How to Add Members to Spaces💥
Collaboration within Spaces is easy! Here’s how you can add members to start collaborating with your Spaces collections:
From a Wakelet Space, click on “Members”
Click on the green “Invite Members” plus sign
Share the Spaces link, code, or QR code with your students / colleagues


💥12 Ways to Use Wakelet Spaces💥
Here are some ways that you can start using Wakelet Spaces in your classroom:
Virtual School Supplies: Create Spaces for virtual school supplies that the students can use. For example, create a space for Math manipulatives where students can find links to things tools like: base ten blocks, hundred chart, number lines, etc. Click here or the image below for a FREE collection of virtual student supplies that you can add for yourself!

Planning with your Team: Create a Space for each subject where you and colleagues can add content to be used when teaching / planning lessons. You can have multiple profiles listed as contributors or editors, making it easy to collaborate with your team.
Group Projects: Educators can create a collection, then share the collection to students working together in a group. Students can add content to the group project, and the educator can easily monitor the progress.
Student Portfolios: Create a Space for each student and allow them to add content that they would like to share. Share the link with families to open the window to the classroom! (Tip: the URL of collections never change, so the portfolios can be bookmarked by families for quick access)
Easy Differentiation: Our current favorite way to use Spaces is for delivering differentiated content to our students. Create a Space that meets the needs of a student, or group of students. Then, create a collection for your subjects. When your students log onto the Space, they will be able to view what has been shared in the Space. Additionally, you can allow them to add content by enabling collaboration. If you have several groups who are close in regards to their instructional needs, you can copy collections and then move them into multiple Spaces - that way you won’t need to recreate your content from scratch for each group.

Units of Study Collections: Create Spaces for each of your units of study. Build the content appropriately, but be sure to invite your students to help. Providing this creative outlet pushes the creation > consumption mindset.
Formative Assessments: Build your end-of-the unit assessments by creating Spaces for each. The ability to keep them organized is convenient for educators and enable collaboration is an engaging way to assess your students.
Newsletters: If you’re working in an asynchronous scenario, it may be beneficial for families to have access to older newsletters in addition to the most recent. Create Spaces for each month where families can find your past (and present) newsletters.

Science Experiment Comparisons: Group your students and create a Space for each group. Provide an experiment for your students to complete, and have your students added as contributors to the Spaces. Then, the students can compare their results with their group. Before completing the assignment, share out the results from the other groups’ Spaces so that all students can compare to the rest of the class.
Professional Learning Umbrellas: Create separate Spaces for platforms and add content to each. For example, if you’re looking to learn more about Microsoft Teams, create a Space for it and then add the content to keep it organized.
FAQ Spaces for Virtual Families: Just like the professional learning umbrellas, create Spaces for various apps. Build “how-to’s” for each app, and then share with your classroom families so that they can troubleshoot through any potential issues that they may run into.
Integrate with Microsoft Teams or Google Classroom: Educators can easily share a Space into Microsoft Teams or Google Classroom. From the Space’s front page, click “Share” where you will find the share link. If you’re using Google Classroom, you can share it directly from Wakelet. Microsoft Teams users (for now) will need to copy the URL and paste it in Teams. However, there could be an update coming soon that would streamline that process. Stay tuned!

Looking for other ways to make teaching and learning relevant through the use of technology? Check out our book The InterACTIVE Class!


Collaborating in Wakelet!
Wakelet has placed a great deal of focus on collaboration, and now educators have the ability to control who gets to manage the content being shared. In this blog post, learn how to provide contributor and admin rights!
Wakelet has placed a great deal of focus on collaboration, and now educators have the ability to control who gets to manage the content being shared. In this blog post you’ll learn:
(Click on any subheading to jump to that section)
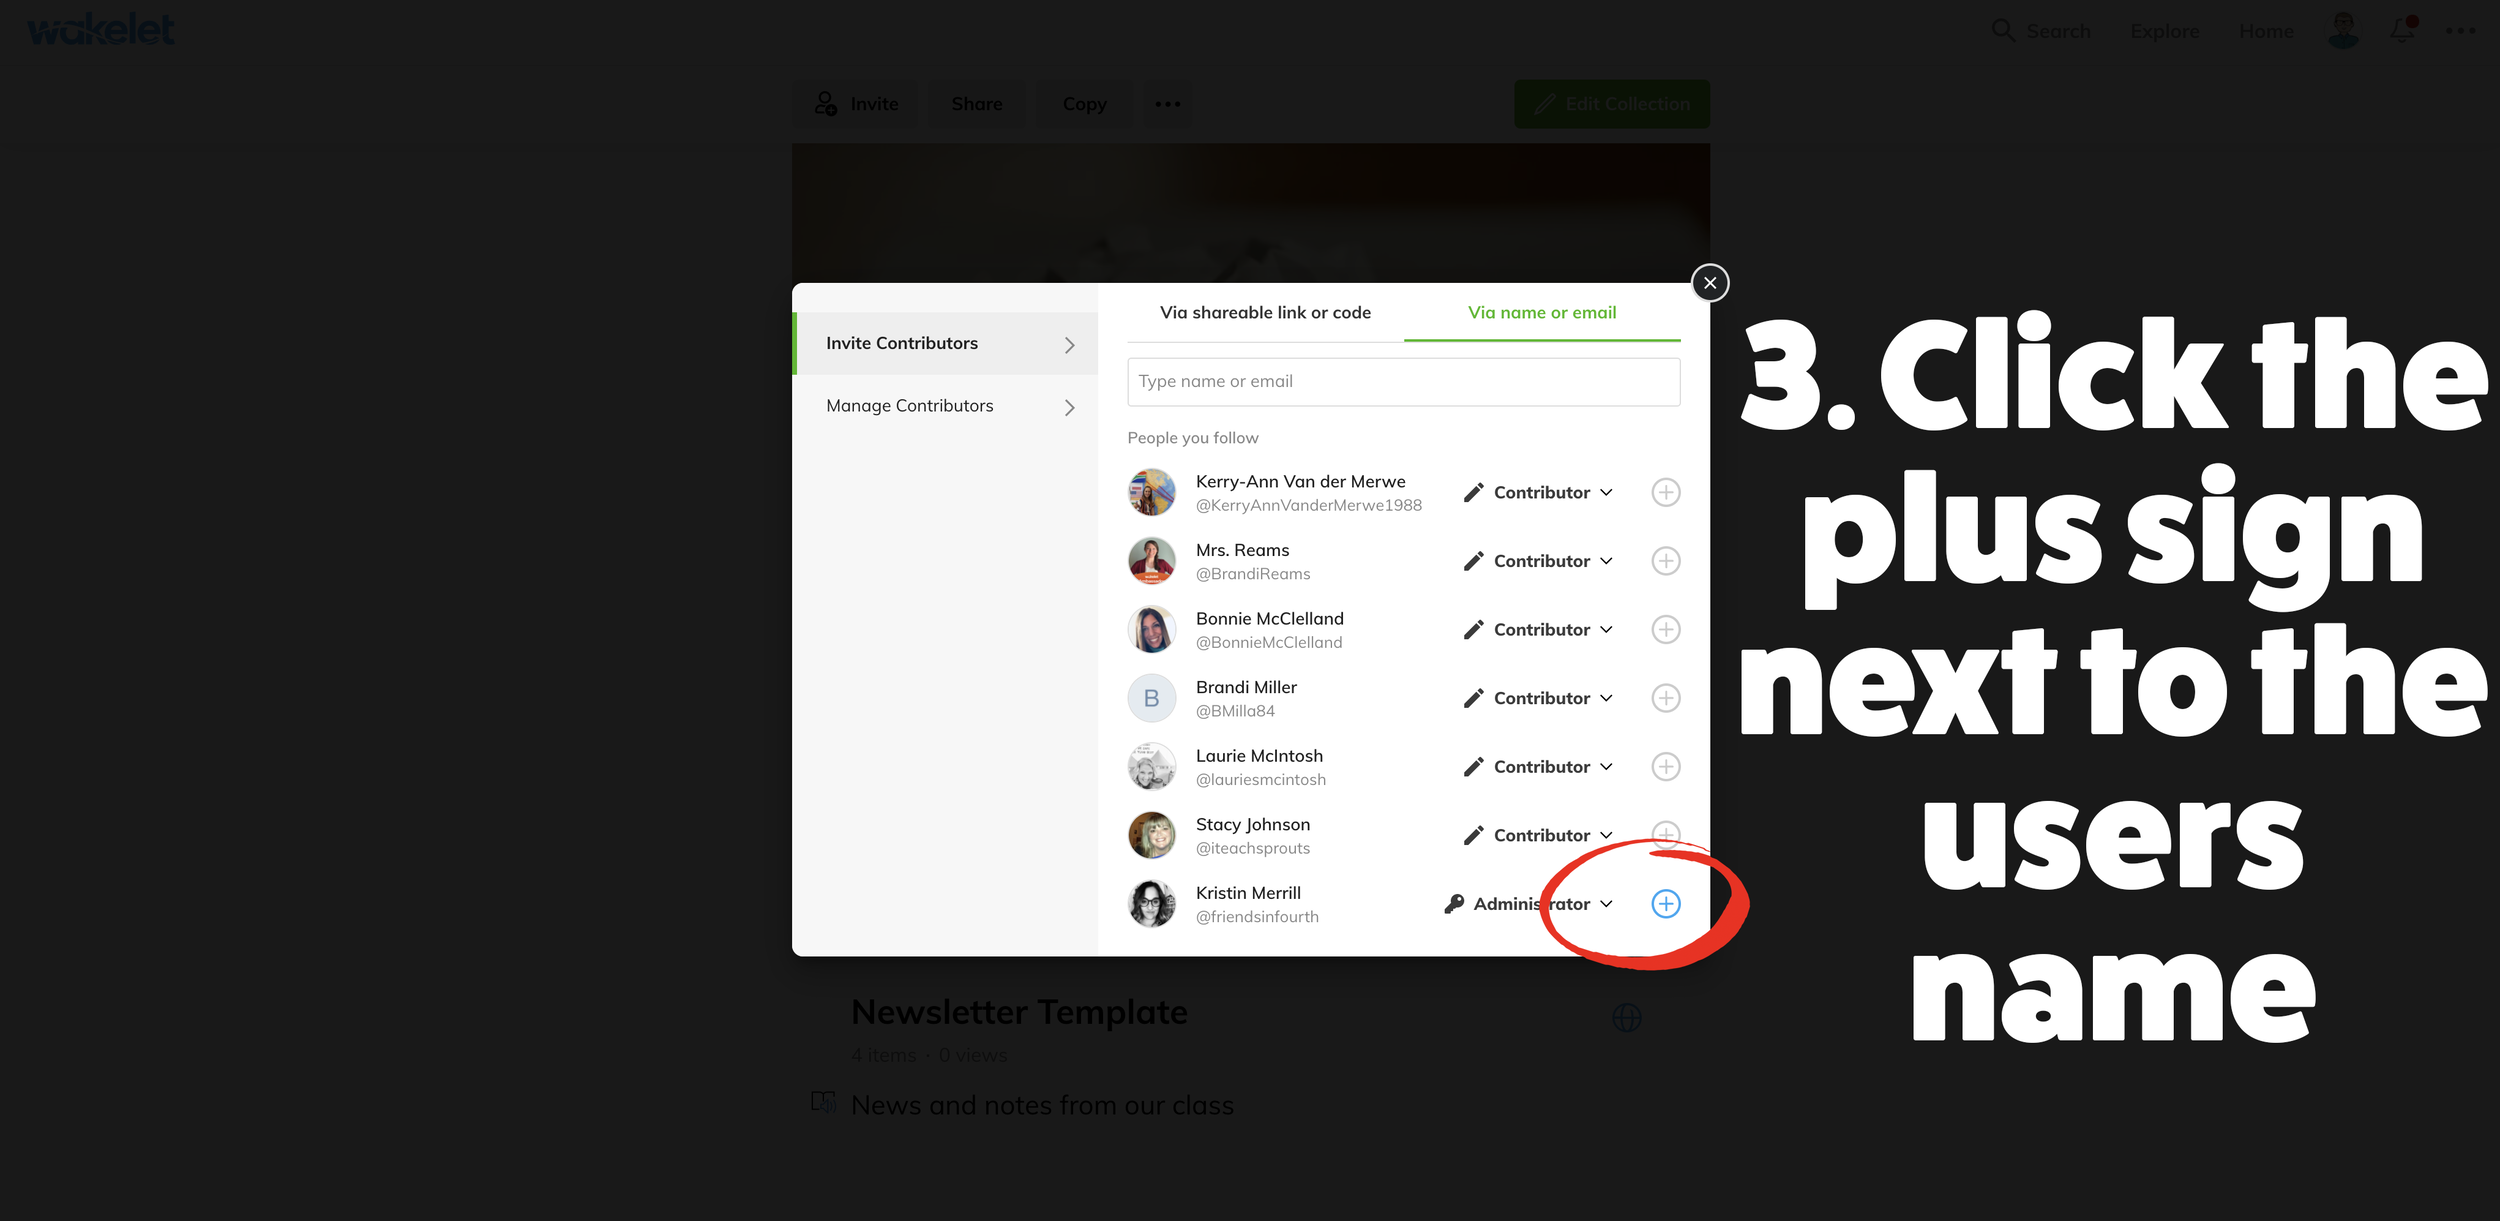
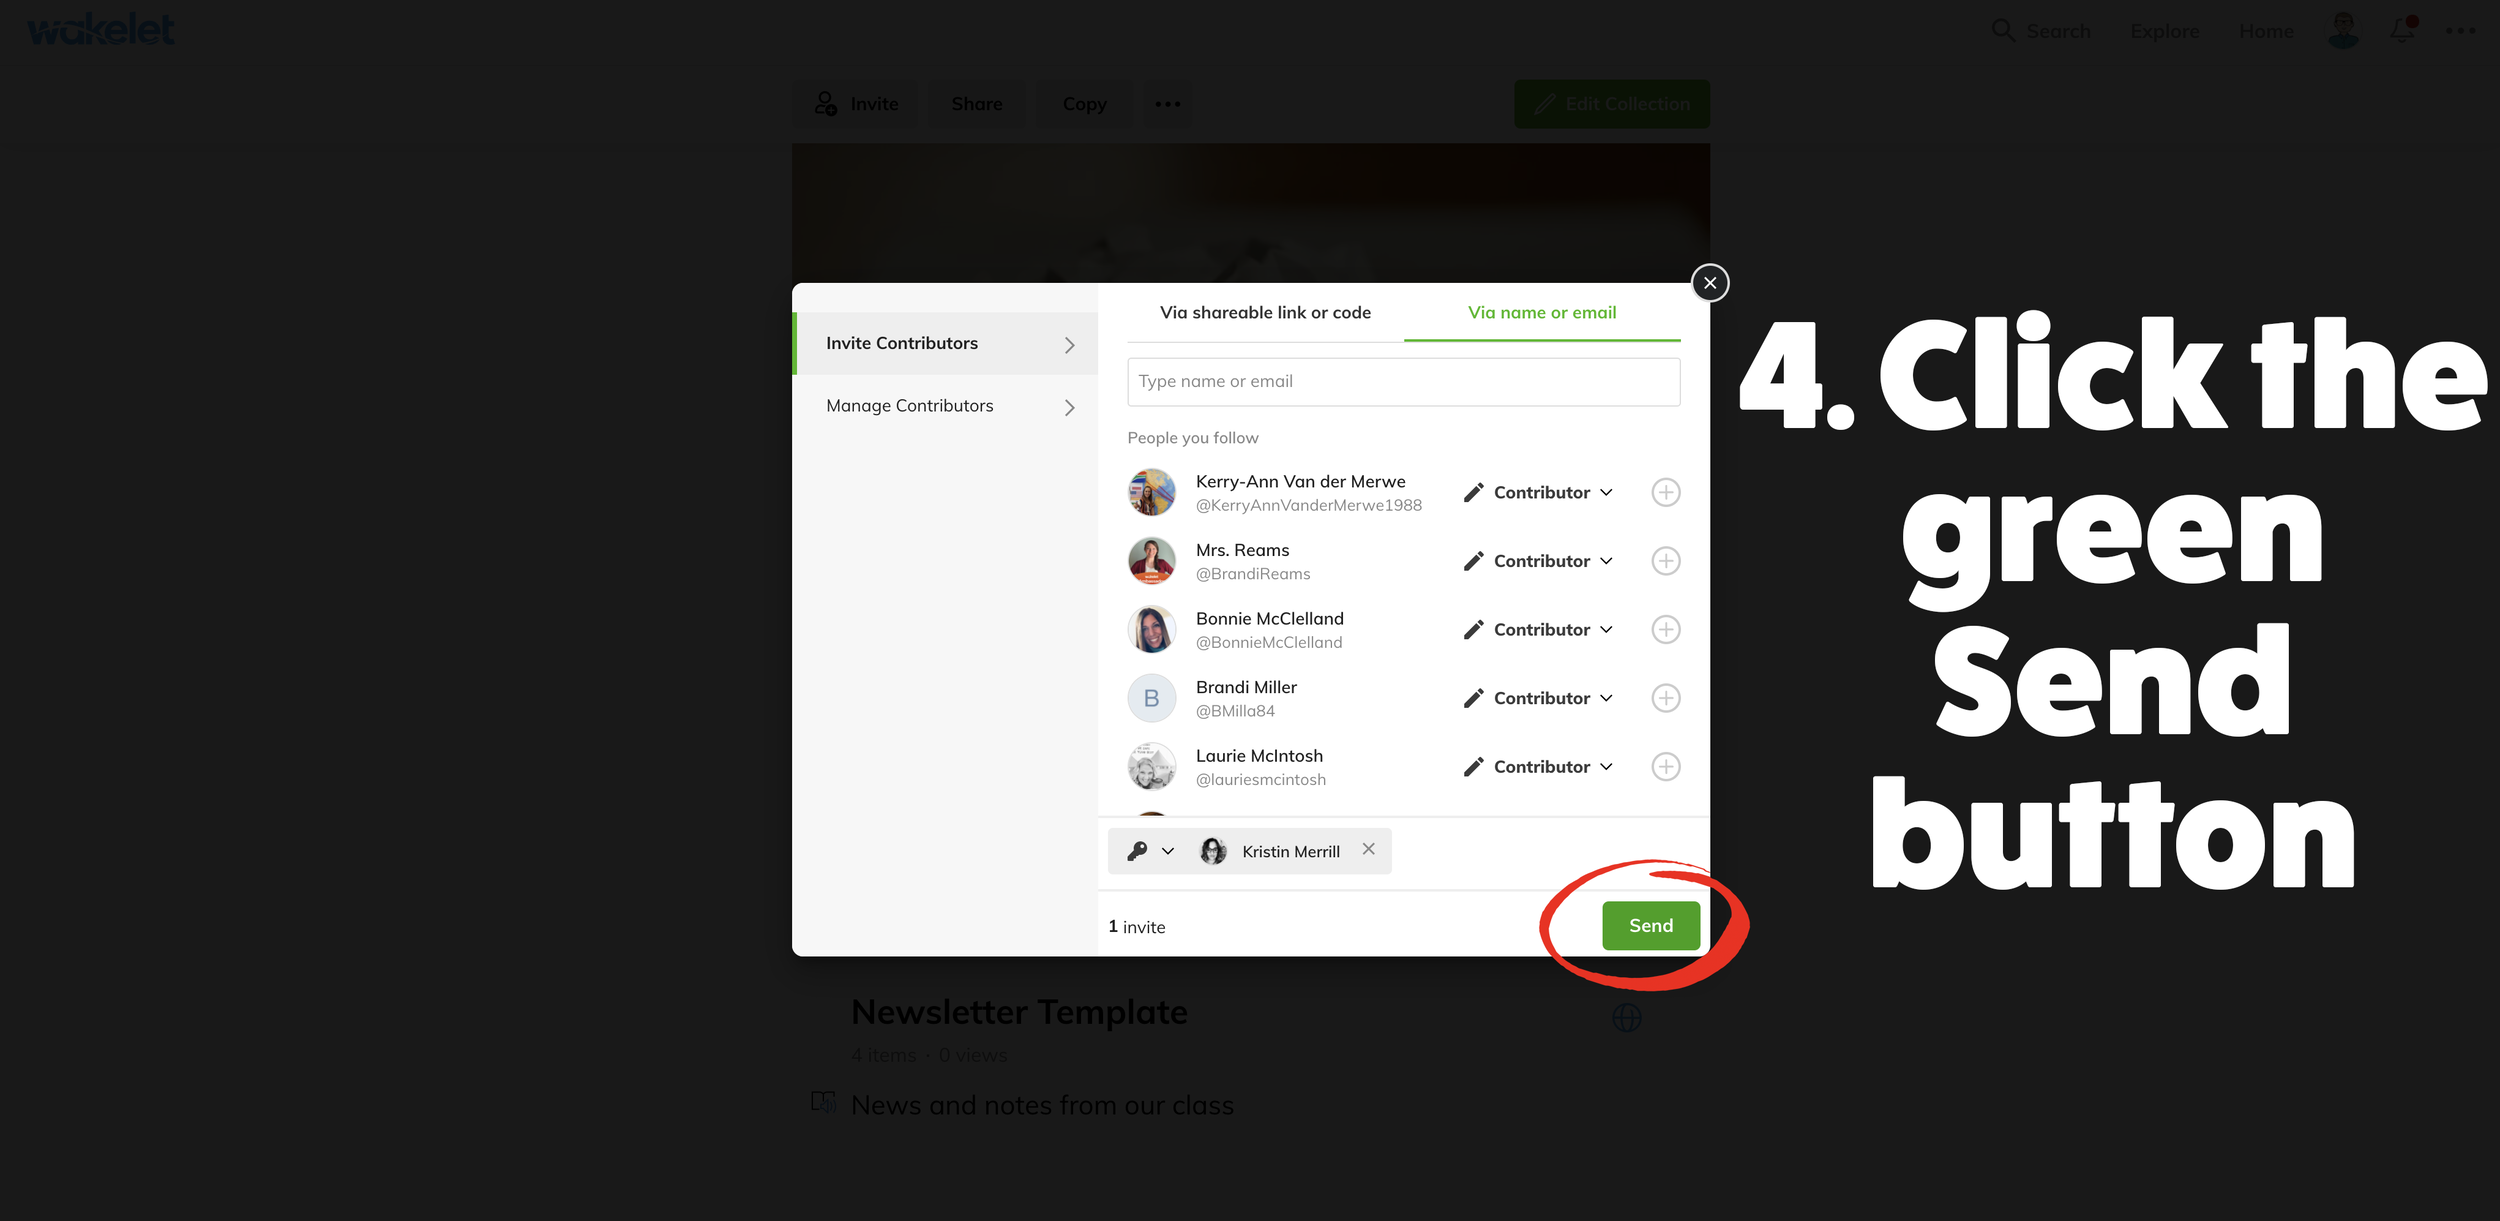
How to Add a Contributor to a Wakelet Collection
The first thing that you’ll need to do to add a contributor to your Wakelet collection is to click on the “Invite” button on the top left of the screen. Once you click this, a new window appears. Now, click “Via name or email.” From here, you can invite friends to gain access to your collection. If the person you’re looking for doesn’t appear in the list of names, you can search for them using the search bar located at the top of the window. Once you’ve found the people (or person) to share with, click the “+” and then click on the green “Send” button. Wakelet automatically sends an invite to the people (or person) you’ve selected.


Something to note: A Contributor can only add and change their own content. If you can’t find someone using the method above, that might mean they don’t have a Wakelet account. To learn how to add contributors without Wakelet accounts, see below.
Ideas for adding a contributor:
Give students contributor privileges to manage a group project collection during remote learning
Allow students to maintain portfolios that you can moderate
share out lesson ideas, planning, and more without fear of anything getting deleted
How to Add Someone Without a Wakelet Account as a Contributor
A Wakelet account is not required to collaborate on collections. This means you could invite students to add content - without having to create a class. The set up is quick and easy!
Once you have a Wakelet collection ready to be shared, click the “Invite” button on the top left. After you click this, a new window appears. In this window, you have several options to share your collection:
Sharing the URL
Click “Copy link” and share out the URL
When contributors access the URL, they will be prompted to add their name. Once they do, they are ready to start collaborating!


Sharing a Code
Share the code (located to the right of the QR Code) with the contributor(s).
Have the contributor(s) log onto wakelet.com
Click on “Enter Code” at the top of the screen, then enter your shared code.
Contributors will be asked to provide a name. Once they do, they will be able to add content!


Sharing a QR Code
Right click on the QR Code, then select “Save As” to download the QR Code. (Don’t forget where it gets saved!)
Display the QR Code where the contributors can access it. Have them scan the QR Code.
On the next screen, they will need to enter their name. Once they do, they are ready to start adding content!

Ideas for collaboration with those who do not have wakelet accounts:
Share a wakelet collection with your class and have them collaborate on a topic
Have your class conduct research together
gather evidence
support an arguement
How to Add an Administrator to a Wakelet Collection
If you’re working with a teammate who will need editing access to your Wakelet collection, you can now assign them as an Administrator. An admin can add, change, edit and remove any content in a collection. To get started, follow these steps:
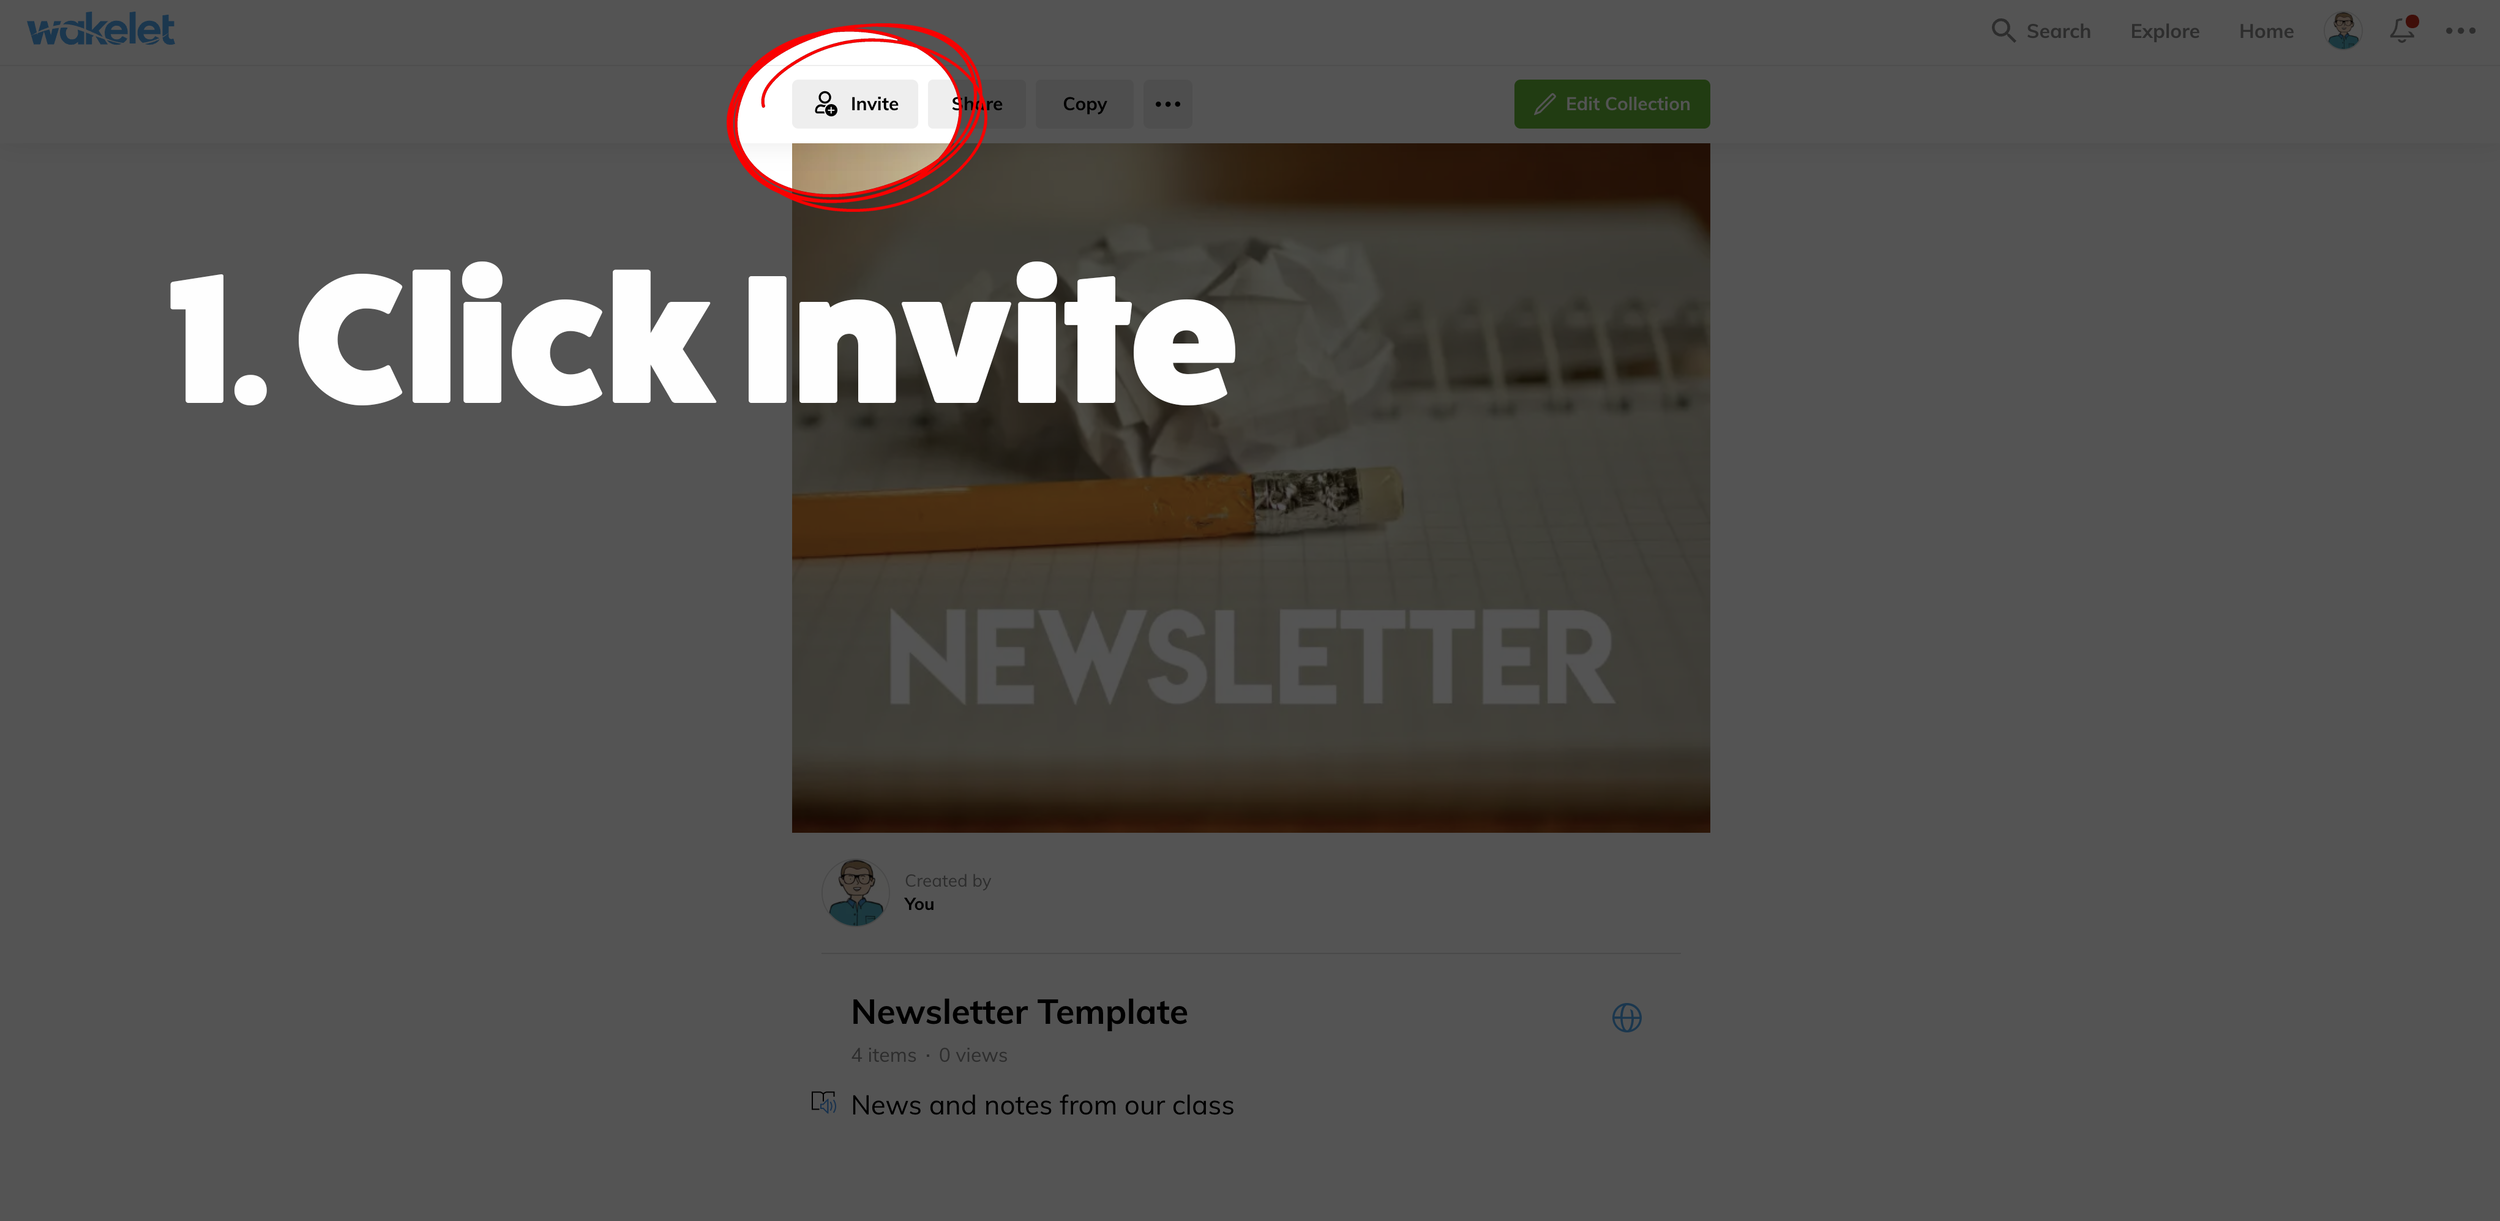
From your Wakelet collection, click on “Invite.”
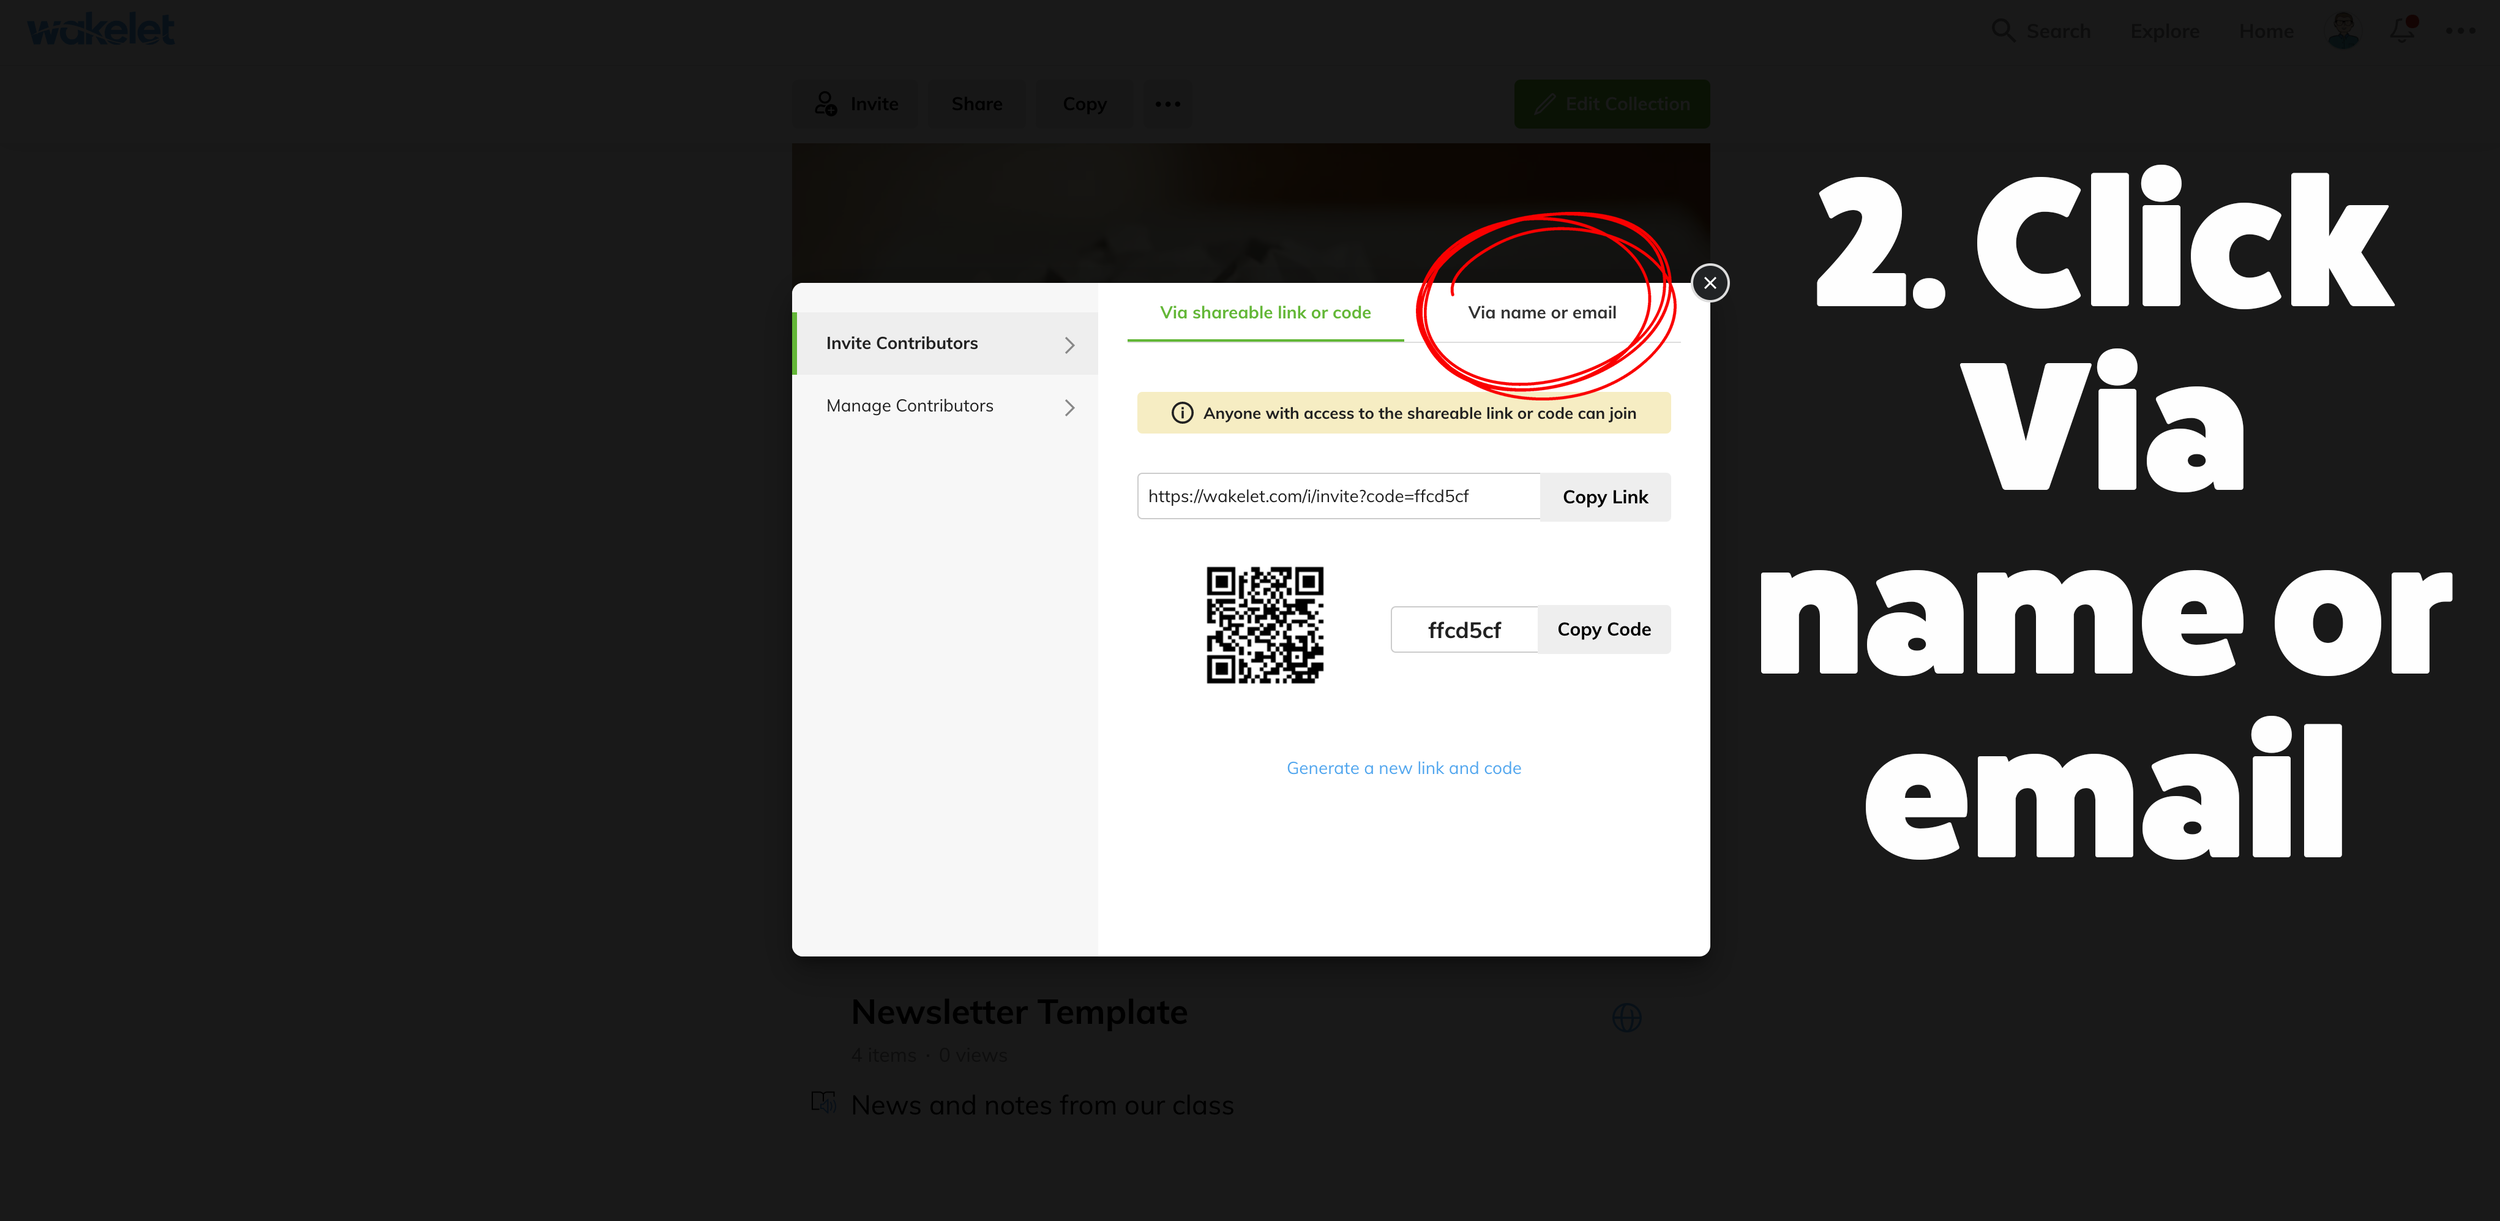
Once the new window opens, click “Via name or email.”
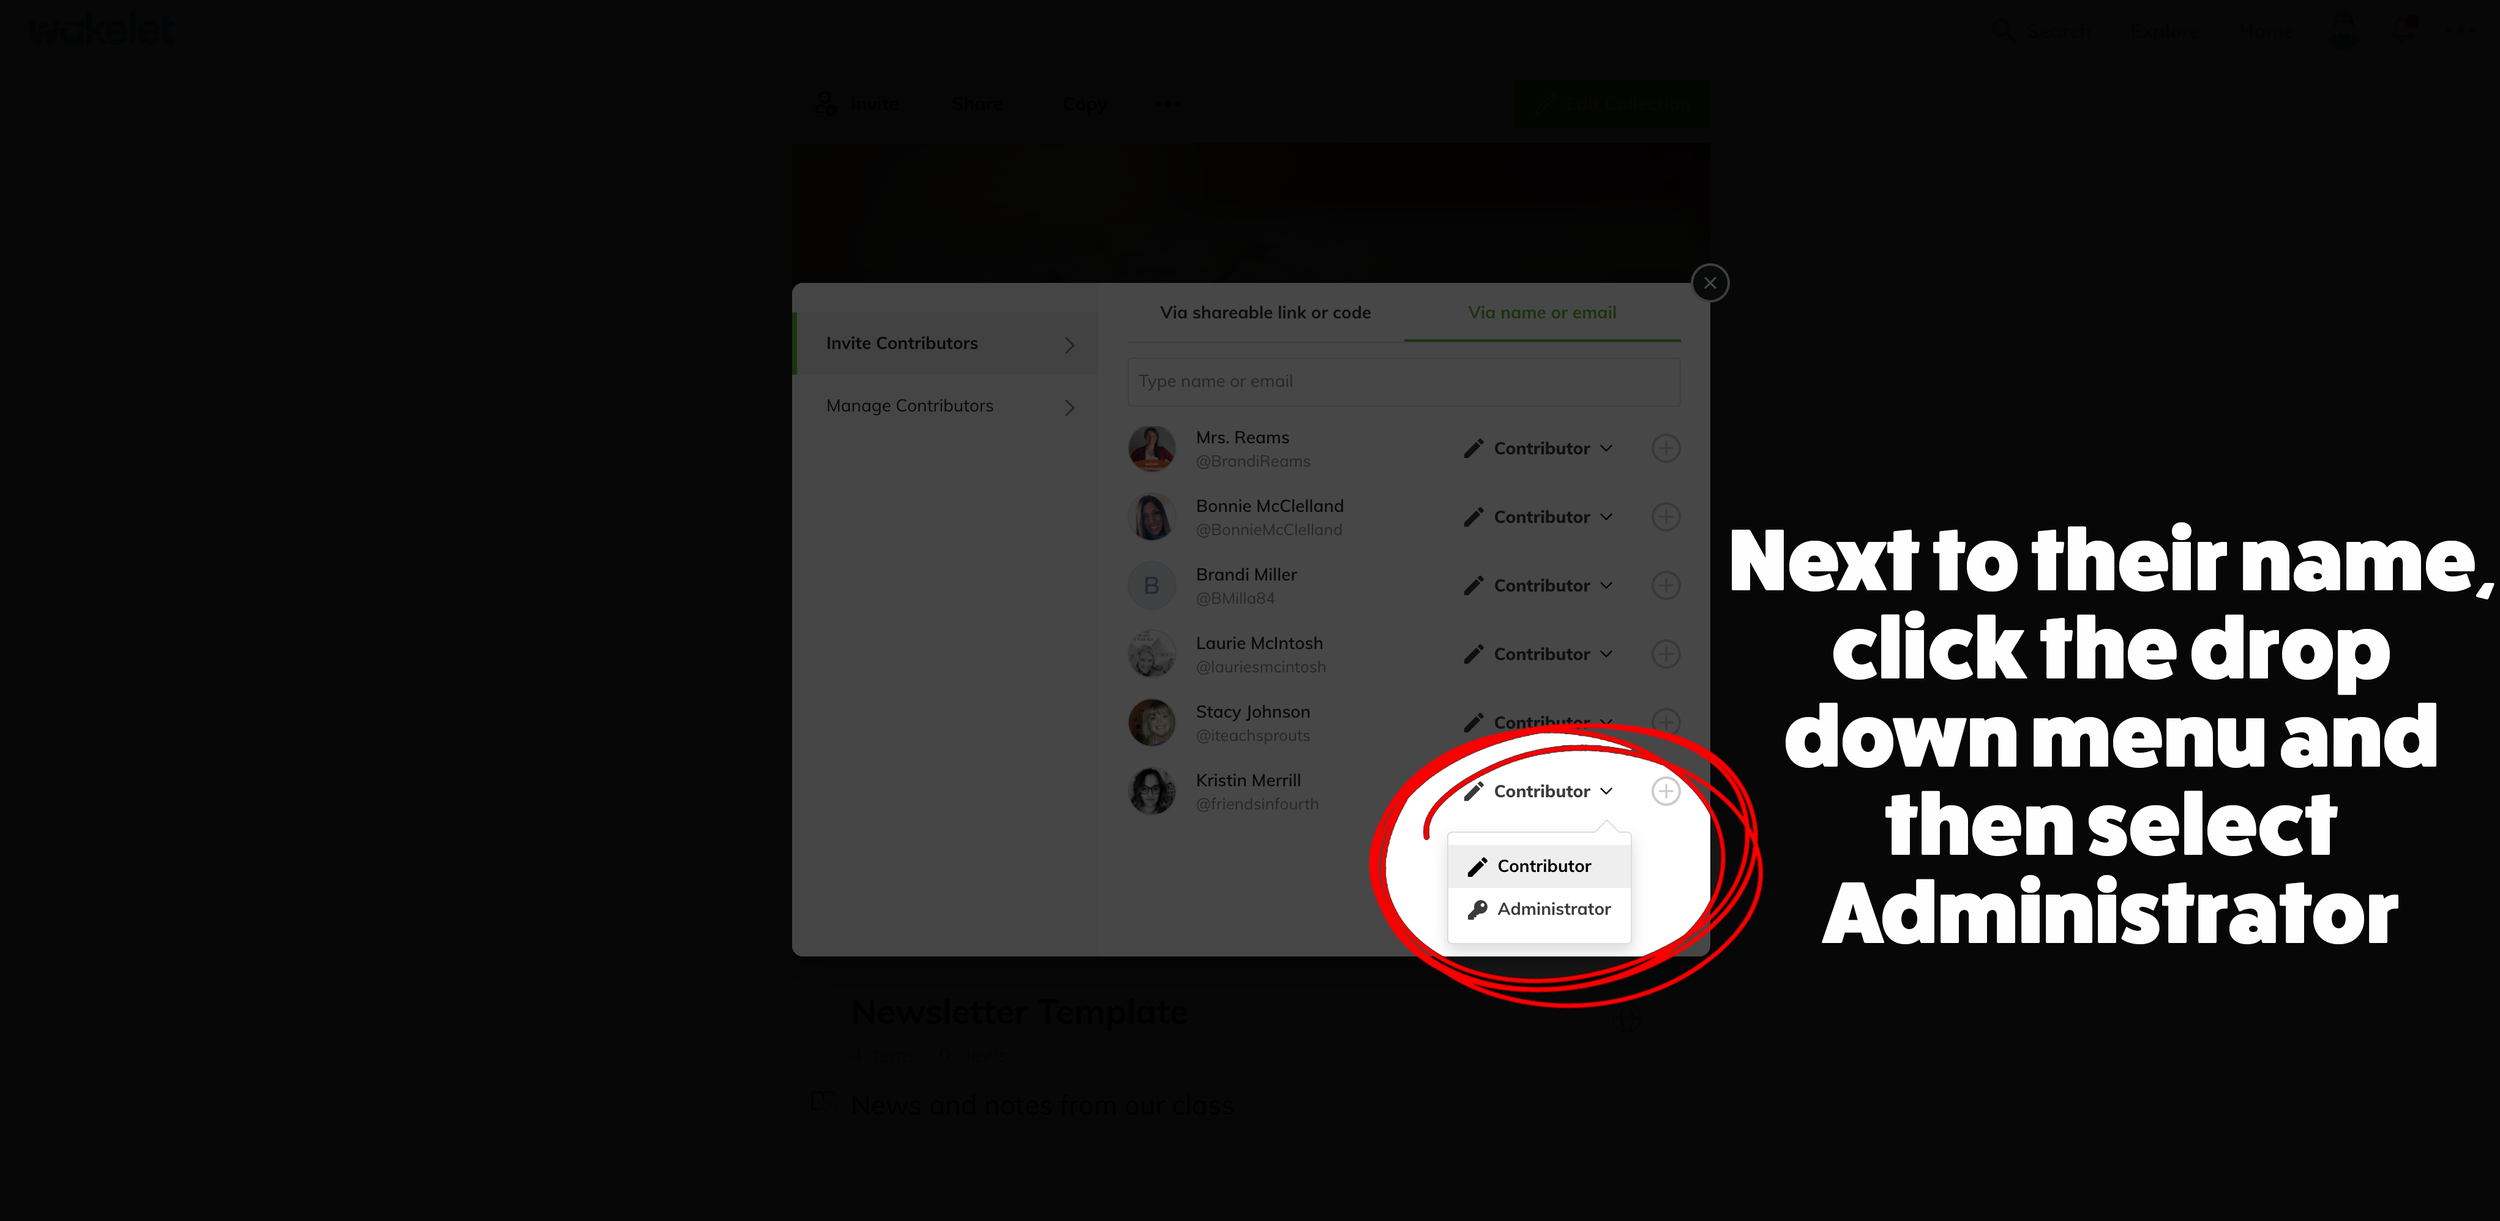
Type the name of the person you’d like to add as an administrator. (Note, they must have a Wakelet account)
Once you have found their name, click the drop down menu (to the right of the pencil icon) next to their name. Select “Administrator.”
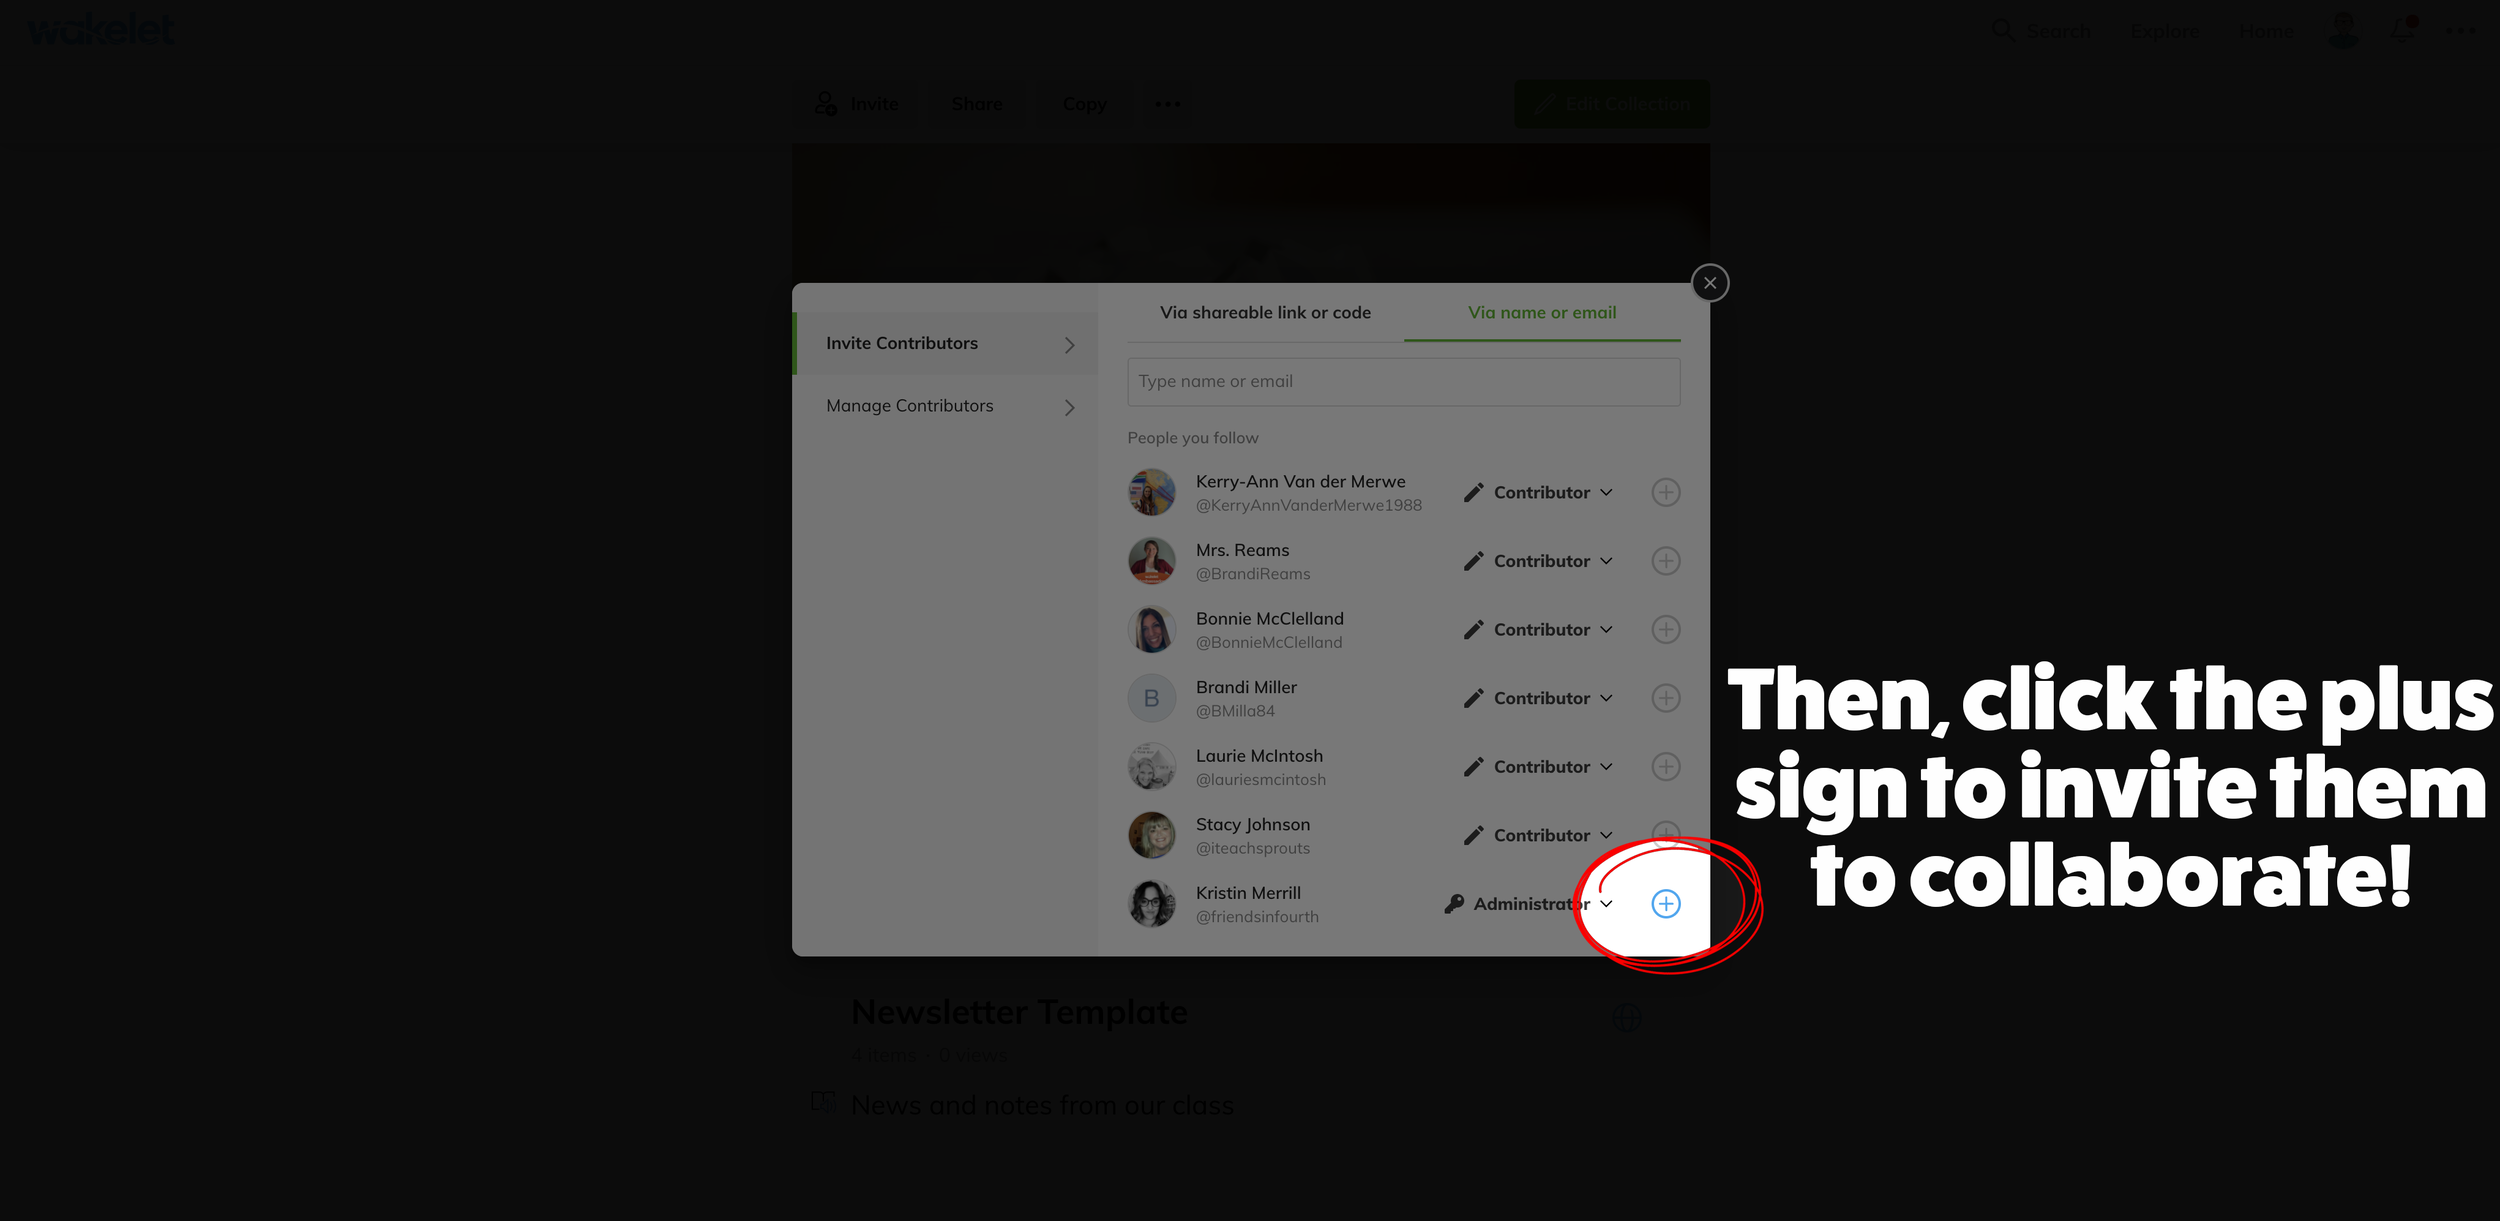
Last, click the “+” sign to the right of their name. This will automatically send the individual an email notification to join the collection.
Ideas for adding an administrator to a wakelet collection:
Co-teaching situations
Planning with your grade level team
Sharing resources for multiple classes
School-wide resoruces
For more #interACTIVE lesson ideas, check out our book The InterACTIVE Class on Amazon!


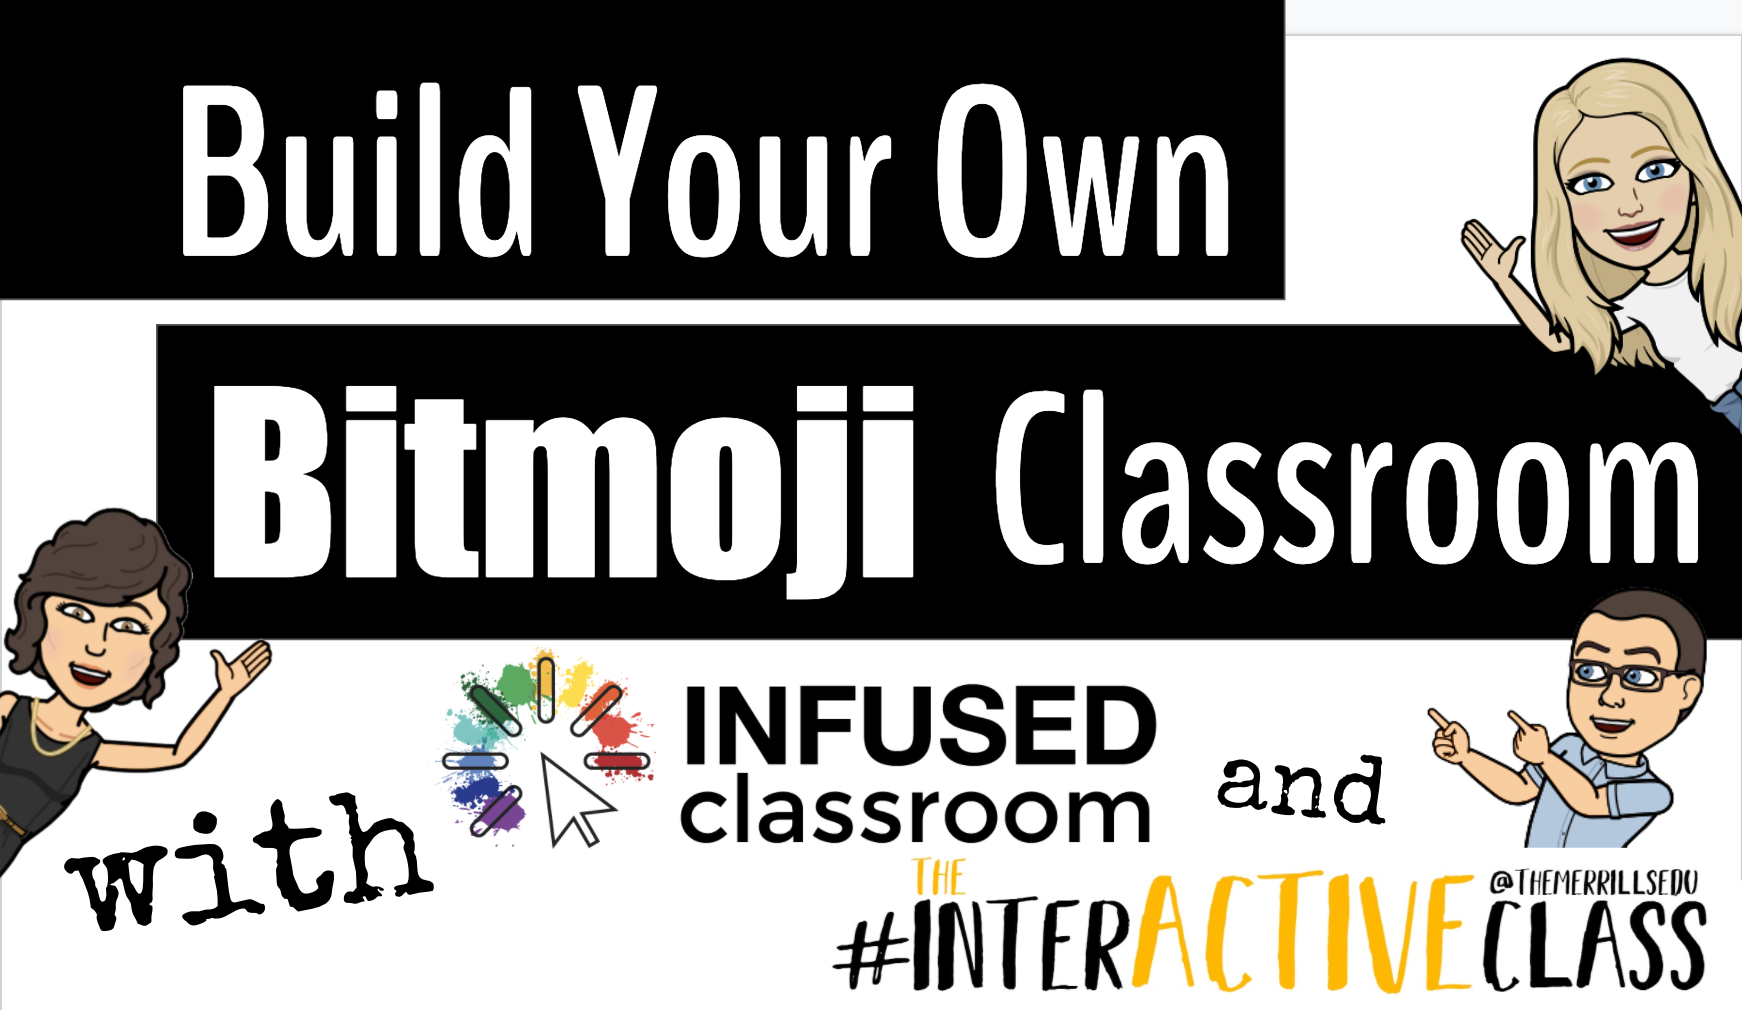
Building a Bitmoji Classroom
The Bitmoji craze is taking over the remote learning world as a fun, interactive way for teachers to engage their students when teaching remotely. Now obviously, it is important to note that once your Bitmoji classroom is built, you need to make sure that it is easy for students to navigate, not overwhelming and that the lessons linked to it are structured in solid pedagogy. But for the sake of this post, we are going to just have fun decorating and building a Bitmoji classroom.
The Bitmoji craze is taking over the remote learning world as a fun, interactive way for teachers to engage their students when teaching remotely. Now obviously, it is important to note that once your Bitmoji classroom is built, you need to make sure that it is easy for students to navigate, not overwhelming and that the lessons linked to it are structured in solid pedagogy. But for the sake of this post, we are going to just have fun decorating and building a Bitmoji classroom. Here’s what you’ll learn about:
(Click on any subheading to jump to that section)
Beginning a Bitmoji Classroom
Bitmoji classrooms can be built in PowerPoint or Google Slides and the process is the same for both. To begin building a Bitmoji Classroom, you need to start with a nice, calm background. You want the background to have as few objects in it as possible so that you can add in the personalized items you wish to have in your own room. Once you have found the background image you like, you want to save the image to your desktop and then add it to the background of your slide. That way it cannot be moved or layered among other smaller items.
Tip: When looking for backgrounds you can make your own with a few images and icons, or you can try searching for classroom/office images on google. Using the word screen savers or background helps!
Once you have chosen your background you can begin by finding the items you wish to add into it. The key is that the items need to be transparent—this means they have a clear background instead of the normal solid white of a jpeg image. You can do this in Google by typing the item you wish to look for into the search bar, and then clicking IMAGES under the bar.

Once you have clicked images, then hit TOOLS —> COLOUR —> TRANSPARENT. Once you find the image you’d like you simply copy it, and then paste it into your Bitmoji classroom.

Tip: Try adding your Bitmoji in first to get an idea of how large you would like the other items sized.
Bitmoji Classroom Resources
We know how hard it can be to build a Bitmoji classroom from scratch, so we partnered with our dear educational guru Holly Clark from the Infused Classroom, to give your somewhere to start. Simply click here and grab the entire deck of backgrounds and images to use as you get started. Please remember that this resource is to be used in the classroom, and not as something that will later be sold to other educators.
There are a lot of great websites to use when working on a Bitmoji Classroom and creating lessons for students working in a remote environment. We have so many applications we could recommend, but below are some of our favorite FREE applications that would fit into a Bitmoji classroom and accompany a virtual teaching environment nicely.
Flipgrid: A social learning platform where students engage with the teacher and peers through videos and demonstrate their knowledge by pressing record!
Wonderopolis: This online informational site that asks and answers interesting questions about the world. Every day, a new "Wonders of the Day" question is posted, and each is designed to get kids and families to think, talk, and find learning moments together in everyday life. With the integration of Immersive Reader, students can have articles read aloud to them making this a great remote learning website!
Wakelet: allows users to curate customizable content. It is also a great tool for keeping research projects interactive and social. Use it much like a virtual pin-board for class discussions, or group students and have them collaborate on an activity together.
Branching Bitmoji Classrooms
Once you get the hang of building a classroom setting, have fun leveling it up and linking one room to another. Try creating a sort of “homeroom” class where maybe students start off the day, but have it linked to a science lab, a math room and maybe a reading corner. This would allow you to have more resources available for students without cluttering one single slide up.
You can do this in two ways. You can create the slides in one deck and just link them together, or you can create a new deck for each “classroom”, where when students click it takes them out to that new room where all they can see is the new classroom slide.
If you are looking for more ideas about Bitmoji classrooms, check out our other related posts:
Creating a Virtual Classroom with Buncee (Free resource!)
How to Animate Yourself in a Bitmoji Classroom
Bitmoji Keychain Keepsakes
If you are looking for other ideas on how to make teaching and learning relevant and engaging through the use of technology, check out our book The InterACTIVE Class!


Updates in Nearpod - Videos, Expanded Library, and Zoom Integration!
Nearpod has just announced what updates users can expect for this coming year - and there is a lot to talk about!

Nearpod has just announced what updates users can expect for this coming year - and there is a lot to talk about! Here’s a list of what you can expect (note: click on any subheading to skip to that section):
Interactive Videos in Nearpod
Now, educators will have the ability to bring the interactivity of Nearpod beyond a lesson - and now into a video! This feature can be used to create video embeds directly into new lessons, or it can be added into your previous lessons.
From inside any Nearpod lesson, click the “Add Slide” icon. Then, under “Content,” select “Video.” This opens a few options. You can select a video from the Nearpod library, a Youtube link, or upload your own video.


If you’re selecting a video from the Nearpod library, you can narrow down the results by selecting a subject or grade level. The Nearpod videos have activities (open ended and multiple choice questions) embedded directly into them, so when students are watching, the video will pause once an activity comes up. Educators can add their own activities on any time stamp. Once you have the activities embedded into the video, click “Save” to add the video into your Nearpod presentation.


This new feature will work with YouTube videos and your own uploaded videos. Just use the same steps listed above to add activities! It’s also important to note that educators can receive both a real time and post session report from the students who have completed the video activity!
Expanded Content into the
Nearpod Library
Nearpod is expanding its content in the Library. Currently, educators can find over 7,500 editable standard-aligned lessons. Nearpod plans to continue to add additional resources such as “Draw It” and SEL lessons. These lessons can be used for either remote learning or in-person learning.

Zoom Integration
With many districts returning to remote learning, Nearpod has announced an integration with Zoom. Using this integration, educators will be able to launch Nearpod lessons and Zoom meetings together at the same time using just one click.
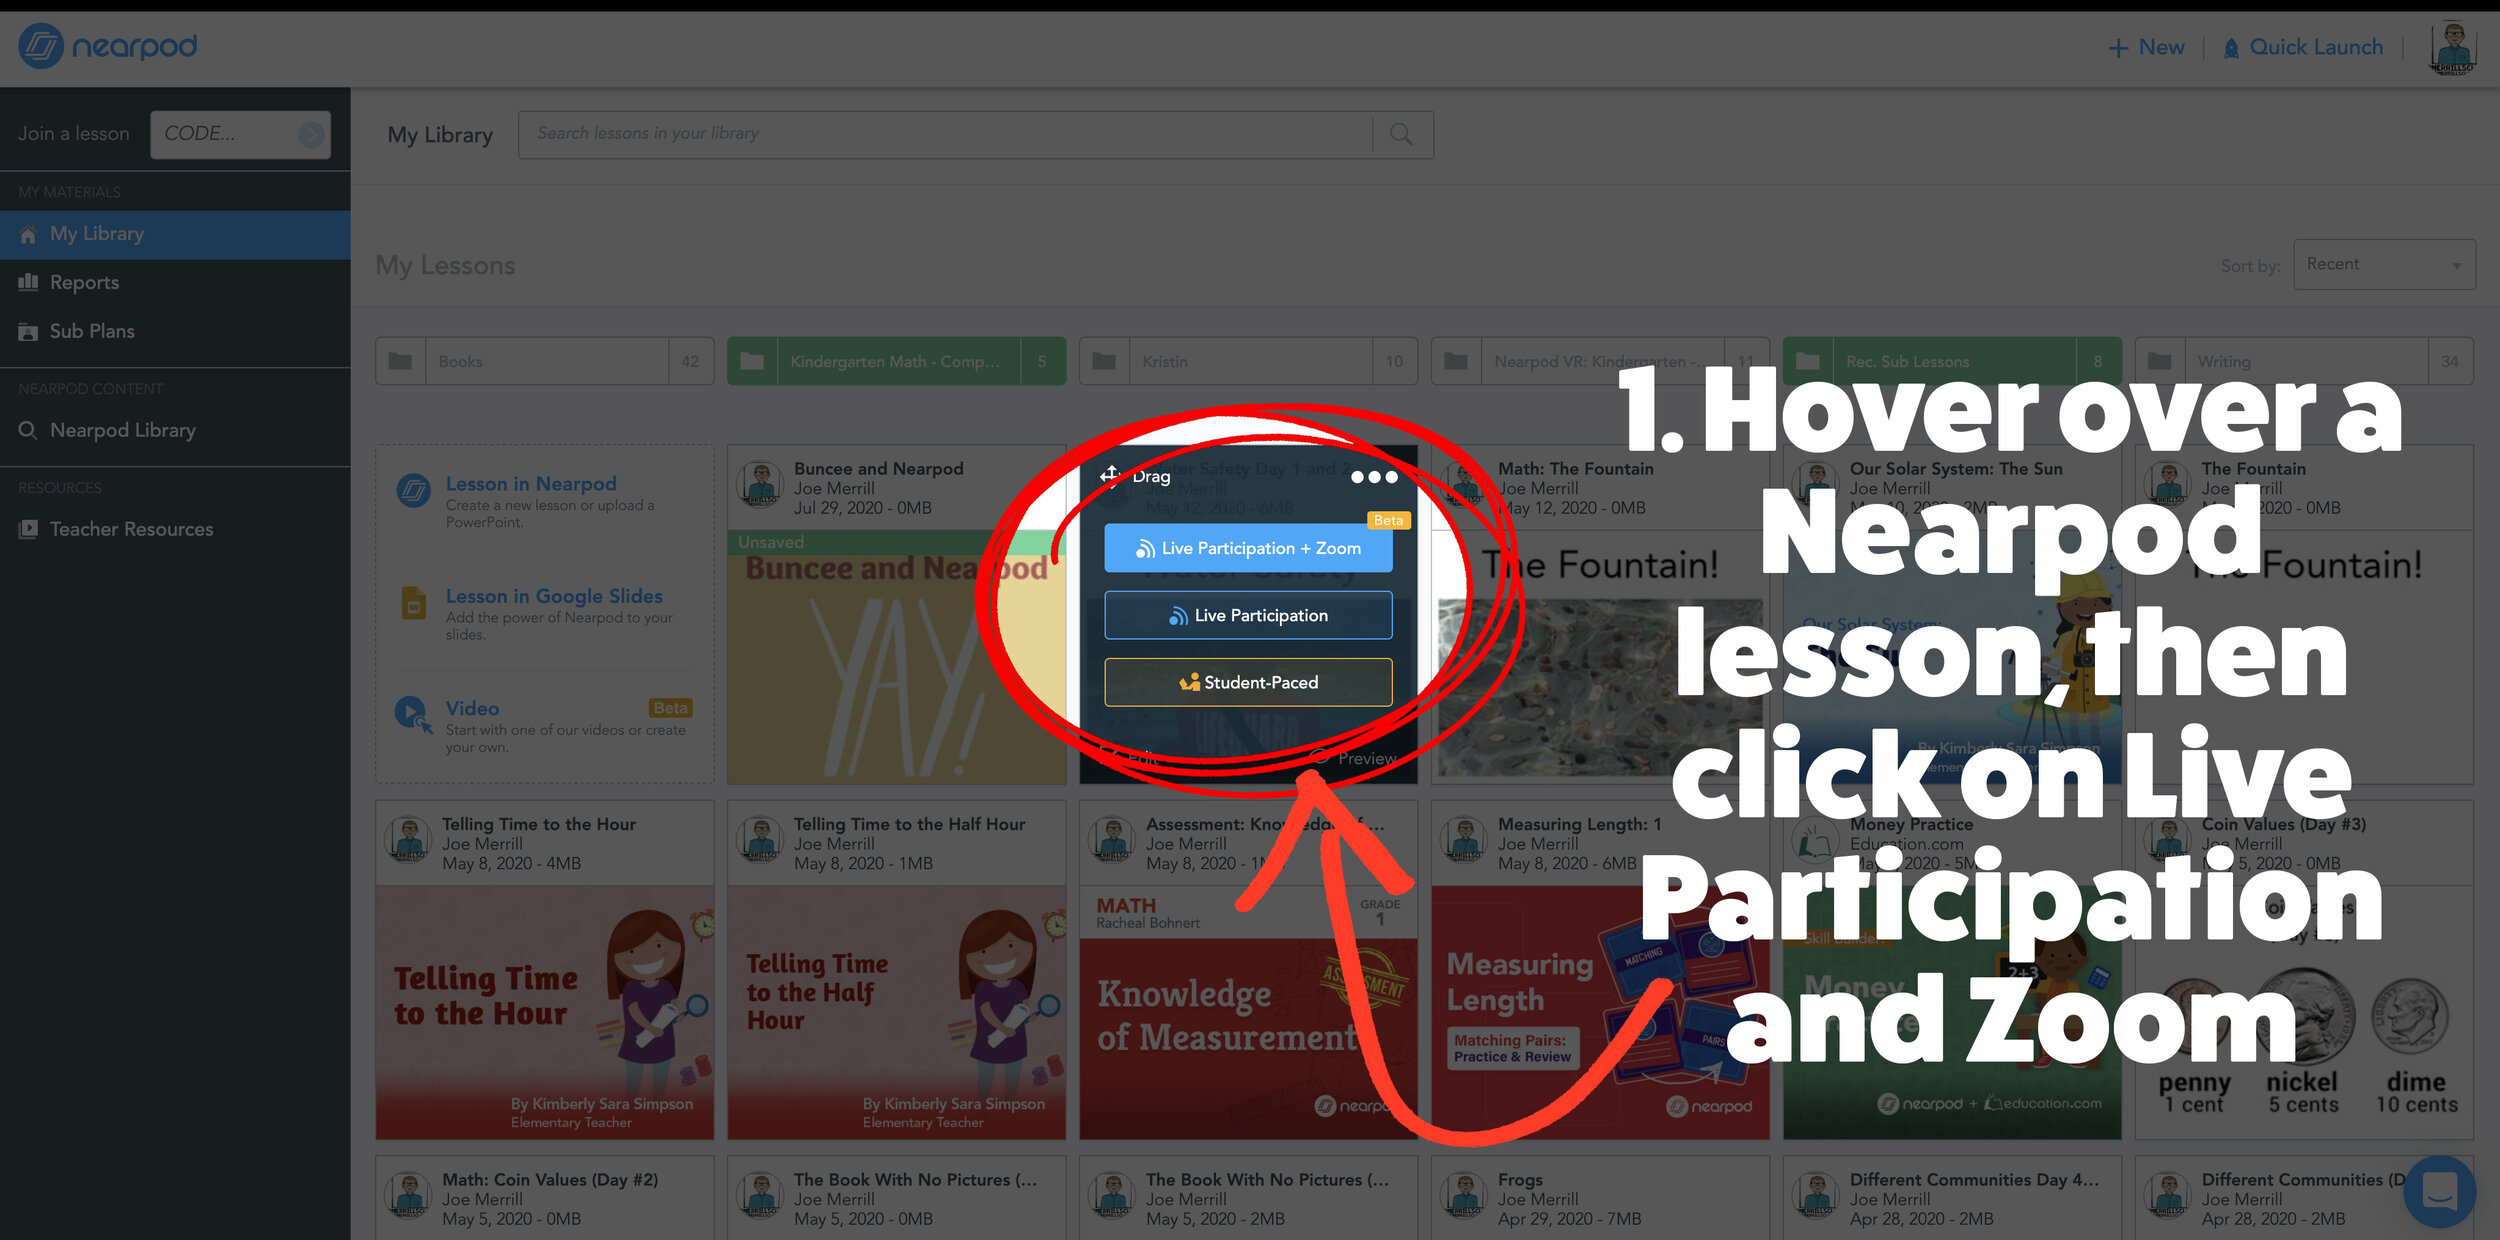
To launch a Zoom and Nearpod lesson, hover over a lesson in your library. Then, click the blue “Live Participation & Zoom” button. After your lesson opens, click the blue “Create Your Zoom Meeting” button to launch it!
(Note: this requires both a Zoom and Nearpod account)

Stay #interACTIVE!
-👗➕👓
If you’d like to learn more about interACTIVE teaching and learning, check out our book The InterACTIVE Class today!


15 Ways to Connect with Students During Remote Learning
The first few weeks of school are so important when it comes to lying the foundation for the entire school year. This is the time we build community, learn about one another and develop trust. For educators teaching remotely this is a challenge in and of itself due to the fact that the group will not be meeting in person together. How can we build relationship and create interACTIVE learning experiences for our students while distanced and apart?

With so much uncertainty this fall, there is one thing that connects educators everywhere—regardless of where we live, the subject or grade we teach, or how we are planning to deliver our instruction, we are all teaching in a way that is different than our old “normal”. For many, virtual or remote learning is the plan for at least the first 9 weeks, and many other educators are facing the potential of some form of hybrid model.
The first few weeks of school are so important when it comes to lying the foundation for the entire school year. This is the time we build community, learn about one another and develop trust. For educators teaching remotely this is a challenge in and of itself due to the fact that the group will not be meeting in person together. How can we build relationship and create interACTIVE learning experiences for our students while distanced and apart? Community is defined as a feeling of fellowship you share with others, and this feeling is built as a result of sharing common attitudes, interests, and goals. As educators of remote learners, who don’t necessarily need to be together in person to build community as long as we are giving our students opportunities fo share their interests, attitudes and goals with each other.
Remote Learning Community Building Activities
Flipgrid Introductions: When building community it is important for students to see, hear and share with each other and Flipgrid is a wonderful platform to do this in. Day 1, model how to get on and give students a fun, non academic way to share about themselves. Two of our favorite activities to do with students is All About Me and 2 Truths and a Lie. The first is just as it sounds—students get an open invitation to use the engaging tools Flipgrid offers (filters, stickers, font, images, frames, etc.) to share about themselves. With 2 Truths and a Lie, students share three statements about themselves and then classmates have to decipher which statement is untrue and respond back with their guess. Both of these activities can be found for you to use in Flipgrid’s Discovery Library. (and they are also linked above too!)
Get to Know the Teacher Gimkit: Gimkit is a great game to play LIVE with your class regardless on your platform. (Zoom, Teams, Google Meet, WebEx) Since the first week is all about community building, make the questions about you the teacher and use the game time as a way to have fun while also letting your students earn about you too! If you prefer to keep students from friendly competition in the first few weeks, try making it a competition where students play against each other, you could have students play towards a team goal where they are all working towards a specific goal together.
Wheel of Names: This free resource makes any remote learning lesson personalized and fun. Combine it with one of the get to know you activities above and when each students’s name is chosen they can share which of their statements was a lie. You can customize it to fit any type of lesson and
All About Me Graffiti Wall: Giving students a brick wall to upload for their own background, have students take advantage of the new fonts and filters to create “graffiti” sharing all about themselves. When finished, students can voice over their artistic masterpieces explaining all about themselves. Check out the Topic in the Discovery library to customize for your own students here!

Breakout Rooms with Book Creator: Many video platforms now allow you to group students and give them a separate break out space to share and talk together. Try grouping students together and giving them time to collaborate on a book in Book Creator together. They could be setting goals for the year, developing a set of class rules to share with the class or targeting a specific learning goal specified by the teacher. While working together and communicating through their breakout rooms, the teacher can pop in and out as needed to assist them while they work.
Wakelet Wall: Wakelet is an easy way to curate and why not use it to build community with students. Within the platform teachers can turn on collaboration, which gives all students with the code the ability to add content to the same Wakelet. Try giving students some form of creation challenge—possibly in a platform where you would like them to take time to learn their way around. (ie. Google Slides, PowerPoint, Adobe Spark etc.) Once students have finished their assignment, have them come to Wakelet to post it alongside their classmates. Add creations to Wakelet through links, by uploading an image or even as a PDF! Simply turn on the collaboration mode within Wakelet and watch as their own “class wall” begins to fill up. Try with a simple activity such as this where students can share about themselves.

Mentimeter “Morning Meetings”: Mentimeter is an interactive presentation platform that allows you to prepare, present and analyze presentations in real time. Ask questions and then allow the audience to respond in real time. There is a free version, but you are limited to the amount of questions per presentation you can ask. For around $7 a month you can access the basic educational plan which gives you options like unlimited questions, the ability to import PowerPoint and Google Slide presentations, and much more. This would be a fun way to conduct meaningful morning meetings each day where students can “check in” and let you know how they are doing anonymously. The teacher may ask for adjectives to describe their feelings which are put into a class word cloud, or ask students to rate an assignment on a scale of 1-10. This is a great tool to help us keep an eye on our students mental well being in a way that fosters engagement, connection and the ability to engage with the teacher.
Flipgrid Playground: When learning remotely, students will miss out on the opportunity to engage and socialize on the playground each day. So why not create a safe space where those types of conversations can still be had? Create a new Topic titled “Playground” where students can simply share cool things, hobbies, funny jokes, toys they like and other non academic things with one another. This will give them a way to find commonalities between themselves and others while apart. Check out the topic example in the Discovery Library!
Tip: It is a good idea to keep this Topic moderated at first so that the videos are viewed by the teacher before being published to the class.

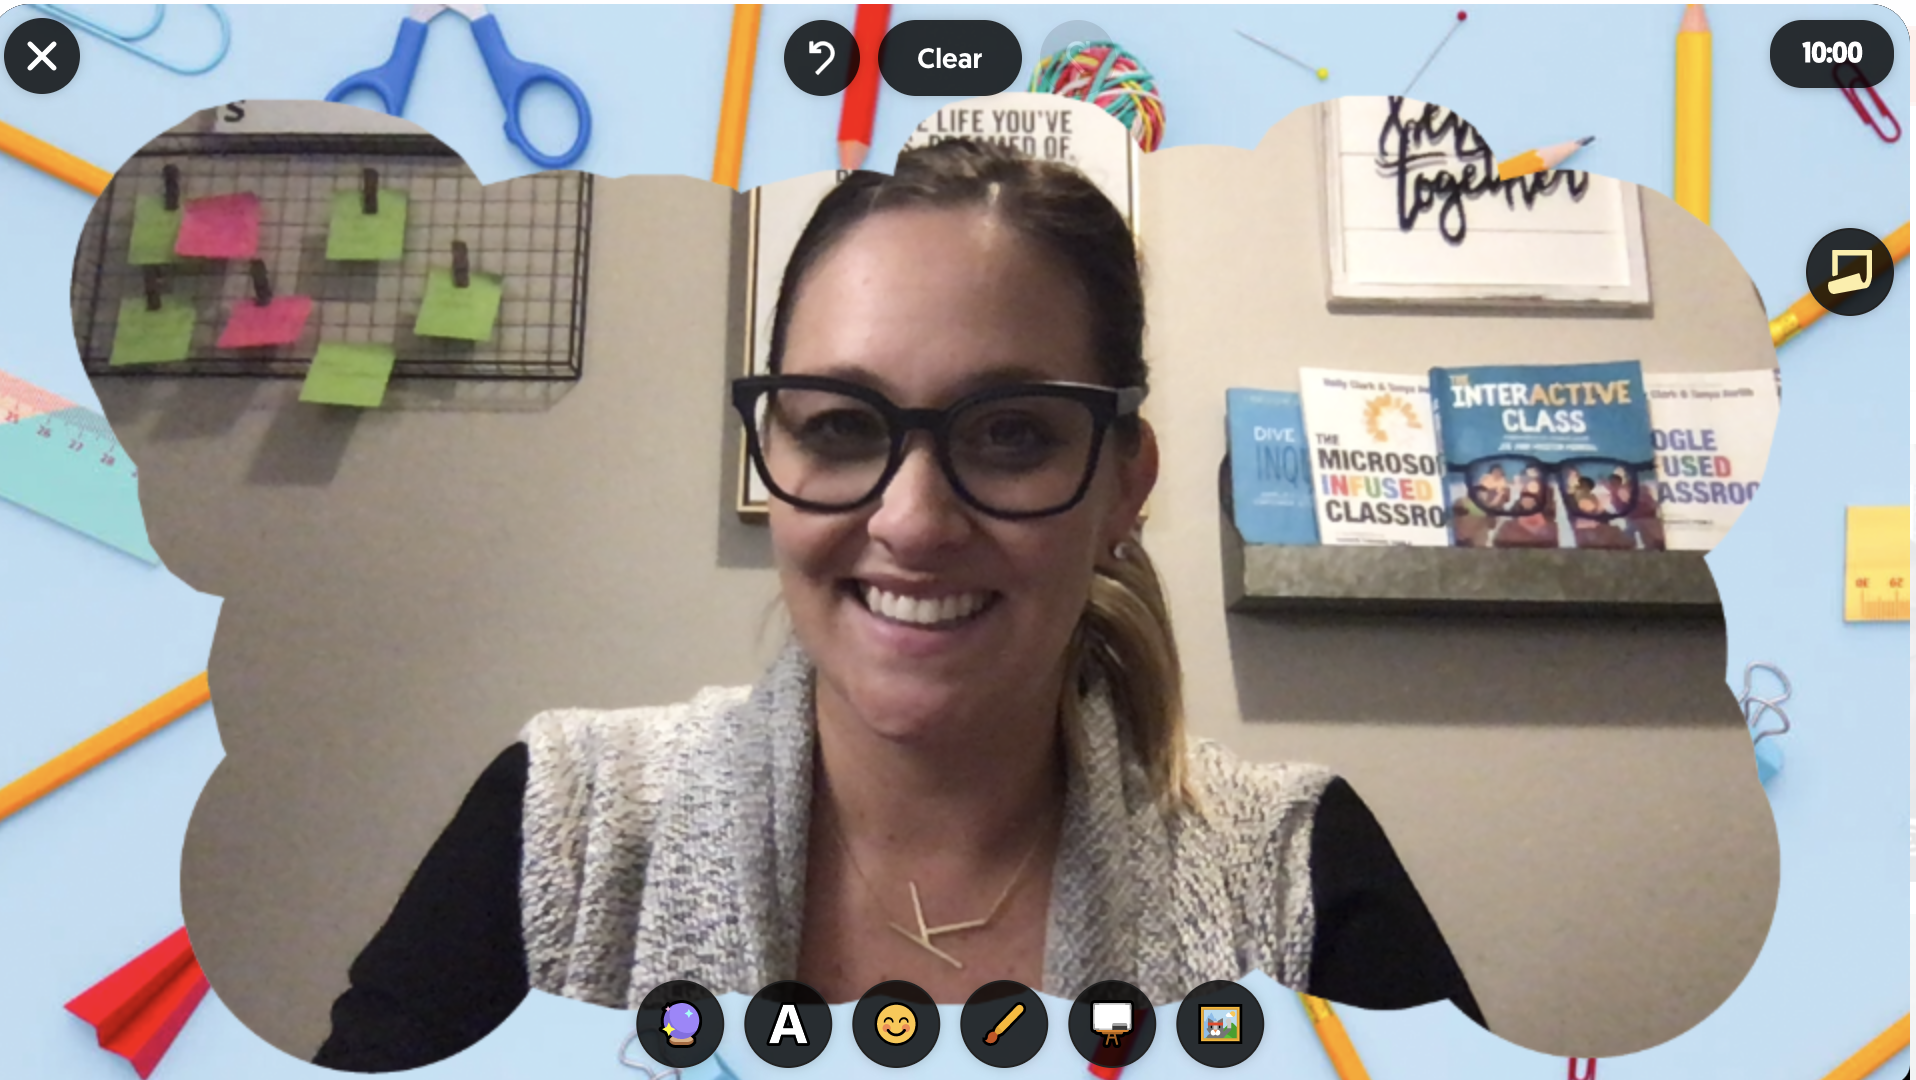
Student Selfies: Taking selfies with the teacher on the first day of school is a staple for many elementary classrooms. Take fun PNG frames and attach them in a simple Flipgrid Topic. Students can download the one they like, use it to take their first day of school selfie and then share with the class. They can even download their own video/selfie to keep as a classroom profile photo. To download the free frame below, and several more, click here!

What’s In My Bag?: Remember the old activity you would do in person with students where they had to go through and guess items from the teacher’s bag, then hearing how each item revealed something about the teacher? Why not do this digitally with students? In the same way you would set up Student Selfies, attach the PNG file frame of the bag for students within the topic, and then allow them to “add” things to their bag as they fill it up with things about themselves. Then they can share for their classmates to watch and learn more about them! To download this free frame, and more (including the frame above), click here!

Flipgrid “Paper, Rock, Scissors!”: Build your classroom community and encourage honesty with this fun spin on this traditional game. Have your students record them selves saying, “Rock, paper, scissors…” and then share what they picked. Their friends can watch the videos back and participate “virtually” (without cheating - of course!) and reply with what they selected and whether or not they were defeated - again encouraging honesty! If you’d like to incorporate this activity with a fun read aloud, we love the book The Legend of Rock Paper Scissors by Drew Daywalt.

Tip: If you’re worried about students cheating, have them chose a Flipgrid response to reply to. But, instruct them to not watch the original video before responding. Then, after the second student has left a response, they can go back and leave another response indicating whether they won or lost the match.
Video Conference Creativity Spark!: This is a great way to spark creativity with your students - which can be quite challenging in a remote learning setting. Pick a letter from the alphabet, and have your students draw a quick picture of the first thing they think of when they hear that letter. Repeat this three times, then have them look over what they illustrated. Then, ask them to come up with a story that connects all three images. This can be shared on Flipgrid, or even used to create a writing piece.
Heads Up! Warm Up: Before diving into a content area lessons, take a few minutes prior to play Heads Up. Created by Ellen DeGeneres, this game reinvents charades for the app generation. Pick a category, then hold your device up to your head, screen facing outward, and guess the words using your friends’ clues. You can even record and share videos of your friends’ increasingly frantic efforts to clue you in. You can create your own deck of images too. Try adapting the game by using images of words related to the lesson or just play from the deck given on your device. Don’t want to use your device? No worries! You could also just print out a set of images to play with live.
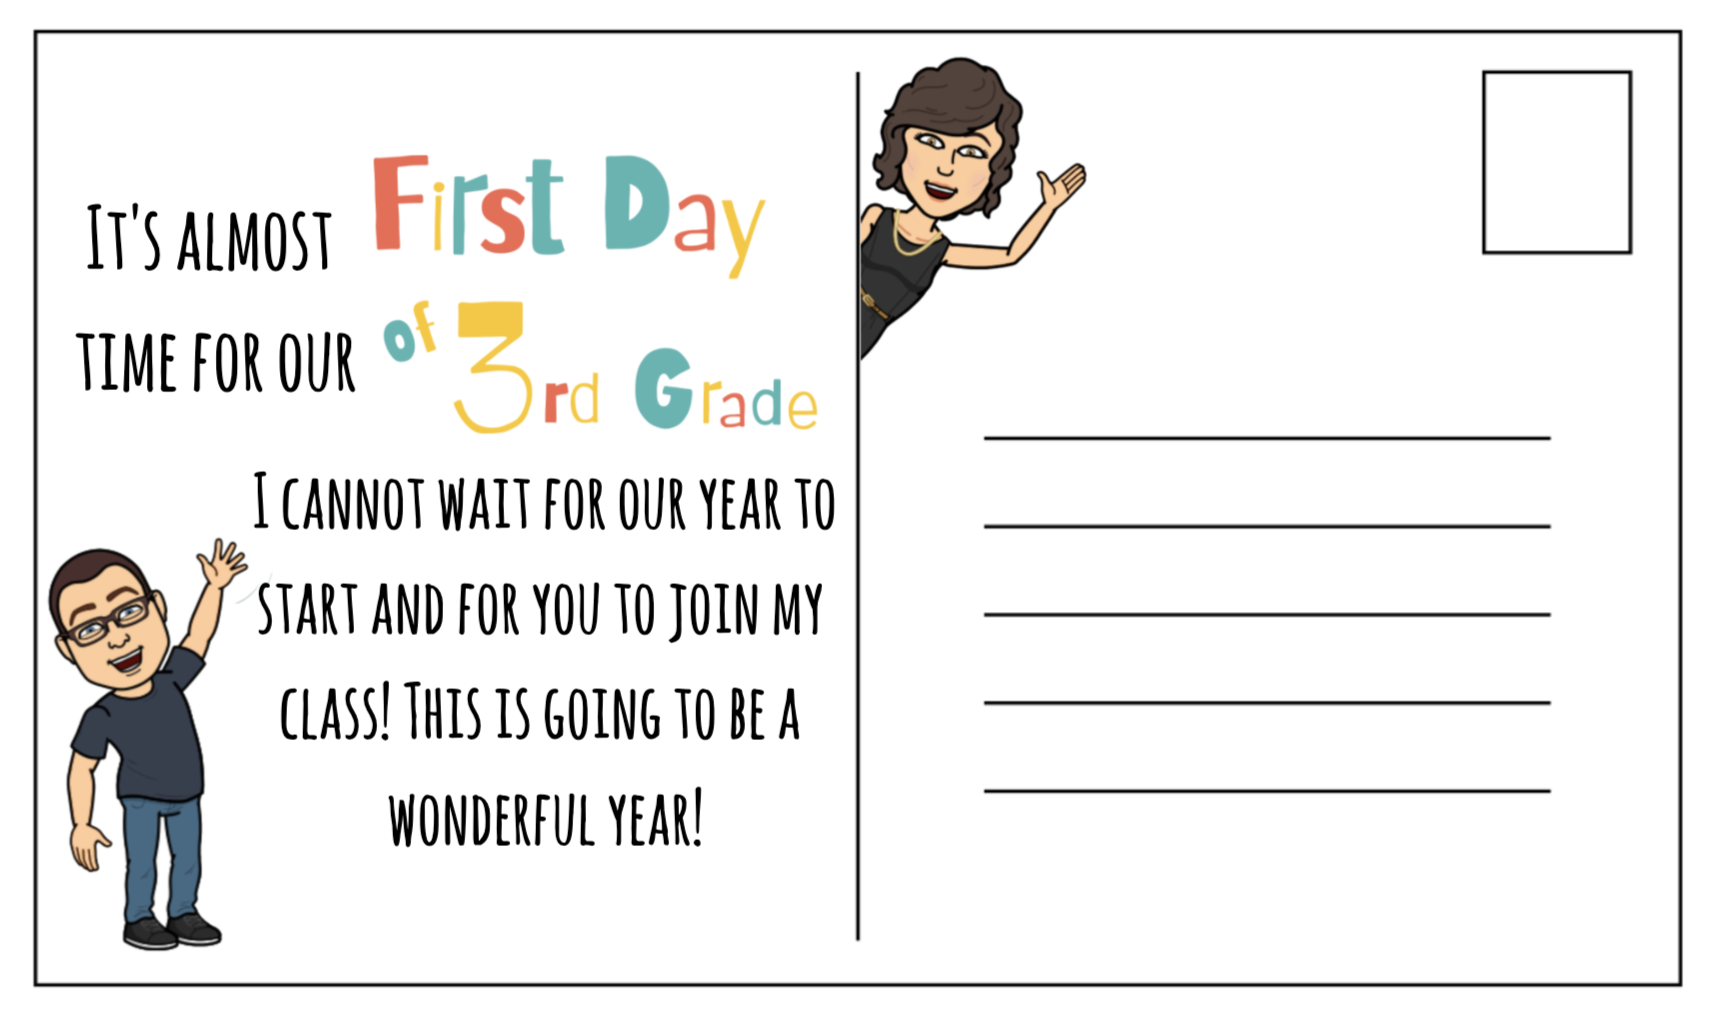
Buncee Bitmoji Postcards: “Meet” students before the school year even begins by popping up in their mailbox. Students love to receive mail, and how special would it be if it were from their new teacher?! Buncee is an a super easy design platform to create fun postcards. You can choose to either have the message on them, or you could leave them blank to handwrite as you go. Start the year off with a simple gesture showing students how much you care.
Tip: Not interested in mailing them? You can choose to email your postcards or other greetings to families!

Stay #interACTIVE!
-👗➕👓
If you’d like to learn more about interACTIVE teaching and learning, check out our book The InterACTIVE Class today!


Creating Custom Frames in Flipgrid
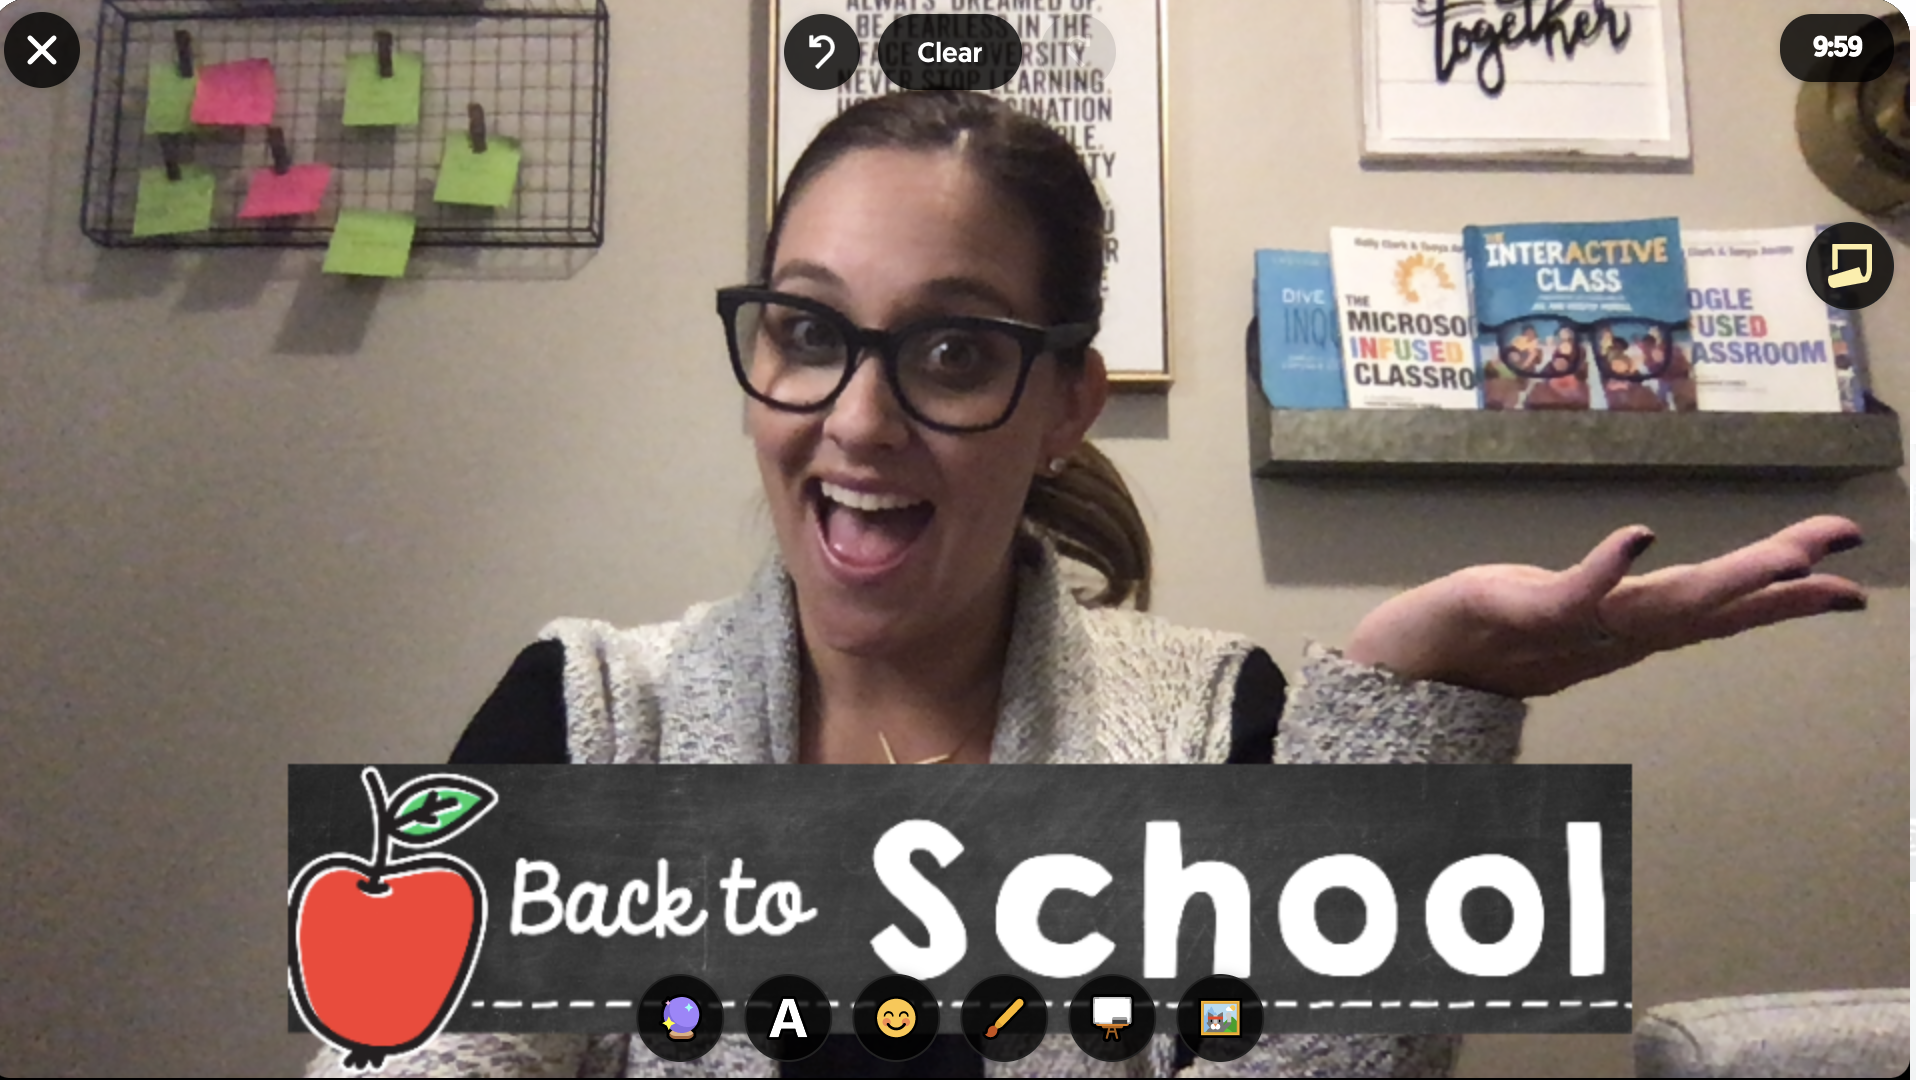
With all of the new Frames being added we thought of a fun activity you can use for both students in class and those learning remotely— First Day of school photos! Learn how to create custom frames to fit any Flipgrid lesson!
With the new school year starting we are so excited for the new Flipgrid platform to launch on August 5th! (If you missed what’s coming check out the Flipgrid LIVE release here!) One of the new features coming to Flipgrid is the addition of Frames.


With all of the new Frames being added we thought of a fun activity you can use for both students in class and those learning remotely— First Day of school photos! We all know the iconic photos parents and teachers alike take on the first day of school welcoming students to the new grade level while documenting their first day in their new class. There are so many ways you can incorporate first day photo frames within Flipgrid but we would suggest pairing them with some sort of First Day/Get to Know You activity like 2 Truths and a Lie or All About Me. (Both of which you can find in Flipgrid’s Discovery Library)
How to Create Custom Flipgrid Frames
(Note: At this time, this will only work on the web version of Flipgrid - not mobile devices)
To create custom frames, we suggest designing in a program like Adobe Spark, due to the ability to save creations with a transparent background. When designing, keep in mind the orientation students may be recording in depending on their device and be sure to keep enough space open to leave room for the person recording the video to be seen. After your frame has been designed, save the image as a PNG file. Be sure to select “transparent background.” This will take any of the white from the background layer and make it transparent.
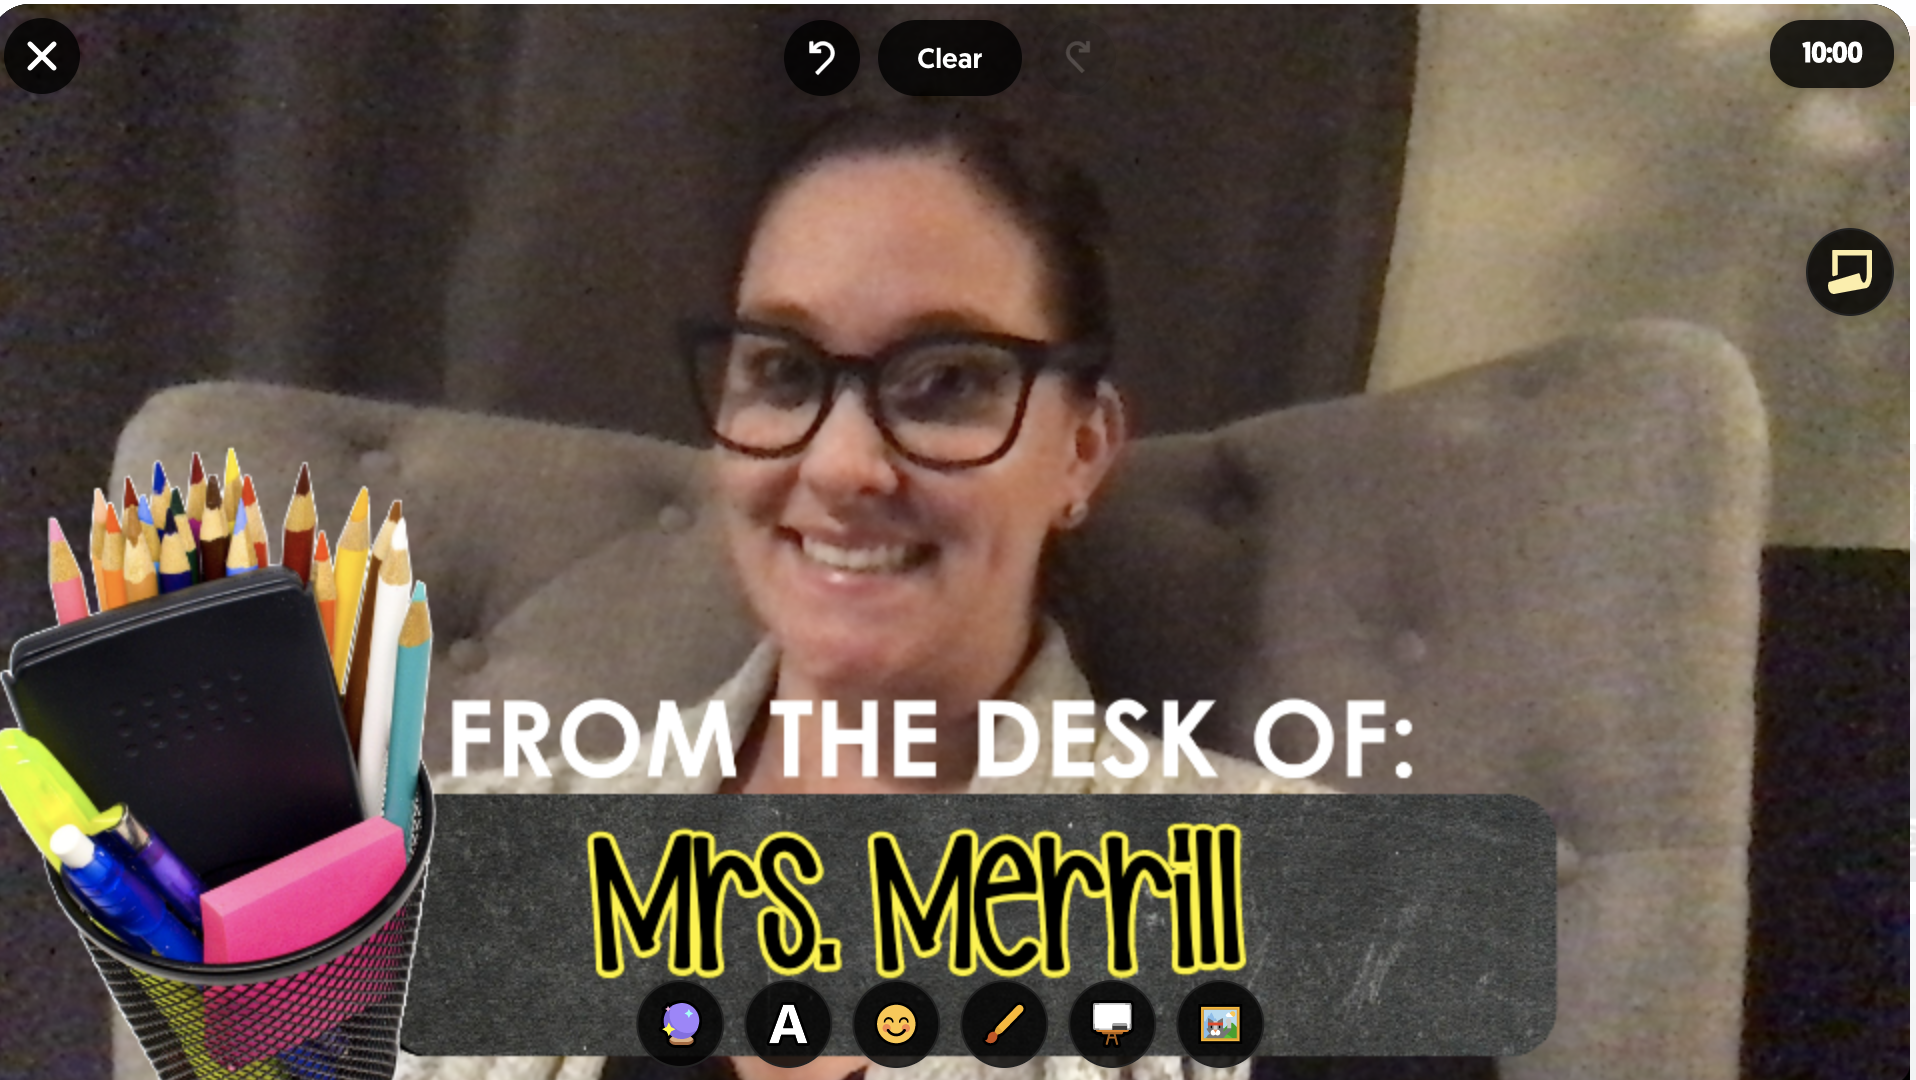
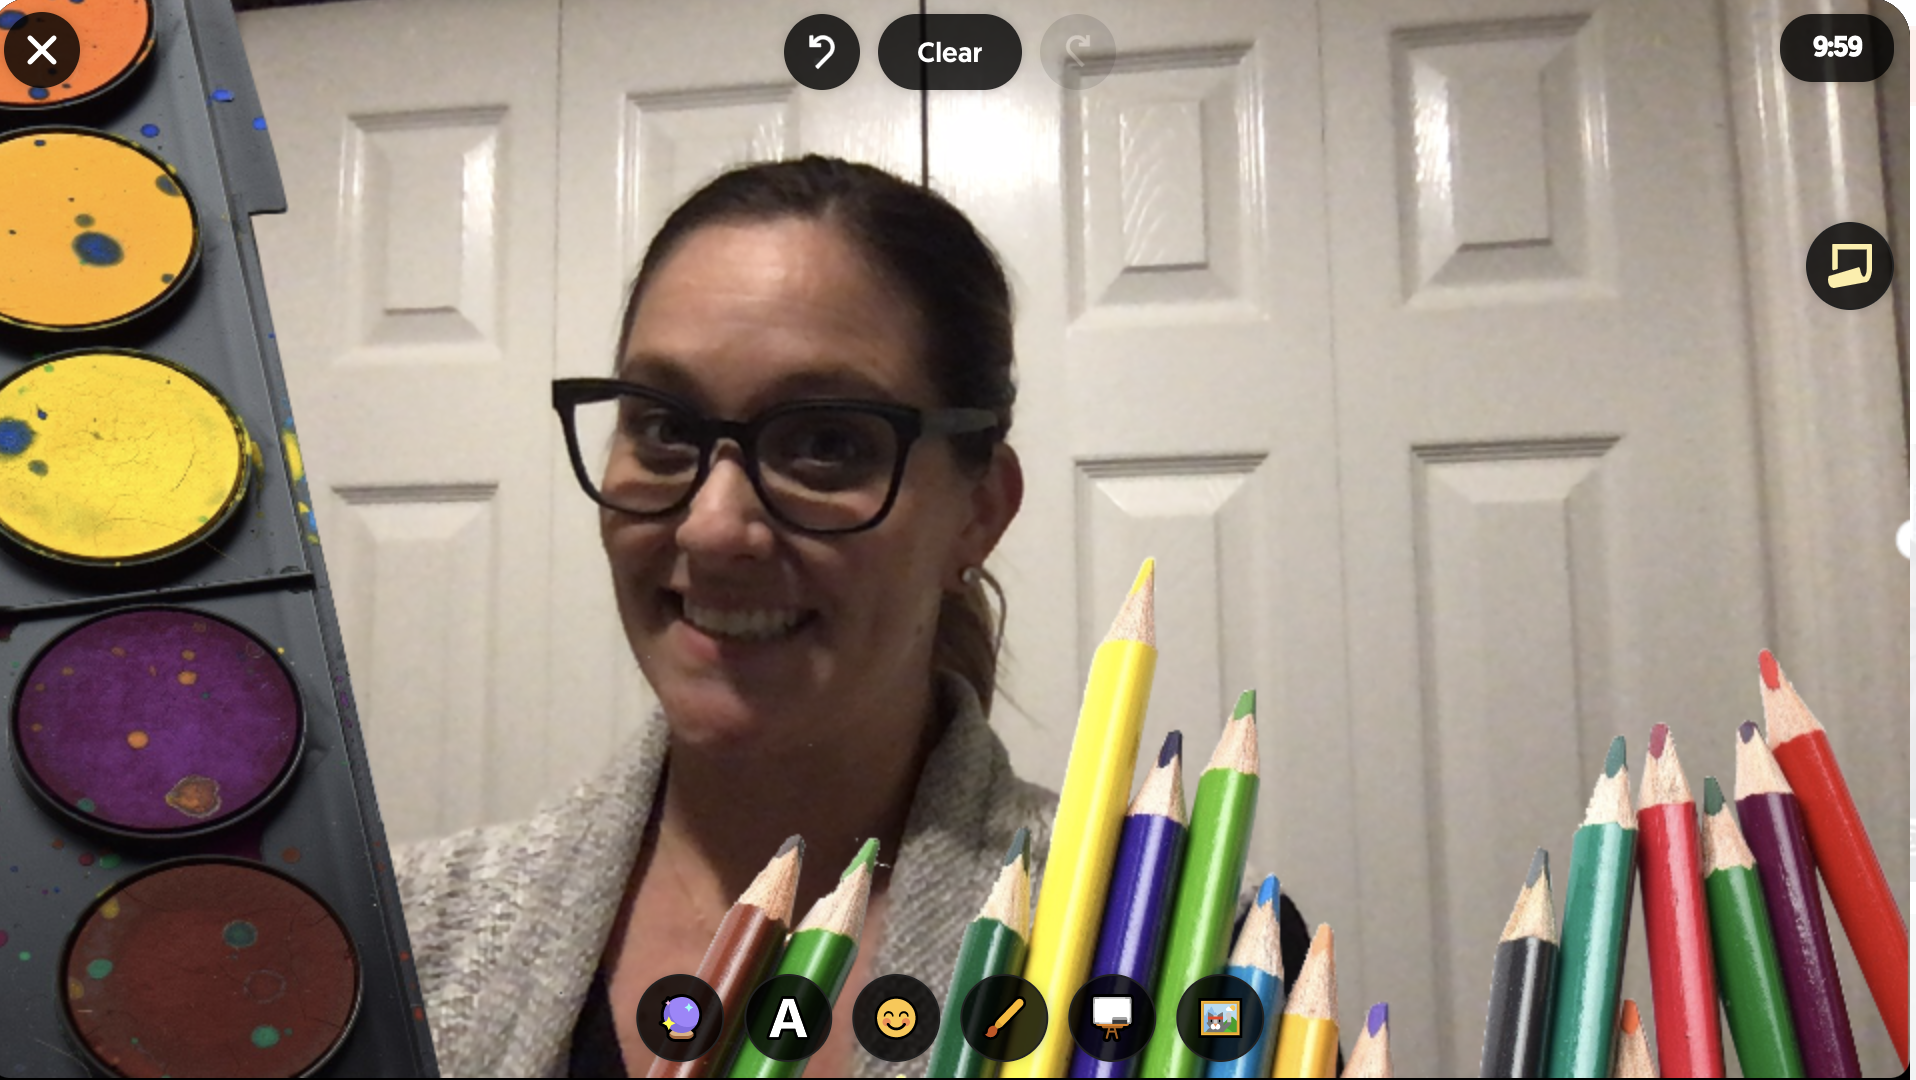
Now you are ready to set up your Back to School Selfie Topic! Simply attach the PNG images to the Topic (you can attach up to 10!) making it easy for students to access the frames independently. Don’t forget to leave clear directions for students in the Topic Focus and then sit back and leave the recording, creativity and sharing up to them!

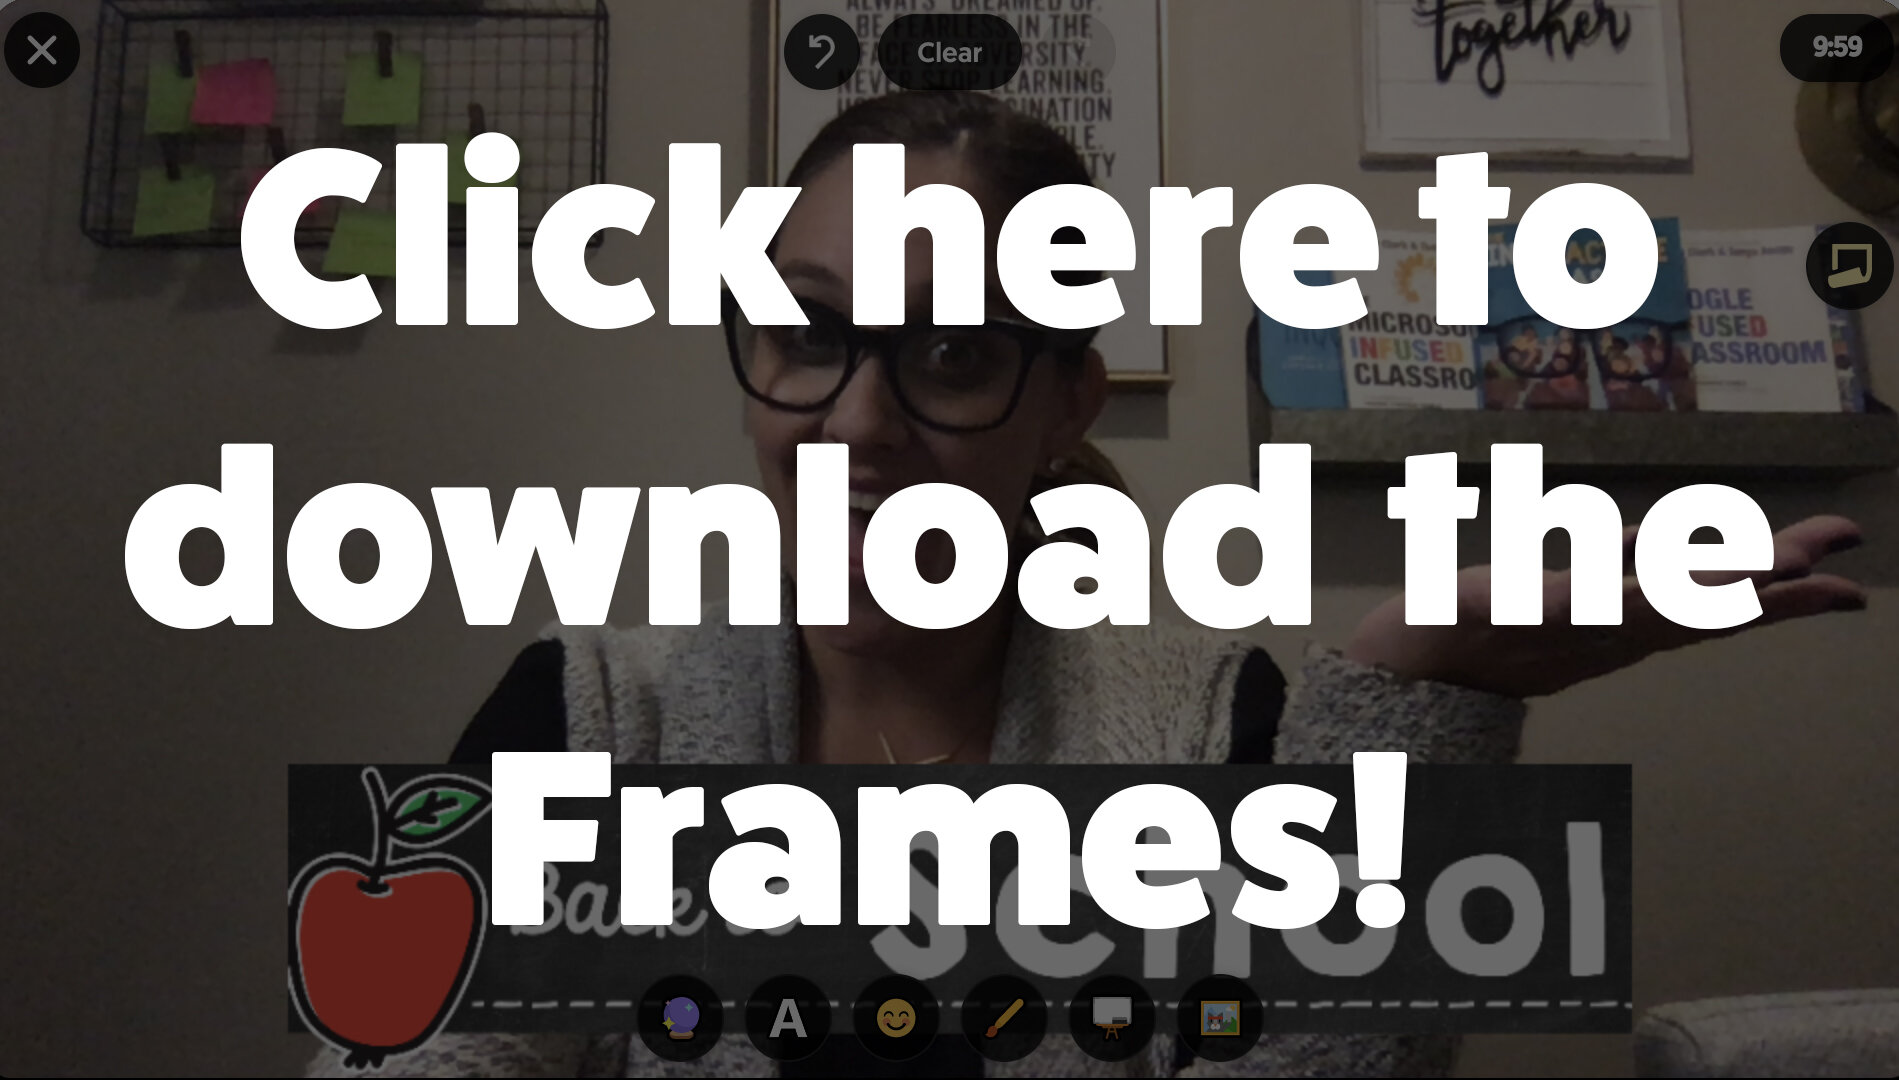
If you would like some of the free frames we used to start building your own Topic with, just click here! We can’t wait to see how you take this idea to build community in your classroom in the first weeks using Flipgrid!
If you want to learn more about Flipgrid, check out other posts like these!
Creating Digital BreakOuts with Flipgrid (click here)
Digital Anchor Charts in Flipgrid (click here)
Creating Flipgrid BookTalks (click here)
Stay #interACTIVE!
-👗➕👓
If you’d like to learn more about interACTIVE teaching and learning, check out our book The InterACTIVE Class today!


How to Add Yourself Into a Virtual Classroom!
Adding “yourself” to your virtual classroom doesn’t mean you need a green screen. You can do it using this simple “background remover.” In this post, you’ll learn how it all works!

Adding “yourself” to your virtual classroom doesn’t mean you need a green screen. In this post, we’ll cover a simple and easy method to get the job done. You’ll learn how to:
(Click on any subheading to skip directly to that section.)
How to Remove a Background From a Video / Gif
How to Download the Transparent Gif
How to Upload the Transparent Gif File Into a Virtual Classroom
(If you’d like a tutorial on how to create a Bitmoji Virtual Classroom, click here.)
How to Remove a Background From a Video / Gif
First, record a quick video that you would like to upload to your virtual classroom.
Note, when you remove the background you will lose all audio and the clip will only be approximately 5 seconds. So, make it something fun like dancing or a silly face. It also helps to use solid color backgrounds and lots of lighting.
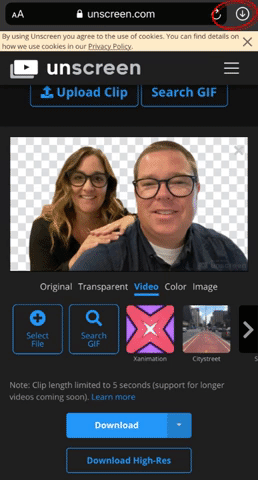
Once you have your video ready, head to Unscreen.com by clicking here or the image to the left.
Next, click on “Upload Clip” and select your video file.

How to Download the
Transparent Gif

After you have selected your video, Unscreen will work to remove the background automatically.
There are a few options that can be added as a replacement background, but in order to get the file into a virtual classroom, you’ll want to be sure to bypass selecting these.
Once the file has uploaded and the background is transparent, it’s time to download the file.
Click the blue “download” button. A drop down menu will appear. In order to maintain the movement in the video and upload to your virtual classroom, you’ll need to select “GIF.” After the file encodes, then click “download.”
If you’re using a mobile device, you’ll need to follow these steps to make sure you’ve saved the file:
Locate the download arrow, typically located to the right of the URL bar. The image to the right shows where to find it if you’re using an iPhone.
Once you have found the download arrow, click it. A new drop down will appear. This will show you where you can find your downloaded file. Tap the new drop down and select your file. This will save it onto your device.
Now, you’re ready to upload the file into your virtual classroom!
How to Upload the Transparent Gif File Into a Virtual Classroom
To upload your file into your classroom, follow these steps:
Buncee:
If you’re using Buncee to create your virtual classroom, here’ what you’ll need to do (all steps are displayed in the video tutorial to the right, too):
Open the Buncee
Tap the “+” sign to add a new item
Click “Uploads",” then select (or click and drag) your file to upload into the Buncee.
Move and reposition the image as you see fit, then click “Share!”
Google Slides:
If you’re using Google Slides to create your virtual classroom, here’ what you’ll need to do (all steps are displayed in the video tutorial to the right, too):
Open your Virtual Classroom on Google Slides
Click on “Insert” from the menu bar
Click on “Image,” then “Upload from computer.”
Select your file
Move and resize as you see fit. Click “Share” to share with your students!
PowerPoint:
If you’re using PowerPoint to create your virtual classroom, here’ what you’ll need to do (all steps are displayed in the video tutorial to the right, too):
Open your Virtual Classroom on PowerPoint
Click on “Insert” from the menu bar
Click on “Pictures,” then “Picture from File”
Select your file
Move and resize as you see fit. Click “Share” to share with your students!
Help! I’m looking for instructions on how to make a Bitmoji Virtual Classroom!
No worries! You’re (almost) in the right place. Click here, and we’ll get you over to a step-by-step tutorial. 🙌

For more #interACTIVE lesson ideas, check out our books The InterACTIVE Class and Flipgrid in the InterACTIVE Class on Amazon!


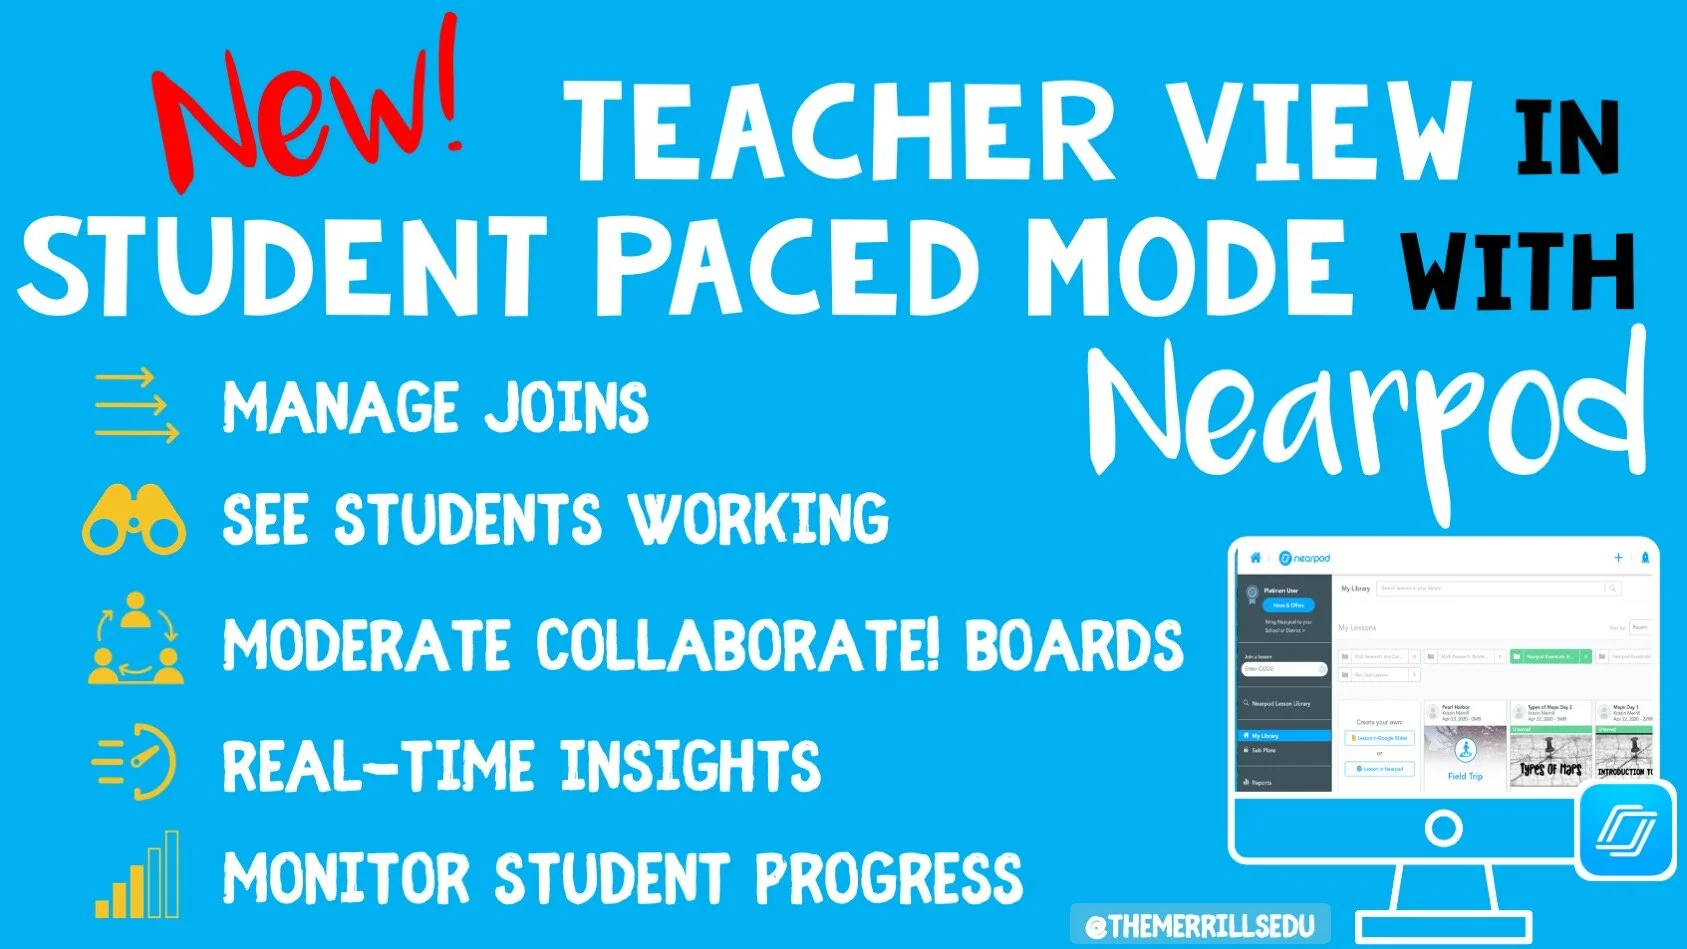
Using Teacher View in Student Paced Mode with Nearpod
With teachers all over the world ending the school year with remote learning, Nearpod has come through with a helpful update to their already robust platform—teacher view during student pace mode!
With teachers all over the world ending the school year with remote learning, Nearpod has come through with a helpful update to their already robust platform—teacher view during student pace mode! Teachers were used to having specific control during teacher-led mode, and now many of these same features are available when lessons are set to student paced. This gives teachers the opportunity to create asynchronous lessons for students to complete when their schedule permits, while still giving teachers the ability to monitor and moderate over that extended time.
Using Teacher View to Monitor and Manage
Teachers are using Nearpod’s self-paced mode more than ever during remote learning, and these new features released will help teachers be even more efficient while monitoring and managing student work.
Manage Students as They Join
Teacher view allows you to quickly see who has joined your student-paced lesson. It can be helpful to know who is working on what lesson when, but this features also makes it easier when giving feedback to students. Now you can give feedback faster since you know they are are on and working.
Moderate Collaborate! Boards
Monitoring student work is a foundation of good teacher and it has become one of the hardest things to do during remote learning. Now teachers can moderate student responses when using the collaborate feature. They can delete posts from Student-Paced collaborate boards by viewing the board in their reports. Read more on how to enable collaborate boards in student paced mode here!
Monitor Student Progress
One of the great features of Nearpod is it’s ability for teaches to see in real time how their students are comprehending and taking in new information. Now this can be done in self-paced mode too. Teachers can go in and see a student’s collaborate response, their quiz report or other activities in real time for immediate feedback and updates just like when using live!
Stay #interACTIVE!
-👗➕🕶️
For more tips, tricks and lesson ideas for making learning more interACTIVE, check out our books The InterACTIVE Class and Flipgrid in the InterACTIVE Class on Amazon!


Creating Flipgrid Book Talks During Remote Learning
I was determined to find a way for us to share this time together even though we are apart and Flipgrid was the perfect platform to do this in. The multiple features and tools within the Flipgrid platform make read aloud possible and still give us a space for discussions during this time of asynchronous learning.
Reading aloud to my kids was something I enjoyed doing every day. We would sit together, read through a story together and talk. We would journey through the various stories together, each taking away different things, sharing as we went. When we moved to virtual teaching online, the path of remote learning looked like it would take away this time.
I was determined to find a way for us to share this time together even though we are apart and Flipgrid was the perfect platform to do this in. The multiple features and tools within the Flipgrid platform make read aloud possible and still give us a space for discussions during this time of asynchronous learning.
We continue our reading daily so after dividing the book up into daily sections, I recorded myself reading. Now there are two ways to do this. 1) Record directly into Flipgrid and then put the video as your Topic focus. This will house the read aloud portion in the thumbnail of the topic. You can record up to 10 minutes in one video which makes it much easier to read a nice portion of your story. 2) The other option is to record the reading video in another platform and then attach to the Topic. This is what I did. I chose not to use the Topic focus for my actual read aloud because I like to use my Topic focus as a place to start the actual discussion.
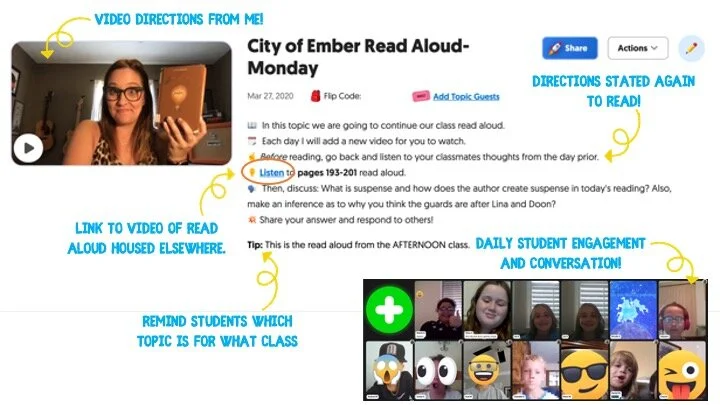
In addition to starting the discussion within my Topic video, I also wrote them out in the prompt portion of the Topic. I like to use emojis to make the different steps stand out. Emojicopy.com is a great place to find, copy and paste emojis for this. The Tip feature is also great to help my different classes know which read aloud was for them, but you can use this to give recording hints, a reminder for discussion and much more!
Finally, many miss the link feature within the Topic prompt. This is where I linked my read aloud. The students would click there, be taken to a safe search window where they would watch me read the book, and then they would participate in our discussion back on Flipgrid. You can also link the read aloud as one of the 9 Topic attachments you can have. For more information on how to attach links as Topic attachments check out this YouTube tutorial.
You can choose to moderate videos before they appear, but I chose to just participate with the students’ discussions rather than moderating beforehand. Finally, once I had the first day’s Topic created, I used the Duplicate Topic feature to duplicate the entire Topic.

I then went in and changed out the link for listening, rerecorded a new direction video and changed out the prompt in the directions. This was a HUGE time saver since I had 5 to do each week for both classes. I could keep the same emoji decorations, list of directions etc. and just change out the parts that were different each day. (read aloud video, discussion prompt)
Our read aloud ended last week and I thought the kids would be happy to have one less thing to do. Completely the opposite! They are asking when the next book will be started and what we will be reading! I can’t wait to continue this time of reading and discussion while we are #remotelearning and I am thankful to have a platform like Flipgrid to facilitate this time with my students.
-K 👗
For more #interACTIVE lesson ideas using Flipgrid, check out our book The InterACTIVE Class on Amazon!


Lesson Resources for Remote Learning: Spy Transformations
Transforming the classroom has always been one of our favorite ways to engage students. They walk in intrigued, curious as to what the day of learning would hold for them. This heightened interest would help them persevere through difficult tasks they might otherwise give up on. Plan a week of spy themed activities or turn your students into learning detectives. Dress the part, play some music and infuse this theme into any content you are teaching.

Transforming the classroom has always been one of our favorite ways to engage students. They walk in intrigued, curious as to what the day of learning would hold for them. This heightened interest would help them persevere through difficult tasks they might otherwise give up on. It created an atmosphere of challenge balanced with fun and interaction. Well why not do this virtually?! Plan a week of spy themed activities or turn your students into learning detectives. Dress the part, play some music and infuse this theme into whatever content you plan on teaching.
Spy Themed Resources
To help you with your content creation, we have curate various resources available for you to take and use. We spread the resources across platforms in an attempt to find things that everyone can use regardless of how their distance learning lessons are structured and set up. Please feel free to share with colleagues and other teachers in your PLN who may benefit too!

Spy-themed Slides
Slides Mania is an awesome resource for teachers with slide decks for all occasions. Check out this set of slides perfectly suited for problem solving and detective work. Slide decks are available for both Google Slides and Powerpoint.
Seesaw Mystery Slides
This idea was shared with us awhile ago by an educator named Kris Szajner and we think it is a perfect #interACTIVE activity for a week of remote learning lessons themed around spies or detectives. Simply have students search for hidden text within the slide. This is done by changing the color of the text to black after formatting & “hiding” it in place. Then, using the “magnifying glass” (which is just an enlarged text box window), students hunt for the hidden text. It could be multiples of a number, the words matched with definitions, the main idea of paragraphs—easy to adapt to any content and standard. Grab the mystery template here!


Secret Spy-Themed Soundtrack
Add some flair and suspense throughout the week with some music! You can use this free soundtrack on YouTube as a background soundtrack for your live Zoom or Google Meet calls or for any recorded teaching material you make for your distance learners.
Spy and Detective Background Images
Use this slide deck for fun, detective themed images you can use while recording lessons for students or during live calls in the various platforms. Snag the slides here!


Digital Break Out
We love doing break out games with our kids in the classroom, so while out during remote learning why not bring it to your students. This STEM themed digital breakout is one of the many on the Breakout EDU website and does require platform access. But, check out free digital games in the Flipgrid Disco Library. A few of our favorites include, Around the World in 30 Days, Design Decisions, and GPS Mess.
Spy Themed Stories
During remote learning there are many platforms offering free resources for students to read while working from home. Epic! is one of these platforms worth checking out. When searching “spy” a combination of over 60 fiction and nonfiction titles came up ranging from Geronimo Stilton, to WWII Spies and much more. For more info on using Epic click here.

Spy Scavenger Hunt (Live!)
Have you tried playing a game live with your student while on a call. Whether you use Zoom, Microsoft Teams, Google Meet—the principal of the game is the same. Take the general “scavenger hunt” and turn it into a live “spy hunt.” Have students race through the house to find items various themed items like a flashlight, a magnifying glass, a hat and more. For the complete list click here!
Remote Learning Read Alouds
Storylineonline.com is a great reading resource during remote learin. The Case of the Missing Carrot Cake is just one of the many books available for free use. Narrated by Wanda Sykes, students read to learn about what happens to Miss Rabbit’s cake goes missing and what the detectives do to track down the thieves. Read it here! Another great title offered is Private I. Guana read by Esai Morales and The Coal Thief read by Christian Slater. All books come with activity guides for teachers and for parents.


Buncee Backgrounds and Images
Student creation is always important so why not assign your tasks within a Spy Themed Buncee! Check out their newly designed backgrounds and animations or have students design from scratch on their own! Or, try using a playlist where students can work on tasks in a specific order!
Costume Changes
If you are looking for an additional way to add engagement, try dressing the part! Wear a fun hat or costume while delivering lessons or during live video calls. Send students a fun surprise “stach” in the mail ahead of time so they can get in on the fun too! Check out a few ideas here.


We hope you take these Spy themed resources and create #interACTIVE and engaging lessons for your students during this time of distance learning. Tag us on all social media platforms @TheMerrillsEDU and share will use the creative ways you make learning come alive with your spies and detectives!
Stay #interACTIVE!
-👗➕👓
For more #interACTIVE lesson ideas to use during remote learning, check out our book The InterACTIVE Class on Amazon!


How to Embed Nearpod Presentations Into Microsoft Teams
Nearpod and Microsoft Teams have partnered up to provide a complete game changer - especially when it comes to remote learning. Now, you can “go live” with your Nearpod Lessons in Microsoft Teams!
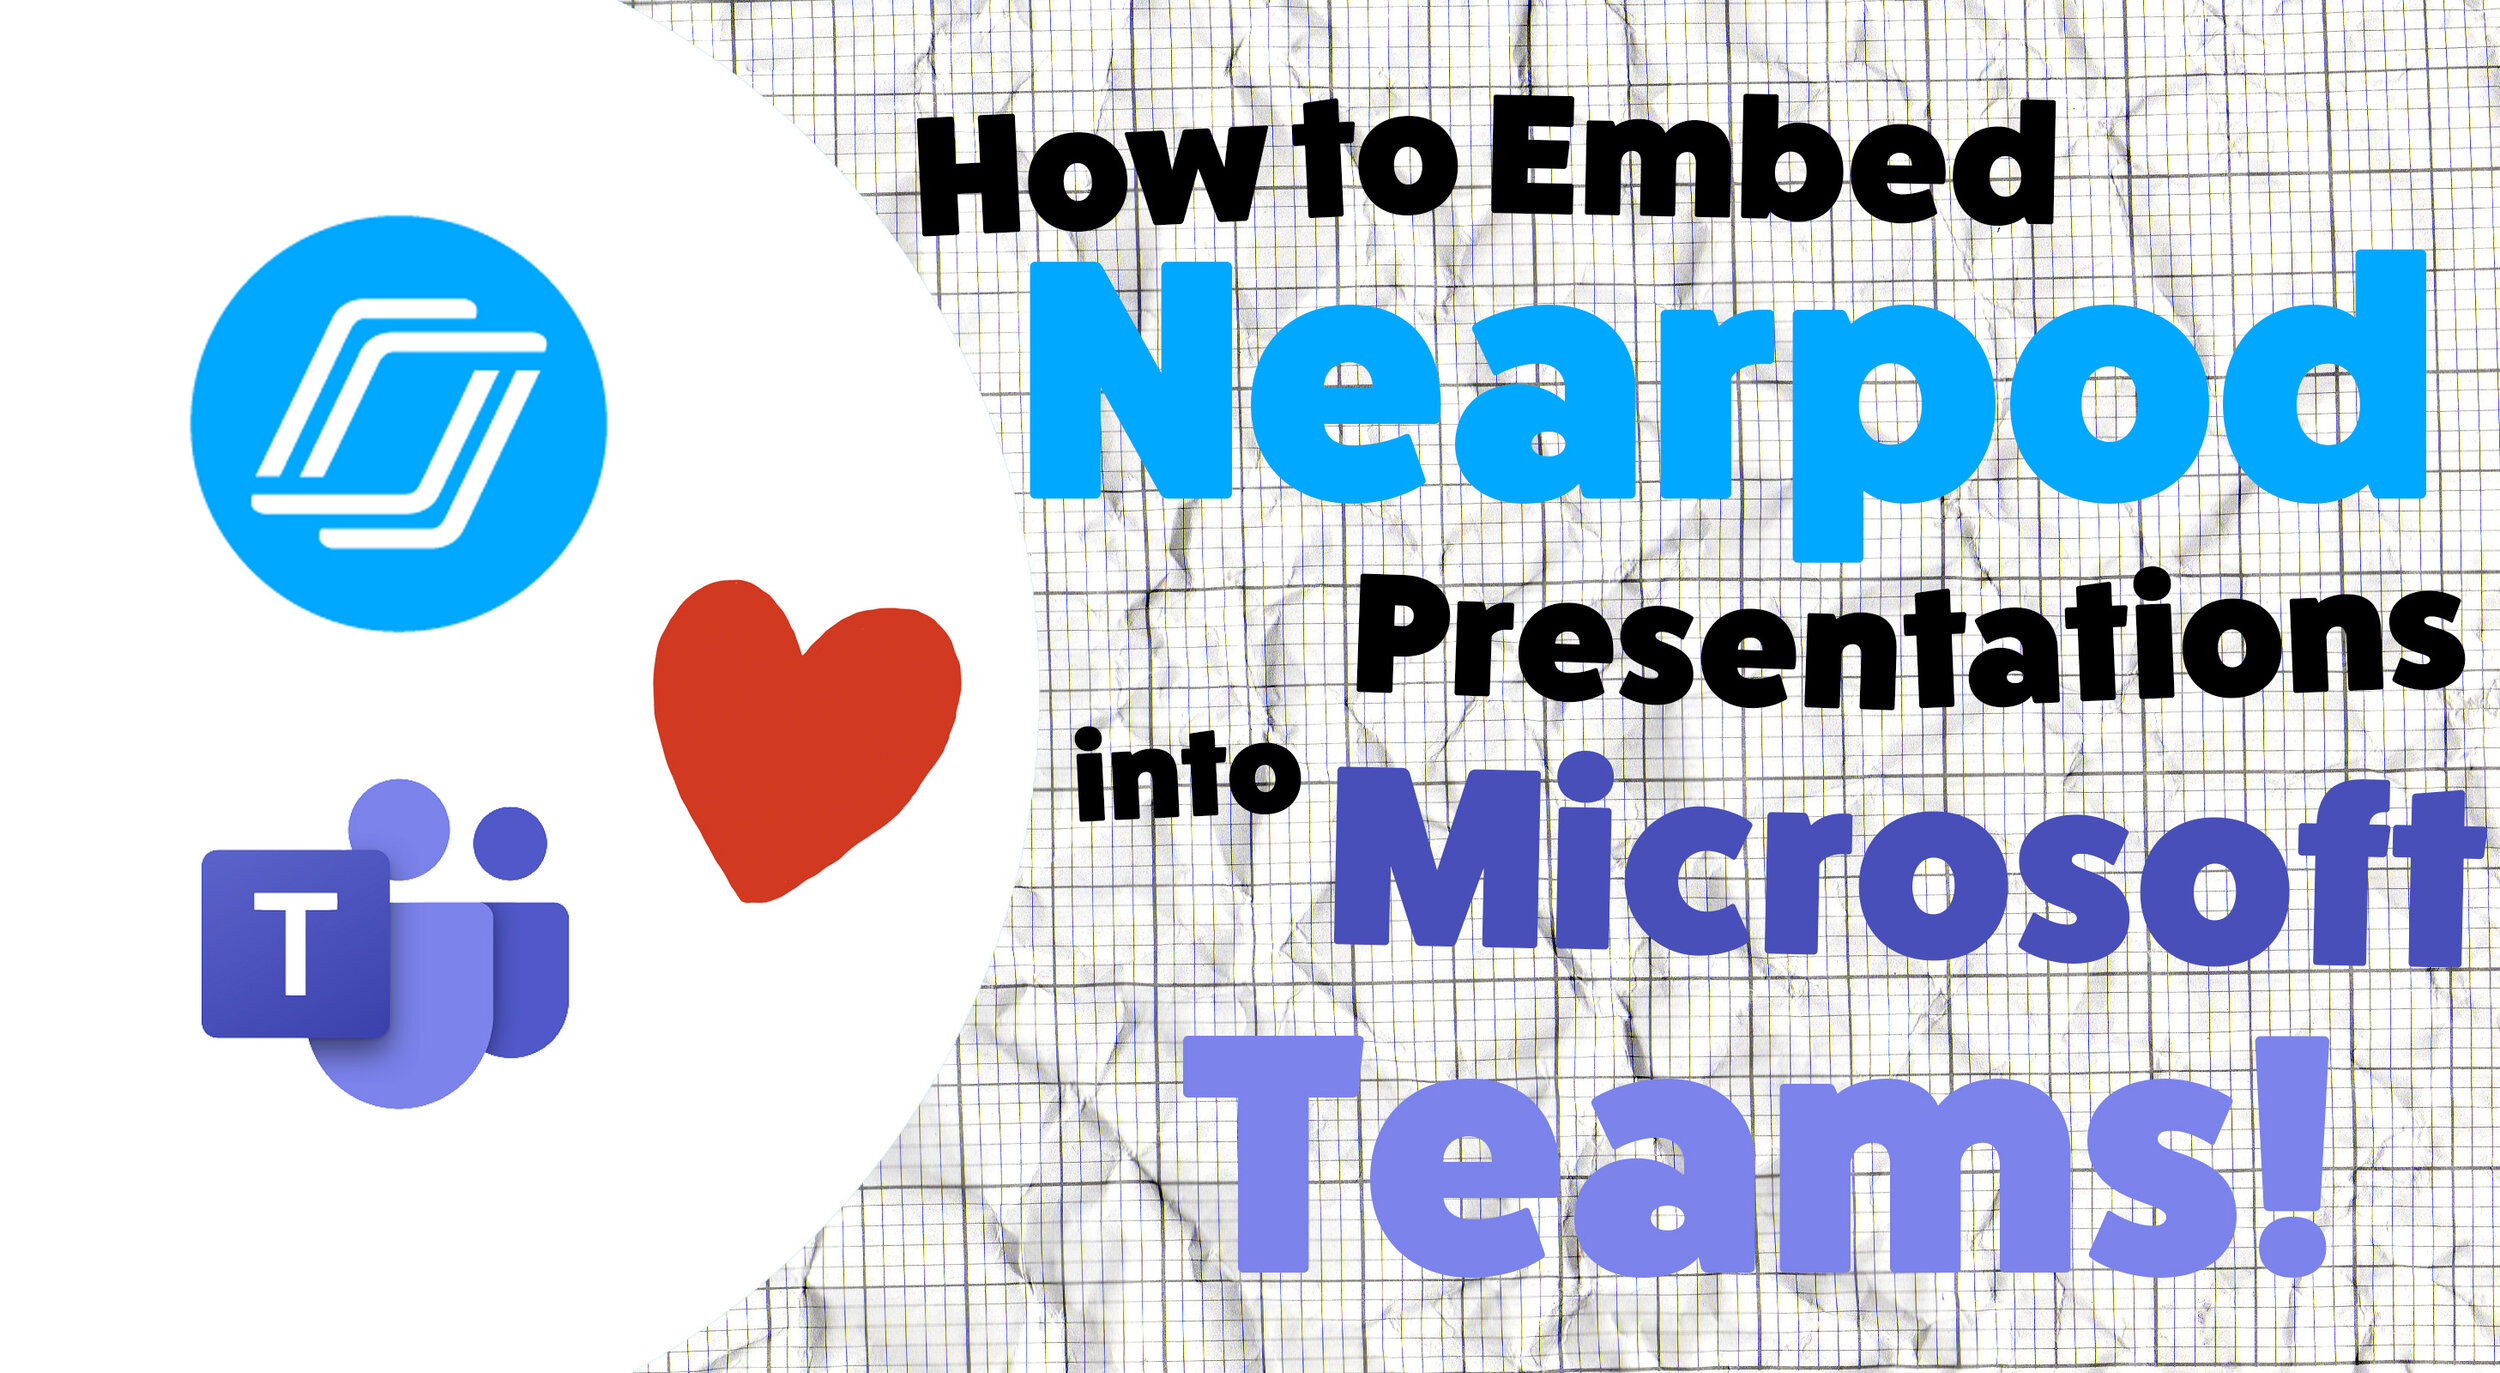
Nearpod and Microsoft Teams have partnered up to provide a complete game changer - especially when it comes to remote learning. Now, you can “go live” with your Nearpod Lessons in Microsoft Teams! You’ll learn:
💥 How to embed a Nearpod presentation into Teams
💥 How to start a meeting in Teams
💥 How to launch your Nearpod presentation while you’re LIVE in a TEAMS meeting!
💥 HOW TO EMBED A NEARPOD PRESENTATION INTO TEAMS 💥

You’ll need to make sure that you are logged into your Microsoft Teams account, and that you have already created an account on Nearpod. From your preferred Teams “General” channel, click the “+” sign on the top right of the tabs bar.
Once you click on the “+” sign, you’ll be asked what type of tab you would like to add. If Nearpod doesn’t show up in the first few images, you can do a quick search for it. Once it pops up, go ahead and click the Nearpod image.


Now you’ll be asked to log into your Nearpod educators account. Enter your username and password, then click the blue “Log In” button. Tip: At first glance, it looks like you won’t have any options to log in. Make sure you scroll down a bit (the window is small), and you should see the required fields.
Once you’re logged into your Nearpod account, you’ll have the option to select the (predesigned) presentation that you would like the class to complete. Pick out the presentation, then you’ll be asked which type of lesson you prefer: Live Lesson (where students complete the presentation together in real time), or Student Paced (where students complete the presentation on their own time). For our example today, we’ll pick “Live Lesson.”
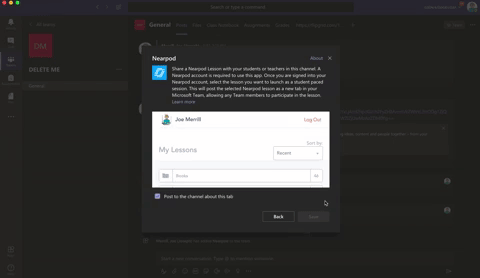

Once you’ve selected your preferred lesson type, the presentation will automatically embed directly into your Teams channel. It will appear in the conversation, and also at on the top tab bar. Congratulations! You’ve successfully embedded your Nearpod presentation into Teams!
💥 HOW TO START A LIVE CLASS MEET IN MICROSOFT TEAMS! 💥
To start a live class meet in Microsoft Teams, click on the “camera” icon located in the bottom of the tools bar. If you’re unsure if which icon to click, try hovering over them until you find the one that says “Meet Now.” Click it, then click the purple “Meet Now” button. Once you do, you’re LIVE!

💥 HOW TO LAUNCH YOUR NEARPOD PRESENTATION WHILE YOU’RE LIVE IN A TEAMS MEETING!💥


Now that you’re LIVE, you’ll need to wait for your students to log on to the meeting. You can check a meeting’s attendance by clicking on the “Participants” icon (that looks like two people). Once everyone has arrived, explain to your students that you will work on a Nearpod presentation together. Reveal that they will need to click the back button on their Teams Meet window to return to the conversation tab. Explain that they can access the Nearpod presentation from either the post in the chat, or from the tab located at the top. Once they select Nearpod, they will be asked to log in using their name. This is all they will need to enter the presentation. Once everyone has logged in, you may begin your live instruction!
Check out this video for a step-by-step explanation, and a side-by-side comparison of what educators see and what students see.


Creating a Virtual Classroom with Microsoft Teams
With so much unknown right now in education, one thing we can do as educators is focus on meeting the needs of our students the best we can while remote learning. We may have lost the sense of security and safety our physical classrooms gave us, but with the help of Microsoft Teams we can expand those four walls and bring our students into a different type of interACTIVE learning environment.
With so much unknown right now in education, one thing we can do as educators is focus on meeting the needs of our students the best we can while remote learning. We may have lost the sense of security and safety our physical classrooms gave us, but with the help of Microsoft Teams we can expand those four walls and bring our students into a different type of interACTIVE learning environment.
Microsoft Teams has worked hard and listened to the needs of educators to make the platform as versatile and streamlined as possible. With integrations and features such as announcements, OneNote class notebook, Tabs and Assignments, and chat—Teams provides teachers with options tailored for teaching and learning.

Conversations in Teams
Being able to connect and keep in touch with students while out of the classroom is so important and channel posts makes this so easy to do in Teams. Create classroom announcements and posts that can be edit to get your students' attention. You can also control who replies to a post, change the importance of a post to draw students’ attention to something specific, and post across multiple channels at the same time.
Once a post is sent in a channel, the conversation is organized by date and then threaded. Find the thread you want to reply to, then click Reply. Add your thoughts and click Send. When replying you can also @mention someone to get their attention and to have them see a post sooner. Students (and teachers!) can also have fun by posting and replying with emojis, memes and GIFS using the buttons under the reply bar.
Creating Assignments in Teams
When creating assignments, teachers have the ability to customize each and every assignment to meet the needs of their students. Add grading rubrics for students to reference while working and for you as the teacher to use laster when evaluating their work. Customize every assignment by adding or attaching resources. This can be content from OneDrive, your device, links, and more. Once an assignment is creating you can distributed it to multiple classes or personalize the assignment by assigning it to individual students. Finally, when creating, you can customize all the dates and times that are important to the assignment. you have the ability to edit due dates and close dates, in addition to scheduling assignments to appear on a later date.
Keeping student work in order and easy to find can be challenging during remote learning, making the organization of Teams so beneficial. Teams lets you as the teacher create learning activities for students with integrated Office applications while also giving you the ability to leave feedback for students. You can also grade and track student progress by using the Grades tab. View both upcoming and turned in assignments by class, or view them across all your classes. Selecting an assignment will allow you to turn it in or view feedback and scores.
Holding Online Meetings in Teams
Microsoft Teams is a great platform to connect with students virtually and gives you as the teacher control of the meeting. You can speak and share video, mute and remove participants, share content and your screen, and privately view a PowerPoint presentation all while participating in a live meeting. The organizer also has the option to start and stop recording of the meeting which allows for asynchronous learning by proving content to learners on their own time. Students can also share their screen and view PowerPoint presentations during a chat, but the other features are for presenters only.

Simply click Meet now under the message box to start a live meeting in a channel. If you click Reply to a message, then the meeting will be attached to that conversation. You can select Meet now to start the meeting right away or Schedule a meeting to schedule the meeting for the future. Members of the channel will see an invitation for the meeting in their calendar if you decide to schedule it for later.
Content and Collaboration in Teams
Content can be shared in multiple ways when using Microsoft Teams. Teachers can add Tabs within a channel to centralize where students are going and keeping the workflow in Teams. Click + by the tabs at the top of the channel, click the app you want, and then follow the prompts. Use Search if you don’t see the app you want. Apps like Flipgrid, Buncee, Peardeck and Wakelet are just a few of the many different options available!
You can also share content directly in channel posts. Click Attach under the box where you type messages, select the file location and then the file you want. Depending on the location of the file, you’ll get options for uploading a copy, sharing a link, or other ways to share.

Collaborating in Teams has never been easier with the integration of the OneNote class notebook. OneNote notebooks are a digital binder that can be used in your class or with your staff to take notes and collaborate. OneNote Class Notebooks have a personal workspace for every student, a Content Library for handouts, and a Collaboration Space for lessons and creative activities.

We way not be able to close out the year with our students, but let’s make distance learning as familiar and comforting to our students as we can! By working in Microsoft Teams we can continue to encourage and engage students from the walls of our “virtual classroom.”
Stay #interACTIVE!
-👗➕👓
For more on using Microsoft Teams in the classroom check out the following post:
For more ideas on how to create relevant and engaging digital lessons, check out our book The InterACTIVE Class out now on Amazon!


Using the Draw Tool in Flipgrid
Part of what makes the Shorts camera so powerful are the features available to students to use when sharing their voice and ideas. Digital inking can take ideas and explanations to a whole new level.
Creative Features in Flipgrid
Part of what makes the Shorts camera so powerful are the features available to students to use when sharing their voice and ideas. Digital inking can take ideas and explanations to a whole new level.
The digital inking tool is symbolized on the Shorts camera dock with a pencil. From the moment you click on it your entire screen becomes a live digital board ready to be written on. Students can write directly on the video screen both when the video is paused and while recording live. The digital inking tool can used in combination with the whiteboard/blackboard feature to create more focus on the writing, or used alongside the photo sticker tool for annotation directly on top of images.
Creative Ways to Use Digital Inking While Recording in Flipgrid
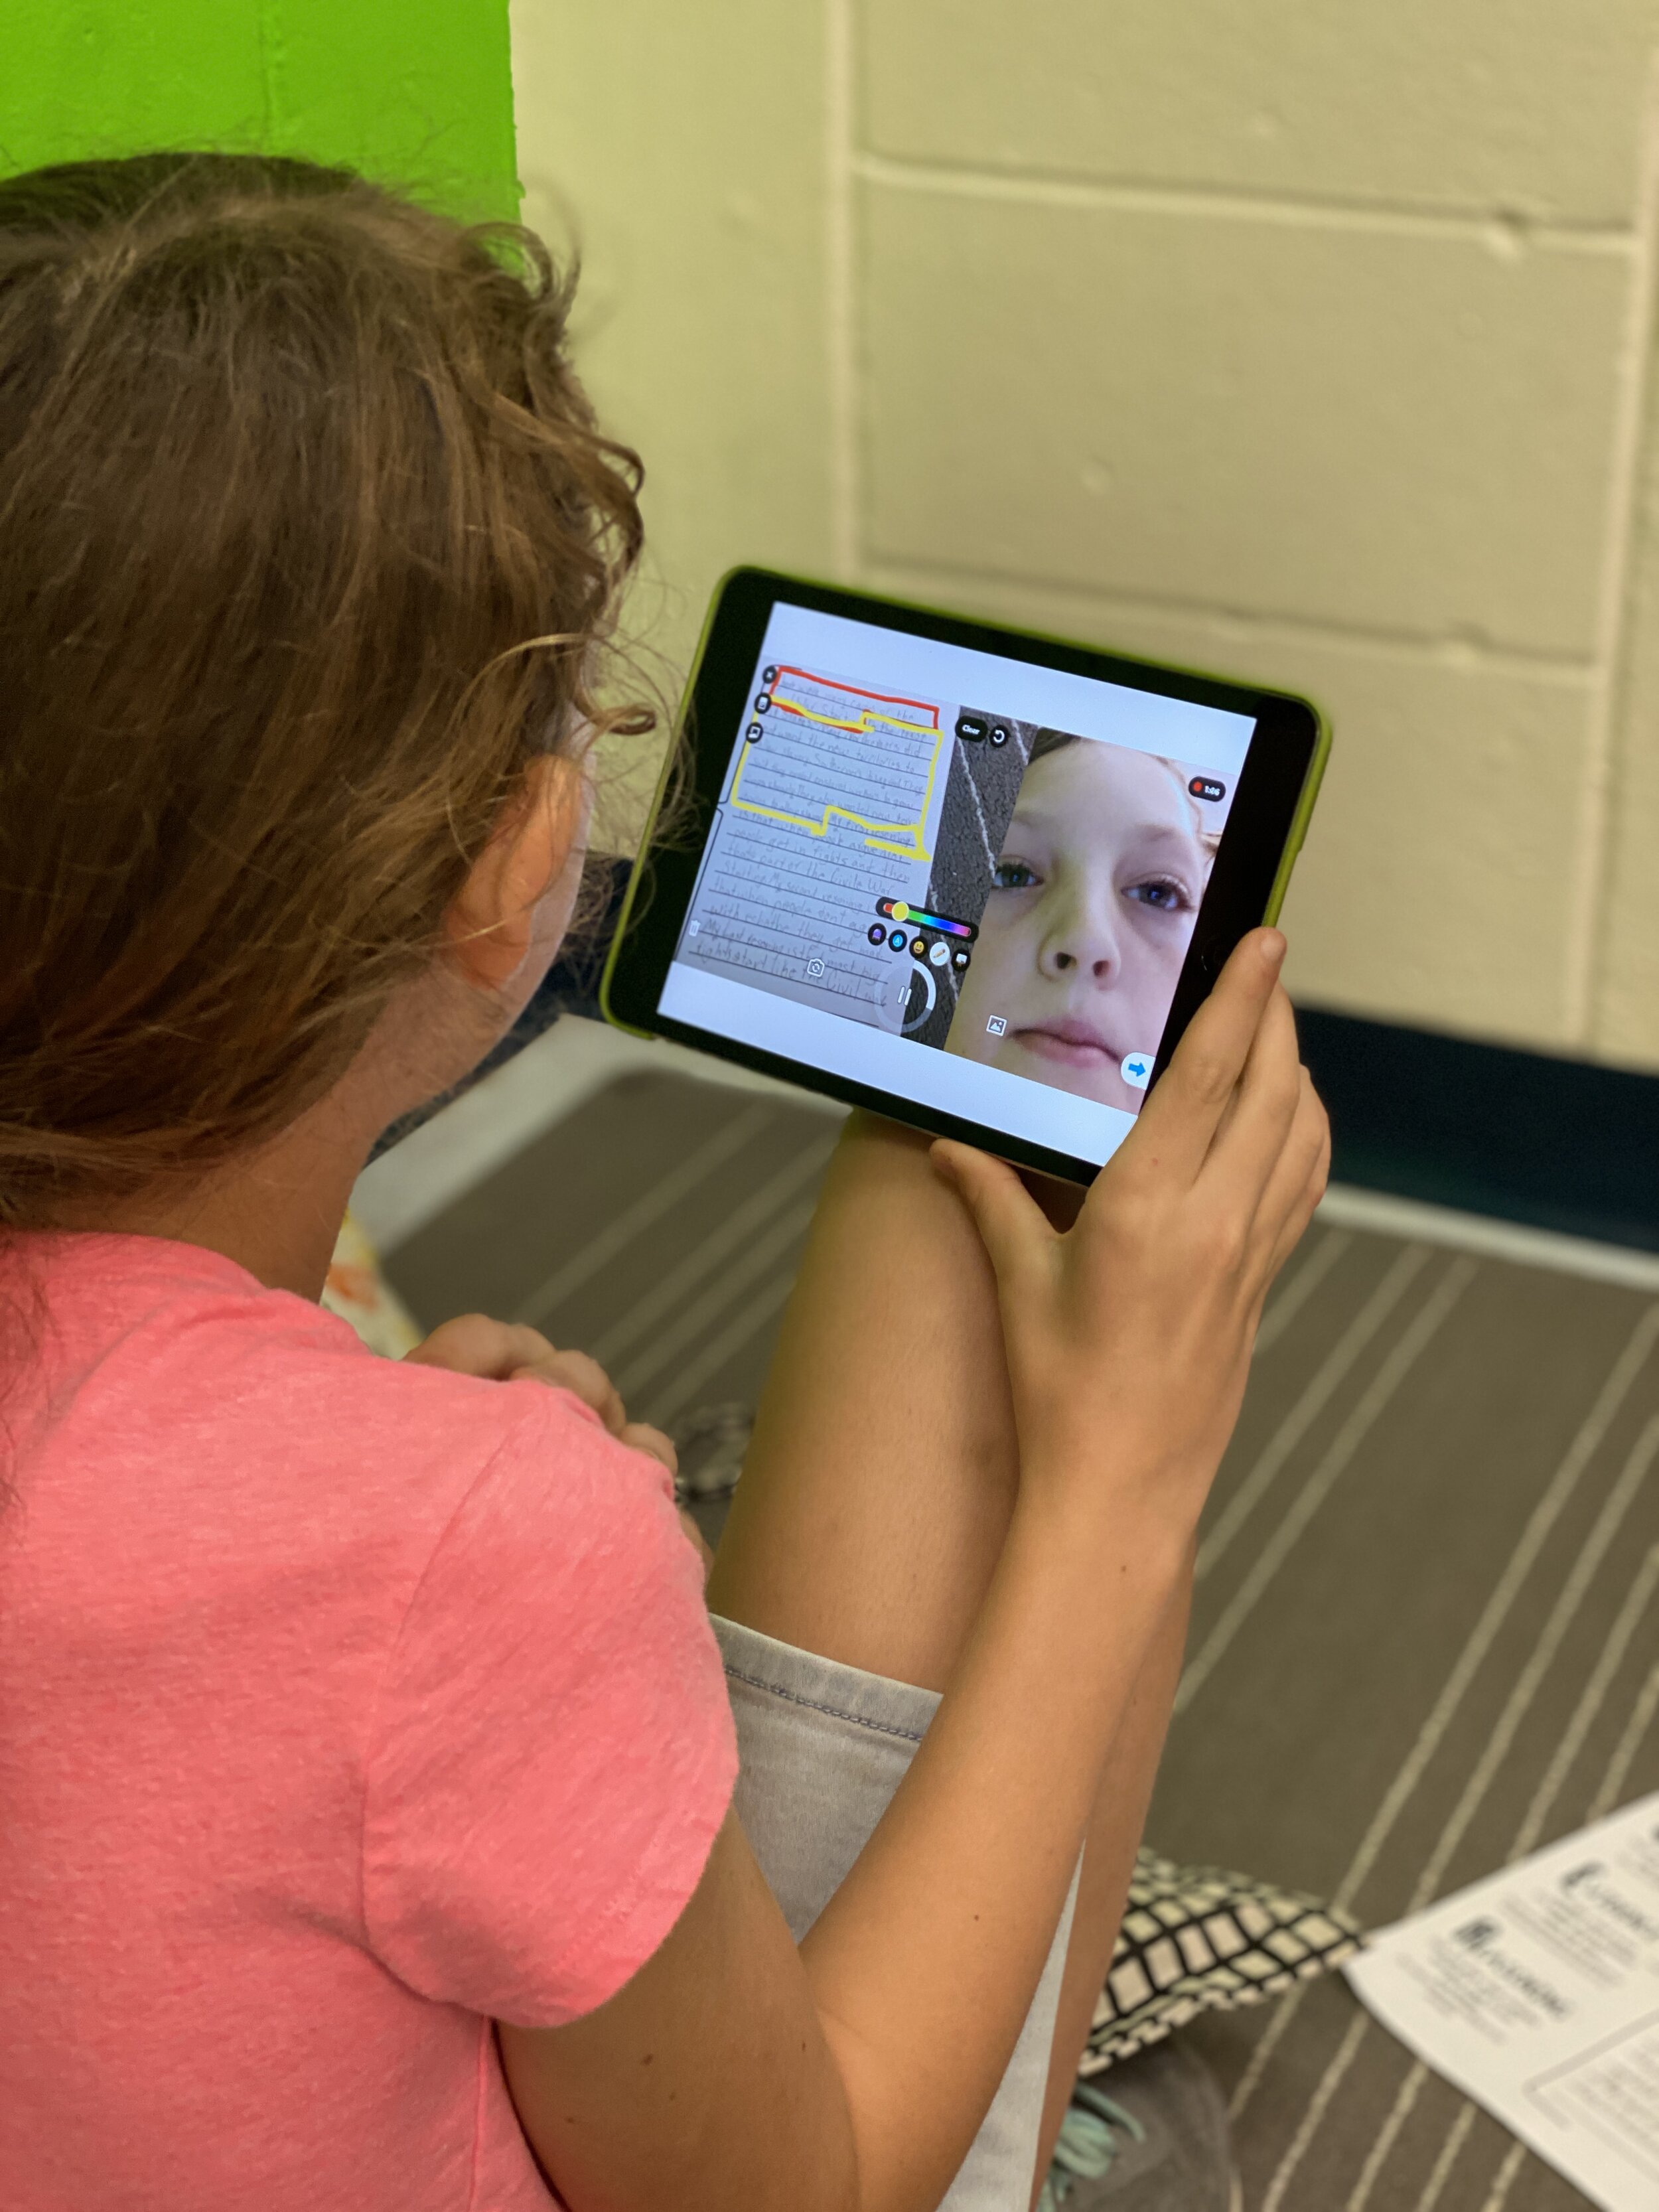
Book Snaps- Using the photo sticker tool along with the draw tool, students can live ink right on top of the pages of a book. They quickly take a photo of the paragraph or page, and then can ink, highlight, or draw, to identify parts of speech, find text evidence to support an inference or simply to draw attention to a character’s thoughts, dialogue or actions.
Math Hunt- Have students hunt for different shapes or identify angles in their video circling with the live inking draw tool as they record. They can pause as they go for a more edited video, or live record and draw as they go.

Science Scavenger Hunts- Demonstrating knowledge of subject matter doesn’t need to just be in math! Have students use the draw tool to identify living vs. non-living things in the backyard, constellations in the sky (real or student created!), or to show length and measurement.
Math Explanations/Number Talks- Students can have a unique place to share their math thinking and explanations. Using the whiteboard/blackboard feature along with the live inking (and even the sticker emojis!), students can explain their thinking and show their work for various types of math problems. Take it a step further and combine the live inking with the pause feature in Flipgrid, and students can share multiple ways to solve the same problem all in one video.

Creative Costumes- Flipgrid developers have spent so much time designing and developing a large set of of creative stickers and emojis, but sometimes the exact sticker just can’t be found. Use the draw tool to create the perfect Dr. Seuss hat, , or to transform yourself into the president you are researching in class.
For more information on how to use the draw tool, check out our tutorial on the Flipgrid YouTube channel.
To read more about Flipgrid check out these posts:
Using Flipgrid to Critical Thinking
- 👗➕👓
For more #interACTIVE lesson ideas using Flipgrid, check out our book The InterACTIVE Class on Amazon!

