


10 Classroom Management Tips and Strategies
Danny Steele was quoted as saying, “Classroom Management is not about having the right rules. It’s about having the right relationships.” We completely agree here. If you’re looking for classroom management tips, it’s important to take into consideration that your management should change every year because your students change every year. Deepening the relationships between you and your students can create a rich and thriving interACTIVE environment. To get to this point, we’ve curated 10 classroom management tips. Check them out here!

Danny Steele was quoted as saying, “Classroom Management is not about having the right rules. It’s about having the right relationships.” We completely agree here. If you’re looking for classroom management tips, it’s important to take into consideration that your management should change every year because your students change every year. Deepening the relationships between you and your students can create a rich and thriving interACTIVE environment. To get to this point, we’ve curated 10 classroom management tips.
(click on any subheading to jump to that section)


Custom Device Wallpaper Using Canva

Whether you’re using shared devices or in a 1:1 ratio, device management is crucial. To make this easier, we like to change out the wallpaper on the devices so that we can differentiate them. Canva makes this easy! Just search for your device’s wallpaper dimensions and you will find templates to use immediately.


Compliment Overload!

Positive reinforcement is the most important key to unlocking powerful student relationships - and it doesn’t take much effort at all. In fact, your words are the most powerful tool to making your students feel welcome, encouraged and successful. Even when your students are wrong, there are ways to go about encouraging them in a discouraging situation. Here are some examples:
Thank you for showing me that you are ready!
I love the way that (student) is showing me that they are (task).
You are absolutely on fire right now!
I like the way you’re thinking…
You were a leader when you…
That was an amazing idea!
You’ve inspired us all!
I’m really impressed with your ability to…
Amazing work! I can tell you put a lot of effort into…
Thank you for teaching us the way that you think. We have all learned from you today!

Differentiation with Wakelet

Differentiating instruction doesn’t have to be hard or time consuming. With Wakelet, educators can quickly and easily assign targeted content to their students. Start with a collection and then add the work you’d like the students to complete. If you have groups working on the same task(s), you can always copy your Wakelet collection to save even more time. With integrations like Canva and Microsoft flip, you have tons of options for your students. To download our template, click here or thee image below!


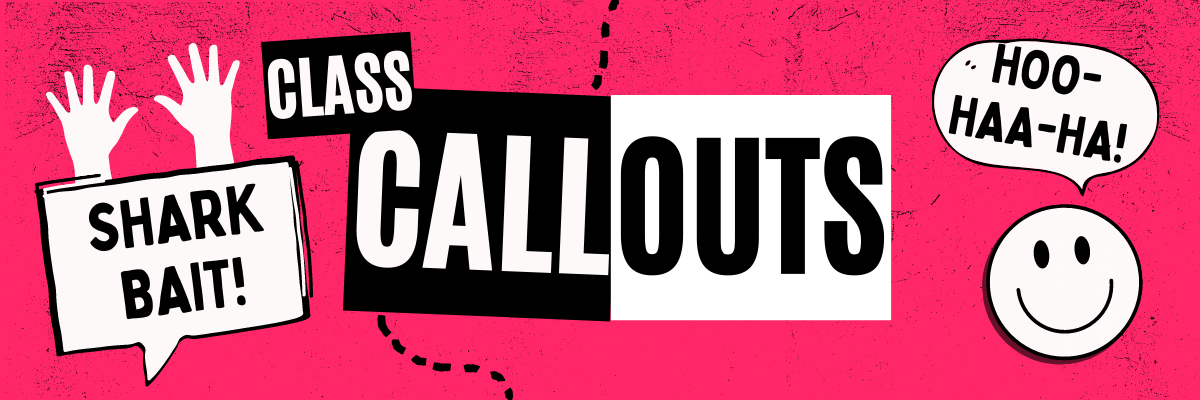
Class Callouts!

Class callouts (or chants) are a fun way to grab your students’ attention in a hurry. It’s best to use these with regularity to help your students become more familiar with them. Here is a list of some of our favorites:
“Shark bait…” (HOO-HA-HA!)
“Flat tire…” (Shhhh!)
“Hear ye, hear ye…” (Yes, Queen?)
“Yellow or red, let’s discuss…” (Time to stop acting SUS!) [Among Us reference]
“Tootsie Roll, Lollipop…’ (We were talking, now let’s stop!)
“Hey, ho…” (Let’s go!)
“Does anybody know?” (We don’t talk about Bruno, no, no!)
“Shake it, shake it…” (Like a polaroid picture!)

Group Management

In our classrooms, we have multiple incentives: one for individual students, one for tables/groups, and one for the entire class. In Joe’s room, he has five tables of students (each is named “Hot Spot #1, Hot Spot #2, etc). When he sees tables working together as a team, he moves a bandana (located hanging on the front board) to that particular table/group. The bandana gets moved frequently throughout the day, but whichever table/group has it at dismissal wins a prize. The kids love it and it’s a great way to encourage teamwork!

Music Transitions

We know what you’re thinking…How can music have anything to do with classroom management? The key is familiarity! When you use a class playlist and repeat the tracks, your students become familiar with the songs. For example, if you’re playing the same 2 minute long song, the students will know exactly how much time is left in the song as it is played. We have a transition song going from one activity to the next, a clean up song (for a bit longer tasks), and a pack-up song. The kids hear these songs day after day and know that they need to be ready and focused by the time the song is over. Below is a playlist of tracks that we curated that our students enjoy. Click the image below to download for yourself!


Teacher Created Clever Pages

Digital management can be tricky. But, if your district has access to Clever, you can easily get your students to where they are supposed to be quickly and efficiently. Clever is a single-sign on application that basically acts like a bridge between sites. When your students log onto Clever, they are able to log onto other websites without having to re-enter a username or password. The best part of all is that teachers can create their own pages with specific apps and links that are relevant to the class. Swipe through the images and check out our tutorial below!
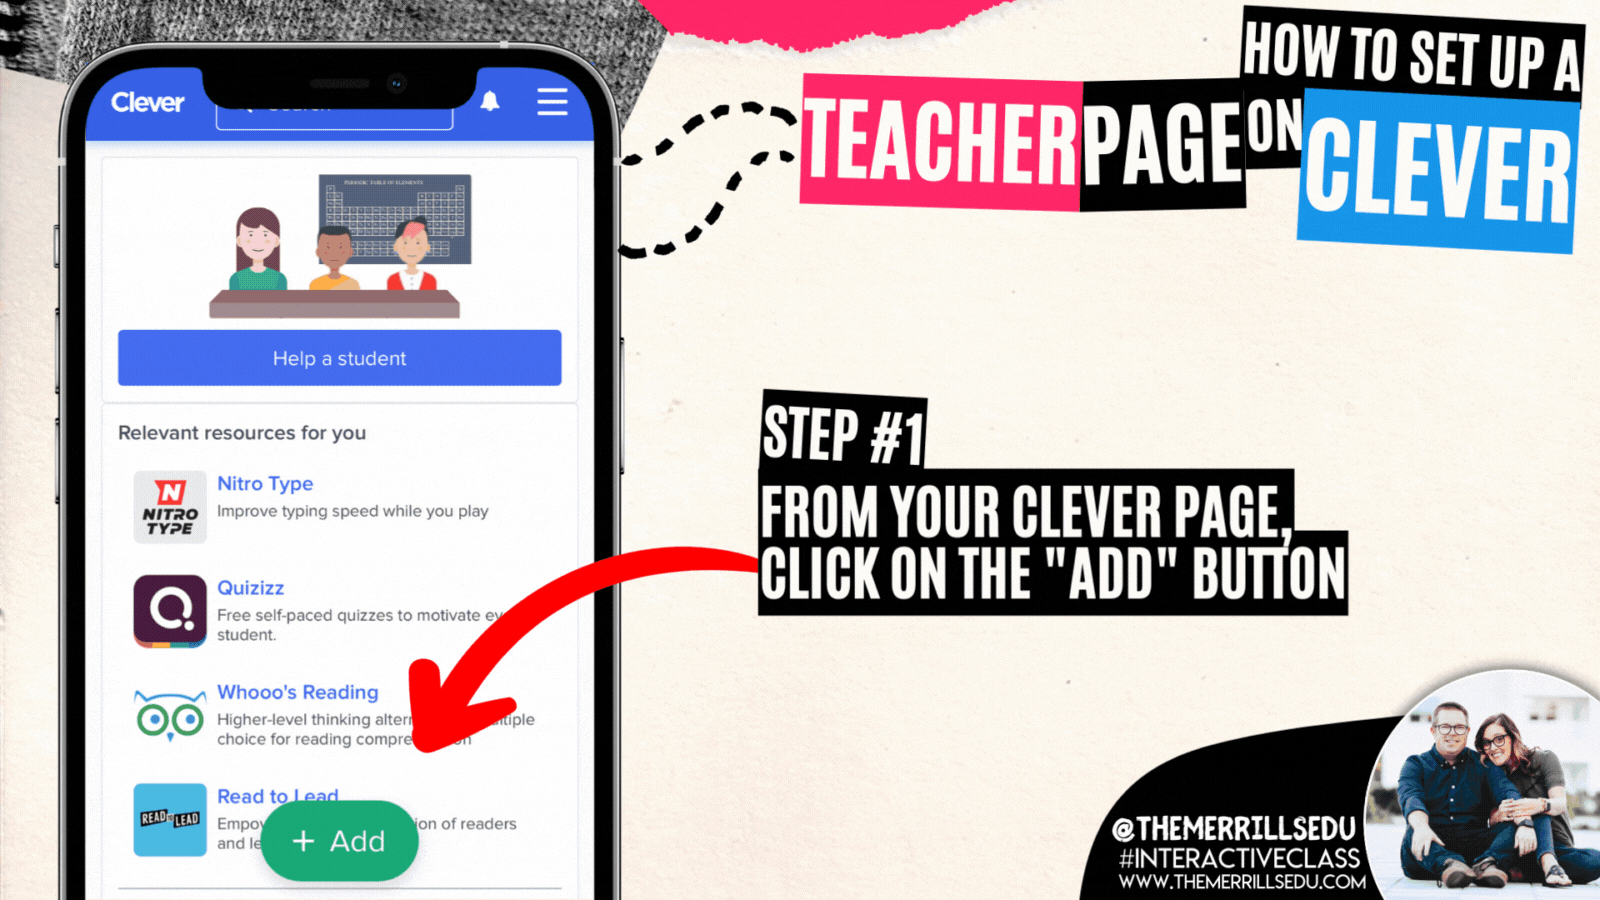
This process may be completed online or via the Clever app. To create your own Teacher page on Clever, log onto Clever. From your educator panel, click on the “add” button.
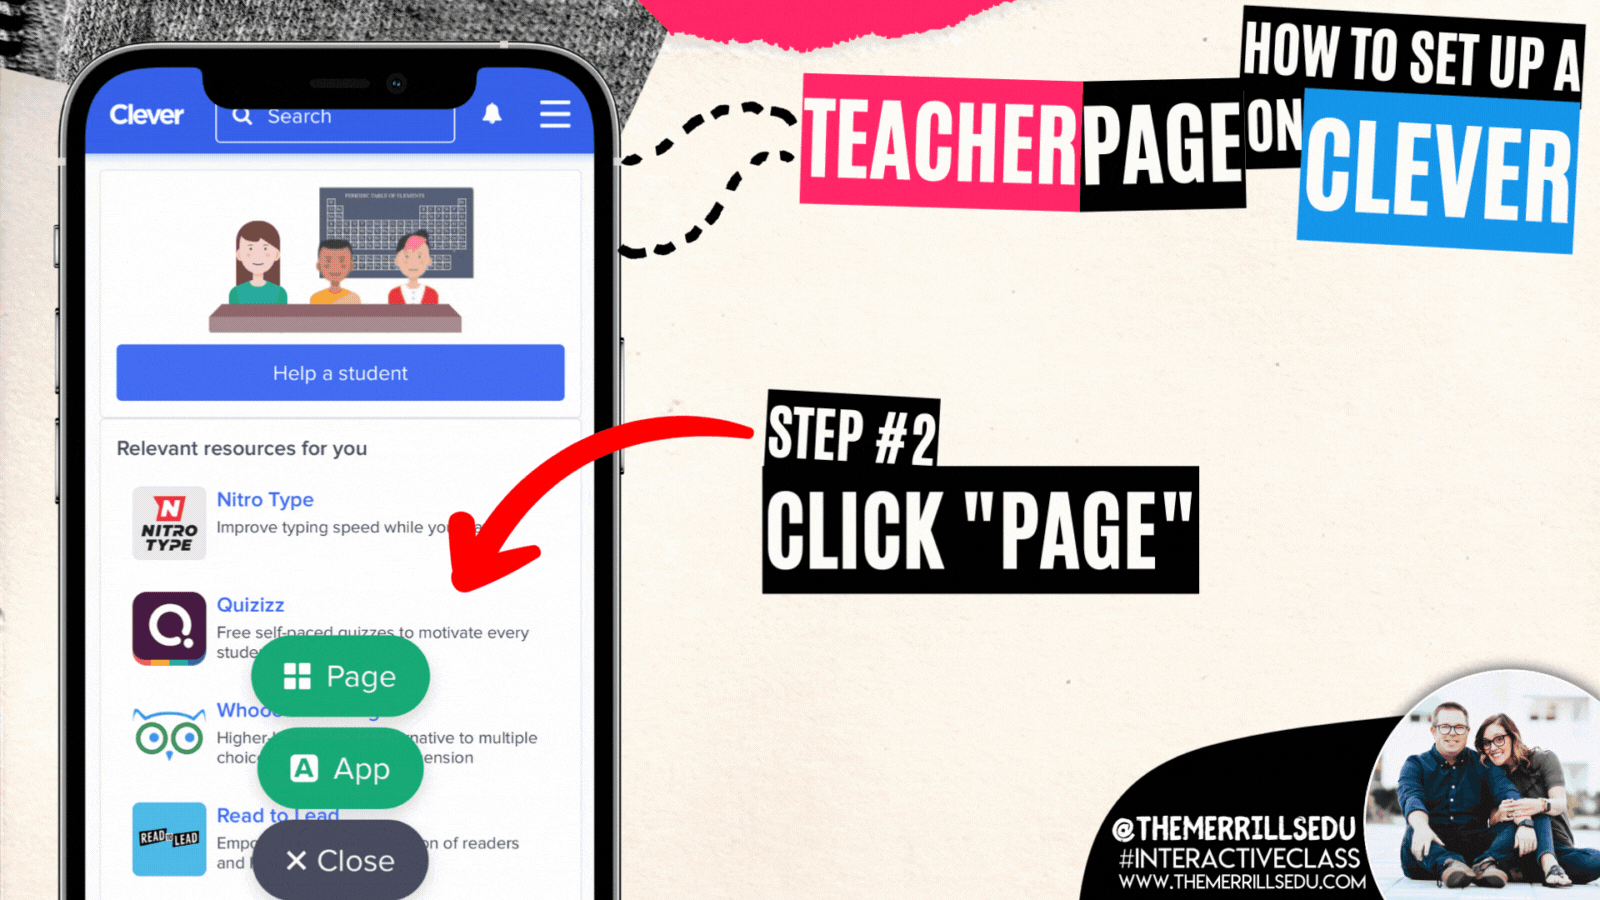
Once you’ve clicked on the “Add” button, a few options appear. Click “Page” to add your own Teacher page.
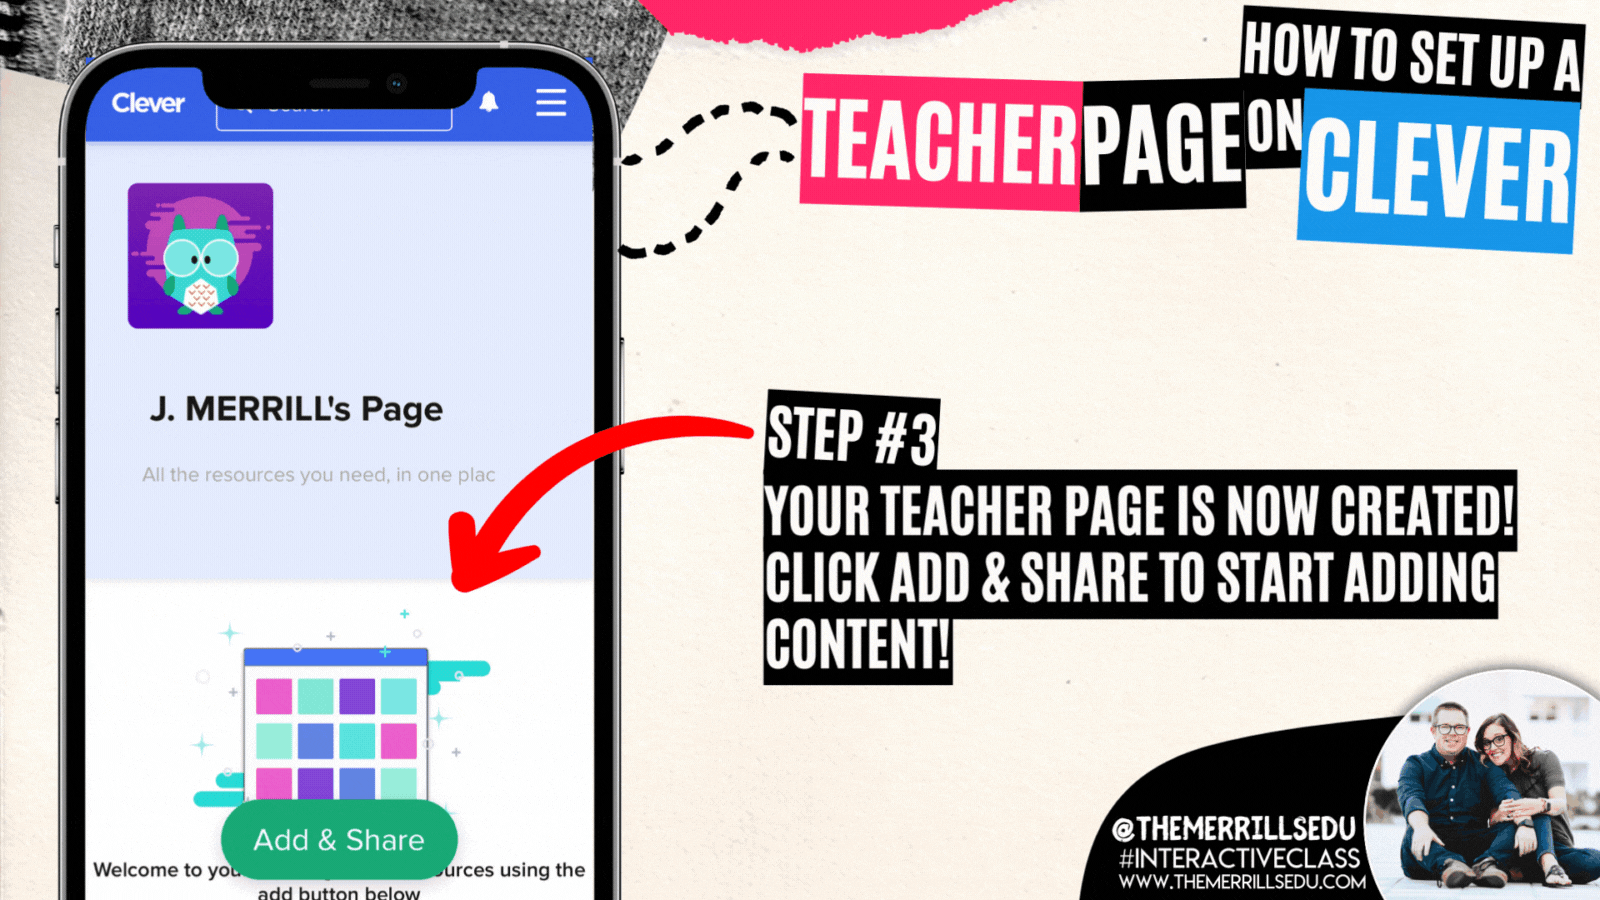
Congrats! Your teacher page has been created! Now, it’s time to start adding content to share out to your students. Click on “Add & Share” to start adding content!
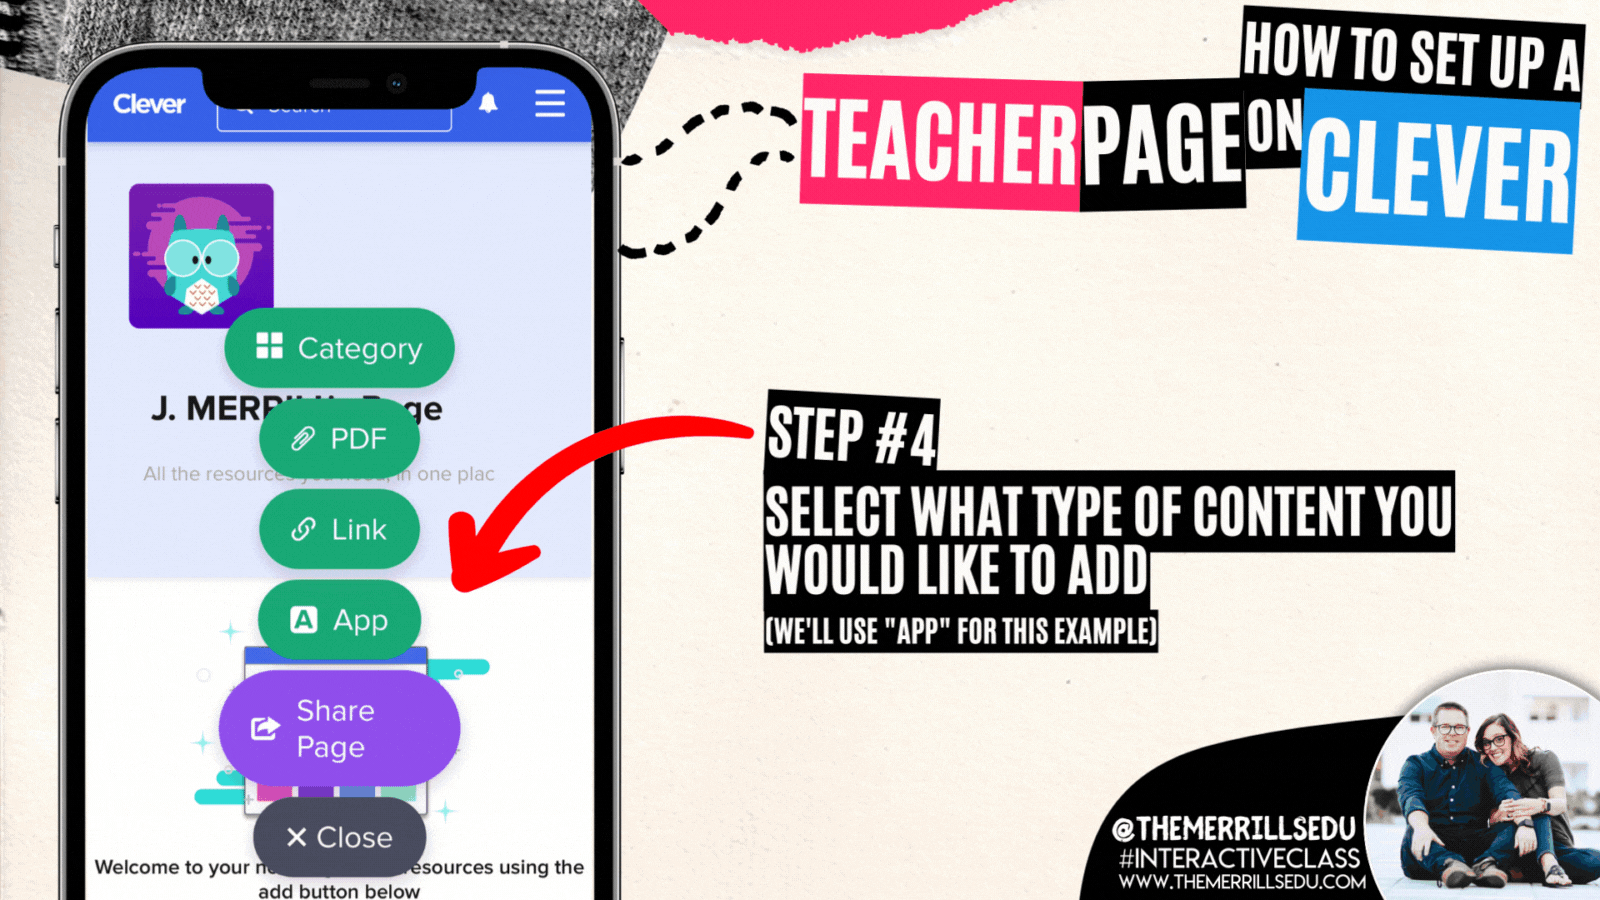
Several options appear. Depending on what you are looking to add, click that particular button. For this example, we’ll choose an App.
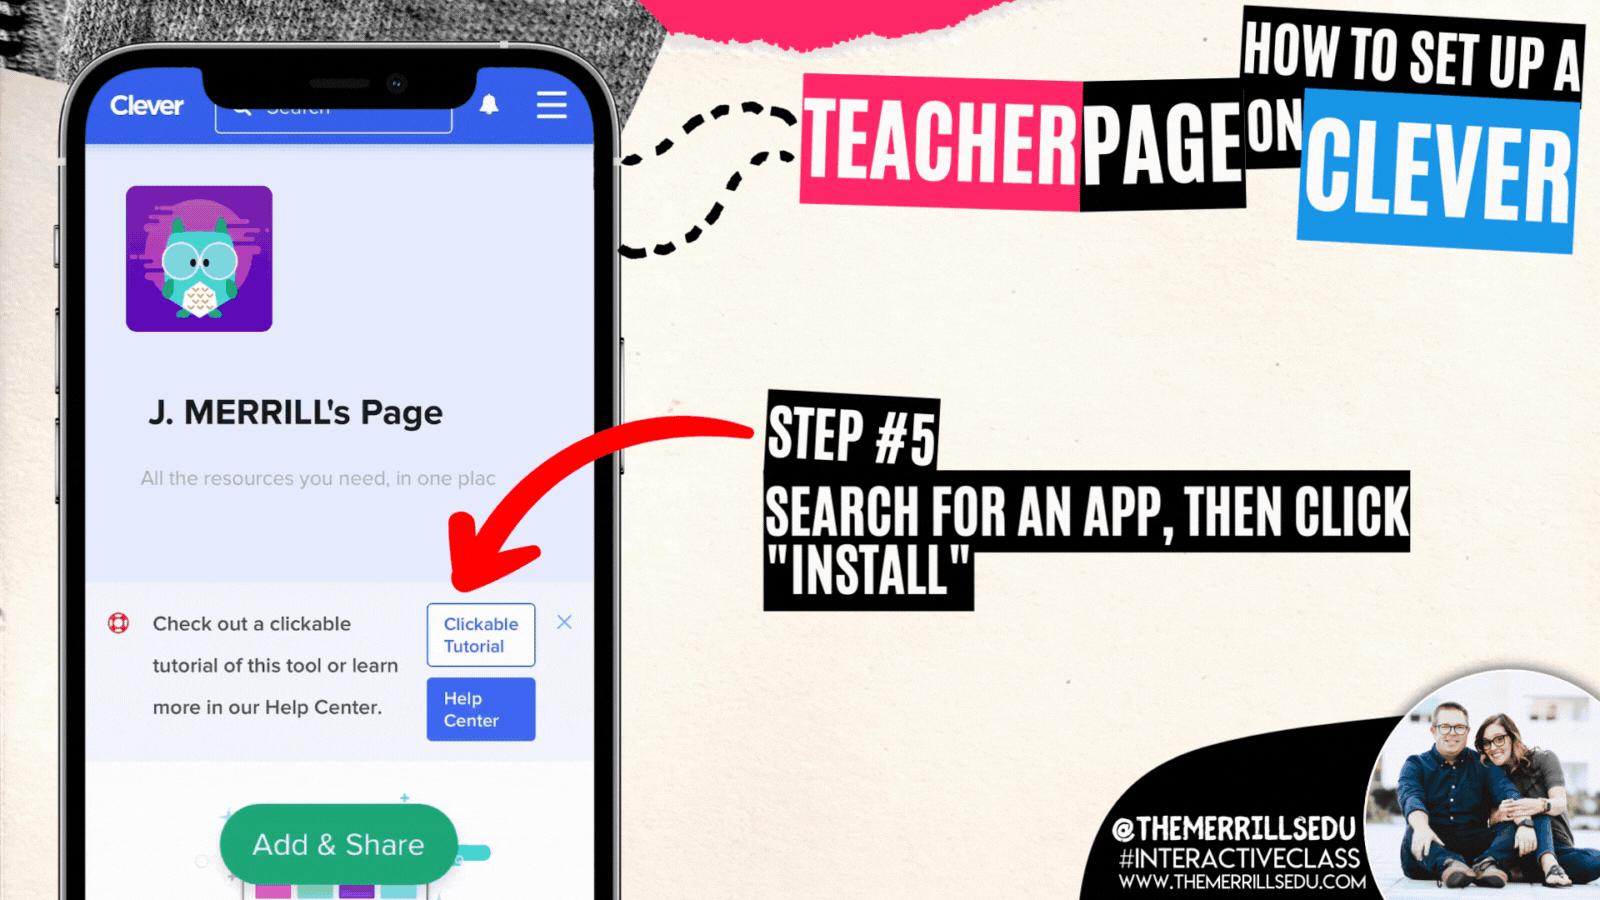
Search for an app that you wish to add to your teacher page. When you find the app, click it and then click “Install” to add it to your teacher page.
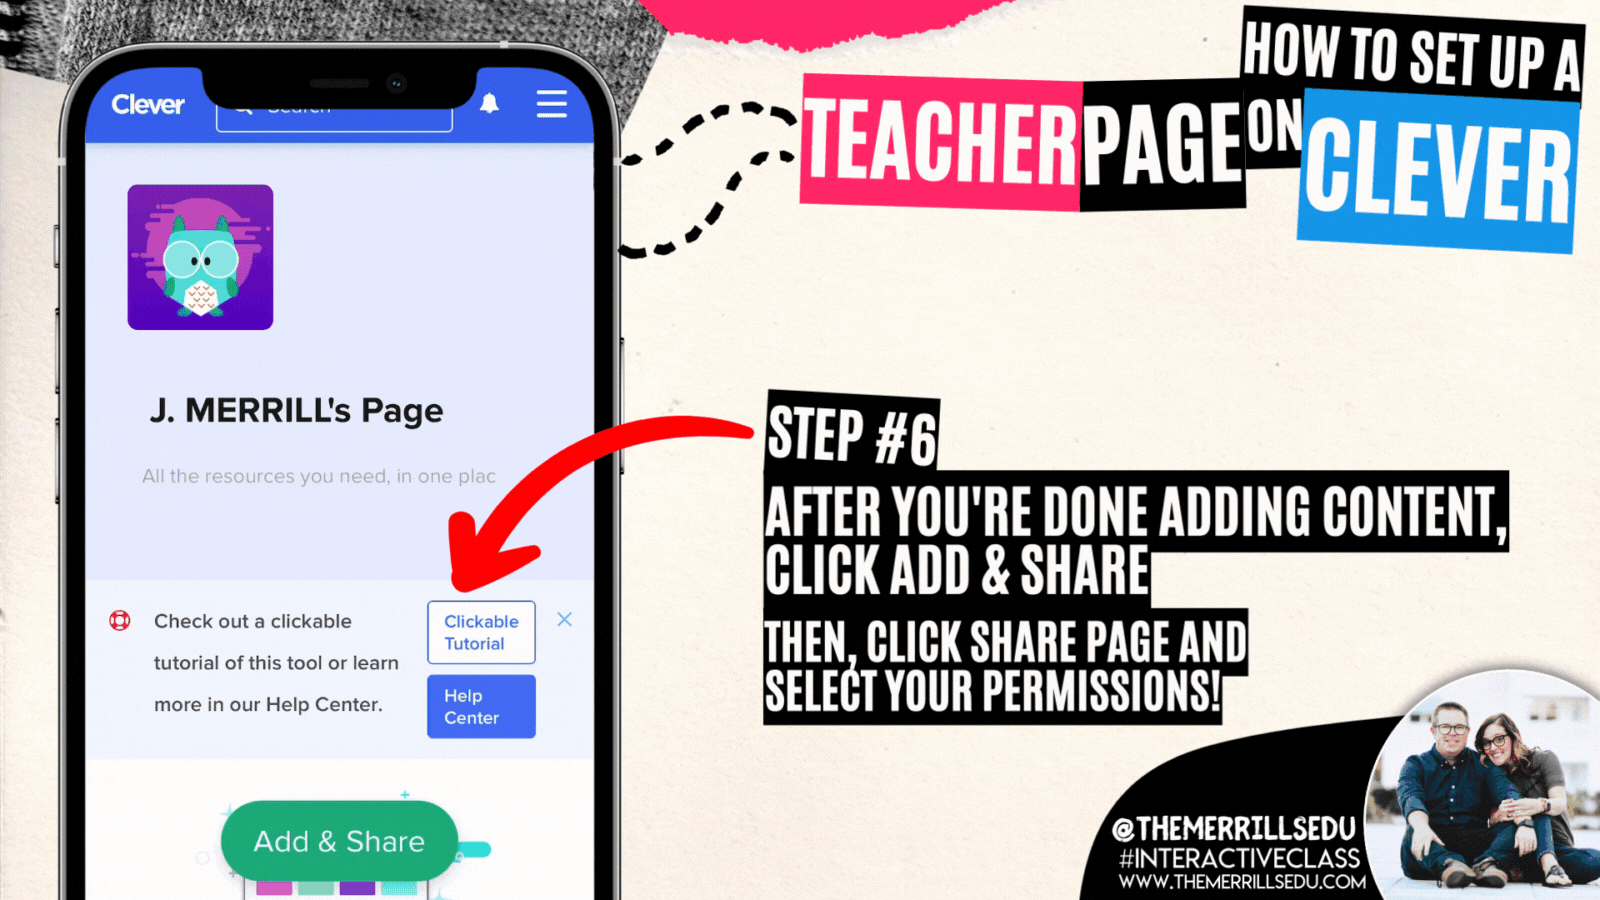
Lastly, click ‘Add & Share.” Then, click “Share Page” and select your permissions!

“S.U.S.” Student Award (Seriously, Unbelievable, Student - inspired by Among Us)

Kids today are going crazy for the game Among Us. Like most video games, in addition to characters and strategy, you also have to learn it’s lingo. one of the more popular terms to come from Among Us is the term: “sus” (short for suspicious). Since the kids are already heads over heels on this, we decided to bring it INTO the classroom. This plush Among Us toy travels around the classroom throughout the day. Every time we catch a student doing something well, we place it on their desk. The agreement is that the only ones allowed to touch the plush is the teacher and the student who earned it. If another student touches it, they may lose the privilege of earning it that day. Whoever has this plush at the end of the day wins a prize! (Tip: we recommend paring this with our bandana / Group Management idea above!)


ClassroomScreen.com
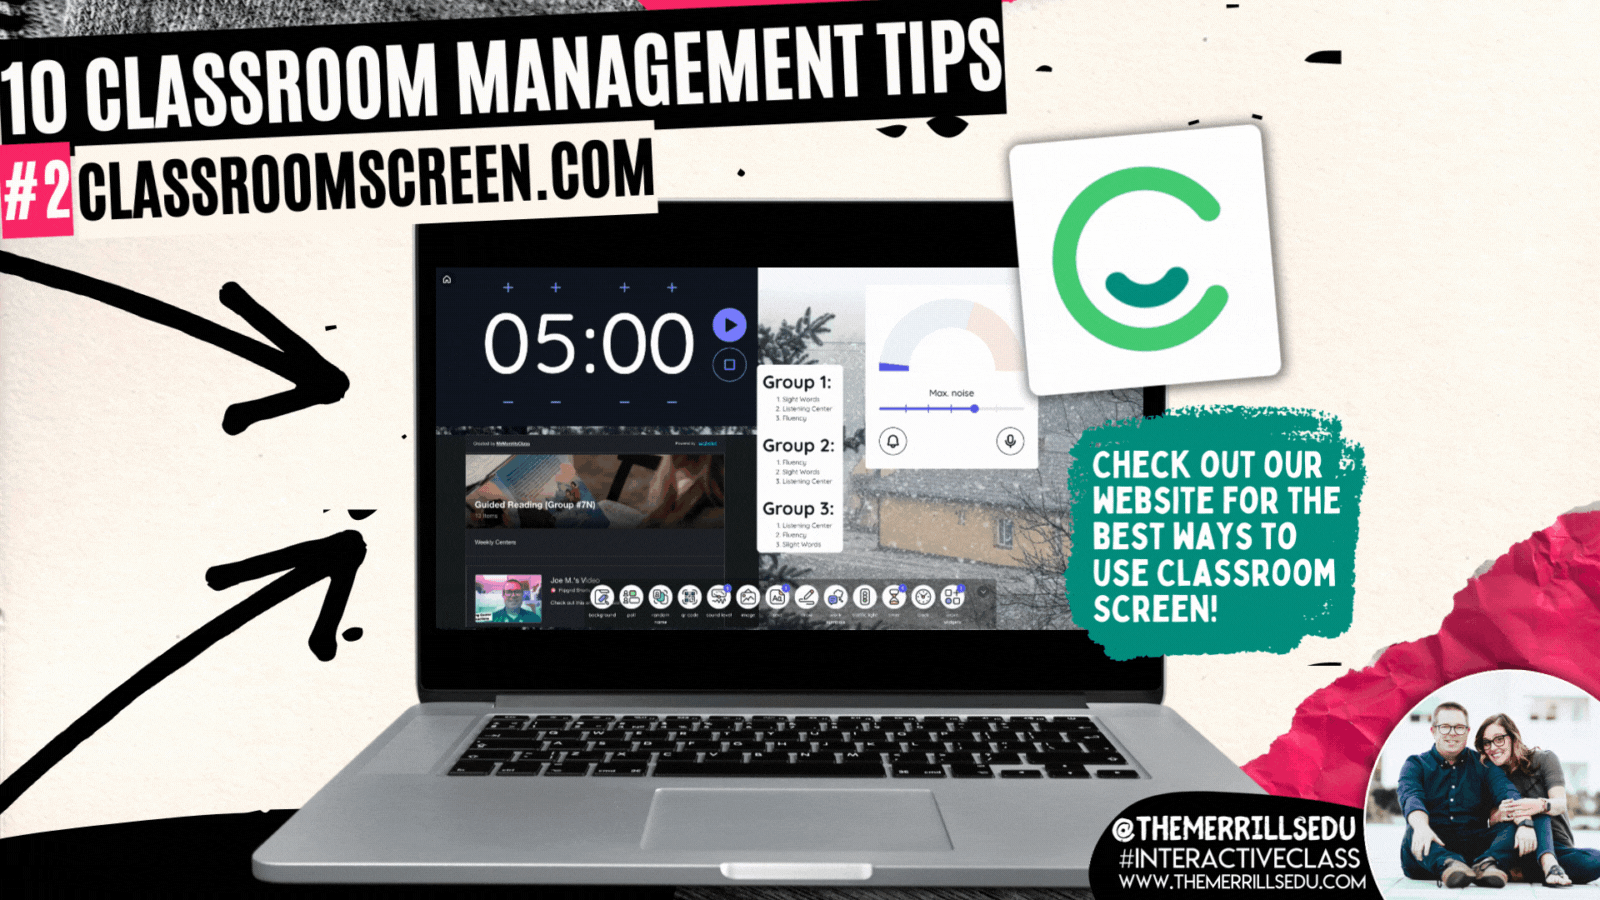
If you’re looking for a good whole group management website, then look no farther than Classroomscreen.com. This website comes in both free and paid versions ($30 a year to go Pro), and offers tons of options. Here are a few of our favorite ways to use it in our classrooms:
Set timers: Let’s be honest…this is every bit as much for us as it is for the kids. We’ve got to stay on schedule!
Add notes: Give specific instructions, spell tough words and more.
Launch noise meters that will “ding” every time the noise level goes beyond a selected range
Embed content: Embed content from your favorite ed tech tools like: Canva, Wakelet, Flip and more!
Random Name Selector: With a “Pro” account, you can enter your class names and this feature will randomly select a student for you1
Webcam: Add your document camera to your Classroom Screen!
There are so many more features to be explored! How are you using ClassroomScreen.com? Tag us on social media and let us know!

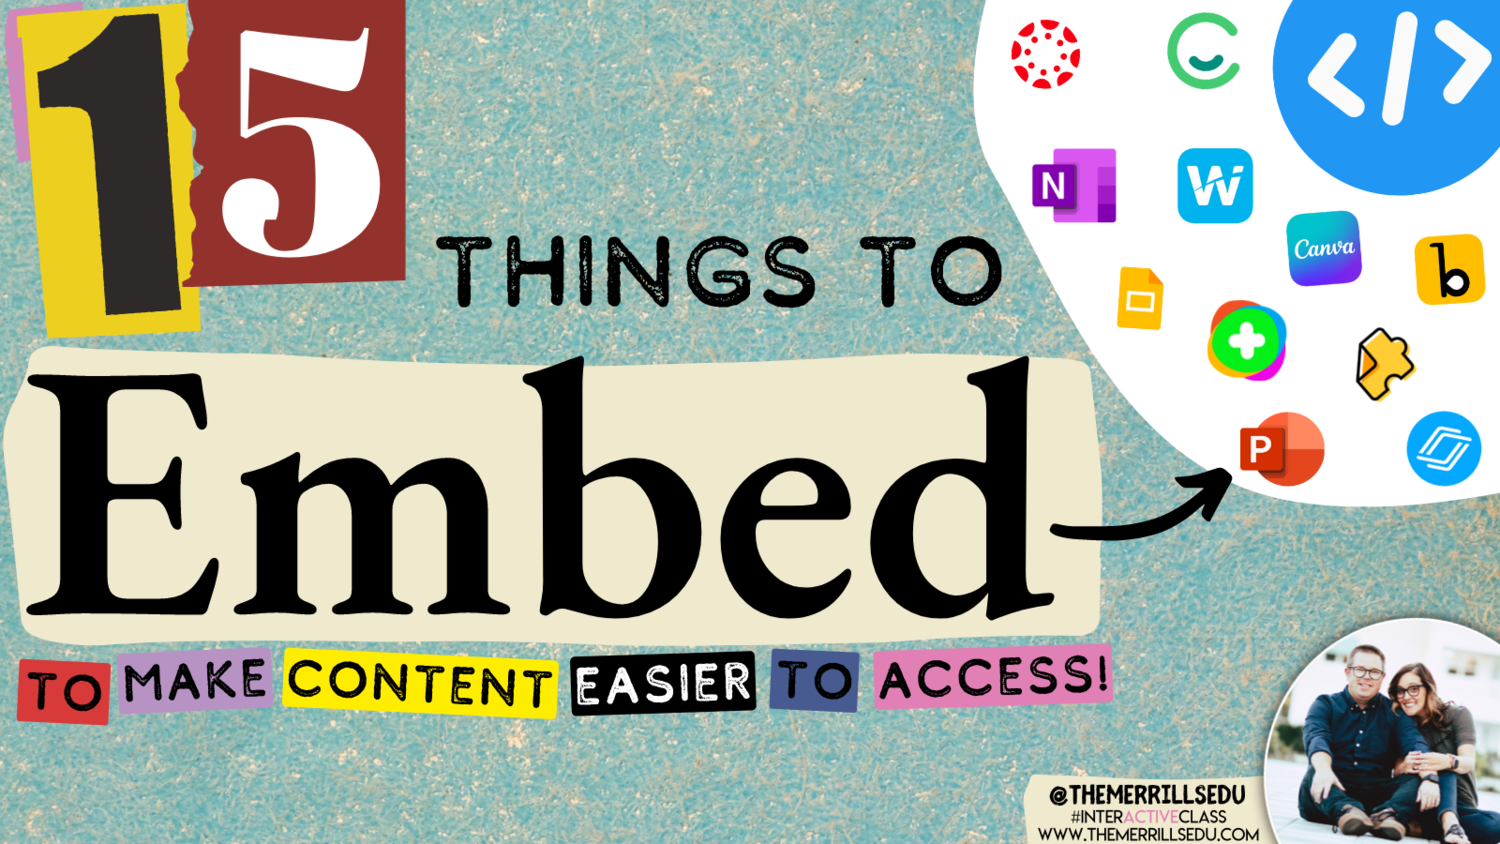
Embedding Content

Embedding apps is a great way to keep your content organized, but more importantly, it can help keep your students focused when working on tasks. The option to embed from apps is becoming increasingly more popular, and you may even be able to embed some of the apps you’re using right now! We hand picked 15 different ways to embed your content. You can learn about them all in our blog post below! Click the image to head that way!
-- Let us know if you’re using any of these ideas in your classroom! Be sure to follow us on social media (@TheMerrillsEDU everywhere) and tag us! 👓👗
For more tips, tricks and lesson ideas for making learning more interACTIVE, check out our books The InterACTIVE Class and Flipgrid in the InterACTIVE Class on Amazon!


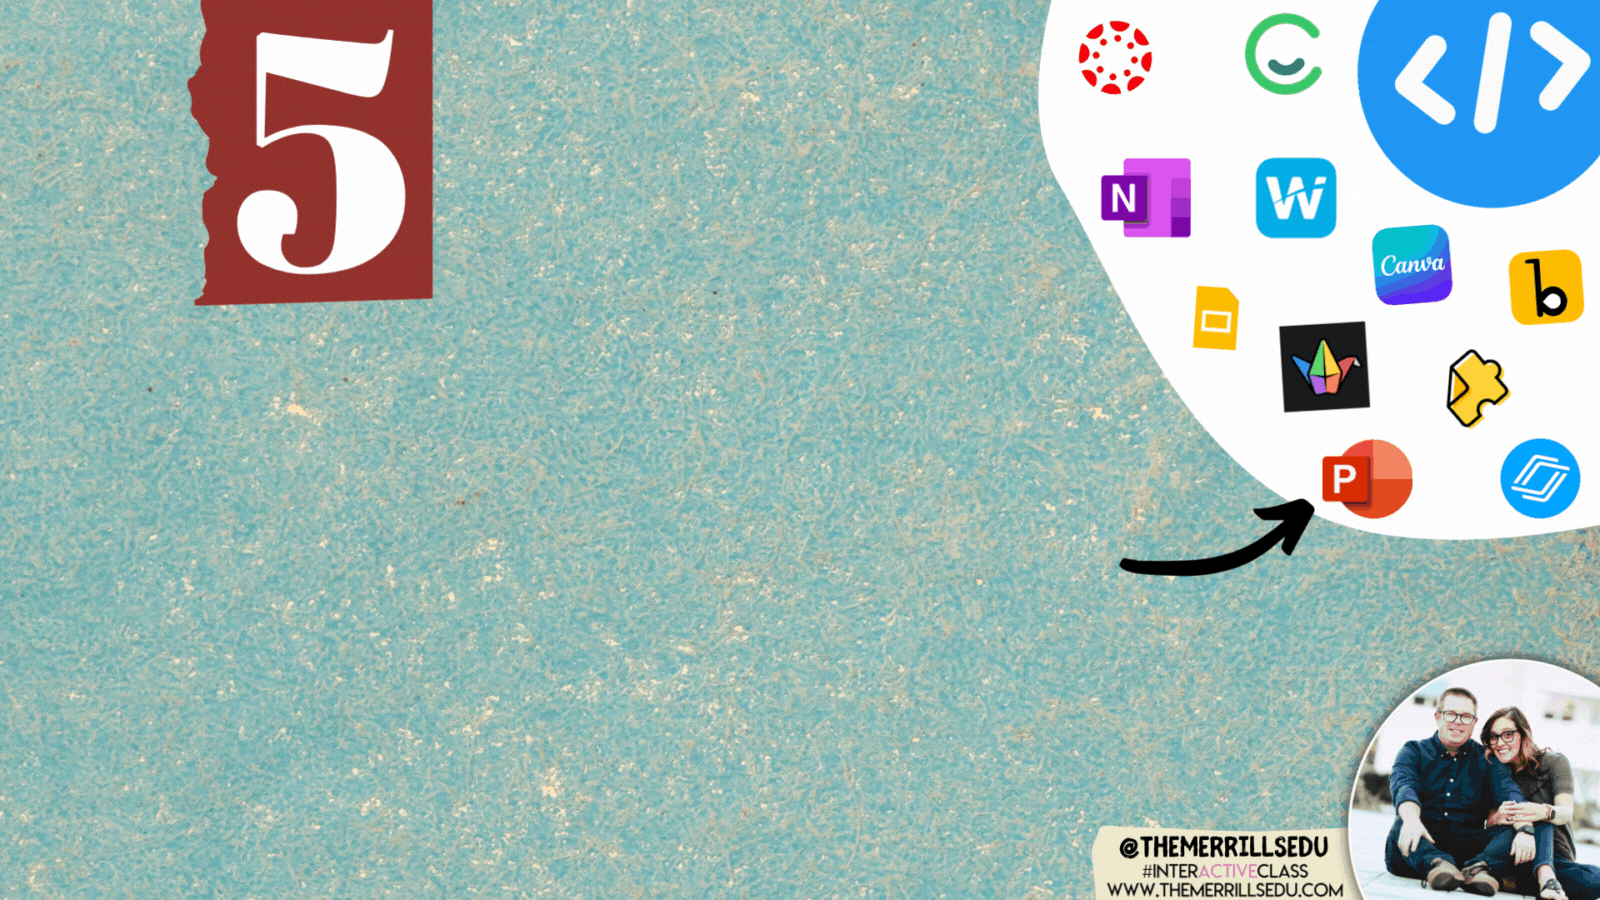
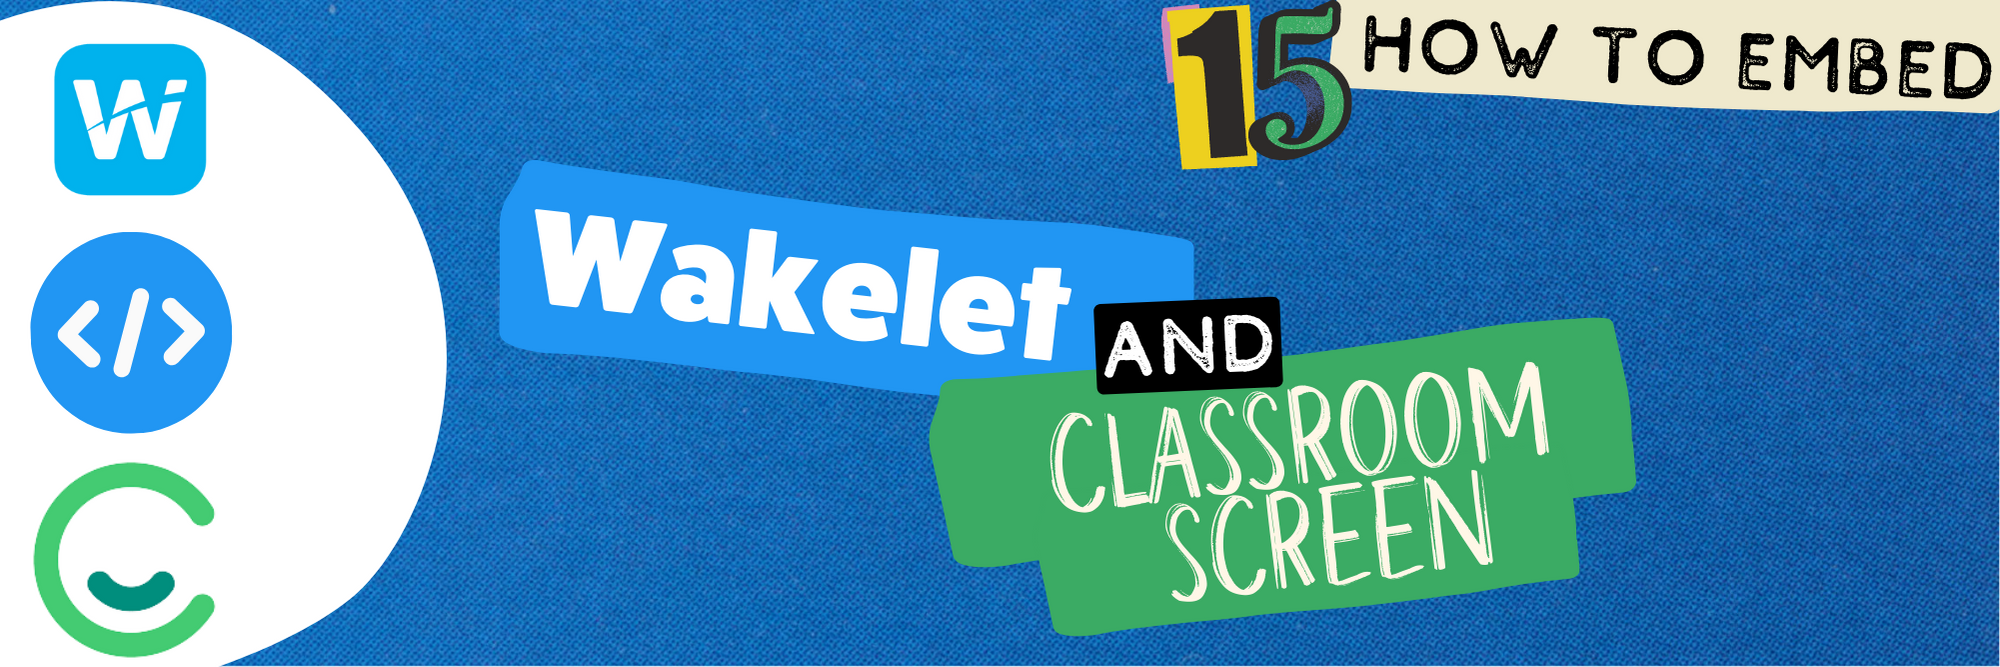
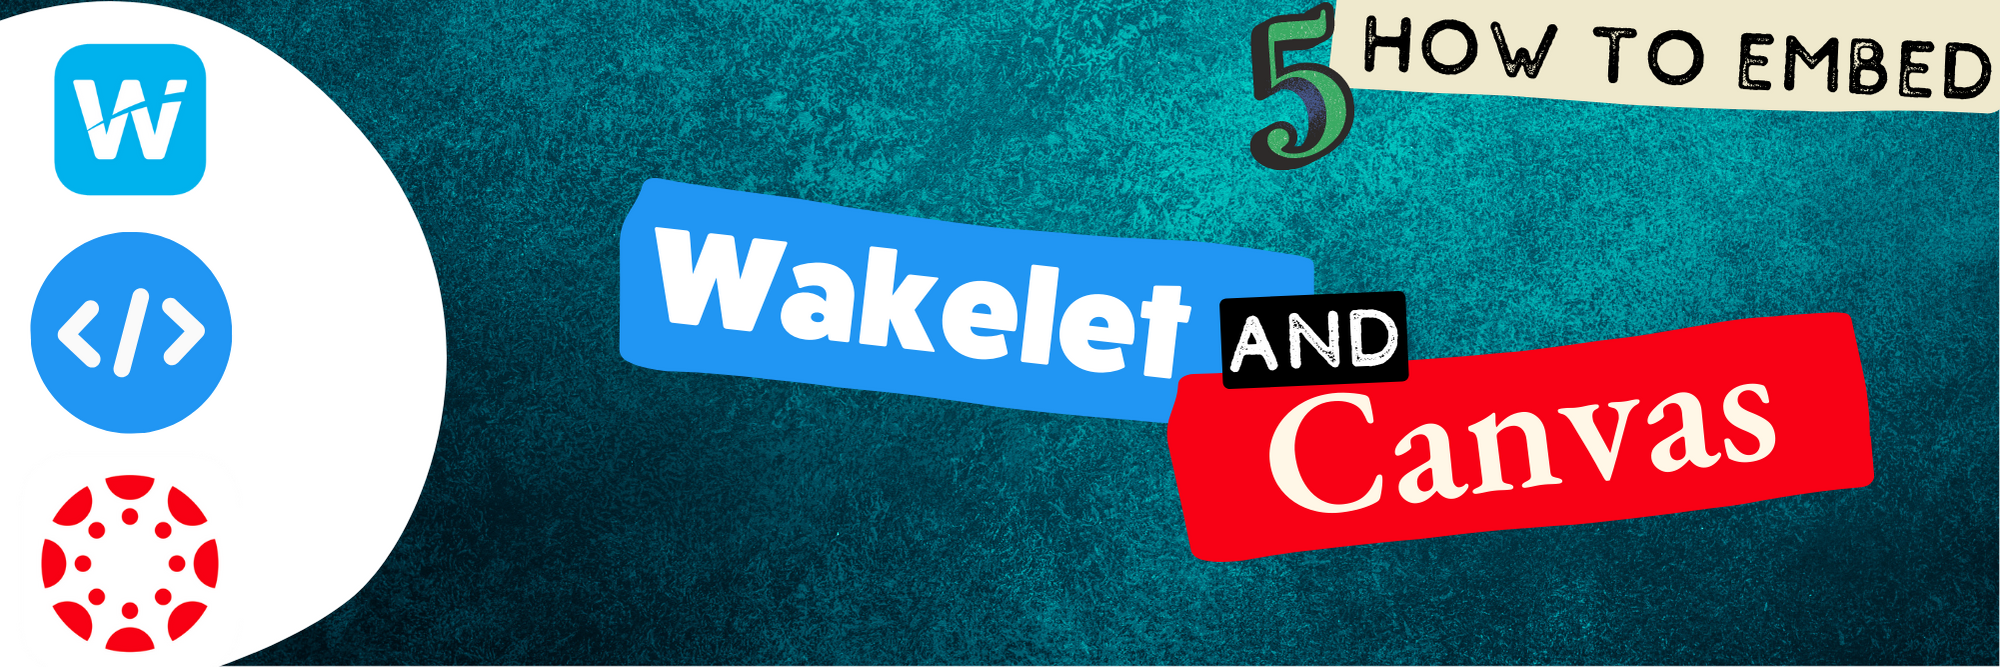
15 Things to Embed to Make Content Easier to Access!
Embedding apps is a great way to keep your content organized, but more importantly, it can help keep your students focused when working on tasks. The option to embed from apps is becoming increasingly more popular, and you may even be able to embed some of the apps you’re using right now! Here are 15 different ways we love to embed!

Embedding apps is a great way to keep your content organized, but more importantly, it can help keep your students focused when working on tasks. The option to embed from apps is becoming increasingly more popular, and you may even be able to embed some of the apps you’re using right now! Here are 15 different ways we love to embed!
Please note: This blog post was hand-crafted and was not created using AI.
(click on any subheading to jump to that section)


What does it mean to embed something?
According to BigCommerce.com, Embedding refers to the integration of links, images, videos, gifs and other content into social media posts or other web media. Embedded content appears as part of a post and supplies a visual element that encourages increased click through and engagement. The key takeaway here is that your embedded content appears to be a part where you are posting it. In other words, it’s being housed by wherever you are placing it.
Embedding & Hyperlinking
So why embed over hyperlink? By embedding your content, your students will not have to leave one app to visit another to complete a task. Everything is organized and in one place. Hyperlinking your content is not a bad thing, it just adds another step for students. Embedding creates a streamlined experience. So, let’s take a look at what some of our favorite embedding combos look like!

Padlet Embedded into Canvas
Take your Padlet boards and place them right into a Canvas page! Here’s how:


Create or find the Padlet board that you’d like to share, then click on the share icon.
Click on Embed in your blog or website.
Click Copy Padlet embed code.
4. In the Canvas page, click the cloud icon (if you don’t see a cloud icon, click the three dots to expand the toolbar).

5. In the pop up window, paste the copied embed code from Padlet then click the blue “Submit” button.
6. Your Padlet board is now embedded into your Canvas page! Click “Save” to keep the changes.

Padlet Embedded into Book Creator
Adding your Padlet boards into Book Creator can help keep track of student work. Here’s how!


Create or find the Padlet board that you’d like to share, then click on the share icon.
Click on Embed in your blog or website.
Click Copy Padlet embed code.
4. Log into Book Creator, then open or start a new book. In the book, click on the + icon, followed by “More.” Scroll down until you see “Embed,” then click it.
5. Paste the copied embed code from Padlet, then click “Confirm.”
6. The Padlet board is now embedded into the book.
This embed is only a hyperlink out to the Padlet board. While it will not allow students to interact with the Padlet content directly in the book, it will provide an organized way to revisit your Padlet boards.

Padlet Embedded into Classroom Screen
What is Classroom Screen?
Classroom Screen is a free tool (with a paid option) that educators can use to project in front of the class. Users can pick a background to be projected from a collection of images, animated gifs, or upload their own image. Classroom Screen provides many options to add to your background such as: a timer, random name generator, sound level alarms, and our personal favorite - embedding.
With Classroom Screen, you can set a class timer to give students time to create, then give them additional time to respond. This alleviates stress that students may face when trying to finish their work. With Classroom Screen’s embed feature, you can add a Padlet board right into your Classroom Screen. Here’s how it works:


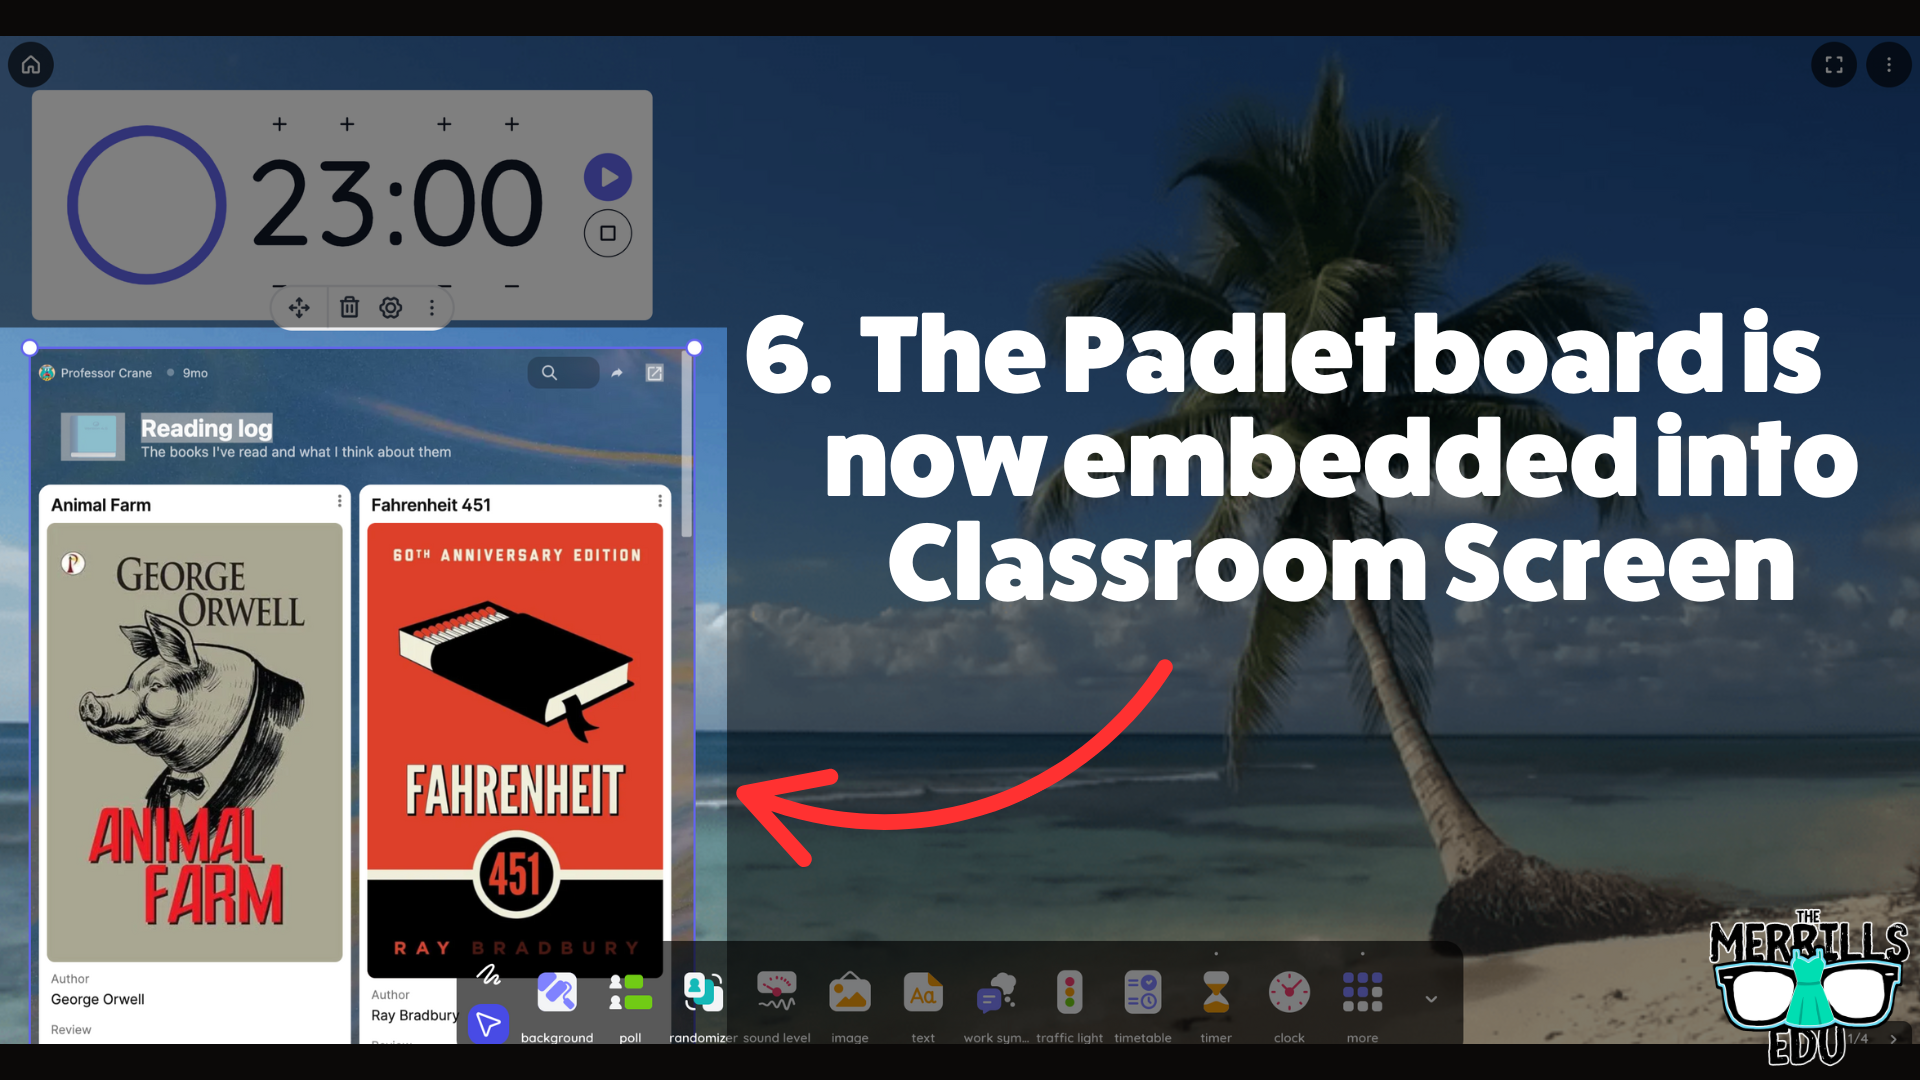
Open the Padlet board that you want to embed, then click the share icon.
Click on Embed in your blog or website.
Click Copy Padlet embed code.
Launch Classroomscreen, then click More located on the bottom toolbar. Then, click Embed.
Paste the embed code, then click Run Code.
Now, the Padlet board is embedded into the Classroomscreen workspace.
This is a true embed - meaning users can interact with it in real time. So, educators can embed this into a Classroomscreen workspace, start a timer, and then the embed will refresh itself so that every time new content gets added, it appears on the screen.

Nearpod Embedded into Canvas
(Note: this requires a paid Nearpod account and the use of Student Paced lessons. It will not work with “Live participation” lessons)
Nearpod users can now expedite the login procedure for their students by embedding lessons right into Canvas. Doing so will eliminate the need for a join code. Here’s how it all works:
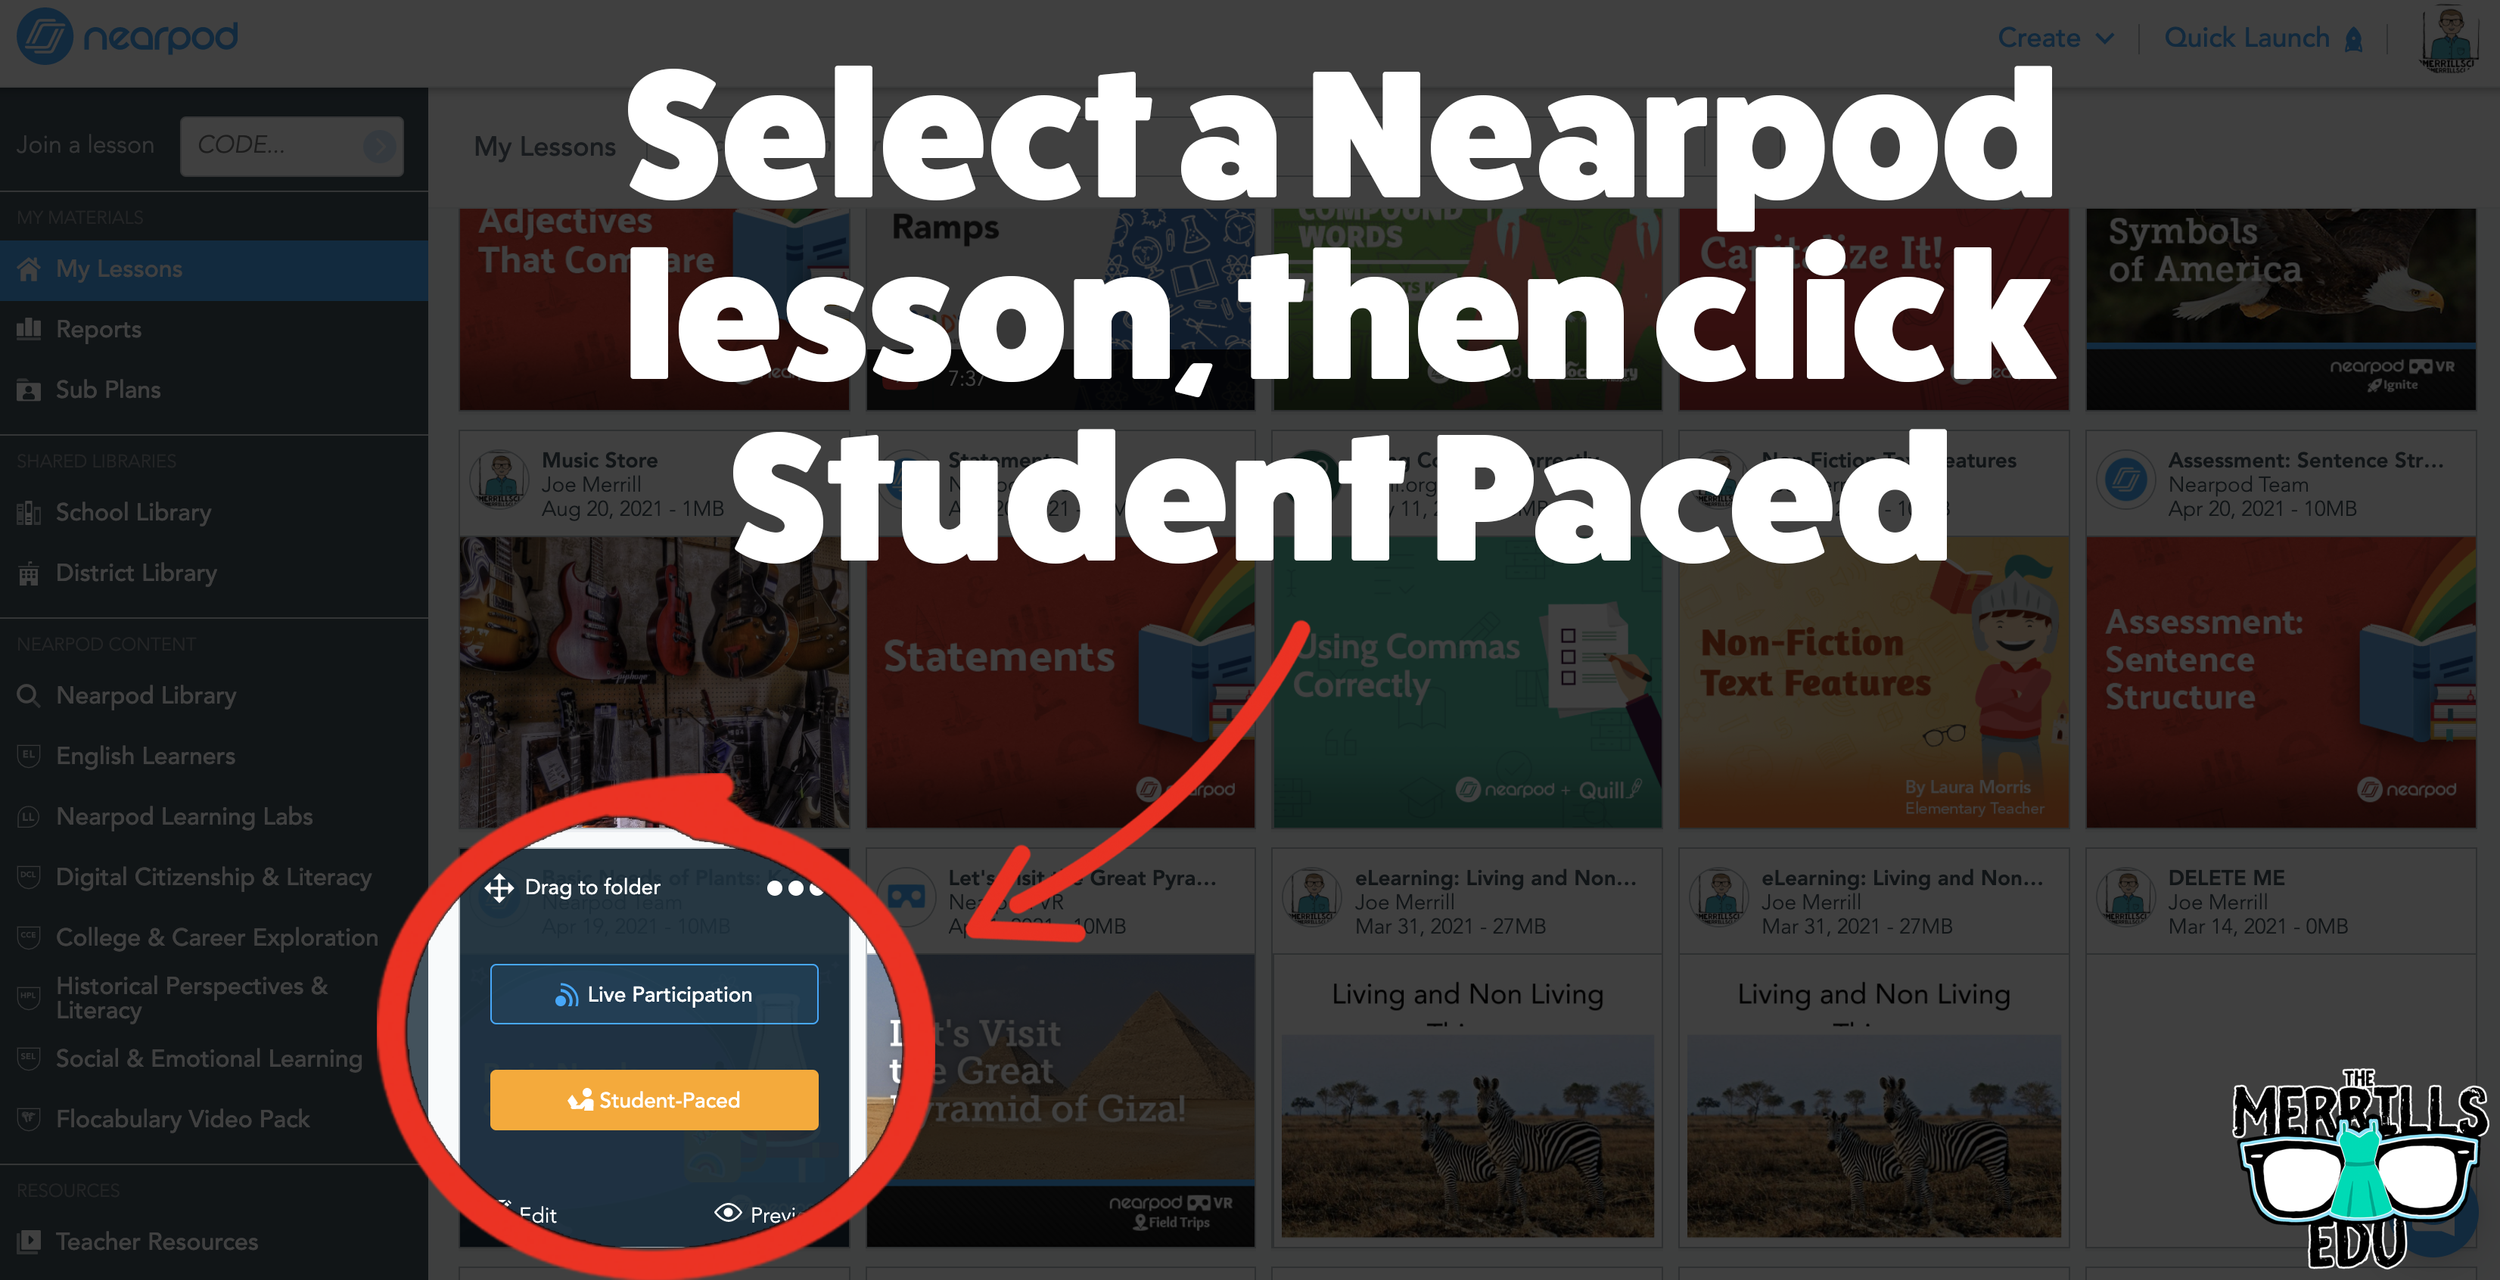
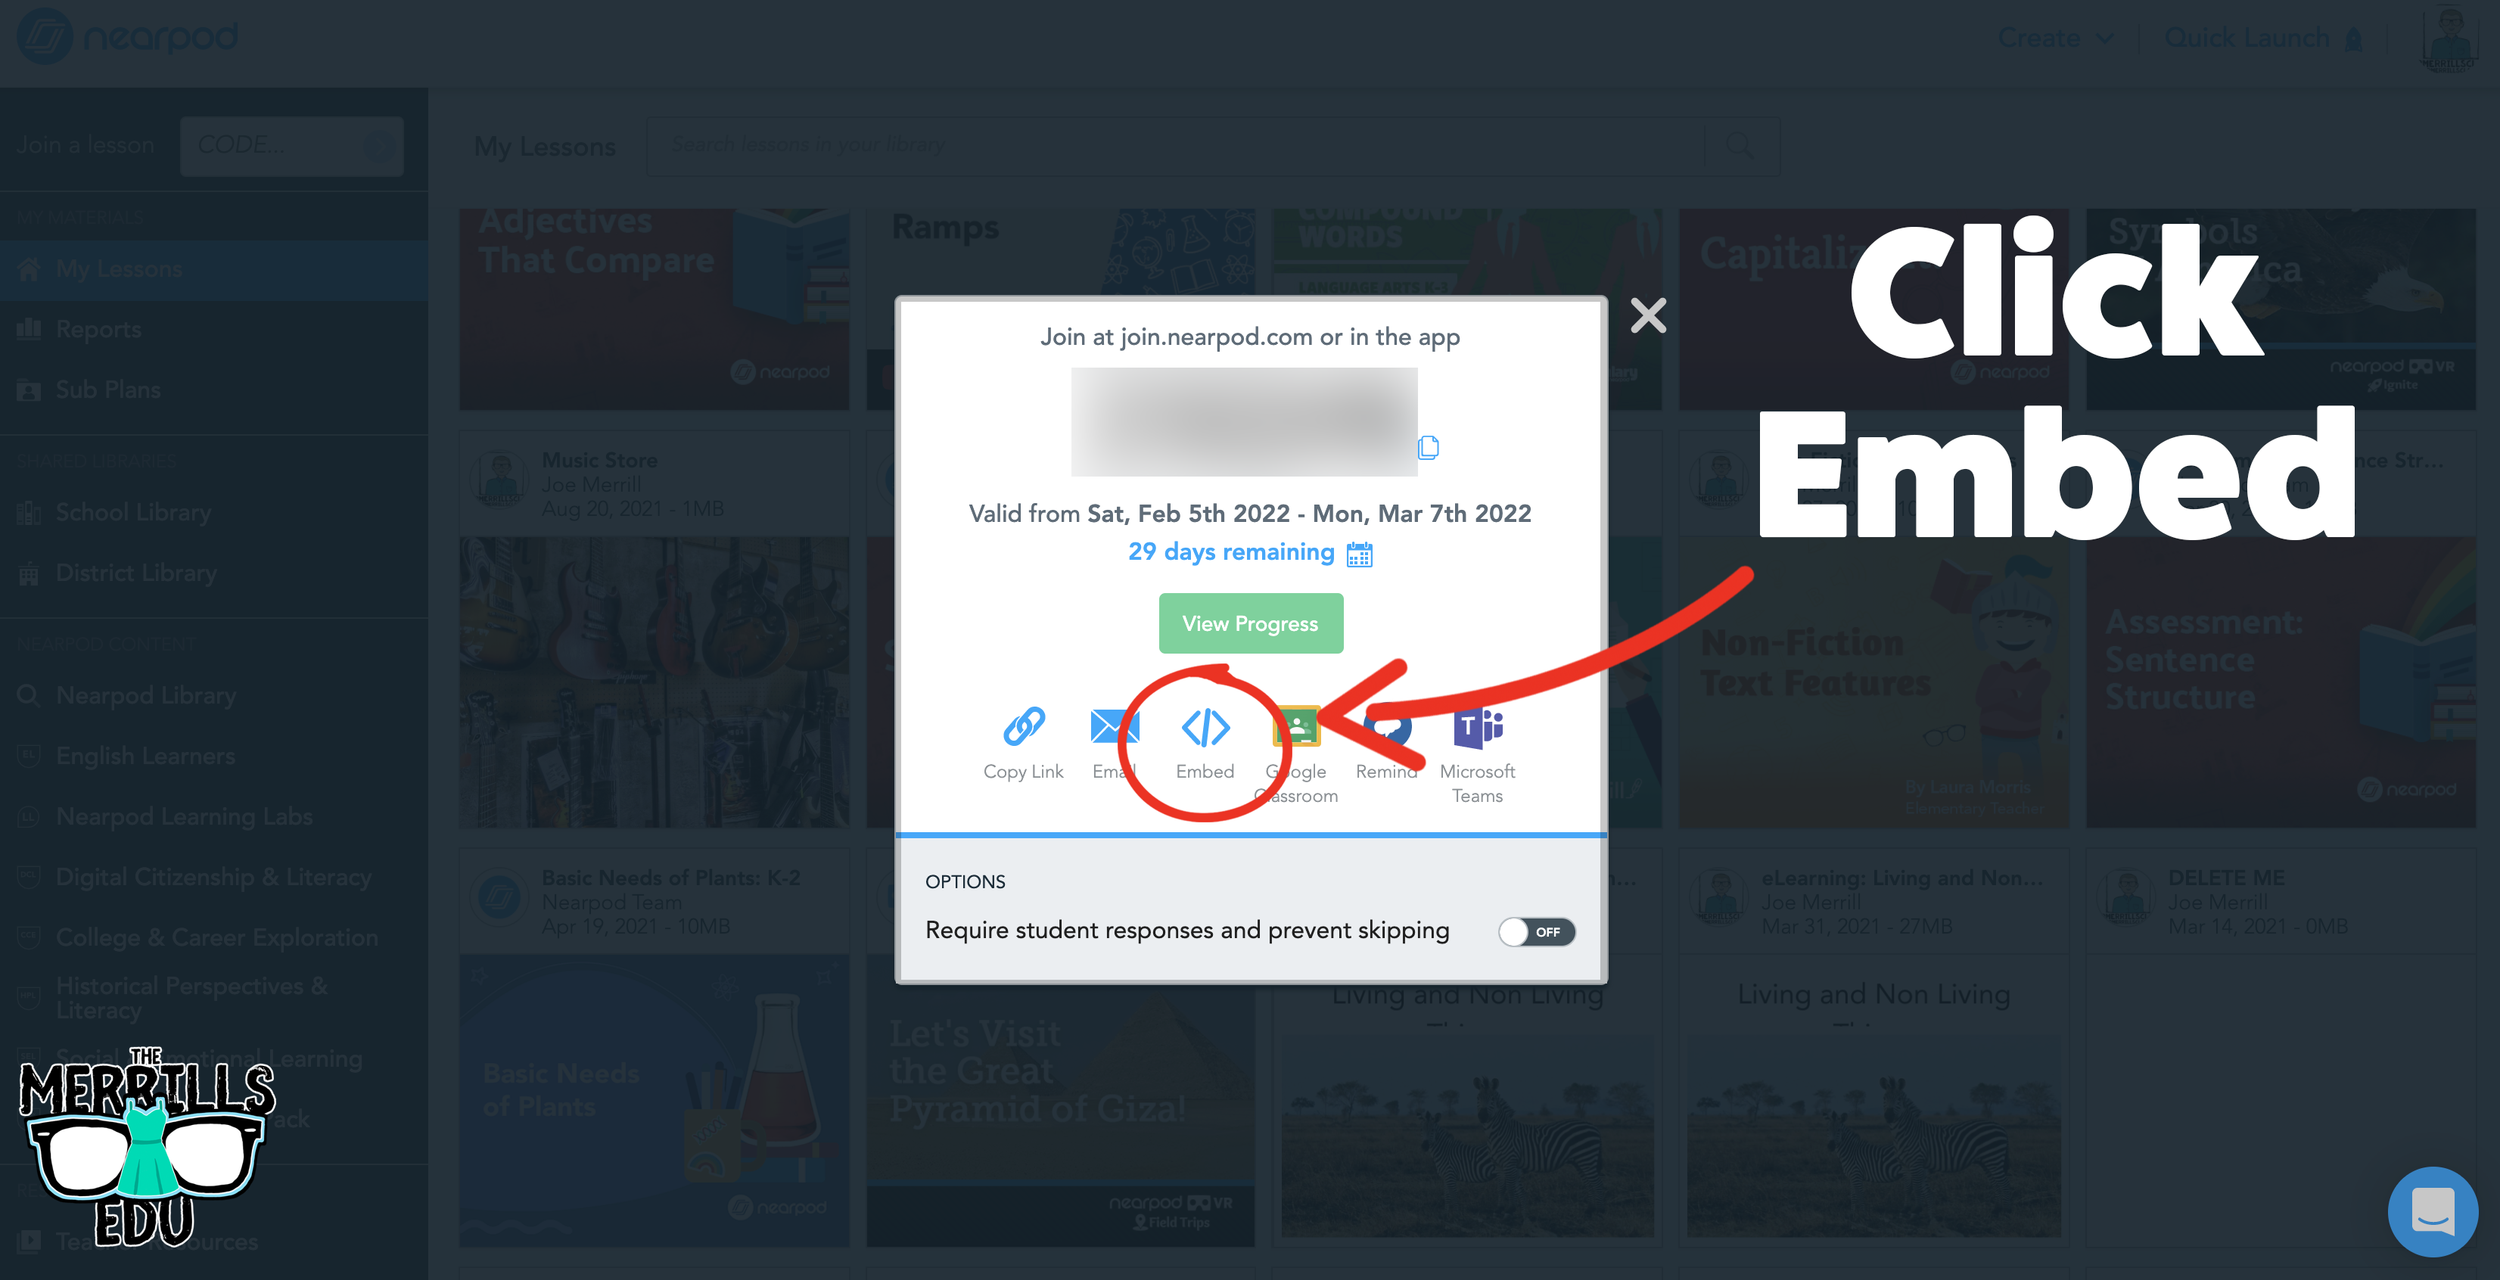


Open the desired Nearpod lesson that you would like to embed into Canvas.
Click on “Student-Paced.”
On the next window, click the Embed icon.
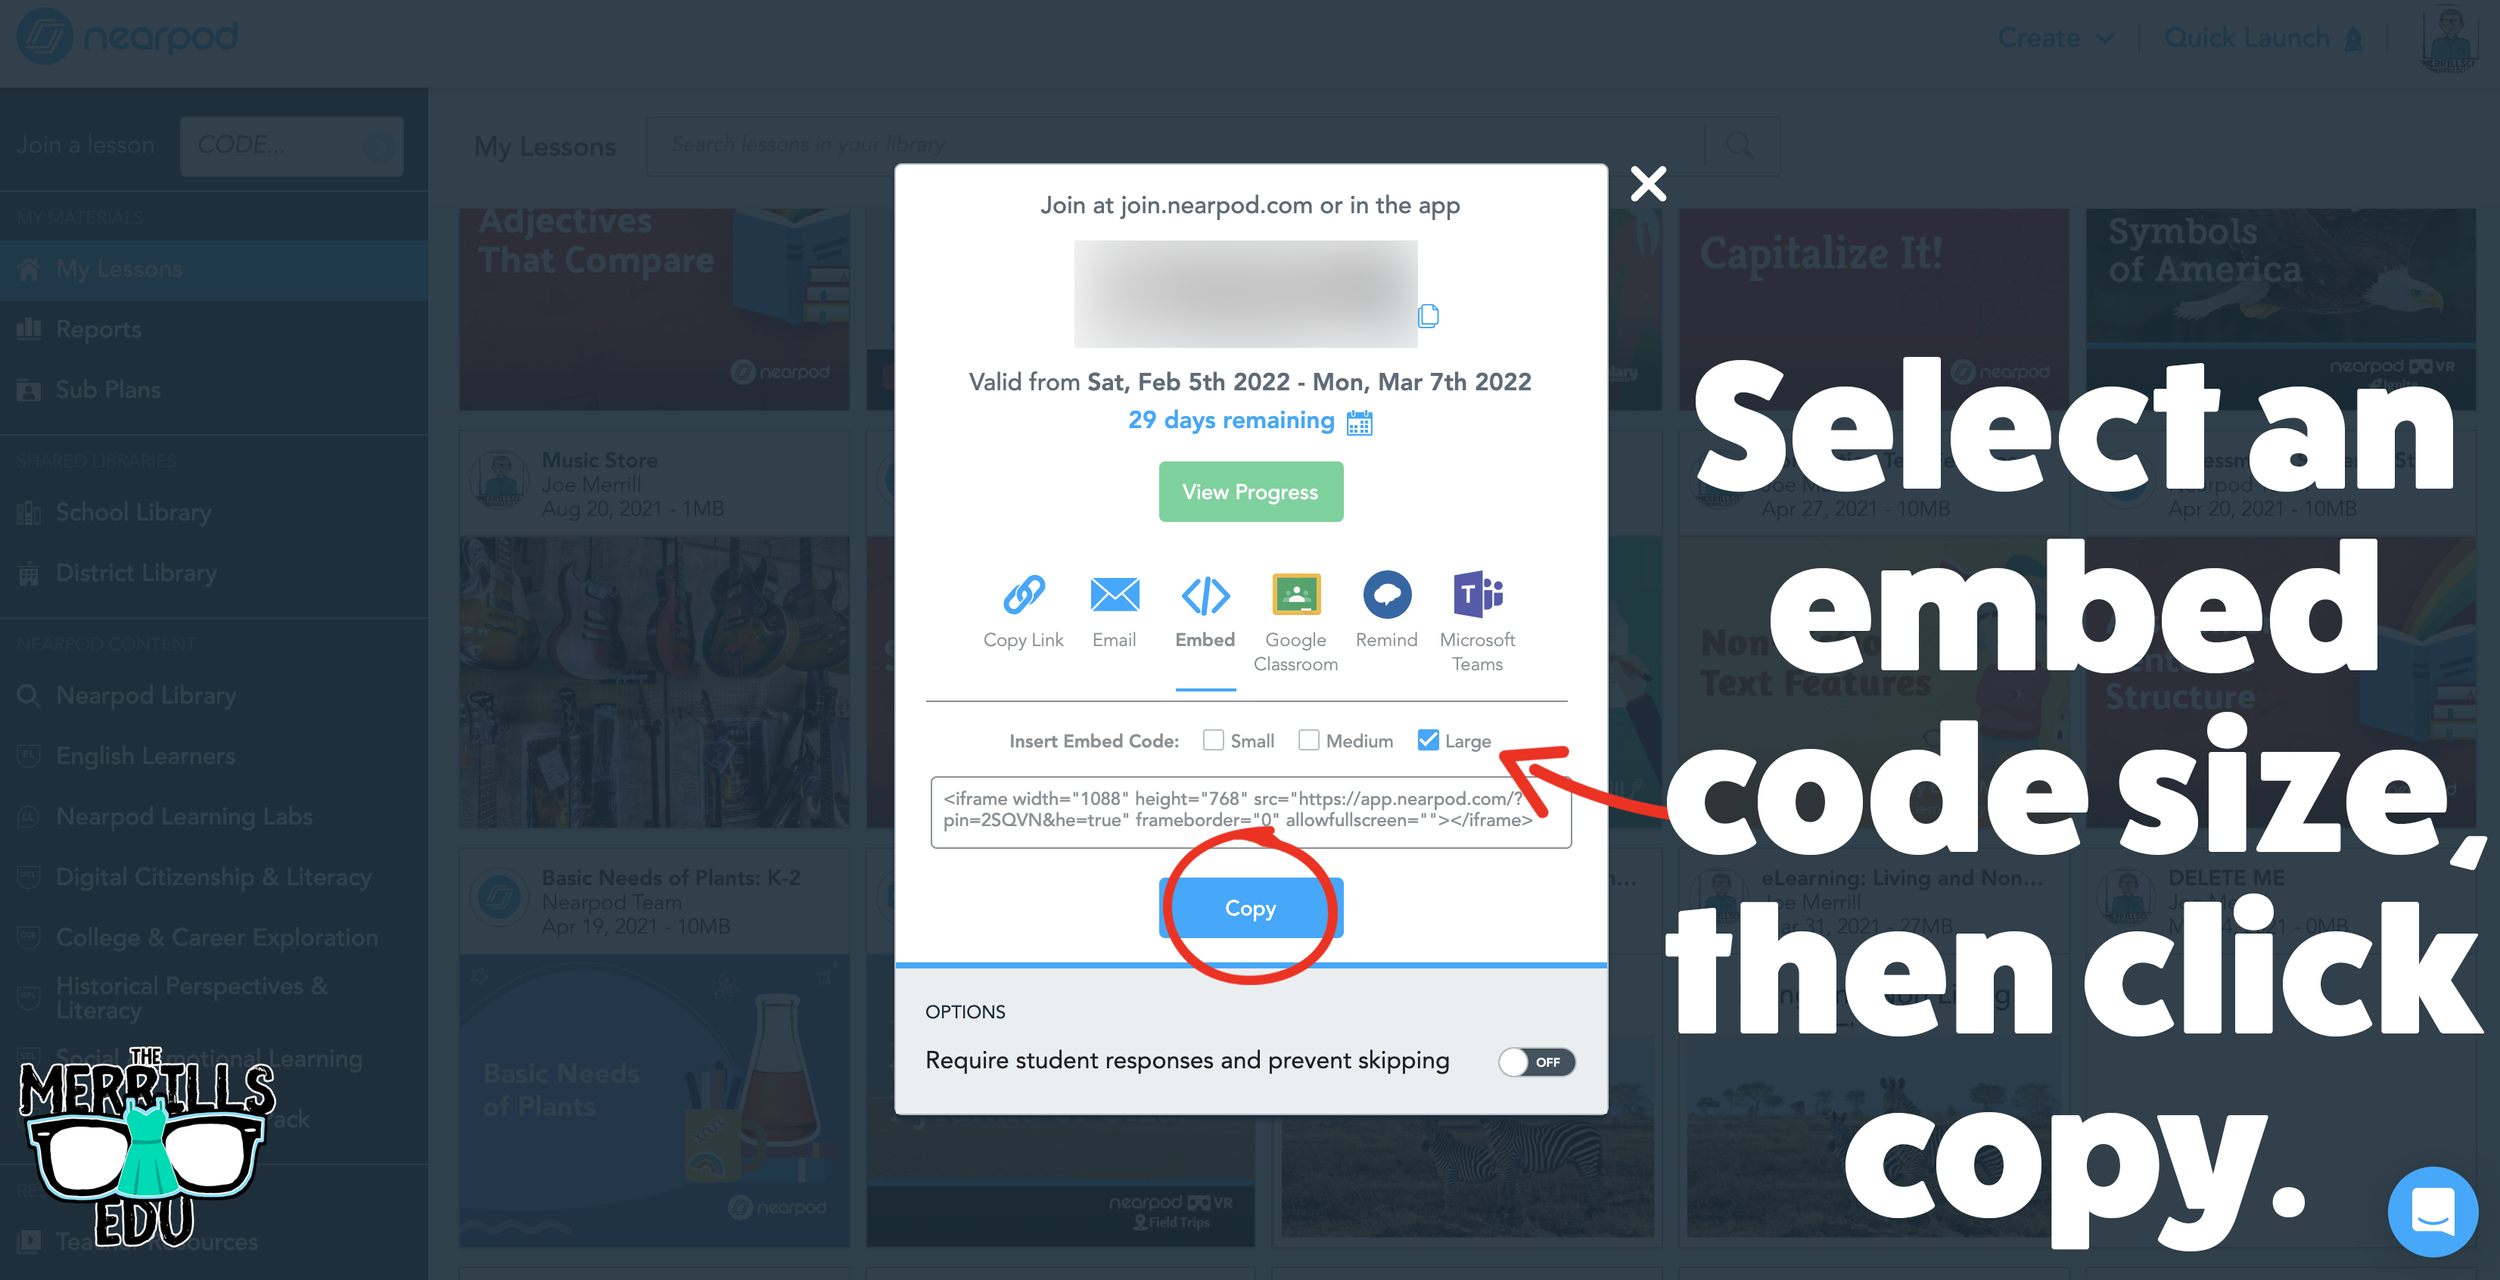
In the Embed window, select a preferred embed code size. We recommend large. Then, click copy.
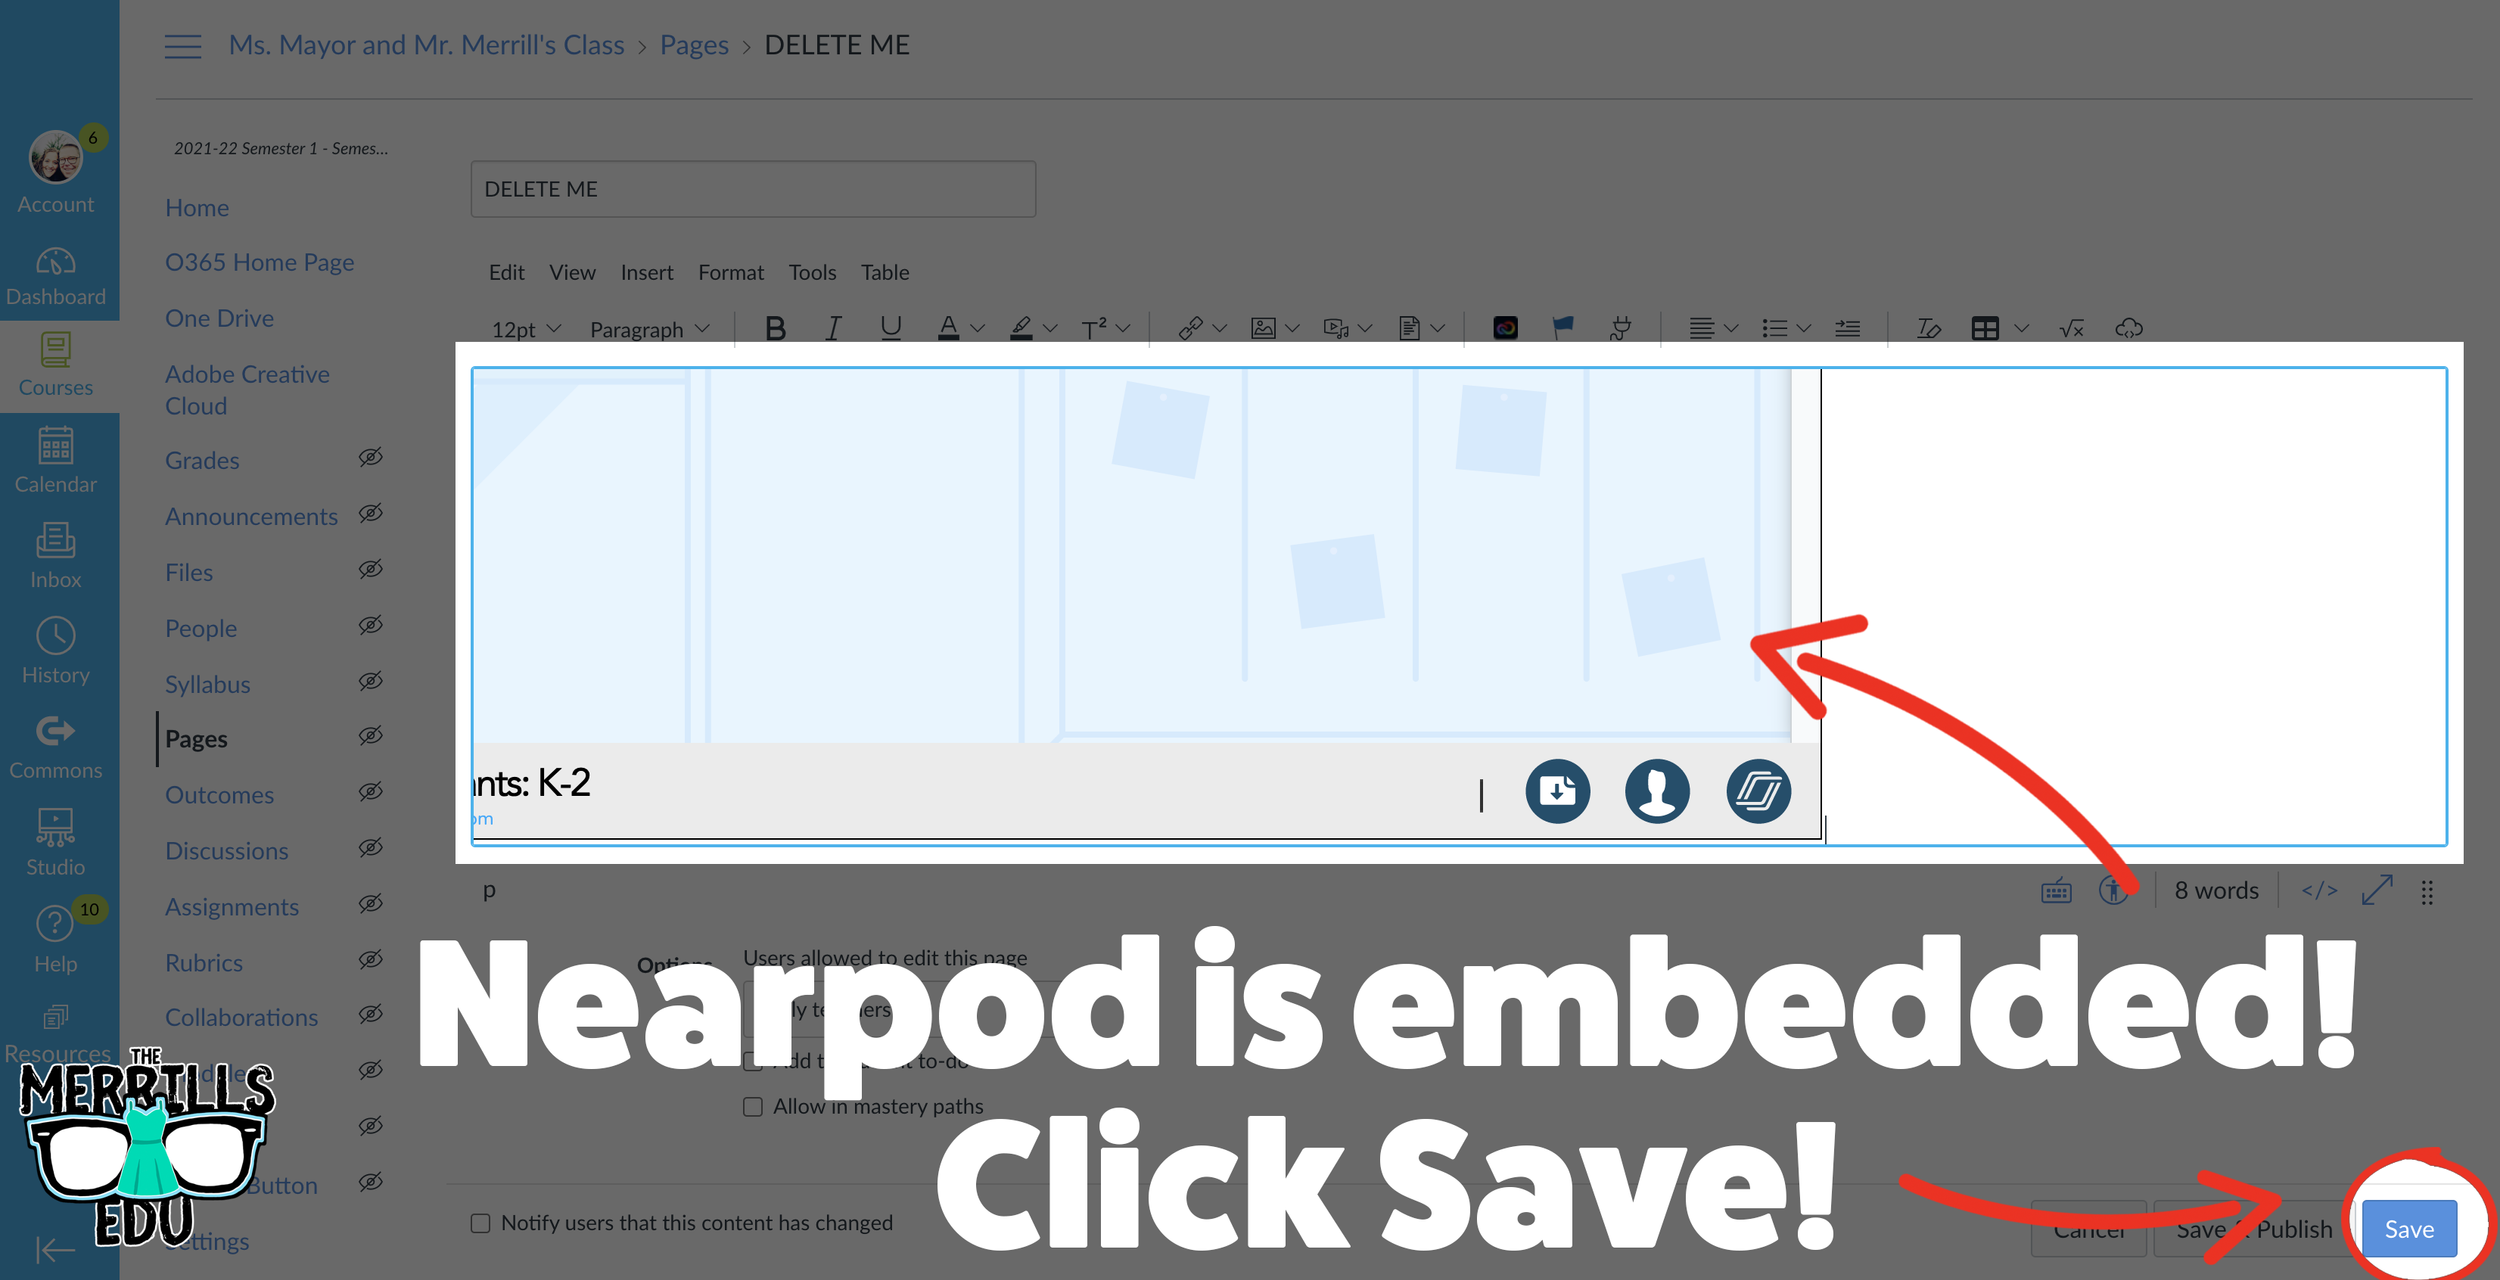
In a separate tab, open the Canvas page that you would like to embed the Nearpod lesson into.
Click on the cloud icon which will open the embed menu (if you don’t see the cloud icon, click on the three dots to the right of the menu bar).
Paste your copied embed code into the box, then click “Submit.”
Your Nearpod lesson will now be embedded into Canvas. Click “Save” to update the changes.
Now, the lesson will be available for your students via Canvas!
Wakelet Embedded into Canvas
Share your Wakelet Collections right within Canvas! This live embed will allow students to make changes to the Wakelet collection without having to re-embed it afterwards. In other words, changes will be available as they are made - without having to go through this process again. Here’s how it all works:
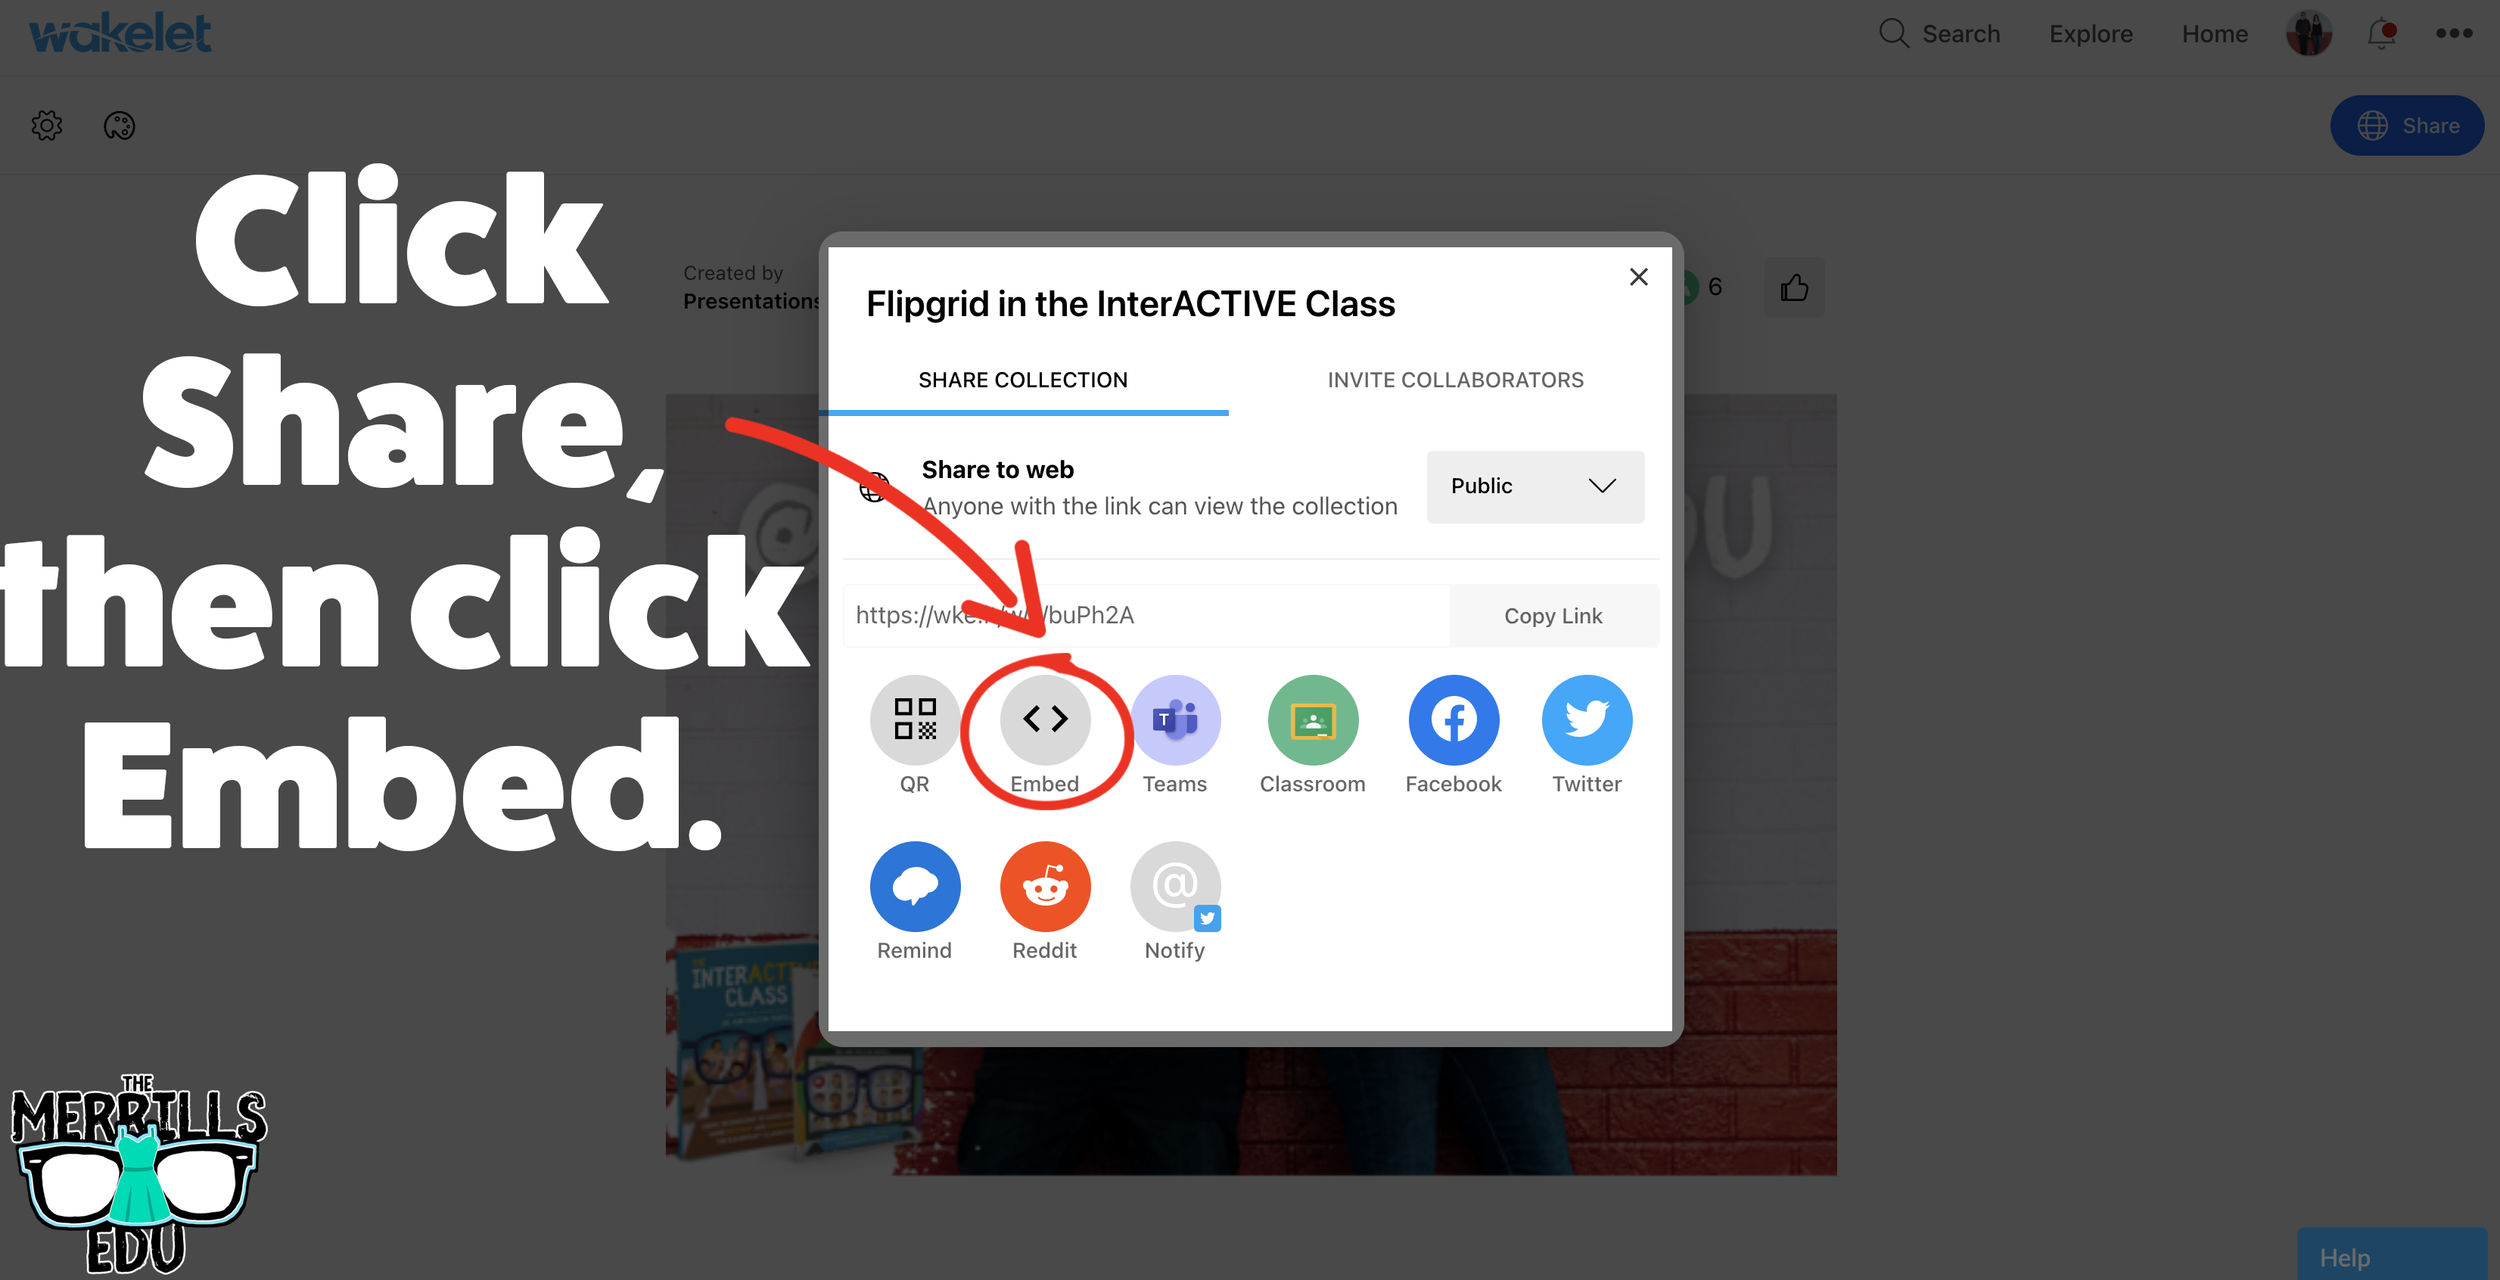

(Note: Your Wakelet Collection must be set to “Public” in order for you to embed it)
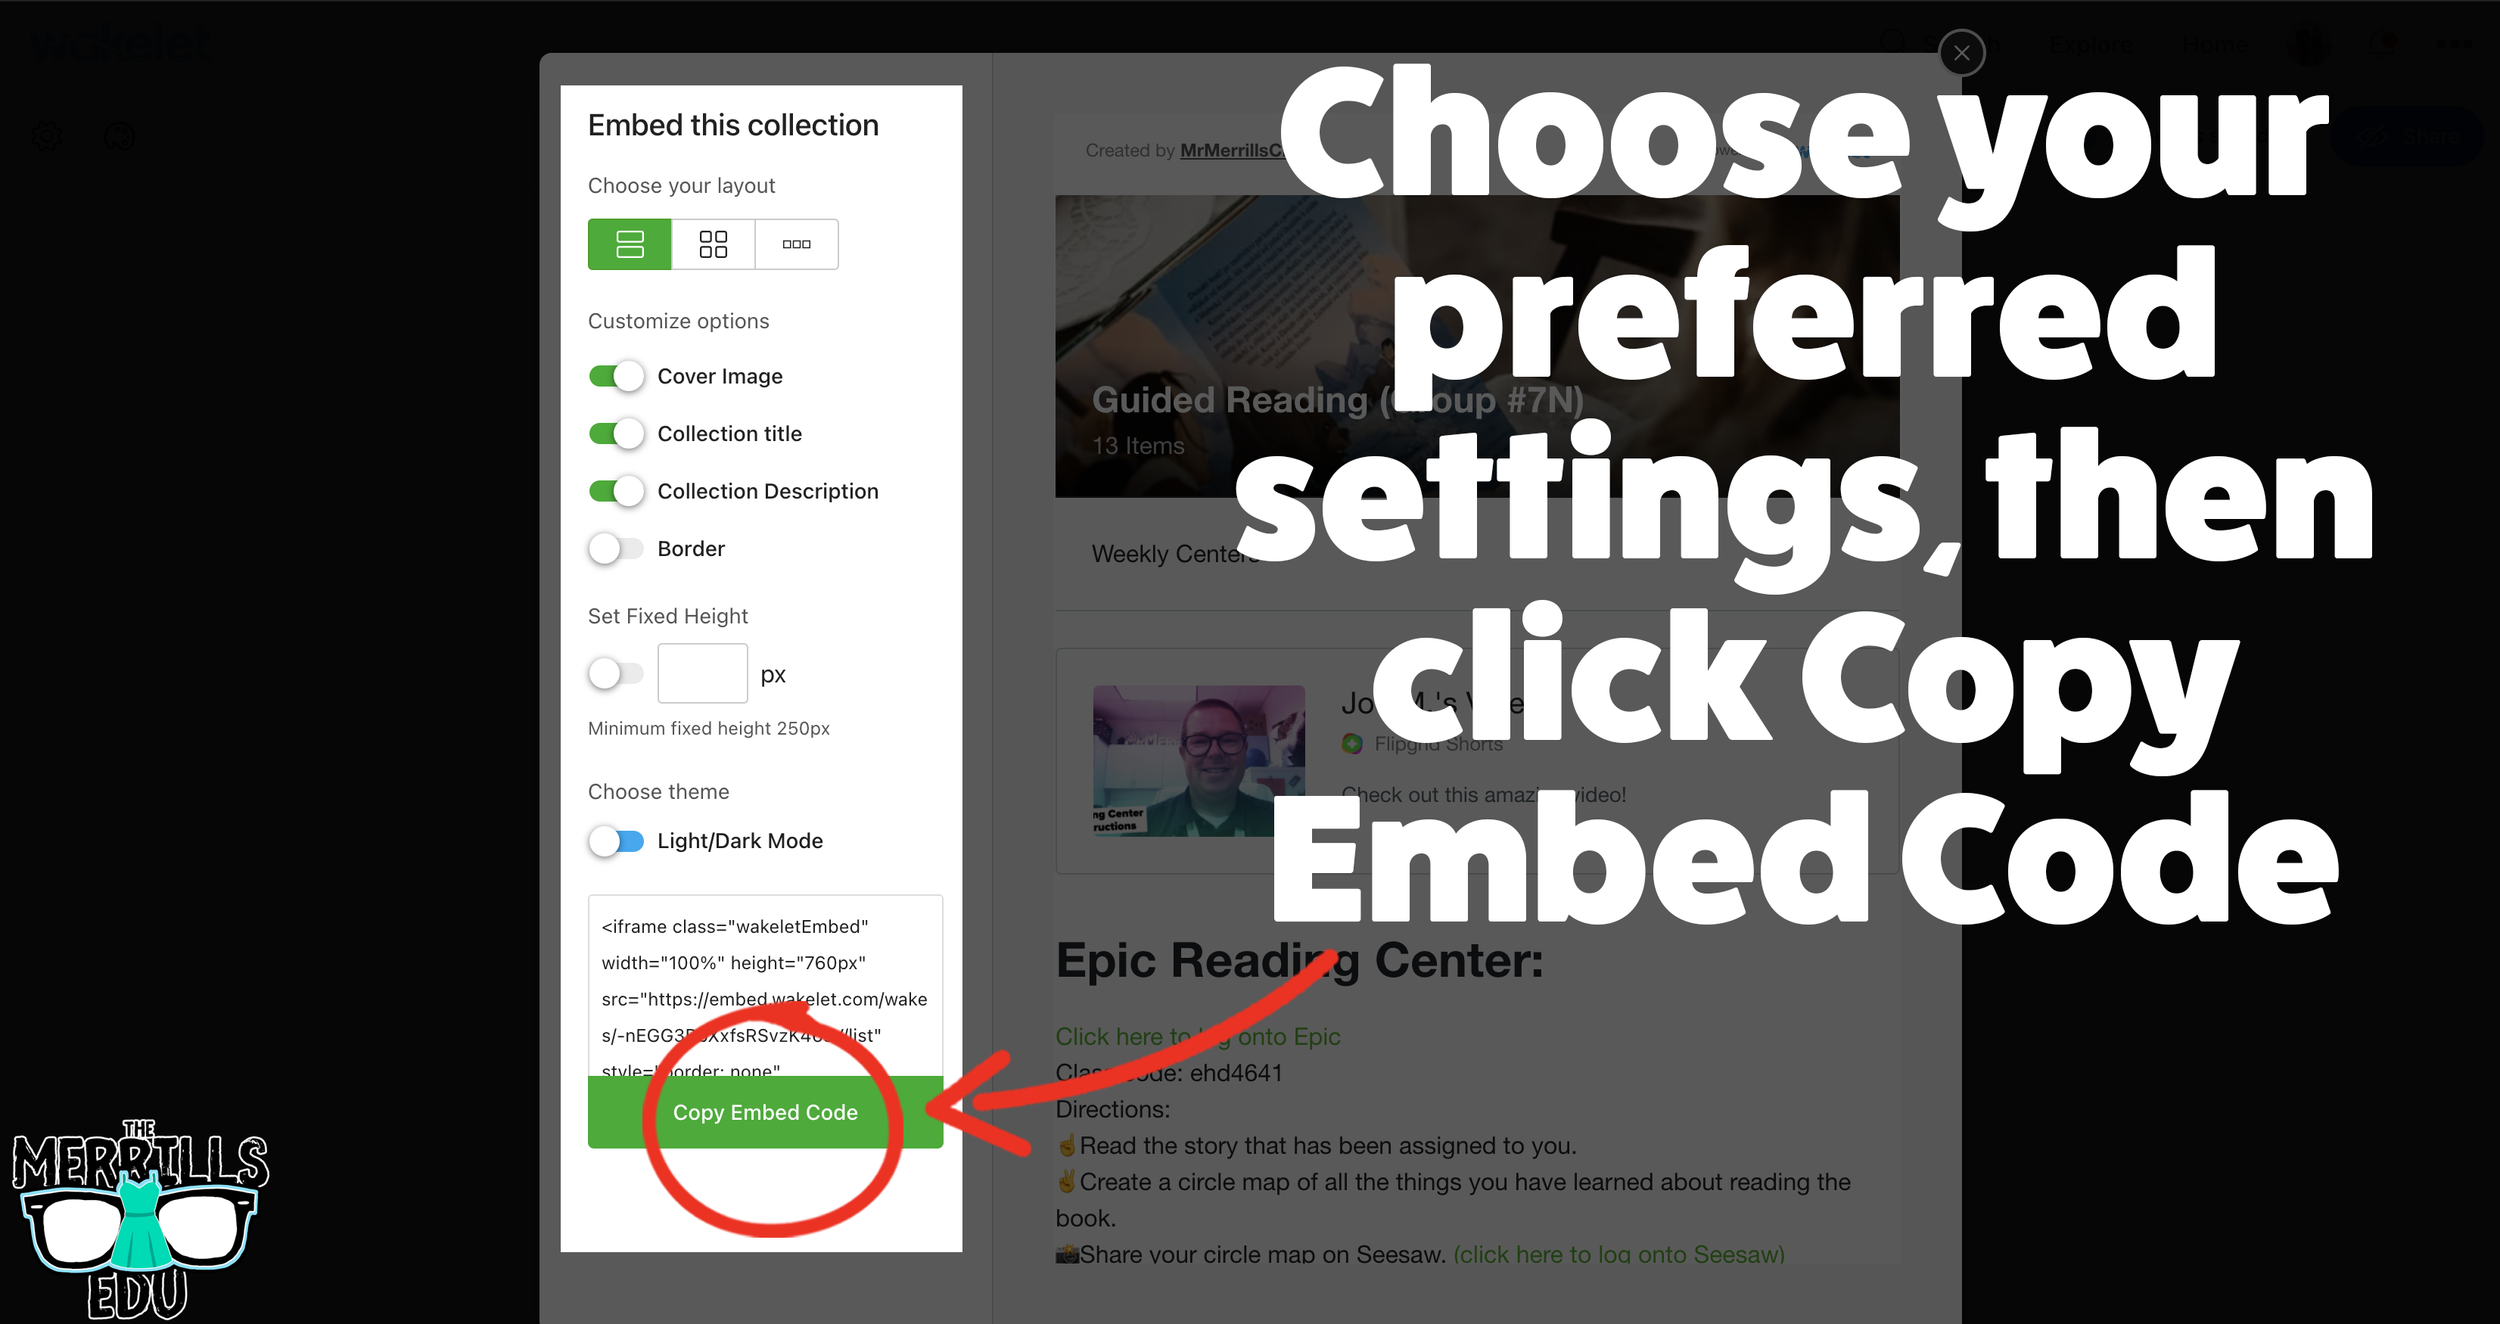
In a Wakelet Collection, click the “Share” button, then click “Embed.”
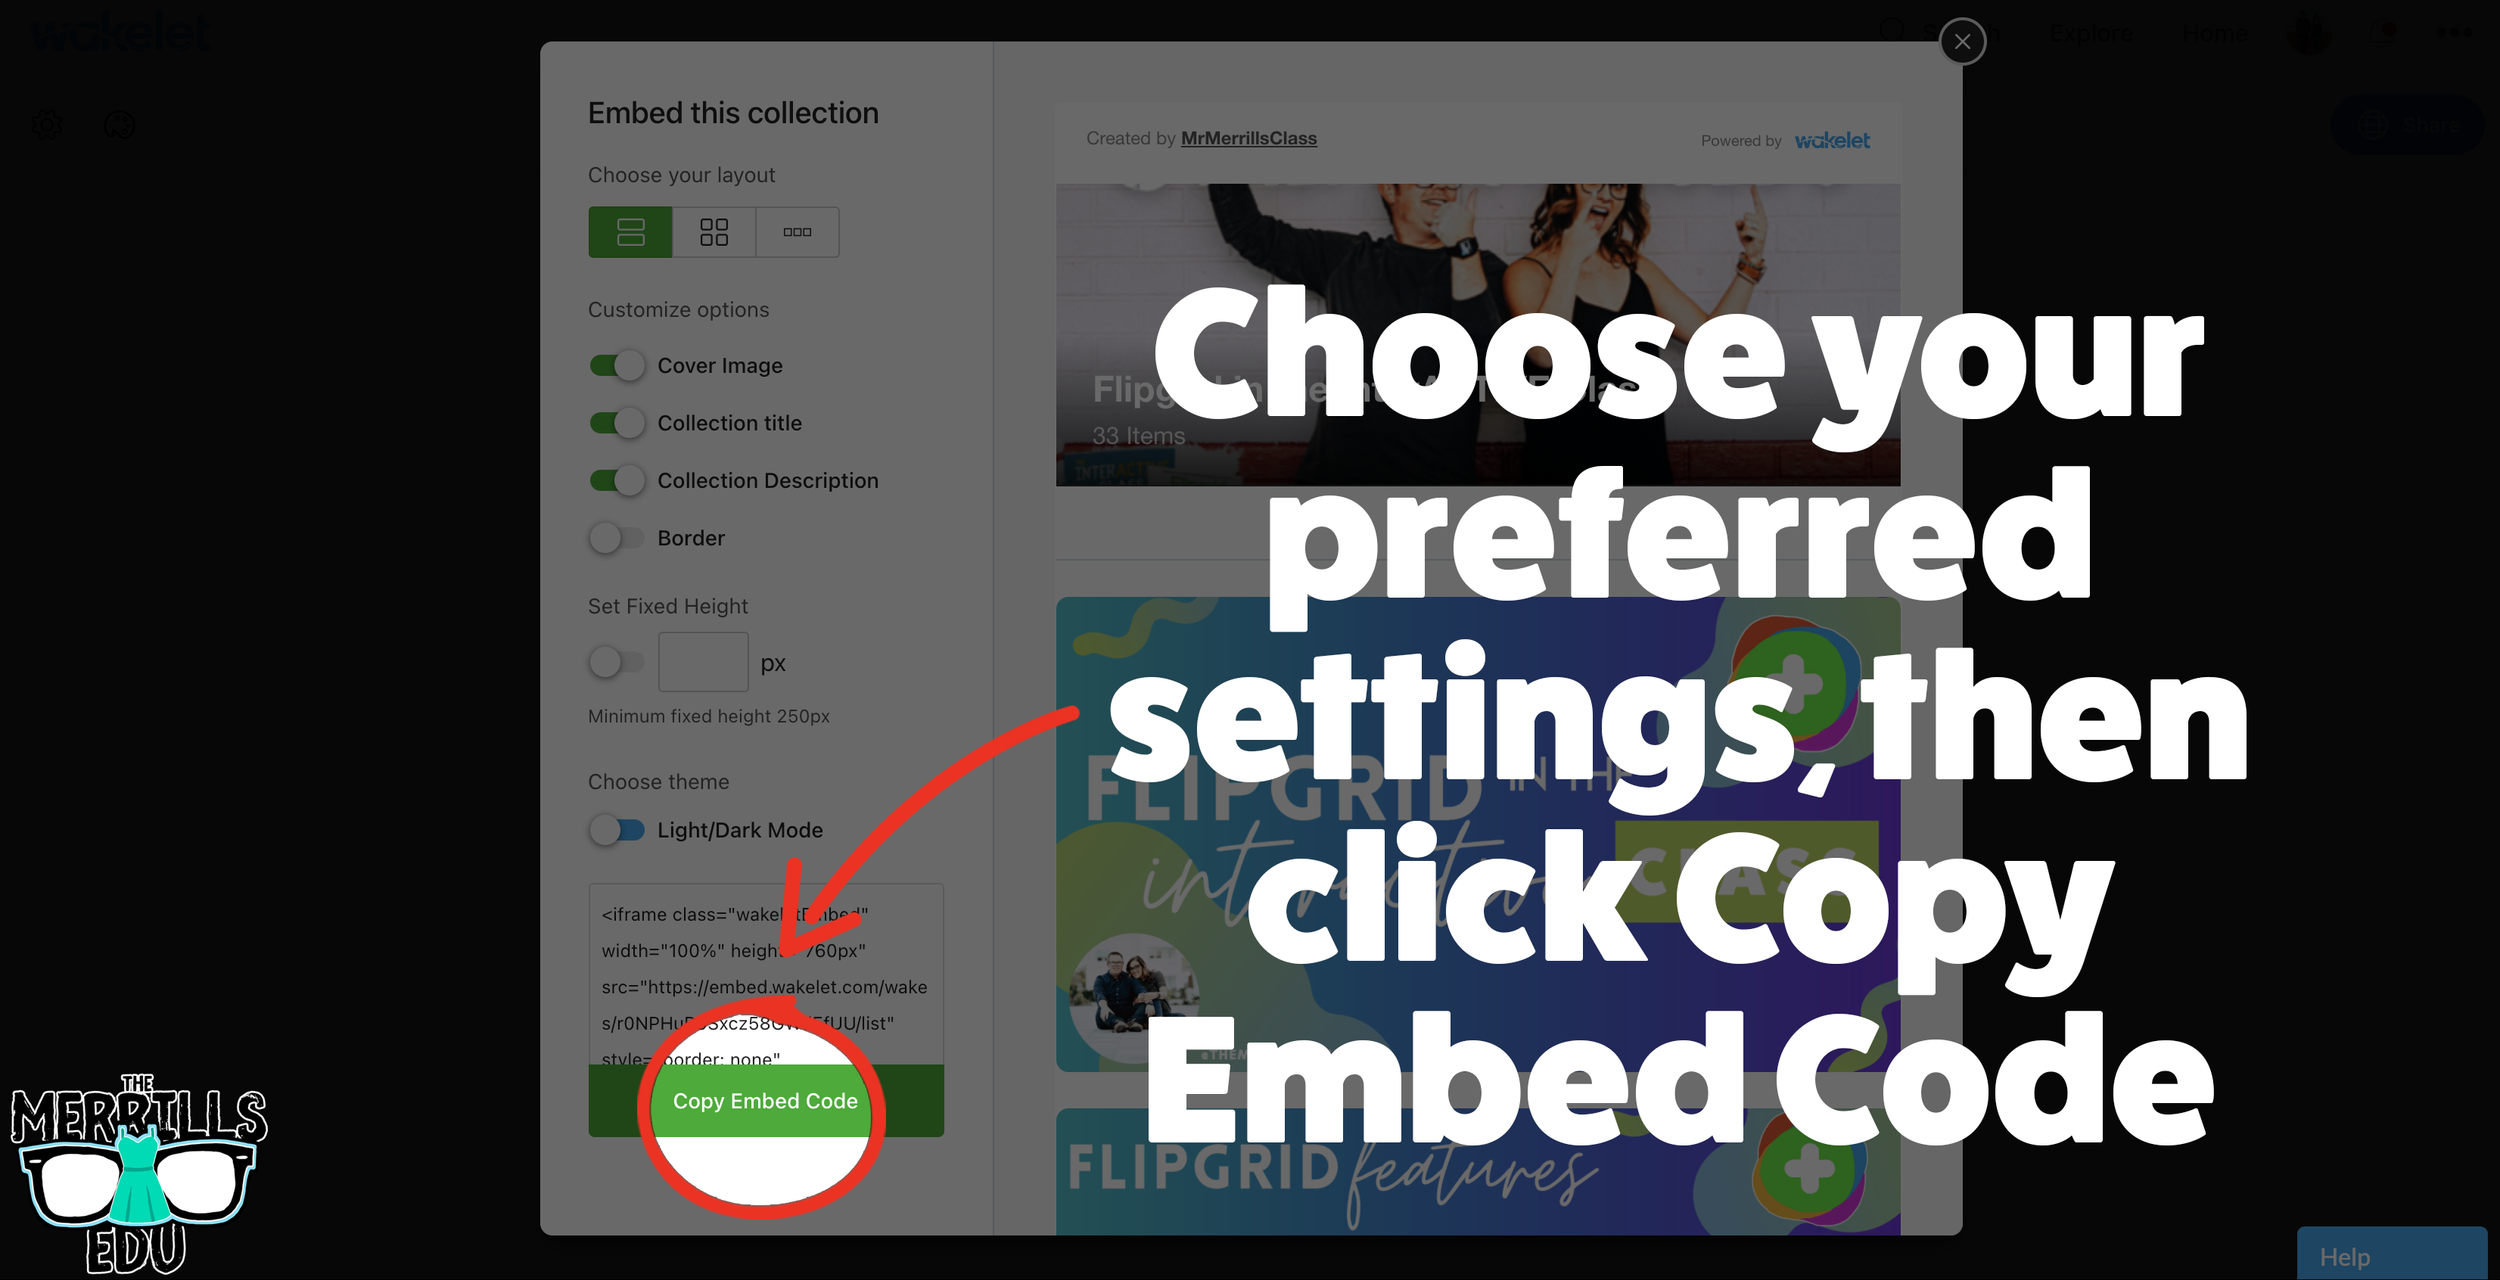
Chose your preferred settings, then click “Copy Embed Code.”
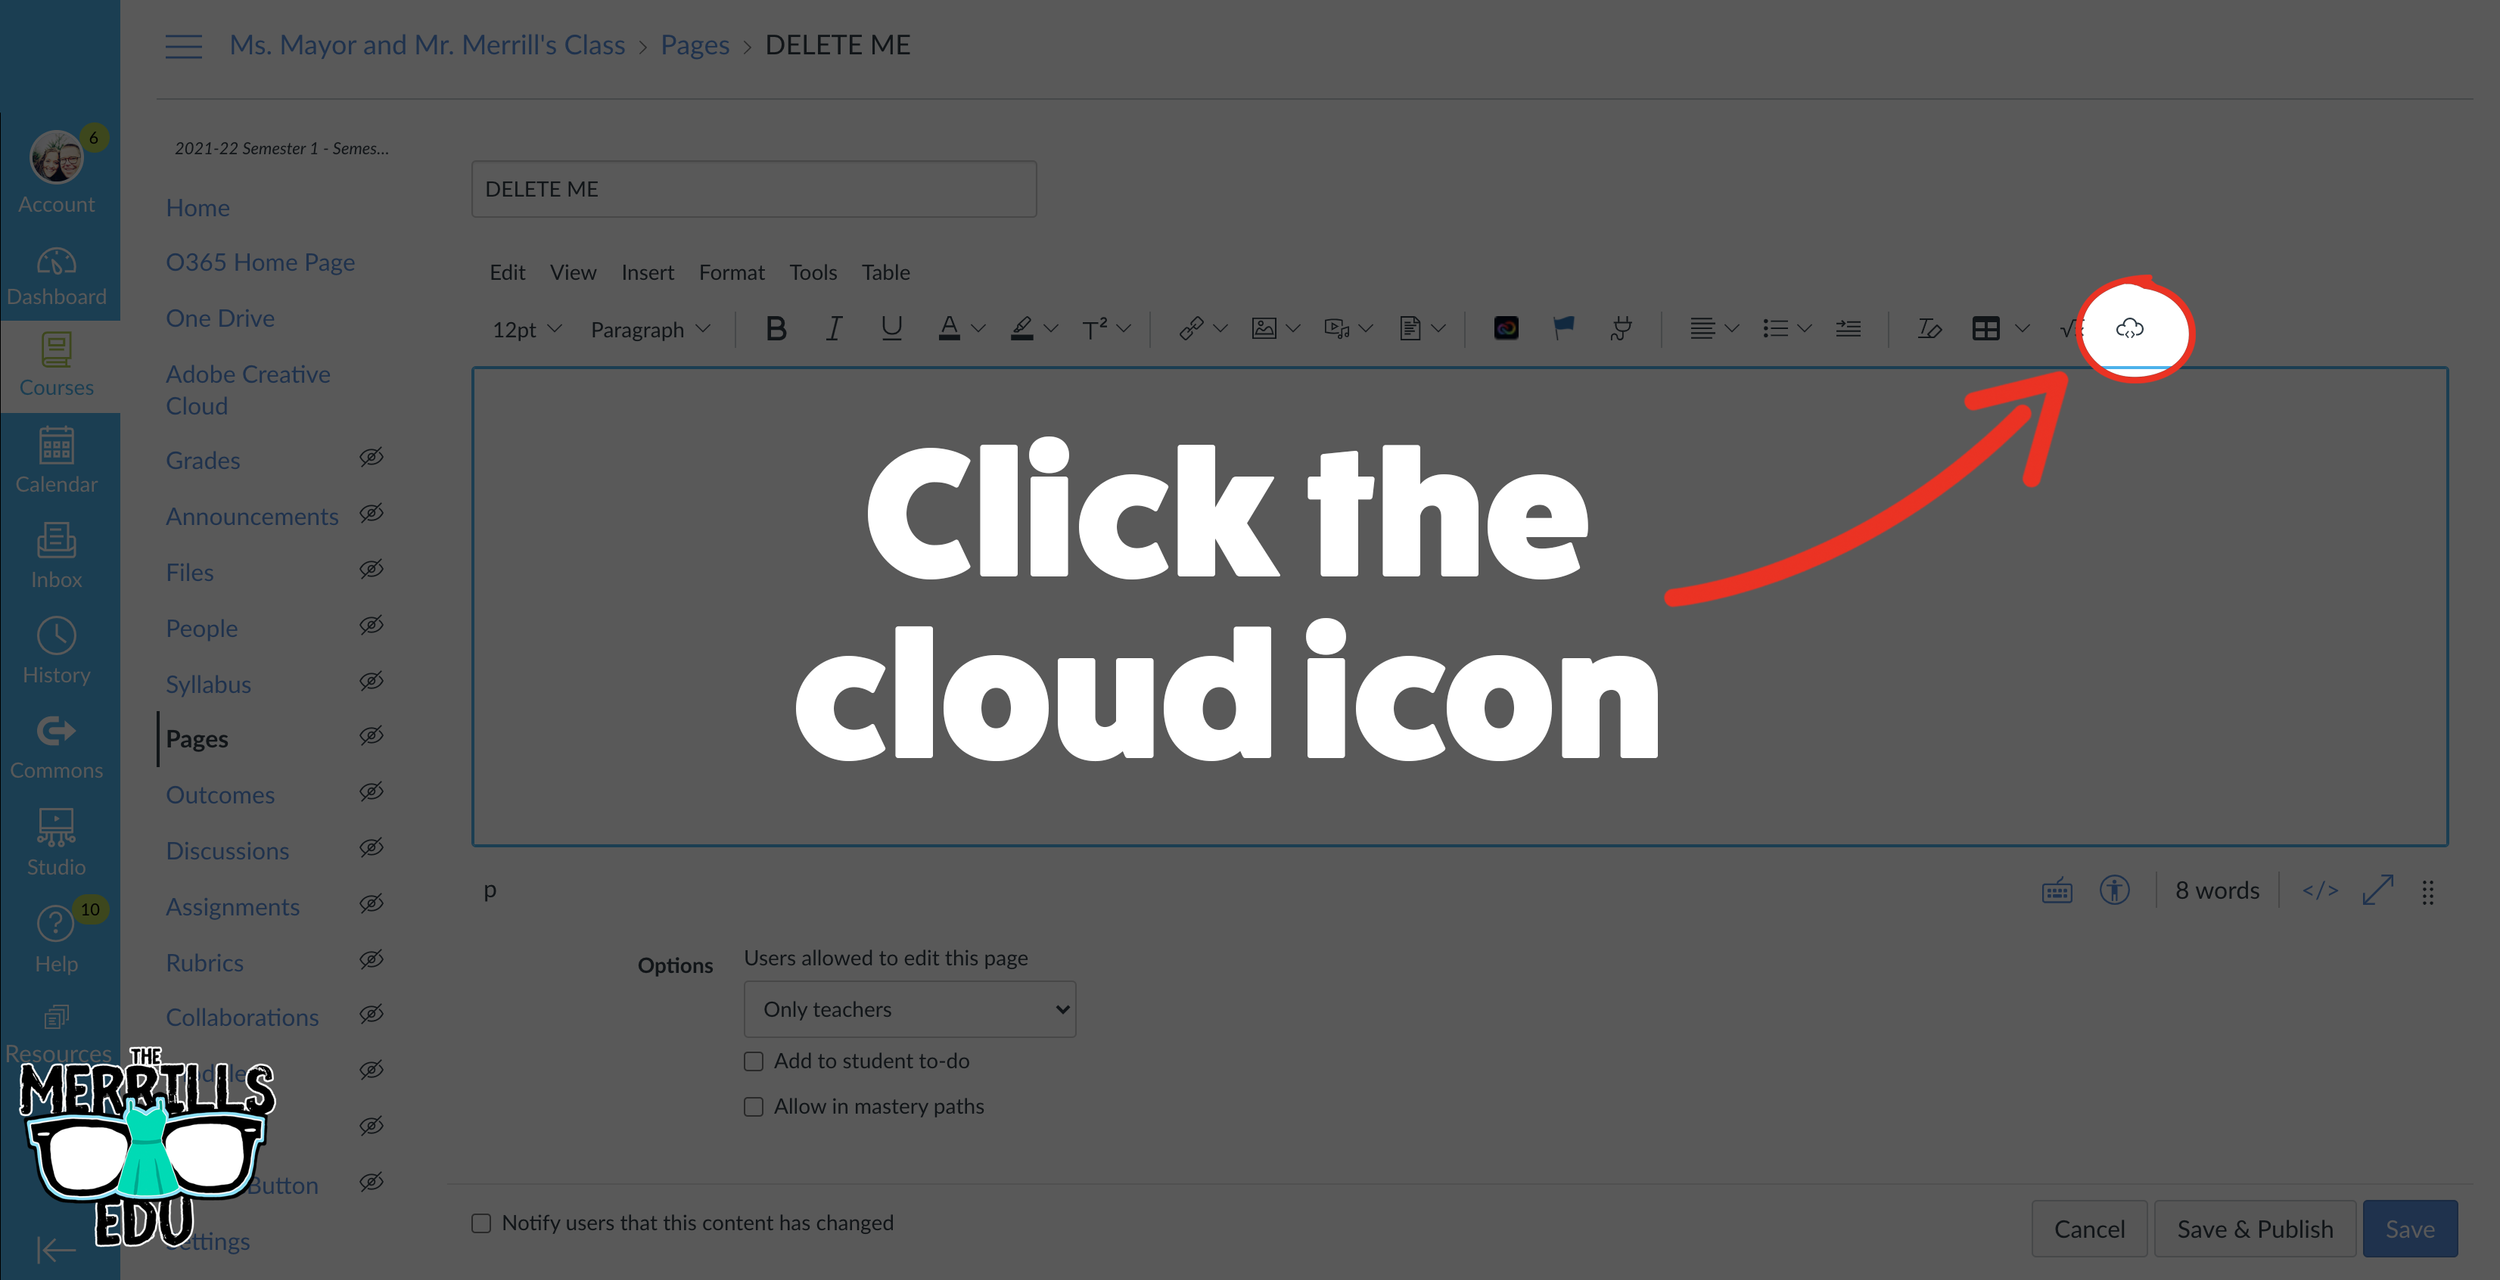
In a separate tab, open the Canvas page that you would like to add the Wakelet Collection to. Then, click on the cloud icon.
In the embed window, paste your copied code from Wakelet. Then, click submit.
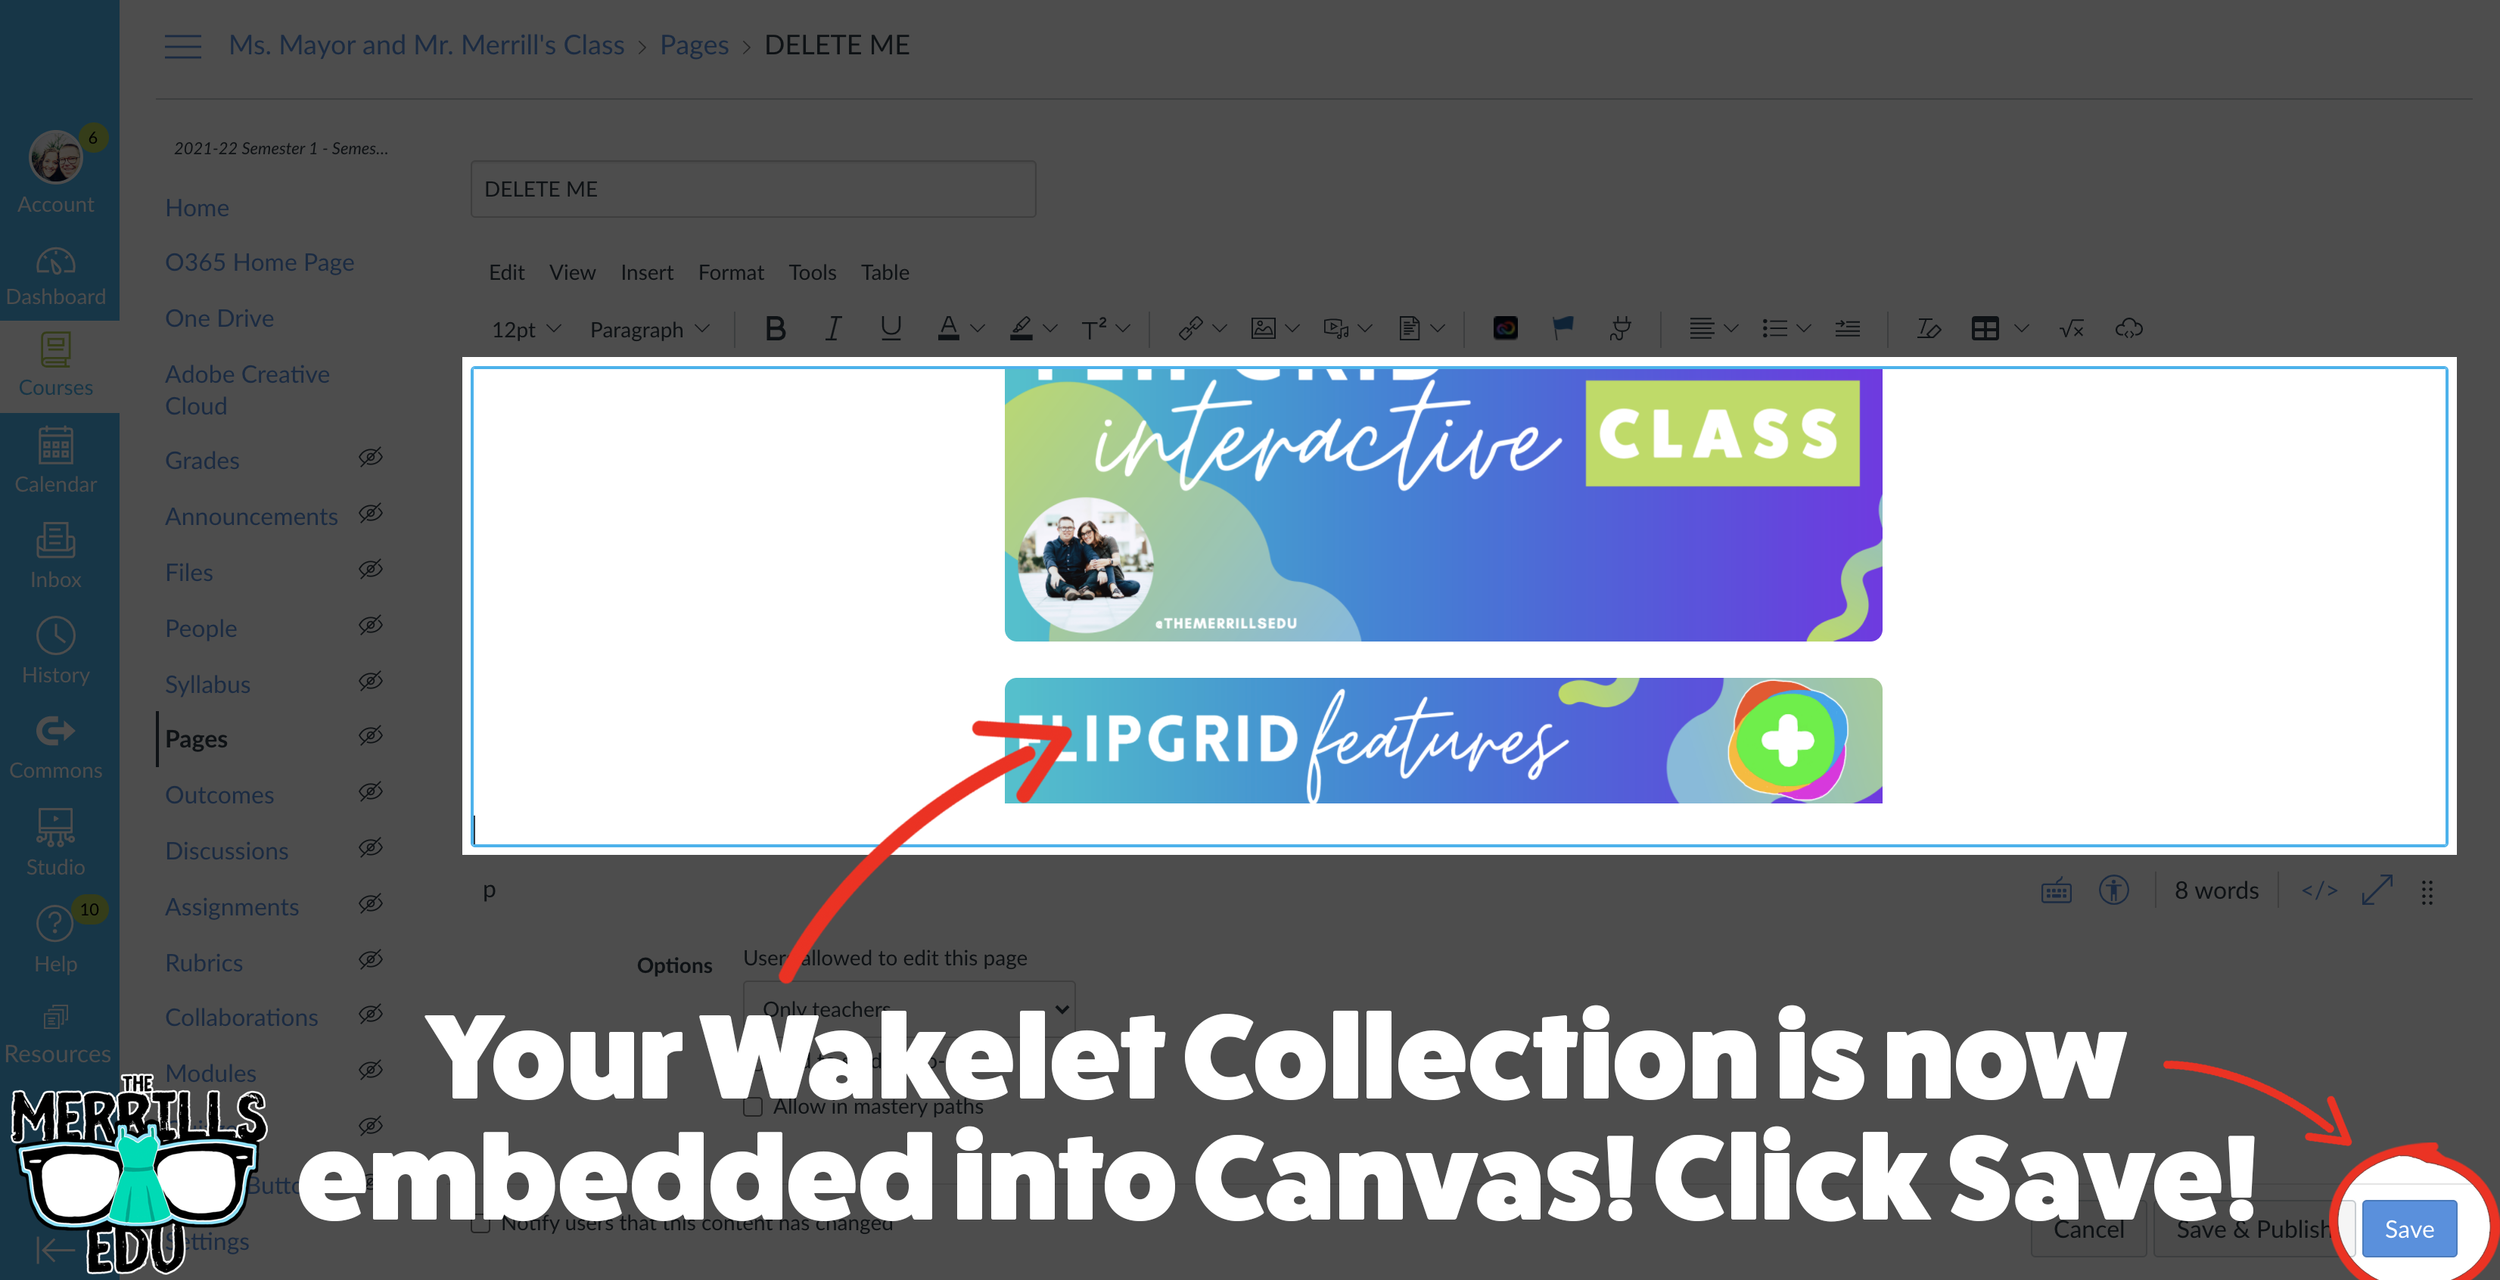
Your Wakelet collection is now embedded into the Canvas page! Click on “Save” to update the changes.

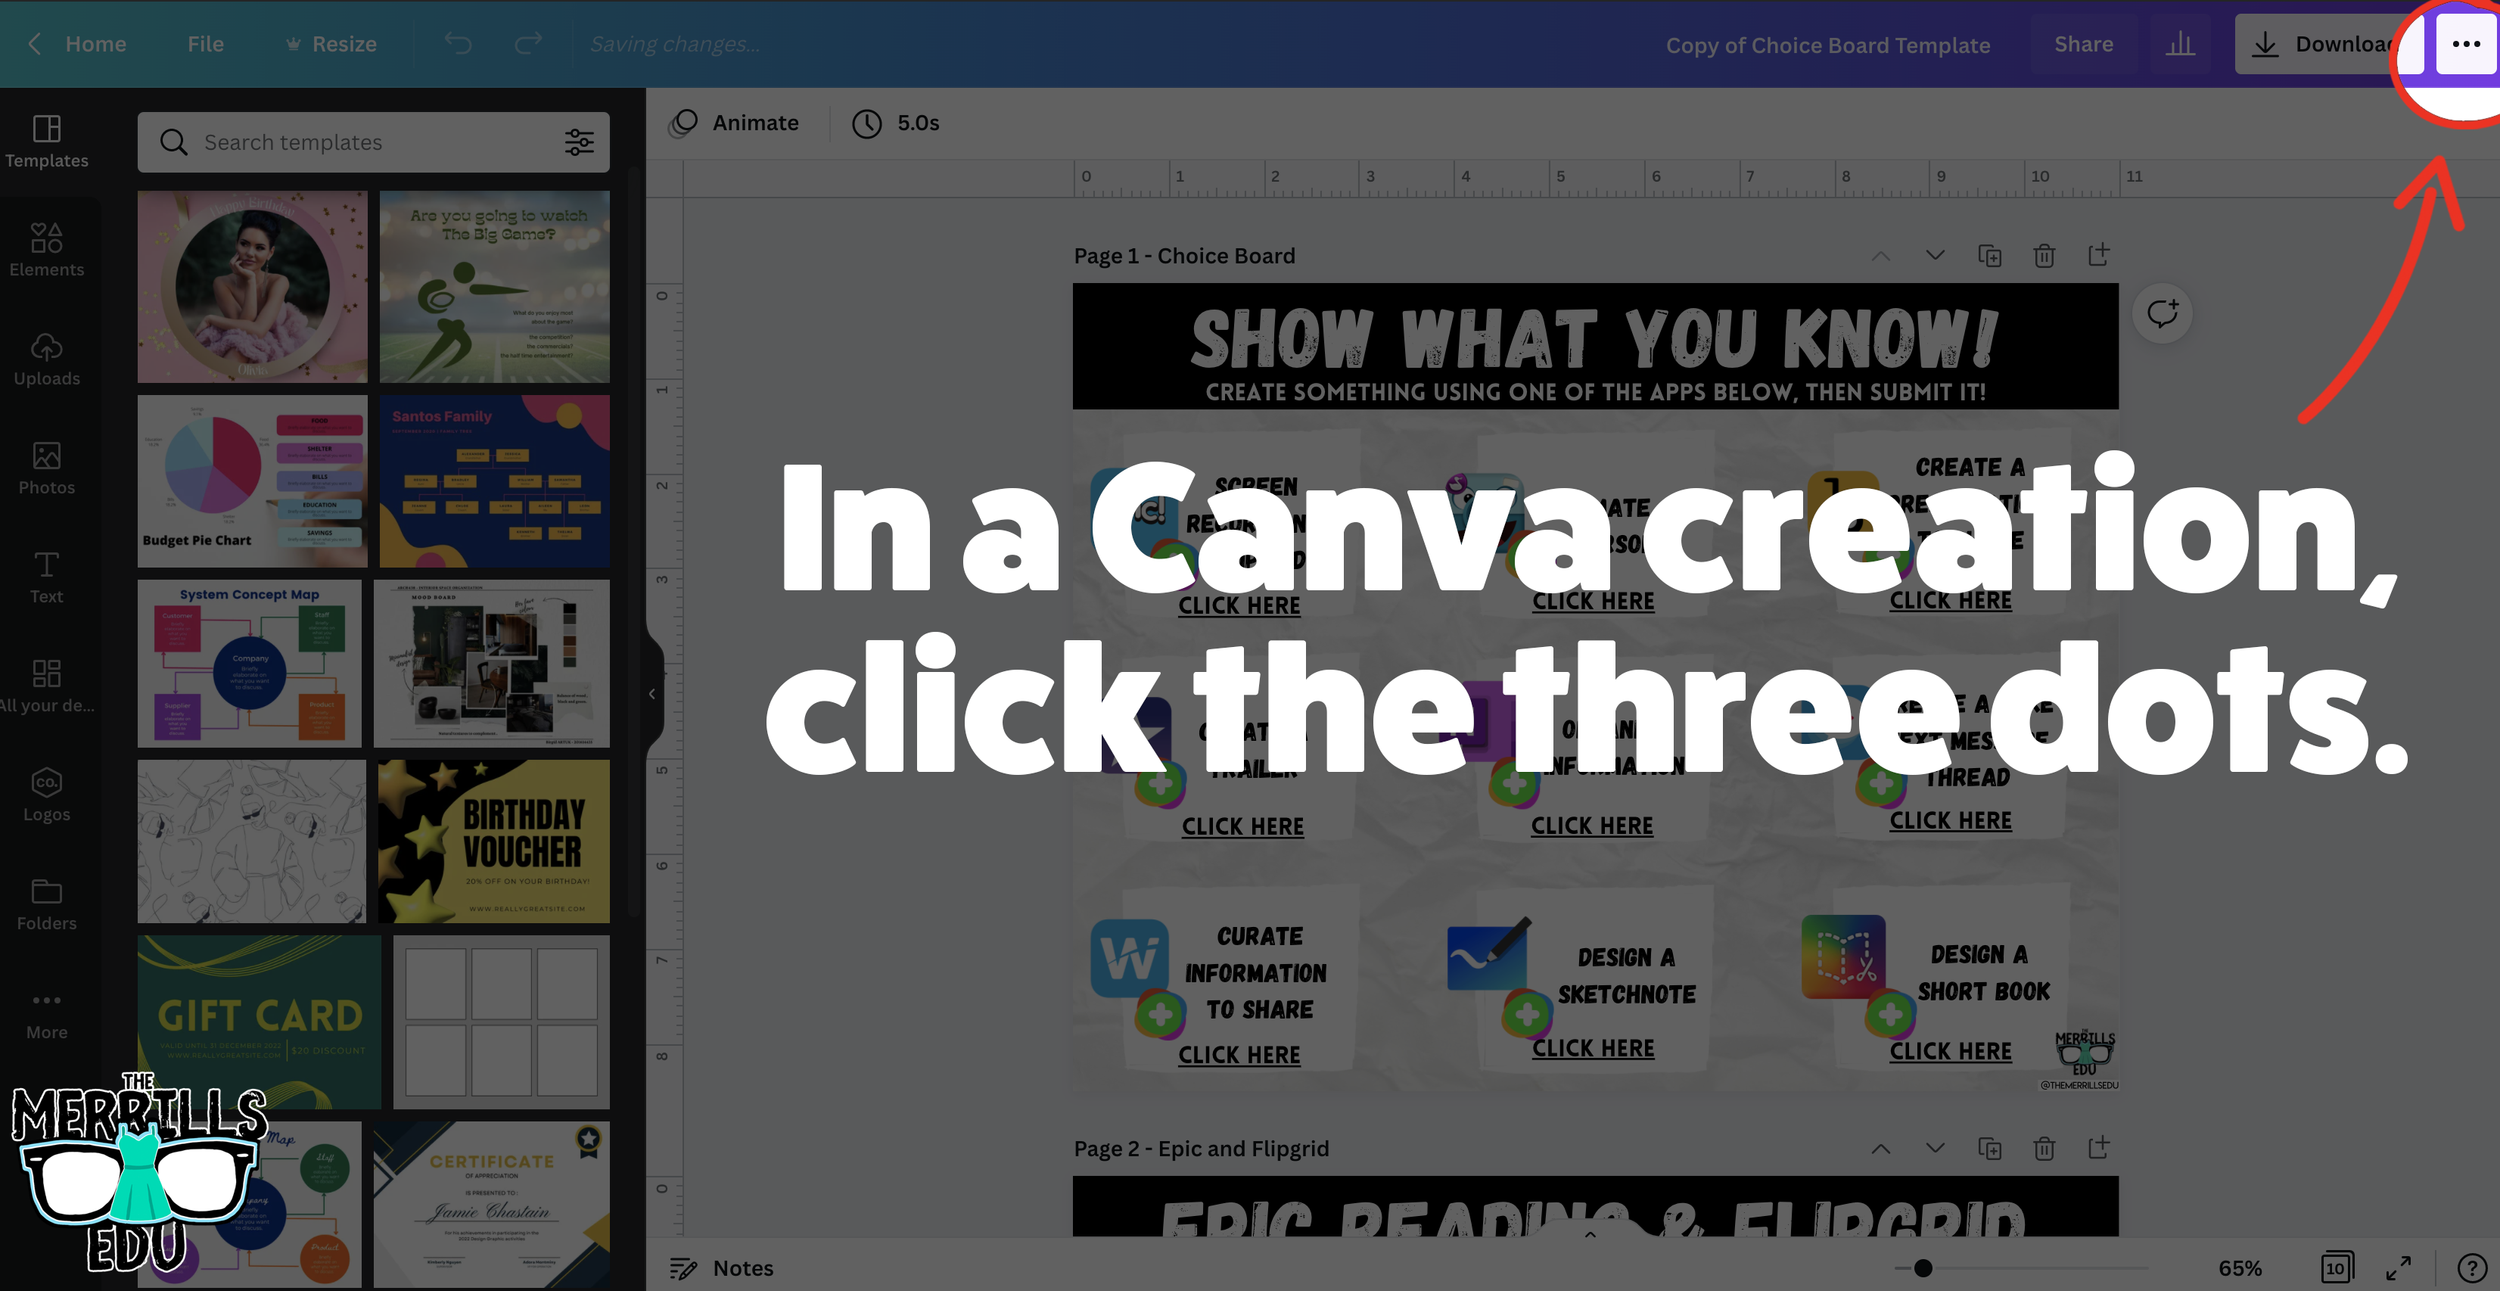
Canva Embedded into Canvas
Embedding Canva into Canvas will take your Canva creations live on any Canvas page! This live embed means that anything that you update on the Canva end will automatically update on the Canvas end. So, if you make changes to the Canva creation, you won’t have to worry about re-embedding it! Here’s how it all works:
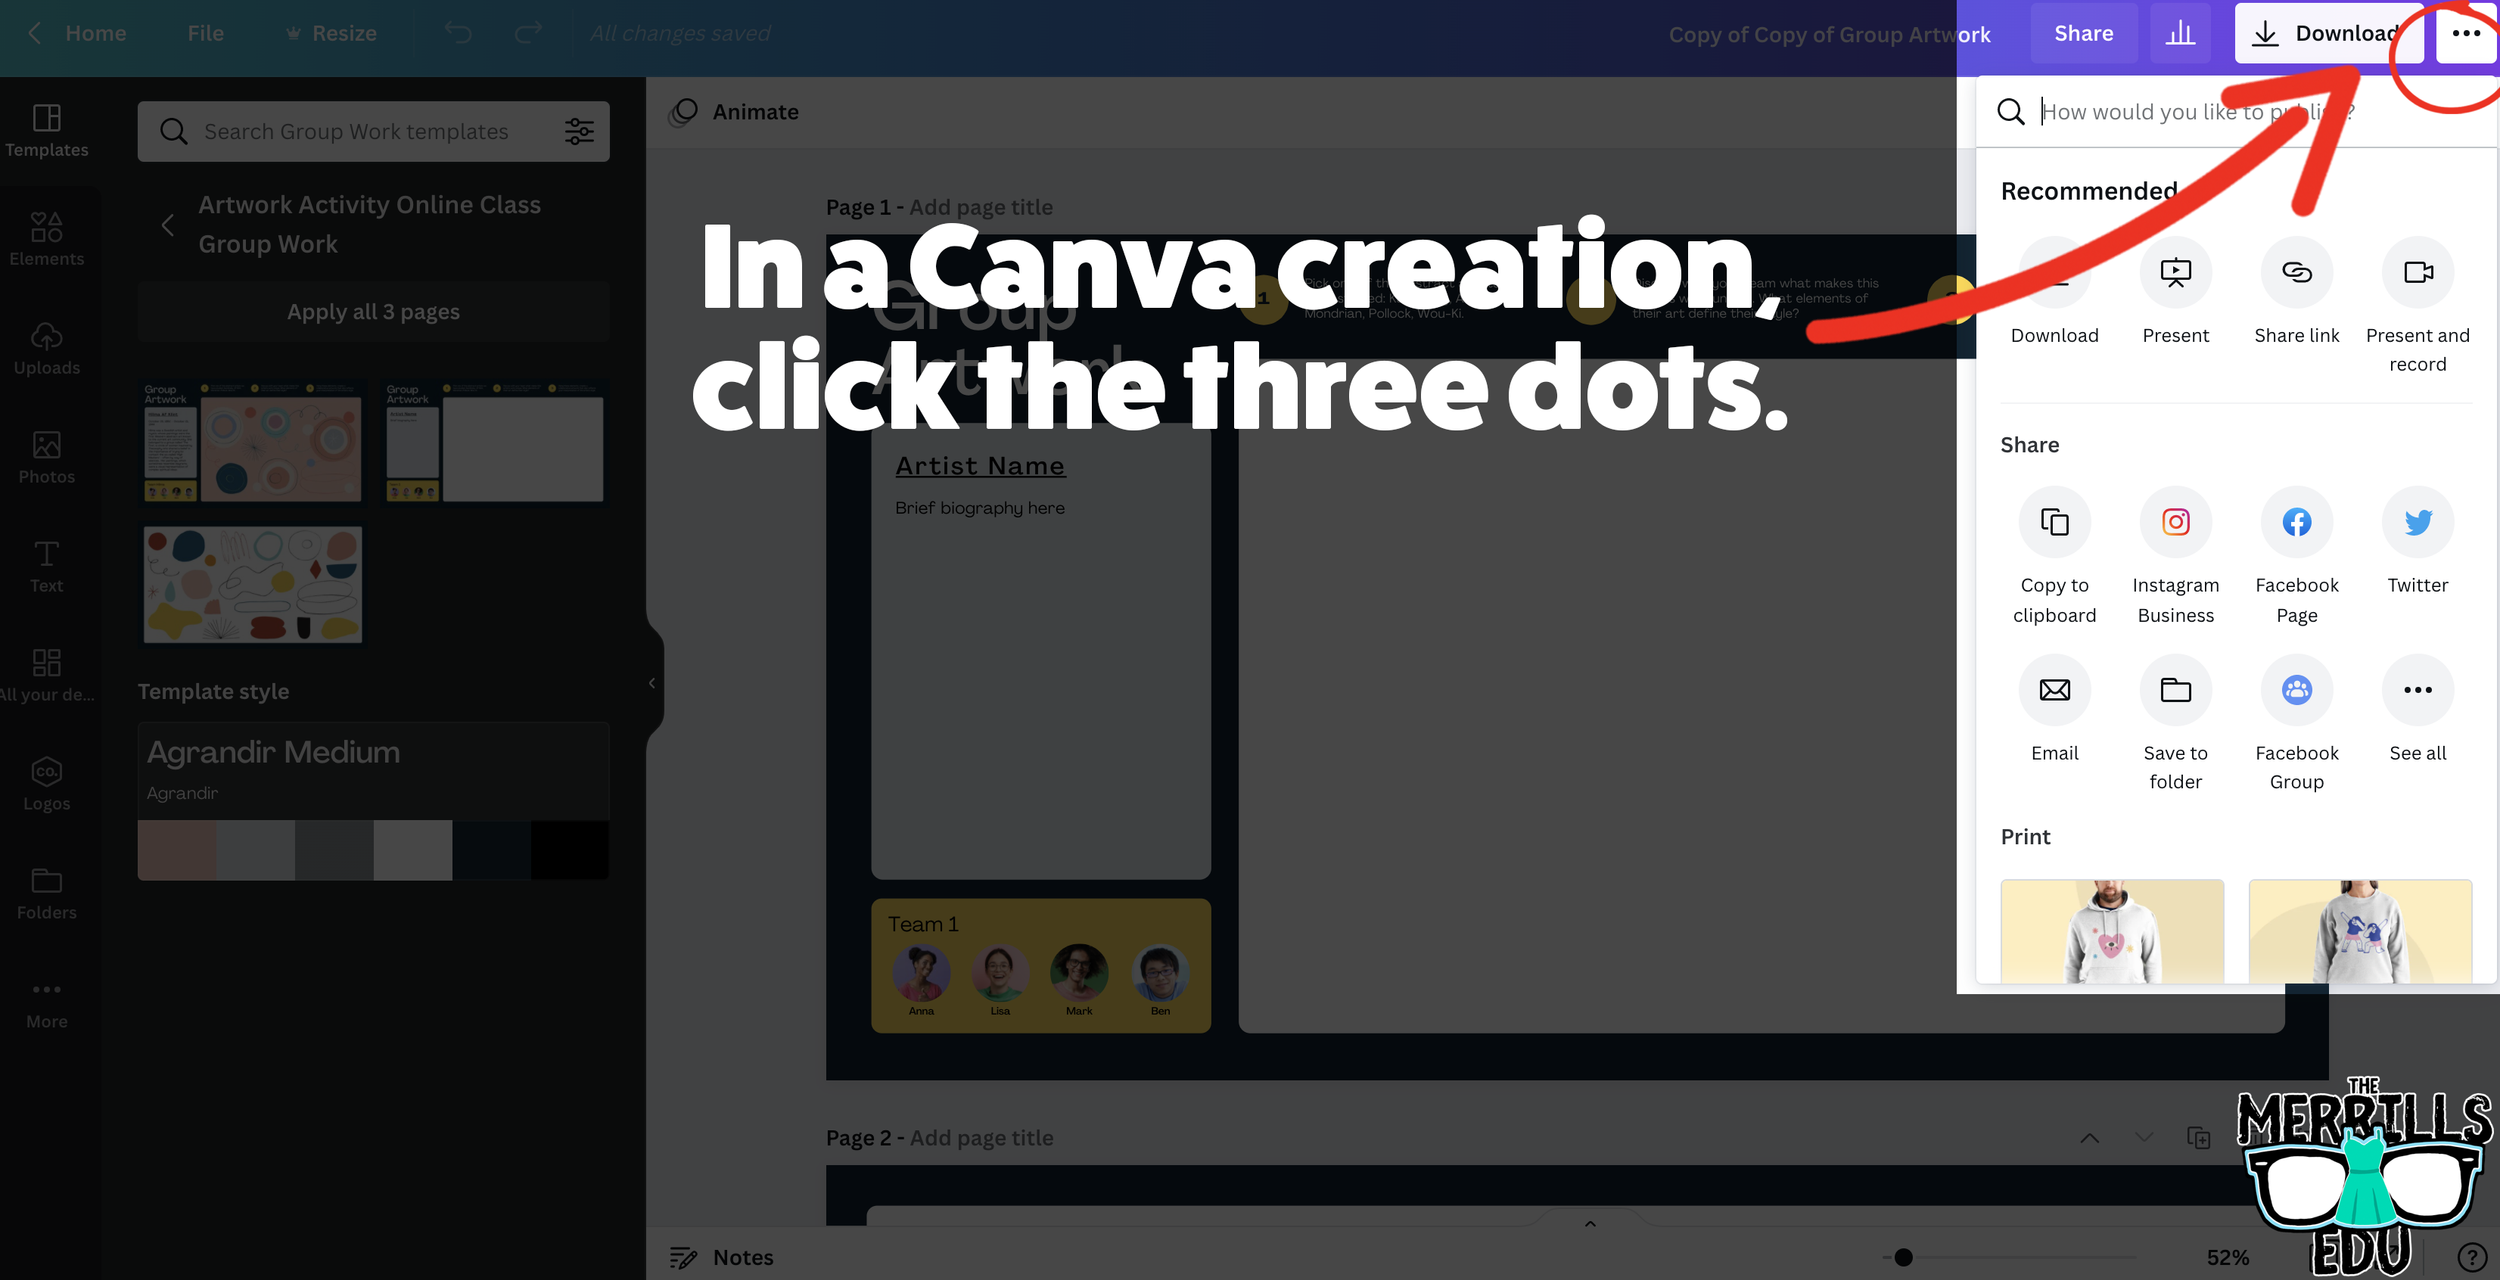


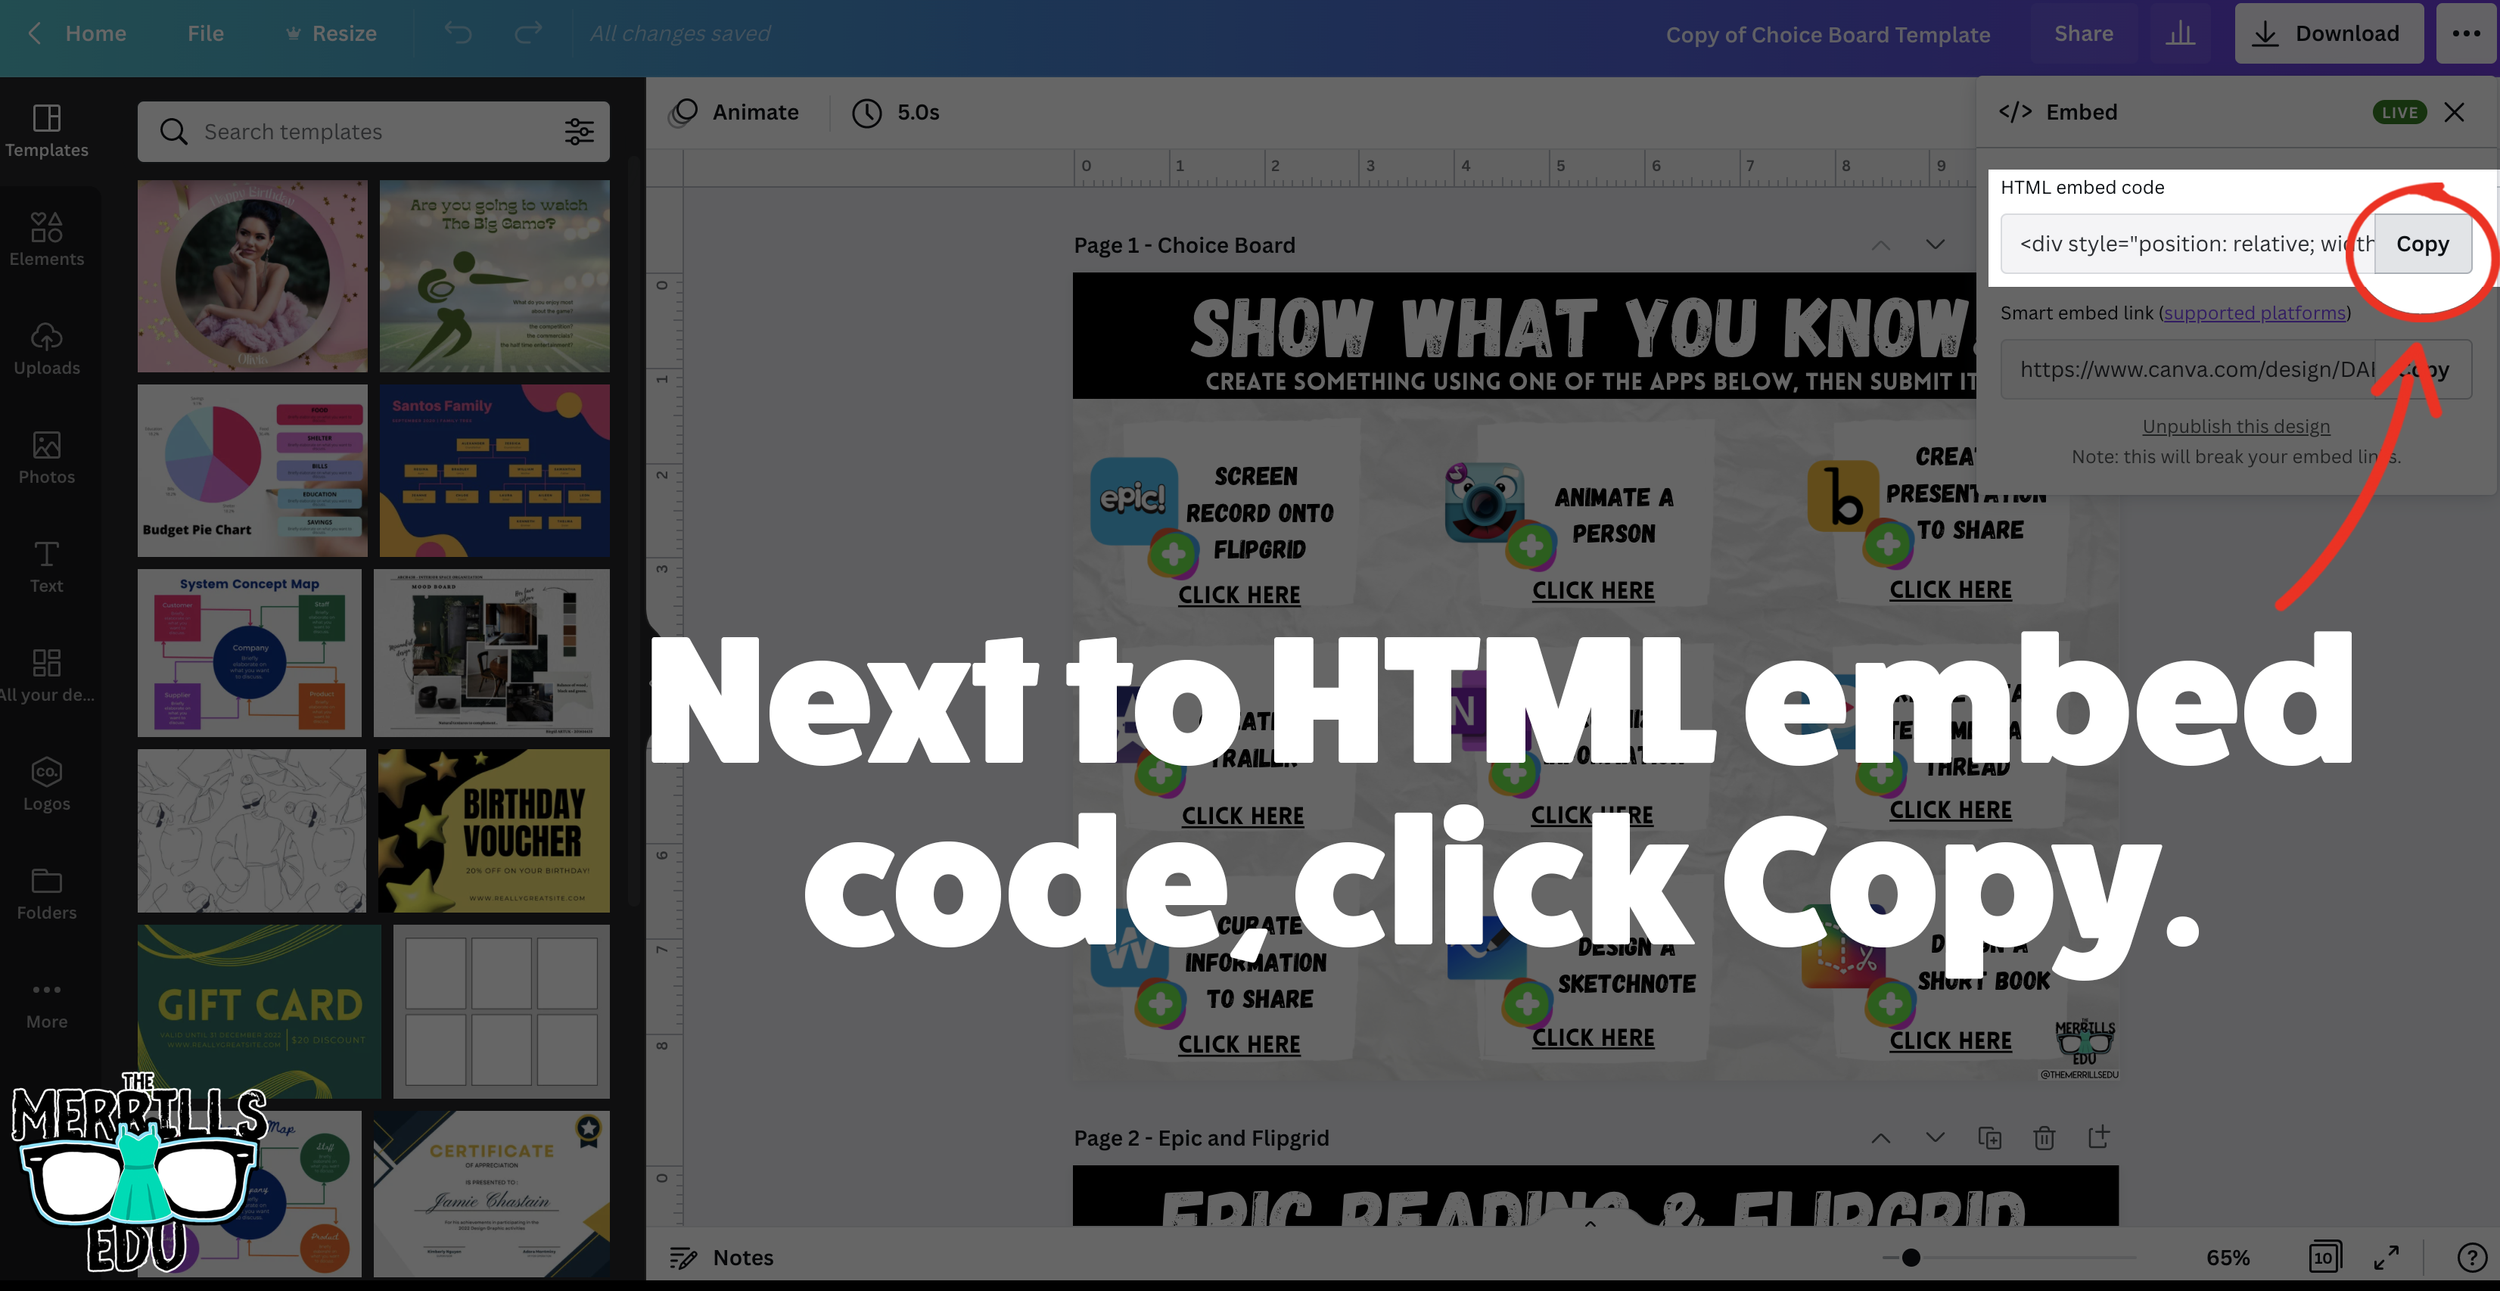
Open a Canva creation, then click on the three dots located on the top right side of the screen.
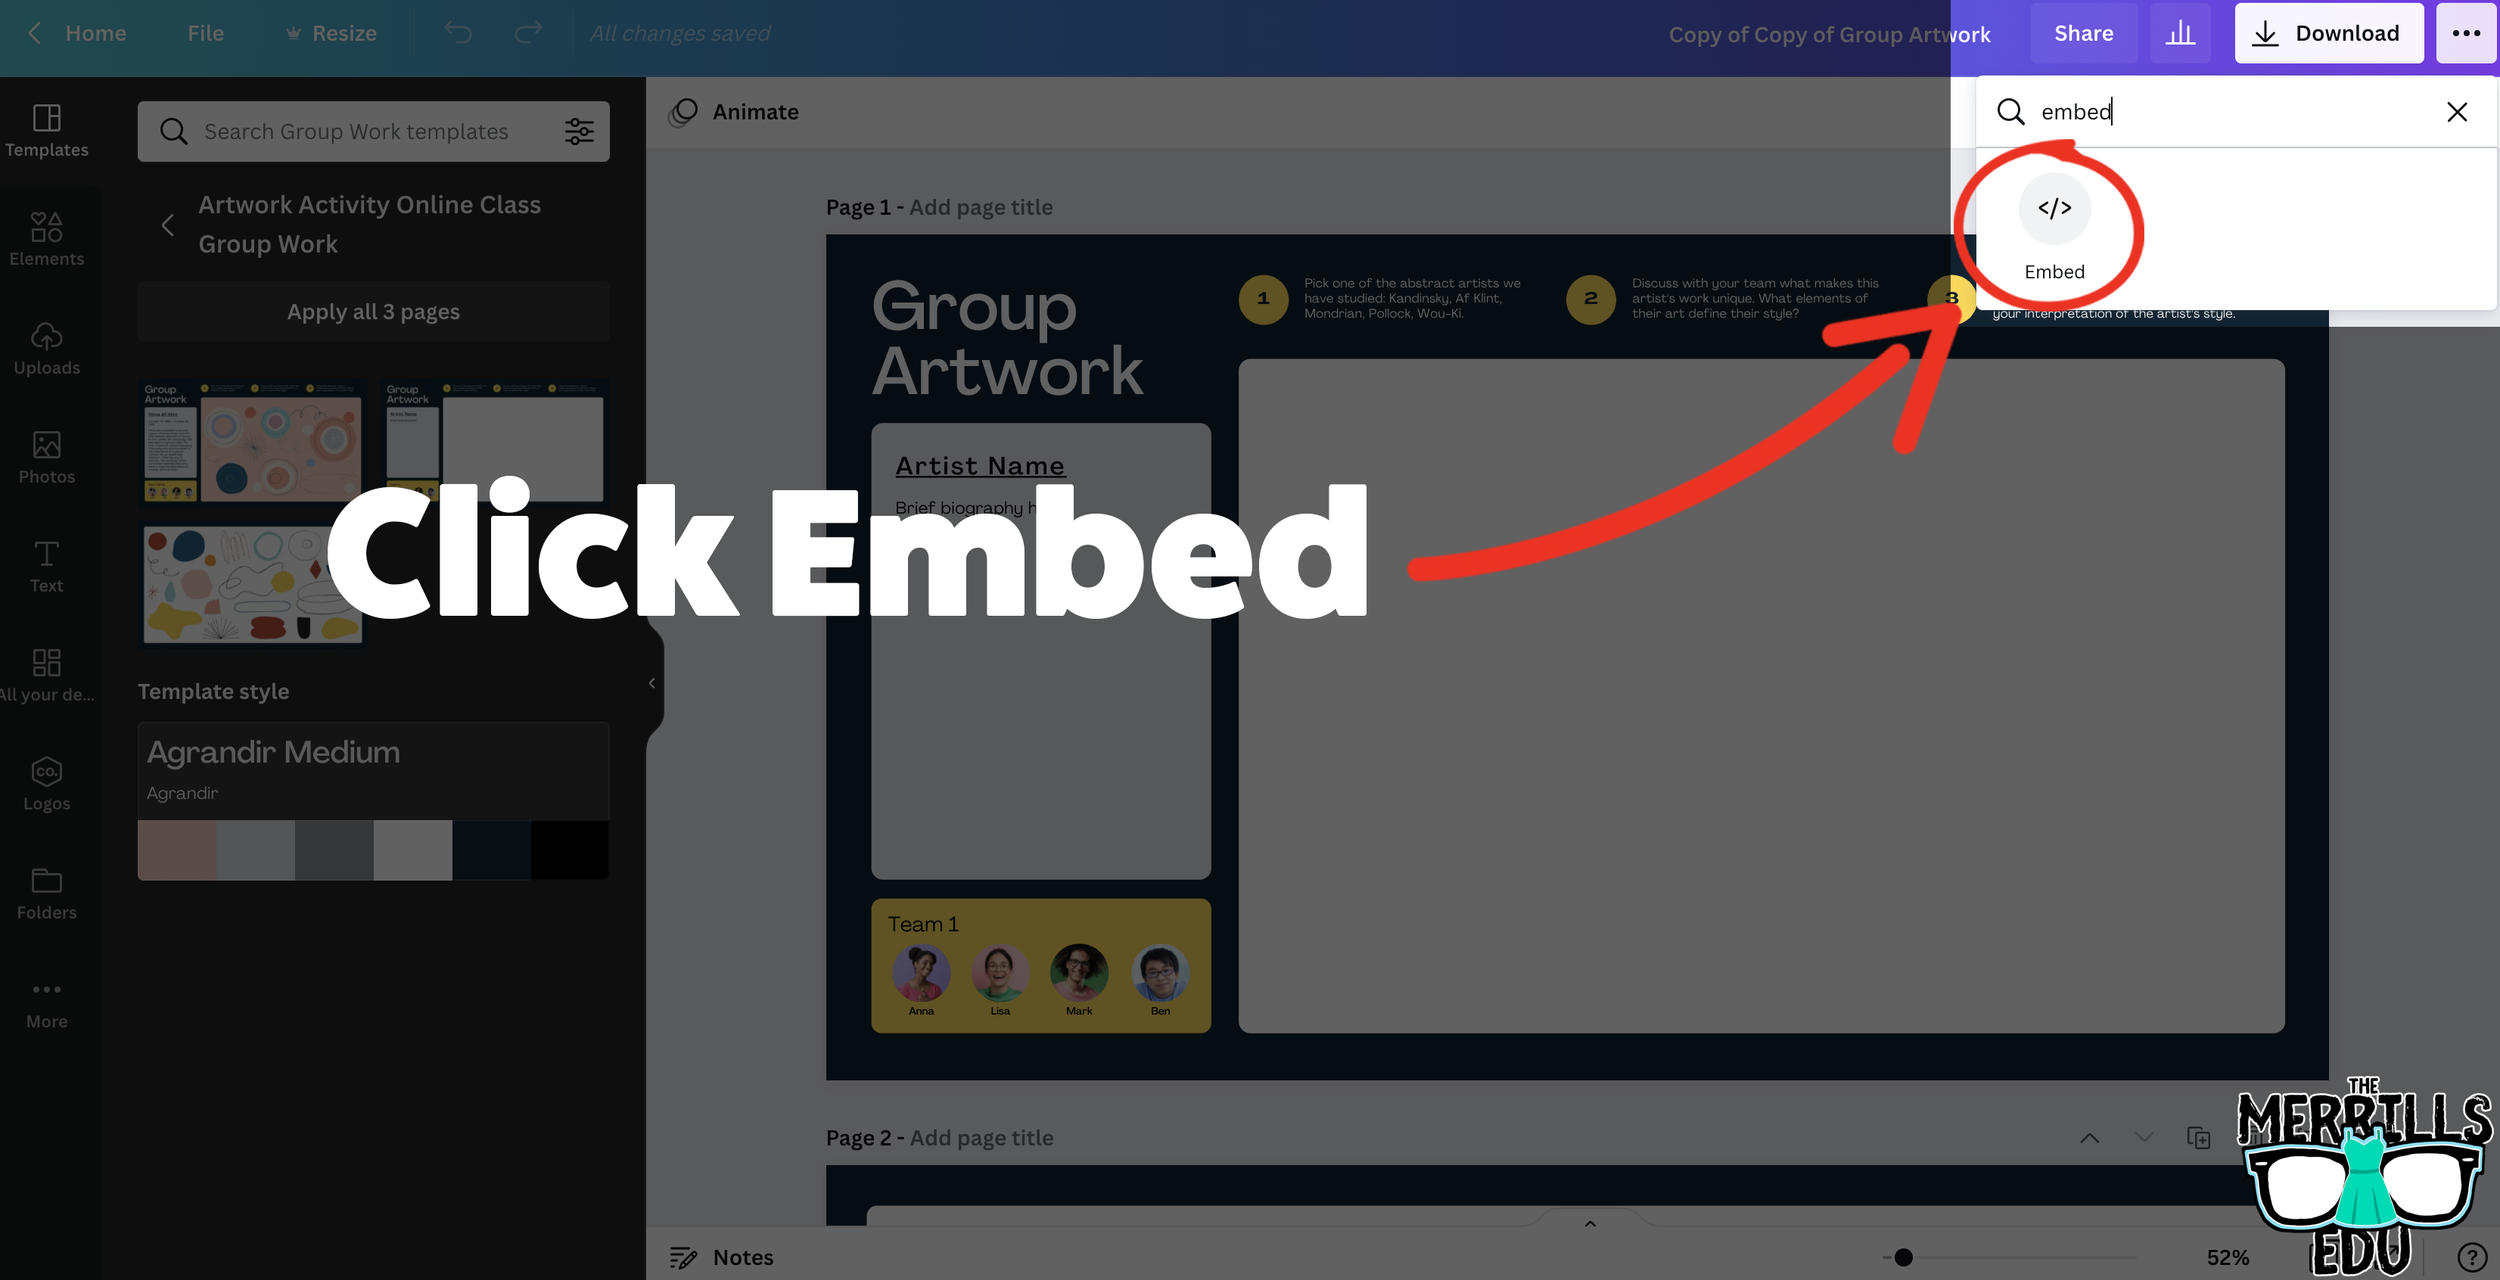
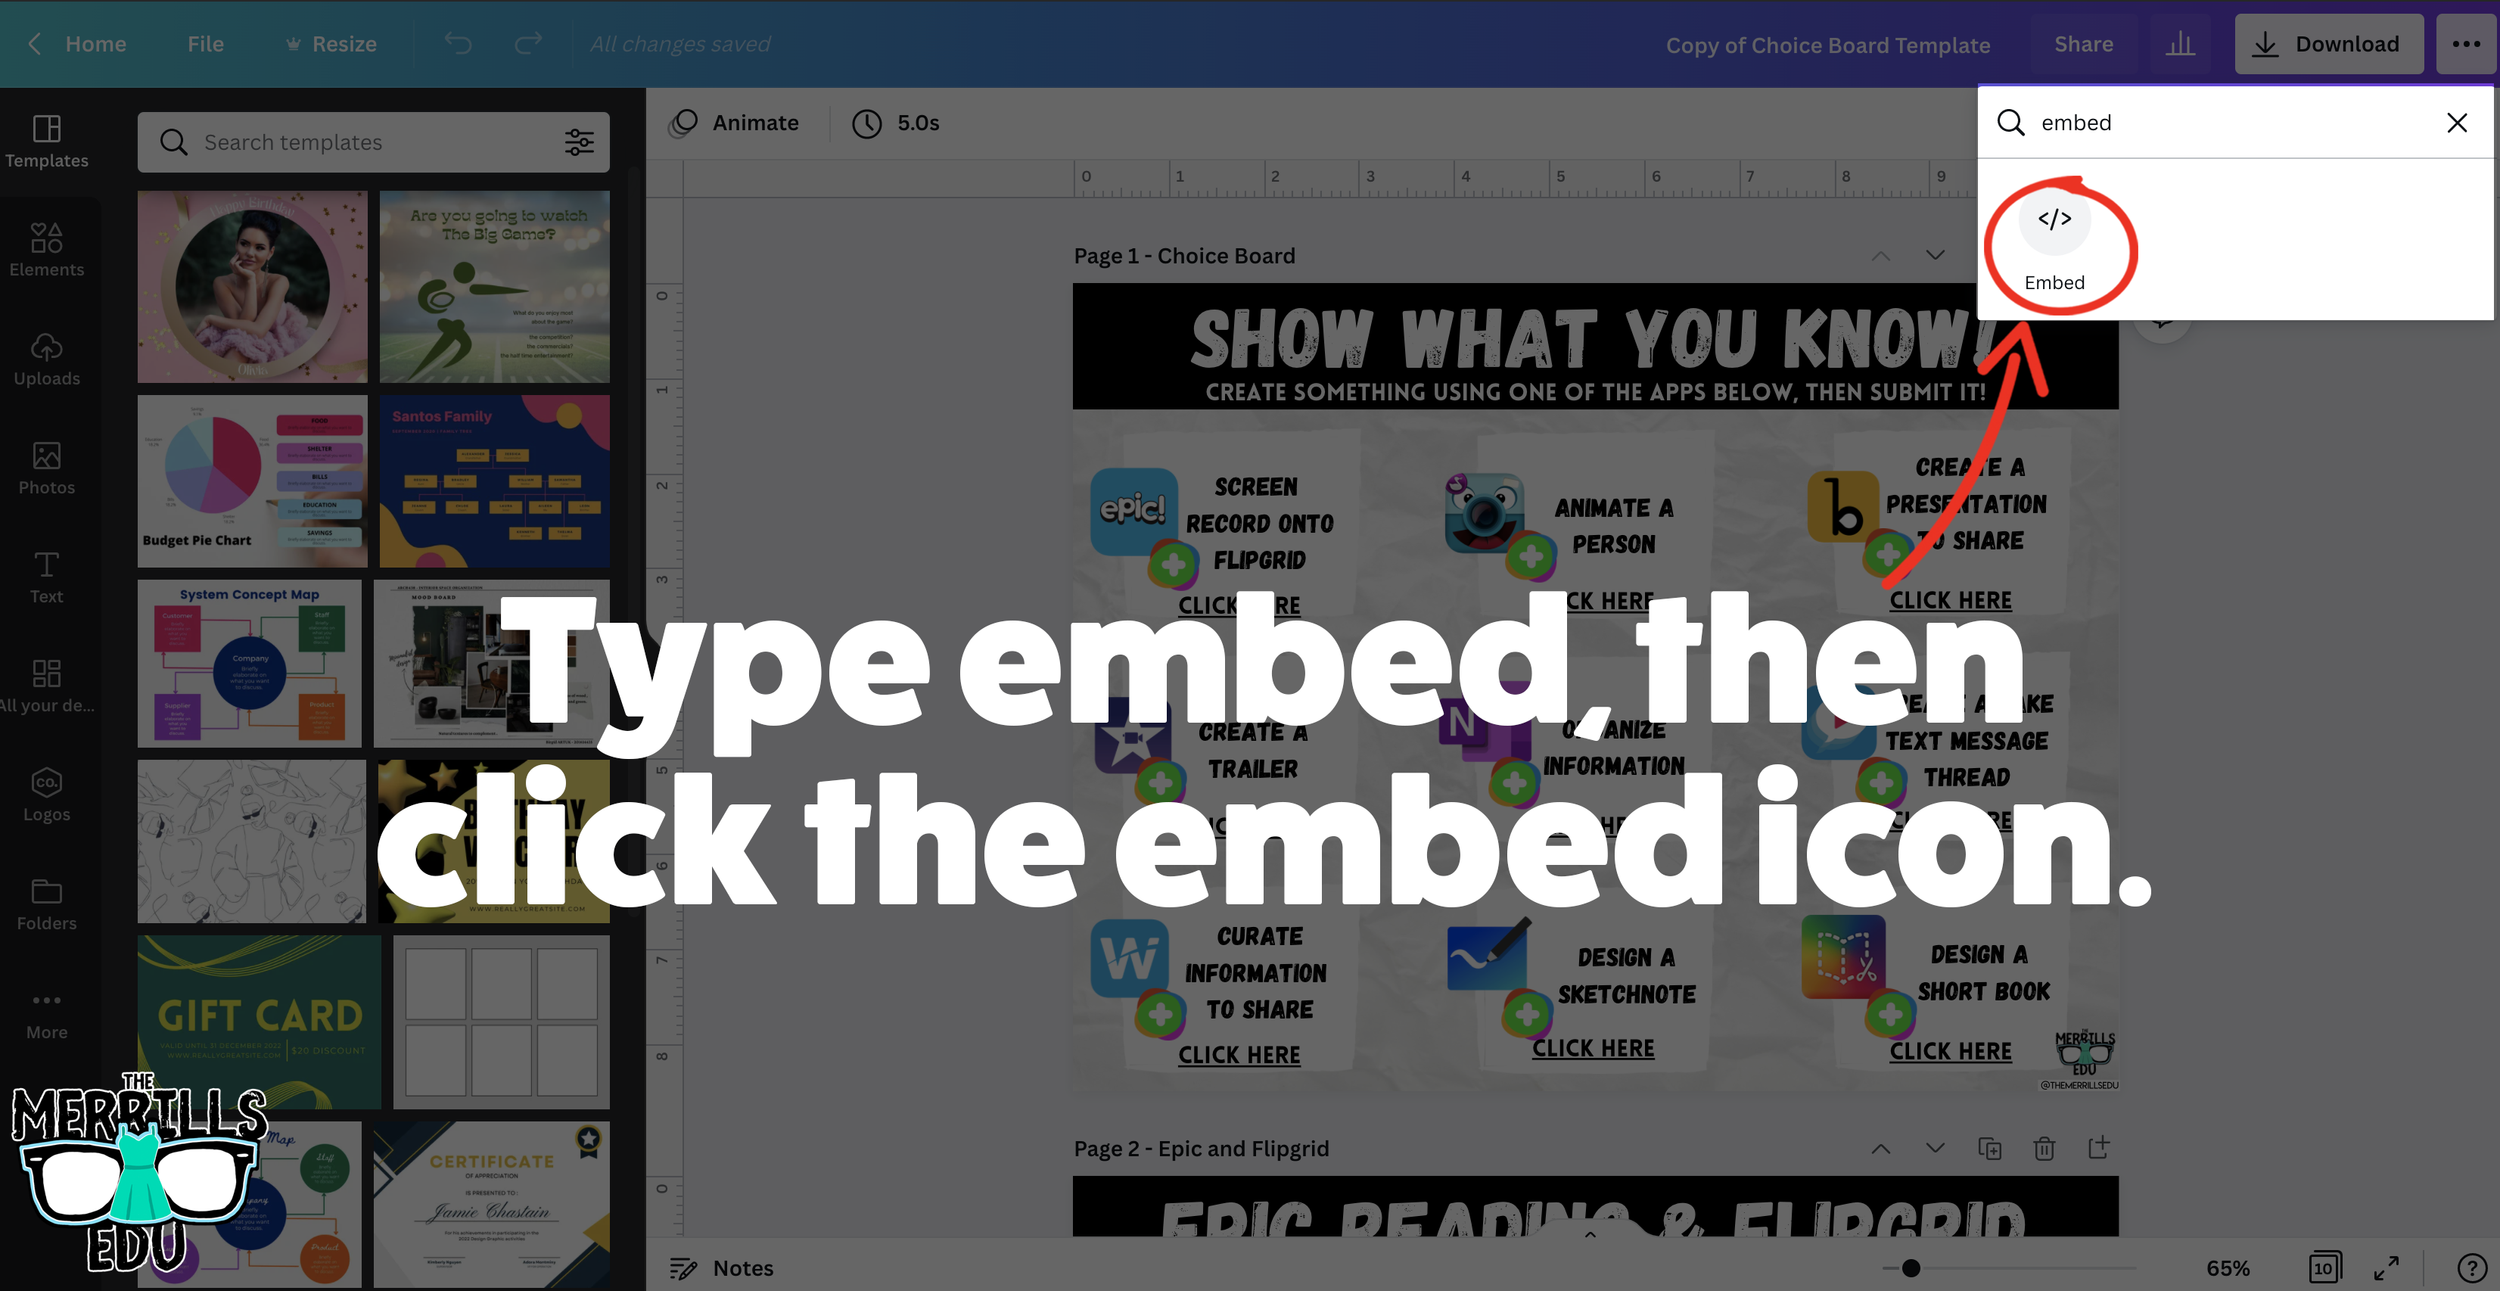
In the search bar, type “embed,” then click the embed icon.
In the next window, click “Embed” to take the creation live.
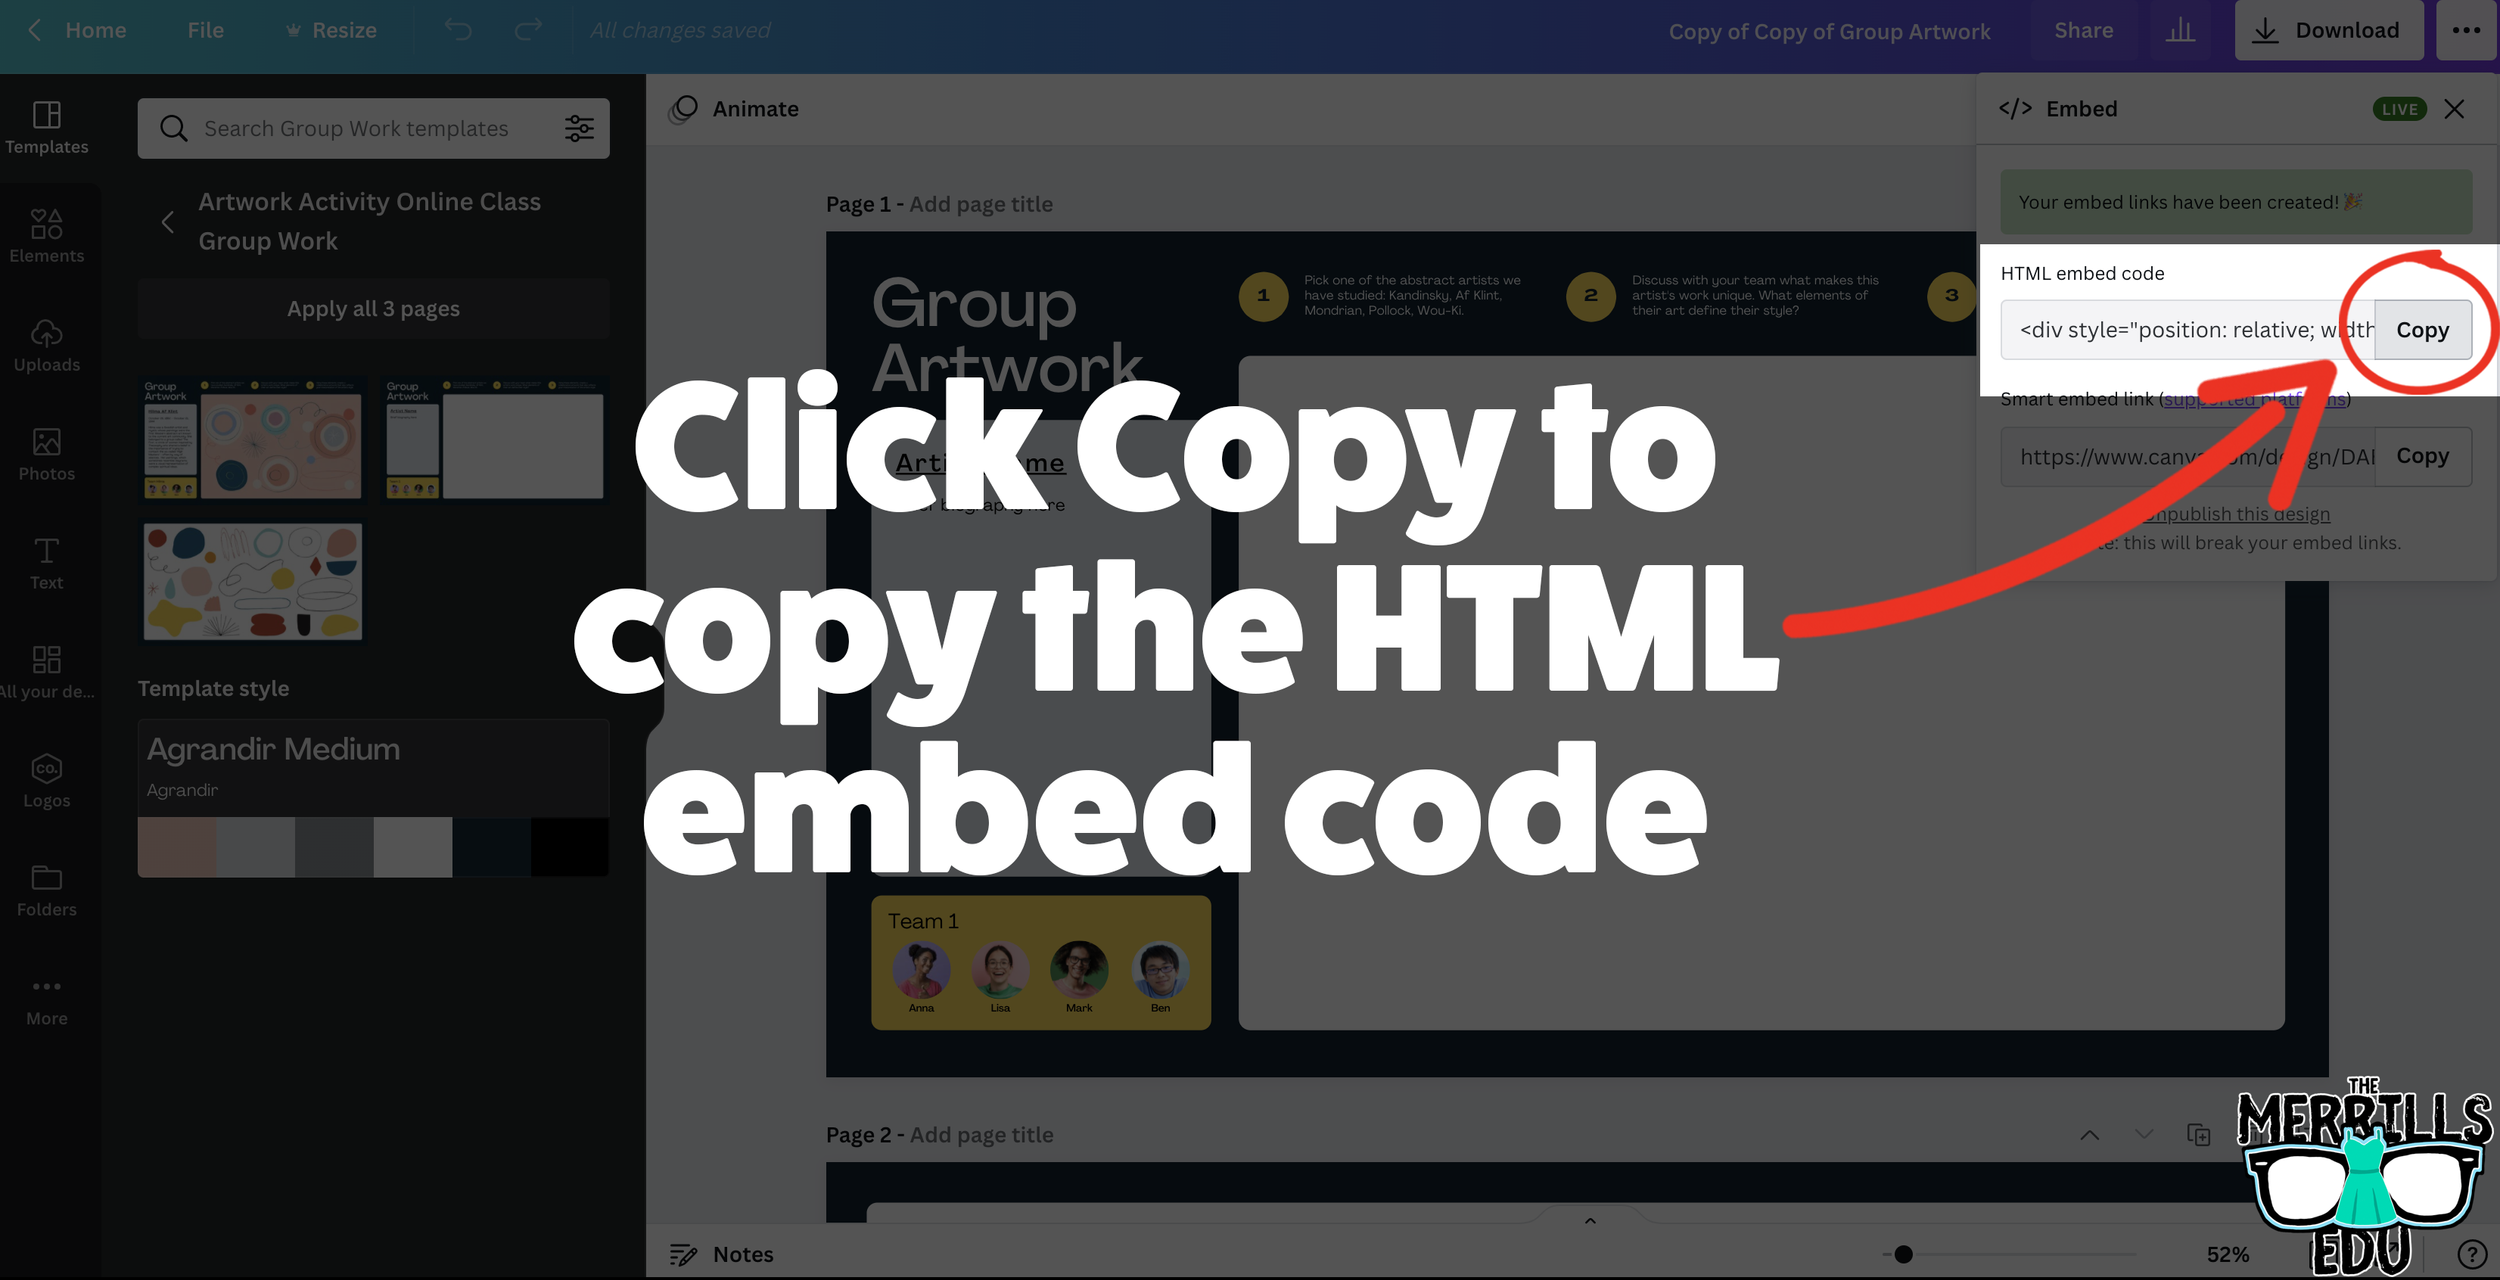
A few options will open up on the next window. Click and copy the HTML embed code (the smart embed will only work on selected platforms, so the HTML code is a safer route).
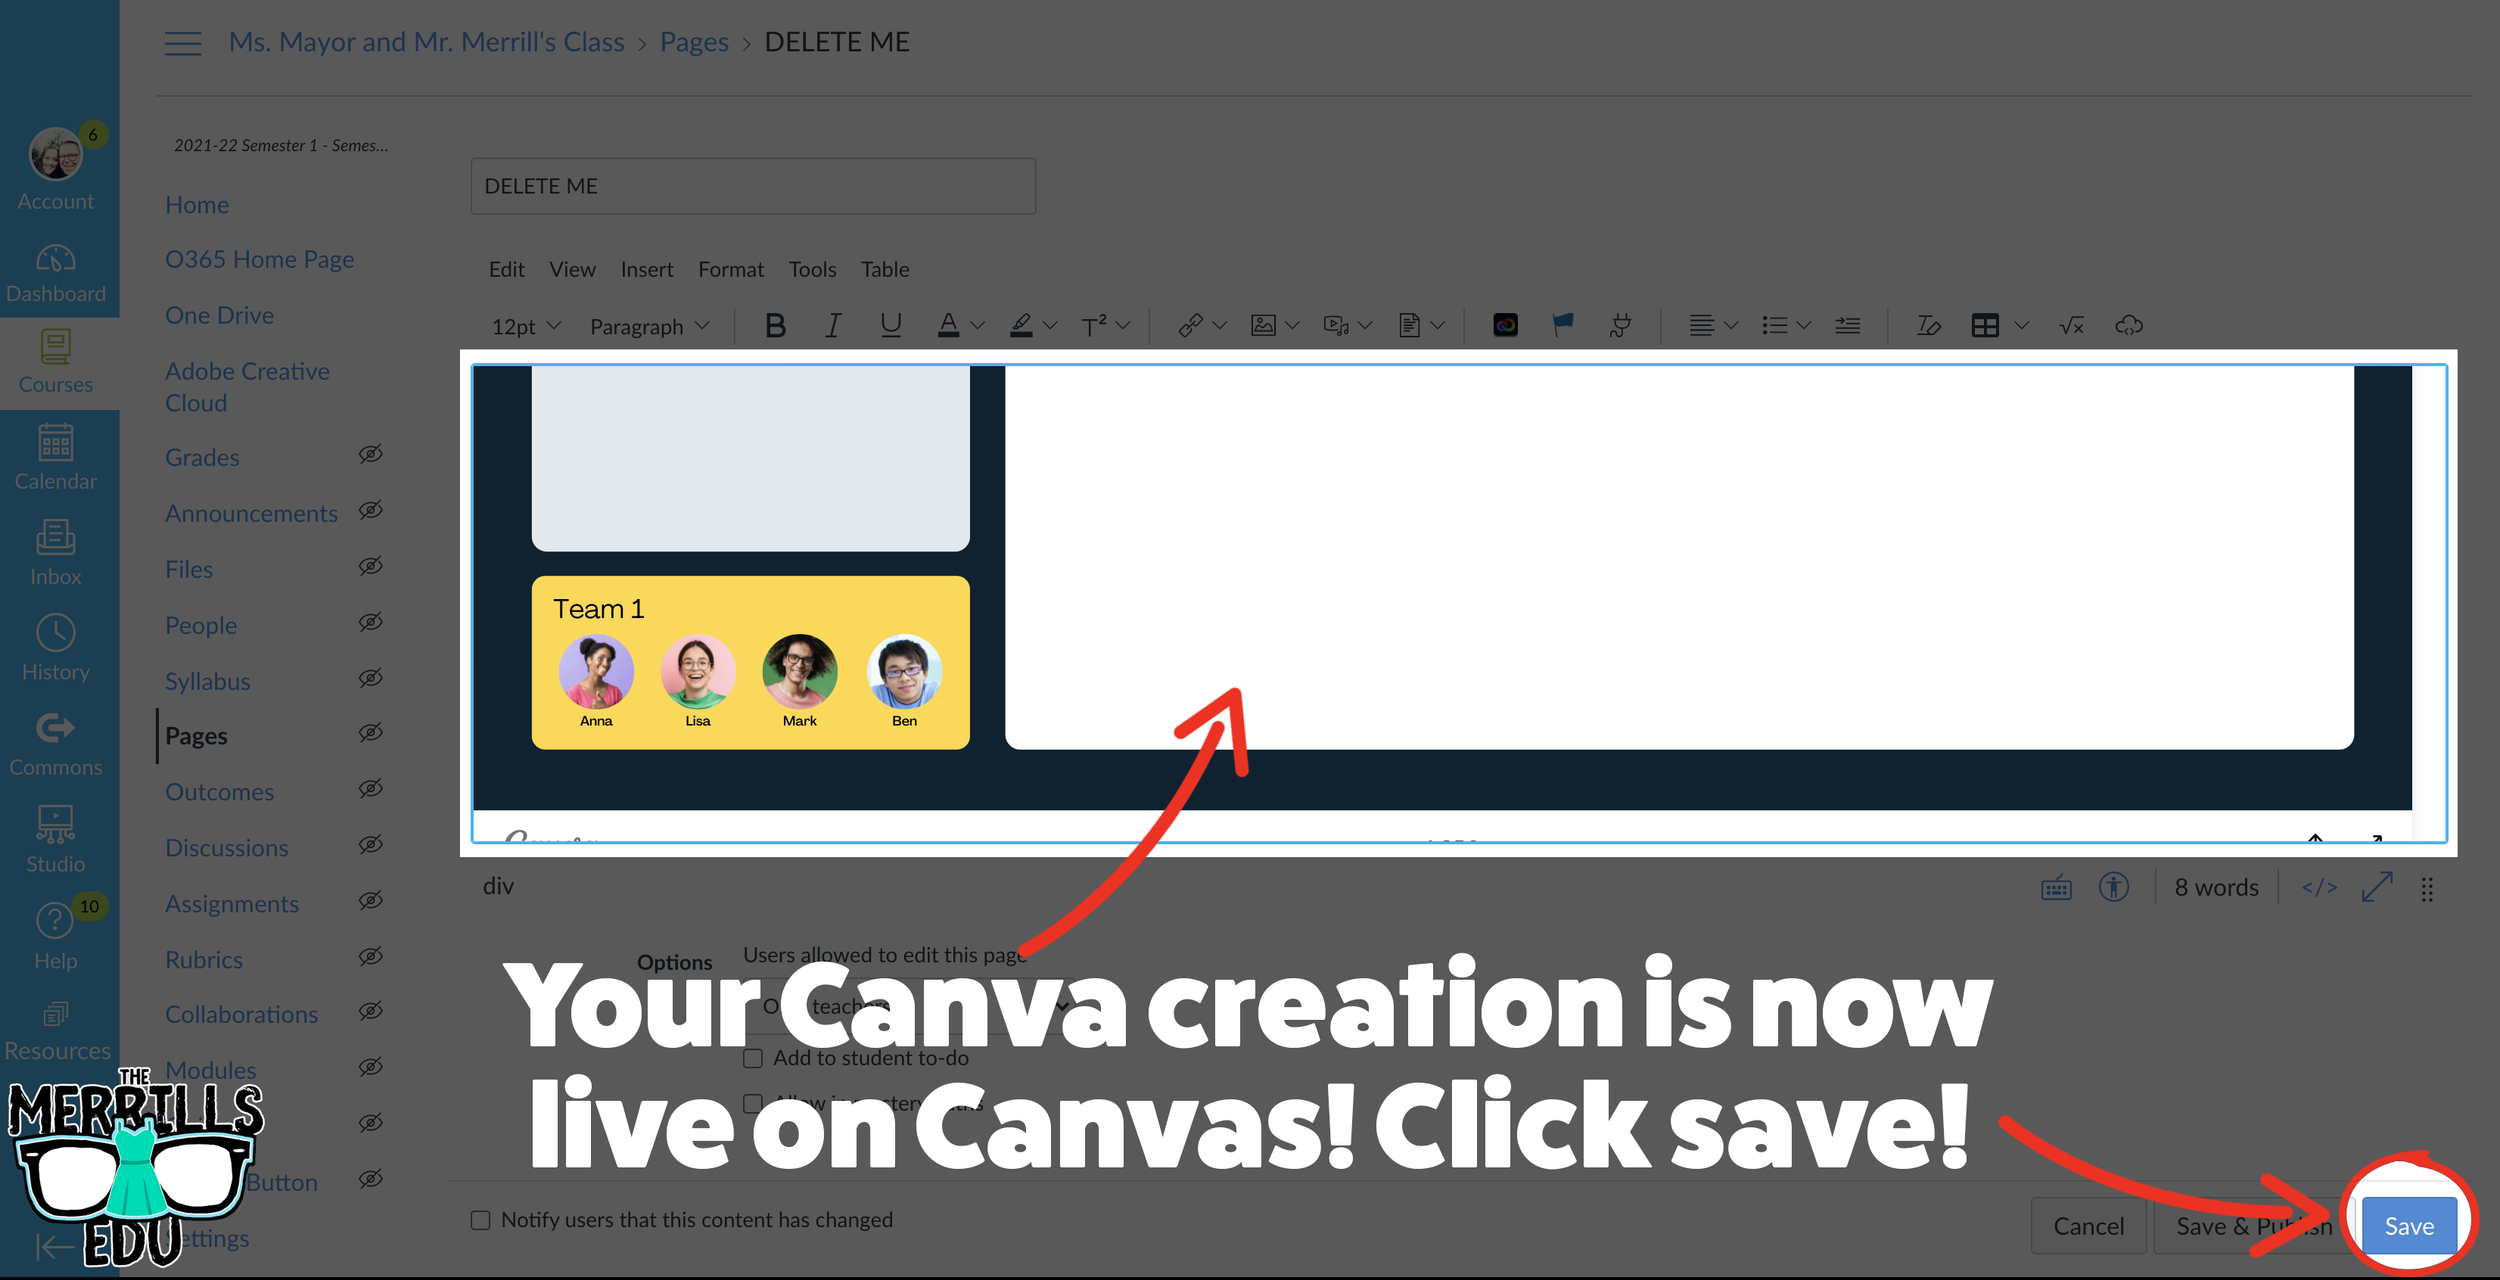
In a separate tab, open the Canvas page that you would like to add the Canva creation to. Then, click on the cloud icon (if you don’t see the Cloud icon, click the three dots to expand the menu bar).
In the embed window, paste your copied code from Canva. Then, click submit.
Your Canva creation is now embedded into the Canvas page! Click on “Save” to update the changes.

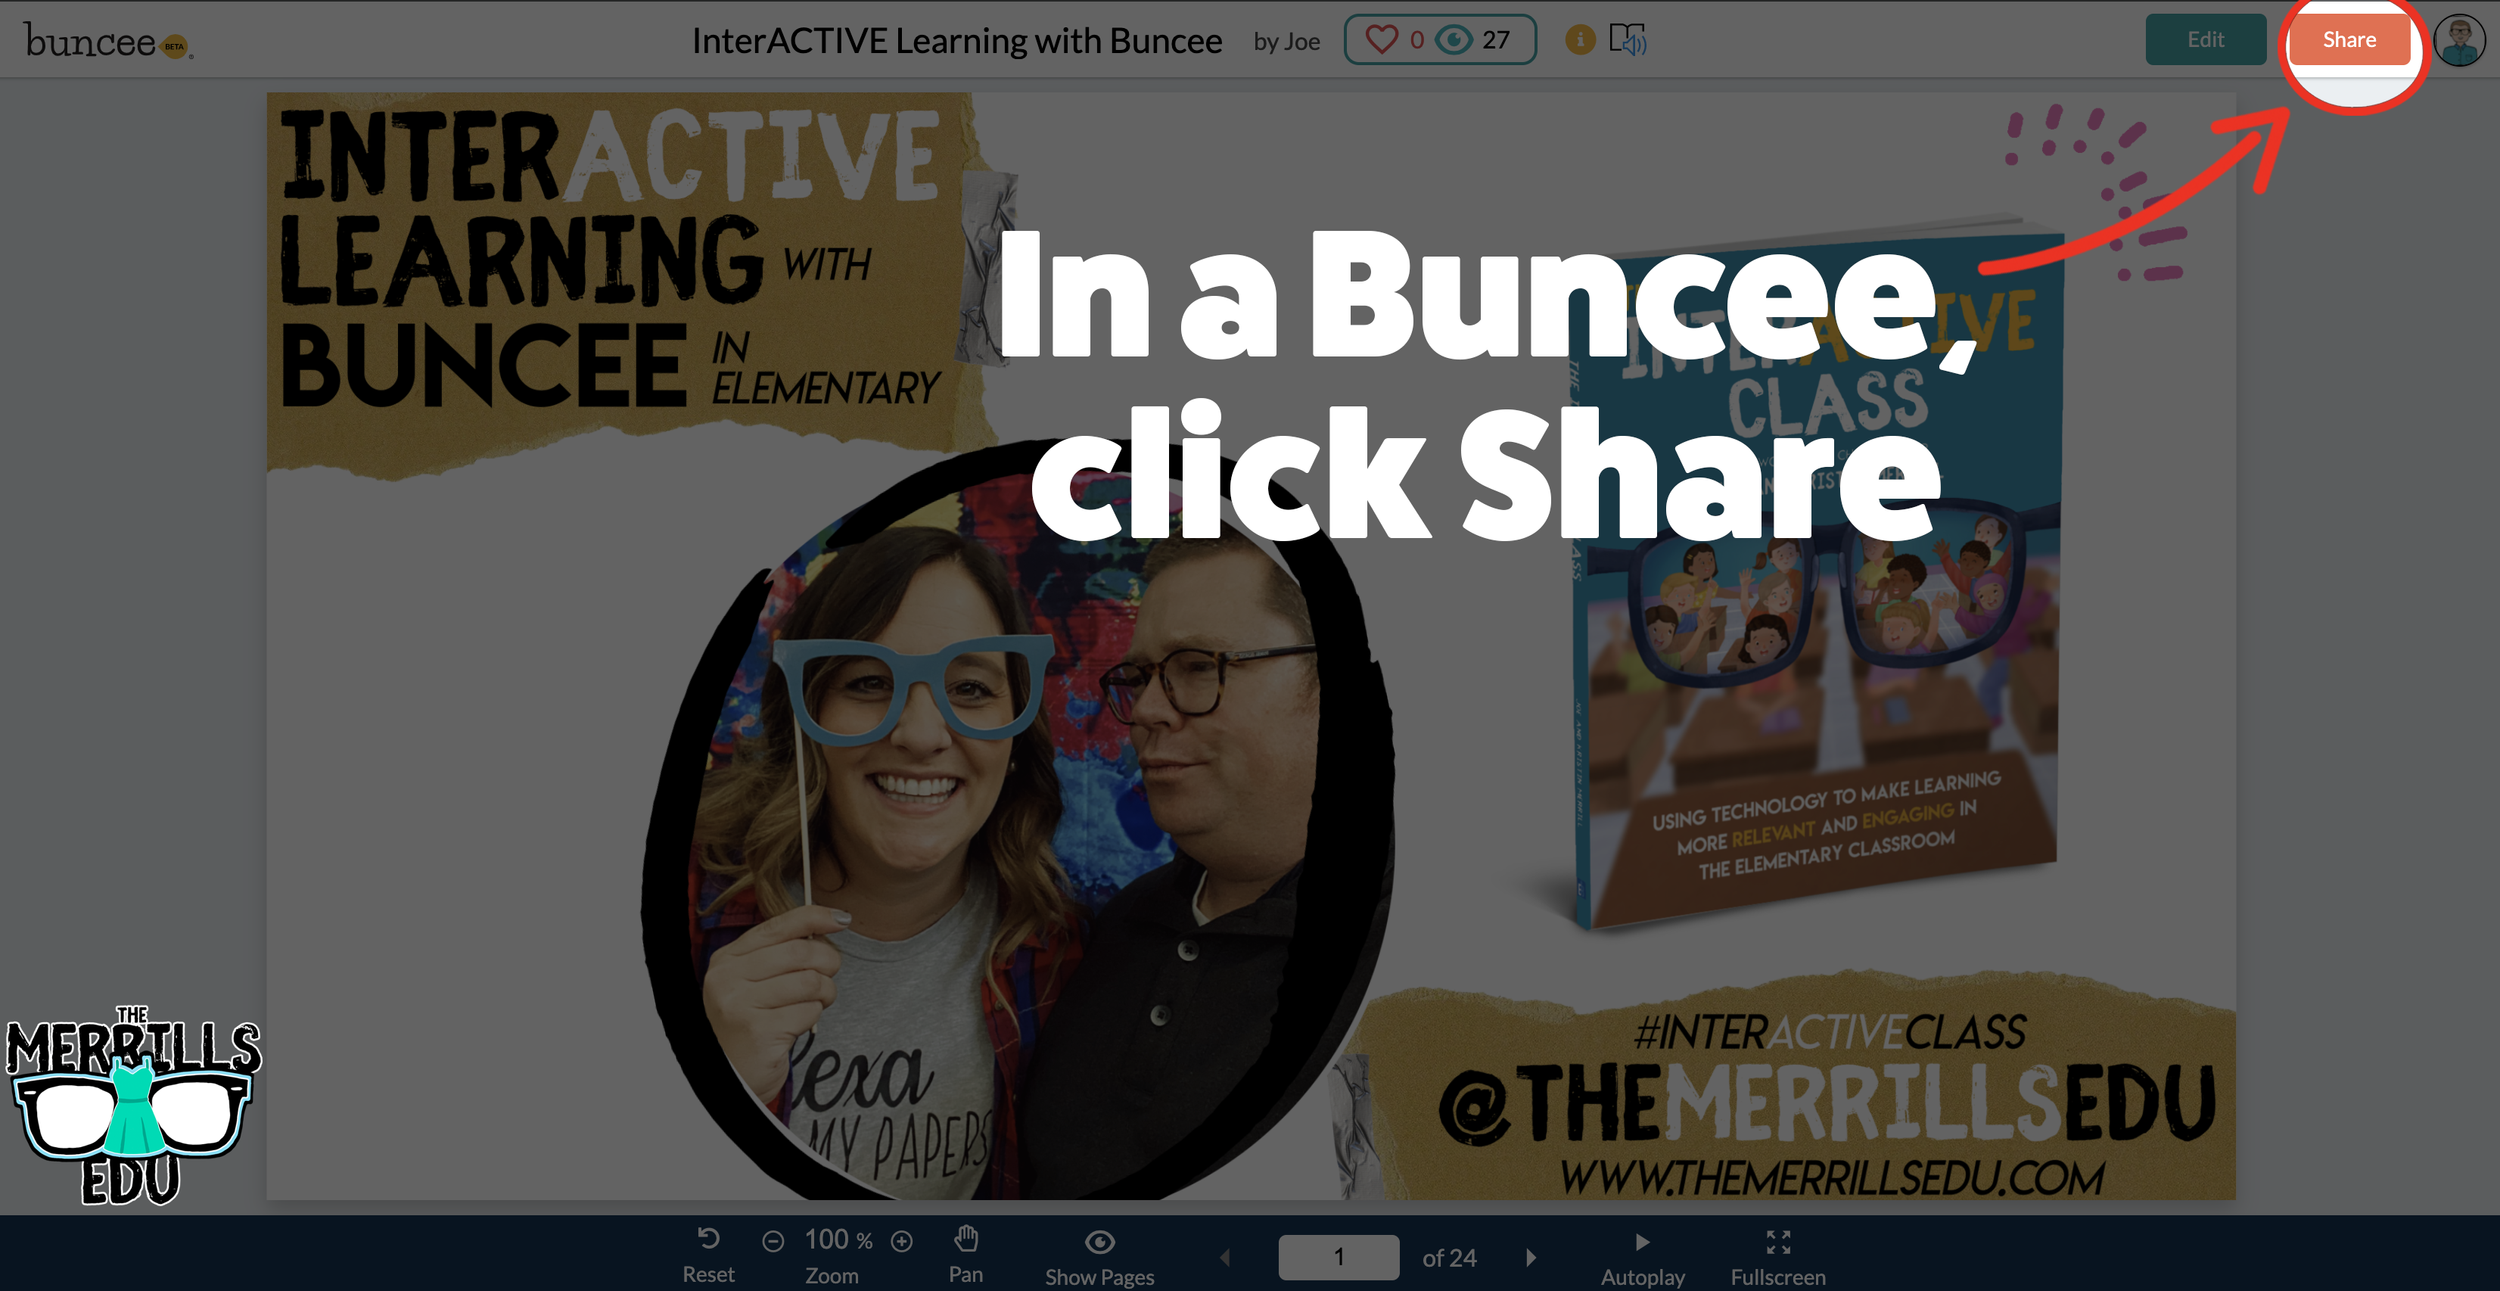
Buncee Embedded into Canvas
Buncee creations can be added to Canvas, too! There’s a lot of embed options (which we love!), so you have complete control of how things look and work. Options include autoplay and dimensions of the embed. Here’s how it all works:
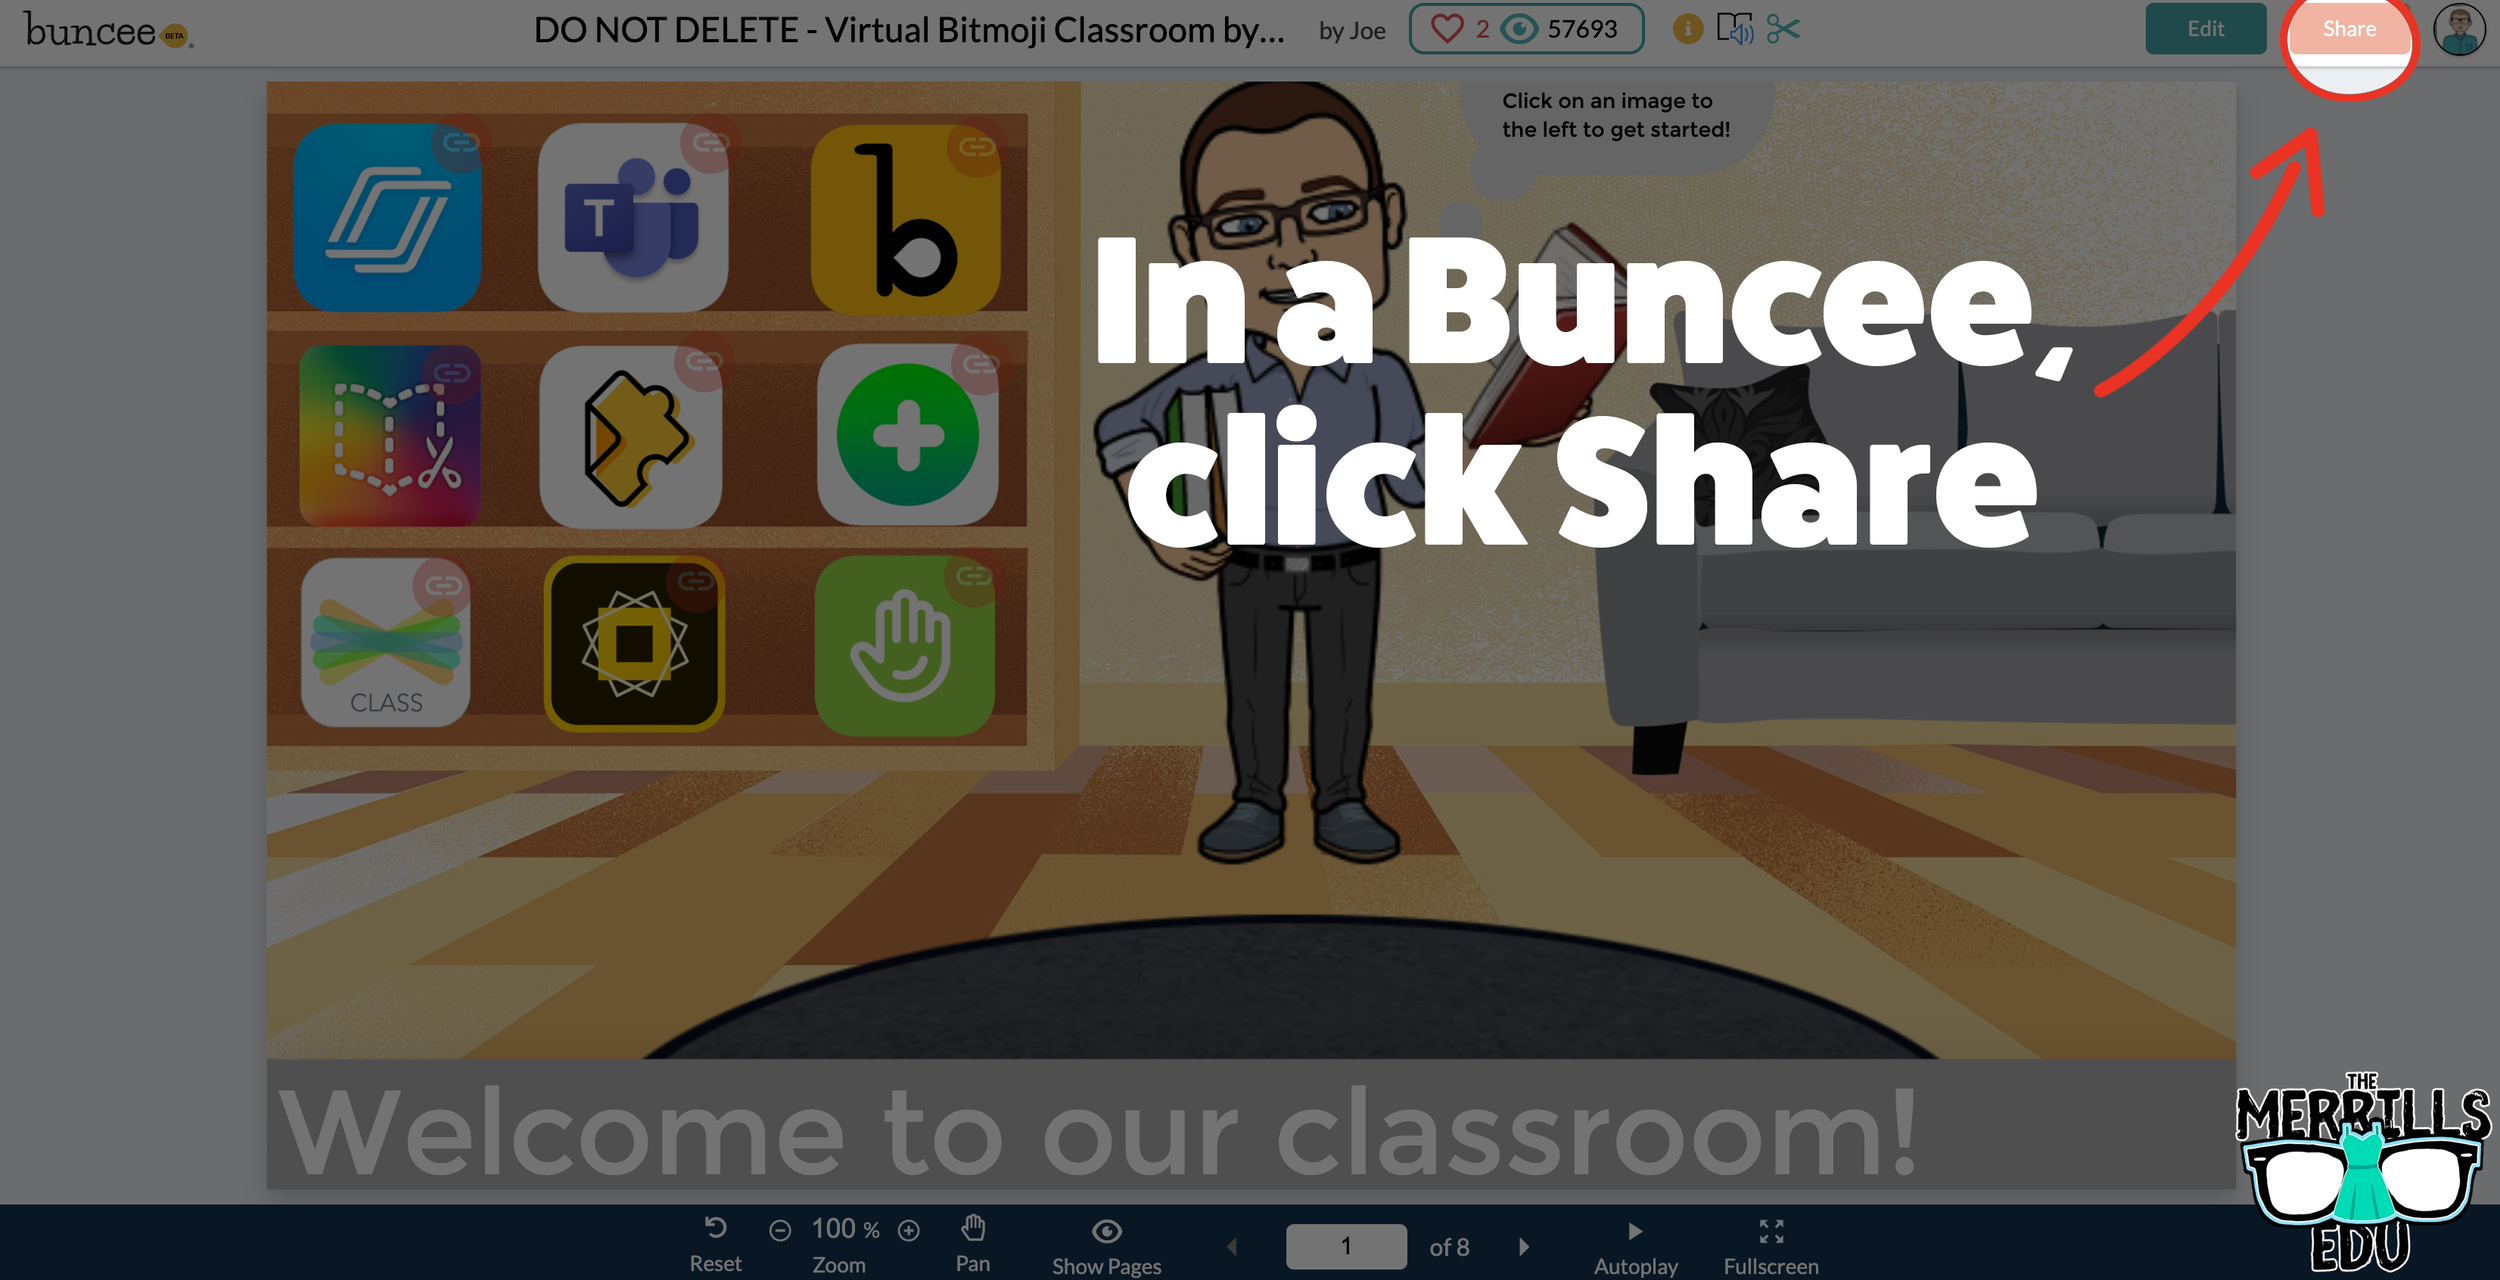


Open a Buncee, then click the “Share” button located in the upper right side of the screen.
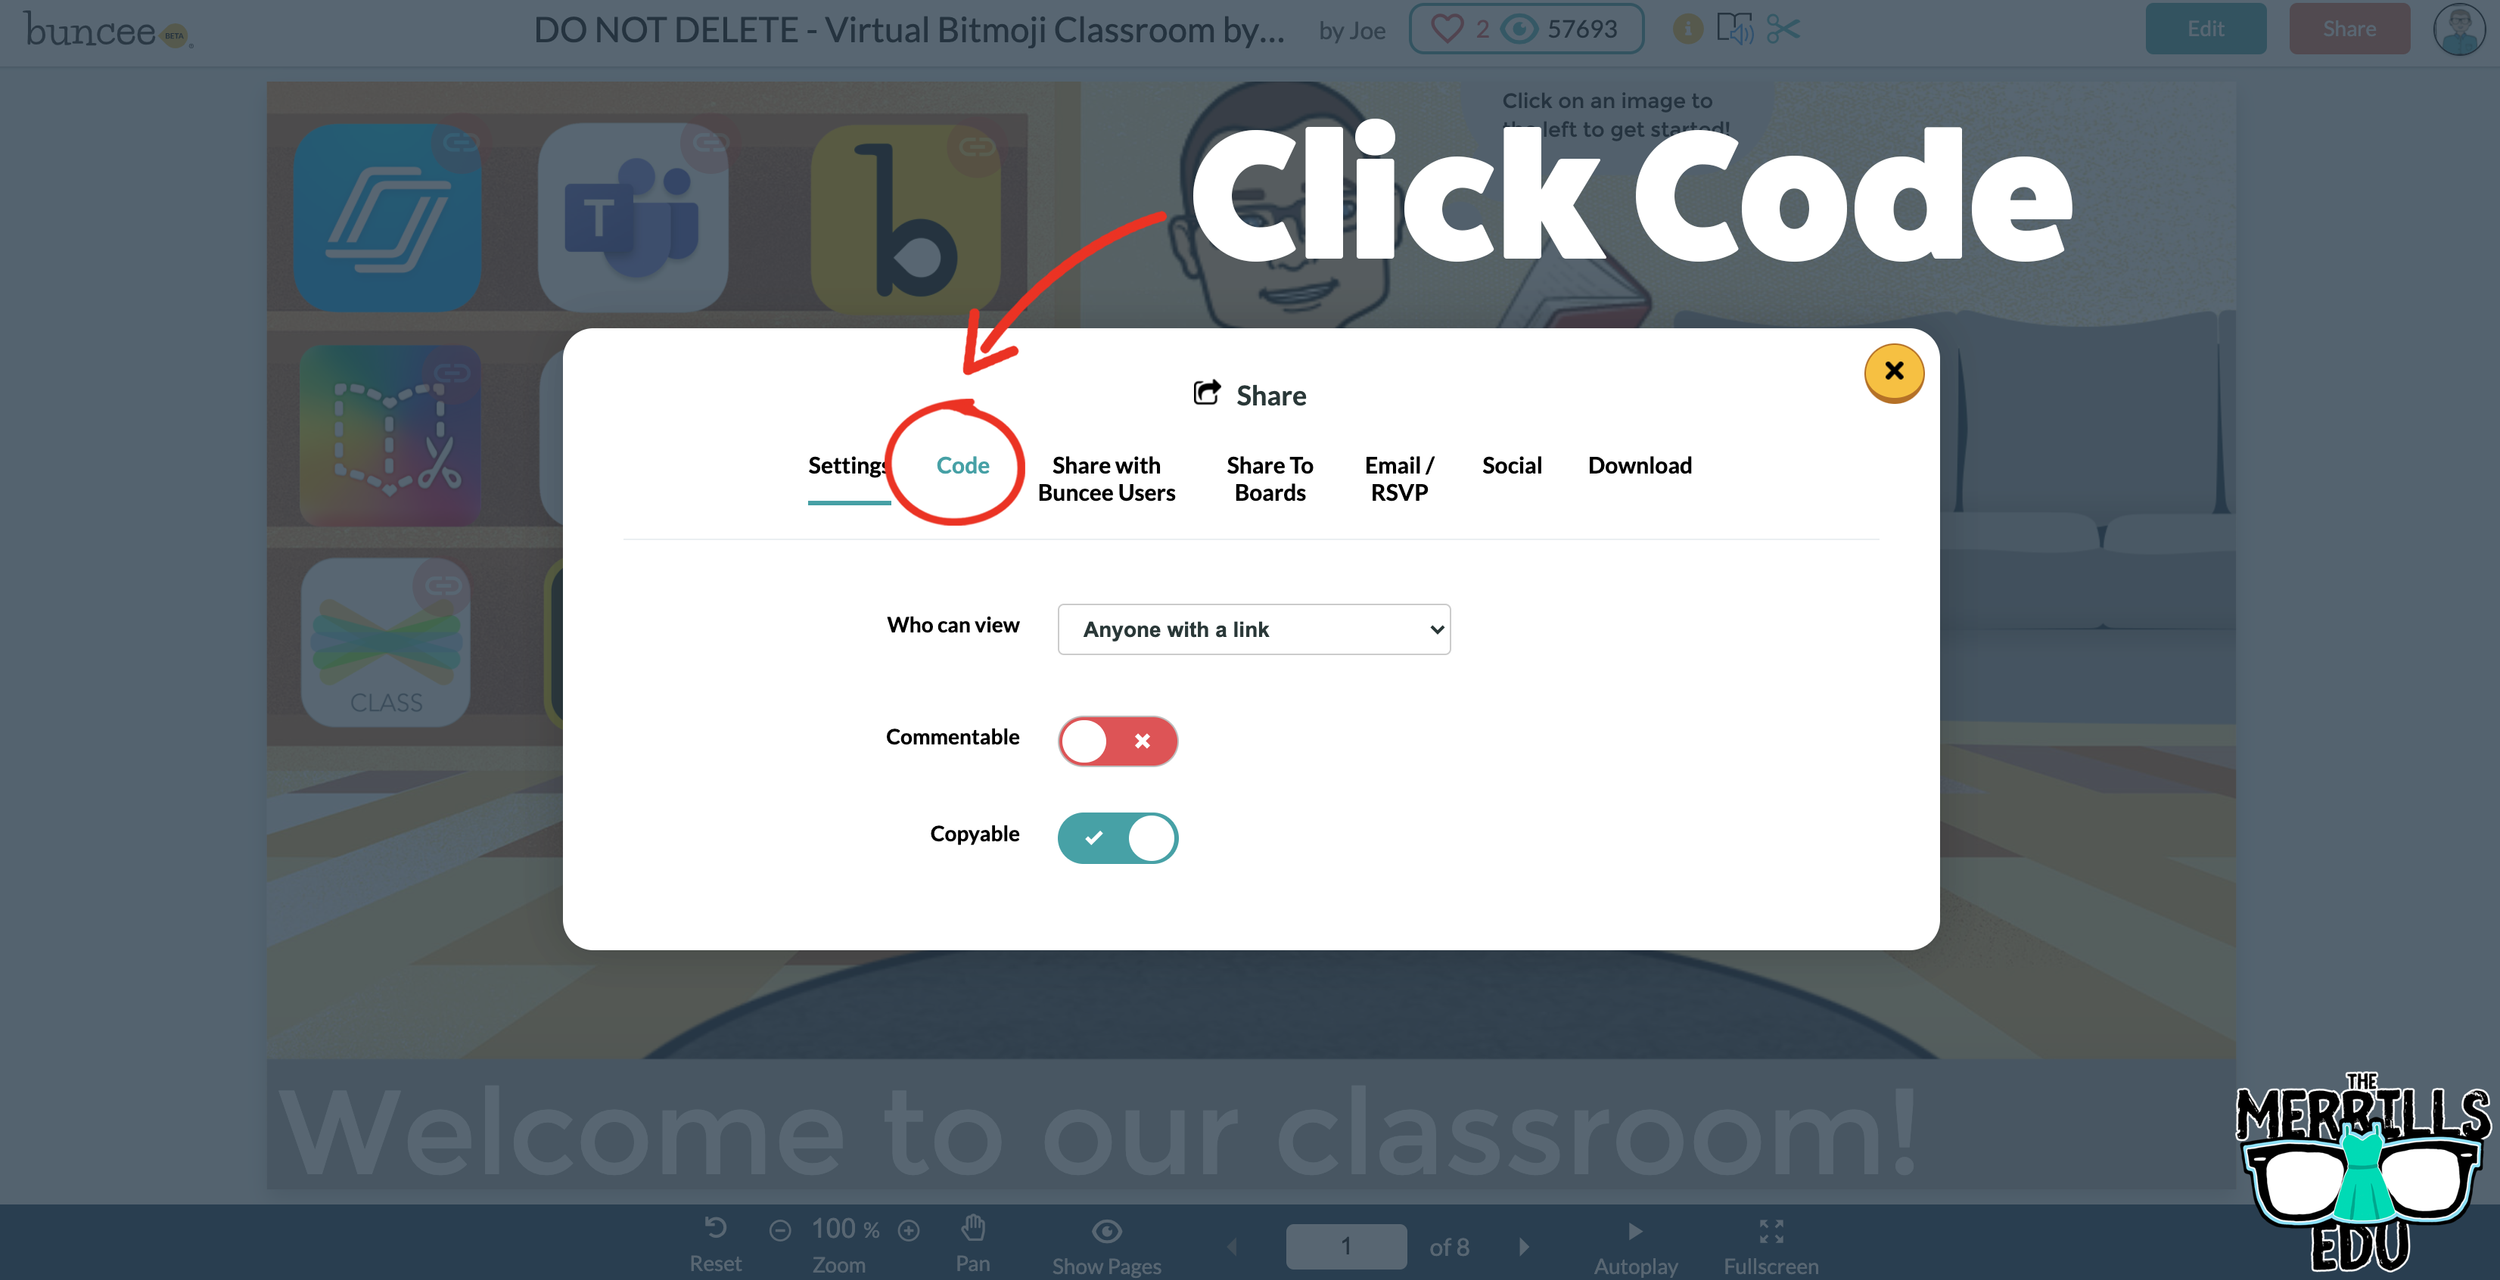
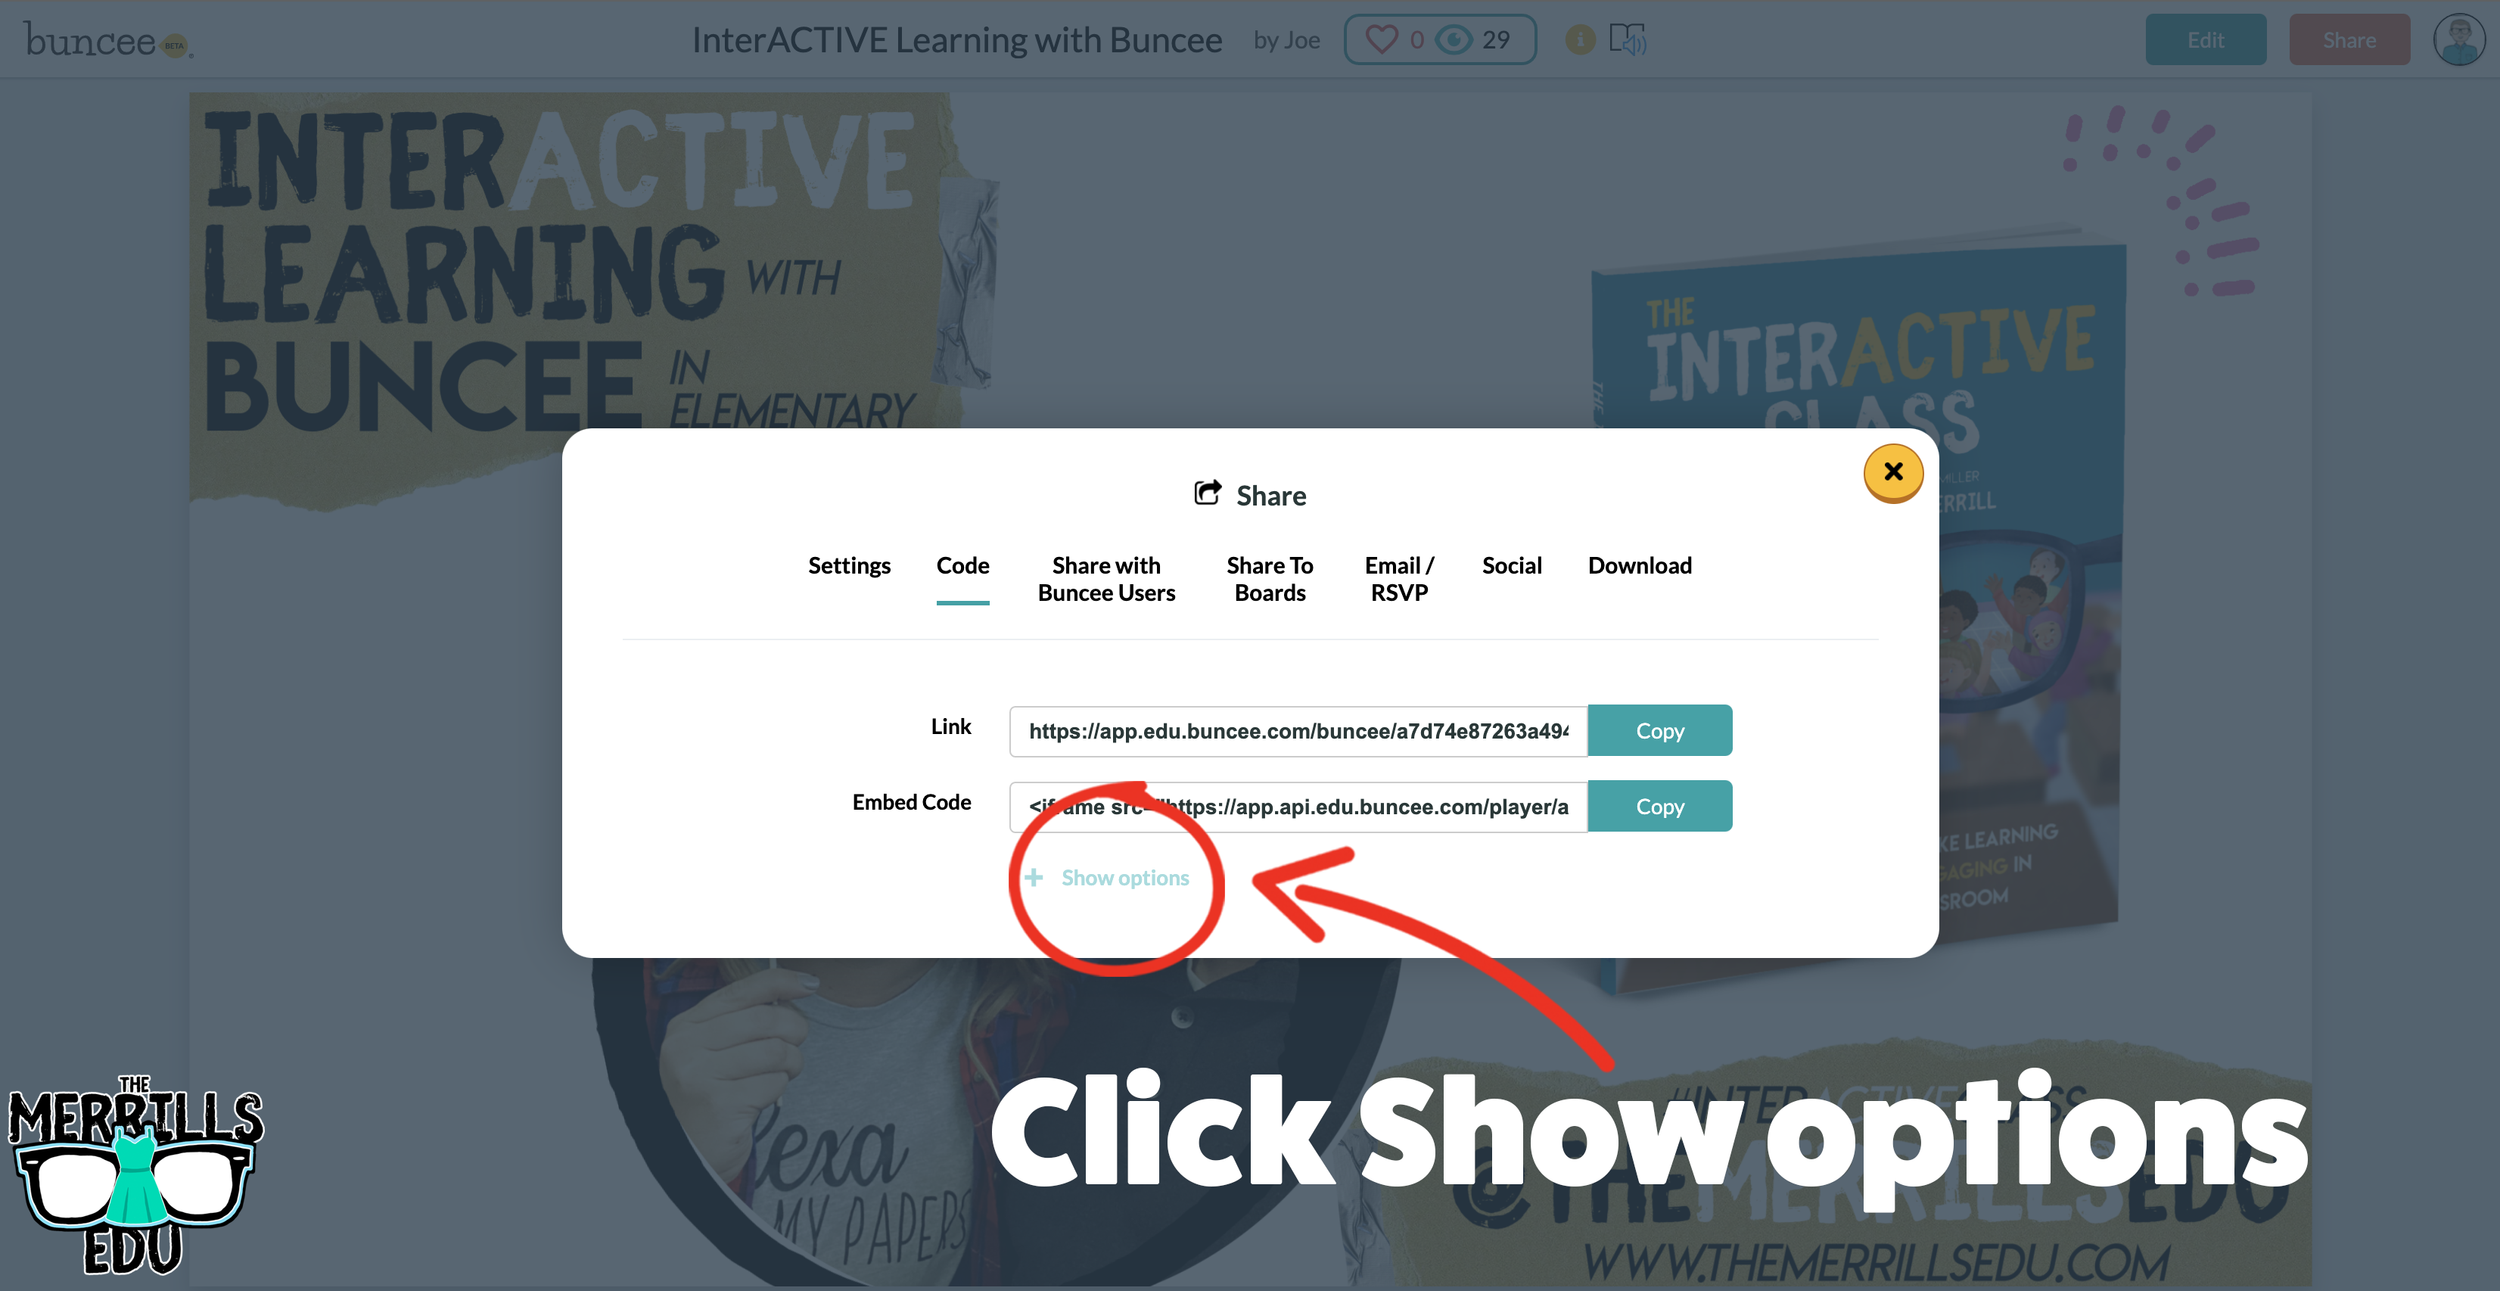
A new window will pop up. Click on “Code.”
Under “Code” click “+ Show Options.”
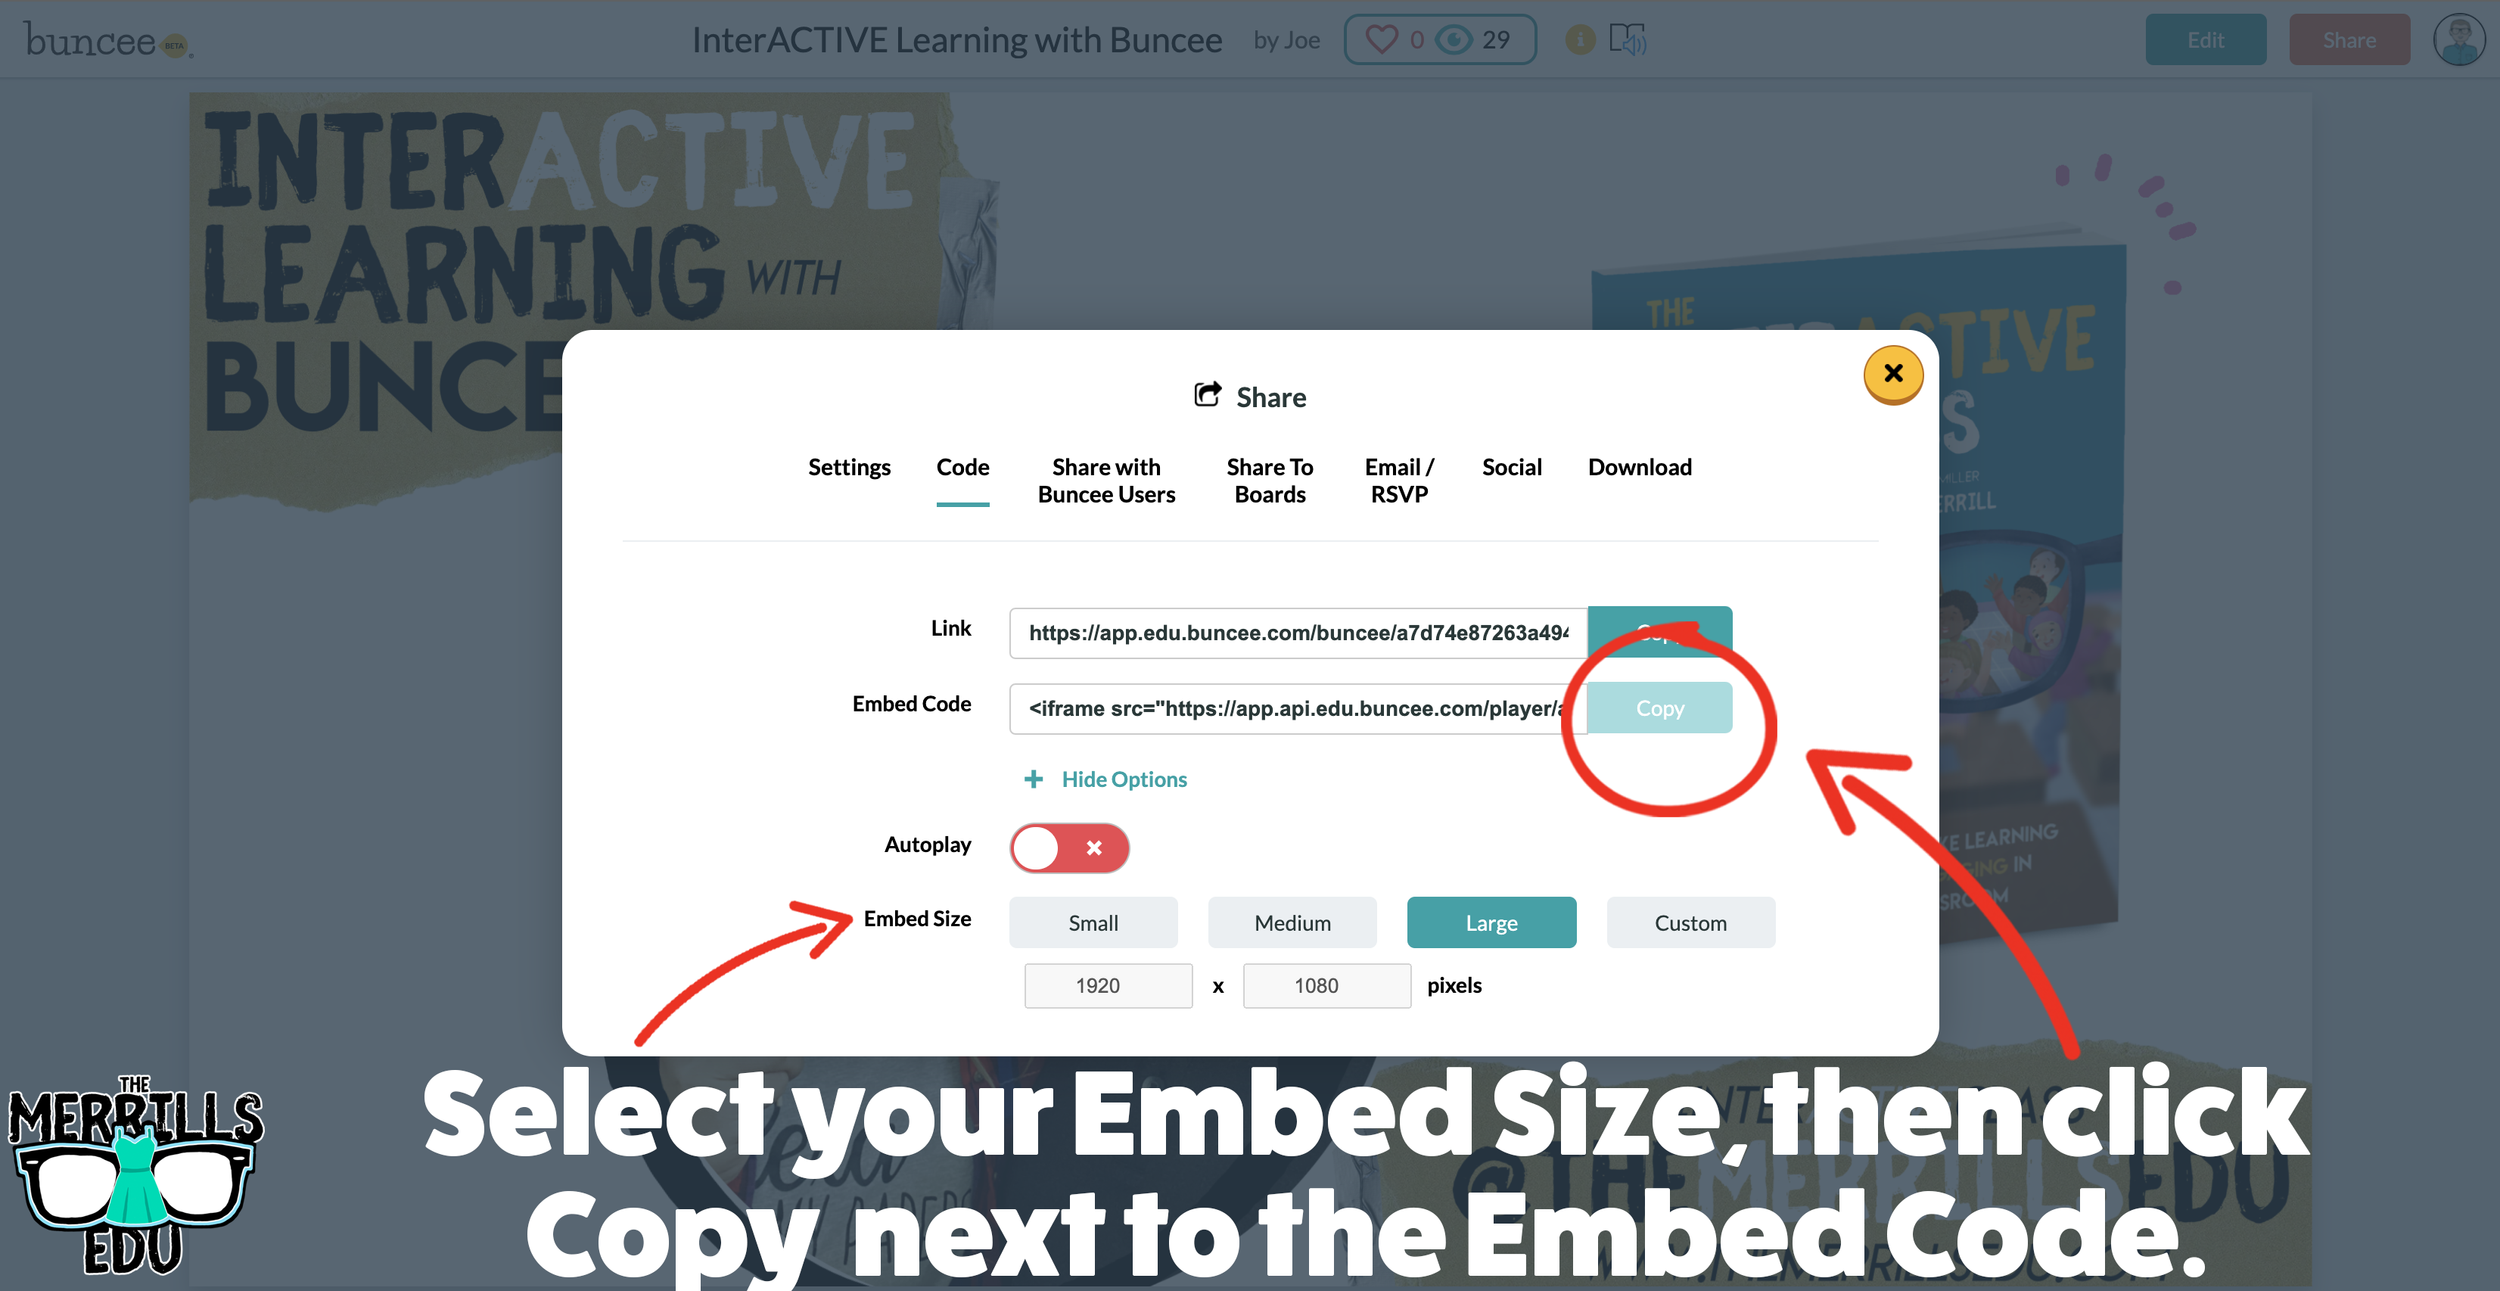
Select your preferred embed size (there are also options to autoplay the Buncee).
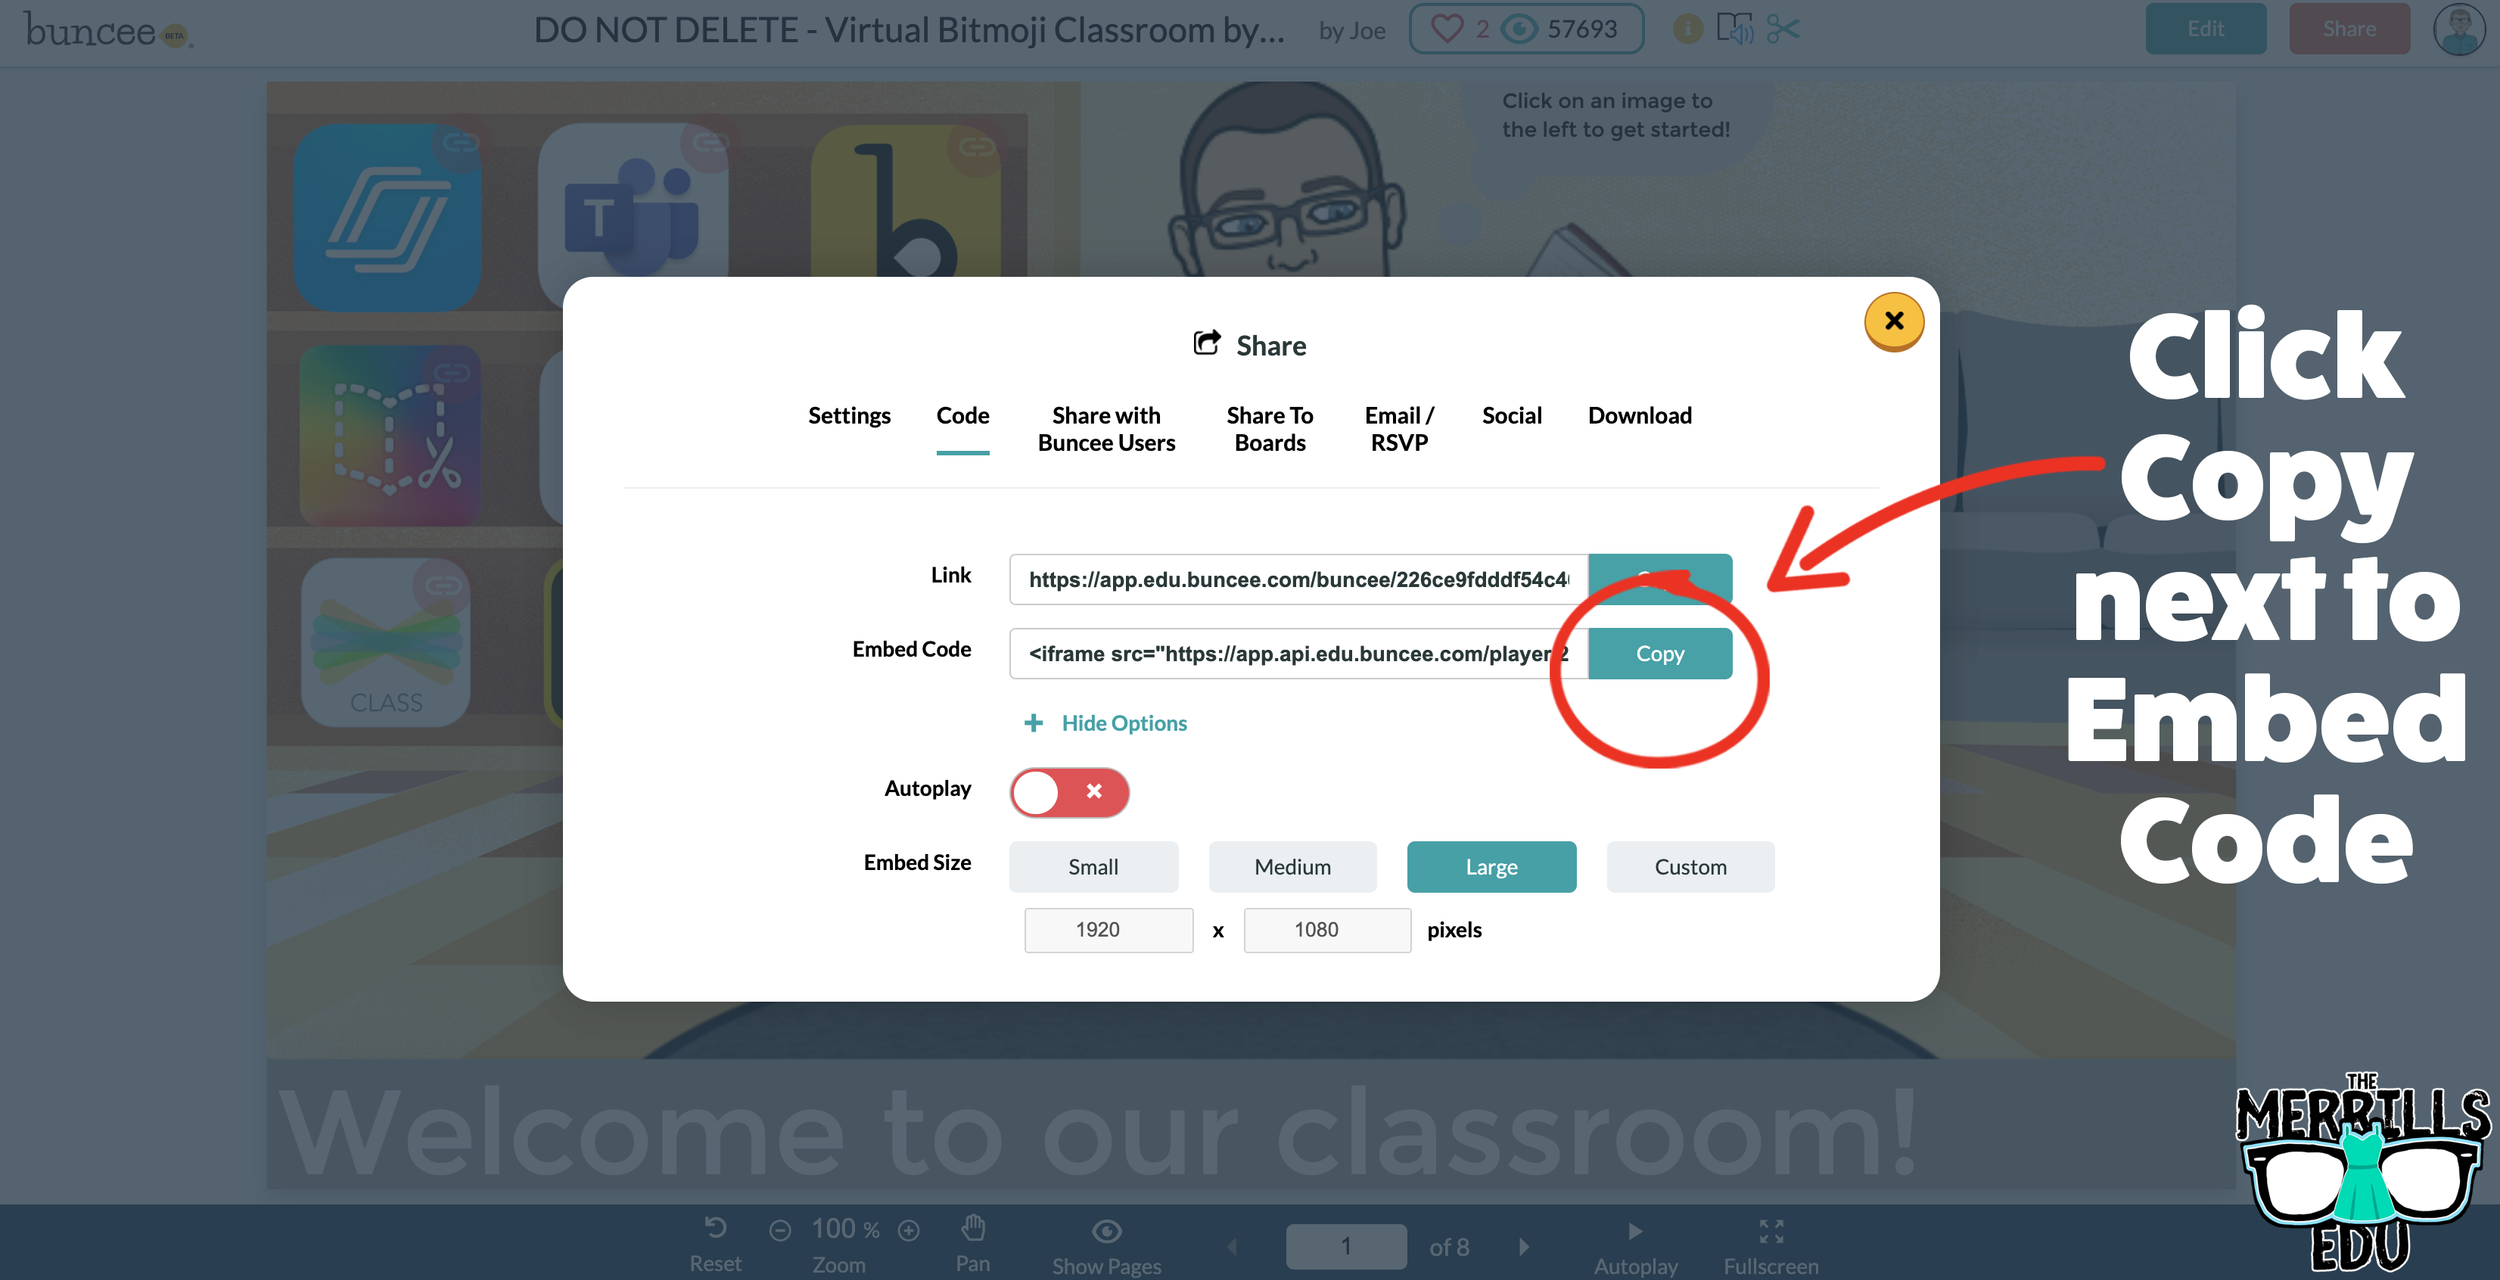
Then, in the same window, click “Copy” next to the Embed Code bar.
In a separate tab, open the Canvas page that you would like to add the Buncee creation to. Then, click on the cloud icon (if you don’t see the Cloud icon, click the three dots to expand the menu bar).
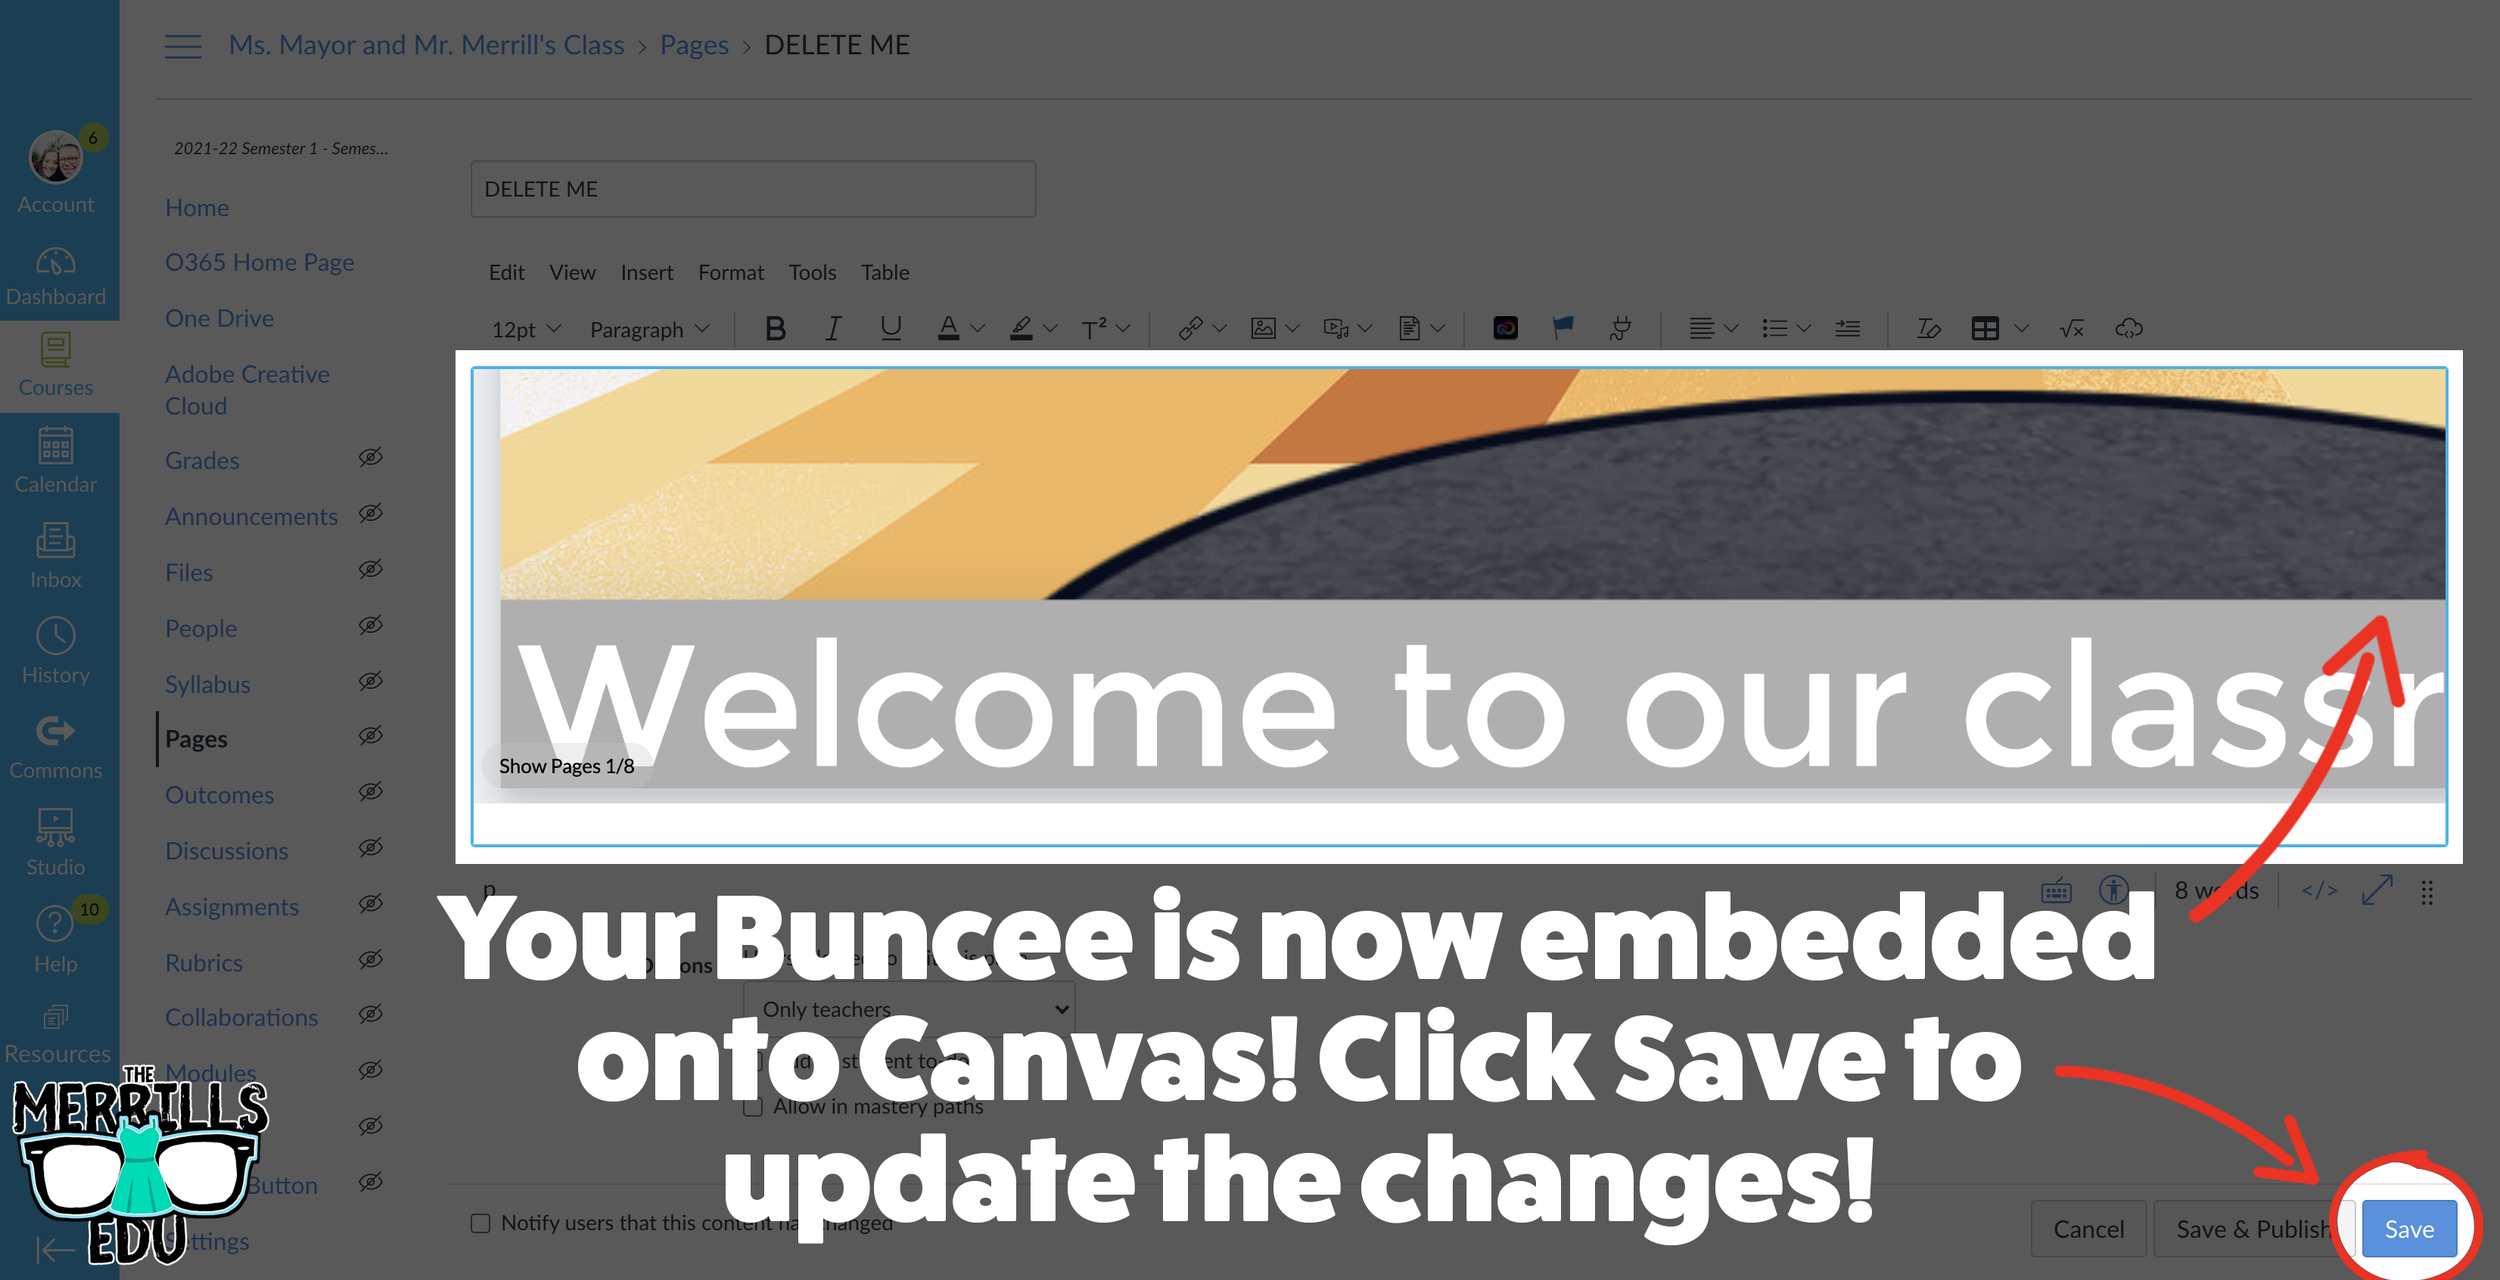
In the embed window, paste your copied code from Buncee. Then, click submit.
Your Buncee creation is now embedded into the Canvas page! Click on “Save” to update the changes.

Ed Puzzle Embedded into Canvas
Ed Puzzle is a video assessment platform tool that allows teachers to find or create videos and then generate questions that go along with the video. The result is an engaging formative assessment that your students will actually like! Keeping Ed Puzzle embedded into Canvas will help keep everything organized in the same place. Here’s how it all works:


(note: You will need to set up a class in Ed Puzzle prior to the steps below)
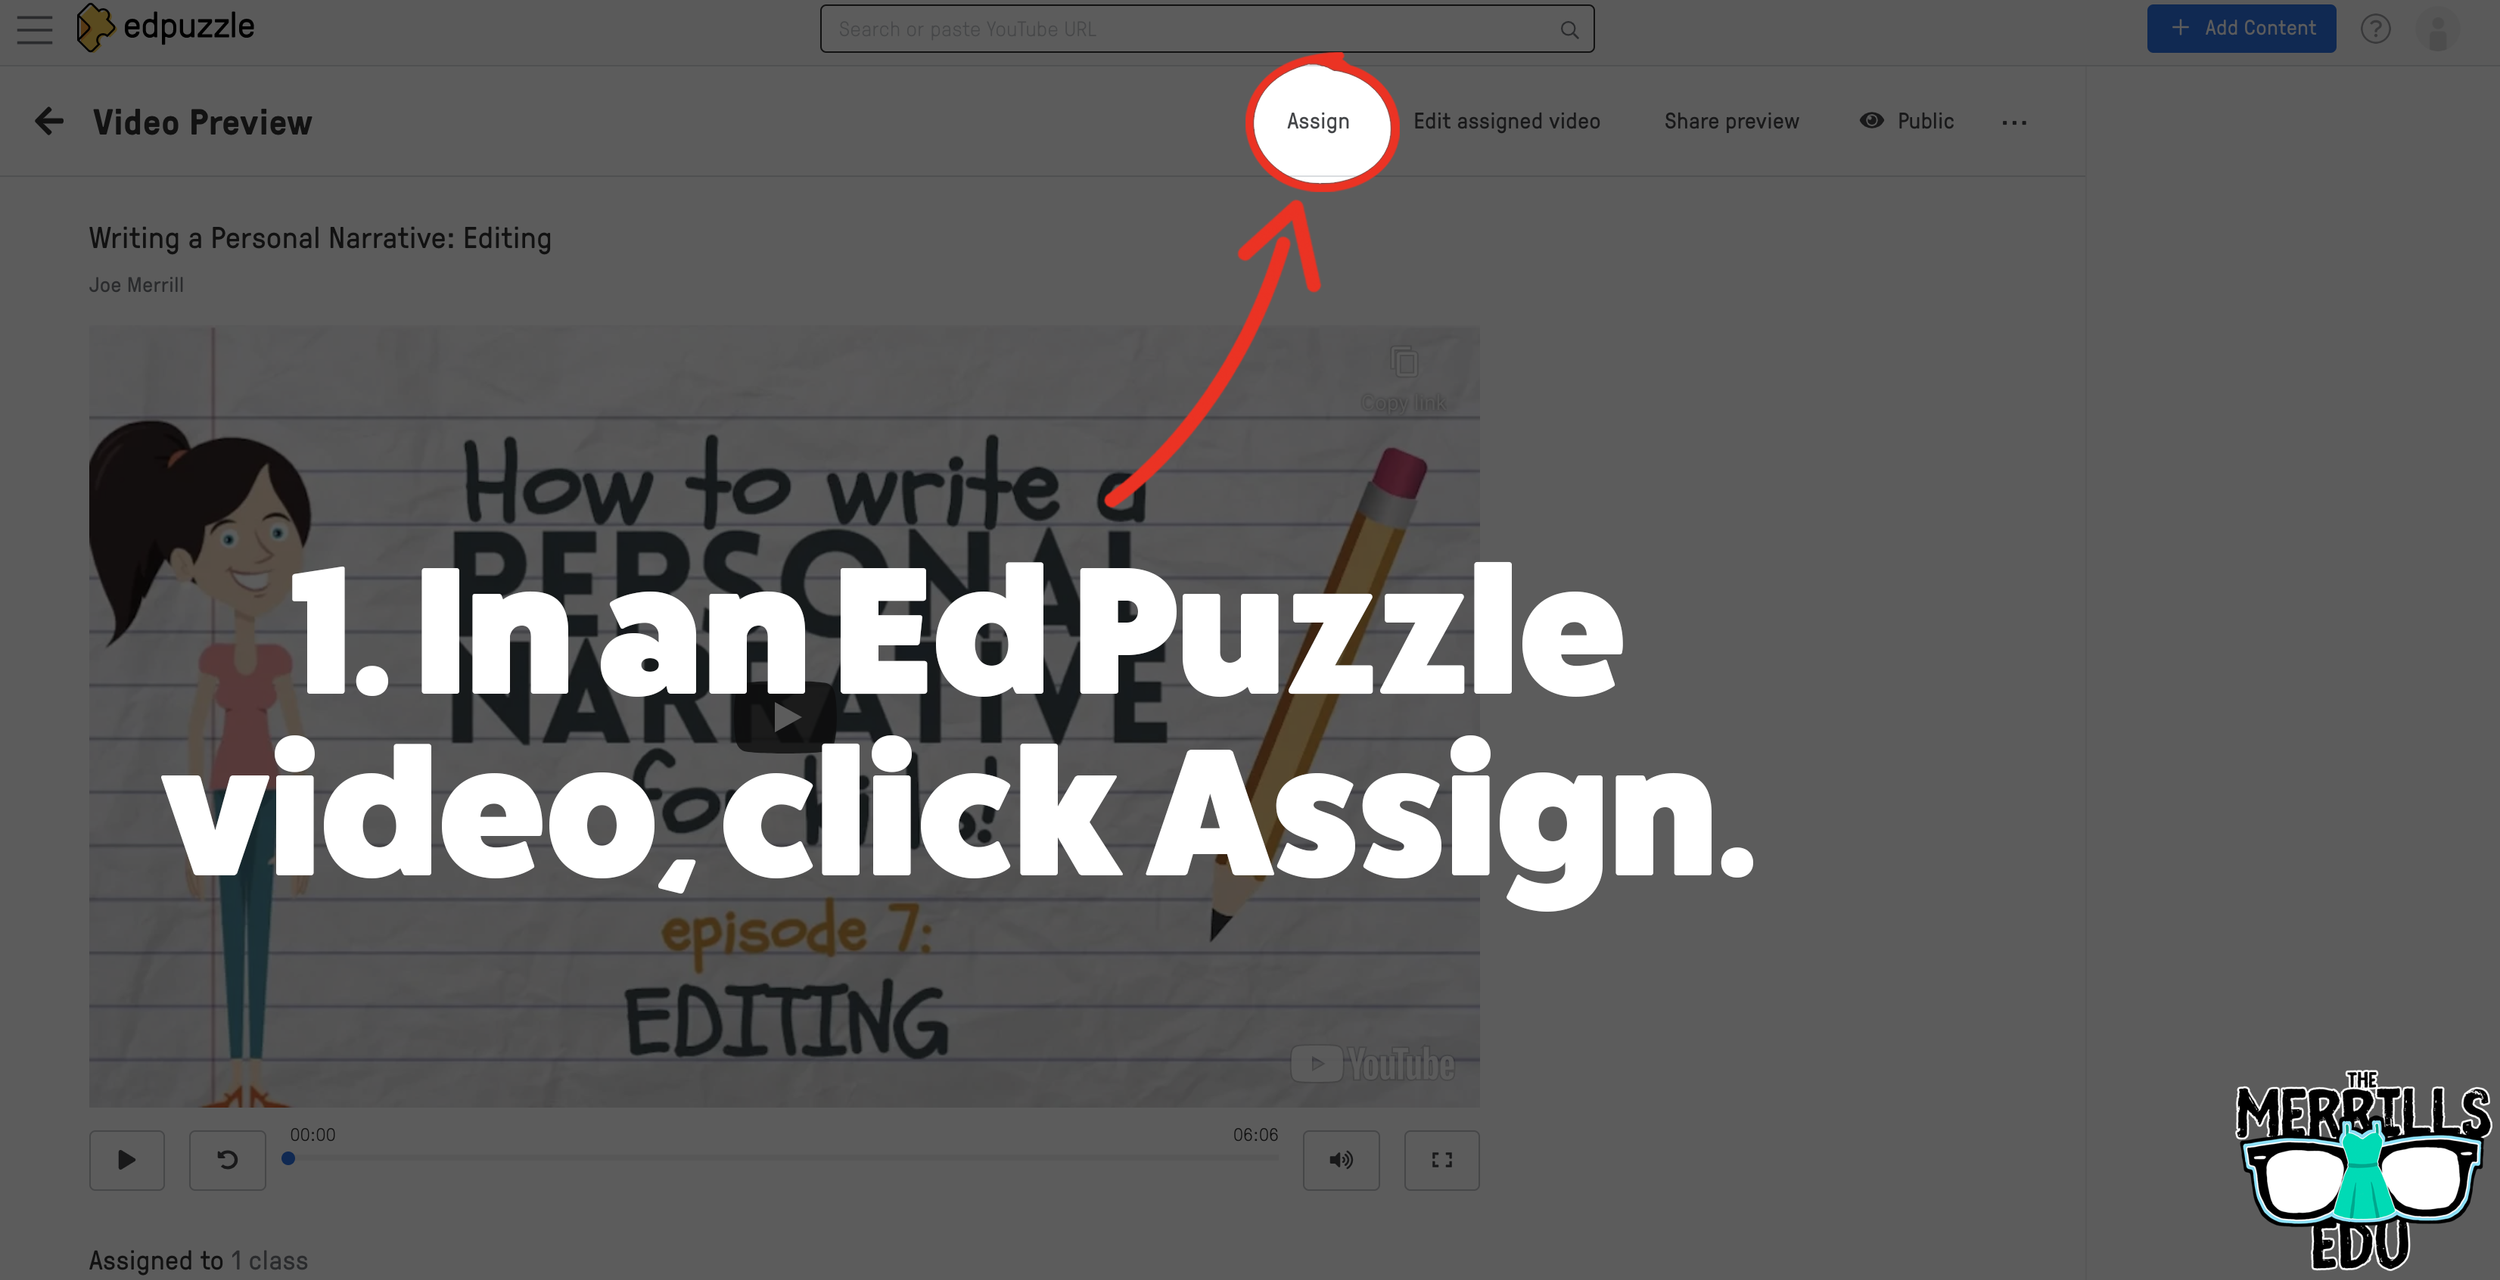
Select. the video that you would like to embed from Ed Puzzle.
Click “Assign”
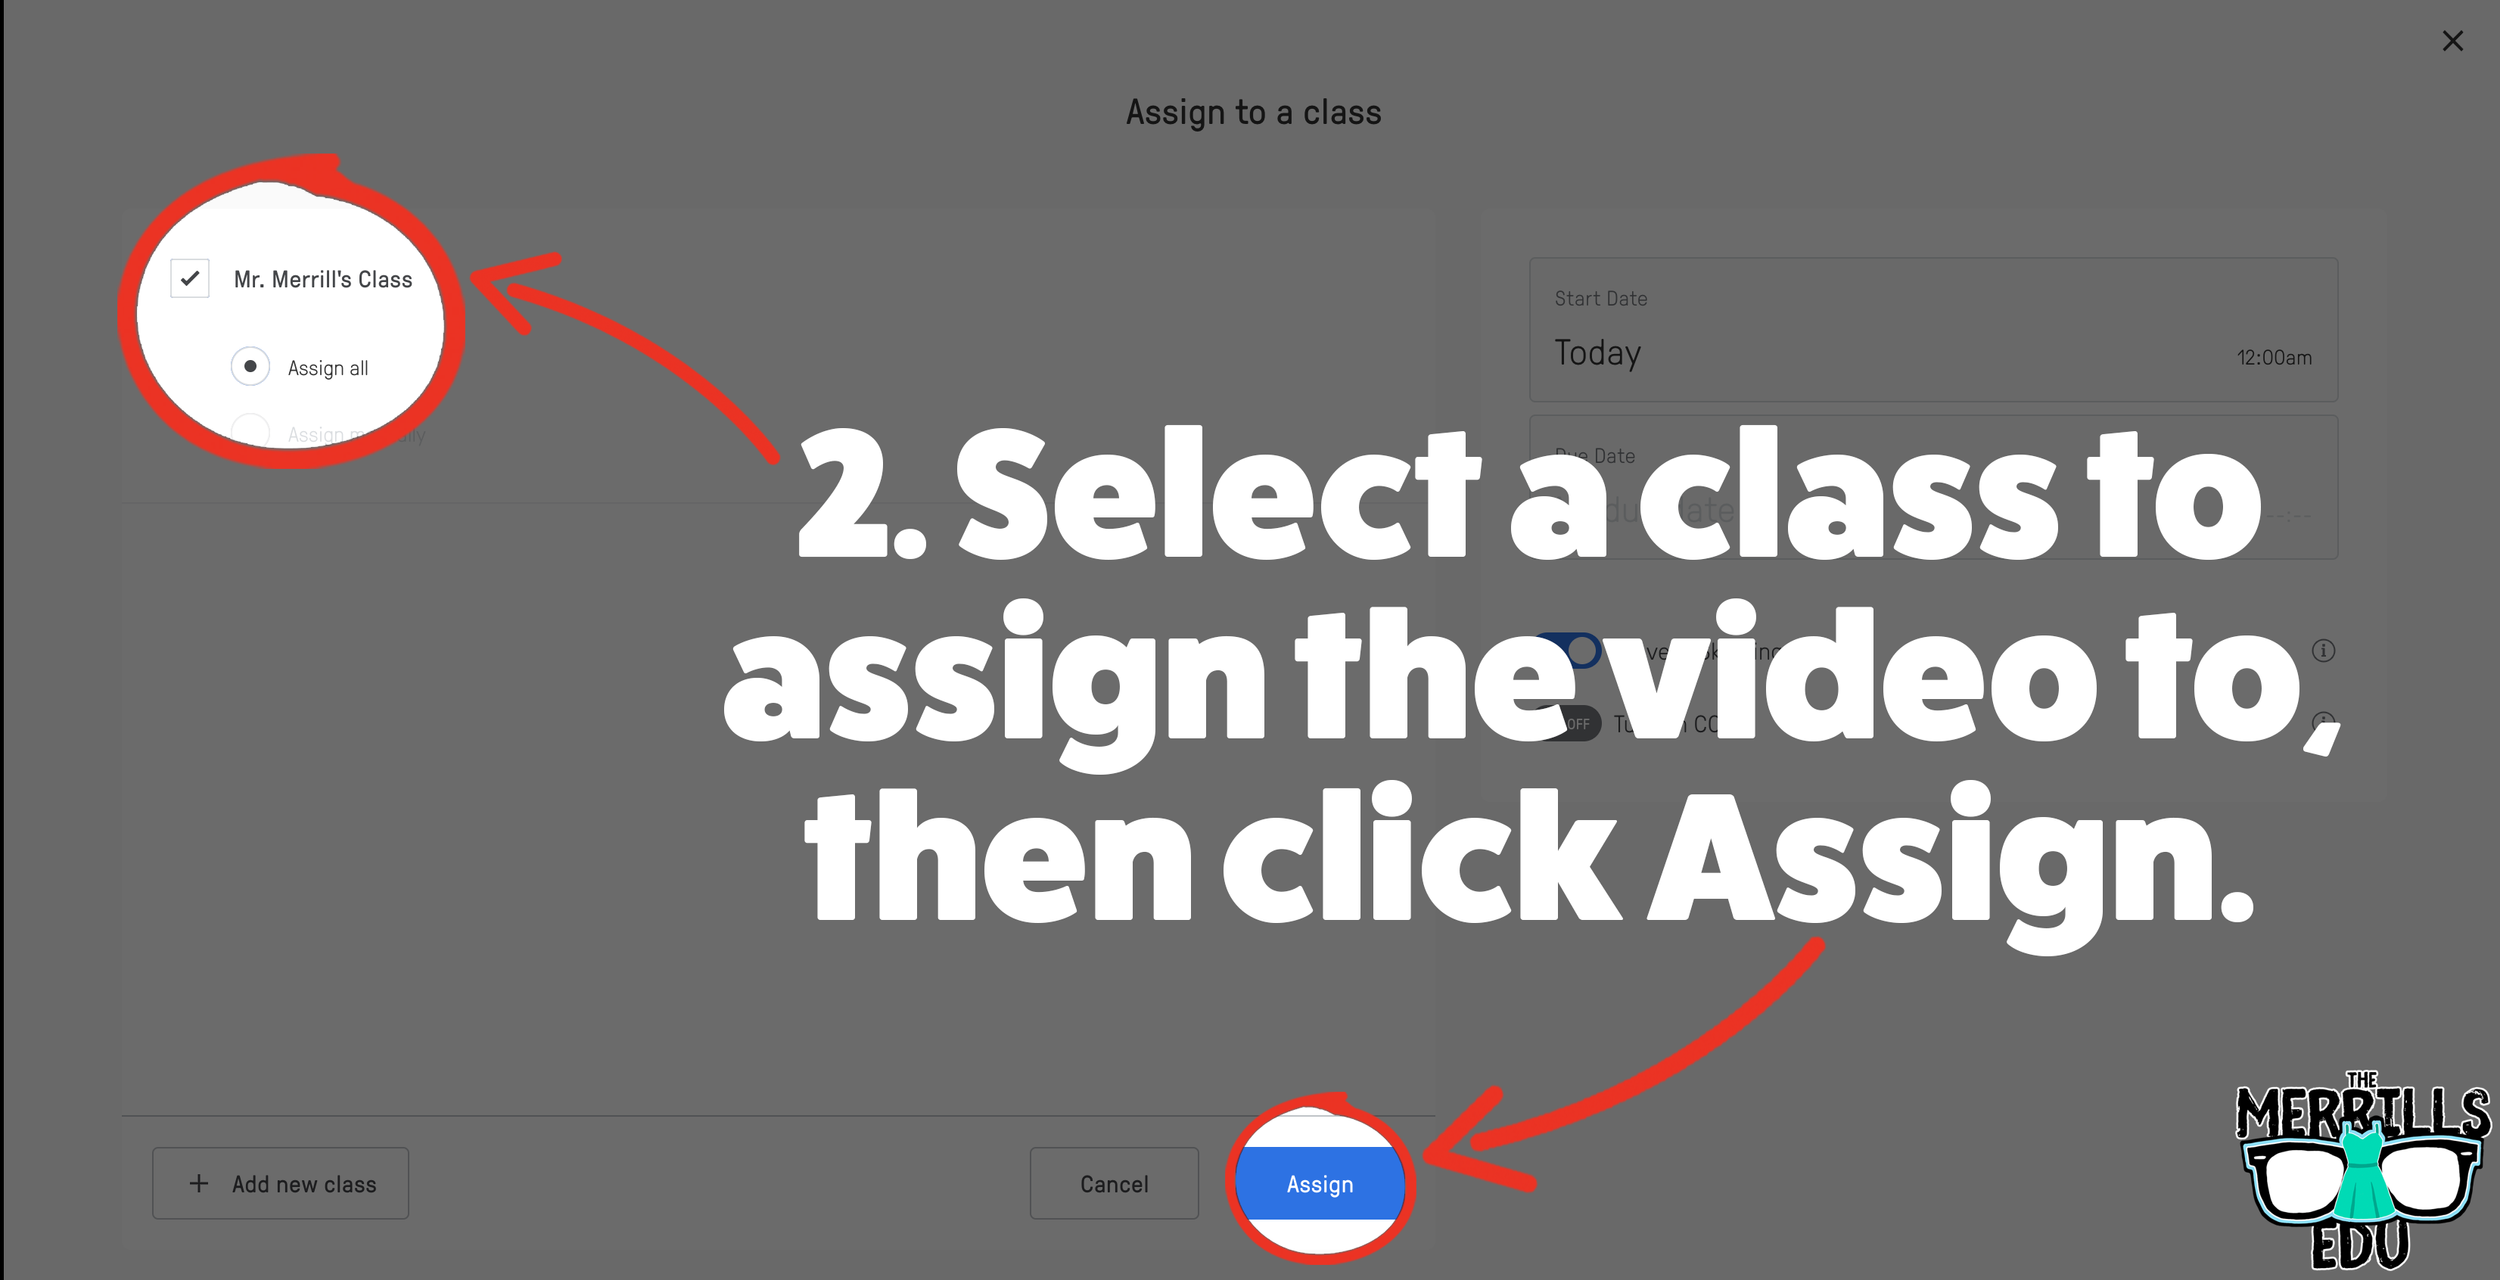
Select the class that you would like to assign the video to, then click “Assign.”
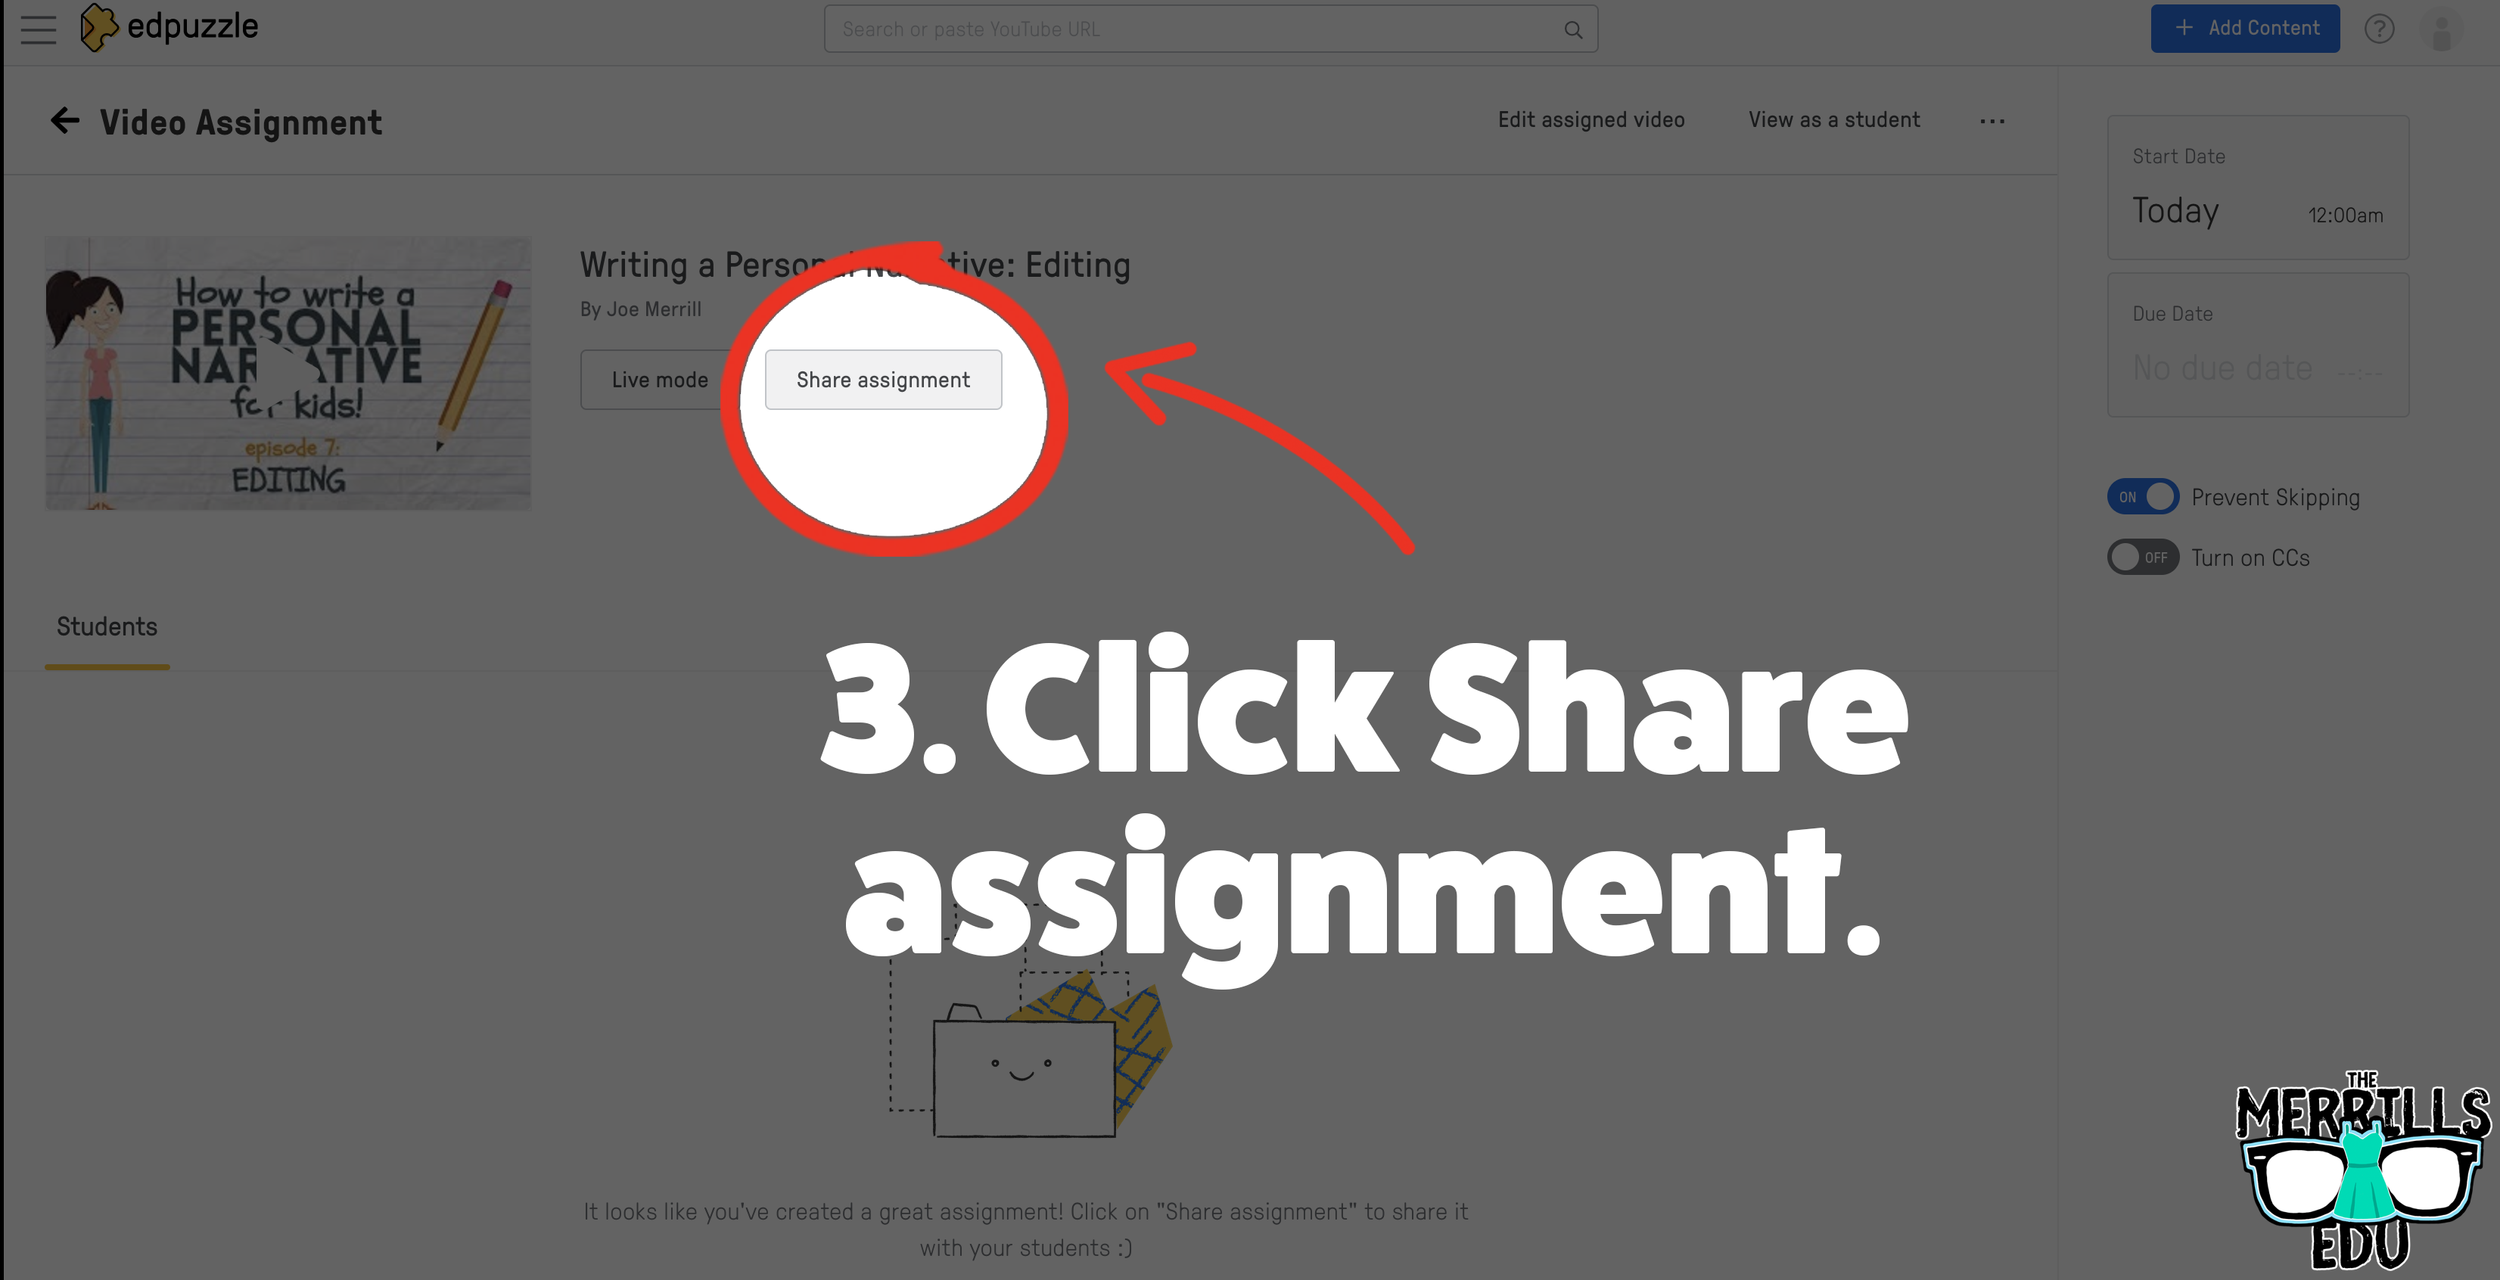
On the next screen, click “Share assignment.”
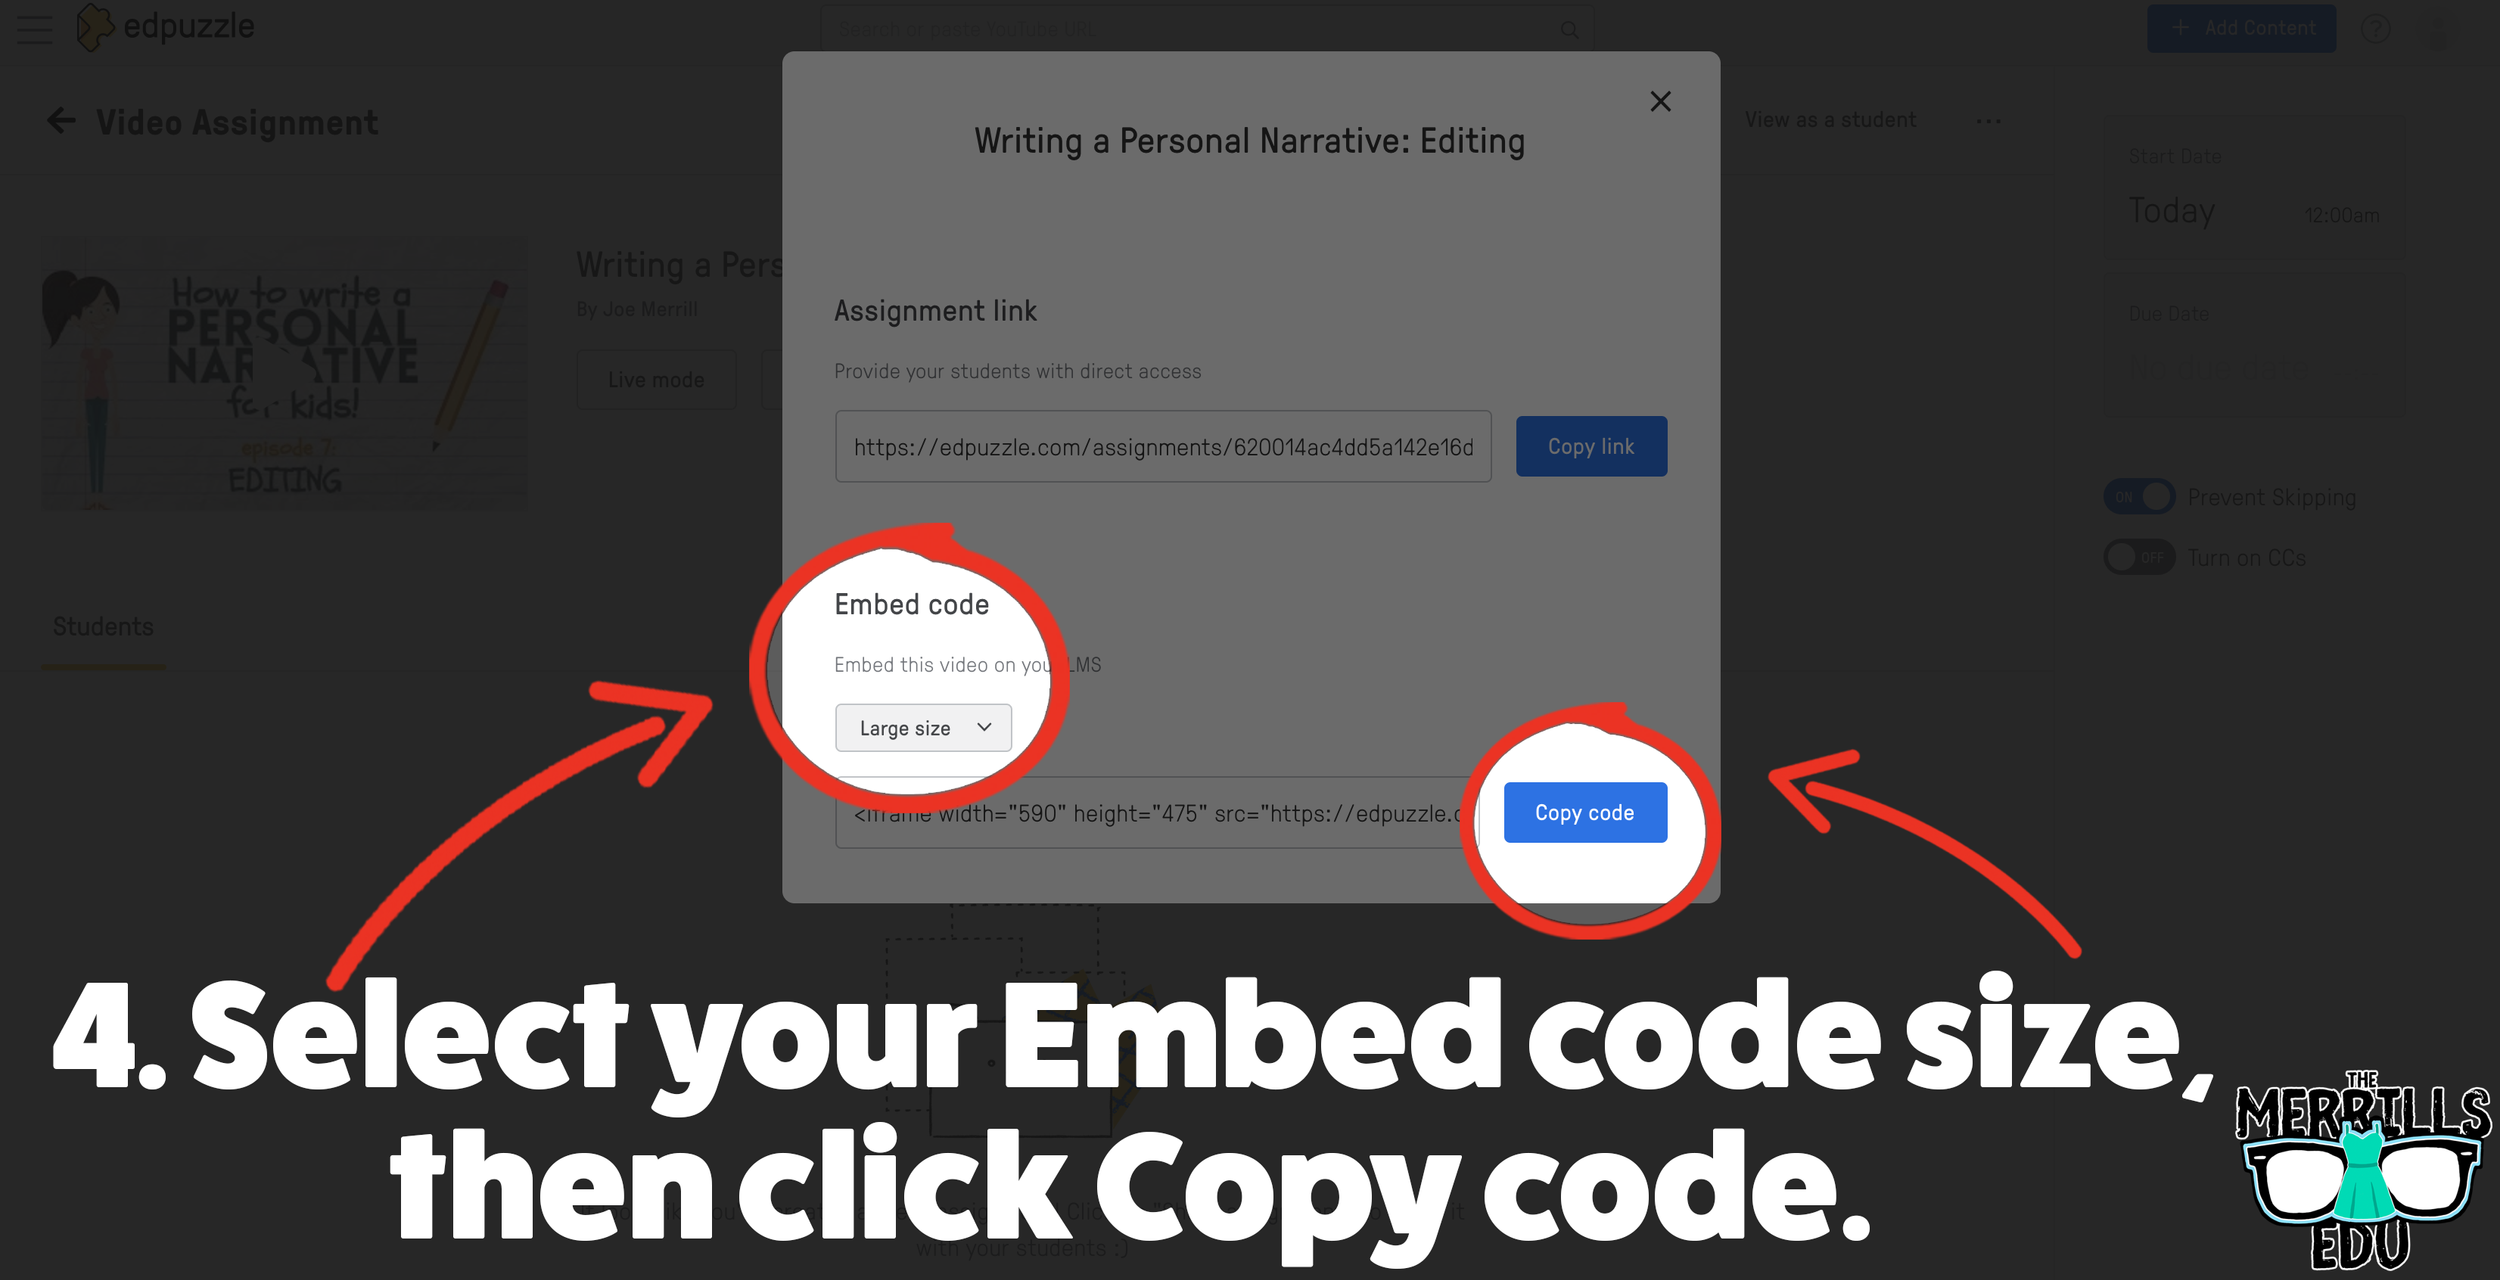
(Optional: We recommend changing the embed code size to large) Under Embed Code, click “Copy code.”
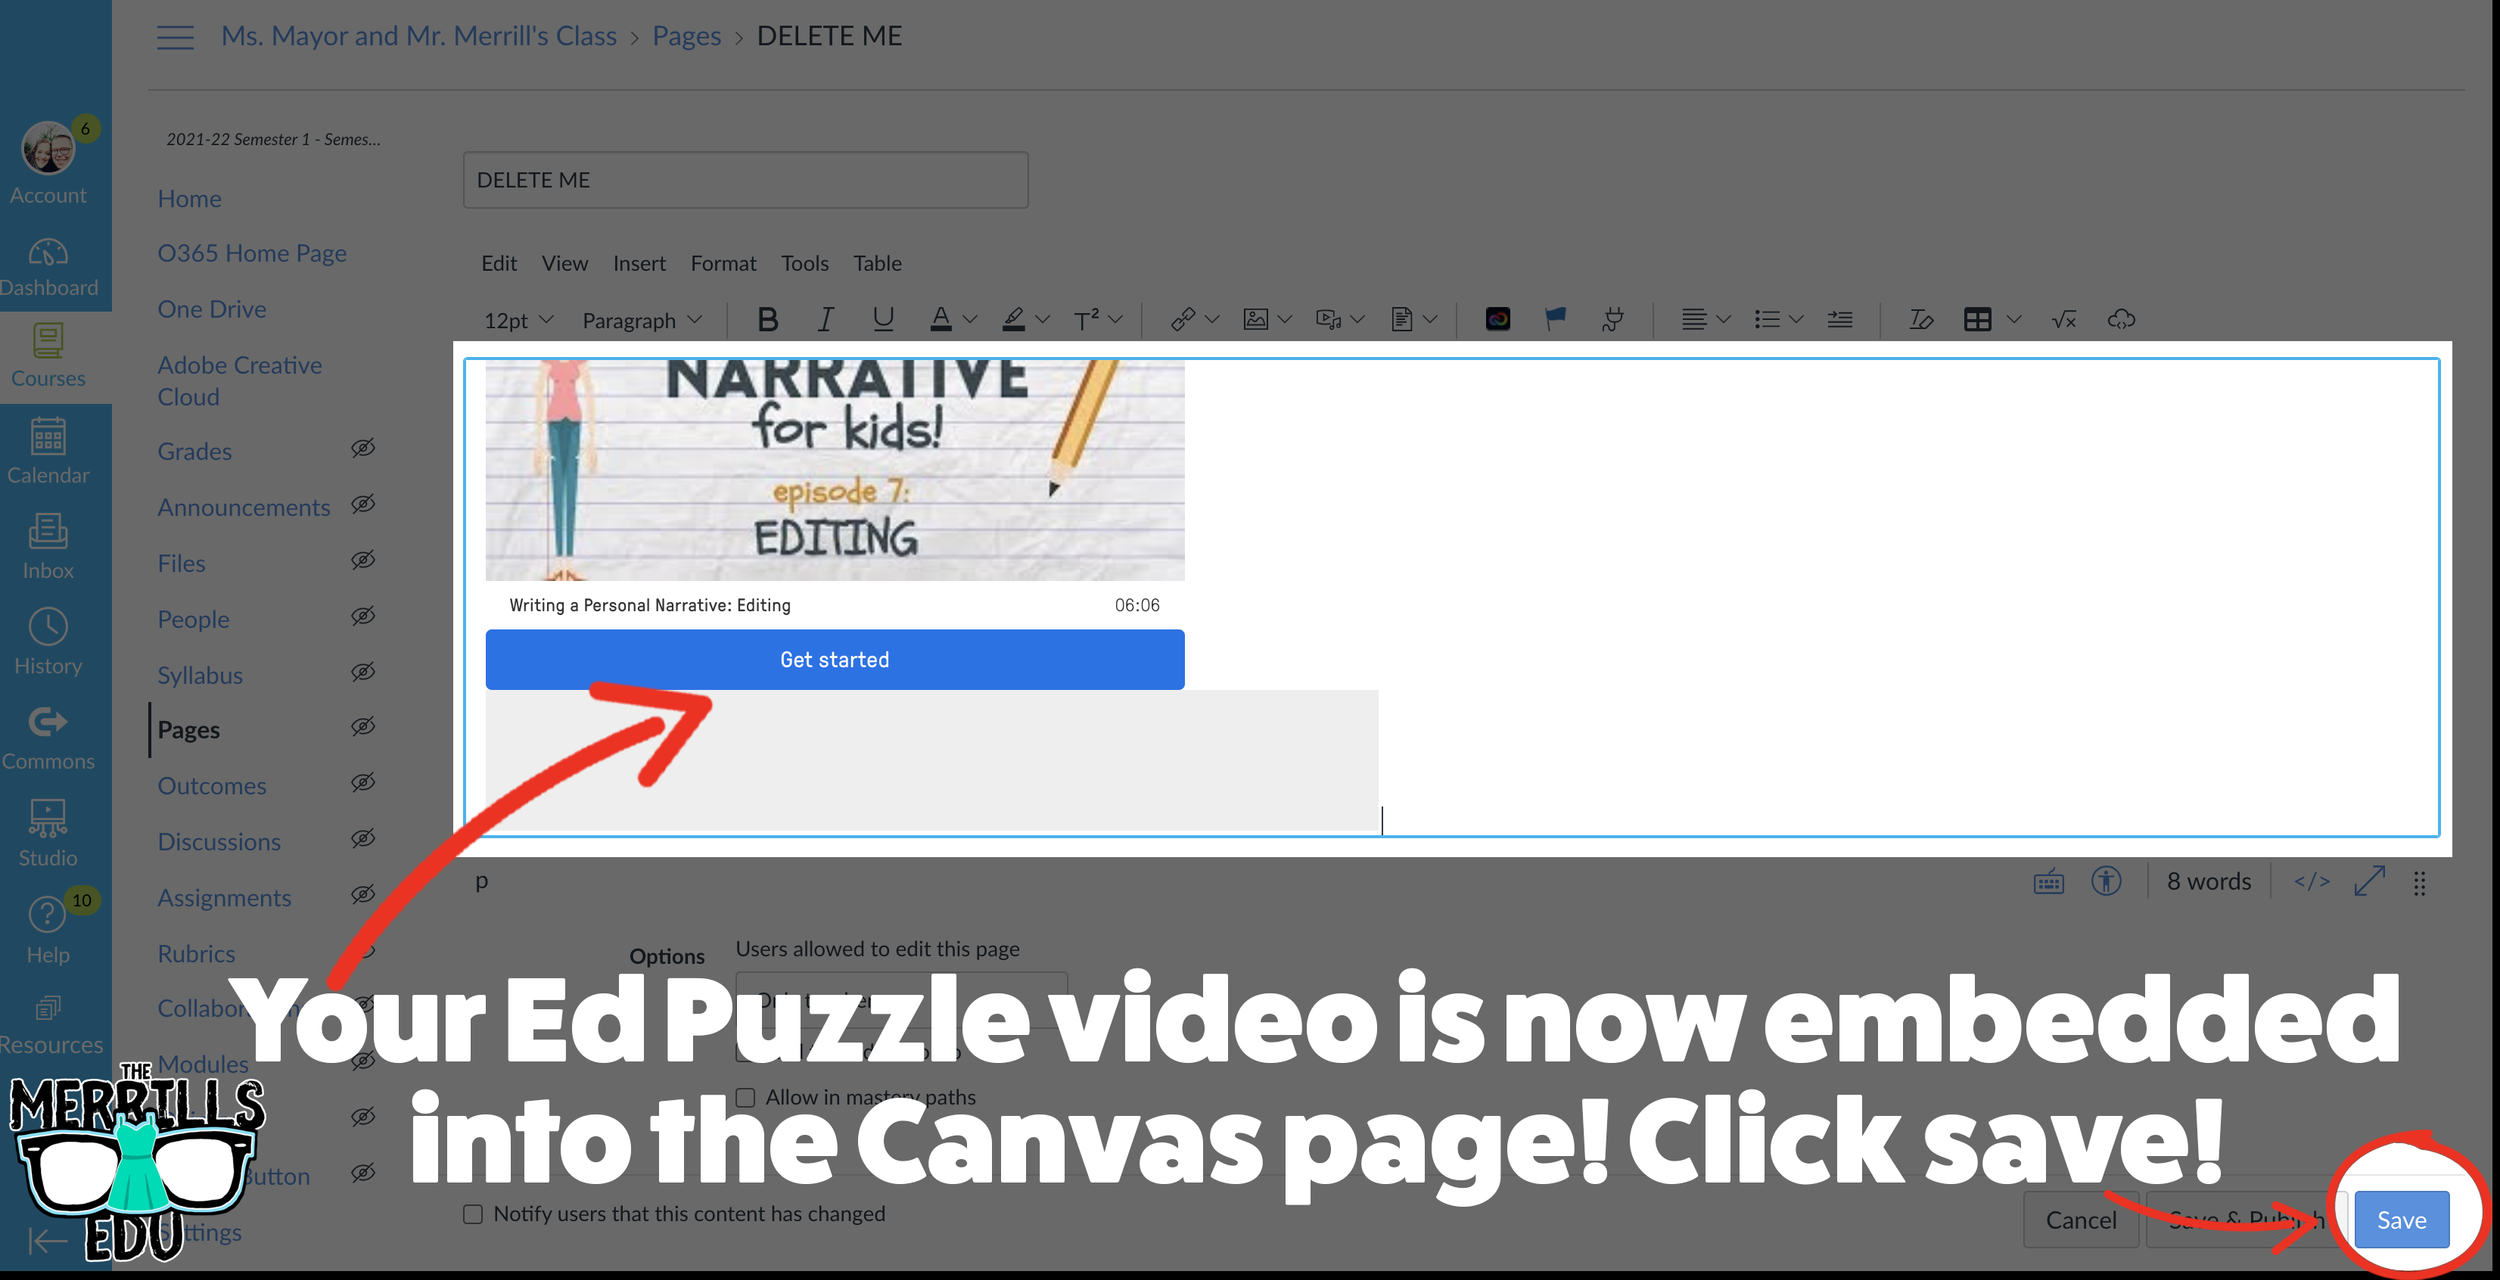
In a separate tab, open the Canvas page that you would like to add the EdPuzzle video to. Then, click on the cloud icon (if you don’t see the Cloud icon, click the three dots to expand the menu bar).
In the embed window, paste your copied code from Ed Puzzle. Then, click submit.
Your Ed Puzzle video is now embedded into the Canvas page! Click on “Save” to update the changes.

PowerPoint Embedded into Canvas
Do you have a PowerPoint deck that you’d like to give your students so that they can follow along? Embedding it into your LMS is the perfect way to deliver that content while keeping everything organized. Here’s how to embed PowerPoint decks into Canvas:

(Note: You will need to use PowerPoint Online (a Microsoft 365 account) to use this embed. You may also need to adjust your share settings for this to work correctly)
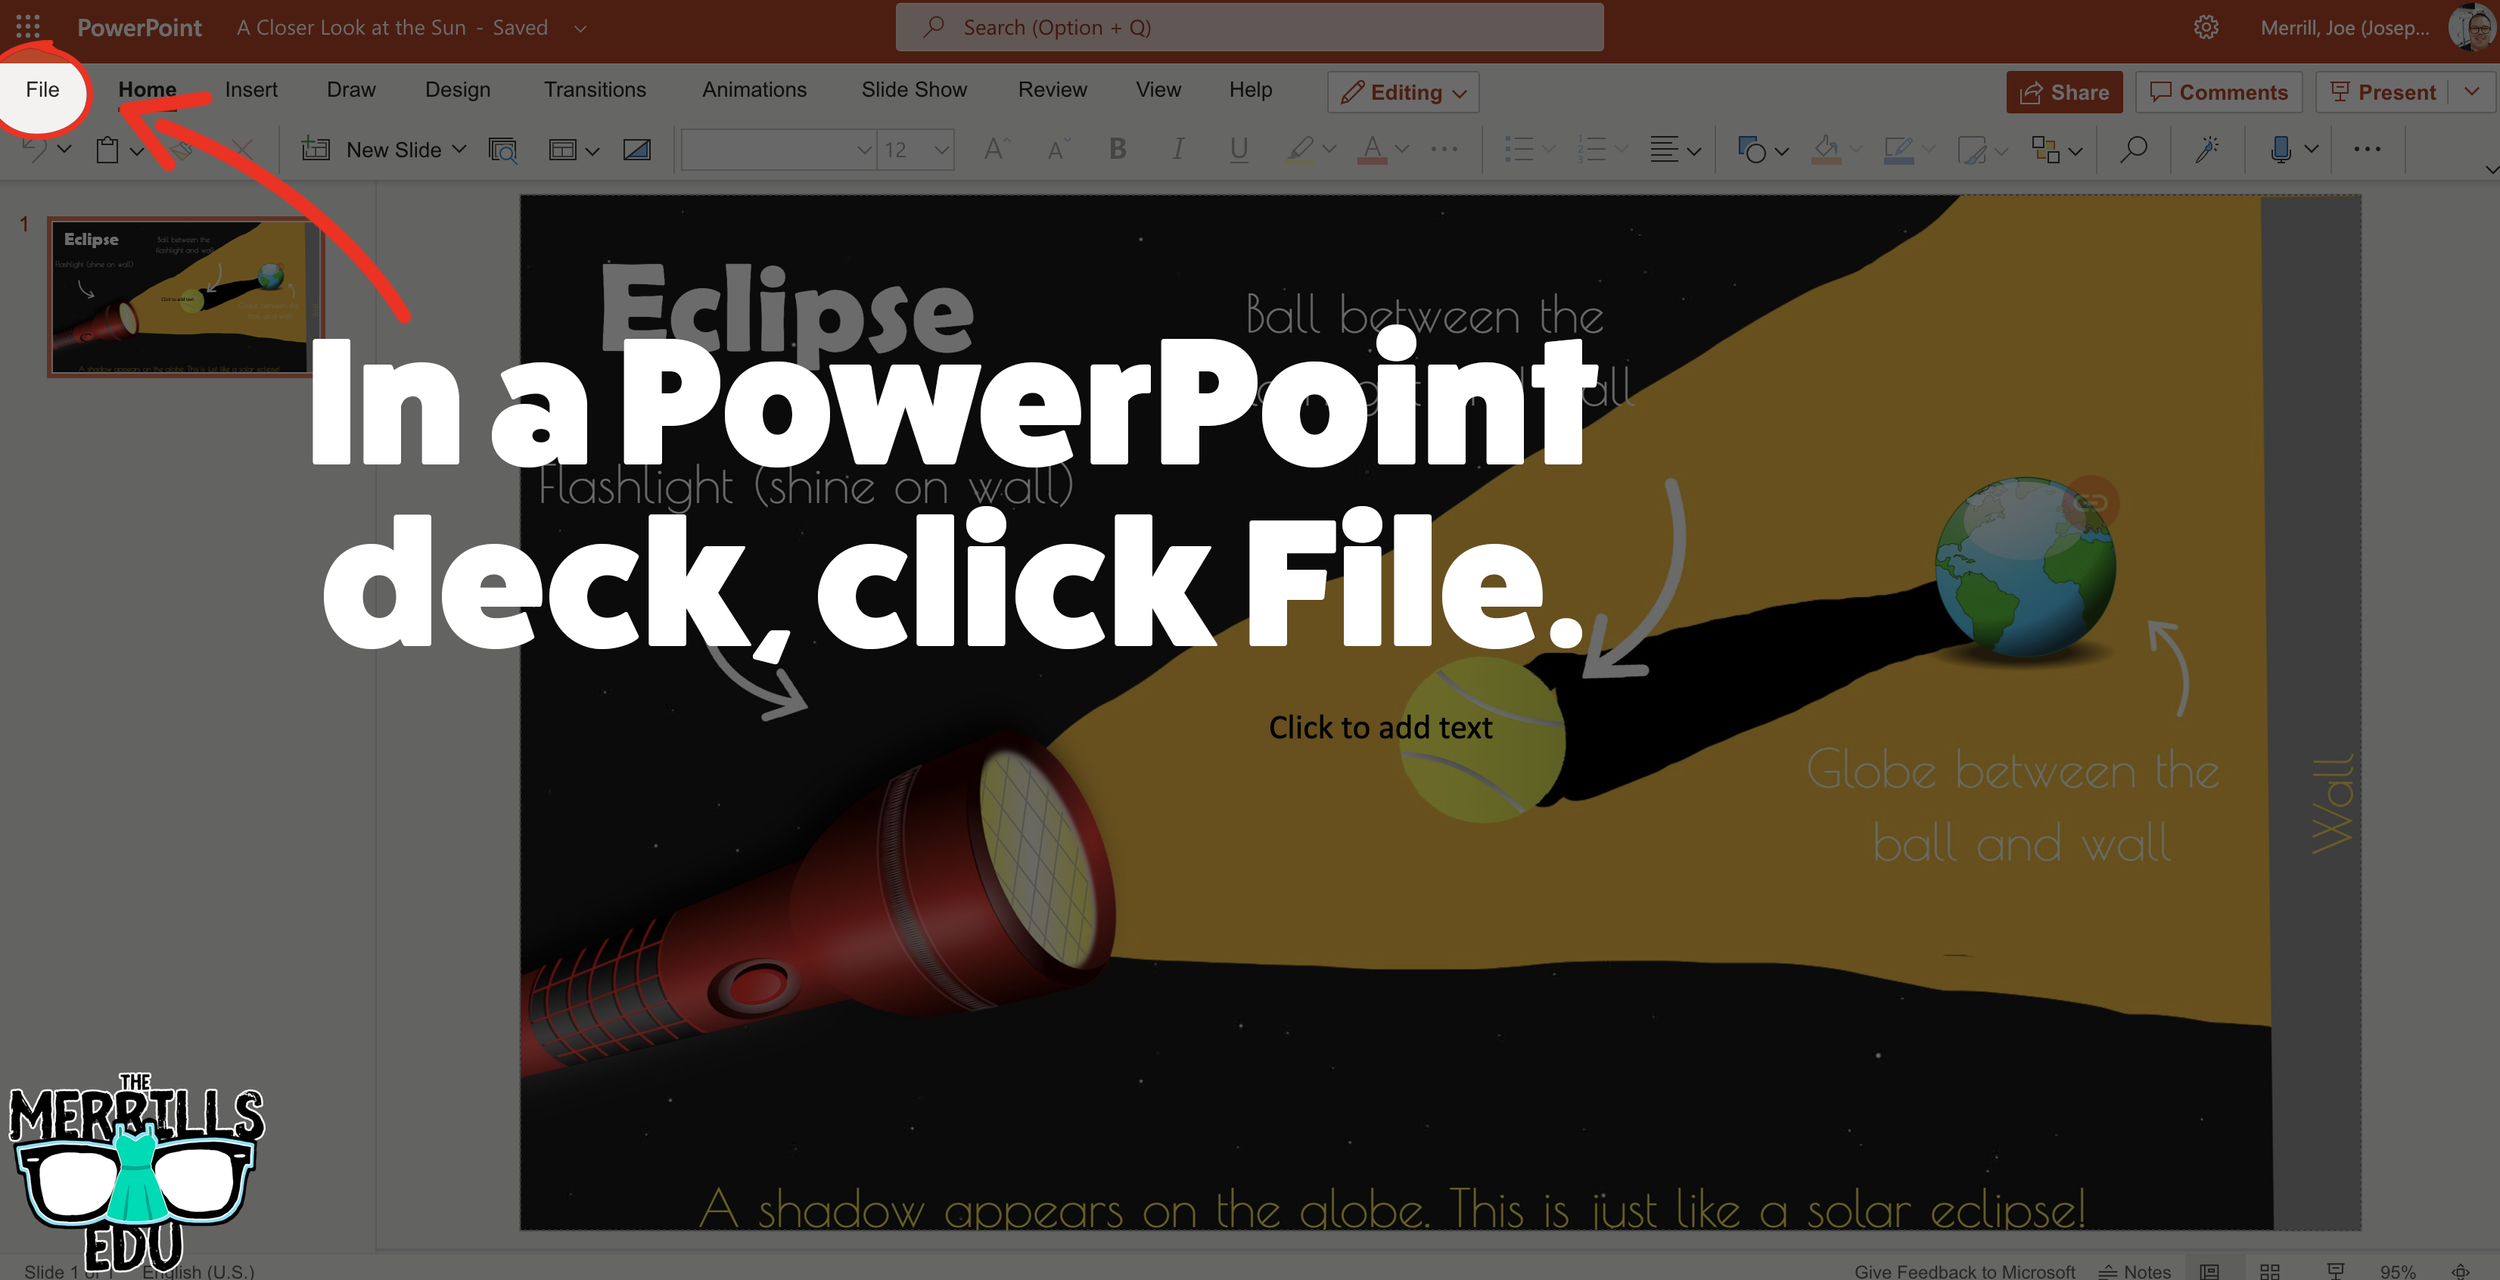
In your PowerPoint online deck, click File.
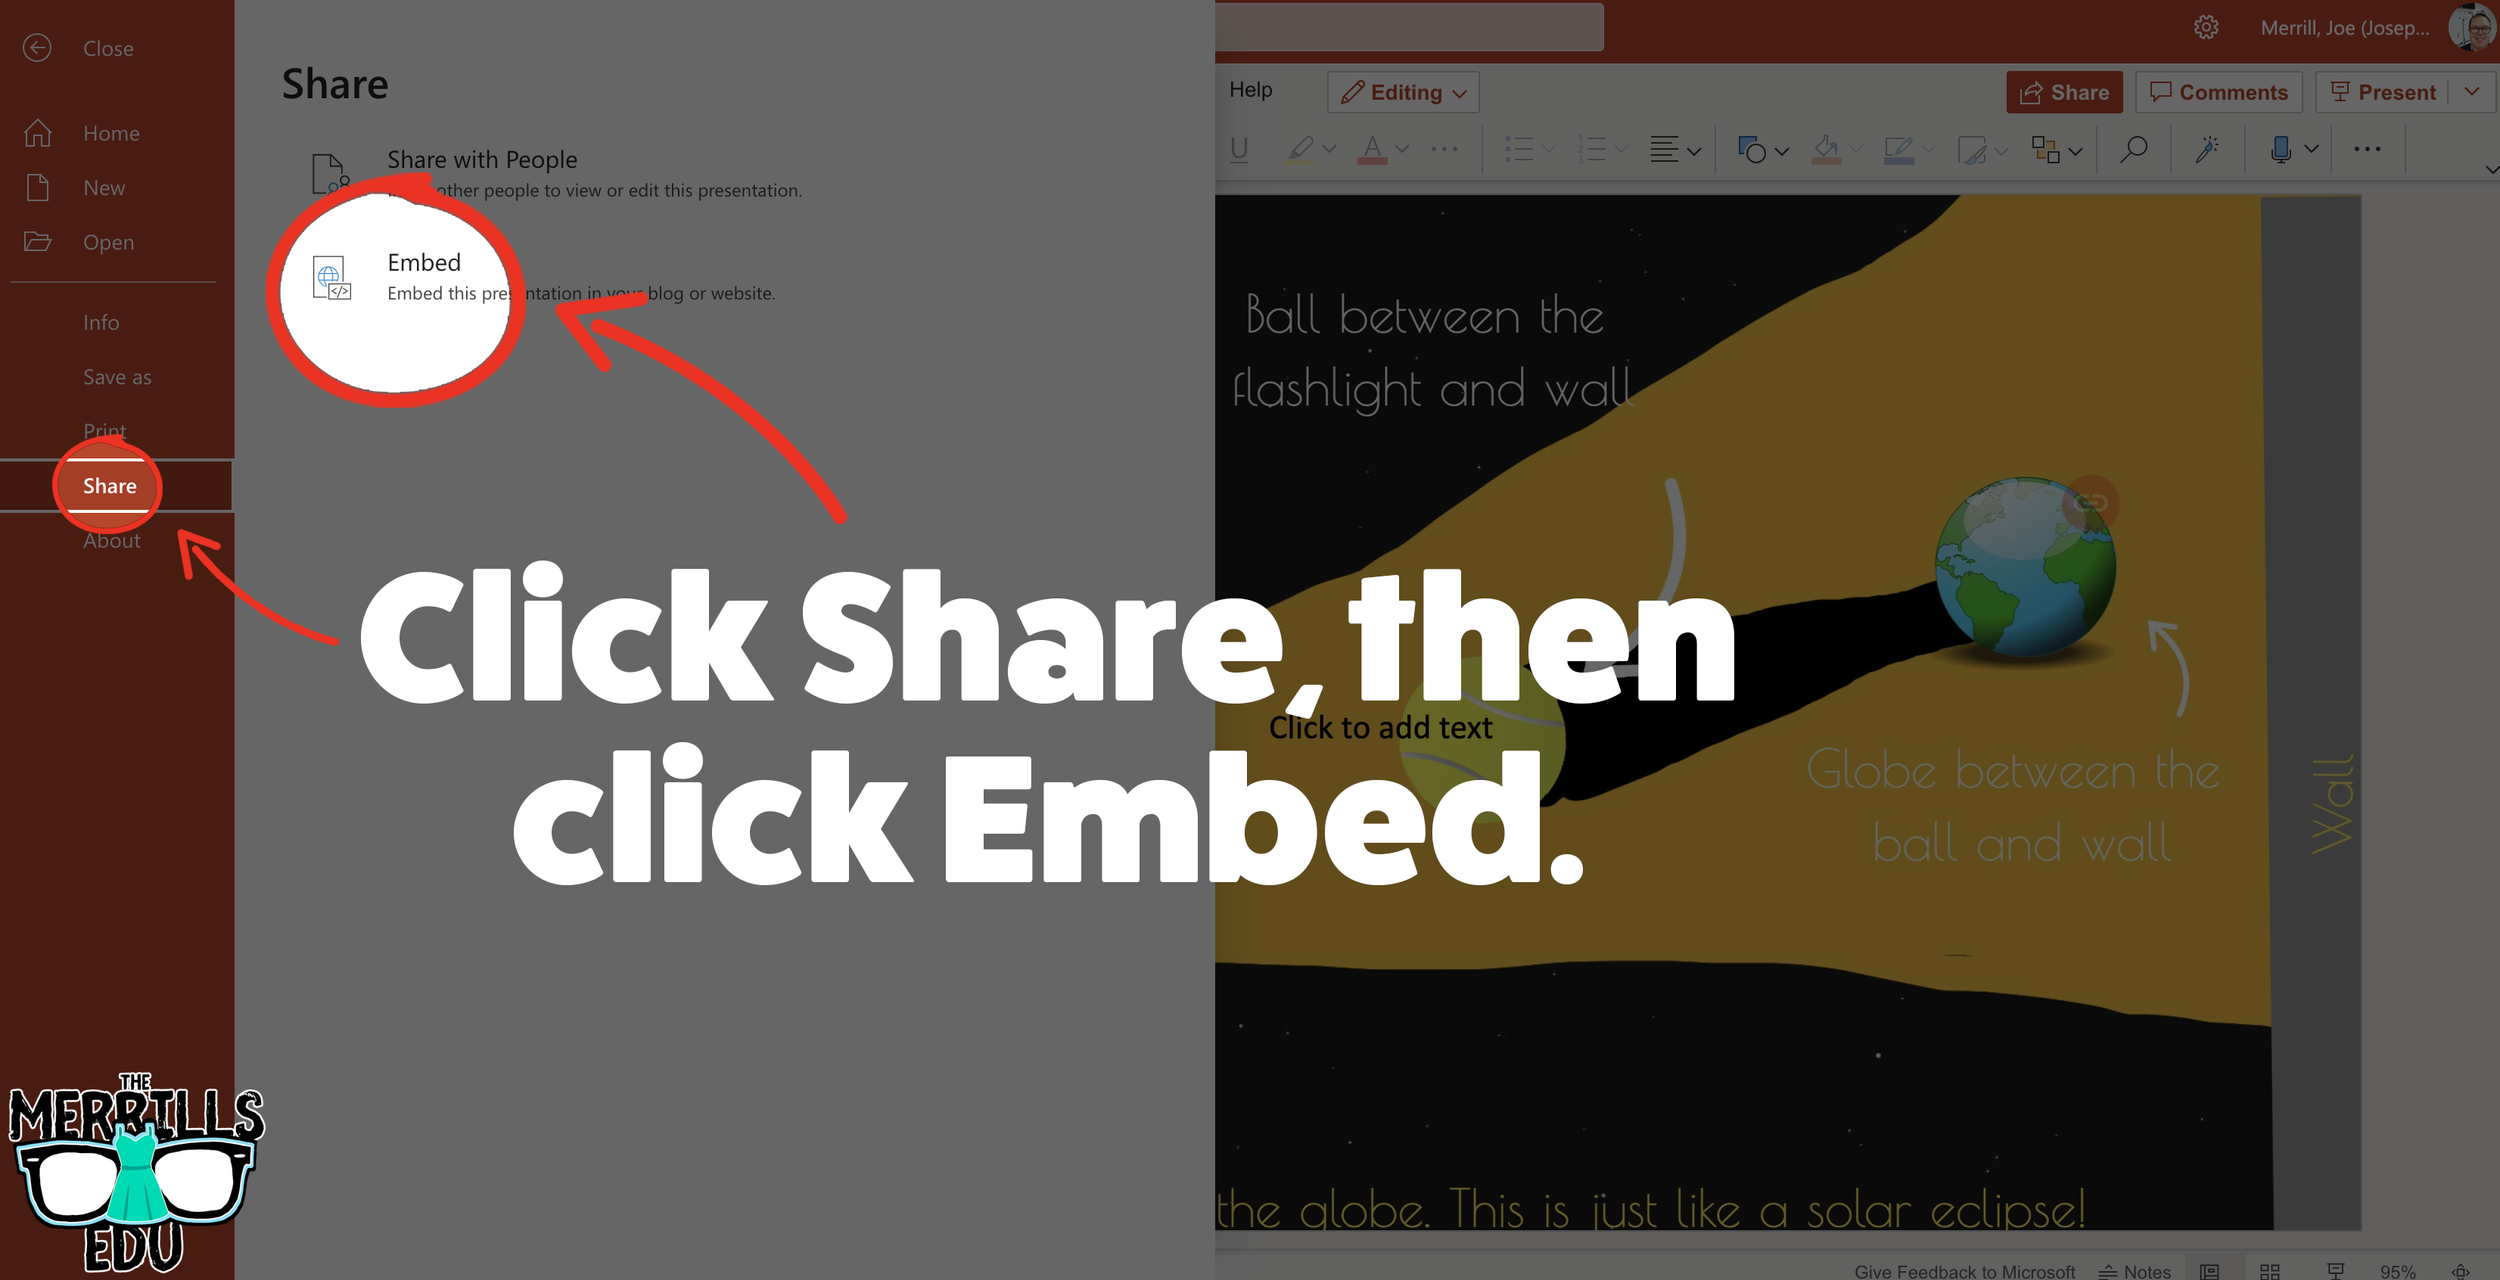
Next, click “Share” then click “Embed.”
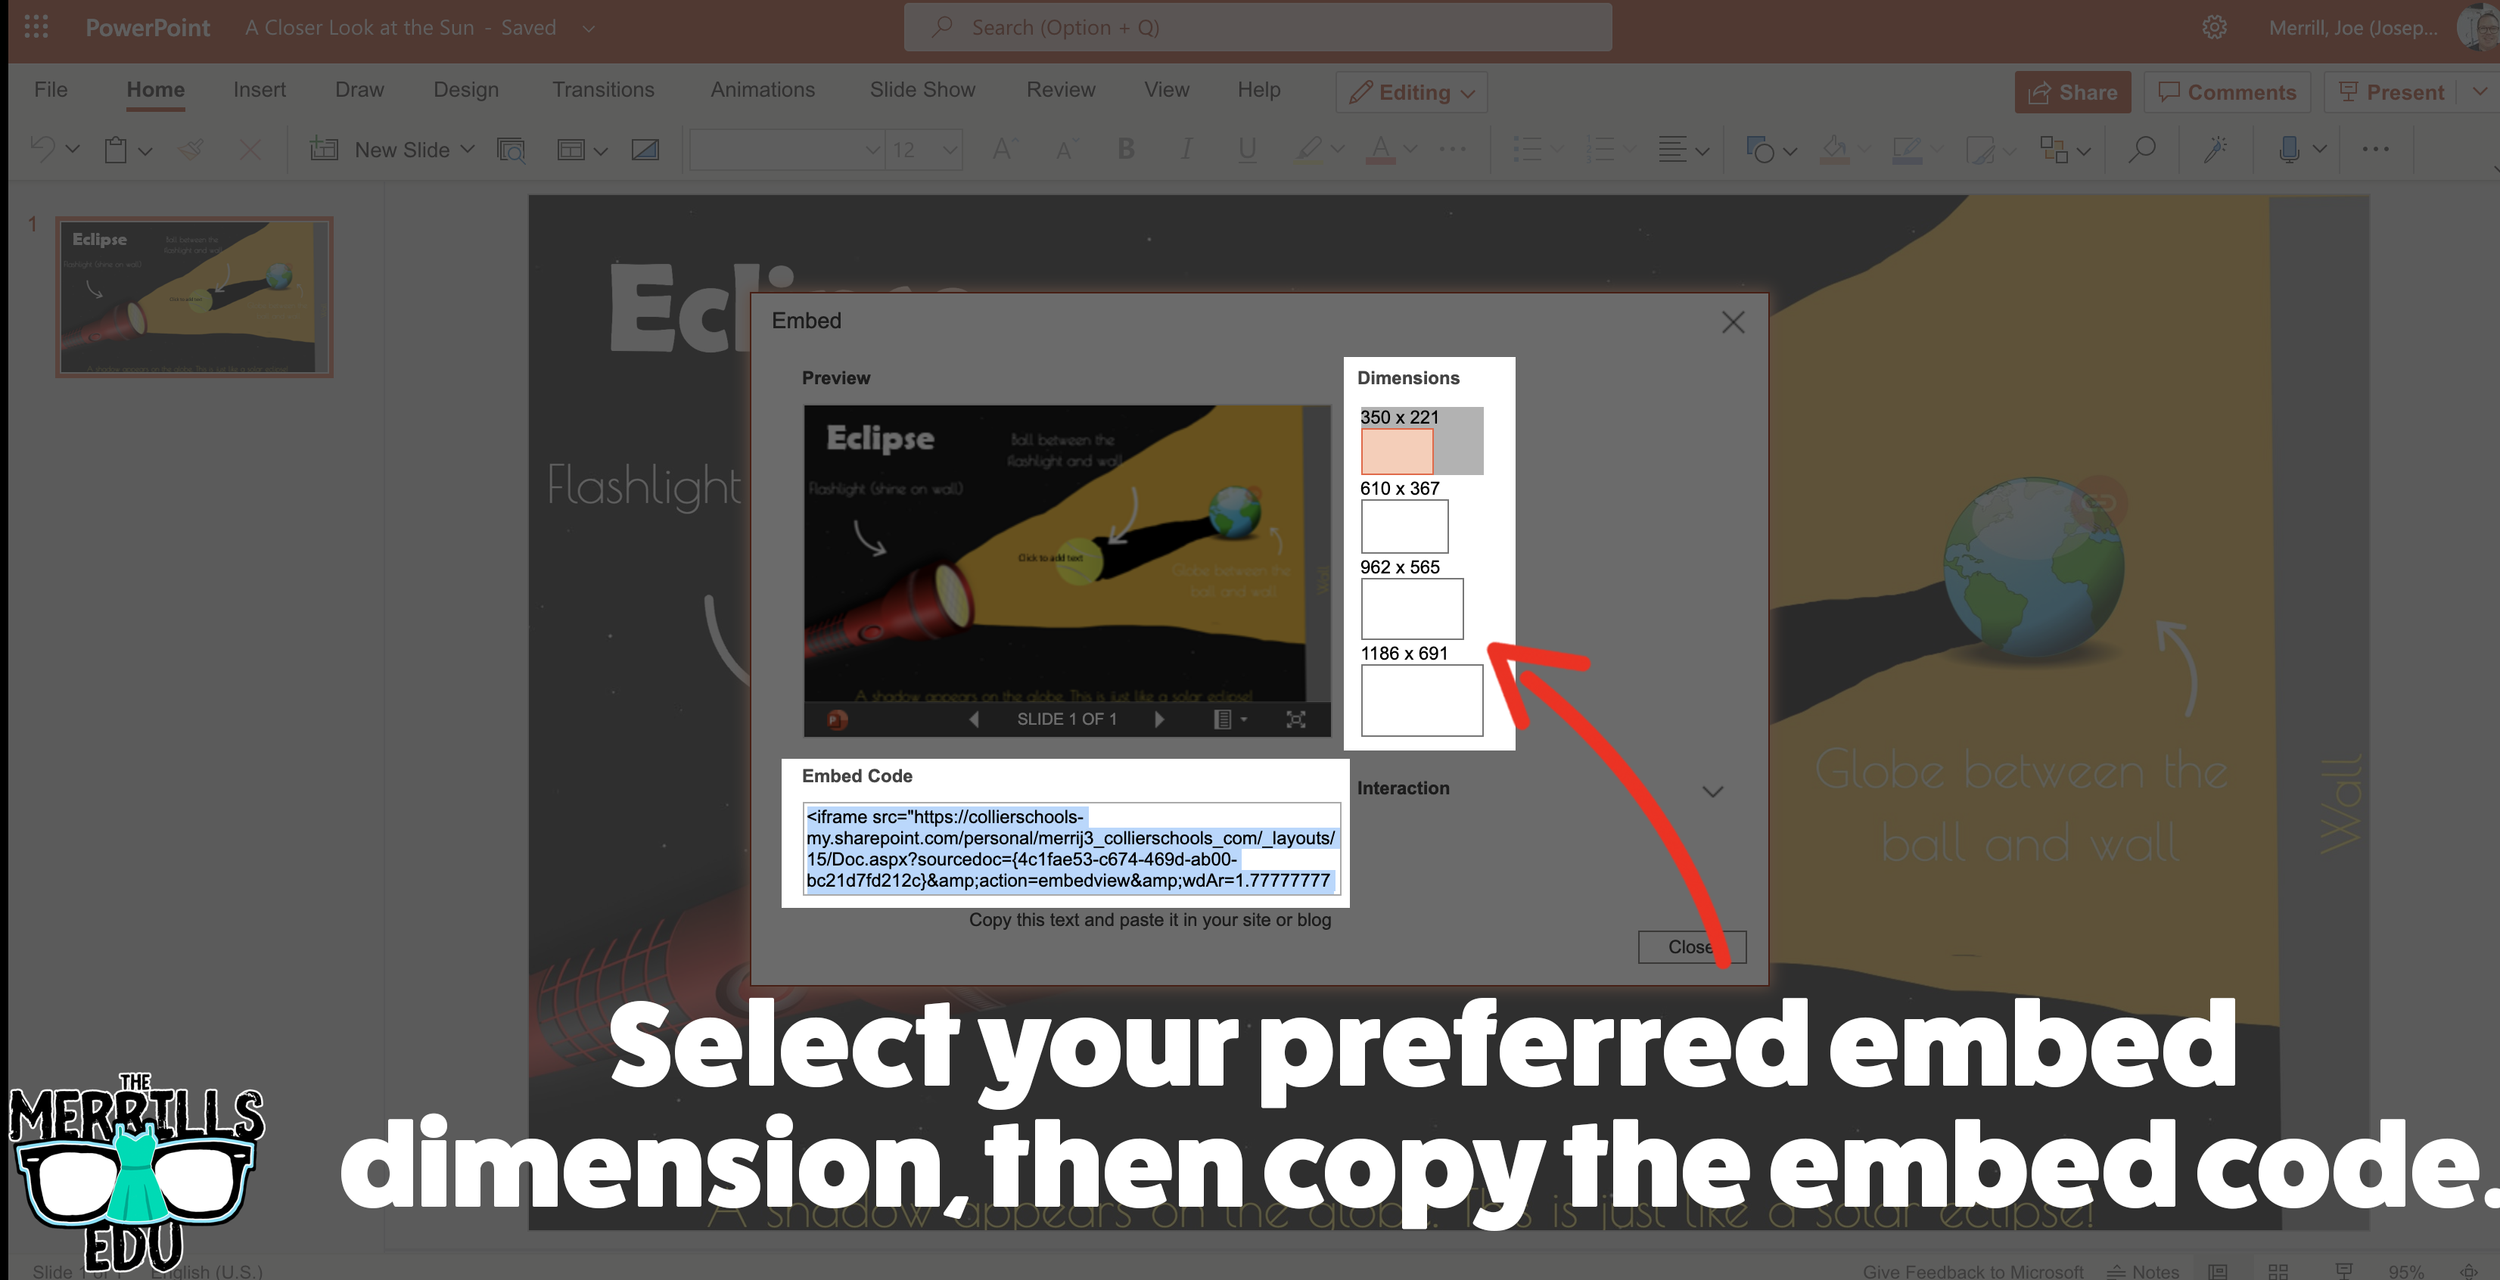
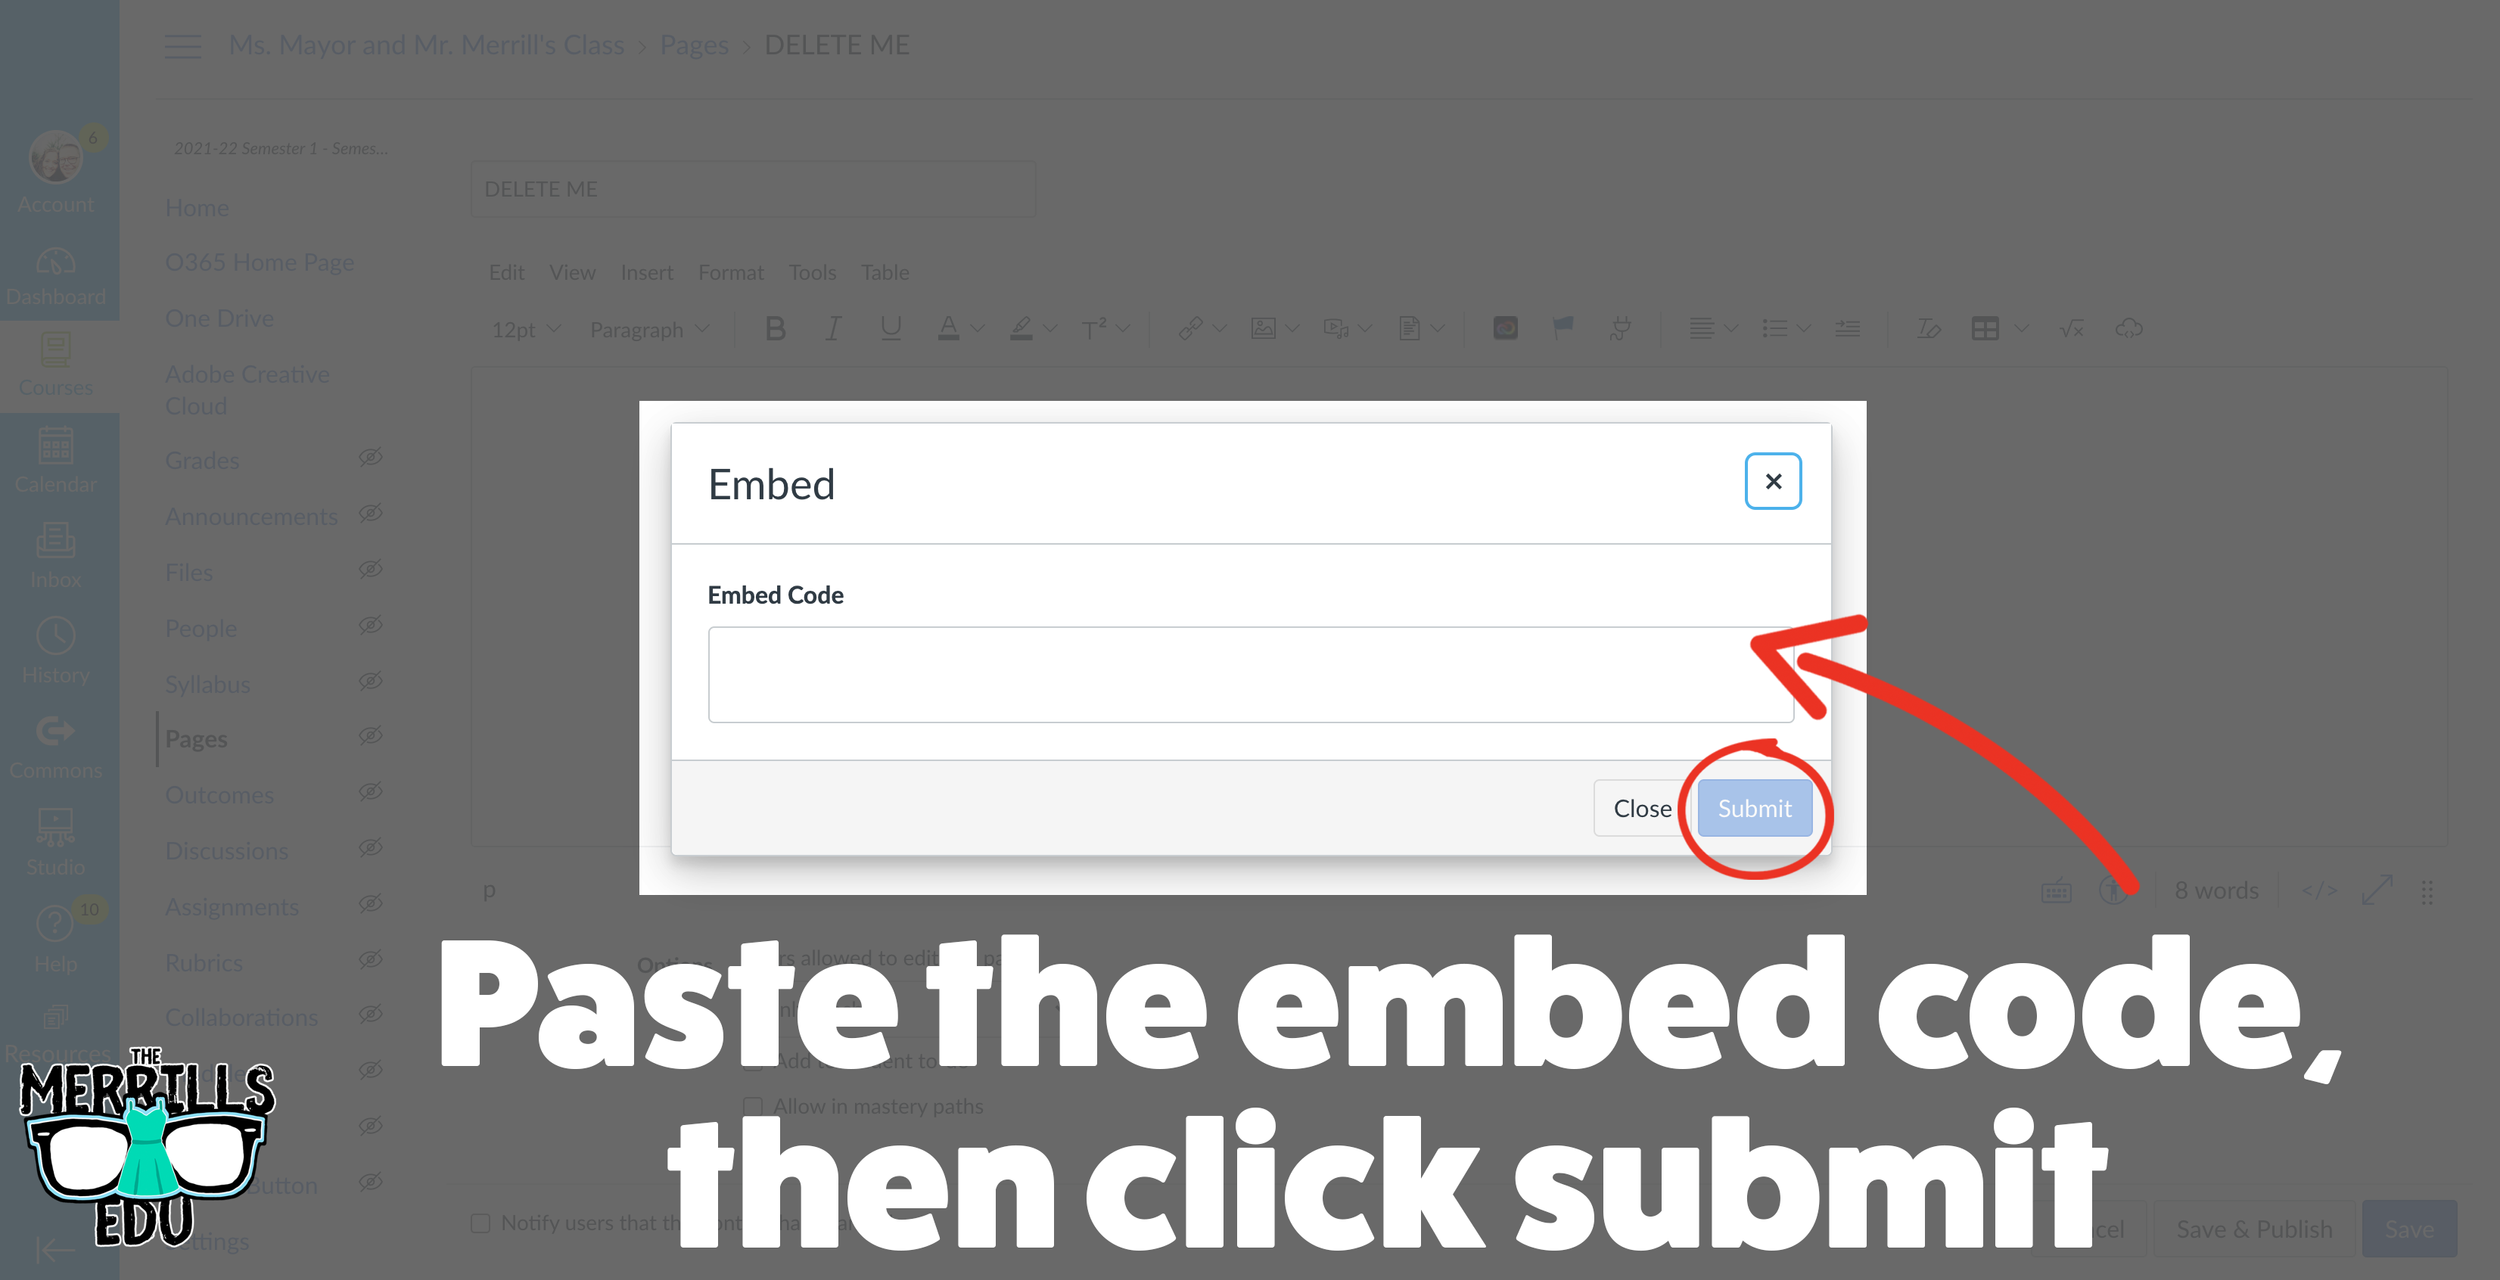
On the next screen, select your preferred embed size. Then, copy the Embed code.
In a separate tab, open the Canvas page that you would like to add the PowerPoint deck to. Then, click on the cloud icon (if you don’t see the Cloud icon, click the three dots to expand the menu bar).
In the embed window, paste your copied code from PowerPoint Online. Then, click submit.
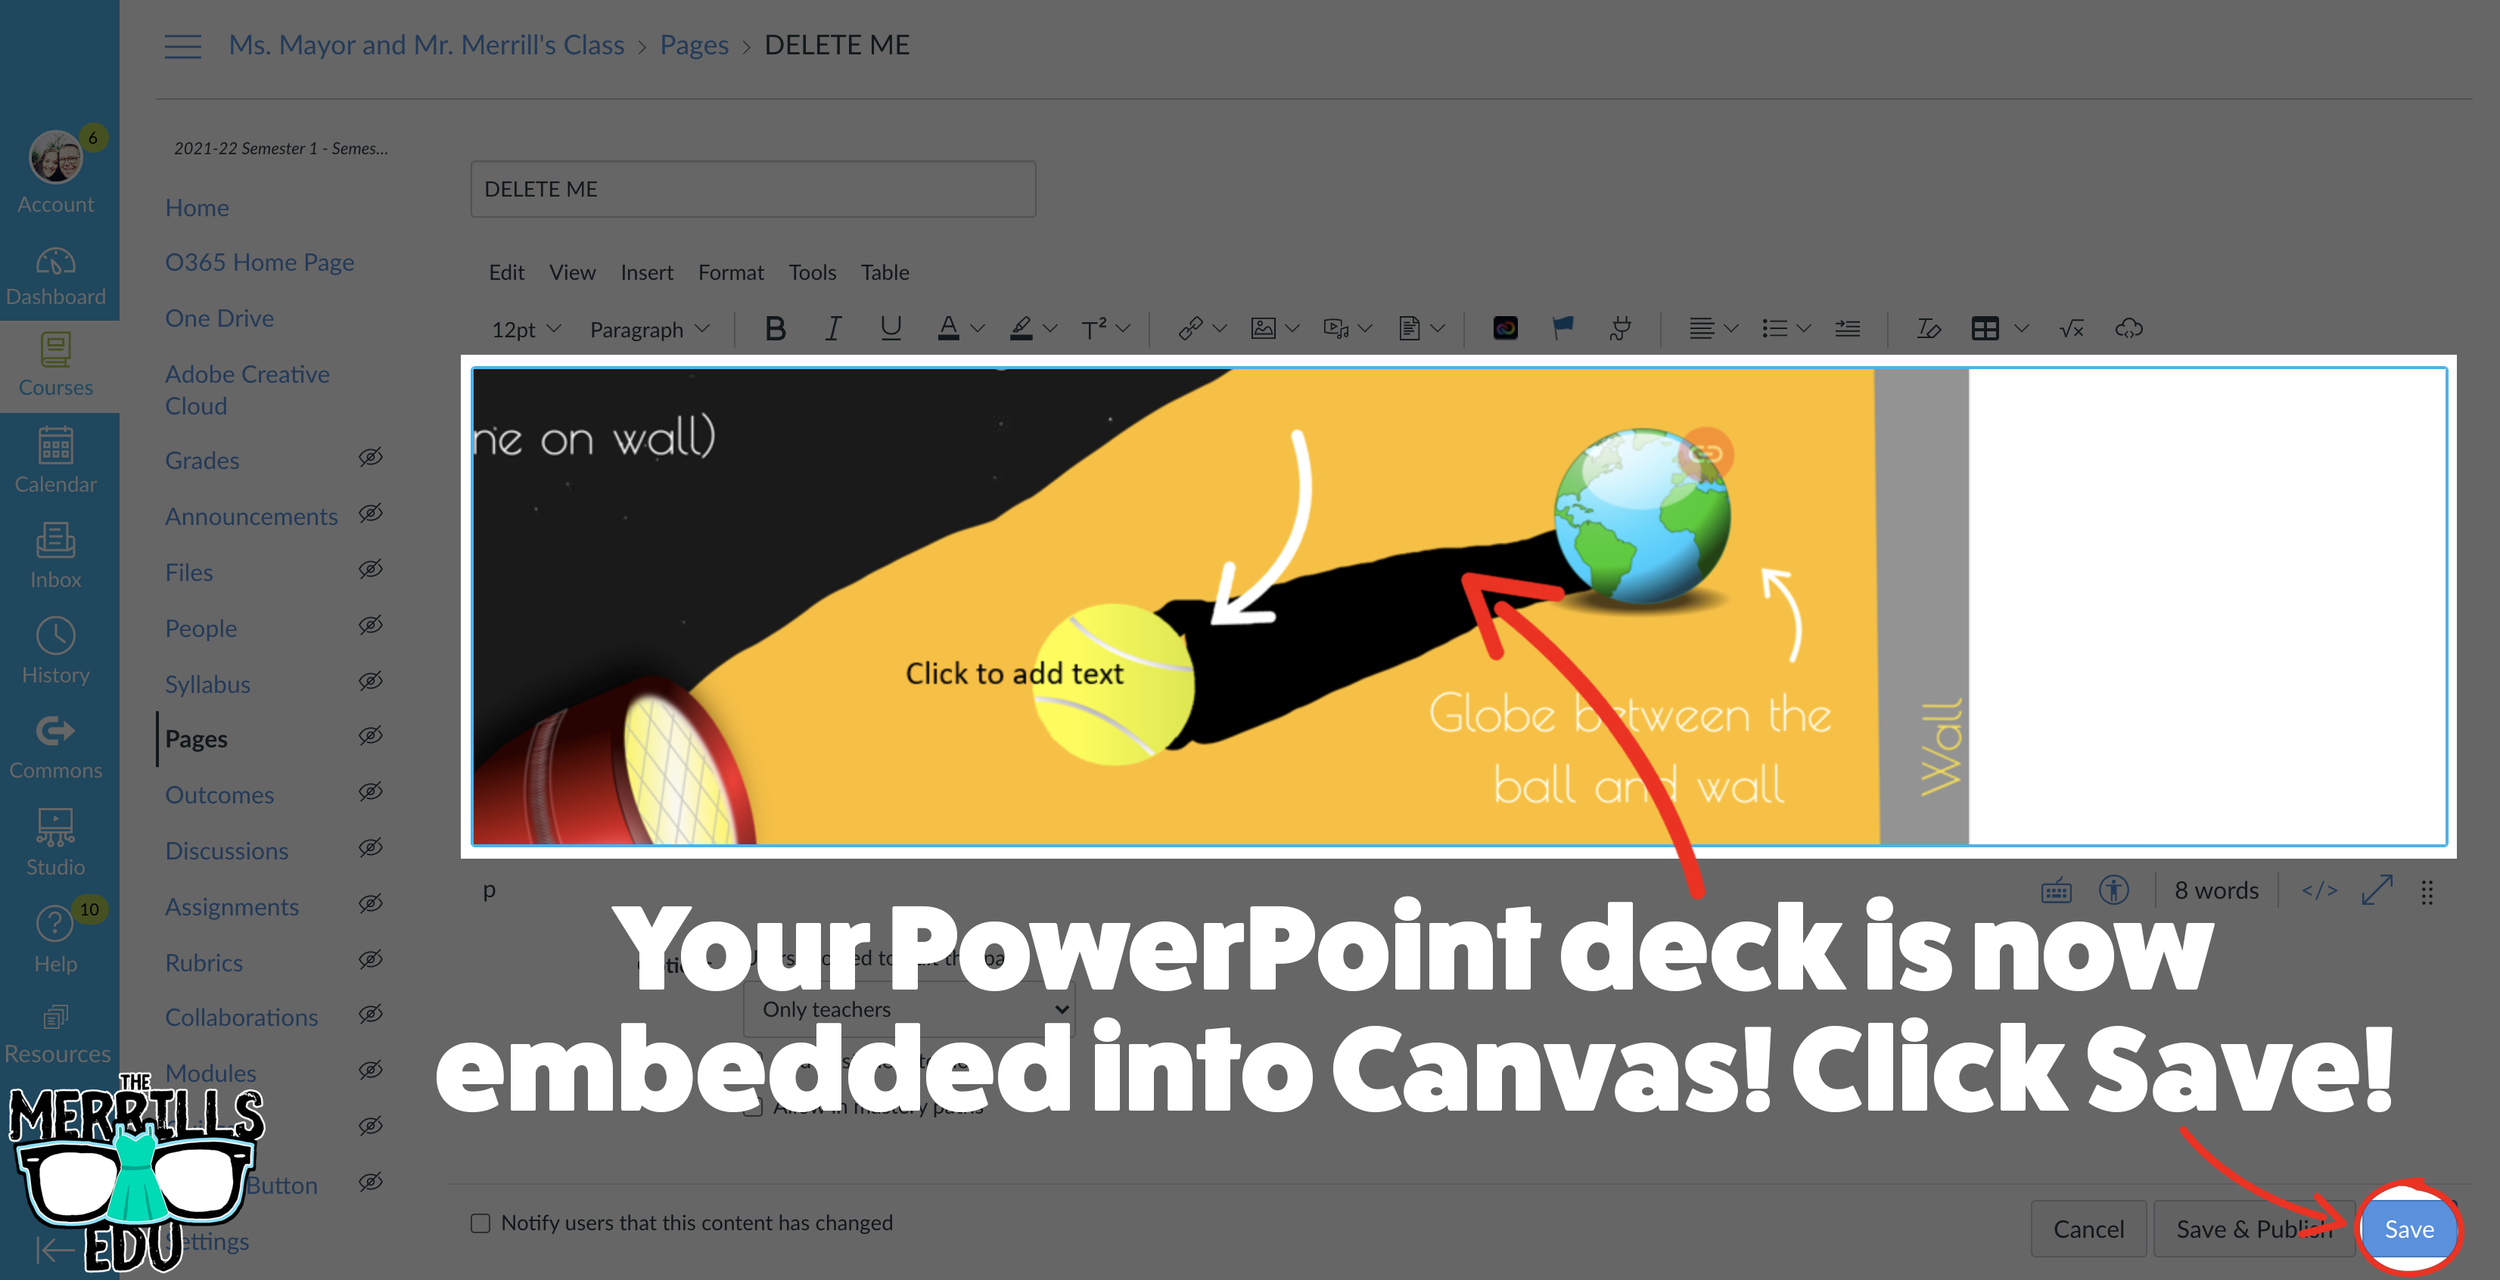
Your PowerPoint deck is now embedded into the Canvas page! Click on “Save” to update the changes.

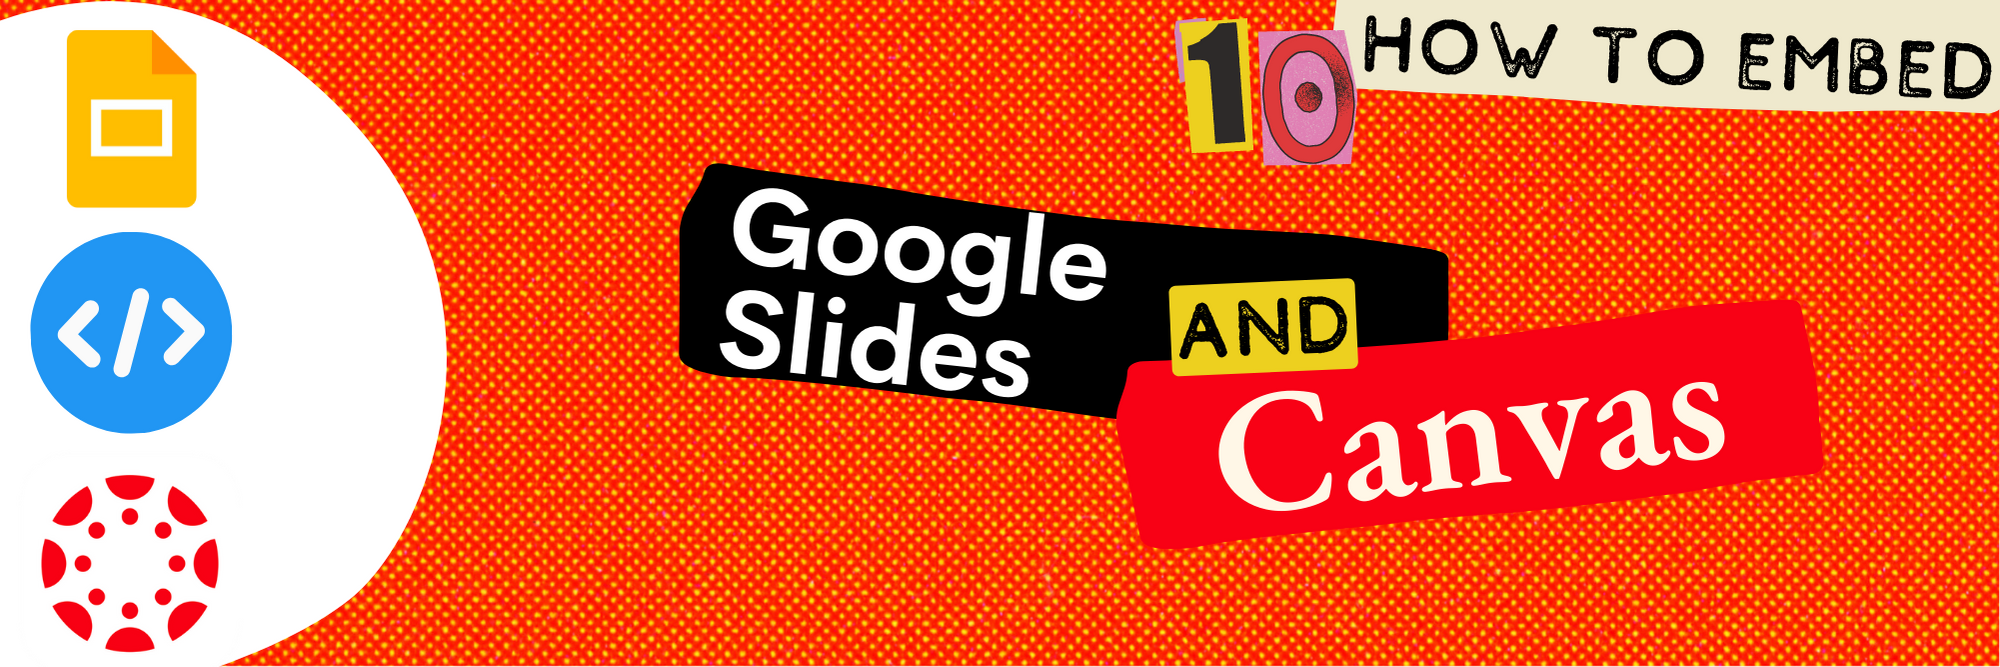
Google Slides Embedded into Canvas
Google Slides users can get in on the embedding fun, too! In just several clicks, you can take your Google Slides deck and embed them into Canvas. Here’s how:
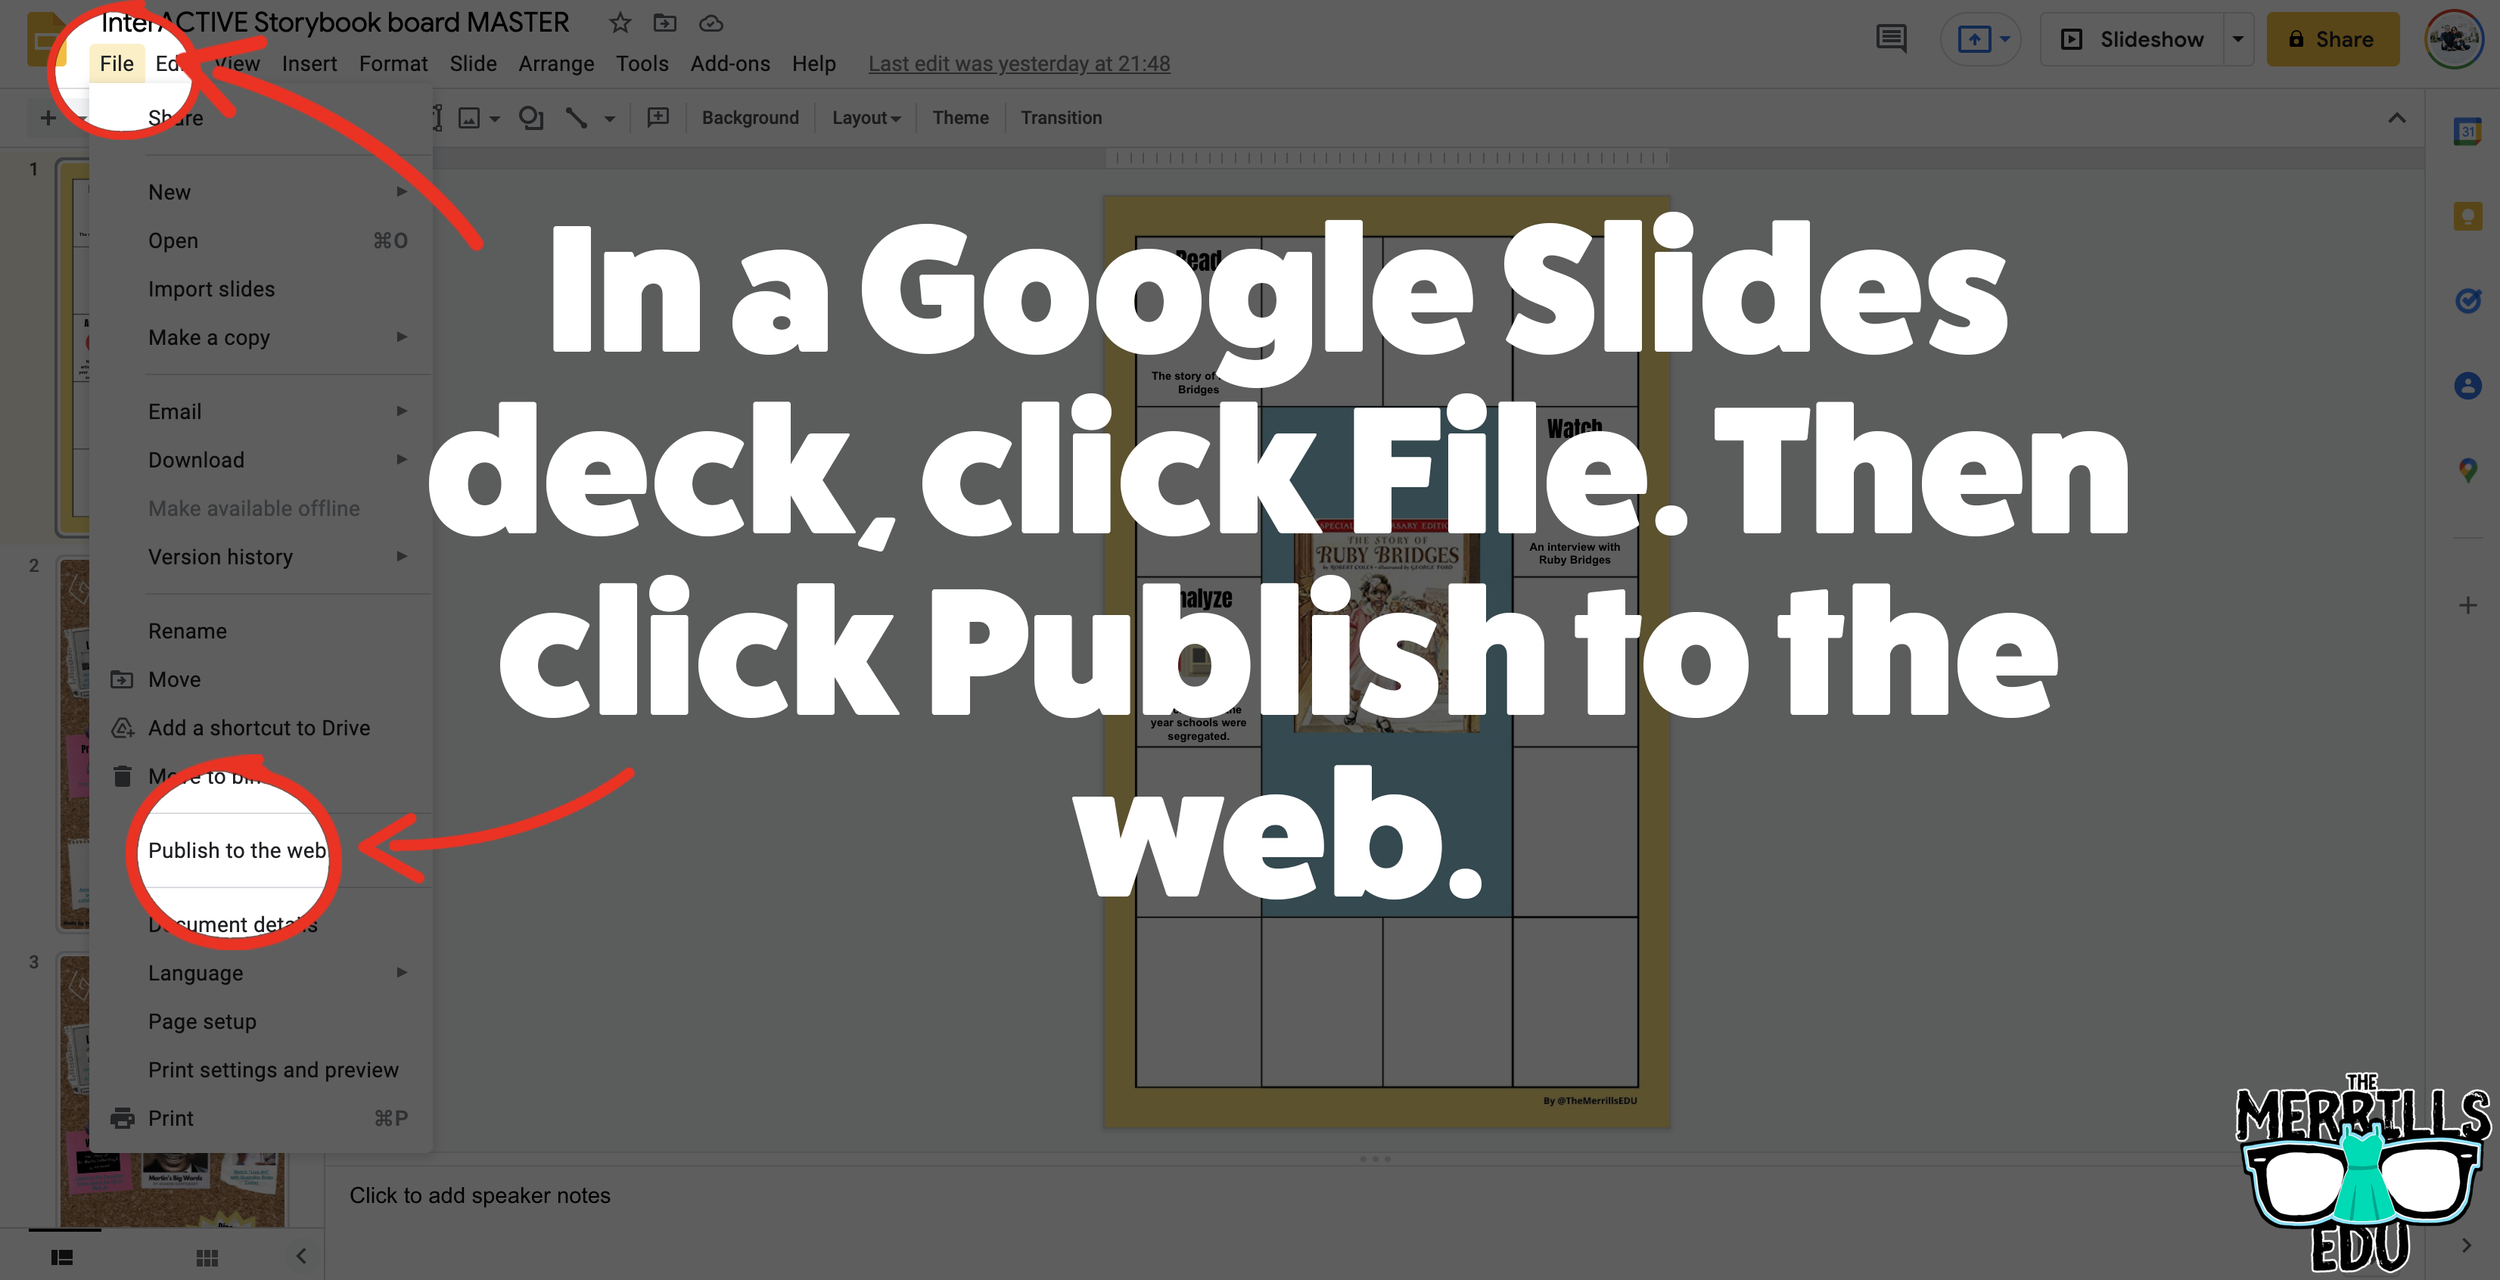
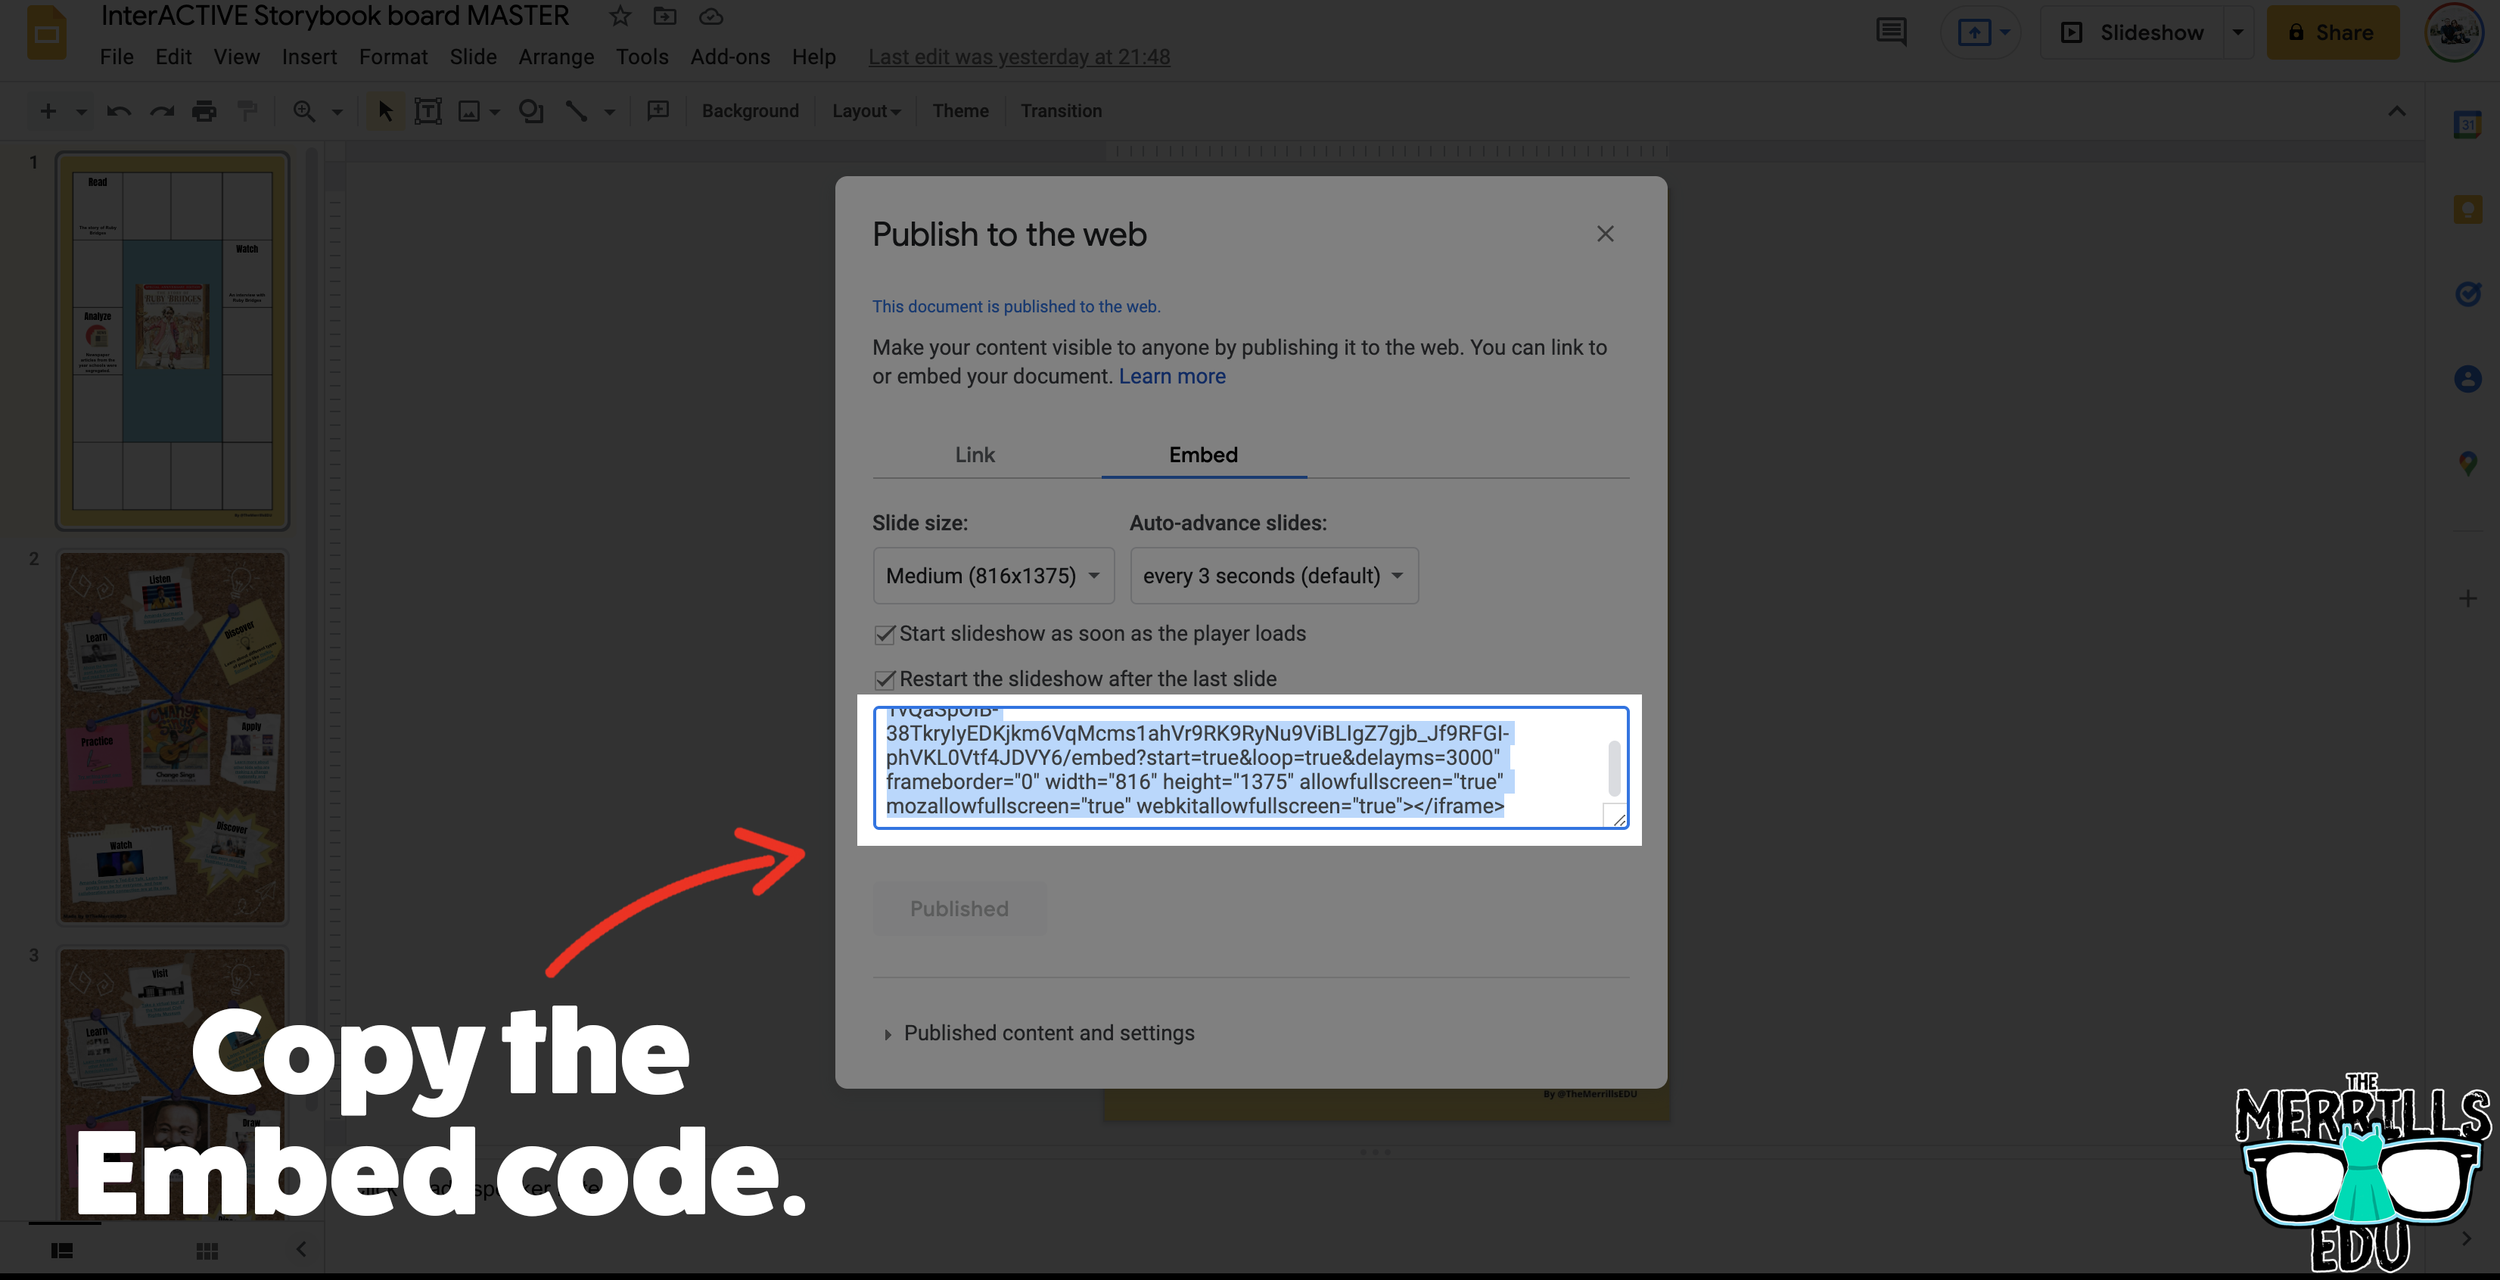


In your Google Slide deck, click “File,” then click “Publish to the web.’
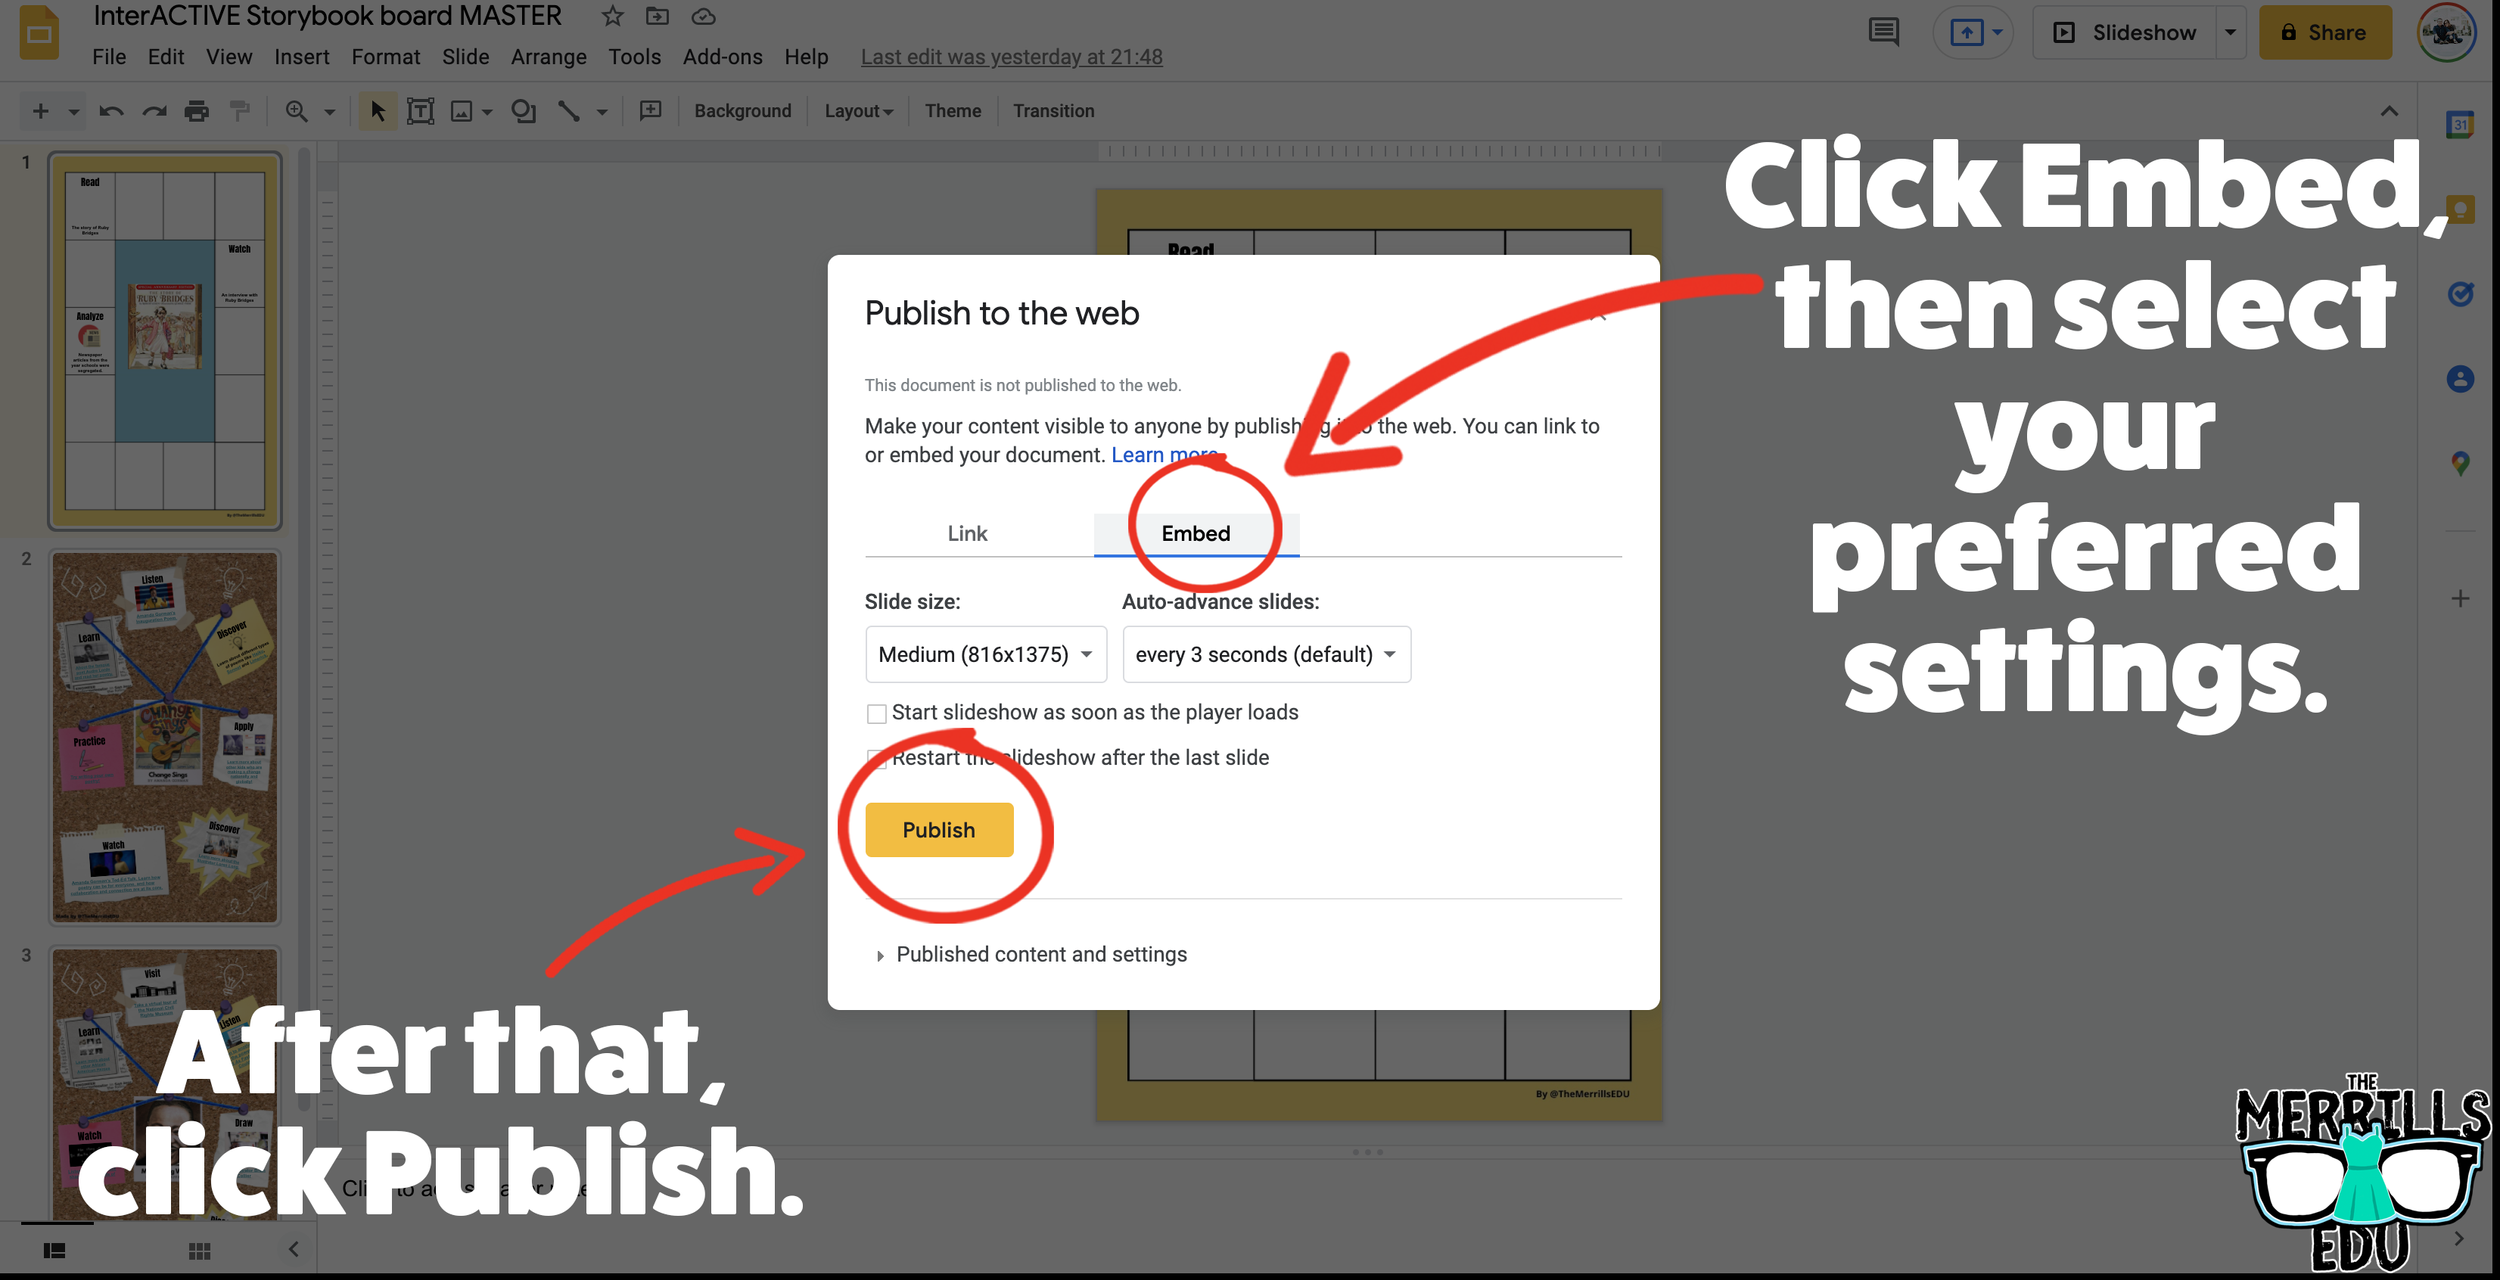
Click on Embed, then select your preferred settings. Once you have everything set, click “Publish.” (If you’re asked if you are sure you want to publish, say “yes or ok.”)
On the next screen, copy your embed code.
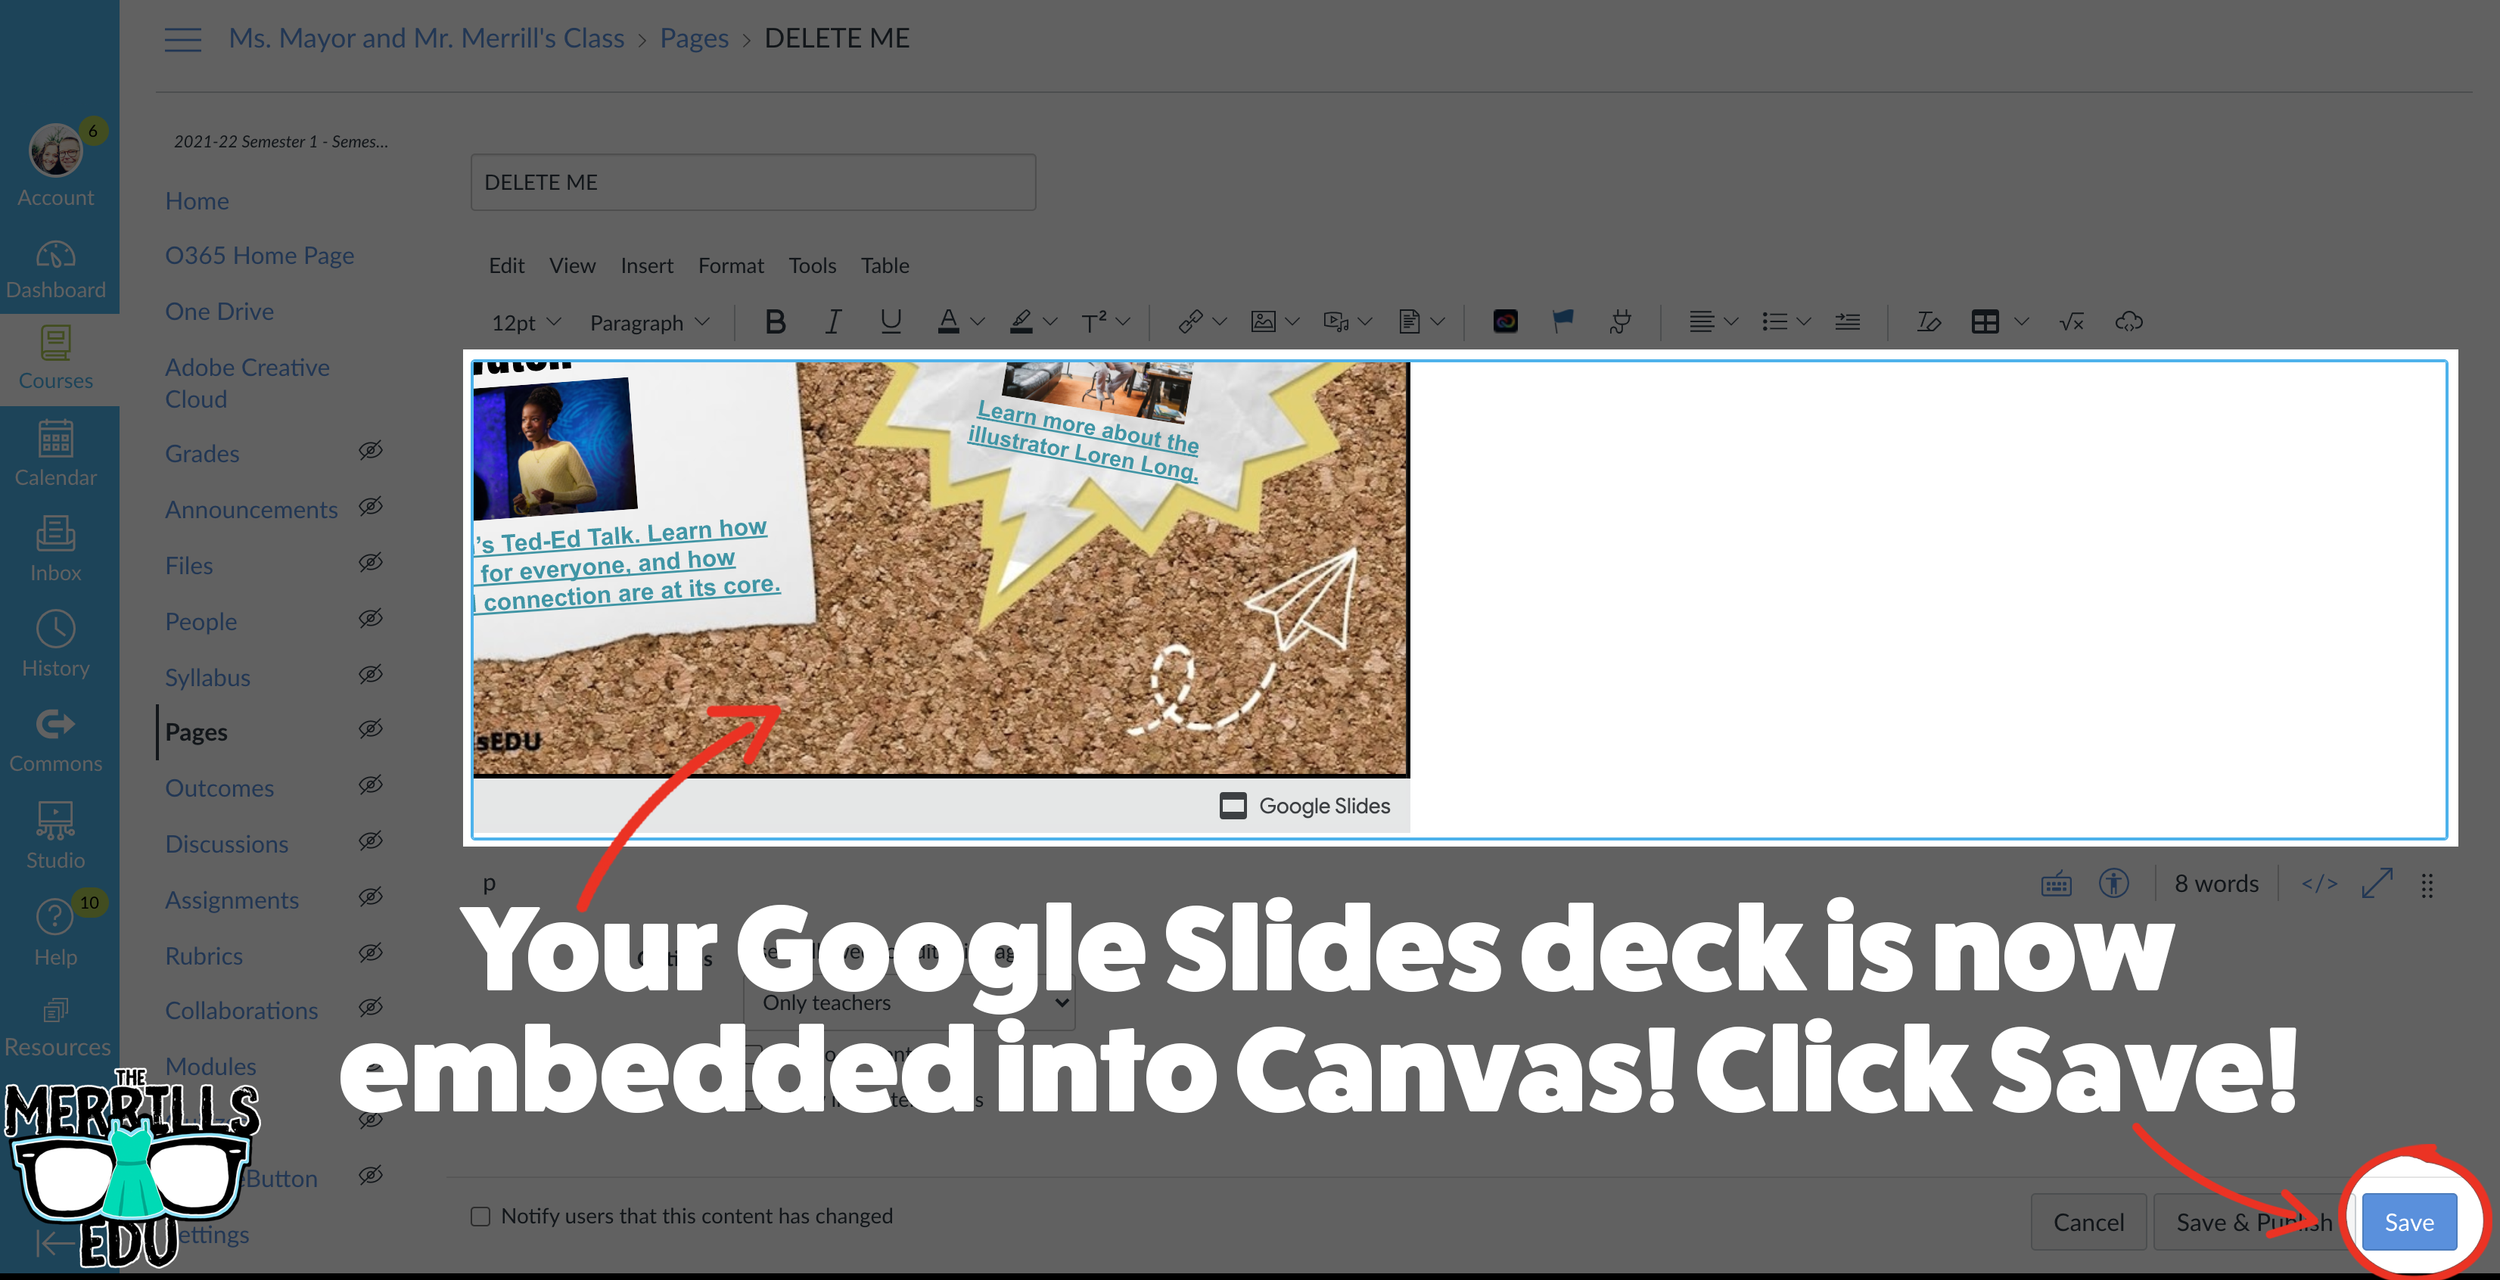
In a separate tab, open the Canvas page that you would like to add the Google Slides deck to. Then, click on the cloud icon (if you don’t see the Cloud icon, click the three dots to expand the menu bar).
In the embed window, paste your copied code from Google Slides. Then, click submit.
Your Google Slides deck is now embedded into the Canvas page! Click on “Save” to update the changes.

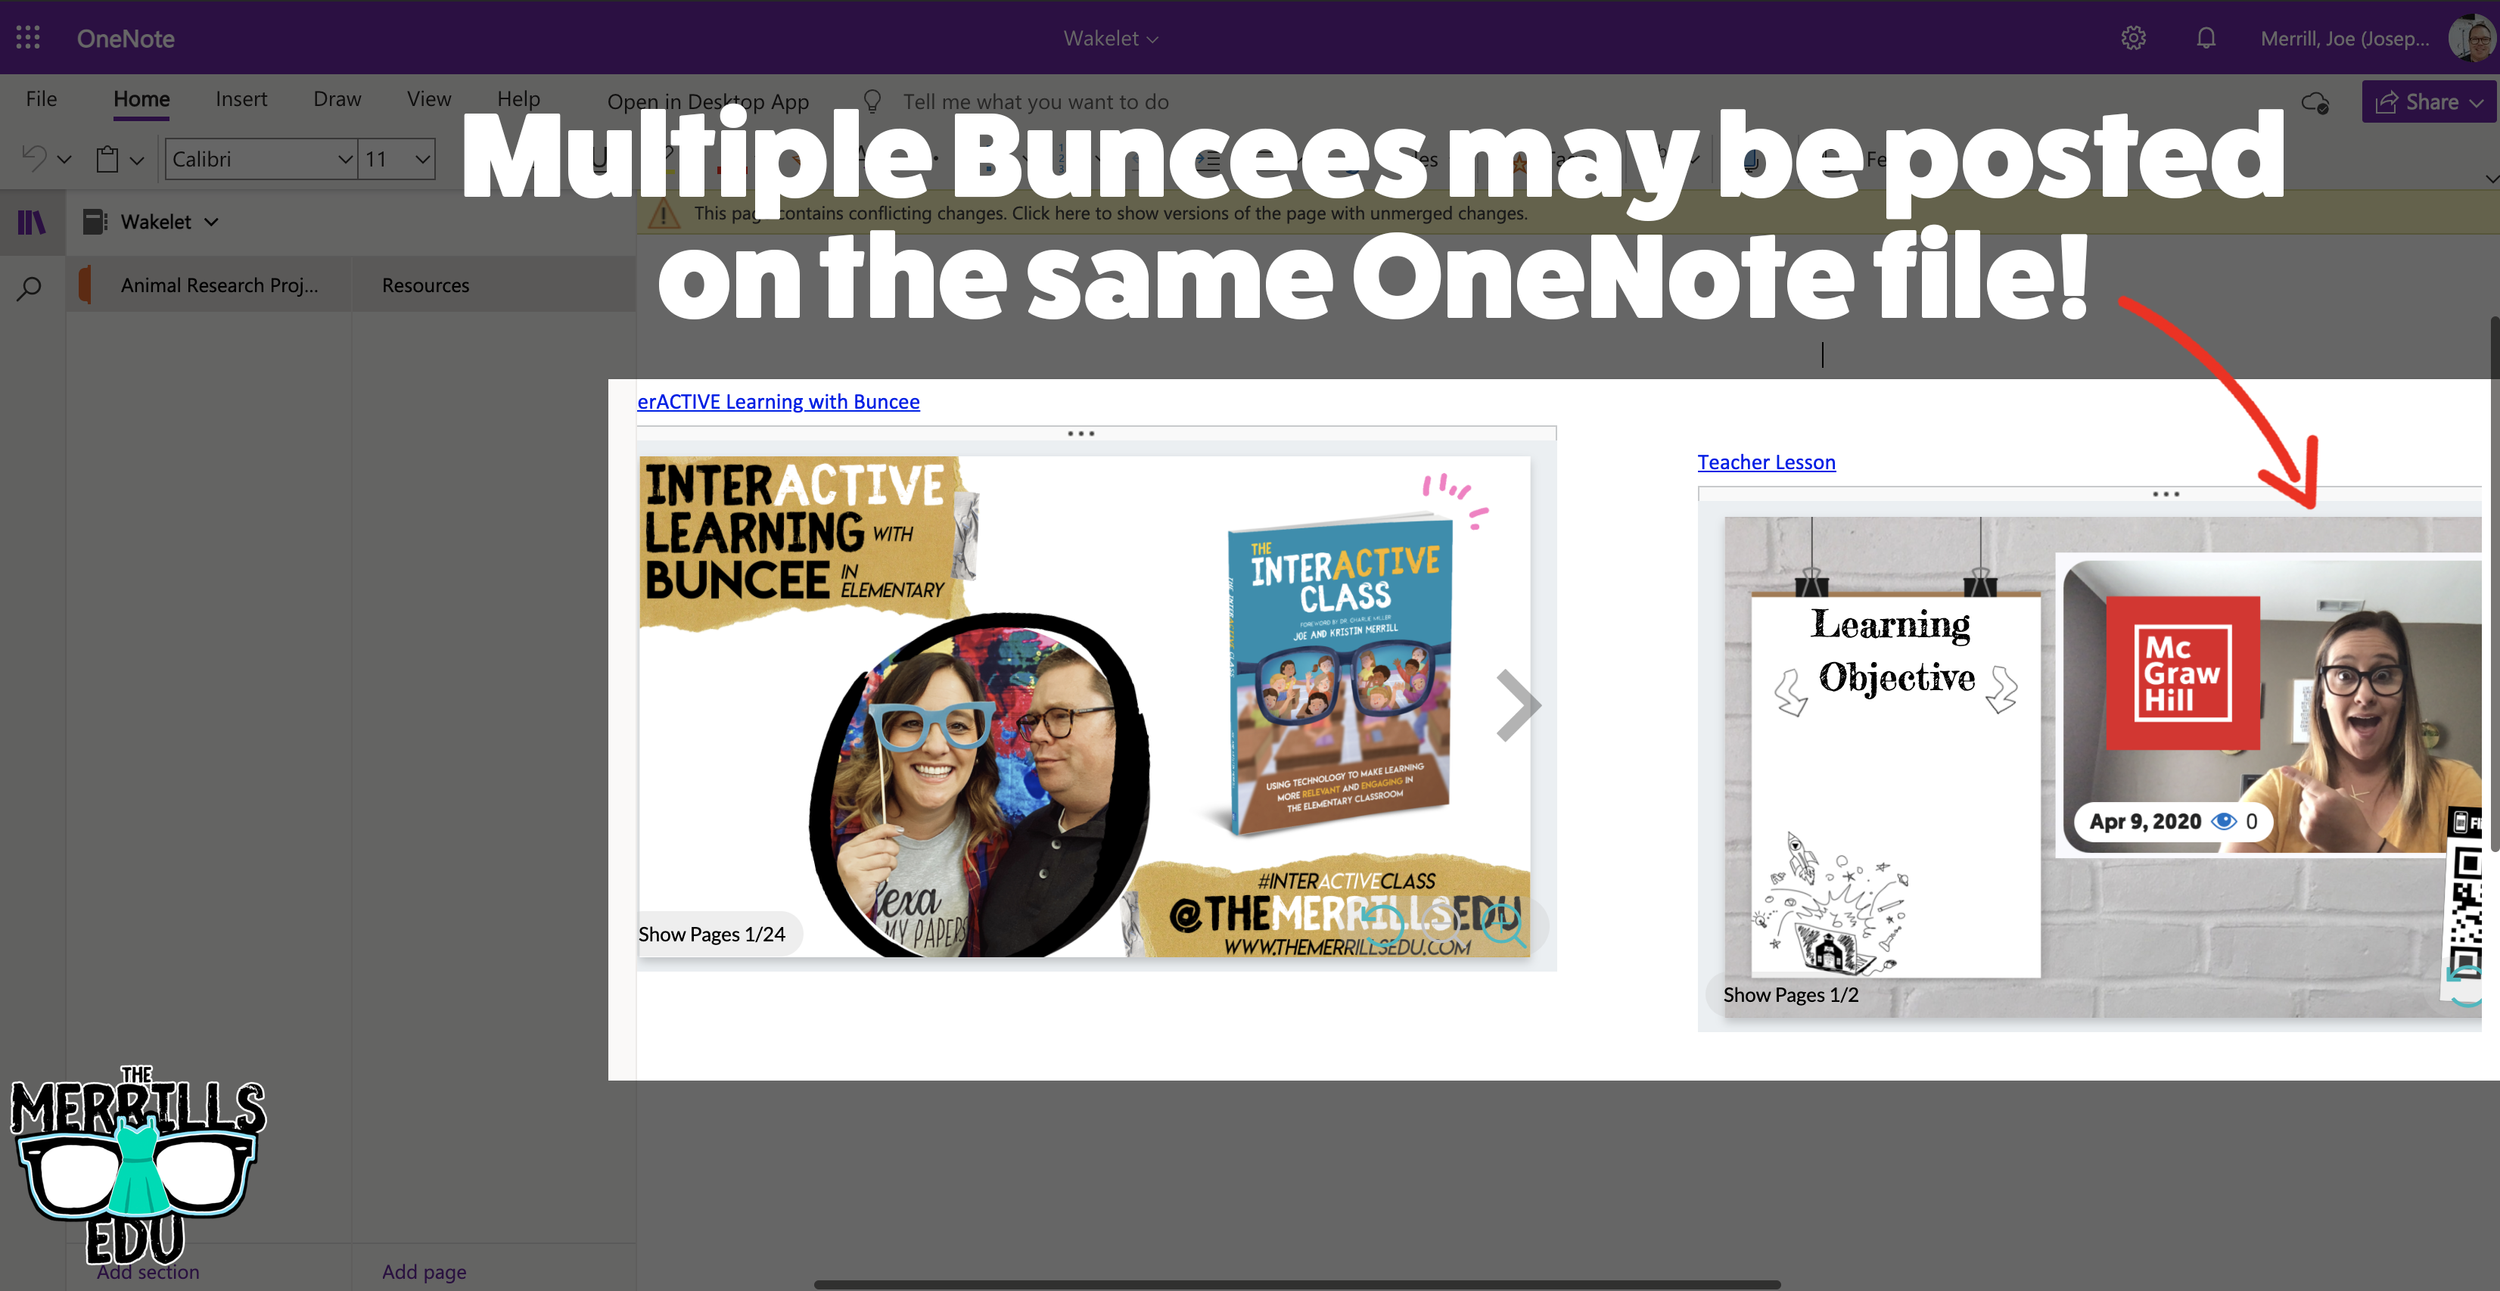
Wakelet Embedded into OneNote
You don’t need an LMS (learning management system) to embed apps. If you’re a Microsoft user, you can embed Wakelet collections right into a OneNote file. The best part of all - this is a ⚡️LIVE⚡️ embed, meaning that any changes made to the Wakelet collection will automatically change in the OneNote file. Additionally, you can embed multiple Wakelet collections into one - OneNote file. Here’s how it all works:
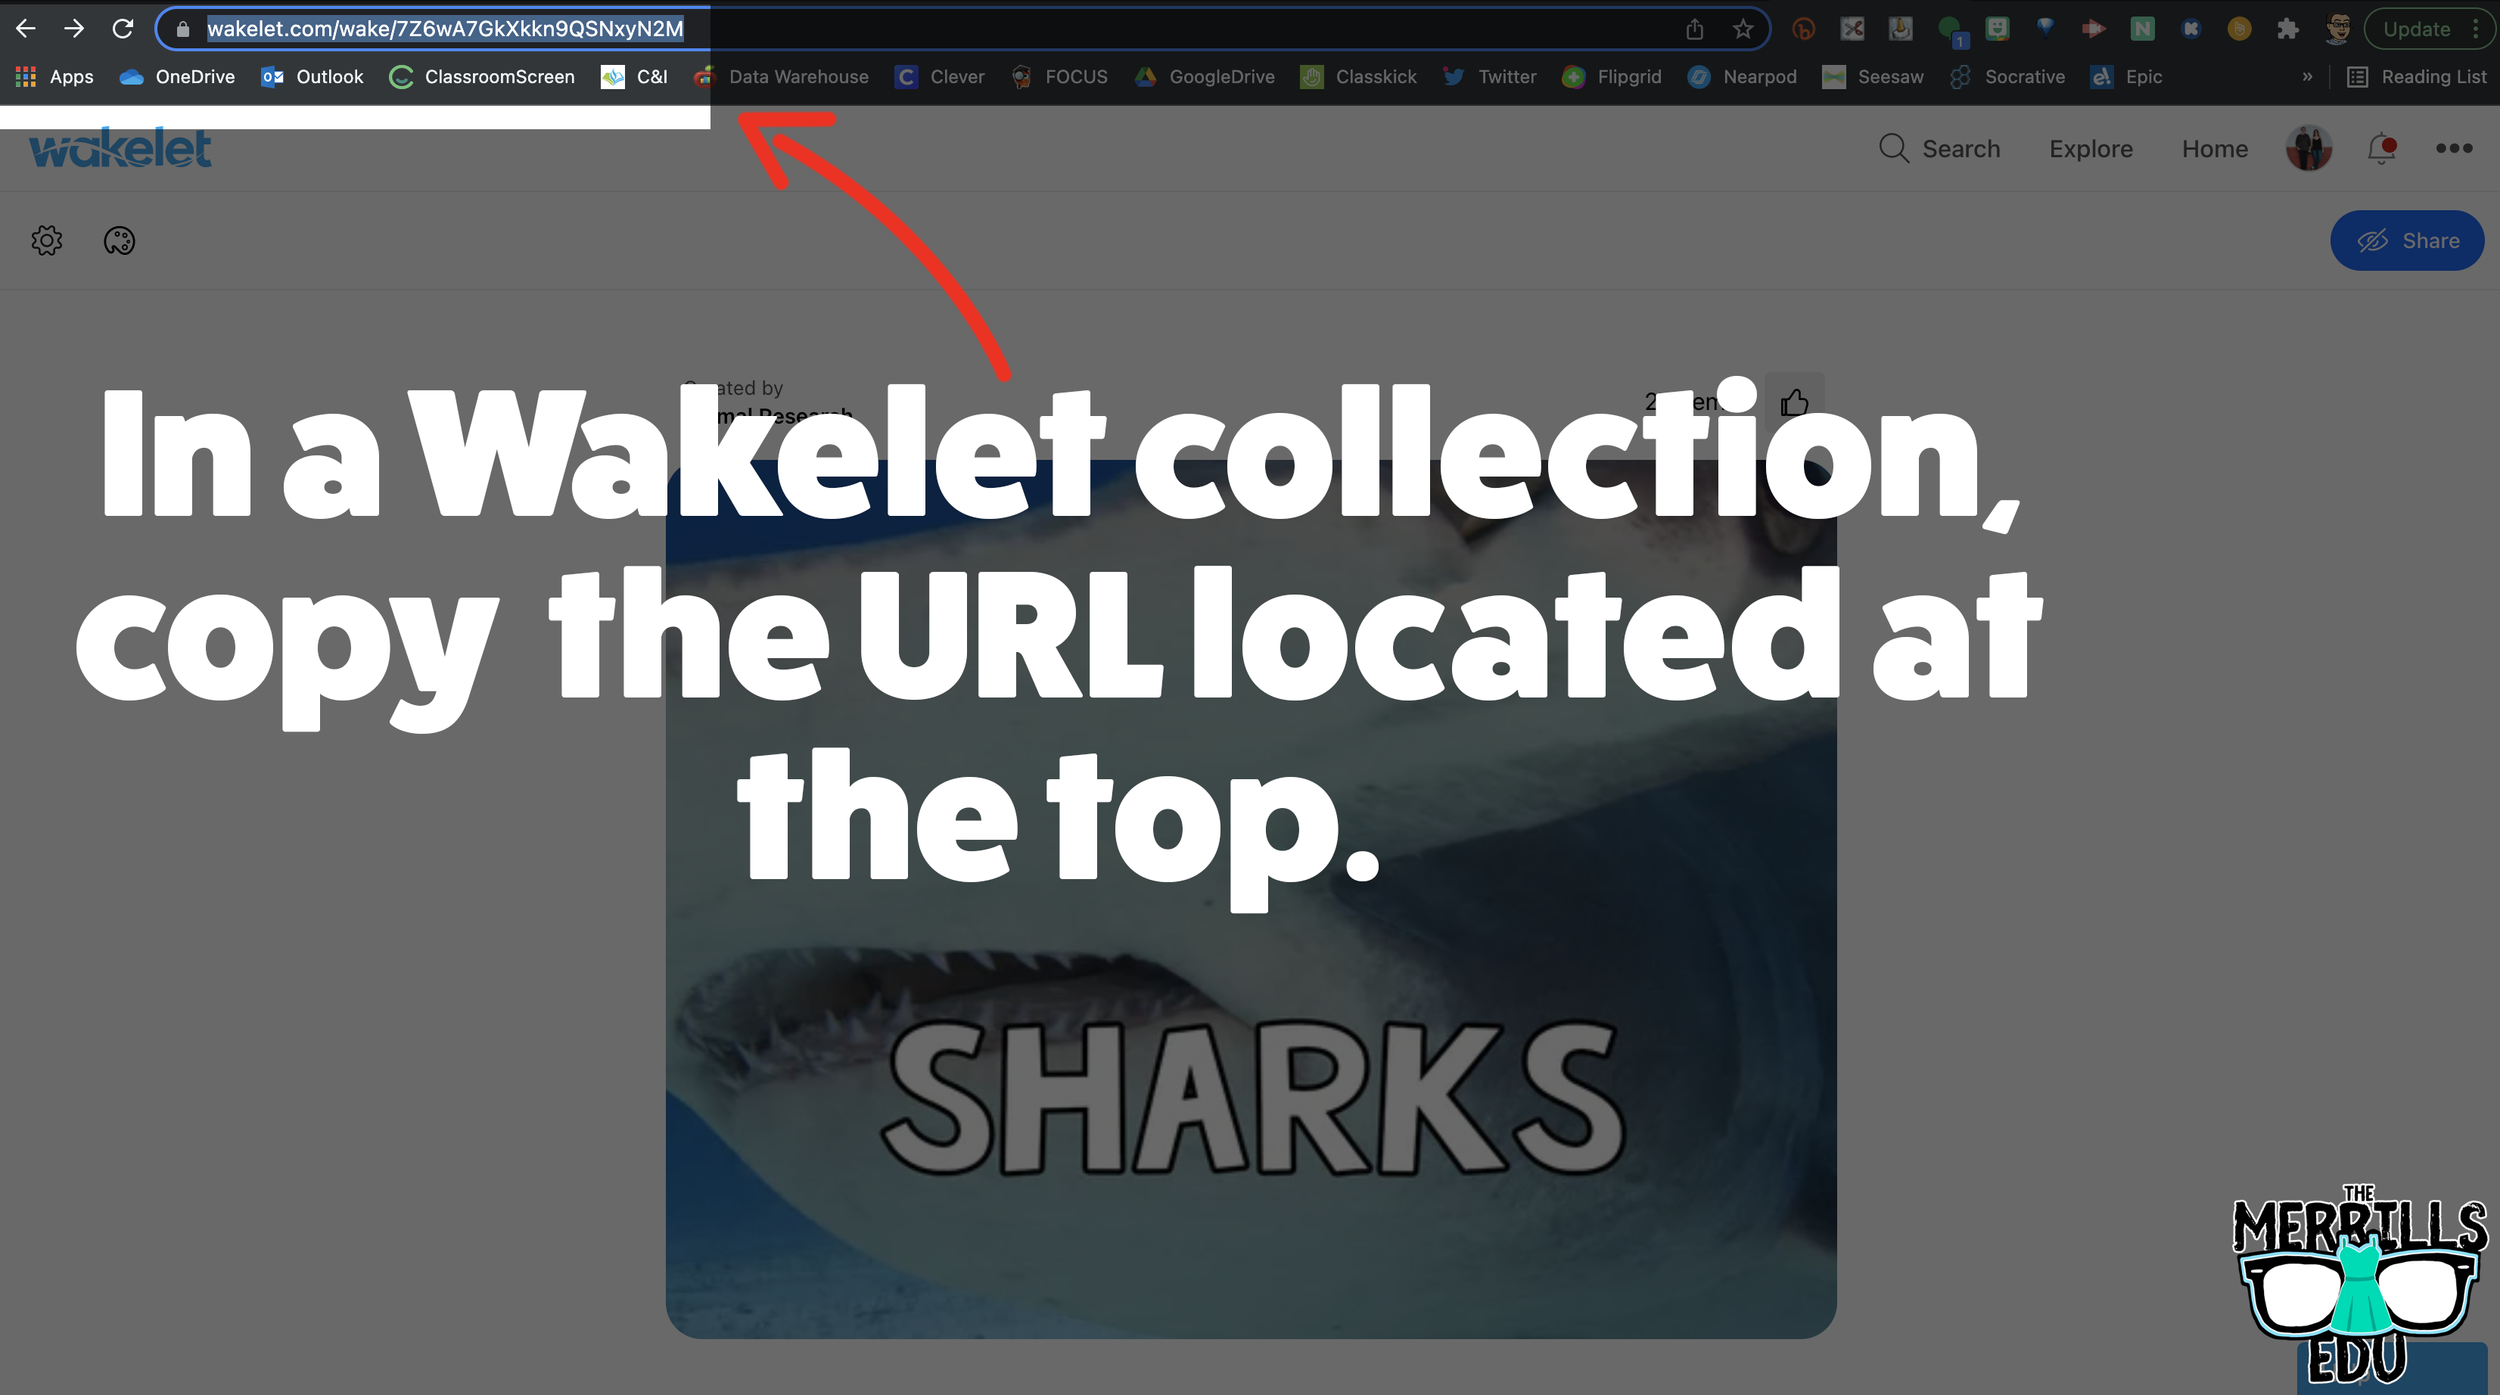
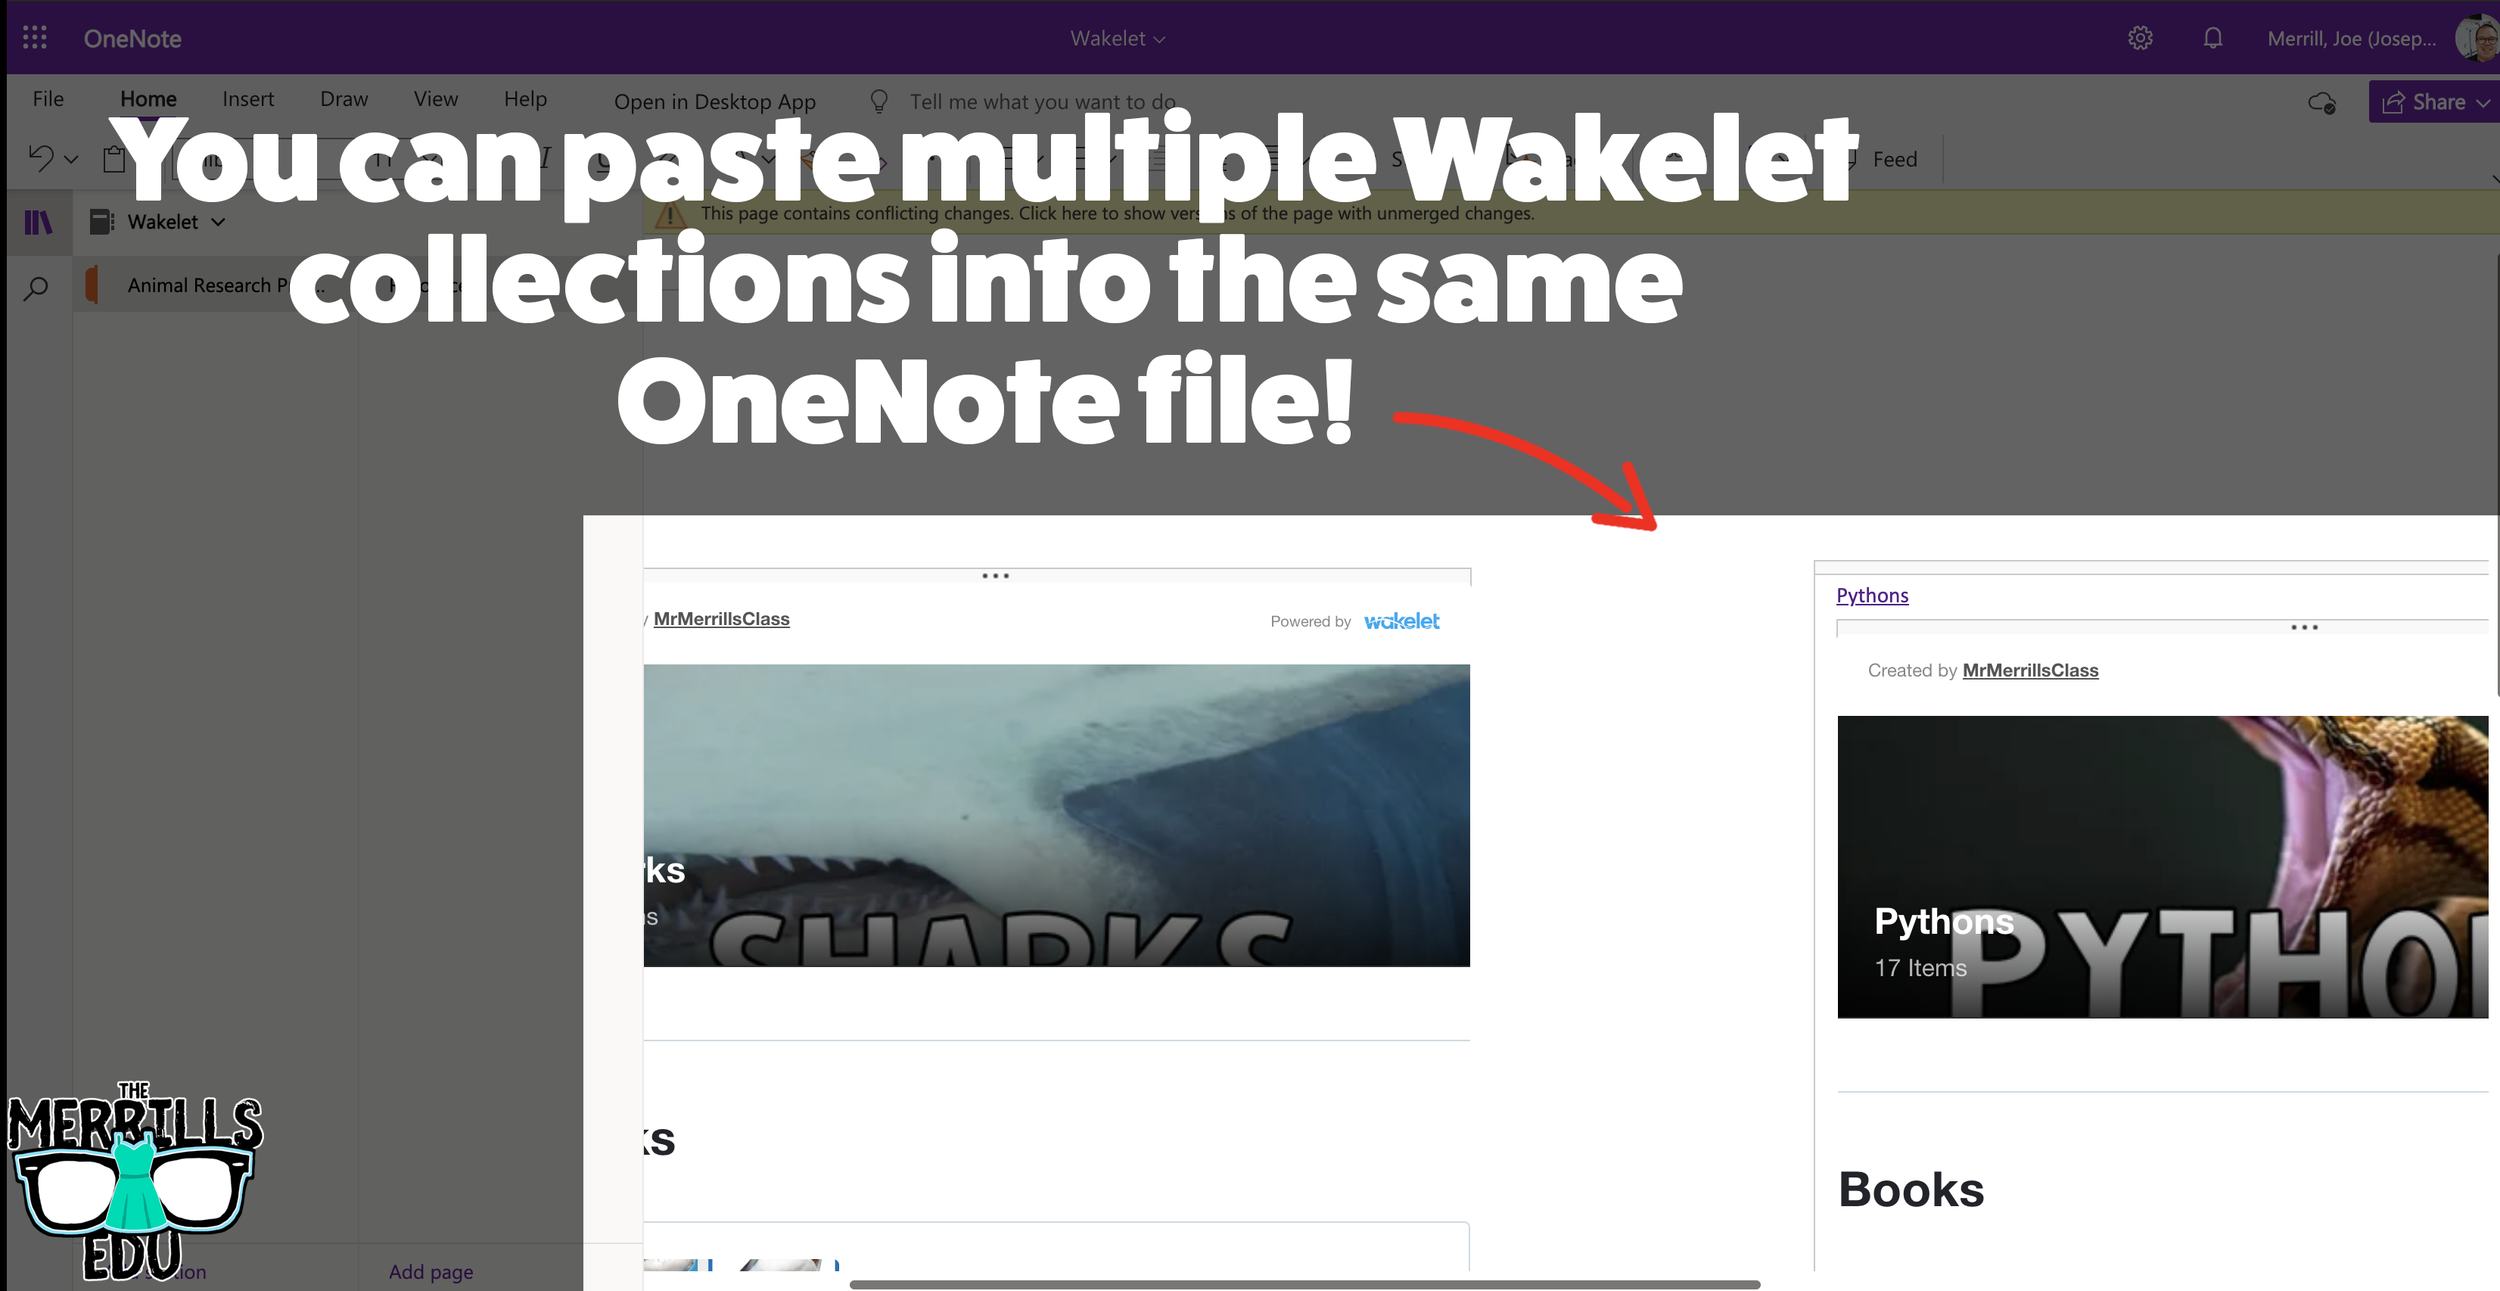
In a Wakelet Collection, copy the URL located at the top.
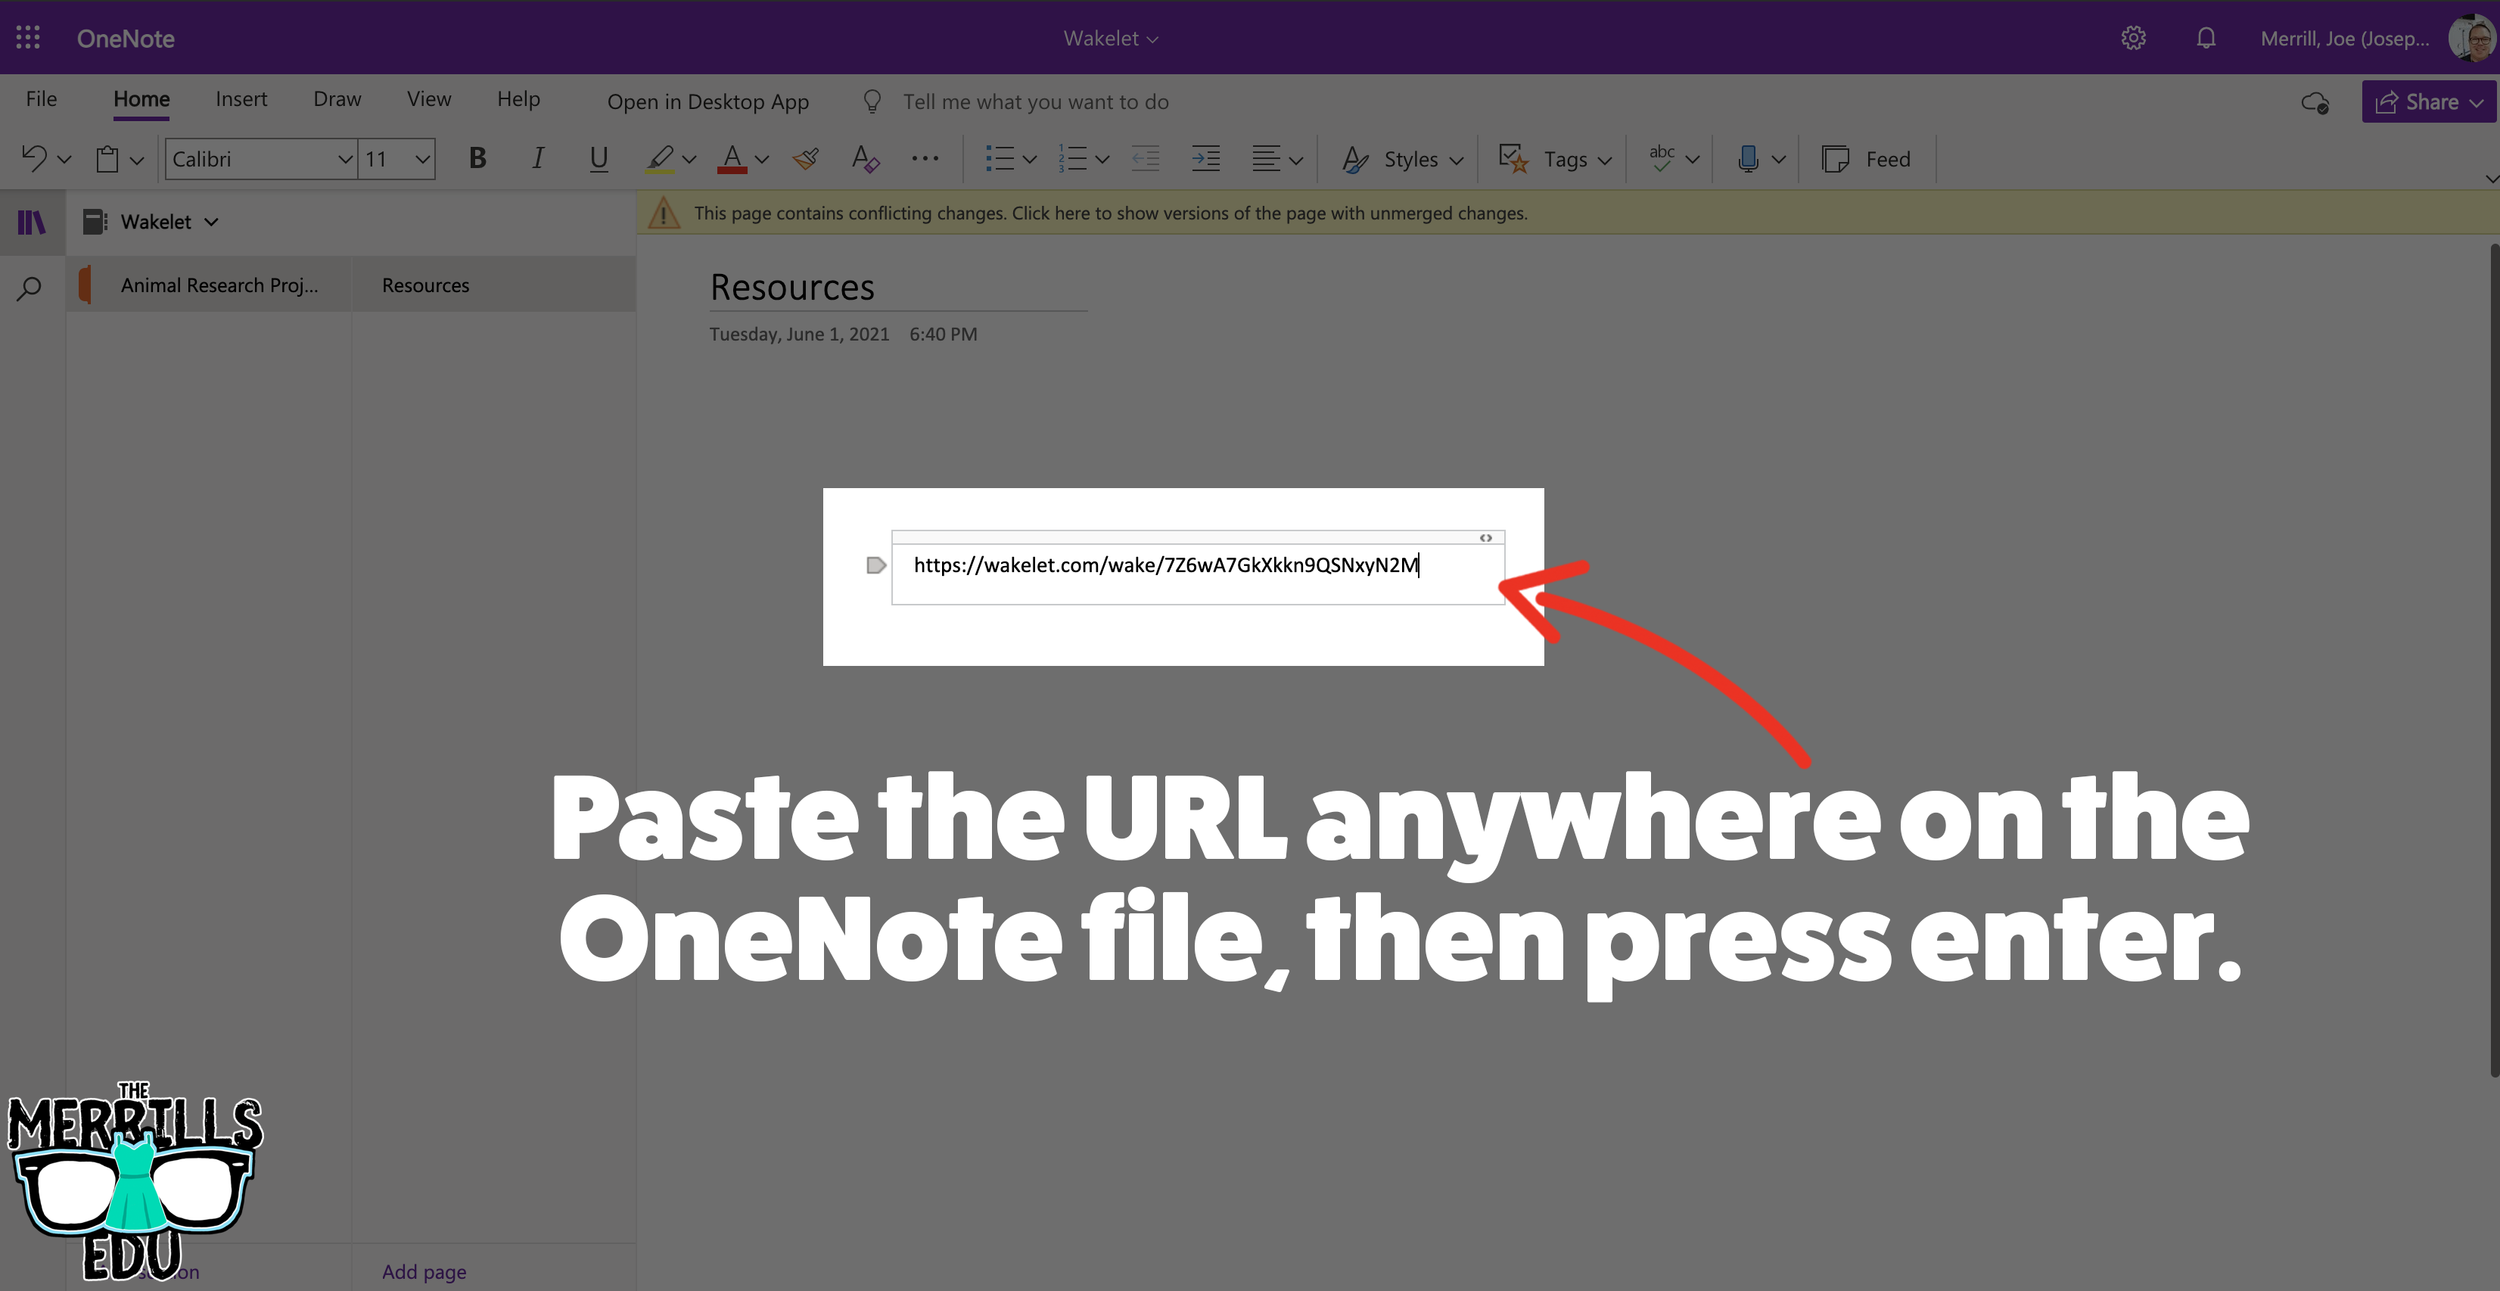
In a separate tab, open the OneNote file that you would like to add the Wakelet Collection to. Then, paste the URL anywhere on the OneNote file.
Press enter to start the live embed.
Repeat this process to add additional collections to the OneNote file.

Buncee Embedded into OneNote
This embed takes the cake as the most creative! Most embedding is done on the educators end, but not this one (although educators can definitely do it, too). With the Buncee and OneNote embed, students have the ability to take their Buncee creations and share them in one central location for others to see. Here’s how it all works:

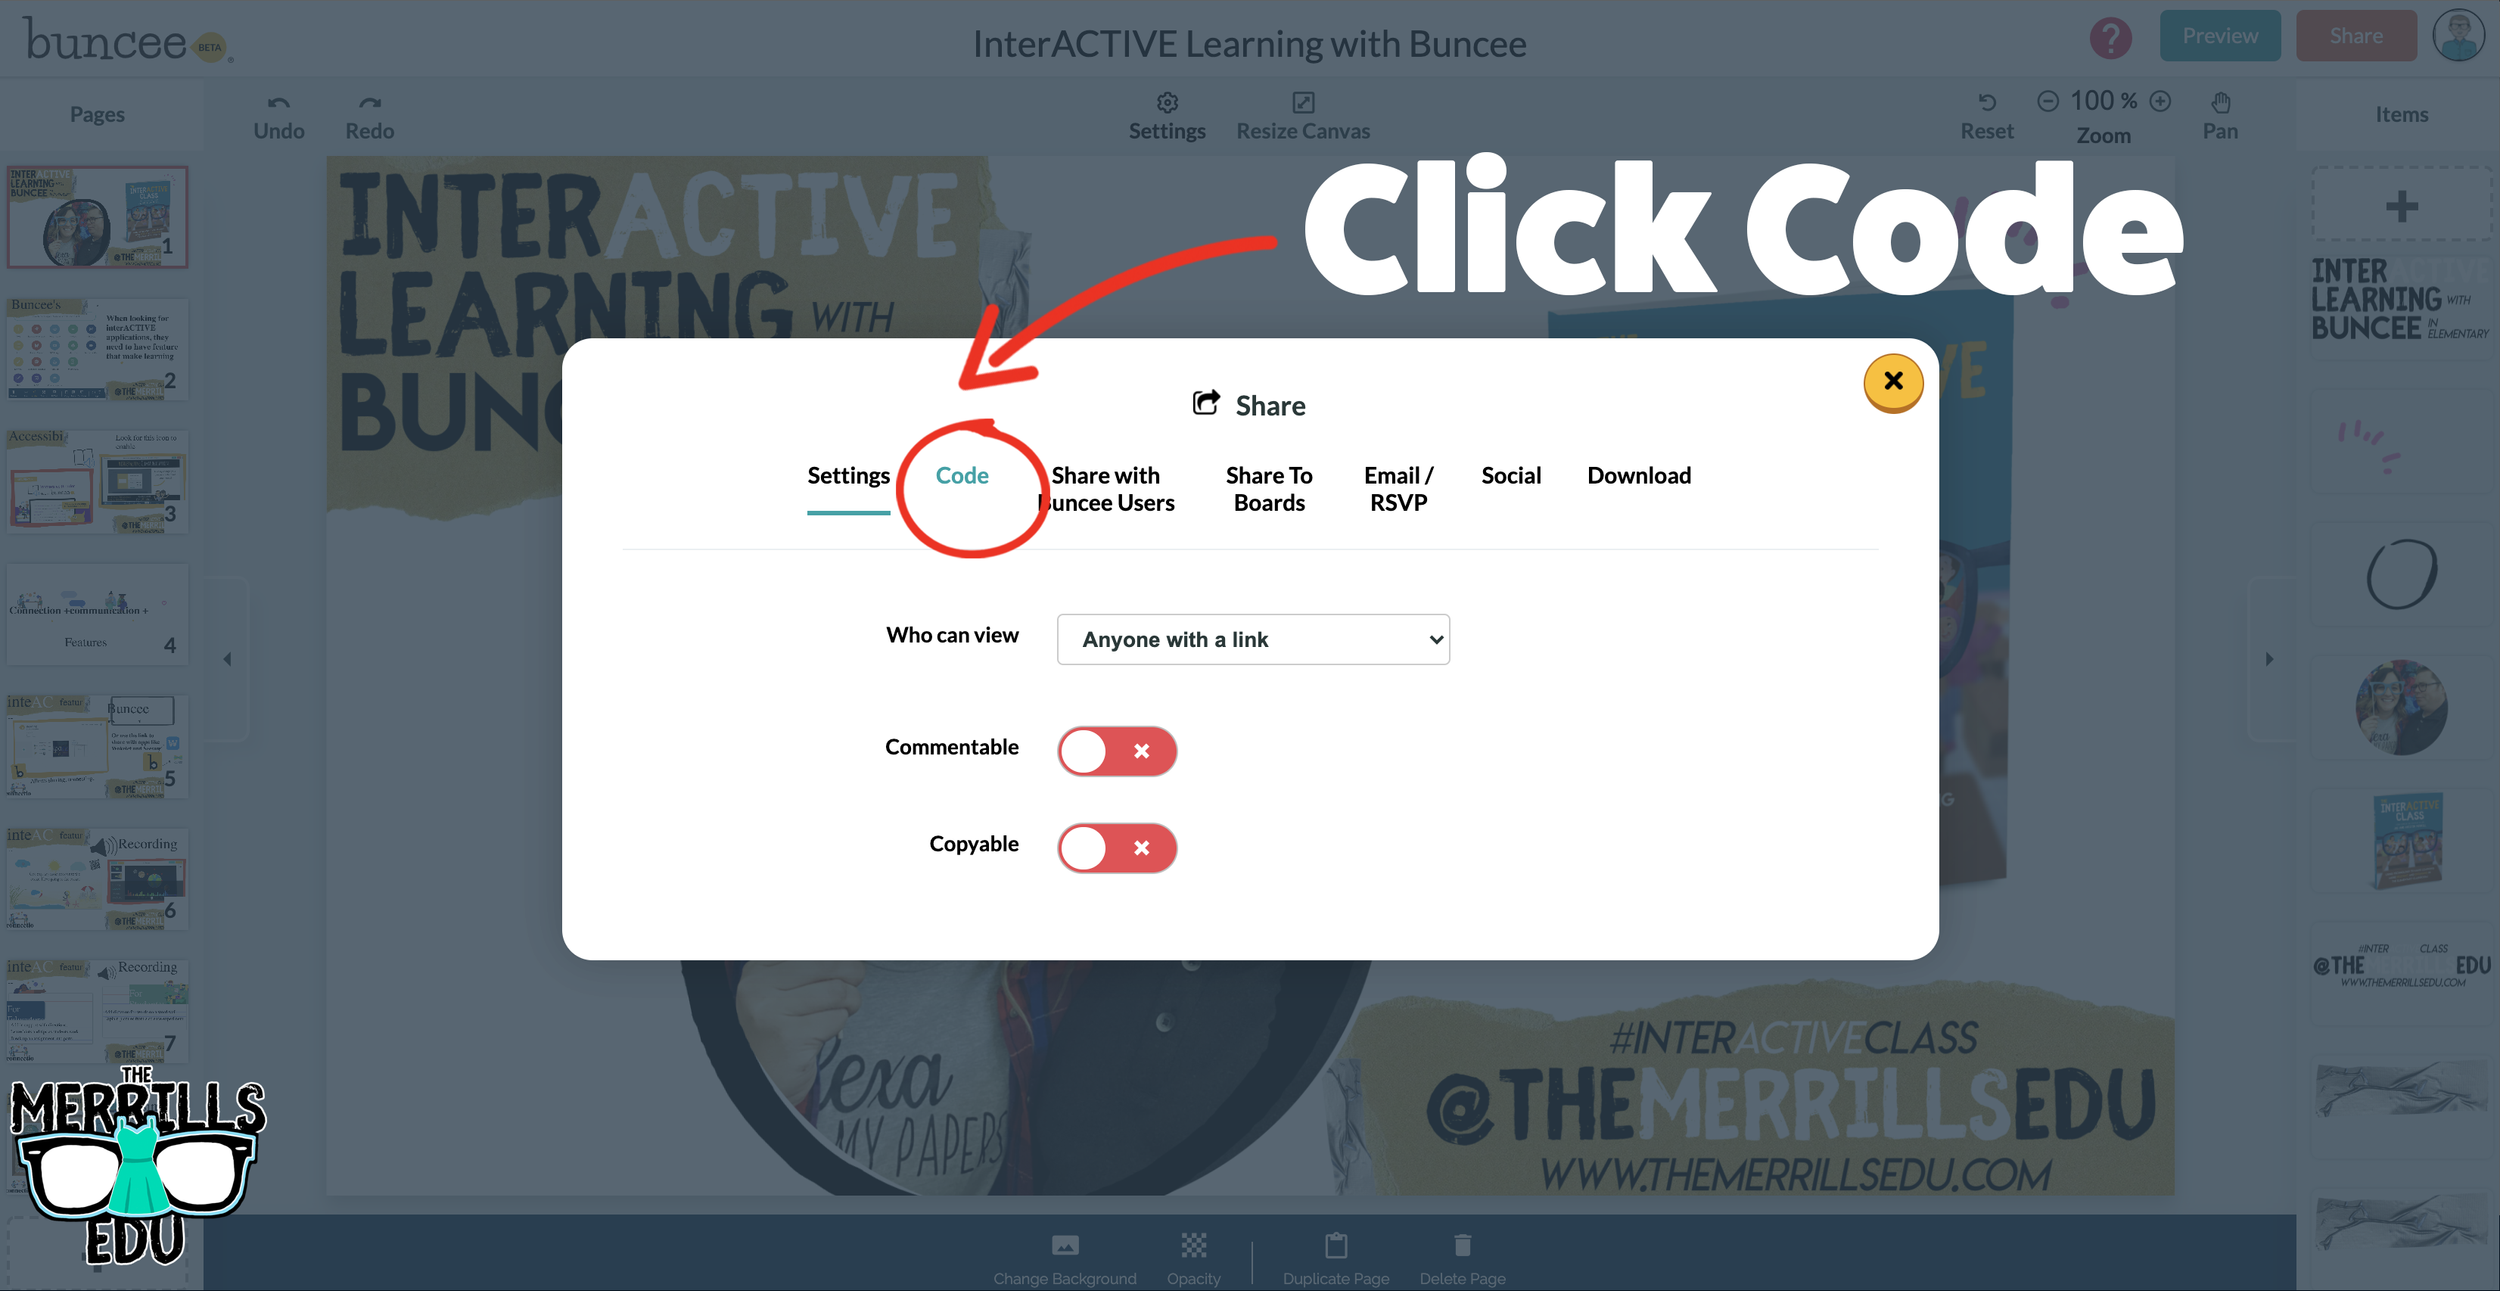
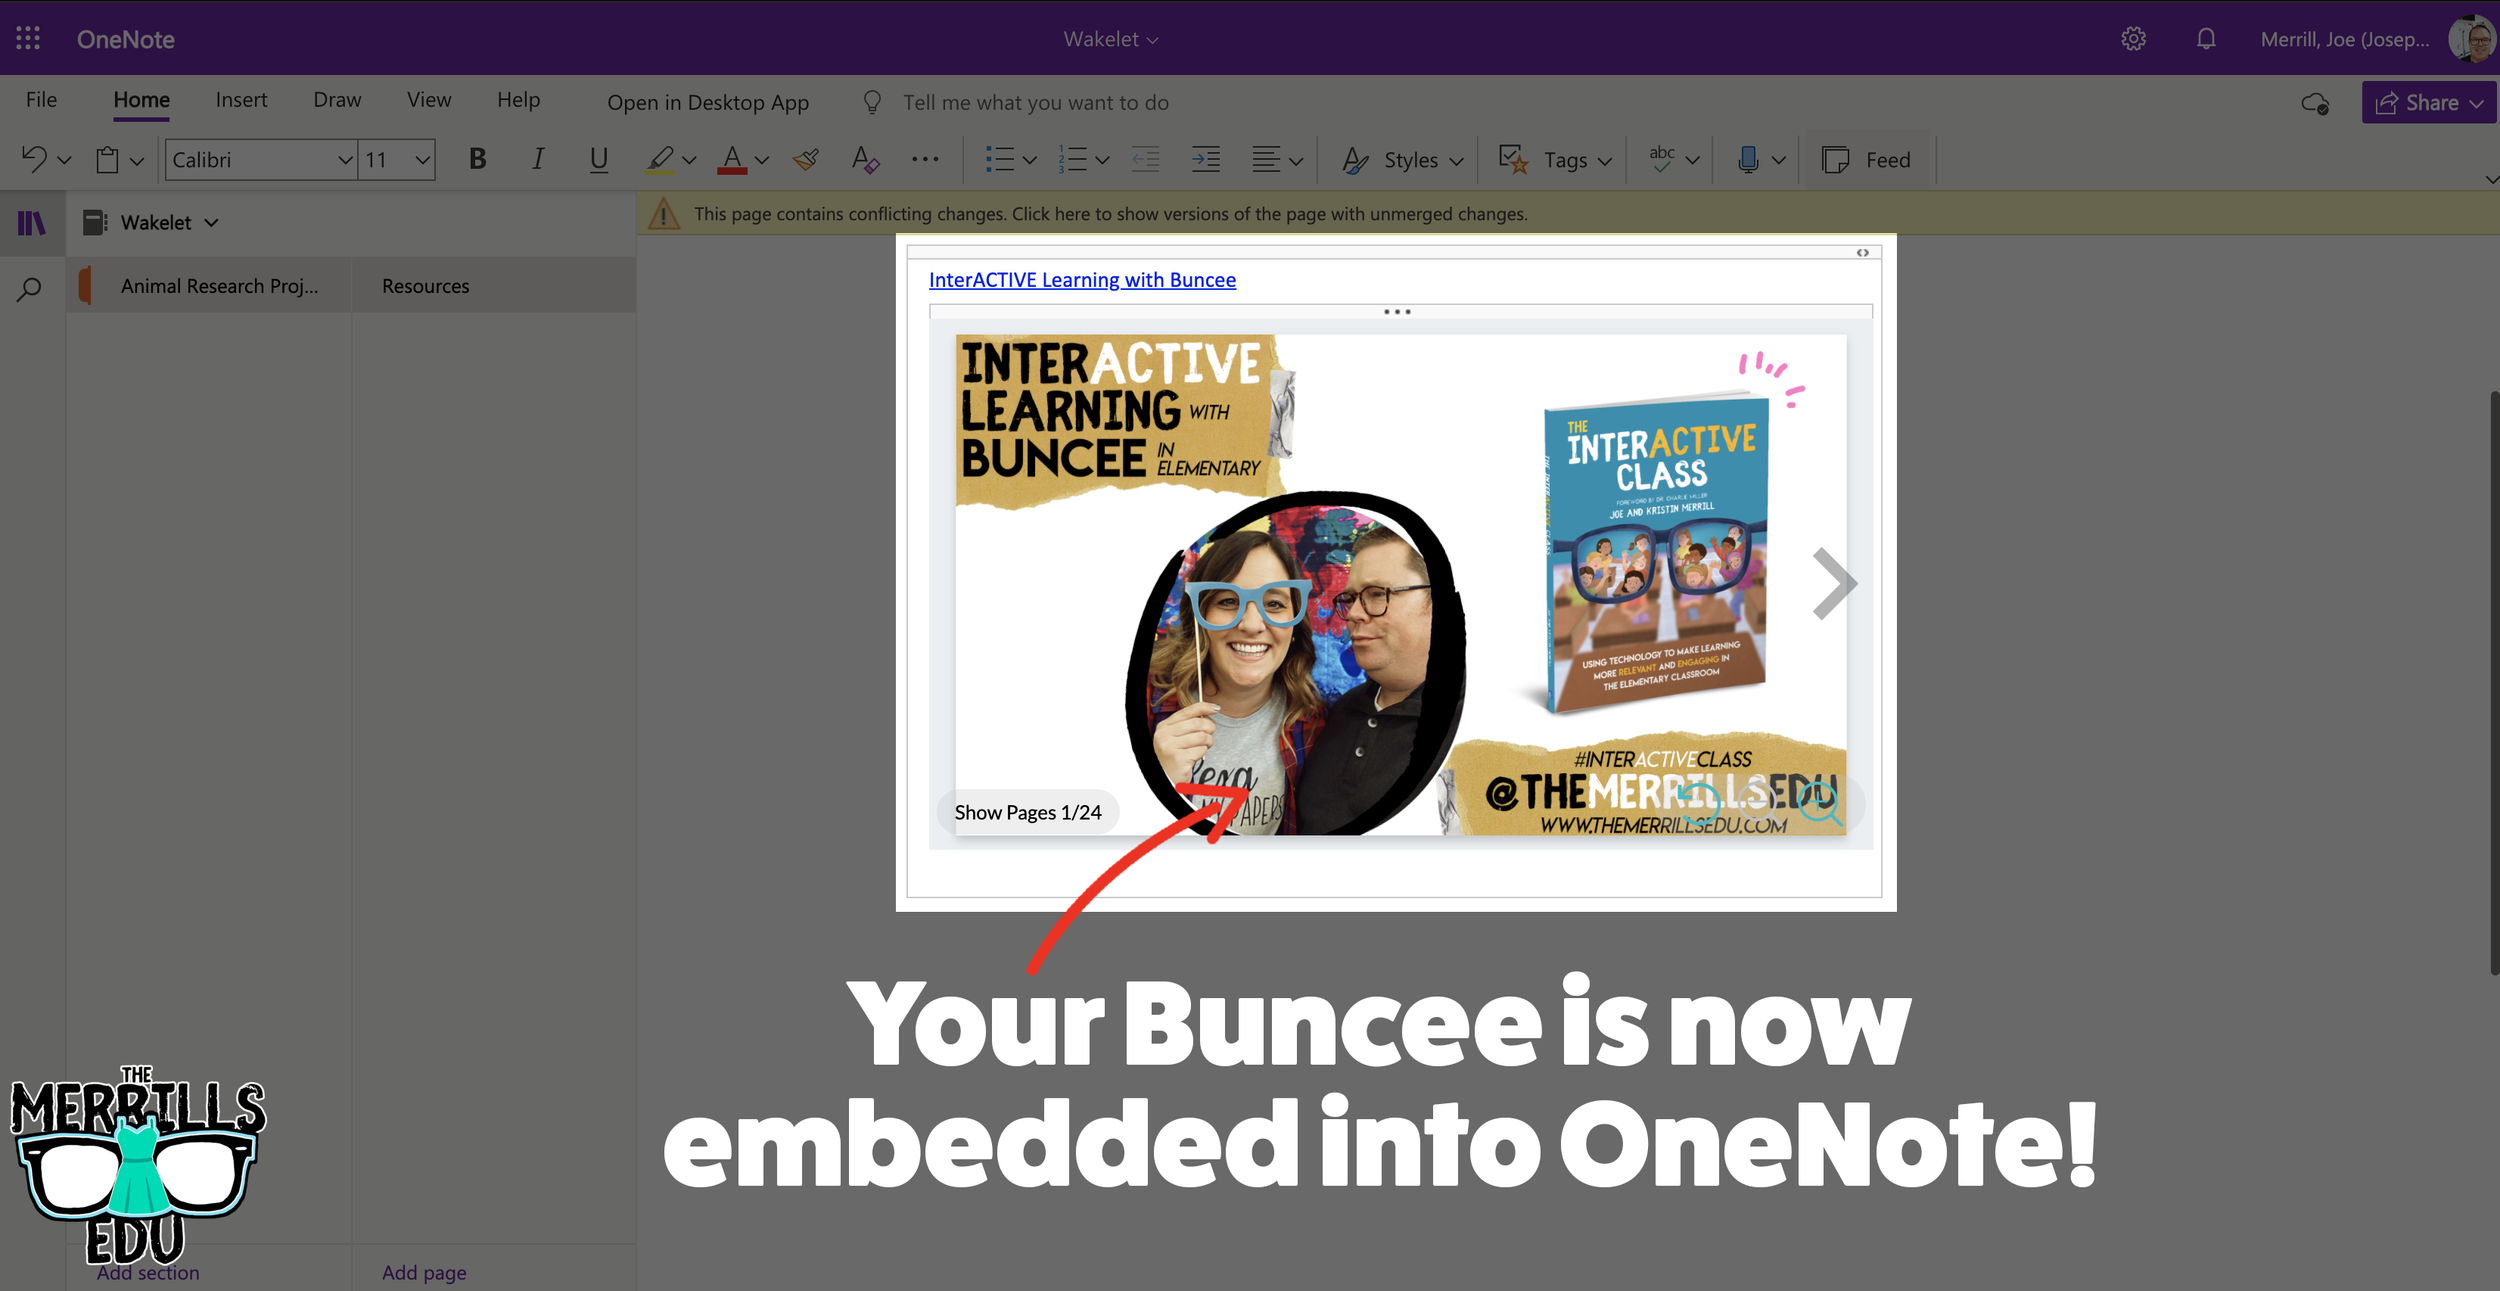
Open a Buncee, then click the “Share” button located in the upper right side of the screen.
A new window will pop up. Click on “Code.”
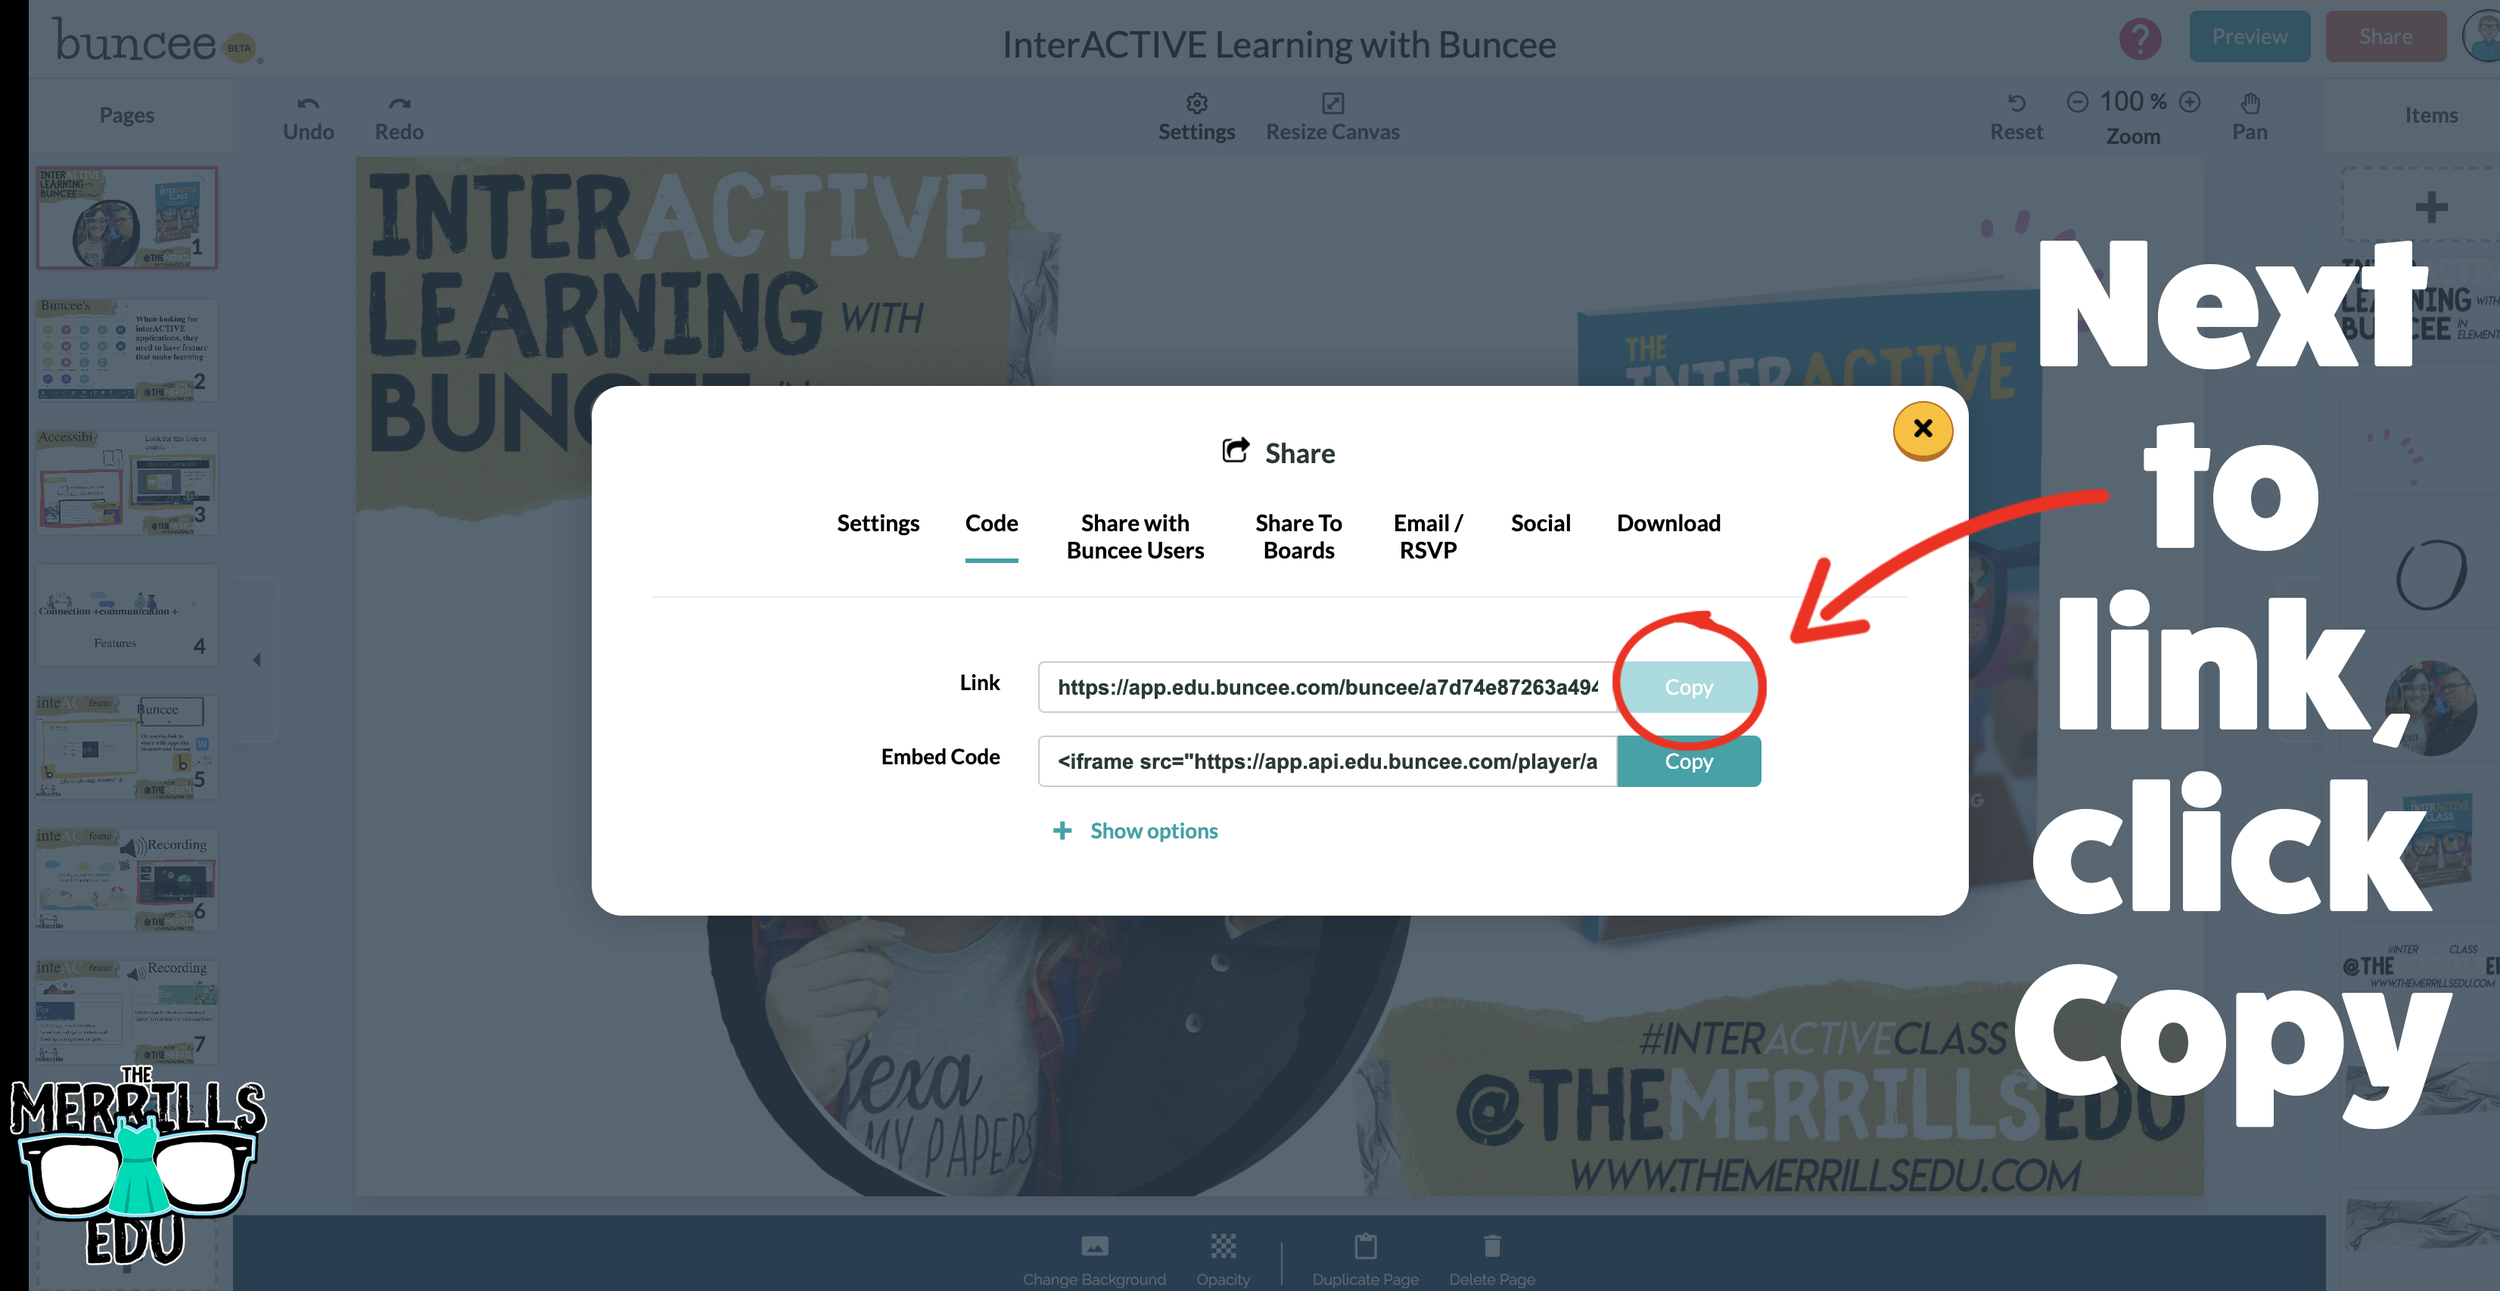
Under “Code” and next to Link, click “Copy.”
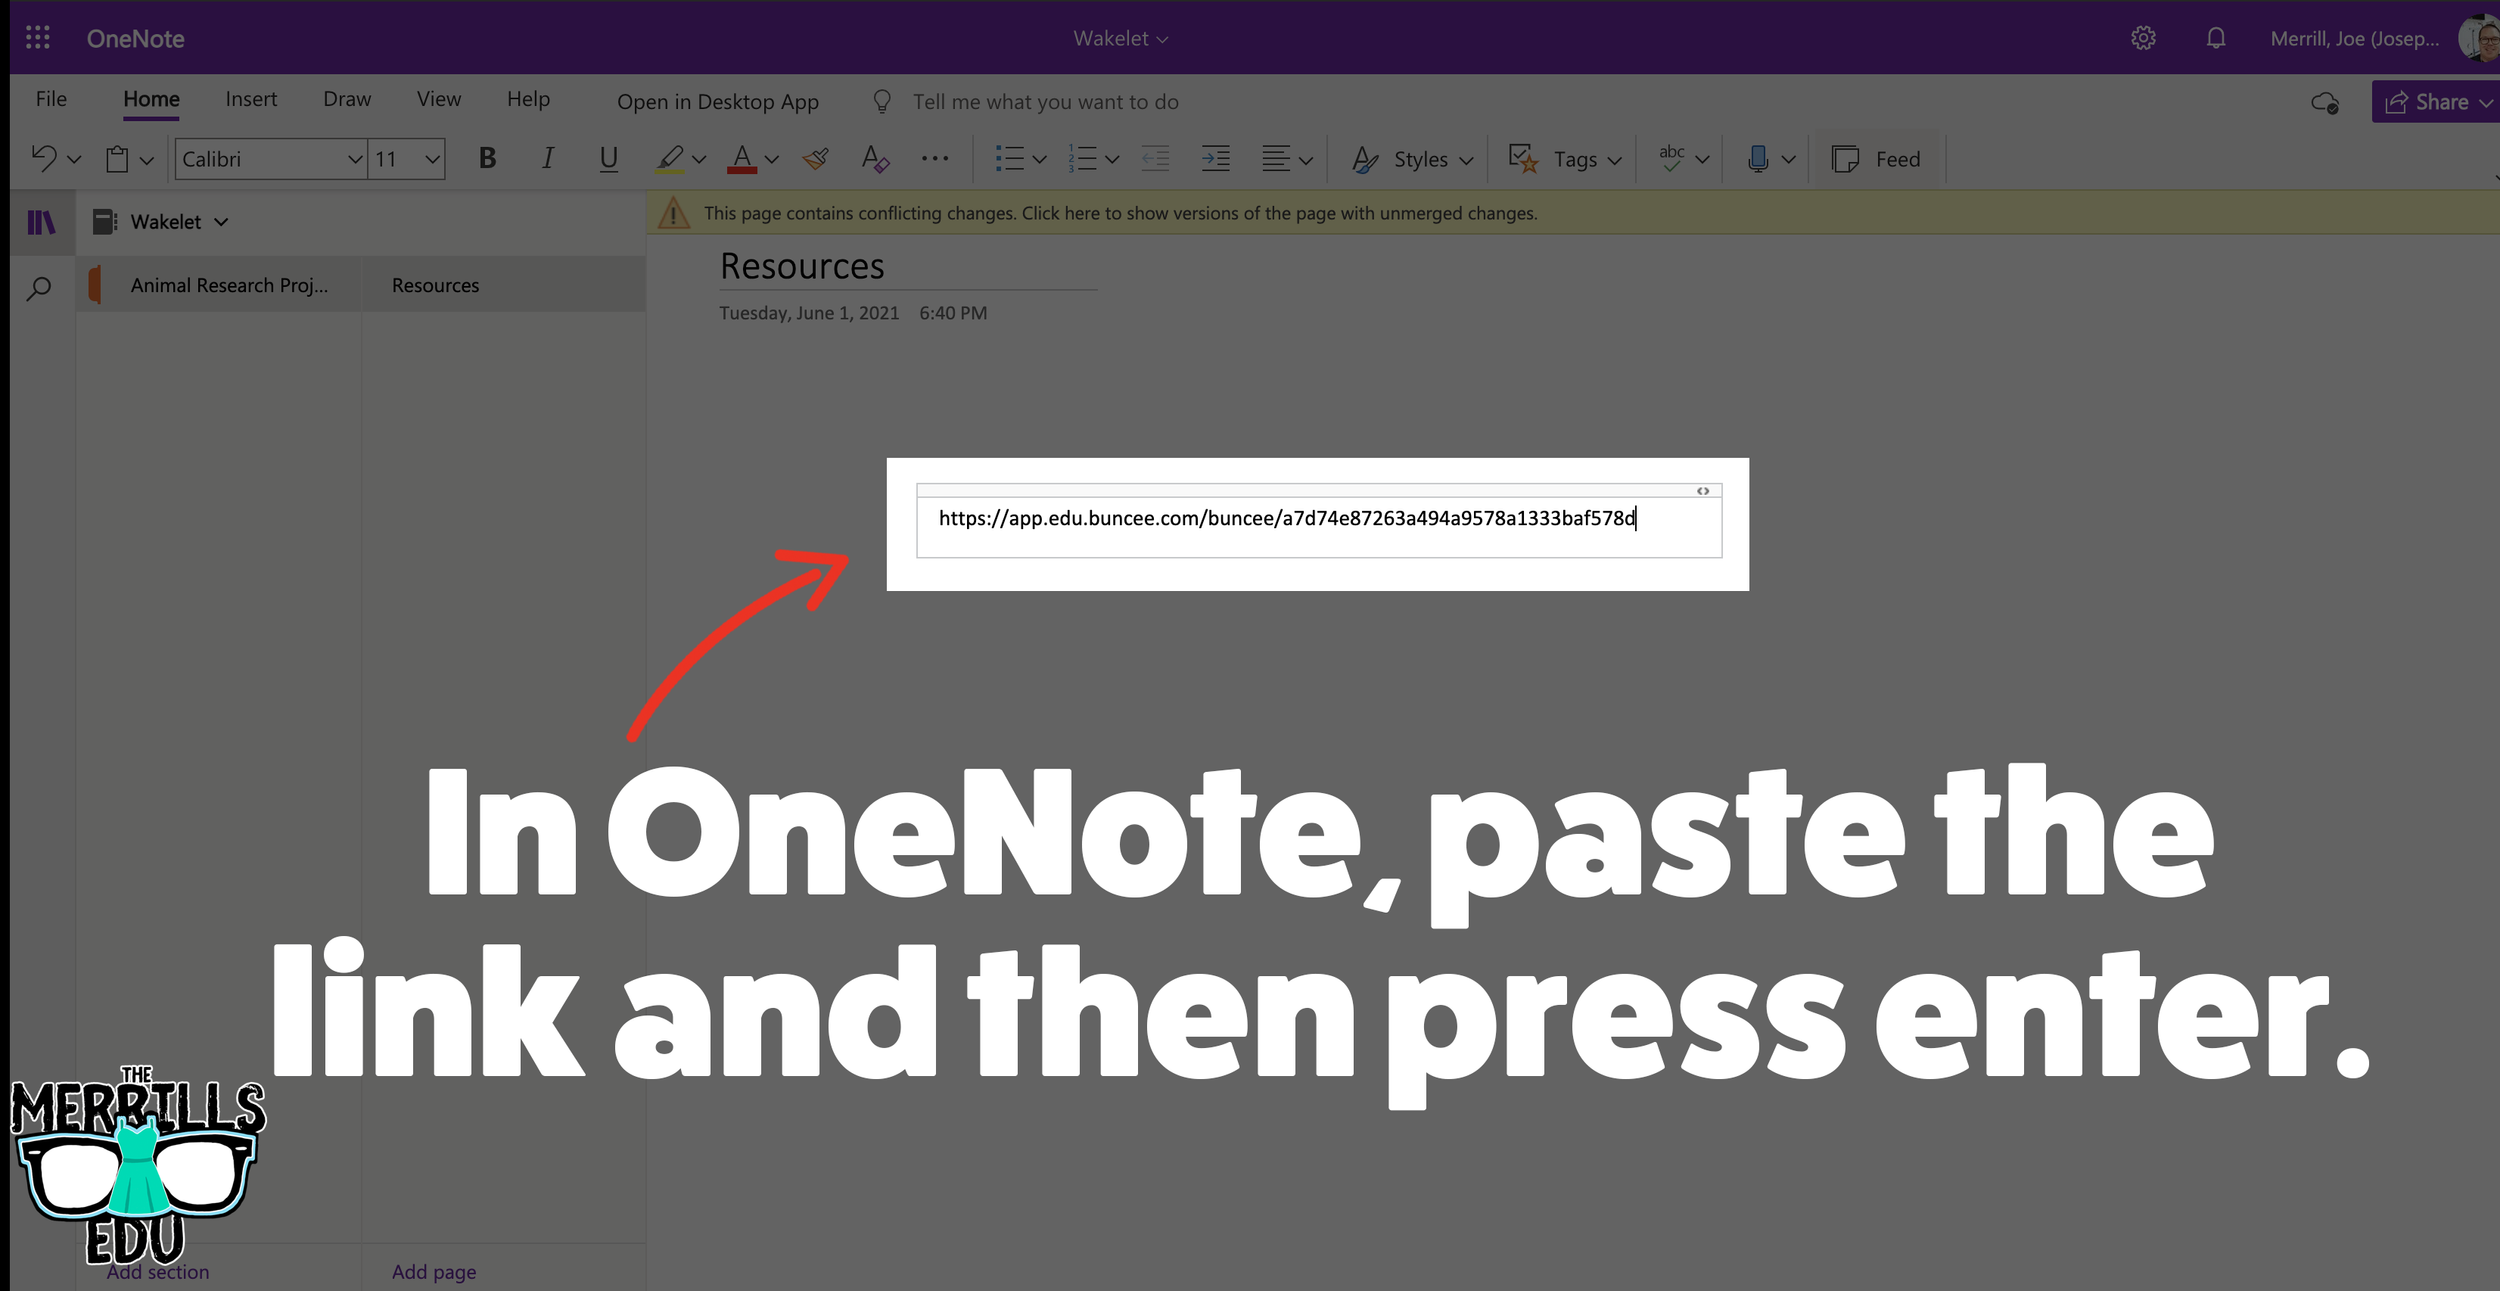
In a separate tab, open the OneNote file that you would like to add the Buncee creation to. Then, paste the URL anywhere on the OneNote file.
Press enter to start the live embed.
Repeat this process to add additional Buncees to the OneNote file.

Canva Embedded into Classroom Screen
Need to post your directions on the board? Perhaps you need a timer to go along with it? This embed will be your saving grace! Embed your Canva creations right into Classroom Screen. Here’s how:
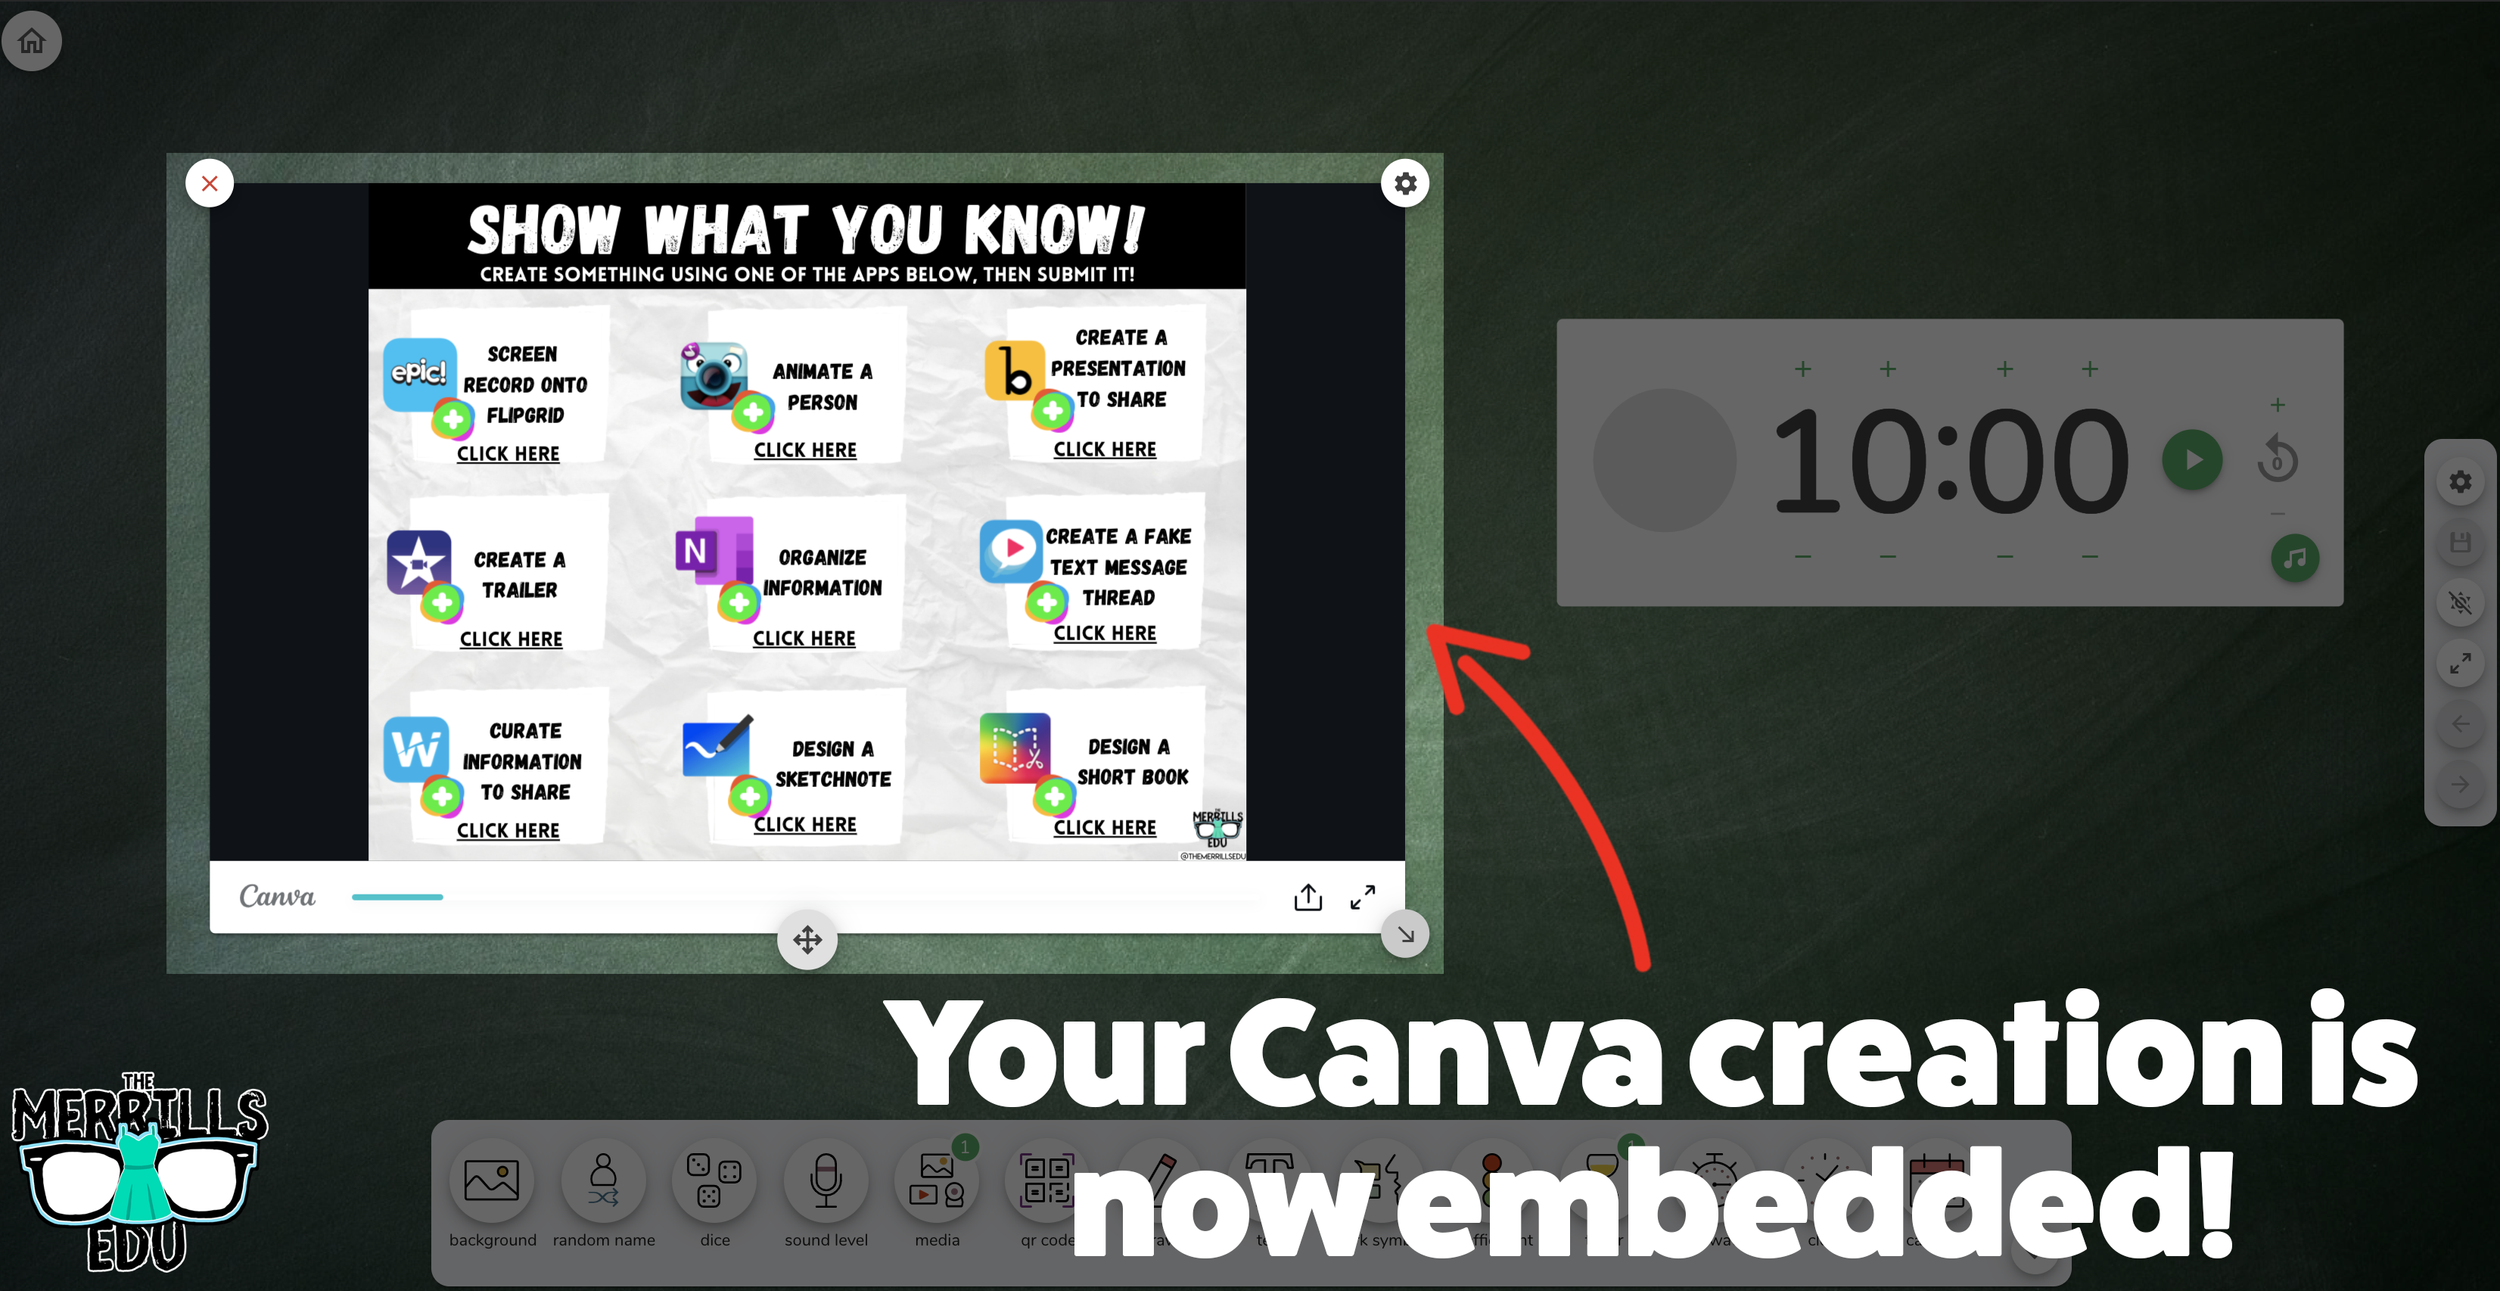
Open a Canva creation, then click the three dots.
In the drop down, type “embed.”
Click the “Embed” icon.
On the next frame, click the “Embed” button. This will take your creation “live.”
Now, next to HTML Embed Code, click “Copy.”
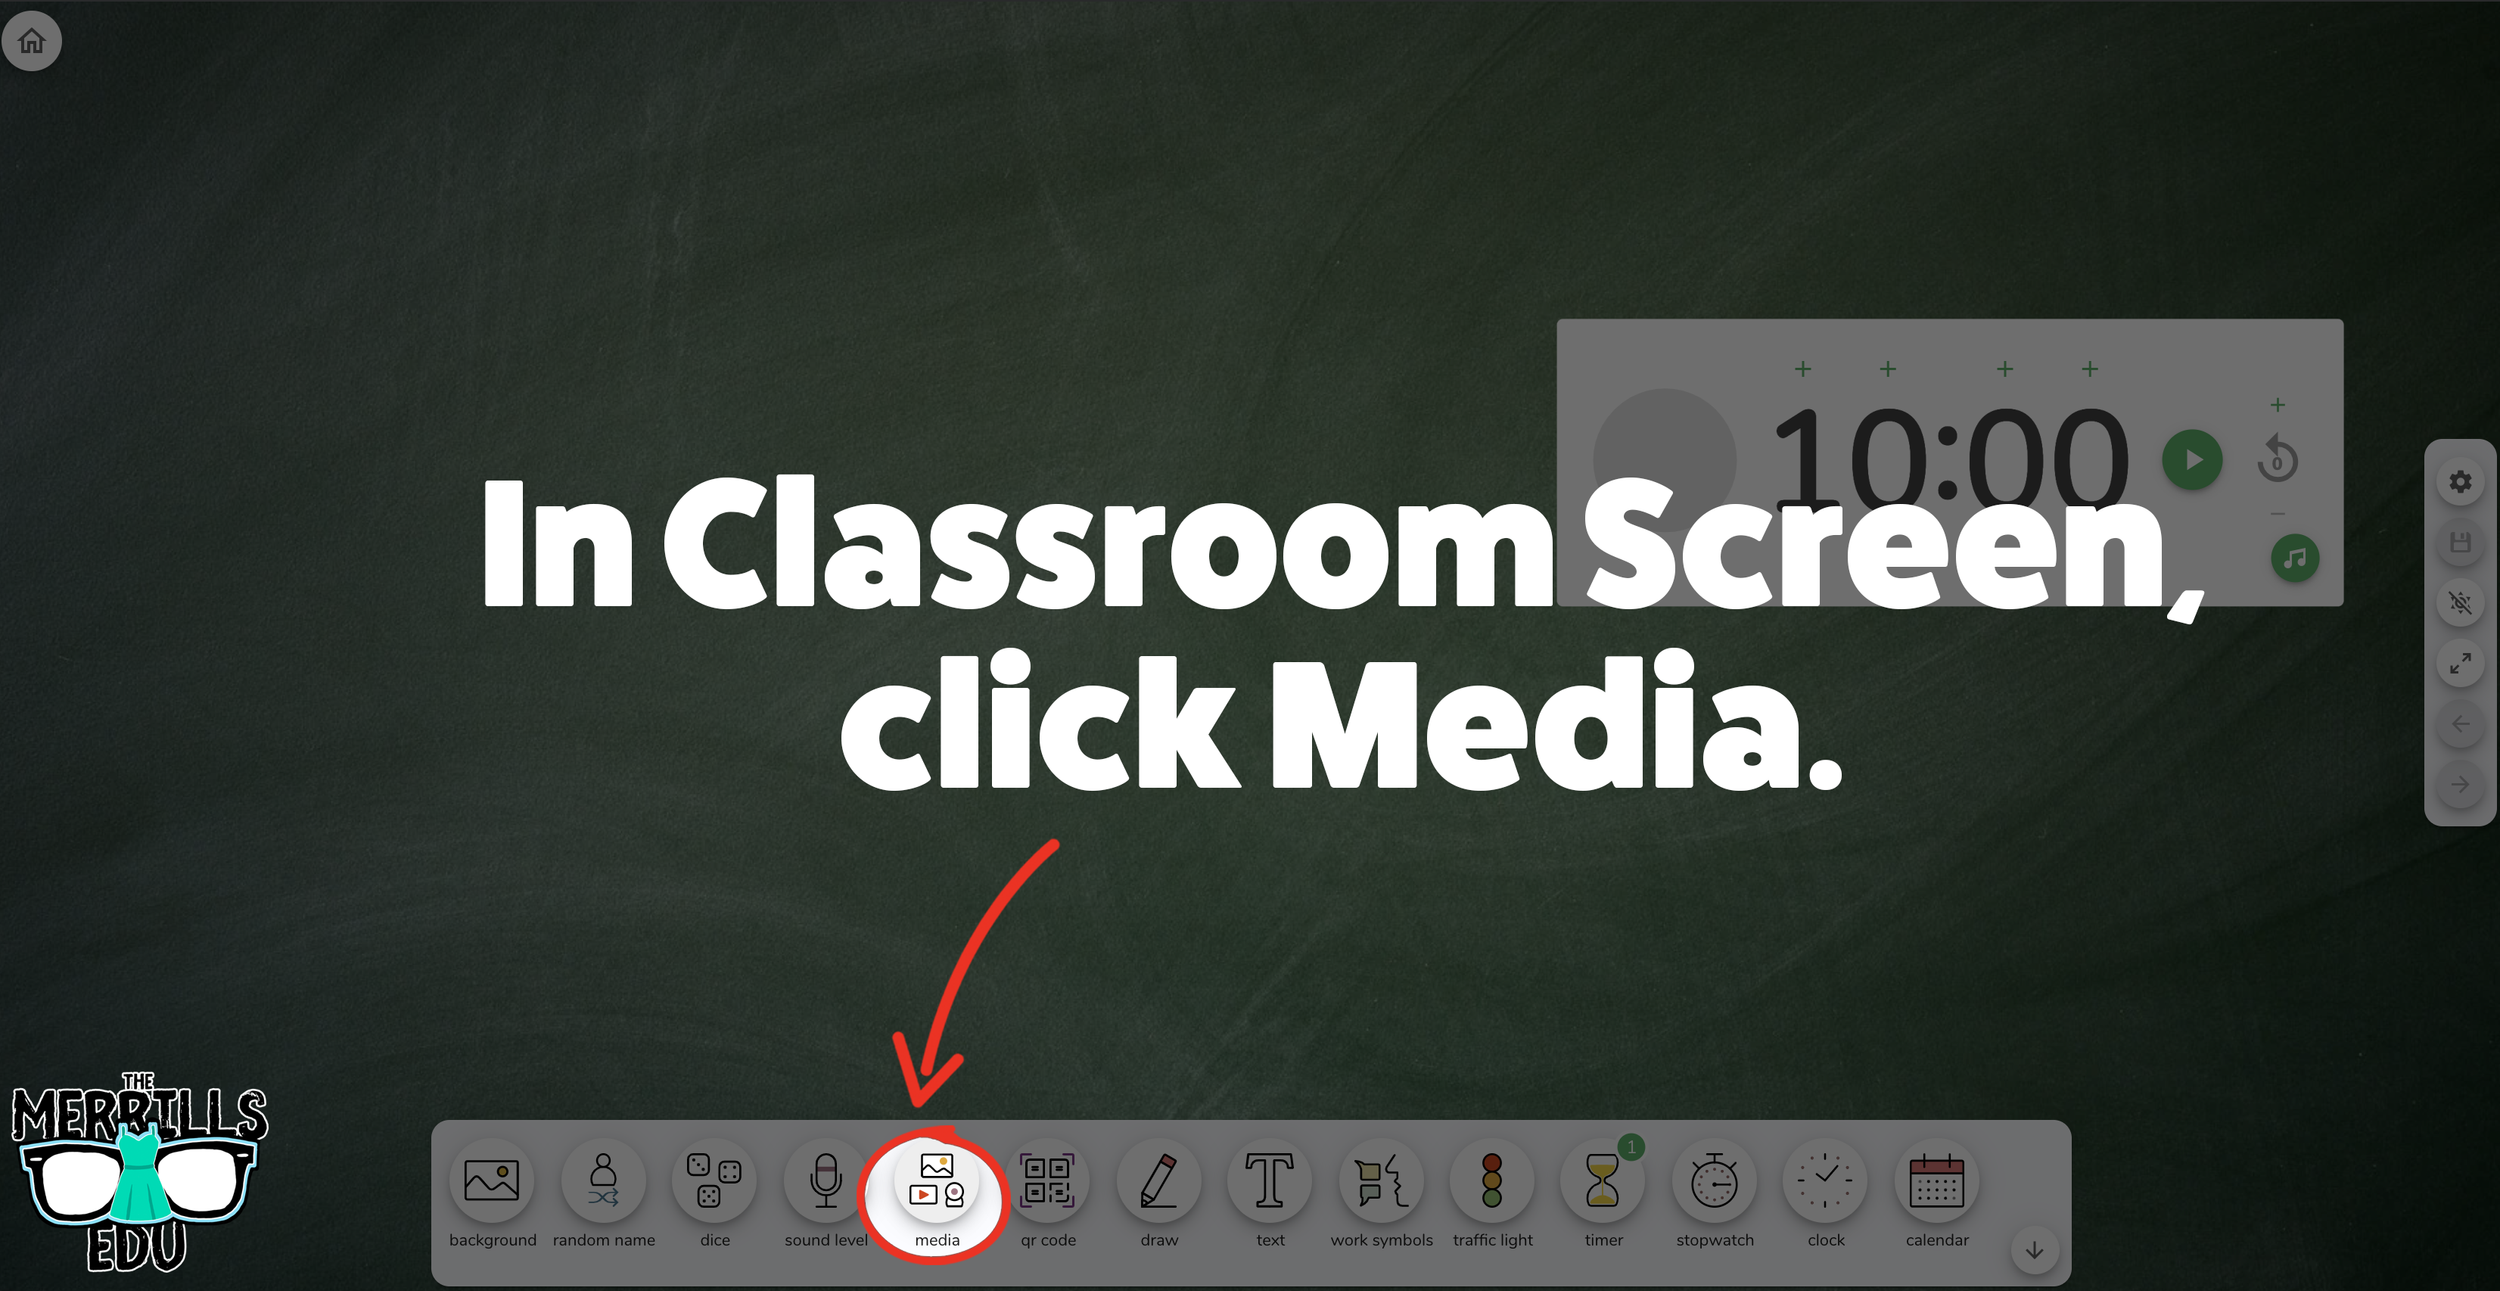
In a separate tab, head over to ClassroomScreen.com and start a new screen (or open an old one).
With your Classroom Screen open, click on “Media” from the menu options running along the bottom of the screen.
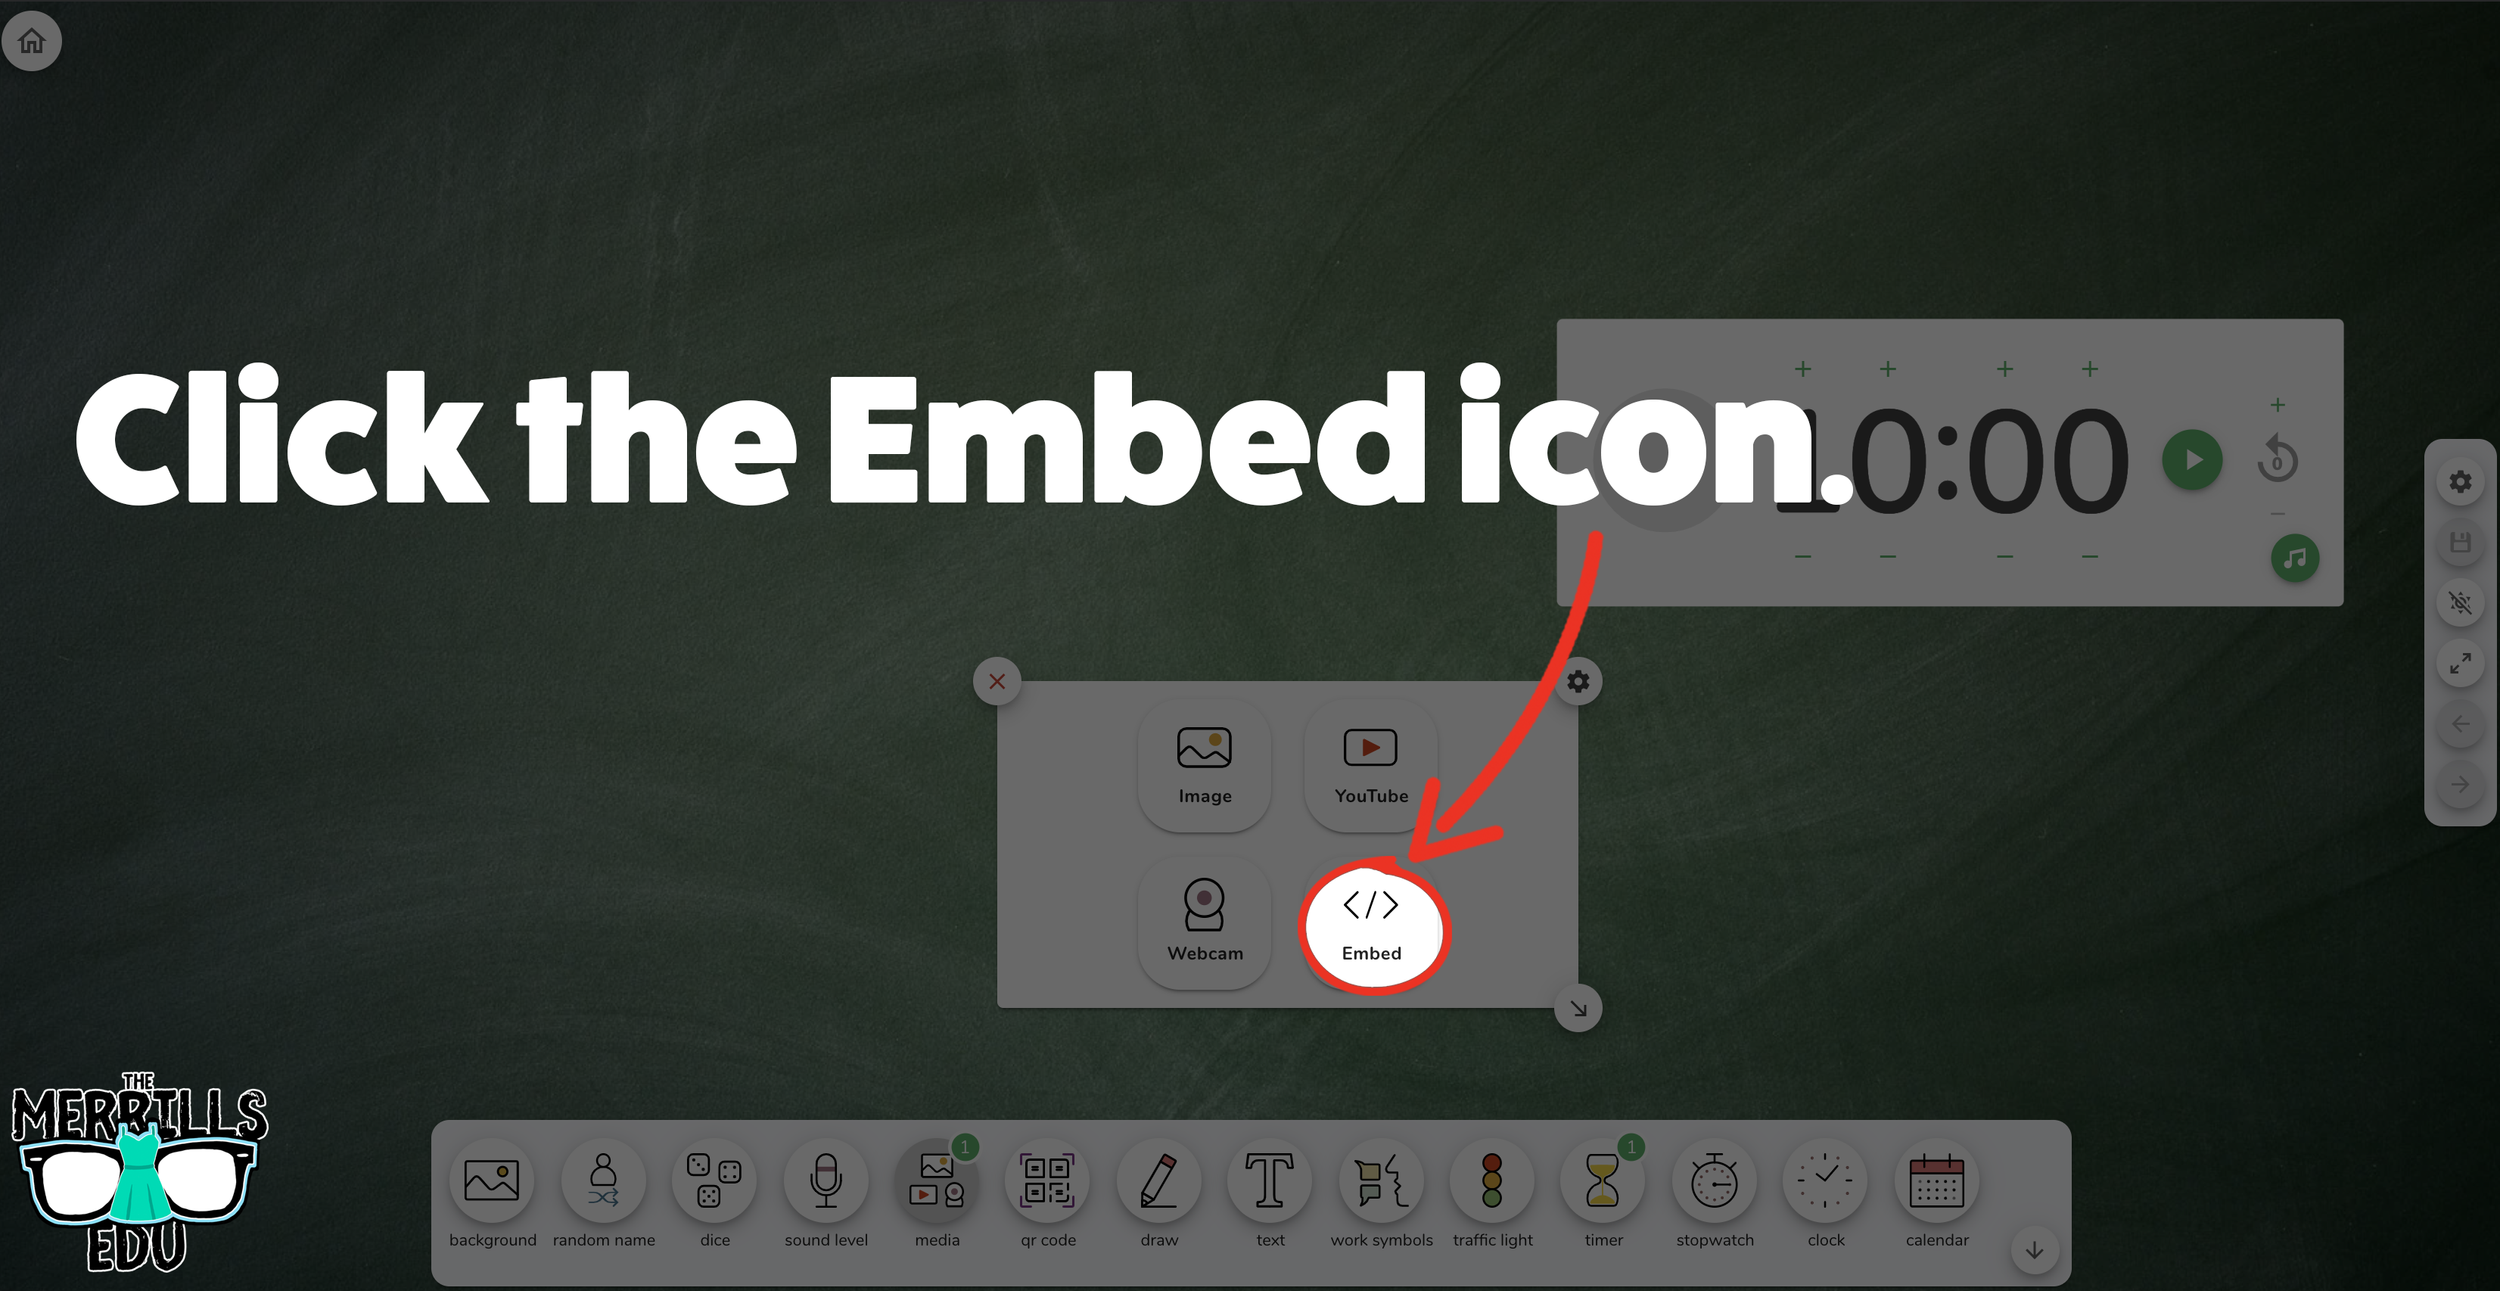
A new window will open. Click “Embed.”
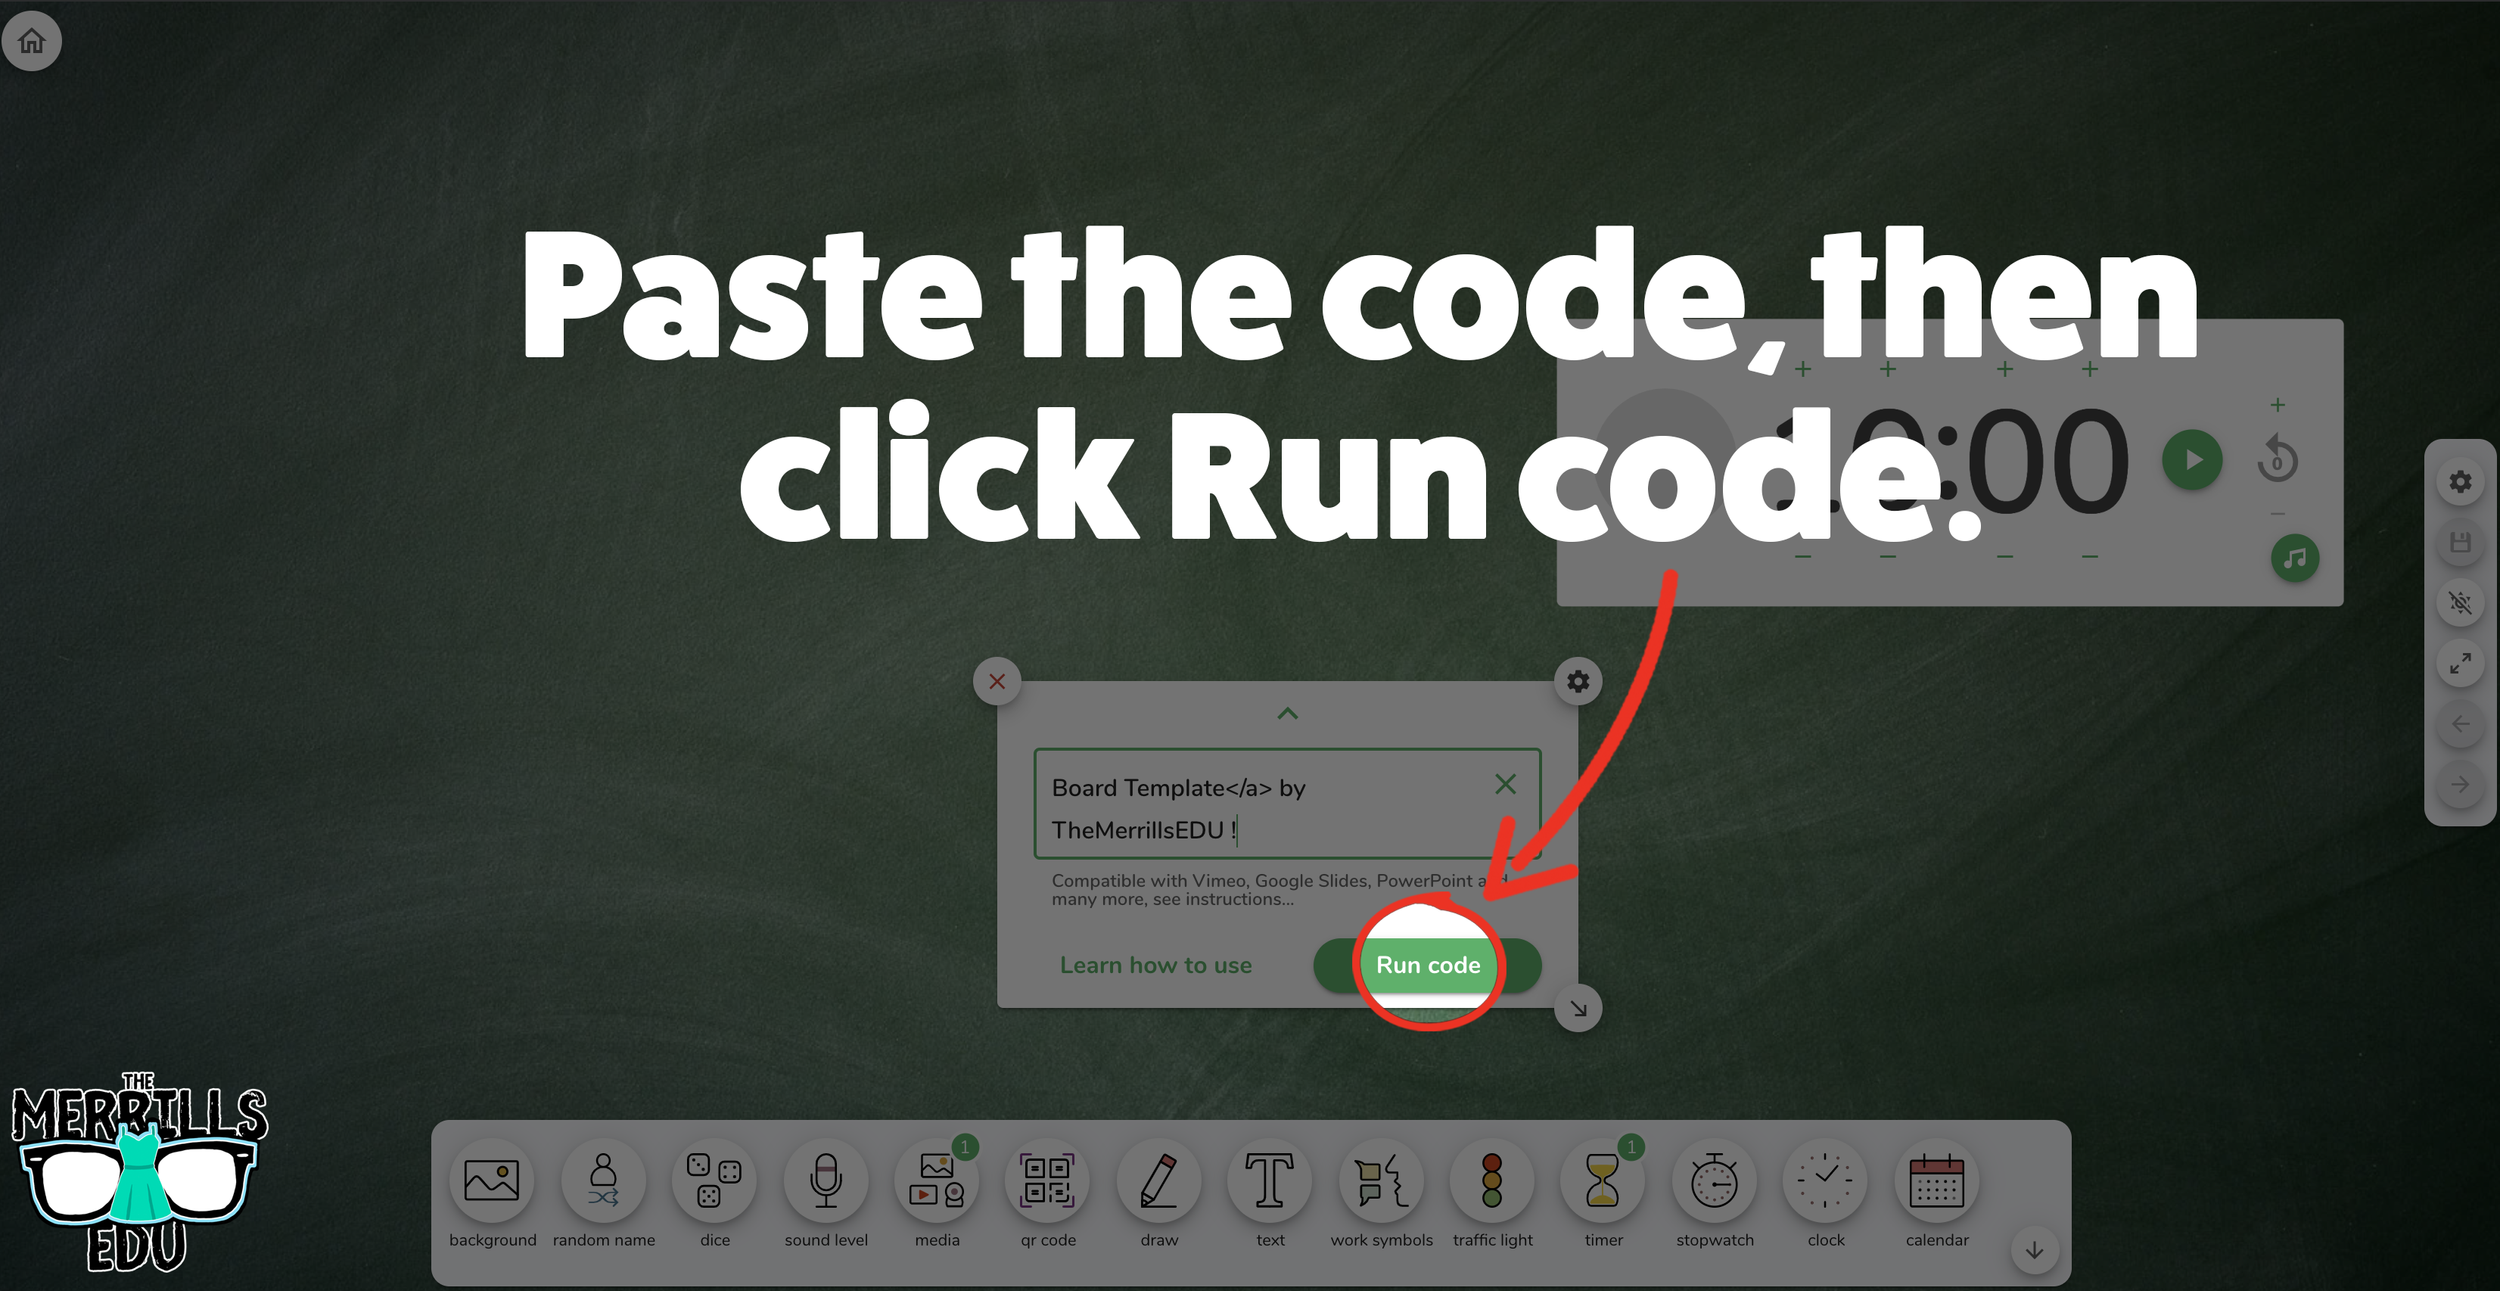
Click inside the embed area and paste your Canva code.
With the code pasted, click on “Run code.”
Your Canva creation will now appear! You can move the Canva creation around by clicking on the arrows (located at the bottom), or stretch the creation out by clicking the arrow on the bottom right - then dragging it to the desired location.
Now, Canva is embedded into Classroom Screen!

Buncee Embedded into Classroom Screen
Buncee creations can also be embedded into Classroom Screen! This is great if you have different tasks that you share for your student to perform daily. For example, if you have different tasks for multiple groups, you can create a Buncee and then share it on the Classroom Screen background. Here’s how it all works:


Open the Buncee creation that you want to embed, then click “Share.”
In the pop-up, click “Code.”
Click “+Show Options” and then select your preferred size.
Once you have selected your size, click “Copy” next to the Embed Code bar.
In a separate tab, head over to ClassroomScreen.com and start a new screen (or open an old one).
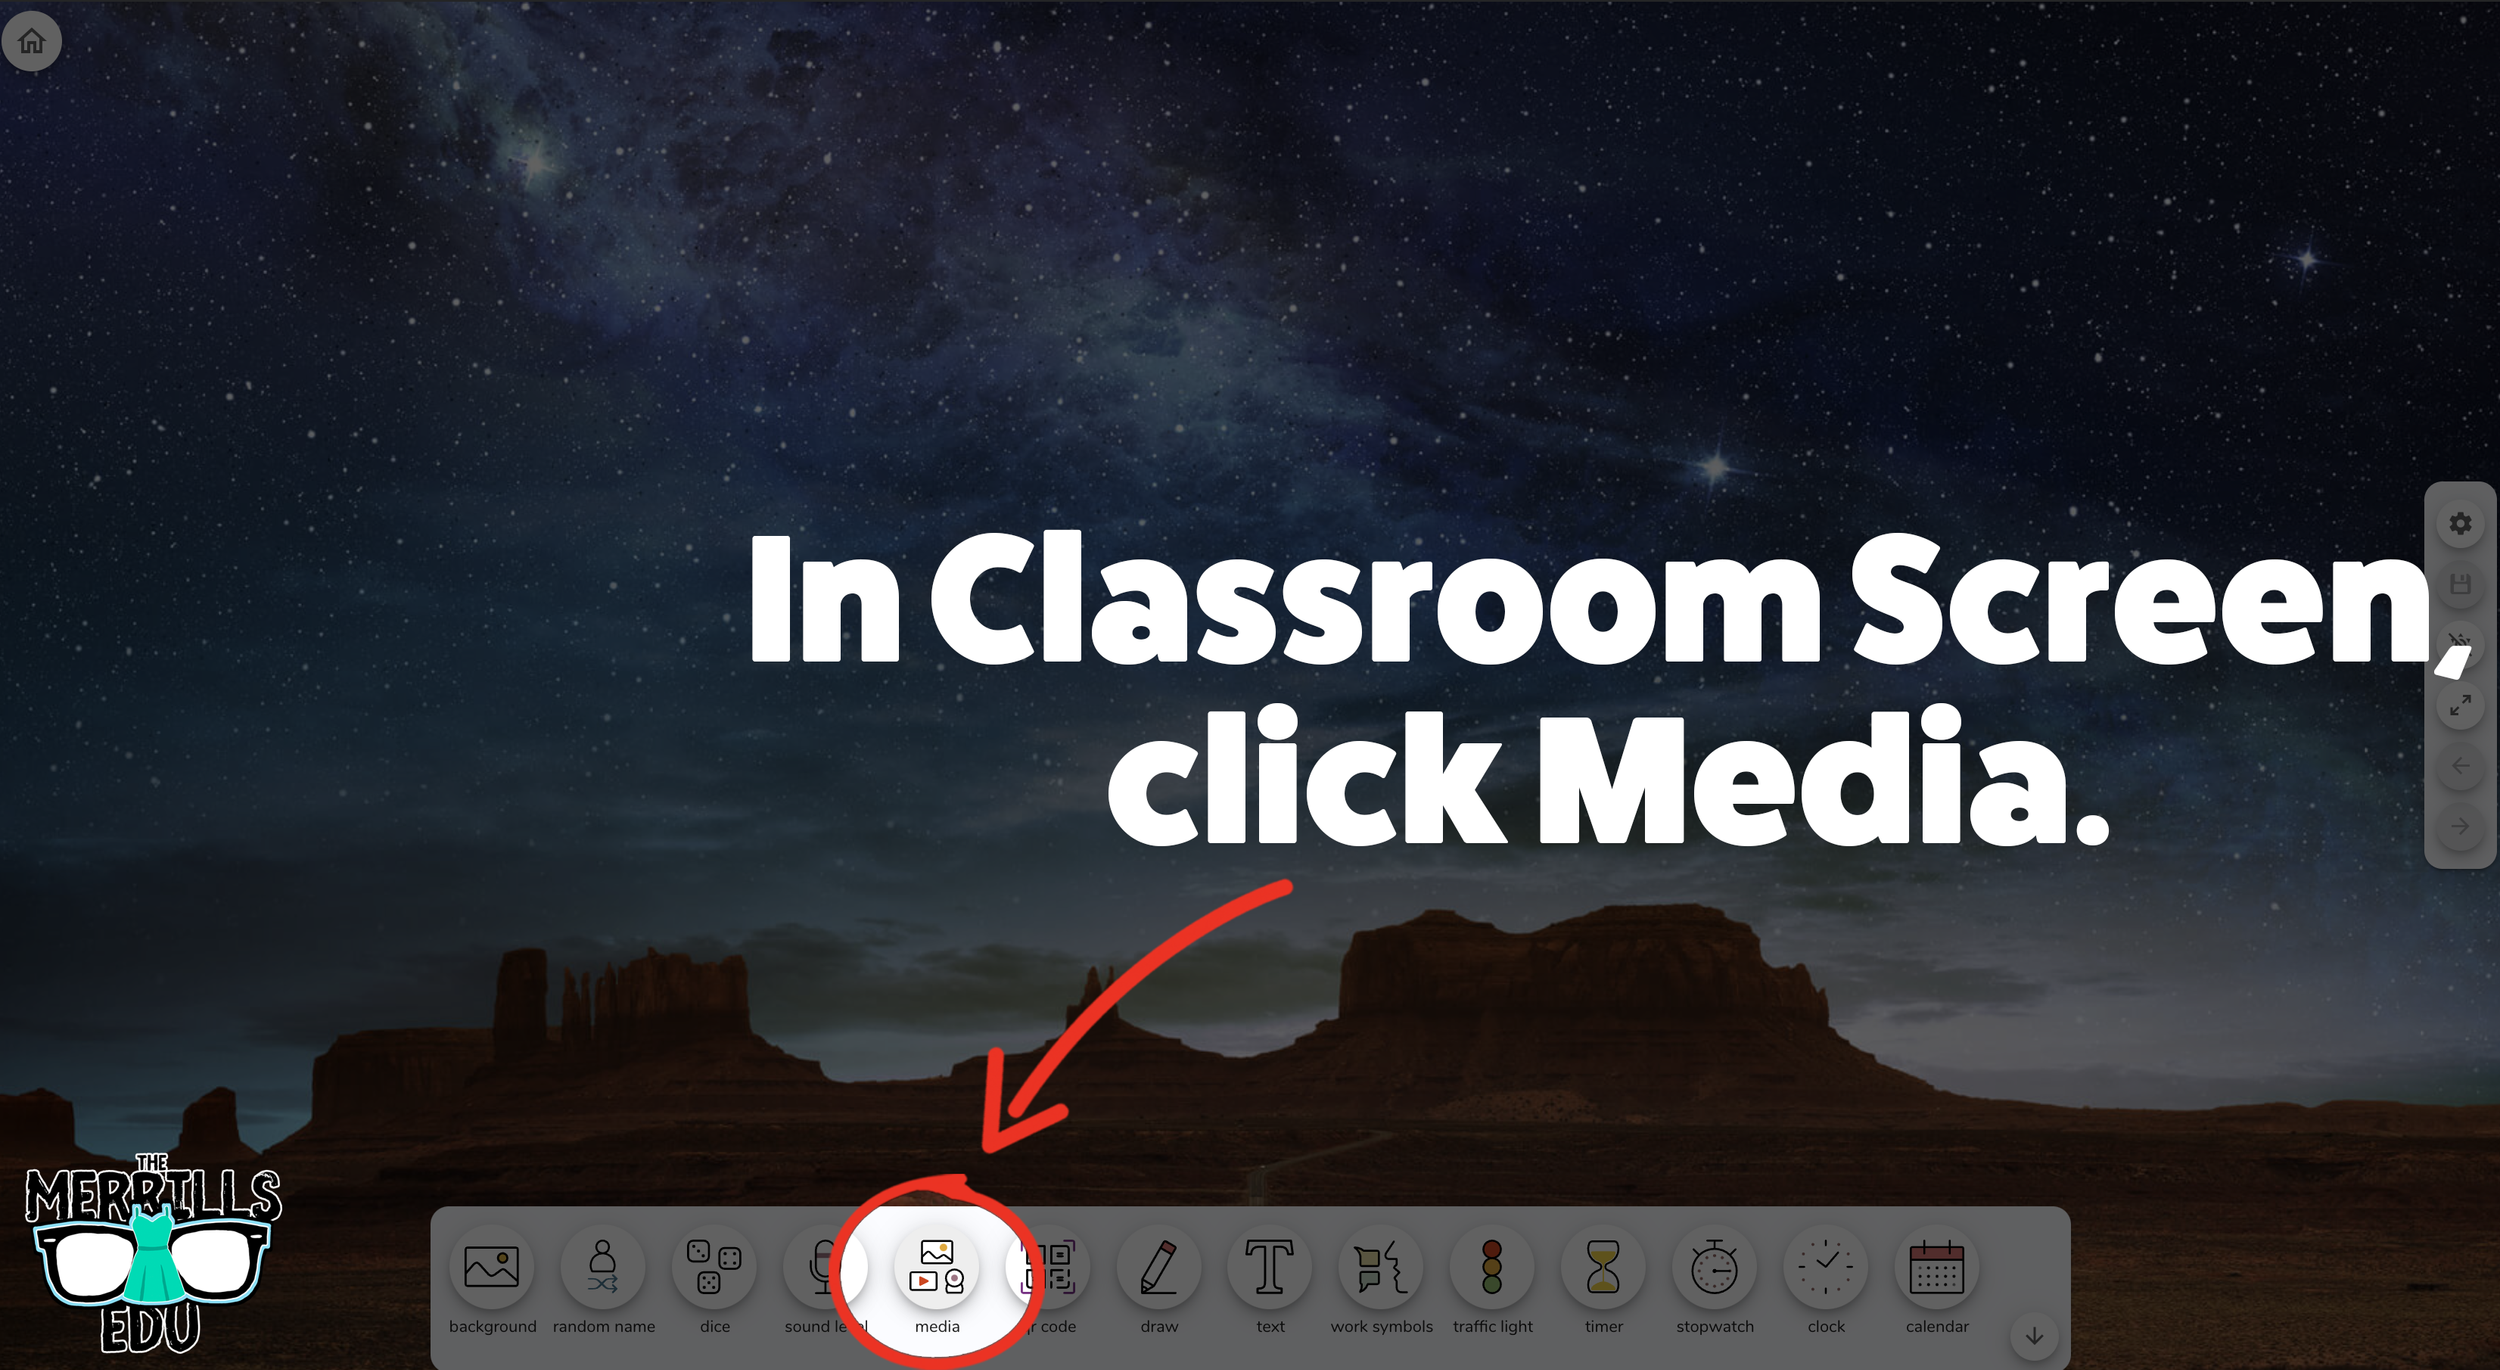
With your Classroom Screen open, click on “Media” from the menu options running along the bottom of the screen.
A new window will open. Click “Embed.”
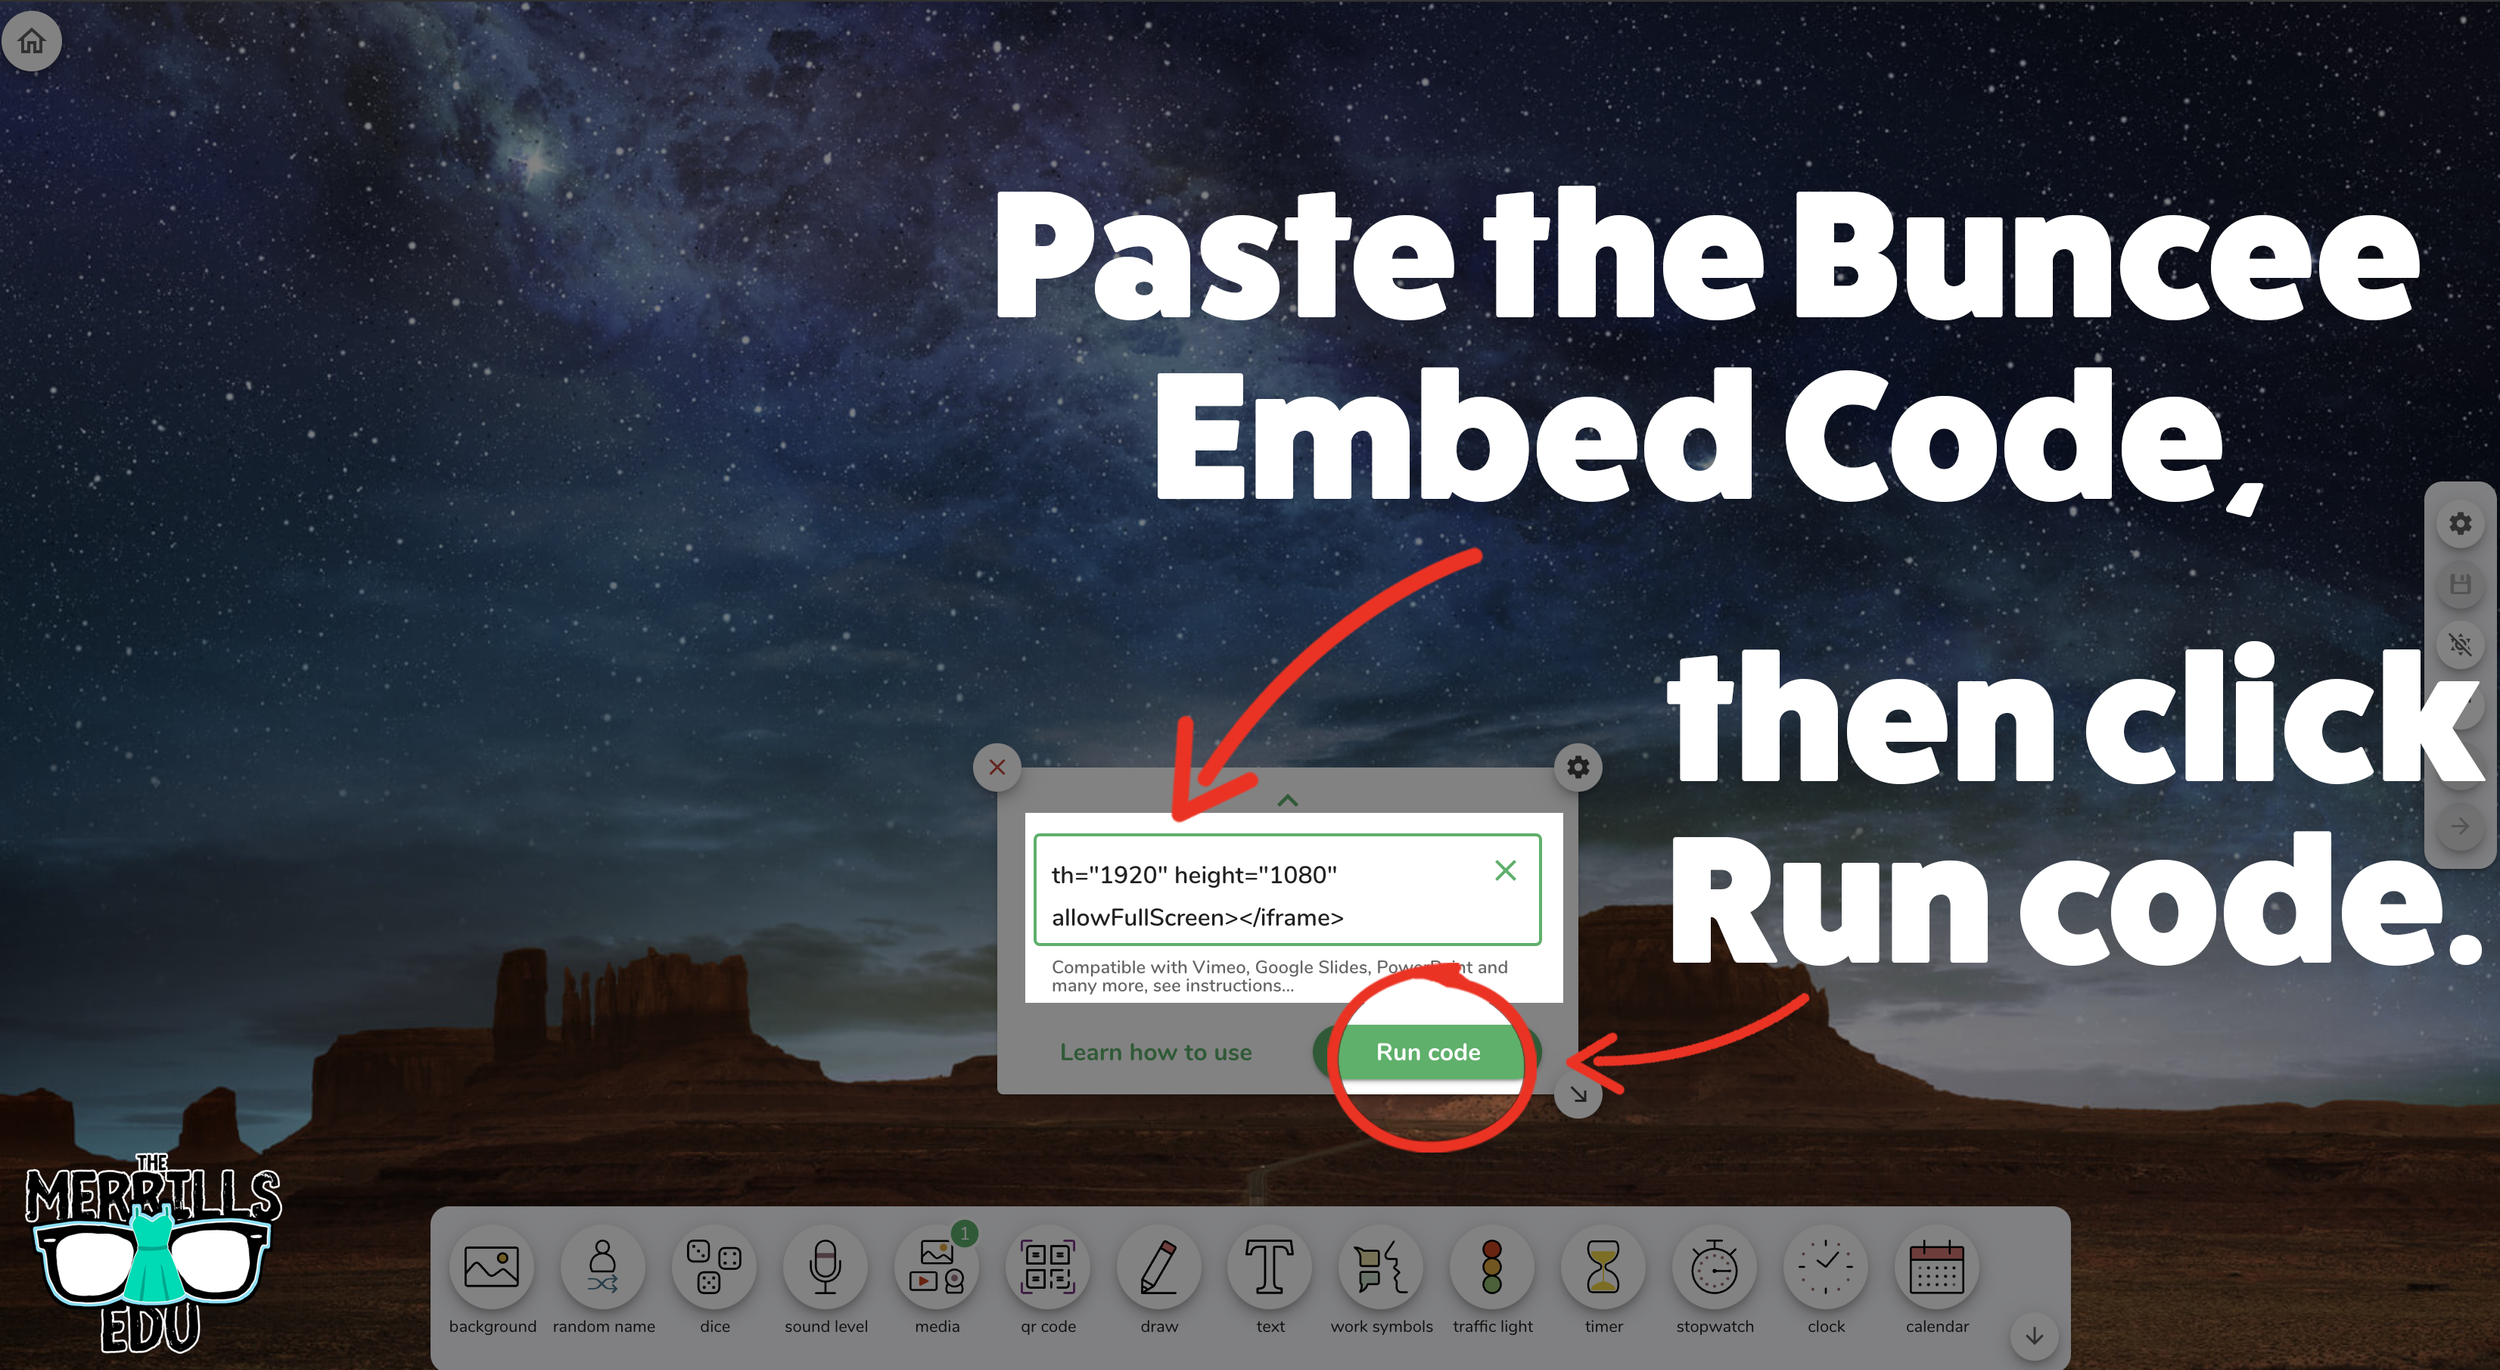
Click inside the embed area and paste your Buncee code.
With the code pasted, click on “Run code.”
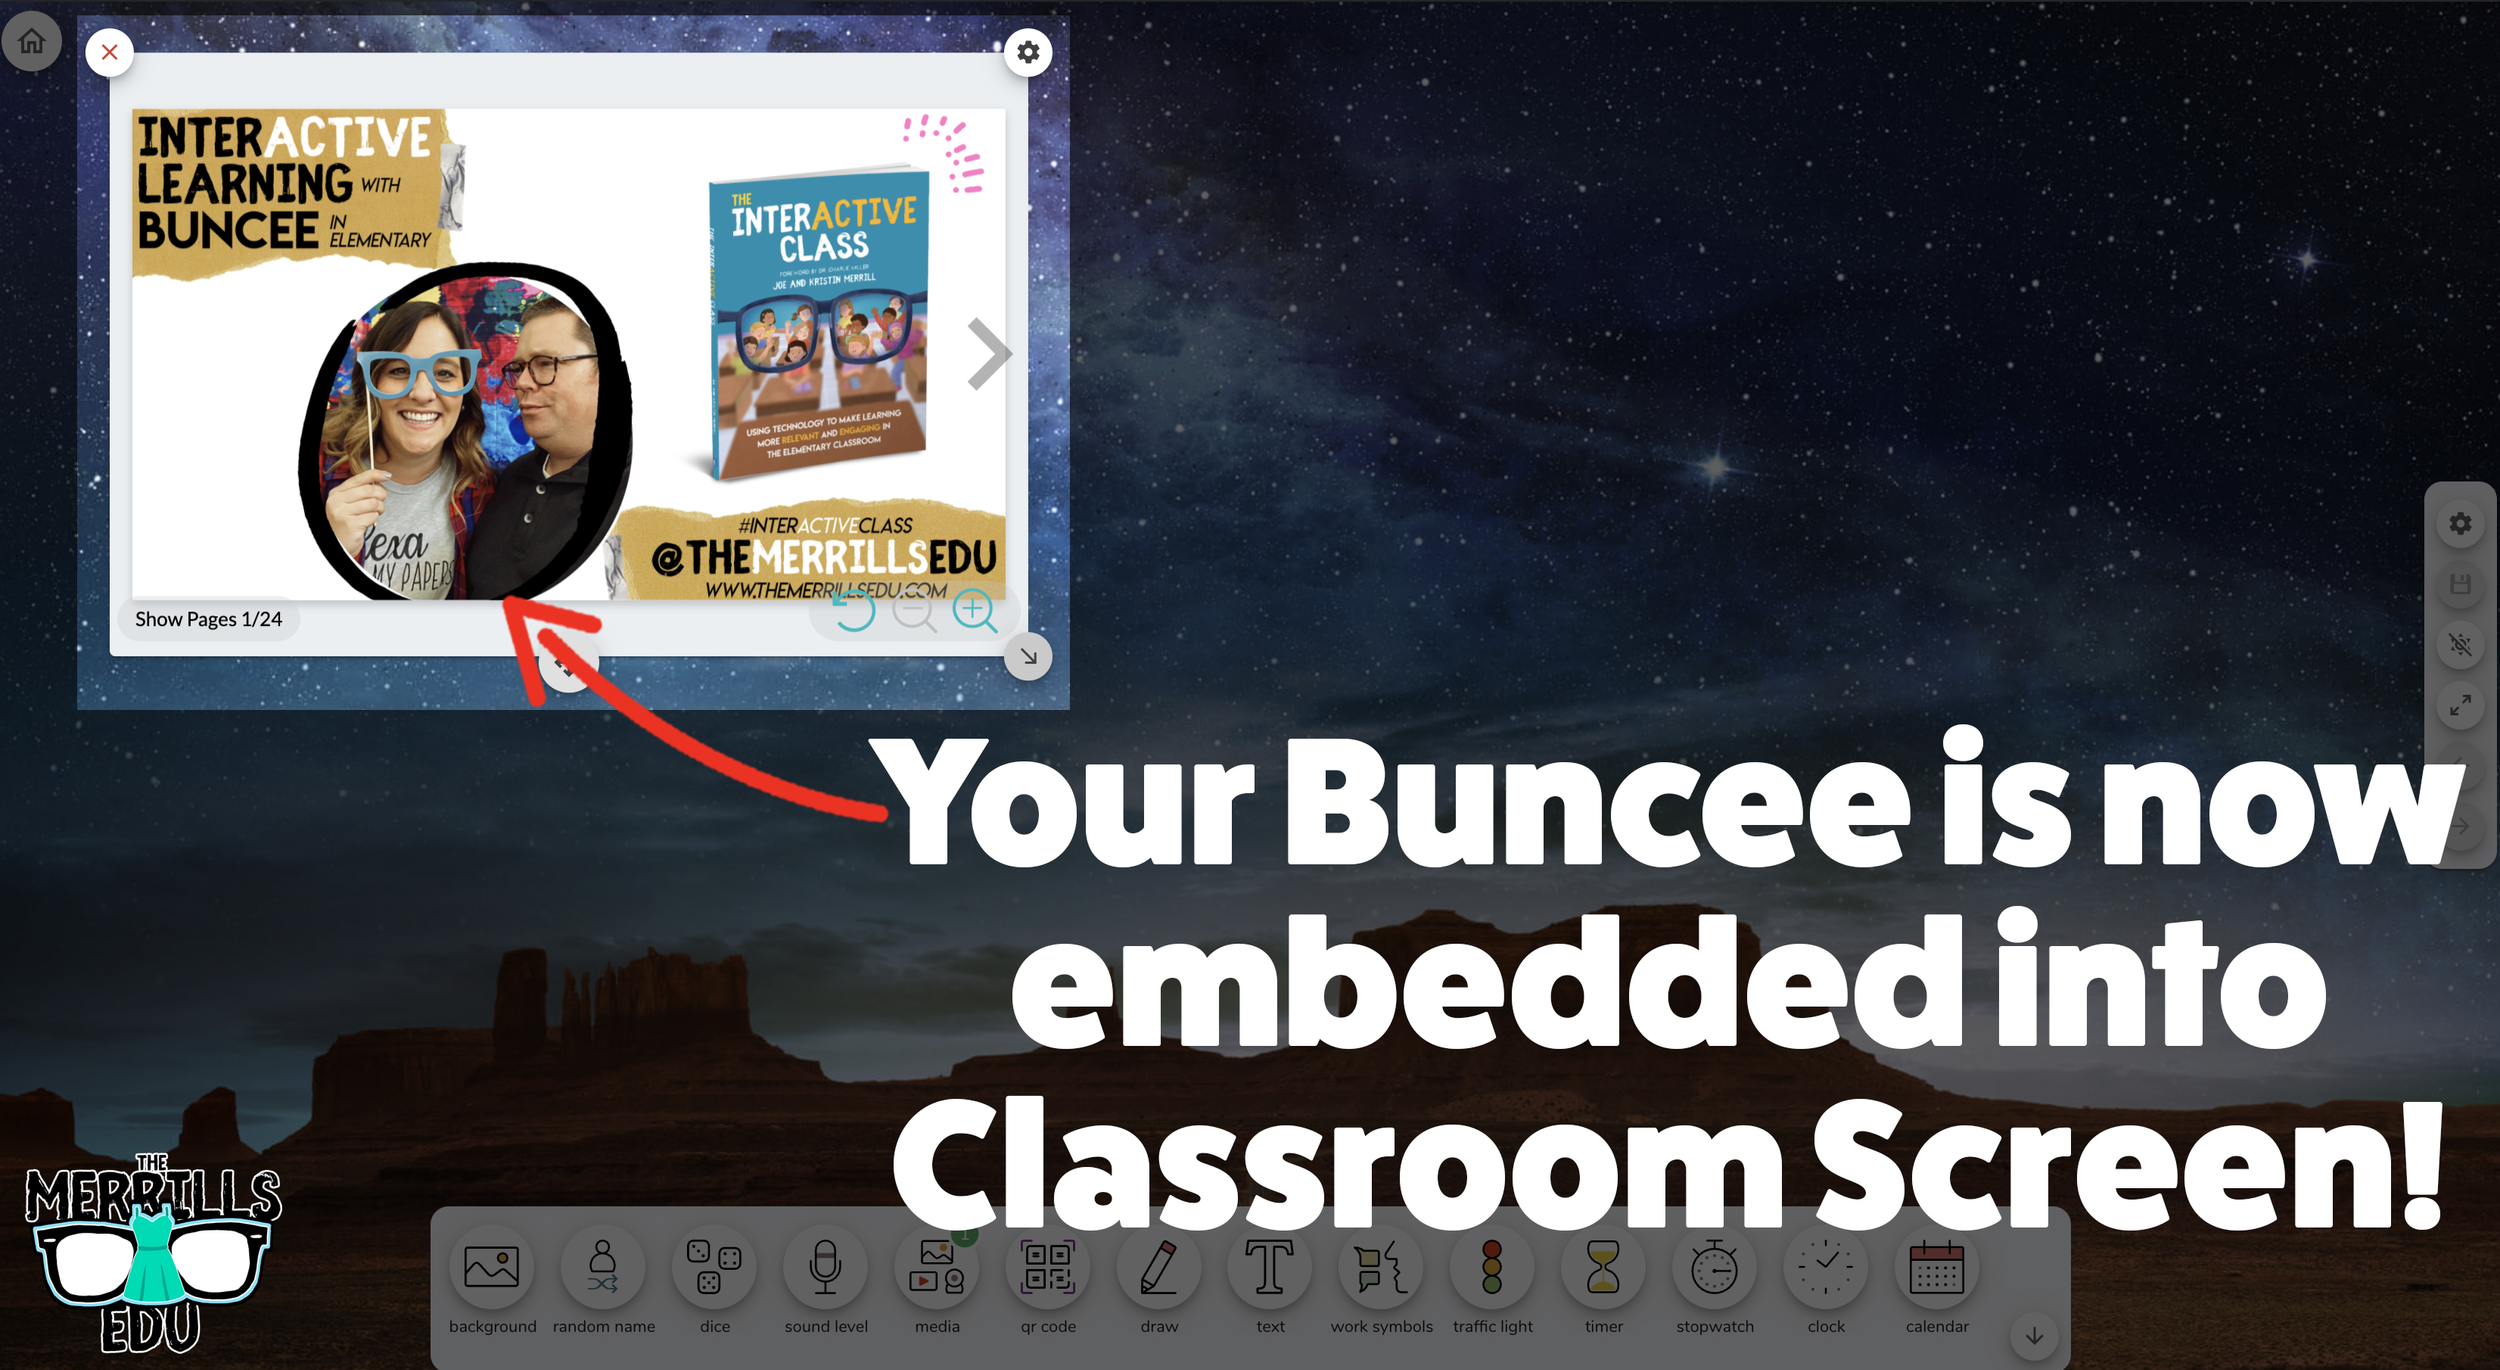
Your Canva creation will now appear! You can move the Buncee creation around by clicking on the arrows (located at the bottom), or stretch the creation out by clicking the arrow on the bottom right - then dragging it to the desired location.
Now, Buncee is embedded into Classroom Screen!

Wakelet Embedded into Classroom Screen
This embed is great if you need to post several different Wakelet collections in the same place. For example, you could group your students and then provide differentiated tasks on Wakelet - all of which are embedded onto Classroom Screen. Here’s how it all works:


(Note: you will need to make your Wakelet collection either Public or Unlisted for this to work)
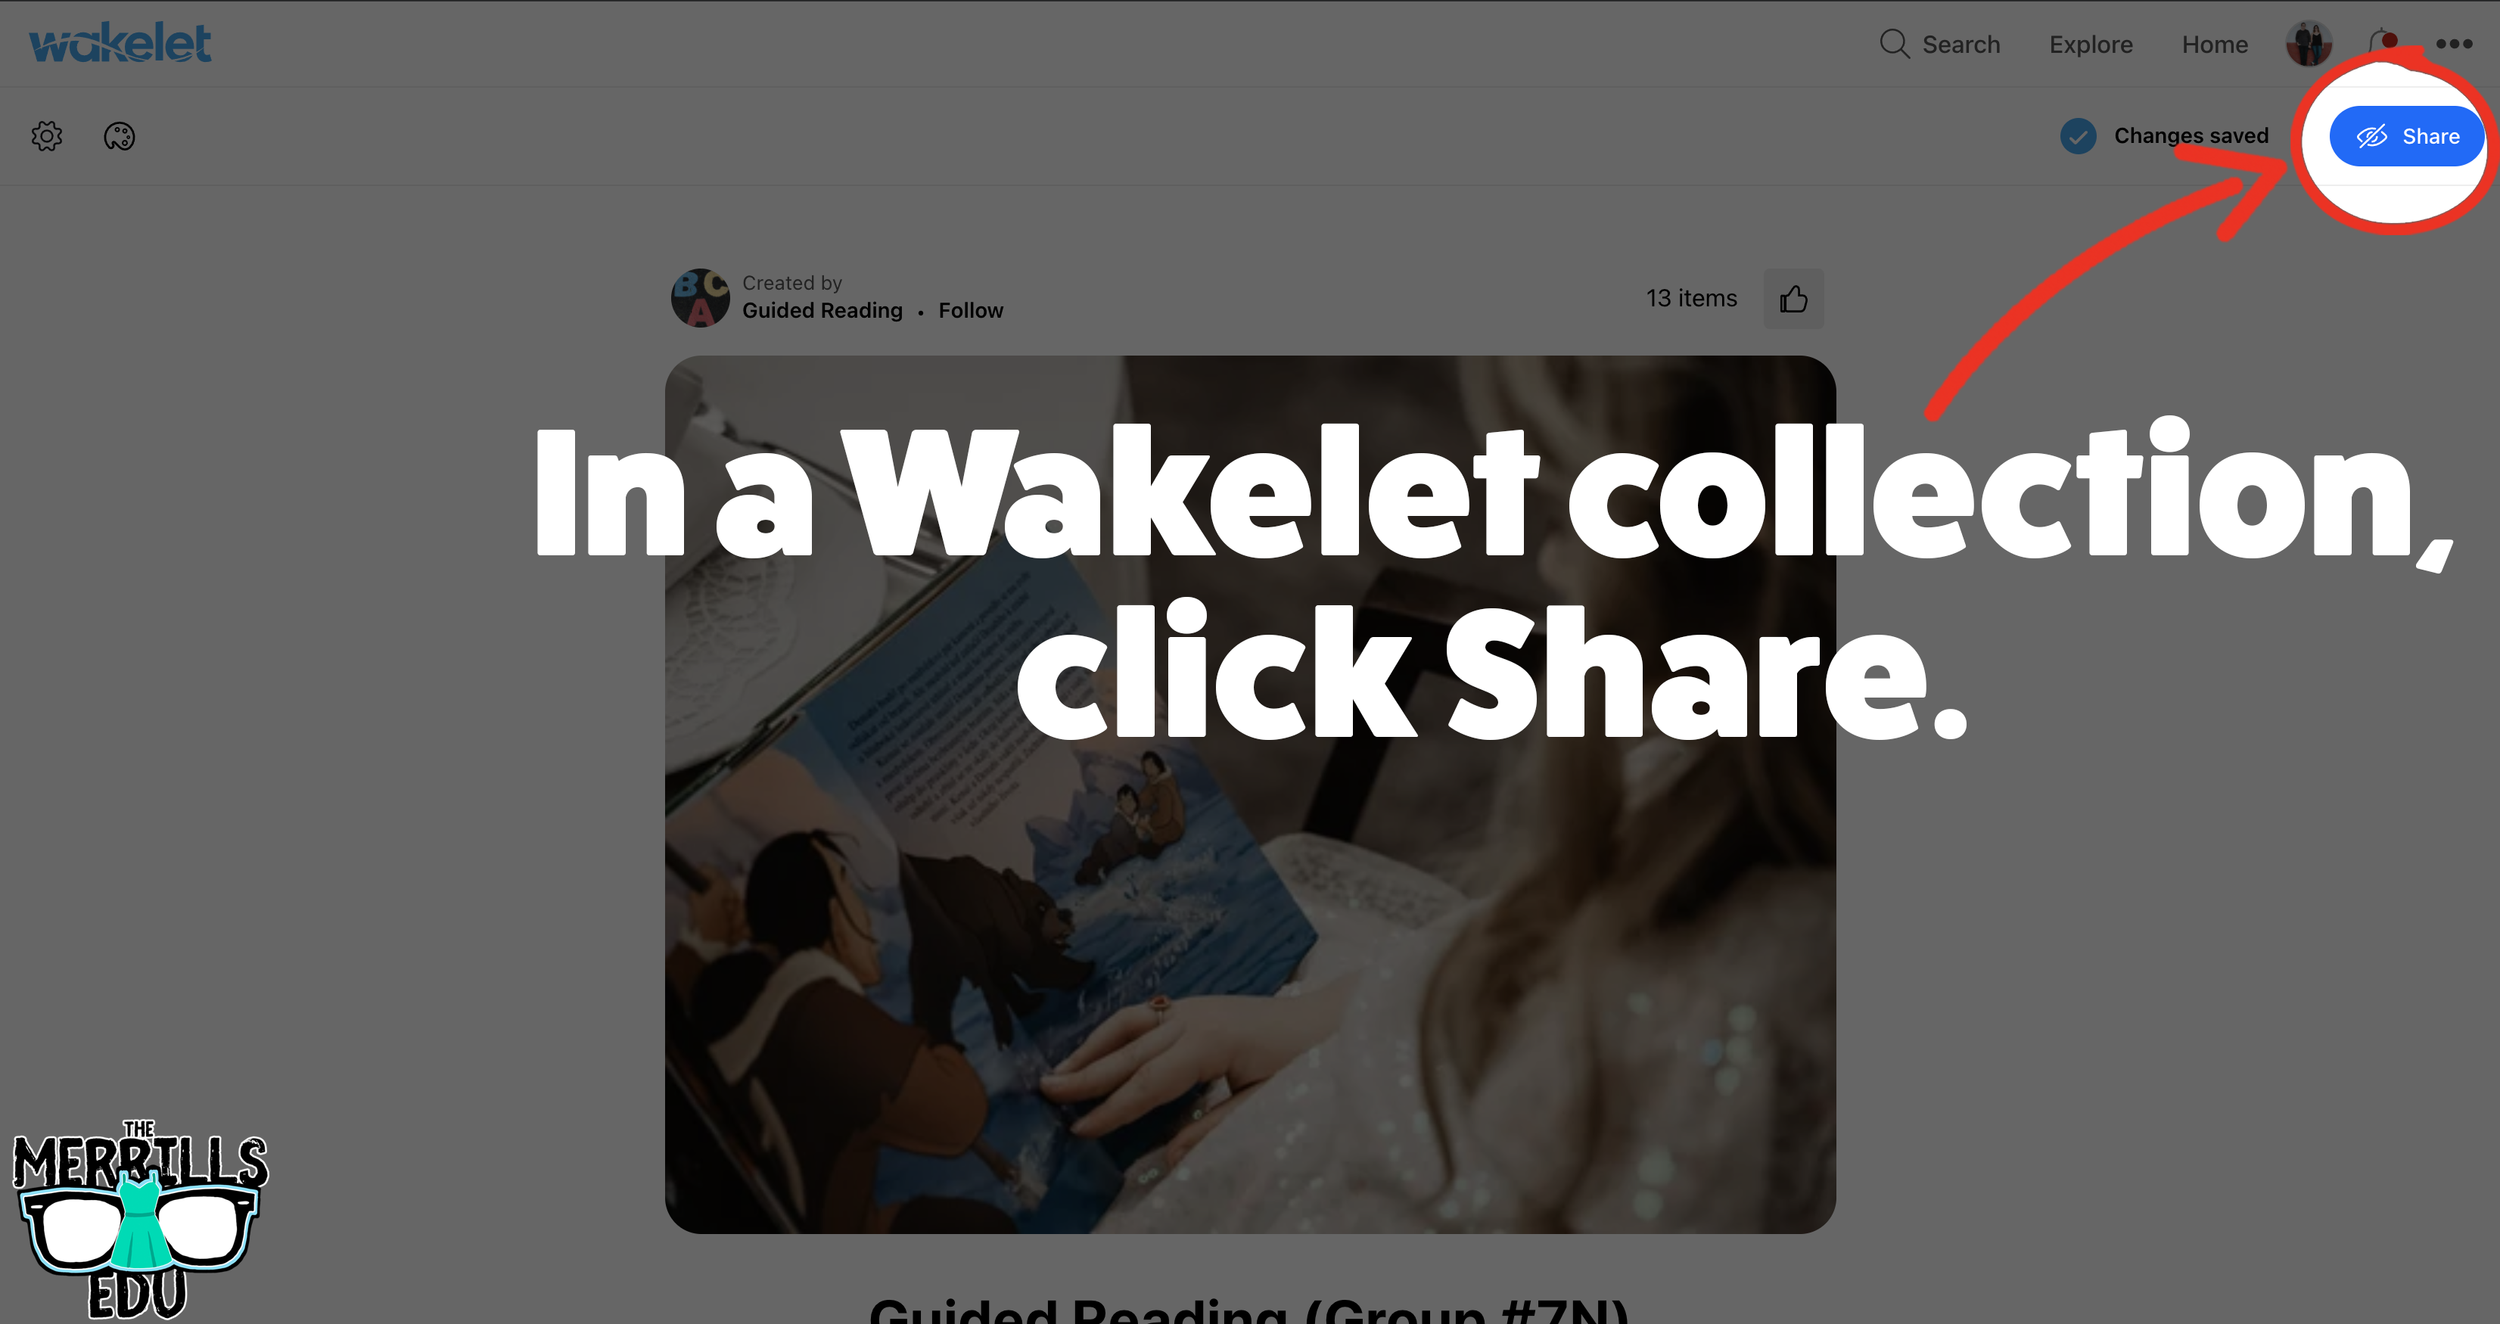
In a Wakelet collection, click the “Share” button.
In the pop-up window, click “Embed.”
Select your preferred settings, then click “Copy Embed Code.”
In a separate tab, head over to ClassroomScreen.com and start a new screen (or open an old one).
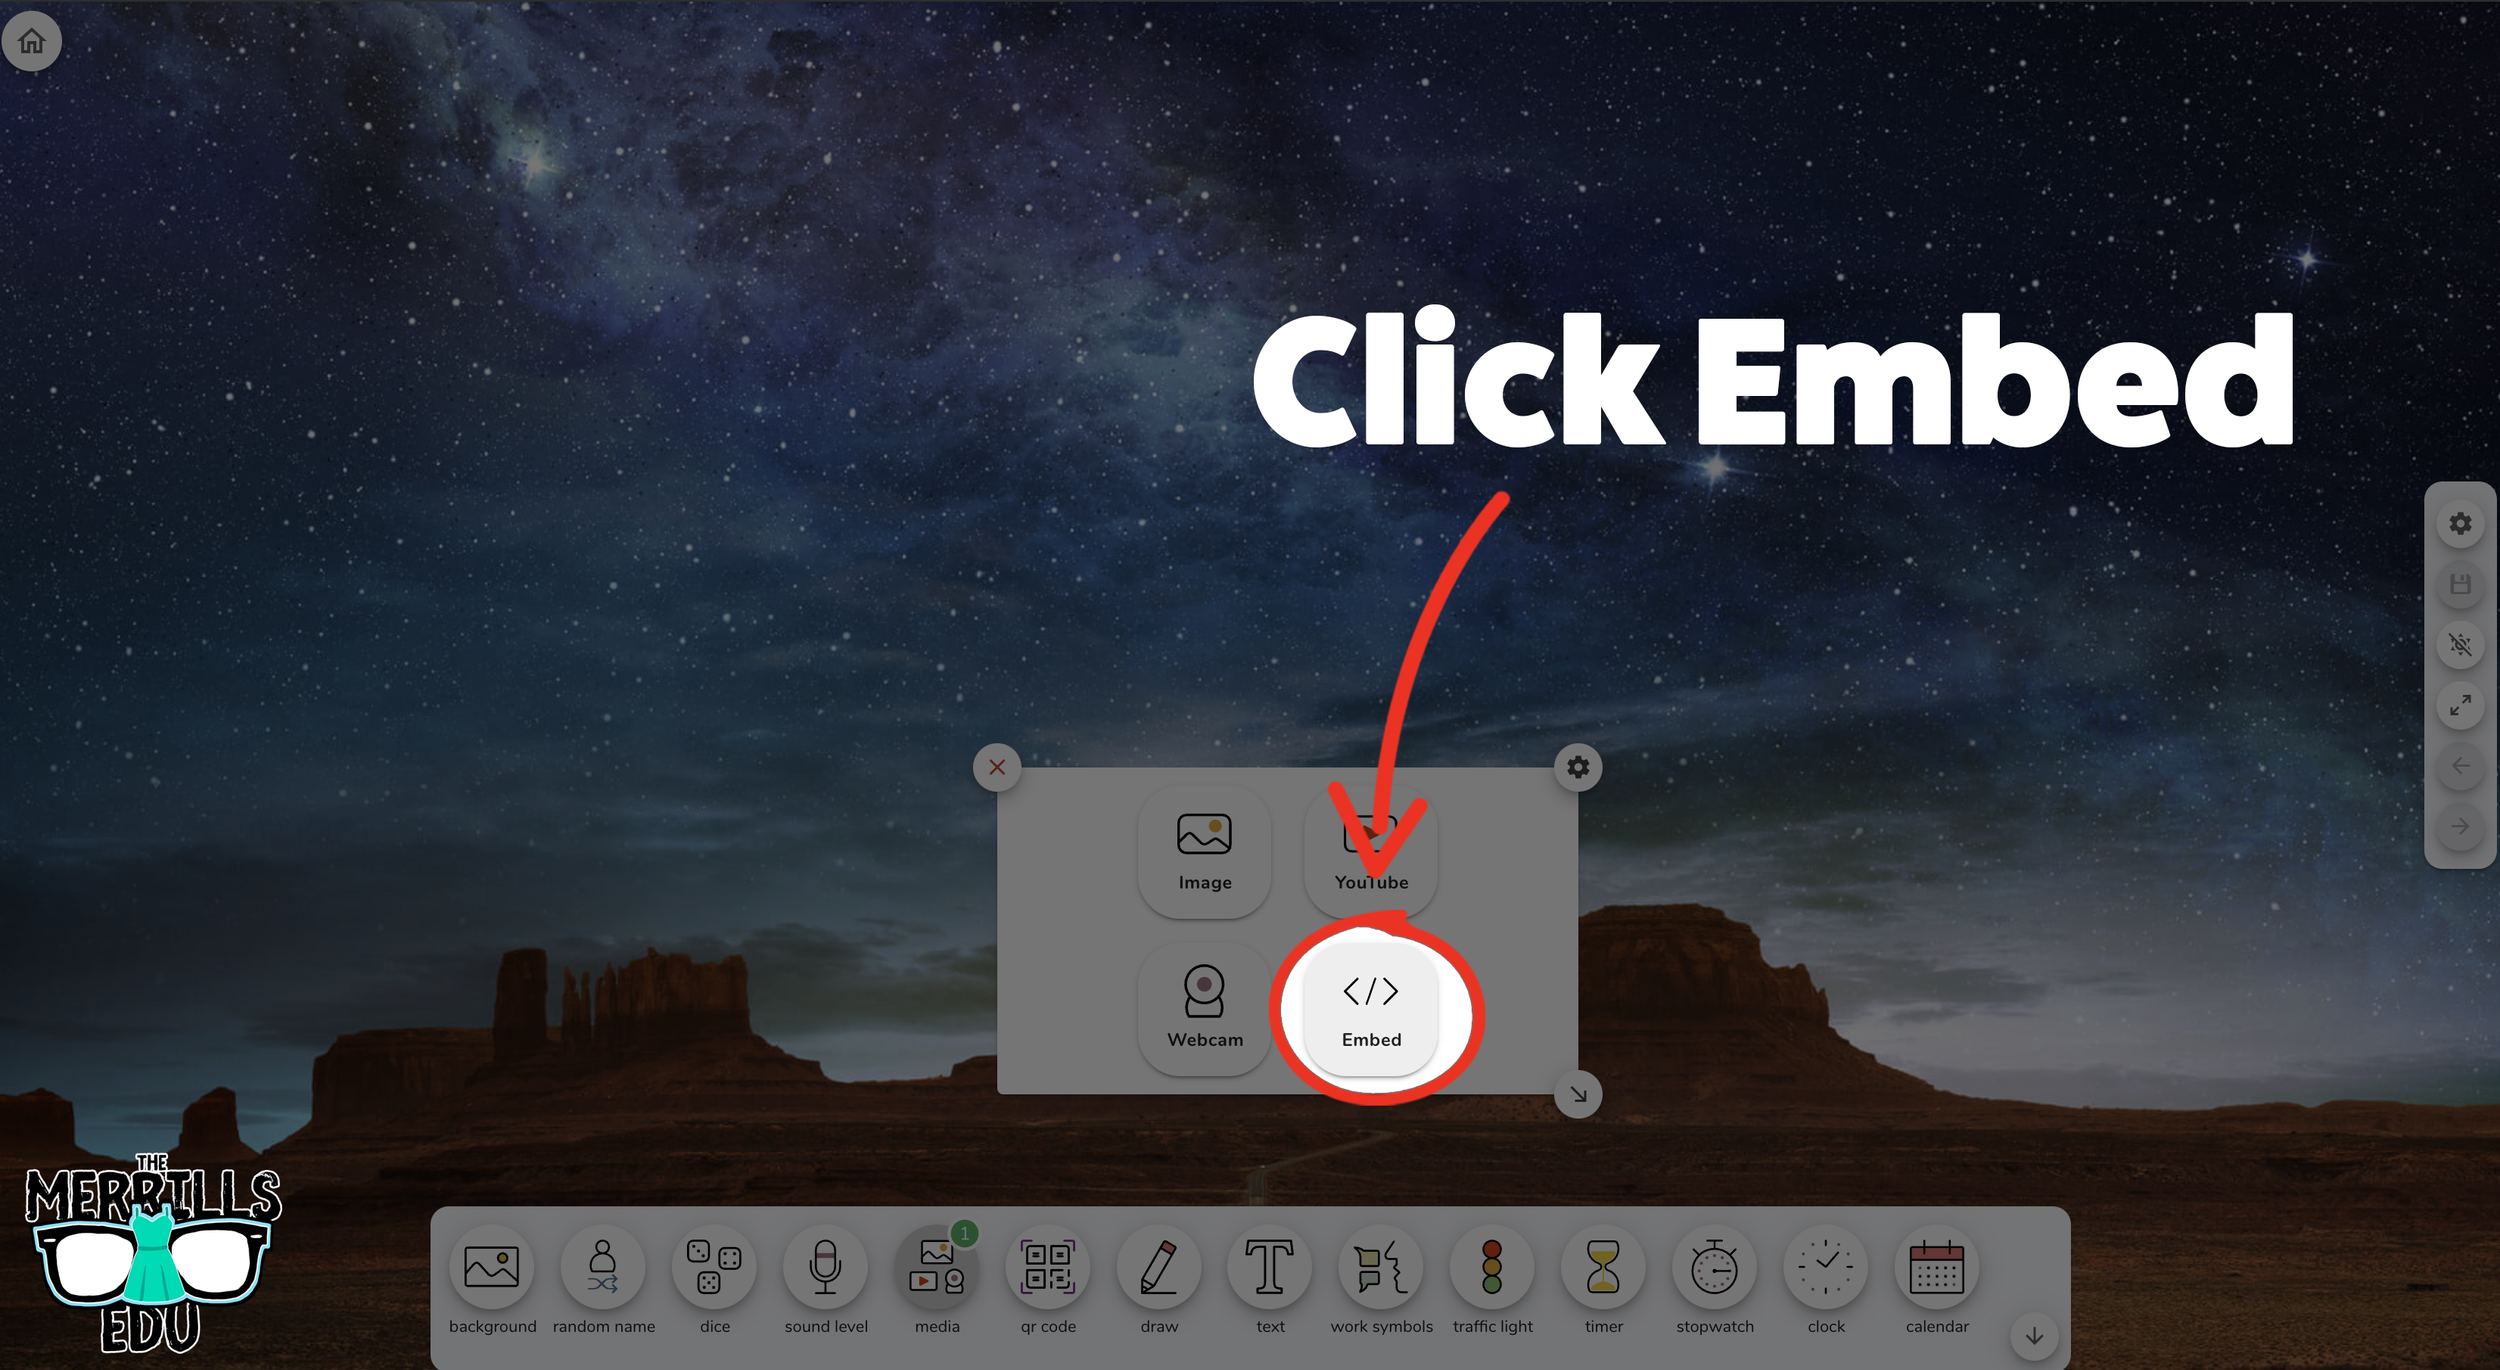
With your Classroom Screen open, click on “Media” from the menu options running along the bottom of the screen.
A new window will open. Click “Embed.”
Click inside the embed area and paste your Wakelet code.
With the code pasted, click on “Run code.”
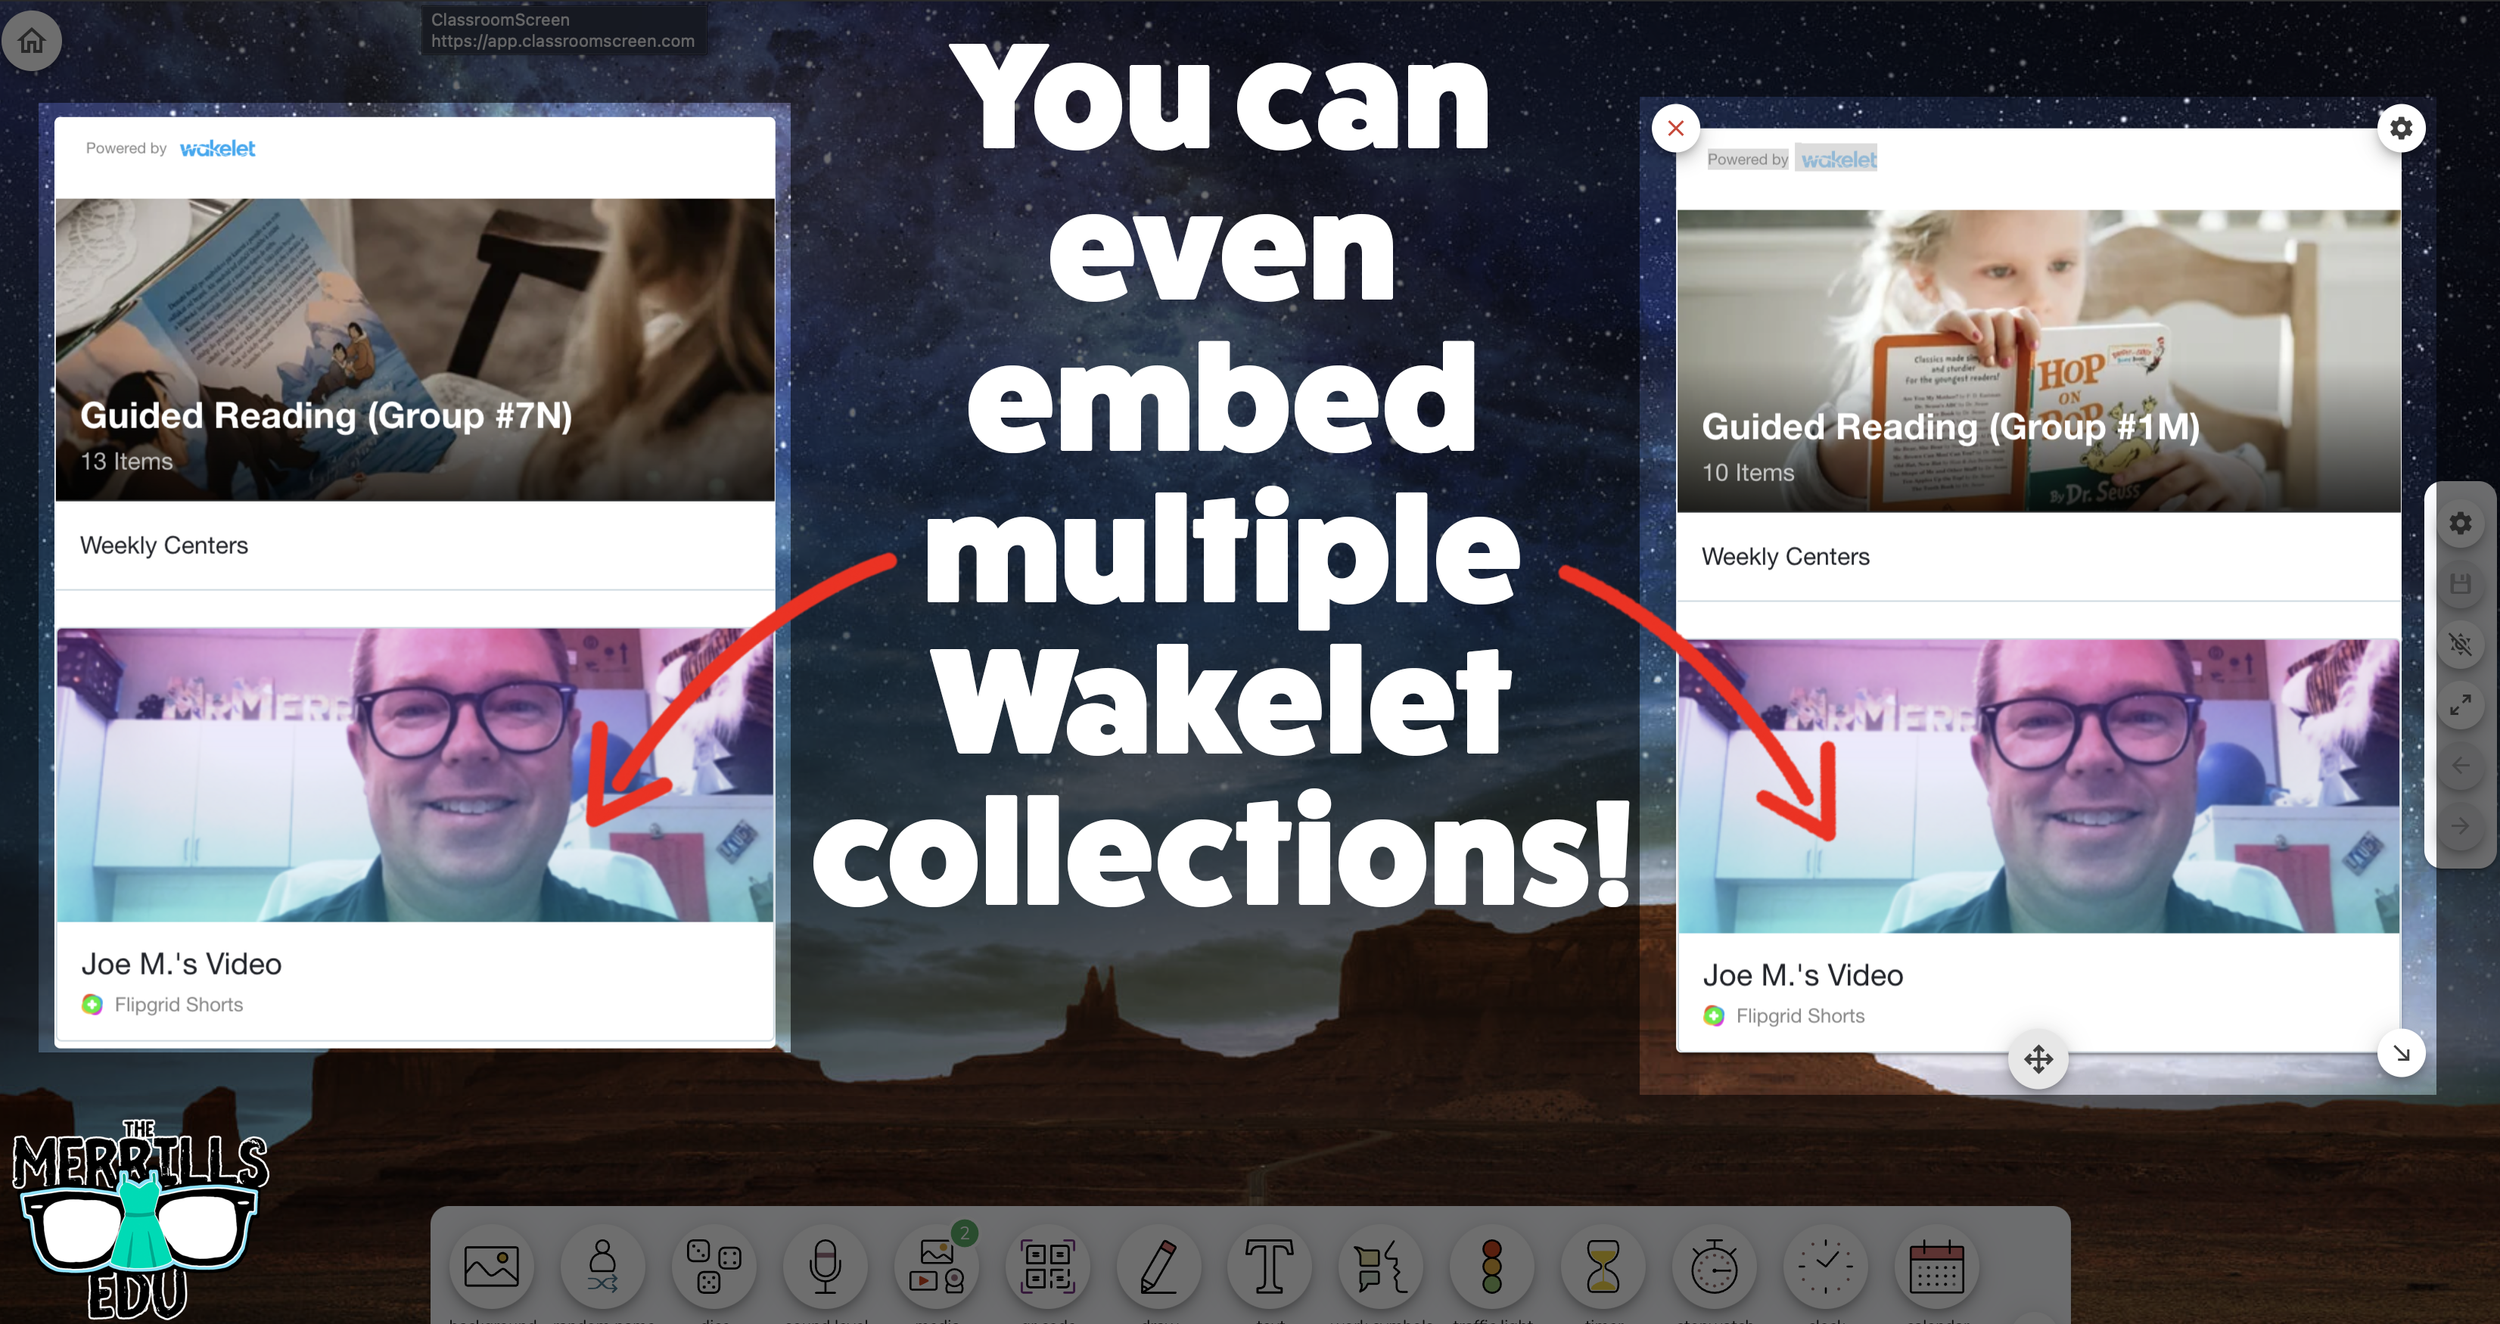
Your Wakelet collection will now appear! You can move the Wakelet collection around by clicking on the arrows (located at the bottom), or stretch the collection out by clicking the arrow on the bottom right - then dragging it to the desired location.
Now, Wakelet is embedded into Classroom Screen!
BONUS: You can add multiple Wakelet embeds onto the same Classroom Screen!
-- Let us know if you’re using any of these ideas in your classroom! Be sure to follow us on social media (@TheMerrillsEDU everywhere) and tag us! 👓👗
For more tips, tricks and lesson ideas for making learning more interACTIVE, check out our books The InterACTIVE Class and Flipgrid in the InterACTIVE Class on Amazon!


