


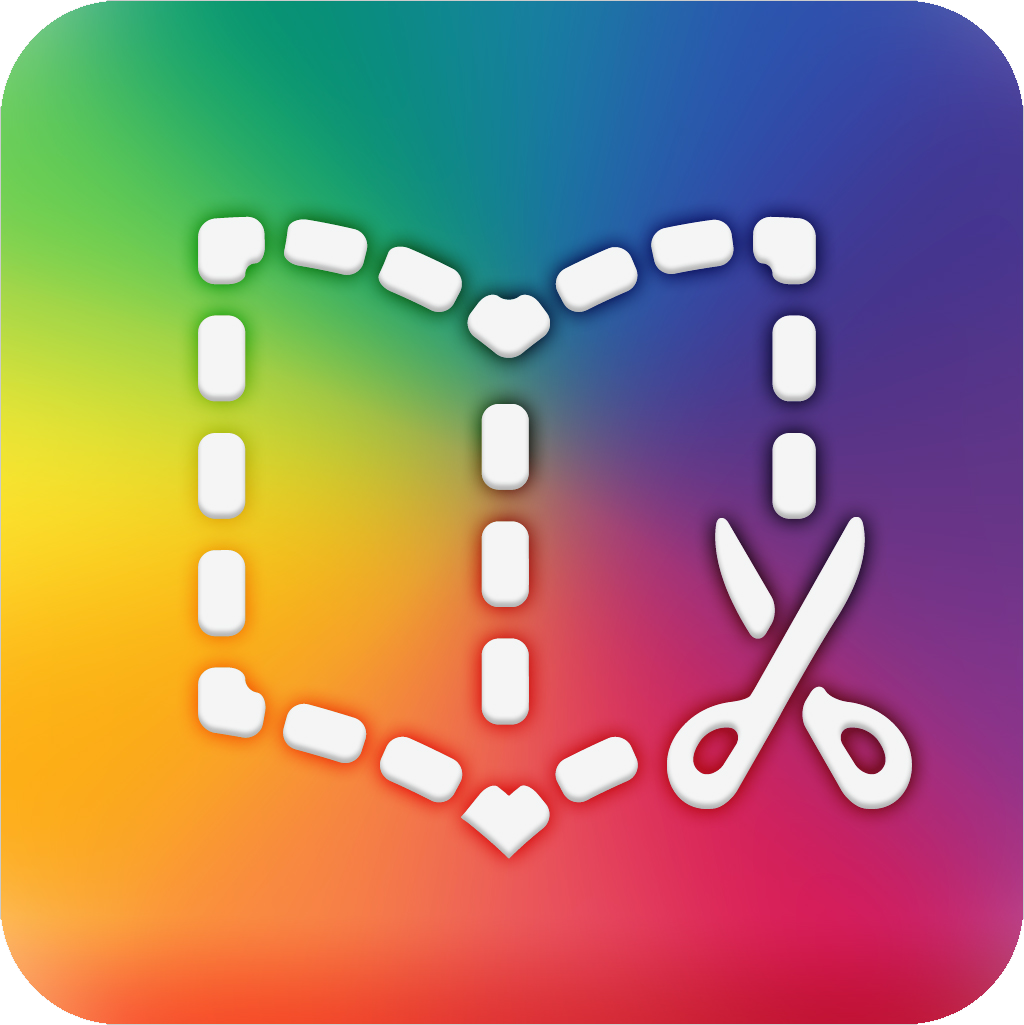
How to Use Gimkit Ink
@theMerrillsEDU “unpack” how to use Gimkit’s latest tool: Ink. In this blog post you’ll learn: what Gimkit Ink is, how to launch it for your students and how students can publish their work and share it with their classmates!

Gimkit is notorious for building engagement and with Ink, Gimkit delivers on a whole new level. Ink creates a refreshing take on writing, storytelling and much more. In this blogpost, you’ll learn:
(click on any subheading to jump directly to that section)
✏️What is Gimkit Ink and How Does It Work?
⚡Quick Start Guide:⚡
🚀 Launch a Project
💪 Having Students Add Content
📚 Publishing Student Work
👀 Viewing Other Students Work
💡What are The Paper and Time Machine Features?
What is Gimkit Ink?

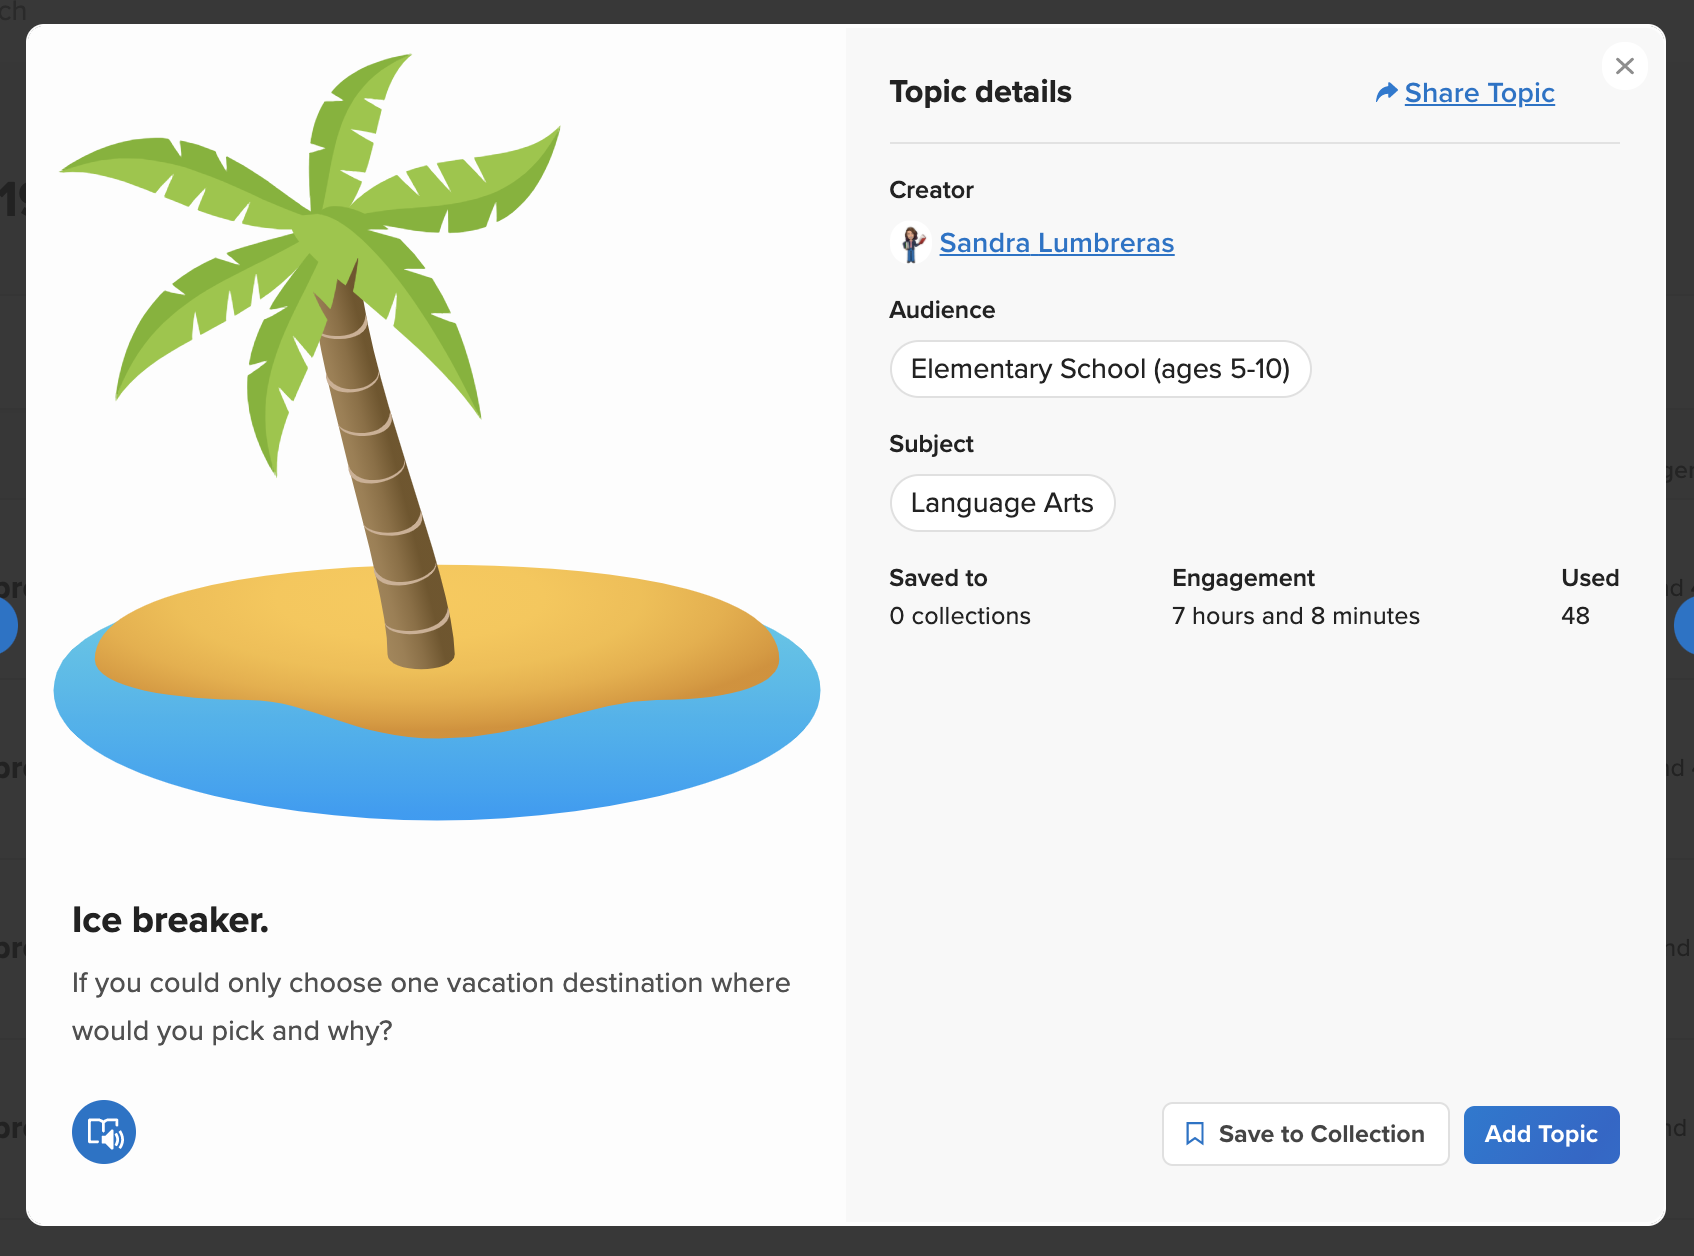
Gimkit Ink is a fresh take on how writing should look in 2021. Instead of turning in documents or PDF’s, Gimkit Ink allows students to publish their work online and share them directly back to the educator, classmates and beyond (if they chose to do so). Students may be reluctant to share their writing, so Gimkit Ink provides them with several key elements to help. For example, students who submit their writing can share directly to the teacher or with the entire class. But, if they are nervous about sharing with the class, they may post their work under a pseudonym. The key here is that the students understand that they are creating for a broader audience them just themselves. With this understanding, they will likely place more effort into the quality of their work (since they know it will be shared).
Gimkit Ink is available to all users! However, the free version of Ink is limited. Teachers can create 10 projects on the Gimkit Basic plan. There are no other restrictions at this time.

Quick Start Guide
Step #1: Launch a Project

Educators can launch Gimkit Ink tasks from their Gimkit Hub (or login page). Click “Gimkit Ink",” which will take you to the educators dashboard. To get started immediately, click on “New Project” under Projects. Fill out the information on the next page, then select your privacy settings. Once everything looks good, click the blue “Start Project” button. Doing so will launch a live link / webpage where content will be shared and delivered. Share this link with your students to have them start adding content. This link is important, as it also acts as the “house” where all of the content submitted will “live” or be posted. Students will be able to return to this link to view content from their peers after they have submitted their own work.
Step #2: Having Students Add Content

After you have shared the link with your students, they are ready to start adding content. Have them click the blue “+ Create New Post” button. This opens several options for them: create a new article or story.

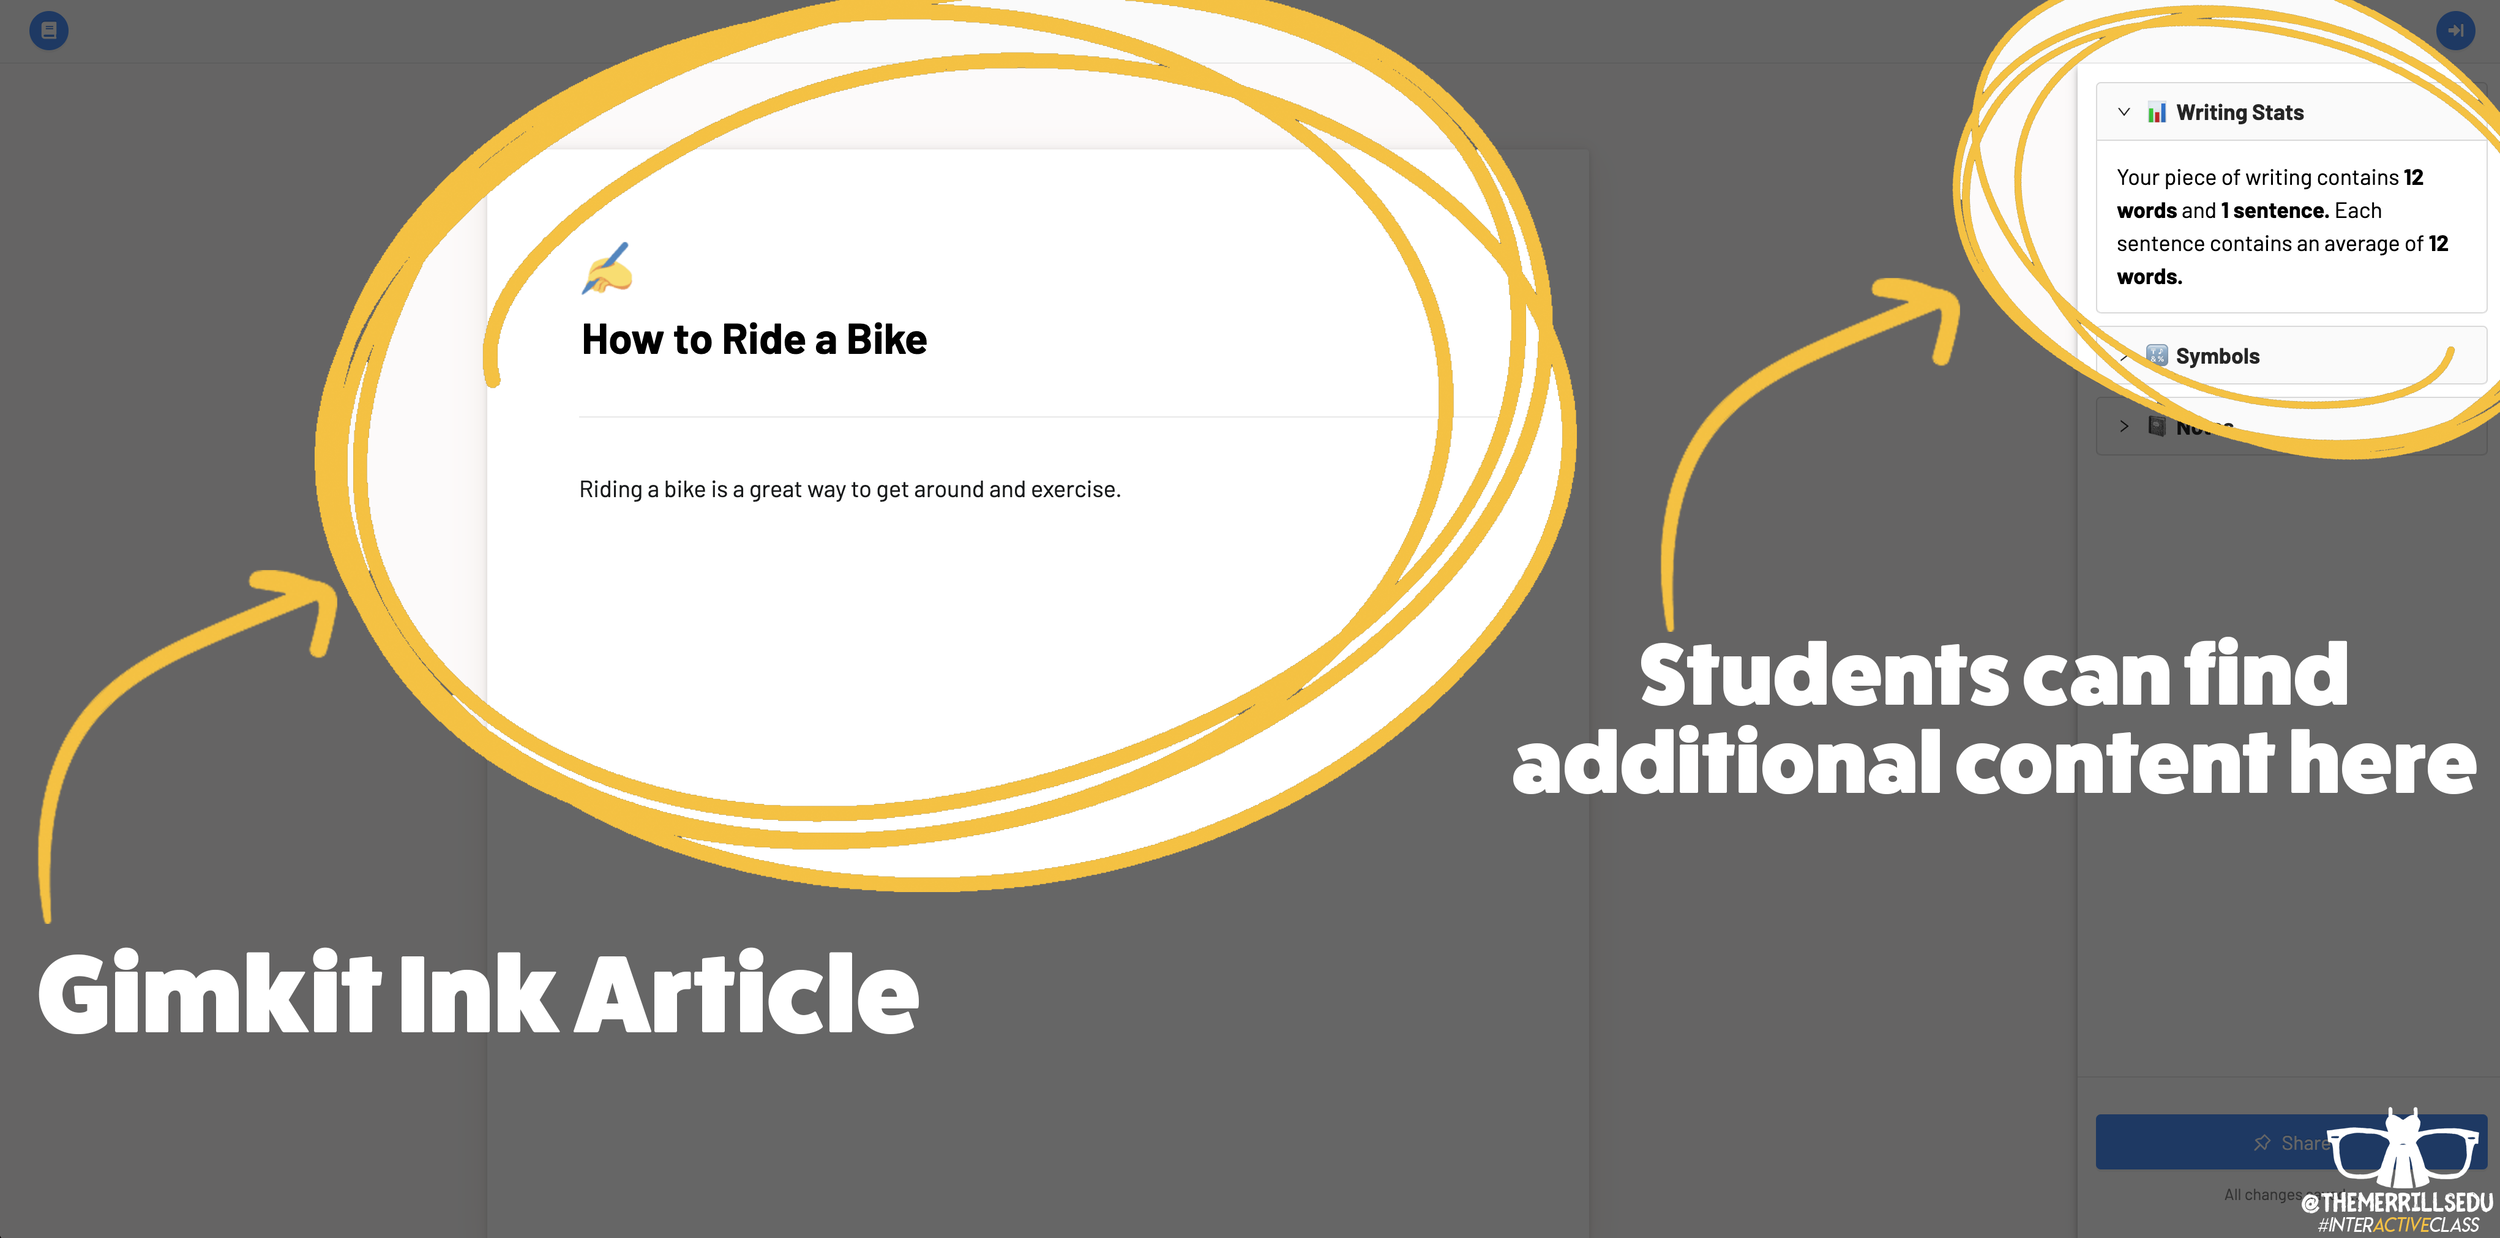
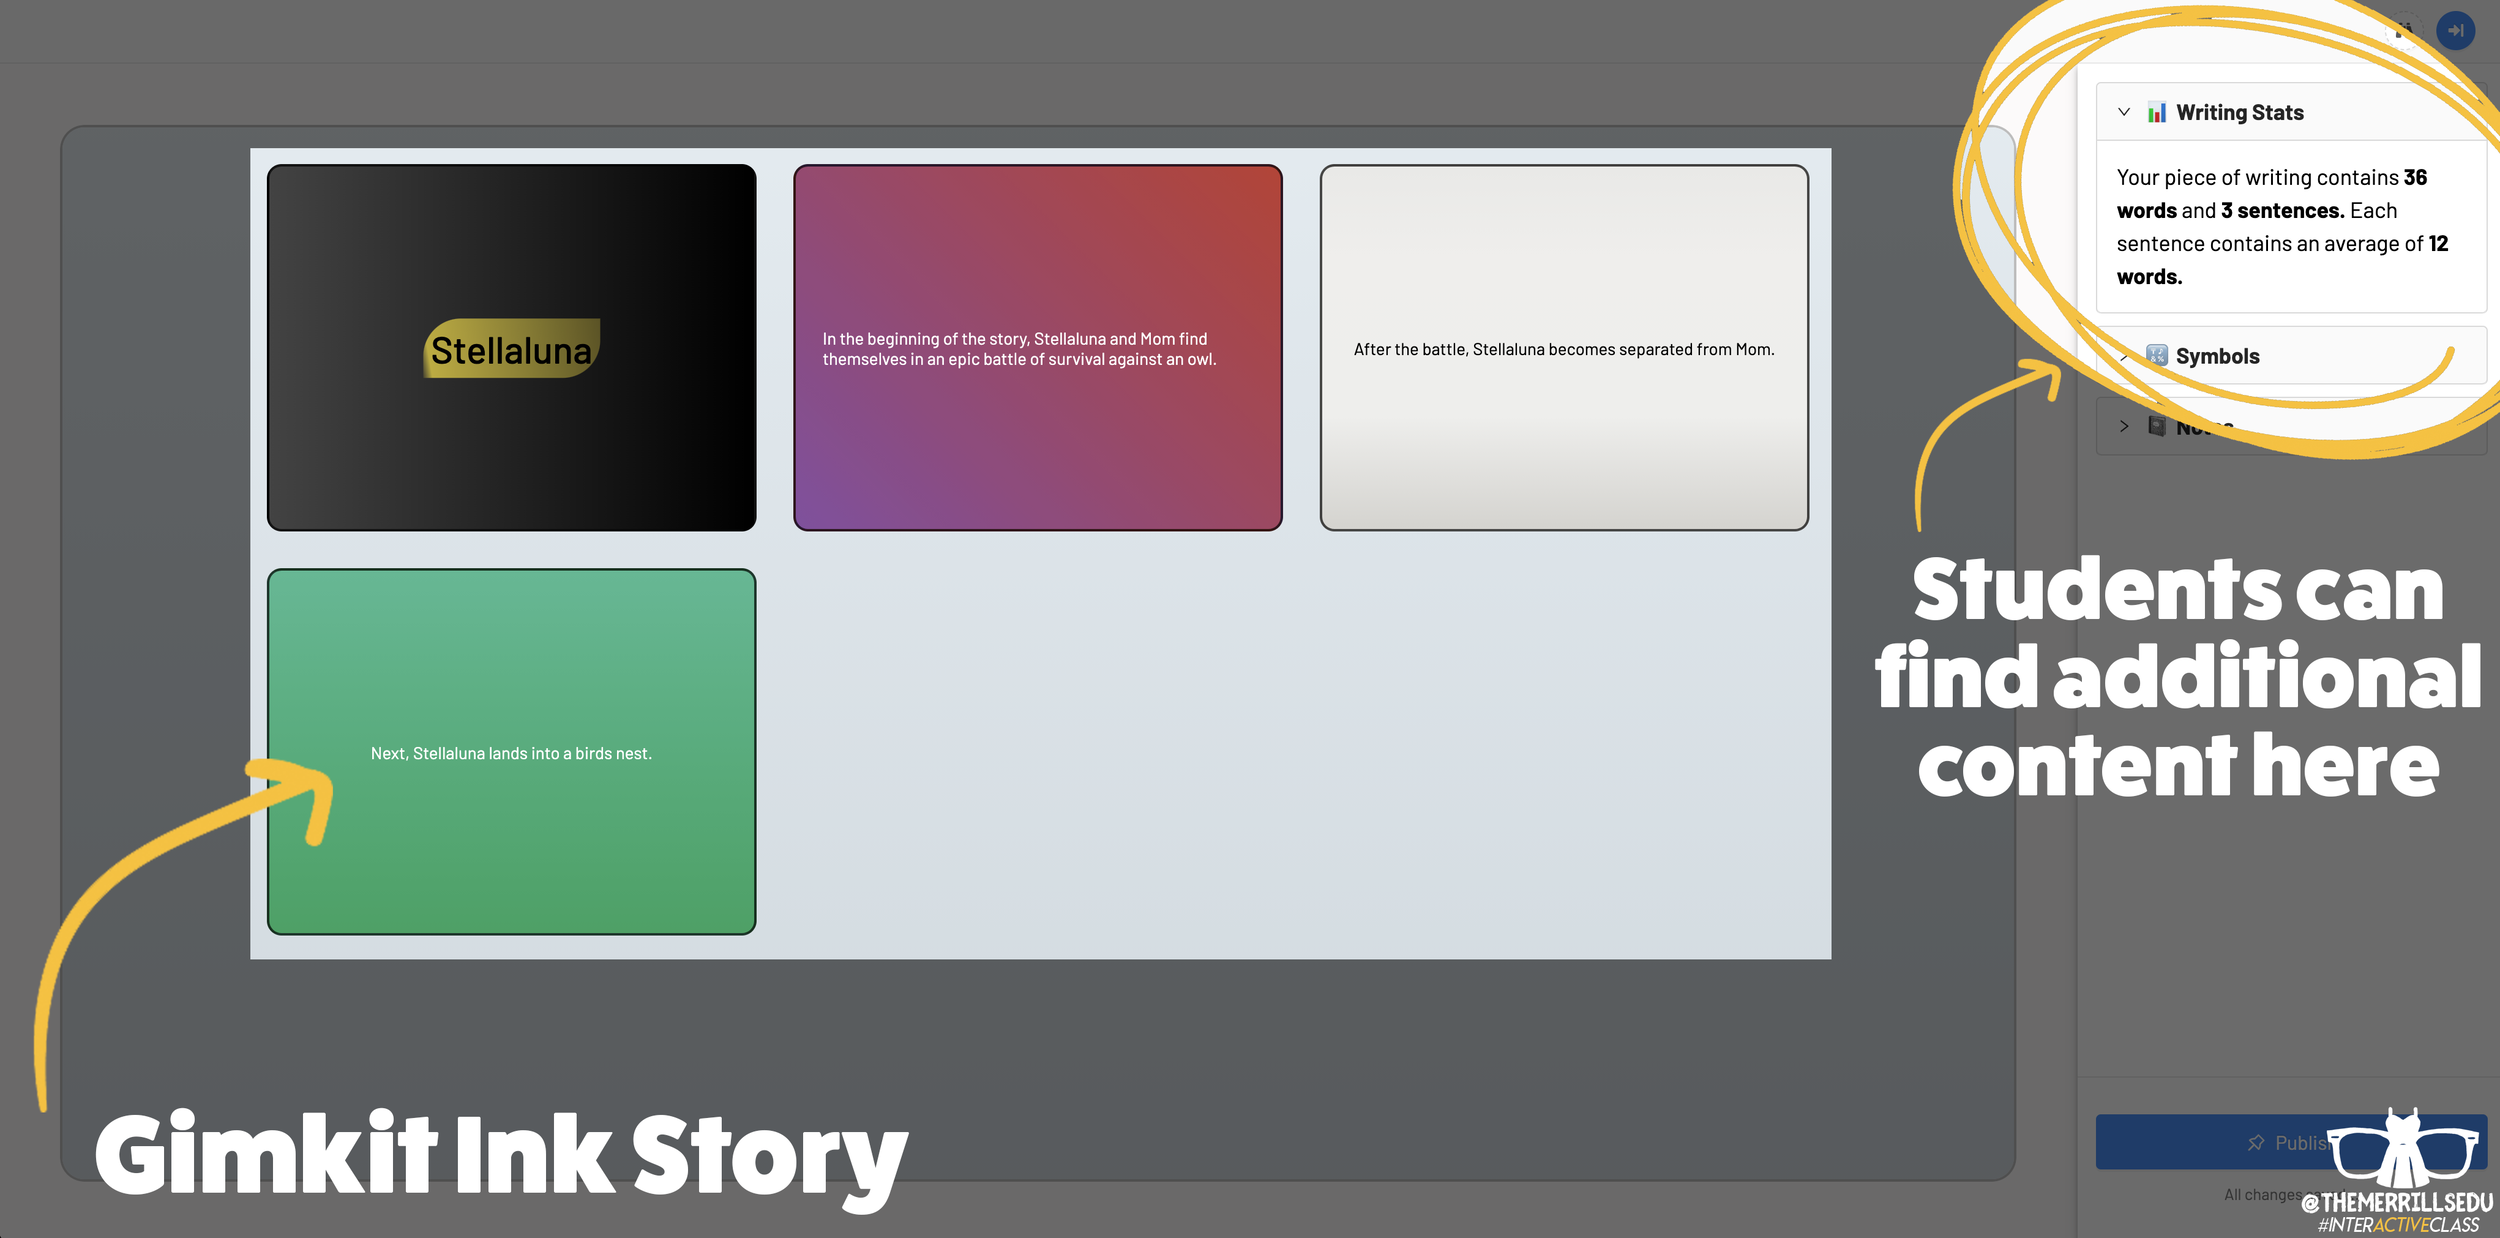

Writing an article on Gimkit Ink provides an editable document where your students can add titles, subtitles, text and more. This is perfect for sharing an idea - similar to a newspaper, blog post, etc. Adding a story gives students options to generate a storyboard or mind map experience to generate their writing. It’s more visual and allows the writer to control the pace. This is ideal when working to tell a story, and can be extremely powerful for young learners who are trying to organize their thoughts. In a Story, students have the capability to add features such as: images, YouTube videos, Desmos Graphs, Flipgrid Shorts recordings, Scratch projects, Google slides / sheets / docs, Anchor podcasts and Codepen. Students can add additional frames to their story, creating an easy to follow flow map - but Gimkit intelligently permits students to move their frames around (in case something gets placed out of order, just move it around!). This allows for easy editing and correction.

Step #3: Publishing Student Work
Once Your students have completed adding their information, they are ready to publish their work. To do so, they click the blue “Publish” button. It will prompt them to check their work - are you ready to publish or should you go back and edit? Once they are sure everything looks good, have them click the blue “Ready to Publish” button. The next screen asks your students to enter a title for their work and to select an emoji that they would like associated with it. After entering this info, students are to click the blue “Continue” button. Next, they must pick who can read their work: anyone or just the teacher. After making the first selection, Gimkit asks if they would like to share their name. Students may choose anyone or just the teacher. From here, they are to click the blue “Publish” button. Now, their work is live and ready to be viewed. Note: each student post has it’s own unique URL. So, this may be shared with families at home through other apps like Seesaw, Microsoft Teams, Google Classroom, etc.
Step #4: Viewing Other Students Work

Once your students have published their own work, they are prompted with a screen that shares their own personal URL to their project. Additionally, they have the option to “Open the Project,” which will take them back to the original landing page that you the educator created (“the house!”). Now your students can see everything that is and has been shared. If enabled, students can leave emoji reactions for quick peer-to-peer feedback. It’s a great way to provide an outlet for your students to share content with their friends!

The Paper and Time Machine
The Paper is Gimkit Ink’s workflow that shares all of the latest post from across all of your projects. This is helpful if you have multiple projects going at the same time and need to bounce back and forth efficiently. Your posts can also be found by clicking on “Time Machine” from the Gimkit Ink dashboard.
-- Stay tuned for more on how you can embed Gimkit’s Ink into your classroom! 👓👗
For more tips, tricks and lesson ideas for making learning more interACTIVE, check out our books The InterACTIVE Class and Flipgrid in the InterACTIVE Class on Amazon!


InterACTIVE Attendance Slides! (Guest Post: Karie Frauenhoffer)
Learn how rockstar 7th Grade educator Karie Frauenhoffer makes taking attendance into an interACTIVE experience! Be sure to follow Karie on Twitter at @legitkfrauey for more tips and tricks!

Walking into school and waiting for your day to begin may be sluggish for some students. So, we reached out to our dear friend Karie (@legitkfrauey) who shared this ⚡️EPIC⚡️ tweet!
Meet Karie!

Karie has spent a decade in the classroom and 7th graders have had her heart for the last nine years. Currently she is hybrid teaching both Language Arts and Social Studies and loves the challenge of taking her lessons and making them #InterACTIVE. Karie is a Flipgrid Ambassador and #MIEExpert. You can follow her on Twitter @legitkfrauey!
In this blog post, you’ll learn and receive:
(Click on any subheading to jump to that section)
⭐️ How Karie makes attendance interACTIVE!
⭐️ Download a ⚡️FREE TEMPLATE⚡️ to start your own!
InterACTIVE Attendance!
Virtual learning ISN'T fun… I mean, don’t get me wrong -- I do love teaching with my pups, but I do miss the kiddos. One of the ways that I have learned how to hook my kiddos and get them excited for the day is with my interactive attendance slides.
Interactive attendance slides?! WHAT?! YES!! Let me tell you how this came about!
I started doing just standard attendance slides using PearDeck (an AMAZING interactive tool, highly recommend!) -- students would click the link to access the PearDeck (in teacher-paced) and they would move the icon over their number & that would indicate they were present.

But this got boring-- obviously. SOOOO, I began to experiment with different types.
We made the PearDeck Pear, Peary a turkey!

LOOK at those cute turkeys!
We also experimented with This or That slides…

And I began to see MORE students were present for class & were engaging with me. I always tied the attendance into the lesson and used it as a way to chat with the students.
I got my BIGGEST excitement with my hidden picture attendance slides…


To hold students accountable for not just DOING the attendance but not doing the work; in their classwork for the day-- I incorporated a question that tied in with the hidden picture. (How many Ms. Frauey’s are there? What was Ms. Frauey doing?)
⭐️ Download a ⚡️FREE TEMPLATE⚡️ to start your own!

Enjoy and thank you for reading!
—Karie ❤️
For more tips, tricks and lesson ideas for making learning more interACTIVE, check out our books The InterACTIVE Class and Flipgrid in the InterACTIVE Class on Amazon!


How to Record Collaborative Videos in Flipgrid with Multiple Users
How can you allow multiple students to appear in the same Flipgrid video? @TheMerrillsEDU walk you through how to add a new element of collaboration to your lessons!

Remote Learning has challenged how educators can successfully implement collaboration within and outside of the classroom. The ability for students to work together and remain six feet apart, or even work together remotely has spawned numerous creative ideas, but this idea from our friend Adam may be our favorite: “Collaborative Videos in Flipgrid: Record with Friends, From Anywhere.” Check out his tweet:
So…How does this work? It’s actually not as difficult as it might sound! In this post we’ll walk you through each step.
(NOTE: this will not work on mobile devices at this time)
Click on any subheading to jump to that section:
🚀 Launch a ⚡LIVE⚡ Zoom / Google Meet / Teams / WebEx call with Breakout Rooms
(Click your preferred platform to jump to that section)
Microsoft Teams | Zoom | WebEx | Google Meet
🚀 Launch a ⚡LIVE⚡ Zoom / Google Hangout / Teams call
Step #1: Launching a collaborative chat session
It doesn’t matter what you’re using for this step - all the platforms will work! Start off by launching a new meeting / call. If you’re using one of the aforementioned platforms to conduct a class call, you can always generate breakout rooms to properly group your students.
How to Launch Breakout Rooms on Microsoft Teams
Start a new meeting. Then once in the meeting, look for the “Breakout Room” button located at the top right hand side of the screen. Click here to open new options.
After you have clicked the “Breakout Room” icon, you will have several options. Start off by selecting how many rooms you need. Then, select how you prefer to assign the participants (automatically or manually).
For more information on Breakout Rooms in Teams, click here.
Click here to move onto Step #2


How to Launch Breakout Rooms on Zoom
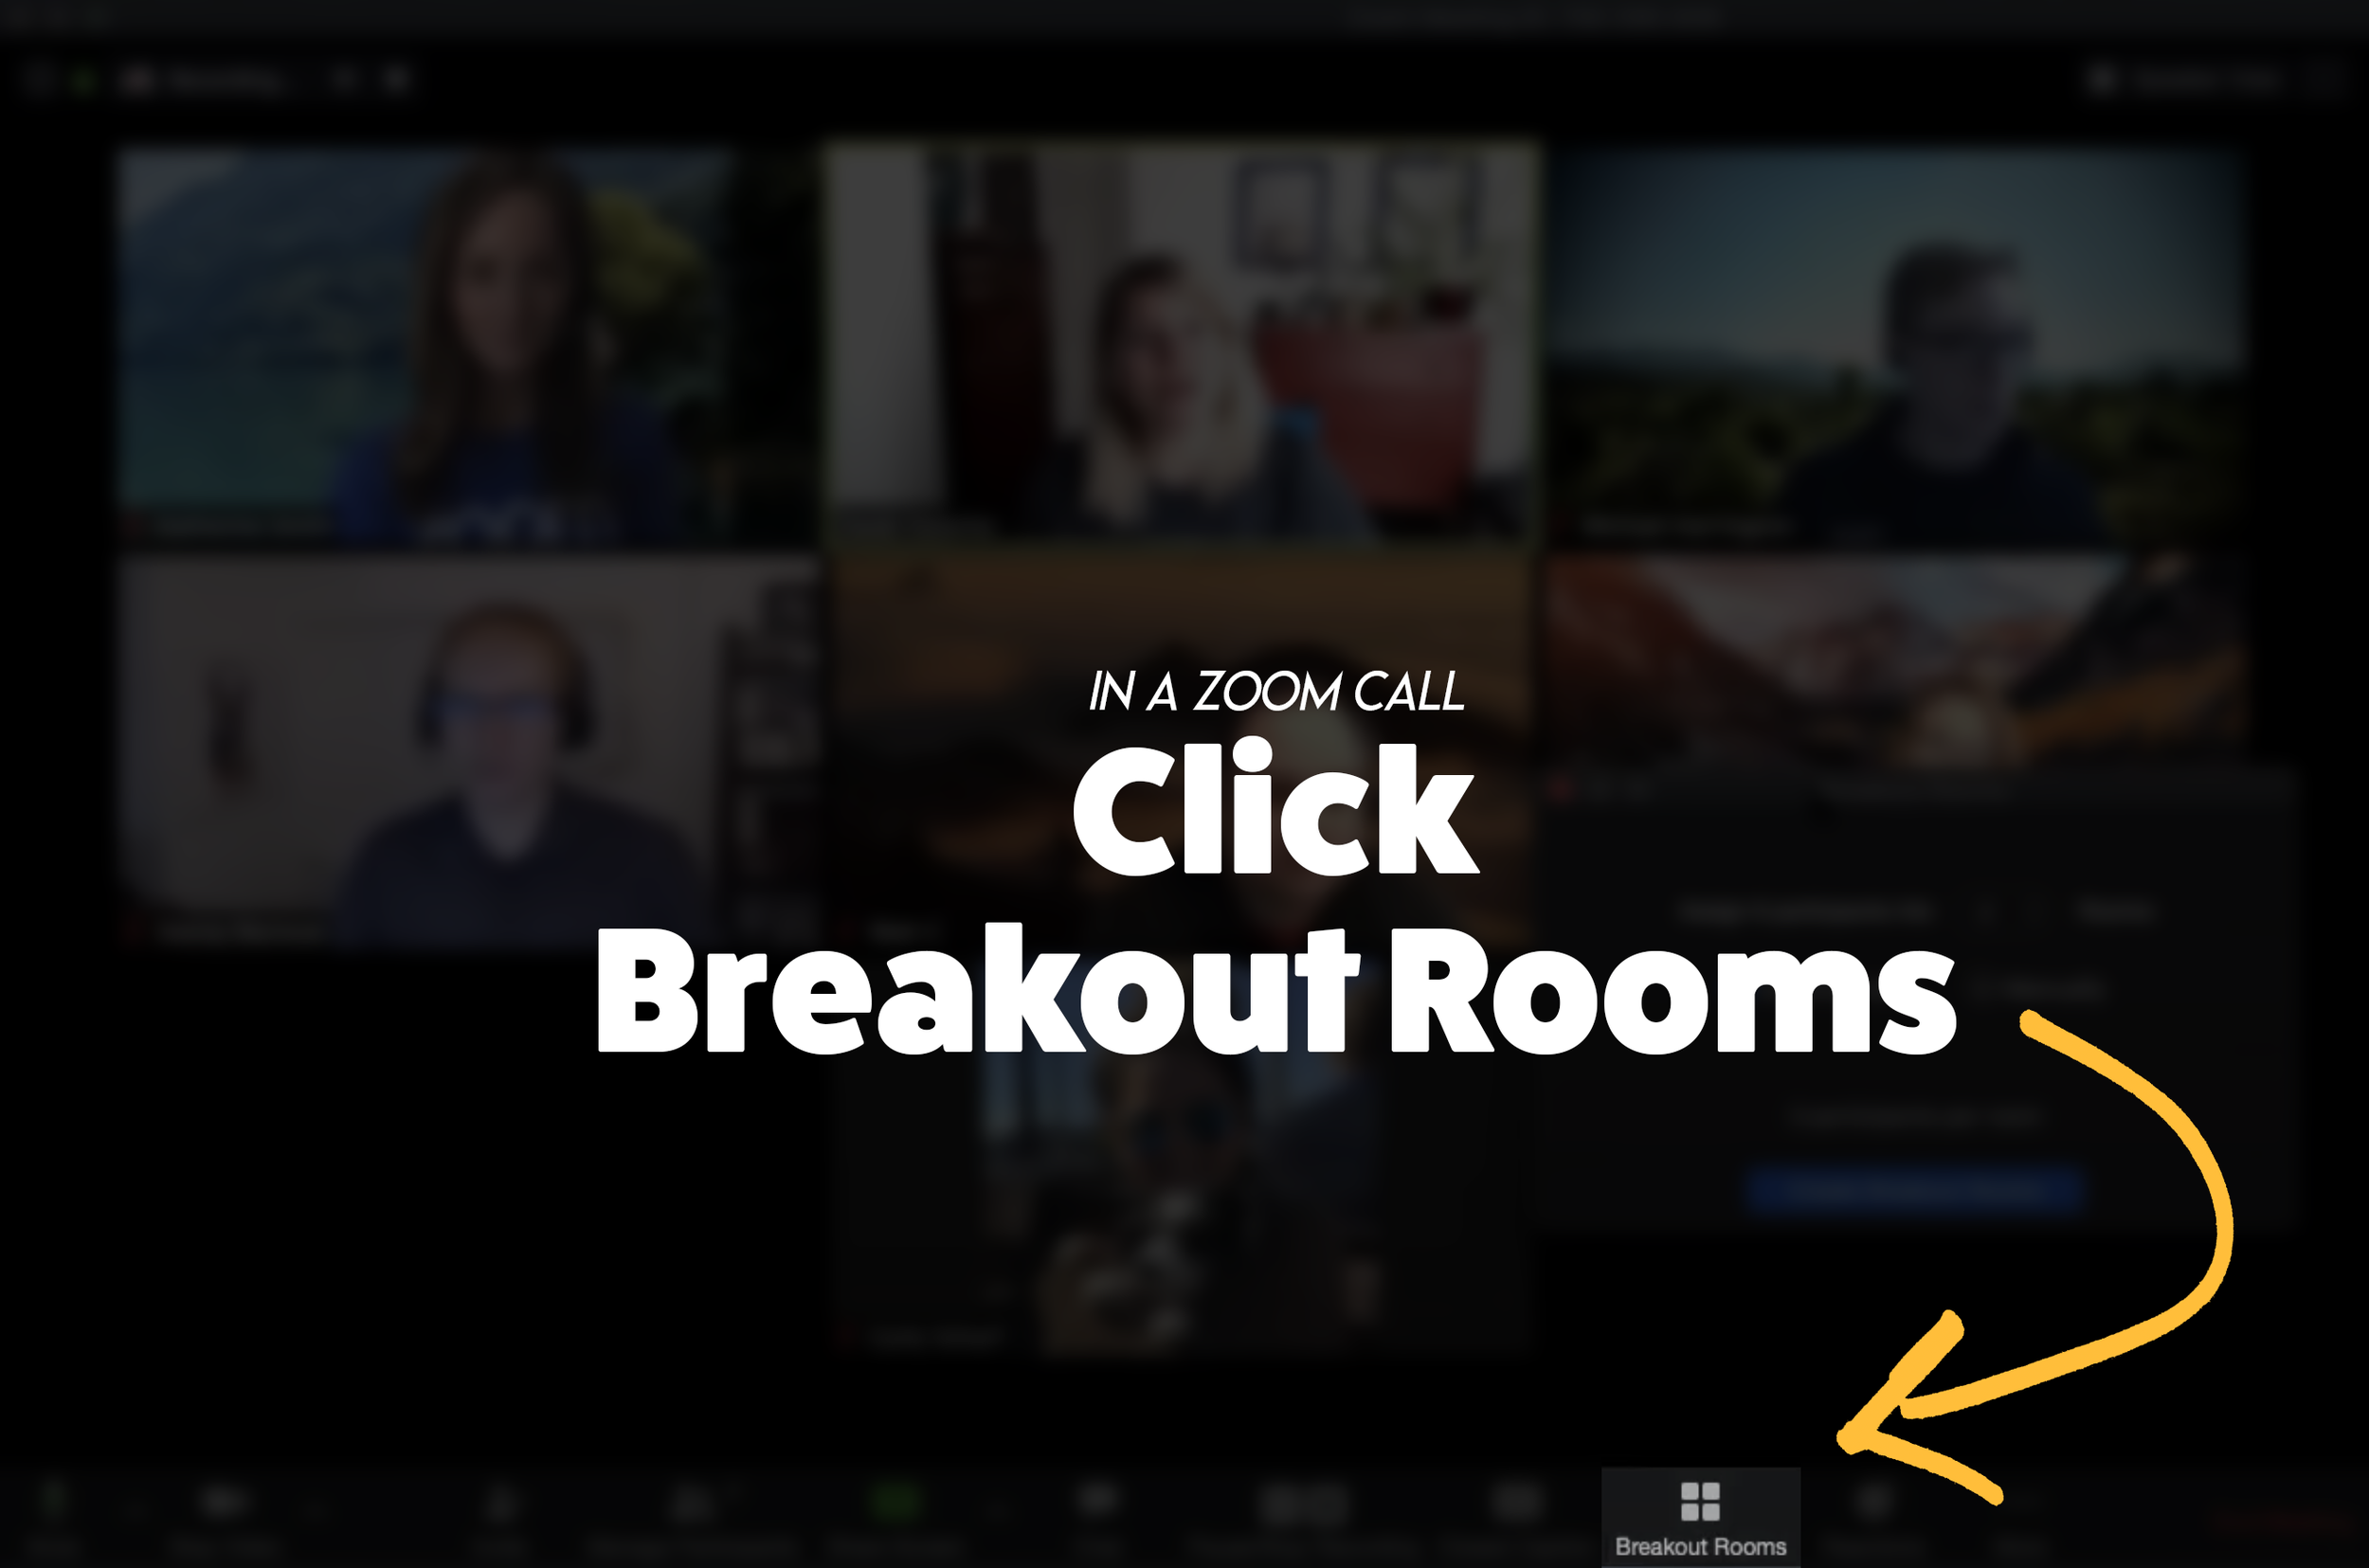
From a Zoom Call, click the “Breakout Room” icon. Then, follow the prompts to select the number or rooms and how to assign participants. If you need to enable Breakout Rooms on Zoom, follow these steps (or click here for more info):

Sign in to the Zoom web portal as an administrator with the privilege to edit account settings.
In the navigation menu, click Account Management then Account Settings.
Navigate to the Breakout Room option on the Meeting tab and verify that the setting is enabled.
If the setting is disabled, click the toggle to enable it. If a verification dialog displays, choose Turn On to verify the change.(Optional) Click the checkbox to allow meeting hosts to pre-assign participants to breakout rooms.
(Optional) If you want to make this setting mandatory for all users in your account, click the lock icon, and then click Lock to confirm the setting.
Click here to move onto Step #2


Launch a WebEx meeting, then select “Breakout Rooms” from the lower portion of the window. Next, select the Breakout tab and choose “Enable Breakout Session.”
Once enabled, “Enable Breakout Session” will appear with a checkmark and the button will appear at the bottom of the menu bar.
Click the “Breakout Session” button and then follow the prompts to set up your breakout rooms.
Click here to move onto Step #2
How to Launch a Breakout Room on Google Meet
For more info on Breakout Rooms in Google Meet, click here.

Breakout Rooms is currently available to users with G Suite Business, Workspace Essentials, Business Standard, Business Plus, Enterprise Essentials, Enterprise Standard, and Enterprise Plus editions. This is also available to users with G Suite Enterprise for Education license and permissions to create meetings.
On your computer, start a video call.
In the top right, click Activities Breakout rooms.
Tip: To prevent students from having the ability to create breakout rooms, admins should ensure Meet creation privileges are reserved for faculty/staff organizational units only.
In the Breakout rooms panel, choose the number of breakout rooms. You can create up to 100 breakout rooms in a call.
Call participants are then distributed across the rooms. To manually move people into different rooms, you can:
Enter the participant’s name directly into a breakout room.
Click the participant’s name. Hold down the mouse, drag the name, and then drop it into another breakout room.
To randomly mix up the groups again, click Shuffle .
In the bottom right, click Open rooms.
Click here to move onto Step #2
Step #2: Launch the Flipgrid Screen Recorder in a Topic Response

Now that you are live in your Breakout room, head over to Flipgrid and access the Topic you wish to collaborate on. Once you’re logged into the Topic, click the add a response button or the red record button. When the Flipgrid camera opens, click on the “Options” icon. Then click on “Screen Recorder.” Now, with your screen shared, you can capture yourself and all the others on your web call / meeting!
Step #3: Sharing Screens
You can get creative with this! The user who initiates the Flipgrid response doesn’t have to be the only one who shares their screen. Have students take turns sharing screens by having the Flipgrid camera screen record the web meeting / call. Students can share each others’ screens through the call platform, allowing for everyone to share.
Tip: Use the pause button between students to save recording time and engagement.
Now, your students have collaborated in the same Flipgrid response!
Stay #interACTIVE!
-👗➕🕶️
For more tips, tricks and lesson ideas for making learning more interACTIVE, check out our books The InterACTIVE Class and Flipgrid in the InterACTIVE Class on Amazon!


How to Use Flipgrid During Remote Learning
Remote learning is challenging, but infusing technology can help make tasks easier. Flipgrid gives both educators and students opportunities to share content in creative and unique ways. In this blog post you’ll learn about some of our favorite ways to use Flipgrid throughout remote learning.

Remote learning is challenging, but infusing technology can help make tasks easier. Flipgrid gives both educators and students opportunities to share content in creative and unique ways. In this blog post you’ll learn about some of our favorite ways to use Flipgrid throughout remote learning.
Click on any subheading to jump to that section:


Educator Ideas
Here are some ways that educators can use Flipgrid throughout remote learning (and beyond!)

Use the Shorts Camera!
From the Flipgrid educators dashboard, locate the “Shorts” tab from the top. Clicking on it will give you access to the Flipgrid Shorts camera. Use the Flipgrid Shorts camera to record lessons, launch lessons, or simply teach to a specific target. Educators have a maximum of ten minutes of recording time.
Embed a Flipgrid Topic / Group into your LMS
If you’re currently using an LMS (Learning Management Software), you can easily embed a Flipgrid Topic or Group right into it. From a Flipgrid Topic or Group, click the blue “Share” button. Then click the embed icon (</>). It will appear as though nothing happens, but your device has just copied the embed code. Simply paste it into your LMS’s embed editor. Now, your Topic / Group will appear right in the LMS.
Flipgrid and YouTube LIVE Hack
Educators can launch a live YouTube lesson right within a Flipgrid Topic! To do so, launch a live YouTube video and then create a new Topic. Next, click on YouTube in the Topic’s media section. Paste the link to your YouTube live video. You are now live in the Flipgrid Topic!
Virtual Office for Parents / Video Voicemail
Allow parents (or students) to reach out with questions any time and respond when its convenient for you! Set up a Topic and share the Join Code or QR Code with families.
Fluency Checks
Set up a Topic for your students to monitor their fluency. Assign a reading passage in the Topic (or attach a link) and select a recording time for your students. Students open the passage and hit record!
Anchor Charts
Use the Flipgrid Shorts Camera to create digital anchor charts. Add resources as Photo Stickers, then resize / move as needed.
For a full tutorial on how this works, click here.

Send Home Messages with the AR (Augmented Reality) Feature
Use the Flipgrid Shorts Camera to record a message for your students. Share the message by downloading the Flipgrid AR QR code. Send out the QR code and then have your students open the message using the Flipgrid app. Doing so will open the video up in augmented reality.
Modeled Science Experiments
Use the Flipgrid Shorts Camera to record the guided steps of a Science experiment. This will allow students to start / stop the video to follow along.

Virtual Field Trips
The pandemic has eliominated any changes of taking your class on a “real” field trip, but that doesn’t mean that you can’t give them a similar experience a virtual field trip! Record a video of yourself at a preferred destination. Then, set up a Flipgrid Topic and upload the video. Have your students log onto the Flipgrid Topic and then either answer questions, or leave questions!
Click here or the image to visit The Met on Flipgrid’s Discovery Library
Student Ideas
Here are some recommended activities for using Flipgrid throughout remote learning - and even in-person!
Share Critical Thinking Skills
One of the easiest ways to use Flipgrid is to have your students explain their work. For example, after working out a math problem on a whiteboard, have your students explain their thinking in a Flipgrid video. This strategy then is seen by all the other students in the class - who theoretically are acting as young teachers themselves. Even the incorrect responses can teach us!


Whiteboard
Flipgrid’s Whiteboard feature is built directly into the Shorts camera. Have your students quickly turn their screen into a digital whiteboard where they can annotate over it.
Mic Only Mode
Mic Only Mode is a friendly way for camera shy students to share their voice. In Mic Only Mode, the students voice is recorded, but not the video. There are many creative uses for Mic Only Mode, but this Tweet from Ann Kozma (@annkozma723) is one of our favorites!

Text Comments
Like Mic Only Mode, this feature is ideal for students with low-bandwidth. Adding a text comment allows students to comment on videos without having to upload lots of data.
Opinion Writing
Working on Writing throughout remote learning is difficult. But, using Flipgrid to help students organize their thinking can improve their results. For example, students can use Flipgrid to debate the pros and cons of a topic prior to writing to generate their thinking.


Book Clubs
Educators can easily differentiate reading instruction on Flipgrid. By assigning students reading tasks, students can participate in Book Clubs where they exchange thoughts about what they are reading. This could also be an activity associated with Literature Circles.
Three Truths and a Lie
(with Non-Fiction Texts)
After reading a non-fiction text, have your students complete a Three Truths and a Lie video. This is where students give three facts about what they learned, and one lie. Other students watch the video to see if they can pinpoint which one isn’t true.


Main Idea Summarization
Have your students use the built in Flipgrid Frames feature to add the “breaking news” frame around their video response. Then, students explain what they believe the main idea of the text was.
Character Illustrations
Use the built in emoji stickers in the Flipgrid Shorts Camera to have your students retell the beginning, middle and ending of the story. Check out our example Tweet!

Emoji Math
Have students use the built in Flipgrid emoji stickers as math manipulatives when working with the digital whiteboard. Or, as an educator, make a math challenge that substitutes the numbers with emojis. Then, your students must guess what numbers the emojis represent.
Math Collaboration
Have your students design their own math challenges by recording a prompt on Flipgrid, then sharing it with their classmates. Their classmates must attempt to solve, and the creator checks their work!

Stay #interACTIVE!
-👗➕🕶️
For more tips, tricks and lesson ideas for making learning more interACTIVE, check out our book The InterACTIVE Class and Flipgrid in the InterACTIVE Class on Amazon!


20 Apps that Work with Flipgrid
There’s no question that Flipgrid is one of our favorite Ed Tech tools. One of the best parts about Flipgrid is just how well it integrates with other apps. Whether you’re app smashing, embedding, or just simply adding a link, here are 20 apps that work well with Flipgrid.
There’s no question that Flipgrid is one of our favorite Ed Tech tools. One of the best parts about Flipgrid is just how well it integrates with other apps. Whether you’re app smashing, embedding, or just simply adding a link, here are 20 apps that work well with Flipgrid.
Click on any image to jump to that section, or start reading below!


1. Adobe Spark
Create images, video, and webpages
Link 👉 https://spark.adobe.com/
Ways to Use with Flipgrid:
Design a podcast cover in Spark, then save it and upload it to Flipgrid. Record your podcast in Flipgrid!
Create a Spark page, then copy the link. Share the link in a Flipgrid response
Create a Spark video and download it. Then, upload it to Flipgrid!


2. BreakoutEDU
Engaging gamification for the classroom
Link 👉 https://www.breakoutedu.com/
Ways to Use with Flipgrid:
Have your students complete a Breakout challenge, then have them answer follow-up questions on Flipgrid
Use different videos for different puzzles, then have students respond to the appropriate puzzle’s video

3. Book Creator
A simple way to create digital books online
Link 👉 https://bookcreator.com/
Ways to Use with Flipgrid:
Create a collaborative class book, then embed a Flipgrid topic into the book. As your students read the book, they can add their thoughts into the topic.
Create a book on Book Creator, then share the link in a Flipgrid video.

4. Buncee
Create and share engaging content
Link 👉 https://app.edu.buncee.com/
Ways to Use with Flipgrid:
Create a Buncee that ties into a text, then have your students answer several follow-up questions on Flipgrid.
Create a Bitmoji classroom, then share the Buncee as a Topic Resource. This will add your Buncee Bitmoji classroom to the top of the Flipgrid Topic
Create a Flipgrid Topic and record a video as a student in that topic. Ask your students to solve some type of challenge. Then, from the Flipgrid educators dashboard, add a Buncee that hyperlinks to another Buncee. This Buncee should somehow tie into your video challenge, and can be used as a breakout or a way to access different “rooms.”
5. Canvas
Learning management system
Link 👉 https://www.instructure.com/canvas/
Ways to Use with Flipgrid:
From the Flipgrid Educator’s Dashboard, select a Topic or Group. Click the blue “Share” button, then click on the blue brackets symbol (</>) to copy the embed code. On a Canvas page, click on the “Edit/Insert Media” button. Next, click on “Embed,” and then paste the copied Flipgrid code. Click “Ok” to embed your Flipgrid content directly into the Canvas page!


6. Chatterpix Kids
Easily animate still images
Link 👉 https://apps.apple.com/us/app/chatterpix-kids/id734046126
Ways to Use with Flipgrid:
In the Chatterpix Kids app, animate a character from a story by explaining the characters’ feelings, or experience. Export your Chatterpix video, then upload it into Flipgrid as a clip.
Bring historical figures to life by animating them in Chatterpix Kids and exporting the video to your device’s camera roll. Then, upload it to Flipgrid and have your students watch their classmates videos and respond accordingly.
7. (Apple) Clips
Simple and easy video editor
Link 👉 https://www.apple.com/clips/
Ways to Use with Flipgrid:
Record a video in Clips to launch an exciting lesson. Download the Clips video to your camera roll, then upload it to a Flipgrid topic to share with your students.
In Clips, camera shy students can add a Memoji and place it over their face while they record. Once their video is ready, have them export the video to their camera roll. Then, upload it to Flipgrid to share!


8. Do Ink Green Screen
Primary friendly green screen app
Link 👉 https://apps.apple.com/us/app/green-screen-by-do-ink/id730091131
Ways to Use with Flipgrid:
Buy several green plastic table cloths from the Dollar Store, then hang them around your classroom. In the Do Ink app, have your students place themselves into a text. Add an image to the middle layer in Do Ink, then on the top layer have them use the live video camera (while they stand in front of the green screen). Export the video, then upload it to Flipgrid to share with other classmates!
9. Epic Reading App
The Netflix of books for kids
Link 👉 https://www.getepic.com/
Ways to Use with Flipgrid:
Create a class in Epic, then assign differentiated texts to your students. In the Flipgrid Educator’s Dashboard, create a Flipgrid Topic where the students can retell the story that they read. Add the links to the assigned Epic books into the Topic.
Have your students use Flipgrid’s screen record to share important parts of a book from Epic that they learned from. This could include a scavenger hunt for: text features, phonograms, compound words, etc.

10. Genially
Create interactive content
Link 👉 https://www.genial.ly/en
Ways to Use with Flipgrid:
Embed a Genially project as a Flipgrid resource, then have your students maneuver their way through the project. Have them answer questions in a Flipgrid video.
Have your students design their own projects on Genially, then share their links in a Flipgrid video. Fellow classmates can view their classmates Genially projects, then leave feedback on Flipgrid.


11. Herstory
Bring forgotten stories of women to life
Link 👉 https://www.lessonsinherstory.com/
Ways to Use with Flipgrid:
From the Herstory app, have your students save an image to their camera roll. Then on Flipgrid, have them upload the image as a sticker in the Flipgrid camera. Students can move the image appropriately, then explain what they learned in a video.
12. Nearpod
Classroom management and presentation
Link 👉 http://www.nearpod.com
Ways to Use with Flipgrid:
Embed a Flipgrid Topic or Group right into your Nearpod presentations
Add a Nearpod link to your Flipgrid Topics


13. Newsela
School-aged articles appropriate for all levels
Link 👉 https://newsela.com/
Ways to Use with Flipgrid:
Assign an article to your students in Newsela, then have them answer several questions on a Flipgrid Topic.
Create a Flipgrid Topic and attach a Newsela link. Have your students read the article, then respond accordingly.
14. Seesaw
Digital Portfolios and Family Communication
Link 👉 https://web.seesaw.me/
Ways to Use with Flipgrid:
From the Flipgrid Educator’s Dashboard, select a student’s video response. Click on the share button to copy the video’s URL. On the Seesaw Educator’s Dashboard, add the video as a link to share with families.
Have students create a video in Flipgrid, then download the video to their device. Upload it to Seesaw to share with their teacher and family.


15. Microsoft’s Sway
Simple and Efficient Web Pages
Link 👉 https://sway.office.com/
Ways to Use with Flipgrid:
Use Flipgrid to document the writing process. Type out the writing into a Word Document, then transform it to a Sway. Share final Sway product on Flipgrid so that classmates can see.
Use Flipgrid as a collaborative tool for students to discuss how to create / design their group Sway. Once the product is finalized, share it back on Flipgrid for the world to see!
16. Microsoft’s Teams
The “House” for All of Your Content
Link 👉 https://www.microsoft.com/en-ww/microsoft-365/microsoft-teams/group-chat-software
Ways to Use with Flipgrid:
Add Flipgrid as a tab in a Teams channel
Add Flipgrid in a Teams conversation


17. TextingStory
Create Fake Texting Threads
Link 👉 https://textingstory.com/
Ways to Use with Flipgrid:
Launch the TextingStory app, then re-create a conversation between two characters from a text. Export the video, then upload it to Flipgrid to share.
Alter a section of a story by recreating a conversation between two characters. Export the video, then upload it to Flipgrid to share.
18. ThingLink
Add Video and Text to Images
Link 👉 https://www.thinglink.com/app/
Ways to Use with Flipgrid:
Create a ThingLink project and add it as a Flipgrid Topic’s resource.
Use Flipgrid’s built-in screen recorder to record a ThingLink project.


19. Wakelet
Save, Organize and Share Content
Link 👉 https://wakelet.com/
Ways to Use with Flipgrid:
From a Wakelet collection, record a Flipgrid video. Then, share the Wakelet collection with your students.
Create a collaborative Wakelet collection and hyperlink a Flipgrid topic. Students can collaborate, then share their final answers on Flipgrid.
20. Wonderopolis
Higher Level Questioning
Link 👉 https://wonderopolis.org/
Ways to Use with Flipgrid:
Add a Wonderopolis article to a Flipgrid Topic’s resource or directly into the prompt.
Have students discuss their opinions after reading a Wonderopolis article.
Stay #interACTIVE!
-👗➕🕶️
For more tips, tricks and lesson ideas for making learning more interACTIVE, check out our books The InterACTIVE Class and Flipgrid in the InterACTIVE Class on Amazon!


How to Introduce Students to Flipgrid
You’re ready to give Flipgrid a try, but not sure where to start? We’ve got you covered! In this blog post you’ll learn how to set up Groups / Topics, what a student sees, tips for getting started, and even free recommended lessons.

Depending on how your district technology runs, you have several options when introducing your students to Flipgrid. In this post, you’ll learn (click on any subheading to jump to that section):
How to Set Up Your Class on Flipgrid
If you’re new to Flipgrid, it’s important to understand the verb-age. The two key terms that you’re immediately introduced to are: Groups and Topics. Groups are where Topics (or questions) are stored. If you were a high-school teacher, you may want to create a group for each of your periods (unless you want the students in different periods collaborating with one another). For example, you could create a group for Period #1, Period #2, etc. Topics are the question prompts you ask your students to complete. When you create a question / task for your students, you would create a Topic on Flipgrid for them. Students log onto the Topic and complete the assignment. When creating your class, we recommend staying organized from the get-go, as it will save you trouble later on.

Follow these steps to start setting up your class:
From the educator’s dashboard, click on the blue “Create a Group” button.
Give your new Group a name
Optional: Customize the Group’s join code. We recommend doing this because this personalizes how your students log onto Flipgrid. Try changing the join code to your last name, or something memorable.
Choosing How Your Students Will Log On:
Flipgrid offers several ways for your students to access assignments. When building your class, it’s important to make decision here, so let’s discuss what each of the permissions mean. If your students have access to email addresses, you can set up your class to where they use them to log in. You would set your class up as “Student Email” (note: this requires a Google or Microsoft email account). If your students don’t have access to email addresses, then they will need to log on using a Student ID. This can be a lunch number, birthdate, or something familiar to the student.
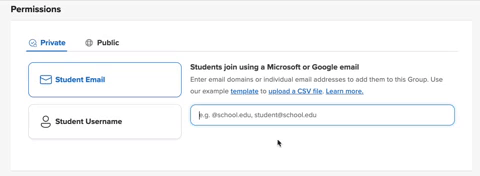
How to Set Up a Student Email Group:
Be sure that you have the Student Email option selected when creating your new Group.
Add the domain of your school’s email addresses (example: @school.com)
How to Set Up a Student Username Group:
Be sure that you have the Student Email option selected when creating your new Group.
Enter in the first name, last name, and student ID of your students. Note: If you have access to a CSV file of your class list, you can upload the entire class list at once.

Once you have selected how your students will log on, you can add a personal touch selecting or uploading an image for the Group cover. After you’re satisfied, click the blue “Create Group” button. Now you’re ready to start adding Topics into the Group.

How to Create a Topic in Flipgrid
Now that you have your Group set up, it will be easy to keep things organized from here on out. To add a Topic (or question that you would like your students to answer) to a Group, start in the Flipgrid Educator’s Dashboard. Click on the Group that you wish to assign the Topic to. Next, click the blue “Add Topic” button. On the next screen, enter a Topic title and prompt (or directions). You also have the option to add additional media to your Topic, such as: a video, image, GIF, YouTube, etc. This will place the media into the Topic so that your students will be able to see it once they log on. Just underneath the Media section is an area where you can adjust the Permissions and Essentials (adjust recording length, moderate the responses, toggle on/off video and text comments and include captions on videos). Once you’re happy, click the blue “Create Topic” button to launch the Topic.

How Students Log Onto Flipgrid
Depending on how you have set up your Group, your students will log onto Flipgrid using either their email address or student ID. Here’s what it will look like from a student’s perspective.

If Students Log on Using Email Addresses:
If your students are logging on using email addresses, they will go to: http://www.flipgrid.com or open the Flipgrid app. They will need to enter your Group Join Code (remember how we recommended customizing it? This is why!), then they will be prompted to log in using their Google or Microsoft email accounts. Once they do this, they will be logged into your class Flipgrid Group.
If Students Log on Using a Student ID:
If your students are logging on a student ID, they will go to: http://www.flipgrid.com or open the Flipgrid app. They will need to enter your Group Join Code (remember how we recommended customizing it? This is why!), then they will be prompted to log in using their student ID. Once they do this, they will be logged into your class Flipgrid Group.

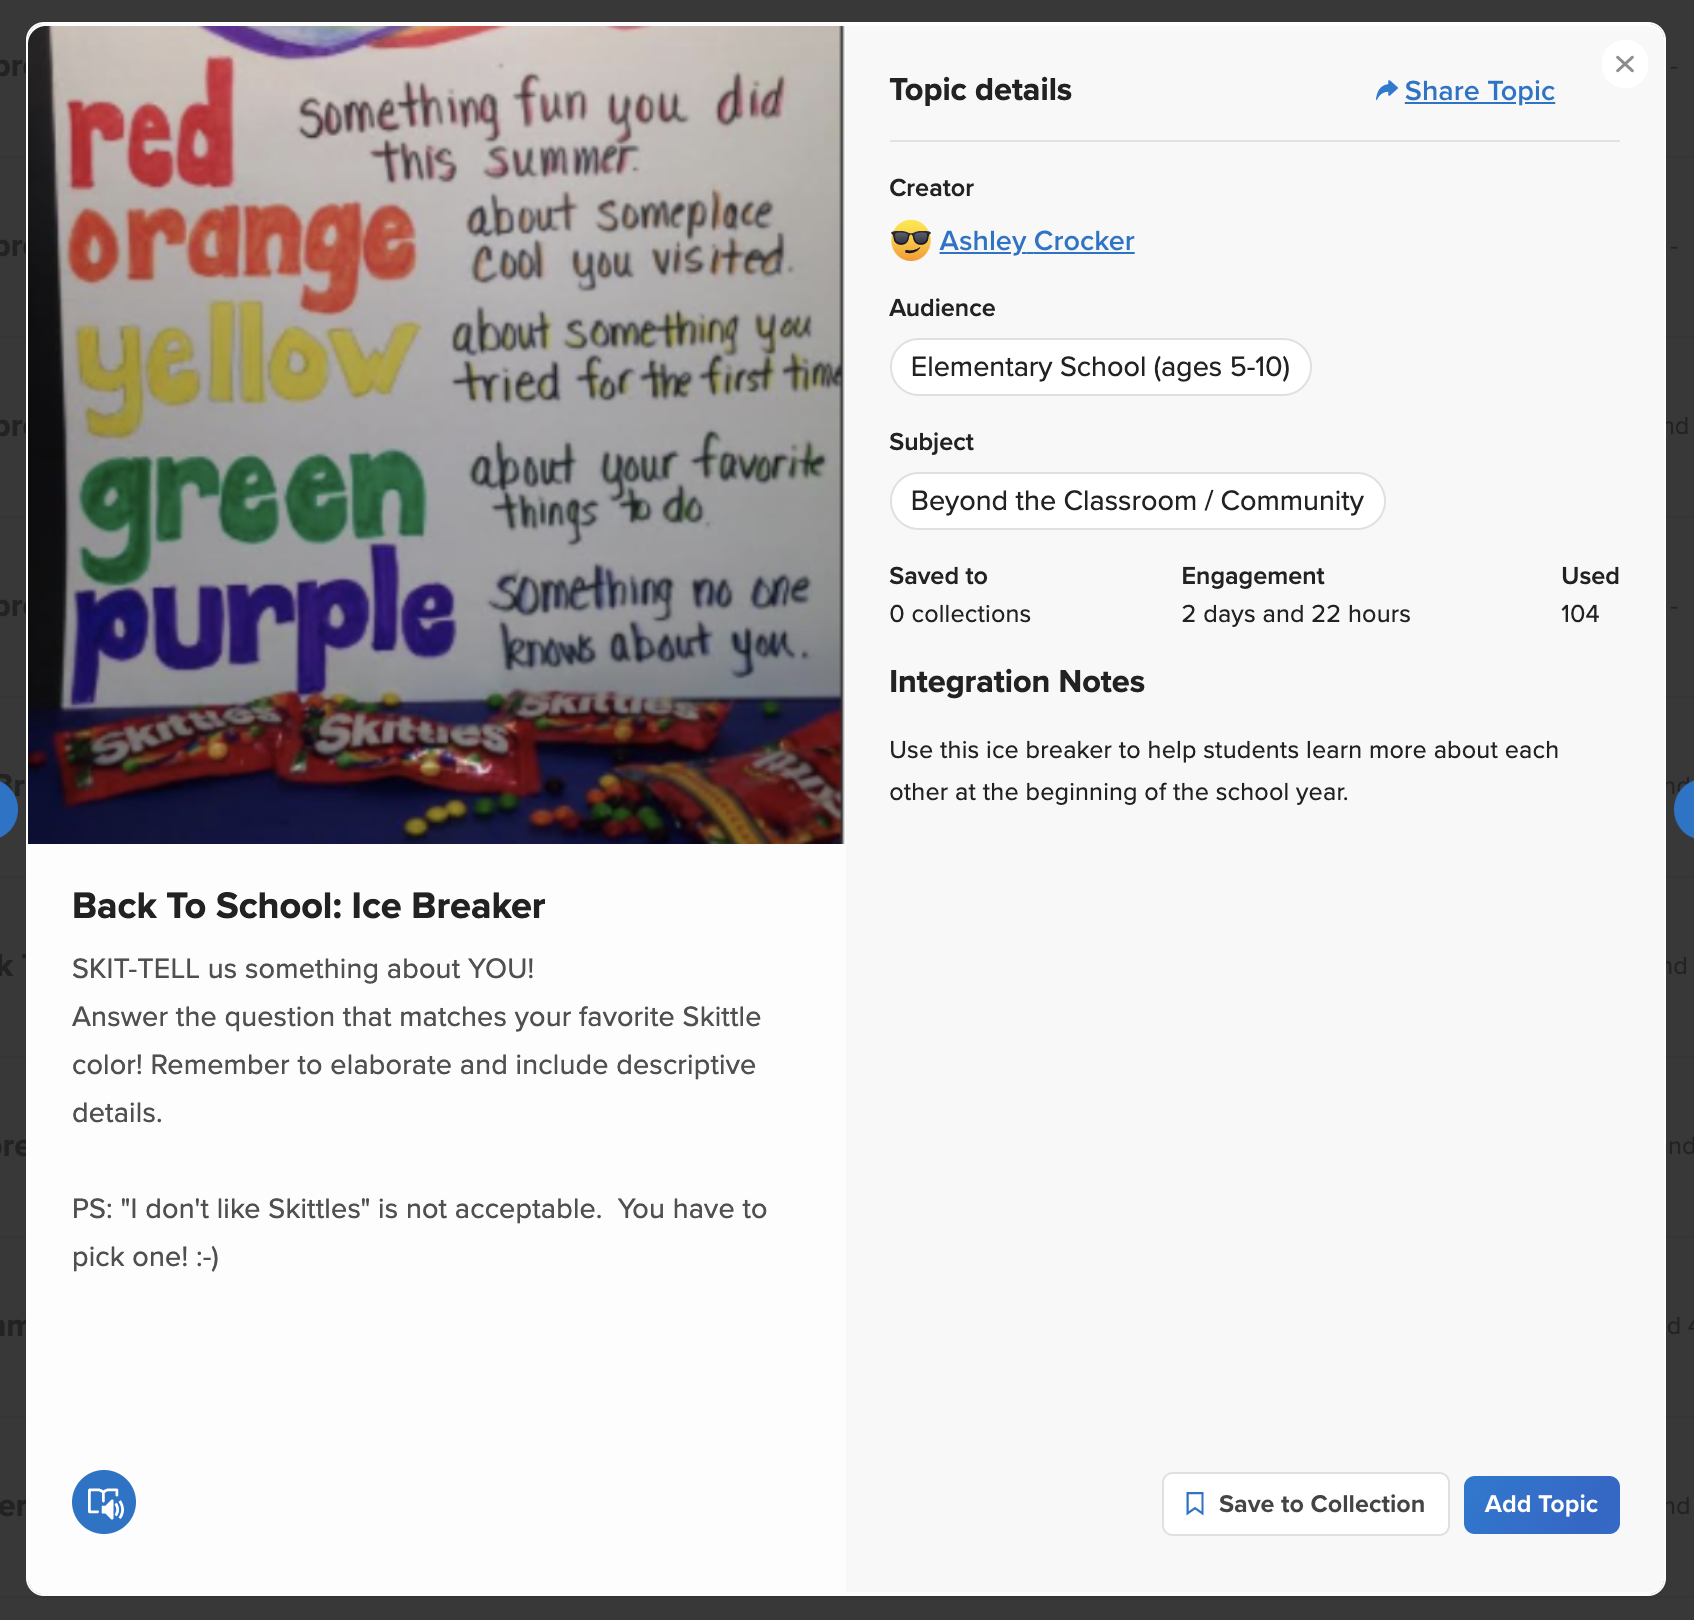
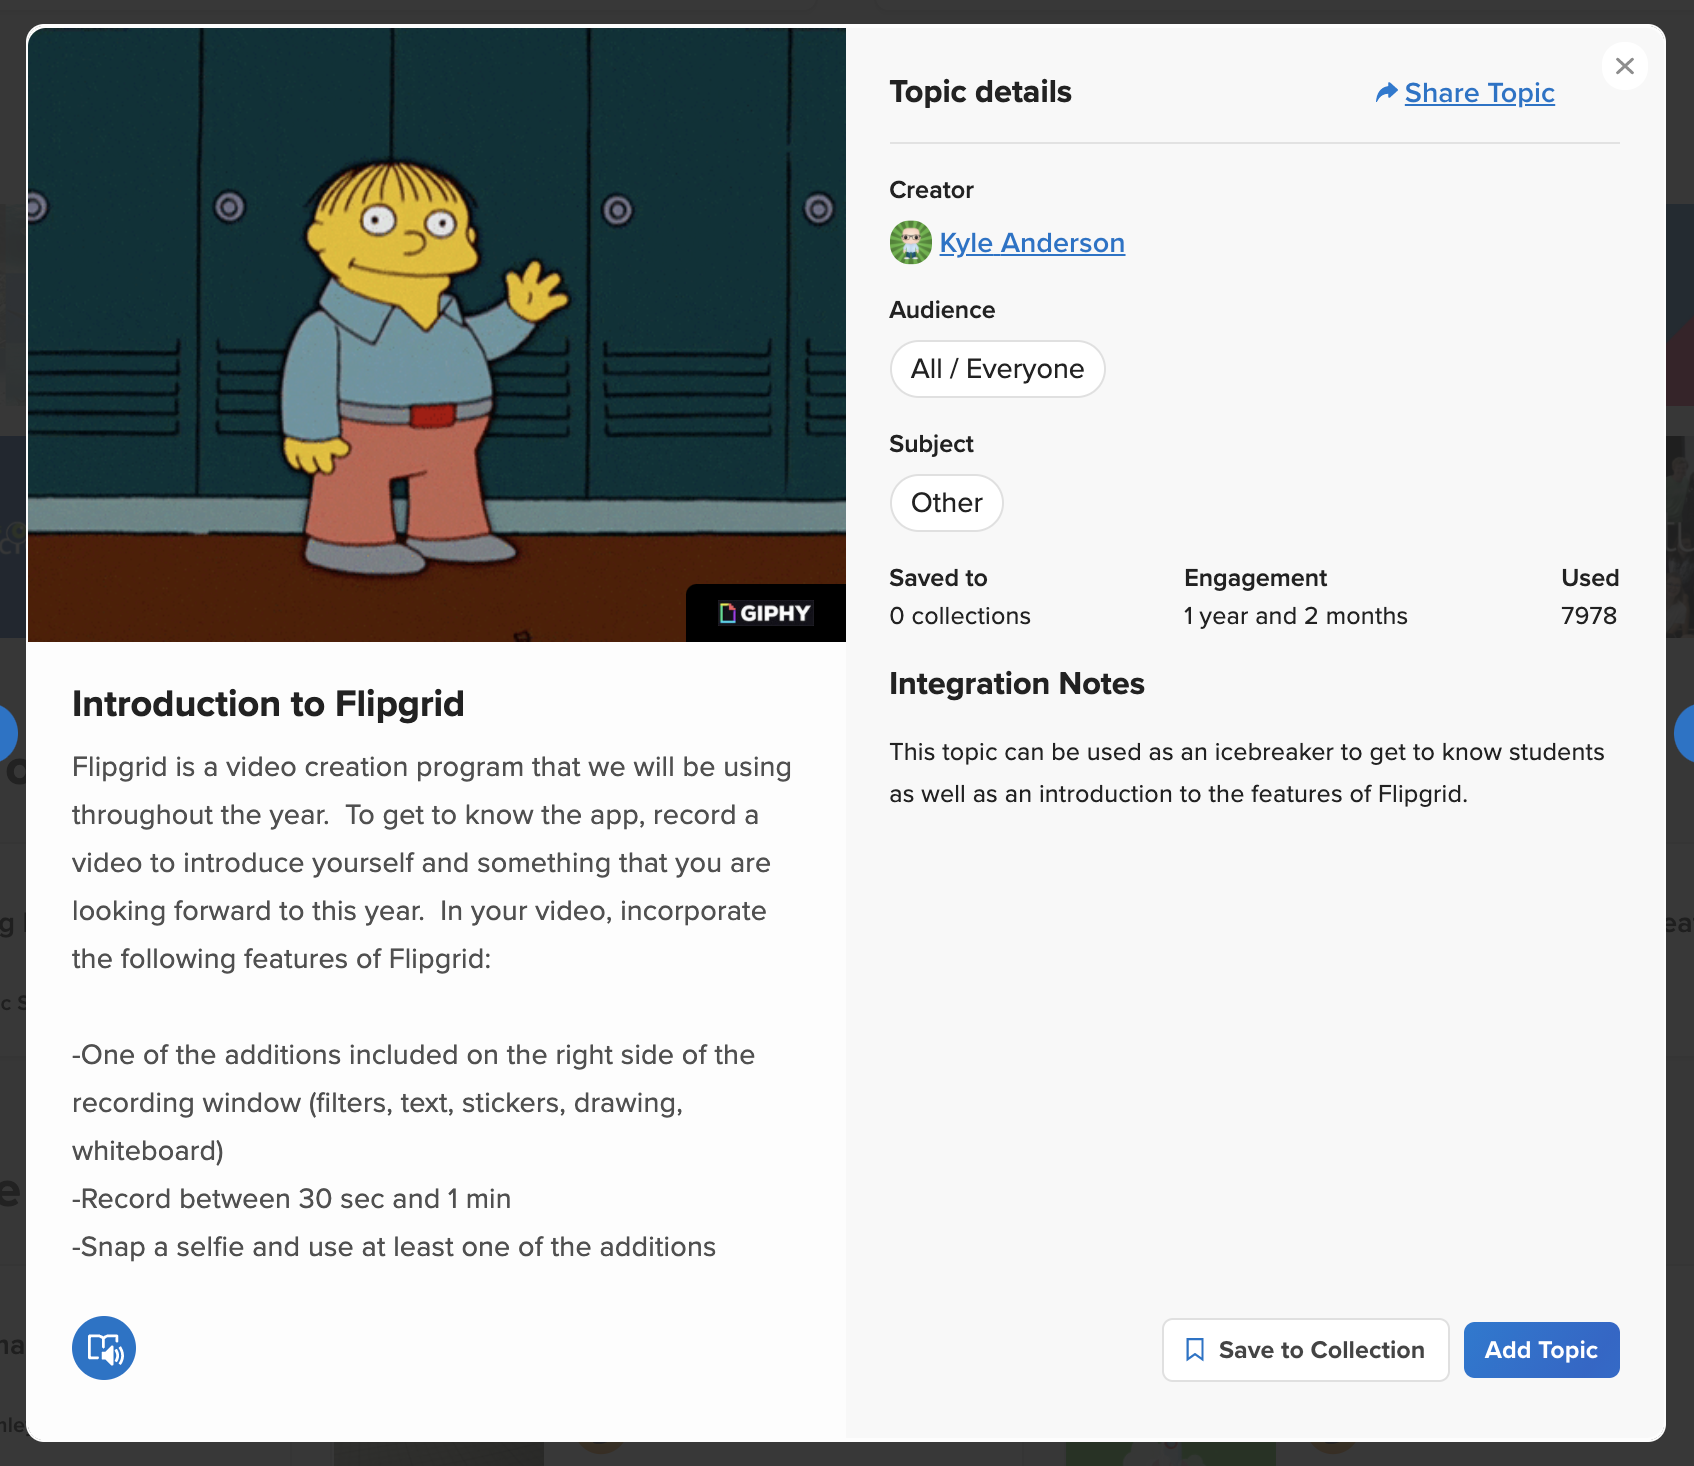
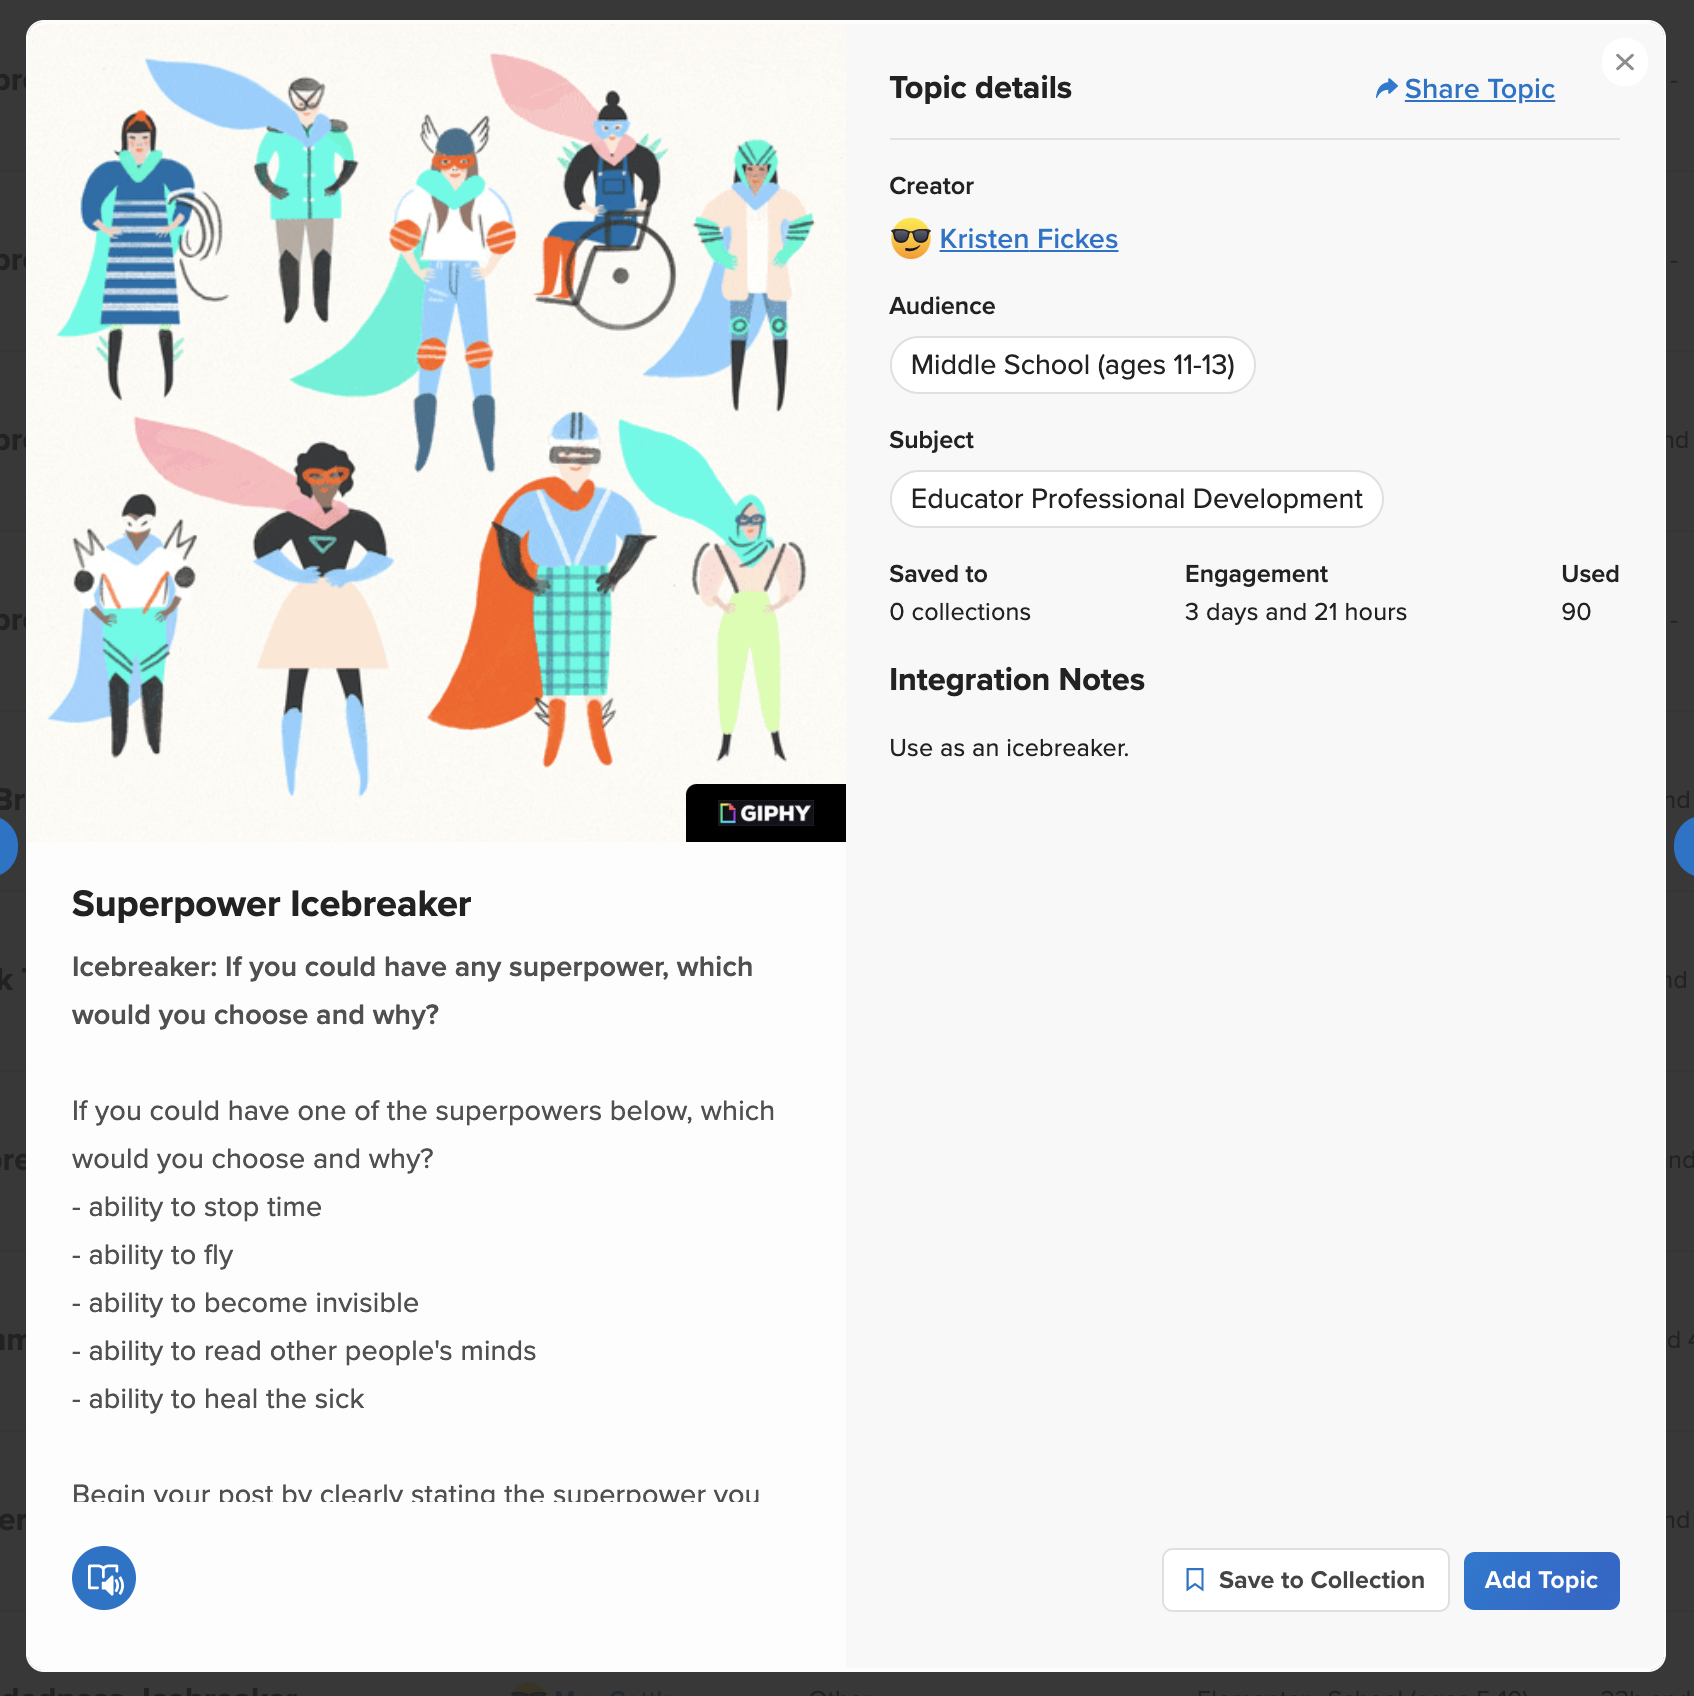
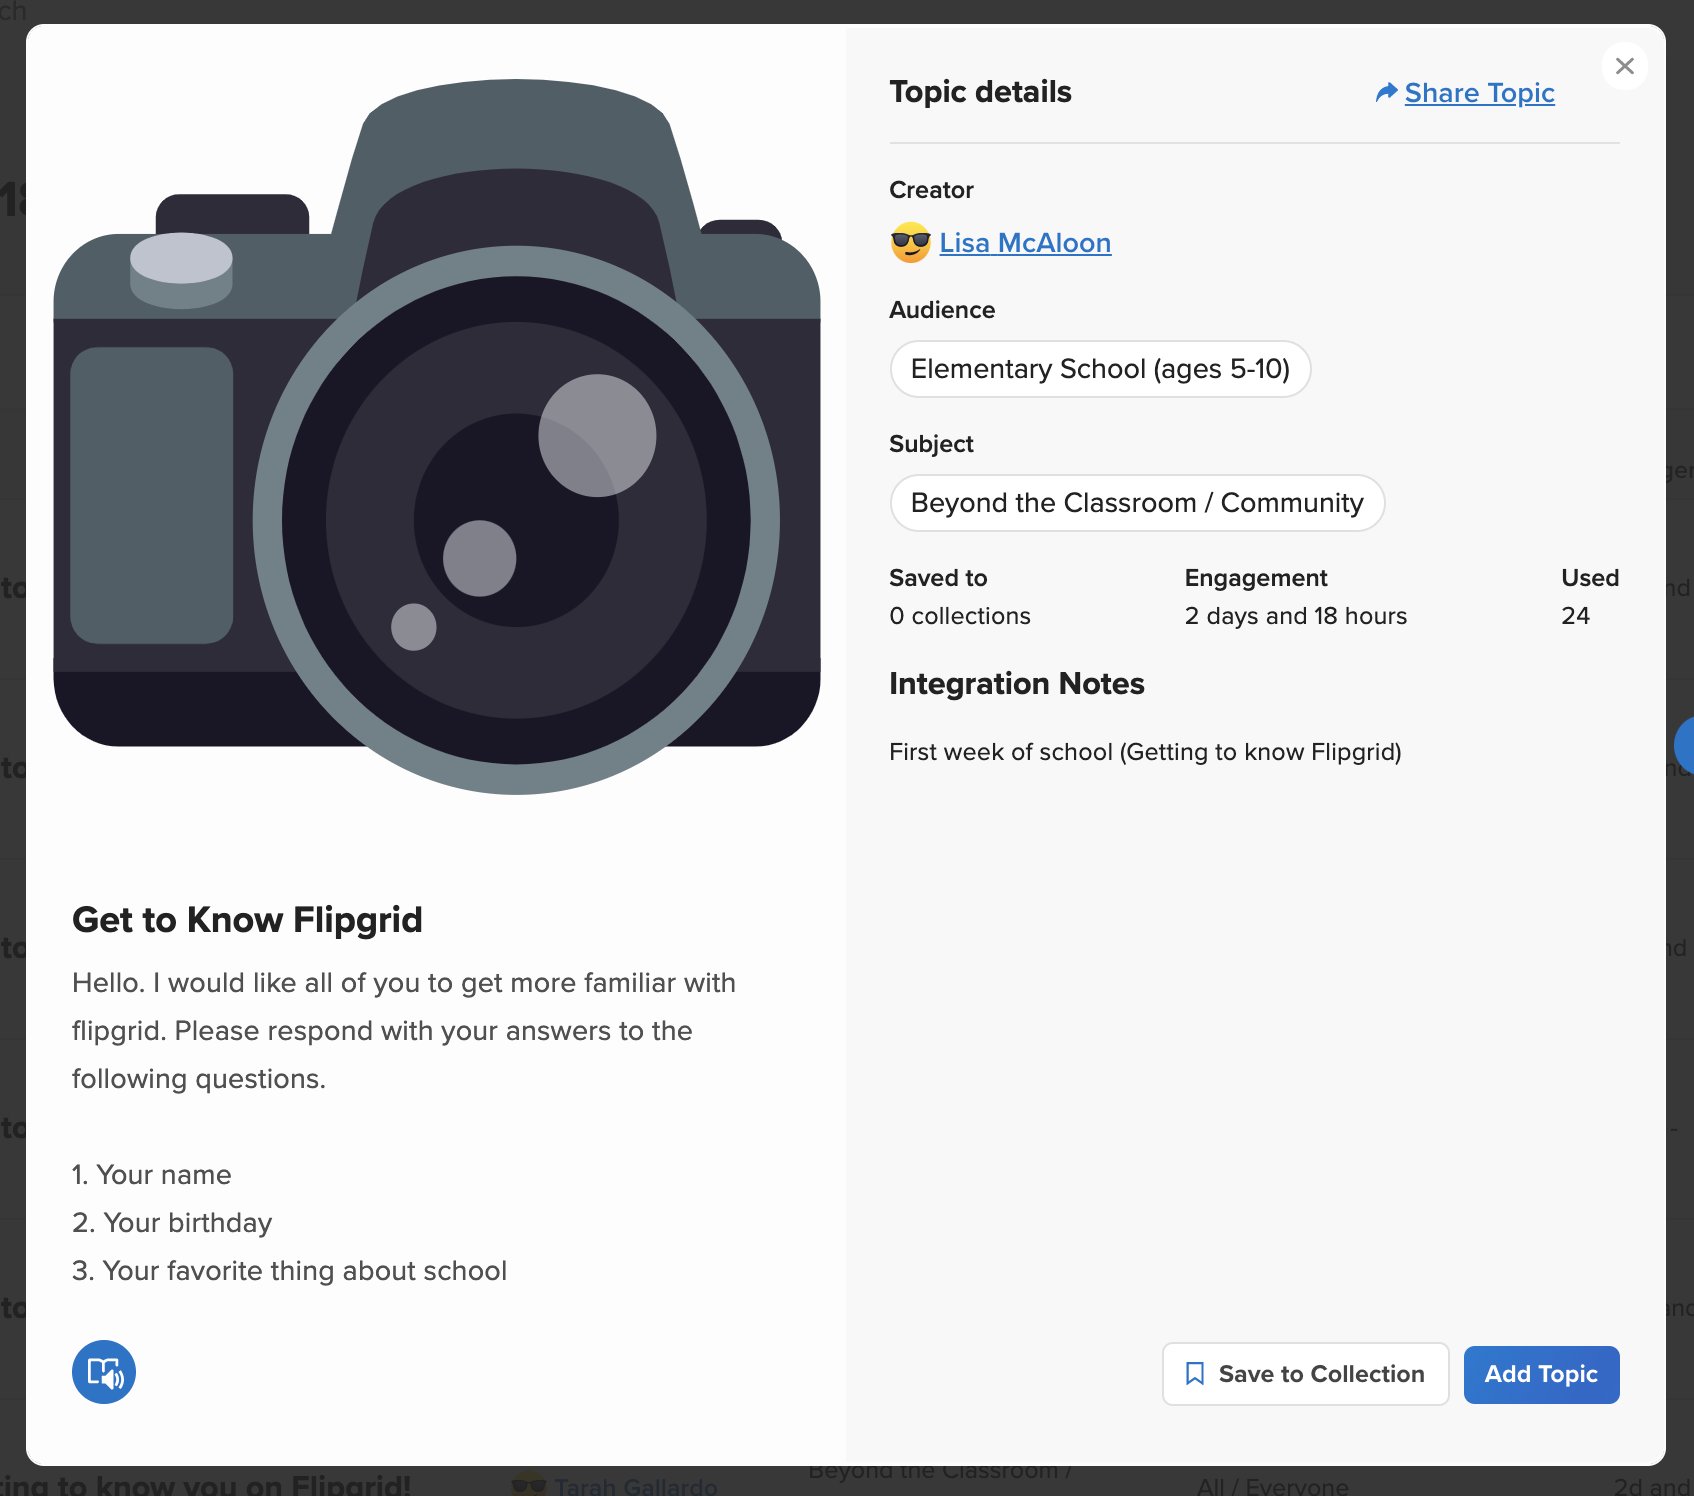
Ideas for Introducing Your Students to Flipgrid
When first introducing Flipgrid to your students, we recommend starting off with something simple - like an ice breaker. This gets your students familiar with how the platform works, and once they’re comfortable - then you can things to the next level. Here are a few ideas from the Flipgrid Discovery Library to help you (and your students) get started. Click on any image to open and save it to your Flipgrid collection!

Video Tutorial
Still not quite sure how it all works? Mrs. Merrill has you covered! Check out her video on how to get started below!
Stay #interACTIVE!
-👗➕🕶️
For more tips, tricks and lesson ideas for making learning more interACTIVE, check out our books The InterACTIVE Class and Flipgrid in the InterACTIVE Class on Amazon!


Top Five (FREE) Apps of 2020!
2020 was a wild year - especially for educators. We experienced the world’s greatest PD event, but which apps / websites proved to be the most resourceful? We’ll walk you through five of the ones that we find ourselves using the most in our own classrooms.
Teaching in 2020 was like brushing your teeth while eating Oreos. It was like shoveling snow while it’s still snowing. Or maybe it was like being a chameleon stuck inside a bag of skittles. But educators are resilient and before we threw up our hands and said that it’s “forget this o’clock,” we tapered down for the world’s largest PD event. We became familiar with websites and apps that we had never heard of. We quickly realized the importance of the “mute” button, and that most of our “staff meetings” really could be sent out in an email. But, now that we’ve had almost a year of this under our belt, we can confidently say that some apps have proven to be essential throughout remote learning and our gradual return back into the classroom. So, without further-ado, these are our top five (FREE) most commonly used apps of 2020. These apps are compatible on any device. Click on any subheading to learn more about the app and how we have been using it in our classrooms.
5. Gimkit (Gamification in the Classroom)
4. Classkick (Instant Feedback / Monitoring)
3. Nearpod (Classroom Management / Content Delivery)
2. Seesaw (Student Portfolios / Where Everything “Lives”)
1. Flipgrid (Student Creation / Social Learning)

5. Gimkit
Gamification in the classroom
Link 👉 http://www.gimkit.com
Gimkit is a live quiz learning platform where students answer questions and can earn “money” for power-ups. It was developed by a high school student who built a game that he wanted to play in class. The free version allows educators to create and edit content as much as they need. However, games can only be hosted with 5 players or fewer and new assignments cannot be created while on Gimkit Basic. We highly recommend upgrading!
How To Use it in the Classroom:
Have your students develop their own questions in the “Collab” mode. Then launch the kit and see how they perform!
Math fluency review
Use Gimkit as a way for students to go back into a text and find the answers to the questions
TIP: The more questions that you have in each “kit,” the better!

4. Classkick
Instant Feedback and Monitoring
Link 👉 https://classkick.com/
Classkick is a free app that students work on and get help instantly from their teacher and peers. Students may receive assistance from teachers (and peers) instantly. Teachers create assignments, see all their students’ work in real-time, and give LOTS of student feedback. Best of all, students can help each other anonymously.


How to Use Classkick in the Classroom:
Create assignments that students can work home regardless of where they are
Save your Powerpoint files as JPEG’s, then upload them to a new Classkick assignment
Use Classkick for Number Talks / Number of the Day
TIP: Create an assignment titled, “White Boards,” and use them as daily digital white boards. Students can erase the white boards after daily use, and return to the same link / code the next day.

3. Nearpod
Classroom Management and Content Delivery
Link 👉 http://www.nearpod.com
Nearpod is a student engagement platform built to make teaching with technology easy. With Nearpod you can control what your students see and get feedback in real-time. With a free account, you have the ability to share assignments with your students and then transition what they see from slide-to-slide. For example, if you upload an assignment from Google Slides or PowerPoint, Nearpod will convert it into an assignment. Teachers have control of the assignment, and when they move to the next slide, it will automatically change on all devices logged onto that presentation.
How to Use Nearpod in the Classroom:
Upload an assignment from Google Slides or PowerPoint, then add a virtual reality field trip! (Click: Add slide > Virtual Field Trip)
Add an activity for your students to complete while in the lesson. Activities include: Draw It, Quiz, Poll, Collaboration Board, and more!
Differentiate by duplicating assignments and adjusting as necessary. Share the appropriate login codes with the assigned students.
You may also like:
How to Integrate Flipgrid into Nearpod
How to Embed Nearpod Presentations into Microsoft Teams

2. Seesaw
Student Portfolios and Where all of Your Content Can “Live”
Link 👉 http://seesaw.me
Seesaw is a platform where students share their learning in their Seesaw portfolio, giving teachers and families valuable insights into what the students know. Assignments can be easily created, differentiated, and shared - think of it as a “house” for all of your content. The best part of all: every time a student adds an artifact to their portfolio, it notifies their connected family member(s) so that they may be kept in the loop with their child’s learning.


How to Use Seesaw in the Classroom:
Create assignments and select the students that you would like to complete them (easy differentiation)
Allow students to add content on their own (let them take a photo, then annotate over the photo)
Keep families at home in the loop with what is happening in class
You may also like:
What’s New in Seesaw (2020)
Flipgrid
Student Creation and Social Learning Platform
Link 👉 http://www.flipgrid.comFlipgrid is a video based social learning platform. Educators pose a question or assignment, then students respond in the form of a video. Once the conversation starts, other classmates may view their friends’ videos and respond to them. This creates a web of discussion, which automatically elevates the overall curricular level of the classroom.
How to Use Flipgrid in the Classroom:
Allow students to explain their thinking by holding up a whiteboard or their writing
Sequence the events of a text or historical time period
Use the Flipgrid Camera to record your own lessons - even create digital anchor charts
You may also like:
How to Play Among Us on Flipgrid
Using the Draw Tool on Flipgrid
Creating Student Podcasts on Flipgrid

Stay #interACTIVE!
-👗➕🕶️
For more tips, tricks and lesson ideas for making learning more interACTIVE, check out our book The InterACTIVE Class on Amazon!


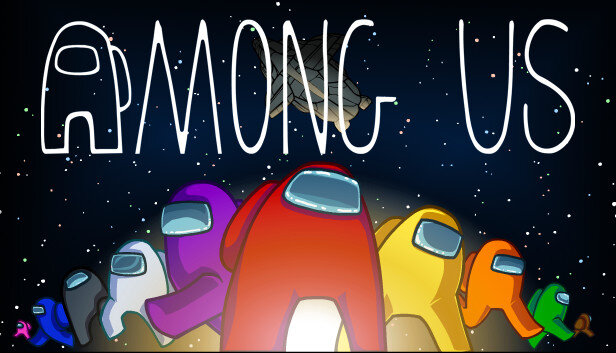
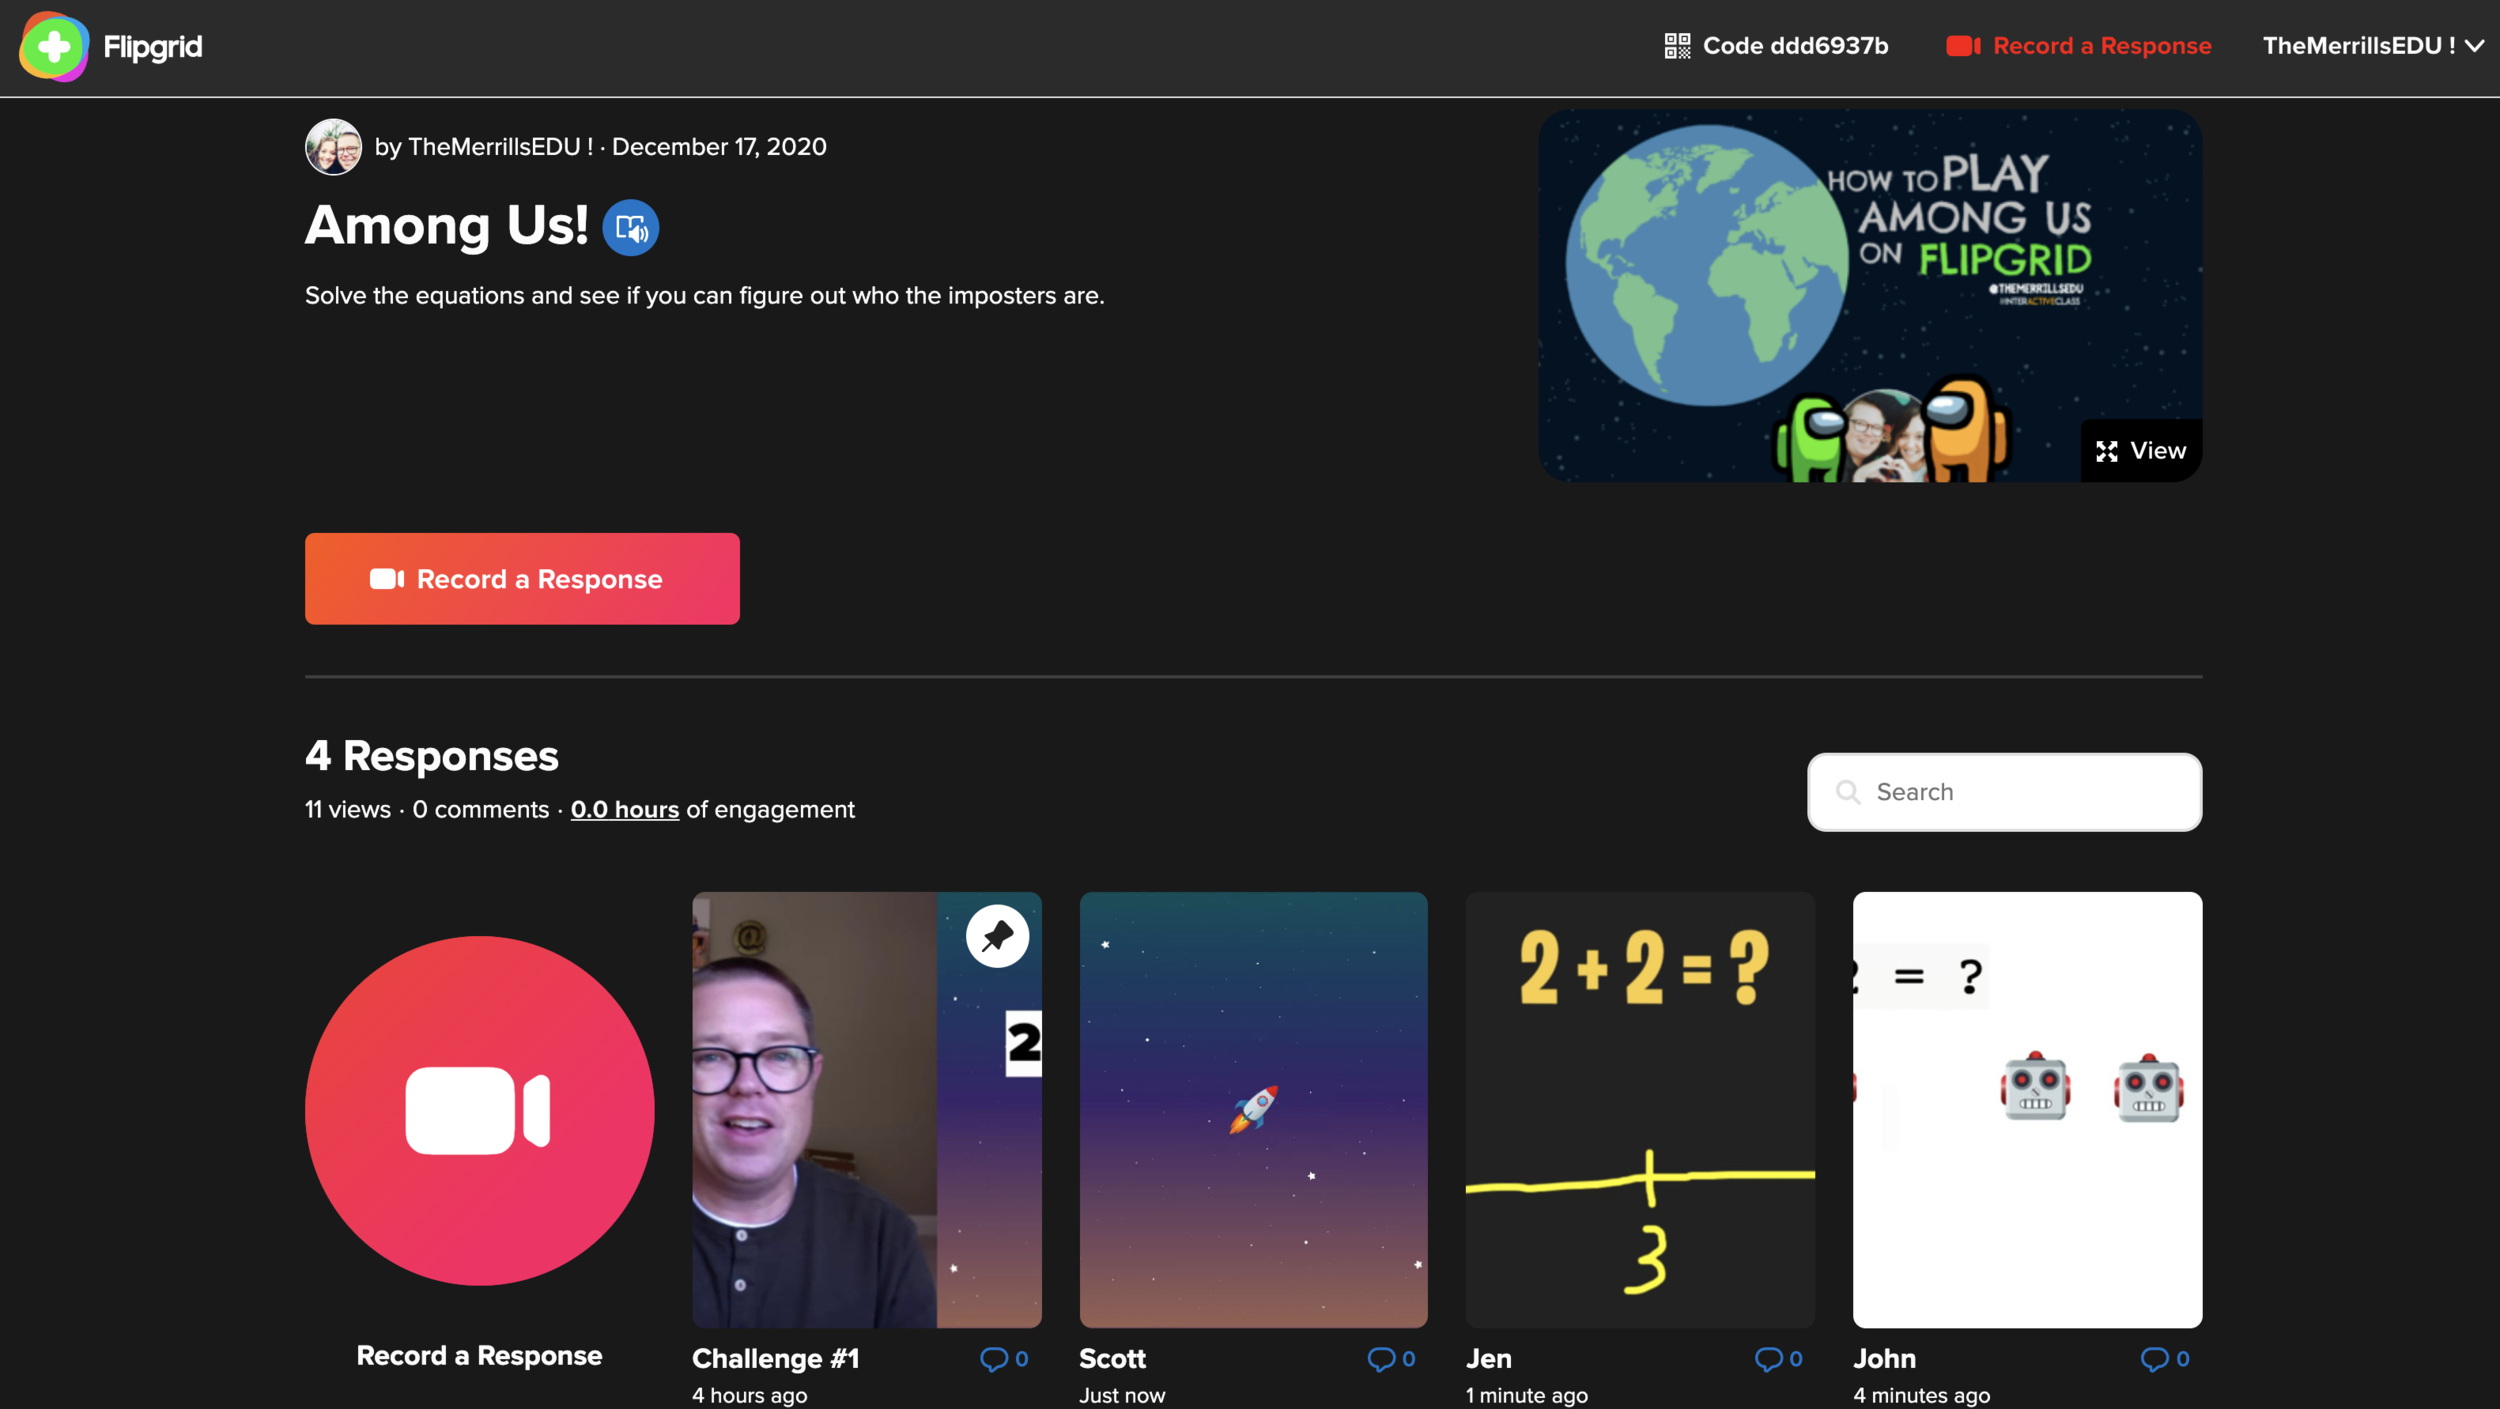
How to Play "Among Us" on Flipgrid!
Your students LOVE the game Among Us, but how can we integrate this in an educational way? We’ve got you covered! In this post, you’ll learn how to set up and play Among Us on Flipgrid!

“Among Us” is a trending game that is popular with students. In this blog post, you’ll learn (Click on a subheading to jump to that section):
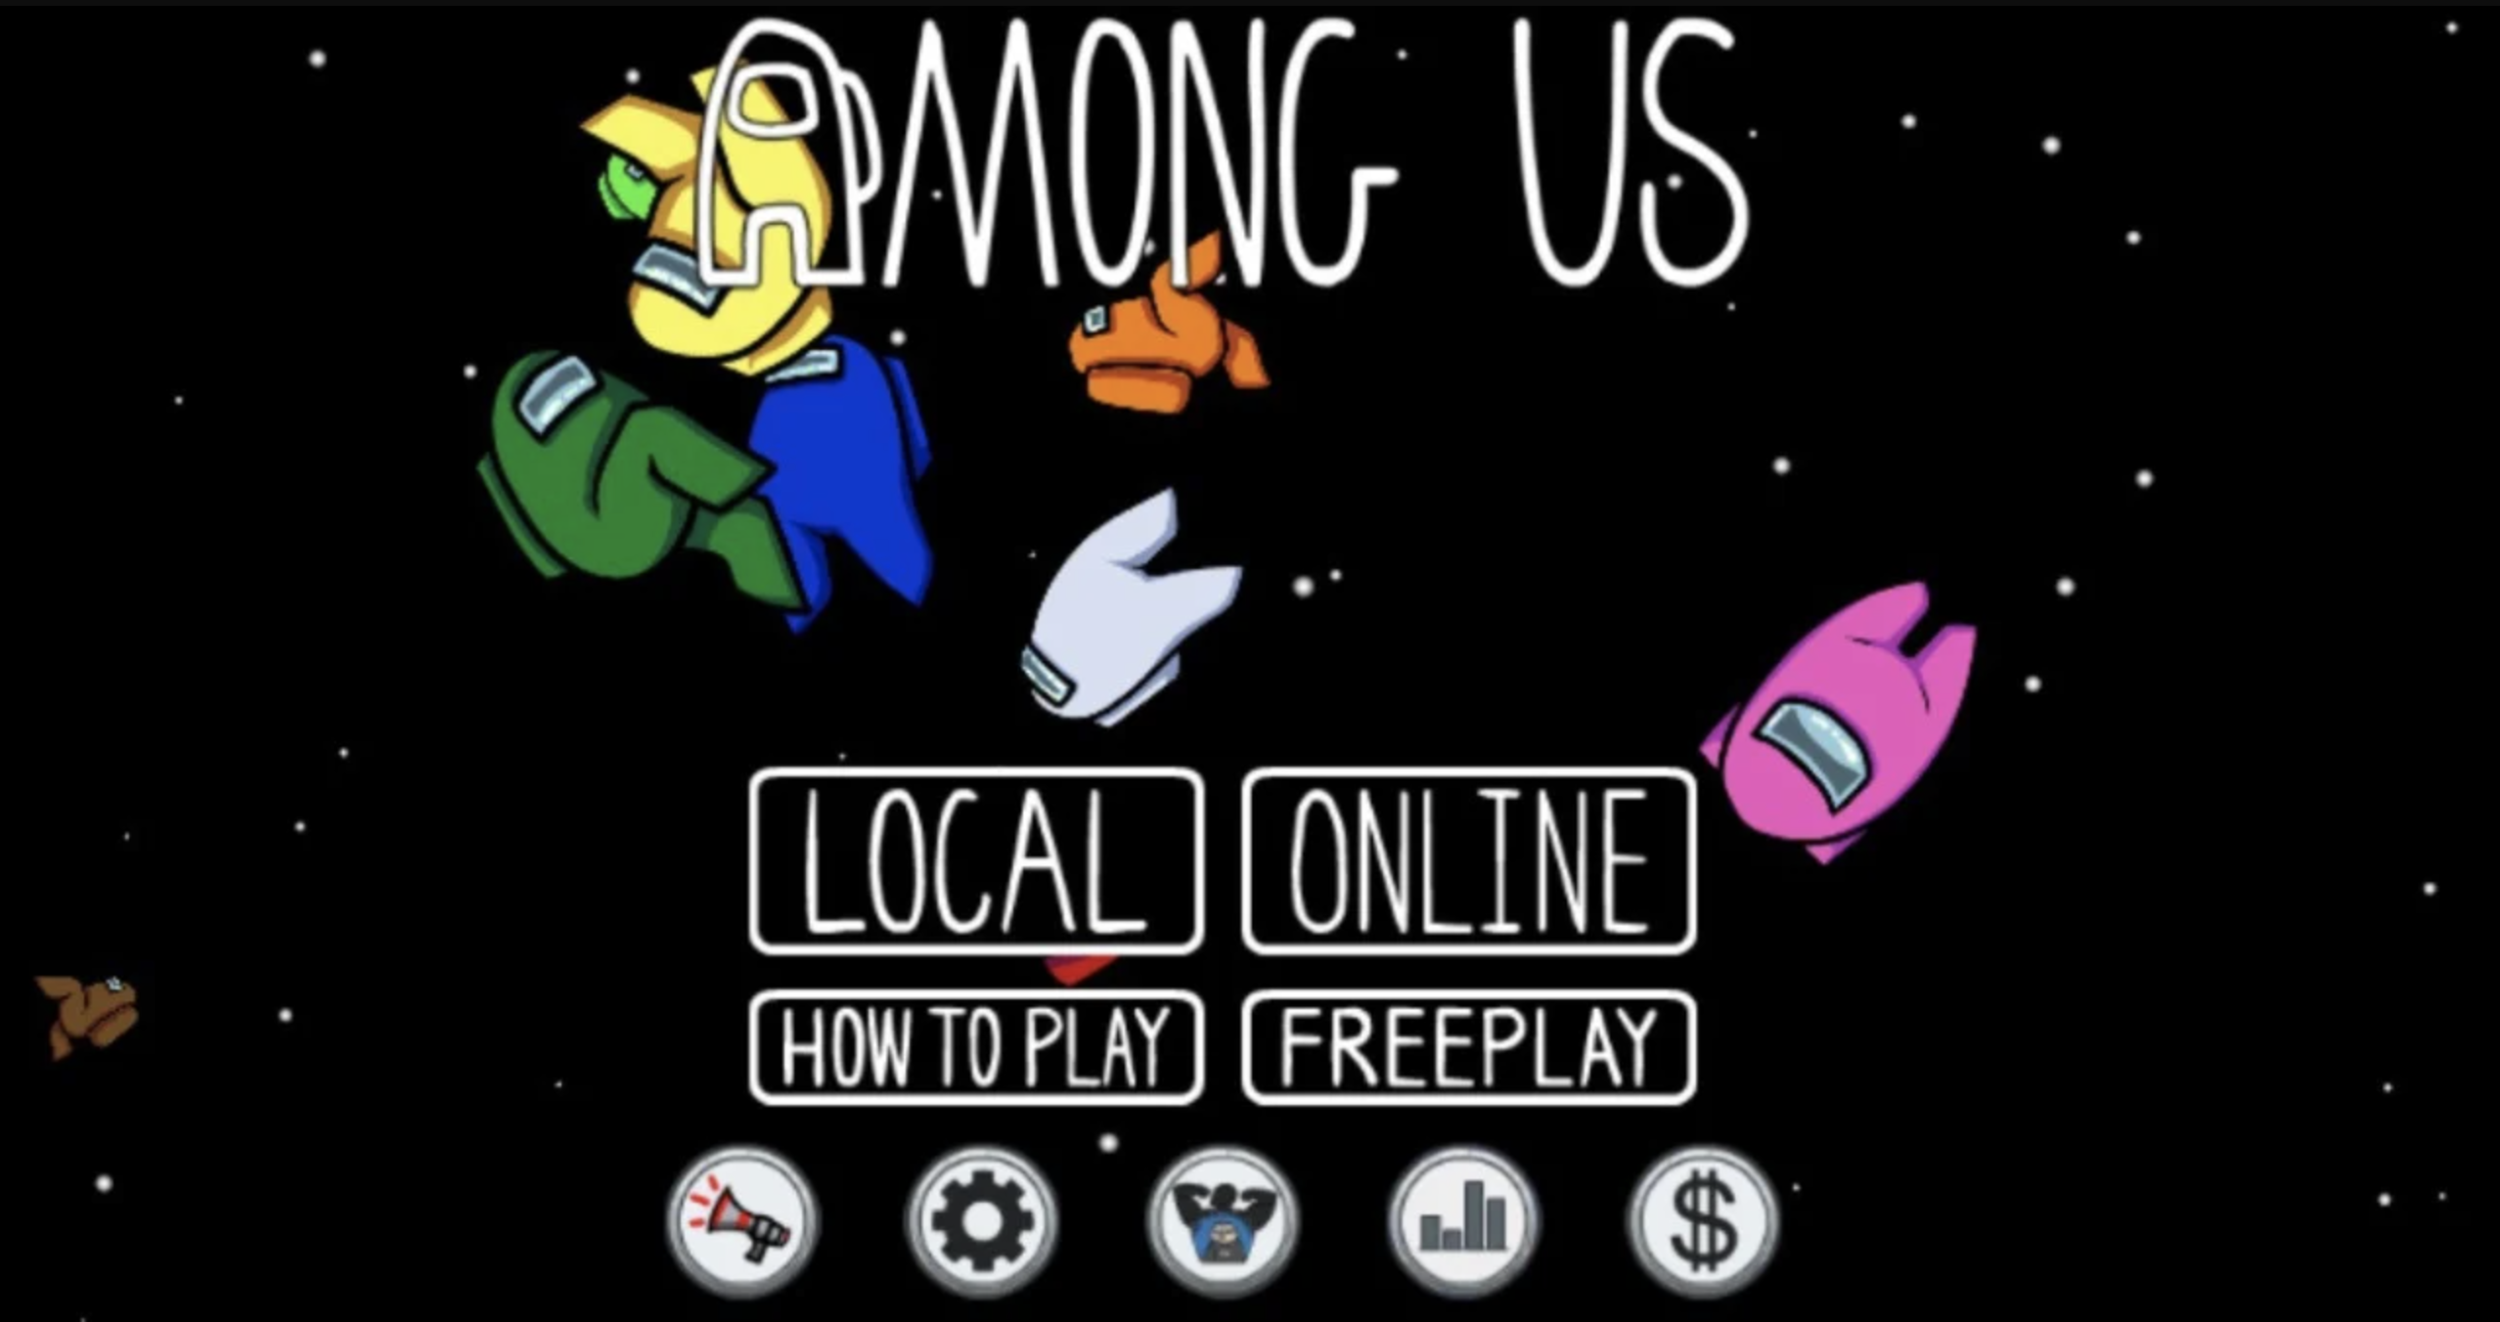
What is the Game Among Us and where do you play it?
From the New York Times: Among Us is a multiplayer game where between four and 10 players are dropped onto an alien spaceship. Each player is designated a role as a “crewmate” or “impostor.” Crewmates must run around the ship and try to complete a set of tasks while trying to identify and avoid becoming sabotaged by the one or several impostors. Players can be voted off the ship, so each game becomes one of survival: Successfully vote off the impostors, or complete all your tasks to win. The game is available on all mobile devices.
How to Play Among Us in the Classroom
Here are a few ideas for bringing the game Among Us into your classroom.
Integrate your math lessons into the game! Have students solve and share their thinking using Flipgrid. Then, allow the “imposters” to have an opportunity to eliminate the “crewmates,” and you can even include a class meeting!
Tie in a detective-related text, then have the students discuss who they think the suspect (or imposter) might be. Vote out the suspect / imposters as you read.
Assign a few students to be the “imposters.” Then, have your students complete a set of tasks. When solving the tasks, the “imposters” have to all use either a symbol, keyword, or clue. Crewmates must work together to figure out who the imposters are. If they suspect a classmate of using one of the symbols / keywords / clues, they can cast votes to vote them off the ship.
LEVEL UP: If your students are learning virtually and have access to breakout rooms, you can use the breakout rooms as the different “parts of the ship.” The students can use the breakout rooms to create a meeting where they discuss who the “imposters” are. Then, meet in the main meeting to cast their votes.
How to Play Among Us on Flipgrid
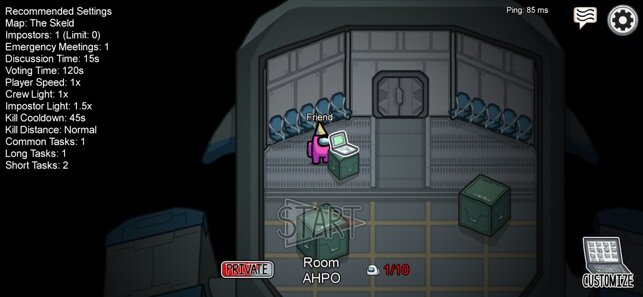
Ready to bring Among Us Flipgrid-style to your classroom? Follow these steps:
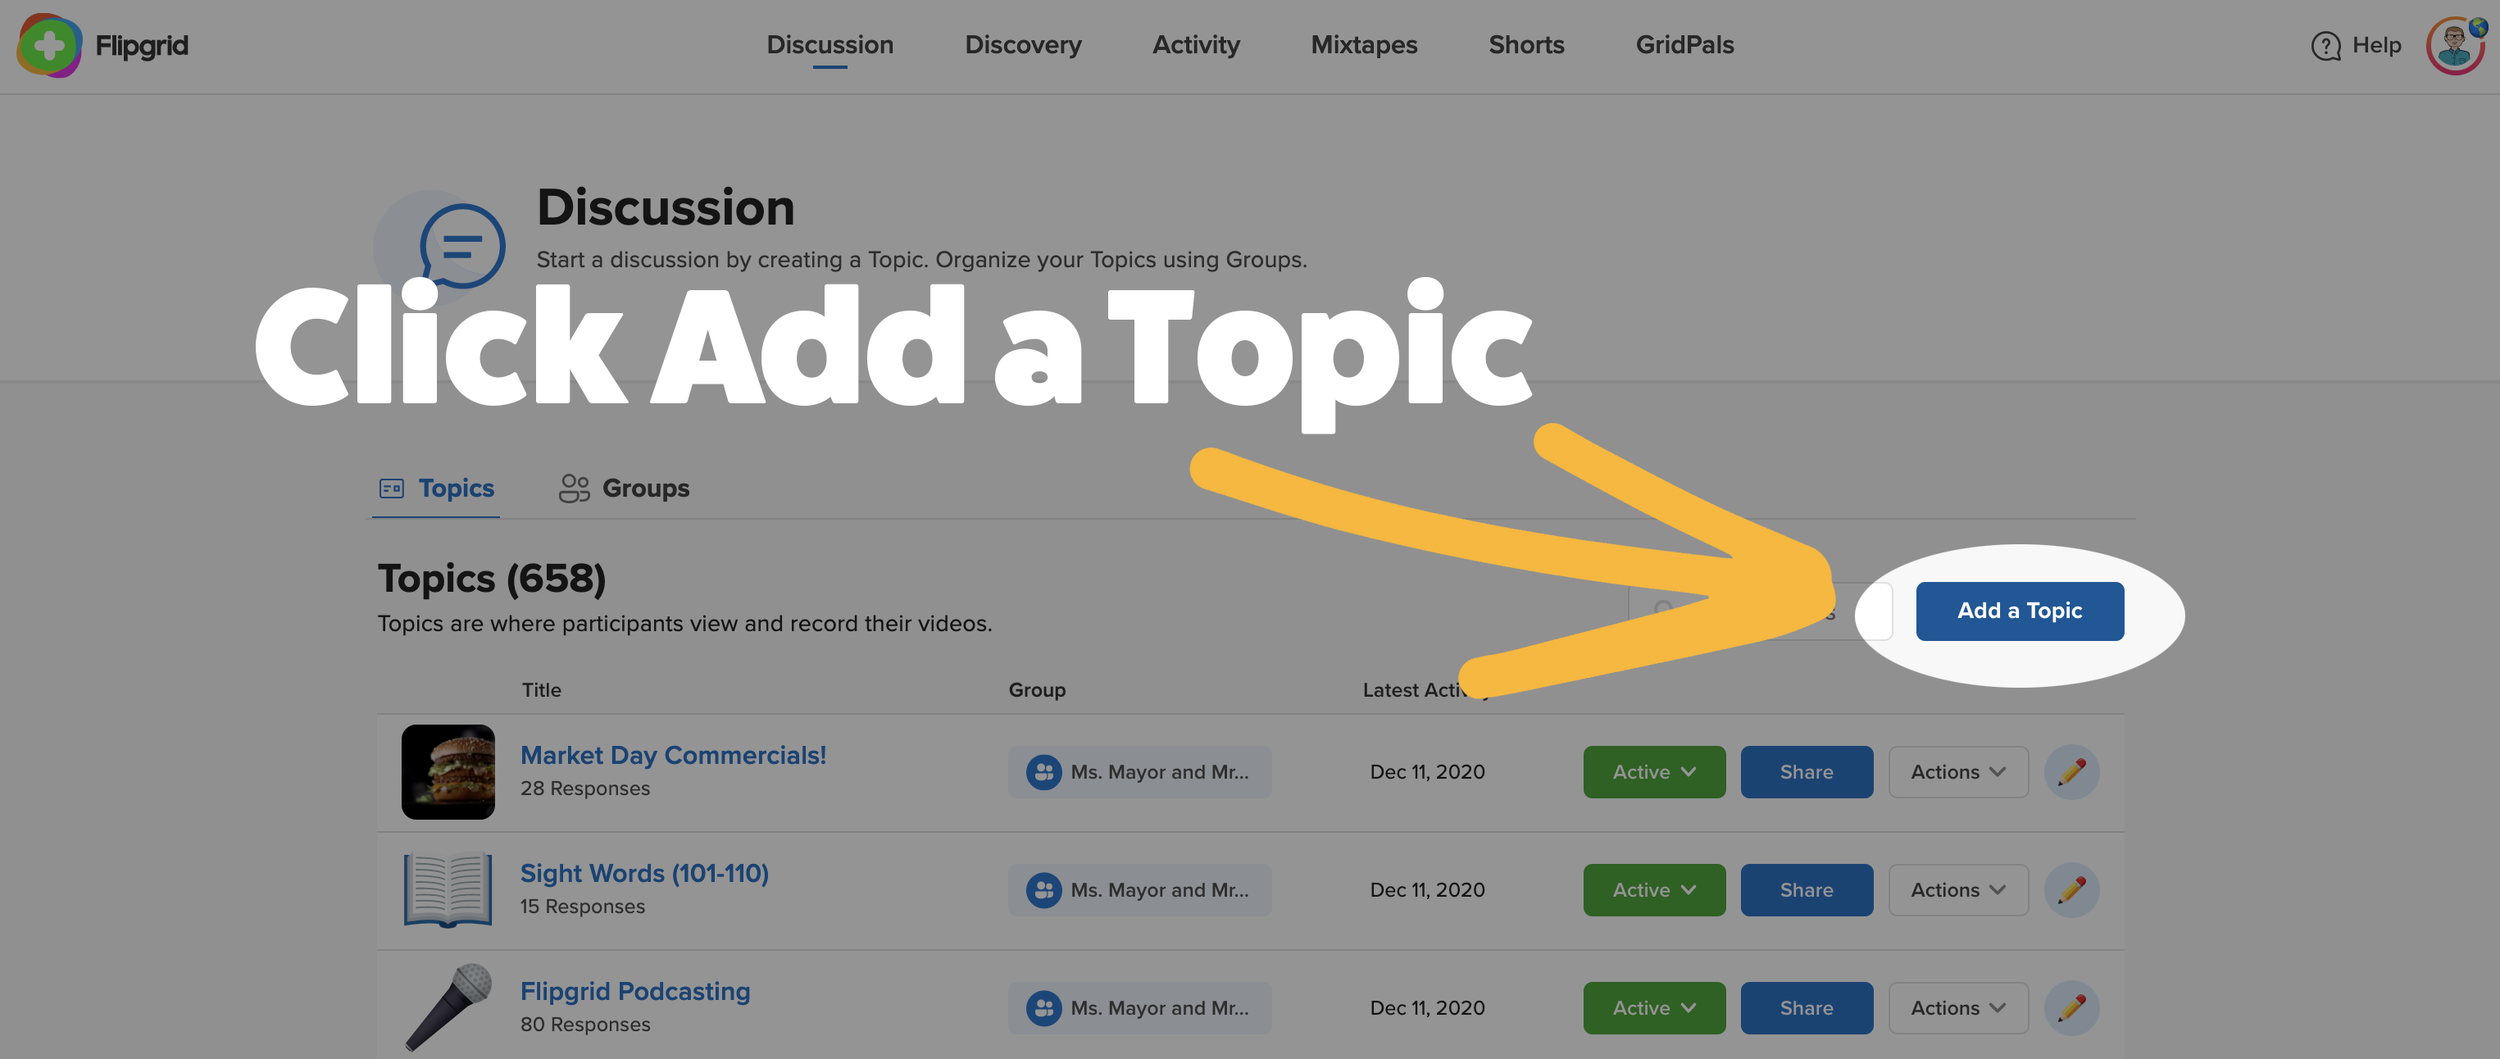
Step #1: Create a new topic
Log into the Flipgrid Educators dashboard, then click the blue “Add Topic” button. Then, add a topic title and prompt.
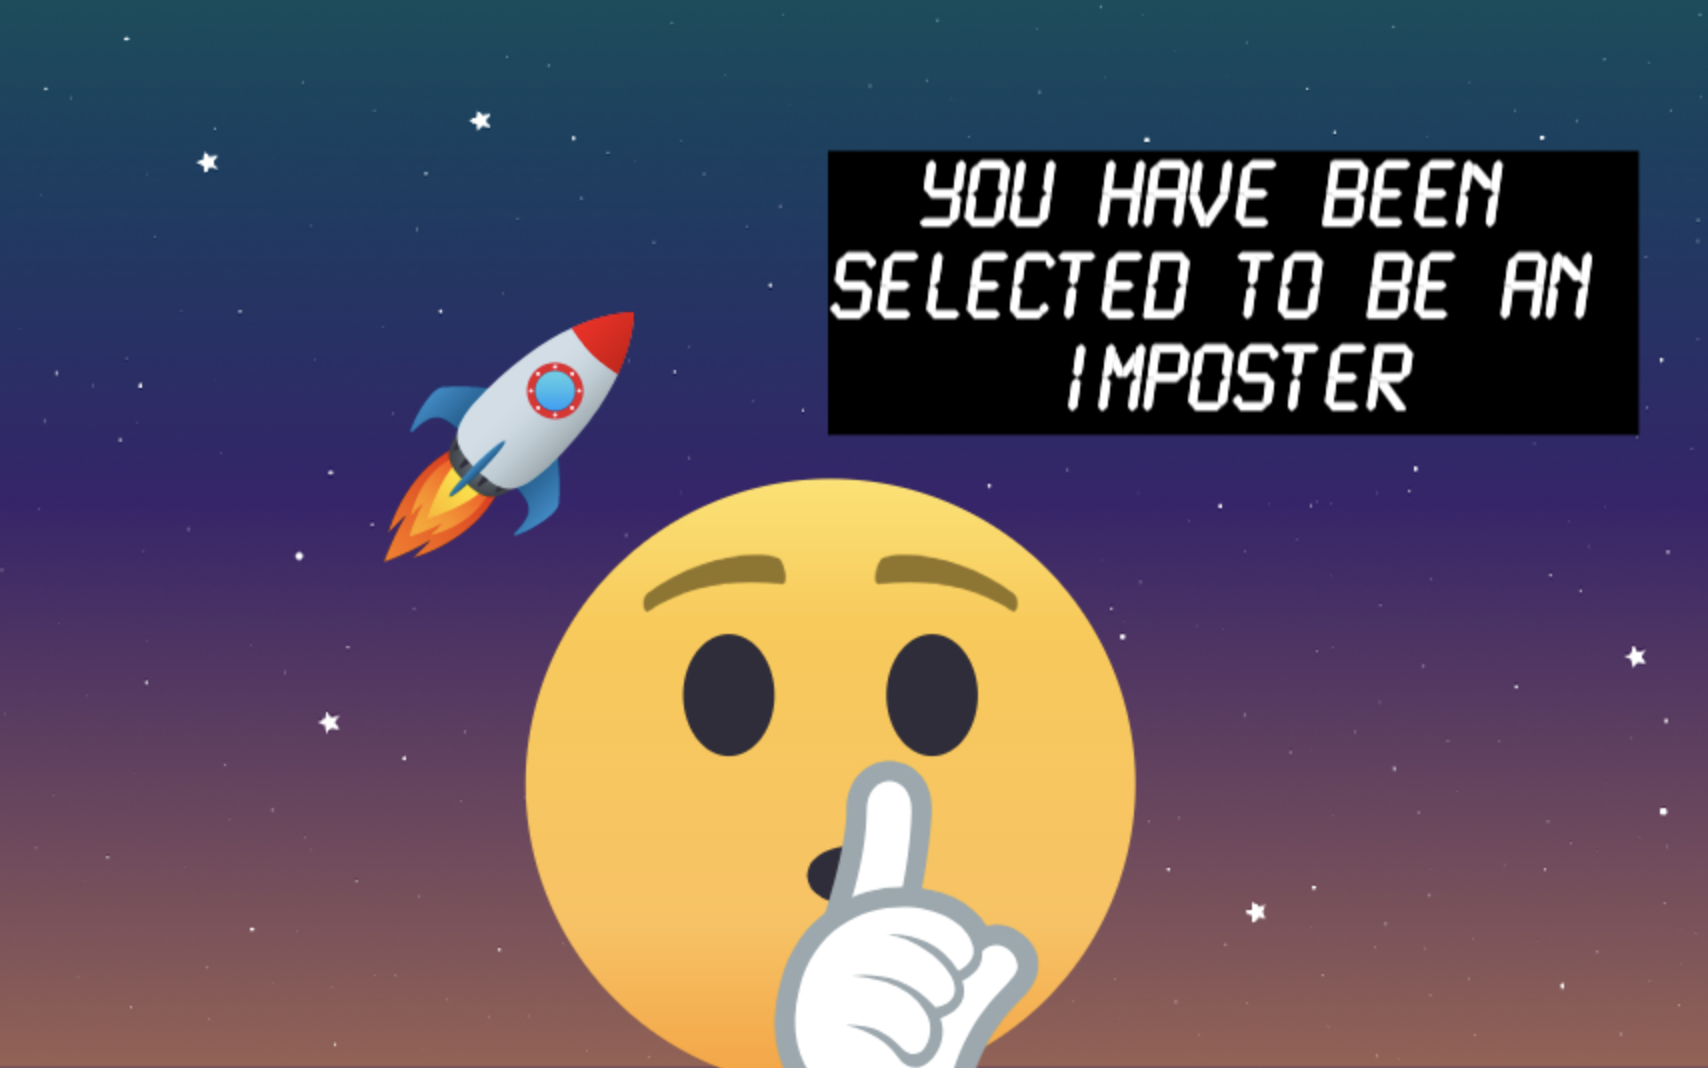
Step #2: For added engagement, pre-record two videos.
After a class meeting, one person will be voted off. This doesn’t mean that the game is completely over for that person, it just means that they are no longer able to cast votes. To build suspense, we recommend downloading our videos below. One video indicates that the student was an imposter, and the second indicates that the student was not the imposter. You can add these to your Flipgrid topic by posting them as a student. See the examples below, and click on the links to download them.
“Not an Imposter”
“An Imposter”
Step #3: Pin and “Hide” both the pre-recorded videos.
This way your students can’t see them, and you can easily access them from the educators dashboard. When it comes time to reveal who has been voted off, you can open both videos in different tabs to play, or just toggle from “Hide” to “Active.”

Step #4: Tip off the Imposters
Pick 2-4 students to be the “imposters” (Note: the imposters do not know who the other imposters are. This is important, because if they are “voted off,” they can still participate). Give them some type of keyword, have them use a symbol, or another type of clue that they are to use when recording their response. The other “crewmates” will attempt to identify which classmates are using the keyword / symbol / clue.
If you would like the imposter to have the ability to eliminate other crewmates, instruct them to be the first one to respond to a classmate’s video. After the round is over, if they successfully do so, announce to the classmate that they have been eliminated. Those eliminated may continue to play, but may not cast votes for who to eliminate next.
Step #5: Launch the Game
Launch the game and let the students complete the first task. The imposters will use the keyword / symbol / clue in their Flipgrid video response. Once the students have recorded how to solve the task, they can watch their classmates videos. After a given amount of time, call a class meeting. Ask the class to vote for who they think the imposters are (they vote only once at a time). Whomever receives the most votes is voted “off the ship.” Regardless of whether they were an imposter or not, they may still participate in the game.
Imposters who are voted off may continue to play and attempt to guess who the other imposters are - but they may not participate in the class meetings / voting.
Crewmates who are mistaken for imposters may be tipped off on what the special keyword / symbol / clue is. As a result, they are NOT allowed to spoil the fun - so they are not allowed to participate in class meetings or voting. But, they can still participate in the game by continuing to solve the challenges and see if they can narrow down the suspected remaining imposters. Reminder, they are NOT permitted to cast a vote.
Step #6: Repeat as needed
Once the first round has been completed, launch a new round. You can quickly clear the Flipgrid responses in your grid by clicking:
From your topic in the educators dashboard, click on the box under “Responses” and to the left of “Actions.”
With the box checked, click on “Actions,” then click “Hide Responses.” The videos will not be deleted, but they will not appear when students view the topic. This is a quick way to “reset” the game.
Watch our Video Tutorial!
Here’s a quick reference guide on how to set everything up!
See a Classroom Example
Click below to see this activity in action!
Stay #interACTIVE!
-👗➕🕶️
For more tips, tricks and lesson ideas for making learning more interACTIVE, check out our books The InterACTIVE Class and Flipgrid in the InterACTIVE Class on Amazon!


InterACTIVE Activities for Remote Learning in Book Creator
Book Creator is an incredibly valuable tool that may be used whether you are teaching remotely or in-person. But, we understand that everyone is incredibly busy. So, we’ve decided to share three of our favorite ways to use it with you! Download them inside now!
Book Creator is an incredibly valuable tool that may be used whether you are teaching remotely or in-person. But, we understand that everyone is incredibly busy. So, we’ve decided to share three of our favorite ways to use it with you! You can download all three books by clicking here, or individually below. Something to note: these templates will work whether you are logging on via iPad or desktop.
In this blog post, you’ll gain free access to the following templates (click any one to immediately scroll down to it):
Feel free to download the template to use for yourself! We can’t wait to see what you create with them!
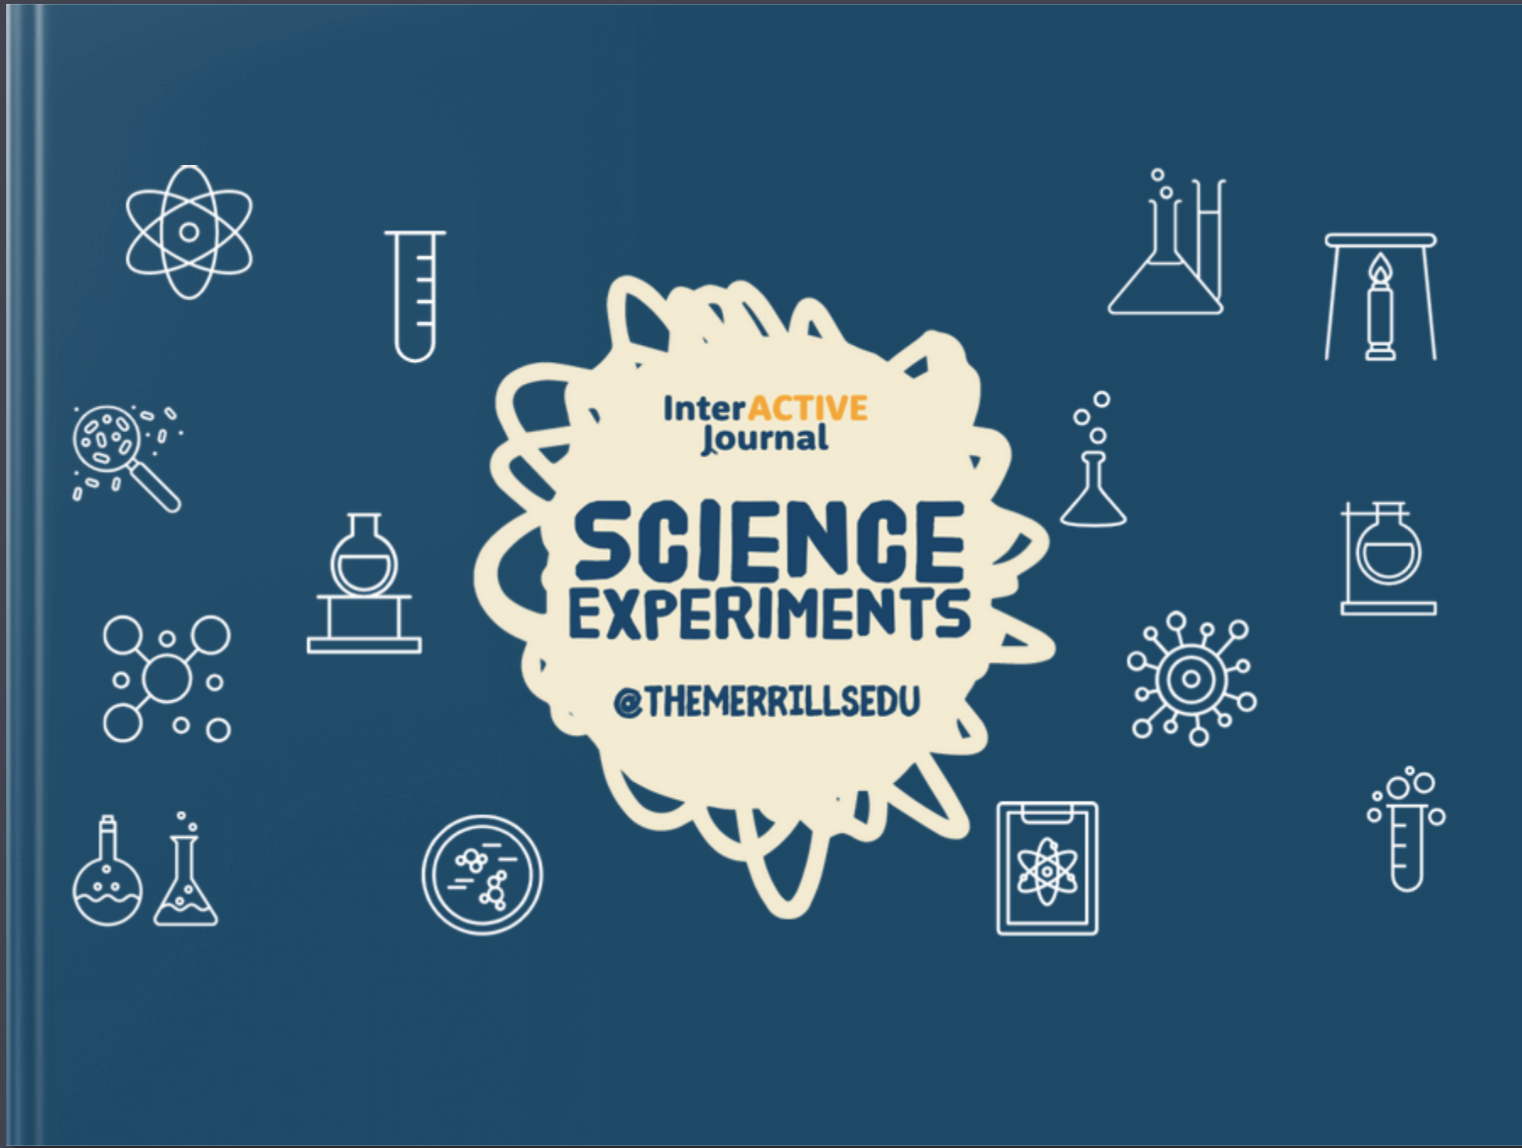
InterACTIVE Science Journal 🥽 🧪
Use this template to document your class’ science experiments. The pages can be duplicated so that you and your students can continue to add content. This is extremely beneficial in a remote or in-person learning environments, as it generates a digital journal that students may access from anywhere (no more “I left my notebook at home!”).

Above is a screen shot of the inside. The text boxes may be edited, as well as the image. Students can use the right side to illustrate their observations using the drawing tool. We recommend taking advantage of the “auto draw” which uses AI (artificial intelligence) to transform the illustrations into icons.
InterACTIVE
Word Wall ✏️
Word Walls have many uses, but a digital word wall opens the door to new opportunities. With a digital word wall, your students have the ability to record audio of the word / definition, and collaborate with one another to continue to add content.


You can even create one book for the entire class, then add all students as collaborators. Now, you have one book to maintain and everyone adds content. Tip: you may want to enable / disable the collaboration feature as needed (that way it limits the possibility of a student accidentally messing things up). We also highly recommend making a copy of the book to back it up periodically.

Mathematical Inferences! 🧮
Our Mathematical Inferences book provides a way for students to demonstrate their thinking by utilizing the Book Creator Draw tool and Text boxes.

Educators can easily add their own text boxes and images to the template above. Students use the right side to work out their strategies and prepare their thinking. If you choose to do so, you can even embed a Flipgrid Topic into Book Creator. So, now the students (who just worked out the problem on Book Creator) can explain their thinking on Flipgrid. More importantly, now they’re exposed to multiple different strategies from their peers.
Stay #interACTIVE!
-👗➕🕶️
For more tips, tricks and lesson ideas for making learning more interACTIVE, check out our book The InterACTIVE Class on Amazon!


Virtual Snow Globes in Buncee
A traditional classroom favorite activity is to place your students into a snow globe. In the past this has been done by capturing a photo of your students, then shrinking down the photo’s size, and possibly even cutting out the background. But, now there’s an easier way - just in time for the virtual learning holiday season.
This post was inspired from the amazing Shannon Miller’s blog post on this topic.

A traditional classroom favorite activity is to place your students into a snow globe. In the past this has been done by capturing a photo of your students, then shrinking down the photo’s size, and possibly even cutting out the background. But, now there’s an easier way - just in time for the virtual learning holiday season.
In this blog post, you’ll learn (click on any subheading to jump to that section):
How To Remove the Background from a Picture
Removing the background from your images is easier now than ever before. This can be done on apps like PowerPoint or Adobe Spark. But, a simple and efficient method is through the website Remove.bg. Follow these simple steps:


Visit the website Remove.bg by clicking here
Upload the photo of your student by clicking the blue “Upload Image” button
Select your file, then download the download the new file with a transparent background!
How to Create Virtual Student Snow Globes
Now that you have your student images with transparent backgrounds, you’re ready to add them into a snow globe. Start by creating a Buncee slide and having students build their own snow globe. Search Buncee to find several created ones (try searching for the term “snowglobe”), or have students piece one together using the selection of image stickers.

In addition to the globe itself, students can also spend time adding in items to create their own winter wonderland scene within the globe.
Once their snow globe design is set, it’s time to add the student’s selfie that was created in Remove.bg. Follow these steps to add the photo:
Click the “+” sign to add a new item on Buncee
Click “Upload",” then select your file
Then, click the green “Upload” button to add it onto your Buncee

Students can add additional items such as snowfall, snowflakes, or even trees. If you’d like to keep it simple, just make a copy of our template for yourself! To do so, follow these steps:
Make sure that you’re logged onto your Buncee account (or create one ahead of time)
Click “Copy” to place it into your Buncee library
Here’s a link to our template:
How to Integrate into Lessons
There are many ways to get students creating in Buncee right within other subject areas and lessons. Below are a few ways you could integrate this project into your classroom to use with students of any age.
Ornament: Print out your Buncee (maybe even laminate it), punch a hole at the top, then tie a string on it to send home!
Virtual Class “craft”: Just because you don’t have the ability to send home craft materials doesn’t mean you can’t make them! Use Buncee to create virtual class “crafts” and then share them on a Buncee Board or Wakelet collection!
Connect to Literature: Tie this activity in with books (see below for a list of recommended titles)
Family Holiday Card: After creating their own snow globe in class, students could go home and create their own family holiday card
Books About Snow Globes
(and Other Winter Themed Titles)
Here are a list of books that you can tie into this activity:

Snow Globe Wishes
A little girl makes a wish on a snow globe and, in the morning, the sun rises on a winter wonderland--beckoning all outside. And what if, on this snow-filled day, families shake their busy lives and everyone goes out to play?

The Great Santa Stakeout
He has Santa posters, Santa action figures, and even Santa underwear. But there is one prize Freddy desperately wants: A photograph taken with Santa, fresh out of the chimney.
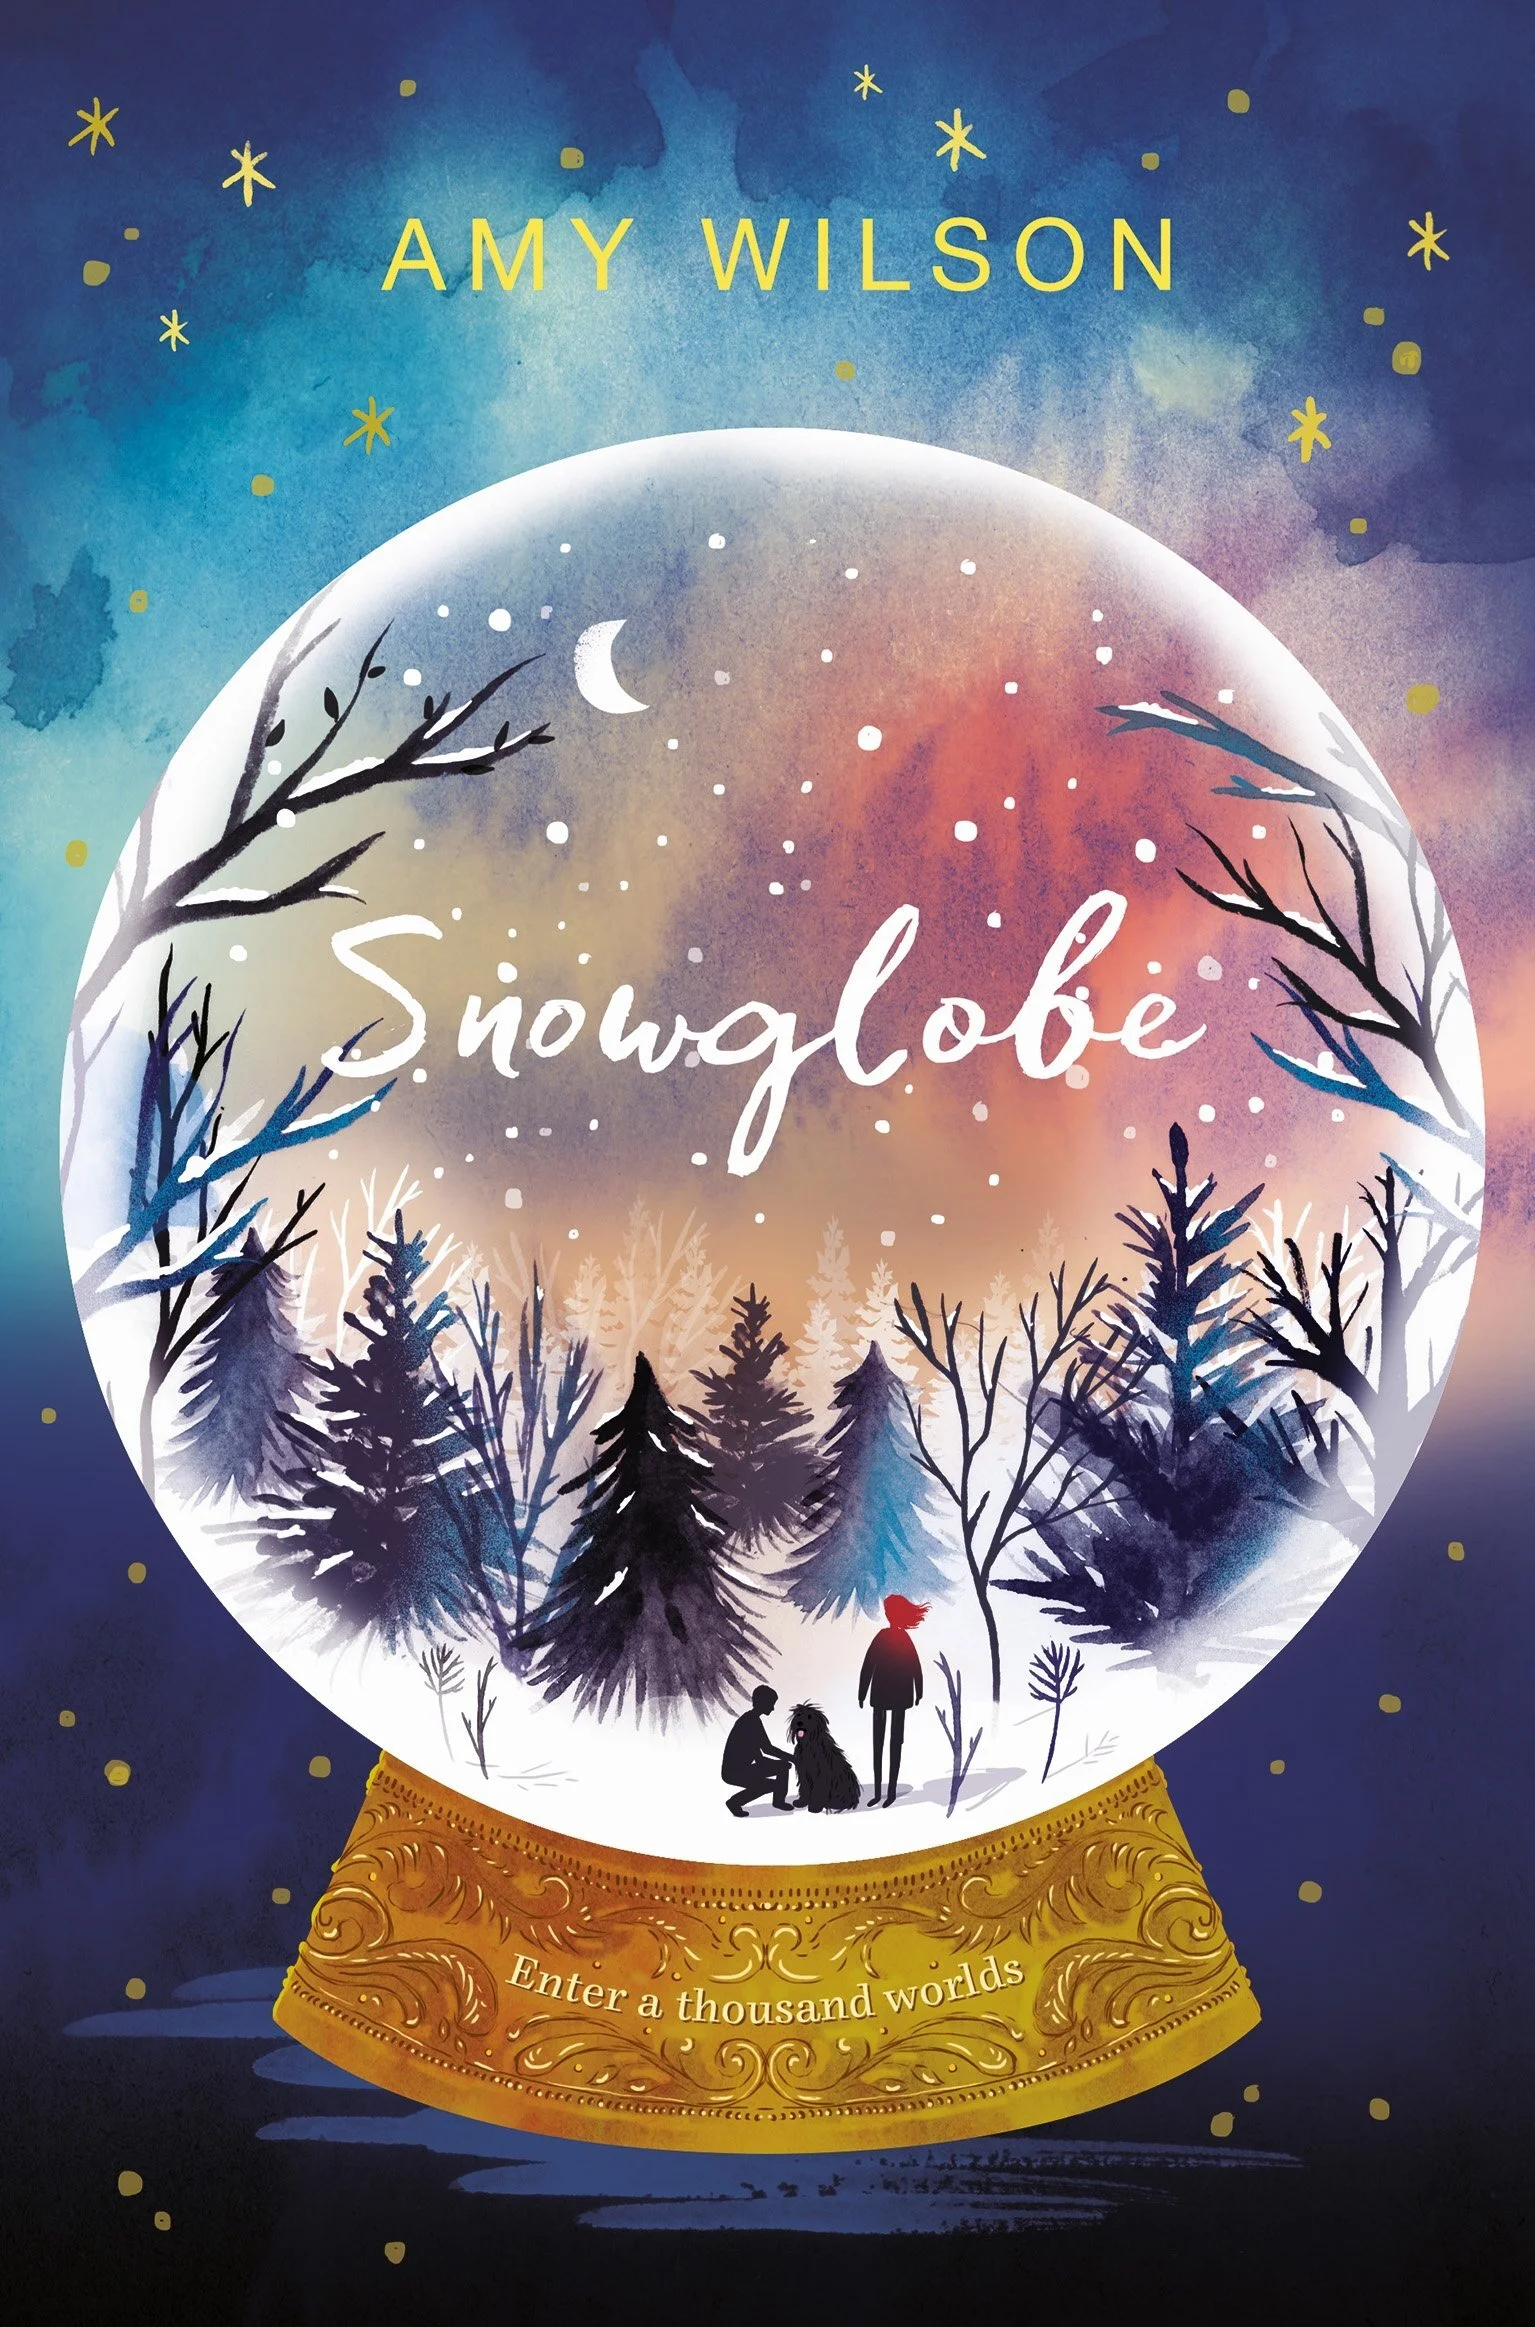
Snowglobe
When daydreamer Clementine discovers a mysterious house standing in the middle of town that was never there before, she is pulled towards it by the powerful sense of a mother she never knew. The place is full of snowglobes, swirling with stars and snow and each containing a trapped magician, watched over by Gan, the bitter keeper of the house. One of these is Dylan, a boy who teases her in the real world but who is now desperate for her help.
Stay #interACTIVE!
-👗➕🕶️
For more tips, tricks and lesson ideas for making learning more interACTIVE, check out our book The InterACTIVE Class on Amazon!


12 Days of Reading
The weeks after Thanksgiving that lead up to Christmas are always the hardest for teachers. Students are out of the normal routine after the extended fall break and are now excited and eager for Christmas to follow in the weeks to come. It can be hard to keep students focused and get all the planned curriculum and lessons in efficiently.

The weeks after Thanksgiving that lead up to Christmas are always the hardest for teachers. Students are out of the normal routine after the extended fall break and are now excited and eager for Christmas to follow in the weeks to come. It can be hard to keep students focused and get all the planned curriculum and lessons in efficiently.
In our own classrooms we do not overtly promote Christmas, although it is the holiday we personally celebrate in our own homes. We do not have elves that visit, or trees lit up all month long. There is not enough time in the month to adequately cover all the different holidays equitably, and it can be dicey trying to determine the personal beliefs and religions of each and every individual student. But nevertheless, Christmas is always the predominant holiday students anticipate, and that excitement spills over with each new day that nears.
As educators we know that student excitement is the key to engagement, and that when students are engaged they are more likely to try new things or stick with hard tasks. Using this excitement and incorporating it into the normal and routine academic activities is an easy way to keep learning alive throughout the holiday season. Thus the 12 Days of Reading was created with one simple goal in mind—keep reading lessons exciting while balancing all that comes along with the holiday sprit. The name is a spin off of the well-known song “12 Days of Christmas” and it is meant to compliment the reading already being done each day. Whether this is reading that must be done from a textbook, or independent reading that students have free choice over.
Day 1- Graffiti Wall

For this activity, students create a word splash to illustrate the book or selection of text they are reading. The words can summarize an event, convey an emotion, describe a character or person, etc. Students can either doodle, draw or sketch these words and phrases on paper or create their painted wall digitally on Flipgrid. If working to create on Flipgrid, you can grab the digital activity and brick wall images right from the Discovery library.
Day 2- Social Media Post

Taking on the persona of someone else and creating a social media page is a fun way for students to summarize, story tell, and take on a different perspective. Teachers can be creative with what students create profiles for—famous historical people, book characters, an inanimate object or even something outside of the box like an element from the periodic table!
The following templates are some of our favorites that we have found over time created by fellow designers, educators and colleagues.
Pinterest Template Created by TEachingTechnix

YouTube Template created by Paula Martinez

Netflix Created by Nick LaFave

Facebook by Ryan O’Donnell

Instagram by TechingTechNix

Twitter by TeachingTechNix

Day 3- Comic Cartoon

Creating Comics are a fun way to review plot, practice summarization and practice matching visuals with text in a story. If working in person, have students draw out a specific part or memorable event in the story, or have students work digitally through Book Creator. Students can either collaborate together in one book, or each create their own comic independently.
Day 4- Lego Character

Some of the most engaging lessons for students aren’t because they are elaborate or even because they use technology, but often because they are targeted around the students’ interests. Legos are a classic toy that students often related to so why not incorporate them into a reading lesson? Have students take the basic blank lego character outline and then design an outfit fitting for the person they are describing. This again could be a person from a book, a famous historical person or maybe to represent the main idea of a selection of text read. Students can decorate on paper with basic art supplies, or you can take the image and embed it into other programs like PowerPoint, Adobe Post and many other to design digitally. When finished, regardless of how they design, students can always share their work on Flipgrid.
Day 5- Draw a Scene

Illustrating a scene is a simple, yet powerful way for students to show what they comprehend while reading. By giving them the freedom to draw, they can then structure their drawing into what they envision. A great platform to take this idea and turn it digital is Buncee. Students can create slides representing different scenes in their books, add in characters, background settings, live animations and more!
The garden from the well known novel The Secret Garden brought to life in Buncee!
Day 7- Alpha Boxes

This activity is a great way to get students talking about text while brainstorming words associated with a story or article. Each box is filled with a word, emoji or picture that starts with the letter and explains some part, feeling, characteristic, etc. of the story. Level up this activity by creating a book on Book Creator for students to collaborate on. They could all share their various words and images together in the same place and create one giant, collaged page for each letter.

Grab the template to use today!
Day 8- Character Award

This activity is fun and lets students be creative with how they would describe the main person or character from their reading. After brainstorming a list of character traits, they then can infer what type of award their main character would most likely received. These awards can be realistic—for example, one might be awarded “most courageous” for fighting peer pressure, another awarded “wisest” for the guidance given to another character—or they can be silly, creative and made up.

Grab the template to use!
Day 9- Dream Vacation
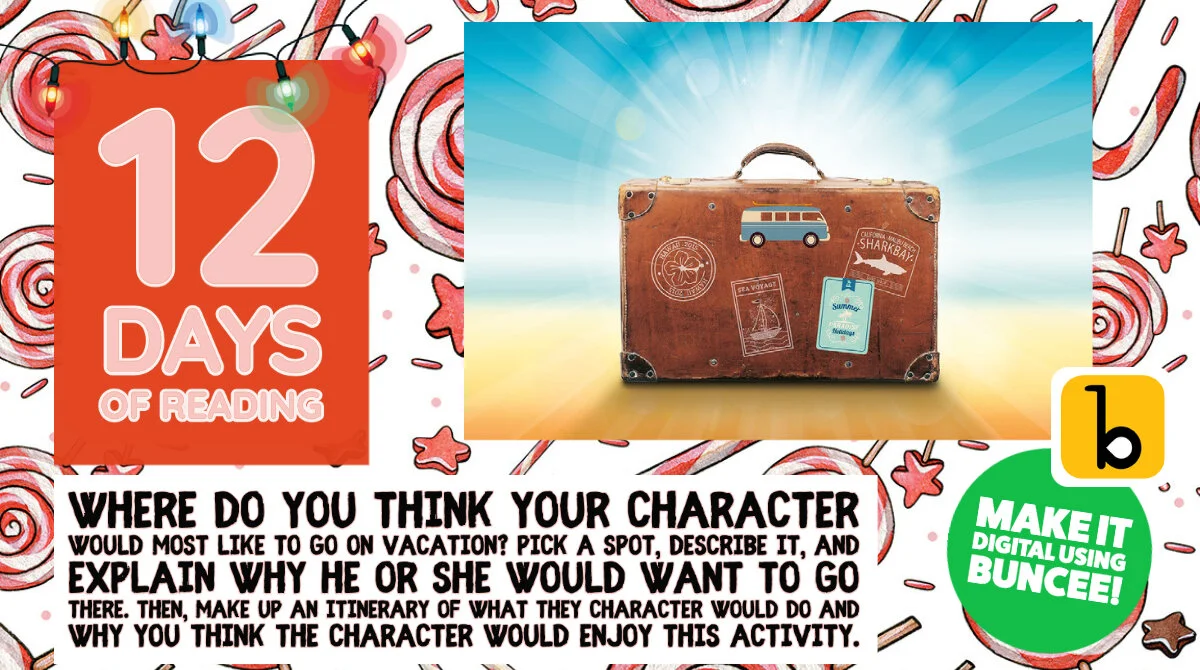
It’s five o’clock somewhere, right? Everyone can relate to the idea of getting away and going on vacation, but the destination is where opinions may vary. With this activity, students take on the persona of a person in their reading and plan a dream vacation based on the interests, likes and personality of that person. They pick a spot, describe it, and explain why he or she would want to go there. Depending on the amount of time you have and the age of the learners, you could even take it a step further and have them make up an itinerary of what they would do and when based on the length of the vacation.
Level Up: This would be fun to use Buncee to create. Students would not only create their itinerary of where to go while on vacation, but also illustrate it using animations, photographs sticker and much more!
Day 10- Letter to Santa

Write a letter from the point of view of one character explaining what they want for Christmas. This is a great review for our digital learners and gives them a chance to practice formal writing other than a text, tweet or tok.

Level Up: Infuse some math into this lesson by giving students time to browse through store circular ads and calculate the total amount it would cost to buy all the items on their list.
Day 11- Character Scrapbook
Image your character were to journal or keep track of important events and memories from their life in a scrapbook. Have students create and design the scrapbook using programs like Buncee and have them share their project link with classmates using Flipgrid, Wakelet or Seesaw.

Download this template to get students started!
Level Up: Instead of creating a scrapbook, have students use Adobe Spark Video to create a video or “home movie” of the character’s memories.
Day 12- Adobe Creative Bundle!
Adobe has curated the most amazing activities for teachers to use over the holiday season and we were honored to help create some of the templates for teachers! Check out the many awesome ideas here!
Check back in tomorrow for the last new reading activity!

Holiday Wishes with Wakelet
Sharing your holiday wish list just got a whole lot easier! Create a Wakelet collection and share it out with family and friends! You can even create a “Space” to curate lists shared with you. Check out the post to learn more!
The holiday season is one of magic, and this year especially we see many unrolling that magic earlier than normal. In addition to the lights and holiday music, many already have their personal decorations up and waiting for the special day. With all the confusion and craziness around, why not make one thing easier—holiday wish lists! With Wakelet, this fun tradition can be modernized and updated for the digital age.

Creating a wishlist is easy with Wakelet’s friendly platform. Simply log in, and begin by creating a new collections. Name it and add some fun holiday flare or the photo of the person it belongs to. (This is great if you are going to make several for various family members) Once you have the initial set up complete adding items to the wishlist can be done by hitting the green plus sign. Users can add links (great for things we fine while searching through social media) or add text and just write in and explain the gift ideas personally.

Tip: When adding links and other forms of media, try adding in specific information for the gift such as size, color. etc.

When finished, before clicking DONE and saving the list you will want to change it from PRIVATE to either UNLISTED or PUBLIC depending on how you are going to share it. If you are just sending the links to loved ones, then you could keep it unlisted and the list will only been seen by those who it was sent to. Public will make it viewable to everyone who comes across it.

If creating lists as a family, try taking each individual collection and putting them together in their own space. Follow these steps:
From the Wakelet educators dashboard, click on “+” sign

2. Add a Space name, then click the green Create button!

Using Wakelet for wishlists could be used in so many ways. Think small and create and share between your immediate family, or think larger by using for a school wide Secret Santa or for a fun way to shower a teacher with small gifts she handpicked herself.
And if you are one who loves the traditional hand written wishlist, any Wakelet collection can be downloaded as a PDF and printed as well!

Stay #interACTIVE!
-👗➕🕶️
For more tips, tricks and lesson ideas for making learning more interACTIVE, check out our book The InterACTIVE Class on Amazon!


Using Wonderopolis for Remote Learning
Remote learning has definitely posed some. new challenges for teachers looking to finish the year virtually. One of these is the ability to monitor, differentiate and provide scaffolding for student learners. Wonderopolis is a great resource for teachers looking to provide meaningful content to students to use for learning, while also being sensitive to the various learning situations student have at home.
Remote learning has definitely posed some. new challenges for teachers looking to finish the year virtually. One of these is the ability to monitor, differentiate and provide scaffolding for student learners. Wonderopolis is a great resource for teachers looking to provide meaningful content to students to use for learning, while also being sensitive to the various learning situations student have at home.
How Can Wonderopolis Be Used in Remote Learning?
Wonderopolis is a great resource to use during remote learning because it is founded on children’s’ innate curiosity and during this time of distance learning it is more important than ever to keep our instruction and content as relevant and responsive as possible. Learning, discovery, and curiosity, as well as the concept of sharing the experience with family members, are strongly encouraged throughout the site and with students learning while at home the more involved the family can be the better.
Remote Learning Features of Wonderopolis
There are many features already built in to Wonderopolis that are very useful for teachers and students to take advantage of during remote learning. These are features that have always been a part of the Wonderopolis platform, but now with teachers having to teach the remainder of the year remotely, they are great to add to distance learning lessons.
Wonder Lengths
The articles, referred to as “wonders” remind me of the fairy tale Goldilocks and the 3 Bears—they aren’t too long, they aren’t too short—they are just right! Every Wonder is numbered making them easy to find, and they are a reasonable length for students who may be working independently.
Immersive Reader
Speaking of working independently, another feature found in every Wonder article is Microsoft’s Immersive Reader. Immersive Reader is an embedded tool that will benefit students in two ways. First, it will read aloud all the text found on the page. This is great for primary students who may be more accustomed to having text read aloud to them, benefits students who may be doing more of their work independently without adult help available, and for students who may read below the reading level of the selected text. The second benefit of Immersive Reader is its ability to translate the text on the page. Students can choose over 50+ different languages to have the Wonder article translated to. This can be a great advantage for our learners of other languages.
Vocabulary Assistance
When reading through the Wonder article, students will find various words highlighted. These are words pre-identified as words the readers may not know, and when you hover over them, a short kid-friendly definition will pop up. Wonderopolis doesn’t offer Wonder articles in various reading levels, so a feature like this, paired with Immersive Reader, helps students who may be reading at a lower level than that of the Wonder article.
Try it Out
At the end of each Wonder article is the Try It Out section. This is a great resources for teachers and often lists various activities or projects to try related to the Wonder. These suggestions range from discussion questions, STEM activities, creative writing prompts and much more!
Flipgrid Partnership
In addition to all the features Wonderopolis offers on its website, it has an amazing partnership with Flipgrid. Wonderopolis is one of the many featured partners that can be found in the Disco Library. The Flipgrid Disco Library is full of already made Flipgrid topics that educators can take and use right away with their students.

Simply click on the Wonderopolis icon and search through the already created Flipgrid topics. Students will be able to read the article on Wonderopolis and then participate in a class discussion with one another on Flipgrid.


12 Ways to Use Wakelet Spaces!
Wakelet’s new feature “Spaces” is here! Learn how it works and twelve ideas to get you started now!

“Spaces” is here and we are REALLY excited about it! “Spaces” is Wakelet’s brand new organization and collaboration feature. In this blog post you’ll learn:
(click on any subheading to jump to that section)
💥What are Wakelet’s “Spaces?”
💥How to Create a Space on Wakelet
💥How to Add Members / Contributors to Spaces
💥 12 Ways to Use Wakelet Spaces
💥What are Wakelet’s “Spaces?”💥
Wakelet’s “Spaces” is an organization and collaboration feature that is built directly into the Wakelet platform. With just several clicks, users can create a “space” to house content to be shared. Now users with lots of collections in their Wakelet accounts can move content around into a Space that is applicable, keeping everything tidy and clean. Collections can be moved into a Space by hovering over the collection icon and clicking the three dots, then “Move Collection.”
💥How to Create a Space on Wakelet💥


Creating a “Space” on Wakelet is simple and can be done in just several clicks. To get started, follow these simple steps:
Log onto your Wakelet account
On the left hand panel, click the “+” sign located under your profile picture.
Edit / change the image and the name, then click “Create”
Your Space is now visible on the left hand panel under your profile picture
💥How to Add Members to Spaces💥
Collaboration within Spaces is easy! Here’s how you can add members to start collaborating with your Spaces collections:
From a Wakelet Space, click on “Members”
Click on the green “Invite Members” plus sign
Share the Spaces link, code, or QR code with your students / colleagues


💥12 Ways to Use Wakelet Spaces💥
Here are some ways that you can start using Wakelet Spaces in your classroom:
Virtual School Supplies: Create Spaces for virtual school supplies that the students can use. For example, create a space for Math manipulatives where students can find links to things tools like: base ten blocks, hundred chart, number lines, etc. Click here or the image below for a FREE collection of virtual student supplies that you can add for yourself!

Planning with your Team: Create a Space for each subject where you and colleagues can add content to be used when teaching / planning lessons. You can have multiple profiles listed as contributors or editors, making it easy to collaborate with your team.
Group Projects: Educators can create a collection, then share the collection to students working together in a group. Students can add content to the group project, and the educator can easily monitor the progress.
Student Portfolios: Create a Space for each student and allow them to add content that they would like to share. Share the link with families to open the window to the classroom! (Tip: the URL of collections never change, so the portfolios can be bookmarked by families for quick access)
Easy Differentiation: Our current favorite way to use Spaces is for delivering differentiated content to our students. Create a Space that meets the needs of a student, or group of students. Then, create a collection for your subjects. When your students log onto the Space, they will be able to view what has been shared in the Space. Additionally, you can allow them to add content by enabling collaboration. If you have several groups who are close in regards to their instructional needs, you can copy collections and then move them into multiple Spaces - that way you won’t need to recreate your content from scratch for each group.

Units of Study Collections: Create Spaces for each of your units of study. Build the content appropriately, but be sure to invite your students to help. Providing this creative outlet pushes the creation > consumption mindset.
Formative Assessments: Build your end-of-the unit assessments by creating Spaces for each. The ability to keep them organized is convenient for educators and enable collaboration is an engaging way to assess your students.
Newsletters: If you’re working in an asynchronous scenario, it may be beneficial for families to have access to older newsletters in addition to the most recent. Create Spaces for each month where families can find your past (and present) newsletters.

Science Experiment Comparisons: Group your students and create a Space for each group. Provide an experiment for your students to complete, and have your students added as contributors to the Spaces. Then, the students can compare their results with their group. Before completing the assignment, share out the results from the other groups’ Spaces so that all students can compare to the rest of the class.
Professional Learning Umbrellas: Create separate Spaces for platforms and add content to each. For example, if you’re looking to learn more about Microsoft Teams, create a Space for it and then add the content to keep it organized.
FAQ Spaces for Virtual Families: Just like the professional learning umbrellas, create Spaces for various apps. Build “how-to’s” for each app, and then share with your classroom families so that they can troubleshoot through any potential issues that they may run into.
Integrate with Microsoft Teams or Google Classroom: Educators can easily share a Space into Microsoft Teams or Google Classroom. From the Space’s front page, click “Share” where you will find the share link. If you’re using Google Classroom, you can share it directly from Wakelet. Microsoft Teams users (for now) will need to copy the URL and paste it in Teams. However, there could be an update coming soon that would streamline that process. Stay tuned!

Looking for other ways to make teaching and learning relevant through the use of technology? Check out our book The InterACTIVE Class!


Empowering Reflection with Sway Portfolios
MicrosoftEDU tools are powerful and robust and can be used in so many ways beyond just typing and presenting. Sway is one of the newer programs added to the Microsoft 365 line up and it may be one of the most powerful.

Let’s be real. Microsoft has been given a bad rep. When you say you work in PowerPoint or that you are collaborating on a Word doc together on the web, people expect you to work in an office type setting and using dated tools from when they grew up. Well they couldn’t be more wrong!
MicrosoftEDU tools are powerful and robust and can be used in so many ways beyond just typing and presenting. Sway is one of the newer programs added to the Microsoft 365 line up and it may be one of the most powerful. Microsoft understands the importance of telling a story while also focusing on content, and has harnessed the power and technology of AI to help students effortlessly demonstrate their learning through web design.
But in addition to demonstrations of learning, Sway can be a power tool for students to use to curate and reflect on their own work throughout the year in the form of student portfolios. These can be as simple or as advanced as you wish depending on the age of your learners and the subject area(s) you are looking to include. Regardless of how you set them up, portfolios allow students to document aspects of their learning that do not show up well in traditional assessments.
Empower Students with Sway
There are many features you can use to create student portfolios in Sway and these features can be used differently depending on how you set up and organize the content.
Headers: These provide an easy way to organize content in a Sway portfolio. Headers could be arranged by subject area, content and learning goals, or to produce a time order of months, quarters or learning semesters.
Text Cards: Text cards provide students with the ability to add in dates, times, and any other commentary or reflection on the work being added. Text cards could also be used to add in content goals or learning objectives within subject area headers for additional organization.
Images: Students have the ability to add in images directly from their learning day, or images of things they created in class that may not stay around. (ie: writing on a white board, a STEM creation, or something created outside of the classroom) Students can also take screenshot of things they work on online if link sharing is not available.
Grouped Images: This is great for images related to each other and is good for saving space in the portfolio. The ability to stack them and scroll through leaves lots of options for what and how students add to demonstrate their learning.
Links: When using EdTech tools we always look for link sharing. Applications like Flipgrid, AdobeSpark, Buncee and many others provide links you can copy and paste to share work with others outside of the platform.
Videos: In Sway, students have the option to upload videos from a device, but they can also record videos directly into the platform. This option is nice because it gives students the option to reflect and share thoughts on their work in real time.
Types of Portfolios
There are several different types of portfolios students can create and it is important to think of why you want students to create them prior to choosing the type best for your specific learning environment. Once you decide on the type of portfolio, then you can move on to organizing them using the features in Microsoft Sway.
Working Portfolio: This type of portfolio gets its name based on the content it holds. This type of portfolio holds work from students that is still “in the works” by the student. It is more than just a holding tank of work, but rather is guided and organized by specific standards and learning goals. The work displayed and curated doesn’t have to necessarily be completed or even a student’s best work, but rather it is a place where students can reflect and have evidence of work that demonstrates both their strengths and weaknesses as learners. Students curate a sufficient amount of work in order to provide ample evidence of their achievement in each particular category. The purpose of having a working portfolio is mainly to benefit the students. By working on the portfolio and reflecting on the quality of work contained there, the student becomes more reflective and self-directed.
Display or Showcase Portfolio: This is probably the most common type of portfolio used in schools. A showcase portfolio consists of students’ best work and the purpose of these portfolios is to demonstrate the highest level of achievement attained by the student. The work they include should make them proud. These types of portfolios are even more beneficial when they are kept over time, from year to year, showing growth over time. They generally consist of academic content, but they can also include the achievements of students outside of the classroom too. Since this type of portfolio holds a student’s best work, it is often shared with parents and others outside of the classroom setting.
Assessment Portfolio: Assessment portfolios are used as a means to document what a student has learned over a specific period of time in direct correlation to a set of standards or skills specified. The content of the curriculum, then, will determine what students select for their portfolios. For example, if the curriculum specifies narrative, informational and persuasive writing, an assessment portfolio should include examples of each type of writing. Often these types of portfolios are used to demonstrate mastery of content in specific learning areas. In an assessment portfolio, the content matters and it must demonstrate and document what students have learned.
Portfolios come in different forms and may be used for different purposes. They help us be used to curate, document, showcase and celebrate learning. Regardless of their purpose or audience, they have the power to transform the learning environment in the classrooms where they are used. But don’t be fooled—the magic of portfolios lies not in the portfolios themselves, but in the process used in creating them and the learning documented within them.
Looking for other ways to make teaching and learning relevant through the use of technology? Check out our book The InterACTIVE Class!


InterACTIVE Student Kits
The interACTIVE class isn’t a place. It isn’t just flexible seating or colorful props, but rather it is the idea of creating learning opportunities for students that are memorable and engaging. So with that attitude in mind, I have set out to come up with a way to keep the learning in my classroom as engaging and interACTIVE as possible. So my newest idea for the fall is the idea of InterACTIVE Student Kits.
How to keep learning InterACTIVE during a time of transition through the use of individual student kits.
It’s like the classroom is in a time warp and we are traveling back in time 30 years. No community spaces. Desks in rows all facing the same direction. Independent work recommended over anything partner or group related. If the InterACTIVE Class were the magic carpet in Aladdin, we would be at the point in the movie where the string of the carpet is being pulled and it is quickly unraveling, barely resembling its former self, and surely unable to function as it was used to.
With every new update, mandate, policy revision and guideline its hard to not feel deflated. It’s a challenge to not feel anxious or overwhelmed. And we are just coming at this whole situation from the teaching and instructional point of view—don’t even get us started on the health concern side of this ordeal. (that is a post for another day and another time) So for the time being, with so little out of my control, I (Kristin) am going to take one something I can control—my teaching style and my lessons.
The interACTIVE class isn’t a place. It isn’t just flexible seating or colorful props, but rather it is the idea of creating learning opportunities for students that are memorable and engaging. So with that attitude in mind, I have set out to come up with a way to keep the learning in my classroom as engaging and interACTIVE as possible. So my newest idea for the fall is the idea of InterACTIVE Student Kits. You can call them whatever you want, but the idea behind them is this—every student will have their own small kit of tools to use daily in our attempt to make learning engaging, creative and fun.
Creating Student Kits
Now this idea of a student kit could take on SO many different forms so don’t feel limited by the way I am choosing to do it. My personal goal is to have kits that can be housed together, in individual student cubbies, in a hanging seat sack or inside a desk. This way, I am leaving my options open once my classroom furniture and set up is finalized. I also have kept in mind that if we have to abruptly go back to learning at home these kits would be something feasible to send home with students and for them to keep track of. (hopefully!)
Small Student Kit
So to start off with you need to decide on what type of “kit” your items will be housed in. Once I had decided on a few of the items for my personal kits, I came to the conclusion that these kits needed to be hard and sturdy. At the time of this post, Michaels had an AMAZING sale going on for the rainbow boxes and storage kit going on. I chose this option over some of the others mentioned below simply because the smaller individual boxes can be housed in the larger one if I need them to and because I also have one of these sets in my classroom so it gave me more individual boxes to work with while keeping them all matching. They are also about 2 inches larger than the others I found and were flat enough to fit within all of the places mentioned above.

In addition to the boxes above, Target had some great options in store in their Dollar Spot for $1. They were a tad smaller, but also a good option if you want a matching, sturdy set. (I have not been able to find these online so going to a store in person would be your best bet.)

InterACTIVE Items List
Once I had decided on a container for the kits, I went searching for items small enough to fit inside. These are the things I have included so far in my interACTIVE kit but I am constantly looking to add more as I go.
Dice: I intend to put various dice in each kit. Obviously the regular 6-sided white dice, but I also found some great colored ones. These not only add the opportunity of rolling larger numbers, but also introduce color into the kits. These colors could be used to call out answers, group students, or allow for other interACTIVE spins on simple tasks.


Fidget Spinner: These have been used in the past for math, but I intent to increase how we use them. Maybe one day they spin and serve as a timer for sharing, and the next day they spin on the desk with problems waiting to be solved based on where the marked end lands. I am also going to work on some type of “mat” that we can make for various lessons that they can be spun on top of to decide actions based on the specific content matter the mat was created around. Still a lot of ideas floating on how to use, but they have increased engagement in the past so I think they are a safe bet.

Mini Flashlight: If for nothing else that taking out a flashlight to read in the dark, these mini lights will be fun. When all else fails, we can dim the lights and work on center work, read aloud or do something quietly with our lights.

Black Light Pen: These are ALWAYS a hit when I do spy themed room transformations and such, but I think they will also come in handy for various search and rescue activities around the room with each student being able to use their own. I am still thinking on other creative ways to integrate them, like possibly having a secret student of the day who you identify with a code on the top of a paper assignment. Stay tuned for more ideas with these!

White board marker: There isn’t much engaging and exciting about white board markers, but students sure do love them and I am including them in this kit merely to try and keep track of them! For whatever reason, students eat them and they always go missing. Maybe by buying some fun colors, these will stick around in our kits longer! Also, we use them to write on our desks (which students LOVE and makes any lesson instantly more engaging!) and they will work well for the individual paper sheet protectors I plan on giving to each student as well.
Finger Eraser: These were not part of my original kit list, but when I saw them I just had to add them. I would be shocked if they last until Christmas but hopefully they will work for our first 9 weeks which I expect to be all separate and spread out due to the specific classroom guidelines our school has in place. These were found in the Target Dollar Spot and were tough to find but they will be a fun addition!

As far as what learning is exactly going to look like, there is no way to know and surely no way to fully prepare and plan. But putting these kits together has made me feel a bit more prepared and dare I say a little more excited to start teaching and learning with my new group of students.
Have an idea on another item to add to an interACTIVE student kit? Message me on Instagram or Twitter at @FriendsinFourth. I’d love to update this post with other great ideas!
Looking for other ideas in regards to teaching during remote learning? Check out some recent blogs:
15 Ways to Connect with Students During Remote Learning
Lessons Resources for Remote Learning: Spy Transformations
If you’d like to learn more about interACTIVE teaching and learning, check out our book The InterACTIVE Class today!


Collaborating in Wakelet!
Wakelet has placed a great deal of focus on collaboration, and now educators have the ability to control who gets to manage the content being shared. In this blog post, learn how to provide contributor and admin rights!
Wakelet has placed a great deal of focus on collaboration, and now educators have the ability to control who gets to manage the content being shared. In this blog post you’ll learn:
(Click on any subheading to jump to that section)
How to Add a Contributor to a Wakelet Collection
The first thing that you’ll need to do to add a contributor to your Wakelet collection is to click on the “Invite” button on the top left of the screen. Once you click this, a new window appears. Now, click “Via name or email.” From here, you can invite friends to gain access to your collection. If the person you’re looking for doesn’t appear in the list of names, you can search for them using the search bar located at the top of the window. Once you’ve found the people (or person) to share with, click the “+” and then click on the green “Send” button. Wakelet automatically sends an invite to the people (or person) you’ve selected.


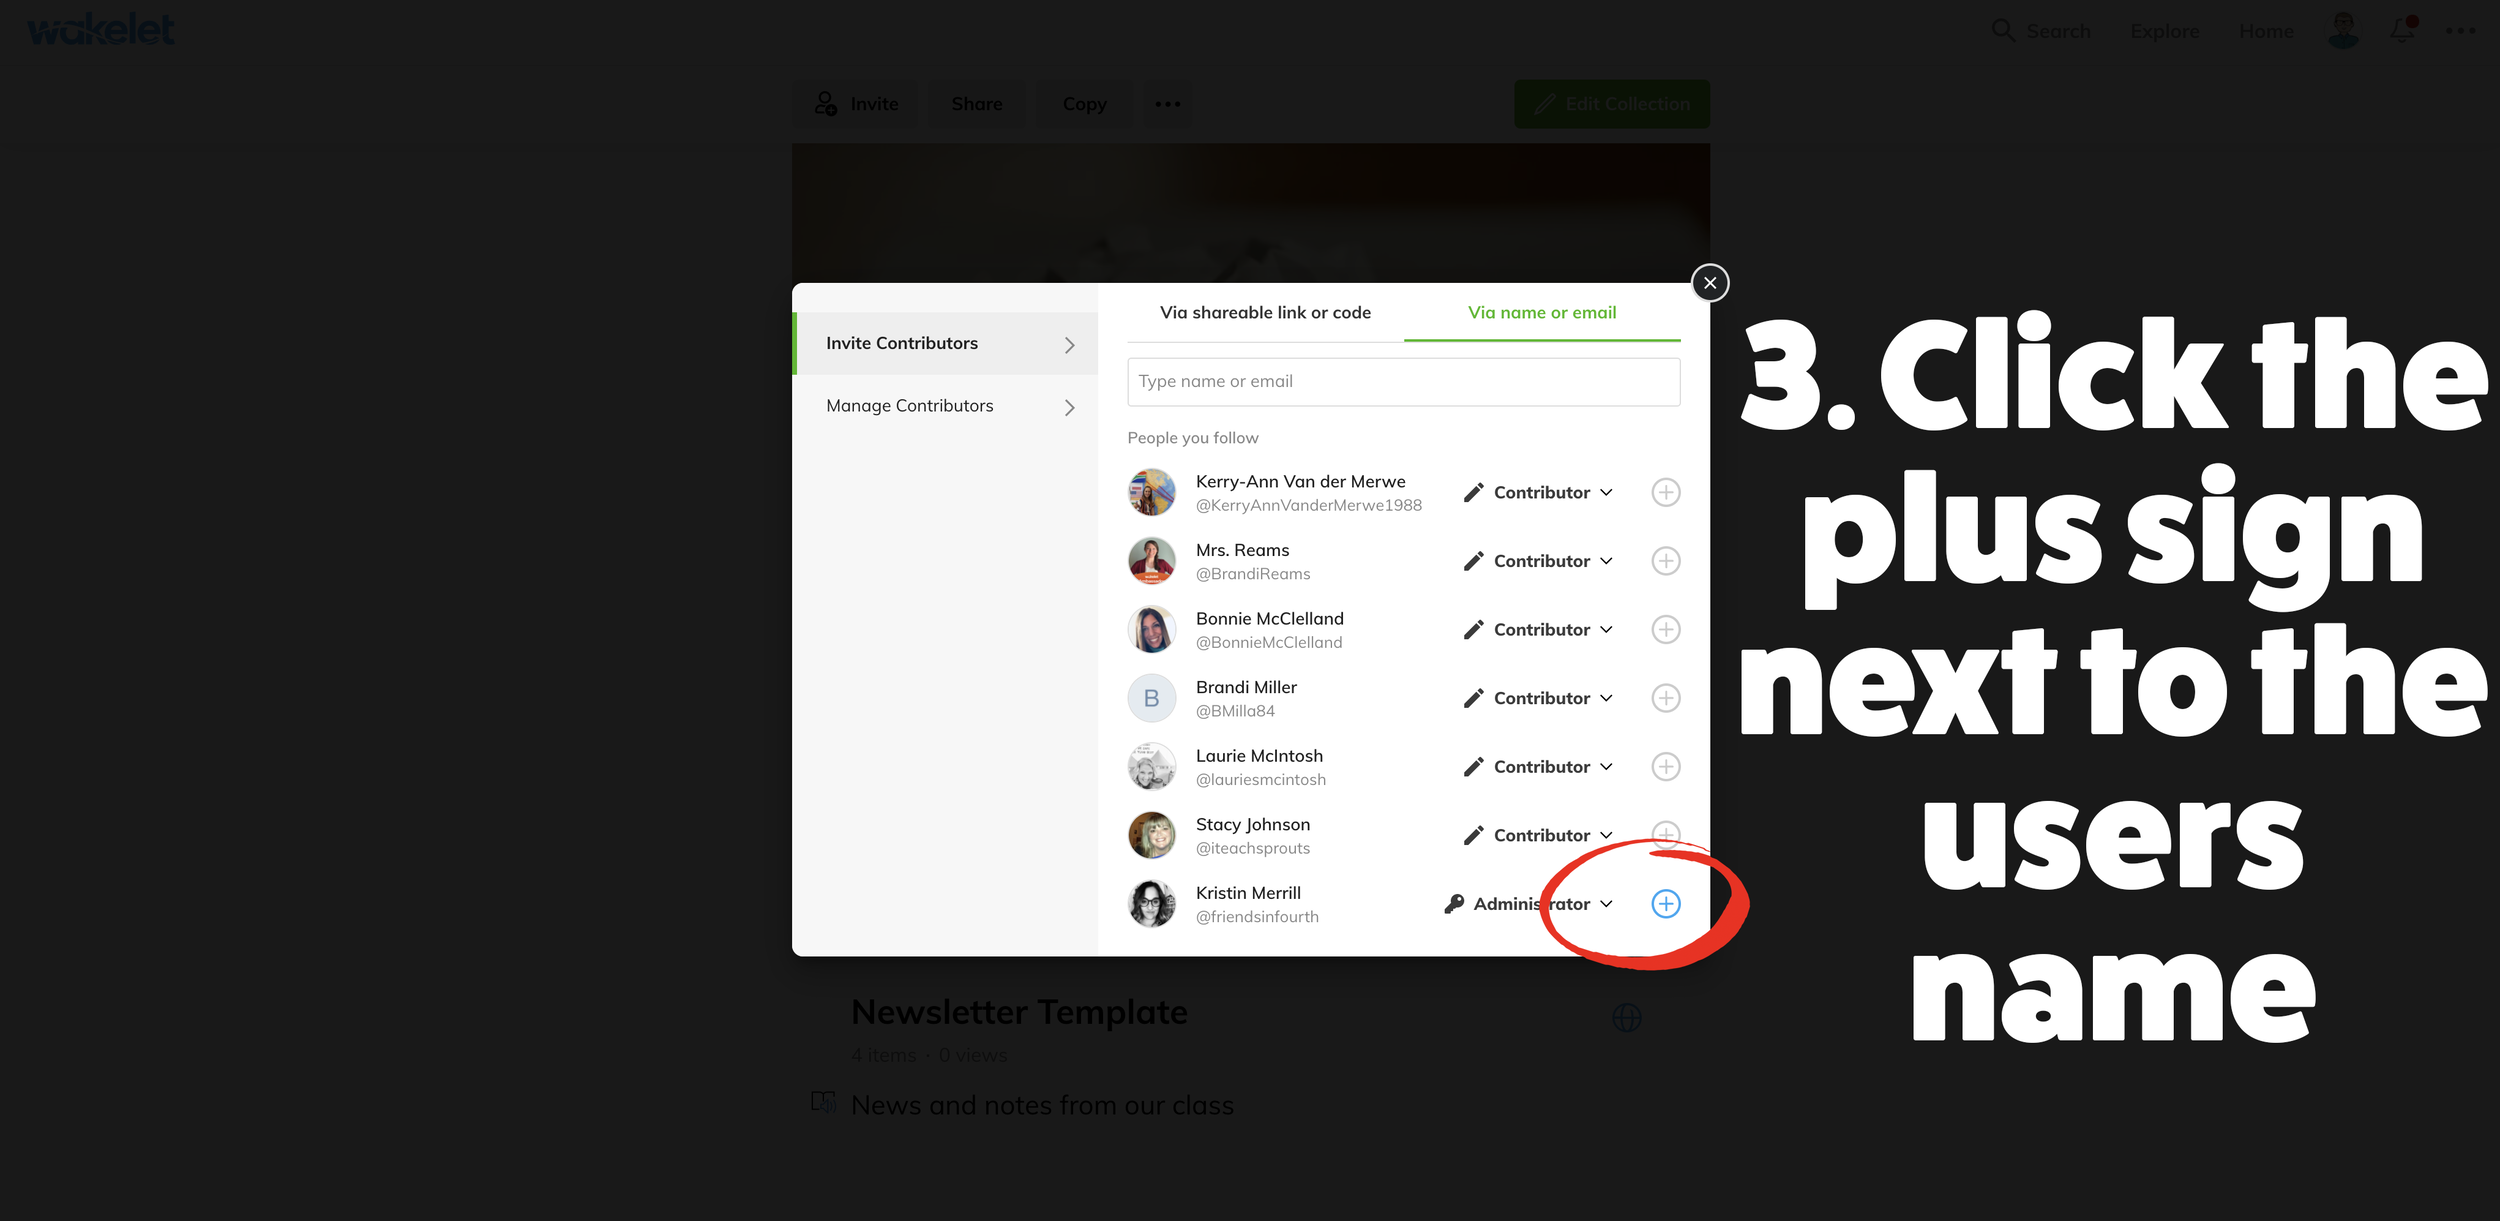
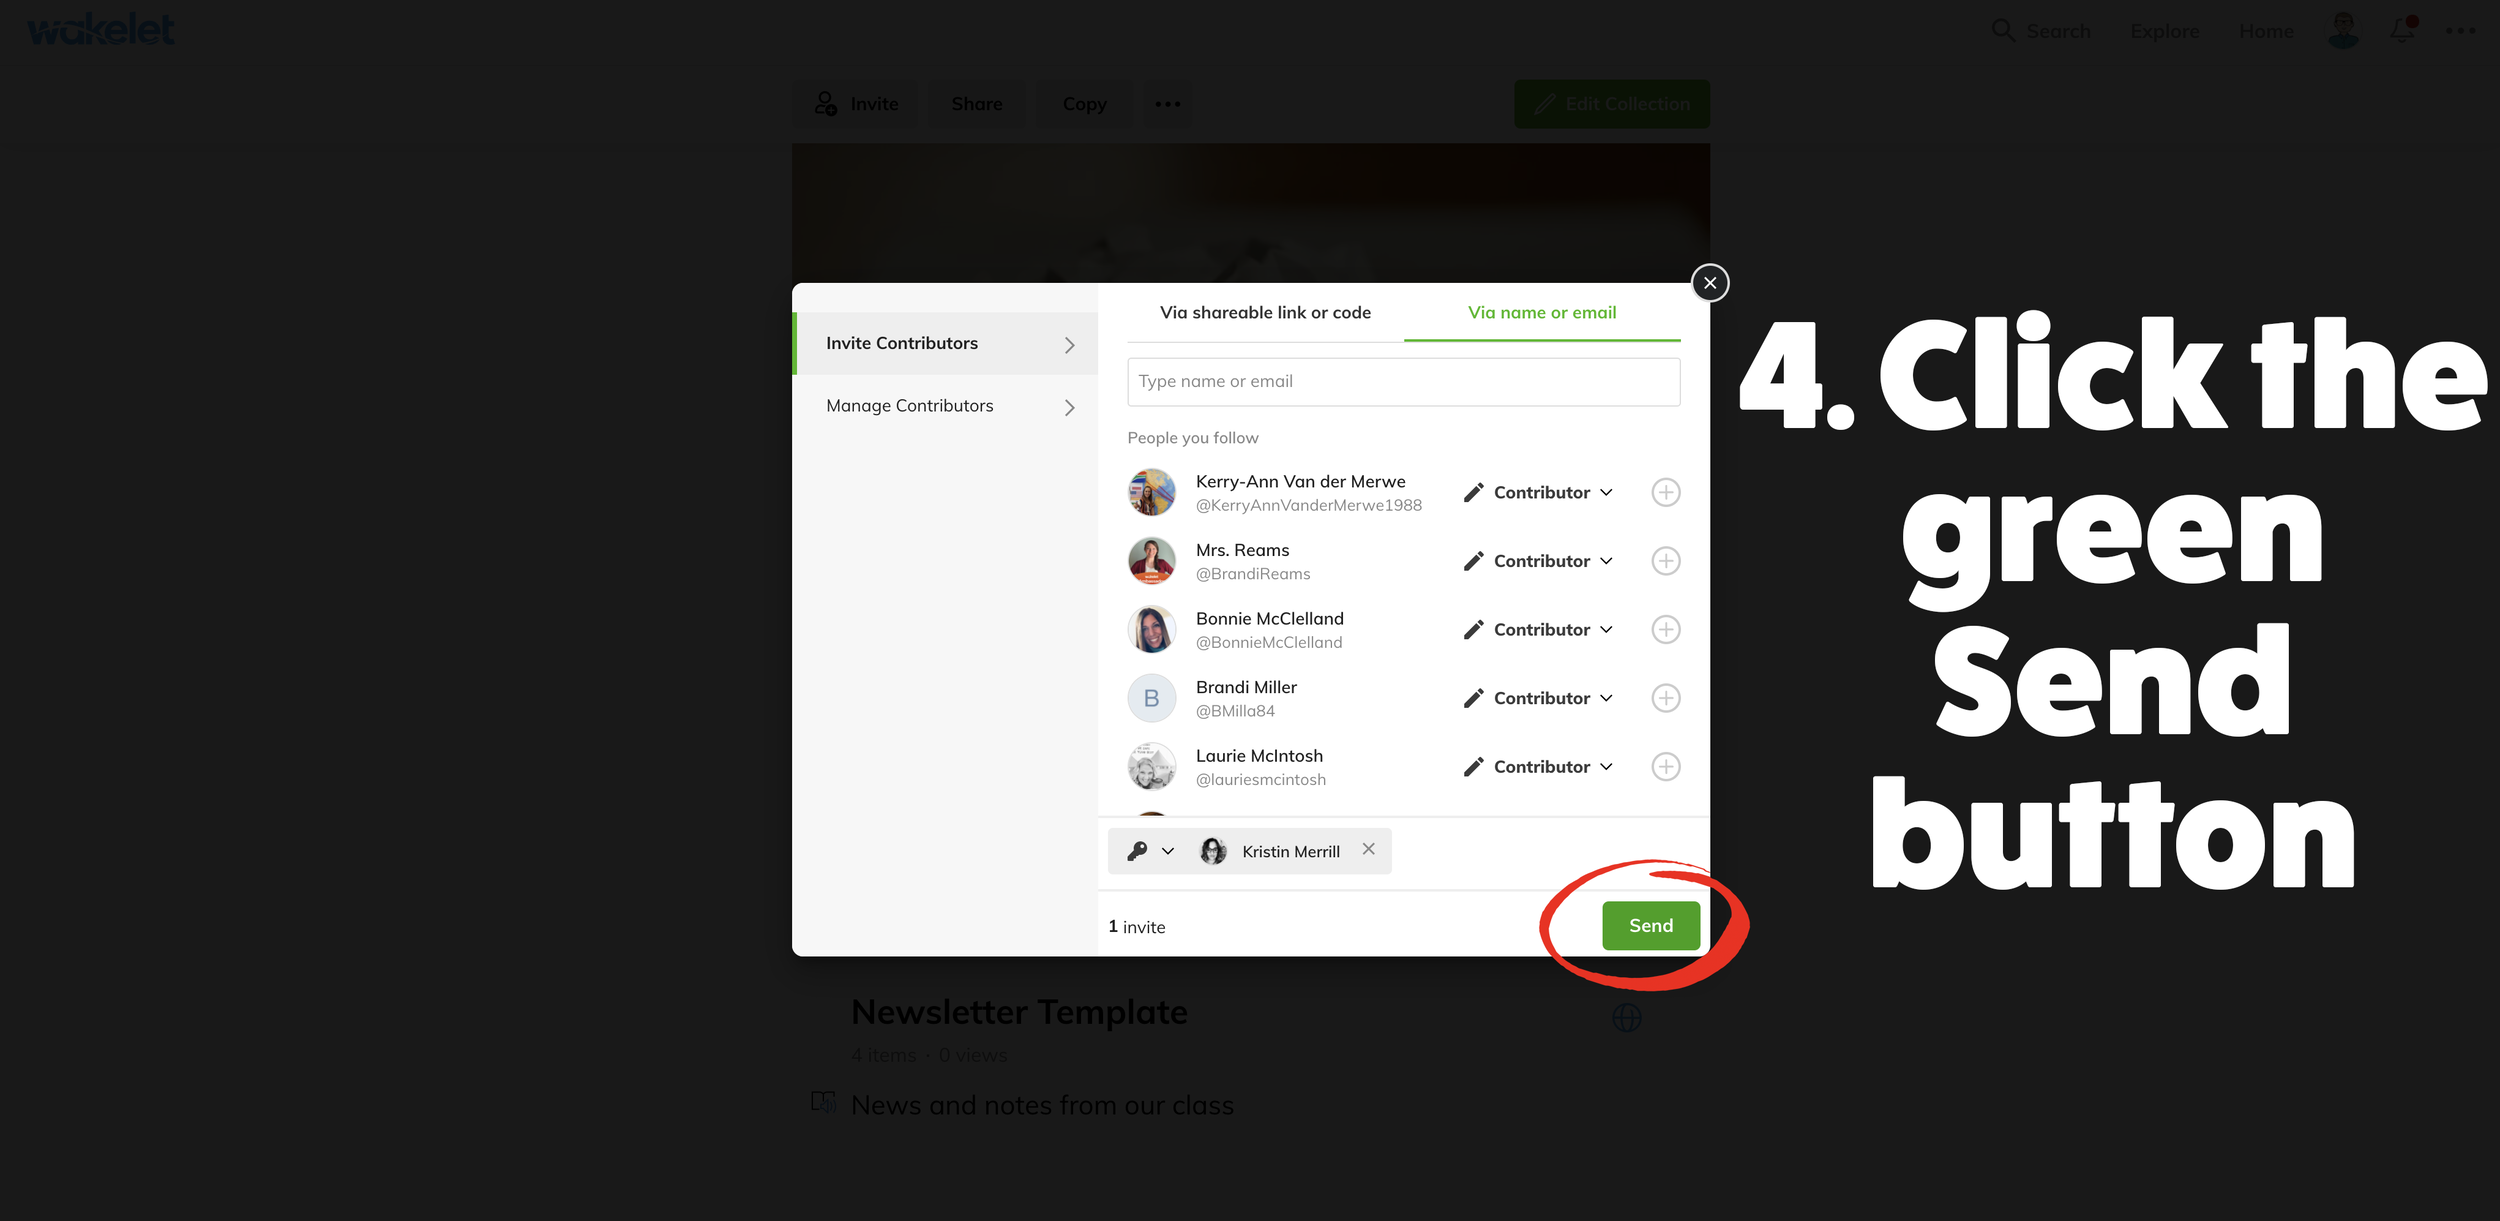
Something to note: A Contributor can only add and change their own content. If you can’t find someone using the method above, that might mean they don’t have a Wakelet account. To learn how to add contributors without Wakelet accounts, see below.
Ideas for adding a contributor:
Give students contributor privileges to manage a group project collection during remote learning
Allow students to maintain portfolios that you can moderate
share out lesson ideas, planning, and more without fear of anything getting deleted
How to Add Someone Without a Wakelet Account as a Contributor
A Wakelet account is not required to collaborate on collections. This means you could invite students to add content - without having to create a class. The set up is quick and easy!
Once you have a Wakelet collection ready to be shared, click the “Invite” button on the top left. After you click this, a new window appears. In this window, you have several options to share your collection:
Sharing the URL
Click “Copy link” and share out the URL
When contributors access the URL, they will be prompted to add their name. Once they do, they are ready to start collaborating!


Sharing a Code
Share the code (located to the right of the QR Code) with the contributor(s).
Have the contributor(s) log onto wakelet.com
Click on “Enter Code” at the top of the screen, then enter your shared code.
Contributors will be asked to provide a name. Once they do, they will be able to add content!


Sharing a QR Code
Right click on the QR Code, then select “Save As” to download the QR Code. (Don’t forget where it gets saved!)
Display the QR Code where the contributors can access it. Have them scan the QR Code.
On the next screen, they will need to enter their name. Once they do, they are ready to start adding content!

Ideas for collaboration with those who do not have wakelet accounts:
Share a wakelet collection with your class and have them collaborate on a topic
Have your class conduct research together
gather evidence
support an arguement
How to Add an Administrator to a Wakelet Collection
If you’re working with a teammate who will need editing access to your Wakelet collection, you can now assign them as an Administrator. An admin can add, change, edit and remove any content in a collection. To get started, follow these steps:
From your Wakelet collection, click on “Invite.”
Once the new window opens, click “Via name or email.”
Type the name of the person you’d like to add as an administrator. (Note, they must have a Wakelet account)
Once you have found their name, click the drop down menu (to the right of the pencil icon) next to their name. Select “Administrator.”
Last, click the “+” sign to the right of their name. This will automatically send the individual an email notification to join the collection.
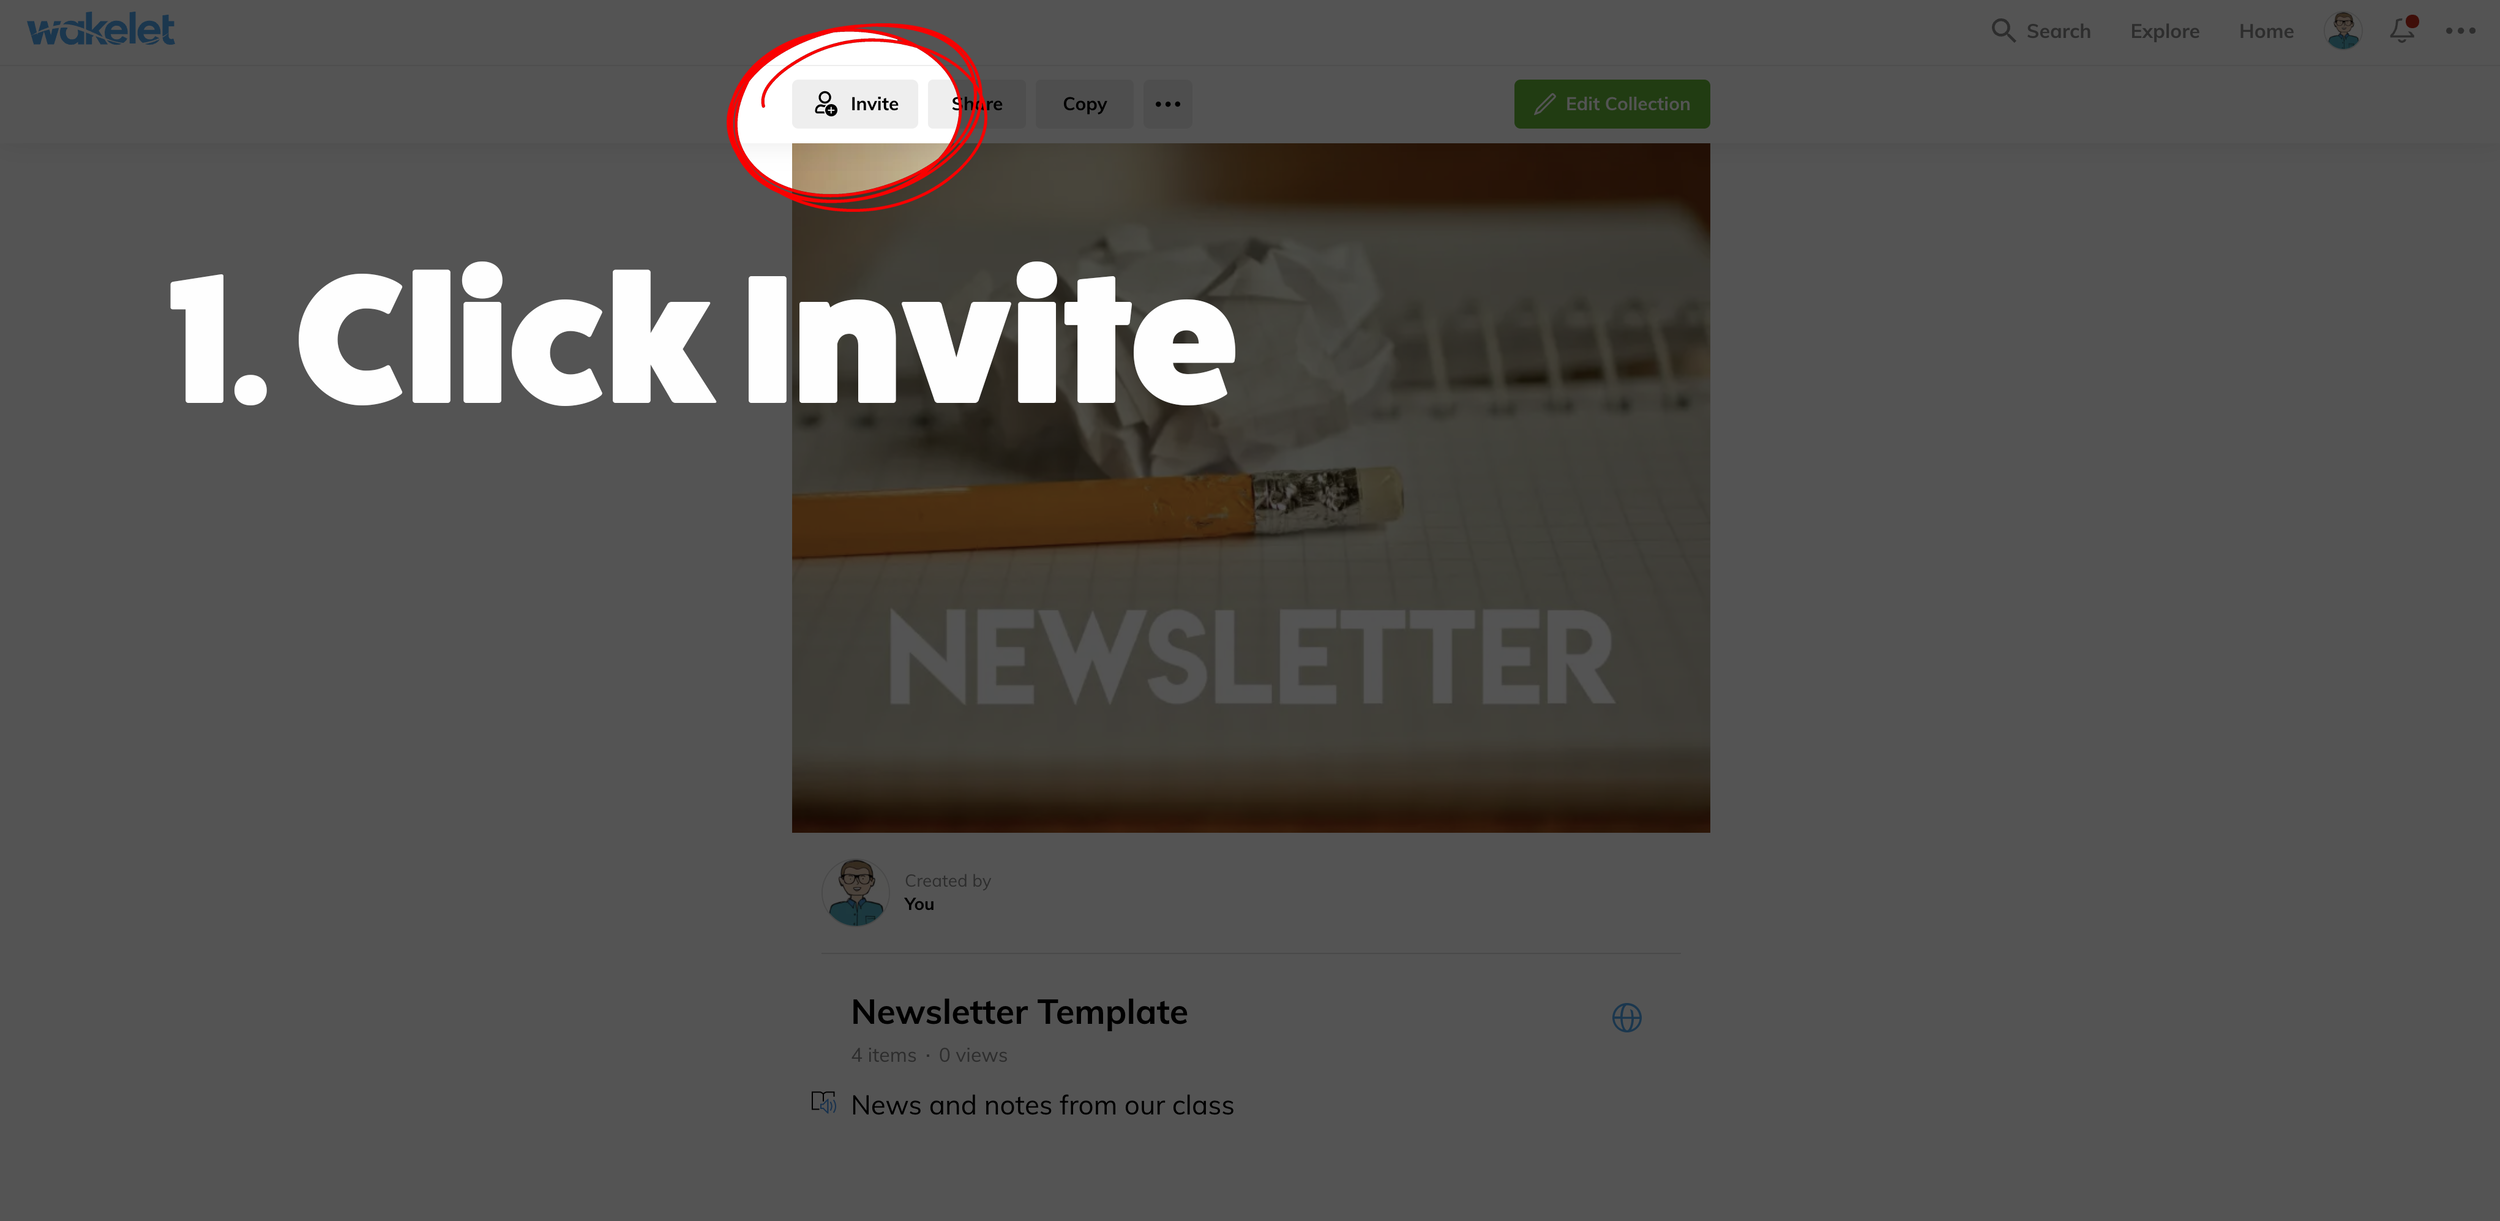
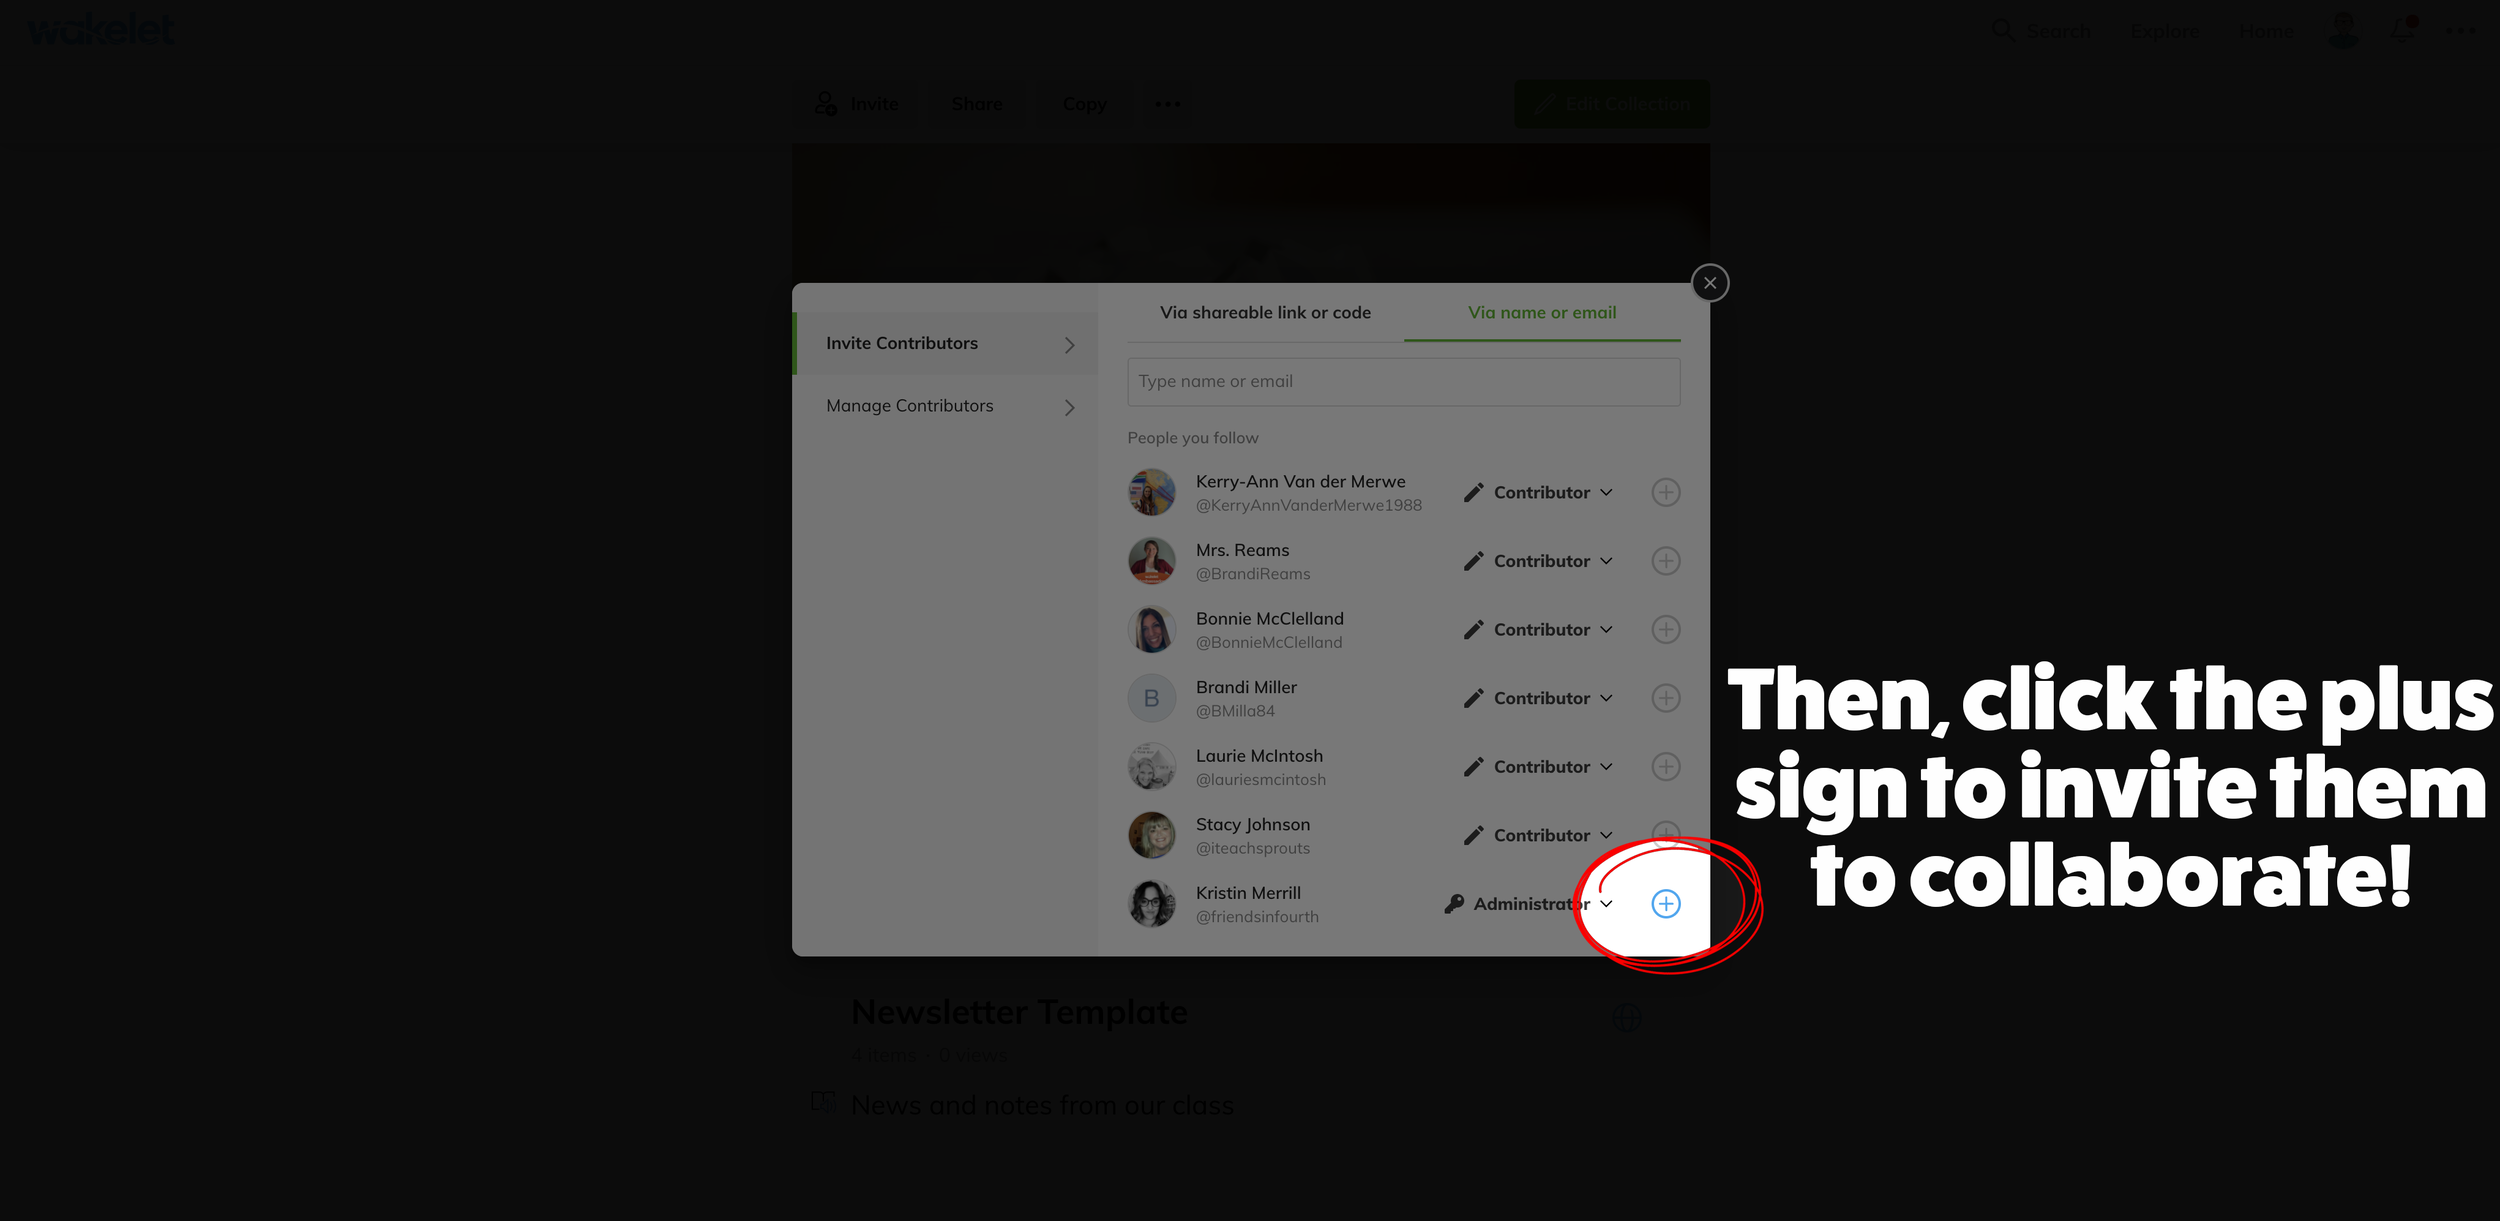
Ideas for adding an administrator to a wakelet collection:
Co-teaching situations
Planning with your grade level team
Sharing resources for multiple classes
School-wide resoruces
For more #interACTIVE lesson ideas, check out our book The InterACTIVE Class on Amazon!


Building a Bitmoji Classroom
The Bitmoji craze is taking over the remote learning world as a fun, interactive way for teachers to engage their students when teaching remotely. Now obviously, it is important to note that once your Bitmoji classroom is built, you need to make sure that it is easy for students to navigate, not overwhelming and that the lessons linked to it are structured in solid pedagogy. But for the sake of this post, we are going to just have fun decorating and building a Bitmoji classroom.
The Bitmoji craze is taking over the remote learning world as a fun, interactive way for teachers to engage their students when teaching remotely. Now obviously, it is important to note that once your Bitmoji classroom is built, you need to make sure that it is easy for students to navigate, not overwhelming and that the lessons linked to it are structured in solid pedagogy. But for the sake of this post, we are going to just have fun decorating and building a Bitmoji classroom. Here’s what you’ll learn about:
(Click on any subheading to jump to that section)
Beginning a Bitmoji Classroom
Bitmoji classrooms can be built in PowerPoint or Google Slides and the process is the same for both. To begin building a Bitmoji Classroom, you need to start with a nice, calm background. You want the background to have as few objects in it as possible so that you can add in the personalized items you wish to have in your own room. Once you have found the background image you like, you want to save the image to your desktop and then add it to the background of your slide. That way it cannot be moved or layered among other smaller items.
Tip: When looking for backgrounds you can make your own with a few images and icons, or you can try searching for classroom/office images on google. Using the word screen savers or background helps!
Once you have chosen your background you can begin by finding the items you wish to add into it. The key is that the items need to be transparent—this means they have a clear background instead of the normal solid white of a jpeg image. You can do this in Google by typing the item you wish to look for into the search bar, and then clicking IMAGES under the bar.

Once you have clicked images, then hit TOOLS —> COLOUR —> TRANSPARENT. Once you find the image you’d like you simply copy it, and then paste it into your Bitmoji classroom.

Tip: Try adding your Bitmoji in first to get an idea of how large you would like the other items sized.
Bitmoji Classroom Resources
We know how hard it can be to build a Bitmoji classroom from scratch, so we partnered with our dear educational guru Holly Clark from the Infused Classroom, to give your somewhere to start. Simply click here and grab the entire deck of backgrounds and images to use as you get started. Please remember that this resource is to be used in the classroom, and not as something that will later be sold to other educators.
There are a lot of great websites to use when working on a Bitmoji Classroom and creating lessons for students working in a remote environment. We have so many applications we could recommend, but below are some of our favorite FREE applications that would fit into a Bitmoji classroom and accompany a virtual teaching environment nicely.
Flipgrid: A social learning platform where students engage with the teacher and peers through videos and demonstrate their knowledge by pressing record!
Wonderopolis: This online informational site that asks and answers interesting questions about the world. Every day, a new "Wonders of the Day" question is posted, and each is designed to get kids and families to think, talk, and find learning moments together in everyday life. With the integration of Immersive Reader, students can have articles read aloud to them making this a great remote learning website!
Wakelet: allows users to curate customizable content. It is also a great tool for keeping research projects interactive and social. Use it much like a virtual pin-board for class discussions, or group students and have them collaborate on an activity together.
Branching Bitmoji Classrooms
Once you get the hang of building a classroom setting, have fun leveling it up and linking one room to another. Try creating a sort of “homeroom” class where maybe students start off the day, but have it linked to a science lab, a math room and maybe a reading corner. This would allow you to have more resources available for students without cluttering one single slide up.
You can do this in two ways. You can create the slides in one deck and just link them together, or you can create a new deck for each “classroom”, where when students click it takes them out to that new room where all they can see is the new classroom slide.
If you are looking for more ideas about Bitmoji classrooms, check out our other related posts:
Creating a Virtual Classroom with Buncee (Free resource!)
How to Animate Yourself in a Bitmoji Classroom
Bitmoji Keychain Keepsakes
If you are looking for other ideas on how to make teaching and learning relevant and engaging through the use of technology, check out our book The InterACTIVE Class!


Updates in Nearpod - Videos, Expanded Library, and Zoom Integration!
Nearpod has just announced what updates users can expect for this coming year - and there is a lot to talk about!

Nearpod has just announced what updates users can expect for this coming year - and there is a lot to talk about! Here’s a list of what you can expect (note: click on any subheading to skip to that section):
Interactive Videos in Nearpod
Now, educators will have the ability to bring the interactivity of Nearpod beyond a lesson - and now into a video! This feature can be used to create video embeds directly into new lessons, or it can be added into your previous lessons.
From inside any Nearpod lesson, click the “Add Slide” icon. Then, under “Content,” select “Video.” This opens a few options. You can select a video from the Nearpod library, a Youtube link, or upload your own video.


If you’re selecting a video from the Nearpod library, you can narrow down the results by selecting a subject or grade level. The Nearpod videos have activities (open ended and multiple choice questions) embedded directly into them, so when students are watching, the video will pause once an activity comes up. Educators can add their own activities on any time stamp. Once you have the activities embedded into the video, click “Save” to add the video into your Nearpod presentation.


This new feature will work with YouTube videos and your own uploaded videos. Just use the same steps listed above to add activities! It’s also important to note that educators can receive both a real time and post session report from the students who have completed the video activity!
Expanded Content into the
Nearpod Library
Nearpod is expanding its content in the Library. Currently, educators can find over 7,500 editable standard-aligned lessons. Nearpod plans to continue to add additional resources such as “Draw It” and SEL lessons. These lessons can be used for either remote learning or in-person learning.

Zoom Integration
With many districts returning to remote learning, Nearpod has announced an integration with Zoom. Using this integration, educators will be able to launch Nearpod lessons and Zoom meetings together at the same time using just one click.
To launch a Zoom and Nearpod lesson, hover over a lesson in your library. Then, click the blue “Live Participation & Zoom” button. After your lesson opens, click the blue “Create Your Zoom Meeting” button to launch it!
(Note: this requires both a Zoom and Nearpod account)
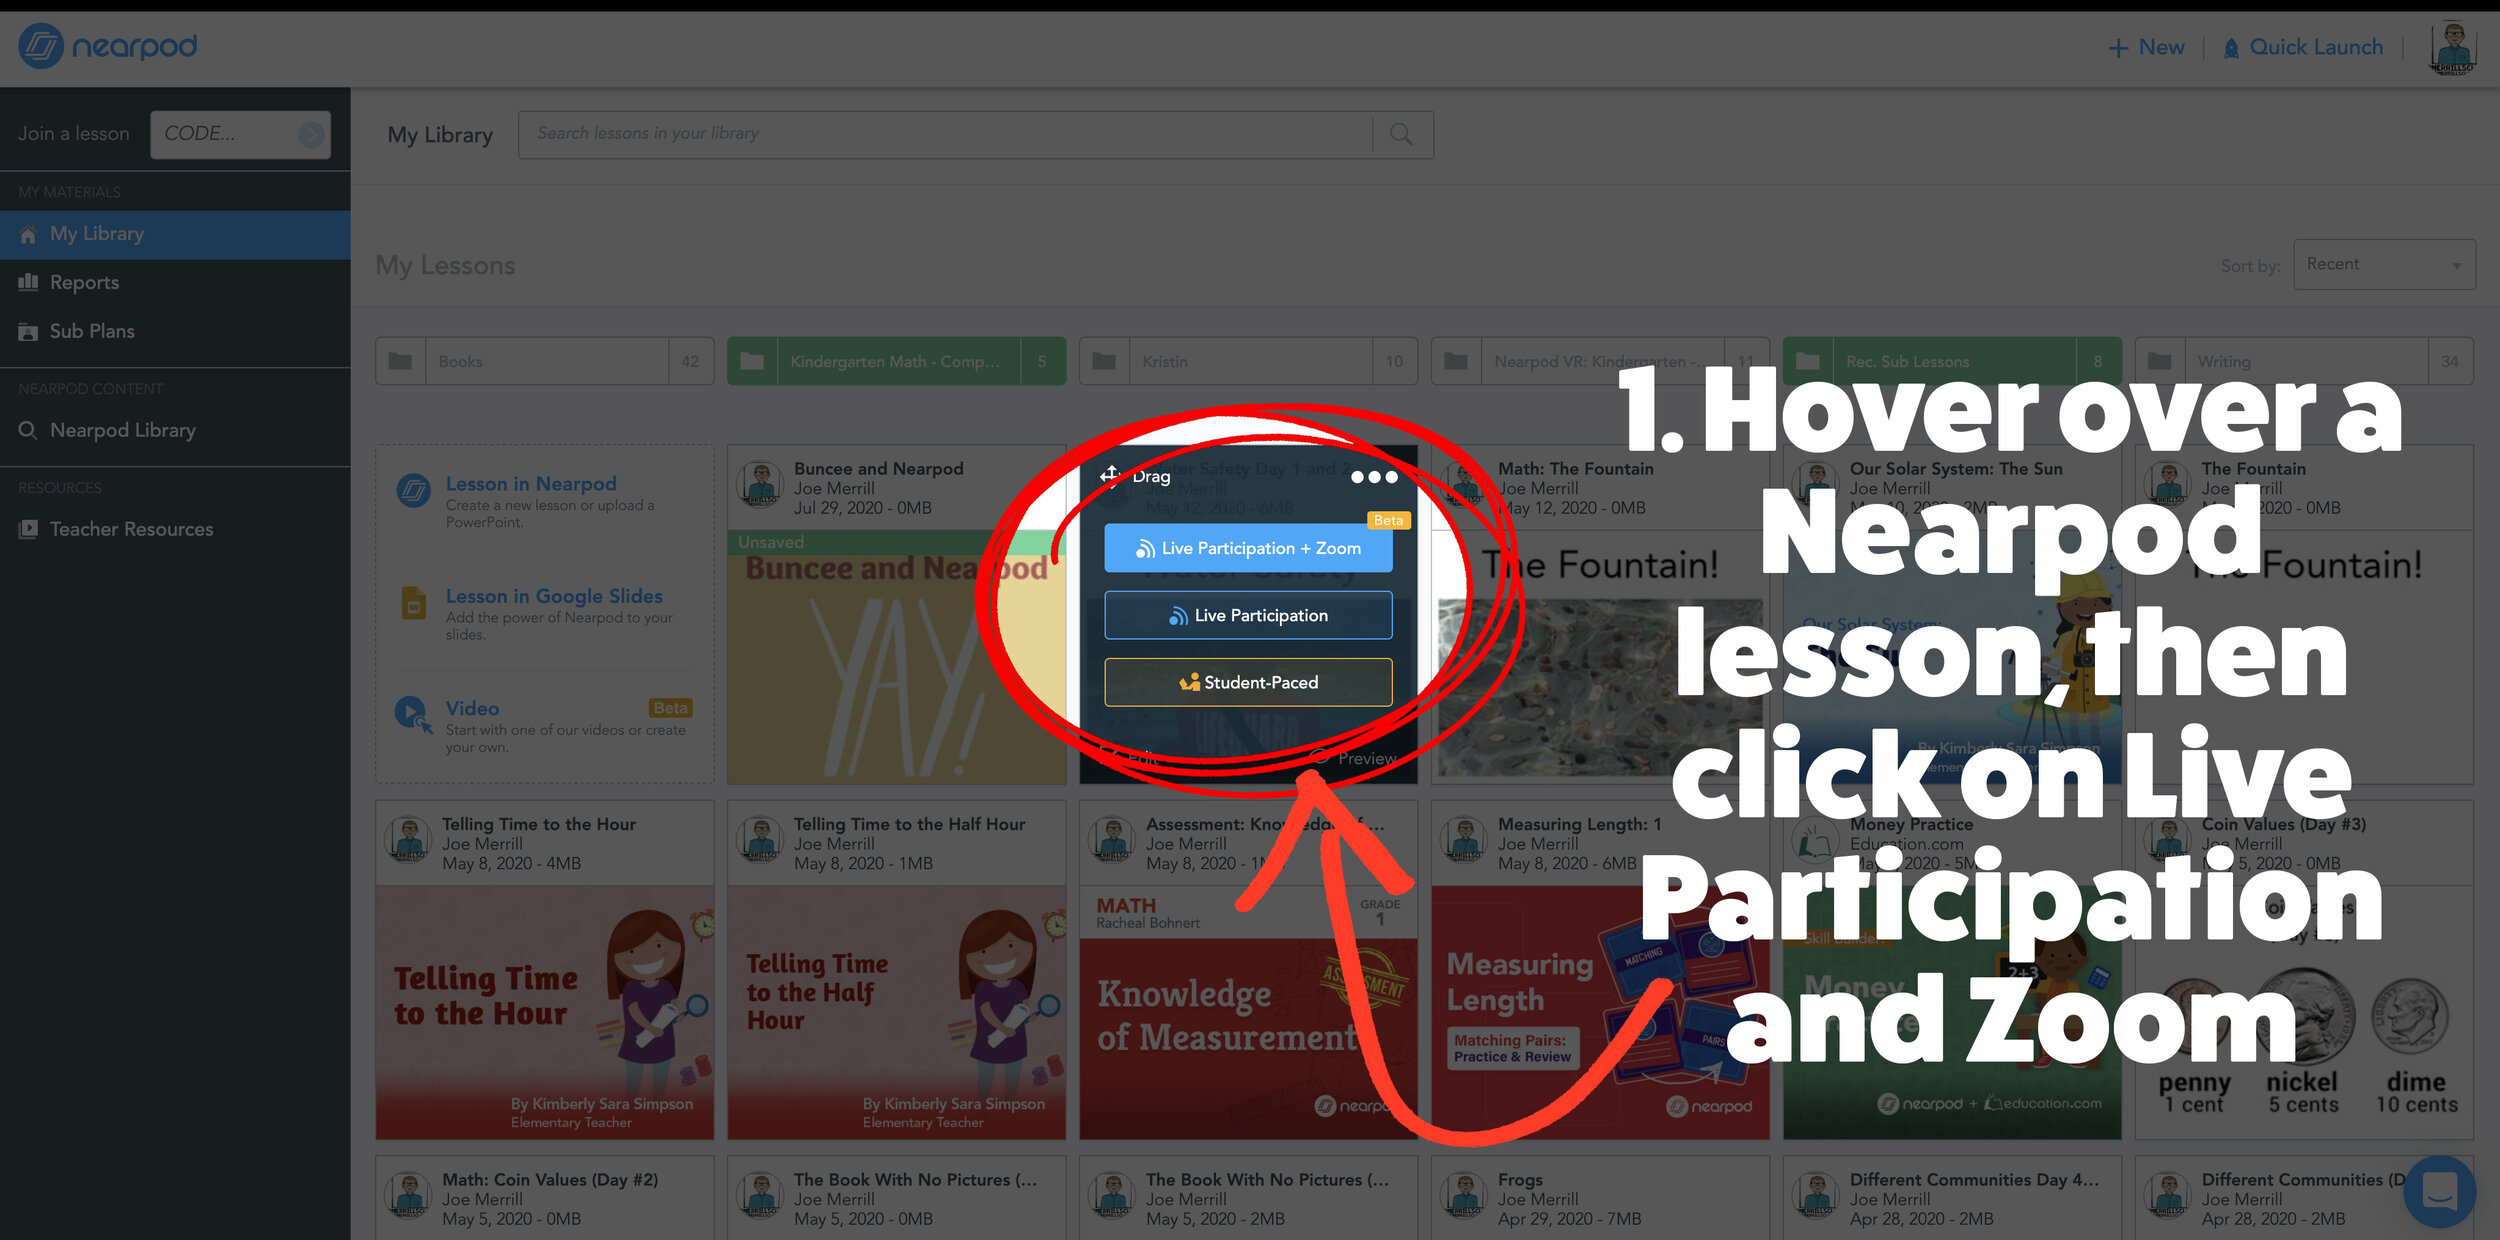

Stay #interACTIVE!
-👗➕👓
If you’d like to learn more about interACTIVE teaching and learning, check out our book The InterACTIVE Class today!


15 Ways to Connect with Students During Remote Learning
The first few weeks of school are so important when it comes to lying the foundation for the entire school year. This is the time we build community, learn about one another and develop trust. For educators teaching remotely this is a challenge in and of itself due to the fact that the group will not be meeting in person together. How can we build relationship and create interACTIVE learning experiences for our students while distanced and apart?

With so much uncertainty this fall, there is one thing that connects educators everywhere—regardless of where we live, the subject or grade we teach, or how we are planning to deliver our instruction, we are all teaching in a way that is different than our old “normal”. For many, virtual or remote learning is the plan for at least the first 9 weeks, and many other educators are facing the potential of some form of hybrid model.
The first few weeks of school are so important when it comes to lying the foundation for the entire school year. This is the time we build community, learn about one another and develop trust. For educators teaching remotely this is a challenge in and of itself due to the fact that the group will not be meeting in person together. How can we build relationship and create interACTIVE learning experiences for our students while distanced and apart? Community is defined as a feeling of fellowship you share with others, and this feeling is built as a result of sharing common attitudes, interests, and goals. As educators of remote learners, who don’t necessarily need to be together in person to build community as long as we are giving our students opportunities fo share their interests, attitudes and goals with each other.
Remote Learning Community Building Activities
Flipgrid Introductions: When building community it is important for students to see, hear and share with each other and Flipgrid is a wonderful platform to do this in. Day 1, model how to get on and give students a fun, non academic way to share about themselves. Two of our favorite activities to do with students is All About Me and 2 Truths and a Lie. The first is just as it sounds—students get an open invitation to use the engaging tools Flipgrid offers (filters, stickers, font, images, frames, etc.) to share about themselves. With 2 Truths and a Lie, students share three statements about themselves and then classmates have to decipher which statement is untrue and respond back with their guess. Both of these activities can be found for you to use in Flipgrid’s Discovery Library. (and they are also linked above too!)
Get to Know the Teacher Gimkit: Gimkit is a great game to play LIVE with your class regardless on your platform. (Zoom, Teams, Google Meet, WebEx) Since the first week is all about community building, make the questions about you the teacher and use the game time as a way to have fun while also letting your students earn about you too! If you prefer to keep students from friendly competition in the first few weeks, try making it a competition where students play against each other, you could have students play towards a team goal where they are all working towards a specific goal together.
Wheel of Names: This free resource makes any remote learning lesson personalized and fun. Combine it with one of the get to know you activities above and when each students’s name is chosen they can share which of their statements was a lie. You can customize it to fit any type of lesson and
All About Me Graffiti Wall: Giving students a brick wall to upload for their own background, have students take advantage of the new fonts and filters to create “graffiti” sharing all about themselves. When finished, students can voice over their artistic masterpieces explaining all about themselves. Check out the Topic in the Discovery library to customize for your own students here!

Breakout Rooms with Book Creator: Many video platforms now allow you to group students and give them a separate break out space to share and talk together. Try grouping students together and giving them time to collaborate on a book in Book Creator together. They could be setting goals for the year, developing a set of class rules to share with the class or targeting a specific learning goal specified by the teacher. While working together and communicating through their breakout rooms, the teacher can pop in and out as needed to assist them while they work.
Wakelet Wall: Wakelet is an easy way to curate and why not use it to build community with students. Within the platform teachers can turn on collaboration, which gives all students with the code the ability to add content to the same Wakelet. Try giving students some form of creation challenge—possibly in a platform where you would like them to take time to learn their way around. (ie. Google Slides, PowerPoint, Adobe Spark etc.) Once students have finished their assignment, have them come to Wakelet to post it alongside their classmates. Add creations to Wakelet through links, by uploading an image or even as a PDF! Simply turn on the collaboration mode within Wakelet and watch as their own “class wall” begins to fill up. Try with a simple activity such as this where students can share about themselves.

Mentimeter “Morning Meetings”: Mentimeter is an interactive presentation platform that allows you to prepare, present and analyze presentations in real time. Ask questions and then allow the audience to respond in real time. There is a free version, but you are limited to the amount of questions per presentation you can ask. For around $7 a month you can access the basic educational plan which gives you options like unlimited questions, the ability to import PowerPoint and Google Slide presentations, and much more. This would be a fun way to conduct meaningful morning meetings each day where students can “check in” and let you know how they are doing anonymously. The teacher may ask for adjectives to describe their feelings which are put into a class word cloud, or ask students to rate an assignment on a scale of 1-10. This is a great tool to help us keep an eye on our students mental well being in a way that fosters engagement, connection and the ability to engage with the teacher.
Flipgrid Playground: When learning remotely, students will miss out on the opportunity to engage and socialize on the playground each day. So why not create a safe space where those types of conversations can still be had? Create a new Topic titled “Playground” where students can simply share cool things, hobbies, funny jokes, toys they like and other non academic things with one another. This will give them a way to find commonalities between themselves and others while apart. Check out the topic example in the Discovery Library!
Tip: It is a good idea to keep this Topic moderated at first so that the videos are viewed by the teacher before being published to the class.

Student Selfies: Taking selfies with the teacher on the first day of school is a staple for many elementary classrooms. Take fun PNG frames and attach them in a simple Flipgrid Topic. Students can download the one they like, use it to take their first day of school selfie and then share with the class. They can even download their own video/selfie to keep as a classroom profile photo. To download the free frame below, and several more, click here!

What’s In My Bag?: Remember the old activity you would do in person with students where they had to go through and guess items from the teacher’s bag, then hearing how each item revealed something about the teacher? Why not do this digitally with students? In the same way you would set up Student Selfies, attach the PNG file frame of the bag for students within the topic, and then allow them to “add” things to their bag as they fill it up with things about themselves. Then they can share for their classmates to watch and learn more about them! To download this free frame, and more (including the frame above), click here!

Flipgrid “Paper, Rock, Scissors!”: Build your classroom community and encourage honesty with this fun spin on this traditional game. Have your students record them selves saying, “Rock, paper, scissors…” and then share what they picked. Their friends can watch the videos back and participate “virtually” (without cheating - of course!) and reply with what they selected and whether or not they were defeated - again encouraging honesty! If you’d like to incorporate this activity with a fun read aloud, we love the book The Legend of Rock Paper Scissors by Drew Daywalt.

Tip: If you’re worried about students cheating, have them chose a Flipgrid response to reply to. But, instruct them to not watch the original video before responding. Then, after the second student has left a response, they can go back and leave another response indicating whether they won or lost the match.
Video Conference Creativity Spark!: This is a great way to spark creativity with your students - which can be quite challenging in a remote learning setting. Pick a letter from the alphabet, and have your students draw a quick picture of the first thing they think of when they hear that letter. Repeat this three times, then have them look over what they illustrated. Then, ask them to come up with a story that connects all three images. This can be shared on Flipgrid, or even used to create a writing piece.
Heads Up! Warm Up: Before diving into a content area lessons, take a few minutes prior to play Heads Up. Created by Ellen DeGeneres, this game reinvents charades for the app generation. Pick a category, then hold your device up to your head, screen facing outward, and guess the words using your friends’ clues. You can even record and share videos of your friends’ increasingly frantic efforts to clue you in. You can create your own deck of images too. Try adapting the game by using images of words related to the lesson or just play from the deck given on your device. Don’t want to use your device? No worries! You could also just print out a set of images to play with live.
Buncee Bitmoji Postcards: “Meet” students before the school year even begins by popping up in their mailbox. Students love to receive mail, and how special would it be if it were from their new teacher?! Buncee is an a super easy design platform to create fun postcards. You can choose to either have the message on them, or you could leave them blank to handwrite as you go. Start the year off with a simple gesture showing students how much you care.
Tip: Not interested in mailing them? You can choose to email your postcards or other greetings to families!

Stay #interACTIVE!
-👗➕👓
If you’d like to learn more about interACTIVE teaching and learning, check out our book The InterACTIVE Class today!

