


10 End of the Year Activities for Elementary Students
@TheMerrillsEDU share 10 end of the year activities for elementary students! this blog post includes actvities from Epic For Kids, Microsoft Flip, Canva, Metademolab, Adobe Express, Wakelet, WeVideo, Do Ink’s Green Screen, Wonderopolis and more! There are also FREE packets! Just print, copy and you’re read to go!

(Edited: May 15th, 2026)
The end of the year is a challenging time for everyone. Whether you’re shuffling state mandated assessments, preparing to move into a new room, or just clinging onto whatever focus your students have left - it’s important to remember one thing: Don’t count down the days. Make them count! We reserve these activities for the last ten days of school. Our students love them, and we hope that yours will too!
Please note: This blog post was hand-crafted and was not created using AI.
(Click on any subheading to jump to that section)


Virtual Reality Field Trip Day
Activity length: All Day

All that’s required to participate in our VR Field Trip Day is a computer / device and a wifi connection - no bus necessary! We wanted to make the experience unique, so the first stop our students make is the airport. They must “check in” before proceeding through “security.” Once they get through, they’ll see a departure sign indicating that all flights are now boarding. Time to head to the gate! Once the student arrive at the “gate” they will choose which destination they would like to visit. To head to that destination, students just click the image at the “gate” which will automatically take them there. Students can easily “hop on another flight” to a different destination (or go back to the tab that has the “gate” opened) at any time.

While they’re at their destinations, they can complete this packet. These activities may be done on paper/pencil/crayons or digitally. The students can add a picture of each destination in the polaroid frames (there are two pages: two pages with 5 frames, and one page with ten - just pick which one you want to use and delete the other), and include the location on the label. Students can also design a sticker to put on their suitcase for each destination. The sticker should describe the destination and should reflect what they saw on their trip. Next up is a pair of binoculars, where the student will illustrate or design an image of their favorite destination. It wouldn’t be a trip without a souvenir, so now they’ll have to design a t-shirt from one of the destinations they visited. Last but not least, double check to make sure that you have visited all ten locations!

Artist Day
Activity length: All Day

Artist Day is the day where we build the confidence of our artistic abilities. First up, we read about what artists do. There are several books available for free on Epic For Kids. We enjoyed reading: “Artist Studio,” and “A Squiggly Story.” Once we’ve read these, it’s time to put our skills to the test. We’ve curated some of our favorite drawing tutorials from YouTubers, “Art For Kids Hub.” The students can pick and choose which videos they would like to watch. Then, they illustrate these on blank pieces of paper. Check out one of the videos below, and be sure to find their other content on their YouTube page here.
The fun is only just beginning, though! Students can upload their illustrations to MetaDemoLab. This will scan their illustrations and create an animation of their work. But, let’s level up! Download the video file and then upload it to Canva as a video file. once it’s uploaded in Canva, remove the background. Then, add a different background of your choice. Now your illustration is wandering in a far away place! Check out the tutorial below to see how it all works!
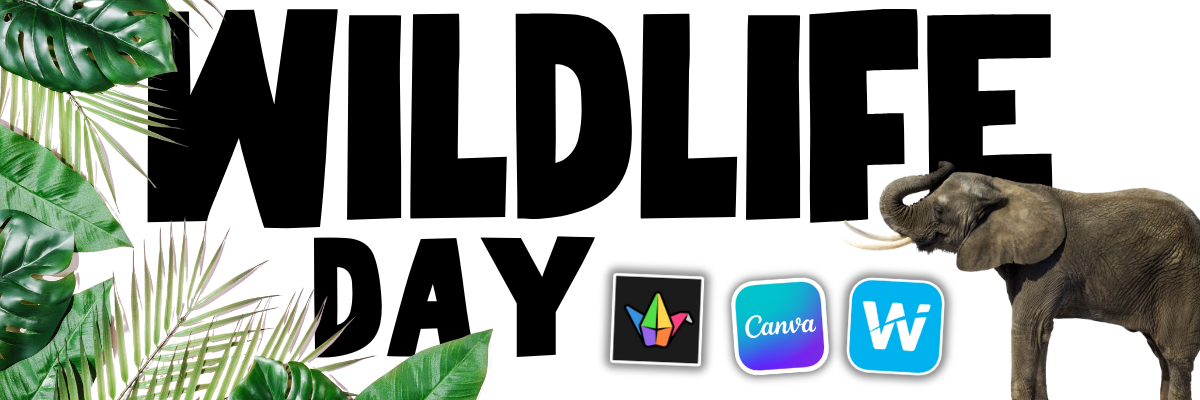
Wild Life Day
Activity length: All Day
Wild Life Day is dedicated to learning about two related animals: Elephants and Manatees! We kick things off by watching back a previously recorded Flip (RIP!) Live event on Manatees from the Mote Aquarium. You can check out both events to the left and below! .
After watching, students use Canva, Google Slides, Powerpoint, Adobe Express, or paper to create an ideal manatee habitat. After that, we watch the second Flip event. This time the topic is Elephants brought to us by The Elephant Sanctuary. Afterwards, repeat the same activity, designing an ideal habitat for Elephants. Now, with both habitats in hand, share your designs on a Wakelet or Padlet board. Students can use the comments to explain what both animals need in the habitats and why it’s critical for their survival. Check out some of our student examples made in Canva below!


Dance Day
Activity length: 1-2 Hours

Q: What kind of music do rabbits like to dance to? A: Hip-hop! Dance Day is a day dedicated to self expression for all students. We start off by reading several books. We liked these from Epic for Kids: “Artist Studio Dance” and “Dance, Dance, Dance!” After reading through these, students create their own dance moves. They can practice their moves by using their device’s camera on Padlet. Then, when they’e ready, they can create a video tutorial on Padlet of how to do their dance, along with how it should look. After that, they can watch each other’s videos and learn one another’s dances!

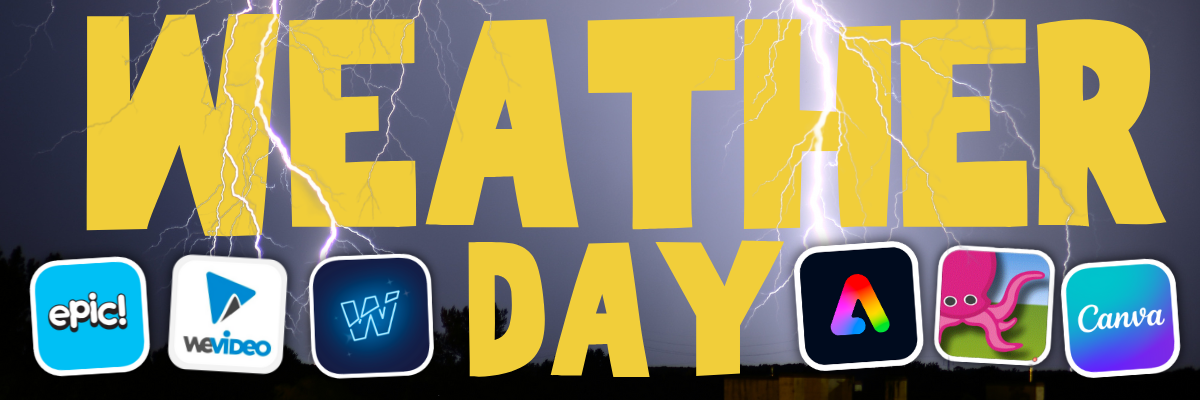
Weather Day
Activity length: All Day
Weather Day is dedicated to all the types of weather that the summer months bring. We’ll focus on: Thunder & Lightning, Wild Fires, Tornadoes and Hurricanes. Epic for Kids has a TON of content on each of these categories, but to save you some time, we’ve curated collections of each below. Click on an image to download the collection.


We like to have the students work in groups for these activities. Give each student a copy of the packet found here. Students pick one type of weather and then they’ll take turns reading through the books on Epic. When they find important details, they can screen shot them and add them into a collaborative Wakelet collection (see below). Using the content they have collected, they can choose important details about their weather type. These can be recorded on the circle map. We encourage the students to narrow down their facts to 6 key details. These six details can then be recorded onto the flow map. The next page has the students providing a five day forecast. Students can draw images on each day, and predict a high and low temperature. The last two pages are called the “teleprompter” pages. This is where students can create a script to read as if they were a meteorologist providing a forecast. This script can be used to create a weather video.


To find your local weather radar, type “_____(my state)____ weather radar gif” on google. Then, click on images to generate GIF files of your local radar. Right click and save the image of your choice, but remember to provide credit from the original source. To create a meteorologist video, students can use Canva, WeVideo, Adobe Express or Do Ink’s Green Screen. Simply upload the GIF file as the background, then add a green screen video of your student as the foreground layer. If you’re using Canva, remove the background of the student, and now they will appear in the weather radar. If you’re using WeVideo or Do Ink, just set the chroma key to the appropriate green color.
Once students have created their video, they can share their work on a Padlet or Wakelet board. Doing so will allow them to view each other’s work and easily provide an opportunity for you to share student work with families.

Water Day
Activity length: 2-3 hours

Water day is the day that we learn about some of the ocean’s most endearing creatures: Sea Turtles! We’ll start off the day by reading some books on Sea Turtles. You can download an entire collection of books from Epic by clicking here.
After we’ve built up some background knowledge, we’ll watch this Flip (RIP!) Live Event from The Mote Aquarium on Sea Turtles. Click here for the event!

After the event, we have our students design Sea Turtle hatching warning posters on Canva. There are lots of inspiring templates to help get the creative juices flowing. Just search for “turtle poster.” These can be shared around school to raise awareness and encourage students to be respectful while visiting beaches over the summer months.

To top everything off, we enjoy spending some time on this website. The Deep Sea starts at the surface of the ocean and plunges deep below, giving facts about different depths in the water. You can check it out by clicking on the image to the right, or right here!

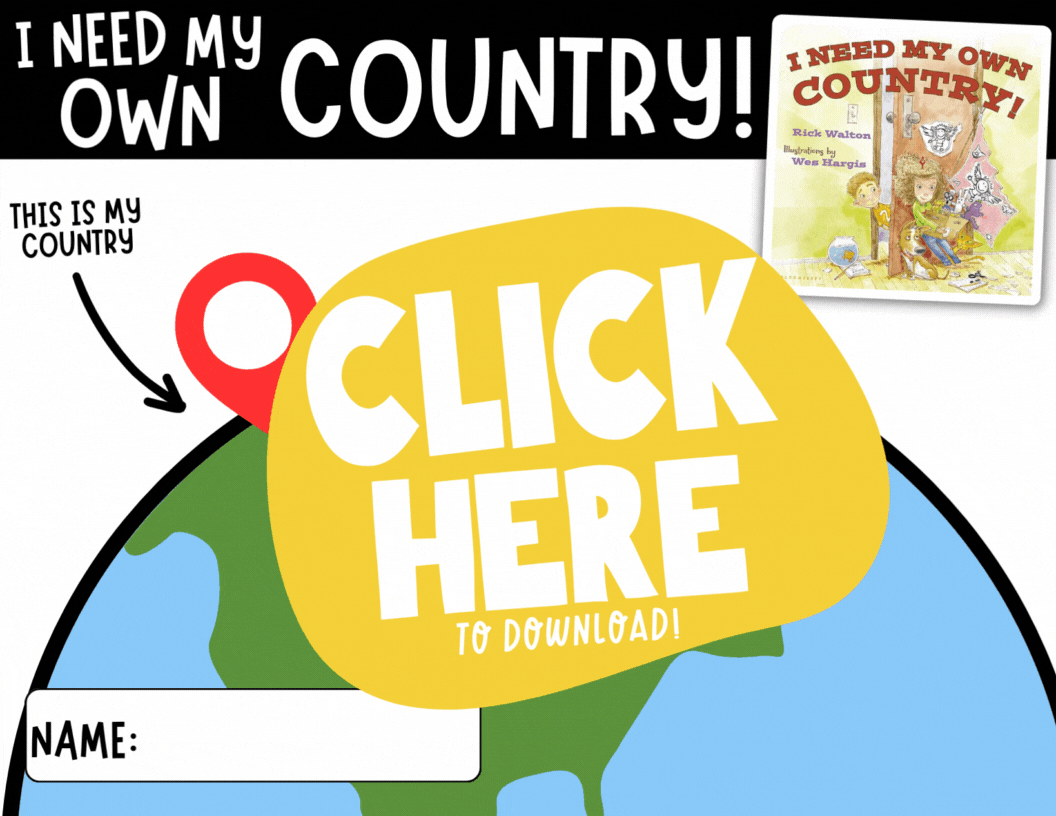
Create Day
Activity length: 2-3 hours

Create Day is best paired with the book, “I Need My Own Country,” by Rick Walton. In this book, the readers are encouraged to create a very special place of their own, by you guessed it - creating their own country! You can get a preview of the book by clicking here, and purchase the book by clicking here.
After reading the book, students can complete the “I Need My Own Country” packet. This may be done digitally or on paper. First, students will design a flag for their country. Then, they’ll illustrate what their currency will look like. Last, they’ll assign jobs to their family / friends. After they’ve developed their country, it’s time to invite tourists! Create a commercial on Canva that encourages people to visit your country. Download your video, then share it on either Wakelet or Padlet. This will allow students to share each other’s country and even vote for “the most desired vacation spot!”

We know that some students will finish an activity like this before others, so here’s an idea for those who do…Let them design the next iPhone! Check out this website, “Design the Next iPhone,” and your students will become the creators of tomorrow’s technology! Check it out by clicking here or the image below!

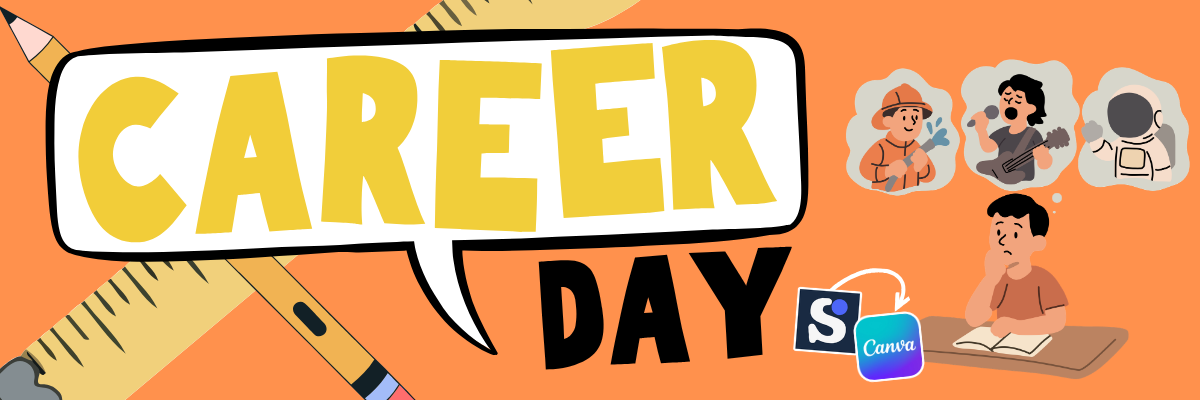
Career Day
Activity length: Two Hours
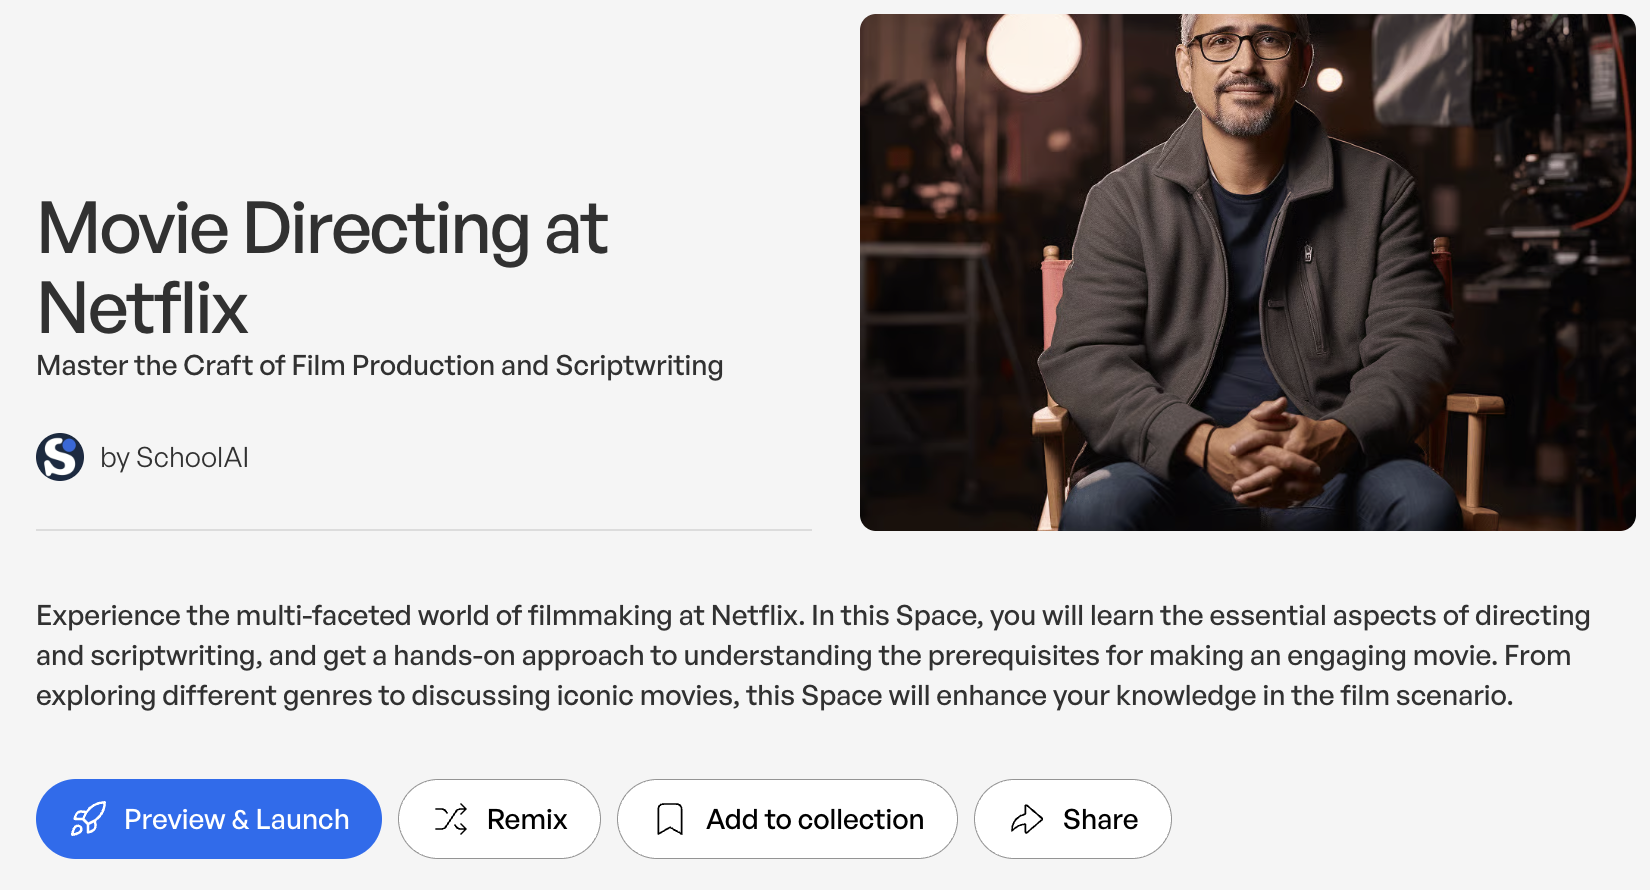
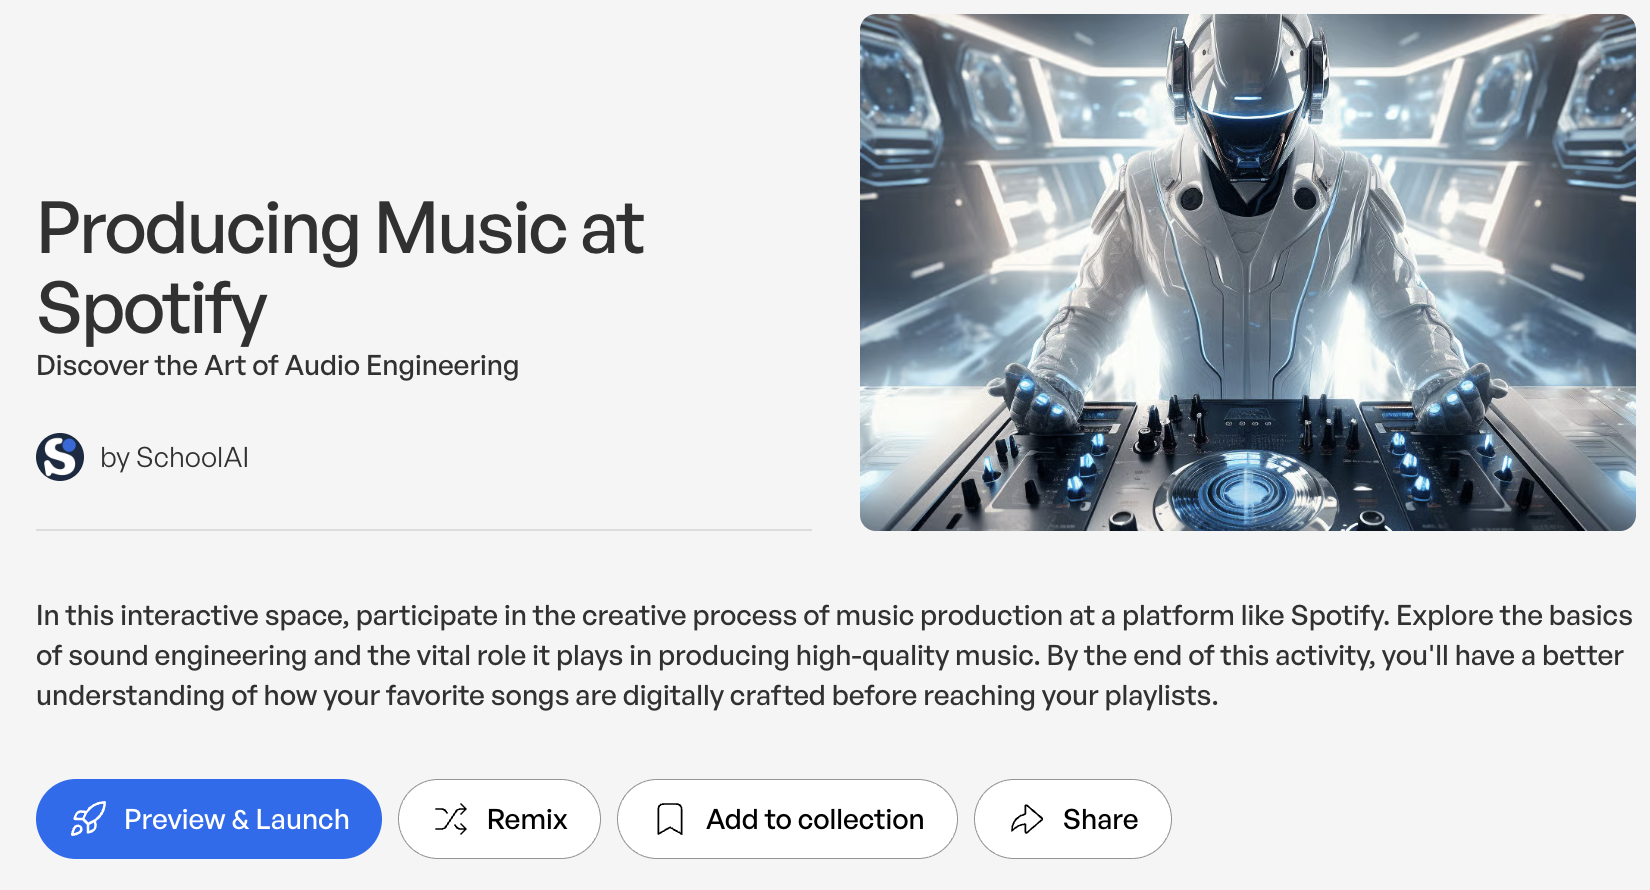
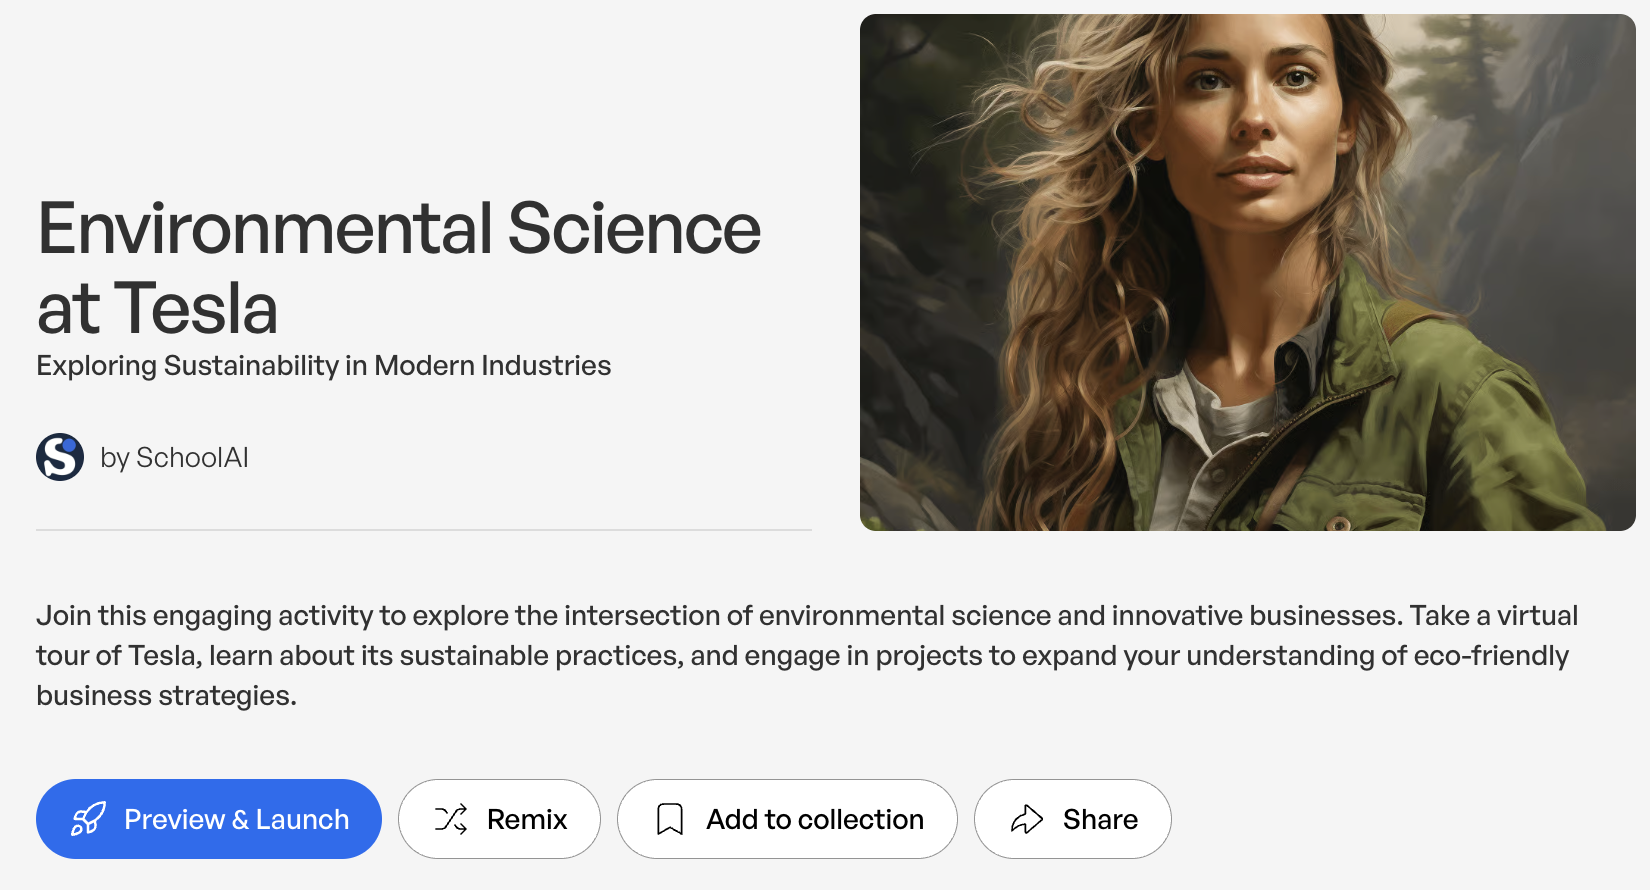
In this activity, students use School AI chatbots to explore different careers. If your students have specific interests, you can search in the Discover Library, or learn create your own. Here are some of our favorites (click any image below to open it on School AI).

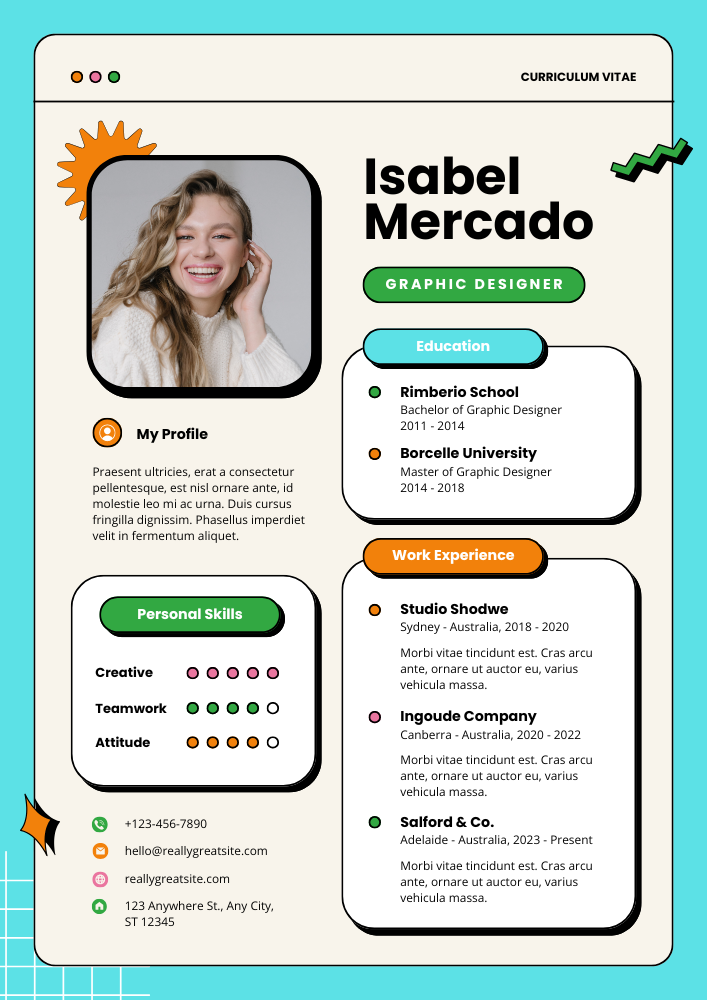
After the students have build background knowledge and gathered enough information, we have them use Canva to create a job resume for themselves. Since they have learned all about their career choice, they should know what qualifications are required for the job. Have the students create the resume (we always explain that this is a learning activity and NOT a real resume) on either Canva and Adobe Express. Then, students share their resume on Padlet for others in the class to view. We like to add in an element of fun with Padlet by enabling reactions. A thumbs up from someone means you’re hired! Check out our Canva resume template by clicking the image or right here!

NASA Day
Activity length: All Day
How do you go about hosting NASA Day? You “planet!” Get ready for an out-of-this-world day! NASA Day is the day is dedicated to all things space. We kick things off by reading some books about NASA astronauts. Check out our collections by clicking on the images below, or here (Mae Jemison), here (Buzz Aldrin), and here (Neil Armstrong).


After we gain some knowledge about these astronauts, we read two space-themed books: “Earthrise” by James Gladstone, and “Eight Days Gone” by Linda McReynolds. “Earthrise” highlights the Apollo 8 mission which captured the iconic photo of Earth rising from the rear of the moon. “Eight Days Gone” is about the Apollo 11 mission to the moon. You can preview “Earthrise” by clicking here, and purchase it by clicking here. You can preview “Eight Days Gone” by clicking here, and purchase it by clicking here.

After reading both books, students can re-create the Apollo 11 moon landing on Canva. They can take things to the next level by animating the astronauts, gear, or maybe even a passing comet or two! Have them explain what occurred, then they can download the project as a video. Next, save the video and then share it to Microsoft Flip. Students will be able to view each other’s work and share their thinking.


Now that they have some background knowledge, invite them to blast off on a mission to the International Space Station! All that you need is a computer / device and wifi. This website will take them on a VR tour throughout the entire space station. It also includes hotspots, or areas where additional information may be accessed. Click here to access the VR Reality Tour!
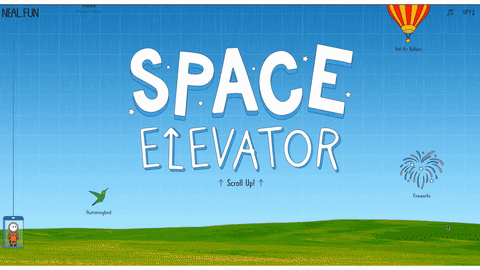

Another fun activity for learning all about launching into outer space is this website from Neal.fun. “Space Elevator” takes you from ground zero, all thee way into outer space - explaining sharing facts along the way. Click here or the image to the right to check it out! Lastly, if you students are having a hard time grasping
the size of space, or objects in space, let them check out this website. “The Size of Space” sequentially places all things space related. Check it out by clicking on the image to the left, or right here!

Adventure Day
Activity length: 2 hours

Adventure Day is the day where students get to travel around the world being tourists! The Adventure Day menu features tourist attractions like The Georgia Aquarium, Eiffel Tower, Boston’s Children Museum, National Portrait Gallery and more! Click here or the image to the left to access the Adventure Day page!

While visiting these destinations, students can complete the packed either digitally or on paper. The packet features tickets where students can explain where they visited, picture frames for students to illustrate photos, a coffee cup souvenir, and a fanny pack where they can design commemorative buttons for each location. To download the pack, click here!
-- Please follow us on social media and tag us with how you’re using these end-of-the-year activities in your classroom! 👓👗
For more tips, tricks and lesson ideas for making learning more interACTIVE, check out our books The InterACTIVE Class and Flipgrid in the InterACTIVE Class on Amazon!


How to Use AI in the Classroom
Artificial Intelligence (AI) has become a hot topic in education in recent years. It has the potential to transform the way teachers teach and students learn in the classroom. Here are six AI tools that you can use in your classroom immediately!

Artificial Intelligence (AI) has become a hot topic in education in recent years. It has the potential to transform the way teachers teach and students learn in the classroom. By using AI, teachers can create a more personalized learning experience for each student, and help them to achieve their full potential. Here are five AI tools that can be easily integrated into our classrooms.
(Click on any subheading to jump to that section)


CoPilot:
Generate Lesson Plans & Other Educational Materials in Seconds
Education CoPilot streamlines your planning and prep with AI generated templates for lesson plans, writing prompts, educational handouts, student reports, project outlines and lots more.
This is an incredibly efficient way to gather content for those pesky units where you’re scrambling to find resources for. In our example, we were working on a unit covering this standard: SC.1.E.6.2 Describe the need for water and how to be safe around water. After entering some information (including the standard), we were provided five lessons all covering the content!
There are also workshop tools that can help generate educational handouts, writing prompts, parent emails, and quiz builder. All are easy to use and require just a few clicks to generate! Check out how it all works below!

Curipod:
Make interactive lessons filled with creativity, reflection and critical thinking.
Curipod is an interactive presentations software for education, meetings and workshops, sparking curiosity and engaging everyone. Create your own presentations, or find premade templates and inspiration.
Enter the topic of your lesson, followed by learning objectives and standards. Give it a few seconds and Curipod will generate an interactive presentation that is fully editable! In our example, we were looking to create content on this standard: ELA.1.R.1.1: Identify and describe the main story elements in a story.
Curipod also features a Discovery library where users can access content created by other educators. The content can be narrowed down by subject, or by searching for what you’re looking for! Check out the video below to see how it all works!
Canva: Text to Image:
Automatically Create the Images You’re Looking For
Now, whenever you can't find the perfect images, you only need to find the right words instead – then watch them magically come to life. Once you’ve entered your words, rather than combining existing images, Text to Image creates entirely new ones from scratch. From practical descriptions to whimsical concepts, Text to Image can create one-of-a-kind images, with the click of a button.
Canva is free for all educators, and “Text to Speech” is available in all Canva accounts now! Here’s a quick overview / tutorial!

Deep Nostalgia:
Video reenactment technology to animate
the faces in still photos
Deep Nostalgia is a video reenactment tool that will animate the faces in still photos. This feature uses deep learning technology to create animated, lifelike movements in static images, bringing old family photos to life.
Deep Nostalgia uses an artificial neural network to apply pre-recorded facial movements to a still photo. When a user uploads a photo, the AI analyzes the face in the photo and applies movements based on a library of pre-recorded facial expressions. These expressions are created by actors and used to simulate realistic movements such as blinking, smiling, and head tilting.
The result is a short video of a still image, where the subject's face appears to be moving and reacting to the environment around them. The effect can be striking, as it creates the impression of bringing a historical figure back to life. Check out the video below to see it in action!

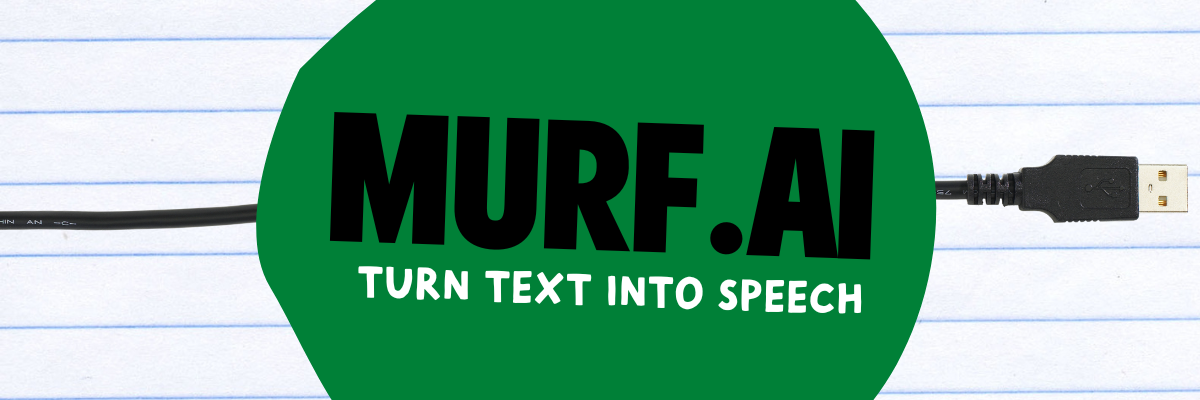
Murf.ai:
Turn Text into Speech
Murf is a tool that allows users to turn typed text into speech. It offers a selection of 100% natural sounding AI voices in 20 languages to make professional voice over for your videos and presentations. Users can easily toggle the different voices to select a voice that is appropriate for the content.
Check out the video below to see how it all works!

Synthesia:
AI video creation platform
Synthesia AI is a video production software that uses artificial intelligence (AI) to create lifelike videos of people speaking in different languages or using different gestures, facial expressions, and body language. This technology allows users to create videos that appear to feature real people speaking and moving, even if those people never actually appeared on camera.
Synthesia AI works by analyzing a script, recording a voiceover, and then mapping the speech to a 3D model of a person's face and body. The AI algorithms then use this information to generate a video of the person speaking, complete with realistic facial expressions and body movements. The resulting videos can be customized in a variety of ways, including adding different backgrounds, changing the clothing or hairstyles of the virtual person, and altering the tone and speed of the voiceover. See it in action below!
-- Please follow us on social media and tag us with how you’re using these ideas in your classroom! 👓👗
For more tips, tricks and lesson ideas for making learning more interACTIVE, check out our books The InterACTIVE Class and Flipgrid in the InterACTIVE Class on Amazon!


15 Things to Embed to Make Content Easier to Access!
Embedding apps is a great way to keep your content organized, but more importantly, it can help keep your students focused when working on tasks. The option to embed from apps is becoming increasingly more popular, and you may even be able to embed some of the apps you’re using right now! Here are 15 different ways we love to embed!

Embedding apps is a great way to keep your content organized, but more importantly, it can help keep your students focused when working on tasks. The option to embed from apps is becoming increasingly more popular, and you may even be able to embed some of the apps you’re using right now! Here are 15 different ways we love to embed!
Please note: This blog post was hand-crafted and was not created using AI.
(click on any subheading to jump to that section)


What does it mean to embed something?
According to BigCommerce.com, Embedding refers to the integration of links, images, videos, gifs and other content into social media posts or other web media. Embedded content appears as part of a post and supplies a visual element that encourages increased click through and engagement. The key takeaway here is that your embedded content appears to be a part where you are posting it. In other words, it’s being housed by wherever you are placing it.
Embedding & Hyperlinking
So why embed over hyperlink? By embedding your content, your students will not have to leave one app to visit another to complete a task. Everything is organized and in one place. Hyperlinking your content is not a bad thing, it just adds another step for students. Embedding creates a streamlined experience. So, let’s take a look at what some of our favorite embedding combos look like!

Padlet Embedded into Canvas
Take your Padlet boards and place them right into a Canvas page! Here’s how:


Create or find the Padlet board that you’d like to share, then click on the share icon.
Click on Embed in your blog or website.
Click Copy Padlet embed code.
4. In the Canvas page, click the cloud icon (if you don’t see a cloud icon, click the three dots to expand the toolbar).

5. In the pop up window, paste the copied embed code from Padlet then click the blue “Submit” button.
6. Your Padlet board is now embedded into your Canvas page! Click “Save” to keep the changes.

Padlet Embedded into Book Creator
Adding your Padlet boards into Book Creator can help keep track of student work. Here’s how!


Create or find the Padlet board that you’d like to share, then click on the share icon.
Click on Embed in your blog or website.
Click Copy Padlet embed code.
4. Log into Book Creator, then open or start a new book. In the book, click on the + icon, followed by “More.” Scroll down until you see “Embed,” then click it.
5. Paste the copied embed code from Padlet, then click “Confirm.”
6. The Padlet board is now embedded into the book.
This embed is only a hyperlink out to the Padlet board. While it will not allow students to interact with the Padlet content directly in the book, it will provide an organized way to revisit your Padlet boards.

Padlet Embedded into Classroom Screen
What is Classroom Screen?
Classroom Screen is a free tool (with a paid option) that educators can use to project in front of the class. Users can pick a background to be projected from a collection of images, animated gifs, or upload their own image. Classroom Screen provides many options to add to your background such as: a timer, random name generator, sound level alarms, and our personal favorite - embedding.
With Classroom Screen, you can set a class timer to give students time to create, then give them additional time to respond. This alleviates stress that students may face when trying to finish their work. With Classroom Screen’s embed feature, you can add a Padlet board right into your Classroom Screen. Here’s how it works:


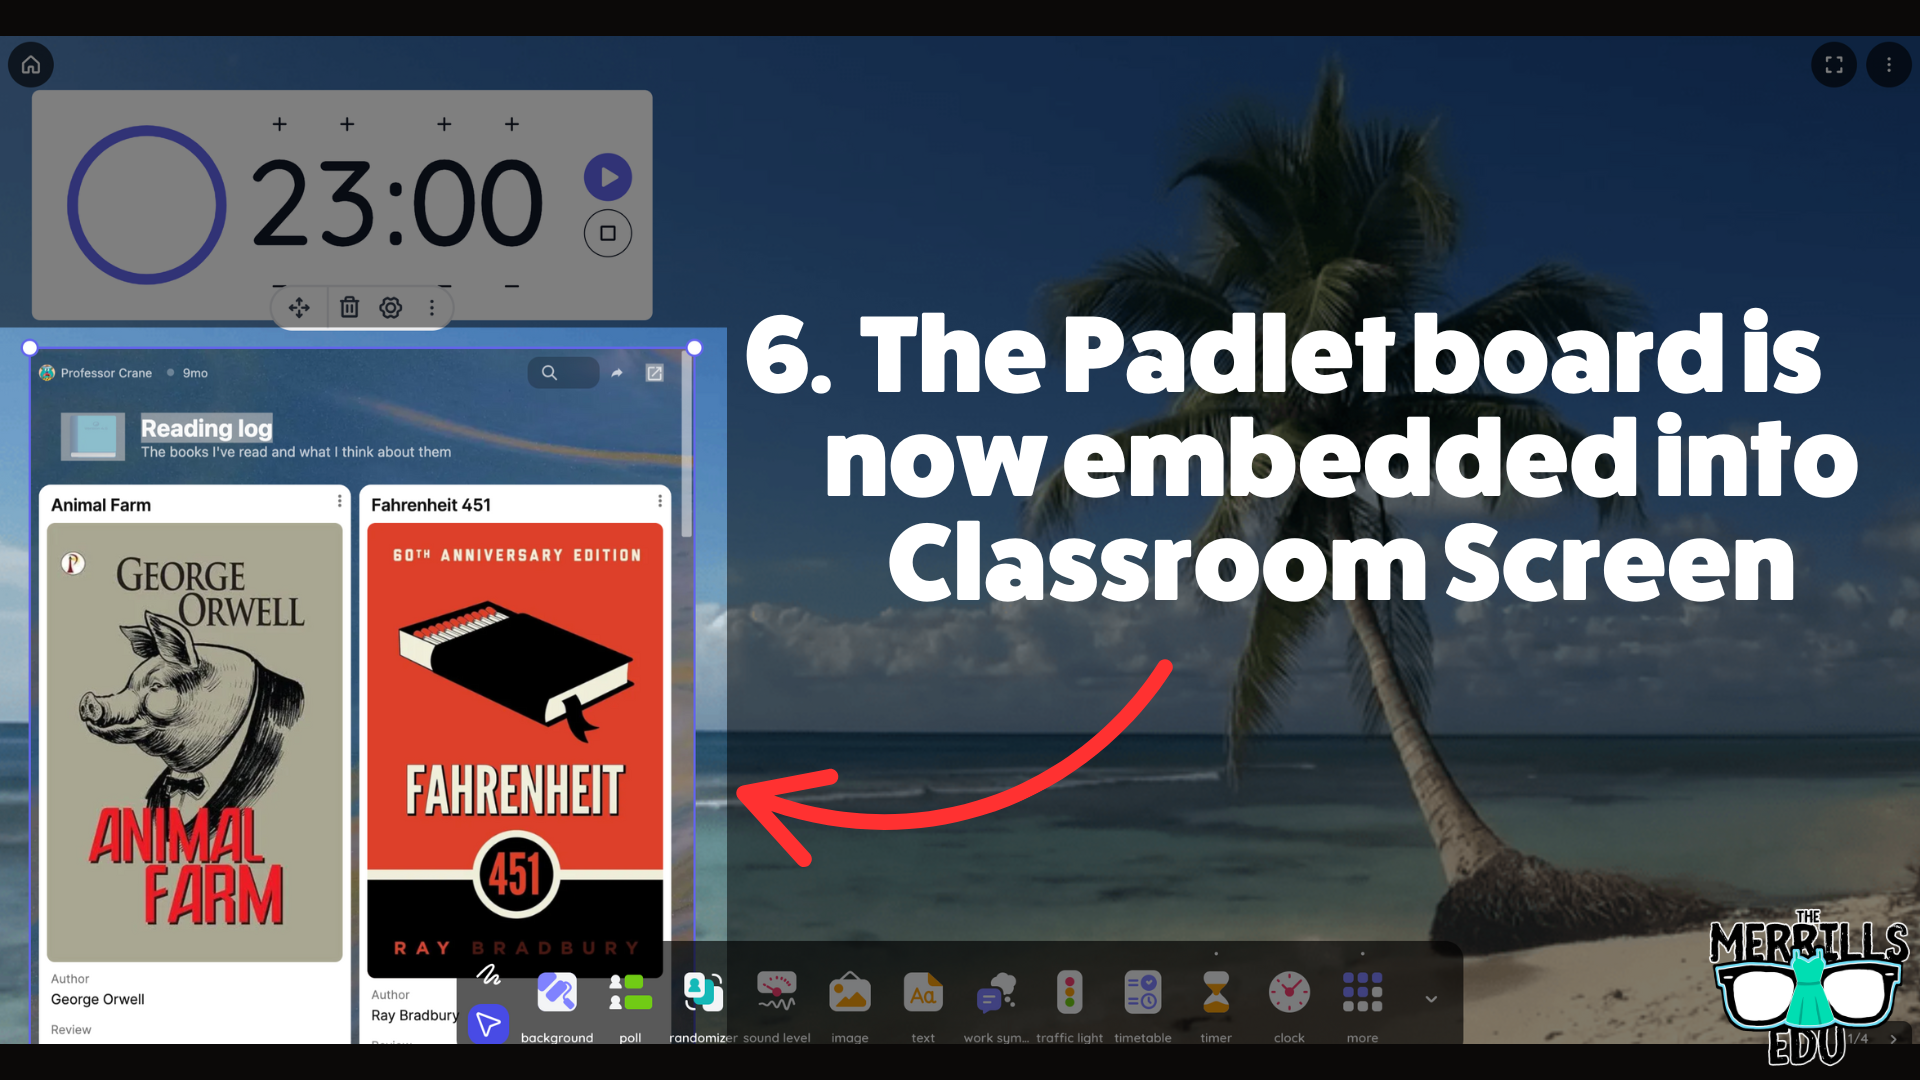
Open the Padlet board that you want to embed, then click the share icon.
Click on Embed in your blog or website.
Click Copy Padlet embed code.
Launch Classroomscreen, then click More located on the bottom toolbar. Then, click Embed.
Paste the embed code, then click Run Code.
Now, the Padlet board is embedded into the Classroomscreen workspace.
This is a true embed - meaning users can interact with it in real time. So, educators can embed this into a Classroomscreen workspace, start a timer, and then the embed will refresh itself so that every time new content gets added, it appears on the screen.

Nearpod Embedded into Canvas
(Note: this requires a paid Nearpod account and the use of Student Paced lessons. It will not work with “Live participation” lessons)
Nearpod users can now expedite the login procedure for their students by embedding lessons right into Canvas. Doing so will eliminate the need for a join code. Here’s how it all works:
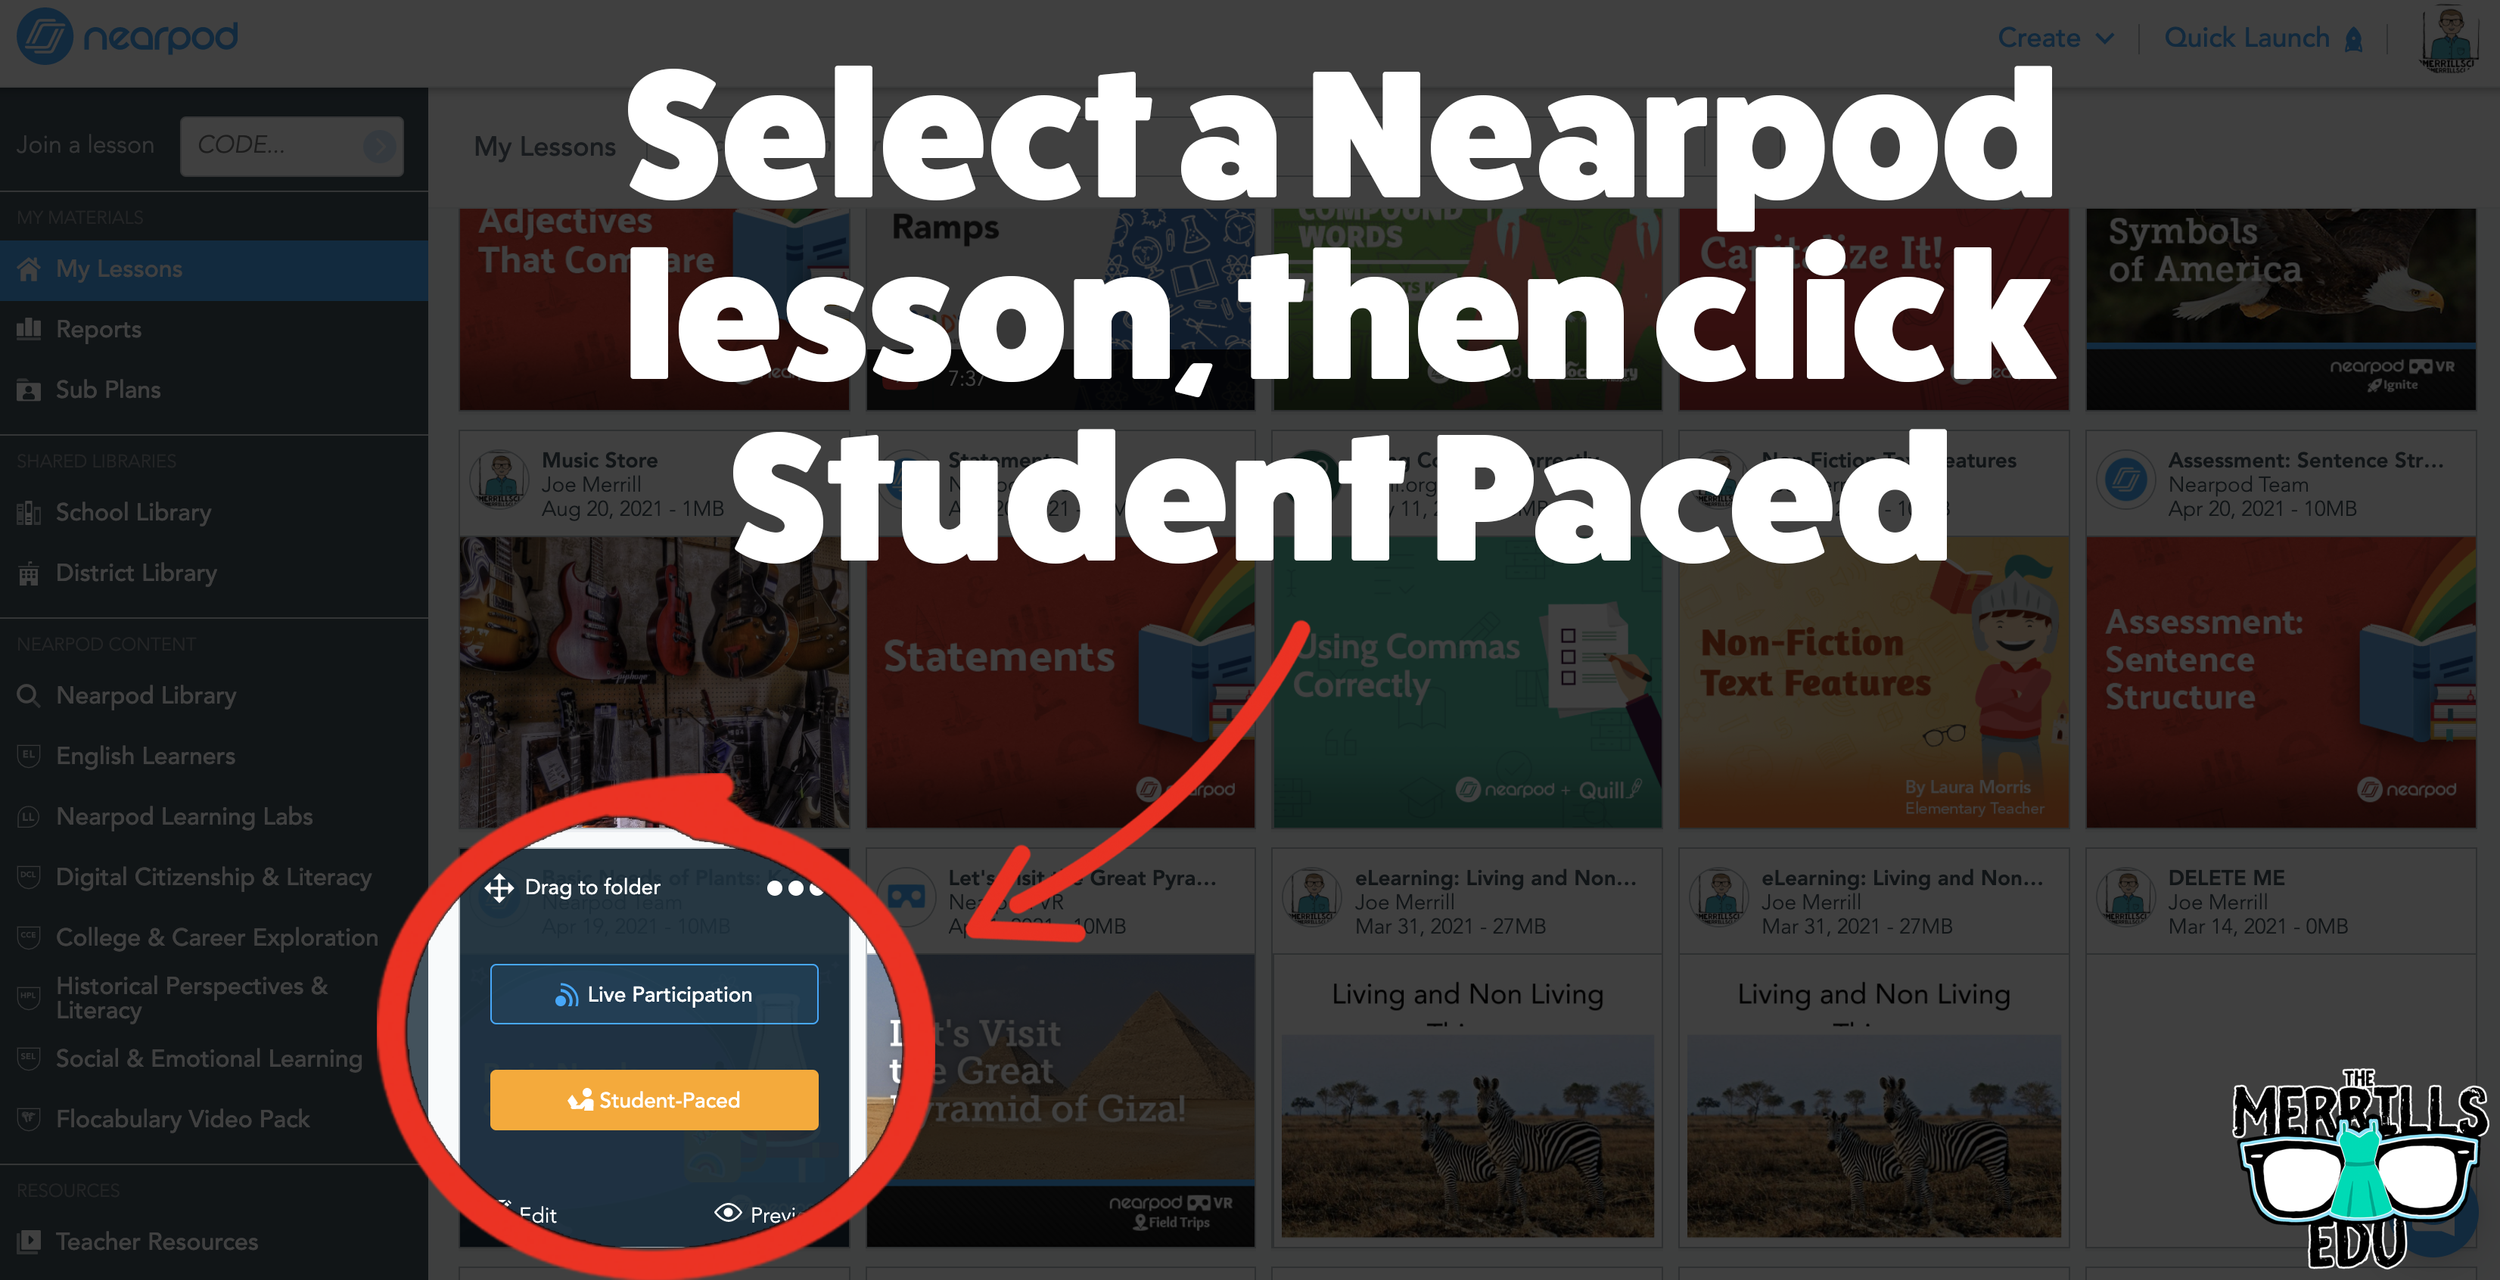


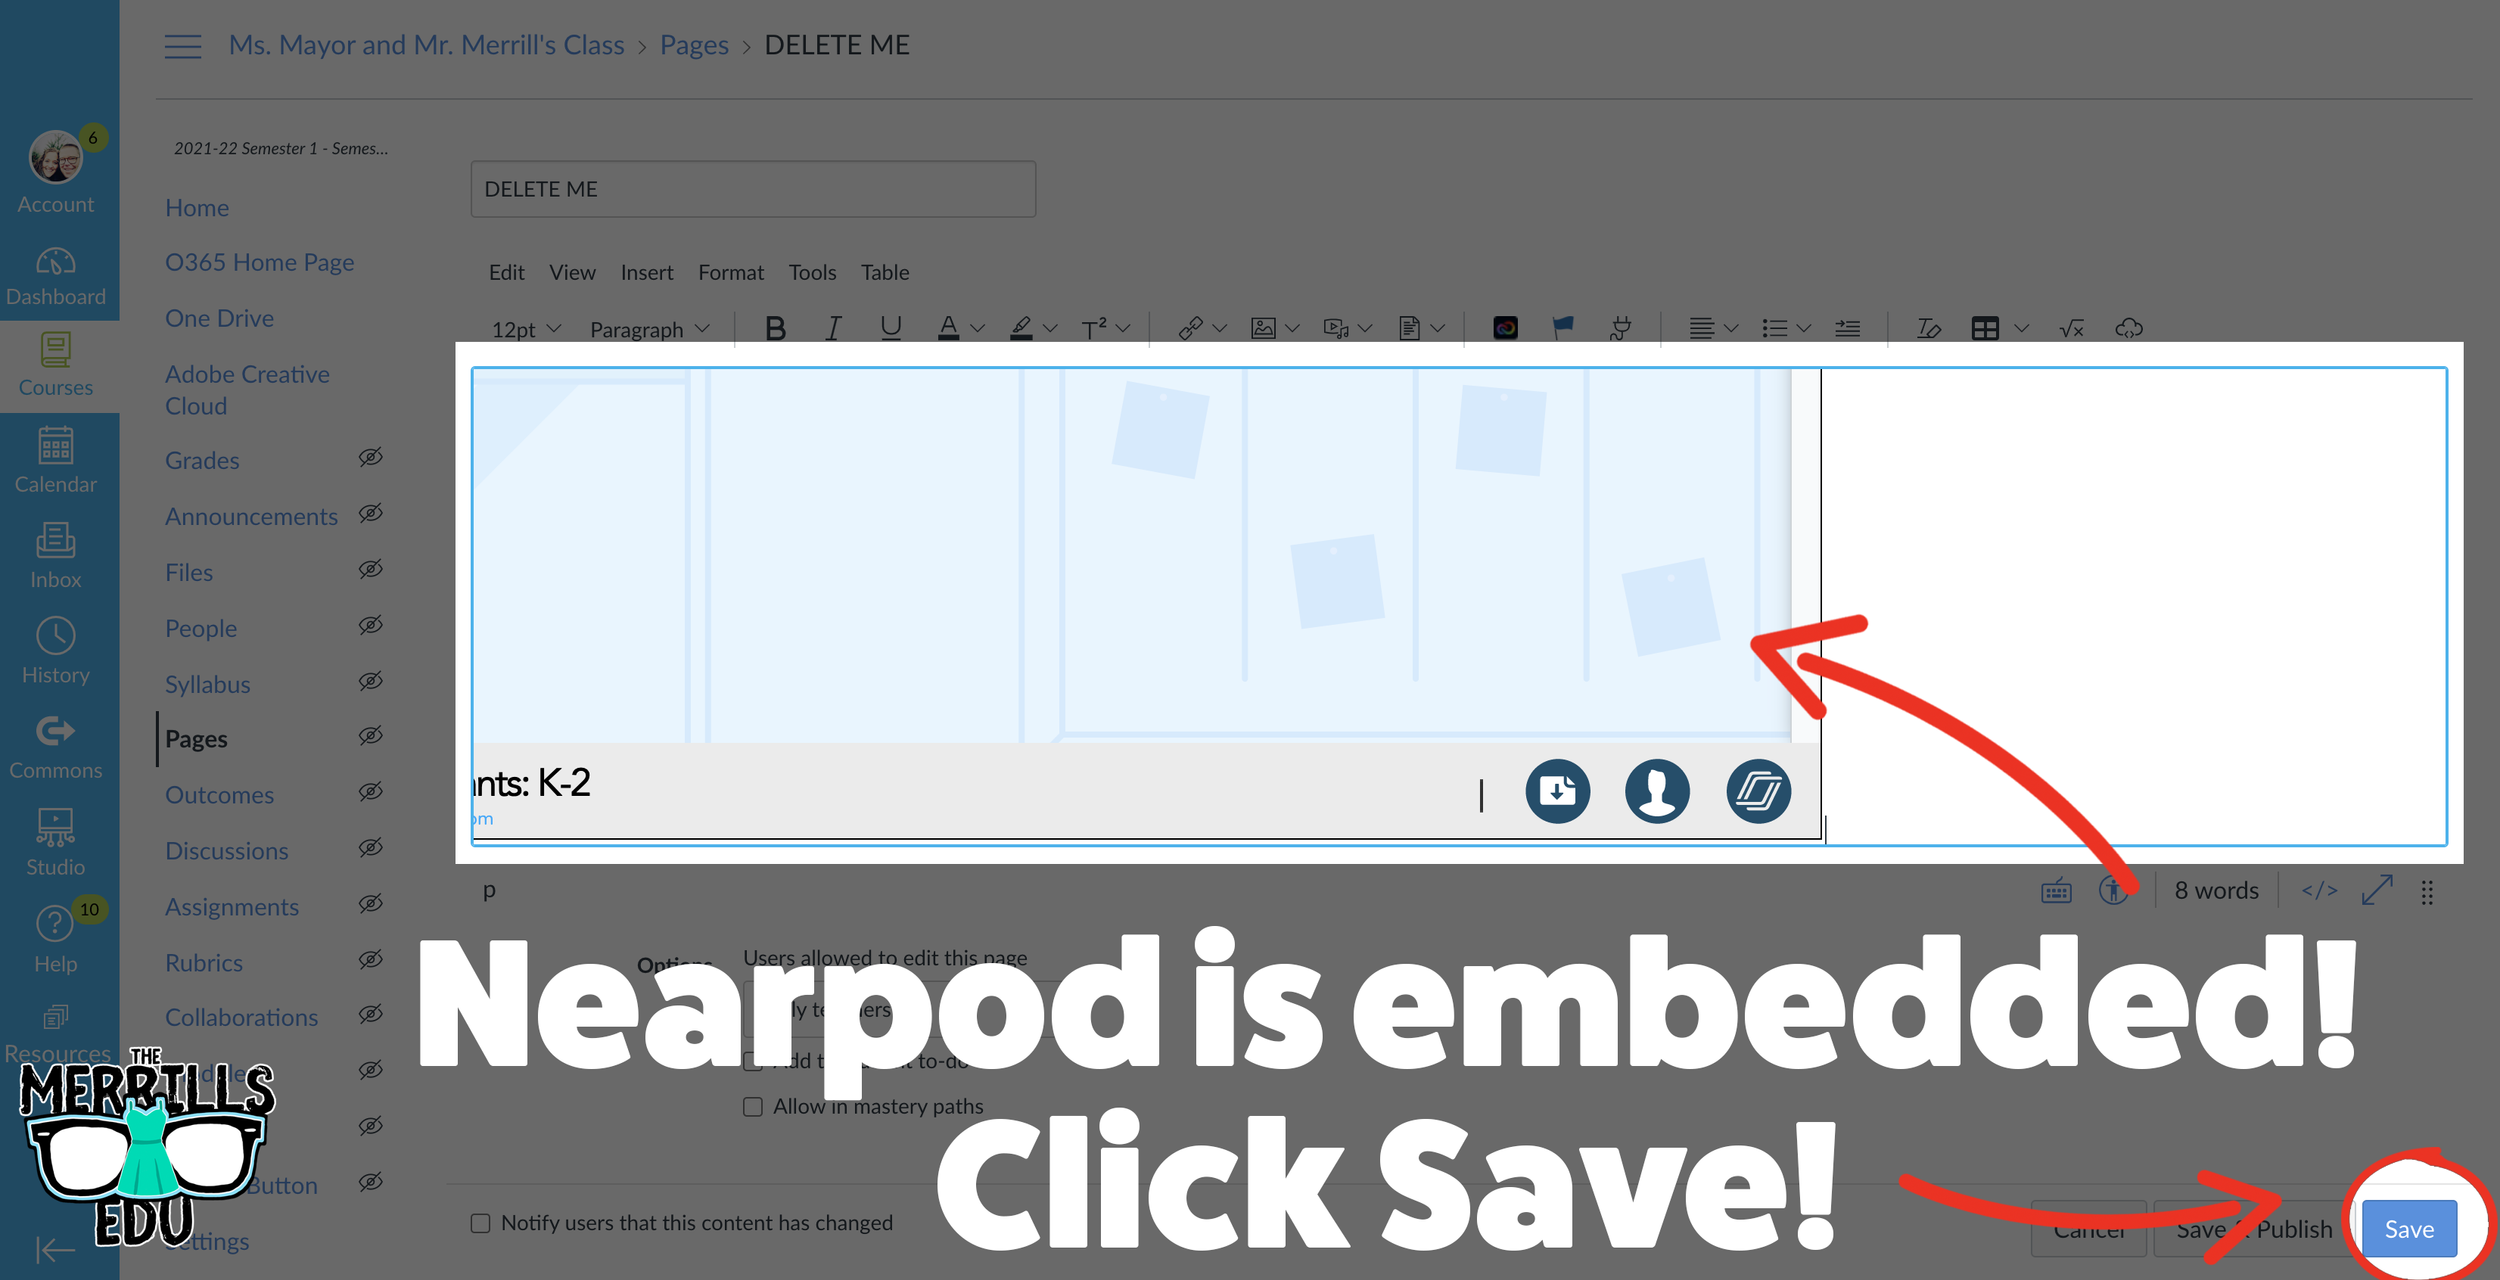
Open the desired Nearpod lesson that you would like to embed into Canvas.
Click on “Student-Paced.”
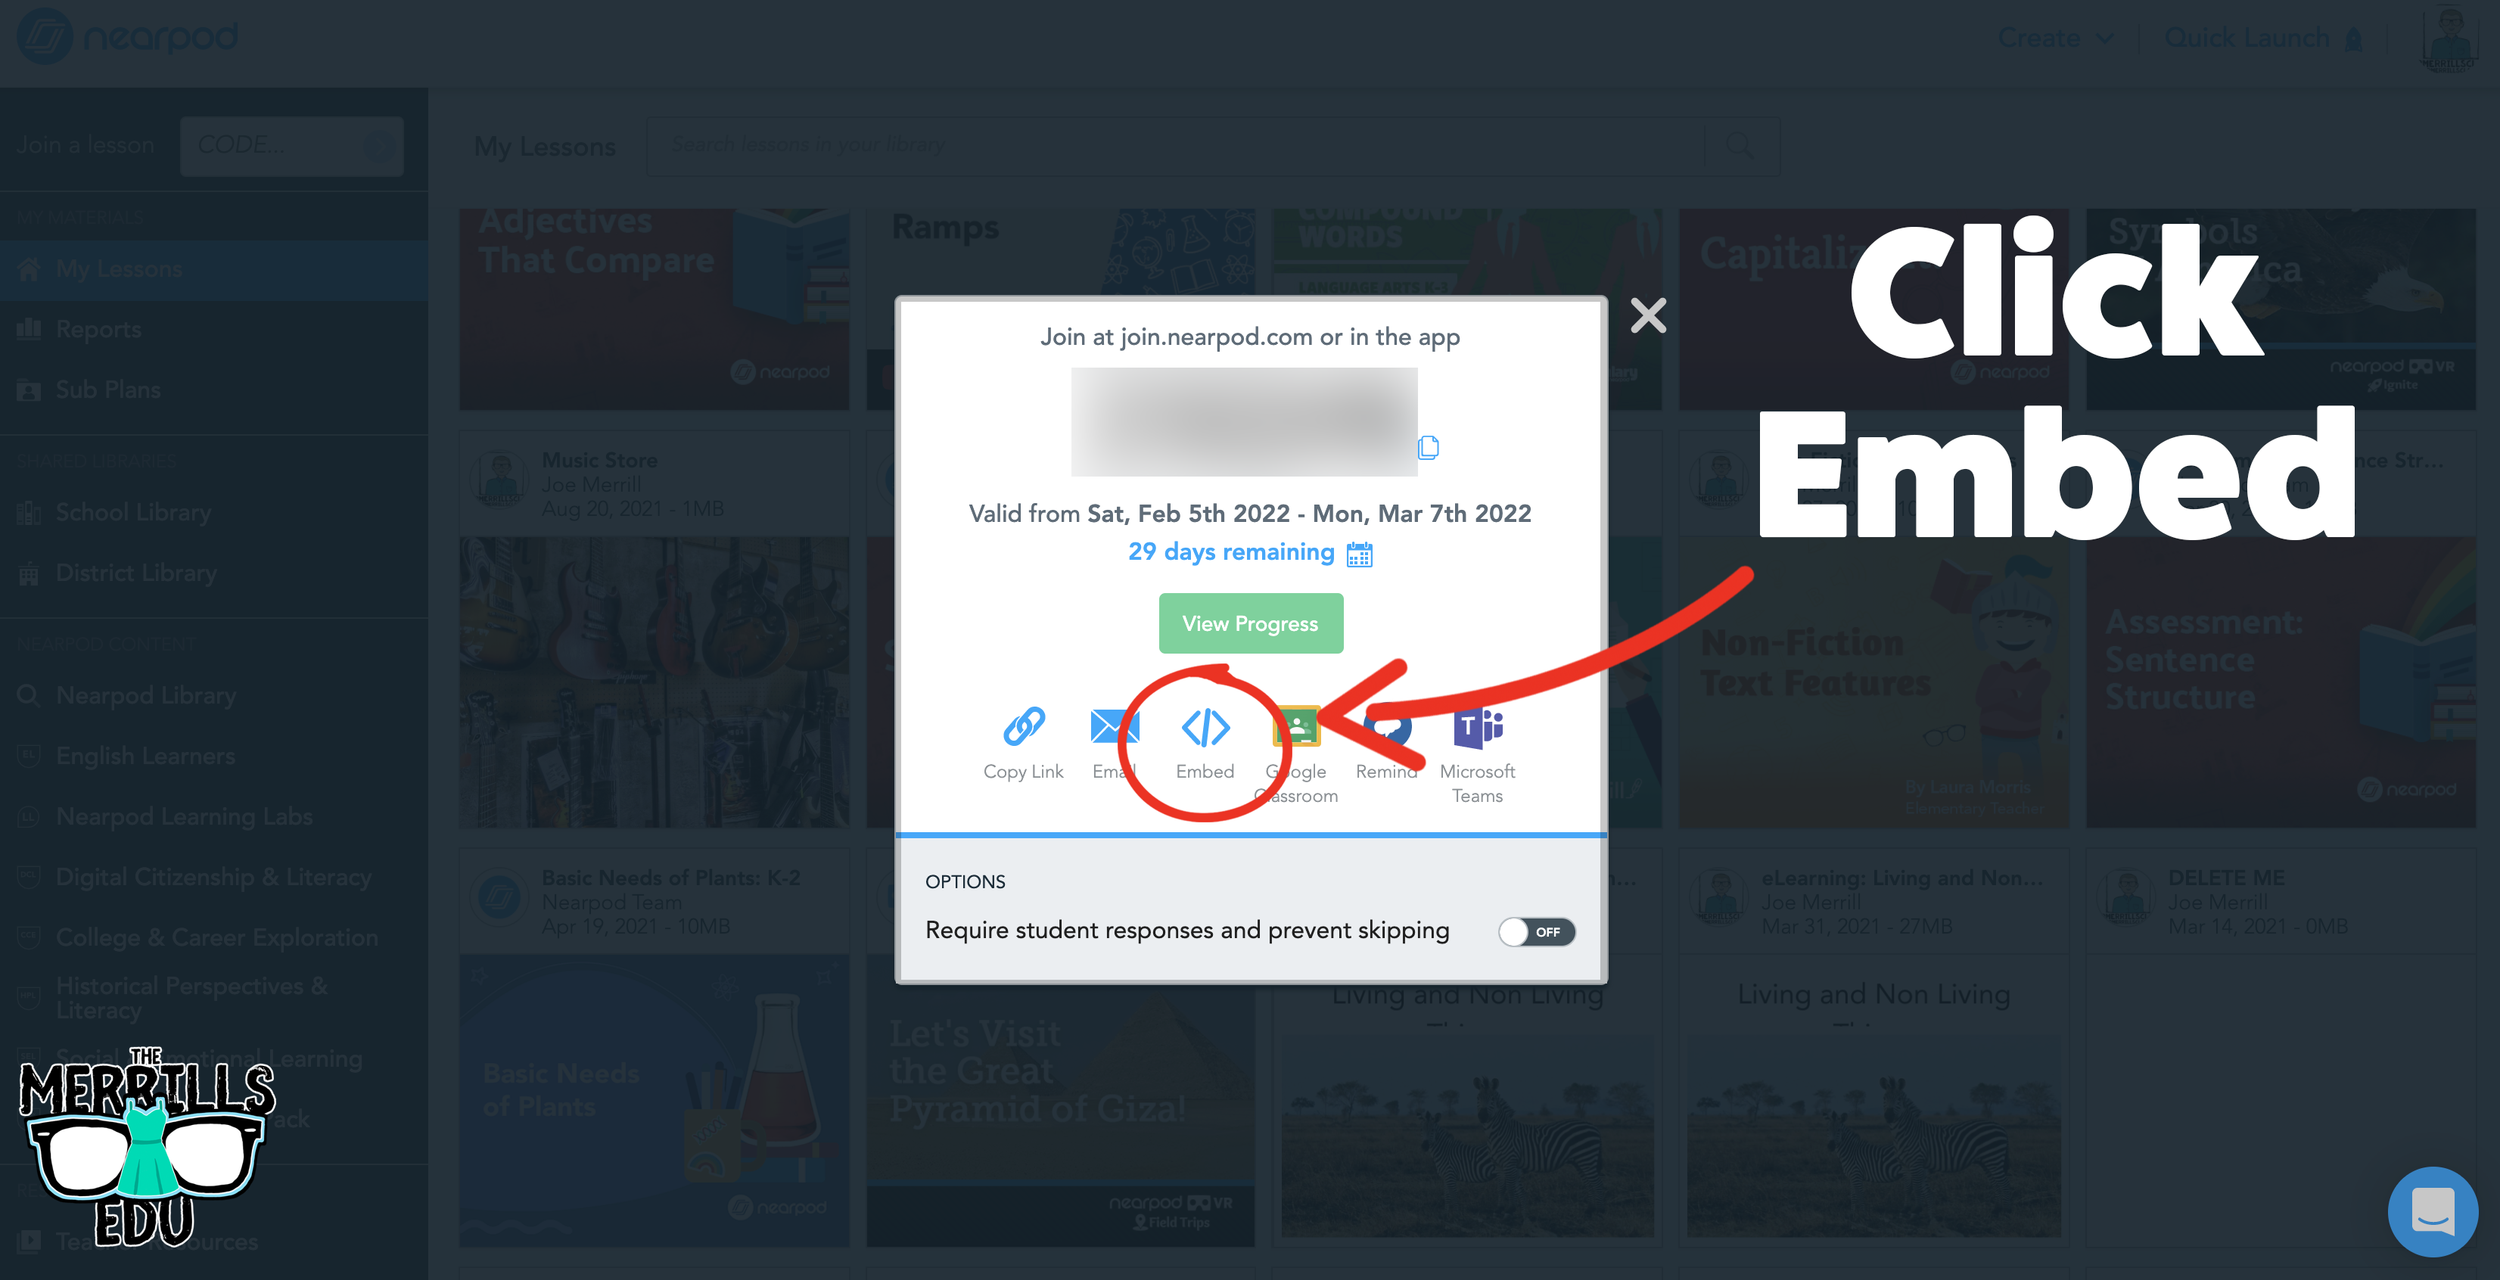
On the next window, click the Embed icon.
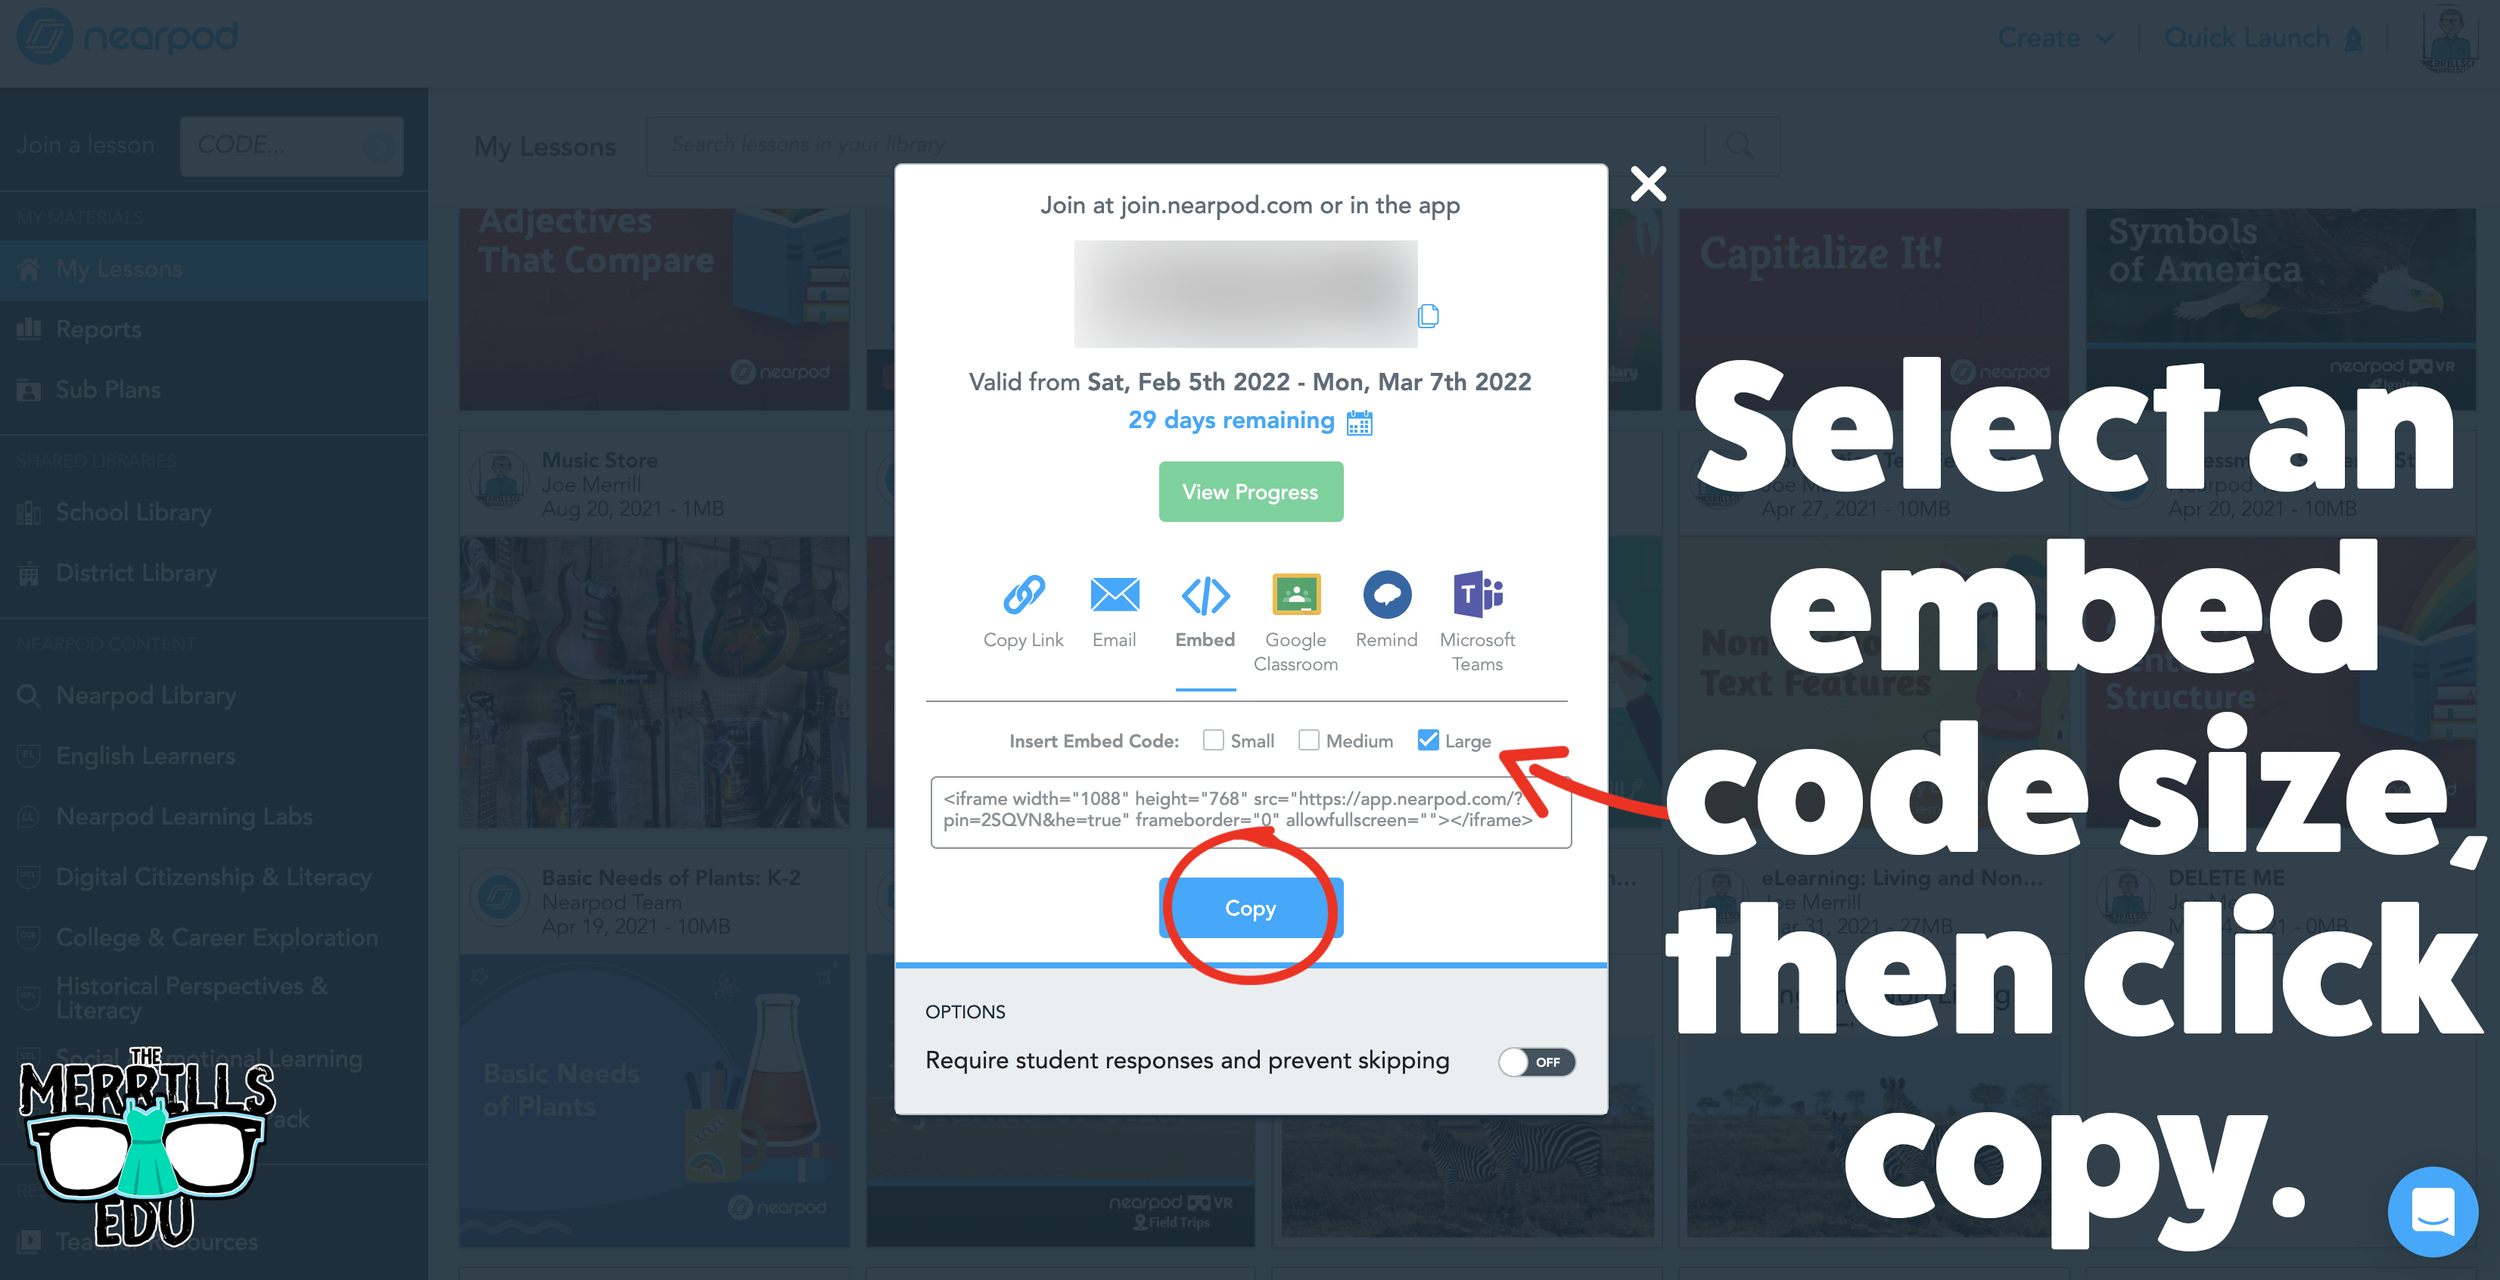
In the Embed window, select a preferred embed code size. We recommend large. Then, click copy.
In a separate tab, open the Canvas page that you would like to embed the Nearpod lesson into.
Click on the cloud icon which will open the embed menu (if you don’t see the cloud icon, click on the three dots to the right of the menu bar).
Paste your copied embed code into the box, then click “Submit.”
Your Nearpod lesson will now be embedded into Canvas. Click “Save” to update the changes.
Now, the lesson will be available for your students via Canvas!
Wakelet Embedded into Canvas
Share your Wakelet Collections right within Canvas! This live embed will allow students to make changes to the Wakelet collection without having to re-embed it afterwards. In other words, changes will be available as they are made - without having to go through this process again. Here’s how it all works:
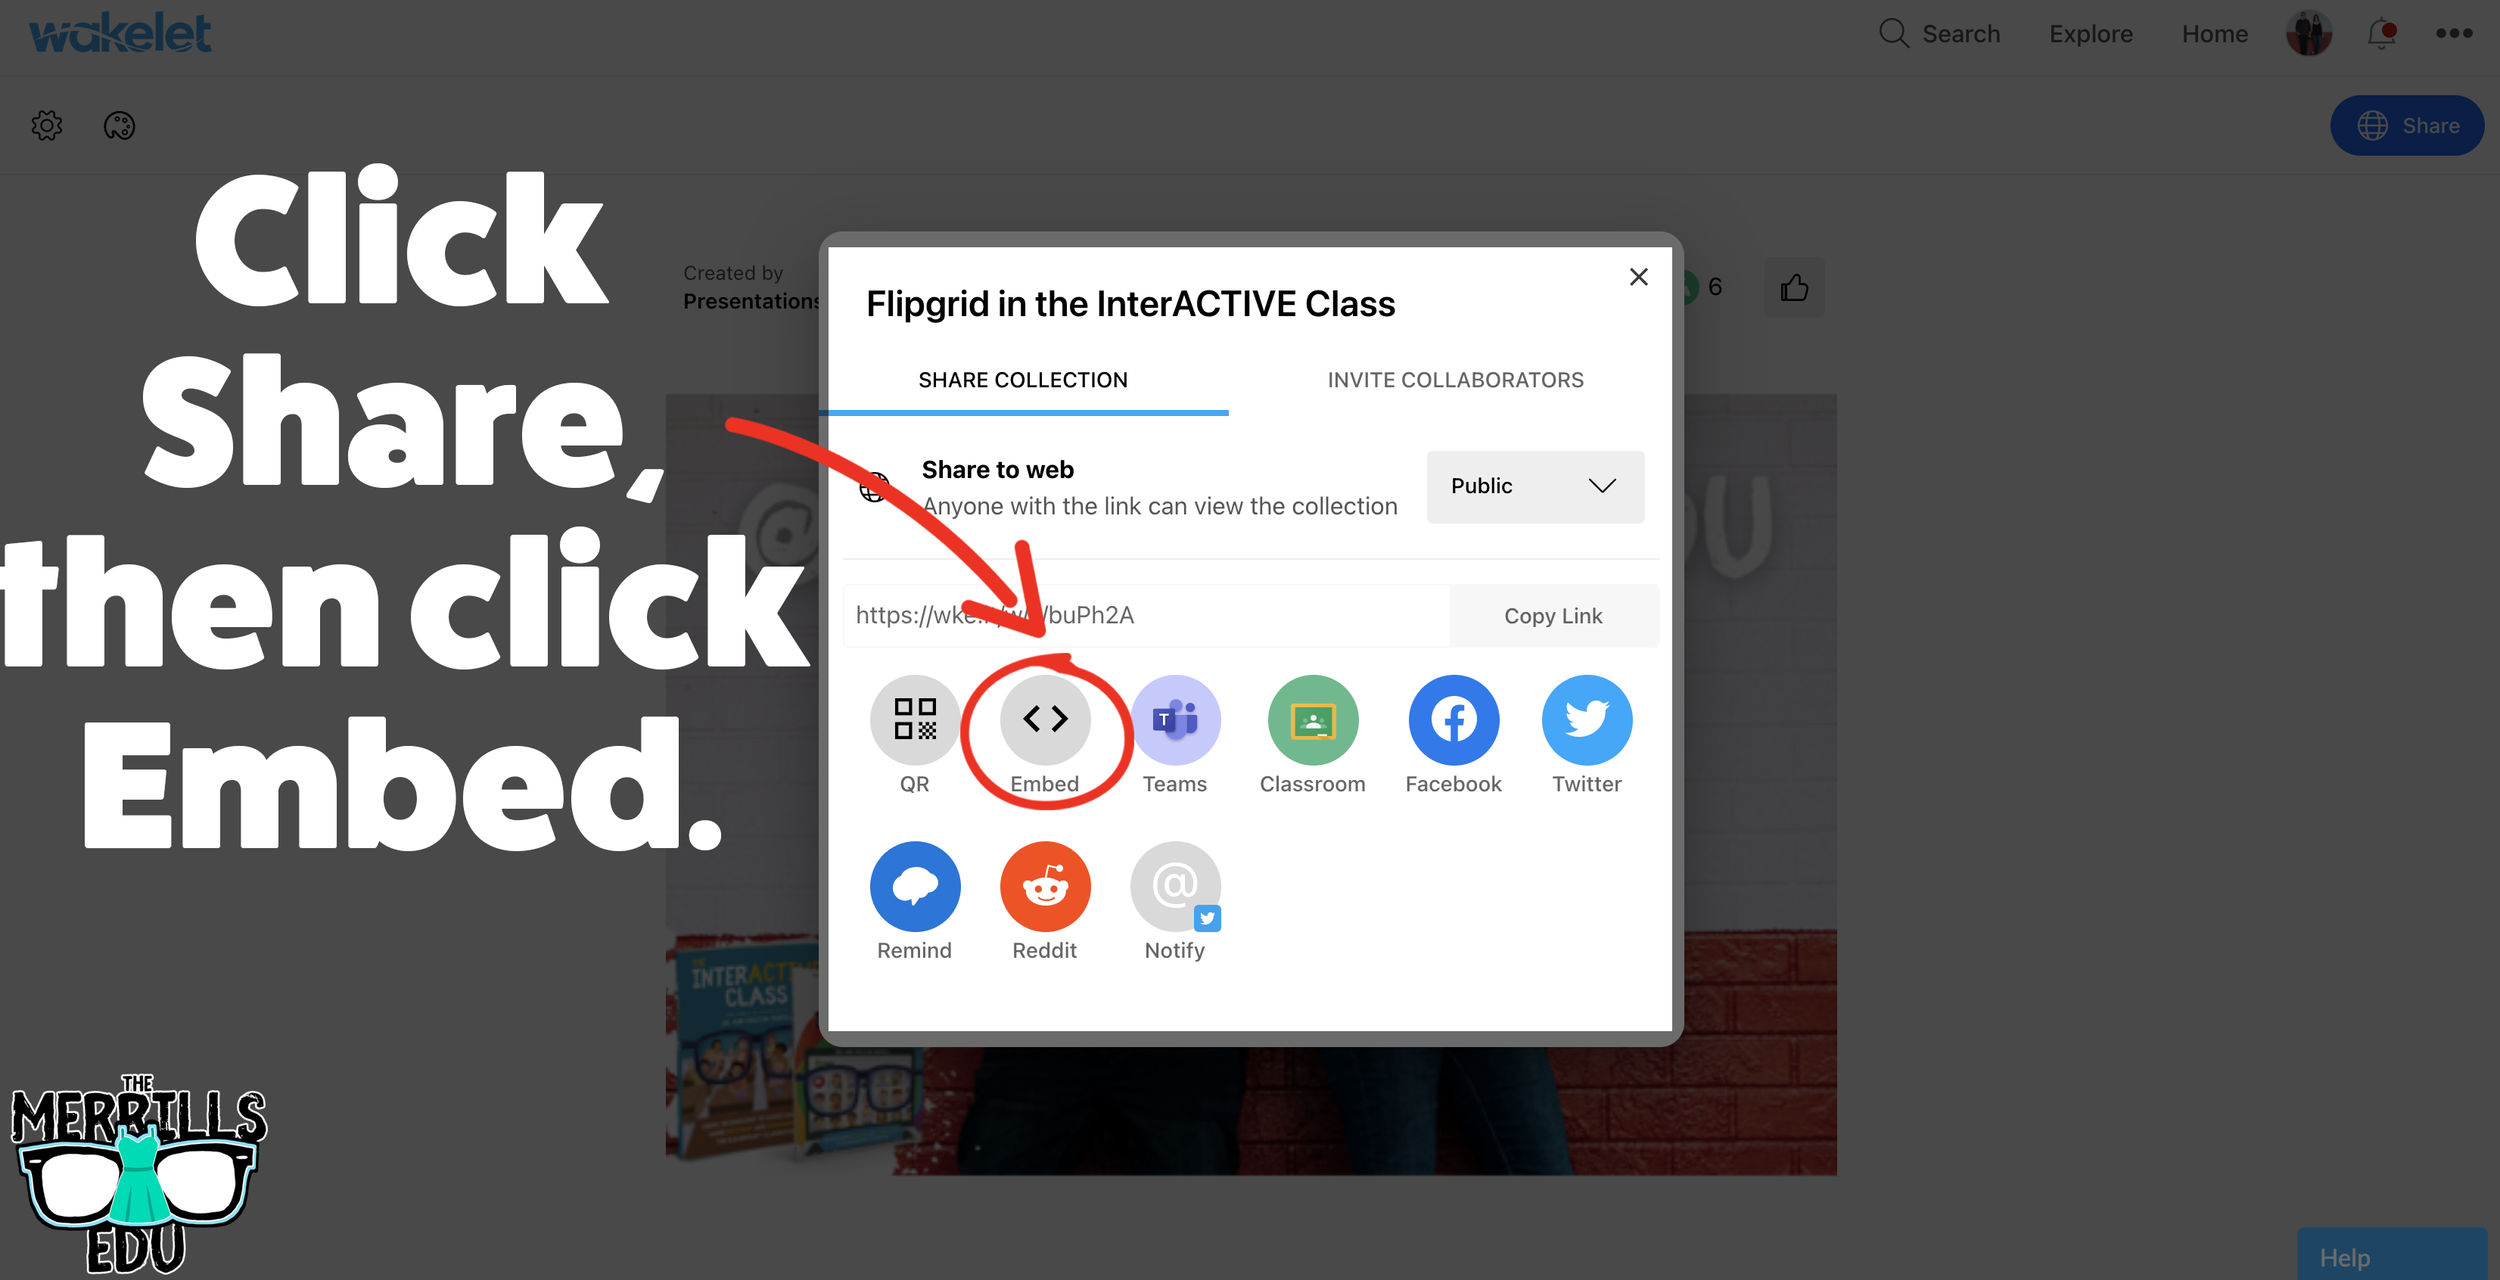

(Note: Your Wakelet Collection must be set to “Public” in order for you to embed it)
In a Wakelet Collection, click the “Share” button, then click “Embed.”
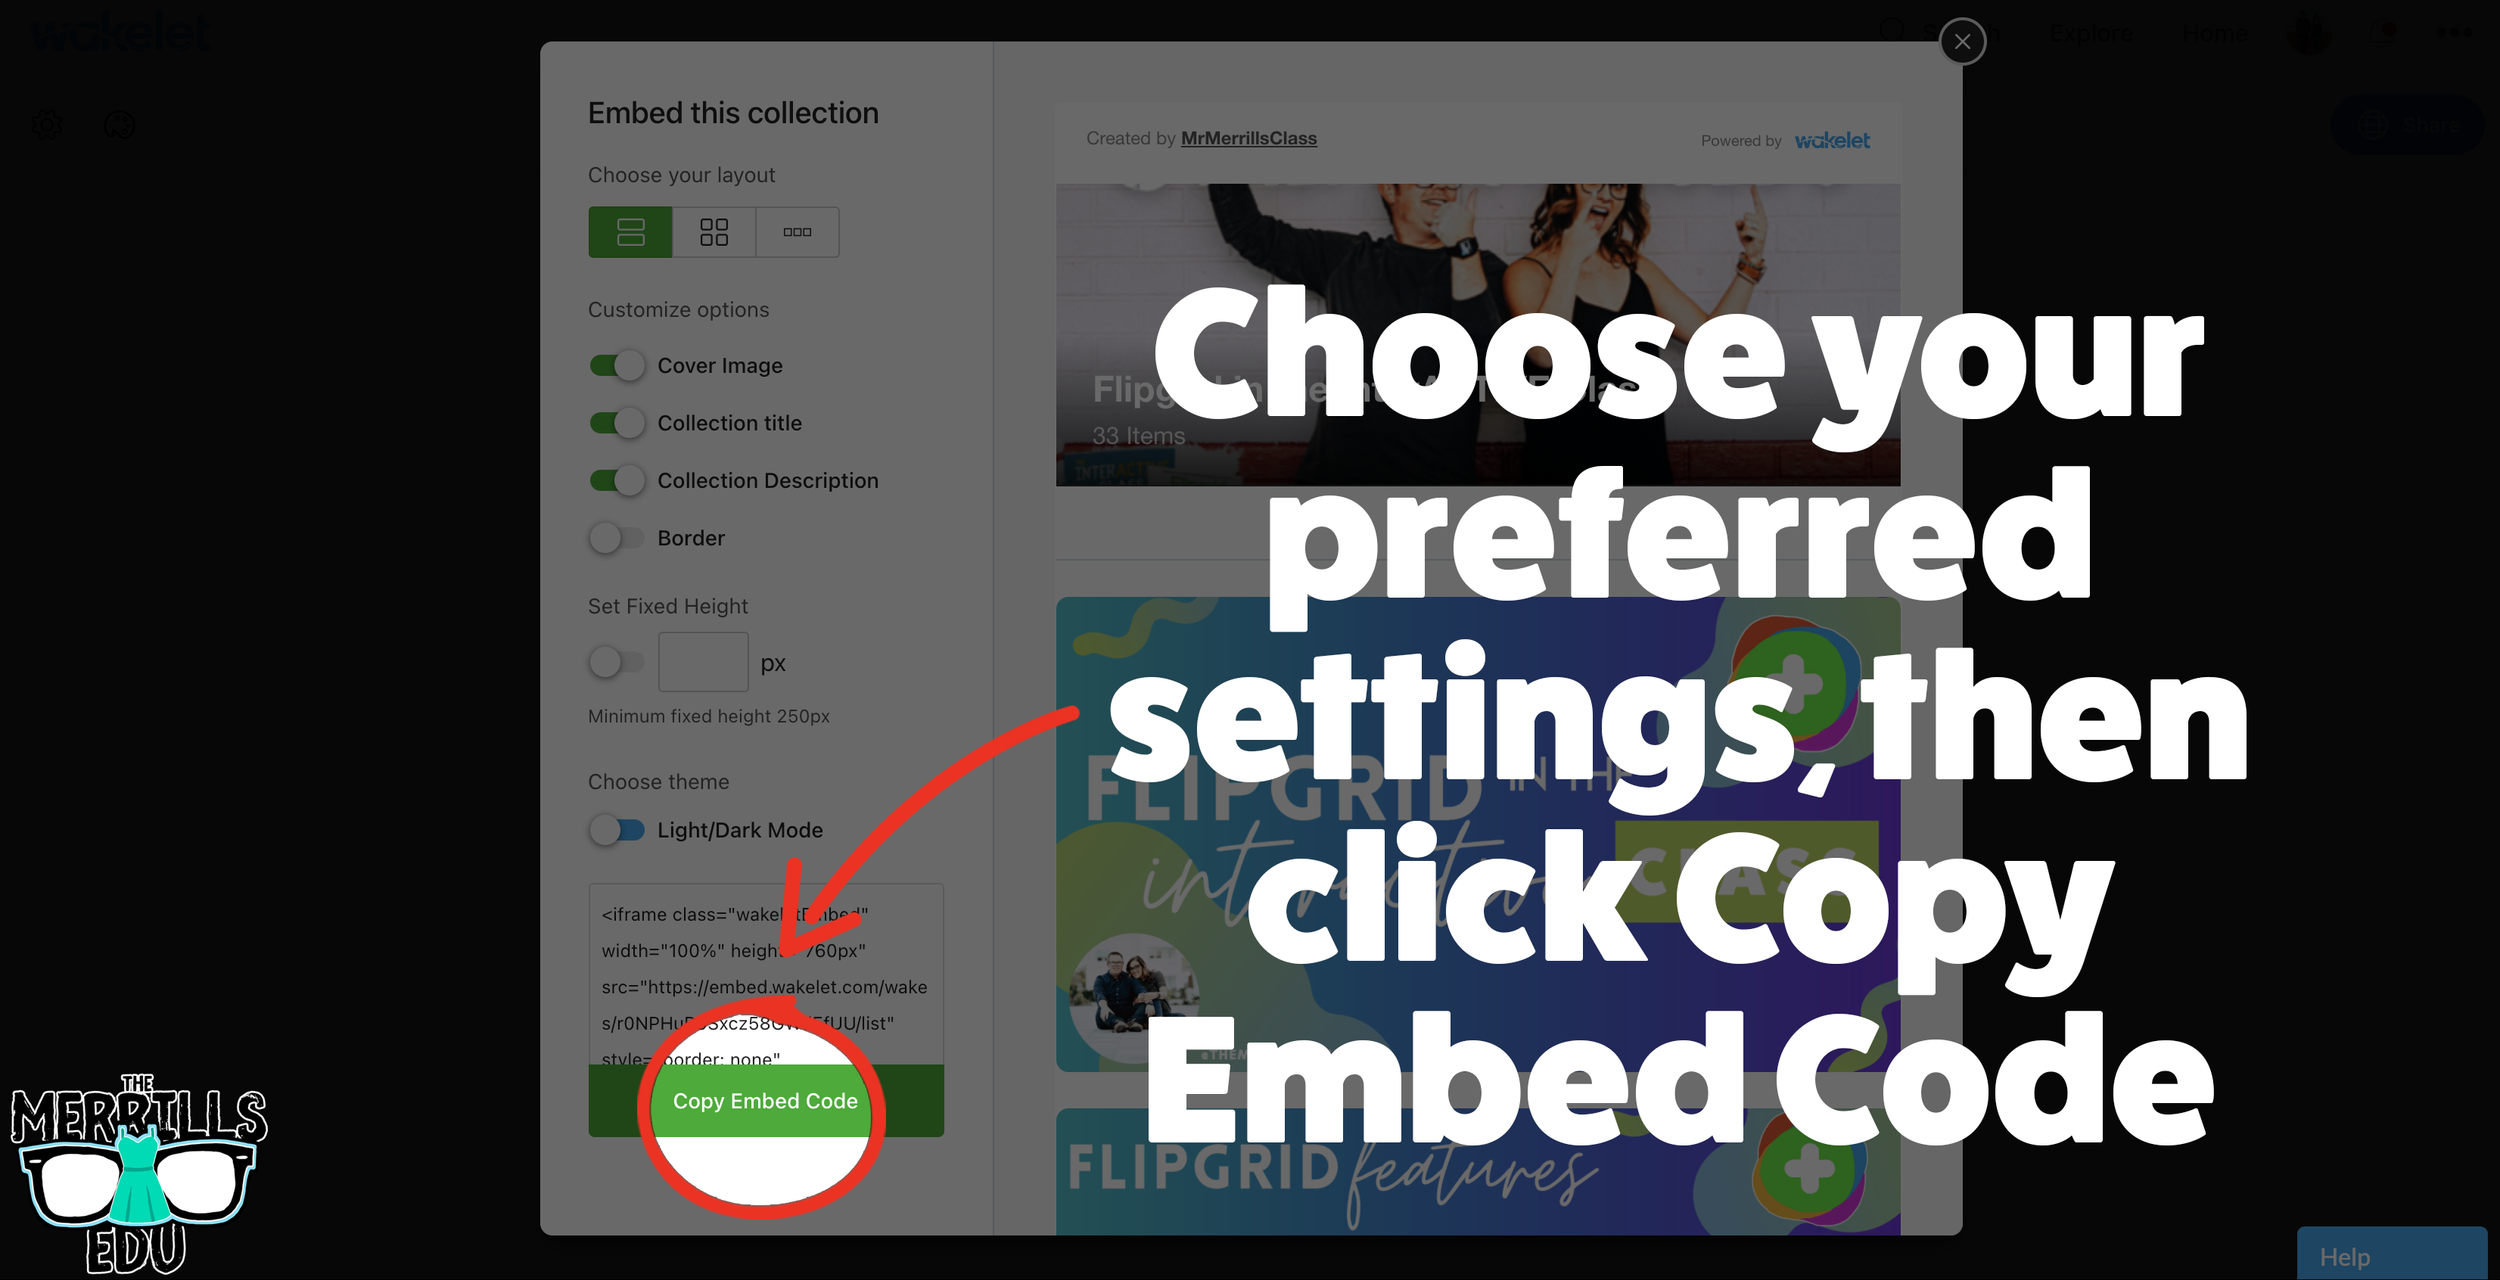
Chose your preferred settings, then click “Copy Embed Code.”
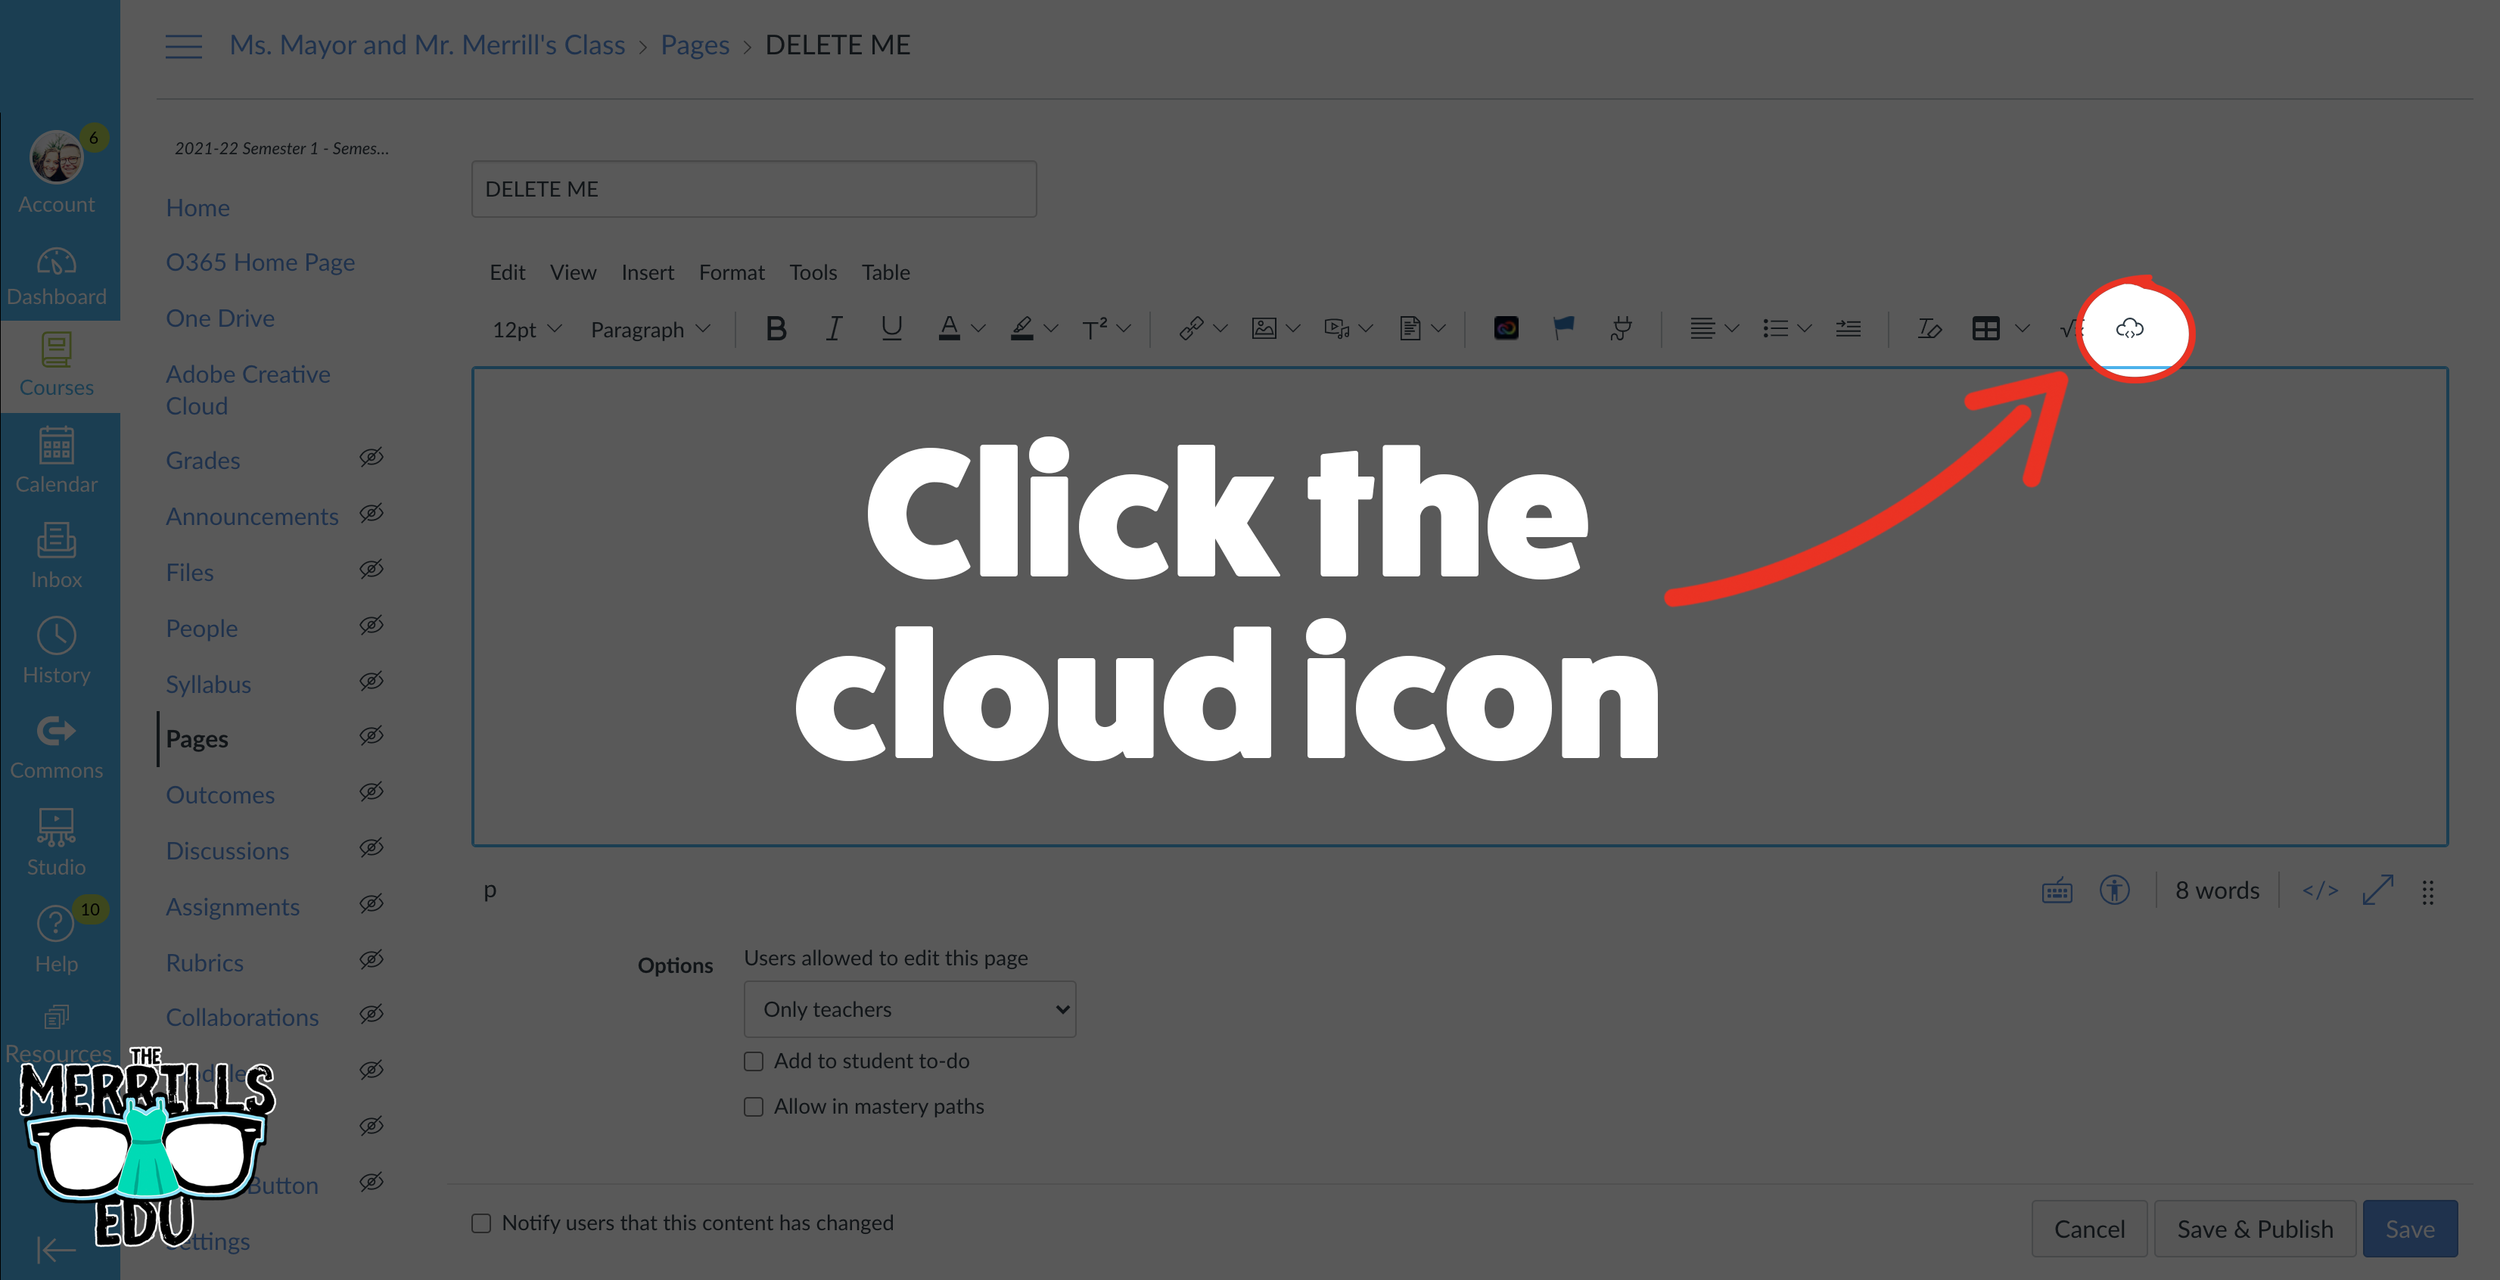
In a separate tab, open the Canvas page that you would like to add the Wakelet Collection to. Then, click on the cloud icon.
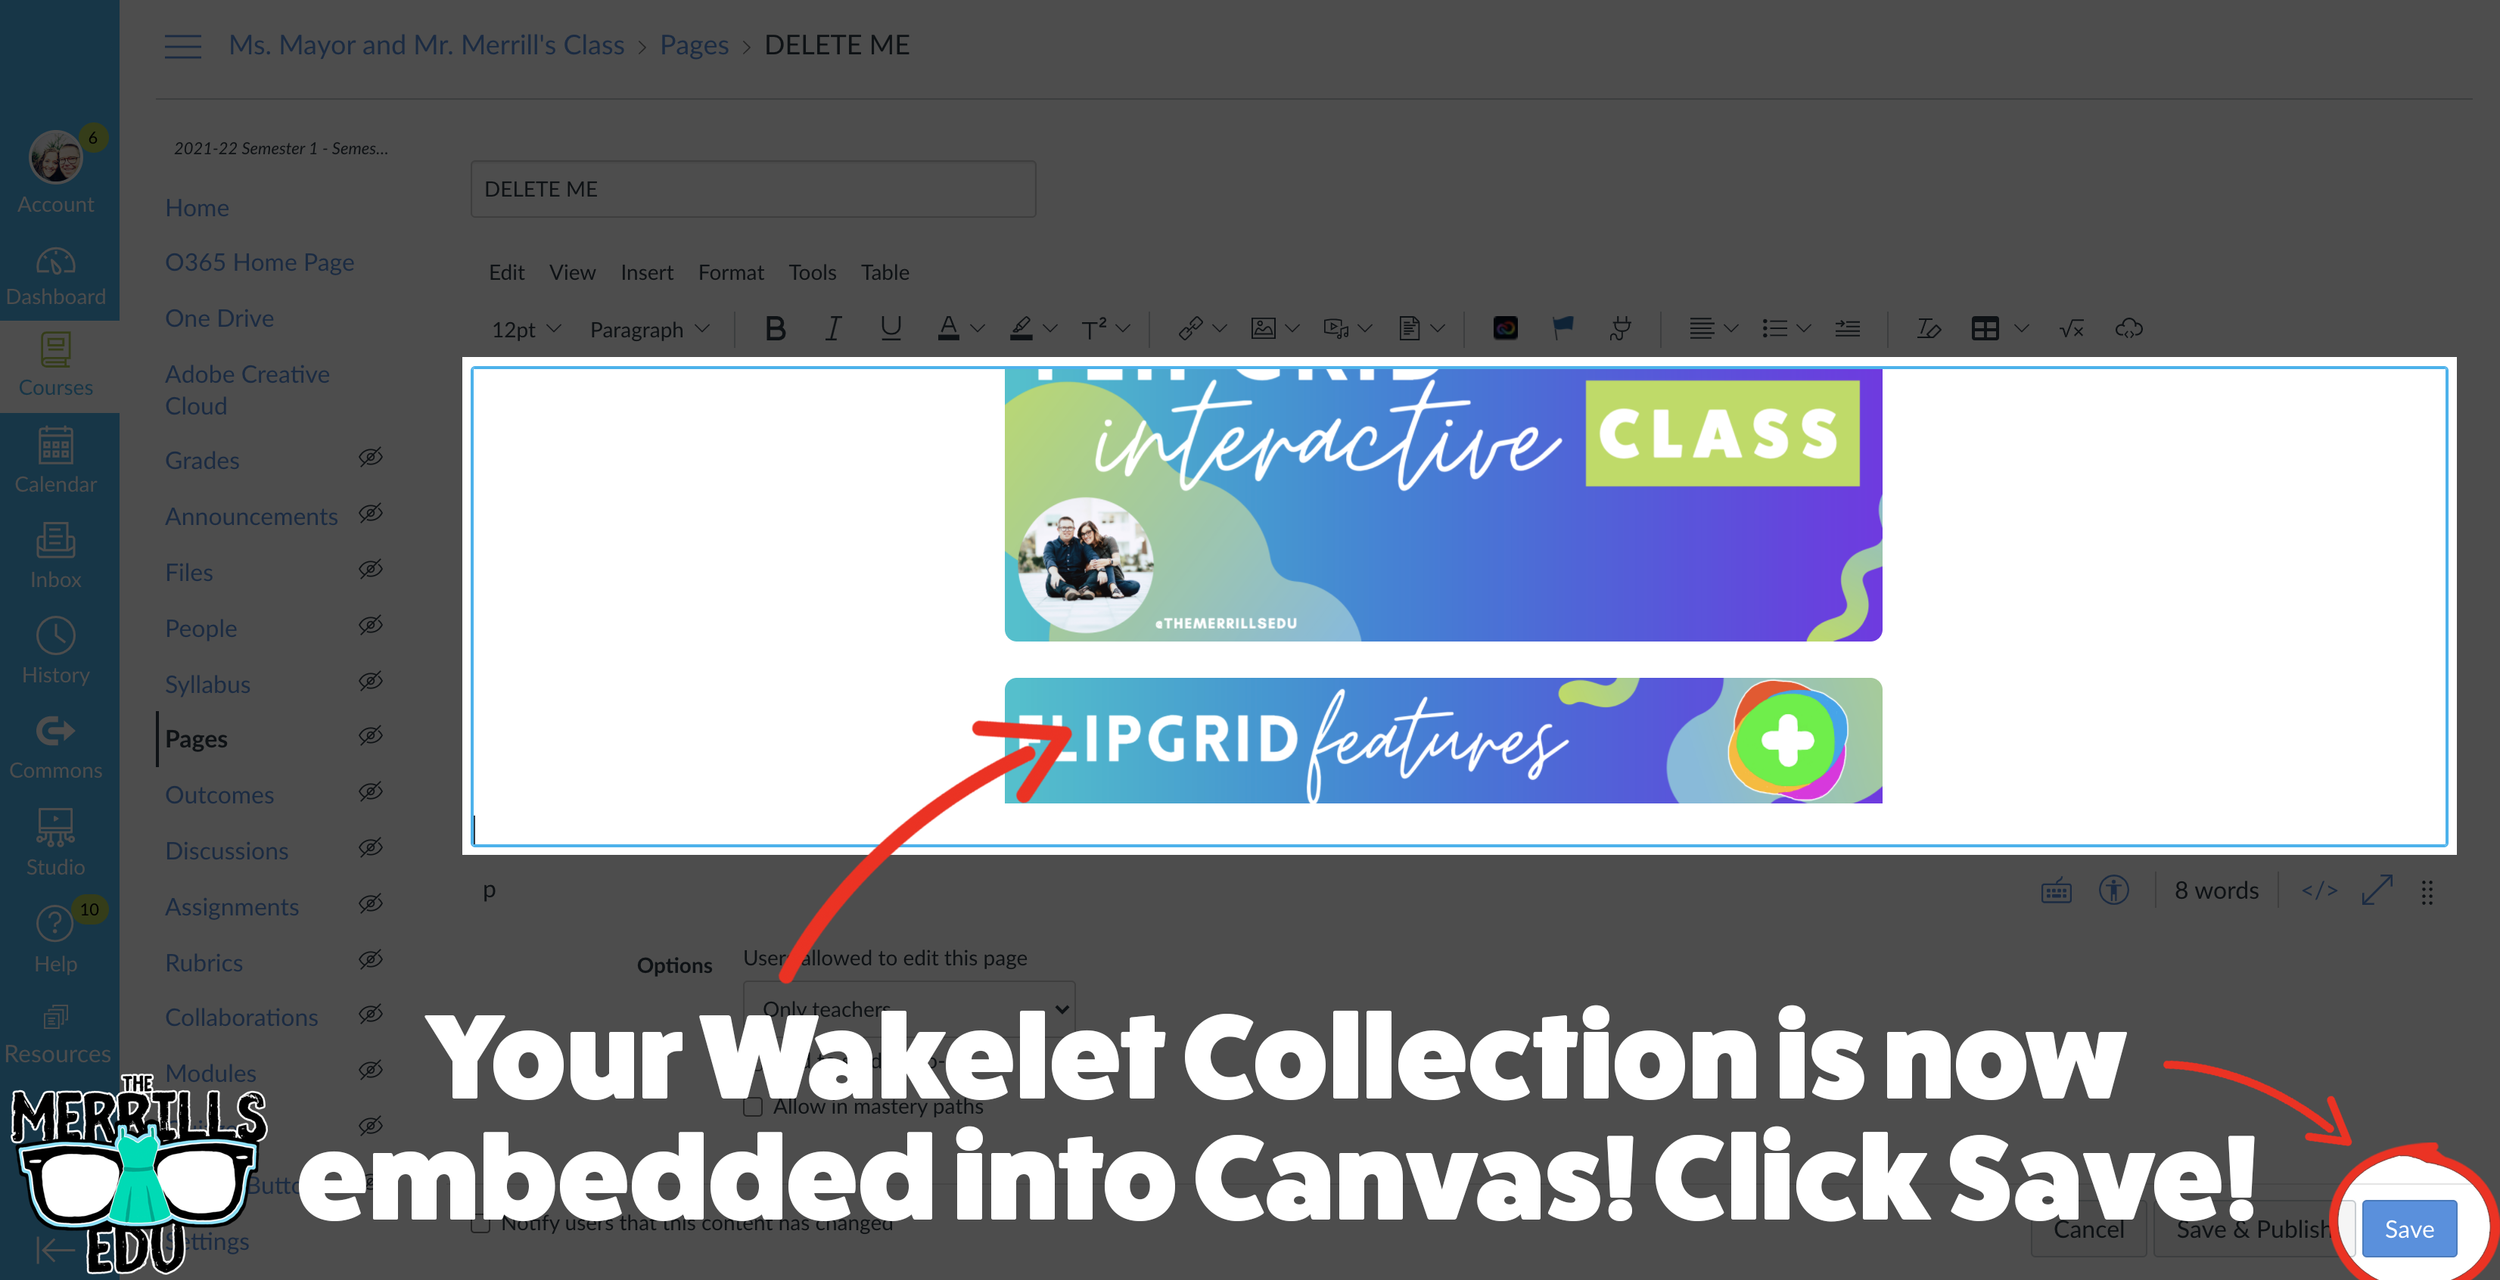
In the embed window, paste your copied code from Wakelet. Then, click submit.
Your Wakelet collection is now embedded into the Canvas page! Click on “Save” to update the changes.

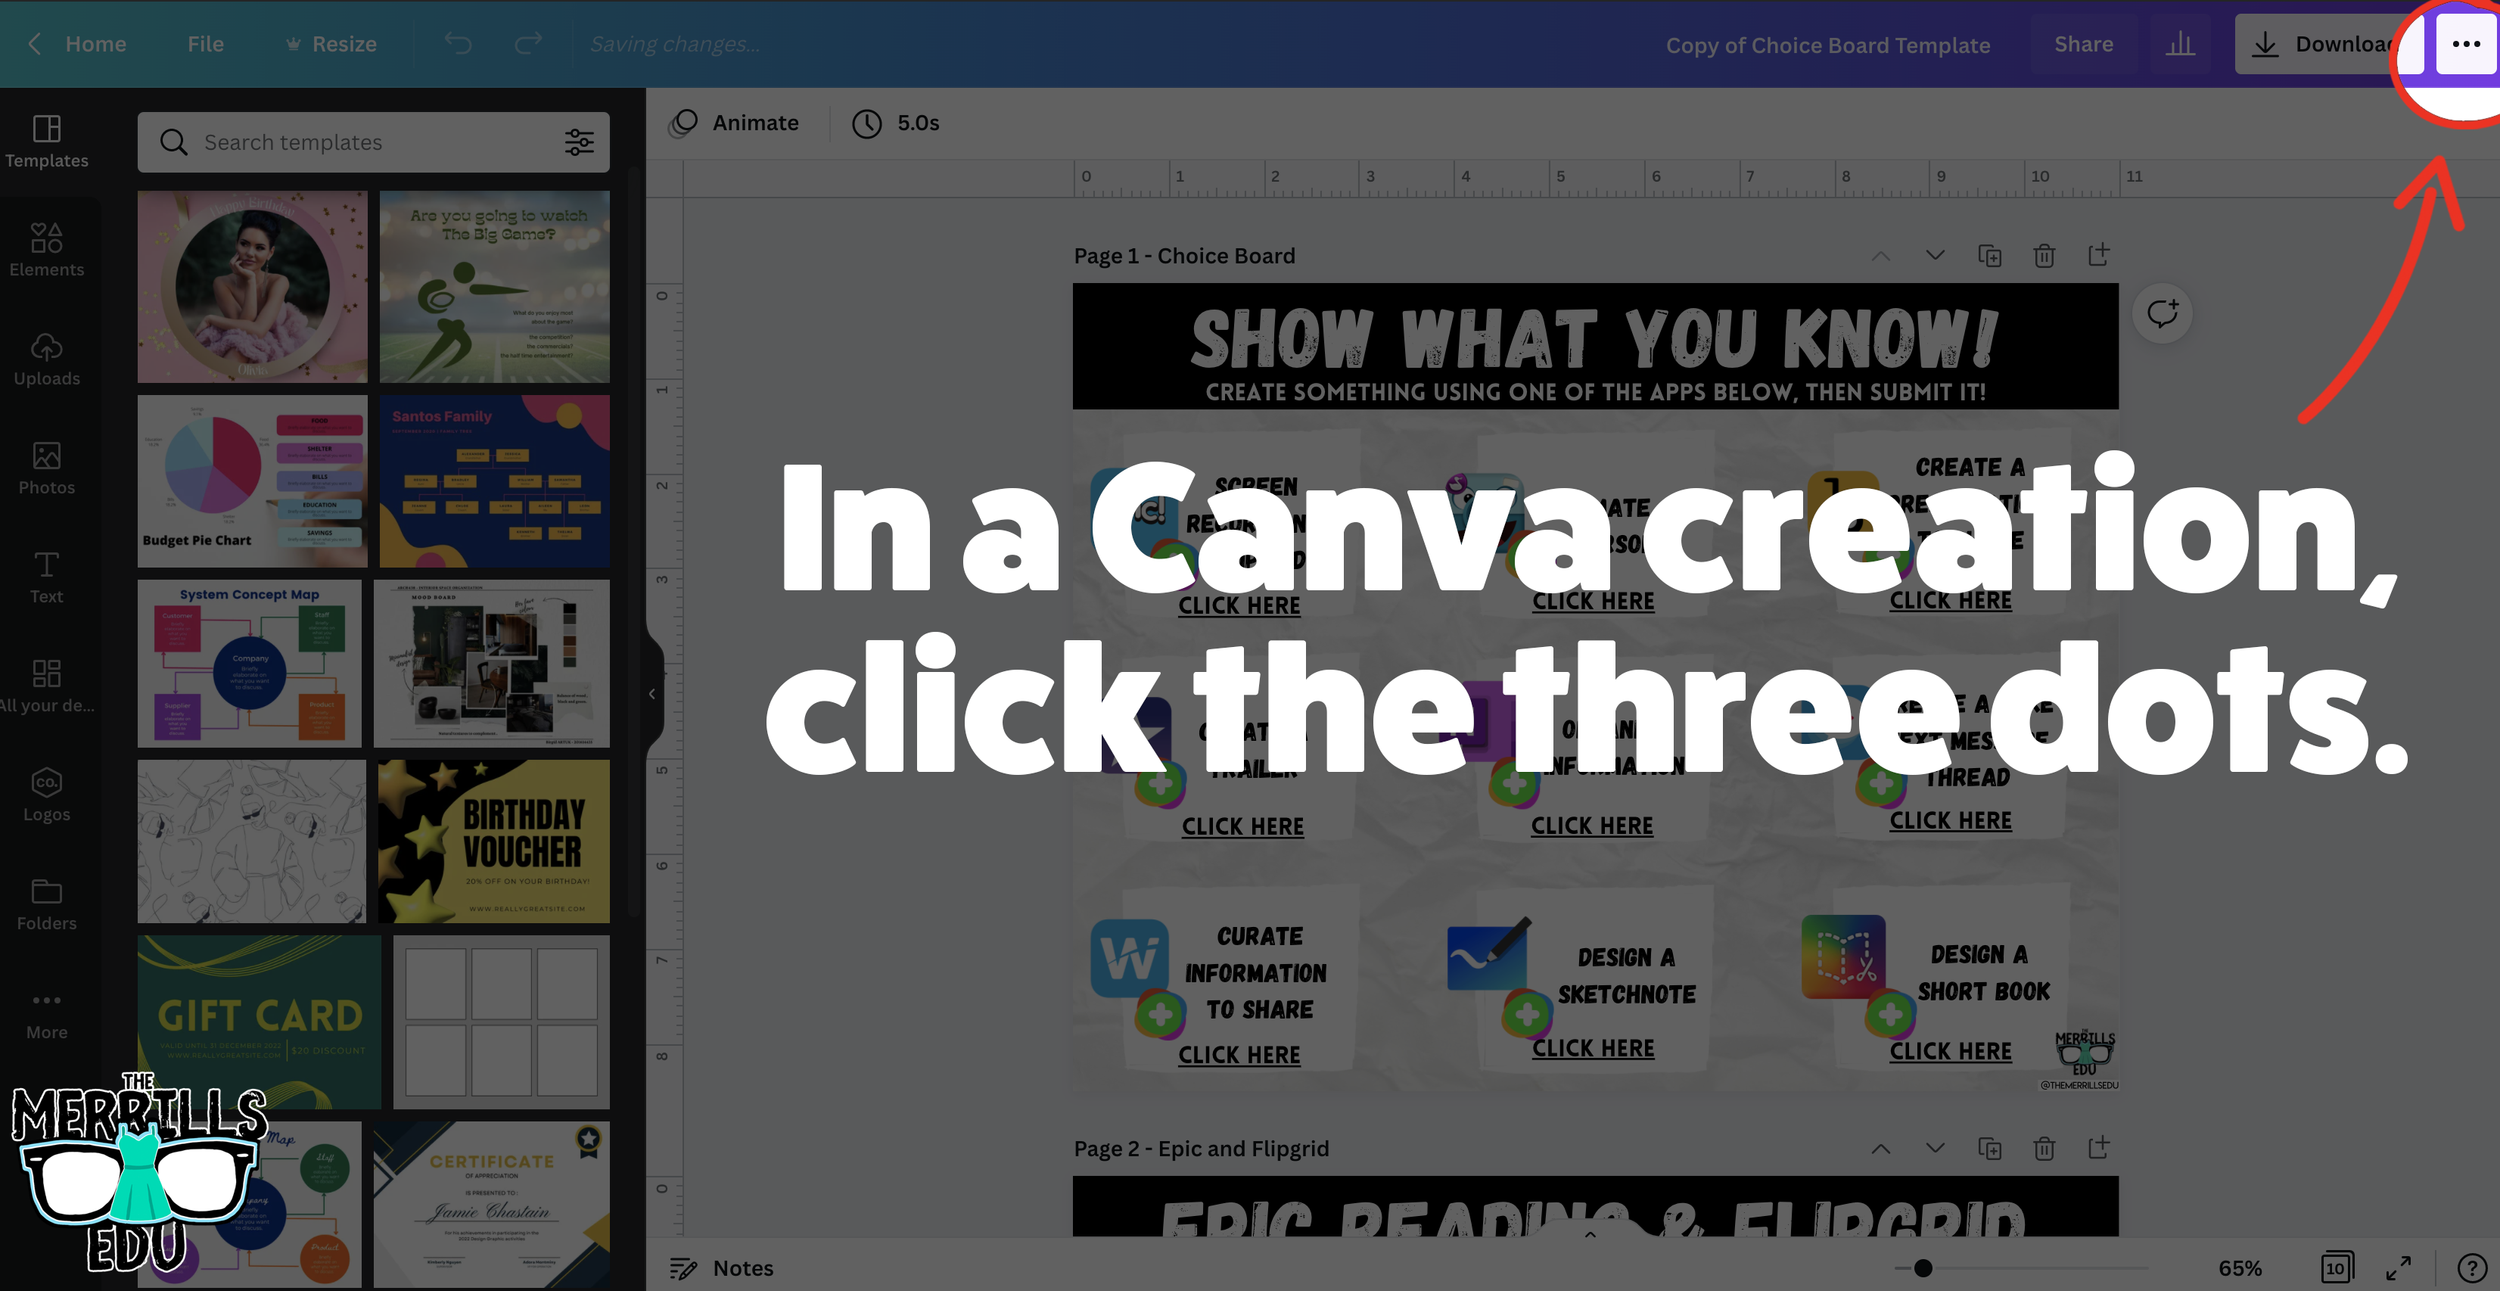
Canva Embedded into Canvas
Embedding Canva into Canvas will take your Canva creations live on any Canvas page! This live embed means that anything that you update on the Canva end will automatically update on the Canvas end. So, if you make changes to the Canva creation, you won’t have to worry about re-embedding it! Here’s how it all works:
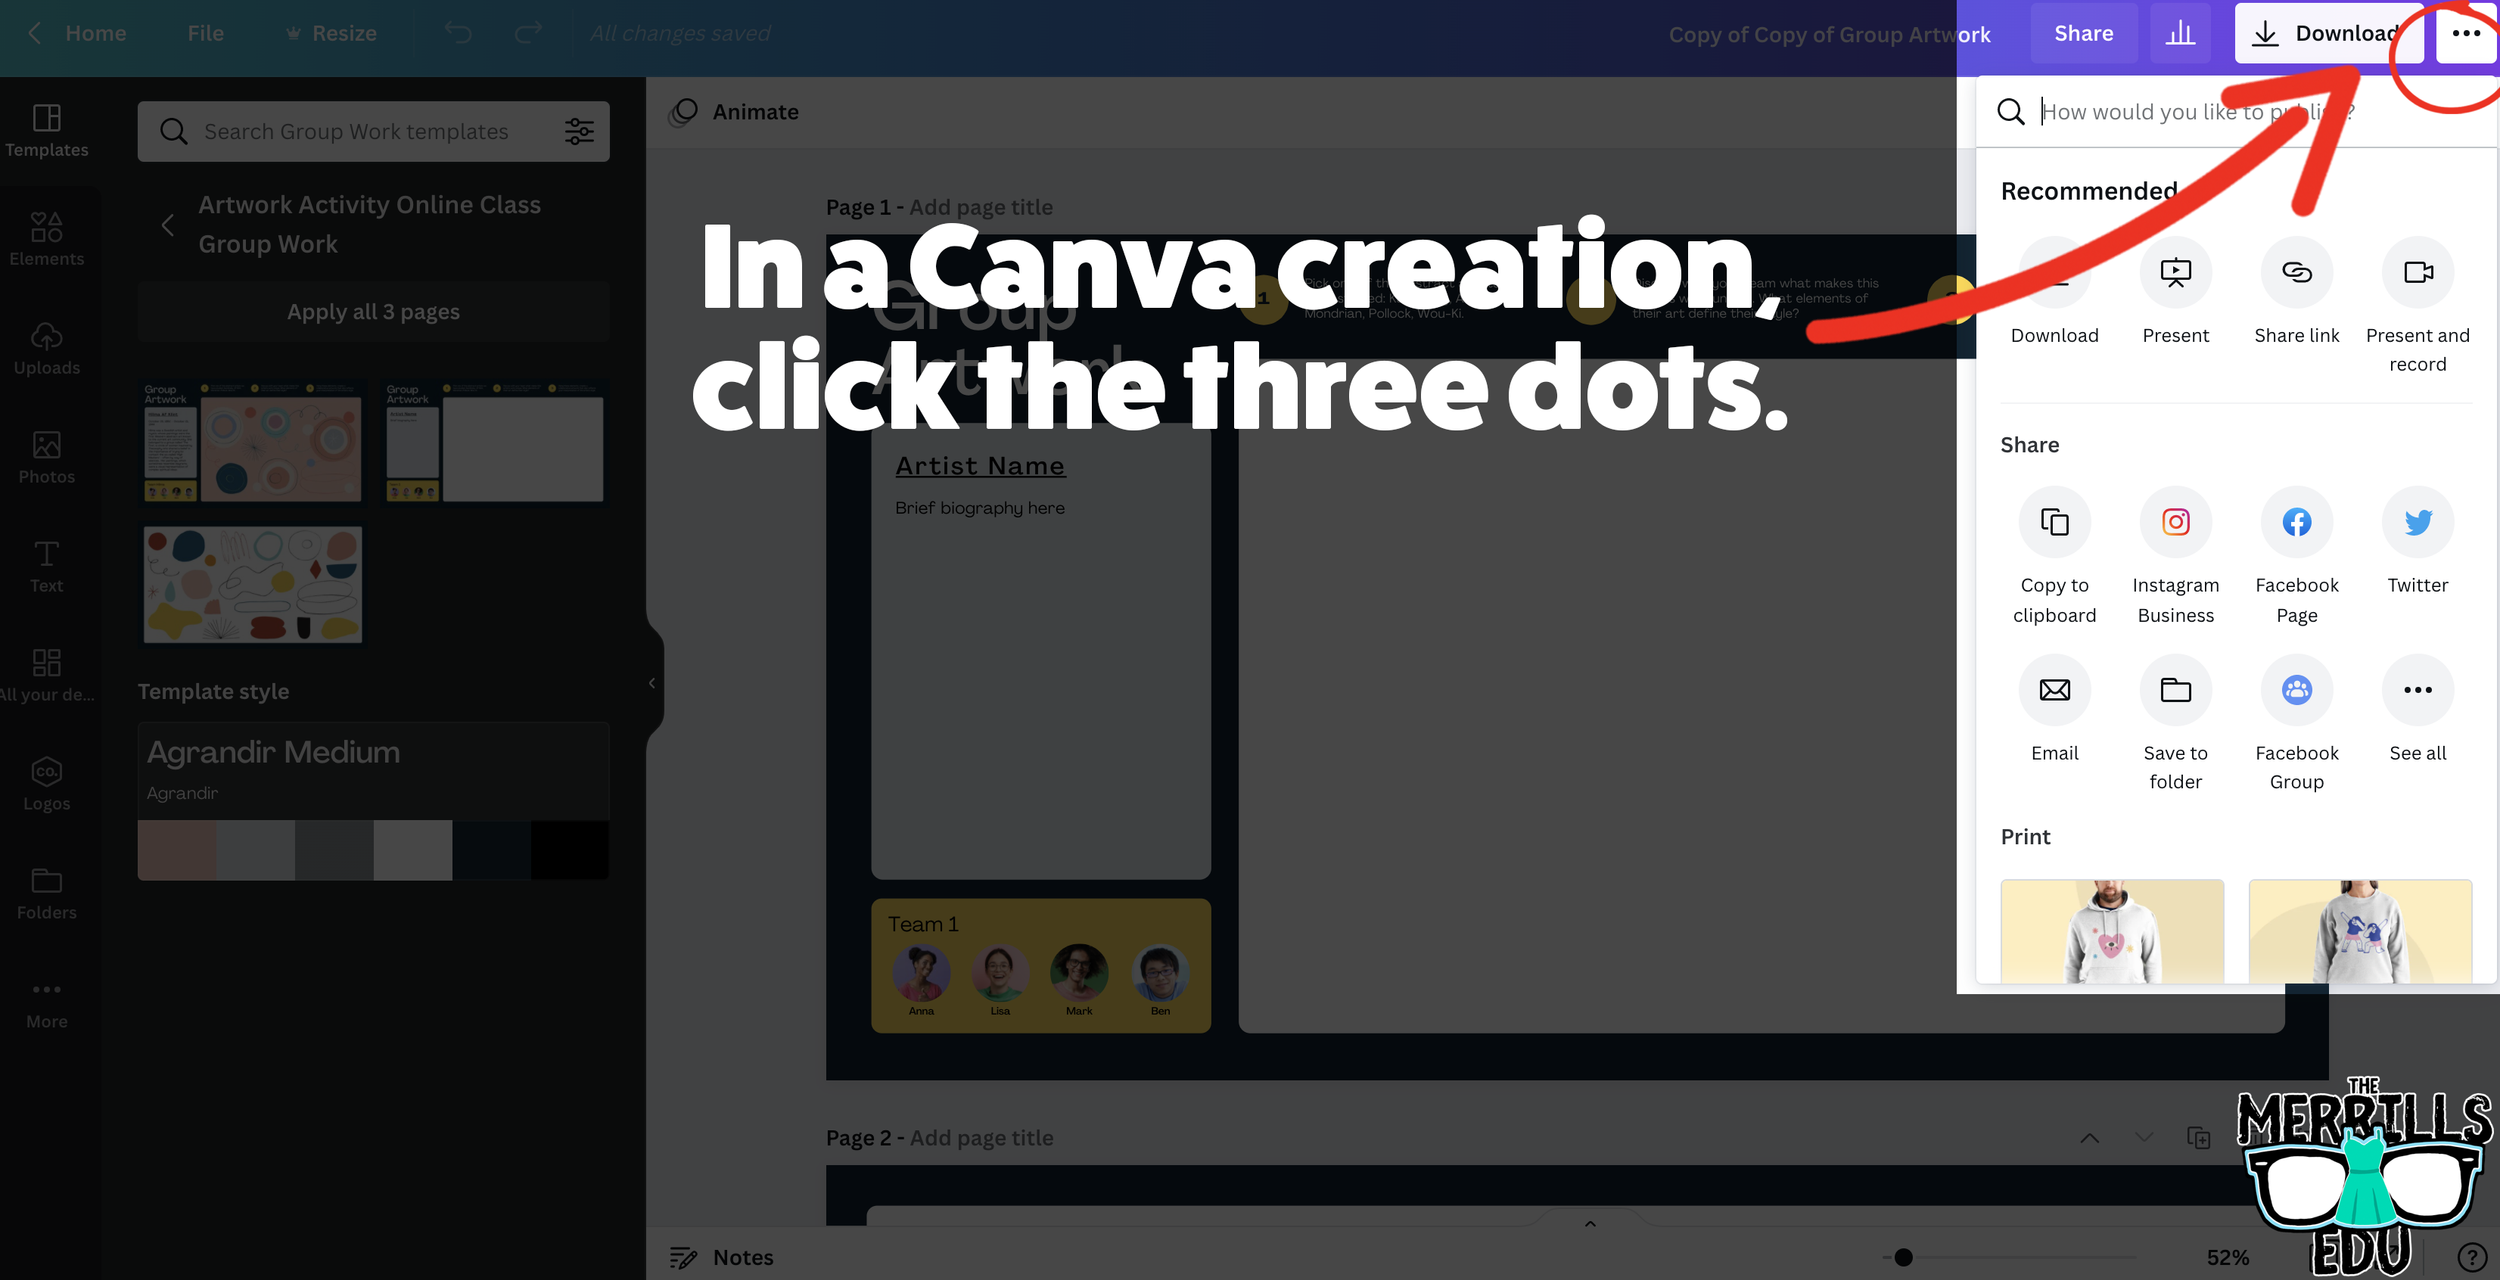

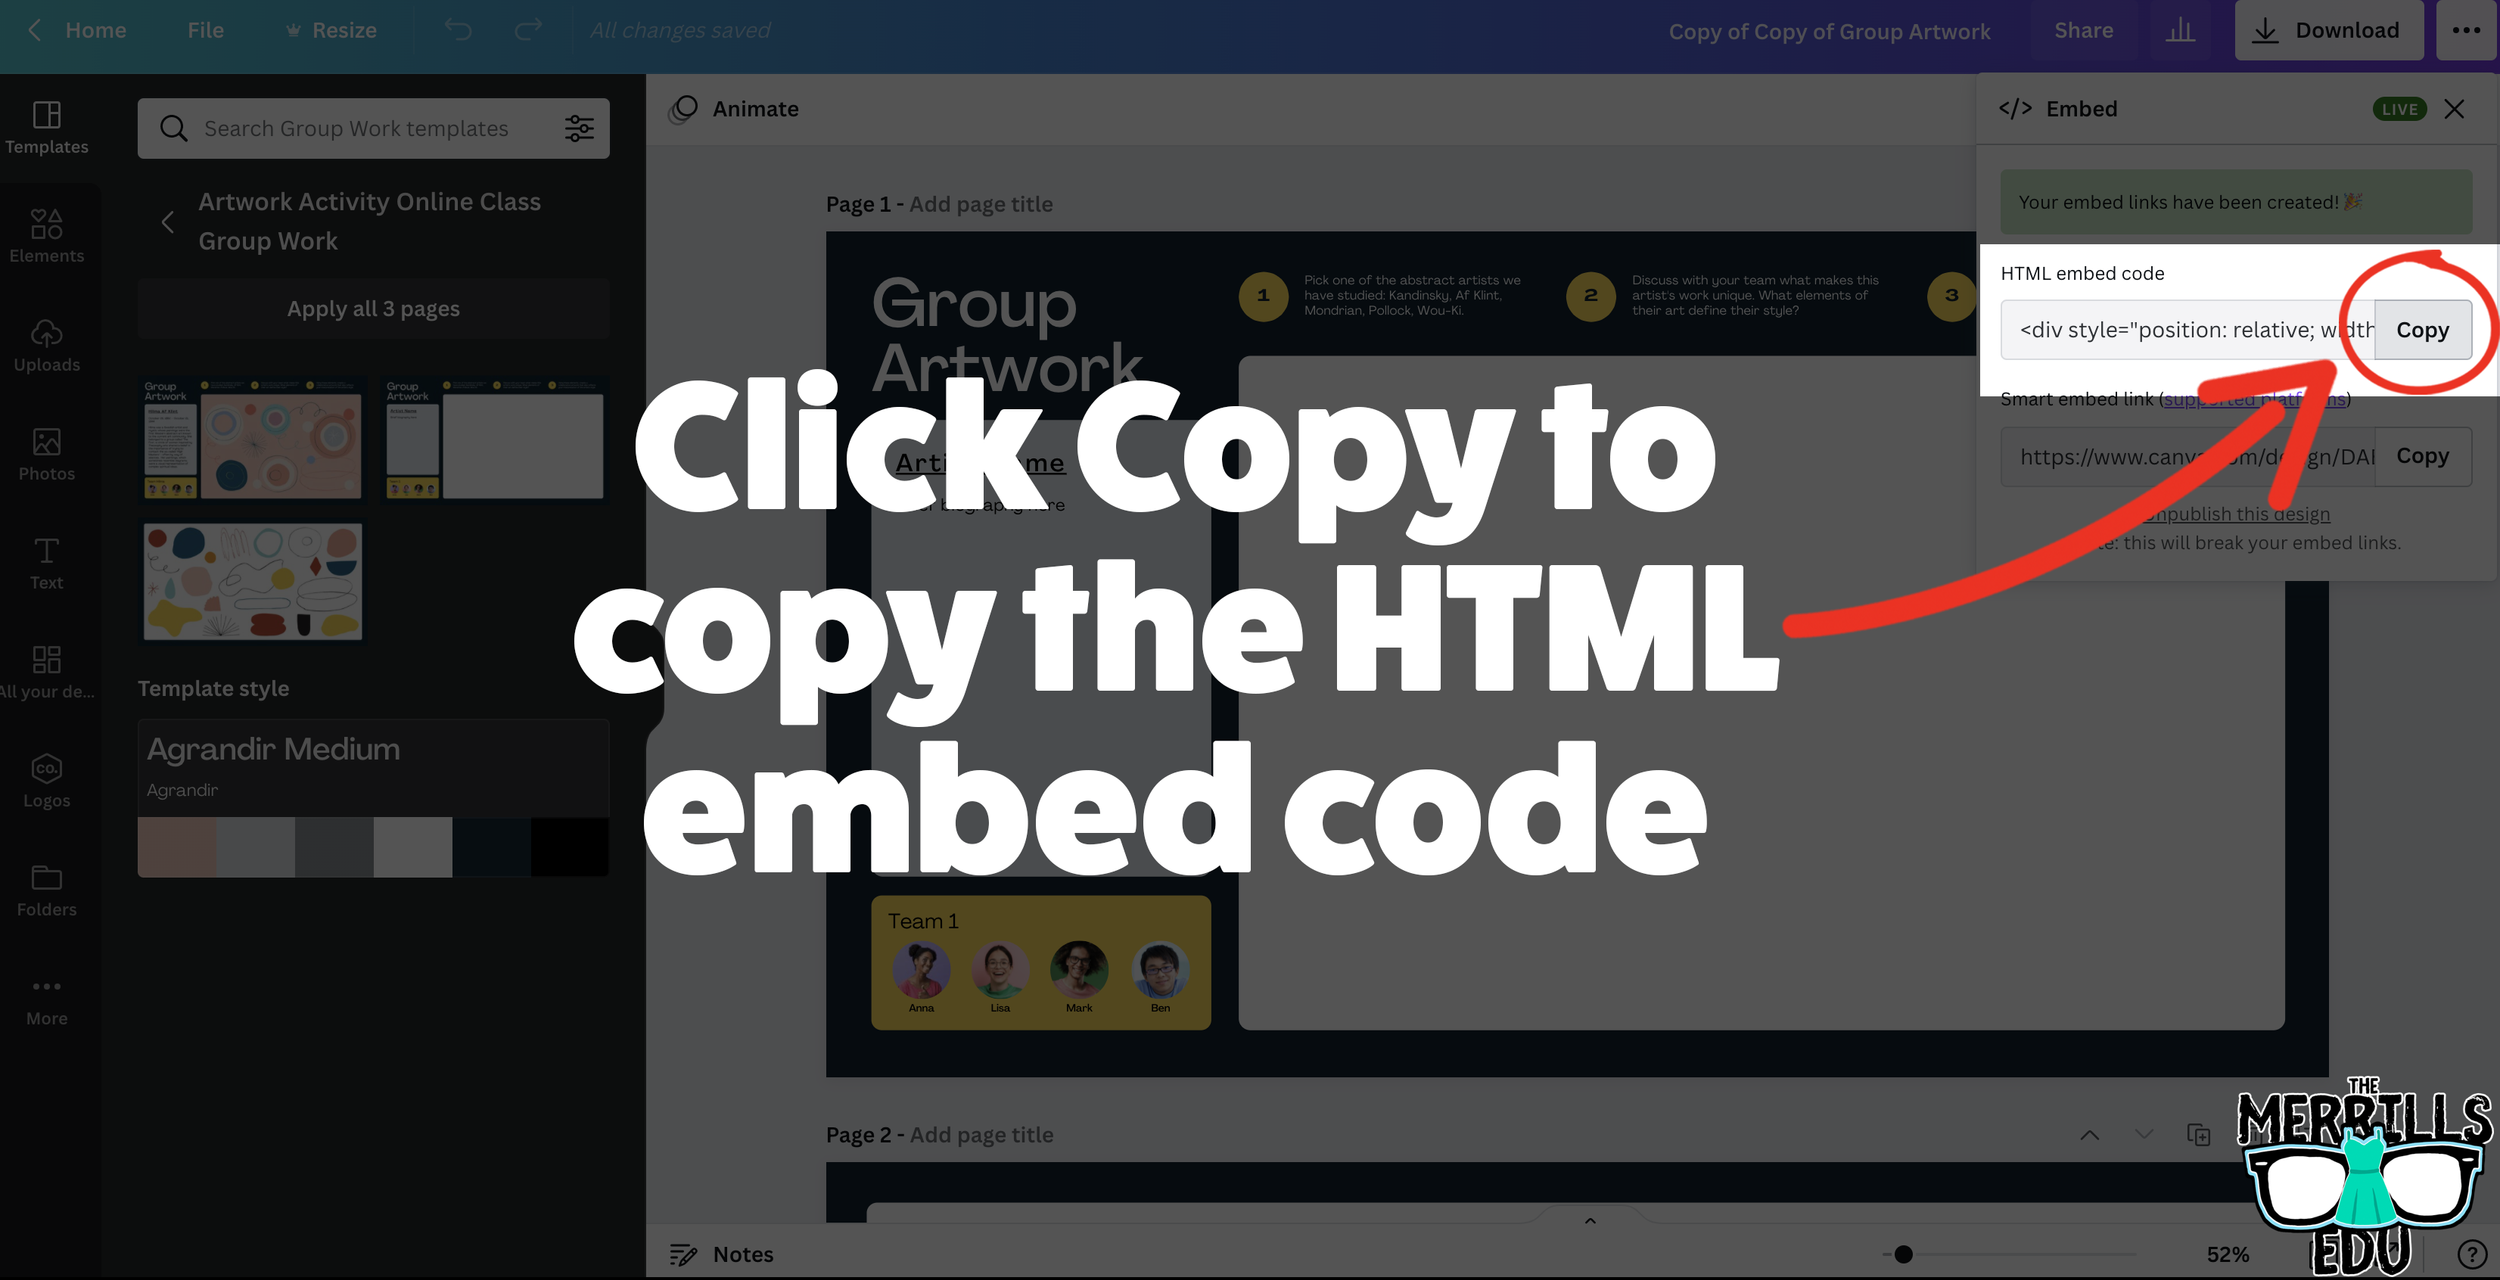


Open a Canva creation, then click on the three dots located on the top right side of the screen.
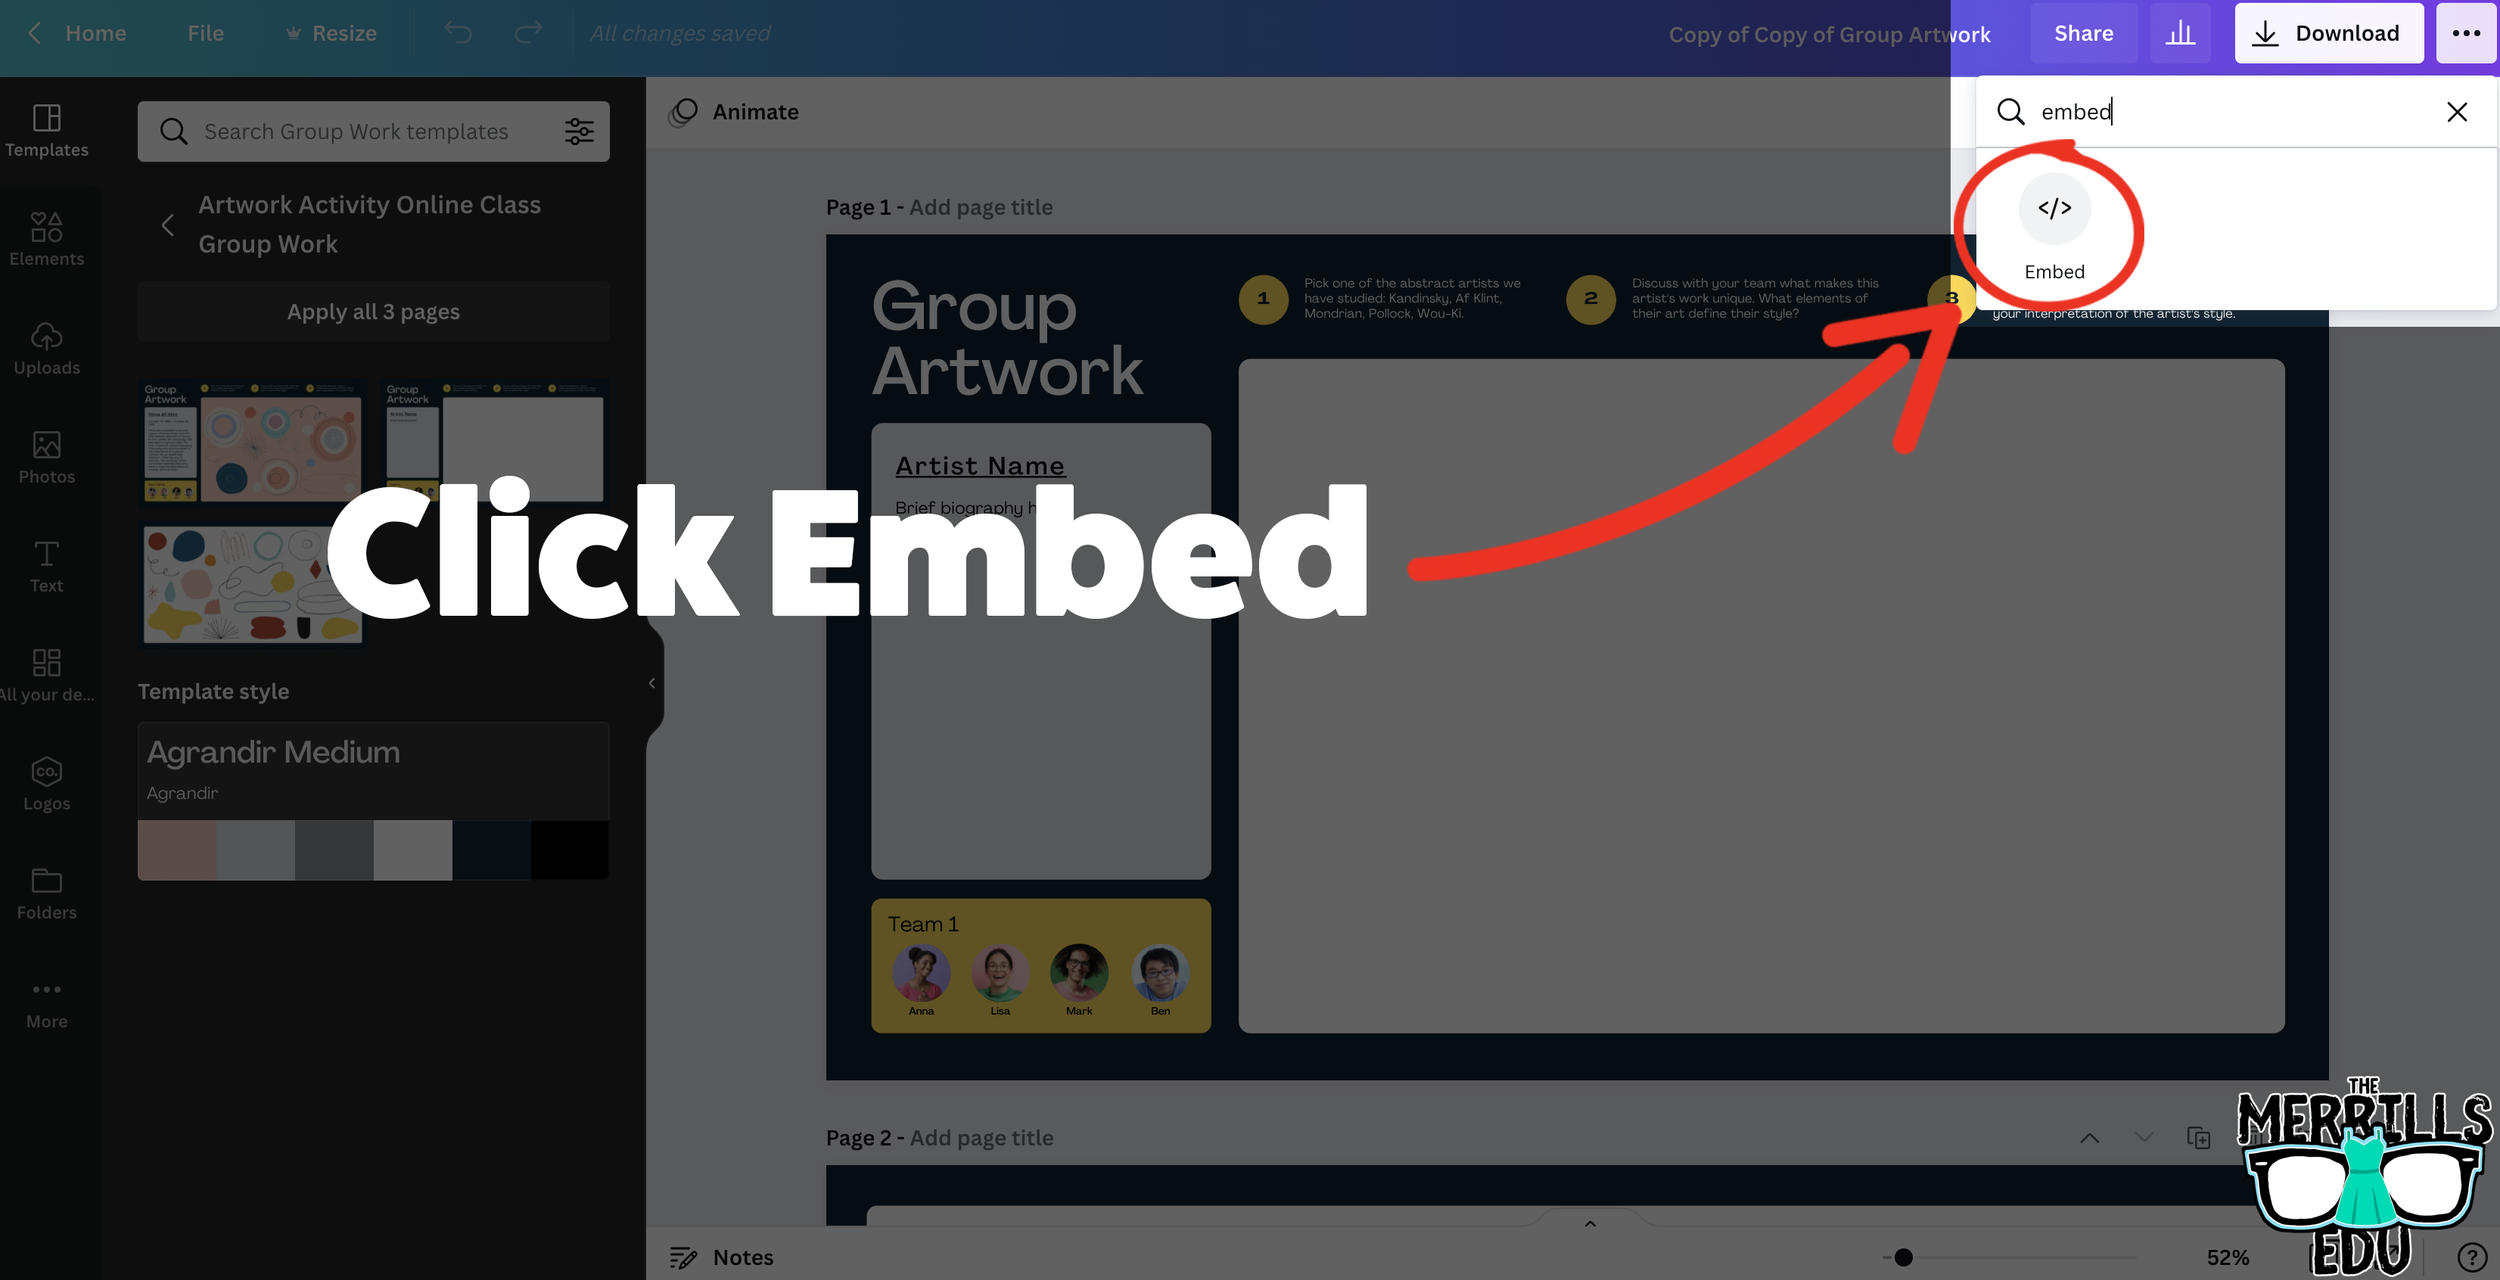
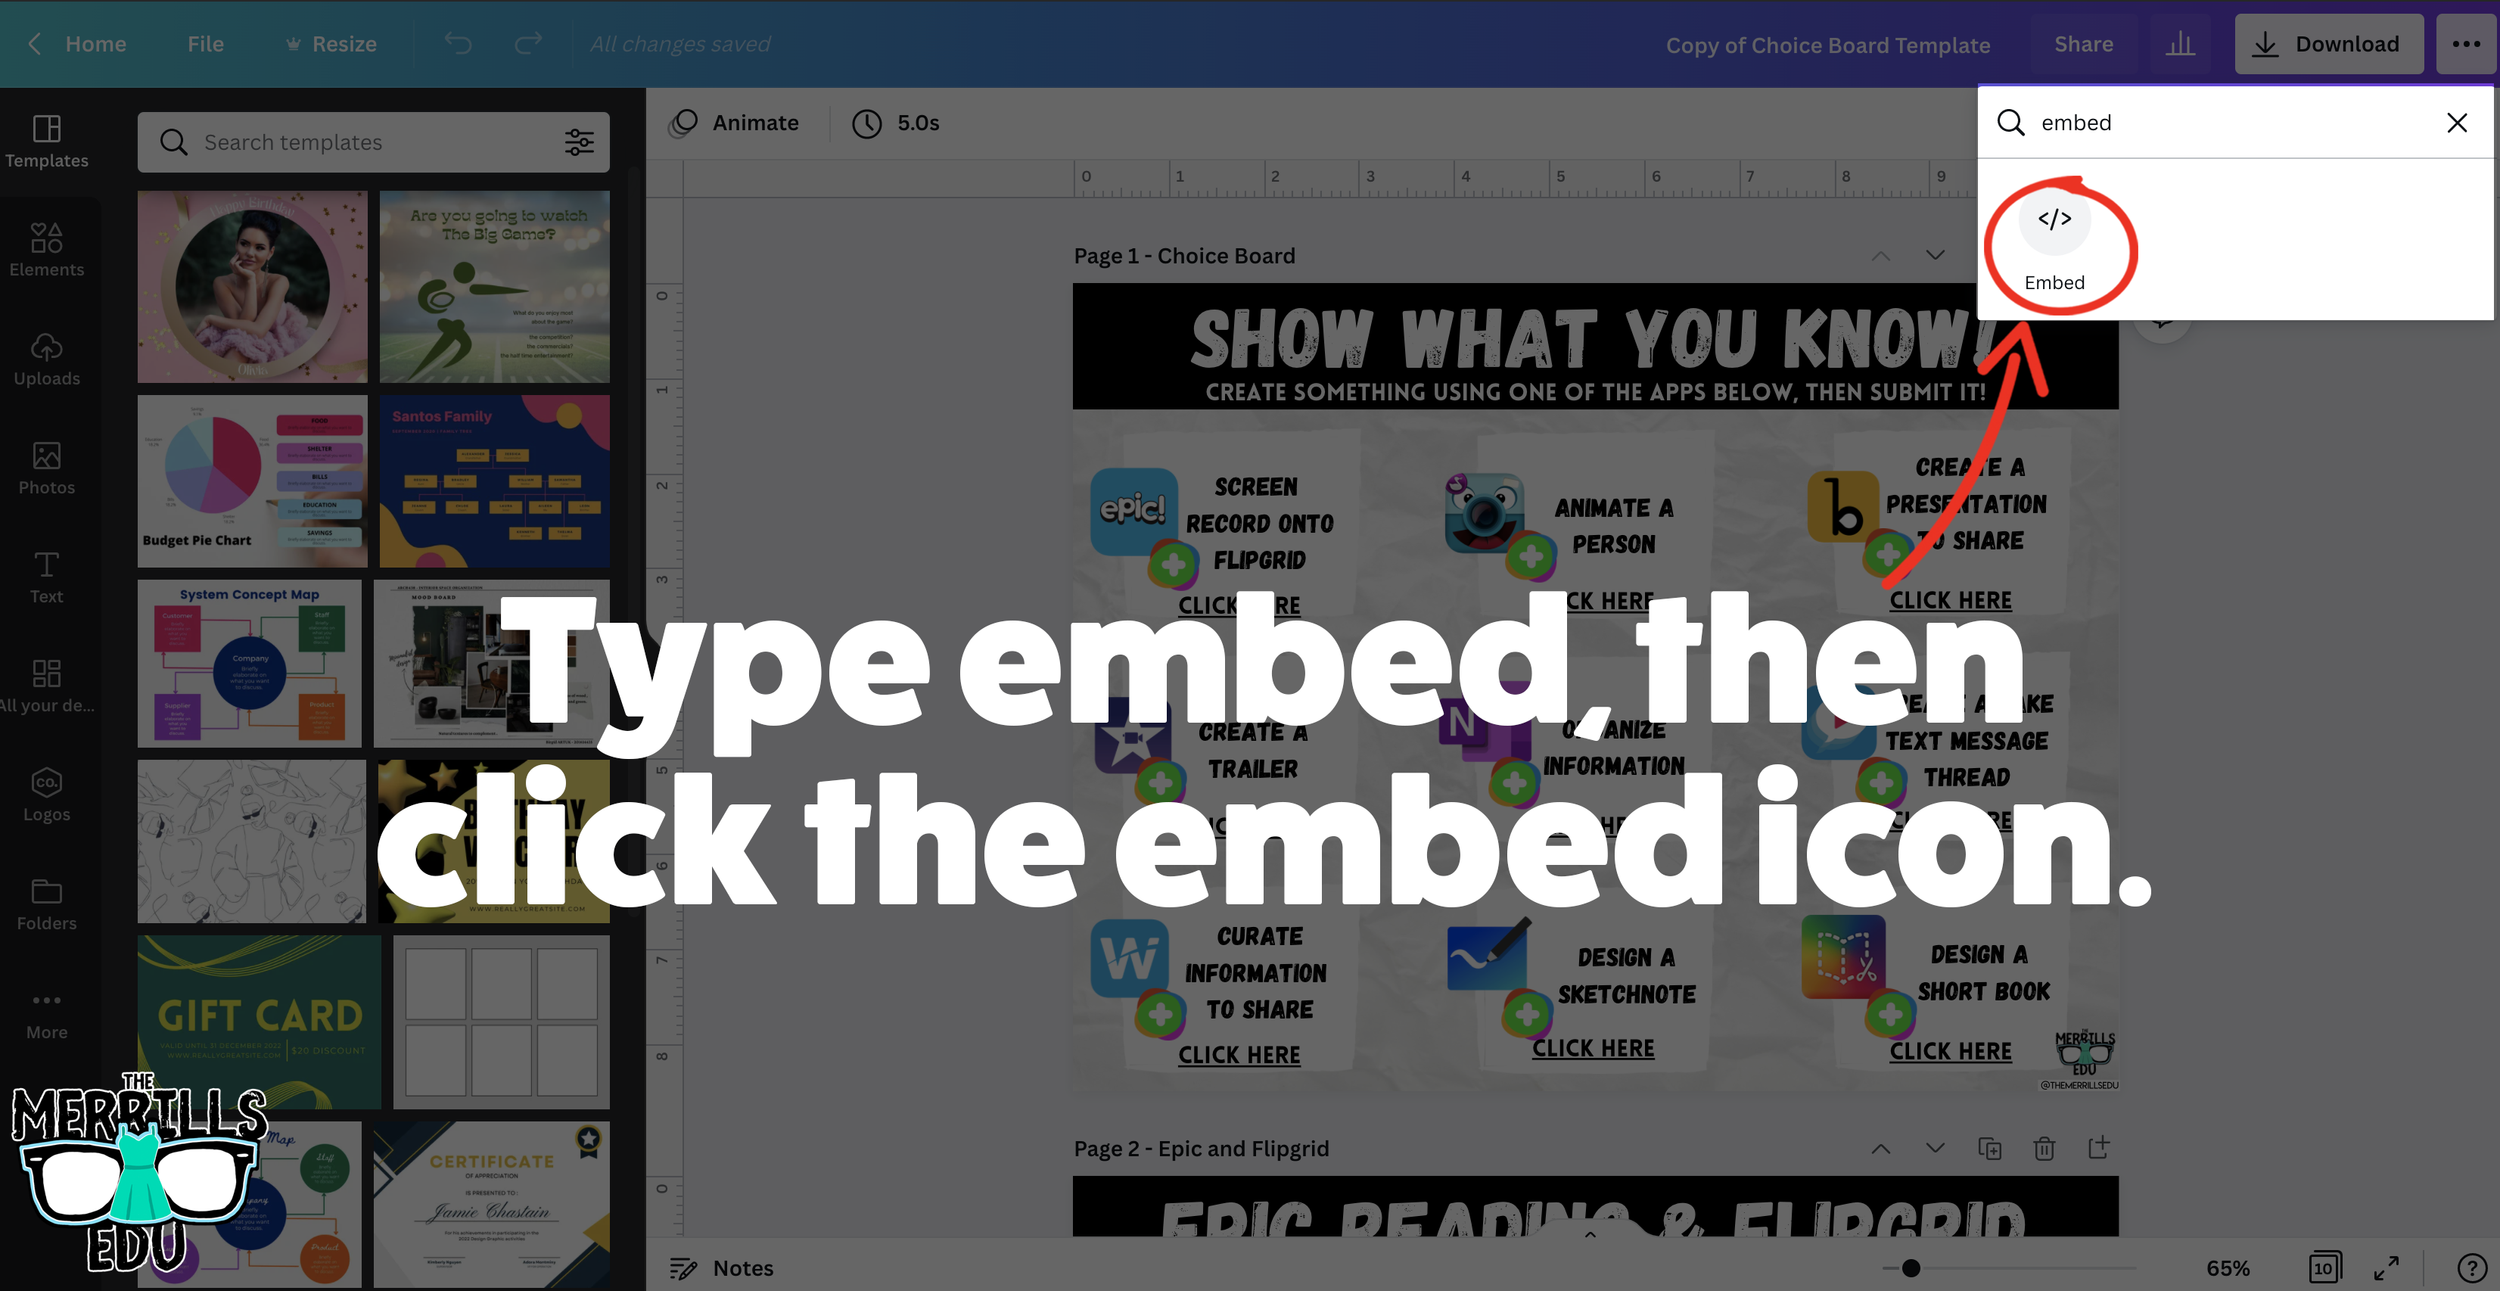
In the search bar, type “embed,” then click the embed icon.
In the next window, click “Embed” to take the creation live.
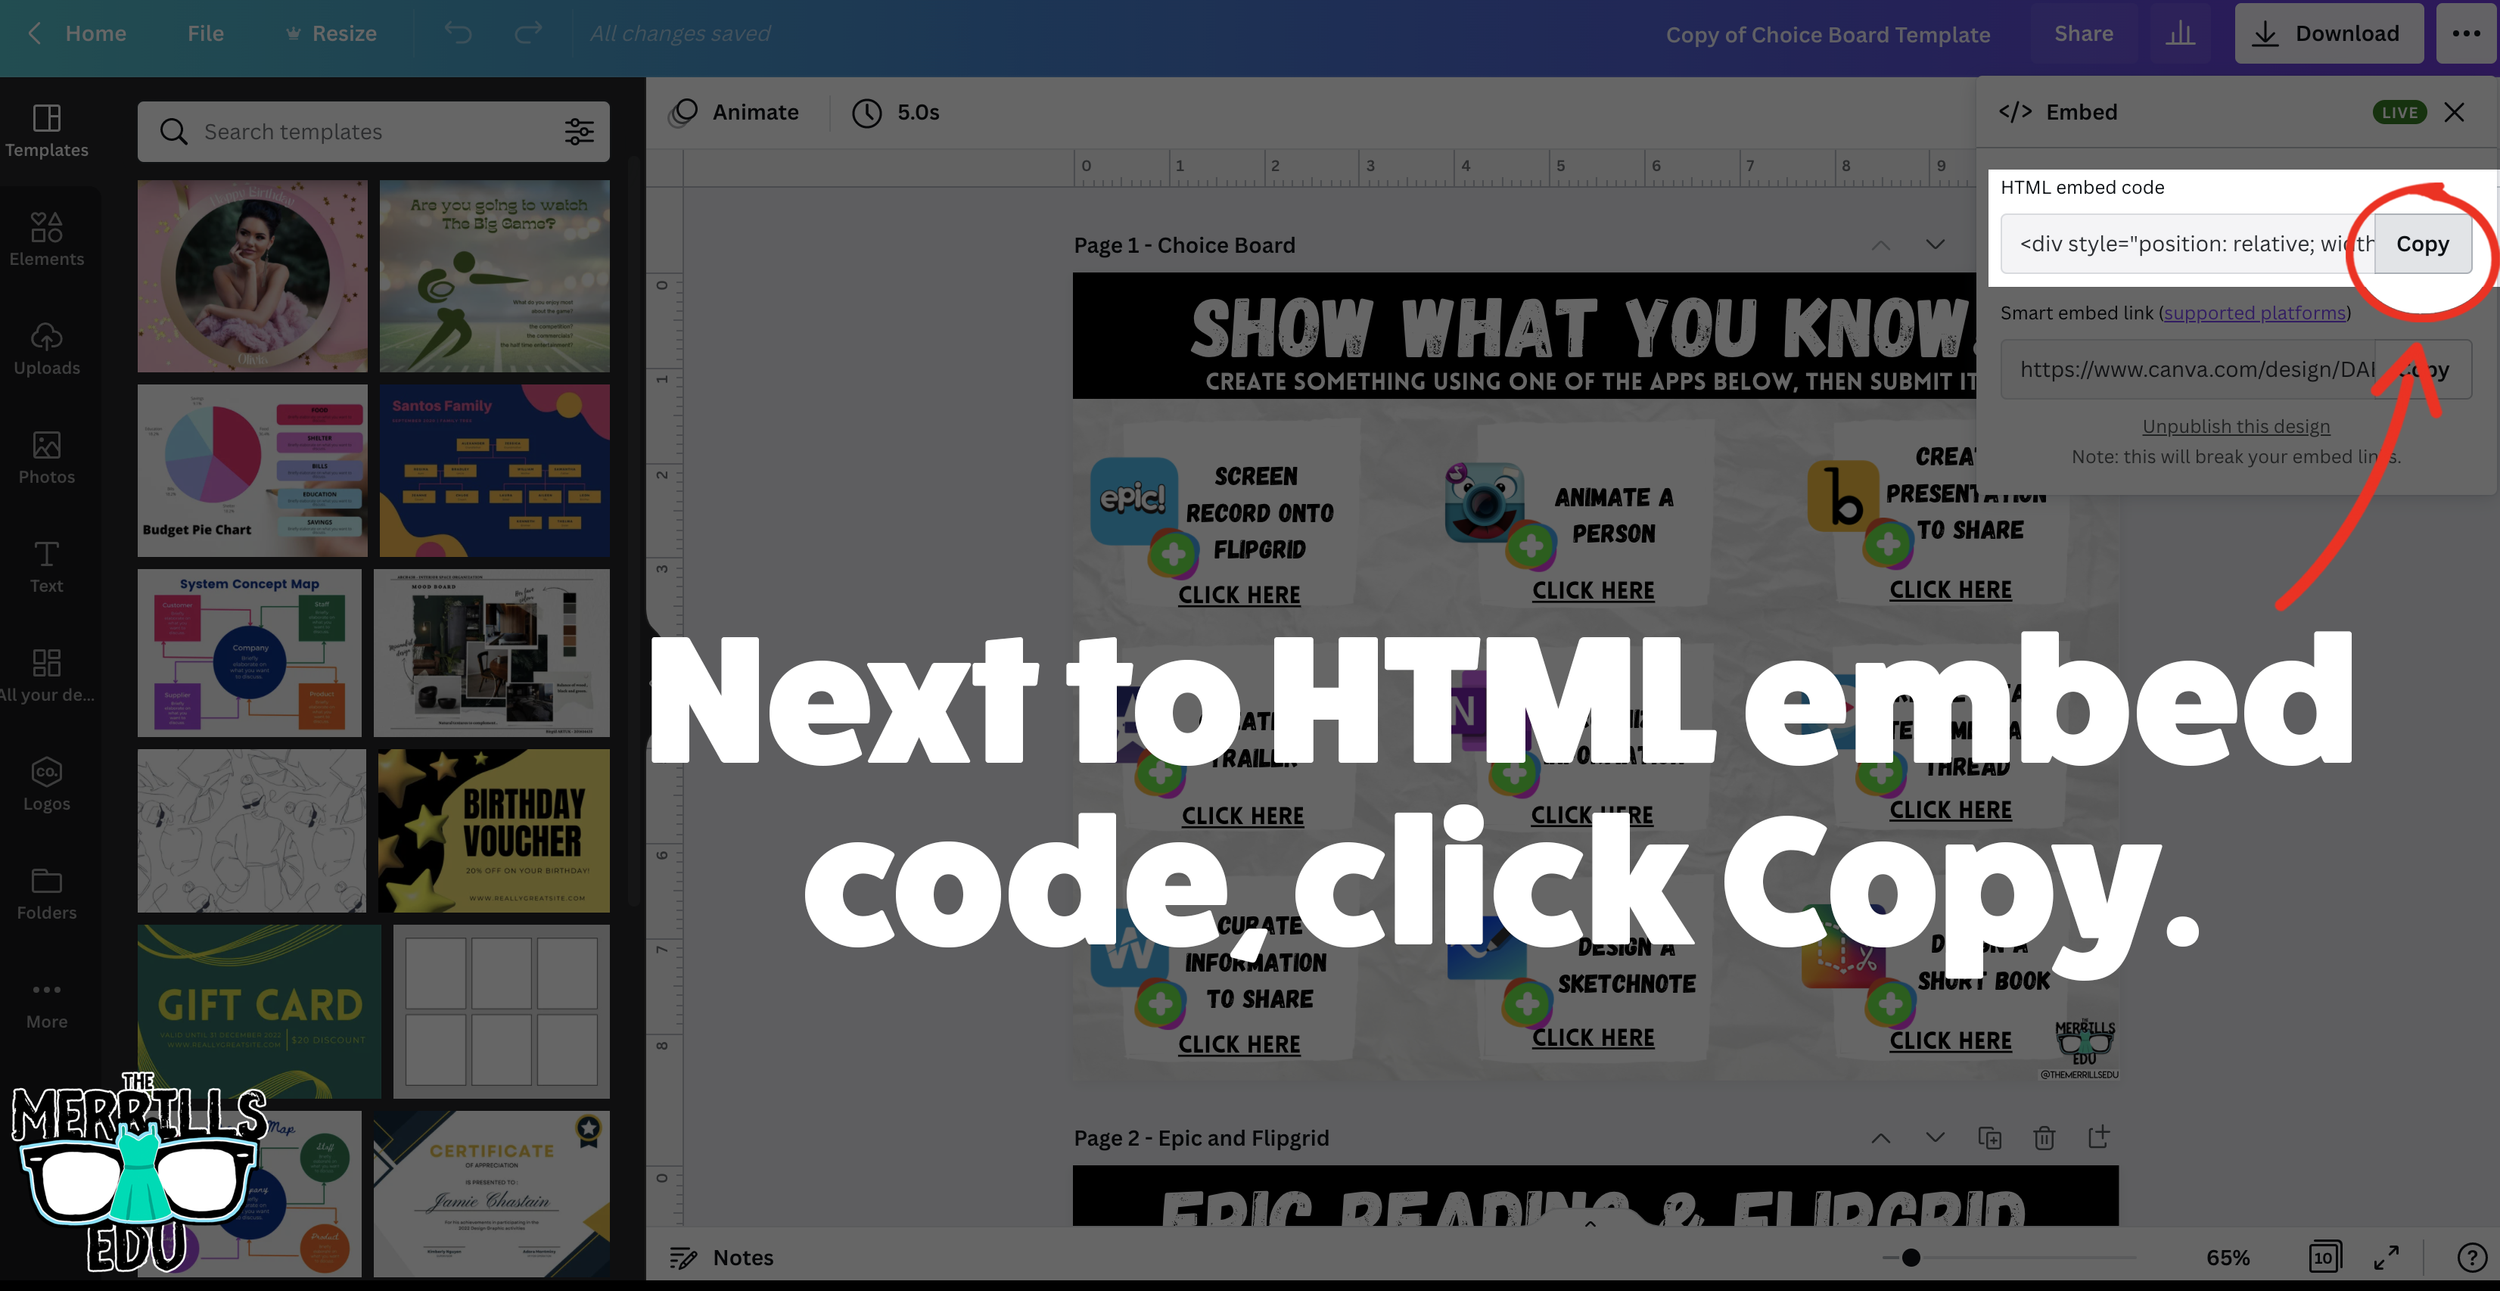
A few options will open up on the next window. Click and copy the HTML embed code (the smart embed will only work on selected platforms, so the HTML code is a safer route).
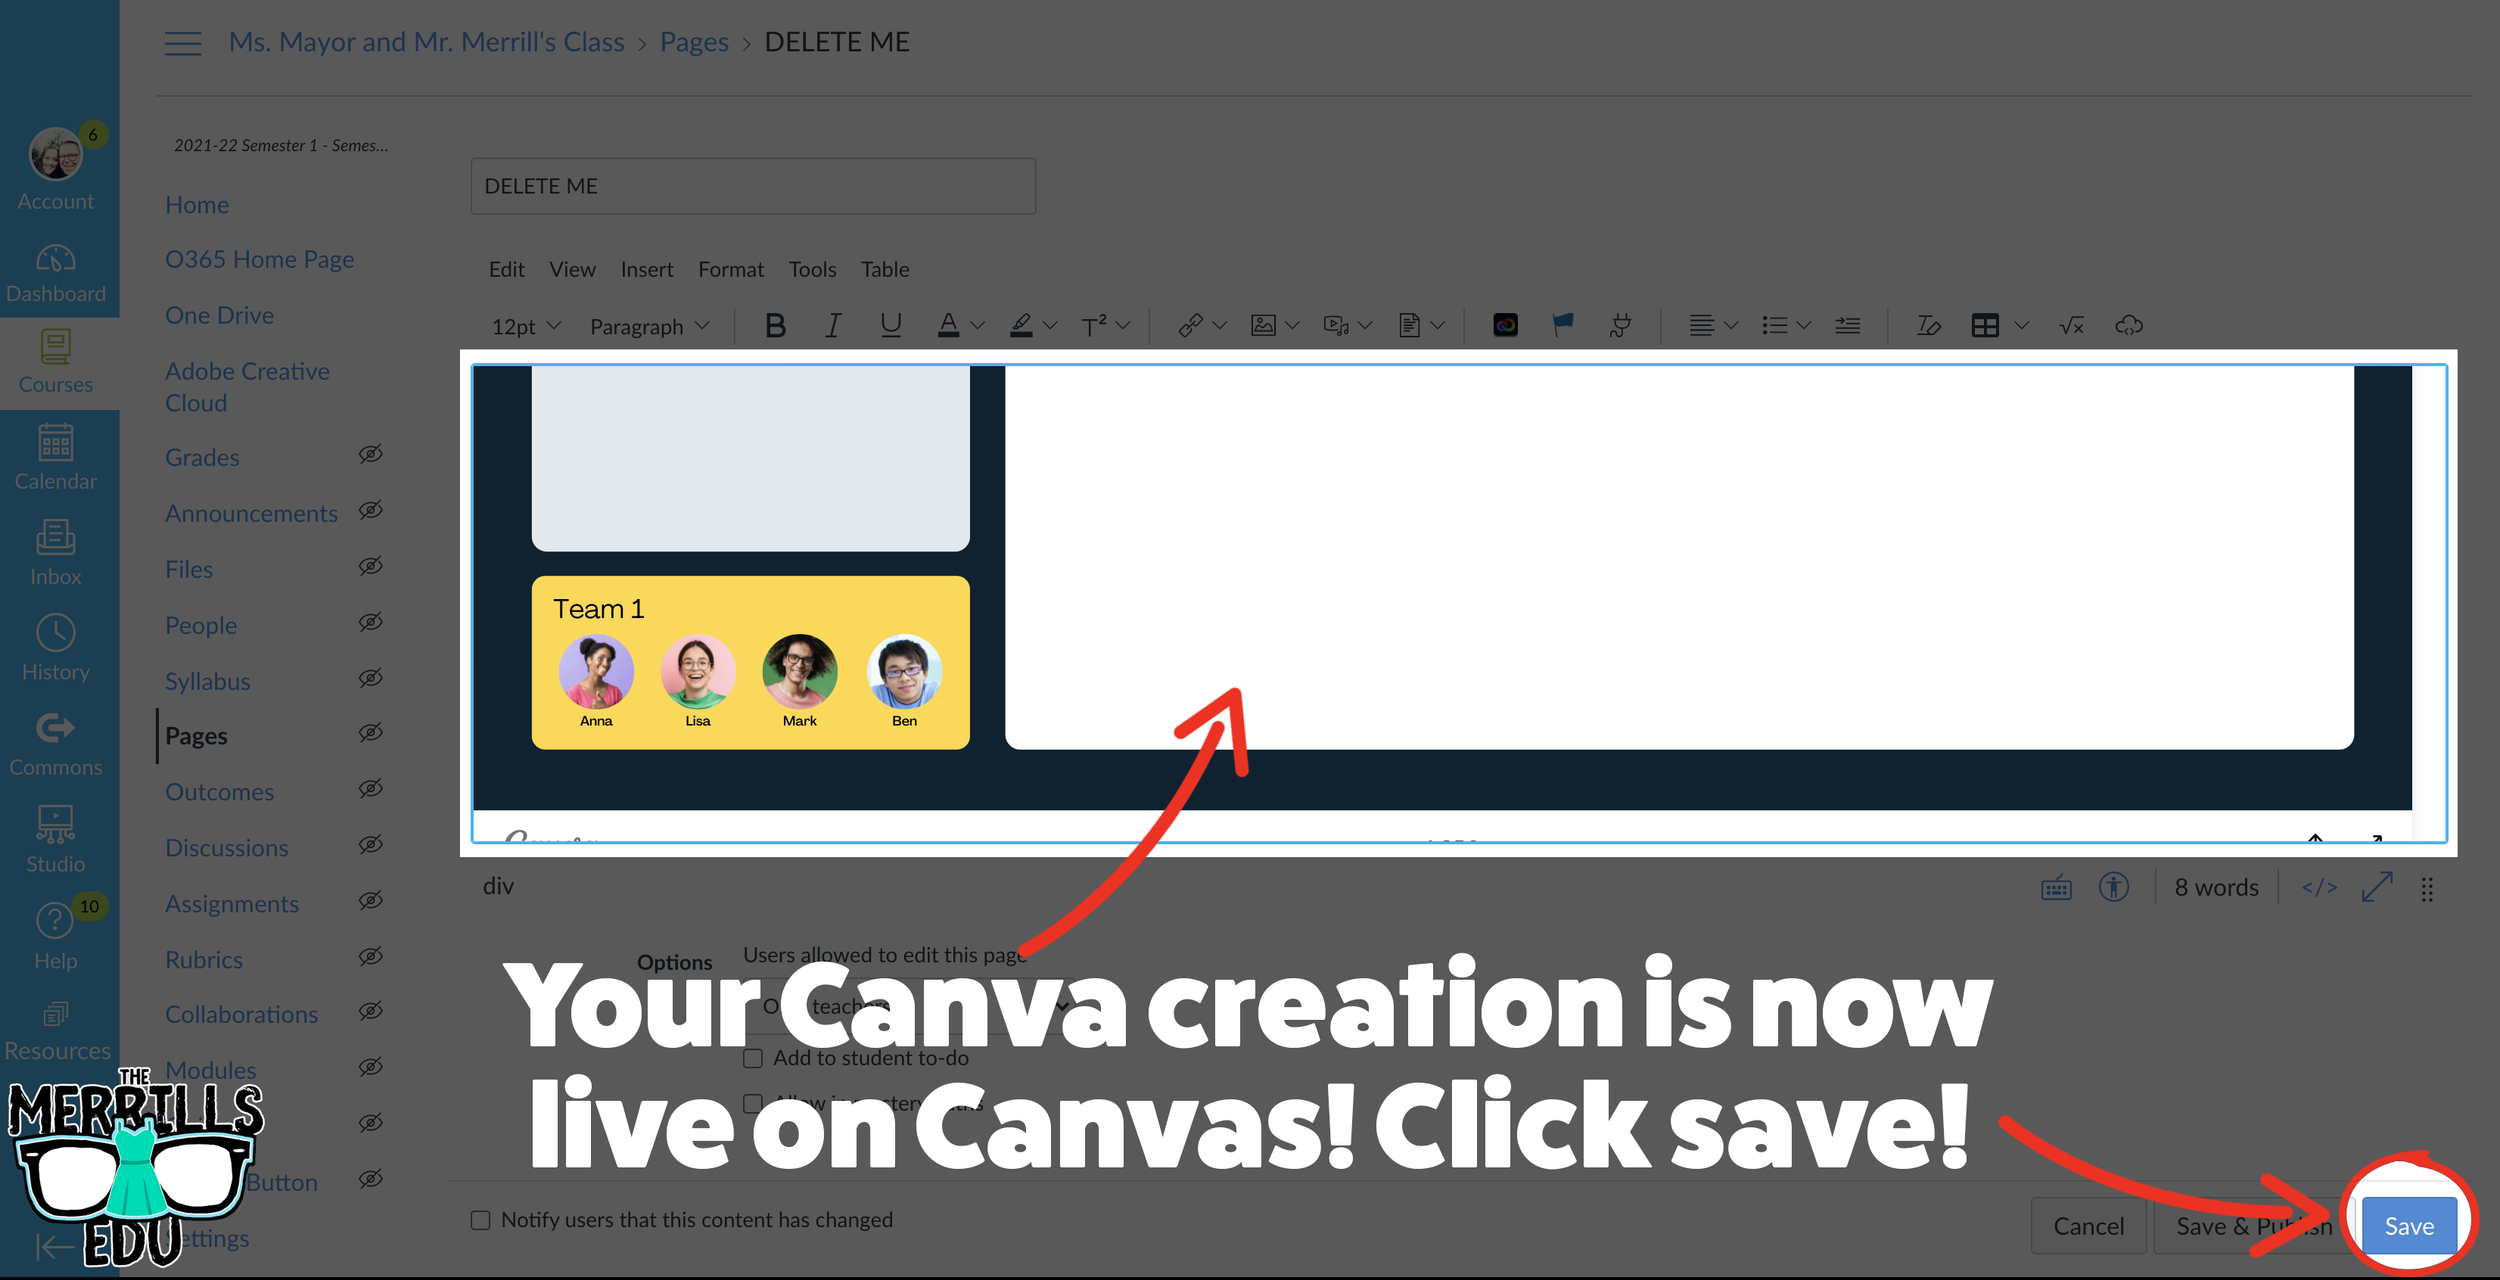
In a separate tab, open the Canvas page that you would like to add the Canva creation to. Then, click on the cloud icon (if you don’t see the Cloud icon, click the three dots to expand the menu bar).
In the embed window, paste your copied code from Canva. Then, click submit.
Your Canva creation is now embedded into the Canvas page! Click on “Save” to update the changes.

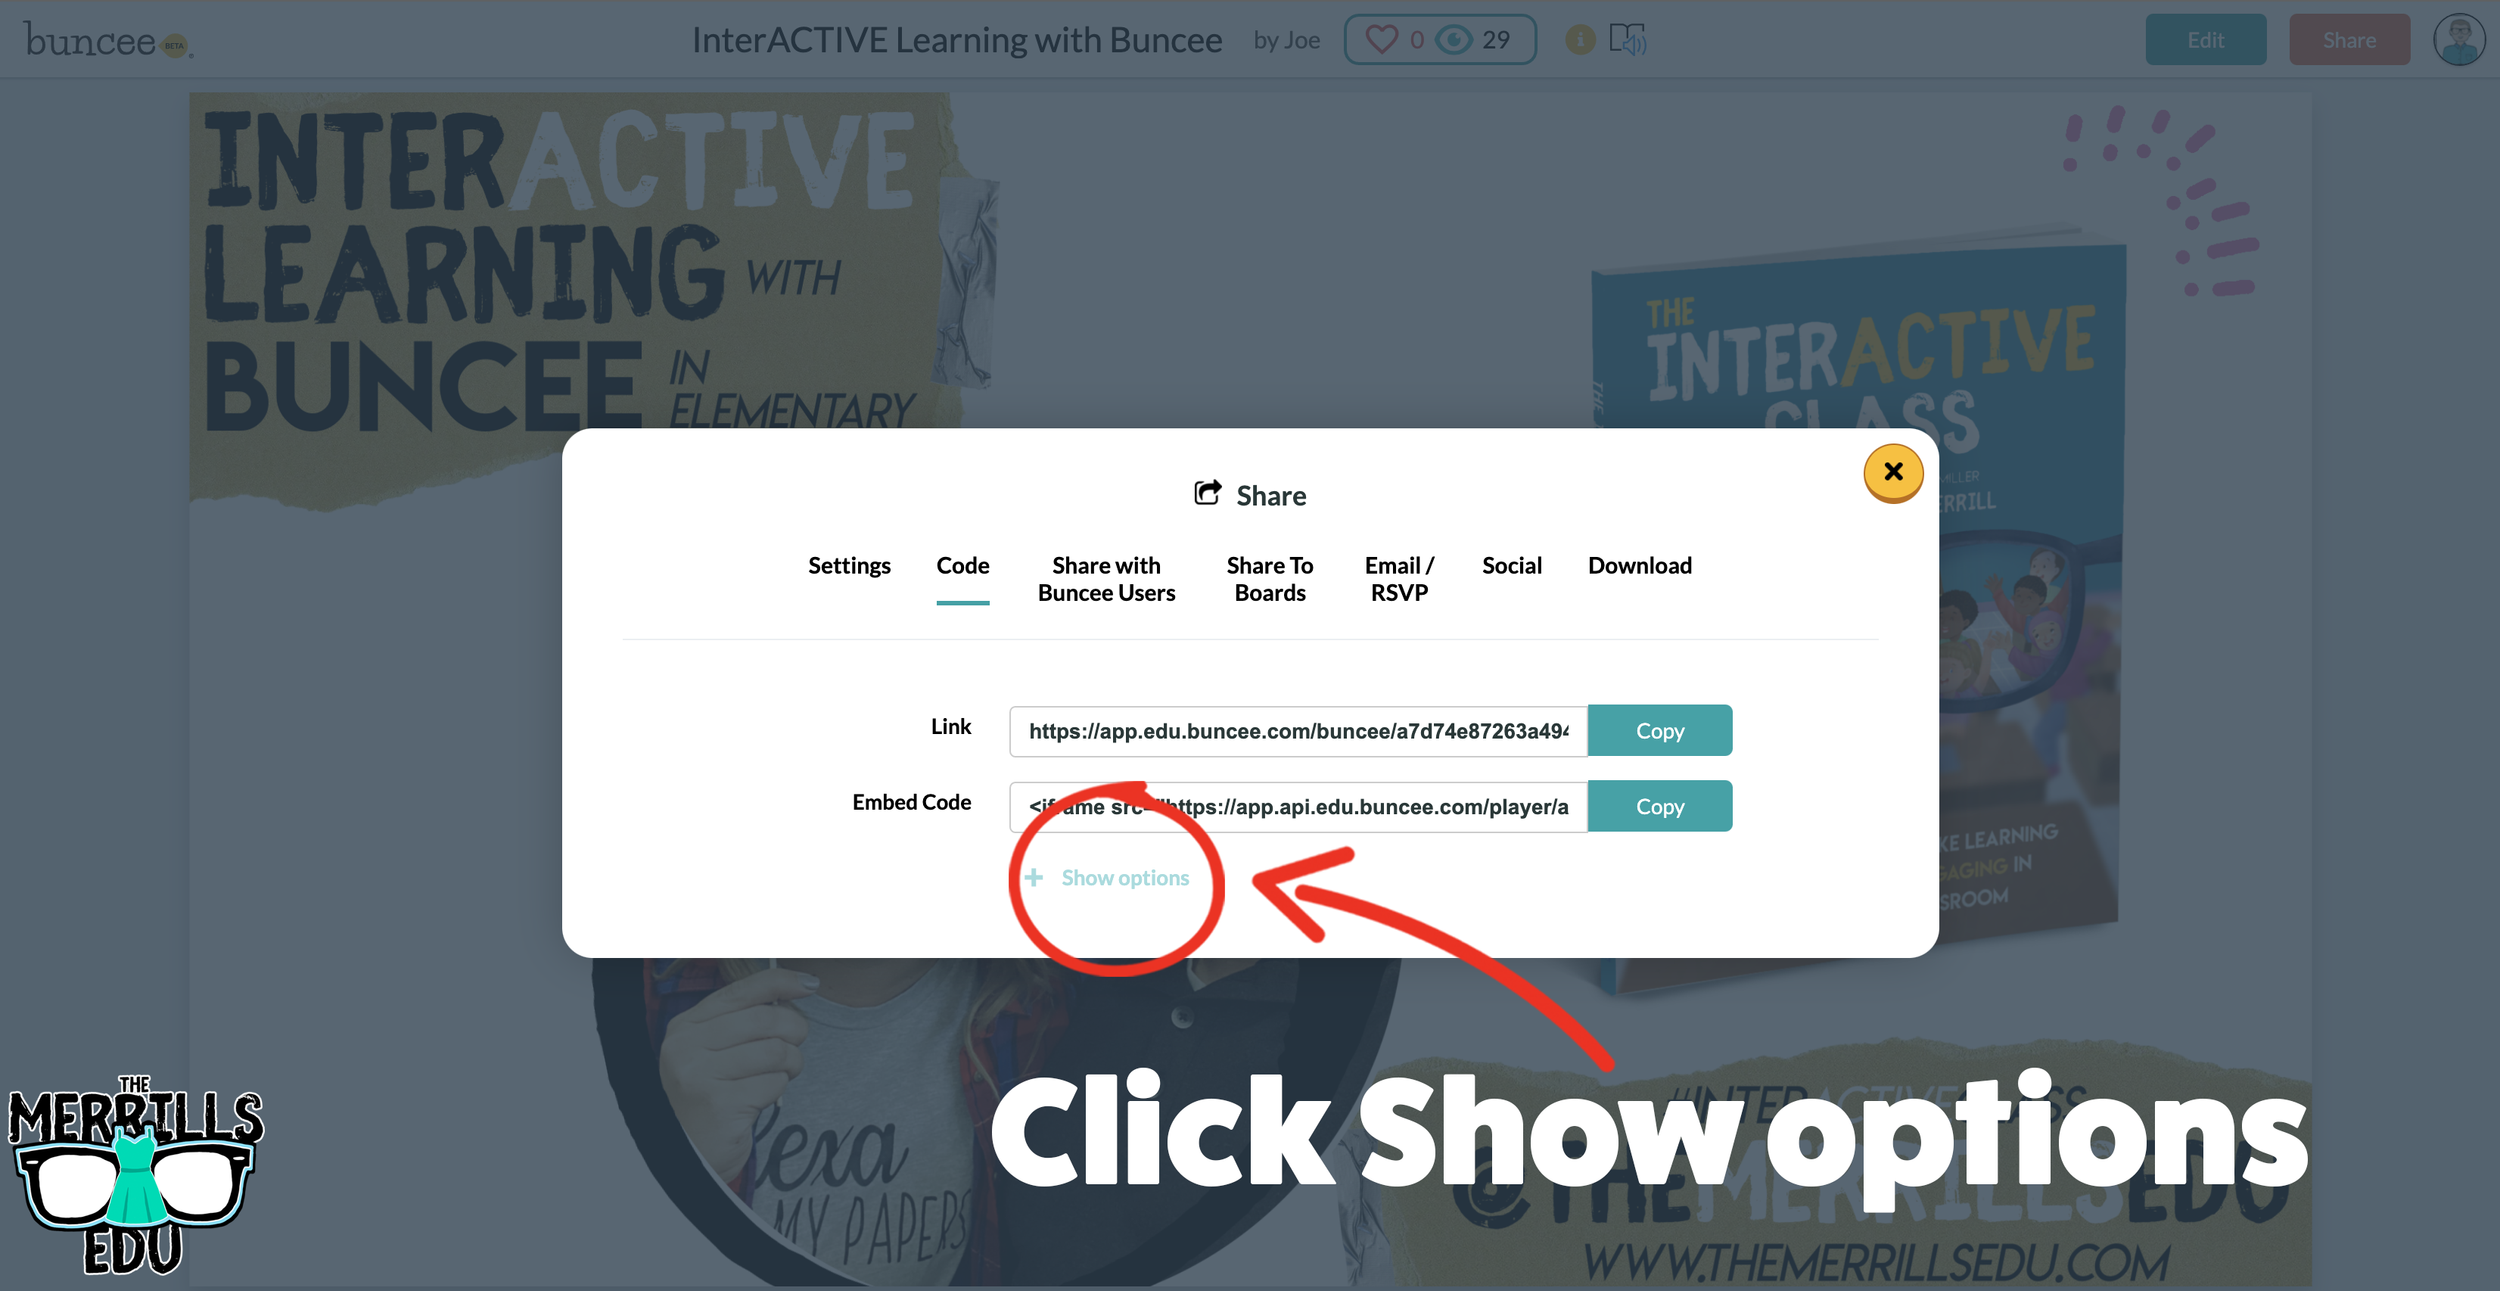
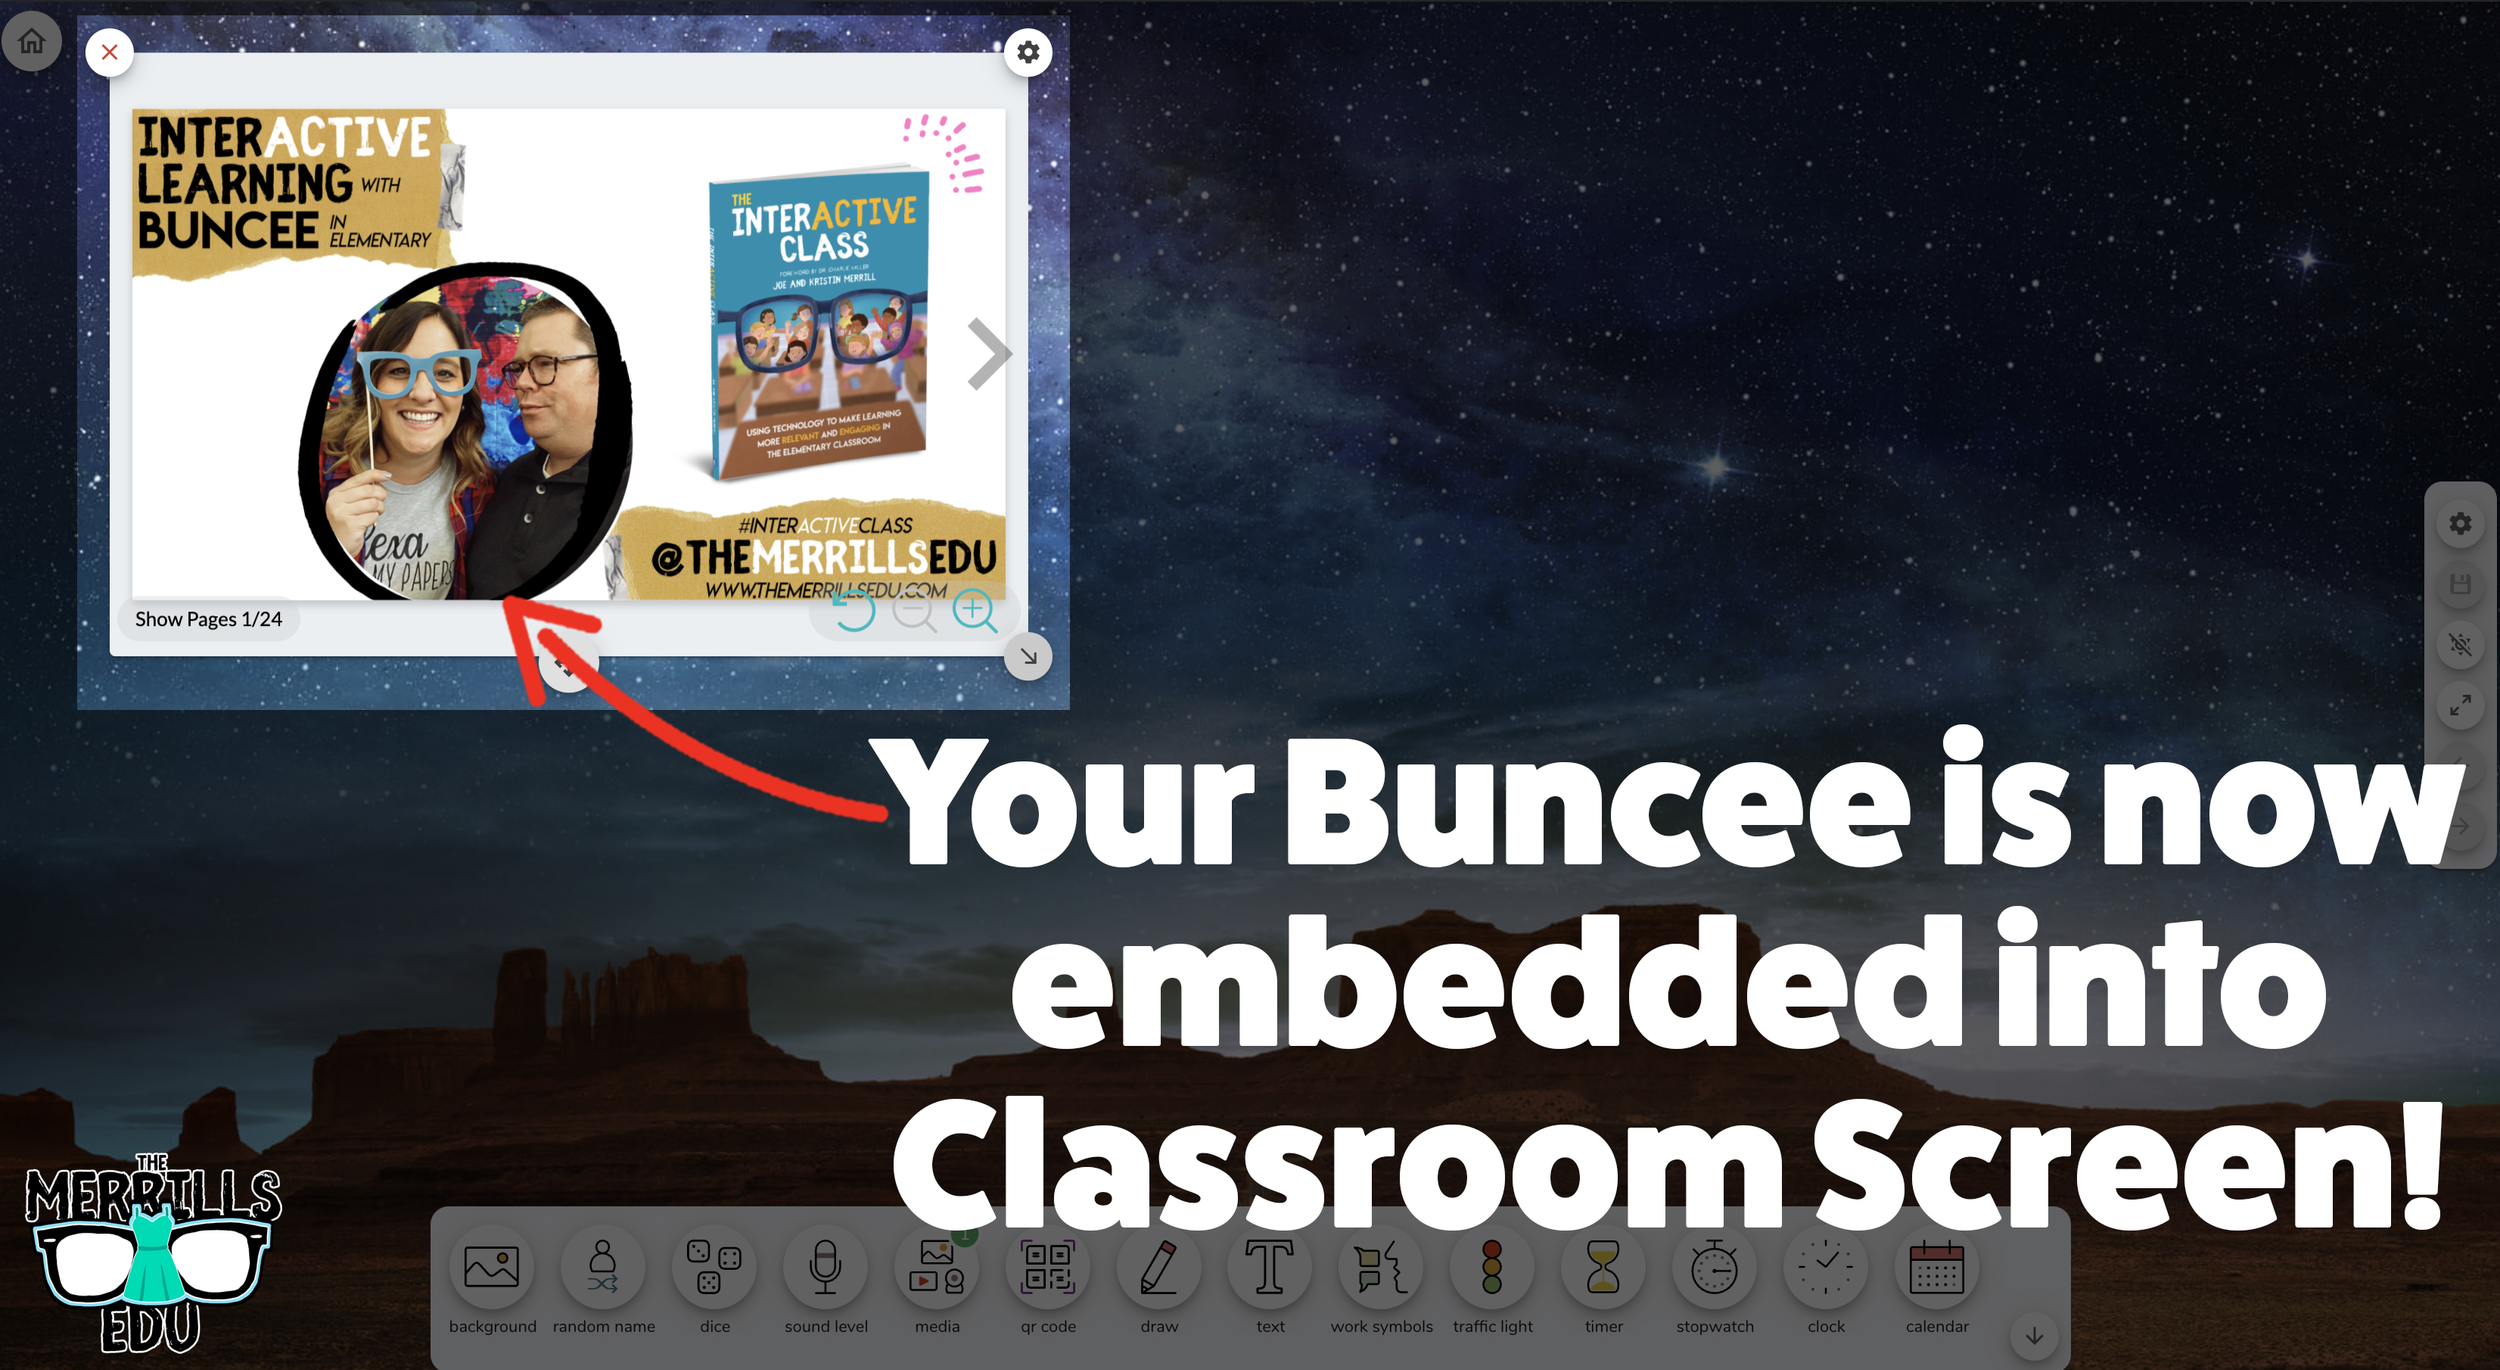
Buncee Embedded into Canvas
Buncee creations can be added to Canvas, too! There’s a lot of embed options (which we love!), so you have complete control of how things look and work. Options include autoplay and dimensions of the embed. Here’s how it all works:
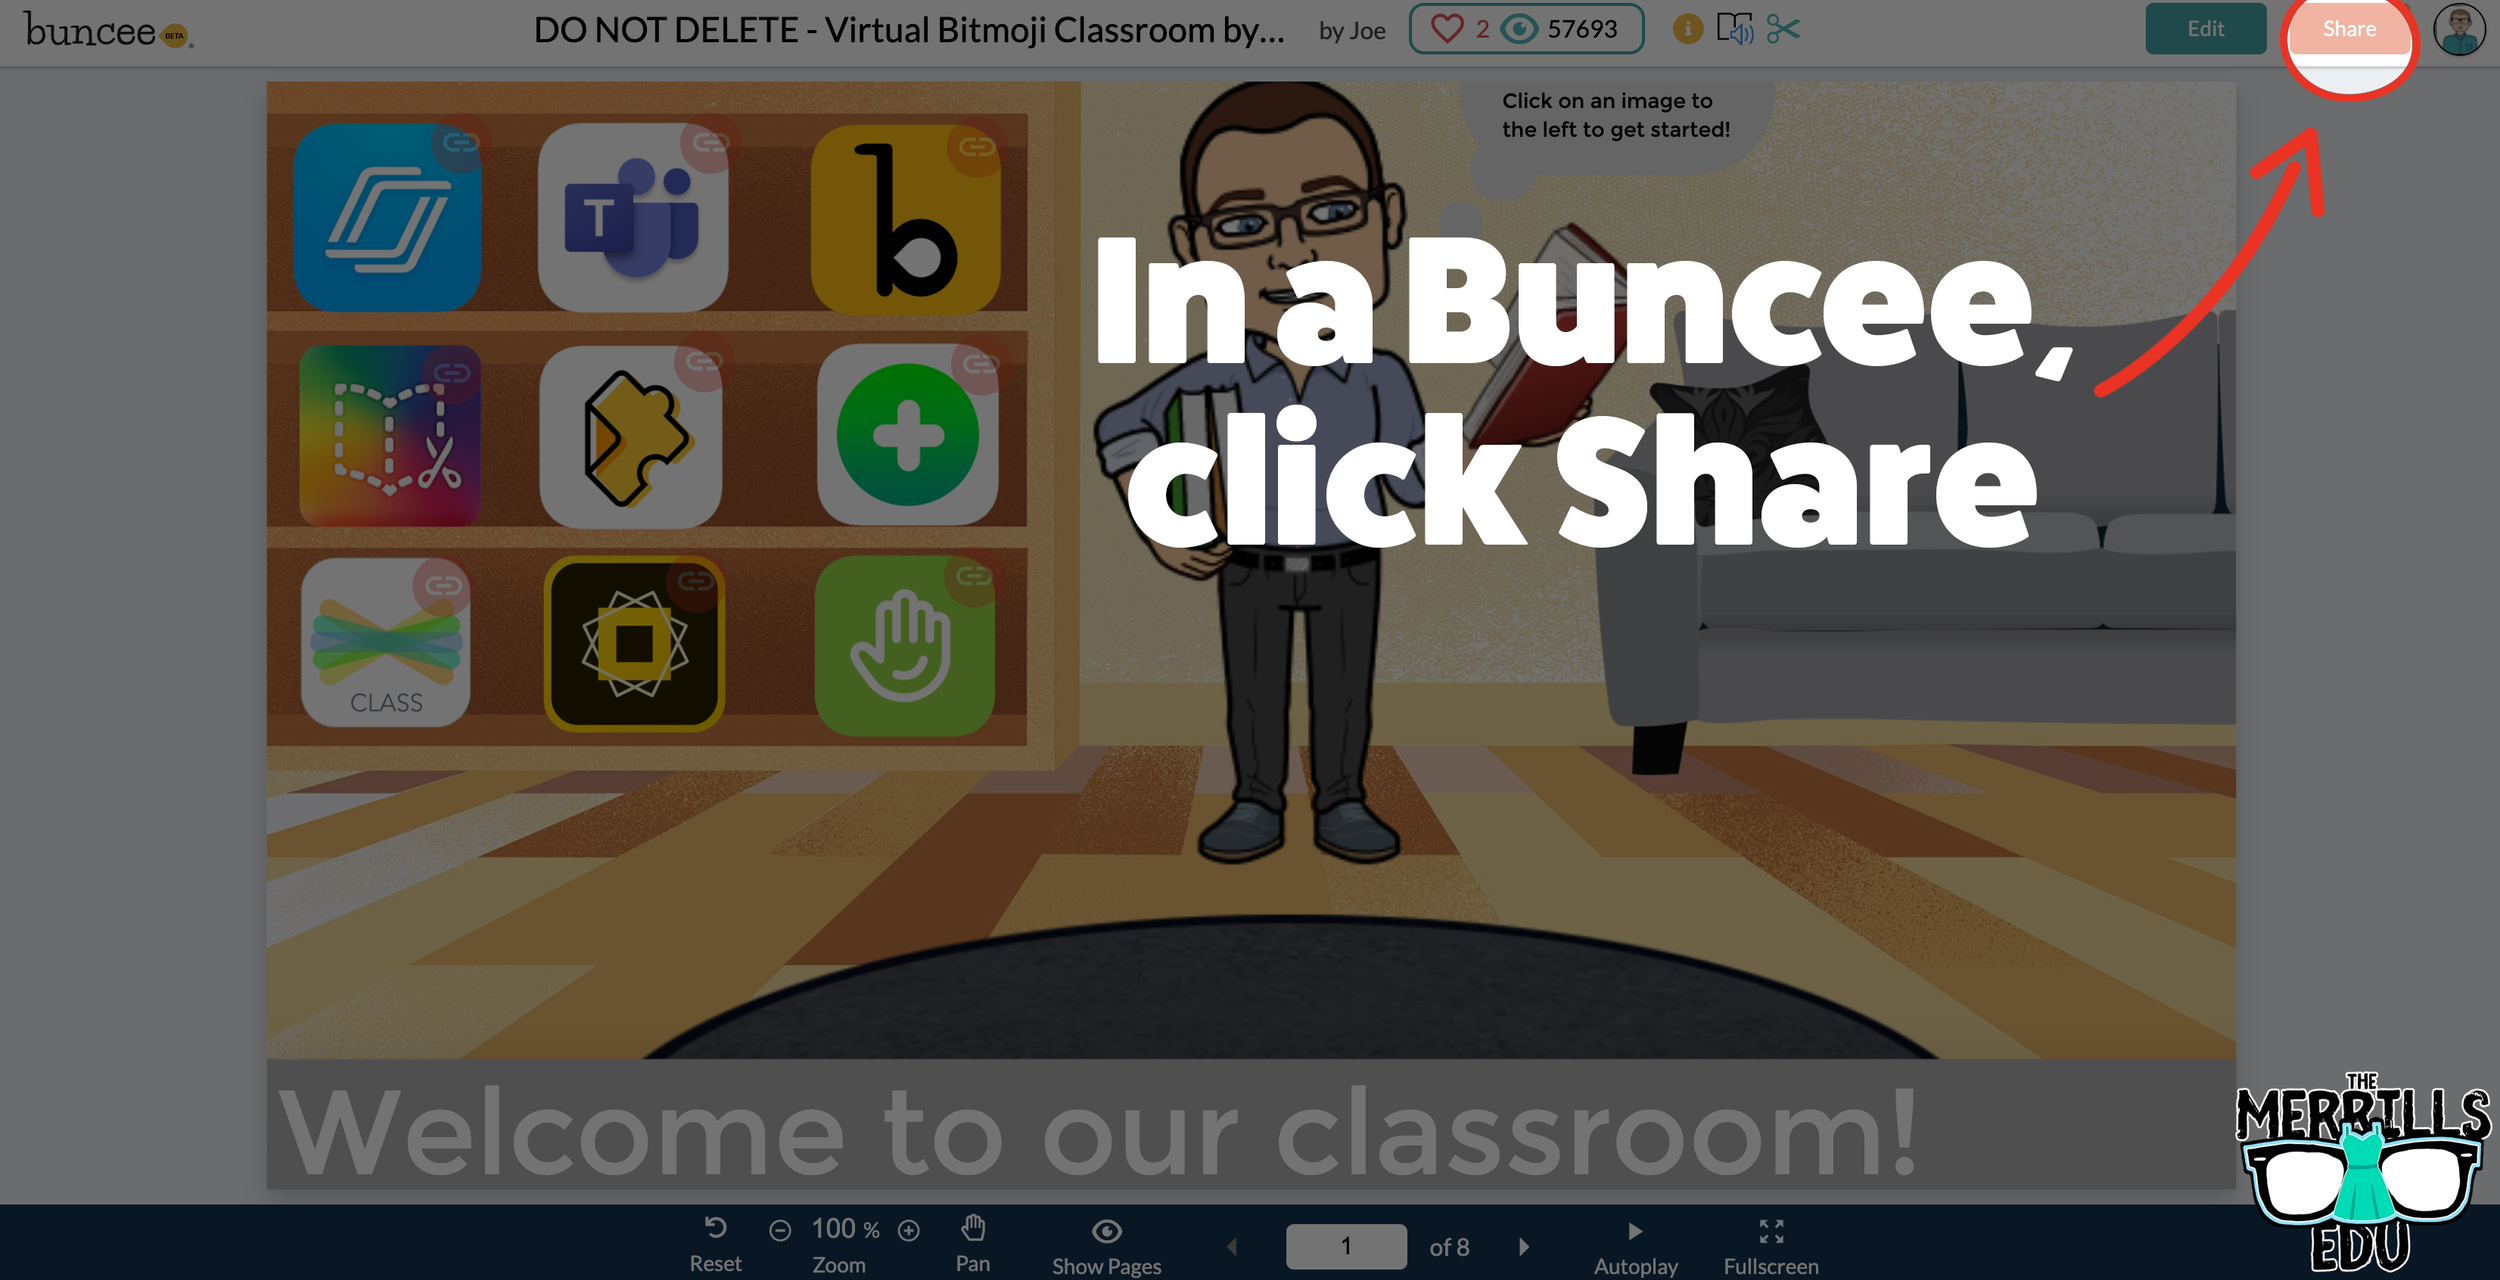

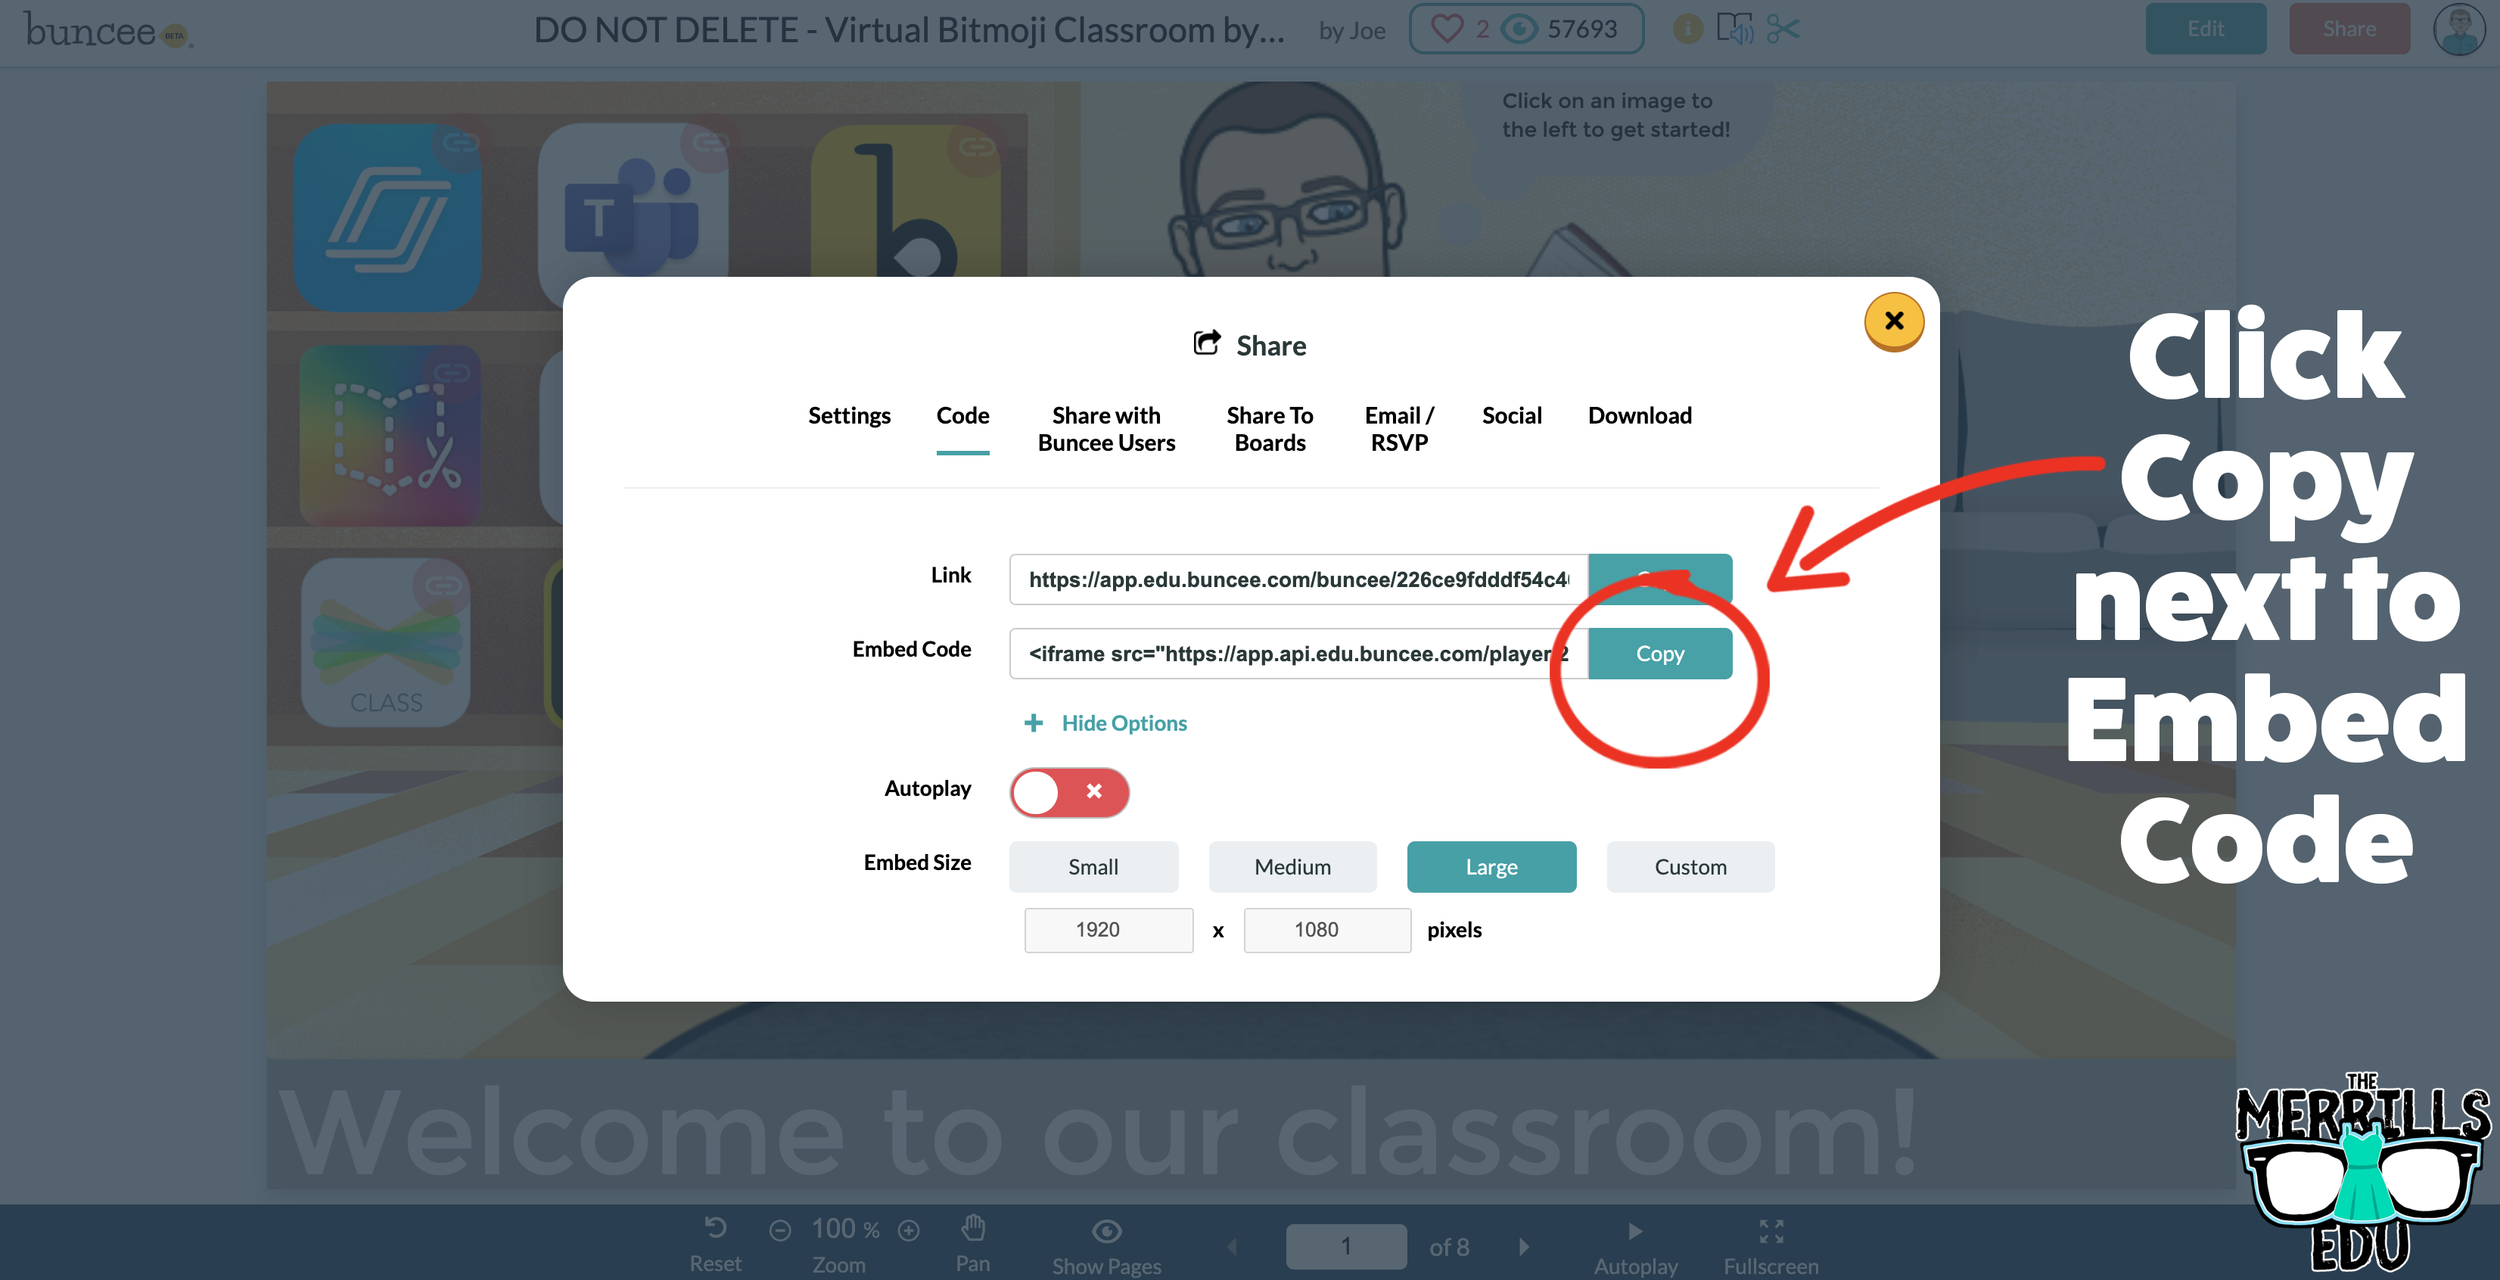


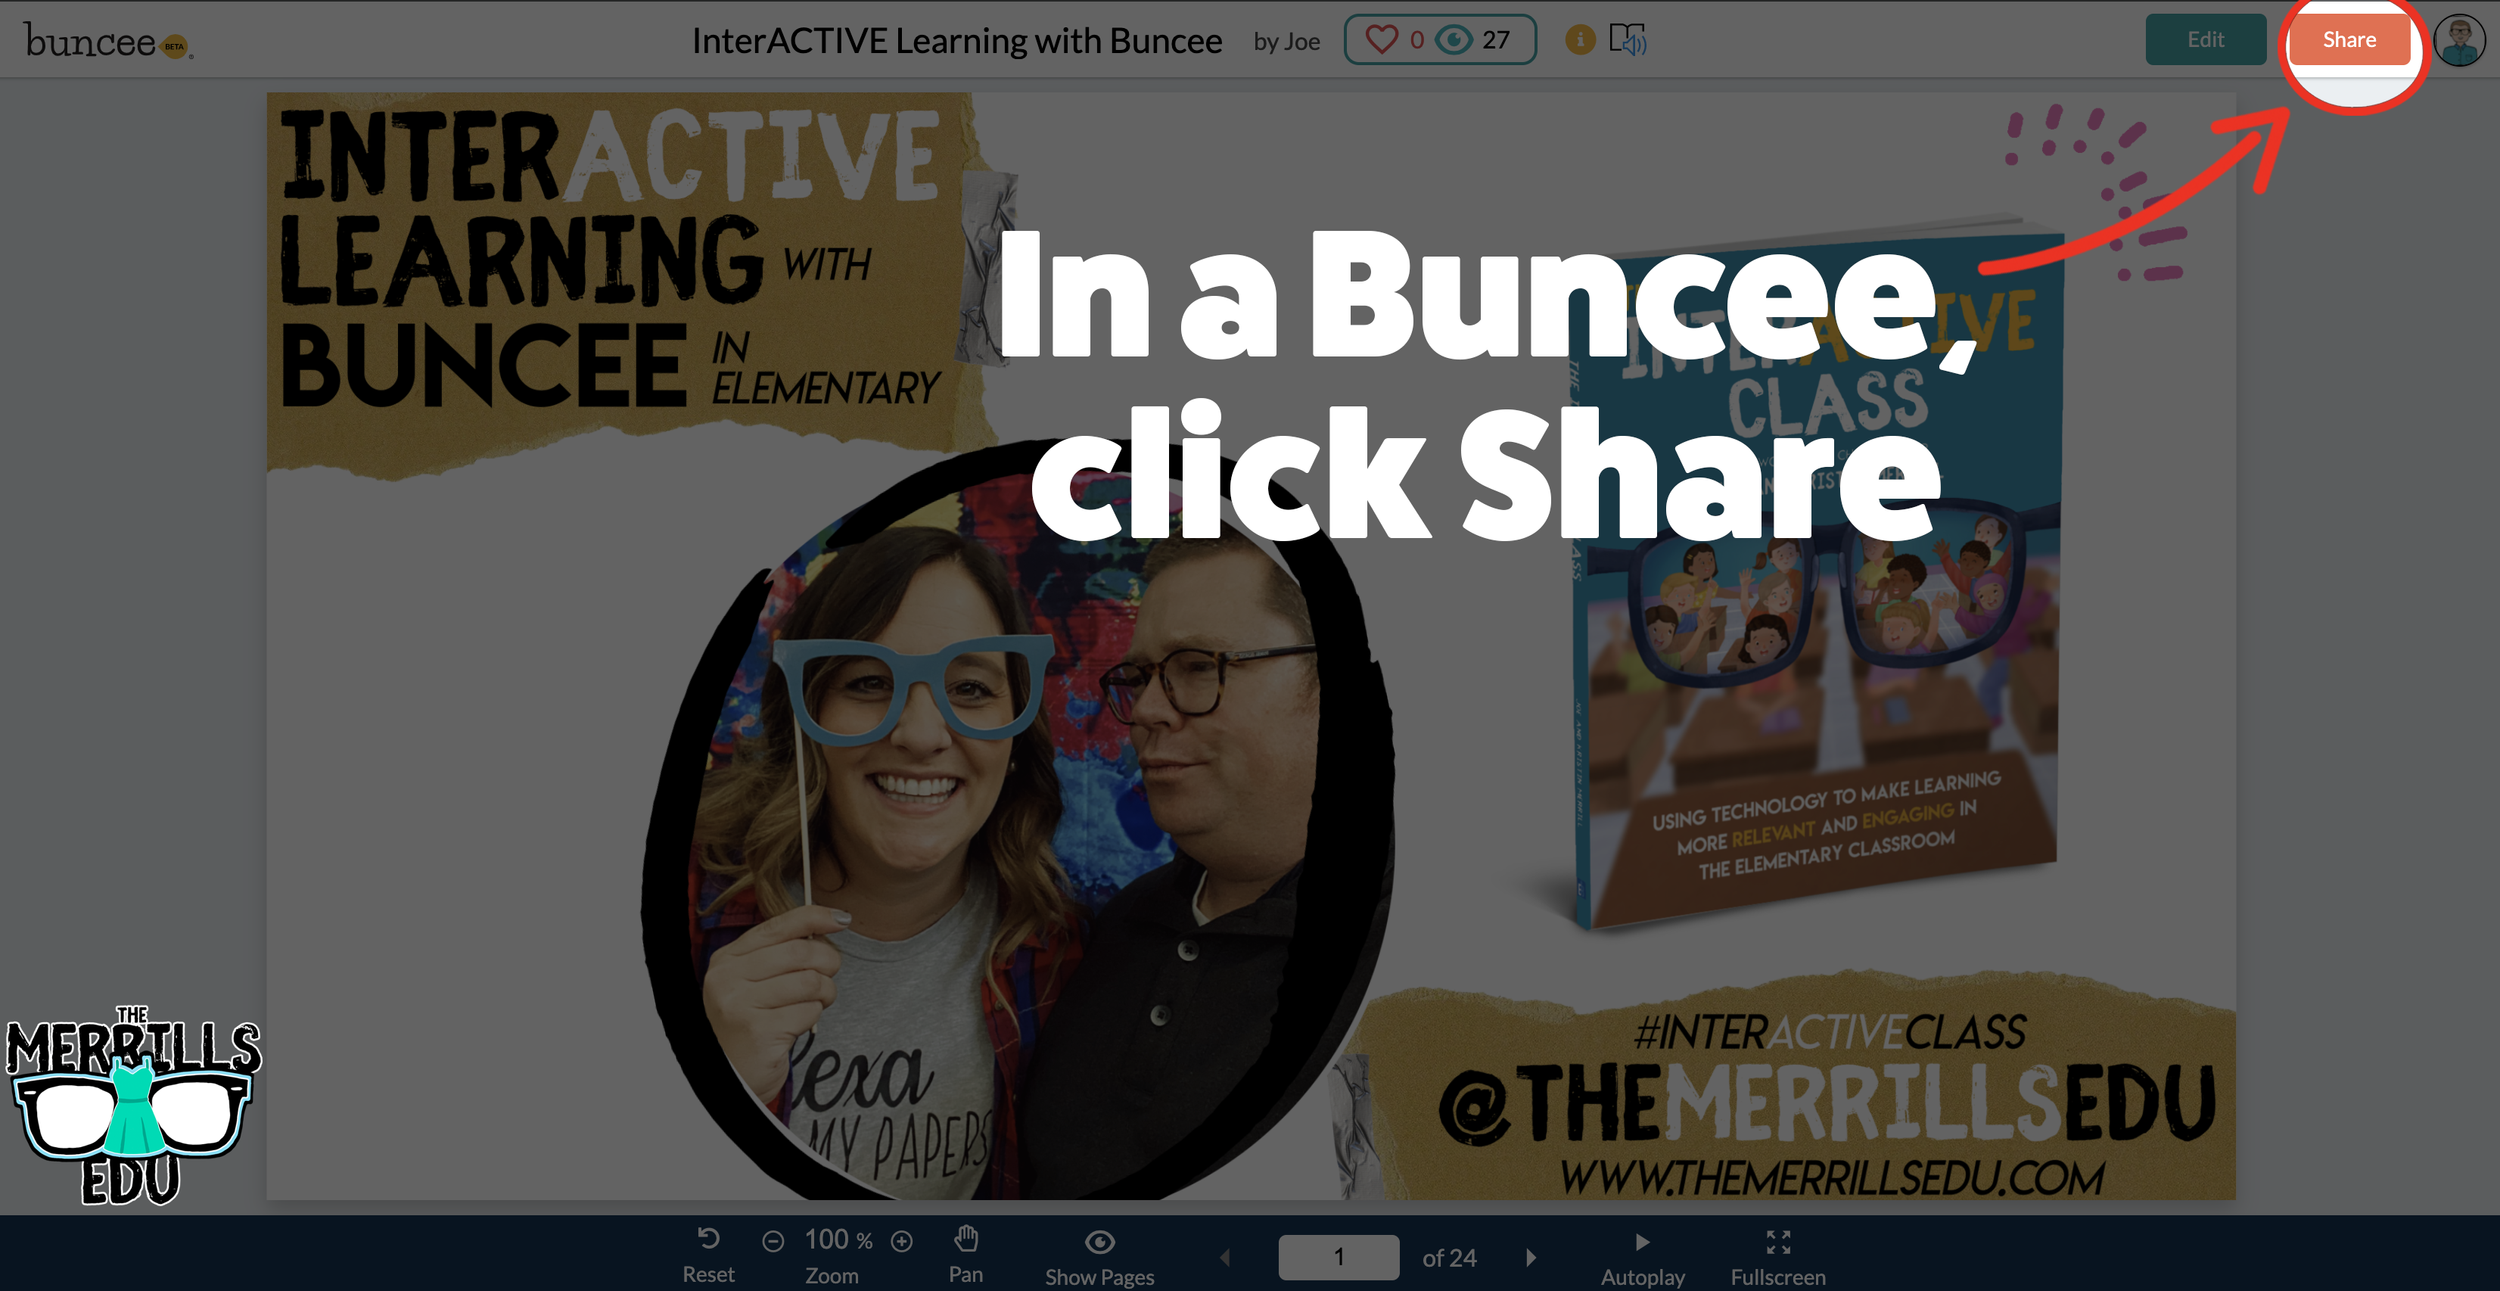
Open a Buncee, then click the “Share” button located in the upper right side of the screen.
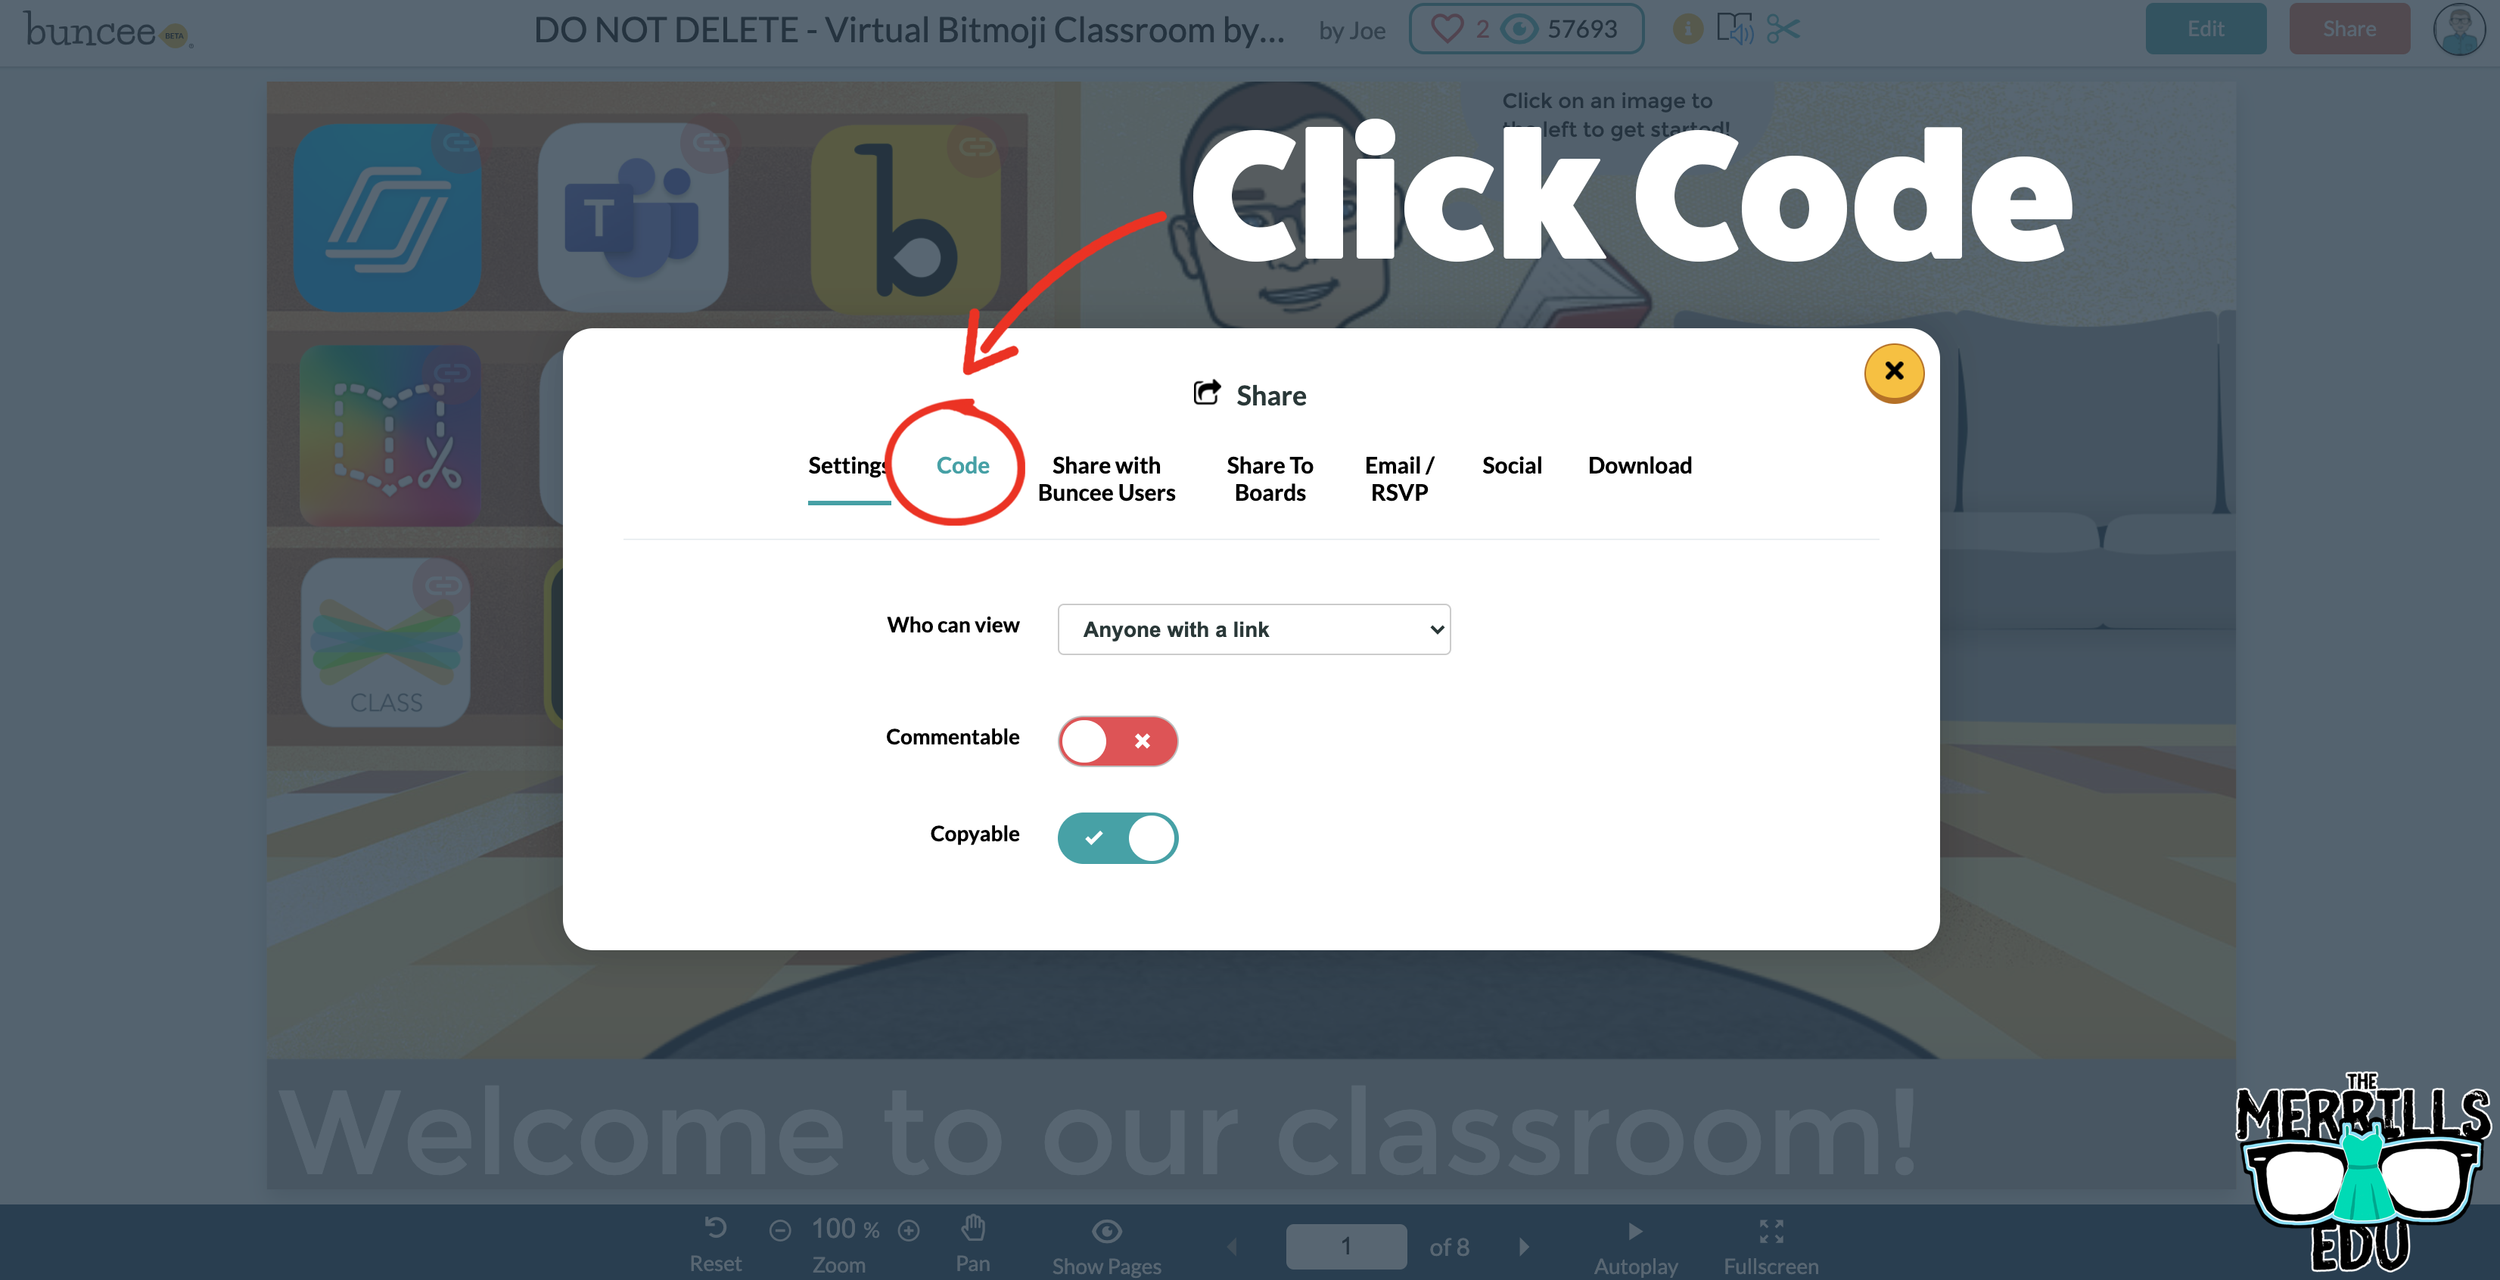
A new window will pop up. Click on “Code.”
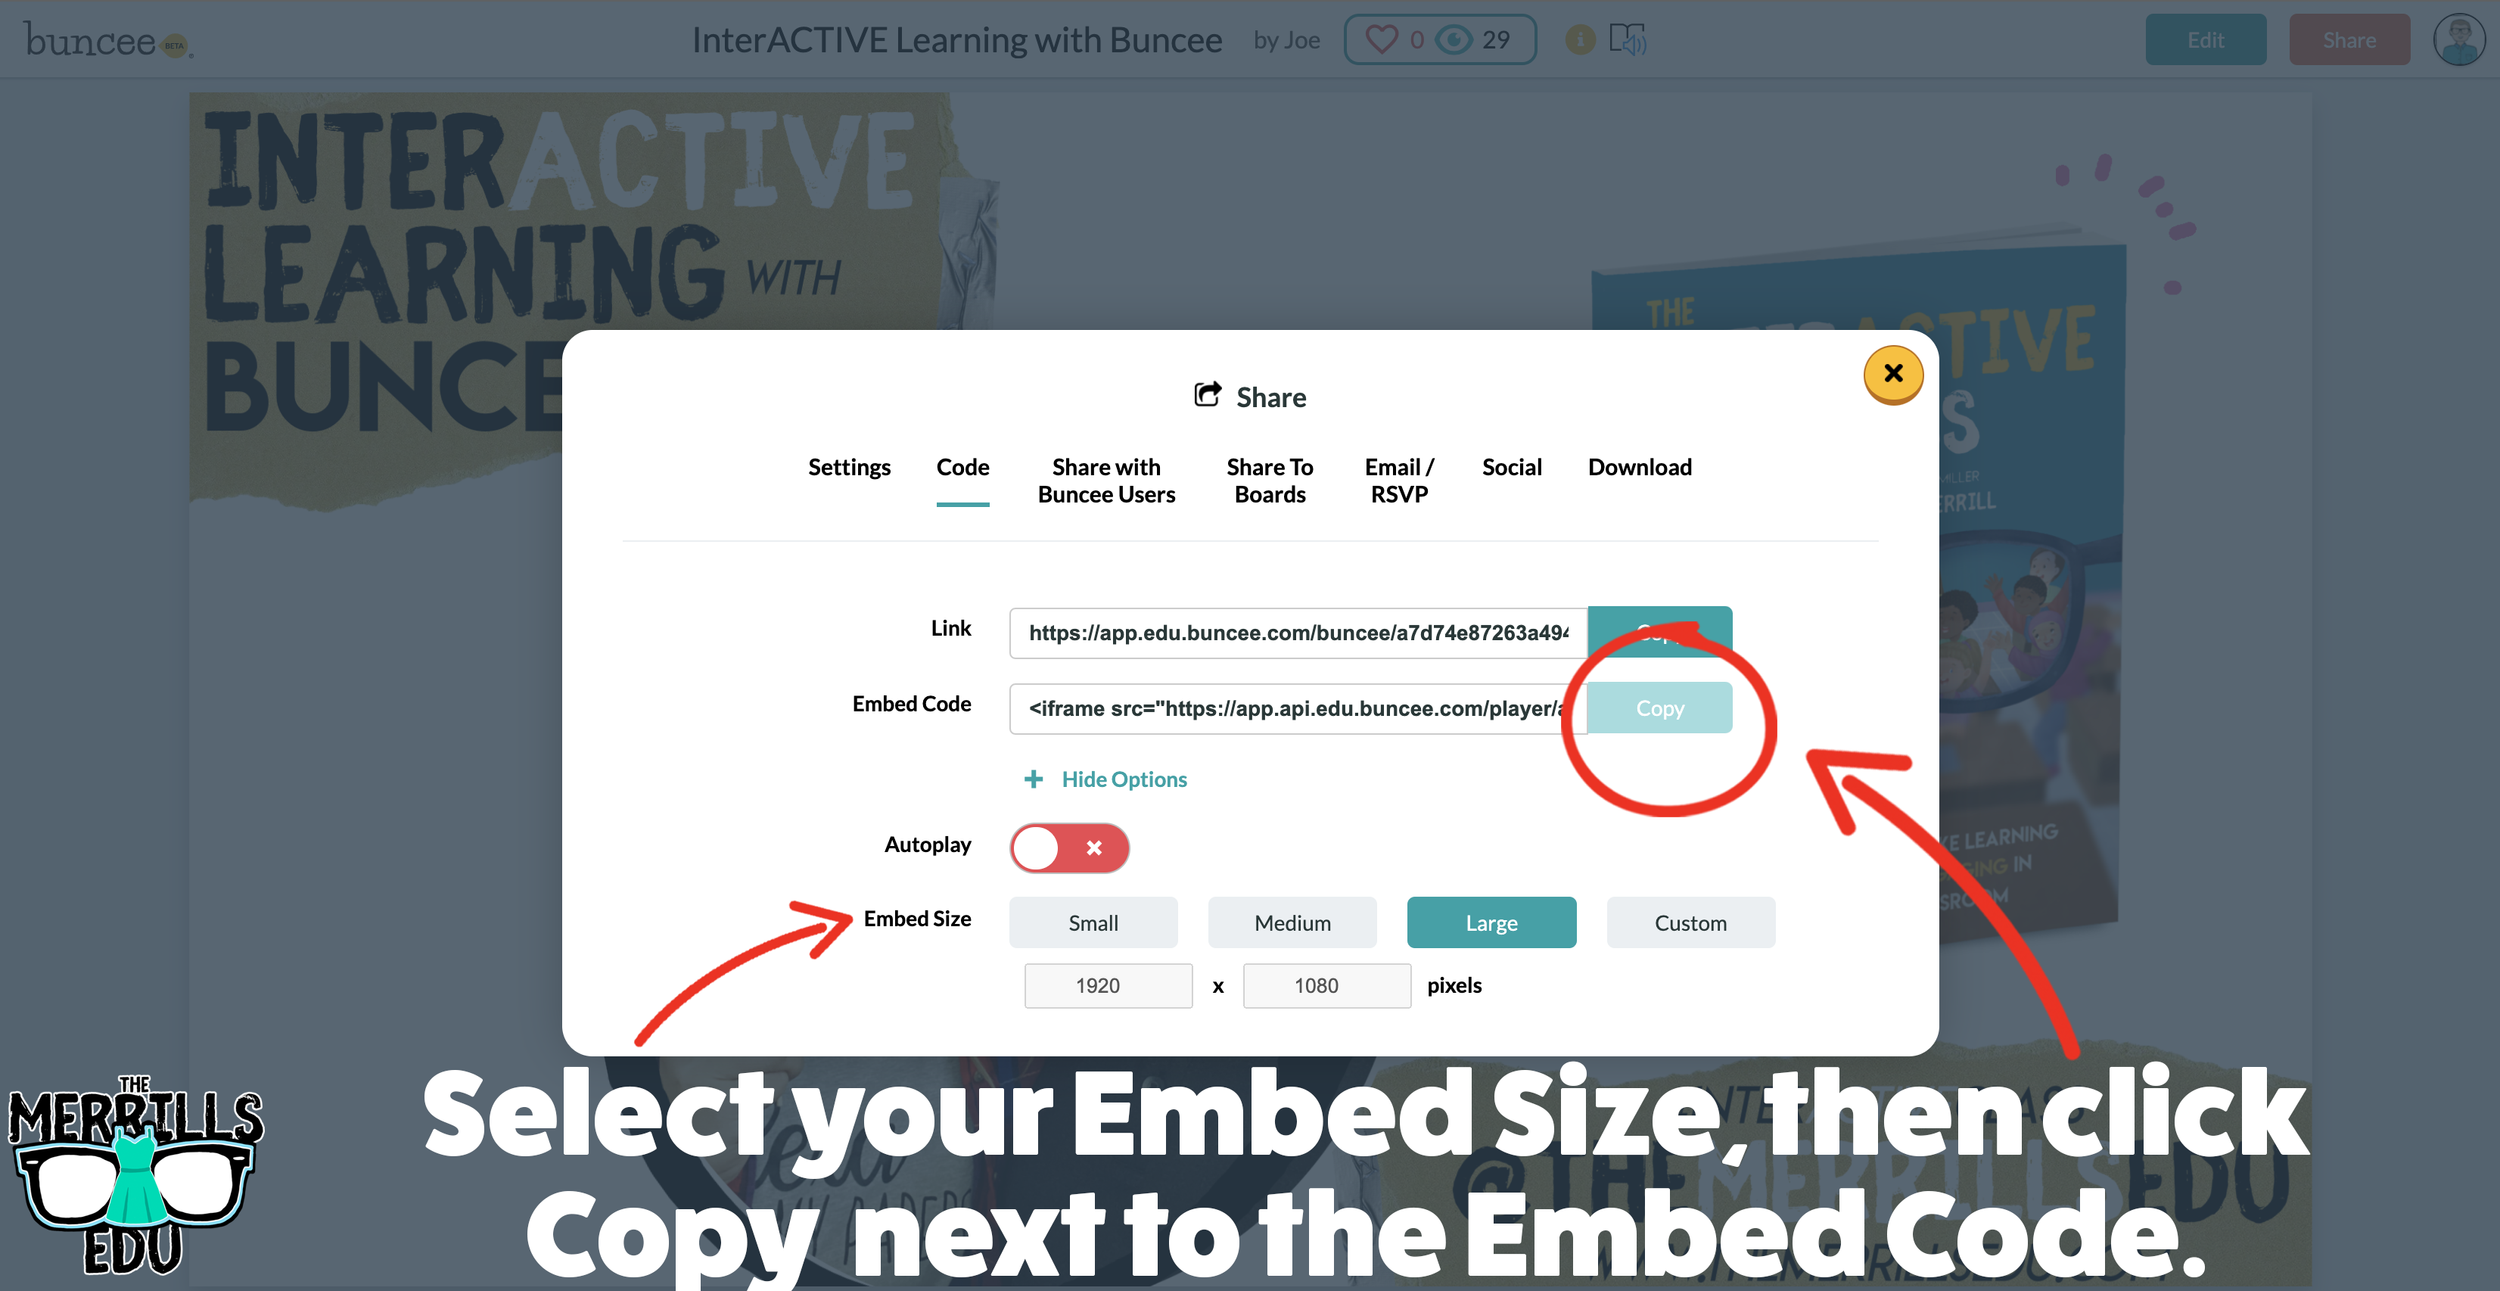
Under “Code” click “+ Show Options.”
Select your preferred embed size (there are also options to autoplay the Buncee).
Then, in the same window, click “Copy” next to the Embed Code bar.
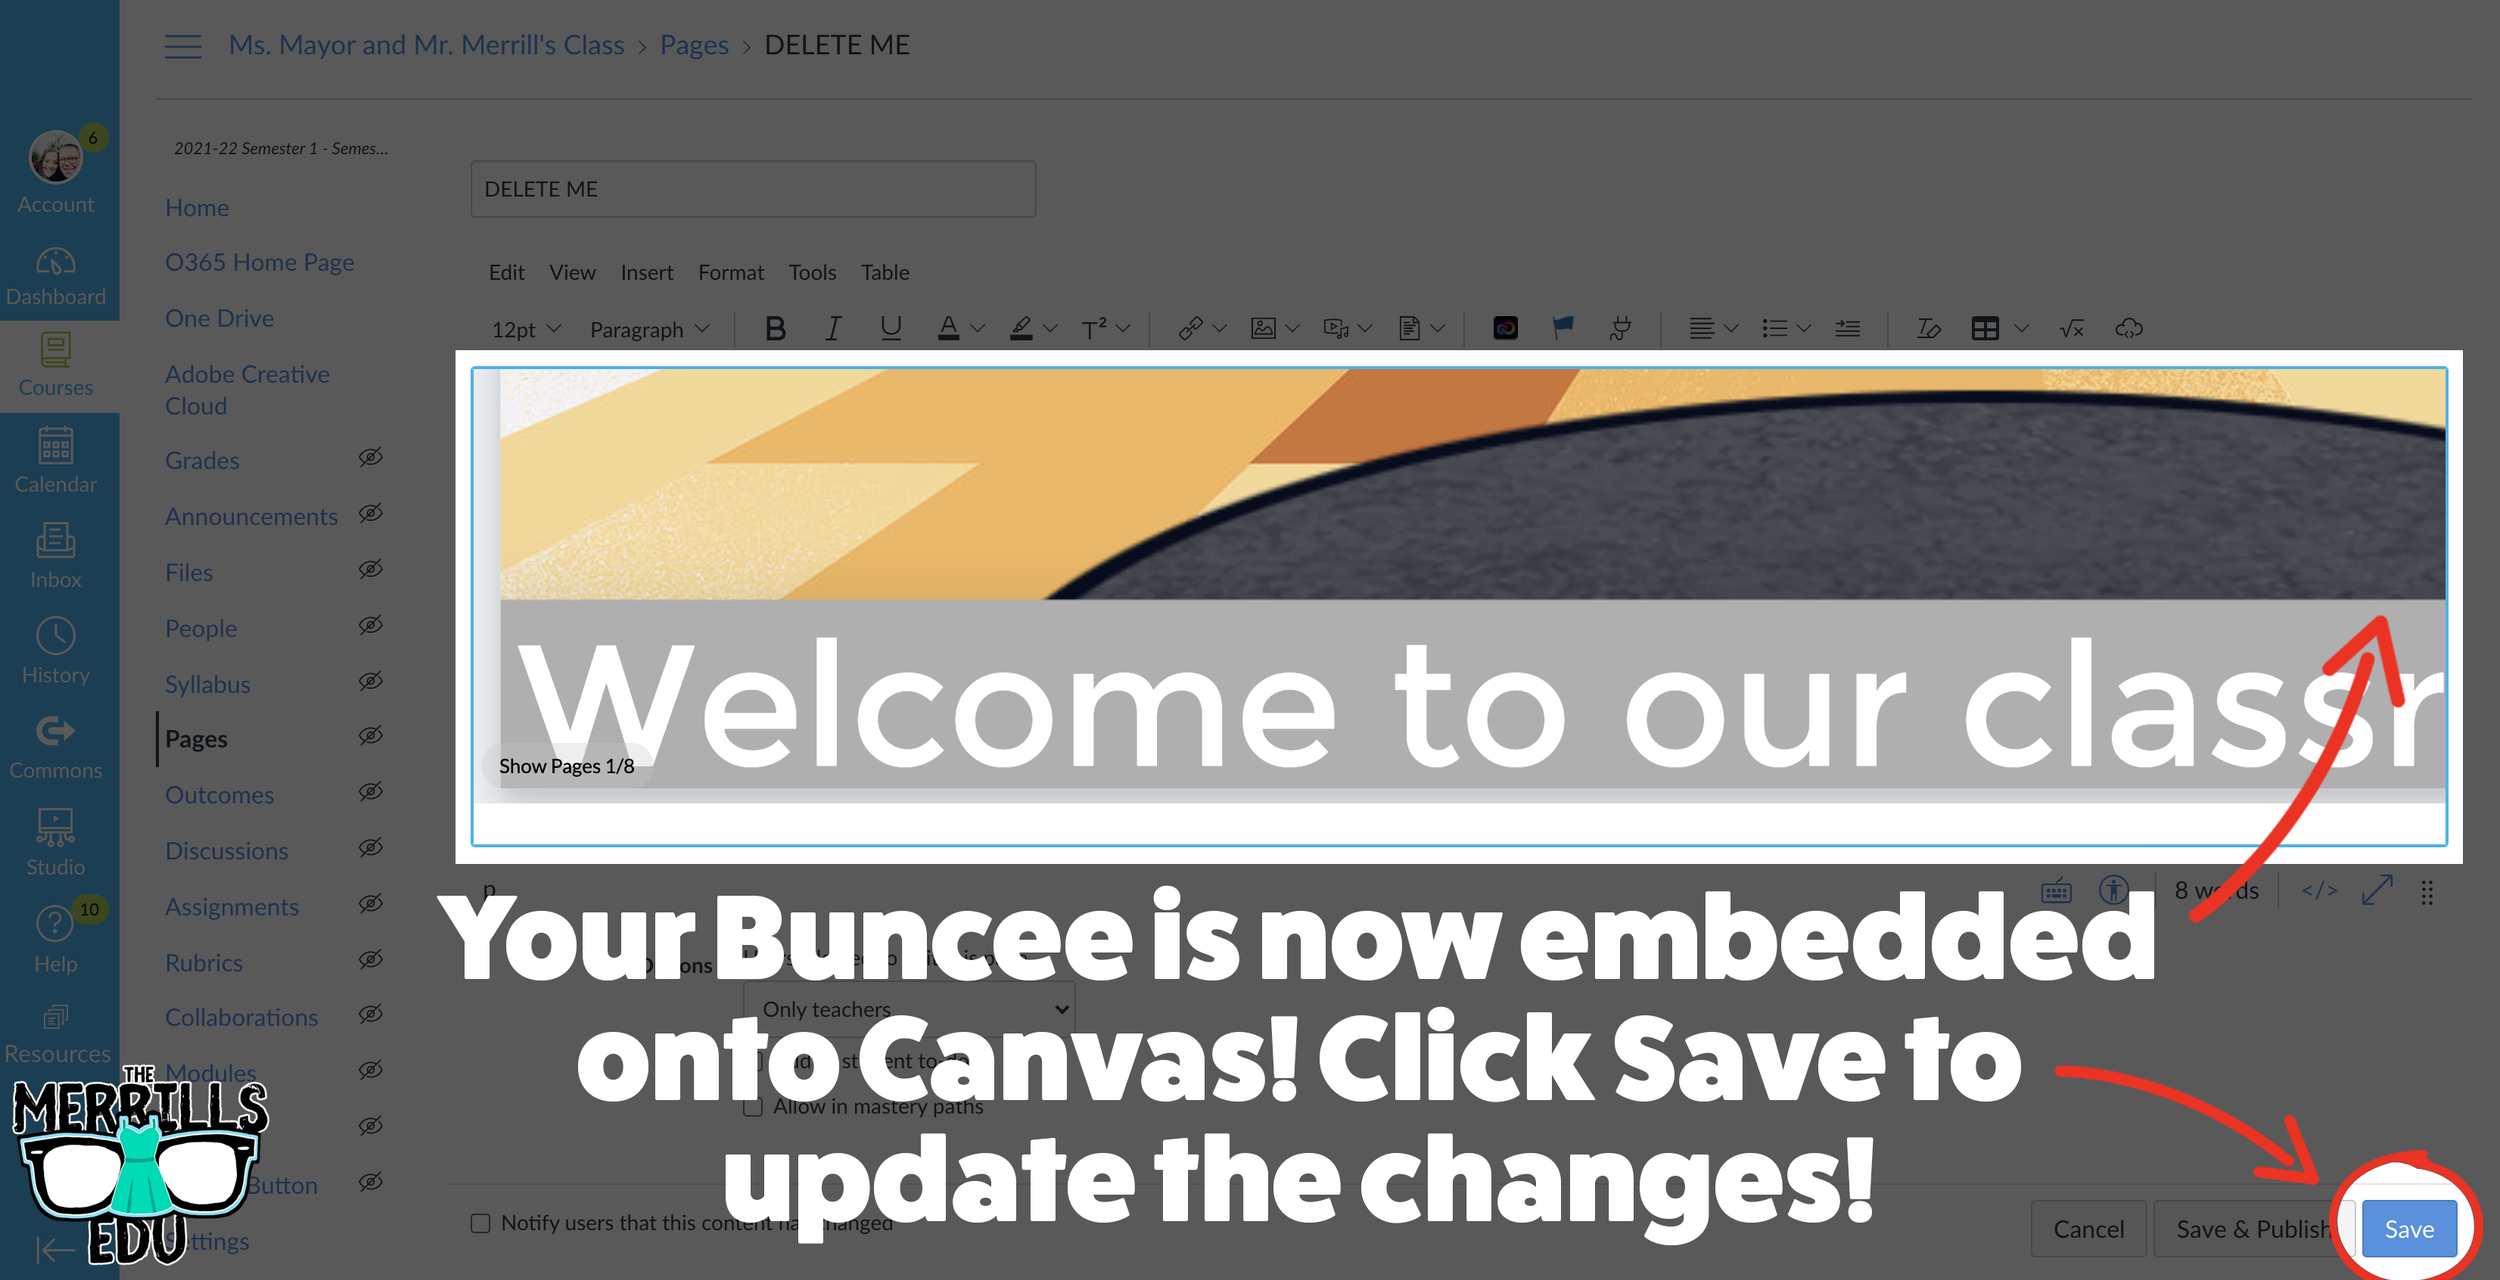
In a separate tab, open the Canvas page that you would like to add the Buncee creation to. Then, click on the cloud icon (if you don’t see the Cloud icon, click the three dots to expand the menu bar).
In the embed window, paste your copied code from Buncee. Then, click submit.
Your Buncee creation is now embedded into the Canvas page! Click on “Save” to update the changes.

Ed Puzzle Embedded into Canvas
Ed Puzzle is a video assessment platform tool that allows teachers to find or create videos and then generate questions that go along with the video. The result is an engaging formative assessment that your students will actually like! Keeping Ed Puzzle embedded into Canvas will help keep everything organized in the same place. Here’s how it all works:
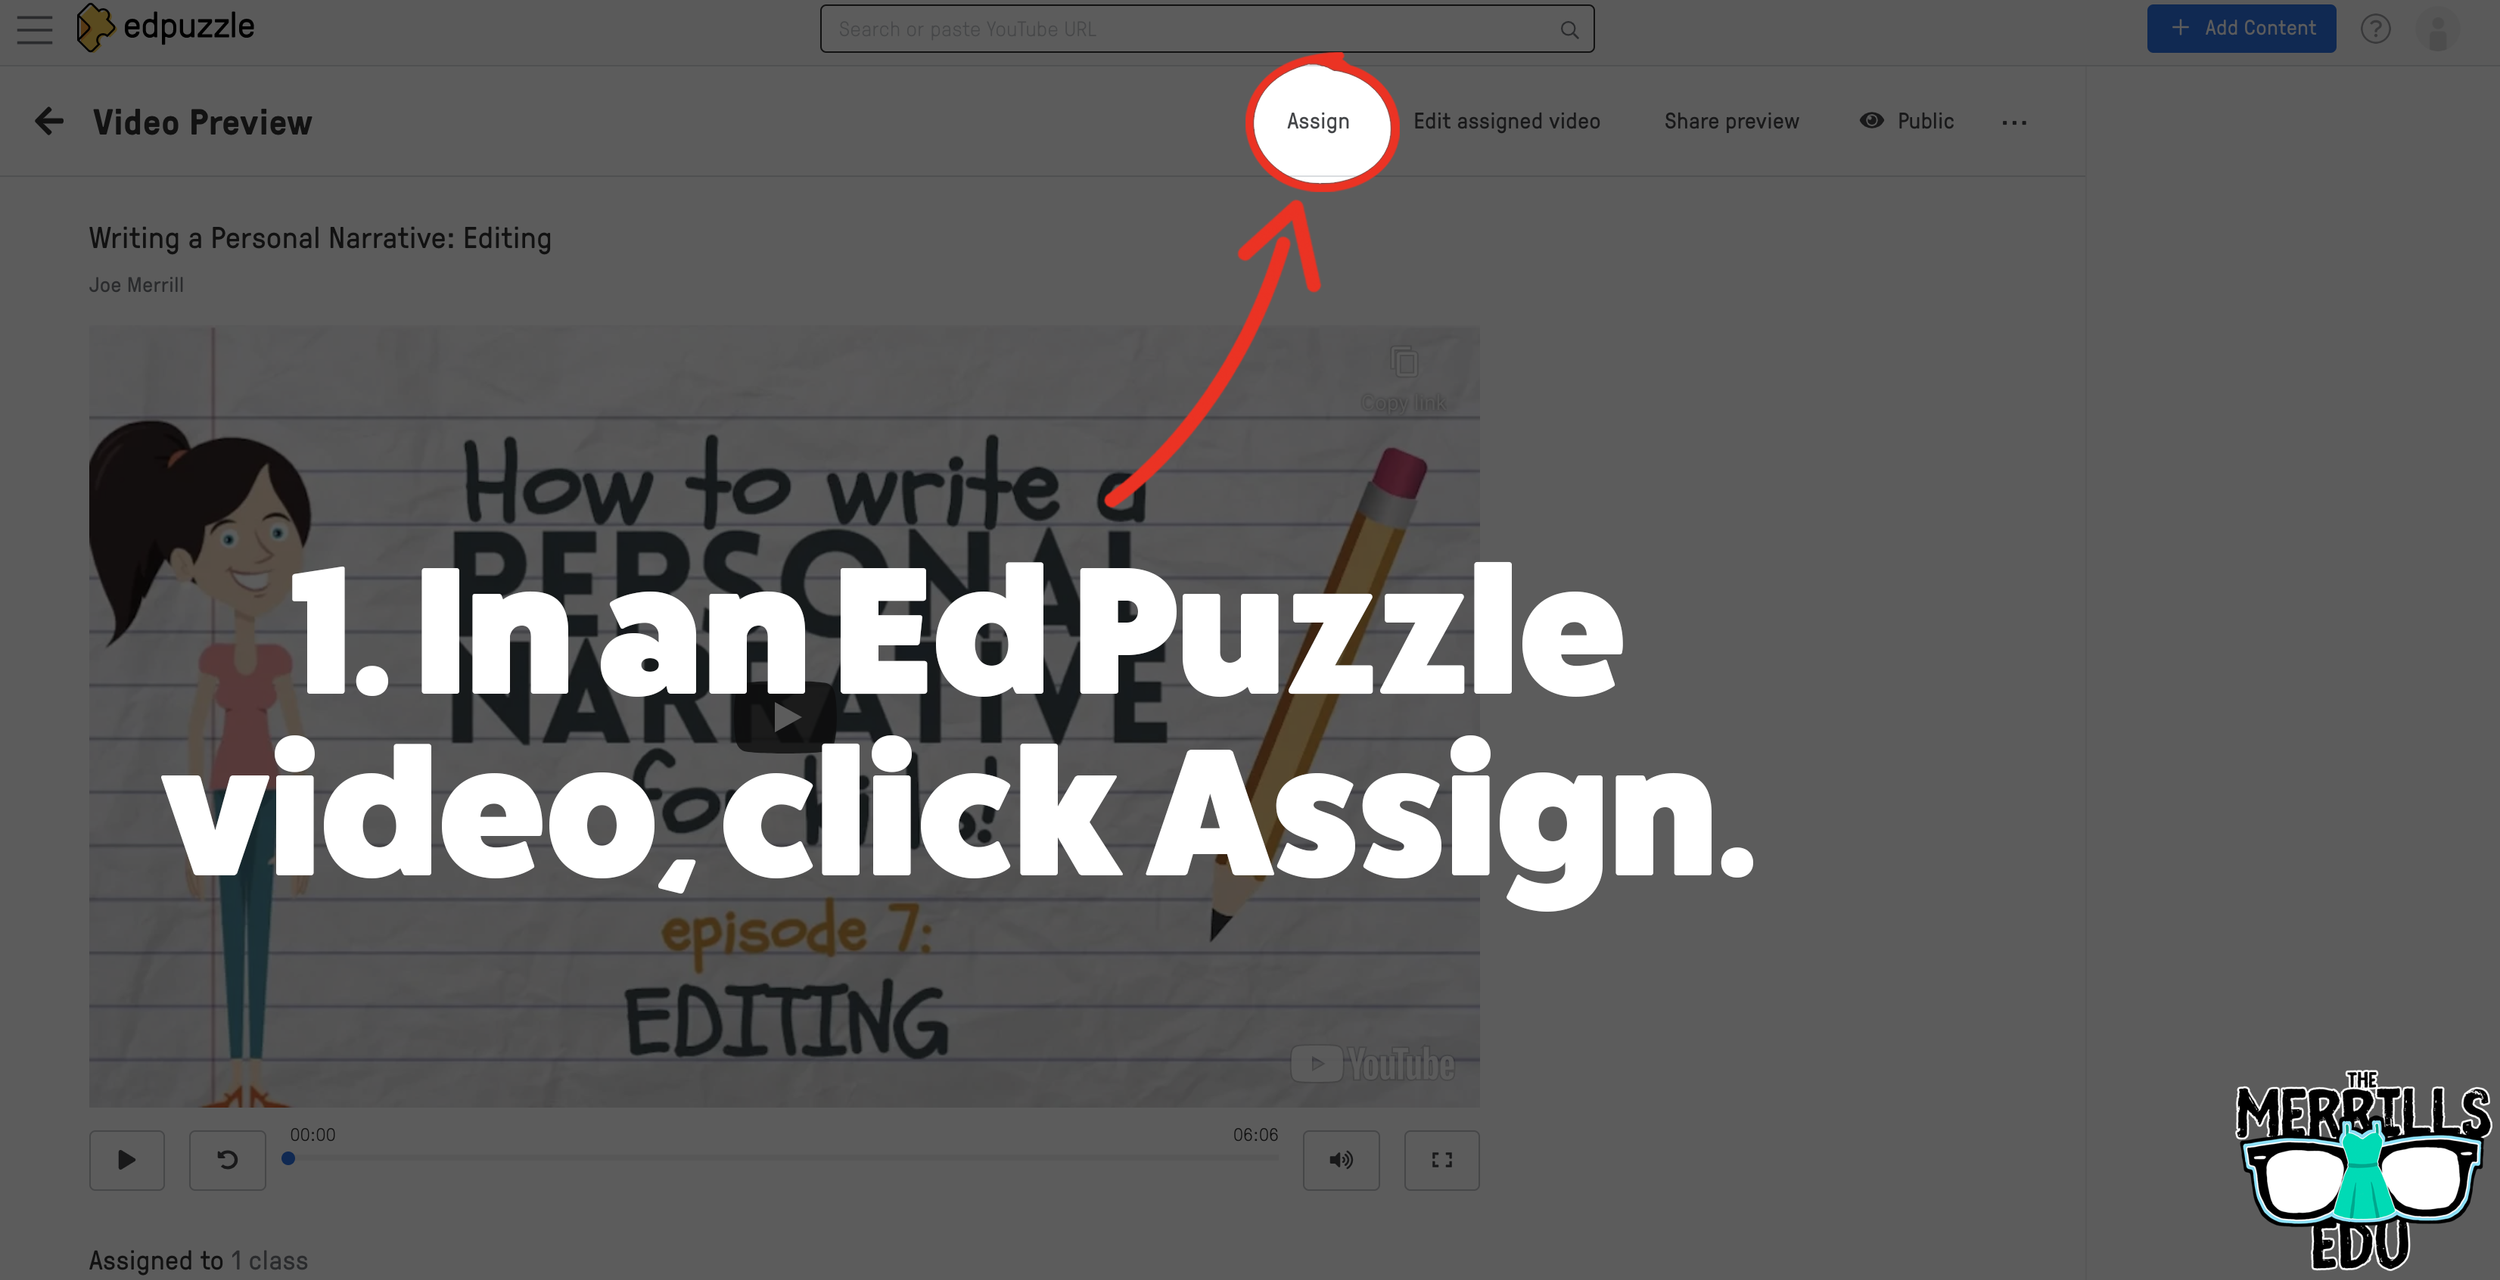


(note: You will need to set up a class in Ed Puzzle prior to the steps below)
Select. the video that you would like to embed from Ed Puzzle.
Click “Assign”
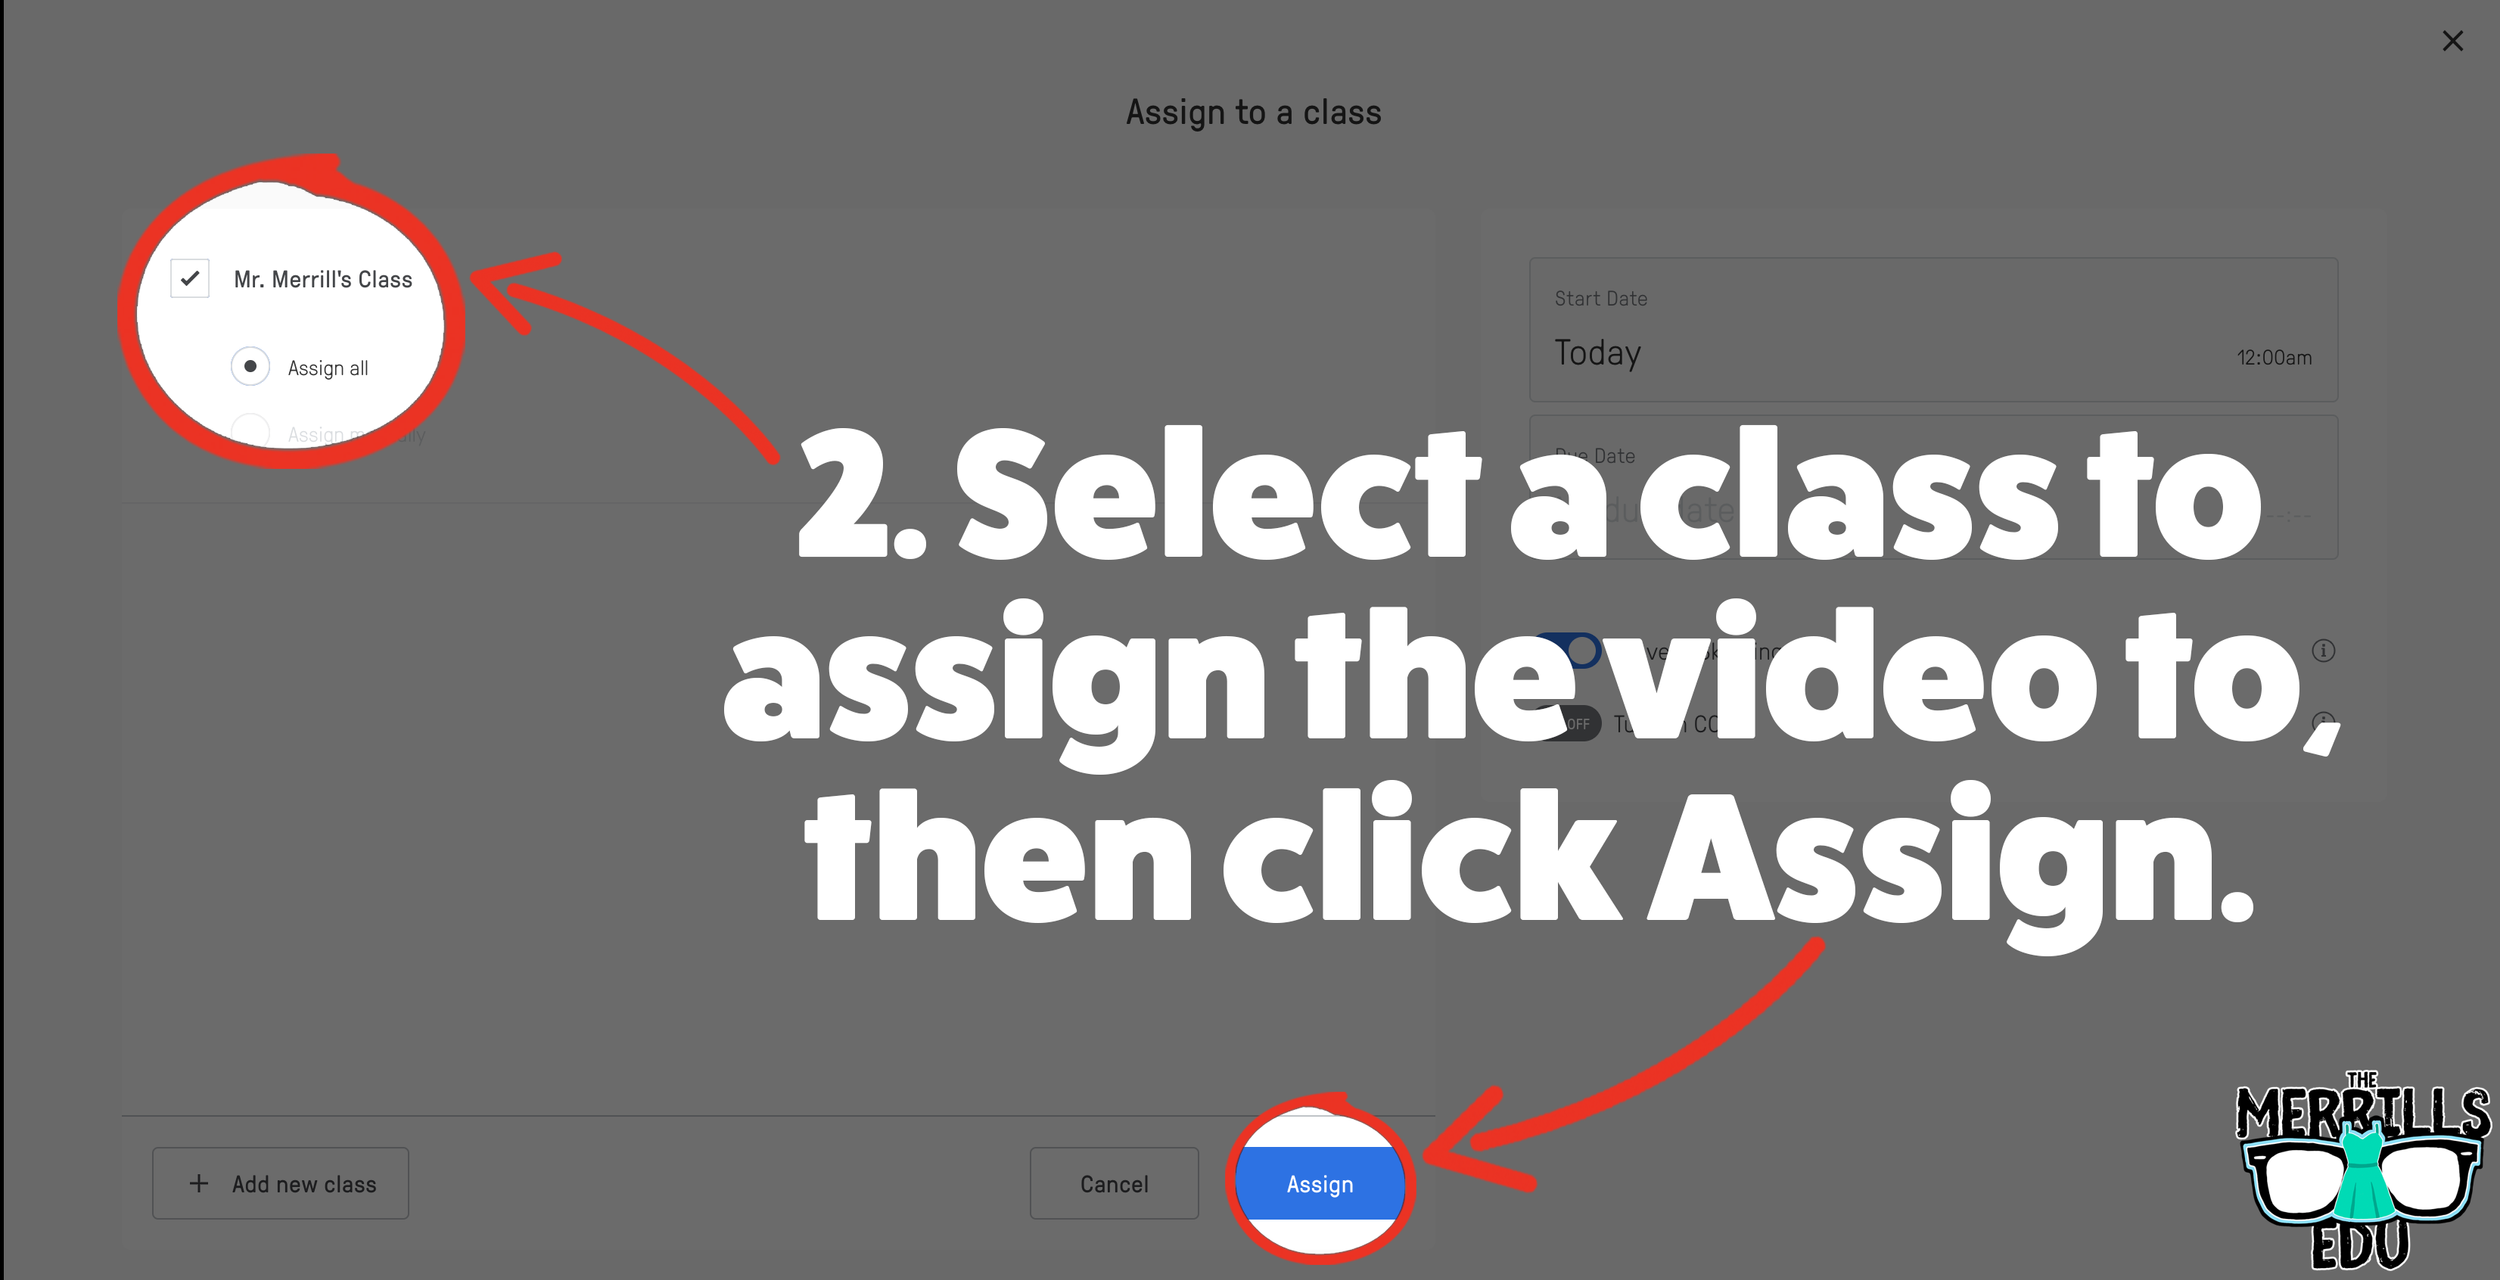
Select the class that you would like to assign the video to, then click “Assign.”
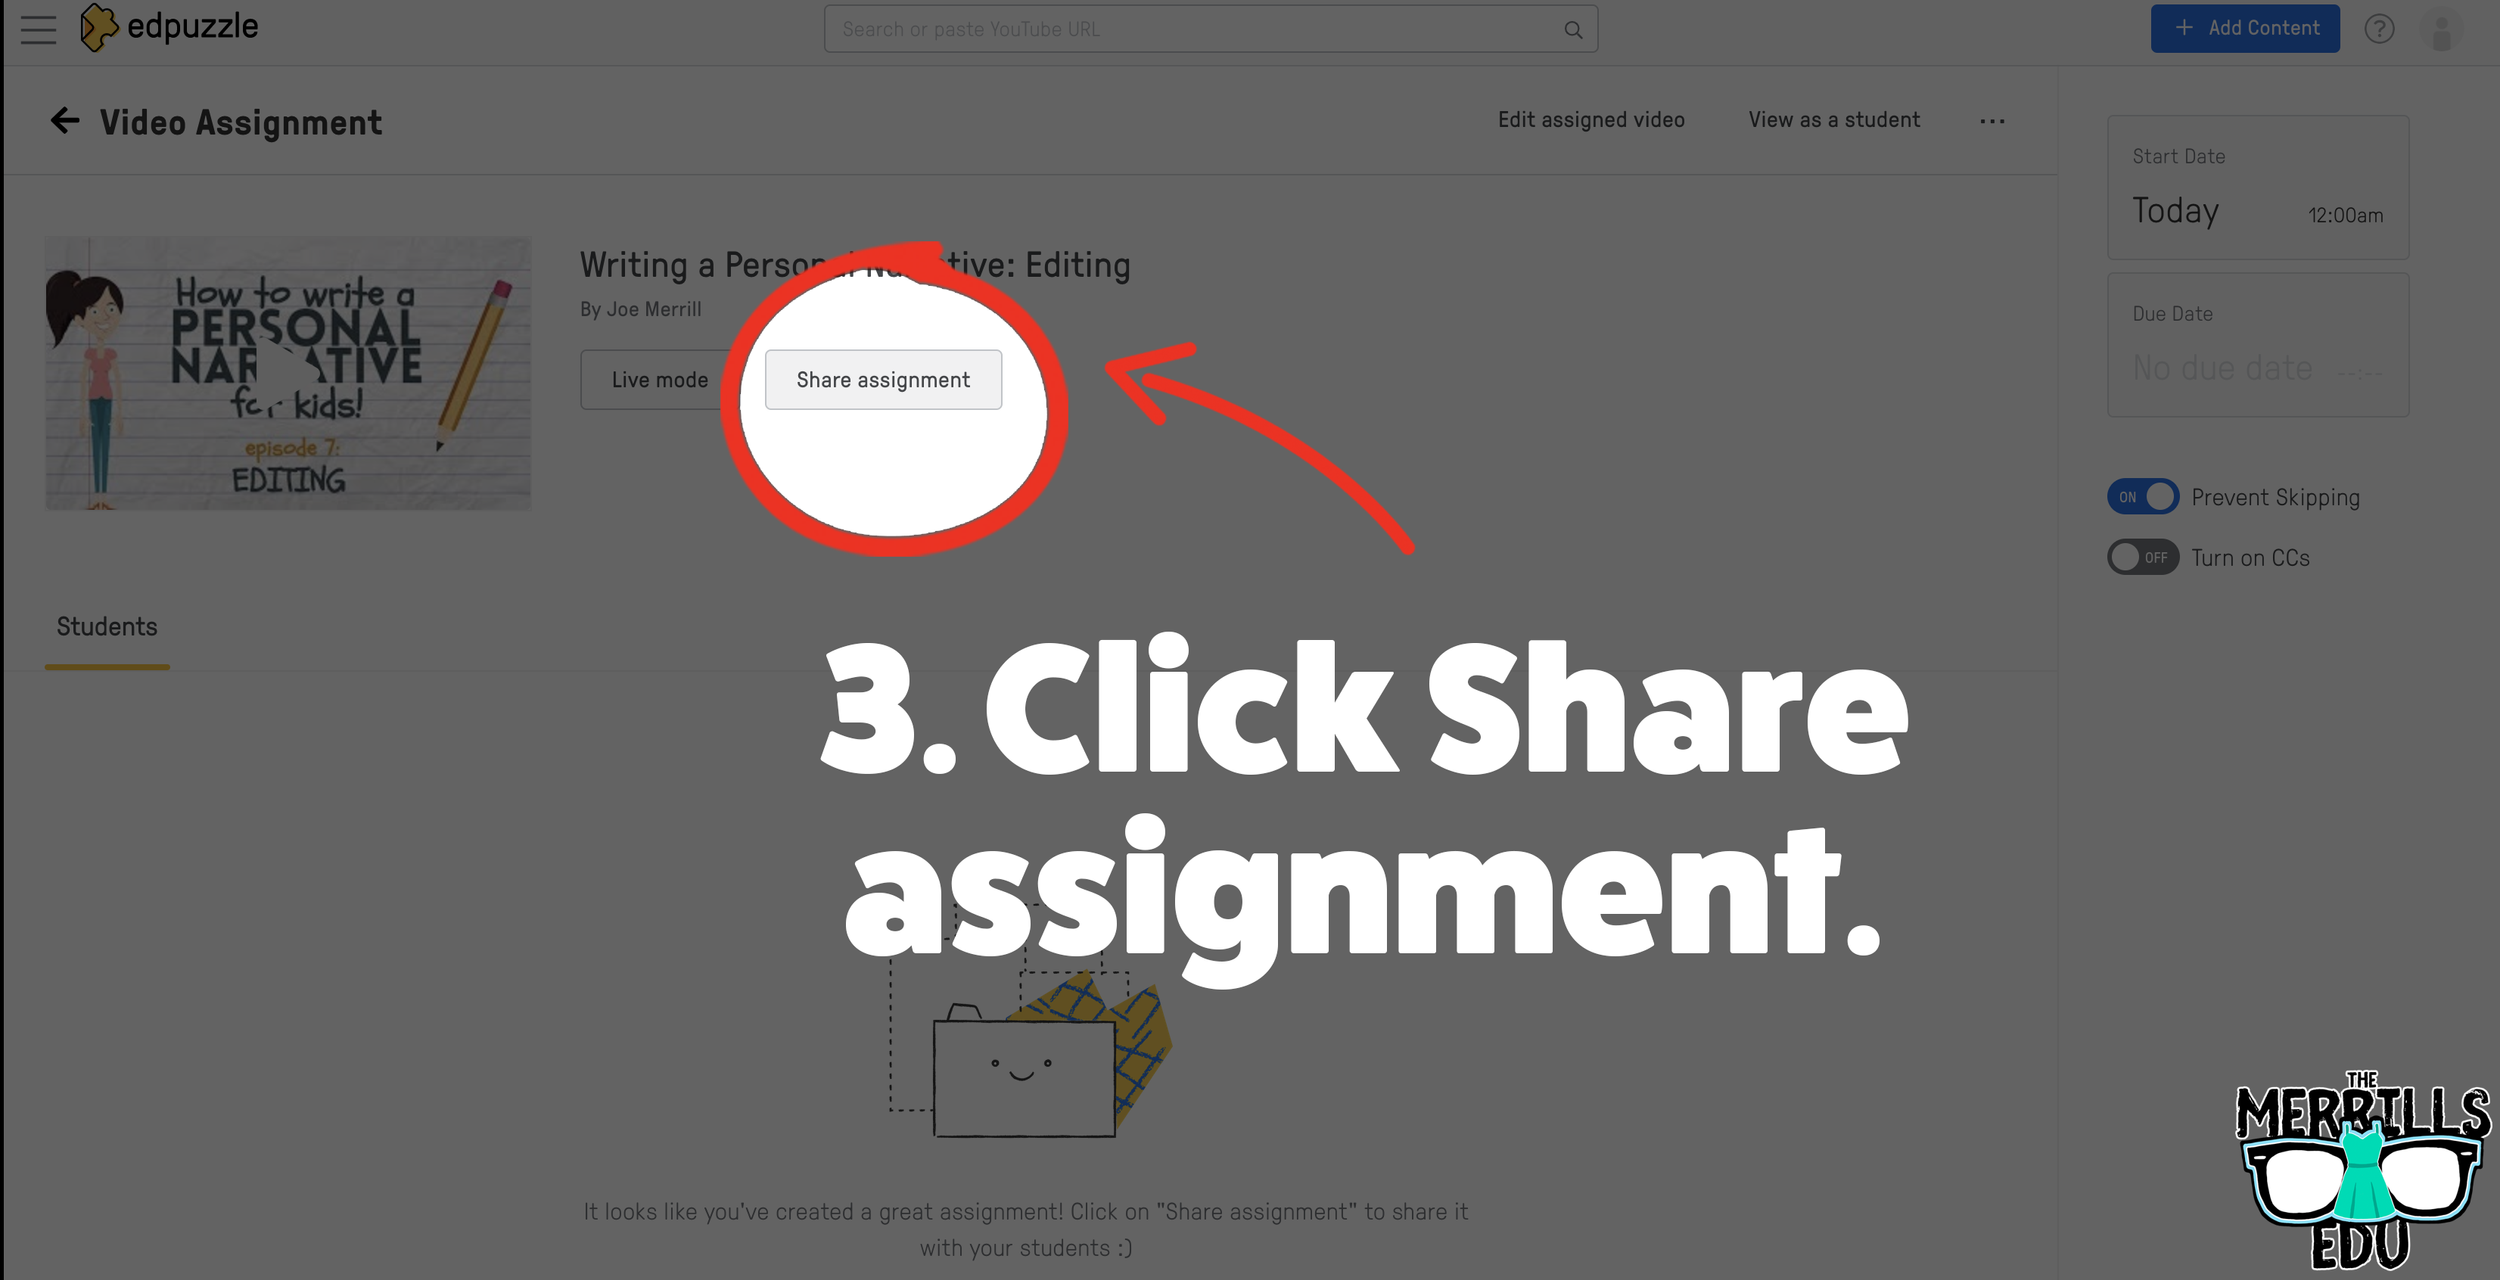
On the next screen, click “Share assignment.”
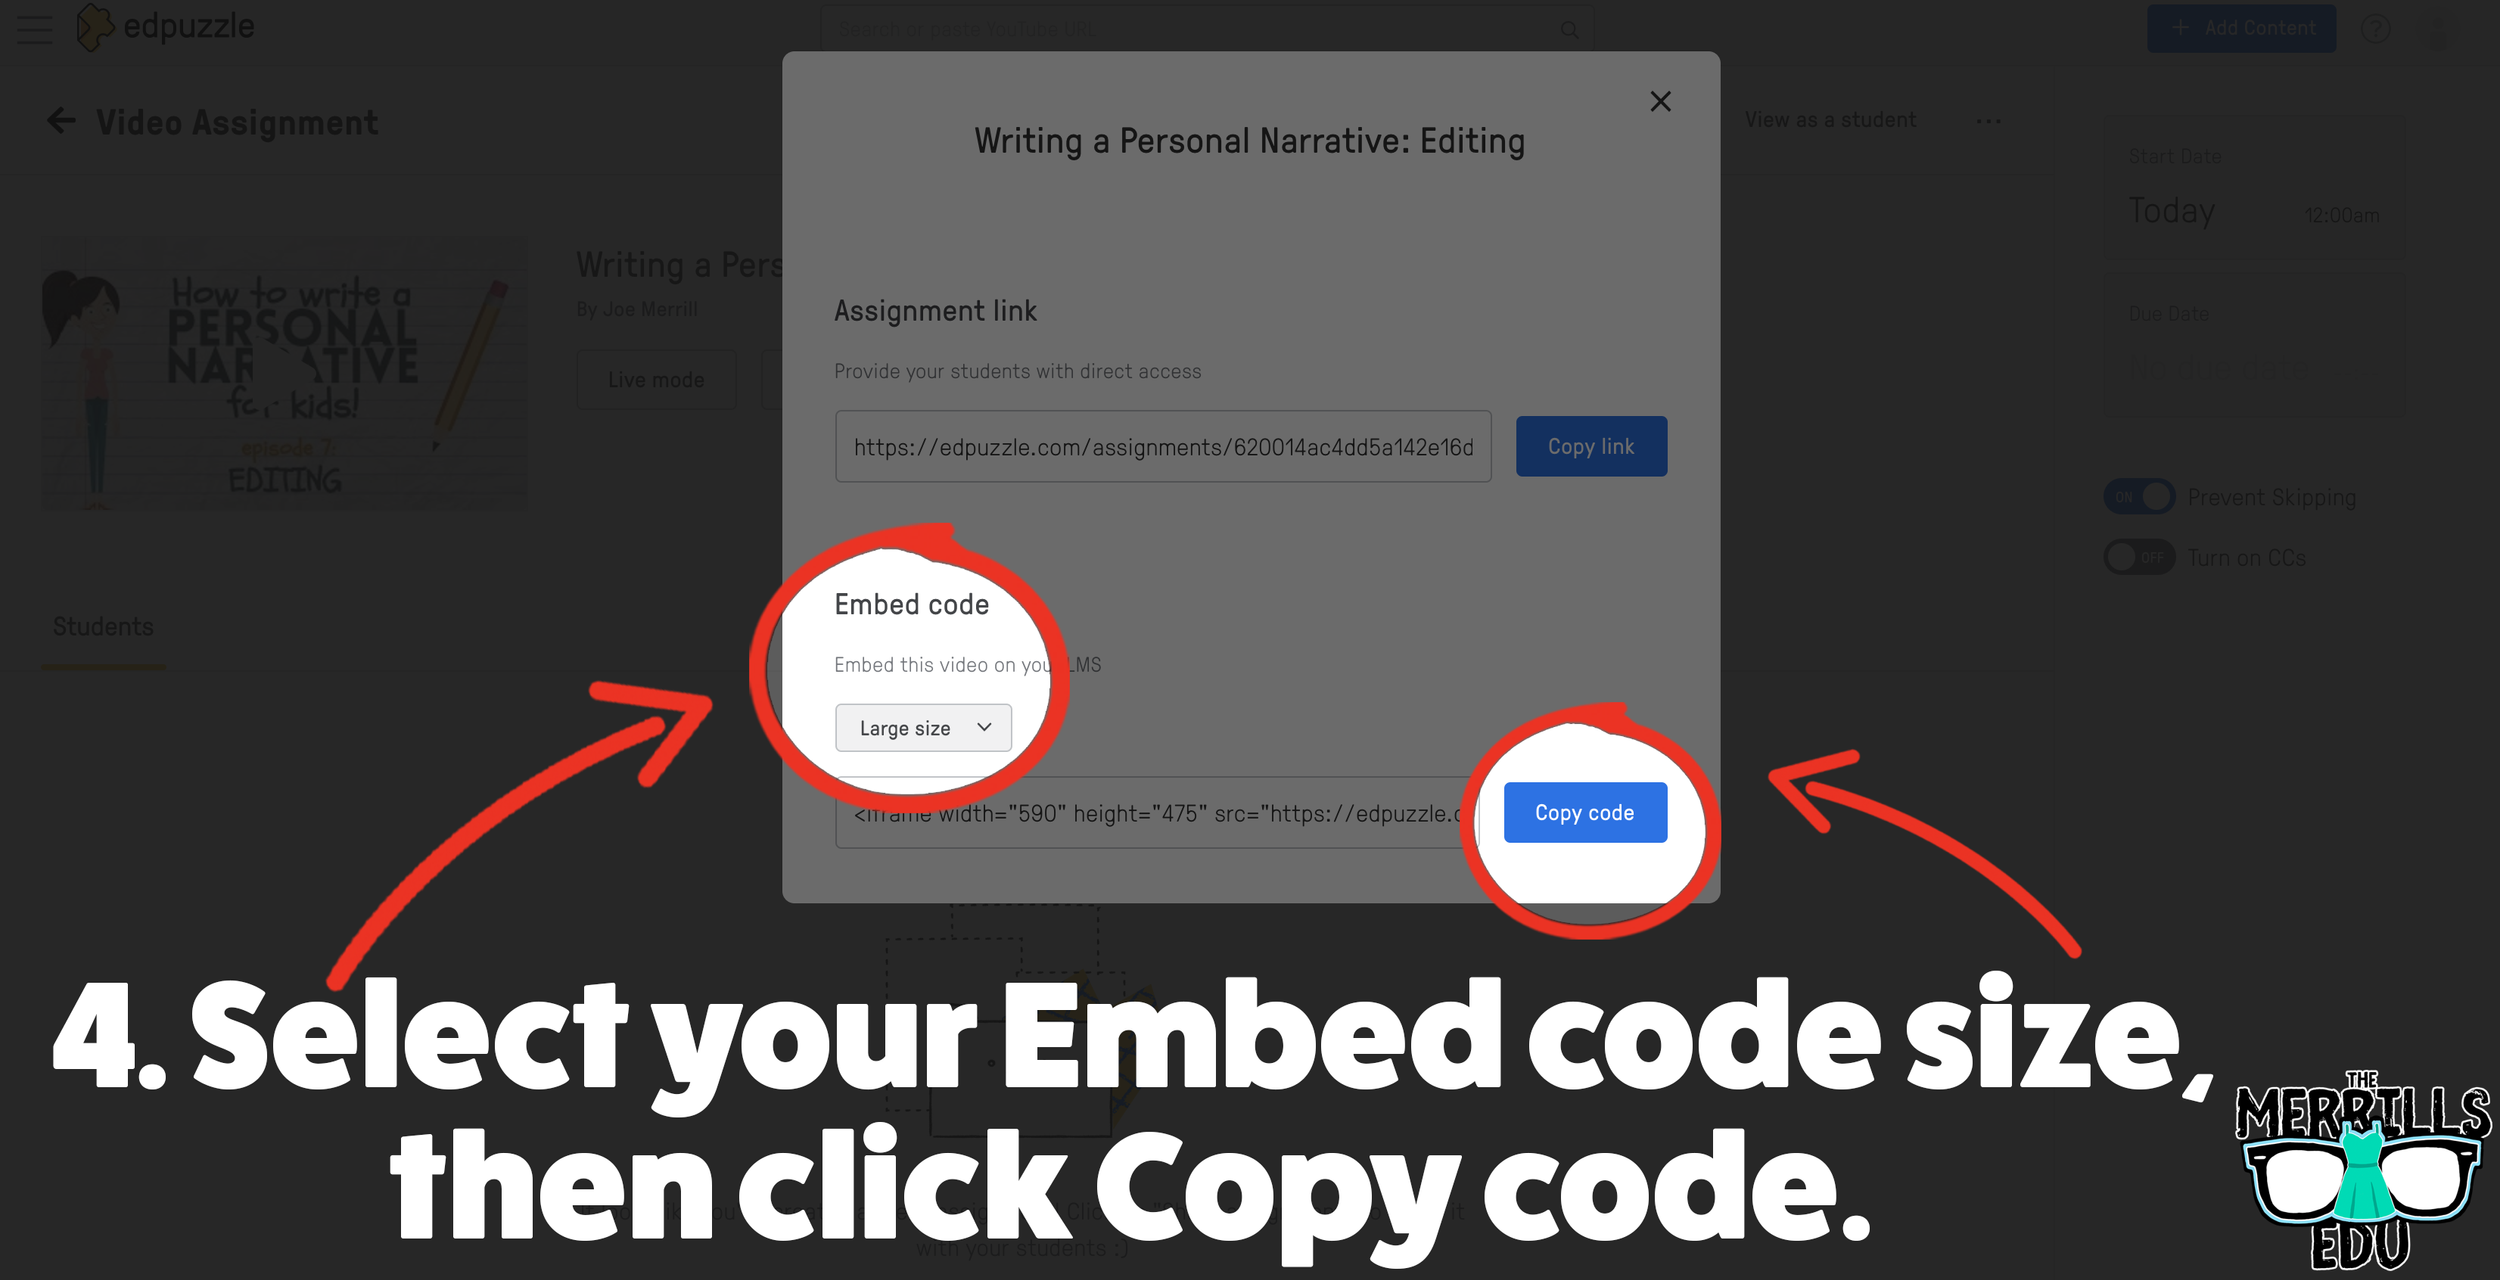
(Optional: We recommend changing the embed code size to large) Under Embed Code, click “Copy code.”
In a separate tab, open the Canvas page that you would like to add the EdPuzzle video to. Then, click on the cloud icon (if you don’t see the Cloud icon, click the three dots to expand the menu bar).
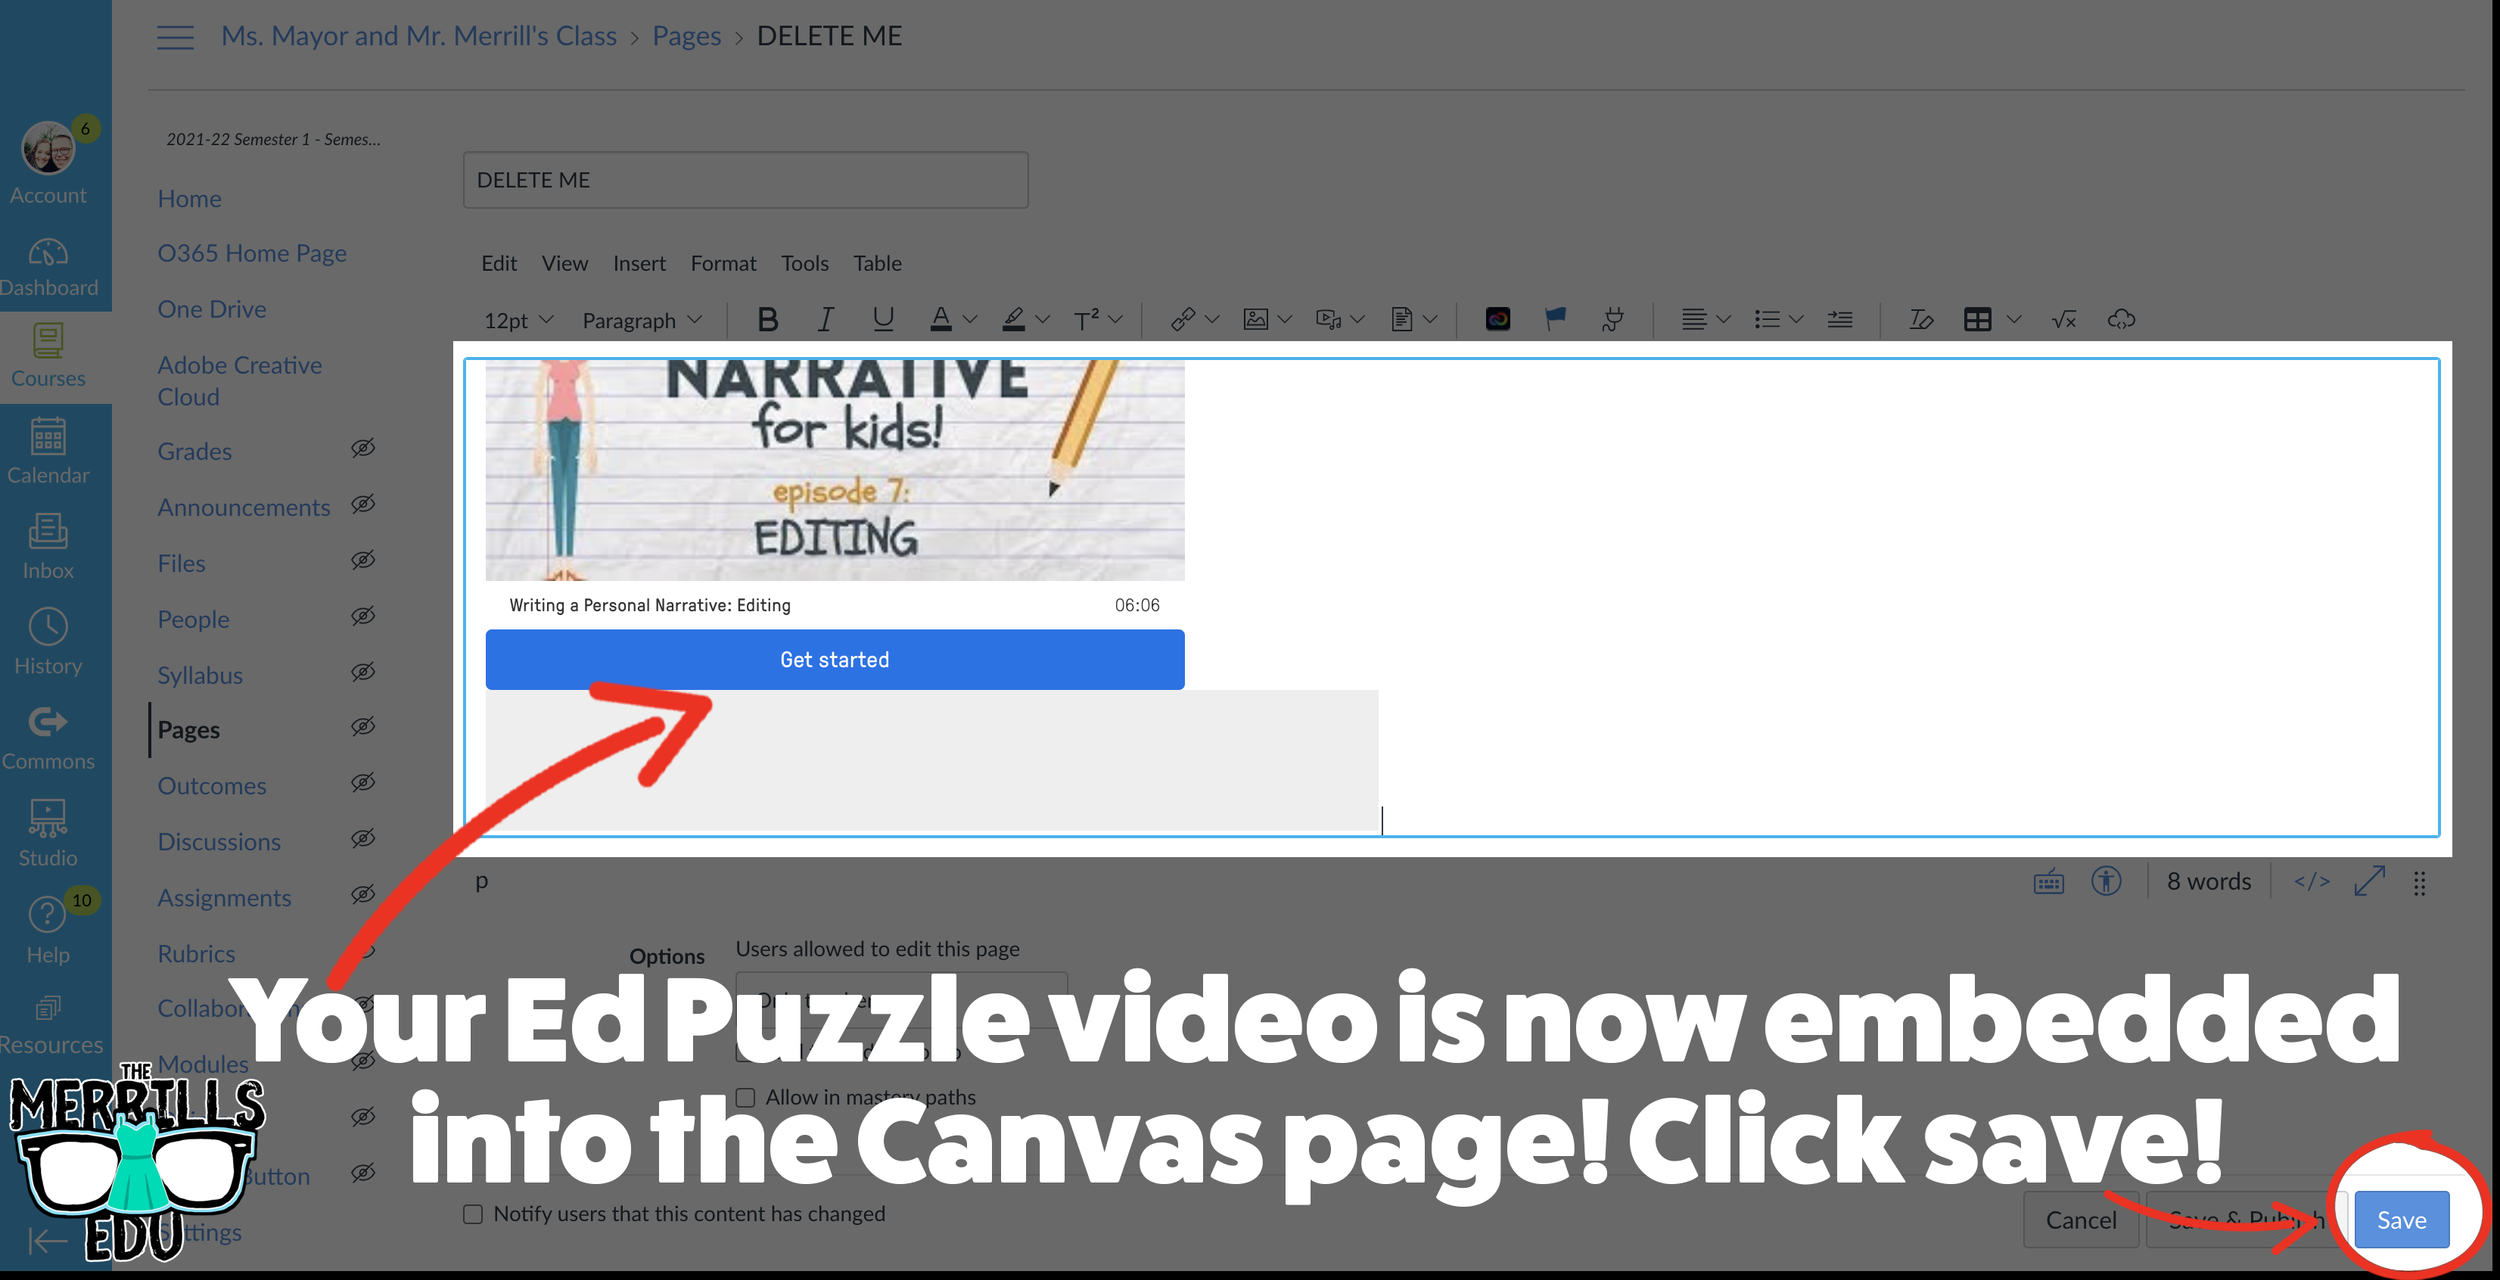
In the embed window, paste your copied code from Ed Puzzle. Then, click submit.
Your Ed Puzzle video is now embedded into the Canvas page! Click on “Save” to update the changes.

PowerPoint Embedded into Canvas
Do you have a PowerPoint deck that you’d like to give your students so that they can follow along? Embedding it into your LMS is the perfect way to deliver that content while keeping everything organized. Here’s how to embed PowerPoint decks into Canvas:

(Note: You will need to use PowerPoint Online (a Microsoft 365 account) to use this embed. You may also need to adjust your share settings for this to work correctly)
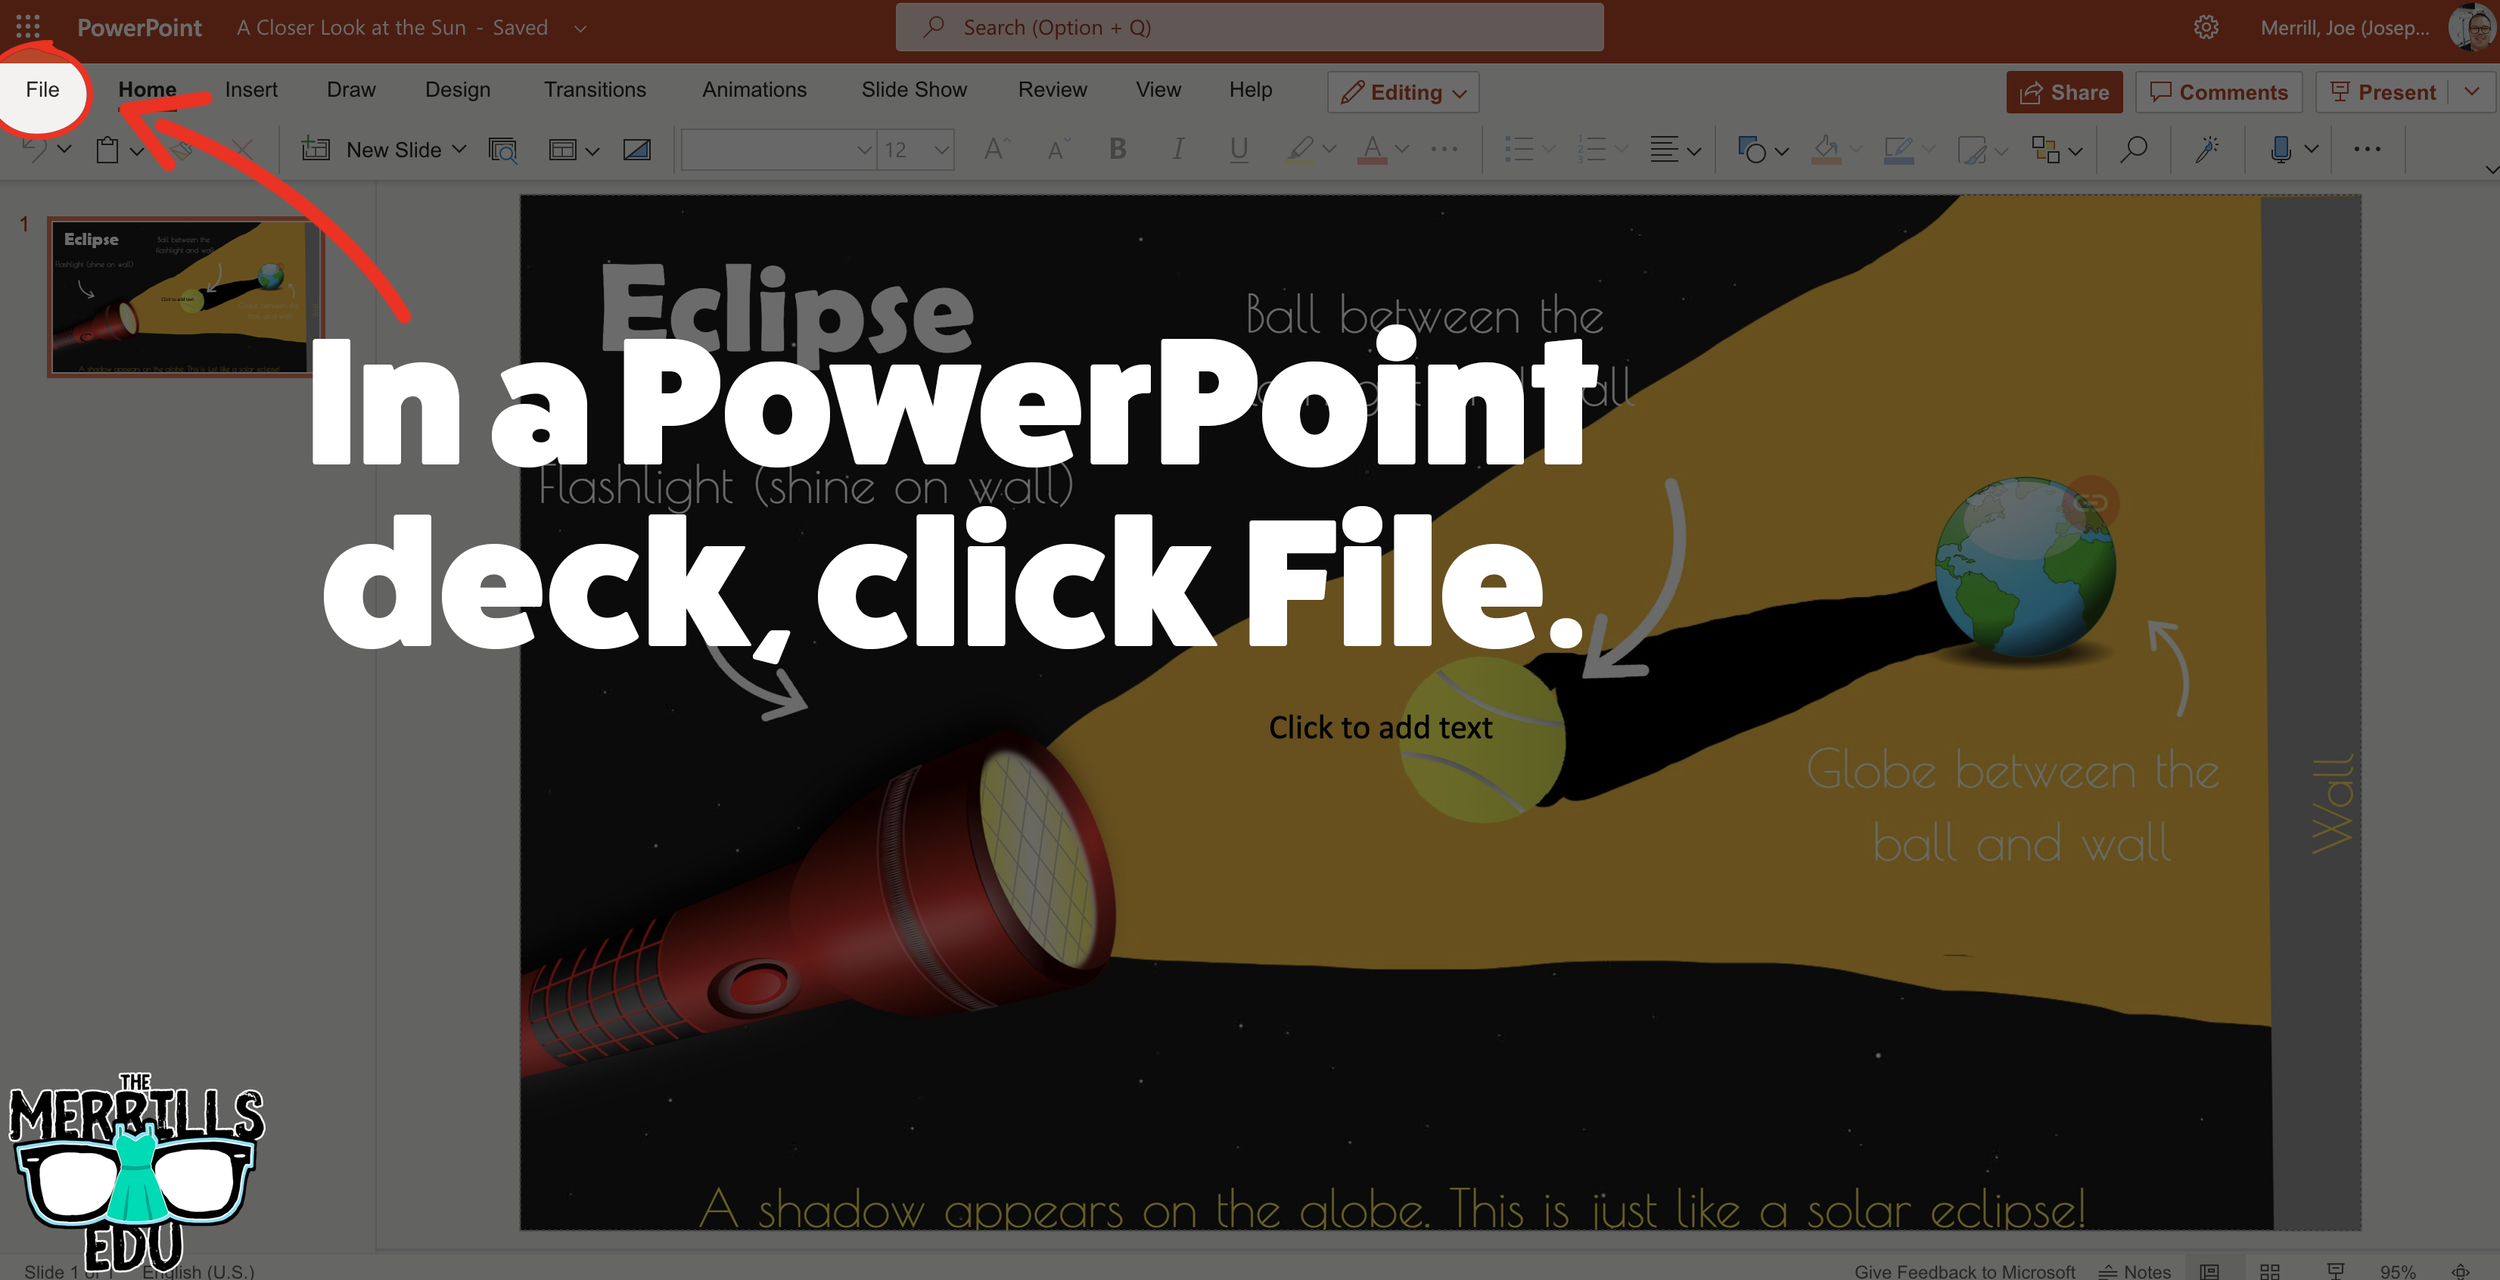
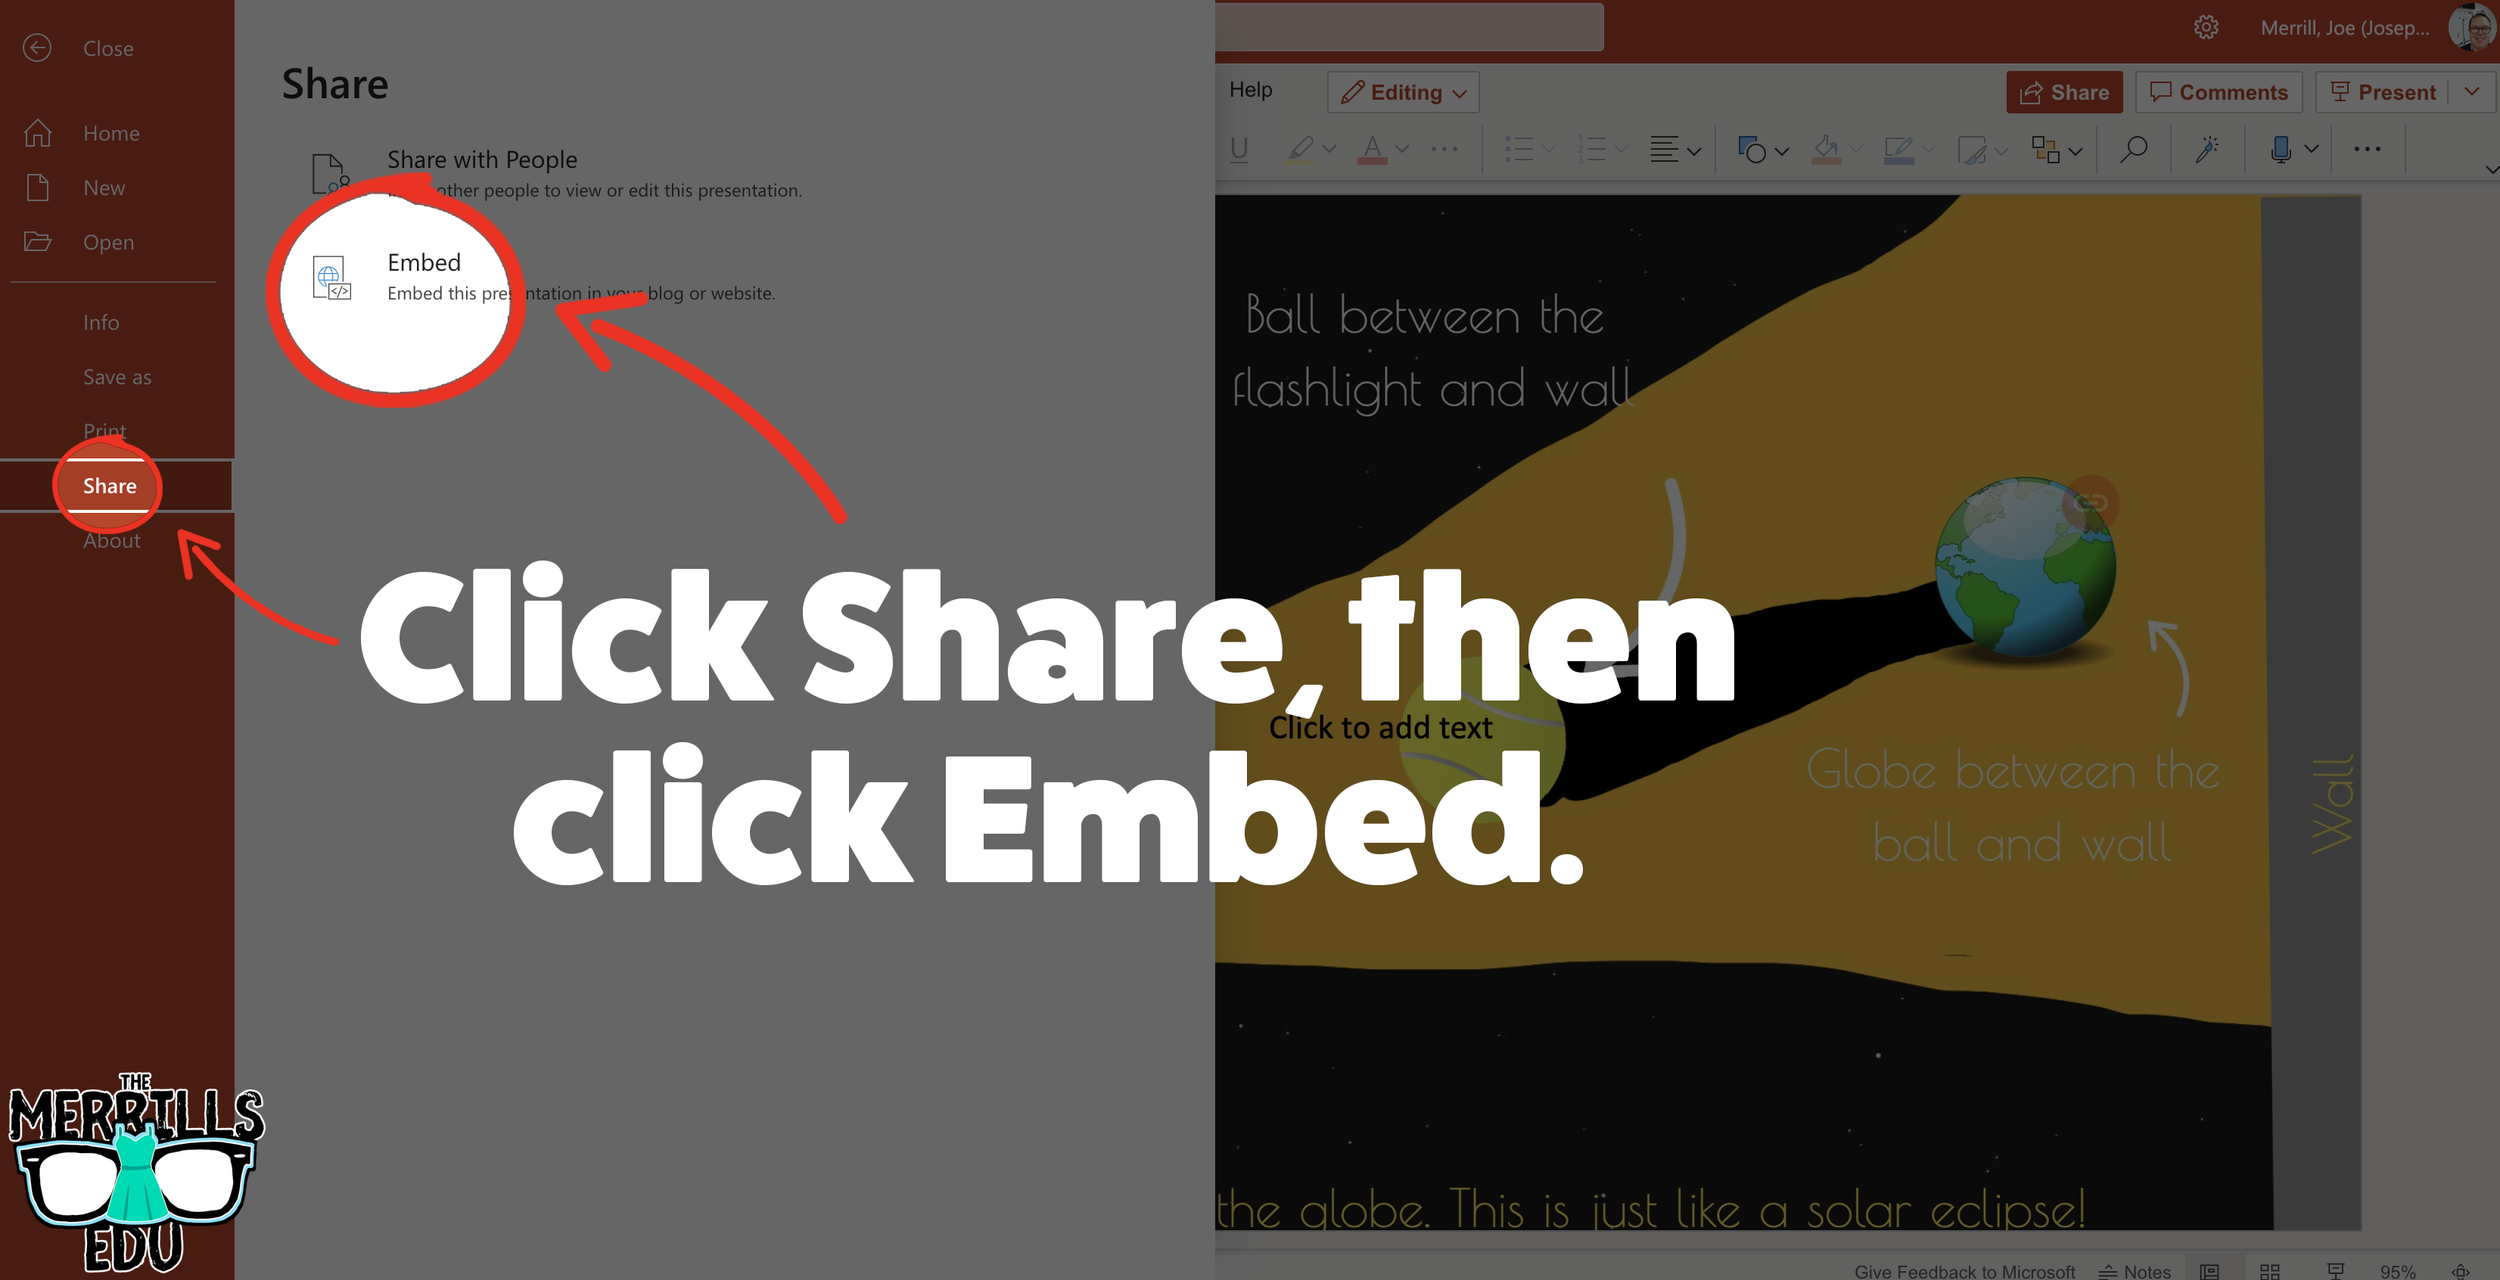
In your PowerPoint online deck, click File.
Next, click “Share” then click “Embed.”
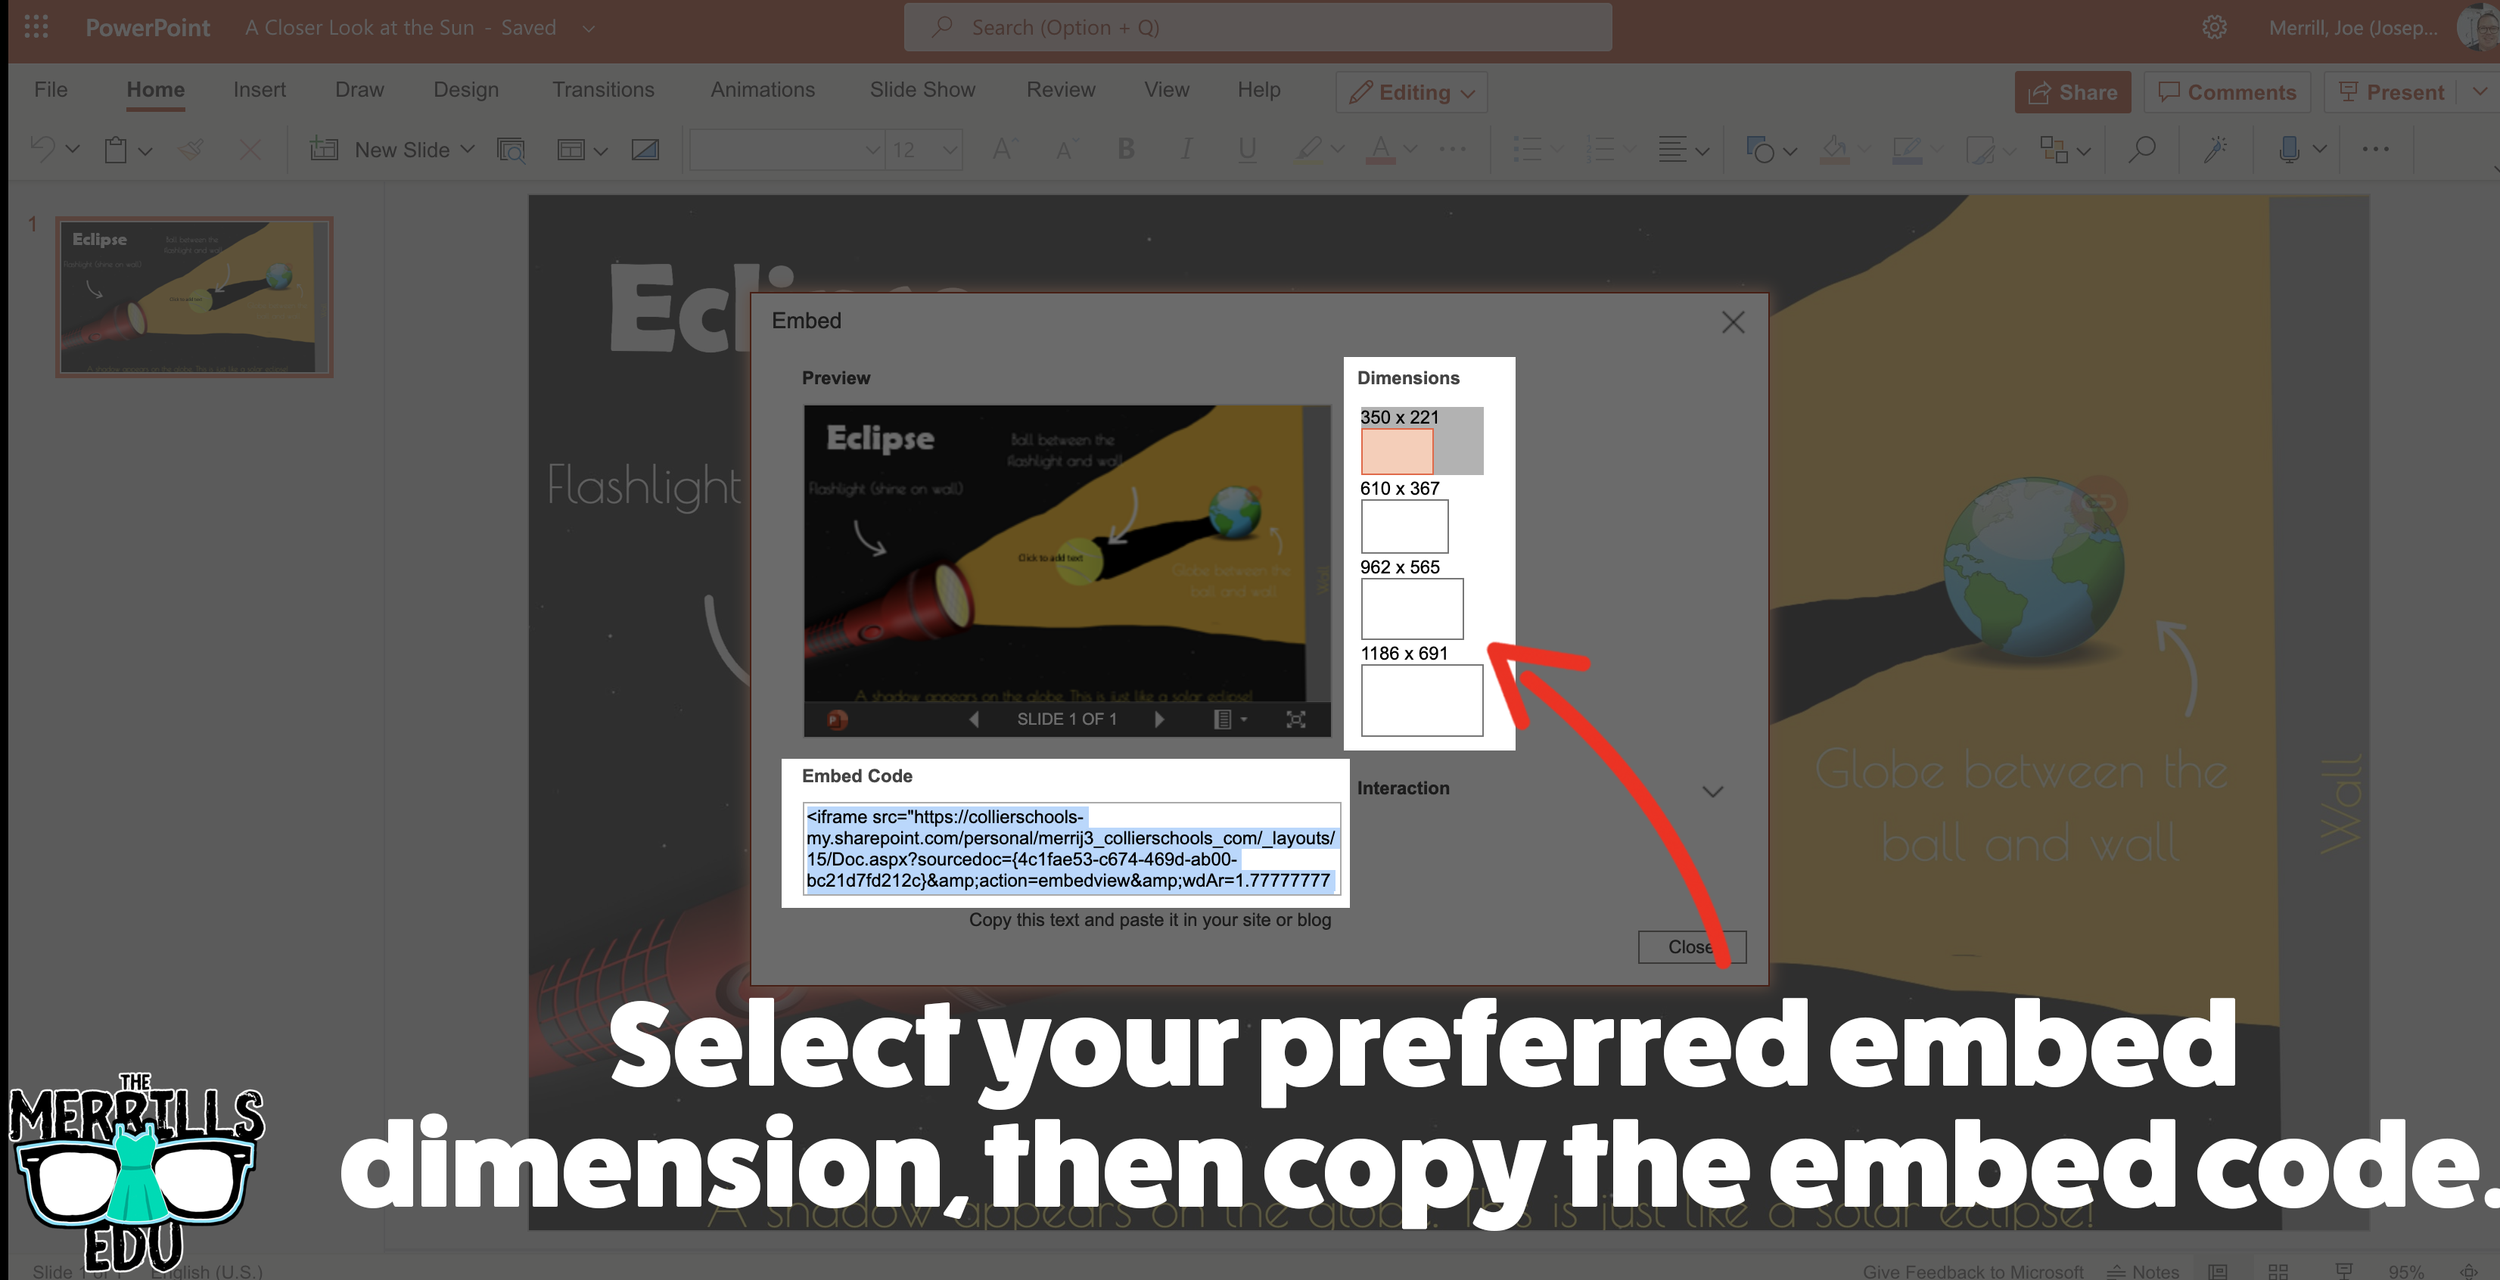
On the next screen, select your preferred embed size. Then, copy the Embed code.
In a separate tab, open the Canvas page that you would like to add the PowerPoint deck to. Then, click on the cloud icon (if you don’t see the Cloud icon, click the three dots to expand the menu bar).
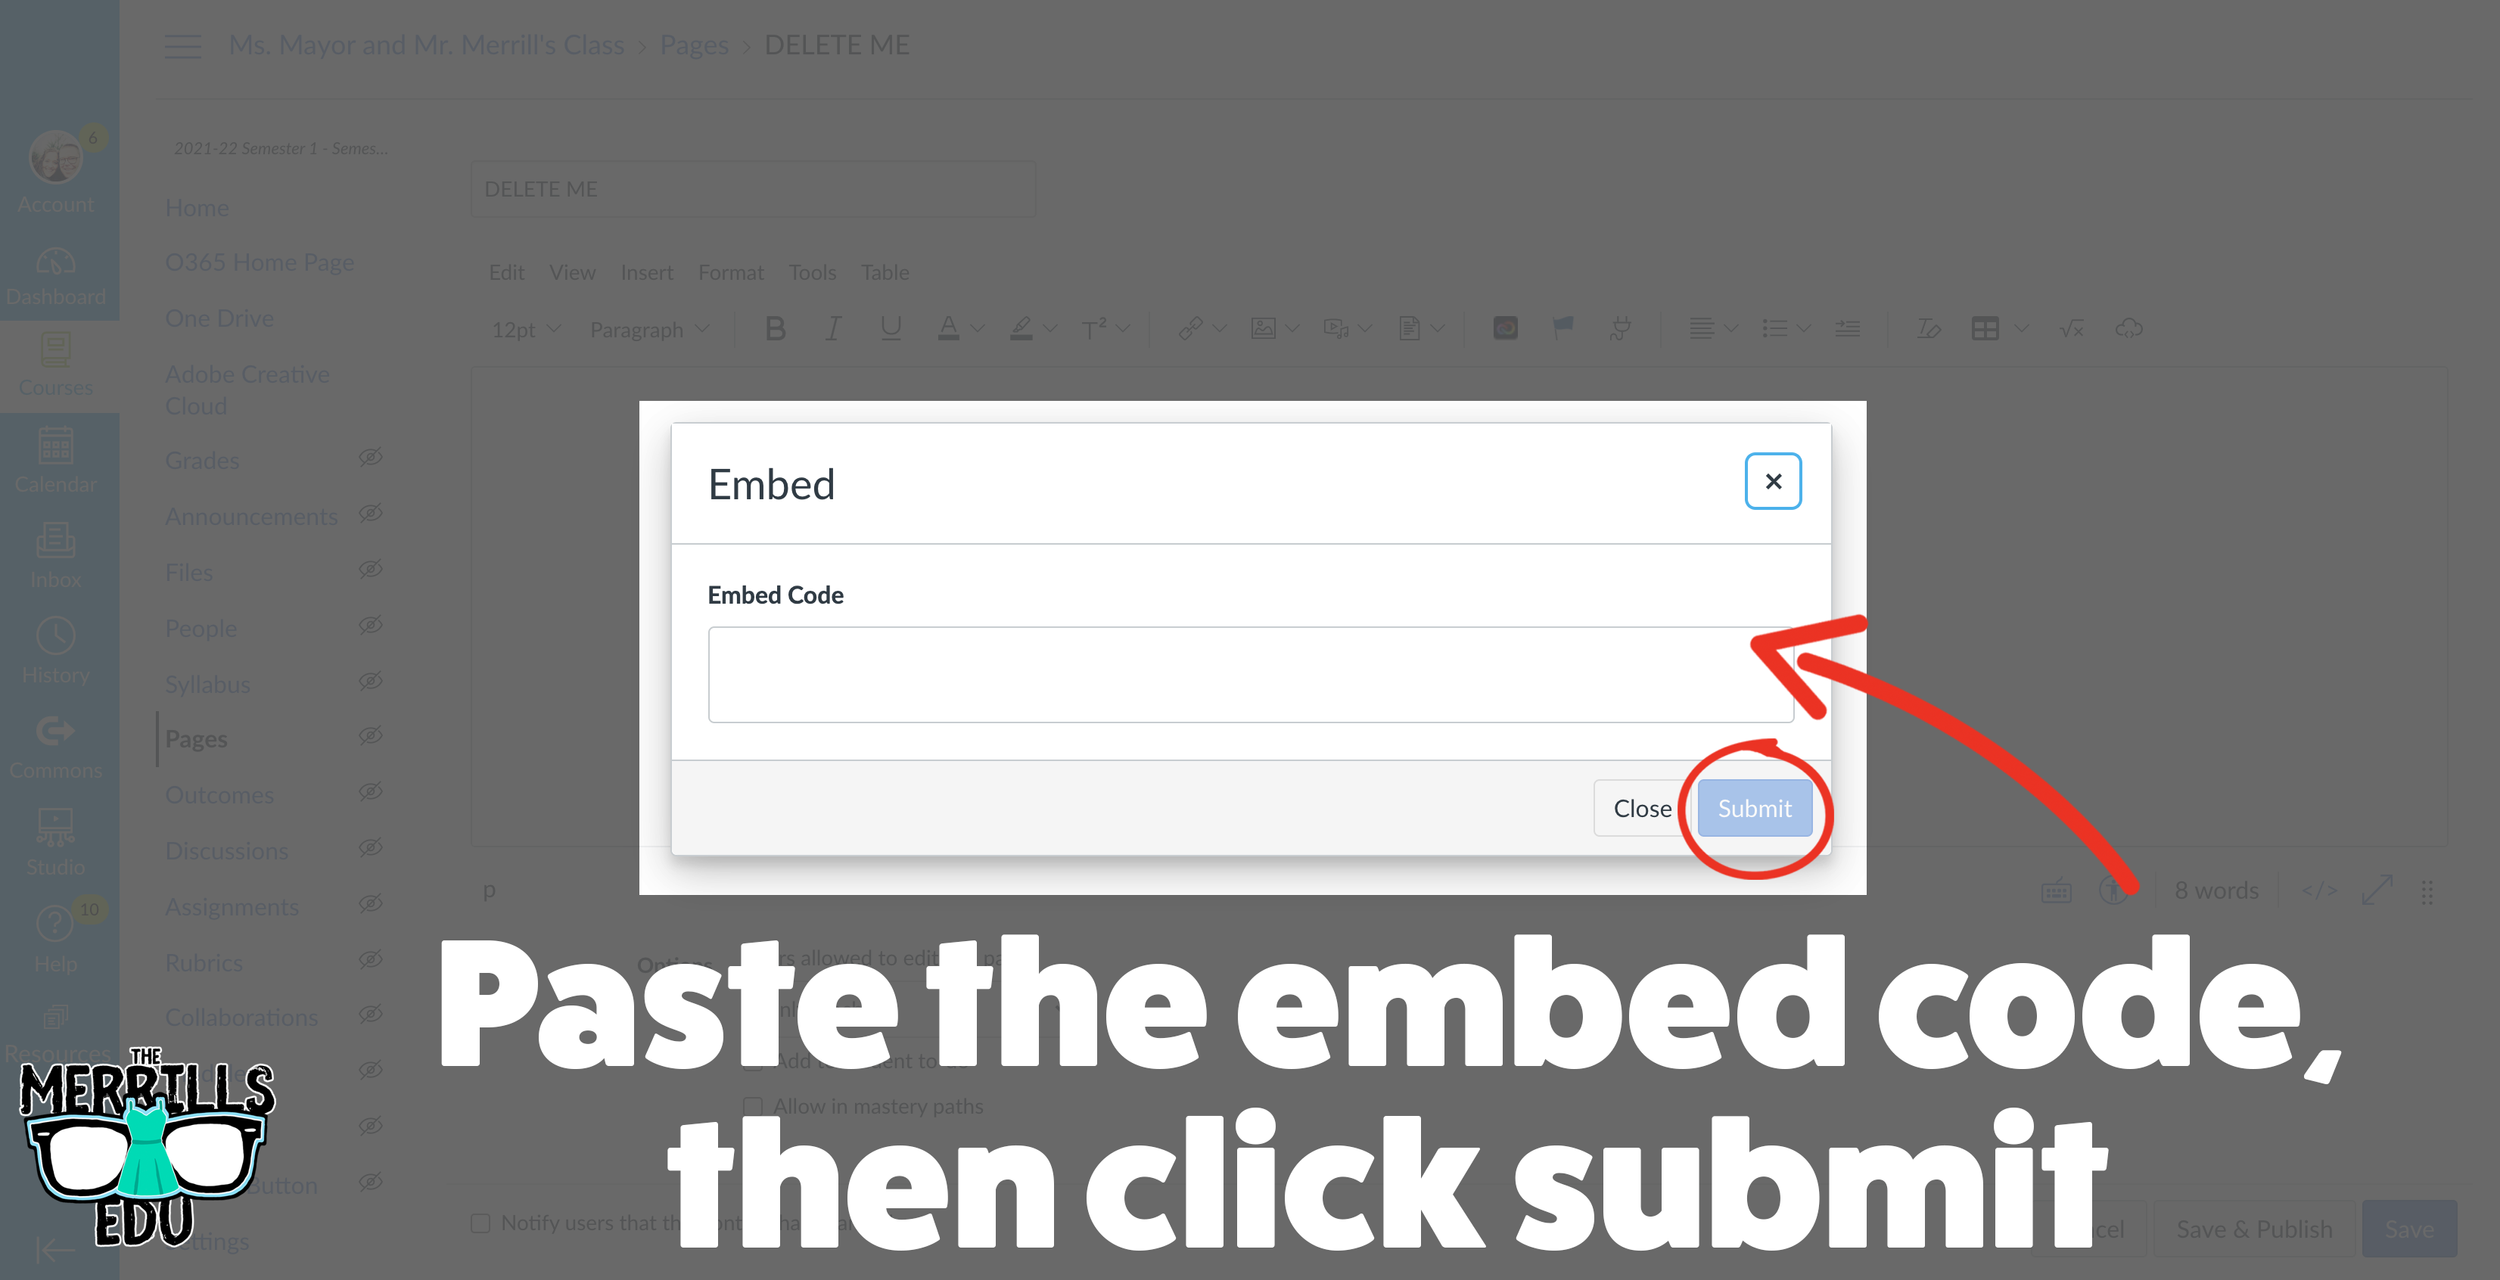
In the embed window, paste your copied code from PowerPoint Online. Then, click submit.
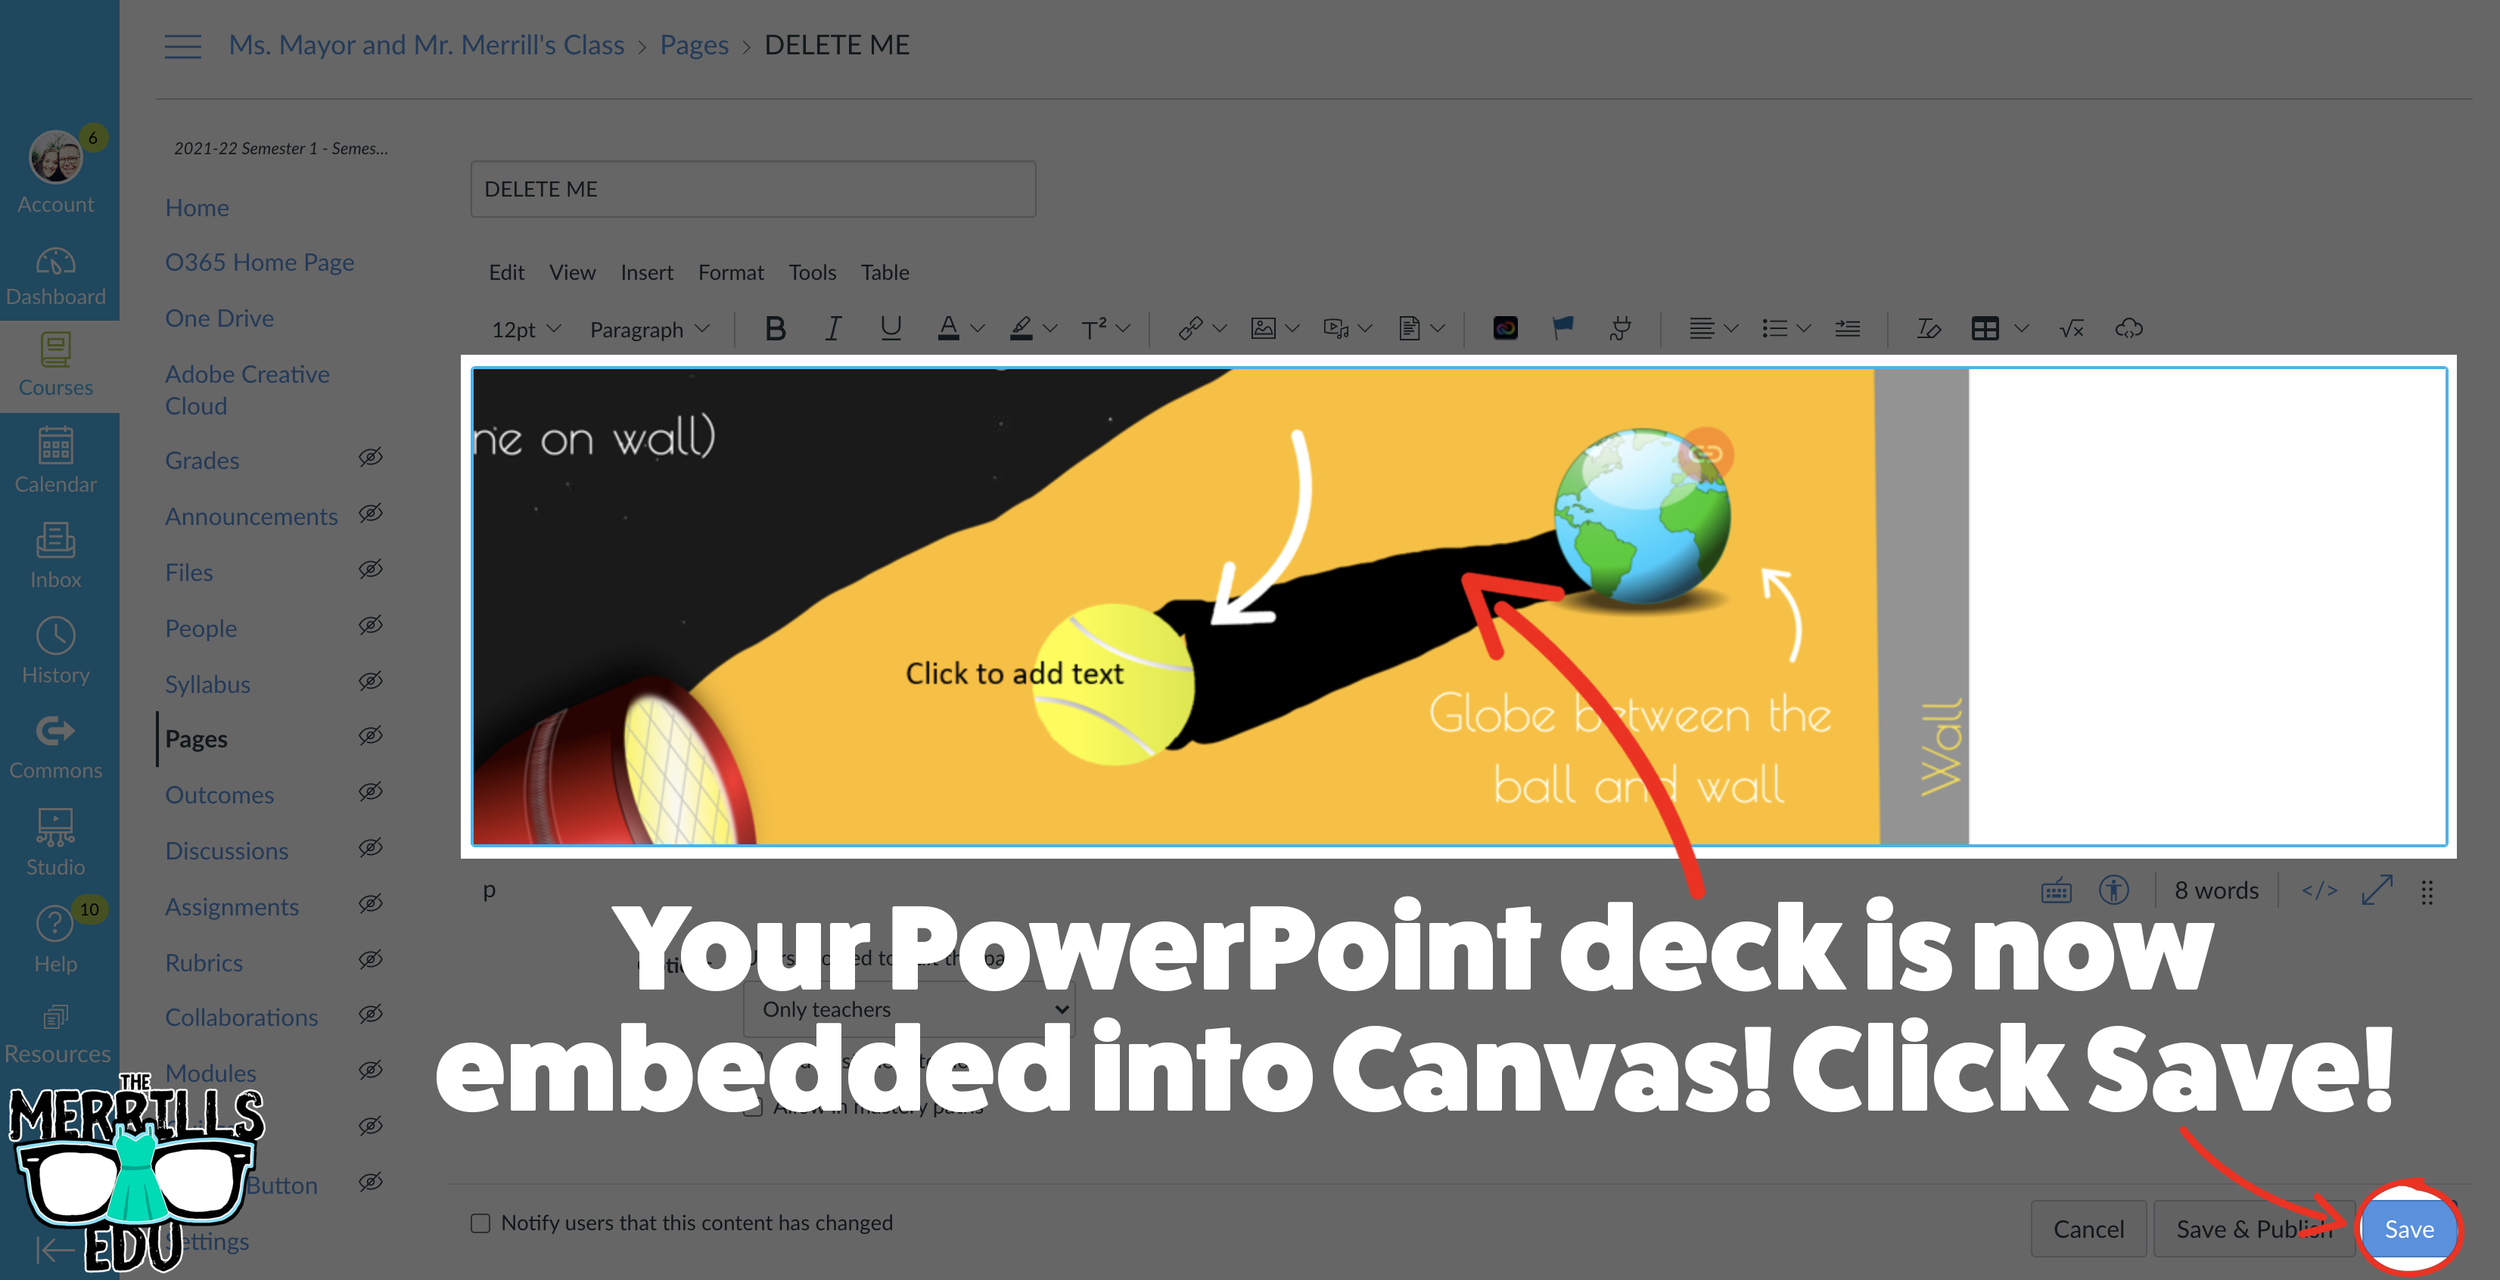
Your PowerPoint deck is now embedded into the Canvas page! Click on “Save” to update the changes.

Google Slides Embedded into Canvas
Google Slides users can get in on the embedding fun, too! In just several clicks, you can take your Google Slides deck and embed them into Canvas. Here’s how:
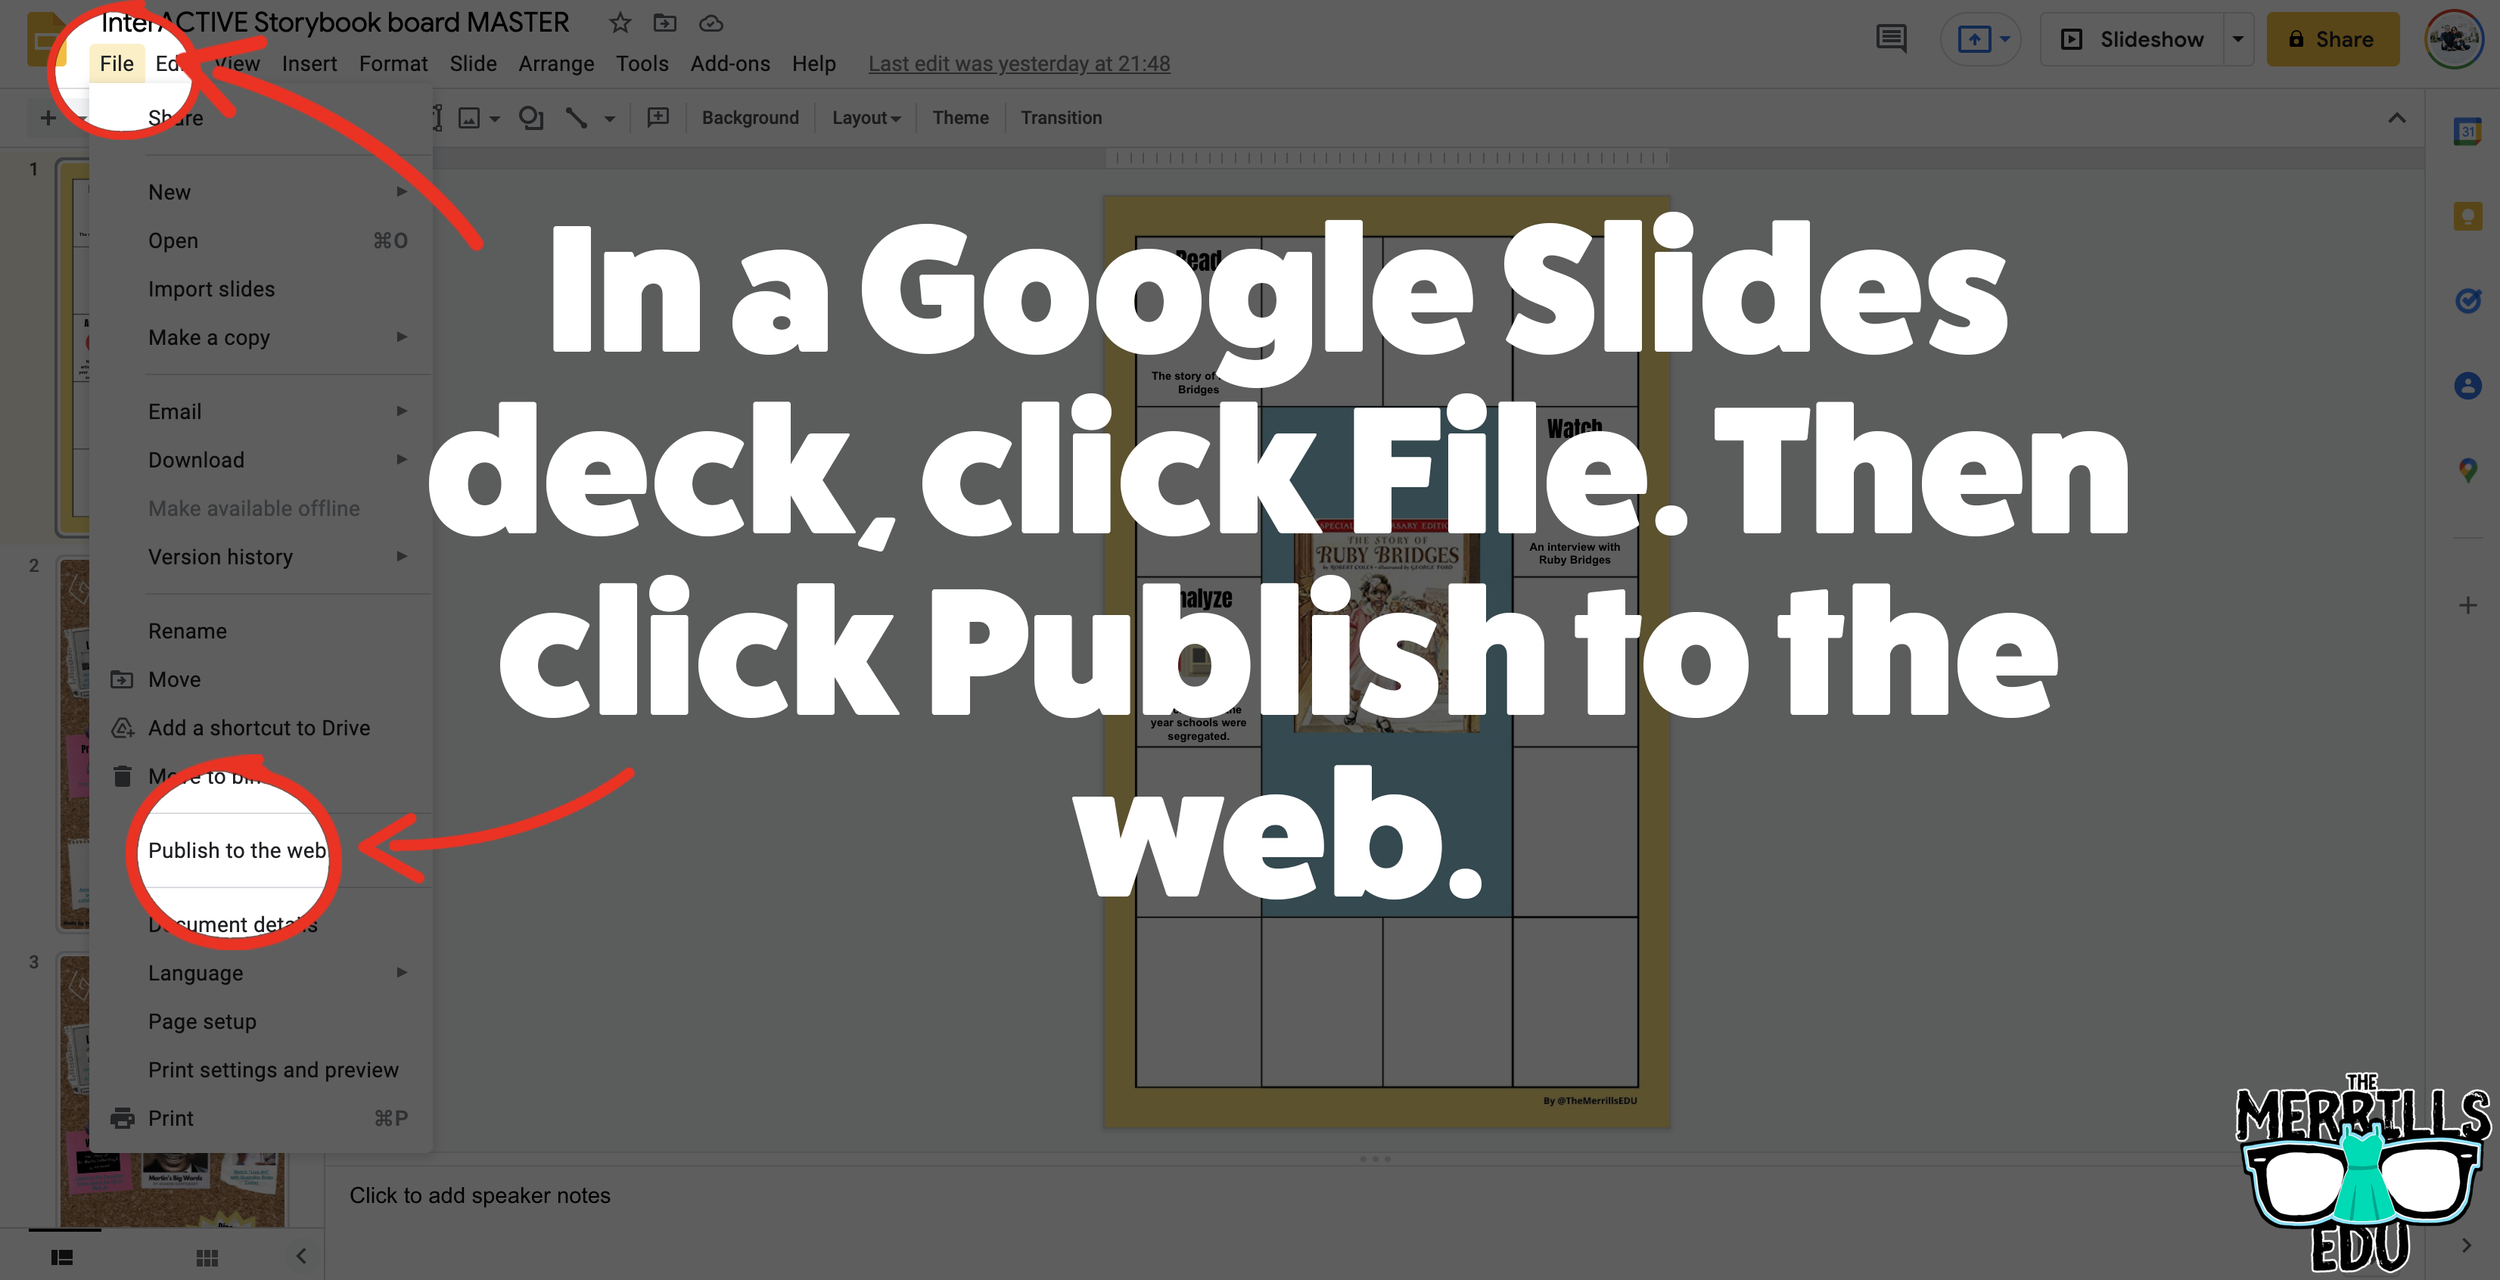


In your Google Slide deck, click “File,” then click “Publish to the web.’
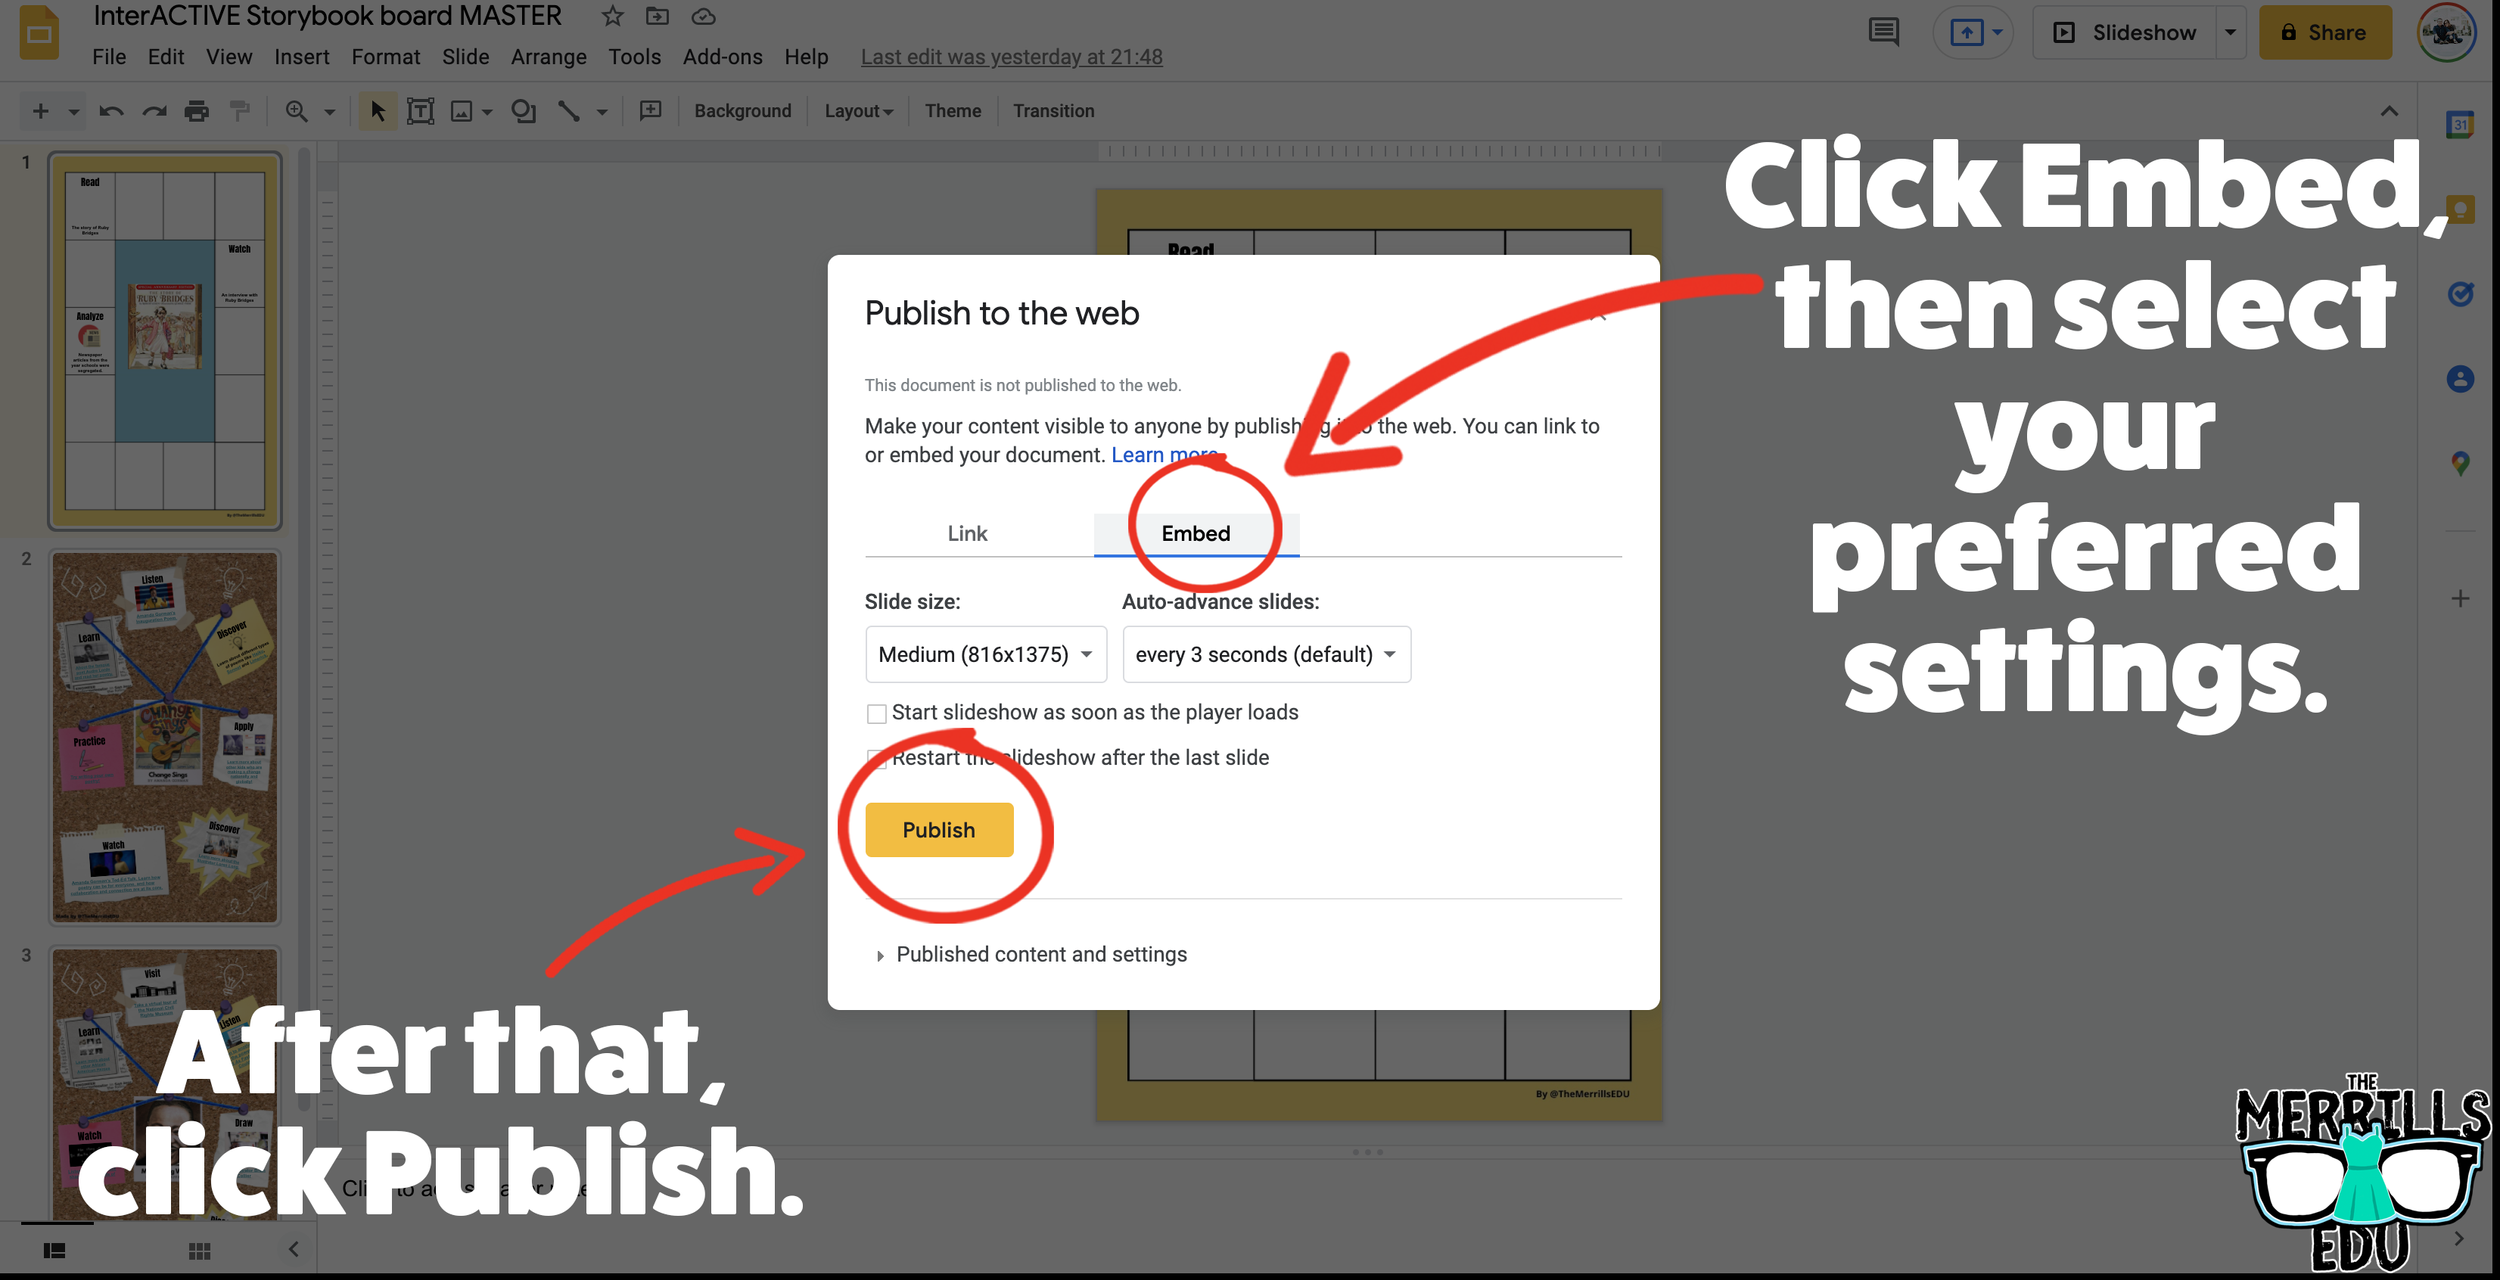
Click on Embed, then select your preferred settings. Once you have everything set, click “Publish.” (If you’re asked if you are sure you want to publish, say “yes or ok.”)
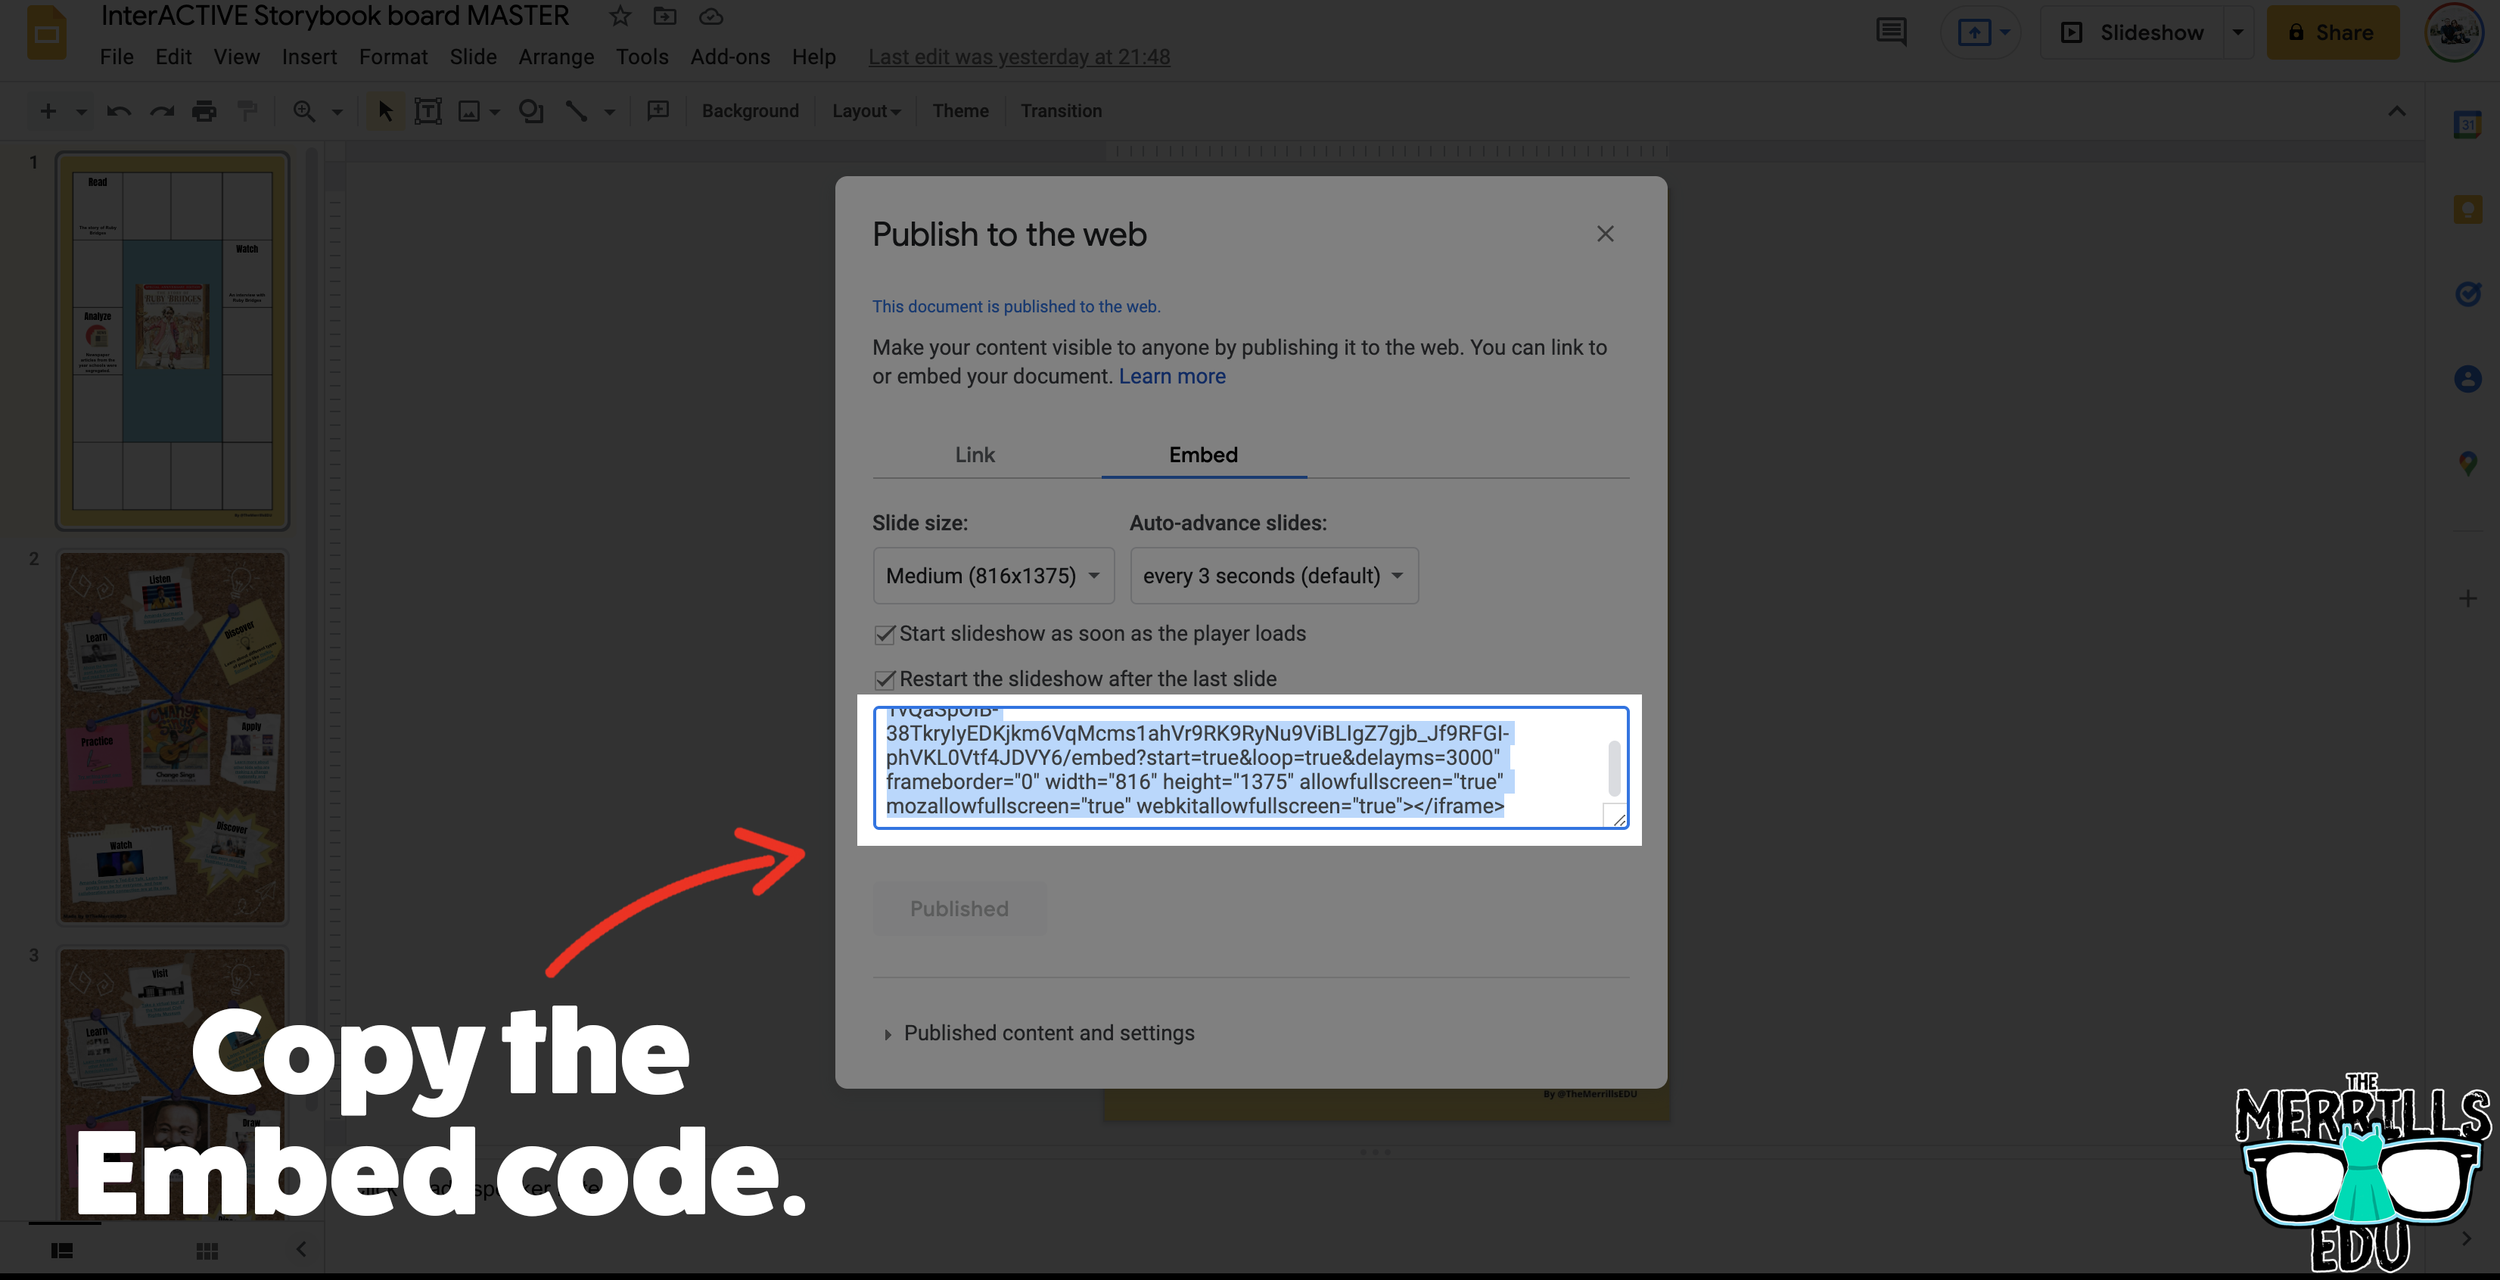
On the next screen, copy your embed code.
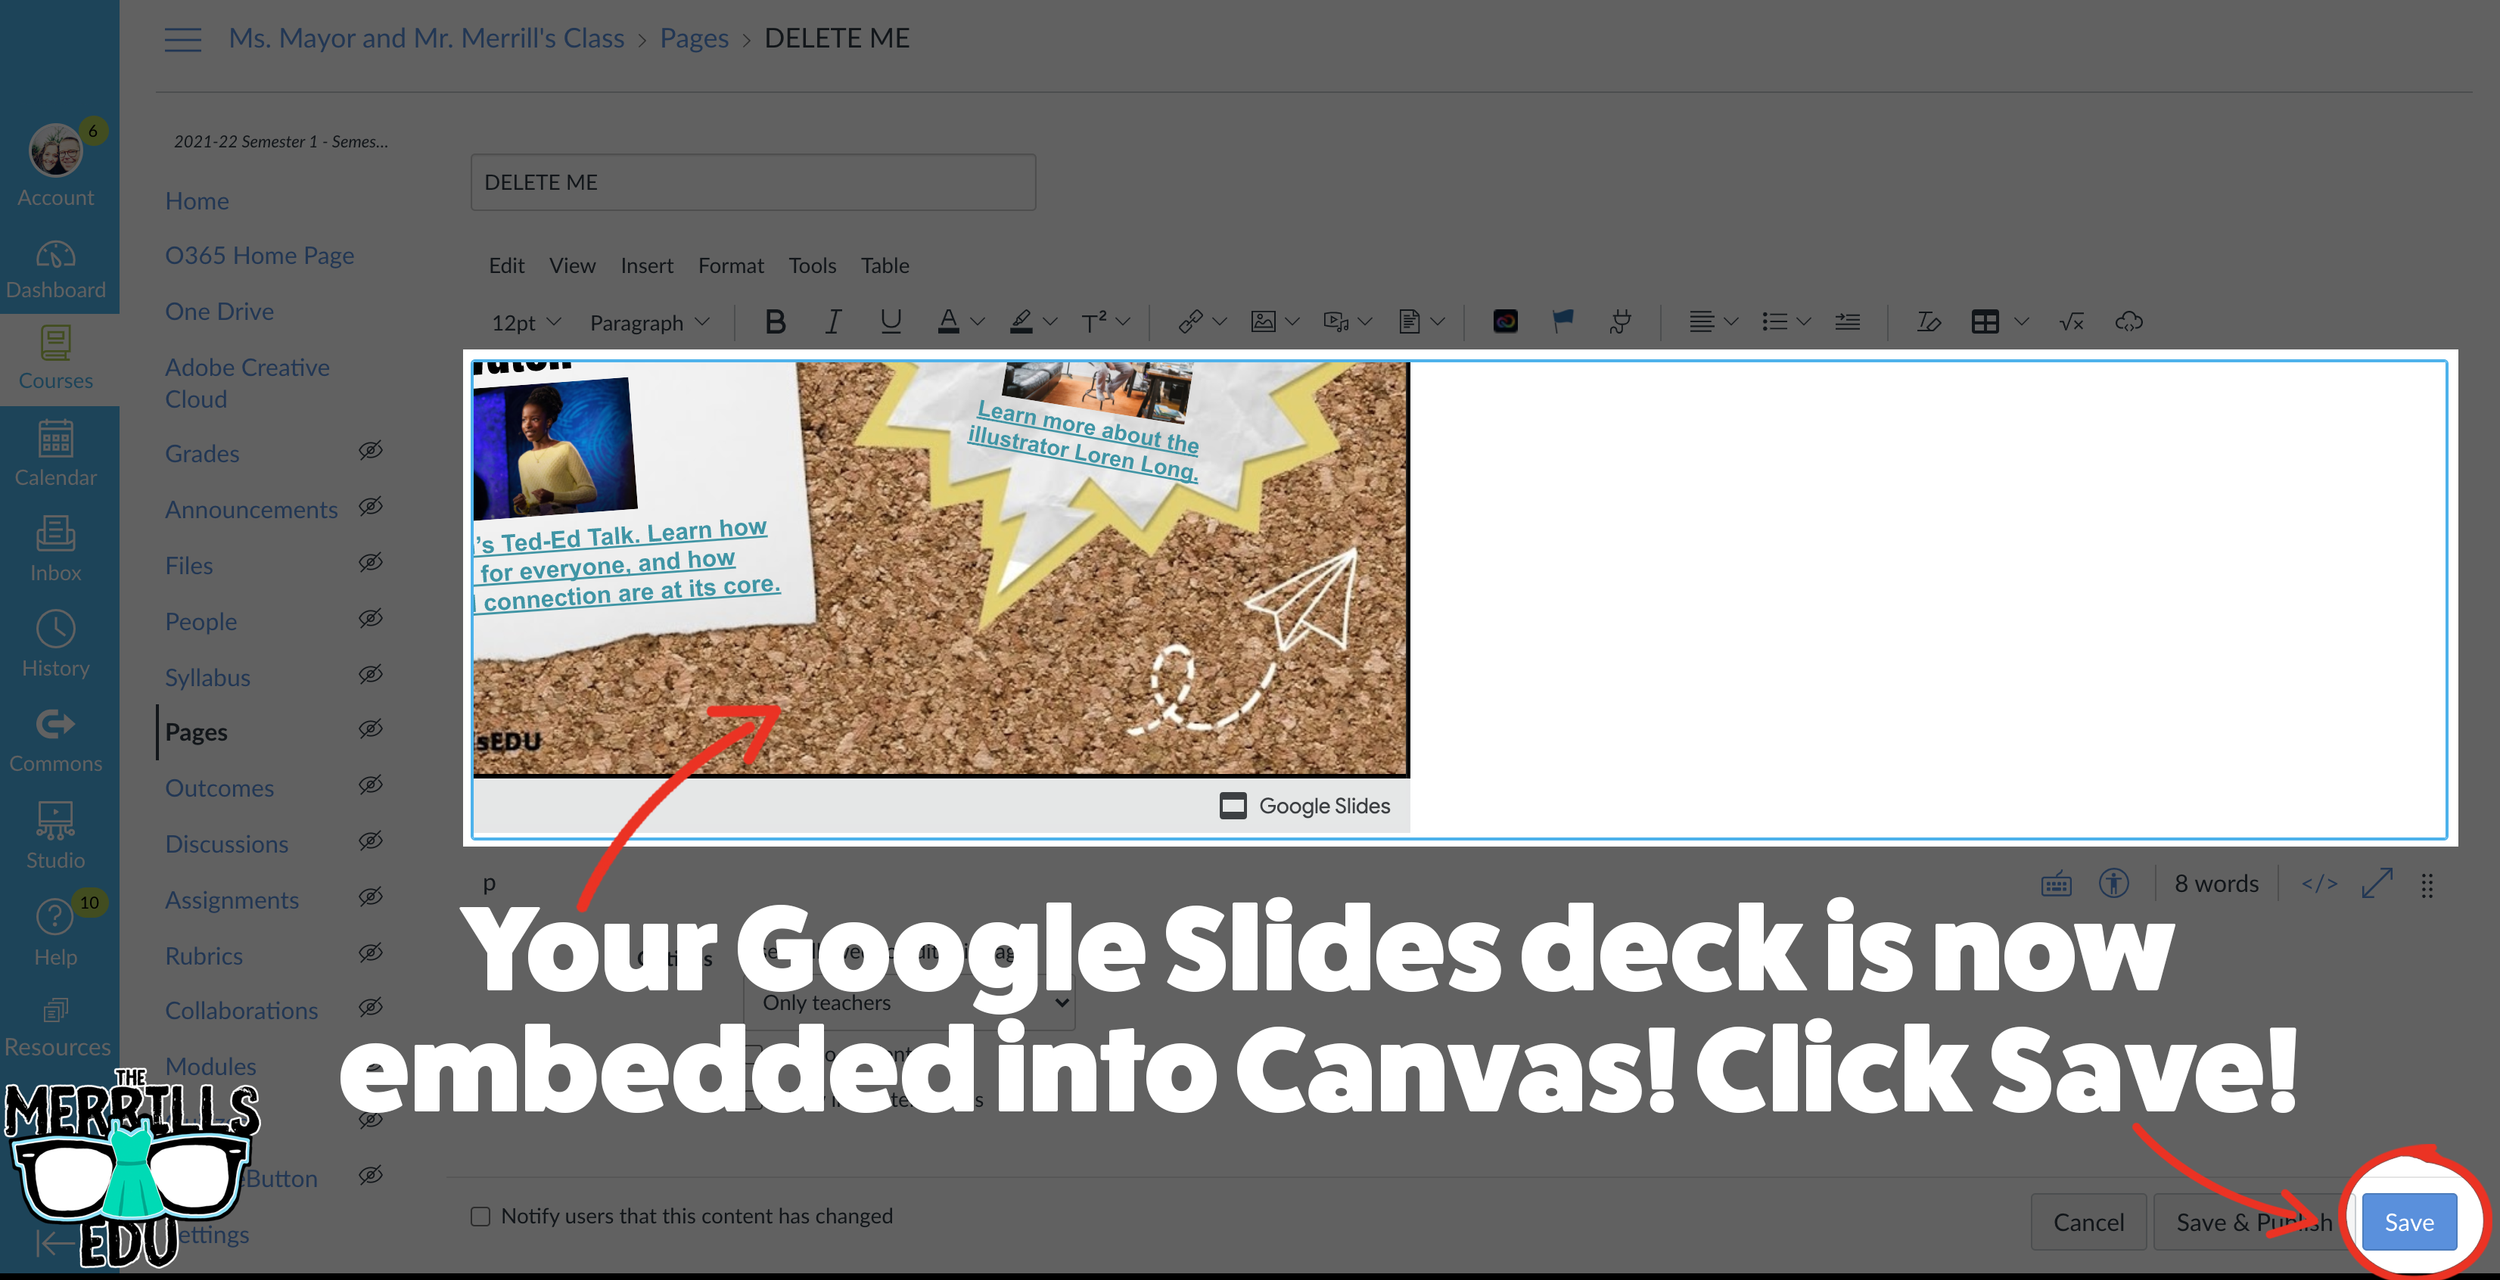
In a separate tab, open the Canvas page that you would like to add the Google Slides deck to. Then, click on the cloud icon (if you don’t see the Cloud icon, click the three dots to expand the menu bar).
In the embed window, paste your copied code from Google Slides. Then, click submit.
Your Google Slides deck is now embedded into the Canvas page! Click on “Save” to update the changes.

Wakelet Embedded into OneNote
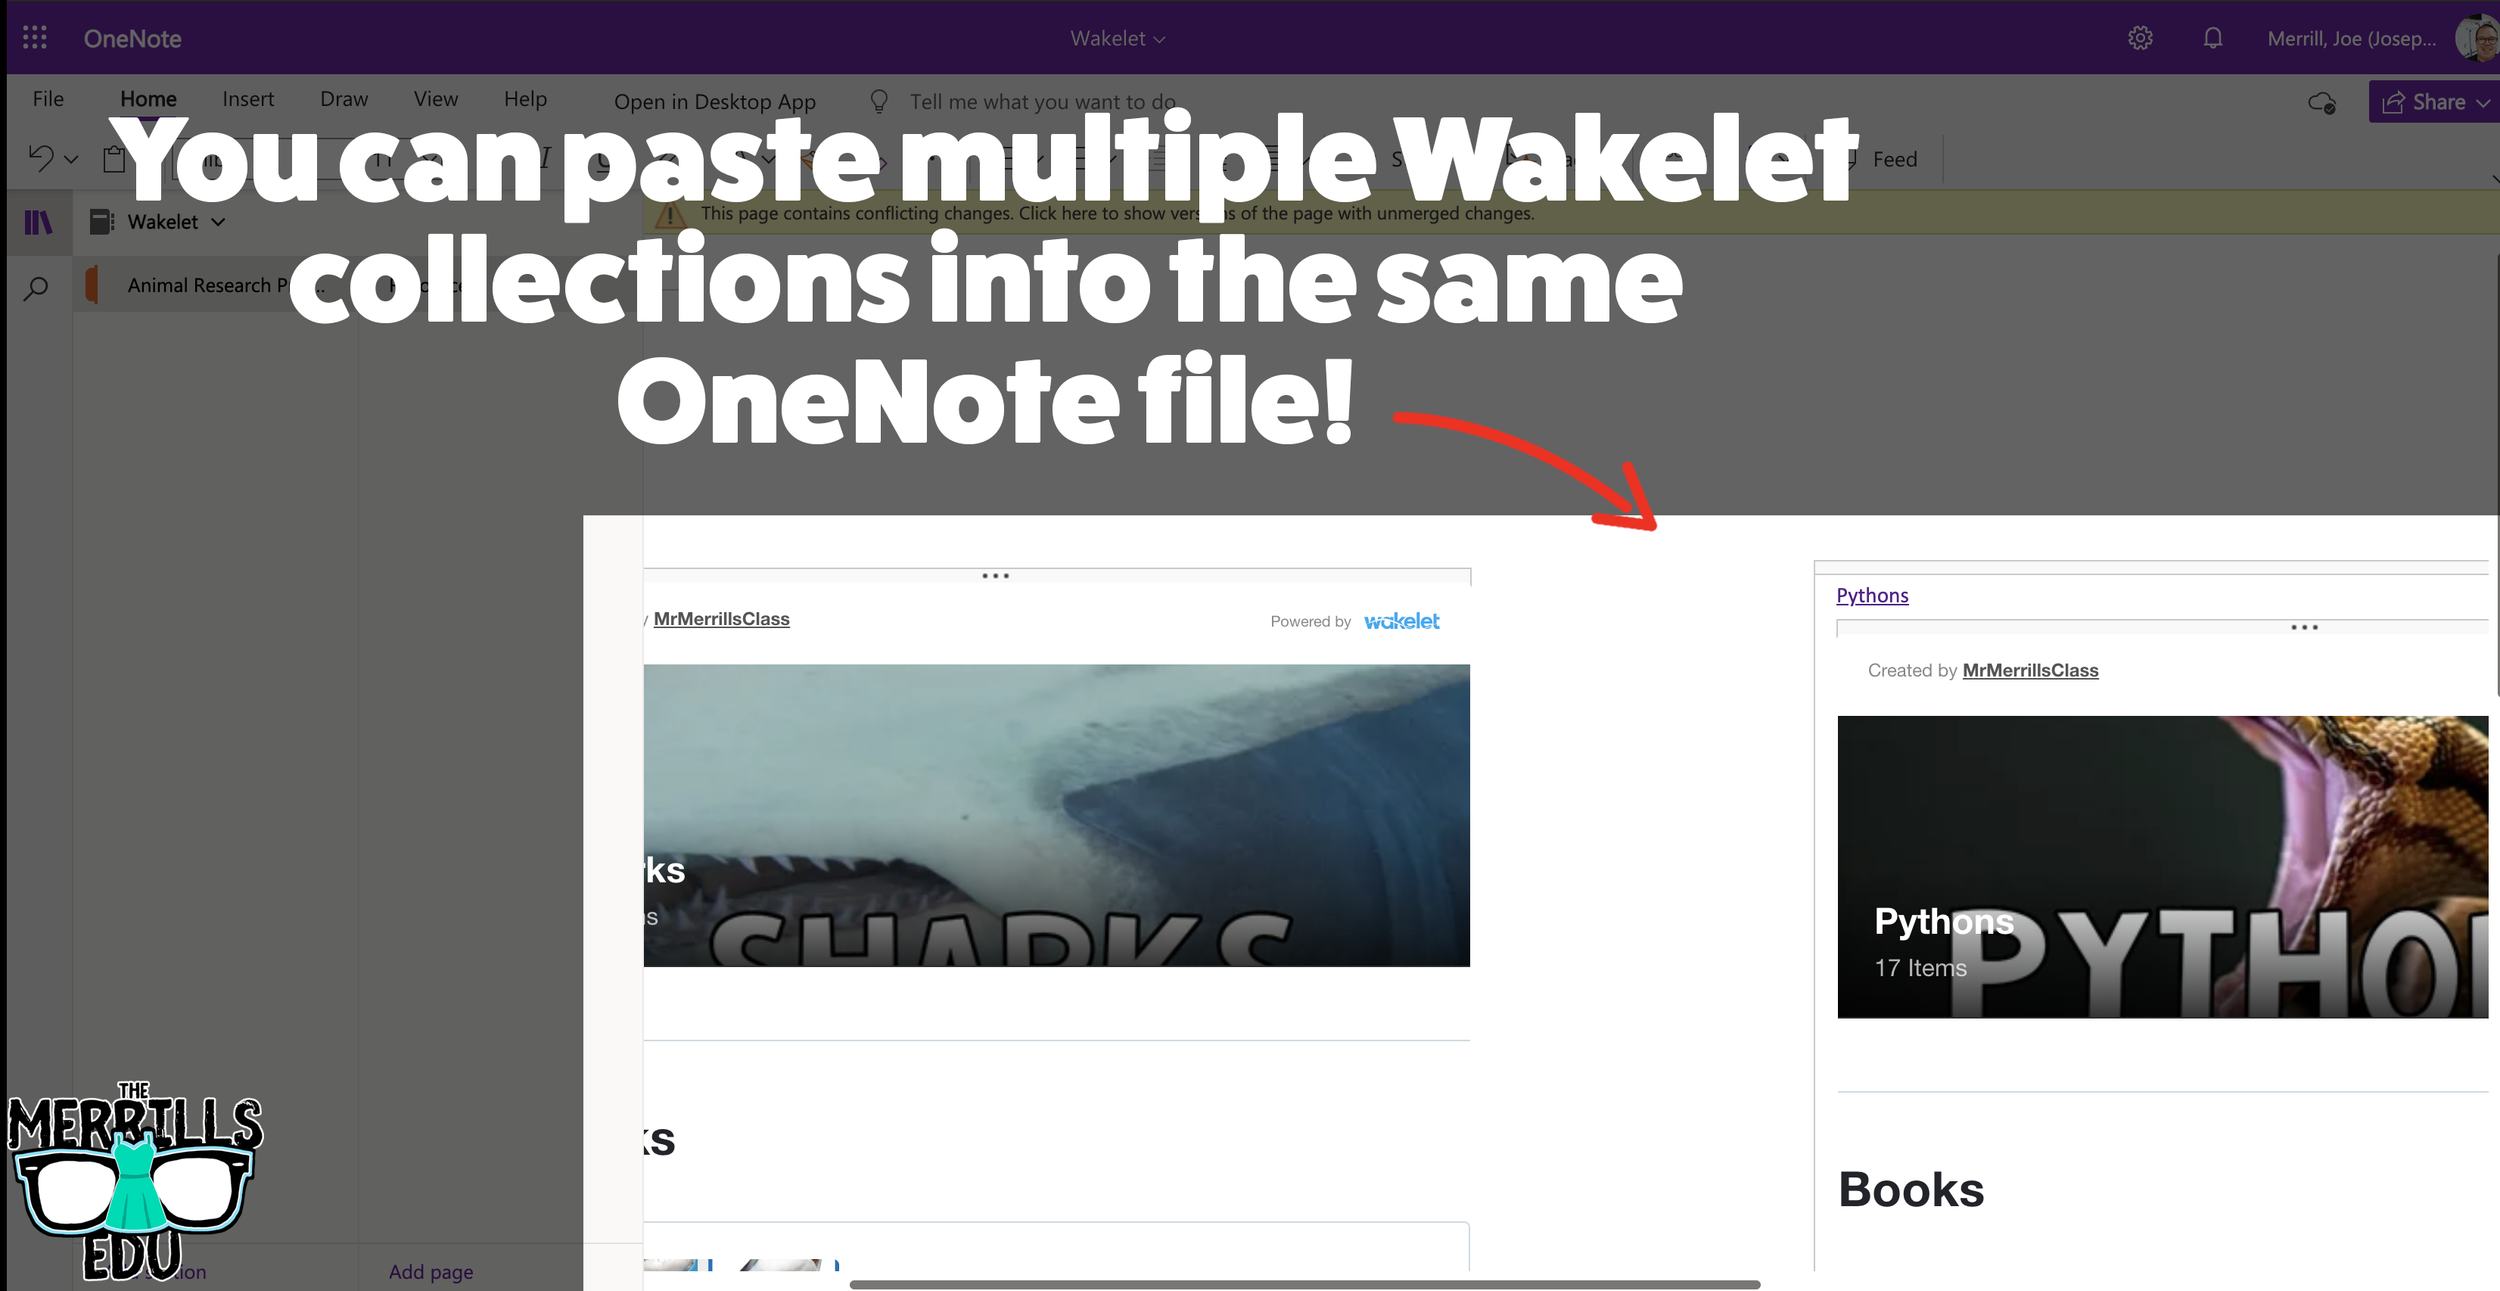
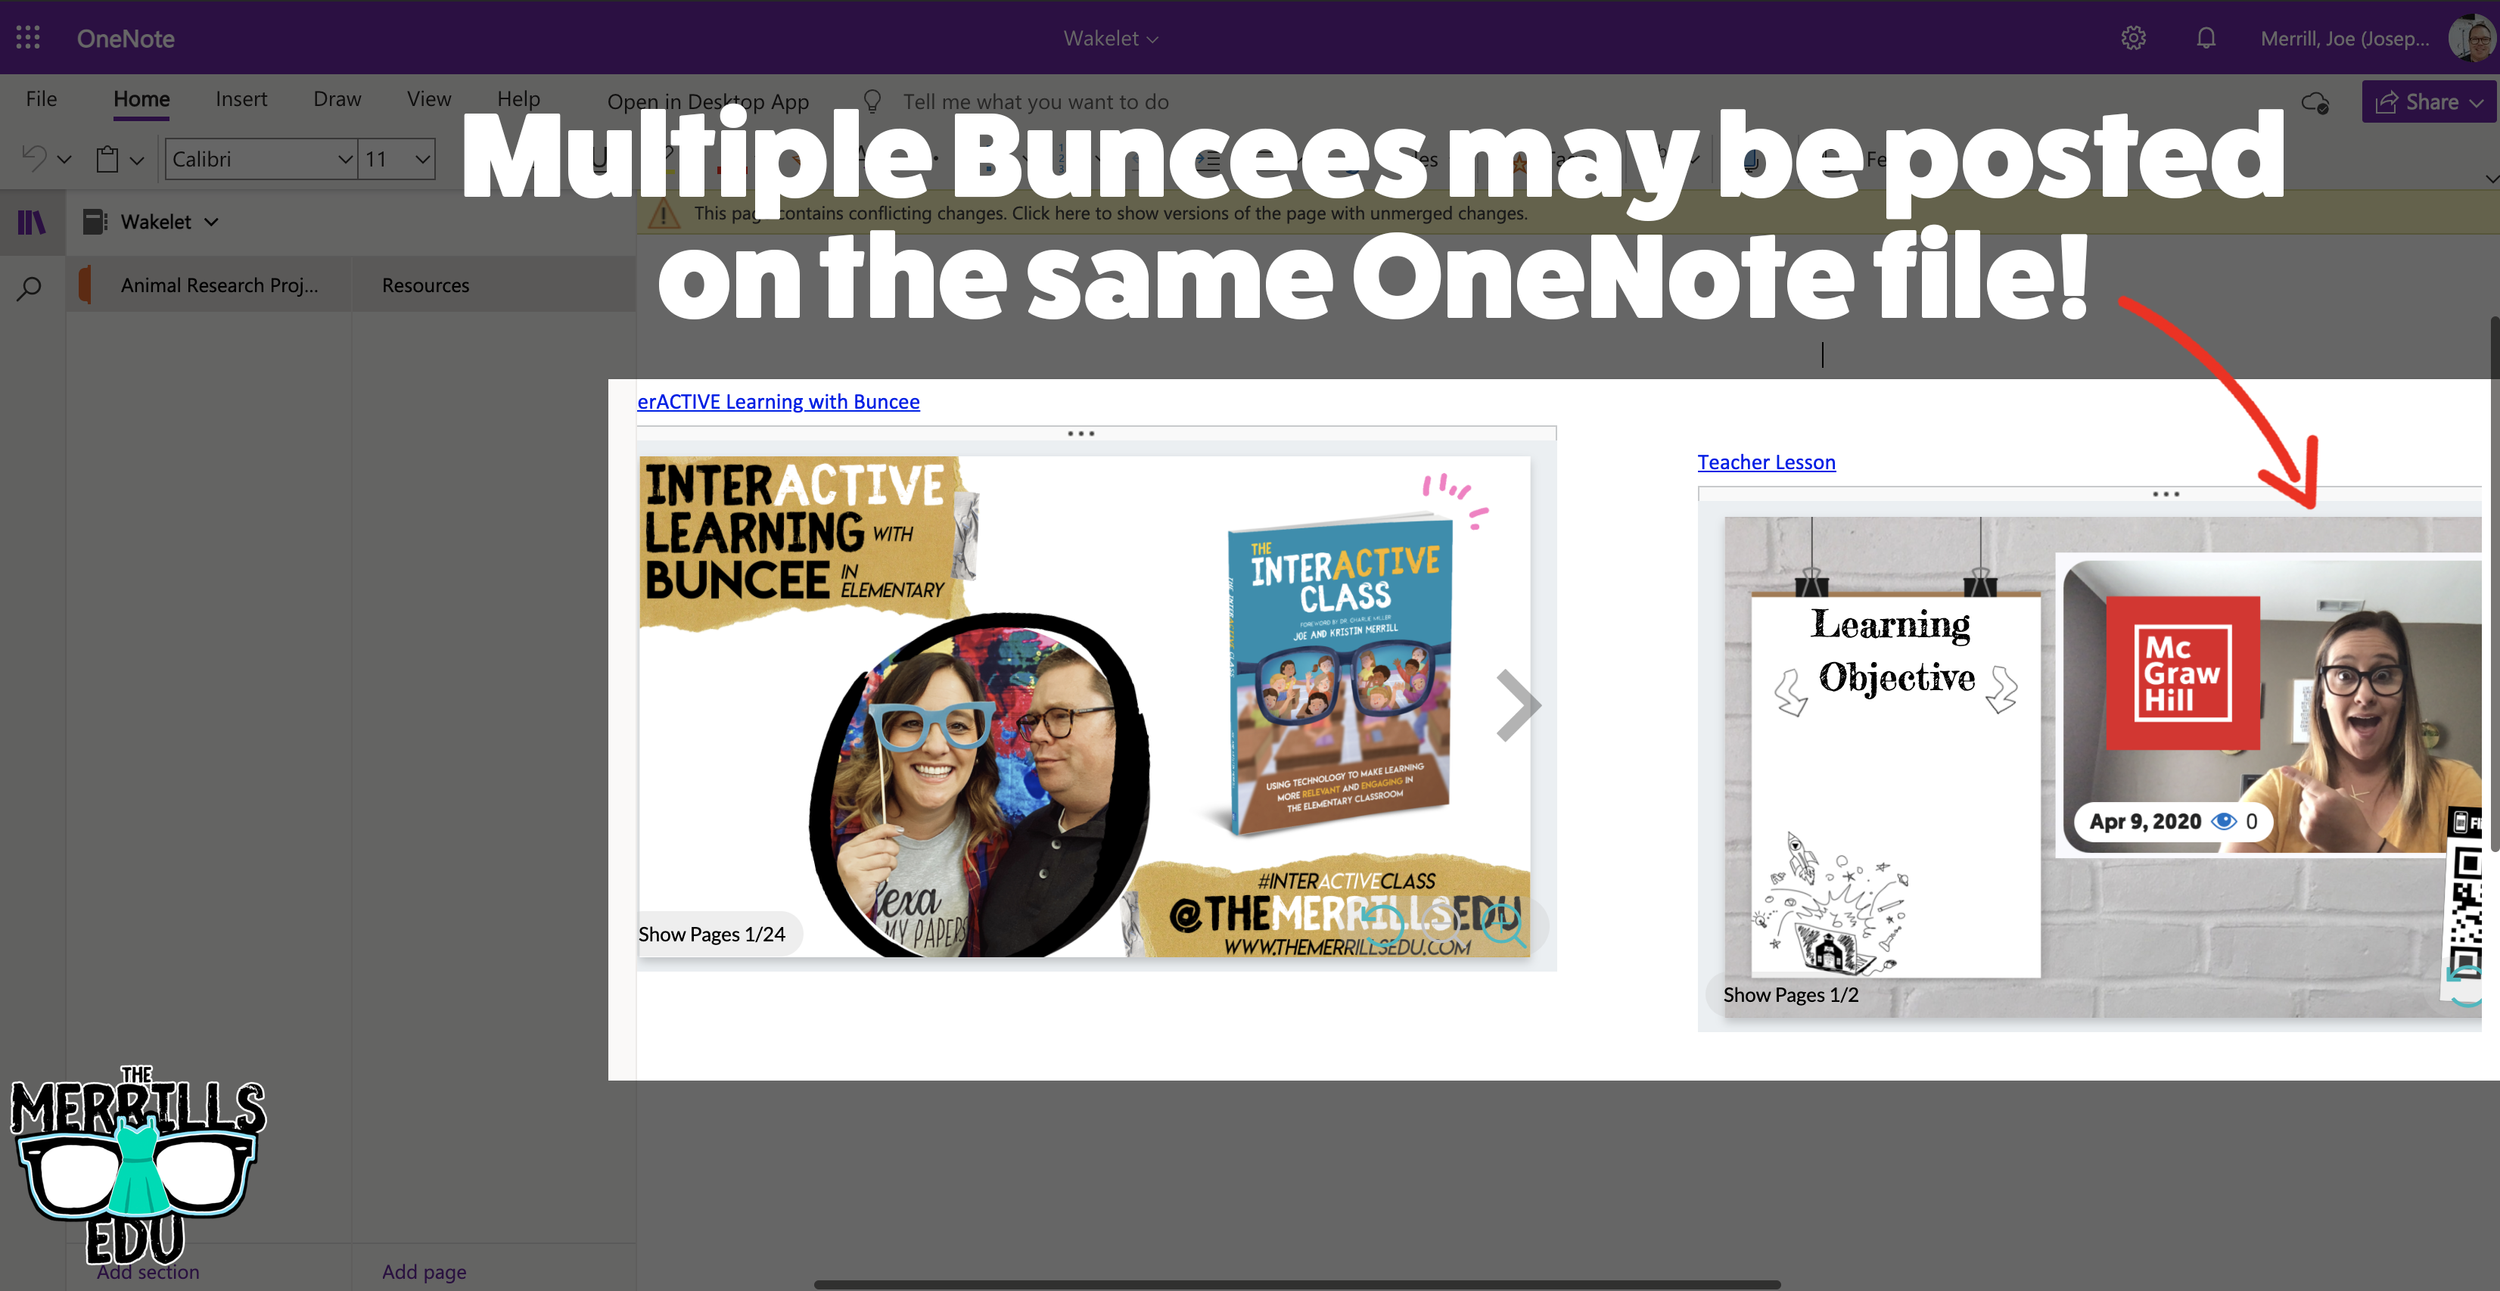
You don’t need an LMS (learning management system) to embed apps. If you’re a Microsoft user, you can embed Wakelet collections right into a OneNote file. The best part of all - this is a ⚡️LIVE⚡️ embed, meaning that any changes made to the Wakelet collection will automatically change in the OneNote file. Additionally, you can embed multiple Wakelet collections into one - OneNote file. Here’s how it all works:
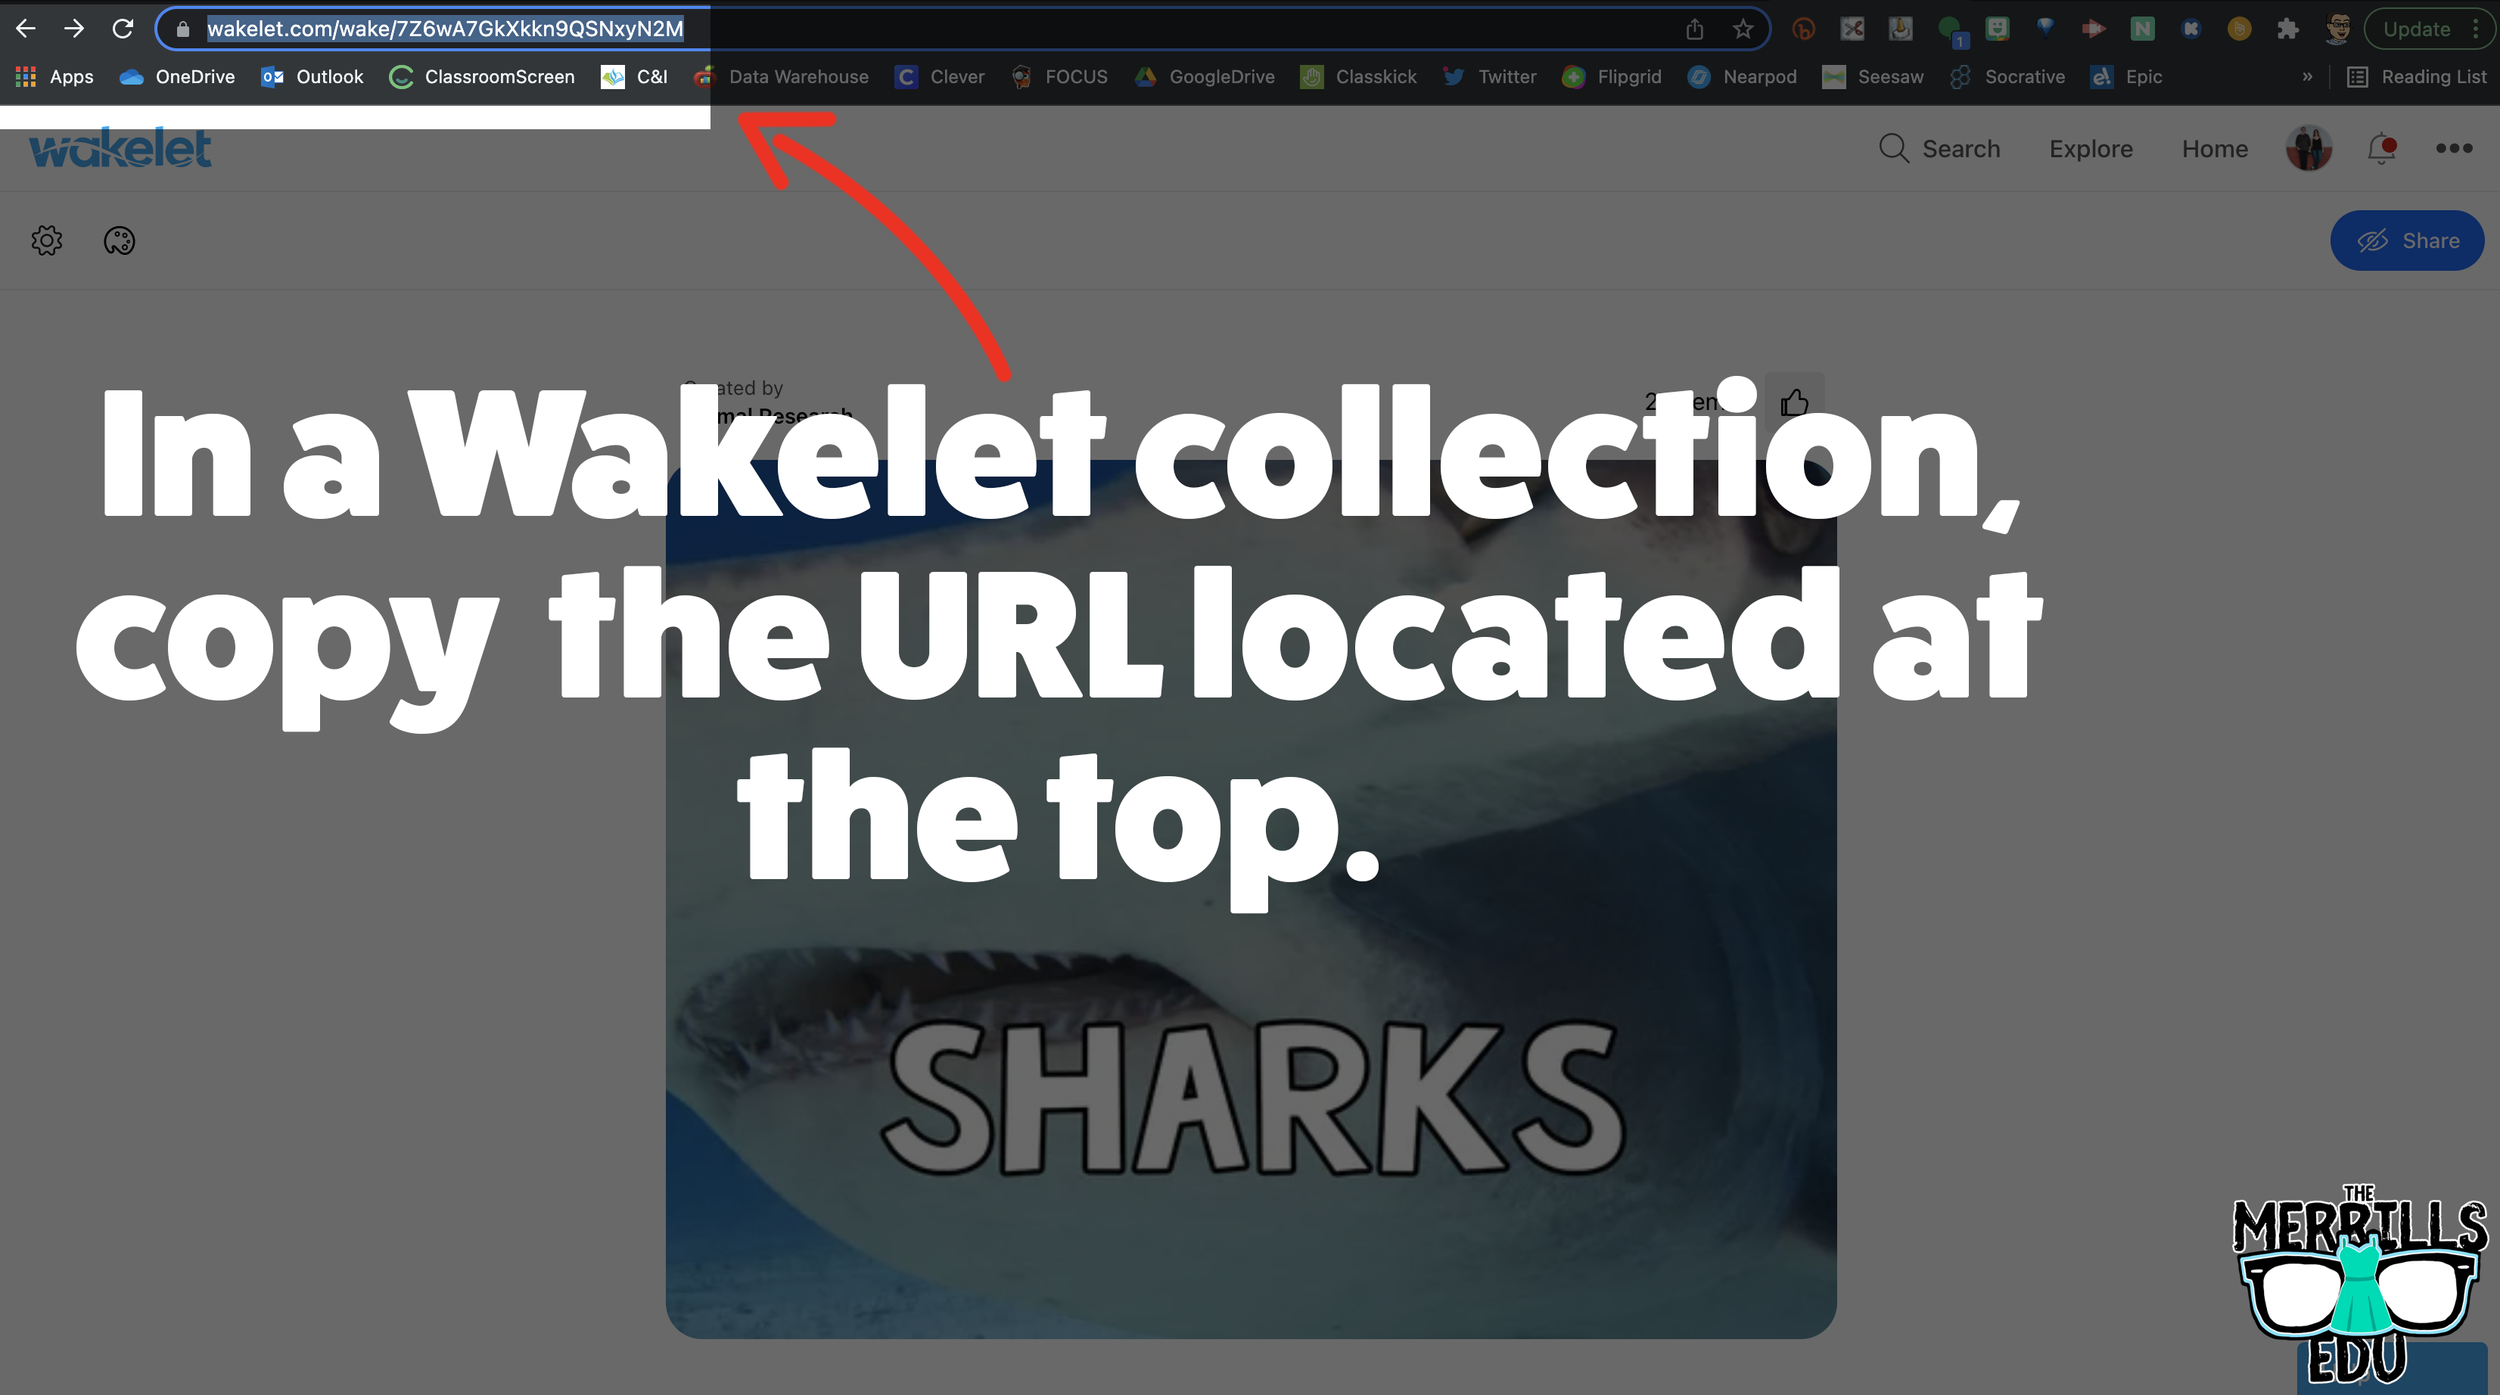
In a Wakelet Collection, copy the URL located at the top.
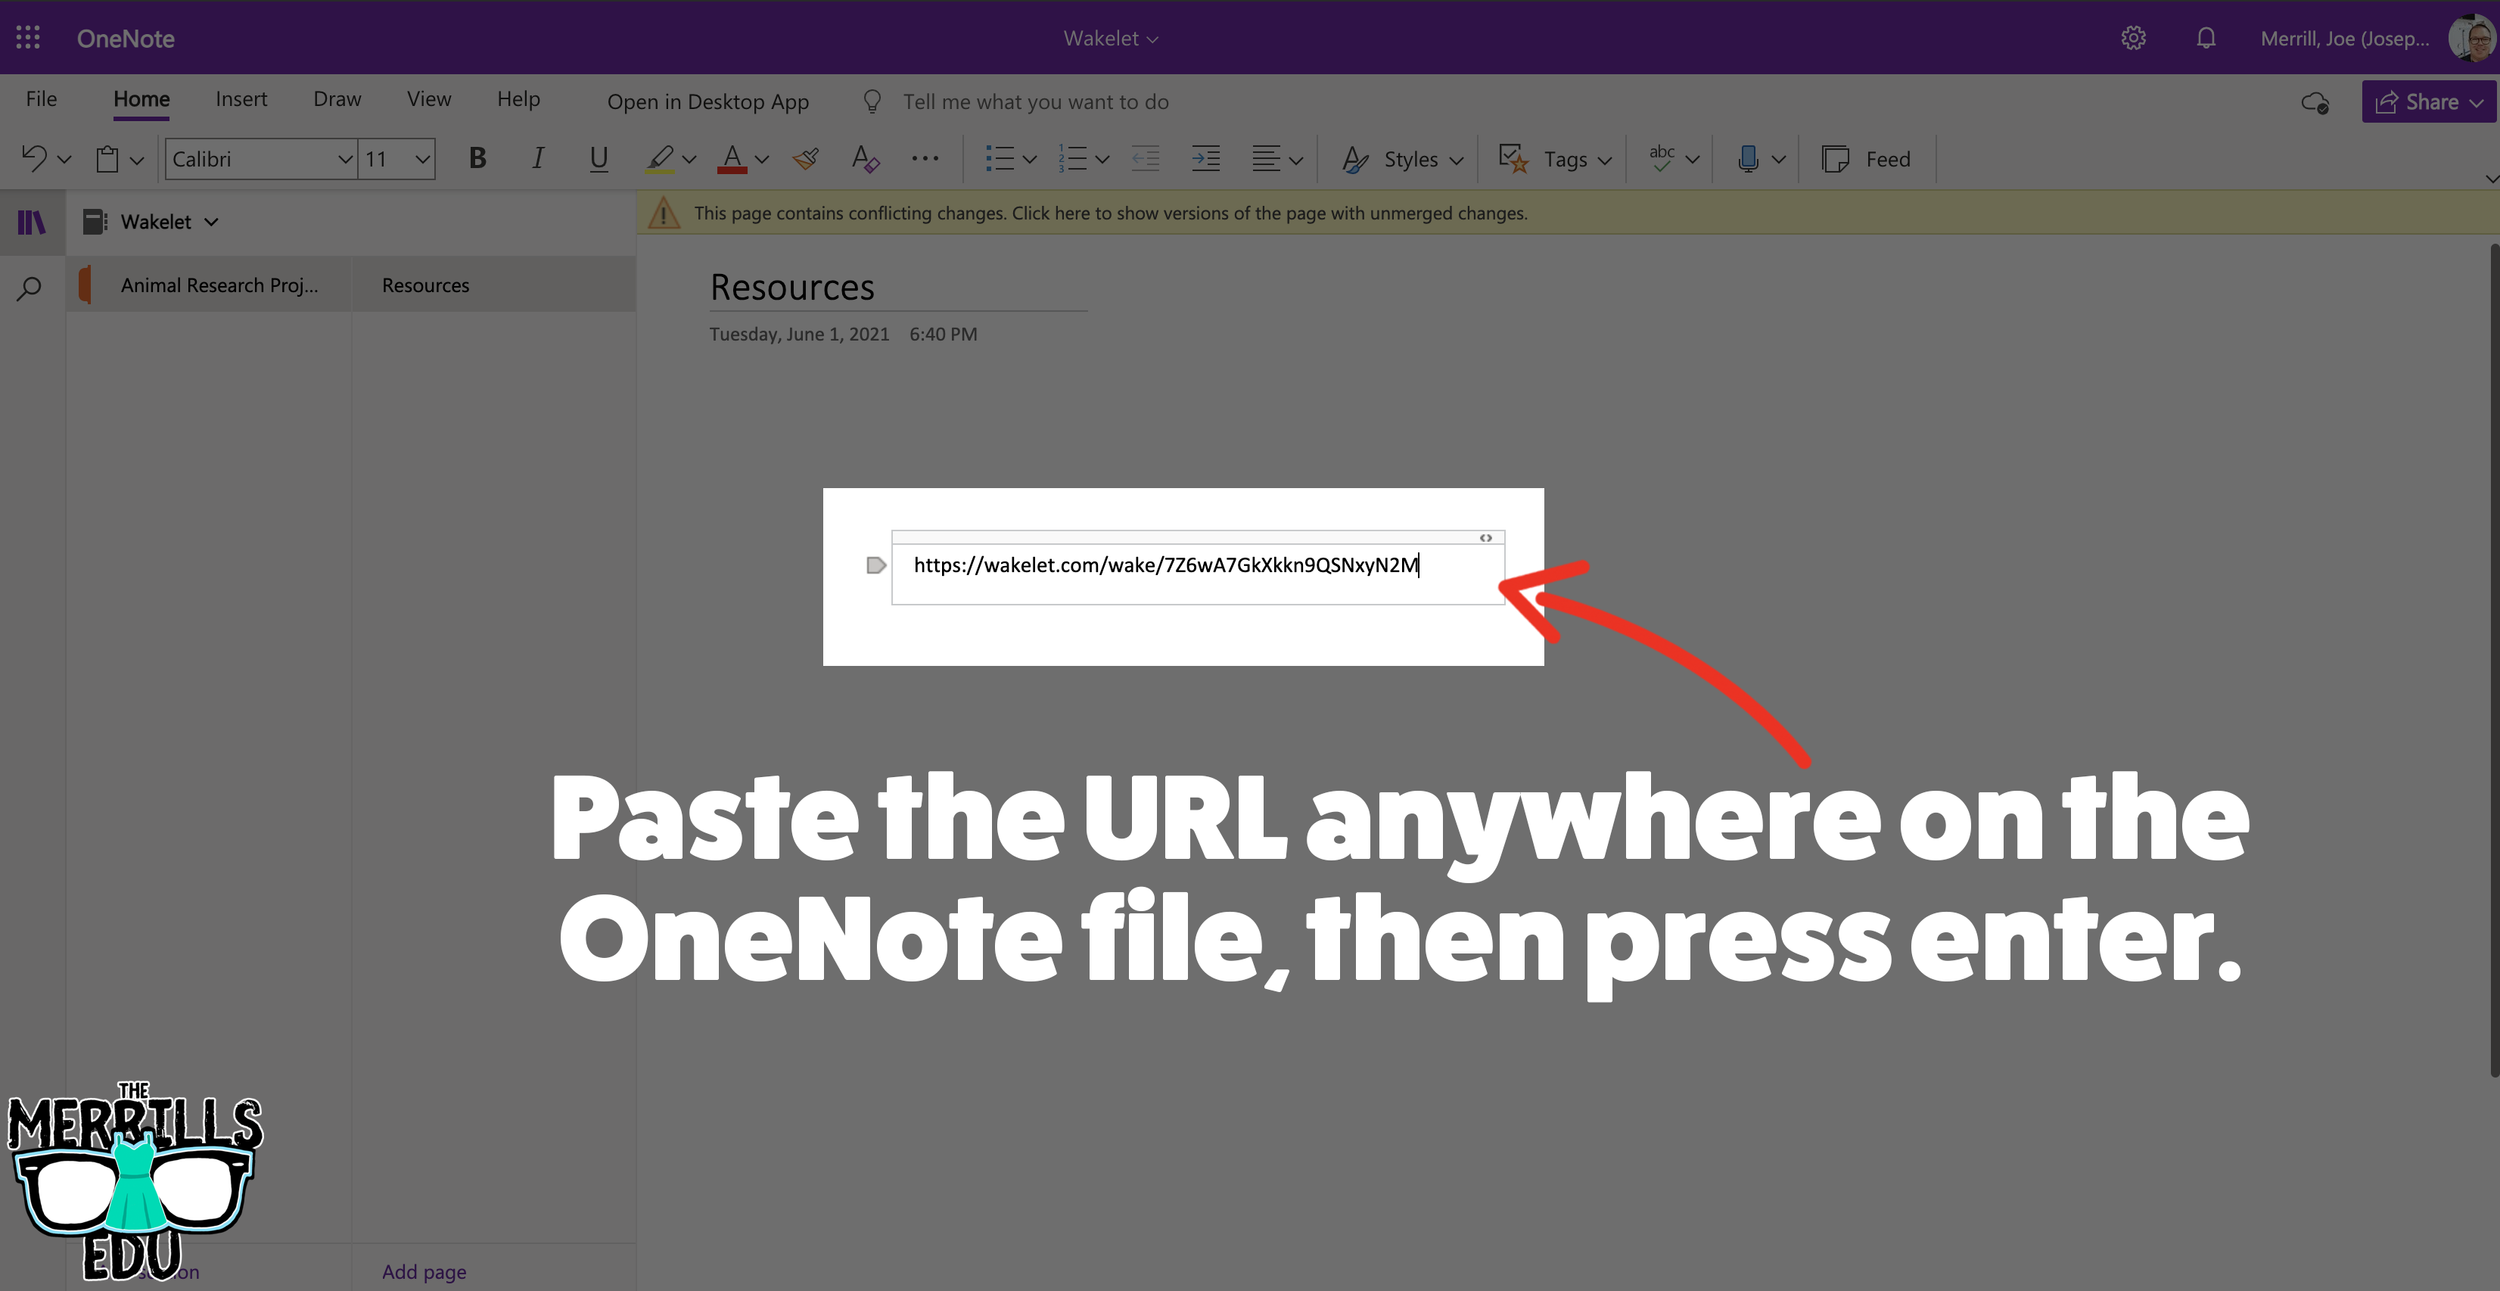
In a separate tab, open the OneNote file that you would like to add the Wakelet Collection to. Then, paste the URL anywhere on the OneNote file.
Press enter to start the live embed.
Repeat this process to add additional collections to the OneNote file.

Buncee Embedded into OneNote
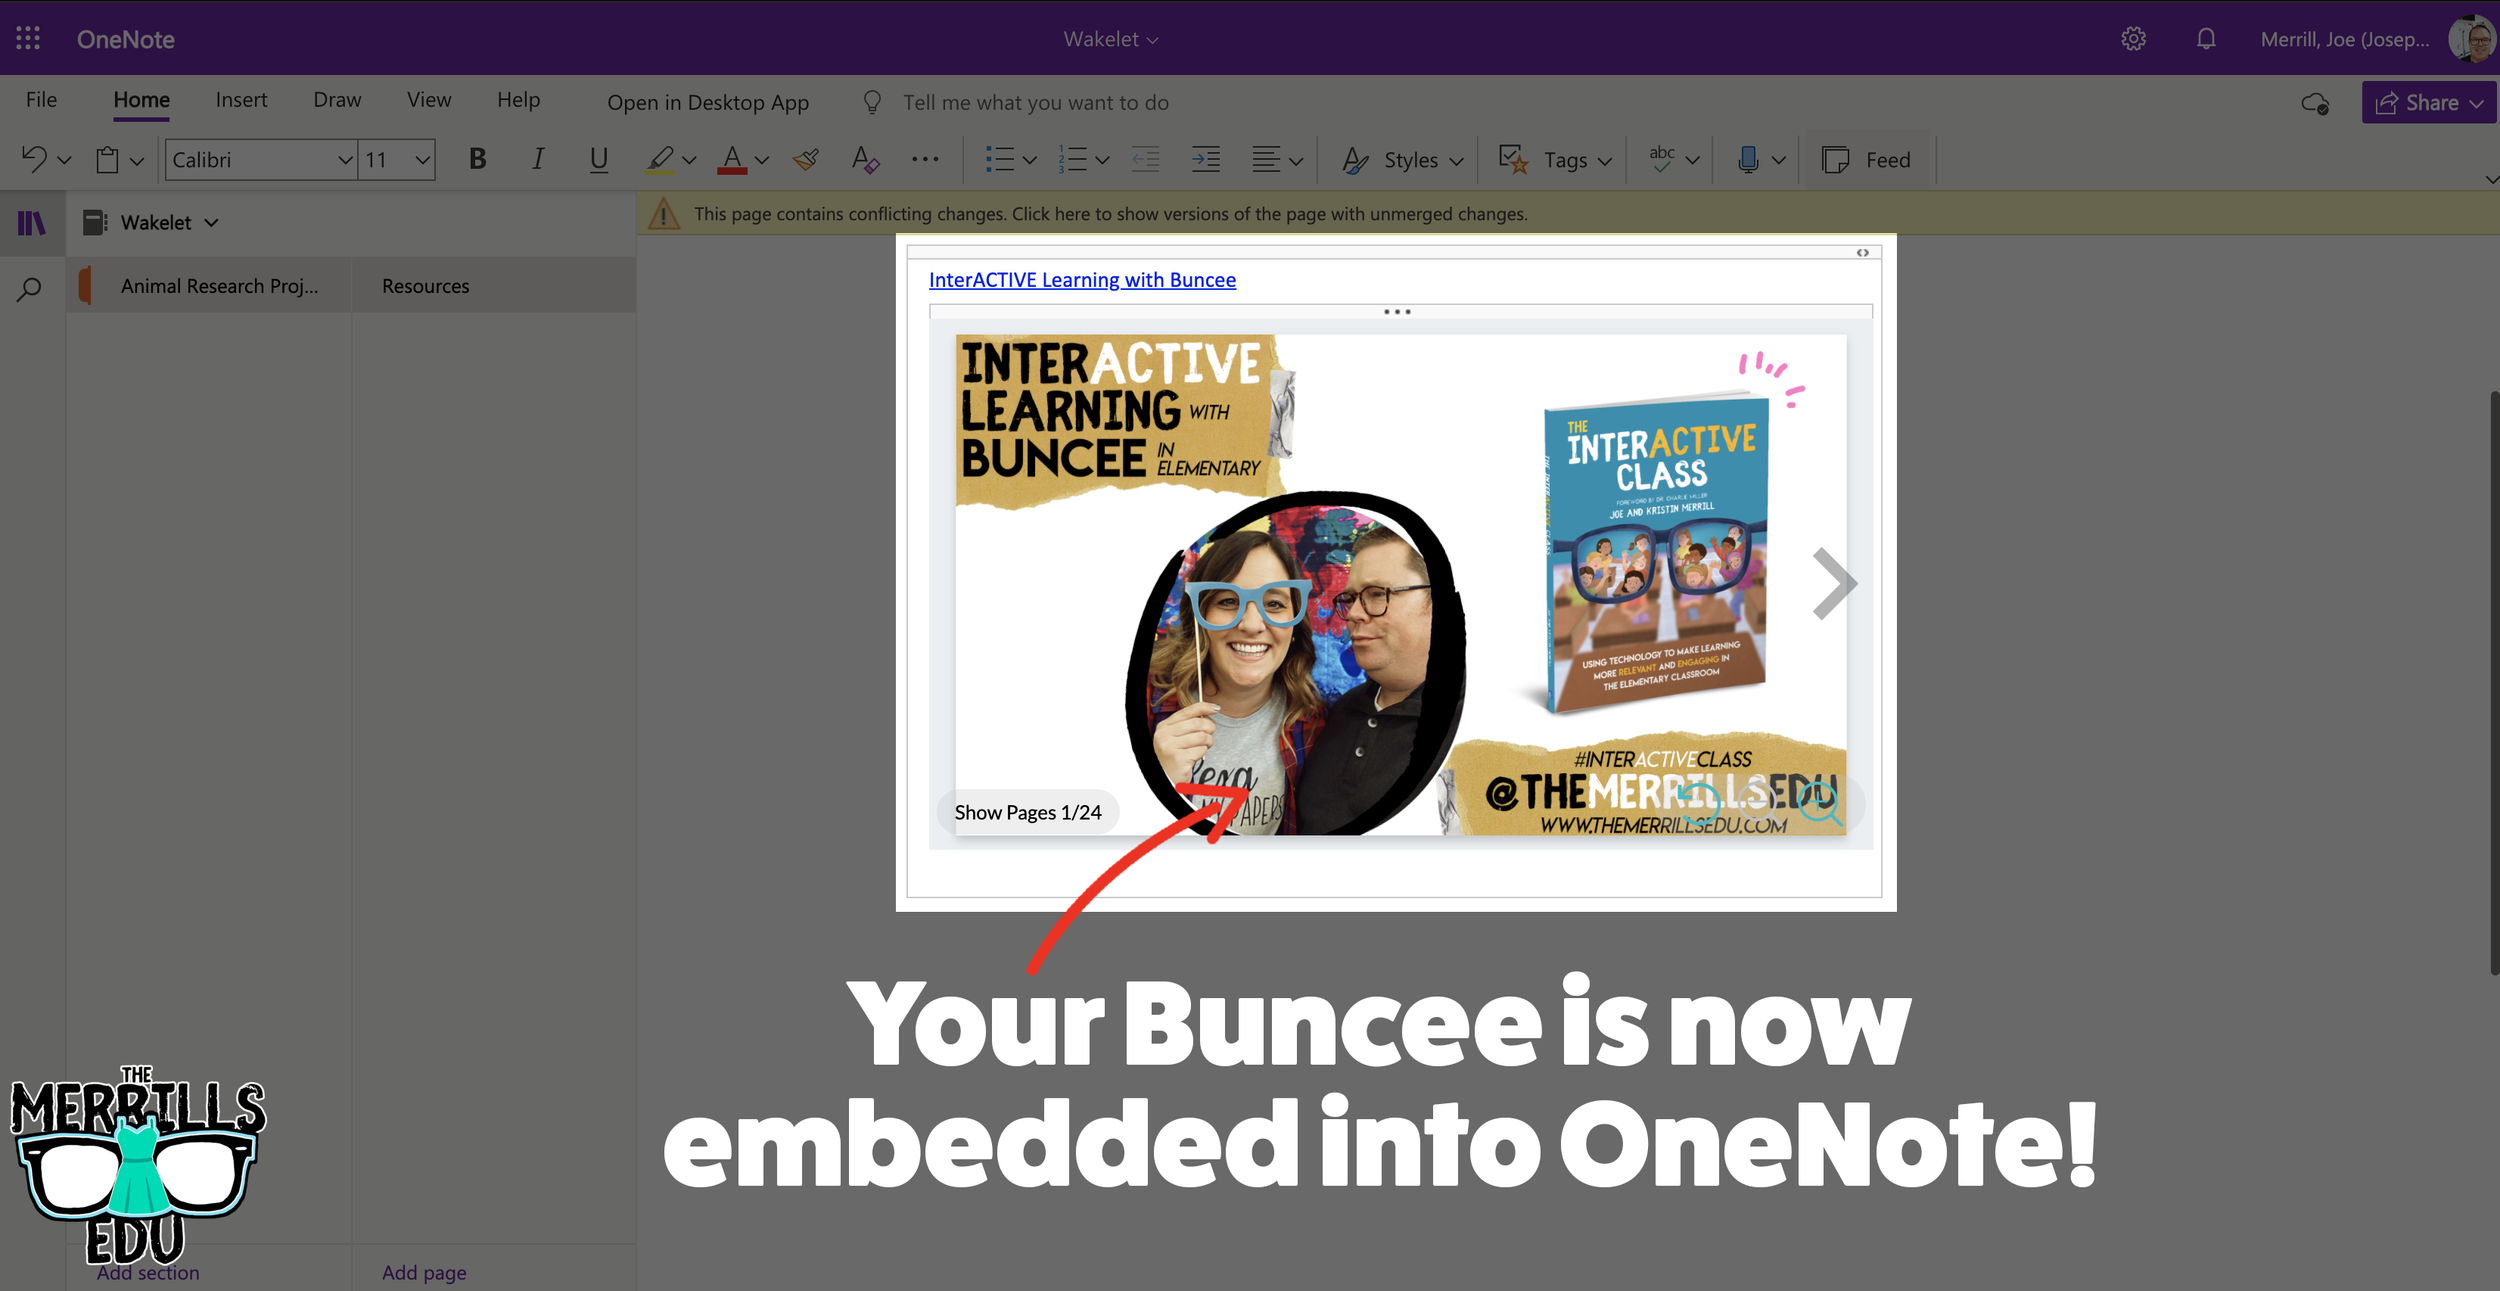
This embed takes the cake as the most creative! Most embedding is done on the educators end, but not this one (although educators can definitely do it, too). With the Buncee and OneNote embed, students have the ability to take their Buncee creations and share them in one central location for others to see. Here’s how it all works:

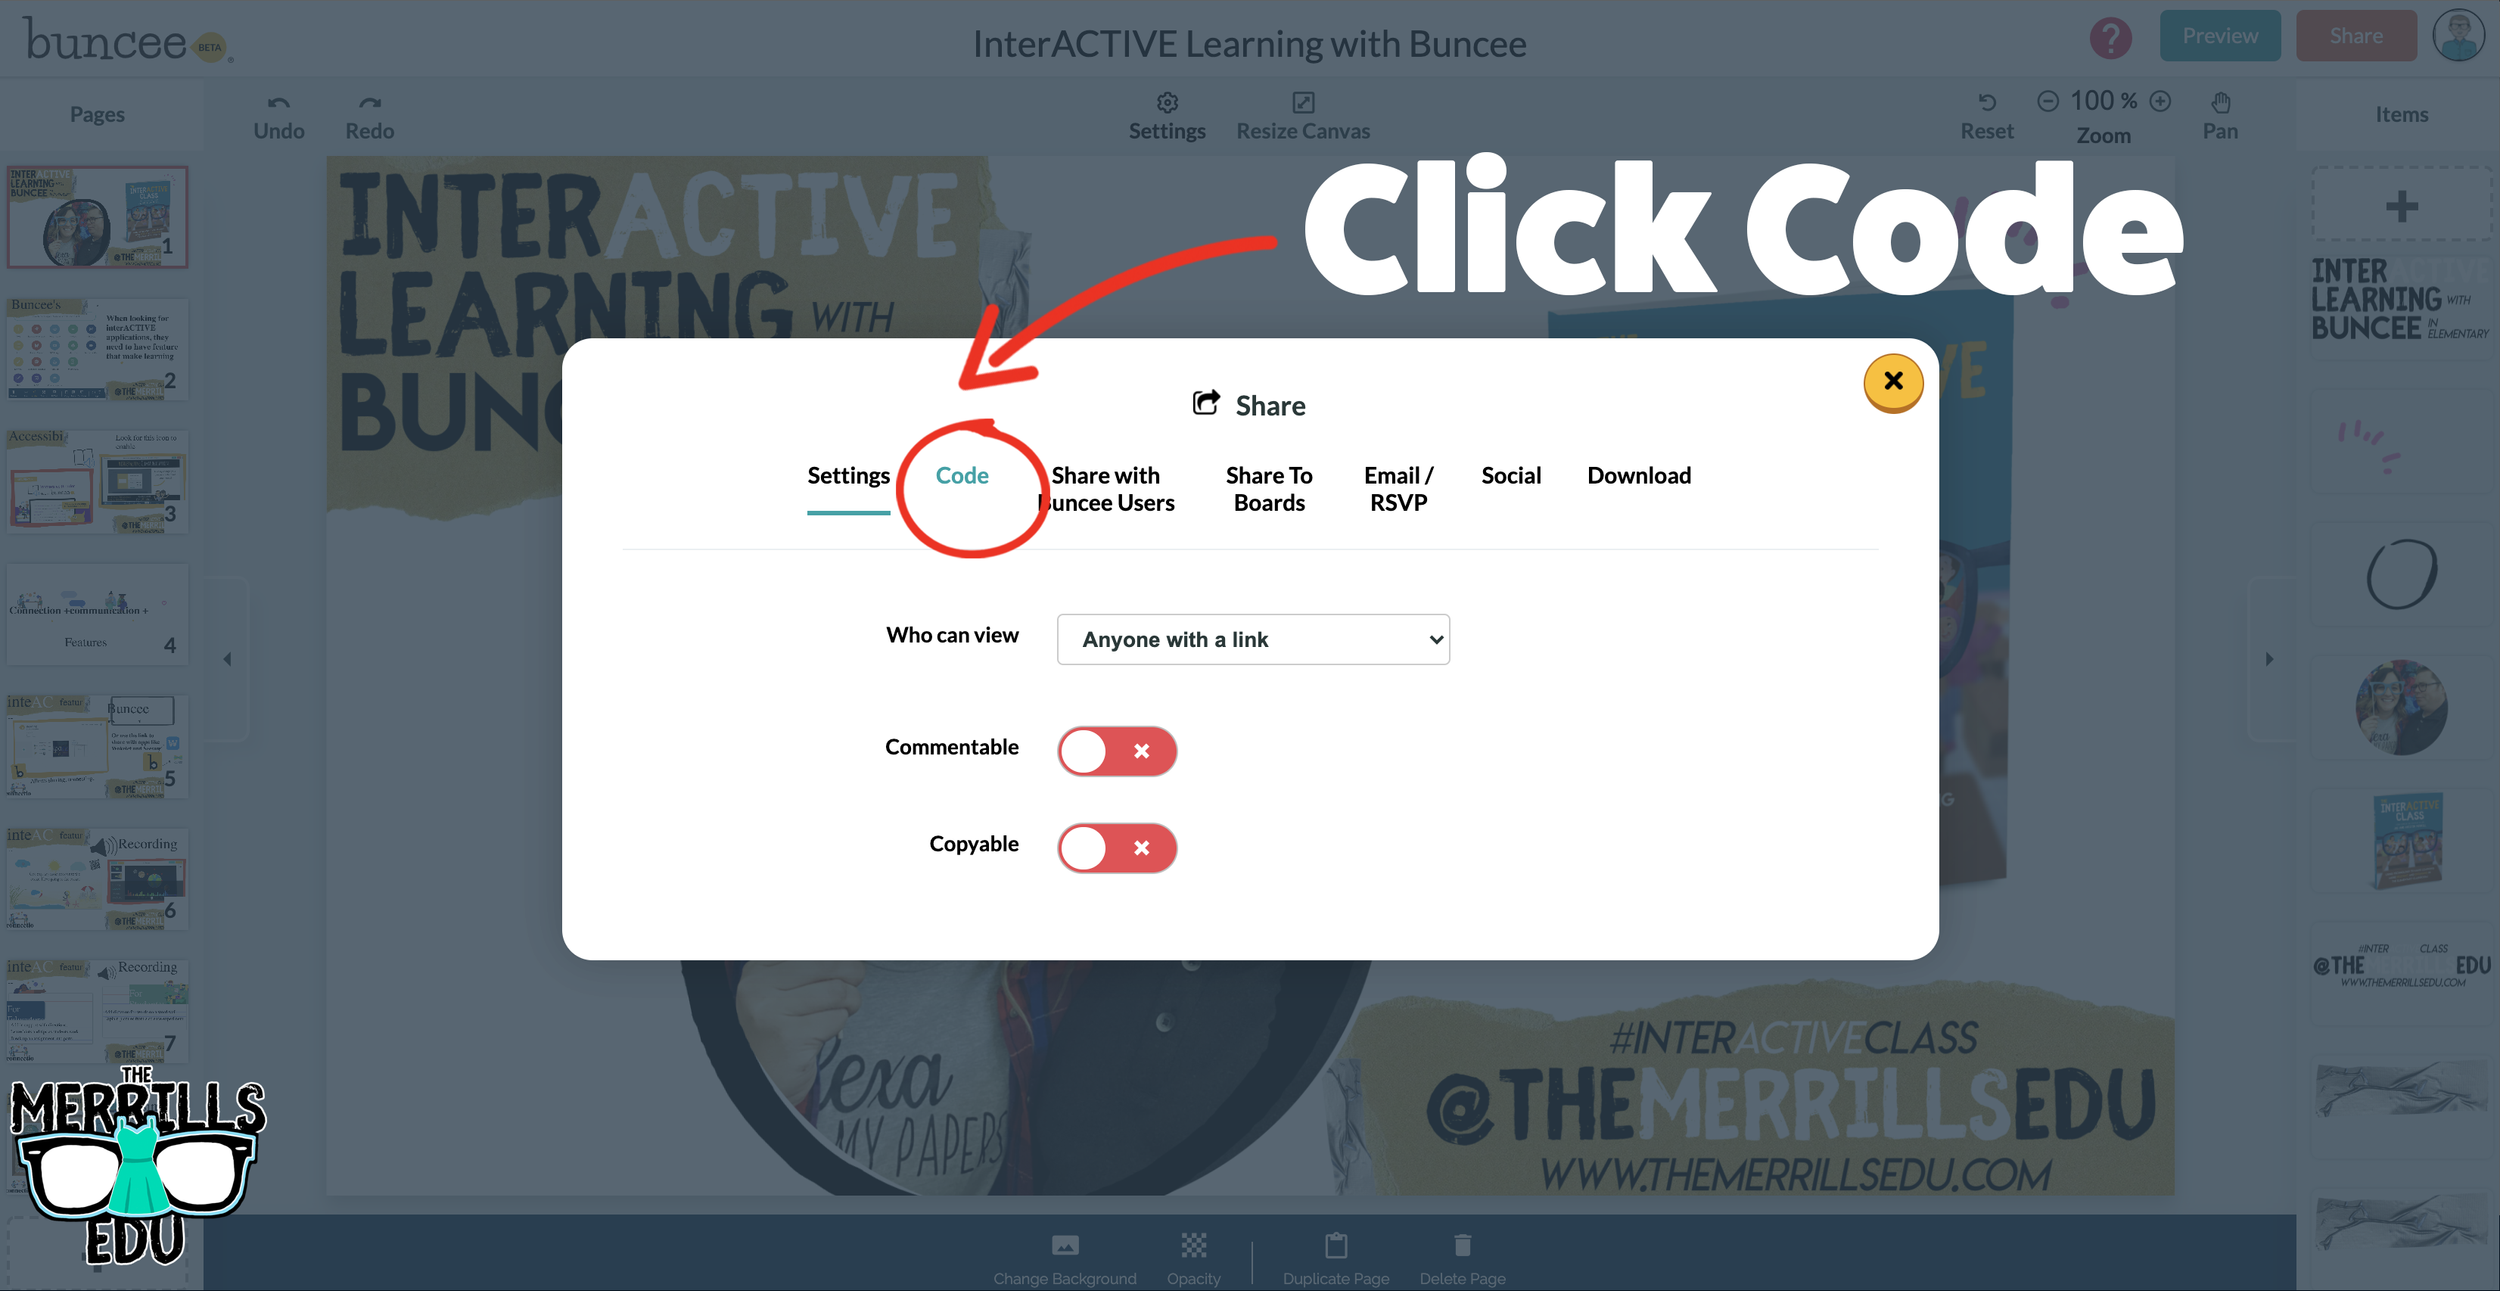
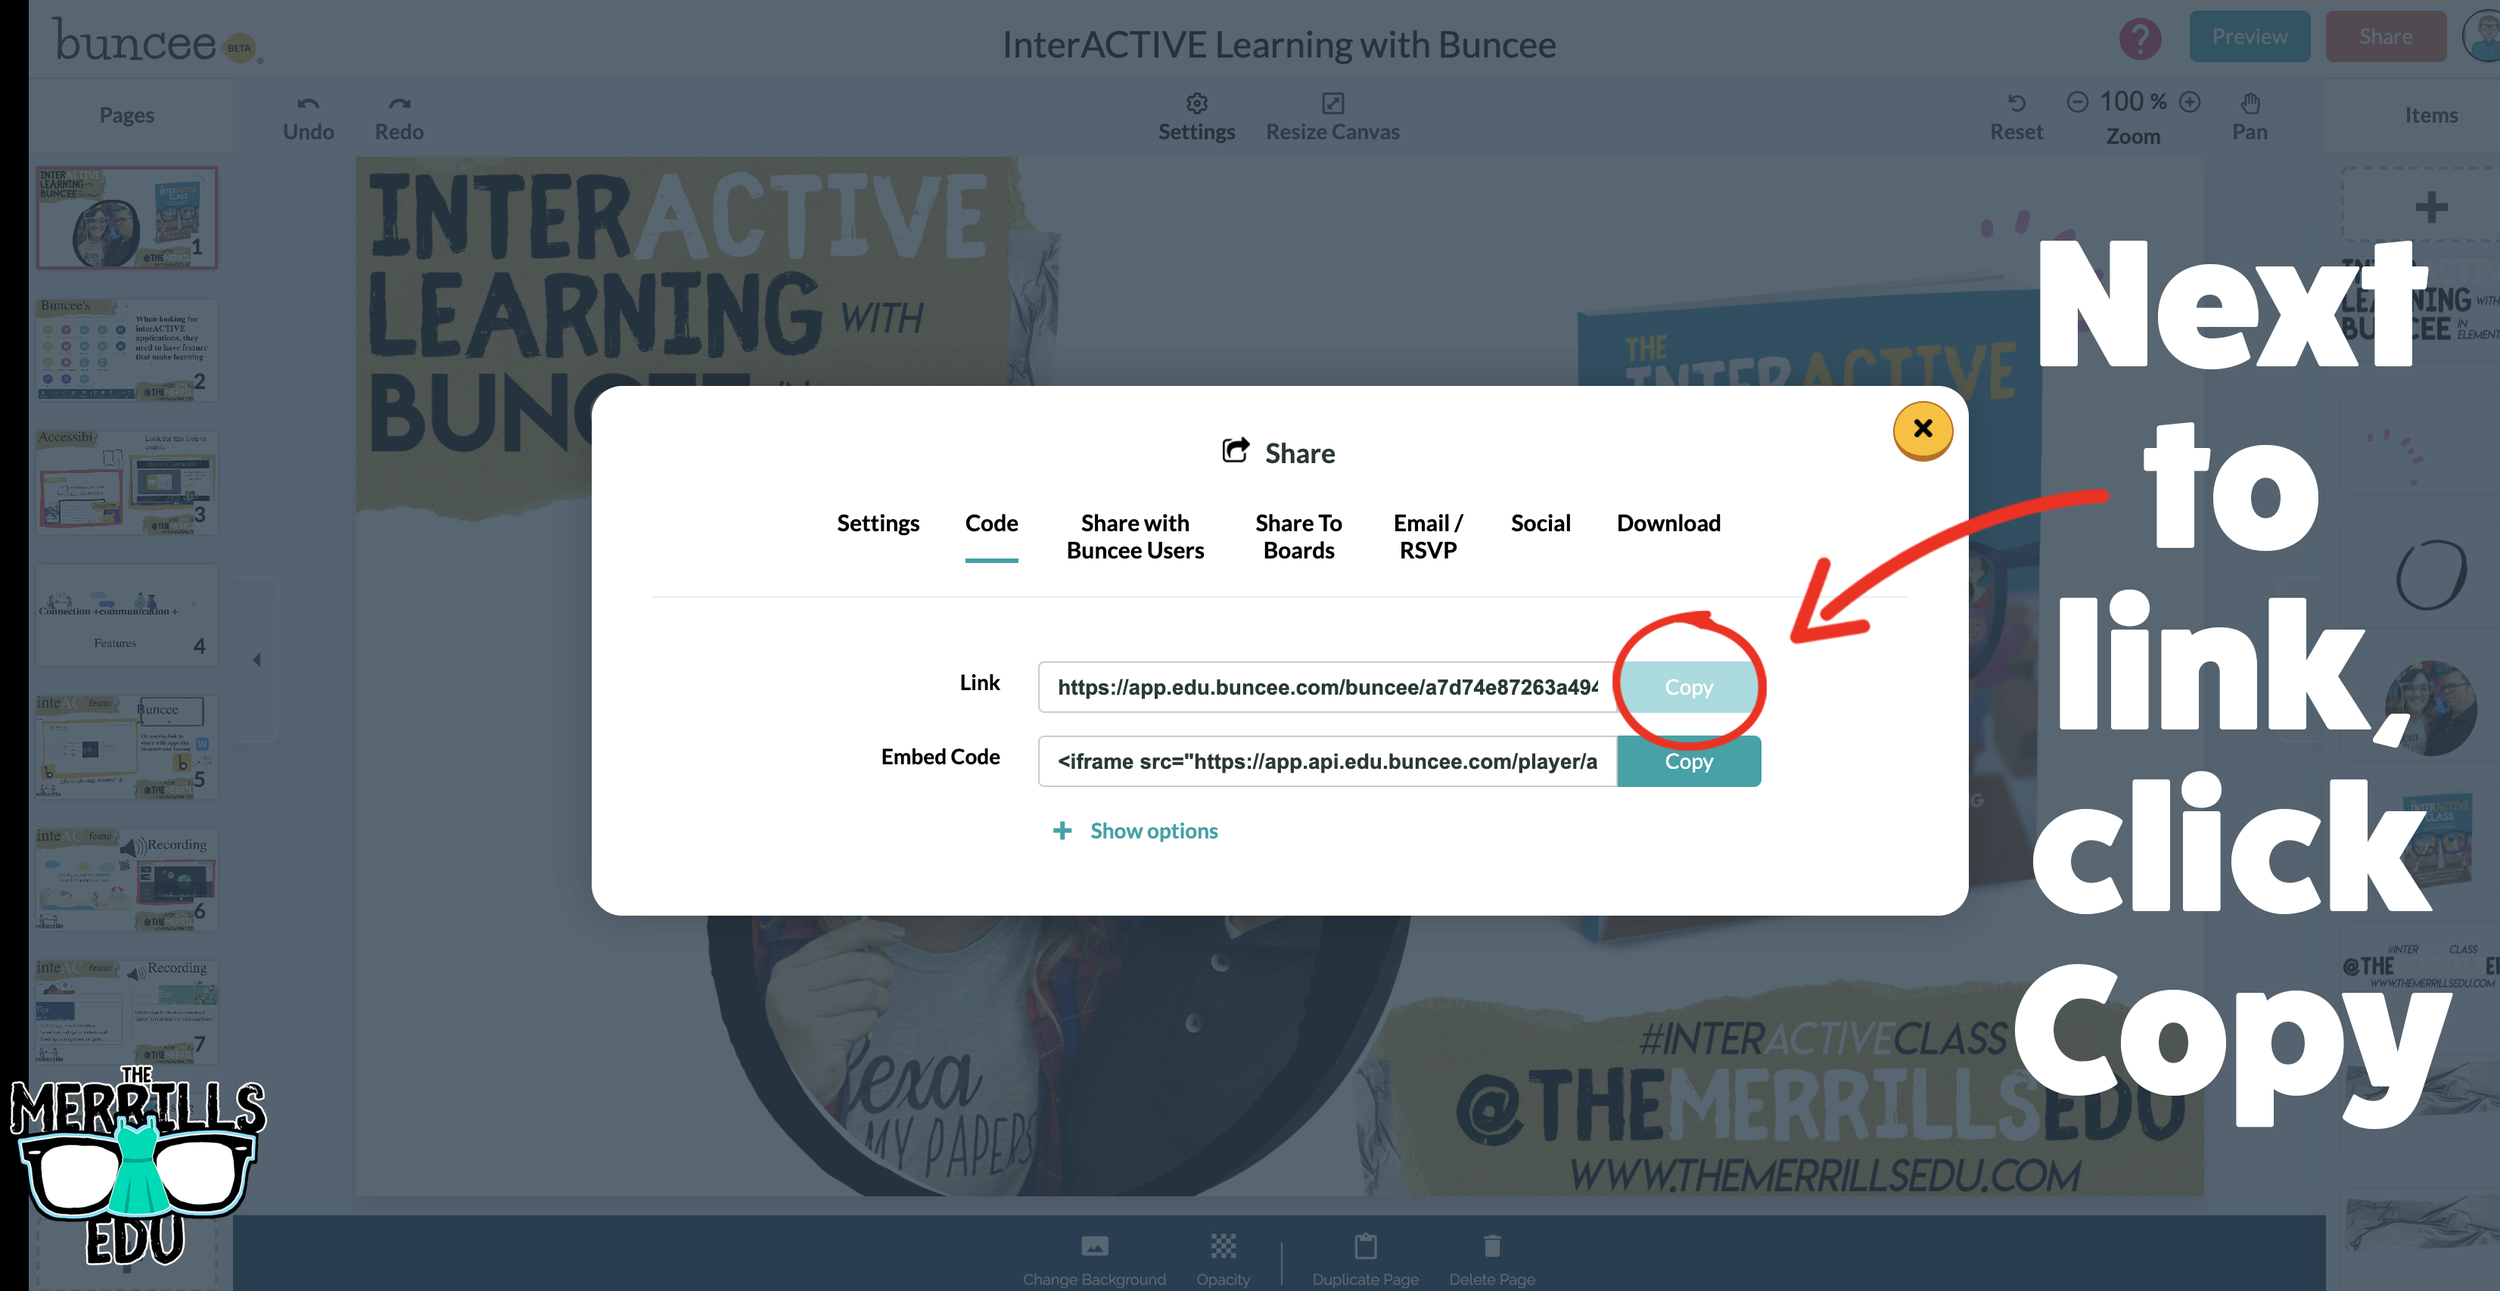
Open a Buncee, then click the “Share” button located in the upper right side of the screen.
A new window will pop up. Click on “Code.”
Under “Code” and next to Link, click “Copy.”
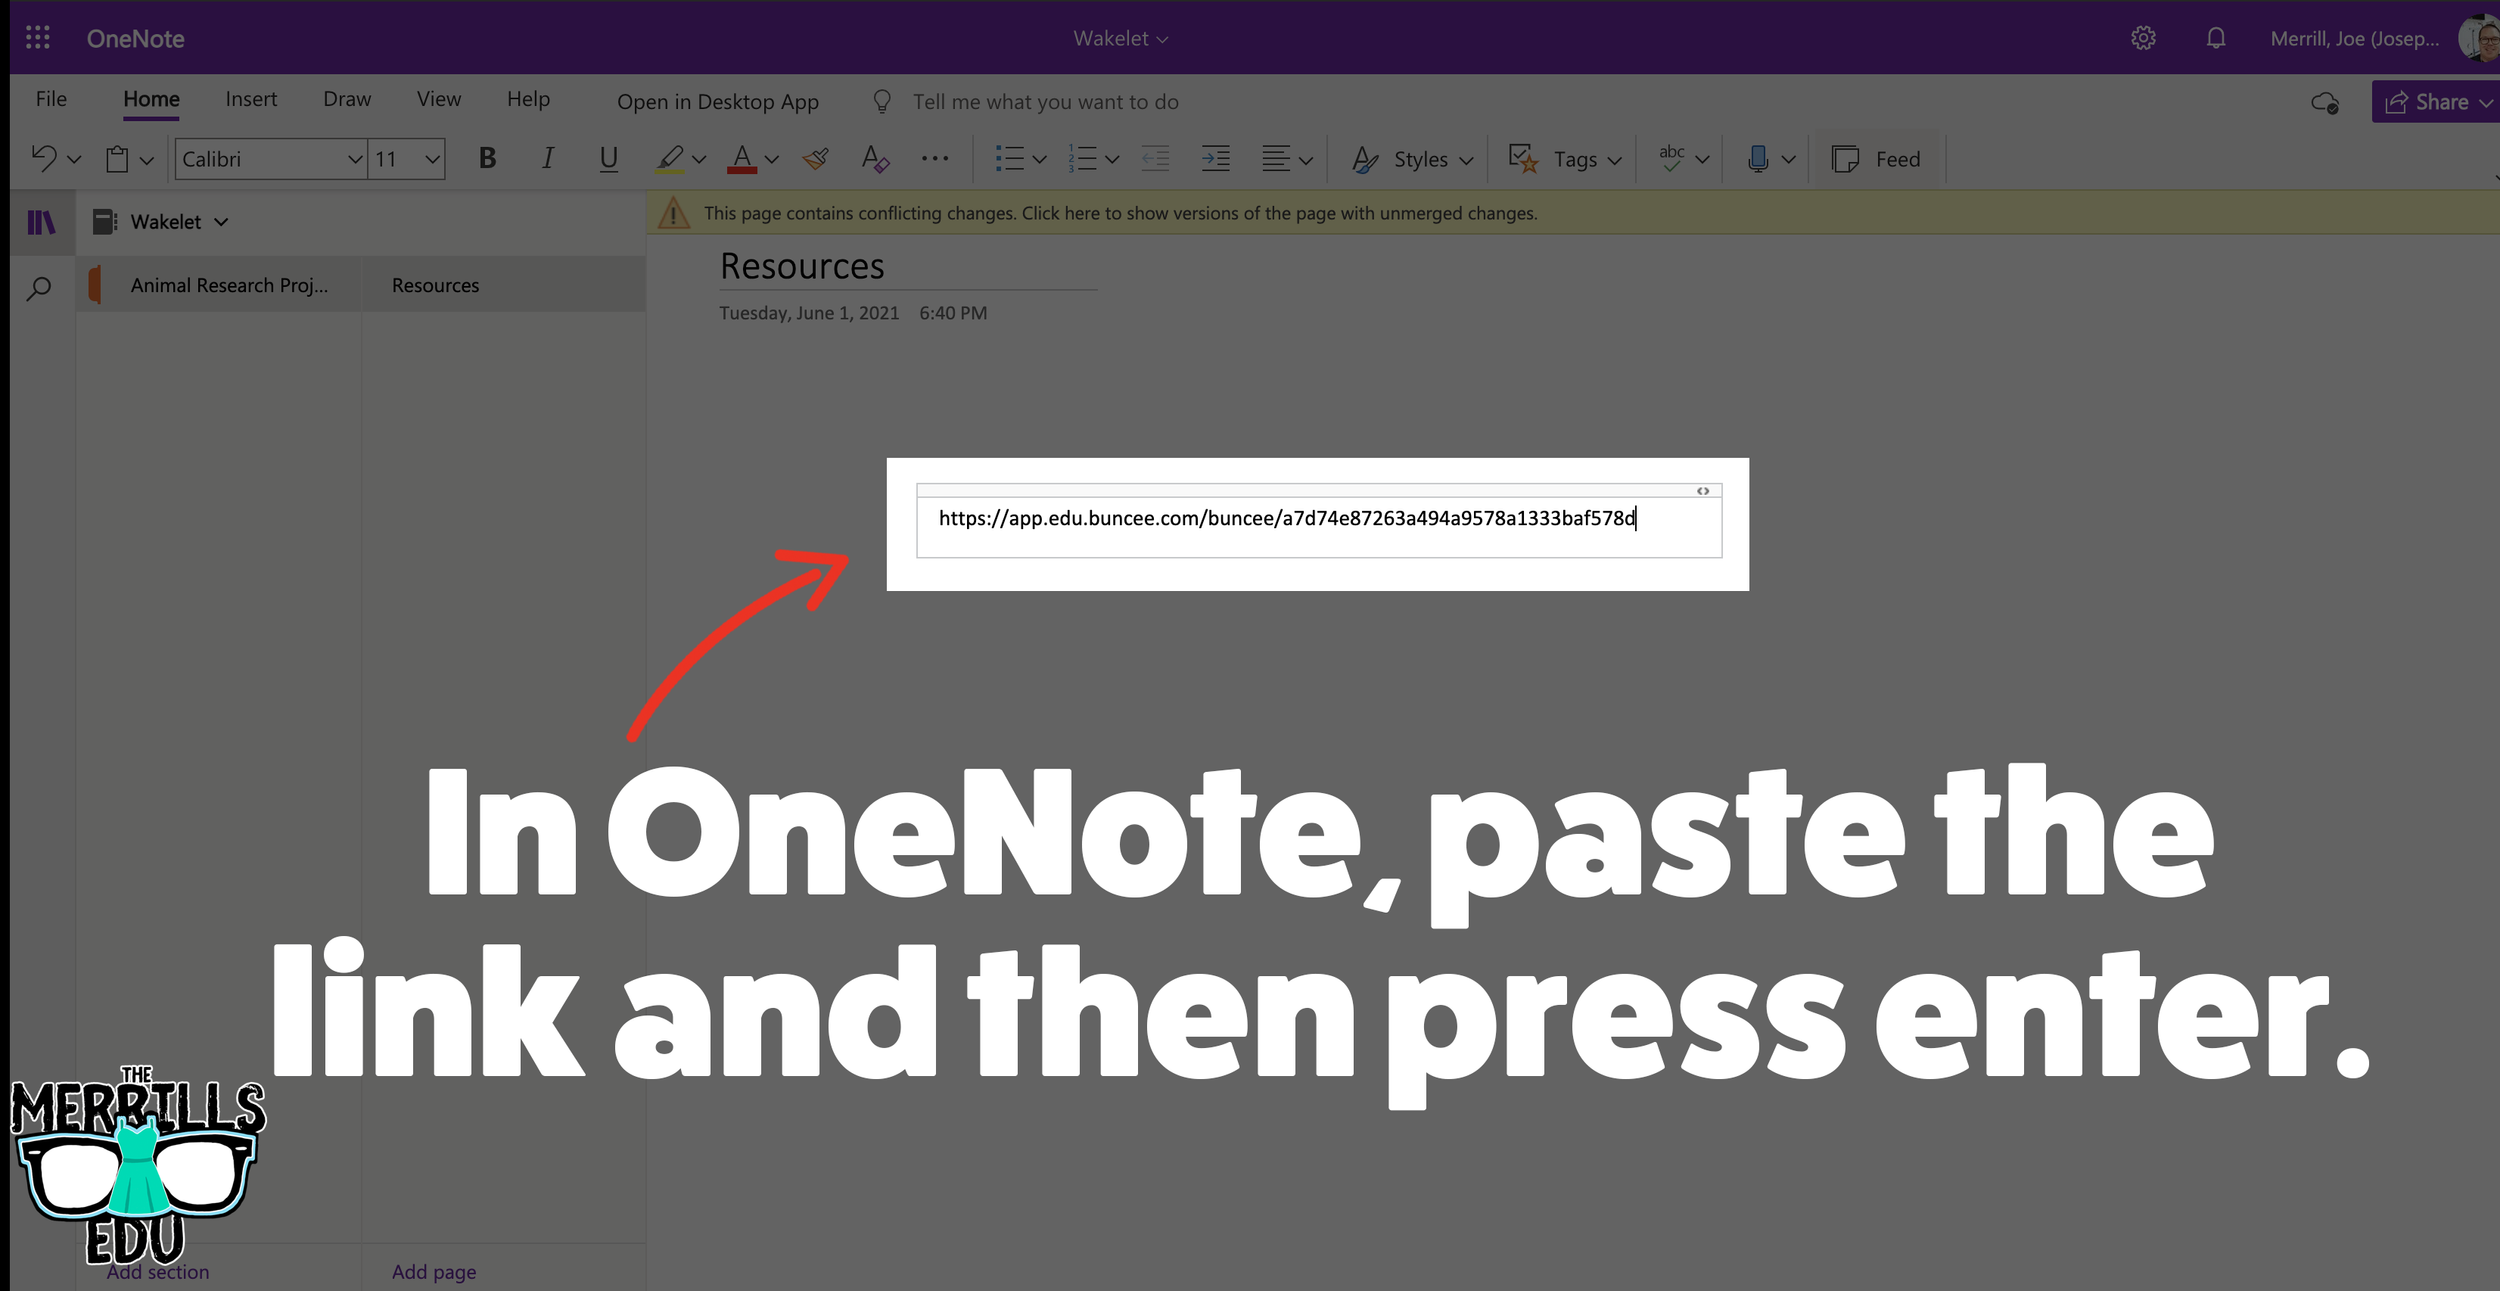
In a separate tab, open the OneNote file that you would like to add the Buncee creation to. Then, paste the URL anywhere on the OneNote file.
Press enter to start the live embed.
Repeat this process to add additional Buncees to the OneNote file.

Canva Embedded into Classroom Screen
Need to post your directions on the board? Perhaps you need a timer to go along with it? This embed will be your saving grace! Embed your Canva creations right into Classroom Screen. Here’s how:
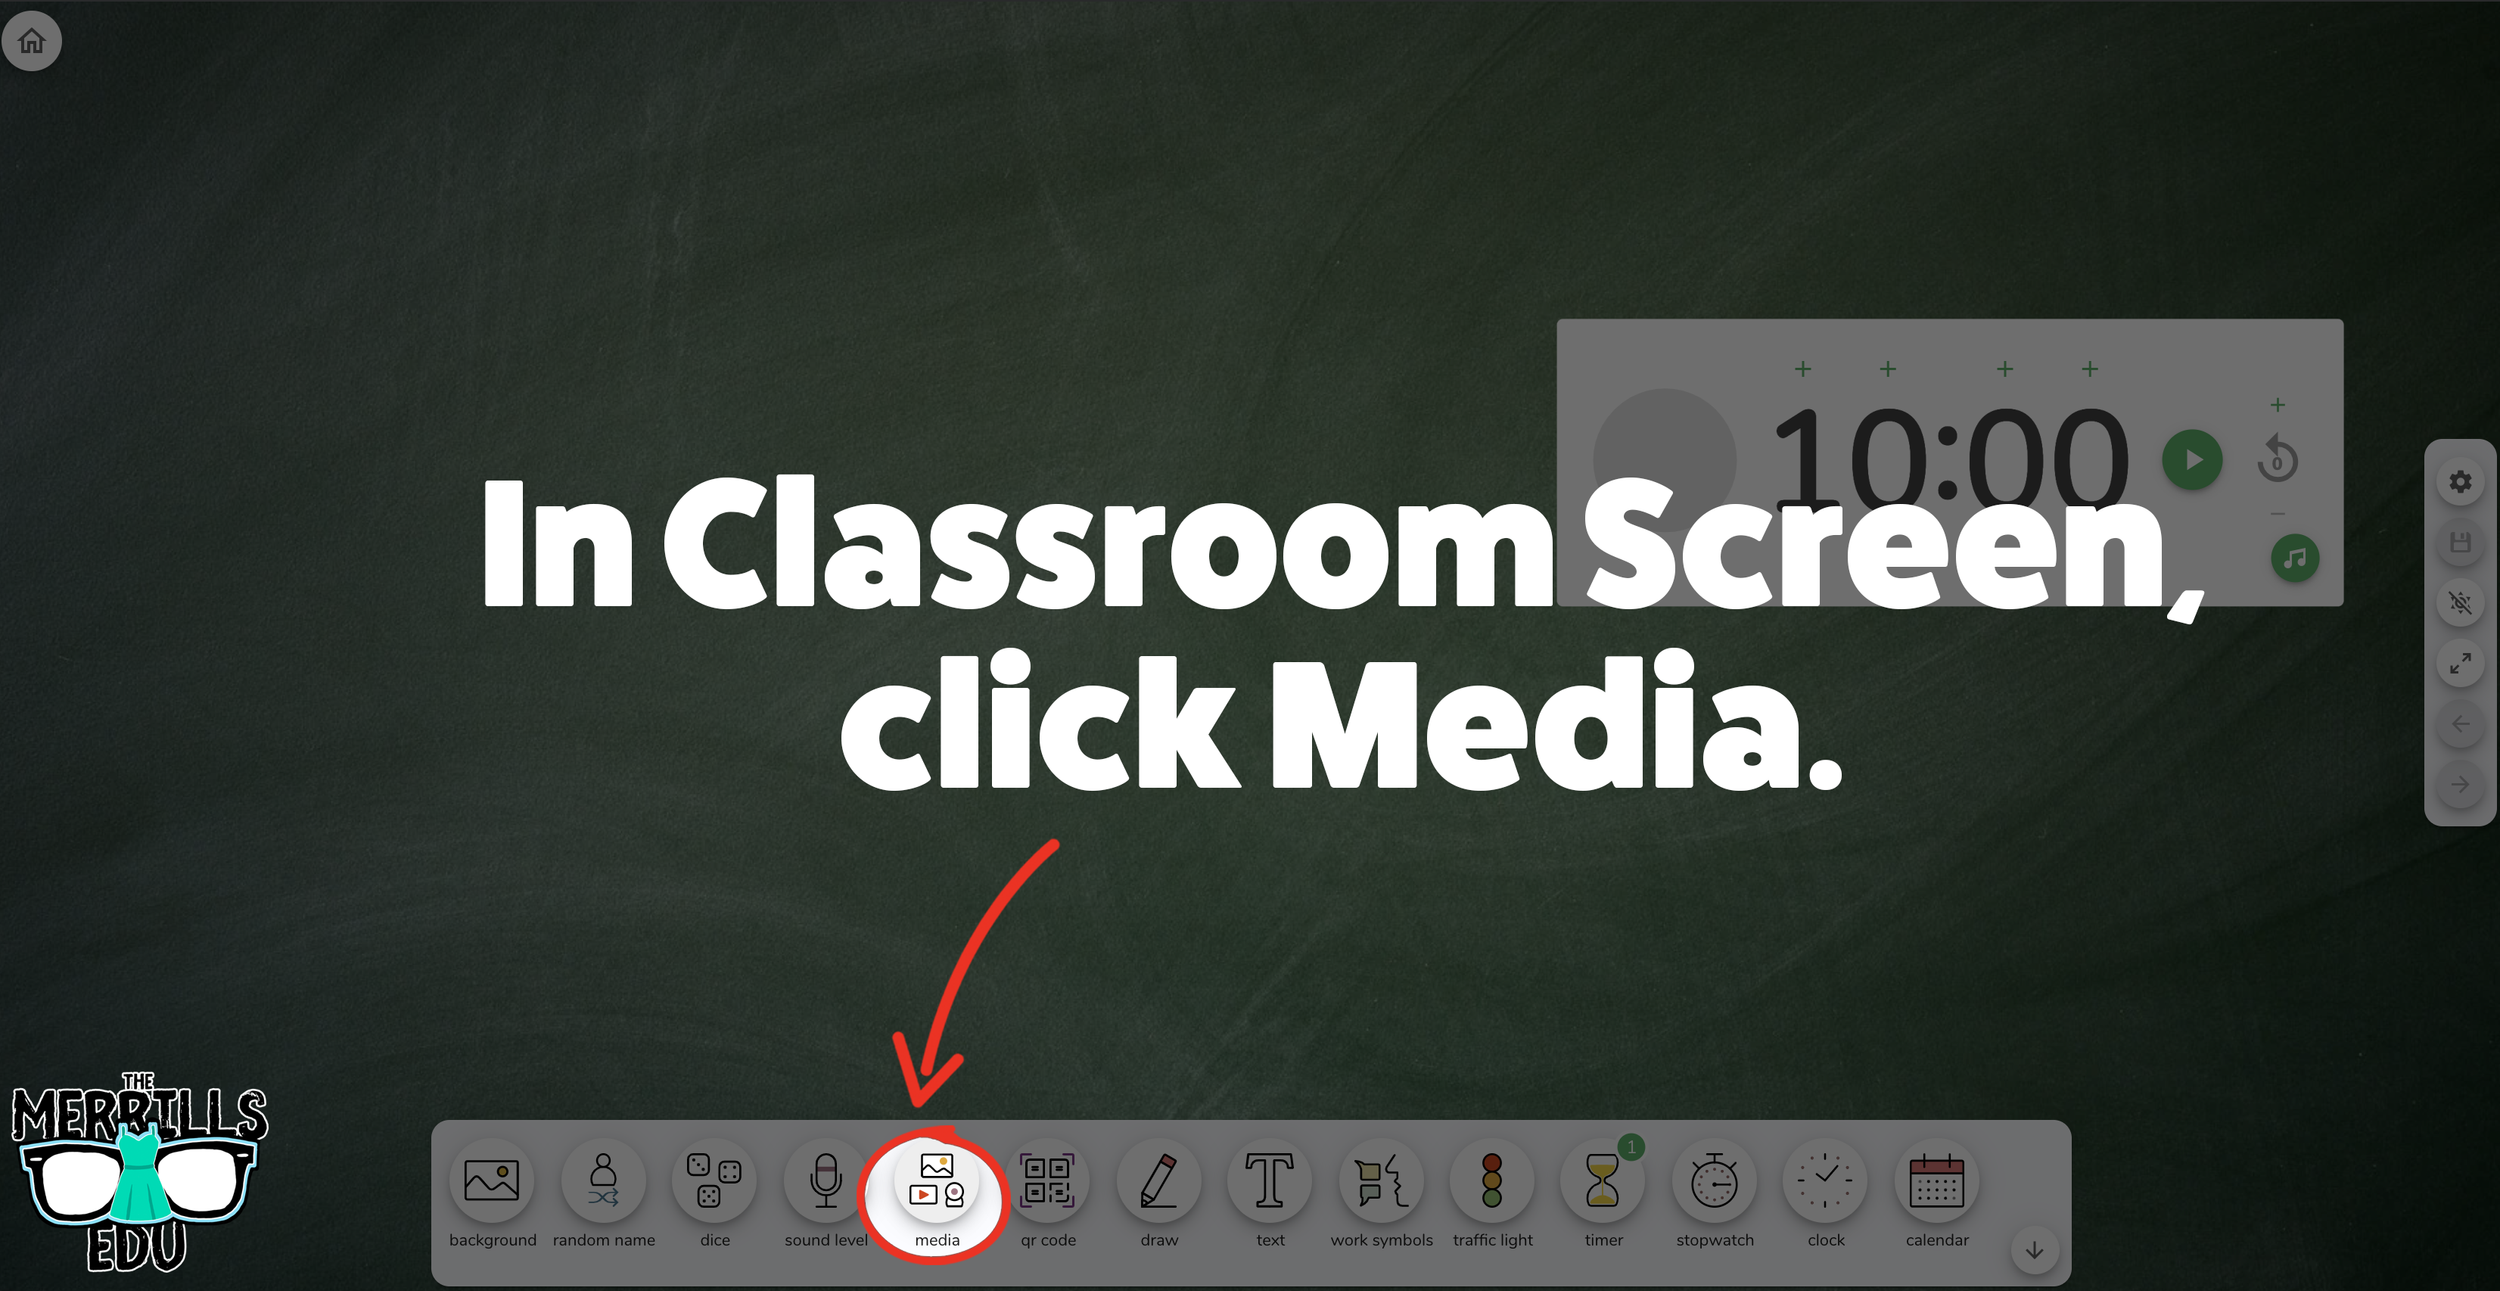
Open a Canva creation, then click the three dots.
In the drop down, type “embed.”
Click the “Embed” icon.
On the next frame, click the “Embed” button. This will take your creation “live.”
Now, next to HTML Embed Code, click “Copy.”
In a separate tab, head over to ClassroomScreen.com and start a new screen (or open an old one).
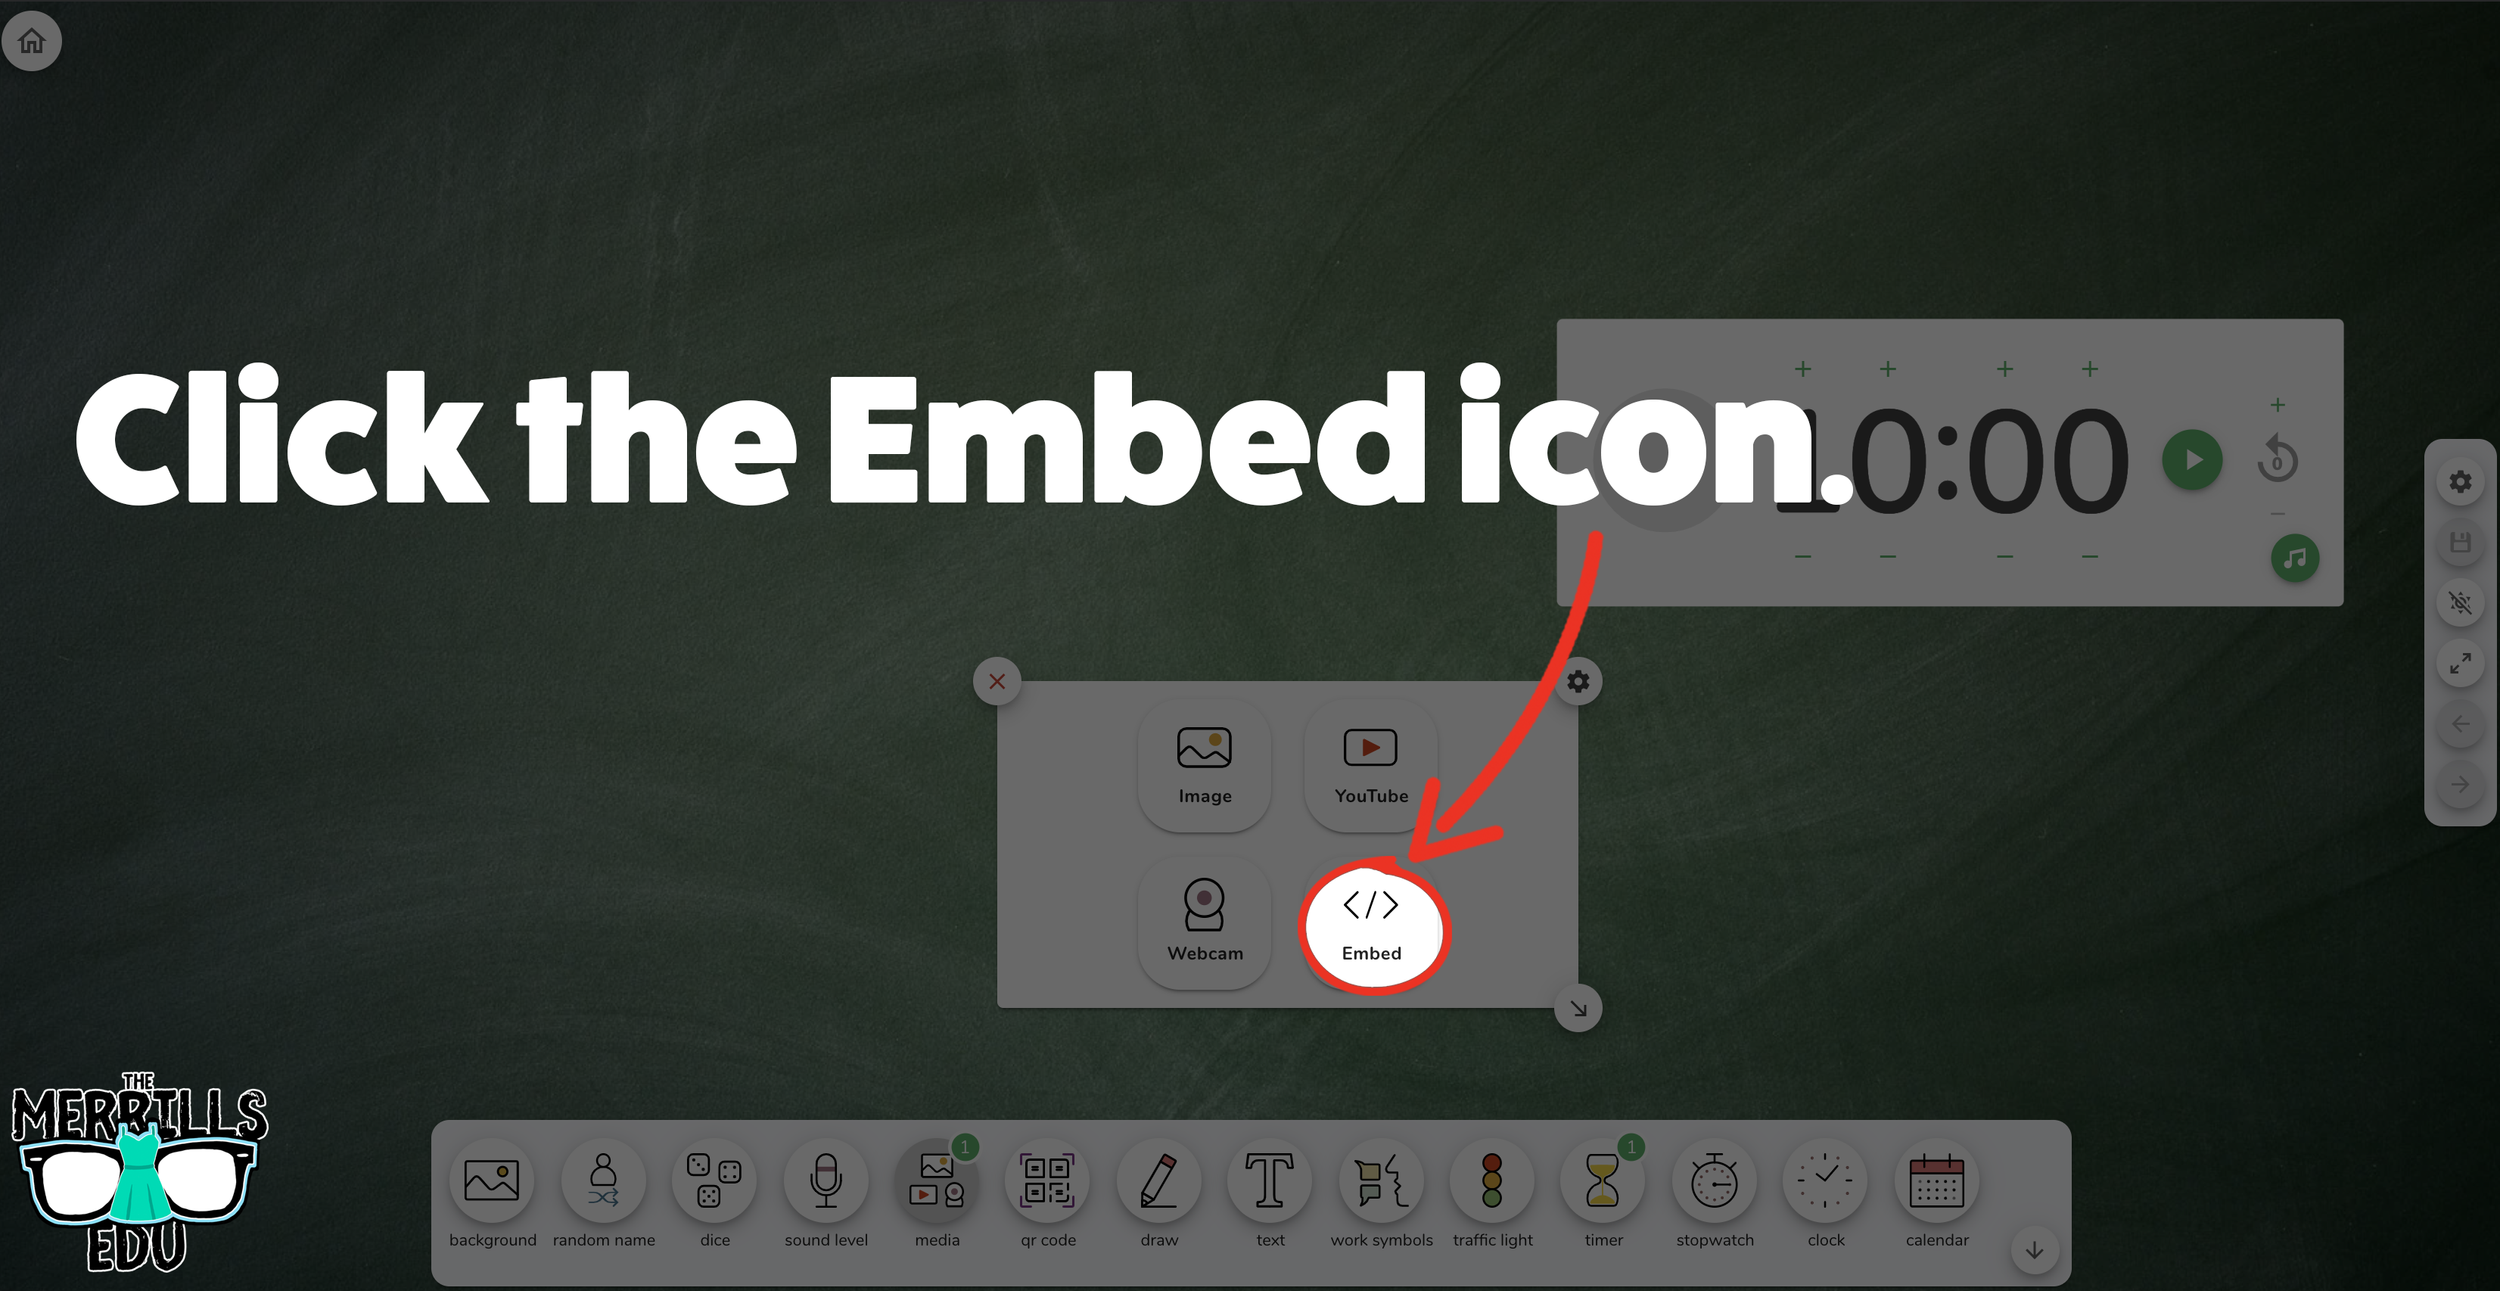
With your Classroom Screen open, click on “Media” from the menu options running along the bottom of the screen.
A new window will open. Click “Embed.”
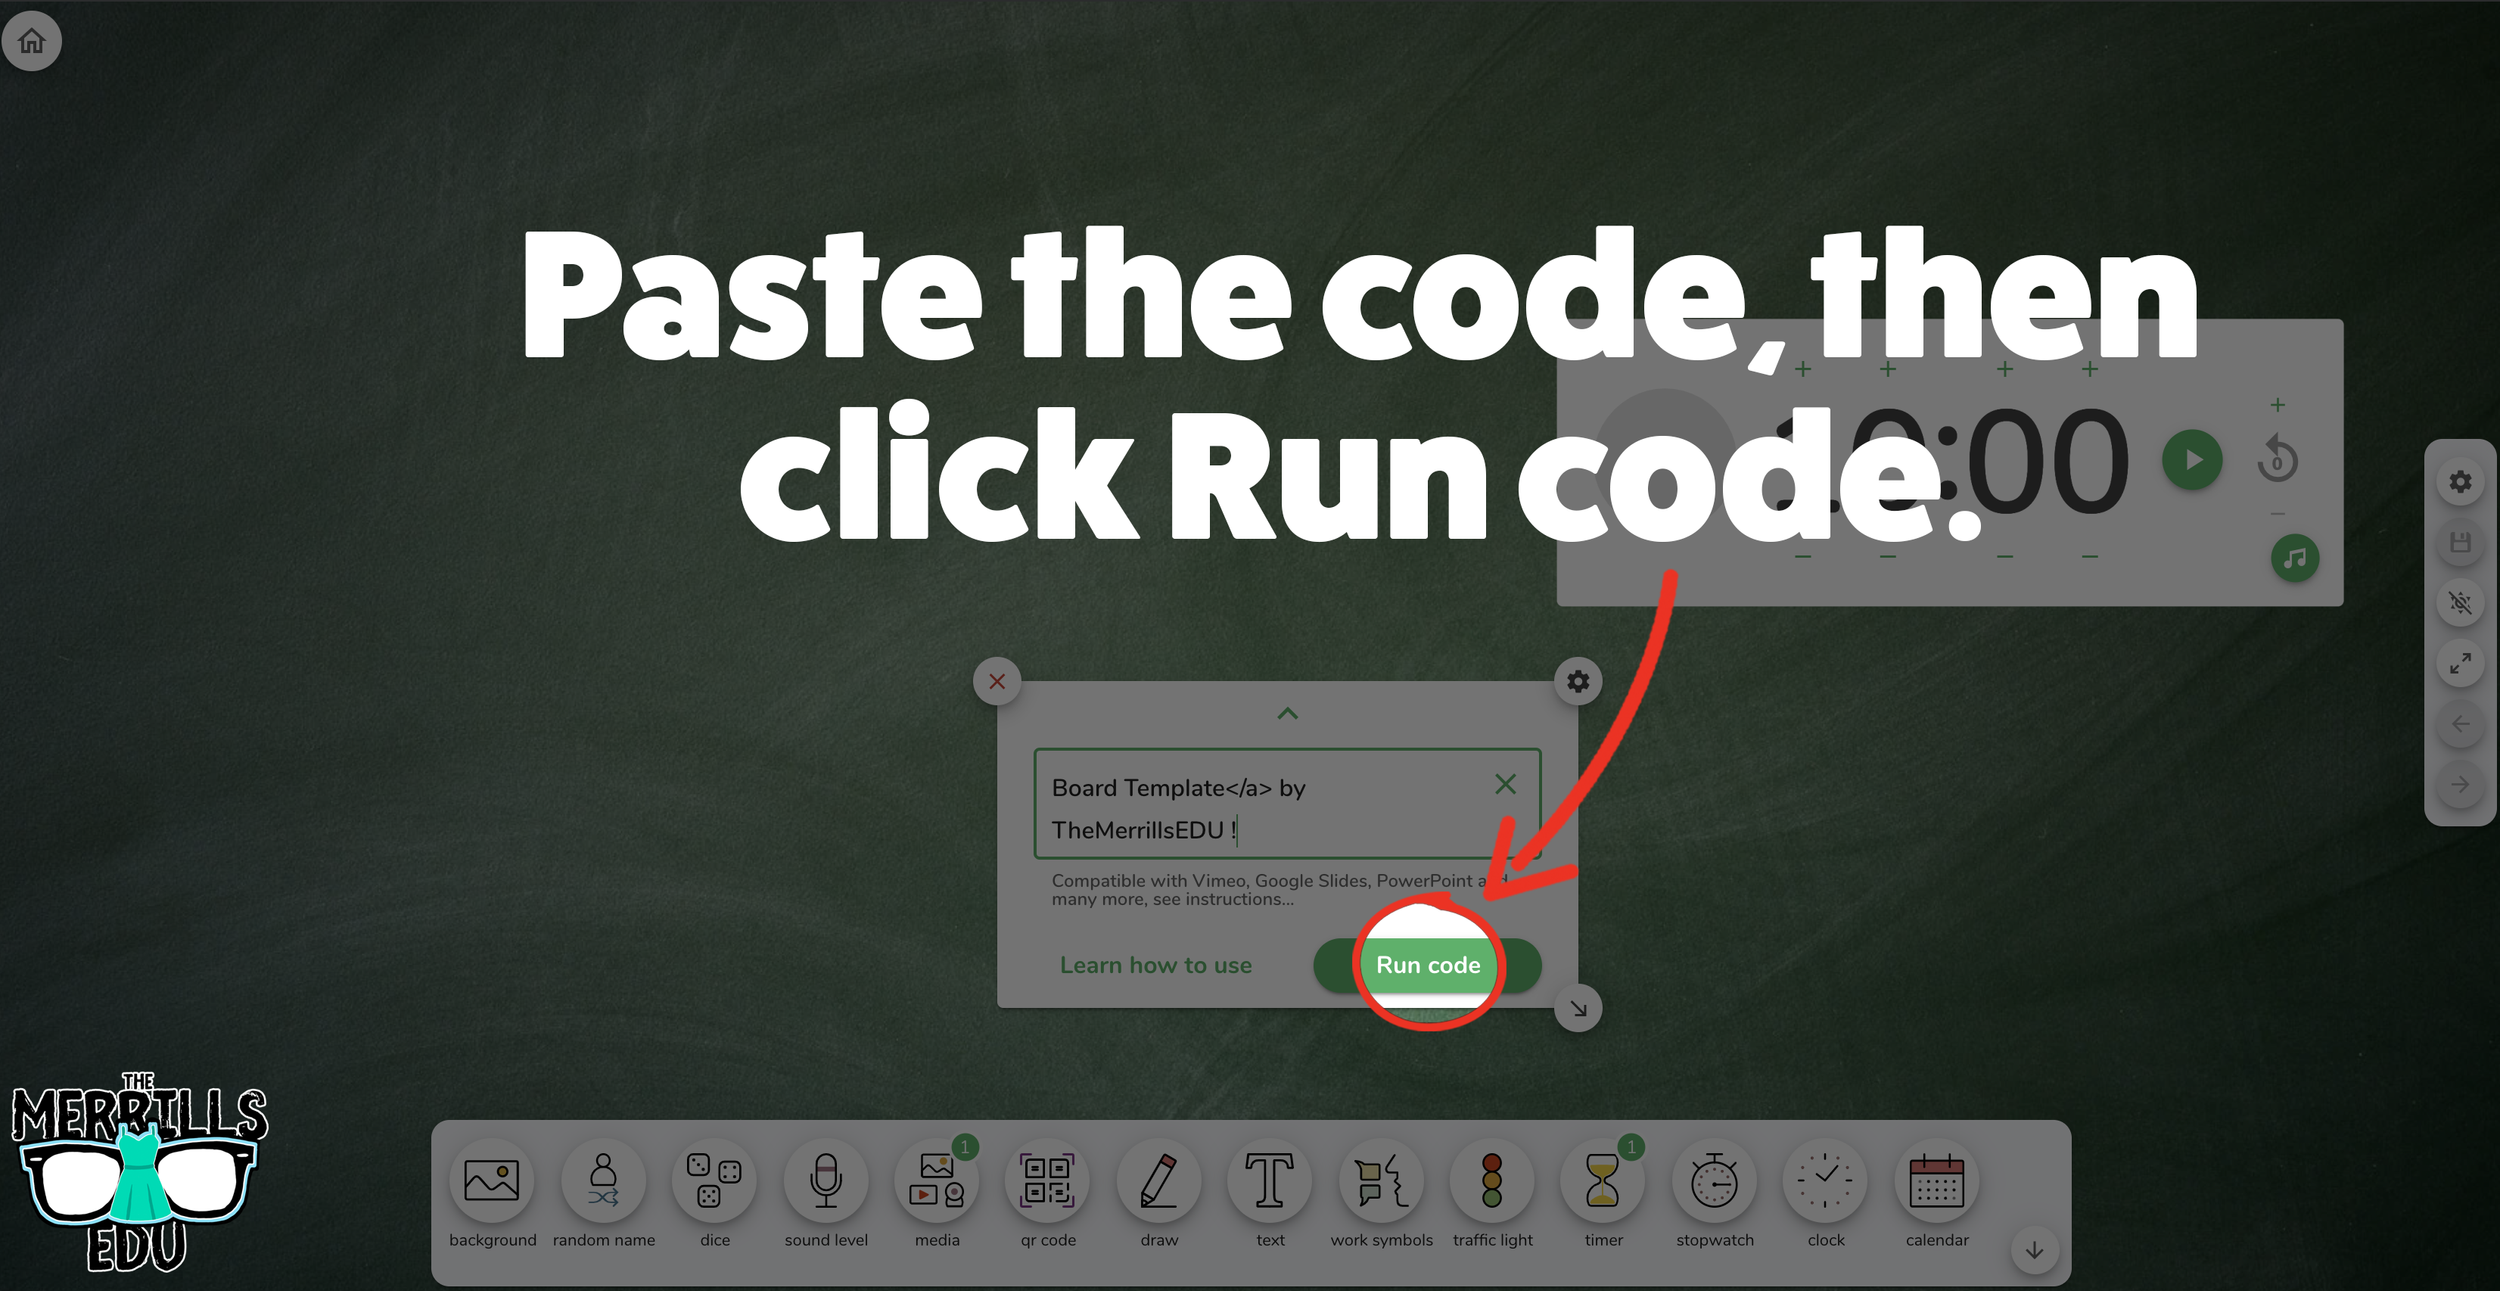
Click inside the embed area and paste your Canva code.
With the code pasted, click on “Run code.”
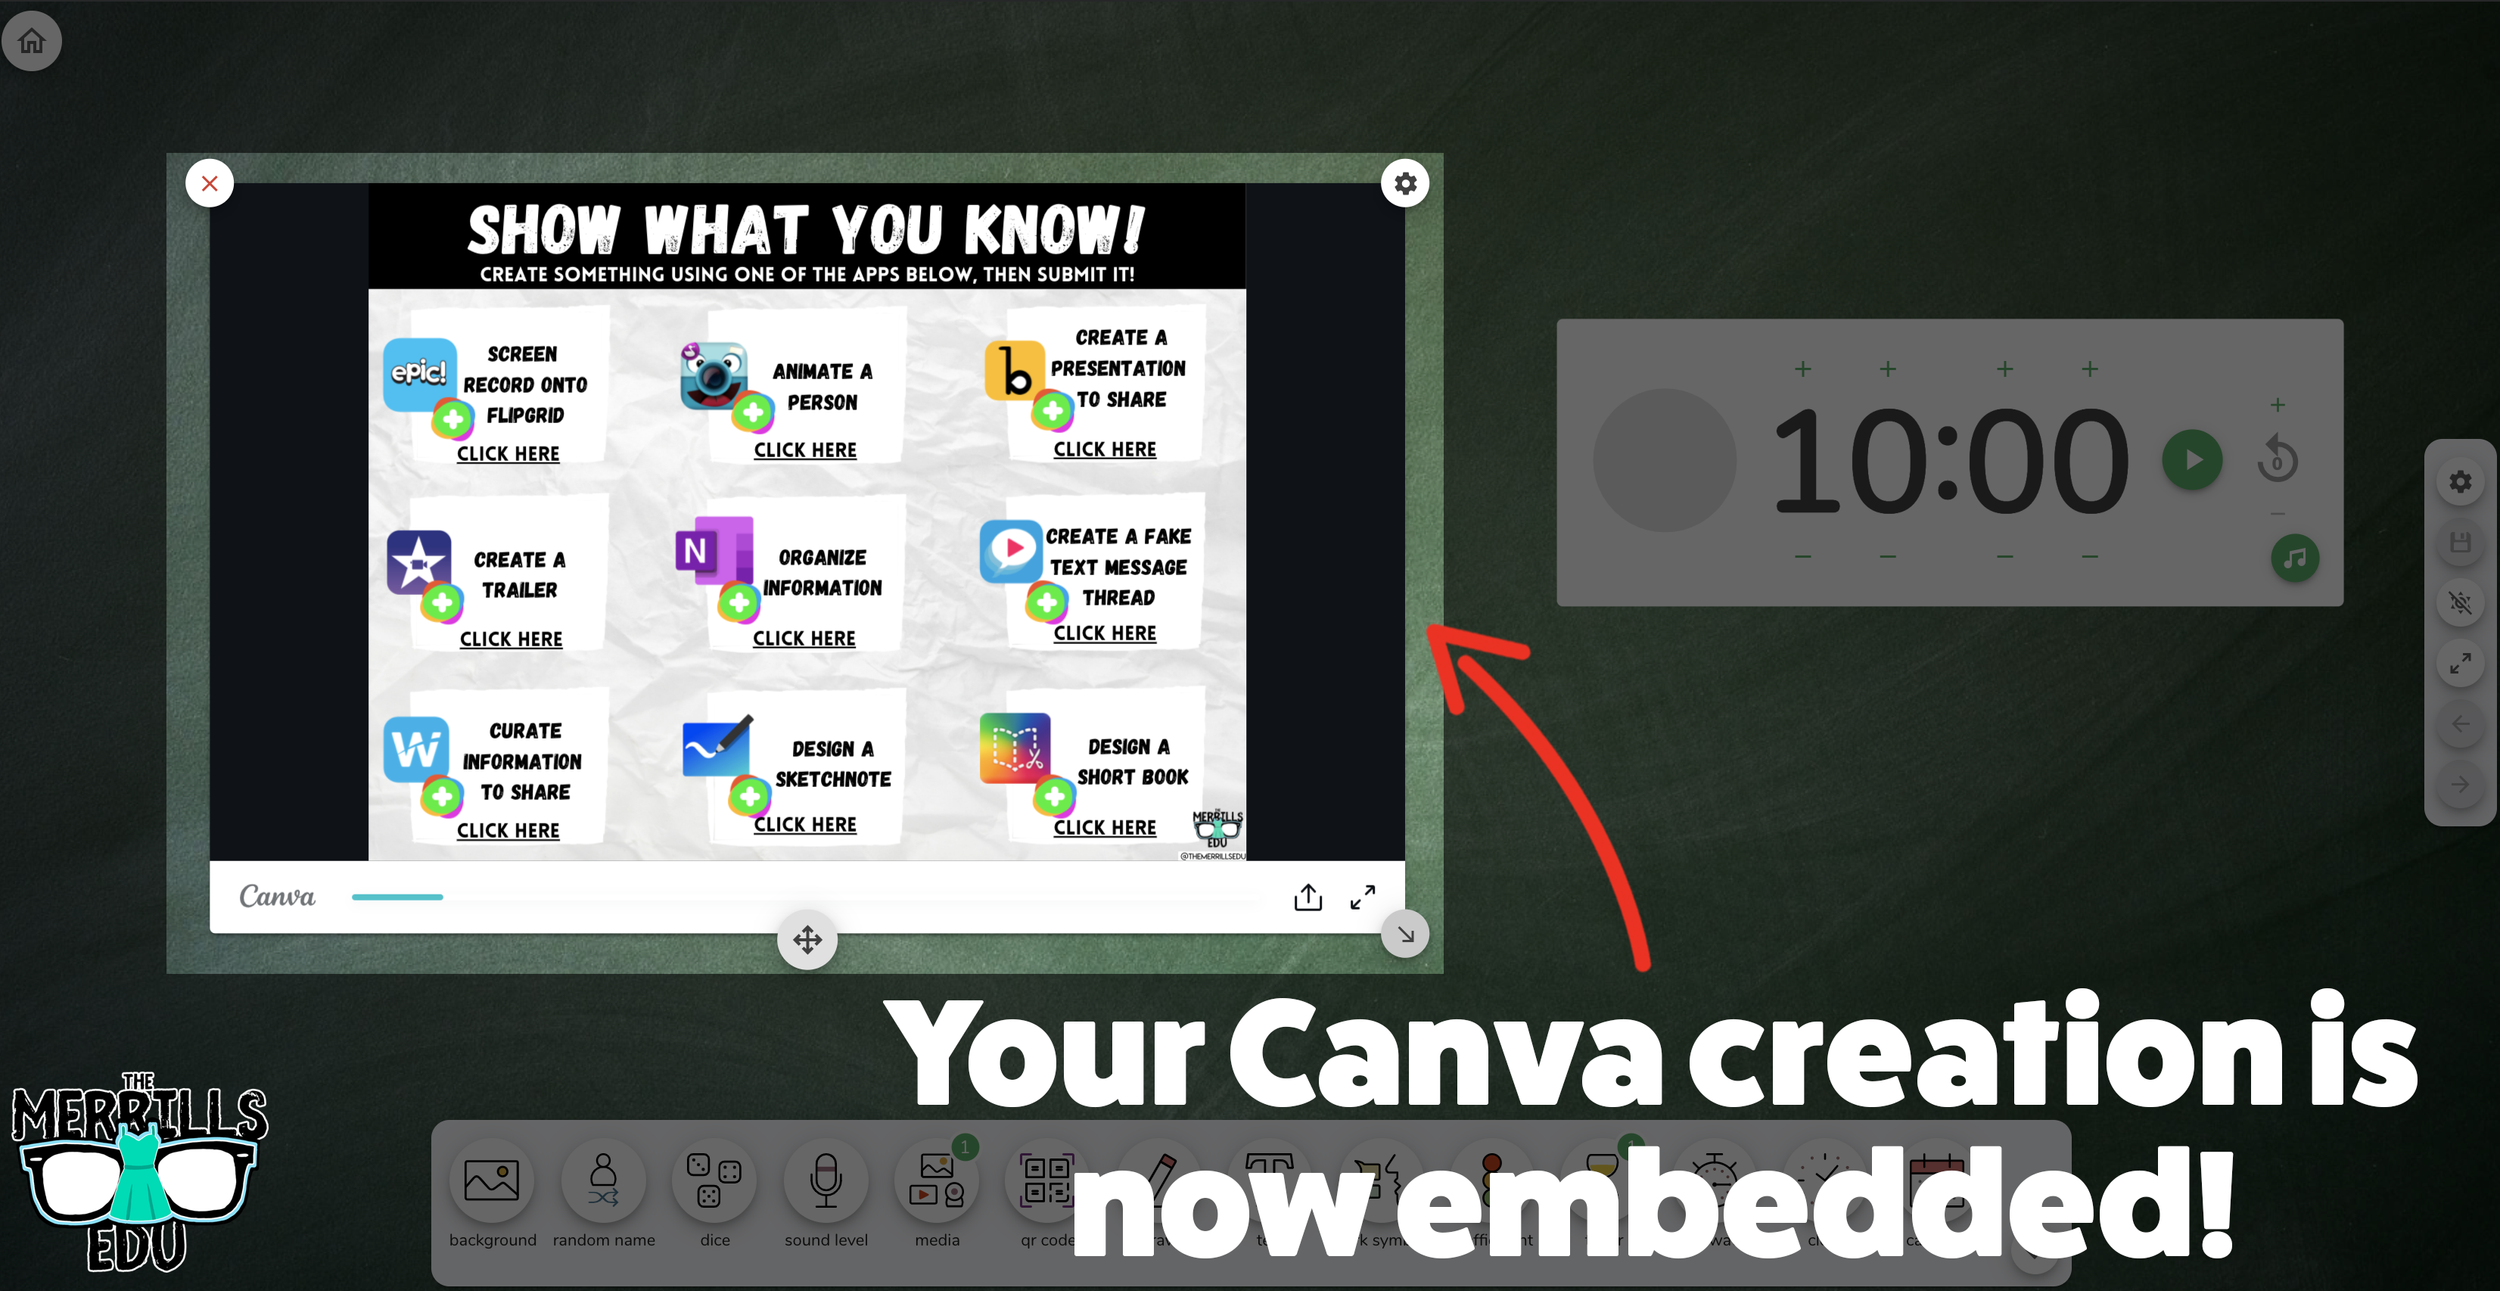
Your Canva creation will now appear! You can move the Canva creation around by clicking on the arrows (located at the bottom), or stretch the creation out by clicking the arrow on the bottom right - then dragging it to the desired location.
Now, Canva is embedded into Classroom Screen!

Buncee Embedded into Classroom Screen
Buncee creations can also be embedded into Classroom Screen! This is great if you have different tasks that you share for your student to perform daily. For example, if you have different tasks for multiple groups, you can create a Buncee and then share it on the Classroom Screen background. Here’s how it all works:

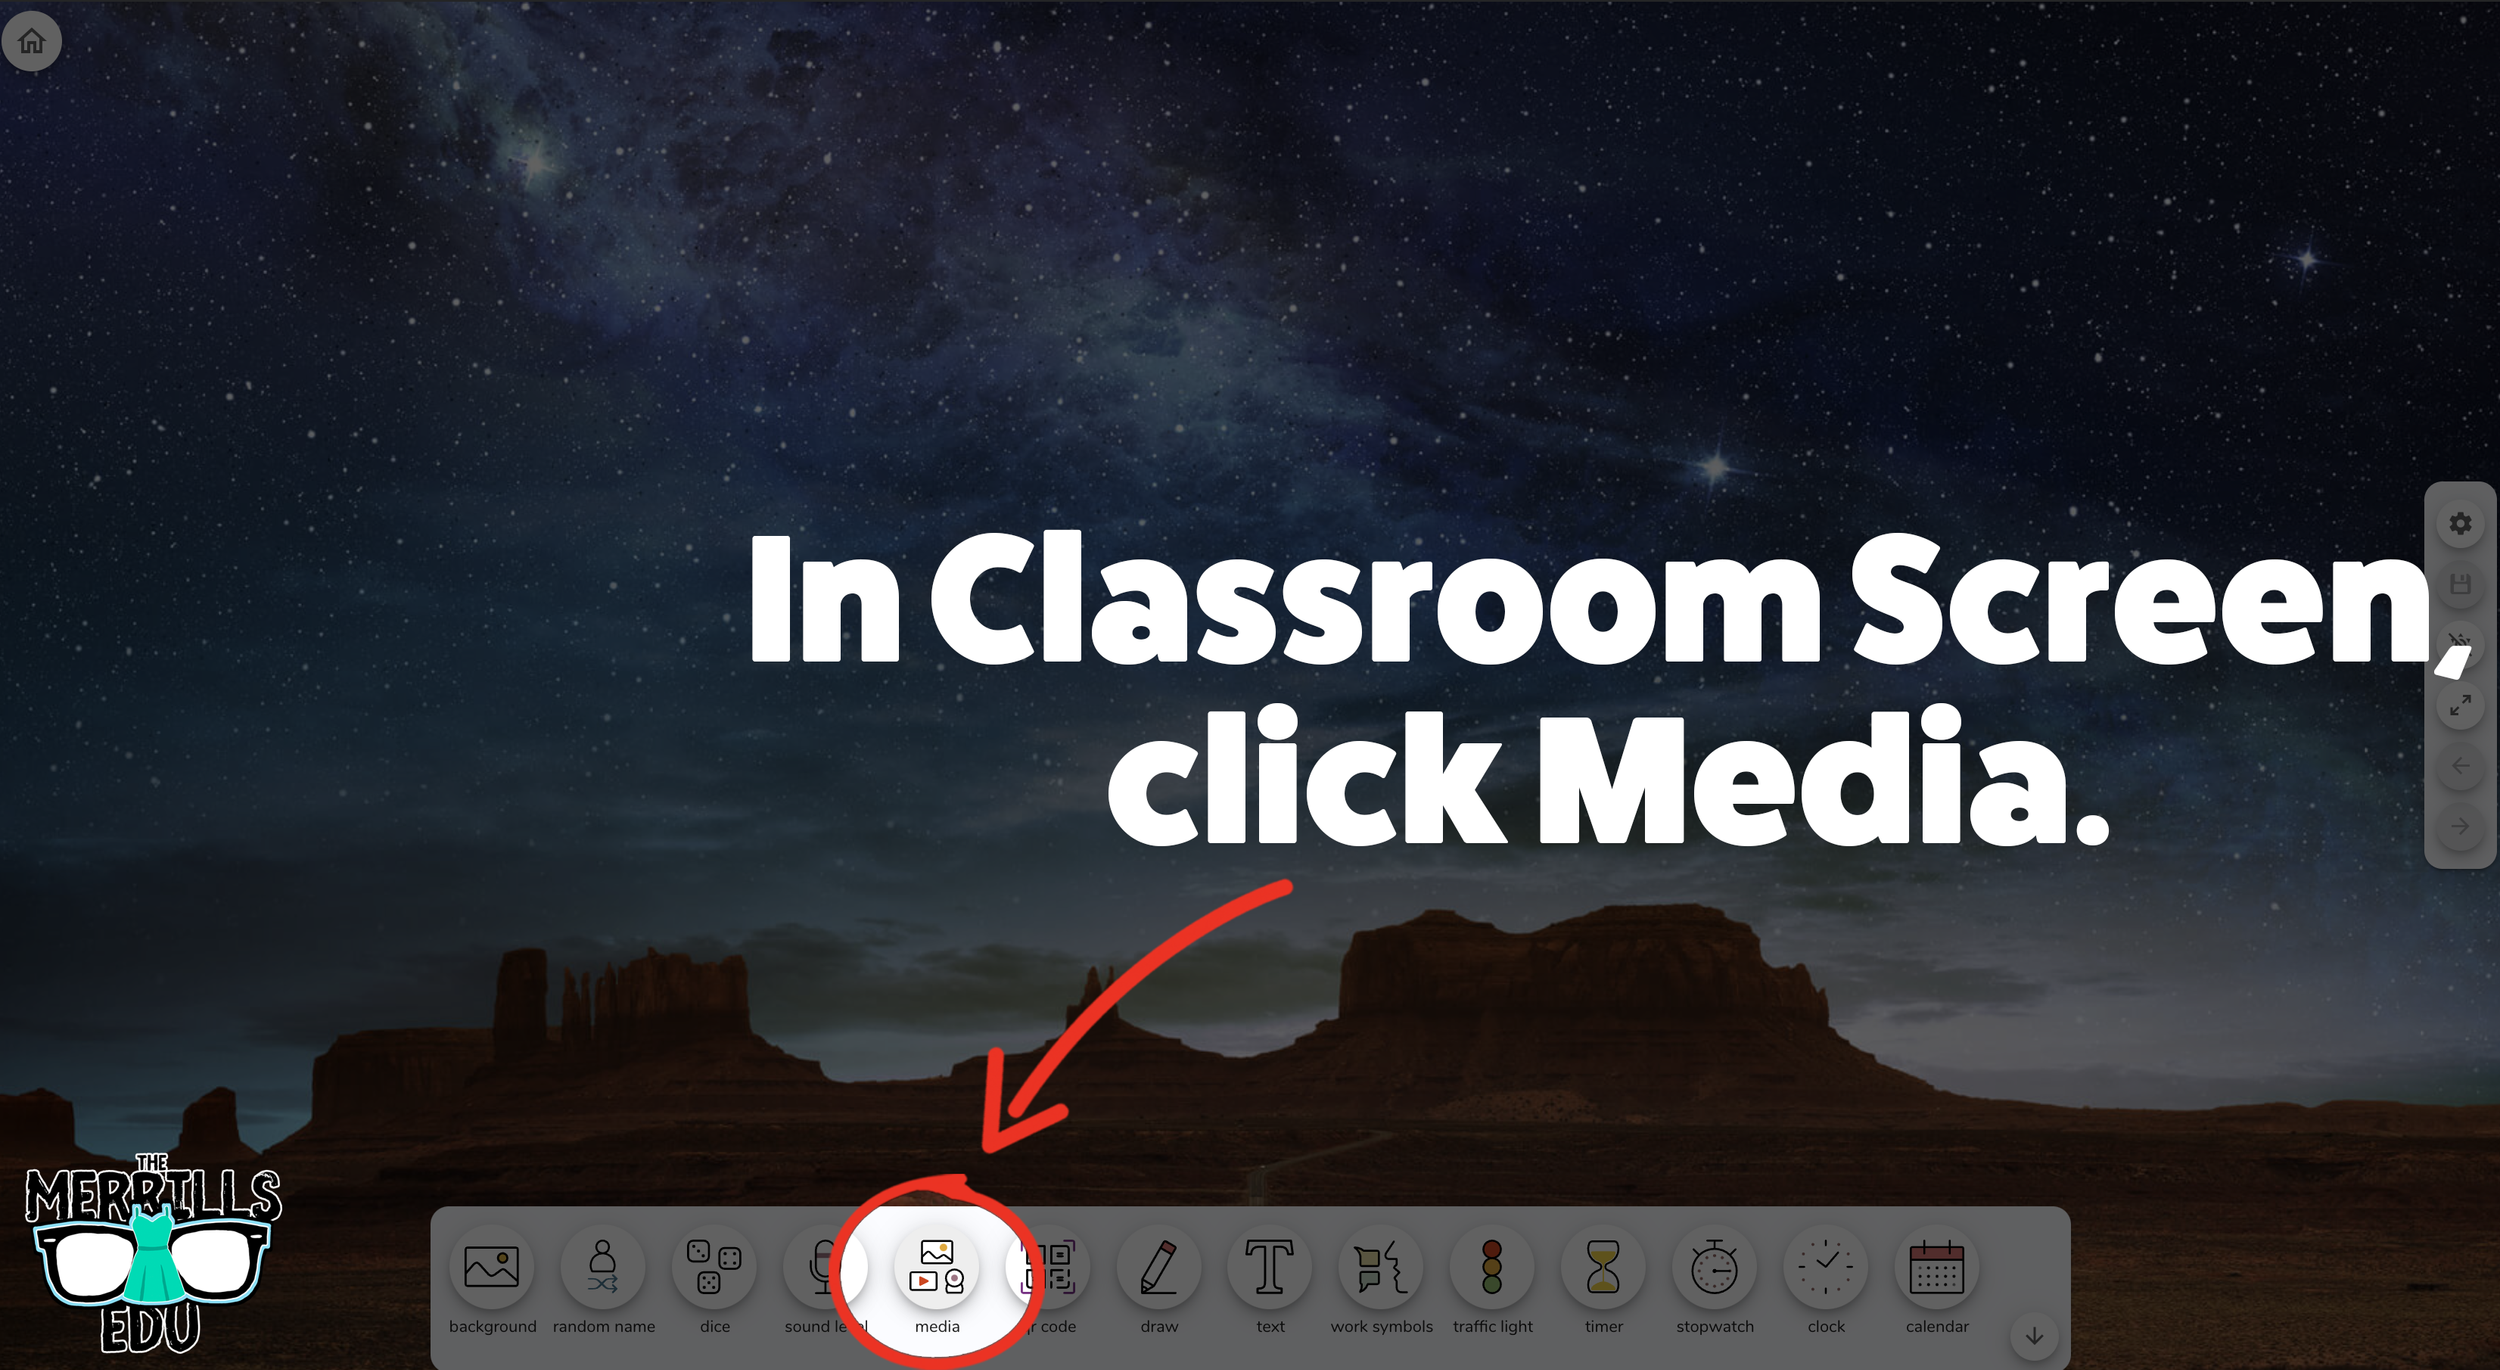

Open the Buncee creation that you want to embed, then click “Share.”
In the pop-up, click “Code.”
Click “+Show Options” and then select your preferred size.
Once you have selected your size, click “Copy” next to the Embed Code bar.
In a separate tab, head over to ClassroomScreen.com and start a new screen (or open an old one).
With your Classroom Screen open, click on “Media” from the menu options running along the bottom of the screen.
A new window will open. Click “Embed.”
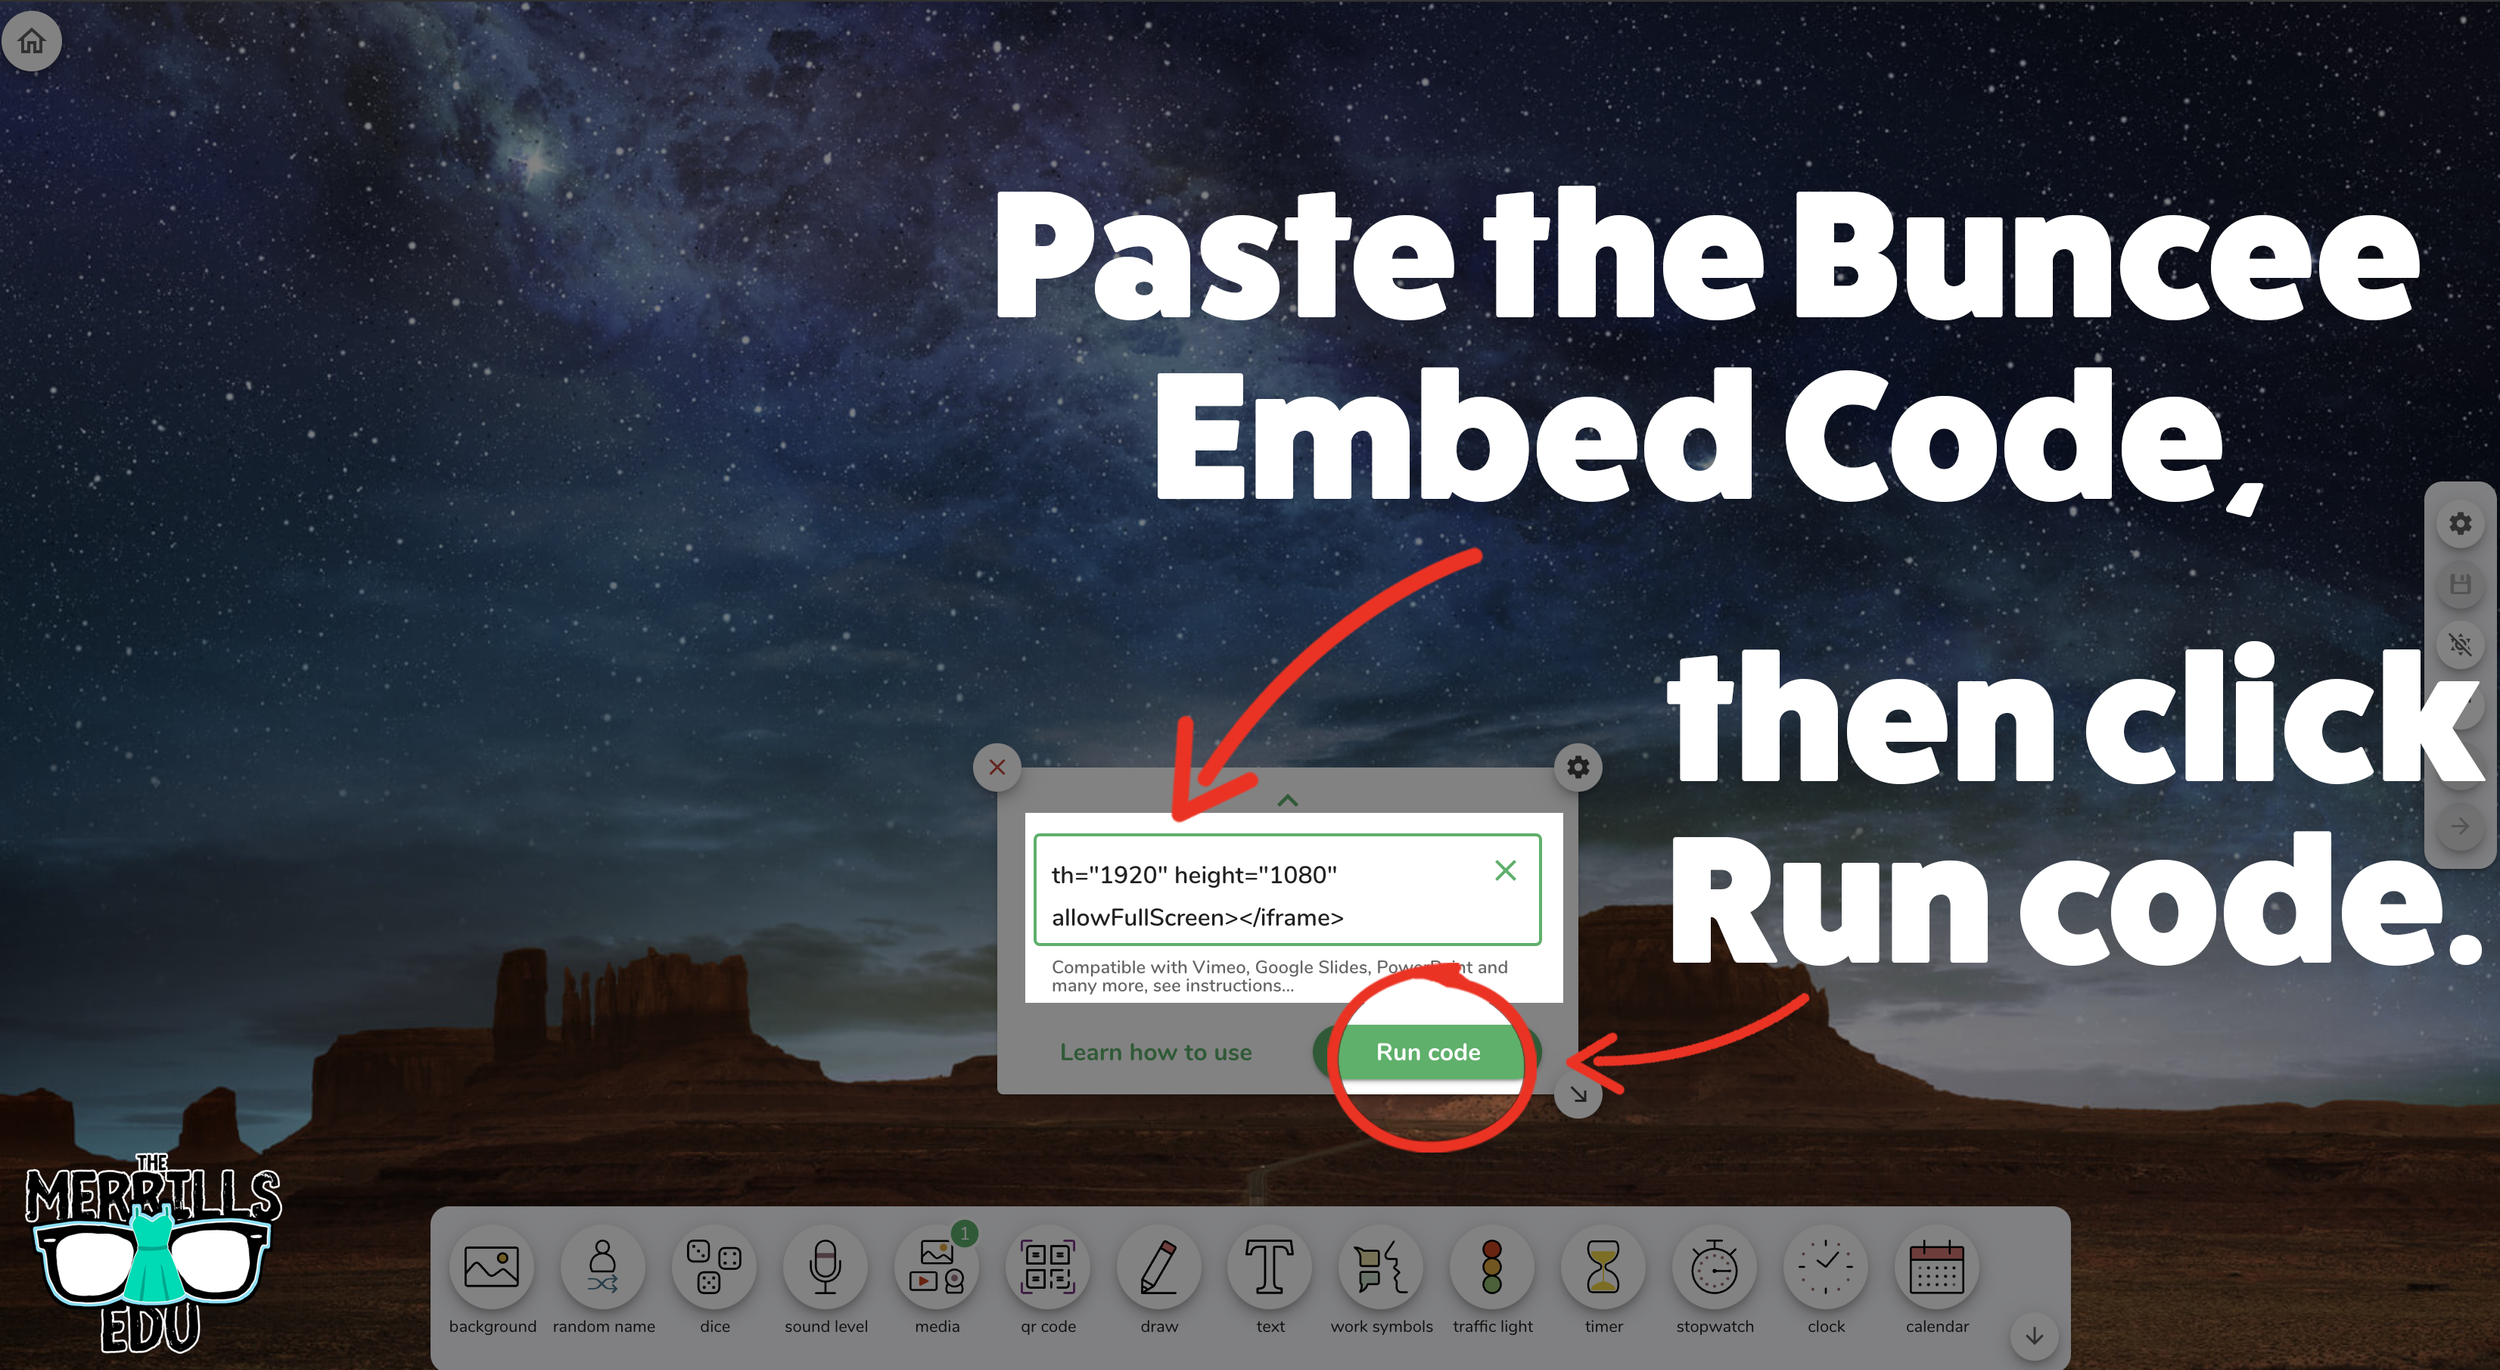
Click inside the embed area and paste your Buncee code.
With the code pasted, click on “Run code.”
Your Canva creation will now appear! You can move the Buncee creation around by clicking on the arrows (located at the bottom), or stretch the creation out by clicking the arrow on the bottom right - then dragging it to the desired location.
Now, Buncee is embedded into Classroom Screen!

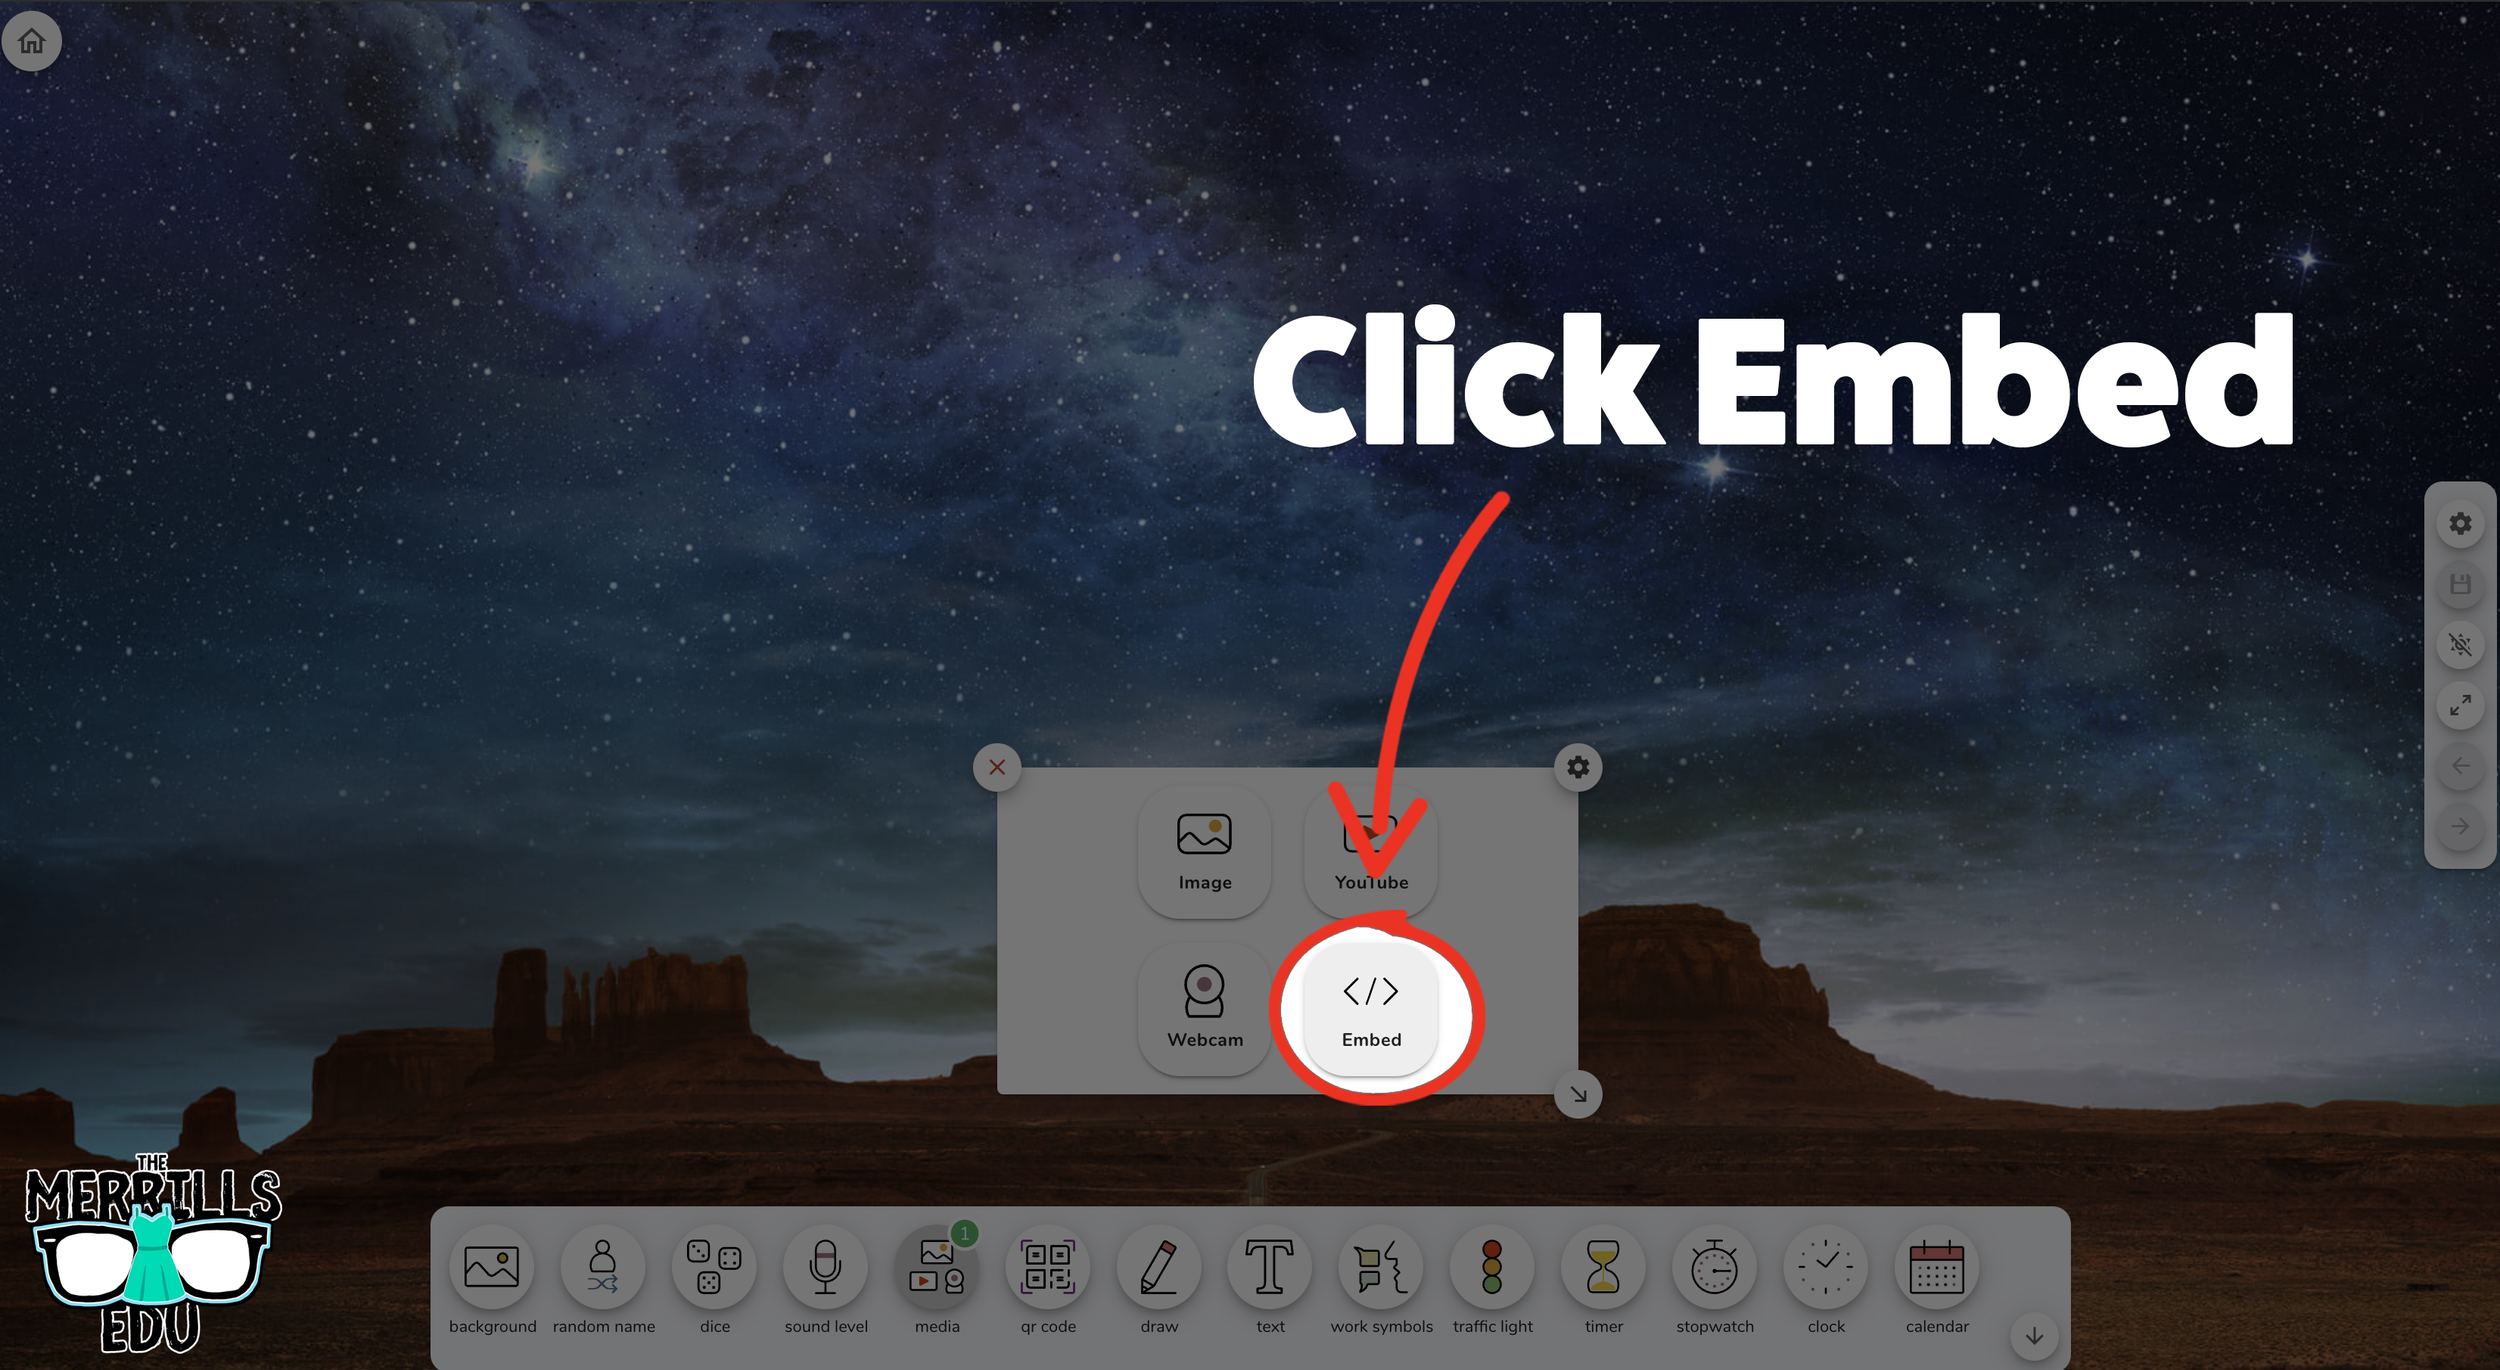
Wakelet Embedded into Classroom Screen
This embed is great if you need to post several different Wakelet collections in the same place. For example, you could group your students and then provide differentiated tasks on Wakelet - all of which are embedded onto Classroom Screen. Here’s how it all works:
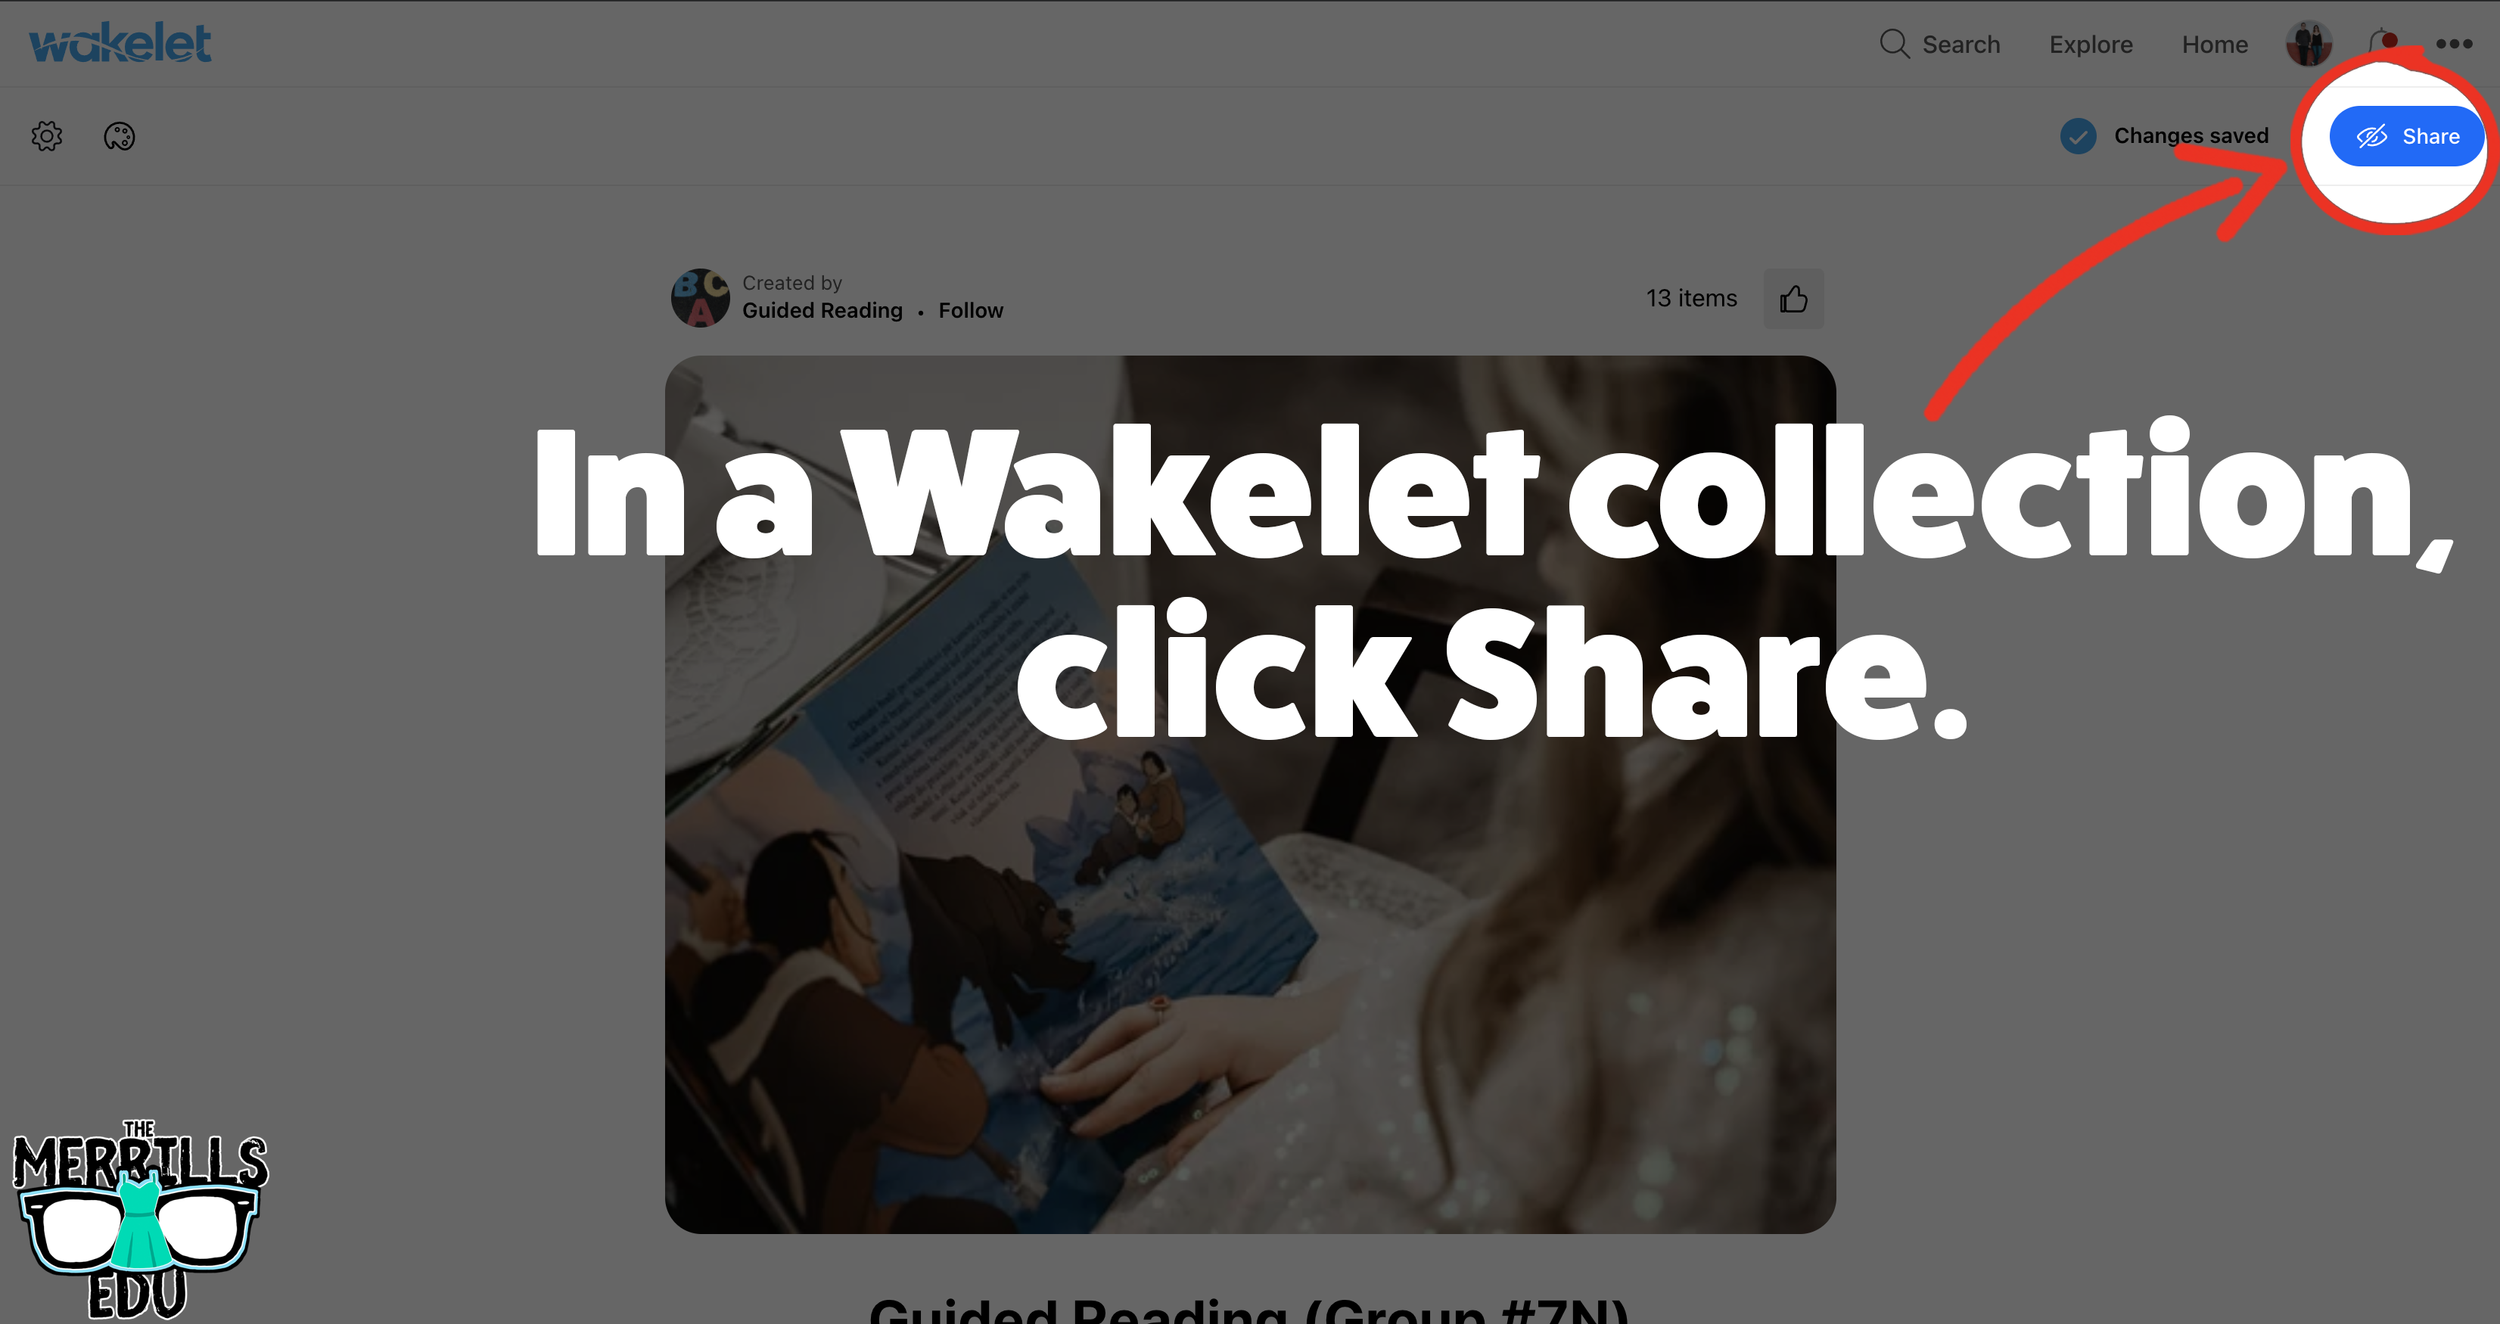

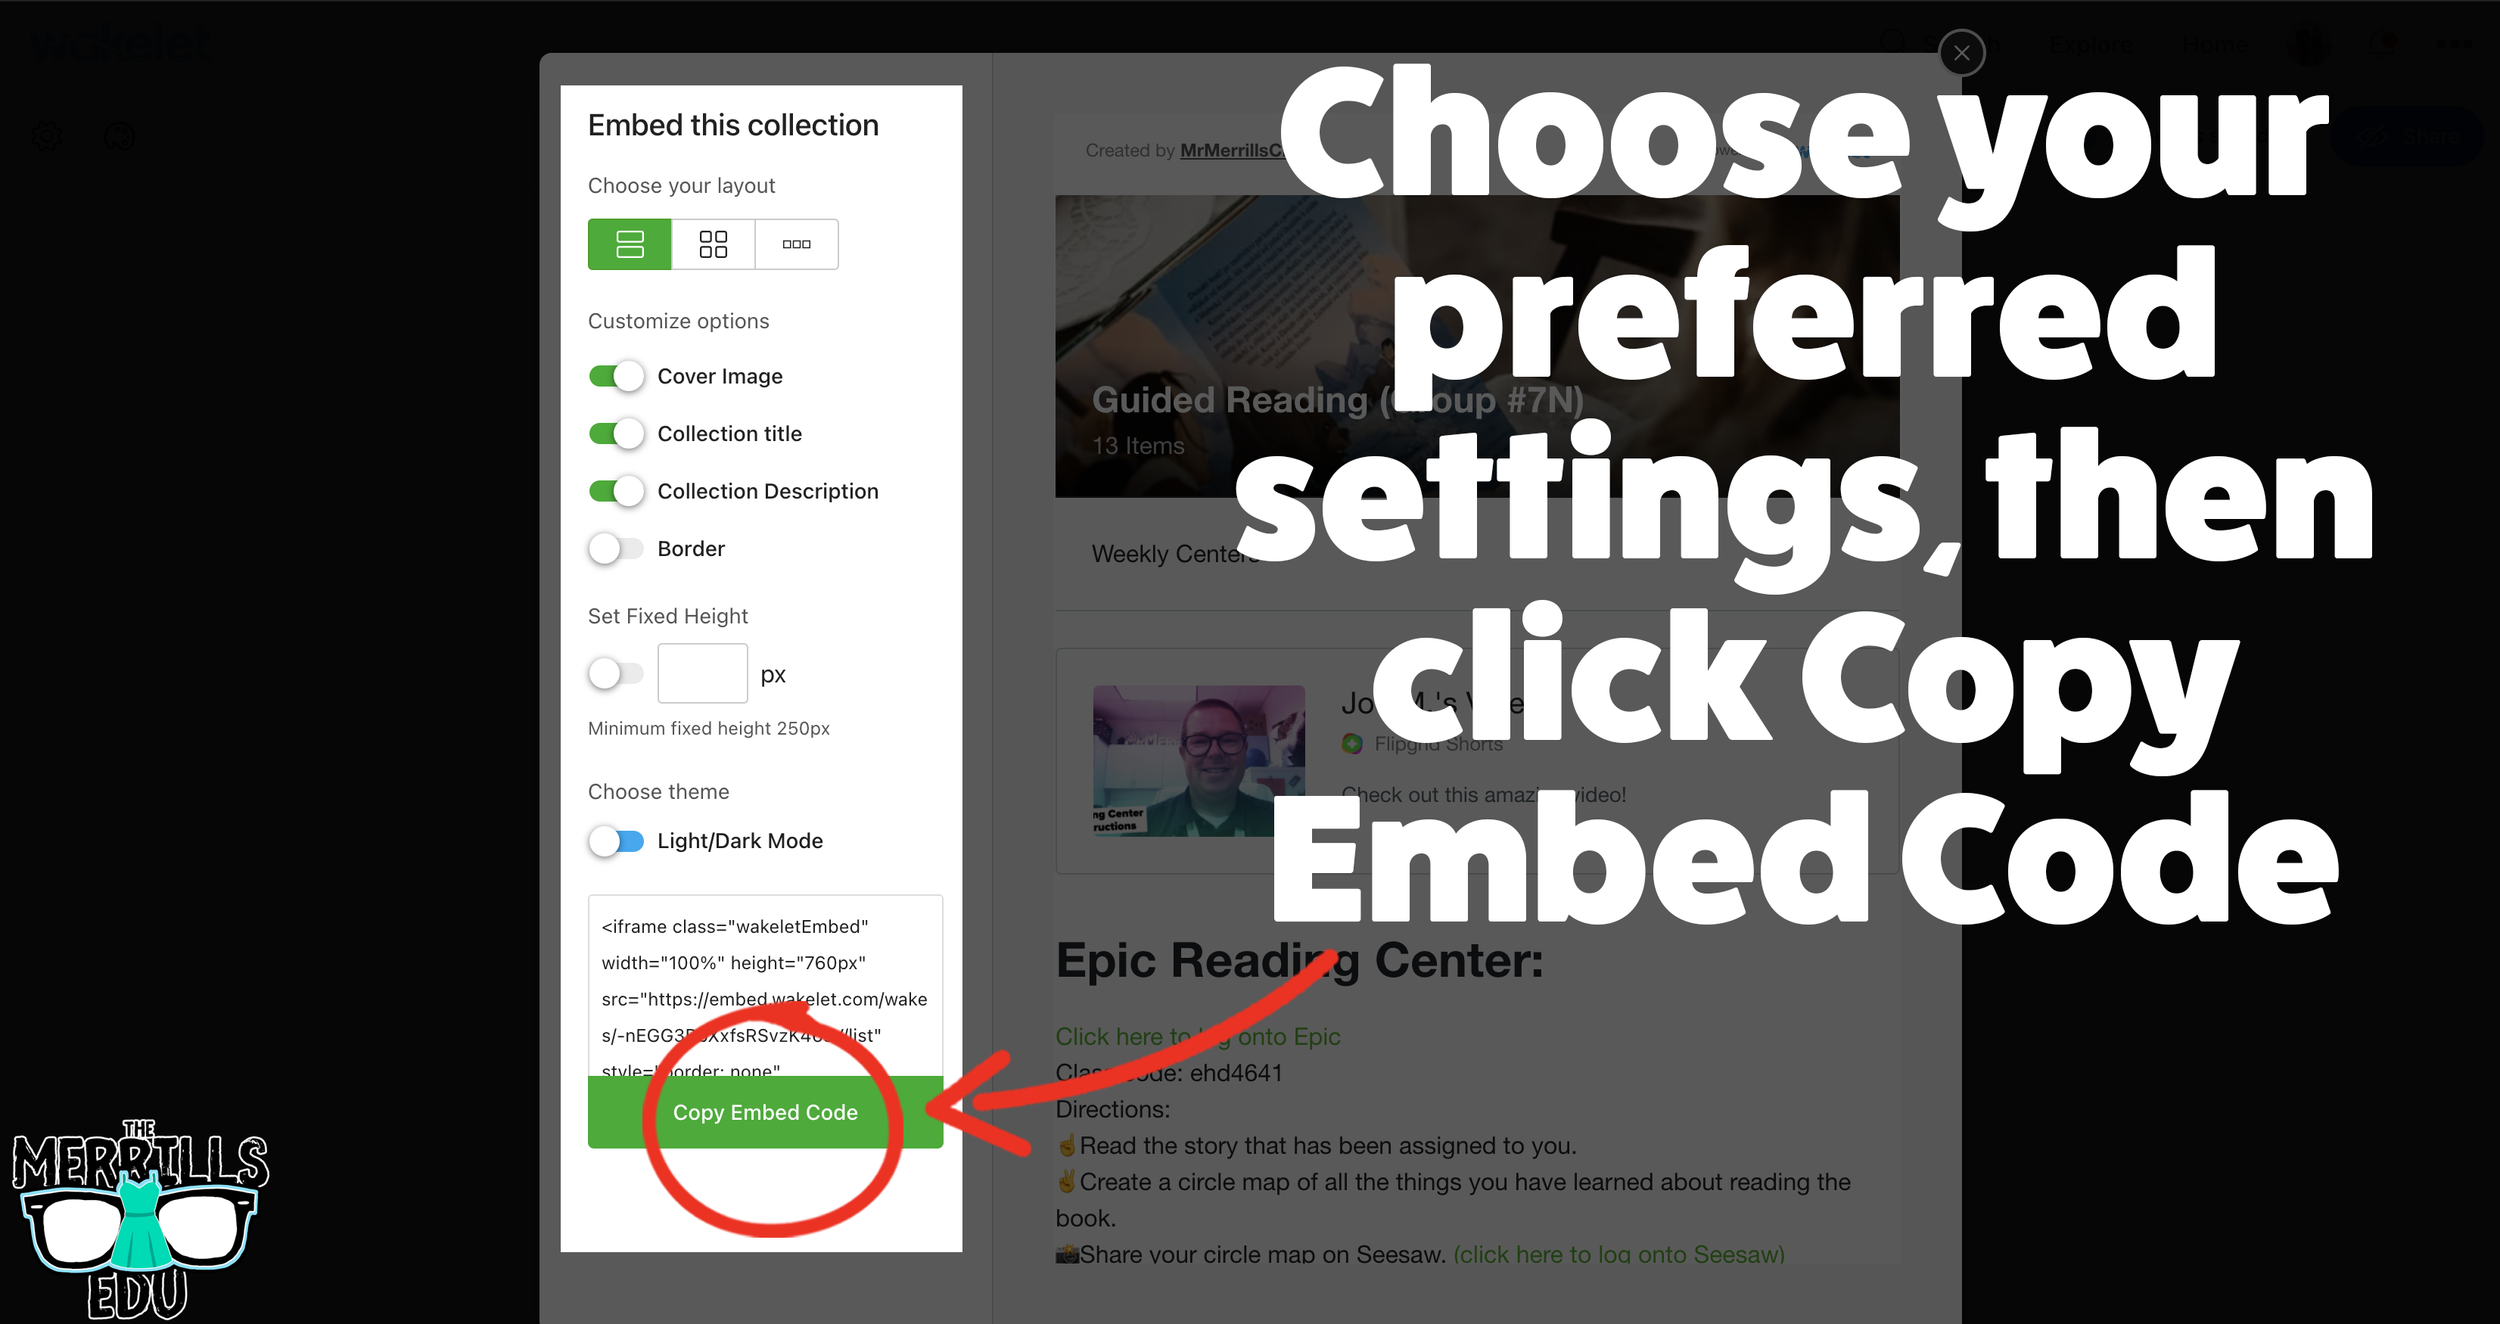


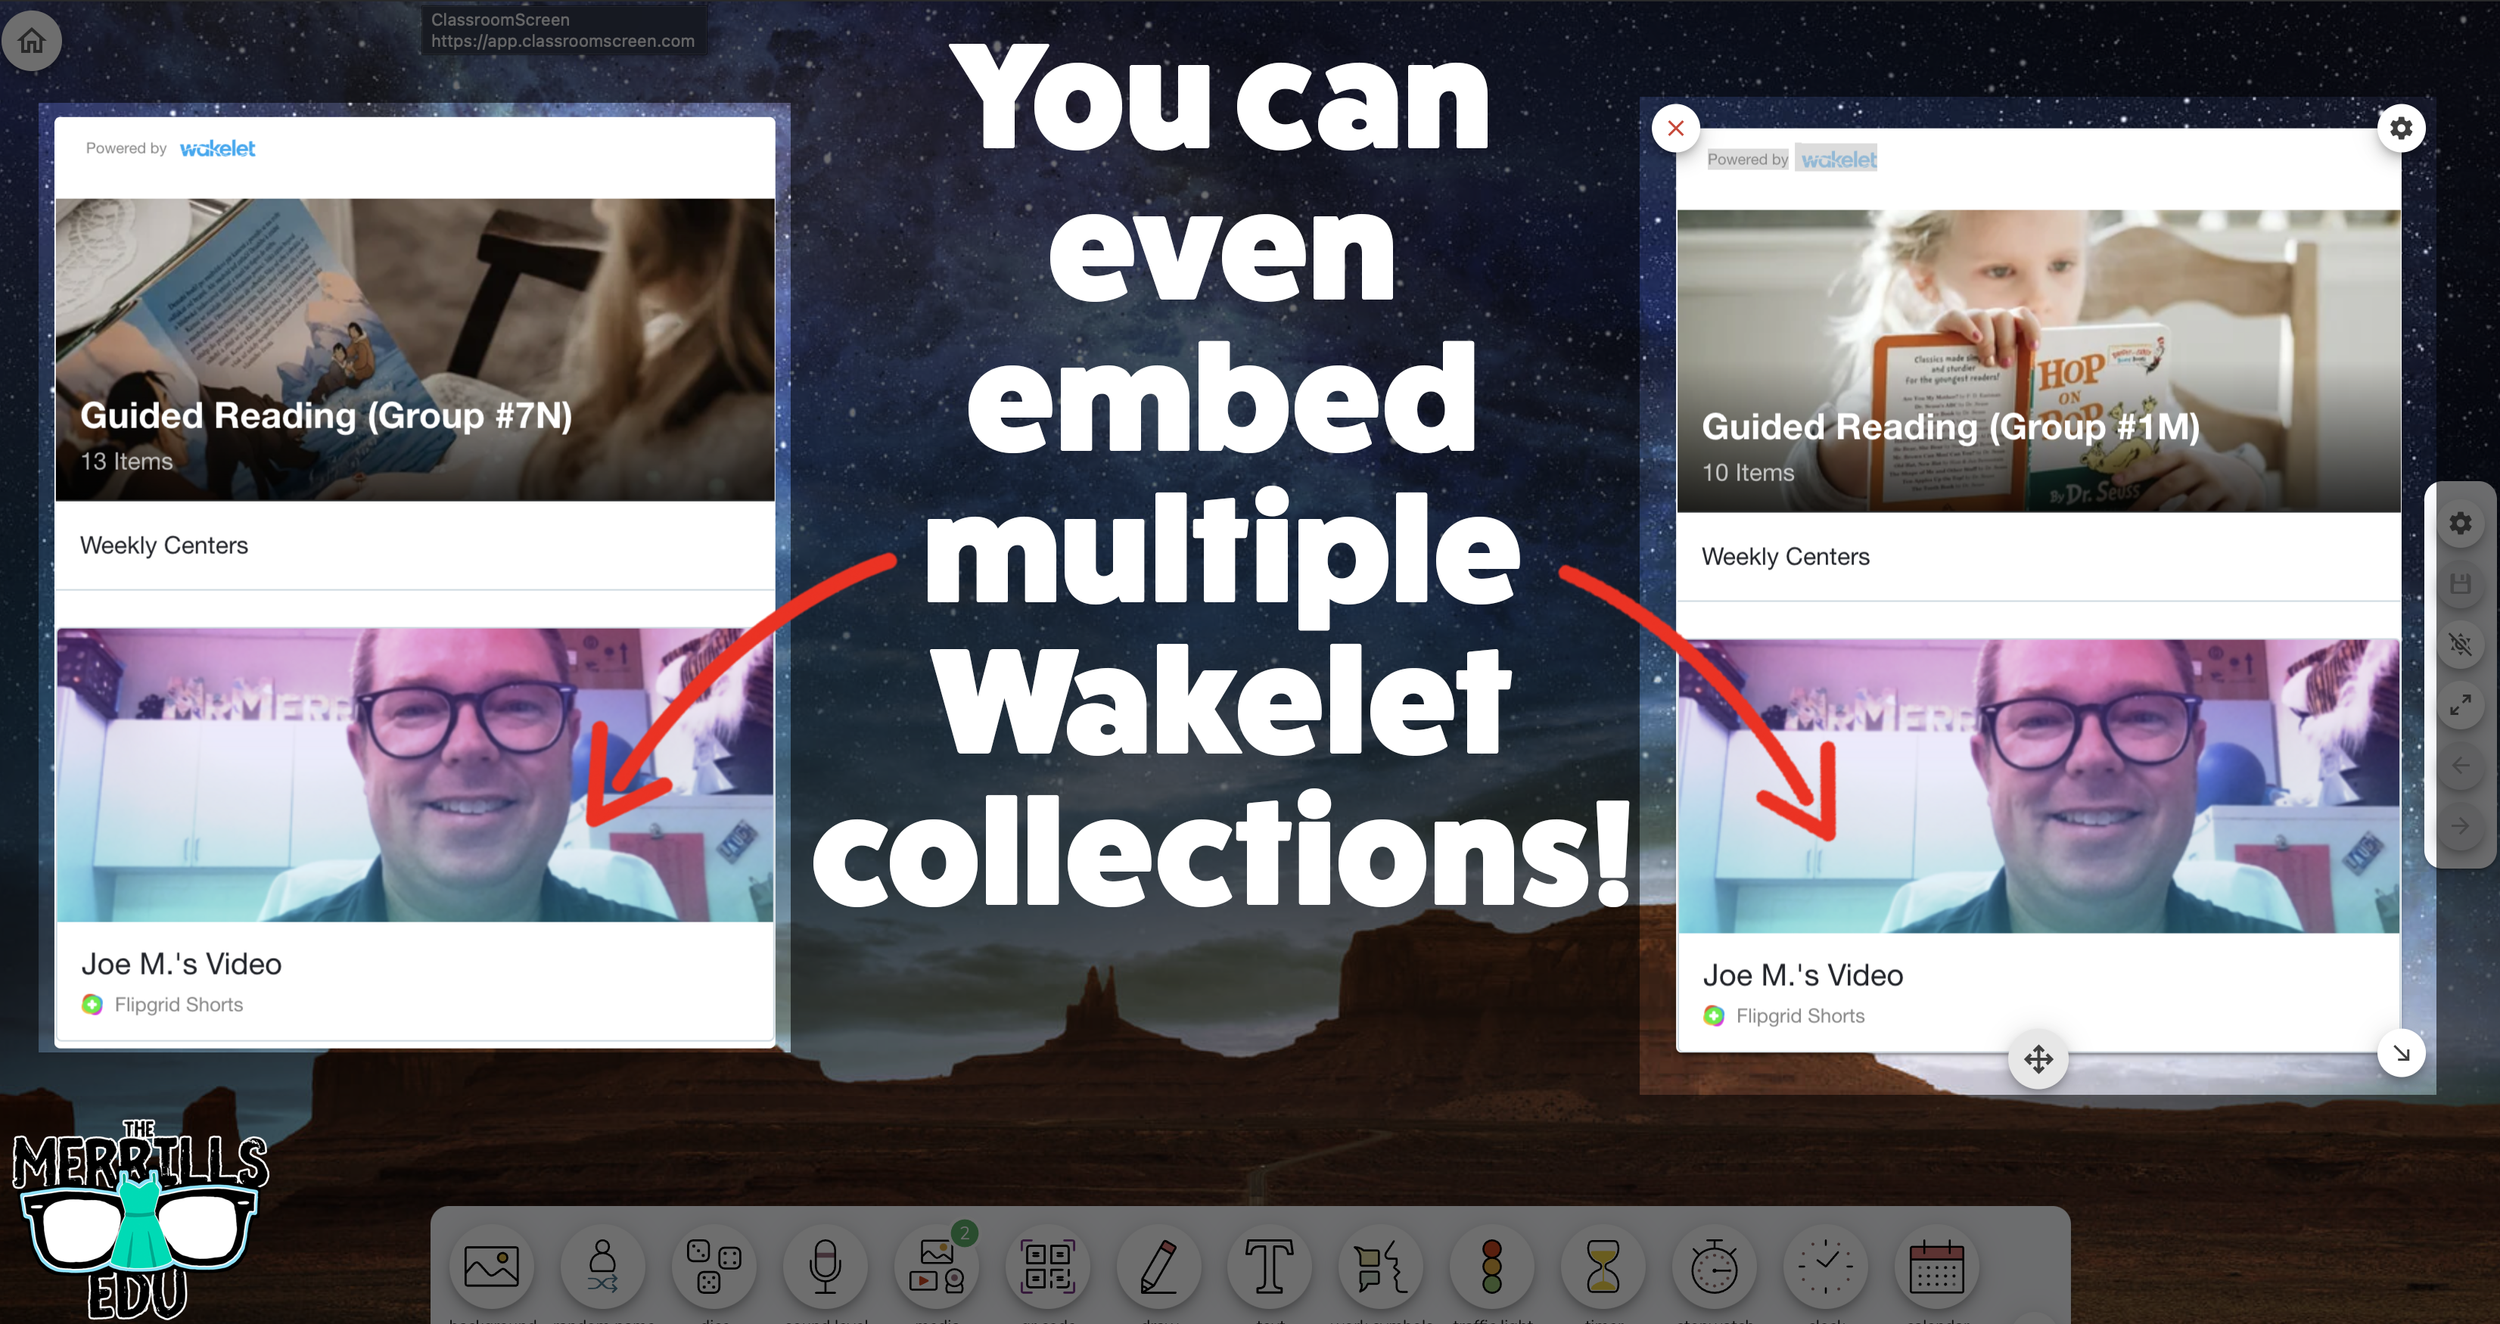
(Note: you will need to make your Wakelet collection either Public or Unlisted for this to work)
In a Wakelet collection, click the “Share” button.
In the pop-up window, click “Embed.”
Select your preferred settings, then click “Copy Embed Code.”
In a separate tab, head over to ClassroomScreen.com and start a new screen (or open an old one).
With your Classroom Screen open, click on “Media” from the menu options running along the bottom of the screen.
A new window will open. Click “Embed.”
Click inside the embed area and paste your Wakelet code.
With the code pasted, click on “Run code.”
Your Wakelet collection will now appear! You can move the Wakelet collection around by clicking on the arrows (located at the bottom), or stretch the collection out by clicking the arrow on the bottom right - then dragging it to the desired location.
Now, Wakelet is embedded into Classroom Screen!
BONUS: You can add multiple Wakelet embeds onto the same Classroom Screen!
-- Let us know if you’re using any of these ideas in your classroom! Be sure to follow us on social media (@TheMerrillsEDU everywhere) and tag us! 👓👗
For more tips, tricks and lesson ideas for making learning more interACTIVE, check out our books The InterACTIVE Class and Flipgrid in the InterACTIVE Class on Amazon!


How to Use Canva in Book Creator
Book Creator has always been one of our favorite go-to apps in the classroom. But now, with the ability to bring you Canva creations into Book Creator, things just way better! In this post, you’ll learn how to use Canva in Book Creator.
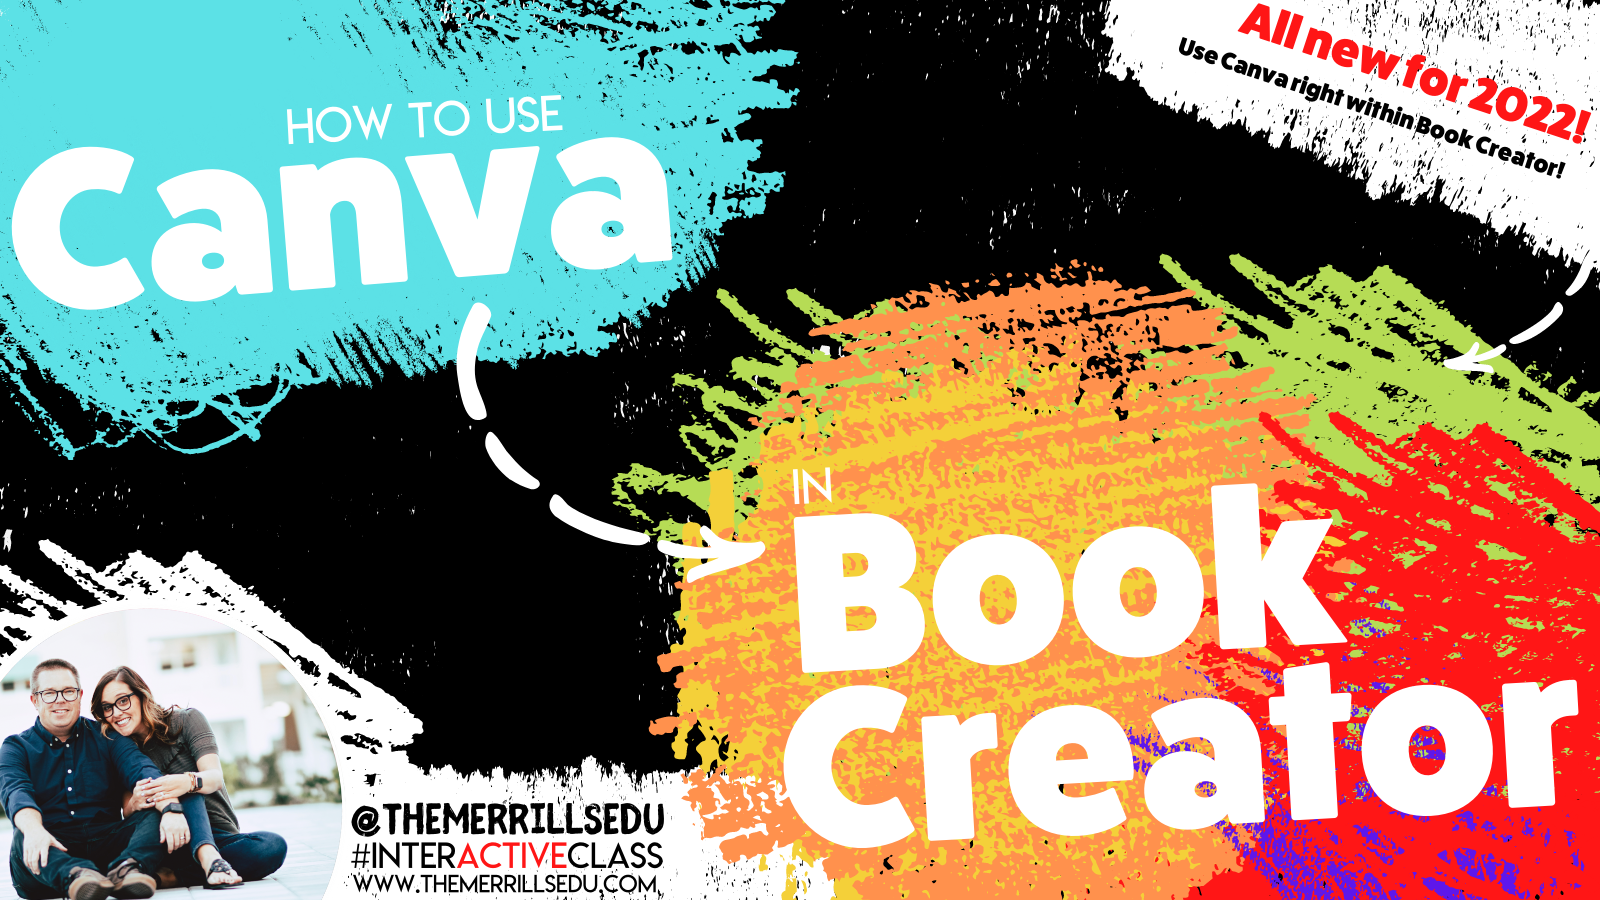
Book Creator has always been one of our favorite go-to apps in the classroom. But now, with the ability to bring you Canva creations into Book Creator, things just way better! In this post, you’ll learn how to use Canva in Book Creator.
(Click any subheading below to jump to that section! This is NOT a paid post.)

How to connect Canva to Book Creator

How to add Canva creations into Book Creator
How to Connect Canva
to Book Creator
Before we get started there is something to note…Both a Canva and Book Creator account are required. Both are free and you can sign up for a Canva (for educators) account here, and a Book Creator account here.
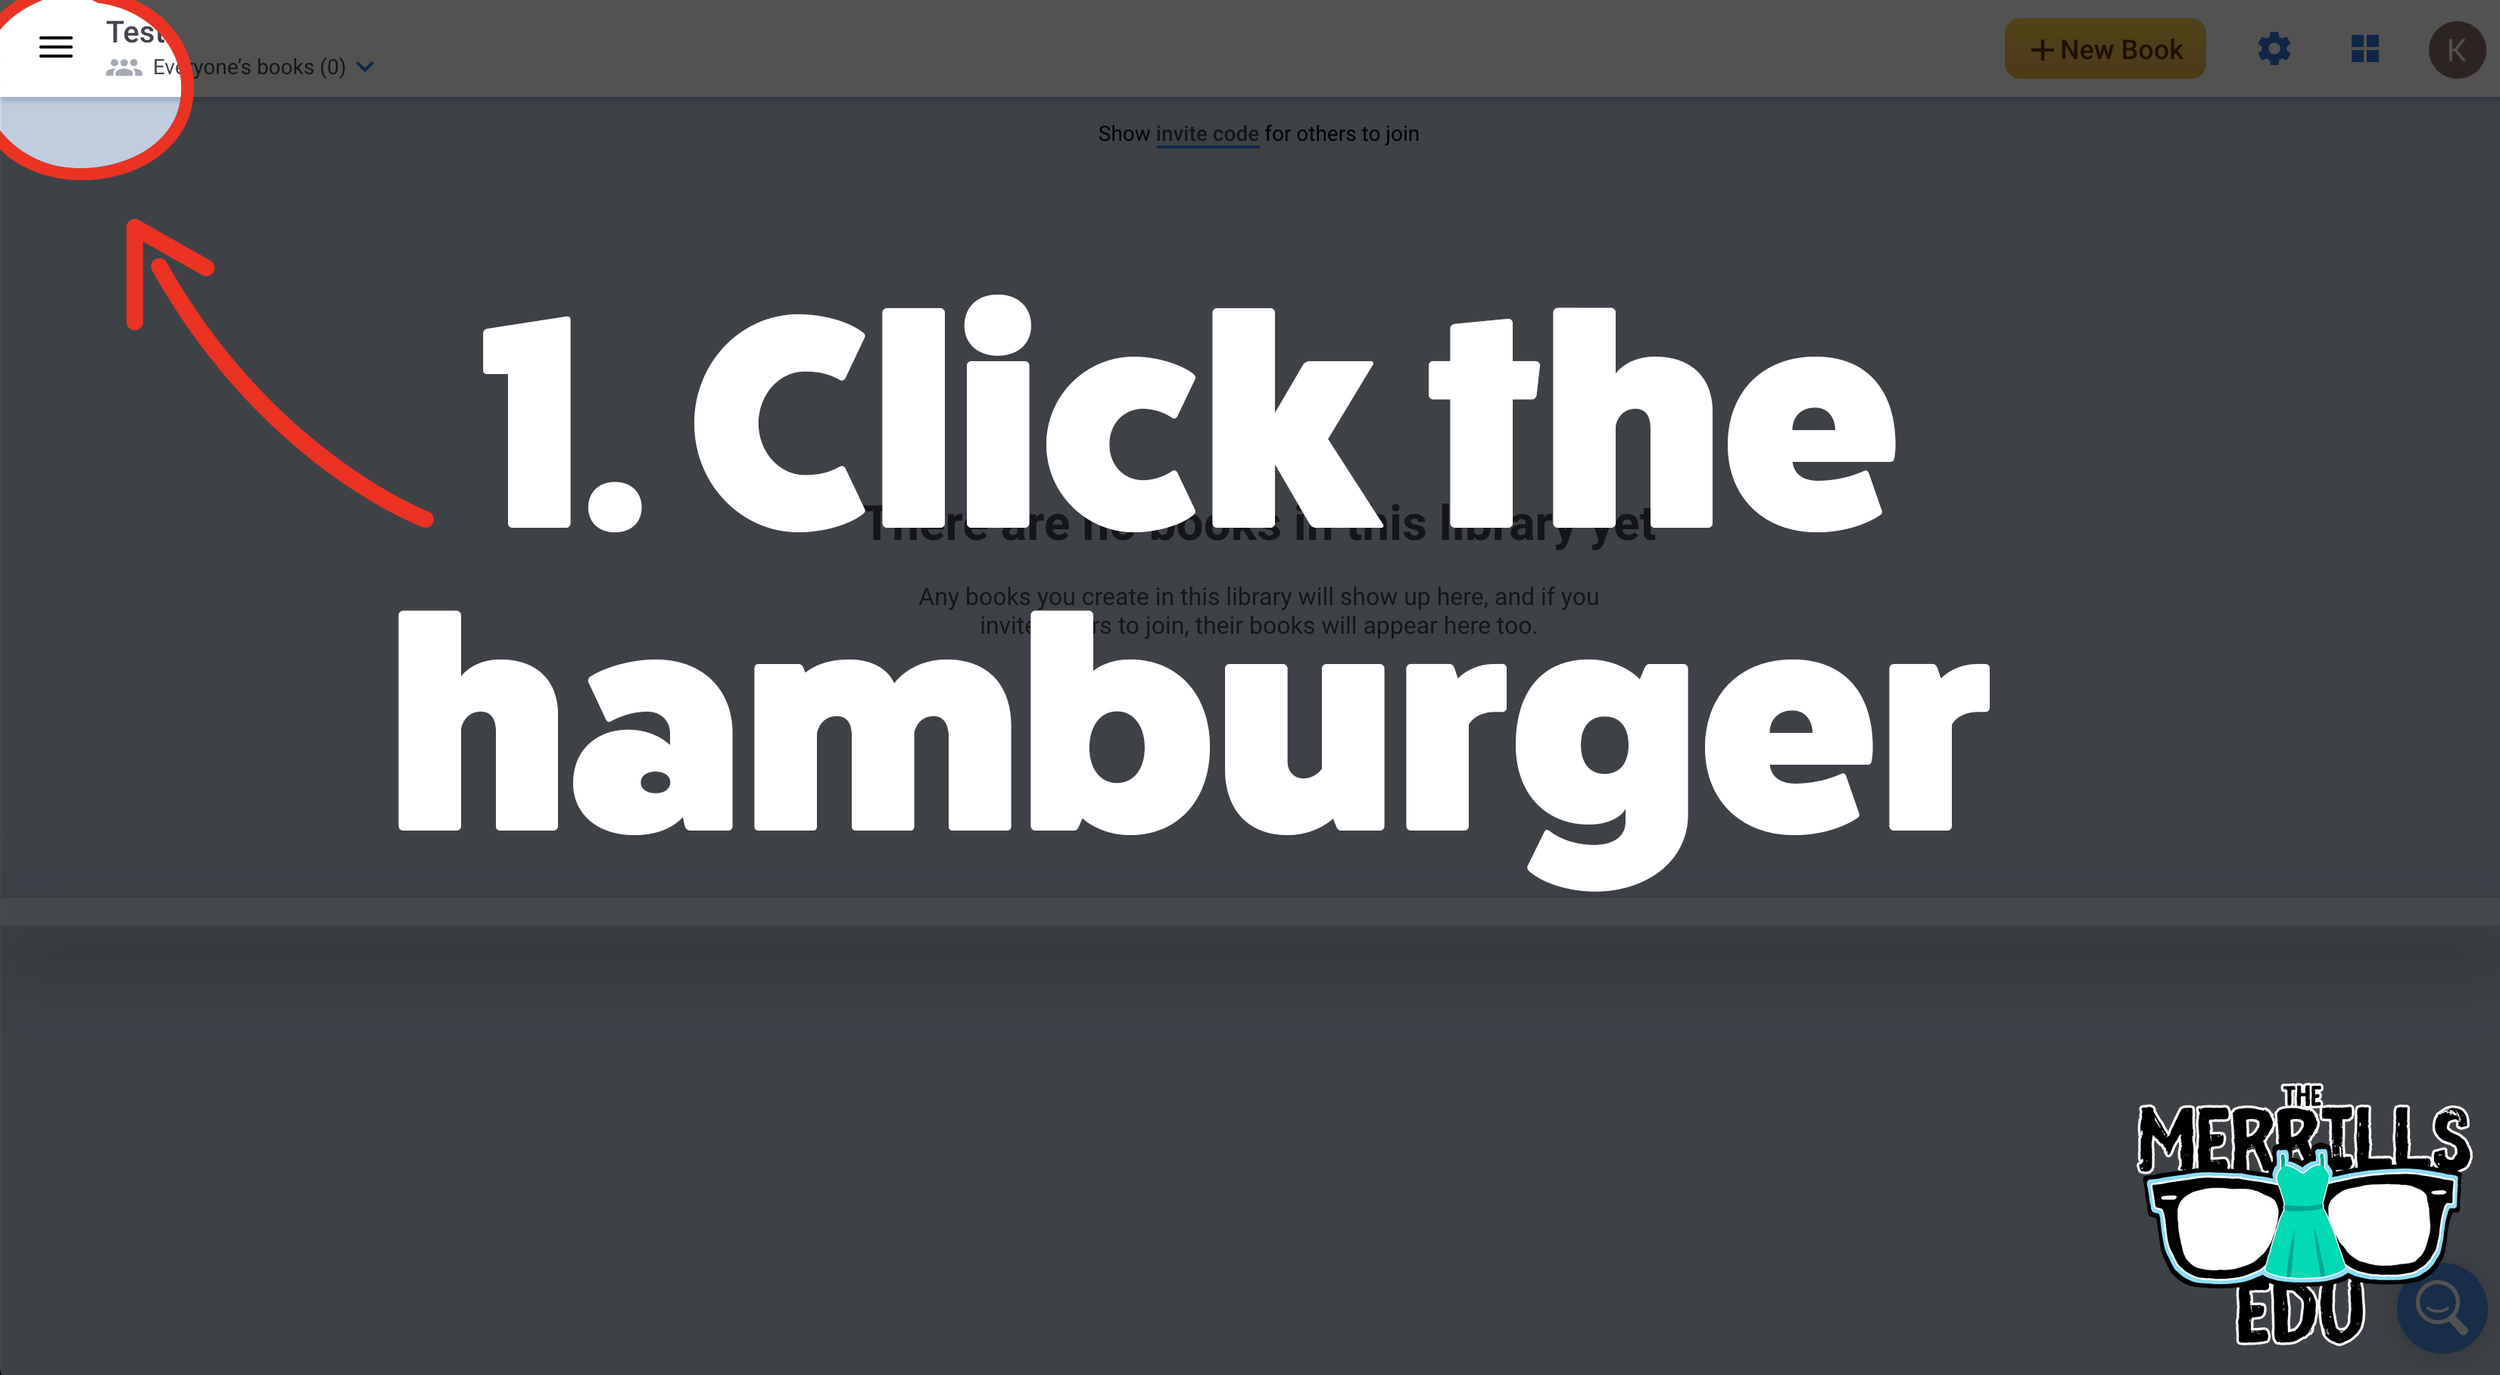
To connect Canva to Book Creator, follow these steps:
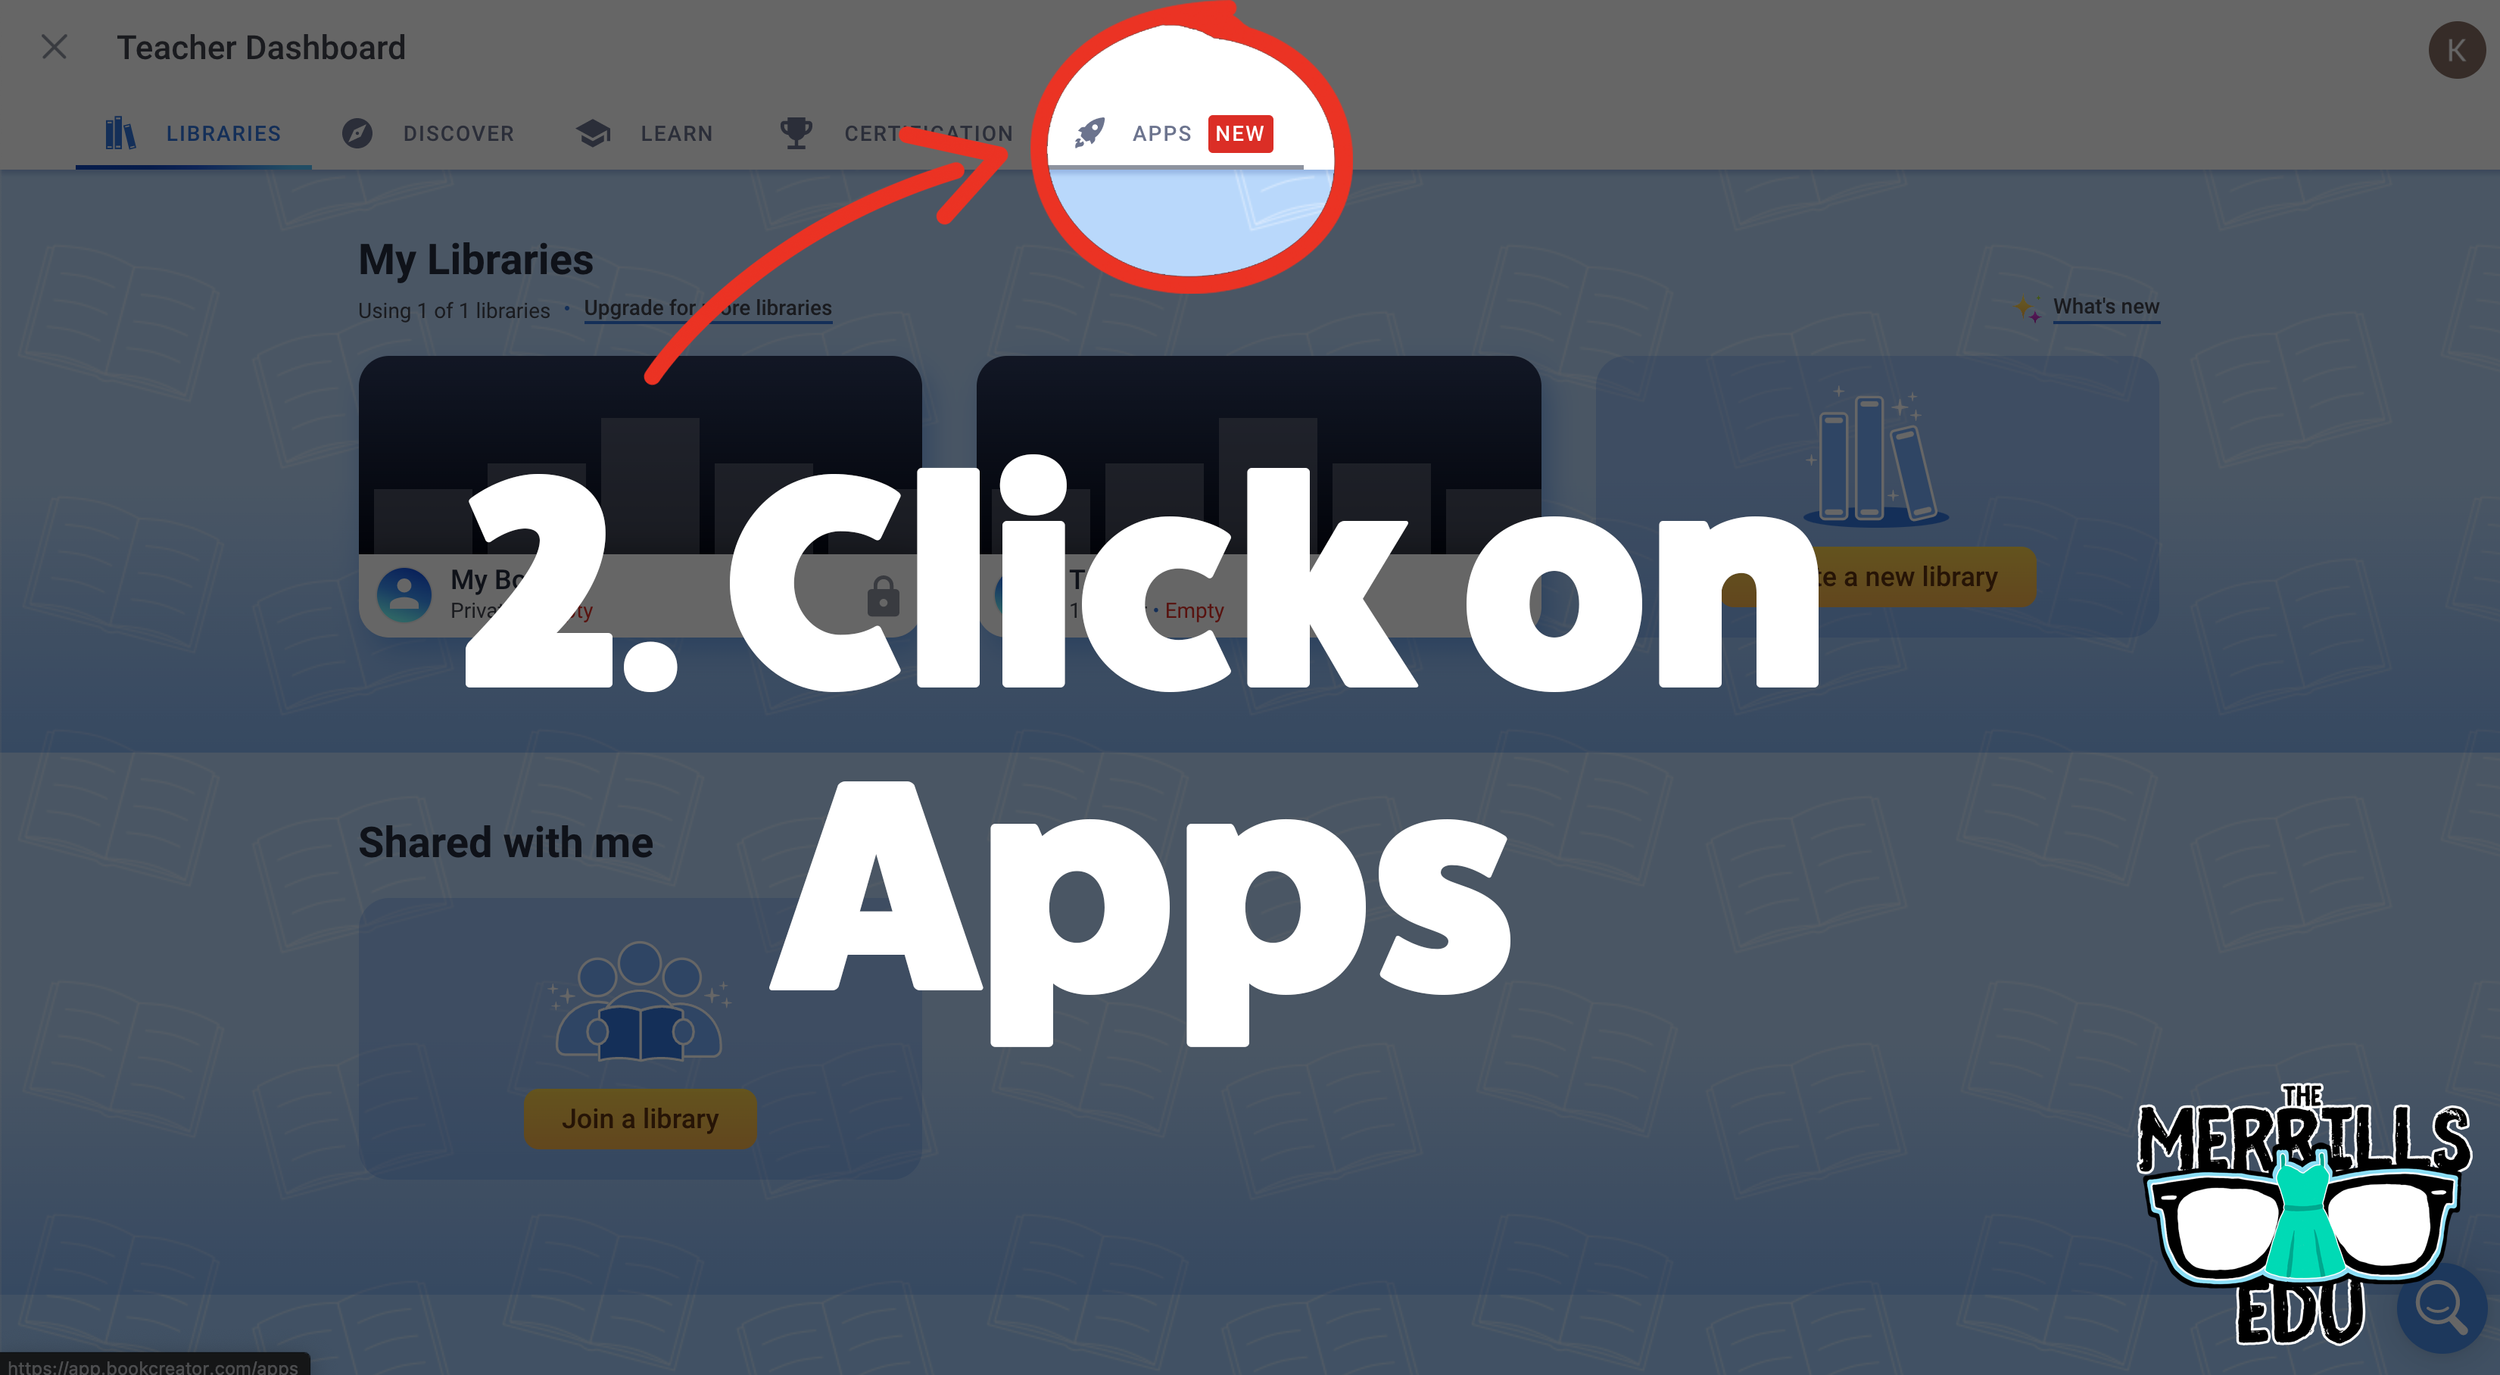
Log into Book Creator, then click on the hamburger / three lines located on the top left.
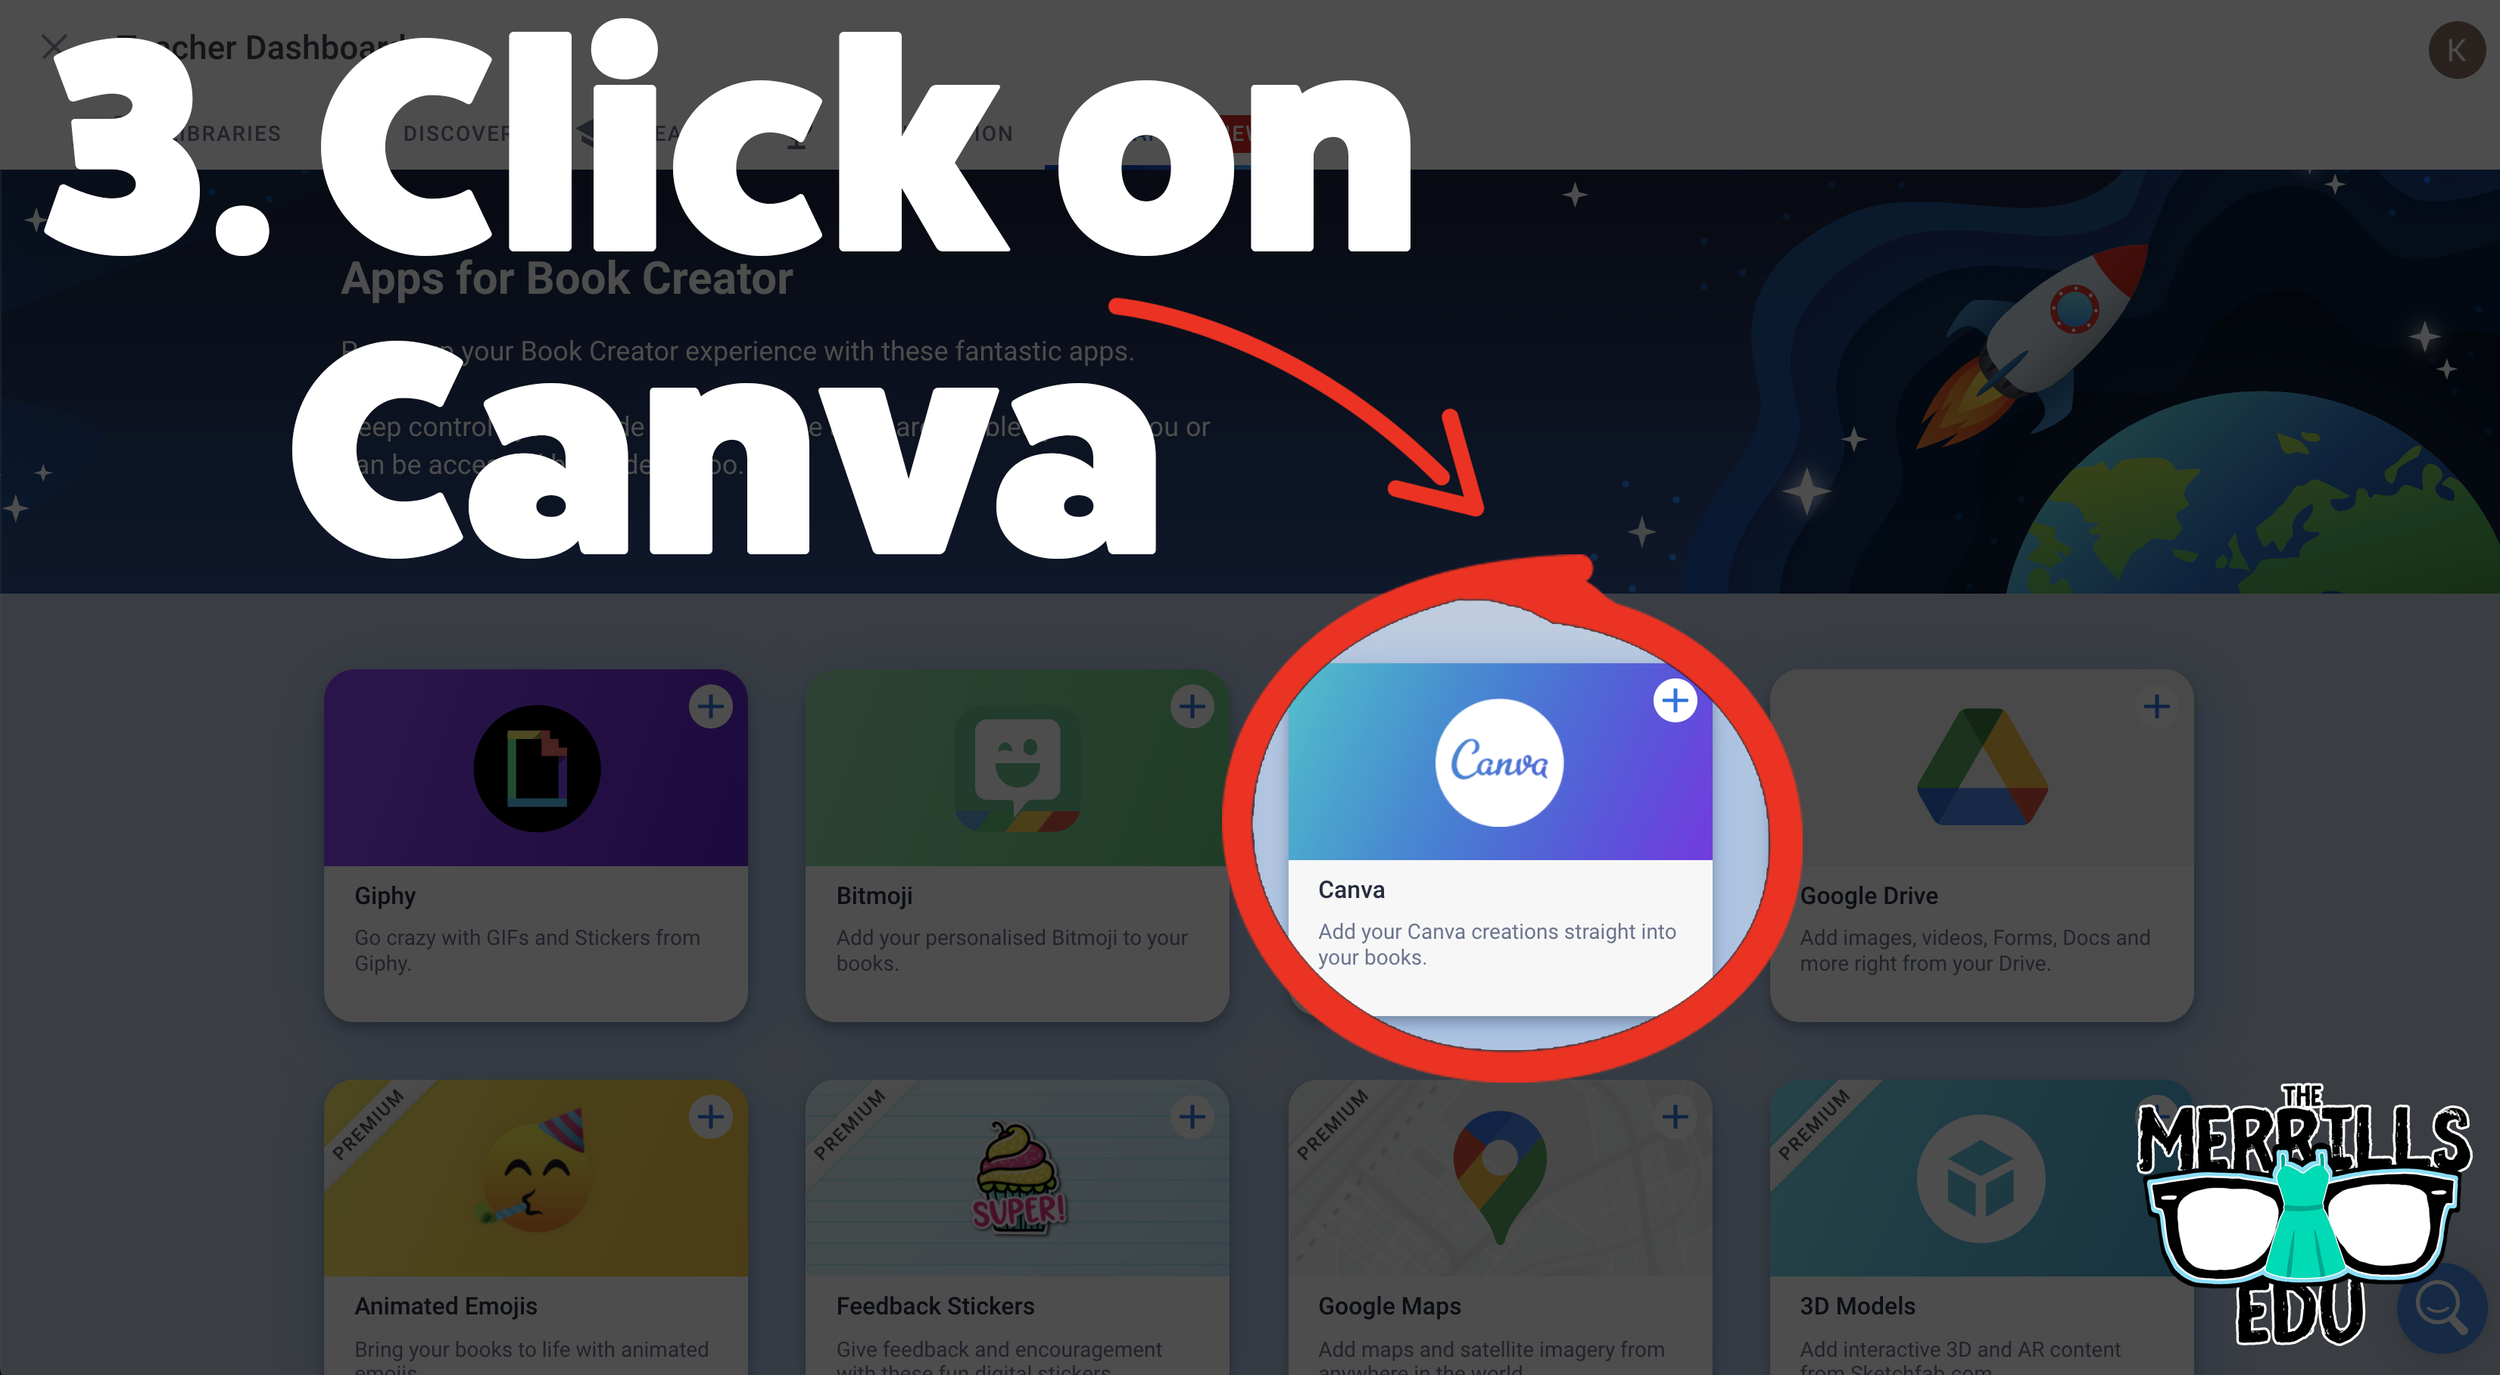
In the next window, click “Apps.”
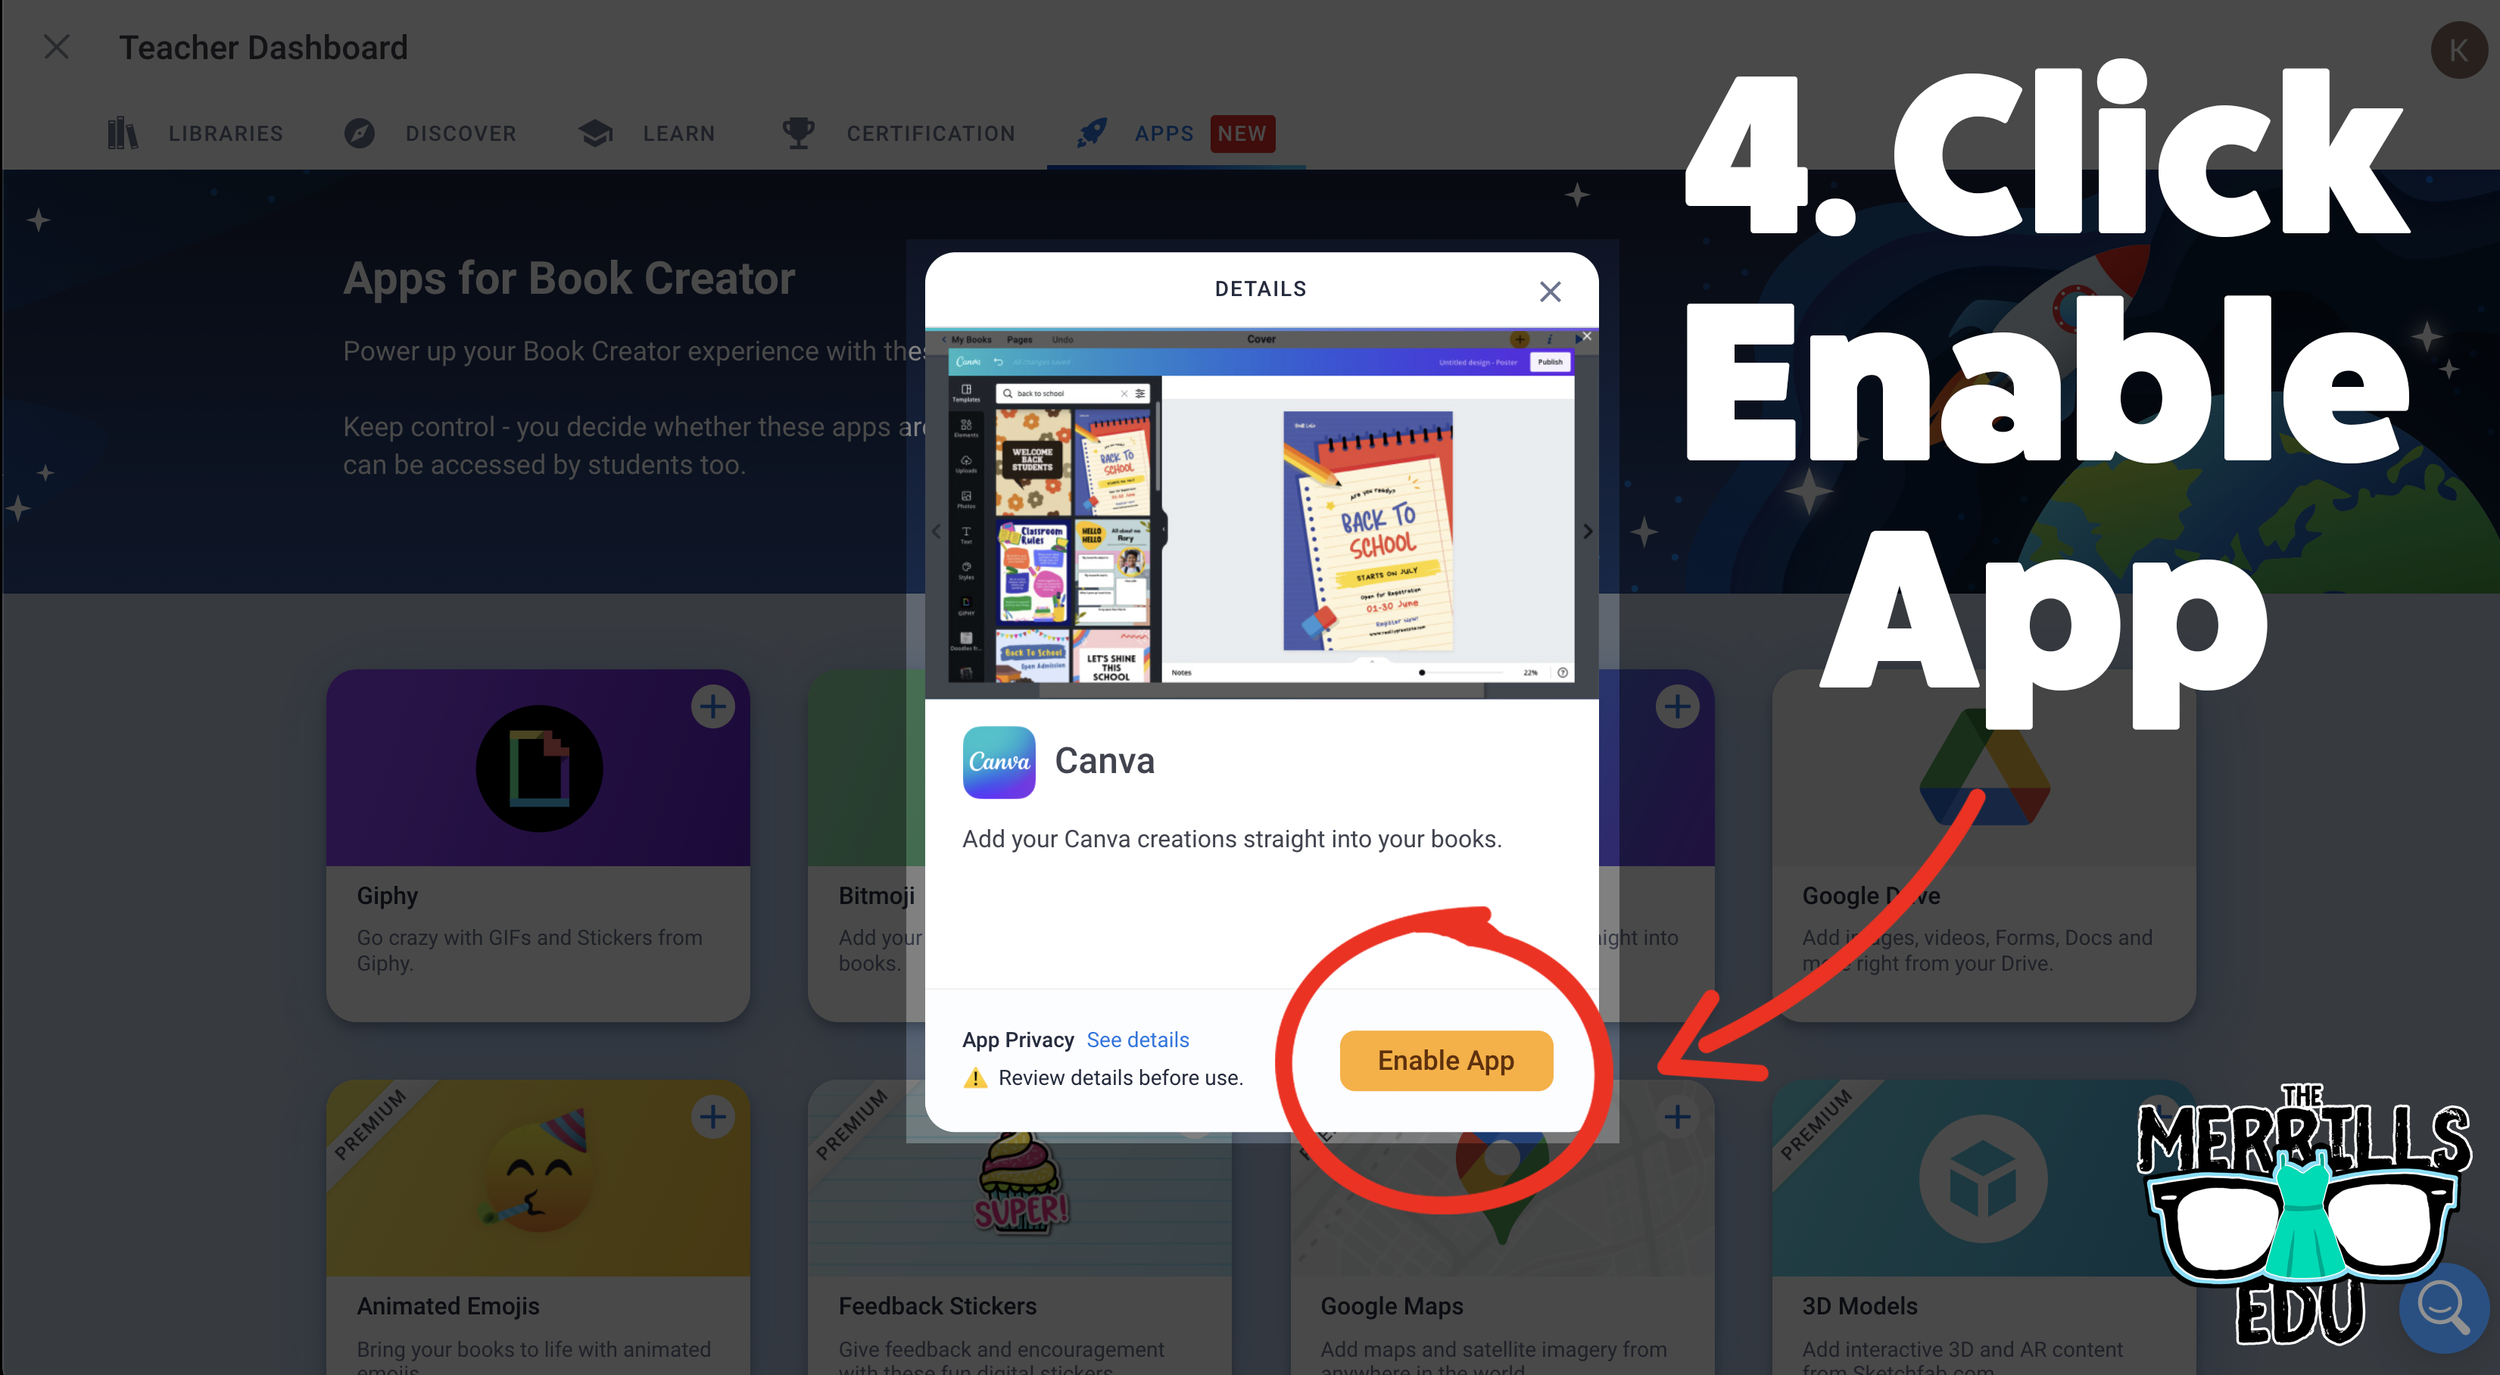
Locate the Canva app section, and then click the “+” sign.
A new window will pop up. Click enable app.
Then, choose the appropriate class or classes and click done.
Now you and your students can use Canva right from Book Creator! Students will not need to toggle back and forth between the two. Canva will open right from within Book Creator. Check it out below!
How to add Canva Creations into Book Creator
Now that you have connected your student’s Canva accounts with Book Creator, here’s how they can start using the two together. Students will not need to toggle back-and-forth to use both apps. Instead, Canva will open right within Book Creator. To add a Canva creation in Book Creator, follow these steps:
In a book, click on the “+” symbol on the top right.
Click “More” from the menu (with the Rocket Ship icon).
Click Canva (you may be prompted to log into your Canva account)
Canva will pop out from Book Creator! Design as you would in Canva.
When you’re finished and ready to add it to your book, click “Add to Book.”
Now, your Canva design is placed into your Book Creator book!
It’s that easy! Something to note - if you have previous designs that you would like to use, you can click on the icon that says, “All of Your Designs.” This will allow you to use anything that you have already created in Canva. Don’t forget, there are also additional options for design by clicking the three dots / “More” icon. This will open up features like Drawing, QR Codes, Building Your Own Character and more!
-- Let us know if you’re using any of these ideas in your classroom! Be sure to follow us on social media (@TheMerrillsEDU everywhere) and tag us! 👓👗
For more tips, tricks and lesson ideas for making learning more interACTIVE, check out our books The InterACTIVE Class and Flipgrid in the InterACTIVE Class on Amazon!


