

15 Things to Embed to Make Content Easier to Access!
Embedding apps is a great way to keep your content organized, but more importantly, it can help keep your students focused when working on tasks. The option to embed from apps is becoming increasingly more popular, and you may even be able to embed some of the apps you’re using right now! Here are 15 different ways we love to embed!

Embedding apps is a great way to keep your content organized, but more importantly, it can help keep your students focused when working on tasks. The option to embed from apps is becoming increasingly more popular, and you may even be able to embed some of the apps you’re using right now! Here are 15 different ways we love to embed!
Please note: This blog post was hand-crafted and was not created using AI.
(click on any subheading to jump to that section)


What does it mean to embed something?
According to BigCommerce.com, Embedding refers to the integration of links, images, videos, gifs and other content into social media posts or other web media. Embedded content appears as part of a post and supplies a visual element that encourages increased click through and engagement. The key takeaway here is that your embedded content appears to be a part where you are posting it. In other words, it’s being housed by wherever you are placing it.
Embedding & Hyperlinking
So why embed over hyperlink? By embedding your content, your students will not have to leave one app to visit another to complete a task. Everything is organized and in one place. Hyperlinking your content is not a bad thing, it just adds another step for students. Embedding creates a streamlined experience. So, let’s take a look at what some of our favorite embedding combos look like!

Padlet Embedded into Canvas
Take your Padlet boards and place them right into a Canvas page! Here’s how:


Create or find the Padlet board that you’d like to share, then click on the share icon.
Click on Embed in your blog or website.
Click Copy Padlet embed code.
4. In the Canvas page, click the cloud icon (if you don’t see a cloud icon, click the three dots to expand the toolbar).

5. In the pop up window, paste the copied embed code from Padlet then click the blue “Submit” button.
6. Your Padlet board is now embedded into your Canvas page! Click “Save” to keep the changes.

Padlet Embedded into Book Creator
Adding your Padlet boards into Book Creator can help keep track of student work. Here’s how!


Create or find the Padlet board that you’d like to share, then click on the share icon.
Click on Embed in your blog or website.
Click Copy Padlet embed code.
4. Log into Book Creator, then open or start a new book. In the book, click on the + icon, followed by “More.” Scroll down until you see “Embed,” then click it.
5. Paste the copied embed code from Padlet, then click “Confirm.”
6. The Padlet board is now embedded into the book.
This embed is only a hyperlink out to the Padlet board. While it will not allow students to interact with the Padlet content directly in the book, it will provide an organized way to revisit your Padlet boards.

Padlet Embedded into Classroom Screen
What is Classroom Screen?
Classroom Screen is a free tool (with a paid option) that educators can use to project in front of the class. Users can pick a background to be projected from a collection of images, animated gifs, or upload their own image. Classroom Screen provides many options to add to your background such as: a timer, random name generator, sound level alarms, and our personal favorite - embedding.
With Classroom Screen, you can set a class timer to give students time to create, then give them additional time to respond. This alleviates stress that students may face when trying to finish their work. With Classroom Screen’s embed feature, you can add a Padlet board right into your Classroom Screen. Here’s how it works:


Open the Padlet board that you want to embed, then click the share icon.
Click on Embed in your blog or website.
Click Copy Padlet embed code.
Launch Classroomscreen, then click More located on the bottom toolbar. Then, click Embed.
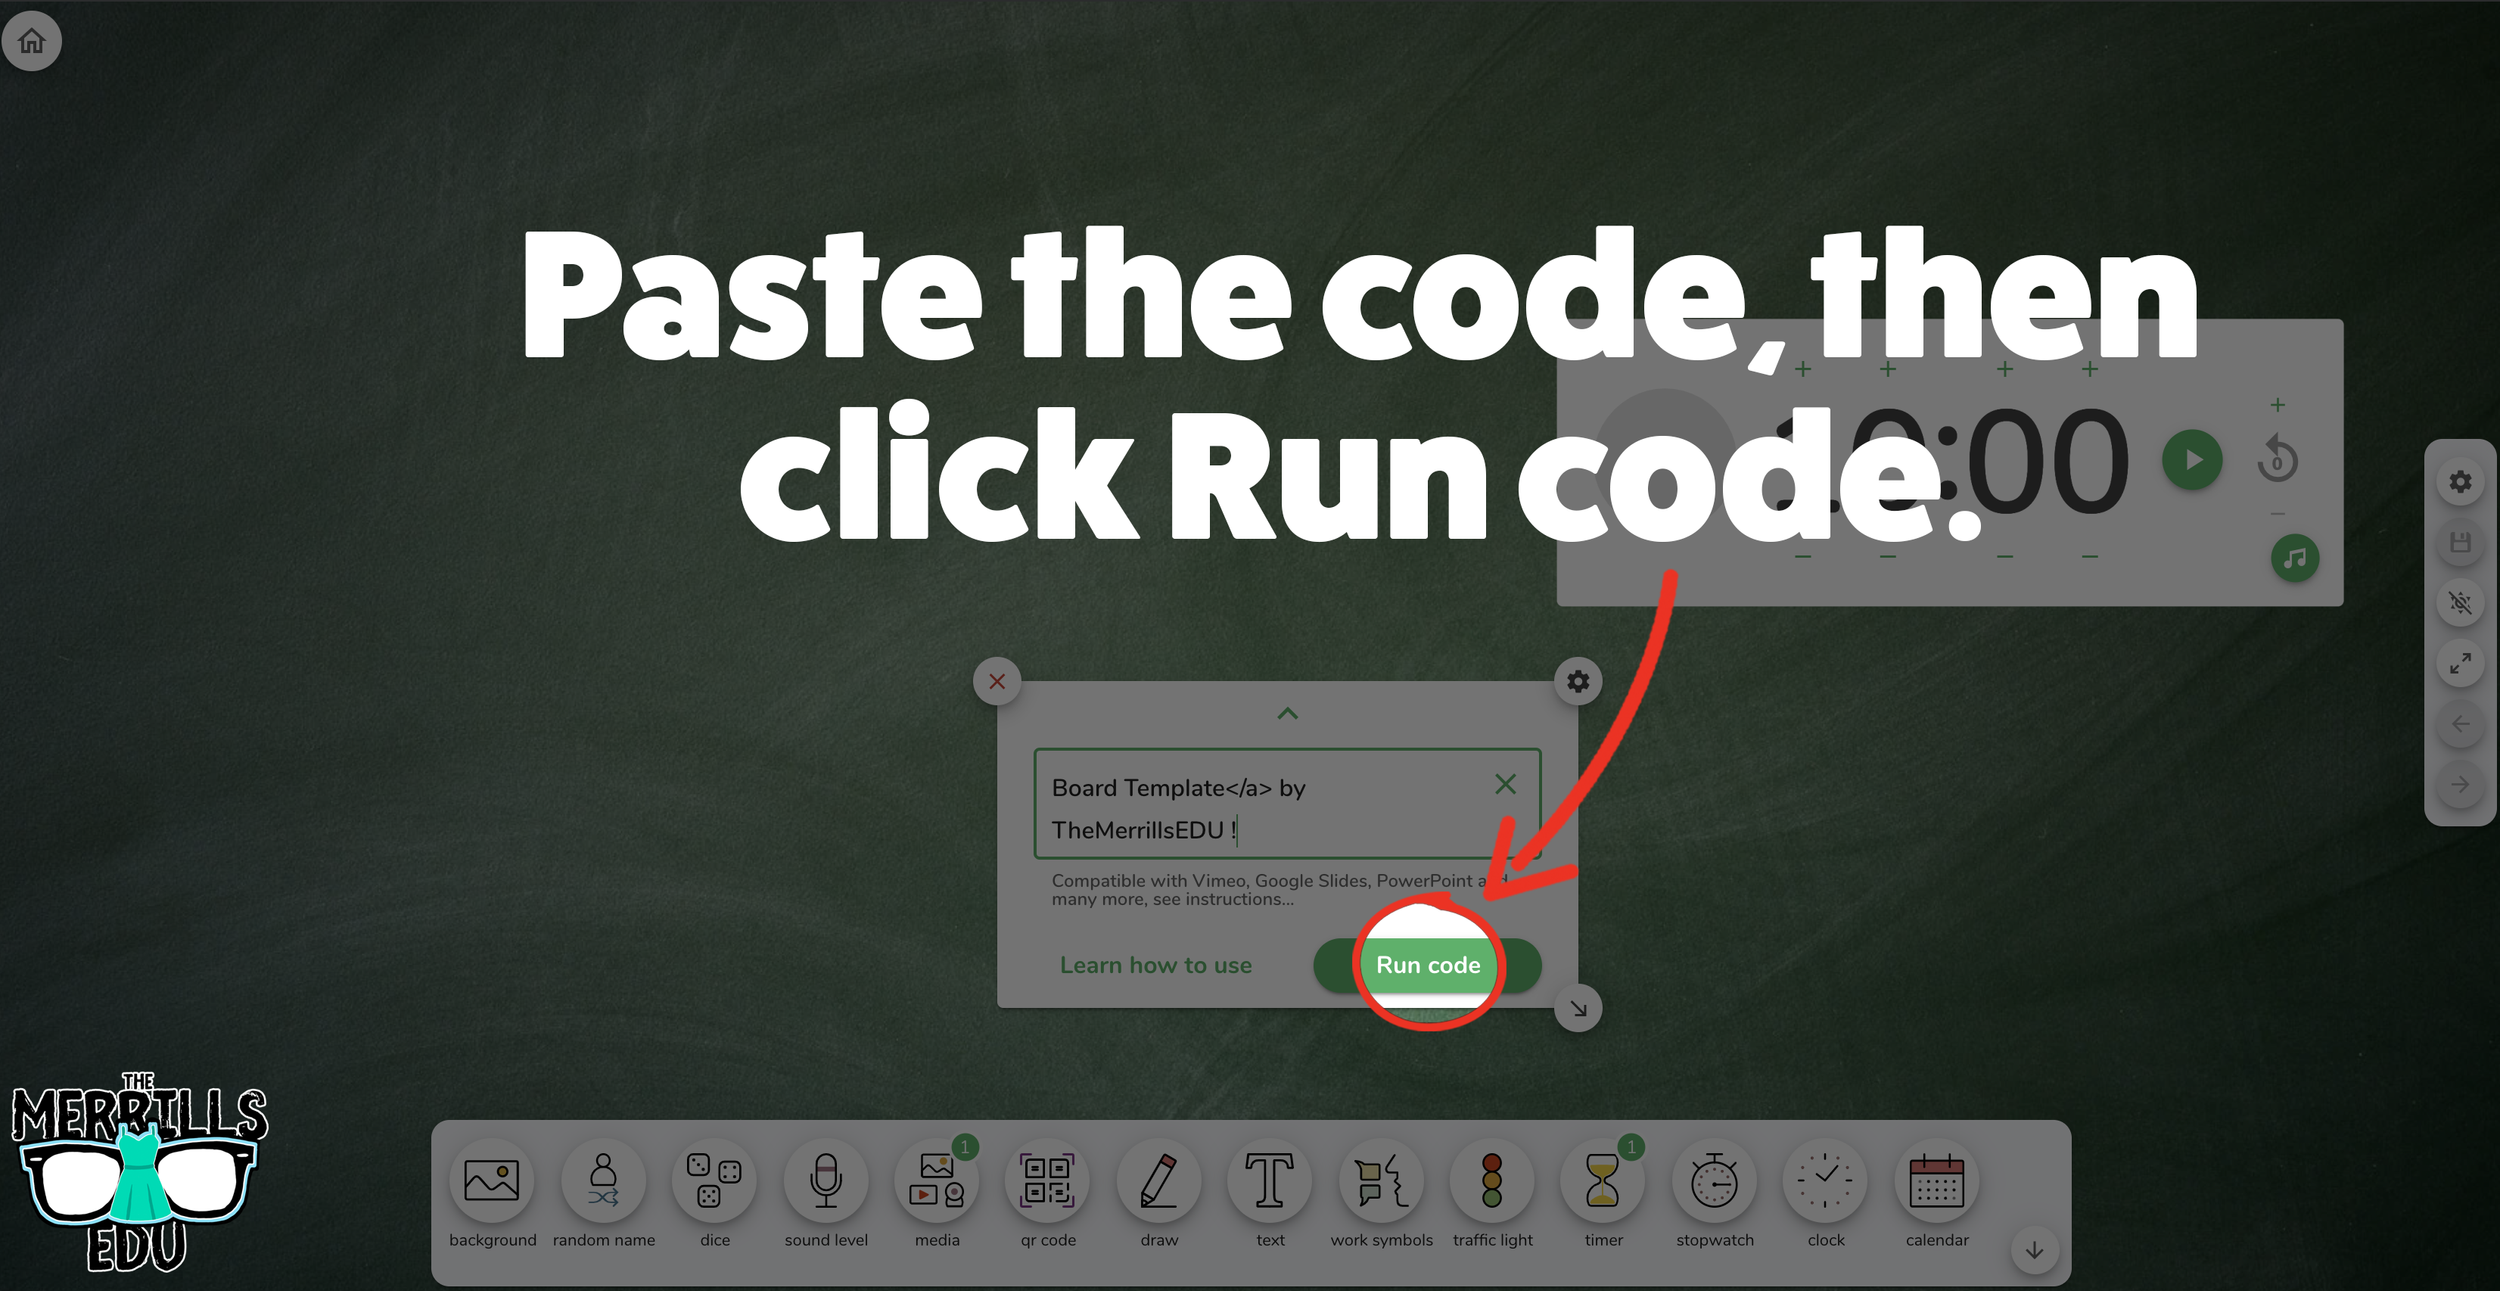
Paste the embed code, then click Run Code.
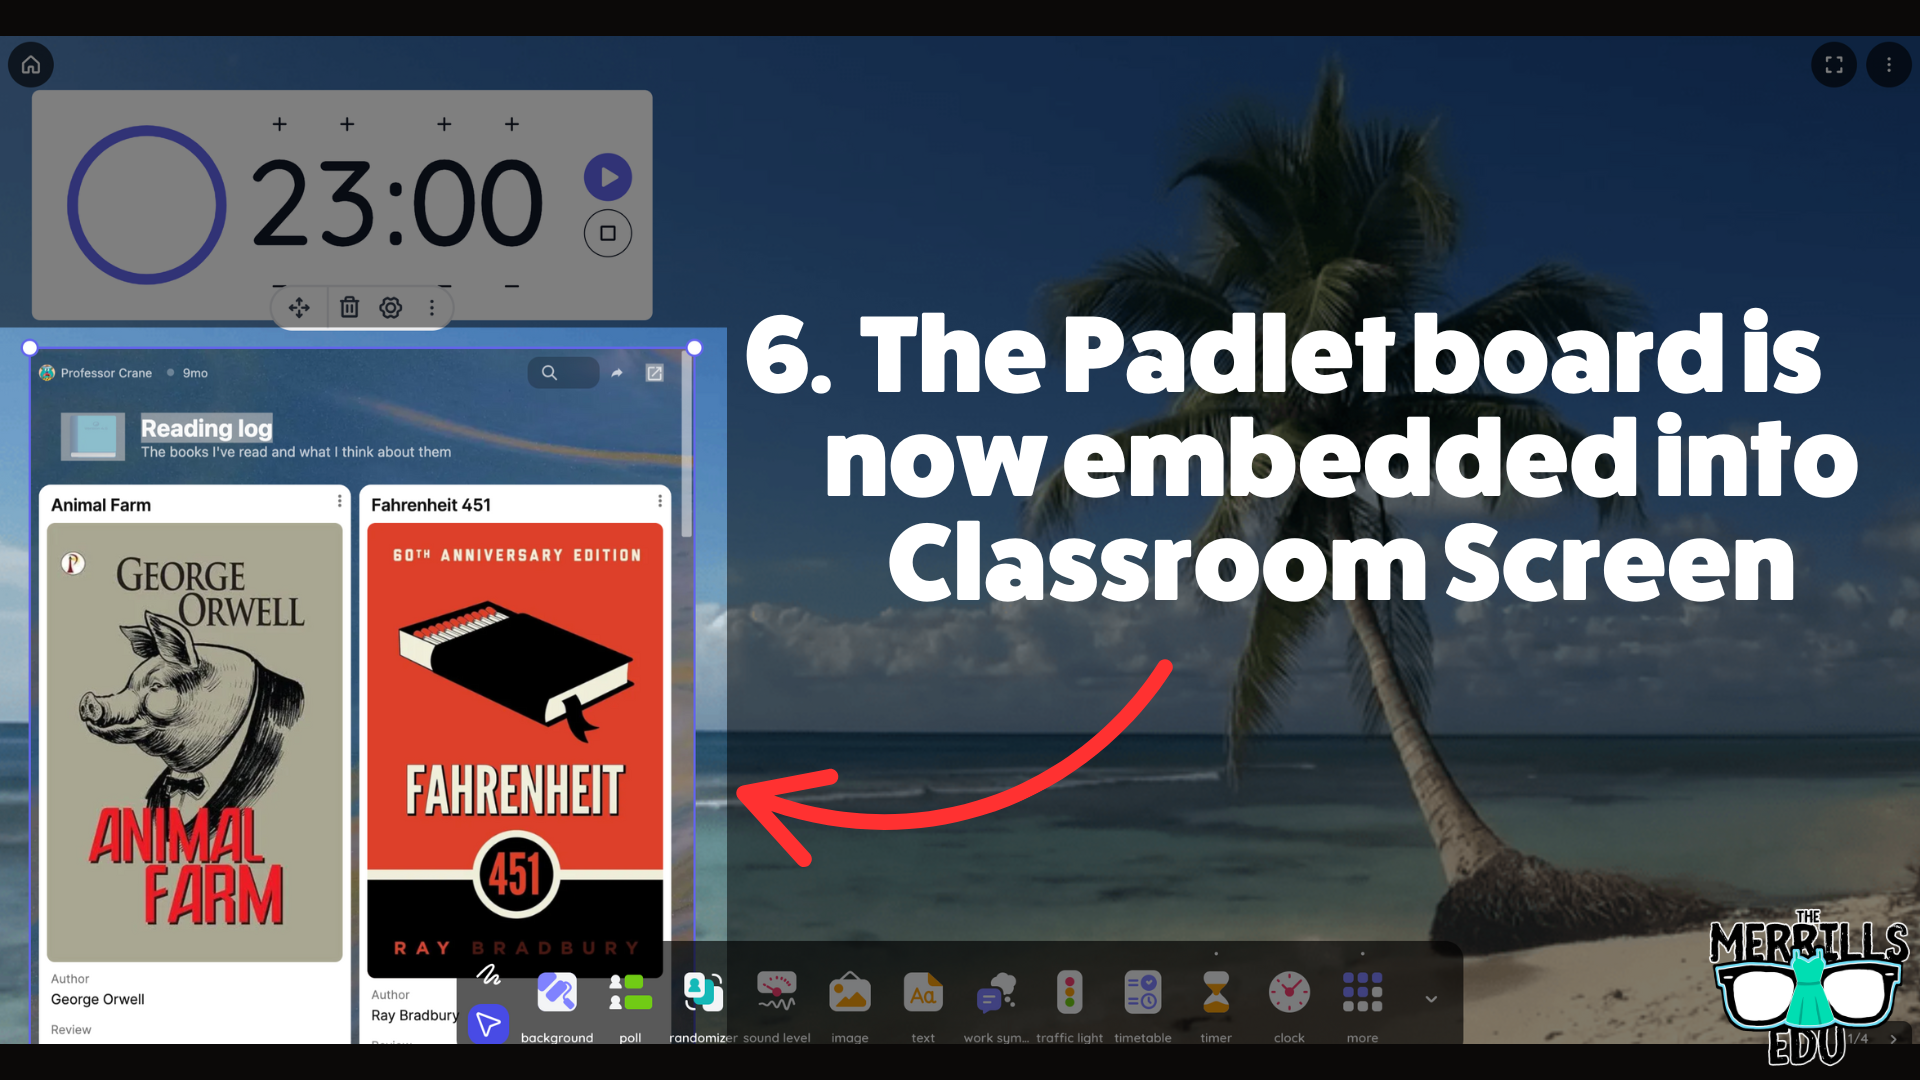
Now, the Padlet board is embedded into the Classroomscreen workspace.
This is a true embed - meaning users can interact with it in real time. So, educators can embed this into a Classroomscreen workspace, start a timer, and then the embed will refresh itself so that every time new content gets added, it appears on the screen.

Nearpod Embedded into Canvas
(Note: this requires a paid Nearpod account and the use of Student Paced lessons. It will not work with “Live participation” lessons)
Nearpod users can now expedite the login procedure for their students by embedding lessons right into Canvas. Doing so will eliminate the need for a join code. Here’s how it all works:
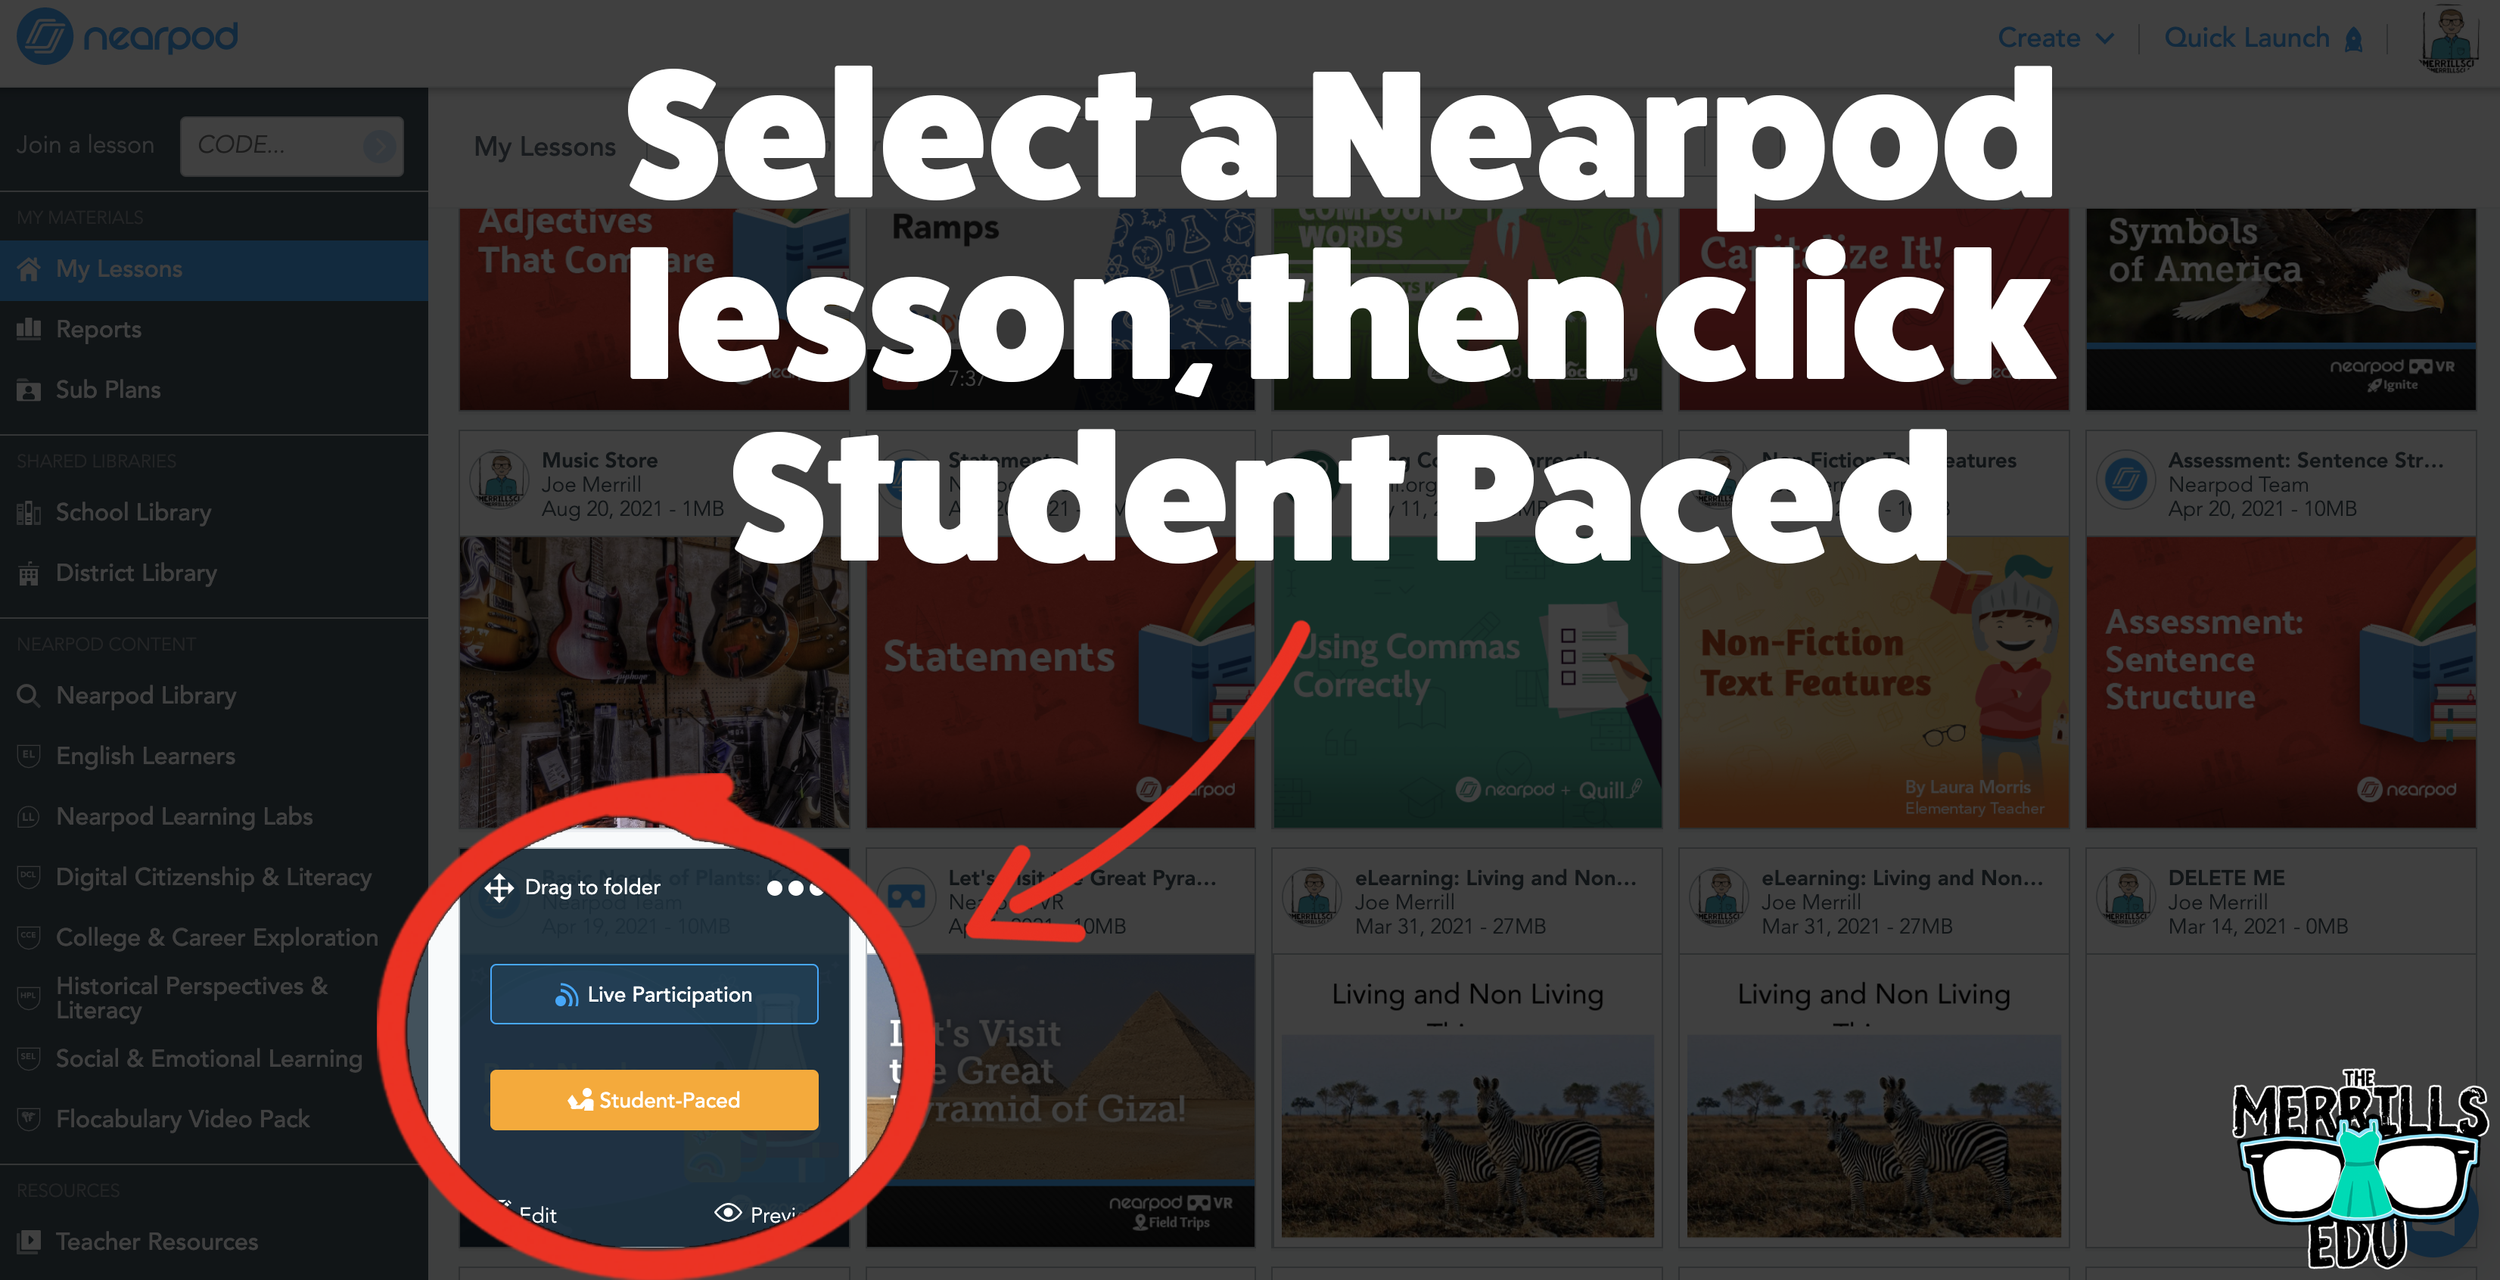


Open the desired Nearpod lesson that you would like to embed into Canvas.
Click on “Student-Paced.”
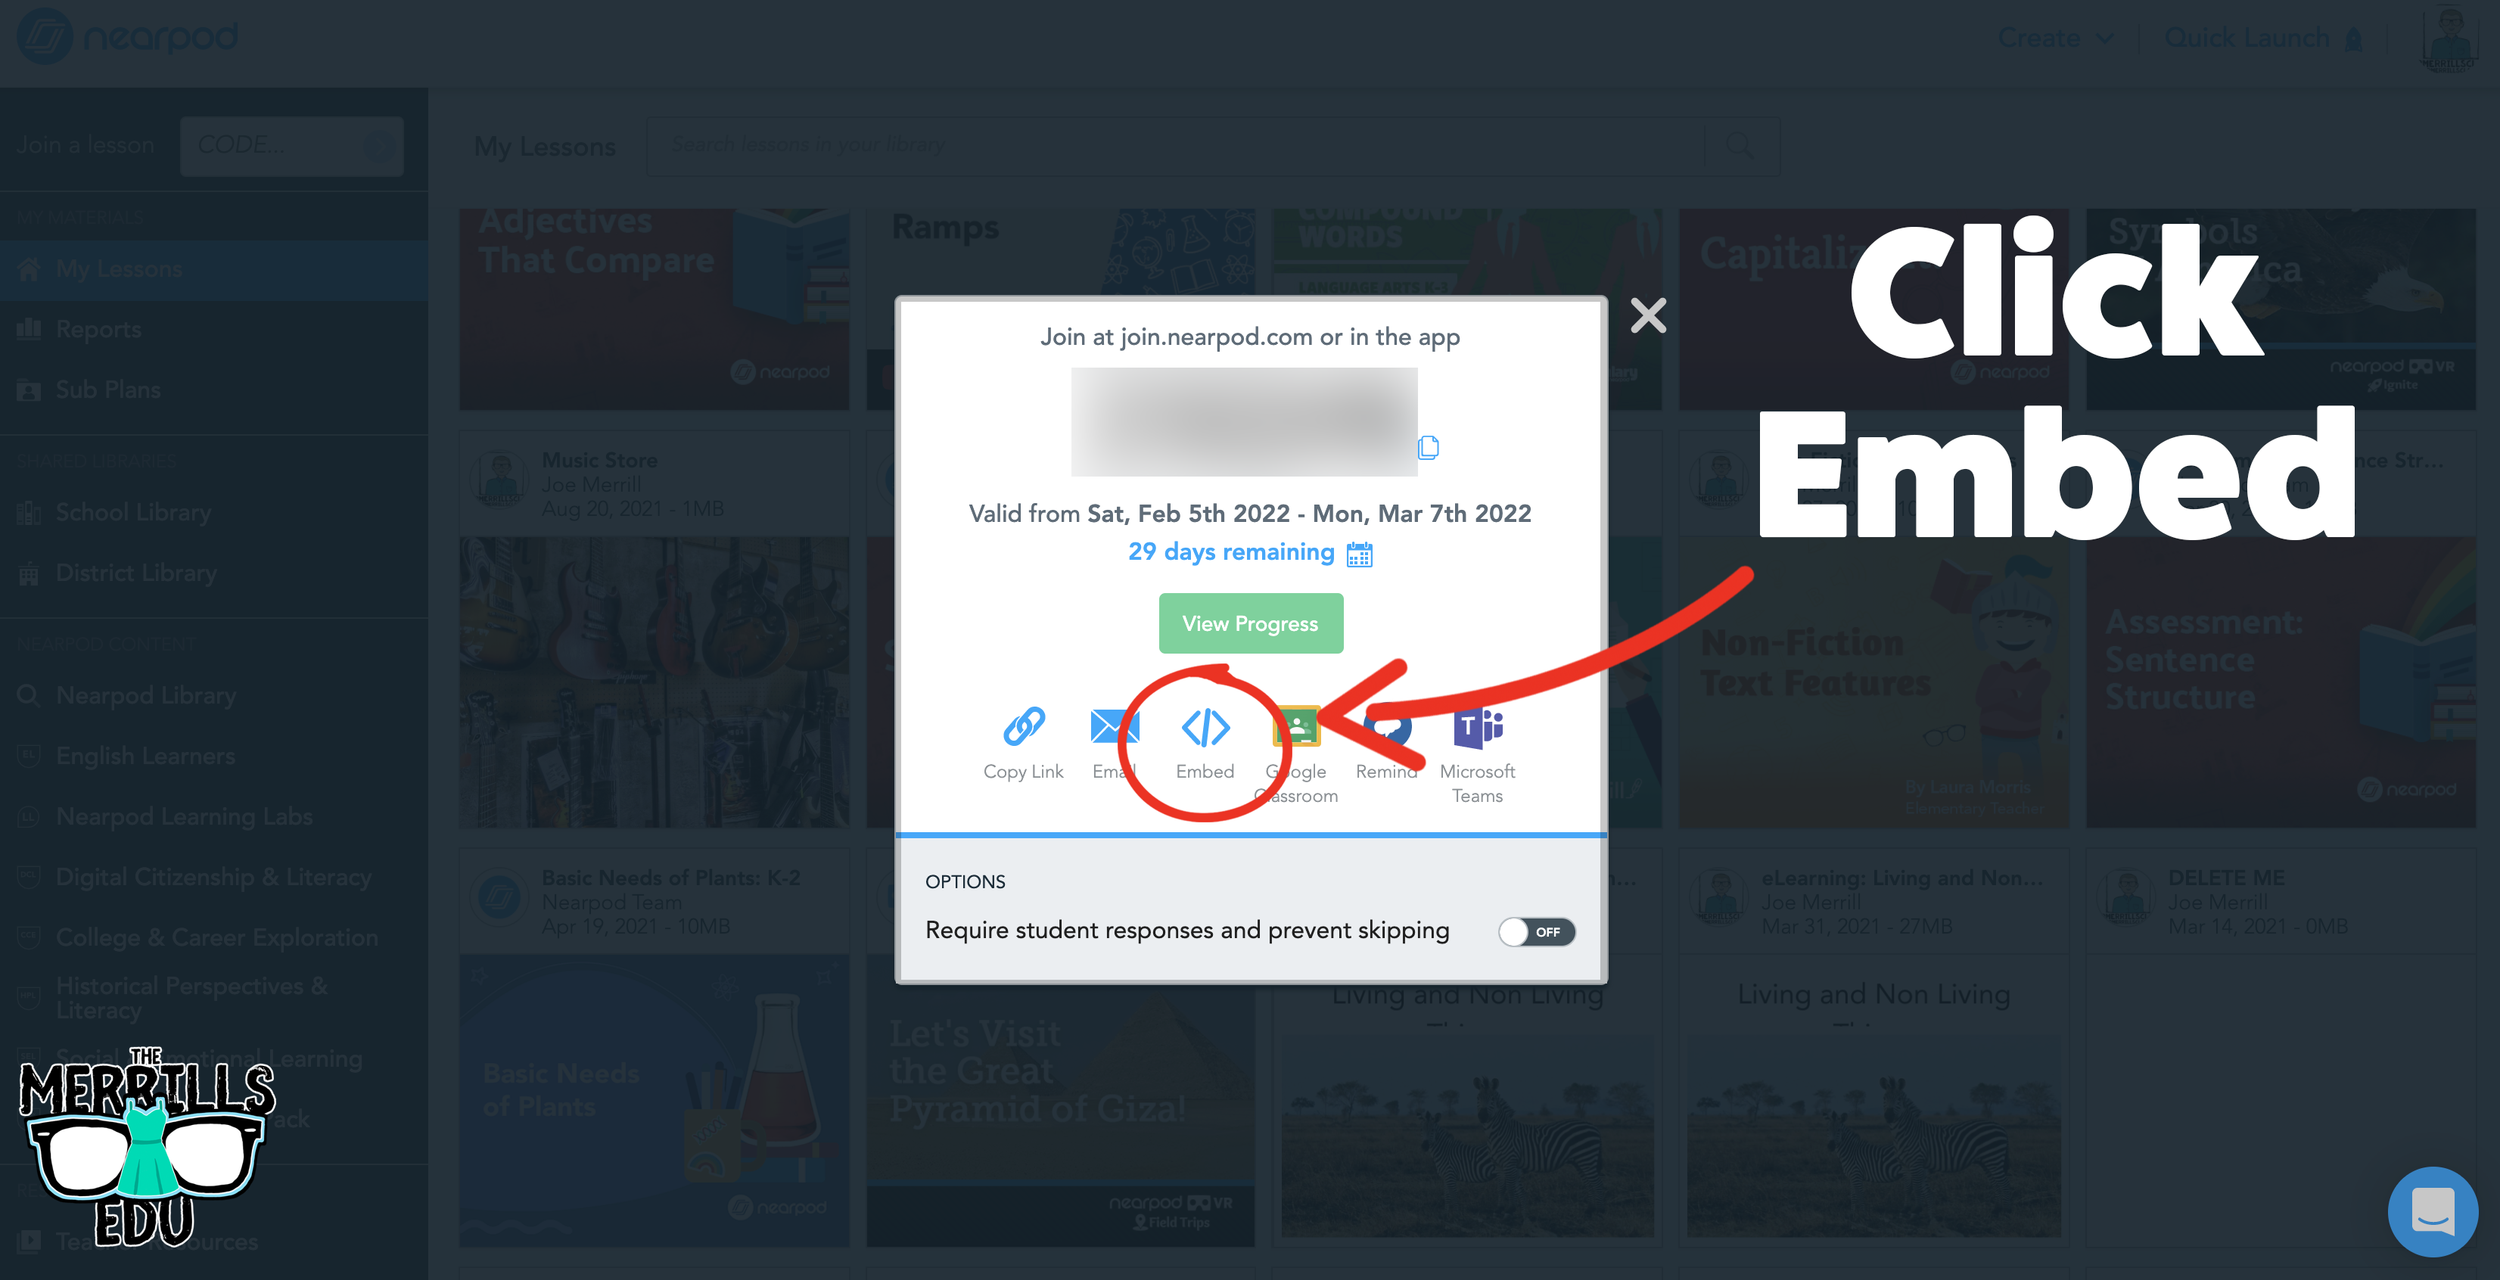
On the next window, click the Embed icon.
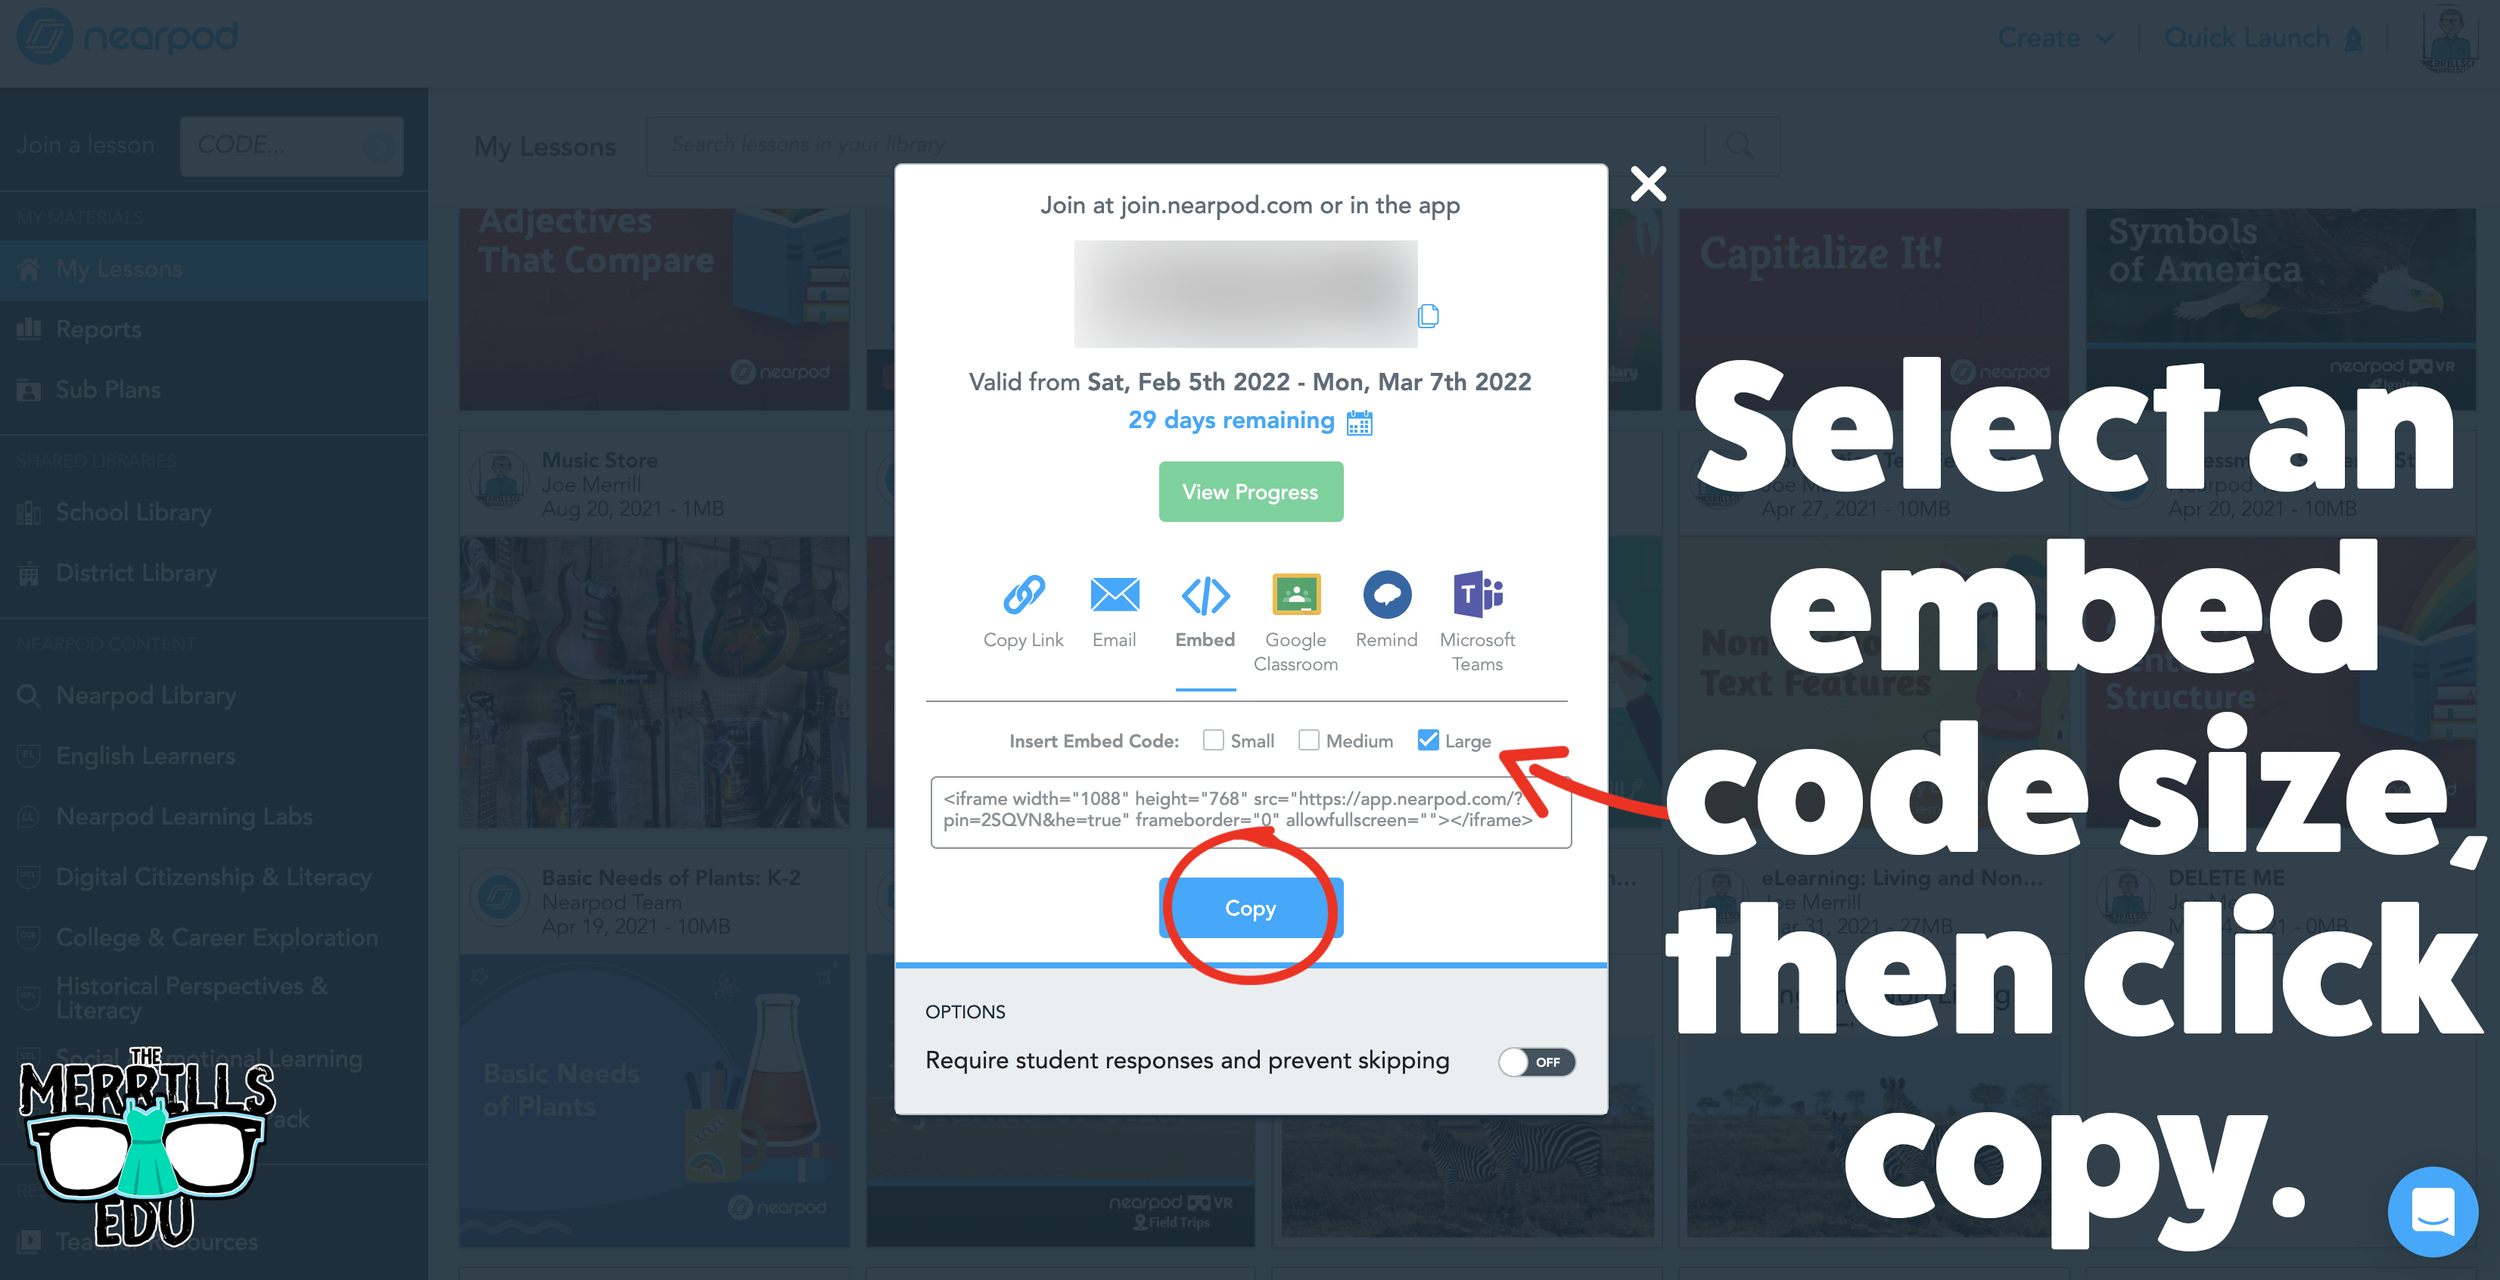
In the Embed window, select a preferred embed code size. We recommend large. Then, click copy.
In a separate tab, open the Canvas page that you would like to embed the Nearpod lesson into.
Click on the cloud icon which will open the embed menu (if you don’t see the cloud icon, click on the three dots to the right of the menu bar).
Paste your copied embed code into the box, then click “Submit.”
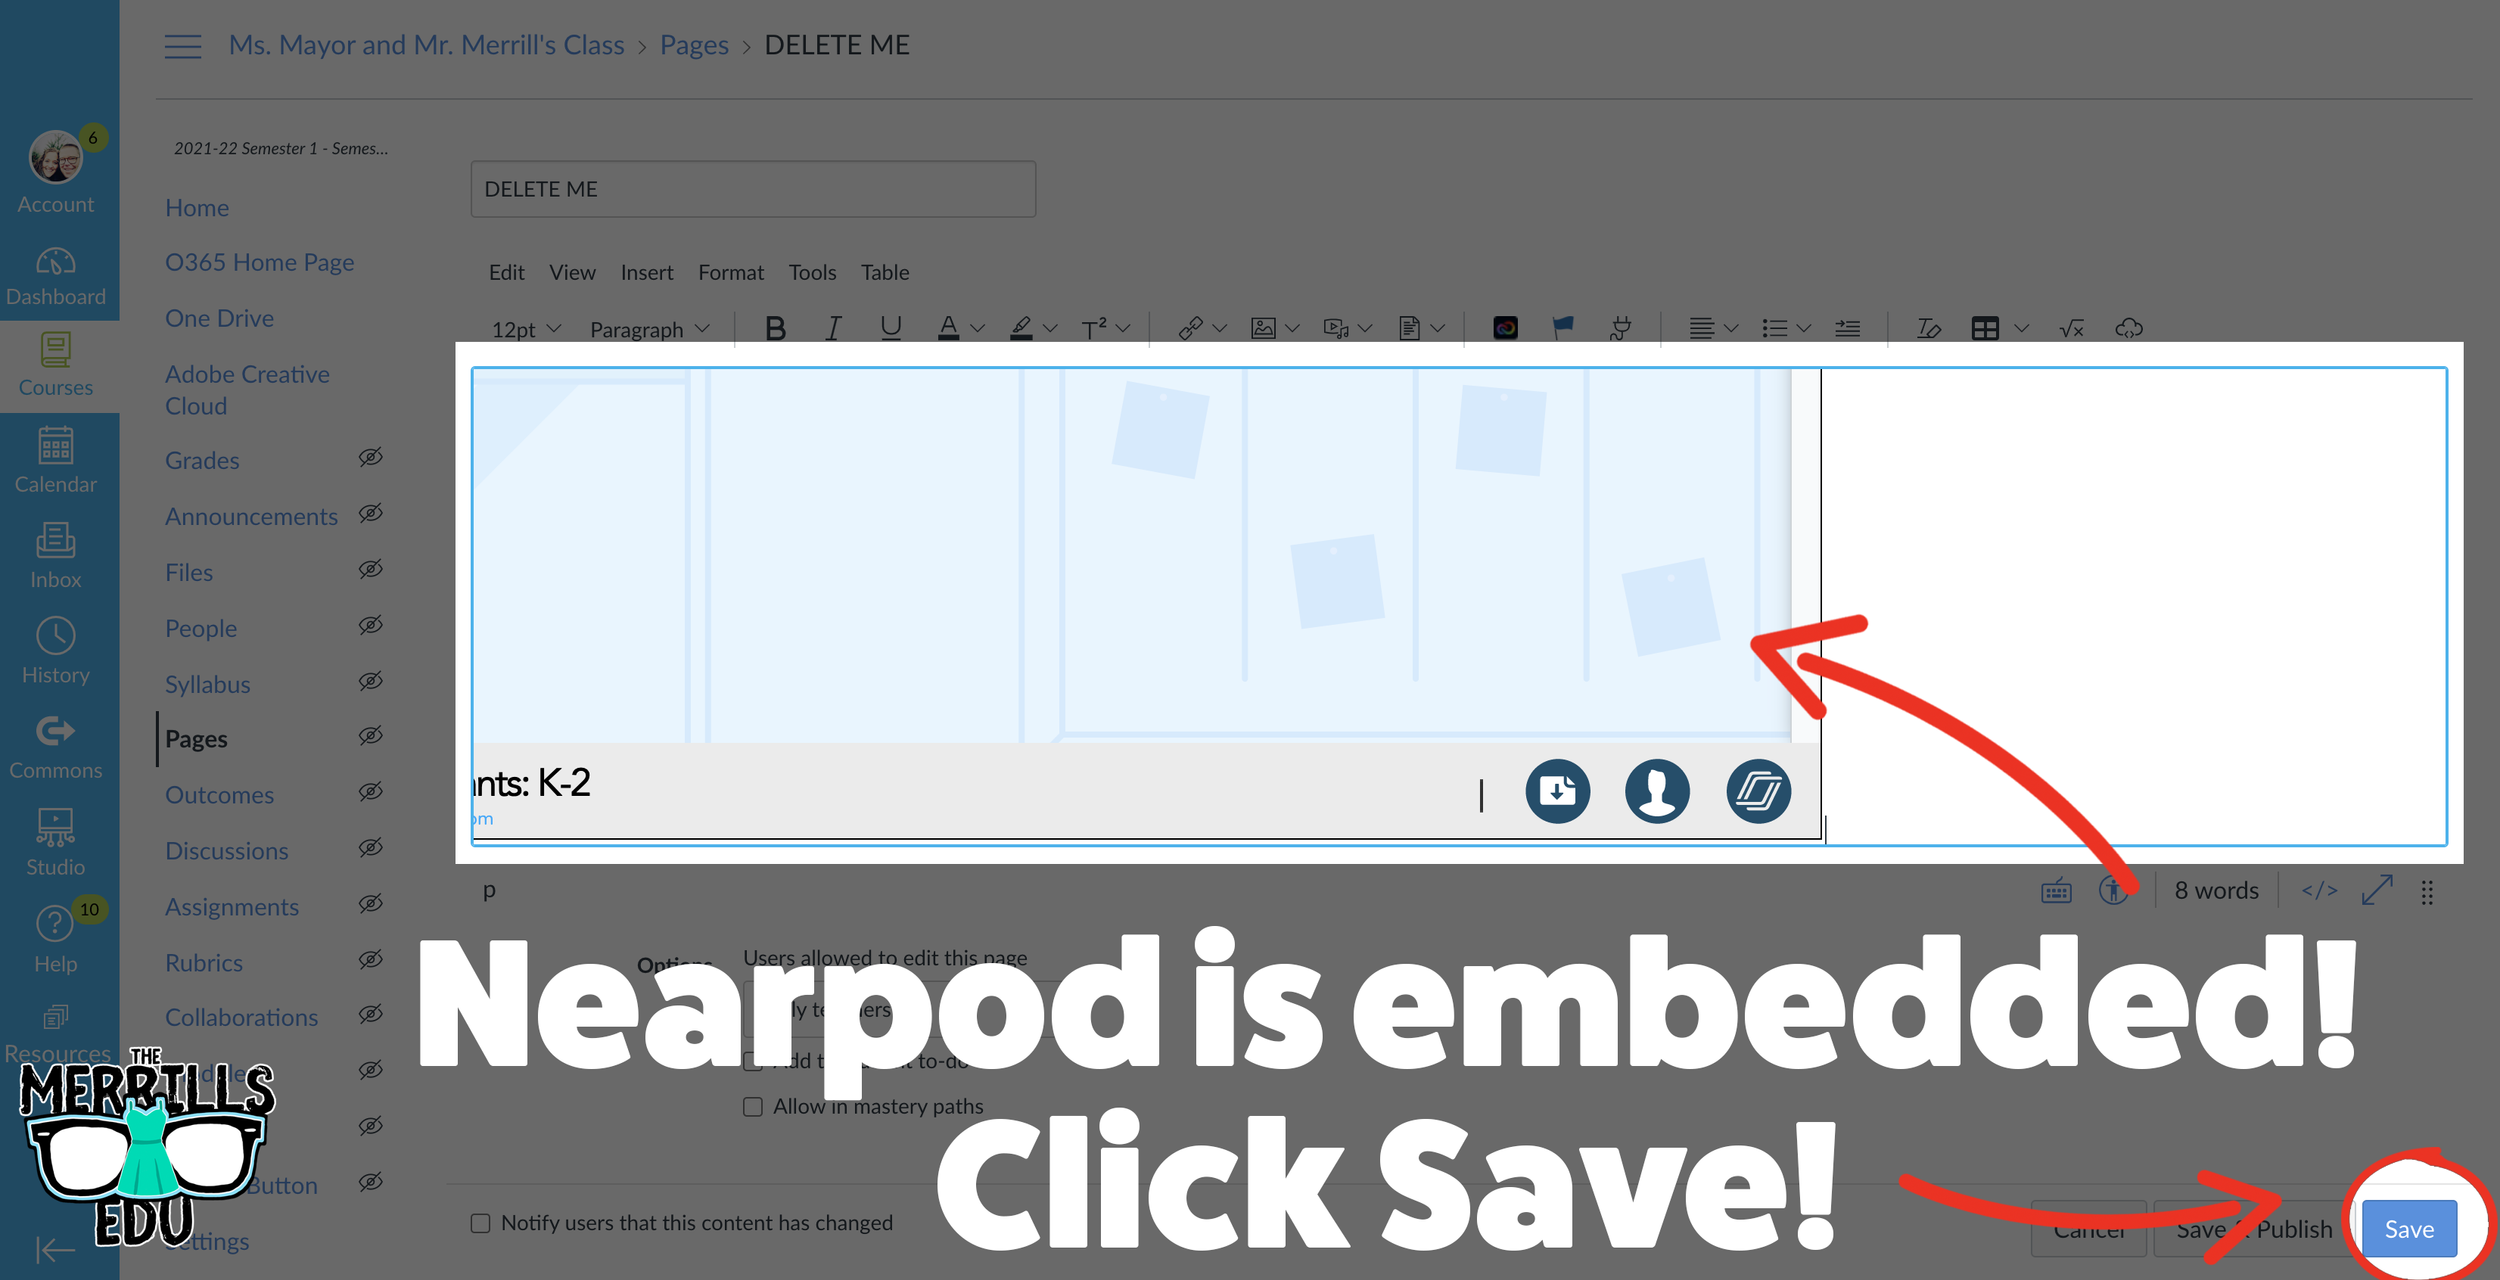
Your Nearpod lesson will now be embedded into Canvas. Click “Save” to update the changes.
Now, the lesson will be available for your students via Canvas!
Wakelet Embedded into Canvas
Share your Wakelet Collections right within Canvas! This live embed will allow students to make changes to the Wakelet collection without having to re-embed it afterwards. In other words, changes will be available as they are made - without having to go through this process again. Here’s how it all works:

(Note: Your Wakelet Collection must be set to “Public” in order for you to embed it)
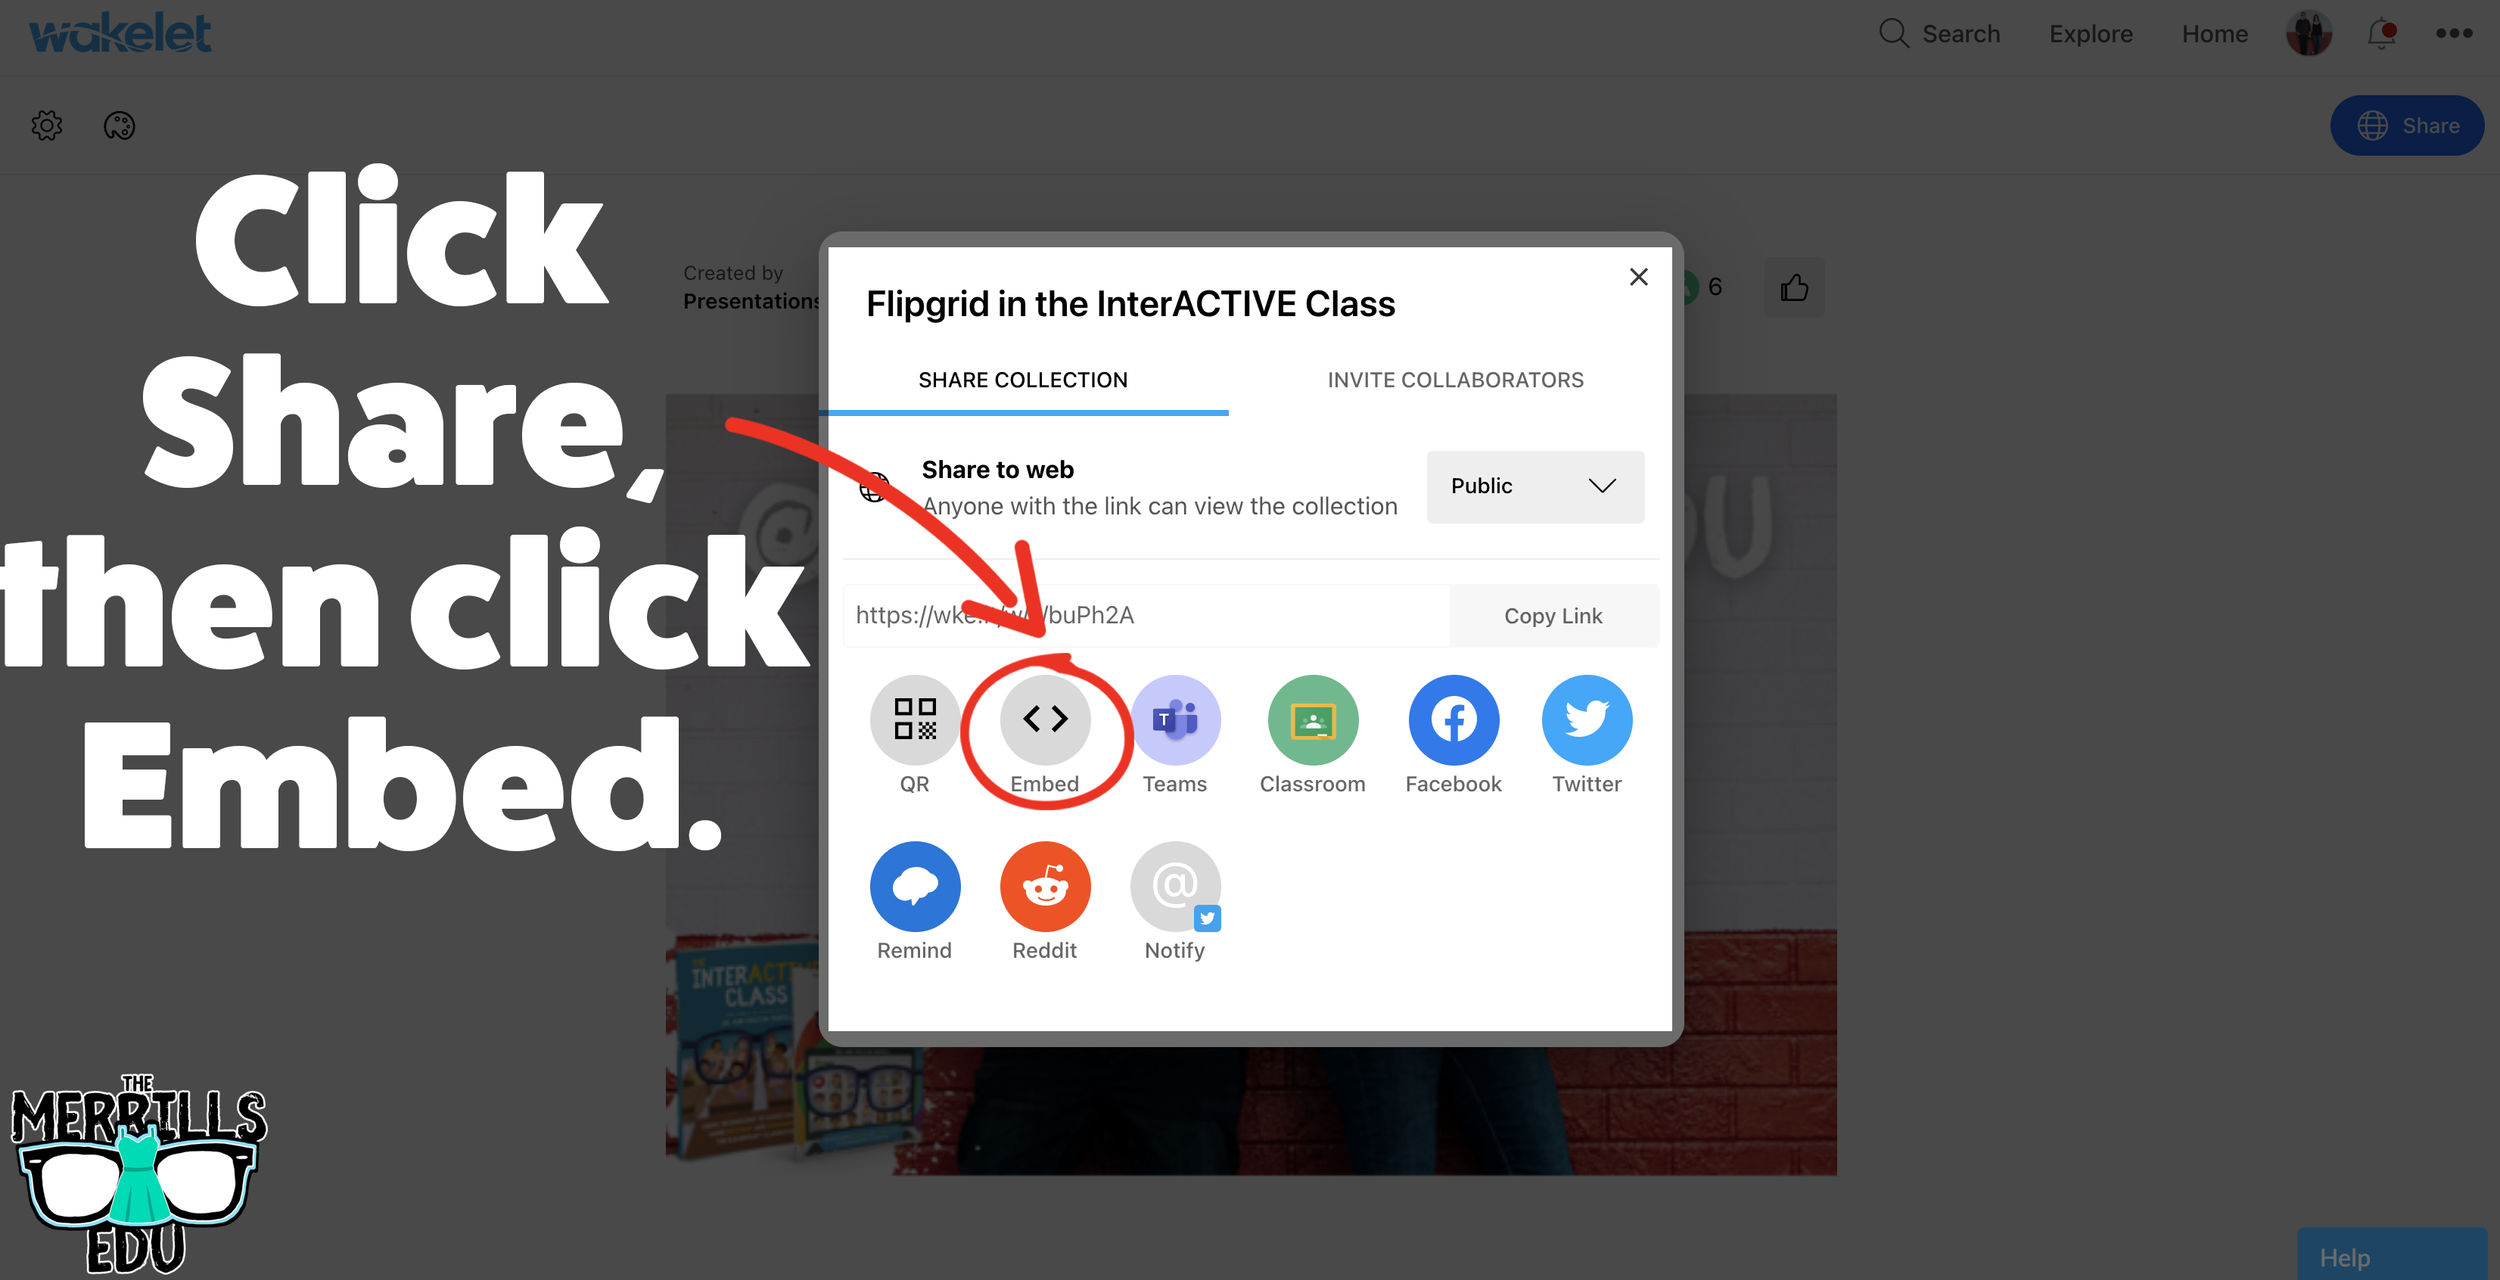
In a Wakelet Collection, click the “Share” button, then click “Embed.”
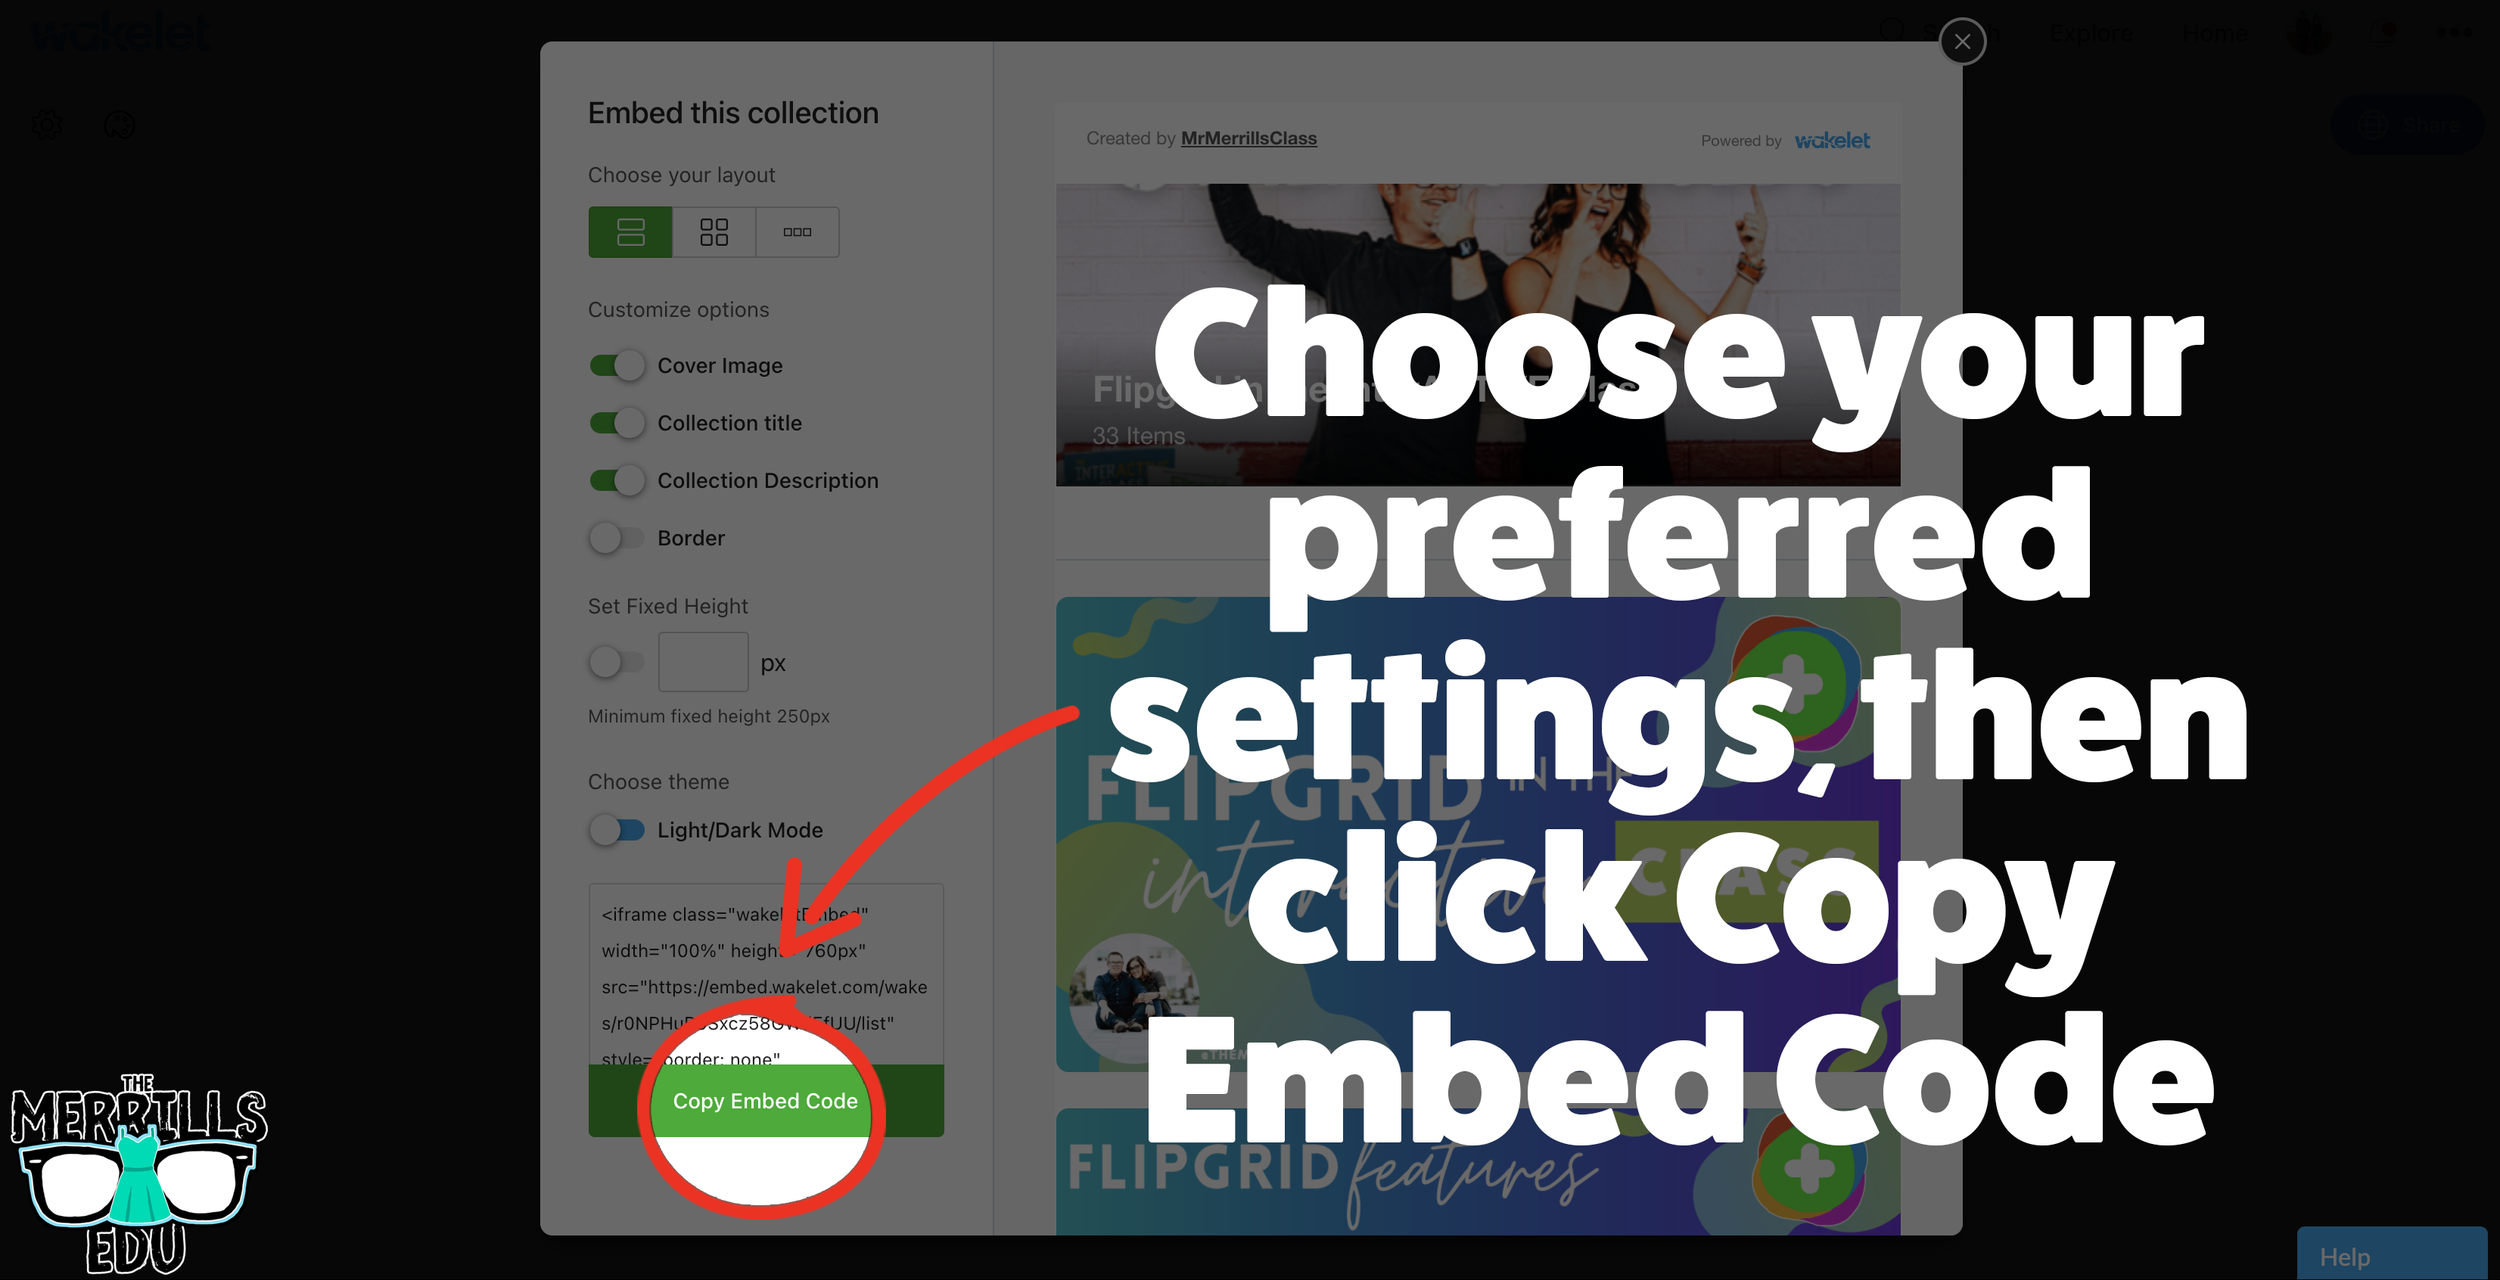
Chose your preferred settings, then click “Copy Embed Code.”
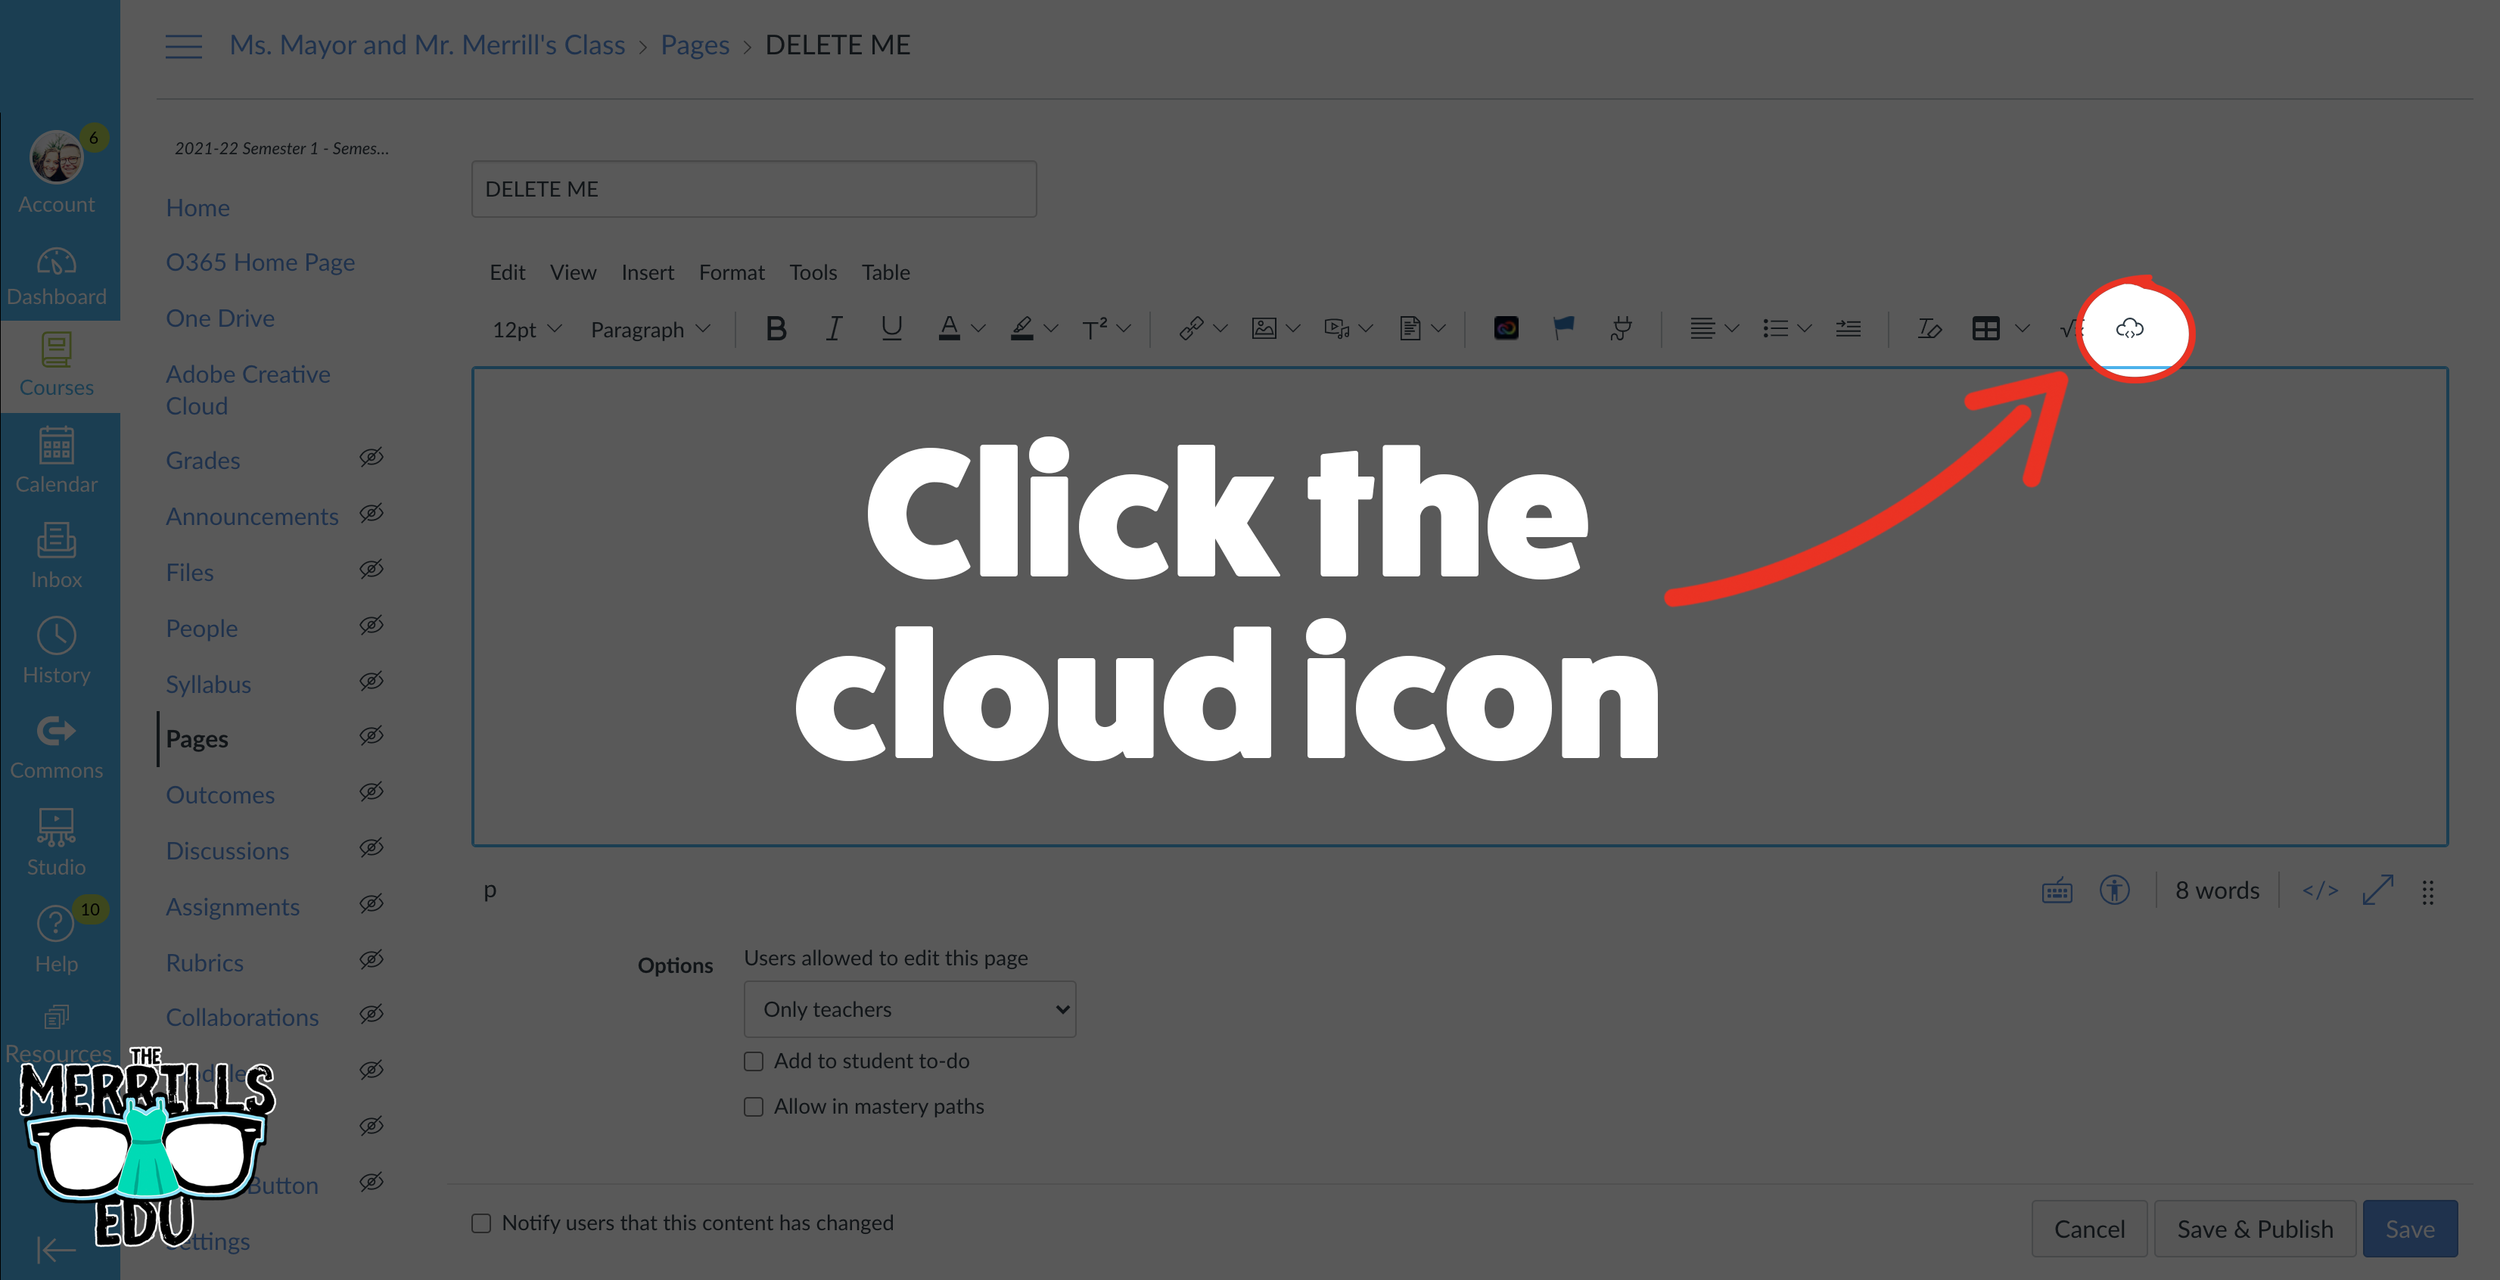
In a separate tab, open the Canvas page that you would like to add the Wakelet Collection to. Then, click on the cloud icon.
In the embed window, paste your copied code from Wakelet. Then, click submit.
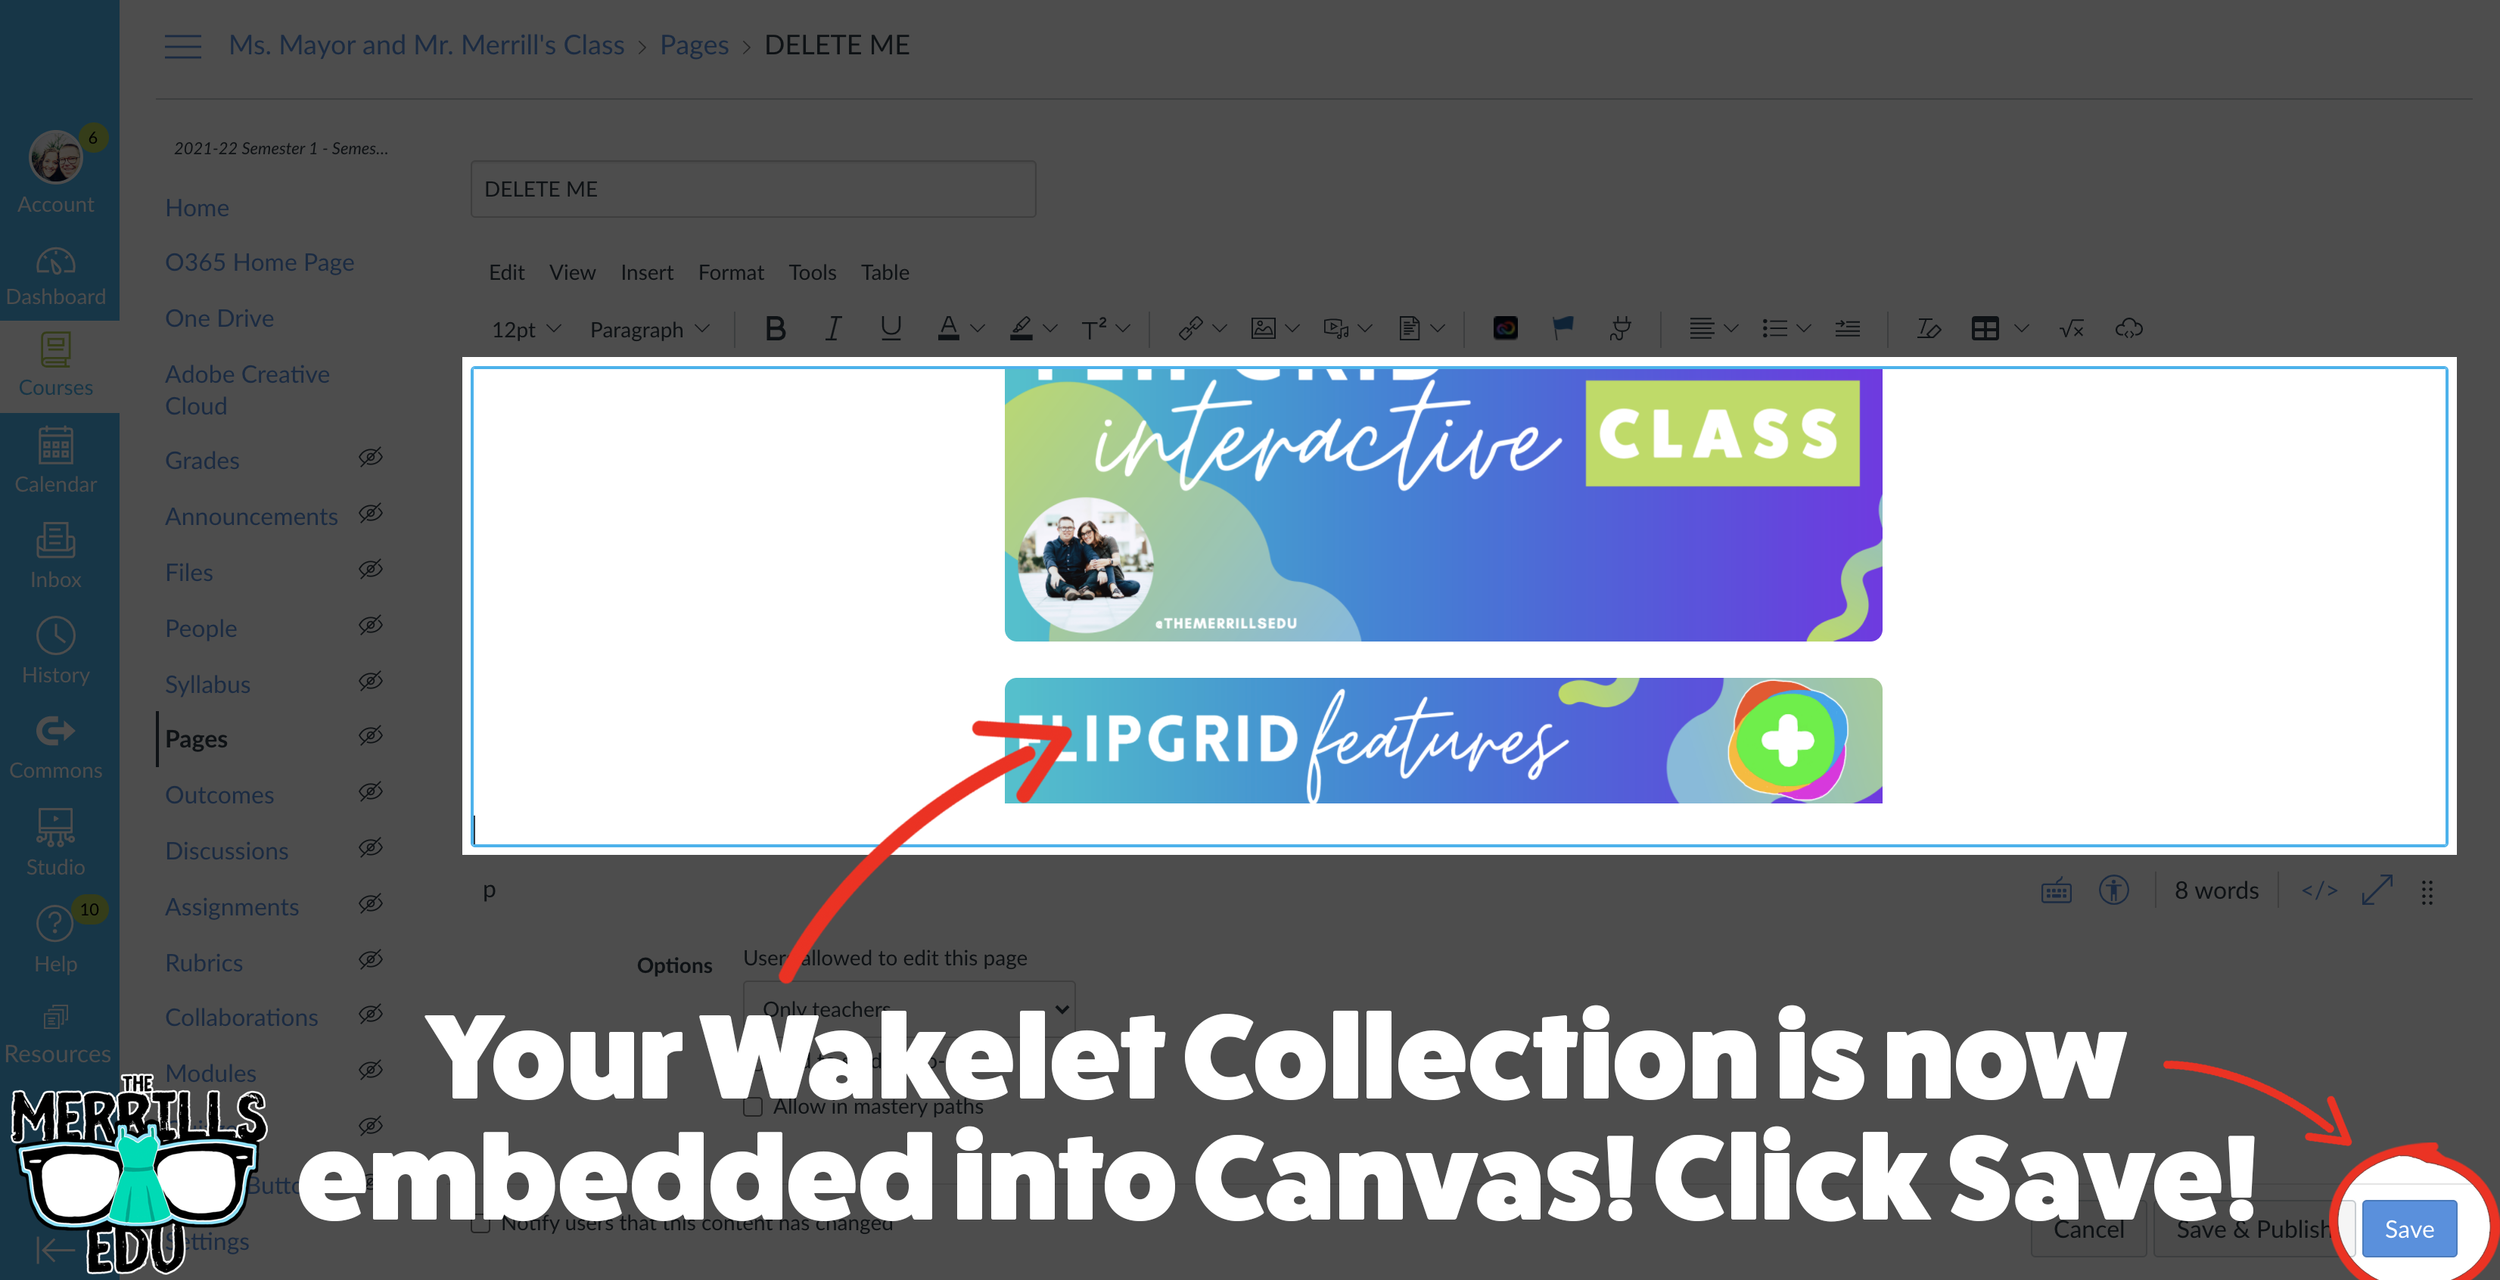
Your Wakelet collection is now embedded into the Canvas page! Click on “Save” to update the changes.

Canva Embedded into Canvas
Embedding Canva into Canvas will take your Canva creations live on any Canvas page! This live embed means that anything that you update on the Canva end will automatically update on the Canvas end. So, if you make changes to the Canva creation, you won’t have to worry about re-embedding it! Here’s how it all works:
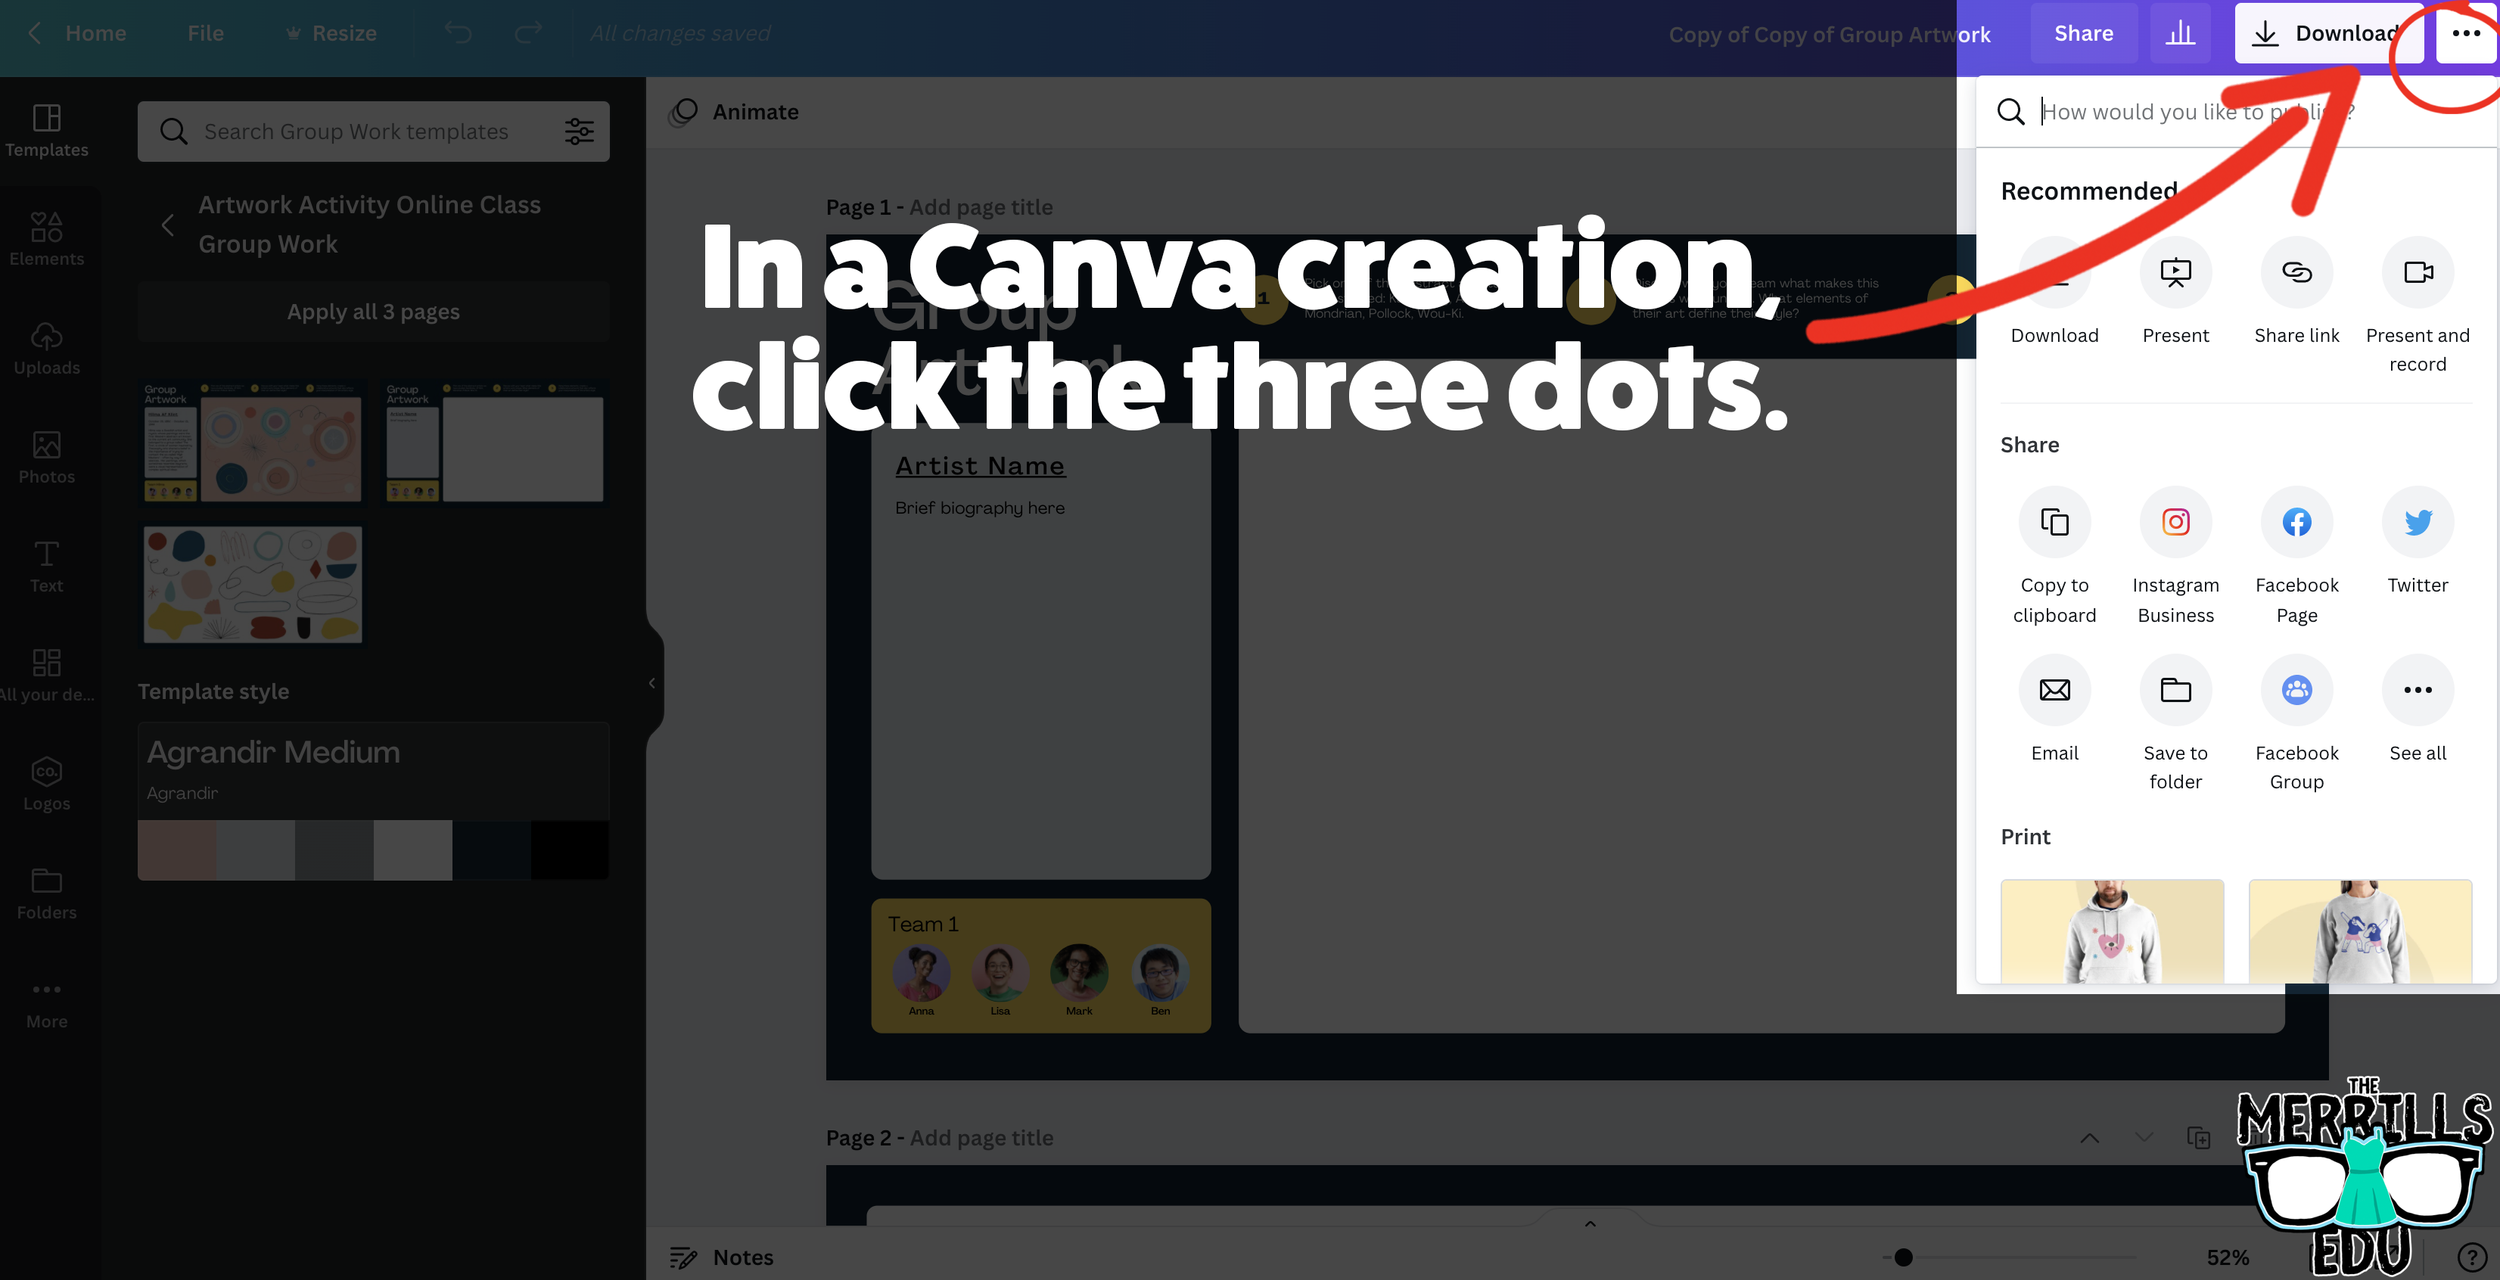


Open a Canva creation, then click on the three dots located on the top right side of the screen.
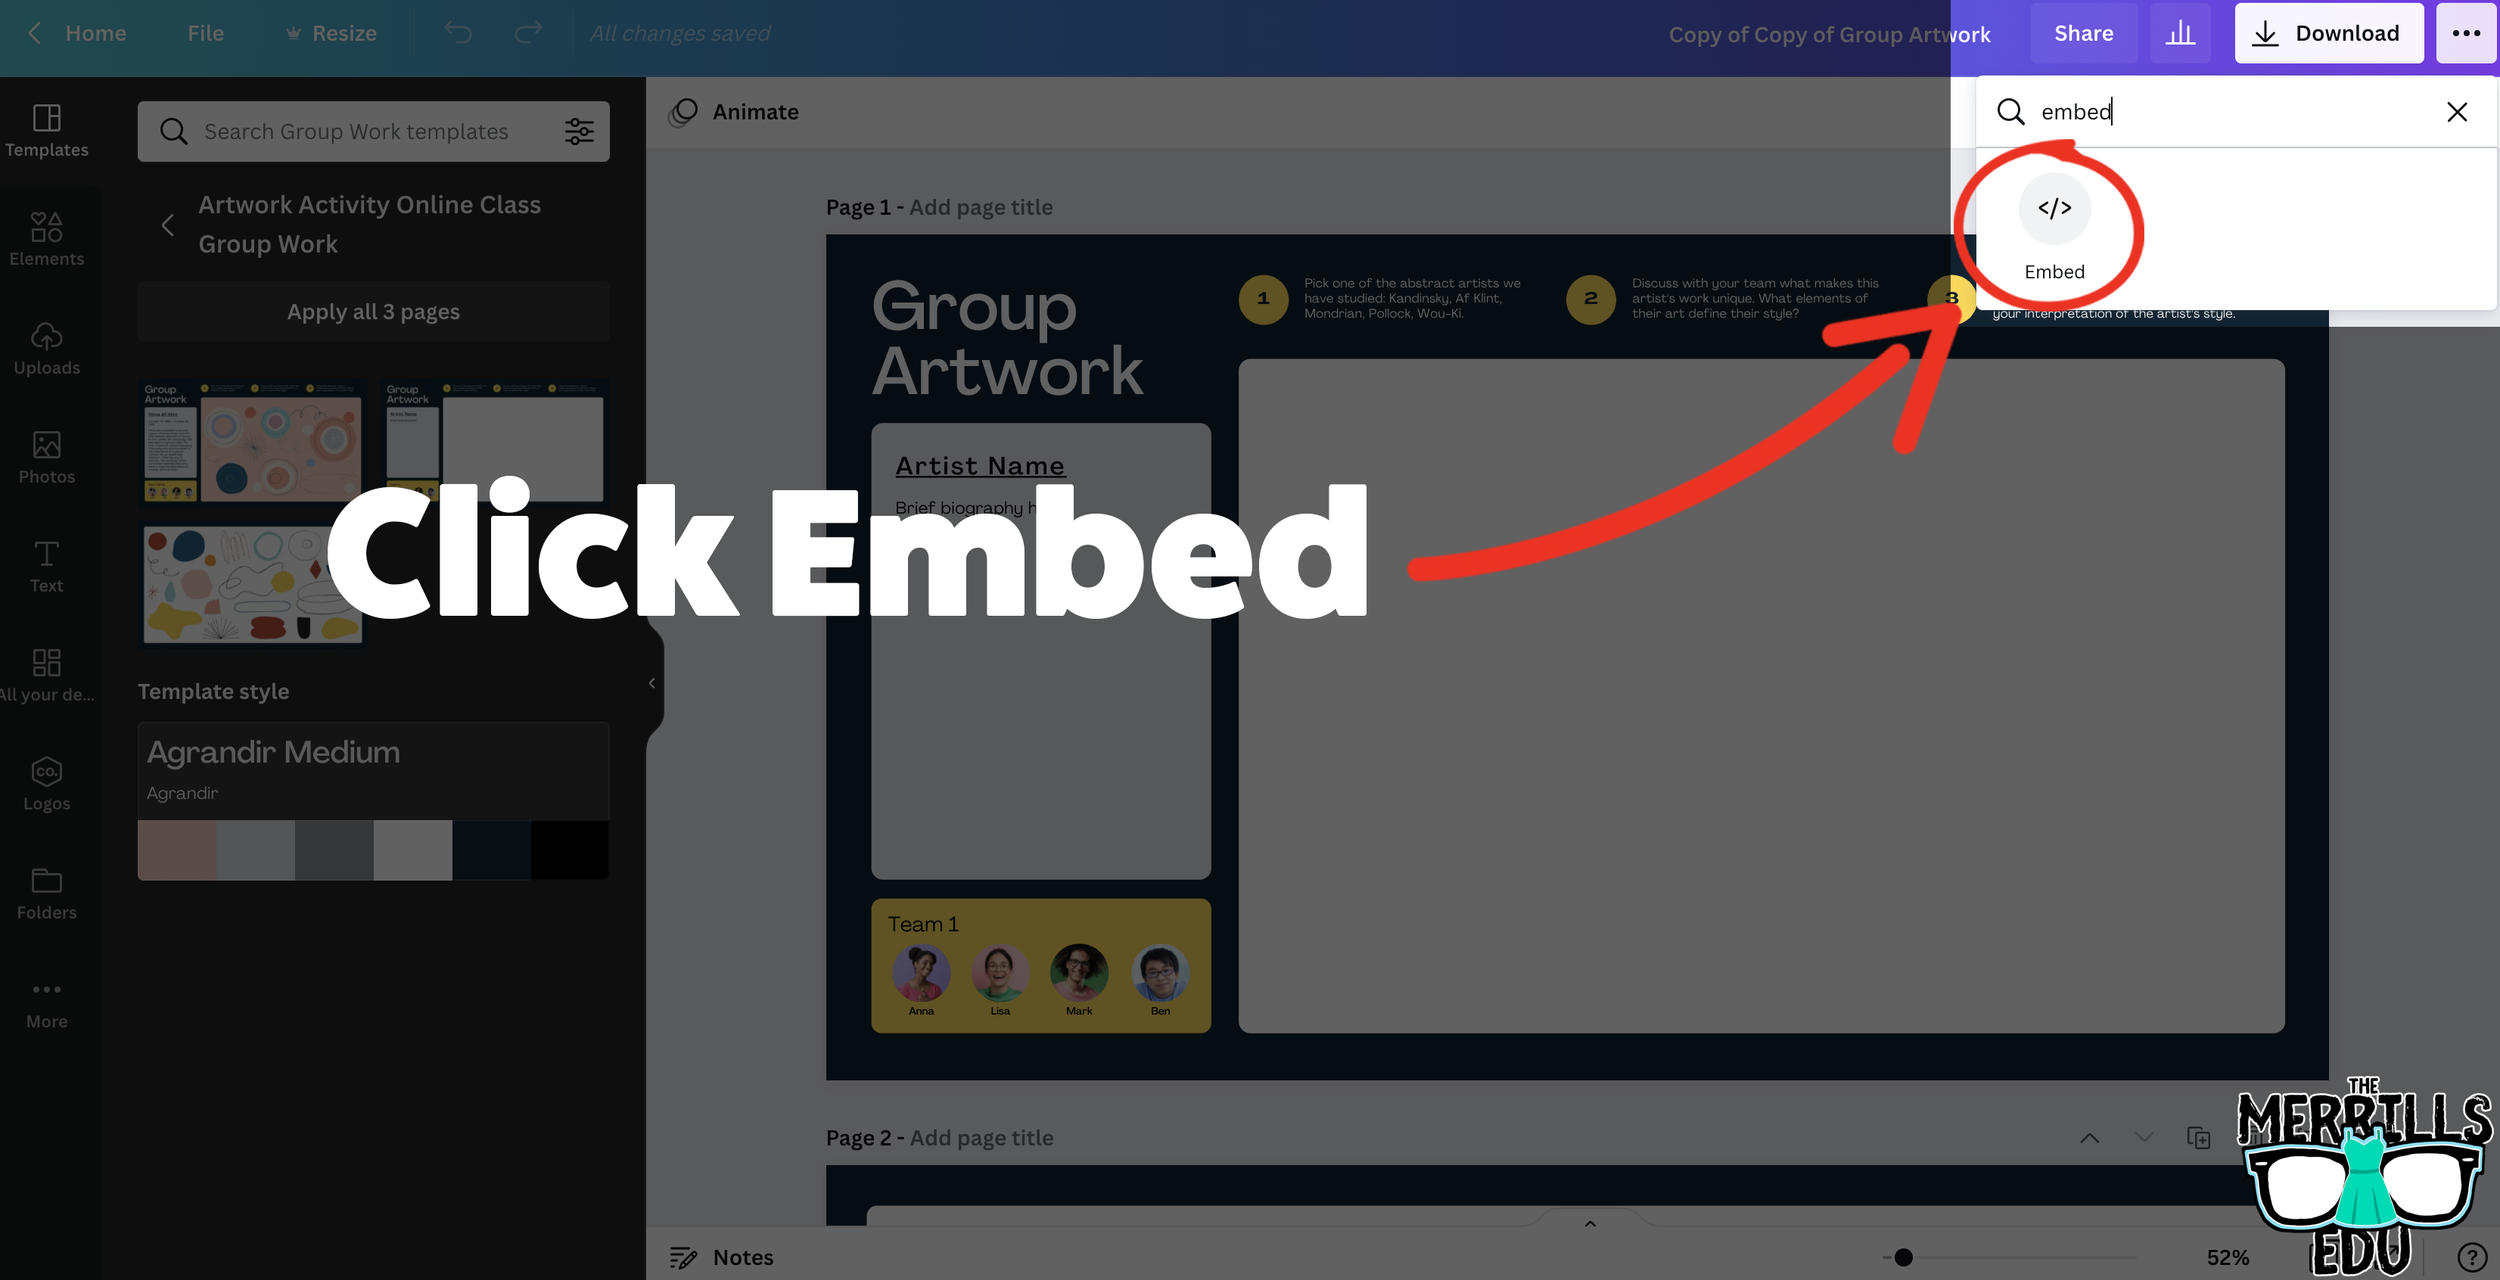
In the search bar, type “embed,” then click the embed icon.
In the next window, click “Embed” to take the creation live.
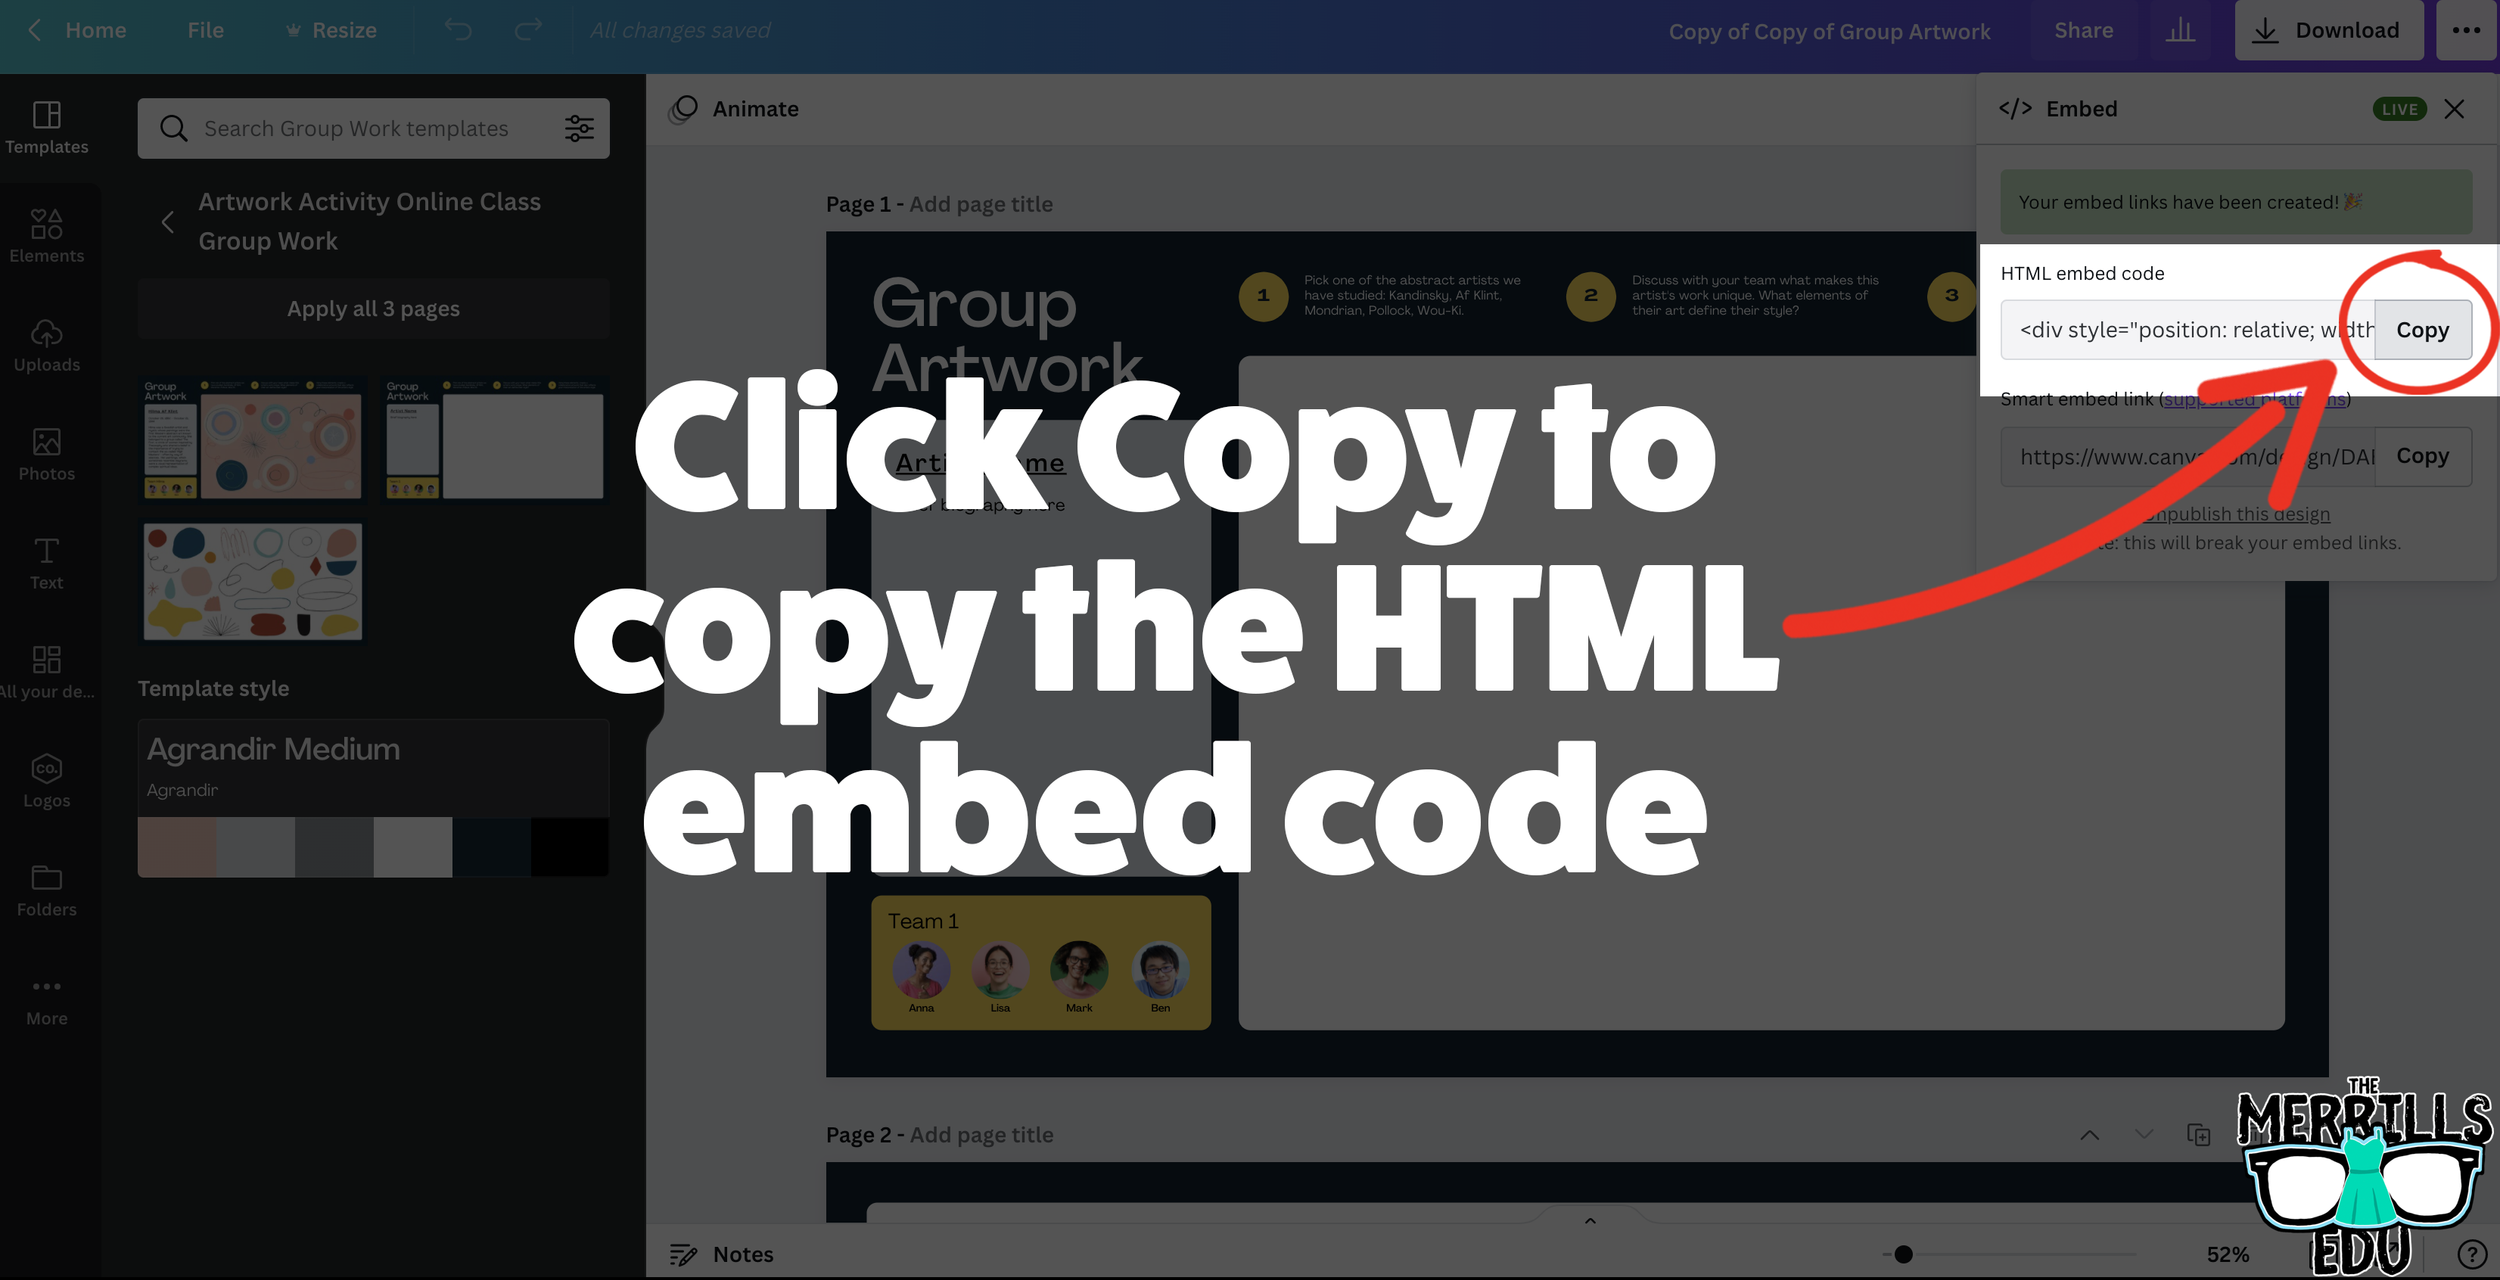
A few options will open up on the next window. Click and copy the HTML embed code (the smart embed will only work on selected platforms, so the HTML code is a safer route).
In a separate tab, open the Canvas page that you would like to add the Canva creation to. Then, click on the cloud icon (if you don’t see the Cloud icon, click the three dots to expand the menu bar).
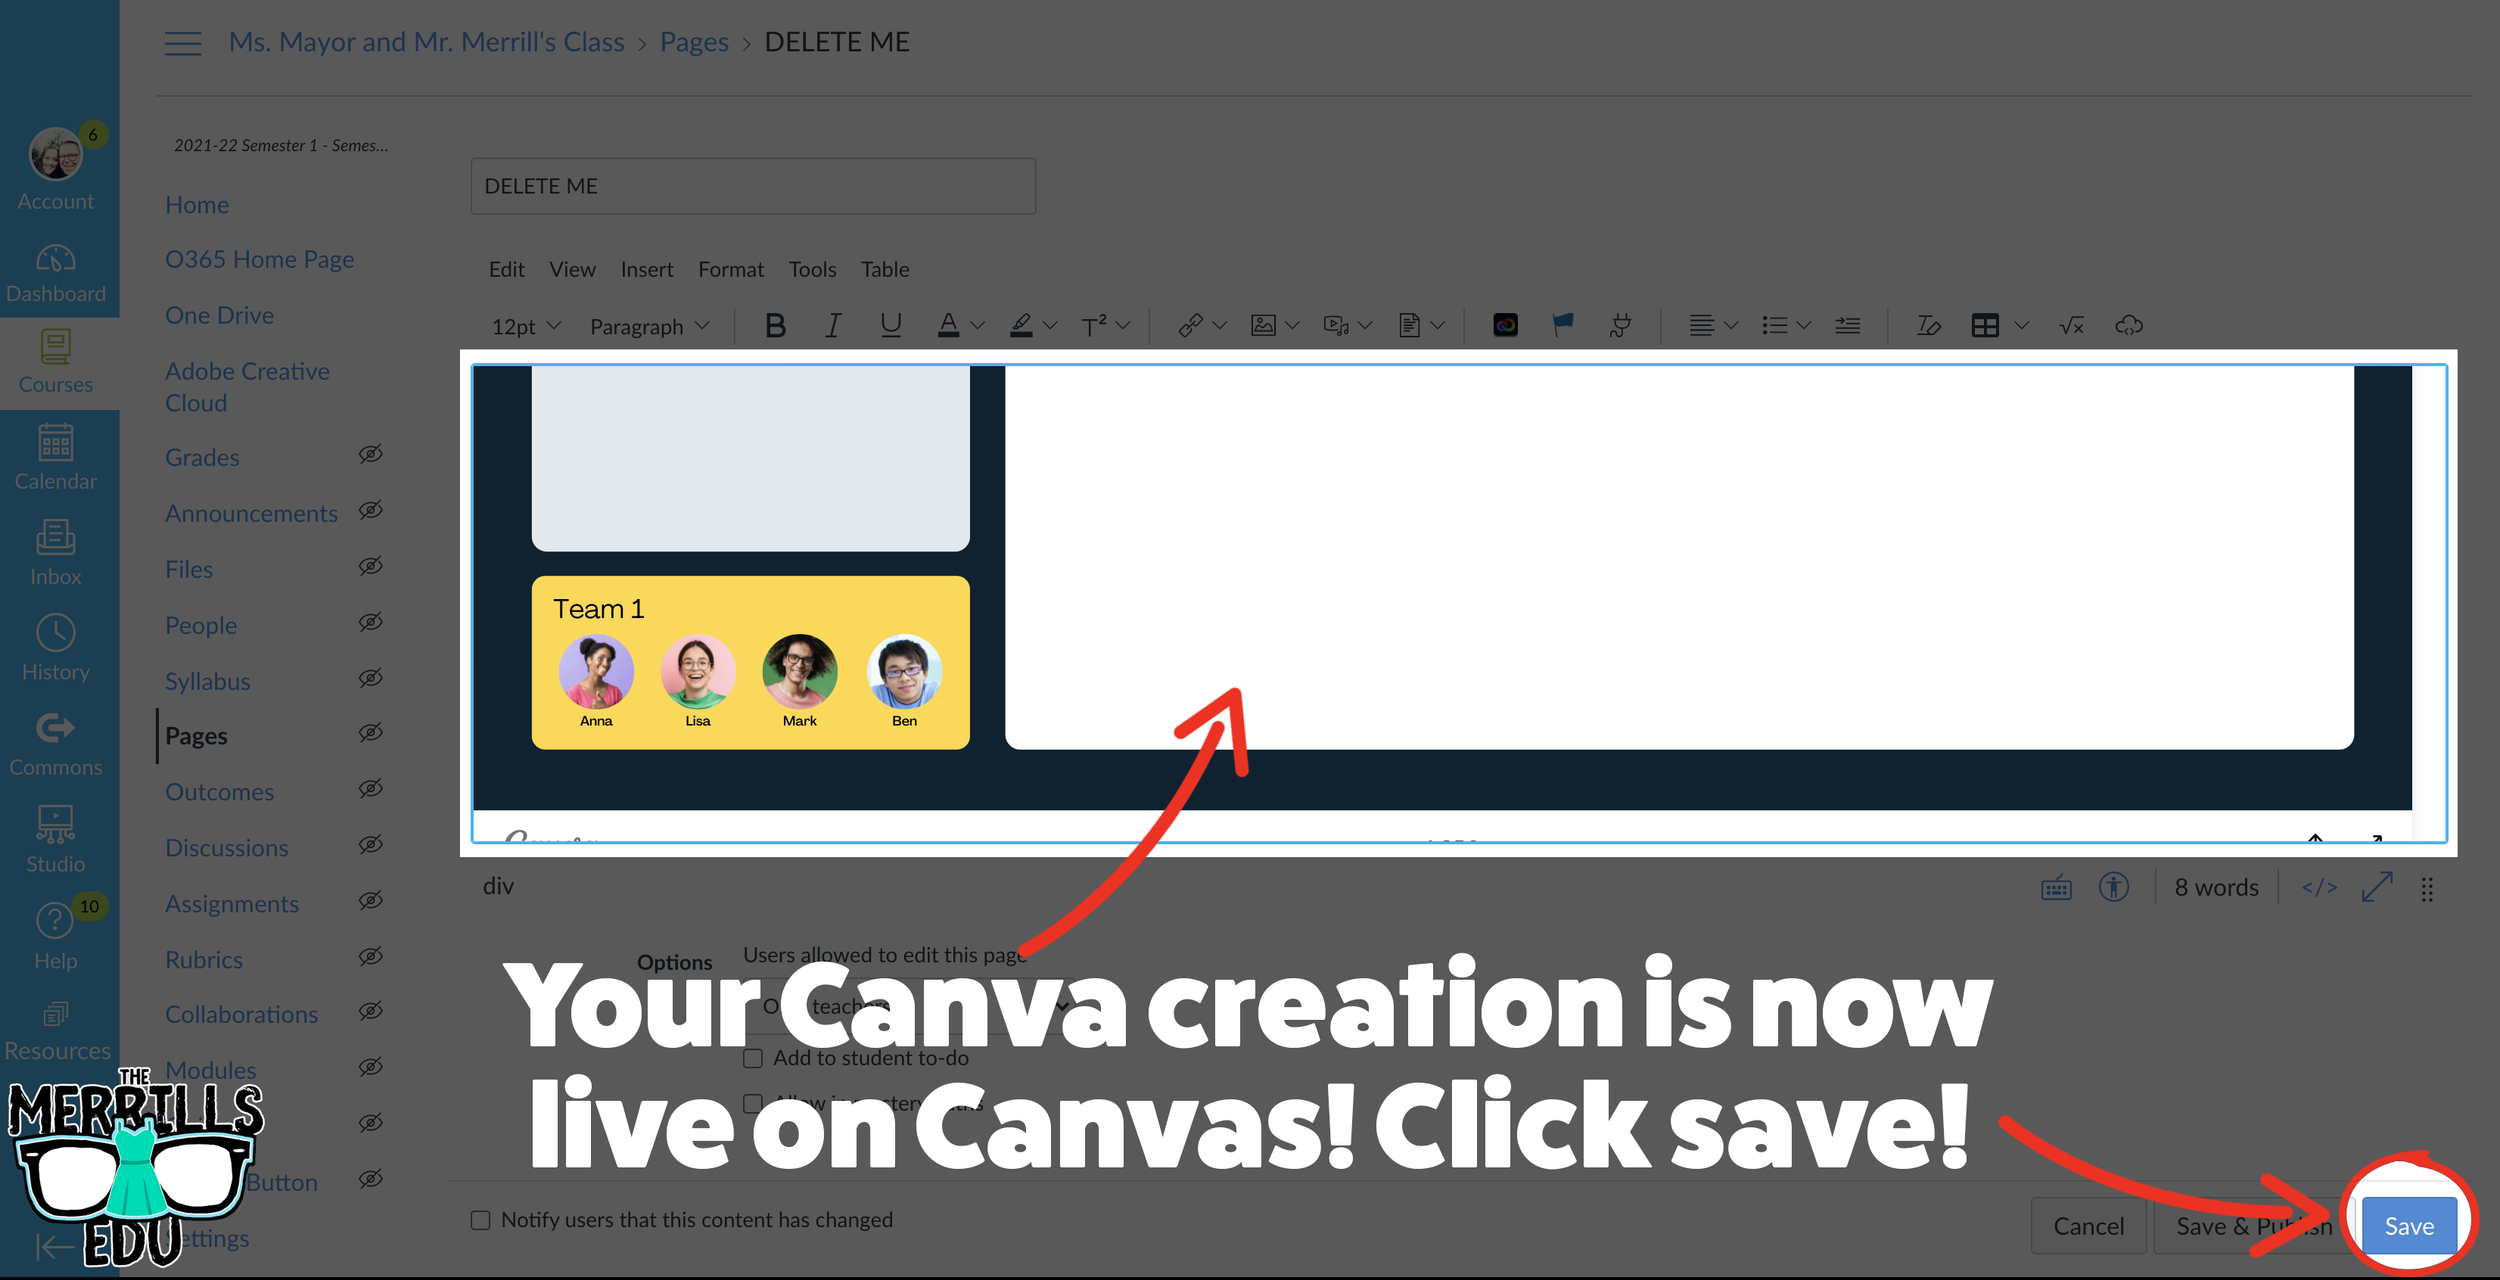
In the embed window, paste your copied code from Canva. Then, click submit.
Your Canva creation is now embedded into the Canvas page! Click on “Save” to update the changes.

Buncee Embedded into Canvas
Buncee creations can be added to Canvas, too! There’s a lot of embed options (which we love!), so you have complete control of how things look and work. Options include autoplay and dimensions of the embed. Here’s how it all works:
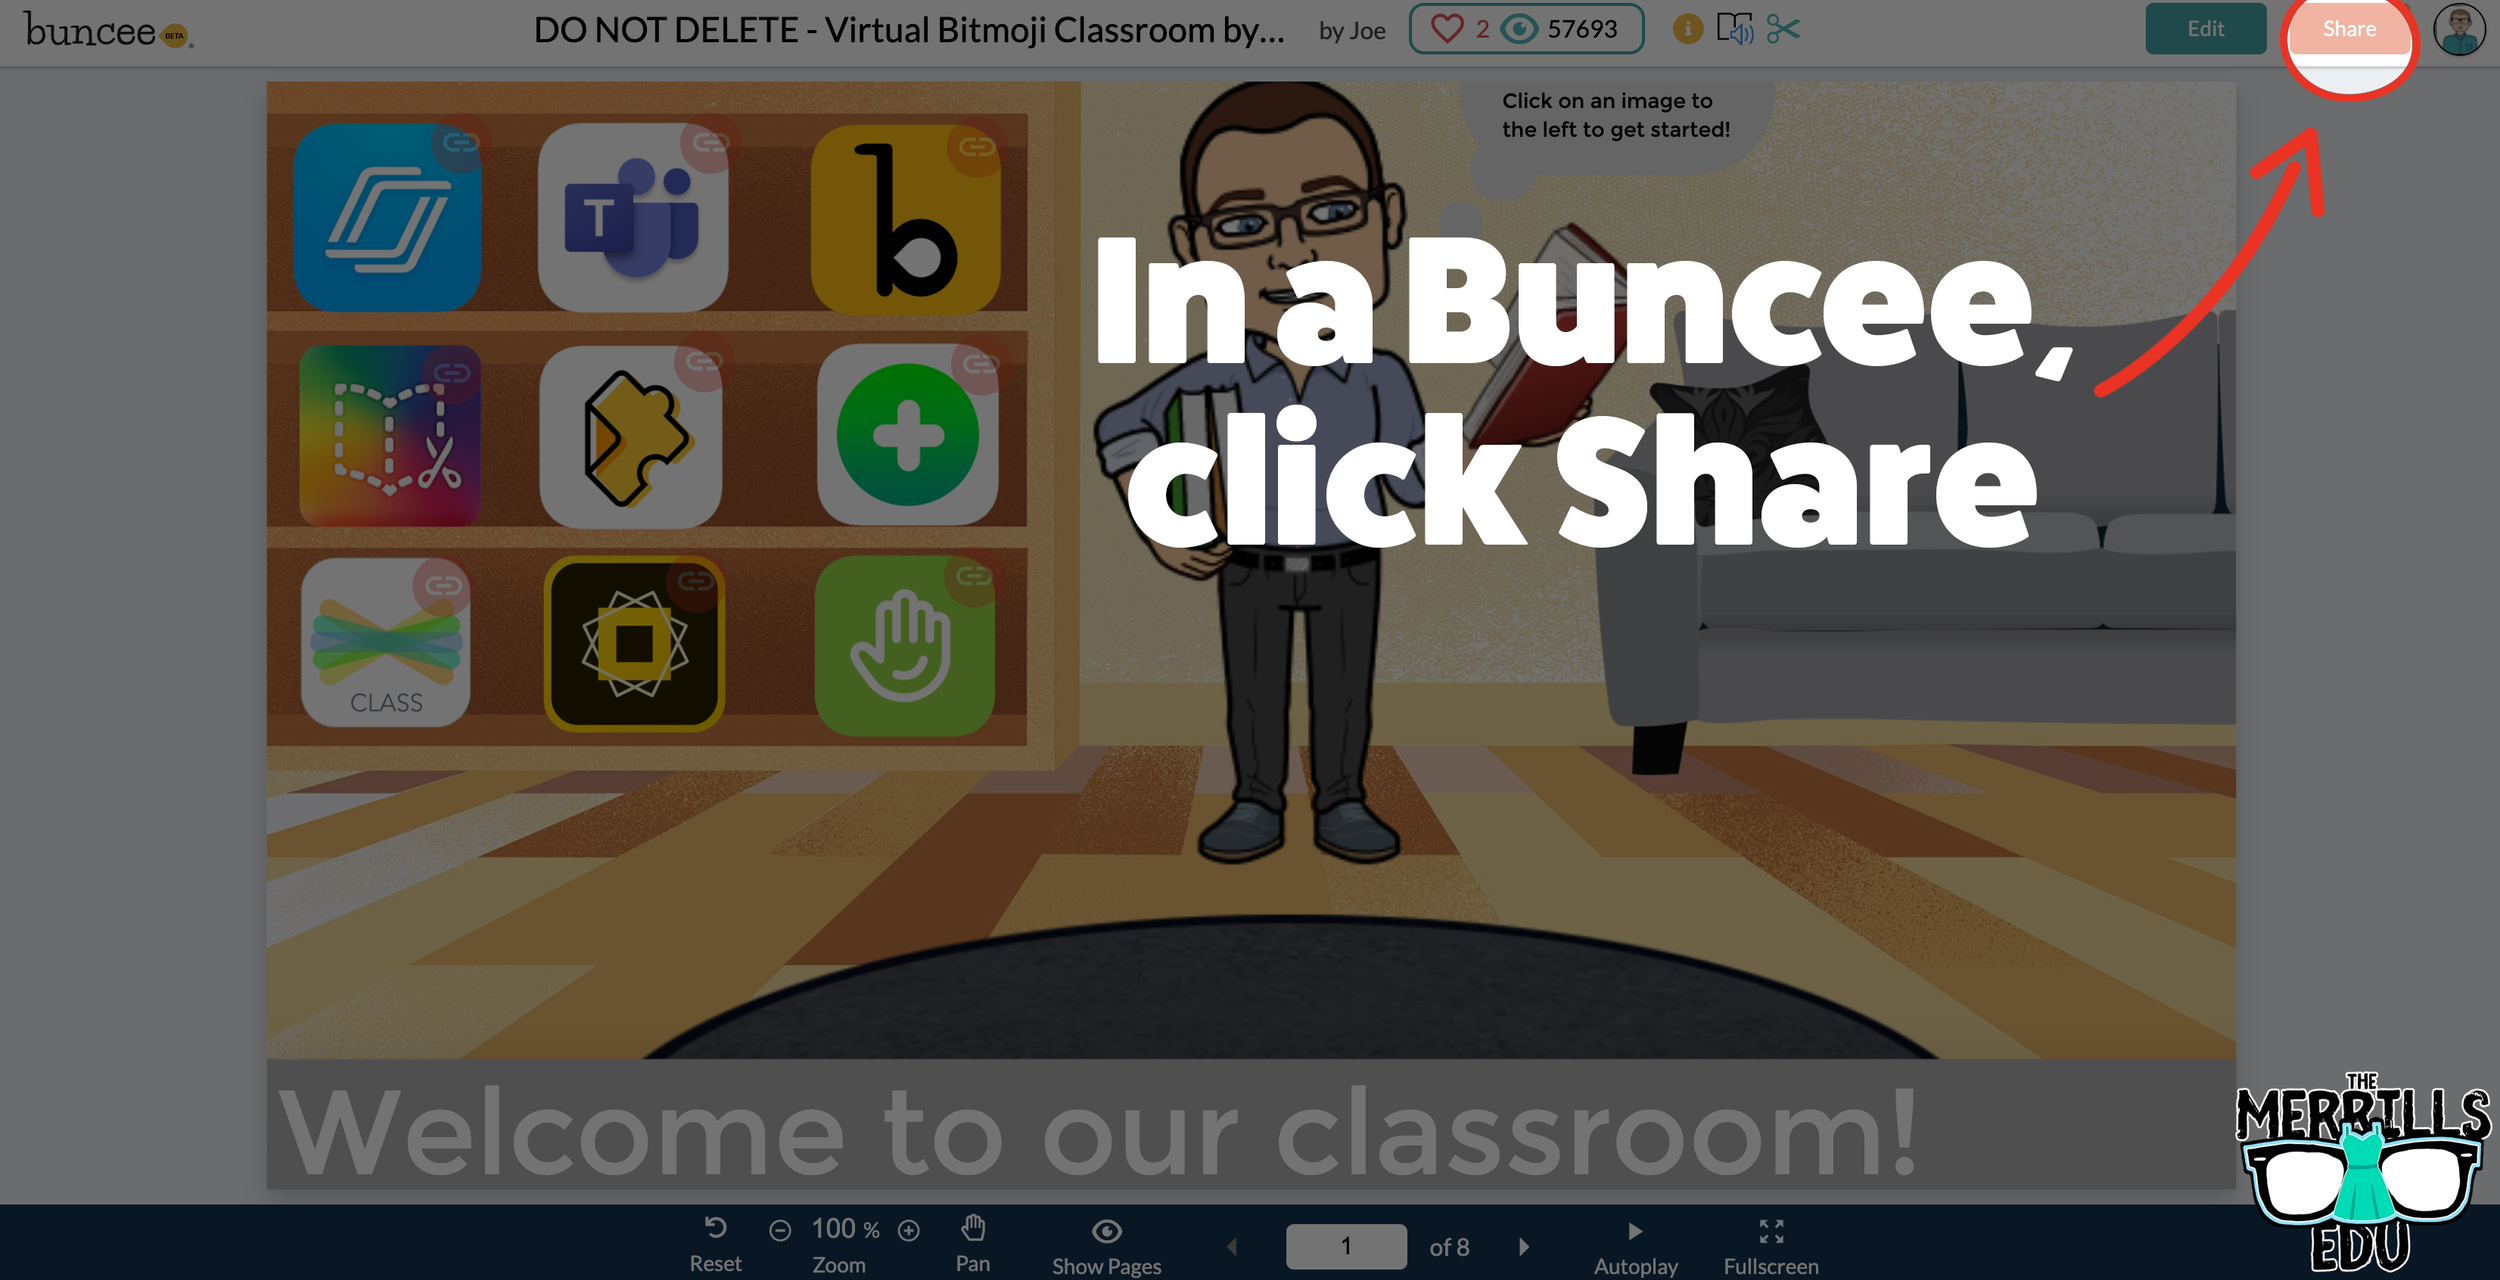


Open a Buncee, then click the “Share” button located in the upper right side of the screen.
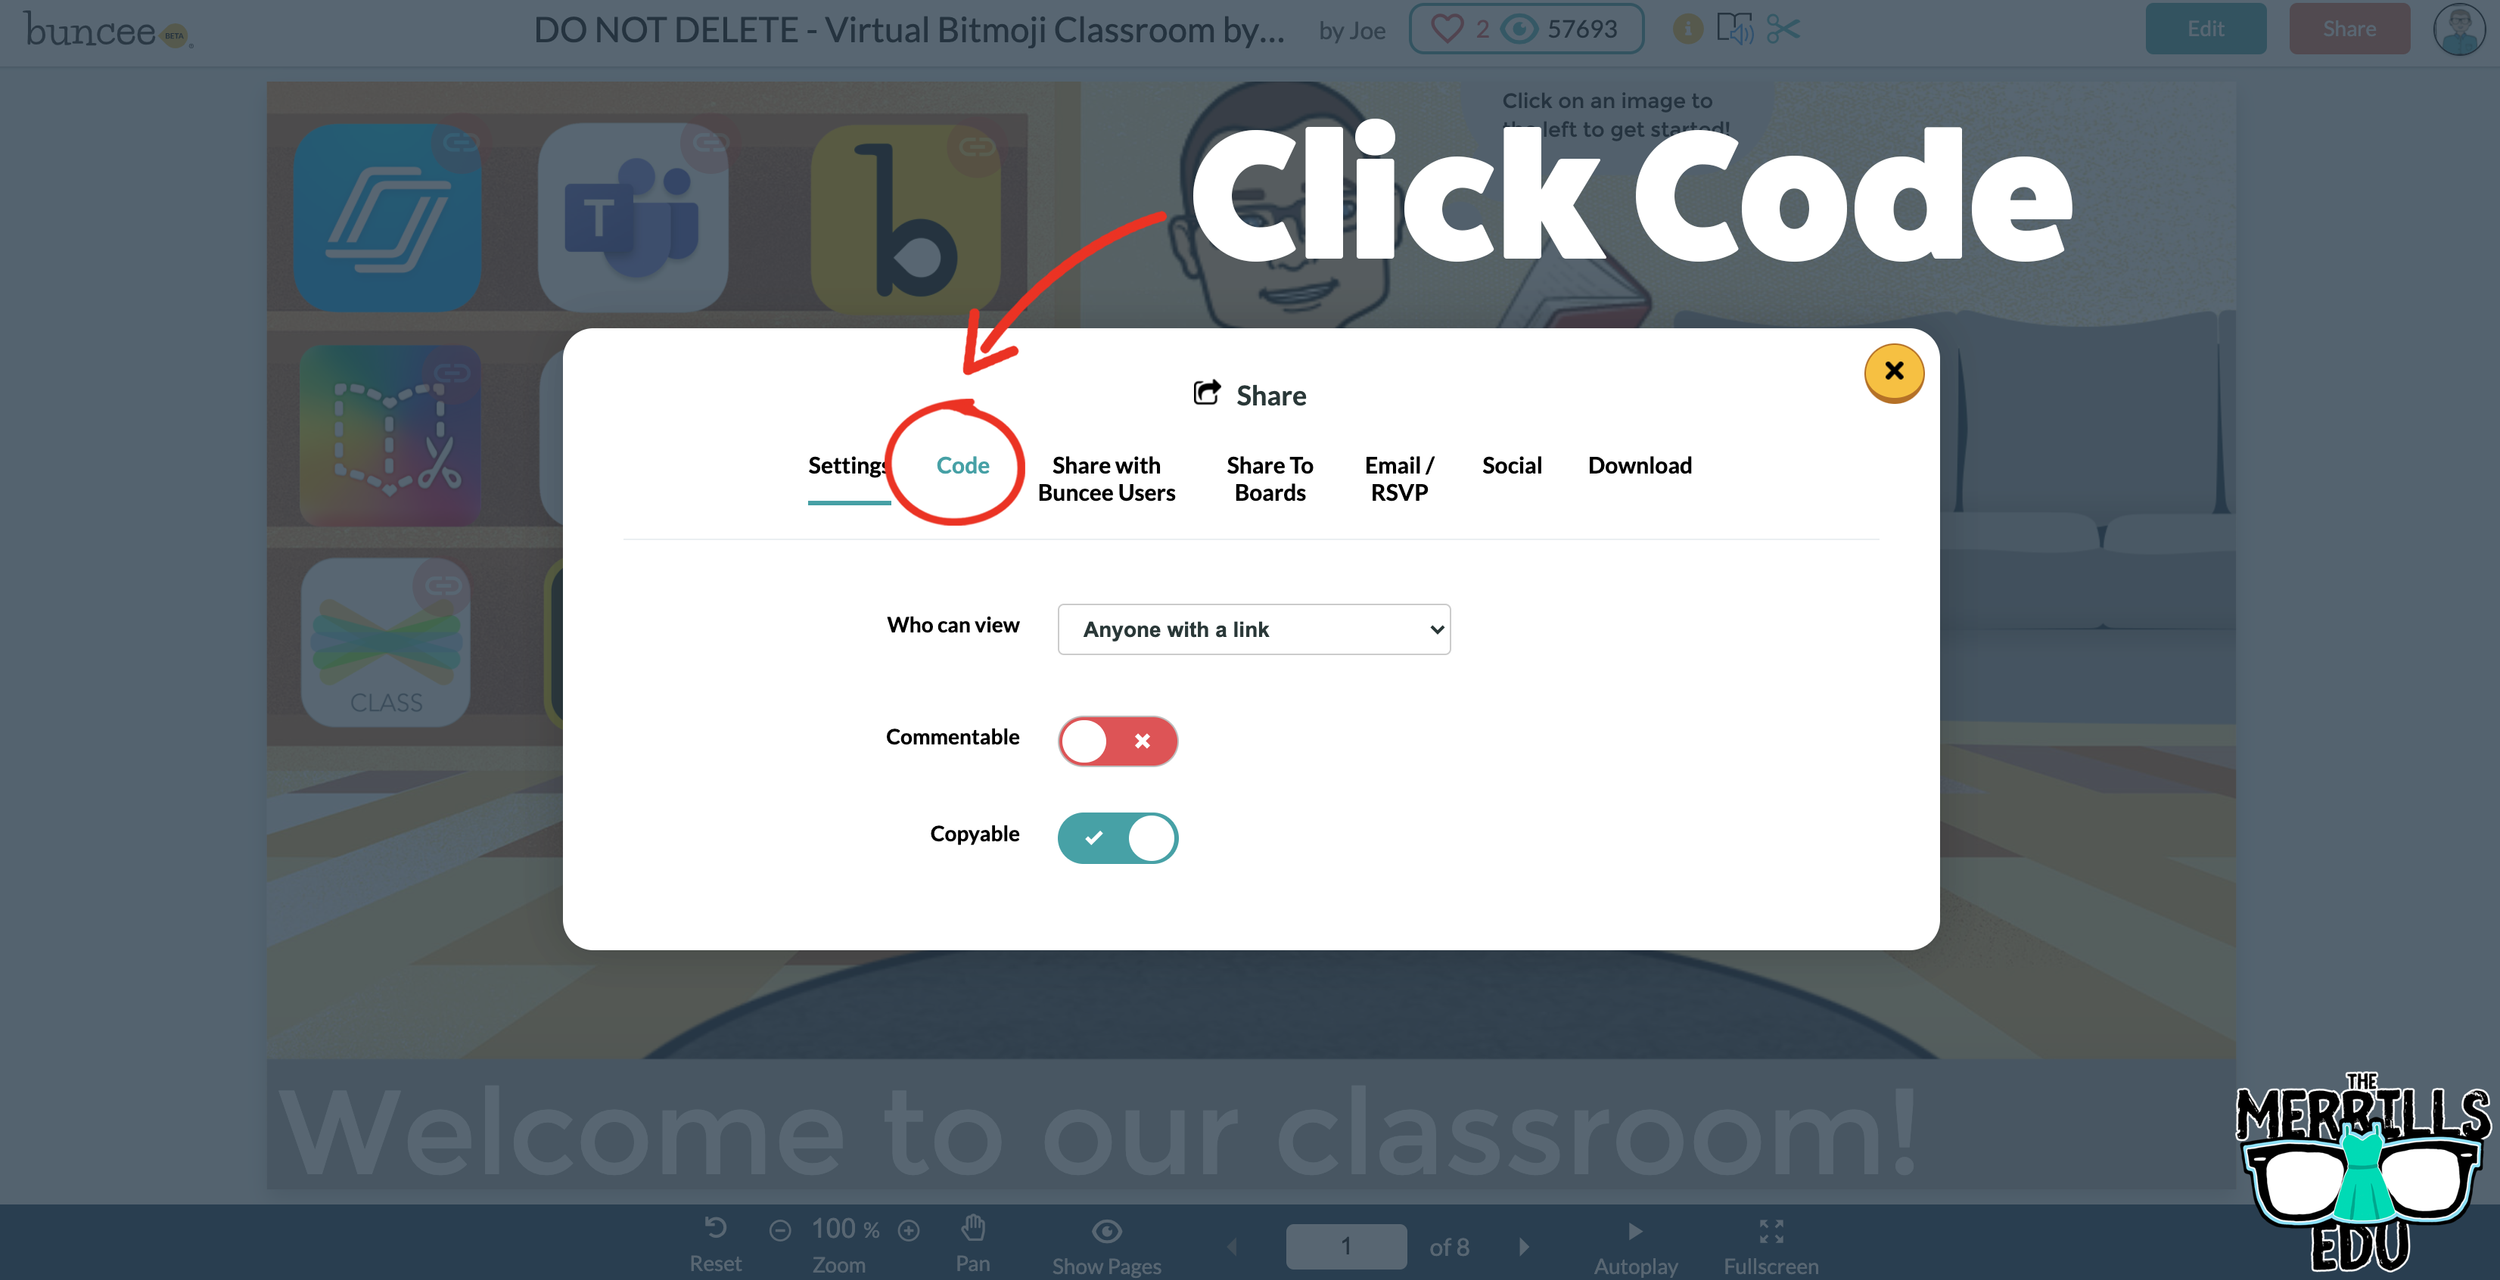
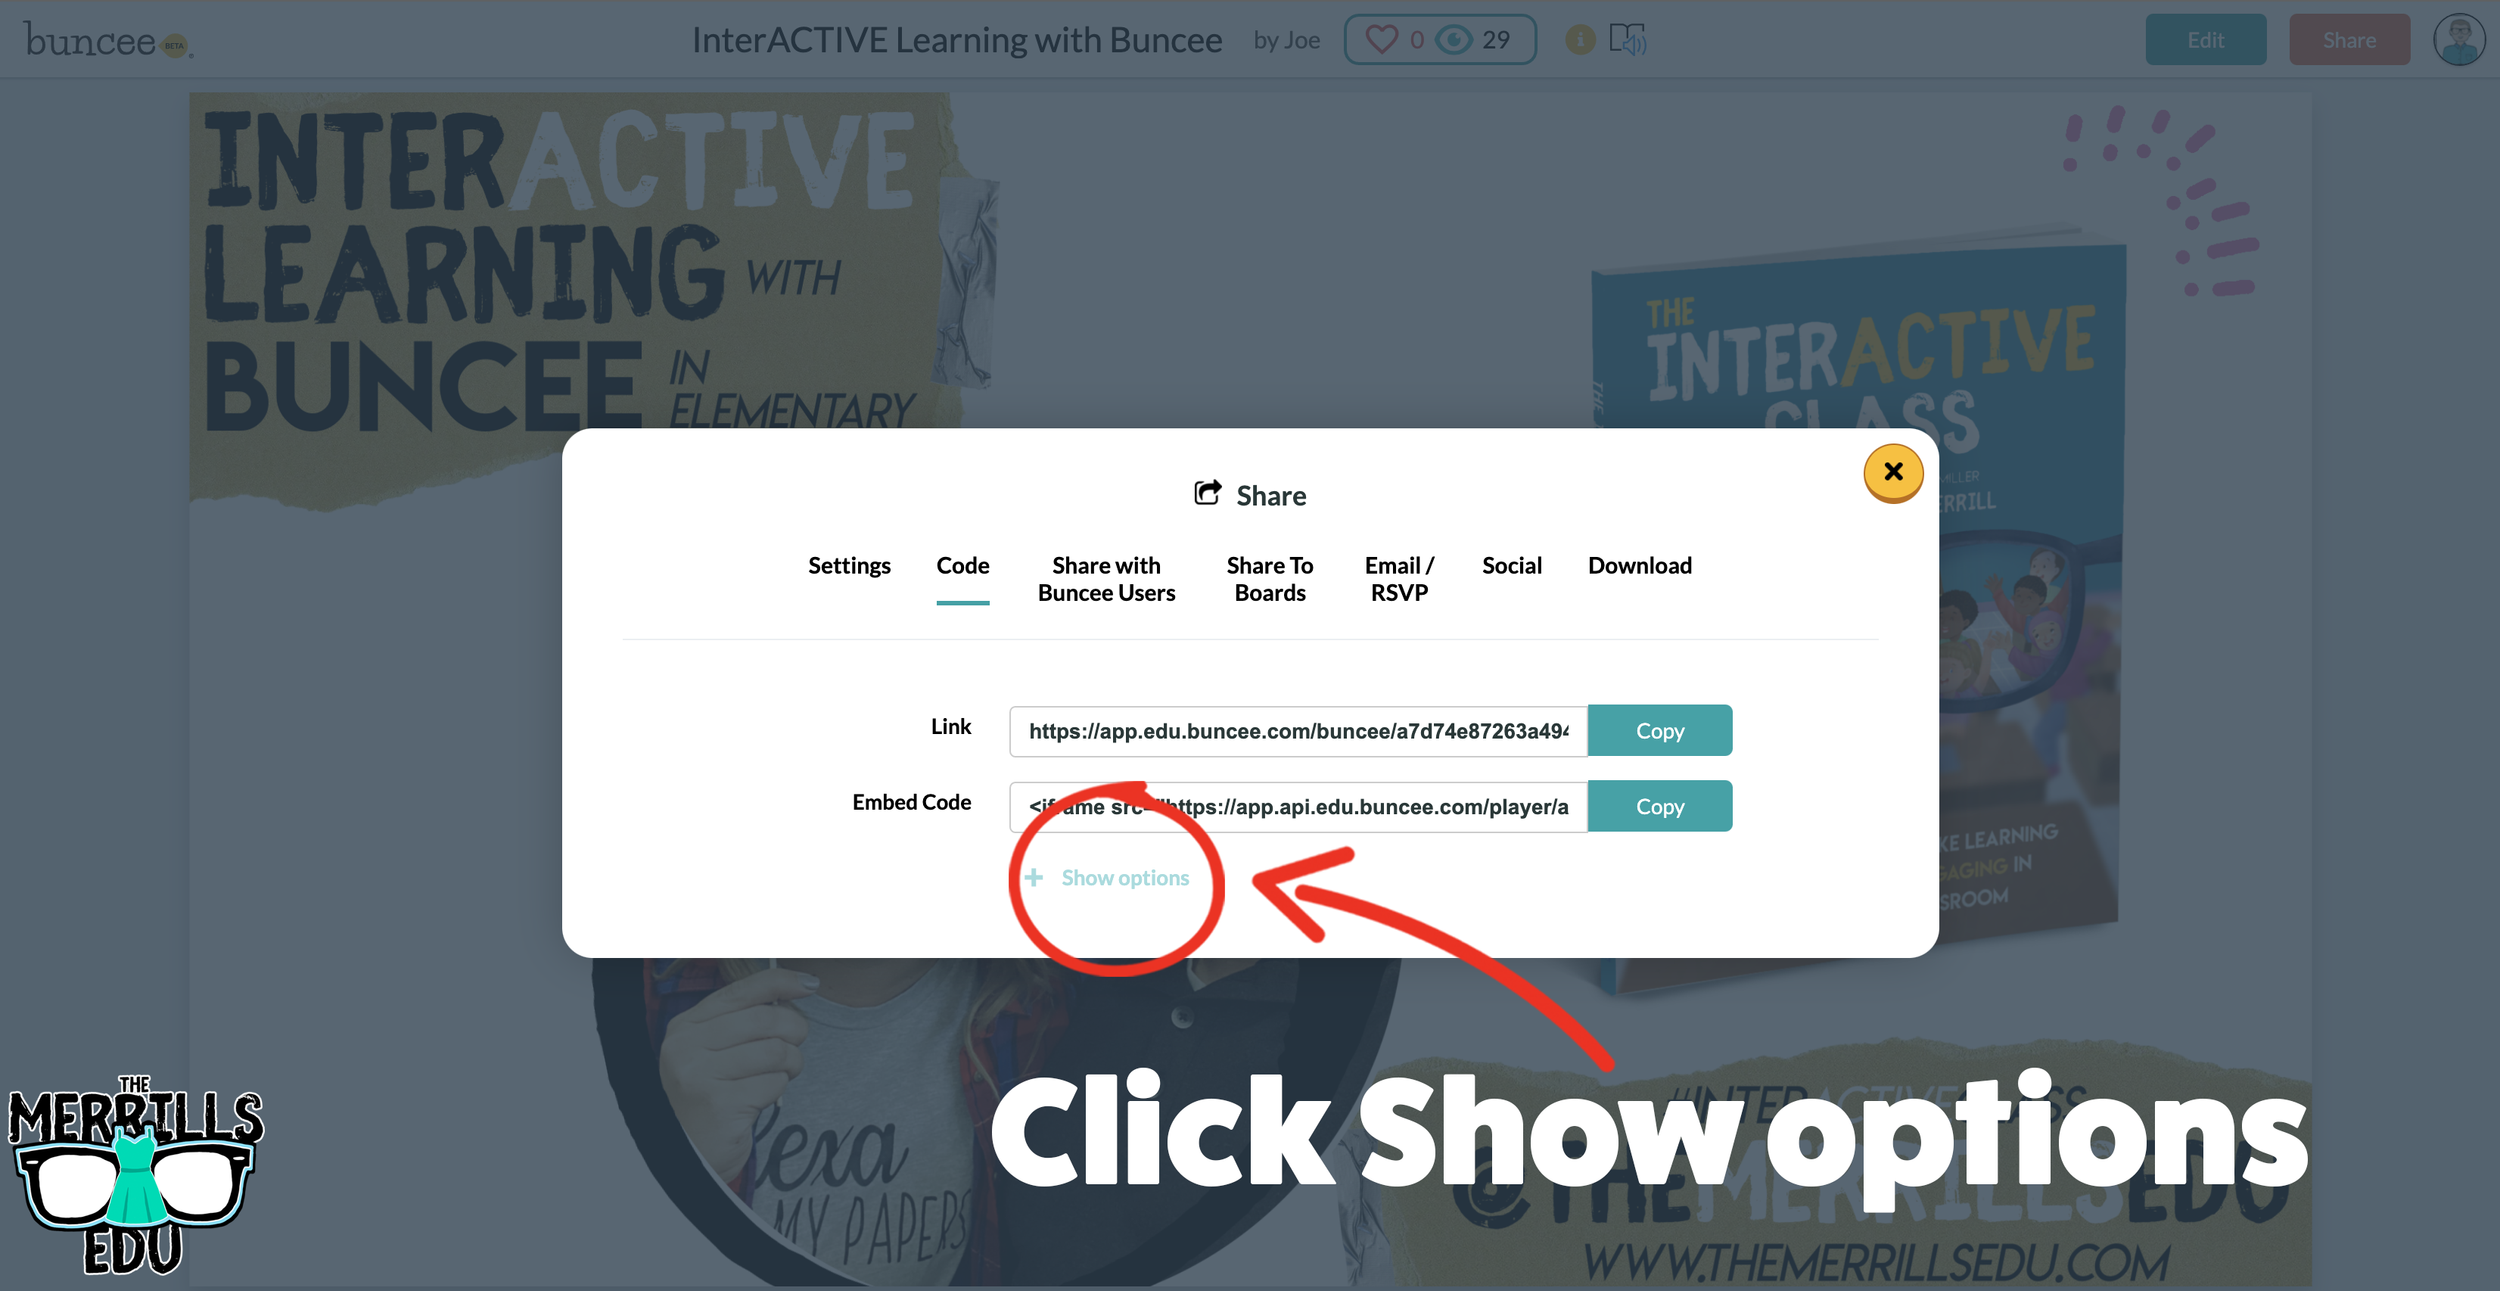
A new window will pop up. Click on “Code.”
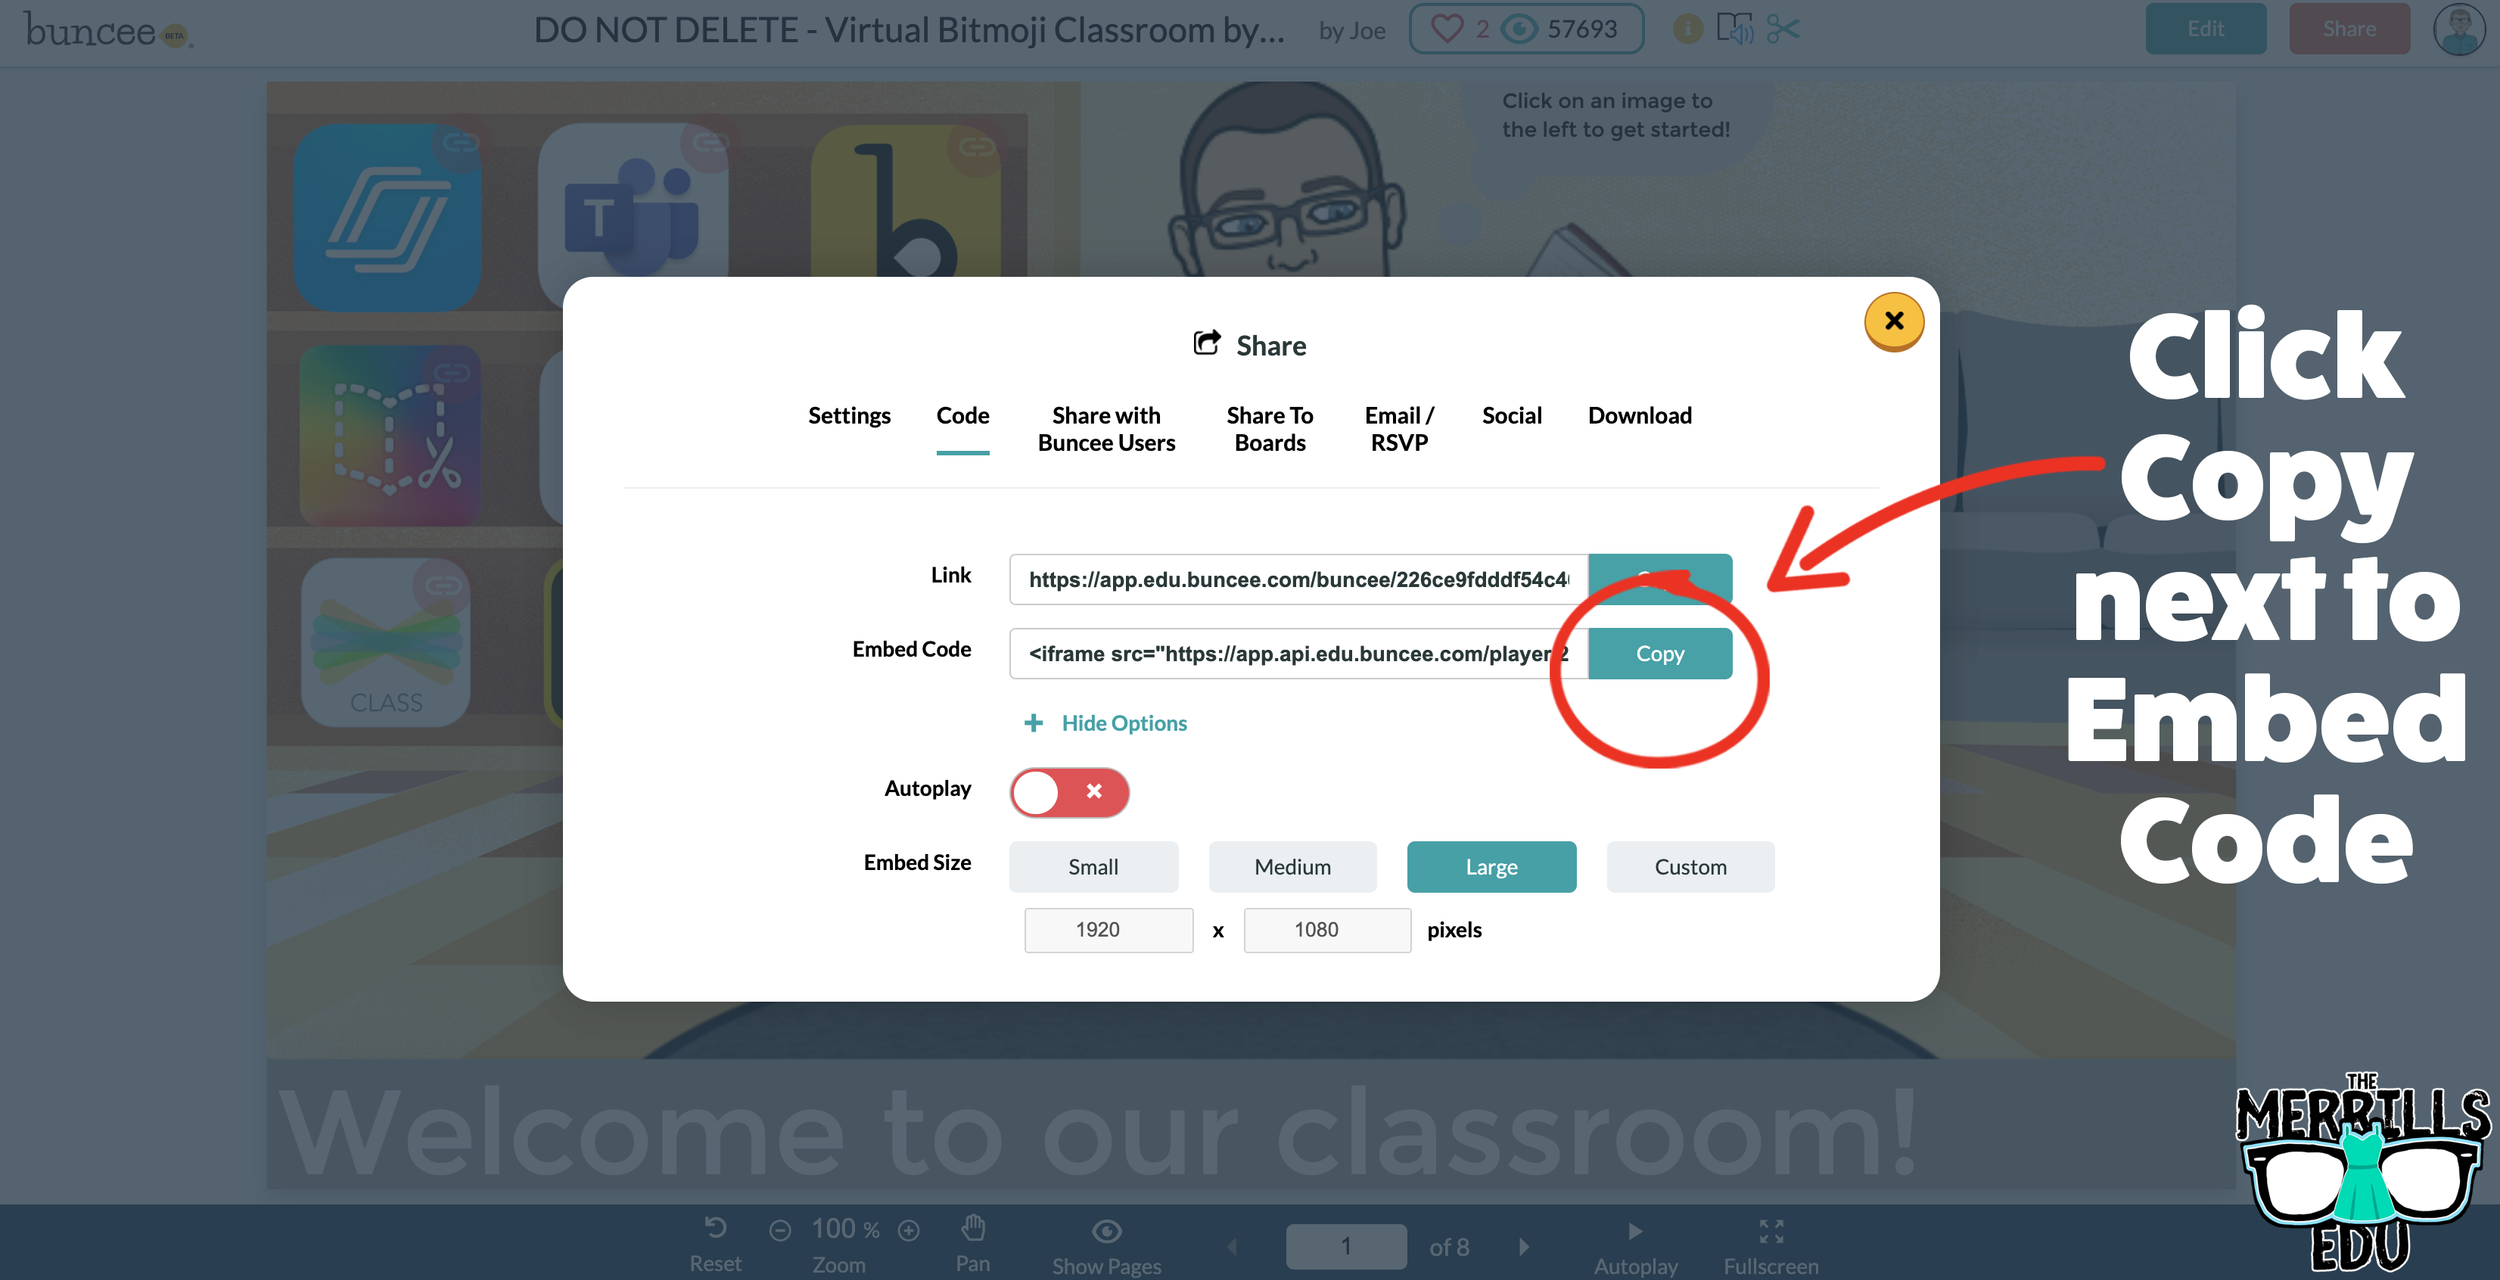
Under “Code” click “+ Show Options.”
Select your preferred embed size (there are also options to autoplay the Buncee).
Then, in the same window, click “Copy” next to the Embed Code bar.
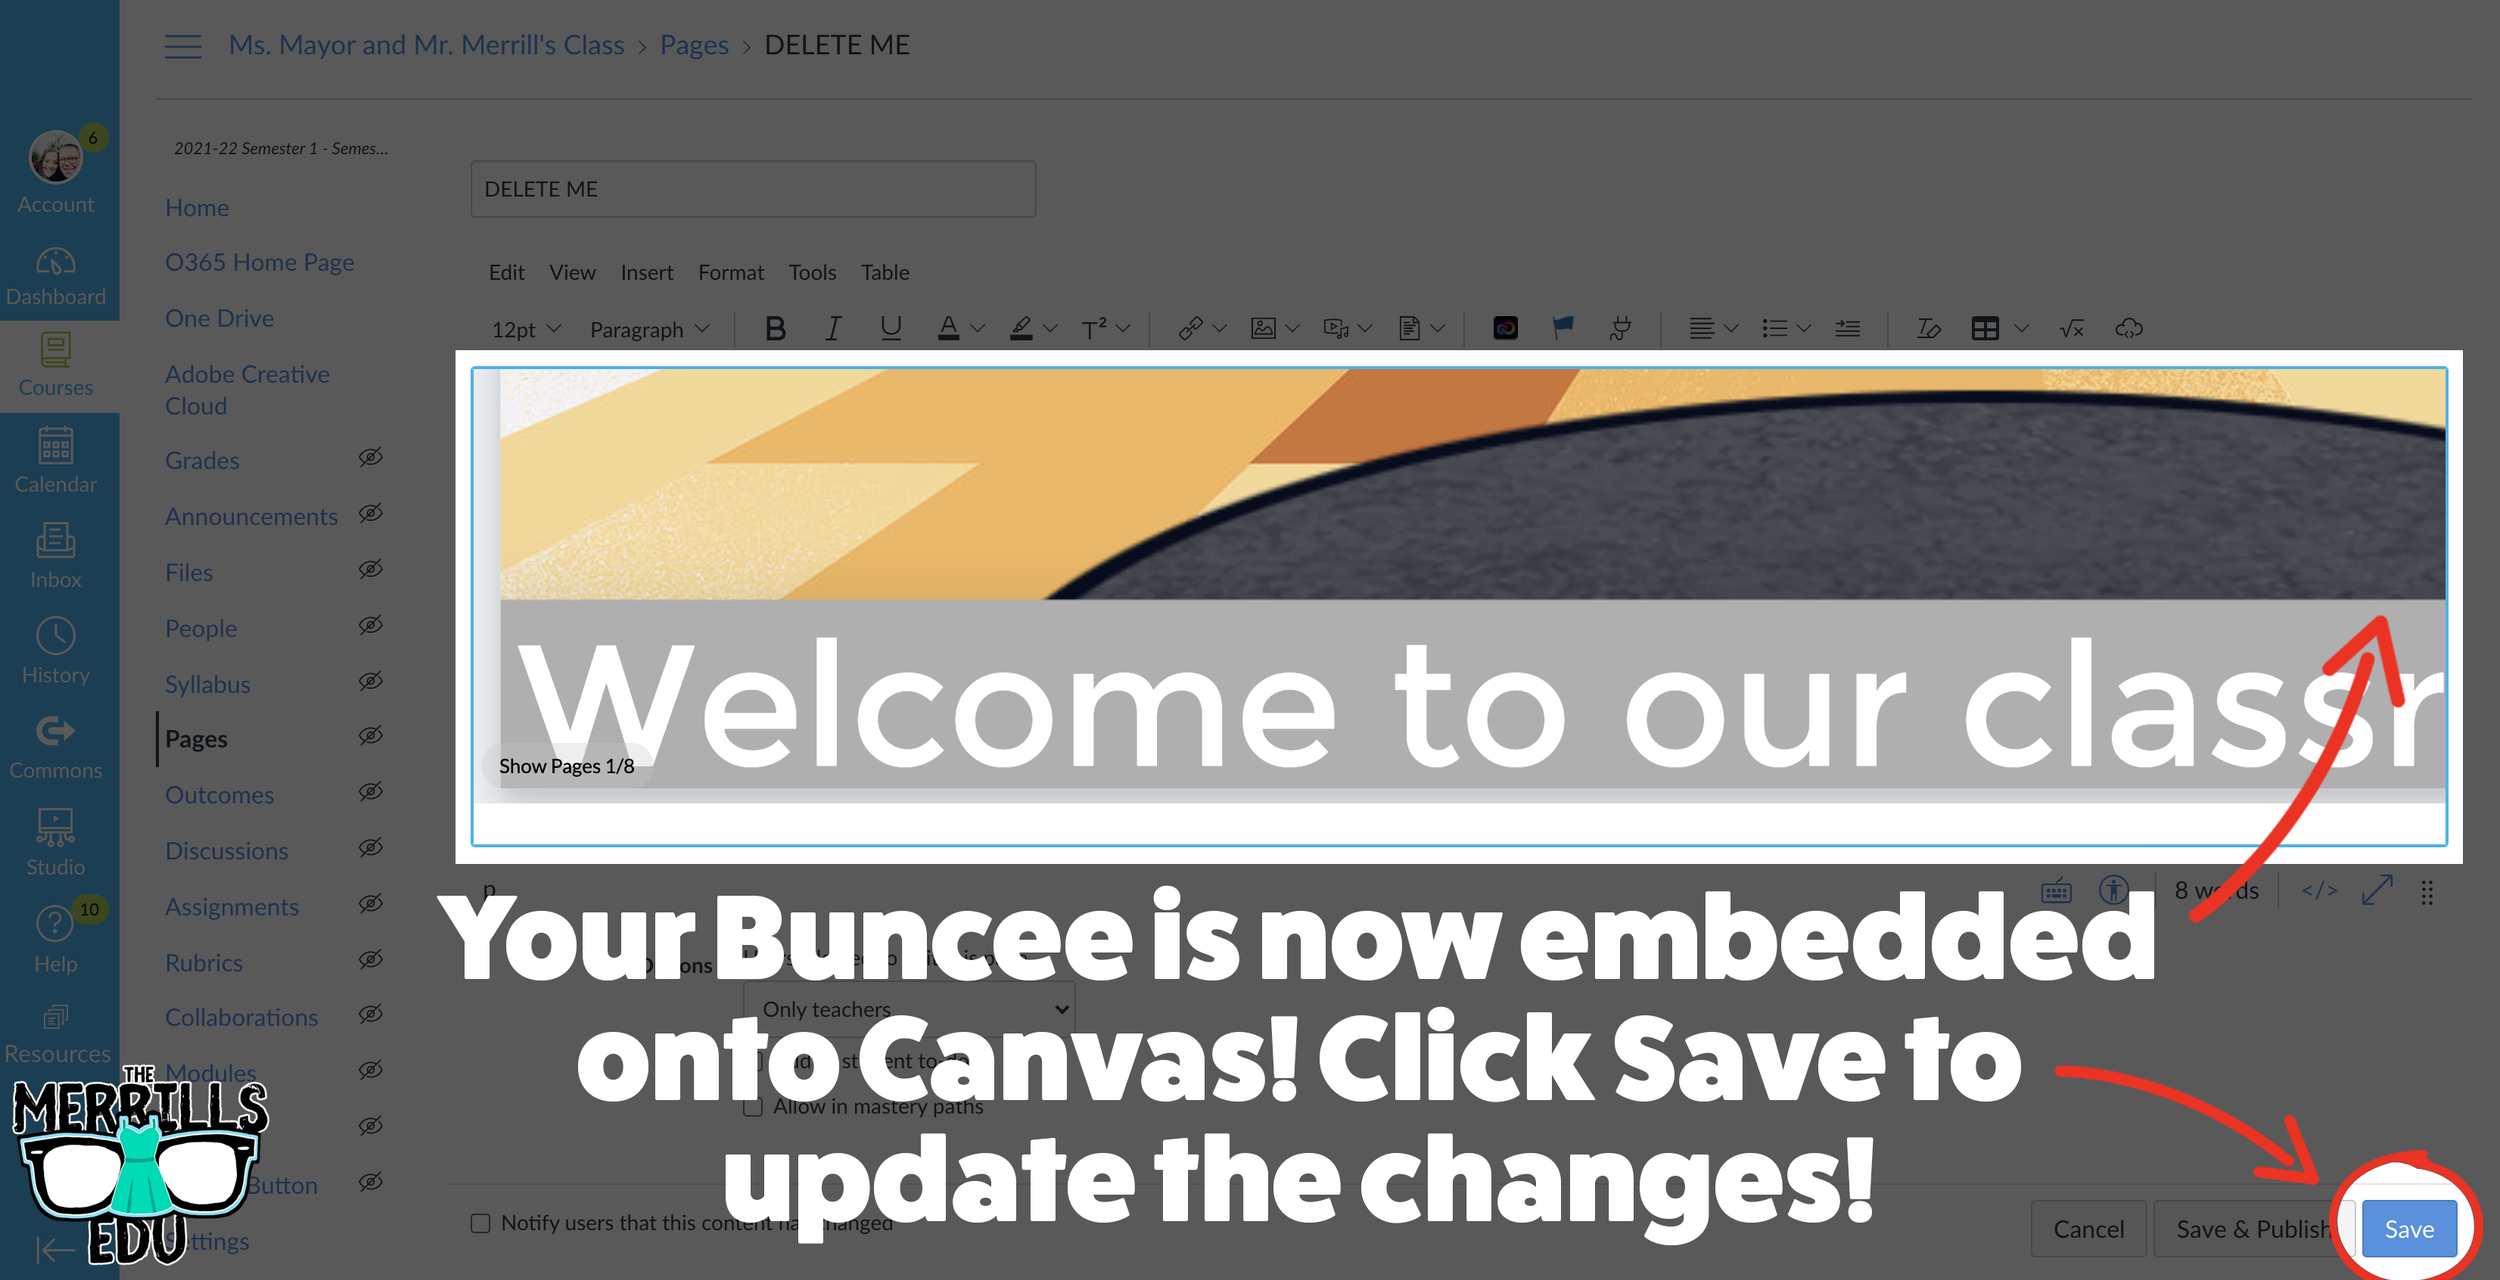
In a separate tab, open the Canvas page that you would like to add the Buncee creation to. Then, click on the cloud icon (if you don’t see the Cloud icon, click the three dots to expand the menu bar).
In the embed window, paste your copied code from Buncee. Then, click submit.
Your Buncee creation is now embedded into the Canvas page! Click on “Save” to update the changes.

Ed Puzzle Embedded into Canvas
Ed Puzzle is a video assessment platform tool that allows teachers to find or create videos and then generate questions that go along with the video. The result is an engaging formative assessment that your students will actually like! Keeping Ed Puzzle embedded into Canvas will help keep everything organized in the same place. Here’s how it all works:


(note: You will need to set up a class in Ed Puzzle prior to the steps below)
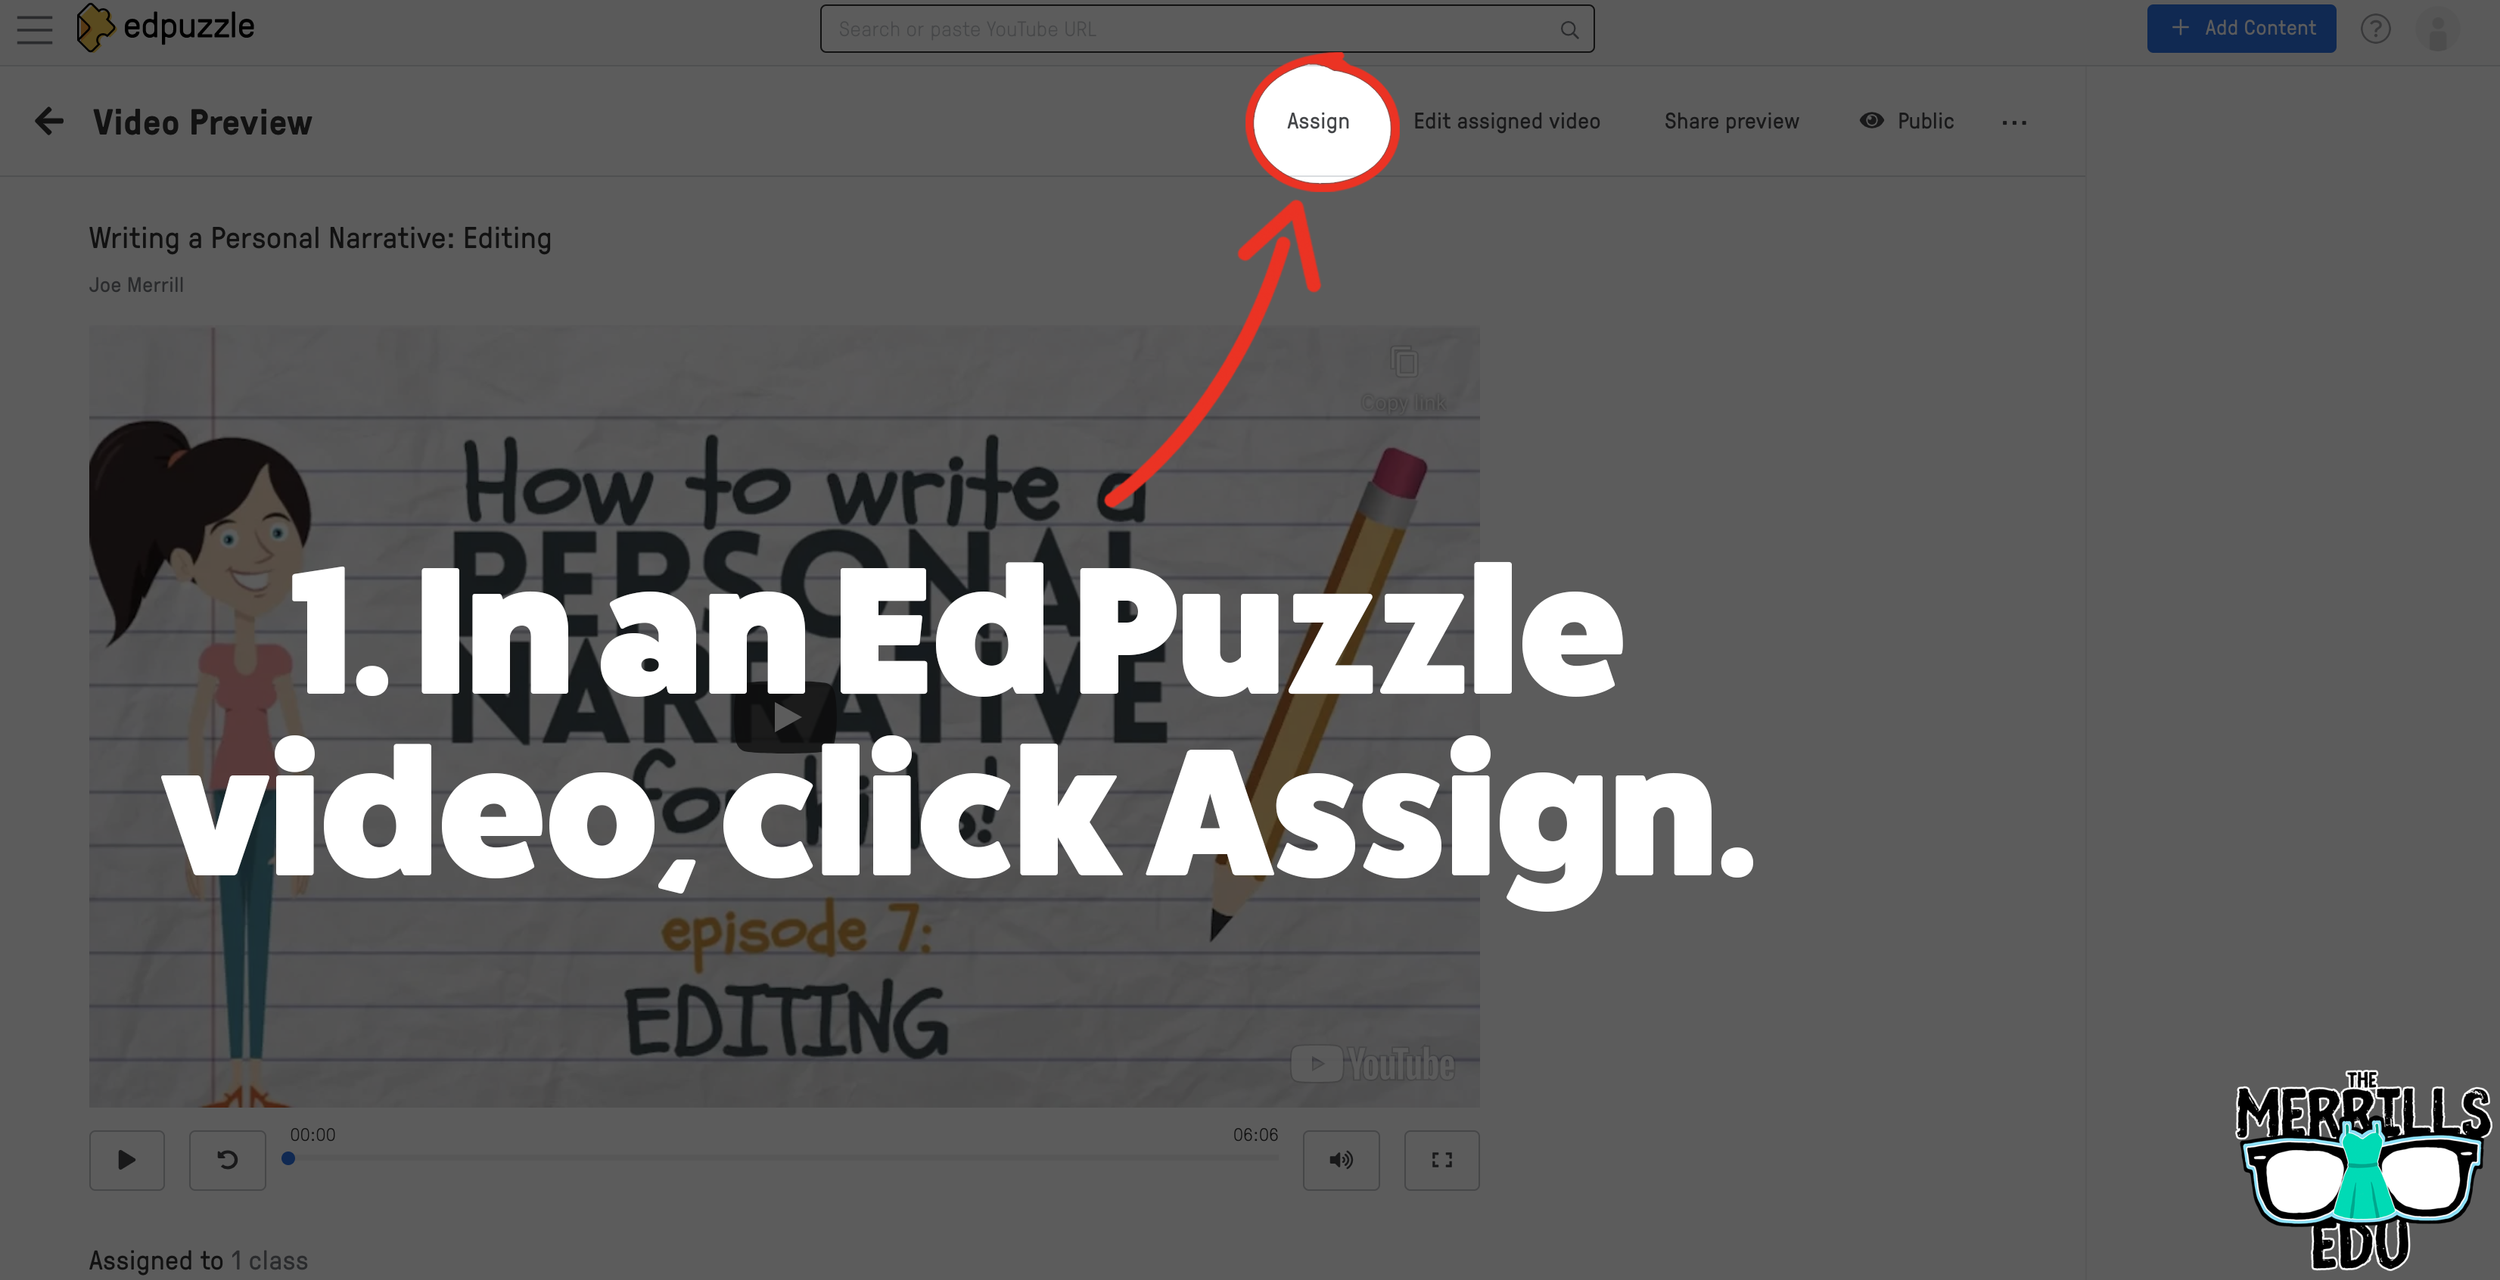
Select. the video that you would like to embed from Ed Puzzle.
Click “Assign”
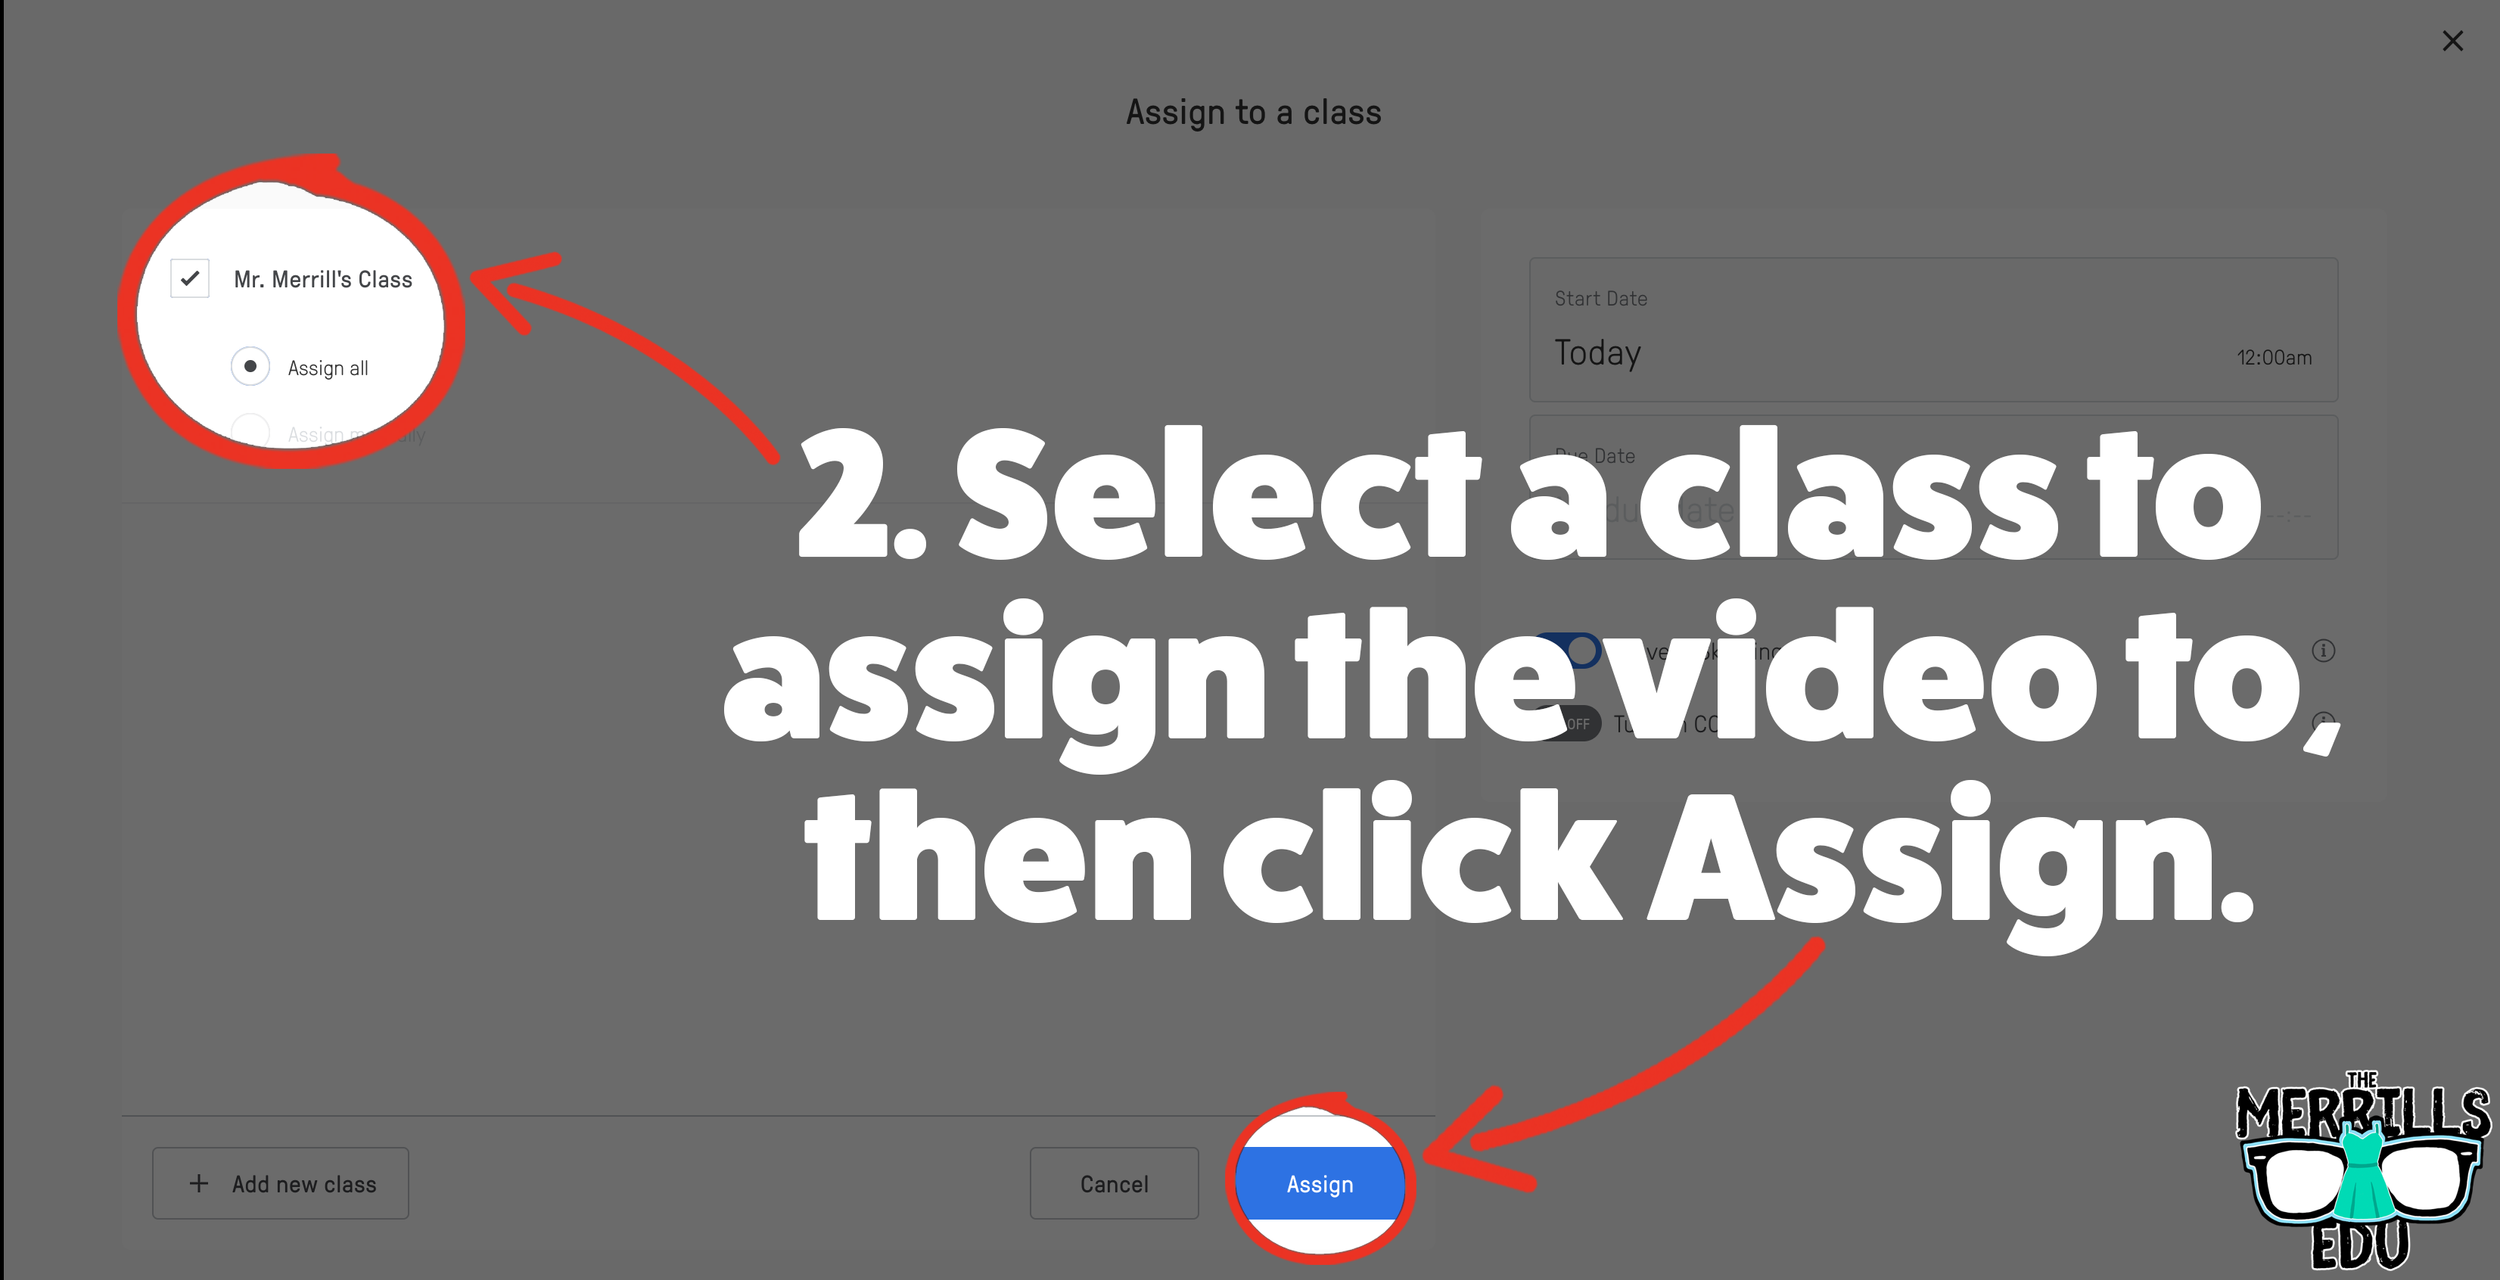
Select the class that you would like to assign the video to, then click “Assign.”
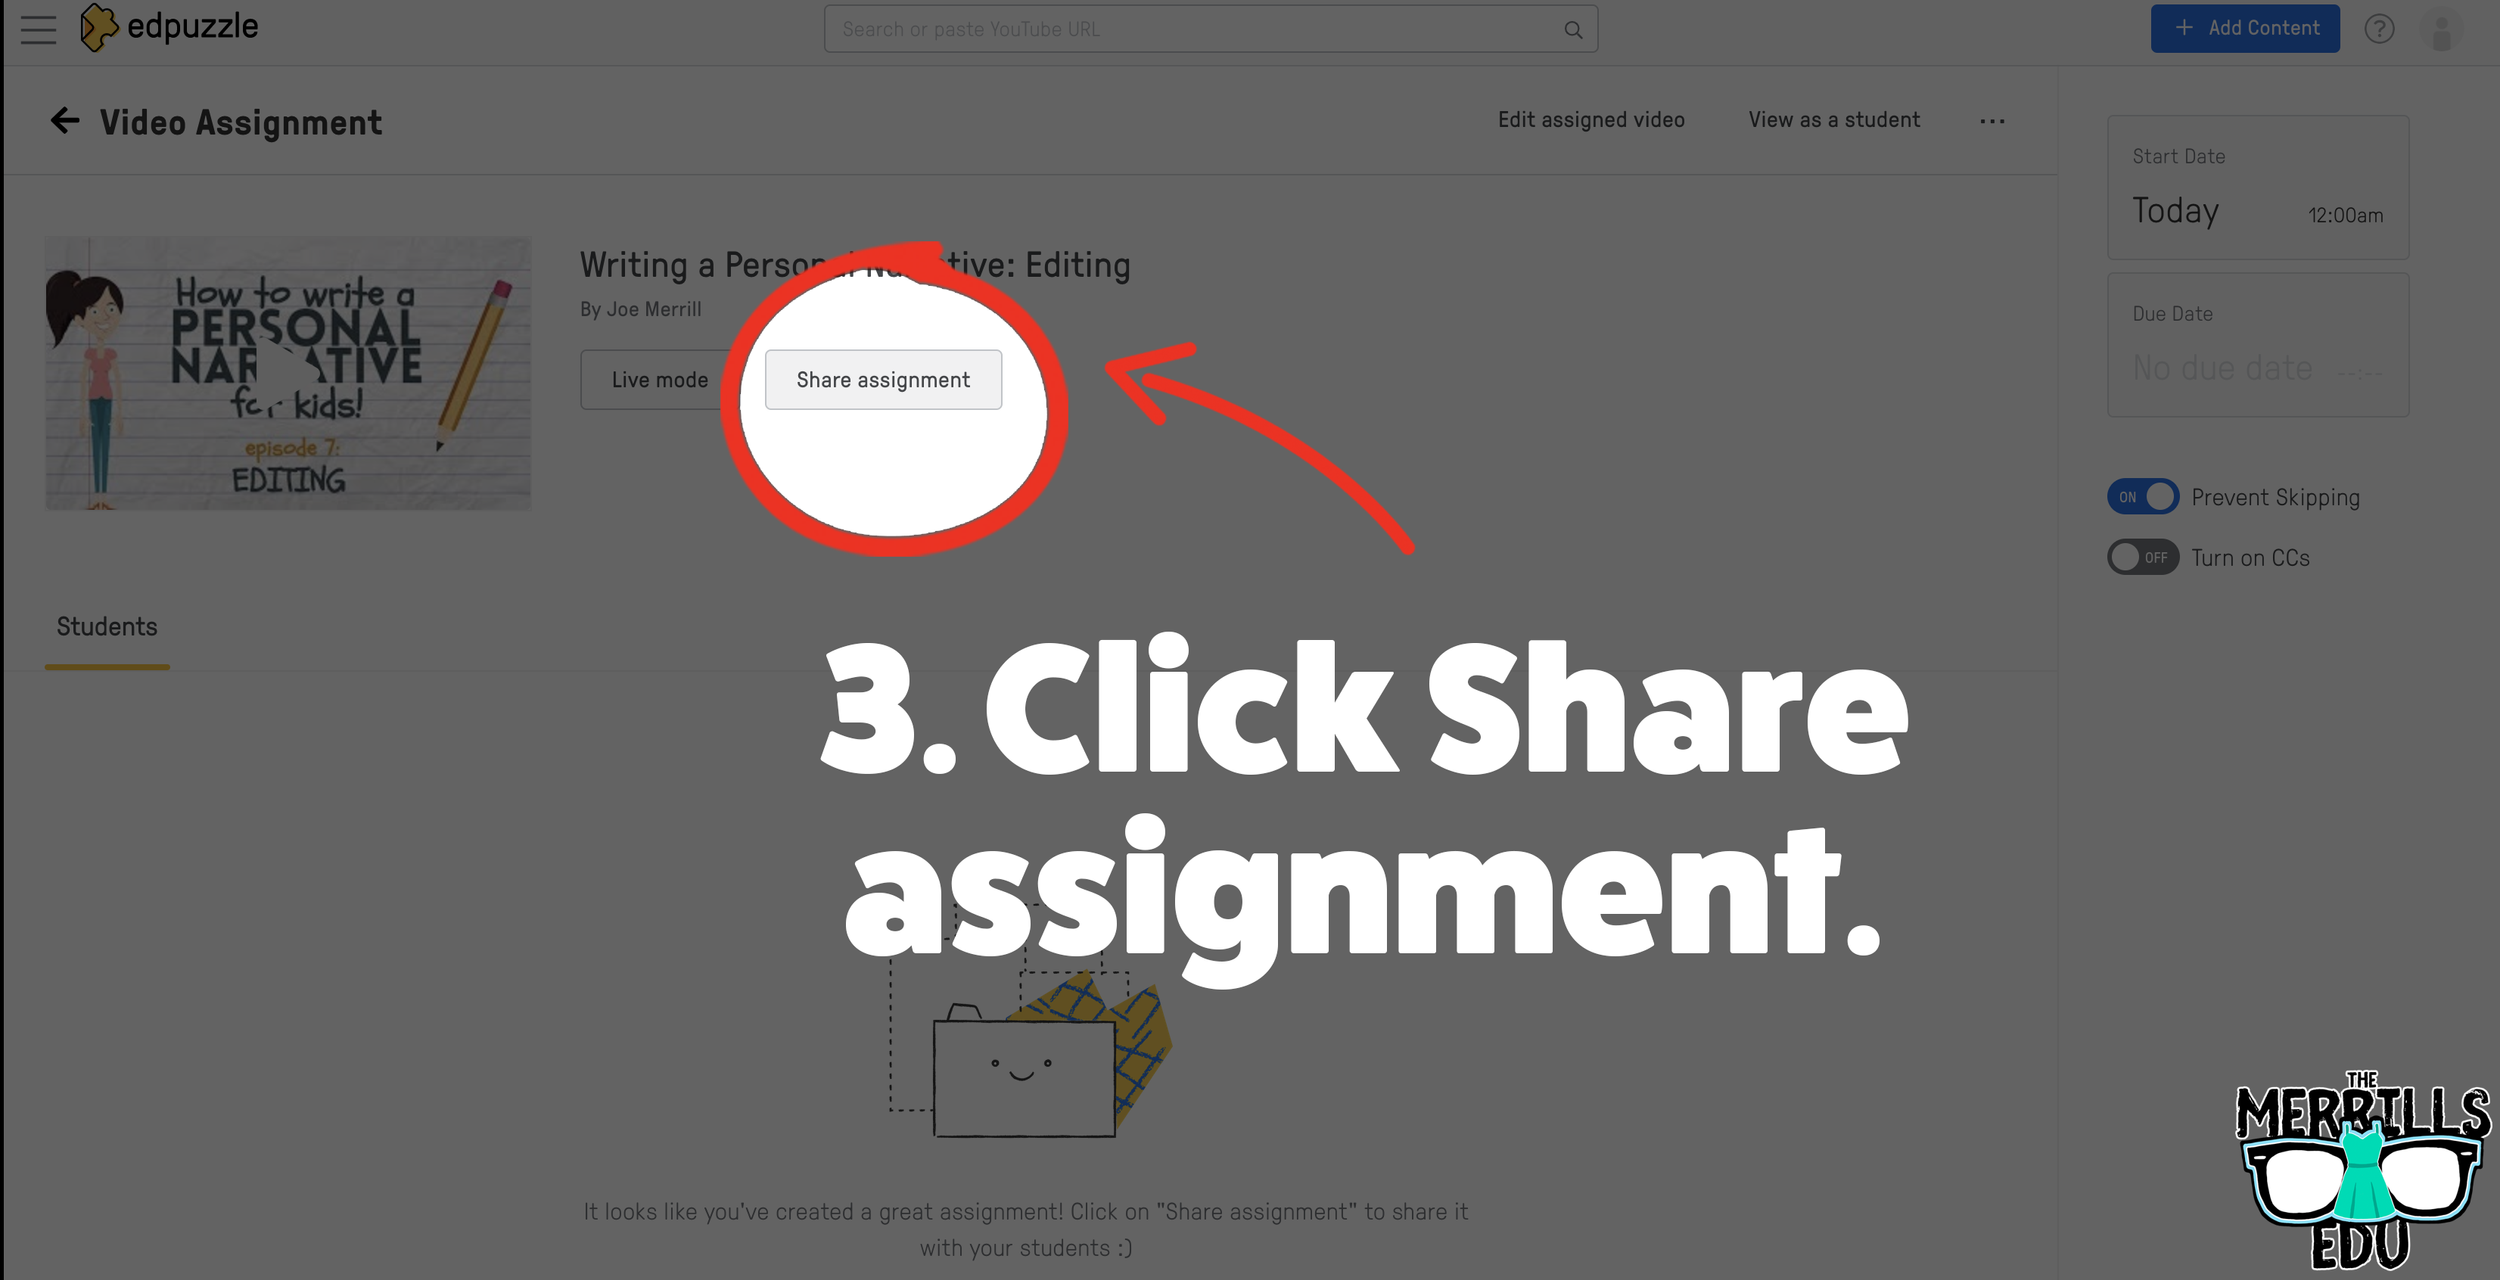
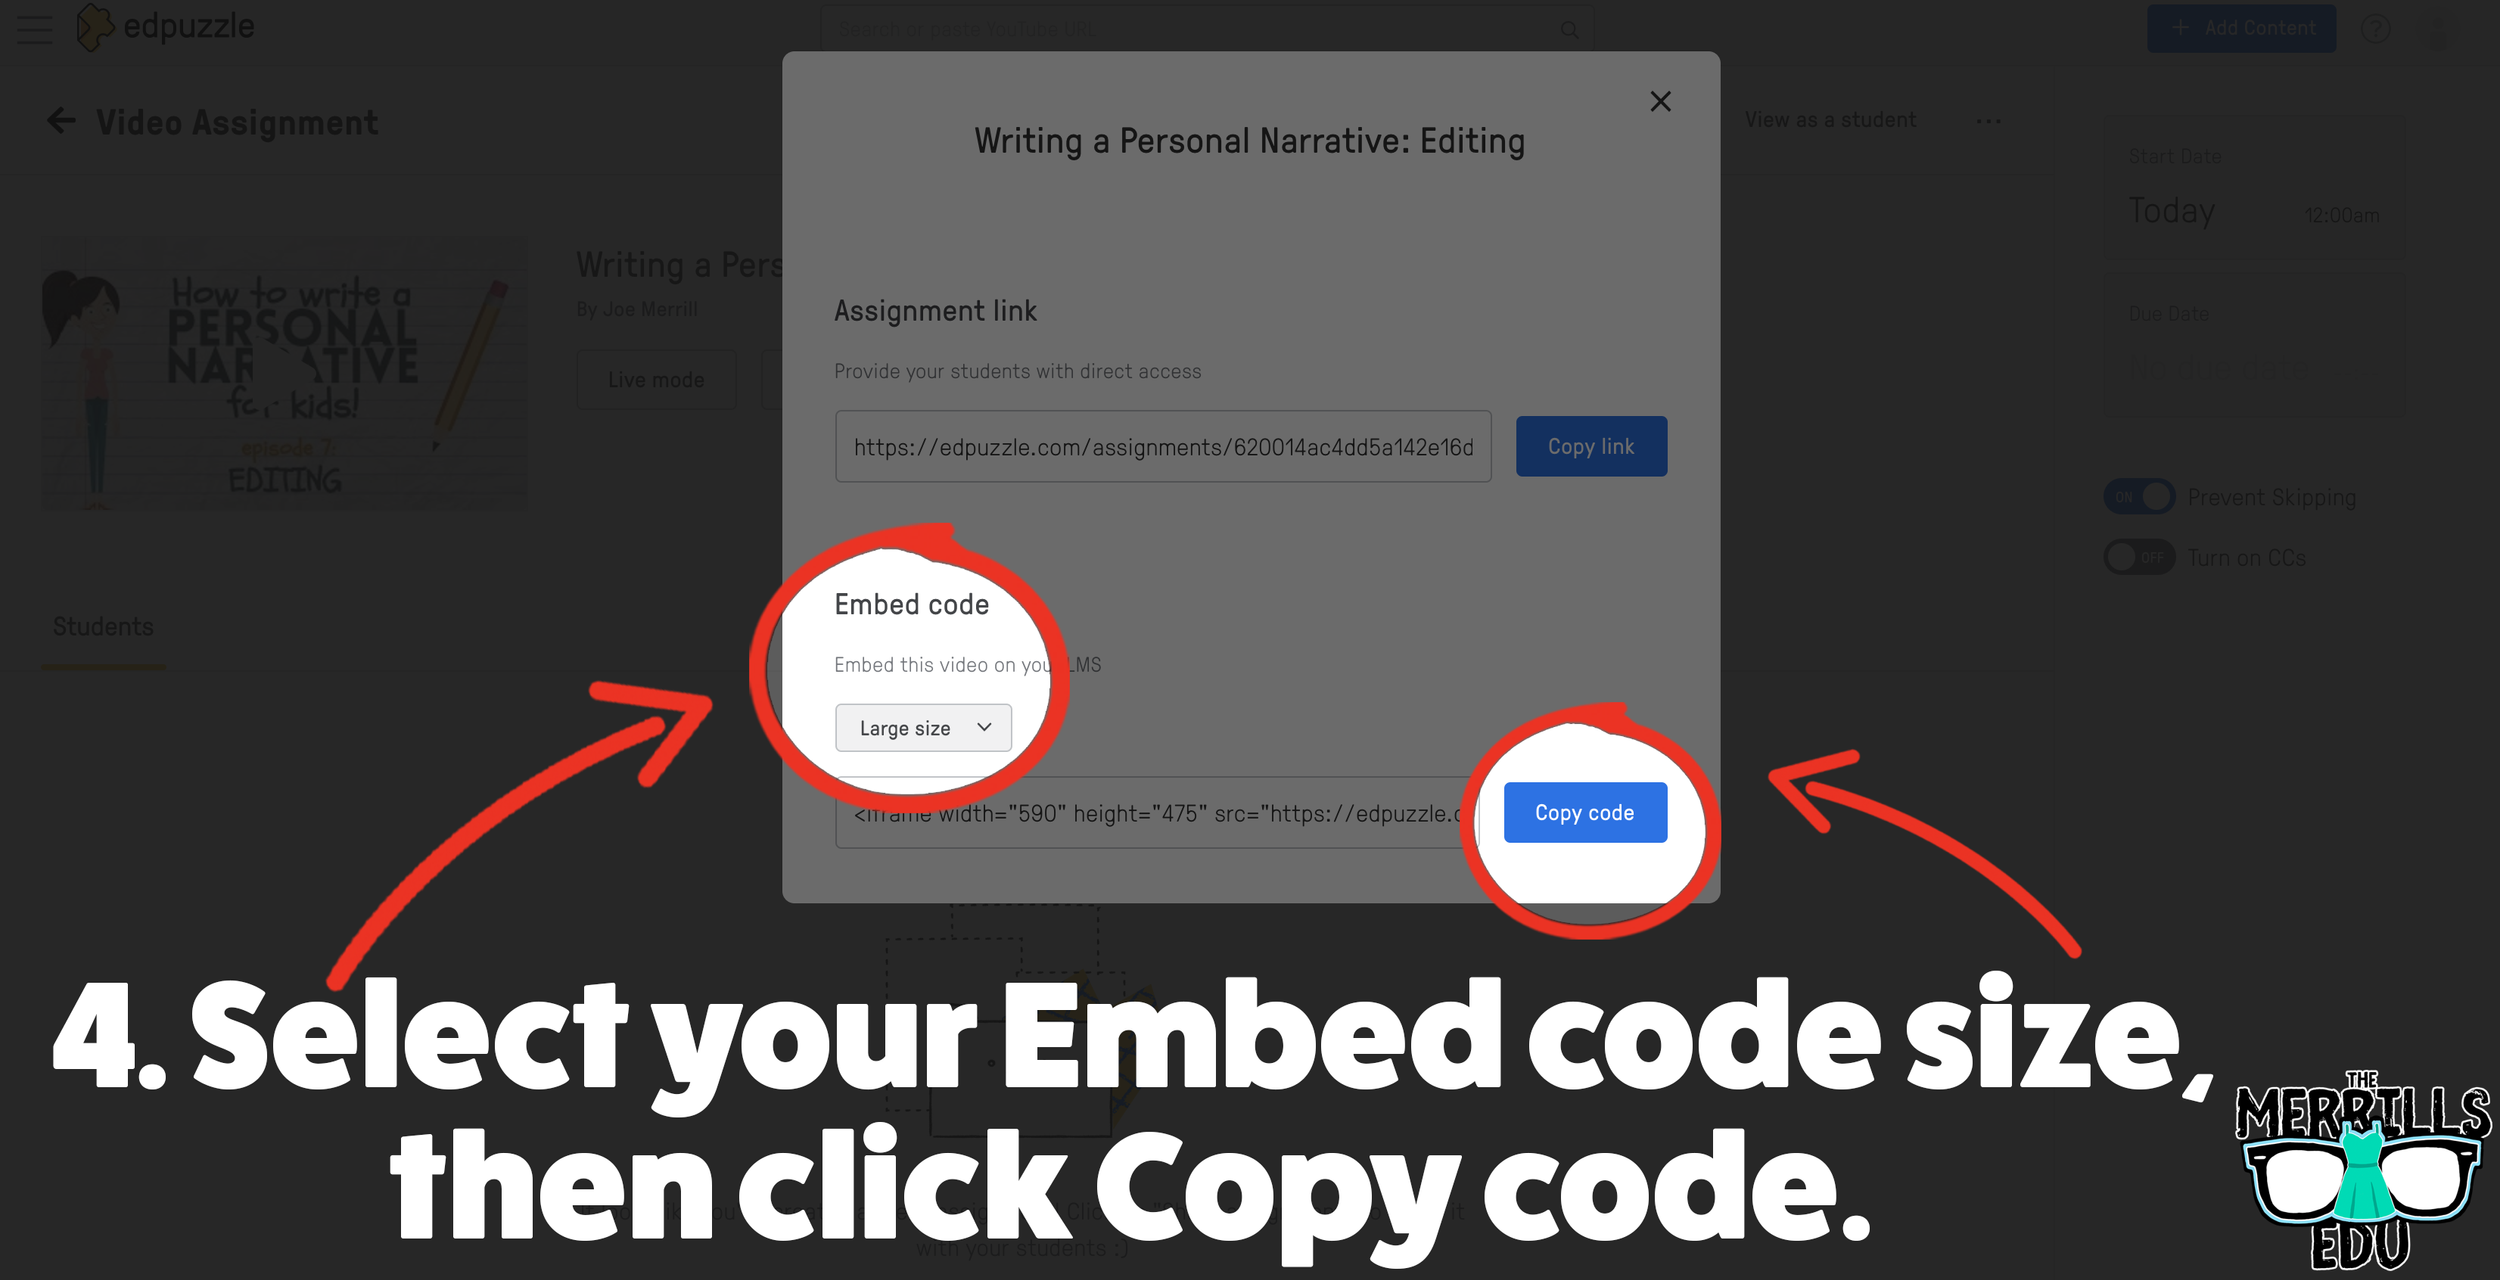
On the next screen, click “Share assignment.”
(Optional: We recommend changing the embed code size to large) Under Embed Code, click “Copy code.”
In a separate tab, open the Canvas page that you would like to add the EdPuzzle video to. Then, click on the cloud icon (if you don’t see the Cloud icon, click the three dots to expand the menu bar).
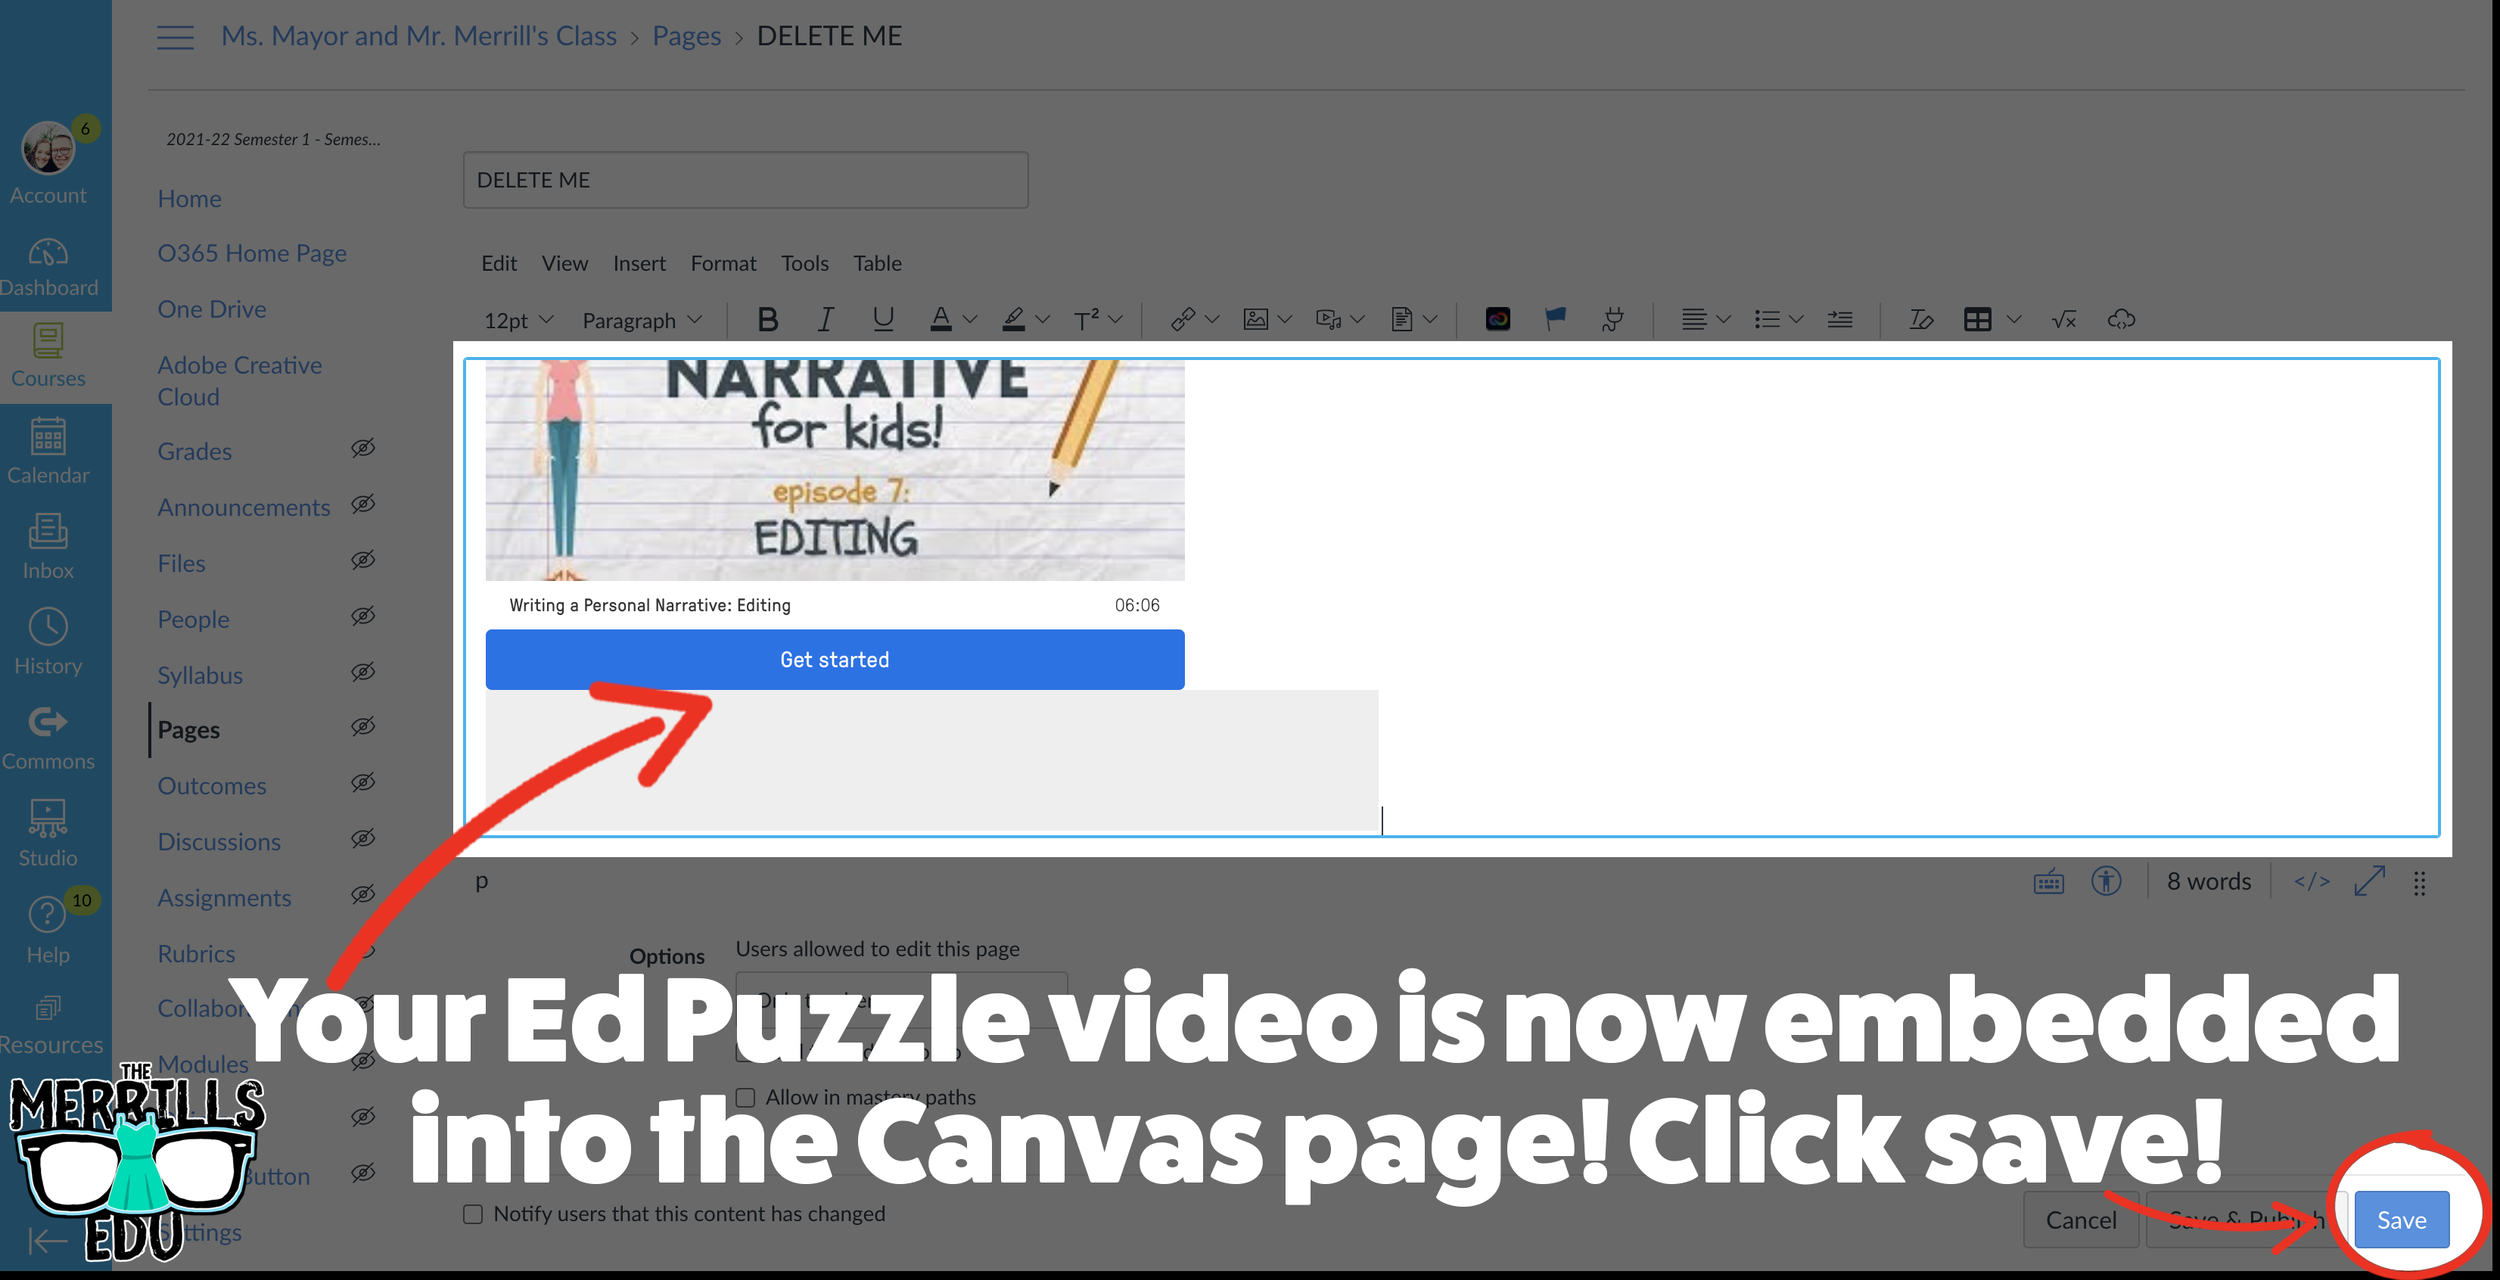
In the embed window, paste your copied code from Ed Puzzle. Then, click submit.
Your Ed Puzzle video is now embedded into the Canvas page! Click on “Save” to update the changes.

PowerPoint Embedded into Canvas
Do you have a PowerPoint deck that you’d like to give your students so that they can follow along? Embedding it into your LMS is the perfect way to deliver that content while keeping everything organized. Here’s how to embed PowerPoint decks into Canvas:

(Note: You will need to use PowerPoint Online (a Microsoft 365 account) to use this embed. You may also need to adjust your share settings for this to work correctly)
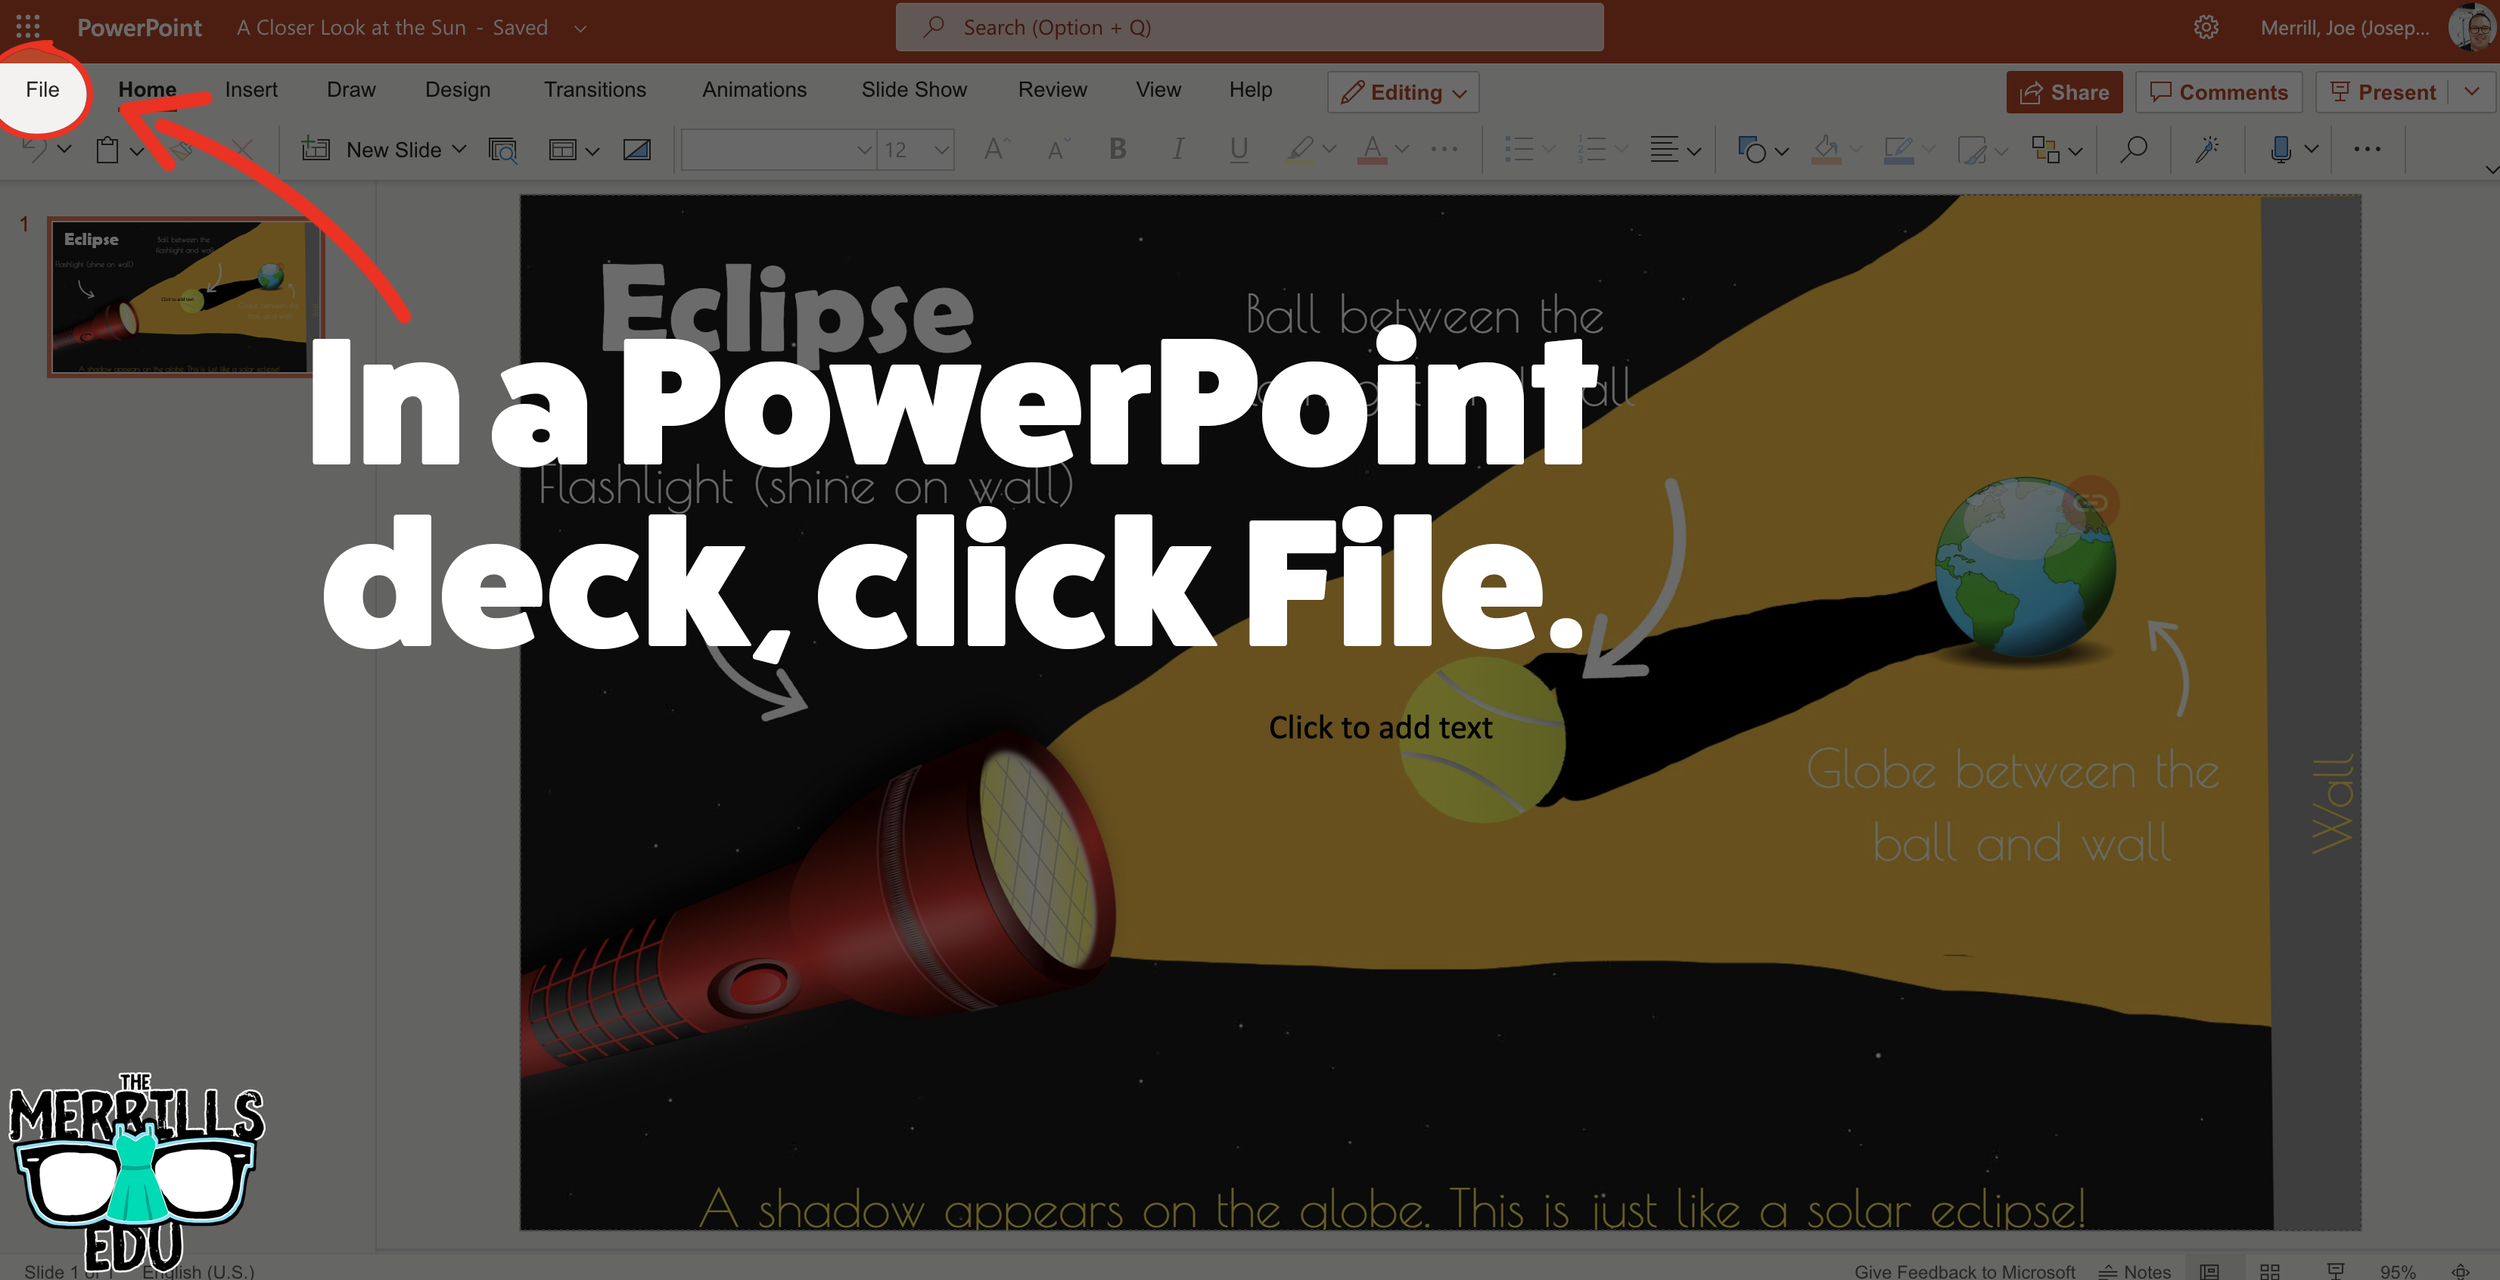
In your PowerPoint online deck, click File.
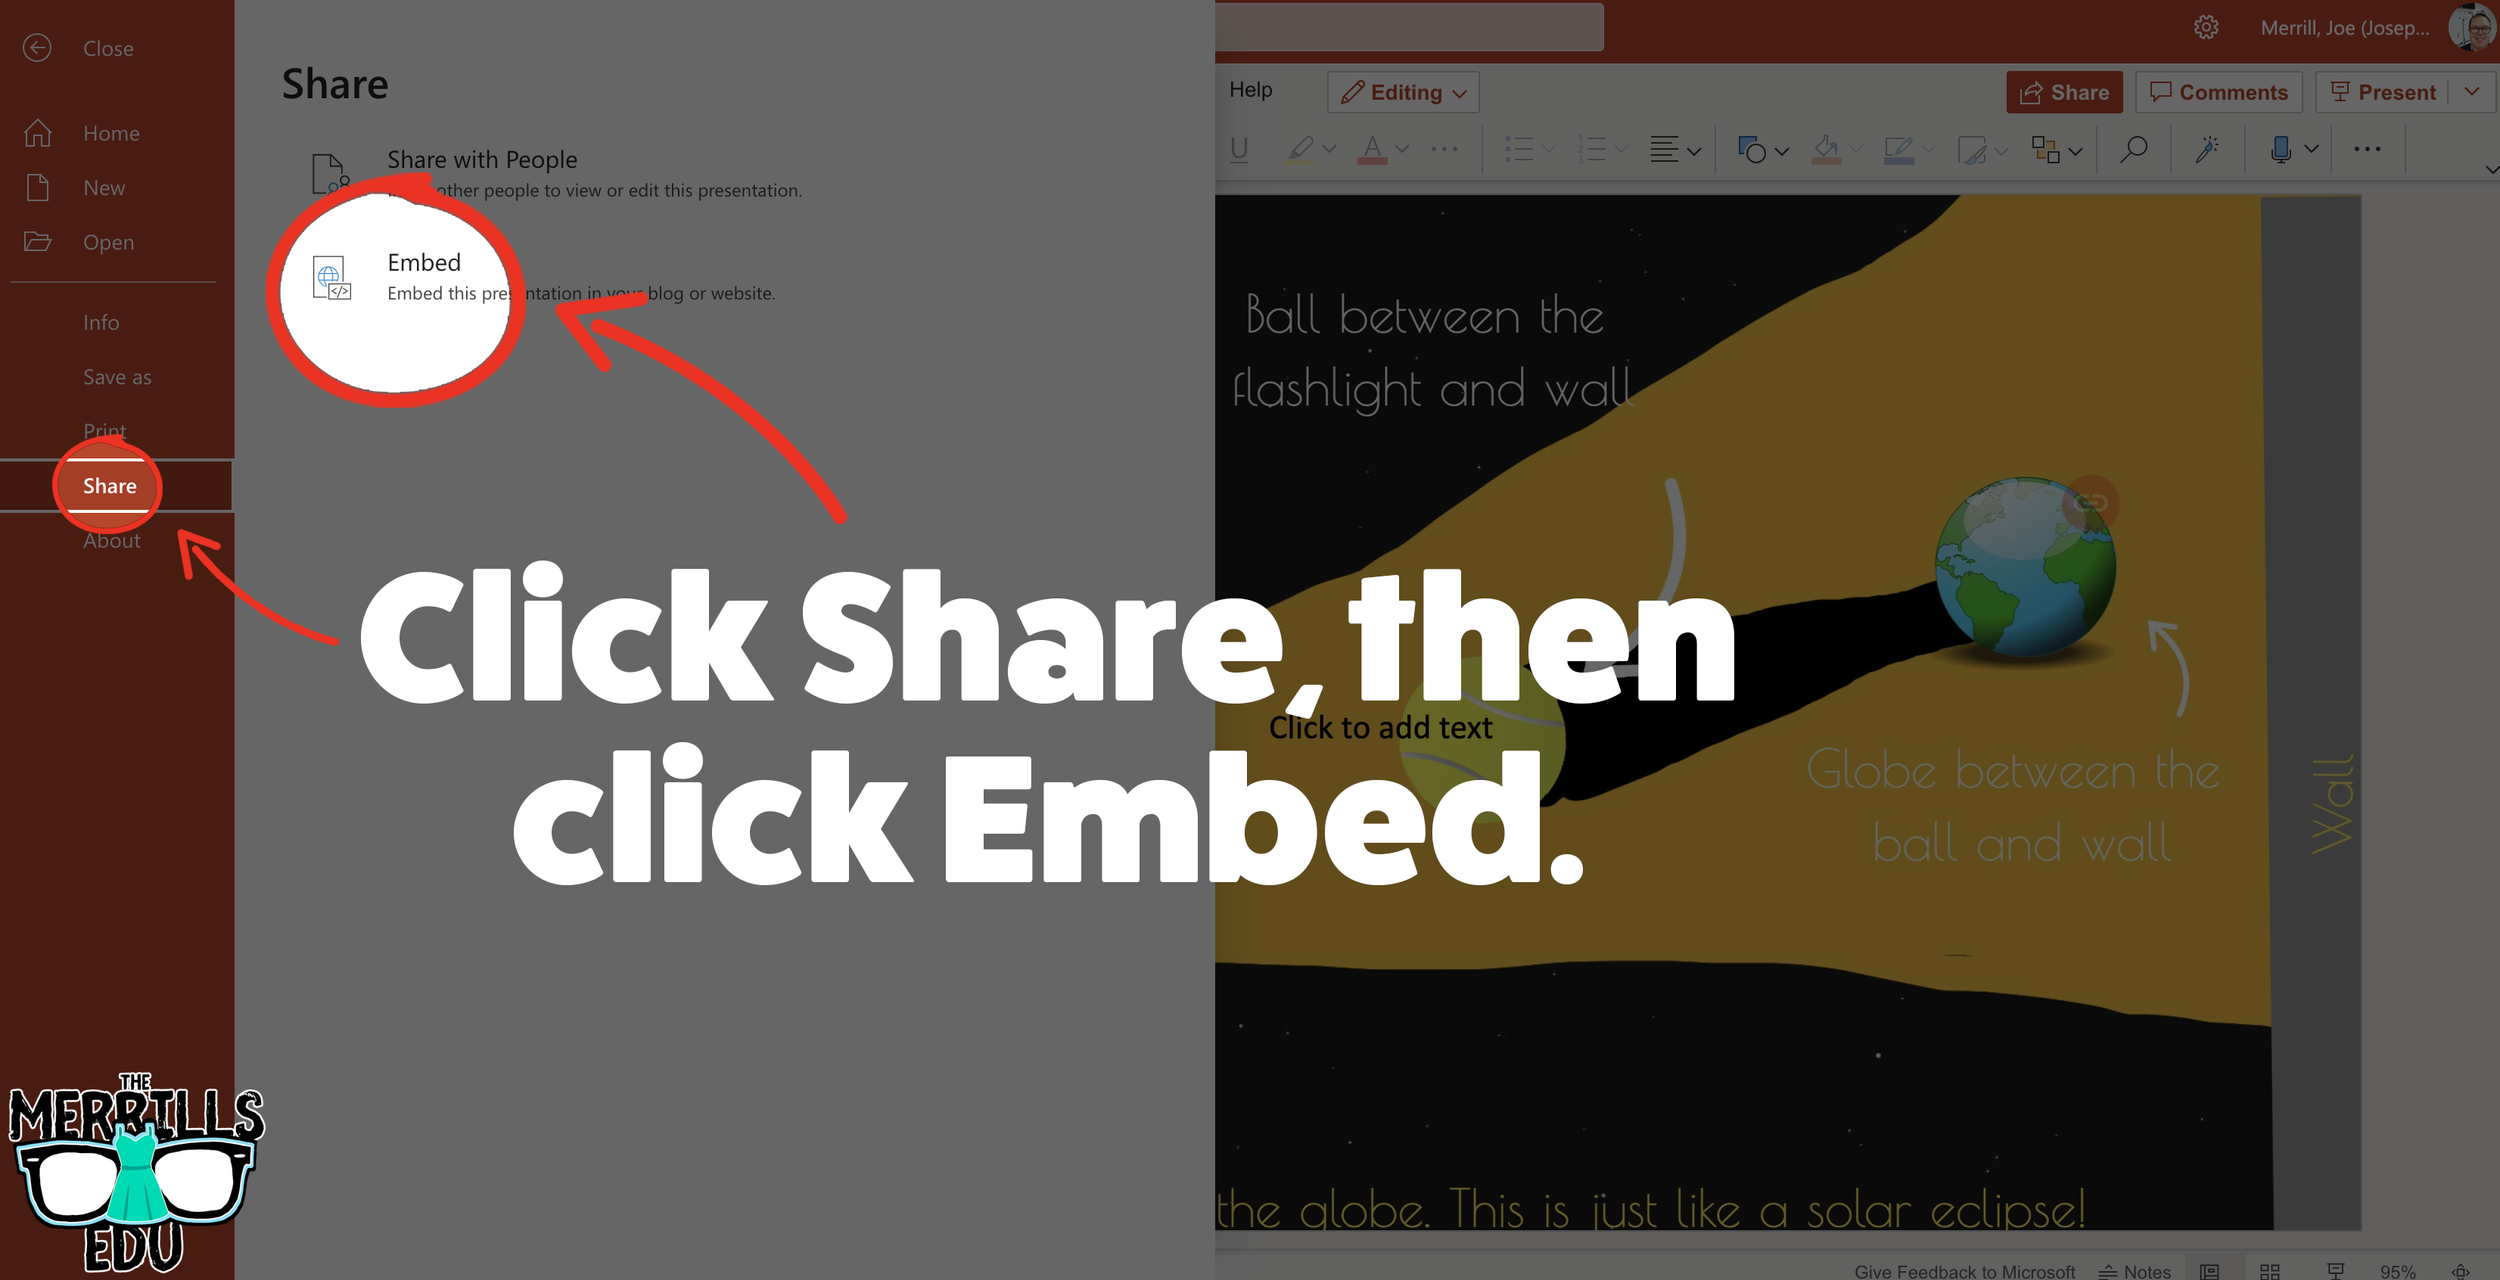
Next, click “Share” then click “Embed.”
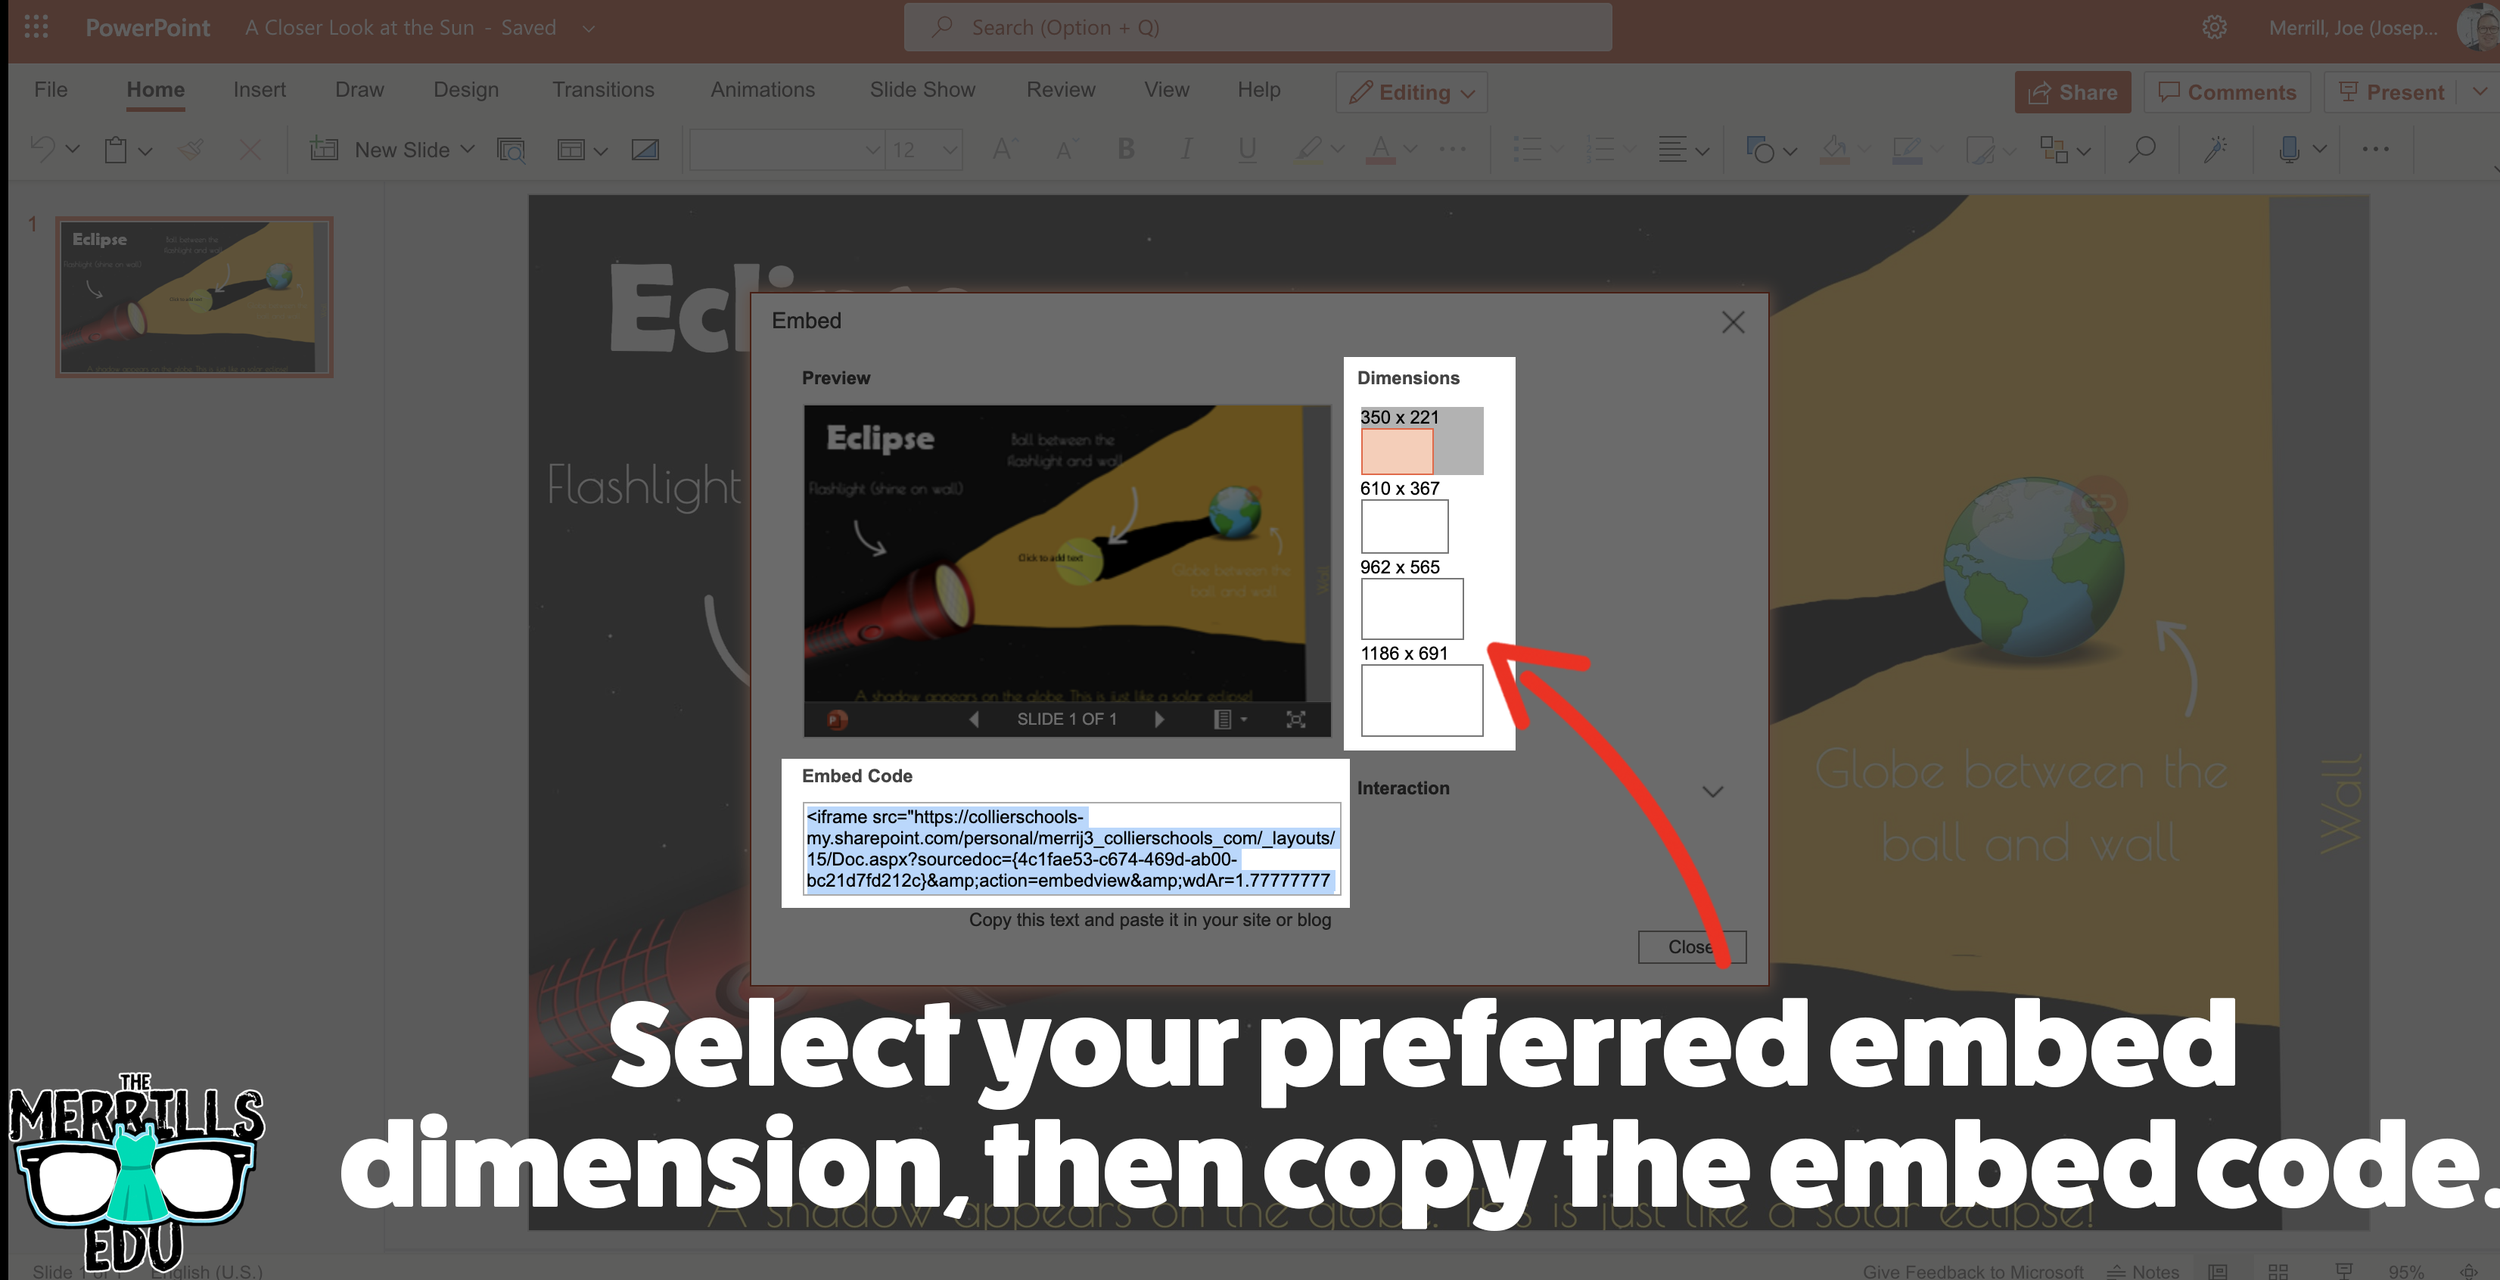
On the next screen, select your preferred embed size. Then, copy the Embed code.
In a separate tab, open the Canvas page that you would like to add the PowerPoint deck to. Then, click on the cloud icon (if you don’t see the Cloud icon, click the three dots to expand the menu bar).
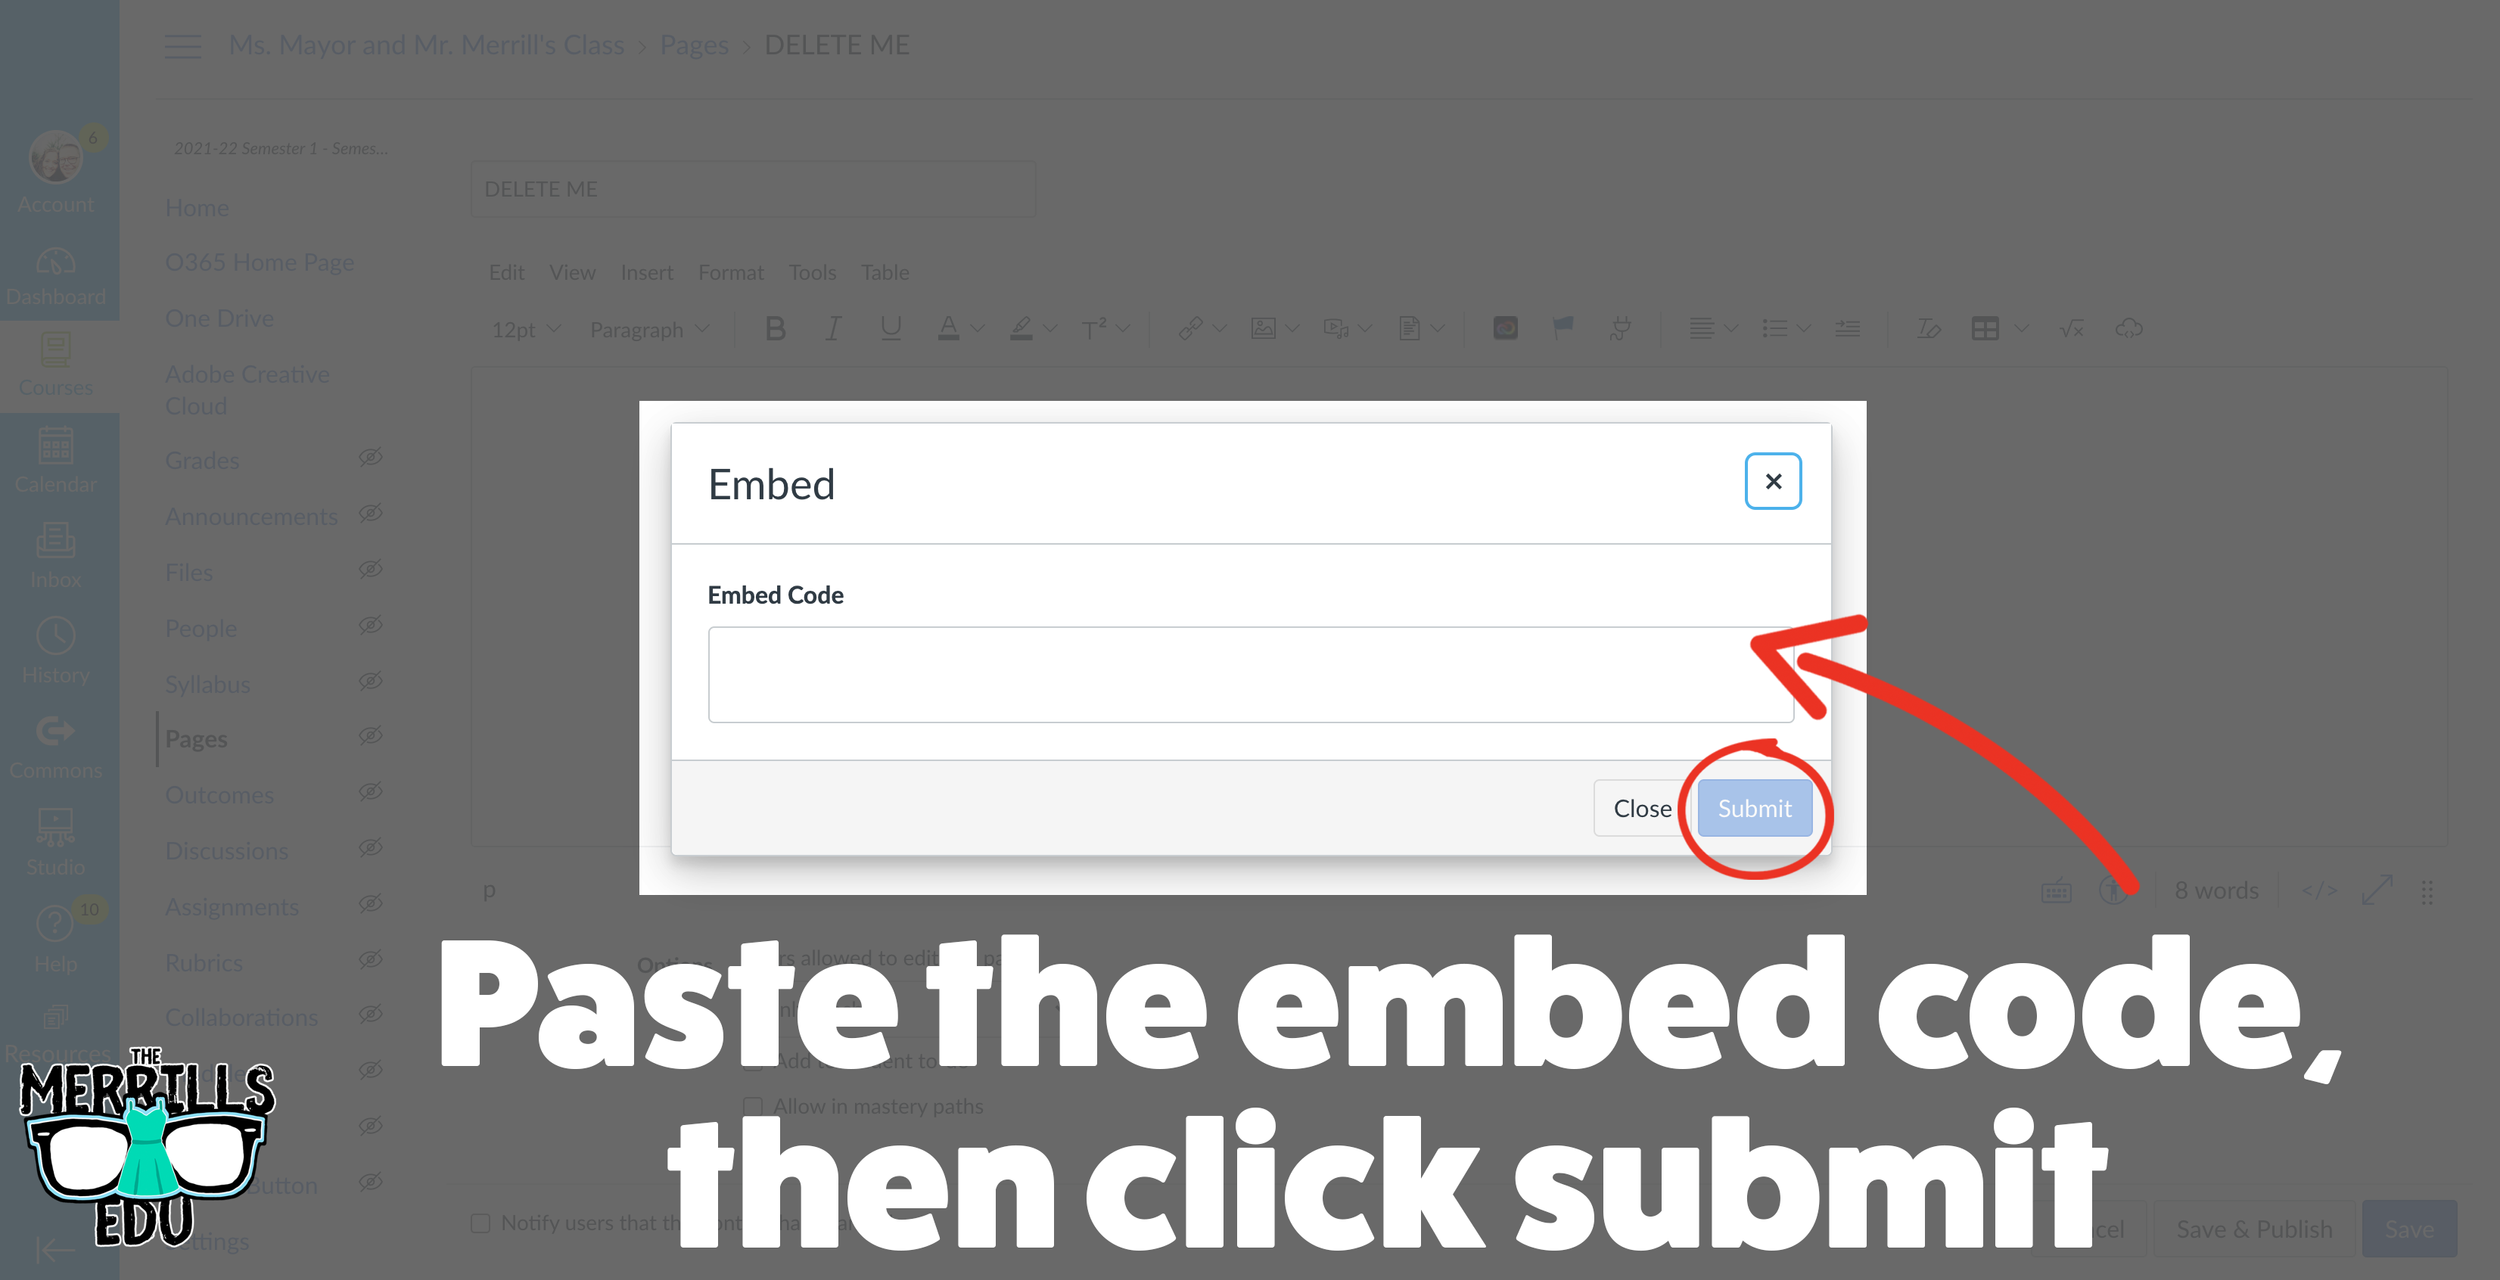
In the embed window, paste your copied code from PowerPoint Online. Then, click submit.
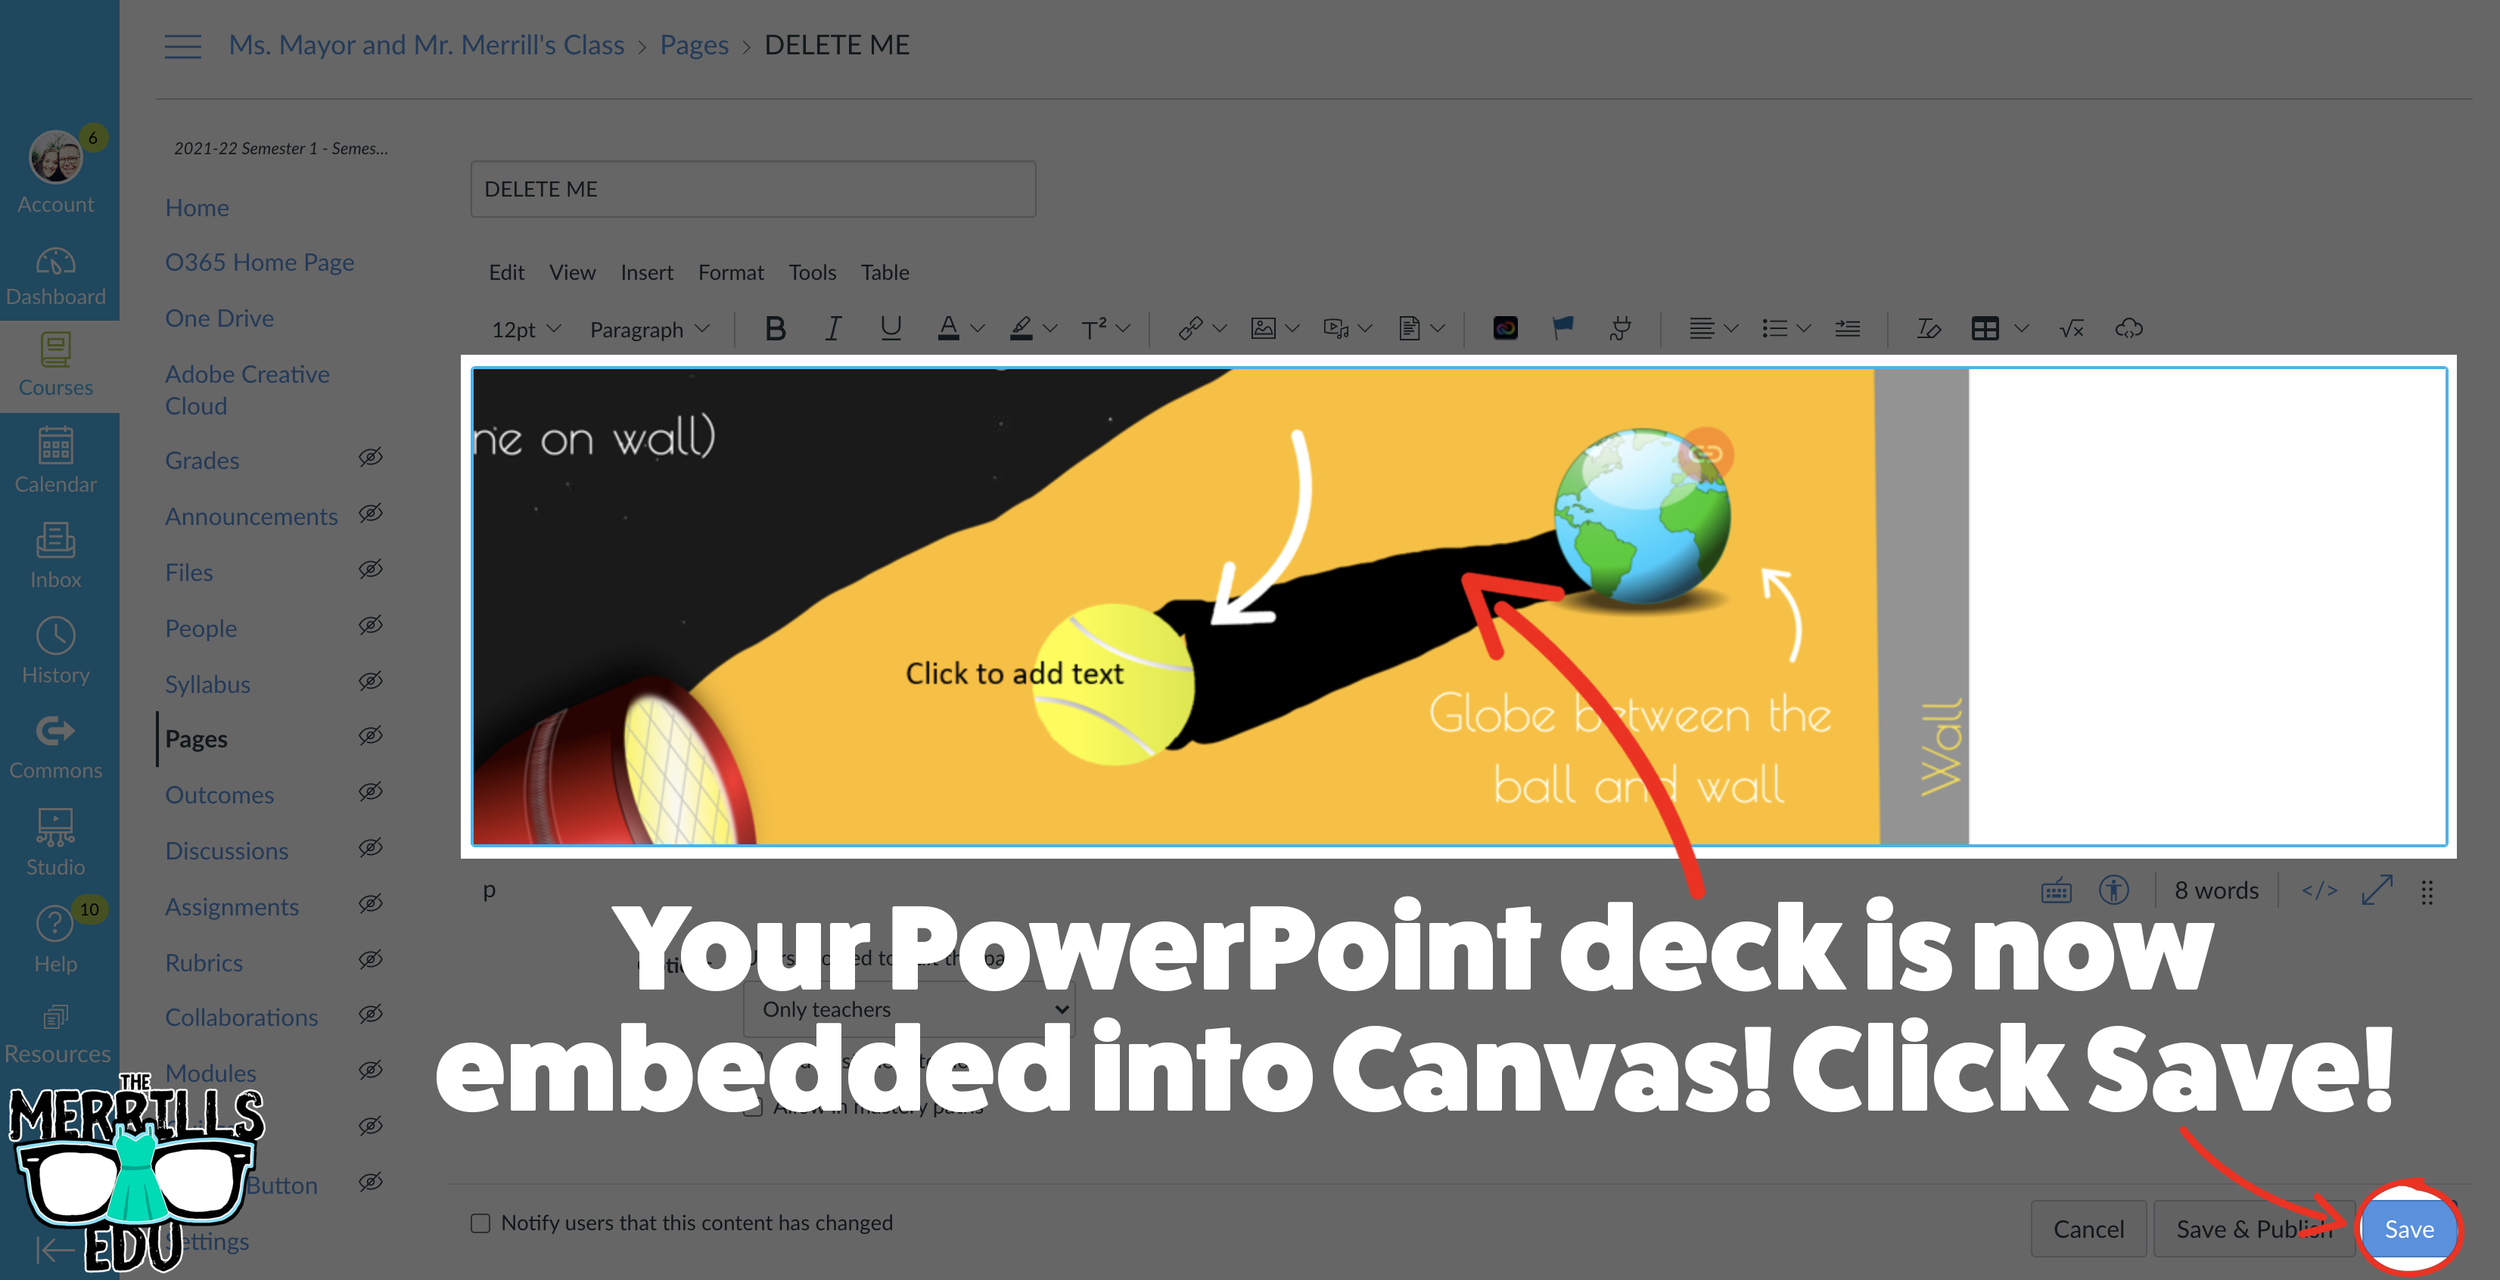
Your PowerPoint deck is now embedded into the Canvas page! Click on “Save” to update the changes.

Google Slides Embedded into Canvas
Google Slides users can get in on the embedding fun, too! In just several clicks, you can take your Google Slides deck and embed them into Canvas. Here’s how:
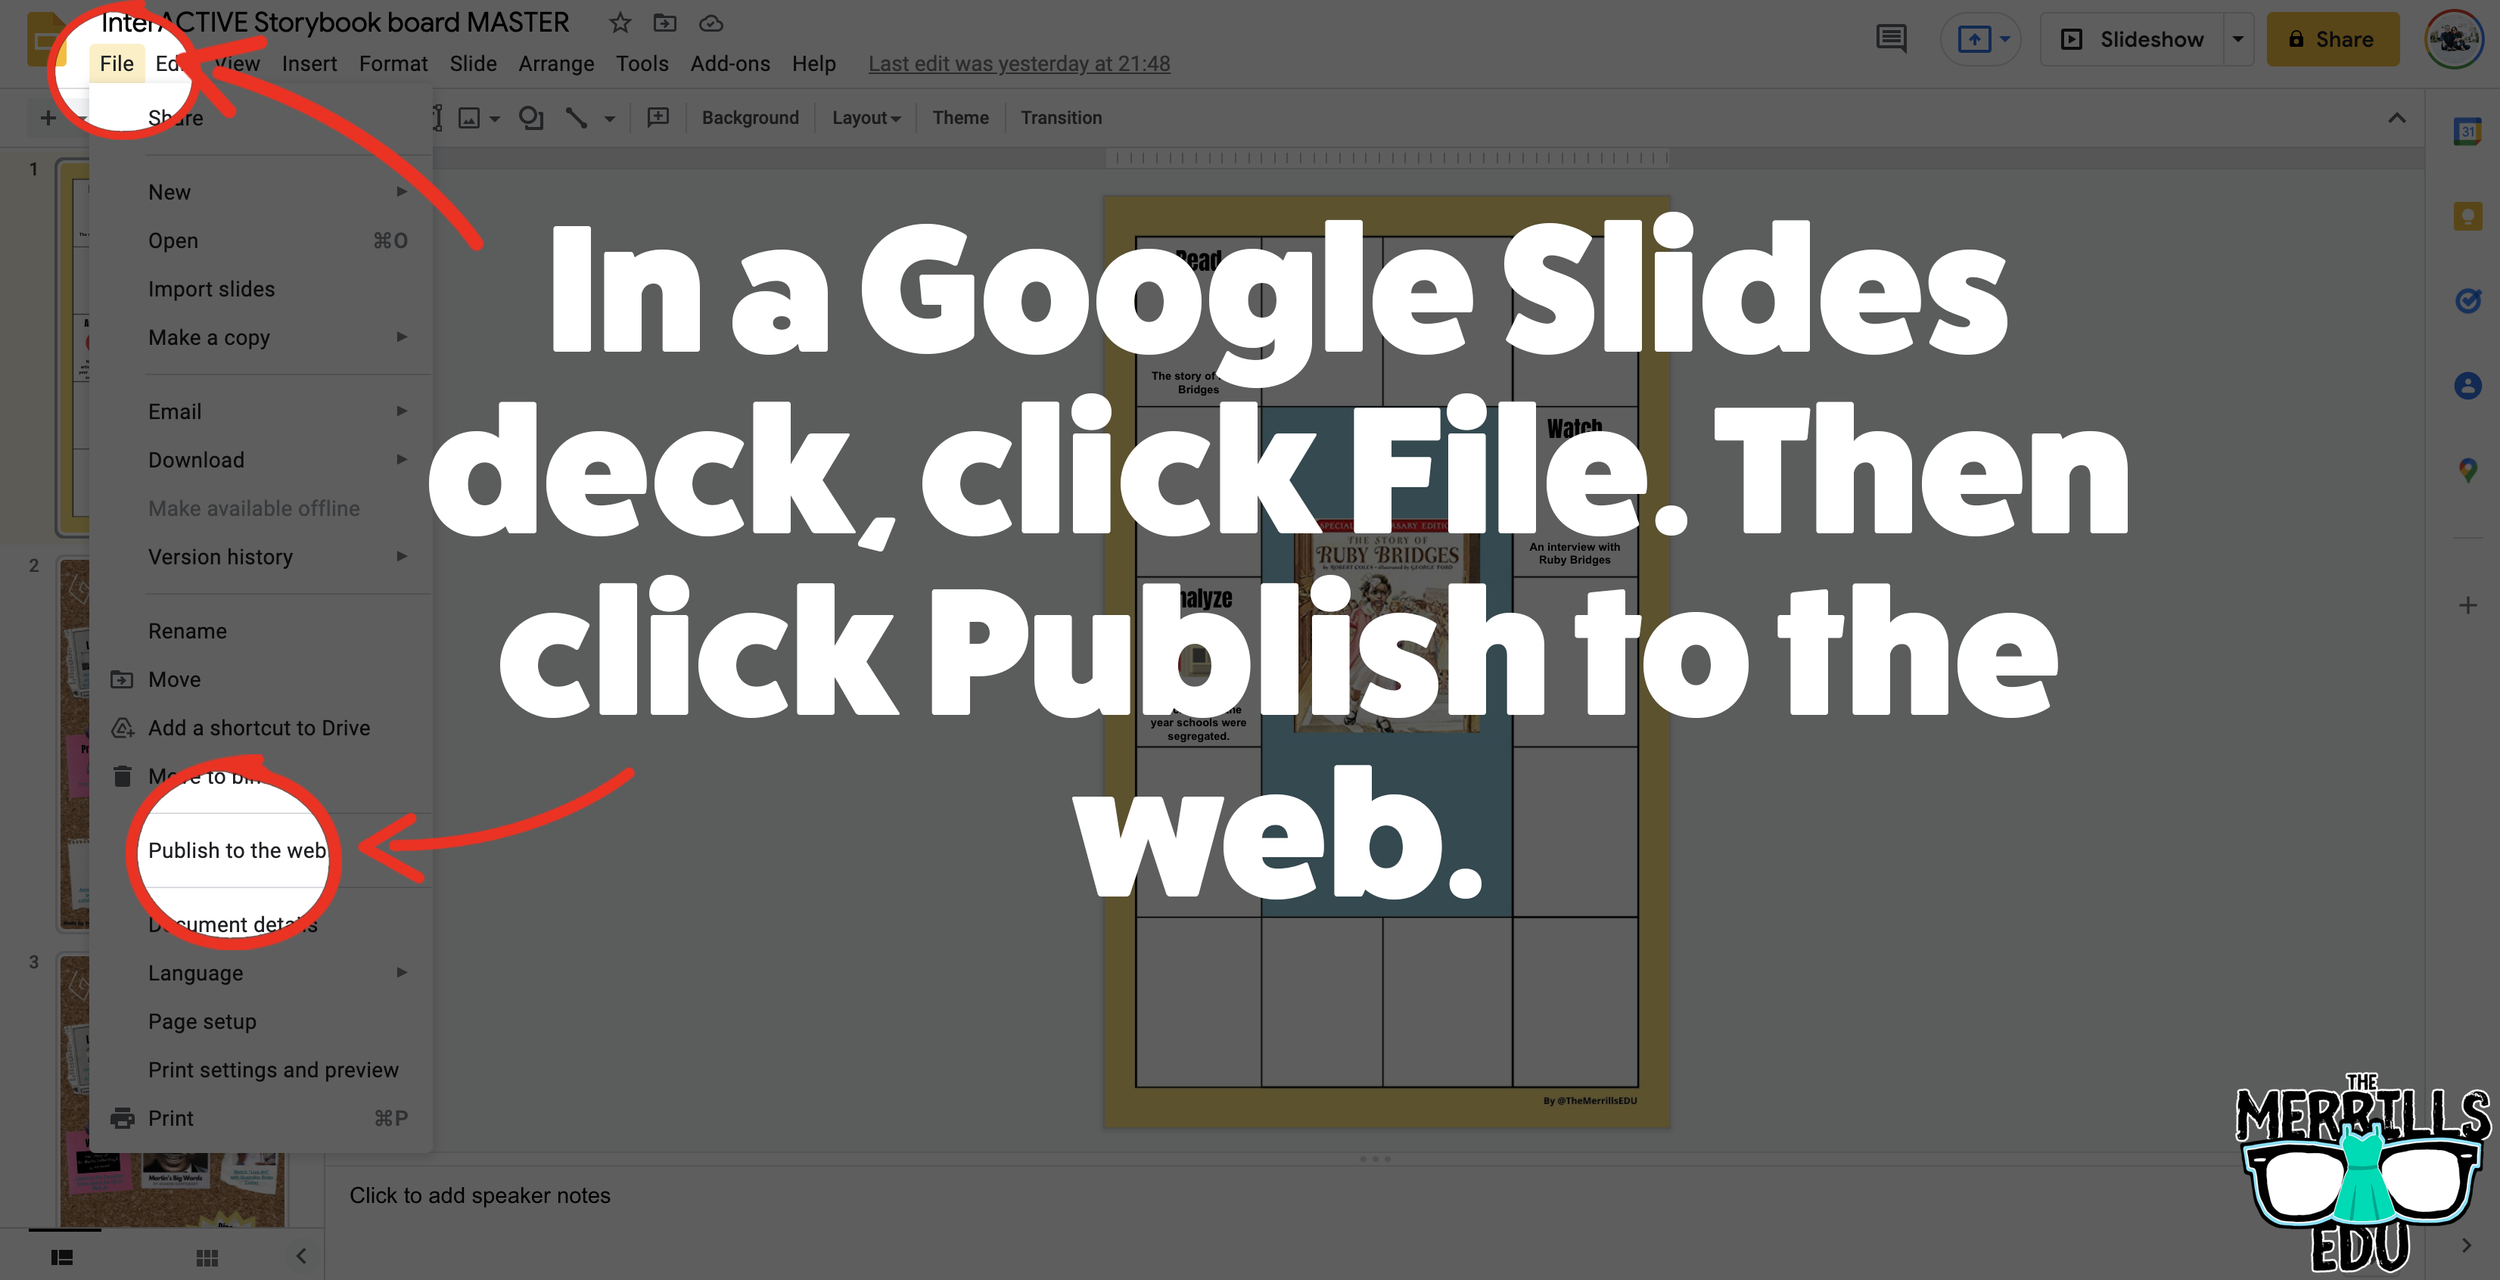
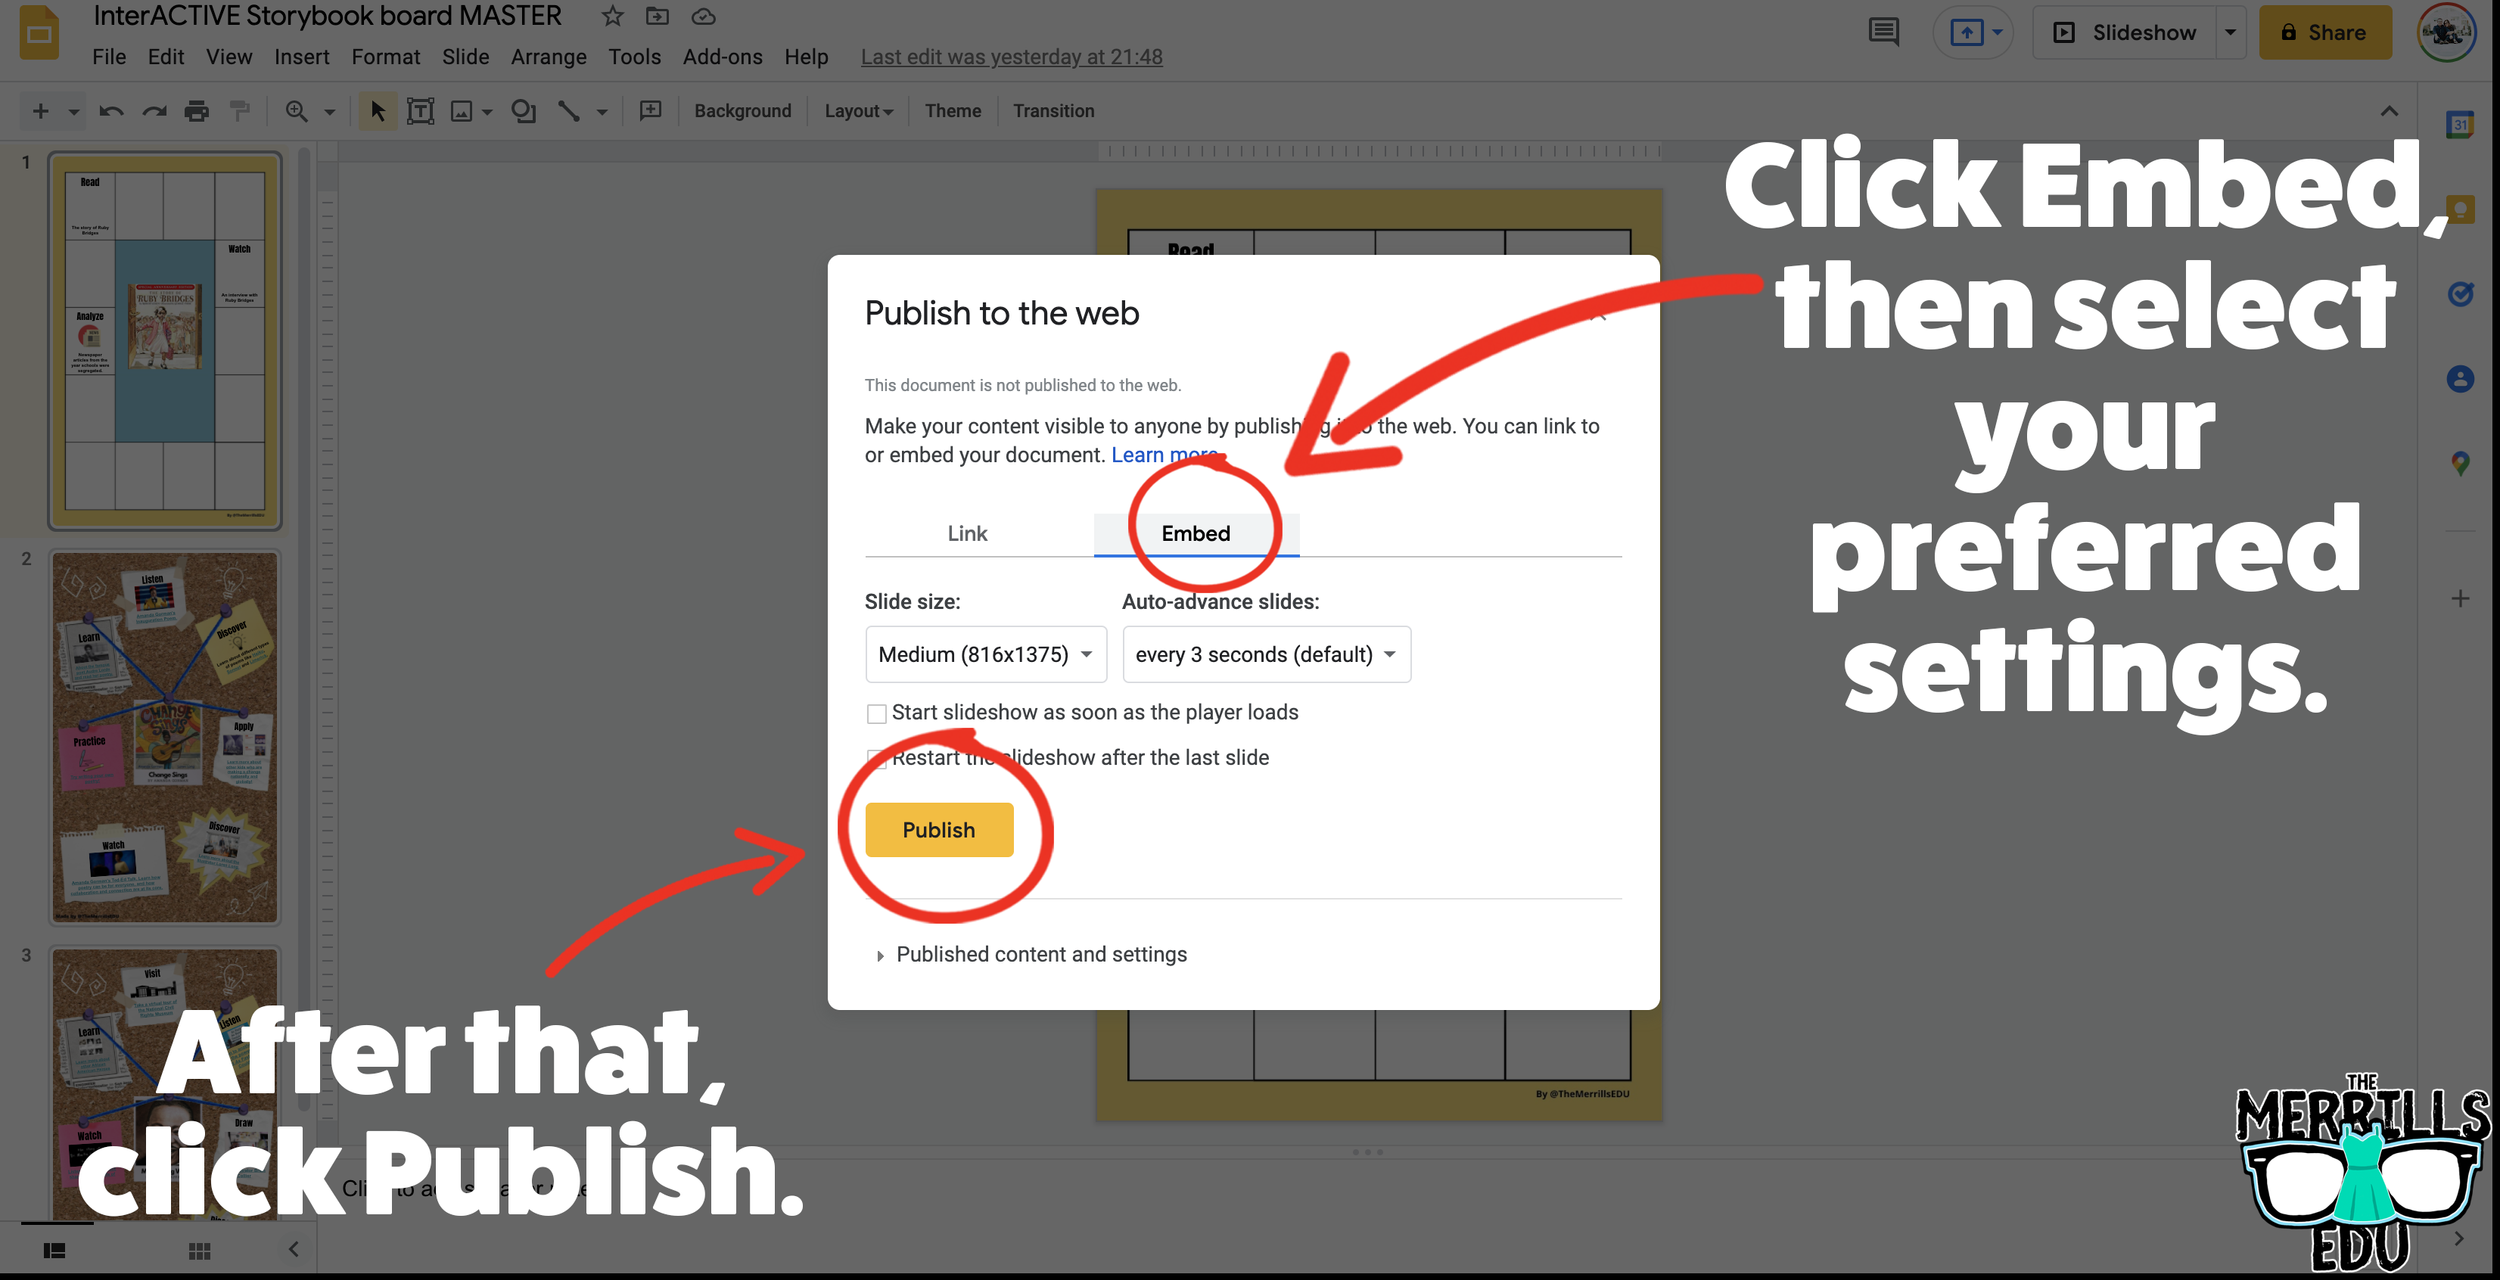


In your Google Slide deck, click “File,” then click “Publish to the web.’
Click on Embed, then select your preferred settings. Once you have everything set, click “Publish.” (If you’re asked if you are sure you want to publish, say “yes or ok.”)
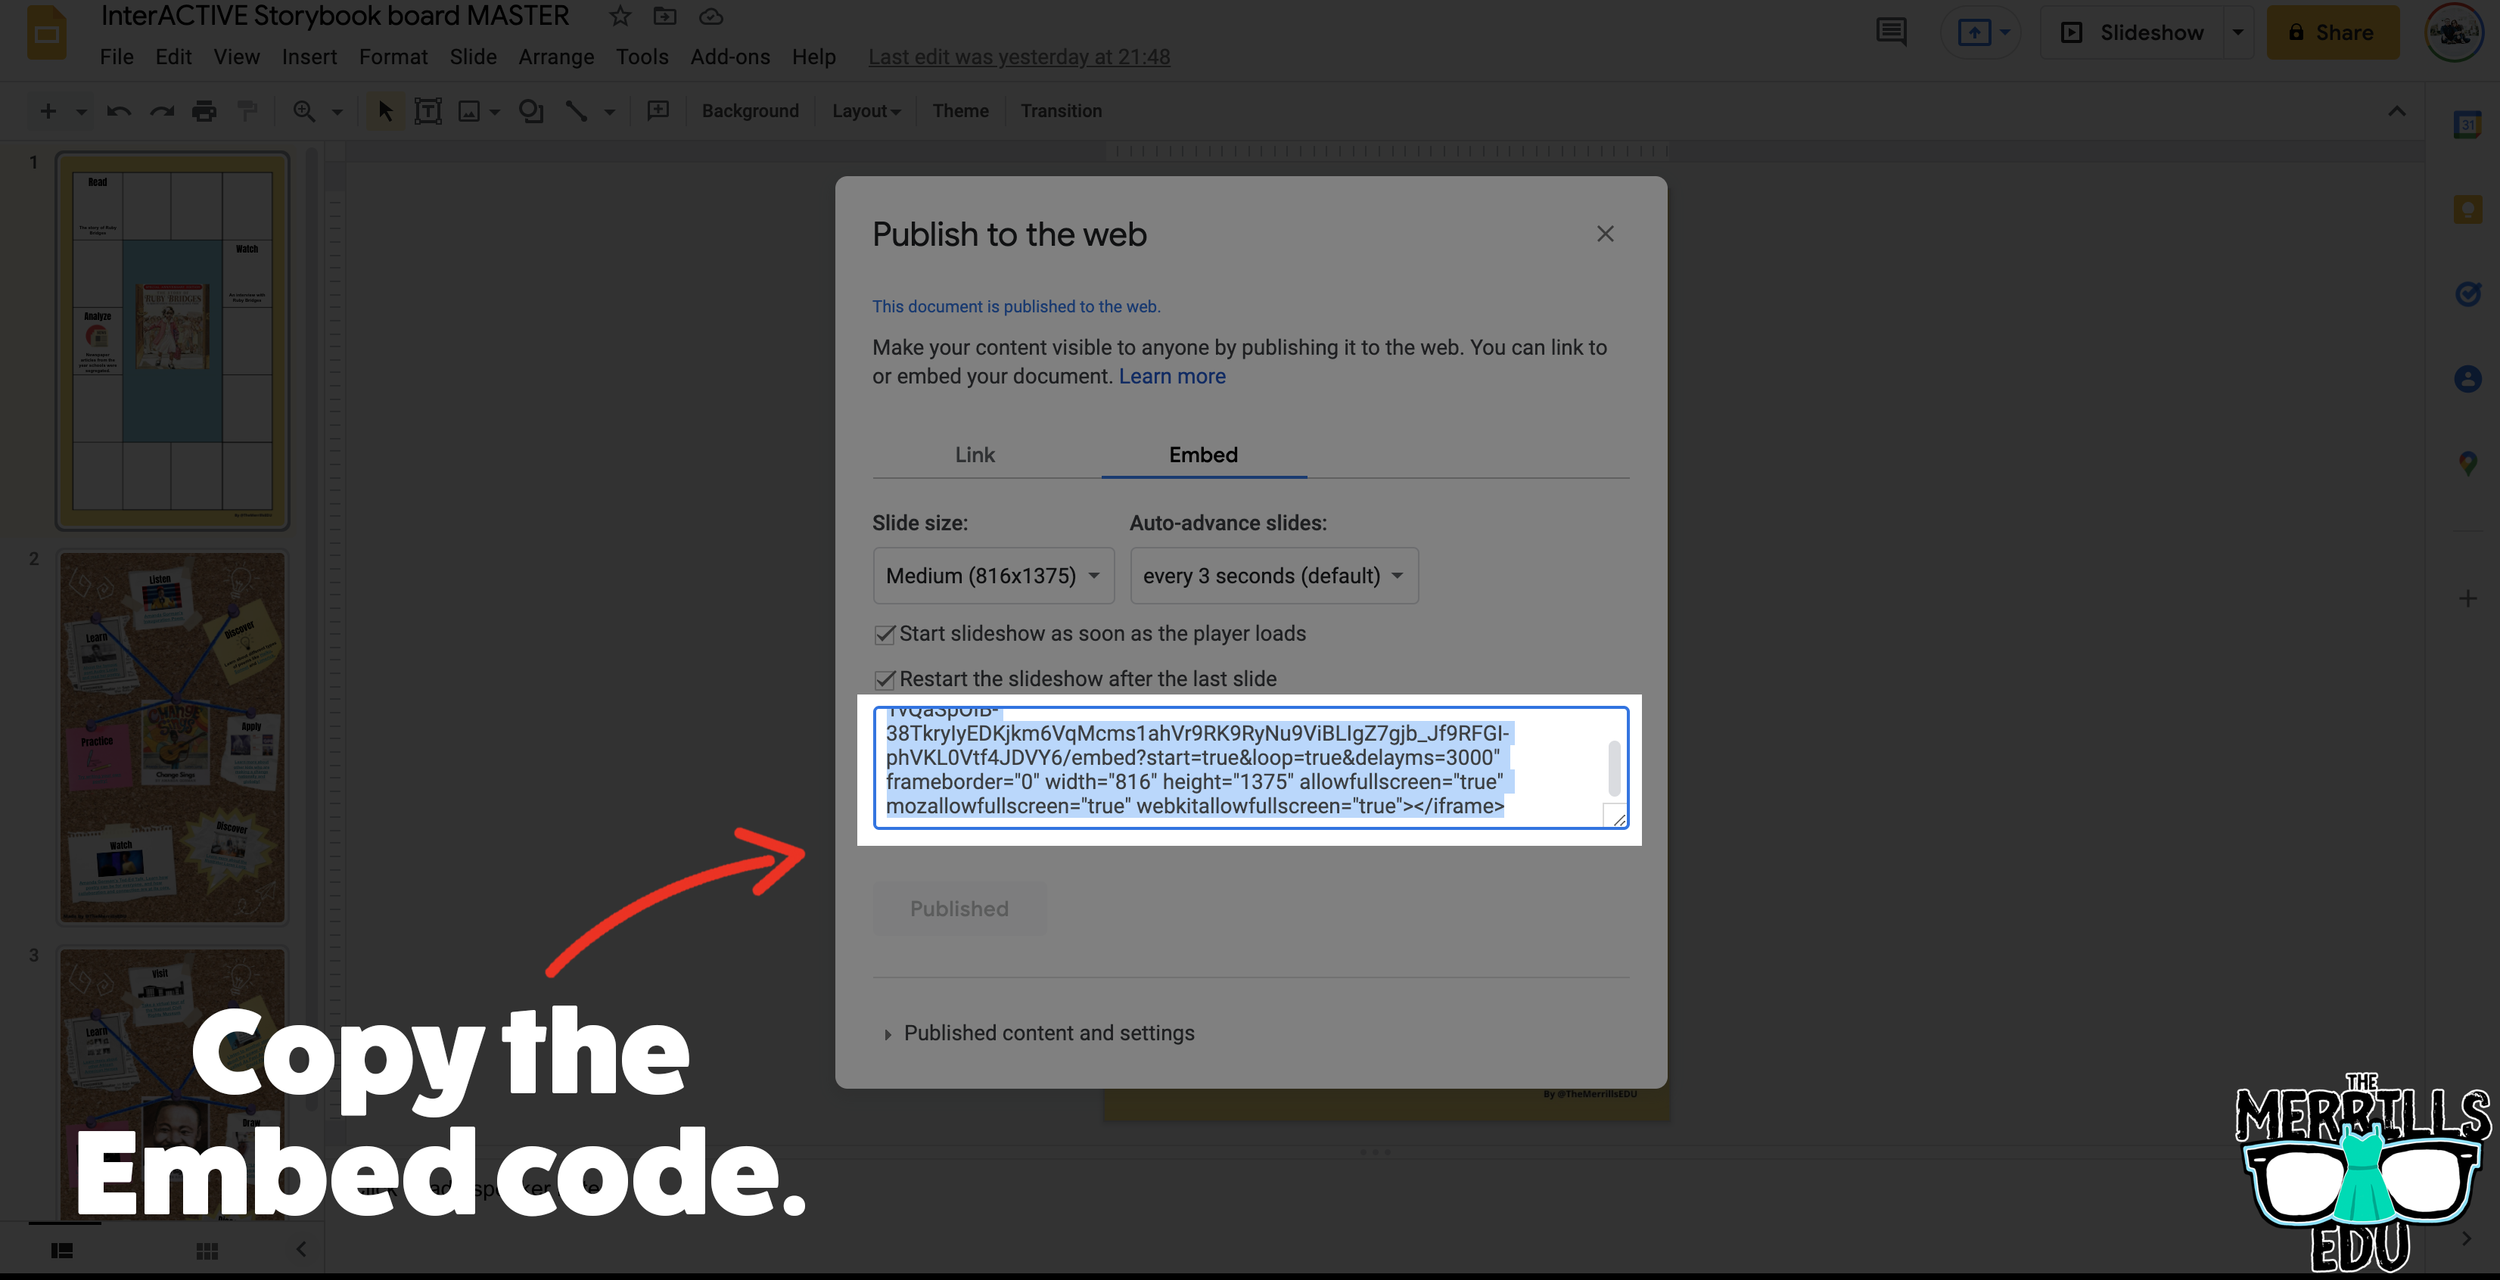
On the next screen, copy your embed code.
In a separate tab, open the Canvas page that you would like to add the Google Slides deck to. Then, click on the cloud icon (if you don’t see the Cloud icon, click the three dots to expand the menu bar).
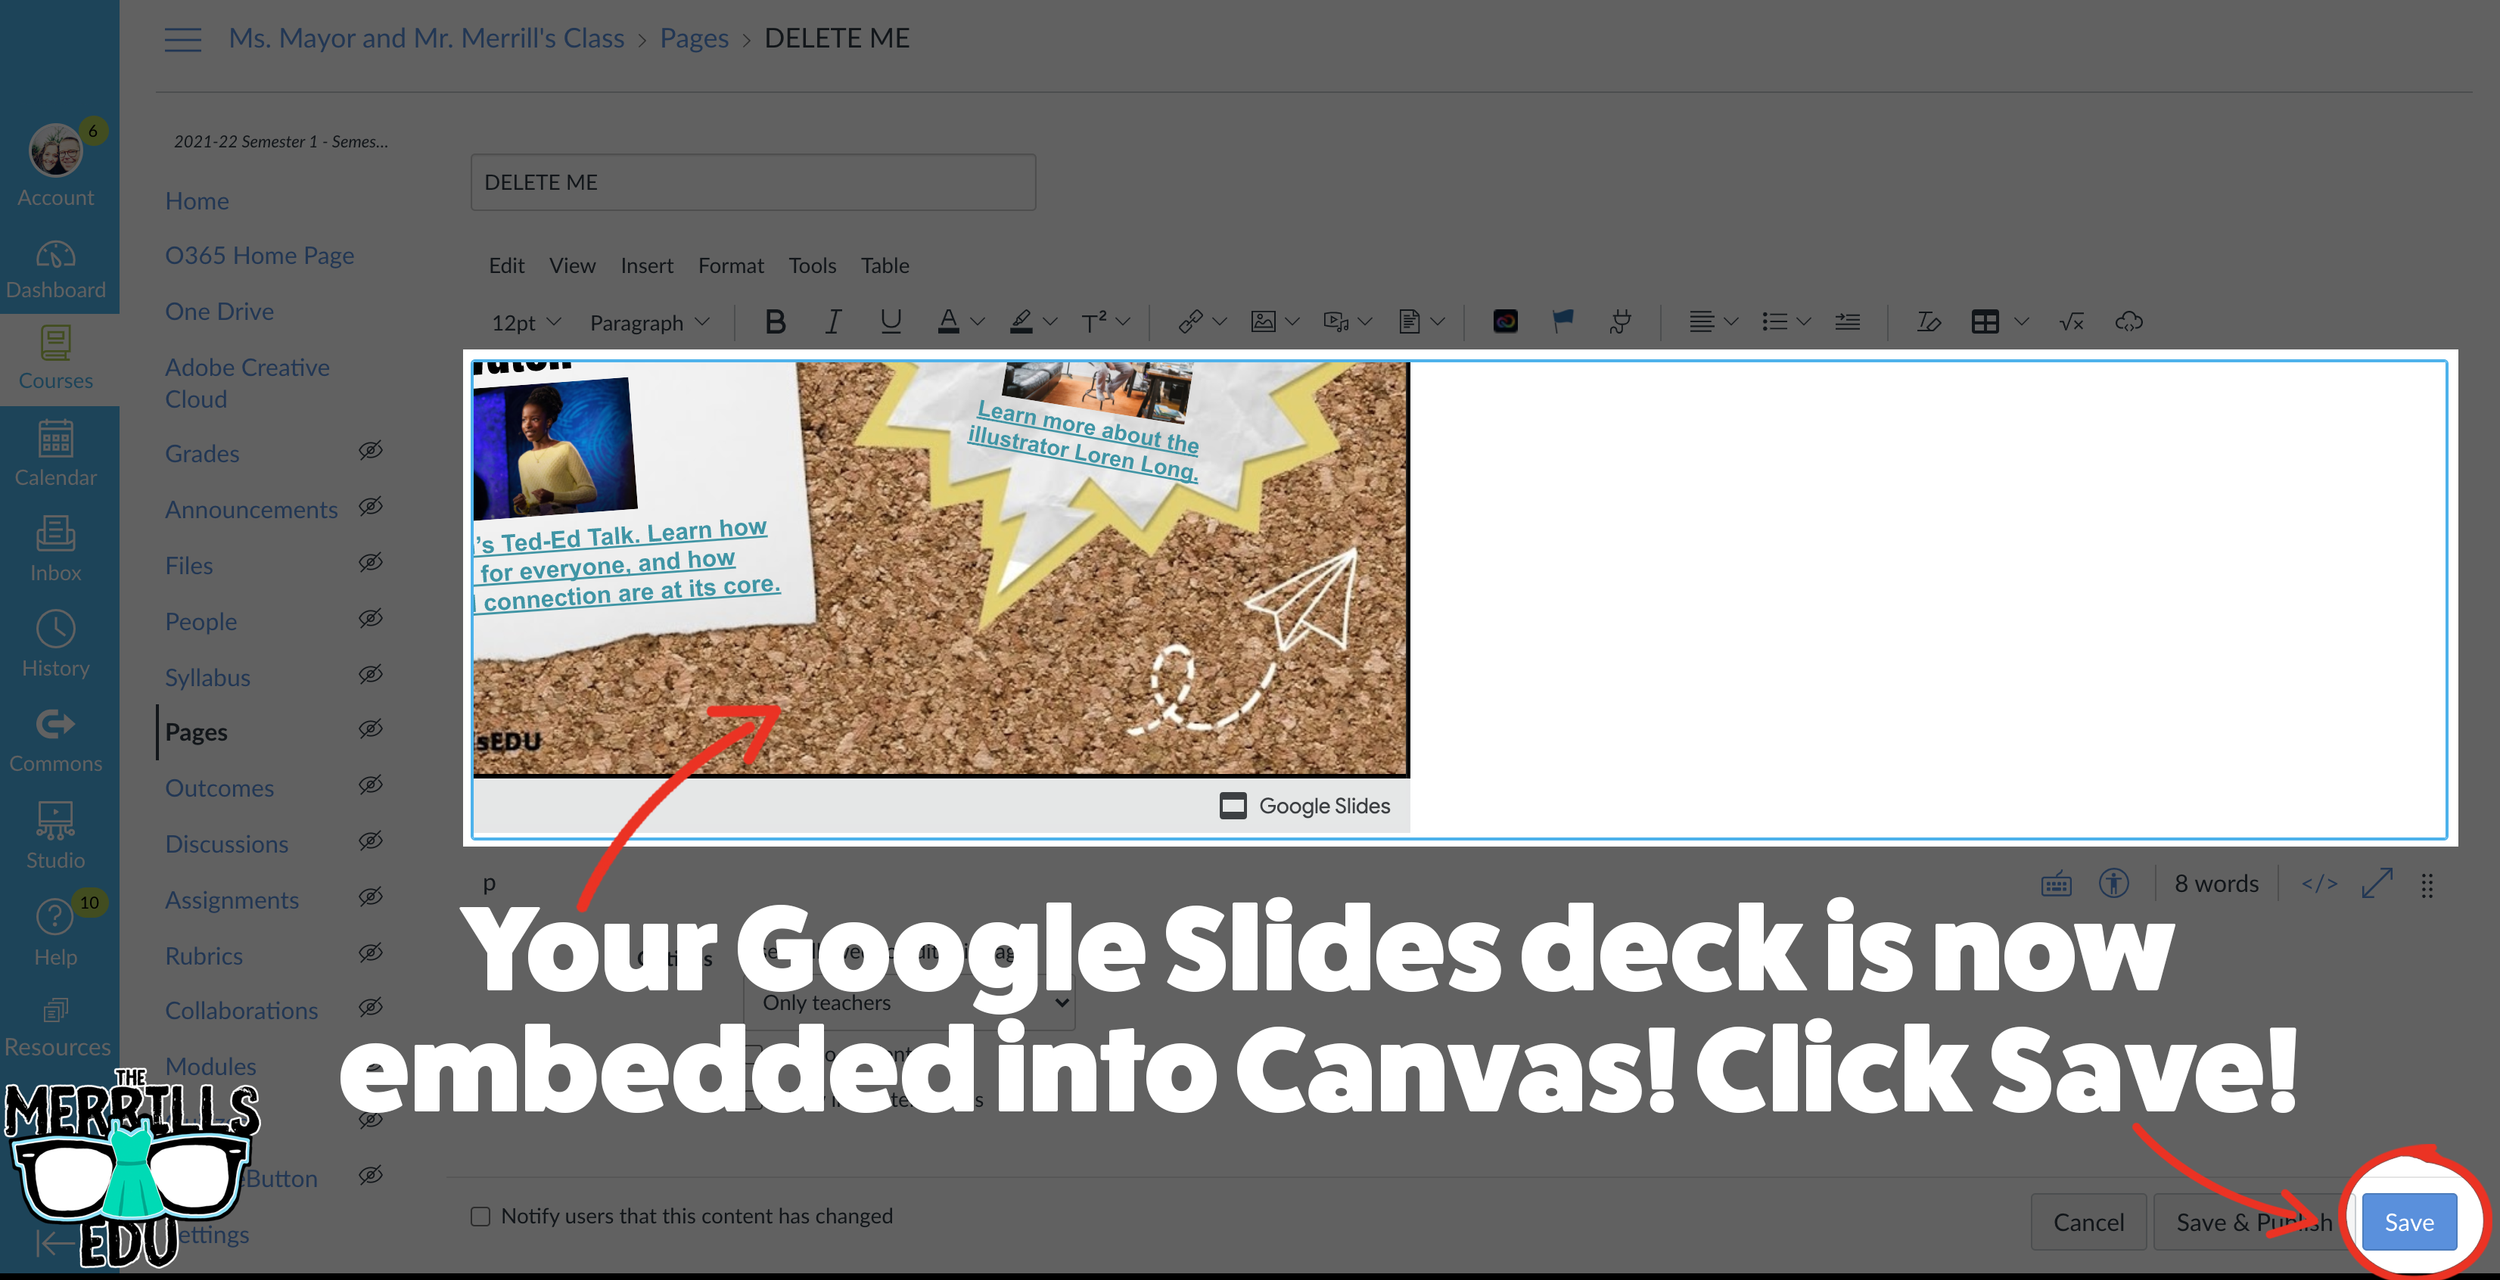
In the embed window, paste your copied code from Google Slides. Then, click submit.
Your Google Slides deck is now embedded into the Canvas page! Click on “Save” to update the changes.

Wakelet Embedded into OneNote
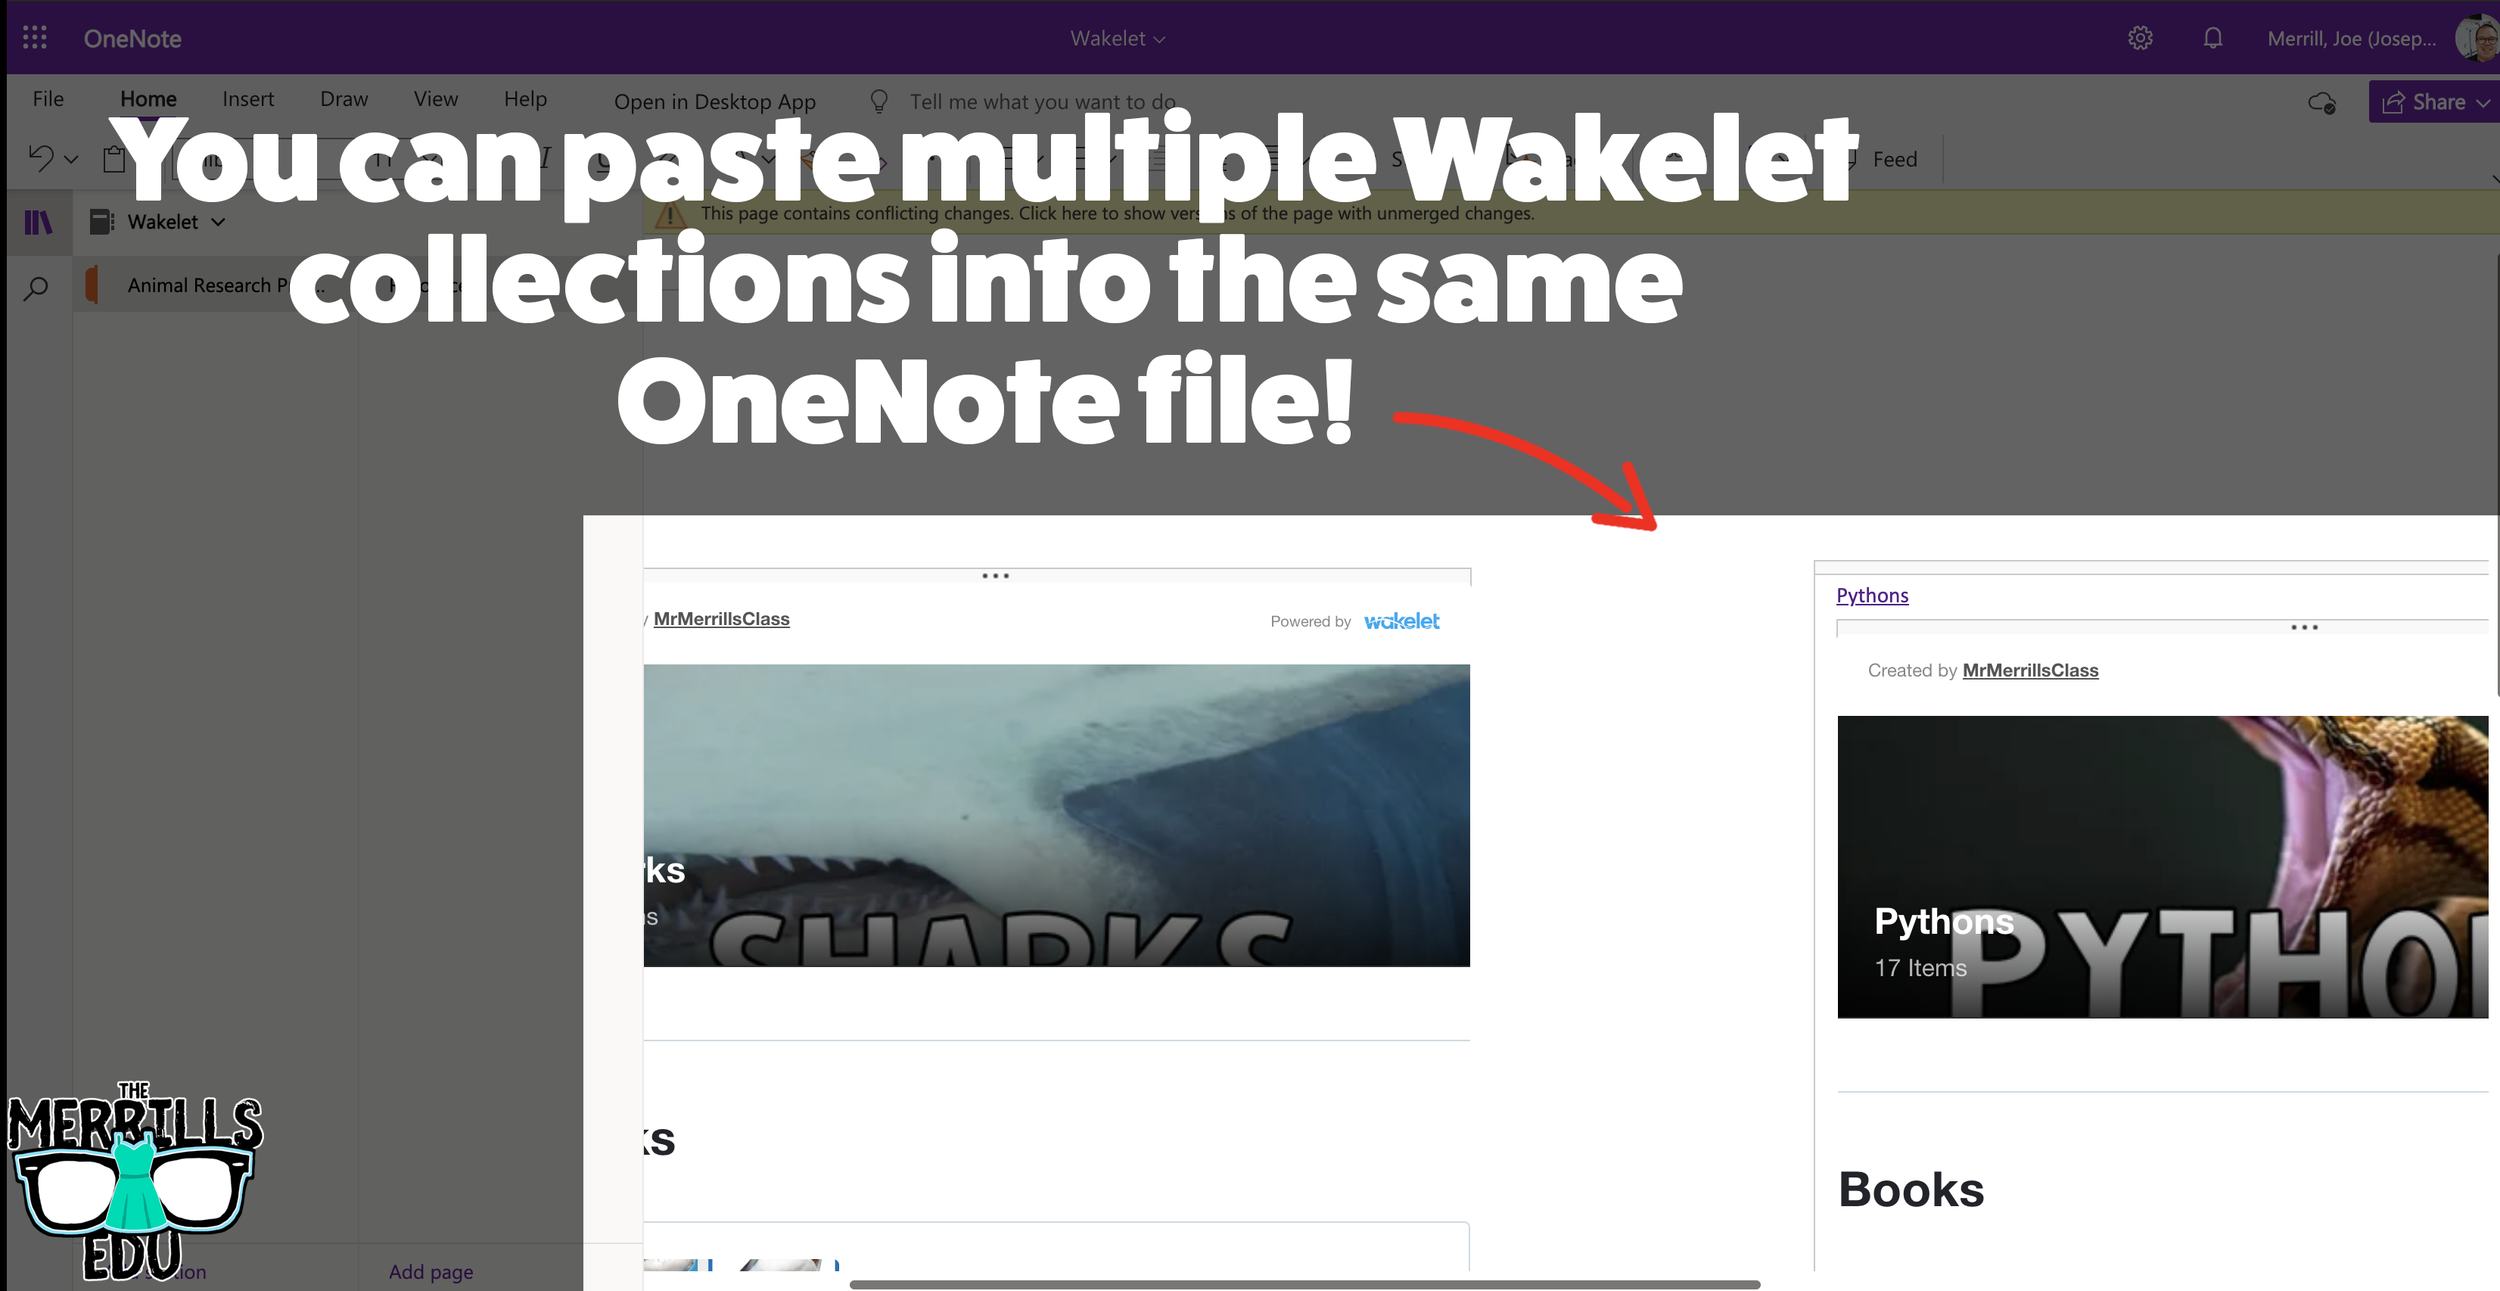
You don’t need an LMS (learning management system) to embed apps. If you’re a Microsoft user, you can embed Wakelet collections right into a OneNote file. The best part of all - this is a ⚡️LIVE⚡️ embed, meaning that any changes made to the Wakelet collection will automatically change in the OneNote file. Additionally, you can embed multiple Wakelet collections into one - OneNote file. Here’s how it all works:
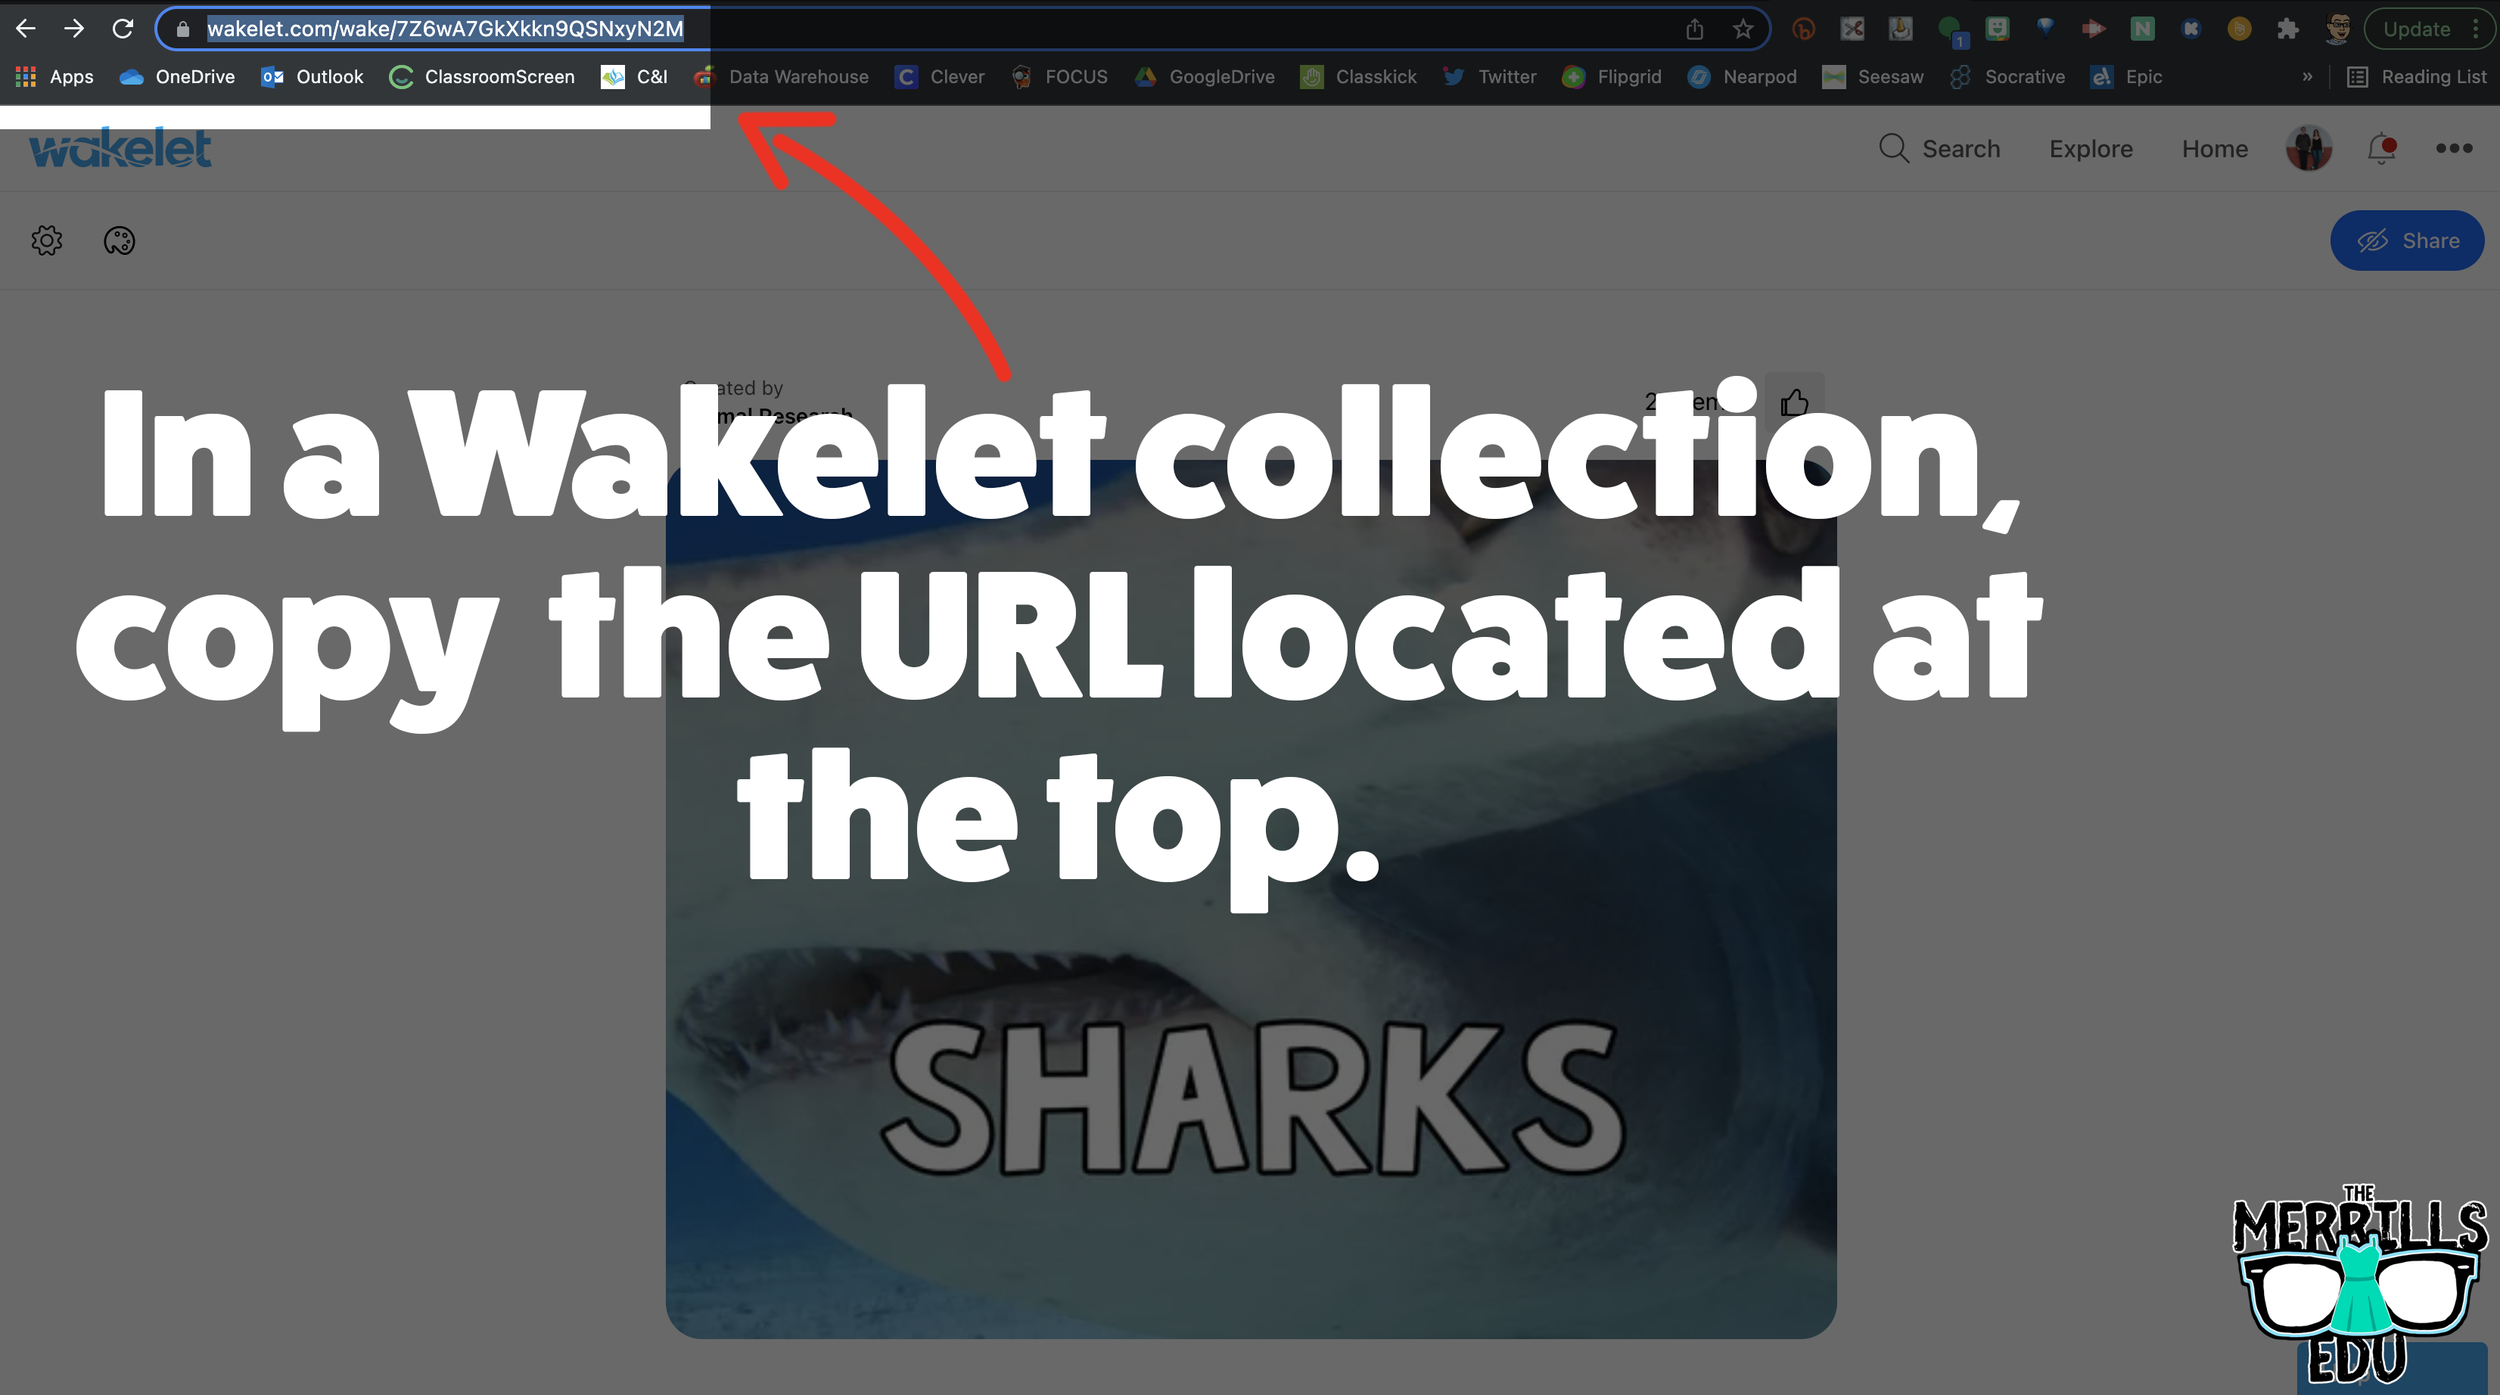
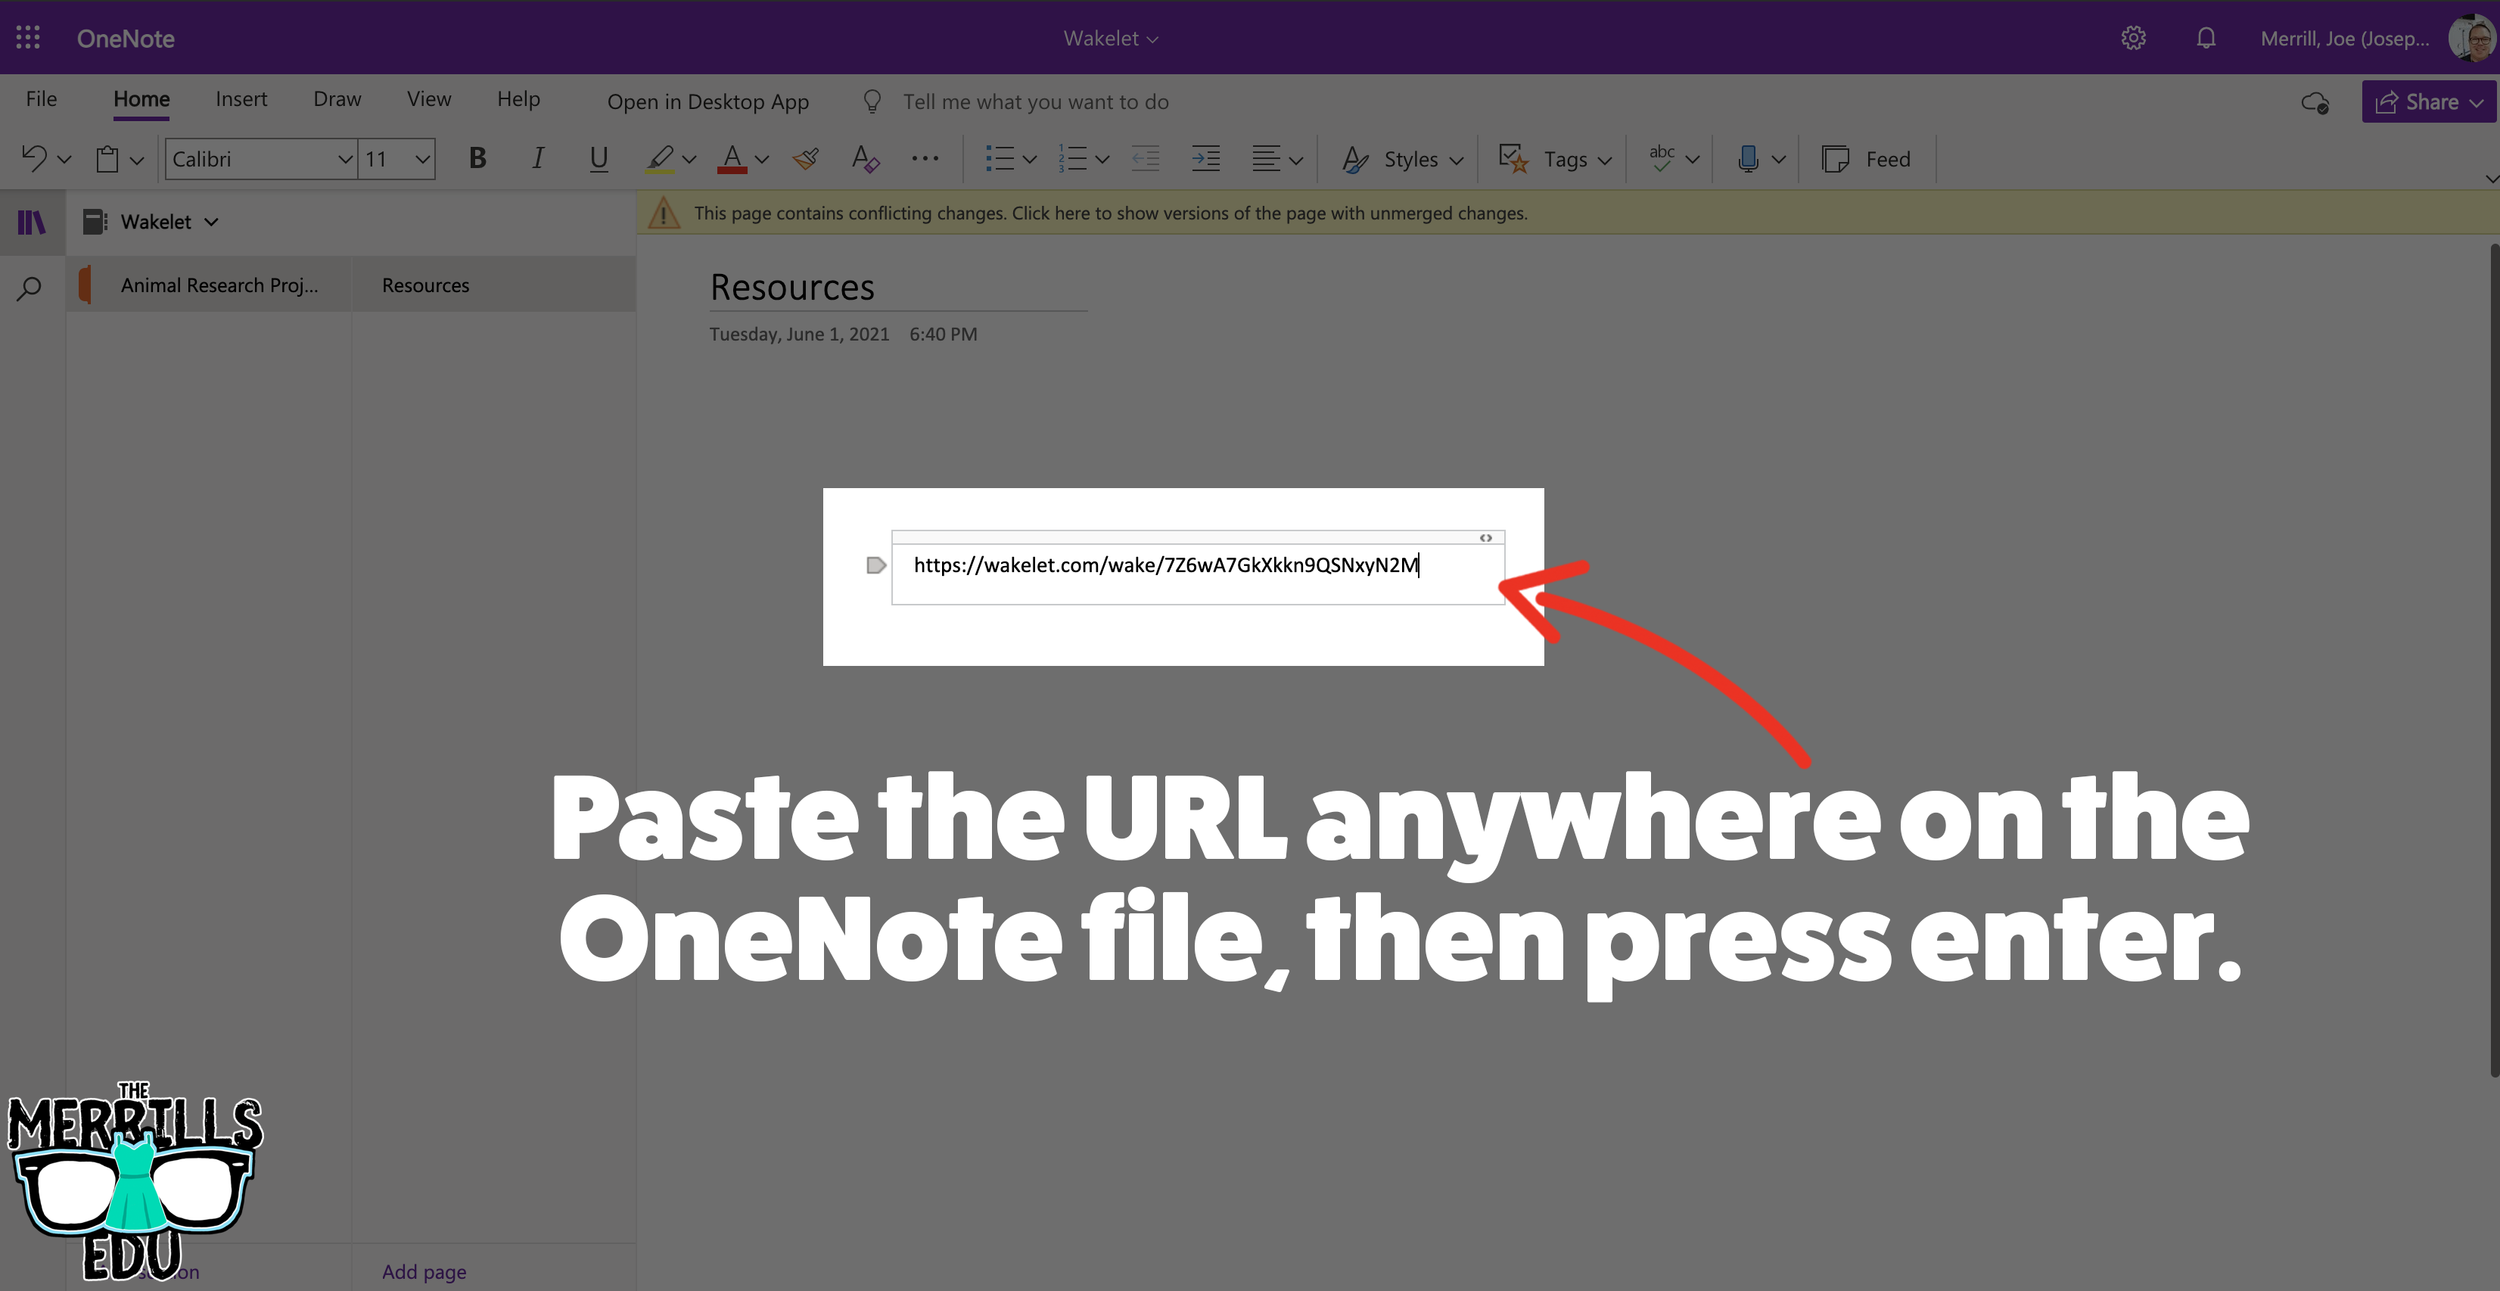
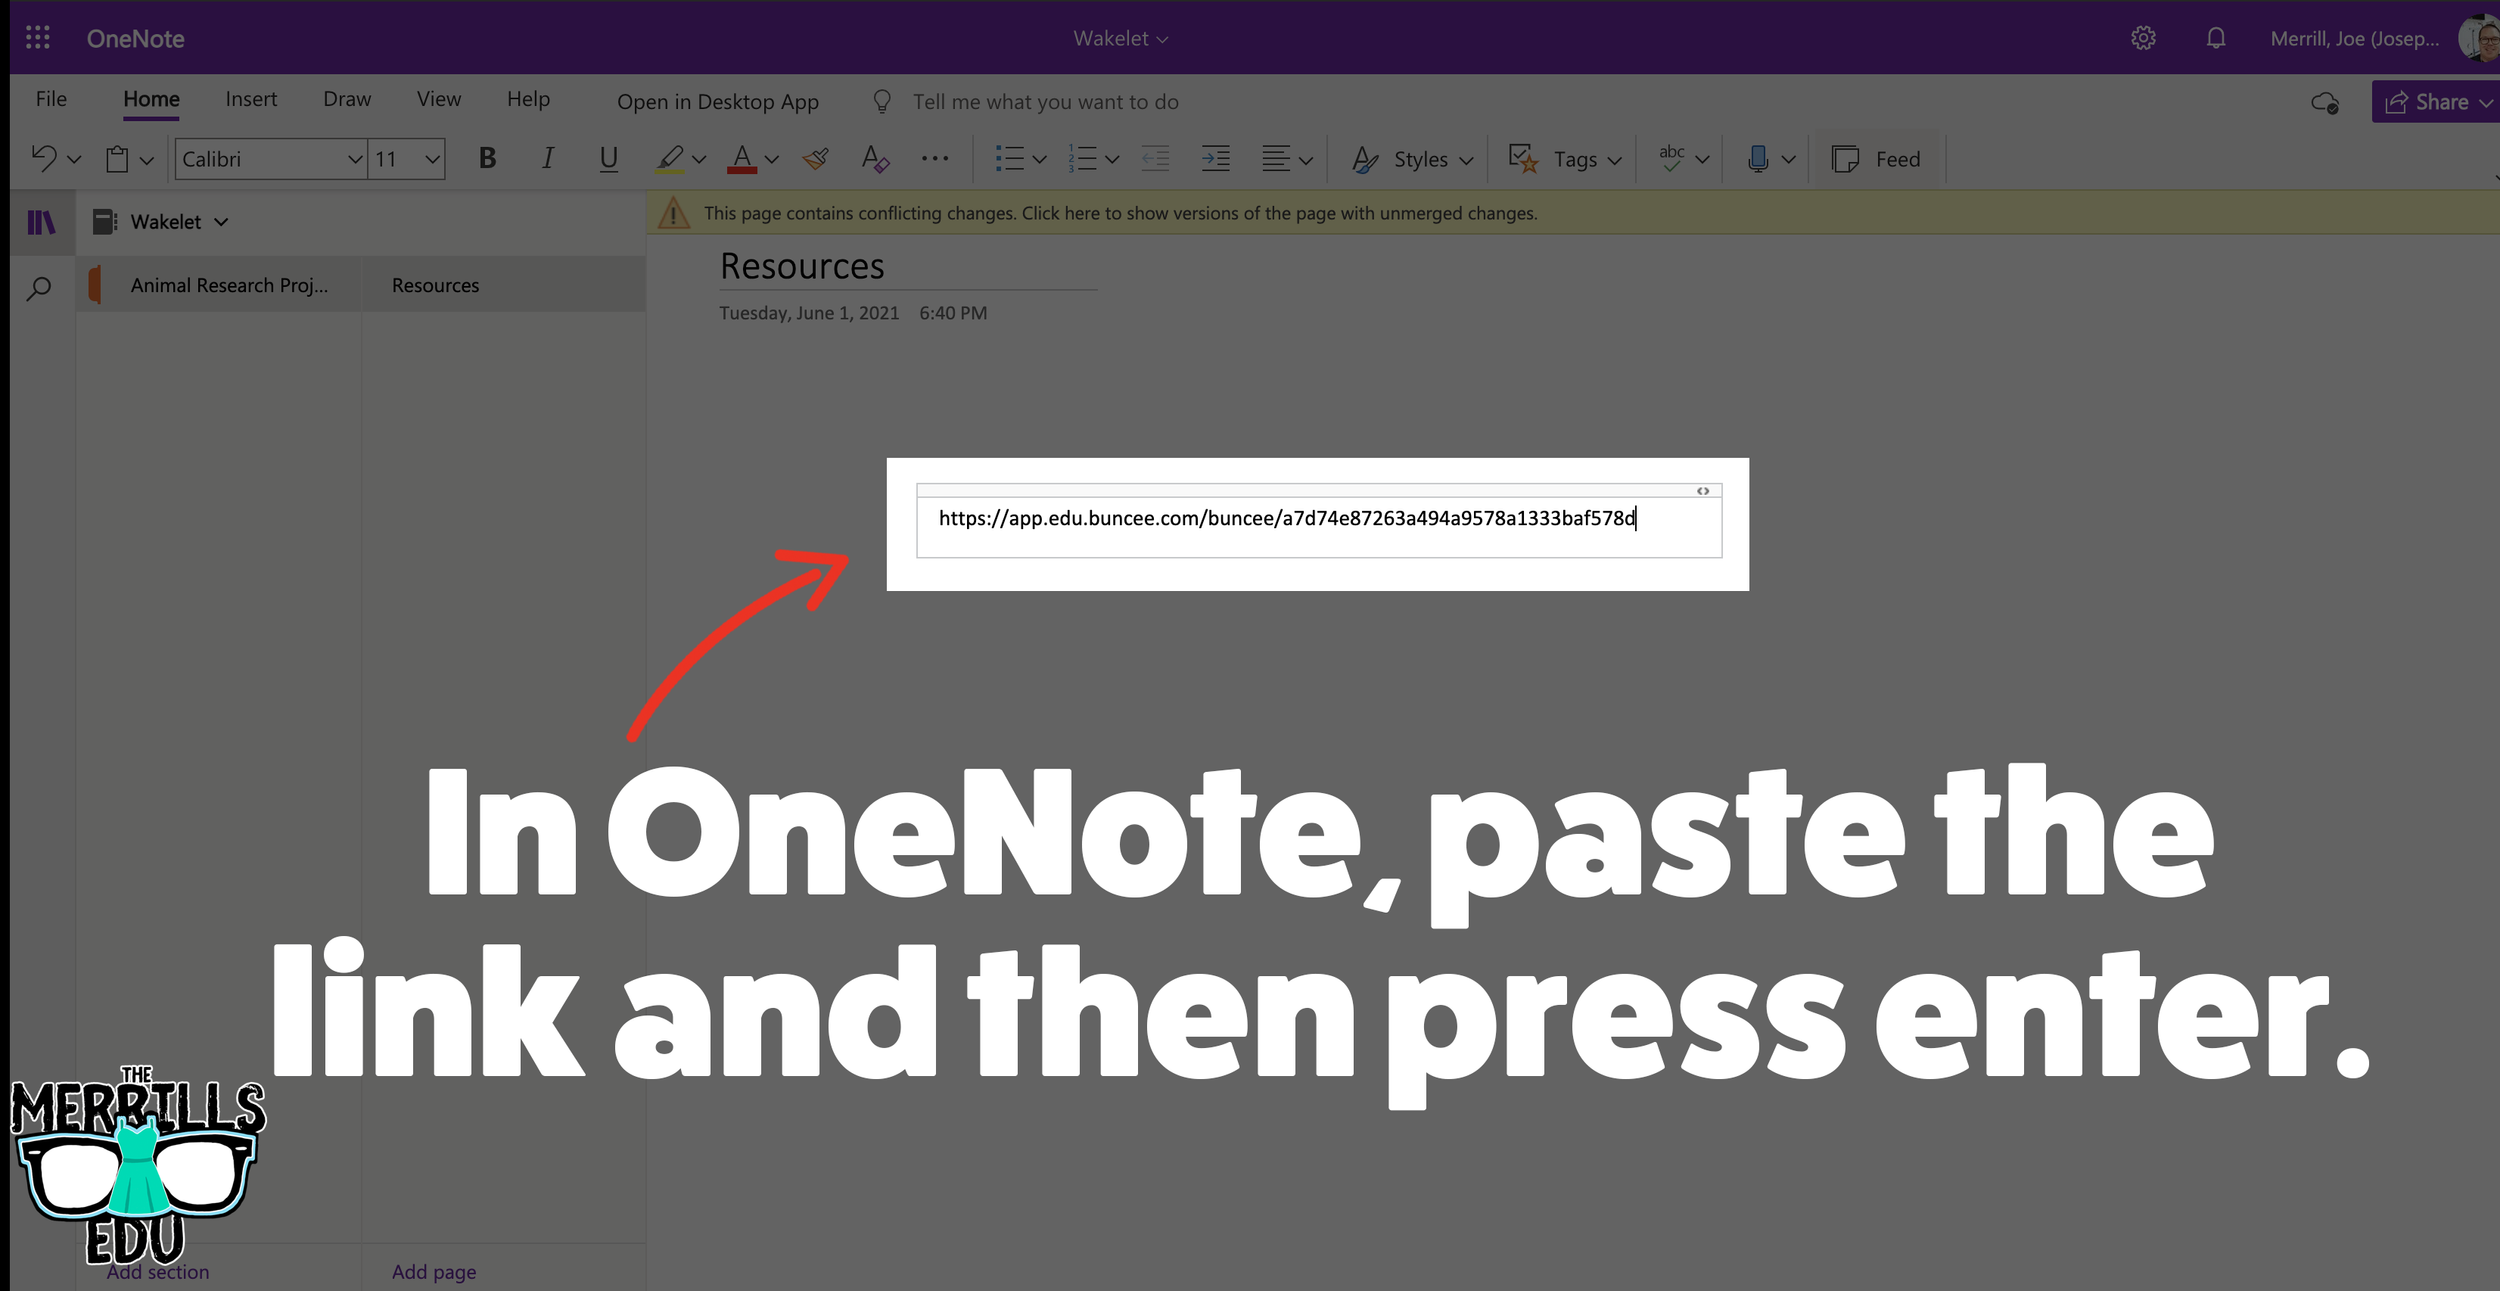
In a Wakelet Collection, copy the URL located at the top.
In a separate tab, open the OneNote file that you would like to add the Wakelet Collection to. Then, paste the URL anywhere on the OneNote file.
Press enter to start the live embed.
Repeat this process to add additional collections to the OneNote file.

Buncee Embedded into OneNote
This embed takes the cake as the most creative! Most embedding is done on the educators end, but not this one (although educators can definitely do it, too). With the Buncee and OneNote embed, students have the ability to take their Buncee creations and share them in one central location for others to see. Here’s how it all works:

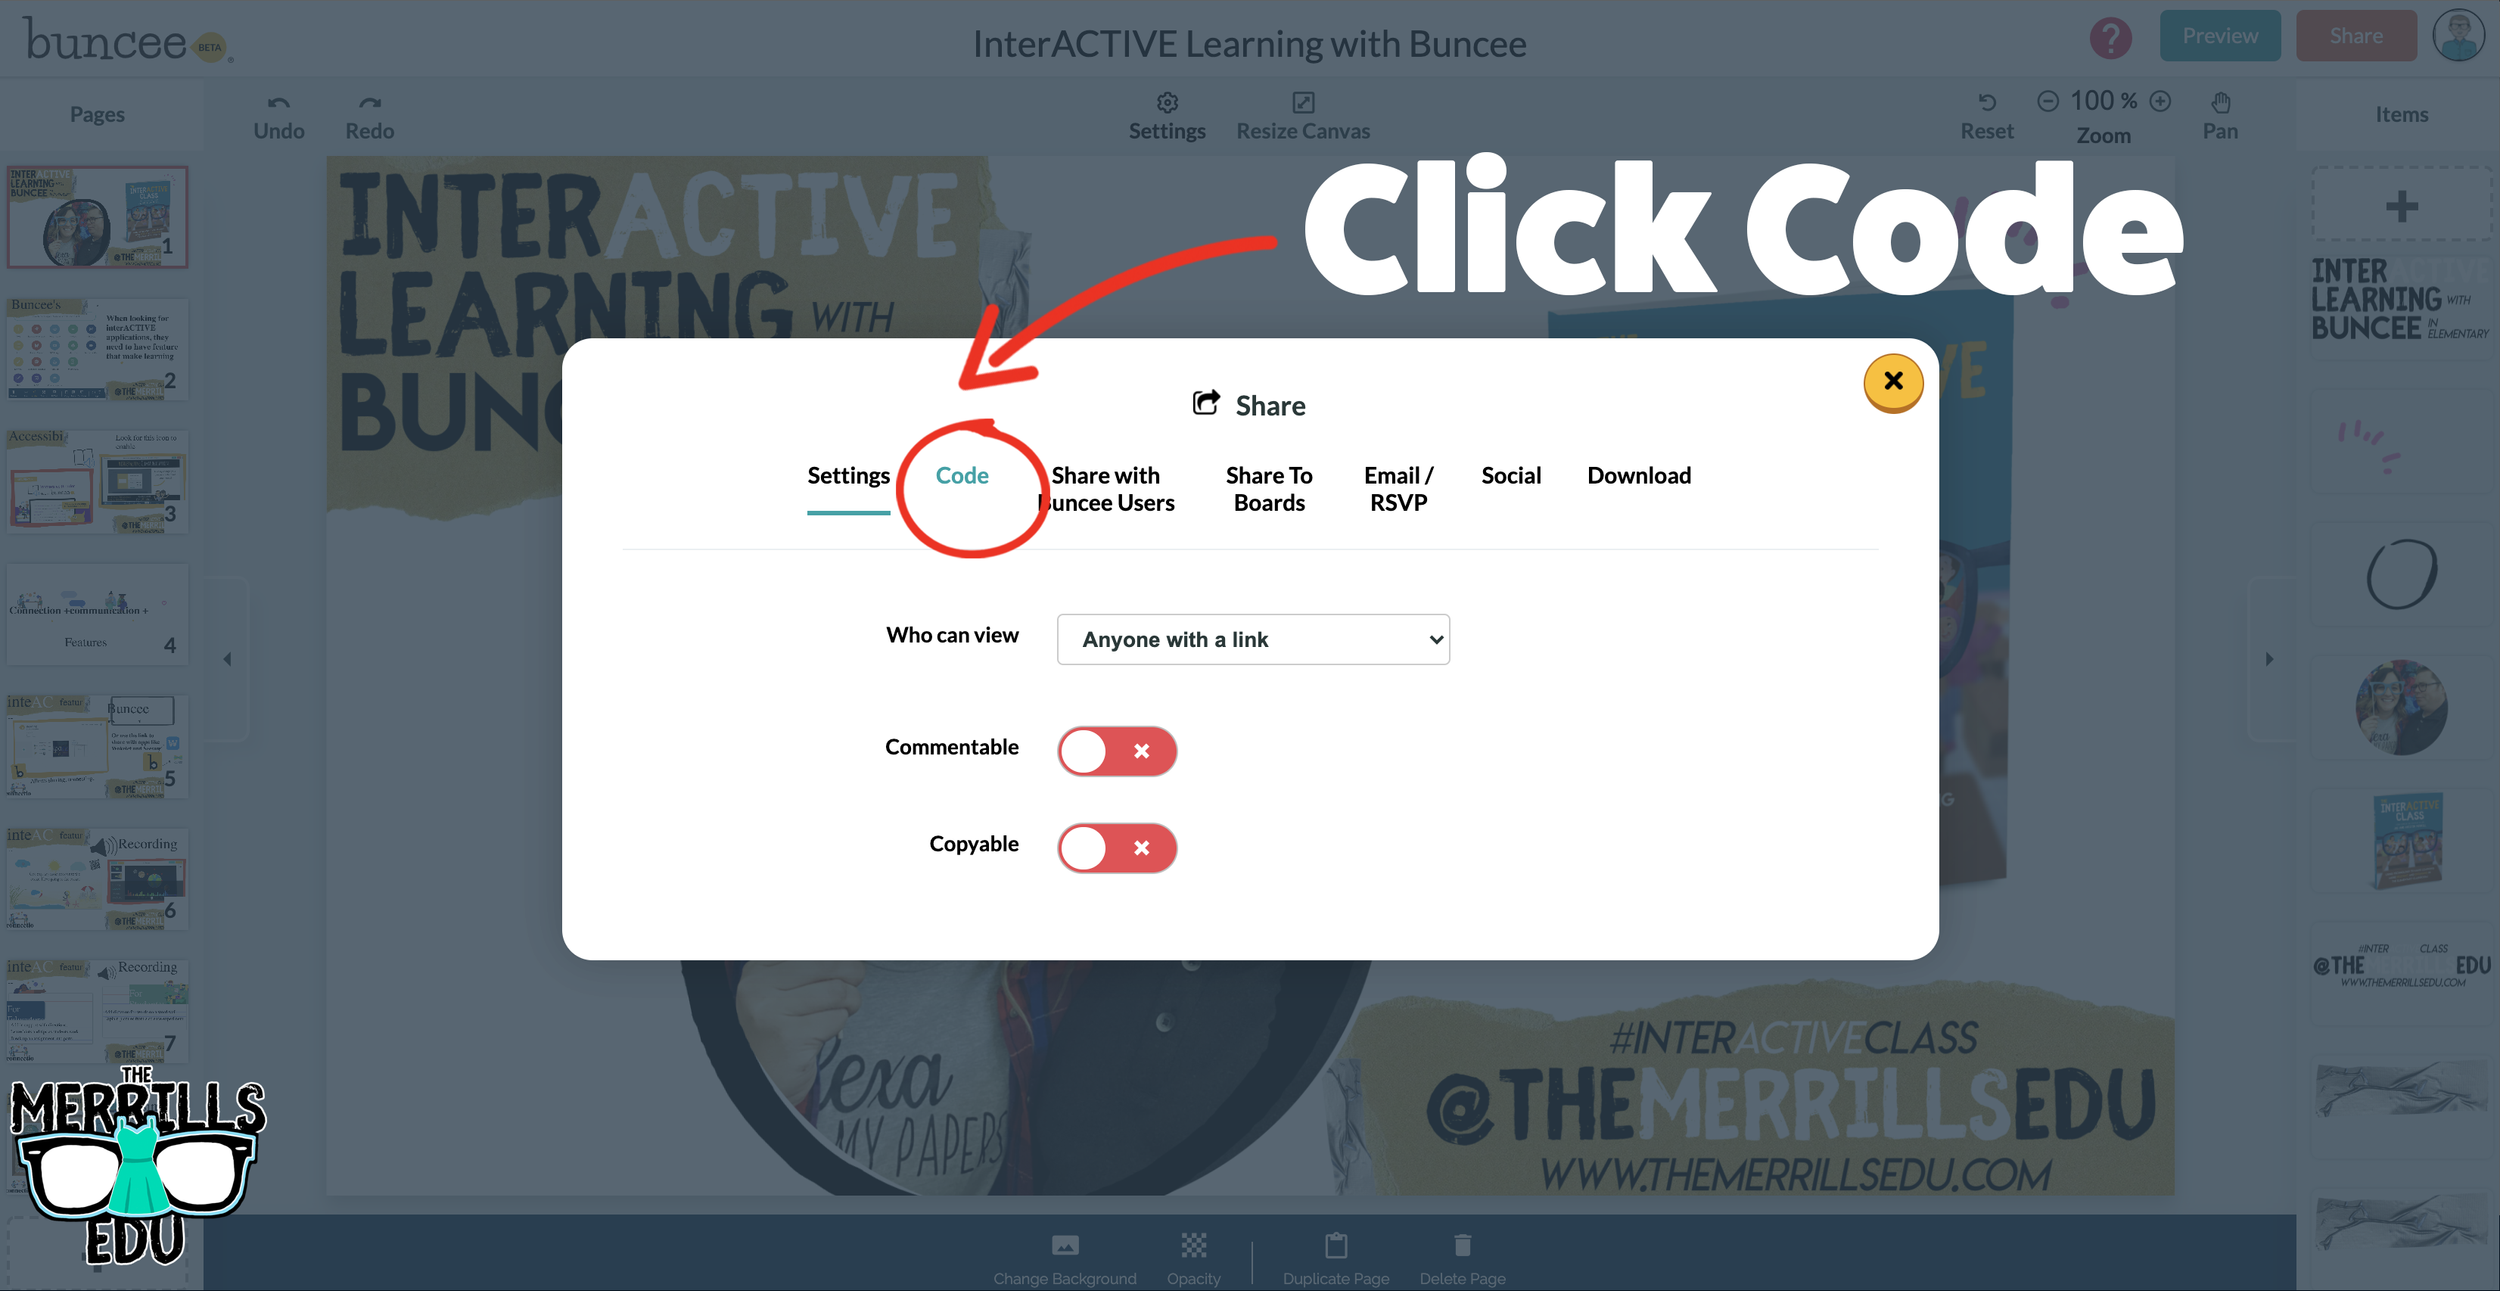
Open a Buncee, then click the “Share” button located in the upper right side of the screen.
A new window will pop up. Click on “Code.”
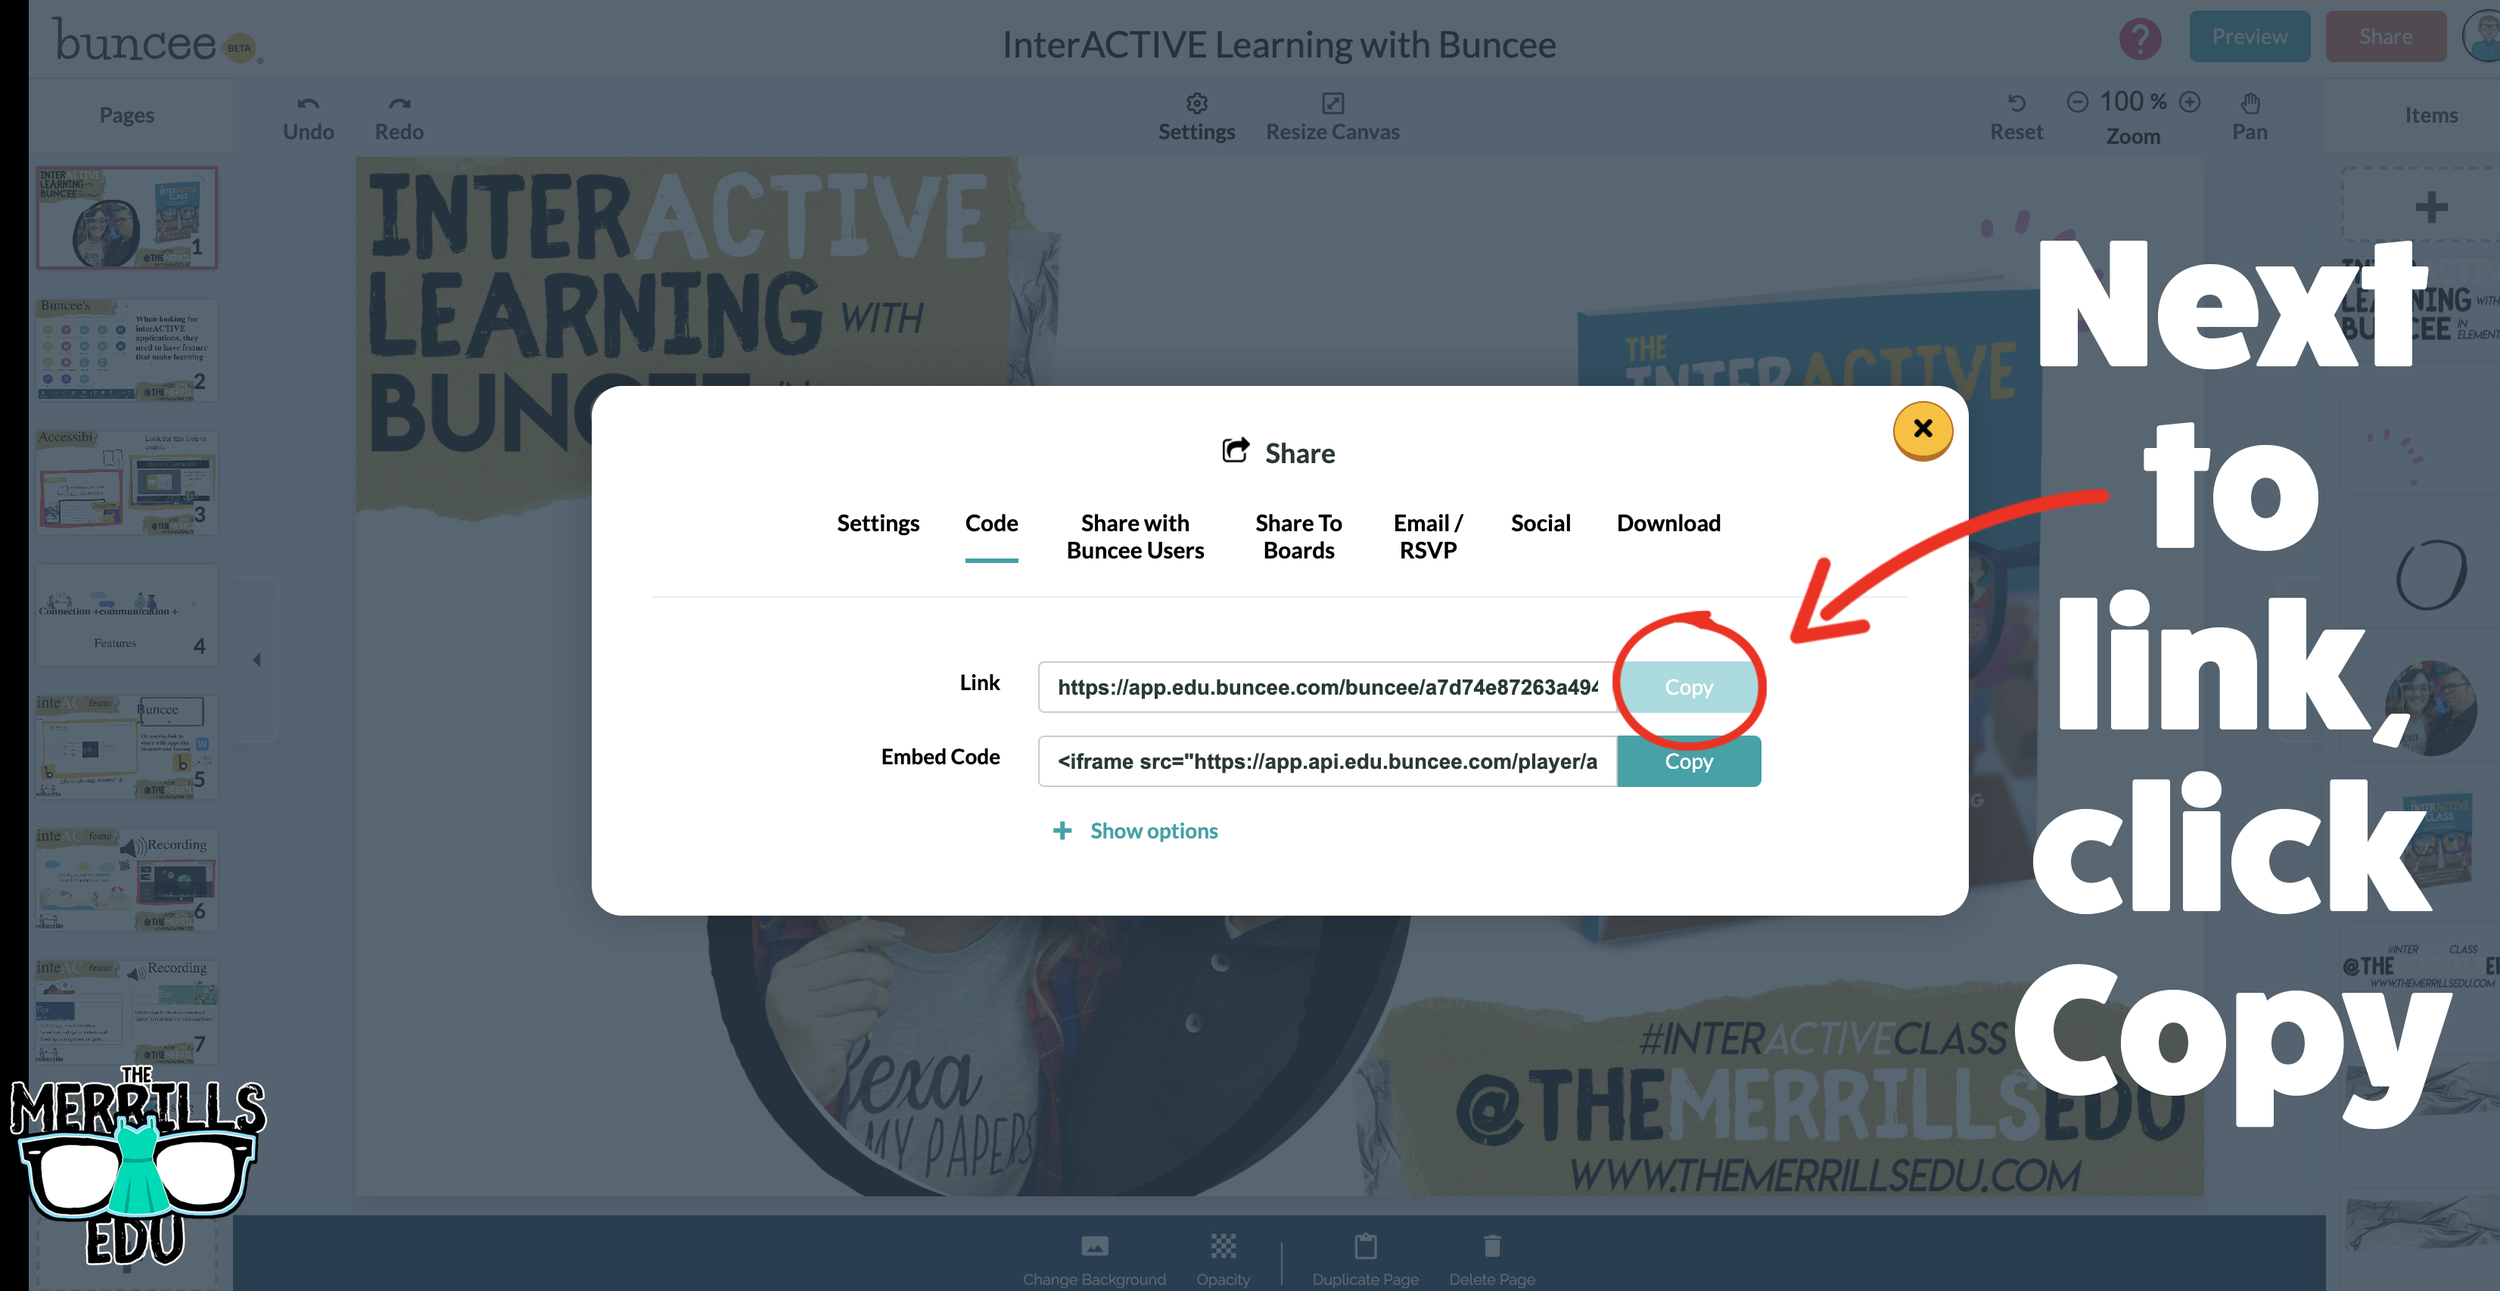
Under “Code” and next to Link, click “Copy.”
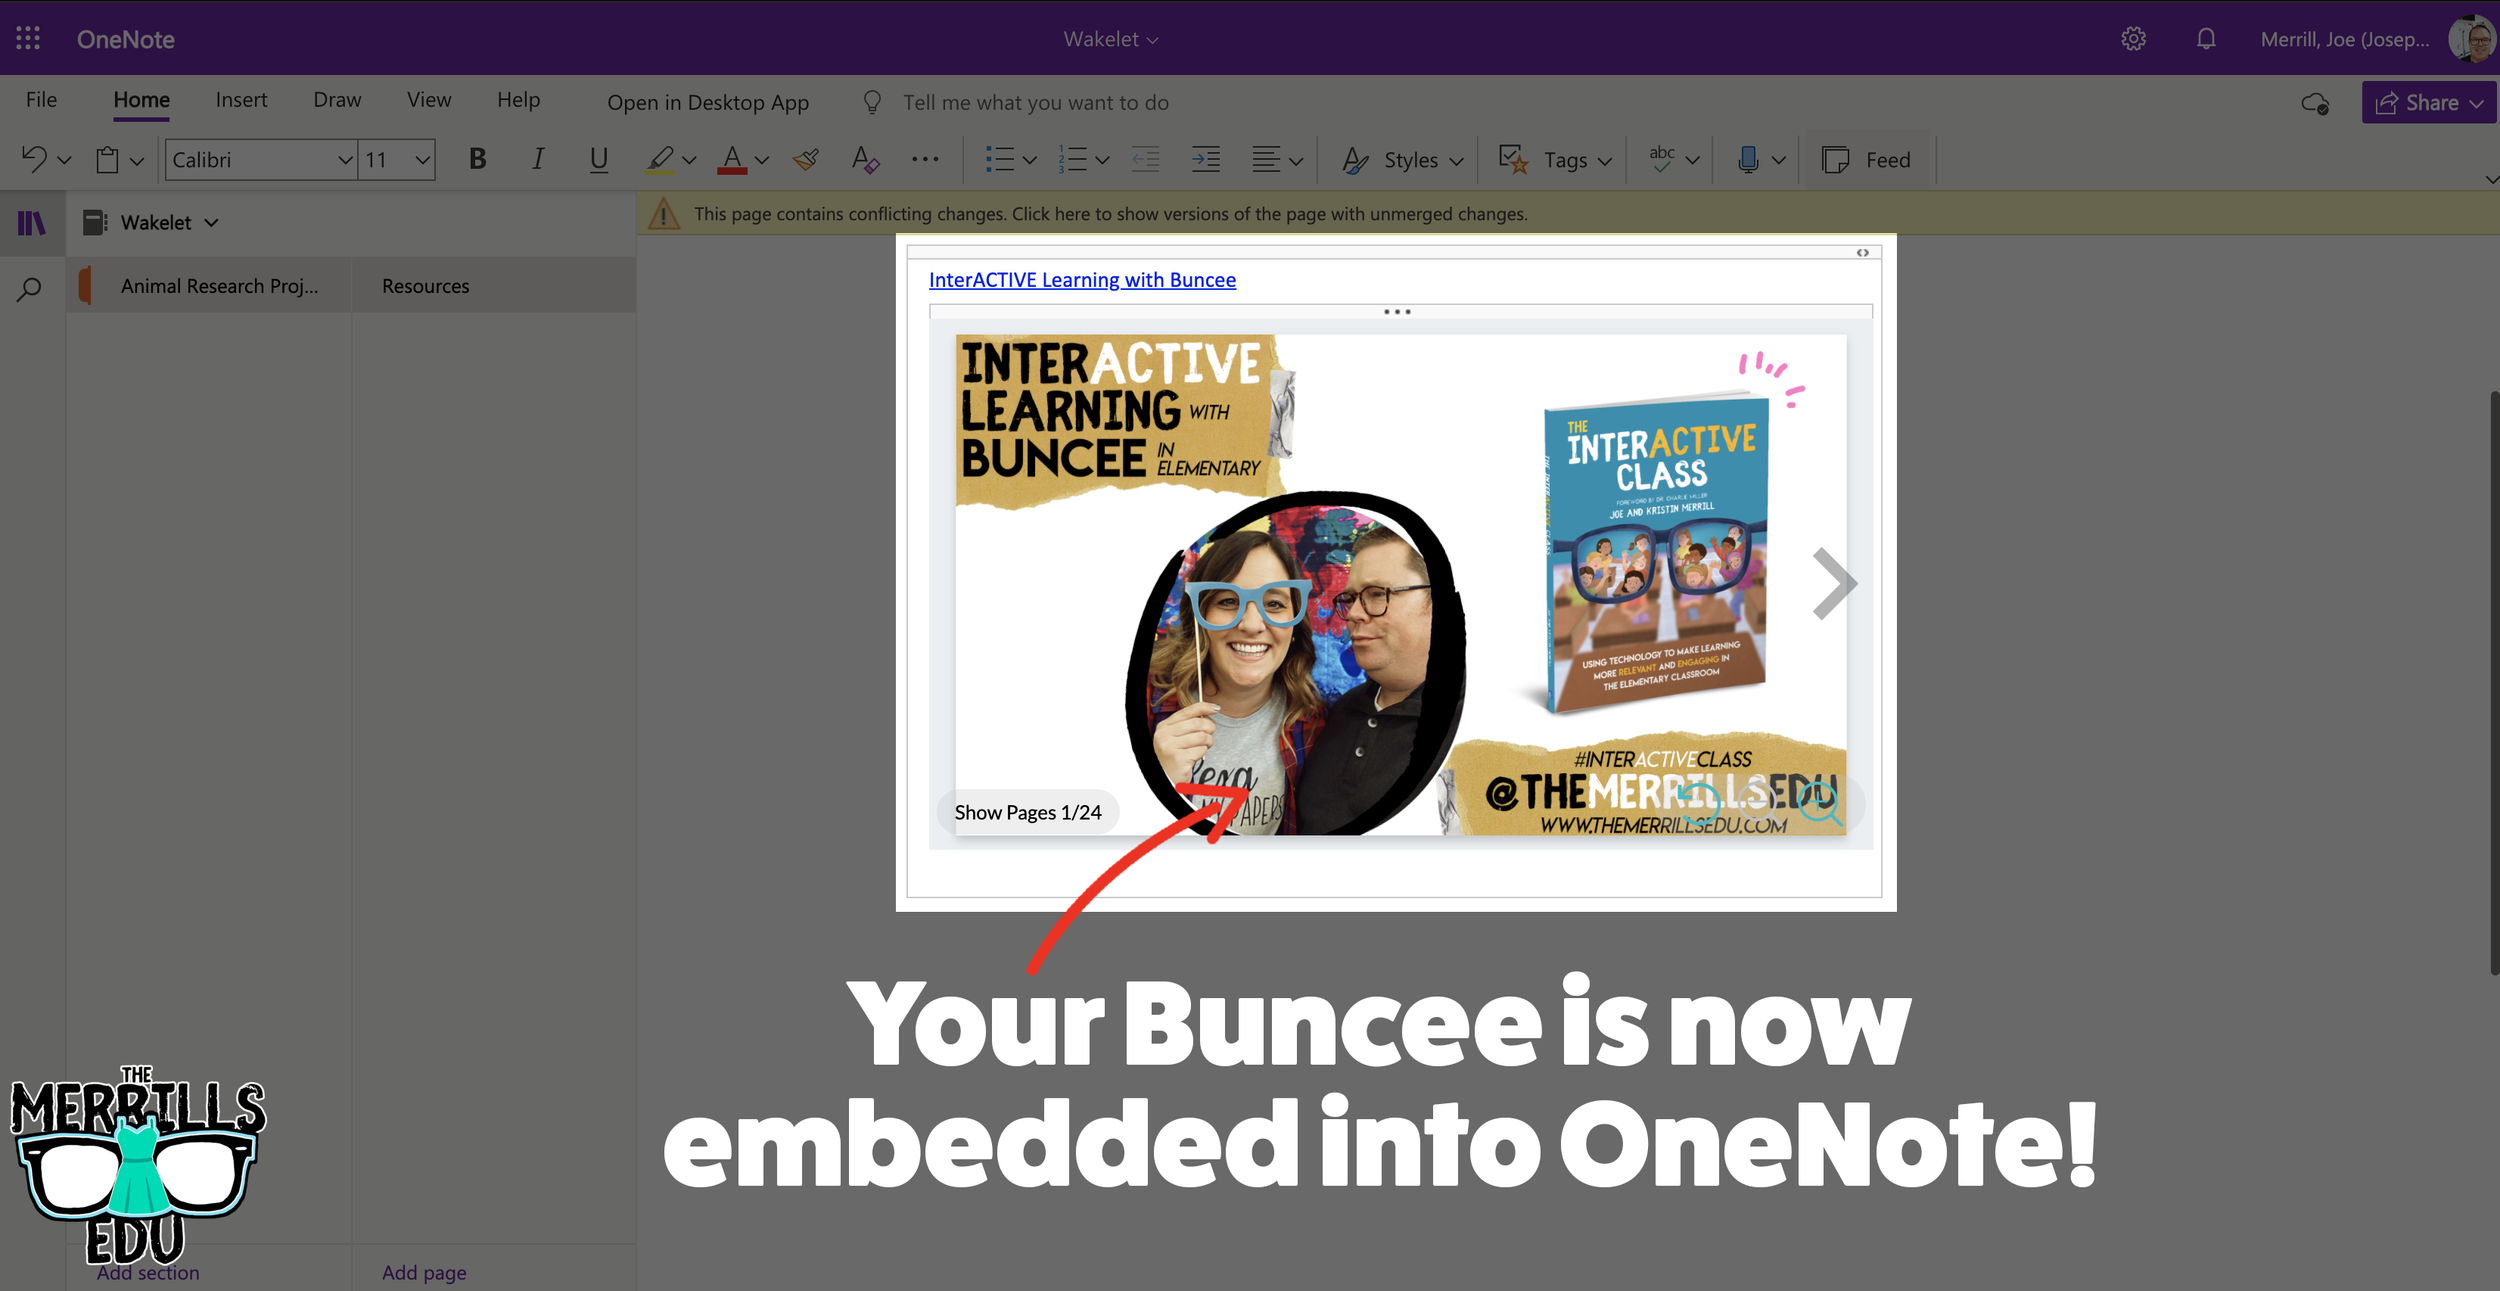
In a separate tab, open the OneNote file that you would like to add the Buncee creation to. Then, paste the URL anywhere on the OneNote file.
Press enter to start the live embed.
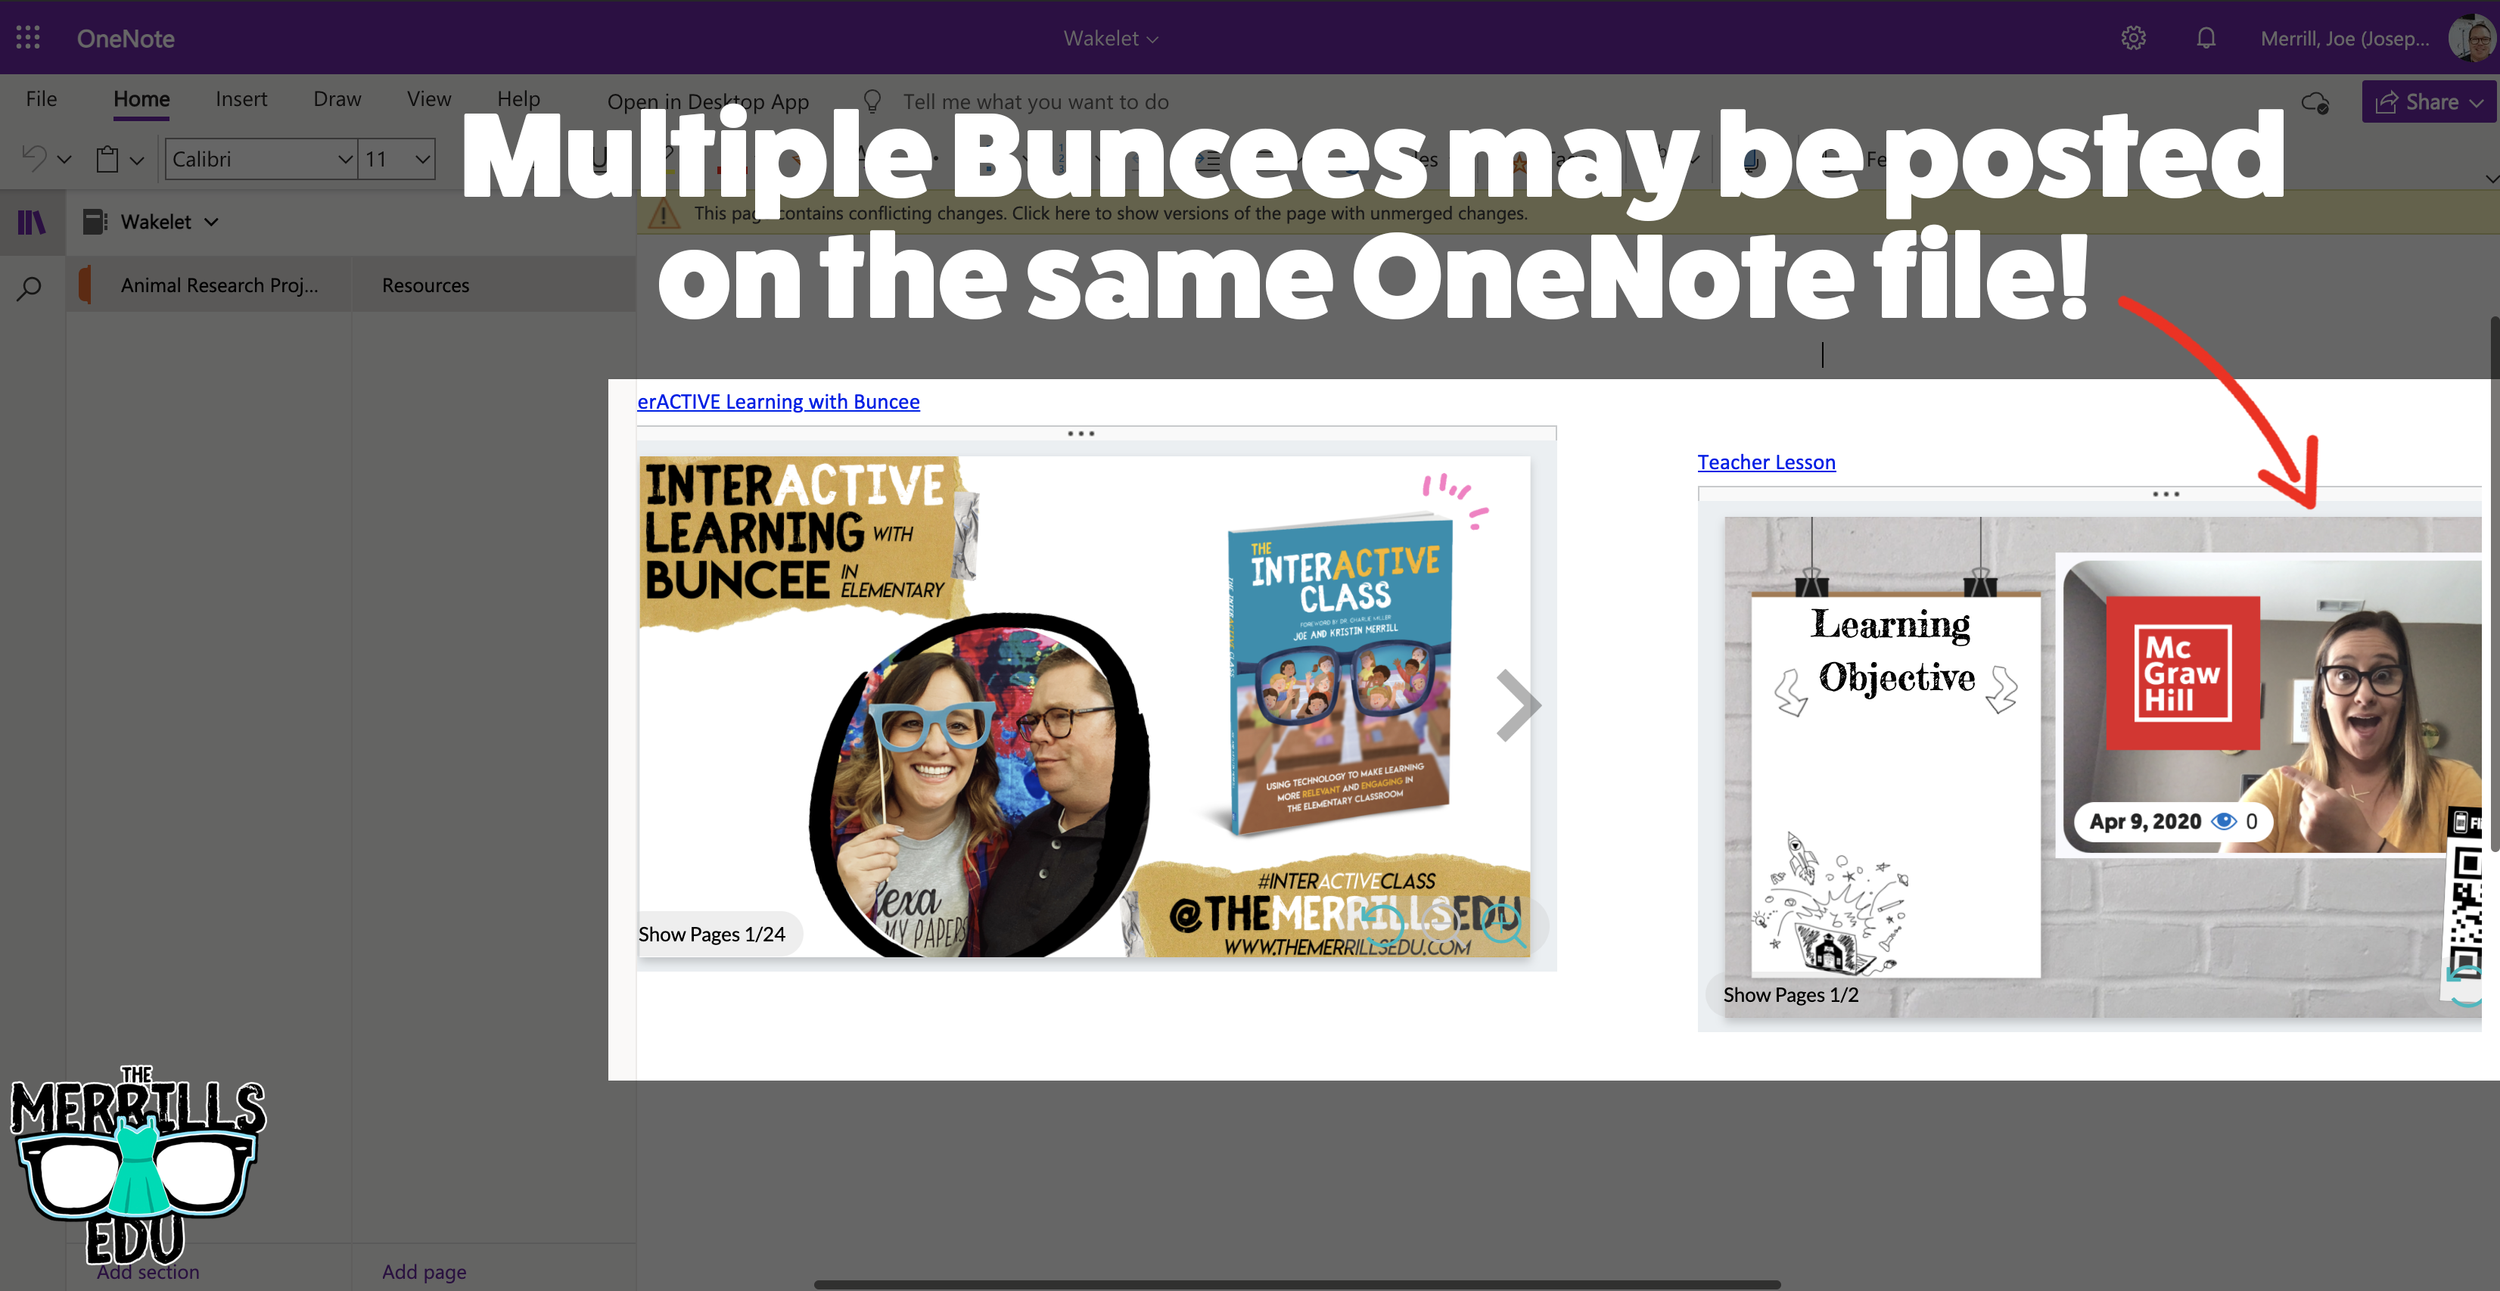
Repeat this process to add additional Buncees to the OneNote file.

Canva Embedded into Classroom Screen
Need to post your directions on the board? Perhaps you need a timer to go along with it? This embed will be your saving grace! Embed your Canva creations right into Classroom Screen. Here’s how:
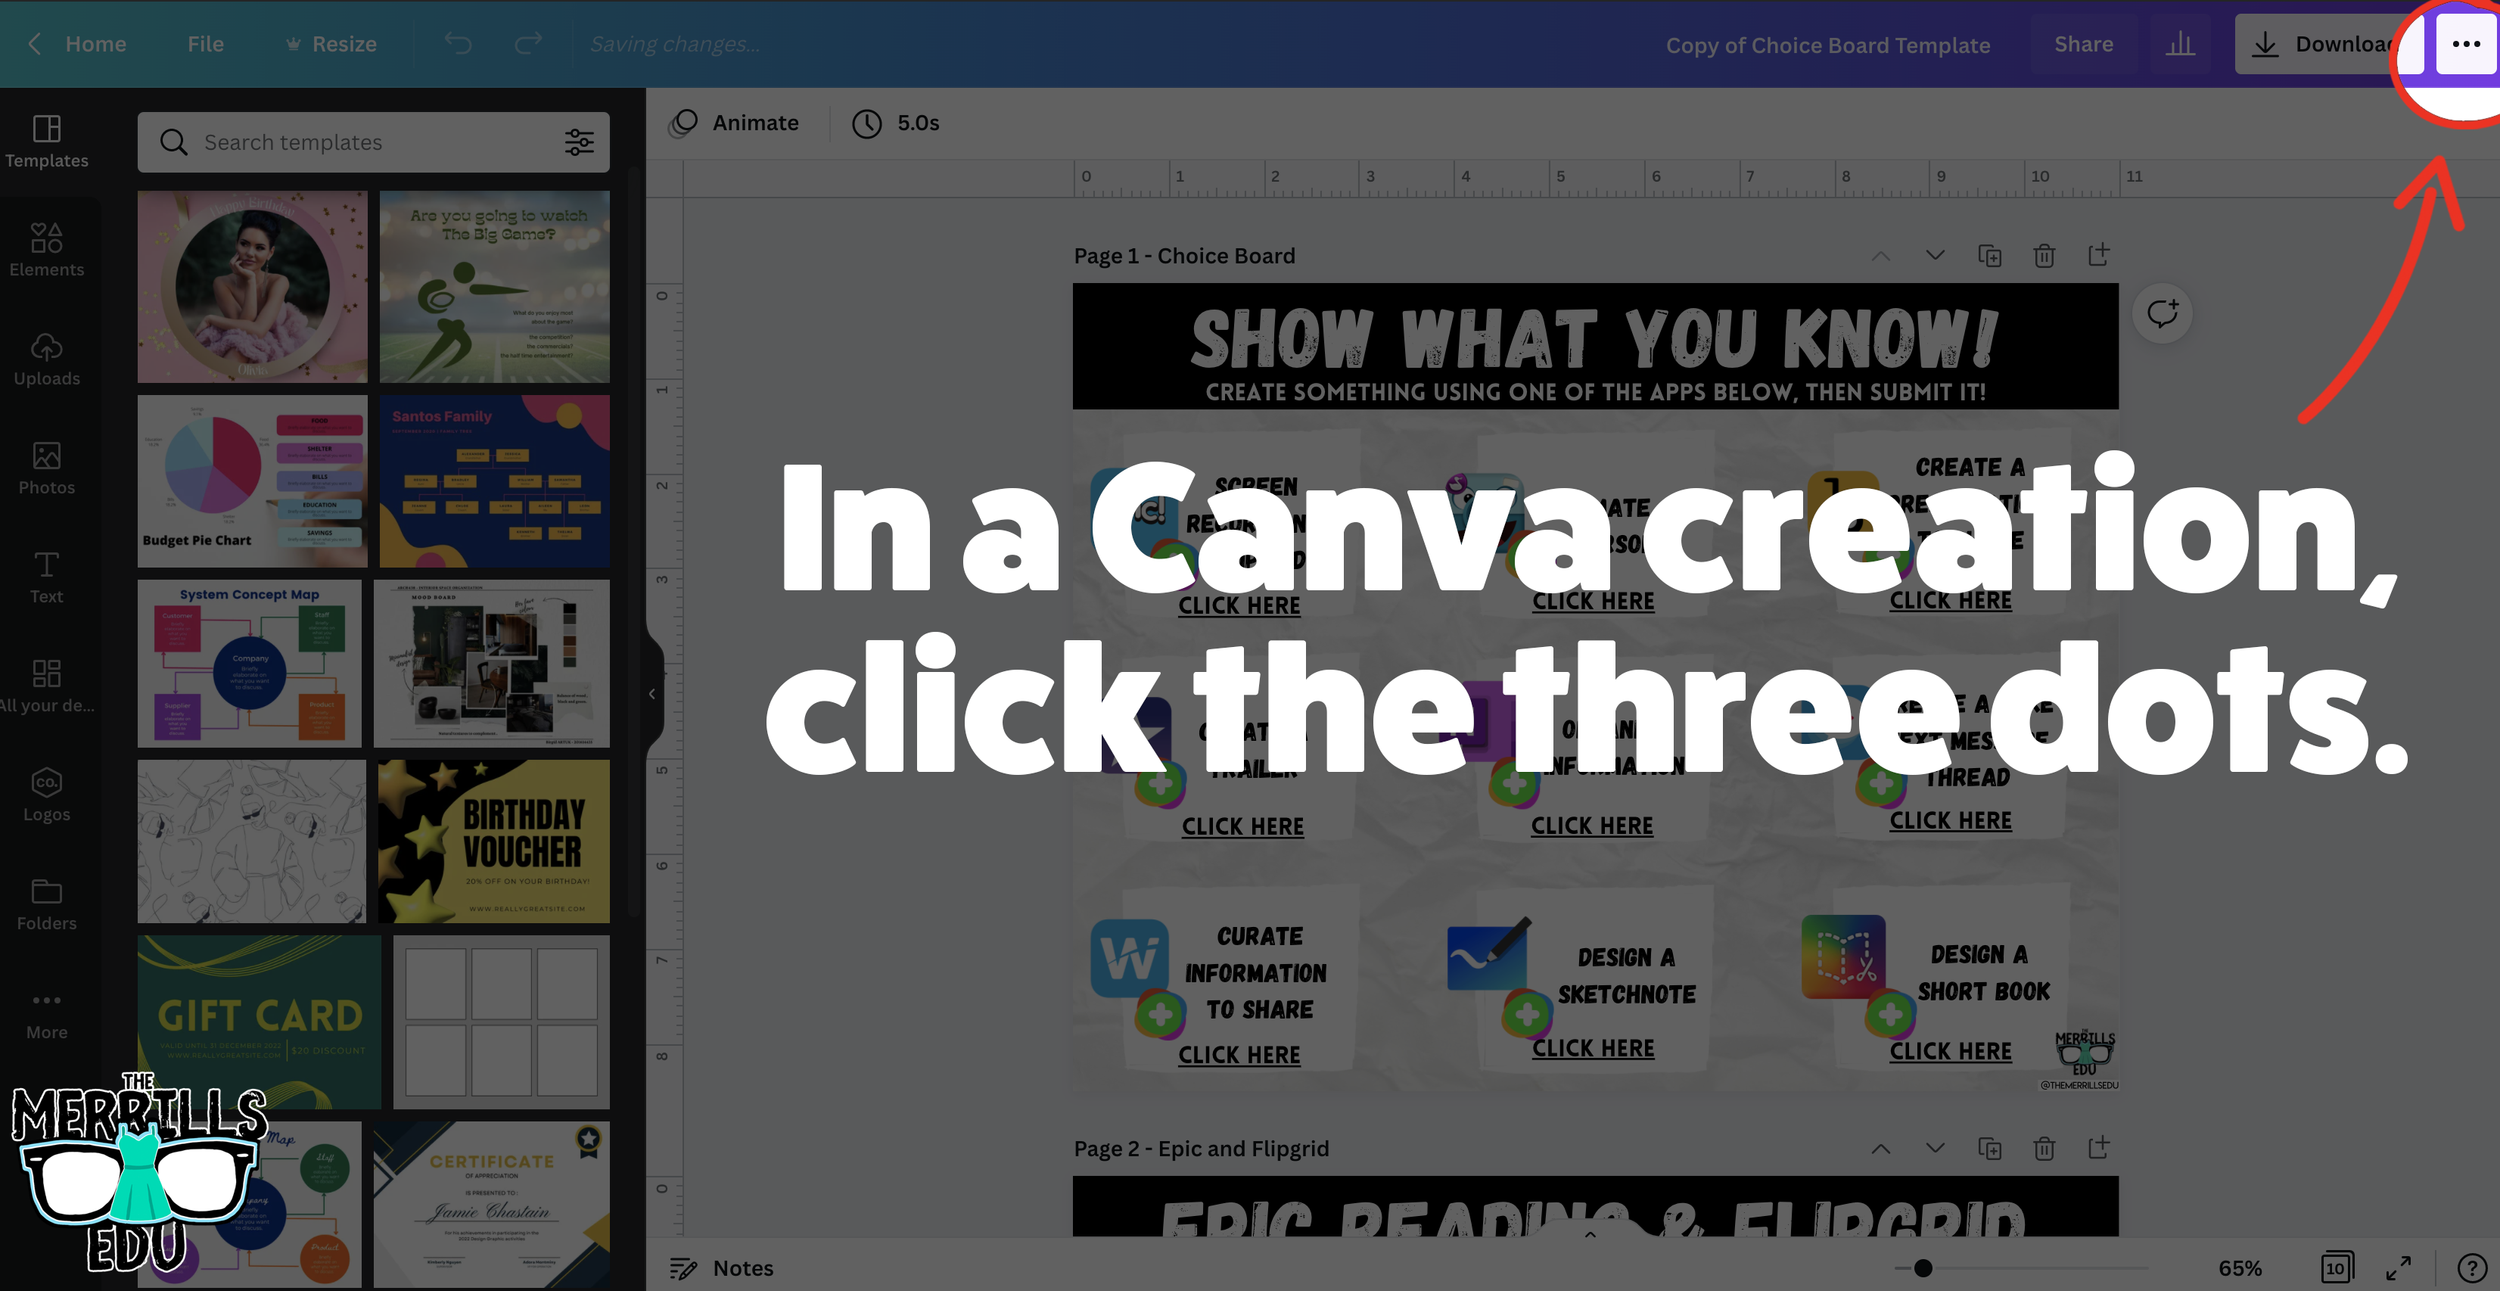
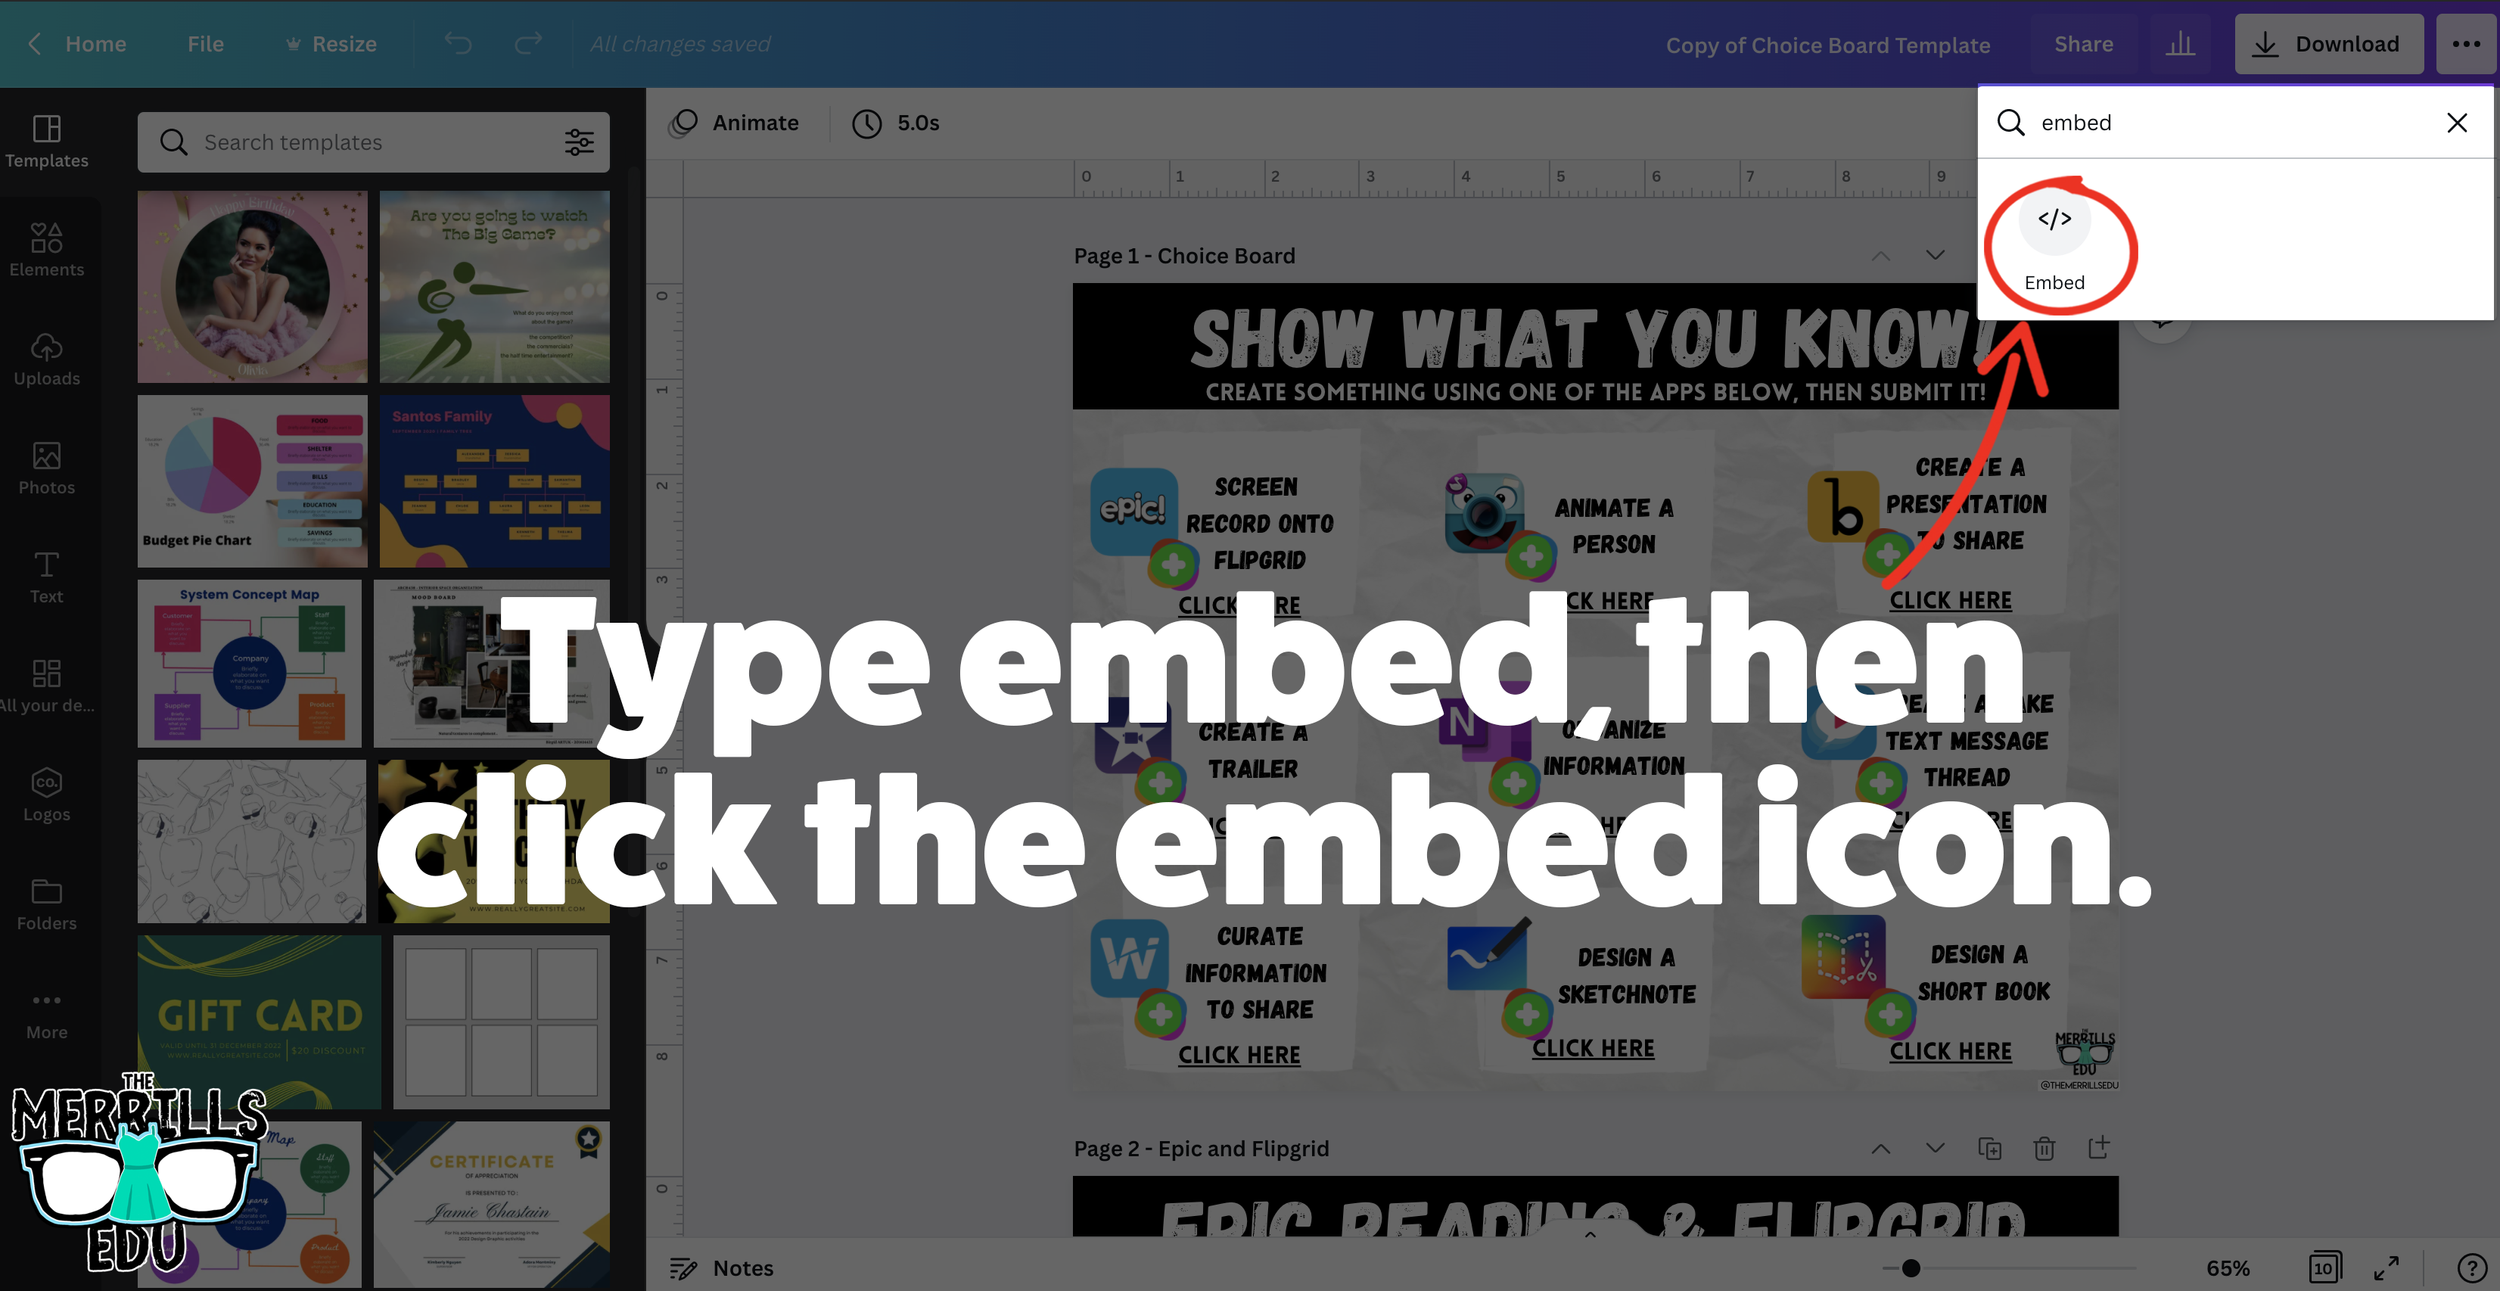
Open a Canva creation, then click the three dots.
In the drop down, type “embed.”
Click the “Embed” icon.
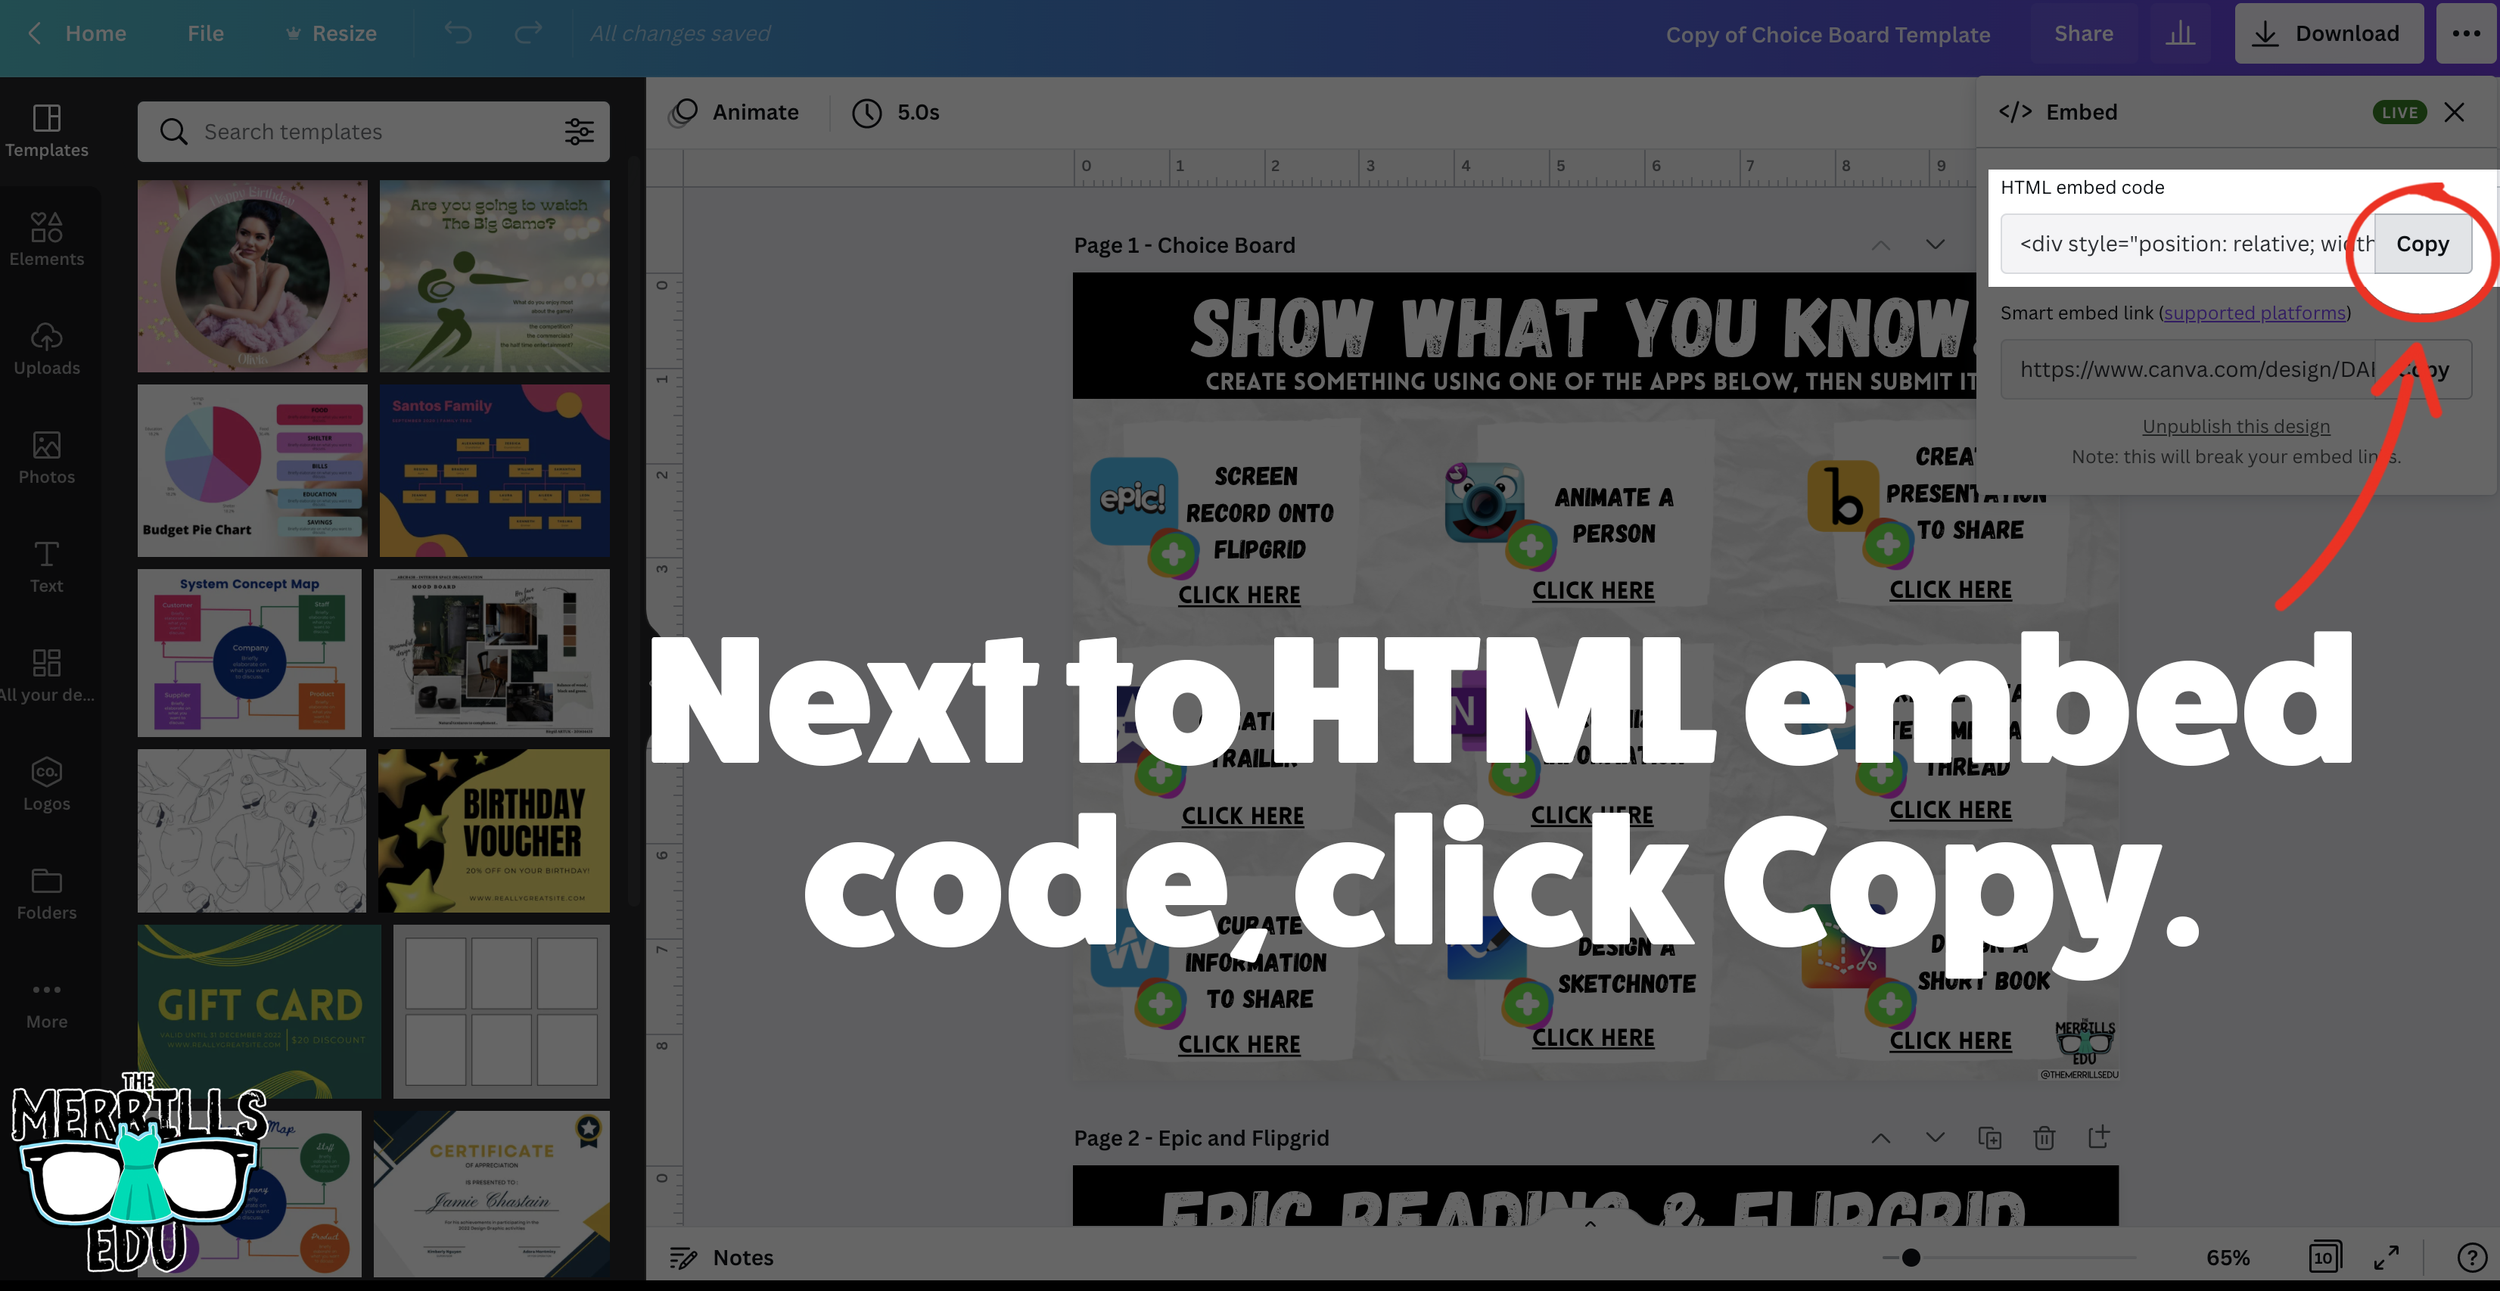
On the next frame, click the “Embed” button. This will take your creation “live.”
Now, next to HTML Embed Code, click “Copy.”
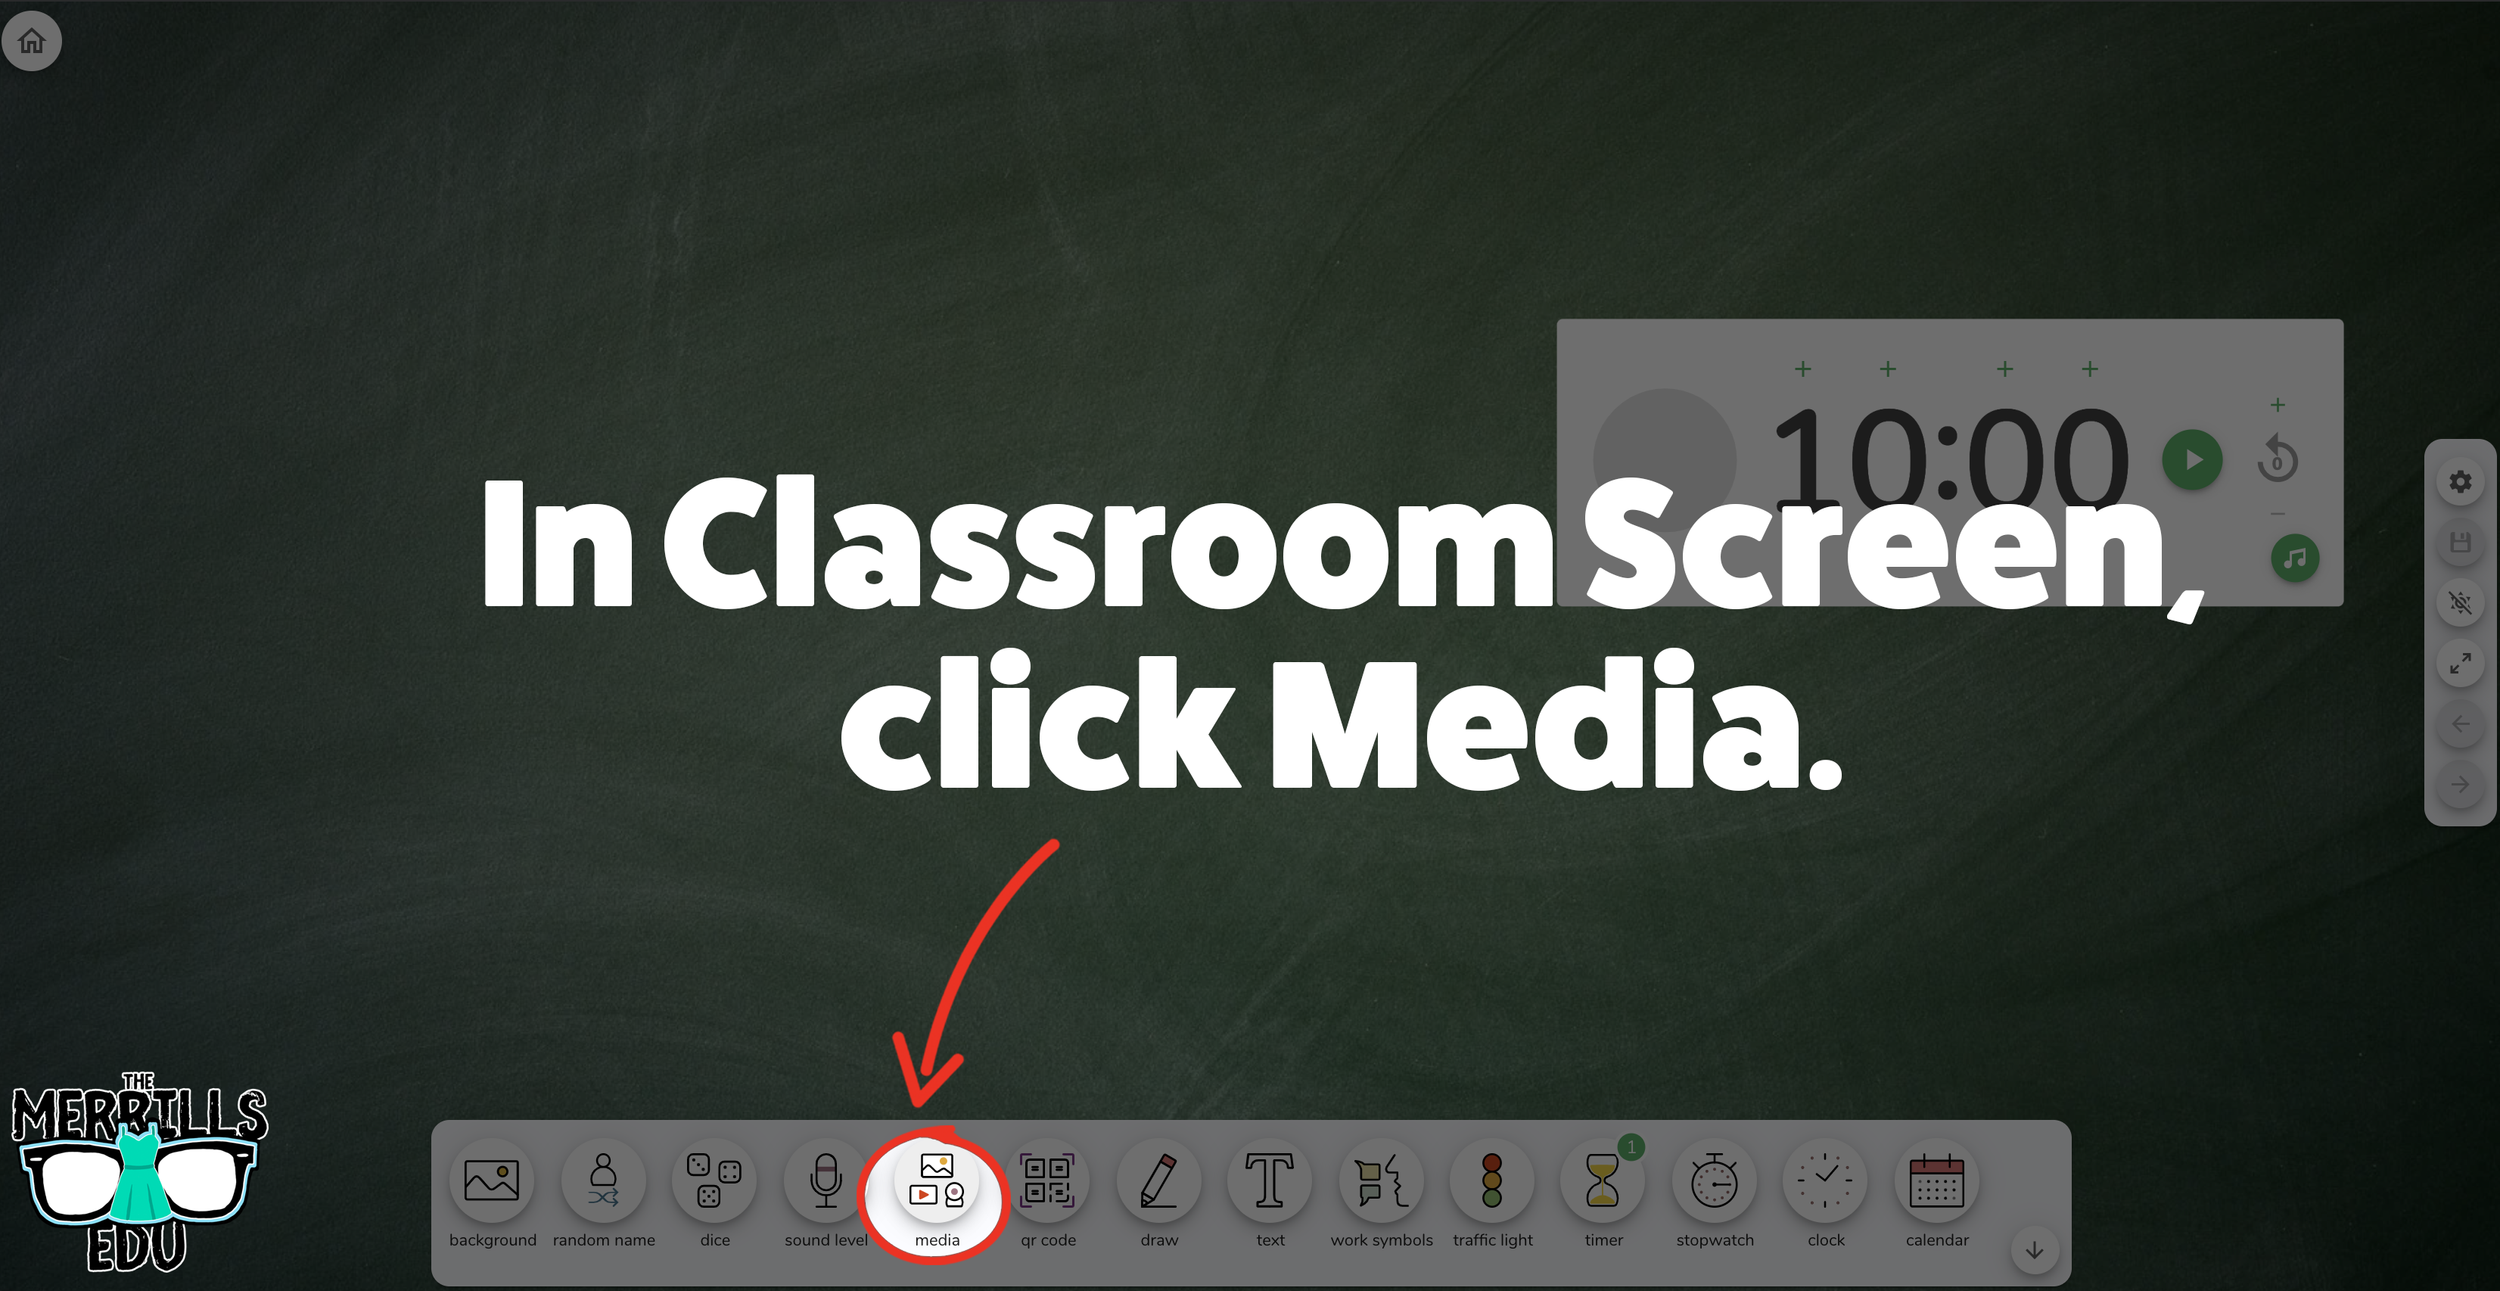
In a separate tab, head over to ClassroomScreen.com and start a new screen (or open an old one).
With your Classroom Screen open, click on “Media” from the menu options running along the bottom of the screen.
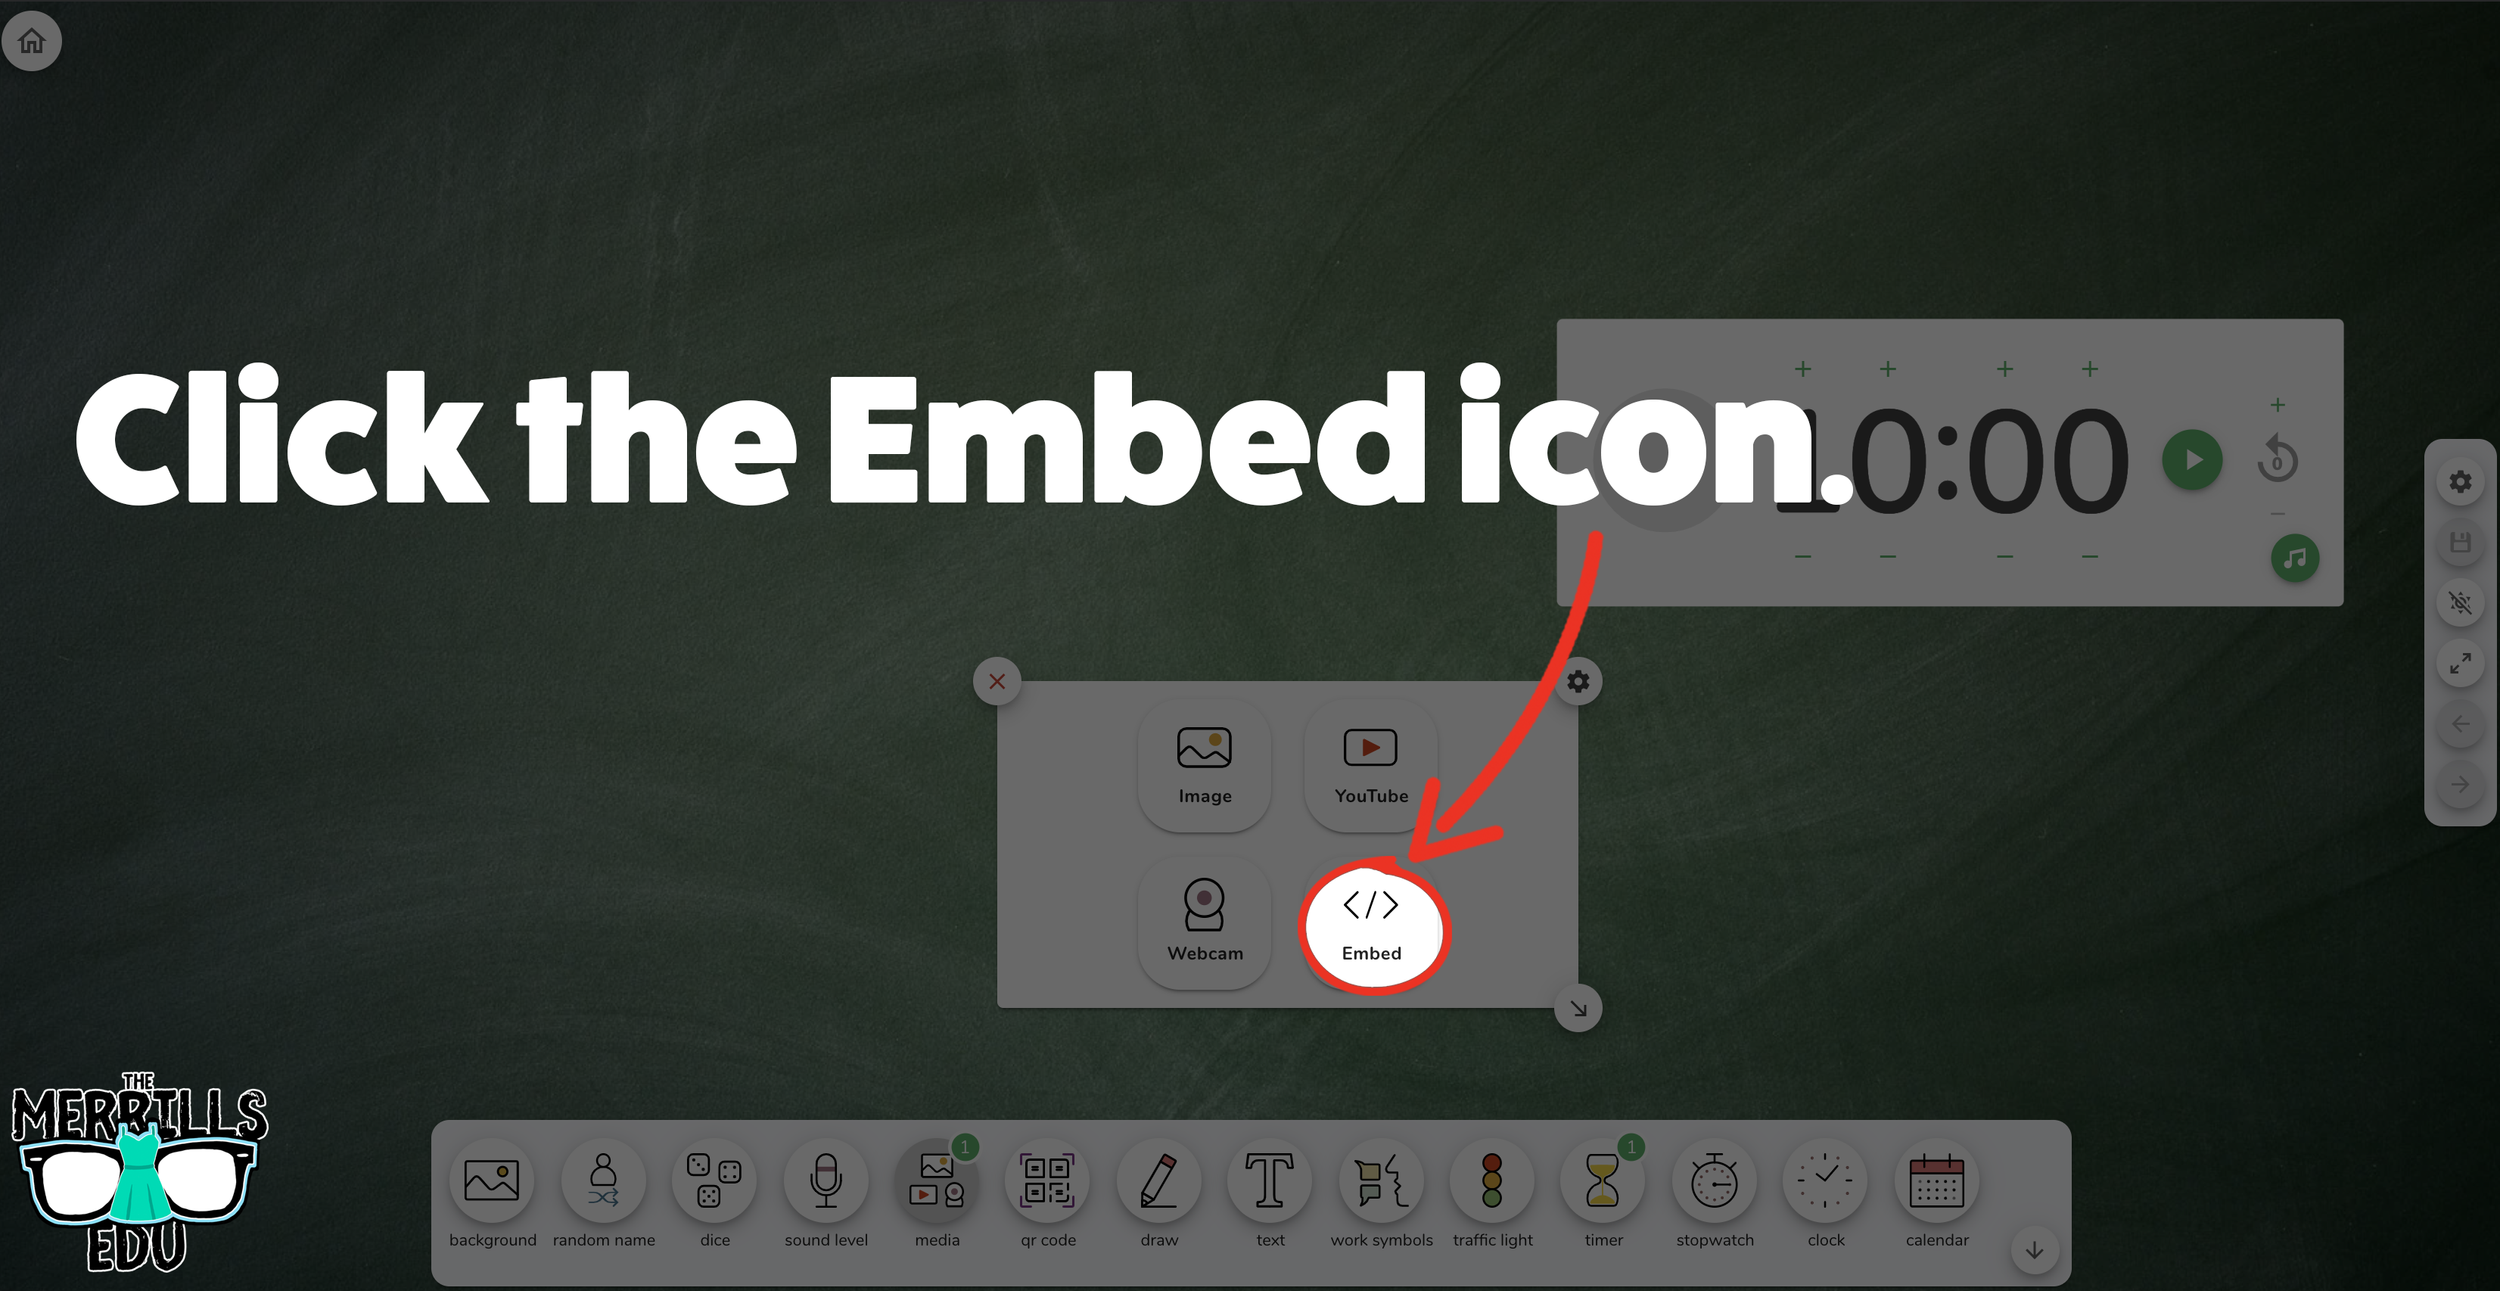
A new window will open. Click “Embed.”
Click inside the embed area and paste your Canva code.
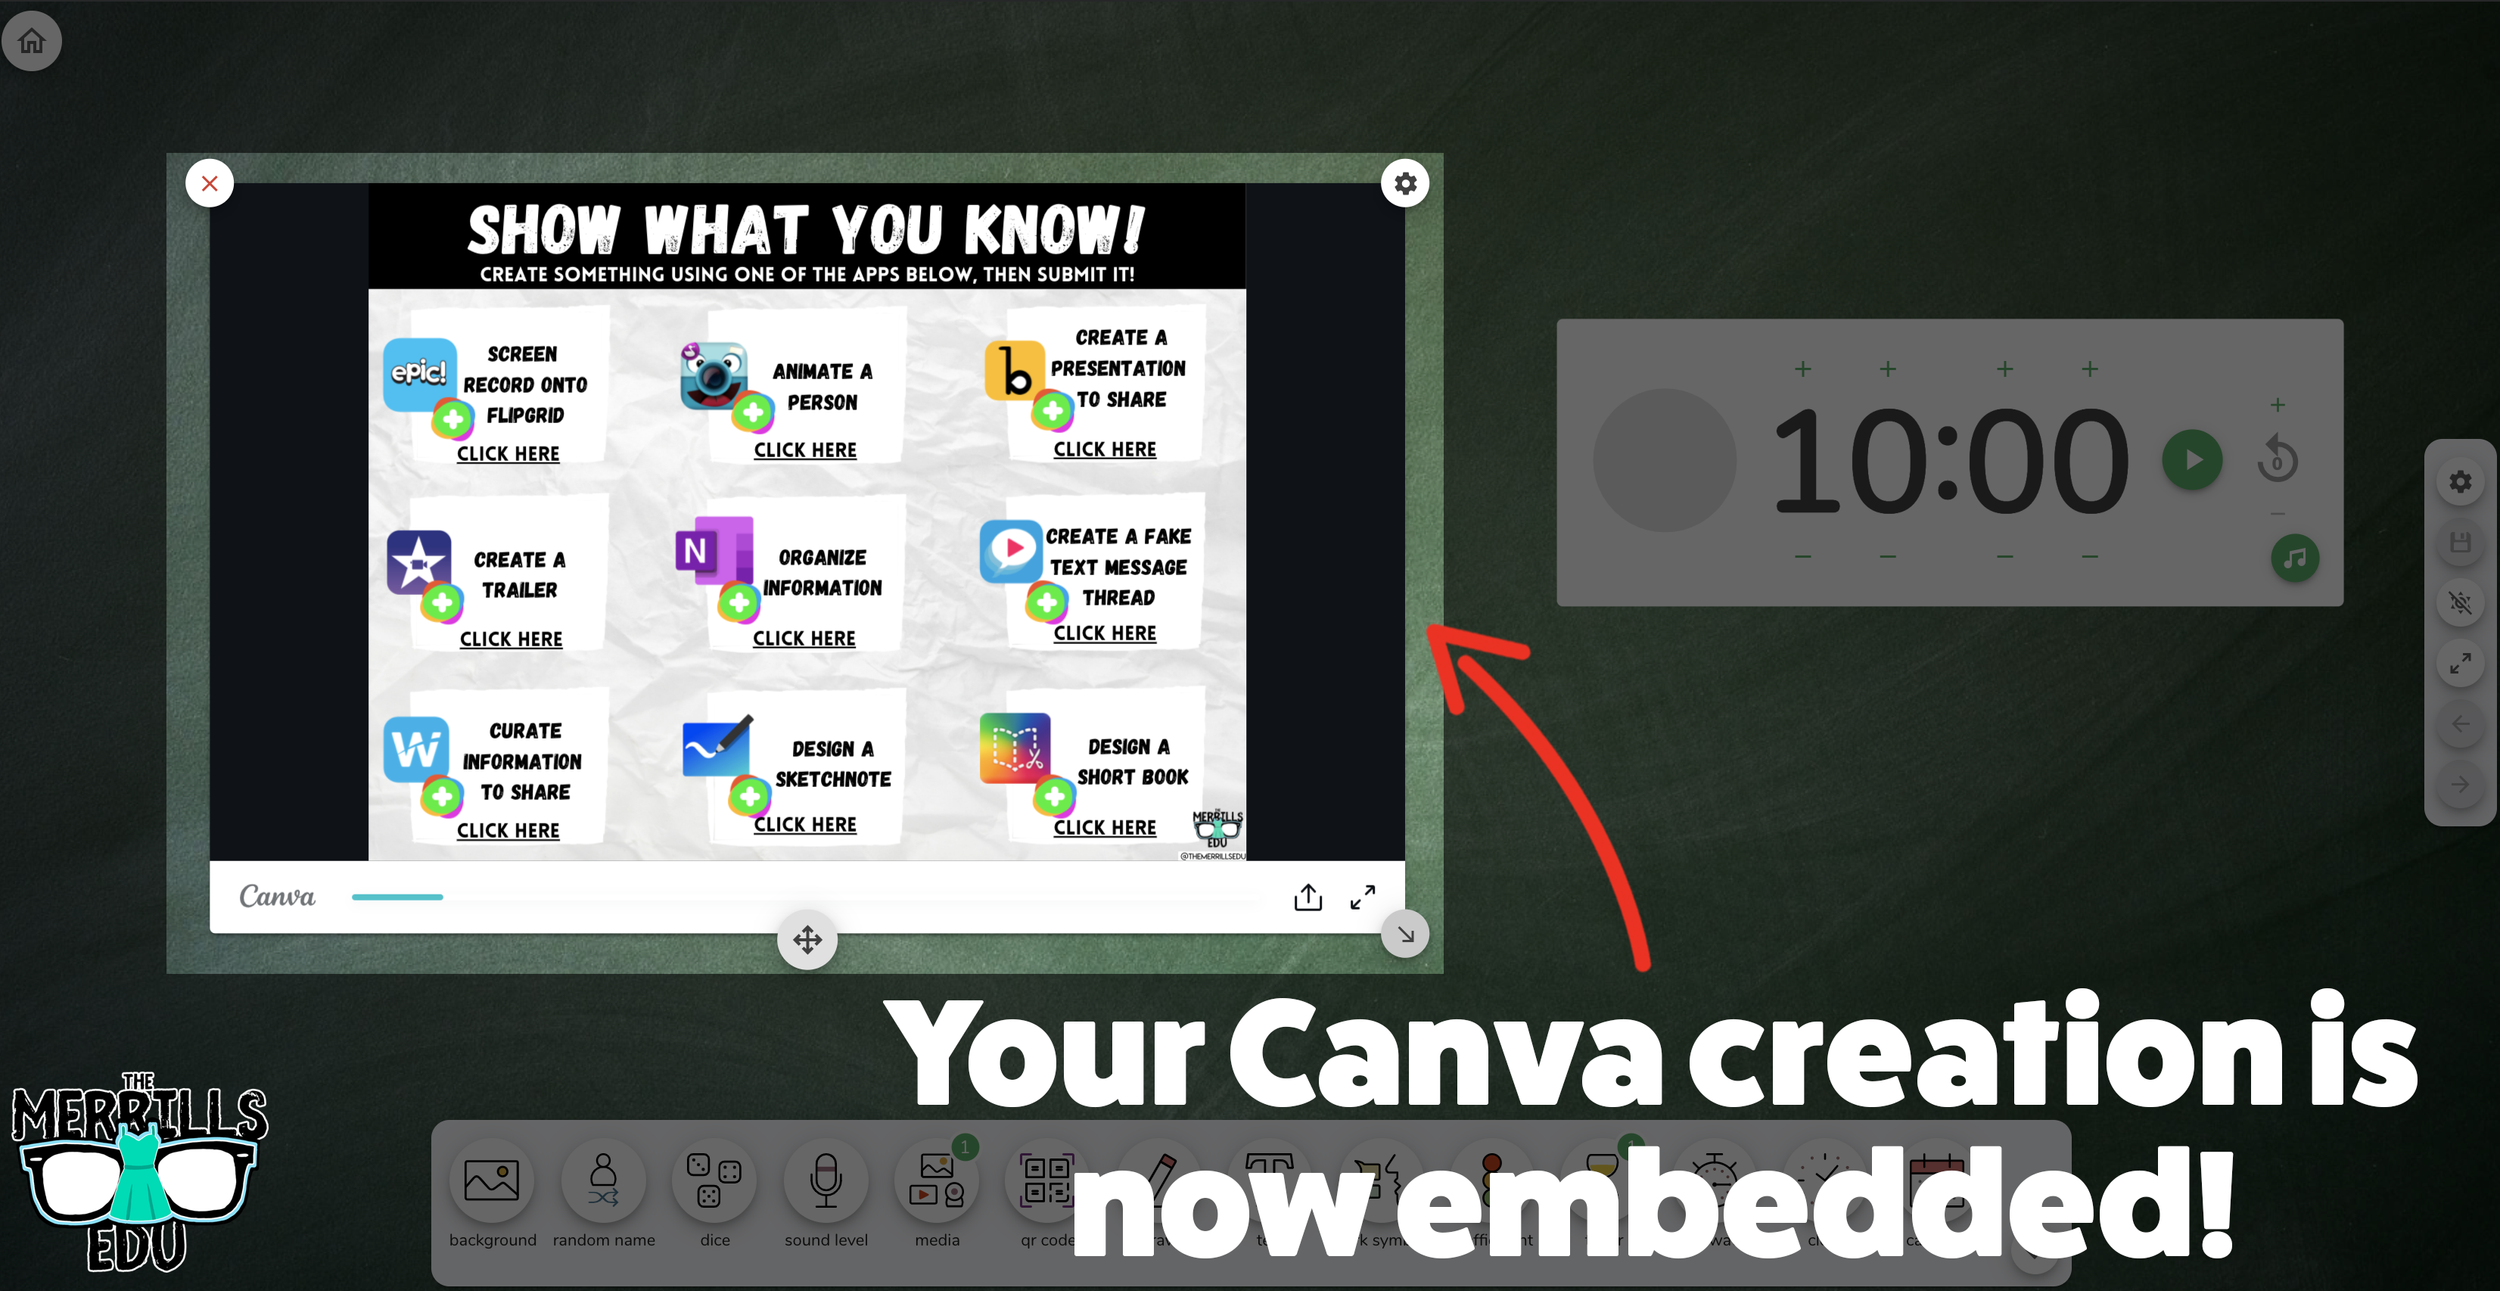
With the code pasted, click on “Run code.”
Your Canva creation will now appear! You can move the Canva creation around by clicking on the arrows (located at the bottom), or stretch the creation out by clicking the arrow on the bottom right - then dragging it to the desired location.
Now, Canva is embedded into Classroom Screen!

Buncee Embedded into Classroom Screen
Buncee creations can also be embedded into Classroom Screen! This is great if you have different tasks that you share for your student to perform daily. For example, if you have different tasks for multiple groups, you can create a Buncee and then share it on the Classroom Screen background. Here’s how it all works:
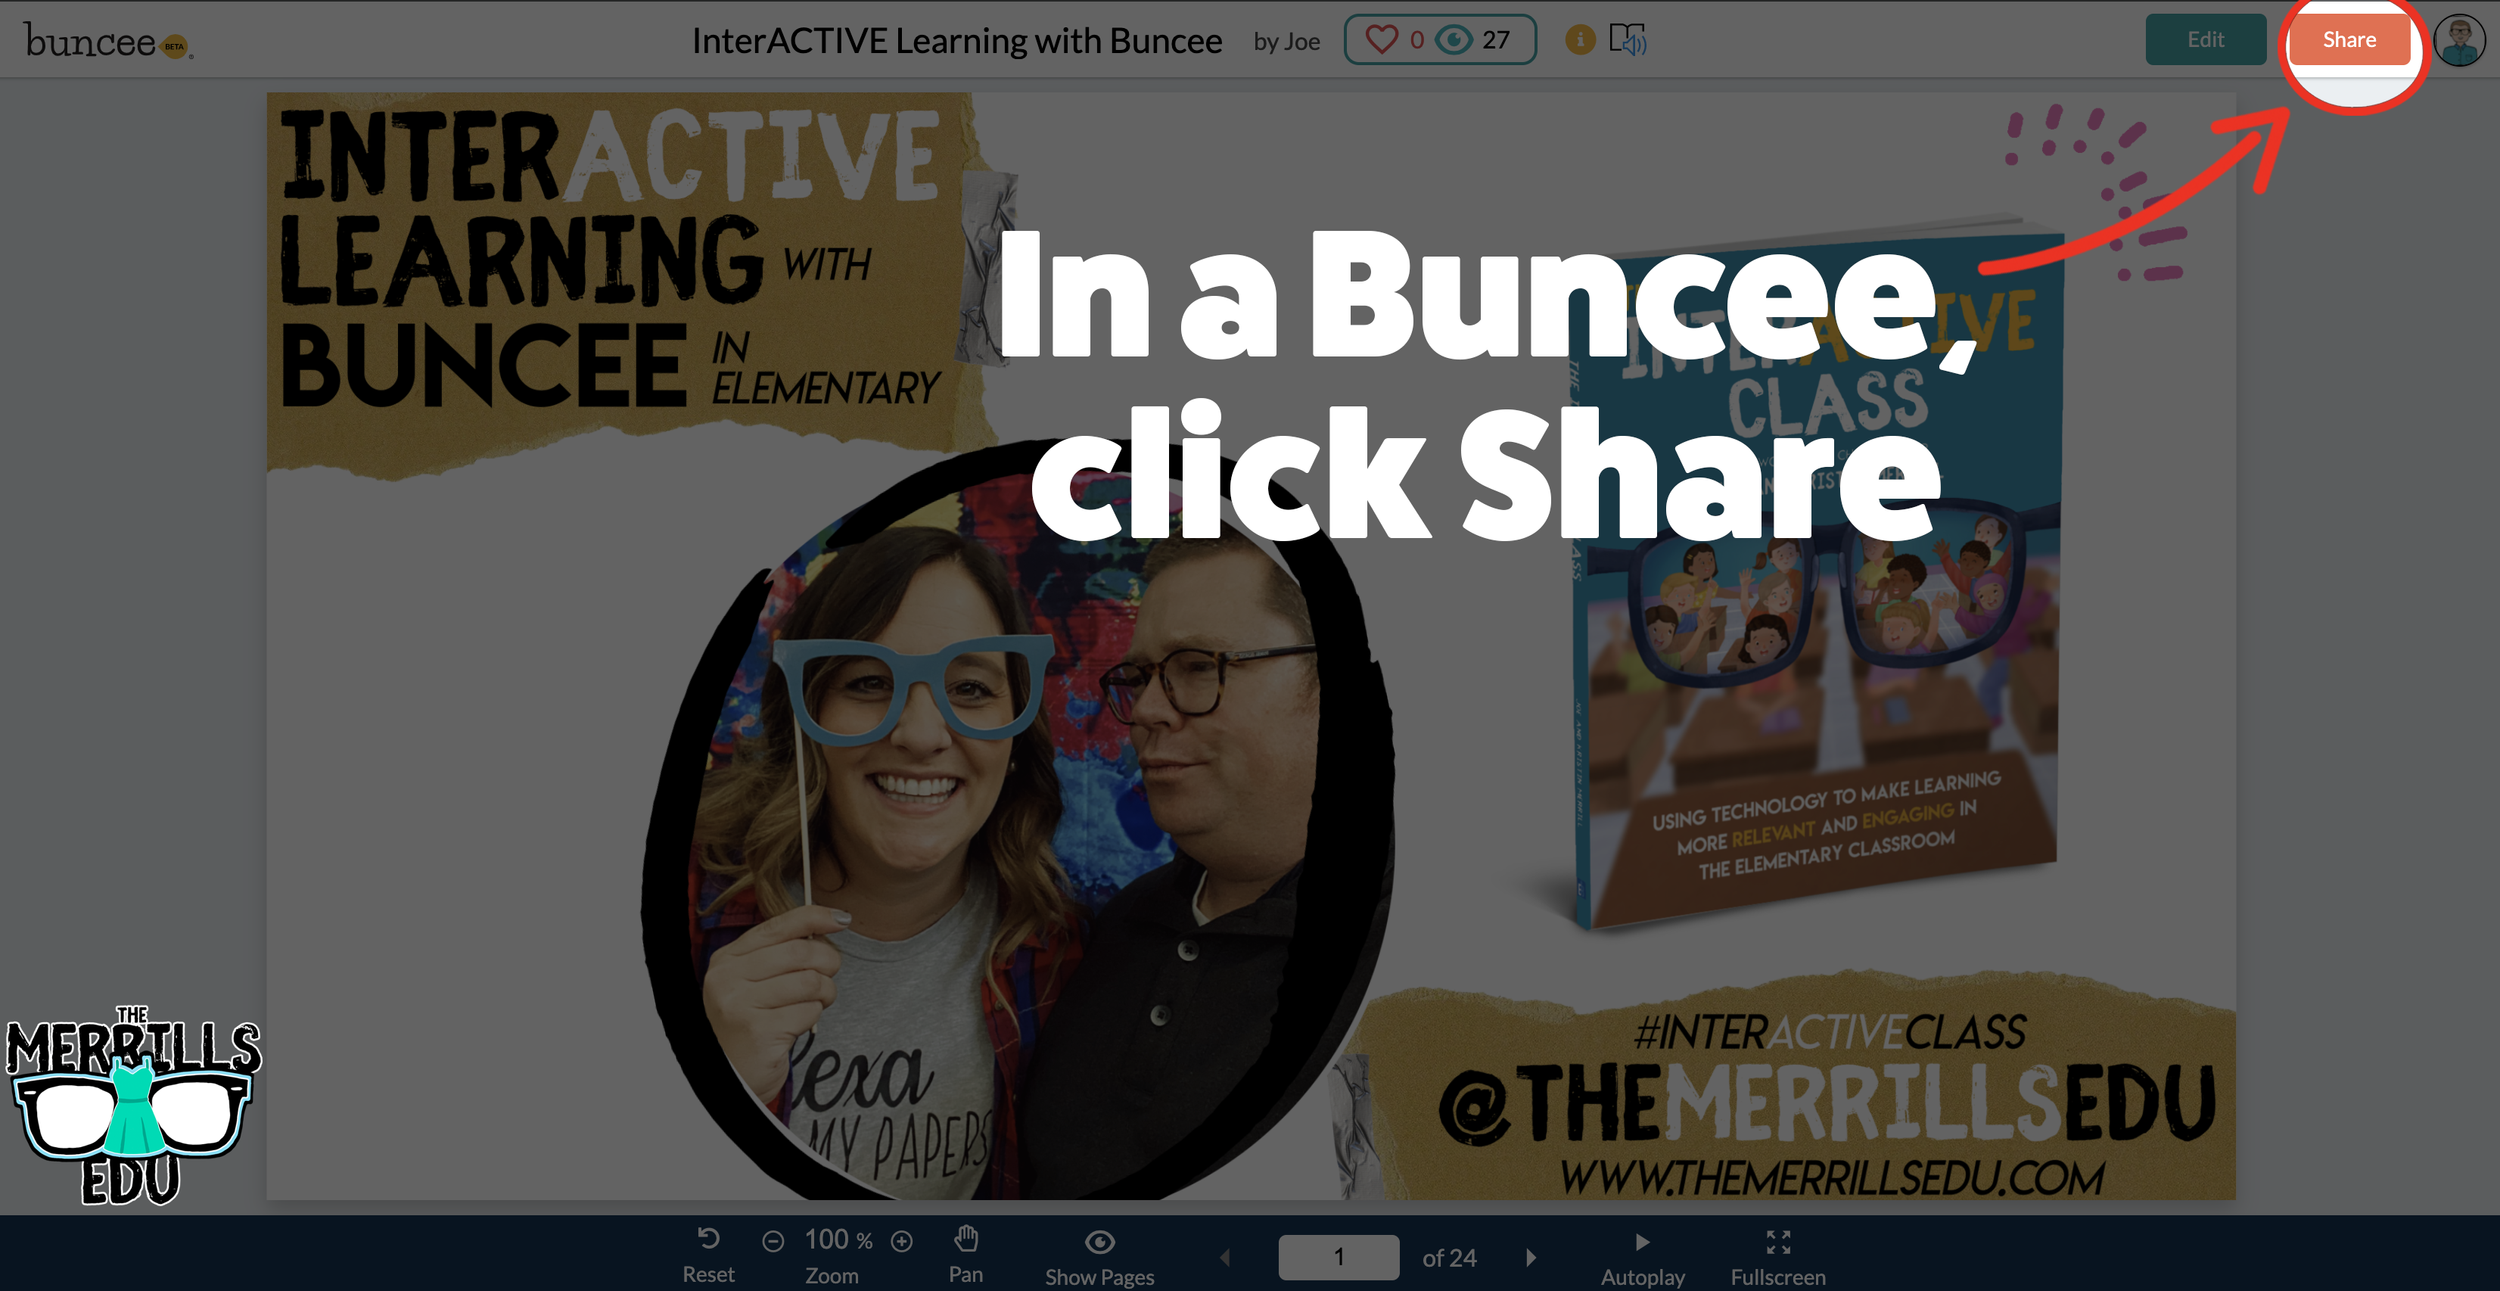

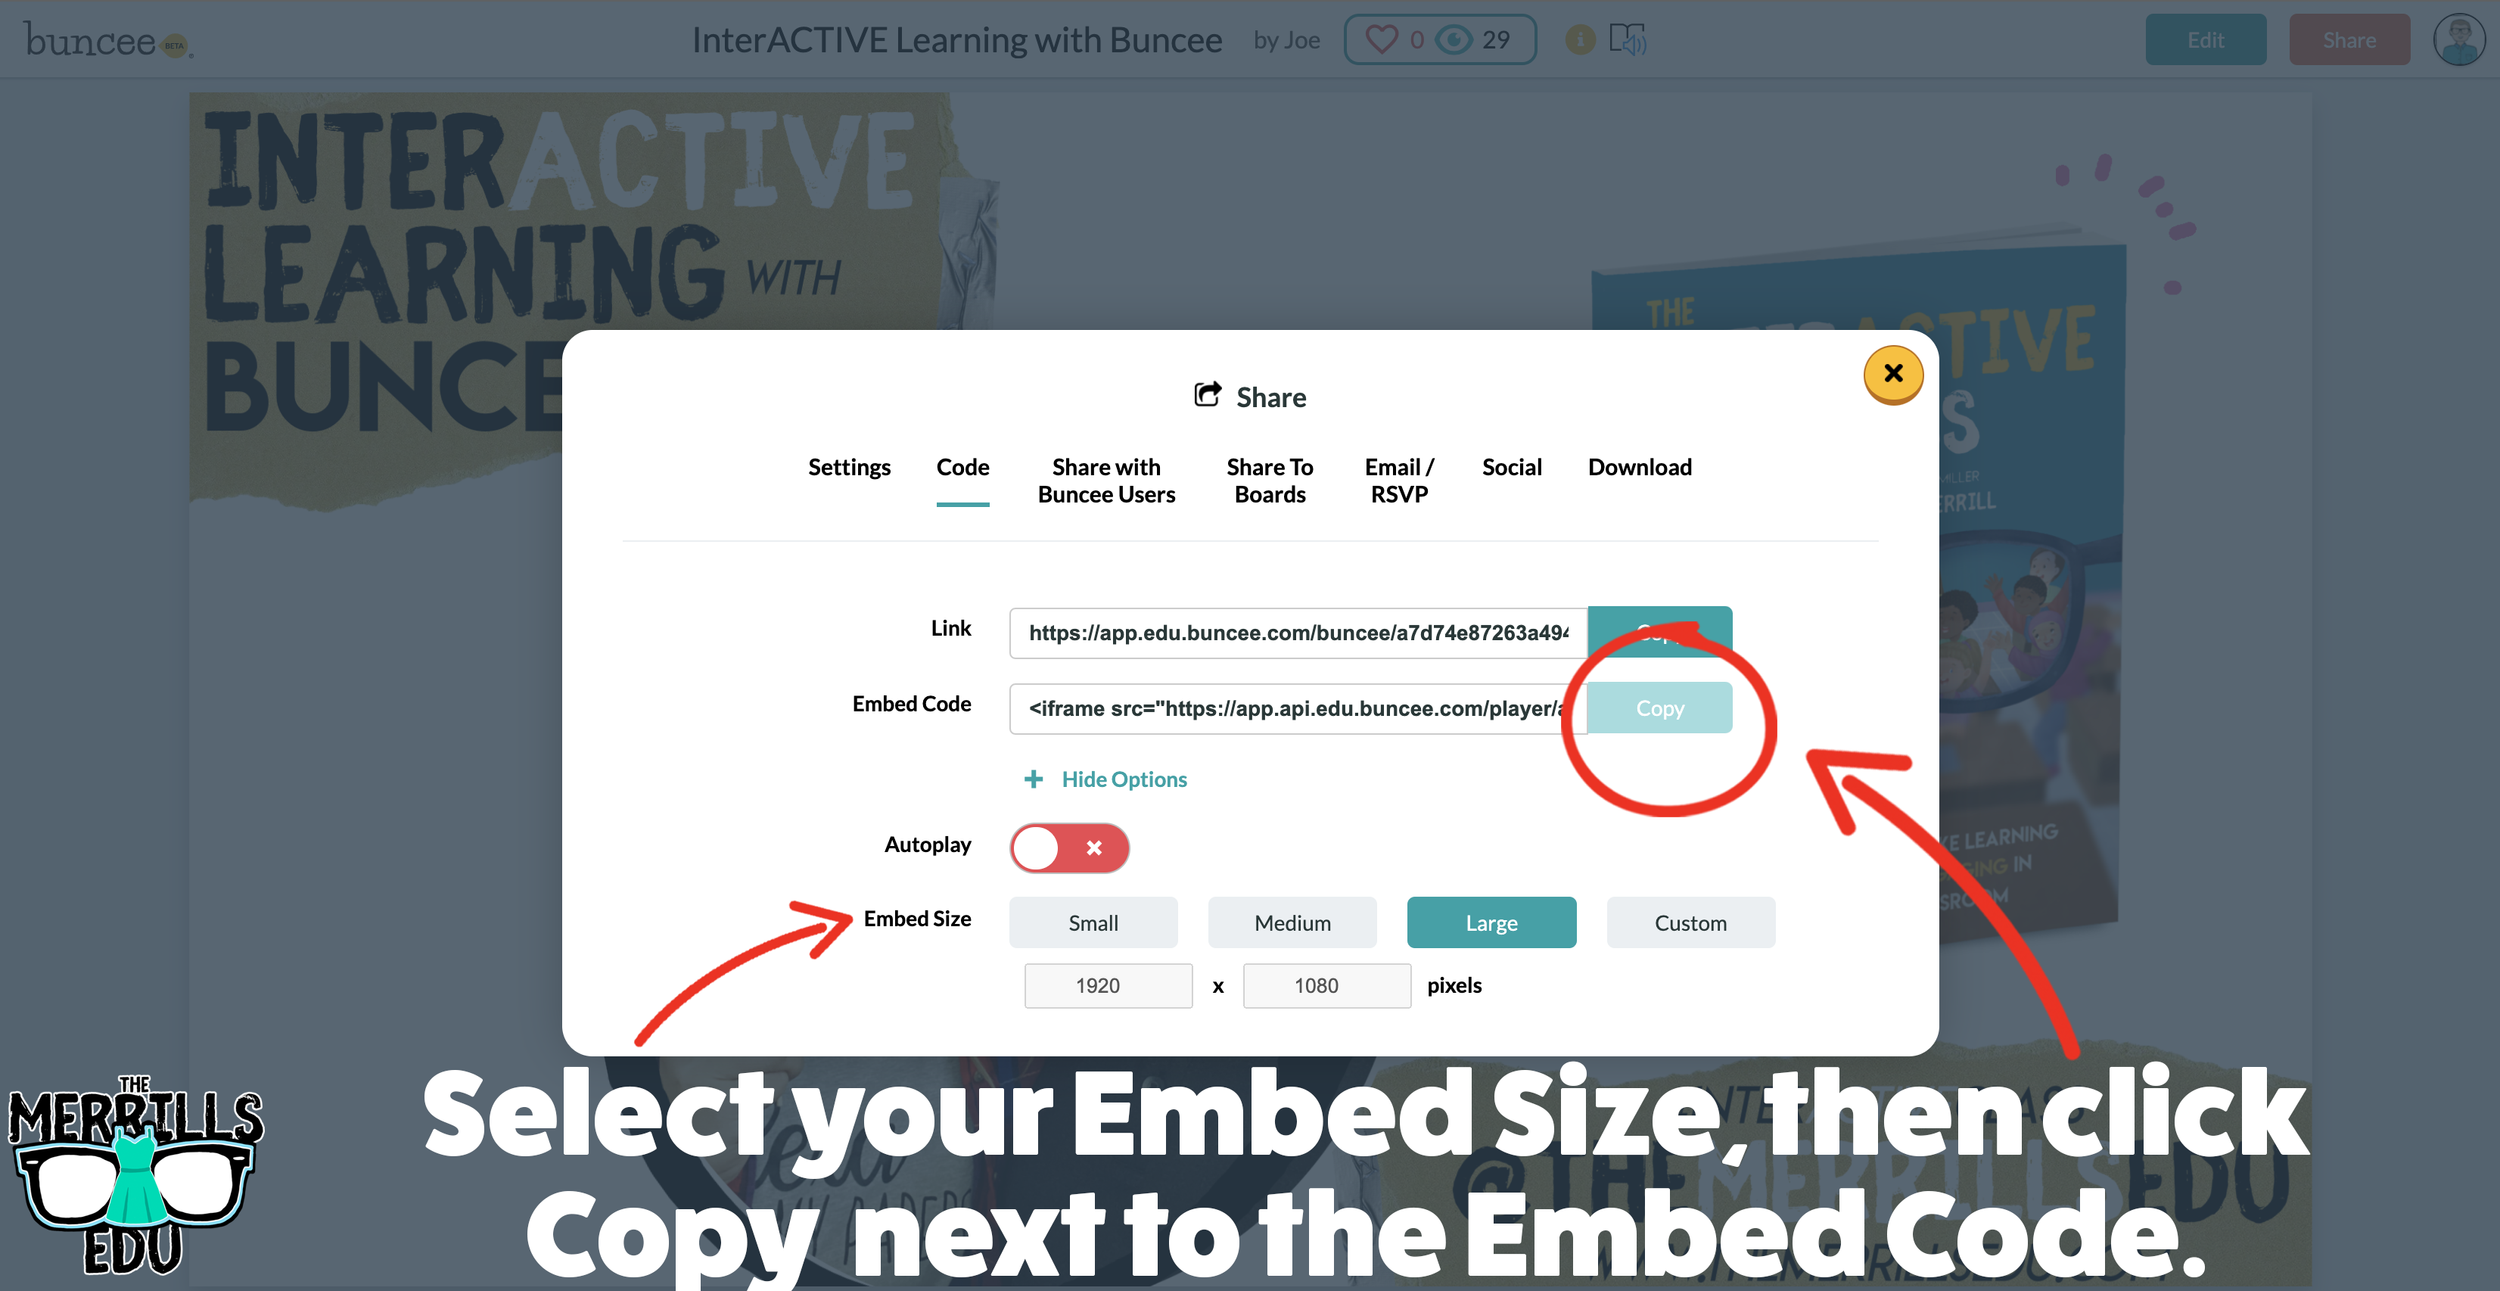

Open the Buncee creation that you want to embed, then click “Share.”
In the pop-up, click “Code.”
Click “+Show Options” and then select your preferred size.
Once you have selected your size, click “Copy” next to the Embed Code bar.
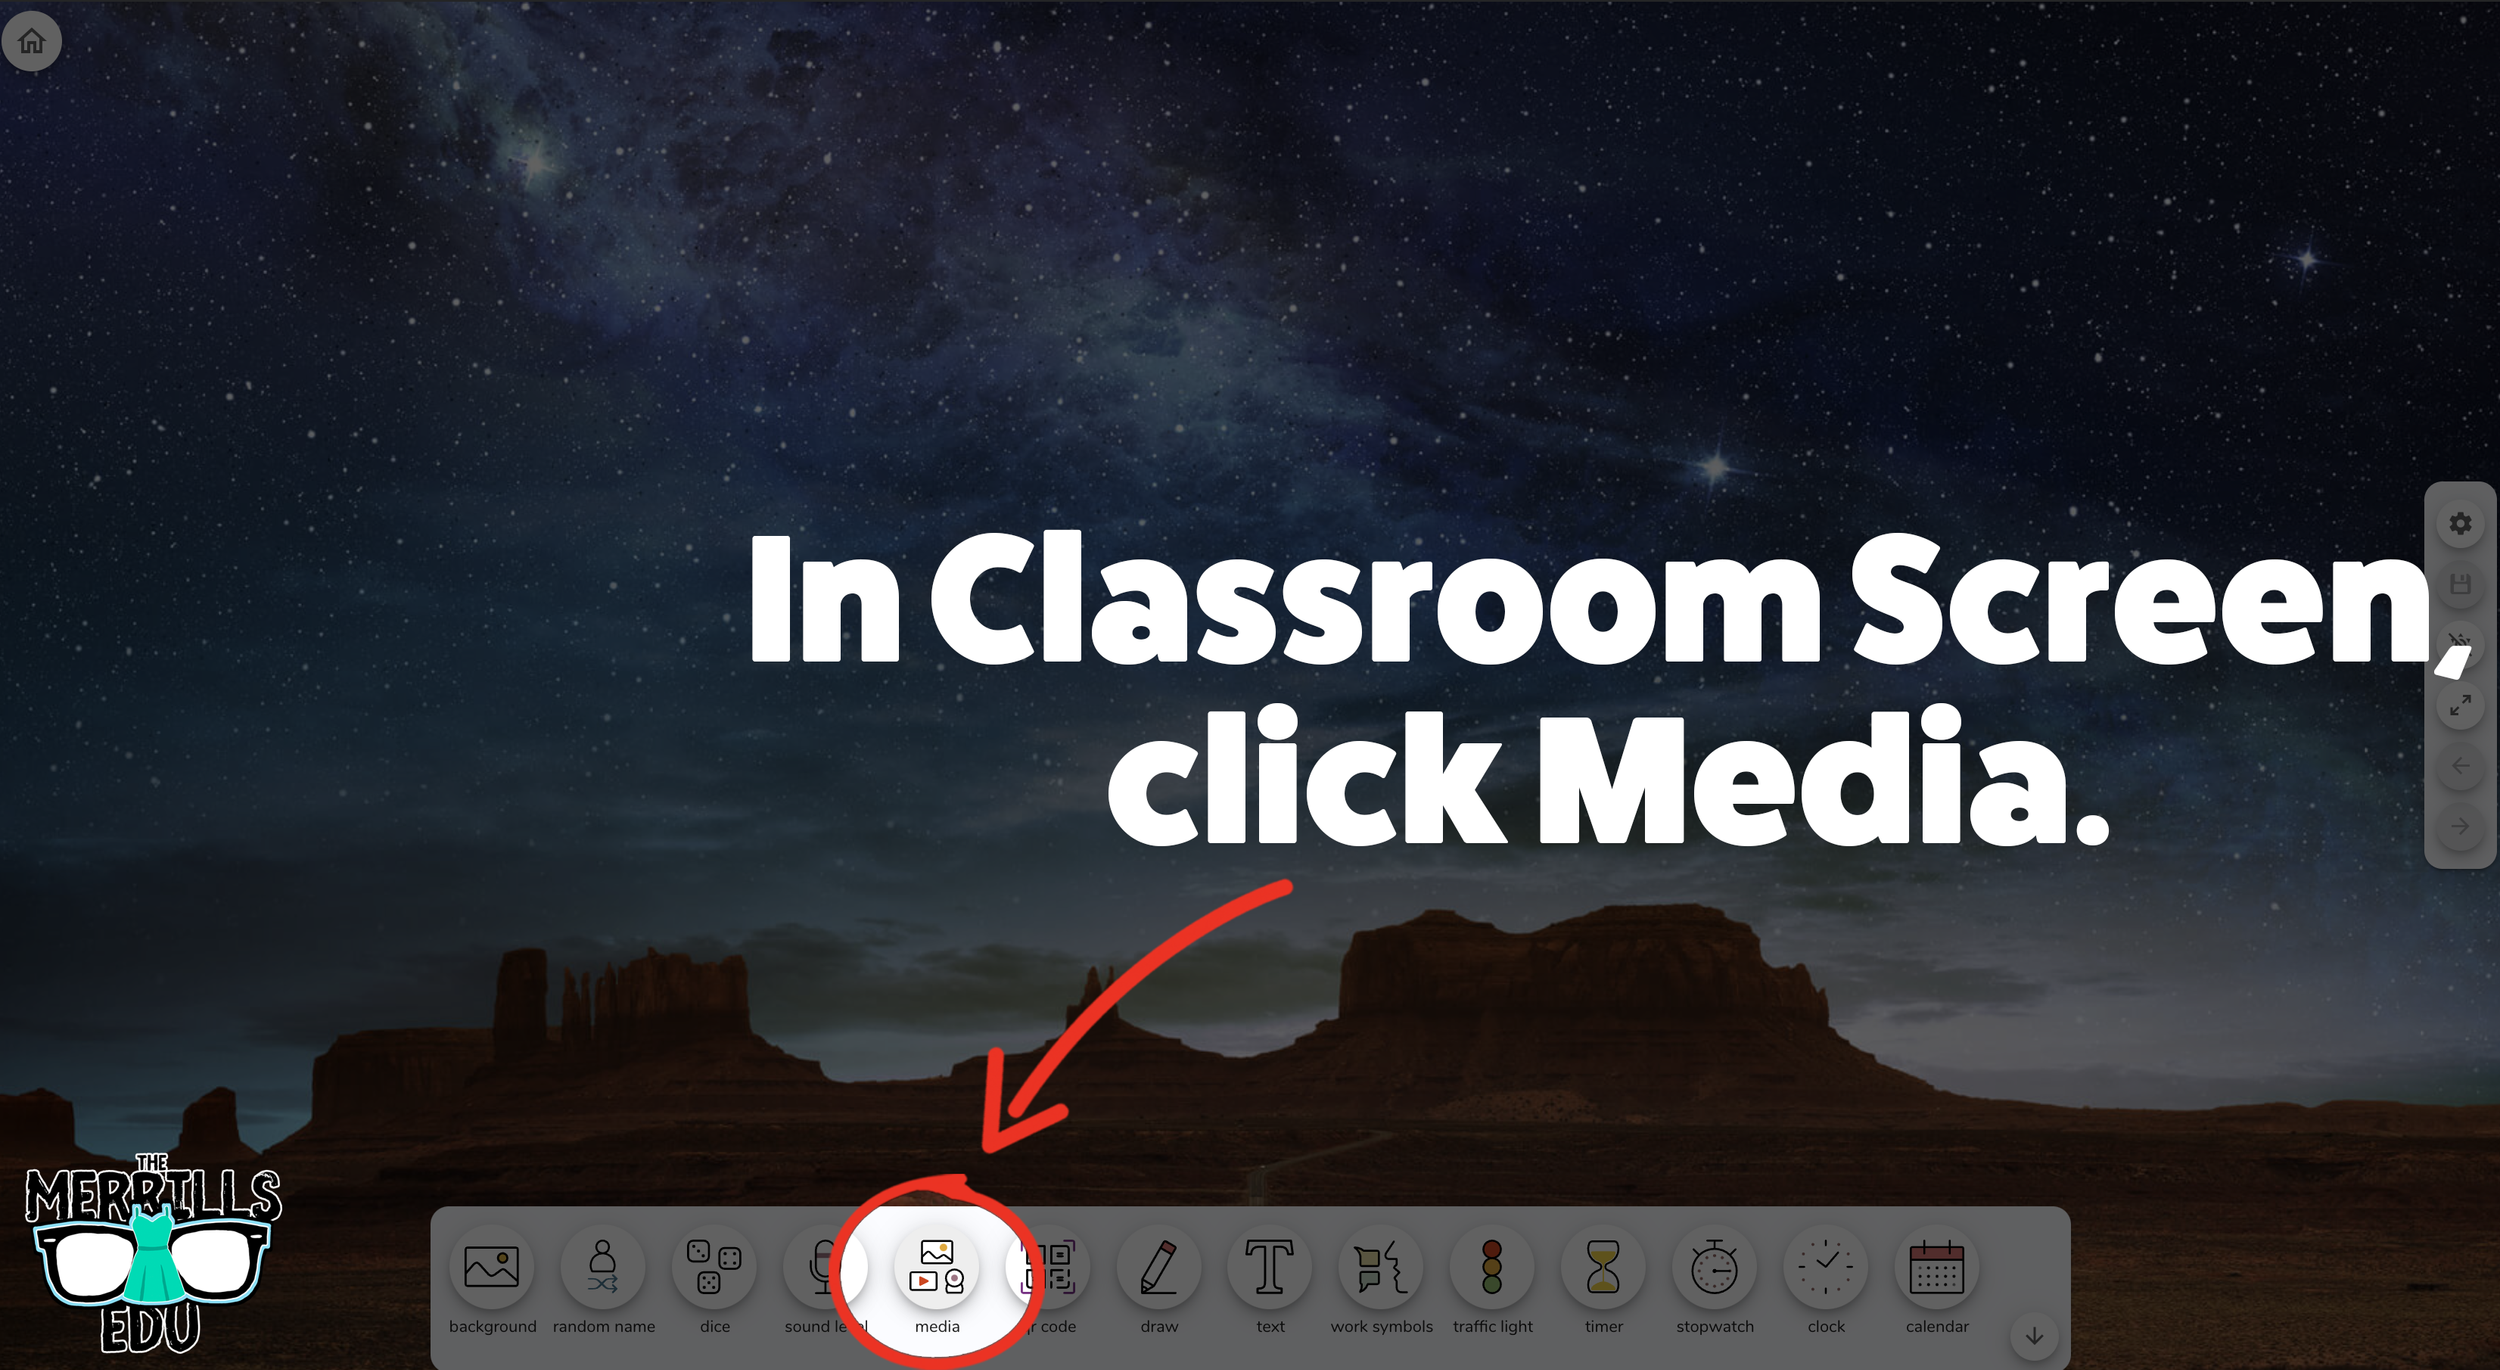
In a separate tab, head over to ClassroomScreen.com and start a new screen (or open an old one).
With your Classroom Screen open, click on “Media” from the menu options running along the bottom of the screen.
A new window will open. Click “Embed.”
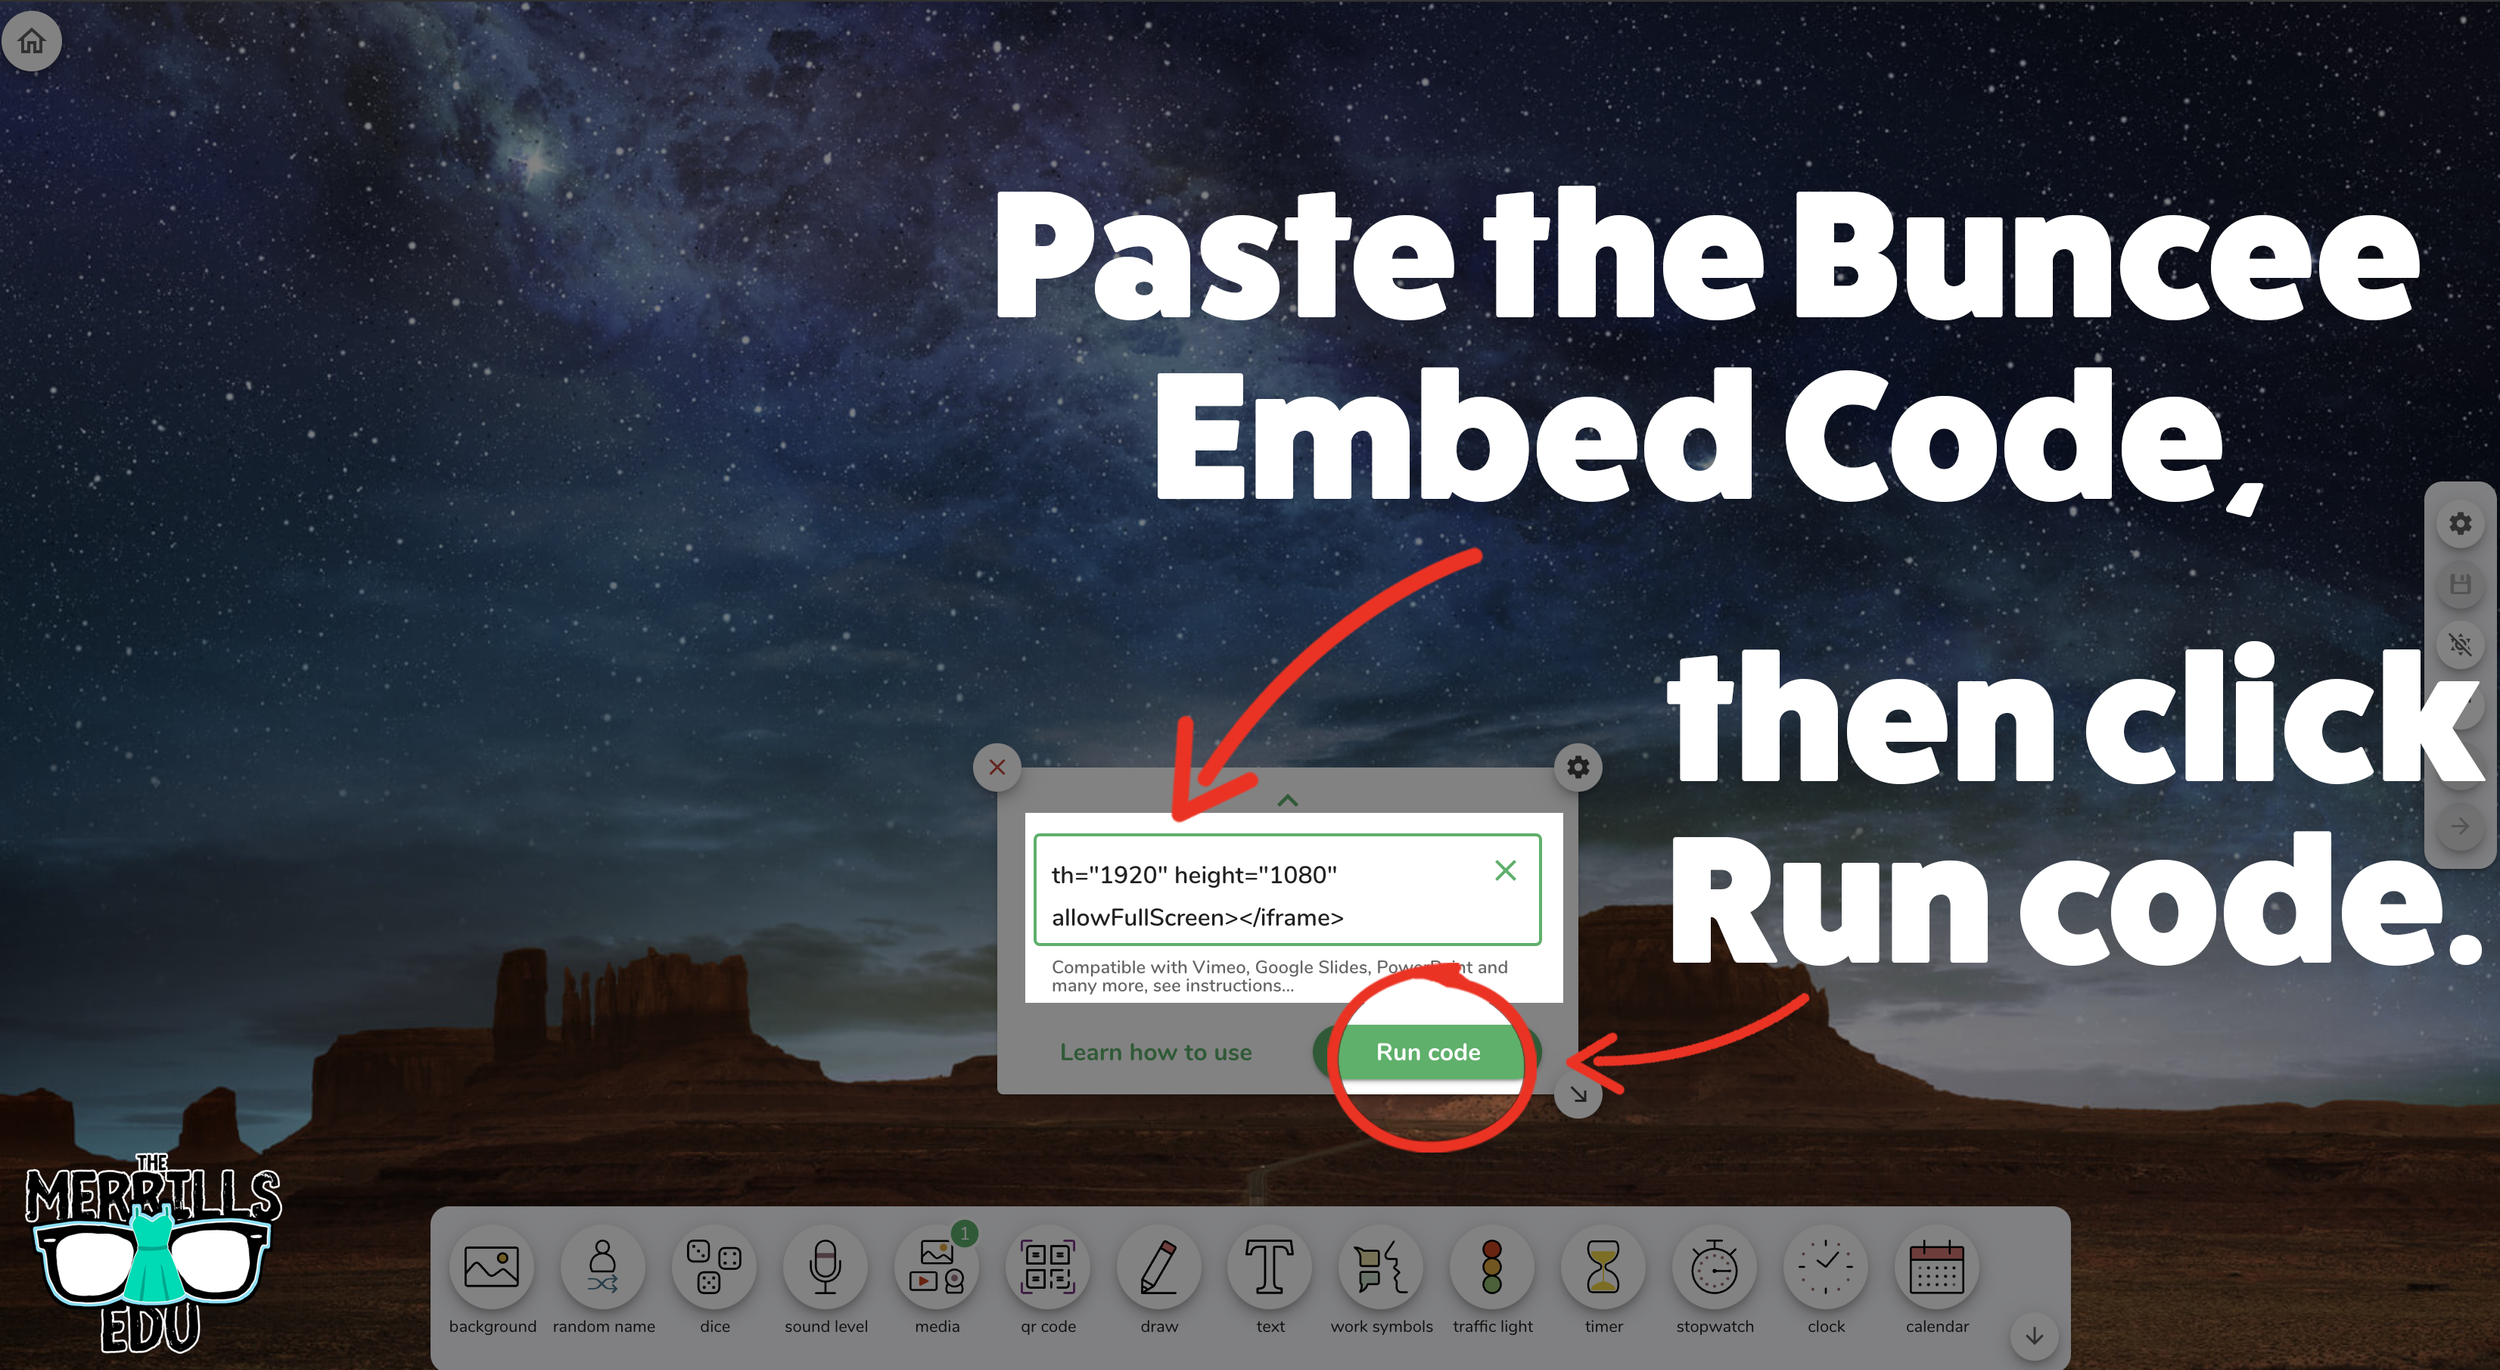
Click inside the embed area and paste your Buncee code.
With the code pasted, click on “Run code.”
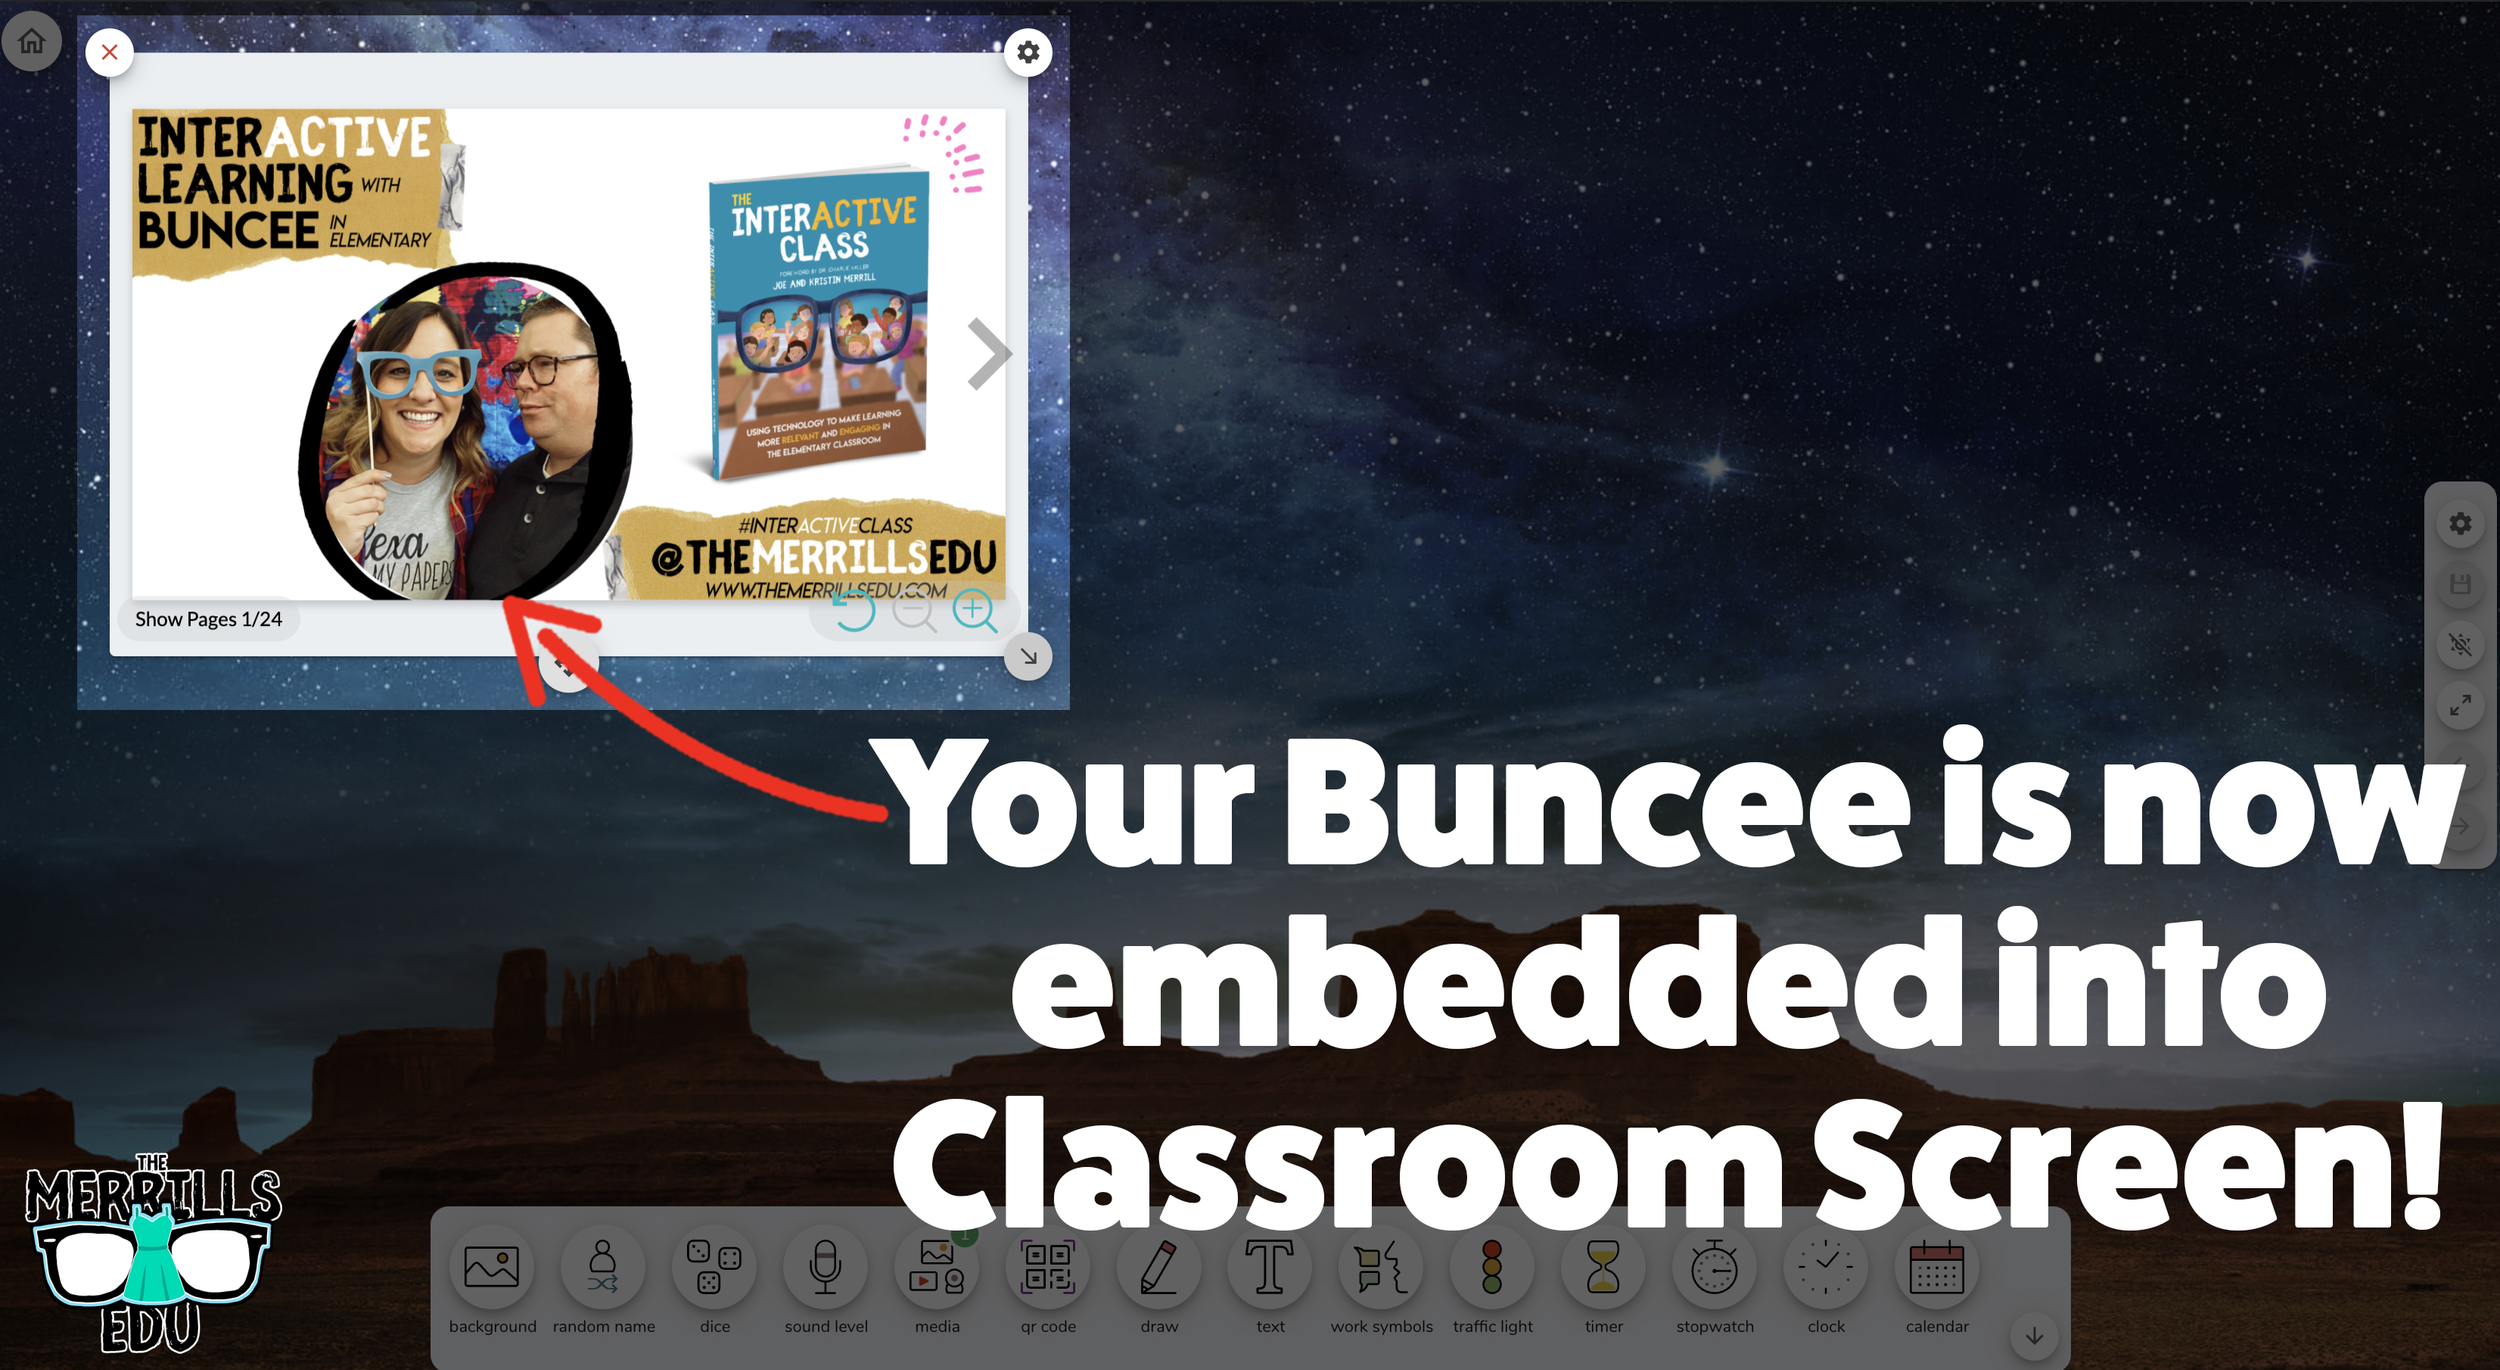
Your Canva creation will now appear! You can move the Buncee creation around by clicking on the arrows (located at the bottom), or stretch the creation out by clicking the arrow on the bottom right - then dragging it to the desired location.
Now, Buncee is embedded into Classroom Screen!

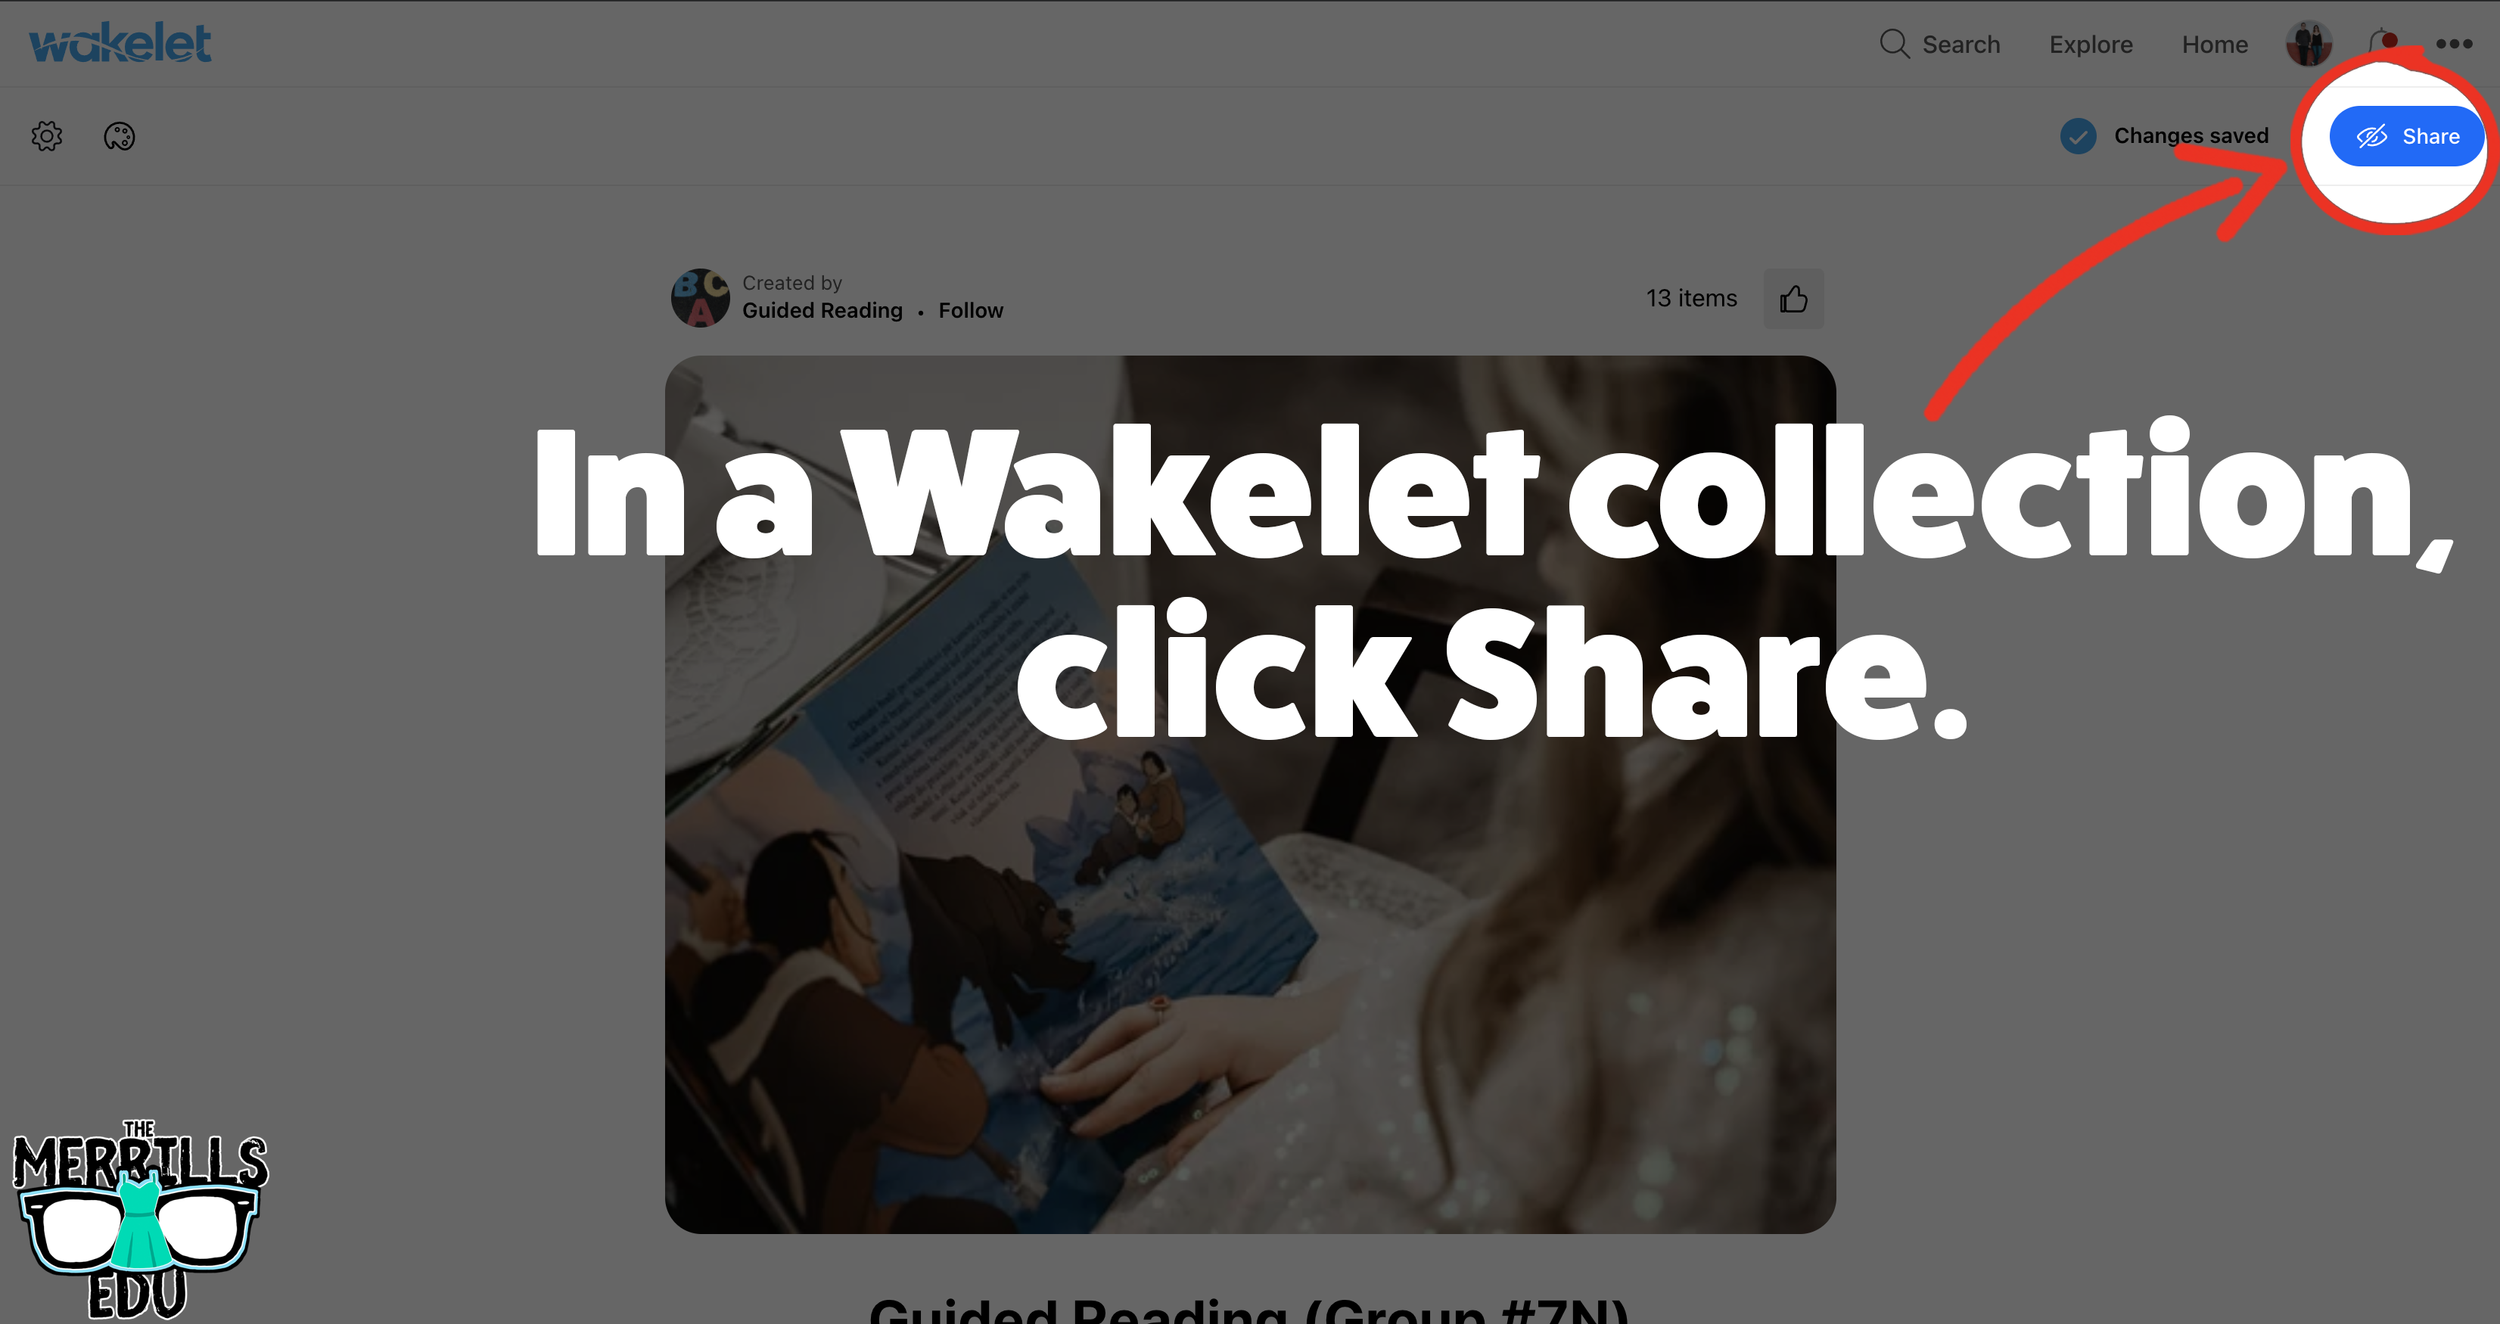
Wakelet Embedded into Classroom Screen
This embed is great if you need to post several different Wakelet collections in the same place. For example, you could group your students and then provide differentiated tasks on Wakelet - all of which are embedded onto Classroom Screen. Here’s how it all works:


(Note: you will need to make your Wakelet collection either Public or Unlisted for this to work)
In a Wakelet collection, click the “Share” button.
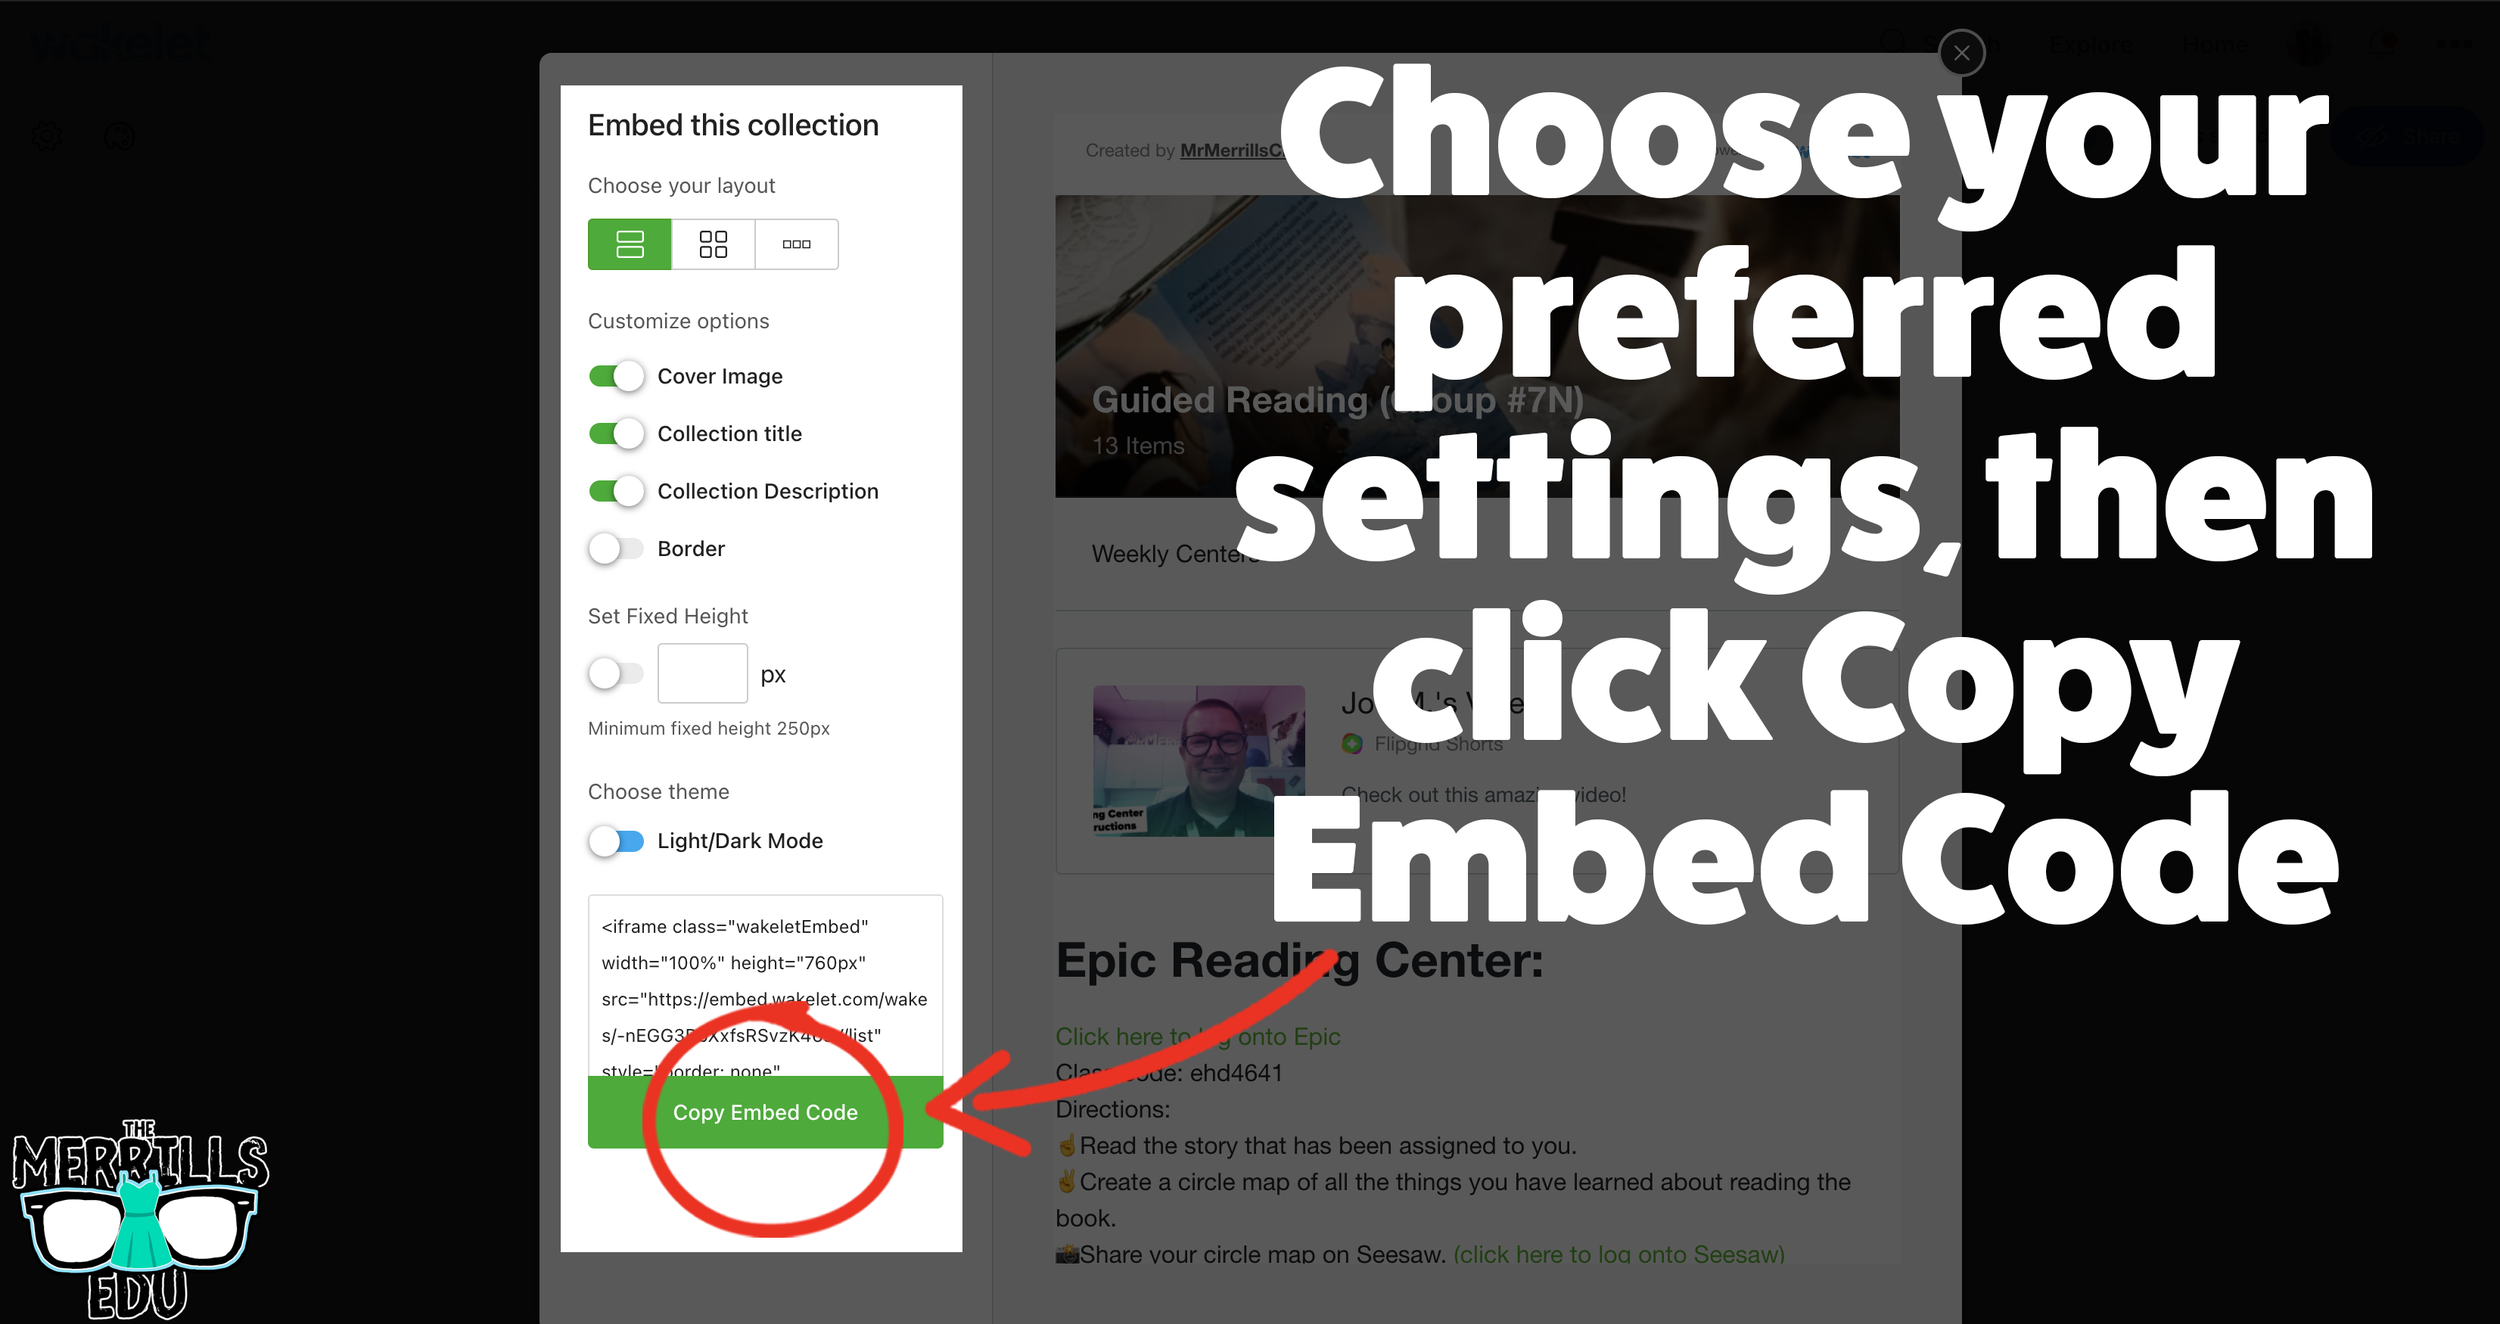
In the pop-up window, click “Embed.”
Select your preferred settings, then click “Copy Embed Code.”
In a separate tab, head over to ClassroomScreen.com and start a new screen (or open an old one).
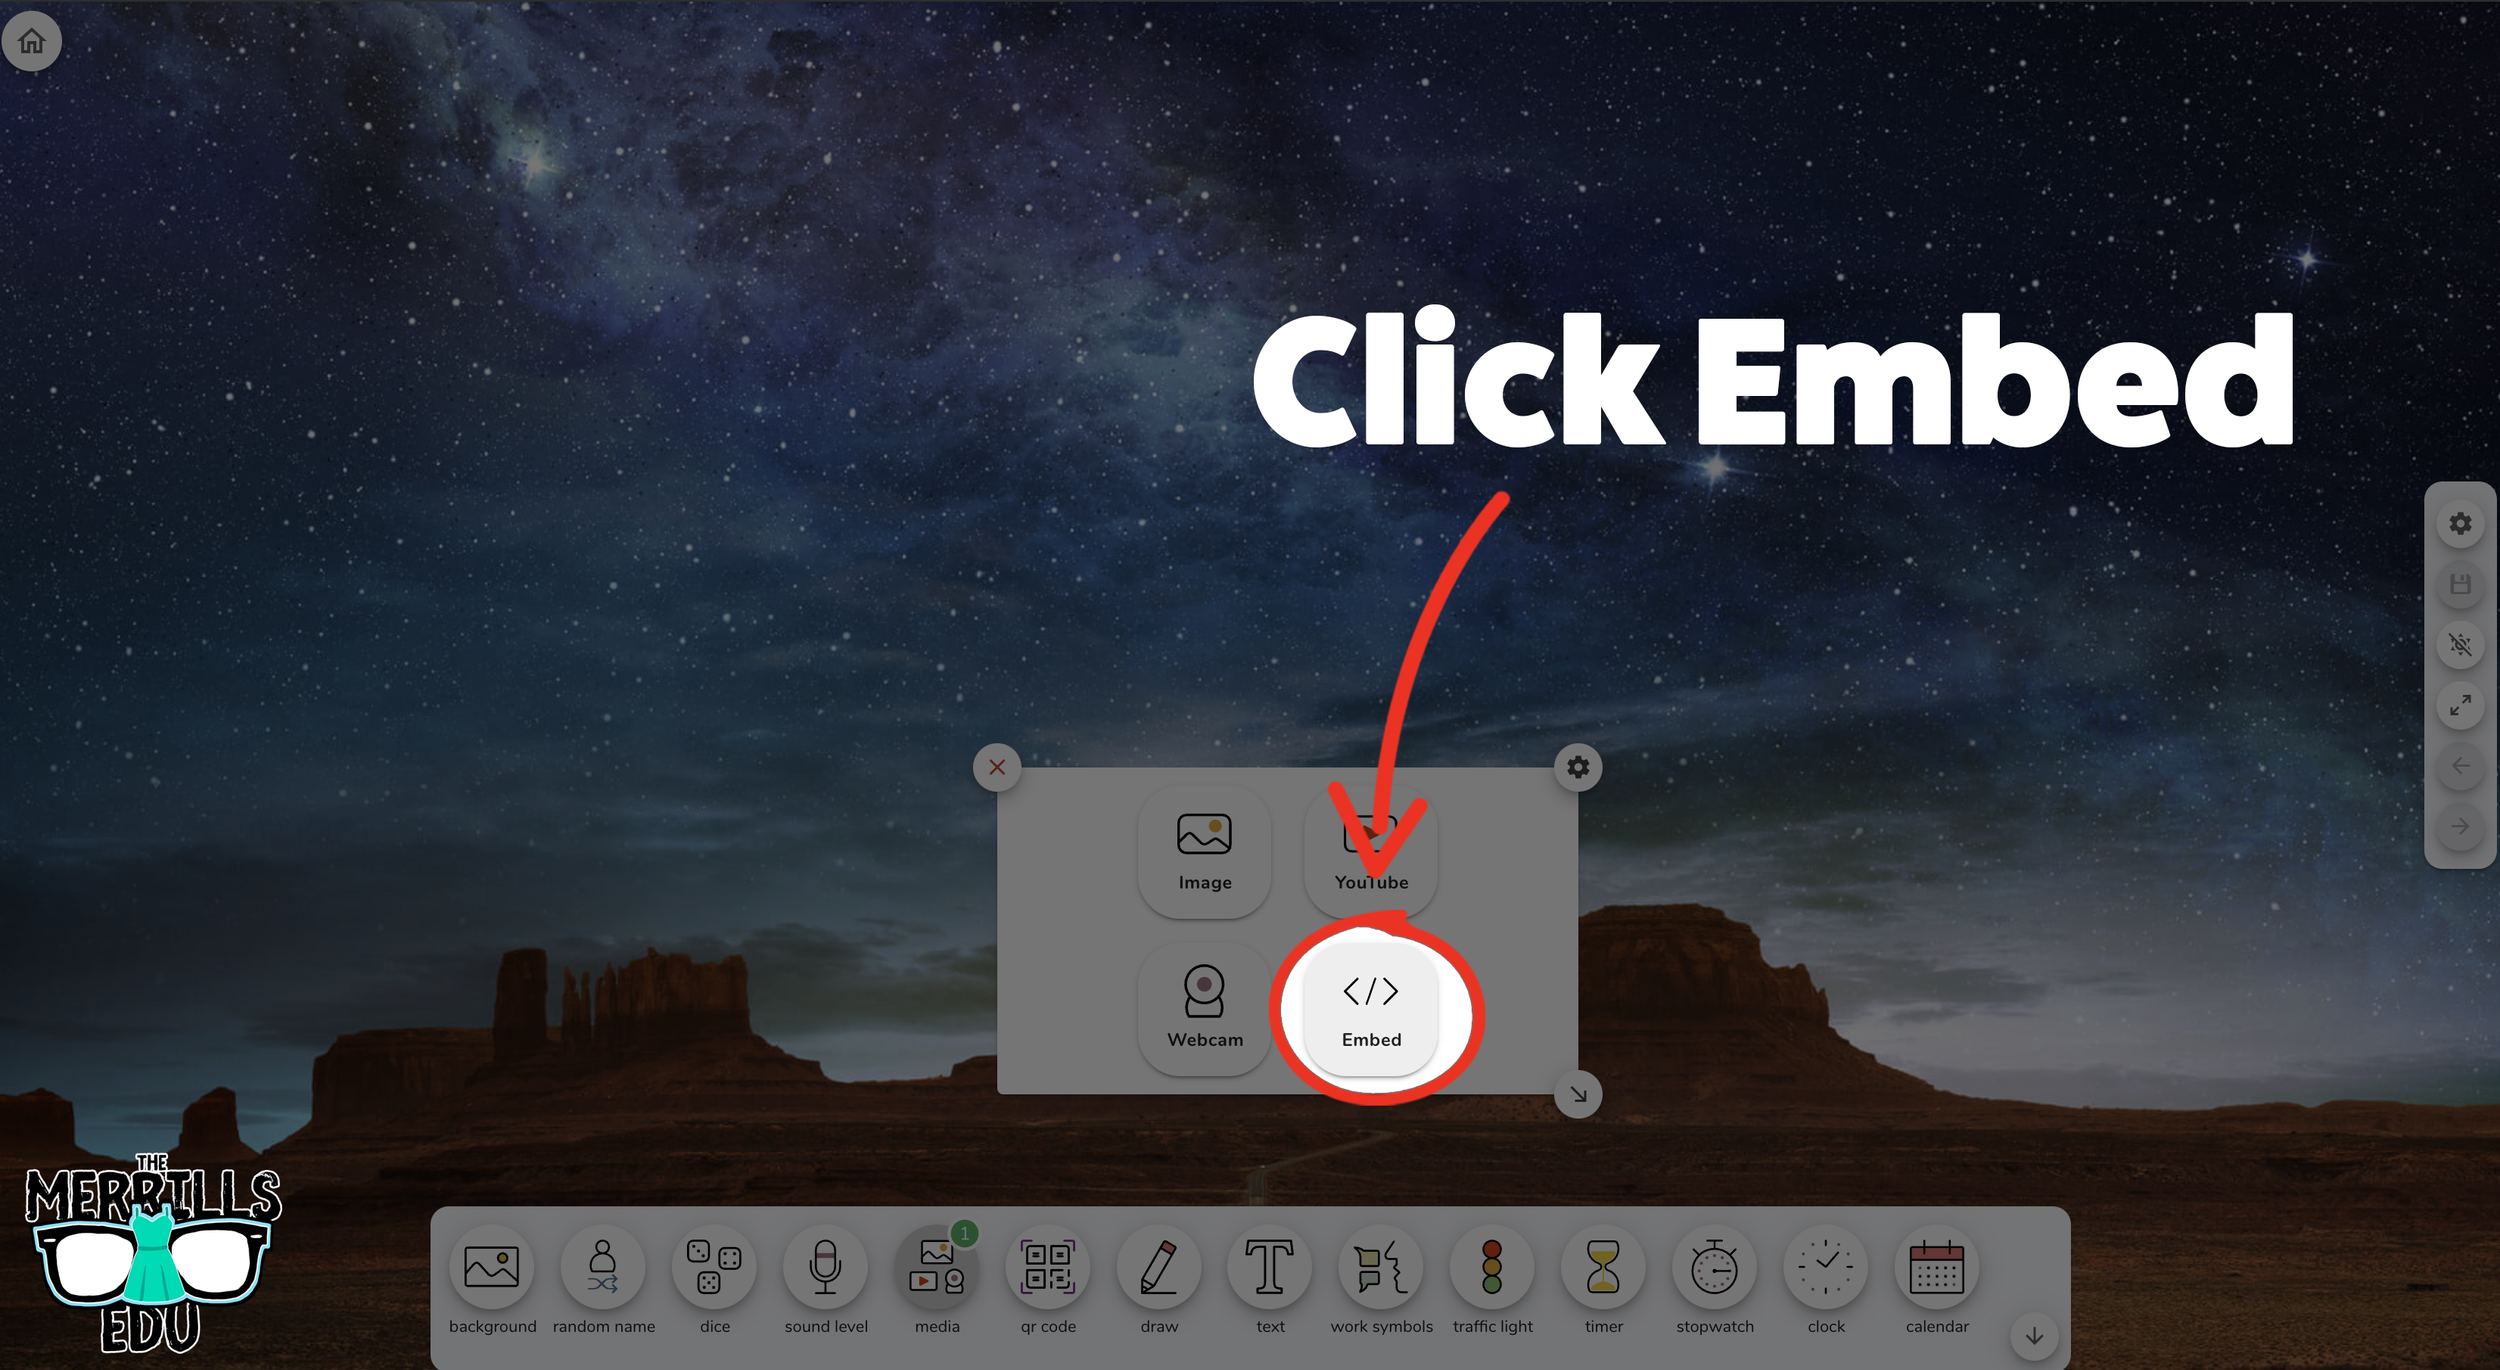
With your Classroom Screen open, click on “Media” from the menu options running along the bottom of the screen.
A new window will open. Click “Embed.”
Click inside the embed area and paste your Wakelet code.
With the code pasted, click on “Run code.”
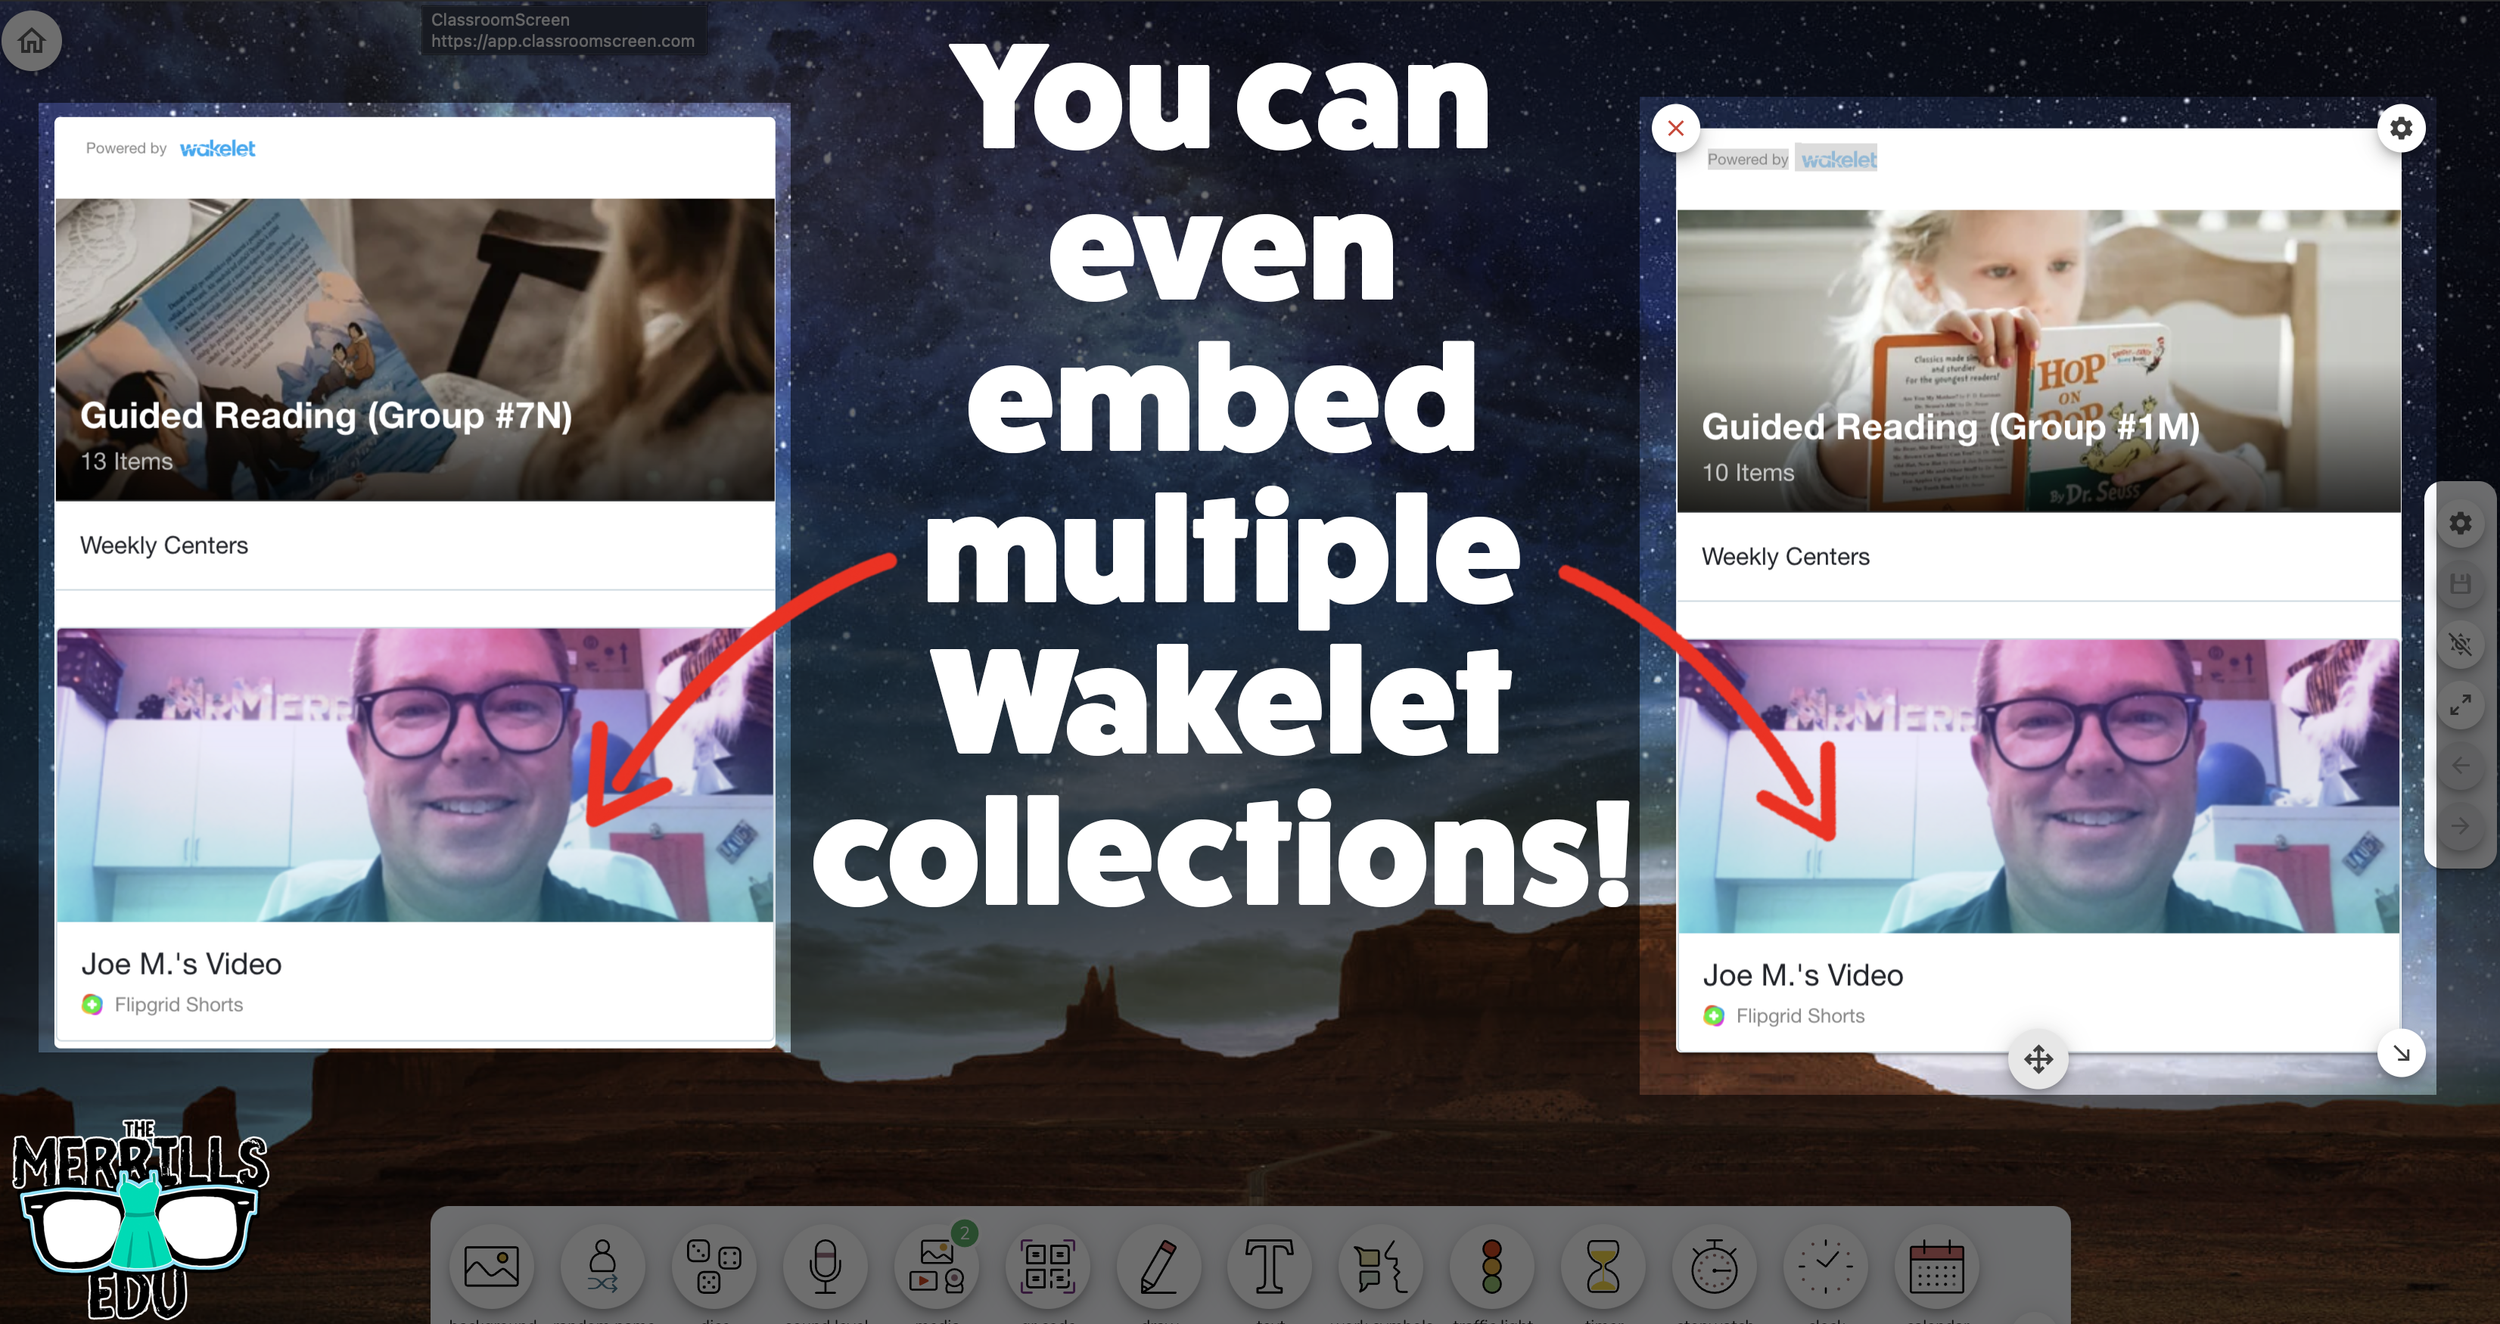
Your Wakelet collection will now appear! You can move the Wakelet collection around by clicking on the arrows (located at the bottom), or stretch the collection out by clicking the arrow on the bottom right - then dragging it to the desired location.
Now, Wakelet is embedded into Classroom Screen!
BONUS: You can add multiple Wakelet embeds onto the same Classroom Screen!
-- Let us know if you’re using any of these ideas in your classroom! Be sure to follow us on social media (@TheMerrillsEDU everywhere) and tag us! 👓👗
For more tips, tricks and lesson ideas for making learning more interACTIVE, check out our books The InterACTIVE Class and Flipgrid in the InterACTIVE Class on Amazon!


InterACTIVE Activities for The Day the Crayons Quit
The Day the Crayons Quit and The Day the Crayons Came Home are two classroom essentials! @TheMerrillsEDU share interACTIVE activities featuring: Google Jamboard, Novel Effect, Chatterpix Kids, Flipgrid and more!
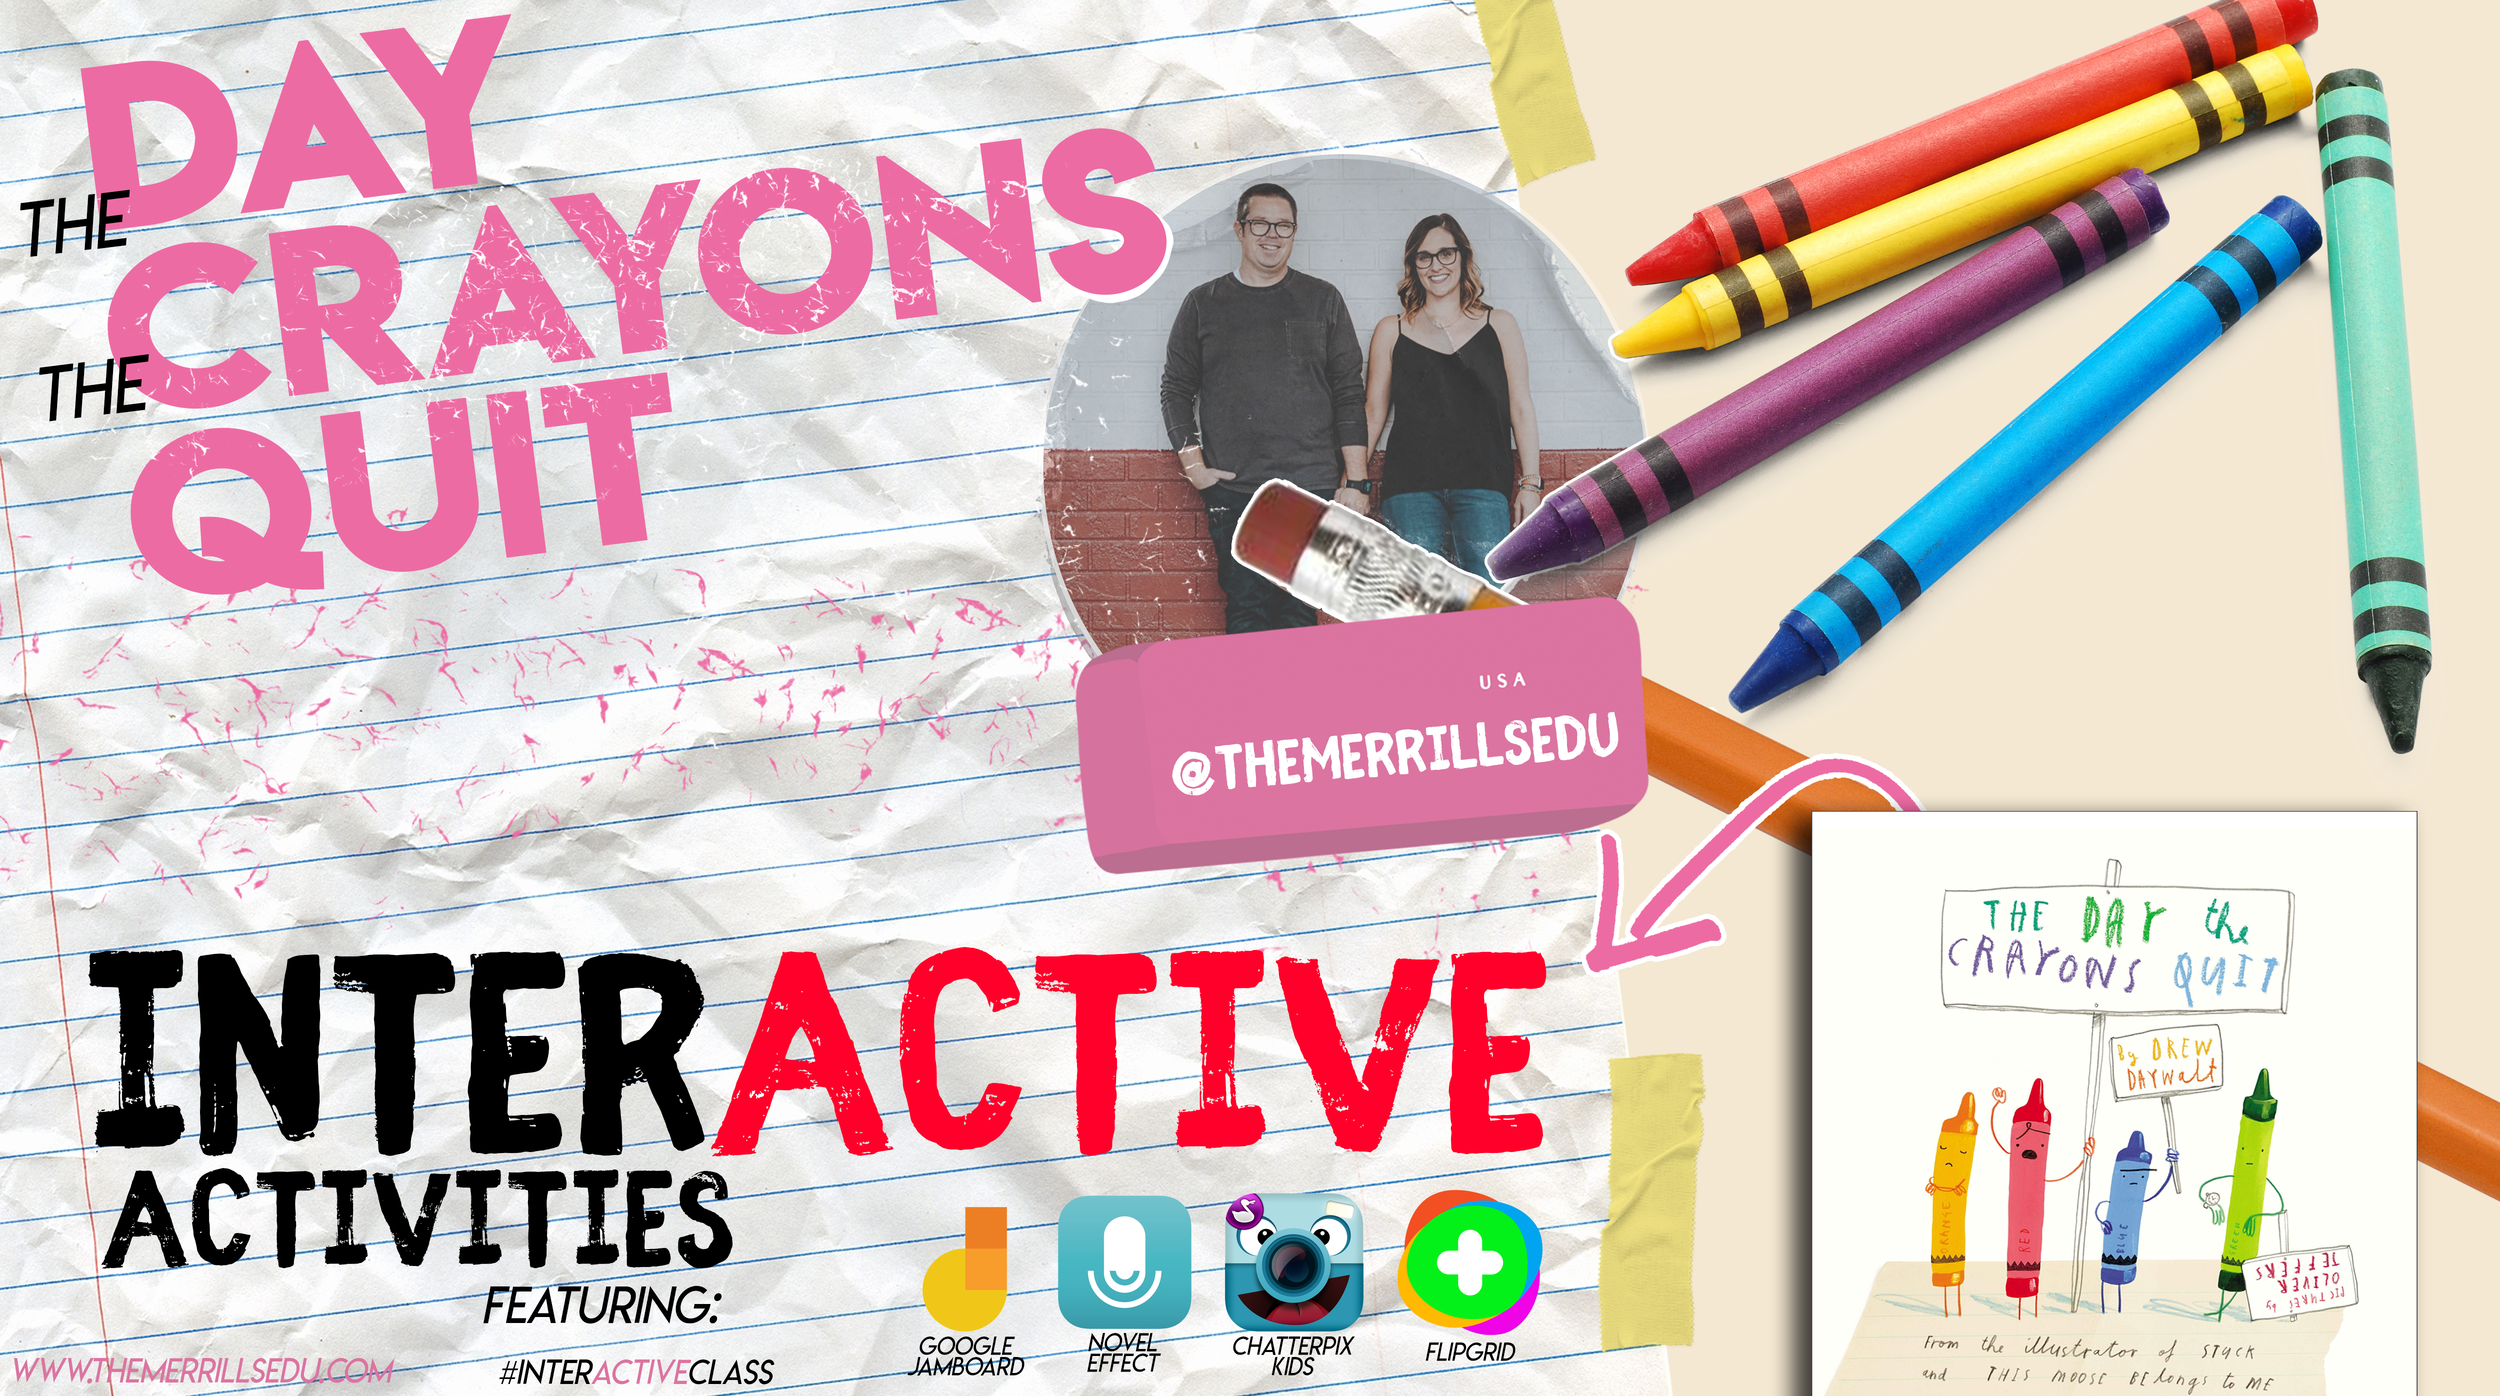
The Day the Crayons Quit and The Day the Crayons Came Home are two essential books required for any classroom. With giggle-inducing text from Drew Daywalt and bold and bright illustrations from Oliver Jeffers, The Day the Crayons Quit and The Day the Crayons Came Home are two perfect additions to any classroom library. If you’re a fan of Don't Let the Pigeon Drive the Bus by Mo Willems and The True Story of the Three Little Pigs by Jon Sciezka and Lane Smith, then this book is for you!
If these books are in your plans, you can easily transform any classroom Crayons activity to make it interACTIVE! Learn how below!
(click on any subheading to jump to that section)
Adding Sound Effects While You Read with Novel Effect

Novel Effect is an app that adds a little magic to books you know and love. Read aloud with your favorite print books and this free, award-winning app follows along playing music, sound effects, and character voices at just the right moment. There are lots of titles in the Novel Effect library, including The Day the Crayons Quit. Furthermore, you can also find the Spanish translation, El Dia Que Los Crayones Renunciaron.
Purchase The Day the Crayons Quit here
Download the Novel Effect app for iOS here
Download the Novel Effect app on Google Play here
Download The Day the Crayons Quit on Novel Effect here
Download El Dia Que Los Crayones Renunciaron on Novel Effect here
Animating Crayons with
Chatterpix Kids


Chatterpix Kids is an app that allows you to bring anything to life! Simply take any photo, draw a line to make a mouth, and record your voice. Then share your video onto a platform like Flipgrid or Seesaw. Getting started is easy, just follow these steps to get started:
Download the Chatterpix Kids app
Open Chatterpix Kids, then tap on “Take Photo”
Using the camera built into the Chatterpix Kids app, snap a photo of a crayon (or any other image) by tapping the orange camera button
Next, tap and hold your finger on the screen and then drag your finger across the screen to make a mouth on the image.
If you don’t like where the mouth is positioned, you can reposition it as you see fit.
Once you’re happy with where the mouth is, click on the red microphone icon to begin recording (tip: you will want to teach your students that they will need to be prepared with what they will say in their video. They only have 30 seconds!)
After you have recorded the audio, click the green play button to see how everything looks. If you’re happy with the way it is, click the orange Next button on the top right. If you’d like to re-record the audio, you can do so by tapping the red microphone.
(Optional) You can add filters, stickers, frames and text. Once you’re satisfied, tap the orange Next button on the top right.
To save your video, tap on the Export button located on the bottom right. Tapping this will save the video to your devices camera roll.

Google’s new Jamboard is a collaborative digital whiteboard. Students can work as a whole group, or assignments can be shared individually. In this activity, you’ll find a board that looks like it is just blank / black. Students will use the eraser tool to erase the black from the board. Doing so will reveal a rainbow color! Students can erase in the shape of a crayon and make their own crayon color. Have them name their color, then click download the frame as an image. To do so, click the three dots in the top right. Then select, “Save frame as image.” This file may then be uploaded to places like Seesaw or Flipgrid to share out accordingly!


Opinion Writing with Flipgrid
Generally, teachers think of Flipgrid as the destination that houses student learning and their content. However, Flipgrid can also be used to launch ideas, spark new ones and take learning to a whole new level. For example, after reading The Day the Crayons Quit, have your students think about which crayon they feel is overworked. Then, have them brainstorm several ideas that back their opinion on a sheet of paper. Next, instruct the students to log onto Flipgrid and explain which color is most tired and why (listing the ideas from the paper). After they have finished, they can watch their classmates’ responses to see how they feel - and possibly pick up some new ideas (or change their mind all together). Students can take this information and create / publish a writing piece that ties into the The Day the Crayons Quit!

Fun with Flipgrid Photo Stickers
If you’re in a hurry and want to hear which crayon your students think is the most overworked, they can do so quickly by explaining their thinking and using our Flipgrid Photo Sticker (see below). This frame may also be used to retell the sequence of events, or compare / contrast both stories.
Click here or below to download our free
Flipgrid Photo Sticker


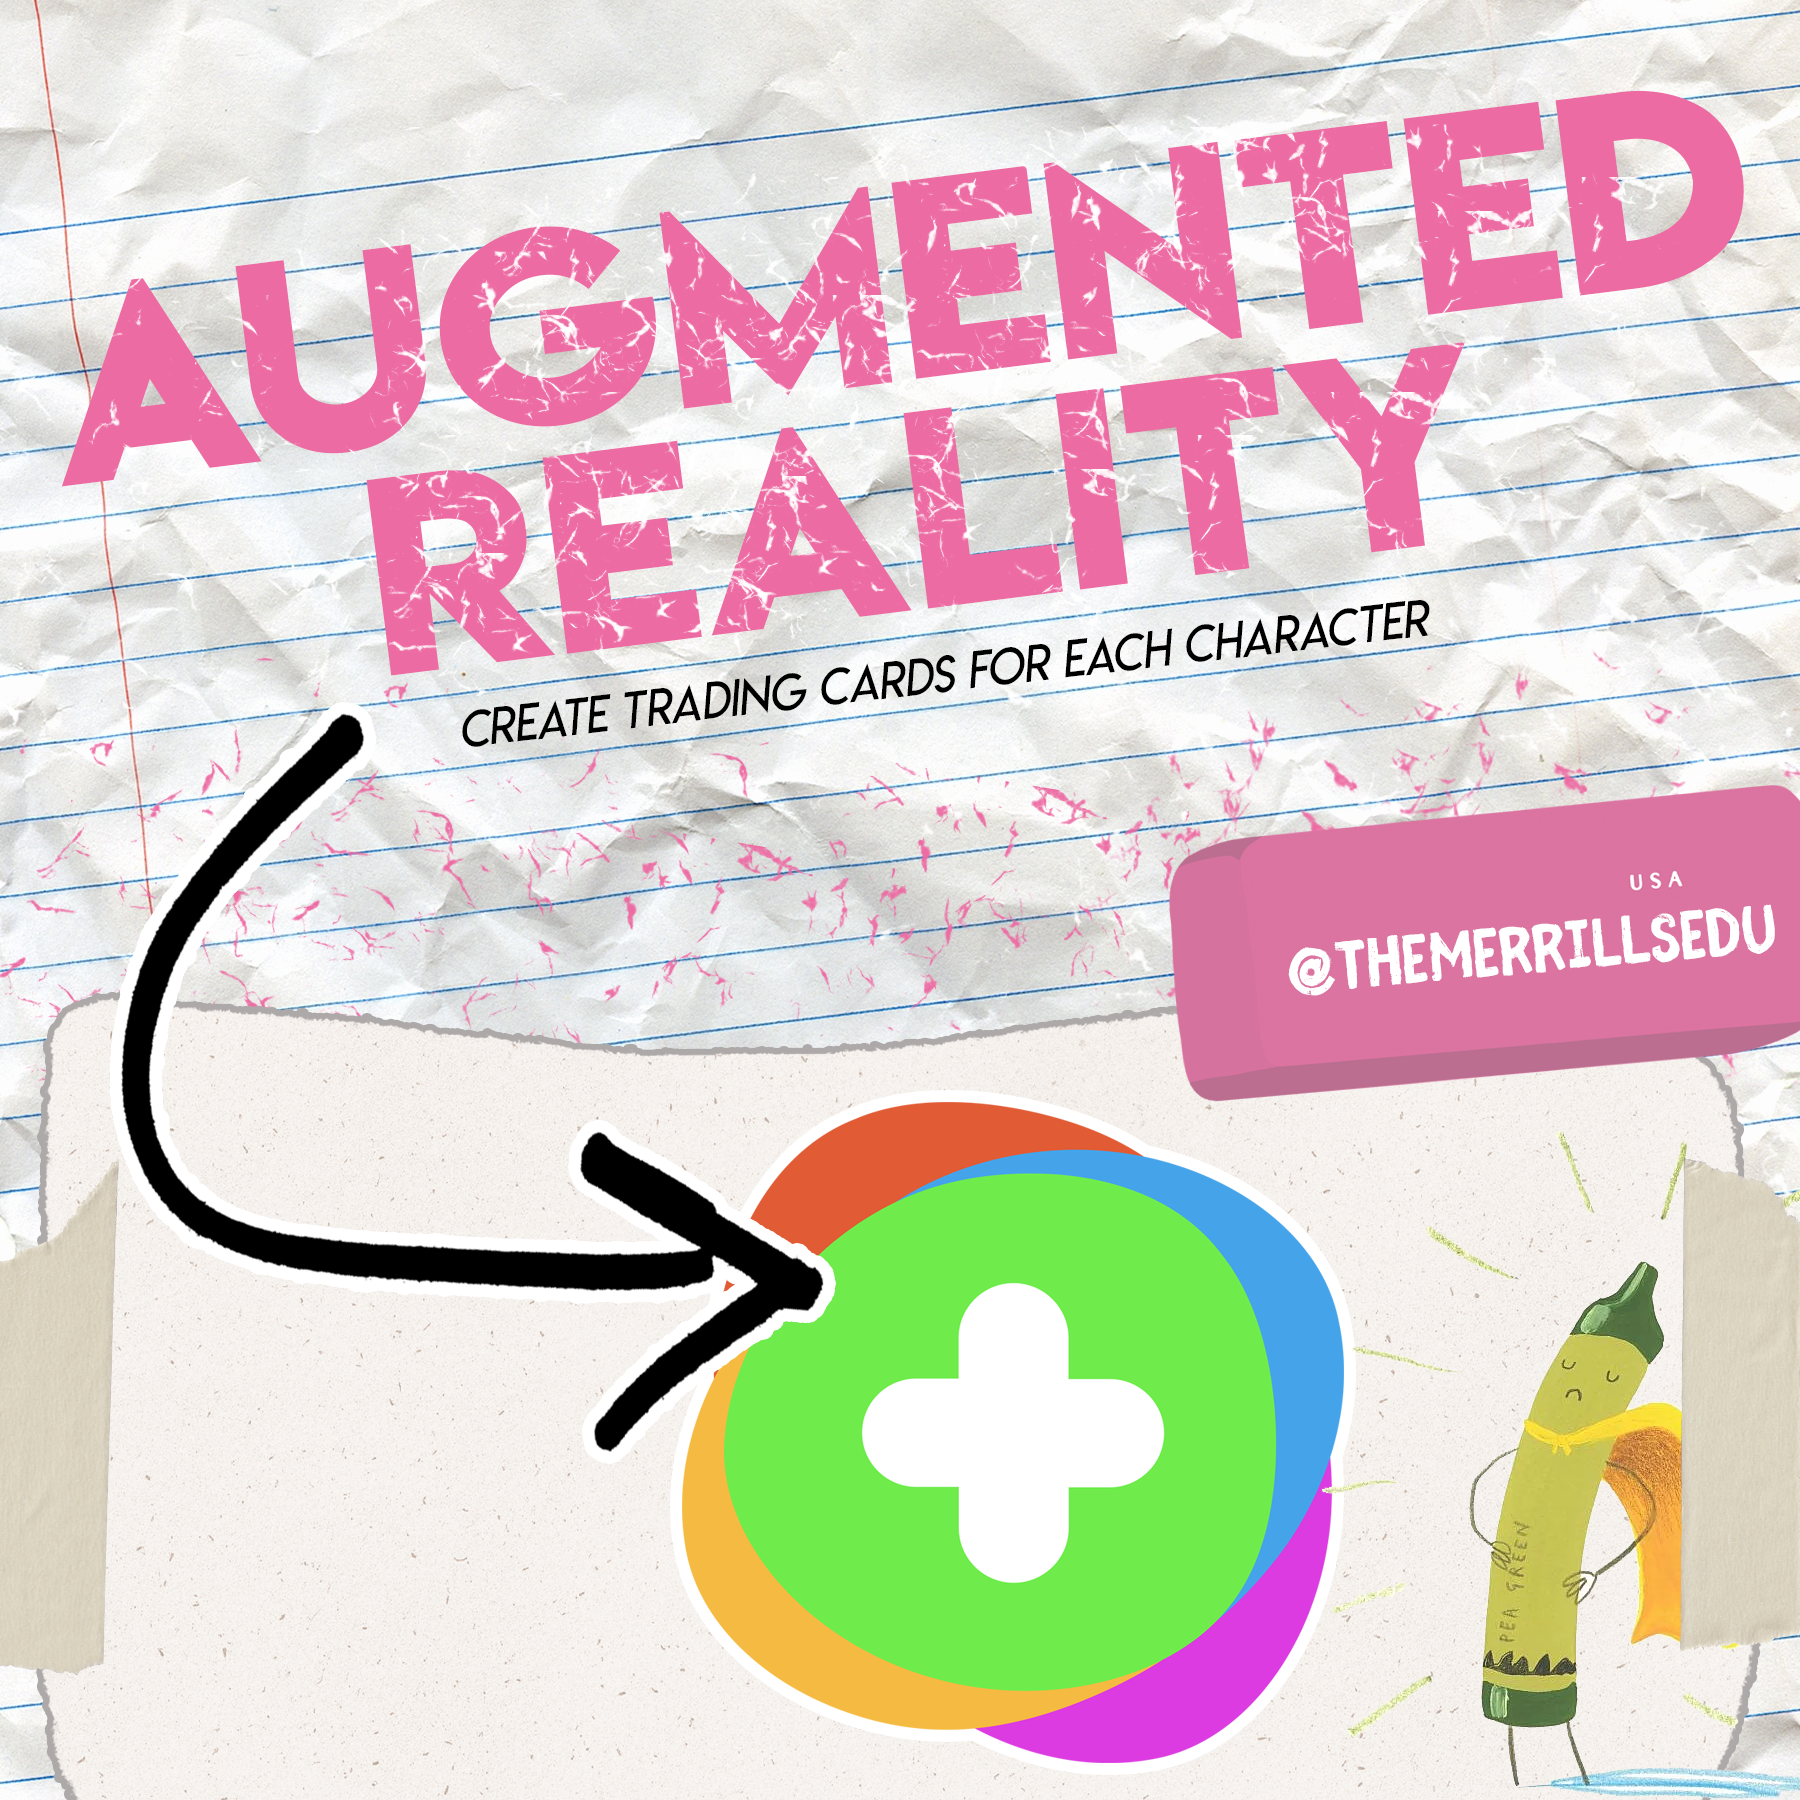
Adding Augmented Reality to the Crayons series
This is a great activity if your students are learning about describing characters, making connections or comparing / contrasting characters. Start off by reading The Day the Crayons Quit or The Day the Crayons Came Home. After you read, revisit each crayon and think about how you would describe each one. We recommend using something like a bubble map to help organize student thoughts on each crayon. Once the class is ready to move on, have the students log onto Flipgrid. Give the students time to record a video where they describe the first character.
After they have submitted the first character, instruct them to view their own video. Once they are logged on watching their own video, have the students add a video comment to themselves describing the next character. Students will repeat this step as many times as necessary to describe all of the characters your class has discussed. Doing so will create an organize thread where only that particular student’s videos will be posted (other classmates will not respond to each other - yet 😜).
Now that you have all student responses, it’s time to take things to the next level! Have your students work on cutting out the trading cards resource (see image or click here to download). While they are cutting them, take a moment to print / download the Flipgrid video response QR codes. This can be done quickly from a topic on the educators dashboard and clicking the open square (next to “Actions”), selecting the appropriate videos (or select all) and then clicking “Print QR Codes.” Tip: These QR codes may be resized in a program like PowerPoint or Google Slides. You will want to resize the QR codes a bit for the next part.


Now that you have the QR codes printed, give each student their QR codes to cut out. The QR codes then get glued to the Trading Card template. Students can illustrate the back of the cards with the appropriate crayon they are referring to. Now, with the QR code printed on the card - have the students open the Flipgrid app (mobile devices only). Instead of logging onto their Group, instruct the students to tap the orange / red “Scan Flipgrid QR” button. This launches Flipgrid’s QR code reader. Students are now able to scan their trading card QR codes with the Flipgrid app. The best part - their responses will open in augmented reality! Now that the cards are completed, it’s time to trade them! Students can now scan the code(s), watch the video(s) and respond to one another accordingly - or just trade with each other for fun. See how this all works in our video below!
More lesson ideas tied to the Crayons series
Here are some other ideas you can tie into the Crayons series:
The Power of Protest: Explain the meaning of a peaceful protest (as in The Day the Crayons Quit). Then, have students create a protest poster / flyer (it can be paper sized) for the crayon that they feel is the most overworked. Share their poster / flyer on Flipgrid, then have the students watch each other’s videos. Lastly, poll the students one last time to see if anyone’s opinion has changed after watching their friends.
Persuasive Letters: Have your students pick a crayon and then pretend that they are the character that they have picked. As the crayon, write a letter to the rest of the class explaining why you feel as though you are overworked, or why your vacation was the best. Then, share the letter on Flipgrid.
Science Integration: Collect all the old crayons from the classroom. Then, use a hair dryer to experiment with melting the crayons. Do new colors form when melting them together? Student hypothesis can be recorded and shared in Flipgrid!
Color Spectrum: Discuss the way light reflects and the color spectrum. How does this help when manufacturers are making crayon colors?
Inquiry Learning with Wonderopolis: Have you ever wondered where crayons were first made? Or maybe what the first crayon color was in the United States? Read this Wonderopolis article to tie in some history!
Planning a Day the Crayons Quit lesson or unit? Download our slide templates below!


-- Please follow us on social media and tag us with how you’re using The Day the Crayons Quit and The Day the Crayons Came Home into your classroom! 👓👗
For more tips, tricks and lesson ideas for making learning more interACTIVE, check out our books The InterACTIVE Class and Flipgrid in the InterACTIVE Class on Amazon!


How to Make a Custom Microsoft Teams Background
Microsoft Teams is constantly providing updates to its platform, but the latest is one that users have been begging for: the ability to upload your own backgrounds. Now, you can create a personalized scene and Teams will virtually place you directly into your image.
Microsoft Teams is constantly providing updates to its platform, but the latest is one that users have been begging for: the ability to upload your own backgrounds. Now, you can create a personalized scene and Teams will virtually place you directly into your image. In this blog post, you’ll learn:
What are some suggested apps you can use to design a custom Microsoft Teams background
How to upload your custom background to Microsoft Teams
Find free backgrounds to download and then upload to Microsoft Teams
Something to keep in mind when designing is that the resolution of your canvas should be 1920 x 1080, and the best format to save as are PNG files.
IMPORTANT: If you have text in your background, it will appear mirrored (or flipped) after you click “apply” in the final step below. But, it will not appear this way to others joining your meeting. It will display properly.
What are some suggested apps you can use to design a custom Microsoft Teams background?
There are a few different options when creating your background. Let’s look over a few of the most popular!
Adobe Spark:
Click here to access the Adobe Spark website
Cost: Free for educators (your IT department will have to set it up, though!)
Why use Spark?
Adobe Spark is easy to use and provides simple options when branding content. You can easily search for royalty free stock images - all safe for EDU environments, and even “remix” ideas from other users.

Buncee:
Click here to access the Buncee website
Cost: Free for the “Lite” version, additional options available
Why use Buncee?
Buncee is a user-friendly platform that’s a one stop shop. You can find everything that you’ll need to create without ever having to leave the app, including safe search / royalty free images.


PowerPoint:
Click here to access the Office 365 website
Cost: Free for the “A1” version (includes Word, PowerPoint, Excel, and more), additional options available
Why use PowerPoint?
PowerPoint is familiar for most, making it easy and comfortable to design in. You can also easily duplicate slides to design several backgrounds at once.

How to upload your custom background to Microsoft Teams
Now that you have your custom background created, follow these steps to upload it to Teams:
From your channel or chat, click the camera icon to start a new meeting.
After the new window opens, click on “Meet Now” to launch the meeting.
Once the meeting has started, click on “Show Background Effects.”
A window will open on the right side of the screen. Click on “Add New” on the top right .
Upload your file, then scroll down to find the image. Select the image, then click “Apply.”


(Note: If you have text in your background, it will appear mirrored (or backwards) on your side of the screen - but, Teams displays the background correctly to others who have joined your meeting)

Free Backgrounds to Download
Looking to save some time? We hear you. Here’s a few neat backgrounds that we found that you are free to download / upload on your own. To do so, simply right click then select save (remember to watch where you are saving the file so that you can find it later on!).
Please note: We did not create any of these, just found them being shared online. All of these images have been labeled for reuse.
Animal Crossing:
Source: Nintendo

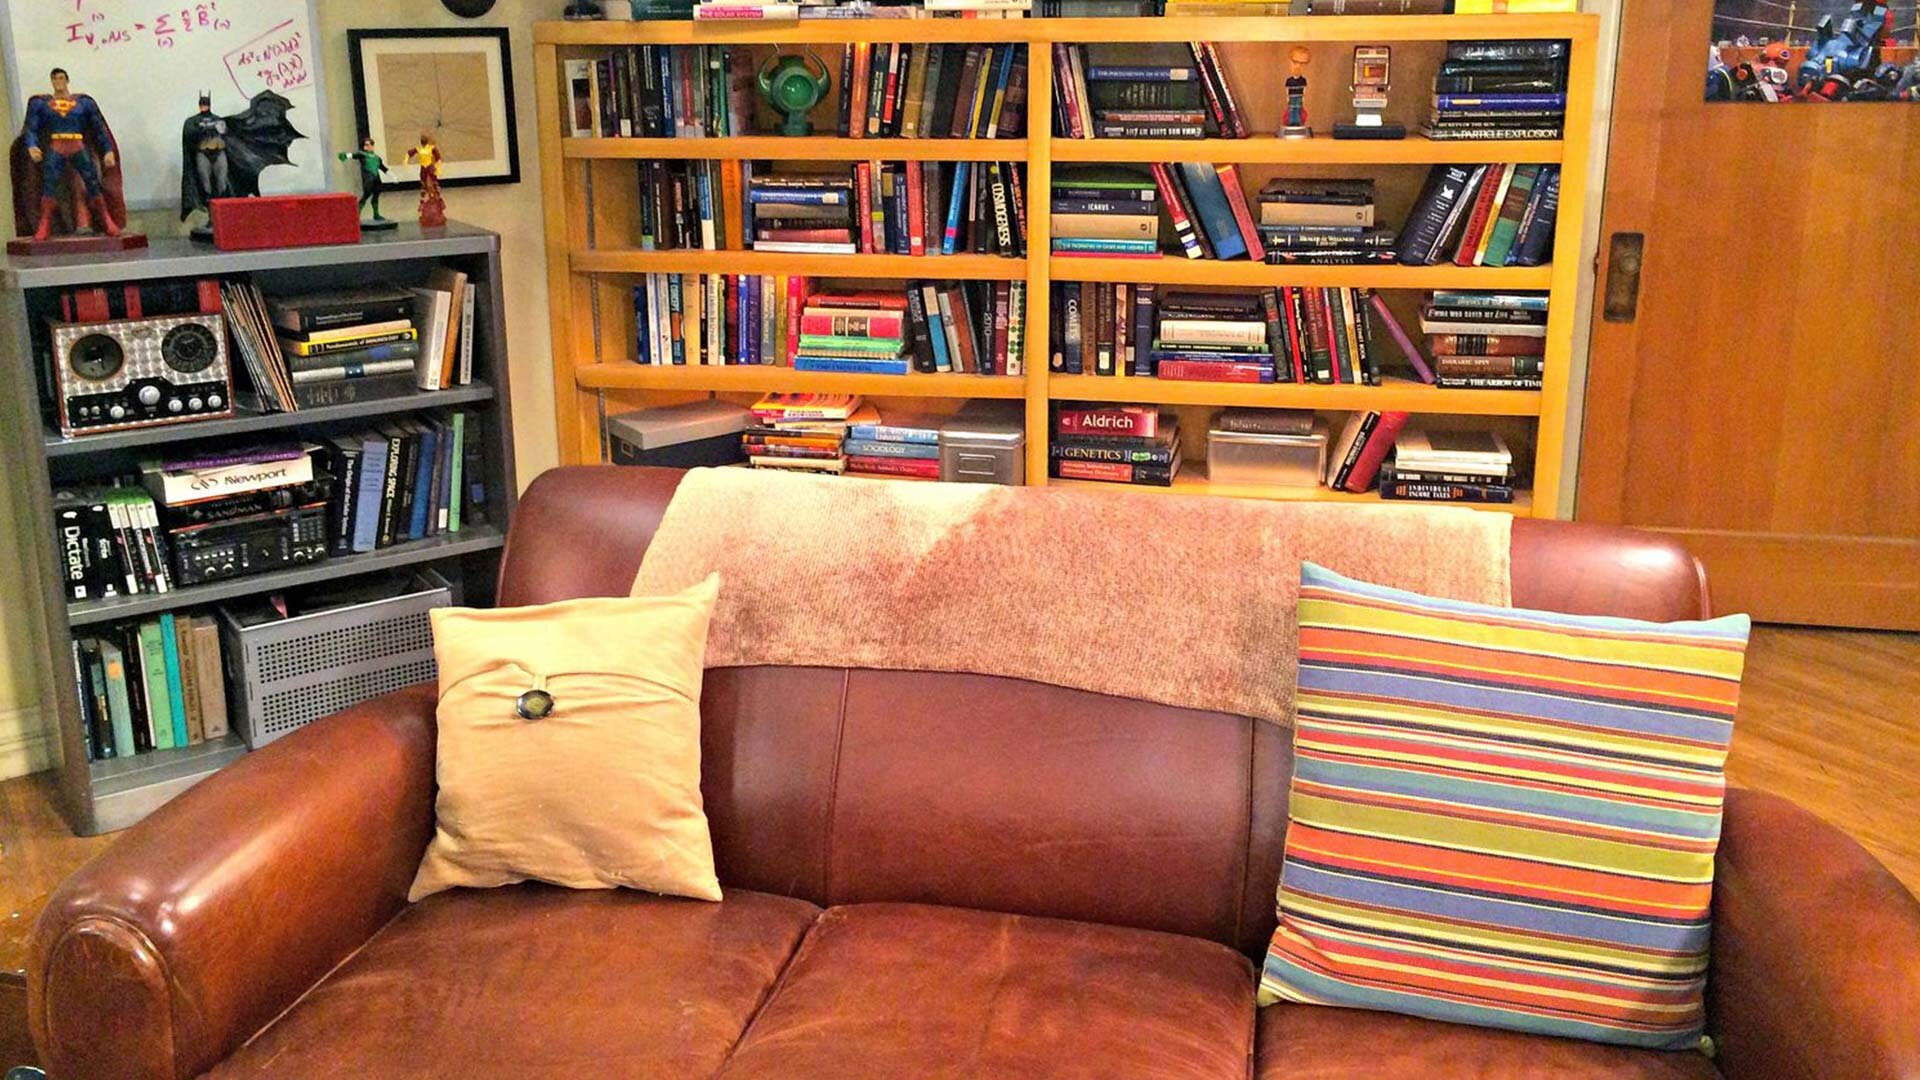
The Big Bang Theory:
Source: TBS
Blue’s Clues:
Source: Nickelodeon

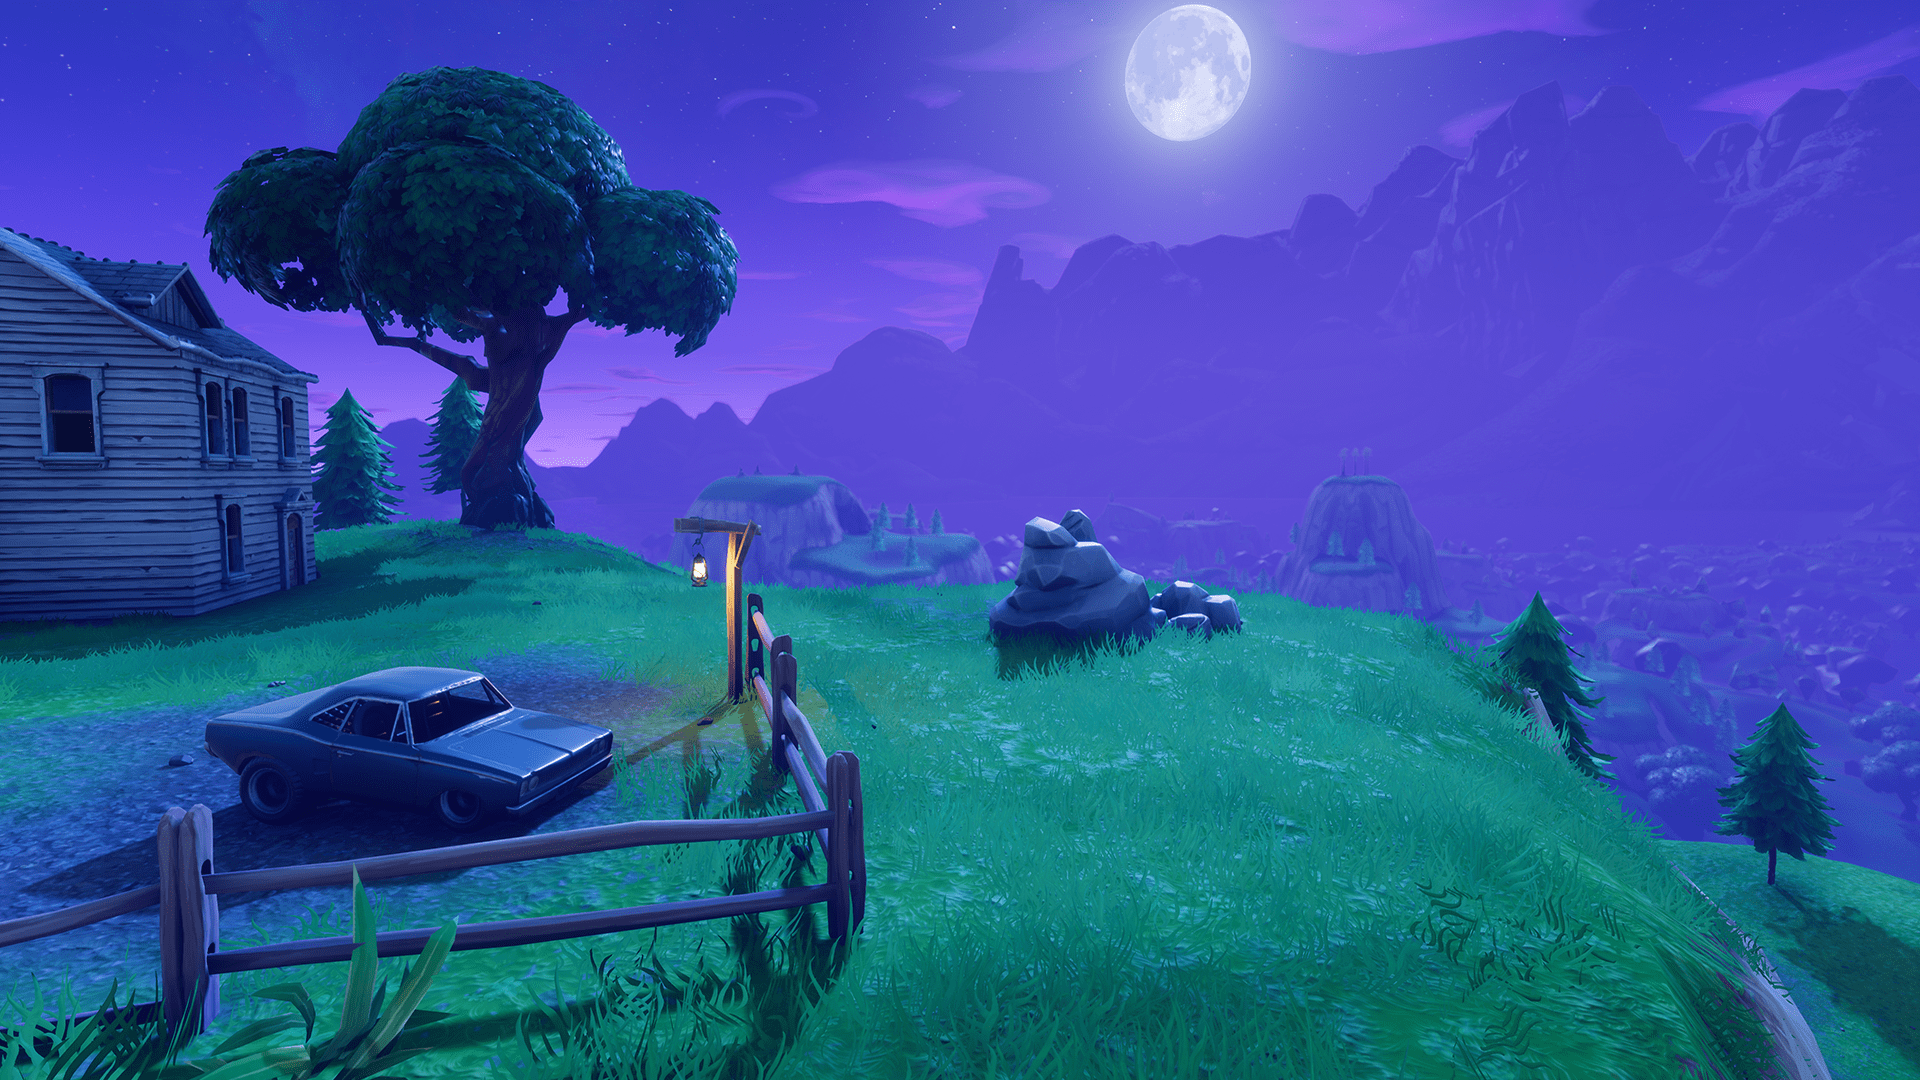
Fortnite:
Source: Epic Games


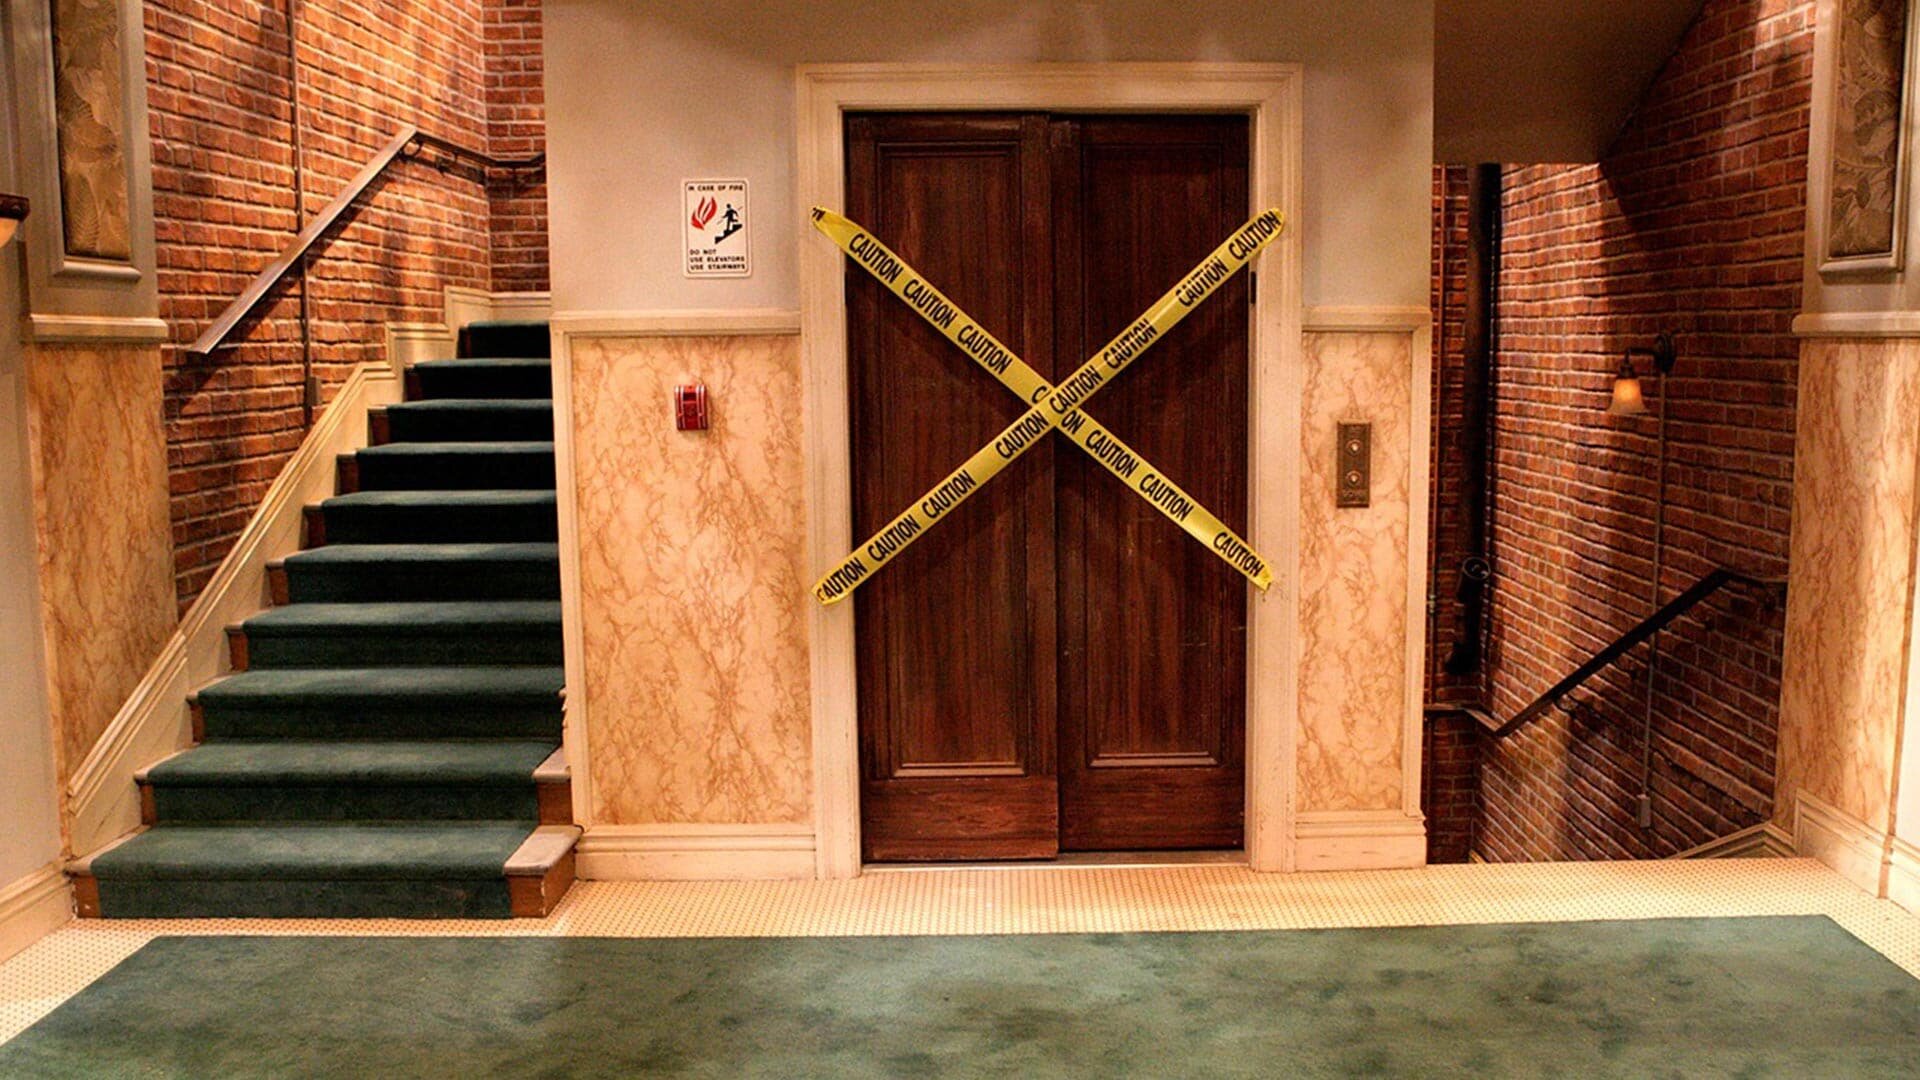
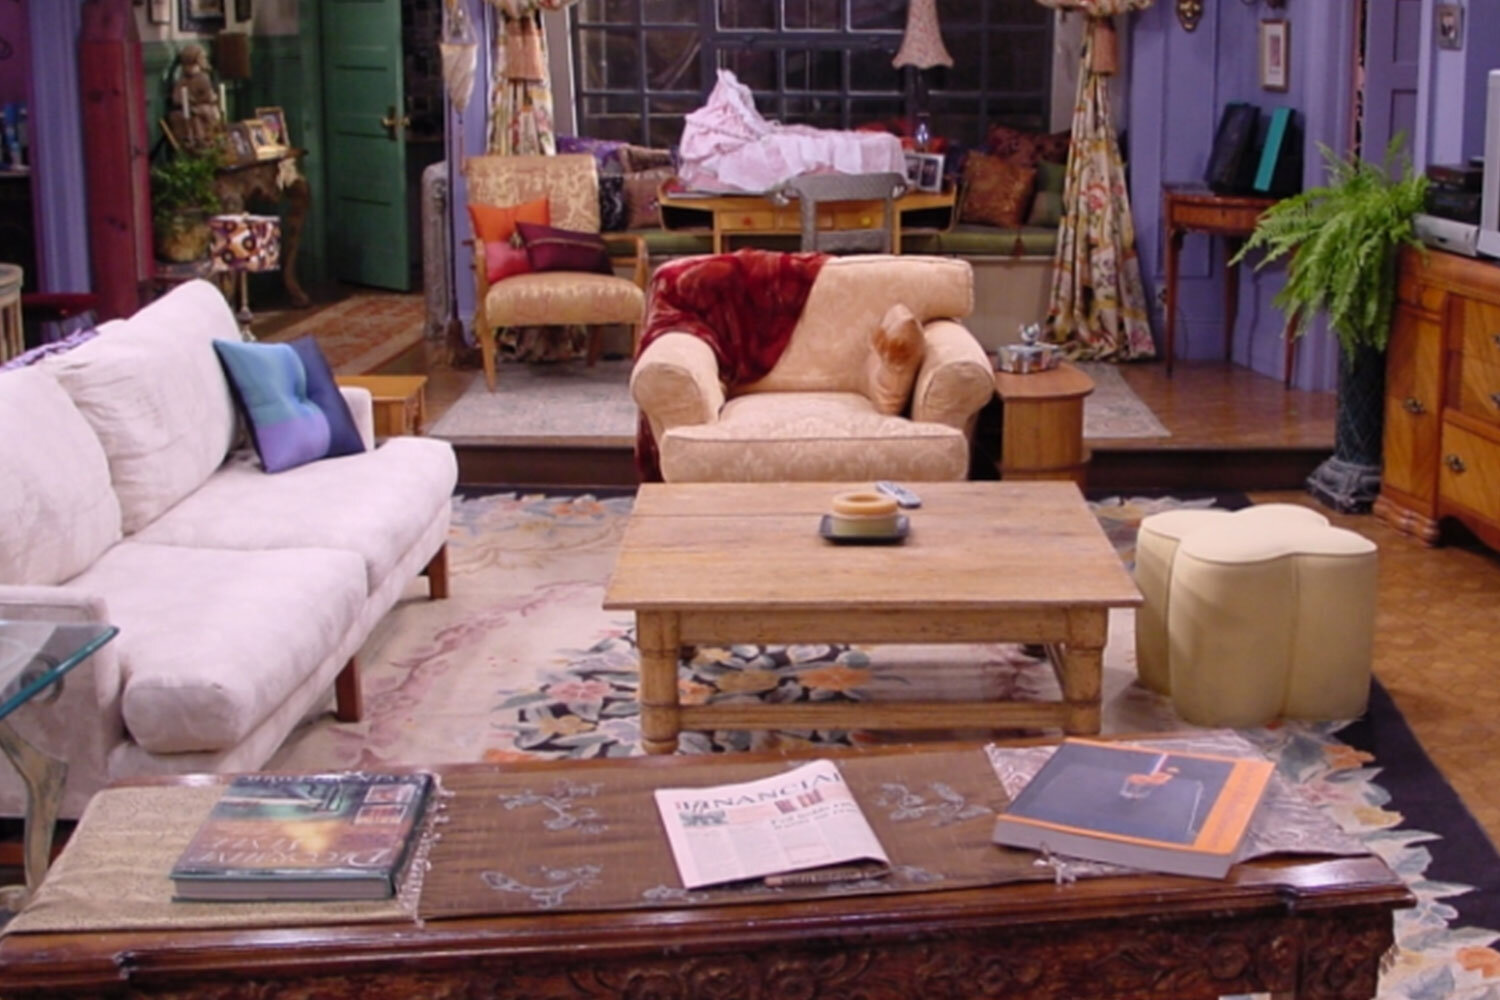
Friends:
Source: FOX

Game of Thrones:
Source: HBO

Jeopardy:
Source: NBC

The Last O.G.:
Source: TBS

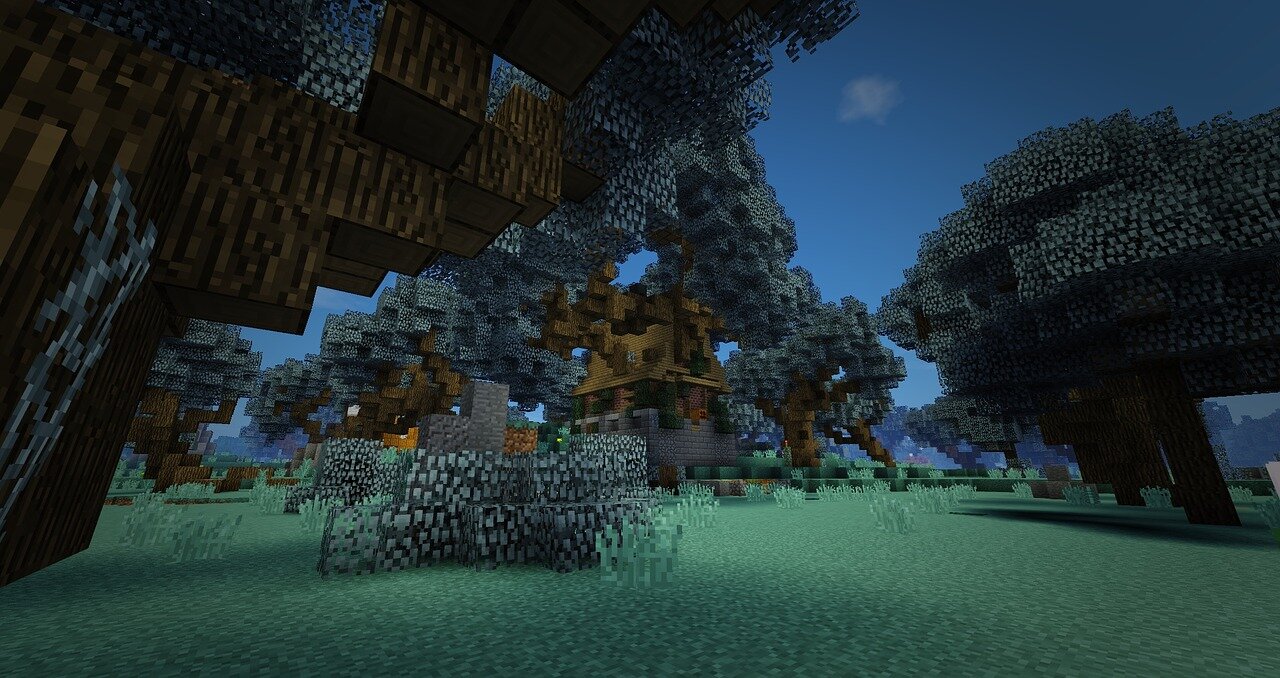
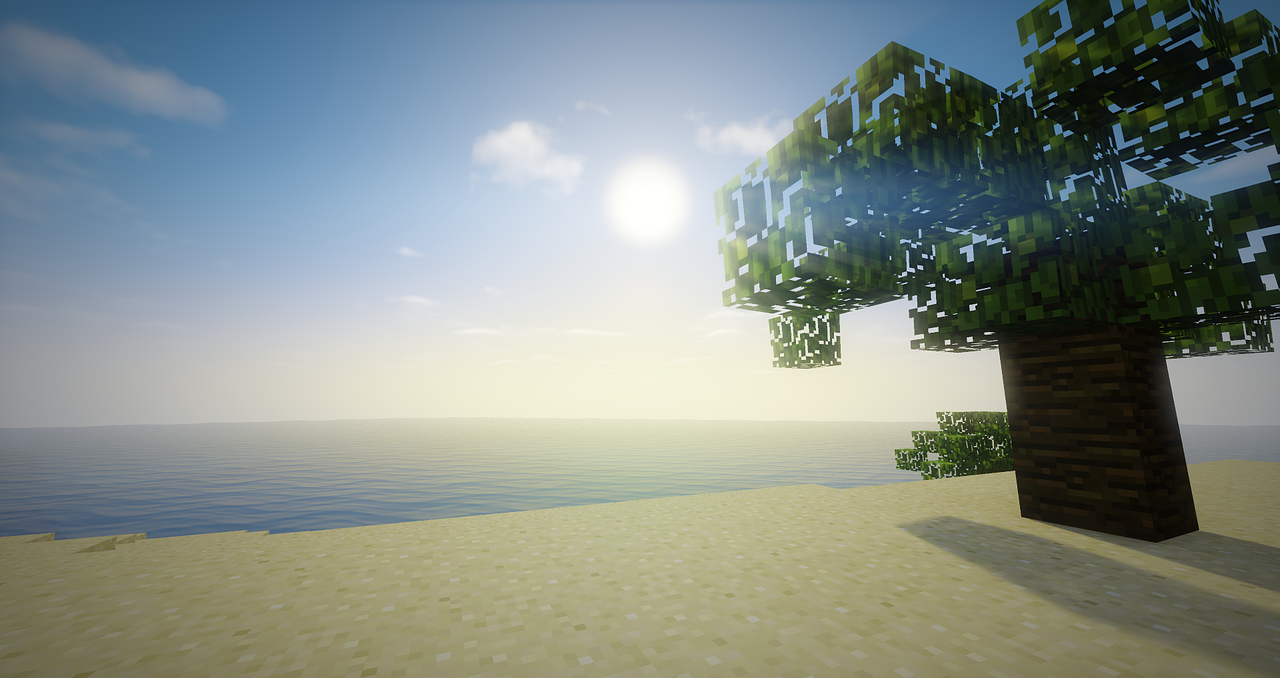
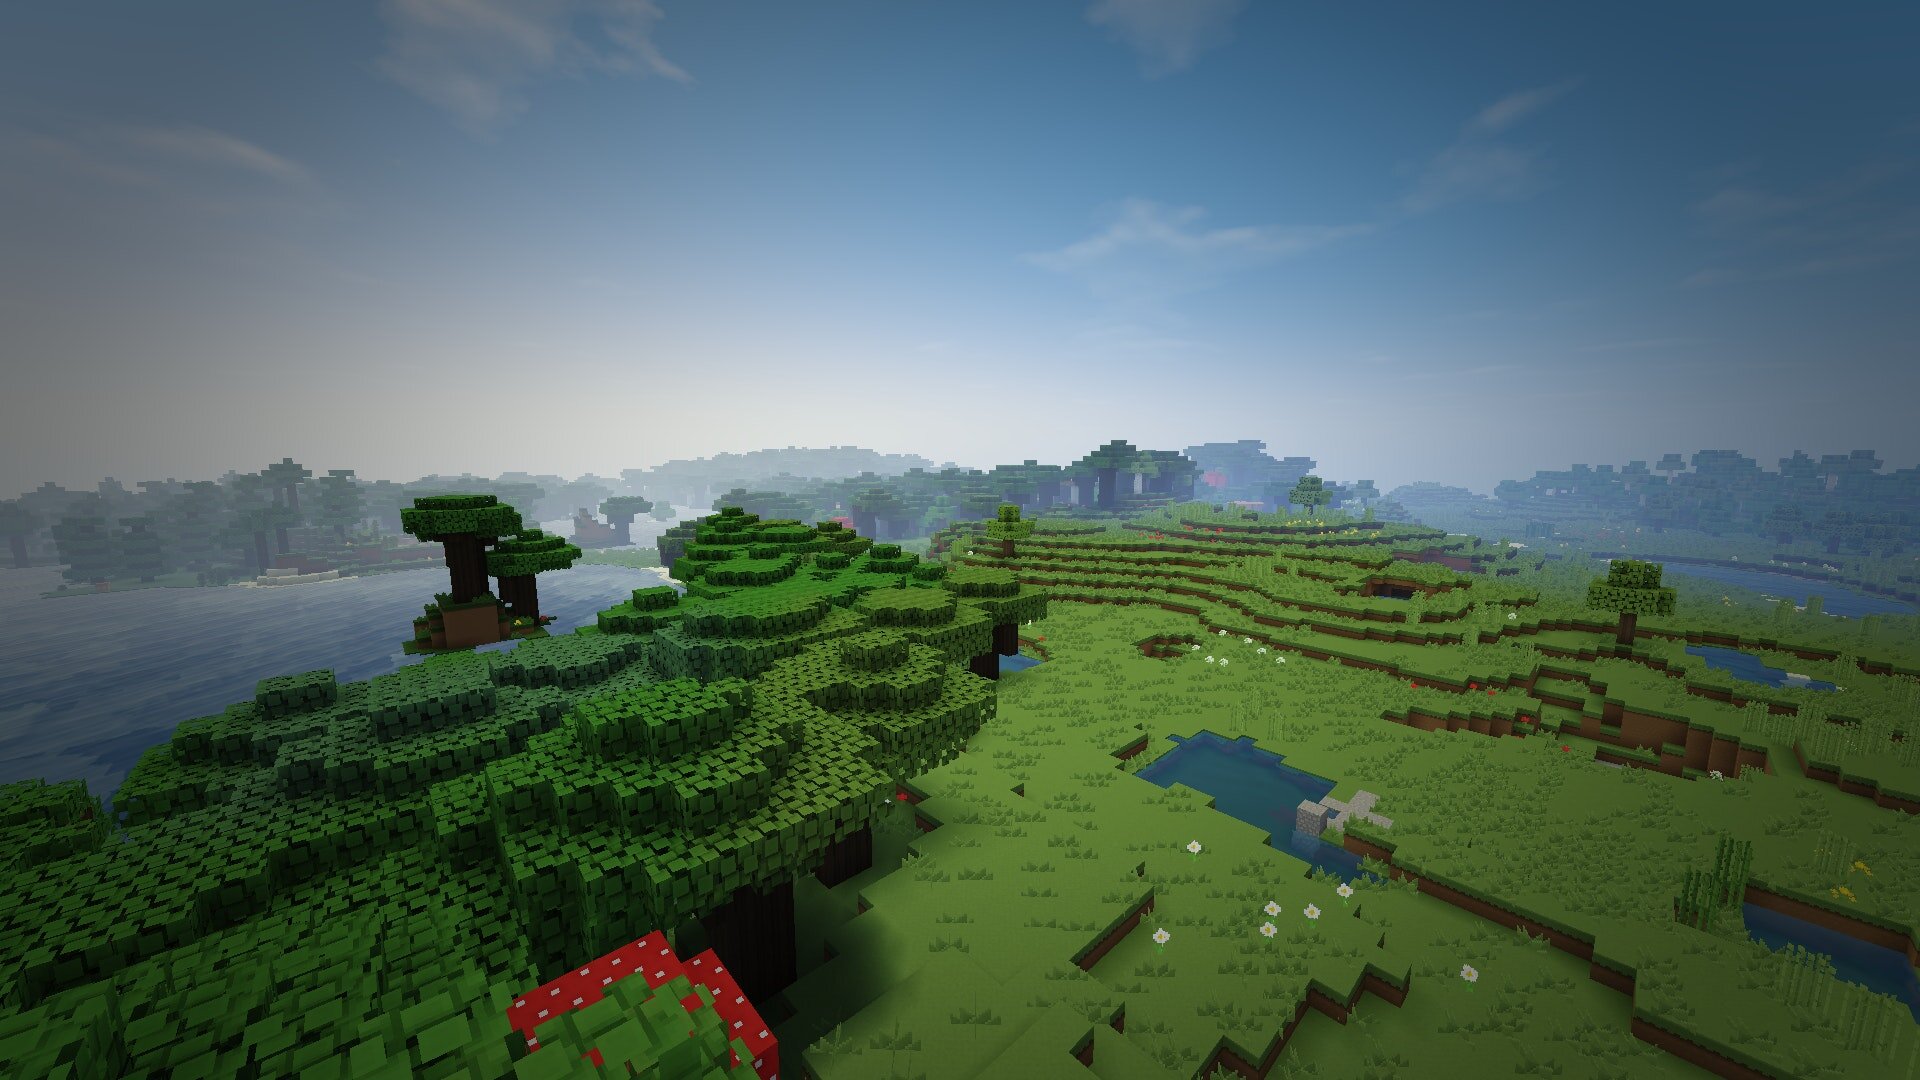
Minecraft:
Source: Microsoft
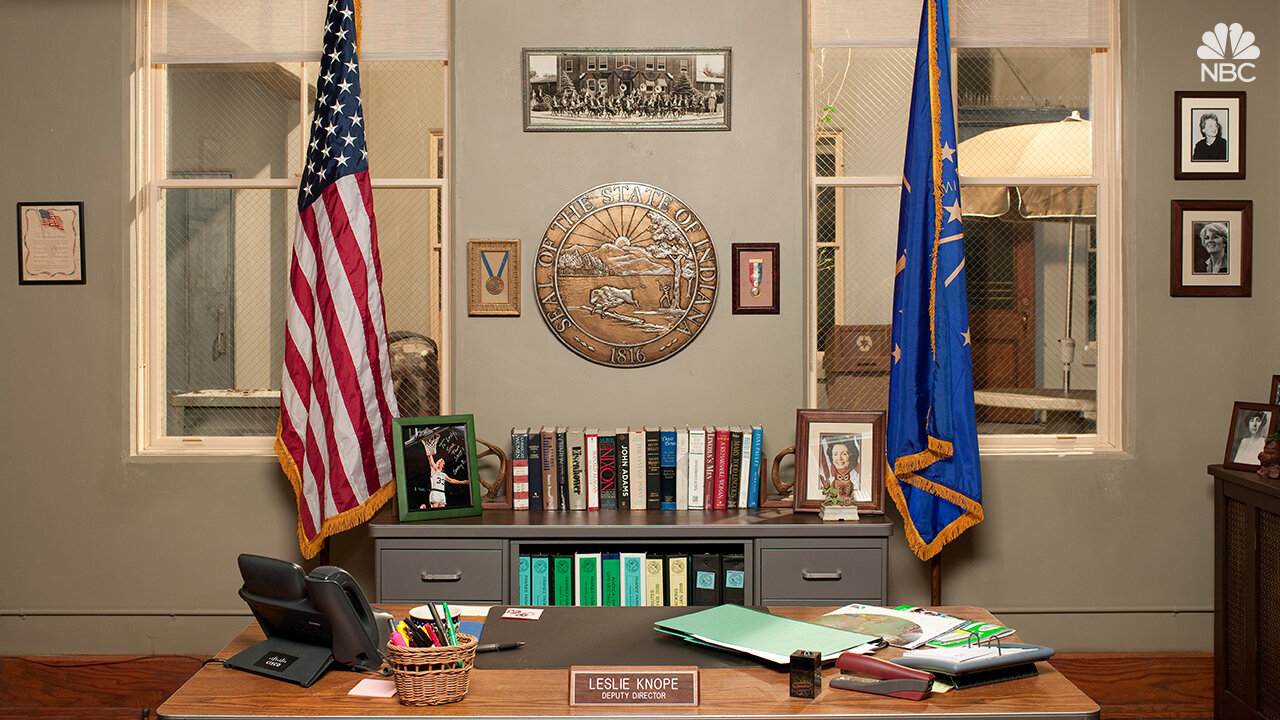
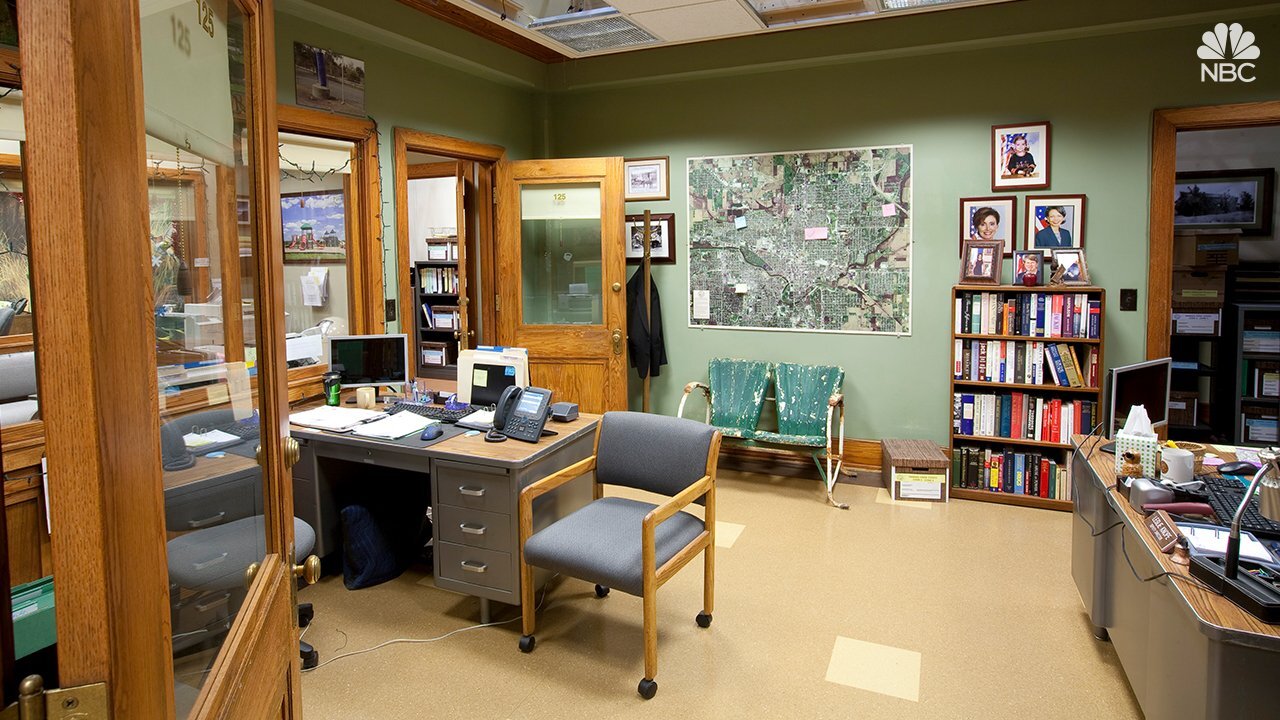
Parks and Recreation:
Source: NBC
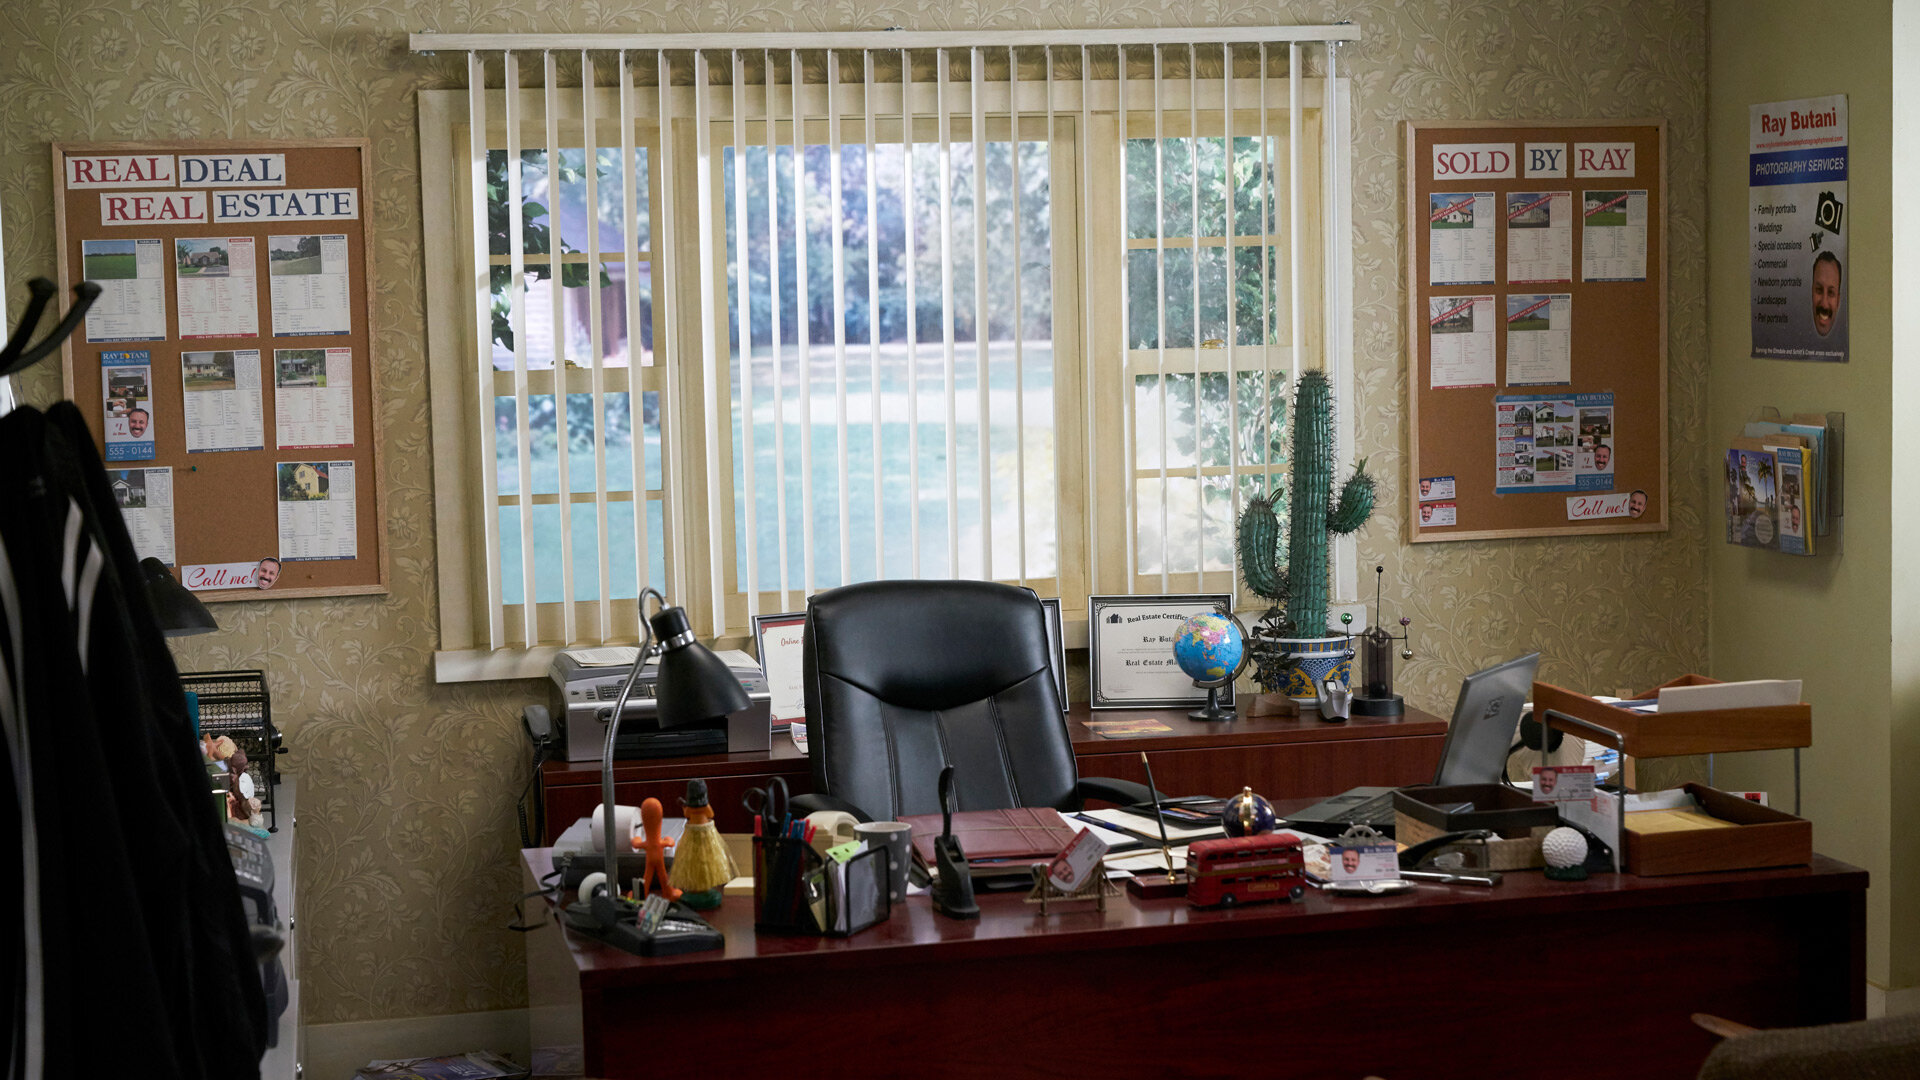
Schitt’s Creek:
Source: Netflix

The Simpsons:
Source: Fox

Spongebob Squarepants:
Source: Nickelodeon

Star Wars:
Source: Star Wars / Disney

The Office:
Source: NBC

Today Show:
Source: NBC

Top Gun:
Source: Paramount


Toy Story:
Source: Pixar / Disney
Stay interACTIVE!
~👗➕👓
For more information on how you can make learning in the classroom more #interACTIVE, check out our books The InterACTIVE Class and Flipgrid in the InterACTIVE Class!


"Scooting" Through the End of the Year
It’s during times like this where I am challenged the most to continue making learning engaging and #interACTIVE. It’s very easy to curate a packet for students to write about end of year memories, but rather I still strive to make memories until our last day.
This can be a challenging time of year. The days seem to drag on and the students are just plain worn out. If you’re like me, we had about four weeks of state testing where all various types of assessments—both state and district—were given. I think my class had at least 7 days worth.

It’s during times like this where I am challenged the most to continue making learning engaging and #interACTIVE. It’s very easy to curate a packet for students to write about end of year memories, but rather I still strive to make memories until our last day in room 6-004.
I like to end our year reading a novel that wraps up our entire year of learning. We cover topics like using our voice to make a difference, acting courageously and focusing on what we can do where we are to make a mark in the world. But this book takes place in a very specific time period and to ensure students understand and hopefully connect with the story we must first cover some grounds in our social studies book. For whatever reason social studies seems to be the hardest content for me to engage my students in. So this year as we were working through it I took those end of unit review questions and I had my students “scoot” through them.
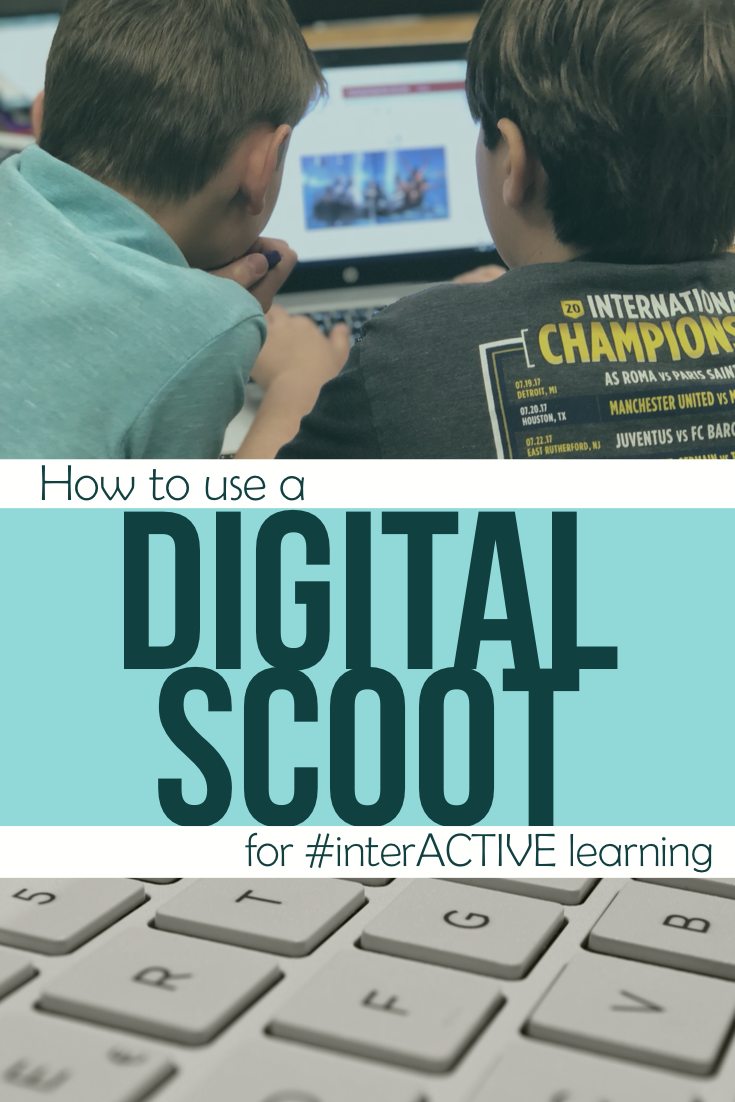
I created what is referred to in the edTech world as a Digital Scoot. The questions were organized in a PowerPoint presentation with one question per slide. I had some questions where students answered using Emojis, poll questions, and even one that were to be answered with drawing. Each device was opened to a different slide and each students was assigned a computer (and slide) to start at. Once they completed the activity, answered the question, or finished the task on the slide in front of them, the student simply “scooted” to the next. Around the room they rotated completing tasks as they went. It’s a fun way to get students physically moving, while also collaborating and sharing ideas with others. I like how this activity also makes every student responsible for their own thinking and contributions within the discussion and gives the teacher a real-time snapshot of where each student is in regards to their thinking and mastery of the content. For primary students you might simplify the activity from answering questions to possible leaving emojis as answers. If you don’t have a device for every student, use what you have and make it more of a center activity allowing students to rotate though the assignment throughout the week.


If you want to give your PowerPoint presentations a little facelift try using predesigned slides from sites like Slide Carnival. This is an easy way to update a lesson without having to put in a lot of extra time designing slides.
Getting students up and moving rarely every lets me down and is an easy way to mix things up! It keeps engagement up and most importantly it’s an easy way to keep students interacting with content as the year winds down.
-K 👗

Memes For Themes
Common standard—needed a new delivery method. One of my favorite ways to engage students is by meeting them where they are at and this year we met to discuss theme….through MEMES. Student created and explained using Microsoft PowerPoint!
As always with everything, we are spiraling through our curriculum and it is time to review THEME. This standard is always hard for me to teach because of the complexity of the standard--you need to reviewing elements of plot (characters and problem) along with having the ability according to our state's standard to summarize.
So this year I do what I always do when I need inspiration--I turn to my PLN on social media. This lesson was adapted by something I saw by author, speaker and best selling author Catlin Tucker--Creating Memes to Explore Themes. (you can check out her original post here) If you aren't one of my many Twitter friends, you may not know this, but technology is a fluid tool in my classroom and something we use and learn from on a daily basis. When I saw this lesson idea I knew it would be an instant hit. I modified Catlin's original lesson a little based on my class make up and age level and you can read through those steps below.

Day 1
I split the lesson into two days to help address the multiple layers of our state standard. First, my students are required to show that they can summarize a story retelling the main events before they state and explain the theme. One of my favorite professional books is a book titled Summarization in Any Subject: 50 Techniques to Improve Student Learning by Rick Wormeli. One of the activities included is called "One Word Summary." Students use their selection of text and collaboratively come up with a list of words they could use to describe the story. Each students defends the "one word" they would use and explain/defend why they would choose that word. For this lesson, my students were working to summarize a novel we had read together as a class. This helped because it allowed me to be working on the same text with all students. After each student had brainstorm their word, their assignment was to "illustrate" their word. They drew the words with “animated” letters that fit with the topic and theme of the book.
When their word was completed, students flipped their papers over and explained why they chose the word they did. They explained their word through basic summaries of the story, using various elements of the story to support the word they chose. This part of the lesson took the first day and we continued with the memes the following day.
Day 2
The next day we picked up right where we left off. Students came to the carpet for a time of modeling and instruction. I showed them the google slides I had prepared--complete with a slide for each of them (names already on it by class number). I modeled what my one word would be using a story we read aloud earlier in the year and then started creating my own meme. I first wrote my personal theme statement in the notes section of the slide. Then I chose a picture, and we brainstormed what text I could use to make my meme communicate the same theme as the book. This entire time I was also modeling how to find an image and how to maneuver through the google slides tools such as text size, font, etc. My example slide was the last slide in the google slides so the kids could refer back to it while they worked. When finished, we talked through any questions and then I let the kids get started. I rotated the room when needed, but also managed the class progress by scrolling through the google slides.
When a student felt they were finished, they came to me and we reviewed their meme. We read their theme statement (located in the notes section) and I then checked to see if it matched what the meme was trying to communicate. I didn't use this time to correct a student with an incorrect theme statement, but rather was looking to see if they could create a meme that visually represented the theme they came up with. I used this as an assessment so I wanted their work to be their own and to represent their knowledge of theme--even if it wasn't 100% correct. I later pulled the few students that struggle the following week to review theme again and to discuss the elements that might have been lacking from those students' original projects.
I have included a few of the memes created along with the theme statement that corresponded with each.

Theme Statement: One small person can make a big impact.

Theme Statement: Doing what you think is right may be scary but if you stick with it you may find yourself enjoying it.

Theme Statement: What we work hard to do can make a big impact on others.