Building a Bitmoji Classroom
The Bitmoji craze is taking over the remote learning world as a fun, interactive way for teachers to engage their students when teaching remotely. Now obviously, it is important to note that once your Bitmoji classroom is built, you need to make sure that it is easy for students to navigate, not overwhelming and that the lessons linked to it are structured in solid pedagogy. But for the sake of this post, we are going to just have fun decorating and building a Bitmoji classroom.
The Bitmoji craze is taking over the remote learning world as a fun, interactive way for teachers to engage their students when teaching remotely. Now obviously, it is important to note that once your Bitmoji classroom is built, you need to make sure that it is easy for students to navigate, not overwhelming and that the lessons linked to it are structured in solid pedagogy. But for the sake of this post, we are going to just have fun decorating and building a Bitmoji classroom. Here’s what you’ll learn about:
(Click on any subheading to jump to that section)
Beginning a Bitmoji Classroom
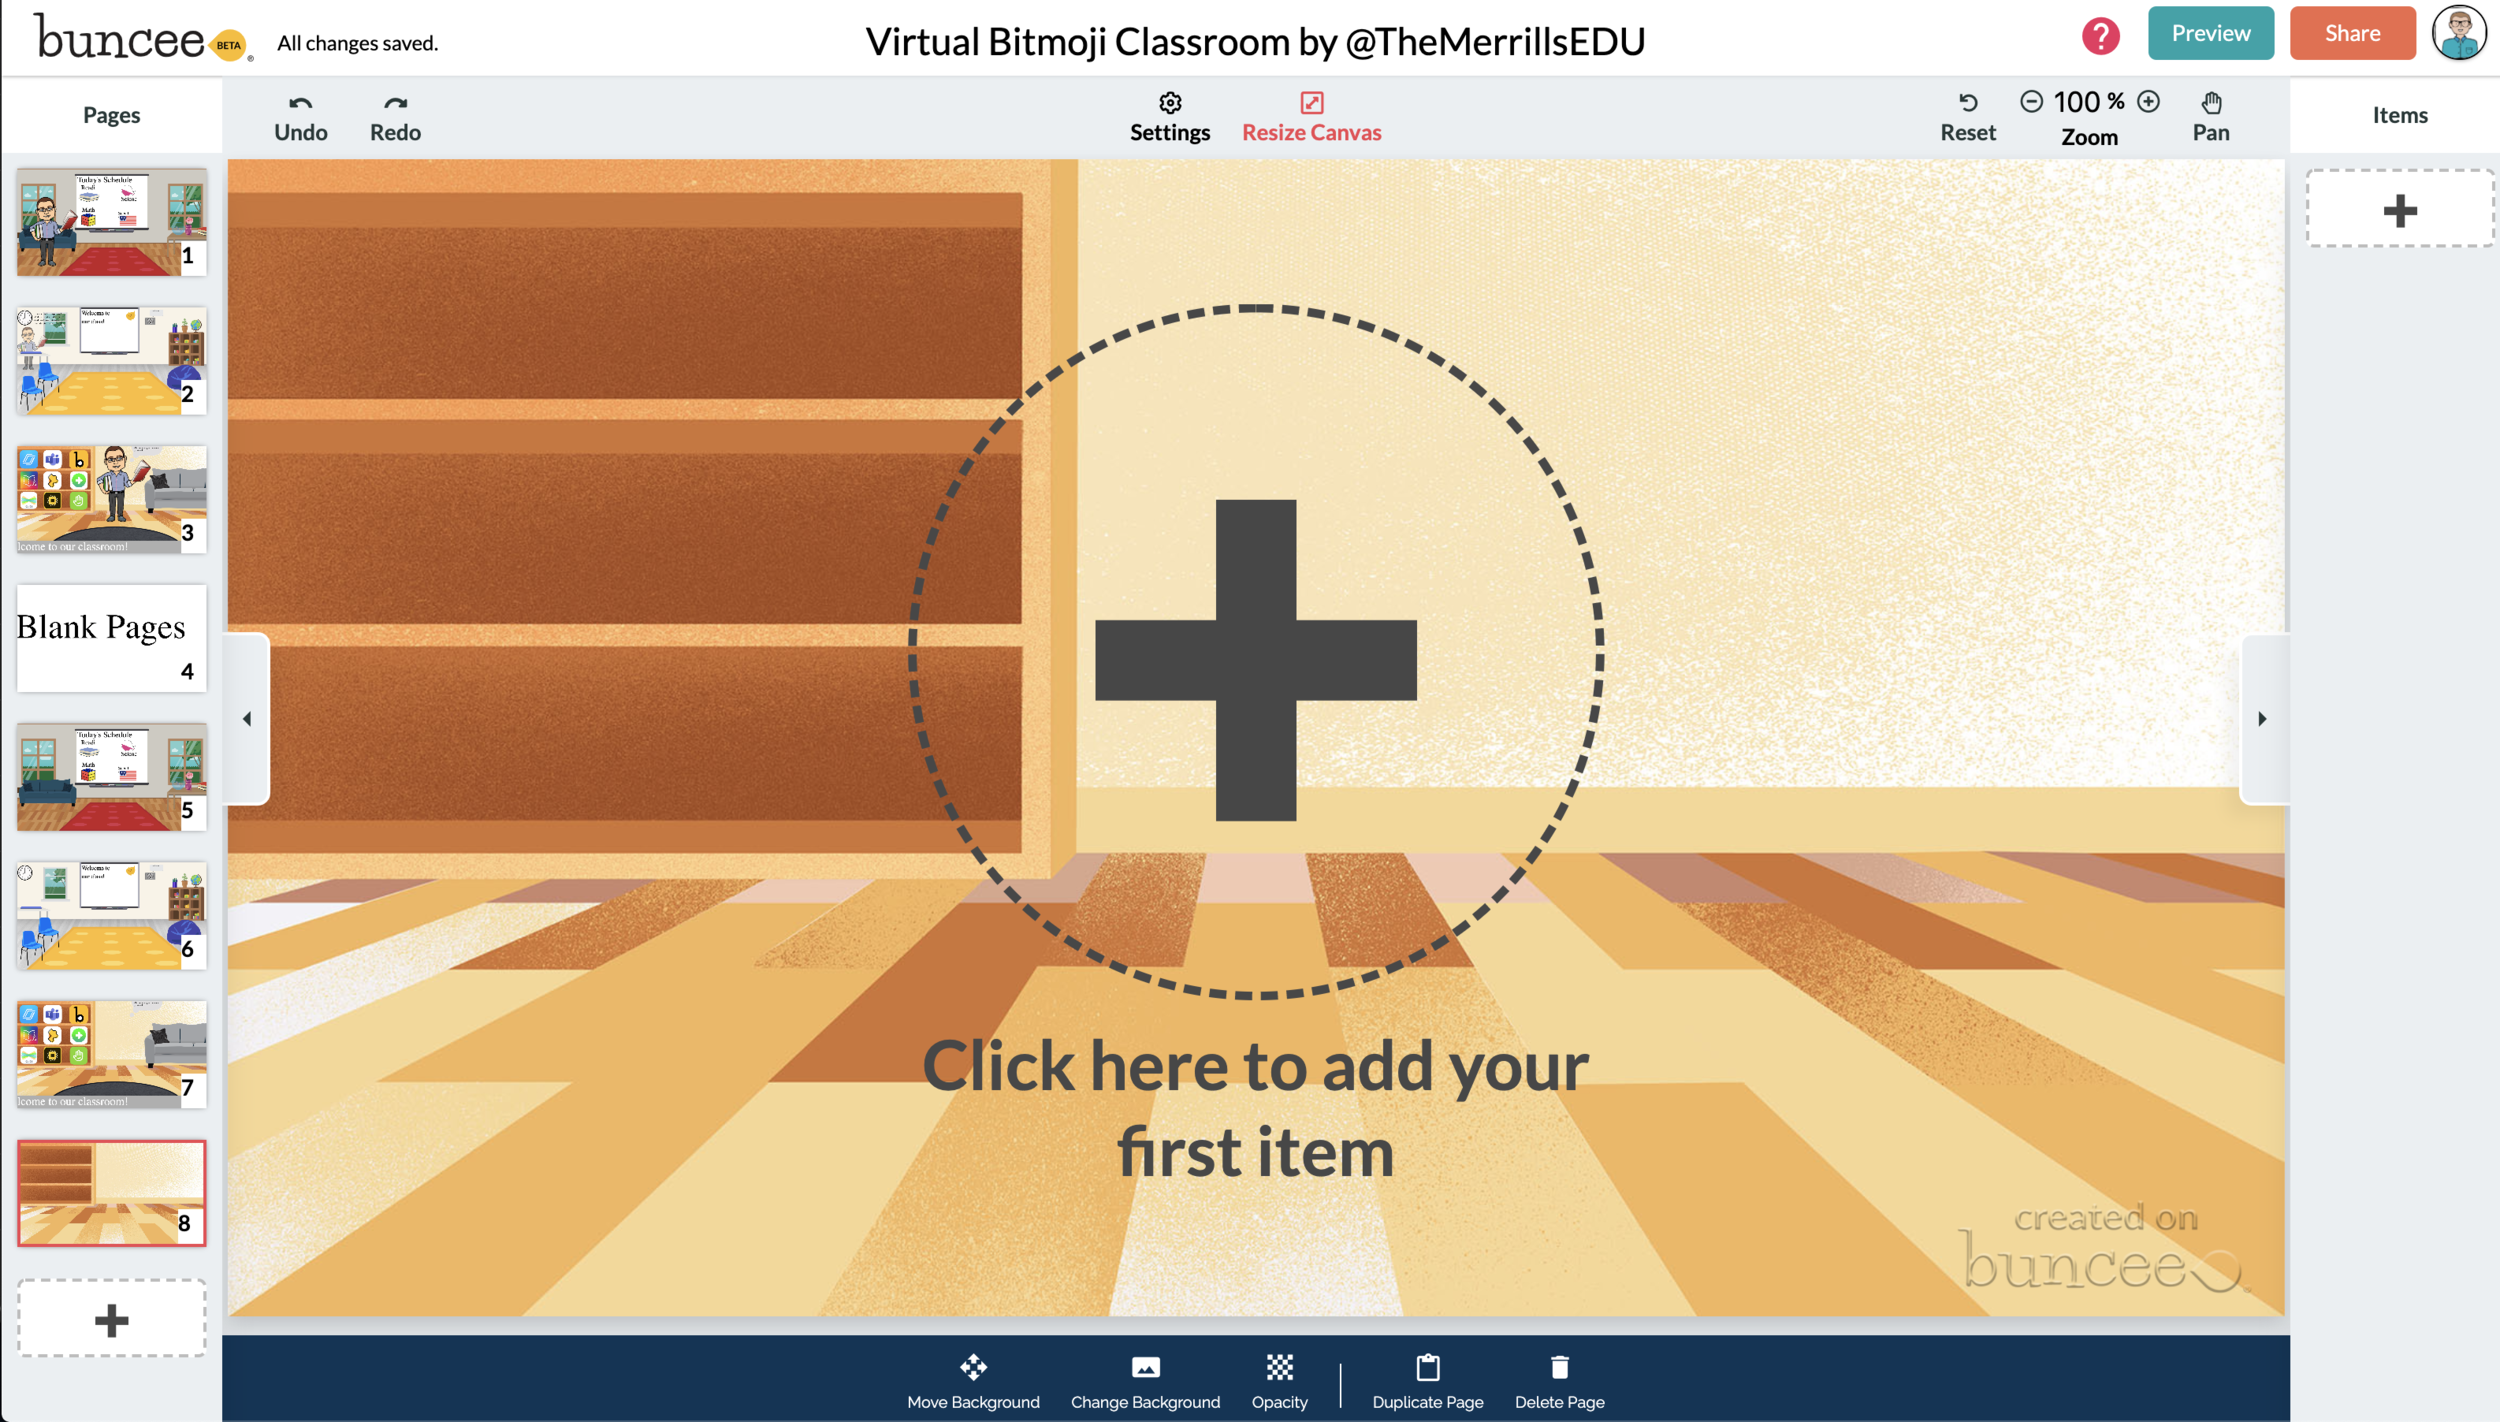
Bitmoji classrooms can be built in PowerPoint or Google Slides and the process is the same for both. To begin building a Bitmoji Classroom, you need to start with a nice, calm background. You want the background to have as few objects in it as possible so that you can add in the personalized items you wish to have in your own room. Once you have found the background image you like, you want to save the image to your desktop and then add it to the background of your slide. That way it cannot be moved or layered among other smaller items.
Tip: When looking for backgrounds you can make your own with a few images and icons, or you can try searching for classroom/office images on google. Using the word screen savers or background helps!
Once you have chosen your background you can begin by finding the items you wish to add into it. The key is that the items need to be transparent—this means they have a clear background instead of the normal solid white of a jpeg image. You can do this in Google by typing the item you wish to look for into the search bar, and then clicking IMAGES under the bar.

Once you have clicked images, then hit TOOLS —> COLOUR —> TRANSPARENT. Once you find the image you’d like you simply copy it, and then paste it into your Bitmoji classroom.

Tip: Try adding your Bitmoji in first to get an idea of how large you would like the other items sized.
Bitmoji Classroom Resources
We know how hard it can be to build a Bitmoji classroom from scratch, so we partnered with our dear educational guru Holly Clark from the Infused Classroom, to give your somewhere to start. Simply click here and grab the entire deck of backgrounds and images to use as you get started. Please remember that this resource is to be used in the classroom, and not as something that will later be sold to other educators.
There are a lot of great websites to use when working on a Bitmoji Classroom and creating lessons for students working in a remote environment. We have so many applications we could recommend, but below are some of our favorite FREE applications that would fit into a Bitmoji classroom and accompany a virtual teaching environment nicely.
Flipgrid: A social learning platform where students engage with the teacher and peers through videos and demonstrate their knowledge by pressing record!
Wonderopolis: This online informational site that asks and answers interesting questions about the world. Every day, a new "Wonders of the Day" question is posted, and each is designed to get kids and families to think, talk, and find learning moments together in everyday life. With the integration of Immersive Reader, students can have articles read aloud to them making this a great remote learning website!
Wakelet: allows users to curate customizable content. It is also a great tool for keeping research projects interactive and social. Use it much like a virtual pin-board for class discussions, or group students and have them collaborate on an activity together.
Branching Bitmoji Classrooms
Once you get the hang of building a classroom setting, have fun leveling it up and linking one room to another. Try creating a sort of “homeroom” class where maybe students start off the day, but have it linked to a science lab, a math room and maybe a reading corner. This would allow you to have more resources available for students without cluttering one single slide up.
You can do this in two ways. You can create the slides in one deck and just link them together, or you can create a new deck for each “classroom”, where when students click it takes them out to that new room where all they can see is the new classroom slide.
If you are looking for more ideas about Bitmoji classrooms, check out our other related posts:
Creating a Virtual Classroom with Buncee (Free resource!)
How to Animate Yourself in a Bitmoji Classroom
Bitmoji Keychain Keepsakes
If you are looking for other ideas on how to make teaching and learning relevant and engaging through the use of technology, check out our book The InterACTIVE Class!


How to Add Yourself Into a Virtual Classroom!
Adding “yourself” to your virtual classroom doesn’t mean you need a green screen. You can do it using this simple “background remover.” In this post, you’ll learn how it all works!

Adding “yourself” to your virtual classroom doesn’t mean you need a green screen. In this post, we’ll cover a simple and easy method to get the job done. You’ll learn how to:
(Click on any subheading to skip directly to that section.)
How to Remove a Background From a Video / Gif
How to Download the Transparent Gif
How to Upload the Transparent Gif File Into a Virtual Classroom
(If you’d like a tutorial on how to create a Bitmoji Virtual Classroom, click here.)
How to Remove a Background From a Video / Gif
First, record a quick video that you would like to upload to your virtual classroom.
Note, when you remove the background you will lose all audio and the clip will only be approximately 5 seconds. So, make it something fun like dancing or a silly face. It also helps to use solid color backgrounds and lots of lighting.
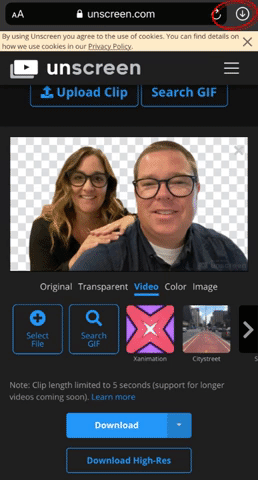
Once you have your video ready, head to Unscreen.com by clicking here or the image to the left.
Next, click on “Upload Clip” and select your video file.

How to Download the
Transparent Gif

After you have selected your video, Unscreen will work to remove the background automatically.
There are a few options that can be added as a replacement background, but in order to get the file into a virtual classroom, you’ll want to be sure to bypass selecting these.
Once the file has uploaded and the background is transparent, it’s time to download the file.
Click the blue “download” button. A drop down menu will appear. In order to maintain the movement in the video and upload to your virtual classroom, you’ll need to select “GIF.” After the file encodes, then click “download.”
If you’re using a mobile device, you’ll need to follow these steps to make sure you’ve saved the file:
Locate the download arrow, typically located to the right of the URL bar. The image to the right shows where to find it if you’re using an iPhone.
Once you have found the download arrow, click it. A new drop down will appear. This will show you where you can find your downloaded file. Tap the new drop down and select your file. This will save it onto your device.
Now, you’re ready to upload the file into your virtual classroom!
How to Upload the Transparent Gif File Into a Virtual Classroom
To upload your file into your classroom, follow these steps:
Buncee:
If you’re using Buncee to create your virtual classroom, here’ what you’ll need to do (all steps are displayed in the video tutorial to the right, too):
Open the Buncee
Tap the “+” sign to add a new item
Click “Uploads",” then select (or click and drag) your file to upload into the Buncee.
Move and reposition the image as you see fit, then click “Share!”
Google Slides:
If you’re using Google Slides to create your virtual classroom, here’ what you’ll need to do (all steps are displayed in the video tutorial to the right, too):
Open your Virtual Classroom on Google Slides
Click on “Insert” from the menu bar
Click on “Image,” then “Upload from computer.”
Select your file
Move and resize as you see fit. Click “Share” to share with your students!
PowerPoint:
If you’re using PowerPoint to create your virtual classroom, here’ what you’ll need to do (all steps are displayed in the video tutorial to the right, too):
Open your Virtual Classroom on PowerPoint
Click on “Insert” from the menu bar
Click on “Pictures,” then “Picture from File”
Select your file
Move and resize as you see fit. Click “Share” to share with your students!
Help! I’m looking for instructions on how to make a Bitmoji Virtual Classroom!
No worries! You’re (almost) in the right place. Click here, and we’ll get you over to a step-by-step tutorial. 🙌

For more #interACTIVE lesson ideas, check out our books The InterACTIVE Class and Flipgrid in the InterACTIVE Class on Amazon!


How to Create a Virtual Classroom with Your Bitmoji in Buncee!
Virtual Classrooms are a great way for educators to deliver content to students in a fun and engaging way. Buncee makes creating one easy! You’ll learn how to create and share your virtual classroom to your students!
Virtual Classrooms are a great way for educators to deliver content to students in a fun and engaging way. Educators can add a Bitmoji into a virtual classroom to create an animated experience for students. You can even organize the images in your “classroom” so that they hyperlink out to external sources! Our preferred tool to create virtual classrooms is Buncee. You can sign up for an account by clicking here!
In this tutorial, you learn:
💥 HOW TO ADD A VIRTUAL CLASSROOM BACKGROUND
💥 HOW TO ADD IMAGES TO YOUR VIRTUAL CLASSROOM
💥 HOW TO ADD TEXT IN YOUR VIRTUAL CLASSROOM
💥 HOW TO ADD HYPERLINKS IN YOUR VIRTUAL CLASSROOM
💥 HOW TO SHARE YOUR VIRTUAL CLASSROOM
💥 HOW TO ADD A VIRTUAL CLASSROOM BACKGROUND 💥
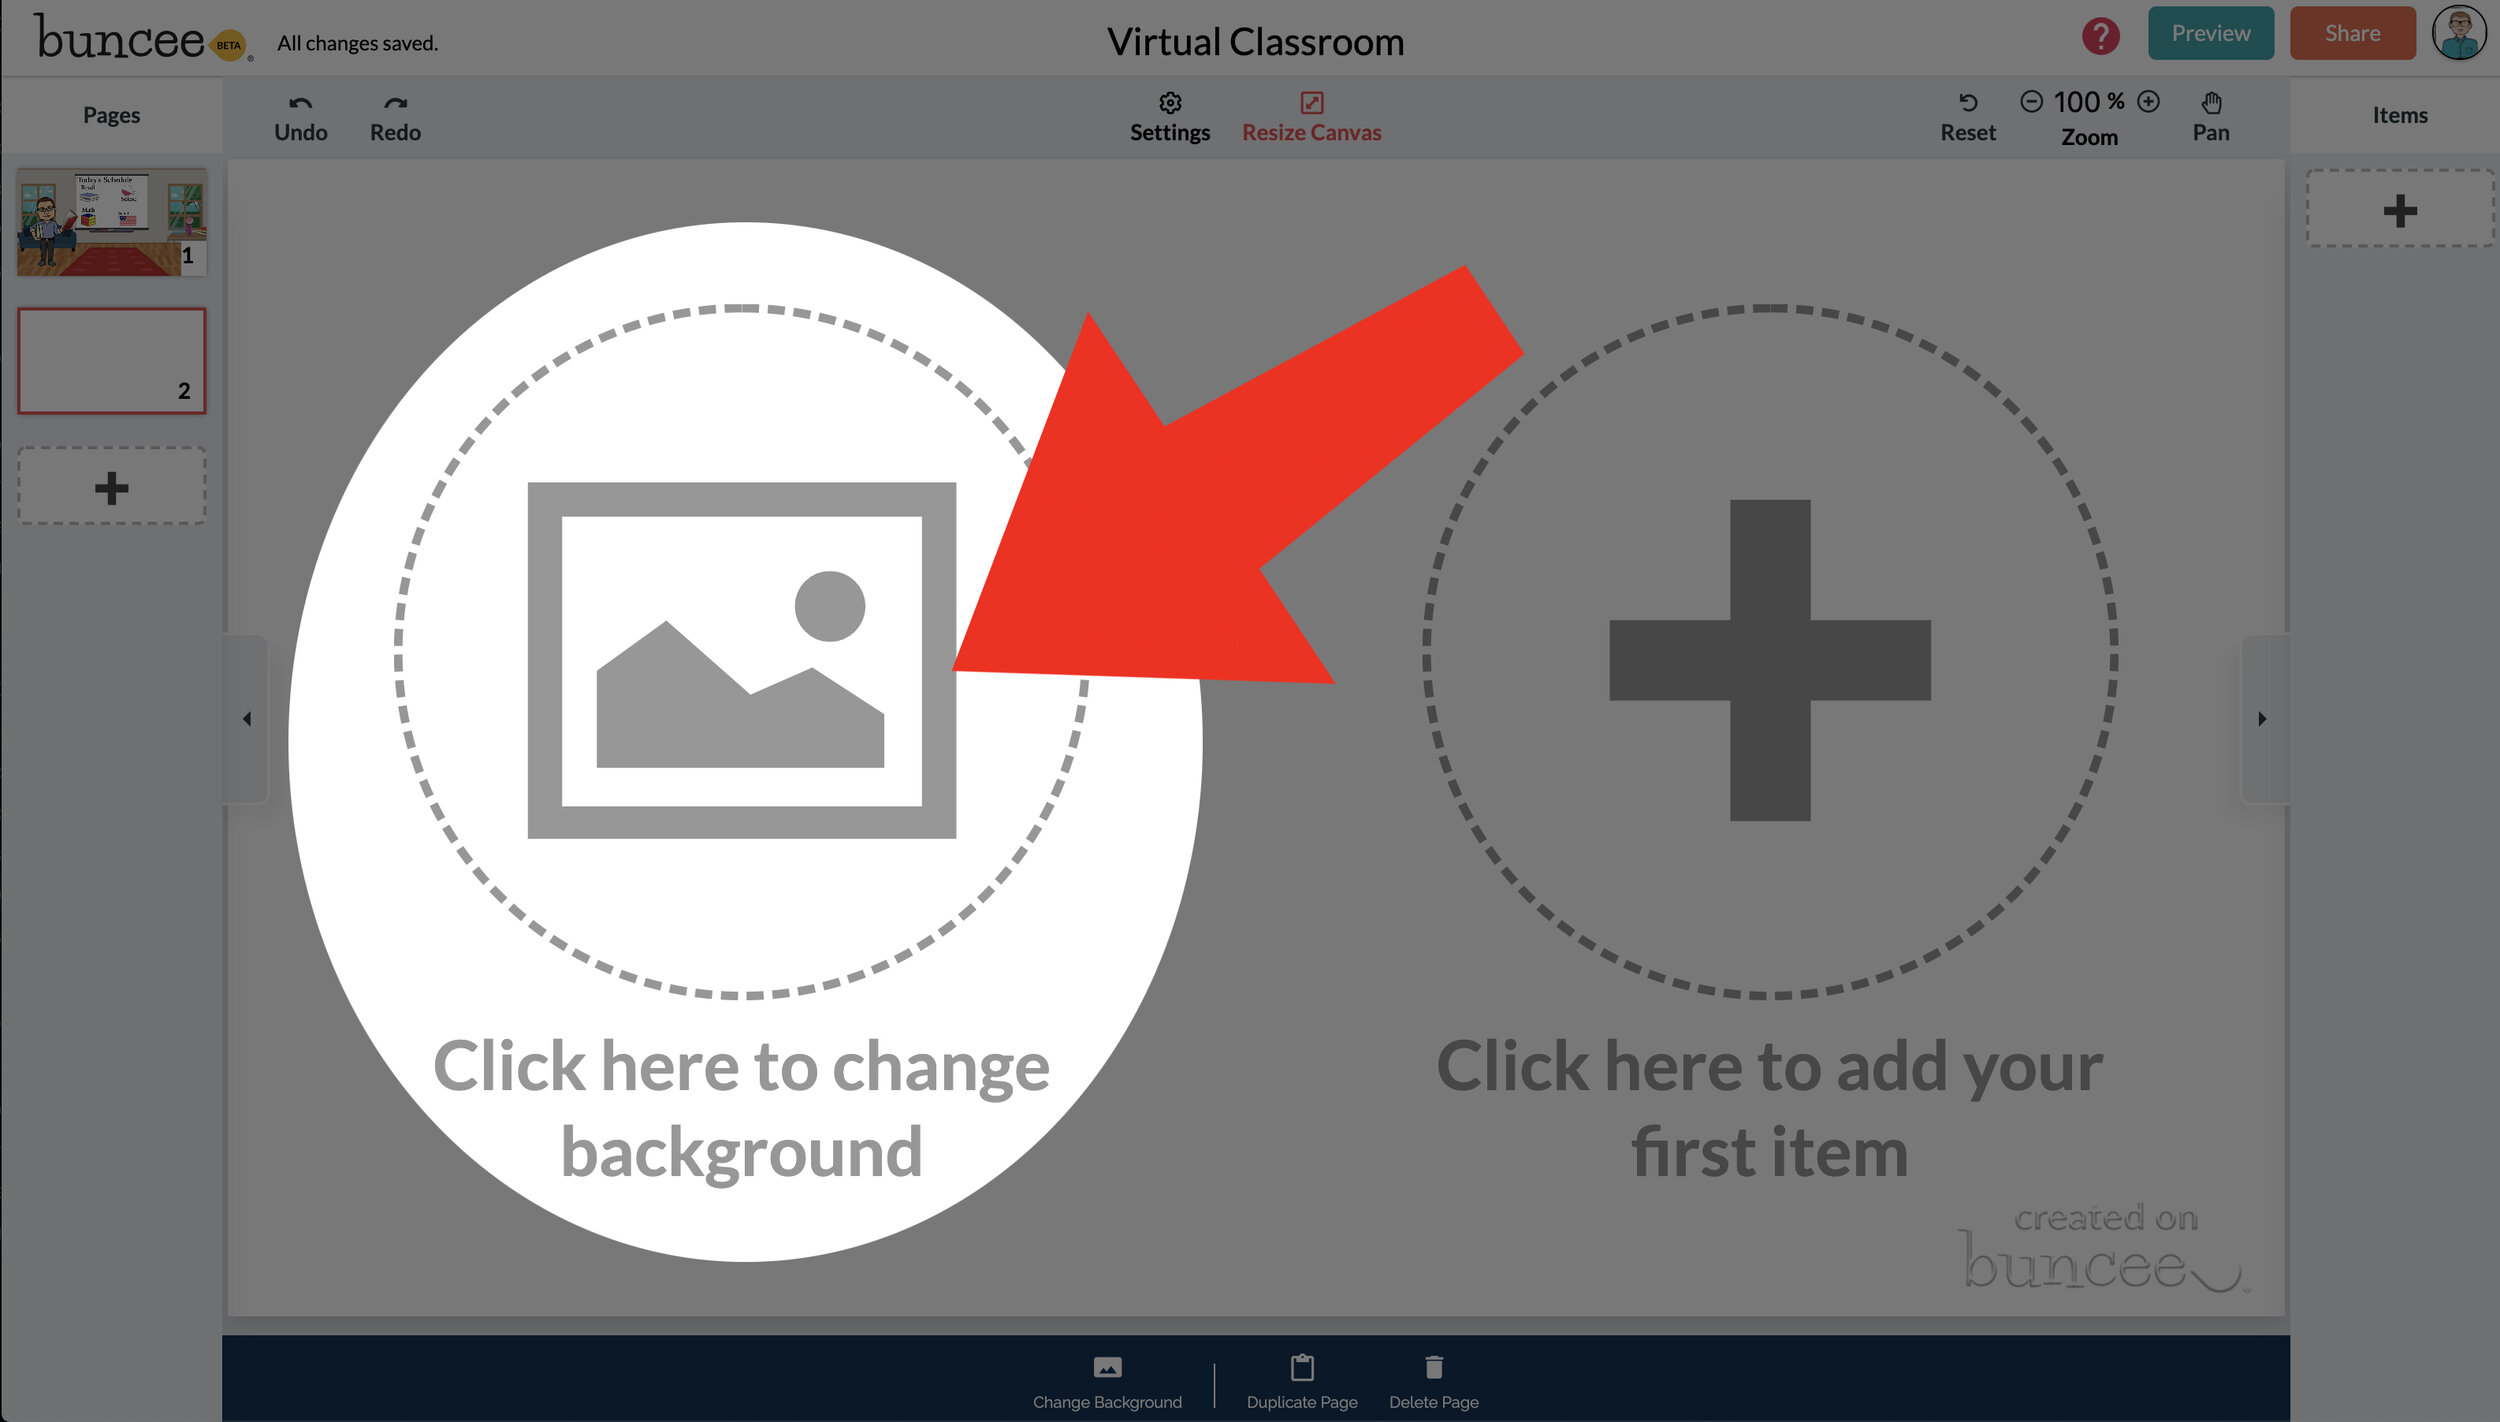

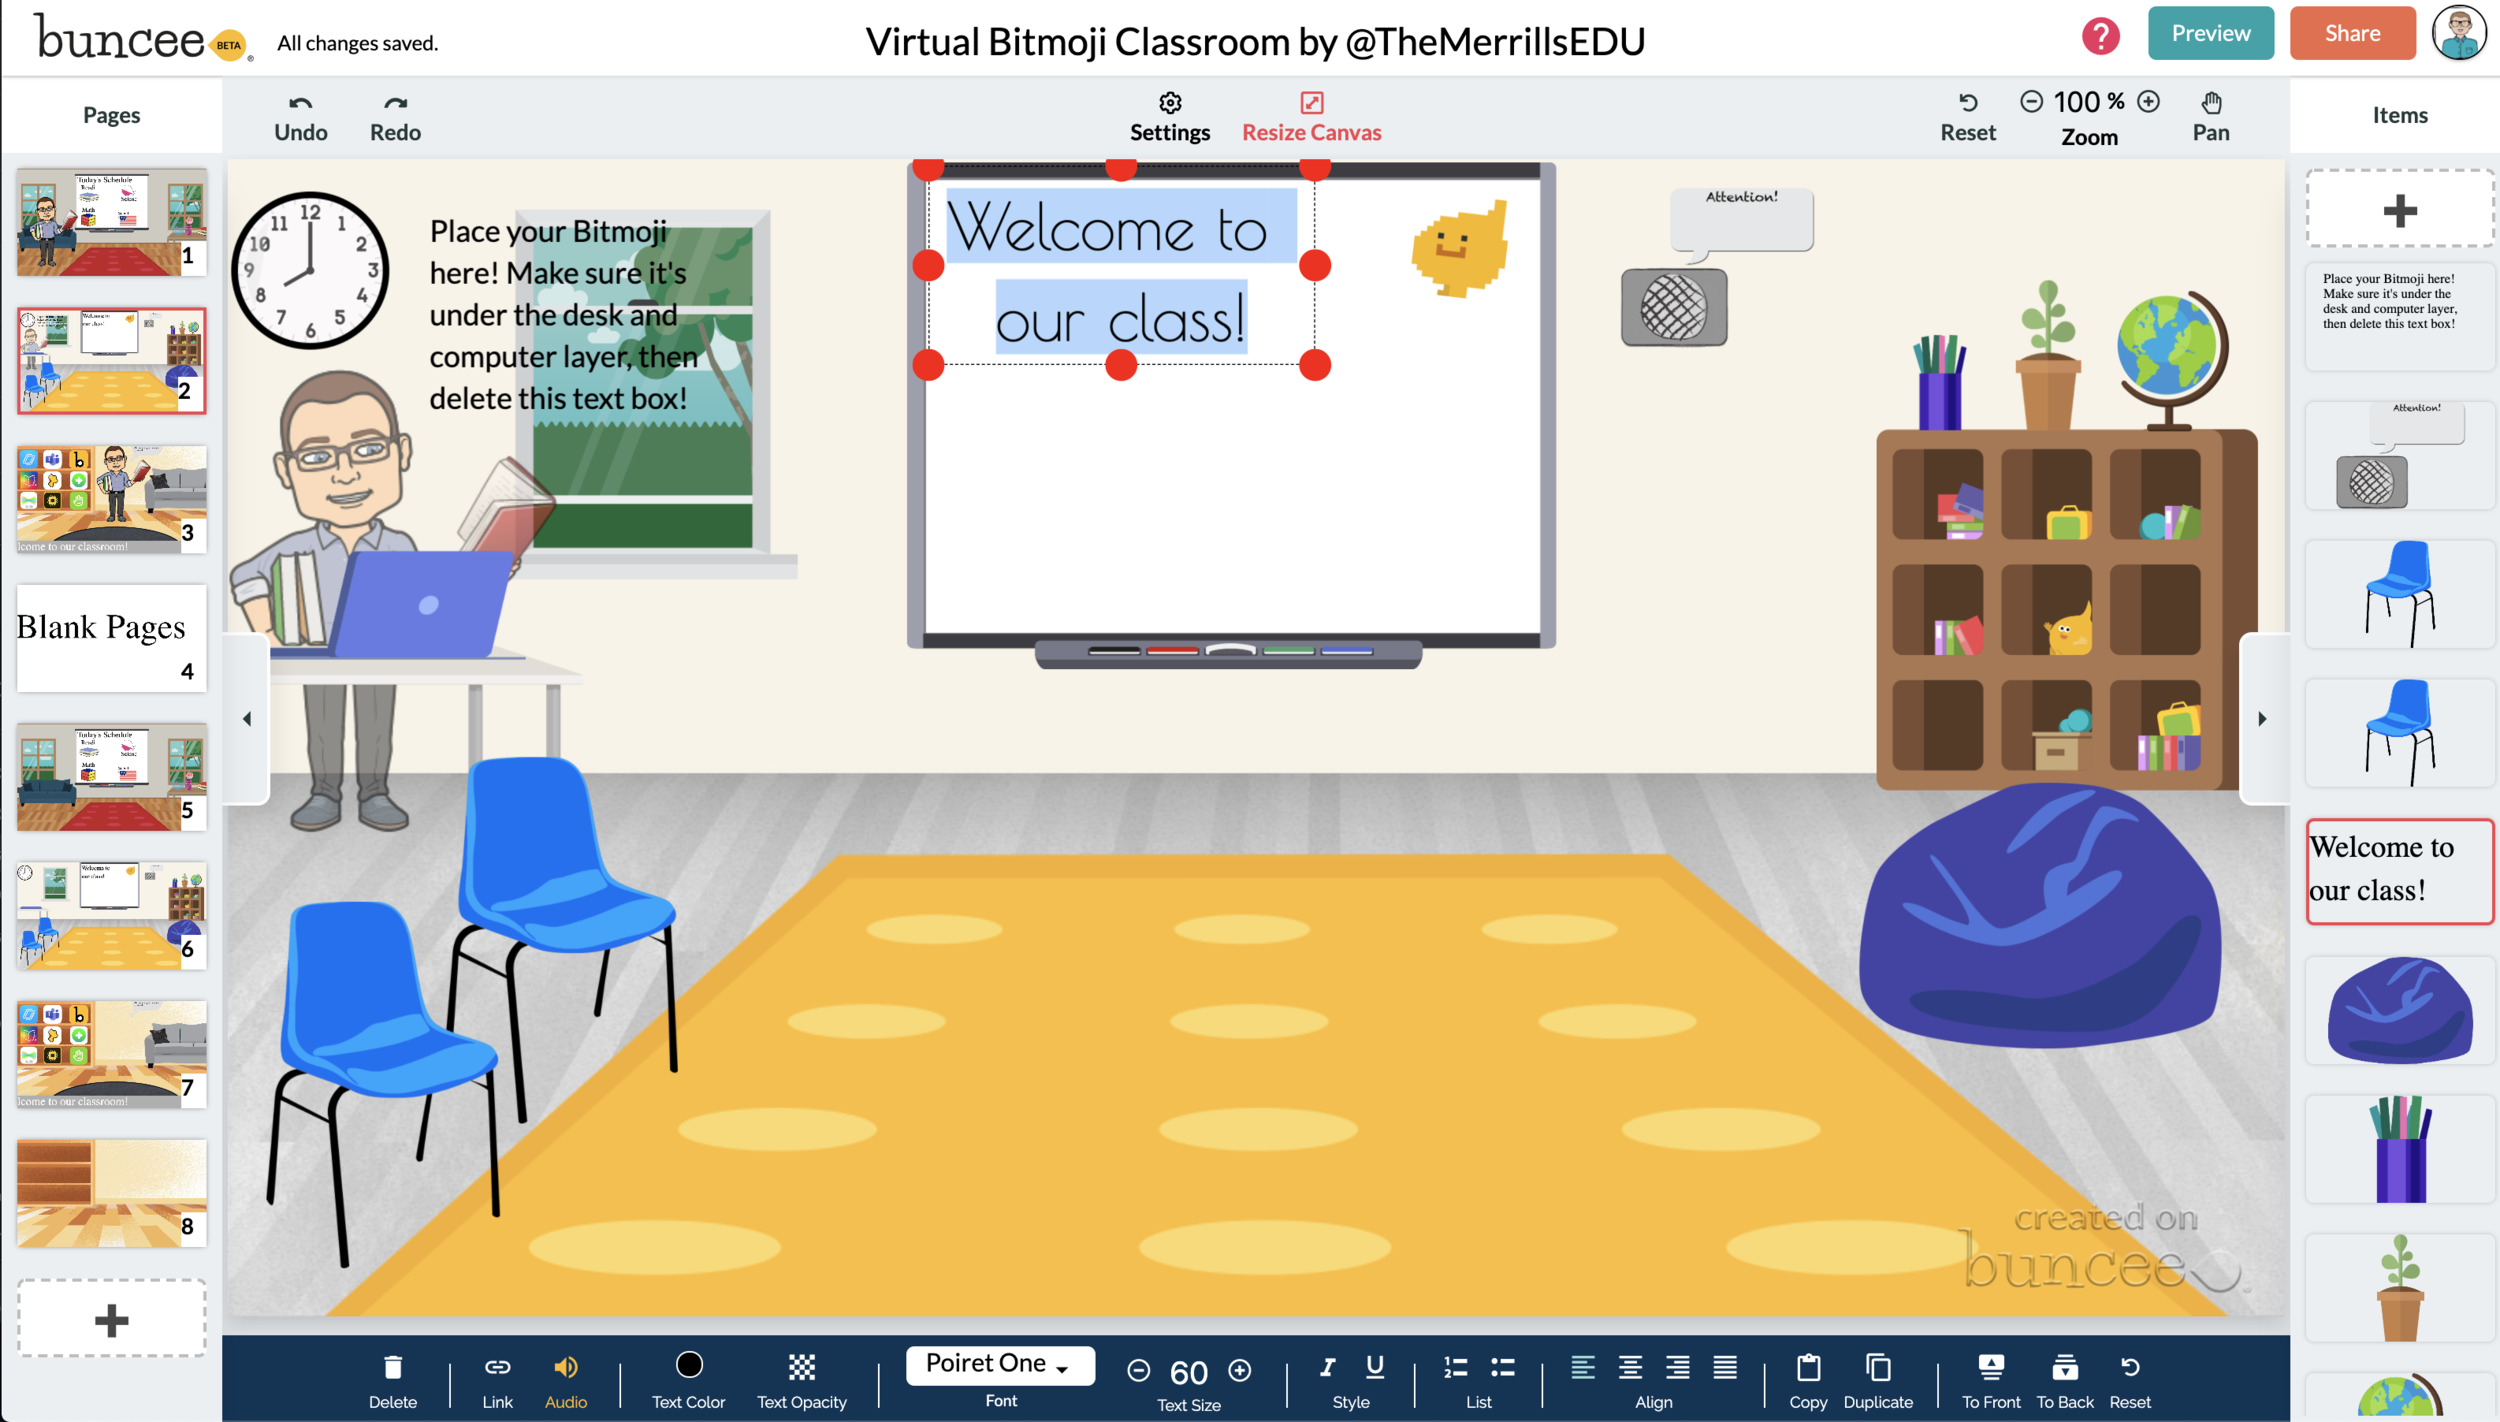
To get started, log into your Buncee account and create a new Buncee. Open the new Buncee and the first thing you’ll want to do is add a background. Follow these steps:
Tap the "click here to change background” option, then search for “class.”
Scroll through and find one that is right for you. There’s lots to choose from! You can find background images with smart boards, chalkboards, and more.
Once you find a background image that works for you, click it. Then, click the blue “add” button just to the right of the search bar. Now, your background is set and locked!
💥 HOW TO ADD IMAGES TO YOUR VIRTUAL CLASSROOM 💥

Now comes the fun part…Design your virtual classroom with some images! Click on the “+” sign to add an item. Use Buncee’s search tools to find items that you’d like to add to your classroom. Some fun things to search for include:
Smart Boards
Desks
Books
Clock
Computer
Bookshelf
Chair (you can even find a bean bag chair!)
Window
Couch
Speech (for a speech bubble)
If you’re having a hard time finding items to add, try typing “school” into the search bar. There are tons of item results that will pop up and you can use. You’ll find stickers, still images and moving gif images.
💥 HOW TO ADD TEXT TO YOUR VIRTUAL CLASSROOM 💥
After you’ve added all the items to you virtual classroom, you may want to add text. You can add text on top of items, like your smart board. This is a great way to deliver instructions for your students. To add text in Buncee:
Click on the “+” sign
After the Buncee features window will opens, click on the “text” icon (located to the left of the window)
Double click the new item to enter your text.
Once you have your text ready, you can change the font or font size by clicking the font options located on the bottom of the screen.
Move and place your text accordingly.

💥 HOW TO ADD HYPERLINKS IN YOUR VIRTUAL CLASSROOM 💥


After you have your items and text in place, now it’s time to start hyperlinking. When you hyperlink, your students will be able to click on the items (or text) that you have entered and it will take them to an external source. For example, if you use the Buncee logo, you can hyperlink it so that when it’s clicked, it will take you right to the Buncee login screen. Hyperlinks can be added to any item or text that you have added on Buncee. To add a hyperlink:
Click on the item or text that you want to hyperlink
Click on the “link” option on the bottom of the Buncee features toolbar
Enter the URL into the box
Press enter to “update” the item
💥 HOW TO SHARE YOUR VIRTUAL CLASSROOM 💥
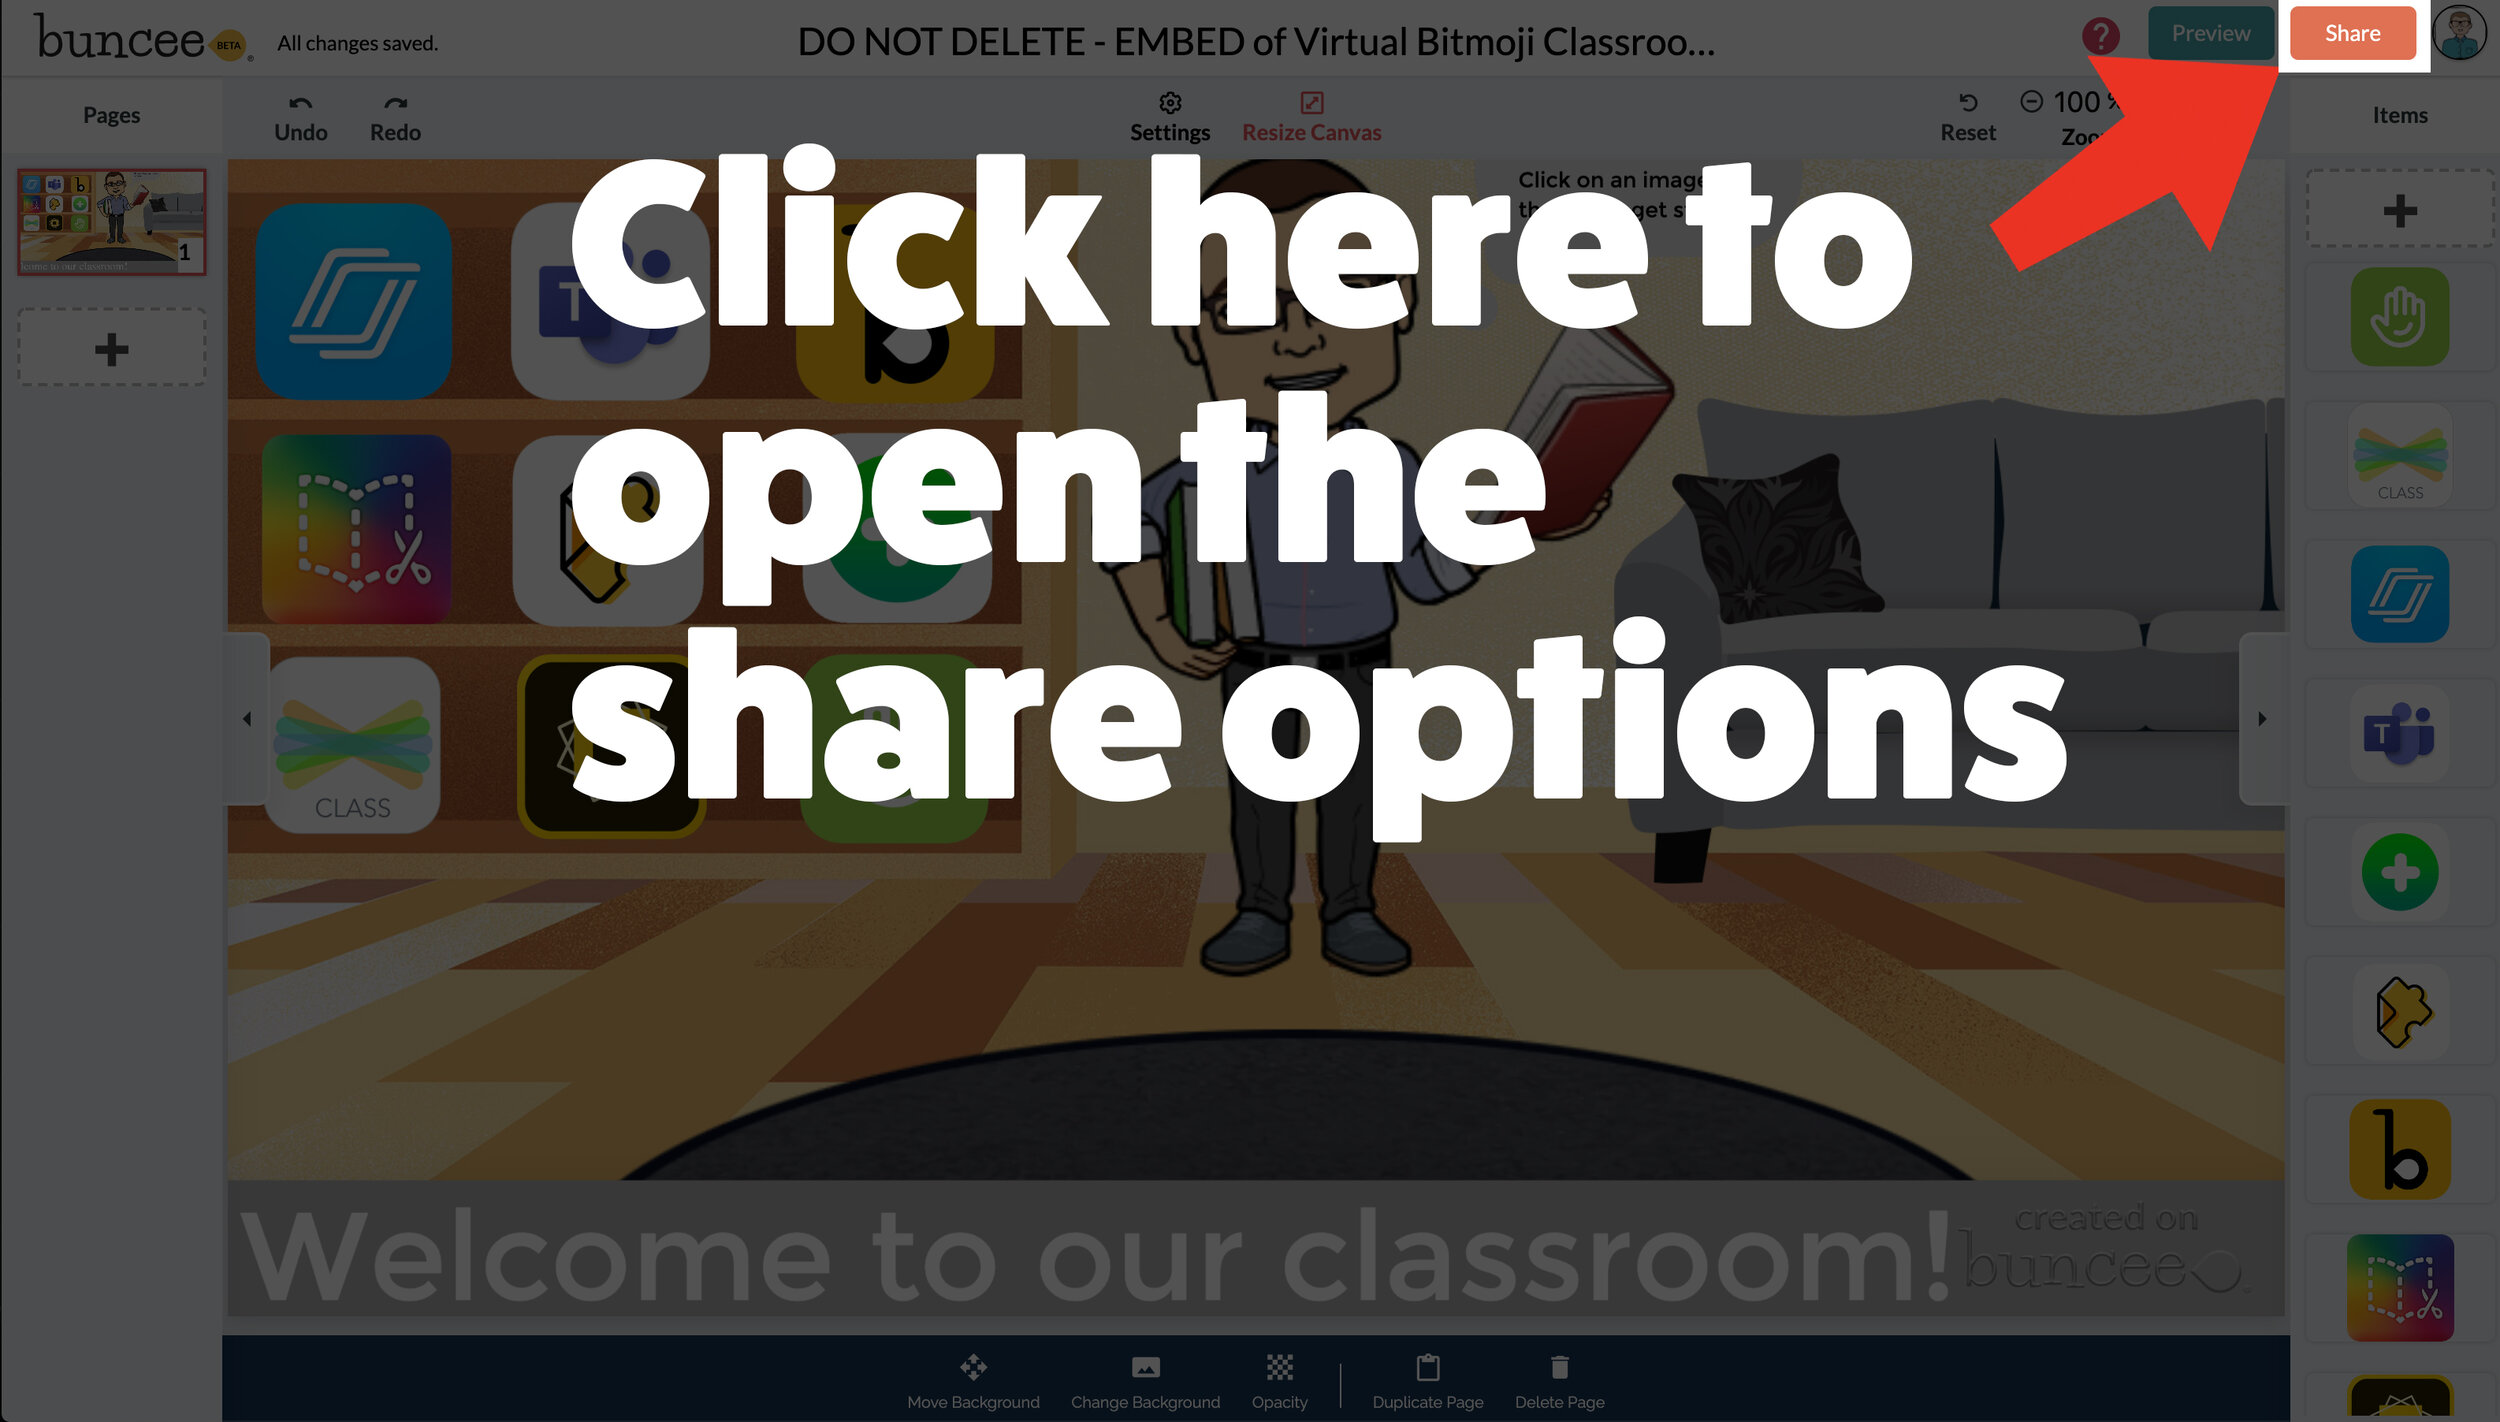

Now that your virtual classroom is ready, it’s time to share it with your students! There are several options to share in Buncee:
Share the Buncee slide deck link
Embed the Buncee slide deck into your LMS (Canvas, Schoology, Microsoft Teams, Google Classroom)
To share the Buncee slide deck link:
Click the red “Share” button
A new window will open. Click “Code” (second option from the top)
Next to the link box, click “Copy.” This will copy the URL to your Buncee.
Share the URL with your students
To embed the Buncee slide deck:
Click the red “Share” button
A new window will open. Click “Code” (second option from the top)
Next to the Embed Code box, click “Copy.” This will copy the embed code to your Buncee. (Tip: you can also click on “Show Options” to change the size of the embed)
Open your LMS (Canvas, Schoology, or anywhere you can embed) and click on the embed option. Paste the embed code from your Buncee, then hit save. Your Buncee will now be embedded into your page.
To share to Microsoft Teams, Google Classroom, or other social outlets:
Click the red “Share” button
A new window will open. Click “Social” (sixth option from the top)
Select the app that you are trying to share to, then follow the instructions

💥 FREE Templates! 💥
We’ve created several templates that you can download, copy, and edit. You can scroll through the different pages by clicking the arrow on the right. If you would like to download these, click here or the image below.

To view the templates, check out the embed of them below!
💥 YouTube Tutorial! 💥
Still not sure how it all works? We’ve got you covered! Check out this walkthrough!
For more #interACTIVE lesson ideas using Flipgrid, check out our book The InterACTIVE Class on Amazon!


Creating a Virtual Classroom with Microsoft Teams
With so much unknown right now in education, one thing we can do as educators is focus on meeting the needs of our students the best we can while remote learning. We may have lost the sense of security and safety our physical classrooms gave us, but with the help of Microsoft Teams we can expand those four walls and bring our students into a different type of interACTIVE learning environment.
With so much unknown right now in education, one thing we can do as educators is focus on meeting the needs of our students the best we can while remote learning. We may have lost the sense of security and safety our physical classrooms gave us, but with the help of Microsoft Teams we can expand those four walls and bring our students into a different type of interACTIVE learning environment.
Microsoft Teams has worked hard and listened to the needs of educators to make the platform as versatile and streamlined as possible. With integrations and features such as announcements, OneNote class notebook, Tabs and Assignments, and chat—Teams provides teachers with options tailored for teaching and learning.

Conversations in Teams
Being able to connect and keep in touch with students while out of the classroom is so important and channel posts makes this so easy to do in Teams. Create classroom announcements and posts that can be edit to get your students' attention. You can also control who replies to a post, change the importance of a post to draw students’ attention to something specific, and post across multiple channels at the same time.
Once a post is sent in a channel, the conversation is organized by date and then threaded. Find the thread you want to reply to, then click Reply. Add your thoughts and click Send. When replying you can also @mention someone to get their attention and to have them see a post sooner. Students (and teachers!) can also have fun by posting and replying with emojis, memes and GIFS using the buttons under the reply bar.
Creating Assignments in Teams
When creating assignments, teachers have the ability to customize each and every assignment to meet the needs of their students. Add grading rubrics for students to reference while working and for you as the teacher to use laster when evaluating their work. Customize every assignment by adding or attaching resources. This can be content from OneDrive, your device, links, and more. Once an assignment is creating you can distributed it to multiple classes or personalize the assignment by assigning it to individual students. Finally, when creating, you can customize all the dates and times that are important to the assignment. you have the ability to edit due dates and close dates, in addition to scheduling assignments to appear on a later date.
Keeping student work in order and easy to find can be challenging during remote learning, making the organization of Teams so beneficial. Teams lets you as the teacher create learning activities for students with integrated Office applications while also giving you the ability to leave feedback for students. You can also grade and track student progress by using the Grades tab. View both upcoming and turned in assignments by class, or view them across all your classes. Selecting an assignment will allow you to turn it in or view feedback and scores.
Holding Online Meetings in Teams
Microsoft Teams is a great platform to connect with students virtually and gives you as the teacher control of the meeting. You can speak and share video, mute and remove participants, share content and your screen, and privately view a PowerPoint presentation all while participating in a live meeting. The organizer also has the option to start and stop recording of the meeting which allows for asynchronous learning by proving content to learners on their own time. Students can also share their screen and view PowerPoint presentations during a chat, but the other features are for presenters only.

Simply click Meet now under the message box to start a live meeting in a channel. If you click Reply to a message, then the meeting will be attached to that conversation. You can select Meet now to start the meeting right away or Schedule a meeting to schedule the meeting for the future. Members of the channel will see an invitation for the meeting in their calendar if you decide to schedule it for later.
Content and Collaboration in Teams
Content can be shared in multiple ways when using Microsoft Teams. Teachers can add Tabs within a channel to centralize where students are going and keeping the workflow in Teams. Click + by the tabs at the top of the channel, click the app you want, and then follow the prompts. Use Search if you don’t see the app you want. Apps like Flipgrid, Buncee, Peardeck and Wakelet are just a few of the many different options available!
You can also share content directly in channel posts. Click Attach under the box where you type messages, select the file location and then the file you want. Depending on the location of the file, you’ll get options for uploading a copy, sharing a link, or other ways to share.

Collaborating in Teams has never been easier with the integration of the OneNote class notebook. OneNote notebooks are a digital binder that can be used in your class or with your staff to take notes and collaborate. OneNote Class Notebooks have a personal workspace for every student, a Content Library for handouts, and a Collaboration Space for lessons and creative activities.

We way not be able to close out the year with our students, but let’s make distance learning as familiar and comforting to our students as we can! By working in Microsoft Teams we can continue to encourage and engage students from the walls of our “virtual classroom.”
Stay #interACTIVE!
-👗➕👓
For more on using Microsoft Teams in the classroom check out the following post:
For more ideas on how to create relevant and engaging digital lessons, check out our book The InterACTIVE Class out now on Amazon!