


Tips, Tricks and Templates to Use with Microsoft this Fall!
@TheMerrillsEDU share ways on how to use Microsoft tools in a post-pandemic classroom. Learn how students can use dictation, convert word files to powerpoint presentations, how to use Microsoft's collaborative whiteboard and so much more! These quick tips and tricks are delivered in less than 90 seconds!

Teaching throughout the pandemic was the world’s greatest PD event for educators. But, now that most of us are gearing up to return to in-person learning next year, how can we continue to use some of the technology and tools that we learned about throughout remote learning? How do tools like Microsoft Teams, Word and PowerPoint still fit into every day use in a “normal” classroom setting? It’s something that is on all of our minds entering next year. So, to help, we’ve created a video series dedicated to helping! We’ll share two new tips, tricks and/or templates per week from now until the end of July - just in-time for the new school year. Check everything out below!
(click on any subheading to jump to that section)
Also, check out our recommended blog posts and tutorials:
How to Convert a Word Document into a PowerPoint
Teaching writing throughout the pandemic was probably one of the hardest subjects for us both. With students both in-person and virtual, we had to rely on Microsoft Word to produce student artifacts that could be transferred digitally (and edited if need be). This trick helped take our students writing and “publish” it into something that they could edit, create and share. The result was something that everyone could be proud of! Learn how it all works below!
Using Dictation in Microsoft Tools
Dictation can now be found in many of Microsoft’s tools. Learn where to find it and how your students can take advantage of this feature below!
Ways to Use Microsoft’s Whiteboard in the Classroom
Microsoft’s Whiteboard is perfect for collaboration and real-time creative thinking. Learn how you can integrate this into your classroom immediately!
Monitoring Social and Emotional Learning with Microsoft EDU
Learn how this Microsoft tool can help you monitor your students’ feelings in just a few clicks! Reflect will help both you and your students returning back to school this fall!
Using Immersive Reader in PowerPoint
Immersive Reader can now be found in PowerPoint! This impressive technology can read out loud any text on the slides and can even translate it into different languages, making your content accessible to all! Learn how it all works in PowerPoint below!
Recommended Blog Posts
and Tutorials:
How to Embed Nearpod Presentations into Microsoft Teams
Organization in any classroom is key and with this tip, you’ll be able to keep your Nearpod presentations embedded right into Microsoft Teams. Check out our blog post and tutorial below for more info!
How to Make a Custom Microsoft Teams Background
Microsoft Teams is constantly providing updates to its platform, but the latest is one that users have been begging for: the ability to upload your own backgrounds. Now, you can create a personalized scene and Teams will virtually place you directly into your image. Learn how it all works and find a free background from our curated list!

6 InterACTIVE Ways to Use Microsoft Forms
There are many hidden gems within Microsoft EDU, and Microsoft Forms is one of them! Here are six interACTIVE ways you can use them!
How to Use Reading Progress
Learn how Microsoft is revolutionizing how educators administer running records and assess their students reading skills. NO MORE RUNNING RECORDS!


Creating a Virtual Classroom with Microsoft Teams
With the help of Microsoft Teams we can expand our classroom walls and bring our students into a different type of interACTIVE learning environment. Learn how to do more with Microsoft Teams!
Number Talks in Microsoft Teams
Are you looking for ways to improve mental math and fact fluency with your students? Then, Number Talks may be the perfect exercise for your class! Pair this activity with Microsoft Teams for full-on engagement!


Check out the entire video series below!
Check back soon for more updates and be sure to follow us on social media or join our mailing list to be the first to know when new content is posted!
-- Stay tuned for more on how to use Microsoft tools in your classroom! Be sure to follow us on social media (@TheMerrillsEDU everywhere) for more! 👓👗
For more tips, tricks and lesson ideas for making learning more interACTIVE, check out our books The InterACTIVE Class and Flipgrid in the InterACTIVE Class on Amazon!


How to Use Microsoft's Reading Progress
NO MORE RUNNING RECORDS! You read that right. Microsoft’s new Reading Progress will take these off your hands, freeing up time that you can dedicate to your students. Learn how it all works, here!

Running Records are crucial assessment pieces. We love having the data that shows how much our students have grown, but it takes a great deal of time to carry out Running Records. Microsoft understands the importance of them, but also understands that our time is valuable. This inspired them to develop their Reading Progress app. What if we told you that Microsoft used the same type of technology used in the Flipgrid Shorts Camera, combined with the power of Immersive Reader and the distribution power of Microsoft Teams. Yes, you read that right! Meet Microsoft’s Reading Progress app! Full launch of this tool is coming in late August!
In this blog post you’ll learn:
(Click on any subheading to jump to that section)
What is Microsoft’s Reading Progress and what does it do?
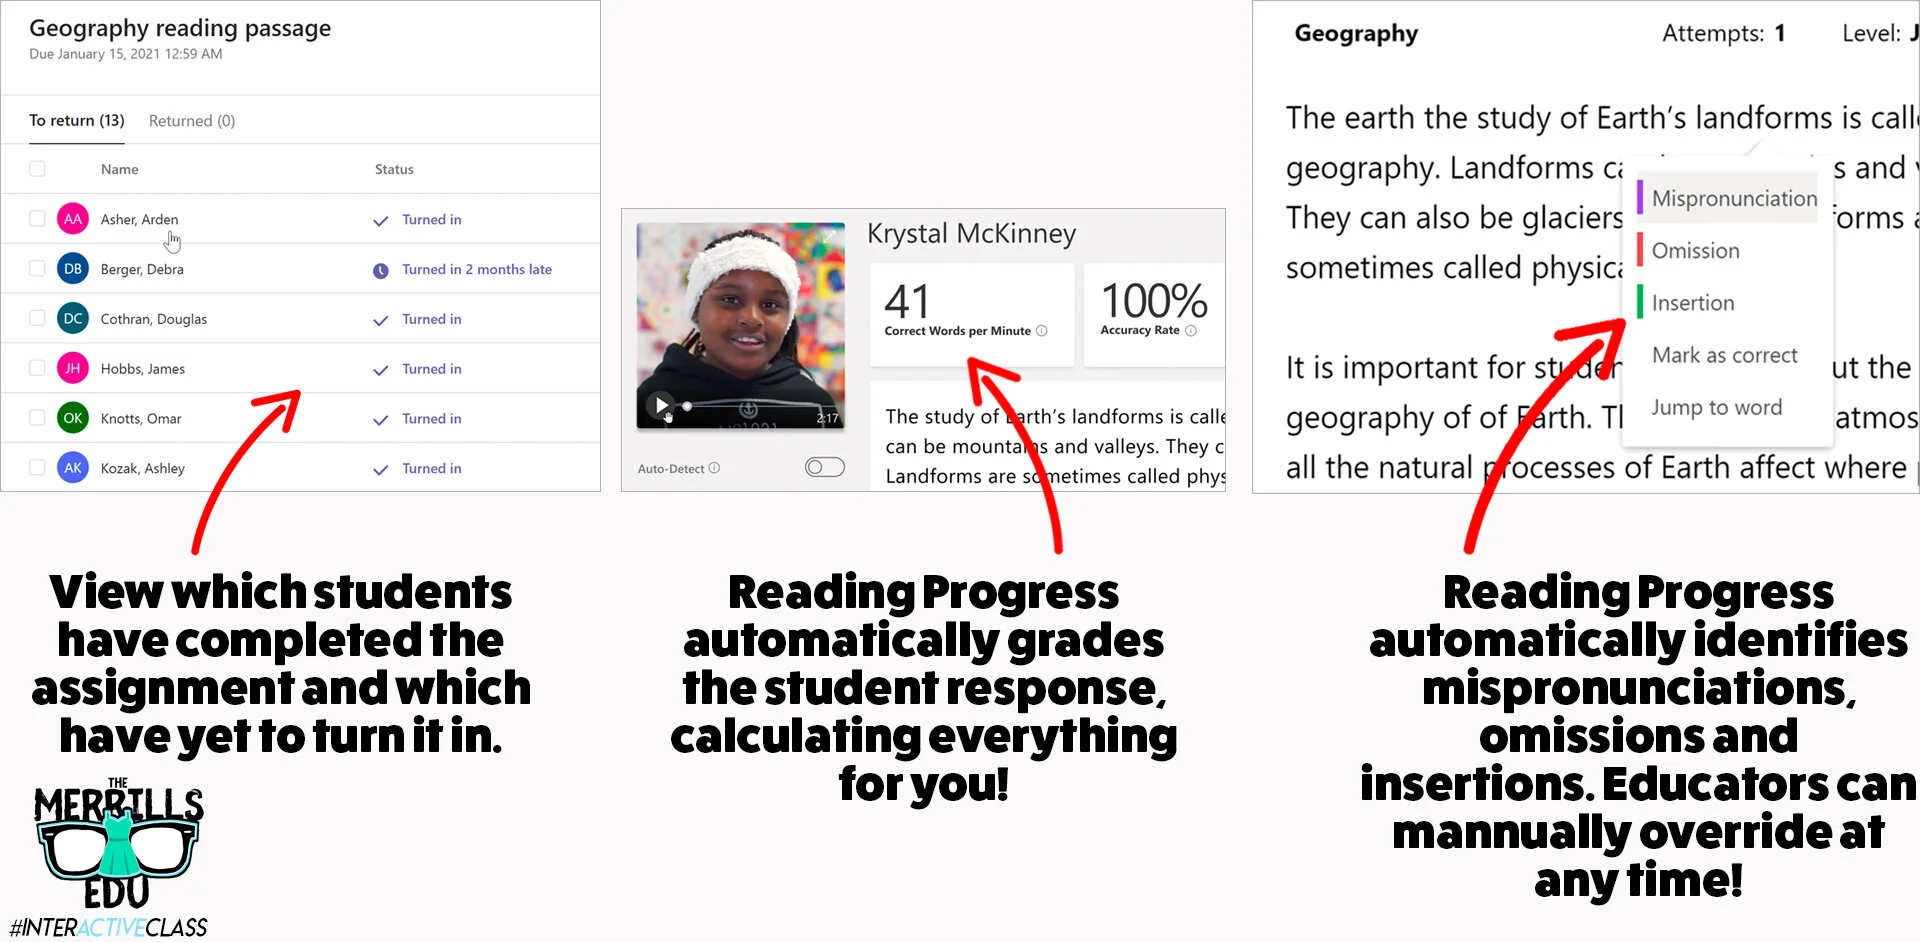
Reading Progress is a ⚡️FREE⚡️ tool that can be found within Microsoft Teams. Imagine if the developers of the Flipgrid Shorts Camera, Immersive Reader and Microsoft Teams all sat down at a table and collaborated on what to do next. Reading Progress uses the technology from the Flipgrid Shorts Camera to record a video of students as they read. The same type of technology that is used in Microsoft’s Immersive Reader then takes the video and intelligently looks for errors, mispronunciations, miscues and more - AUTOMATICALLY. You read that right. The technology does all the work. A full report is provided to the educator, who can go back and view the recorded video and listen back to how the student performed. If the technology marks a student as reading a word correct / incorrect, the educator has the ability to change it on their end. The end result is a full running record, all on video!
How to set up Microsoft’s Reading Progress app
Getting started with Microsoft’s Reading Progress app is simple! Follow these steps to get started.

1. Create a new document in Microsoft Word. (PDF’s will work if you have those, too.)
2. Type out what you would like your students to read.
3. Save a copy (you’ll eventually upload this as the assignment).
4. Launch Microsoft Teams.
5. From your Team, click Assignments.
6. Click the purple Create button located on the lower left side of the screen, then click Assignment.

7. Select the appropriate class /team to assign the passage to, then click Next.
8. Give the assignment a title (TIP: Include the reading level of your passage in the title).
9. Under the Instructions area, locate and click the purple Add Resources link.

10. Click the Reading Progress icon and fill out the information. Give the assignment a name (it can be the same as the title).
11. Now it’s time to upload your Word document (or PDF) reading resource / passage. Under Reading Passage (required), click on Upload a document. Upload the Word document or PDF that contains your passage.
12. After the upload process is finished, enter the reading level and genre. Adjust the number of attempts to any number that you would like (this is the number of chances students have to read / record themselves reading the passage).
13. Next, adjust the pronunciation sensitivity. This adjusts how sensitive the app should be when listening and estimating errors. (Note: educators can always manually edit errors for accuracy).
14. Toggle the Require video on or off. It’s defaulted to on and we recommend leaving it on, but some students may be reluctant or camera shy. In that case, their audio will be recorded but not the video.
15. Last, click Attach to add it to your class assignment. Then, click the purple Assign button on the top right corner to launch it!
Need to see it? No problem! Check out the tutorial below!
How do students use Microsoft’s Reading Progress?
The process for students to access assigned Reading Progress assignments is simple and can be done in just three clicks once they’re logged into Microsoft Teams. Follow these below to get started:
1. Have your students launch Microsoft Teams.
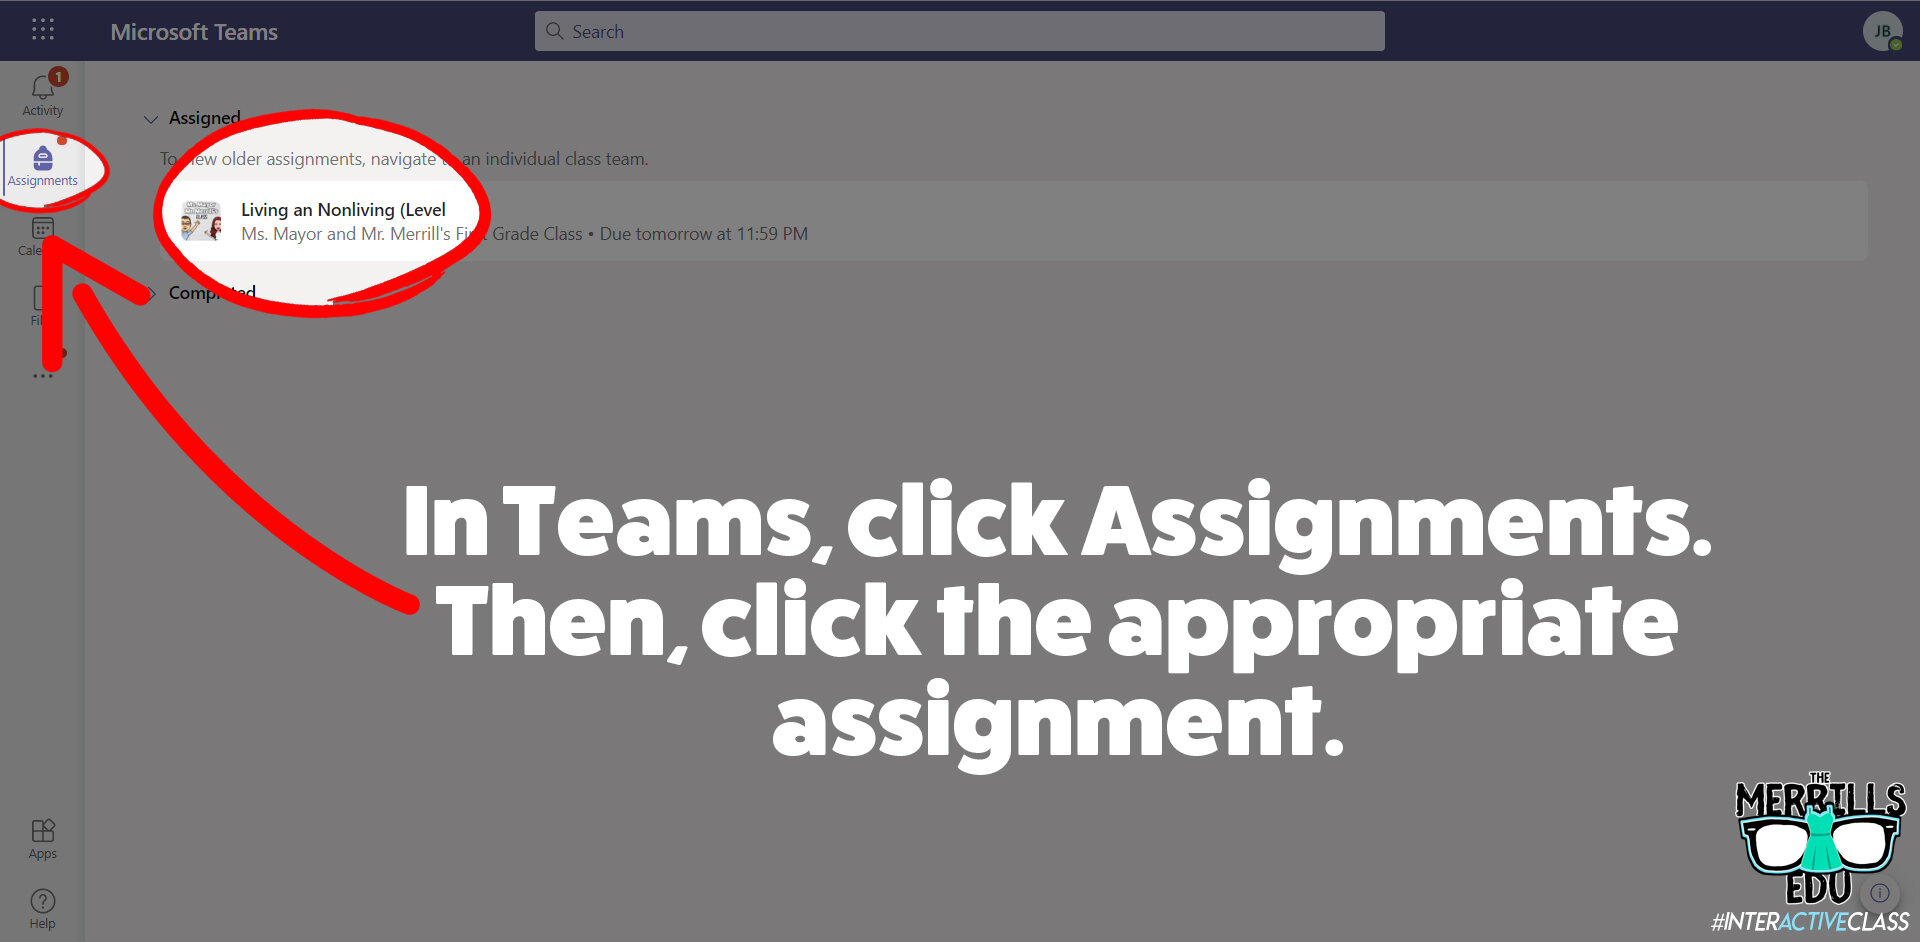
2. Once Teams has opened and loaded, students click on Assignments (located on the left hand panel, with the book bag icon).
3. All of the reading passages (and any other assignments you gave in Teams) will appear.
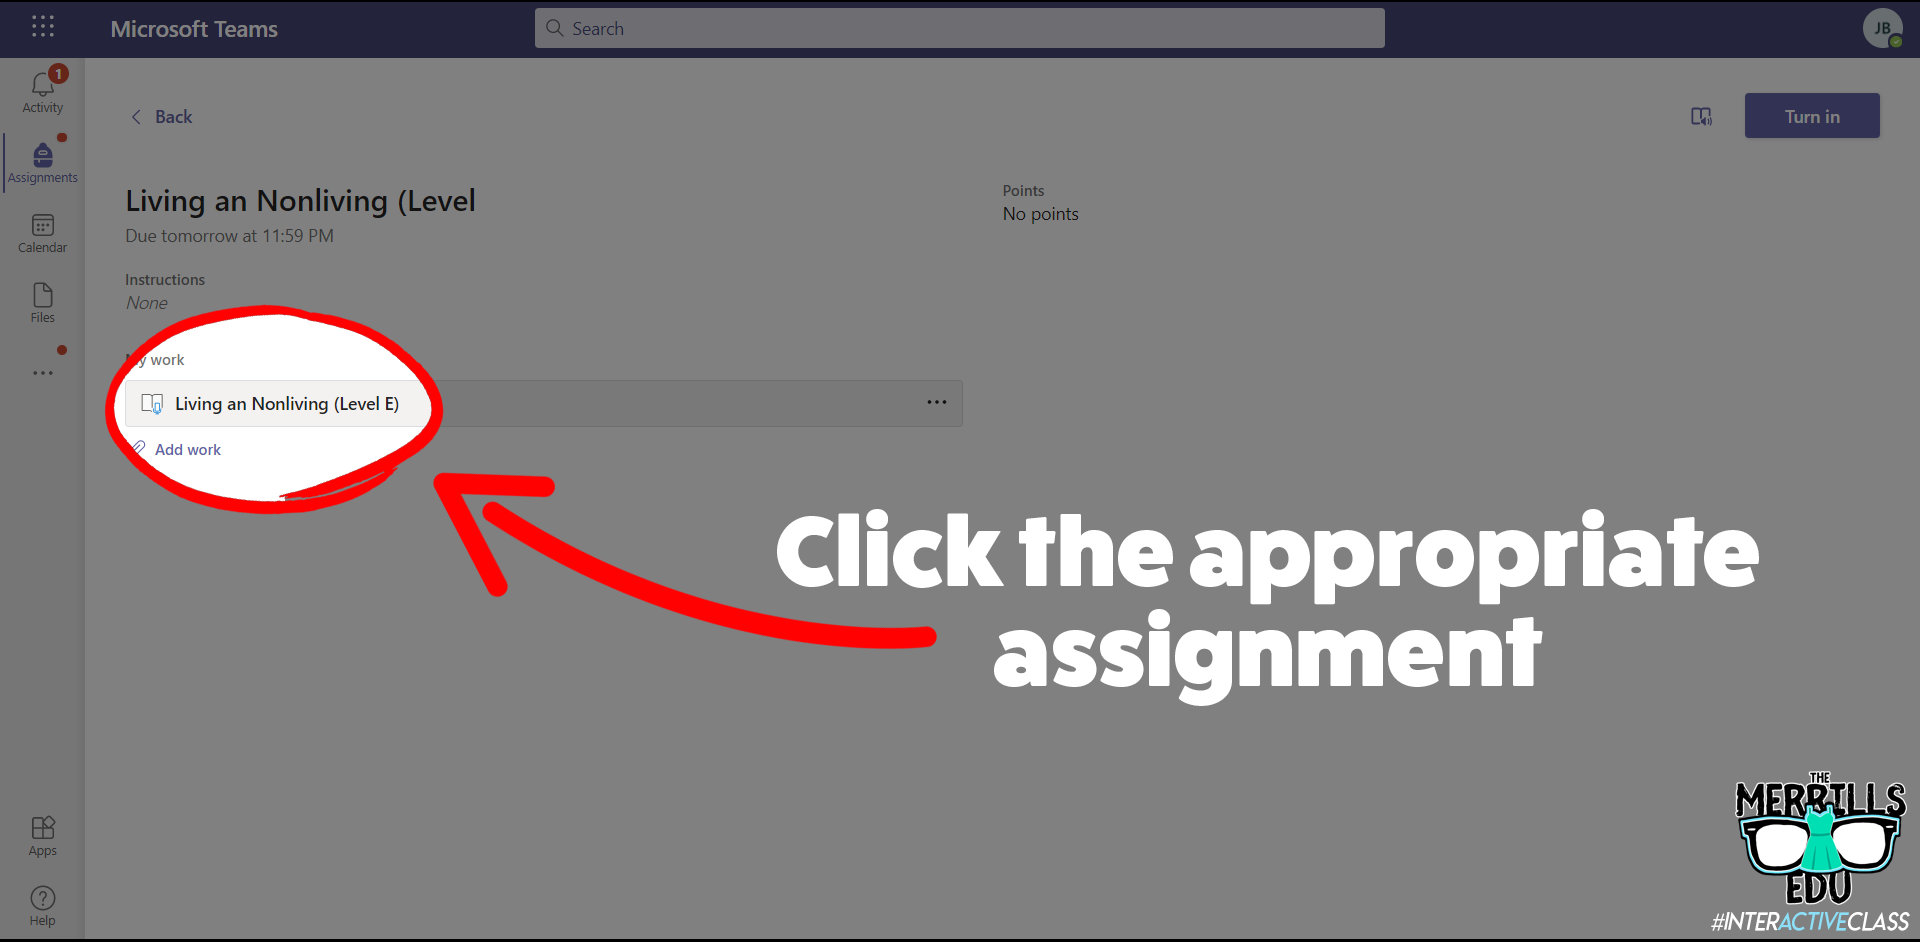
4. Students select one of the reading passage files and click on it to open it.
5. After the assignment opens, click on the passage which is attached under My work.
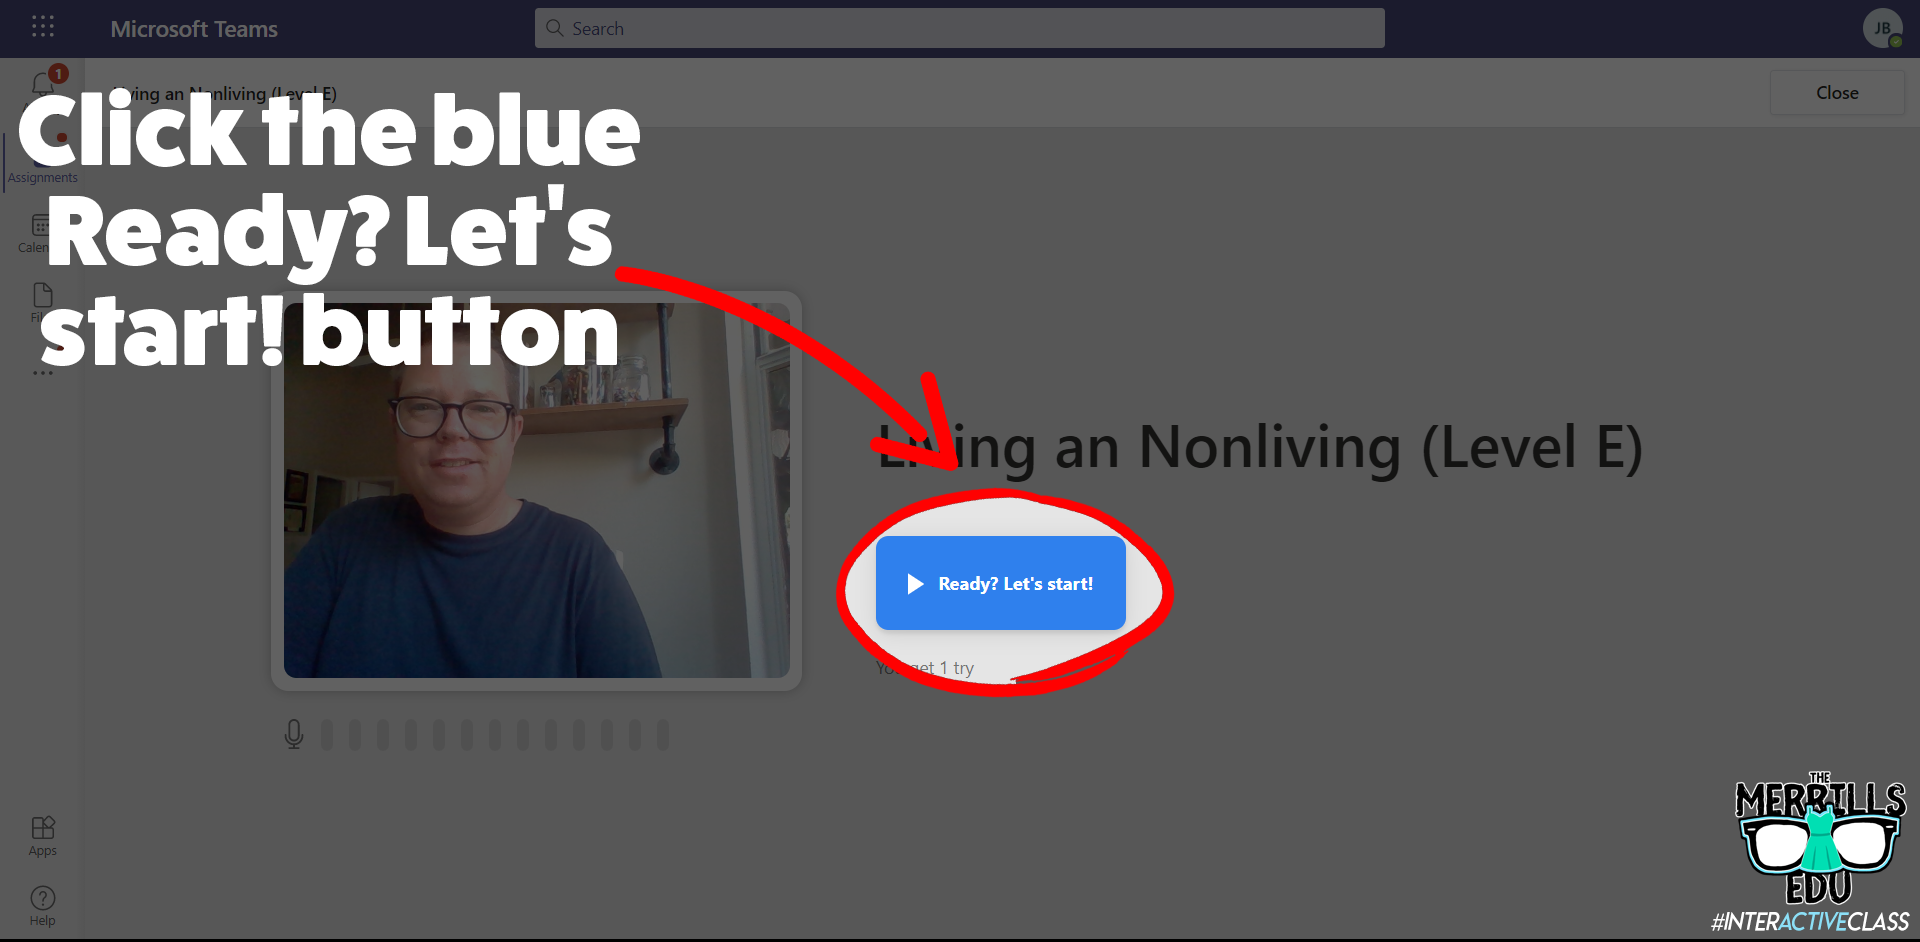
6. Once the assignment loads, click on the blue Ready? Let’s start! button to begin.
7. A countdown will start the recording process. When students are finished, they click the blue I’m done button to stop the recording process.

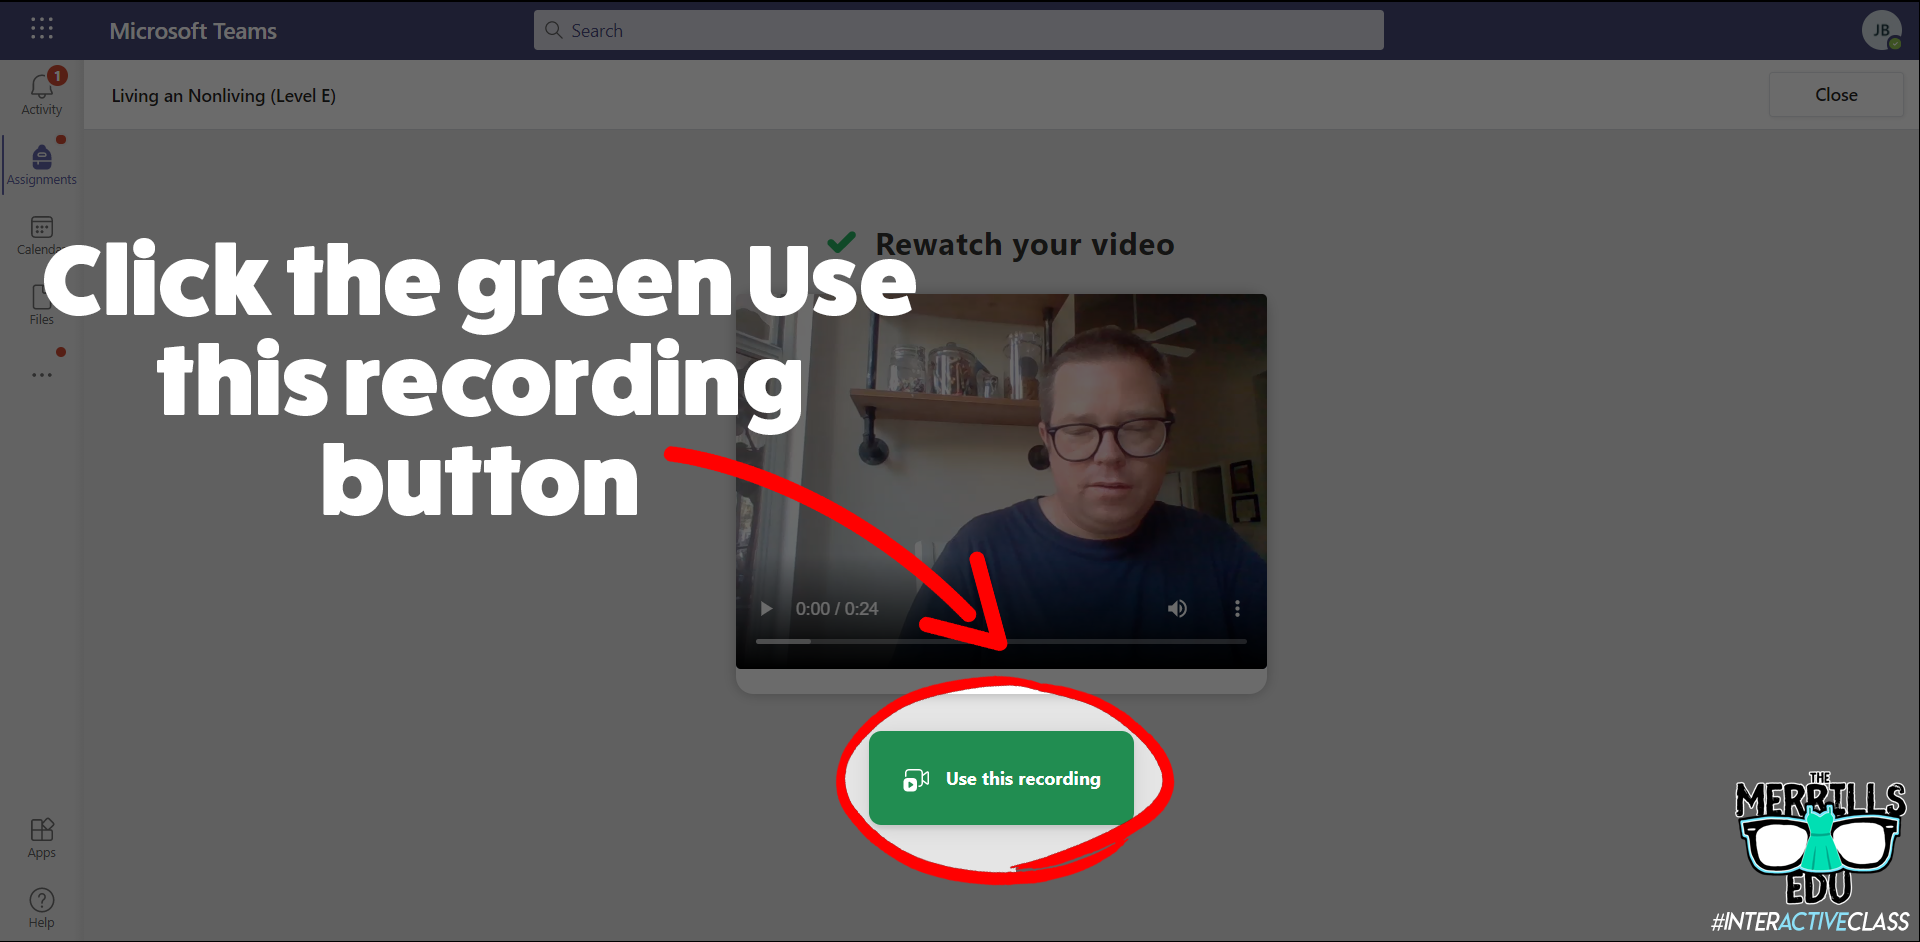
8. Students can watch themselves back (and repeat if you’ve allowed multiple attempts). One they’re ready to turn it in, they click the green Use this recording button.
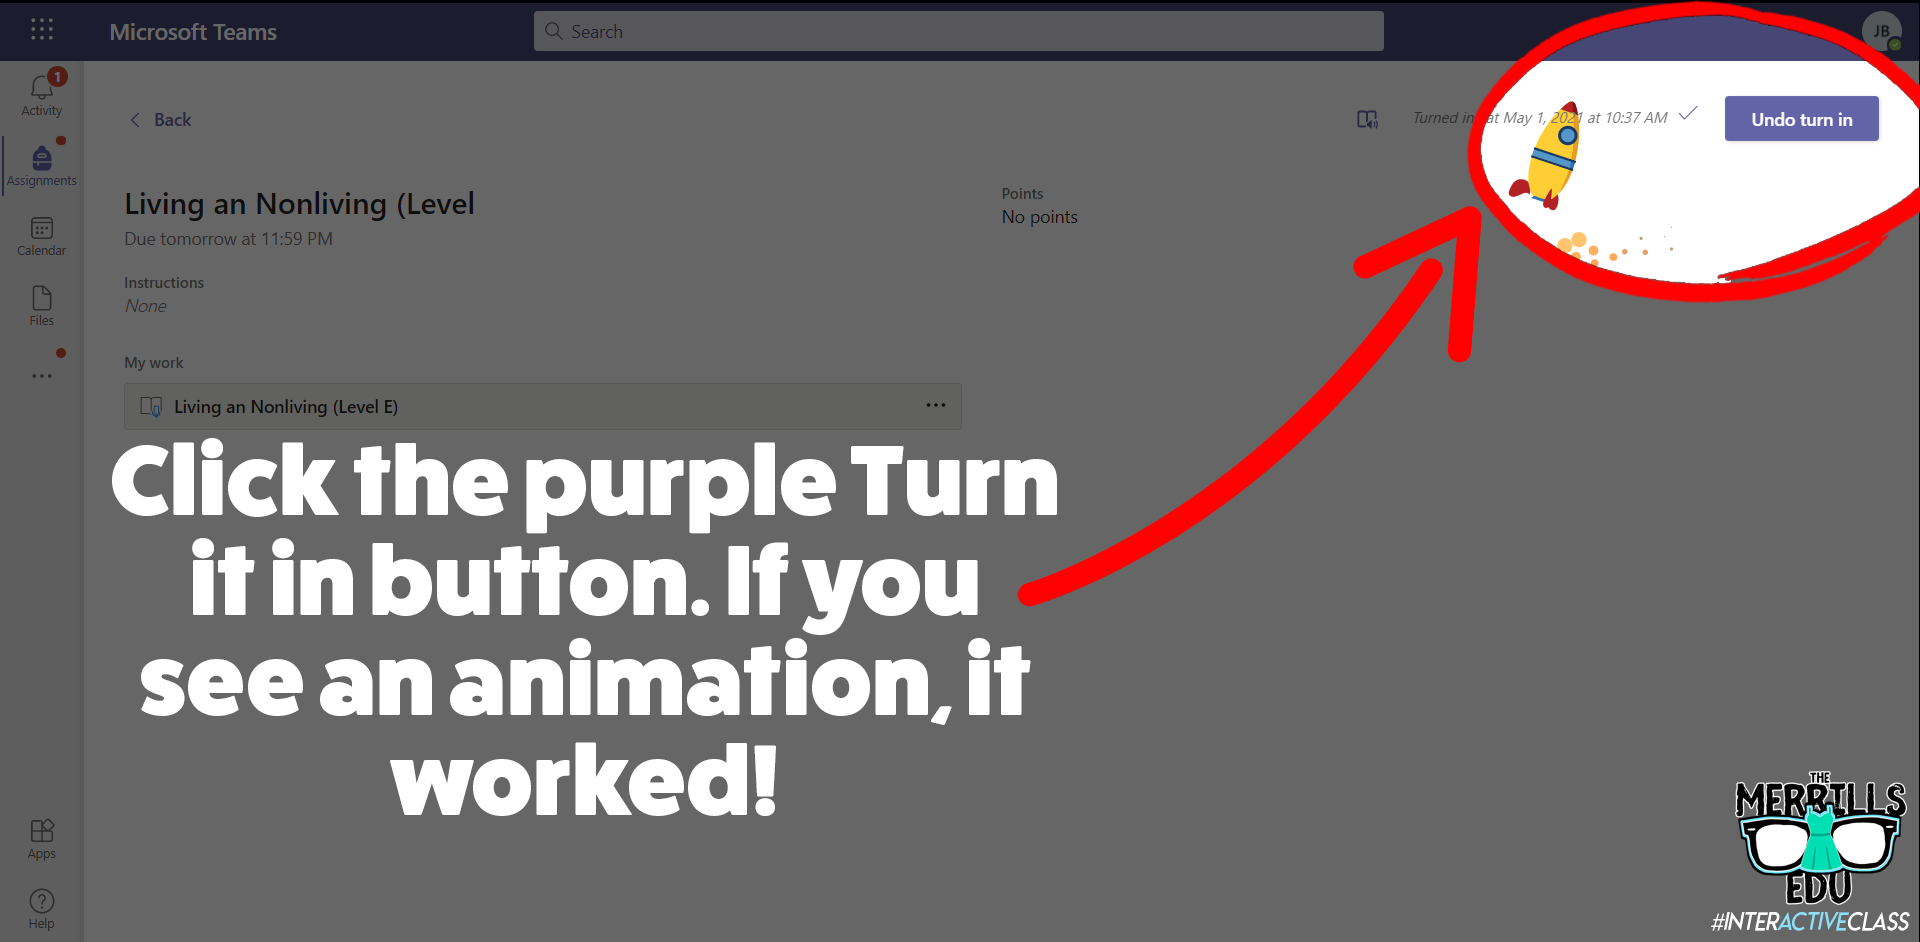
9. Finally, click the purple Turn it in button to complete the assignment. If you see an animation pop up, you have successfully turned it in!
Check out video walkthrough below!
How to create reading passages for Microsoft’s Reading Progress
So you’re sold…But, how can you go about making the reading passages that you are assigning to your students? You’ve got several options:
Open a new Word document and type out what you would like your students to read. Save this file and then upload to your assignments on Teams.
Use the built in microphone to dictate the text in a Word document. Save this file and then upload to your assignments on Teams.
Those ways will get the job done, but if you’re looking for a more efficient method, check out Microsoft’s Lens. Lens is a cross platform app that converts images to PDF, Word, PowerPoint, and Excel files, digitize printed or handwritten text, and save to OneNote, OneDrive, or your local device. Use Lens to scan your pre-made resources and have it turn them into Word documents automatically. Check out our short tutorial:
Once Lens has uploaded the file to your OneDrive, download / save a copy on your computer to upload it onto you assignments on Teams. It’s that easy!
Tips and tricks for using Microsoft’s Reading Progress
We’ve been fortunate enough to pilot this wonderful software for the past year. We’ve learned a lot during this time, so here are our most recommended tips for using Microsoft’s Reading Progress:
When listening back to a student’s video recording, if you click any word - the app will jump to that section of the video where the reader is reading. This is great for when the technology marks something as correct or incorrect and you want to listen to it without having to start the entire video over!
If your students are younger or wearing masks, you might want to lower the sensitivity. New readers may not enunciate words as clearly as more experienced readers. Adjusting this setting may help the technology with marking the words correctly.
Check out the data once the students turn in their work! We love how the technology automatically calculates everything.
ReadWorks Passages Available Directly in Reading Progress!
Now, educators can save even more time when using Reading Progress, all thanks to to Microsoft’s partnership with ReadWorks! Follow these steps to use a passage from the library:
Launch Microsoft Teams, then click Assignments.
Next, click Create followed by Assignment.
Select your preferred Team, then click Next.
Click on Attach, then click Reading Progress.
On the next screen, click Browse sample library. This launches the library where you can select an article of your choice.
You can narrow down the levels by selecting the appropriate grade level. If you select an article, you can also preview that article by clicking Preview.
Once you’ve found an article that you like, click Select. Complete the necessary steps on the following screen, then click Next.
This brings you back to the original assignment screen. Take a moment to make sure that all the information is filled out correctly, then click Assign. This will assign the assignment to your students and even send them a notification that there’s a new assignment due!


-- Please follow us on social media and tag us with how you’re using Microsoft’s Reading Progress in your classroom! 👓👗
For more tips, tricks and lesson ideas for making learning more interACTIVE, check out our books The InterACTIVE Class and Flipgrid in the InterACTIVE Class on Amazon!


Empowering Reflection with Sway Portfolios
MicrosoftEDU tools are powerful and robust and can be used in so many ways beyond just typing and presenting. Sway is one of the newer programs added to the Microsoft 365 line up and it may be one of the most powerful.

Let’s be real. Microsoft has been given a bad rep. When you say you work in PowerPoint or that you are collaborating on a Word doc together on the web, people expect you to work in an office type setting and using dated tools from when they grew up. Well they couldn’t be more wrong!
MicrosoftEDU tools are powerful and robust and can be used in so many ways beyond just typing and presenting. Sway is one of the newer programs added to the Microsoft 365 line up and it may be one of the most powerful. Microsoft understands the importance of telling a story while also focusing on content, and has harnessed the power and technology of AI to help students effortlessly demonstrate their learning through web design.
But in addition to demonstrations of learning, Sway can be a power tool for students to use to curate and reflect on their own work throughout the year in the form of student portfolios. These can be as simple or as advanced as you wish depending on the age of your learners and the subject area(s) you are looking to include. Regardless of how you set them up, portfolios allow students to document aspects of their learning that do not show up well in traditional assessments.
Empower Students with Sway
There are many features you can use to create student portfolios in Sway and these features can be used differently depending on how you set up and organize the content.
Headers: These provide an easy way to organize content in a Sway portfolio. Headers could be arranged by subject area, content and learning goals, or to produce a time order of months, quarters or learning semesters.
Text Cards: Text cards provide students with the ability to add in dates, times, and any other commentary or reflection on the work being added. Text cards could also be used to add in content goals or learning objectives within subject area headers for additional organization.
Images: Students have the ability to add in images directly from their learning day, or images of things they created in class that may not stay around. (ie: writing on a white board, a STEM creation, or something created outside of the classroom) Students can also take screenshot of things they work on online if link sharing is not available.
Grouped Images: This is great for images related to each other and is good for saving space in the portfolio. The ability to stack them and scroll through leaves lots of options for what and how students add to demonstrate their learning.
Links: When using EdTech tools we always look for link sharing. Applications like Flipgrid, AdobeSpark, Buncee and many others provide links you can copy and paste to share work with others outside of the platform.
Videos: In Sway, students have the option to upload videos from a device, but they can also record videos directly into the platform. This option is nice because it gives students the option to reflect and share thoughts on their work in real time.
Types of Portfolios
There are several different types of portfolios students can create and it is important to think of why you want students to create them prior to choosing the type best for your specific learning environment. Once you decide on the type of portfolio, then you can move on to organizing them using the features in Microsoft Sway.
Working Portfolio: This type of portfolio gets its name based on the content it holds. This type of portfolio holds work from students that is still “in the works” by the student. It is more than just a holding tank of work, but rather is guided and organized by specific standards and learning goals. The work displayed and curated doesn’t have to necessarily be completed or even a student’s best work, but rather it is a place where students can reflect and have evidence of work that demonstrates both their strengths and weaknesses as learners. Students curate a sufficient amount of work in order to provide ample evidence of their achievement in each particular category. The purpose of having a working portfolio is mainly to benefit the students. By working on the portfolio and reflecting on the quality of work contained there, the student becomes more reflective and self-directed.
Display or Showcase Portfolio: This is probably the most common type of portfolio used in schools. A showcase portfolio consists of students’ best work and the purpose of these portfolios is to demonstrate the highest level of achievement attained by the student. The work they include should make them proud. These types of portfolios are even more beneficial when they are kept over time, from year to year, showing growth over time. They generally consist of academic content, but they can also include the achievements of students outside of the classroom too. Since this type of portfolio holds a student’s best work, it is often shared with parents and others outside of the classroom setting.
Assessment Portfolio: Assessment portfolios are used as a means to document what a student has learned over a specific period of time in direct correlation to a set of standards or skills specified. The content of the curriculum, then, will determine what students select for their portfolios. For example, if the curriculum specifies narrative, informational and persuasive writing, an assessment portfolio should include examples of each type of writing. Often these types of portfolios are used to demonstrate mastery of content in specific learning areas. In an assessment portfolio, the content matters and it must demonstrate and document what students have learned.
Portfolios come in different forms and may be used for different purposes. They help us be used to curate, document, showcase and celebrate learning. Regardless of their purpose or audience, they have the power to transform the learning environment in the classrooms where they are used. But don’t be fooled—the magic of portfolios lies not in the portfolios themselves, but in the process used in creating them and the learning documented within them.
Looking for other ways to make teaching and learning relevant through the use of technology? Check out our book The InterACTIVE Class!


6 InterACTIVE Ways to Use Microsoft Forms
There are many hidden gems within Microsoft EDU, and Microsoft Forms is one of them! Microsoft Forms was released in 2016 and since then, there have been may updates and features released that take it beyond simple question and answering.

There are many hidden gems within Microsoft EDU, and Microsoft Forms is one of them! Microsoft Forms was released in 2016 and since then, there have been may updates and features released that take it beyond simple question and answering.
Assessment is an important part of any classroom, even an InterACTIVE classroom, but it is imperative that when we do assess students we are using it to bridge the gap between our teaching and learning. We should not simply give and grade an assessment, but rather use it to gather, evaluate, and remediate the gaps between knowledge rendered and knowledge retained.
6 Features of Microsoft Forms
1. Uploading Files to a Microsoft Form
The ability to upload a file created outside of Microsoft Forms is one of our favorite, interACTIVE features. Students need the chance to demonstrate their understanding of a concept through creation, and this powerful feature allows students to create in programs such as Adobe Spark, Flipgrid, Microsoft PowerPoint, iMovie, and then share with the teacher through Forms.
*This feature is only available to users within the same organization.
2. Types of Questions
When creating a Form, you have several types of questions you can use to build it. Choose from these options to customize your Forms in ways that specifically meet the needs of the students you have in your classroom.
Multiple choice: When using this feature, Forms will even suggest possible answers based on the words used in the question or answer choices already submitted.
Text: Giving students the ability to write and explain their thinking is always good and in Forms, you can specify whether it’s going to be a long answer or a brief one.
Rating: You can specify both levels (numeric) and symbols (stars) when using this option. This is great for a book review or character rating after the end of a unit.
Ranking: This type of question is great when asking students to debate or justify an answer. For example, have students rank details in order of importance in regards to the theme of a story. Then, pair with a text question and have them explain their rankings and justify the order they chose.
Branching: Although this isn’t technically one of the types” of questions you can use, it is a great, interACTIVE feature in Forms that allows you to connect, or branch, questions based on a students answer. This allows you to redirect students to different questions based on correct or incorrect answers.

Net Promoter Score: Great for more survey-like type questions or can be used when looking for students’ opinion in regards to a topic.
3. Custom Controls
There are many hidden features in Forms that you may not know about at first glance. Simply head to the Settings in the Three Dot Menu and take advantage of features like shuffling question order, adding a start and end date, creating custom Thank You messages and adding email notification.

4. Peer Collaboration
Creating interACTIVE Forms can often be a two-person job or more, and for that, Microsoft Forms has given creators the ability to collaborate. To share a form with your friend or colleague, simply tap on the Share button in the top right corner of the screen and select the Share option from the right menu.

5. Ability to Analyze Responses
As with any assessment in an InterACTIVE Class, giving the assessment is just the beginning. Once students have finished, you need to review and reflect on the data given. When using Microsoft Forms, you simply head to the Responses tab and you will find the answers to your assessment in both a visual group format and individually.

6. Immersive Reader
The integration of Microsoft’s Immersive reader makes Forms so accessible to all students. Immersive Reader is a free tool that utilizes techniques proven to help people read more effectively, such as read aloud and translation. This feature allows questions and answer choices to be read aloud to students while working to help accommodate and give independence.

Additional Features and Resources for Microsoft Forms
There are so many other features that make Microsoft Forms a great tool to use in the classroom. Sharing with colleagues, the ability to send a copy, sharing with links an QR codes, customizing the themes and colors—this tool is one you will want to get to know before the next school year.
Interested in Microsoft Forms? Here are a few examples you can look at for more ideas.


For more interACTIVE ideas to use when integrating technology into the classroom, check out our book, The InterACTIVE Class.


How to Create a Virtual Classroom with Your Bitmoji in Buncee!
Virtual Classrooms are a great way for educators to deliver content to students in a fun and engaging way. Buncee makes creating one easy! You’ll learn how to create and share your virtual classroom to your students!
Virtual Classrooms are a great way for educators to deliver content to students in a fun and engaging way. Educators can add a Bitmoji into a virtual classroom to create an animated experience for students. You can even organize the images in your “classroom” so that they hyperlink out to external sources! Our preferred tool to create virtual classrooms is Buncee. You can sign up for an account by clicking here!
In this tutorial, you learn:
💥 HOW TO ADD A VIRTUAL CLASSROOM BACKGROUND
💥 HOW TO ADD IMAGES TO YOUR VIRTUAL CLASSROOM
💥 HOW TO ADD TEXT IN YOUR VIRTUAL CLASSROOM
💥 HOW TO ADD HYPERLINKS IN YOUR VIRTUAL CLASSROOM
💥 HOW TO SHARE YOUR VIRTUAL CLASSROOM
💥 HOW TO ADD A VIRTUAL CLASSROOM BACKGROUND 💥

To get started, log into your Buncee account and create a new Buncee. Open the new Buncee and the first thing you’ll want to do is add a background. Follow these steps:
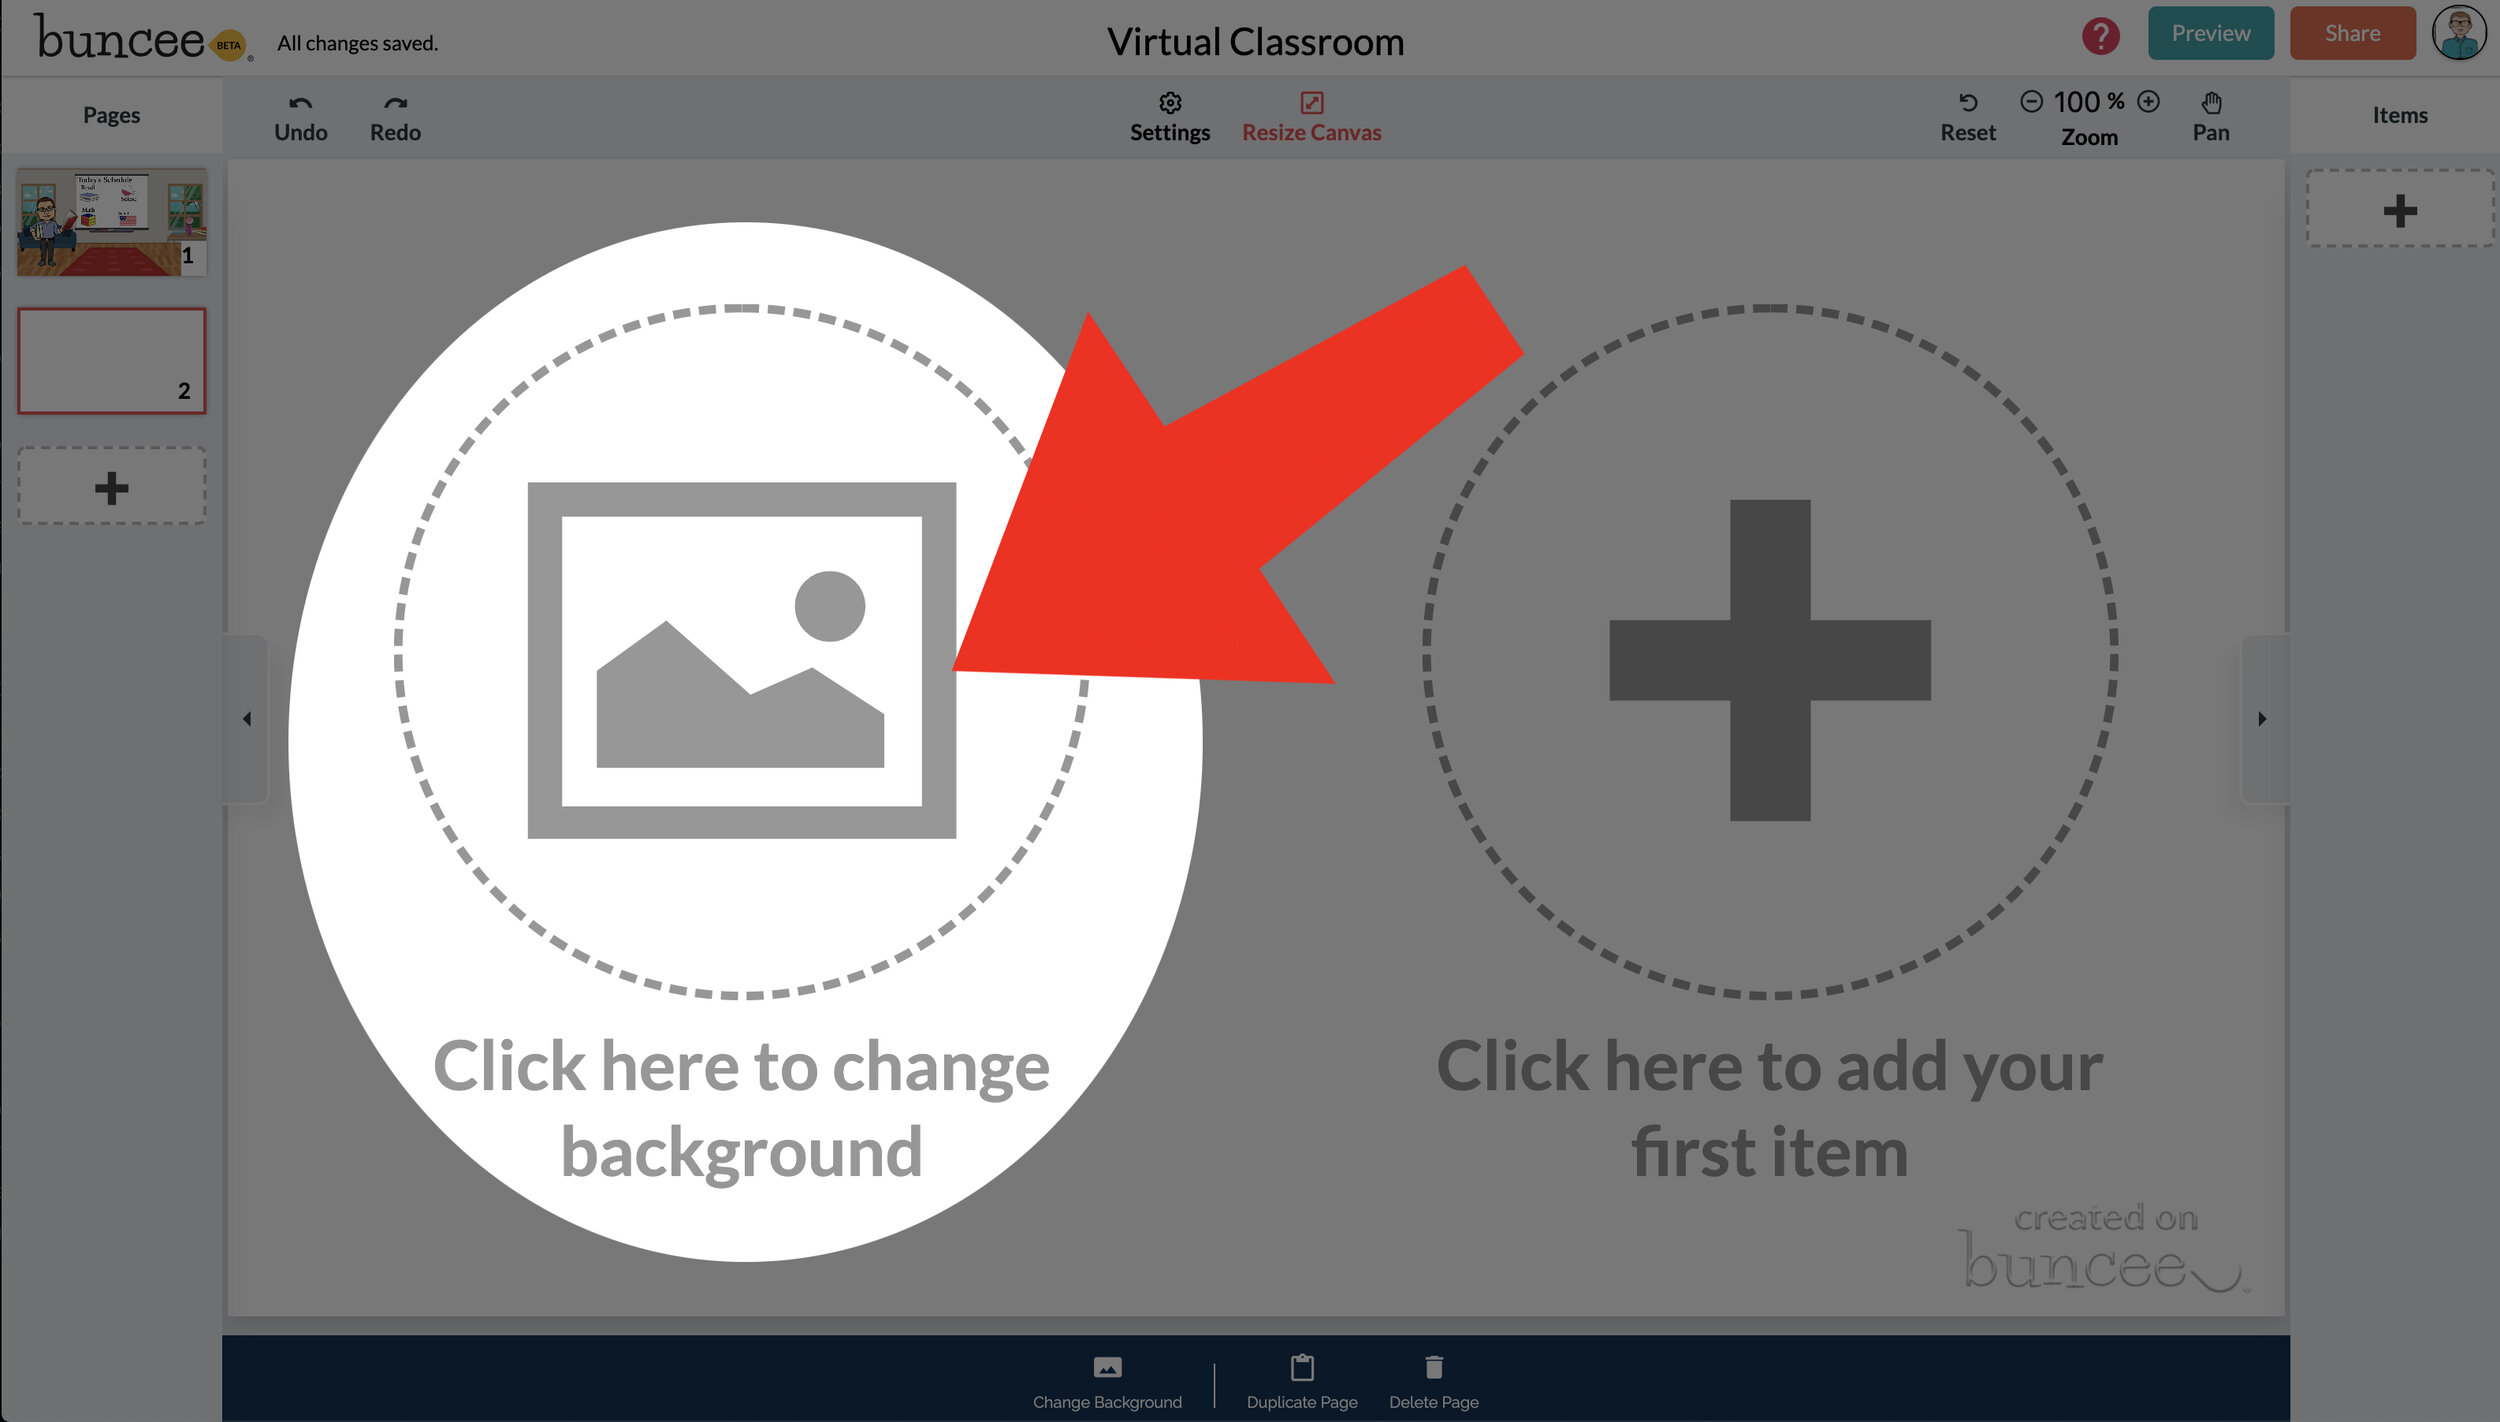
Tap the "click here to change background” option, then search for “class.”
Scroll through and find one that is right for you. There’s lots to choose from! You can find background images with smart boards, chalkboards, and more.
Once you find a background image that works for you, click it. Then, click the blue “add” button just to the right of the search bar. Now, your background is set and locked!
💥 HOW TO ADD IMAGES TO YOUR VIRTUAL CLASSROOM 💥
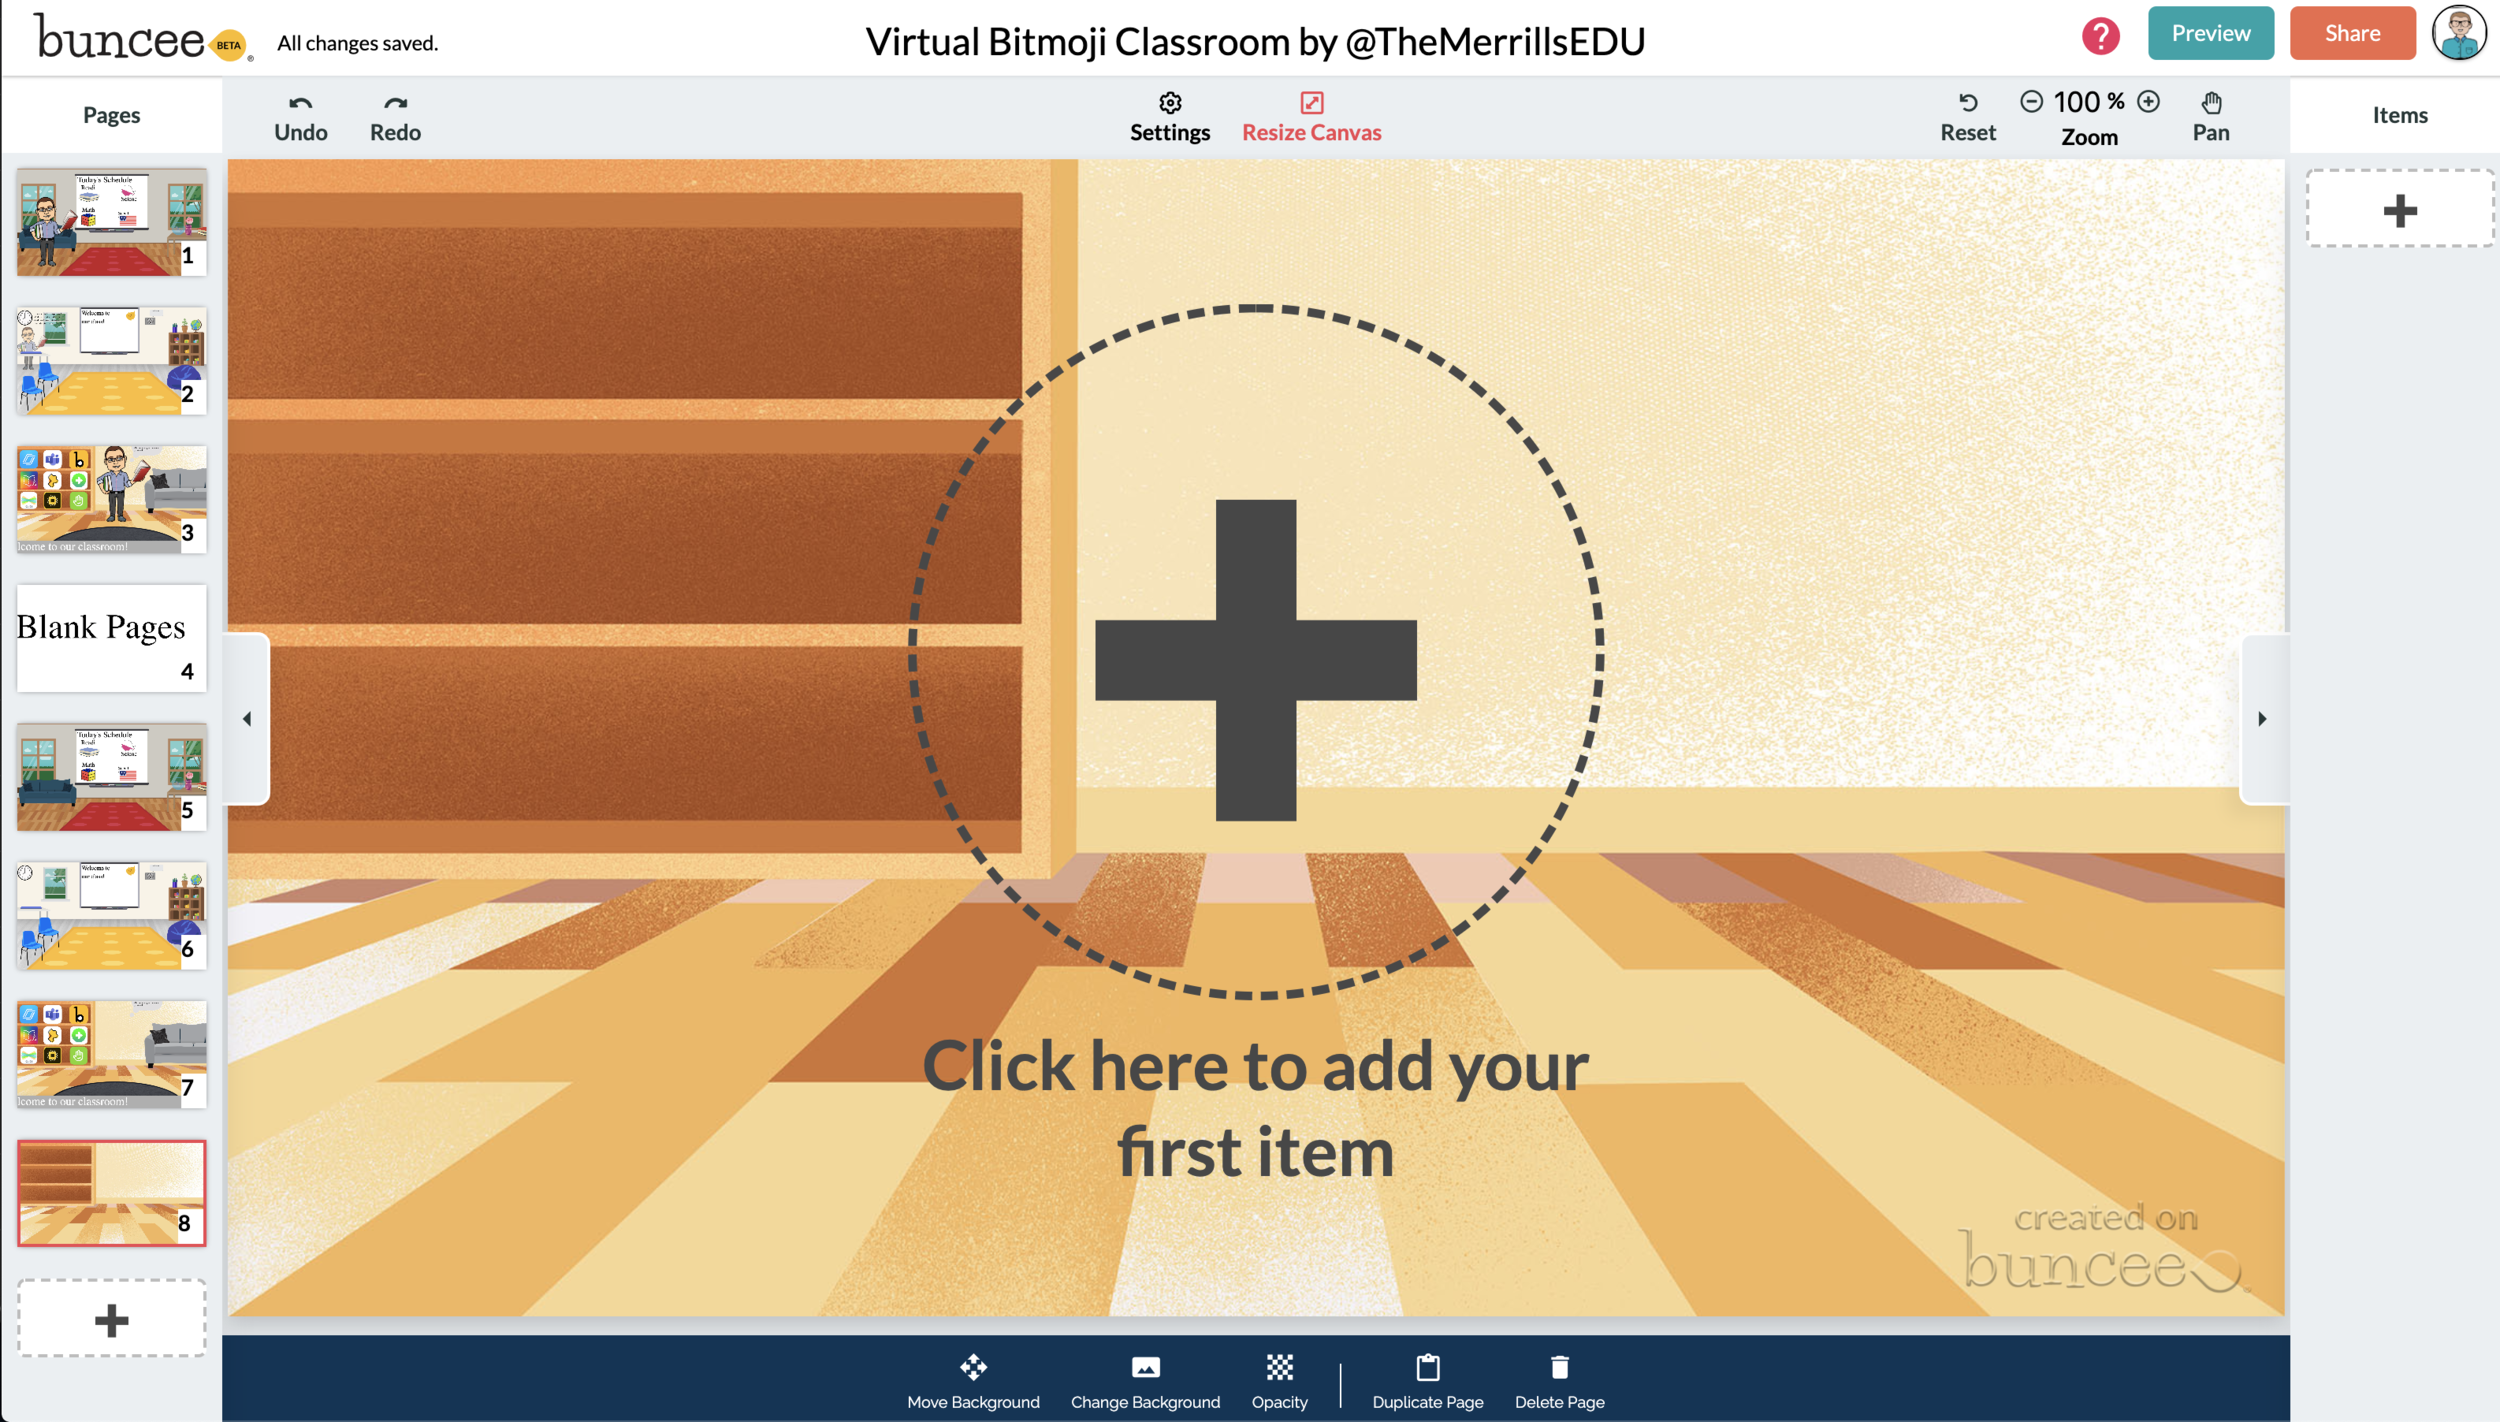

Now comes the fun part…Design your virtual classroom with some images! Click on the “+” sign to add an item. Use Buncee’s search tools to find items that you’d like to add to your classroom. Some fun things to search for include:
Smart Boards
Desks
Books
Clock
Computer
Bookshelf
Chair (you can even find a bean bag chair!)
Window
Couch
Speech (for a speech bubble)
If you’re having a hard time finding items to add, try typing “school” into the search bar. There are tons of item results that will pop up and you can use. You’ll find stickers, still images and moving gif images.
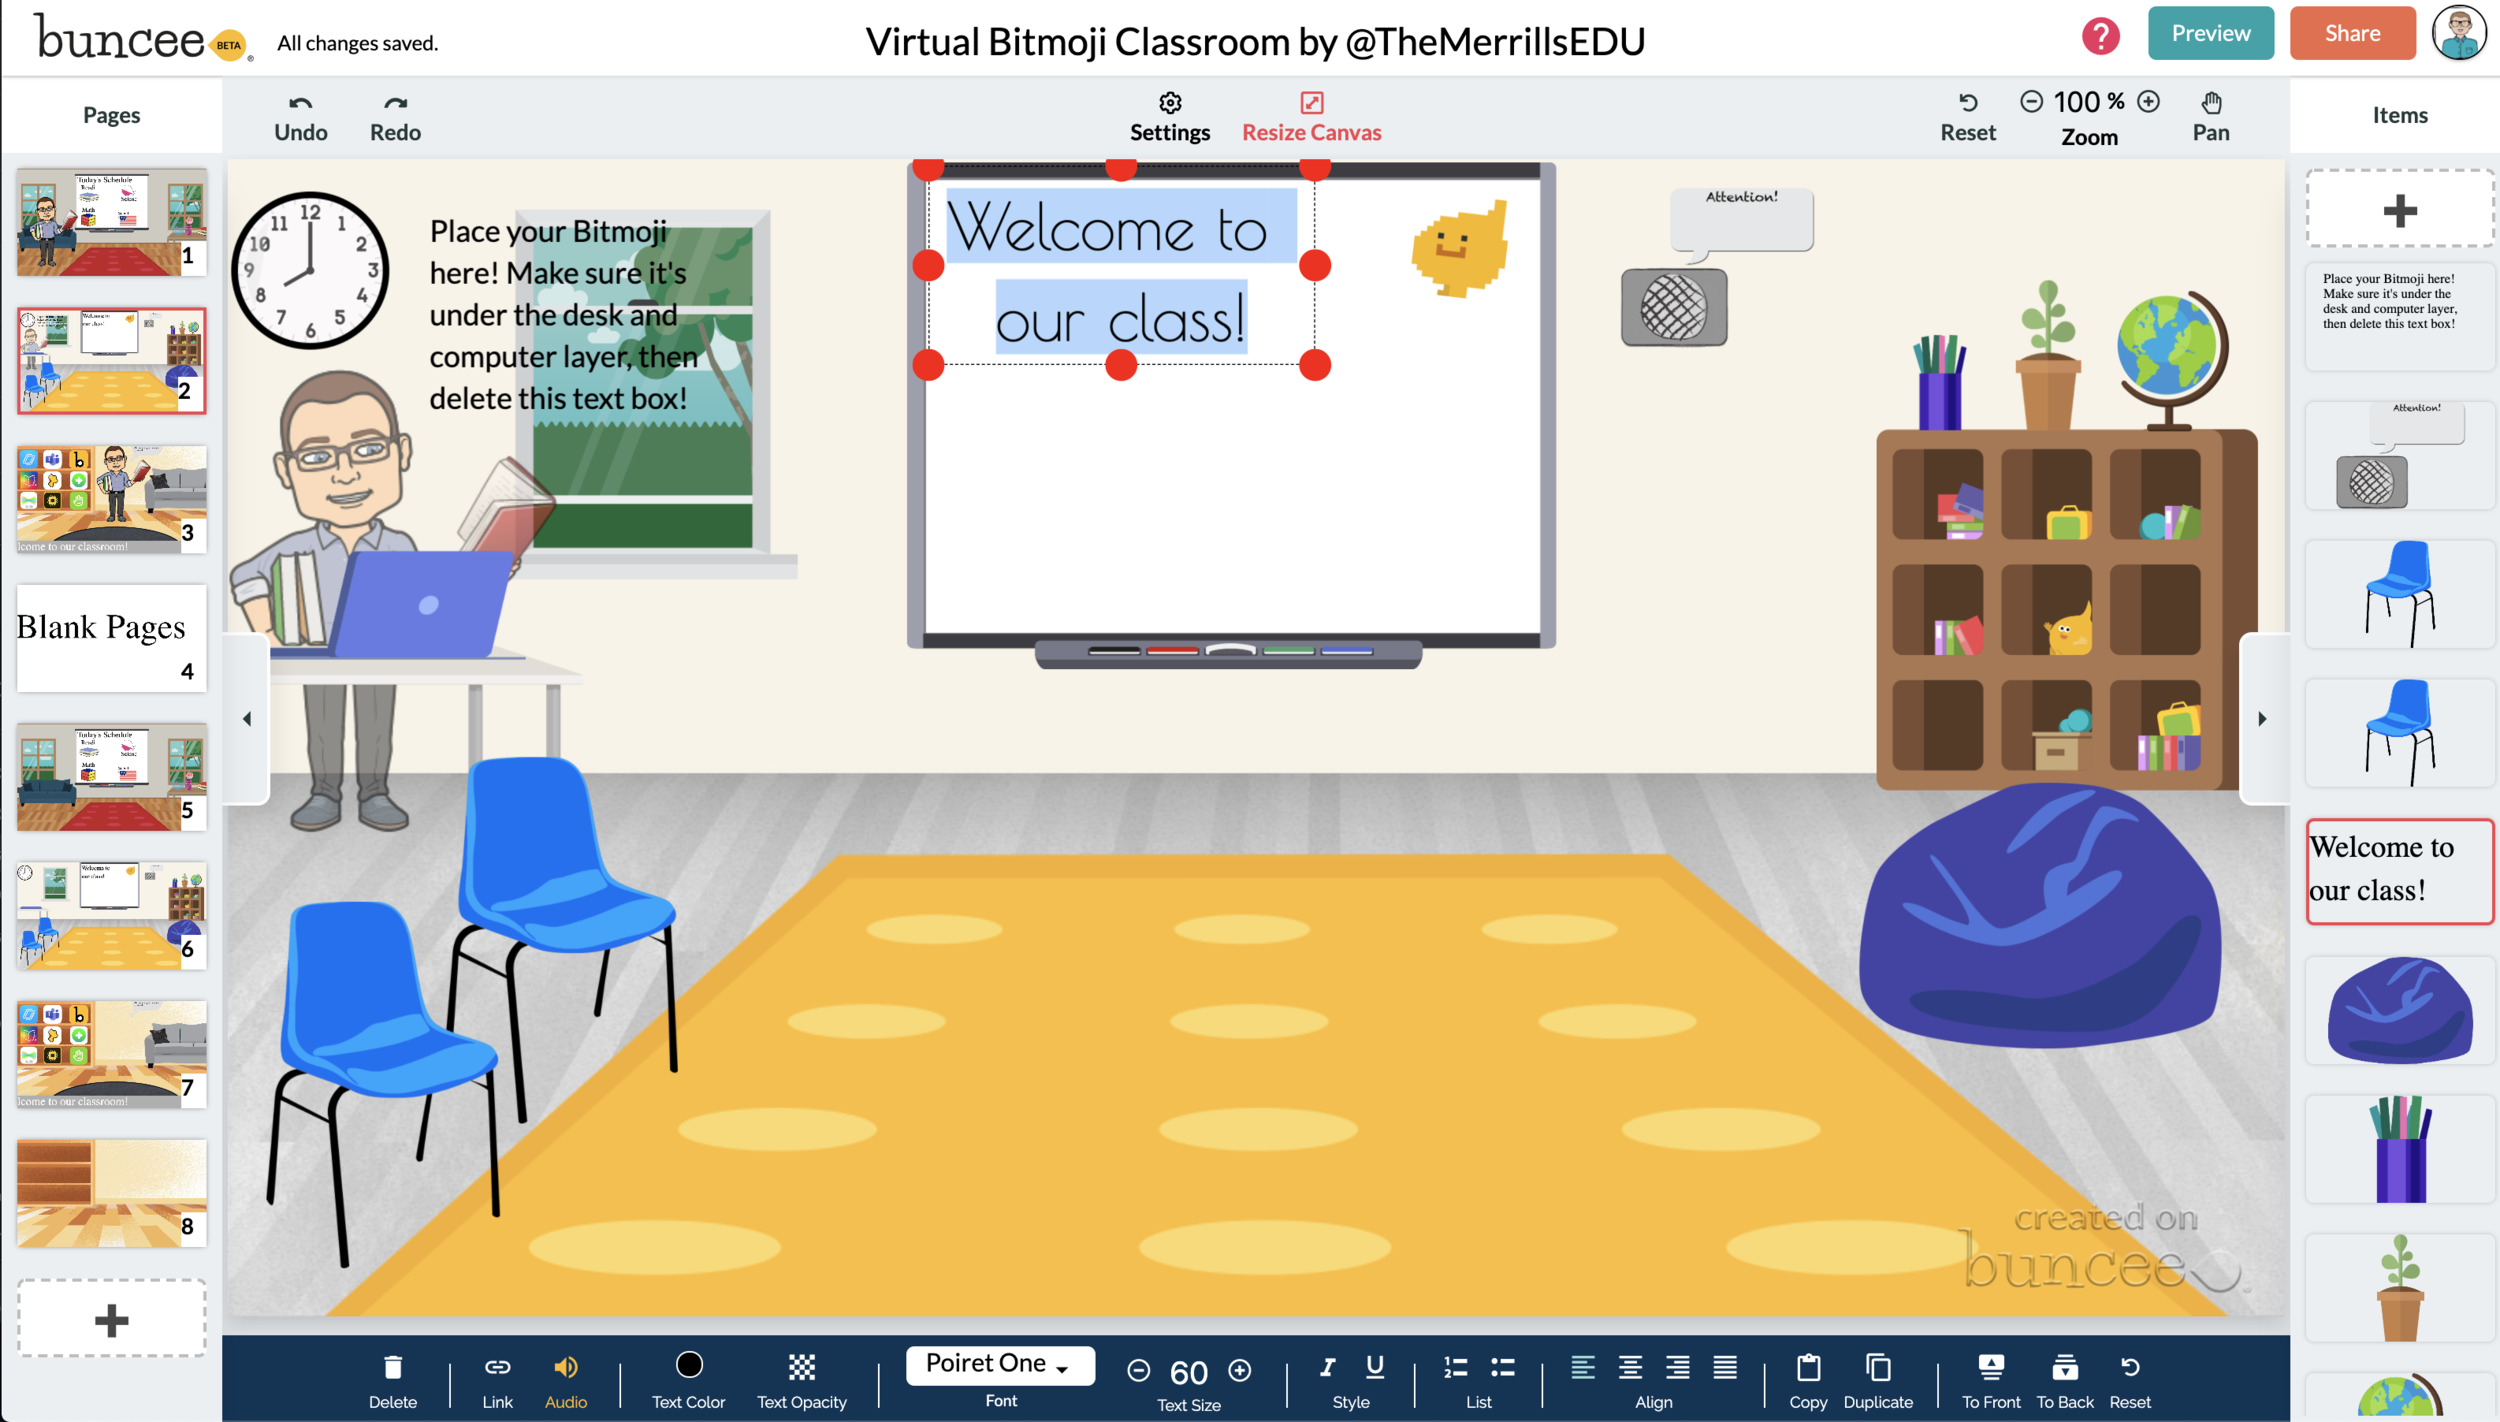
💥 HOW TO ADD TEXT TO YOUR VIRTUAL CLASSROOM 💥
After you’ve added all the items to you virtual classroom, you may want to add text. You can add text on top of items, like your smart board. This is a great way to deliver instructions for your students. To add text in Buncee:
Click on the “+” sign
After the Buncee features window will opens, click on the “text” icon (located to the left of the window)
Double click the new item to enter your text.
Once you have your text ready, you can change the font or font size by clicking the font options located on the bottom of the screen.
Move and place your text accordingly.

💥 HOW TO ADD HYPERLINKS IN YOUR VIRTUAL CLASSROOM 💥


After you have your items and text in place, now it’s time to start hyperlinking. When you hyperlink, your students will be able to click on the items (or text) that you have entered and it will take them to an external source. For example, if you use the Buncee logo, you can hyperlink it so that when it’s clicked, it will take you right to the Buncee login screen. Hyperlinks can be added to any item or text that you have added on Buncee. To add a hyperlink:
Click on the item or text that you want to hyperlink
Click on the “link” option on the bottom of the Buncee features toolbar
Enter the URL into the box
Press enter to “update” the item
💥 HOW TO SHARE YOUR VIRTUAL CLASSROOM 💥
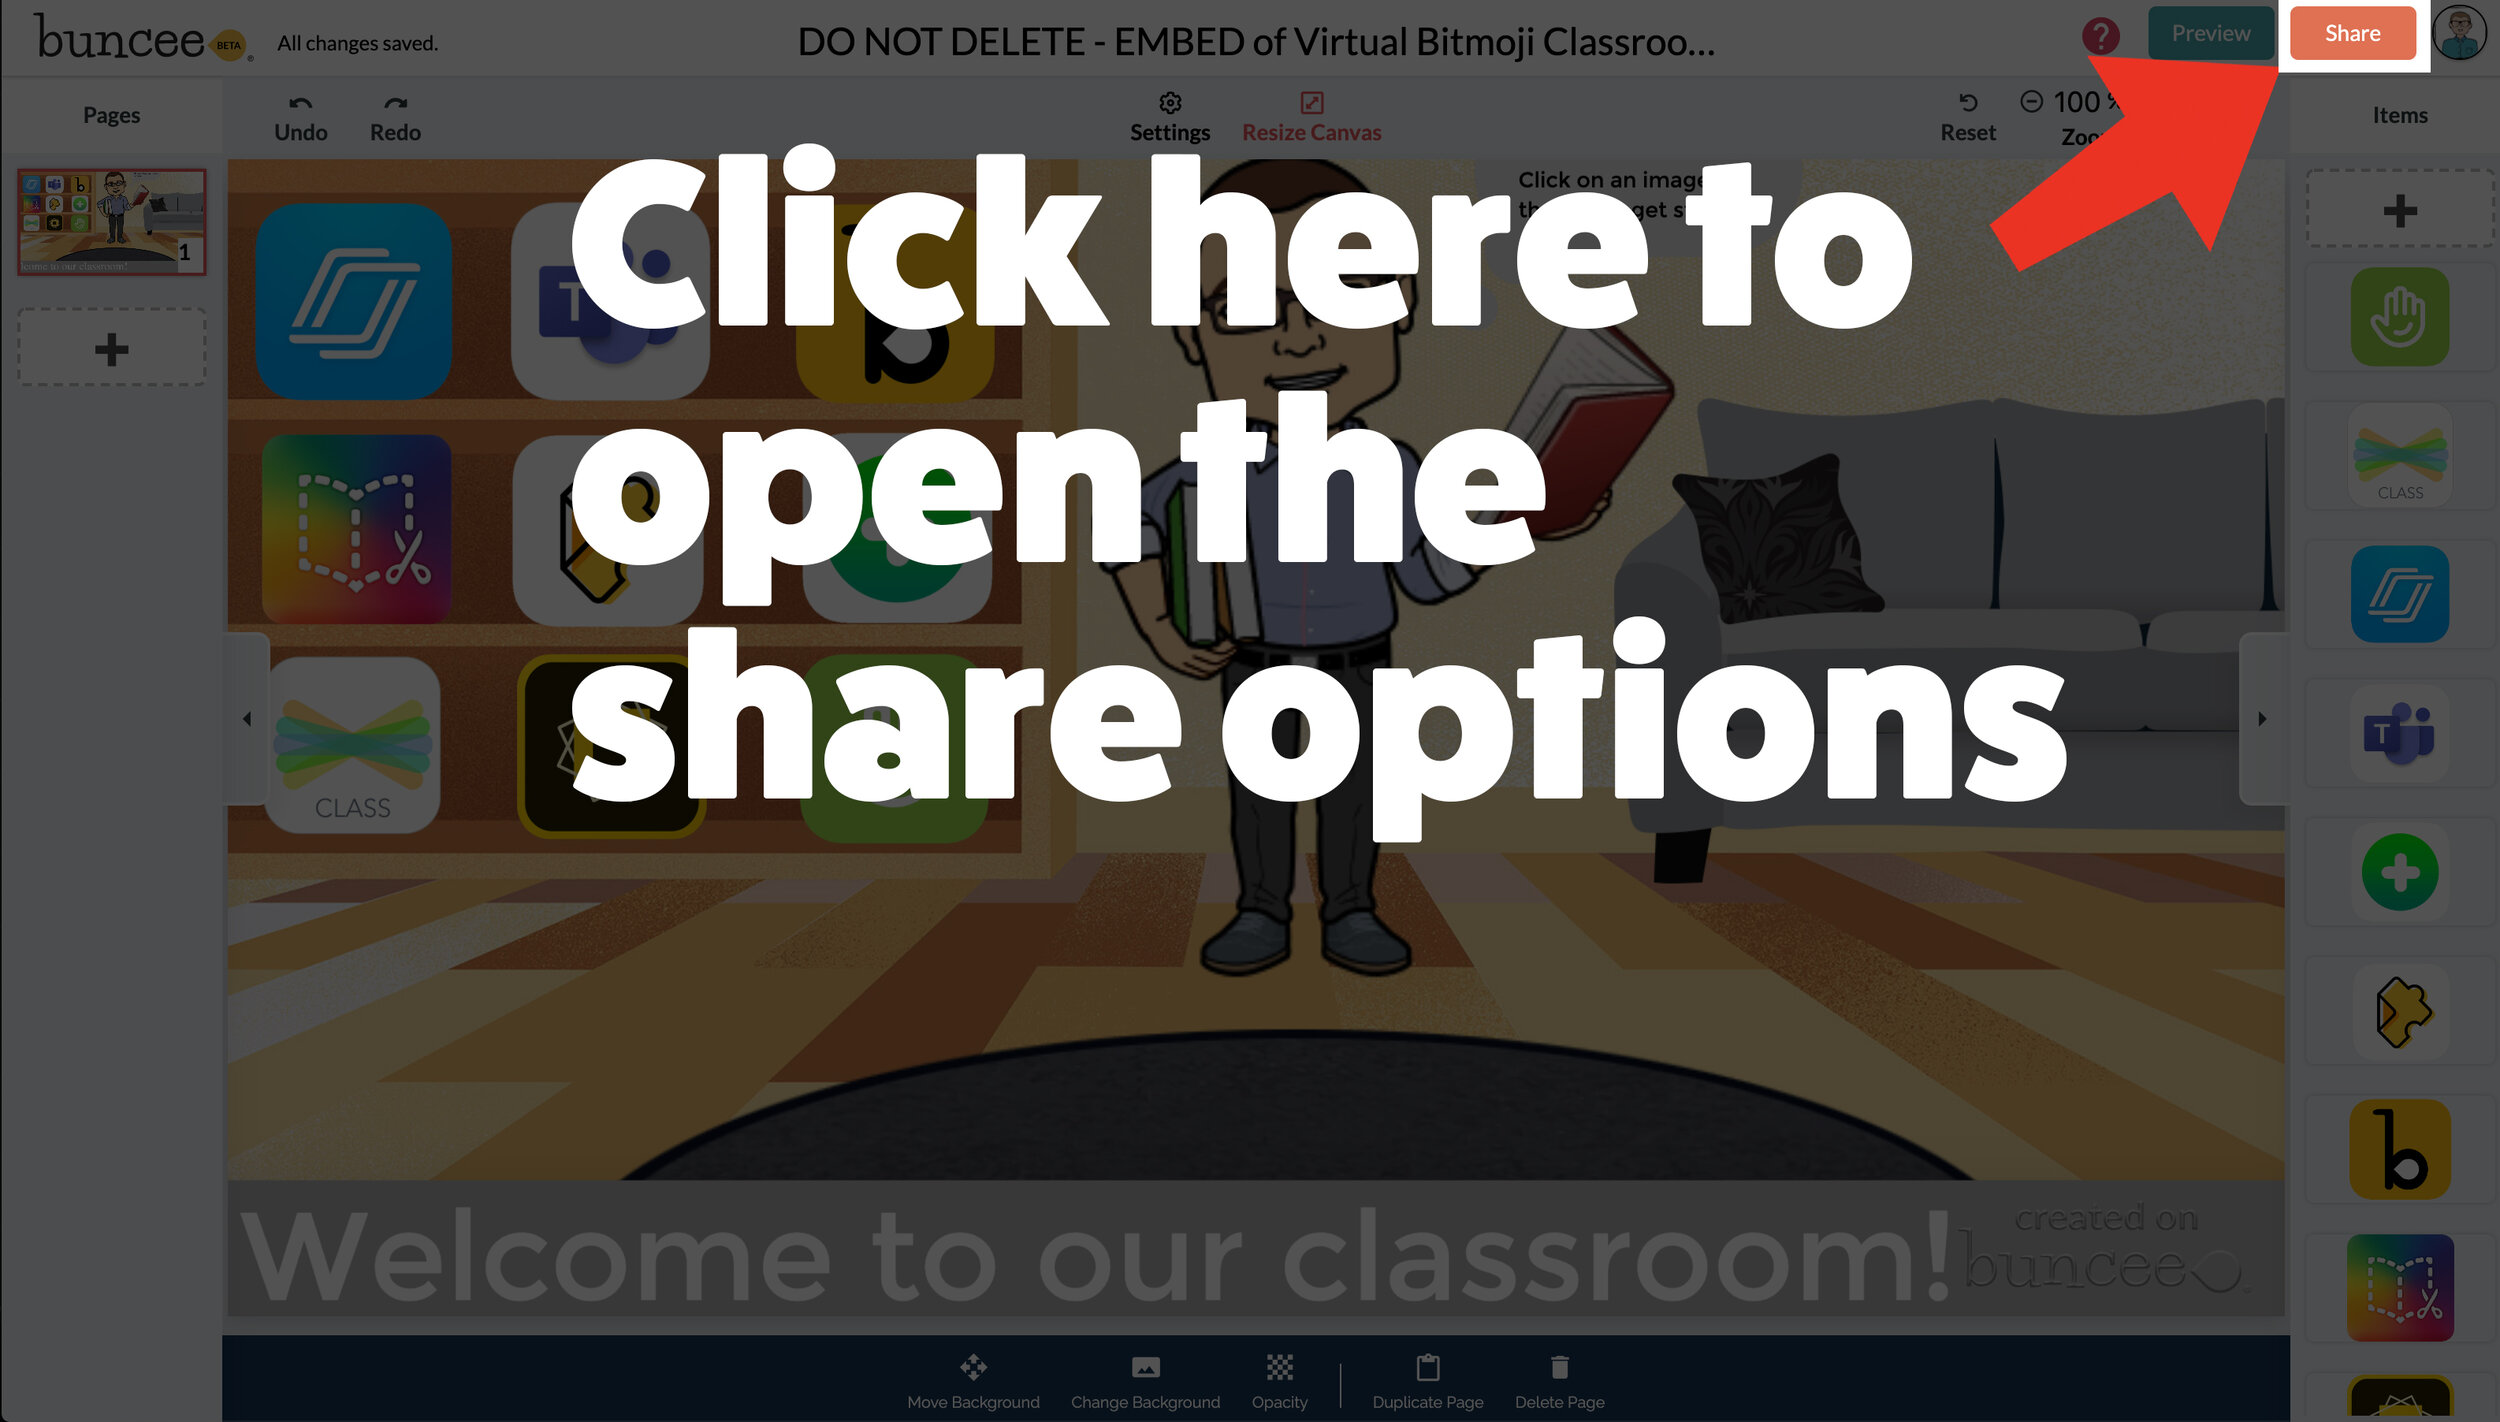

Now that your virtual classroom is ready, it’s time to share it with your students! There are several options to share in Buncee:
Share the Buncee slide deck link
Embed the Buncee slide deck into your LMS (Canvas, Schoology, Microsoft Teams, Google Classroom)
To share the Buncee slide deck link:
Click the red “Share” button
A new window will open. Click “Code” (second option from the top)
Next to the link box, click “Copy.” This will copy the URL to your Buncee.
Share the URL with your students
To embed the Buncee slide deck:
Click the red “Share” button
A new window will open. Click “Code” (second option from the top)
Next to the Embed Code box, click “Copy.” This will copy the embed code to your Buncee. (Tip: you can also click on “Show Options” to change the size of the embed)
Open your LMS (Canvas, Schoology, or anywhere you can embed) and click on the embed option. Paste the embed code from your Buncee, then hit save. Your Buncee will now be embedded into your page.
To share to Microsoft Teams, Google Classroom, or other social outlets:
Click the red “Share” button
A new window will open. Click “Social” (sixth option from the top)
Select the app that you are trying to share to, then follow the instructions

💥 FREE Templates! 💥
We’ve created several templates that you can download, copy, and edit. You can scroll through the different pages by clicking the arrow on the right. If you would like to download these, click here or the image below.

To view the templates, check out the embed of them below!
💥 YouTube Tutorial! 💥
Still not sure how it all works? We’ve got you covered! Check out this walkthrough!
For more #interACTIVE lesson ideas using Flipgrid, check out our book The InterACTIVE Class on Amazon!


Creating a Virtual Classroom with Microsoft Teams
With so much unknown right now in education, one thing we can do as educators is focus on meeting the needs of our students the best we can while remote learning. We may have lost the sense of security and safety our physical classrooms gave us, but with the help of Microsoft Teams we can expand those four walls and bring our students into a different type of interACTIVE learning environment.
With so much unknown right now in education, one thing we can do as educators is focus on meeting the needs of our students the best we can while remote learning. We may have lost the sense of security and safety our physical classrooms gave us, but with the help of Microsoft Teams we can expand those four walls and bring our students into a different type of interACTIVE learning environment.
Microsoft Teams has worked hard and listened to the needs of educators to make the platform as versatile and streamlined as possible. With integrations and features such as announcements, OneNote class notebook, Tabs and Assignments, and chat—Teams provides teachers with options tailored for teaching and learning.

Conversations in Teams
Being able to connect and keep in touch with students while out of the classroom is so important and channel posts makes this so easy to do in Teams. Create classroom announcements and posts that can be edit to get your students' attention. You can also control who replies to a post, change the importance of a post to draw students’ attention to something specific, and post across multiple channels at the same time.
Once a post is sent in a channel, the conversation is organized by date and then threaded. Find the thread you want to reply to, then click Reply. Add your thoughts and click Send. When replying you can also @mention someone to get their attention and to have them see a post sooner. Students (and teachers!) can also have fun by posting and replying with emojis, memes and GIFS using the buttons under the reply bar.
Creating Assignments in Teams
When creating assignments, teachers have the ability to customize each and every assignment to meet the needs of their students. Add grading rubrics for students to reference while working and for you as the teacher to use laster when evaluating their work. Customize every assignment by adding or attaching resources. This can be content from OneDrive, your device, links, and more. Once an assignment is creating you can distributed it to multiple classes or personalize the assignment by assigning it to individual students. Finally, when creating, you can customize all the dates and times that are important to the assignment. you have the ability to edit due dates and close dates, in addition to scheduling assignments to appear on a later date.
Keeping student work in order and easy to find can be challenging during remote learning, making the organization of Teams so beneficial. Teams lets you as the teacher create learning activities for students with integrated Office applications while also giving you the ability to leave feedback for students. You can also grade and track student progress by using the Grades tab. View both upcoming and turned in assignments by class, or view them across all your classes. Selecting an assignment will allow you to turn it in or view feedback and scores.
Holding Online Meetings in Teams
Microsoft Teams is a great platform to connect with students virtually and gives you as the teacher control of the meeting. You can speak and share video, mute and remove participants, share content and your screen, and privately view a PowerPoint presentation all while participating in a live meeting. The organizer also has the option to start and stop recording of the meeting which allows for asynchronous learning by proving content to learners on their own time. Students can also share their screen and view PowerPoint presentations during a chat, but the other features are for presenters only.

Simply click Meet now under the message box to start a live meeting in a channel. If you click Reply to a message, then the meeting will be attached to that conversation. You can select Meet now to start the meeting right away or Schedule a meeting to schedule the meeting for the future. Members of the channel will see an invitation for the meeting in their calendar if you decide to schedule it for later.
Content and Collaboration in Teams
Content can be shared in multiple ways when using Microsoft Teams. Teachers can add Tabs within a channel to centralize where students are going and keeping the workflow in Teams. Click + by the tabs at the top of the channel, click the app you want, and then follow the prompts. Use Search if you don’t see the app you want. Apps like Flipgrid, Buncee, Peardeck and Wakelet are just a few of the many different options available!
You can also share content directly in channel posts. Click Attach under the box where you type messages, select the file location and then the file you want. Depending on the location of the file, you’ll get options for uploading a copy, sharing a link, or other ways to share.

Collaborating in Teams has never been easier with the integration of the OneNote class notebook. OneNote notebooks are a digital binder that can be used in your class or with your staff to take notes and collaborate. OneNote Class Notebooks have a personal workspace for every student, a Content Library for handouts, and a Collaboration Space for lessons and creative activities.

We way not be able to close out the year with our students, but let’s make distance learning as familiar and comforting to our students as we can! By working in Microsoft Teams we can continue to encourage and engage students from the walls of our “virtual classroom.”
Stay #interACTIVE!
-👗➕👓
For more on using Microsoft Teams in the classroom check out the following post:
For more ideas on how to create relevant and engaging digital lessons, check out our book The InterACTIVE Class out now on Amazon!


Learning about map features with Buncee!
You’ve heard of “Where in the World is Carmen Sandiego,” but have you heard of “Where on the map is Mr. Merrill?” Buncee is the perfect tool for such a game! Check out how we used it to create a unique #RemoteLearning experience!

You’ve heard of “Where in the World is Carmen Sandiego,” but have you heard of “Where on the map is Mr. Merrill?” Buncee is the perfect tool for such a game! Check out how we used it to create a unique #RemoteLearning (but it could also be done in a normal classroom setting!) experience!
💥 Design a map in Buncee
💥 Add street names
💥 Create aN “INcorrect” and “correct” Buncee (seperate presentation slides)
💥 Hyperlink the images in the original map to the “correct” and “incorrect” Buncees
💥 Record a video that guides students to the destination!
💥 Copyable buncee slide deck included at the bottom!

💥 DESIGN A MAP IN BUNCEE
The first step (and most time consuming - if you’re picky) is to design a map in Buncee. The good news is that Buncee’s embedded features make it a one stop shop. You can easily add animated graphics, images, videos, and much more - all without having to leave the app. Everything that you see in the image below was found within the Buncee search tool. Simply find what you want to use, then drag it to the proper place.
💥 ADD STREET NAMES
After you have the layout and design of your map created, start adding street names using the text tool. Give each street it’s own unique name - which you’ll later referred to in your video. This step is important, because it helps younger students to be sure they are on the right road. You can even add a school bus and an animated taxi cab, just for fun!


💥 CREATE “INCORRECT” AND “CORRECT” BUNCEE SLIDES
After you have saved what you have worked on, go back to the Buncee dashboard and created a seperate - new Buncee. Design the new Buncee slide to indicate that the selection my students made was incorrect (see image to the left). Now that this slide is complete, design a “correct” slide. When I did this with my class, I added a bit more fun here…I included a 360 image of the city of Chicago, then added a magnifying glass over the top to give it that “detective feel.”
With both slides now ready to go, start hyperlinking them back to my original Map. To do so, open your “incorrect” Buncee slide. Then, click on the orange “Share” button (located in the upper right). This opens a new window, with a few options. If you click on “Code,” you will be able to find the shareable URL to this particular Buncee slide. You’ll need this Link, so click the blue “copy” button to the right of the URL. You’ll take this link and use it on the Map you previously created.

💥 HYPERLINK THE IMAGES IN THE MAP
With the “incorrect” Buncee slide’s URL code copied, open up your original Map Buncee slide. Figure out where you would like to “hide” on the map. After you have picked out your hiding spot, now it’s time to start hyperlinking all of the incorrect places to the “incorrect” Buncee slide. To do, click on one of the images that you added on your map. A crop box will surround the image (this way you know that you have the right item selected). Next click on the “Link” located on the bottom tool bar. When you do, you’ll be given the option to type a URL. Simply paste the URL from the “incorrect” Buncee slide. This way, when a student clicks on that image - it will take them to the “incorrect” slide, indicating that their answer was wrong. Repeat this process for all incorrect images. You’ll notice that all images will have the little red link icon next to them. Be sure that you have added the “incorrect” Buncee slide to all of the images that need to be hyperlinked.
Now it’s time to hyperlink your “correct” spot on the map. This first step is optional, but I recommend it. Open the “Correct” Buncee slide, and click on “Share,” then “Settings.” Toggle on where it says, “Commentable.” This will allow your students to leave a comment once they arrive on the correct answer slide. In the same window, click on “Code” and then click “copy.” This will copy the URL to the “correct” Buncee slide, which you will hyperlink back to the original “map” Buncee slide. Once in the original “map” Buncee slide, click on the “correct” image (tip: you may need to click “edit” from the top right you get logged out), then click “Link” from the bottom menu bar. Paste the URL to the “correct” Buncee slide. This way, when your students click on the image, it will take them to the correct slide.


💥 RECORD VIDEO DIRECTIONS!
The last step is to record a video giving your students clues about where you are hiding. Go through each clue, and remind them to follow along the map from place to place. It also helps to remind the students that they can pause / rewatch the video if need be. When they think they know where you are, tell them to click on the link icon above where they believe you are hiding (if they click on the actual image, the picture will come up instead - they need to click on the link icon). Remind them that they should also leave a comment in the comment box at the end of the map to let you know that they found their way through!

Buncee + Immersive Reader! 💛
It’s also important to note that Microsoft’s Immersive Reader is embedded into Buncee. This means that all text on the Buncee slide can be read aloud to students. It also means that the text can be translated into different languages. All students need to do is click on the Immersive Reader icon!
Check out the real thing! Feel free to play along below!
To make this even easier, we’re happy to share our Buncee with you! Just click on the image to the right!

For more information on Buncee, check out their website and their Twitter account hyperlinked below:
💛 Buncee Website
💛 Buncee Twitter
- 👓
For more #interACTIVE lesson ideas using Buncee, check out our book The InterACTIVE Class on Amazon!


Number Talks in Microsoft’s Teams
Mental Math in younger grades can be tough for some students. But, with today’s technology and group collaboration, we can make this area of learning fun!
Are you looking for ways to improve mental math and fact fluency with your students? Then, Number Talks may be the perfect exercise for your class!
When starting out with Number Talks, think of it as a “number of the day” activity. The teacher gives the students a number, then the students must think of ways to make that number. For example, if the teacher gives the number “25,” students might suggest: 12+13. But the purpose of Number Talks is to show as many ways as you can to make the number. So, that same student might also show: 10+10+5, or 30-5, etc. Typically this activity is done on whiteboards, and the students have a set amount of time to show their thinking. But, how can we make this more exciting for our digital aged learners? The answer is simple: Microsoft’s Teams!
For this activity, I had created a specific channel (or thread of conversation) for my class Number Talks on Teams. Once my students were logged on, I simply sent a message to the class with the number they were to use. Before I sent the message, I explained that they are NOT allowed to post the same equation twice. So if someone else beat them to posting it, then they had to think of another equation. Then, I sat back and watched the show!
I watched as they posted equation after equation. Struggling students quickly realized that they could decompose their classmates equations into new equations. It was a beautiful thing!
After the time was up, I allowed the class to go back through the equations and give “likes” for correct answers, or polite suggestions for incorrect responses. Then, we reviewed them. This entire activity was completed in less than 10 minutes, but the higher level of thinking continues with each time we complete this activity! —J 👓

Memes For Themes
Common standard—needed a new delivery method. One of my favorite ways to engage students is by meeting them where they are at and this year we met to discuss theme….through MEMES. Student created and explained using Microsoft PowerPoint!
As always with everything, we are spiraling through our curriculum and it is time to review THEME. This standard is always hard for me to teach because of the complexity of the standard--you need to reviewing elements of plot (characters and problem) along with having the ability according to our state's standard to summarize.
So this year I do what I always do when I need inspiration--I turn to my PLN on social media. This lesson was adapted by something I saw by author, speaker and best selling author Catlin Tucker--Creating Memes to Explore Themes. (you can check out her original post here) If you aren't one of my many Twitter friends, you may not know this, but technology is a fluid tool in my classroom and something we use and learn from on a daily basis. When I saw this lesson idea I knew it would be an instant hit. I modified Catlin's original lesson a little based on my class make up and age level and you can read through those steps below.

Day 1
I split the lesson into two days to help address the multiple layers of our state standard. First, my students are required to show that they can summarize a story retelling the main events before they state and explain the theme. One of my favorite professional books is a book titled Summarization in Any Subject: 50 Techniques to Improve Student Learning by Rick Wormeli. One of the activities included is called "One Word Summary." Students use their selection of text and collaboratively come up with a list of words they could use to describe the story. Each students defends the "one word" they would use and explain/defend why they would choose that word. For this lesson, my students were working to summarize a novel we had read together as a class. This helped because it allowed me to be working on the same text with all students. After each student had brainstorm their word, their assignment was to "illustrate" their word. They drew the words with “animated” letters that fit with the topic and theme of the book.
When their word was completed, students flipped their papers over and explained why they chose the word they did. They explained their word through basic summaries of the story, using various elements of the story to support the word they chose. This part of the lesson took the first day and we continued with the memes the following day.
Day 2
The next day we picked up right where we left off. Students came to the carpet for a time of modeling and instruction. I showed them the google slides I had prepared--complete with a slide for each of them (names already on it by class number). I modeled what my one word would be using a story we read aloud earlier in the year and then started creating my own meme. I first wrote my personal theme statement in the notes section of the slide. Then I chose a picture, and we brainstormed what text I could use to make my meme communicate the same theme as the book. This entire time I was also modeling how to find an image and how to maneuver through the google slides tools such as text size, font, etc. My example slide was the last slide in the google slides so the kids could refer back to it while they worked. When finished, we talked through any questions and then I let the kids get started. I rotated the room when needed, but also managed the class progress by scrolling through the google slides.
When a student felt they were finished, they came to me and we reviewed their meme. We read their theme statement (located in the notes section) and I then checked to see if it matched what the meme was trying to communicate. I didn't use this time to correct a student with an incorrect theme statement, but rather was looking to see if they could create a meme that visually represented the theme they came up with. I used this as an assessment so I wanted their work to be their own and to represent their knowledge of theme--even if it wasn't 100% correct. I later pulled the few students that struggle the following week to review theme again and to discuss the elements that might have been lacking from those students' original projects.
I have included a few of the memes created along with the theme statement that corresponded with each.

Theme Statement: One small person can make a big impact.

Theme Statement: Doing what you think is right may be scary but if you stick with it you may find yourself enjoying it.

Theme Statement: What we work hard to do can make a big impact on others.

💥S💥U💥R💥P💥I💥S💥E💥! Introducing our new web series!
We’re honored to announce our new @YouTube series: “Journey to Microsoft” is now LIVE!
We’re honored to announce our new @YouTube series: “Journey to Microsoft” is now LIVE! Check out episode 1 below!

Immersive Reader in a Primary Classroom (part 2)
The power and possibilities from Microsoft’s Immersive Reader are endless. So where do you start? How can we get this into the hands of “littles,” who will definitely benefit from it?
The power and possibilities from Microsoft’s Immersive Reader are endless. So where do you start? How can we get this into the hands of “littles,” who will definitely benefit from it?
Teaching writing in primary grades is a tough job. Every student is in a different place, and more often than not, the first student done hasn’t used complete sentences. It’s times like this that we wish we could clone ourselves. If you’ve ever had to deal with this, then you know the feeling. So, during one our recent writing assignments, I had the students take their rough draft, and then type it into Word Online. I didn’t check the drafts, I didn’t ask anyone to show me ahead of time, I just explained that they were to type it once they finished. This was a pretty edgy idea, and I was nervous watching it all go down. Once the kids had everything typed out, I taught them how to open Immersive Reader. This allowed them to hear back exactly what they wrote. If there were mistakes, they could hear them being read. Then I showed them how to go back and make edits. Here’s an example of how it looked:
But wait...it gets better. Each student in my class has a copy of this desk sized guide. We use this with crayons, so the kids can see if they are working towards a “4” (or an A+) in writing. So now that they have fixed their mistakes, they can check to see if they have used things like adjectives to enhance their work. Click here, or the image below to download a copy for free!

The students change the colors to match the rubric, and then Immersive Reader will identify the various parts of speech. It’s amazing!

Now my students have a piece that has been edited, and it’s ready to be “published,” all done independently. But, if you know me, you know I LOVE app smashing. So, I taught my students to transform the Word file to a webpage, which “app smashes” the work into Microsoft Sway. What started out as a simple writing piece, turned into a published website, completely designed by first graders.
These projects were then shared out on Seesaw for my families to see. Now, my class engagement during writing is up, and the students are excited about being able to share their work with the world - all thanks to Microsoft. If you have any questions about Immersive Reader, or how we completed this process, please don’t hesitate to reach out!
👓 - J
Simple Sub Plans with MicrosoftEdu
As as I prepared to leave for FETC, I had to account for all the minutes in all the days (3 to be exact!) and if you’re like me, I hate giving busy work. I value my students’ time and their talents and I don’t want my time away to be wasted. So I turned to Microsoft Teams and OneNote.
You don’t give yourself enough credit. Teachers work hard...and we are reminded of this as we prepare to be away from our class. you know what this reference is to-the dreaded sub plans.
Lunch times.
Specials.
Centers.
It all has to be explained and planned for. Every minute of the day accounted for. This can be a daunting task and it’s often joked that being away is more work than just staying put. But not anymore!
As as I prepared to leave for FETC, I had to account for all the minutes in all the days (3 to be exact!) and if you’re like me, I hate giving busy work. I value my students’ time and their talents and I don’t want my time away to be wasted. So I turned to Microsoft Teams and OneNote.
Through OneNote I was able to create an assignment for my kids that picked up right where we left off on Friday. I could embed video and audio directions to accompany the various assignments I crafted around our most recent novel study. The platform is so flexible that if I’m being completely honest I didn’t even finish editing the tasks until Sunday night—long after my sub plans were printed and laid out on Friday. Once the OneNote assignment was complete I attached it in an assignment created on Teams and viola! Flexible, explicit lessons prepared and I saved the best for last....I can check in throughout the day as my students work to leave comments, answer questions, trouble shoot or simply leave small notes of encouragement.

Little did I know that my students would do the same for me!
👗 -K