

How to Use AI to Automatically Grade Writing Assignments with Class Companion
Learn how AI can automatically grade your student’s writing assignments using the FREE app, Class Companion! We’ll walk you through how to sign up, how it works, and what it looks like for students!

What if we told you that you could use AI to automatically grade your student’s writing assignments? What seemed like a dream is now reality thanks to Class Companion! Class Companion is a website that uses AI to help teachers give instant, personalized feedback on written assignments. It also provides engaged practice for students, time savings and insights for teachers. Teachers can use built-in assignments or add their own. In this blog post, we’ll show you where to sign up for your account, how to create a rubric and assignment, how to get students on (and what that looks like), and how educators have the final say in the grading process.
Please note: This blog post was hand-crafted and was not created using AI.
(click on any subheading to jump to that section)


What is Class Companion and how does it work?
With Class Companion, teachers can cheer on their students with immediate feedback and tailor their learning to their individual needs. Teachers can also use the AI platform to design fun and challenging assignments, spark students' curiosity, share helpful tips, and track their growth over time. Check out our brief overview of the platform in the video!

Where to Sign Up for a Class Companion Account
You heard, “automatically graded writing assignments,” and you were sold! Now what? Class Companion is free for educators and students. However, both teachers and students will need accounts to use the platform. Educator accounts can be created by clicking on the link here. Heads up, students are required to use an email address. Students are able to create accounts by being invited by their teacher(s) via shared link. To create student accounts and invite them to your class, follow these steps:

Log into Class Companion as a teacher. Locate the Students tab on the top, then click it.
Click the +Add students button located on the top right.
Now, select your preferred method: Copy link to share or Invite via email. The Copy link to share option will generate a private link that may be shared to students. Students will use this link to enter their email address and a password to create their accounts. The Invite via email works similarly, only the link is shared via email.
After using either method, your students will automatically appear in your class.

How to Create a Rubric and Assignment
in Class Companion
Now that you have your accounts ready, it’s time to create your first rubric and assignment. Here’s how to create an assignment in Class Companion:
On the top toolbar, click on Assignments.
Now click on “+Add Assignment,” then select either: Duplicate from Content Library, Generate with AI, Import, or Create From Scratch.
Then, complete the steps filling out the information. (TIP: When creating the assignment, we HIGHLY recommend setting the maximum number of attempts to more than 1. Doing so provides an opportunity to edit their work after the AI provides feedback.)
Now, let’s add a rubric to our assignment.
Under Rubric, click Add rubric.
When creating a rubric, you have a choice of the type of format you’d like to use: Paragraph or list, and Table. Select your preferred format, then enter your information in the text boxes. When you’ve finished, click the Create rubric button on the top right.
Your rubric will now be added to the writing assignment. Once everything looks good, click on Save located on the top right. Your assignment will now appear on the student’s dashboard when they log in.
This gets shared to students (student accounts are required) via a shared link or an email.
Students complete their writing by typing out their essay in Class Companion, then submit for AI review / grade.
If you’ve chosen more than one attempt for your students, the AI will coach them through the teacher’s rubric, explaining whether or not the student has met the expectations. The student then has the opportunity to edit their work and try to improve.
When an assignment is submitted, the teacher has the ability to edit the AI’s score to provide a final grade.

How to Get Students Logged Onto Class Companion (and What That Looks Like)
Now that you’ve created a class, rubric, and assignment, it’s time to get your students logged on and working. Have your students follow these steps to find their assignments (note: students must have their accounts created prior to these steps):

Direct students to this link, and have them log in using their credentials.
Once students log in, they will see their assignment(s). They may click on the assignment to get started.
Now that the student has logged in and opened the assignment, they will be prompted according to the directions that you gave when creating the assignment. The students will complete the assignment and turn it in for AI feedback / grading by clicking the Submit assignment button located at the bottom of the screen. Once they submit their work, the AI will produce feedback / grade their work. If you have selected multiple attempts when creating the assignment, the students will have the opportunity to read over the feedback from the AI and make changes to their work. They may repeat this as many times as you have allowed (when selecting multiple attempts). So, if you gave them 8 multiple attempts, they can submit it up to 8 times for feedback.

How to Override the AI’s Grade in Class Companion
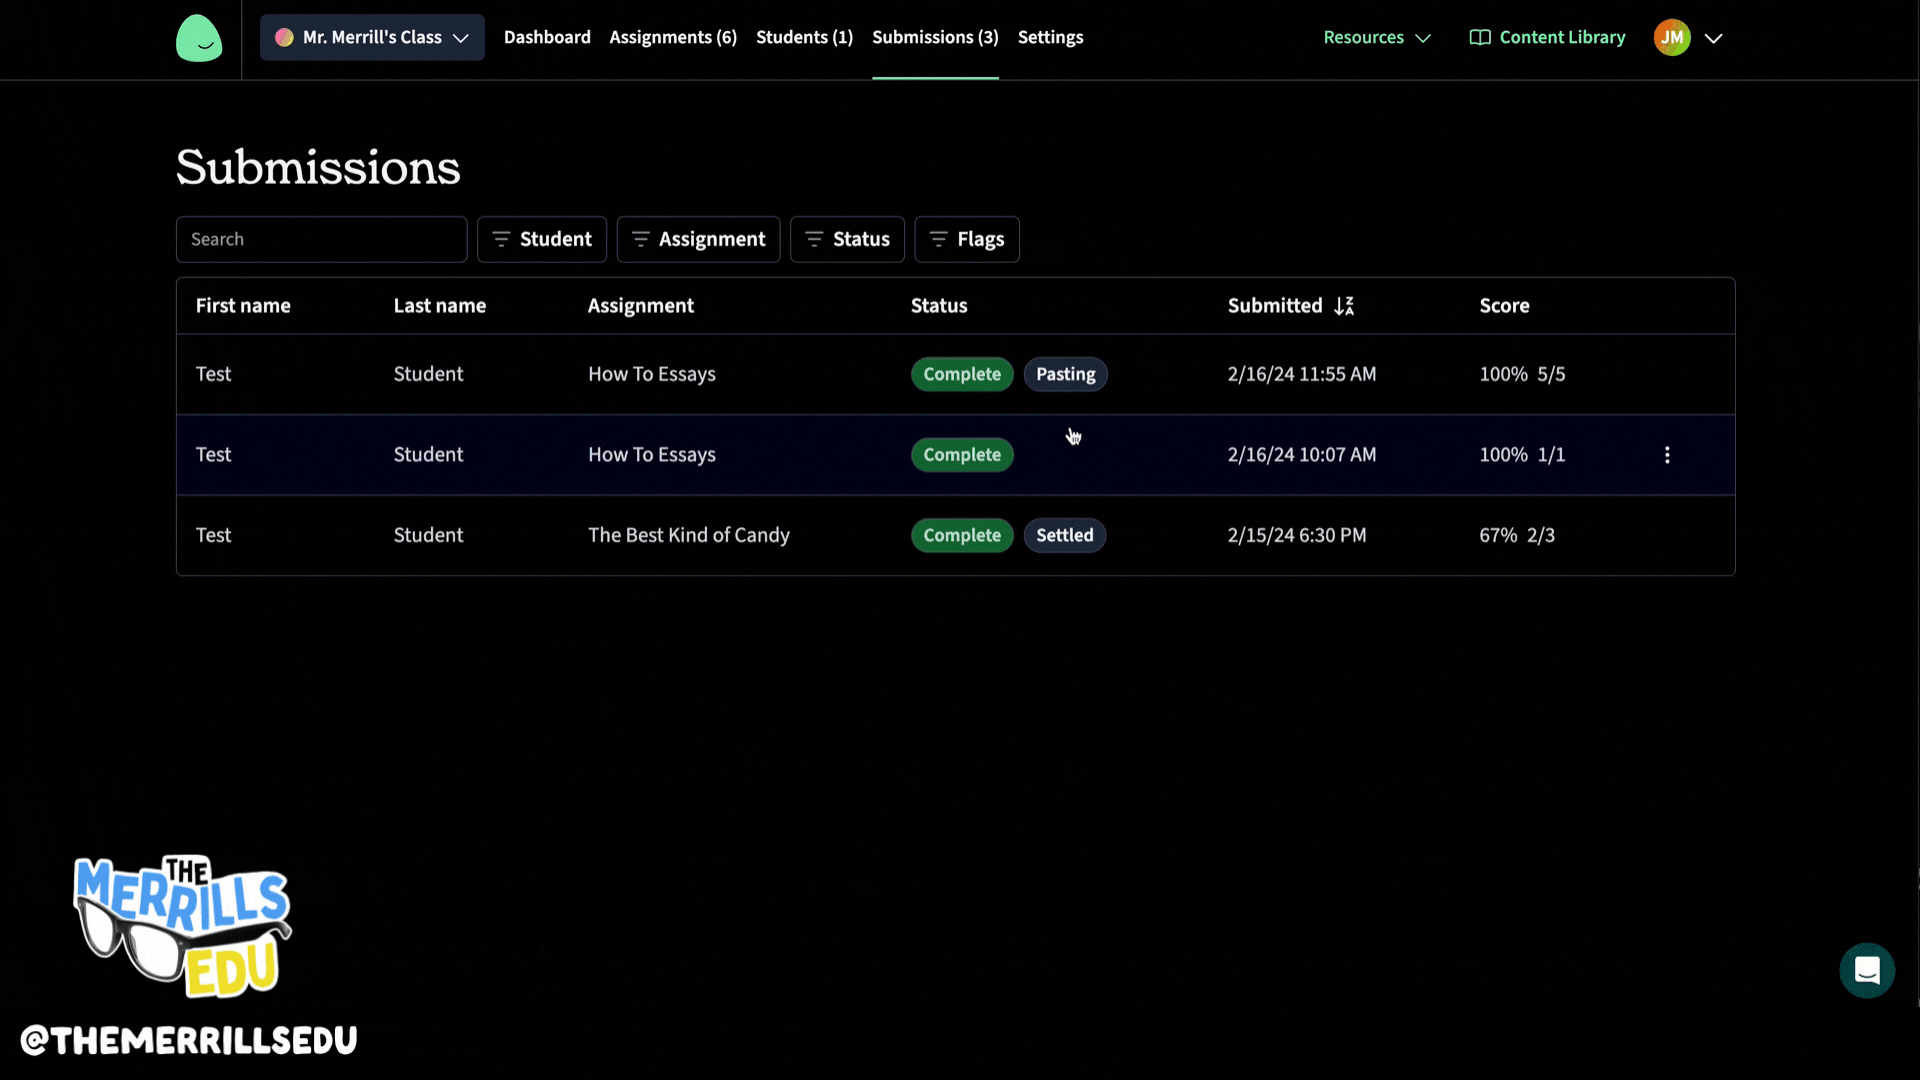
Once they’ve turned the essay in, they will be able to see how they performed according to your rubric / the AI. Something worth noting, is that when a student submits their work, you also have the ability to see if they copied & pasted their work. You will see, “pasting” listed next to the student’s assignment status. As the educator, you have full control and are able to edit any scores as you see fit. Here’s how to edit student scores:
Log onto the Class Companion dashboard, then click on Submissions located at the top of the page.
Click on the student / assignment and review how the AI graded the student’s work.
If you disagree with how the work was graded, you can easily edit the score(s). To do so, click on the Override icon (that looks like a hammer or paint roller).
Then, edit the final score. You also have the option to leave feedback or a comment. Once you have entered the information, click on the save button.
The new score will now be reflected!
-- Please follow us on social media and tag us with how you’re using Class Companion activities in your classroom! 👓👗
For more tips, tricks and lesson ideas for making learning more interACTIVE, check out our books The InterACTIVE Class and Flipgrid in the InterACTIVE Class on Amazon!


How to Use Gimkit Ink
@theMerrillsEDU “unpack” how to use Gimkit’s latest tool: Ink. In this blog post you’ll learn: what Gimkit Ink is, how to launch it for your students and how students can publish their work and share it with their classmates!

Gimkit is notorious for building engagement and with Ink, Gimkit delivers on a whole new level. Ink creates a refreshing take on writing, storytelling and much more. In this blogpost, you’ll learn:
(click on any subheading to jump directly to that section)
✏️What is Gimkit Ink and How Does It Work?
⚡Quick Start Guide:⚡
🚀 Launch a Project
💪 Having Students Add Content
📚 Publishing Student Work
👀 Viewing Other Students Work
💡What are The Paper and Time Machine Features?
What is Gimkit Ink?

Gimkit Ink is a fresh take on how writing should look in 2021. Instead of turning in documents or PDF’s, Gimkit Ink allows students to publish their work online and share them directly back to the educator, classmates and beyond (if they chose to do so). Students may be reluctant to share their writing, so Gimkit Ink provides them with several key elements to help. For example, students who submit their writing can share directly to the teacher or with the entire class. But, if they are nervous about sharing with the class, they may post their work under a pseudonym. The key here is that the students understand that they are creating for a broader audience them just themselves. With this understanding, they will likely place more effort into the quality of their work (since they know it will be shared).
Gimkit Ink is available to all users! However, the free version of Ink is limited. Teachers can create 10 projects on the Gimkit Basic plan. There are no other restrictions at this time.

Quick Start Guide
Step #1: Launch a Project

Educators can launch Gimkit Ink tasks from their Gimkit Hub (or login page). Click “Gimkit Ink",” which will take you to the educators dashboard. To get started immediately, click on “New Project” under Projects. Fill out the information on the next page, then select your privacy settings. Once everything looks good, click the blue “Start Project” button. Doing so will launch a live link / webpage where content will be shared and delivered. Share this link with your students to have them start adding content. This link is important, as it also acts as the “house” where all of the content submitted will “live” or be posted. Students will be able to return to this link to view content from their peers after they have submitted their own work.
Step #2: Having Students Add Content

After you have shared the link with your students, they are ready to start adding content. Have them click the blue “+ Create New Post” button. This opens several options for them: create a new article or story.

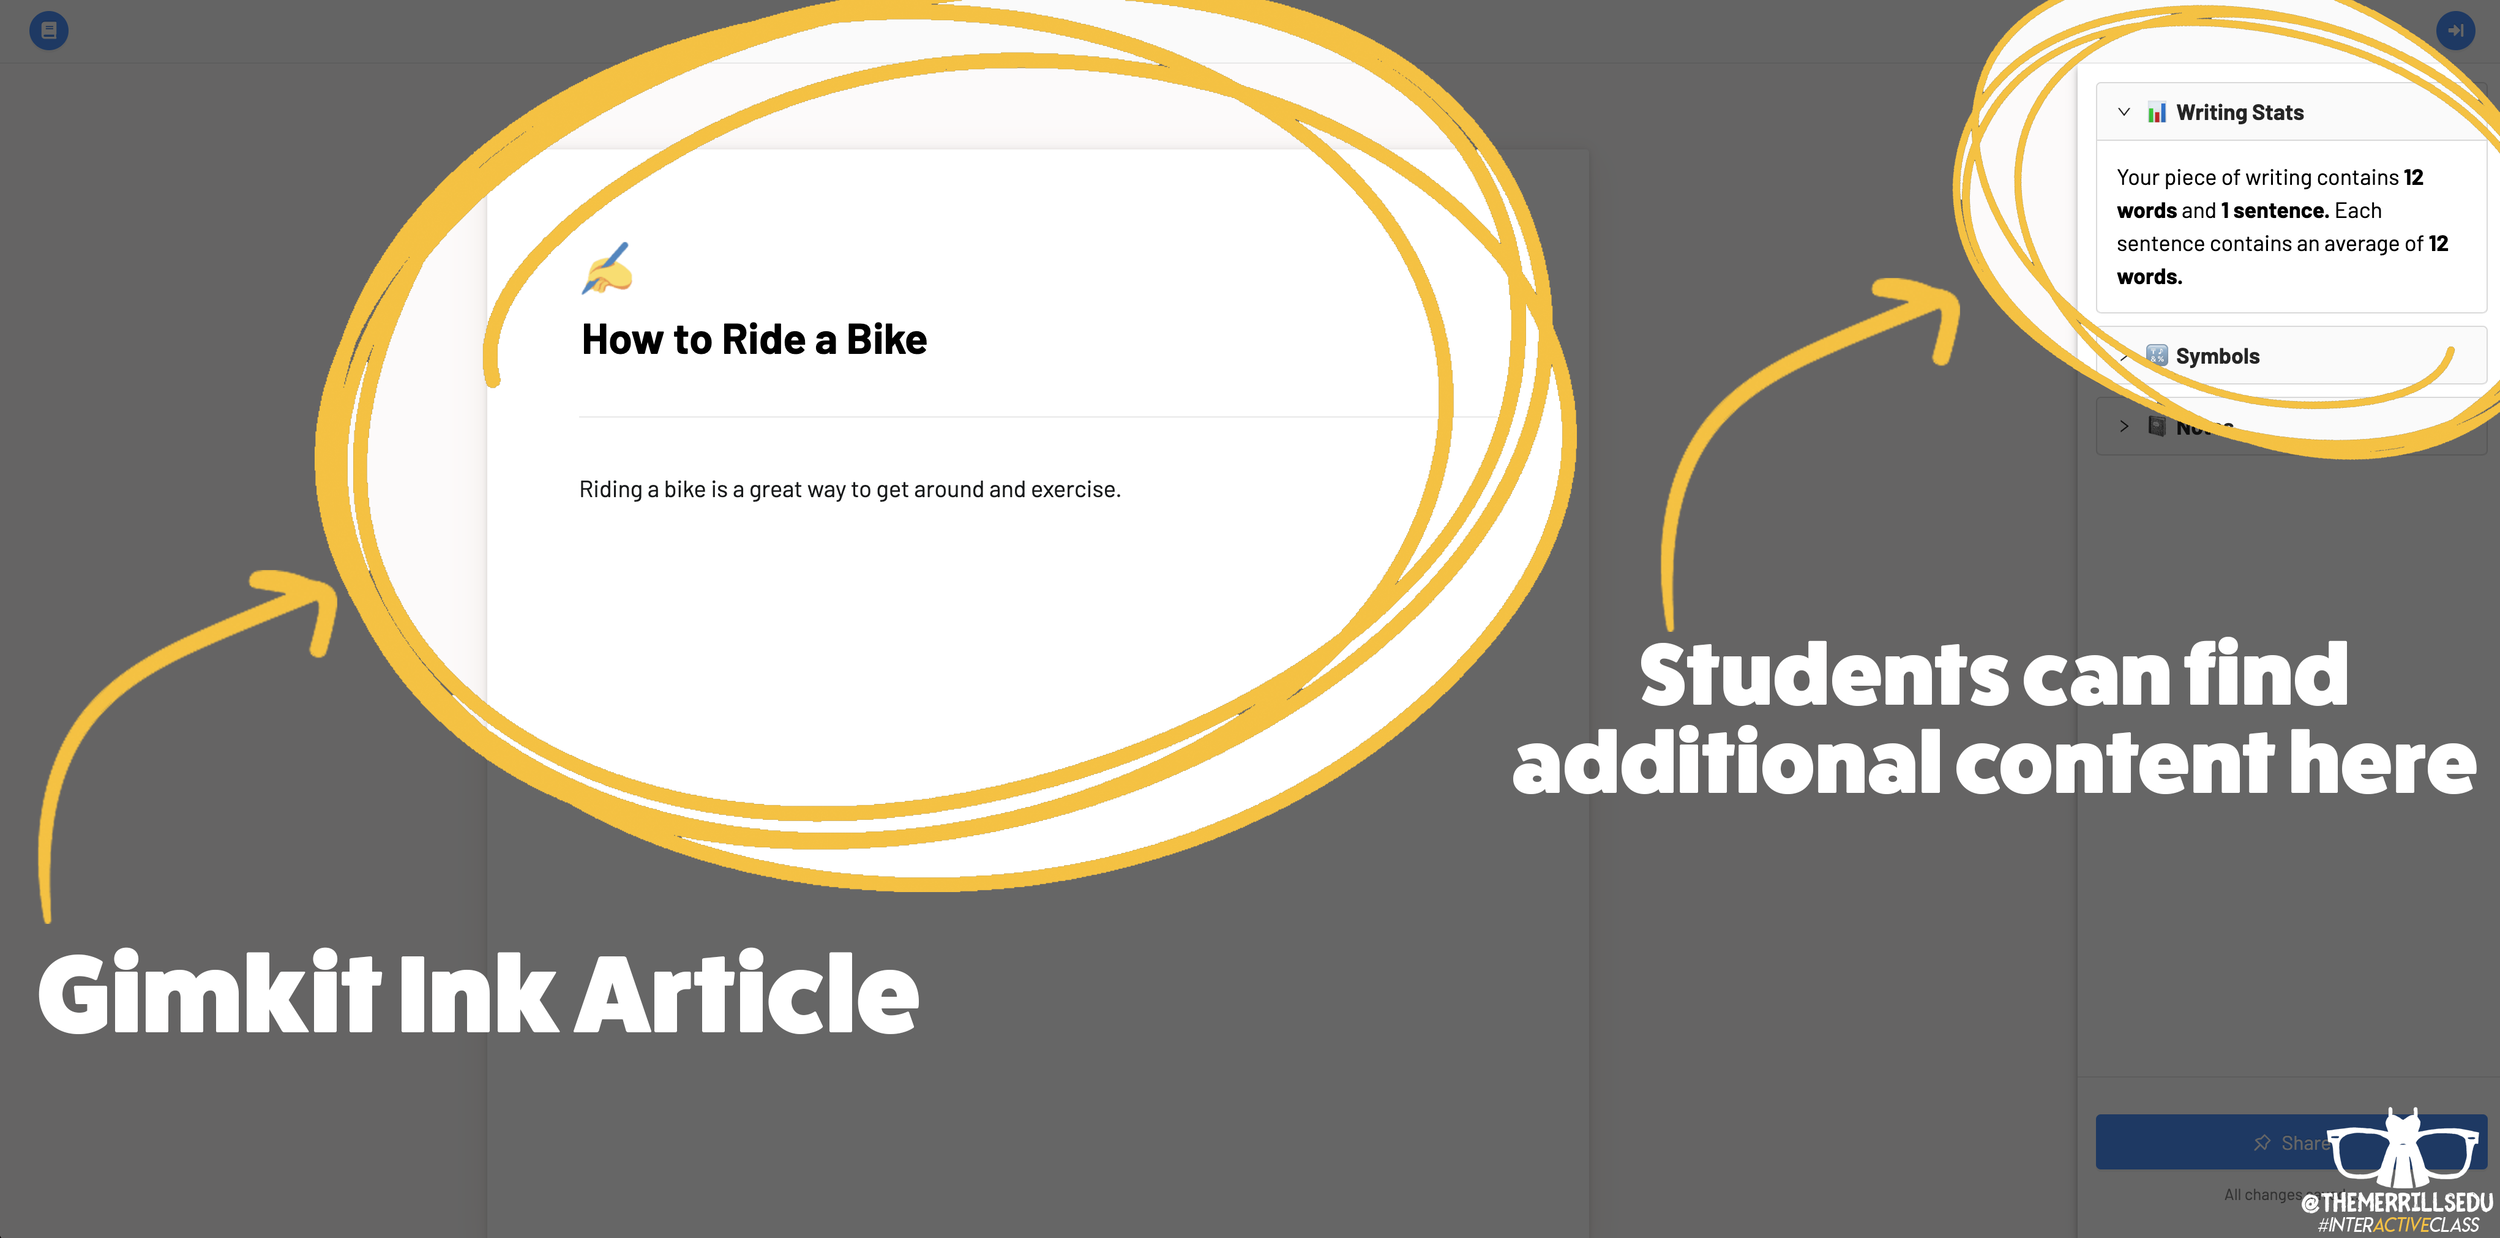
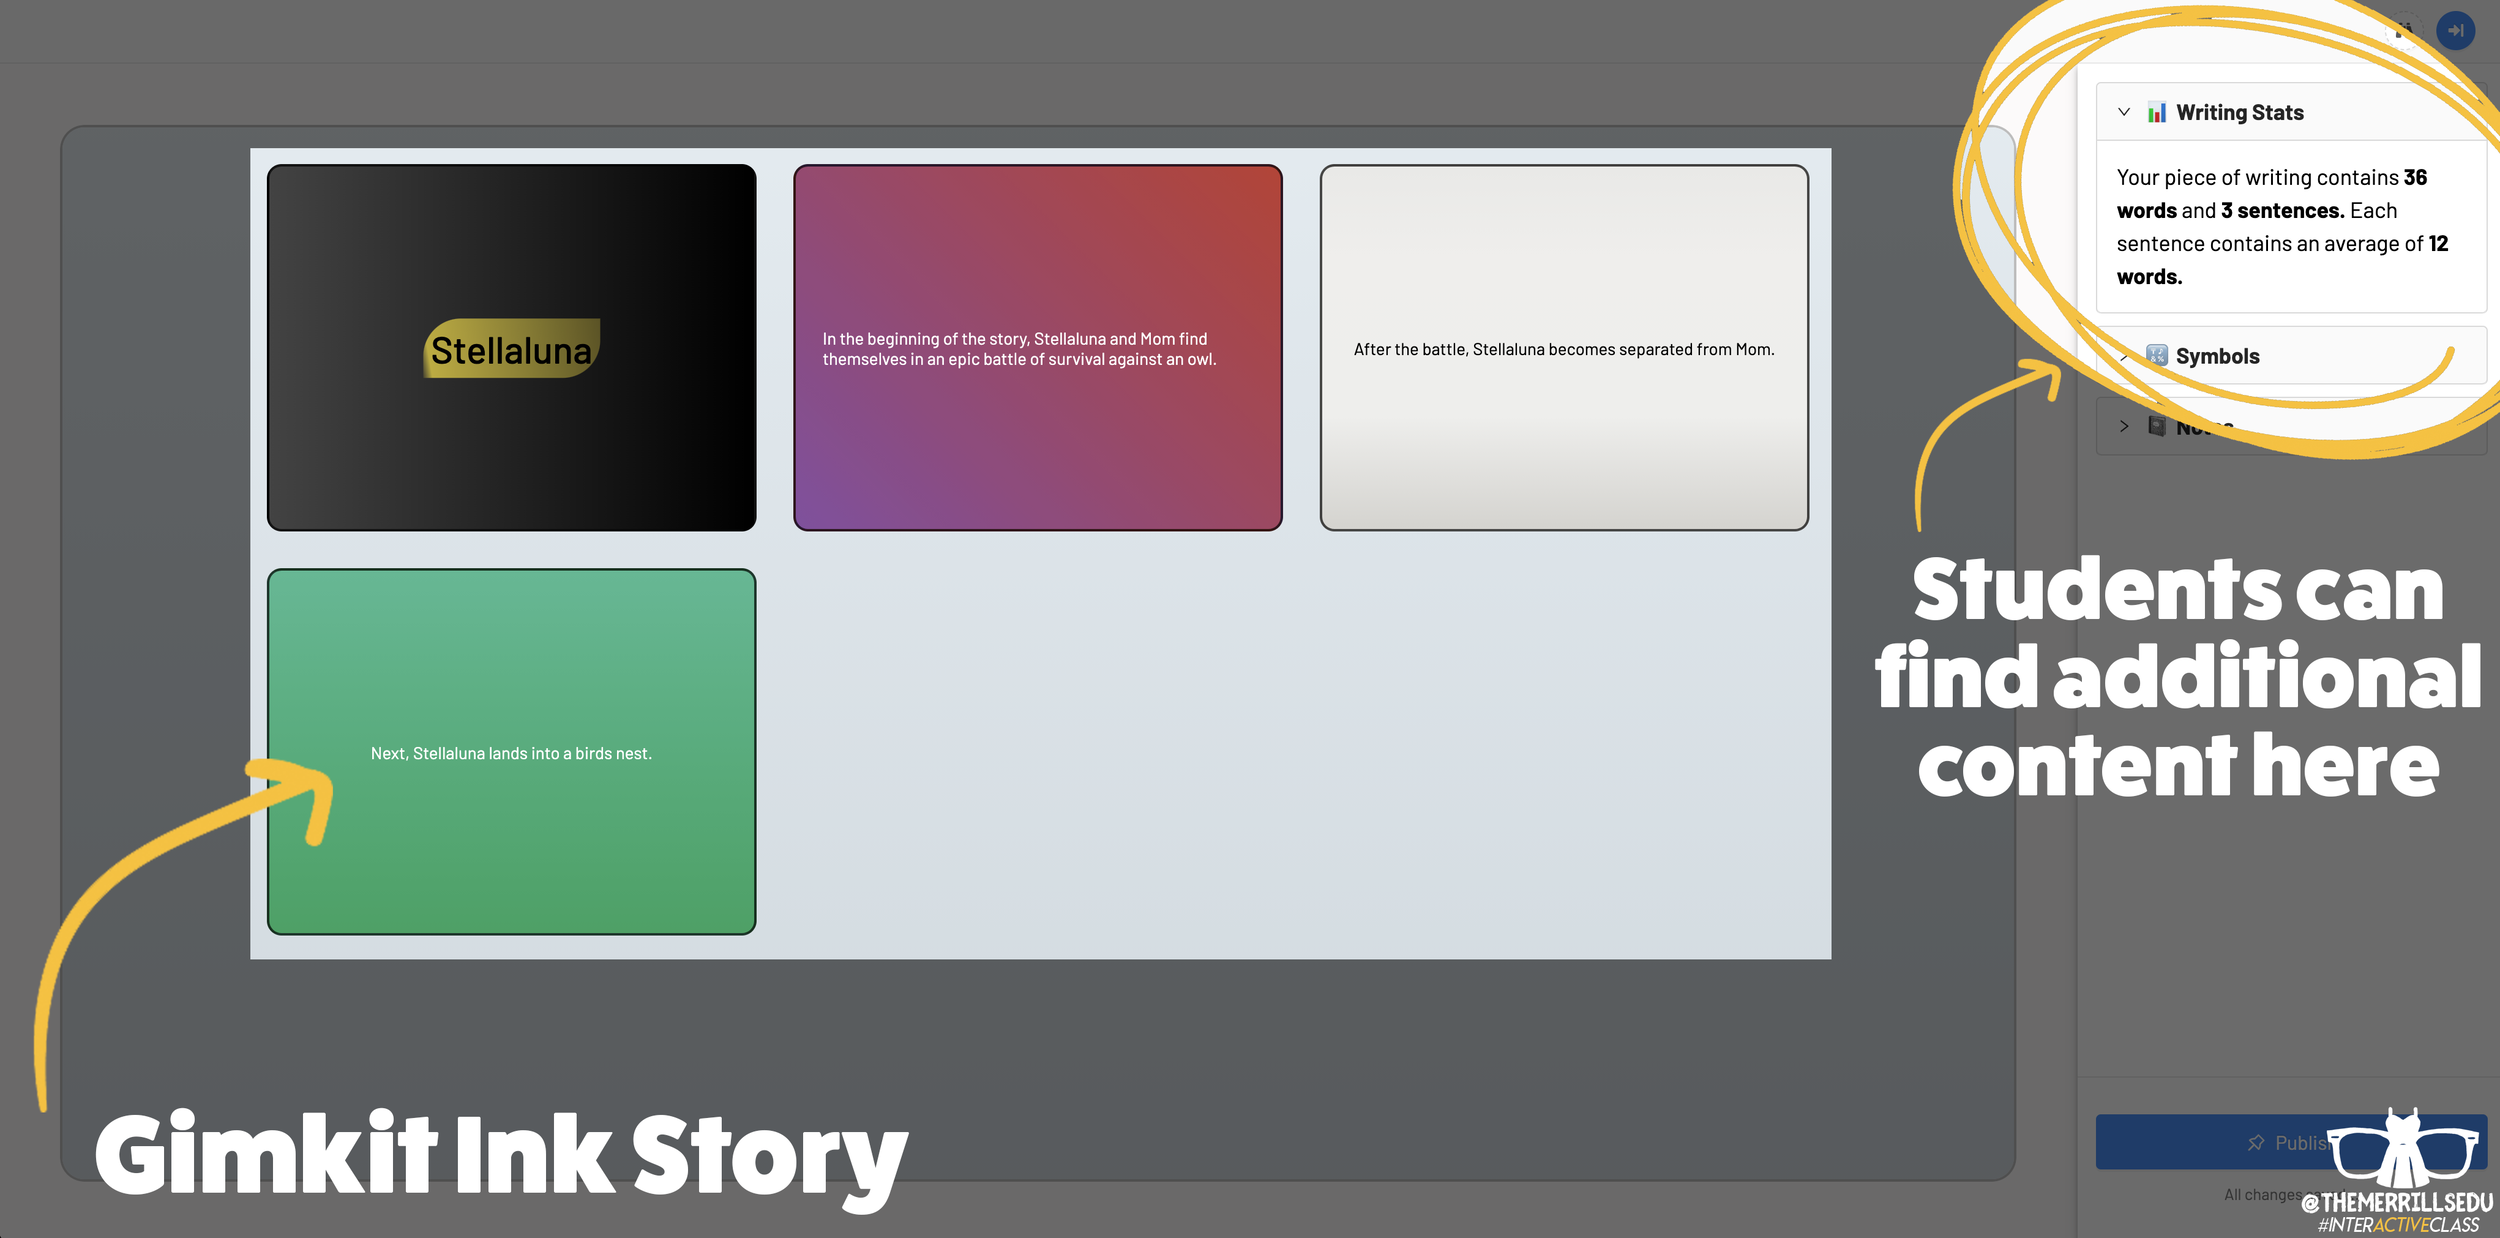

Writing an article on Gimkit Ink provides an editable document where your students can add titles, subtitles, text and more. This is perfect for sharing an idea - similar to a newspaper, blog post, etc. Adding a story gives students options to generate a storyboard or mind map experience to generate their writing. It’s more visual and allows the writer to control the pace. This is ideal when working to tell a story, and can be extremely powerful for young learners who are trying to organize their thoughts. In a Story, students have the capability to add features such as: images, YouTube videos, Desmos Graphs, Flipgrid Shorts recordings, Scratch projects, Google slides / sheets / docs, Anchor podcasts and Codepen. Students can add additional frames to their story, creating an easy to follow flow map - but Gimkit intelligently permits students to move their frames around (in case something gets placed out of order, just move it around!). This allows for easy editing and correction.

Step #3: Publishing Student Work
Once Your students have completed adding their information, they are ready to publish their work. To do so, they click the blue “Publish” button. It will prompt them to check their work - are you ready to publish or should you go back and edit? Once they are sure everything looks good, have them click the blue “Ready to Publish” button. The next screen asks your students to enter a title for their work and to select an emoji that they would like associated with it. After entering this info, students are to click the blue “Continue” button. Next, they must pick who can read their work: anyone or just the teacher. After making the first selection, Gimkit asks if they would like to share their name. Students may choose anyone or just the teacher. From here, they are to click the blue “Publish” button. Now, their work is live and ready to be viewed. Note: each student post has it’s own unique URL. So, this may be shared with families at home through other apps like Seesaw, Microsoft Teams, Google Classroom, etc.
Step #4: Viewing Other Students Work

Once your students have published their own work, they are prompted with a screen that shares their own personal URL to their project. Additionally, they have the option to “Open the Project,” which will take them back to the original landing page that you the educator created (“the house!”). Now your students can see everything that is and has been shared. If enabled, students can leave emoji reactions for quick peer-to-peer feedback. It’s a great way to provide an outlet for your students to share content with their friends!

The Paper and Time Machine
The Paper is Gimkit Ink’s workflow that shares all of the latest post from across all of your projects. This is helpful if you have multiple projects going at the same time and need to bounce back and forth efficiently. Your posts can also be found by clicking on “Time Machine” from the Gimkit Ink dashboard.
-- Stay tuned for more on how you can embed Gimkit’s Ink into your classroom! 👓👗
For more tips, tricks and lesson ideas for making learning more interACTIVE, check out our books The InterACTIVE Class and Flipgrid in the InterACTIVE Class on Amazon!


Immersive Reader in a Primary Classroom (part 2)
The power and possibilities from Microsoft’s Immersive Reader are endless. So where do you start? How can we get this into the hands of “littles,” who will definitely benefit from it?
The power and possibilities from Microsoft’s Immersive Reader are endless. So where do you start? How can we get this into the hands of “littles,” who will definitely benefit from it?
Teaching writing in primary grades is a tough job. Every student is in a different place, and more often than not, the first student done hasn’t used complete sentences. It’s times like this that we wish we could clone ourselves. If you’ve ever had to deal with this, then you know the feeling. So, during one our recent writing assignments, I had the students take their rough draft, and then type it into Word Online. I didn’t check the drafts, I didn’t ask anyone to show me ahead of time, I just explained that they were to type it once they finished. This was a pretty edgy idea, and I was nervous watching it all go down. Once the kids had everything typed out, I taught them how to open Immersive Reader. This allowed them to hear back exactly what they wrote. If there were mistakes, they could hear them being read. Then I showed them how to go back and make edits. Here’s an example of how it looked:
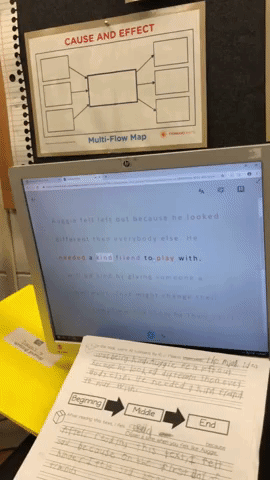
But wait...it gets better. Each student in my class has a copy of this desk sized guide. We use this with crayons, so the kids can see if they are working towards a “4” (or an A+) in writing. So now that they have fixed their mistakes, they can check to see if they have used things like adjectives to enhance their work. Click here, or the image below to download a copy for free!

The students change the colors to match the rubric, and then Immersive Reader will identify the various parts of speech. It’s amazing!

Now my students have a piece that has been edited, and it’s ready to be “published,” all done independently. But, if you know me, you know I LOVE app smashing. So, I taught my students to transform the Word file to a webpage, which “app smashes” the work into Microsoft Sway. What started out as a simple writing piece, turned into a published website, completely designed by first graders.
These projects were then shared out on Seesaw for my families to see. Now, my class engagement during writing is up, and the students are excited about being able to share their work with the world - all thanks to Microsoft. If you have any questions about Immersive Reader, or how we completed this process, please don’t hesitate to reach out!
👓 - J