


How to Add Yourself Into a Virtual Classroom!
Adding “yourself” to your virtual classroom doesn’t mean you need a green screen. You can do it using this simple “background remover.” In this post, you’ll learn how it all works!

Adding “yourself” to your virtual classroom doesn’t mean you need a green screen. In this post, we’ll cover a simple and easy method to get the job done. You’ll learn how to:
(Click on any subheading to skip directly to that section.)
How to Remove a Background From a Video / Gif
How to Download the Transparent Gif
How to Upload the Transparent Gif File Into a Virtual Classroom
(If you’d like a tutorial on how to create a Bitmoji Virtual Classroom, click here.)
How to Remove a Background From a Video / Gif
First, record a quick video that you would like to upload to your virtual classroom.
Note, when you remove the background you will lose all audio and the clip will only be approximately 5 seconds. So, make it something fun like dancing or a silly face. It also helps to use solid color backgrounds and lots of lighting.
Once you have your video ready, head to Unscreen.com by clicking here or the image to the left.
Next, click on “Upload Clip” and select your video file.

How to Download the
Transparent Gif

After you have selected your video, Unscreen will work to remove the background automatically.
There are a few options that can be added as a replacement background, but in order to get the file into a virtual classroom, you’ll want to be sure to bypass selecting these.
Once the file has uploaded and the background is transparent, it’s time to download the file.
Click the blue “download” button. A drop down menu will appear. In order to maintain the movement in the video and upload to your virtual classroom, you’ll need to select “GIF.” After the file encodes, then click “download.”
If you’re using a mobile device, you’ll need to follow these steps to make sure you’ve saved the file:
Locate the download arrow, typically located to the right of the URL bar. The image to the right shows where to find it if you’re using an iPhone.
Once you have found the download arrow, click it. A new drop down will appear. This will show you where you can find your downloaded file. Tap the new drop down and select your file. This will save it onto your device.
Now, you’re ready to upload the file into your virtual classroom!
How to Upload the Transparent Gif File Into a Virtual Classroom
To upload your file into your classroom, follow these steps:
Buncee:
If you’re using Buncee to create your virtual classroom, here’ what you’ll need to do (all steps are displayed in the video tutorial to the right, too):
Open the Buncee
Tap the “+” sign to add a new item
Click “Uploads",” then select (or click and drag) your file to upload into the Buncee.
Move and reposition the image as you see fit, then click “Share!”
Google Slides:
If you’re using Google Slides to create your virtual classroom, here’ what you’ll need to do (all steps are displayed in the video tutorial to the right, too):
Open your Virtual Classroom on Google Slides
Click on “Insert” from the menu bar
Click on “Image,” then “Upload from computer.”
Select your file
Move and resize as you see fit. Click “Share” to share with your students!
PowerPoint:
If you’re using PowerPoint to create your virtual classroom, here’ what you’ll need to do (all steps are displayed in the video tutorial to the right, too):
Open your Virtual Classroom on PowerPoint
Click on “Insert” from the menu bar
Click on “Pictures,” then “Picture from File”
Select your file
Move and resize as you see fit. Click “Share” to share with your students!
Help! I’m looking for instructions on how to make a Bitmoji Virtual Classroom!
No worries! You’re (almost) in the right place. Click here, and we’ll get you over to a step-by-step tutorial. 🙌

For more #interACTIVE lesson ideas, check out our books The InterACTIVE Class and Flipgrid in the InterACTIVE Class on Amazon!


How to Create a Virtual Classroom with Your Bitmoji in Buncee!
Virtual Classrooms are a great way for educators to deliver content to students in a fun and engaging way. Buncee makes creating one easy! You’ll learn how to create and share your virtual classroom to your students!
Virtual Classrooms are a great way for educators to deliver content to students in a fun and engaging way. Educators can add a Bitmoji into a virtual classroom to create an animated experience for students. You can even organize the images in your “classroom” so that they hyperlink out to external sources! Our preferred tool to create virtual classrooms is Buncee. You can sign up for an account by clicking here!
In this tutorial, you learn:
💥 HOW TO ADD A VIRTUAL CLASSROOM BACKGROUND
💥 HOW TO ADD IMAGES TO YOUR VIRTUAL CLASSROOM
💥 HOW TO ADD TEXT IN YOUR VIRTUAL CLASSROOM
💥 HOW TO ADD HYPERLINKS IN YOUR VIRTUAL CLASSROOM
💥 HOW TO SHARE YOUR VIRTUAL CLASSROOM
💥 HOW TO ADD A VIRTUAL CLASSROOM BACKGROUND 💥
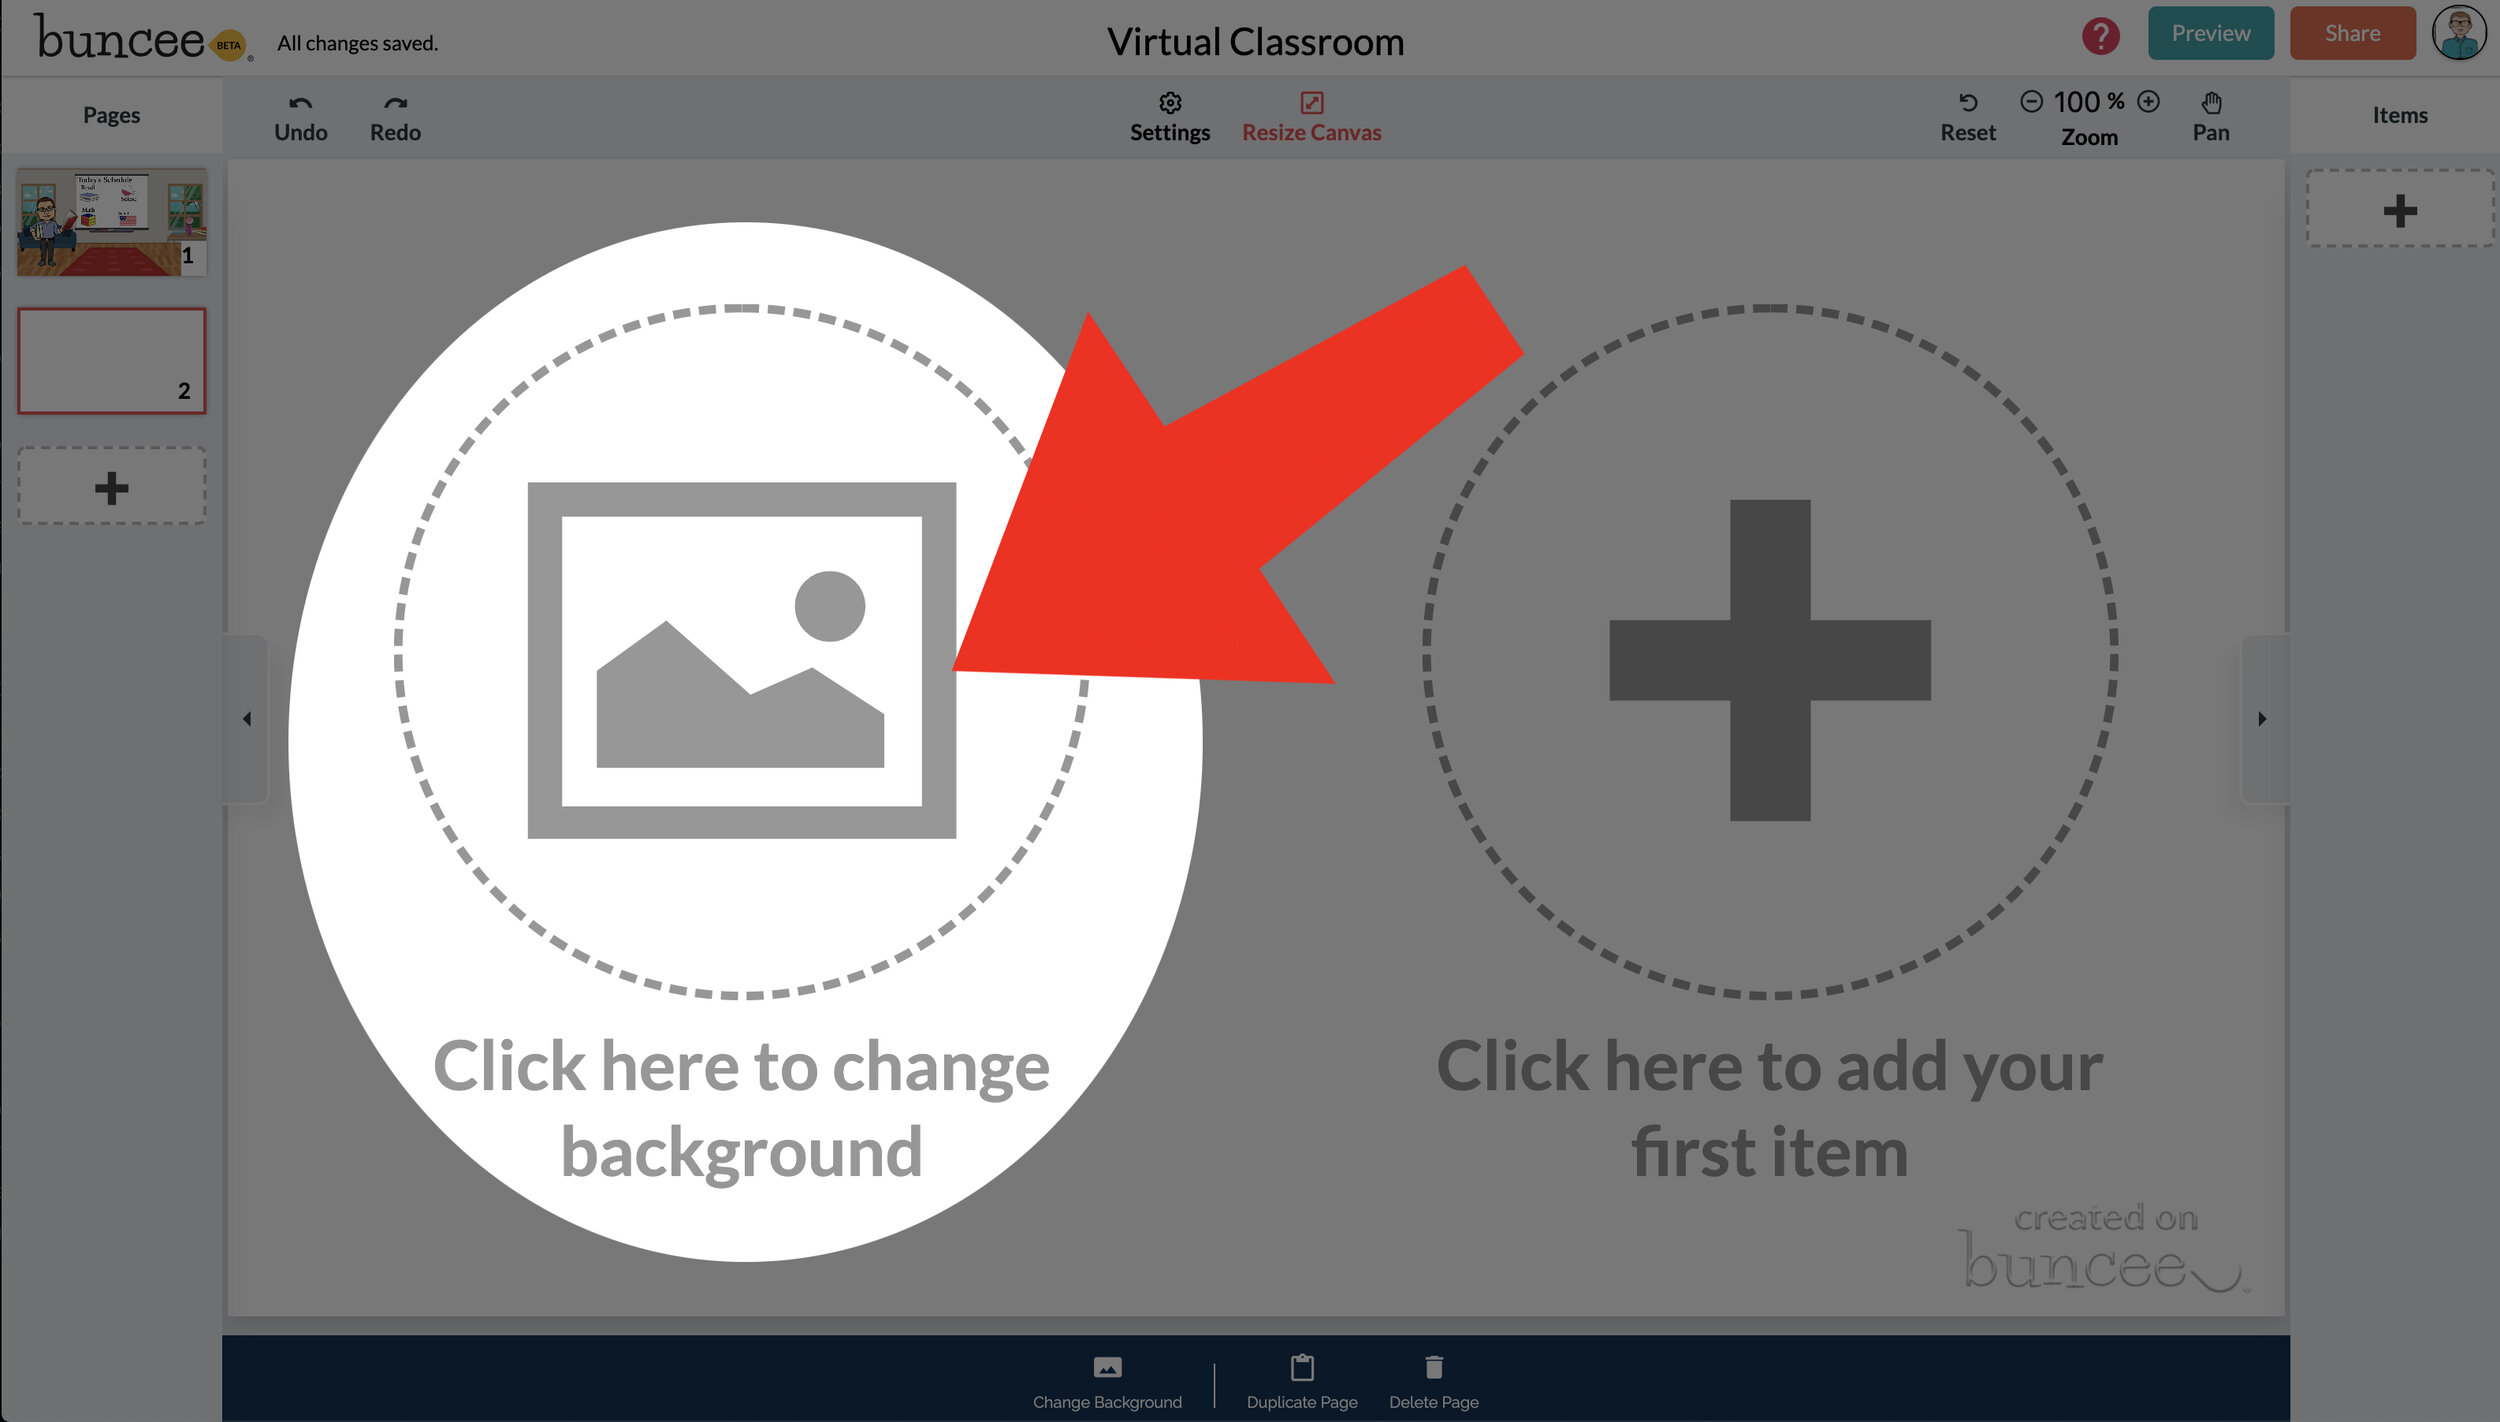

To get started, log into your Buncee account and create a new Buncee. Open the new Buncee and the first thing you’ll want to do is add a background. Follow these steps:
Tap the "click here to change background” option, then search for “class.”
Scroll through and find one that is right for you. There’s lots to choose from! You can find background images with smart boards, chalkboards, and more.
Once you find a background image that works for you, click it. Then, click the blue “add” button just to the right of the search bar. Now, your background is set and locked!
💥 HOW TO ADD IMAGES TO YOUR VIRTUAL CLASSROOM 💥
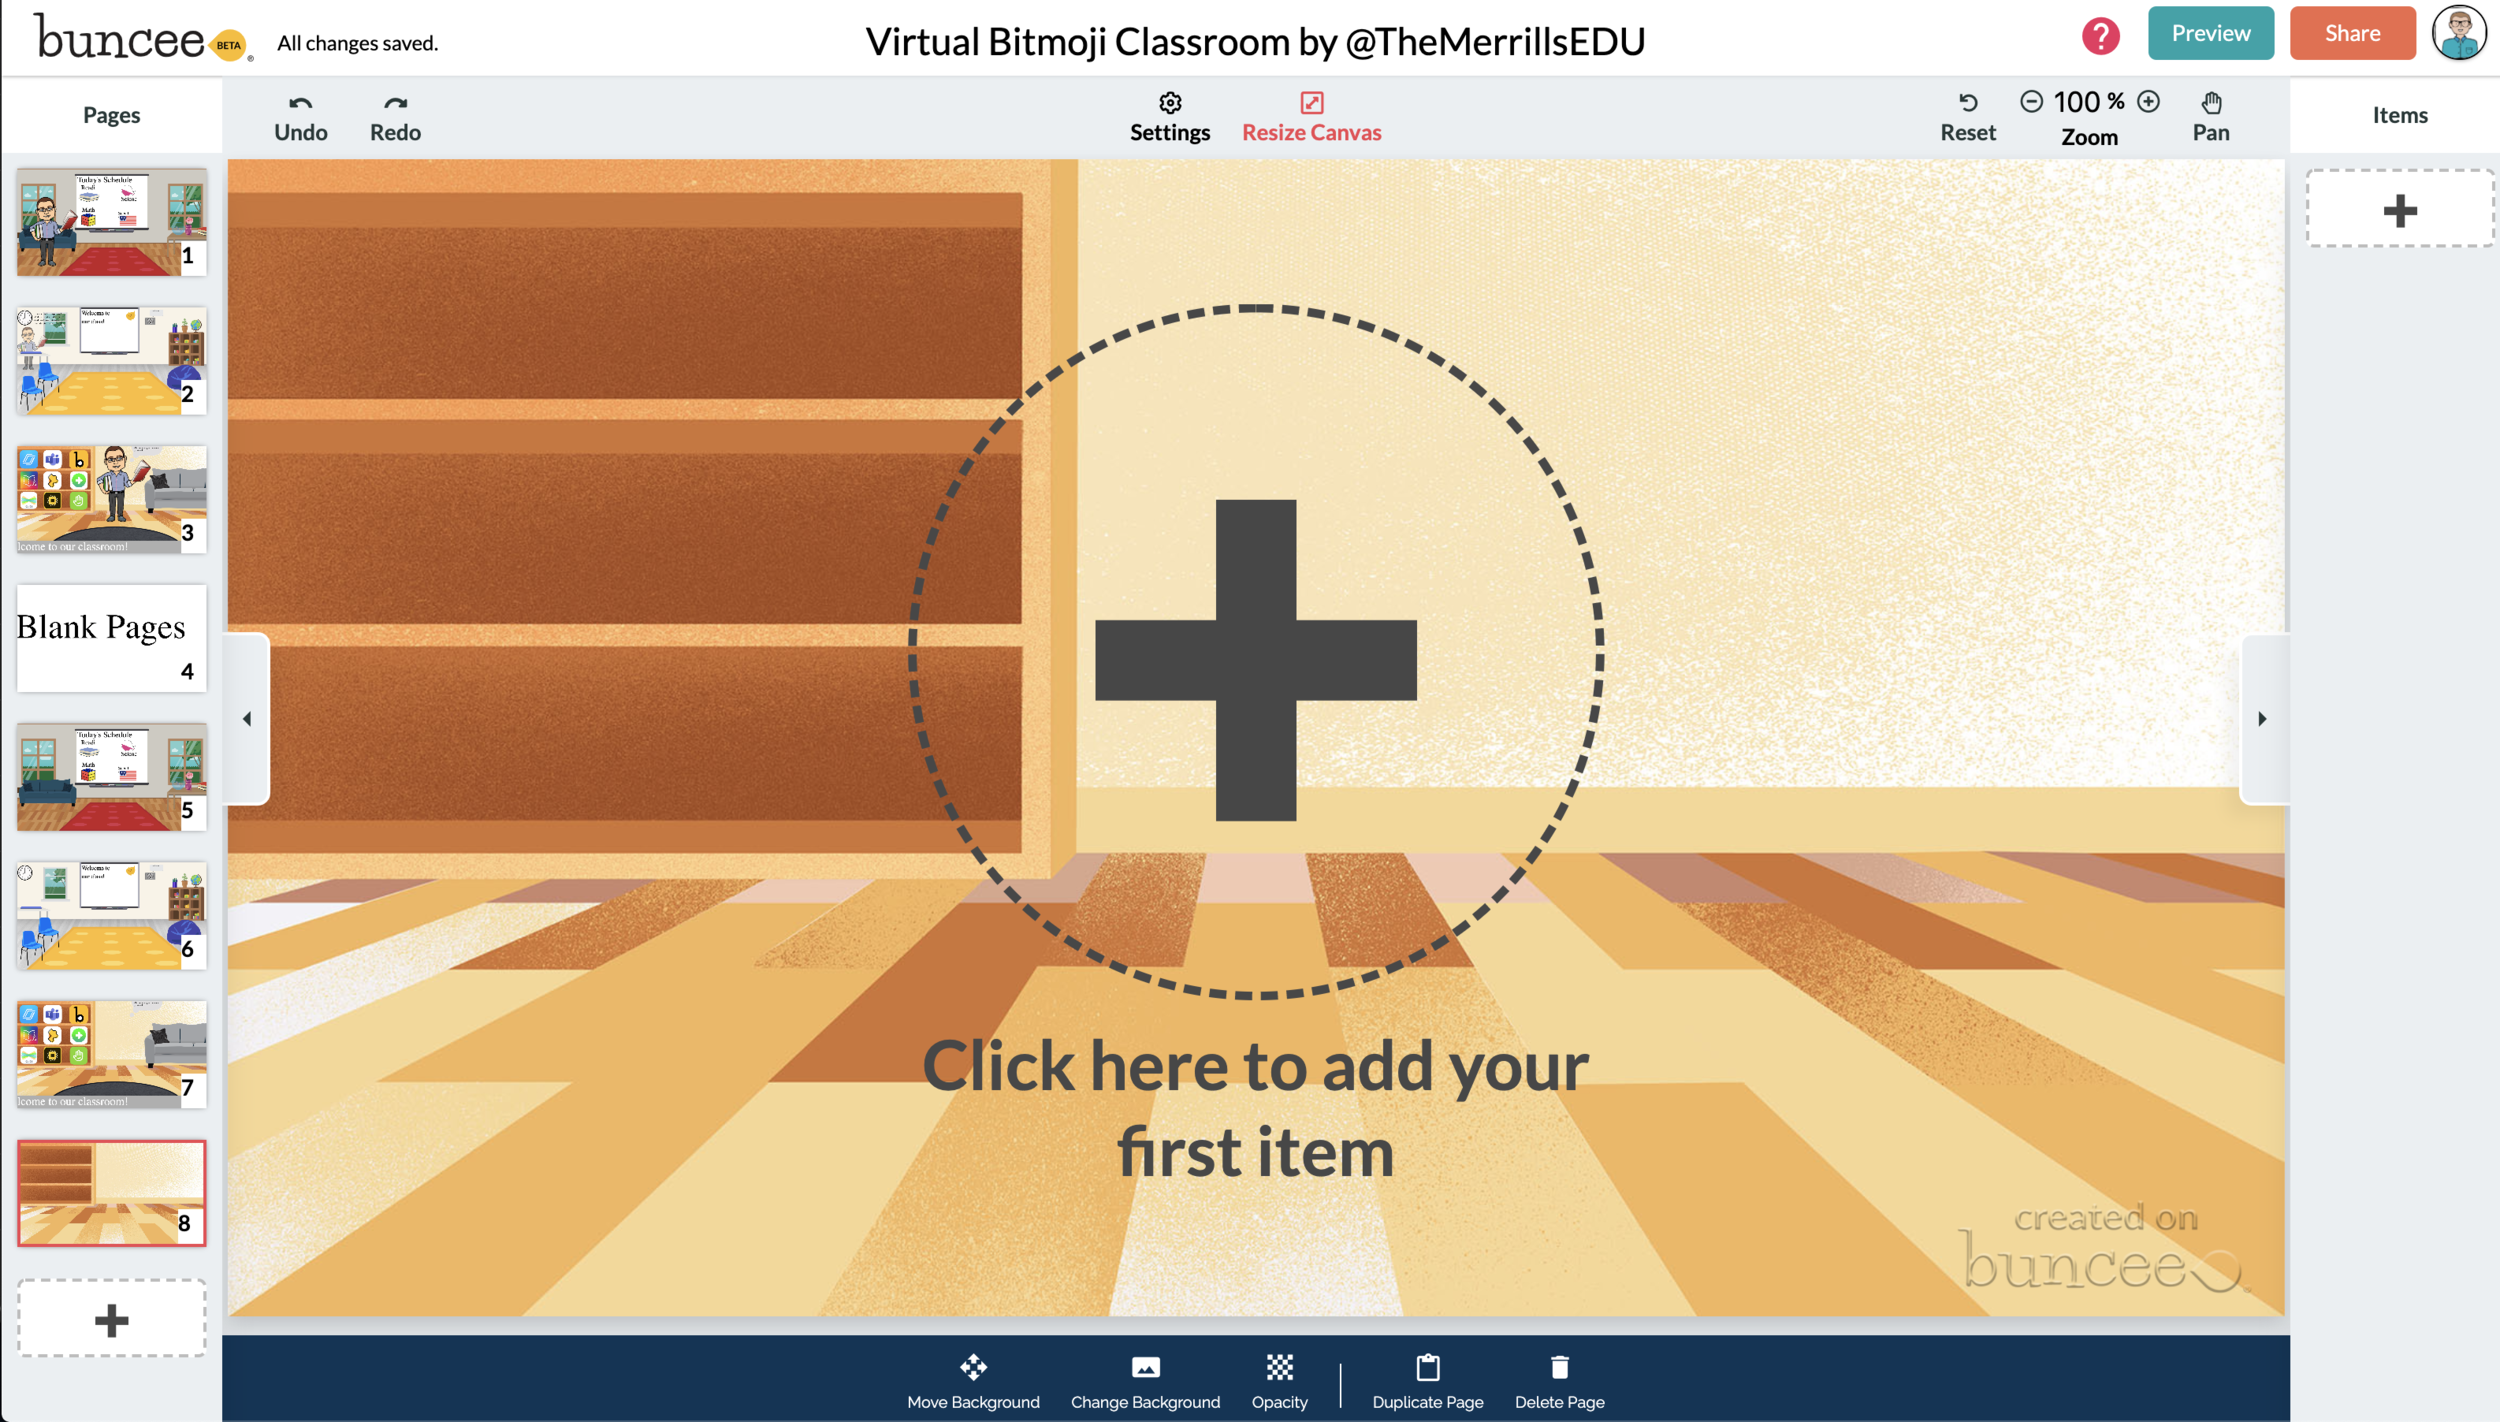

Now comes the fun part…Design your virtual classroom with some images! Click on the “+” sign to add an item. Use Buncee’s search tools to find items that you’d like to add to your classroom. Some fun things to search for include:
Smart Boards
Desks
Books
Clock
Computer
Bookshelf
Chair (you can even find a bean bag chair!)
Window
Couch
Speech (for a speech bubble)
If you’re having a hard time finding items to add, try typing “school” into the search bar. There are tons of item results that will pop up and you can use. You’ll find stickers, still images and moving gif images.
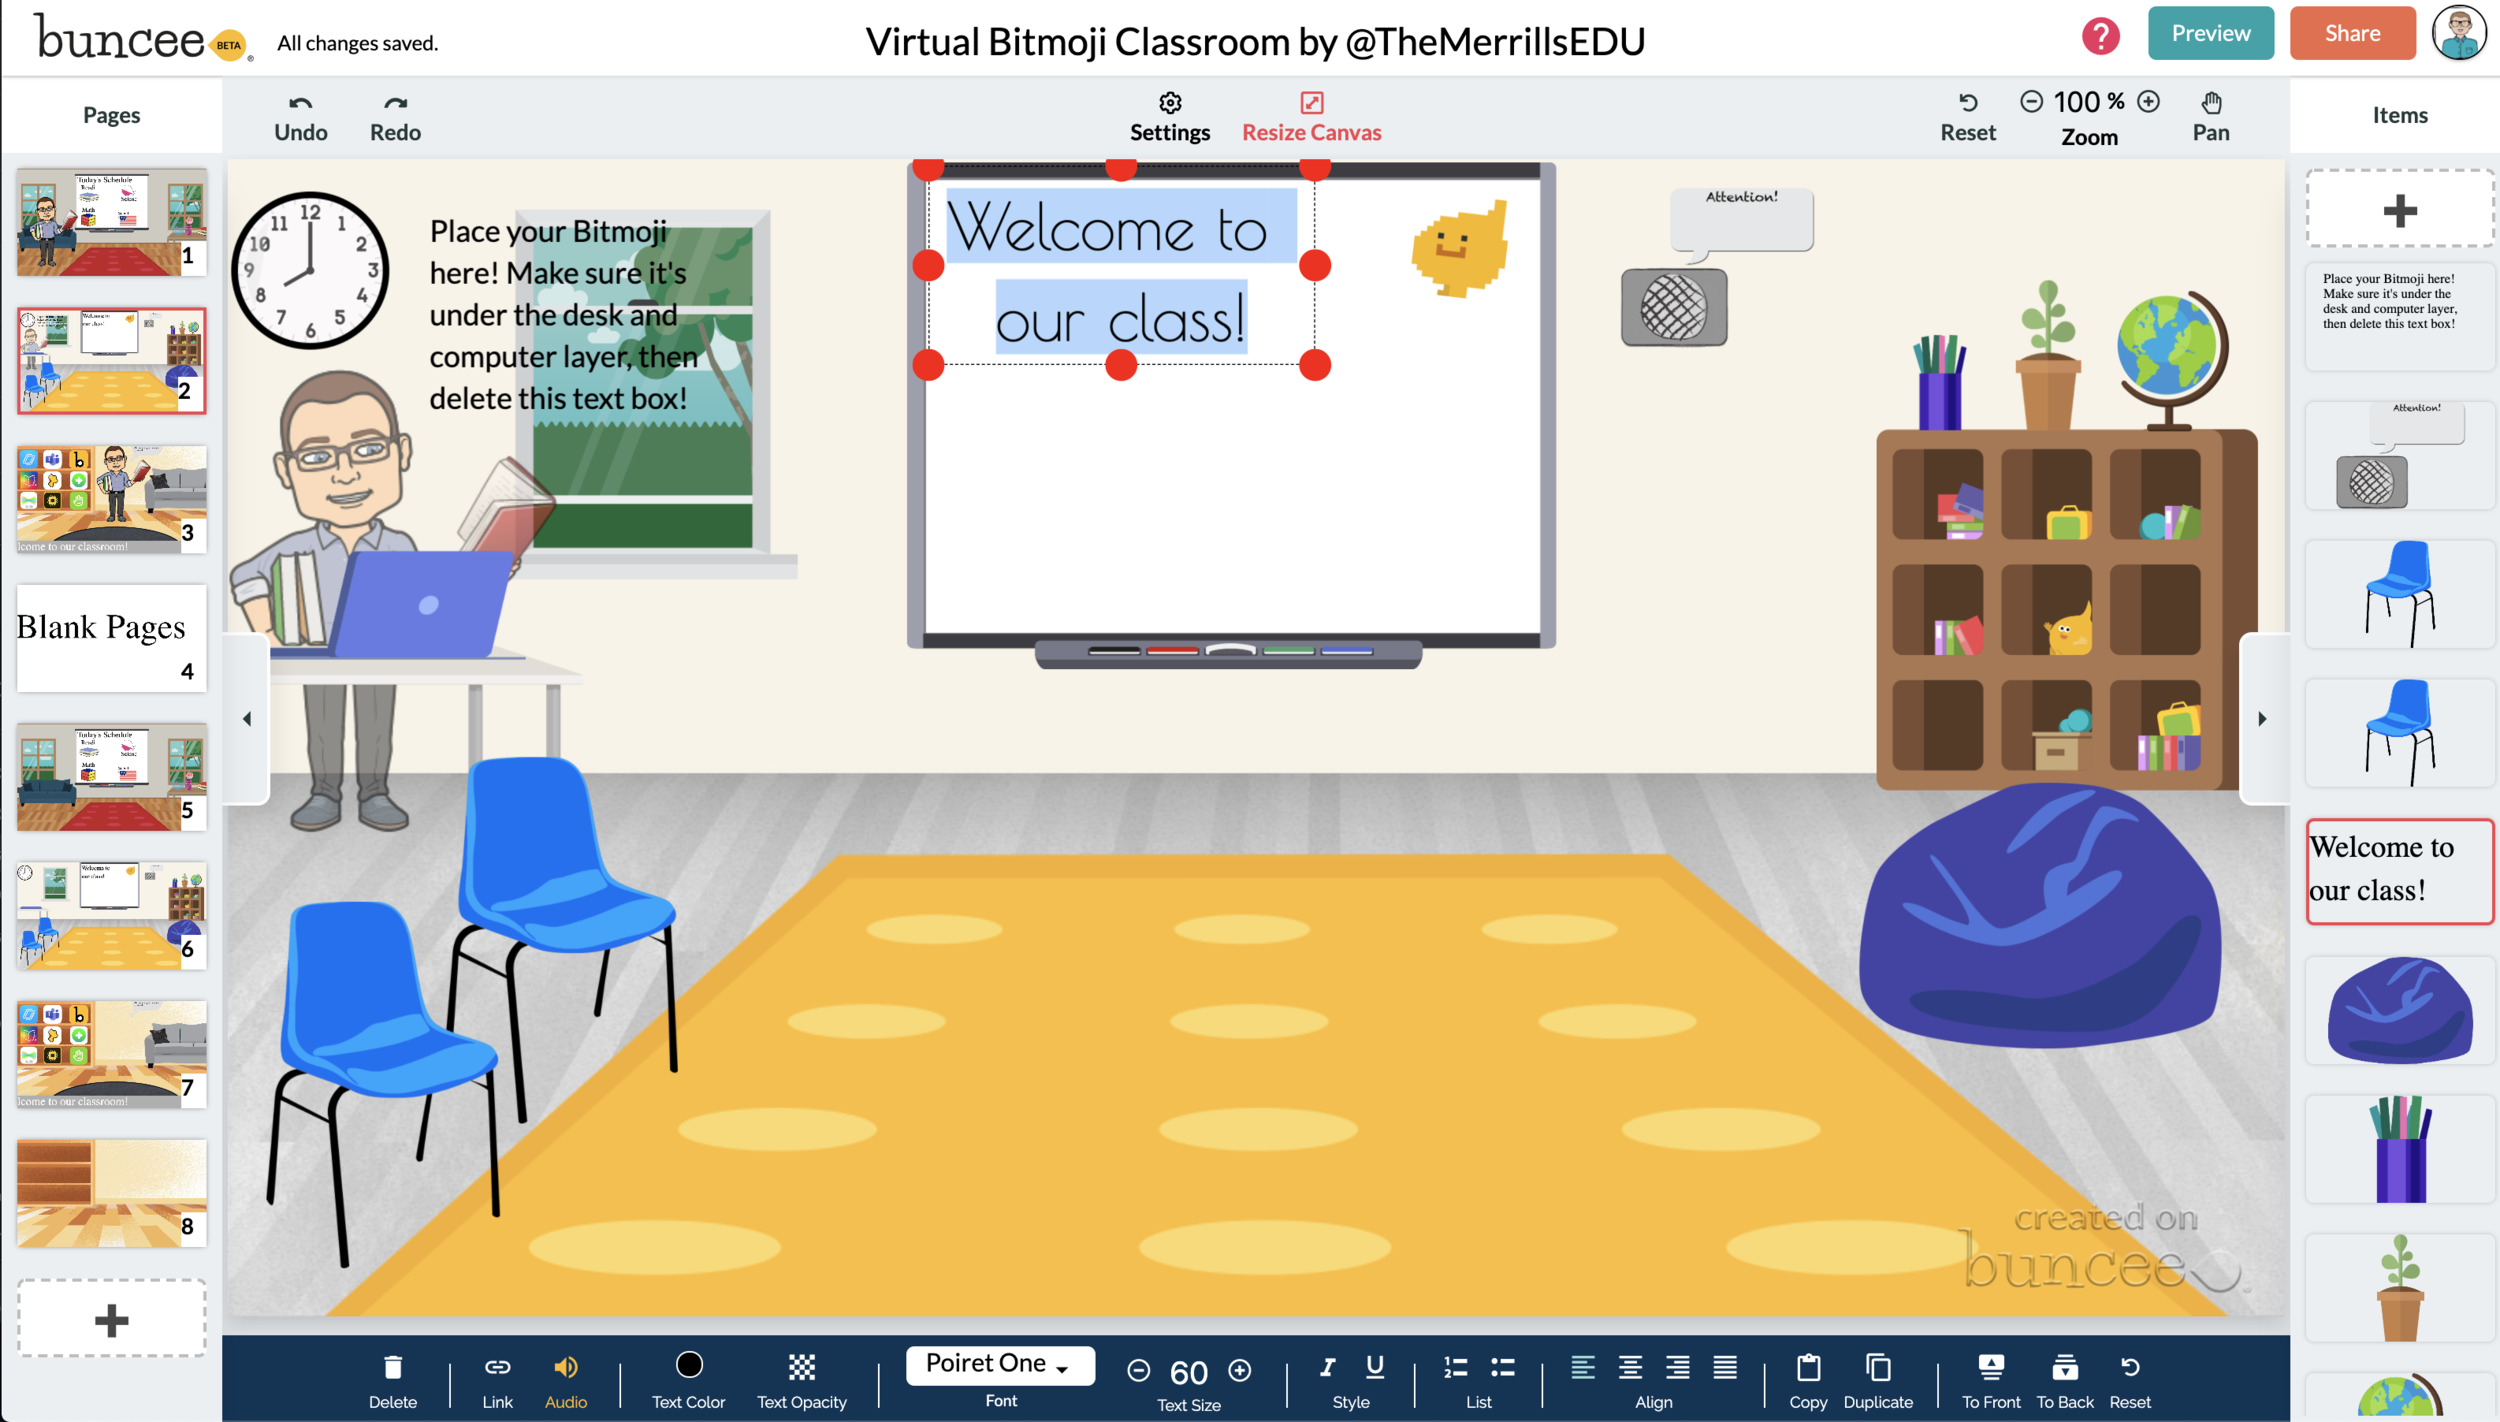
💥 HOW TO ADD TEXT TO YOUR VIRTUAL CLASSROOM 💥
After you’ve added all the items to you virtual classroom, you may want to add text. You can add text on top of items, like your smart board. This is a great way to deliver instructions for your students. To add text in Buncee:
Click on the “+” sign
After the Buncee features window will opens, click on the “text” icon (located to the left of the window)
Double click the new item to enter your text.
Once you have your text ready, you can change the font or font size by clicking the font options located on the bottom of the screen.
Move and place your text accordingly.

💥 HOW TO ADD HYPERLINKS IN YOUR VIRTUAL CLASSROOM 💥


After you have your items and text in place, now it’s time to start hyperlinking. When you hyperlink, your students will be able to click on the items (or text) that you have entered and it will take them to an external source. For example, if you use the Buncee logo, you can hyperlink it so that when it’s clicked, it will take you right to the Buncee login screen. Hyperlinks can be added to any item or text that you have added on Buncee. To add a hyperlink:
Click on the item or text that you want to hyperlink
Click on the “link” option on the bottom of the Buncee features toolbar
Enter the URL into the box
Press enter to “update” the item
💥 HOW TO SHARE YOUR VIRTUAL CLASSROOM 💥

Now that your virtual classroom is ready, it’s time to share it with your students! There are several options to share in Buncee:
Share the Buncee slide deck link
Embed the Buncee slide deck into your LMS (Canvas, Schoology, Microsoft Teams, Google Classroom)
To share the Buncee slide deck link:
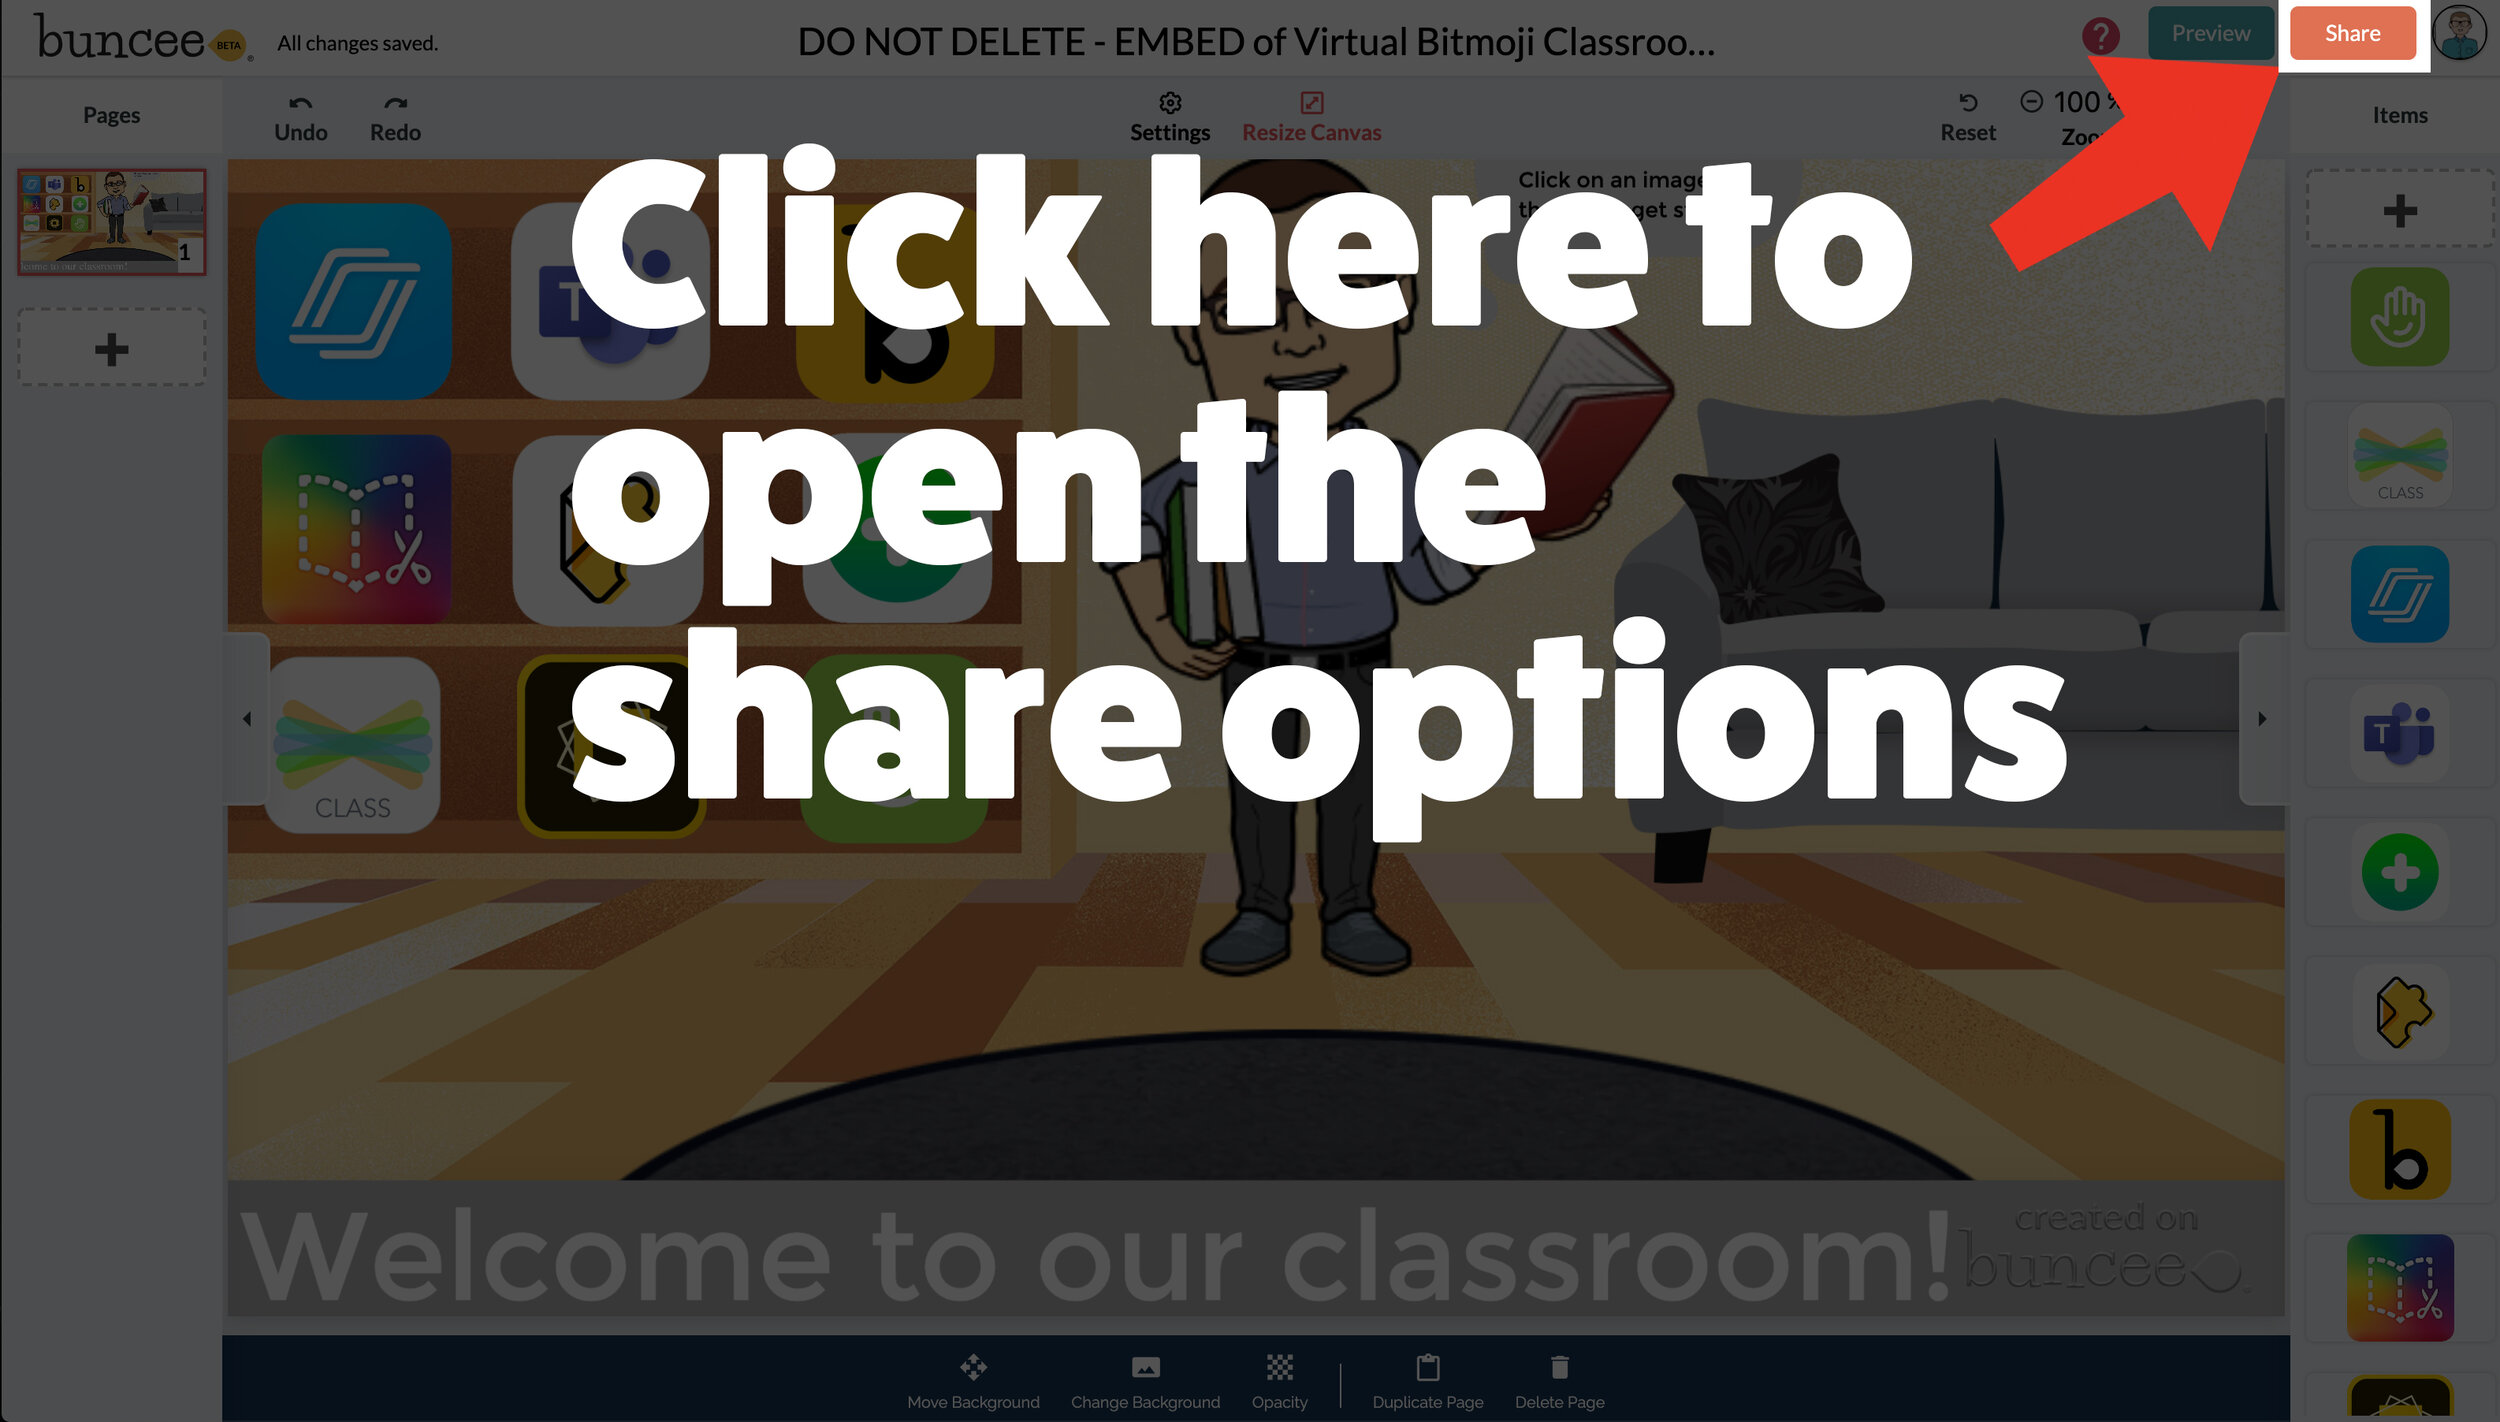
Click the red “Share” button
A new window will open. Click “Code” (second option from the top)
Next to the link box, click “Copy.” This will copy the URL to your Buncee.
Share the URL with your students
To embed the Buncee slide deck:
Click the red “Share” button
A new window will open. Click “Code” (second option from the top)
Next to the Embed Code box, click “Copy.” This will copy the embed code to your Buncee. (Tip: you can also click on “Show Options” to change the size of the embed)
Open your LMS (Canvas, Schoology, or anywhere you can embed) and click on the embed option. Paste the embed code from your Buncee, then hit save. Your Buncee will now be embedded into your page.
To share to Microsoft Teams, Google Classroom, or other social outlets:
Click the red “Share” button
A new window will open. Click “Social” (sixth option from the top)
Select the app that you are trying to share to, then follow the instructions

💥 FREE Templates! 💥
We’ve created several templates that you can download, copy, and edit. You can scroll through the different pages by clicking the arrow on the right. If you would like to download these, click here or the image below.

To view the templates, check out the embed of them below!
💥 YouTube Tutorial! 💥
Still not sure how it all works? We’ve got you covered! Check out this walkthrough!
For more #interACTIVE lesson ideas using Flipgrid, check out our book The InterACTIVE Class on Amazon!

