


Tips, Tricks and Templates to Use with Microsoft this Fall!
@TheMerrillsEDU share ways on how to use Microsoft tools in a post-pandemic classroom. Learn how students can use dictation, convert word files to powerpoint presentations, how to use Microsoft's collaborative whiteboard and so much more! These quick tips and tricks are delivered in less than 90 seconds!

Teaching throughout the pandemic was the world’s greatest PD event for educators. But, now that most of us are gearing up to return to in-person learning next year, how can we continue to use some of the technology and tools that we learned about throughout remote learning? How do tools like Microsoft Teams, Word and PowerPoint still fit into every day use in a “normal” classroom setting? It’s something that is on all of our minds entering next year. So, to help, we’ve created a video series dedicated to helping! We’ll share two new tips, tricks and/or templates per week from now until the end of July - just in-time for the new school year. Check everything out below!
(click on any subheading to jump to that section)
Also, check out our recommended blog posts and tutorials:
How to Convert a Word Document into a PowerPoint
Teaching writing throughout the pandemic was probably one of the hardest subjects for us both. With students both in-person and virtual, we had to rely on Microsoft Word to produce student artifacts that could be transferred digitally (and edited if need be). This trick helped take our students writing and “publish” it into something that they could edit, create and share. The result was something that everyone could be proud of! Learn how it all works below!
Using Dictation in Microsoft Tools
Dictation can now be found in many of Microsoft’s tools. Learn where to find it and how your students can take advantage of this feature below!
Ways to Use Microsoft’s Whiteboard in the Classroom
Microsoft’s Whiteboard is perfect for collaboration and real-time creative thinking. Learn how you can integrate this into your classroom immediately!
Monitoring Social and Emotional Learning with Microsoft EDU
Learn how this Microsoft tool can help you monitor your students’ feelings in just a few clicks! Reflect will help both you and your students returning back to school this fall!
Using Immersive Reader in PowerPoint
Immersive Reader can now be found in PowerPoint! This impressive technology can read out loud any text on the slides and can even translate it into different languages, making your content accessible to all! Learn how it all works in PowerPoint below!
Recommended Blog Posts
and Tutorials:
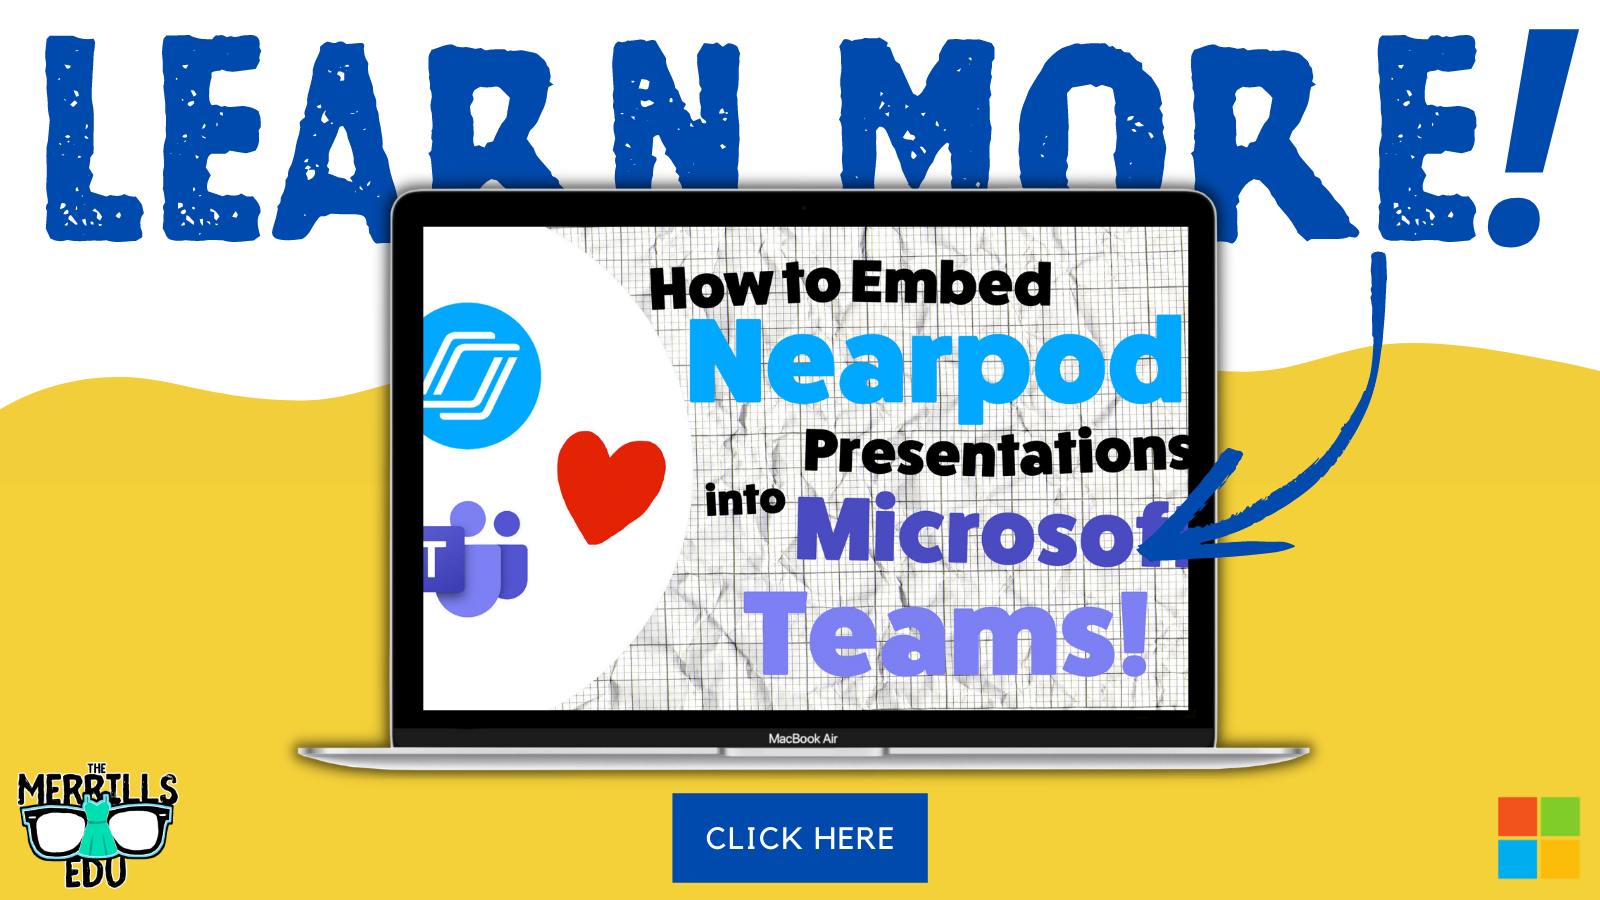
How to Embed Nearpod Presentations into Microsoft Teams
Organization in any classroom is key and with this tip, you’ll be able to keep your Nearpod presentations embedded right into Microsoft Teams. Check out our blog post and tutorial below for more info!
How to Make a Custom Microsoft Teams Background
Microsoft Teams is constantly providing updates to its platform, but the latest is one that users have been begging for: the ability to upload your own backgrounds. Now, you can create a personalized scene and Teams will virtually place you directly into your image. Learn how it all works and find a free background from our curated list!

6 InterACTIVE Ways to Use Microsoft Forms
There are many hidden gems within Microsoft EDU, and Microsoft Forms is one of them! Here are six interACTIVE ways you can use them!
How to Use Reading Progress
Learn how Microsoft is revolutionizing how educators administer running records and assess their students reading skills. NO MORE RUNNING RECORDS!


Creating a Virtual Classroom with Microsoft Teams
With the help of Microsoft Teams we can expand our classroom walls and bring our students into a different type of interACTIVE learning environment. Learn how to do more with Microsoft Teams!
Number Talks in Microsoft Teams
Are you looking for ways to improve mental math and fact fluency with your students? Then, Number Talks may be the perfect exercise for your class! Pair this activity with Microsoft Teams for full-on engagement!


Check out the entire video series below!
Check back soon for more updates and be sure to follow us on social media or join our mailing list to be the first to know when new content is posted!
-- Stay tuned for more on how to use Microsoft tools in your classroom! Be sure to follow us on social media (@TheMerrillsEDU everywhere) for more! 👓👗
For more tips, tricks and lesson ideas for making learning more interACTIVE, check out our books The InterACTIVE Class and Flipgrid in the InterACTIVE Class on Amazon!


How to Use Microsoft's Reading Progress
NO MORE RUNNING RECORDS! You read that right. Microsoft’s new Reading Progress will take these off your hands, freeing up time that you can dedicate to your students. Learn how it all works, here!

Running Records are crucial assessment pieces. We love having the data that shows how much our students have grown, but it takes a great deal of time to carry out Running Records. Microsoft understands the importance of them, but also understands that our time is valuable. This inspired them to develop their Reading Progress app. What if we told you that Microsoft used the same type of technology used in the Flipgrid Shorts Camera, combined with the power of Immersive Reader and the distribution power of Microsoft Teams. Yes, you read that right! Meet Microsoft’s Reading Progress app! Full launch of this tool is coming in late August!
In this blog post you’ll learn:
(Click on any subheading to jump to that section)
What is Microsoft’s Reading Progress and what does it do?
Reading Progress is a ⚡️FREE⚡️ tool that can be found within Microsoft Teams. Imagine if the developers of the Flipgrid Shorts Camera, Immersive Reader and Microsoft Teams all sat down at a table and collaborated on what to do next. Reading Progress uses the technology from the Flipgrid Shorts Camera to record a video of students as they read. The same type of technology that is used in Microsoft’s Immersive Reader then takes the video and intelligently looks for errors, mispronunciations, miscues and more - AUTOMATICALLY. You read that right. The technology does all the work. A full report is provided to the educator, who can go back and view the recorded video and listen back to how the student performed. If the technology marks a student as reading a word correct / incorrect, the educator has the ability to change it on their end. The end result is a full running record, all on video!
How to set up Microsoft’s Reading Progress app
Getting started with Microsoft’s Reading Progress app is simple! Follow these steps to get started.

1. Create a new document in Microsoft Word. (PDF’s will work if you have those, too.)
2. Type out what you would like your students to read.
3. Save a copy (you’ll eventually upload this as the assignment).
4. Launch Microsoft Teams.
5. From your Team, click Assignments.
6. Click the purple Create button located on the lower left side of the screen, then click Assignment.

7. Select the appropriate class /team to assign the passage to, then click Next.
8. Give the assignment a title (TIP: Include the reading level of your passage in the title).
9. Under the Instructions area, locate and click the purple Add Resources link.

10. Click the Reading Progress icon and fill out the information. Give the assignment a name (it can be the same as the title).
11. Now it’s time to upload your Word document (or PDF) reading resource / passage. Under Reading Passage (required), click on Upload a document. Upload the Word document or PDF that contains your passage.
12. After the upload process is finished, enter the reading level and genre. Adjust the number of attempts to any number that you would like (this is the number of chances students have to read / record themselves reading the passage).
13. Next, adjust the pronunciation sensitivity. This adjusts how sensitive the app should be when listening and estimating errors. (Note: educators can always manually edit errors for accuracy).
14. Toggle the Require video on or off. It’s defaulted to on and we recommend leaving it on, but some students may be reluctant or camera shy. In that case, their audio will be recorded but not the video.
15. Last, click Attach to add it to your class assignment. Then, click the purple Assign button on the top right corner to launch it!
Need to see it? No problem! Check out the tutorial below!
How do students use Microsoft’s Reading Progress?
The process for students to access assigned Reading Progress assignments is simple and can be done in just three clicks once they’re logged into Microsoft Teams. Follow these below to get started:
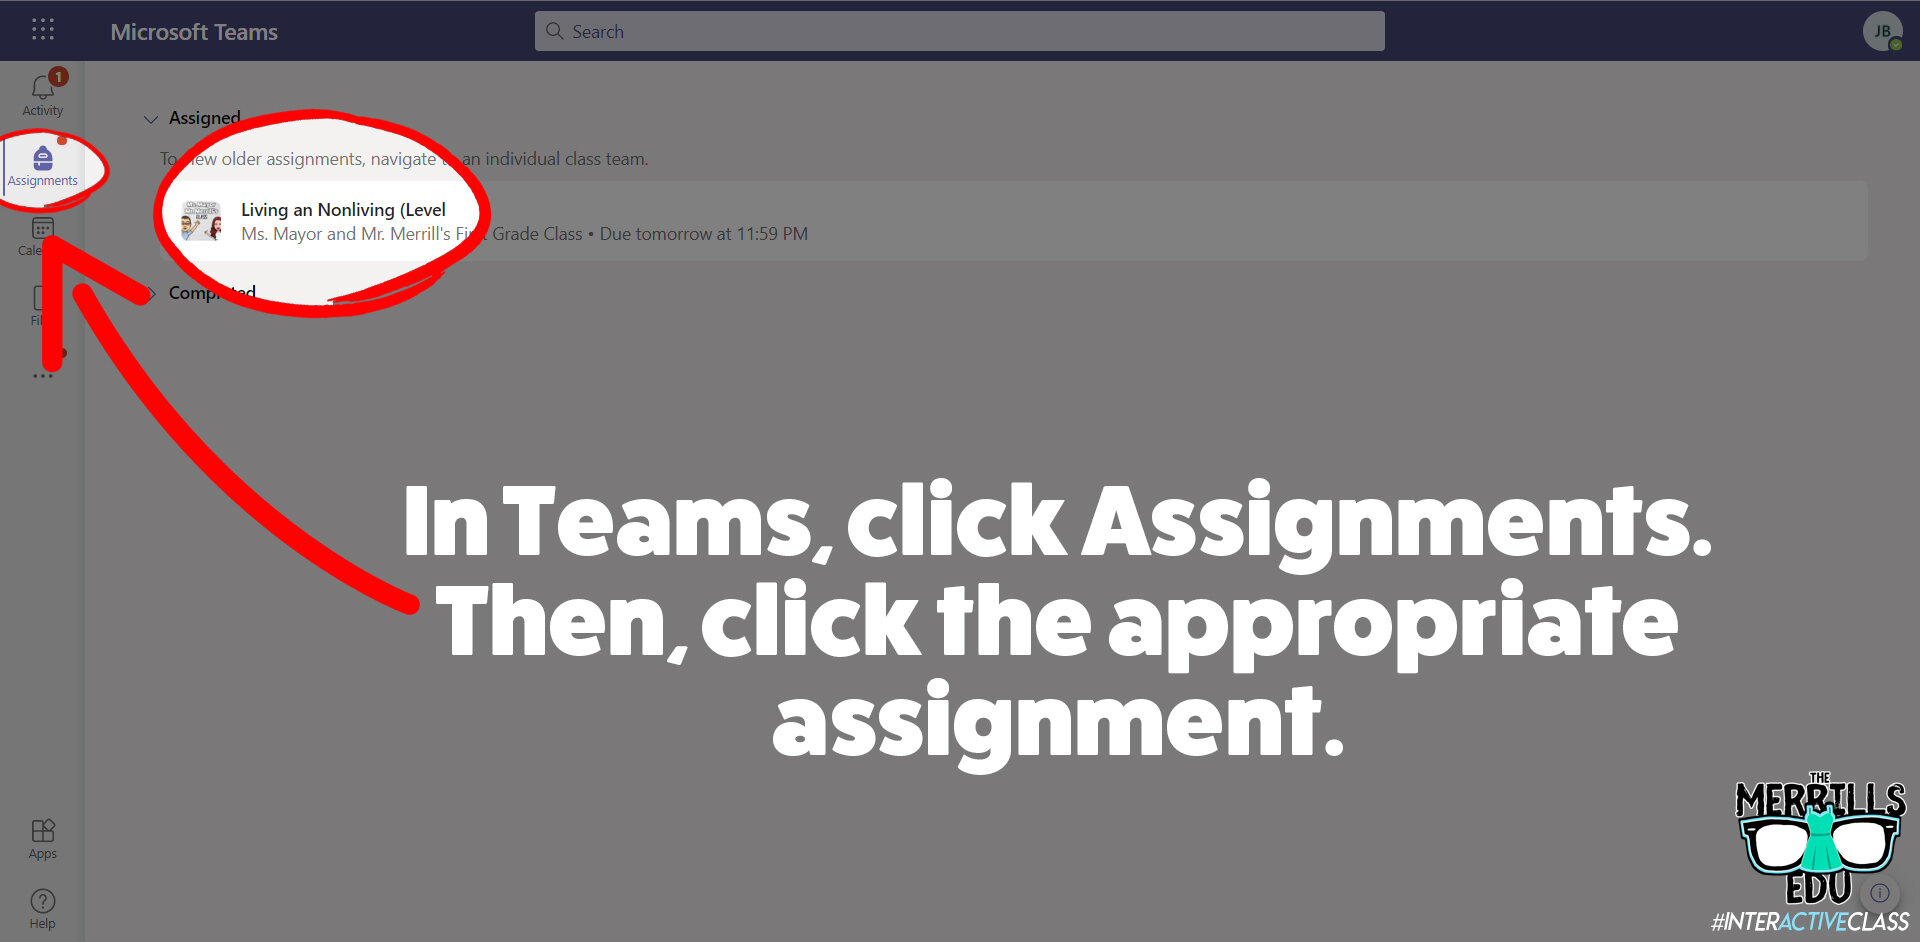
1. Have your students launch Microsoft Teams.
2. Once Teams has opened and loaded, students click on Assignments (located on the left hand panel, with the book bag icon).
3. All of the reading passages (and any other assignments you gave in Teams) will appear.
4. Students select one of the reading passage files and click on it to open it.
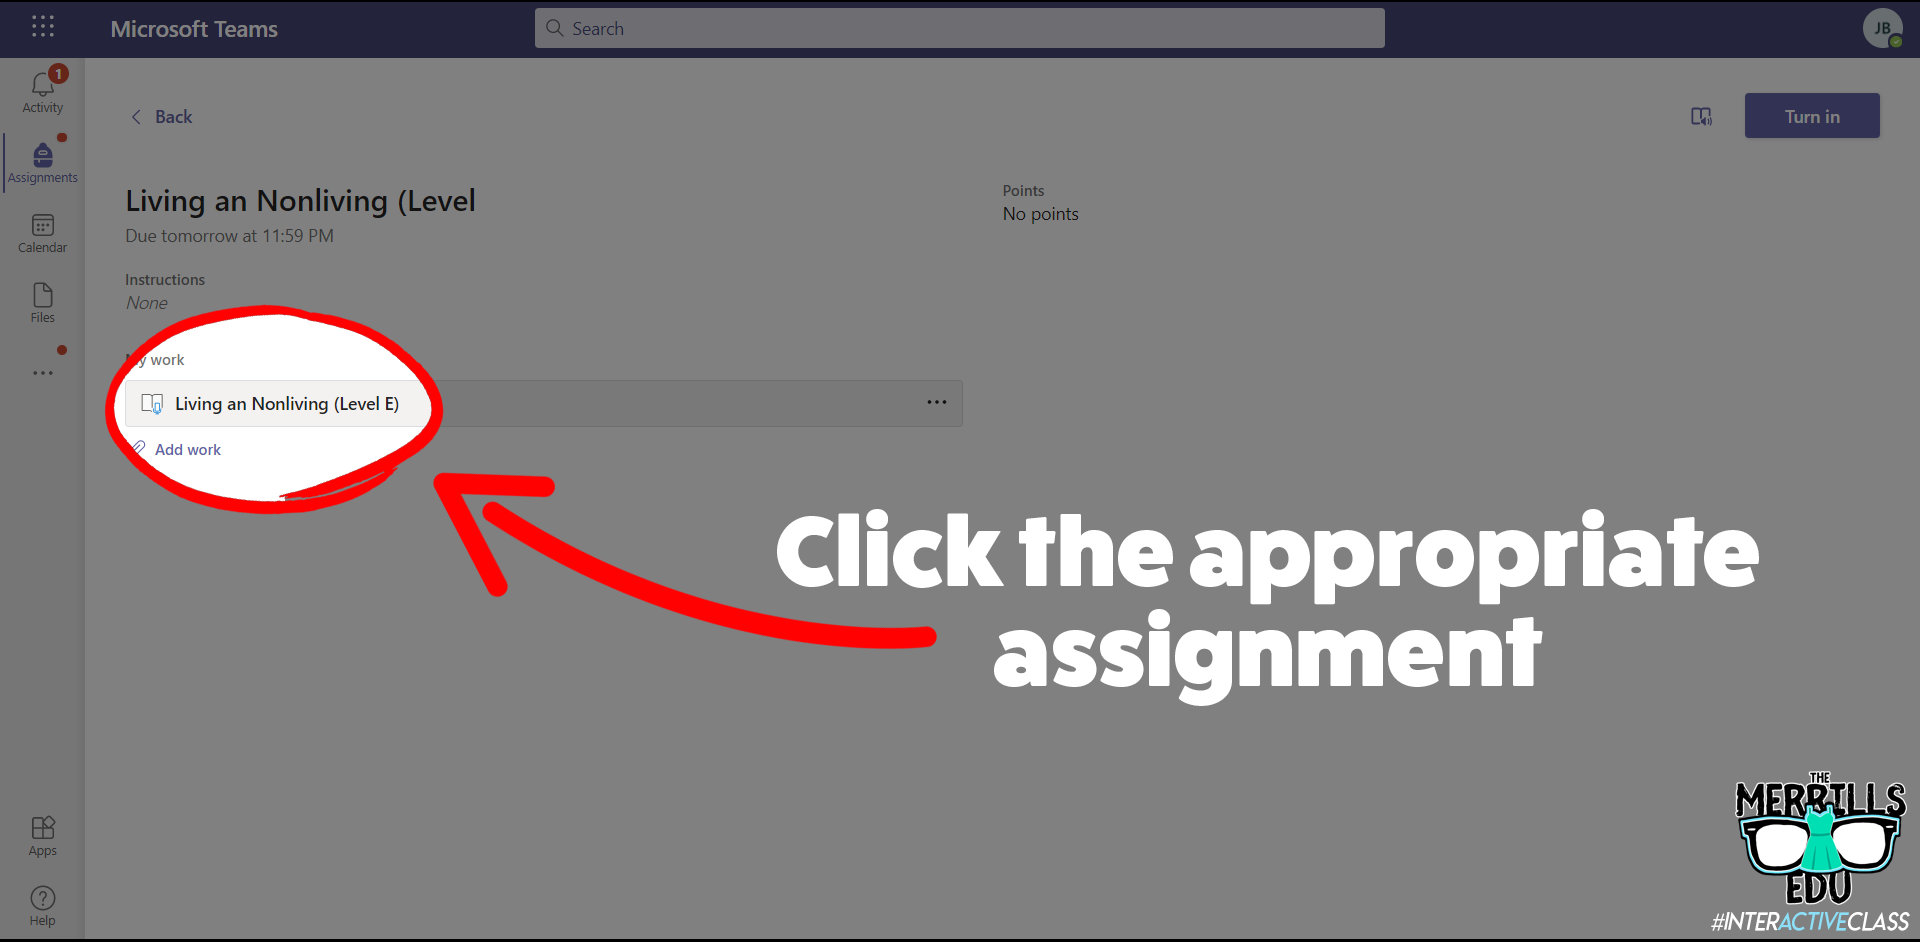
5. After the assignment opens, click on the passage which is attached under My work.
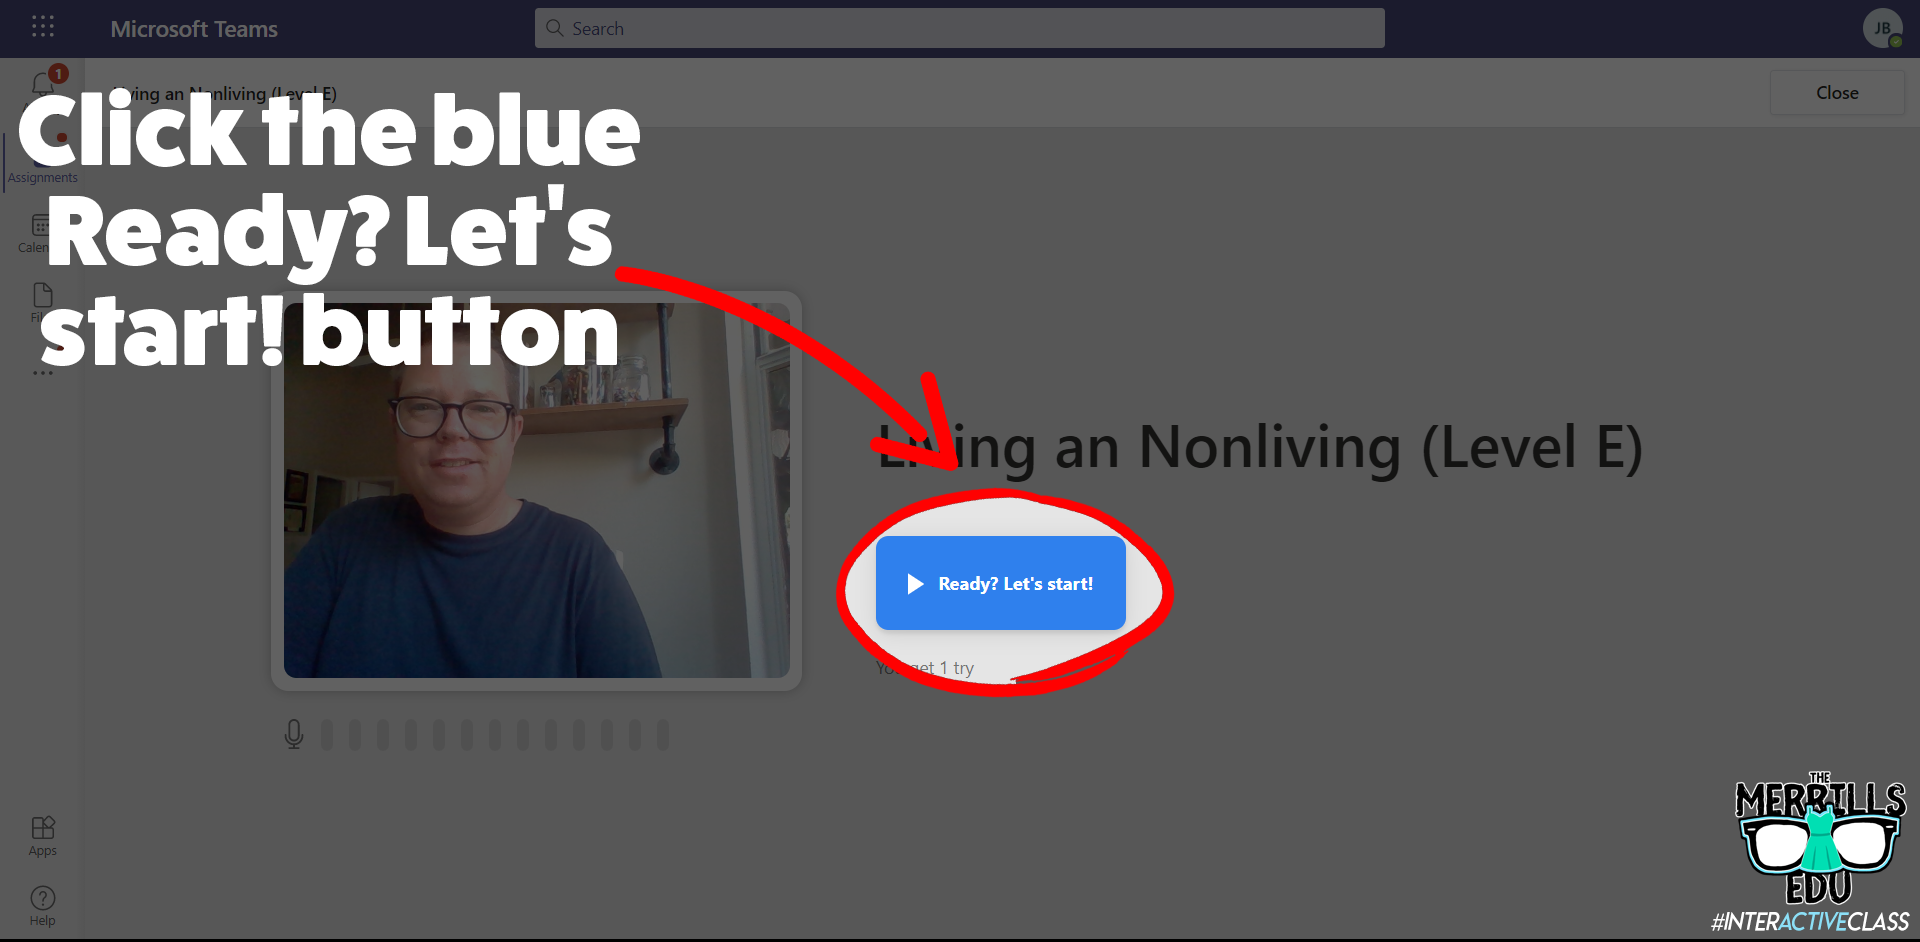
6. Once the assignment loads, click on the blue Ready? Let’s start! button to begin.
7. A countdown will start the recording process. When students are finished, they click the blue I’m done button to stop the recording process.

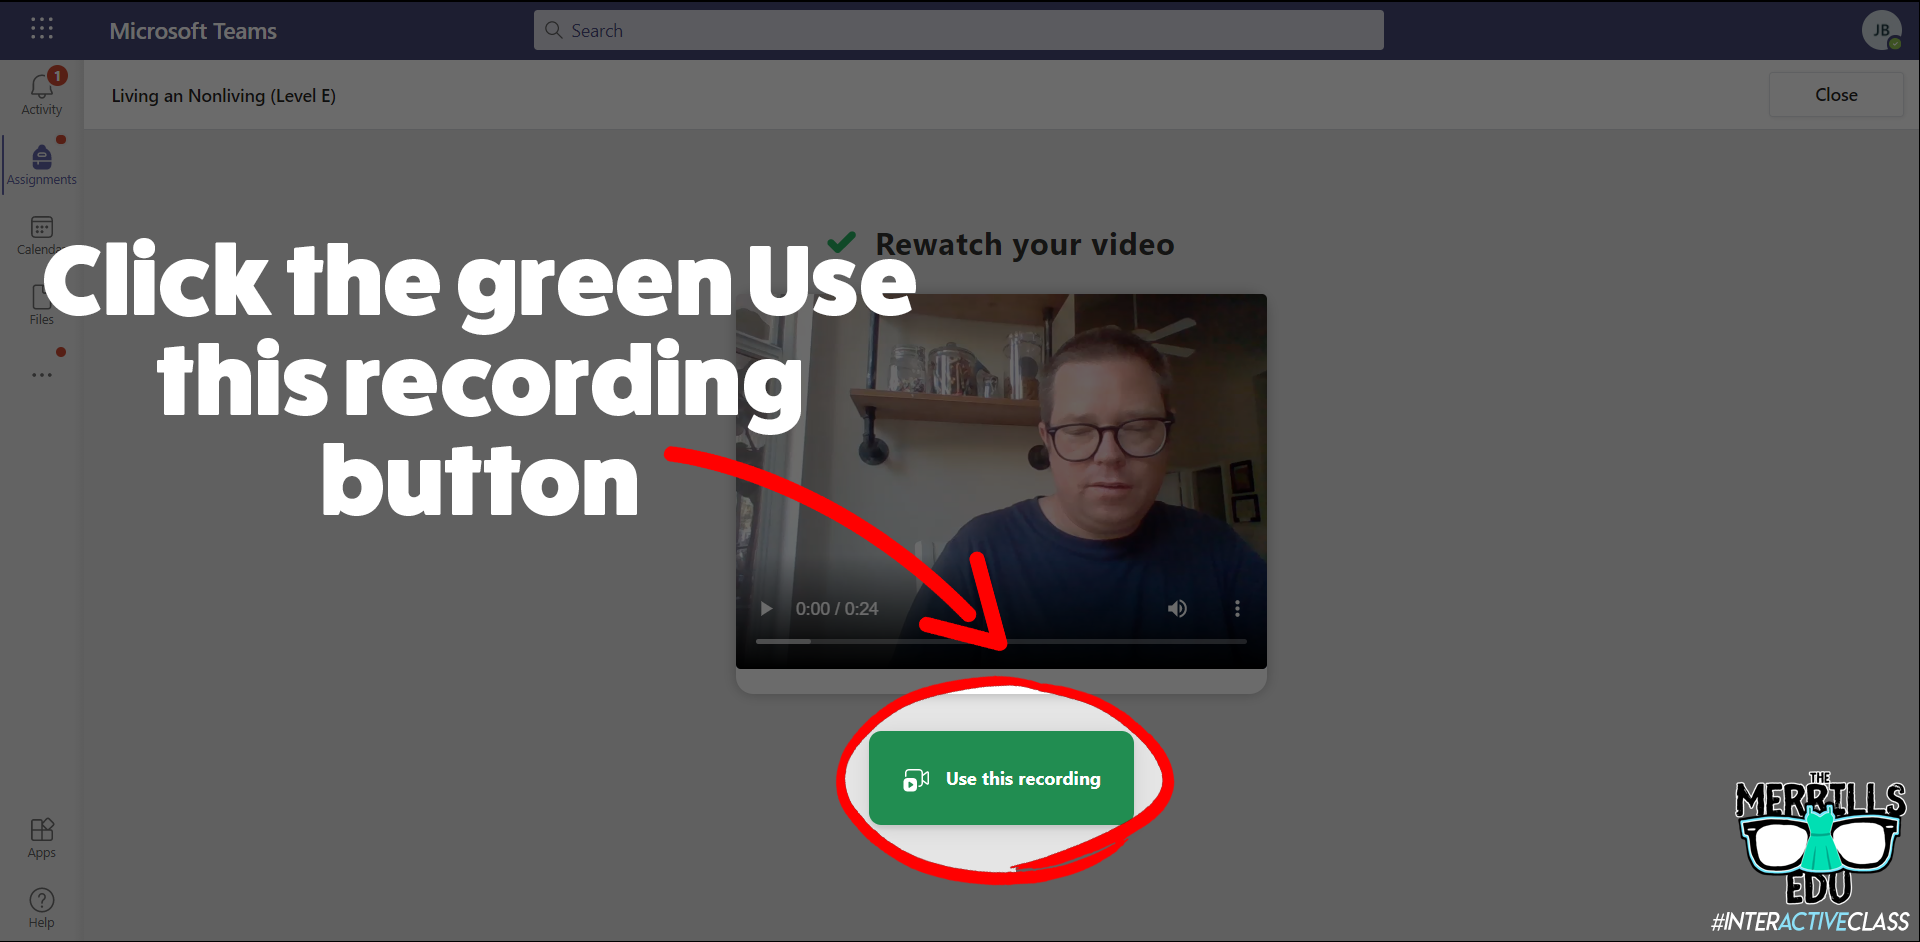
8. Students can watch themselves back (and repeat if you’ve allowed multiple attempts). One they’re ready to turn it in, they click the green Use this recording button.
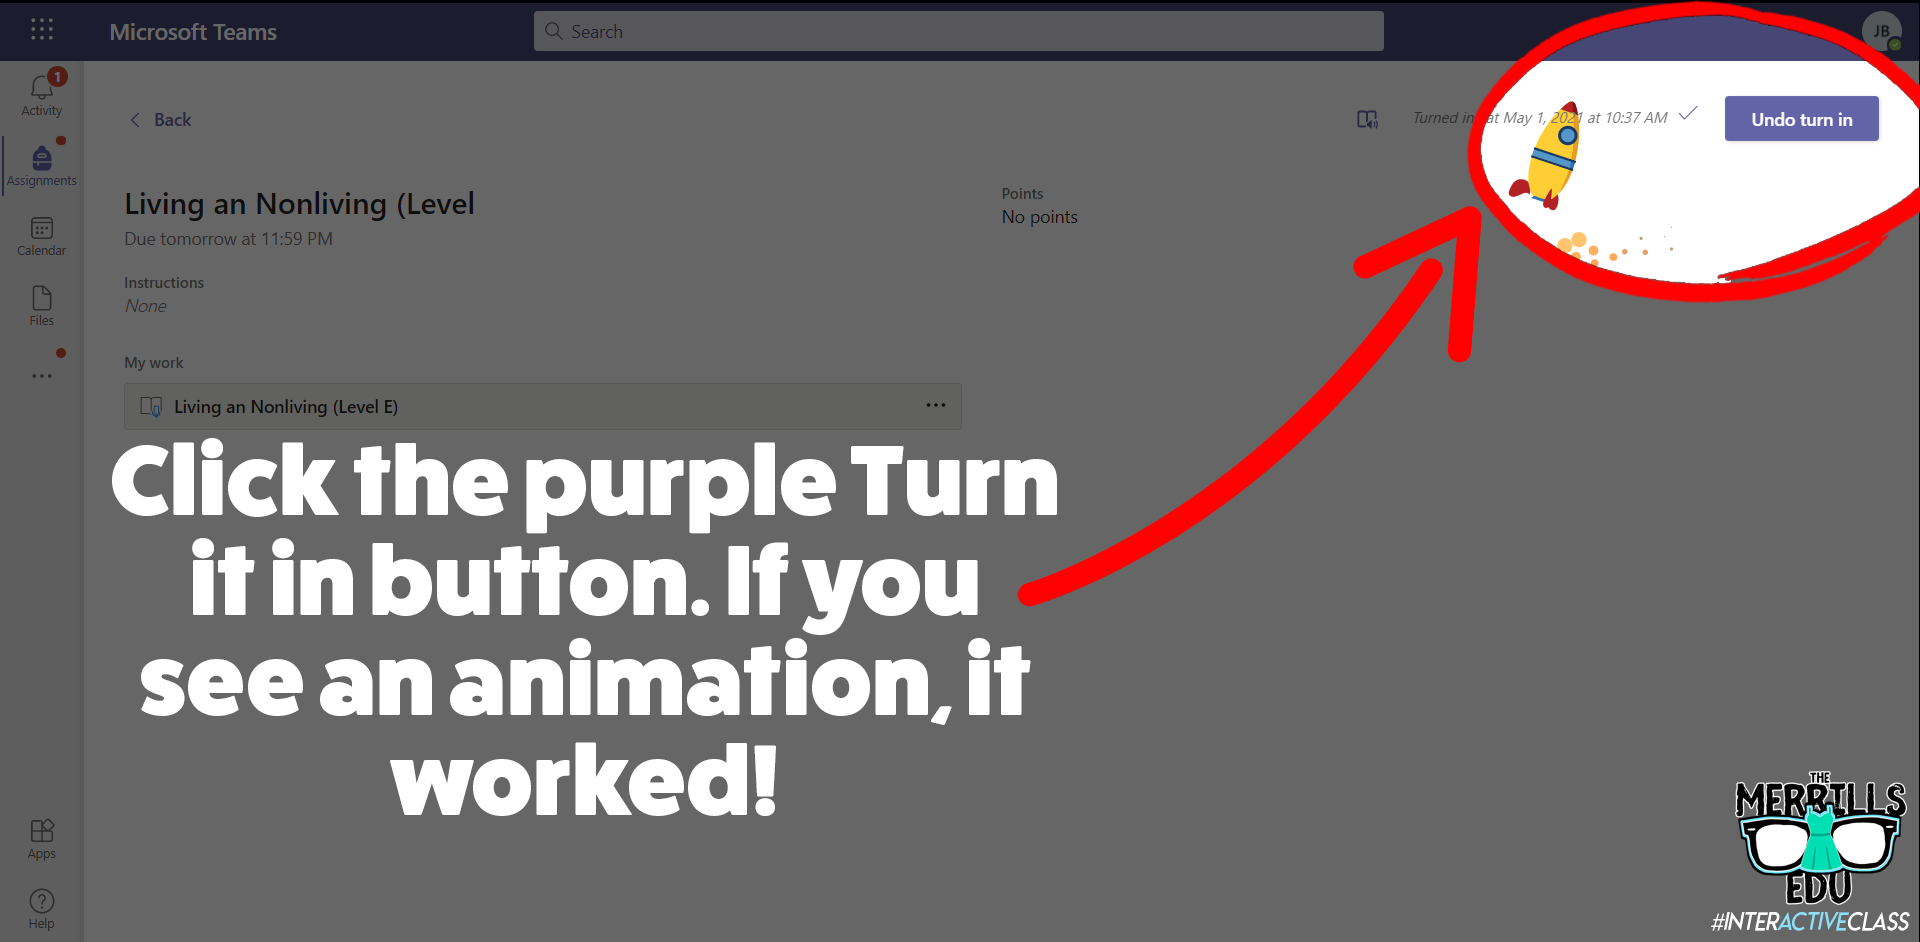
9. Finally, click the purple Turn it in button to complete the assignment. If you see an animation pop up, you have successfully turned it in!
Check out video walkthrough below!
How to create reading passages for Microsoft’s Reading Progress
So you’re sold…But, how can you go about making the reading passages that you are assigning to your students? You’ve got several options:
Open a new Word document and type out what you would like your students to read. Save this file and then upload to your assignments on Teams.
Use the built in microphone to dictate the text in a Word document. Save this file and then upload to your assignments on Teams.
Those ways will get the job done, but if you’re looking for a more efficient method, check out Microsoft’s Lens. Lens is a cross platform app that converts images to PDF, Word, PowerPoint, and Excel files, digitize printed or handwritten text, and save to OneNote, OneDrive, or your local device. Use Lens to scan your pre-made resources and have it turn them into Word documents automatically. Check out our short tutorial:
Once Lens has uploaded the file to your OneDrive, download / save a copy on your computer to upload it onto you assignments on Teams. It’s that easy!
Tips and tricks for using Microsoft’s Reading Progress
We’ve been fortunate enough to pilot this wonderful software for the past year. We’ve learned a lot during this time, so here are our most recommended tips for using Microsoft’s Reading Progress:
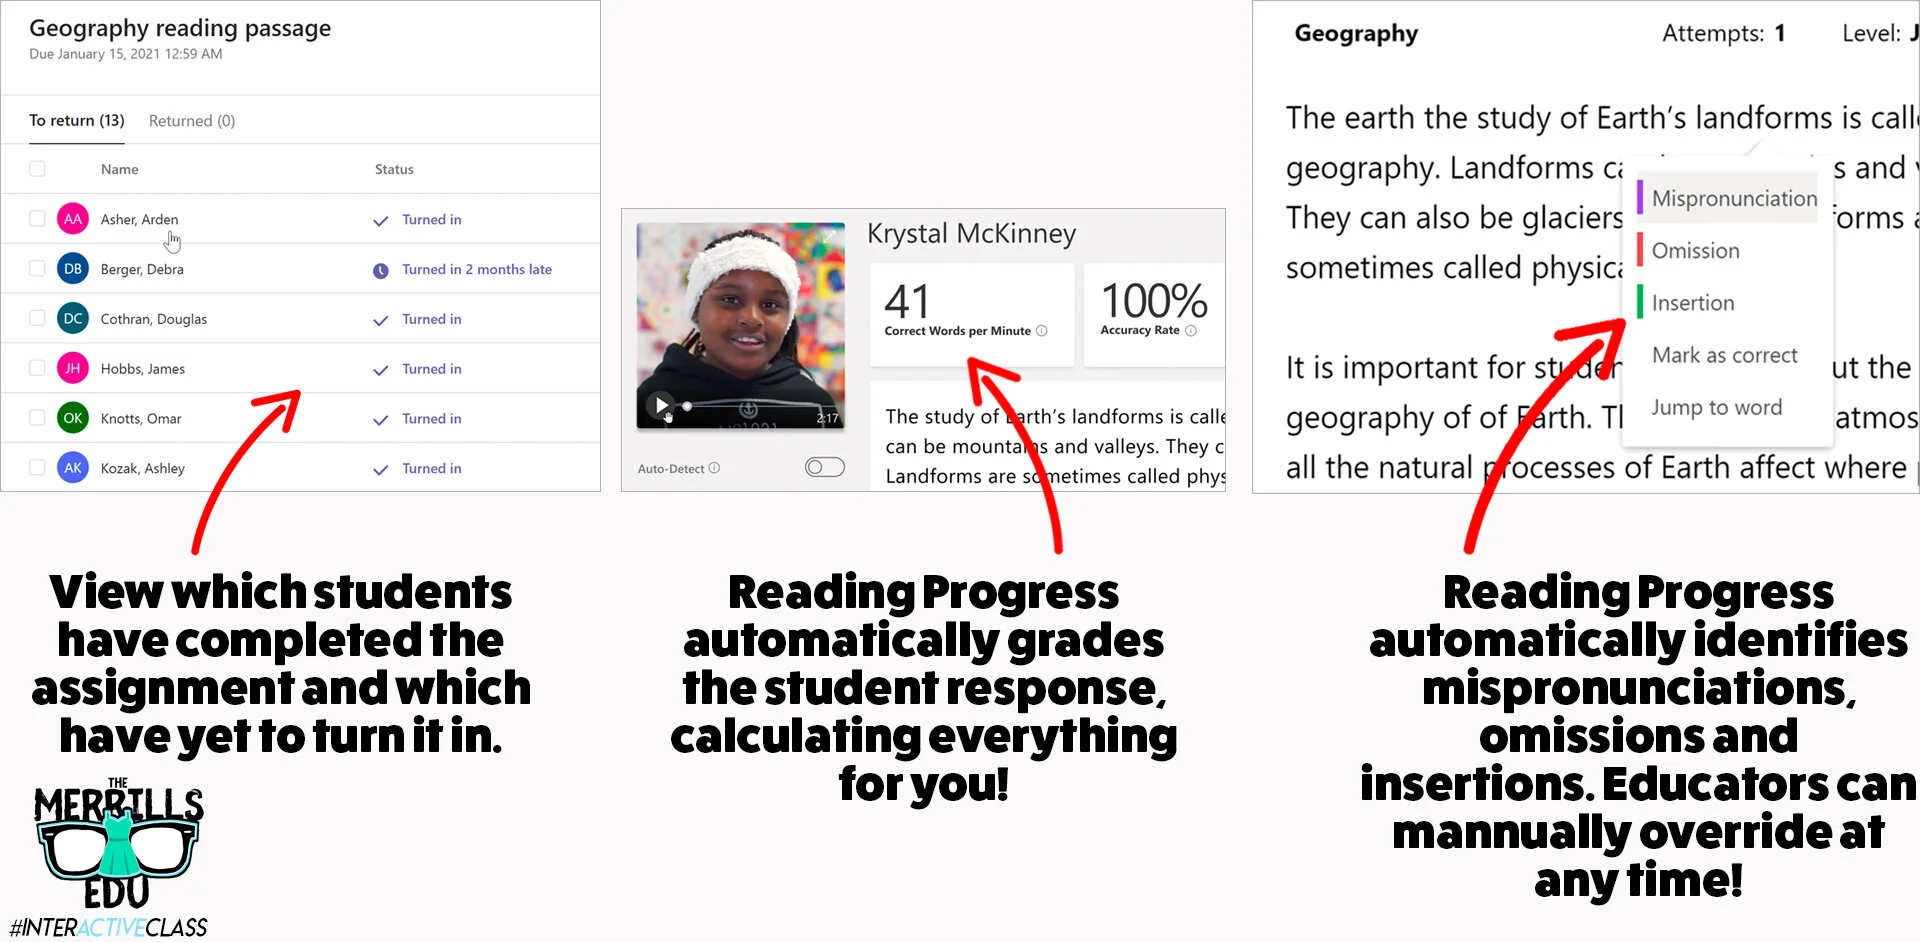
When listening back to a student’s video recording, if you click any word - the app will jump to that section of the video where the reader is reading. This is great for when the technology marks something as correct or incorrect and you want to listen to it without having to start the entire video over!
If your students are younger or wearing masks, you might want to lower the sensitivity. New readers may not enunciate words as clearly as more experienced readers. Adjusting this setting may help the technology with marking the words correctly.
Check out the data once the students turn in their work! We love how the technology automatically calculates everything.
ReadWorks Passages Available Directly in Reading Progress!
Now, educators can save even more time when using Reading Progress, all thanks to to Microsoft’s partnership with ReadWorks! Follow these steps to use a passage from the library:
Launch Microsoft Teams, then click Assignments.
Next, click Create followed by Assignment.
Select your preferred Team, then click Next.
Click on Attach, then click Reading Progress.
On the next screen, click Browse sample library. This launches the library where you can select an article of your choice.
You can narrow down the levels by selecting the appropriate grade level. If you select an article, you can also preview that article by clicking Preview.
Once you’ve found an article that you like, click Select. Complete the necessary steps on the following screen, then click Next.
This brings you back to the original assignment screen. Take a moment to make sure that all the information is filled out correctly, then click Assign. This will assign the assignment to your students and even send them a notification that there’s a new assignment due!


-- Please follow us on social media and tag us with how you’re using Microsoft’s Reading Progress in your classroom! 👓👗
For more tips, tricks and lesson ideas for making learning more interACTIVE, check out our books The InterACTIVE Class and Flipgrid in the InterACTIVE Class on Amazon!


