

How to Add Yourself Into a Virtual Classroom!

Adding “yourself” to your virtual classroom doesn’t mean you need a green screen. In this post, we’ll cover a simple and easy method to get the job done. You’ll learn how to:
(Click on any subheading to skip directly to that section.)
How to Remove a Background From a Video / Gif
How to Download the Transparent Gif
How to Upload the Transparent Gif File Into a Virtual Classroom
(If you’d like a tutorial on how to create a Bitmoji Virtual Classroom, click here.)
How to Remove a Background From a Video / Gif
First, record a quick video that you would like to upload to your virtual classroom.
Note, when you remove the background you will lose all audio and the clip will only be approximately 5 seconds. So, make it something fun like dancing or a silly face. It also helps to use solid color backgrounds and lots of lighting.
Once you have your video ready, head to Unscreen.com by clicking here or the image to the left.
Next, click on “Upload Clip” and select your video file.

How to Download the
Transparent Gif

After you have selected your video, Unscreen will work to remove the background automatically.
There are a few options that can be added as a replacement background, but in order to get the file into a virtual classroom, you’ll want to be sure to bypass selecting these.
Once the file has uploaded and the background is transparent, it’s time to download the file.
Click the blue “download” button. A drop down menu will appear. In order to maintain the movement in the video and upload to your virtual classroom, you’ll need to select “GIF.” After the file encodes, then click “download.”
If you’re using a mobile device, you’ll need to follow these steps to make sure you’ve saved the file:
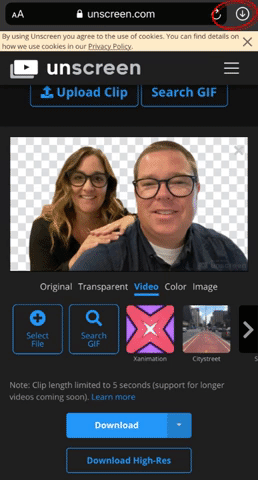
Locate the download arrow, typically located to the right of the URL bar. The image to the right shows where to find it if you’re using an iPhone.
Once you have found the download arrow, click it. A new drop down will appear. This will show you where you can find your downloaded file. Tap the new drop down and select your file. This will save it onto your device.
Now, you’re ready to upload the file into your virtual classroom!
How to Upload the Transparent Gif File Into a Virtual Classroom
To upload your file into your classroom, follow these steps:
Buncee:
If you’re using Buncee to create your virtual classroom, here’ what you’ll need to do (all steps are displayed in the video tutorial to the right, too):
Open the Buncee
Tap the “+” sign to add a new item
Click “Uploads",” then select (or click and drag) your file to upload into the Buncee.
Move and reposition the image as you see fit, then click “Share!”
Google Slides:
If you’re using Google Slides to create your virtual classroom, here’ what you’ll need to do (all steps are displayed in the video tutorial to the right, too):
Open your Virtual Classroom on Google Slides
Click on “Insert” from the menu bar
Click on “Image,” then “Upload from computer.”
Select your file
Move and resize as you see fit. Click “Share” to share with your students!
PowerPoint:
If you’re using PowerPoint to create your virtual classroom, here’ what you’ll need to do (all steps are displayed in the video tutorial to the right, too):
Open your Virtual Classroom on PowerPoint
Click on “Insert” from the menu bar
Click on “Pictures,” then “Picture from File”
Select your file
Move and resize as you see fit. Click “Share” to share with your students!
Help! I’m looking for instructions on how to make a Bitmoji Virtual Classroom!
No worries! You’re (almost) in the right place. Click here, and we’ll get you over to a step-by-step tutorial. 🙌

For more #interACTIVE lesson ideas, check out our books The InterACTIVE Class and Flipgrid in the InterACTIVE Class on Amazon!


