

How to Embed Nearpod Presentations Into Microsoft Teams
Nearpod and Microsoft Teams have partnered up to provide a complete game changer - especially when it comes to remote learning. Now, you can “go live” with your Nearpod Lessons in Microsoft Teams! You’ll learn:
💥 How to embed a Nearpod presentation into Teams
💥 How to start a meeting in Teams
💥 How to launch your Nearpod presentation while you’re LIVE in a TEAMS meeting!
💥 HOW TO EMBED A NEARPOD PRESENTATION INTO TEAMS 💥

You’ll need to make sure that you are logged into your Microsoft Teams account, and that you have already created an account on Nearpod. From your preferred Teams “General” channel, click the “+” sign on the top right of the tabs bar.
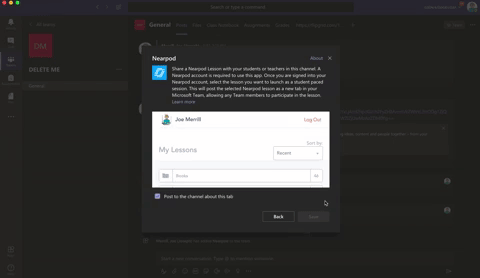
Once you click on the “+” sign, you’ll be asked what type of tab you would like to add. If Nearpod doesn’t show up in the first few images, you can do a quick search for it. Once it pops up, go ahead and click the Nearpod image.


Now you’ll be asked to log into your Nearpod educators account. Enter your username and password, then click the blue “Log In” button. Tip: At first glance, it looks like you won’t have any options to log in. Make sure you scroll down a bit (the window is small), and you should see the required fields.
Once you’re logged into your Nearpod account, you’ll have the option to select the (predesigned) presentation that you would like the class to complete. Pick out the presentation, then you’ll be asked which type of lesson you prefer: Live Lesson (where students complete the presentation together in real time), or Student Paced (where students complete the presentation on their own time). For our example today, we’ll pick “Live Lesson.”

Once you’ve selected your preferred lesson type, the presentation will automatically embed directly into your Teams channel. It will appear in the conversation, and also at on the top tab bar. Congratulations! You’ve successfully embedded your Nearpod presentation into Teams!
💥 HOW TO START A LIVE CLASS MEET IN MICROSOFT TEAMS! 💥
To start a live class meet in Microsoft Teams, click on the “camera” icon located in the bottom of the tools bar. If you’re unsure if which icon to click, try hovering over them until you find the one that says “Meet Now.” Click it, then click the purple “Meet Now” button. Once you do, you’re LIVE!

💥 HOW TO LAUNCH YOUR NEARPOD PRESENTATION WHILE YOU’RE LIVE IN A TEAMS MEETING!💥


Now that you’re LIVE, you’ll need to wait for your students to log on to the meeting. You can check a meeting’s attendance by clicking on the “Participants” icon (that looks like two people). Once everyone has arrived, explain to your students that you will work on a Nearpod presentation together. Reveal that they will need to click the back button on their Teams Meet window to return to the conversation tab. Explain that they can access the Nearpod presentation from either the post in the chat, or from the tab located at the top. Once they select Nearpod, they will be asked to log in using their name. This is all they will need to enter the presentation. Once everyone has logged in, you may begin your live instruction!
Check out this video for a step-by-step explanation, and a side-by-side comparison of what educators see and what students see.

