


10 Innovating Ed Tech Ideas to Try in 2023
@TheMerrillsEDU share 10 Ed Tech ideas that you have to try this coming year! Whether it’s animating drawings into characters, collaborating on docs, or assessing - we’ve got something for you!

If you’re looking for something new to try in the new year, you have come to the right place! We’ve compiled a list of ten innovating ed tech ideas that you can try RIGHT NOW! Check them out below!
(click on any subheading to jump to that section)


Meta Demo Lab & Canva

Meta Demo Lab is a website that will take your drawings and automatically animate them. The key is that the drawings need to be completed on white paper. Once you run through the process of creating your animation, you can download the file as an MP4. But, this is where the magic starts. Take your MP4 file and upload it to a video project in Canva. Once the video uploads, remove the background using Canva’s Background Remover tool. Replace the background with a new element of photo from Canva, and now your drawing is in an entirely different place. We’ve used this idea to have our students illustrate story book characters or historical figures and then animate them back into the setting or moment in time. Click here or the image below to visit the Meta Demo Lab website!


Immersive Reader & Microsoft Edge

Microsoft takes accessibility very seriously, and this new feature in Microsoft Edge is a prime example. This shortcut / hack allows users to turn on Immersive Reader for any Edge web page In the address bar, add "read:" in front of any link. For example, if you’re using Microsoft Edge and visit our website using this link:
read:https://www.themerrillsedu.com
Then, Immersive Reader will be able to read aloud the content of the website to you!

360Schools


360schools is a unique immersive 360° / VR education service designed for teachers and their students. This website brings hundreds of thousands of incredible 360° panoramas to your students. Educators and students can search for specific locations, share content, and even embed the 360 images into a website or LMS. There are even a few guided tours which will take users from point to point in images. For some amazing results, search “underwater” or “The Alamo!” Click here or on the image above to learn more and sign up for an account today!

Adobe Animate from Audio


Adobe’s Animate from Audio is a part of its Animate app. The difference between the two is that Animate from Audio is a free online converter and you won’t need to download the Animate app, or have an Adobe account. This can be done right within your web browser! Click here or the image to the right to visit the Animate from Audio website. Your first task is to select a character. Once you’ve done this, you can choose from a variety of backgrounds (tip: if you choose green, you can remove the background and upload it to Canva to drop your character into a background of your choice). The last option is the size. Once you’ve configured your project, just hit the record button and follow the steps to save your work. It’s that easy!
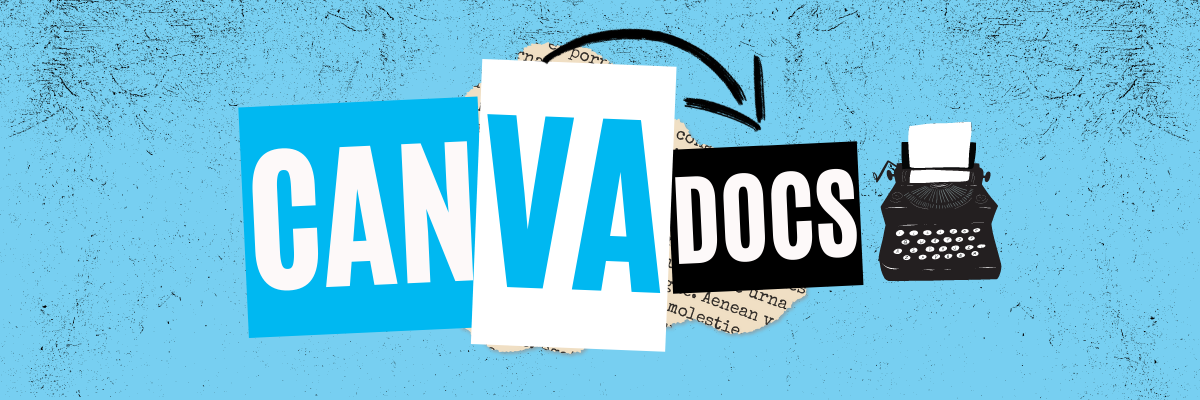
Canva Docs


Canva Docs is a visual-first document creator that allows you to design documents supercharged with videos, images, graphics, charts, and graphs. It lets you bring the same color, movement, and eye-catching visuals you usually reserve for presentations to your documents. So, now your students’ word documents don’t have to be boring! Another thing to love about Canva Docs is the ability to collaborate quickly and efficiently. Now, your students can brainstorm, write, create, and design their projects without ever having to leave Canva. Learn more about Canva docs by clicking here or the image to the right!

Animal Crossing Digital Room Transformation

Chances are if you’re an Elementary teacher, your kids are obsessed with the game Animal Crossing. So, we wanted to figure out a way to integrate this into the classroom. If you’re unfamiliar with the game, it basically works by using a character to walk around an island performing tasks, catching fish & bugs, and then selling them to a store in return for “bells,” or money. Then, you can use the bells to purchase items to put into your house. So how does this translate into the classroom? Well, if you’re looking for a classroom management idea or if you’re learning about map skills, this is for you! Students can use the ABD card to accumulate bells. The catalogue will allow them to purchase items using their bells. The items purchased can go into their house - which they have picked out on the class map. Check out the explanation in our video above, or download each item below!

Each student gets an ABD card. Students can earn “bells” by completing tasks or doing jobs around the classroom. Click here or the image above to download the ABD card!

Students use their bells from the ABD card to purchase items from the catalogue. We recommend sharing this template on your LMS, then your students an copy / past the items to their own homes. Click here or the image above to download the catalogue!

Students use Canva to create their own room (as a blank presentation slide). Then, have them share their slide to you. Next, have them pick out a house from the map. Then, hyperlink their slide to the master copy of the class map. Click here to or the image above to download the map template!

Microsoft Word - Share Link for Review Mode

Writing in the 21st Century looks different. Students are still using paper and pencil, but the possibilities no longer stop there. Now students of all ages are able to publish their writing to share with broader audiences. Microsoft Word has used accessibility features like dictation, Immersive Reader and more to help make this happen. But, educators know that sometimes students like to rush the process a bit. Enter “Share Link for Review” mode. When a student is working on a Word document, they can generate a share link which will allow for review. Then, they can share the link with the teacher who will then be able to leave comments or suggest revisions. Check out the video from Mike Tholfsen to the right for more information!

Microsoft Forms: Insert Images in Multiple Choice Questions


Let’s face it…Multiple choice assessments aren’t our favorite way of assessing, but there are times where we must use it. Microsoft Forms is a great way to generate a quick assessment, and now you can add images in multiple choice selections. This means you can add a picture to each answer selection, giving clear and concise expectations to your students. Learn how it all works by clicking the image to the right or right here!

Minecraft EDU

There are many possibilities with Minecraft EDU, but some of our favorite activities have been where students have created unique features in their worlds. For example, while learning about local Native American tribes, the students re-created their villages and included explanations for the different landmarks. Another class favorite was when the students created theme park rides and the experience had to include the plot and theme from the story. If you’re looking for a history idea, check out the museum template idea featuring information from World War I - where the students included important artifacts and information. Check out examples from all three below!

Students created theme park rides and the experience had to include the plot and theme from the story.

While learning about local Native American tribes, the students re-created their villages and included explanations for the different landmarks.

This is a museum template idea featuring information from World War I - where the students included important artifacts and information.

Osmo Words


Osmo Words has been around for a while, but educators are catching on to the fact that you can create your own custom Osmo Words Albums. The process isn’t as difficult as you think, and can be done in just several clicks. Here’s how:
Go to your myWords dashboard.
Click on Create New Album, and you will be automatically taken to the new album page.
Click on Add Title (or on Untitled Album) to add your album title.
Click on Add Image to upload a picture (or to take one, if you are using your tablet or phone). You can also drag multiple files to upload images in a batch.
Hover your cursor over the image you have just added and click the Edit button.
Type your chosen word in the Add Word field and select a difficulty. If you want some of the letters to appear as given on the screen, you can put them in parentheses. A(NT) will show as _NT, for example. Add a couple more words; the more the merrier!
Return to your album homepage to add as many images and words as you wish.
-- Please follow us on social media and tag us with how you’re using these ideas in your classroom! 👓👗
For more tips, tricks and lesson ideas for making learning more interACTIVE, check out our books The InterACTIVE Class and Flipgrid in the InterACTIVE Class on Amazon!


10 Education Websites to Check Out in 2023
Whether we need to tie gaps in student learning, or we need to take things to the next level, there are some great FREE teacher / EDU websites out there. We’ve hand-picked ten of our favorite, that we currently use, and are sharing them with you here!
Whether we need to tie gaps in student learning, or we need to take things to the next level, there are some great FREE teacher / EDU websites out there. We’ve hand-picked ten of our favorite, that we currently use, and are sharing them with you here!
(click on any subheading to jump to that section)
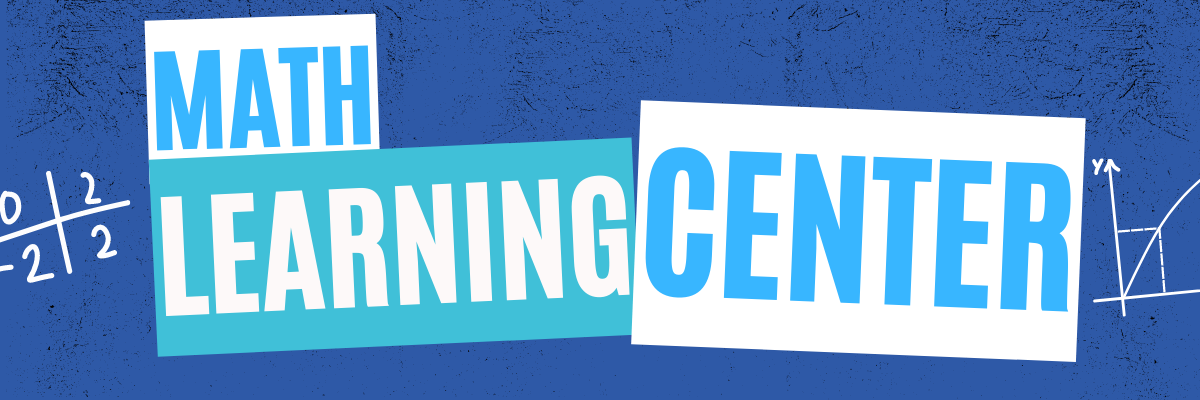


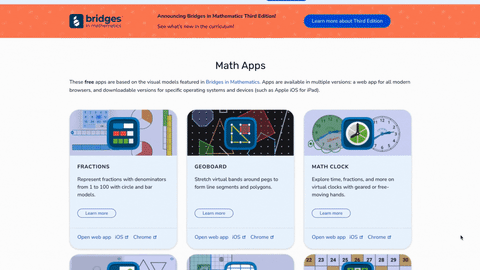
Math Learning Center
The Math Learning Center website was absolute life saver during remote learning. This website provides professional development, lesson ideas, and most important: FREE virtual manipulatives! Their apps are cross platform and will work with desktops, iPads and more. It’s a great way for your students to have access to these materials - especially since they seem so difficult to come by these days. Tip: If you have an LMS like Canvas, Teams or Google Classroom, you can hyperlink directly to the app that you’d like the kids to use. If you’re using mobile devices, you can download each app from the app store. Apps include: fractions, geoboard, clock, money pieces, number chart, number frames, number pieces, number liner, and more! Check them out by clicking the image below to learn more!

Slides Mania


Slides Mania is a site offering free creative PowerPoint templates and Google Slides themes. The entire site is operated by one fantastic human being named Paula. Paula has created TONS, and we mean TONS, of FREE resources for you. This site has it all, from educational resources, planners, formal presentations and so much more. You’re going to want to take some time here, as there are SO MANY goodies. Paula even has educational bundles, games, certificates, and more. Click the image above to learn more and visit the site!

Flocabulary
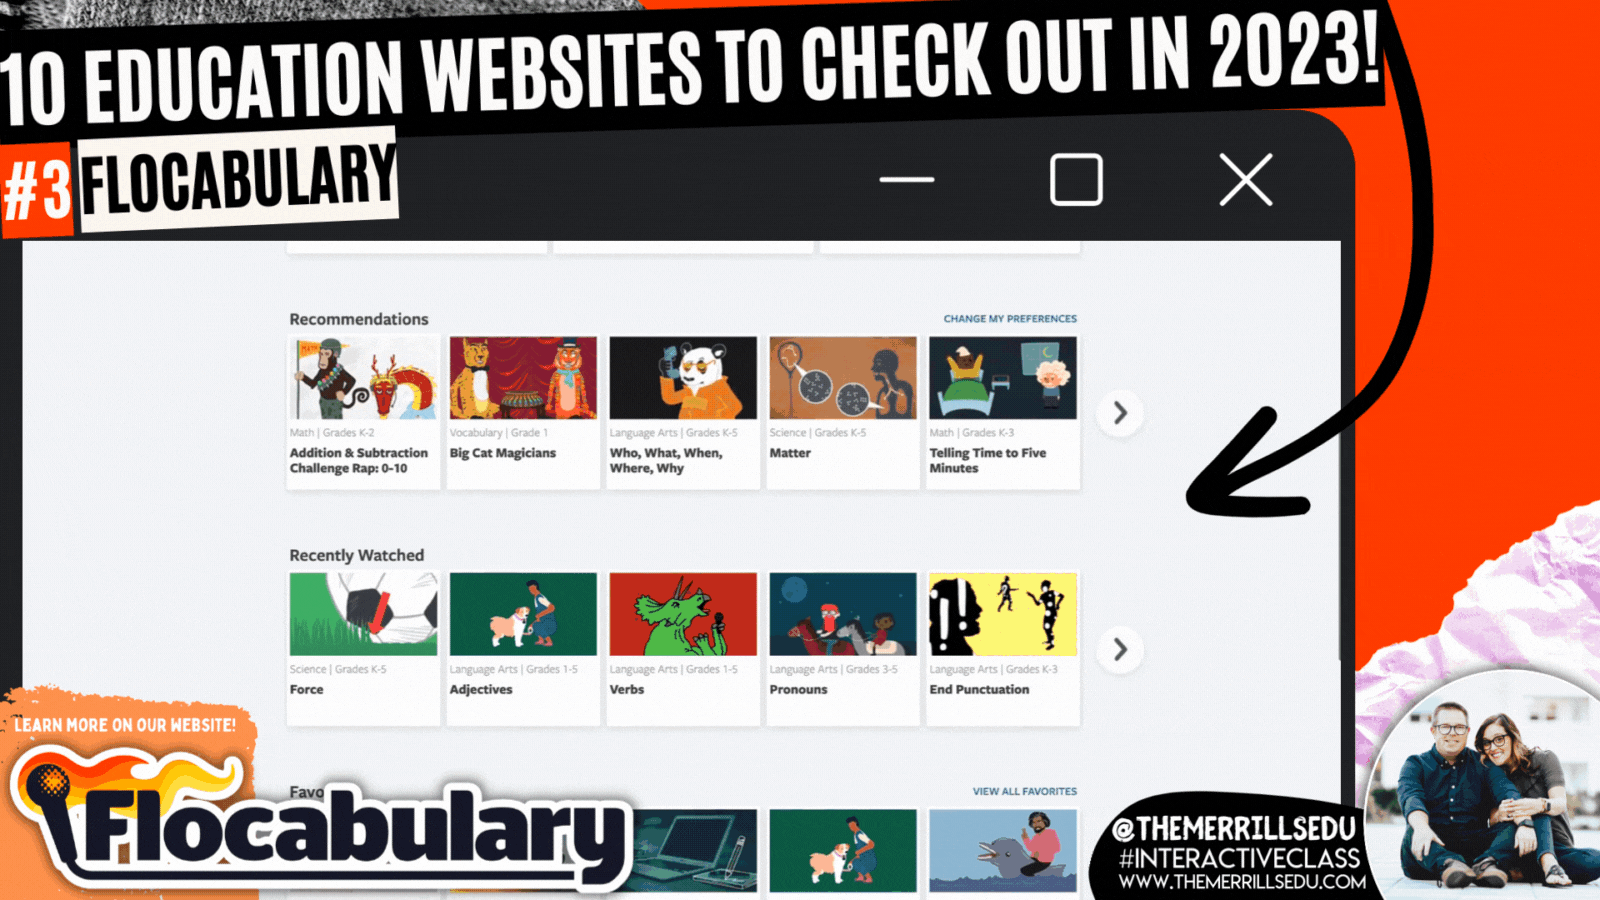

The Bright Horizons website explains that music ignites all areas of child development and skills for school readiness, including intellectual, social-emotional, motor, language, and overall literacy. It helps the body and the mind work together. Exposing children to music during early development helps them learn the sounds and meanings of words. Dancing to music helps children build motor skills while allowing them to practice self-expression. For children and adults, music helps strengthen memory skills. Enter Flocabulary. This website takes all of the topics that you would normally teach throughout the day, but then turns them into catchy tunes that will have your students reciting the words throughout your unit. Level it up with a built in activity where students can use beats from Flocabulary to with their own rap. Pair this with Microsoft Flip for a truly interACTIVE lesson! Click the image above or to the right to learn more about Flocabulary!

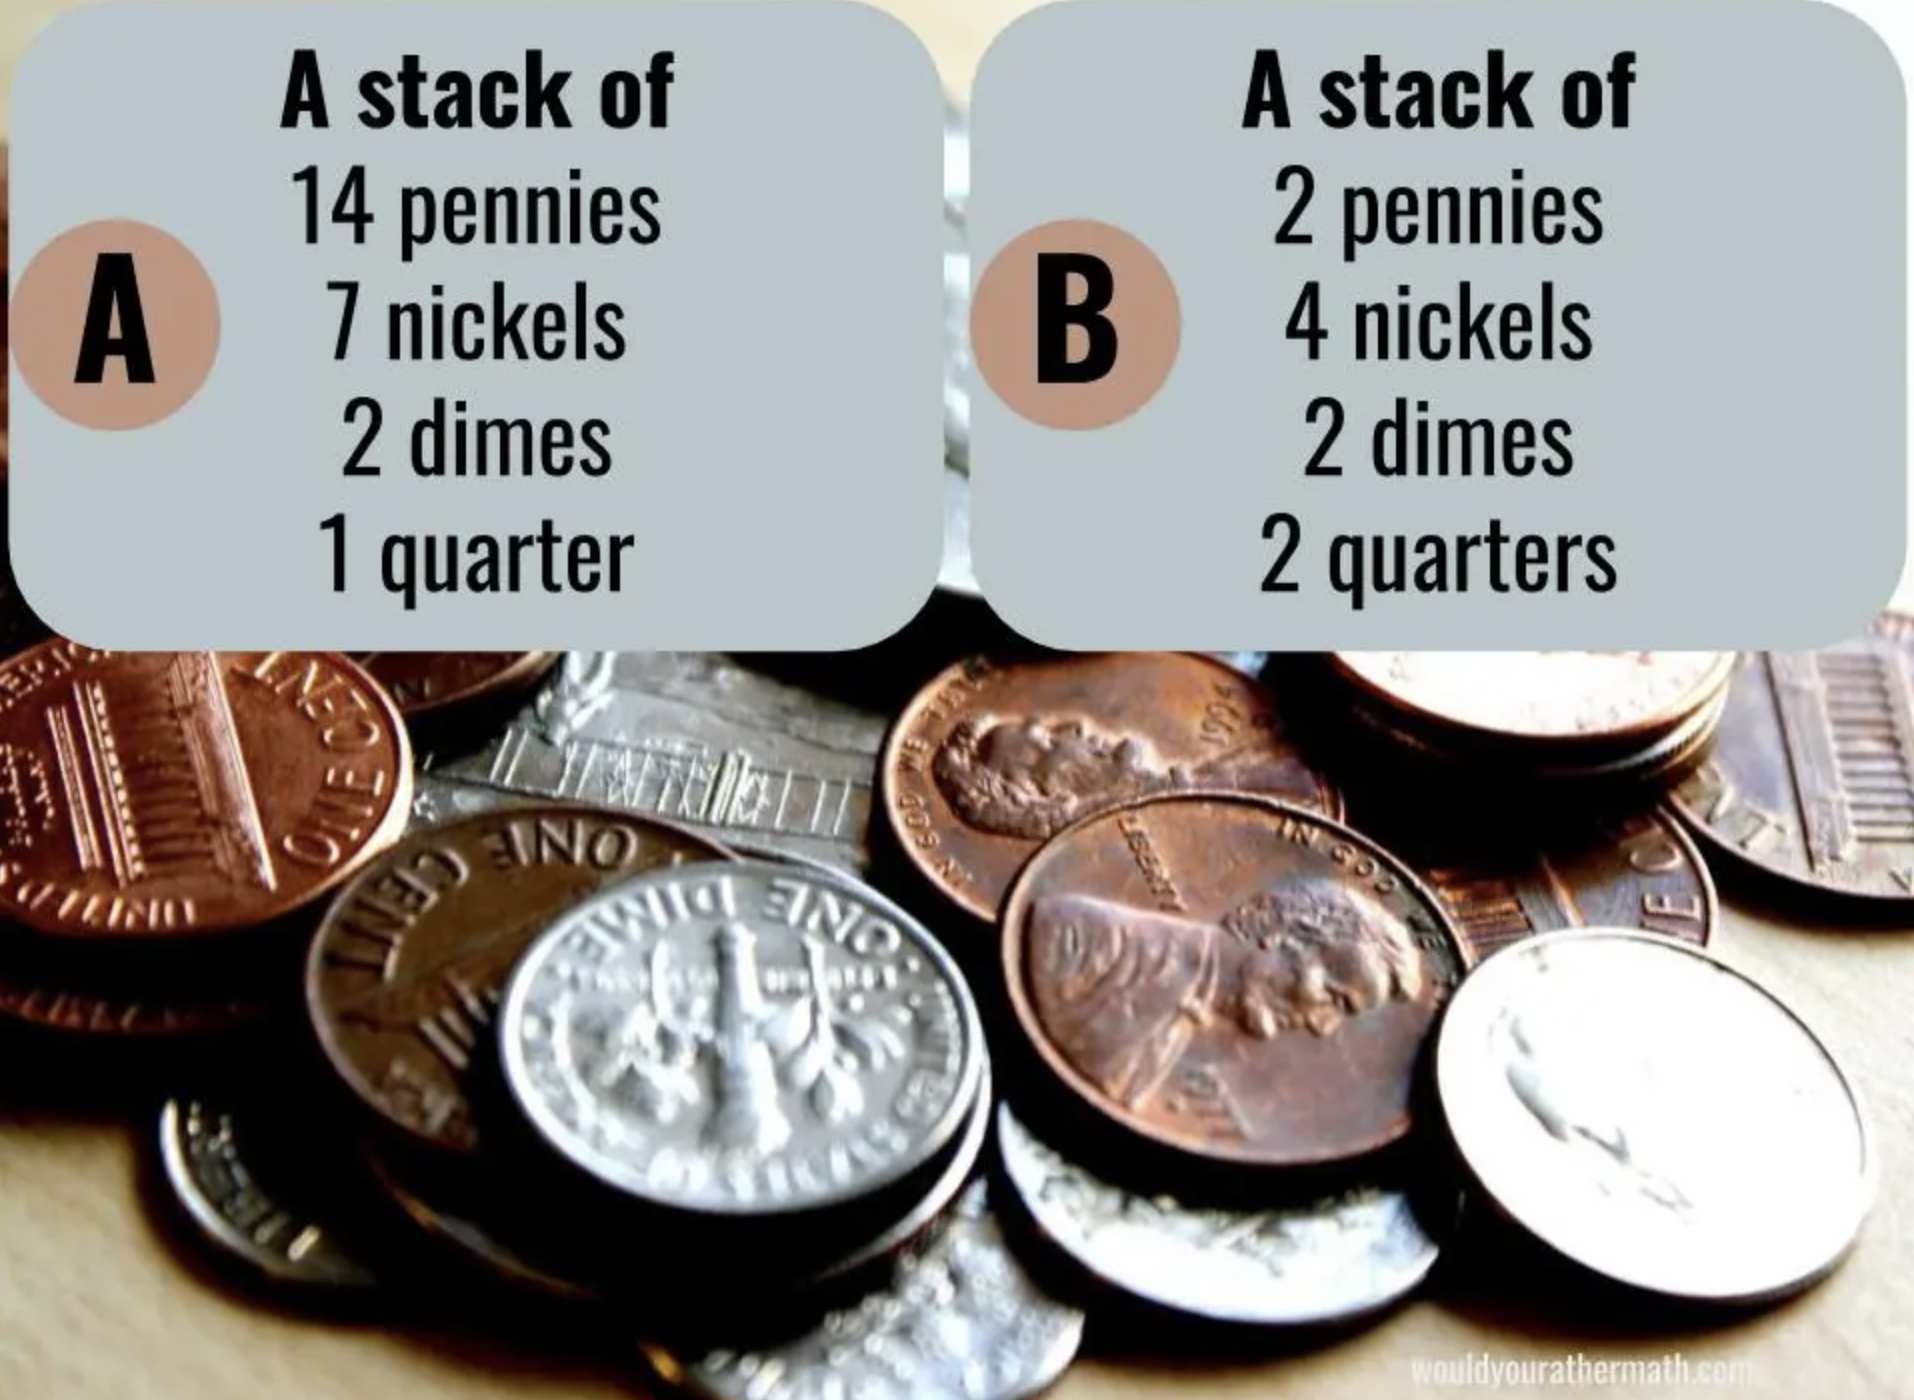
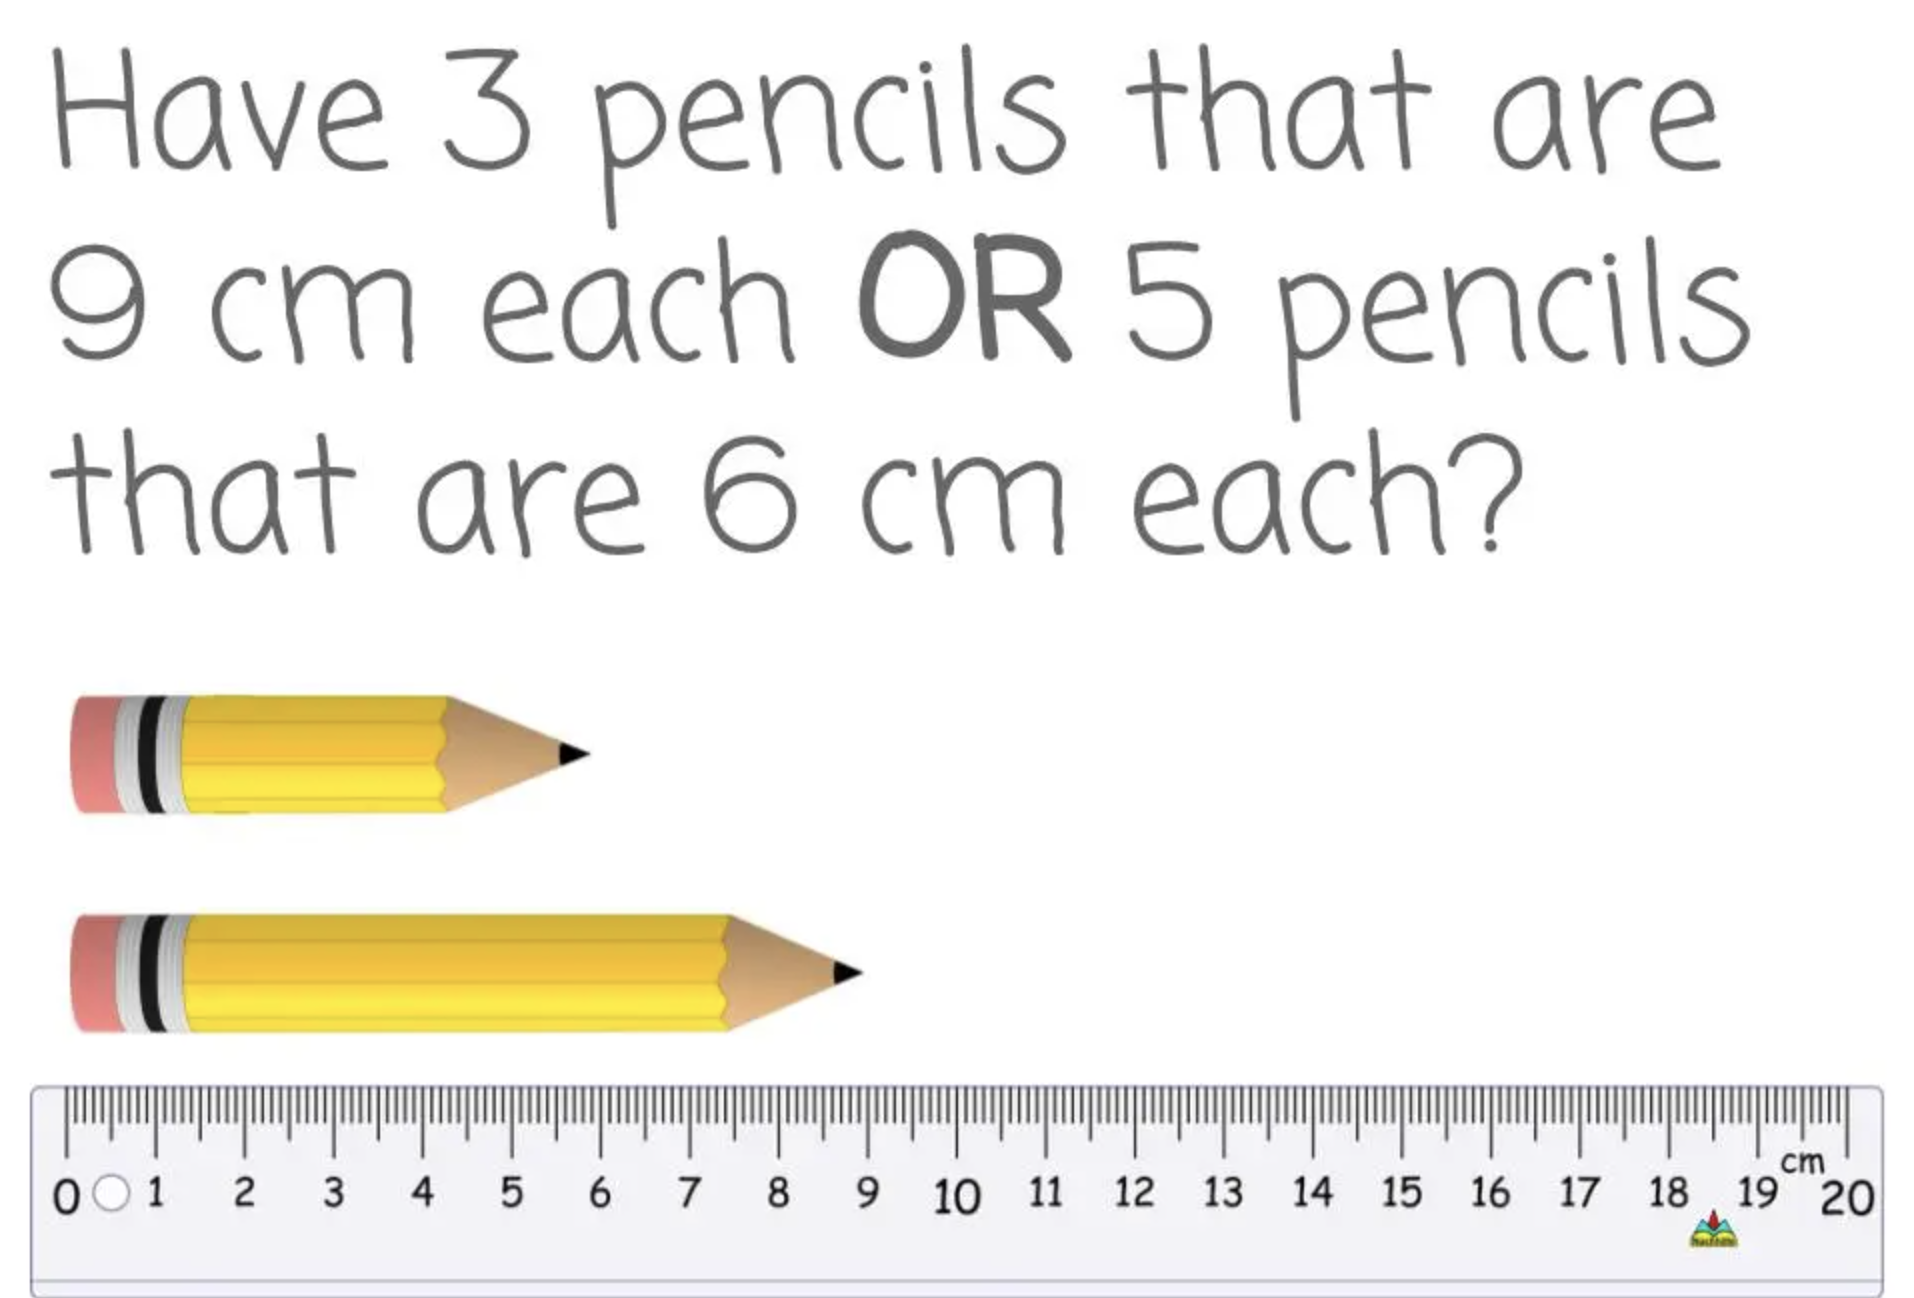
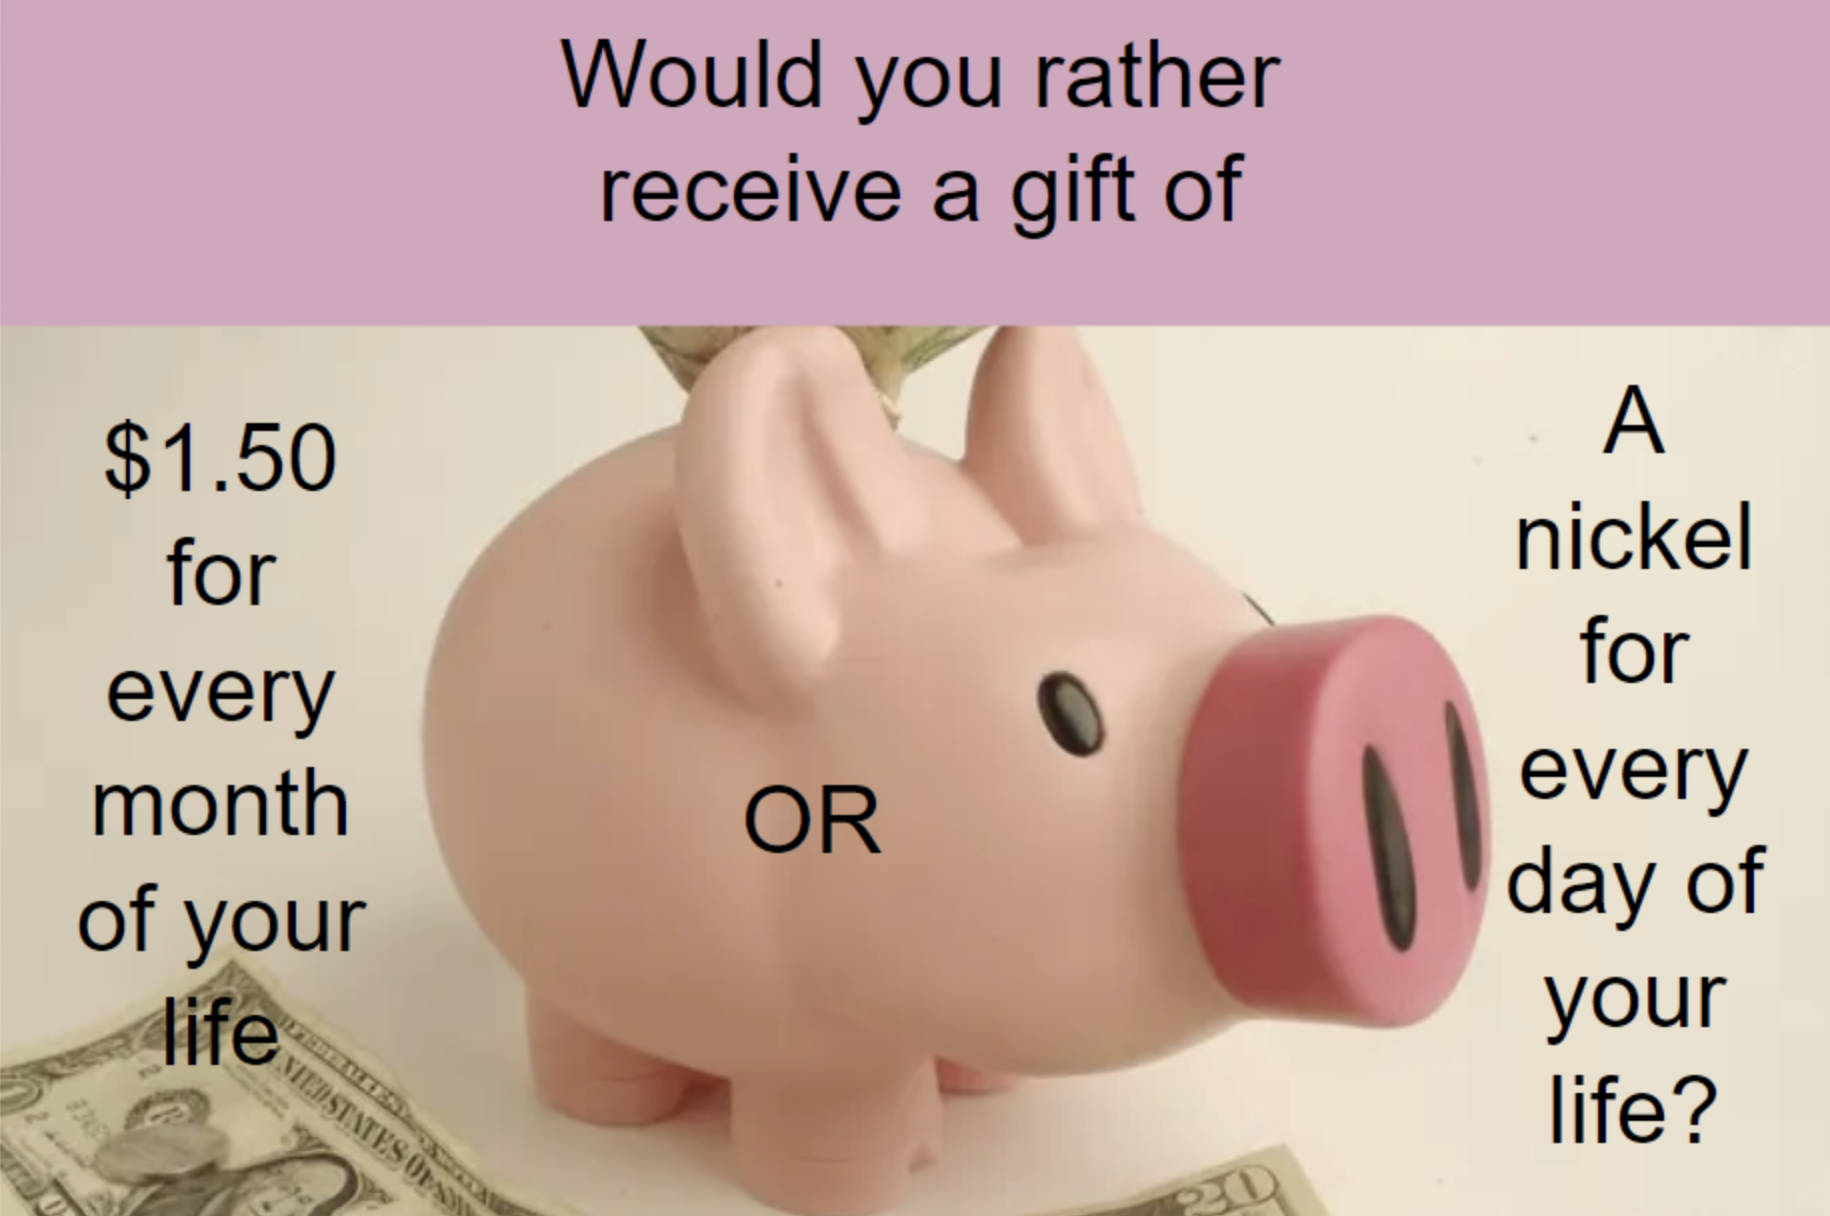
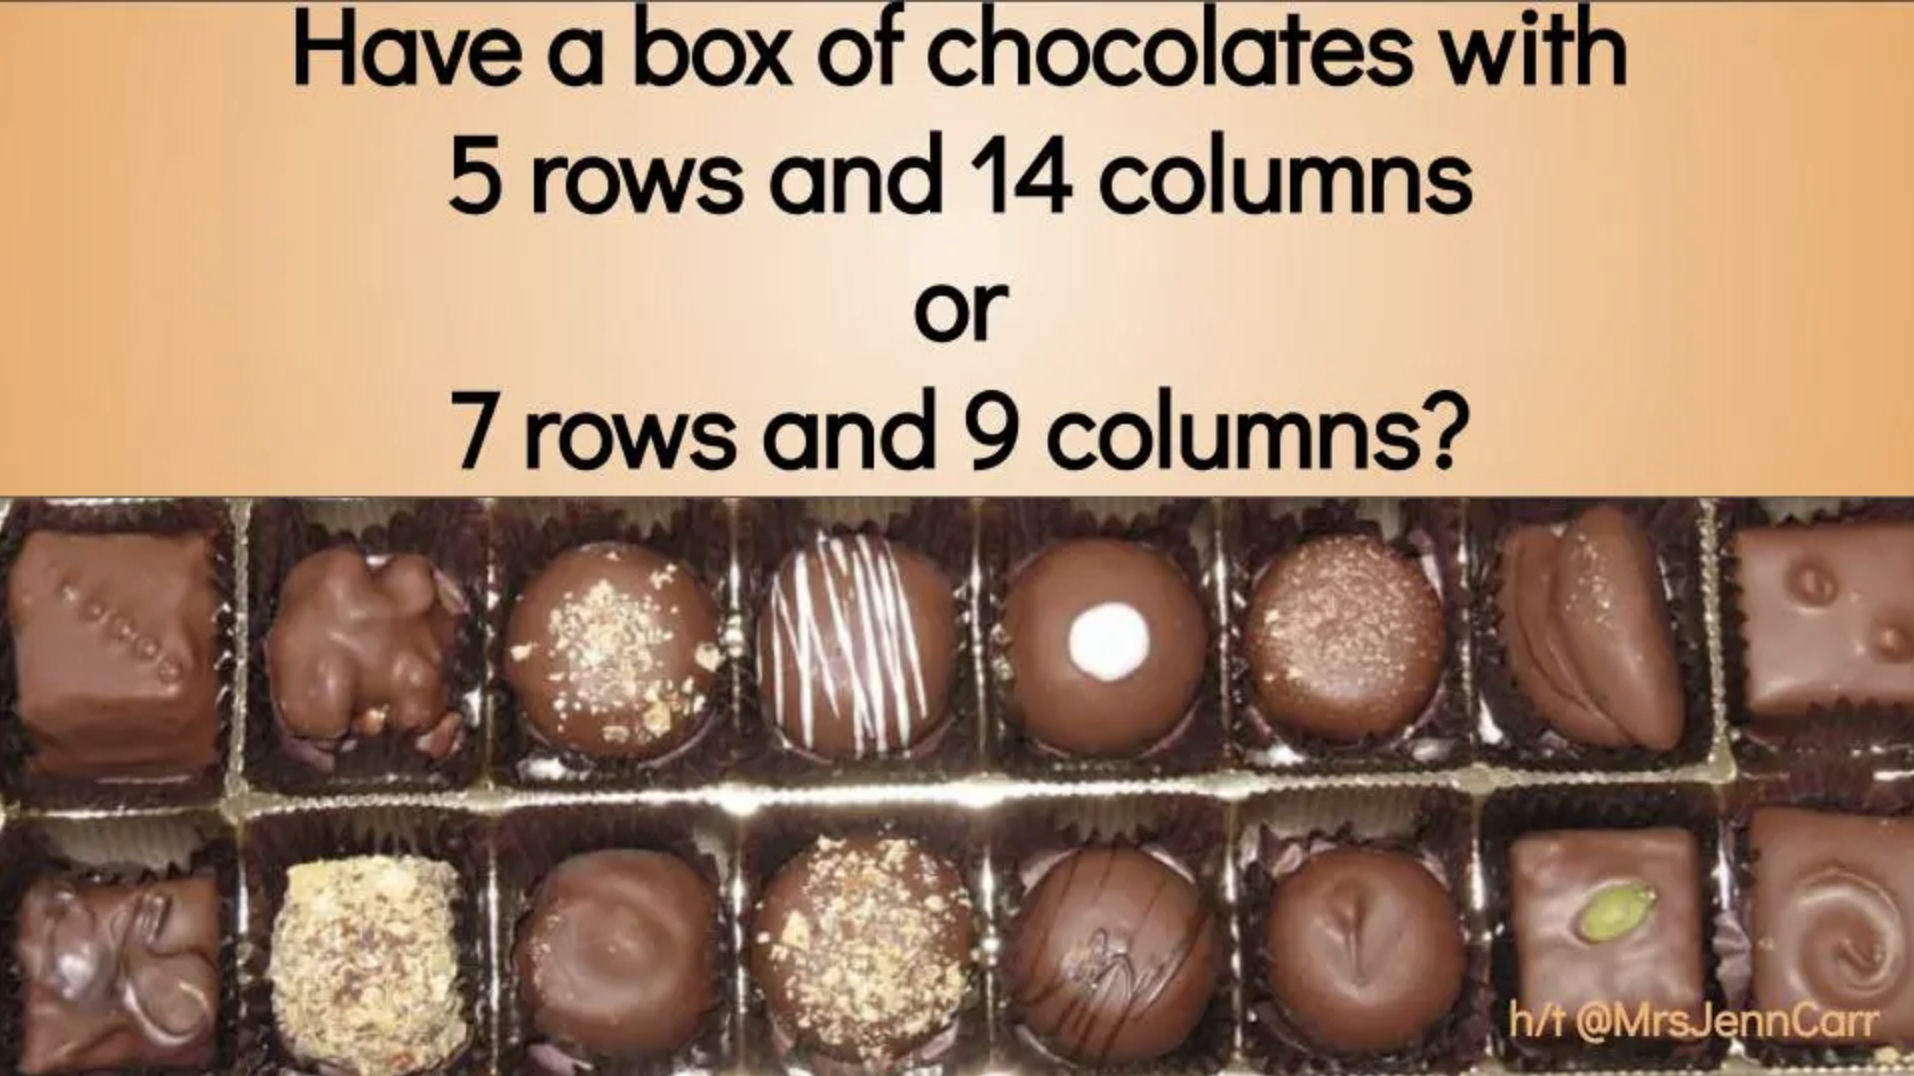
Would You Rather Math


Would You Rather Math (brought to us by John Stevens) is an incredibly resourceful website that differentiates itself by grade levels: K-2, 3rd-5th, 6th-8th, and 9th-12th. Each group features grade level appropriate content that educators can use to launch their math lessons. These prompts promote higher level thinking, requiring your learners to stop and process what is being asked before jumping to a conclusion. It’s a great way to get your students ready for the learning goal of the day. Check out some examples below and click the image to the right to visit Would You Rather Math!

Wonderopolis


Wonderopolis is an informational site that helps kids ask and answer interesting questions about the world. Every day, a new "Wonder of the Day" question is posted -- each designed to get kids to think, talk, and find learning moments together in everyday life. Wonderopolis is a place to find inspiration and provoke curiosity. We love using this site for enrichment or as an intro to a unit. What’s really impressive with Wonderopolis is the variety of content. Learners can find articles on everything from Space to Fortnite, to the Aztec Empire and why rainforests are important. Another important feature to include is that Wonderopolis now features Microsoft’s Immersive Reader, which means its articles can be read aloud to students. If you’re a Microsoft Flip user, you can find many different Topics in the Flip Discovery Library. Click here to check them out and click the image to the right to check out the Wonderopolis website!

Zoo Montana

Zoo Montana is a unique zoo with special insights into some of its animals. In addition to featuring teaching resources, you can also find LIVE animal cams. These change out, but currently you can view Bruno & Ozzy the (Grizzly) Bears and Winston the Sloth. What we really love about Zoo Montana is it’s partnership with Microsoft Flip. Students can watch a video from the Zoo and then respond in a Flip video. For example, students can learn about the Red Panda by watching a video from the Zoo. Then, they can create a habitat that they feel would be suitable for the Red Panda and share it on Microsoft Flip. You can grab this Topic from the Flip Discovery Library by clicking right here, or check out the other Topics in the Flip discovery Library by clicking the image to the right!

3 Act Math (Graham Fletcher)
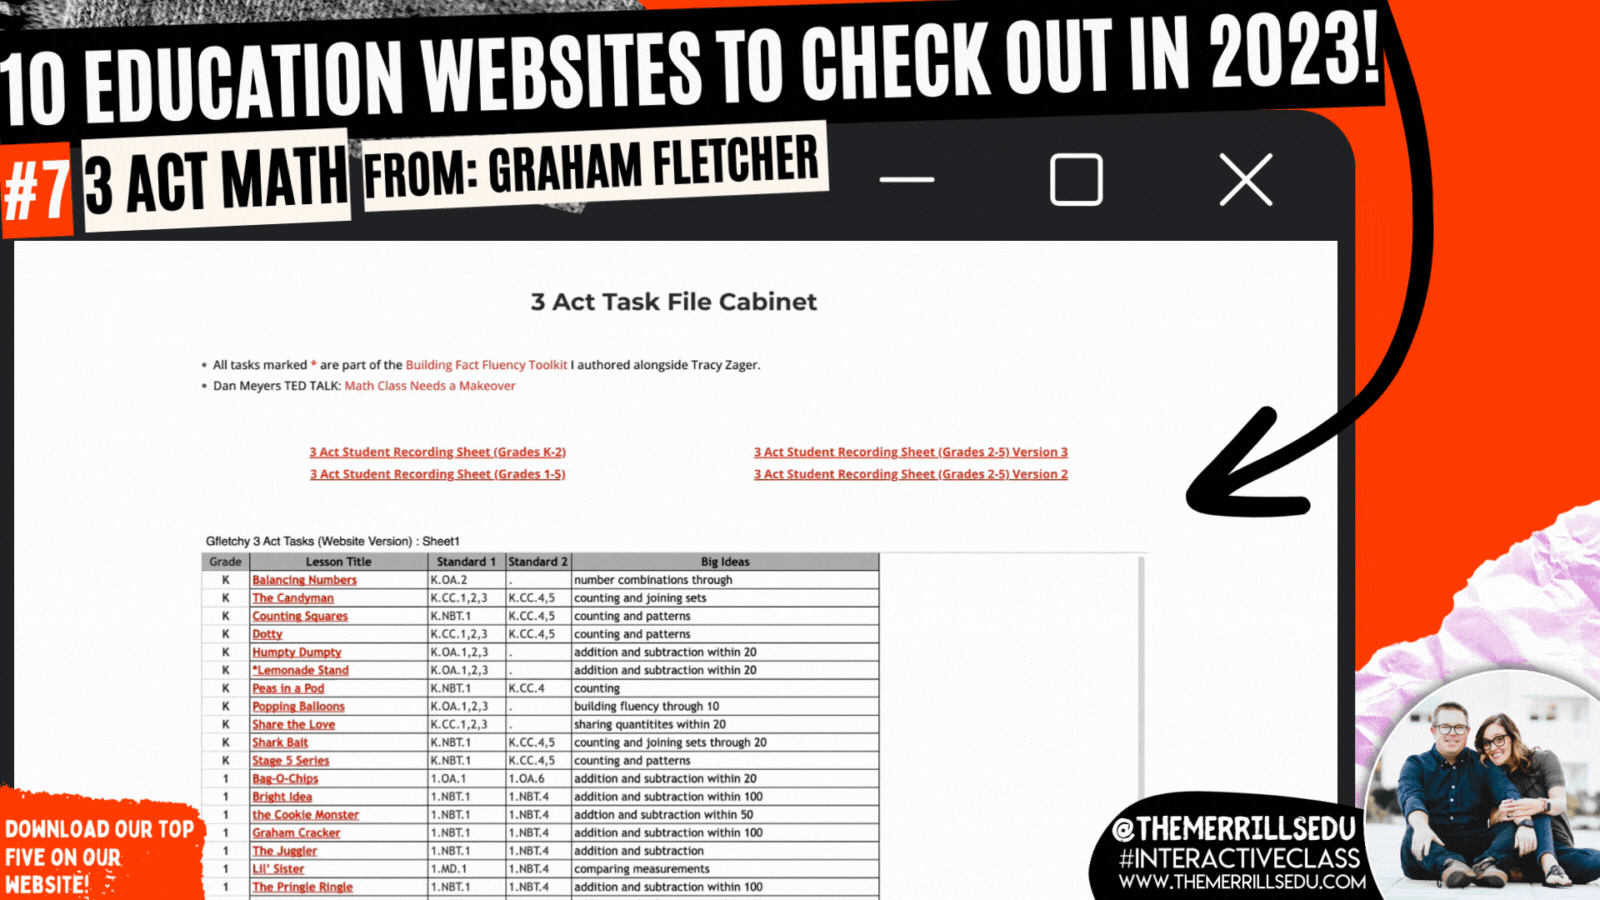

Graham Fletcher has an amazing website where he shares how to build fact fluency, progression videos (which we HIGHLY recommend), fresh ideas and 3 Act Tasks. A Three-Act Task is a whole-group mathematics task consisting of three distinct parts: an engaging and perplexing Act One, an information and solution seeking Act Two, and a solution discussion and solution revealing Act Three. Like in “Would You Rather Math,” we love using these ideas to launch our math lessons. Graham has done all of the hard work for you, creating videos targeting specific standards. Each task features a video and prompt - which can be modified and differentiated. Check out the full list of Graham’s 3 Act Math tasks by clicking on the image to the right!

Monterey Bay Aquarium


There’s a lot to love on the Monterey Bay Aquarium website. From it’s cute otters to sly sharks, to free online courses (in both English and Spanish), the Monterey Bay site has you covered! If you’re learning about anything that lives under the water, you’ll want to tie in this website. Students can log into LIVE web cams featuring 12 different species of animals. Our students’ favorite: the Shark cam which shares sharks and fish gliding through the aquarium’s exhibit. This could also be used as a calm down after returning from recess or transitioning from an exciting activity. Click the image to the right to check out the website and all of the animal cams!

Pebble Go
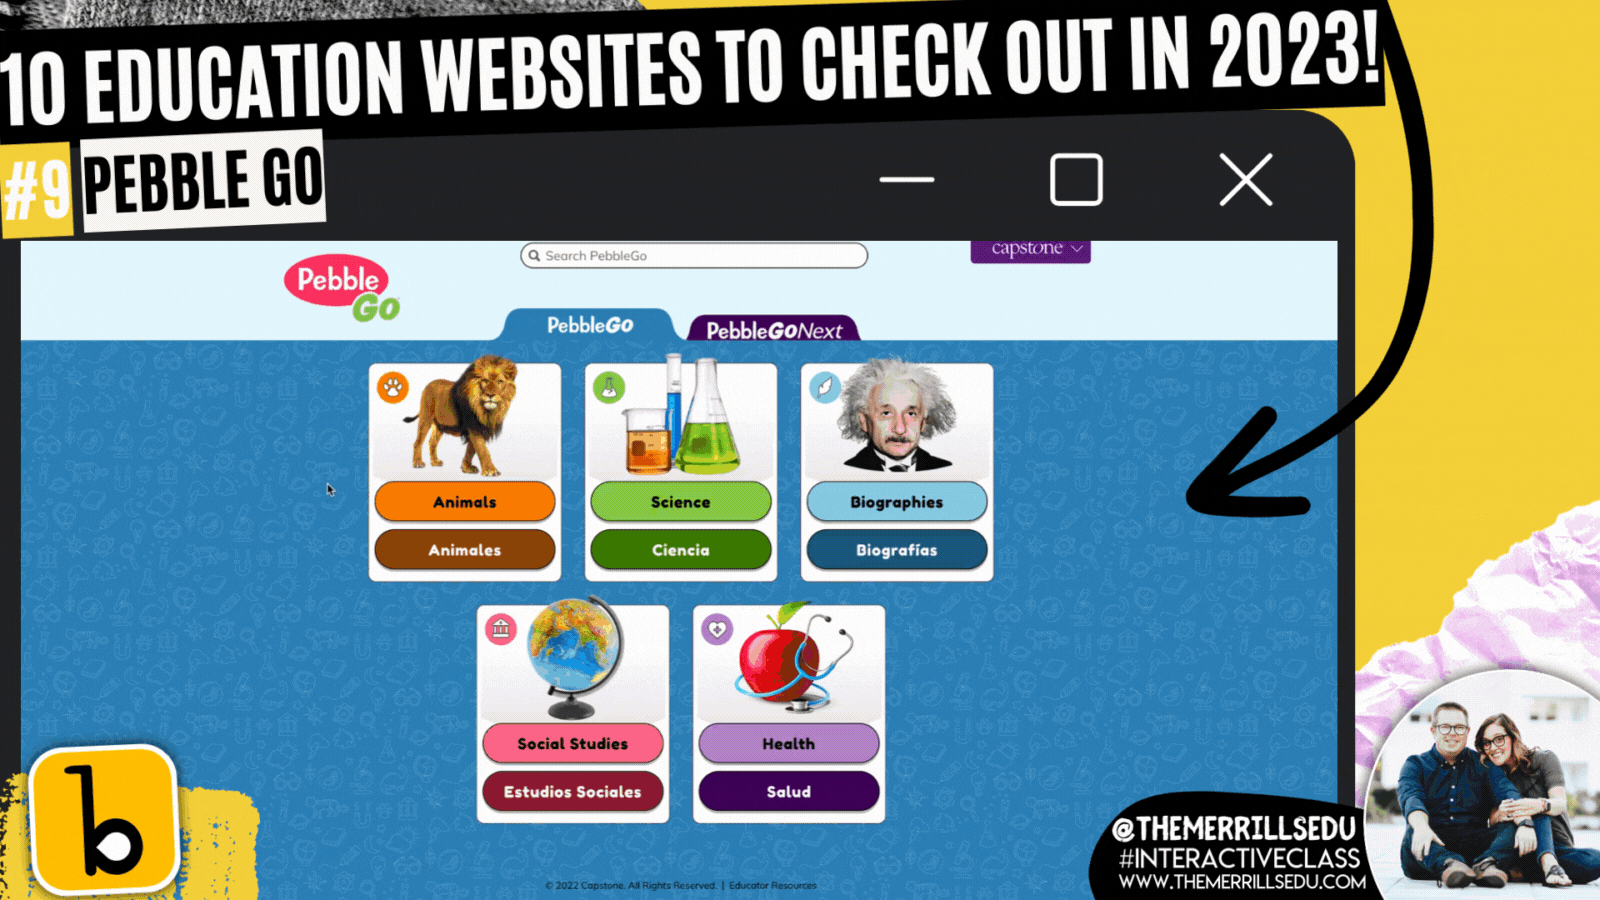

Pebble Go is hands down the best research website constructed for primary and intermediate level students. The site has tons of topics for students to learn about - all with accessibility in mind. Students can click on an article and have it read aloud. Each article is broken down into different tabs, targeting important content regarding the subject. For slightly older students, Pebble Go Next takes all of the amazingness of Pebble Go and kicks it up a notch. This version is more appropriate for 3rd-5th grades. It features topics that pertain to their interests. To level it up, pair Pebble Go with Buncee Create - the new partnership aimed at getting creative with its content. Click the image above or to the right to visit the Pebble Go website!

Epic


Epic is a teacher’s dream come true. A FREE digital library built on a collection of 40,000+ popular, high-quality books from 250+ of the world's best publishers. Books are categorized by subjects, topics, F&P levels and more. WE love that educators can create assignments and collections to assign to specific students (or groups of students). This allows for quick and easy differentiation. The community on Epic is very strong and a lot of material is shared. If you’re looking for a collection of books on the Planets, chances are someone already has created exactly what you are looking for. Just add it to your own collection and assign away! Check out some of our favorite collections below, or click the image to the right to head over to the Epic website!


-- Please follow us on social media and tag us with how you’re using these websites in your classroom! 👓👗
For more tips, tricks and lesson ideas for making learning more interACTIVE, check out our books The InterACTIVE Class and Flipgrid in the InterACTIVE Class on Amazon!


10 Education Apps to try in 2023
@TheMerrillsEDU share 10 different education apps that you’re going to want to try in the new year! We’ve got something for Literacy, Math, Social Studies and Science. Check it out!
2022 introduced to one of our favorite new education apps, new ways to collaborate, news ways to create, and so much more. We’re sharing 10 different education apps and how you can use them in 2023. Check them out below!
(click on any subheading to jump to that section)


Osmo’s Reading Adventure
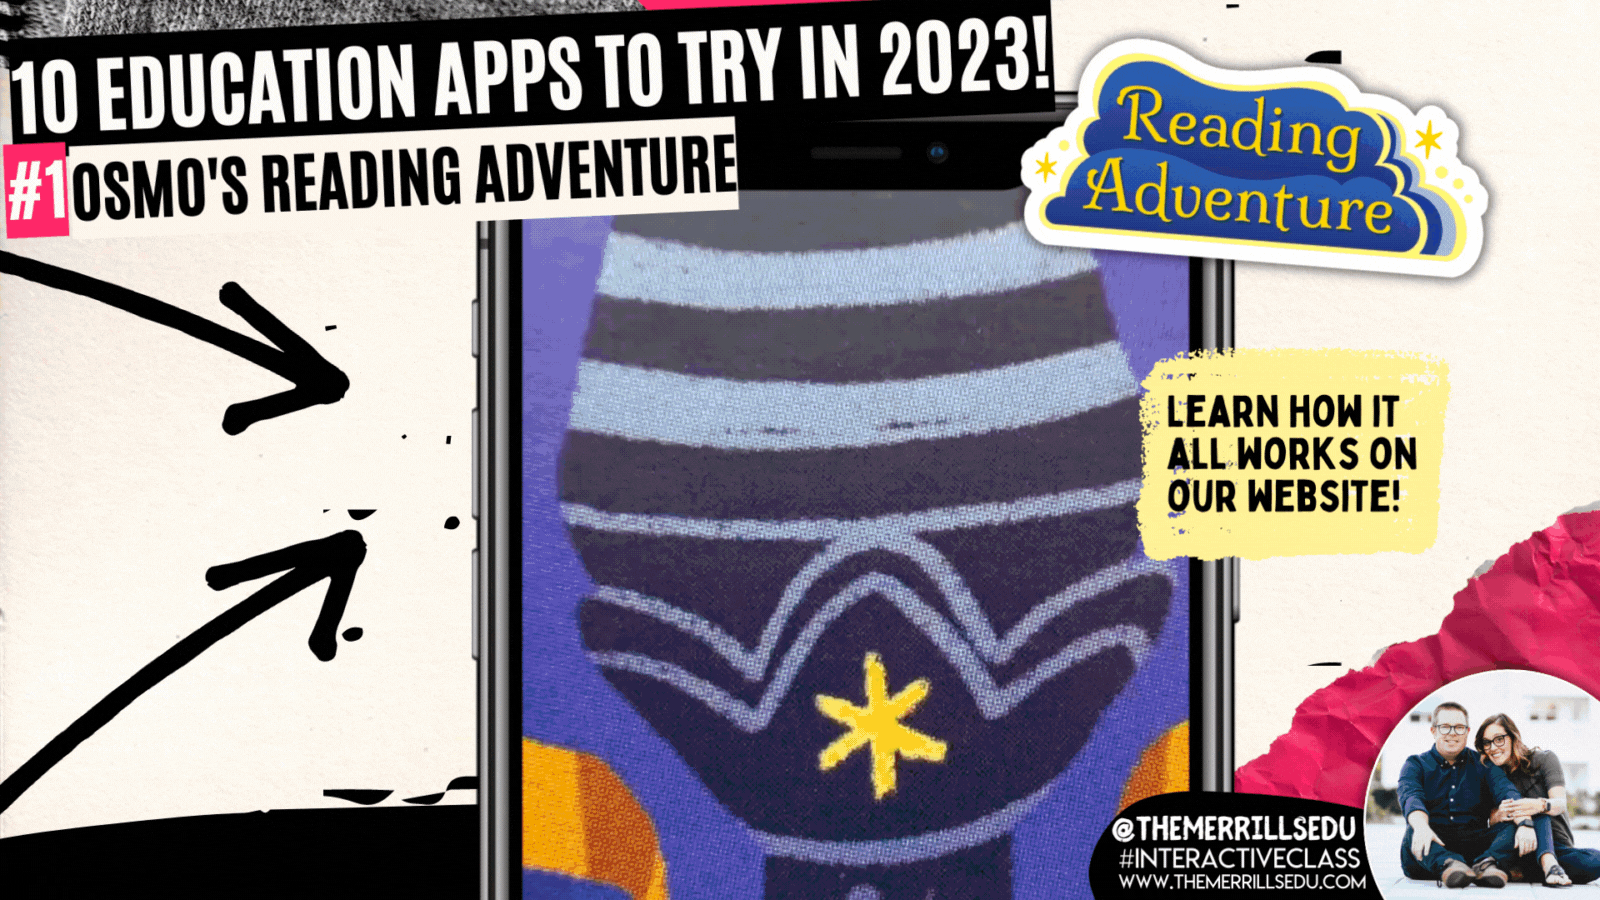
This past summer, we were introduced to Osmo’s latest addition: “Reading Adventure.” Reading Adventure is an interactive program that helps students learn to read. Reading Adventure uses speech recognition to create a personalized reading experience for your students, complete with actual books and a crystal wand. Developed with educators, Reading Adventure interacts with your child to give personalized feedback, increasing reading proficiency. The game features the characters Oliver and Nebula, who join your child on a quest to catch "Dreams" and return them to the Kingdom of Slumber. Check out how it works in our video below!


Book Creator
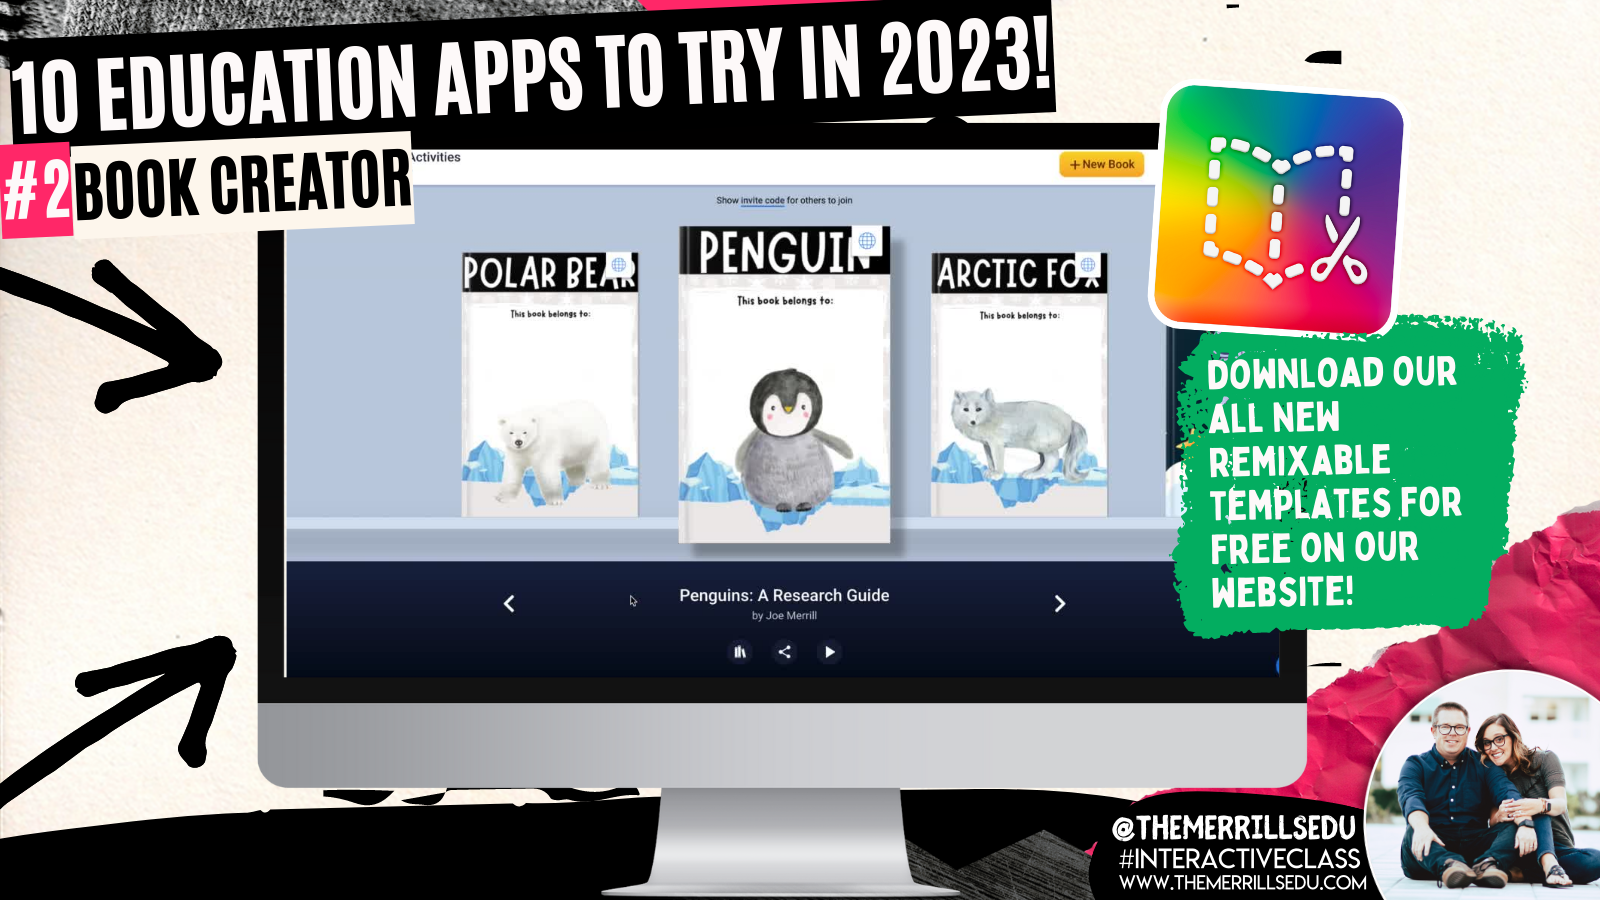
Book Creator announced some key updates this past fall. In addition to its integration with Canva, remixable books and comments, now users can crop images and import PDF’s. We’re HUGE fans of the Canva integration, which allows students to design using Canva without ever having to leave Book Creator (you read that right)! Learn more about this update by clicking here and checking out our blog post! our next favorite update has to be the ability to “remix” books. Think of these as templates that can be shared and edited / altered. We’re loving the designs being shared, and there are more appearing every day! To see some of our remixable books, click here or the images below. Let us know how you are using them!


Gimkit
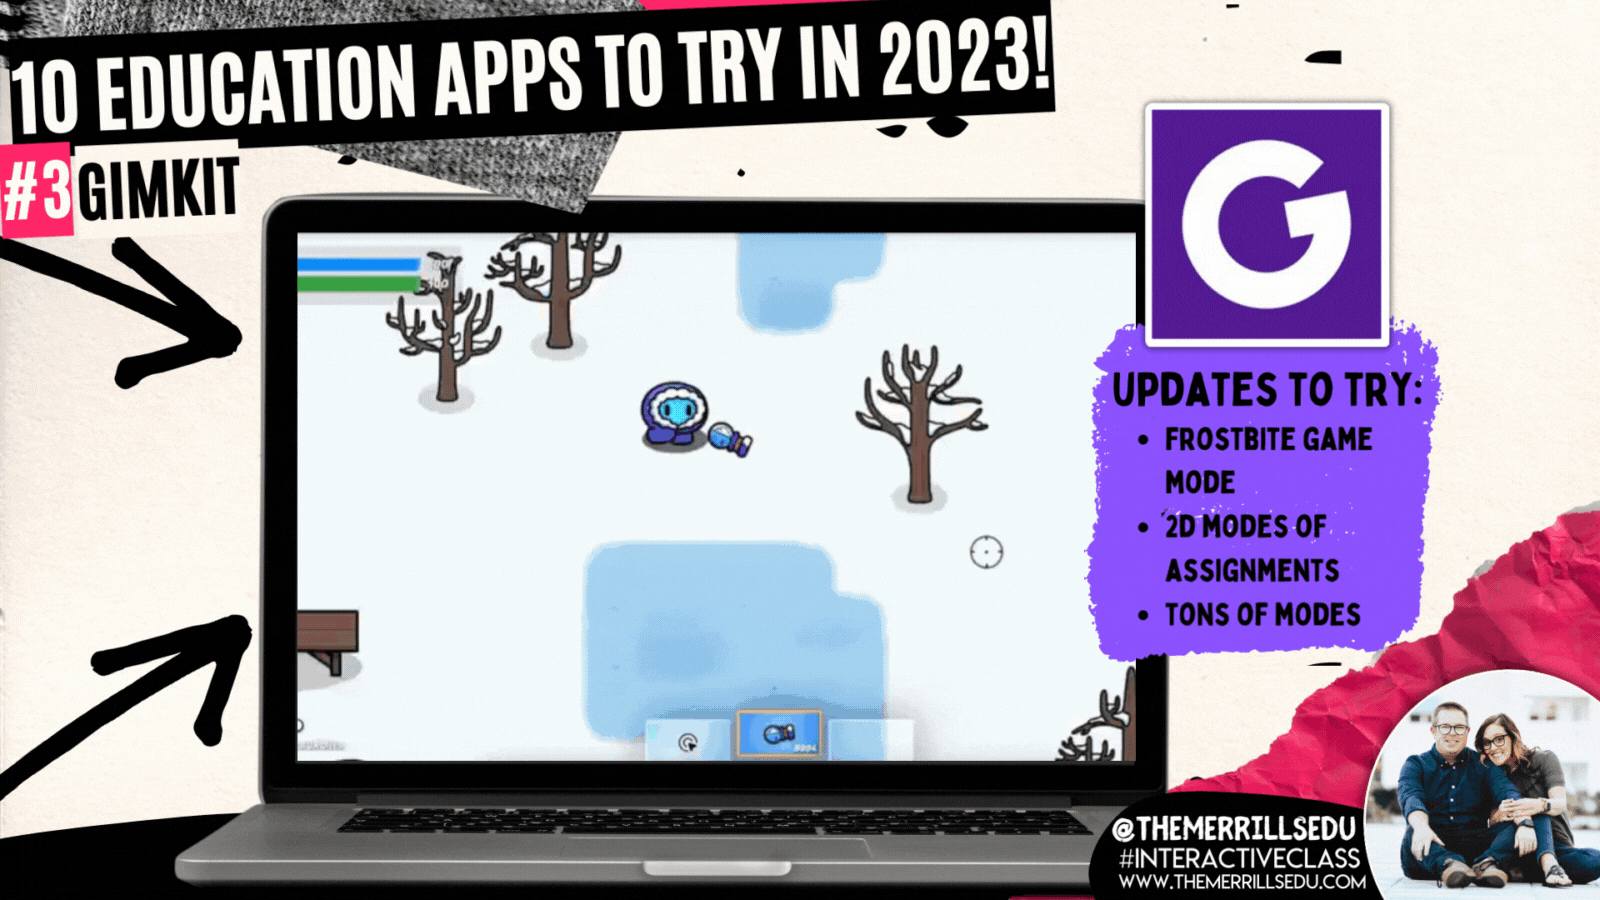
GimKit is a great way to take those boring formative assessments and turn them into engaging experiences for your students. There is a free and paid version, but we highly recommend the paid version as it unlocks all of the modes (and won’t break your bank at only $59.88 a year or $9.99 per month). The Pro (or paid) version will give you access to new modes like “Frostbite,” “This or That,” and “Farmchain.” We love these modes because it adds a new element of excitement into the games. For example, in “Frostbite,” the focus isn’t necessarily on money, but rather “knockouts” with snowballs. The only way you can earn snowballs is to answer questions! Learn more about the other modes below and give GimKit a shot!

Seesaw

Seesaw has always been a top five app for us. Its ability to communicate with families in a quick and efficient manner is a must for any classroom. Then, add on it’s creation tools, and it’s a must have. But, this past summer Seesaw took parent engagement to the next level by adding a messaging option. Now, educators can communicate with families via messages. A lot of attention went into the details of this feature. Educators can start 1:1 messages, group conversations, or whole-group announcements. They can choose if a message is one-way or two-way, and even use the search bar to quickly find recipients. There are also options for specialist teachers to message multiple classes at once, or give students the ability to reach out to the teacher for help. Learn more about messaging on Seesaw by clicking right here or check out the tutorial below!

Wakelet


Wakelet is one of our favorite ed tech apps and it just keep getting better. What started out as a way to curate information, has now turned into a creative outlet for your students. Our favorite new Wakelet feature introduces its integration with Canva. Now, users can design with Canva without ever having to leave Wakelet (yes, you read that right!). For example, when adding an image to a collection, the option to design with Canva appears. Clicking it will launch Canva as a pop up right within the same browser window. If you’re on the educator side, you can use Canva to design differentiated Wakelet collections. Canva has a ton of header template images available. to view them, click the image to the right or here!

Canva
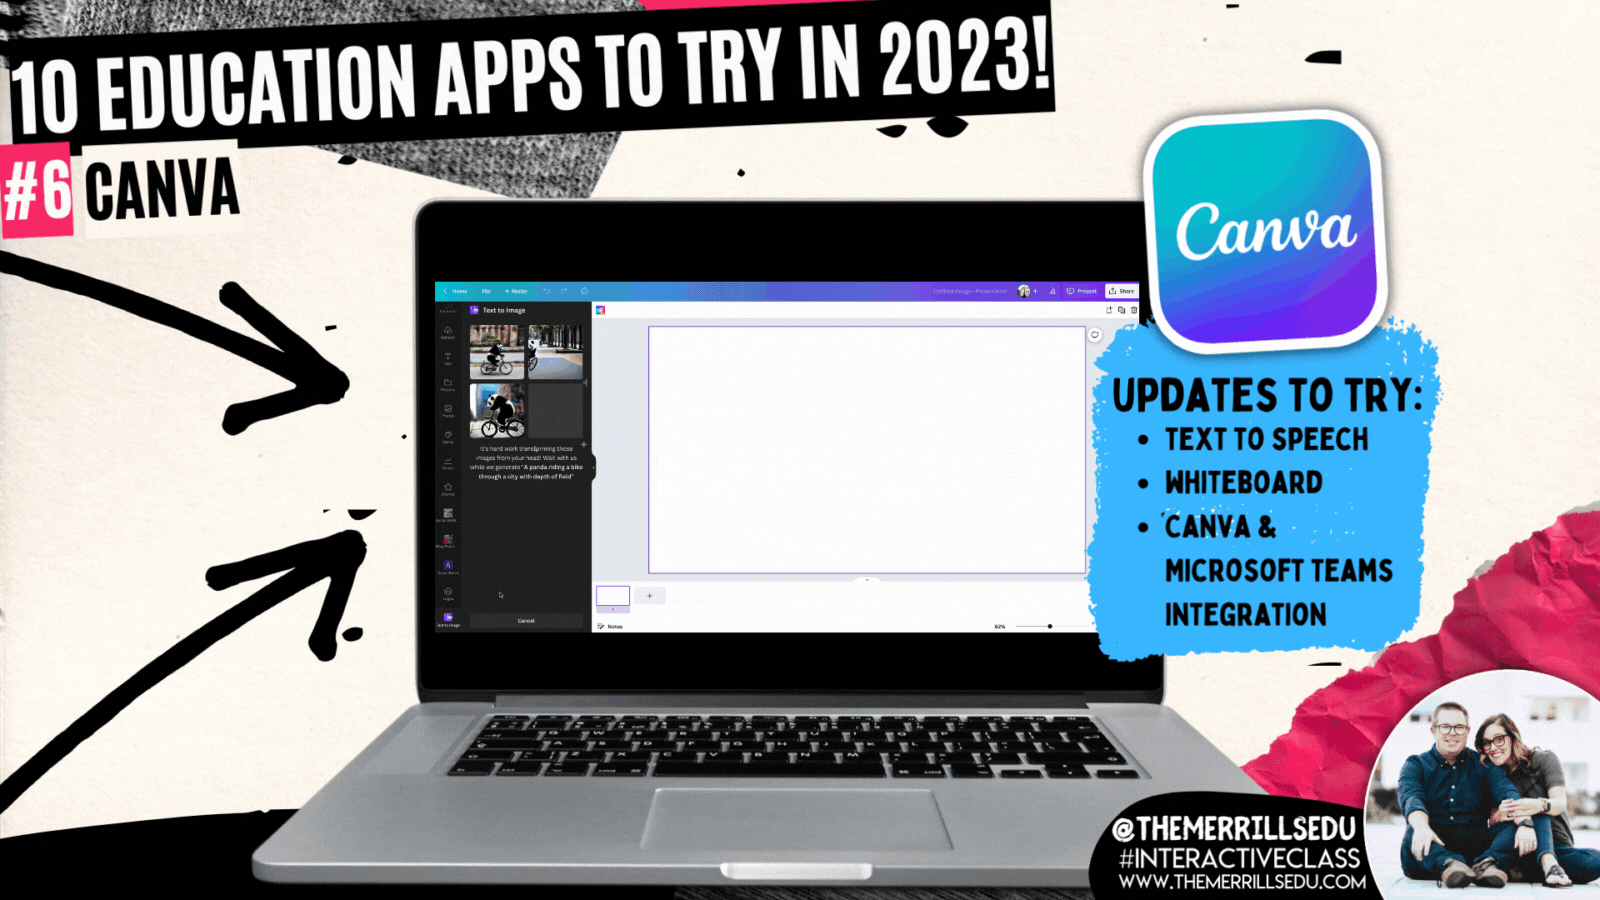
Canva announced a slew of updates this past year, some more hidden than others. This past year brought us tables, whiteboards and docs into Canva. But, some of the more well hidden features caught our attention. For example, check out the all-new magic design tool called “Text to Generate Images.” With “Text to Generate Images,” users type of the specifics of what they are looking for. Then, Canva does all the work - looking for a design that best suits what was described. Check out out video to the right to learn how it all works! Another feature added (to premium accounts only) was “Magic Write,” which is an AI-enabled writing assistant that empowers anyone to effortlessly and quickly create written content. You can use it for social posts, business plans, websites, blogs, poems, journaling, creative writing, and so much more. It can generate sentences, paragraphs, lists, outlines, and more based on the text prompt you enter. This was intended for creators, so Canva has not (yet) included it in their Education accounts. However, educators should familiarize themselves with this tool and educate students accordingly. It’s an incredible resource, but could be used in the wrong way if it isn’t taught properly. Learn more about “Magic Write” by clicking on the image below or right here!


Novel Effect


Novel Effect has exploded over the past year. This app uses the microphone built into your smart phone (or iPad) to listen to you read. As you read a story, Novel Effect will play music and / or soundscapes that go along with the book. It’s important to note that while Novel Effect uses your devices microphone, it’s not actually recording and saving you read. New books are being added every day, and now the entire library is full of books that you most likely already own in your own personal classroom library. But, what really got us thinking this past year was Novel Effect’s ability to impact our student’s reading. For example, give students the chance to be the readers while using Novel Effect. This will encourage them to slow down so that the sound effects can keep up with what they are reading. Novel Effect has also started a learning resource page on their website. Here you can find FREE content that goes along with the books you are reading. Check it out by clicking the image to the right or here!

Classkick


Classkick is a website / app that allows you to see all your students work and give high-quality feedback–from anywhere, anytime. The key word being “anywhere,” and they mean it! Even if a student is home working on an assignment, you can see them working in real time. You can also provide feedback to them in real time. The educator dashboard gives you a class-wide view of everything that the students are doing, so you can tell what the pace of the class is. As amazing as all of this sounds, what we really love about Classkick is the accessibility features. Educators and students can add audio recordings to explain directions or how they were thinking. There’s also options to allow collaboration. Students can help out others once they have completed tasks - all of which can be easily monitored on the educator side. To learn more, click on the image to the right or here!

Microsoft Flip (Formally Flipgrid)

Microsoft Flip is always listening to educators and updating based on their preferences. The major take away from Flip this year is it’s all-new educator dashboard, which mirrors what students see on their side. This makes it easier to get a student-view of what is being asked. Hidden amongst the platform comes another slew of valuable updates. The key takeaway here: don’t be afraid to push some buttons! You may find hidden features! For example, with the camera launched - click the three dots. A drop down will appear giving you the option to mirror your camera. Dig a little deeper and you’ll quickly find that you are able to toggle between both front and rear facing cameras without having to pause! Check out our video to the right for a full walk through! Another hack / tip our students came up with this year was using Flip for writing. When working on a “How To” writing assignment, the kids began by recording a video of the steps required to accomplish the task. Then, they enabled the captions to make sure that they were able to spell difficult words that they normally may not be able to spell. This helped them as they went on to write. Normally, we think of Flip as being the final place for content - but in this case, it ignite learning! (Note - we actually circled back around and created final videos for each writing piece!) To learn more about this writing process, click here or the image below!


Microsoft Teams

Microsoft Teams acts like a house for content. Some of the more stand-out updates come from built-in apps like Reflect, Reading Progress and Whiteboard. In Reading Progress, educators can gain valuable insights and data on student progress. The program will intelligently identify “challenge” or frequently mis-read words. On the educator side, you can now create an assignment to help your readers master the missed terms. Check out the video from Mike Tholfsen to learn more. Also new in Teams is an updated student view in the app “Reflect.” Students can privately answer questions that educators can use to monitor the social and emotional well being of their students. To learn more, click here! Lastly, Whiteboard lands with more features than ever. We love differentiating our instruction into groups on Teams, and then letting the small groups use Whiteboard to collaborate. Students can now add images, videos and links - all collaboratively!
-- Please follow us on social media and tag us with how you’re using these resources in your classroom! 👓👗
For more tips, tricks and lesson ideas for making learning more interACTIVE, check out our books The InterACTIVE Class and Flipgrid in the InterACTIVE Class on Amazon!


10 Classroom Management Tips and Strategies
Danny Steele was quoted as saying, “Classroom Management is not about having the right rules. It’s about having the right relationships.” We completely agree here. If you’re looking for classroom management tips, it’s important to take into consideration that your management should change every year because your students change every year. Deepening the relationships between you and your students can create a rich and thriving interACTIVE environment. To get to this point, we’ve curated 10 classroom management tips. Check them out here!

Danny Steele was quoted as saying, “Classroom Management is not about having the right rules. It’s about having the right relationships.” We completely agree here. If you’re looking for classroom management tips, it’s important to take into consideration that your management should change every year because your students change every year. Deepening the relationships between you and your students can create a rich and thriving interACTIVE environment. To get to this point, we’ve curated 10 classroom management tips.
(click on any subheading to jump to that section)


Custom Device Wallpaper Using Canva

Whether you’re using shared devices or in a 1:1 ratio, device management is crucial. To make this easier, we like to change out the wallpaper on the devices so that we can differentiate them. Canva makes this easy! Just search for your device’s wallpaper dimensions and you will find templates to use immediately.


Compliment Overload!

Positive reinforcement is the most important key to unlocking powerful student relationships - and it doesn’t take much effort at all. In fact, your words are the most powerful tool to making your students feel welcome, encouraged and successful. Even when your students are wrong, there are ways to go about encouraging them in a discouraging situation. Here are some examples:
Thank you for showing me that you are ready!
I love the way that (student) is showing me that they are (task).
You are absolutely on fire right now!
I like the way you’re thinking…
You were a leader when you…
That was an amazing idea!
You’ve inspired us all!
I’m really impressed with your ability to…
Amazing work! I can tell you put a lot of effort into…
Thank you for teaching us the way that you think. We have all learned from you today!

Differentiation with Wakelet

Differentiating instruction doesn’t have to be hard or time consuming. With Wakelet, educators can quickly and easily assign targeted content to their students. Start with a collection and then add the work you’d like the students to complete. If you have groups working on the same task(s), you can always copy your Wakelet collection to save even more time. With integrations like Canva and Microsoft flip, you have tons of options for your students. To download our template, click here or thee image below!


Class Callouts!

Class callouts (or chants) are a fun way to grab your students’ attention in a hurry. It’s best to use these with regularity to help your students become more familiar with them. Here is a list of some of our favorites:
“Shark bait…” (HOO-HA-HA!)
“Flat tire…” (Shhhh!)
“Hear ye, hear ye…” (Yes, Queen?)
“Yellow or red, let’s discuss…” (Time to stop acting SUS!) [Among Us reference]
“Tootsie Roll, Lollipop…’ (We were talking, now let’s stop!)
“Hey, ho…” (Let’s go!)
“Does anybody know?” (We don’t talk about Bruno, no, no!)
“Shake it, shake it…” (Like a polaroid picture!)

Group Management

In our classrooms, we have multiple incentives: one for individual students, one for tables/groups, and one for the entire class. In Joe’s room, he has five tables of students (each is named “Hot Spot #1, Hot Spot #2, etc). When he sees tables working together as a team, he moves a bandana (located hanging on the front board) to that particular table/group. The bandana gets moved frequently throughout the day, but whichever table/group has it at dismissal wins a prize. The kids love it and it’s a great way to encourage teamwork!

Music Transitions

We know what you’re thinking…How can music have anything to do with classroom management? The key is familiarity! When you use a class playlist and repeat the tracks, your students become familiar with the songs. For example, if you’re playing the same 2 minute long song, the students will know exactly how much time is left in the song as it is played. We have a transition song going from one activity to the next, a clean up song (for a bit longer tasks), and a pack-up song. The kids hear these songs day after day and know that they need to be ready and focused by the time the song is over. Below is a playlist of tracks that we curated that our students enjoy. Click the image below to download for yourself!


Teacher Created Clever Pages

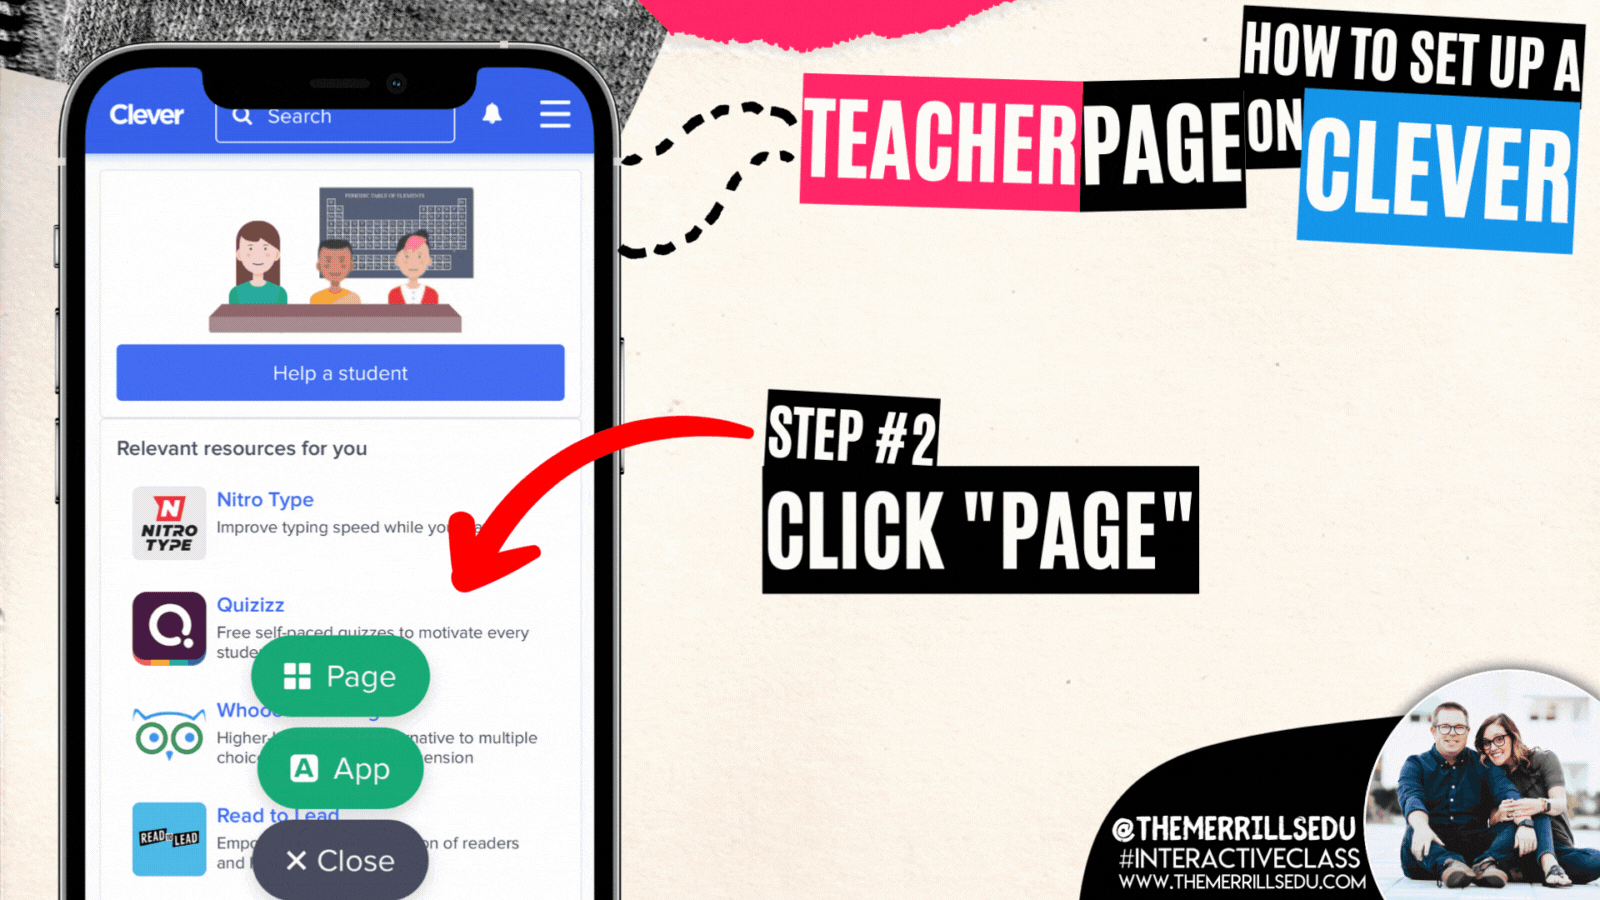
Digital management can be tricky. But, if your district has access to Clever, you can easily get your students to where they are supposed to be quickly and efficiently. Clever is a single-sign on application that basically acts like a bridge between sites. When your students log onto Clever, they are able to log onto other websites without having to re-enter a username or password. The best part of all is that teachers can create their own pages with specific apps and links that are relevant to the class. Swipe through the images and check out our tutorial below!
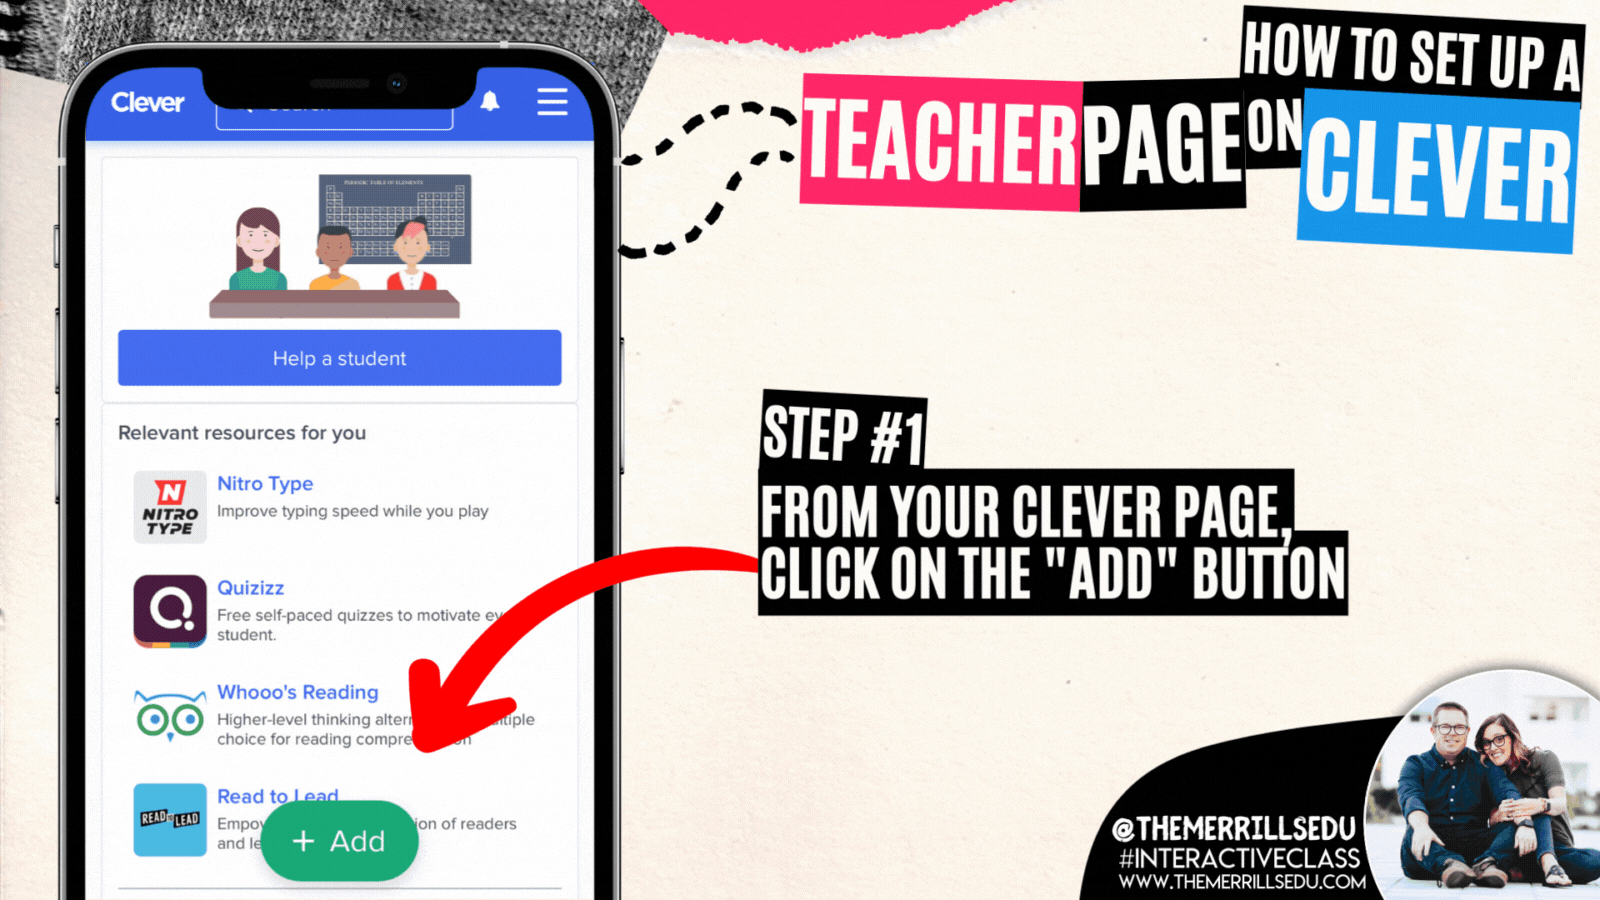
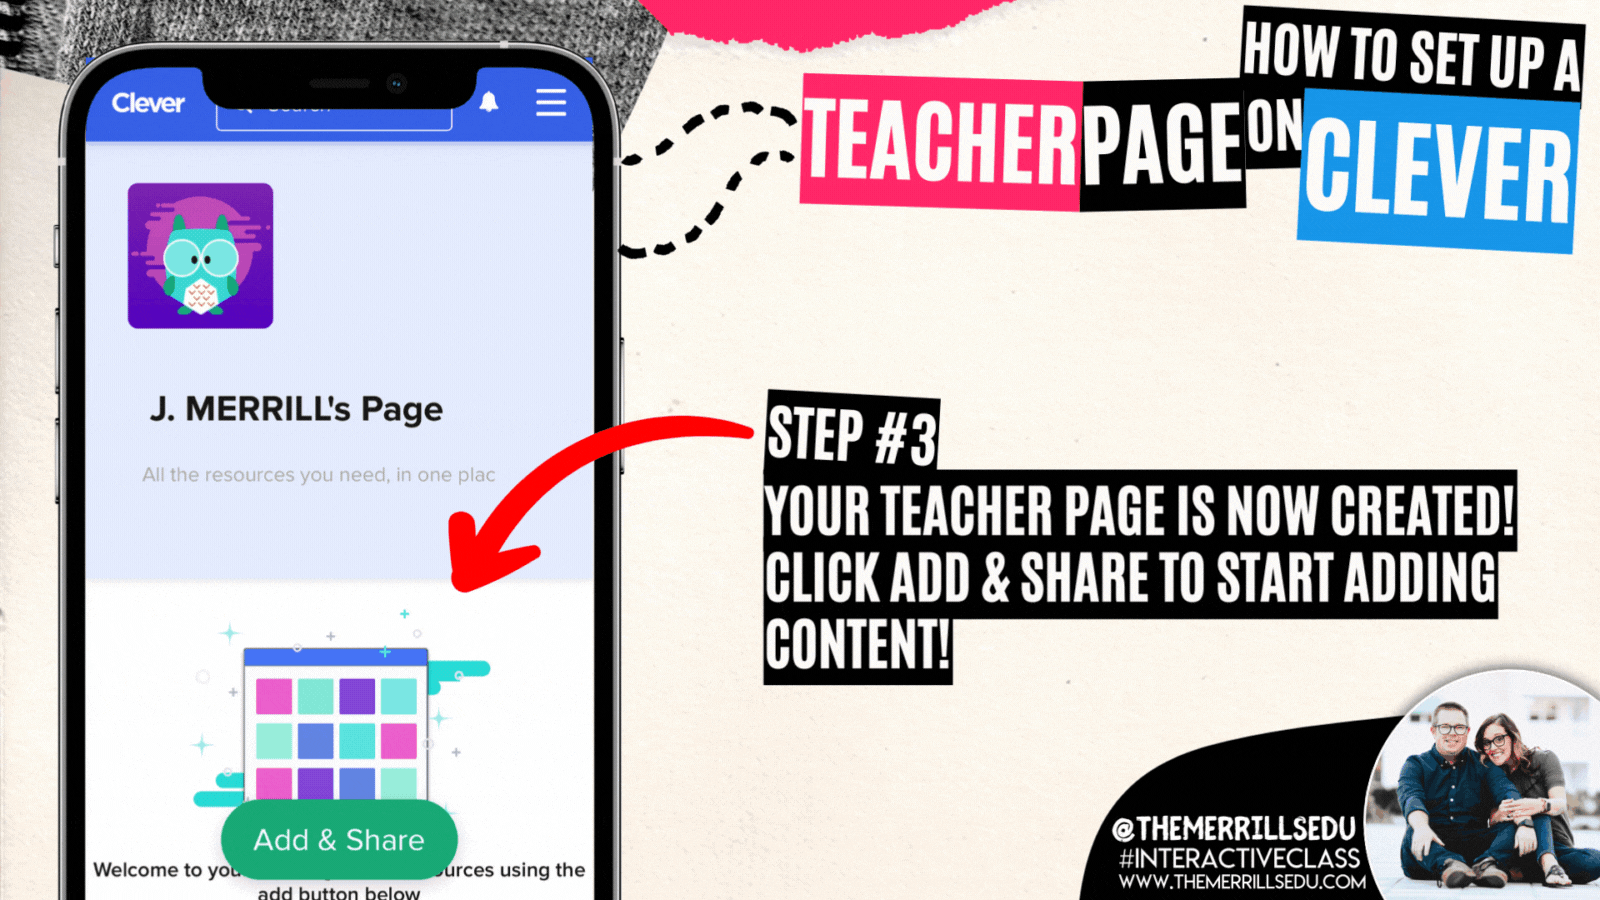
This process may be completed online or via the Clever app. To create your own Teacher page on Clever, log onto Clever. From your educator panel, click on the “add” button.
Once you’ve clicked on the “Add” button, a few options appear. Click “Page” to add your own Teacher page.
Congrats! Your teacher page has been created! Now, it’s time to start adding content to share out to your students. Click on “Add & Share” to start adding content!
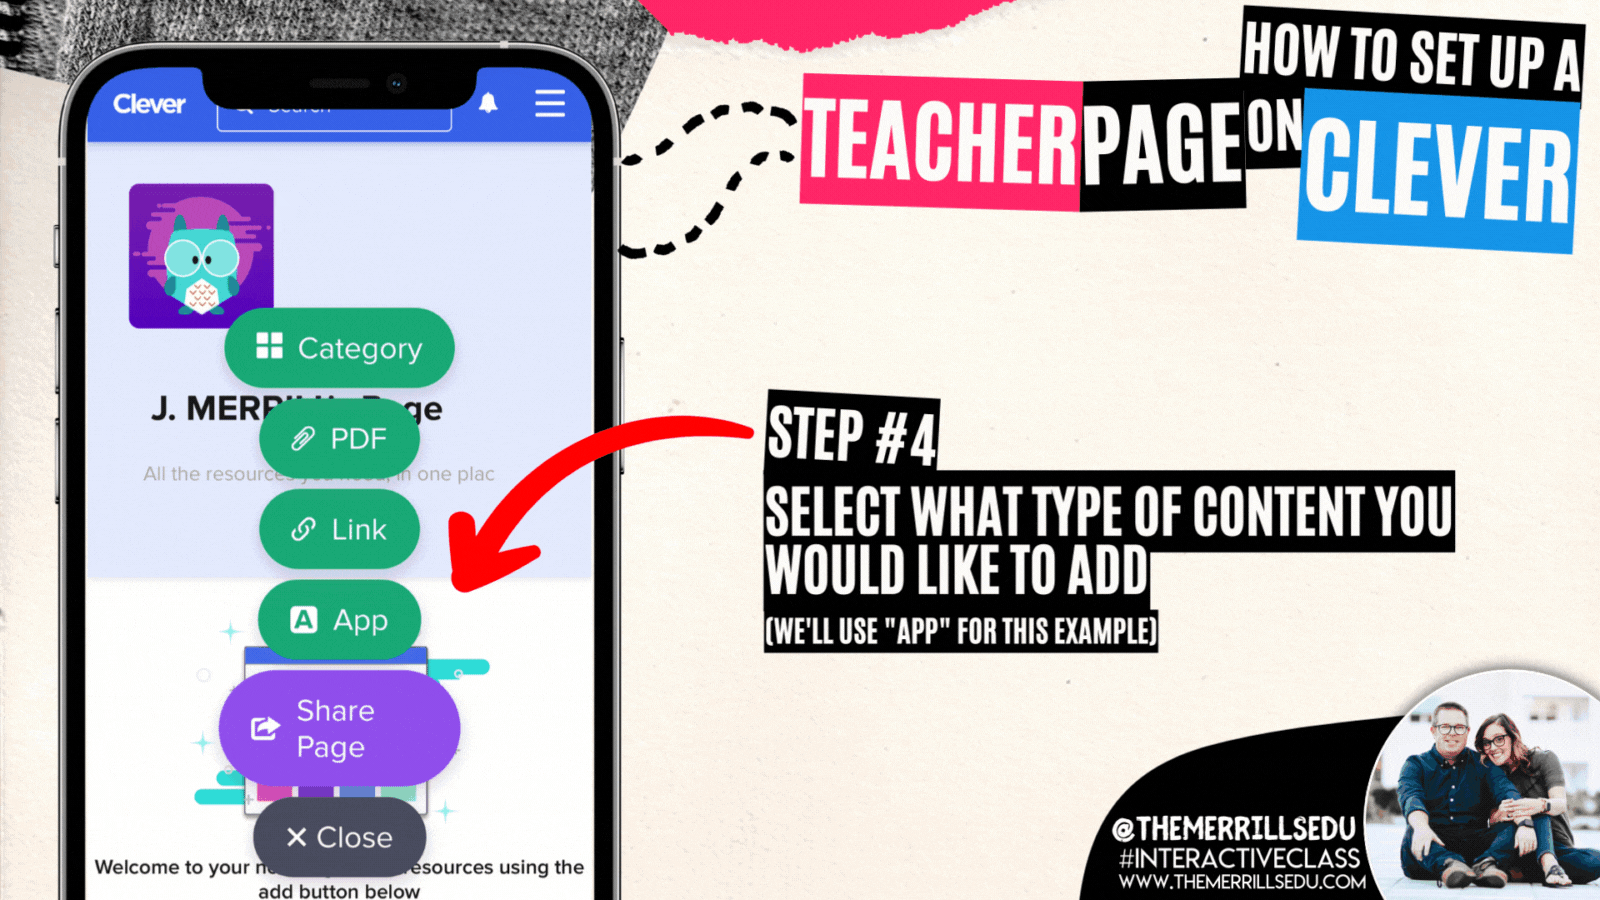
Several options appear. Depending on what you are looking to add, click that particular button. For this example, we’ll choose an App.
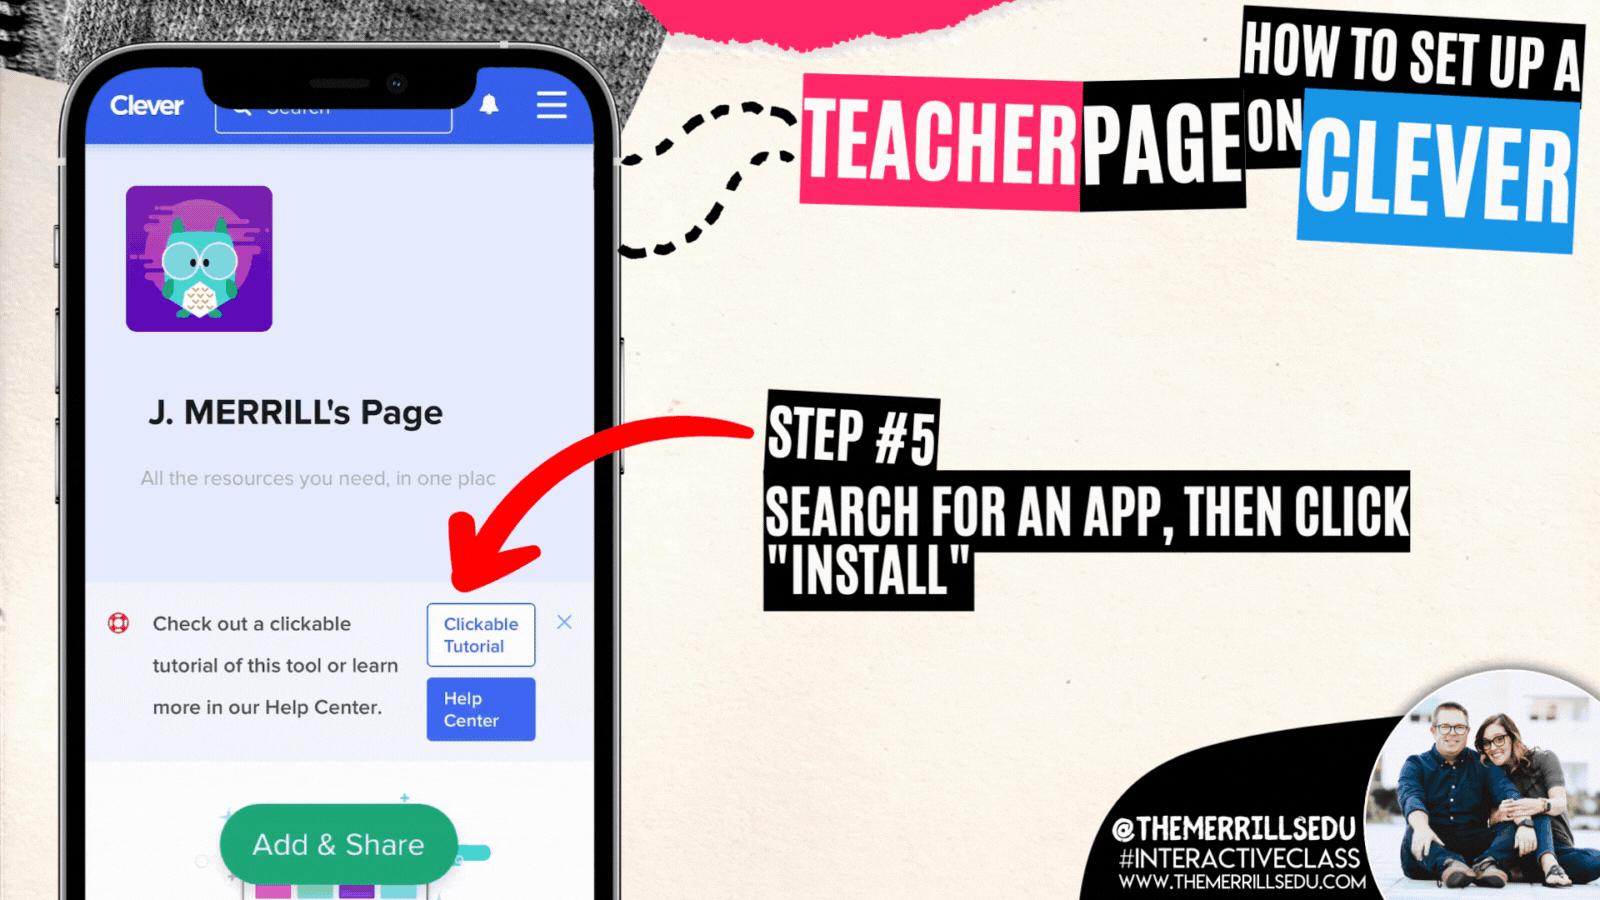
Search for an app that you wish to add to your teacher page. When you find the app, click it and then click “Install” to add it to your teacher page.
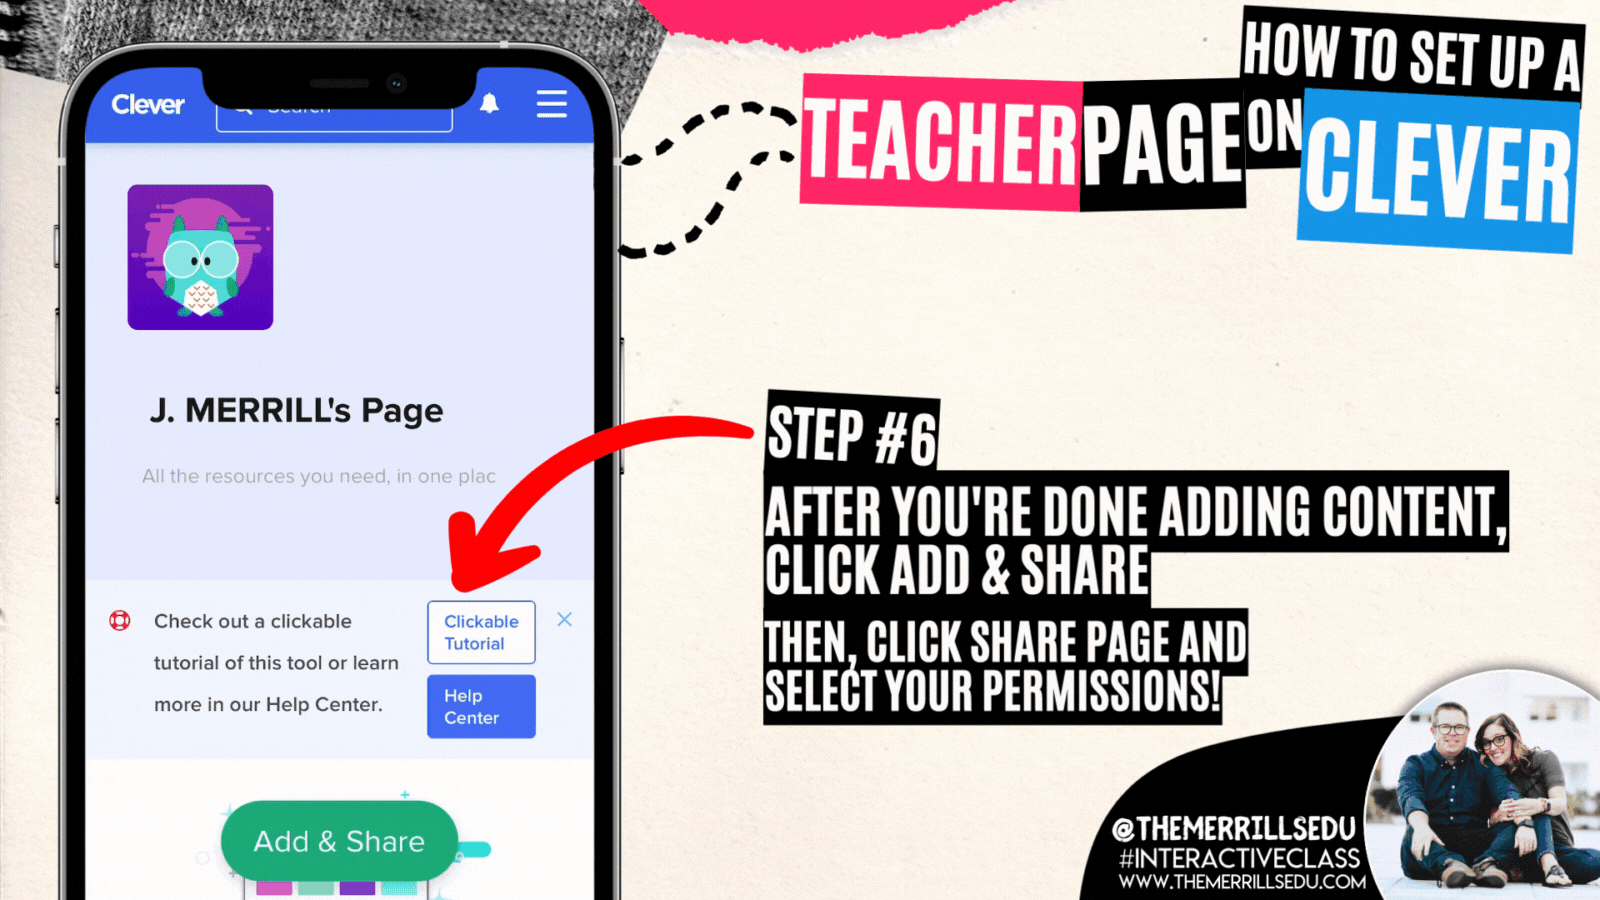
Lastly, click ‘Add & Share.” Then, click “Share Page” and select your permissions!

“S.U.S.” Student Award (Seriously, Unbelievable, Student - inspired by Among Us)

Kids today are going crazy for the game Among Us. Like most video games, in addition to characters and strategy, you also have to learn it’s lingo. one of the more popular terms to come from Among Us is the term: “sus” (short for suspicious). Since the kids are already heads over heels on this, we decided to bring it INTO the classroom. This plush Among Us toy travels around the classroom throughout the day. Every time we catch a student doing something well, we place it on their desk. The agreement is that the only ones allowed to touch the plush is the teacher and the student who earned it. If another student touches it, they may lose the privilege of earning it that day. Whoever has this plush at the end of the day wins a prize! (Tip: we recommend paring this with our bandana / Group Management idea above!)


ClassroomScreen.com
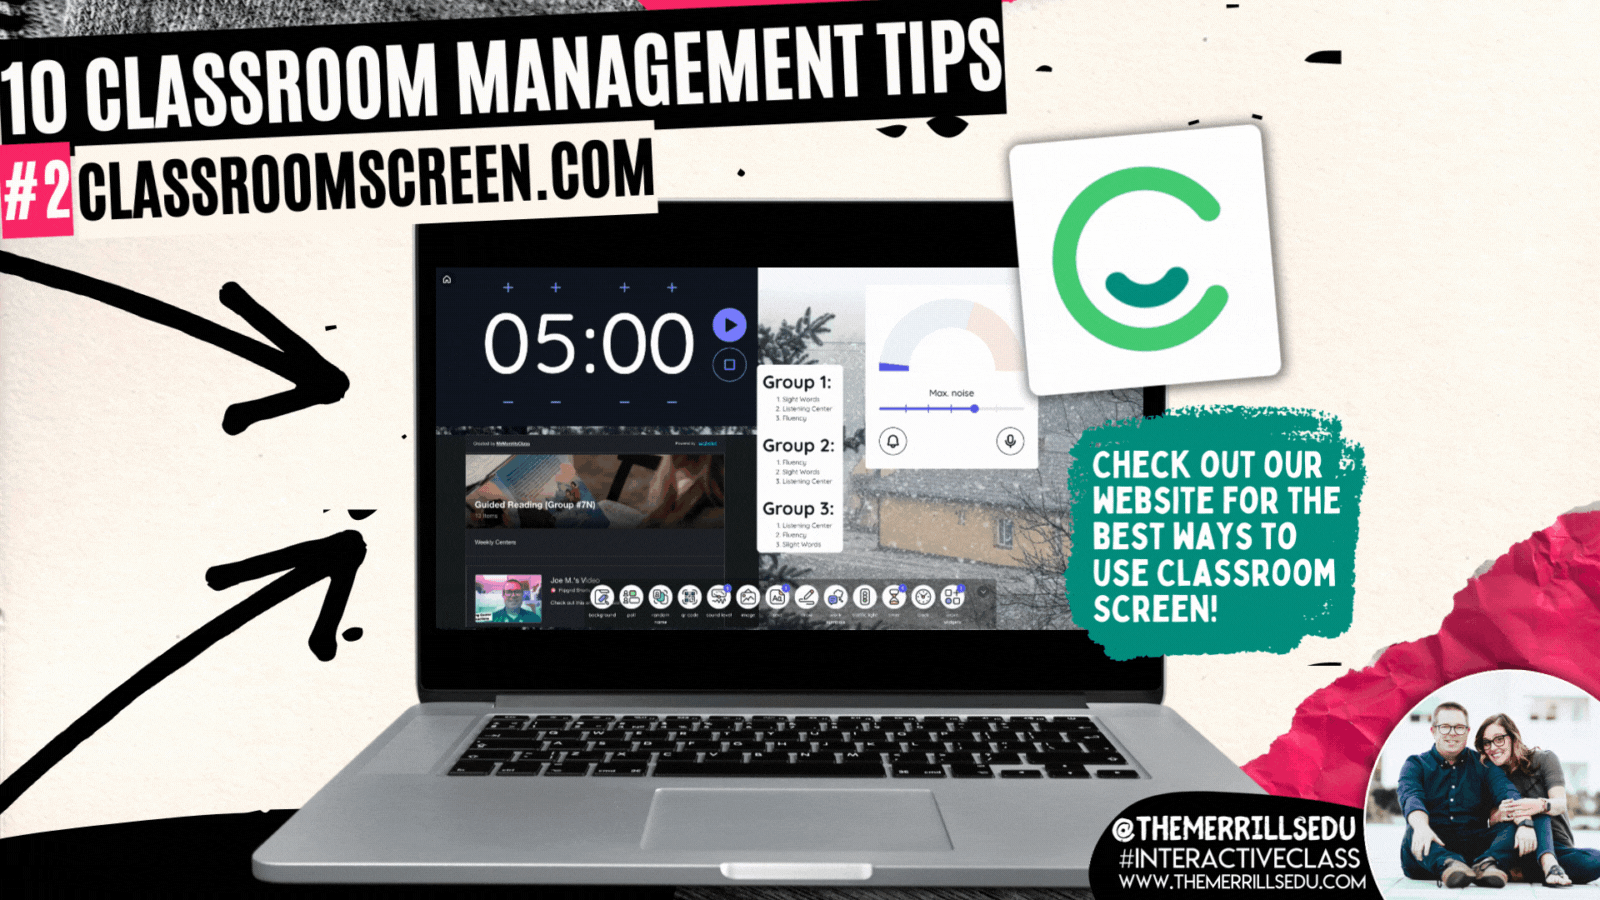
If you’re looking for a good whole group management website, then look no farther than Classroomscreen.com. This website comes in both free and paid versions ($30 a year to go Pro), and offers tons of options. Here are a few of our favorite ways to use it in our classrooms:
Set timers: Let’s be honest…this is every bit as much for us as it is for the kids. We’ve got to stay on schedule!
Add notes: Give specific instructions, spell tough words and more.
Launch noise meters that will “ding” every time the noise level goes beyond a selected range
Embed content: Embed content from your favorite ed tech tools like: Canva, Wakelet, Flip and more!
Random Name Selector: With a “Pro” account, you can enter your class names and this feature will randomly select a student for you1
Webcam: Add your document camera to your Classroom Screen!
There are so many more features to be explored! How are you using ClassroomScreen.com? Tag us on social media and let us know!

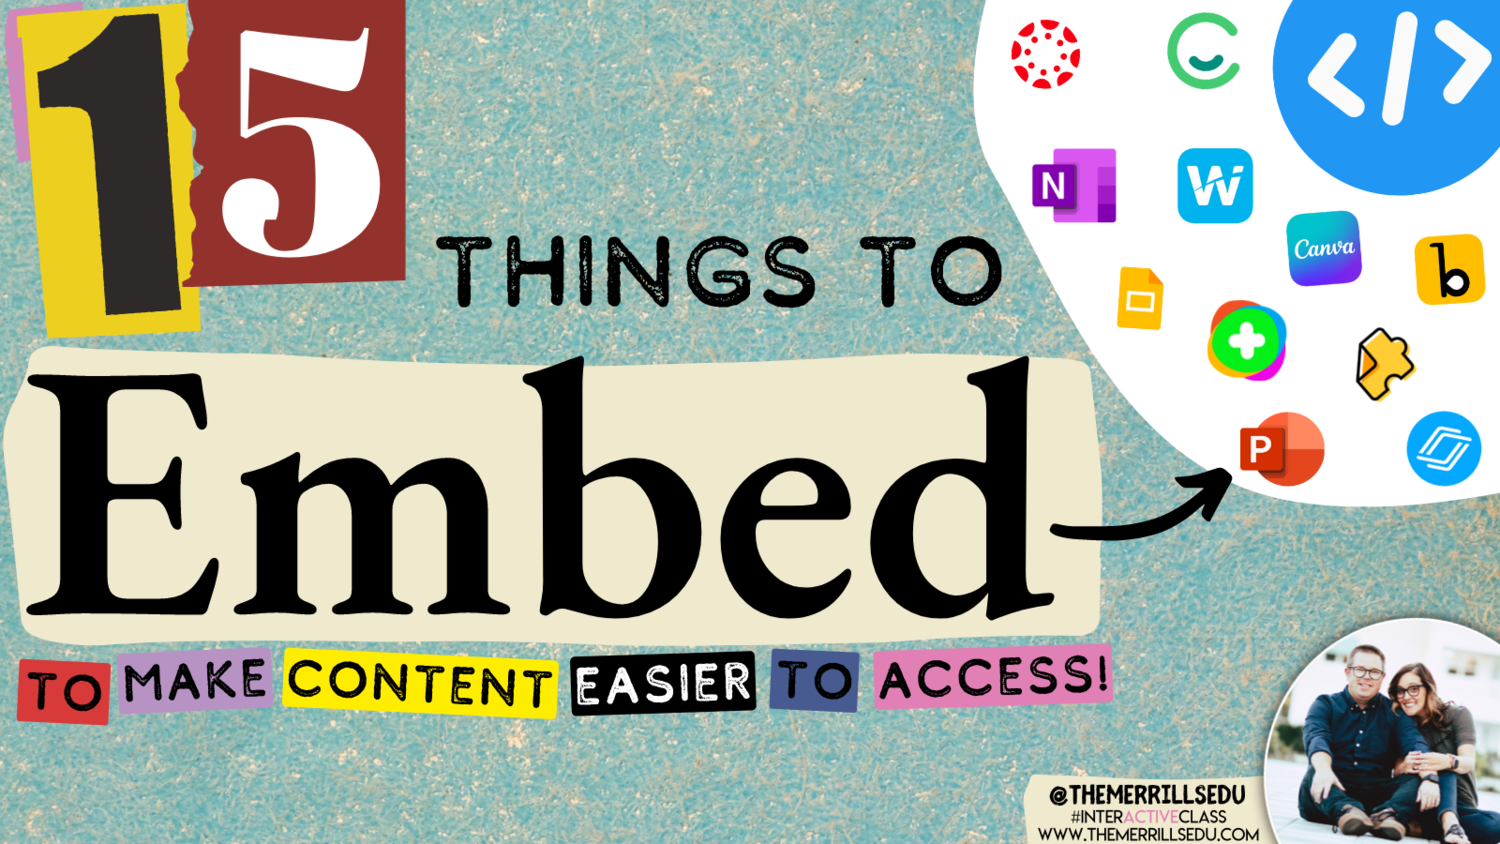
Embedding Content

Embedding apps is a great way to keep your content organized, but more importantly, it can help keep your students focused when working on tasks. The option to embed from apps is becoming increasingly more popular, and you may even be able to embed some of the apps you’re using right now! We hand picked 15 different ways to embed your content. You can learn about them all in our blog post below! Click the image to head that way!
-- Let us know if you’re using any of these ideas in your classroom! Be sure to follow us on social media (@TheMerrillsEDU everywhere) and tag us! 👓👗
For more tips, tricks and lesson ideas for making learning more interACTIVE, check out our books The InterACTIVE Class and Flipgrid in the InterACTIVE Class on Amazon!


Christmas Ideas and Activities for the Elementary Classroom!
@TheMerrillsEDU share Christmas ideas and activities for the Elementary Classroom! You’ll find: Something to Make 🎨, Something to Wear 👕, Something to Read 📚, and Something to Share 🙌🏻!

Boy, do we have something for YOU! 😲🫢
Your "P🎁R🎁E🎁S🎁E🎁N🎁T🎁S" is requested!
This holiday season, we've collected ideas of:
🎨Something you MAKE
👕Something you WEAR
📚Something to READ
🙌Something to SHARE
Check it out below, or click on a day to jump to that content!


“Trap” students inside their own designed snow globe with these pre-made templates! Click below to download our Adobe Express, Canva, Buncee or print template!


Joy to the wool 🎄! Challenge students or staff to design the ugliest holiday sweater! We’ve also included a template for an Ugly Stocking and Ugly Socks! Click the image below or right here to download all templates w/ instructions!

We’re KNOT kidding, this simple craft is perfect for the holiday season! All you need is a ring, string, and knowledge on how to tie a loop knot!


Will you catch an ELFie this year? Now, you can create a video of the elf on the shelf in YOUR OWN classroom! 👀 Click on the image below or right here to download our template with instructions!

Go where SNOWman has gone before! Pair our Adobe Express template with any of these snowman books. Then, have your students build their on snowman! Click the image below or right here to download the template!


You don’t need a Christmas tree to give a memory that families won’t FIRget! Try this Canva card template! Just download and then have your students change out the pictures with their own. This would be great as an individual student project, or as a class card! To grab the template, click the image below or right here!


Here’s a quick and easy class craft idea that your class is FIR sure to enjoy! These can hang BEANIEth any tree! All you need is a paper towel roll, yarn, and cotton balls! Follow our directions above!

Forgetting things around the Holidays? YULE be sorry! 😲 Foster responsibility with our reminder bracelets from Canva! Click the download button below to grab the template and print or edit for yourself!


Sleigh it ain’t so! Share this Adobe Express overlay sticker template with students for simple, personalized cards or holiday crafts! Click the image or right here to download it for yourself!

Roses are 🌹, Violets are blue 💙, David agrees 👍🏻, Worksheets are, “EW!” 👎🏻
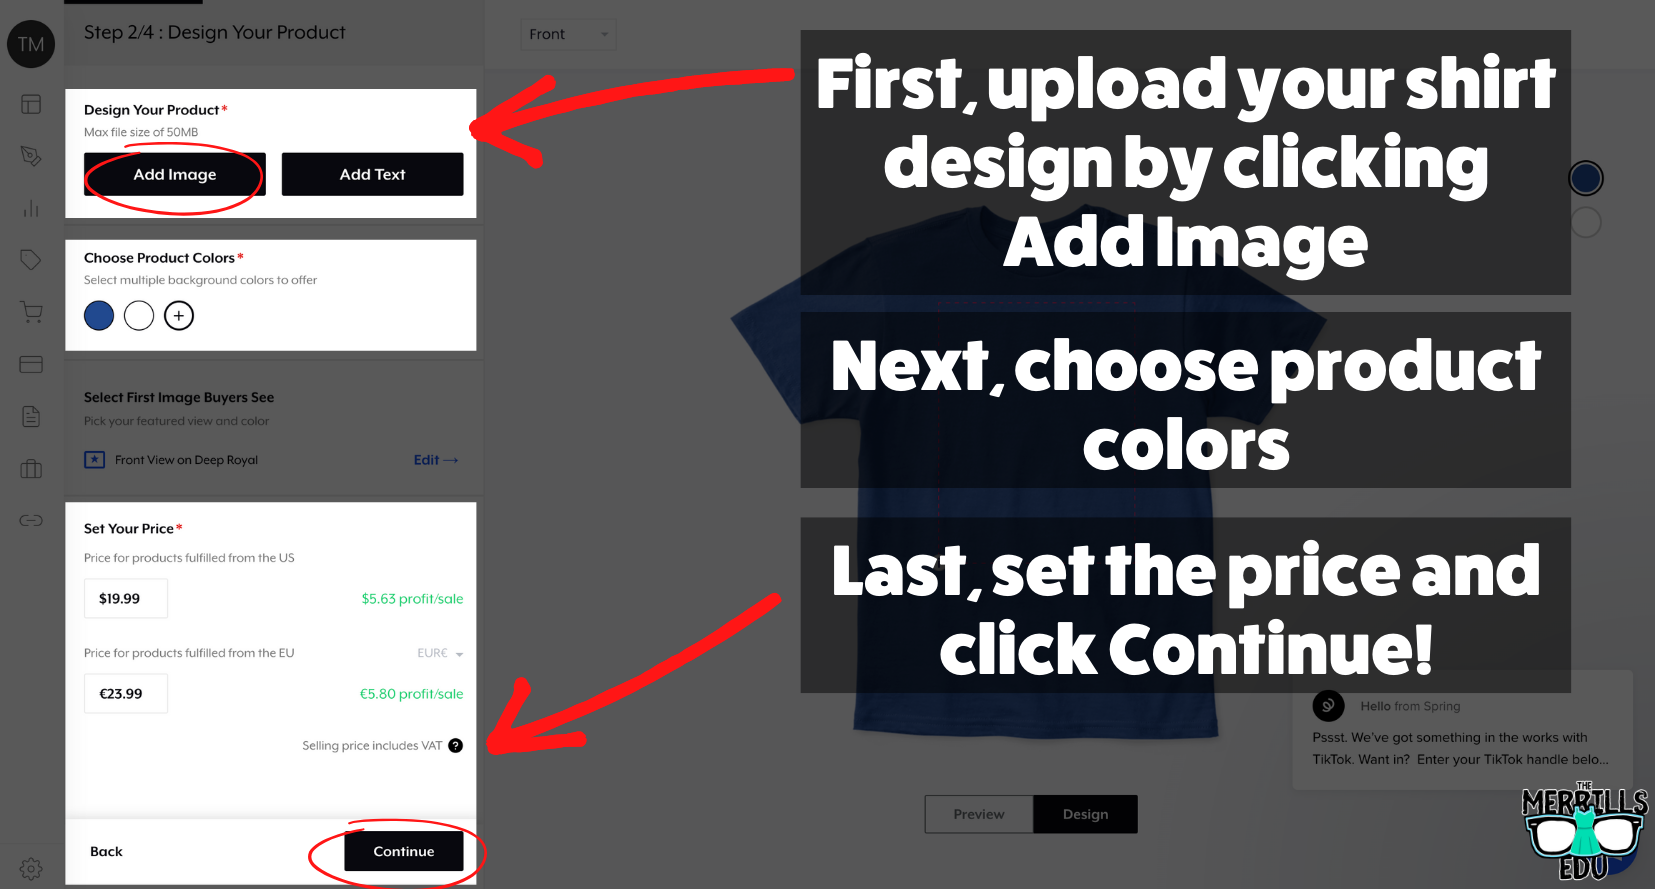
Pick up our latest shirt design from our merch store by clicking on the image above or right here!


They say that Christmas is a time to “tree-t” yourself, so why not show off your interACTIVE spirit with some festive wear? Check out our store by clicking on the image below or right here!


Turn your holiday read alouds into a magical experience with Novel Effect! Learn more about Novel Effect by clicking the image above or right here!


Your students will open these gifts at a WRAPid pace! 🎁 Give the gift of a new book this season! This idea from TheGameGal.com has everyone starting with a wrapped book and each time the words left or right are read aloud in the poem, you pass your “present” along. When the poem ends, you get to unwrap your new book! Click on the image above, here, or below to download the poem!


Treat yo’elf to a magical read aloud activity with the book, “How to Catch an Elf!” Read along to the book on Novel Effect, then incorporate STEM into the holiday season with an elf trap building challenge! We’ve also included a persuassive letter template from the elf’s point of view - trying to convince the students to release him! You can grab the template by clicking on the image below, or right here!

How about a Holiday READth?! Click on any book in the image above to immediately “spruce” up your classroom!
Get Hanukkah off to a great STARCH with Oskar and the Eight Blessings! Read this special story on Novel Effect and then discuss / brainstorm gifts and acts on Microsoft Flip. Then, download & print our template where students can discuss blessings found in the story. Click on the image below or right here to download our template!


We BELIEVE that you will love this Polar Express activity! Start out ordering some small jingle bells by clicking here or the image below. When they arrive, place a fake return address on the package and then place them into the freezer. Let them sit in the freezer for as long as possible (even if it’s for a day or so). Pro tip: I like to have our office manager save them in her refrigerator, so that way she can hand deliver them to the class to make it look like the package is more authentic. She usually comes in and plays the part well - exclaiming that there has been a “special delivery for the class!”
After that, print and cut out tickets from our Polar Express Ticket Canva template, and our letter from “The Boss” (links below). Then, read the book with Novel Effect and watch the movie! Lastly, have the bells “delivered!” Be sure to explain to the person delivering the bells that they will need to do so quickly, as the bells will thaw quickly. But, if you are able to deliver them fast enough, the bells will be cold when you open the package! Download / purchase all necessary materials below!


The Holidays are a FONTastic time of the year! Check out some of our favorites and download them all for ⭐️FREE⭐️ by clicking on the image below or right here!


Time to SPRUCE things up with a new idea or two! 🎄 We’re inspired daily by the interACTIVE ideas from across the world. So, we decided to curate them and share them with you! To view the entire collection, click on the image below or right here!

Encourage your students to see the “bigger picture” with our interACTIVE posters! Just download, print, and hang! Click the image below or right here to download!


Oh, DEER! 🦌 Your students will love this ⚡️LIVE⚡️ reindeer cam! Just click on the image below or right here to access the website!


These year-round tunes will have the sugar plums dancing in your head! These hits aren’t just for the Holidays, so keep them jamming all year long! These are available on Apple Music or Spotify - you choice! Click on the image you prefer below!


Gifts are meant to be shaken like a pole-aroid picture! Use these tags to keep track of whose is whose. We’ve got several different designs for you. Which one will you choose? Click the image below or right here to download! 🤶

-- Please follow us on social media and tag us with how you’re using these Christmas Ideas and Activities in your classroom! 👓👗
For more tips, tricks and lesson ideas for making learning more interACTIVE, check out our books The InterACTIVE Class and Flipgrid in the InterACTIVE Class on Amazon!


Practicing and Assessing Sight Words in Canva!
Learn how to use Canva to practice and assess your students sight words! These ideas can be used to assess or as a center!

If you’re a primary teacher, you know the pain of assessing 20+ students. Chances are that this takes a great deal of time and can be frustrating for both teachers and students. We’ve used tools like Microsoft’s Reading Progress to assess sight words (click here to learn more), but sometimes you just need to sit down with a student to hear how they’re performing. That’s where this idea comes in! In this mini-blog post, you’ll learn how to use Canva to assess sight words. Click any subheading to jump to that section:


How to use Canva to Practice and Assess Sight Words
This idea can be used as a center for students, or as an assessment tool. The idea is to have your slides automatically advance so that they progress through the words relatively quickly. Here’s how it all works:
Start off by creating a presentation deck that has all of your sight words on it.

Once you’ve settled on a design, change the timing on your slides. To do this, click on the clock icon located at the top of the screen. Adjust the timing to your preference. We recommend around 5 seconds. Be sure toggle on “Apply to all pages,” which will place the same timing on all of your pages.
Now your deck is ready. When you want to start assessing a student, explain that a sight word will appear on the screen. If they know if, they can say the word. If they don’t know it, that’s okay. The word will change in a few seconds and they can try the next word. Here are the steps to launch the deck:
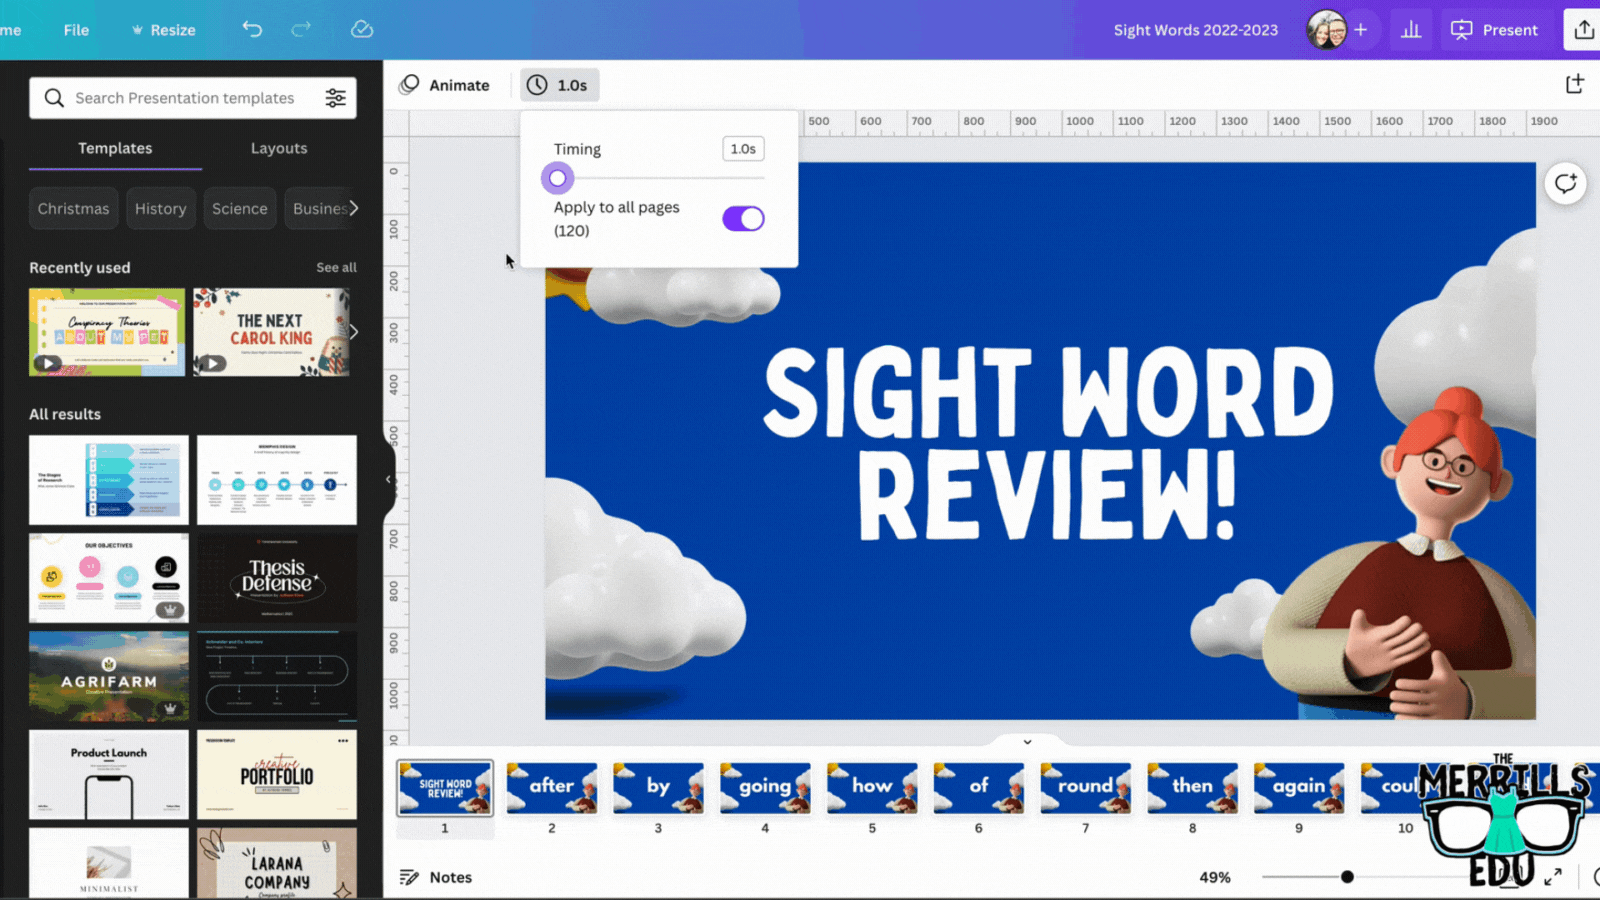
In the deck, click “present” to take the pages full screen. Now, change the type from “Standard,” to “Autoplay.” This will automatically transition the pages to the time you selected. Students read off the words as they appear on the screen.

Download our Excel template to
record student responses
If you prefer to manage your data digitally, we have you covered! We’ve designed a Microsoft Excel sheet that has all of our sight words on it. When a student gets a word correct, enter a “1” in the white box. Doing so will change the word from being highlighted to white - an indication that the student has mastered that particular word. This document will also automatically calculate the number of correct words. Record each assessment on the lower right side to keep accurate data. Note: this document is editable, but you may need to change the formulas if you edit it. Click here or the image below to download it now!


How to use Canva to Practice and Assess Sight Words (Video Tutorial)
Need to see it in action to understand all of this? We’ve got you! Check out the video tutorial below to understand each step.

Download our Free Canva Sight Word Deck
Does all of this sound awesome but you’re just not sure where to start? Teachers are busy, so we’ve got you covered here, too! You can download our Canva Sight Word deck by clicking here or the image below.

-- Please follow us on social media and tag us with how you’re using these Canva Sight Word ideas in your classroom! 👓👗
For more tips, tricks and lesson ideas for making learning more interACTIVE, check out our books The InterACTIVE Class and Flipgrid in the InterACTIVE Class on Amazon!


20 Read aloud Activities to Use with Novel Effect (and Other Apps)!
Novel Effect is a MUST TRY app for any classroom! See how you can use this app with books that you’re already reading. Check out some of our favorite classroom activities to use Novel Effect with - including ideas with Microsoft Flip, Canva, Adobe Express, Seesaw and more. Here’s 20 of our favorite!

If you teach reading, you HAVE to check out Novel Effect. Novel Effect is an award-winning app that follows your voice as you read out loud from a children's story book and responds at just the right moment with interactive music, sound effects, and character voices. You can learn more and download it by clicking here!
So how can we fit this amazing app into our standards? It’s easy! Novel Effect’s library is FULL of books that you most likely already have in your collection - and they continue to add more weekly. Now that we have had some time using the app, we’d like to share 20 of our favorite activities. Click on any subheading to jump to that section/activity!


The Bad Seed
Jory John’s “The Bad Seed” has a bad temper, bad manners, and a bad attitude. But, it doesn’t last long in this popular story. One of our favorite activities to do with this book is with Novel Effect and Microsoft Flip. Follow the steps below:
Read The Bad Seed on Novel Effect
Have students use the Bad Seed sticker in a Microsoft Flip video
Students can retell the story, or explain what positive actions they can do to help promote kindness in the classroom and school campus
You can download The Bad Seed sticker by clicking here or the image.


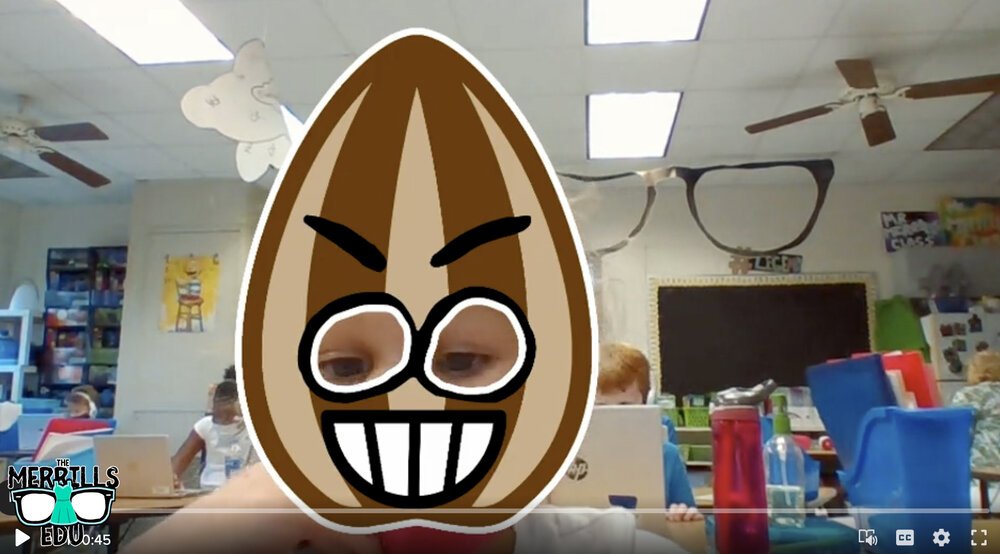
The Good Egg
In part two of Jory John and Pete Oswald’s series, The Good Egg is trying to look out for others but forgets the most important person: themself. After some careful reflection, The Good Egg decides to do what’s best and make a change. We absolutely love to use this book as a classroom management tool. Here’s how:
Purchase an Egg plastic trophy here (you might want to remove the name plate)
Click here to read The Good Egg on Novel Effect
Give the egg trophy to a student who is meeting your expectations
Move the egg frequently, “catching” students who are doing the RIGHT thing.
The person who has the trophy at the end of the day earns a prize!

Purchase an Easter Egg trophy by clicking here
Here’s another idea that is great for the beginning of the year!

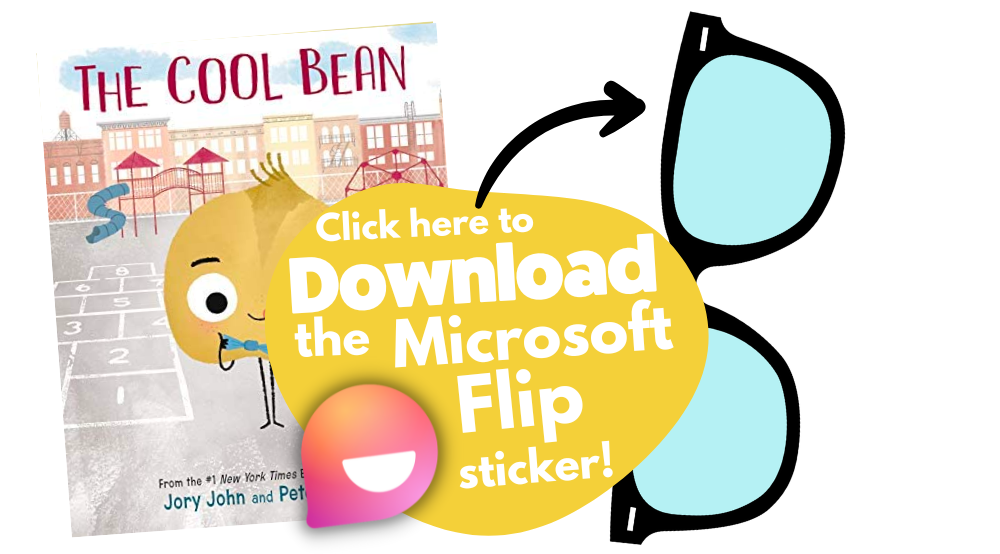
The Cool Bean

In part 3 of John and Oswald’s series, a bean always finds himself on the sidelines. After unsuccessfully trying everything he can to fit in with the crowd— the cool beans step in to show him how it’s done. Just when if it couldn’t get any cooler - it does! Now you can read this book on Novel Effect! Here’s our favorite activity includes using Microsoft Flip:
Read The Cool Bean on Novel Effect
Have students use the The Cool Bean “Raybean” sticker in a Microsoft Flip video
Students can retell the story, or explain how they would act like cool beans around the classroom and school campus.

The Couch Potato

In part 4 of John and Oswald’s series, The Couch Potato has everything within reach and doesn't have to move from the sunken couch cushion. But when the electricity goes out, Couch Potato is forced to peel away from the comforts of the living room and venture outside. Bring this story to life with Novel Effect and check out this activity:
Read The Couch Potato on Novel Effect
Have students use The Couch Potato “webcam” sticker in a Microsoft Flip video
Students can use the sticker to explain why using technology all the time may not be best.
Click here to download the The Couch Potato “Webcam” sticker


The Smart Cookie

In part 4 of Johns and Oswald’s series, This cookie has never felt like a smart cookie no matter how hard she tries, especially in comparison to all the clever cupcakes and brilliant rolls in the bakery. But, a dash of creativity and a sprinkle of confidence helps her learn that perfect scores and having all the answers aren’t the only ingredients for intelligence! But the cookie doesn’t have to be the only creative one. With this activity, your students will be creating the perfect cookie with all the right ingredients!

Here’s how:
Read The Smart Cookie on Novel Effect
Download the Smart Cookie Canva template
Assign the template to your students
Students use the template to design a smart cookie and use text boxes to include things that you are good at!
Save your work and then share it on Seesaw!


Chrysanthemum

Kevin Henke’s “Chrysanthemum” gets children thinking about and bonding with their own names and the names of everyone else in the class. It's the perfect vehicle for starting a discussion about treating classmates with tolerance, kindness, and compassion. With Novel Effect, this book comes alive! Here’s an activity that we’ve done in our own classrooms:
Give each student a copy of the Chrysanthemum name tag
Students create a design for the name tag that describes Chrysanthemum’s feelings in the beginning, middle and end.
(This can be done digitally on Canva or Adobe Express - or simply with crayons)
Share your work on Seesaw!
Click here to download the Chrysanthemum name-tag (Canva) template


Wemberly Worried

Okay, we might be a bit biased on this one…Together, we’re the voice actors for the mother and father of this book on Novel Effect. In this book, Wemberly worried about everything. Big things. Little things. And things in between. Then it was time for school to start. And Wemberly worried even more. If you ever worry (or know someone who does), this is the book for you! Here’s one of favorite activities to do with it:
Read Wemberly Worried on Novel Effect
Have students use the Wemberly Worried “cover” sticker in a Microsoft Flip video
Students can use the sticker to explain what are some things that they worry about.


Enemy Pie

Derek Munson and Tara Calahan King’s “Enemy Pie” is a funny yet endearing story where one little boy learns an effective recipe for turning a best enemy into a best friend. This book is perfect for any time of the year - and often we see ourselves re-visiting it throughout the year. Here’s our favorite “Enemy Pie” activity!
Read Enemy Pie on Novel Effect
Use Canva or Adobe Express to find a recipe template (or use our Canva below!)
Assign the template to your students
Students use the template to design a recipe that includes ingredients to become a good friend.
Save your work and then share it on Seesaw!

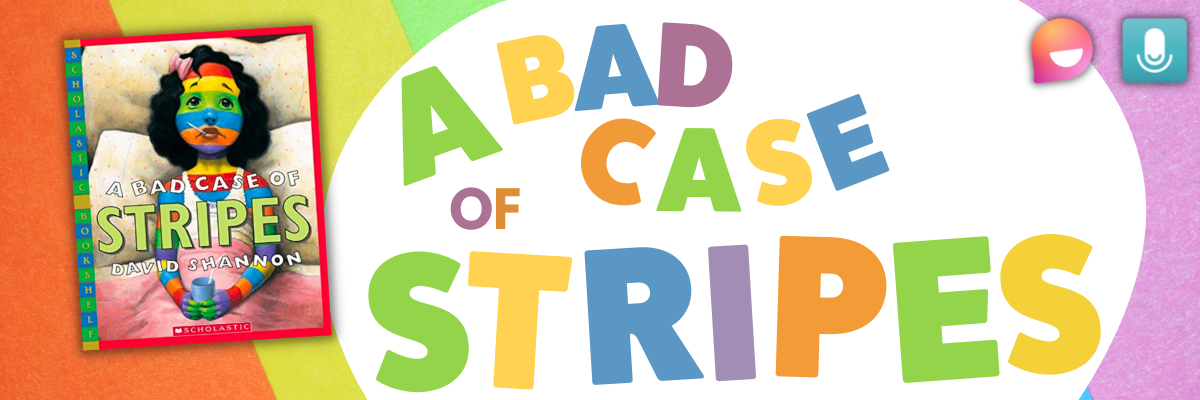
A Bad Case of Stripes

David Shanon’s “A Bad Case of Stripes” is about a little girl who secretly enjoys lima beans. However, she’s concerned about what others might think of her if they learn that she loves them. Until one day - when everyone finds out! Here’s our favorite “A Bad Case of Stripes” activity:
Read A Bad Case of Stripes on Novel Effect
Have students use the Bad Case of Stripes sticker in a Microsoft Flip video
Students can use the sticker to explain what happens in the story, or even share something unusual that they like.
Click here to download the Bad Case of Stripes sticker


Hey Little Ant

Phillip Hoose’s “Hey Little Ant,” is about a surprising conversation between a tiny ant and a little girl. The book is bound to inspire important discussions about caring, kindness and respect for both animals and humans. Here’s our favorite activity:
Read Hey Little Ant on Novel Effect
Have students use the magnifying glass sticker in a Microsoft Flip video
Students can use the sticker to explain how the illustrations in the book may portray a different message. than the words.


Grumpy Monkey

In “Grumpy Monkey,” Suzanne and Max Lang bring hilarity and levity to this very important lesson on emotional literacy, demonstrating to kids that they are allowed to feel their feelings. This is a great lesson for any time of the year, and here is our favorite activity:
Read Grumpy Monkey on Novel Effect
Have students use the Grumpy Monkey sticker in a Microsoft Flip video
Students can use the sticker to explain how the illustrations in the text told a different story than the words.


Mae Among the Stars

Roda Ahmed’s “Mae Among the Stars,” is an inspiration to students to reach for the stars - no pun intended. We love how it encourages girls (specifically) to aspire for the impossible, and to persist with childlike imagination. Here’s our favorite “Mae Among the Stars” activities:
Read “Mae Among the Stars” on Novel Effect
Have students use the astronaut sticker in a Microsoft Flip video
Students can use the draw tool to add planets, stars, etc. Or, students can add stickers like a rocket!
Have the students retell the story as an astronaut!

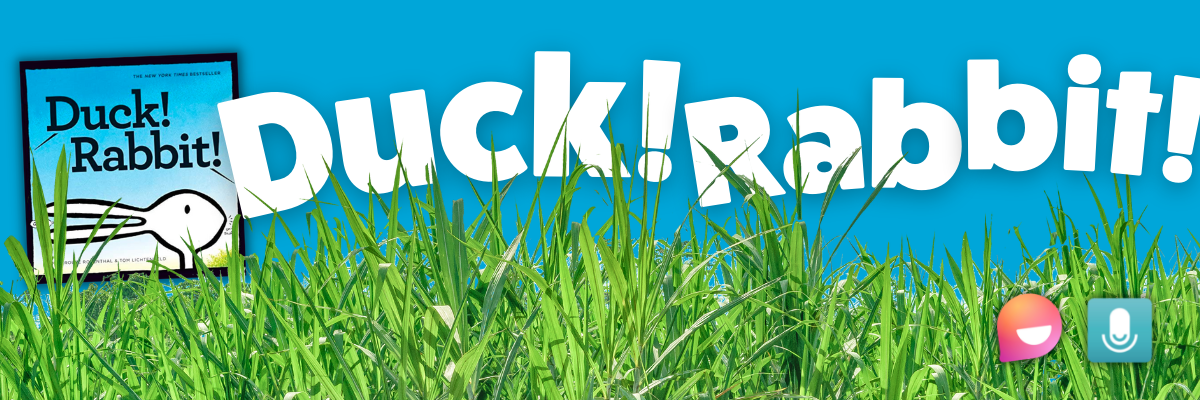
Duck! Rabbit!

Amy Rosenthal and Tom Lichtenheld’s, “Duck! Rabbit!” has a clever take on the age-old optical illusion: is it a duck or a rabbit? Depends on how you look at it! Readers will find more than just humor here; there's also a subtle lesson for kids who don't know when to let go of an argument. Here’s our favorite “Duck! Rabbit!” activity:
Read “Duck! Rabbit!” on Novel Effect
Have students use the Duck Rabbit sticker in a Microsoft Flip video
Students can use the draw tool to add a duck bill or rabbit ears to share their opinion on whether the image is a duck or a rabbit
Have students watch the other responses and see if another student can convince them otherwise!
Click here to download the Duck Rabbit sticker


The Oldest Student

Rita Hubbard and Oge Mora’s “The Oldest Student” is based on the true life story of Mary Walker. Imagine learning to read at the age of 116! Mary, the nation's oldest student, did just that. We love this story for so many reasons and it can be used in lots of different ways. Here is just one of our favorite ways to use it:
Read “The Oldest Student” on Novel Effect
Have students use the Grandma Glasses sticker in a Microsoft Flip video
Students can use the sticker to retell the events of the story and Mary Walker’s life!


I Want My Hat Back

Jon Klassen is one of our favorite authors. We love his writing and artistic style. “I Want My Hat Back,” is a take on the classic repetitive tale, but it plays out in sly illustrations laced with visual humor. The reader(s) feels to be in on the joke, as the bear frantically looks back to find his beloved hat. Here’s our favorite activity:
Read “I Want My Hat Back” on Novel Effect
Have students use the red hat sticker in a Microsoft Flip video
Students can use the sticker to retell the sequence of events in the story!


This is Not My Hat

In part 2 of Klassen’s series, the hat series takes a bit of a twist. This time, we follow the character who deliberately took a hat from its owner. The character is confident, perhaps overly confident, which leads him into trouble. We really enjoy reading this book after “I Want My Hat Back.” This allows us to complete this activity:
Read “This is Not My Hat” on Novel Effect
Have students use the tiny hat sticker in a Microsoft Flip video
Students can use the sticker to compare / contrast “I Want My Hat Back” and “This is Not My Hat.”


Are You Scared Darth Vader?

In Adam Rex’s “Are You Scared Darth Vader,” nothing can scare Lord Vader! Not monsters or witches or ghosts, and especially not the dark. So what is Darth Vader scared of? A surprise at the end, that’s for sure! If you’re a Star Wars fan - or have kids that are, then this book is for you! Here’s our favorite activity:
Read “Are You Scared Darth Vader” on Novel Effect
Have students use the Darth Vader sticker in a Microsoft Flip video
Students can use the sticker to recreate the ending of the story: What else do you think Darth Vader might be scared of?


Those Shoes

In Maribeth Boelts’ “Those Shoes,” Jeremy desperately wants a pair of popular shoes. However, he soon sees that the things he has -- warm boots, a loving grandma, and the chance to help a friend -- are worth more than the things he wants. Here’s our favorite activity:
Read “Those Shoes” on Novel Effect
Give each student a copy of the Shoes template (this can also be done virtually on Canva or Adobe Express)
Students design a pair of shoes that they would like to give to a friend
Students share their thoughts in a Microsoft Flip video: “Why would these be perfect for your best friend?”


Shark Lady: The True Story of How Eugenie Clark Became the Ocean's Most Fearless Scientist

Eugenie Clark devoted her life to learning about sharks. After earning several college degrees and making countless discoveries, Eugenie wrote herself into the history of science, earning the nickname "Shark Lady." Through her accomplishments, she taught the world that sharks were to be admired rather than feared and that women can do anything they set their minds to. This book by Jess Keating walks through those accomplishments! Here’s our favorite activity:
Read “Shark Lady” on Novel Effect
Have students use the underwater, mask and shark fin sticker sticker in a Microsoft Flip video
Layering is important for this to look correct. The underwater scene must be in the back. The next layer should be the mask - but if students place the mask layer in the back (behind the underwater scene) - it won’t look right.
Students can use the stickers to explain some of Eugenie Clark’s accomplishments


The Day the Crayons Quit

This classroom favorite from Drew Daywalt and Oliver Jeffers features crayons that are feeling overworked and exhausted. What can the main character, Duncan, possibly do to appease all of the crayons and get them back to doing what they do best? We love spreading this book out over several days to talk about persuasion. One of our favorite activities uses trading cards made by the students for each character. Here’s the activity:
Read “The Day the Crayons Quit” on Novel Effect
Give each student a copy of the trading card template
Students select crayons of their choice and decorate the cards as they see fit
On the “level” section of the cards, students can rate each crayon on a scale of how persuasive was the color was in the story (1 being the lowest, 10 being the highest)
Students can save their work, then upload it to Seesaw!


Download all of our stickers!
Love what you see, but don’t want to have to download each sticker one-by-one? We’ve got you covered! Click here or the button below to download every Flip sticker from our activities above!

-- Please follow us on social media and tag us with how you’re using Novel Effect or these activities in your classroom! 👓👗
For more tips, tricks and lesson ideas for making learning more interACTIVE, check out our books The InterACTIVE Class and Flipgrid in the InterACTIVE Class on Amazon!


Connect, Create and Communicate with Seesaw
Learn how Seesaw can help you connect families, encourage creation with your students, and communicate what is happening in the classroom! We’ve included some ⚡️FREEBIES⚡️ and even walk you through how to print your own class shirt using Seesaw creativity!

Using Seesaw is the easiest way to connect the daily learning happening in the classroom with families at home. Whether you’re using Seesaw as a “house” for your student’s content or as a creation tool, this app has plenty of amazing abilities. In this blog post, we’ll cover how to connect families, how to teach students how to use Seesaw, new Seesaw features and more! Click on any subheading image below to jump to that section!


🙌🏼 How to Connect your Families to Seesaw 🙌🏼
One of Seesaw’s most powerful features is it’s ability to connect families with what is happening in the classroom. This is done in a safe and secure way. Families can receive an email indicating that there is a new addition to their child’s portfolio, or they can receive a notification if they have the Seesaw Family App installed (click here for the download link). But, if you’re new to Seesaw, here’s a pro-tip: Use it without advertising it for the first month or so of school. This way, you won’t feel the pressure once your families are invited and you’ll already be comfortable with the platform. Here’s how to get your families connected:

Log into your class on Seesaw and then click on the gear icon (top right)
A new window will pop open. Click on Families
Enter the email addresses of your family members, then click invite!
You can also print out invitations or share an invite link, but we find that the above method gets our families connected easiest!

🎨🖌️ Teaching Students How to Use Seesaw’s Features 🎨🖌️
Seesaw is much more than just a portfolio app. Students have the ability to create right from the app with lots of key features. Our favorite way to teach students the basic features is to have them create what we call a “Seesaw Selfie,” or a self portrait of themselves. The kids can use the pen / drawing tools, shapes and more. We even have a ⚡️FREE DOWNLOAD⚡️ of this activity to download by clicking here! To assign this activity, follow the steps below.
Download the activity by clicking the link here.
Log onto your Seesaw class and assign the activity!


✌🏼😀 Customized Student Avatar in Seesaw 😀✌🏼
While we love the Seesaw emoji’s that are automatically assigned to students, we’ve noticed that personalized customization helps students find their profiles much quicker. So, we use our “Seesaw Selfie” activity (see above, or click here)! Students create their own Seesaw self portrait, which you (the educator) can turn around and download. After you’ve downloaded the “selfie,” you can upload it to change out the Seesaw emojis. This gets students on quicker. Here’s how it all works:


Assign your students the “Seesaw Selfie” activity (download it here)
Select a student, then click the three dots in the Seesaw Selfie assignment.
Click Save.
This will automatically download the Seesaw Selfie image. Unfortunately, there is no way to do this for the entire class all at once (if you know of a way to do so, please let us know!). So you’ll have to go one-by-one. The next step is to upload the Selfie as their profile avatar. Here’s how to do that:
(Click on the arrow in the image below to see a step-by-step)
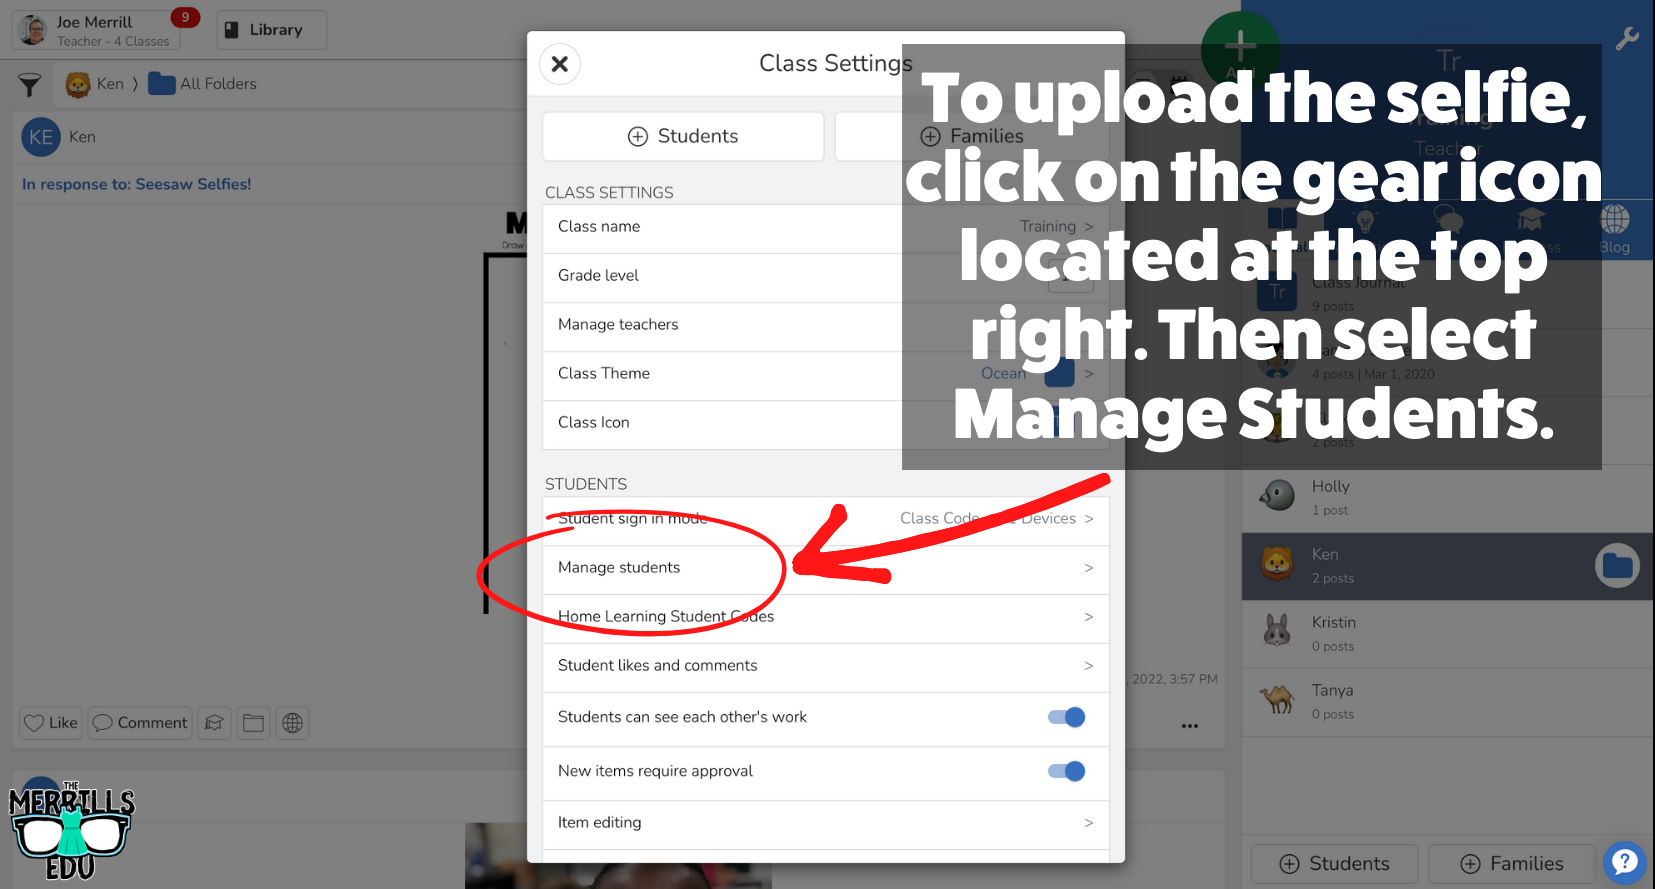
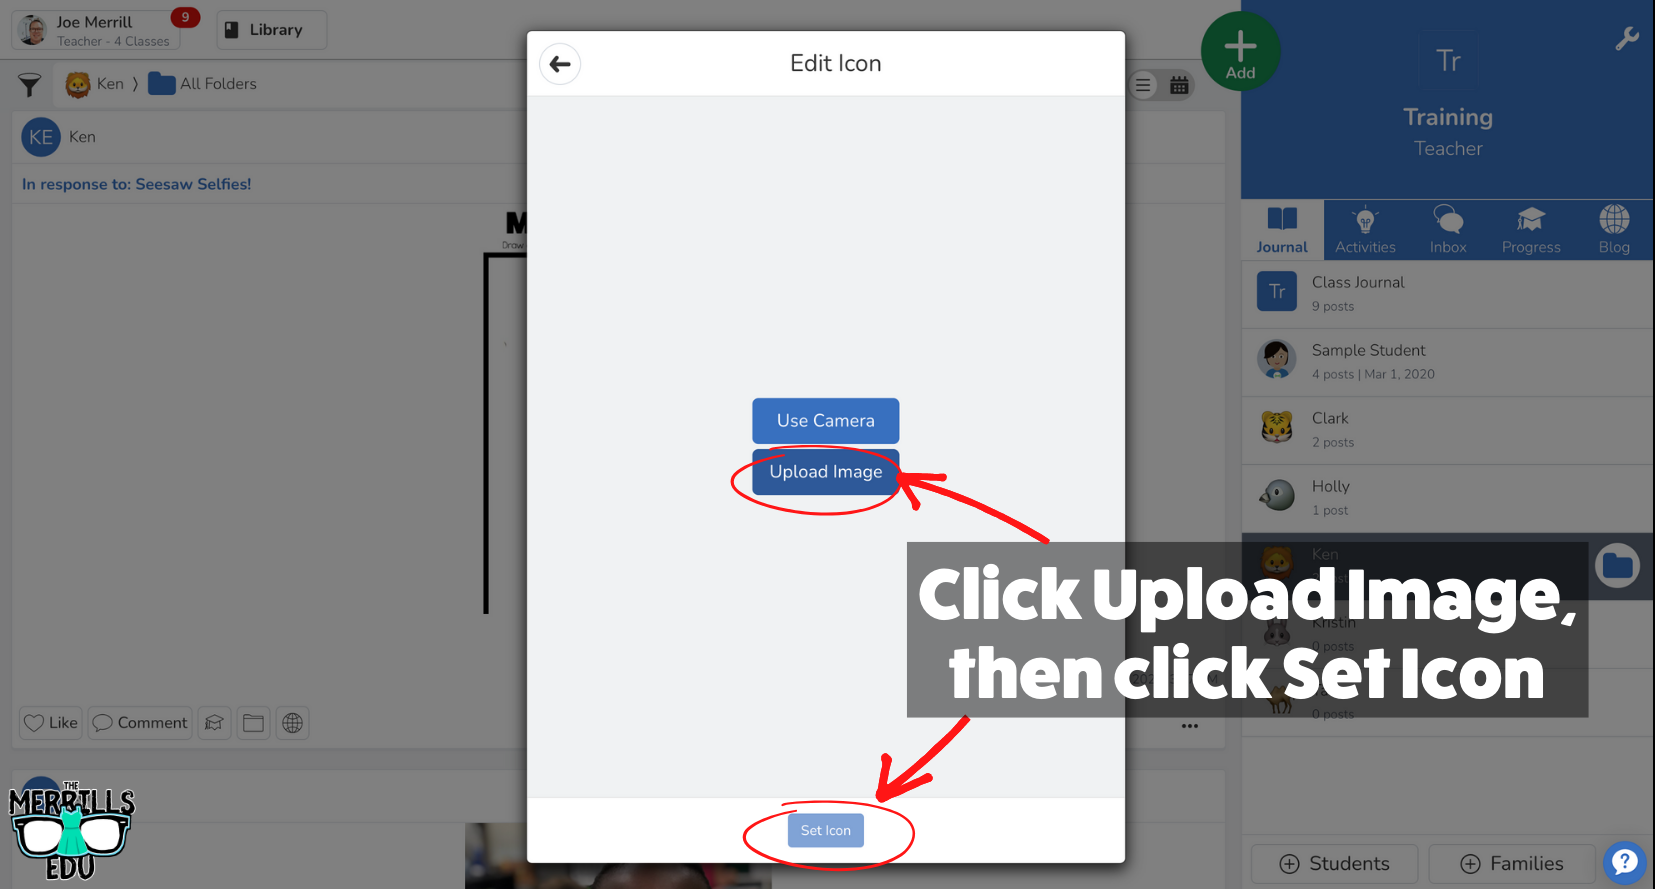
Once students have submitted their work, click the gear icon on the top right of the educators dashboard.
Click “Manage Students” in the new pop up window.
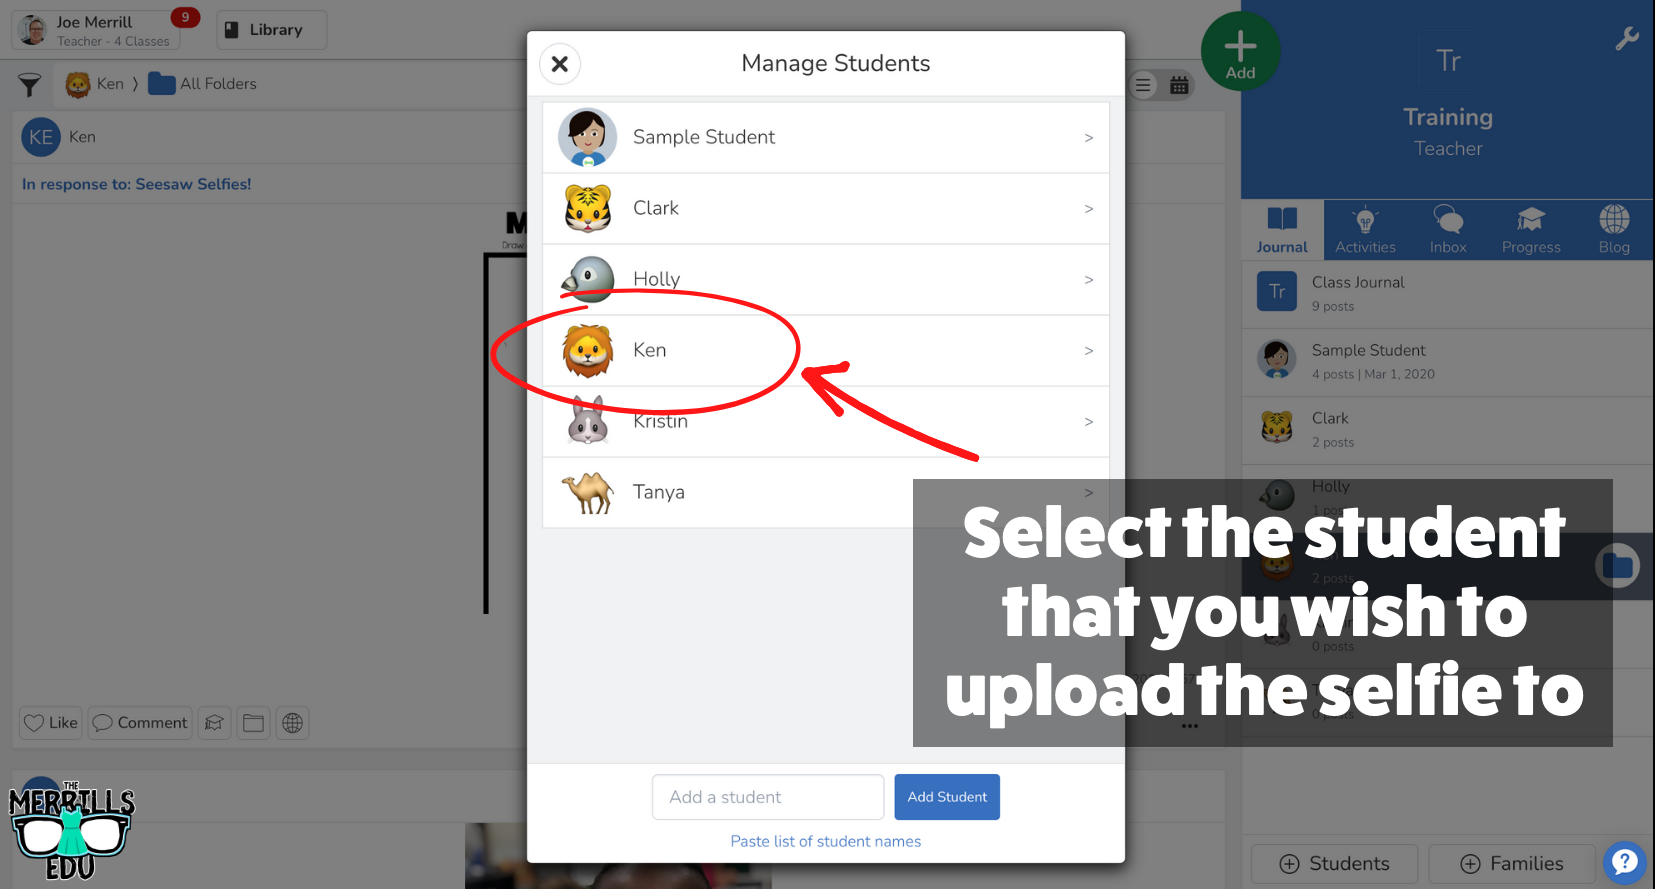
Next, select the student that you wish to edit.
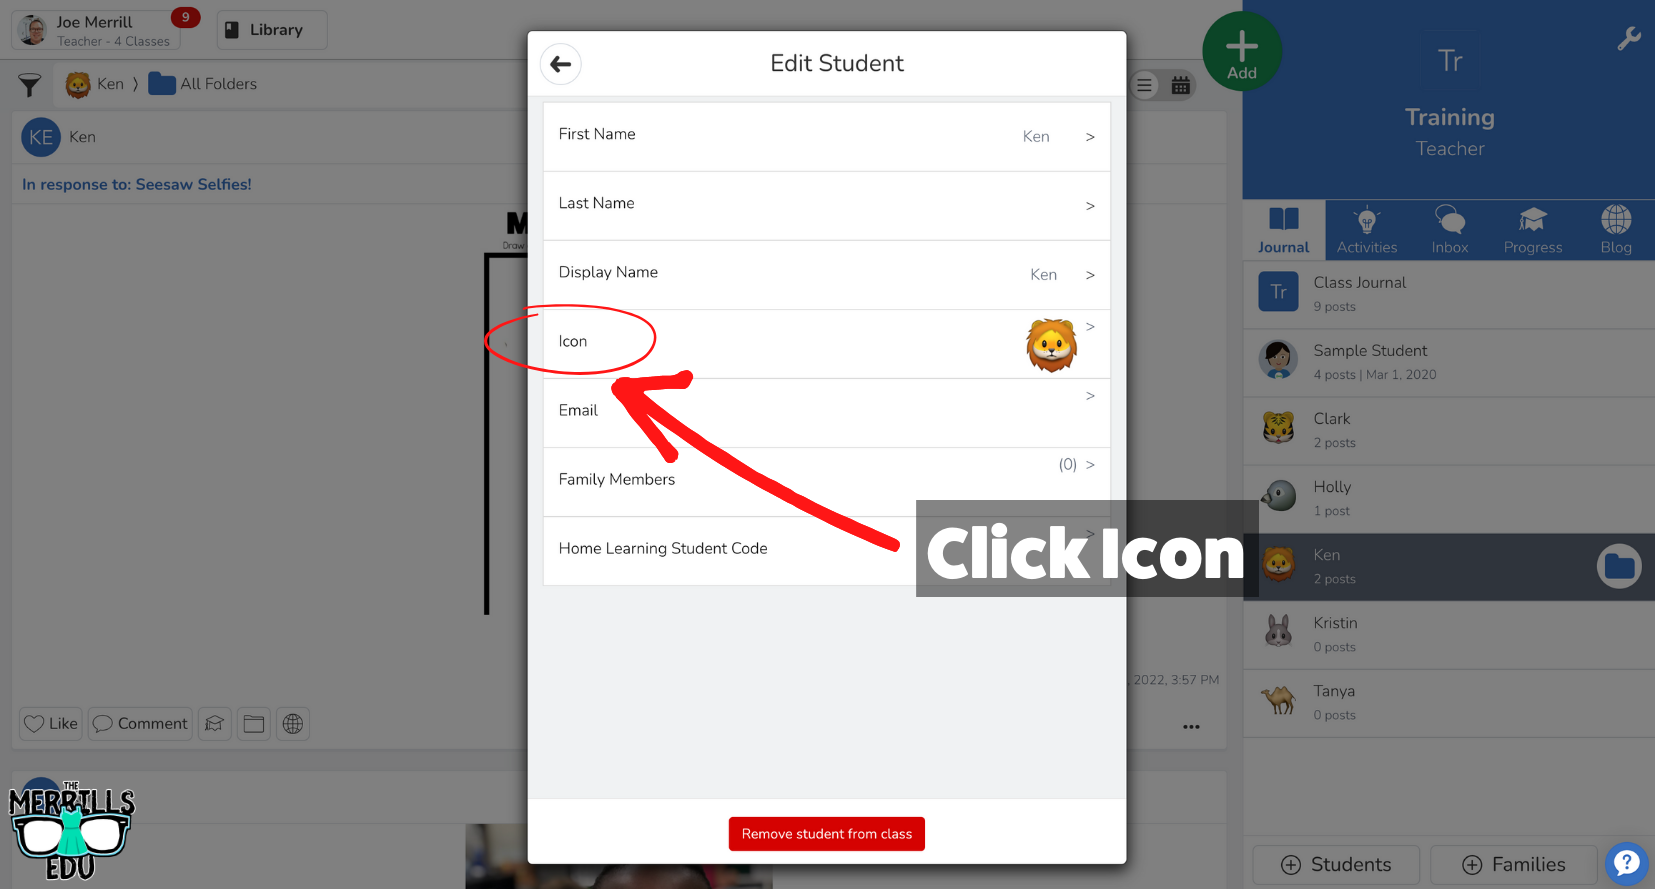
In the next window, click “Icon.”
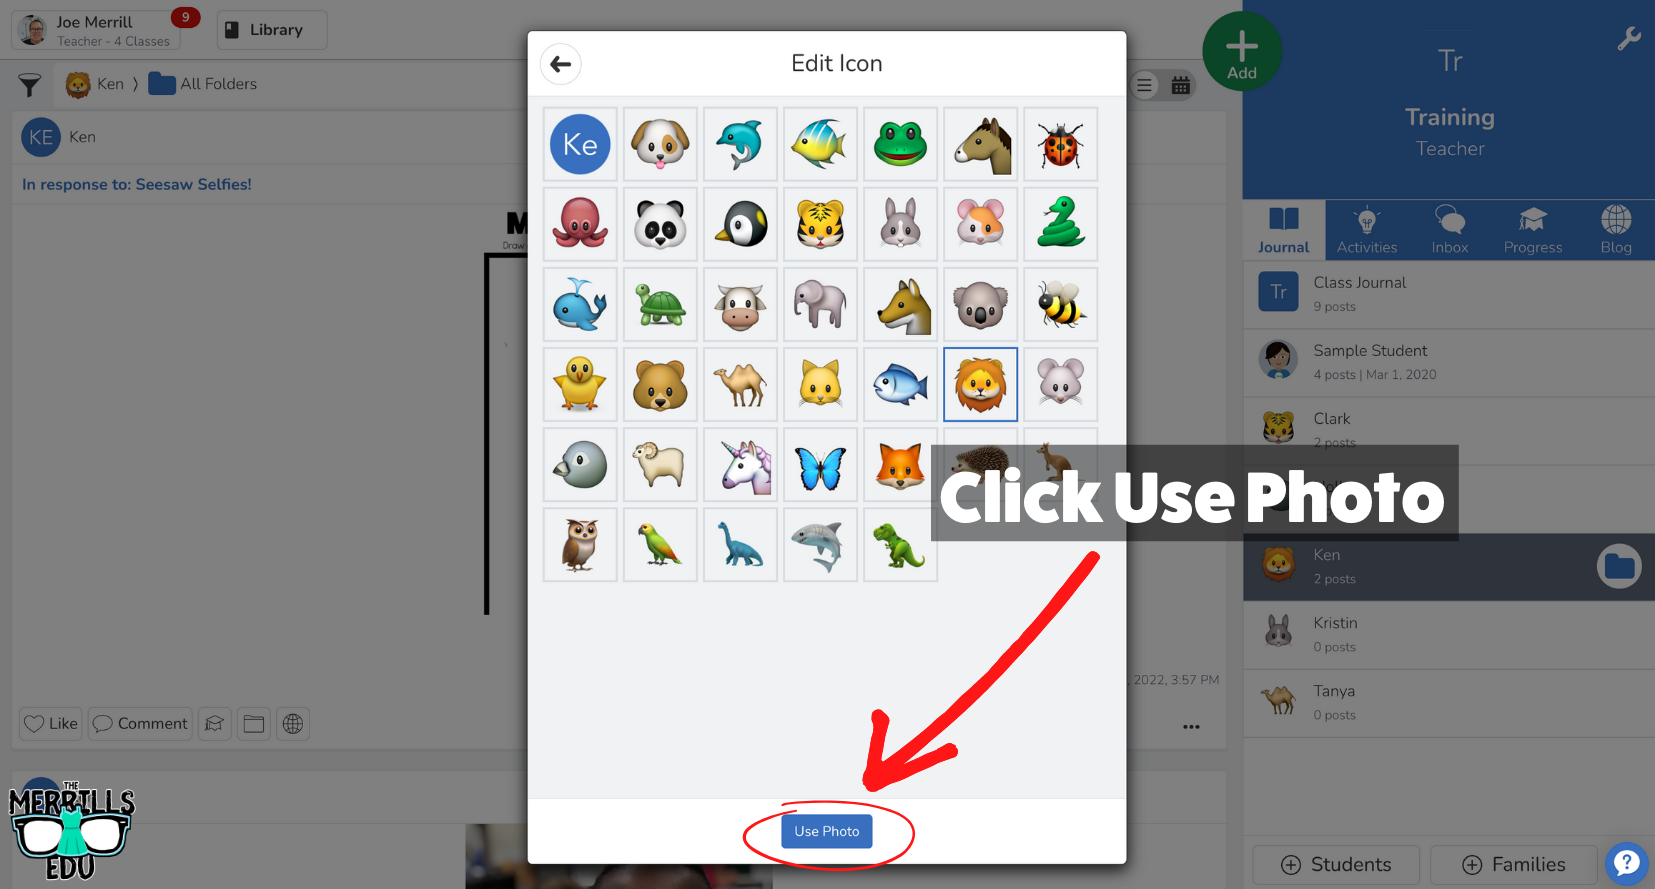
A new pop up will open with the Seesaw emojis. Click “Use Photo” located at the bottom.
Upload the downloaded Seesaw Selfie from the student by clicking “Upload Image,” then click “Set Icon” to save!
Once you’re done, you may not want to delete all of those selfies! Be sure to check out how we used all of our class selfies to design a class t-shirt! All the info is below!

🤔 How to Create a Student Choice Board in Seesaw 🤔
So now you have your students on Seesaw and they’re starting to learn the in’s and out’s of the application. But the fun doesn’t have to stop there! You grab instant engagement by turning any of your centers or assignments into Student Choice Boards. These offer different choices for students when completing tasks, but at the end of the day, everyone is completing the same assignment. To create Student Choice Boards on Seesaw, follow the steps below!
(Click on the arrow in the image below to see a step-by-step)
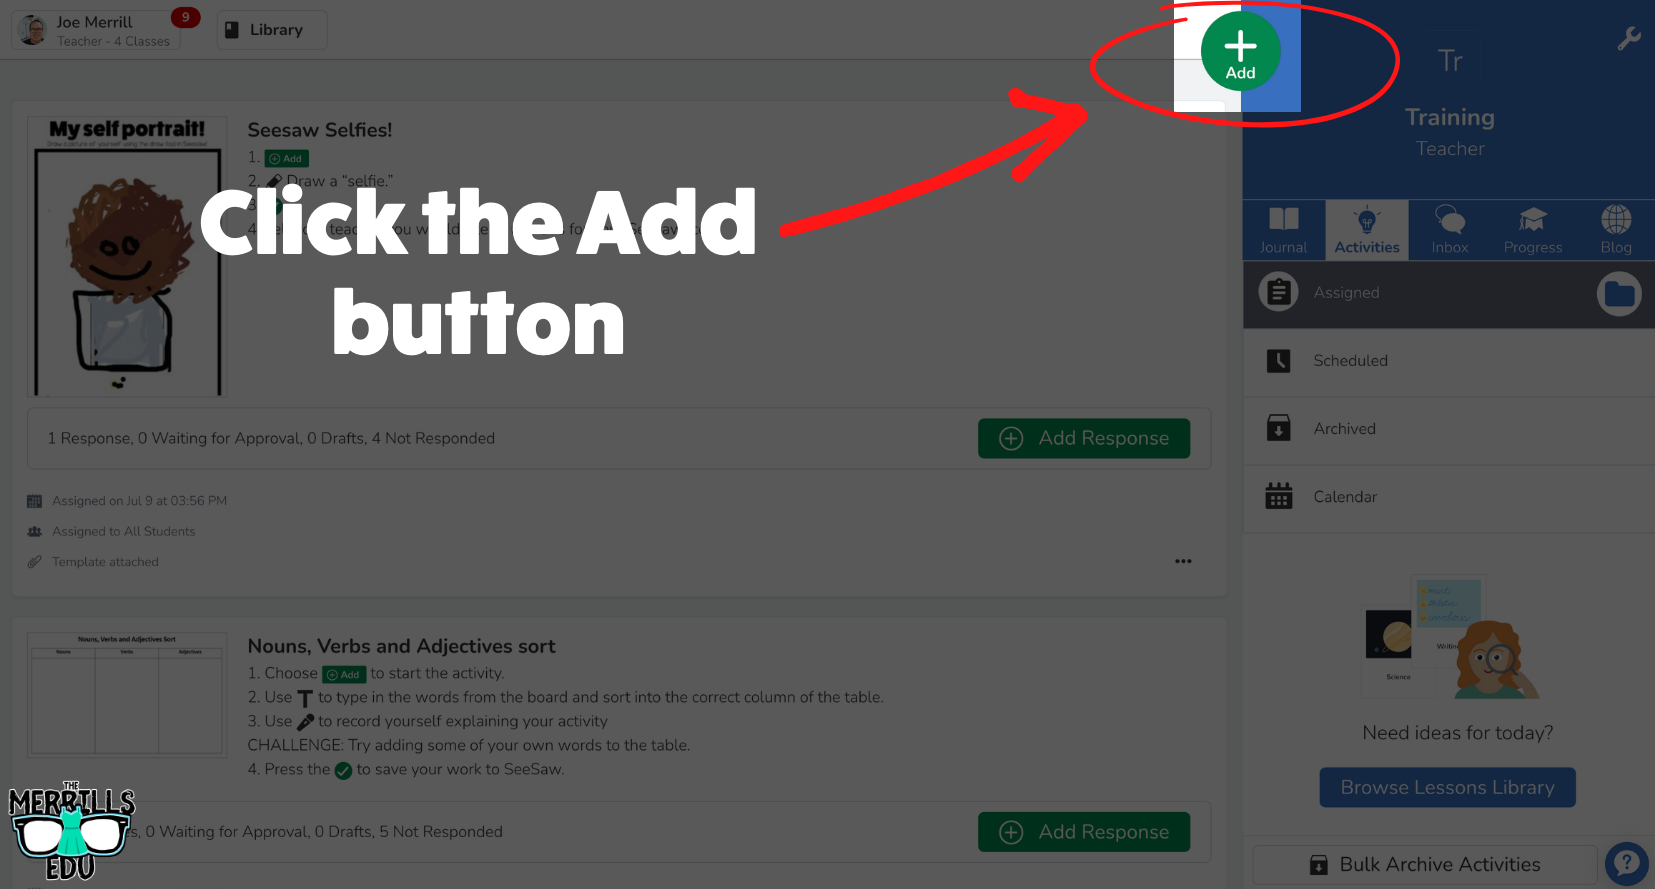
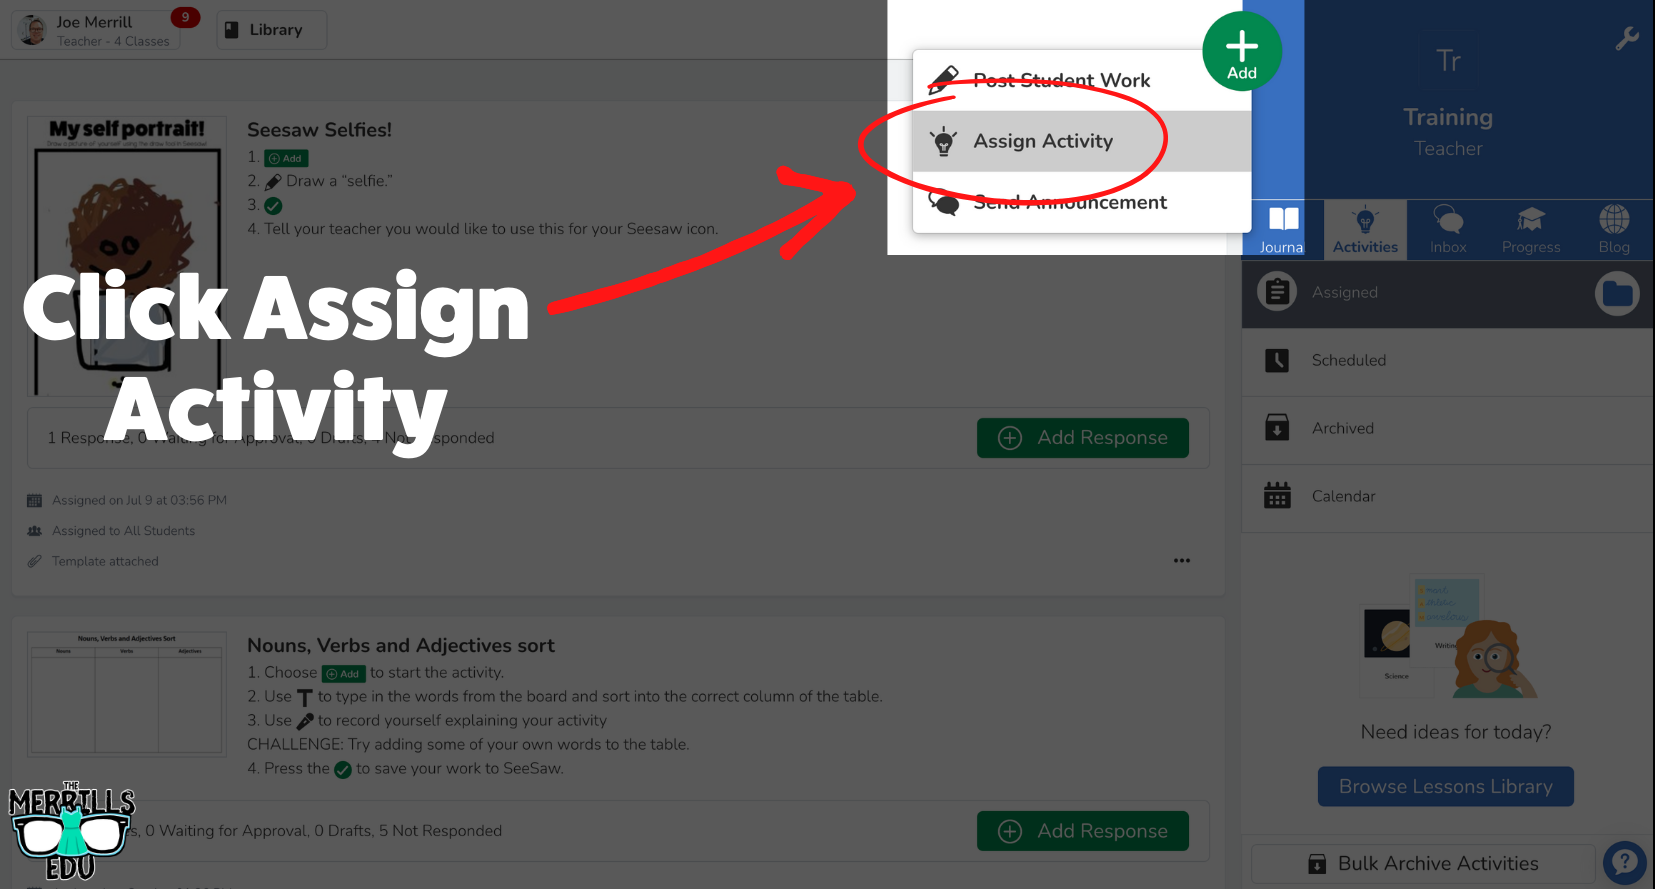

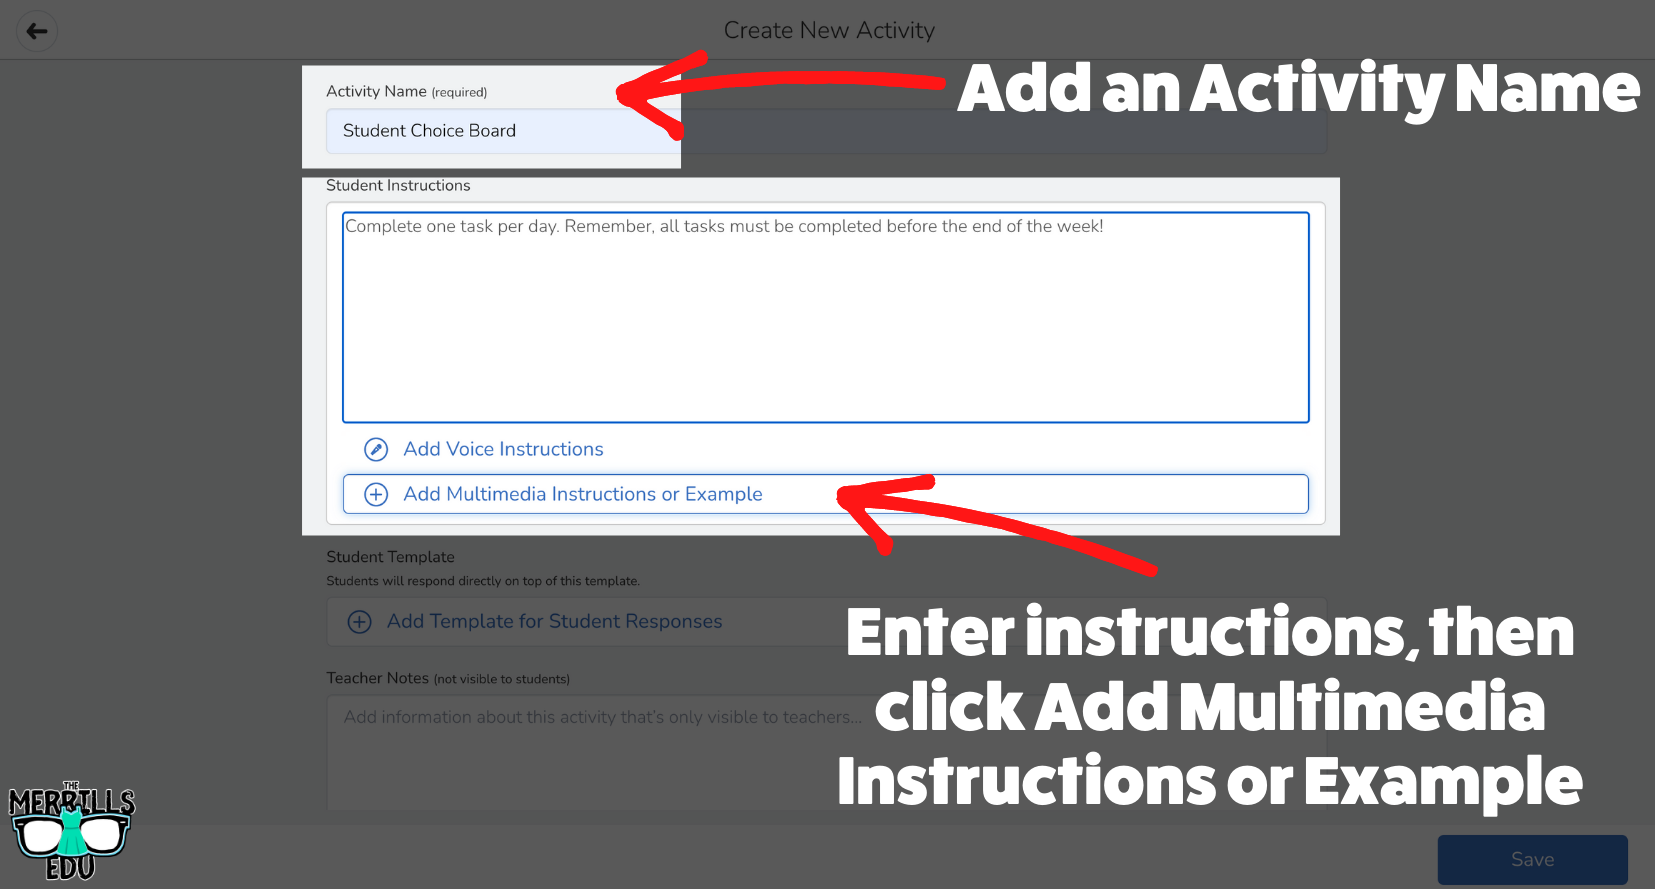


Click the Add button.
Click Assign Activity.
Under My Library, click Create New Activity.
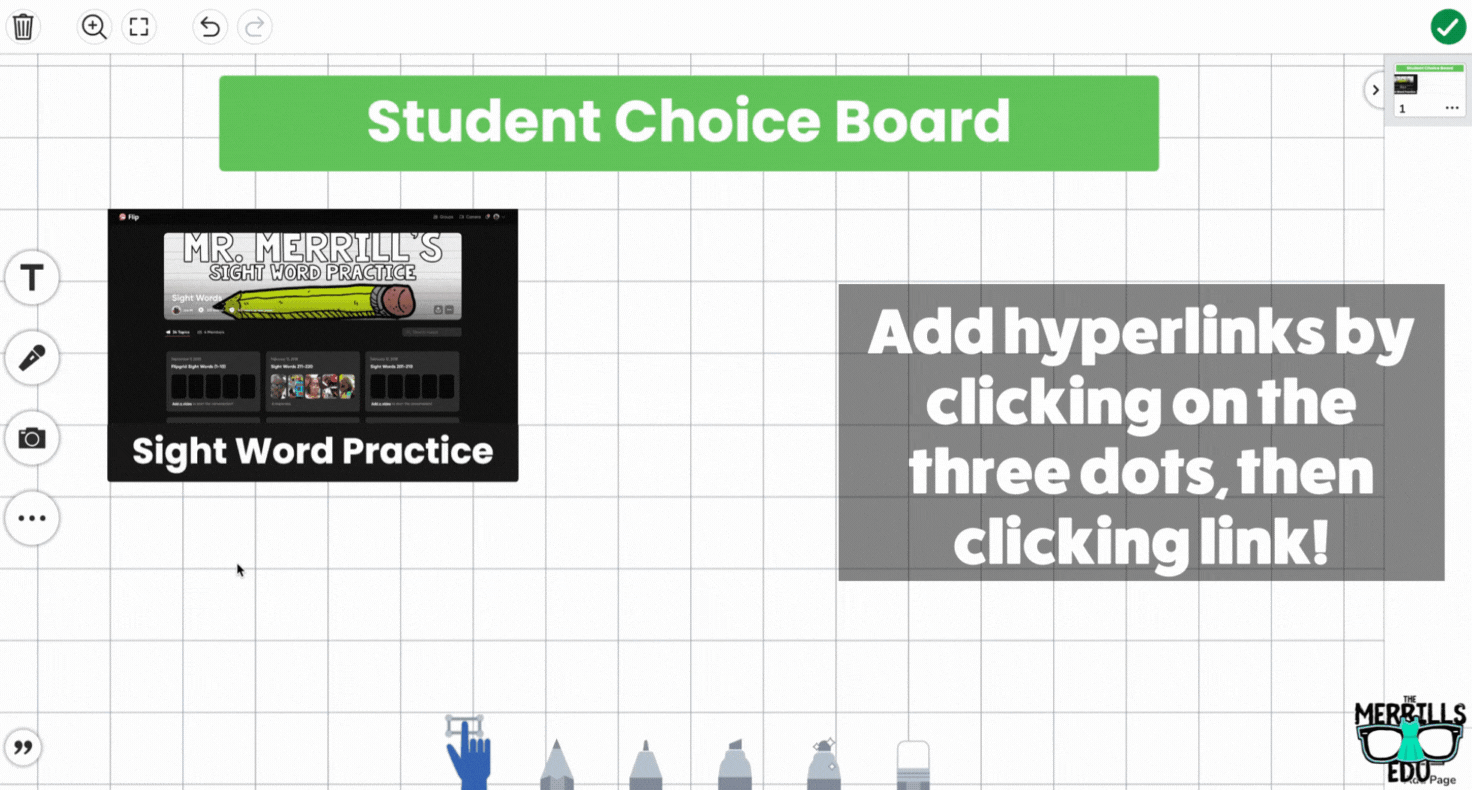
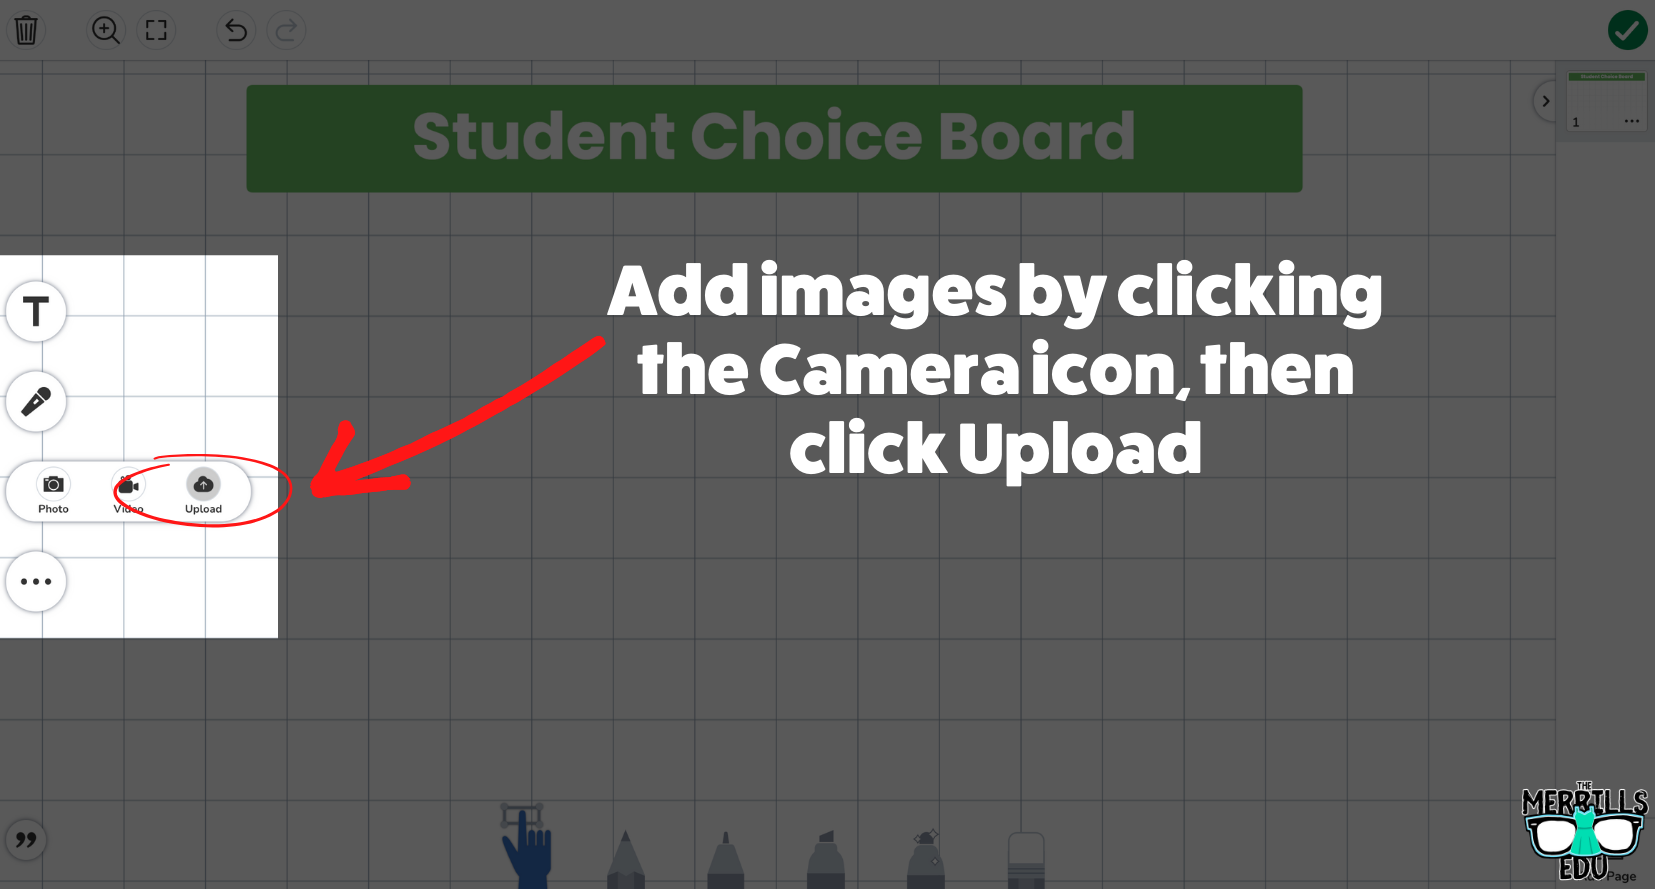
Add an Activity Name and then enter instructions. Next, click Add Multimedia Instructions or Example.
In the following window, click “Drawing.”
You can add images by clicking the Camera icon, then click Upload.
To hyperlink something, click on the three dots. Then, click “Link,” and enter your URL. Tip: You can link outside of Seesaw! Try linking to Flip, Nearpod and more!
Save your Choice Board and click “Assign” to assign it to your students!

🗣️ Adding Audio Captions on Seesaw: A Hidden Seesaw Feature!
There’s a well hidden feature in Seesaw that might be one of our favorites: Adding Audio Captions! This is PERFECT when working with littles who may have a difficult time typing out their thinking. To enable this feature, follow these steps:

From an activity, click on the Caption icon.
Click “Record Voice.” Doing so will launch the audio recorder, so be ready to speak!
Click the green Done button to stop the recording.
Now your students have the ability to express their thinking by explaining their thoughts - all in just several clicks!

📲 Using Messages on Seesaw 📲
A new feature is heading into Seesaw: Messages. With Messages, teachers manage the student and family experience. Admin and teachers are able to block and remove messages, and students can only message one another with teacher supervision. We love the ability to open new possibilities here, but the best part of all of this comes with communicating with families. With Messages, you will be able to translate messages to families into over 100 languages, which will provide read receipts (so you know when they see it)! To learn more about Messages, watch the video below!

🗃️ Create Hints or Pull Tabs in Seesaw 🗃️
This idea comes from our good friend Kris Szajner, the Curriculum Manager at Seesaw. In the video below, Krist demonstrates how to create hints or tabs that students can pull out on Seesaw assignments. Check it out below!

👕 How to Create Seesaw Selfie Class Shirts! 👕

Remember that Seesaw Selfie activity? Well, what the kids didn’t know was that we planned to take their creations and add them all together to make a class shirt. We do this every year, and we wear them on spirit days. It’s a great way for students to learn about community and how their work can go beyond the four walls of the classroom. Check out a shirt that Joe designed with his co-teacher!
The shirt can be designed on anything, but we recommend a program like Canva or Adobe Express to guarantee that your design will have the necessary requirements. Just search for “shirt design” on either of those platforms and you’ll be able to find a template. The best part of all is that once you finished your design, the hard part is over! You will not have to collect any money or write down shirt sizes. Your families at home will do all of that! So, once you have downloaded all of your Seesaw Selfies and designed your class shirt, follow the next steps to have them printed.
(Click on the arrow in the image below to see a step-by-step)
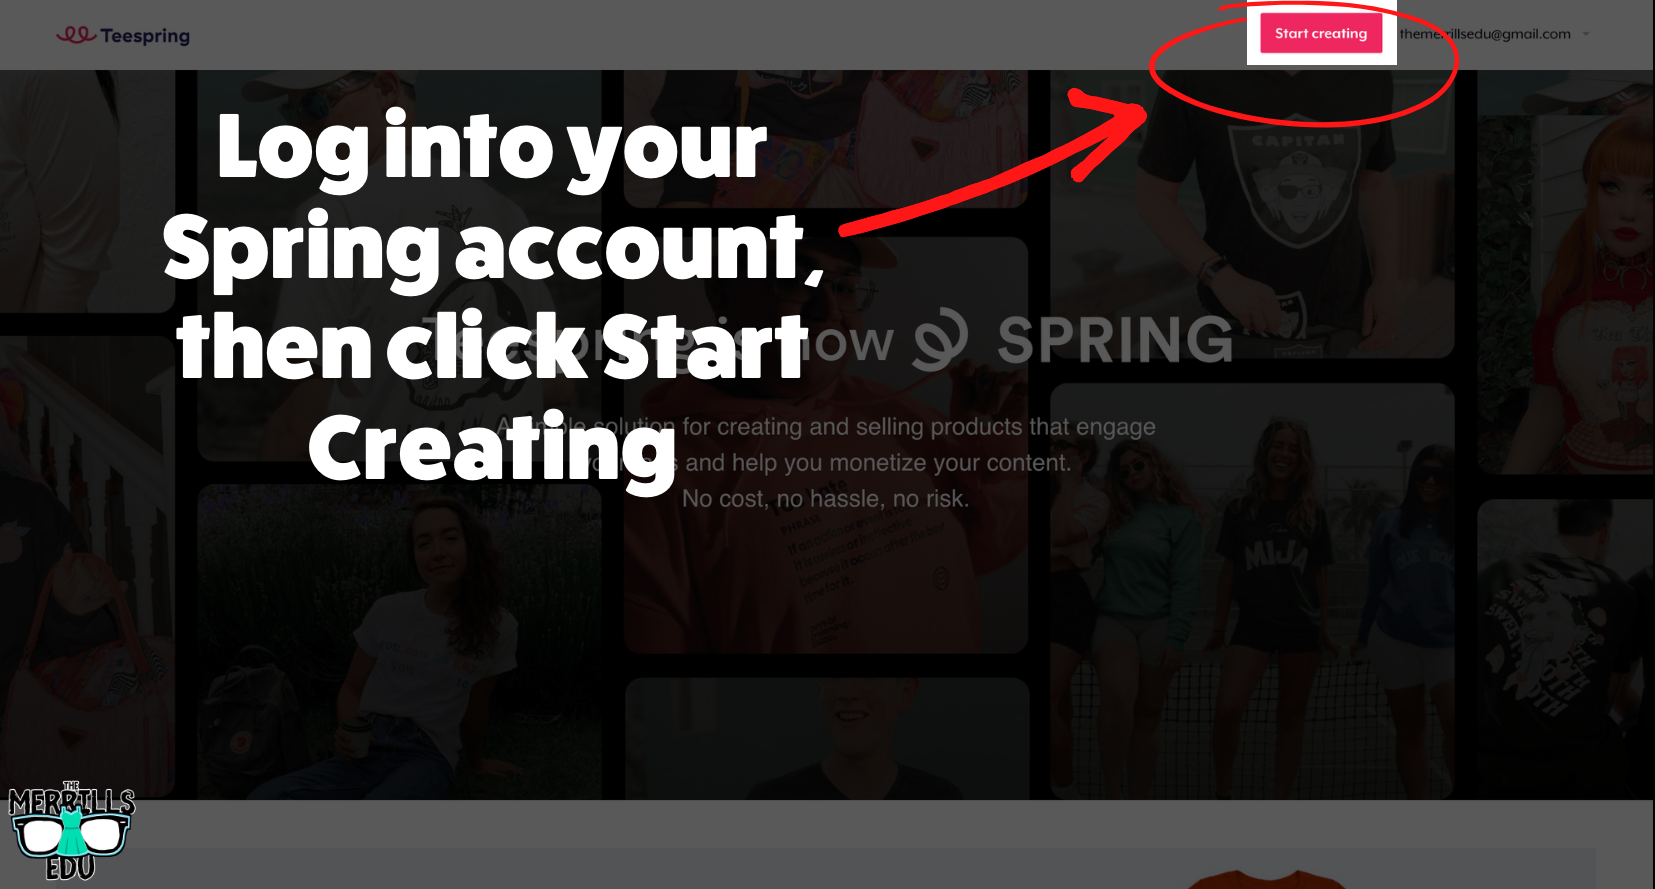
(Note, there are other options to do have shirts printed, but this is a method that we have found to work best for us)
Head over to Spring (click here) and create an account.
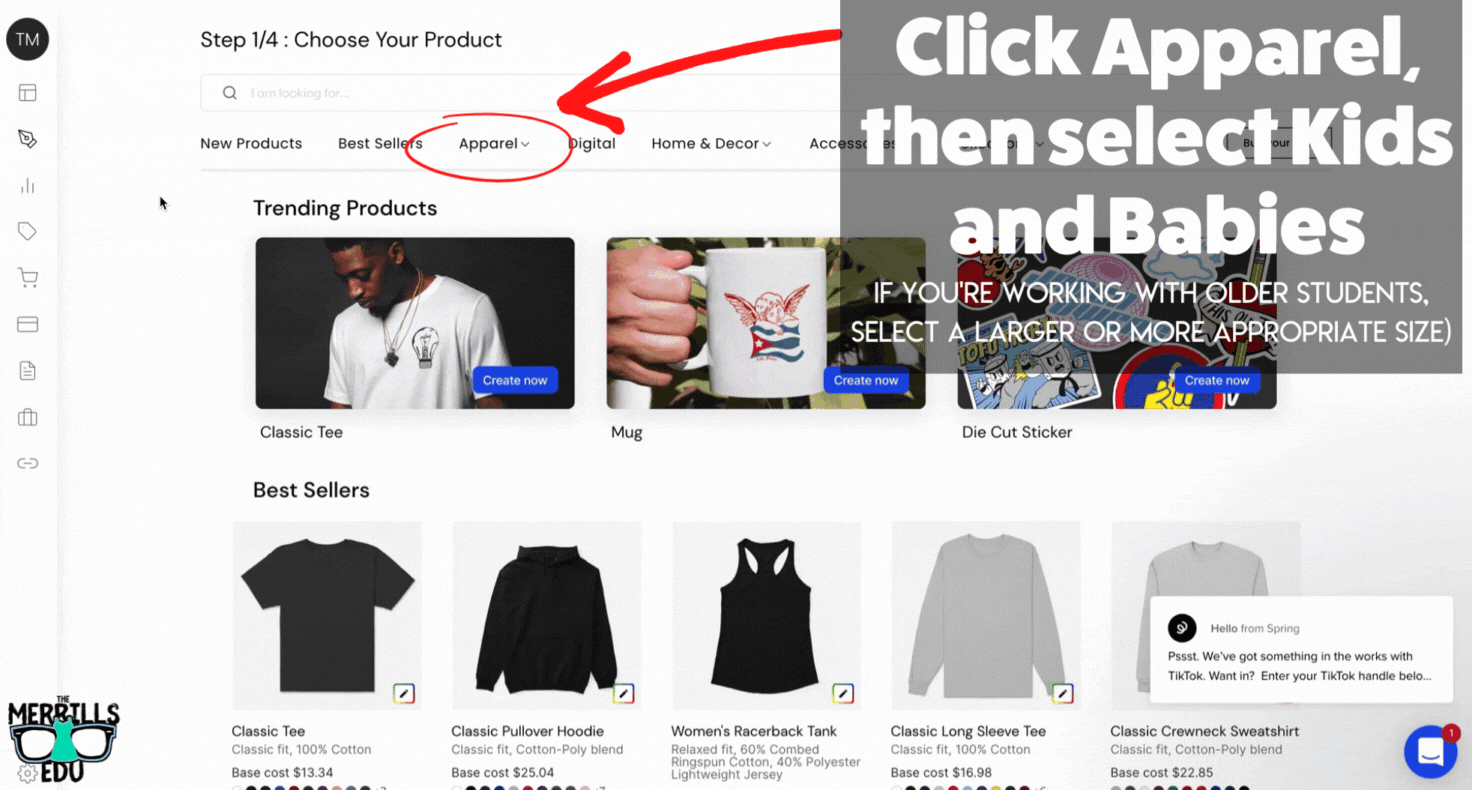
Click Apparel, then select Kids and Babies. Note: you can also create a separate listing for adult sizes (order one for yourself or if your families at home would like one)!
Next, upload your shirt design (that you created in Canva or Adobe Express) by clicking Add Image.
Be sure to choose several product colors. This will allow your students and families to select from different shirt color options when purchasing. Tip: Be sure to check your artwork to make sure it looks good on the colors you’ve selected before continuing!
Now, set the price. We are NOT trying to make a profit on these, so we drop the price as low as Spring will allow it to go (you will need to edit the numbers based on your design). You will also need to do the same in for prices in the EU (this is mandatory, even if you are only selling domestically). Once you have it set as low as possible, click Continue!
Enter a title and description for your shirt and then follow the steps to complete your listing. Once you have everything completed, your shirts are ready for purchase! Repeat the steps above to create options for adult sizes or other products (like hoodies!).
-- Let us know if you’re using Seesaw or any of these ideas in your classroom! Be sure to follow us on social media (@TheMerrillsEDU everywhere) and tag us! 👓👗
For more tips, tricks and lesson ideas for making learning more interACTIVE, check out our books The InterACTIVE Class and Flipgrid in the InterACTIVE Class on Amazon!


Five Must Try Flipgrid Hidden Gems Teachers and Students
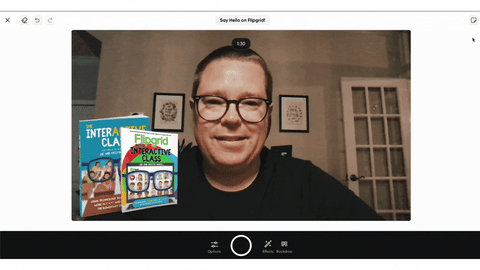
One of our favorite things about Flipgrid is the fact that anyone can use it. It doesn’t matter if you’re just starting school, finishing school, teaching in school, or just using it to be COOL - Flipgrid is for you. The app is constantly changing, and often times gems are hidden right under our nose - or mouse pointer!

One of our favorite things about Flipgrid is the fact that anyone can use it. It doesn’t matter if you’re just starting school, finishing school, teaching in school, or just using it to be COOL - Flipgrid is for you. The app is constantly changing, and often times gems are hidden right under our nose - or mouse pointer! In this blog post, you’ll learn about five MUST TRY Flipgrid hacks that both you and your students can try. Click on any button below to jump to that section, or check them all out!


Editing and Arranging Flipgrid Photo Stickers
Our students love adding photo stickers to their videos. Sometimes it’s a book cover, other times it’s their own work. You may not realize this, but you can add more than one photo sticker on a video. But, figuring out where to position the photo sticker is important and sometimes it requires a little bit of precision. Which leads us to the first hack - guaranteed to blow your mind!
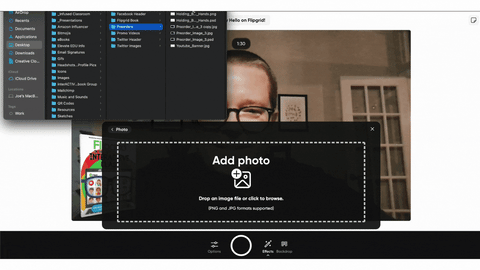
Launch the Flipgrid Shorts Camera and prepare to record your video.
Add a photo stickers of your choice.
After you have added the second photo sticker, press one of the arrow keys on your keyboard. A new sidebar will appear on the right side of your screen!
This will allow you to position, scale, reorder, duplicate, trash or even undo the previous step. To remove the sidebar, simply click on the screen again and it will disappear. To make it reappear, just click the arrows on your keyboard again!

Sticky Notes on Flipgrid
A well hidden (pun intended) Flipgrid Feature is the ability to use Sticky Notes when creating your video. Adding sticky notes helps students keep focused and on task with what your prompt is. These notes aren’t visible to anyone else other than the student, and they will not appear in the final product of the video. But, hold on…It get’s better! You can add multiple sticky notes and move them around your screen as you please! Here’s how:

Launch the Flipgrid Shorts Camera and prepare to record a video.
Locate the Sticky Notes button on the outside of the recording area, located in the top right hand corner.
Click the button to open a Sticky Note. This can be moved anywhere on the screen and it will not appear in the final product. (TIP: Place the sticky note in the top-middle part of you screen. This will make it look like you’re still looking at the camera)
Repeat this process as many times as needed!
Mirroring the Flipgrid Shorts Camera
Often times, our students share work they have completed on a whiteboard or piece of paper right into their Flipgrid video. But, most students are using devices that utilize a front-facing camera. The end result is a backwards image / video. But, this hack will fix that in just two clicks!
Launch the Flipgrid Shorts Camera and prepare to record a video.
When the camera opens, click the Options button.
To mirror your video, click “Mirror Video.”


Go Live in a Flipgrid Topic with YouTube
this hack is definitely a level up and you’ll need both a Flipgrid and YouTube account. You’ll need the ability to go “Live” on YouTube - if you’re using a new YouTube account, this requires the use of a desktop computer and a 24 hour activation. Basically, you will need to wait 24 hours before you gain the ability to go live.
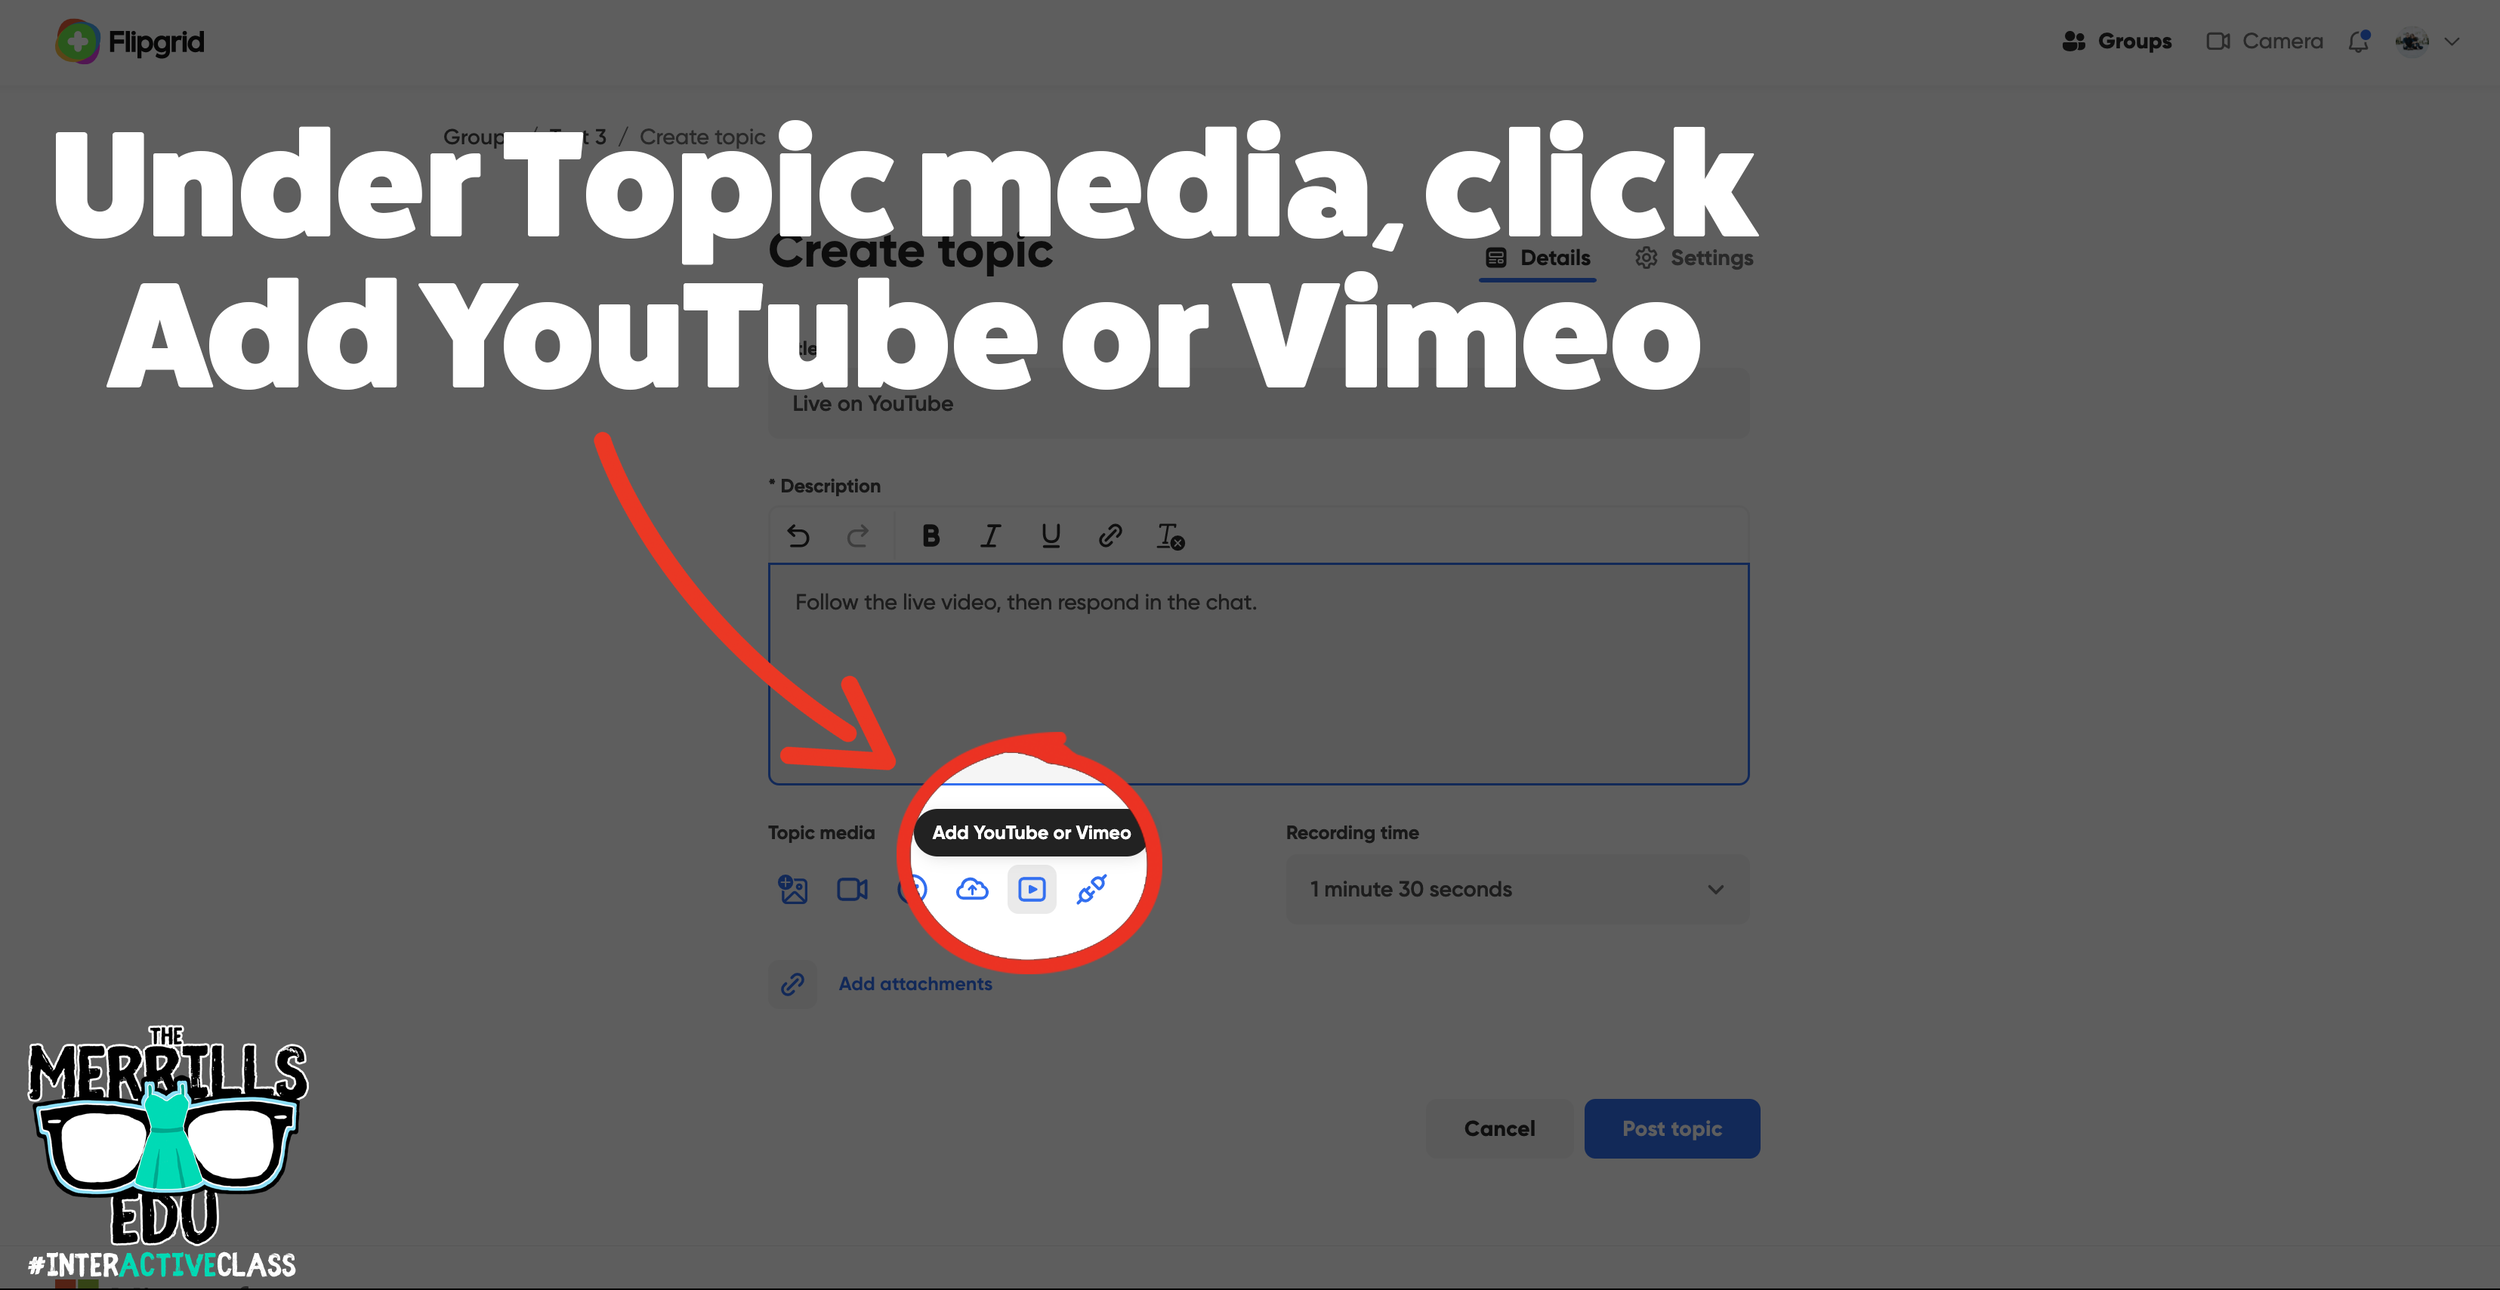
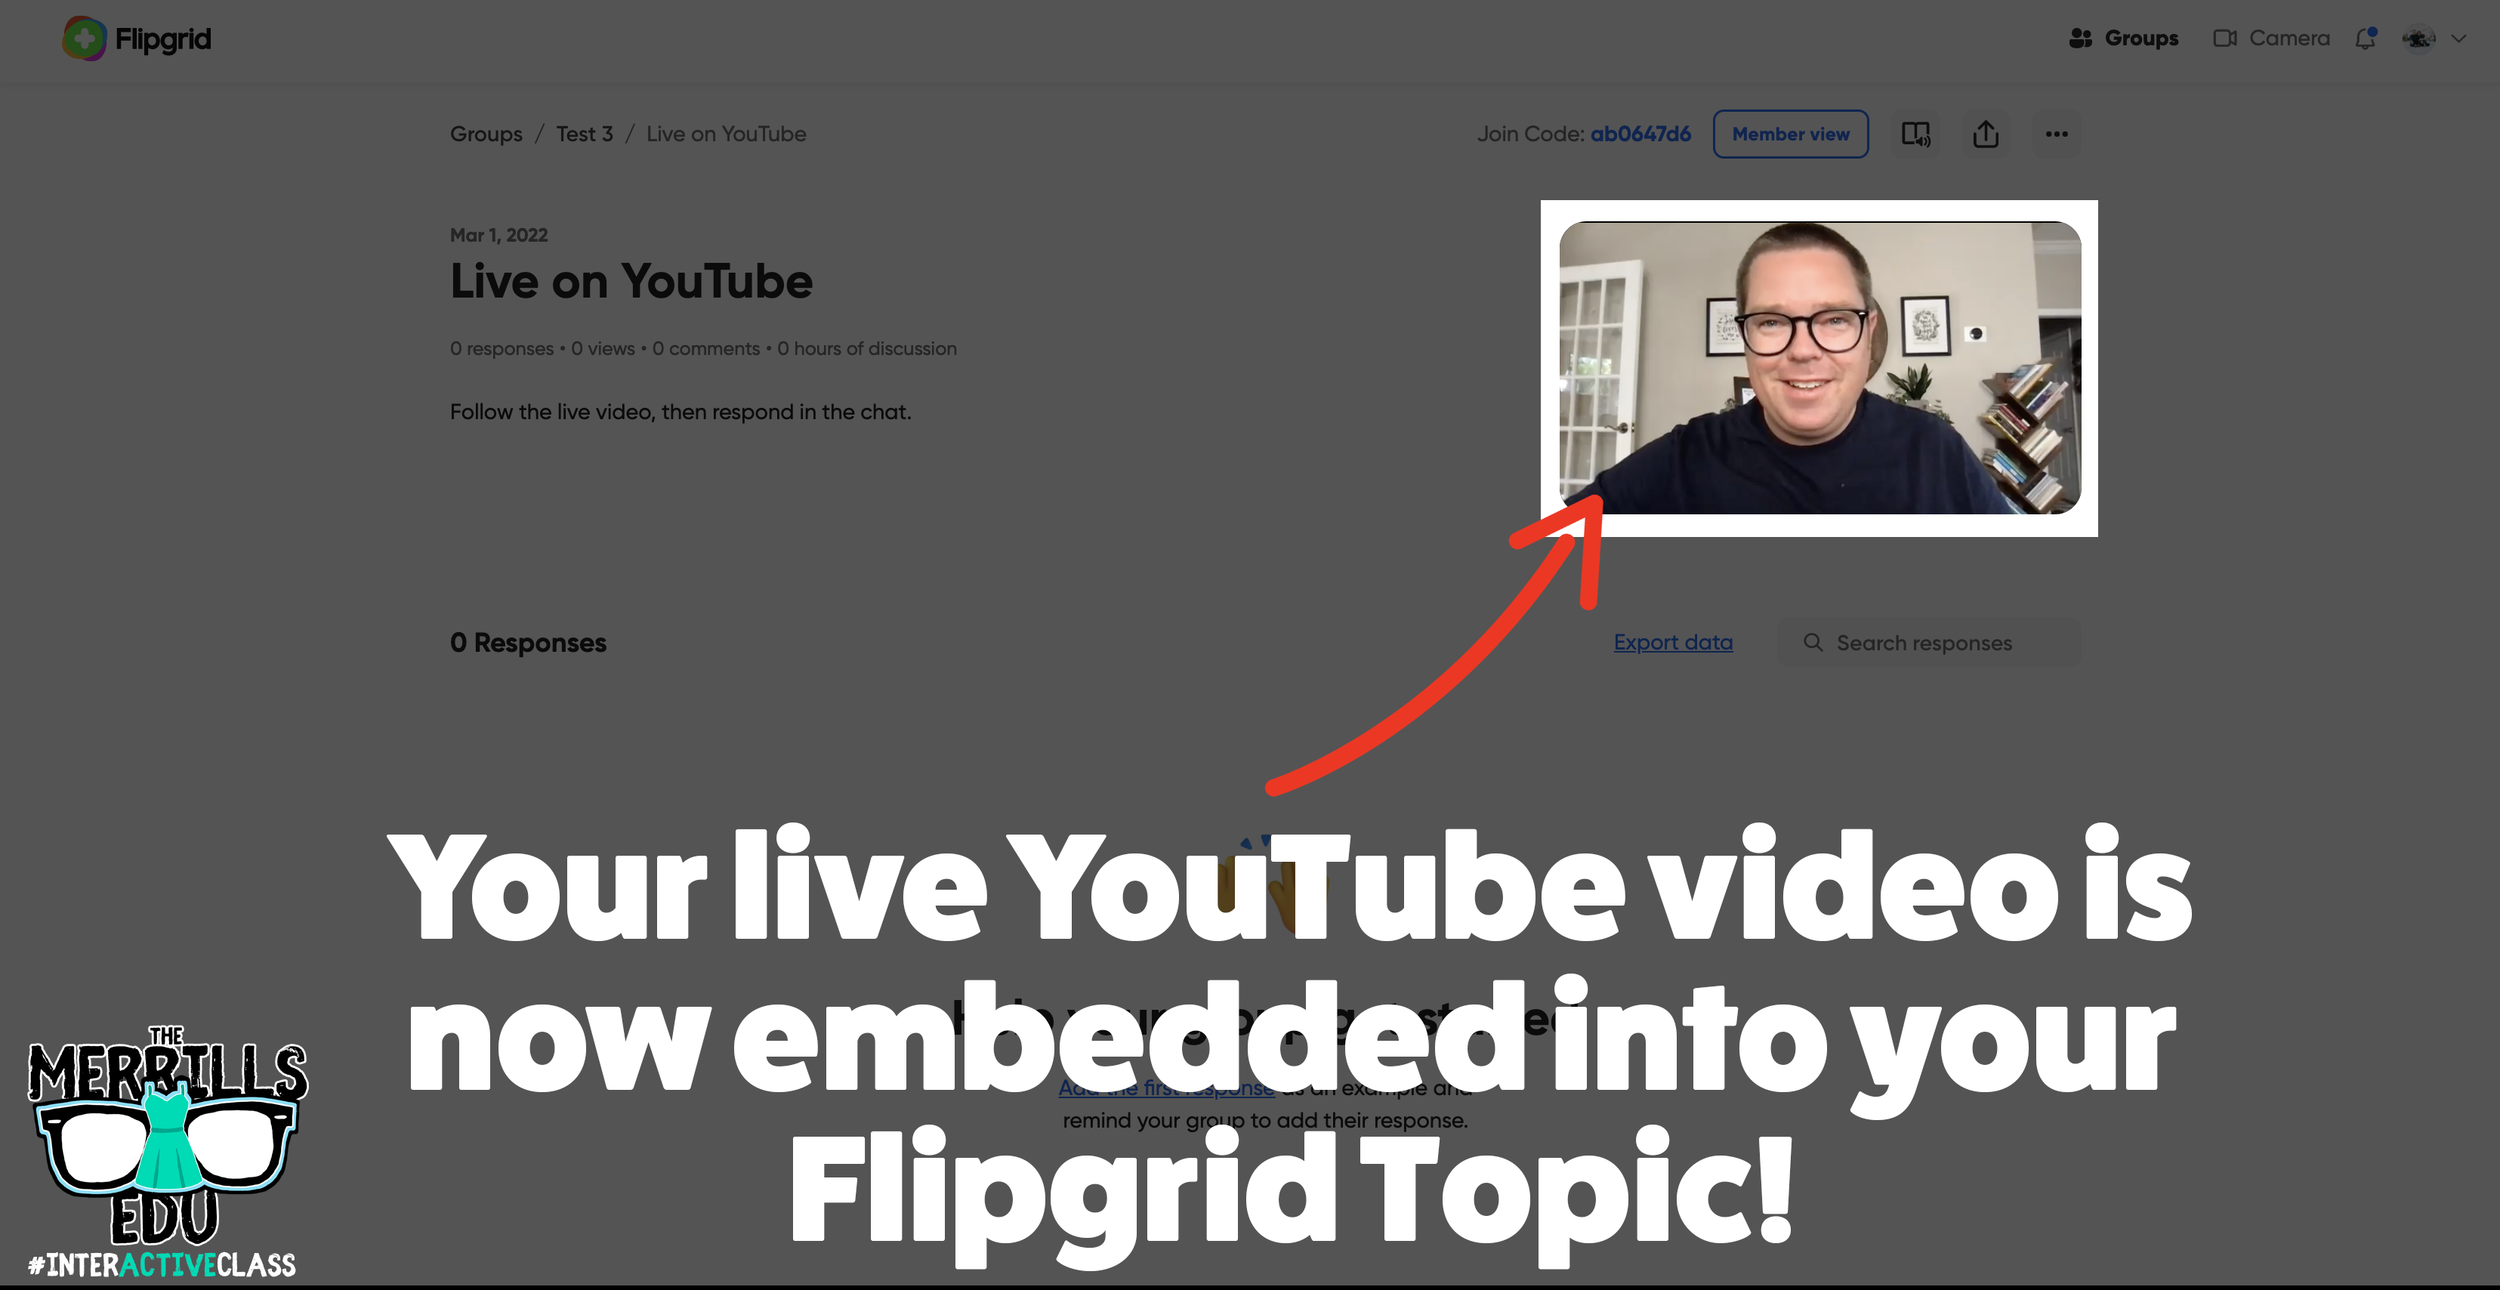
On the Flipgrid side, the steps are actually very easy. Here’s how it all works:
Create a new Flipgrid Topic.
Fill out the Topic’s Title and Description.
Under the Topic Media, click on “Add YouTube or Vimeo.”
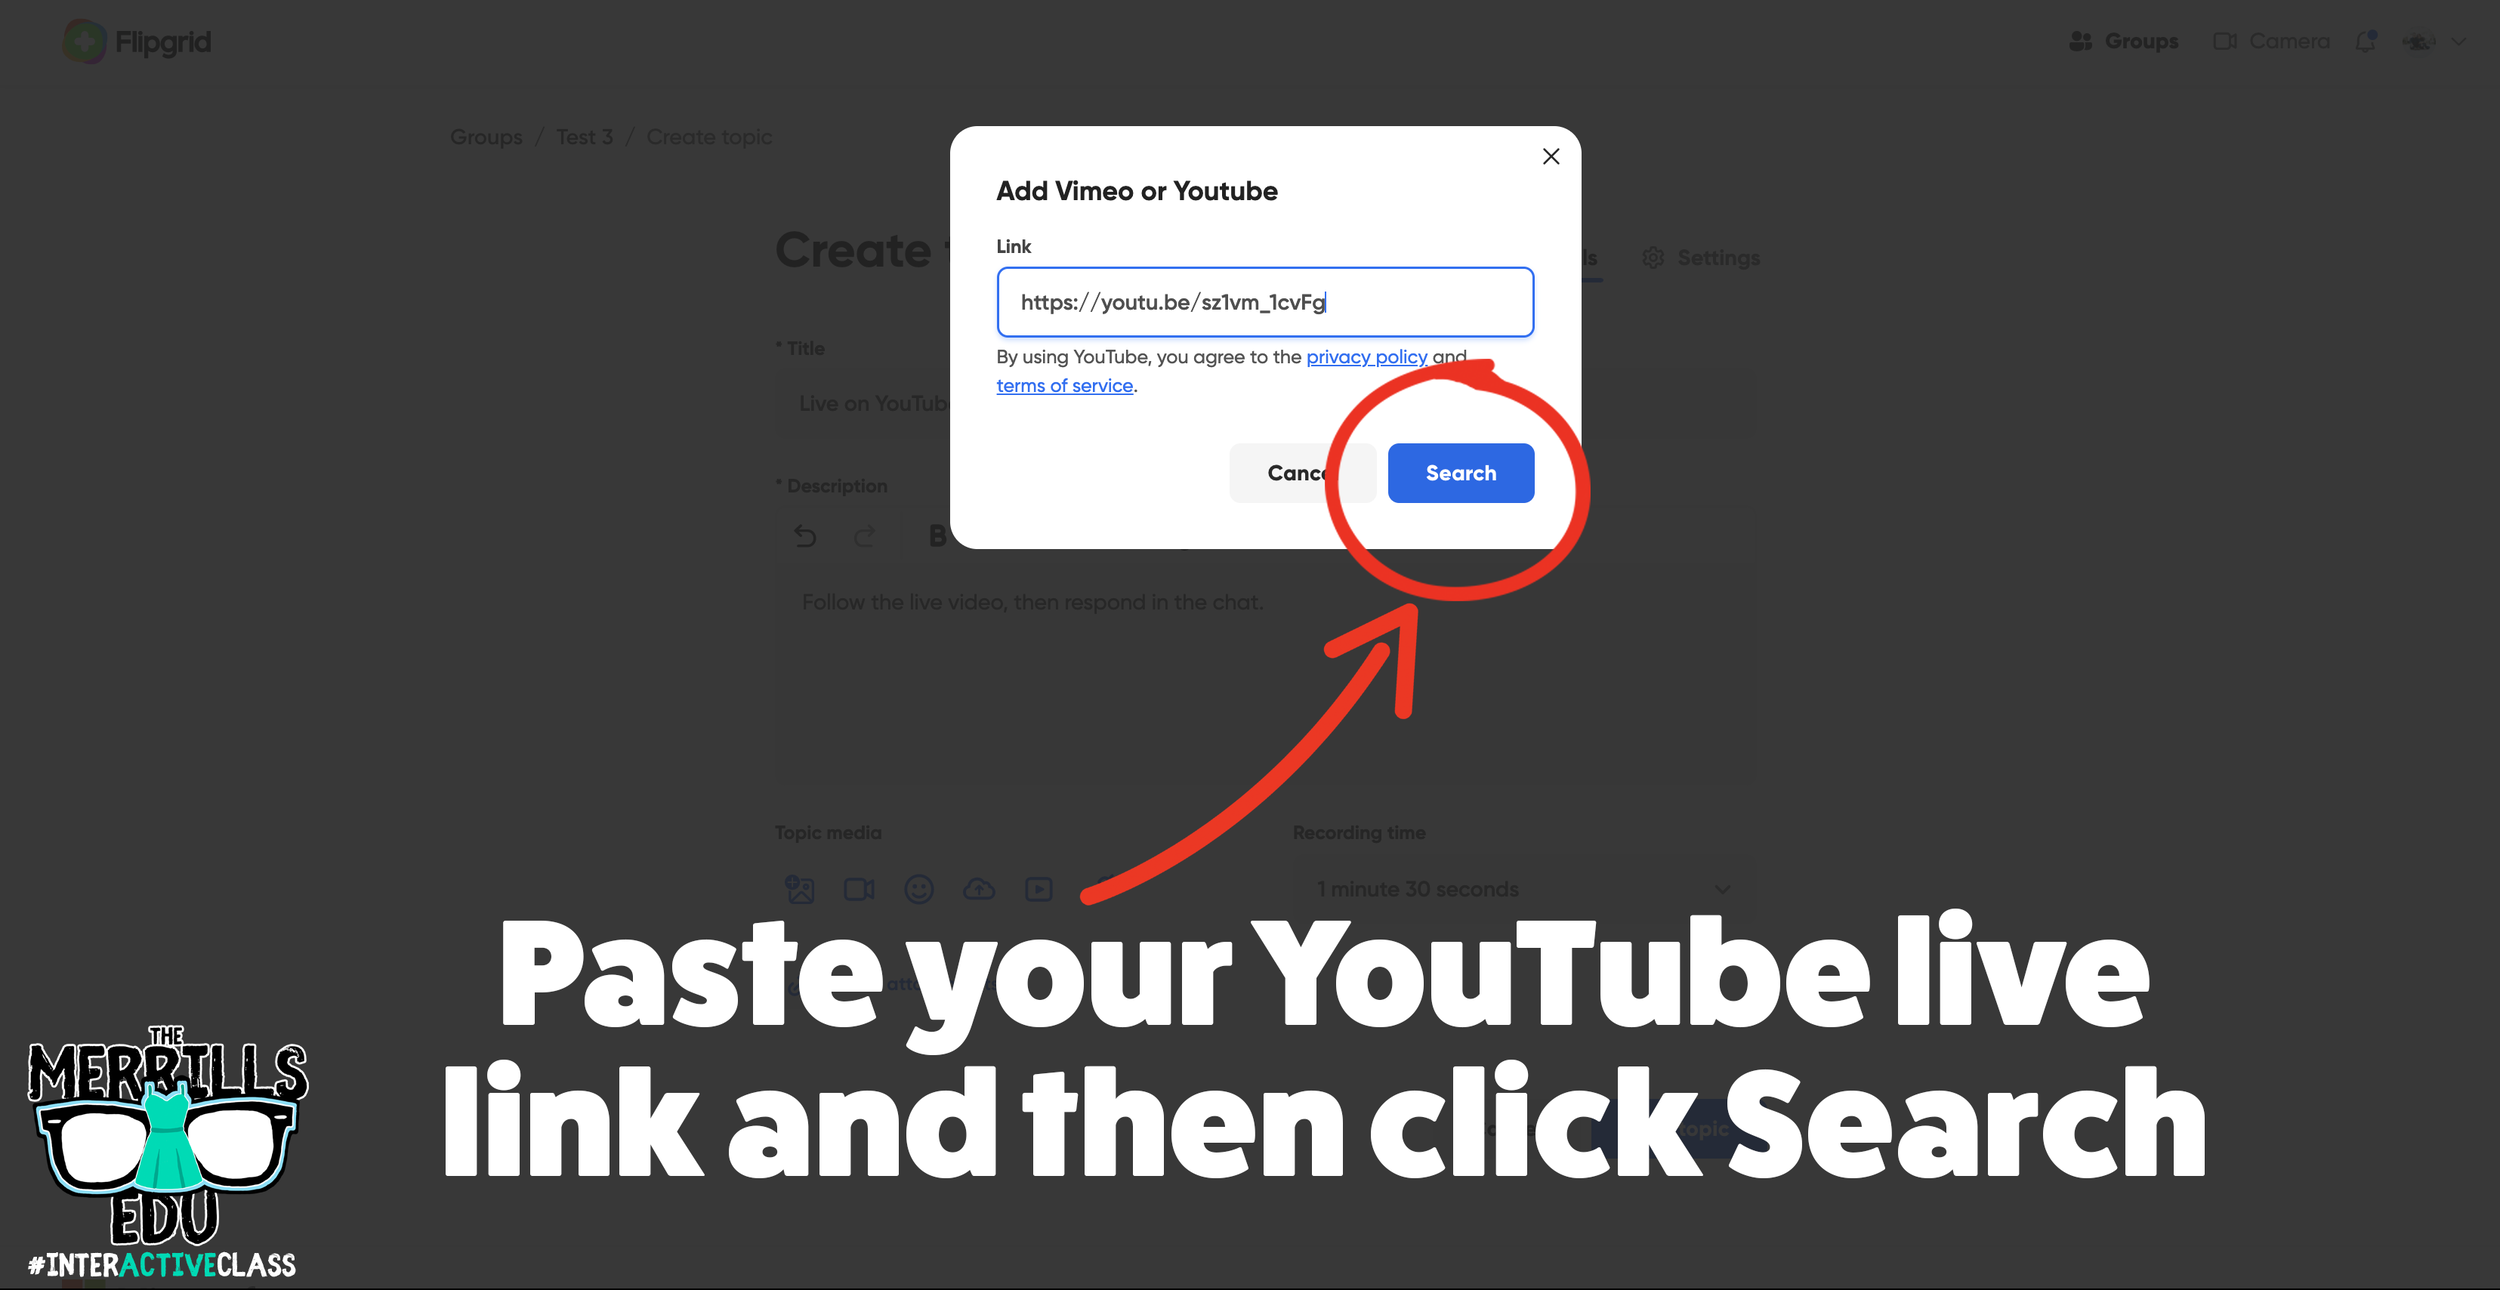
Paste the link of your Live YouTube video in the pop up, then click “Search.” (note: you will need to set the YouTube video to either “Public” or “Unlisted” for this hack to work)
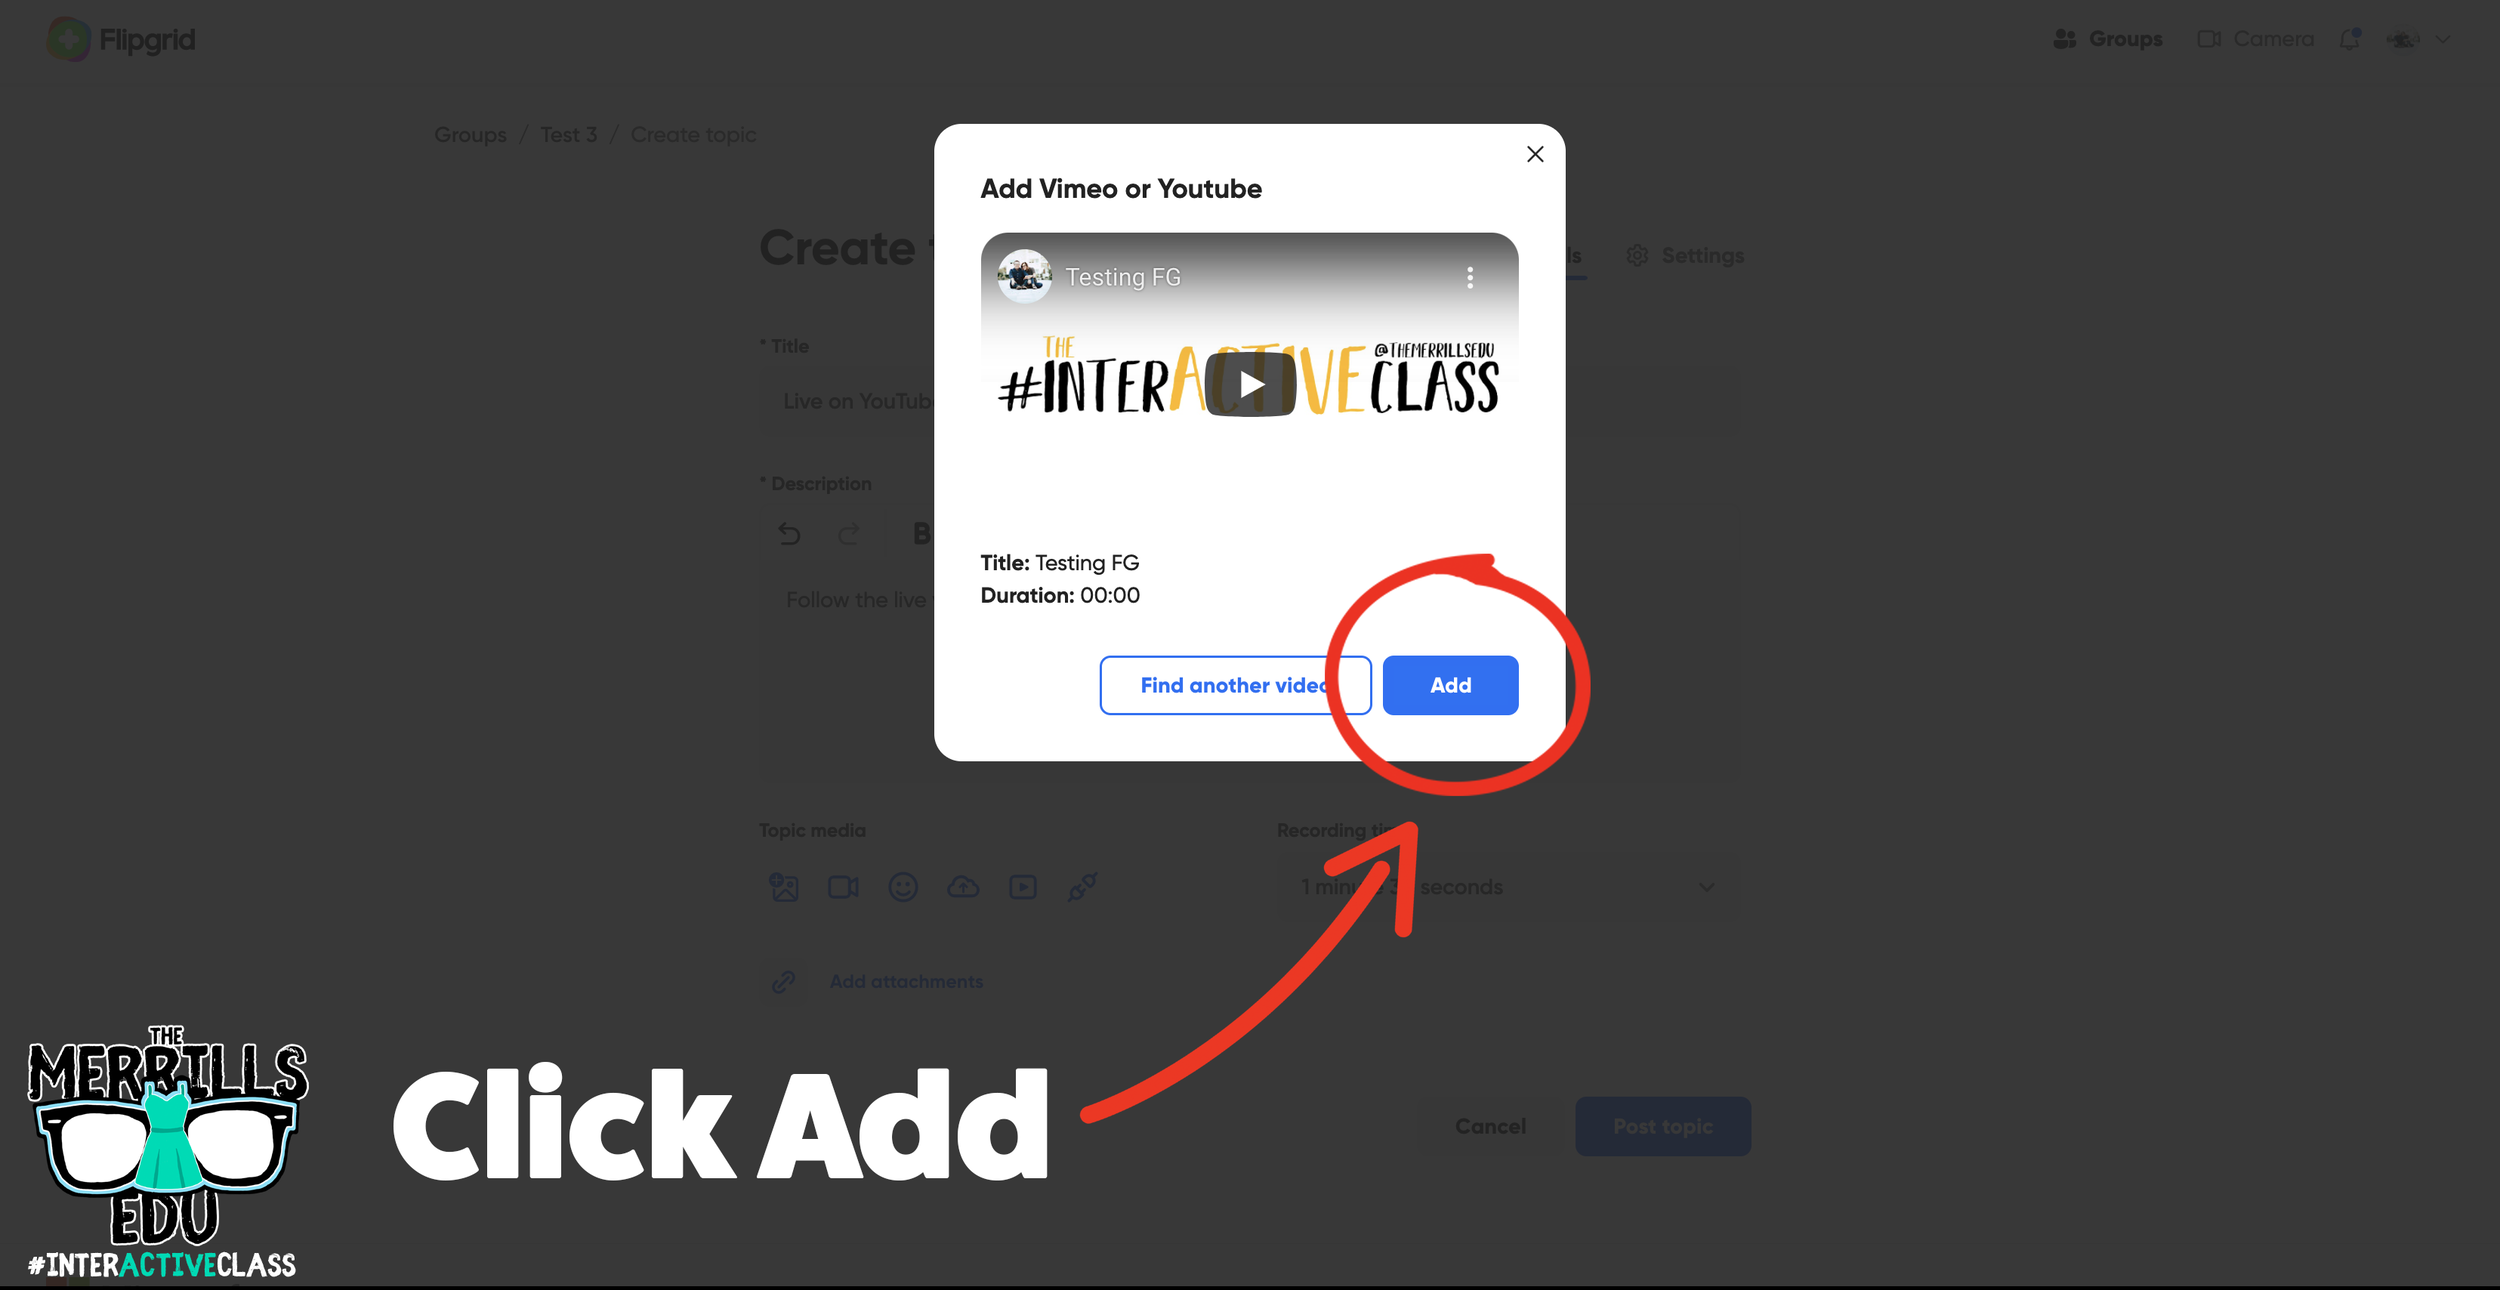
Once Flipgrid finds your live stream, click on “Add” to add it to the Topic.
Need to see it all from the beginning? We’ve got you covered. Here are all the steps from start to finish! Check it out below.
Creating a Breakout Game Using Flipgrid
Creating a breakout game using Flipgrid is a great way to engage your students. In order to make this happen, you’ll need to “hack” Flipgrid a bit. Here’s how to set up your own breakout game:
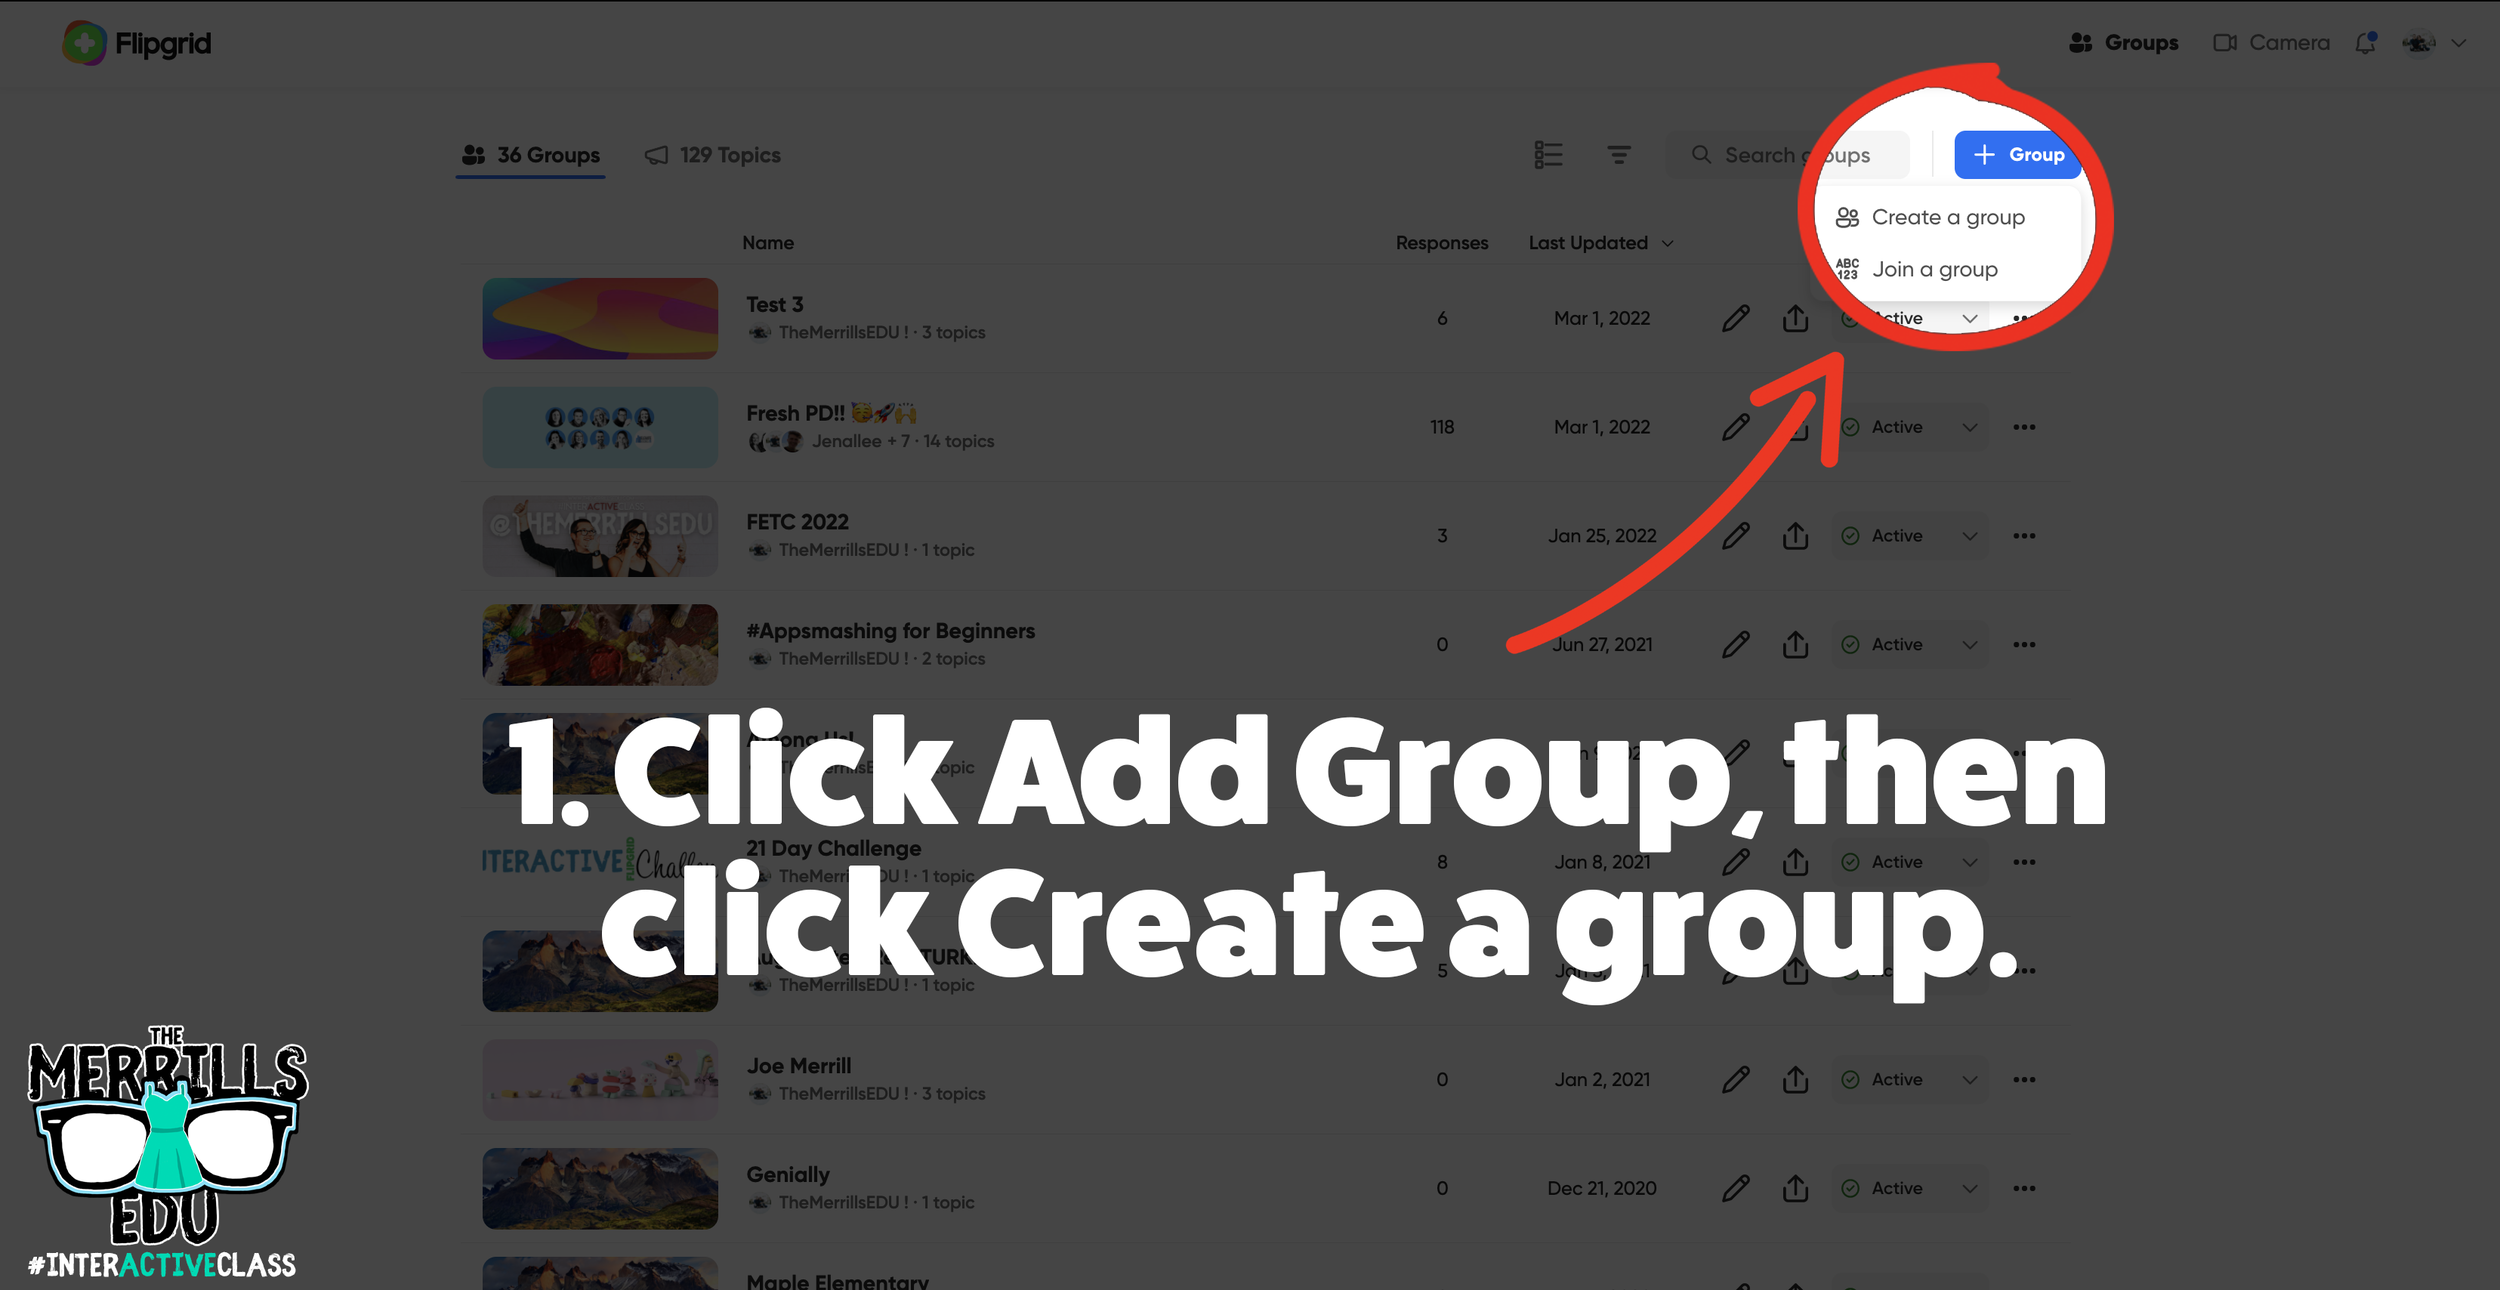
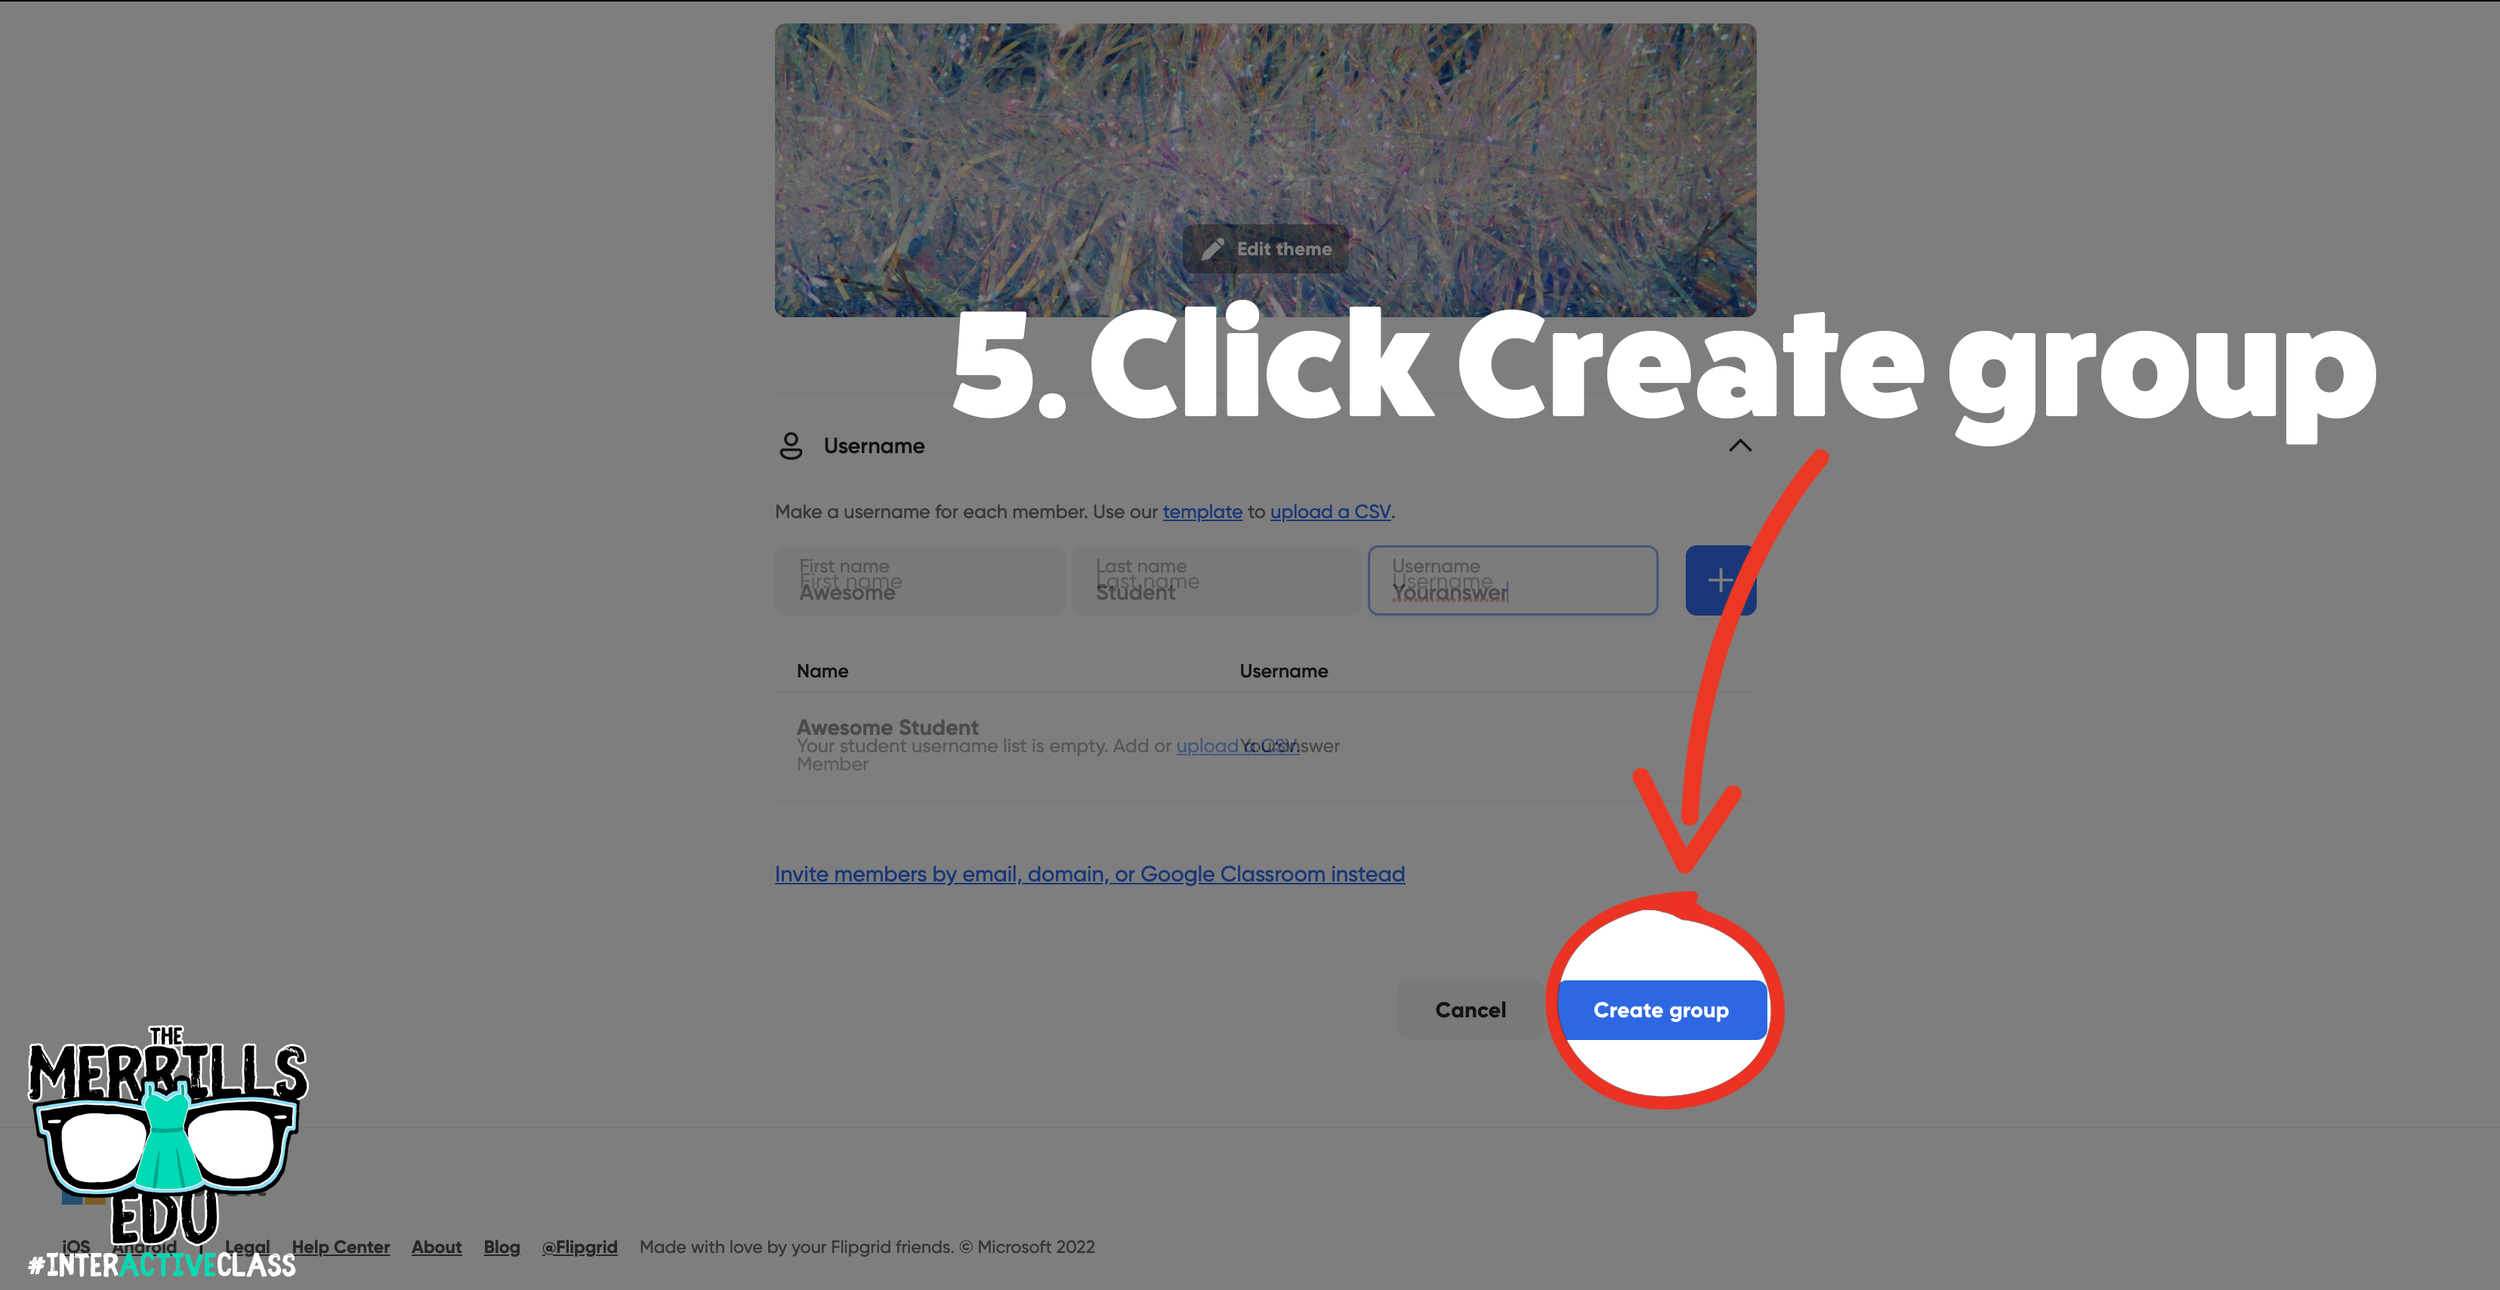

Log onto Flipgrid and click the “+Group” button at the top, then click “Create a group.”
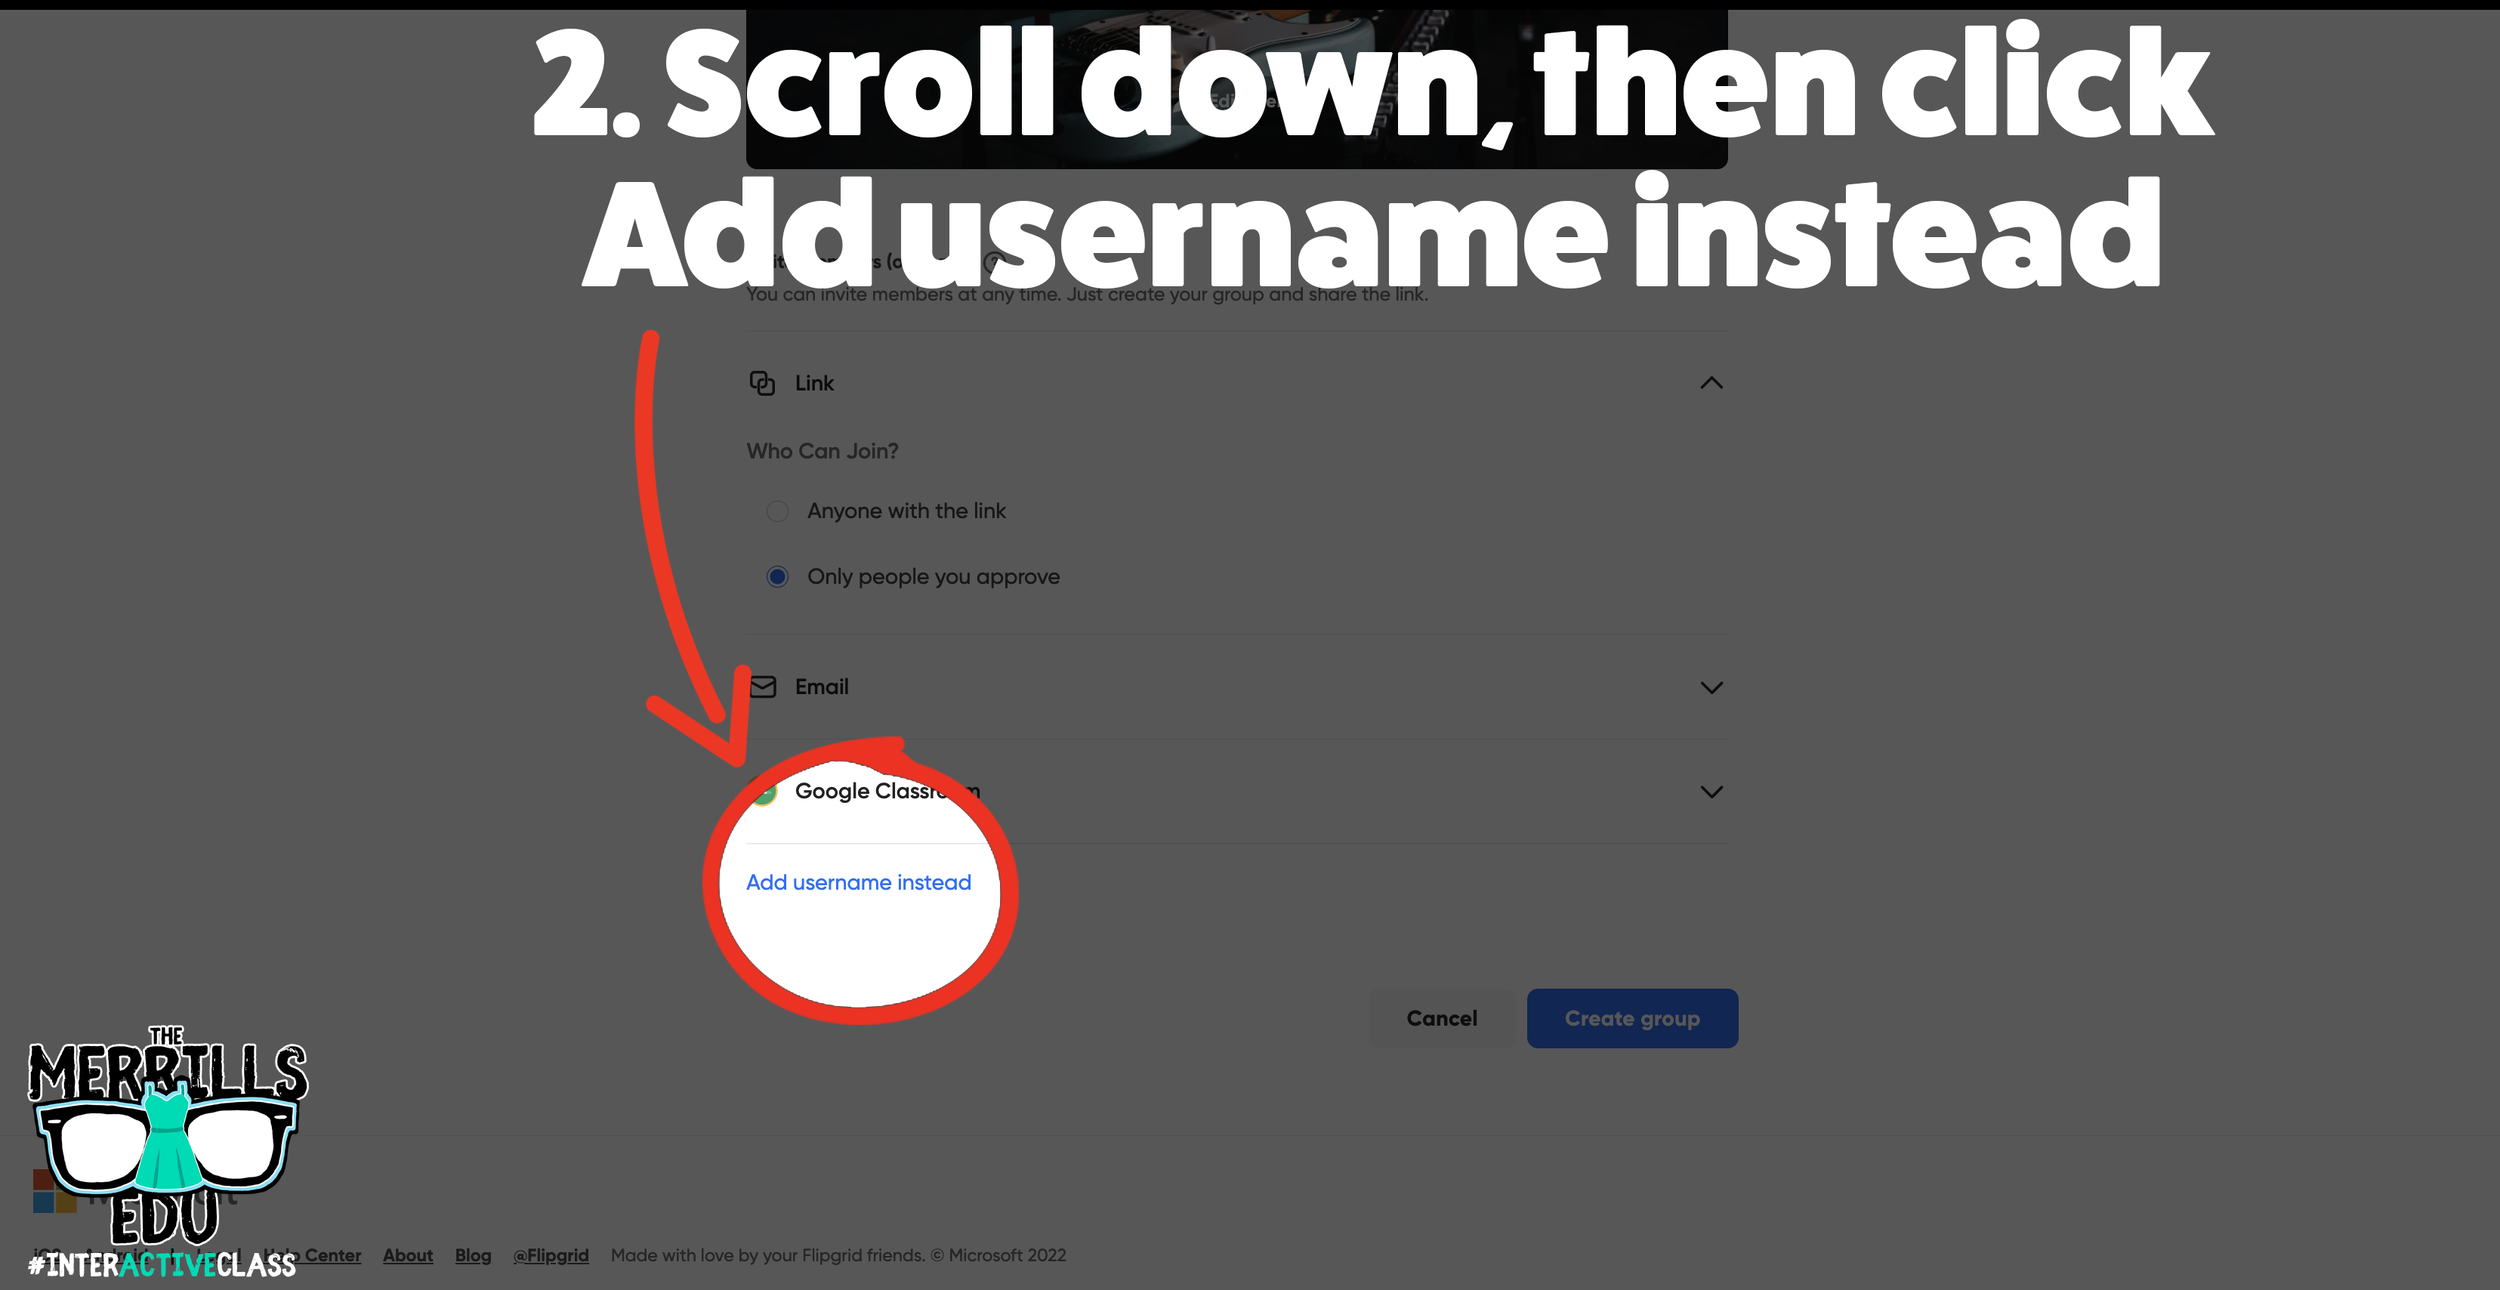
Fill out the information on the next page, then scroll down to the bottom and click on “Add username instead.”
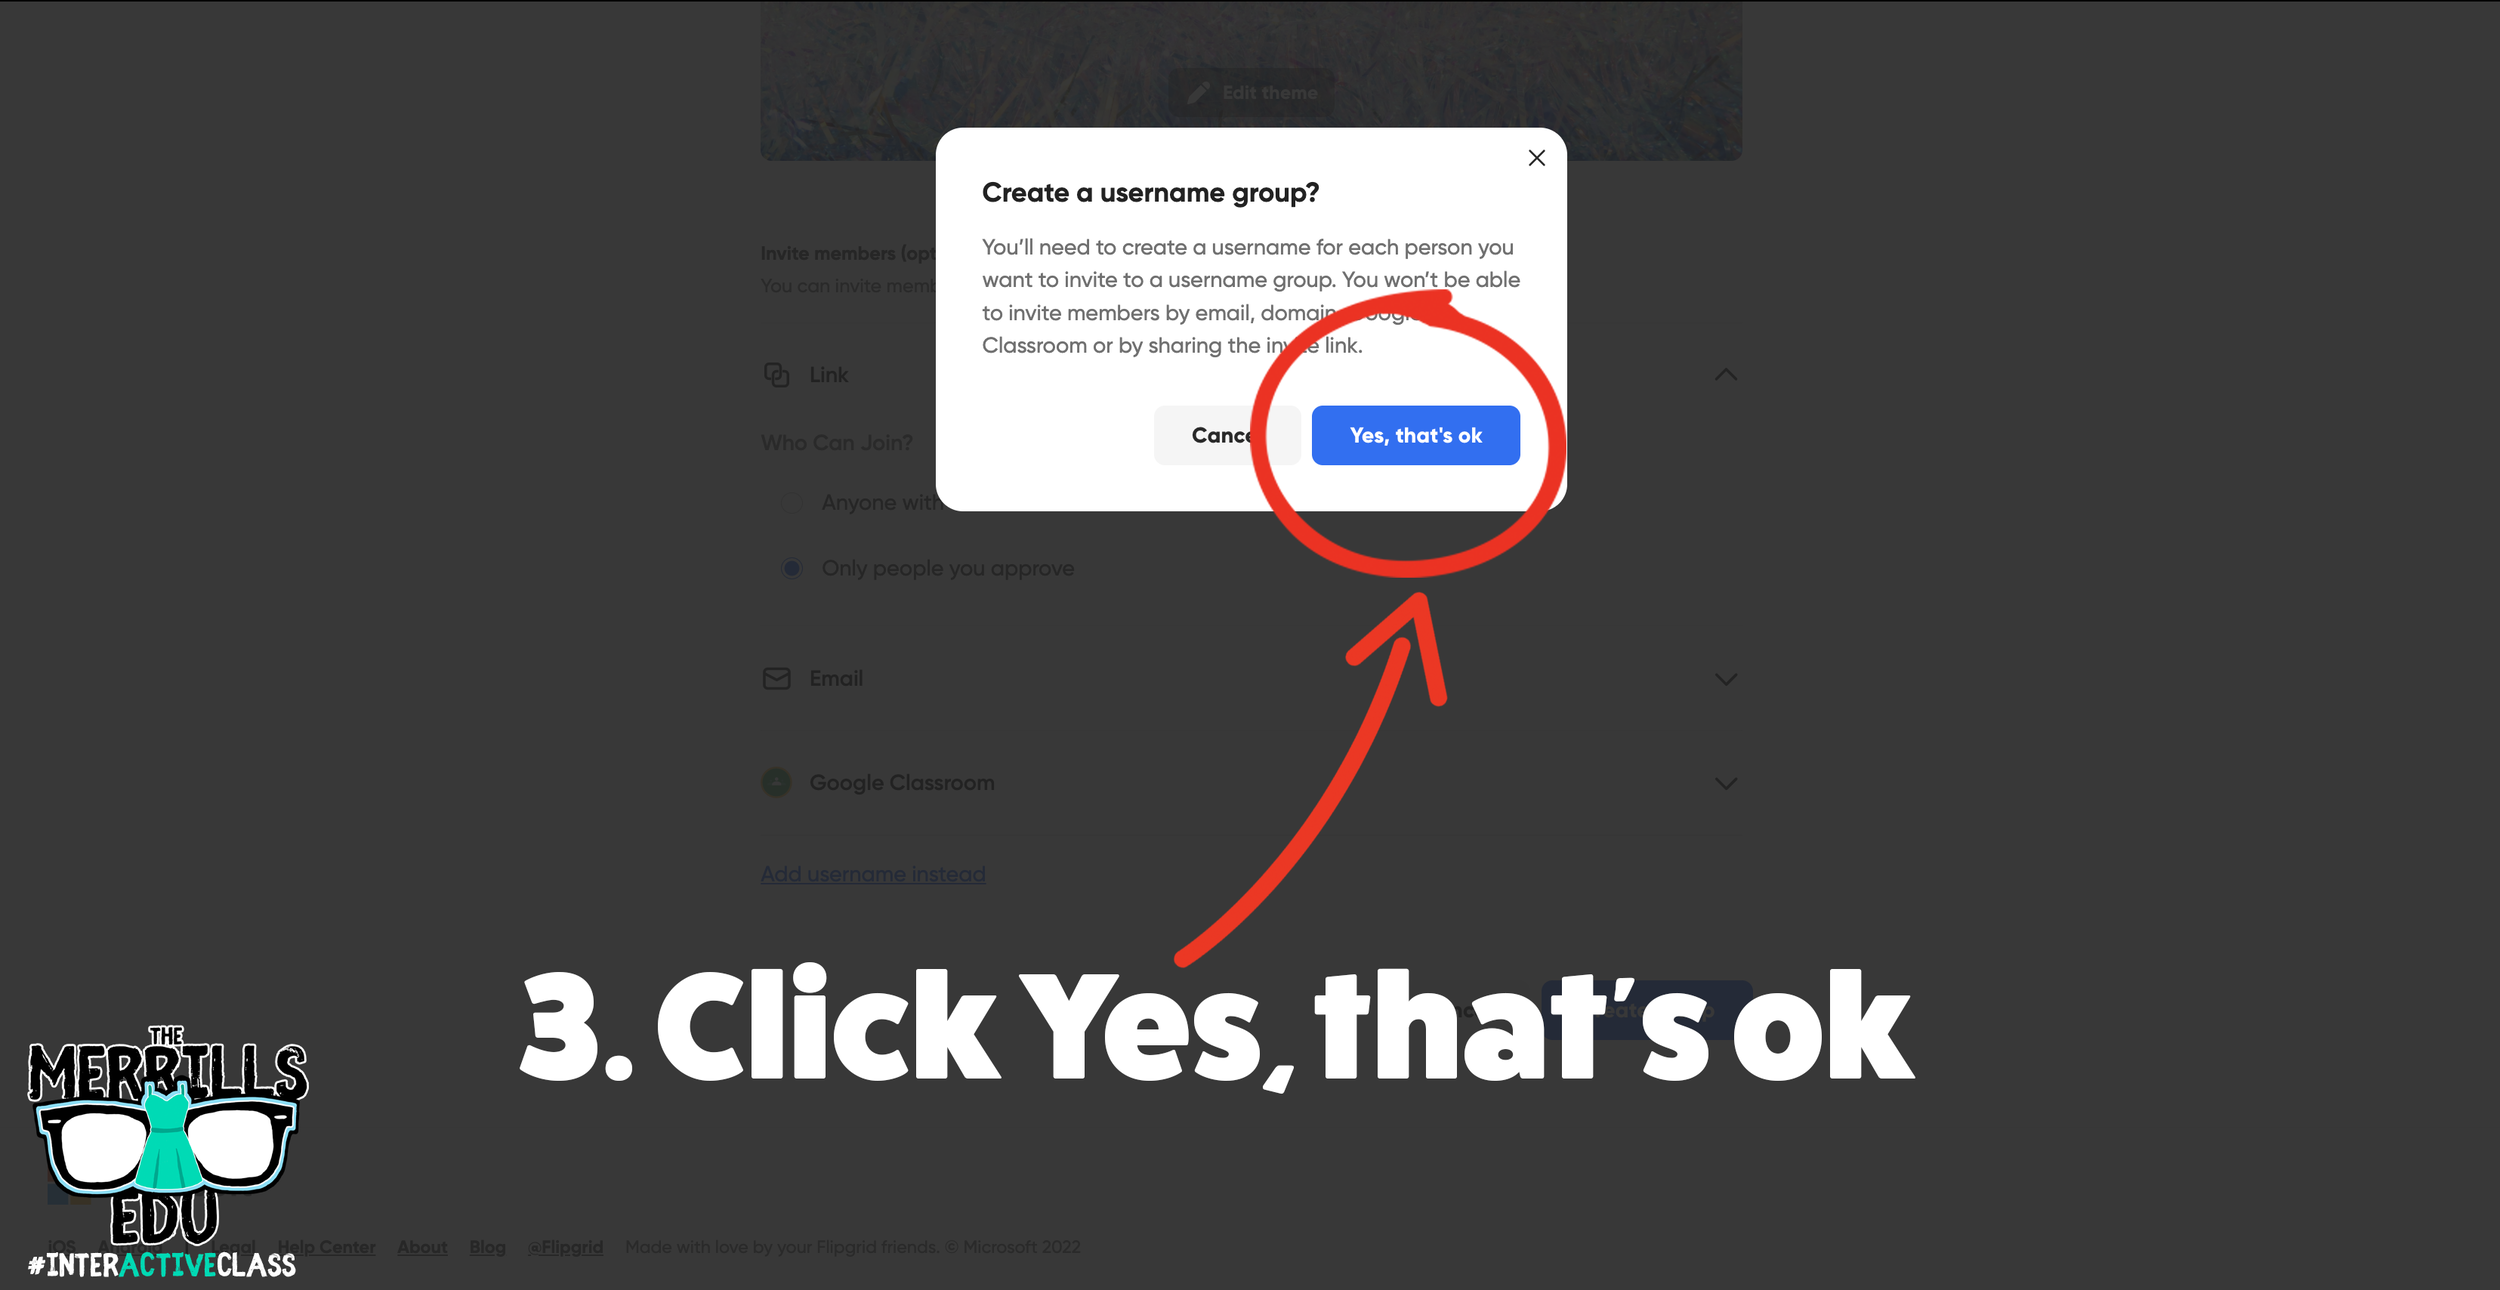
On the next window, click “Yes, that’s okay.”
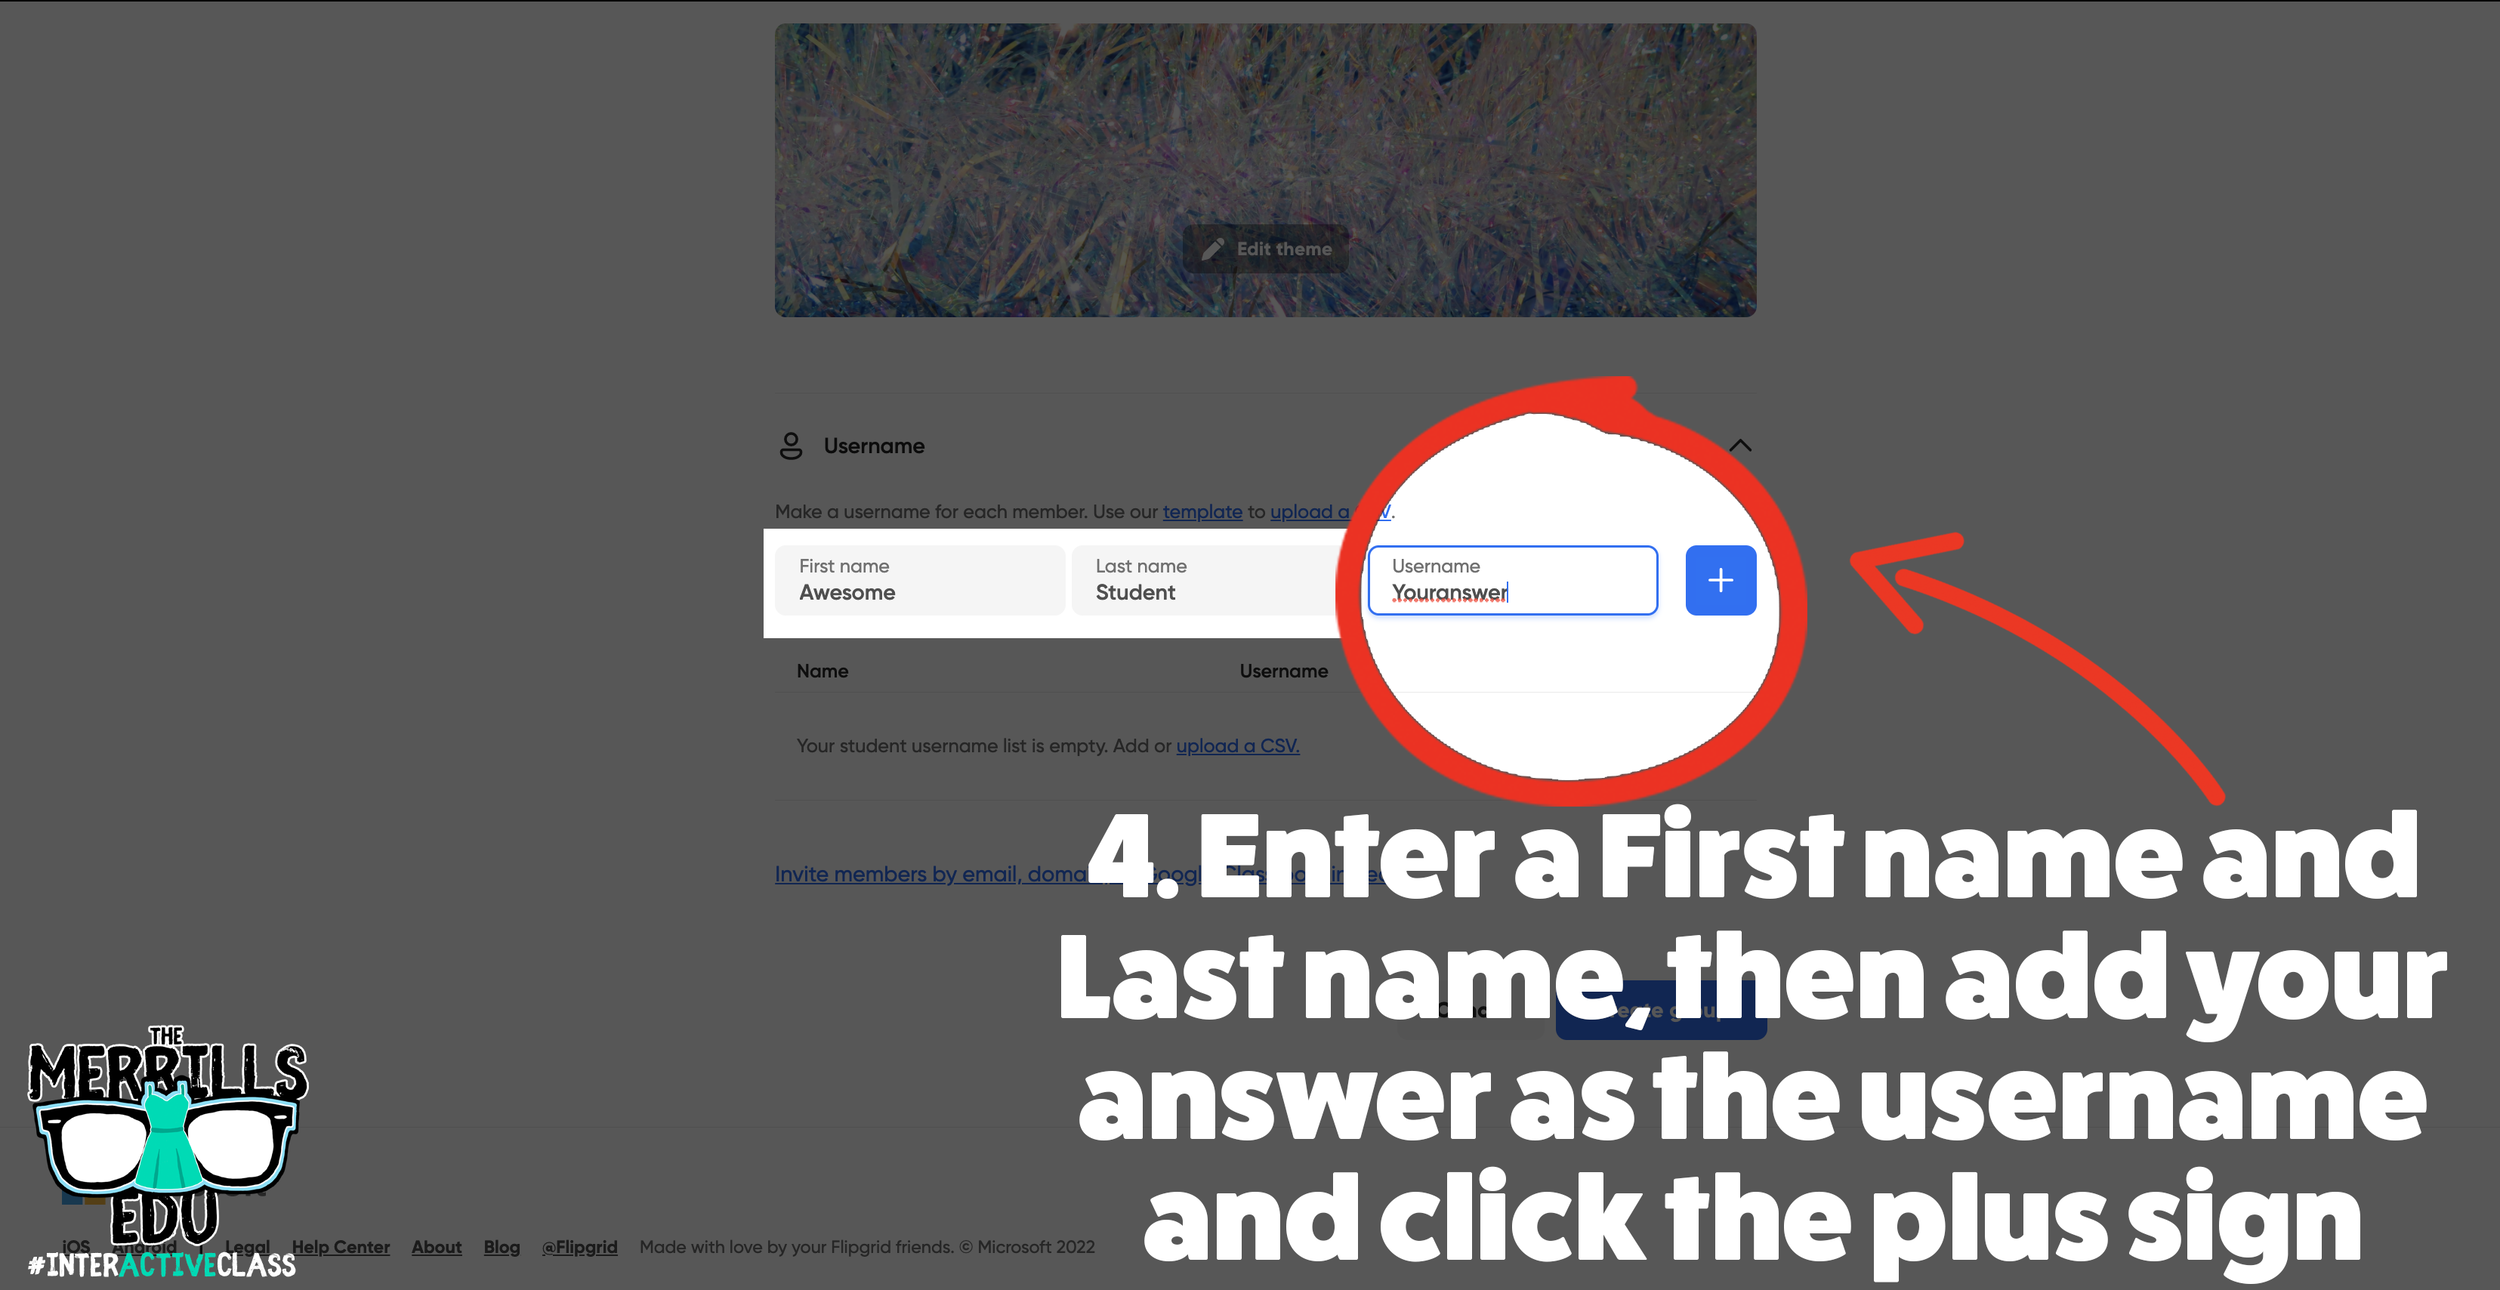
Enter a pseudo name (for example, “Awesome Student”) for First and Last name.
Under username, enter whatever it is you want the answer to be. Keep in mind - you will not be permitted to use spaces (so this may work best for a math assignment).
Then click, “Create group.”
Share the group on your LMS, Teams, or Google Classroom.
Explain to the students that they will need to answer your question to be able to “break into” the Flipgrid Group. Once they think they have the answer to your question, they can attempt to use the answer to log into the Flipgrid Group.
We recommend creating a topic within your new group that the students will land on once they’ve broken in. For example, maybe it’s something fun like, “Record a victory dance now that you have arrived here!”
A Collection of Flipgrid Ideas
Let’s keep the awesomeness going! Here are a few of our favorite Flipgrid ideas. Feel free to add your own!
-- Let us know what your favorite Flipgrid hacks are! Be sure to follow us on social media (@TheMerrillsEDU everywhere) and tag us! 👓👗
For more tips, tricks and lesson ideas for making learning more interACTIVE, check out our books The InterACTIVE Class and Flipgrid in the InterACTIVE Class on Amazon!


What is Microsoft's Reading Coach?
In late 2021, Microsoft released Reading Progress - a tool designed to help students become better readers and save educators time. Now, a new update and integration is here: Reading Coach!

In late 2021, Microsoft released Reading Progress - a tool designed to help students become better readers and save educators time. Now, a new update and integration is here: Reading Coach. In this blog post, you’ll learn what Reading Progress is and how it works, tips and tricks and how Reading Coach can help your students. Click any subheading below to jump to that section.


What is Microsoft’s
Reading Progress?
Reading Progress is a free tool built into Microsoft Teams designed to support and track reading fluency in your class. Students record their reading on camera and submit it to you. Imagine this, the same type of technology used in the Flipgrid Shorts Camera, combined with the power of Immersive Reader and the distribution power of Microsoft Teams. All of these ideas together form Microsoft’s Reading Progress. If you’re interested in learning more about all the nitty gritty details, click here or the image below. We’ll walk you through everything!


Tips and Tricks When Using Microsoft’s Reading Progress
One of the things we love most about Microsoft’s Reading Progress is that it is appropriate for all ages. We love how it can quickly and efficiently assess our students and how it saves time grading running records. We also appreciate how easy it is to use. Once your students are in the assignment, they’re recording themselves in (literally) just several clicks. But now that we have had almost a full year working with Reading Progress, here’s a few tips we can share:
If you teach younger students, we recommend lowering the sensitivity.

Younger students may have difficulty enunciating clearly, which sometimes leads to errors. This can be remedied by lowering the sensitivity to “Less sensitive.”
Take advantage of the option to limit time.
Toggling on the time limit might prevent frustration if a student is struggling with a passage. If a student is fluently reading, they will still feel successful when the timer stops. This feature can be turned on/off when creating the assignment - directly under the “Number of Attempts."
Assignments are now editable!

A little known secret is that Reading Progress assignments are now fully editable! When Reading Progress launched, if you made a mistake on the assignment, you would have to delete it and start all over again. Now, in an assignment, click the three dots and then click “Edit assignment.” No more deleting!
Reading Progress isn’t just for running records.
If you’re a primary teacher, you can use it to assess sight words, too! That’s right…automatically grade sight words! You can learn all about how this works in our blog post. Click here or the image to read all about it!

What is Microsoft’s Reading Coach and How Can it Help My Students?
Microsoft’s Reading Coach is another free add on to Reading Progress. Now, after your students have completed reading a passage, Reading Coach will intelligently (and immediately) identify words that the student struggled with. It will then provide the list of words to practice, prior to the student turning in the assignment. Here’s how it works:
Once a student has stopped the Reading Progress recording, Reading Coach will generate a list of words that the student struggled with. The student can then take time to practice the word(s).

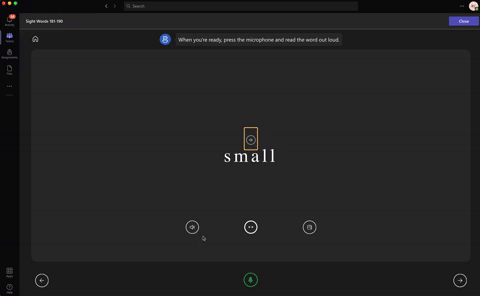
When students click on a word, they have the option to hear the word read allowed, stretch the syllables out, or (if available) “see the word,” which pops up an illustration describing the term. Students can earn a star on the word for correctly saying the word by clicking on the microphone (located on the bottom of the screen).
Students can easily go through the words using the arrows. Notice, all of this can be done prior to turning in the assignment. Reading Coach is optional, though, and students may bypass it by just turning the assignment in. We recommend training your students to take the time to use it, which will give them even more (independent) practice on terms they struggled with.

But, students aren’t the only ones in on the fun! Educators now have access to valuable insights (available through Microsoft Teams by clicking on a student’s assignment, then clicking “Insights.” This report will generate information like correct words per minute, accuracy rate, practiced words, and much more.
If you’re a primary teacher, you can also use Reading Coach to help your students practice their sight words! Check out our blog post for downloadable templates of the 220 Dolch (Sight) Words. Upload them one-by-one and then students can practice the words ten at a time. If a student misses a word, Reading Coach will automatically help tech it to them!
-- Stay tuned for more Microsoft Education ideas that you can use in your classroom! Be sure to follow us on social media (@TheMerrillsEDU everywhere) for more! 👓👗
For more tips, tricks and lesson ideas for making learning more interACTIVE, check out our books The InterACTIVE Class and Flipgrid in the InterACTIVE Class on Amazon!


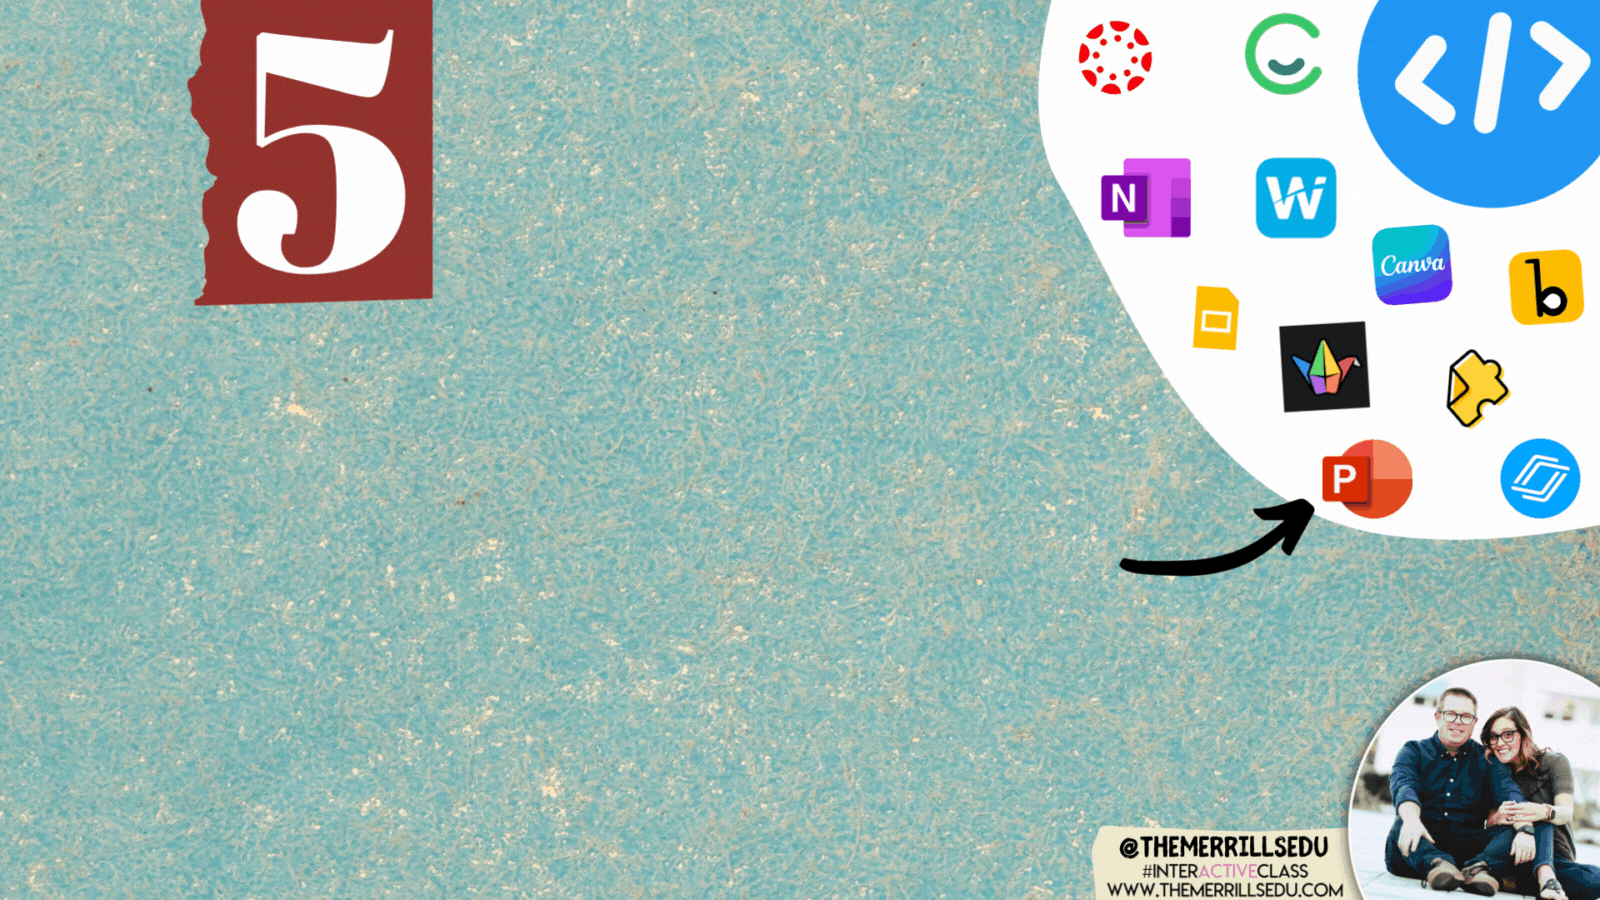
15 Things to Embed to Make Content Easier to Access!
Embedding apps is a great way to keep your content organized, but more importantly, it can help keep your students focused when working on tasks. The option to embed from apps is becoming increasingly more popular, and you may even be able to embed some of the apps you’re using right now! Here are 15 different ways we love to embed!

Embedding apps is a great way to keep your content organized, but more importantly, it can help keep your students focused when working on tasks. The option to embed from apps is becoming increasingly more popular, and you may even be able to embed some of the apps you’re using right now! Here are 15 different ways we love to embed!
Please note: This blog post was hand-crafted and was not created using AI.
(click on any subheading to jump to that section)


What does it mean to embed something?
According to BigCommerce.com, Embedding refers to the integration of links, images, videos, gifs and other content into social media posts or other web media. Embedded content appears as part of a post and supplies a visual element that encourages increased click through and engagement. The key takeaway here is that your embedded content appears to be a part where you are posting it. In other words, it’s being housed by wherever you are placing it.
Embedding & Hyperlinking
So why embed over hyperlink? By embedding your content, your students will not have to leave one app to visit another to complete a task. Everything is organized and in one place. Hyperlinking your content is not a bad thing, it just adds another step for students. Embedding creates a streamlined experience. So, let’s take a look at what some of our favorite embedding combos look like!

Padlet Embedded into Canvas
Take your Padlet boards and place them right into a Canvas page! Here’s how:


Create or find the Padlet board that you’d like to share, then click on the share icon.
Click on Embed in your blog or website.
Click Copy Padlet embed code.
4. In the Canvas page, click the cloud icon (if you don’t see a cloud icon, click the three dots to expand the toolbar).

5. In the pop up window, paste the copied embed code from Padlet then click the blue “Submit” button.
6. Your Padlet board is now embedded into your Canvas page! Click “Save” to keep the changes.

Padlet Embedded into Book Creator
Adding your Padlet boards into Book Creator can help keep track of student work. Here’s how!


Create or find the Padlet board that you’d like to share, then click on the share icon.
Click on Embed in your blog or website.
Click Copy Padlet embed code.
4. Log into Book Creator, then open or start a new book. In the book, click on the + icon, followed by “More.” Scroll down until you see “Embed,” then click it.
5. Paste the copied embed code from Padlet, then click “Confirm.”
6. The Padlet board is now embedded into the book.
This embed is only a hyperlink out to the Padlet board. While it will not allow students to interact with the Padlet content directly in the book, it will provide an organized way to revisit your Padlet boards.

Padlet Embedded into Classroom Screen
What is Classroom Screen?
Classroom Screen is a free tool (with a paid option) that educators can use to project in front of the class. Users can pick a background to be projected from a collection of images, animated gifs, or upload their own image. Classroom Screen provides many options to add to your background such as: a timer, random name generator, sound level alarms, and our personal favorite - embedding.
With Classroom Screen, you can set a class timer to give students time to create, then give them additional time to respond. This alleviates stress that students may face when trying to finish their work. With Classroom Screen’s embed feature, you can add a Padlet board right into your Classroom Screen. Here’s how it works:


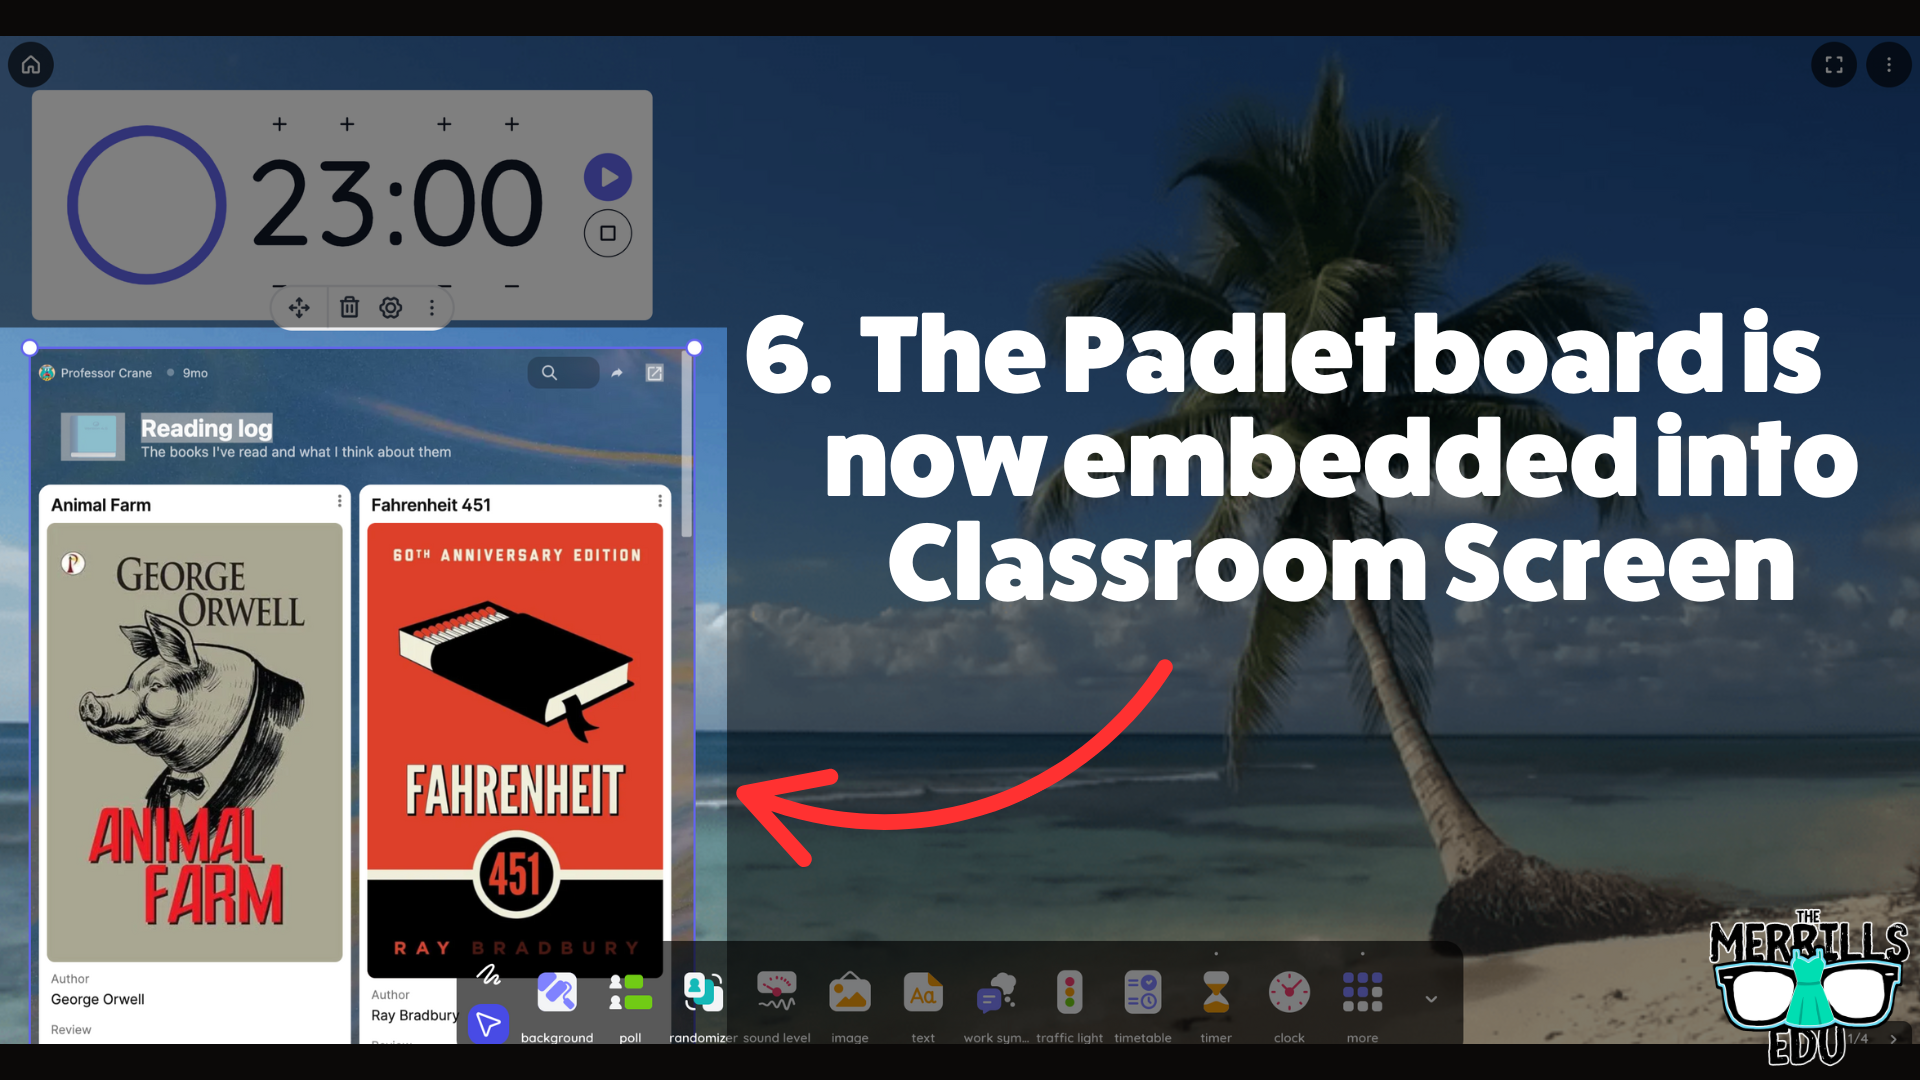
Open the Padlet board that you want to embed, then click the share icon.
Click on Embed in your blog or website.
Click Copy Padlet embed code.
Launch Classroomscreen, then click More located on the bottom toolbar. Then, click Embed.
Paste the embed code, then click Run Code.
Now, the Padlet board is embedded into the Classroomscreen workspace.
This is a true embed - meaning users can interact with it in real time. So, educators can embed this into a Classroomscreen workspace, start a timer, and then the embed will refresh itself so that every time new content gets added, it appears on the screen.

Nearpod Embedded into Canvas
(Note: this requires a paid Nearpod account and the use of Student Paced lessons. It will not work with “Live participation” lessons)
Nearpod users can now expedite the login procedure for their students by embedding lessons right into Canvas. Doing so will eliminate the need for a join code. Here’s how it all works:
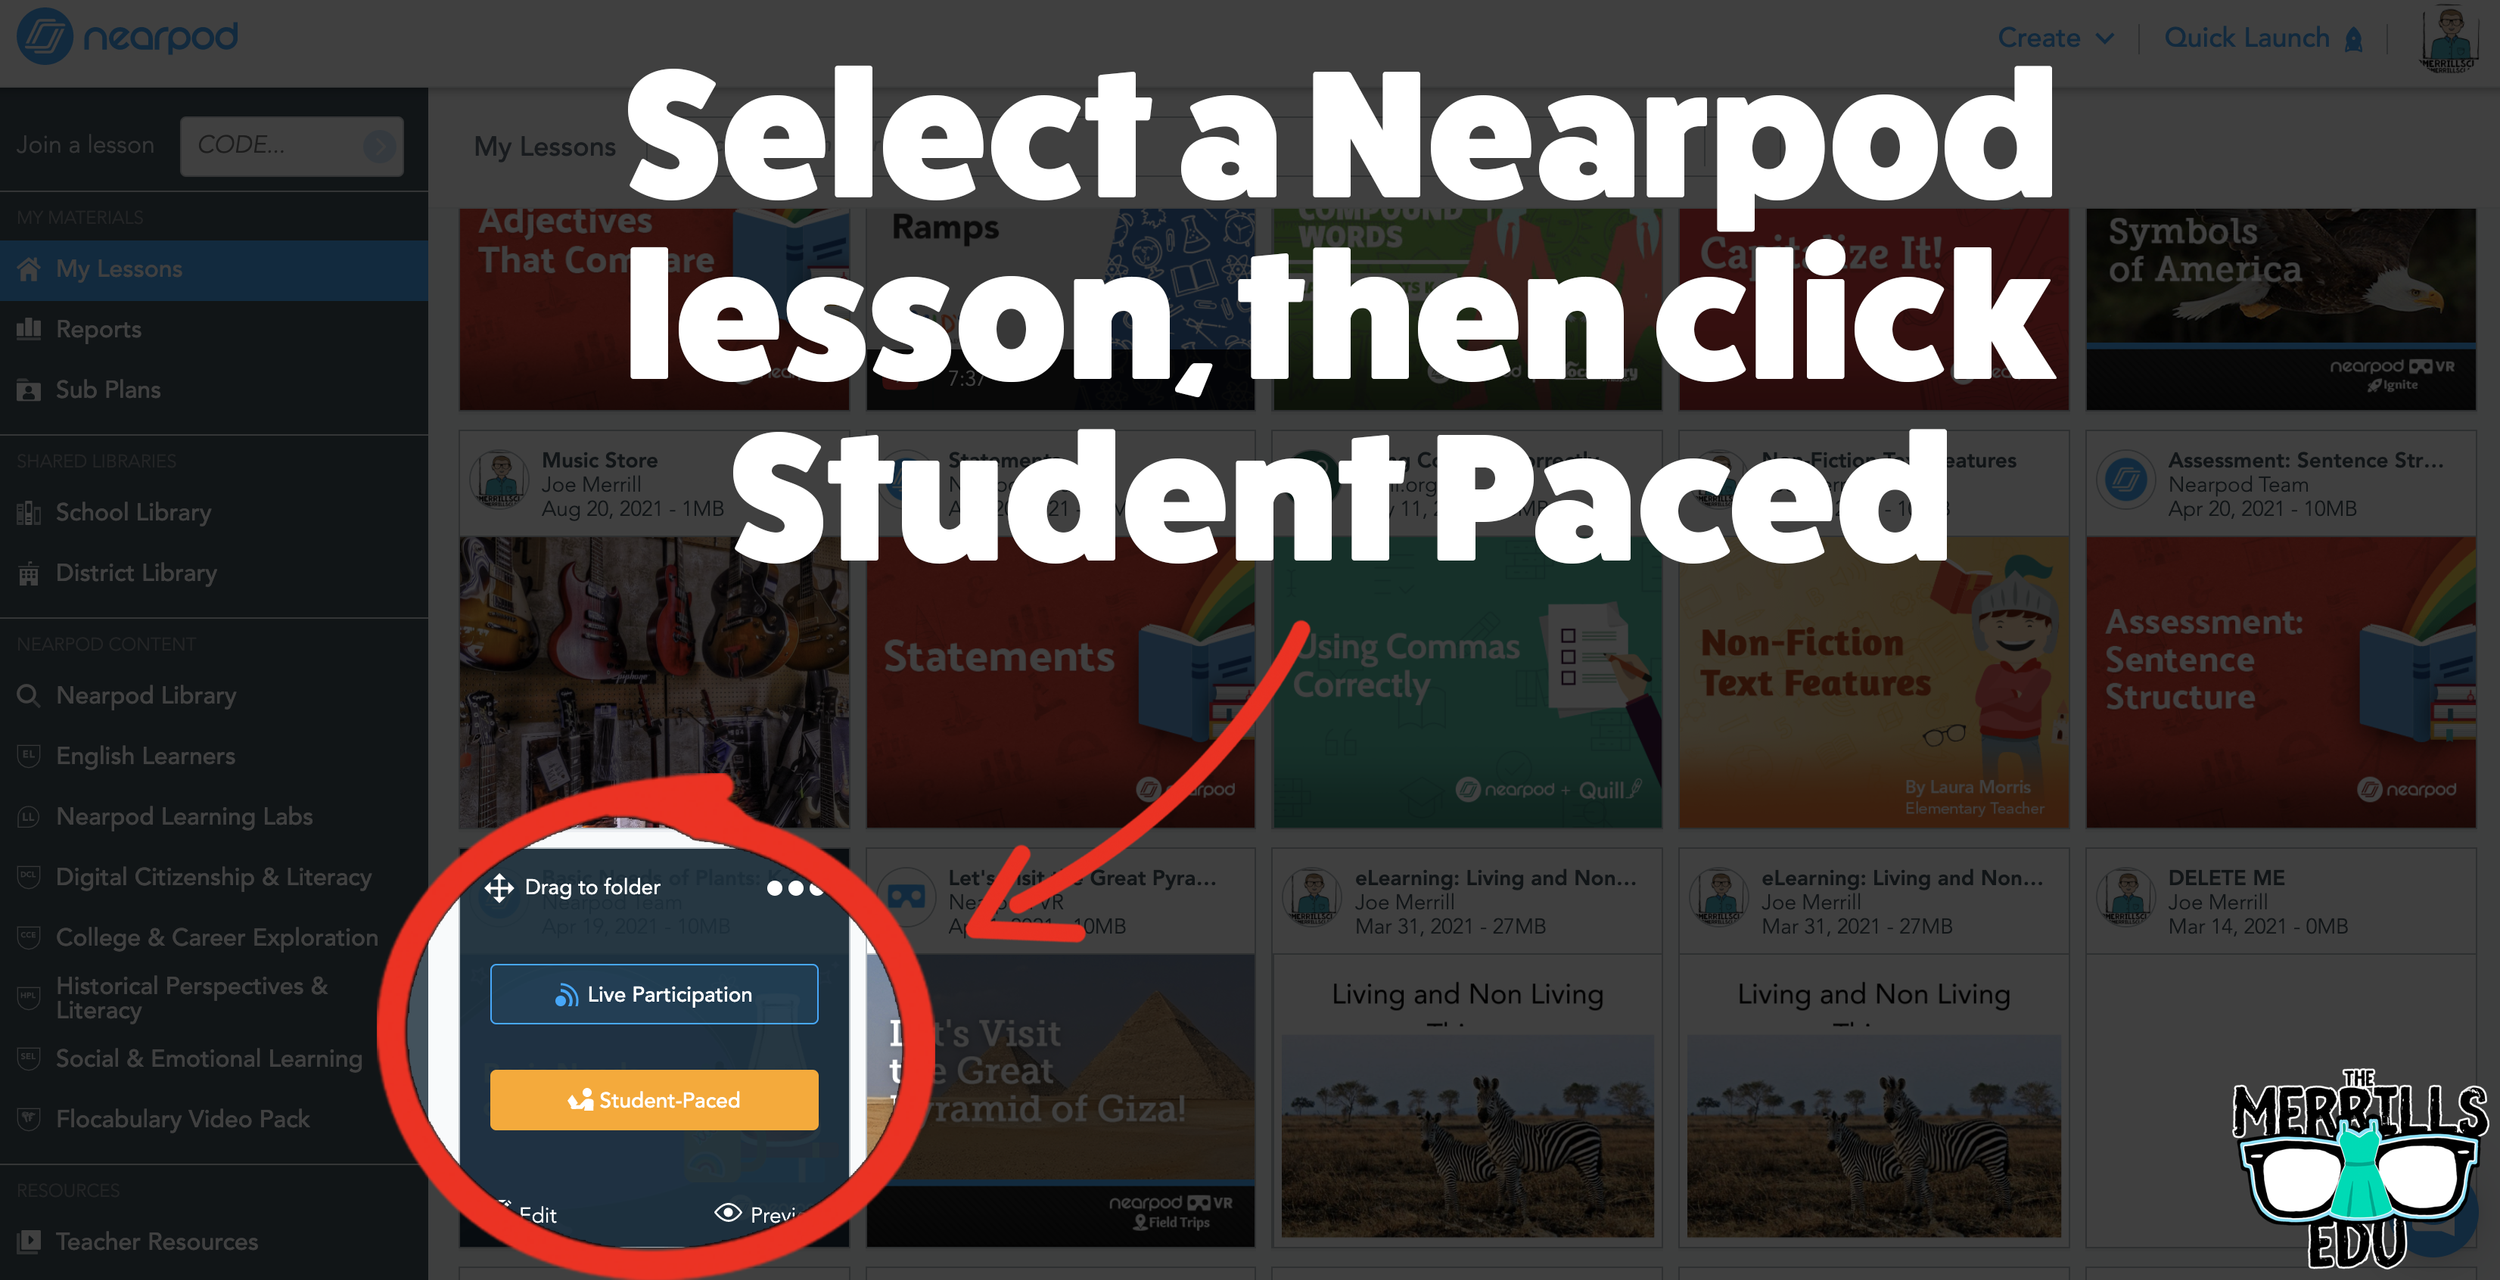
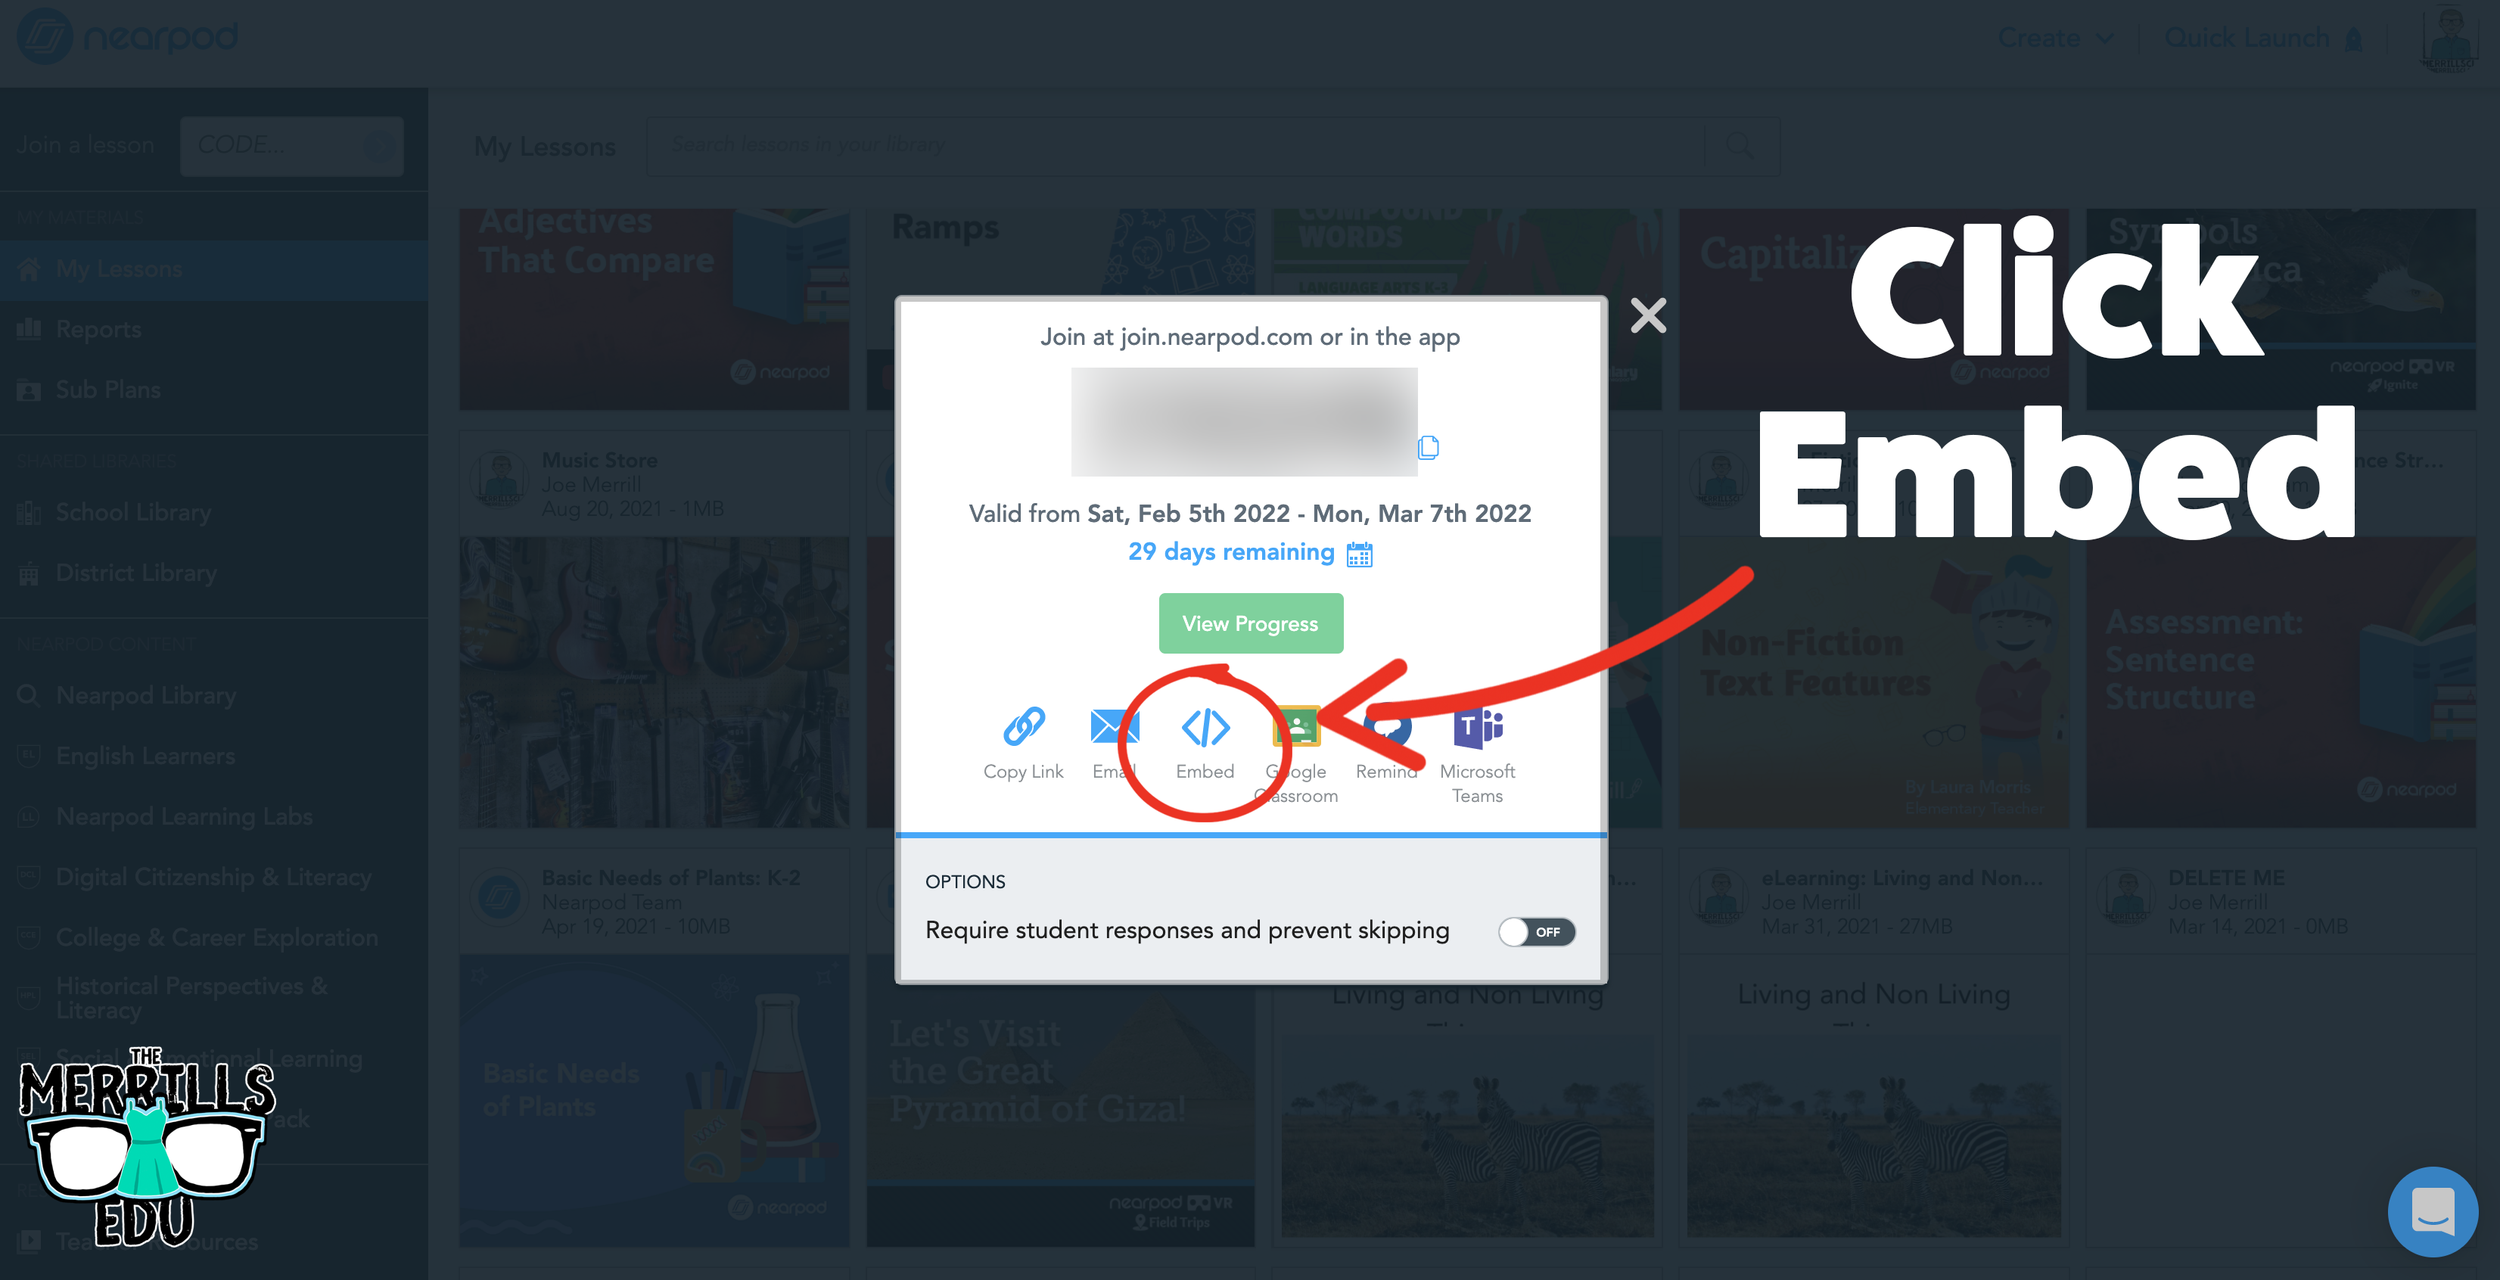
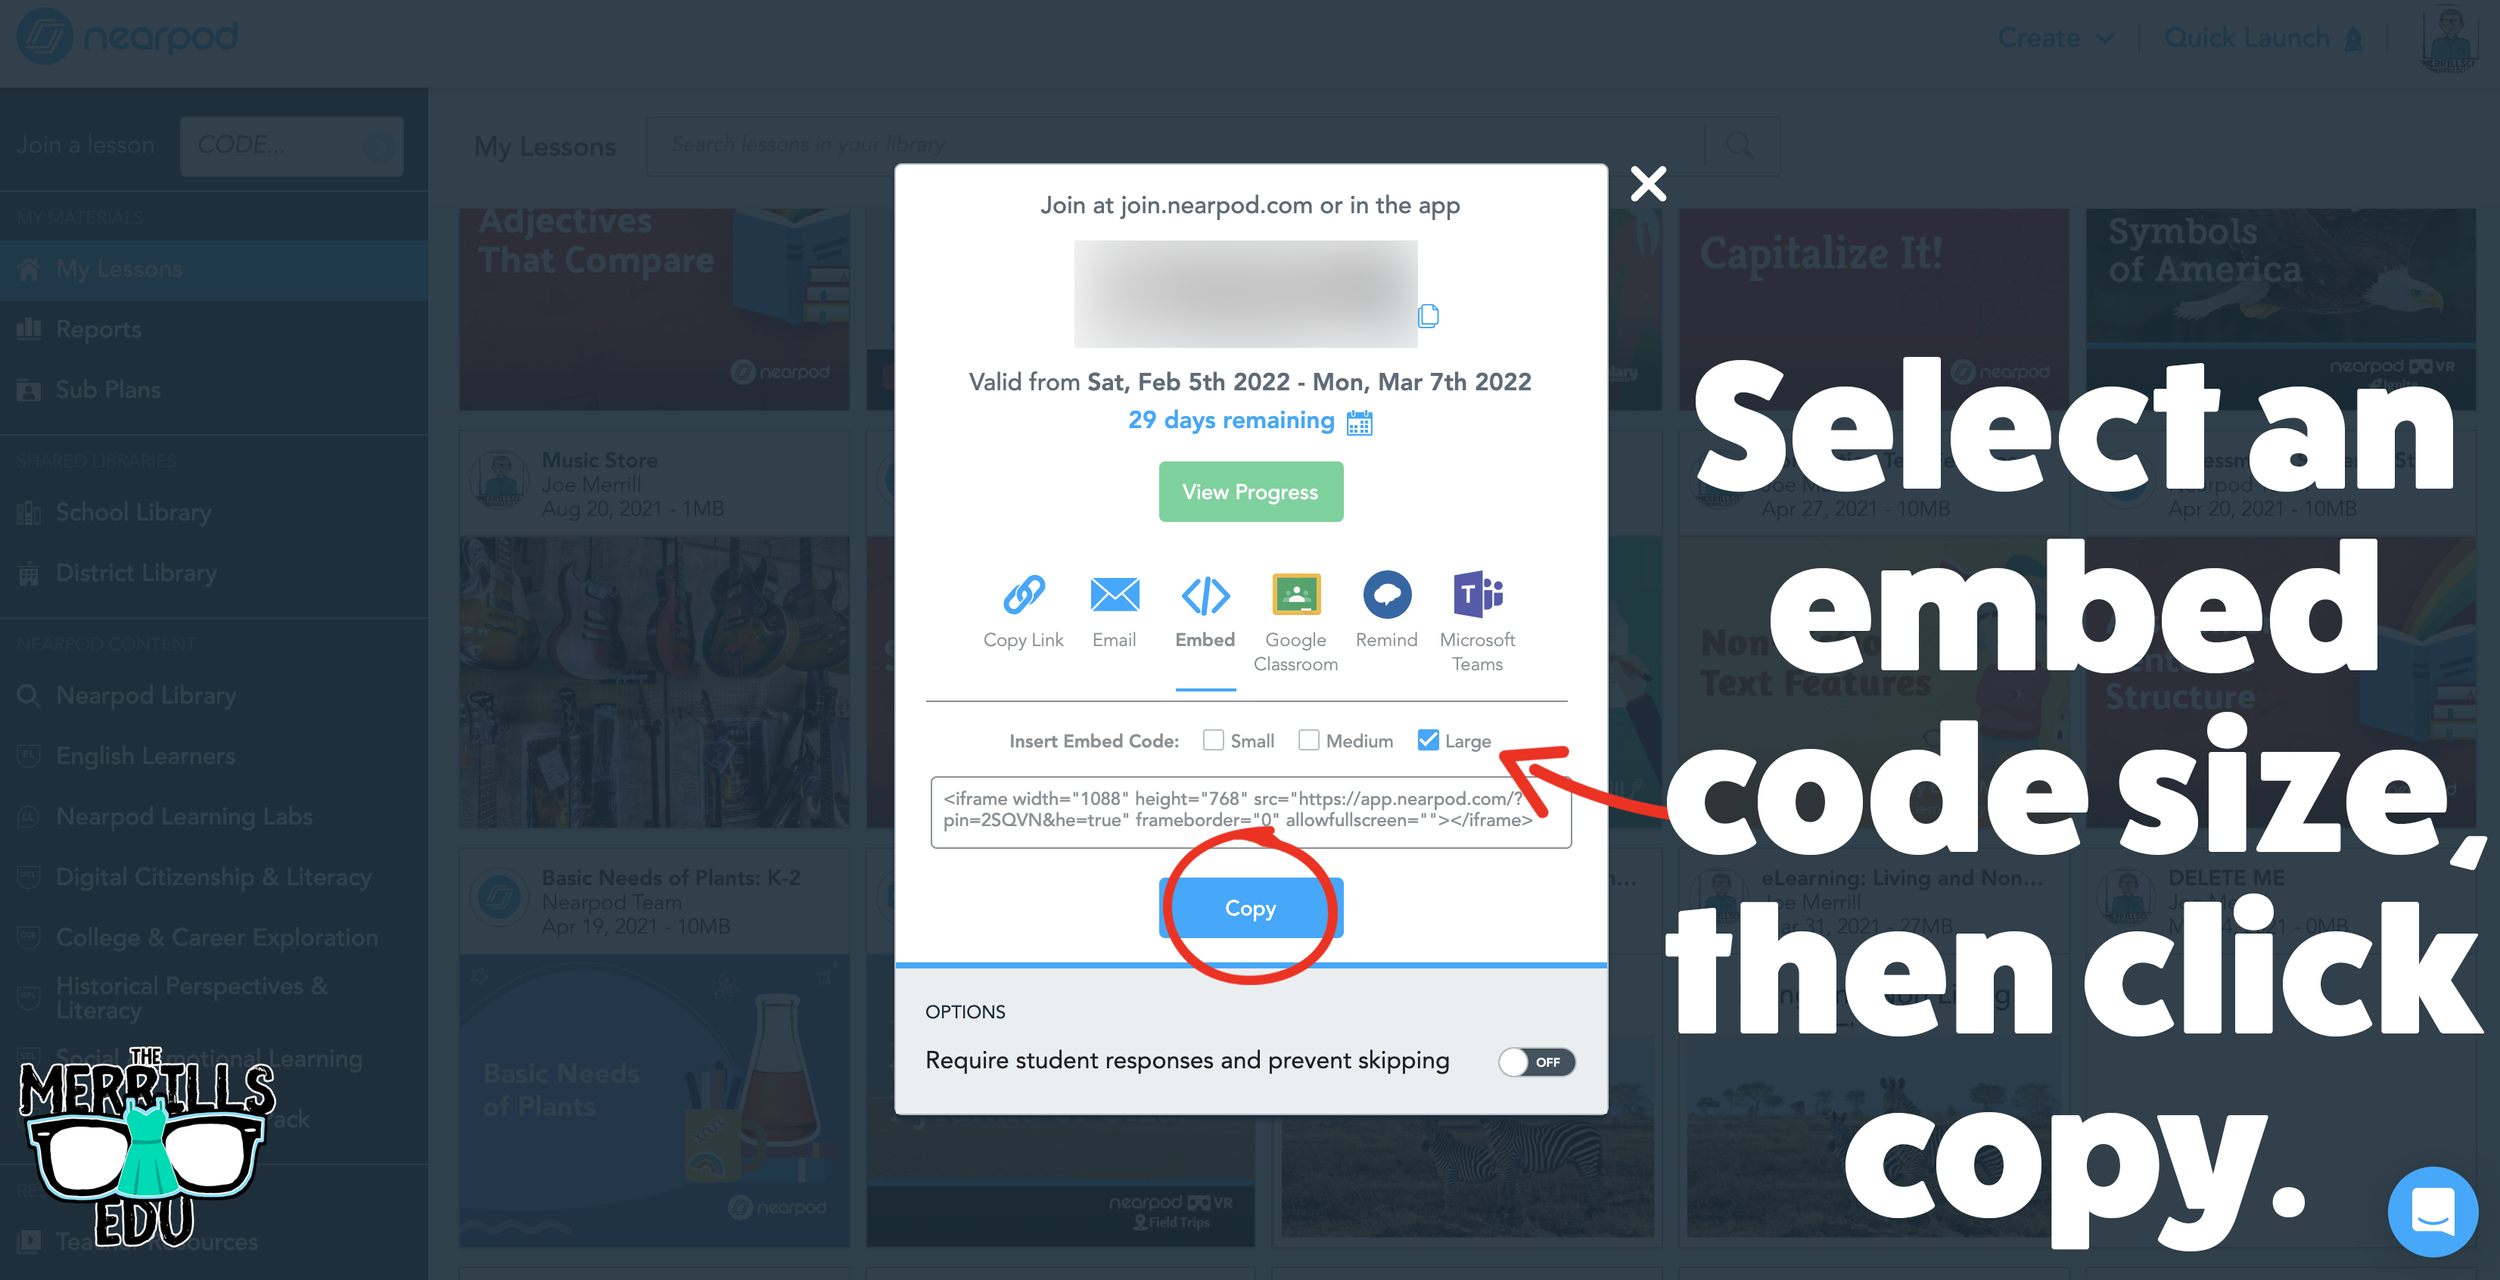


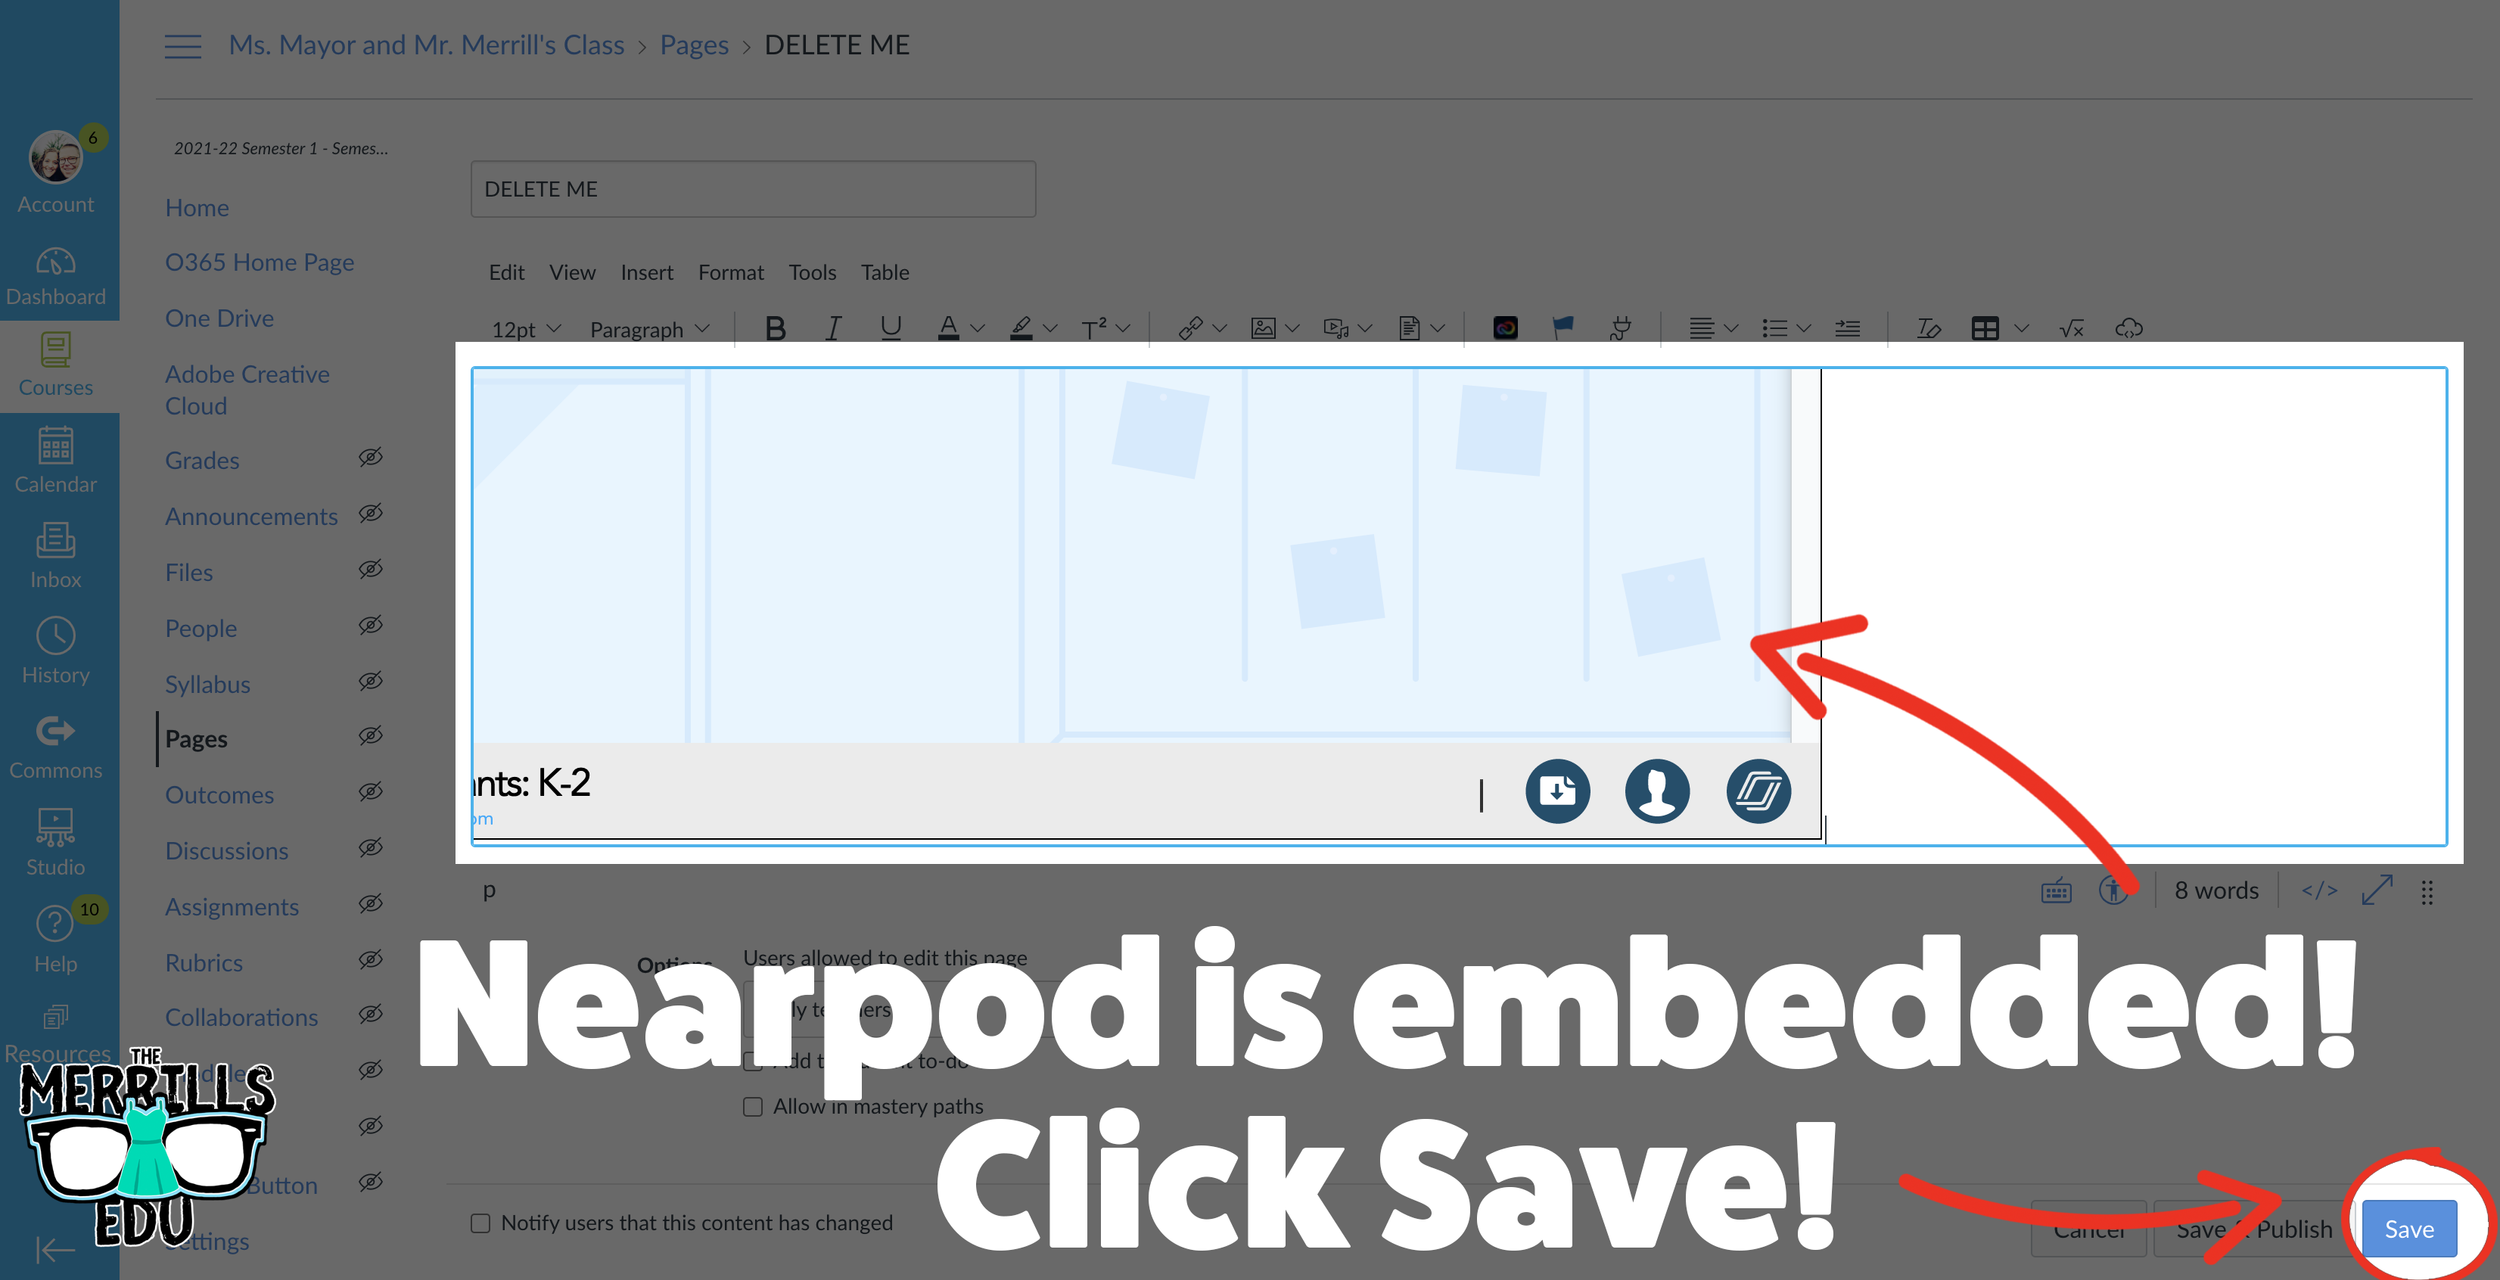
Open the desired Nearpod lesson that you would like to embed into Canvas.
Click on “Student-Paced.”
On the next window, click the Embed icon.
In the Embed window, select a preferred embed code size. We recommend large. Then, click copy.
In a separate tab, open the Canvas page that you would like to embed the Nearpod lesson into.
Click on the cloud icon which will open the embed menu (if you don’t see the cloud icon, click on the three dots to the right of the menu bar).
Paste your copied embed code into the box, then click “Submit.”
Your Nearpod lesson will now be embedded into Canvas. Click “Save” to update the changes.
Now, the lesson will be available for your students via Canvas!
Wakelet Embedded into Canvas
Share your Wakelet Collections right within Canvas! This live embed will allow students to make changes to the Wakelet collection without having to re-embed it afterwards. In other words, changes will be available as they are made - without having to go through this process again. Here’s how it all works:
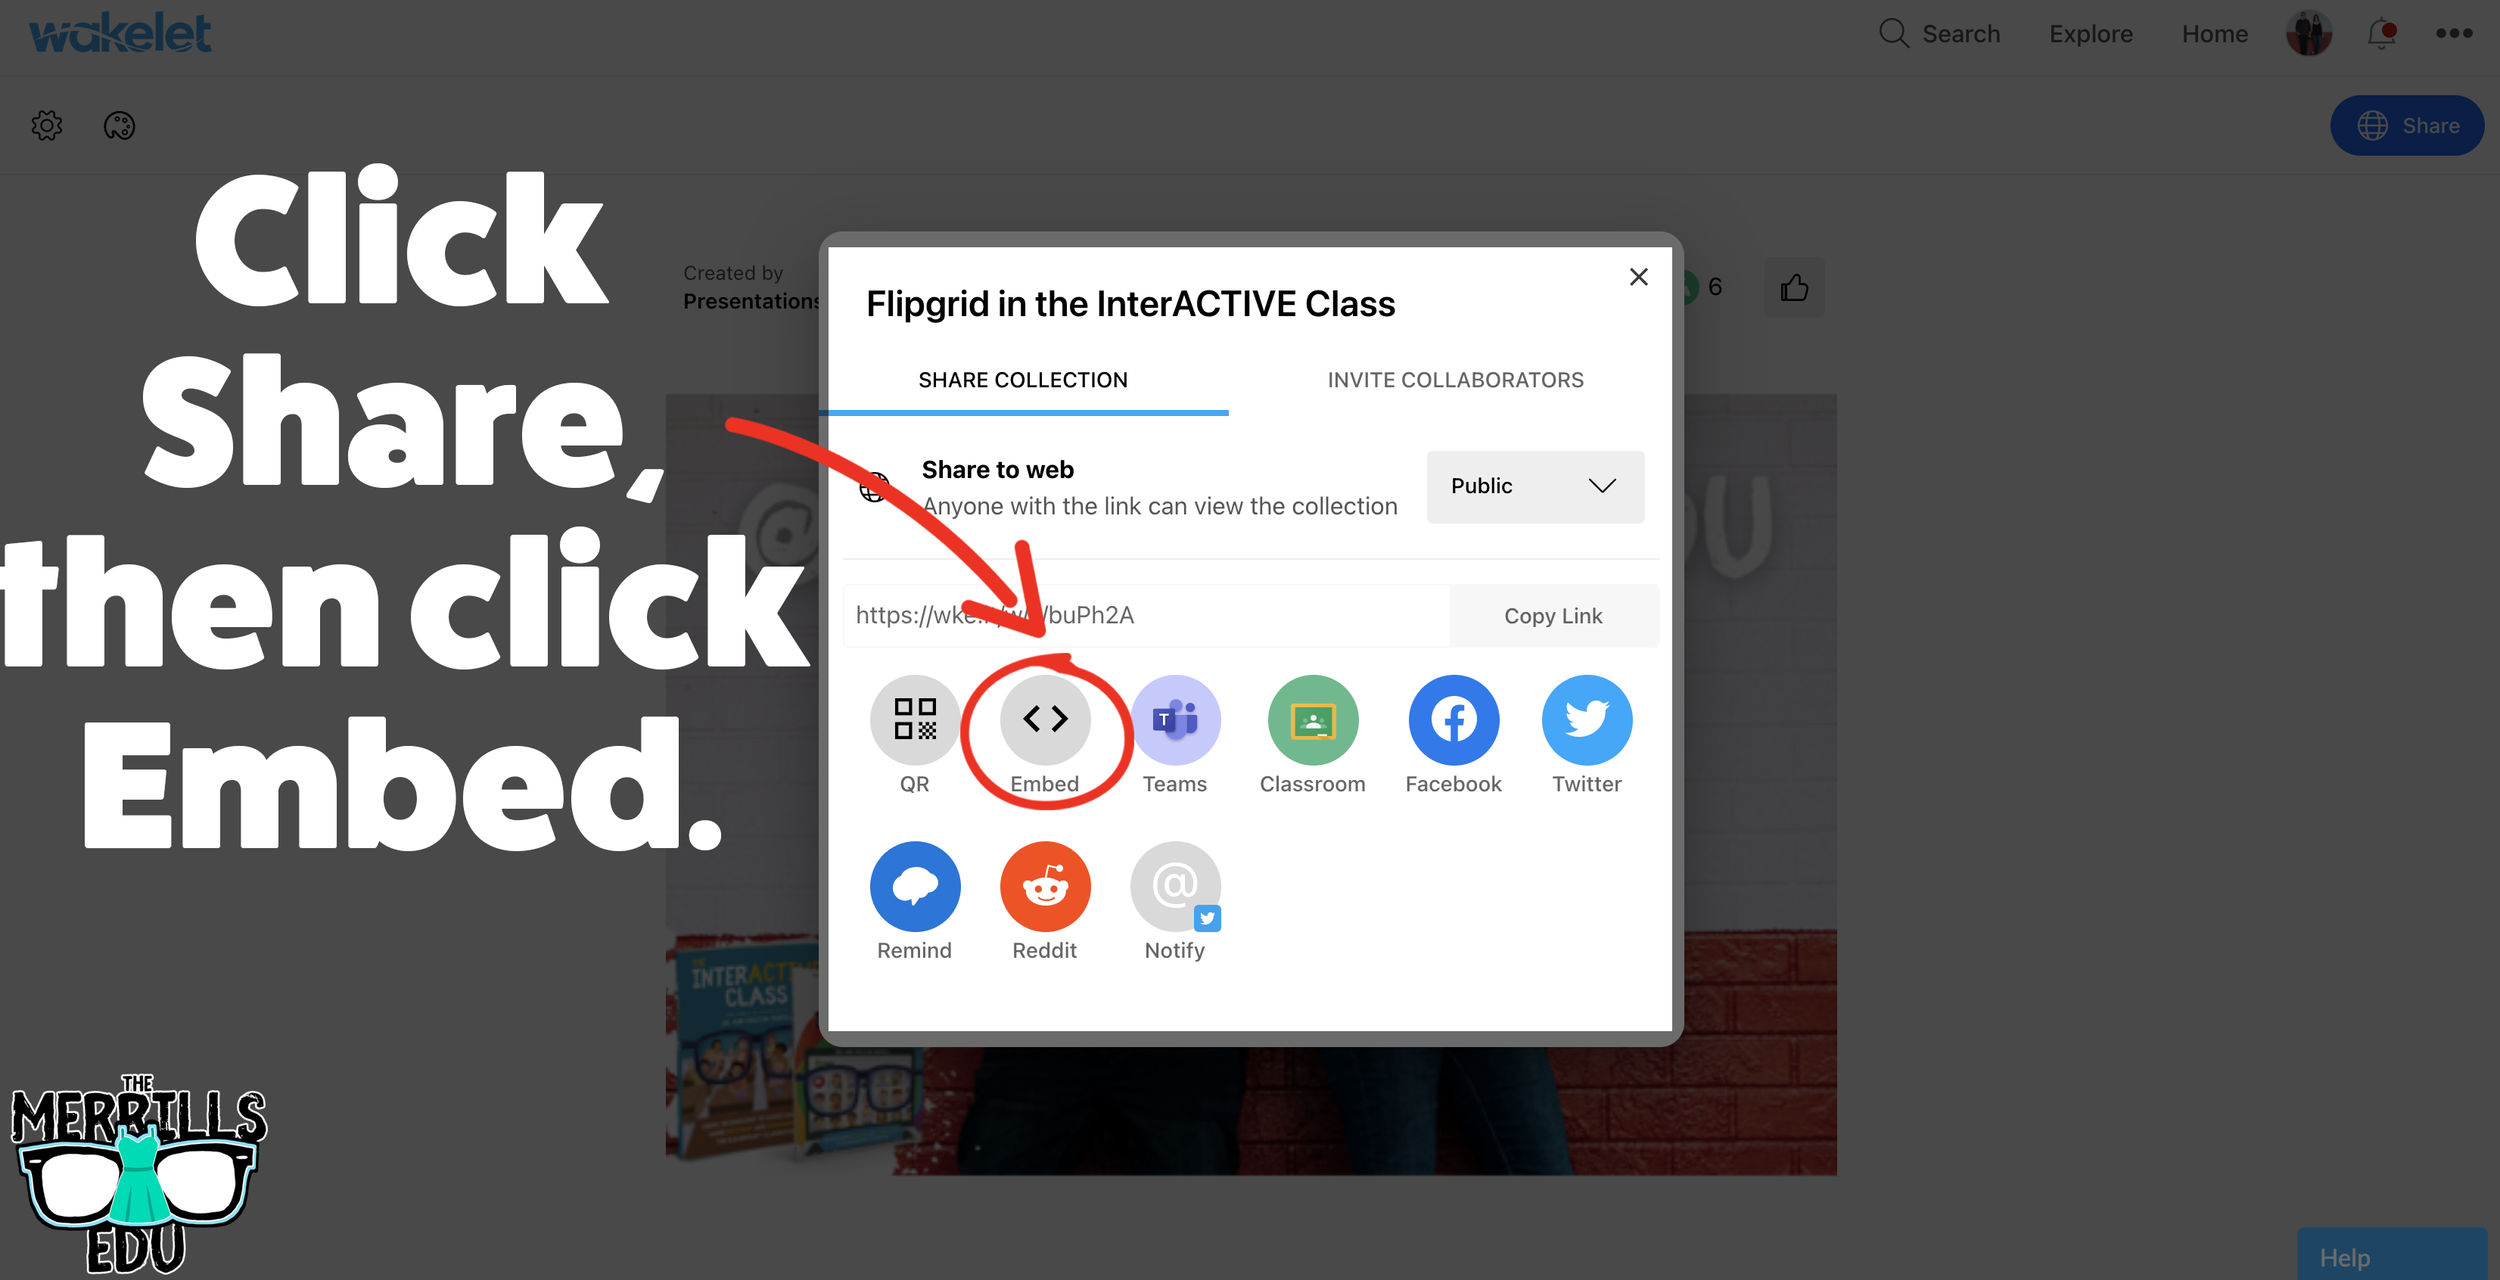
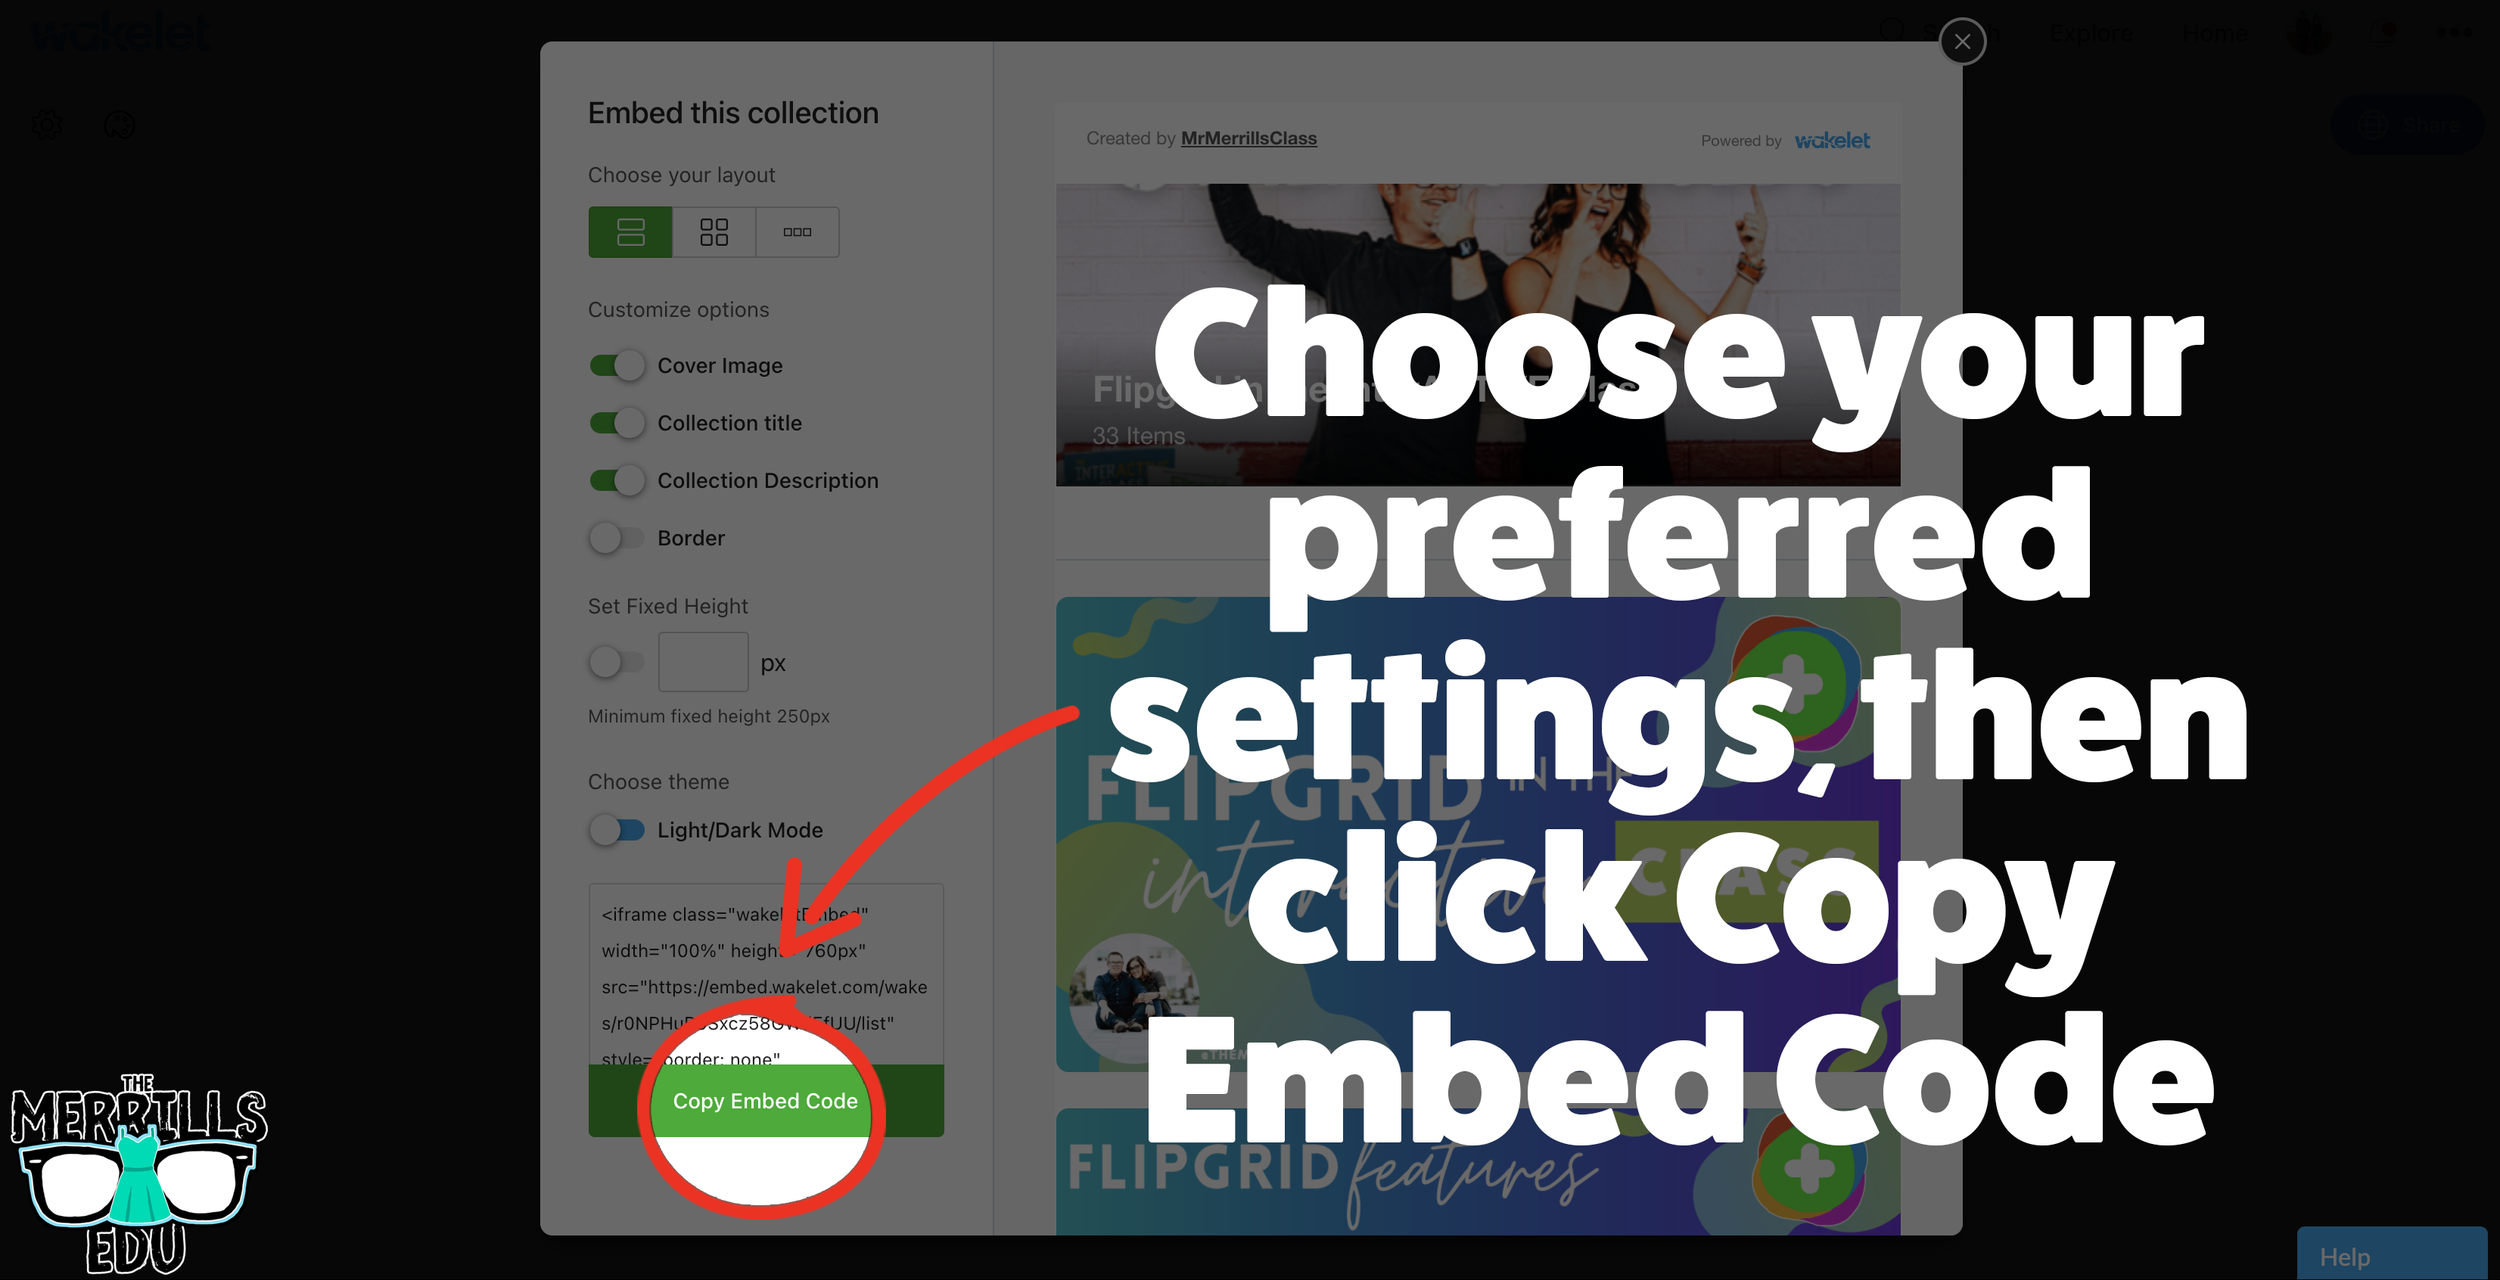
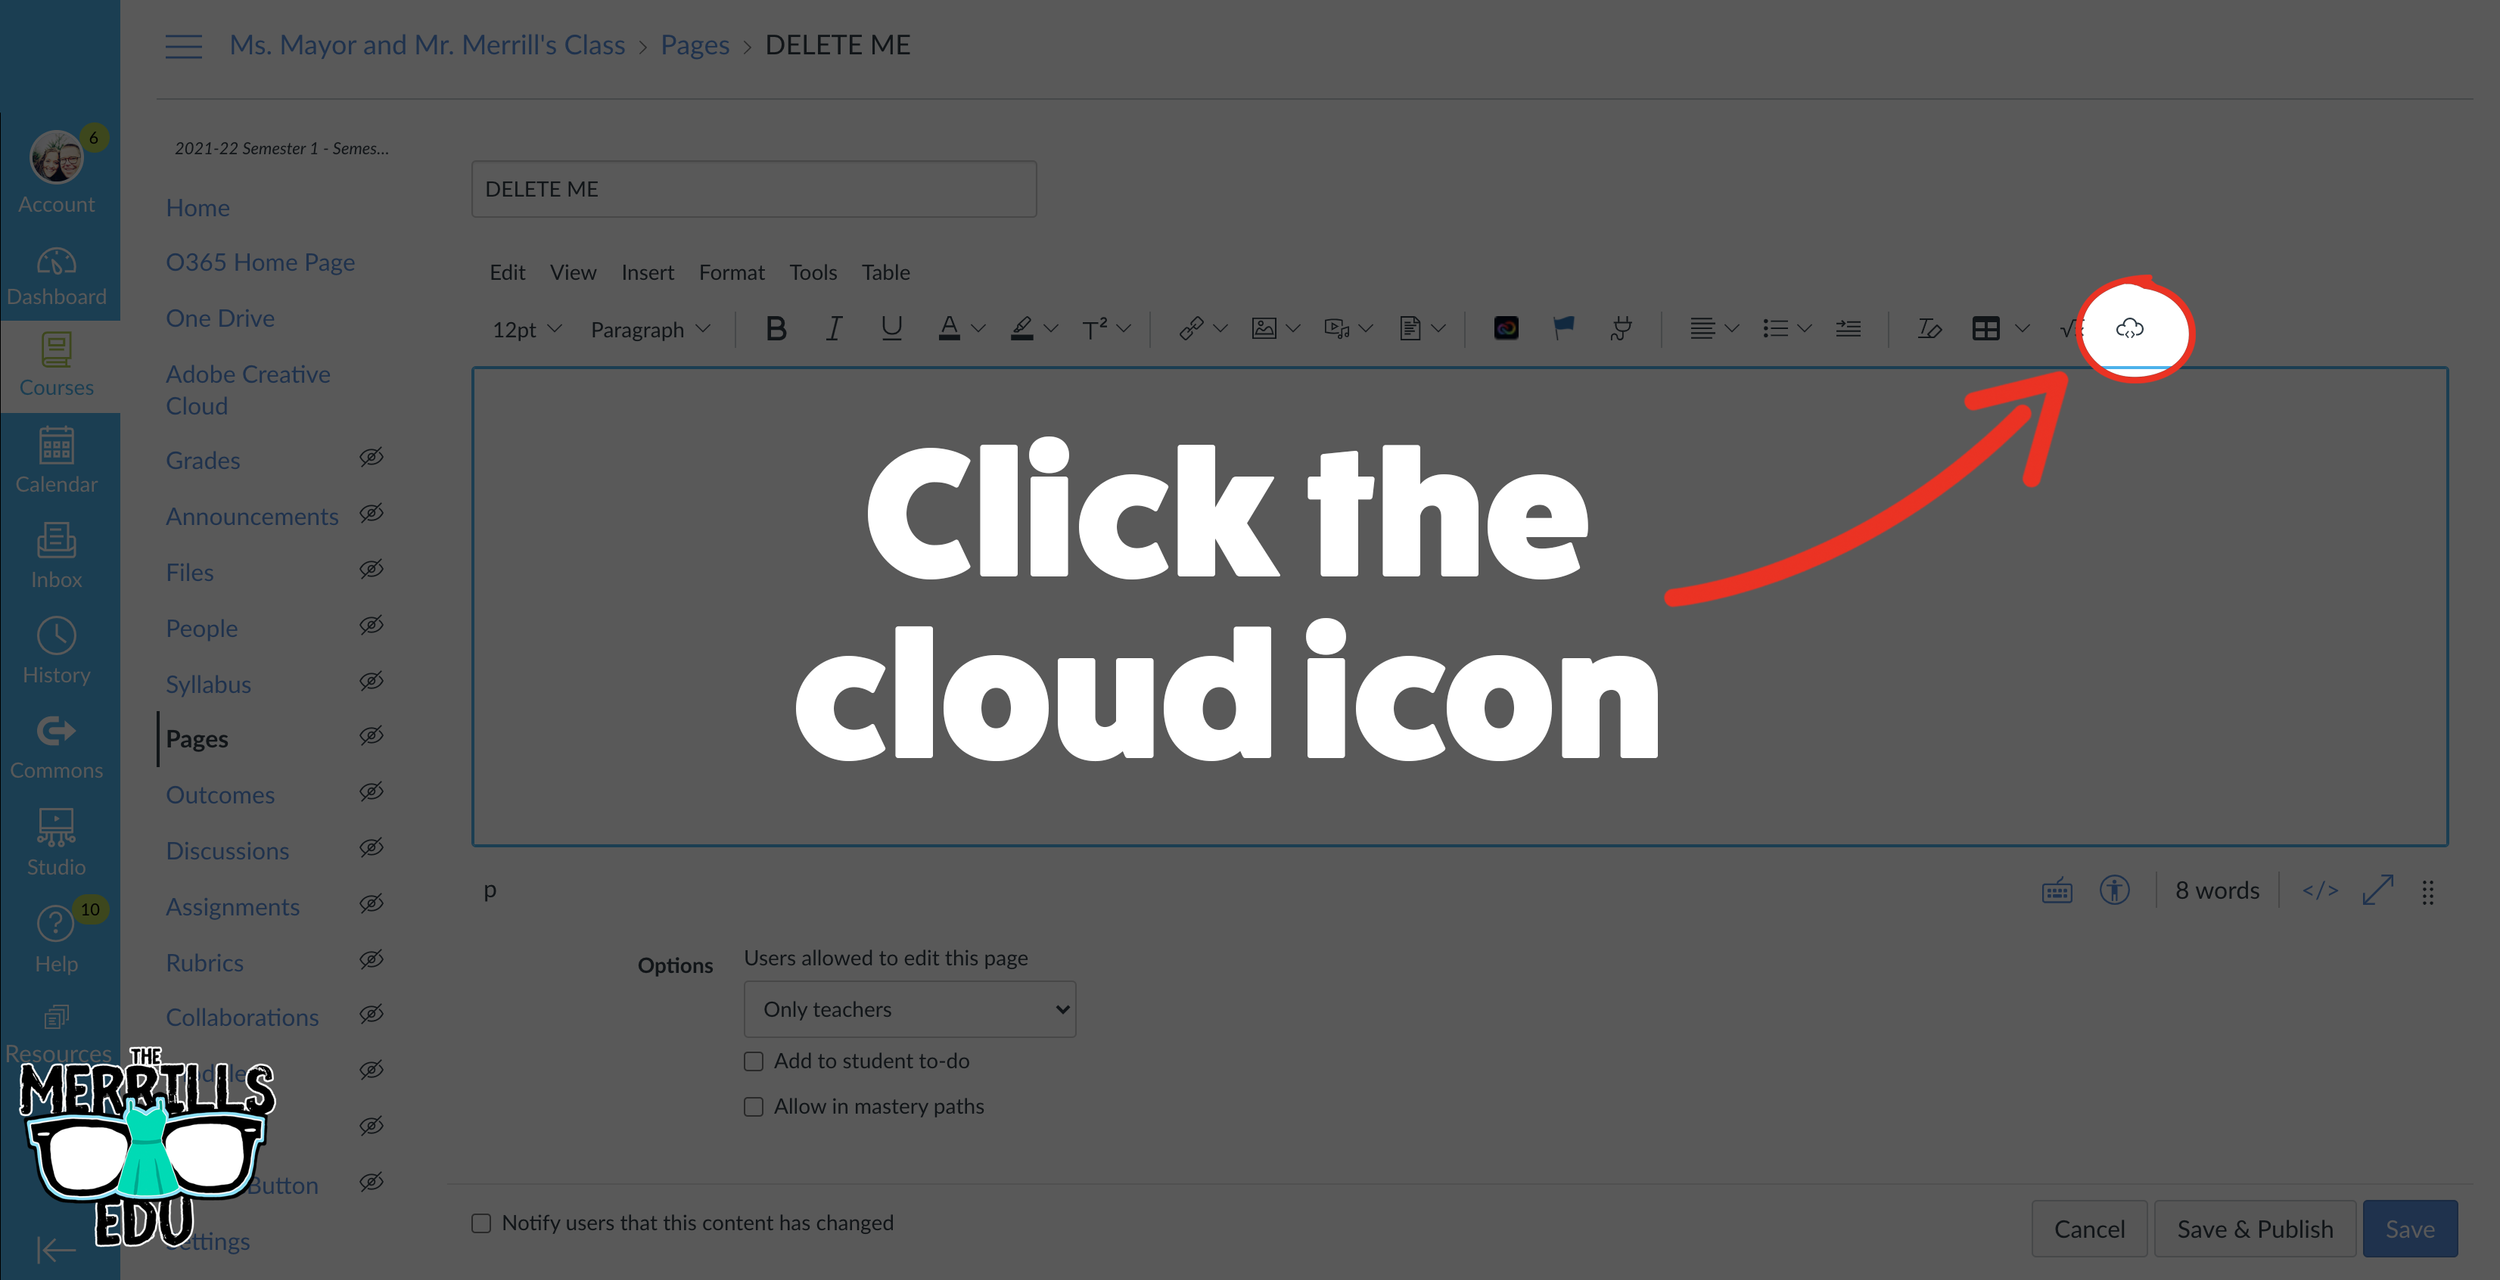

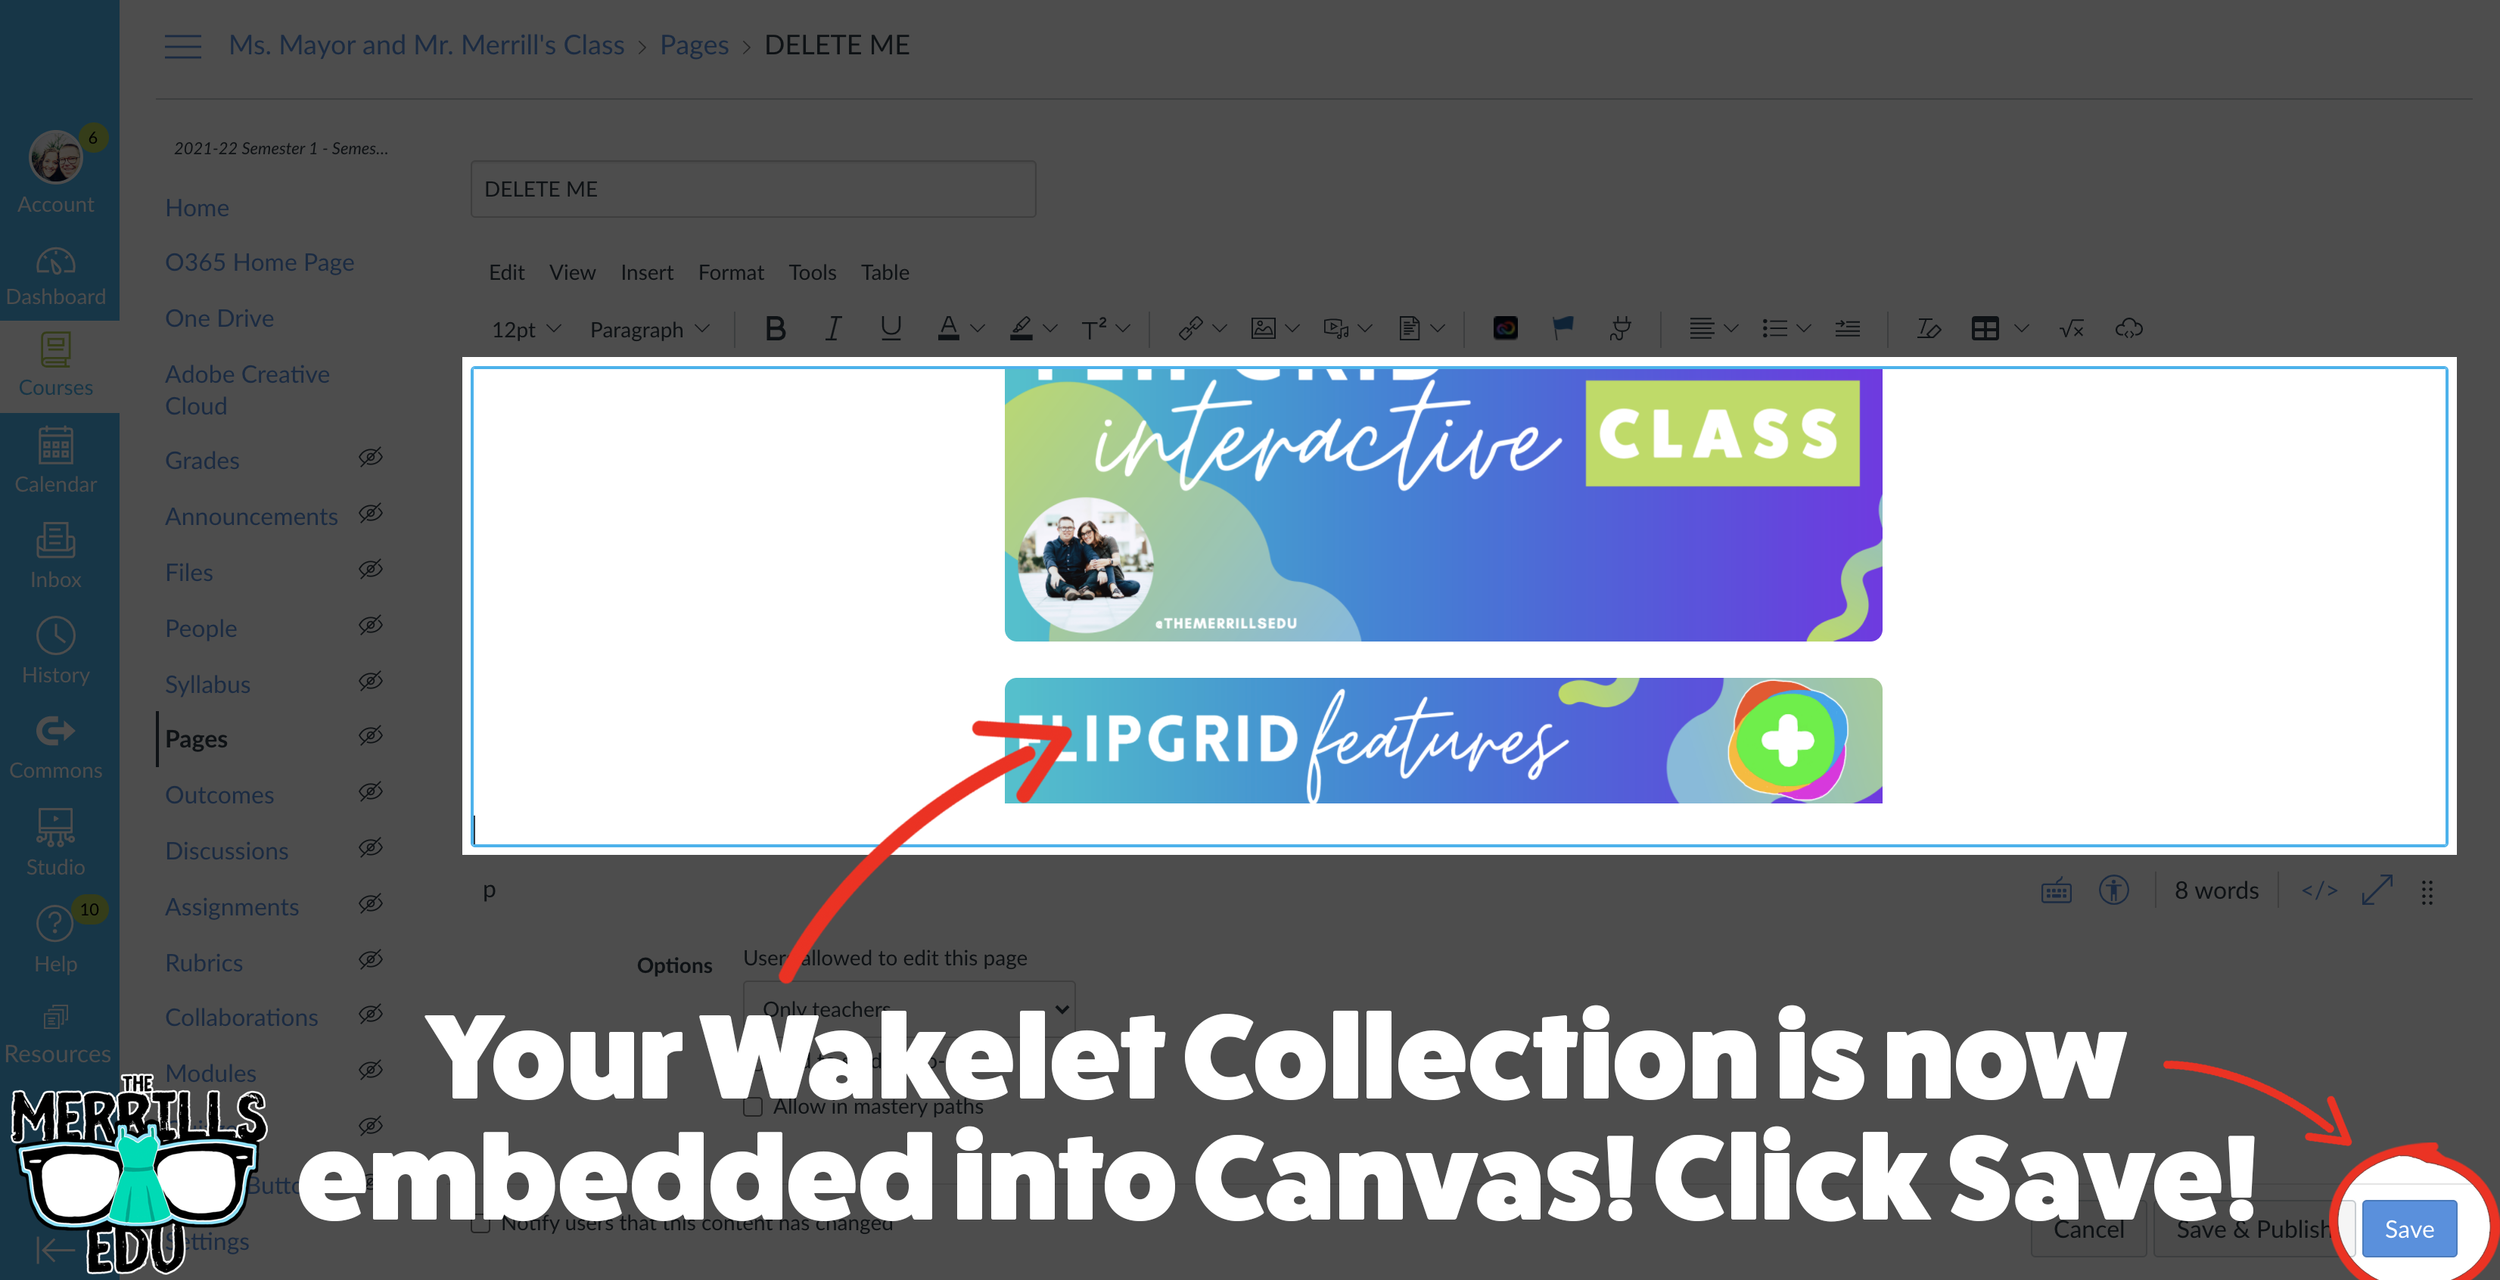
(Note: Your Wakelet Collection must be set to “Public” in order for you to embed it)
In a Wakelet Collection, click the “Share” button, then click “Embed.”
Chose your preferred settings, then click “Copy Embed Code.”
In a separate tab, open the Canvas page that you would like to add the Wakelet Collection to. Then, click on the cloud icon.
In the embed window, paste your copied code from Wakelet. Then, click submit.
Your Wakelet collection is now embedded into the Canvas page! Click on “Save” to update the changes.

Canva Embedded into Canvas
Embedding Canva into Canvas will take your Canva creations live on any Canvas page! This live embed means that anything that you update on the Canva end will automatically update on the Canvas end. So, if you make changes to the Canva creation, you won’t have to worry about re-embedding it! Here’s how it all works:
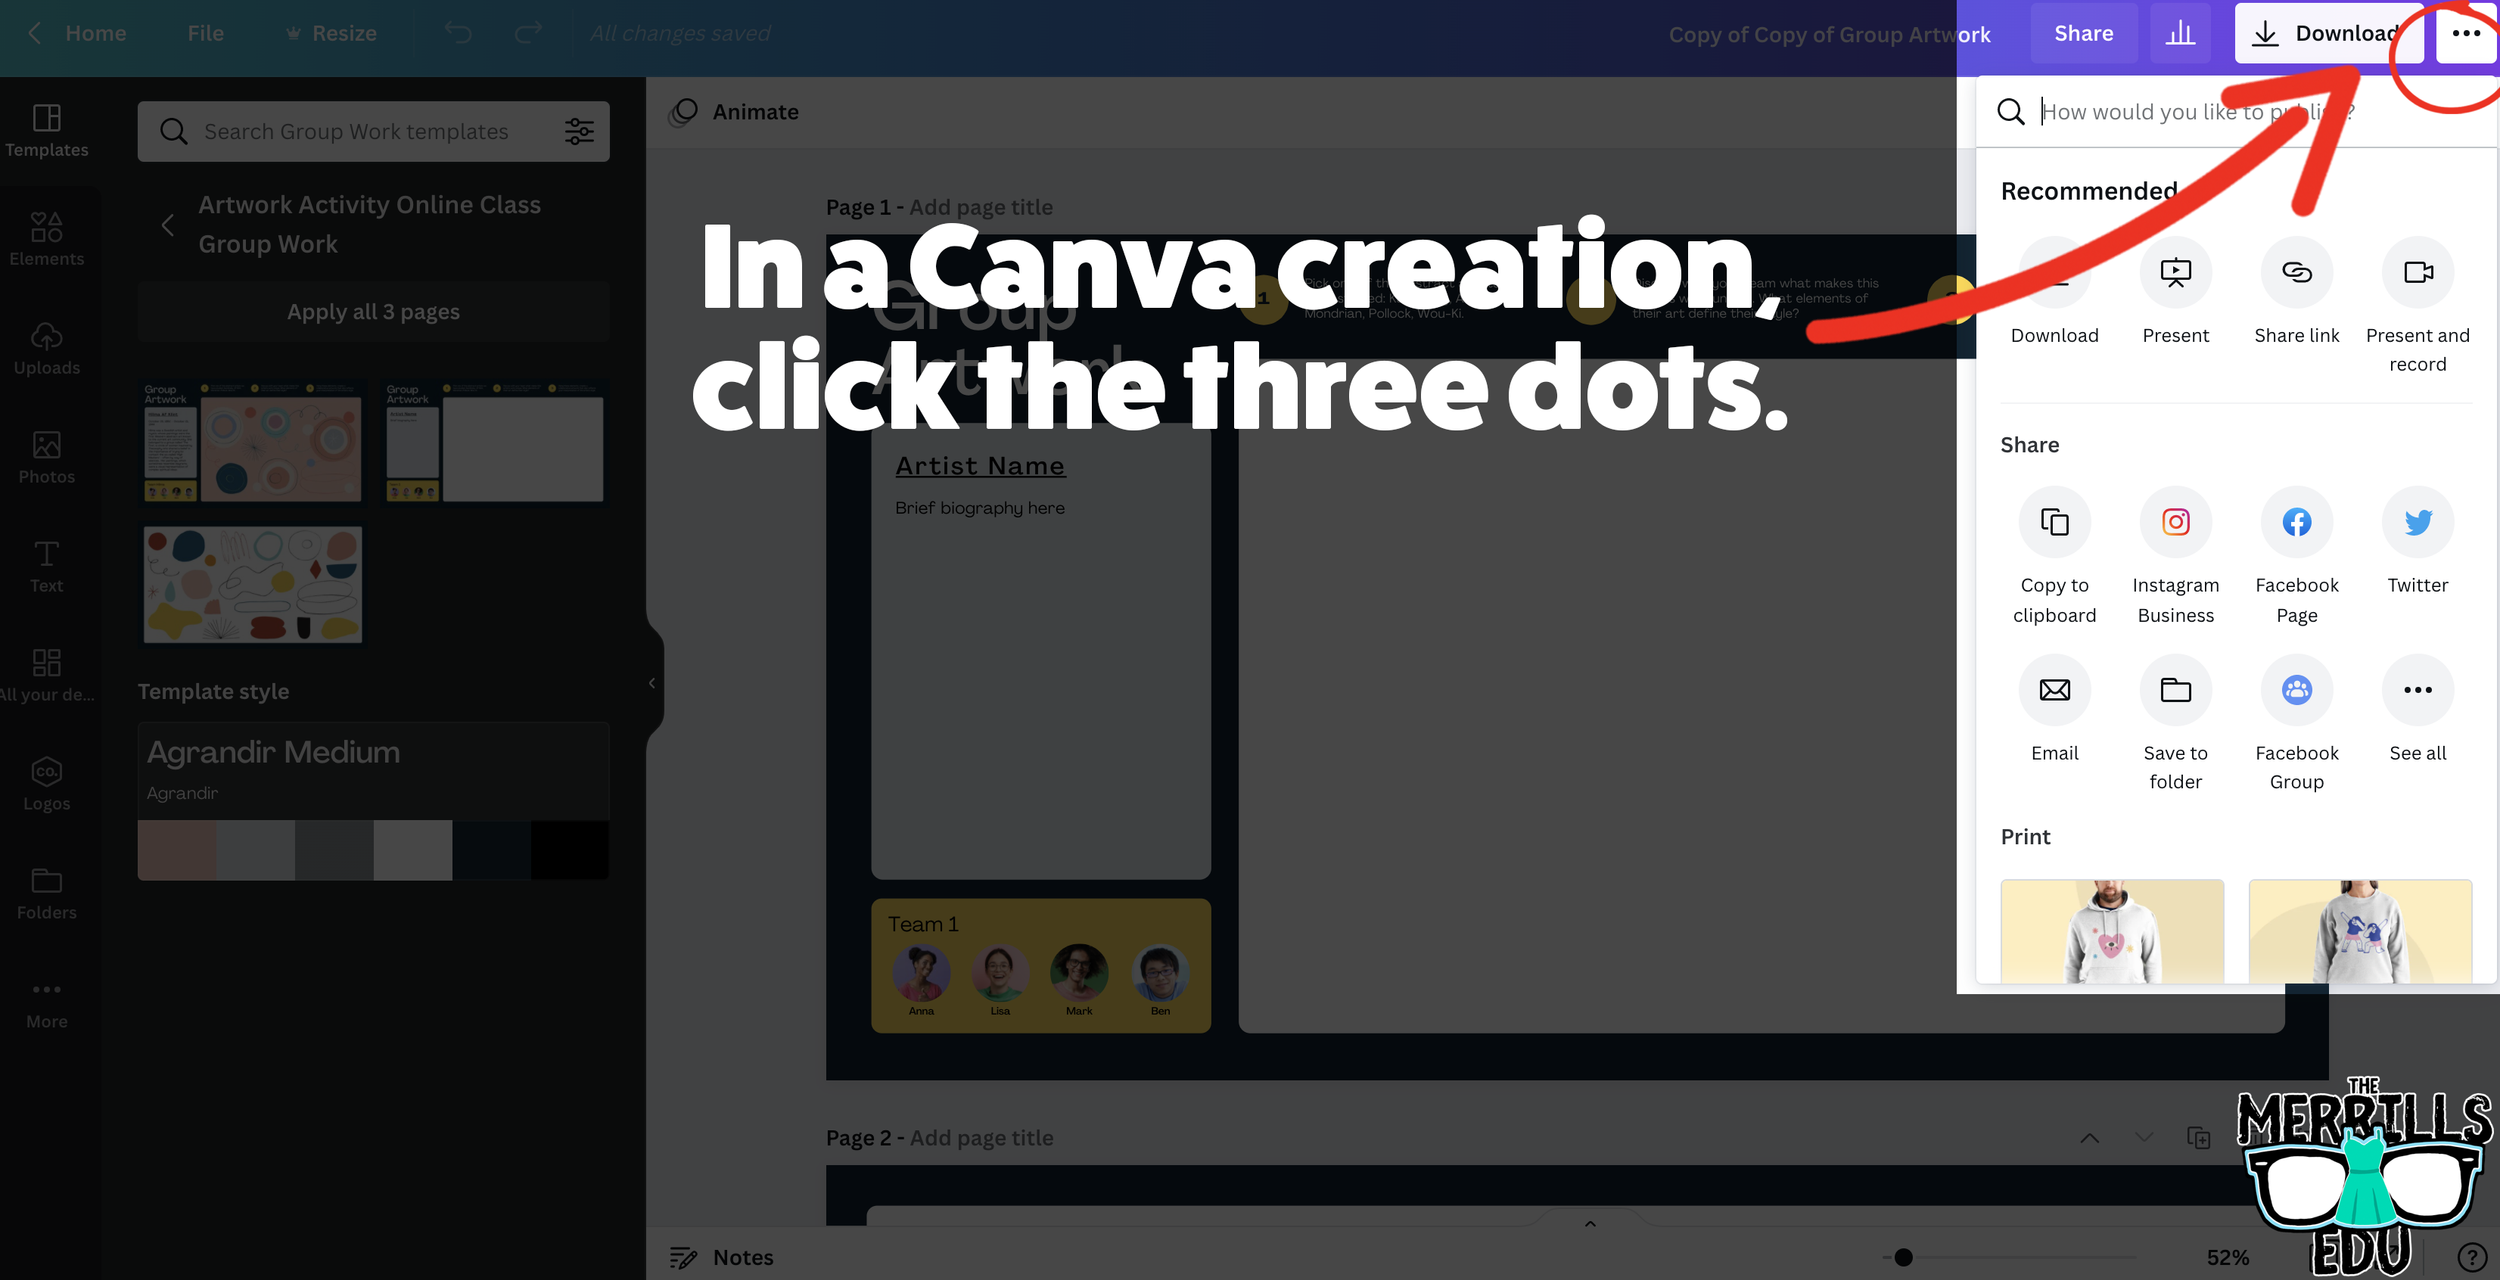
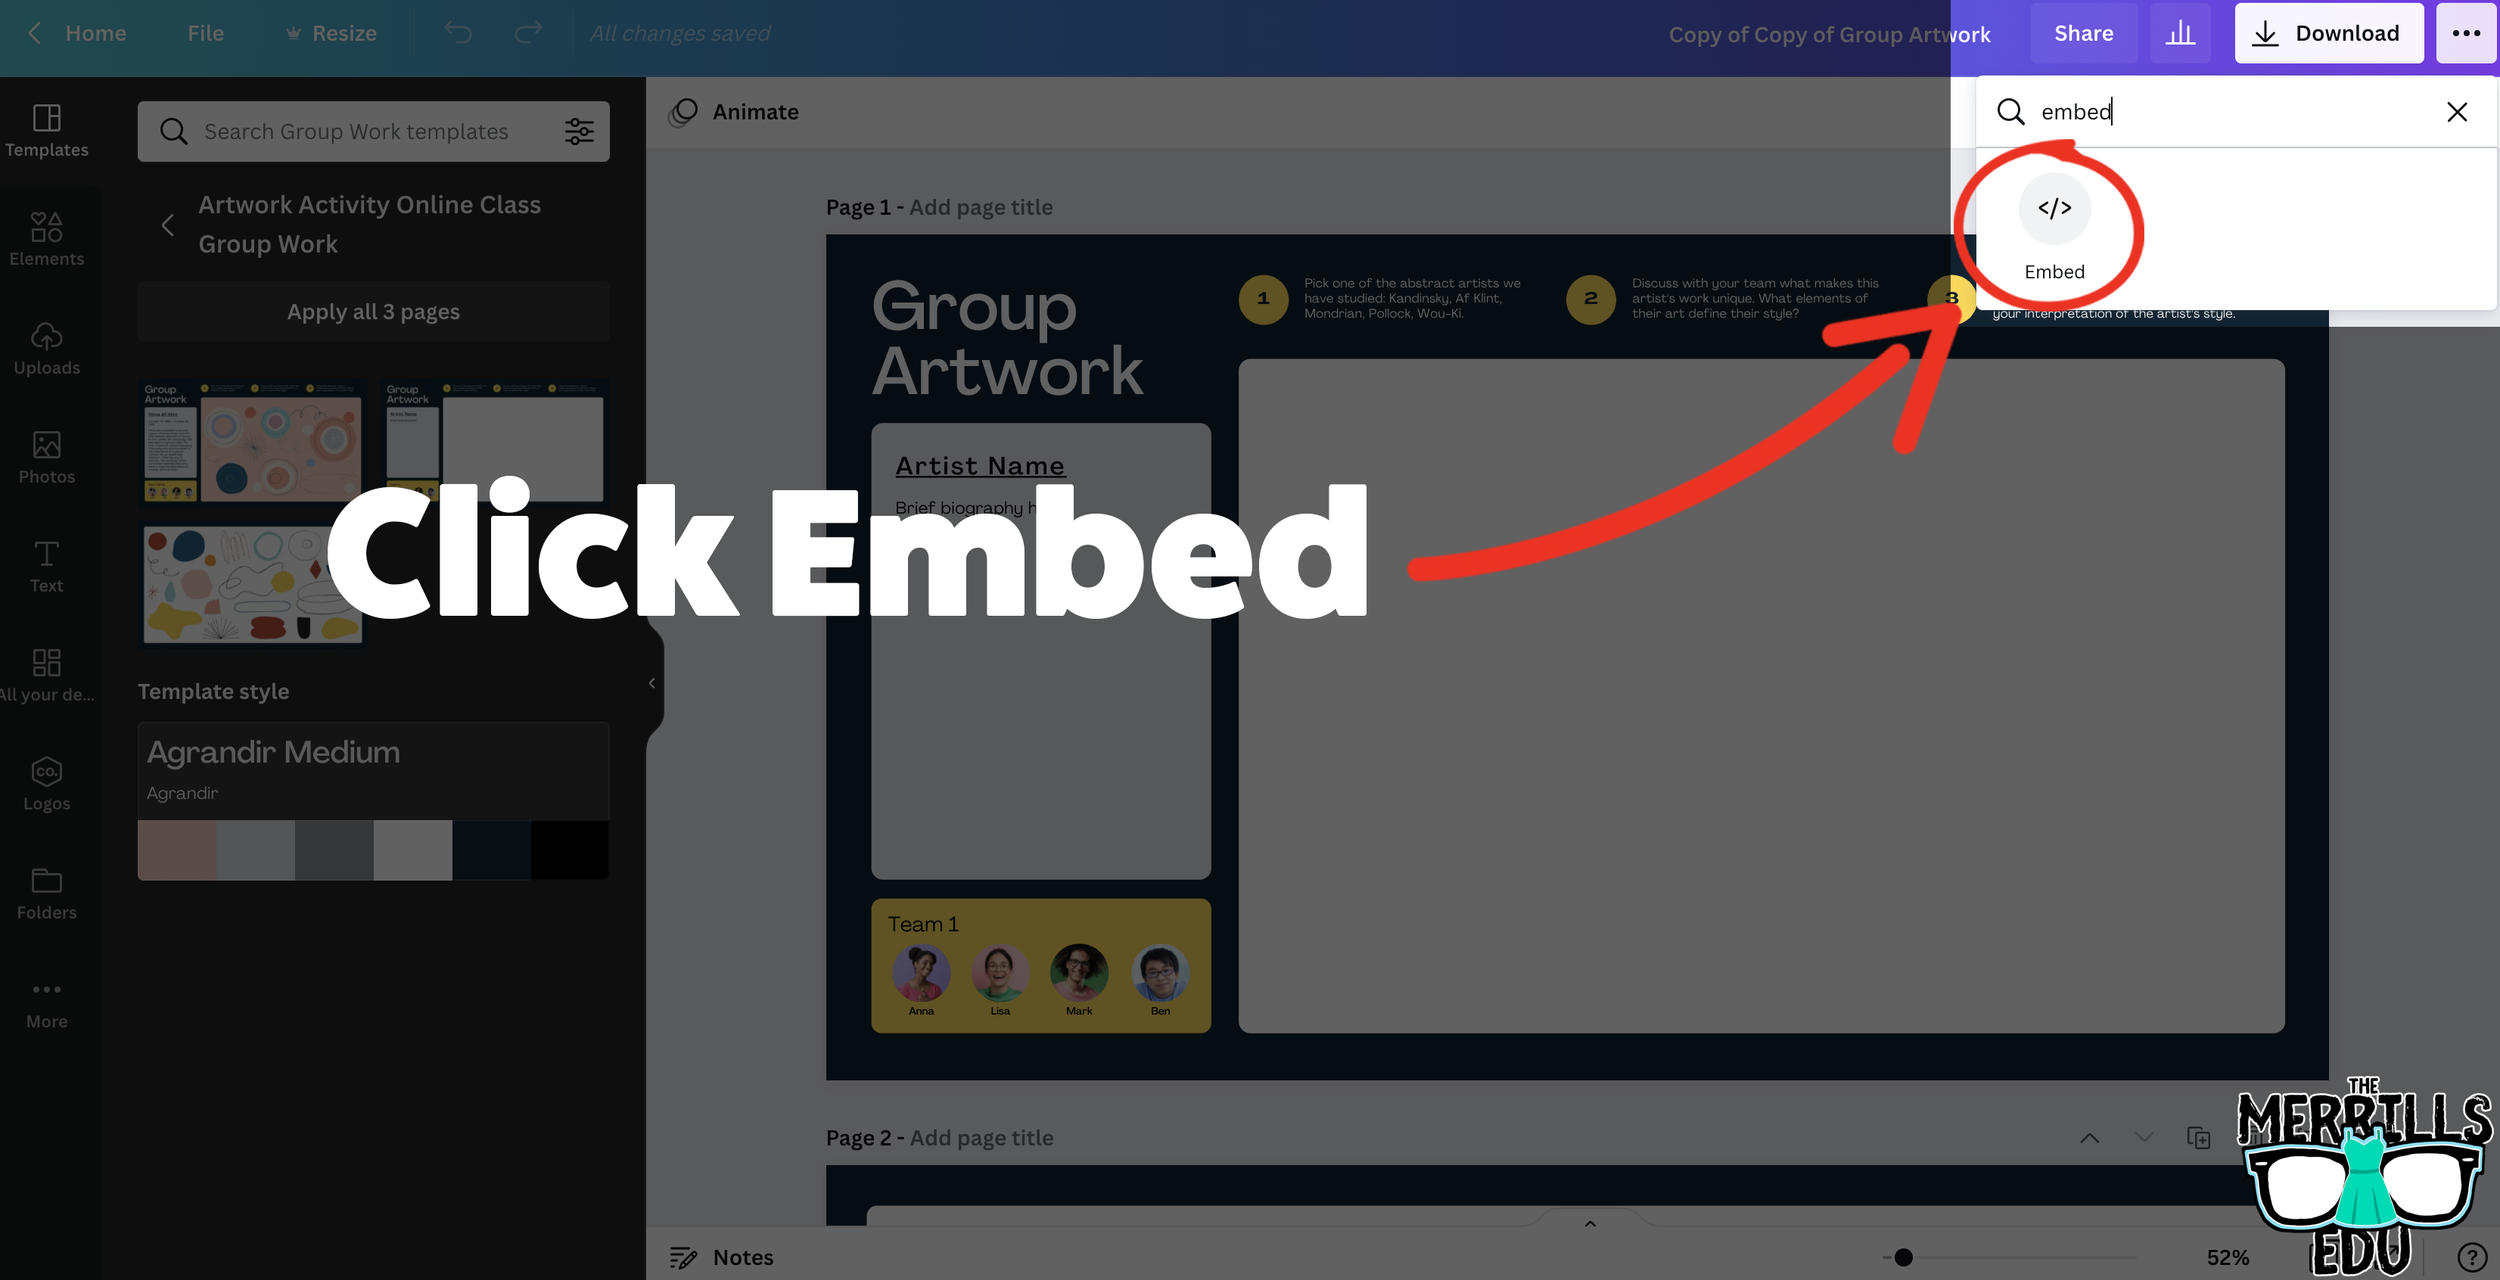

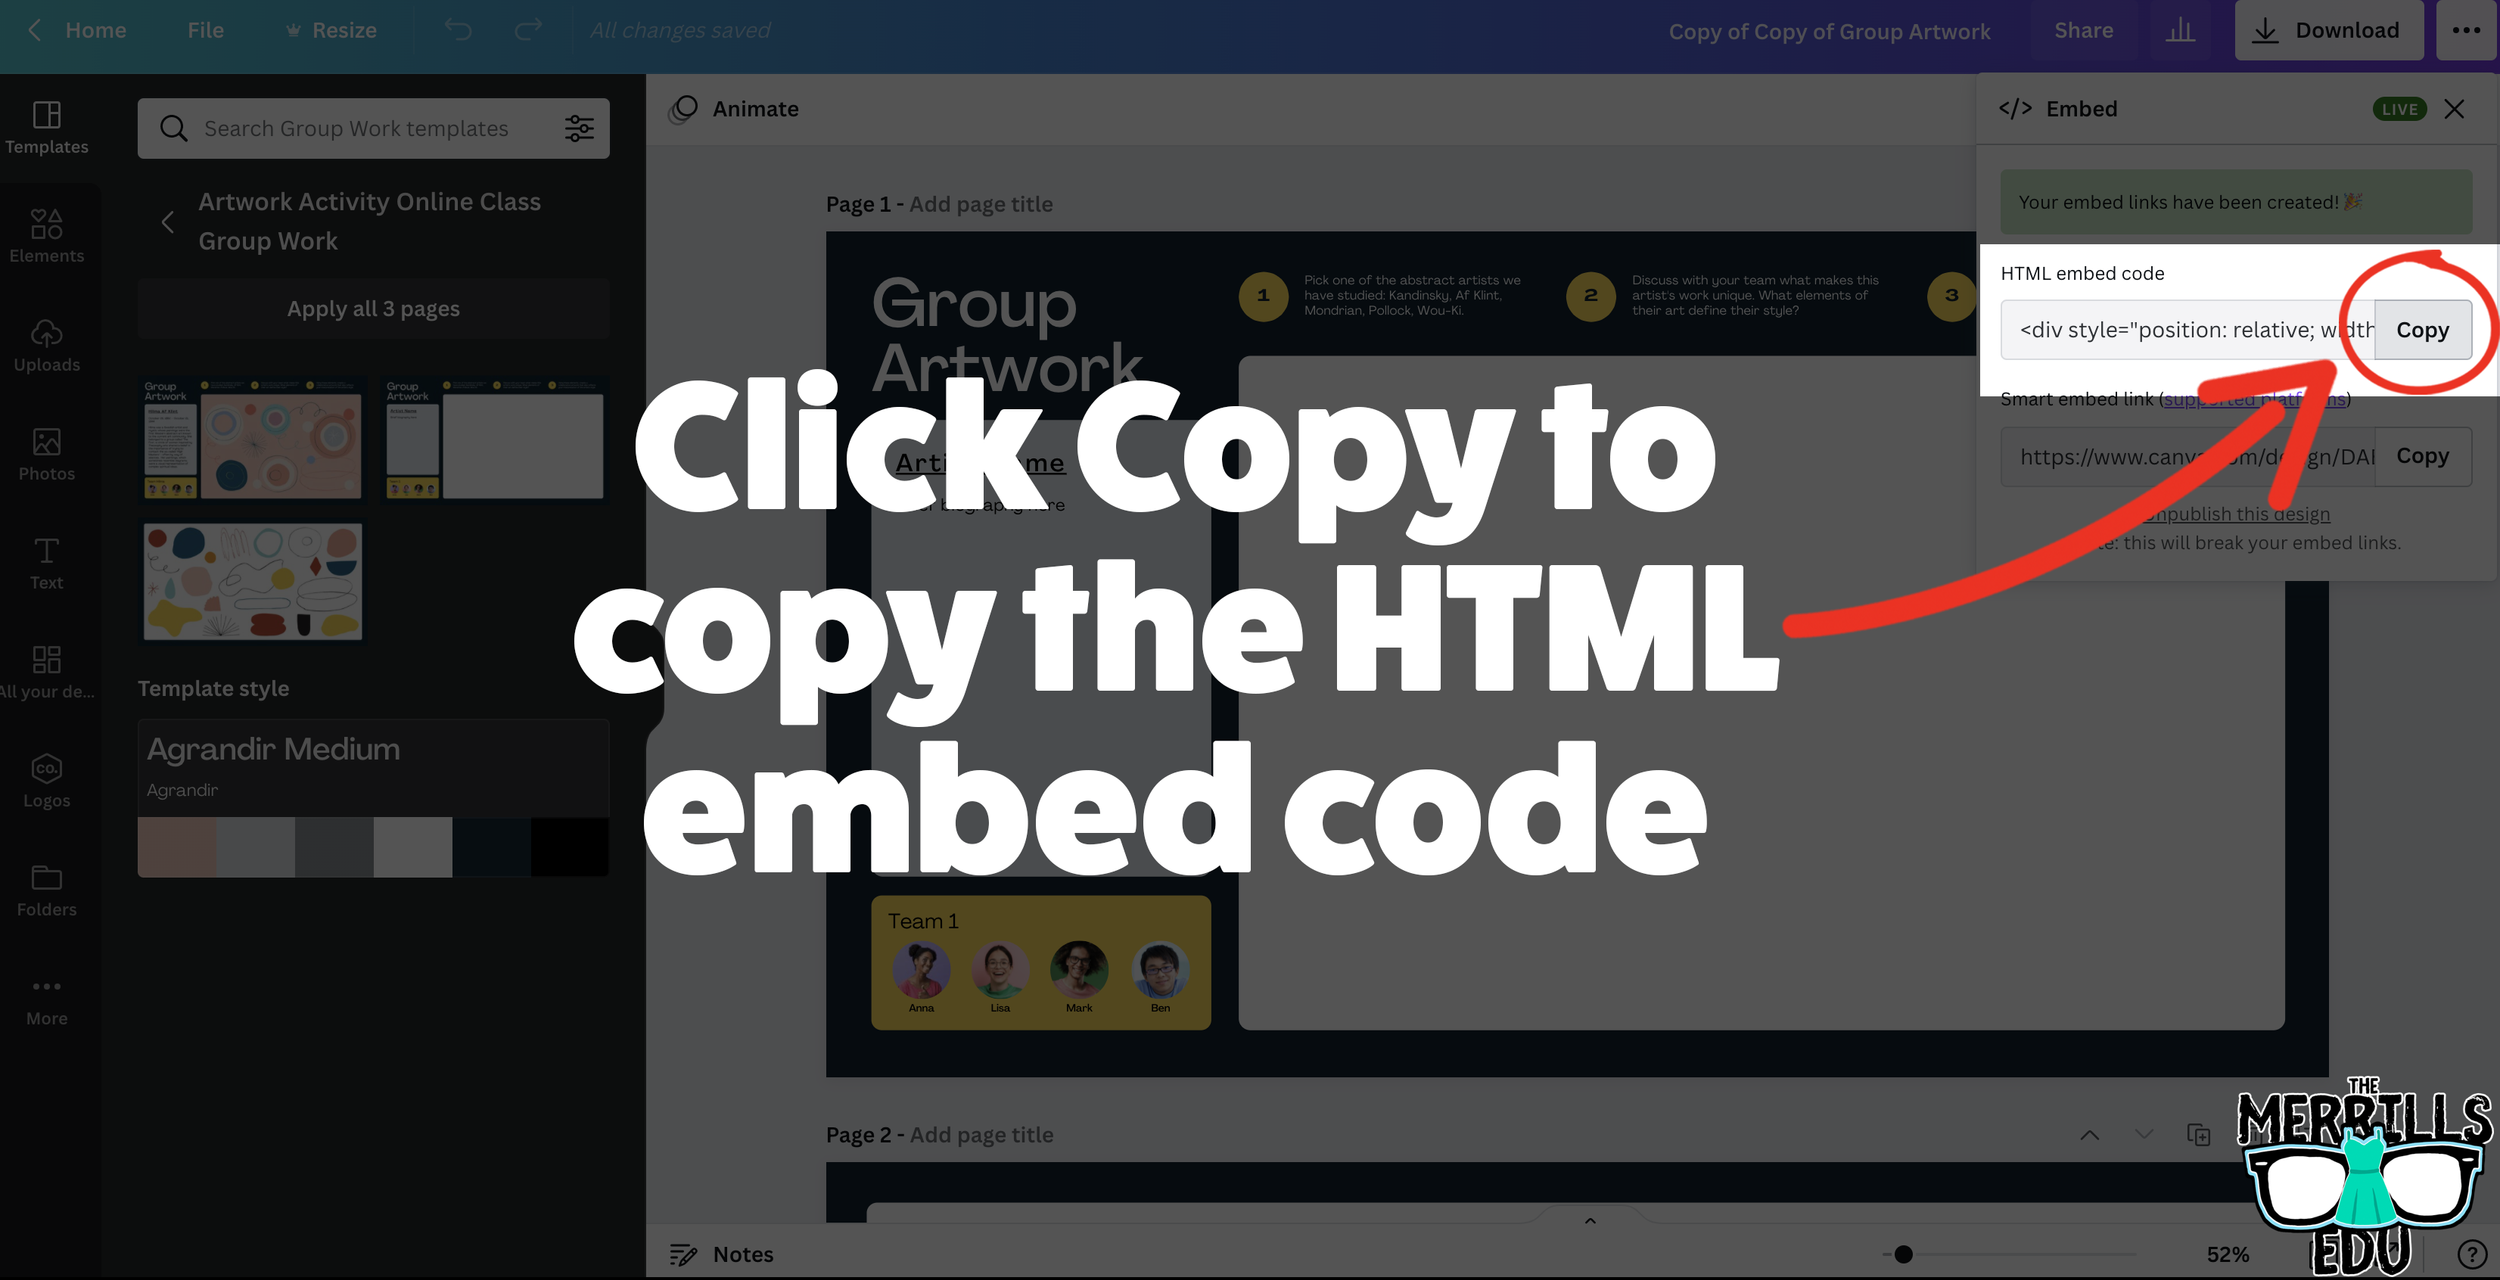


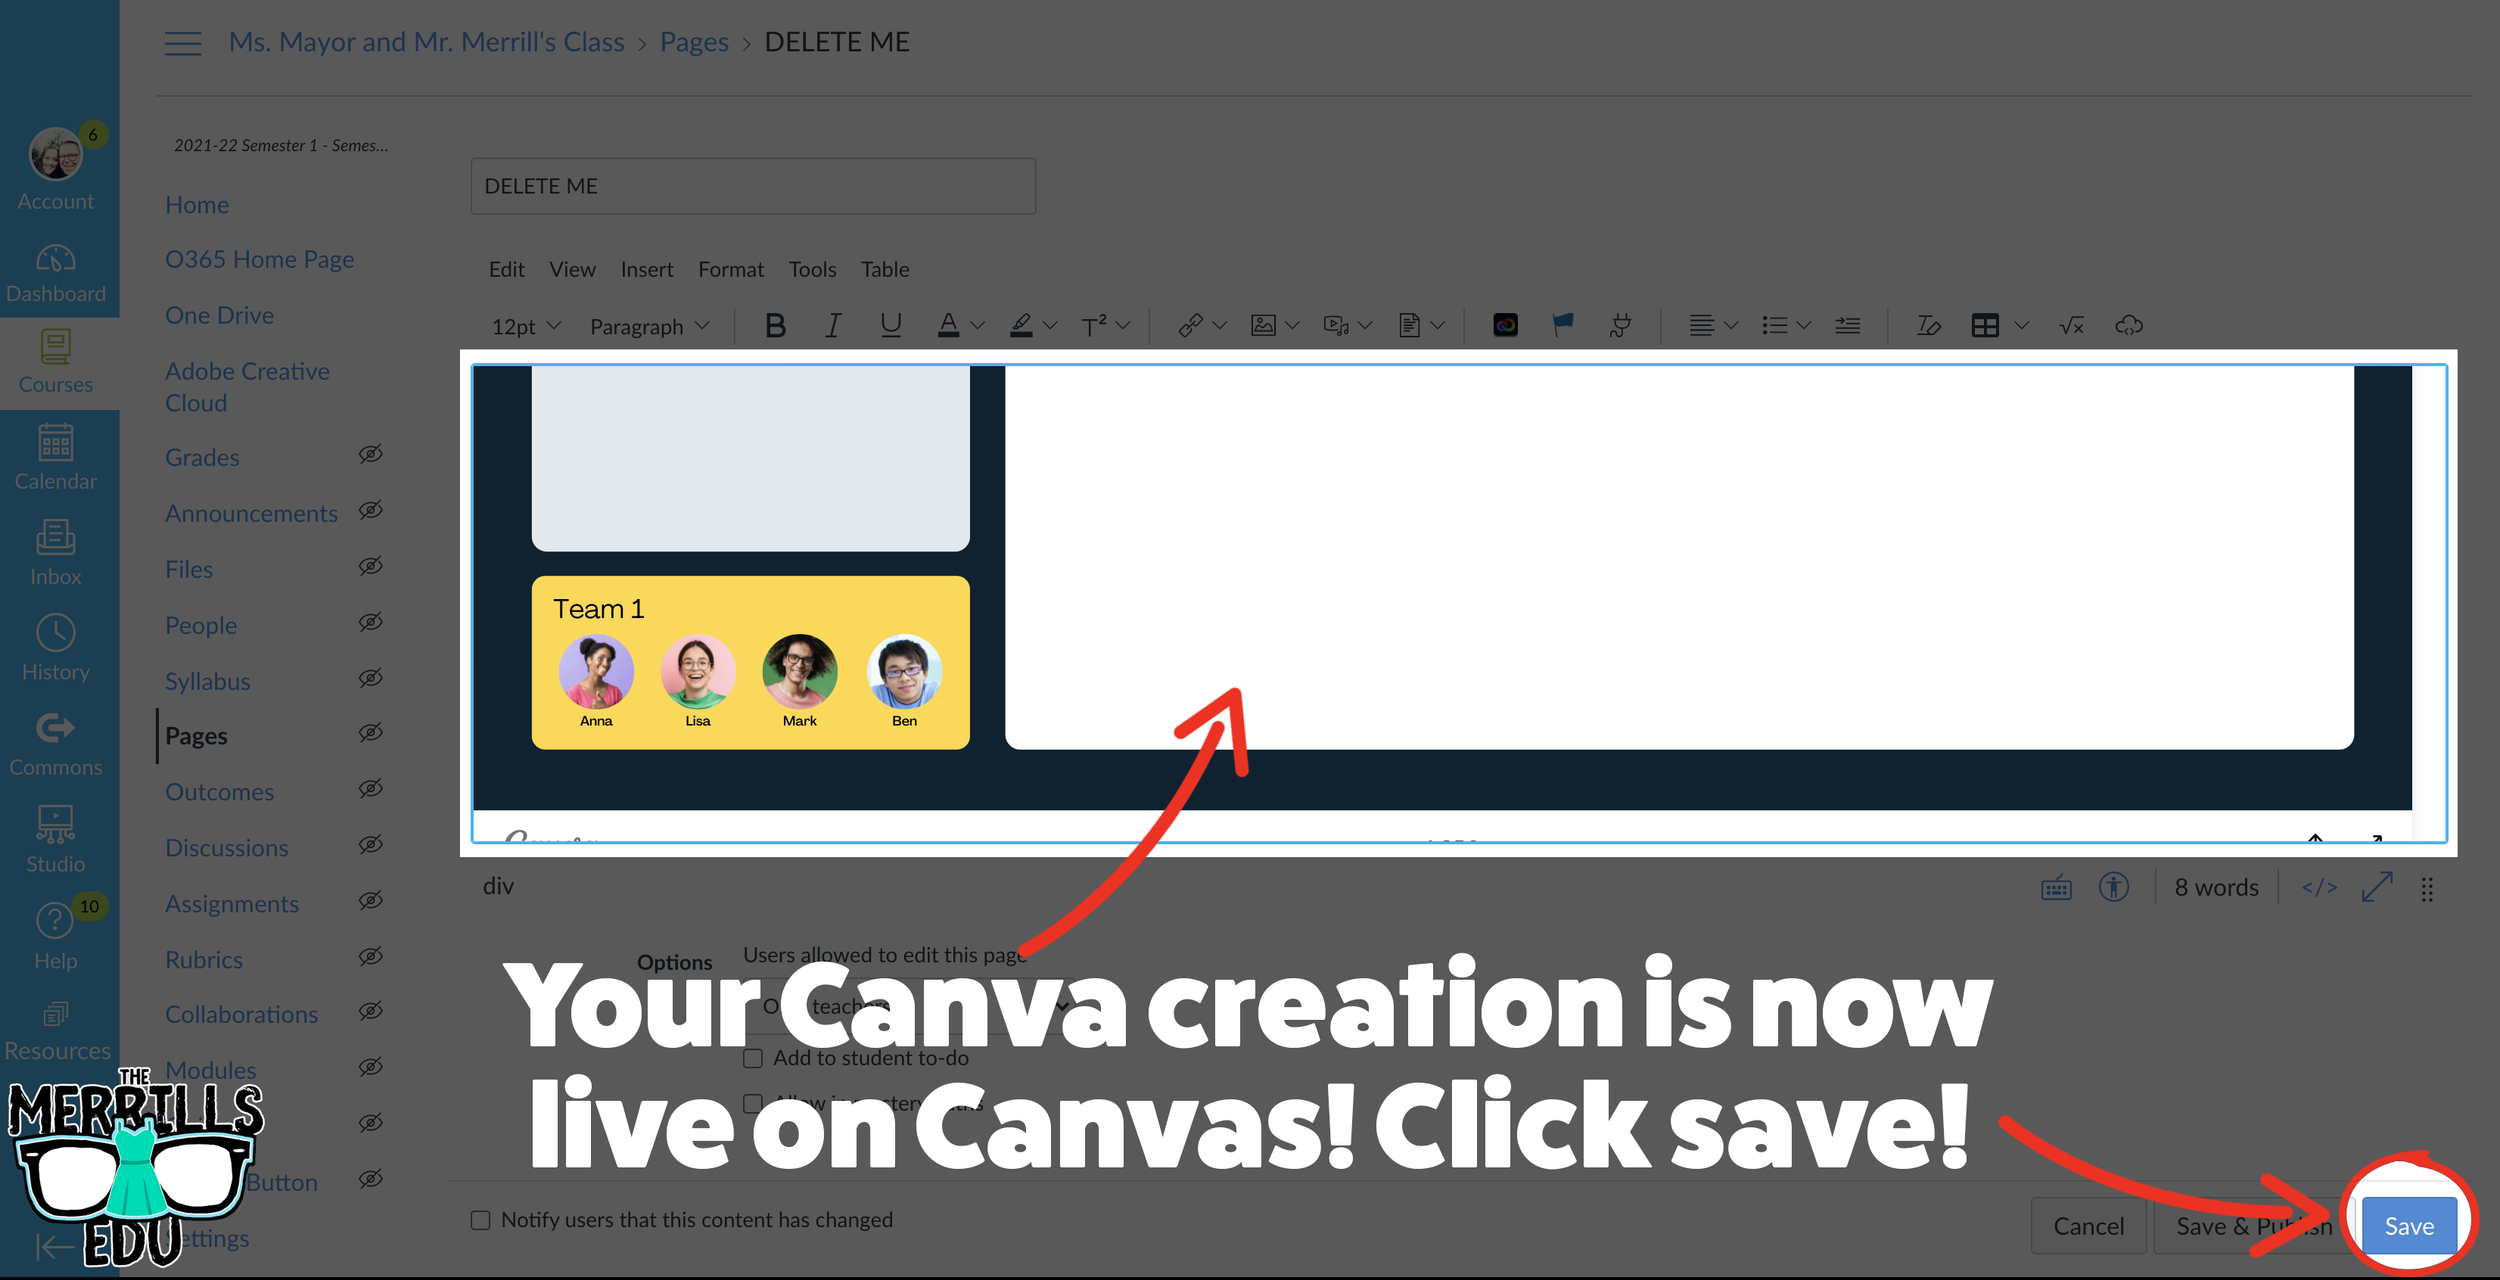
Open a Canva creation, then click on the three dots located on the top right side of the screen.
In the search bar, type “embed,” then click the embed icon.
In the next window, click “Embed” to take the creation live.
A few options will open up on the next window. Click and copy the HTML embed code (the smart embed will only work on selected platforms, so the HTML code is a safer route).
In a separate tab, open the Canvas page that you would like to add the Canva creation to. Then, click on the cloud icon (if you don’t see the Cloud icon, click the three dots to expand the menu bar).
In the embed window, paste your copied code from Canva. Then, click submit.
Your Canva creation is now embedded into the Canvas page! Click on “Save” to update the changes.

Buncee Embedded into Canvas
Buncee creations can be added to Canvas, too! There’s a lot of embed options (which we love!), so you have complete control of how things look and work. Options include autoplay and dimensions of the embed. Here’s how it all works:
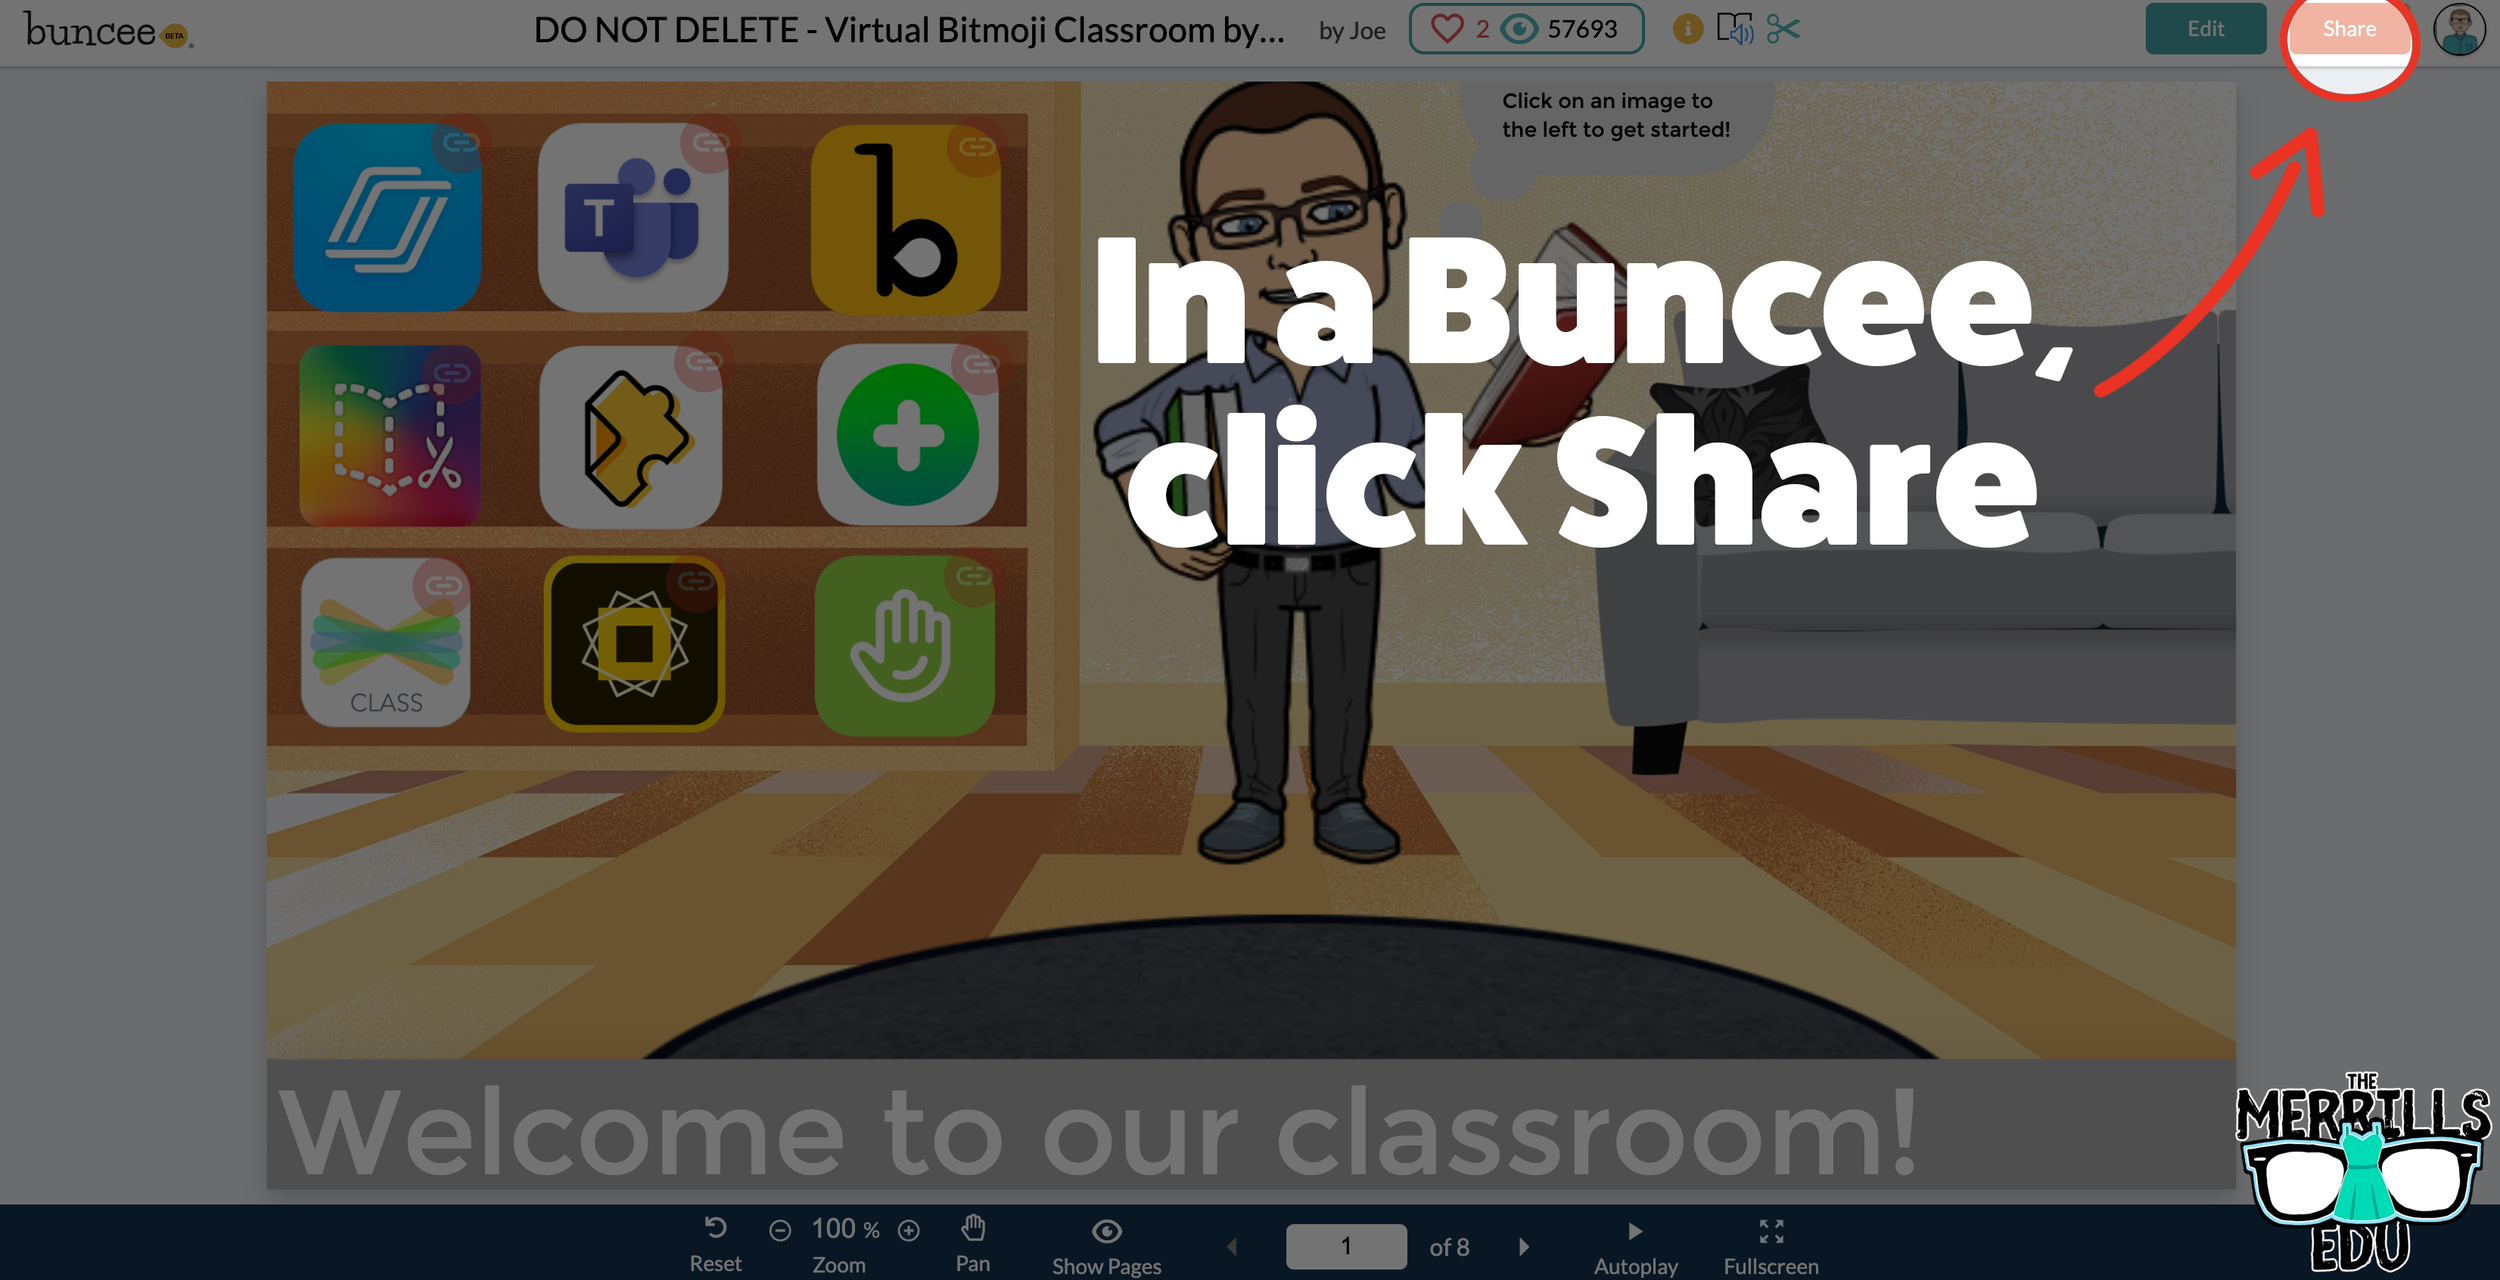
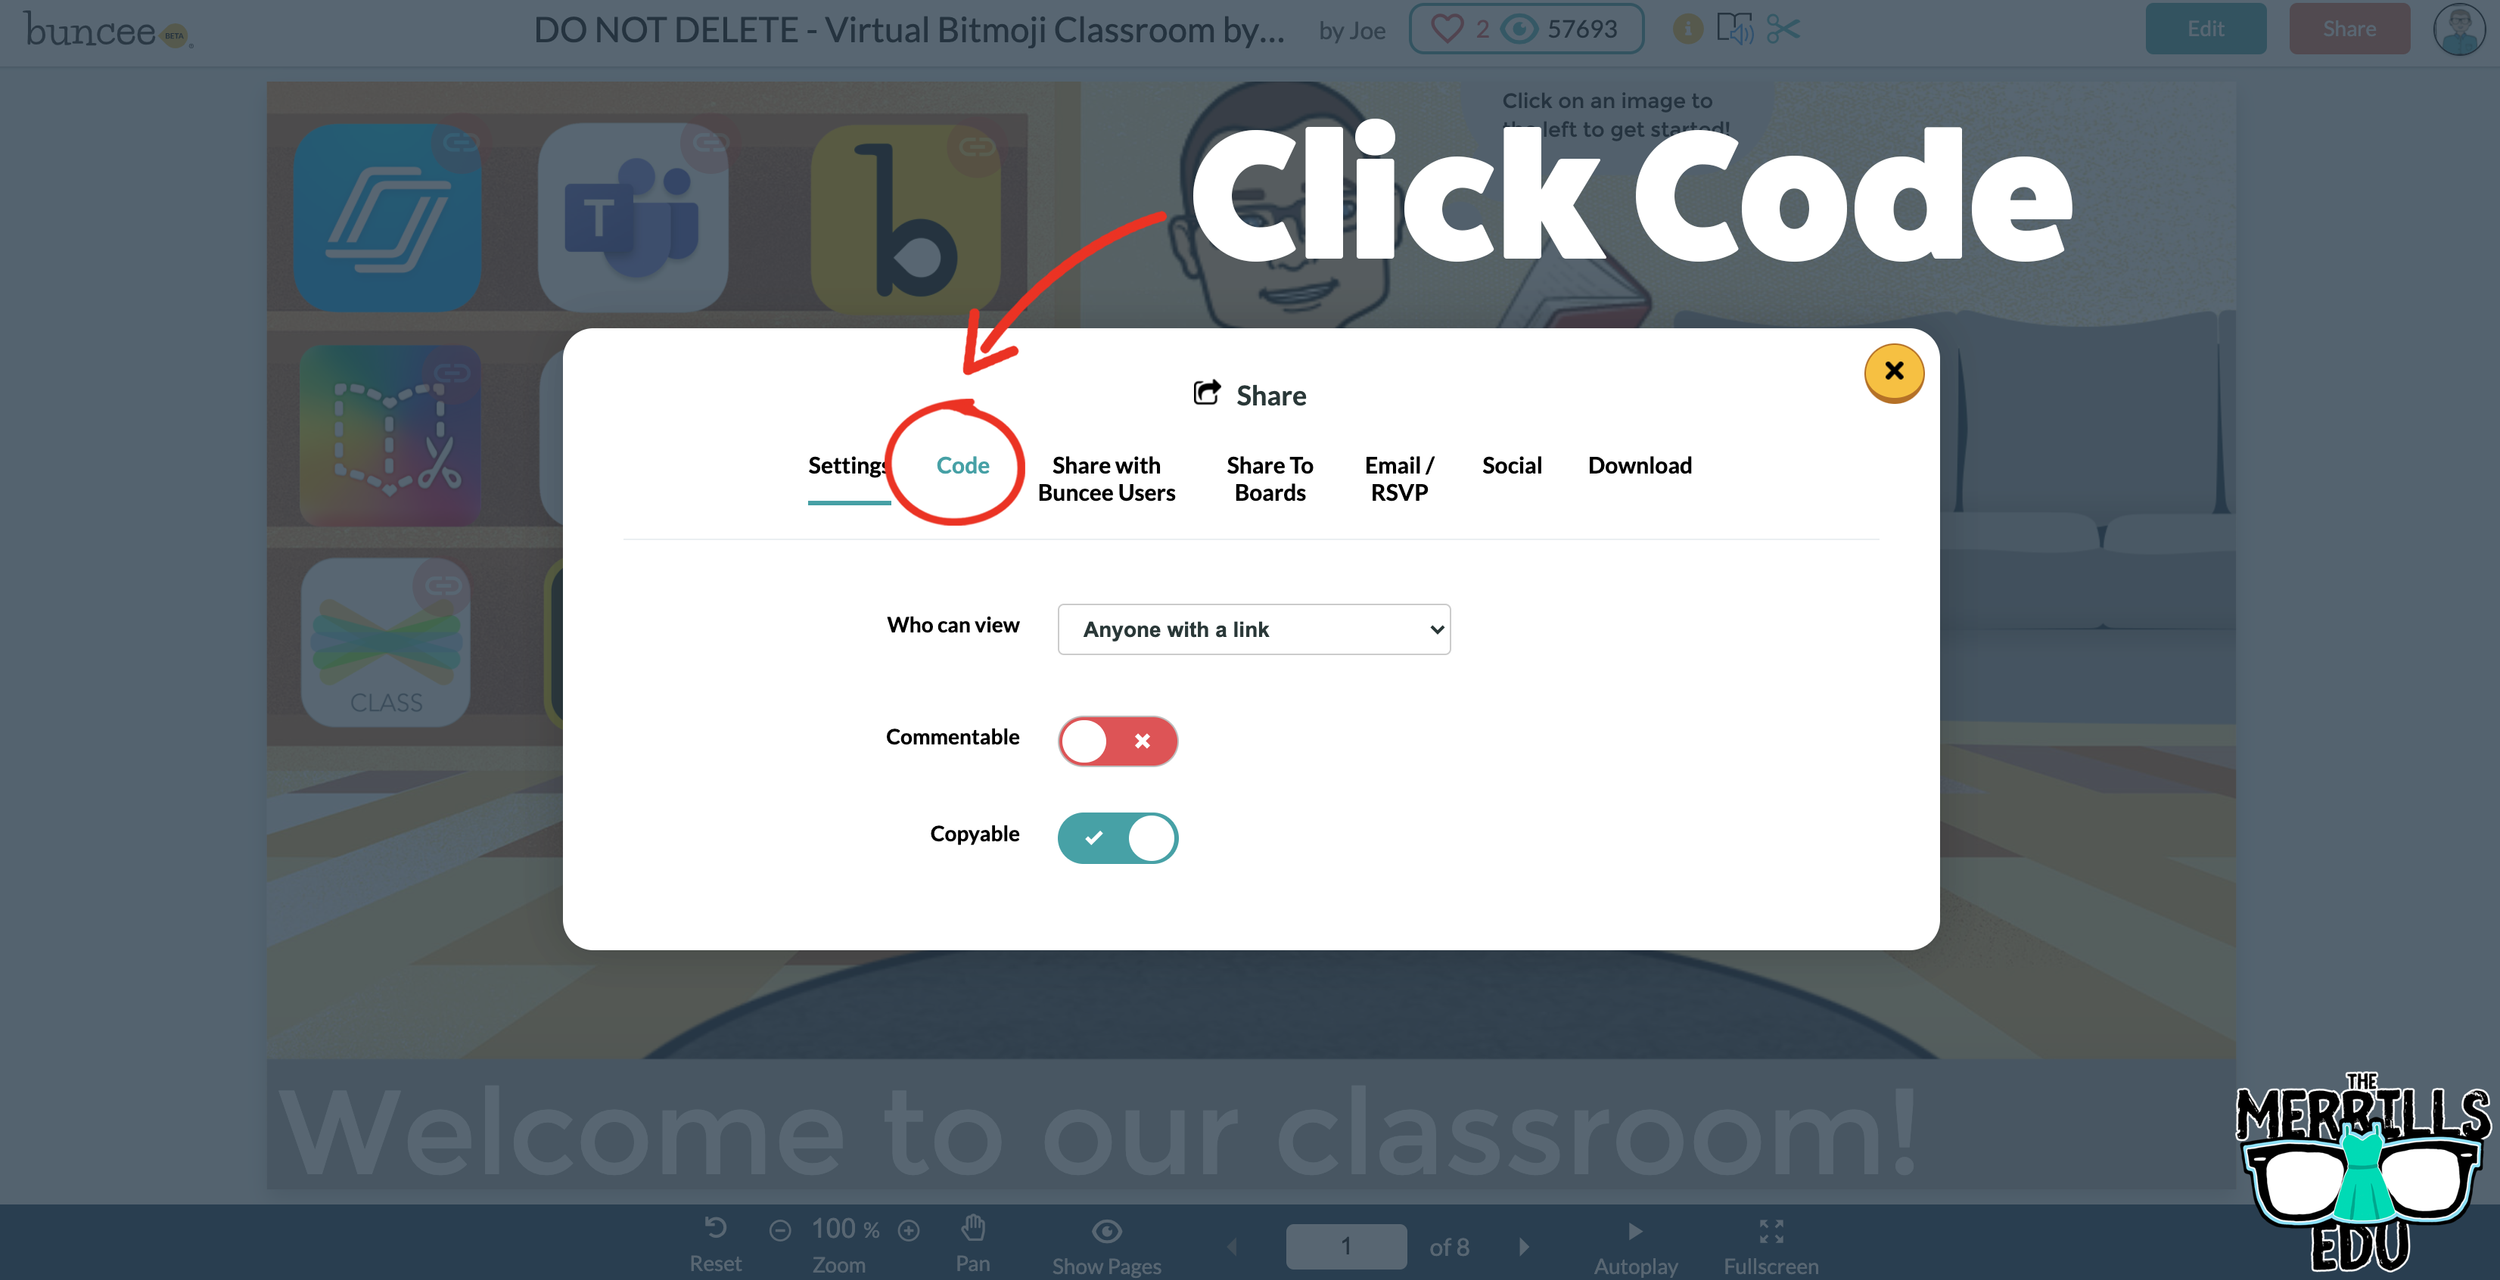

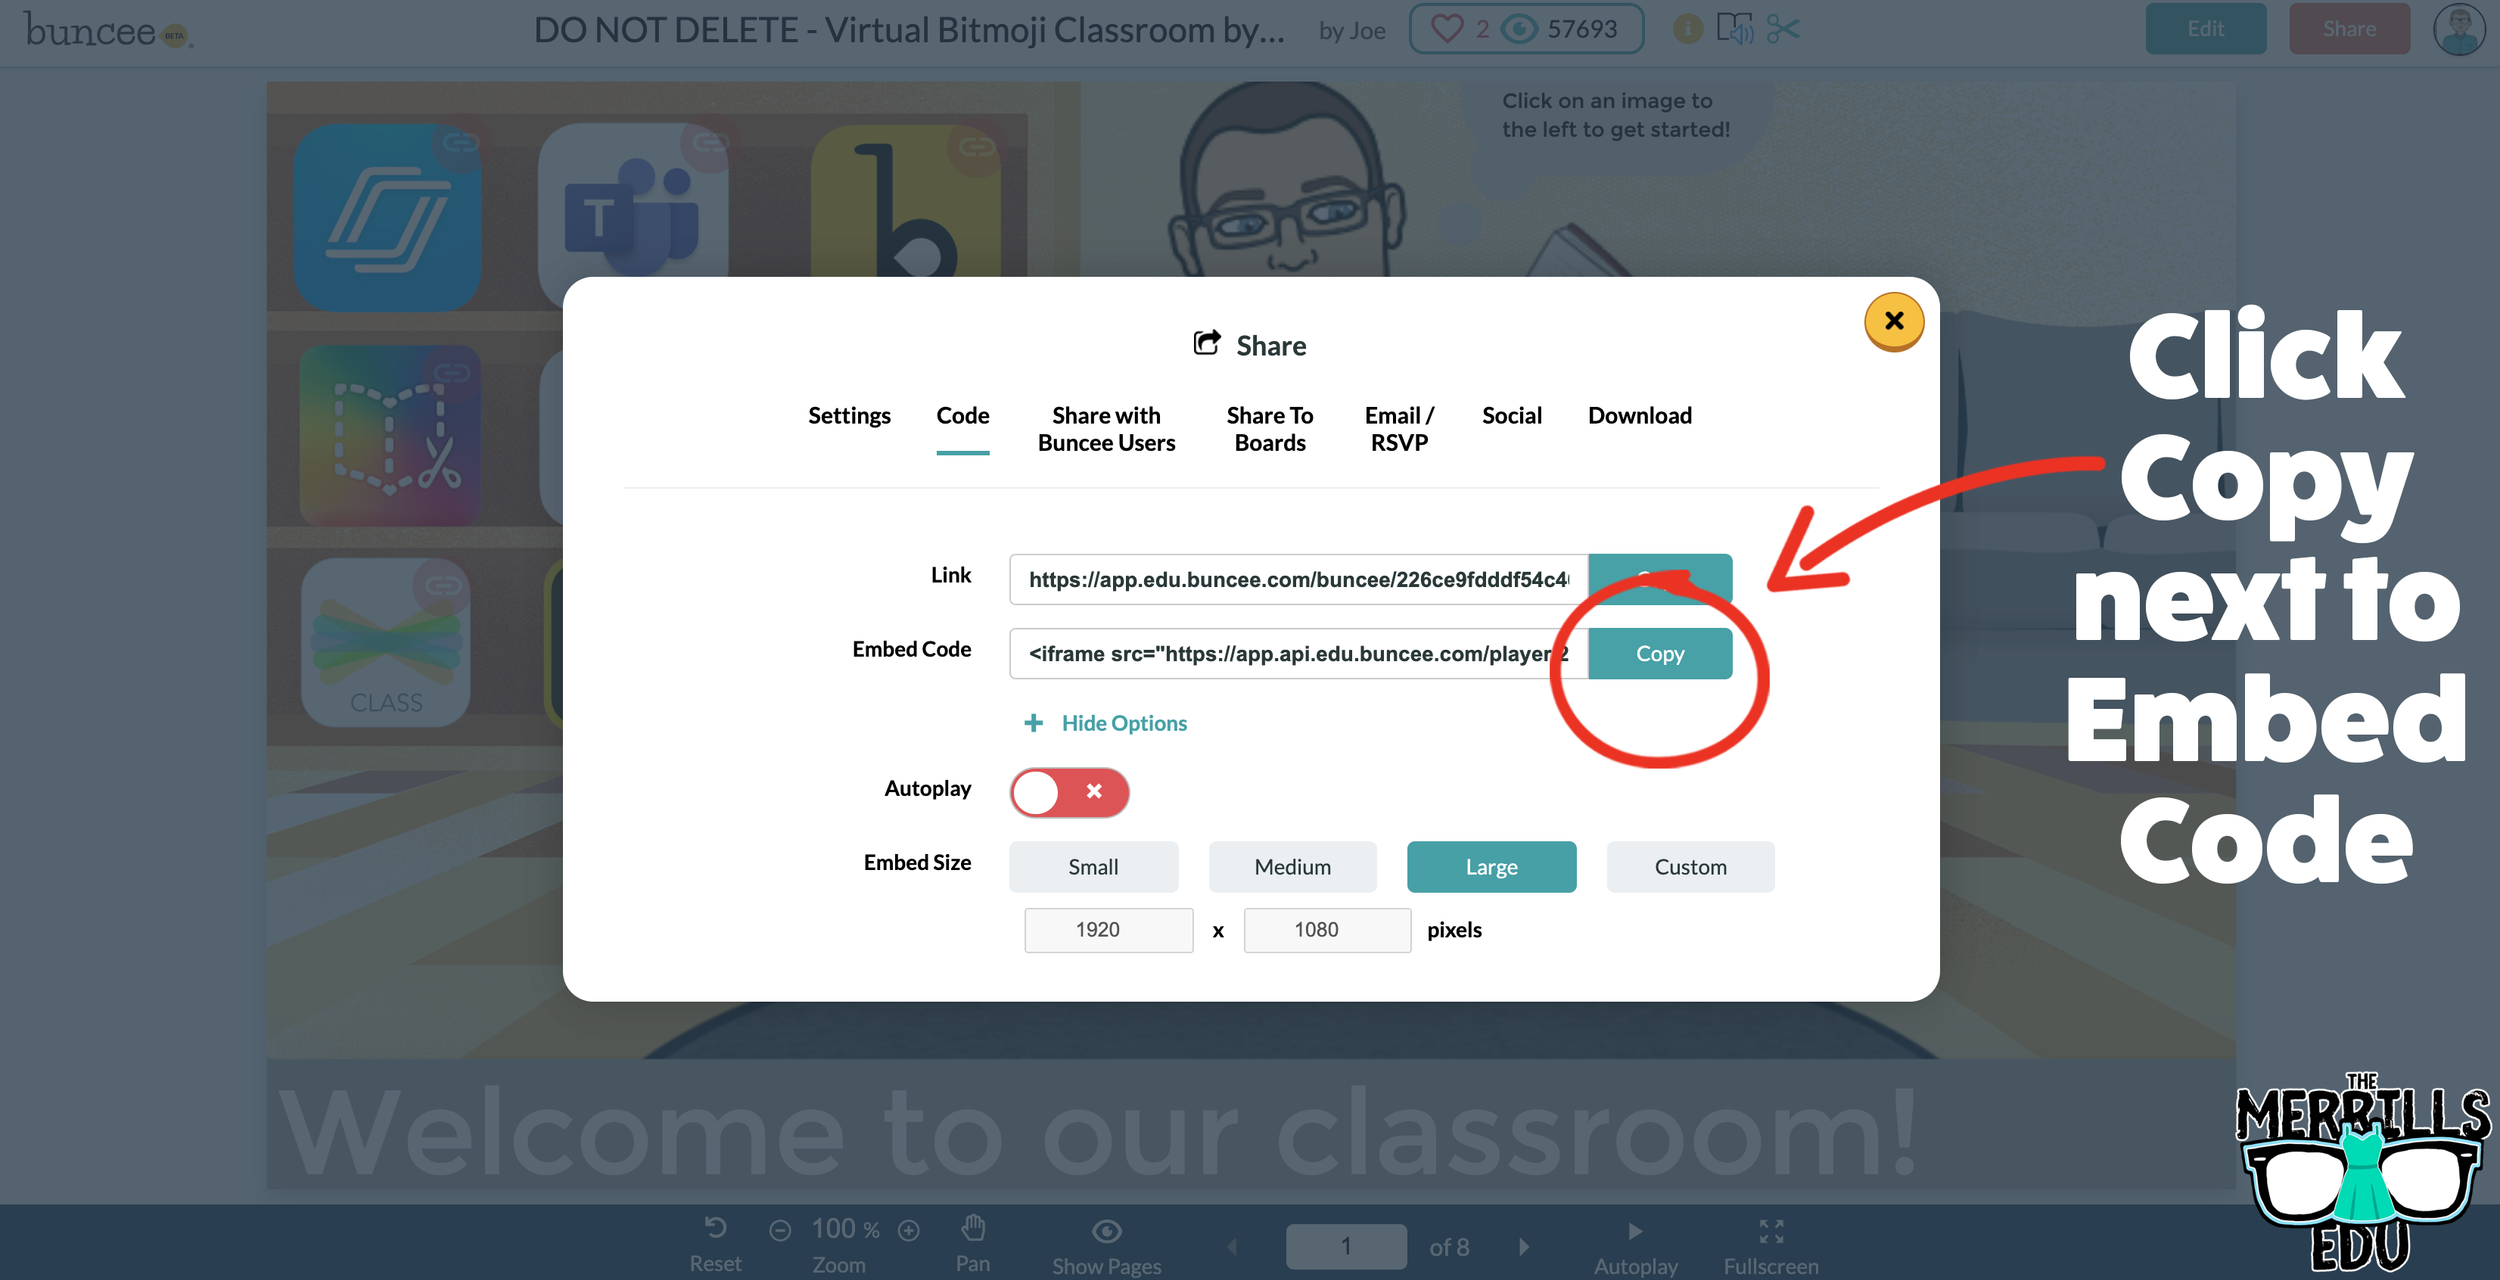


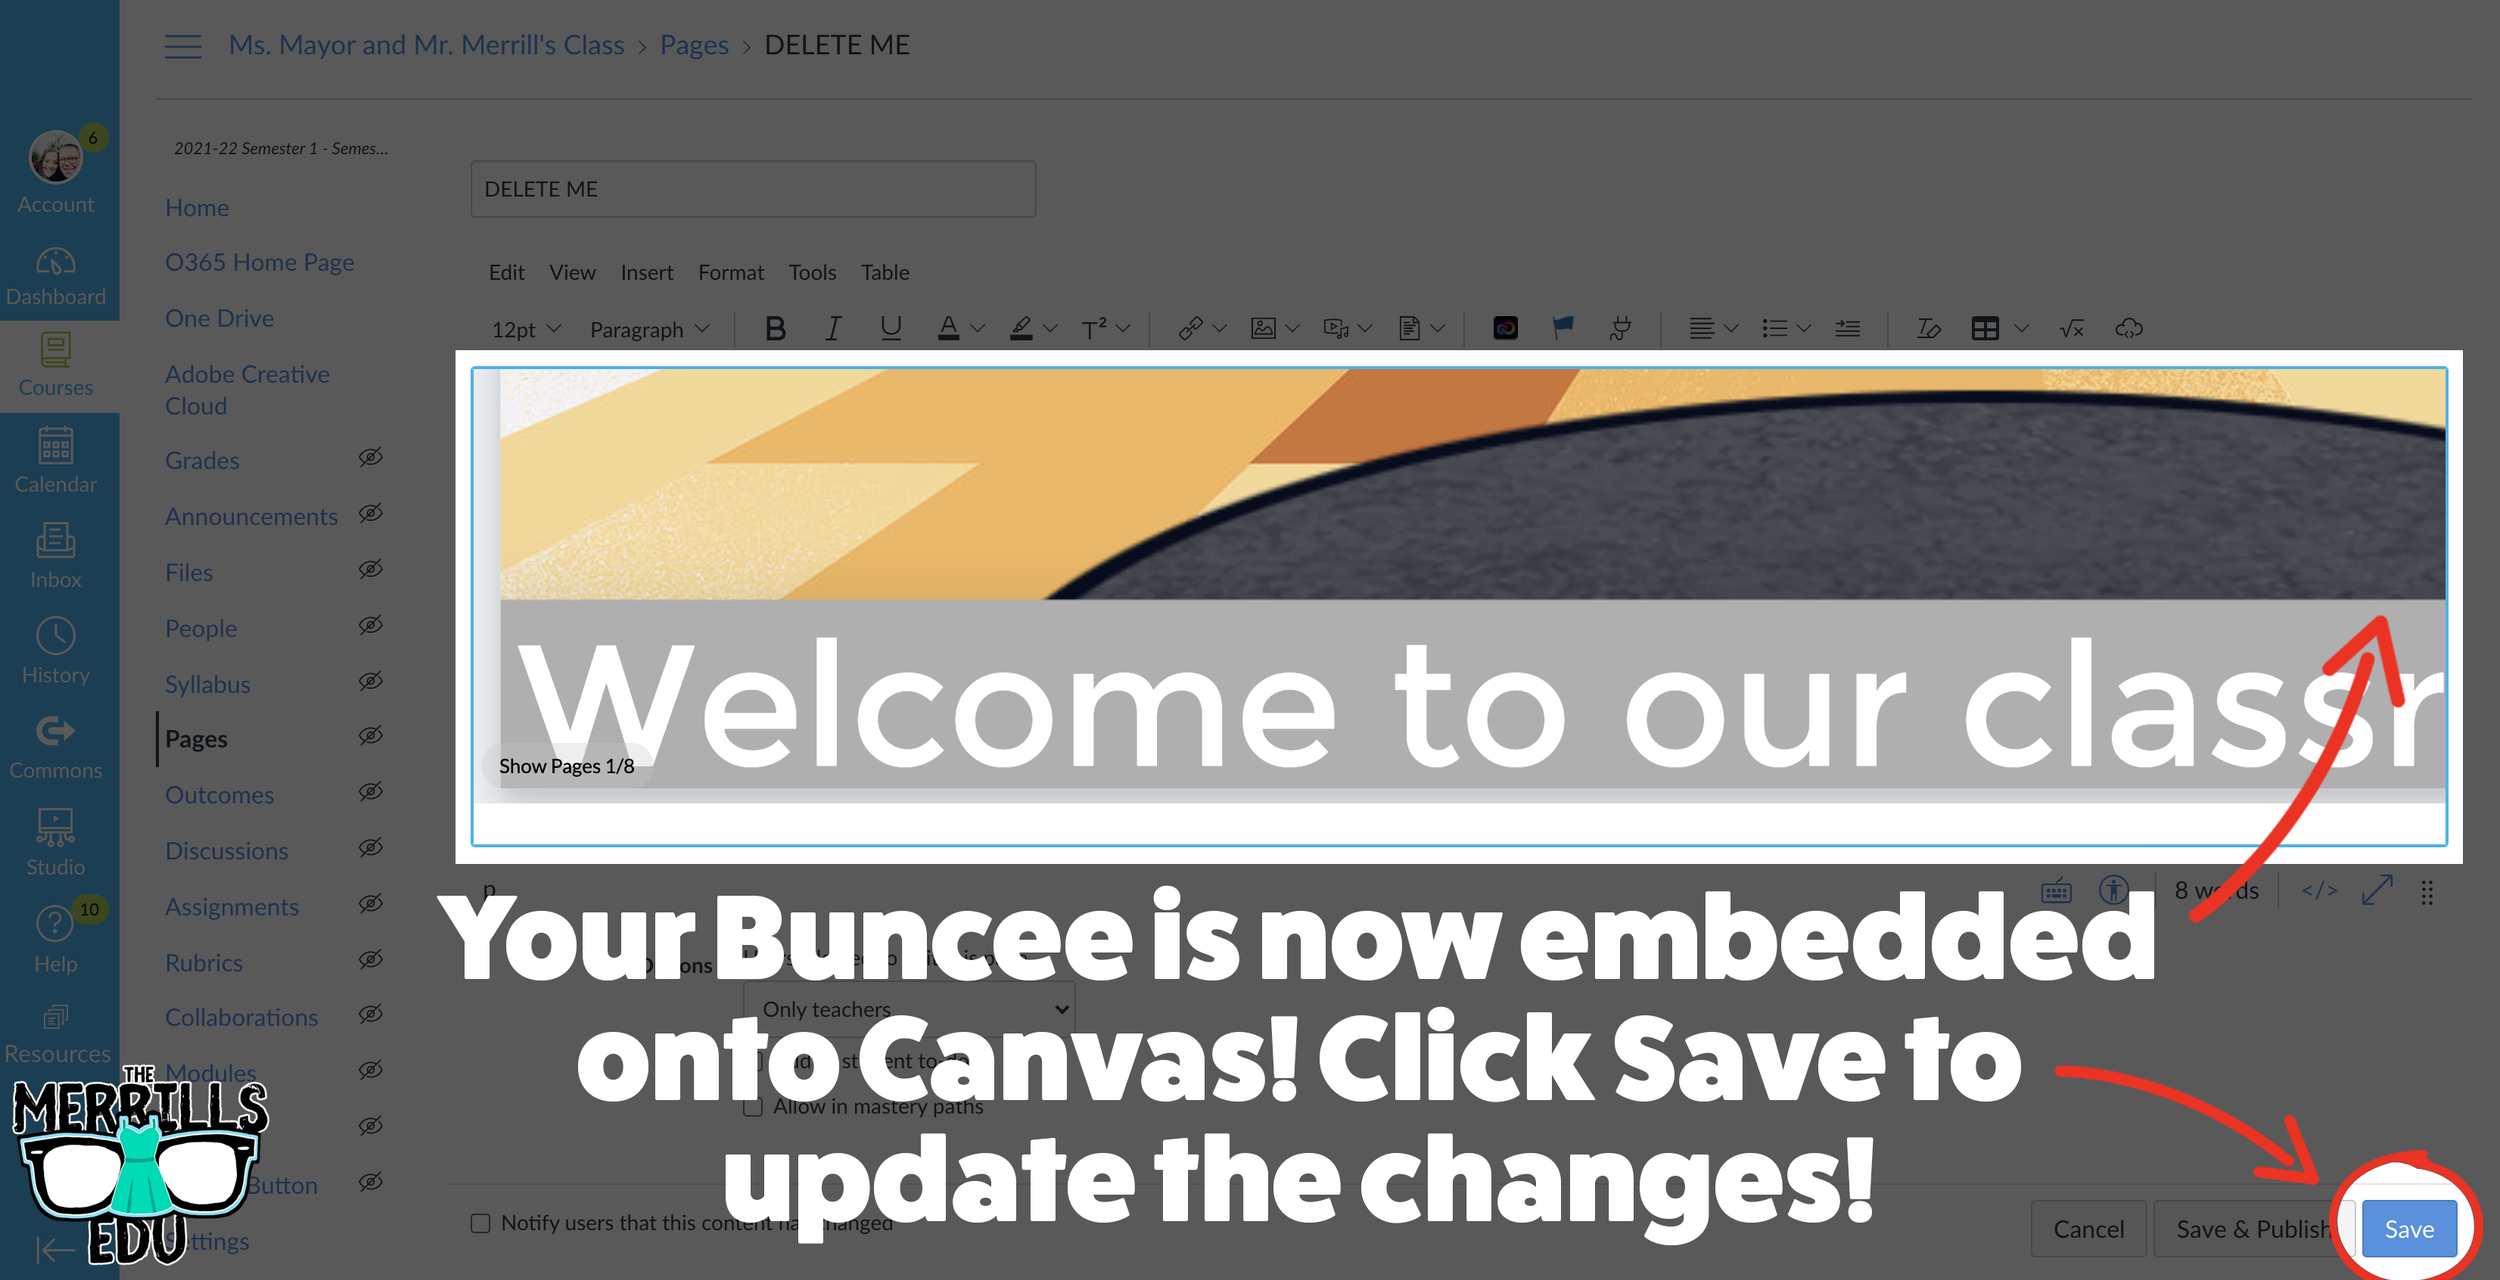
Open a Buncee, then click the “Share” button located in the upper right side of the screen.
A new window will pop up. Click on “Code.”
Under “Code” click “+ Show Options.”
Select your preferred embed size (there are also options to autoplay the Buncee).
Then, in the same window, click “Copy” next to the Embed Code bar.
In a separate tab, open the Canvas page that you would like to add the Buncee creation to. Then, click on the cloud icon (if you don’t see the Cloud icon, click the three dots to expand the menu bar).
In the embed window, paste your copied code from Buncee. Then, click submit.
Your Buncee creation is now embedded into the Canvas page! Click on “Save” to update the changes.

Ed Puzzle Embedded into Canvas
Ed Puzzle is a video assessment platform tool that allows teachers to find or create videos and then generate questions that go along with the video. The result is an engaging formative assessment that your students will actually like! Keeping Ed Puzzle embedded into Canvas will help keep everything organized in the same place. Here’s how it all works:
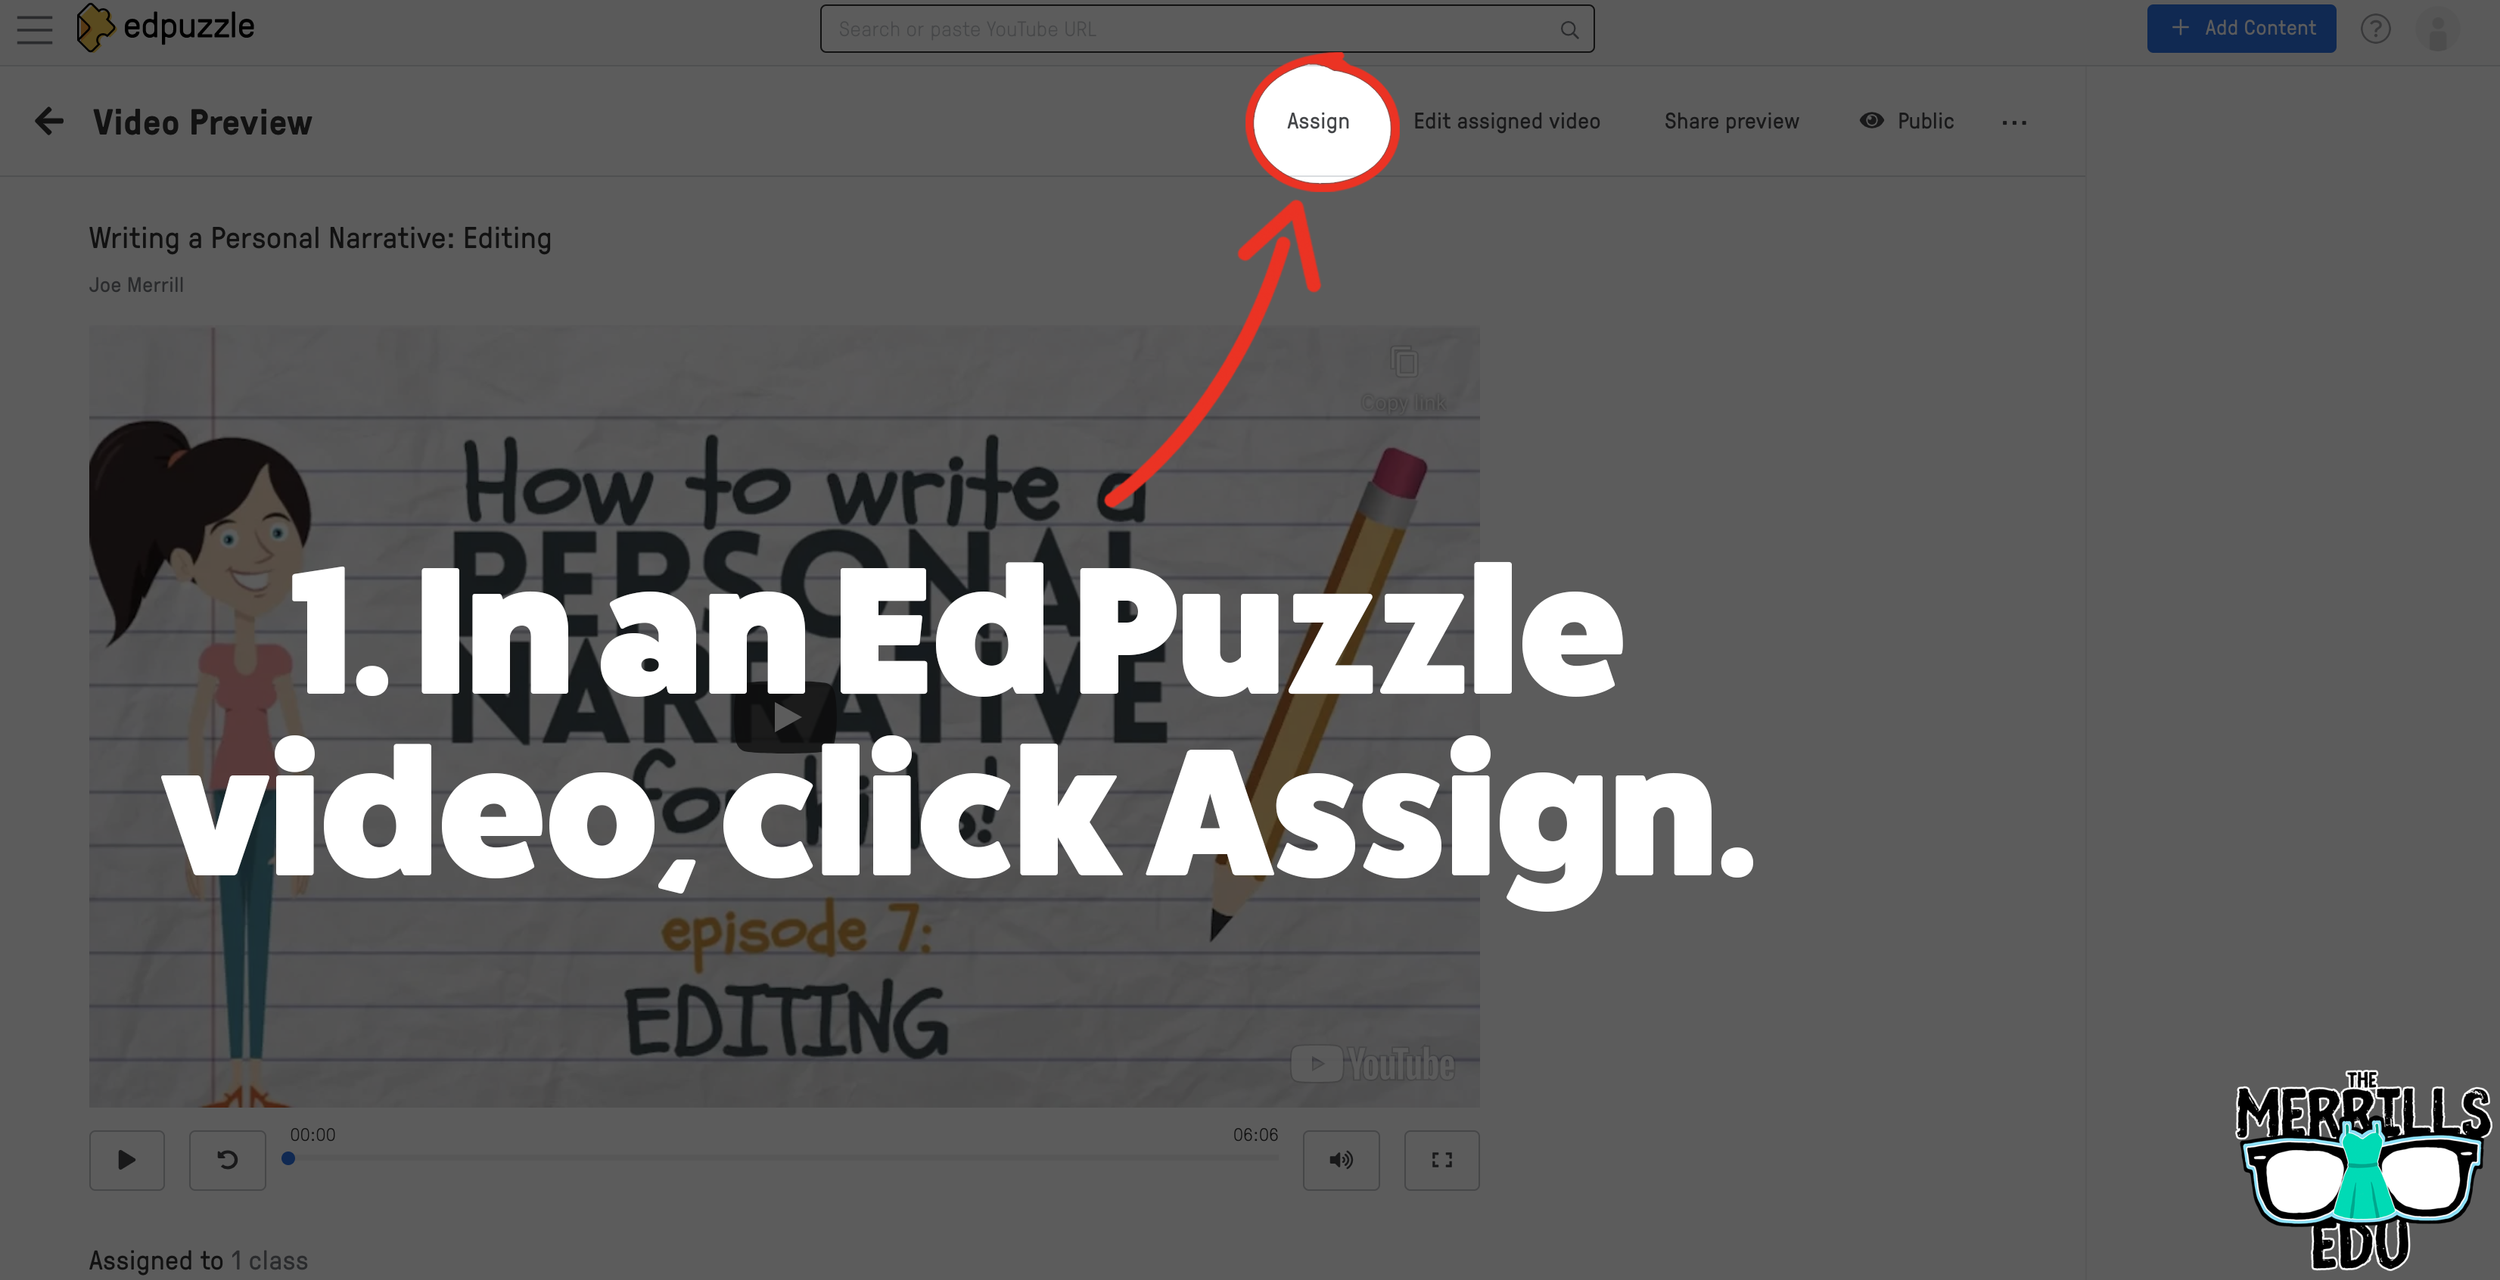
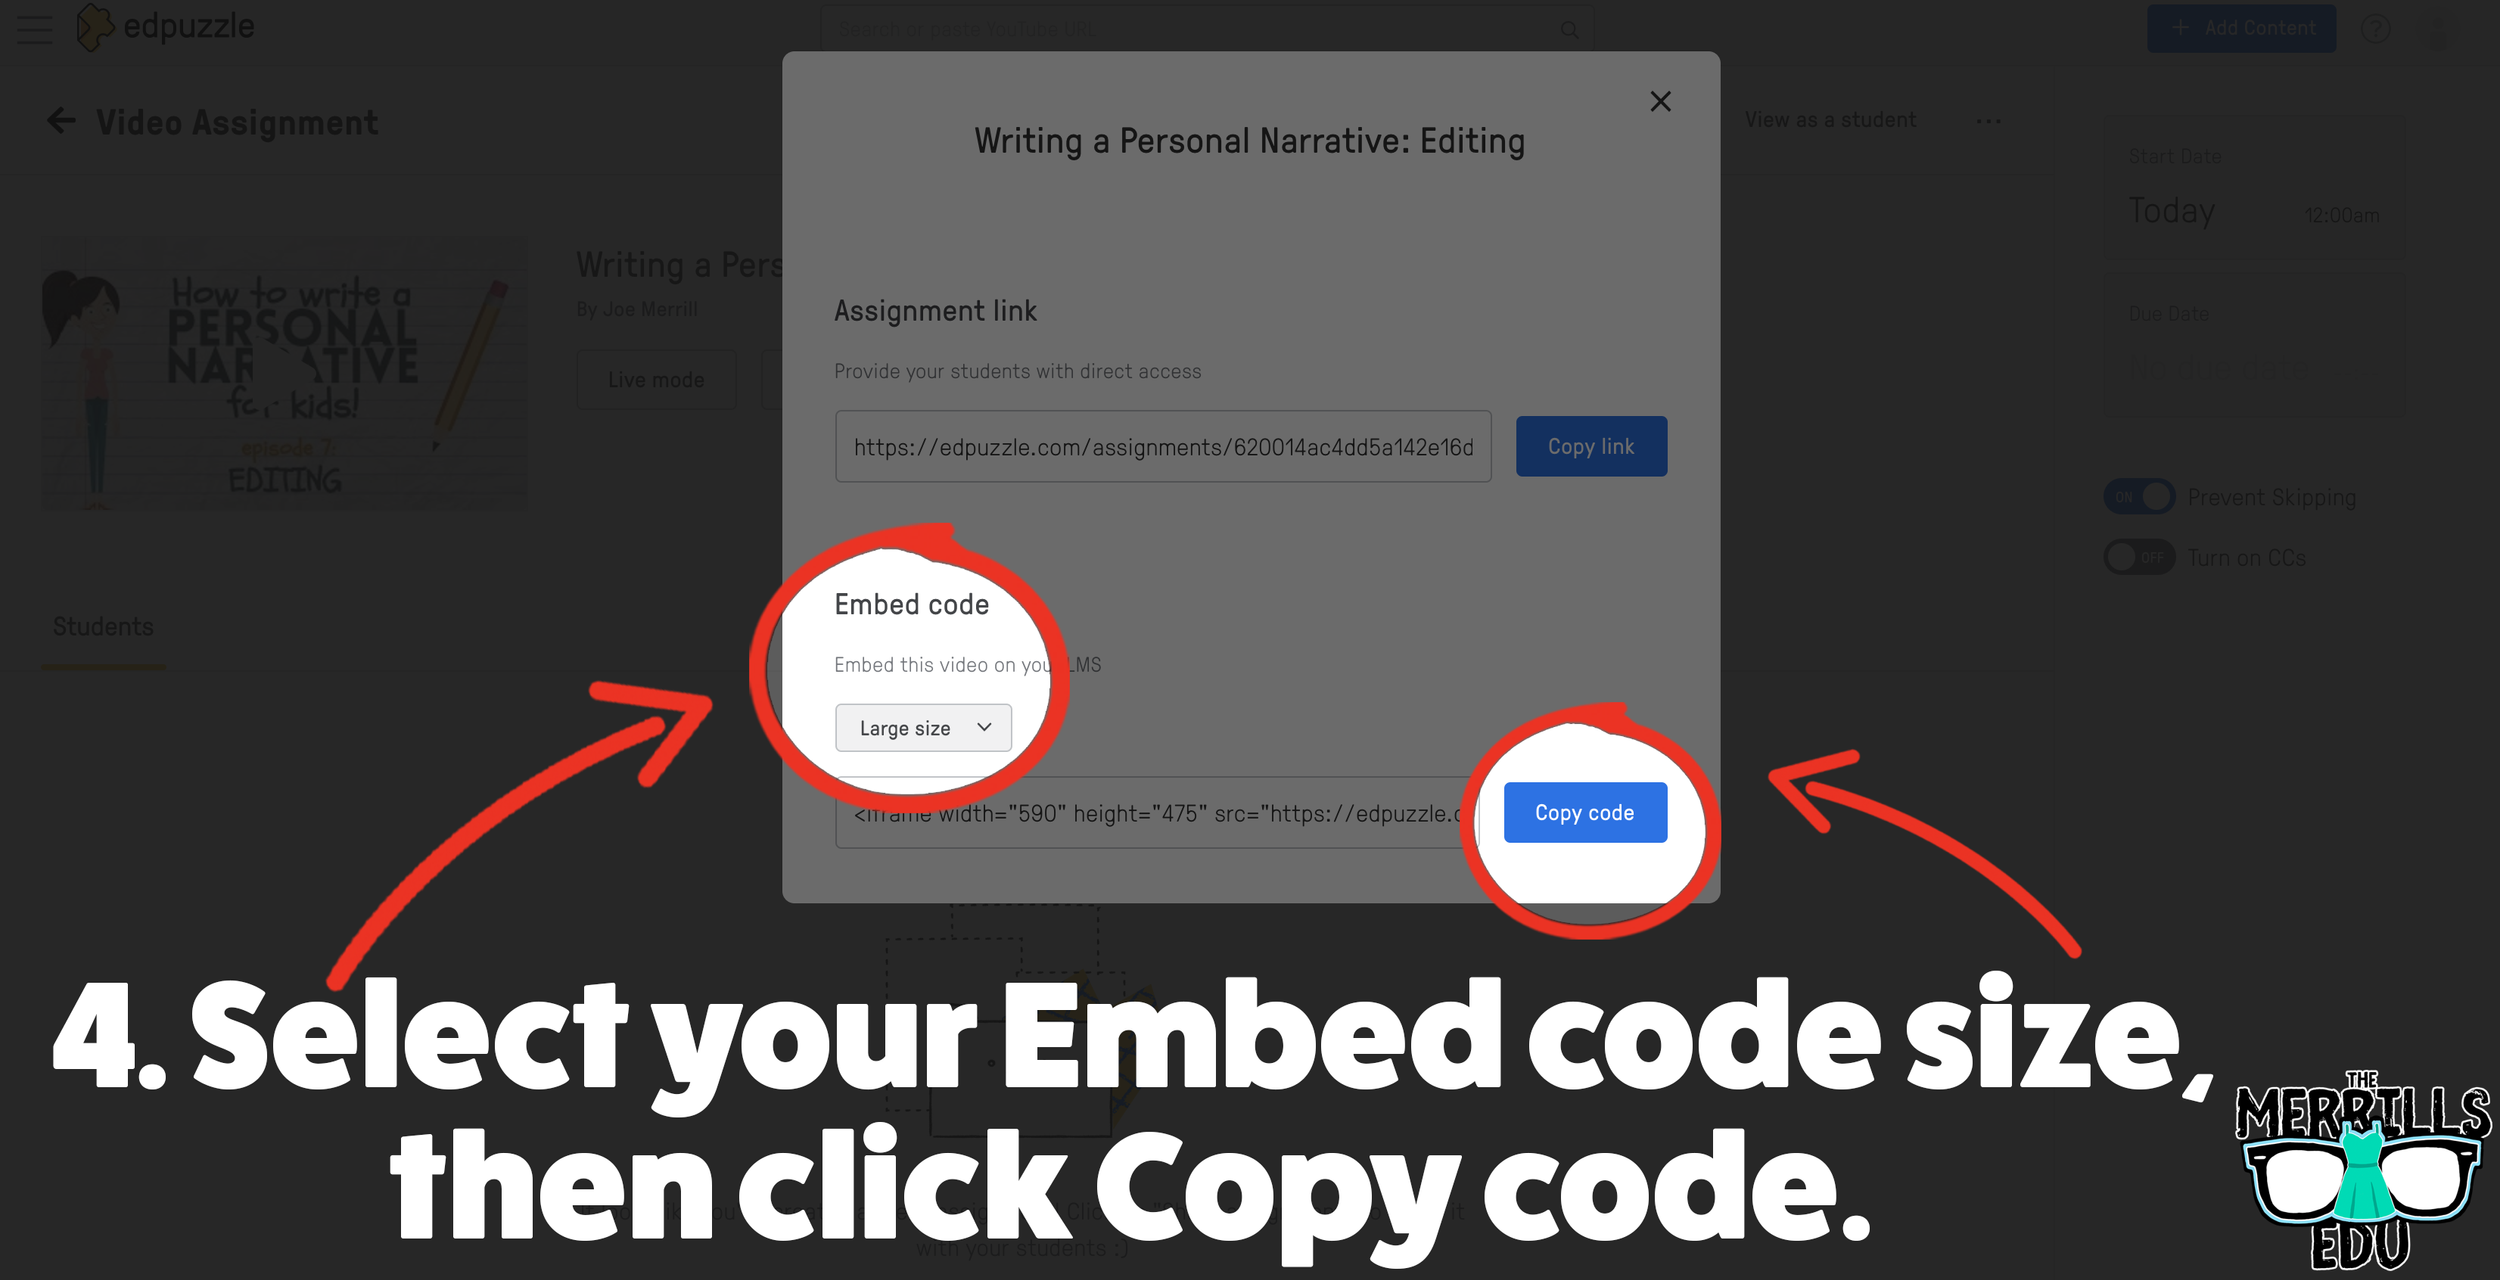


(note: You will need to set up a class in Ed Puzzle prior to the steps below)
Select. the video that you would like to embed from Ed Puzzle.
Click “Assign”
Select the class that you would like to assign the video to, then click “Assign.”
On the next screen, click “Share assignment.”
(Optional: We recommend changing the embed code size to large) Under Embed Code, click “Copy code.”
In a separate tab, open the Canvas page that you would like to add the EdPuzzle video to. Then, click on the cloud icon (if you don’t see the Cloud icon, click the three dots to expand the menu bar).
In the embed window, paste your copied code from Ed Puzzle. Then, click submit.
Your Ed Puzzle video is now embedded into the Canvas page! Click on “Save” to update the changes.

PowerPoint Embedded into Canvas
Do you have a PowerPoint deck that you’d like to give your students so that they can follow along? Embedding it into your LMS is the perfect way to deliver that content while keeping everything organized. Here’s how to embed PowerPoint decks into Canvas:
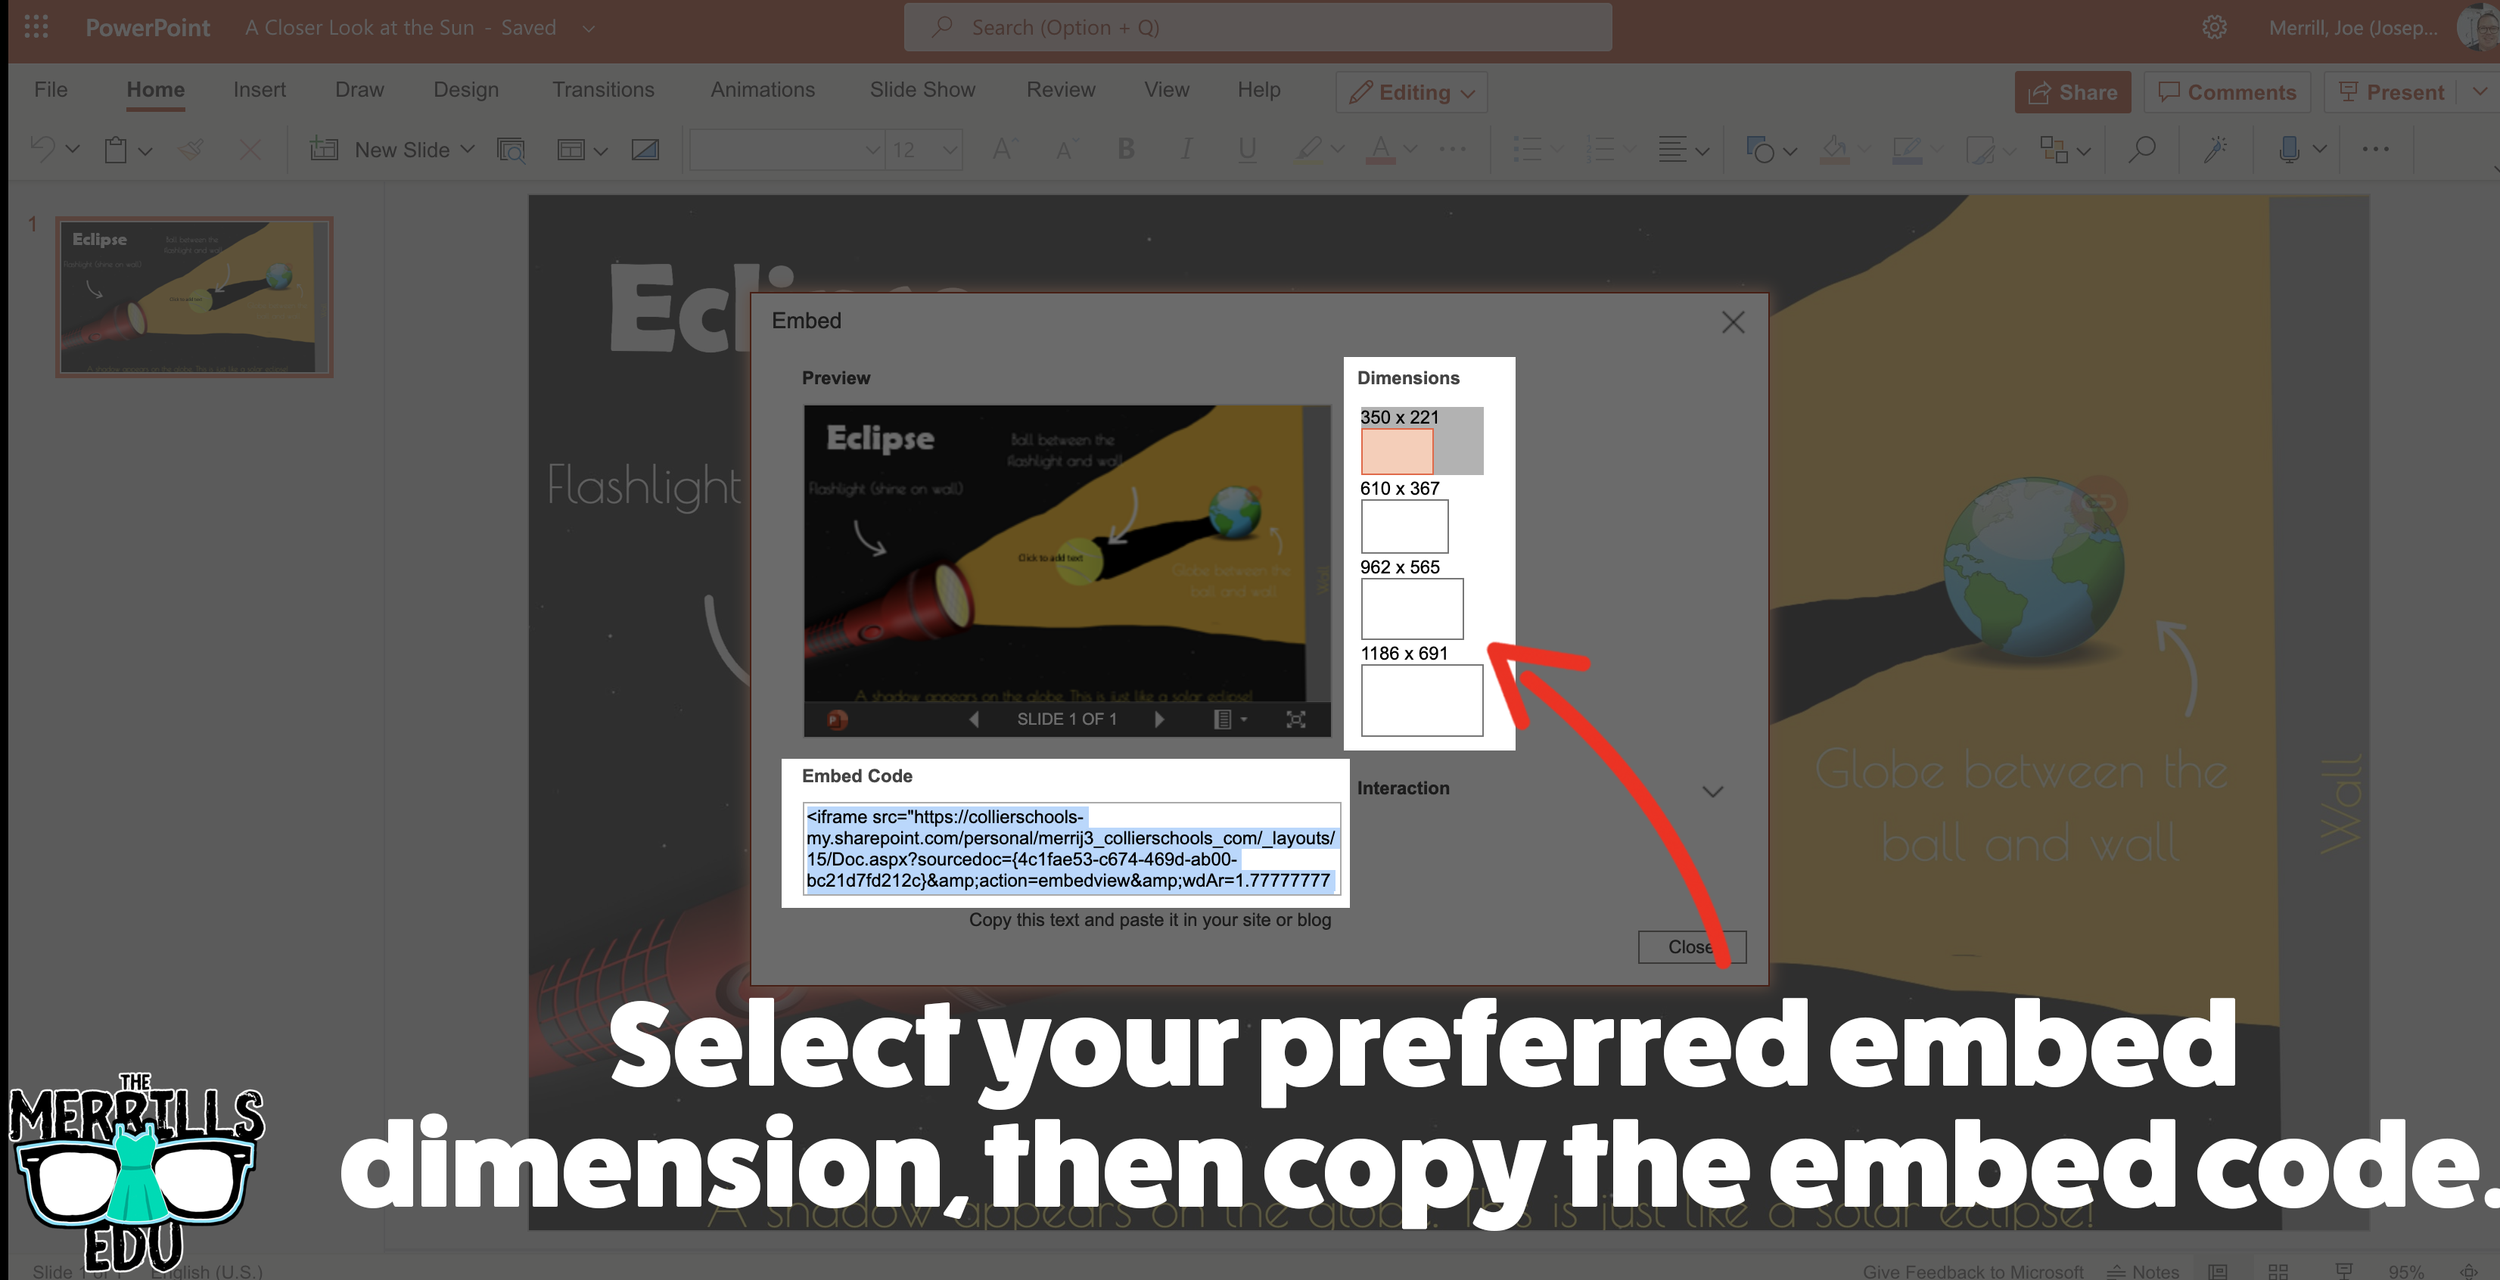

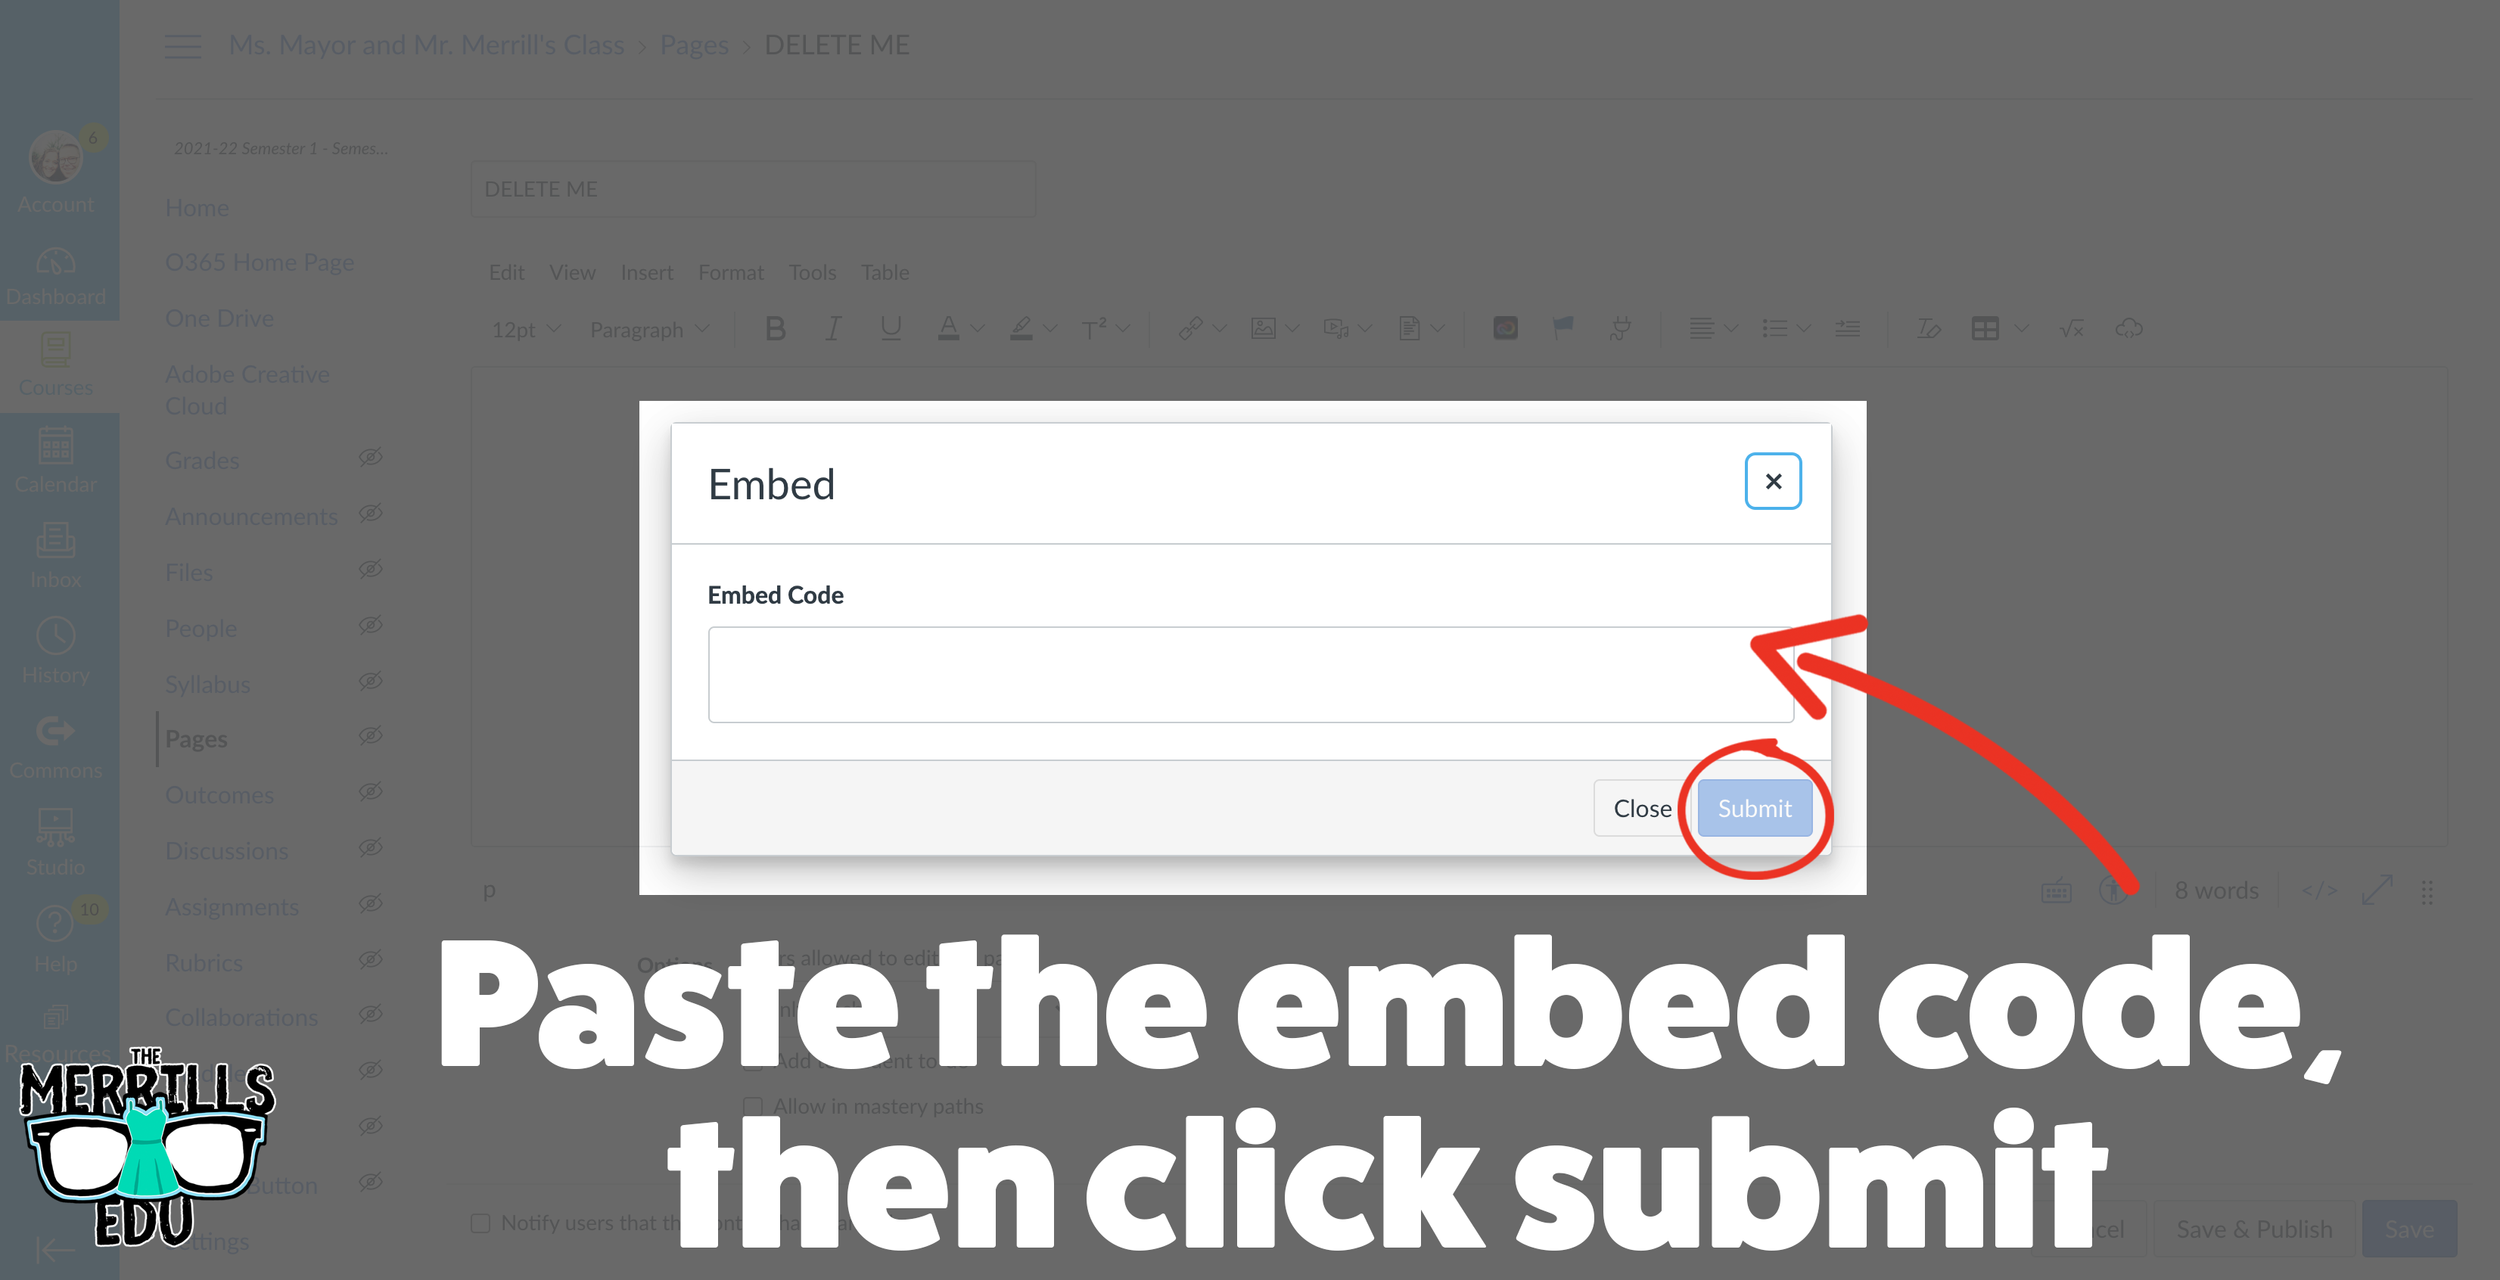
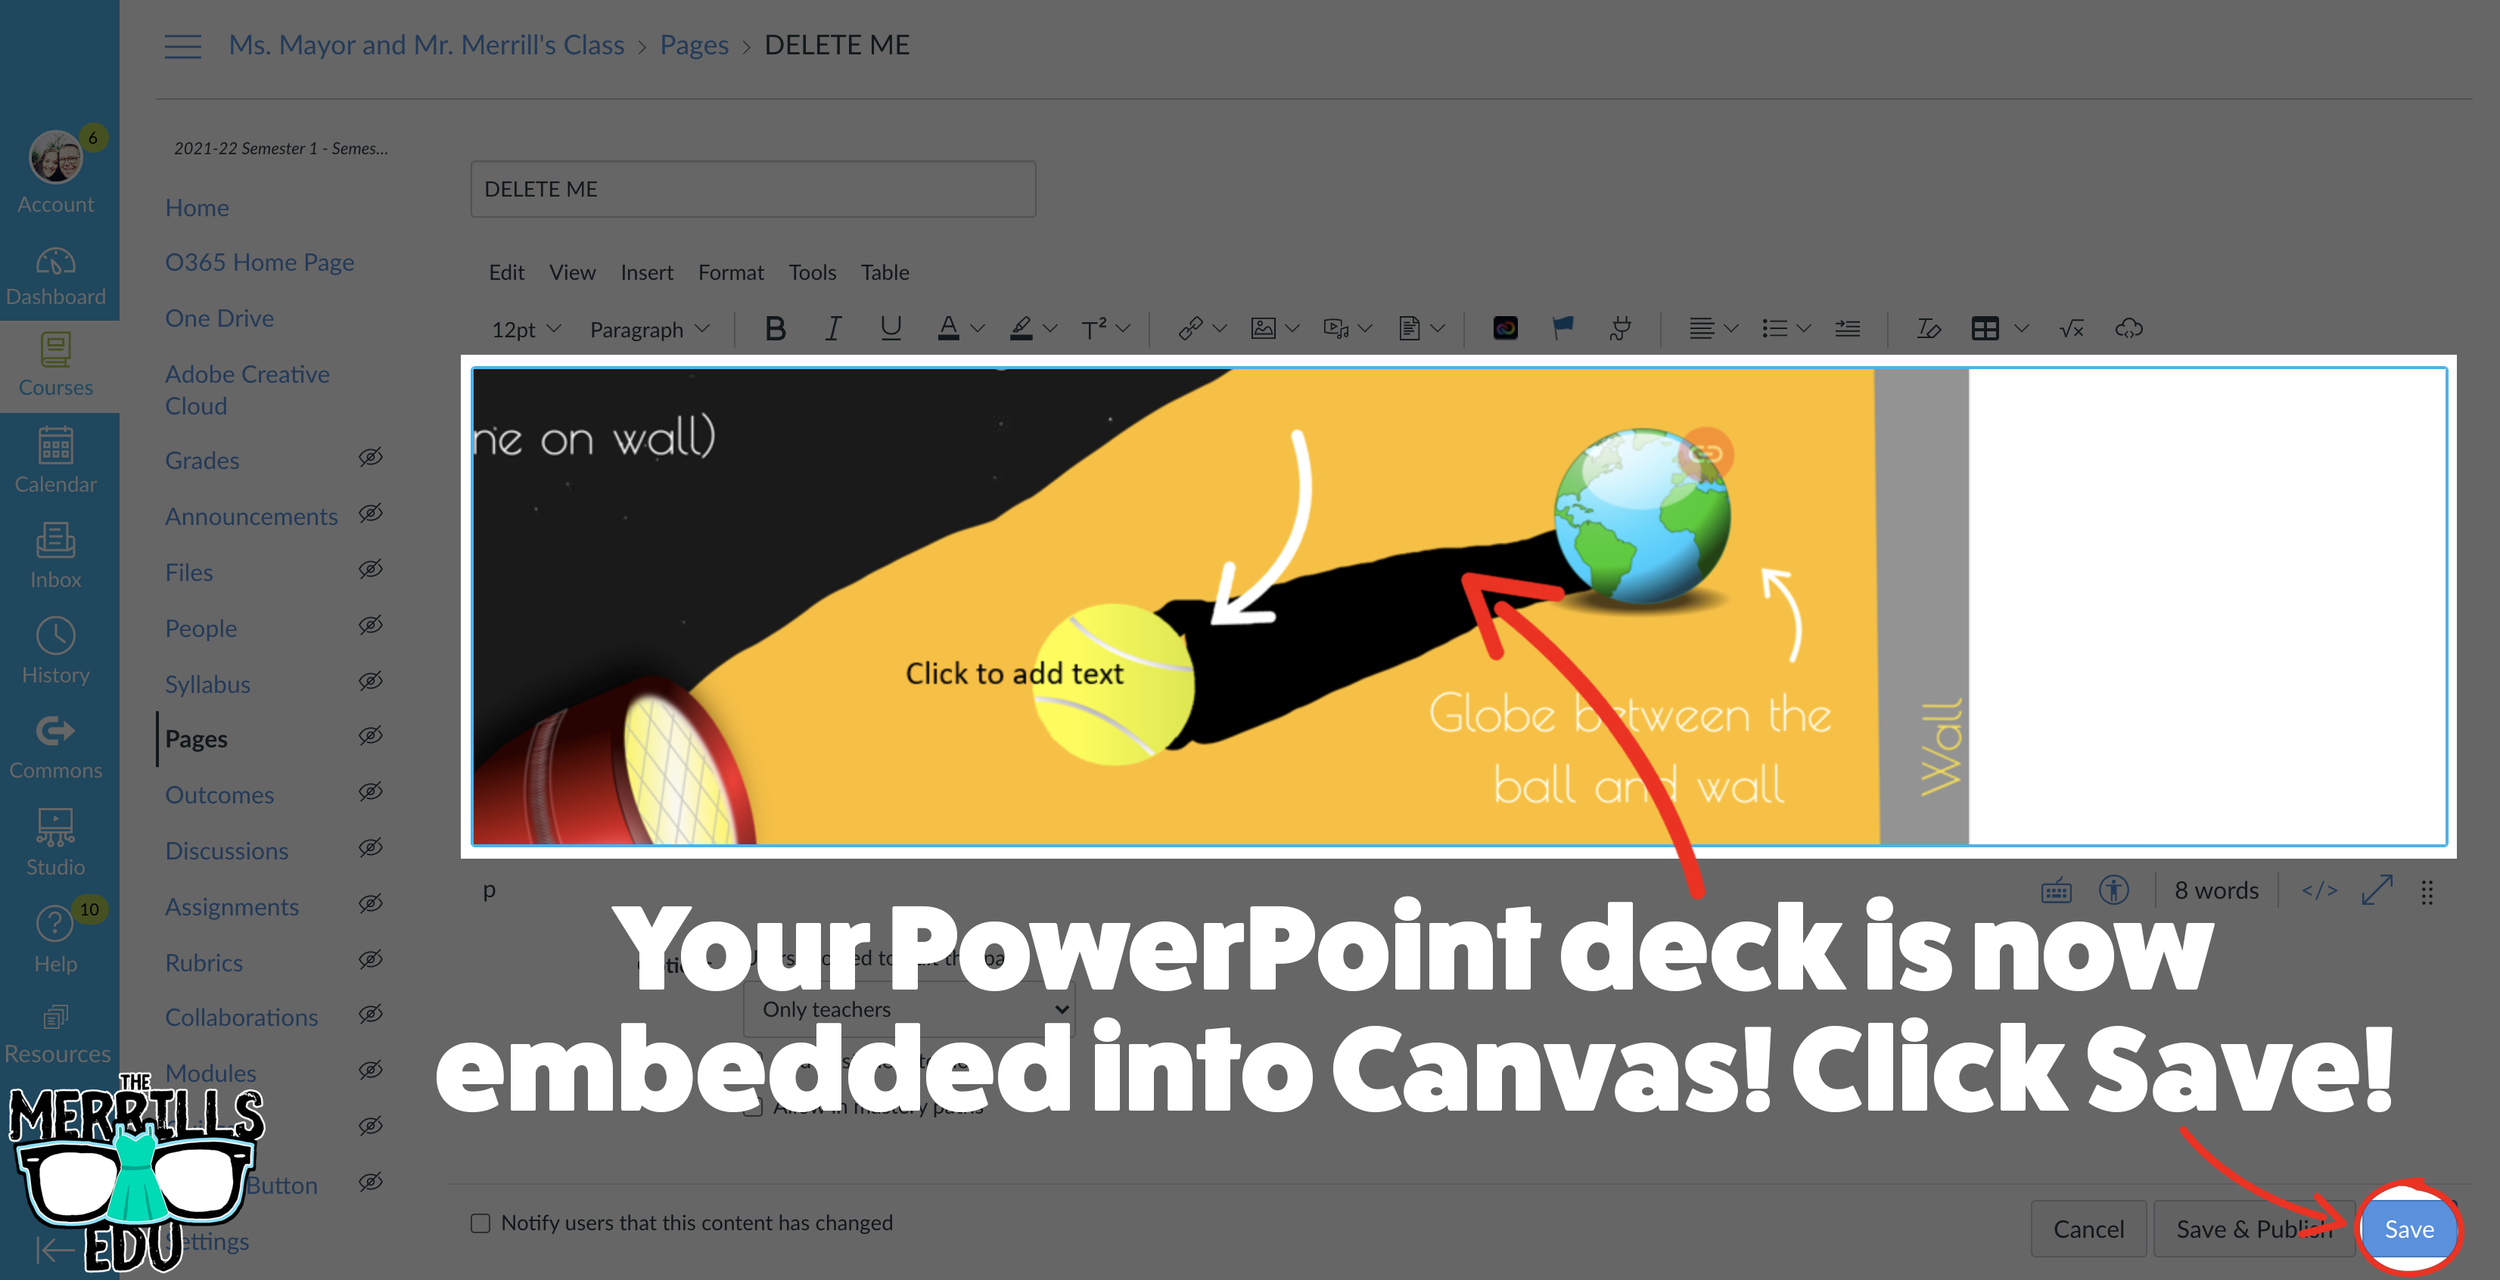
(Note: You will need to use PowerPoint Online (a Microsoft 365 account) to use this embed. You may also need to adjust your share settings for this to work correctly)
In your PowerPoint online deck, click File.
Next, click “Share” then click “Embed.”
On the next screen, select your preferred embed size. Then, copy the Embed code.
In a separate tab, open the Canvas page that you would like to add the PowerPoint deck to. Then, click on the cloud icon (if you don’t see the Cloud icon, click the three dots to expand the menu bar).
In the embed window, paste your copied code from PowerPoint Online. Then, click submit.
Your PowerPoint deck is now embedded into the Canvas page! Click on “Save” to update the changes.

Google Slides Embedded into Canvas
Google Slides users can get in on the embedding fun, too! In just several clicks, you can take your Google Slides deck and embed them into Canvas. Here’s how:
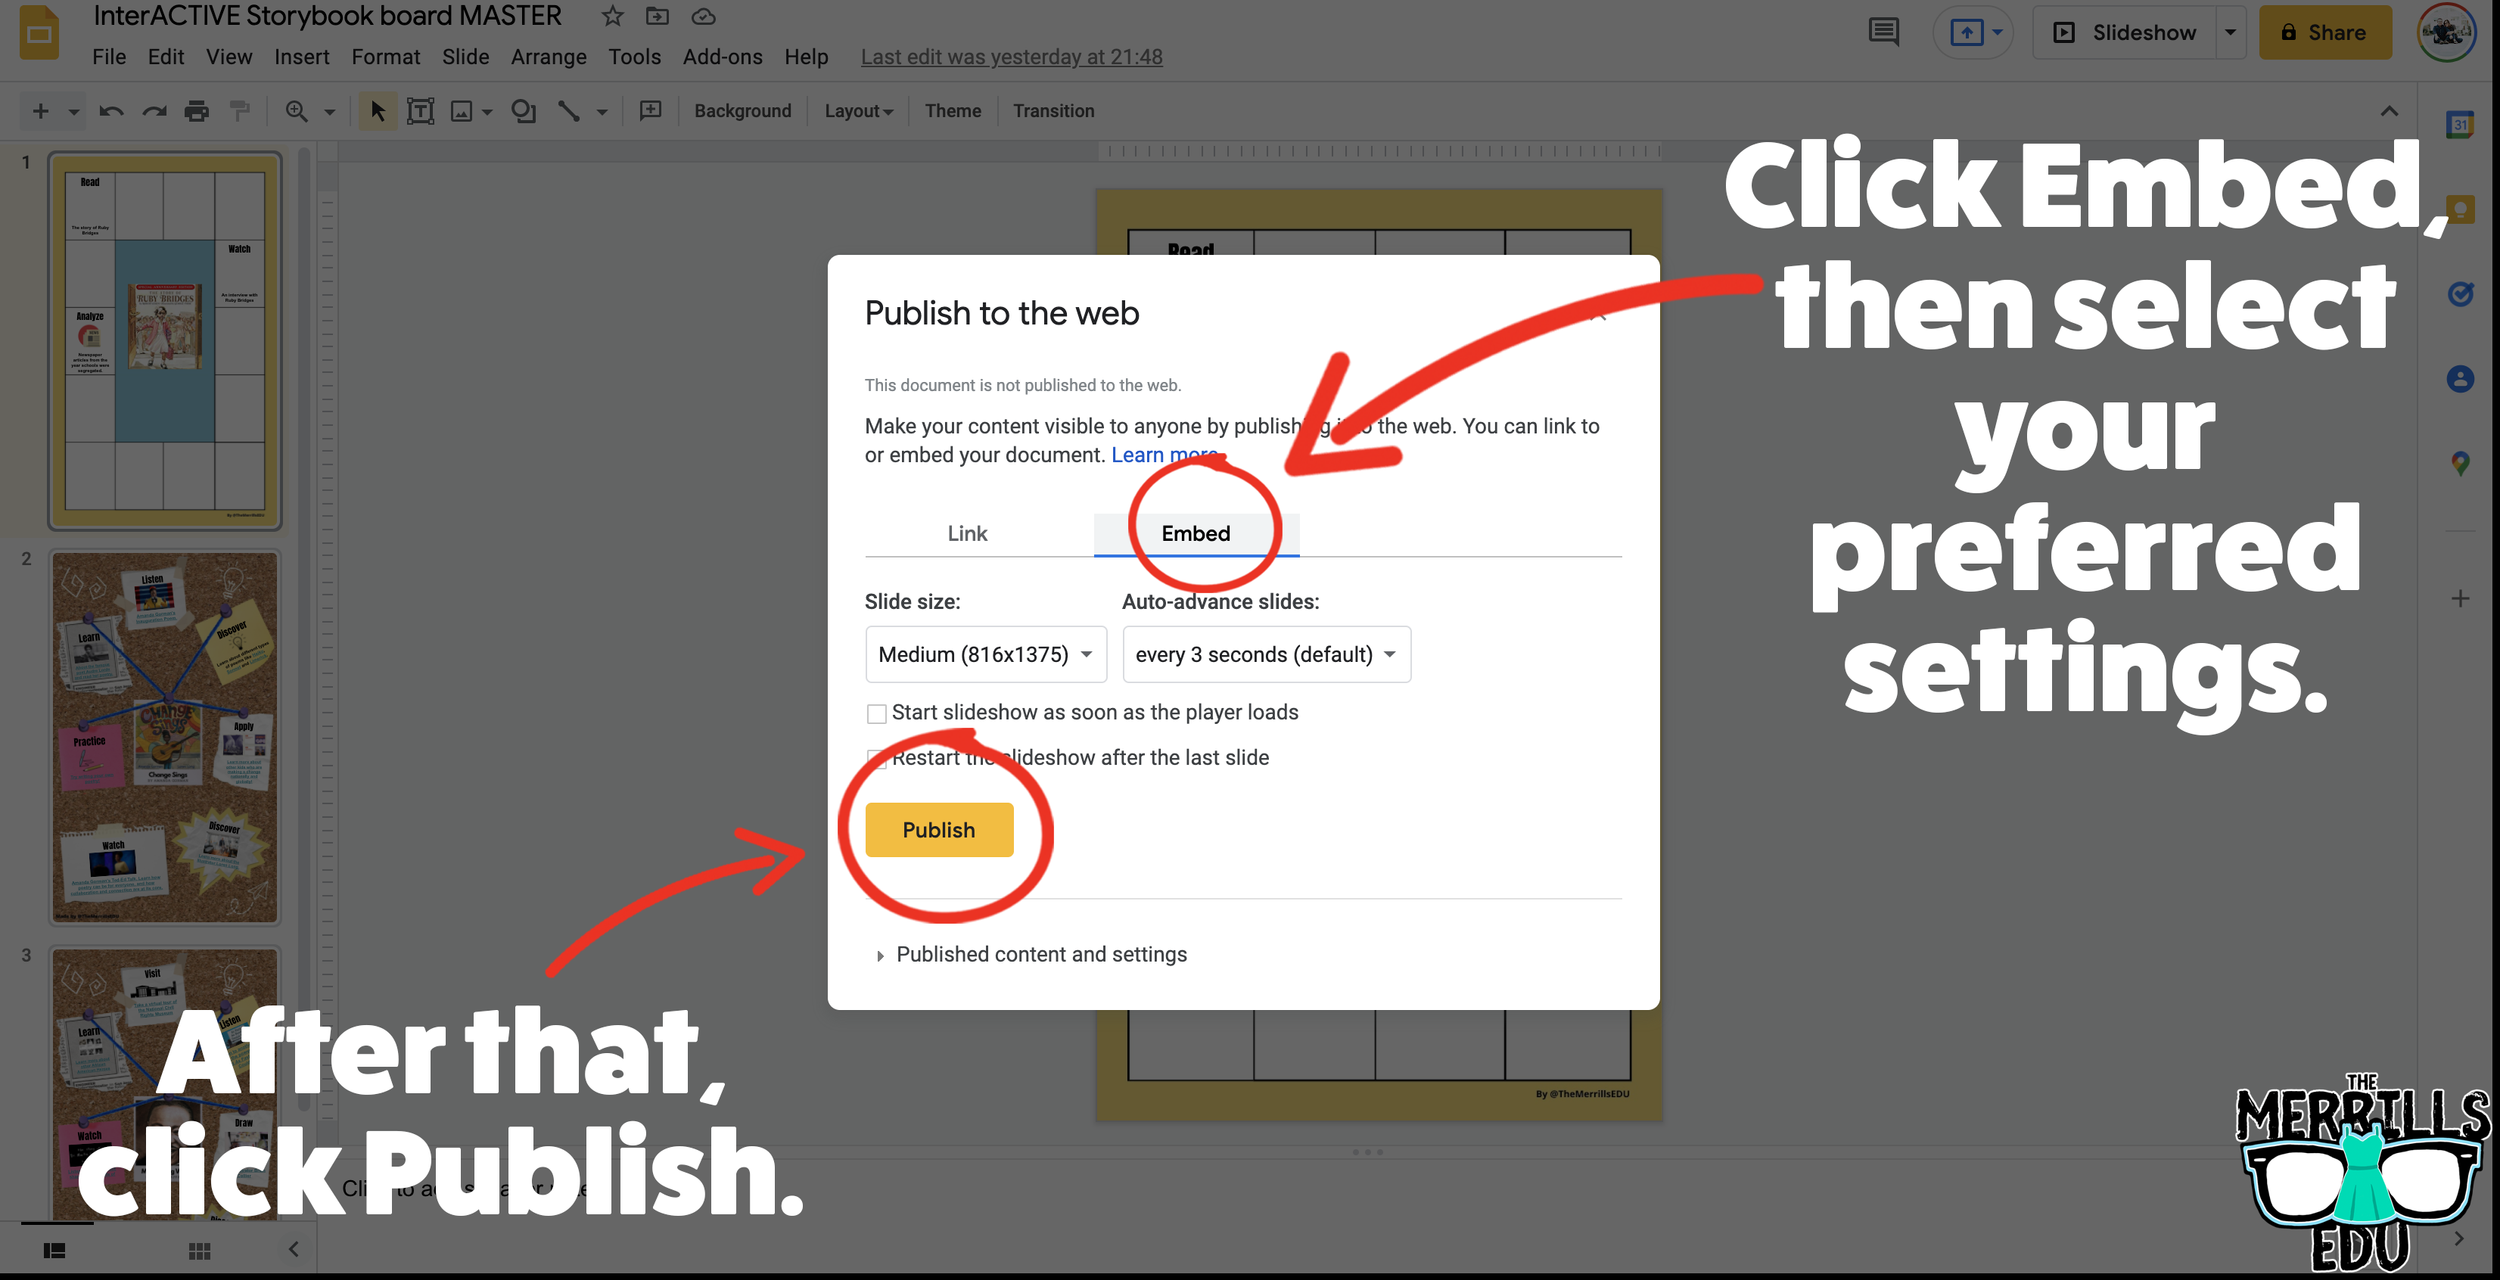
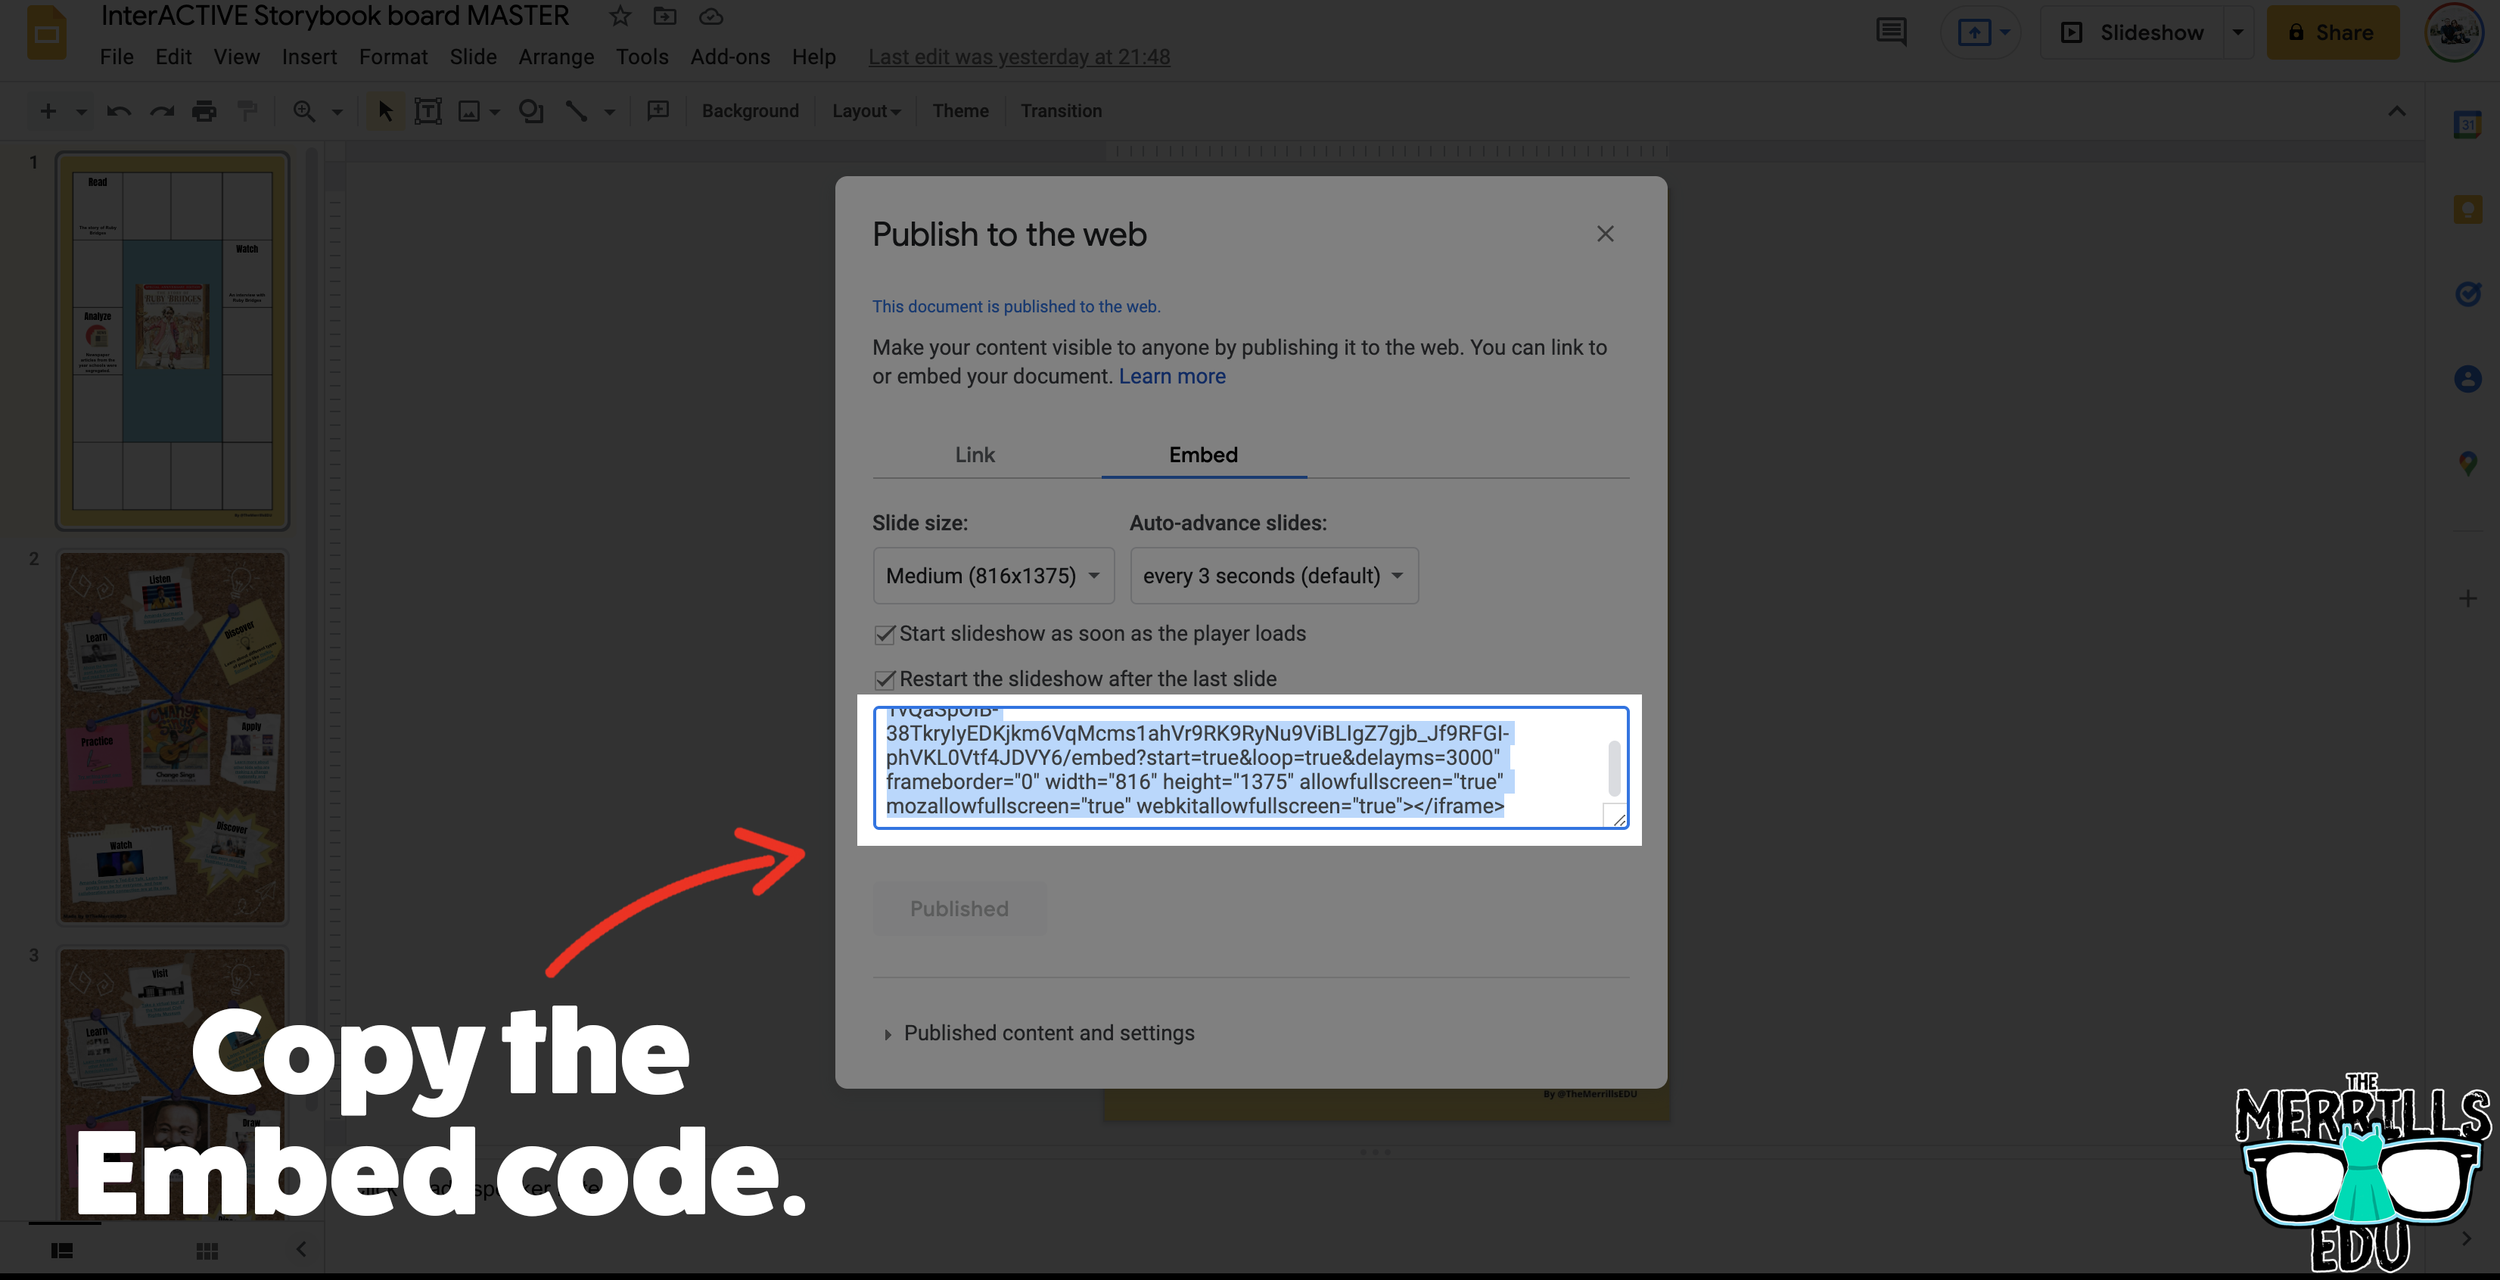


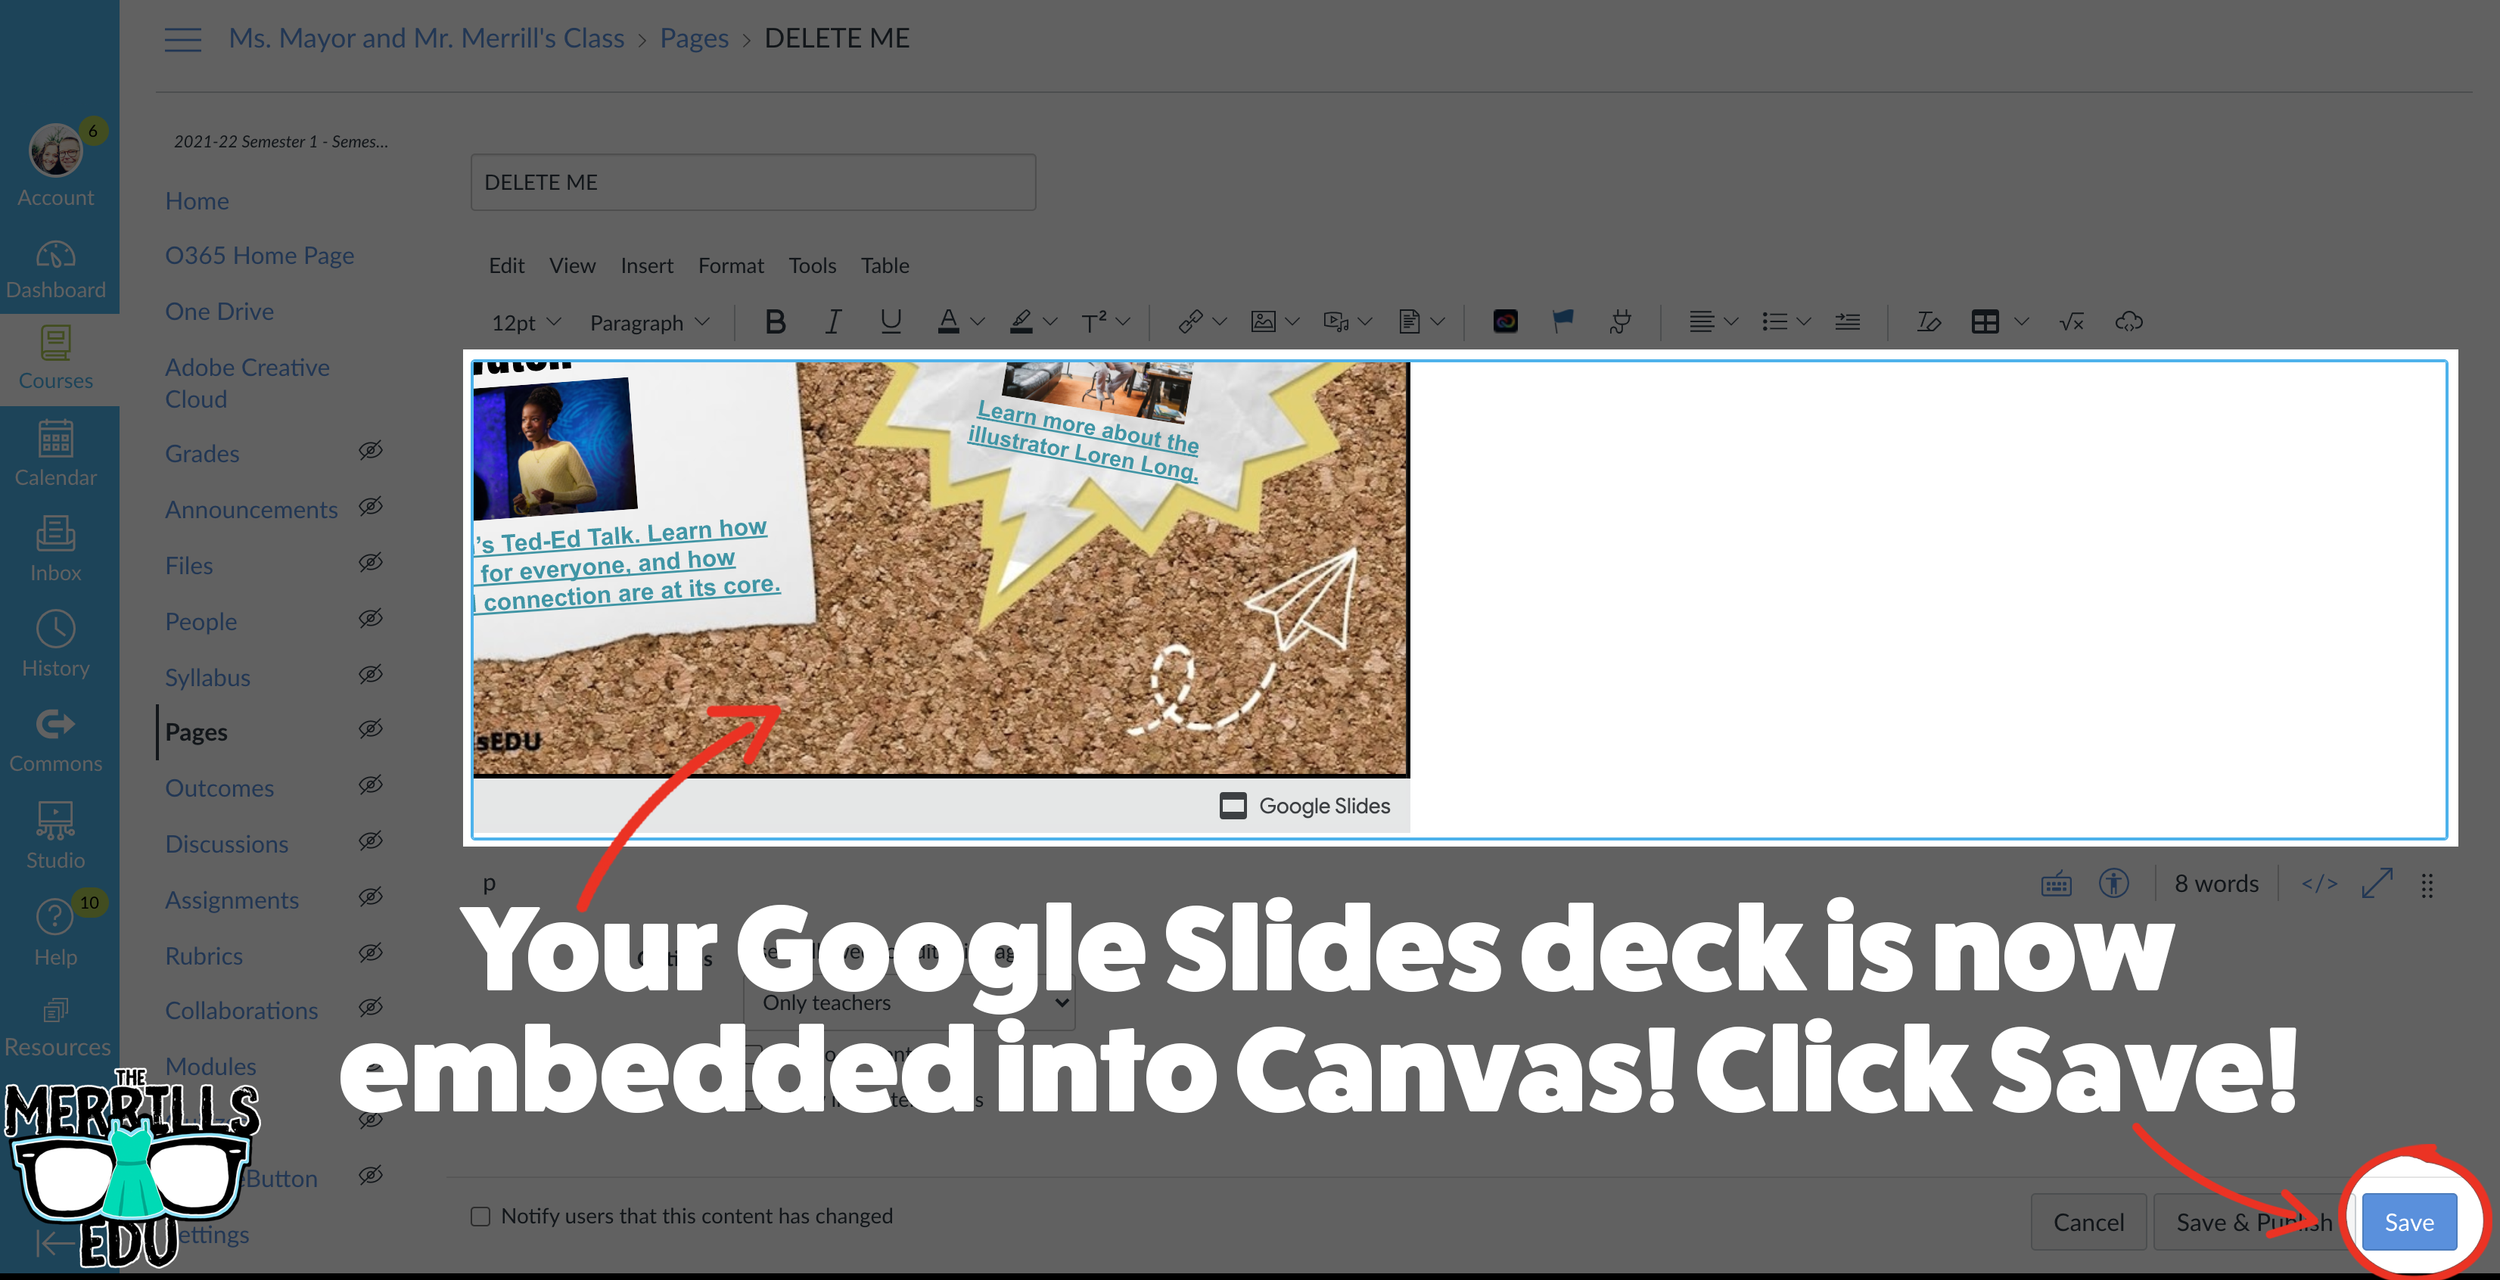
In your Google Slide deck, click “File,” then click “Publish to the web.’
Click on Embed, then select your preferred settings. Once you have everything set, click “Publish.” (If you’re asked if you are sure you want to publish, say “yes or ok.”)
On the next screen, copy your embed code.
In a separate tab, open the Canvas page that you would like to add the Google Slides deck to. Then, click on the cloud icon (if you don’t see the Cloud icon, click the three dots to expand the menu bar).
In the embed window, paste your copied code from Google Slides. Then, click submit.
Your Google Slides deck is now embedded into the Canvas page! Click on “Save” to update the changes.

Wakelet Embedded into OneNote
You don’t need an LMS (learning management system) to embed apps. If you’re a Microsoft user, you can embed Wakelet collections right into a OneNote file. The best part of all - this is a ⚡️LIVE⚡️ embed, meaning that any changes made to the Wakelet collection will automatically change in the OneNote file. Additionally, you can embed multiple Wakelet collections into one - OneNote file. Here’s how it all works:
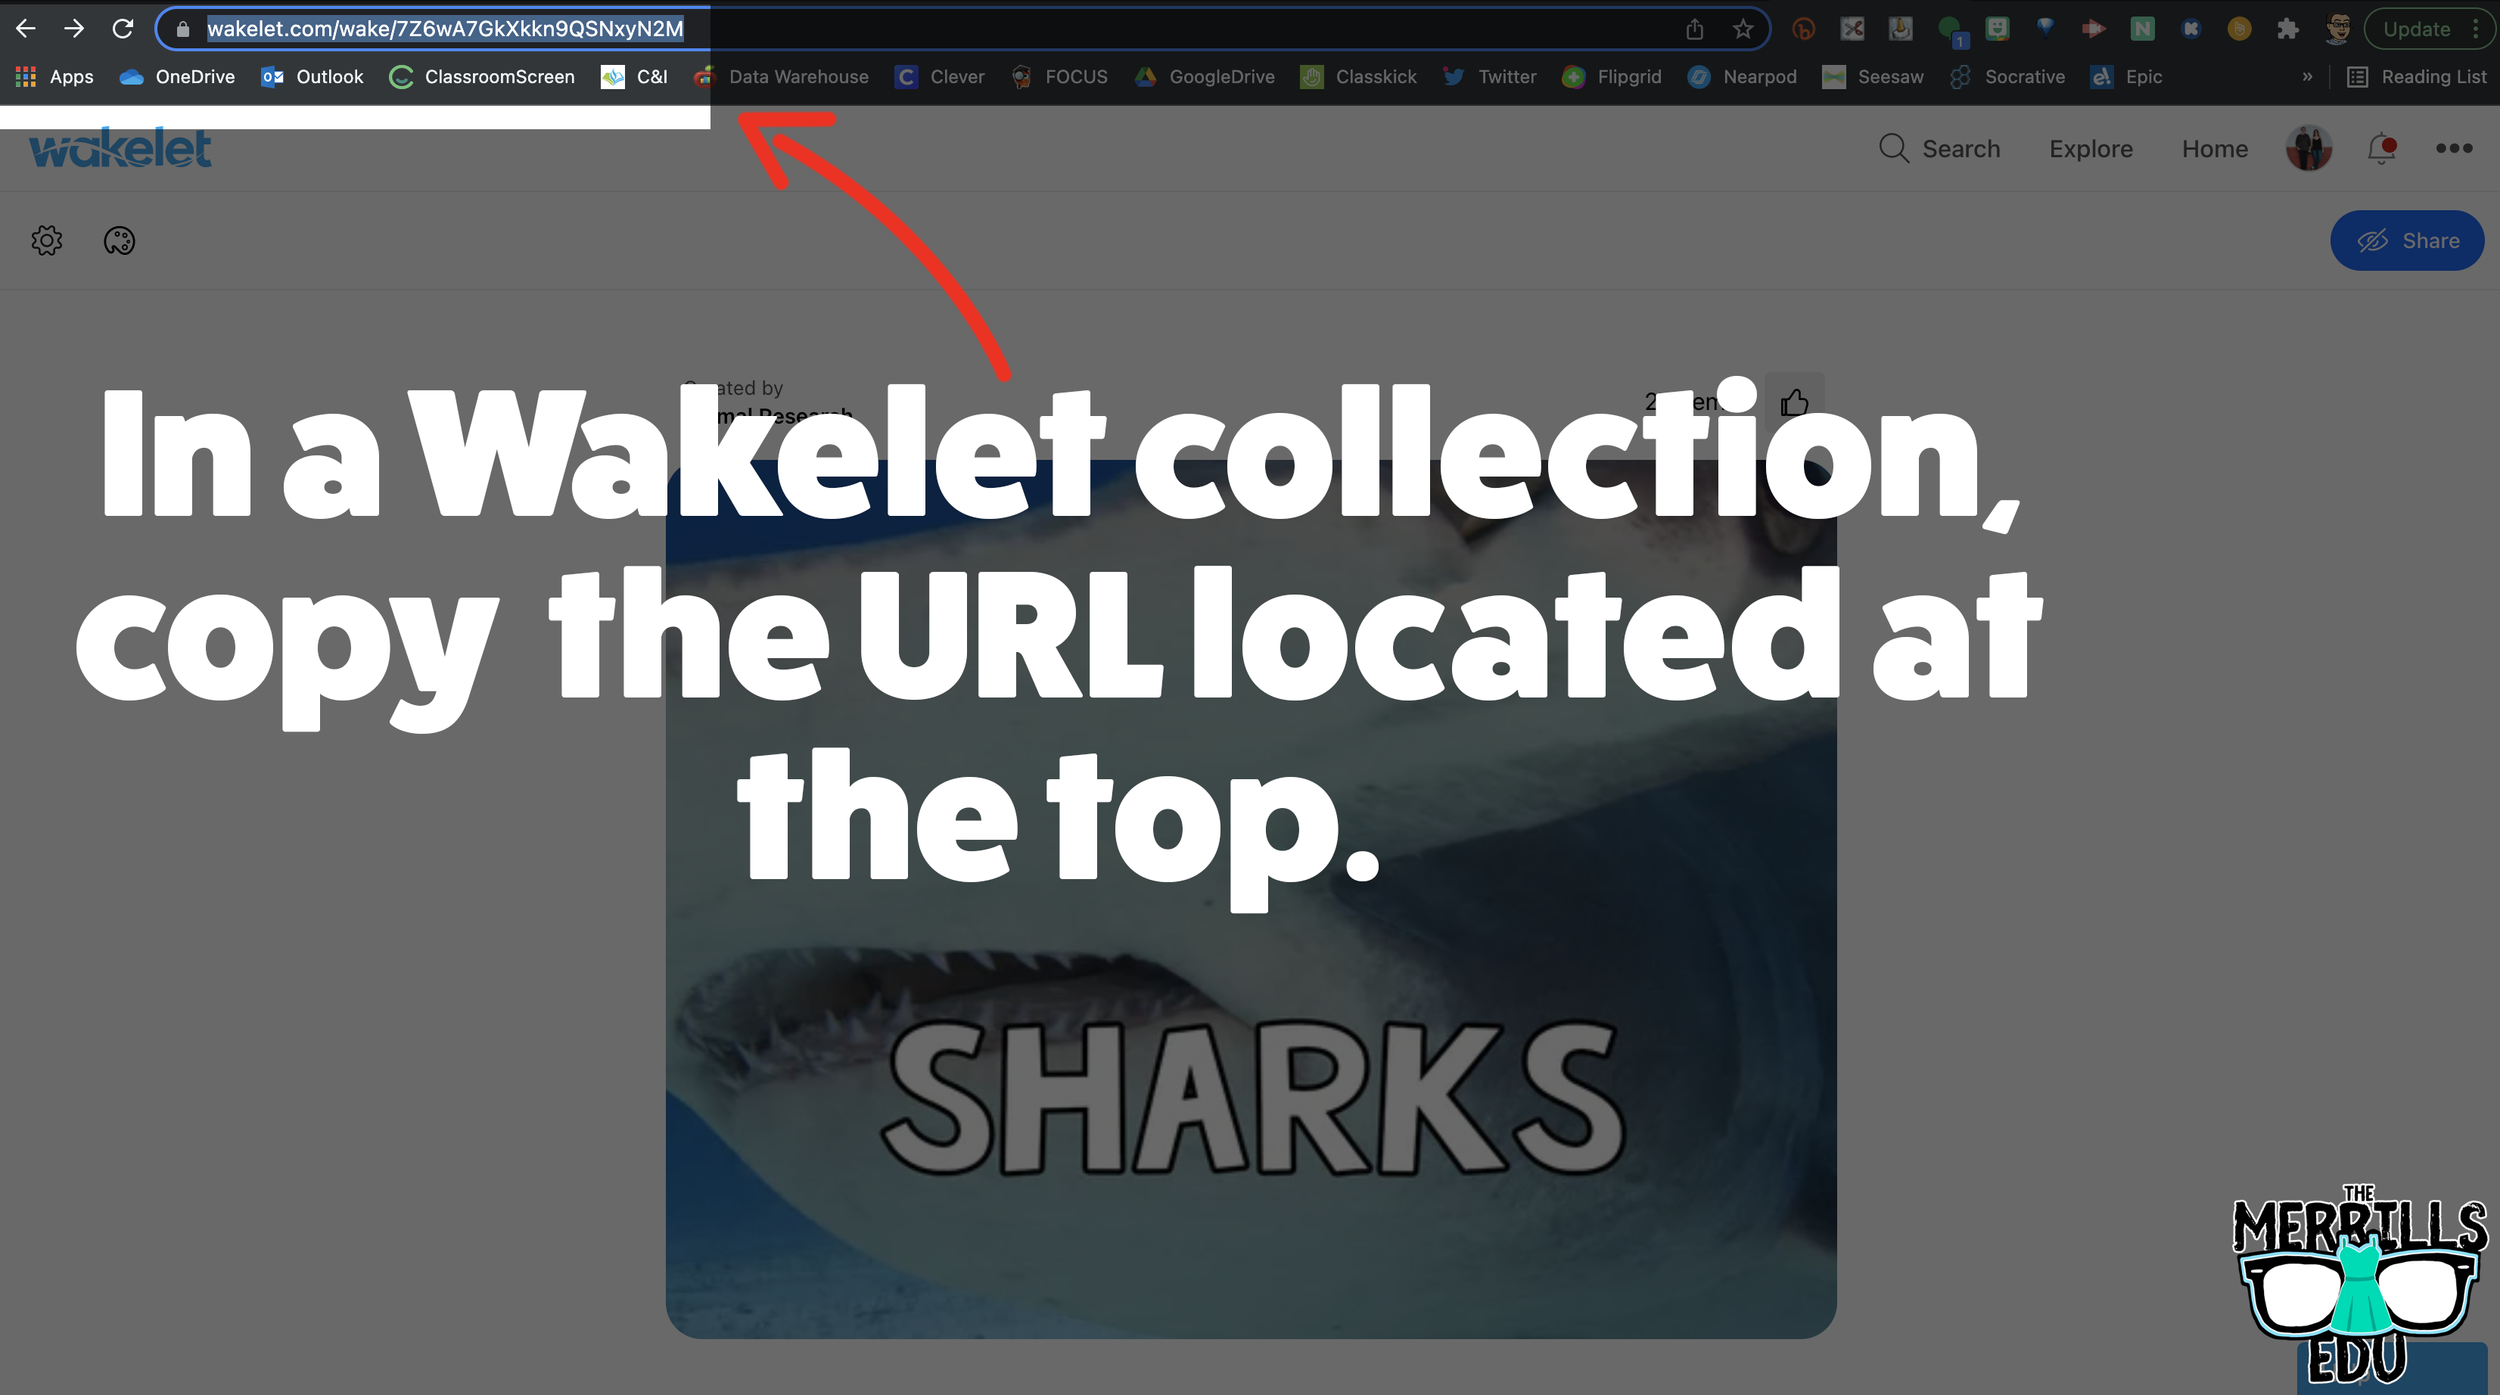
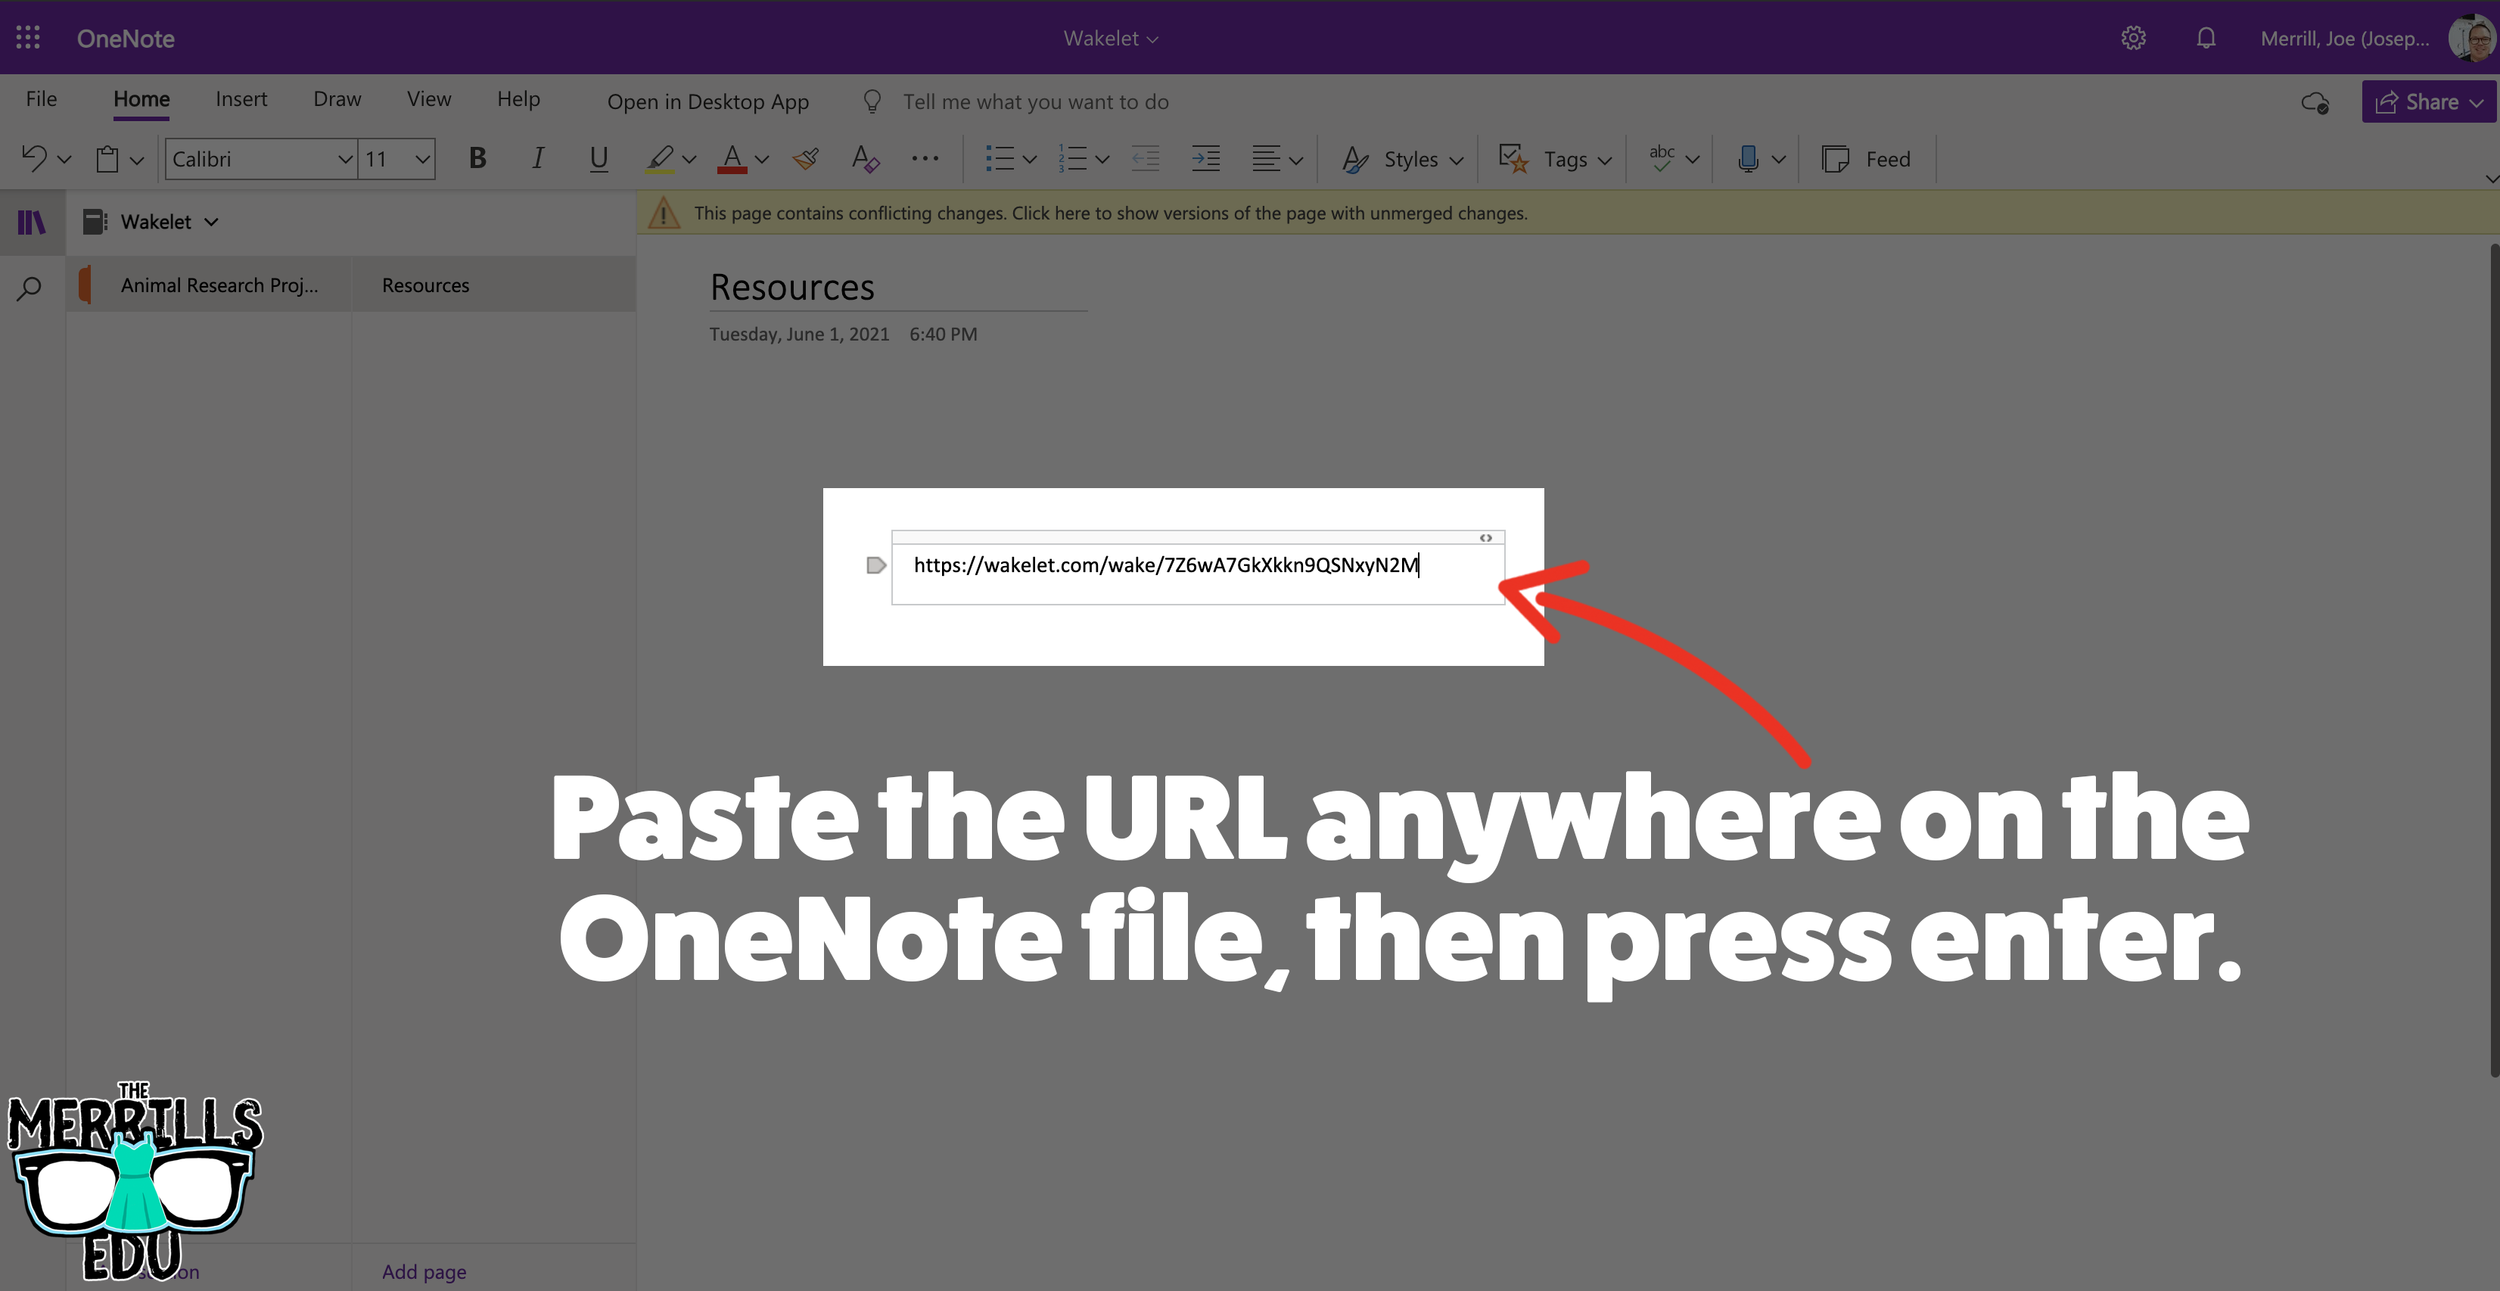
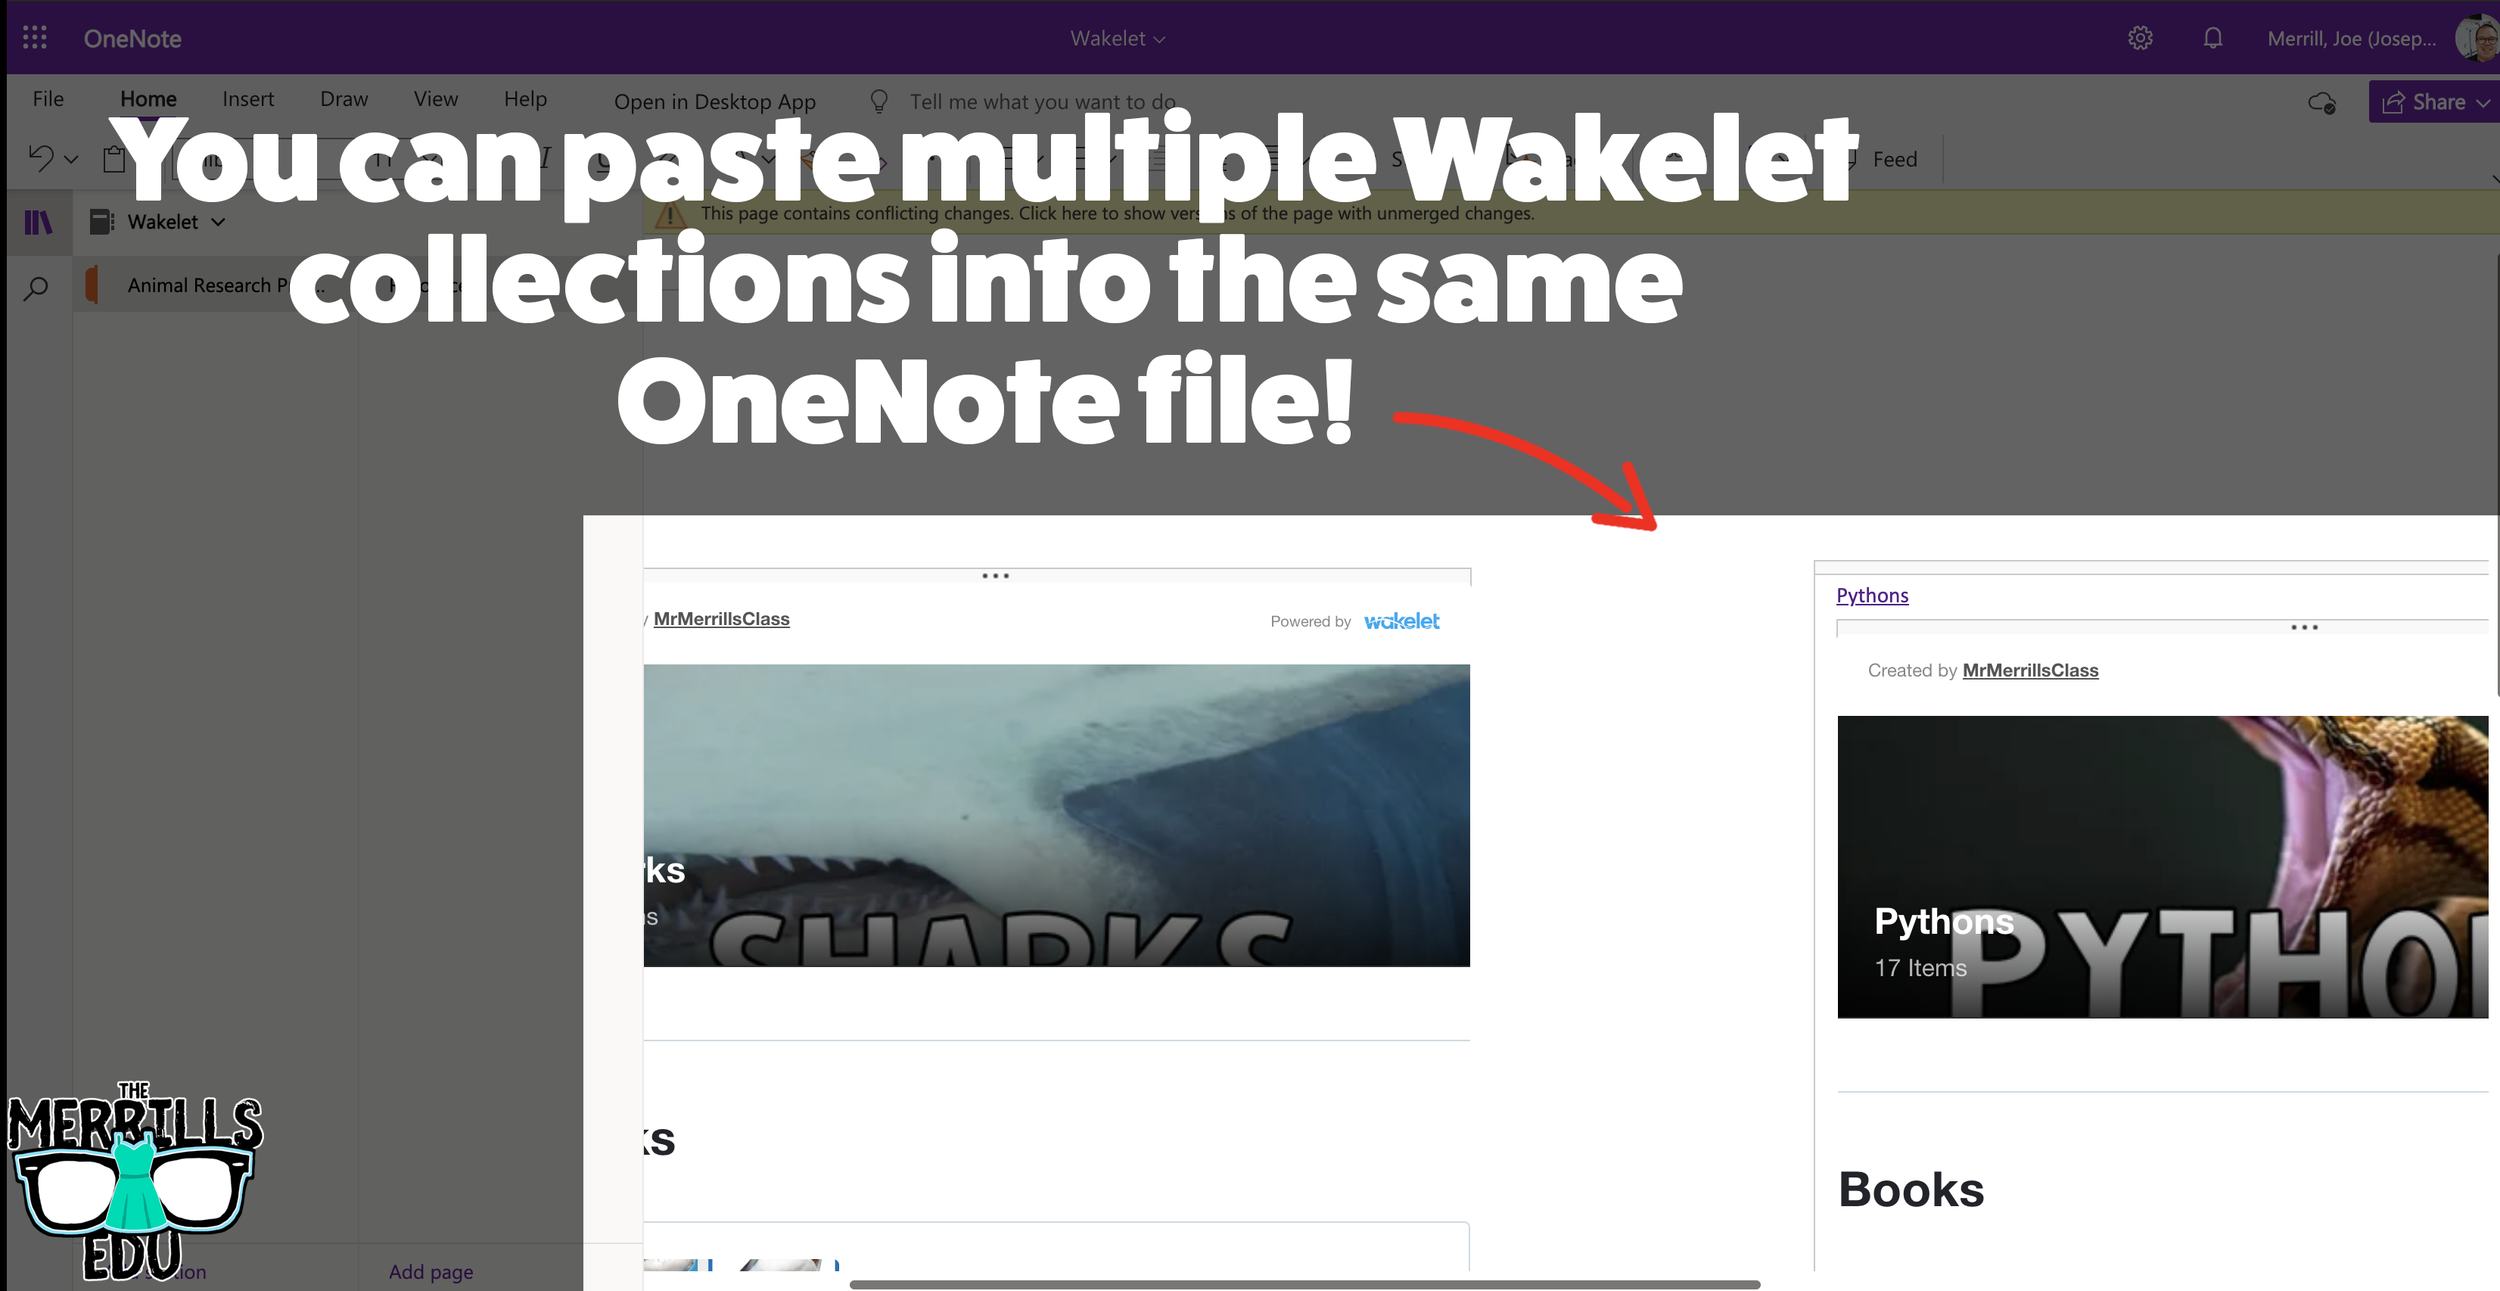
In a Wakelet Collection, copy the URL located at the top.
In a separate tab, open the OneNote file that you would like to add the Wakelet Collection to. Then, paste the URL anywhere on the OneNote file.
Press enter to start the live embed.
Repeat this process to add additional collections to the OneNote file.

Buncee Embedded into OneNote
This embed takes the cake as the most creative! Most embedding is done on the educators end, but not this one (although educators can definitely do it, too). With the Buncee and OneNote embed, students have the ability to take their Buncee creations and share them in one central location for others to see. Here’s how it all works:

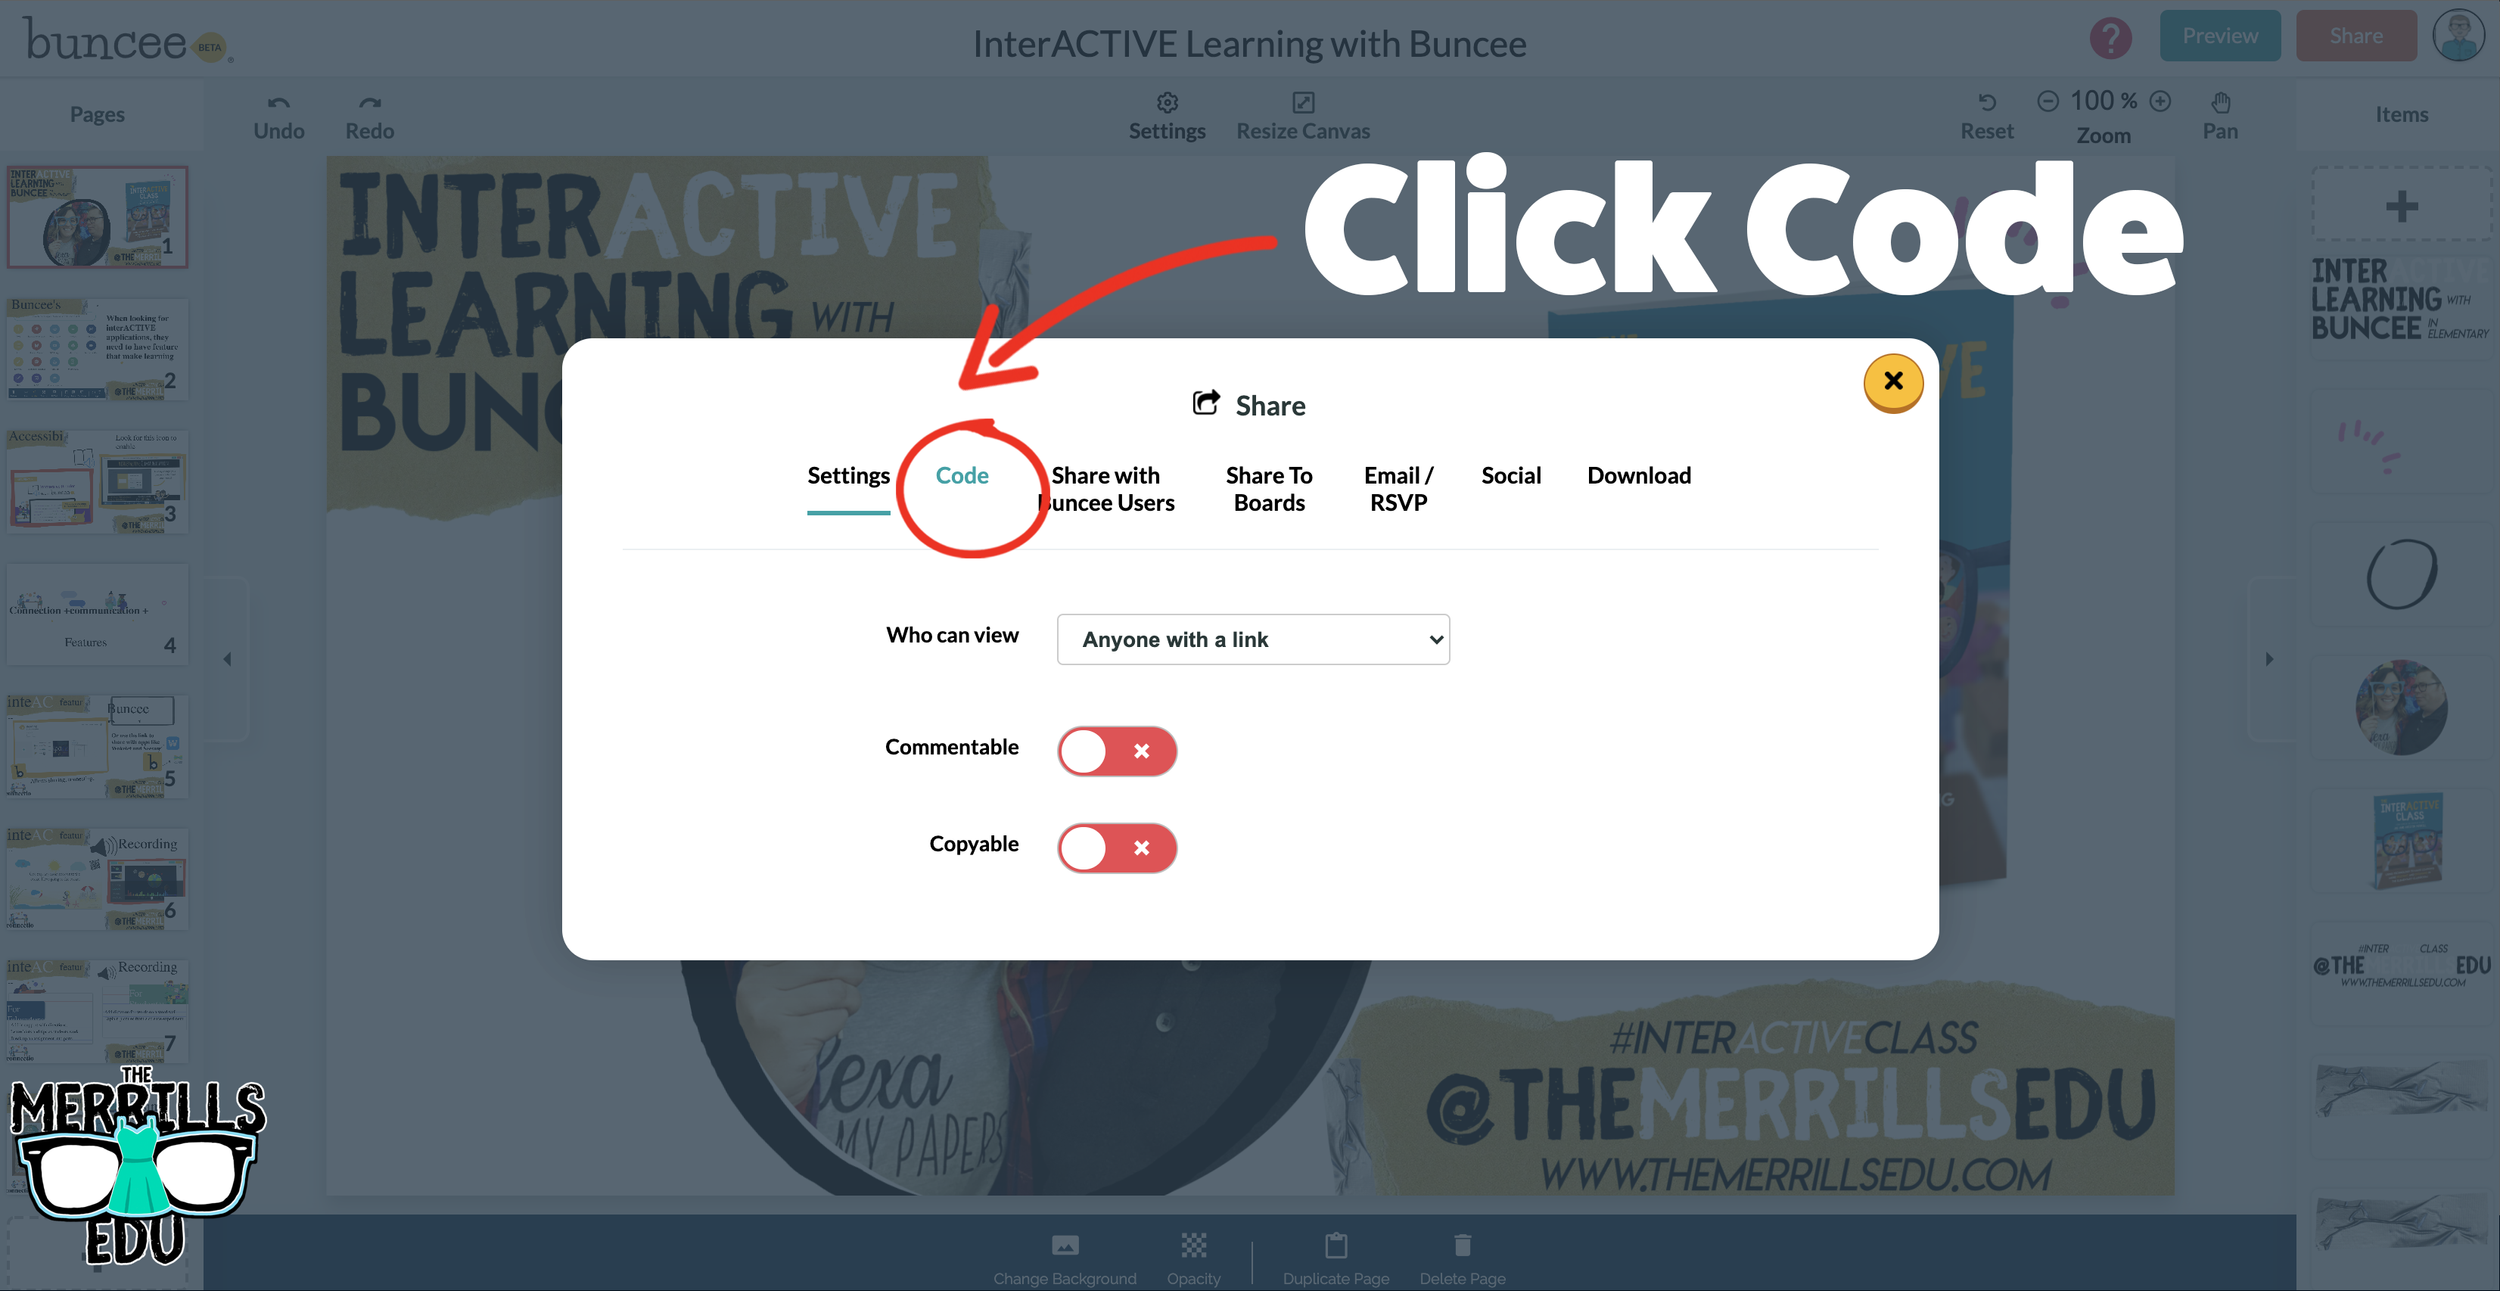
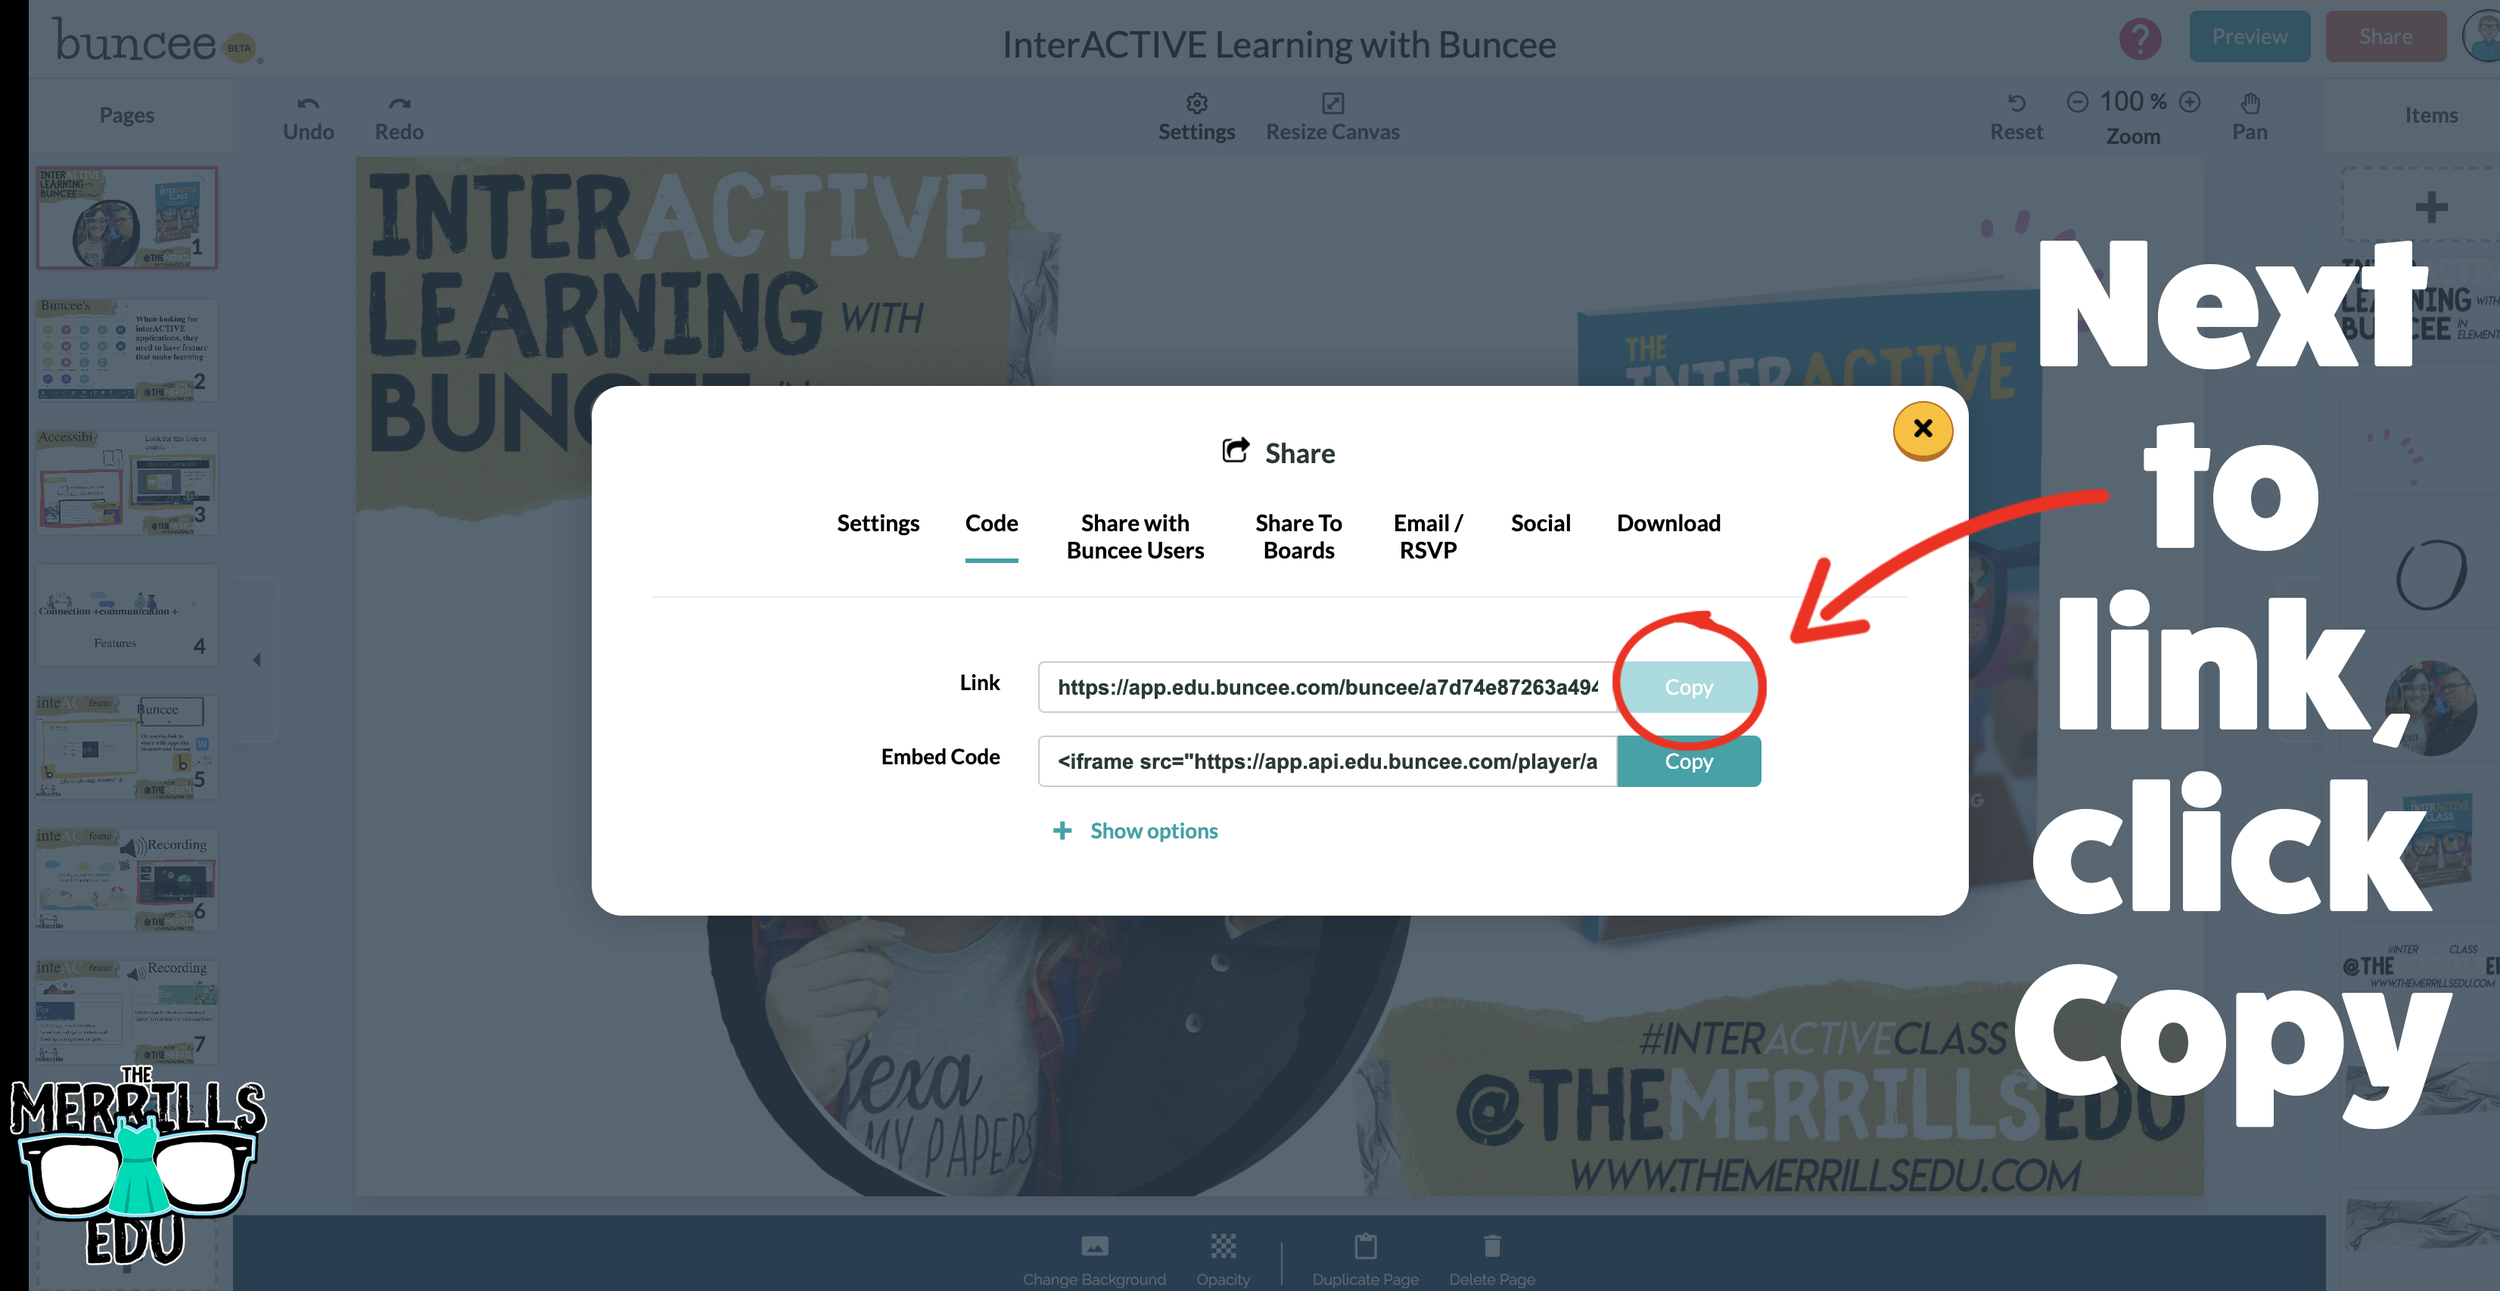
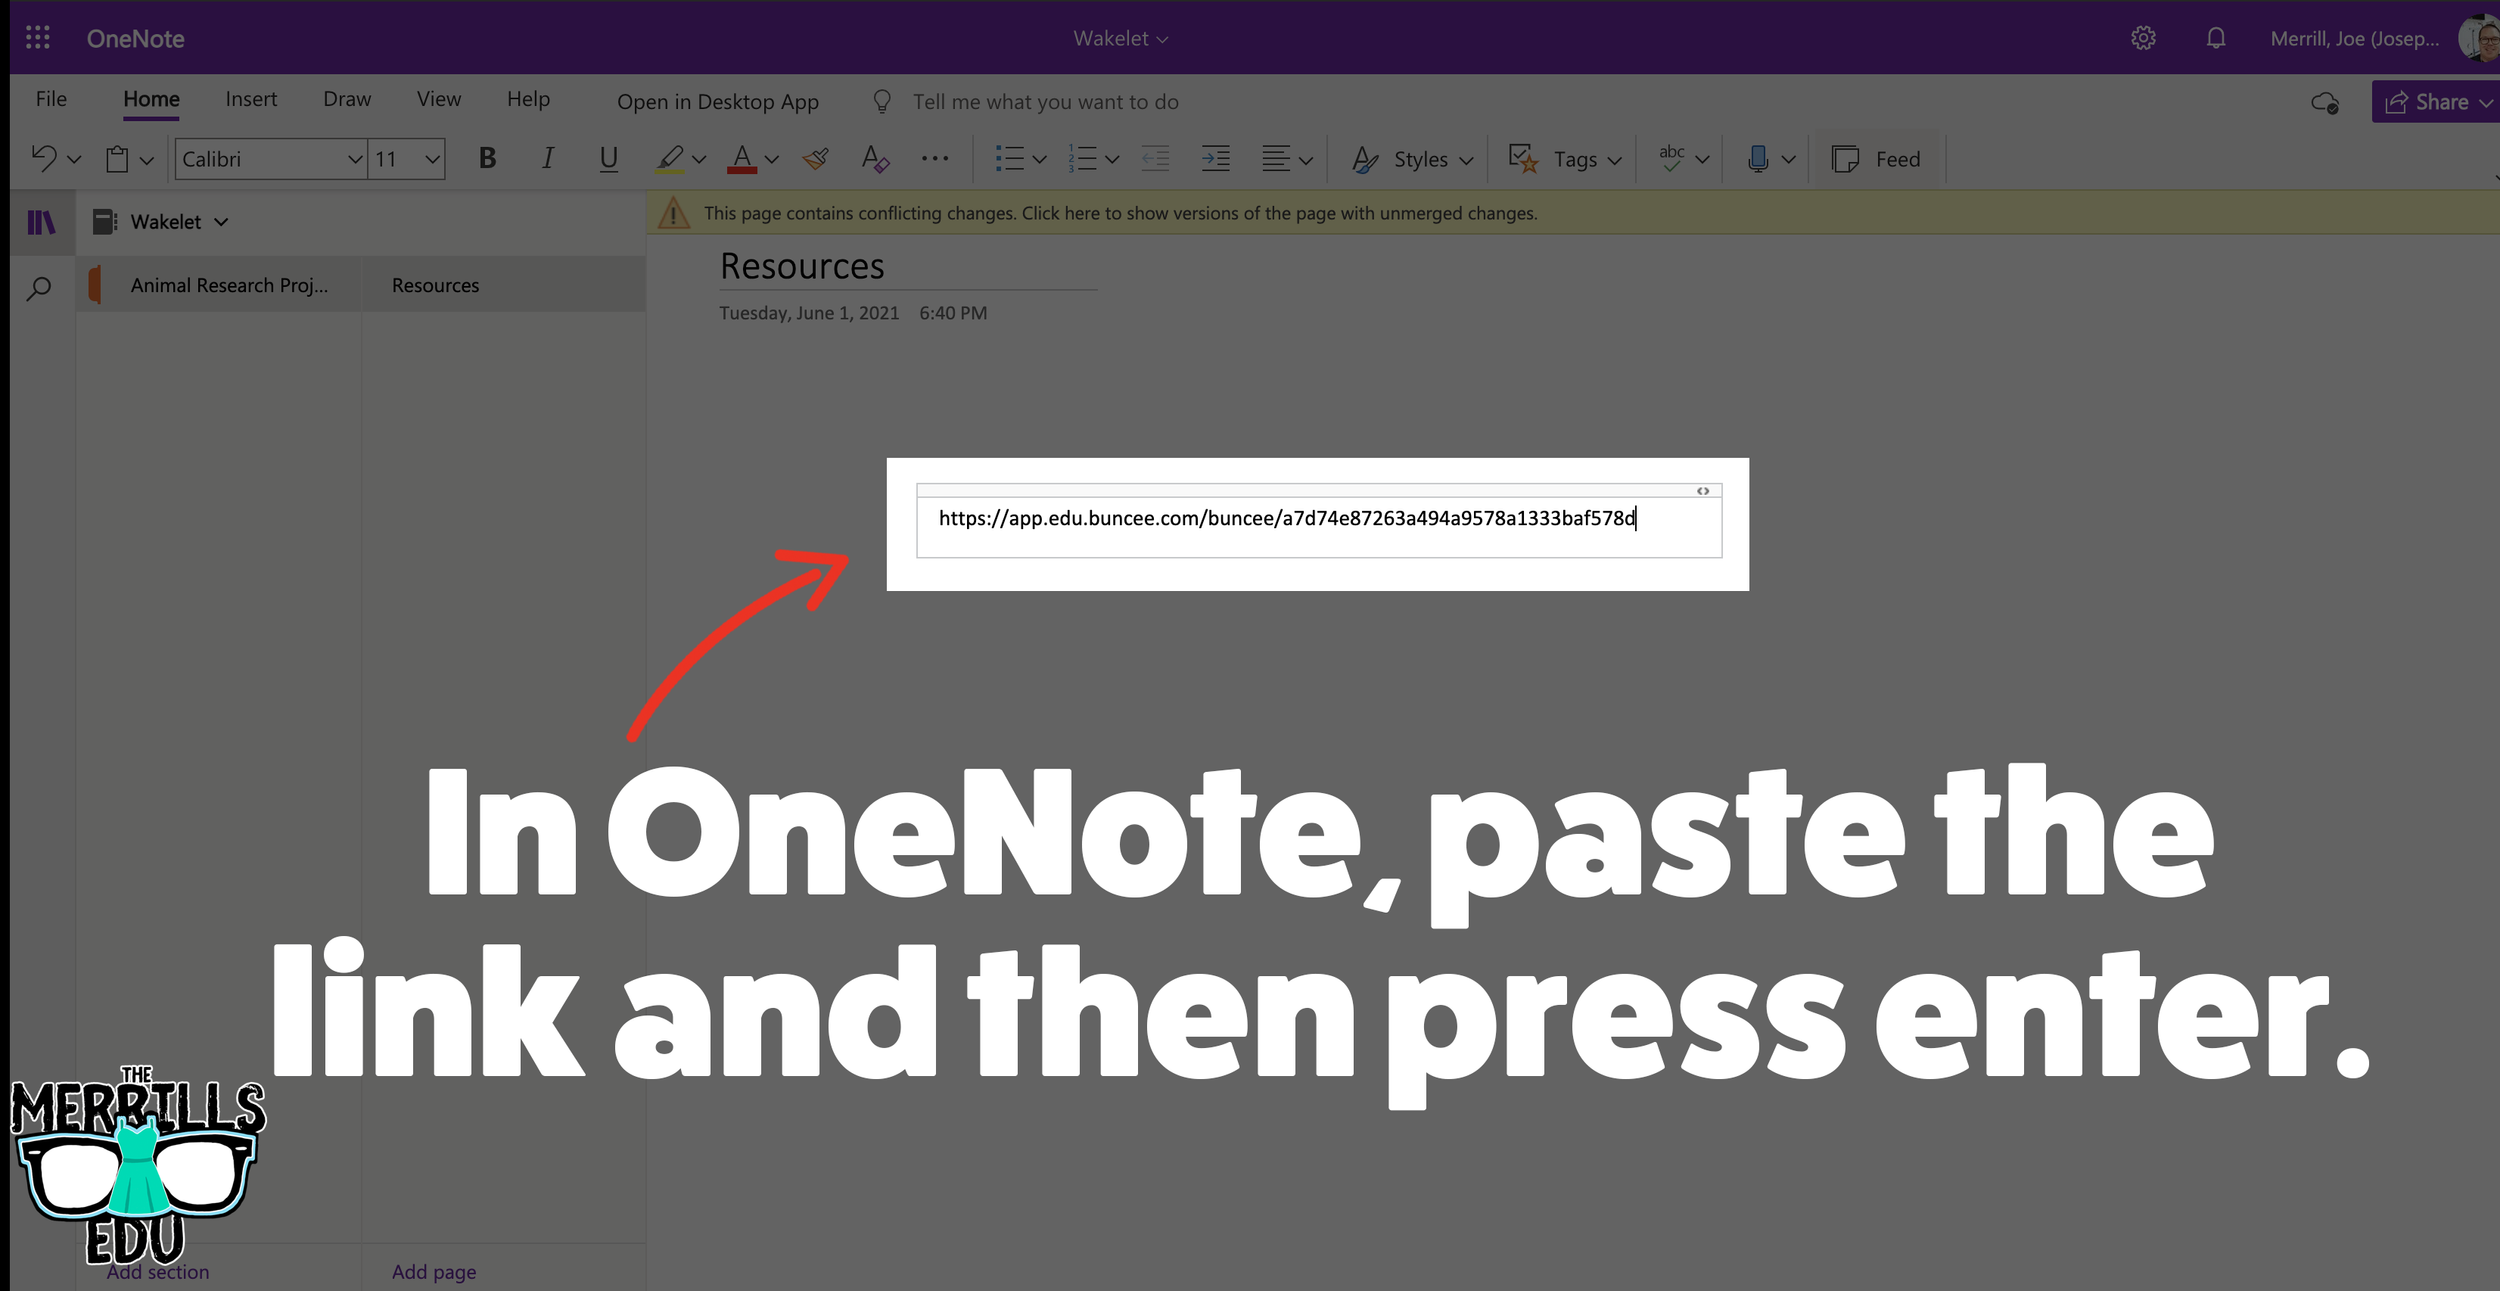
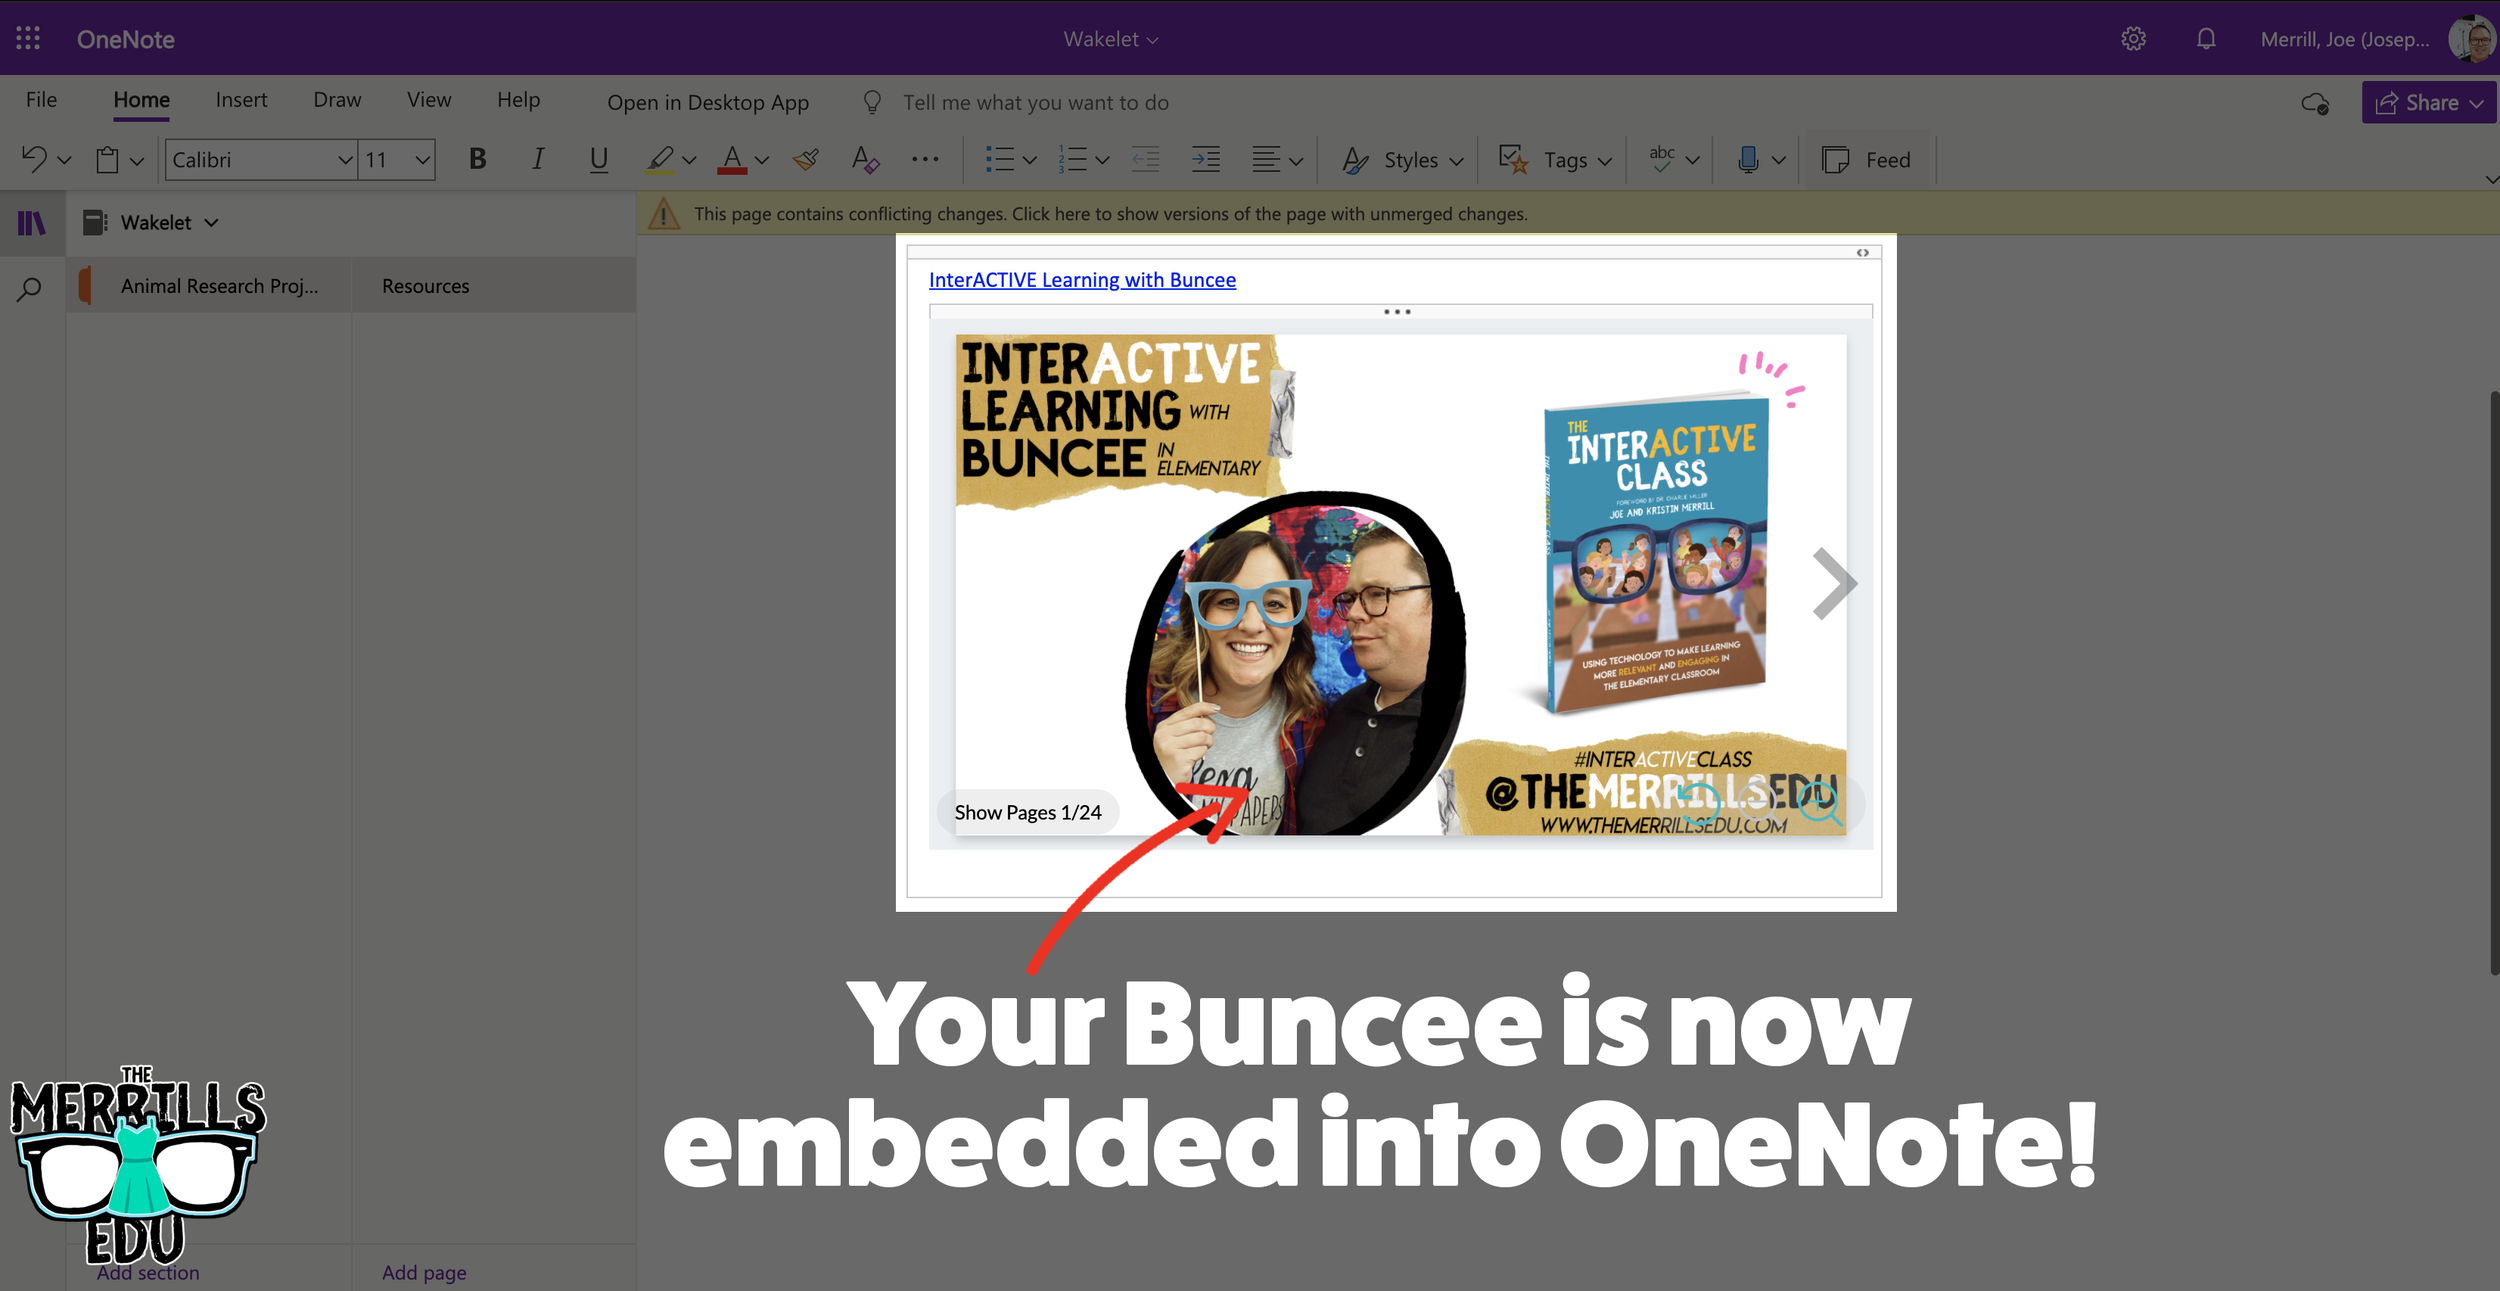
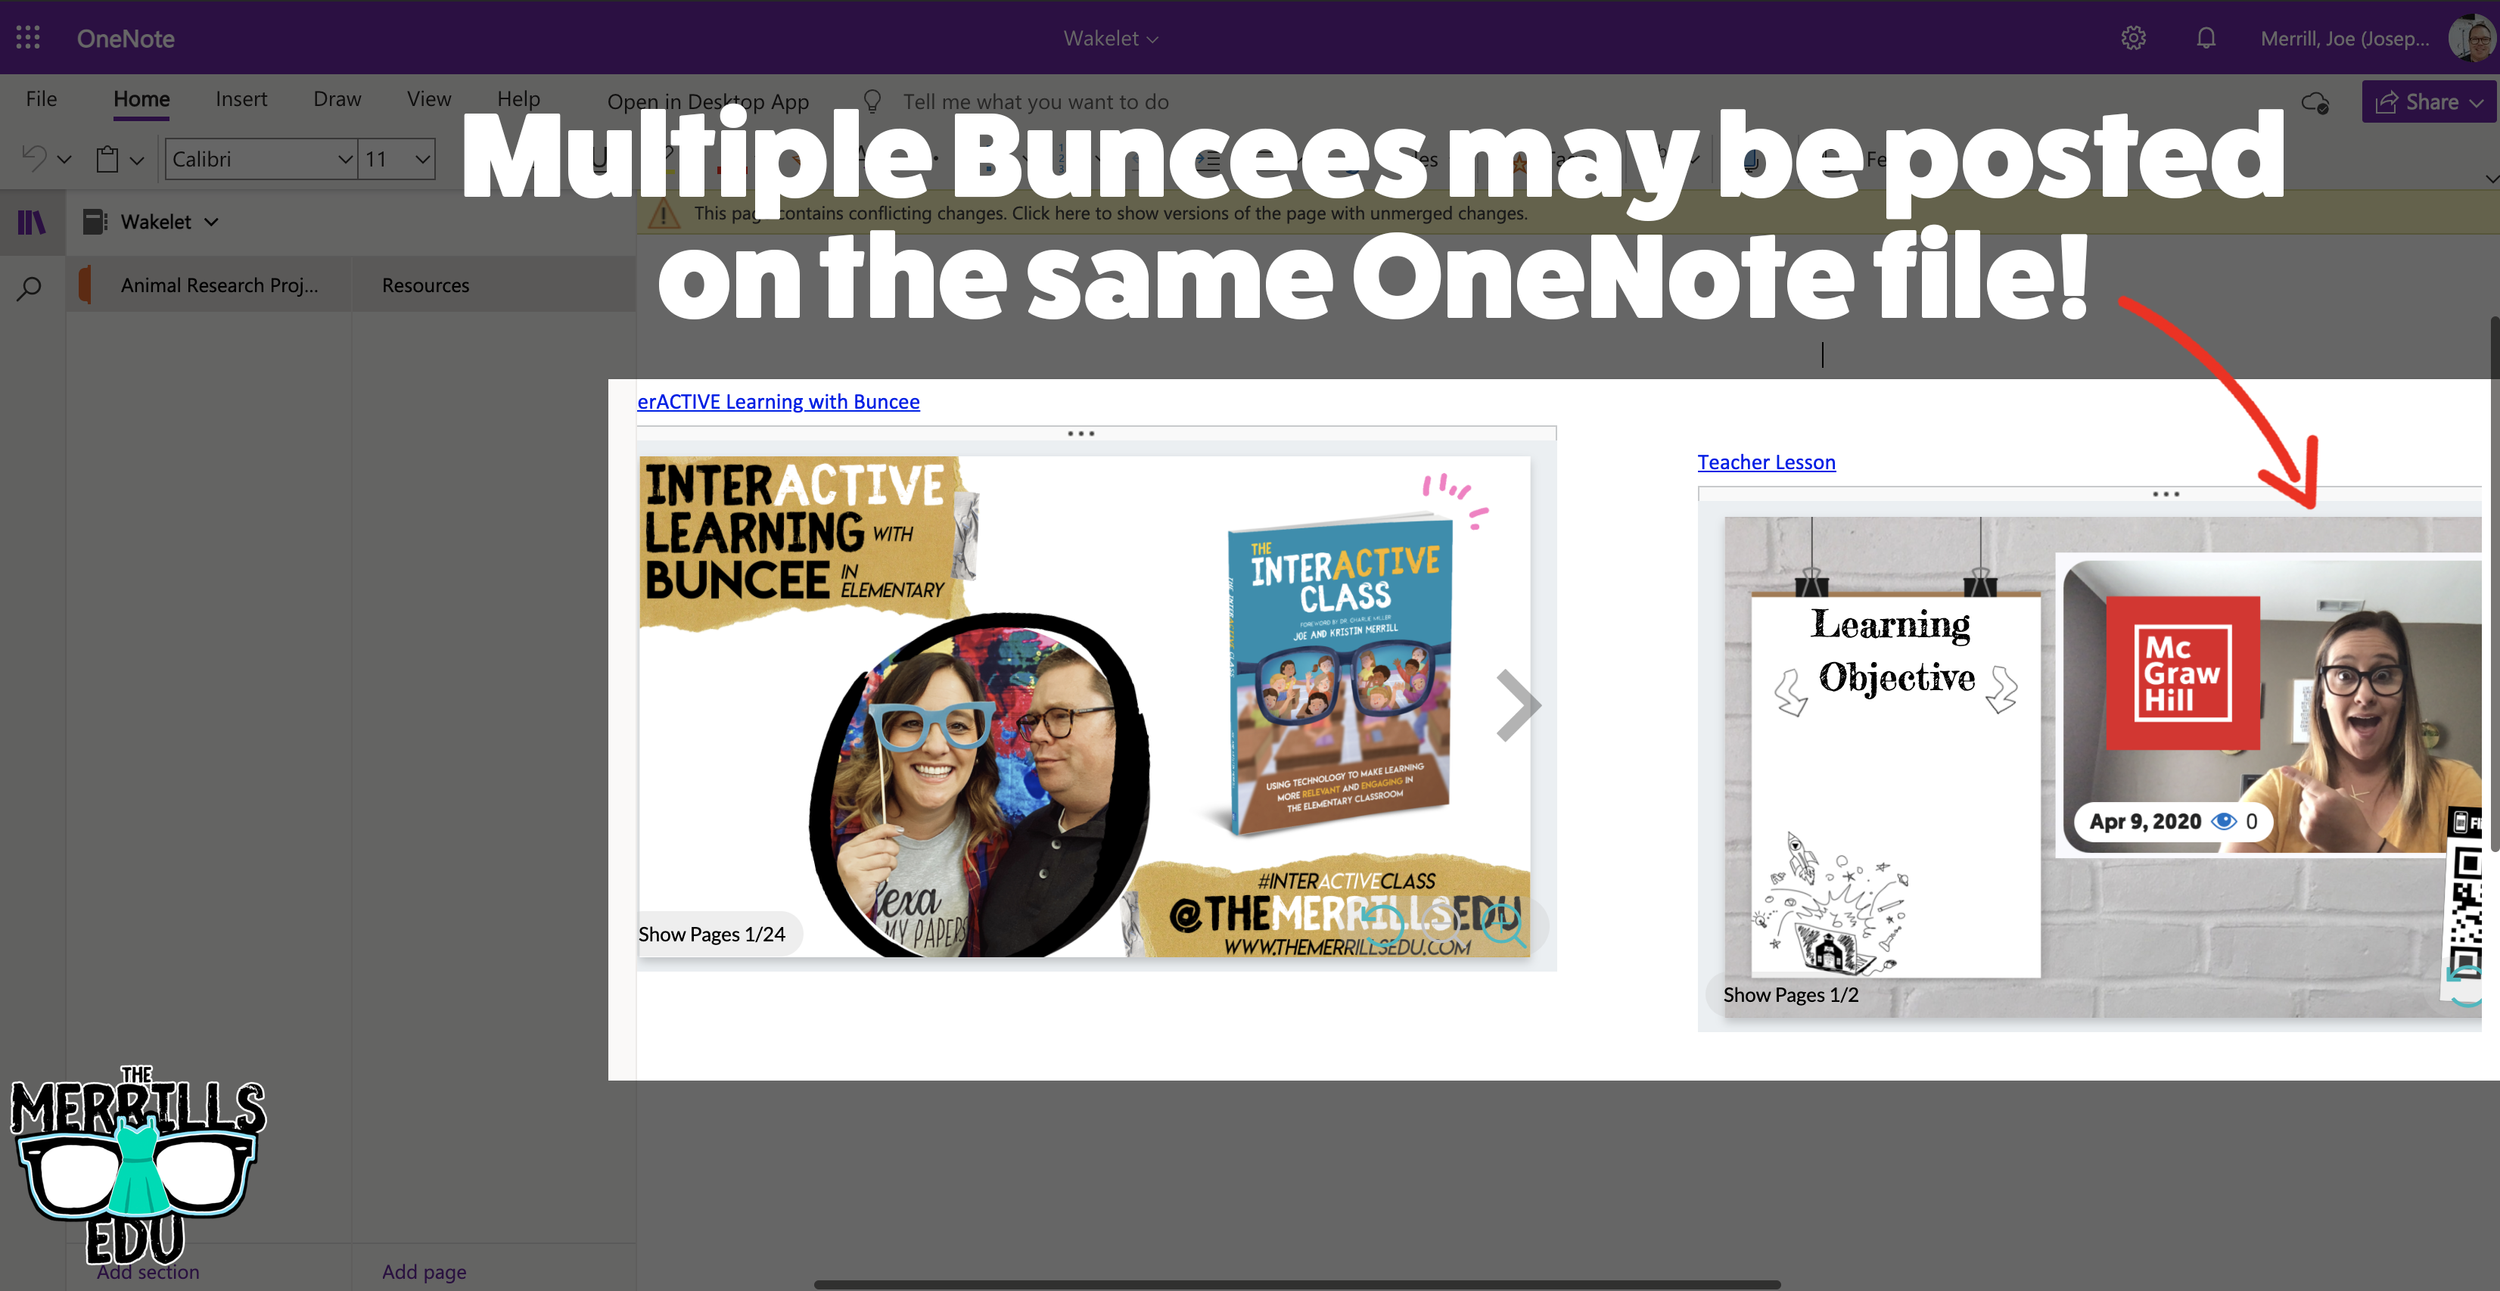
Open a Buncee, then click the “Share” button located in the upper right side of the screen.
A new window will pop up. Click on “Code.”
Under “Code” and next to Link, click “Copy.”
In a separate tab, open the OneNote file that you would like to add the Buncee creation to. Then, paste the URL anywhere on the OneNote file.
Press enter to start the live embed.
Repeat this process to add additional Buncees to the OneNote file.

Canva Embedded into Classroom Screen
Need to post your directions on the board? Perhaps you need a timer to go along with it? This embed will be your saving grace! Embed your Canva creations right into Classroom Screen. Here’s how:
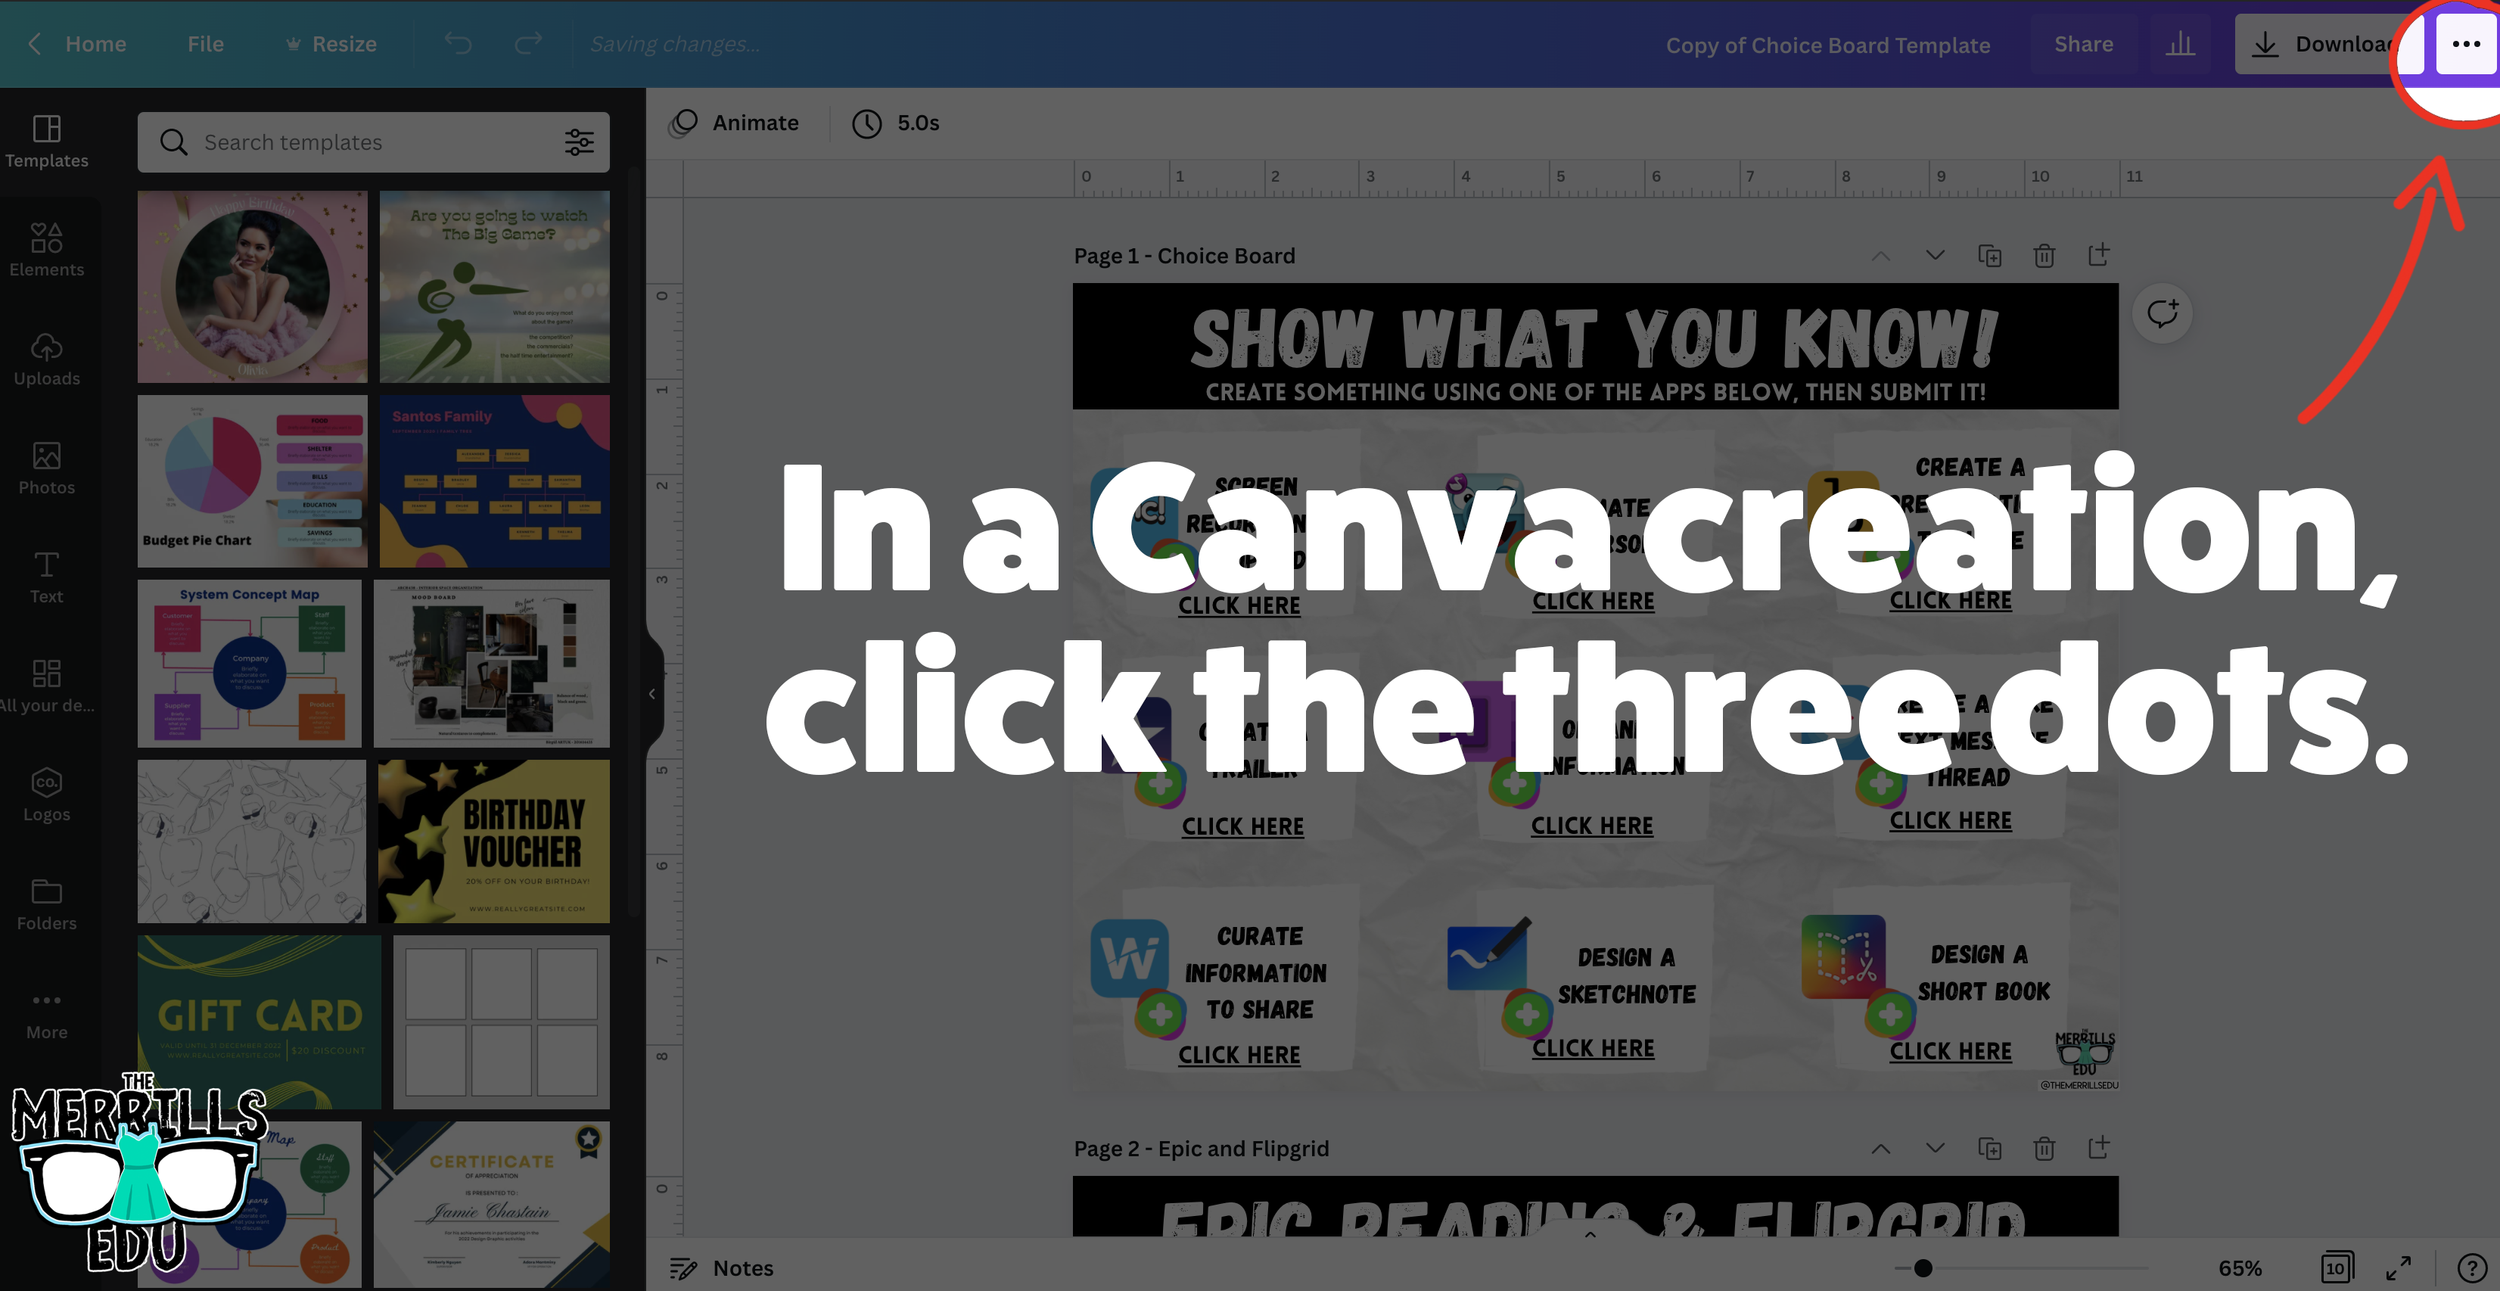
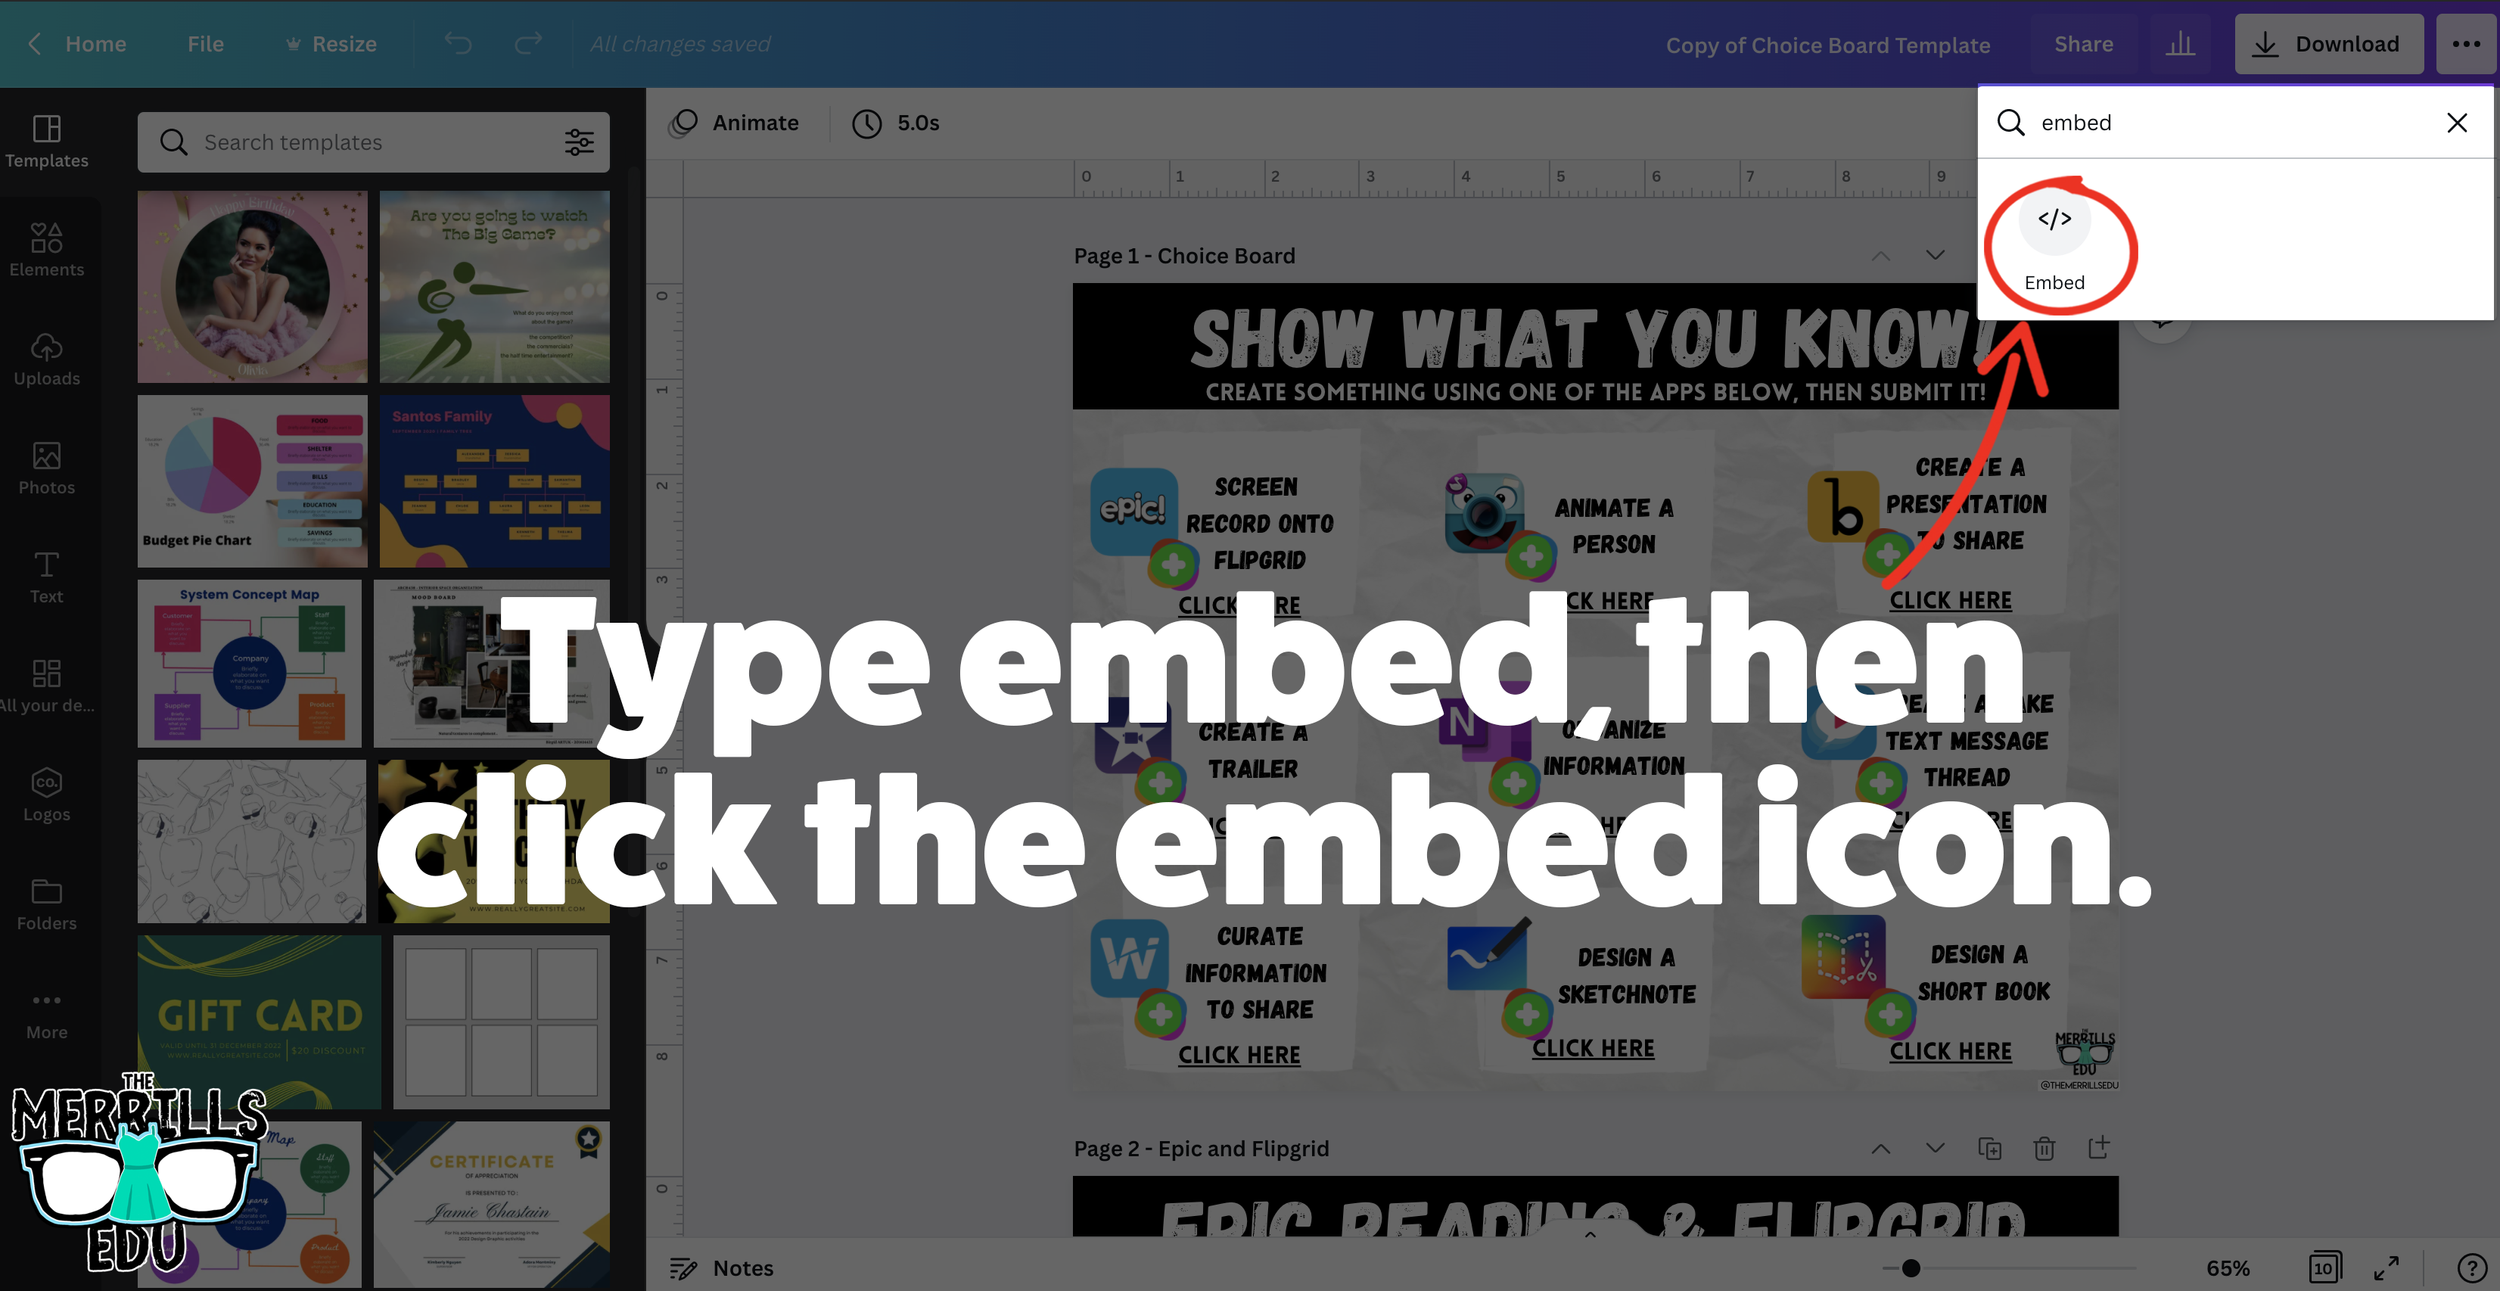
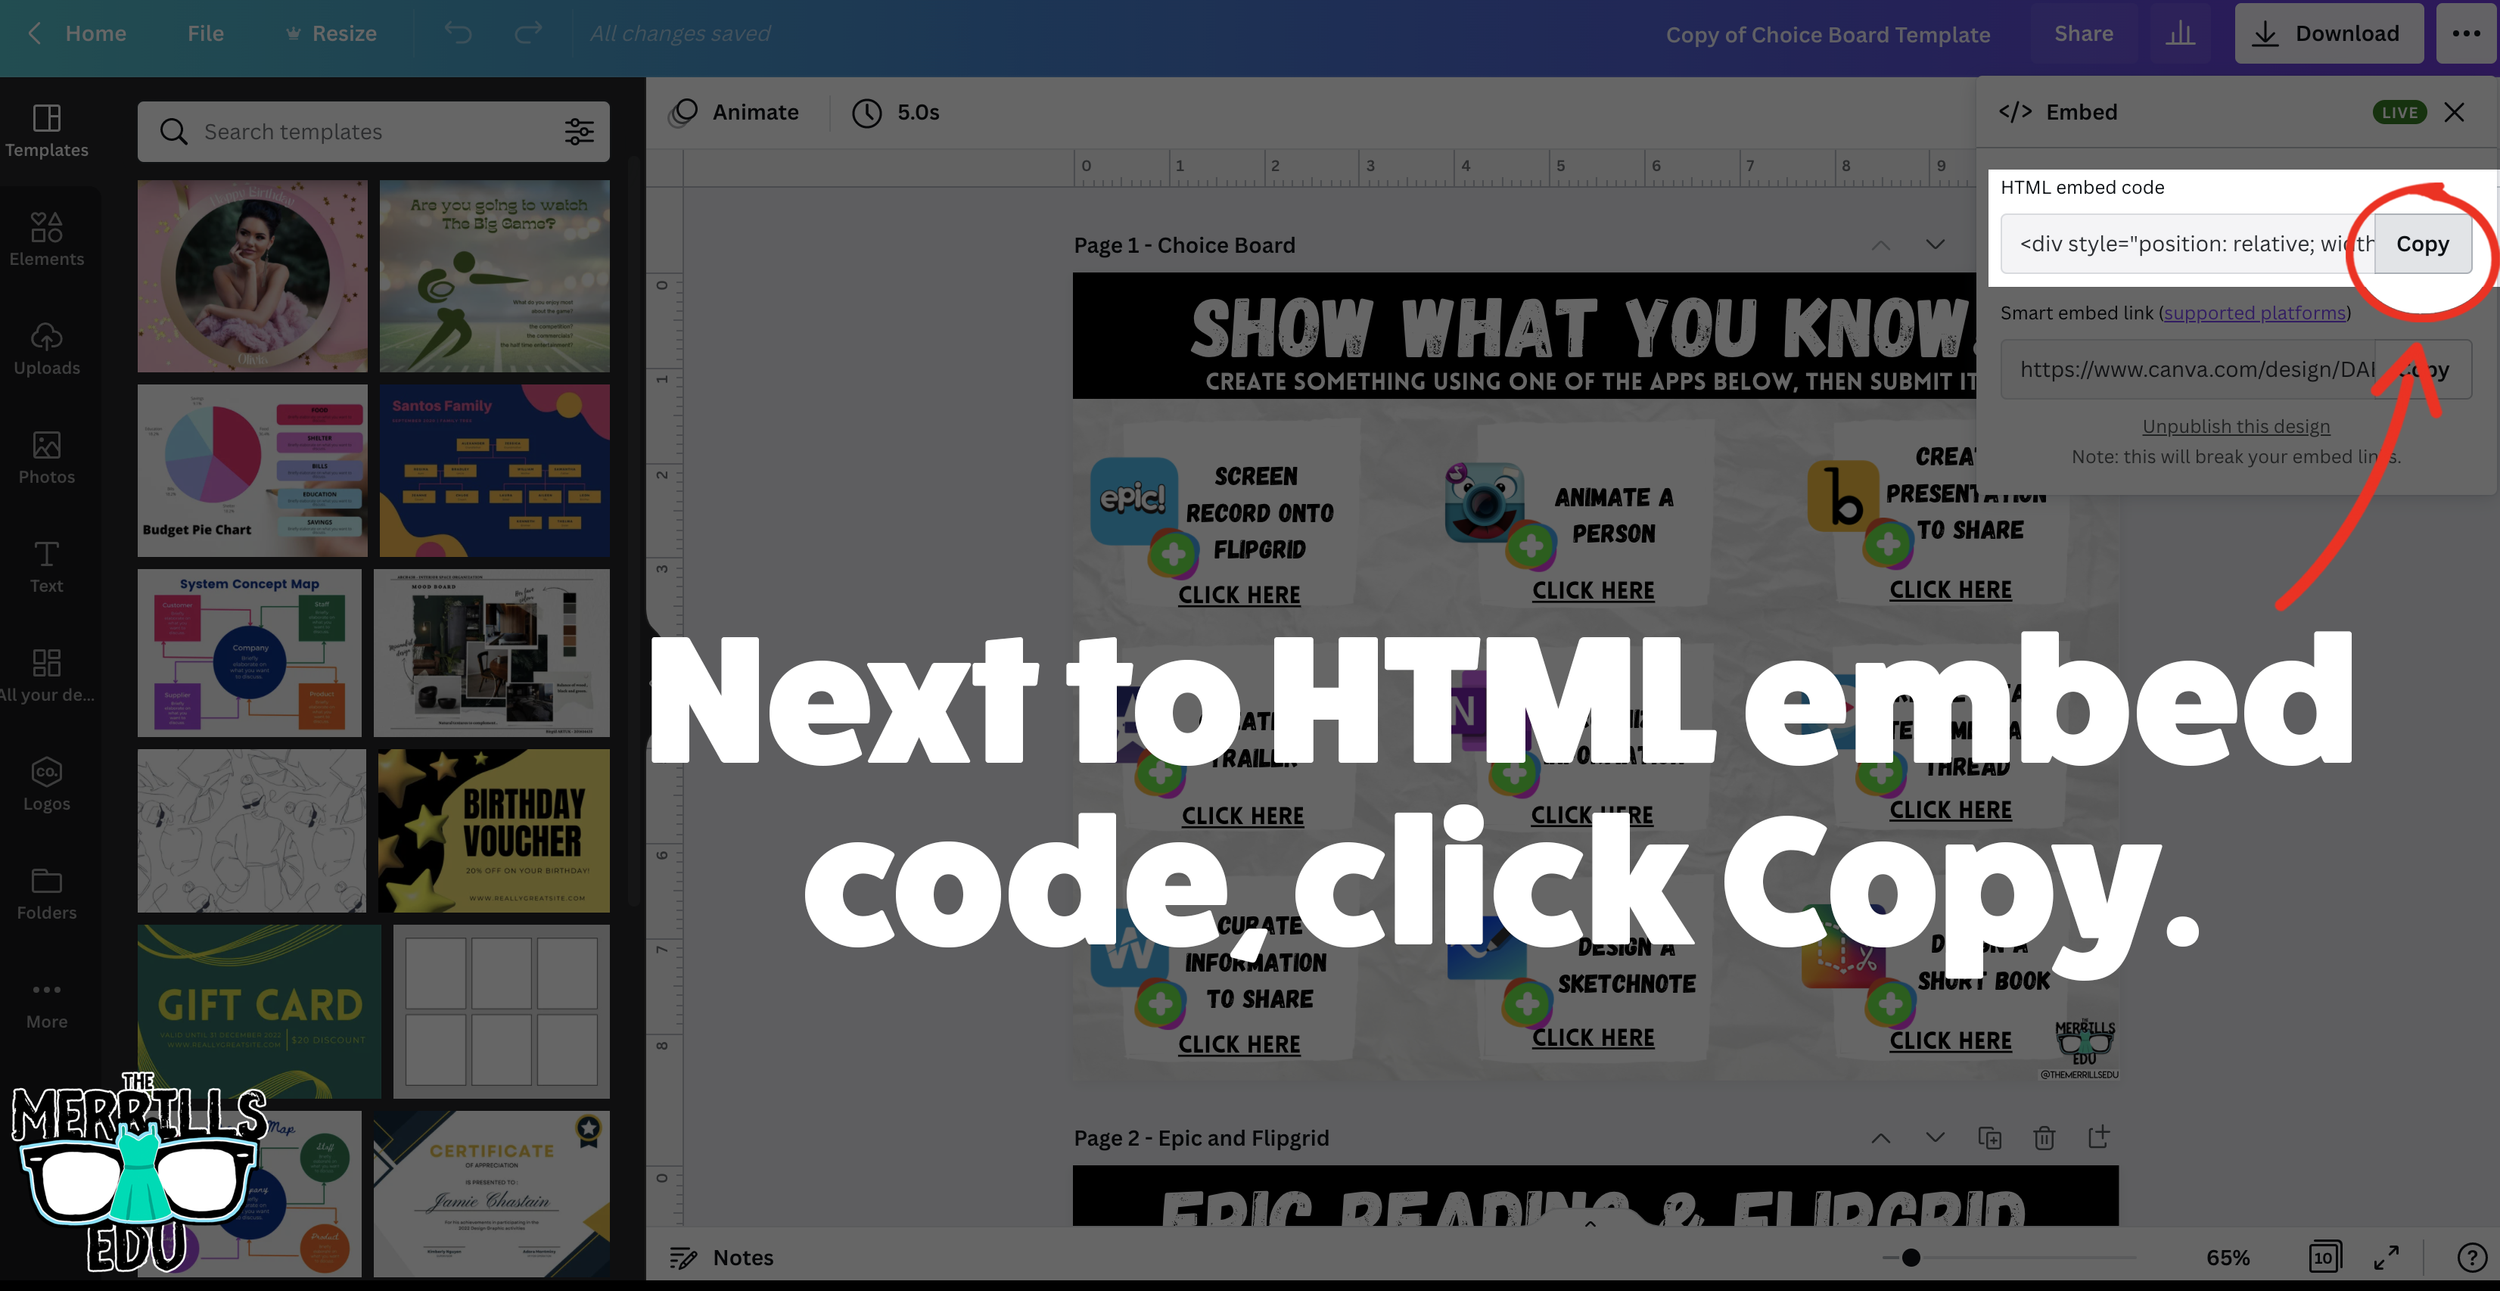
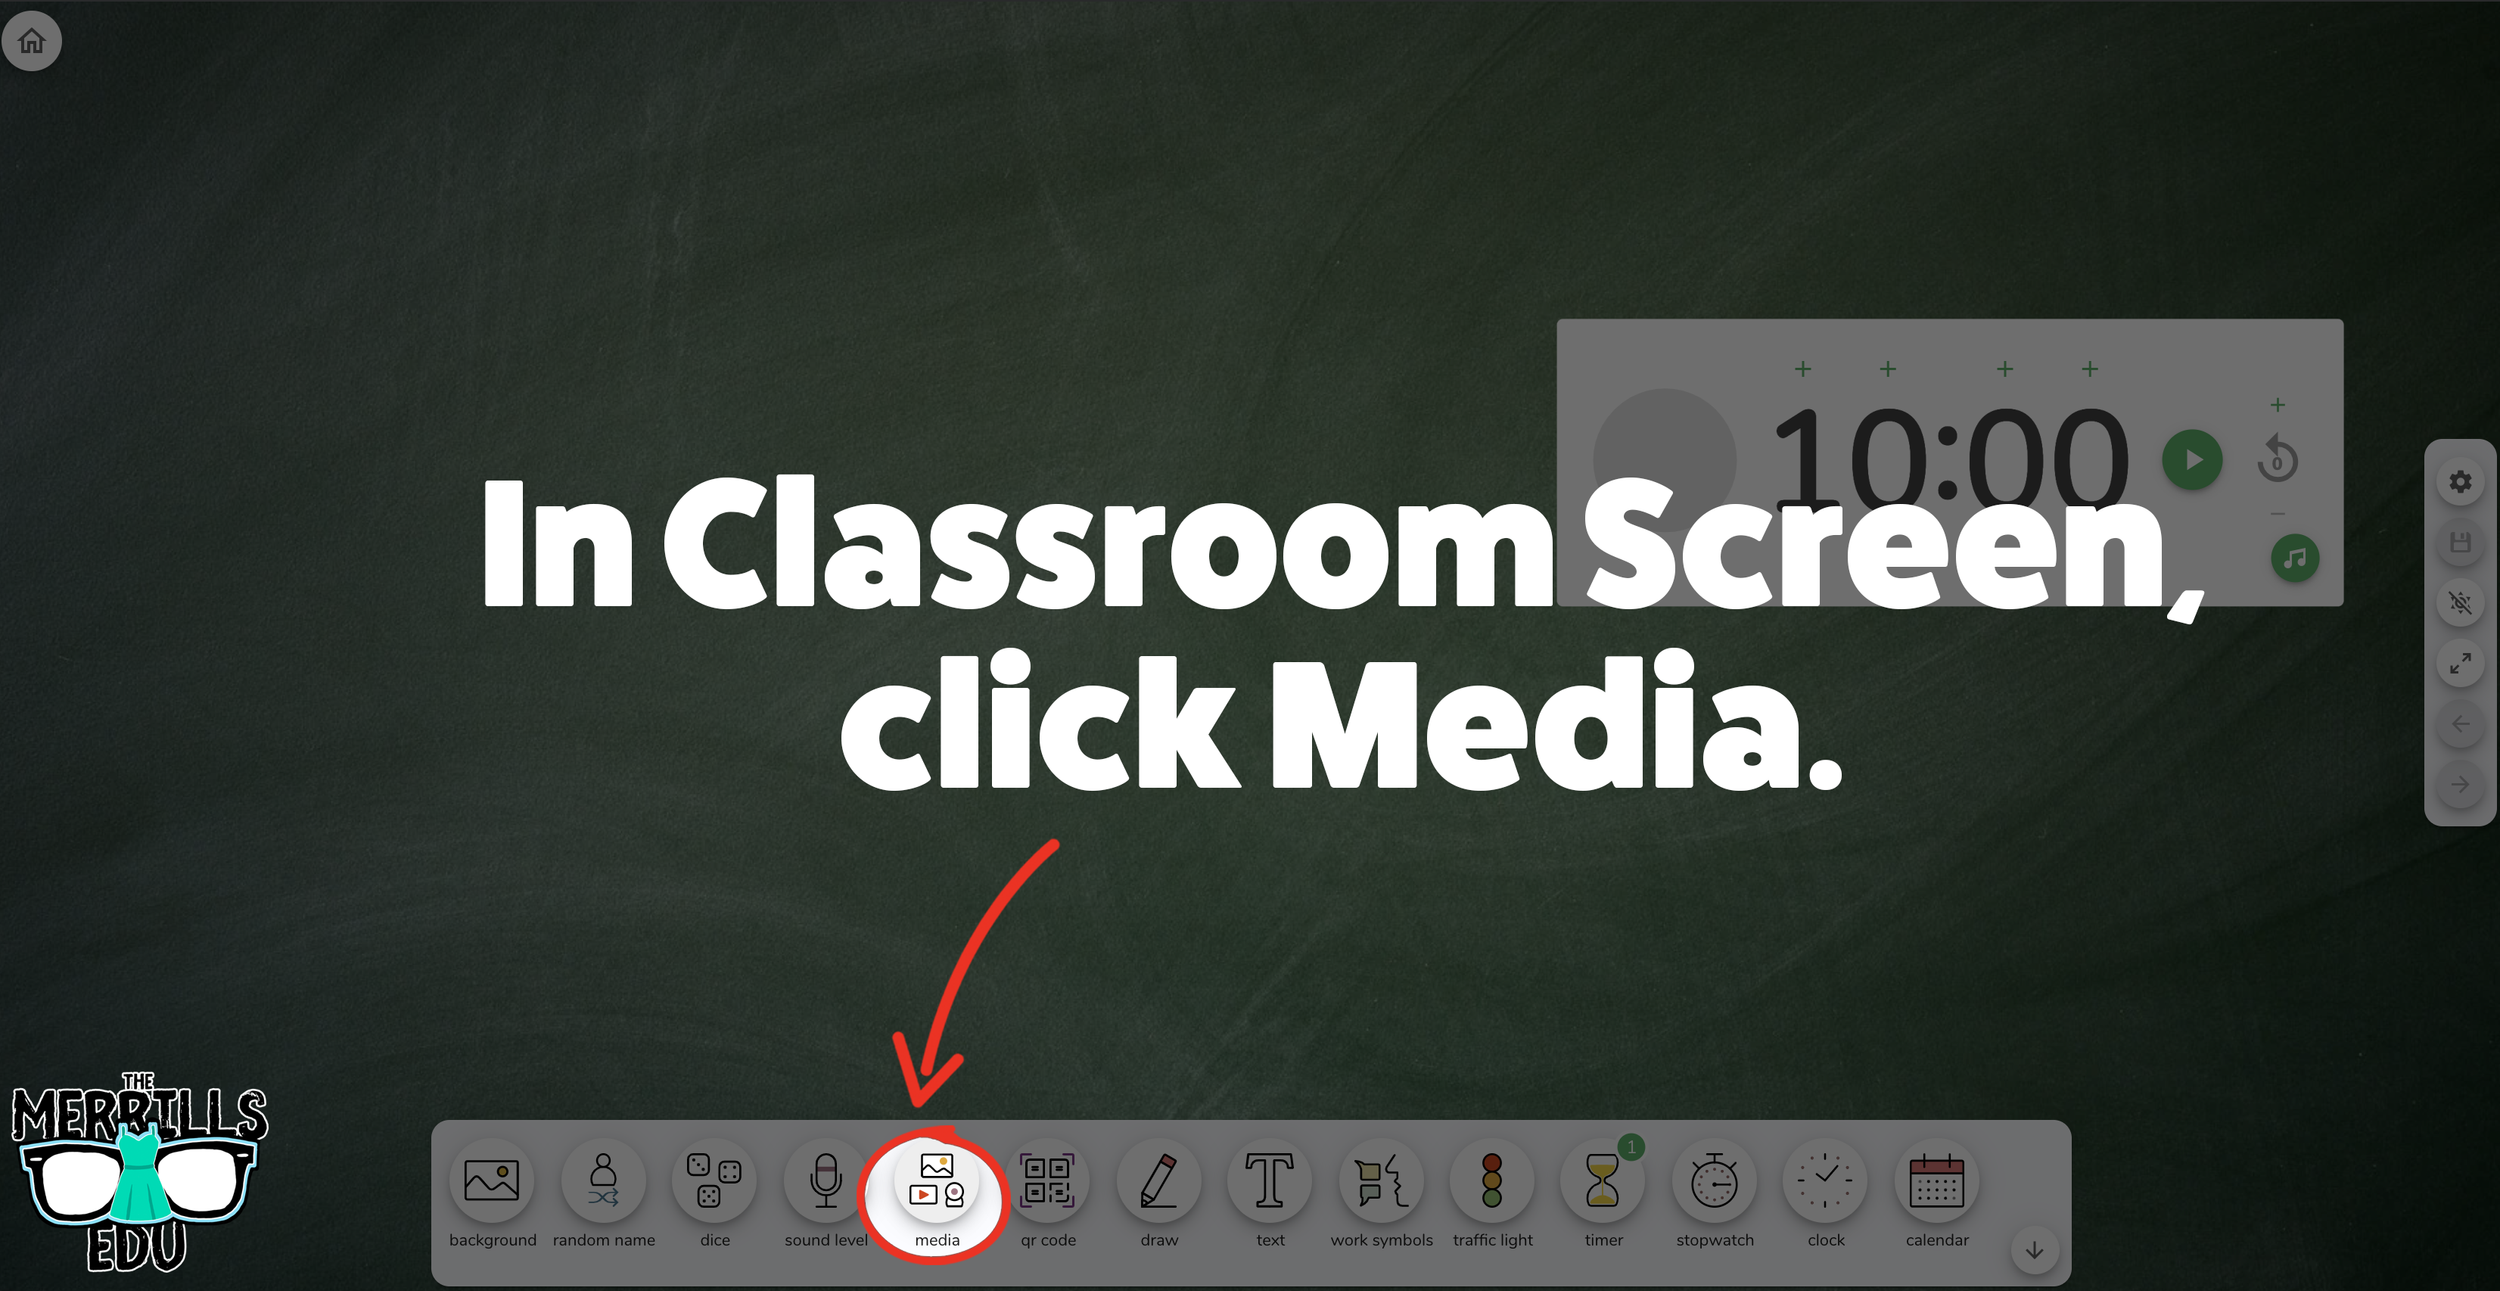
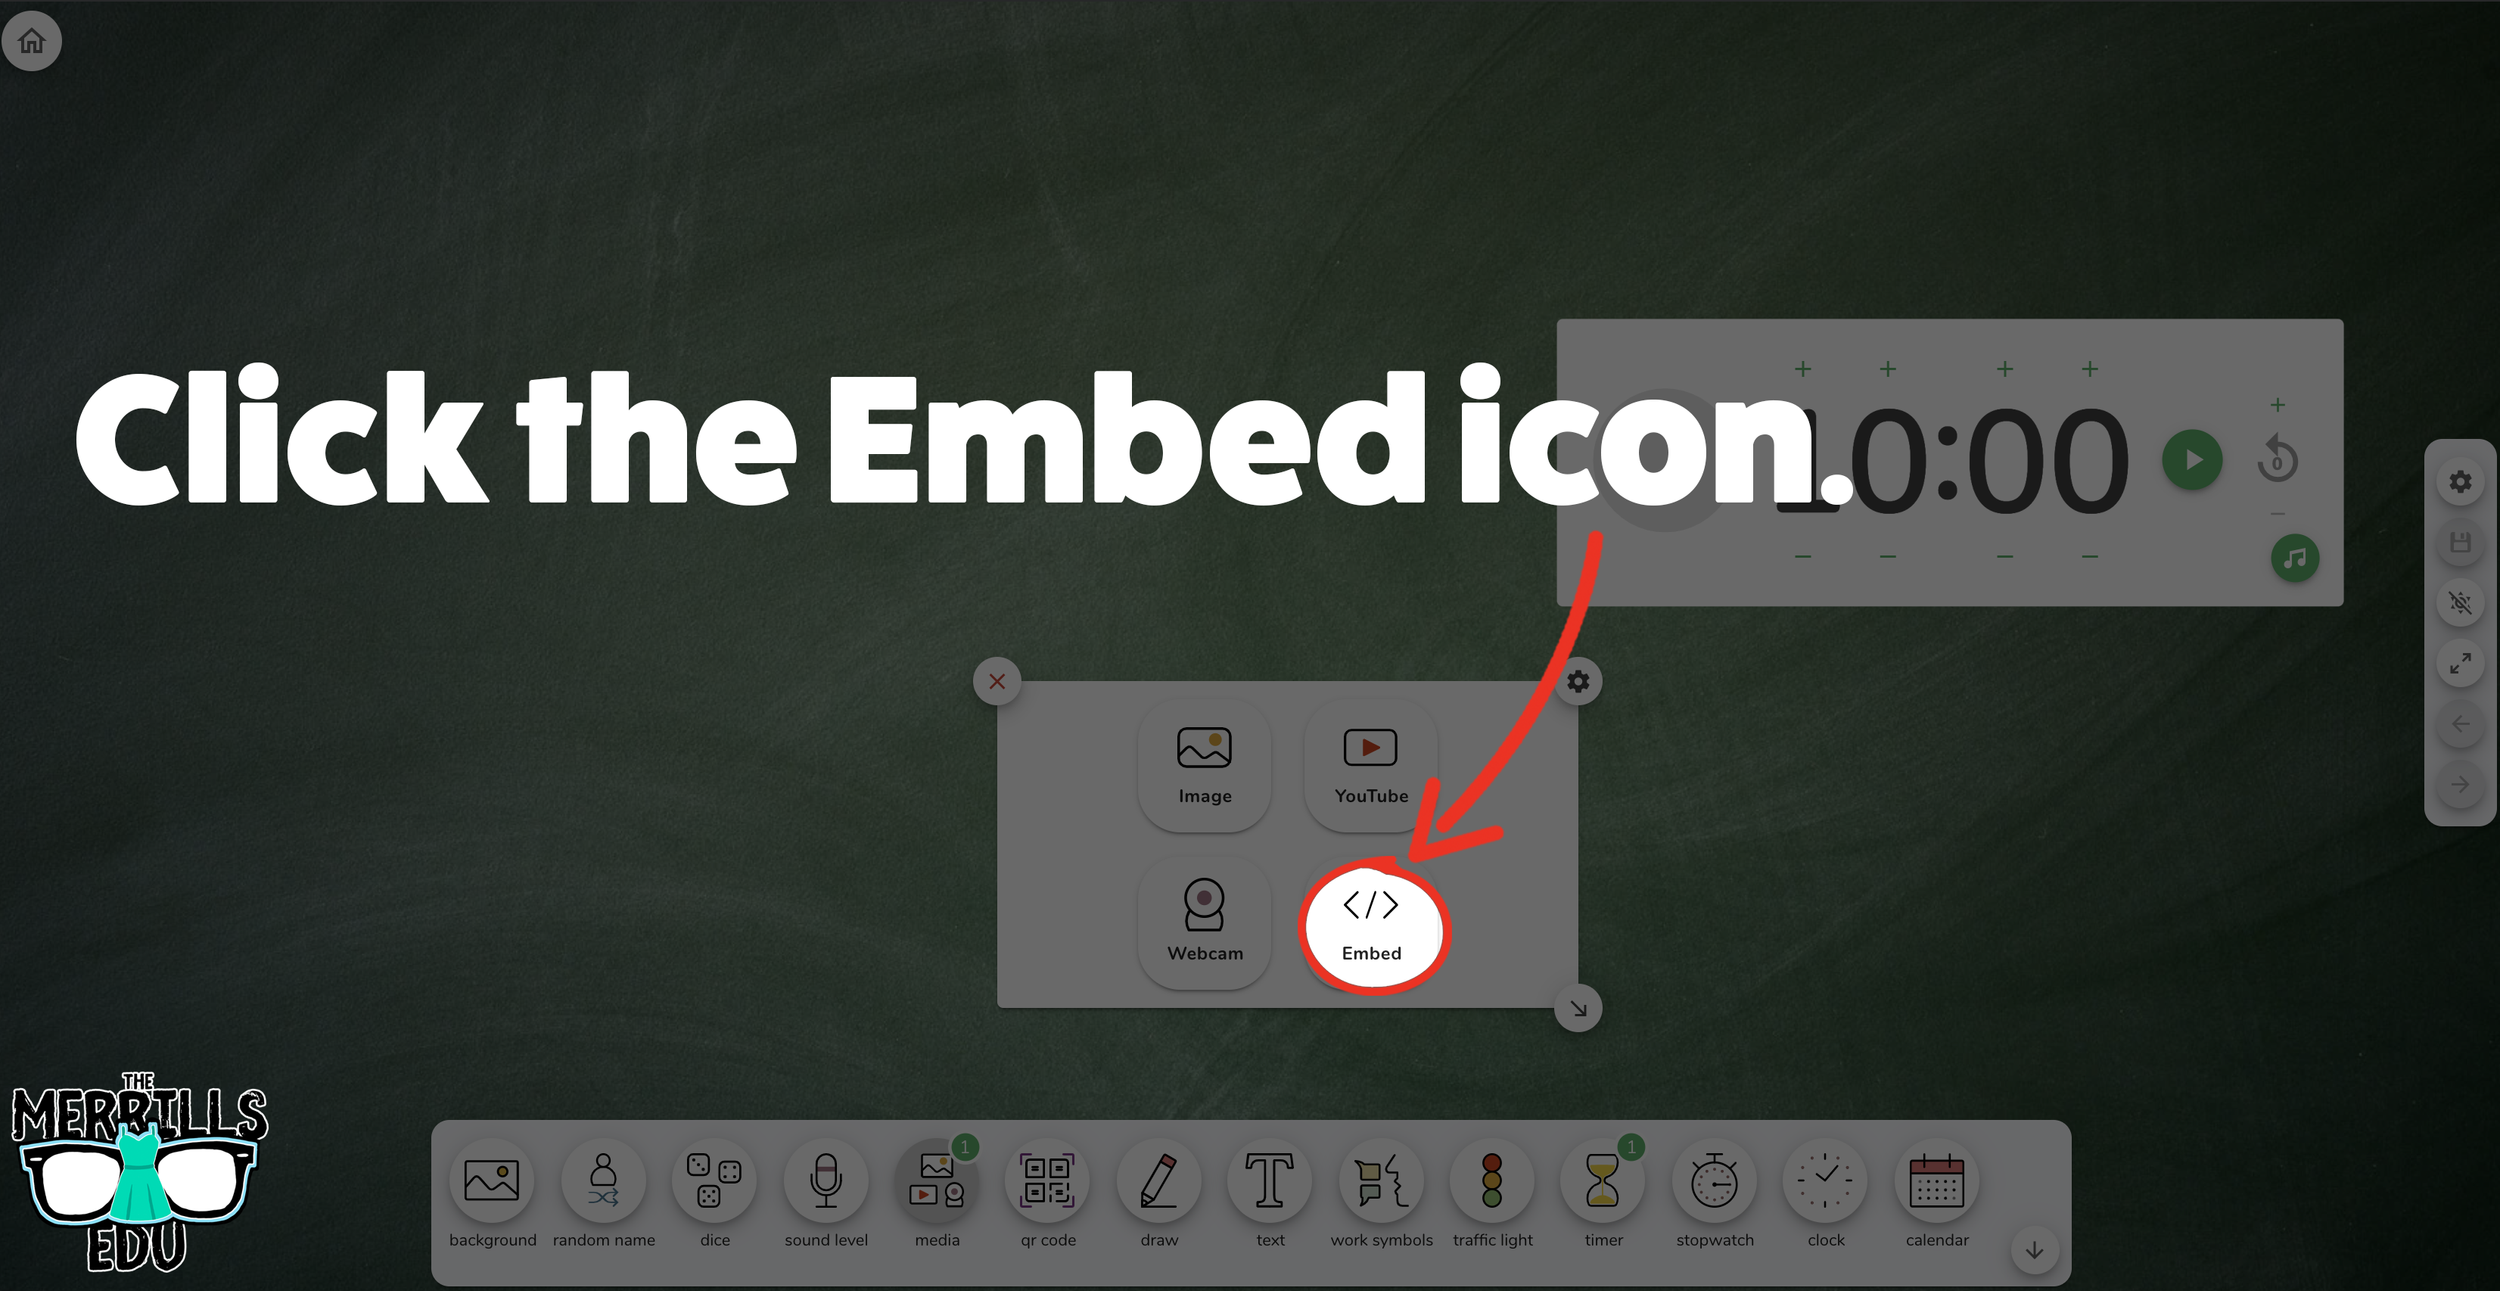
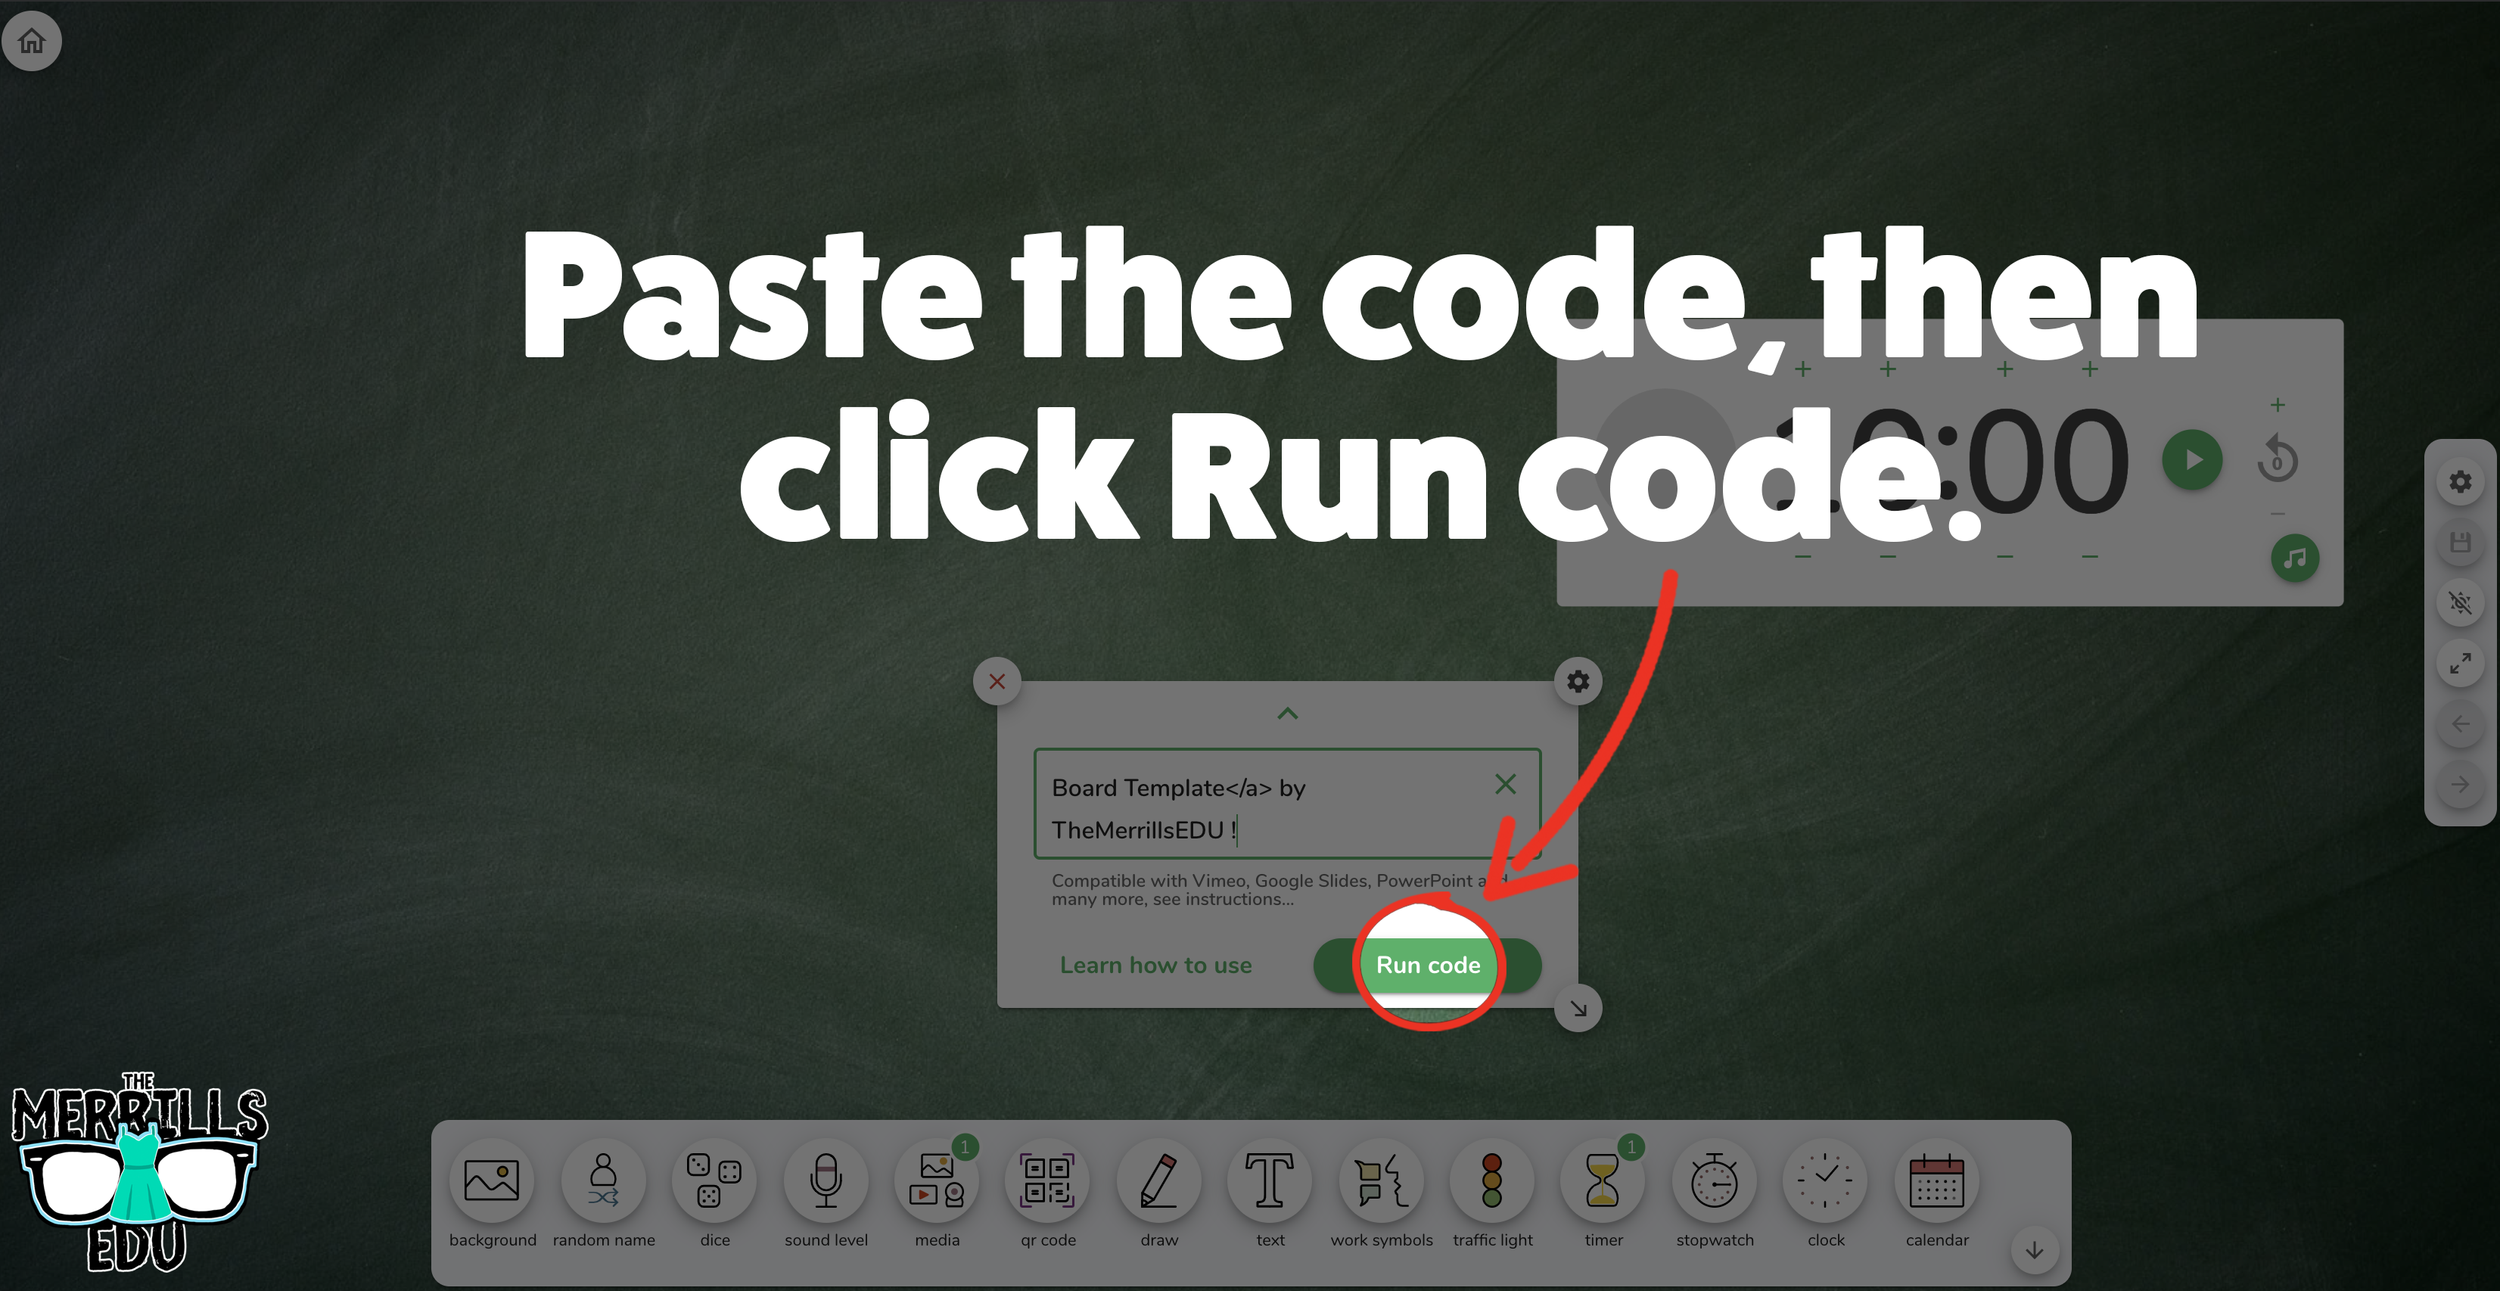
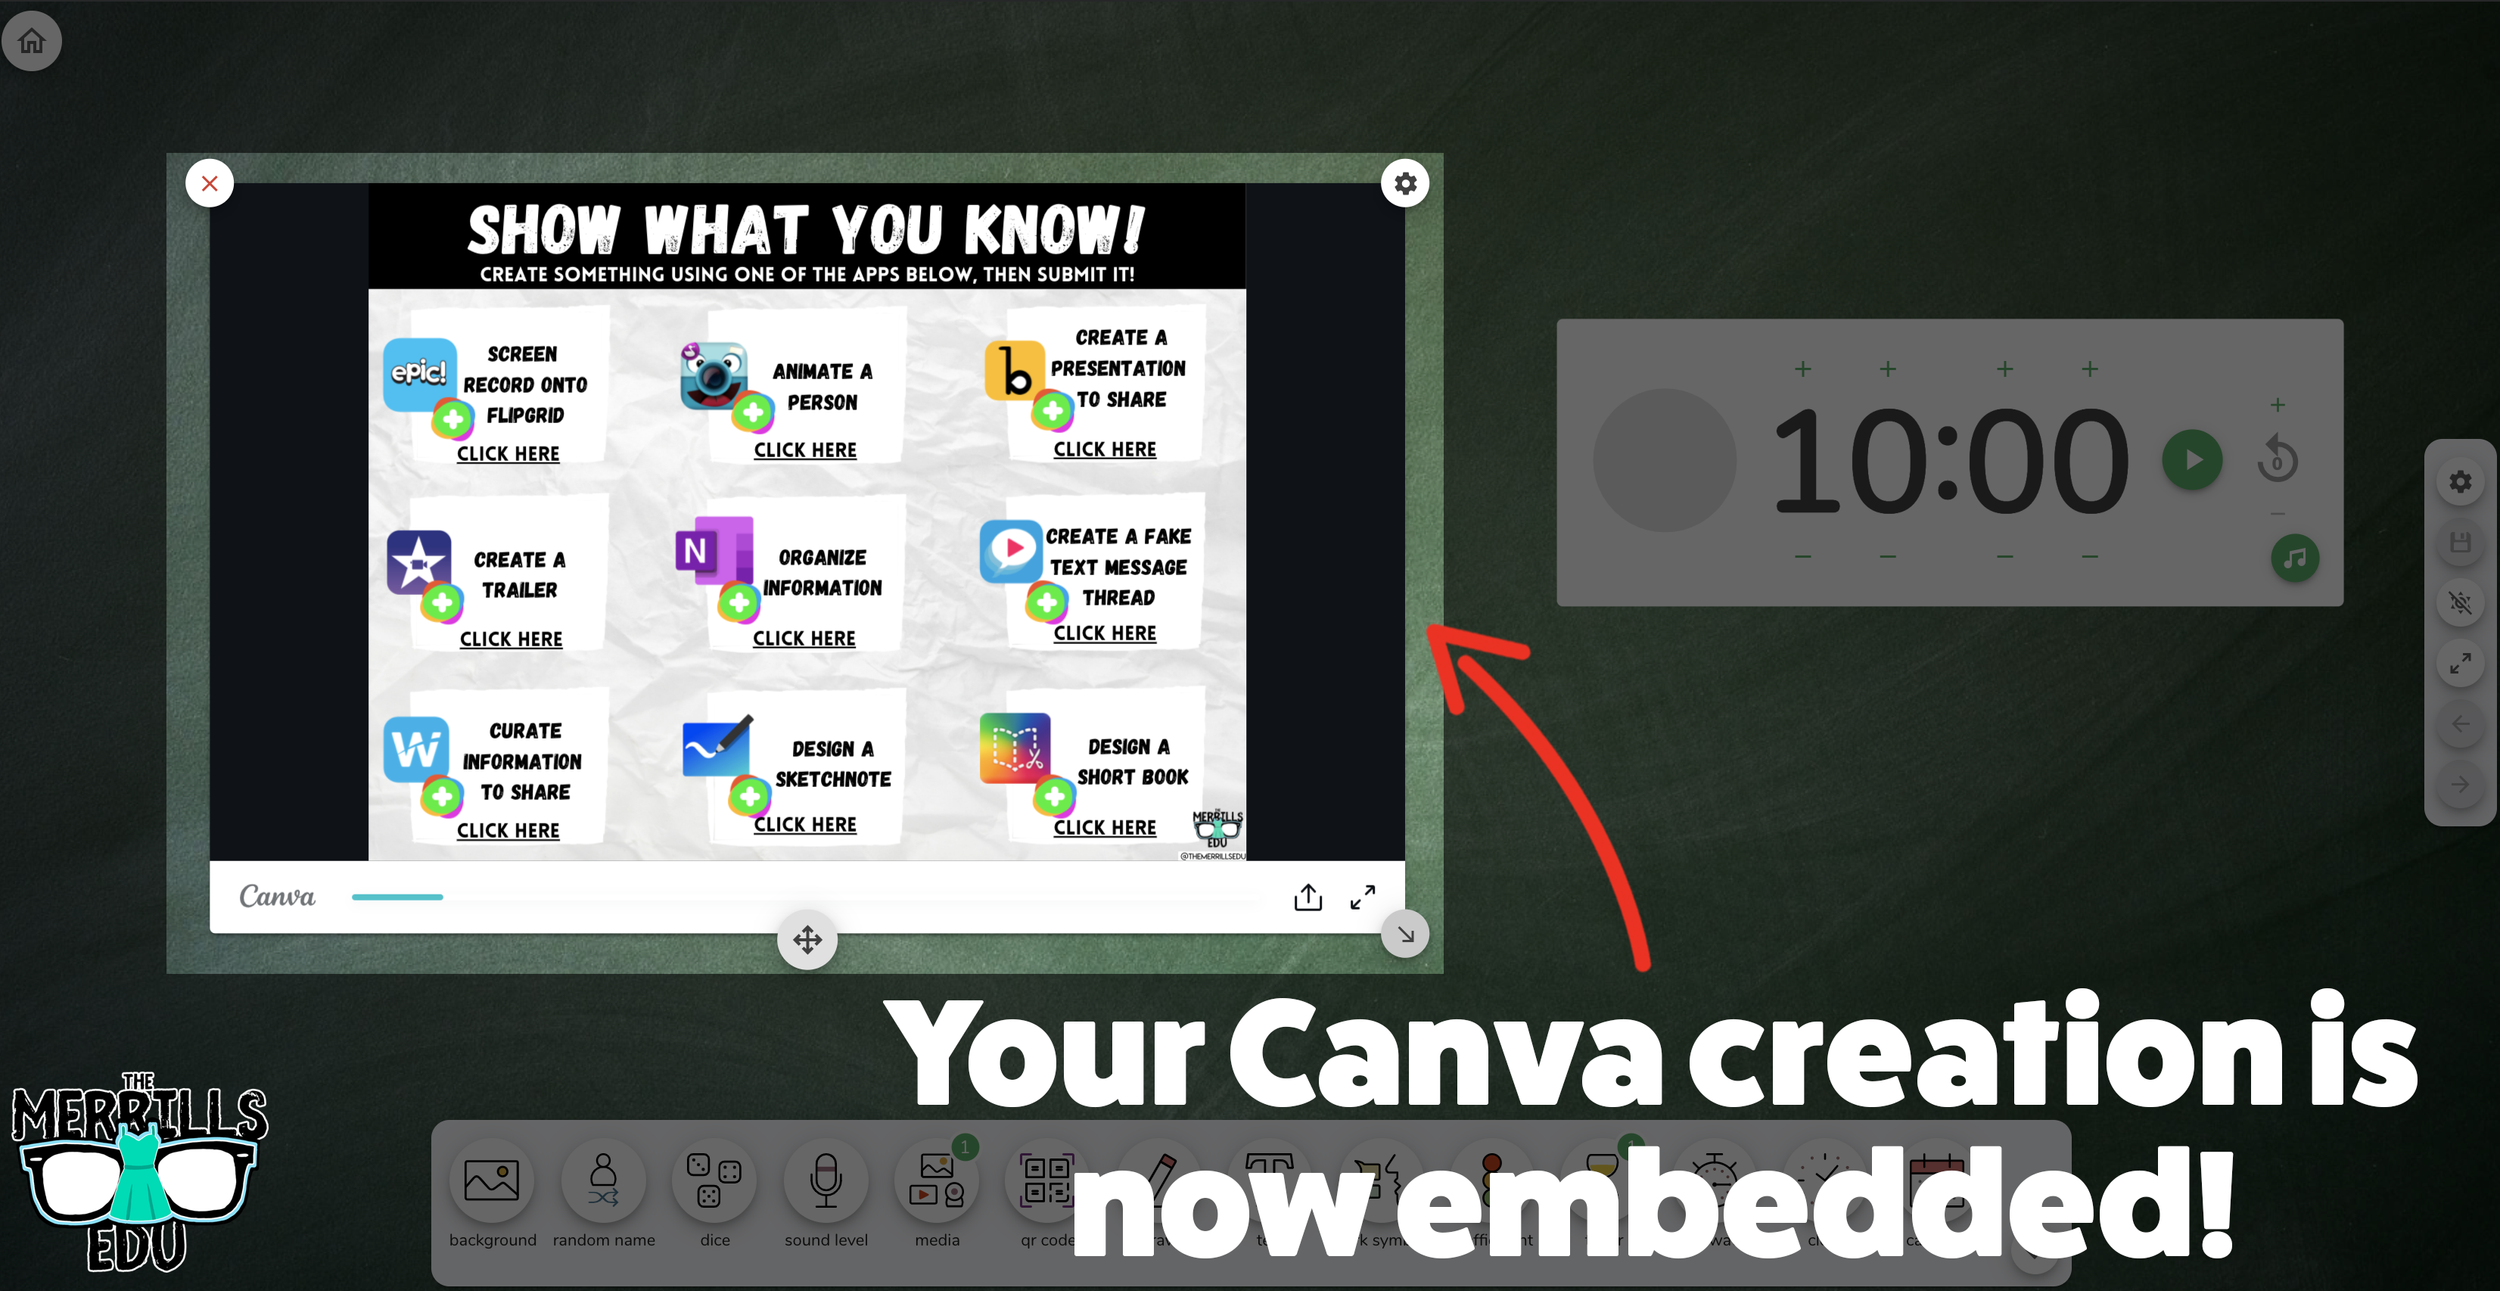
Open a Canva creation, then click the three dots.
In the drop down, type “embed.”
Click the “Embed” icon.
On the next frame, click the “Embed” button. This will take your creation “live.”
Now, next to HTML Embed Code, click “Copy.”
In a separate tab, head over to ClassroomScreen.com and start a new screen (or open an old one).
With your Classroom Screen open, click on “Media” from the menu options running along the bottom of the screen.
A new window will open. Click “Embed.”
Click inside the embed area and paste your Canva code.
With the code pasted, click on “Run code.”
Your Canva creation will now appear! You can move the Canva creation around by clicking on the arrows (located at the bottom), or stretch the creation out by clicking the arrow on the bottom right - then dragging it to the desired location.
Now, Canva is embedded into Classroom Screen!

Buncee Embedded into Classroom Screen
Buncee creations can also be embedded into Classroom Screen! This is great if you have different tasks that you share for your student to perform daily. For example, if you have different tasks for multiple groups, you can create a Buncee and then share it on the Classroom Screen background. Here’s how it all works:
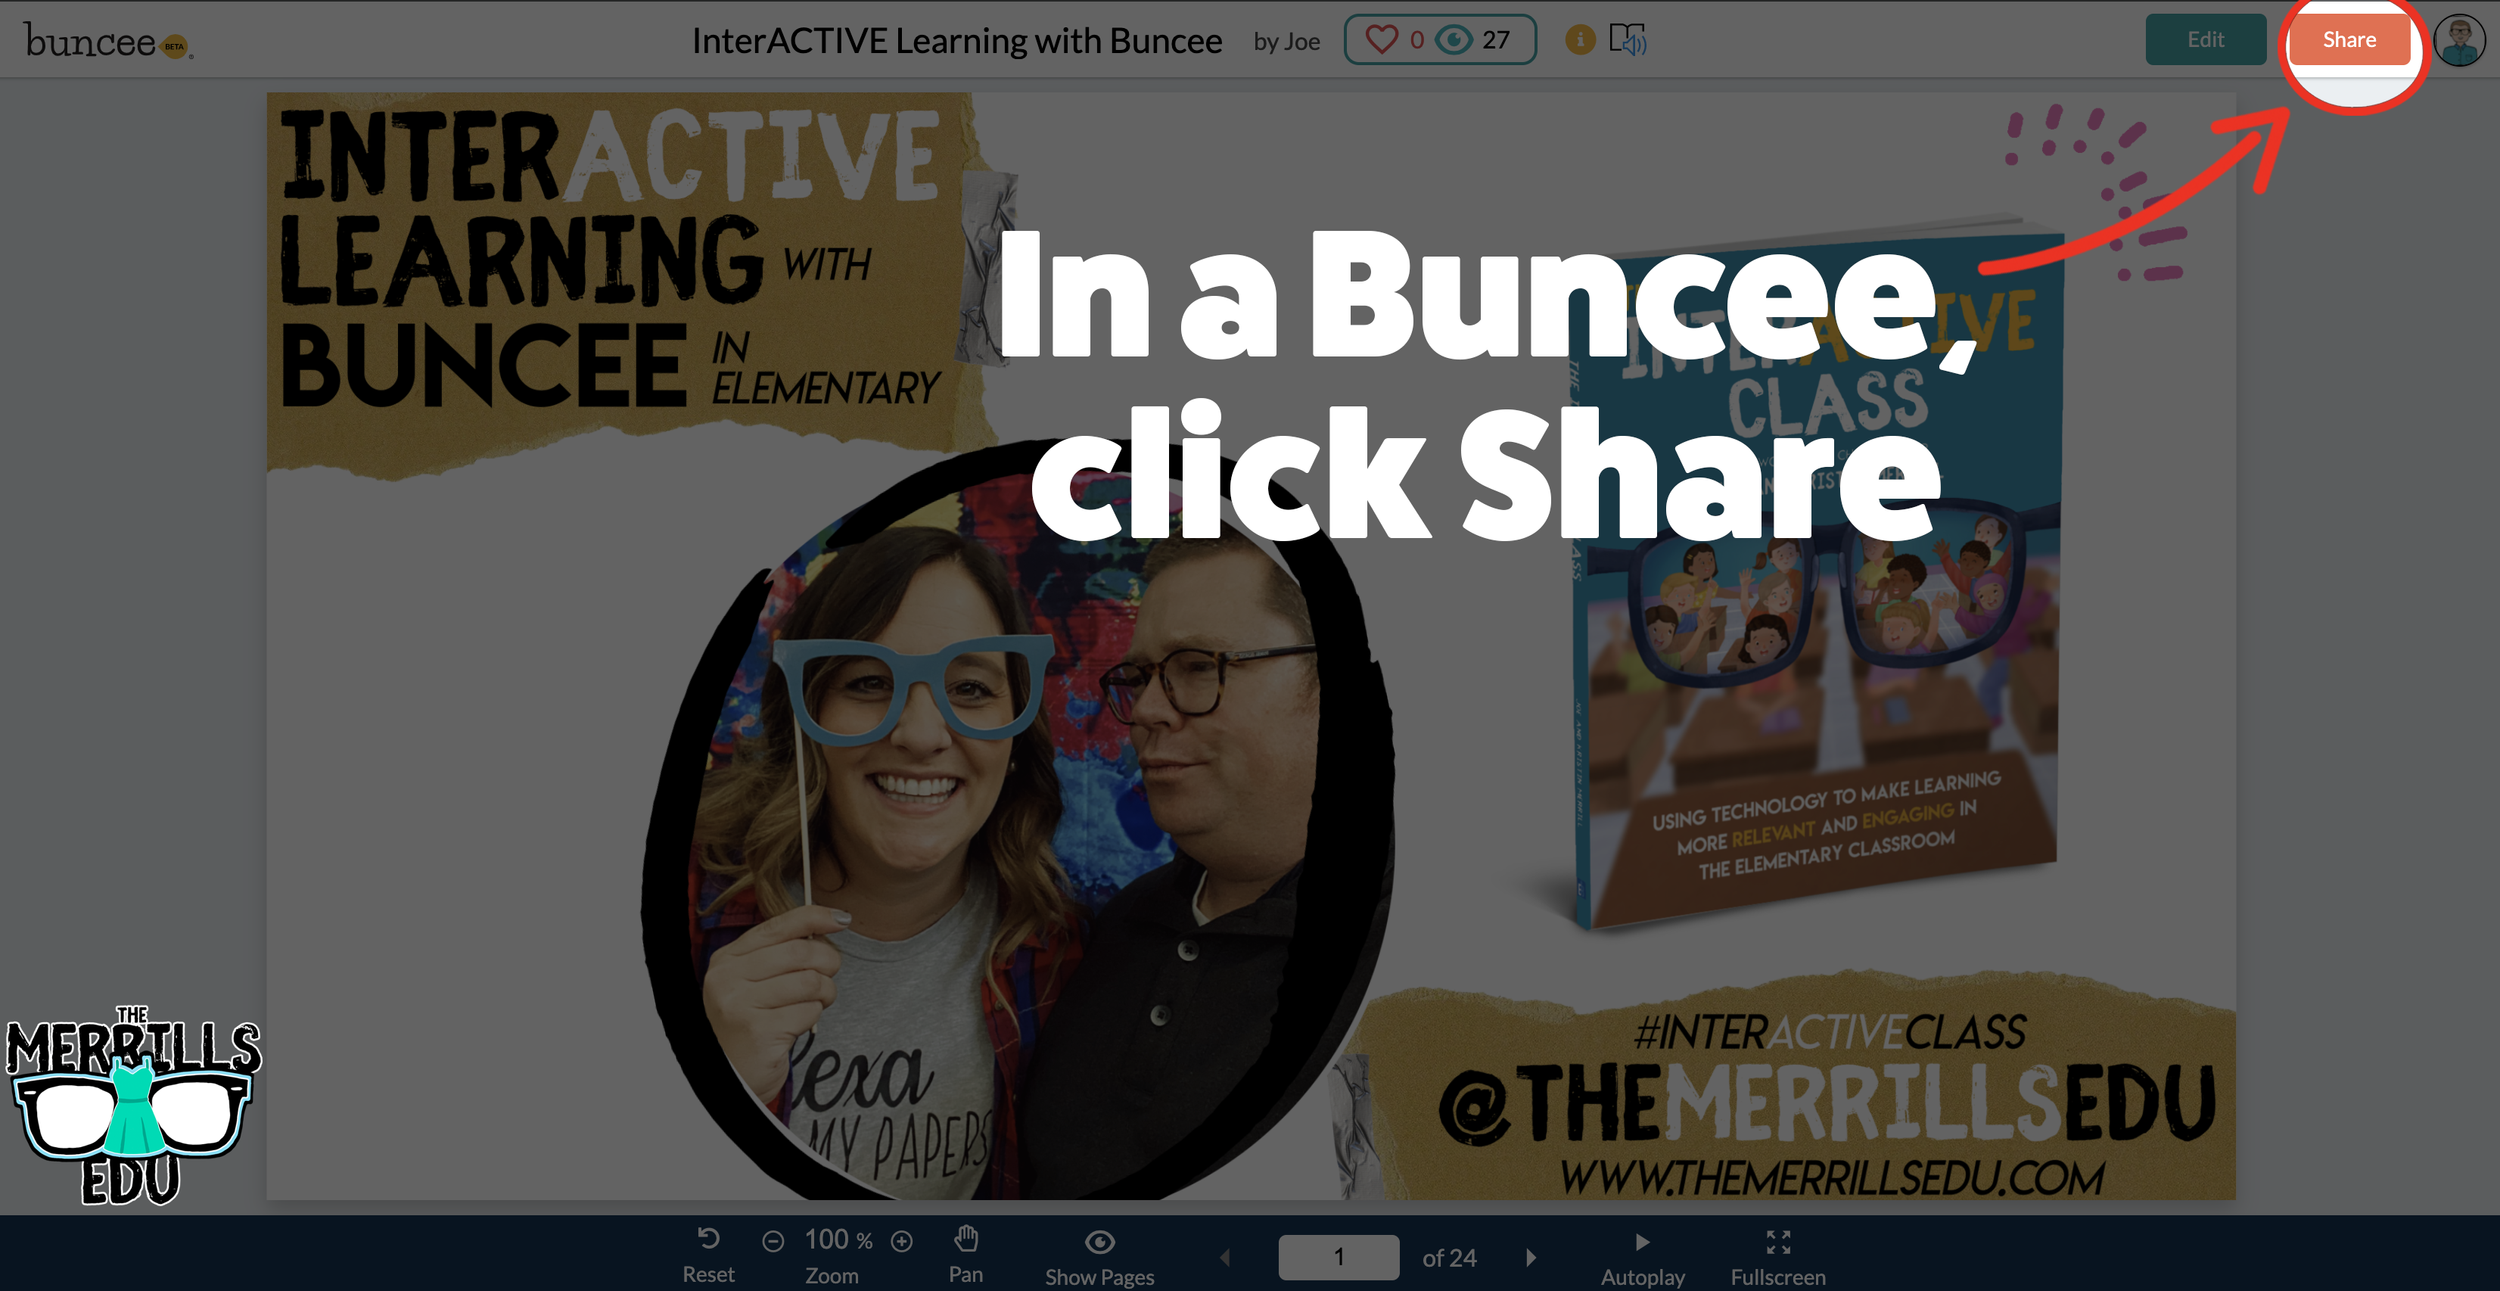

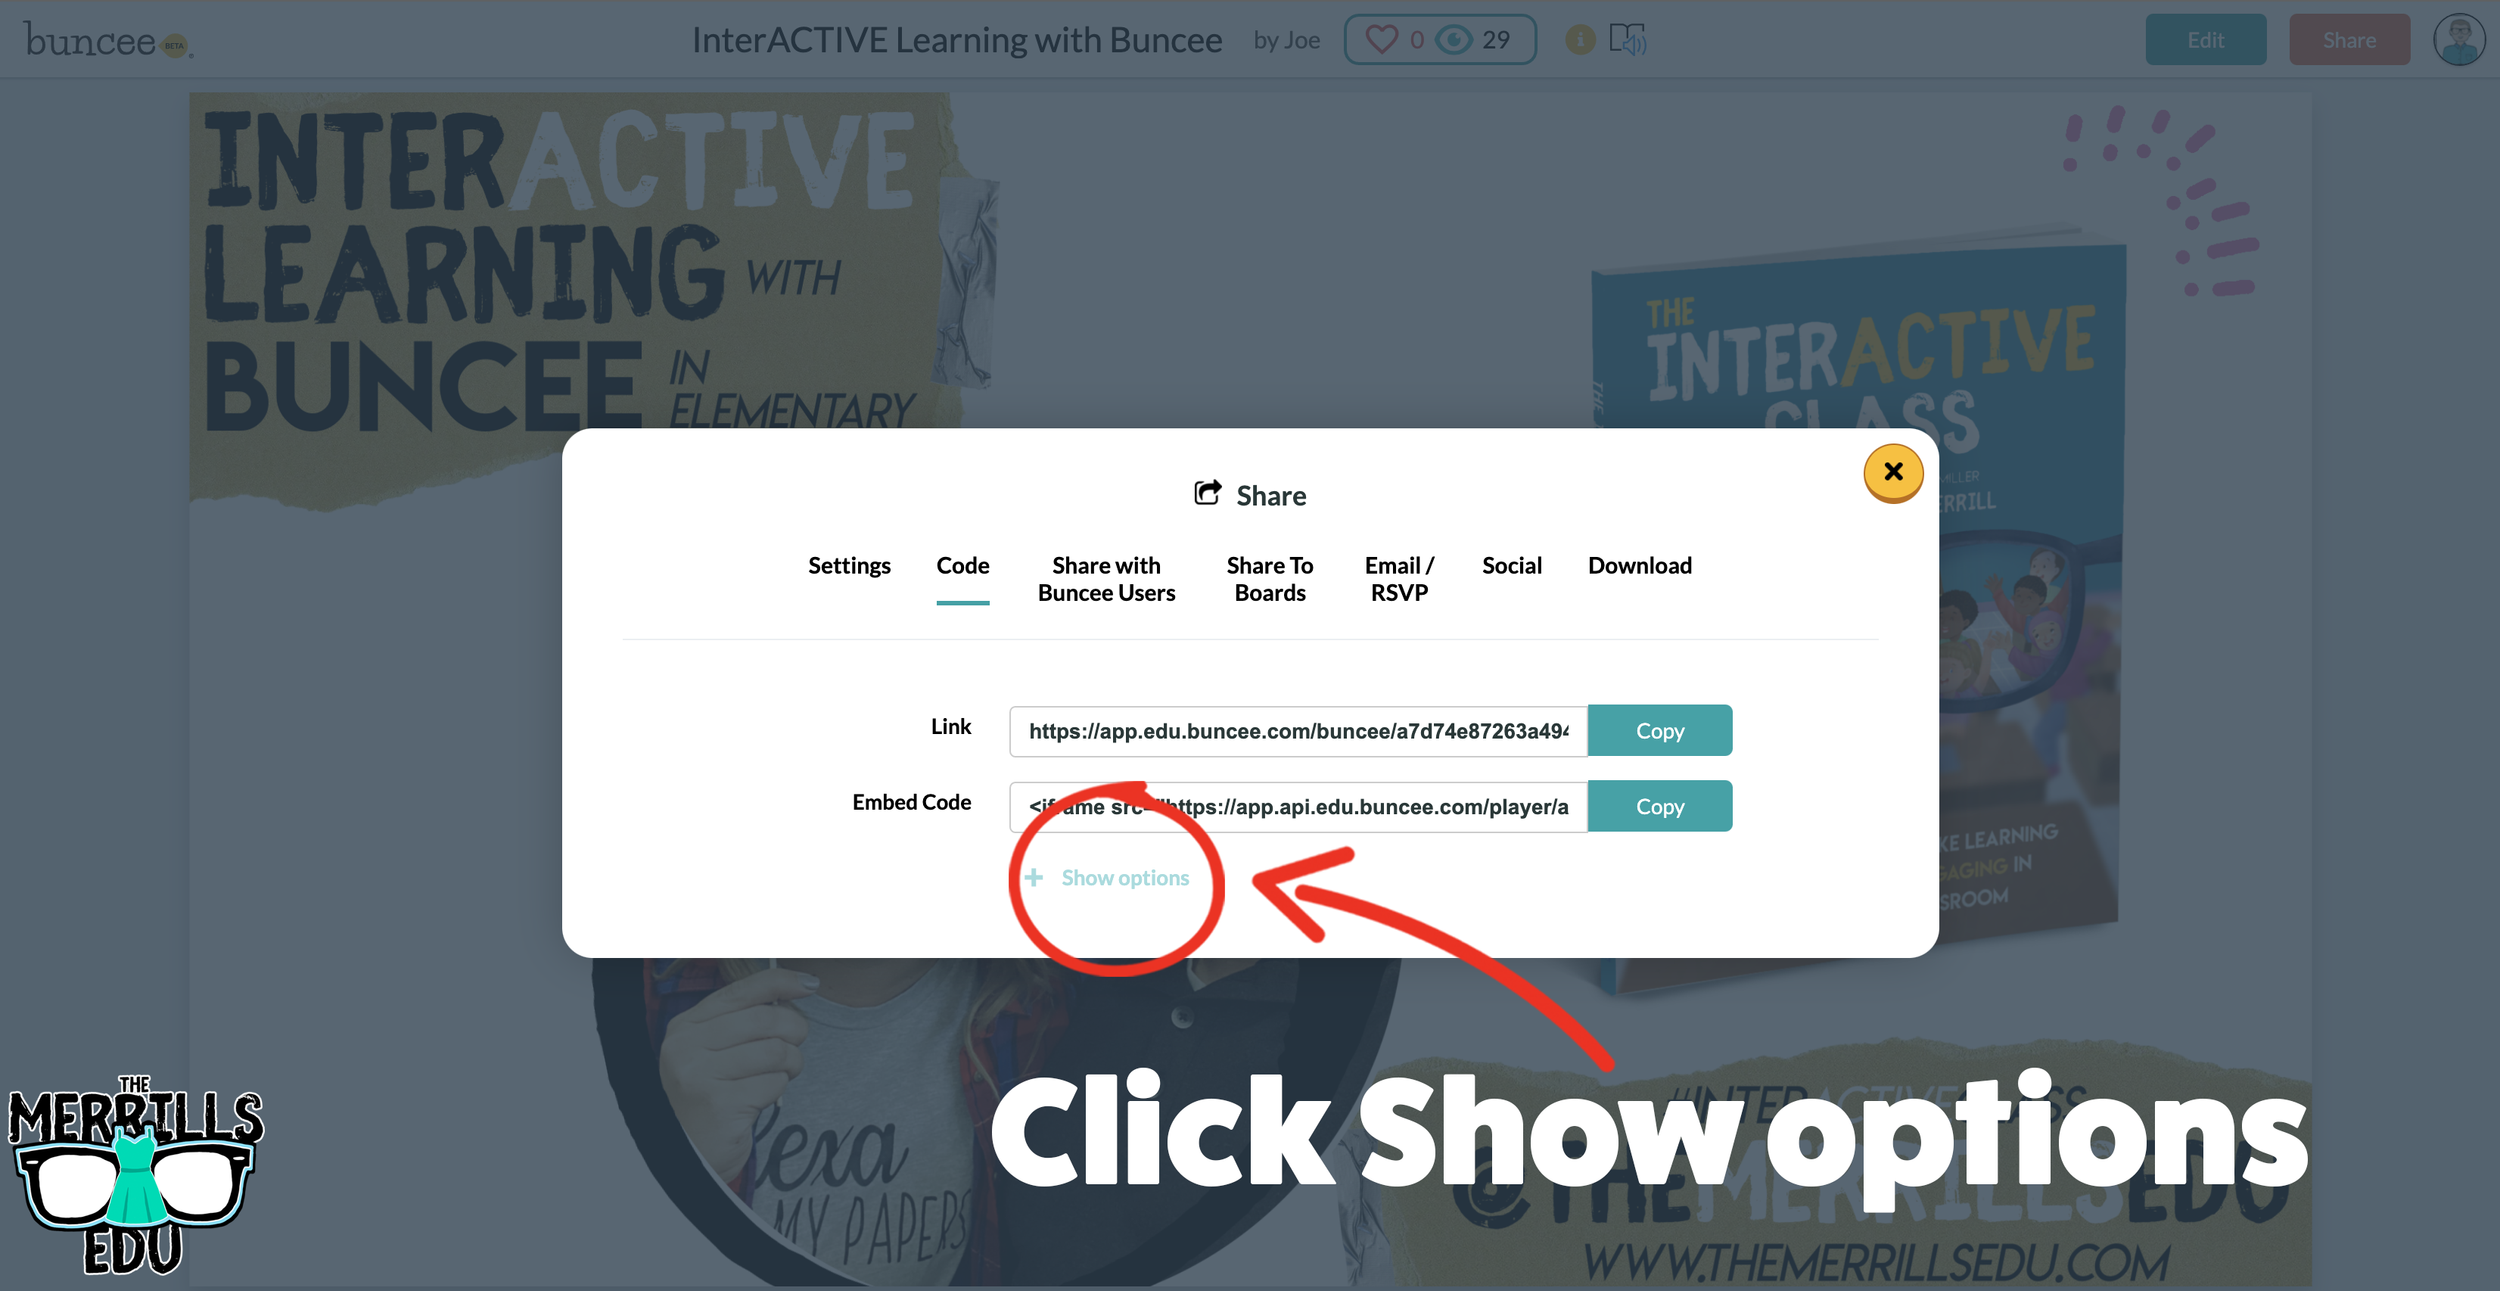
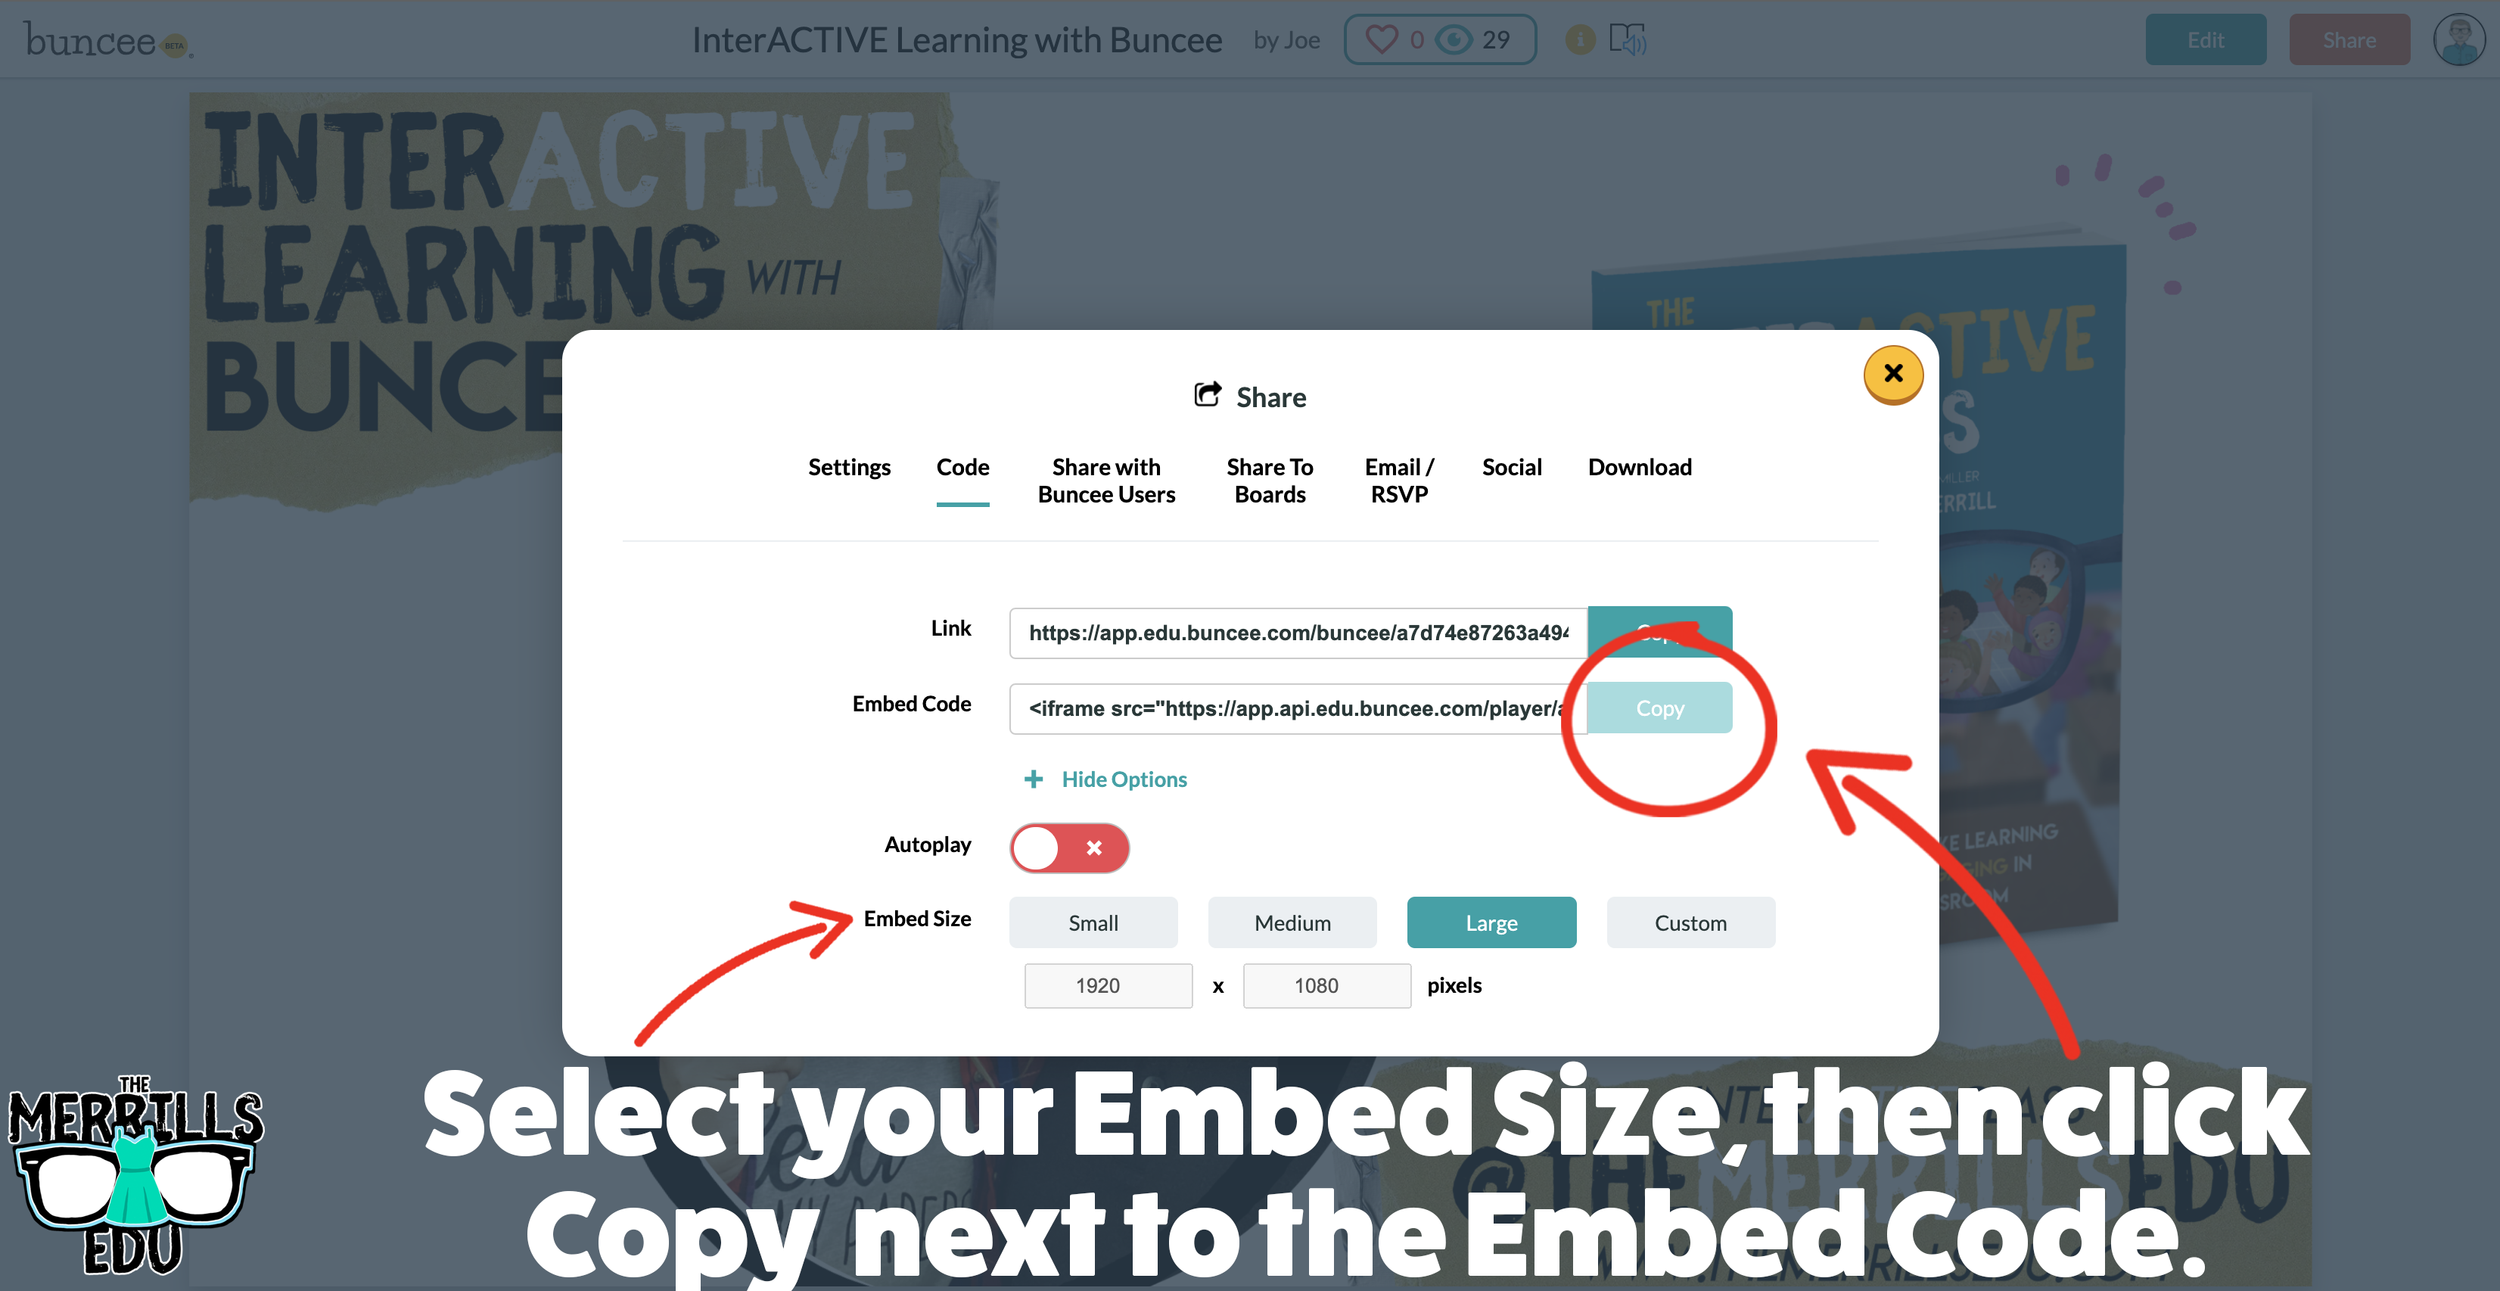
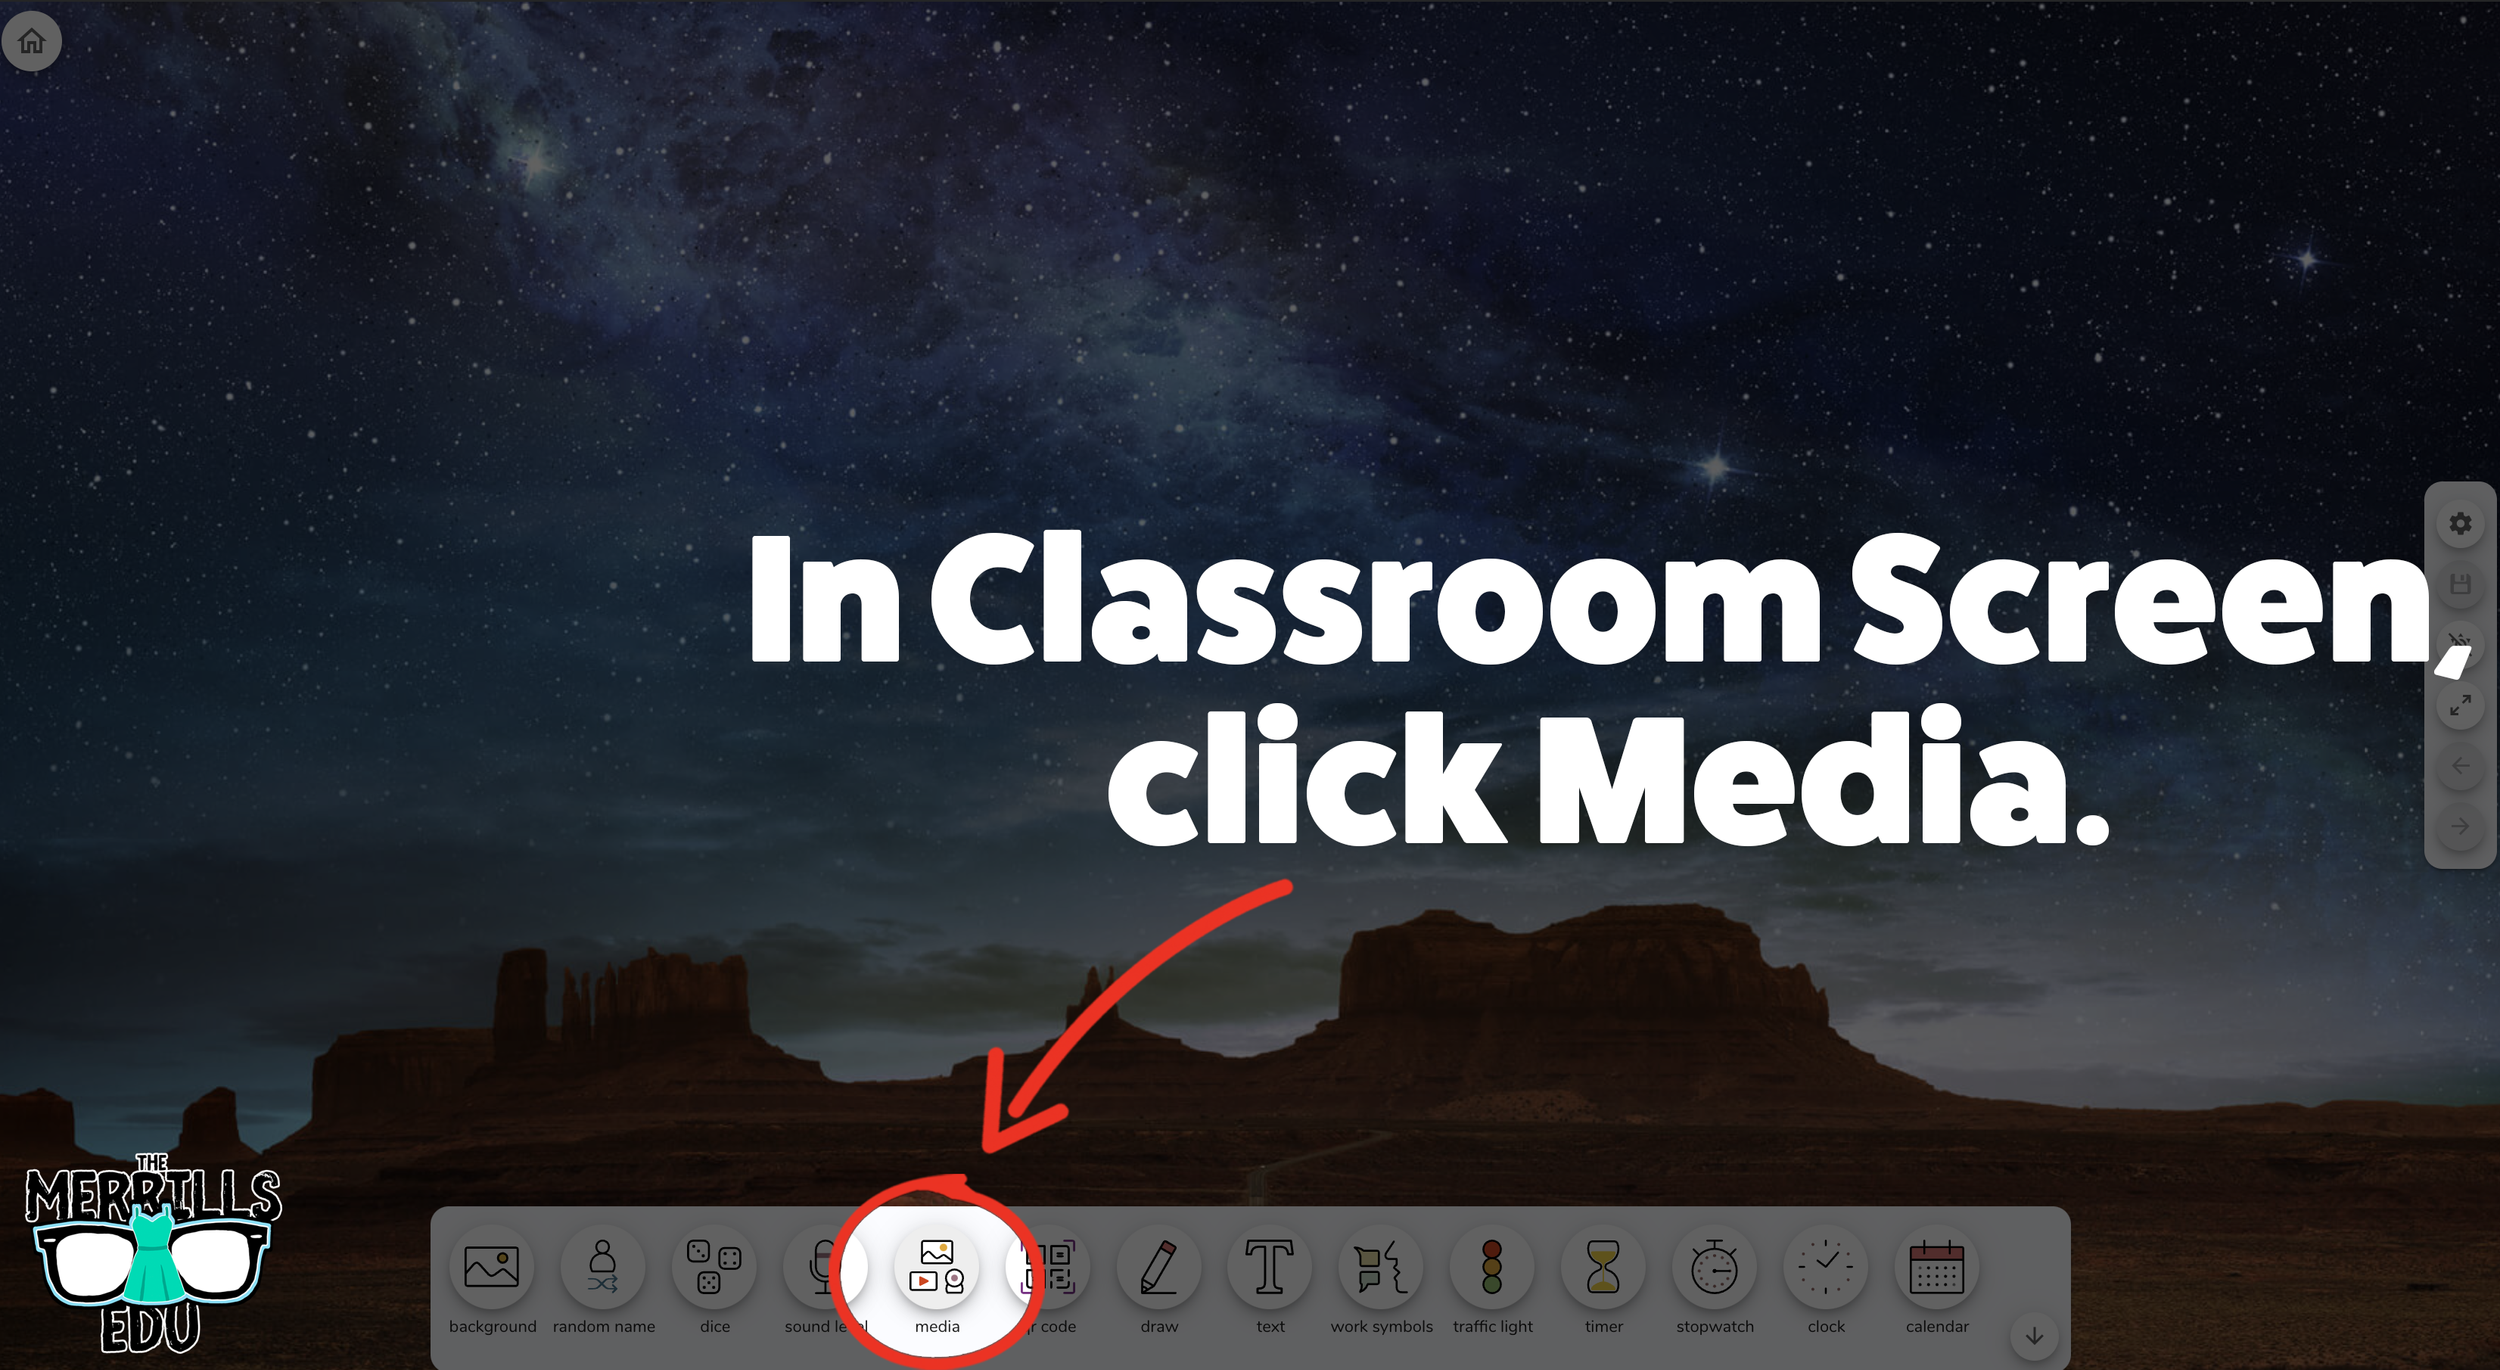

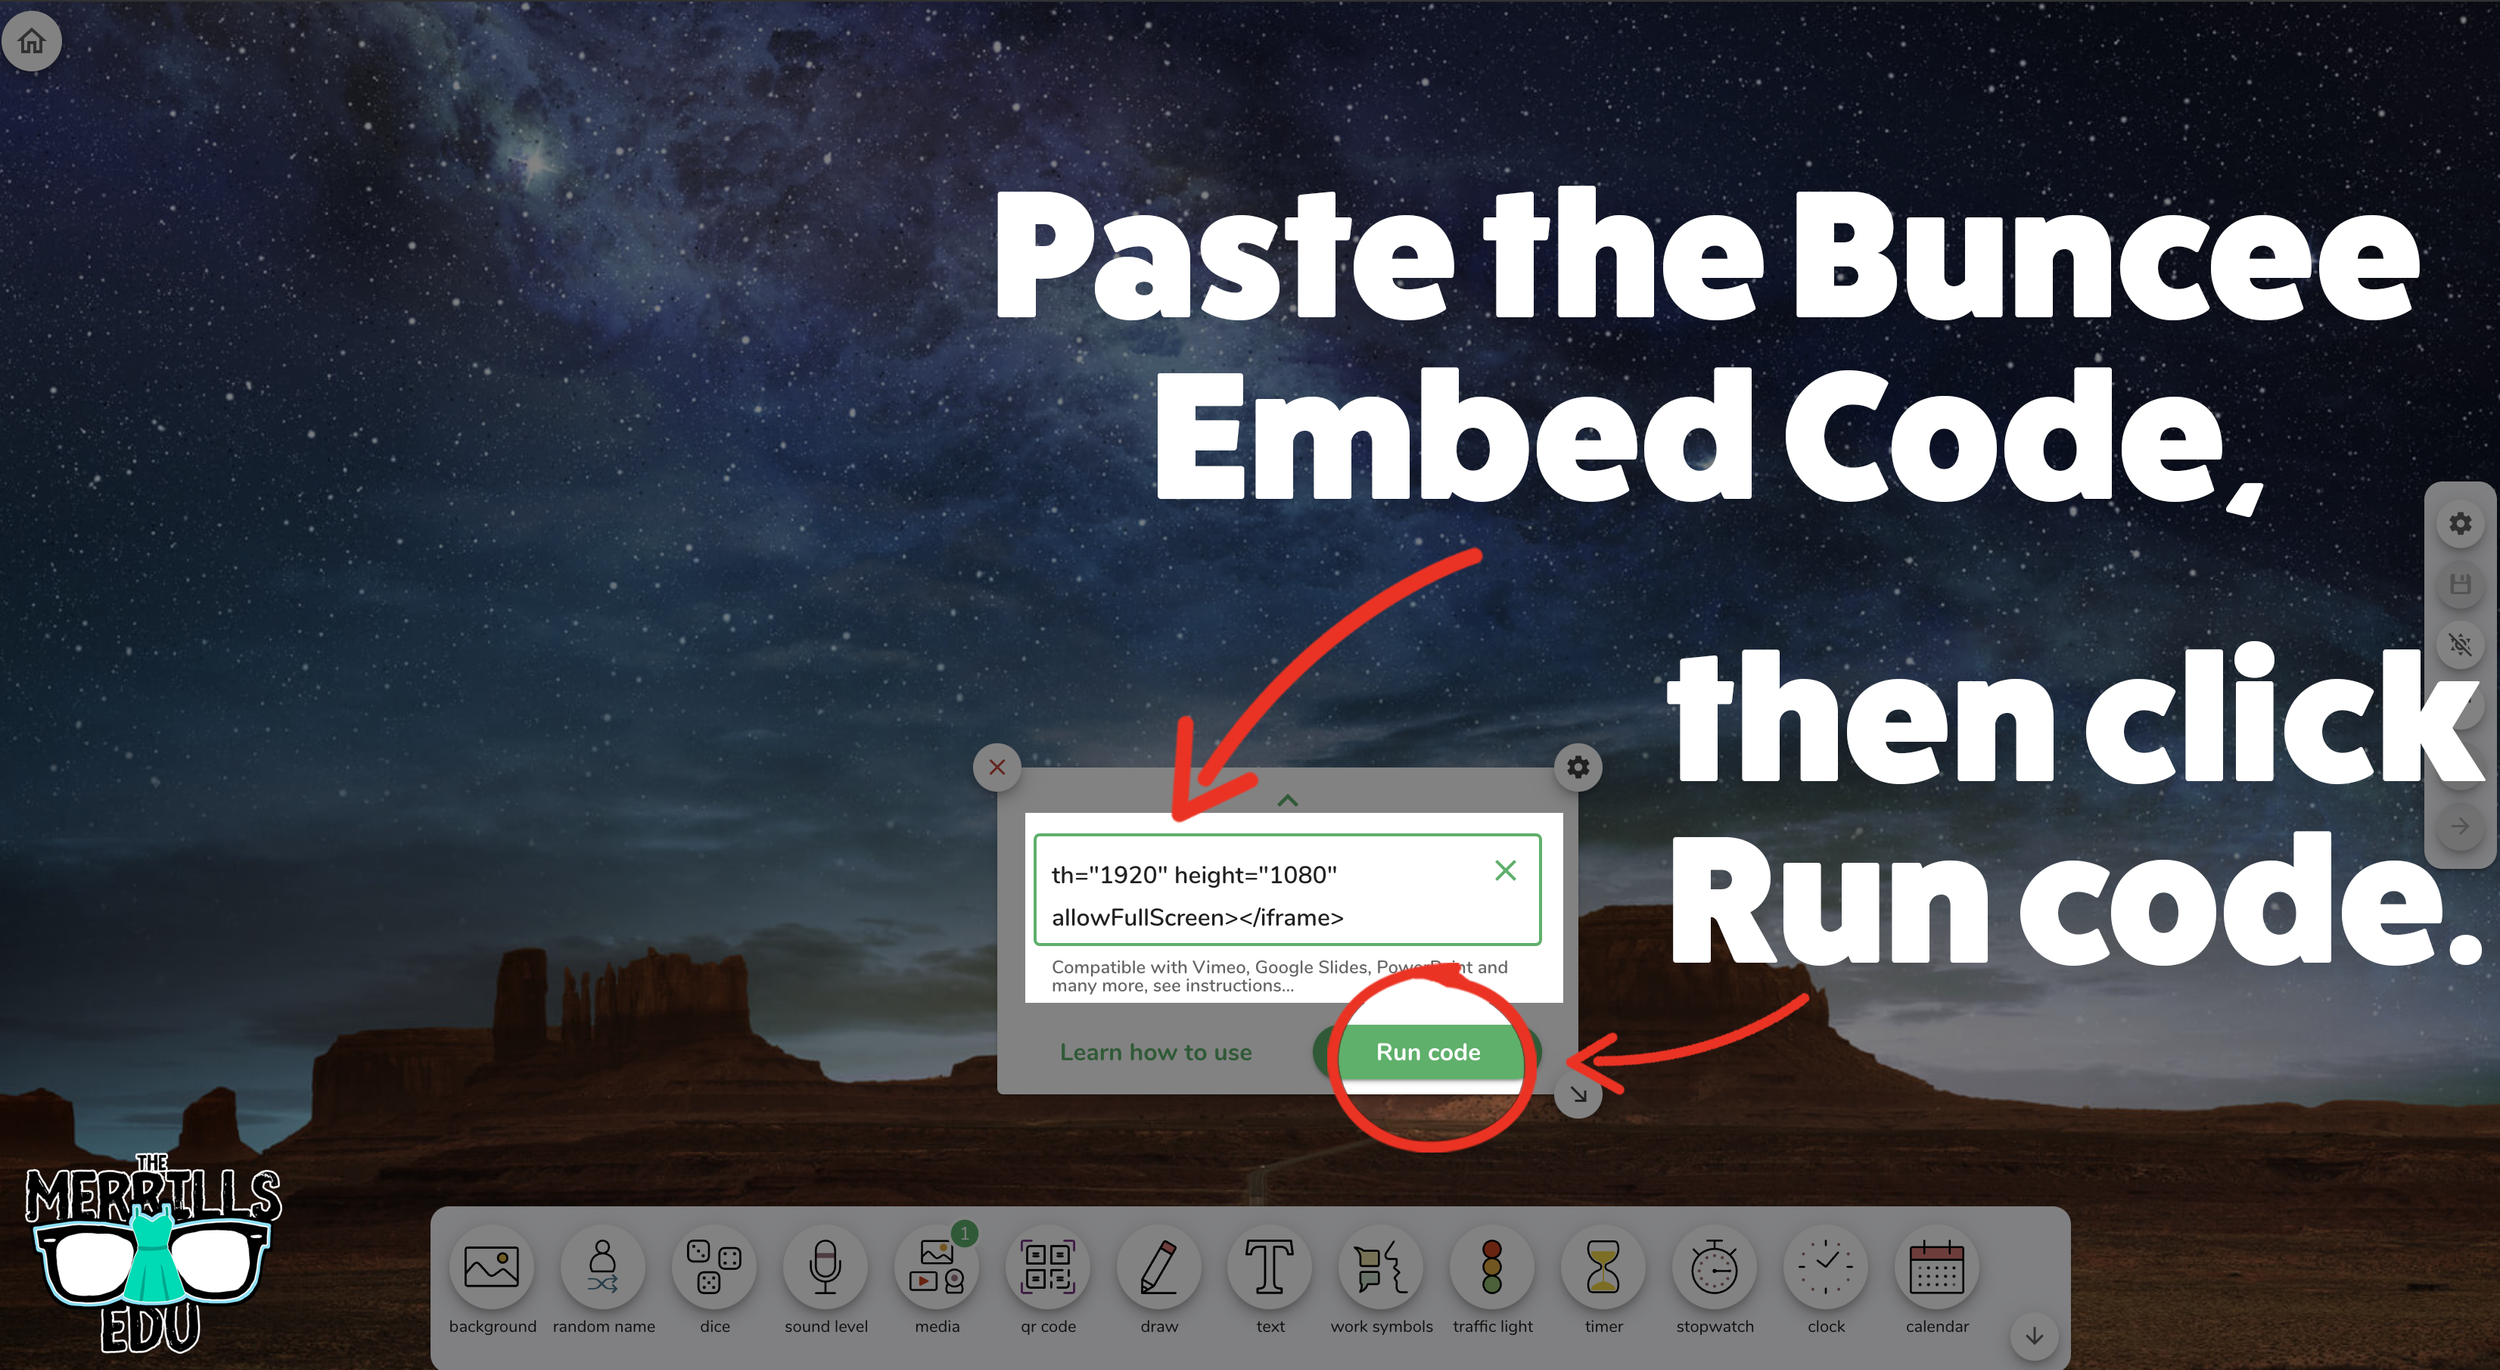
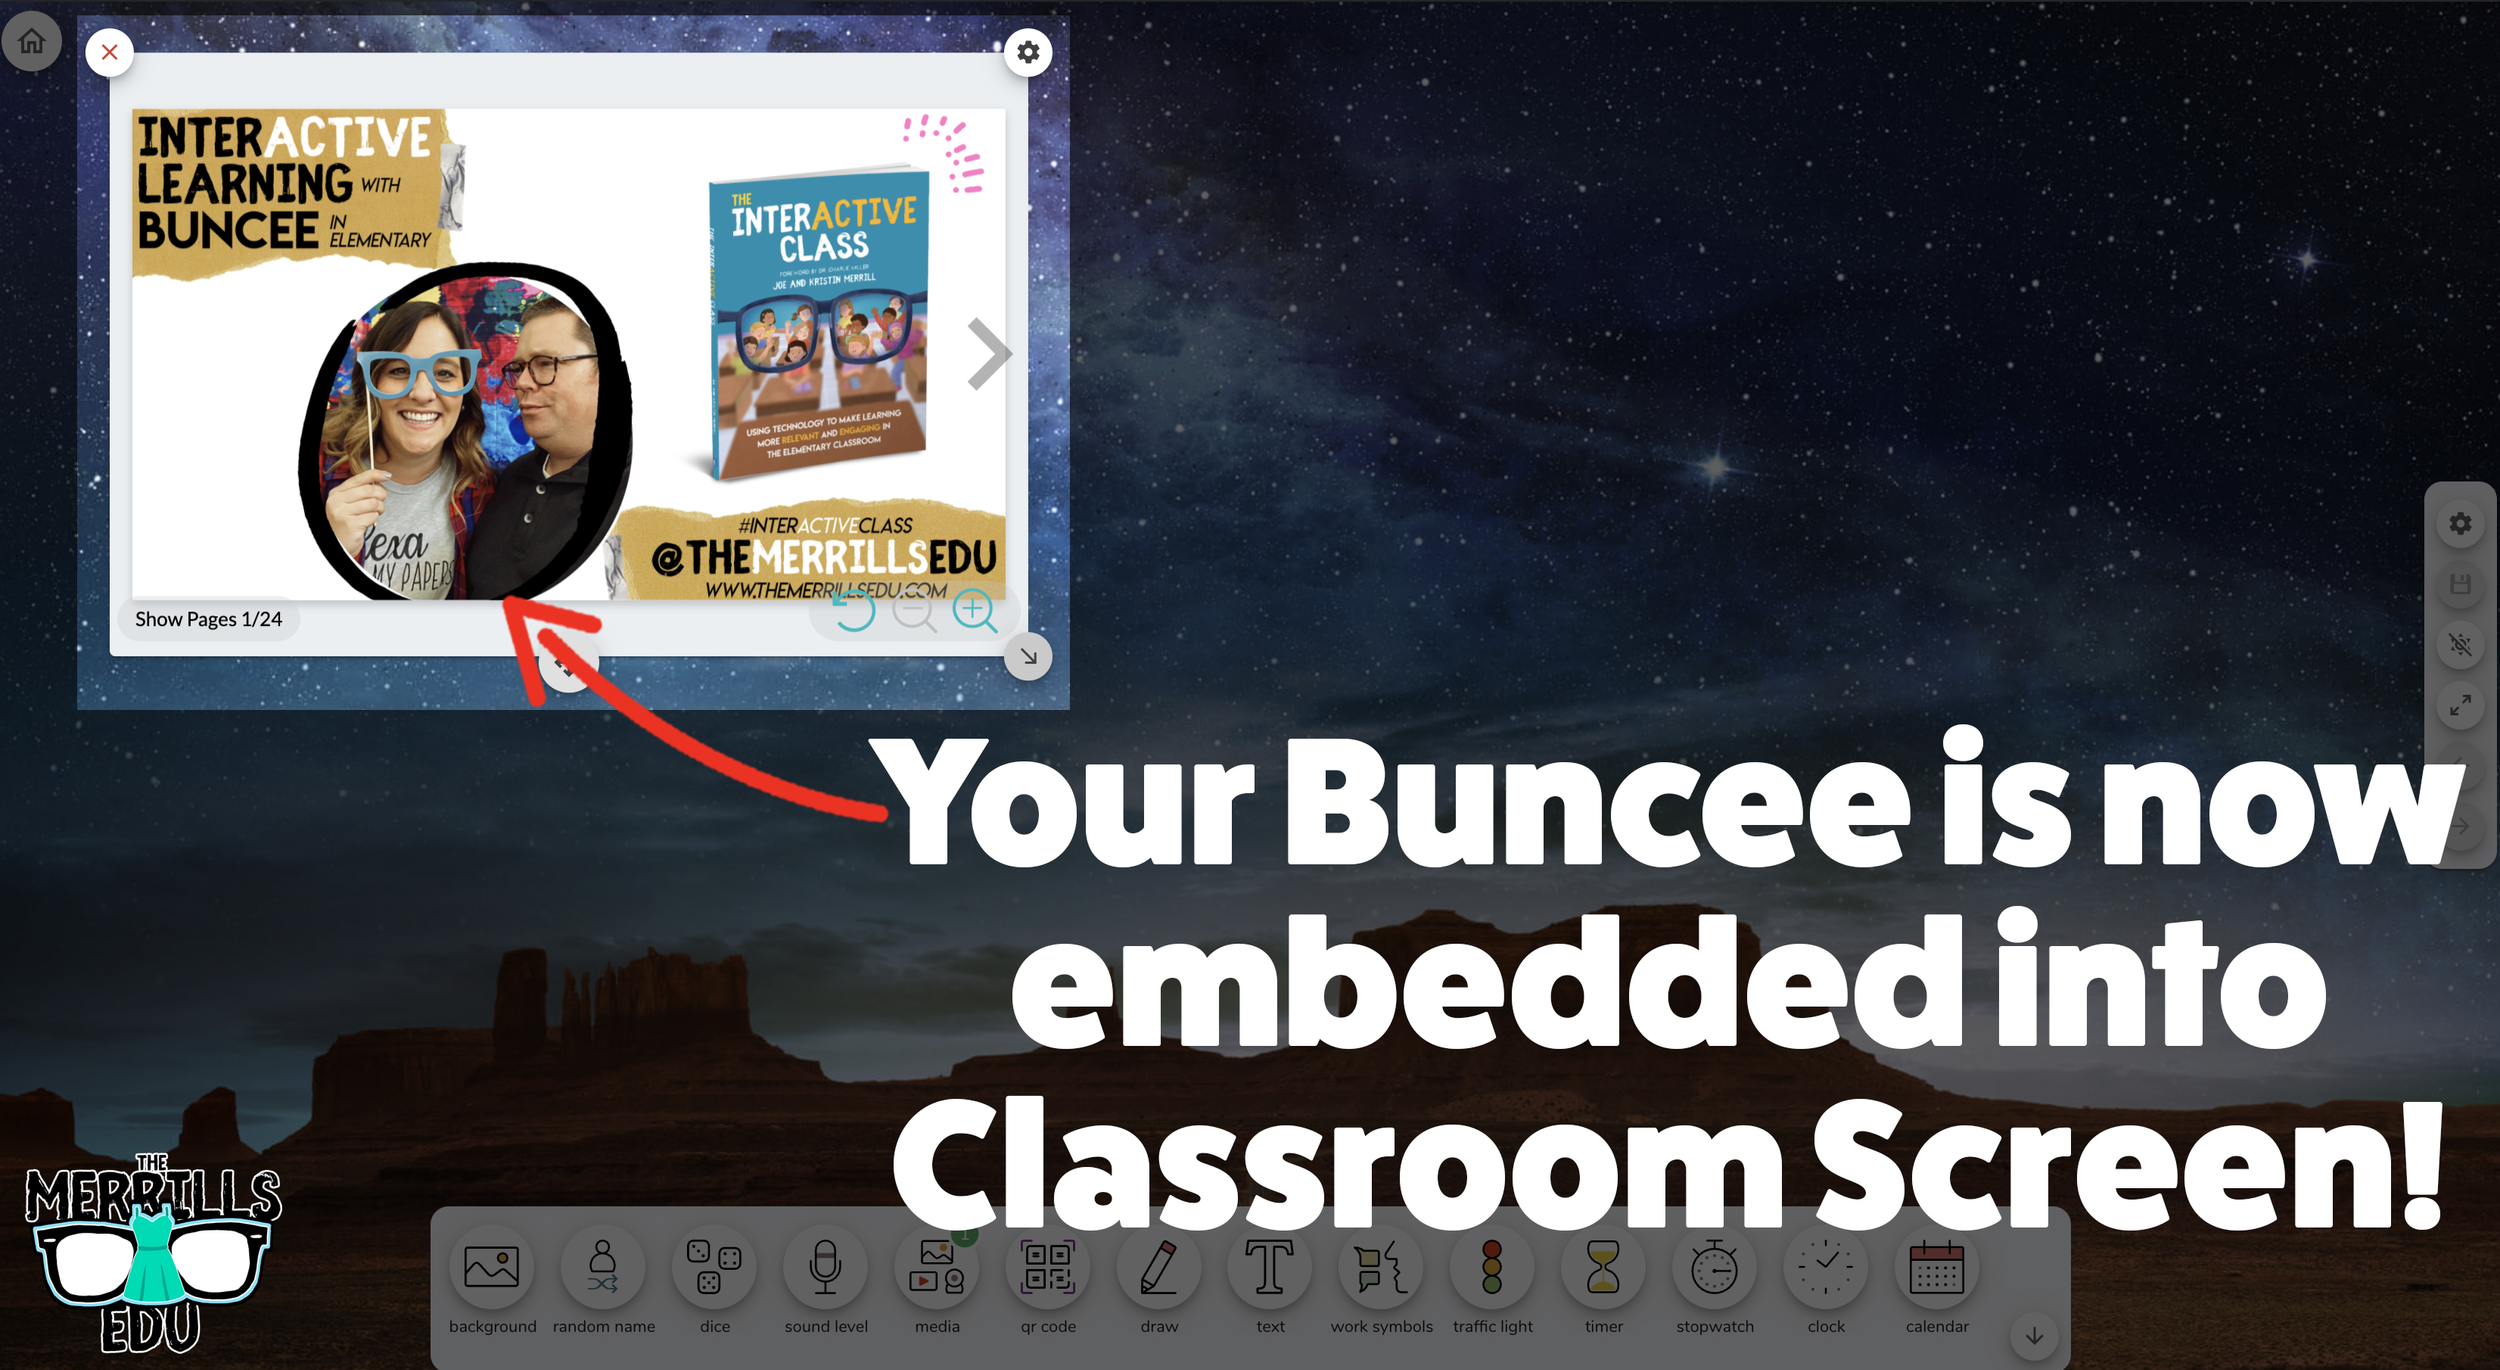
Open the Buncee creation that you want to embed, then click “Share.”
In the pop-up, click “Code.”
Click “+Show Options” and then select your preferred size.
Once you have selected your size, click “Copy” next to the Embed Code bar.
In a separate tab, head over to ClassroomScreen.com and start a new screen (or open an old one).
With your Classroom Screen open, click on “Media” from the menu options running along the bottom of the screen.
A new window will open. Click “Embed.”
Click inside the embed area and paste your Buncee code.
With the code pasted, click on “Run code.”
Your Canva creation will now appear! You can move the Buncee creation around by clicking on the arrows (located at the bottom), or stretch the creation out by clicking the arrow on the bottom right - then dragging it to the desired location.
Now, Buncee is embedded into Classroom Screen!

Wakelet Embedded into Classroom Screen
This embed is great if you need to post several different Wakelet collections in the same place. For example, you could group your students and then provide differentiated tasks on Wakelet - all of which are embedded onto Classroom Screen. Here’s how it all works:
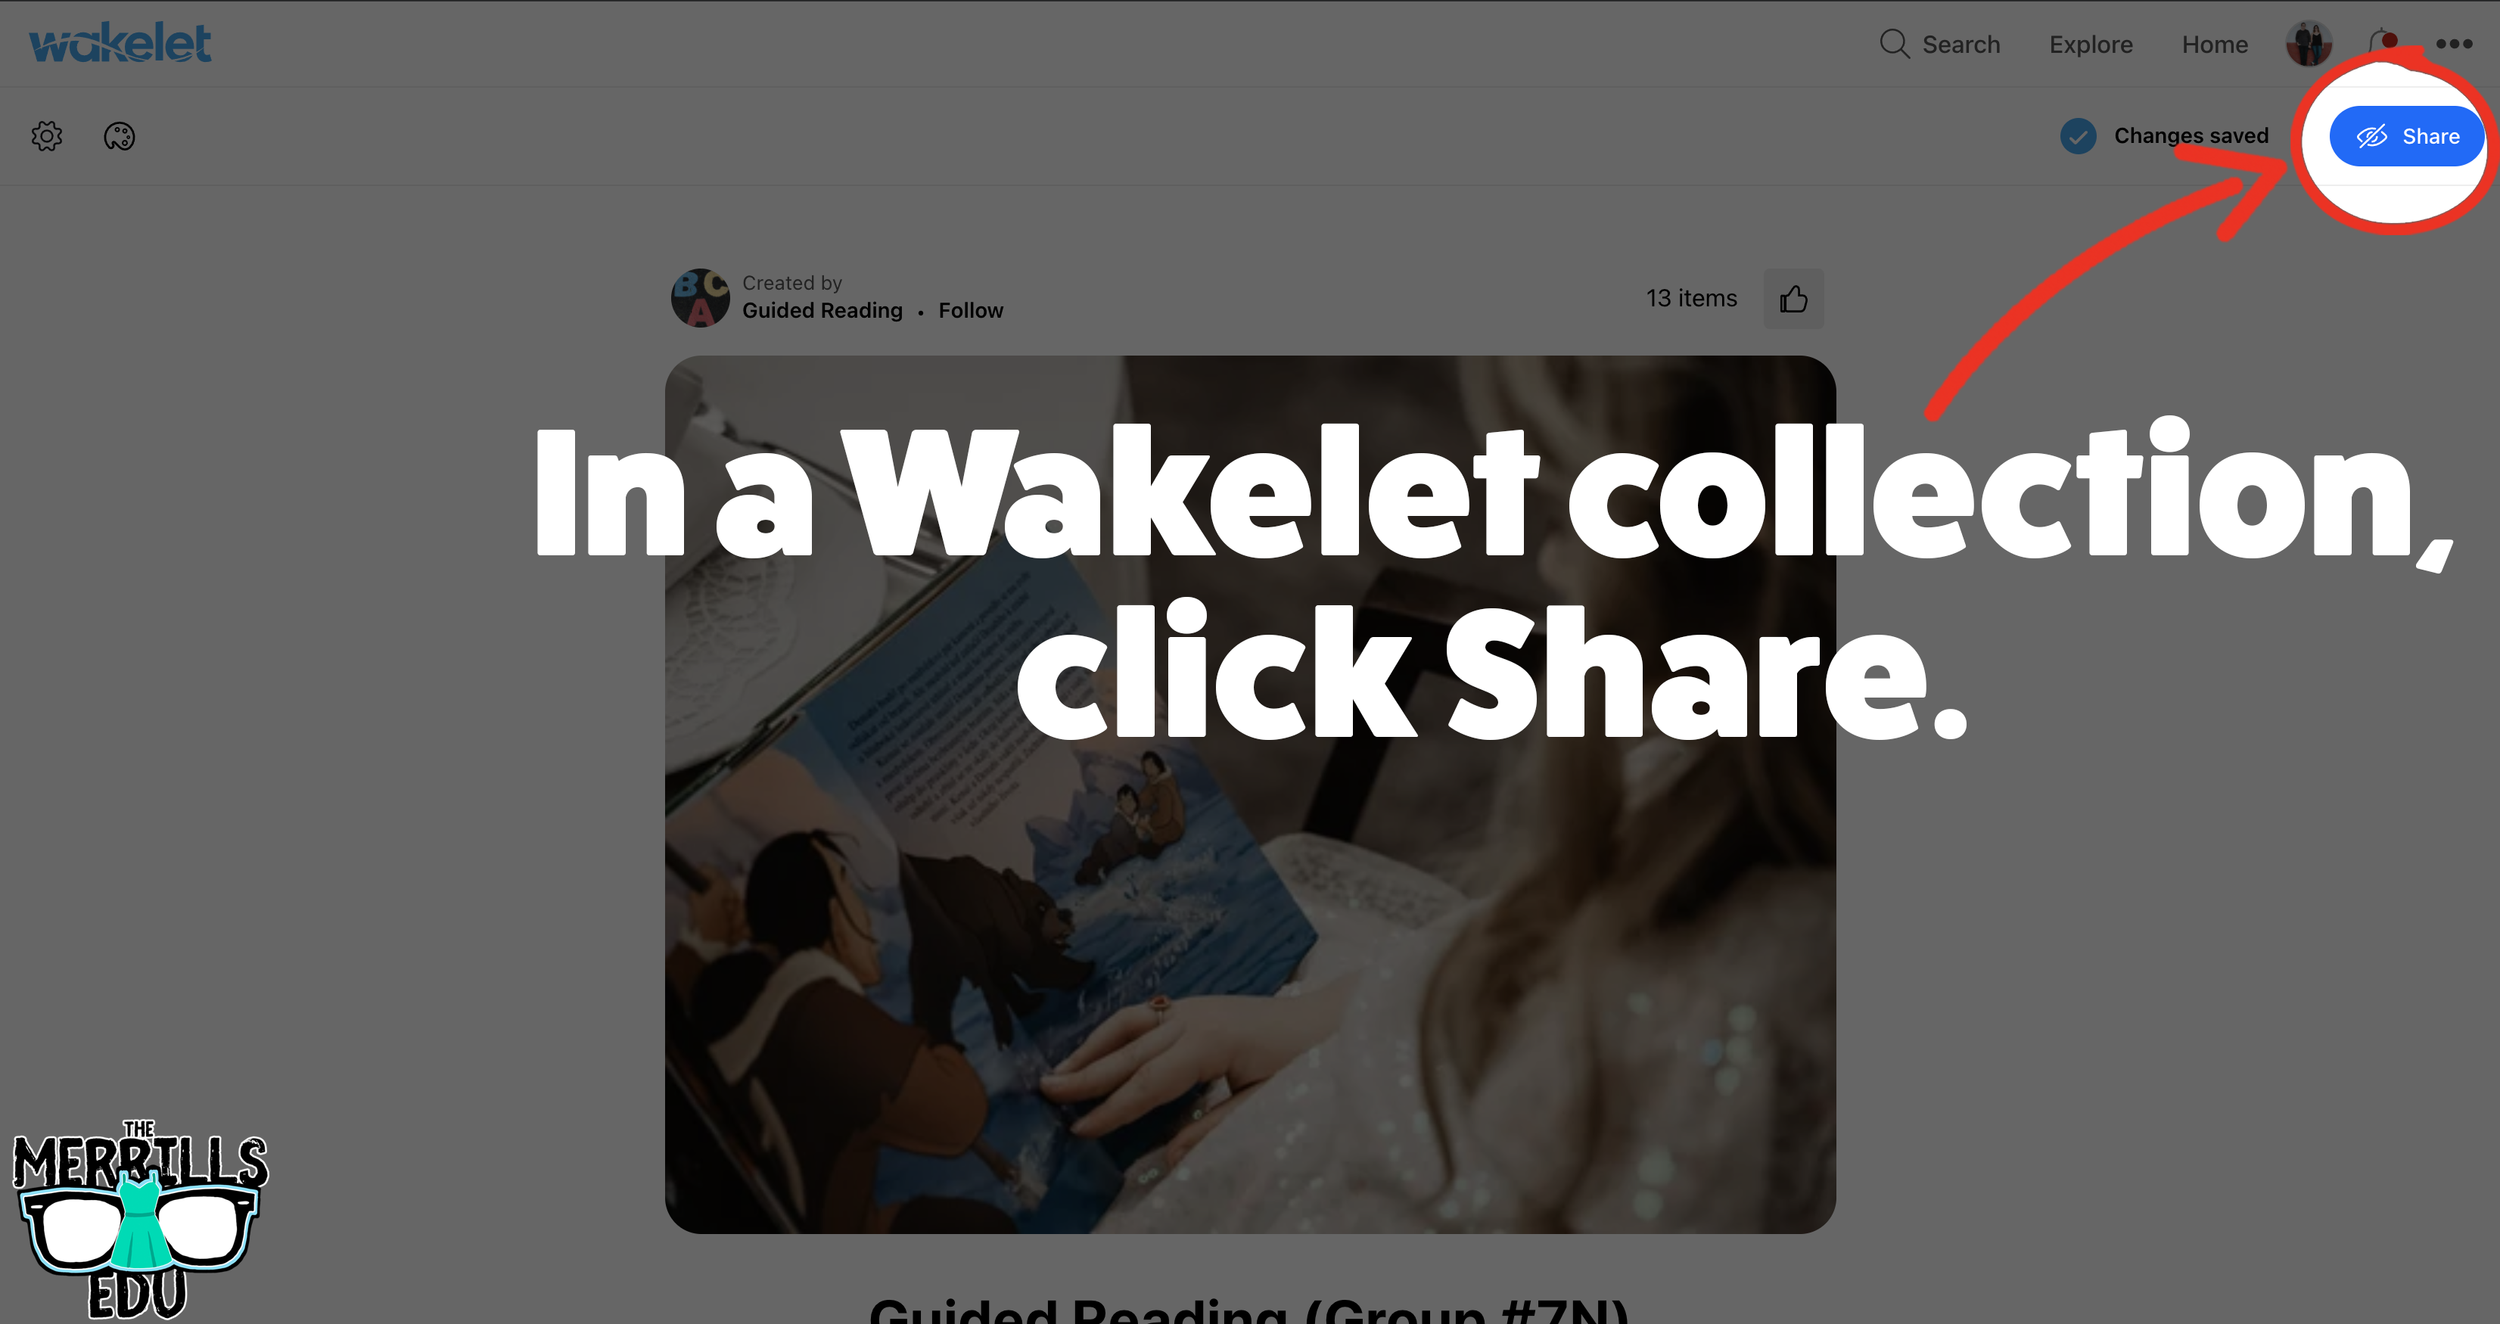

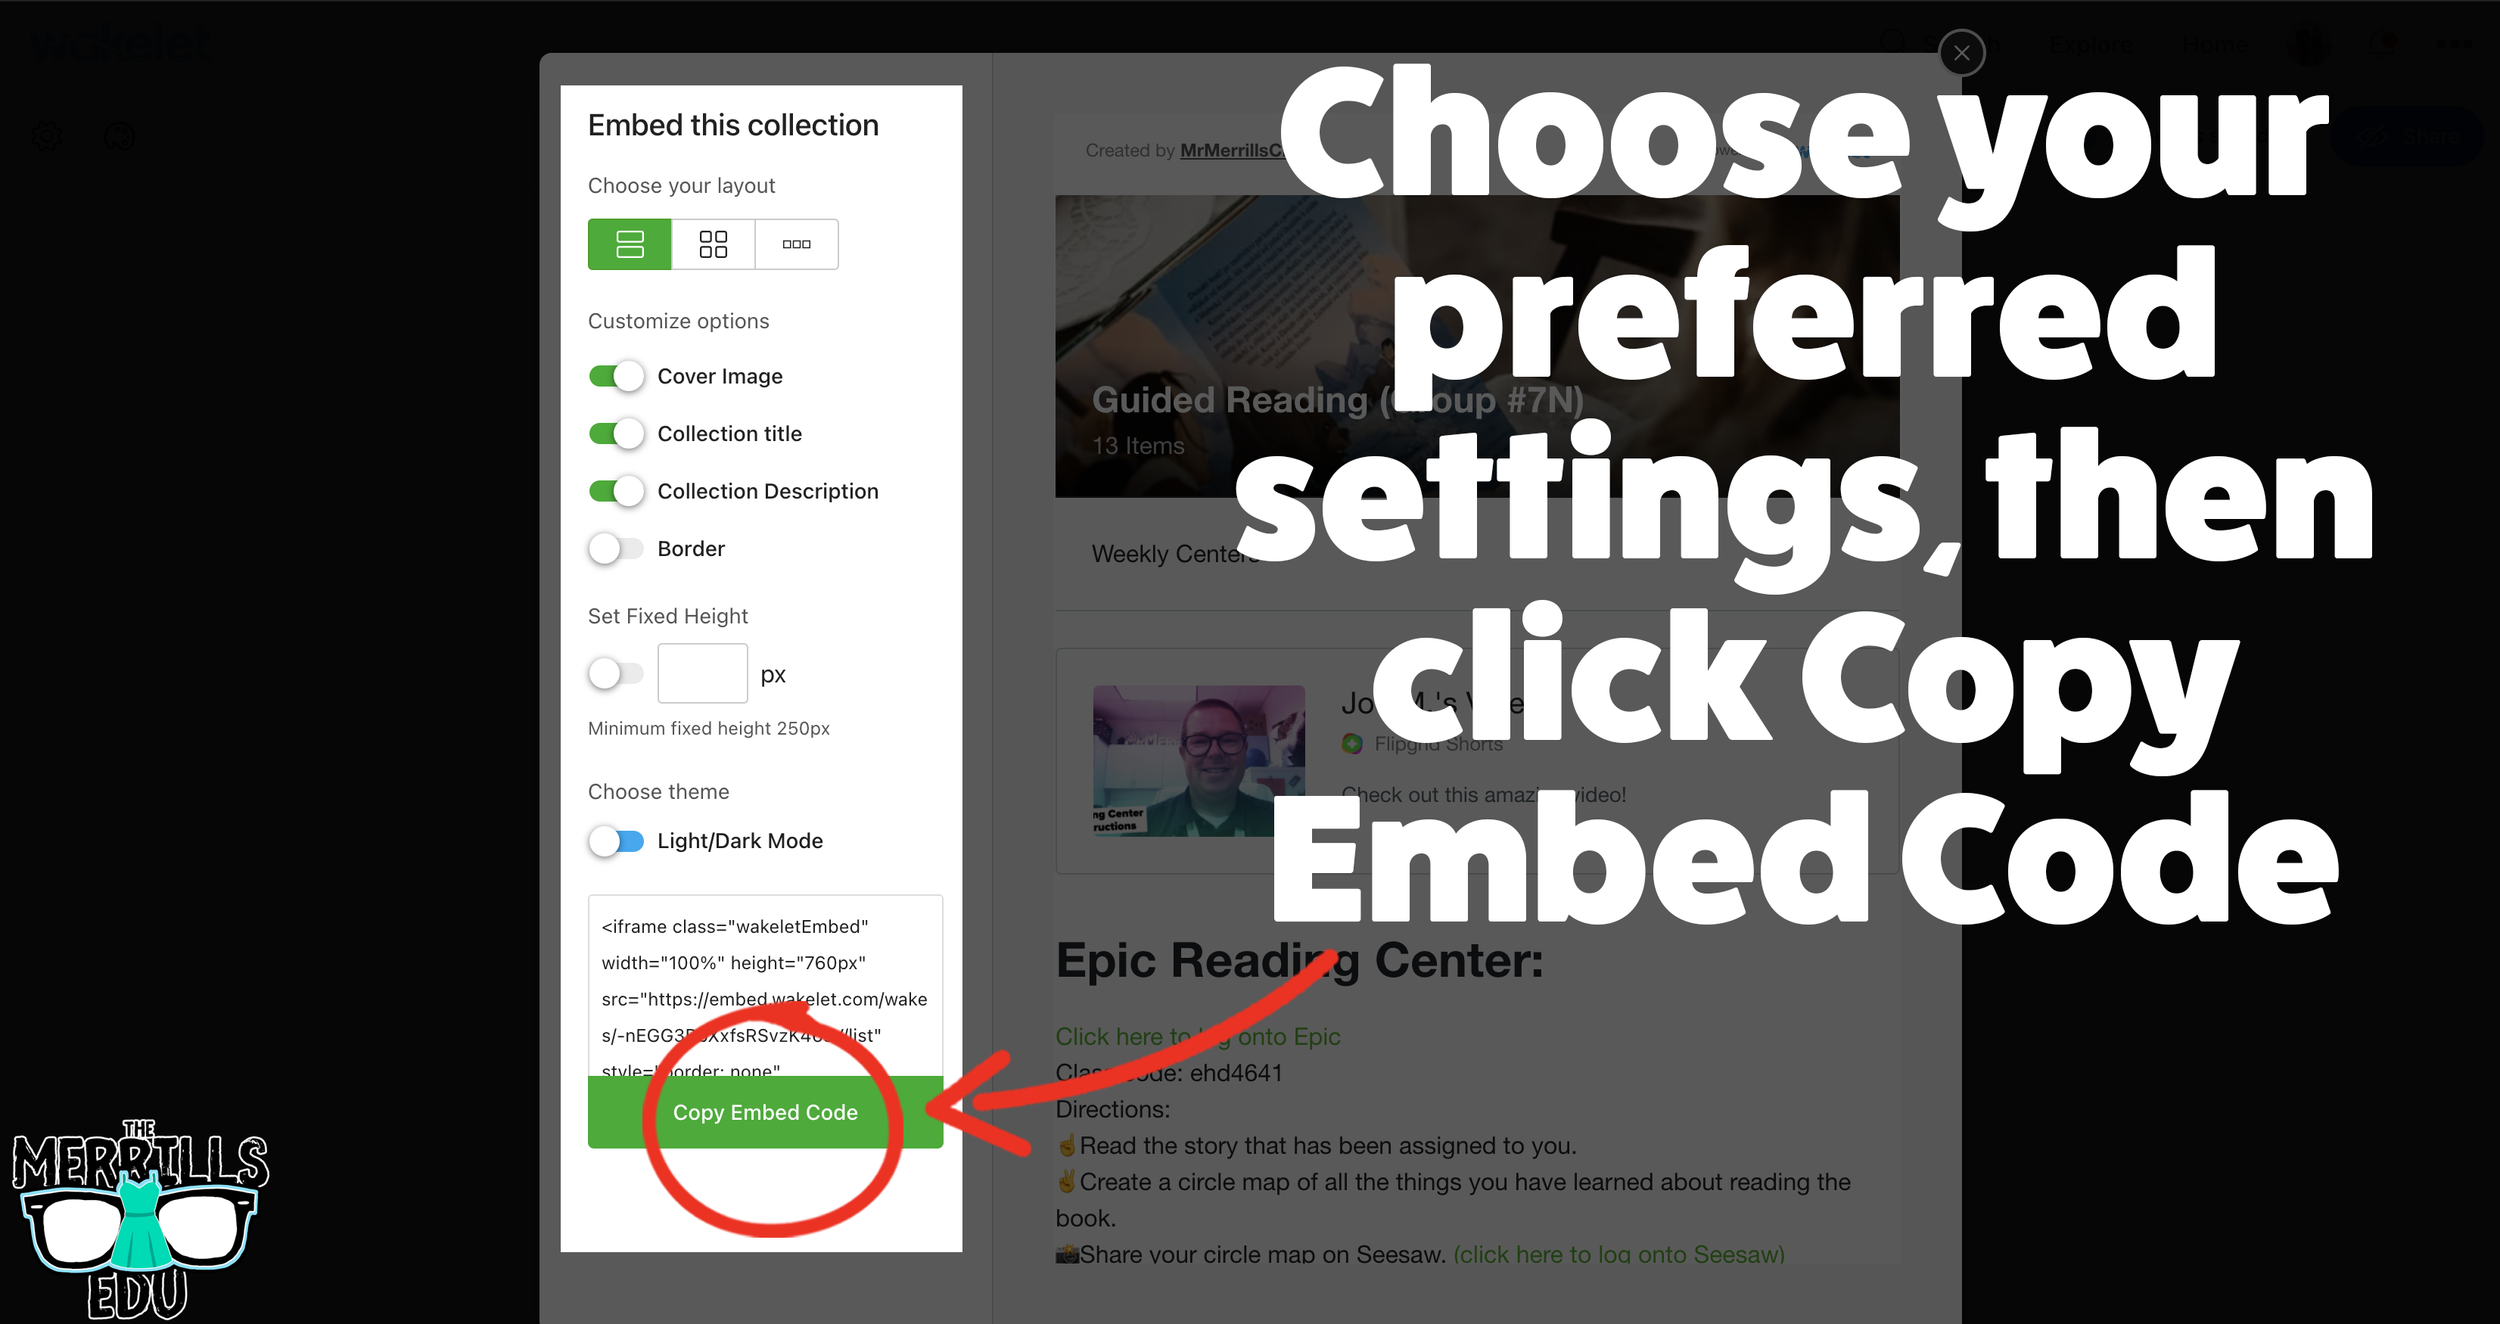

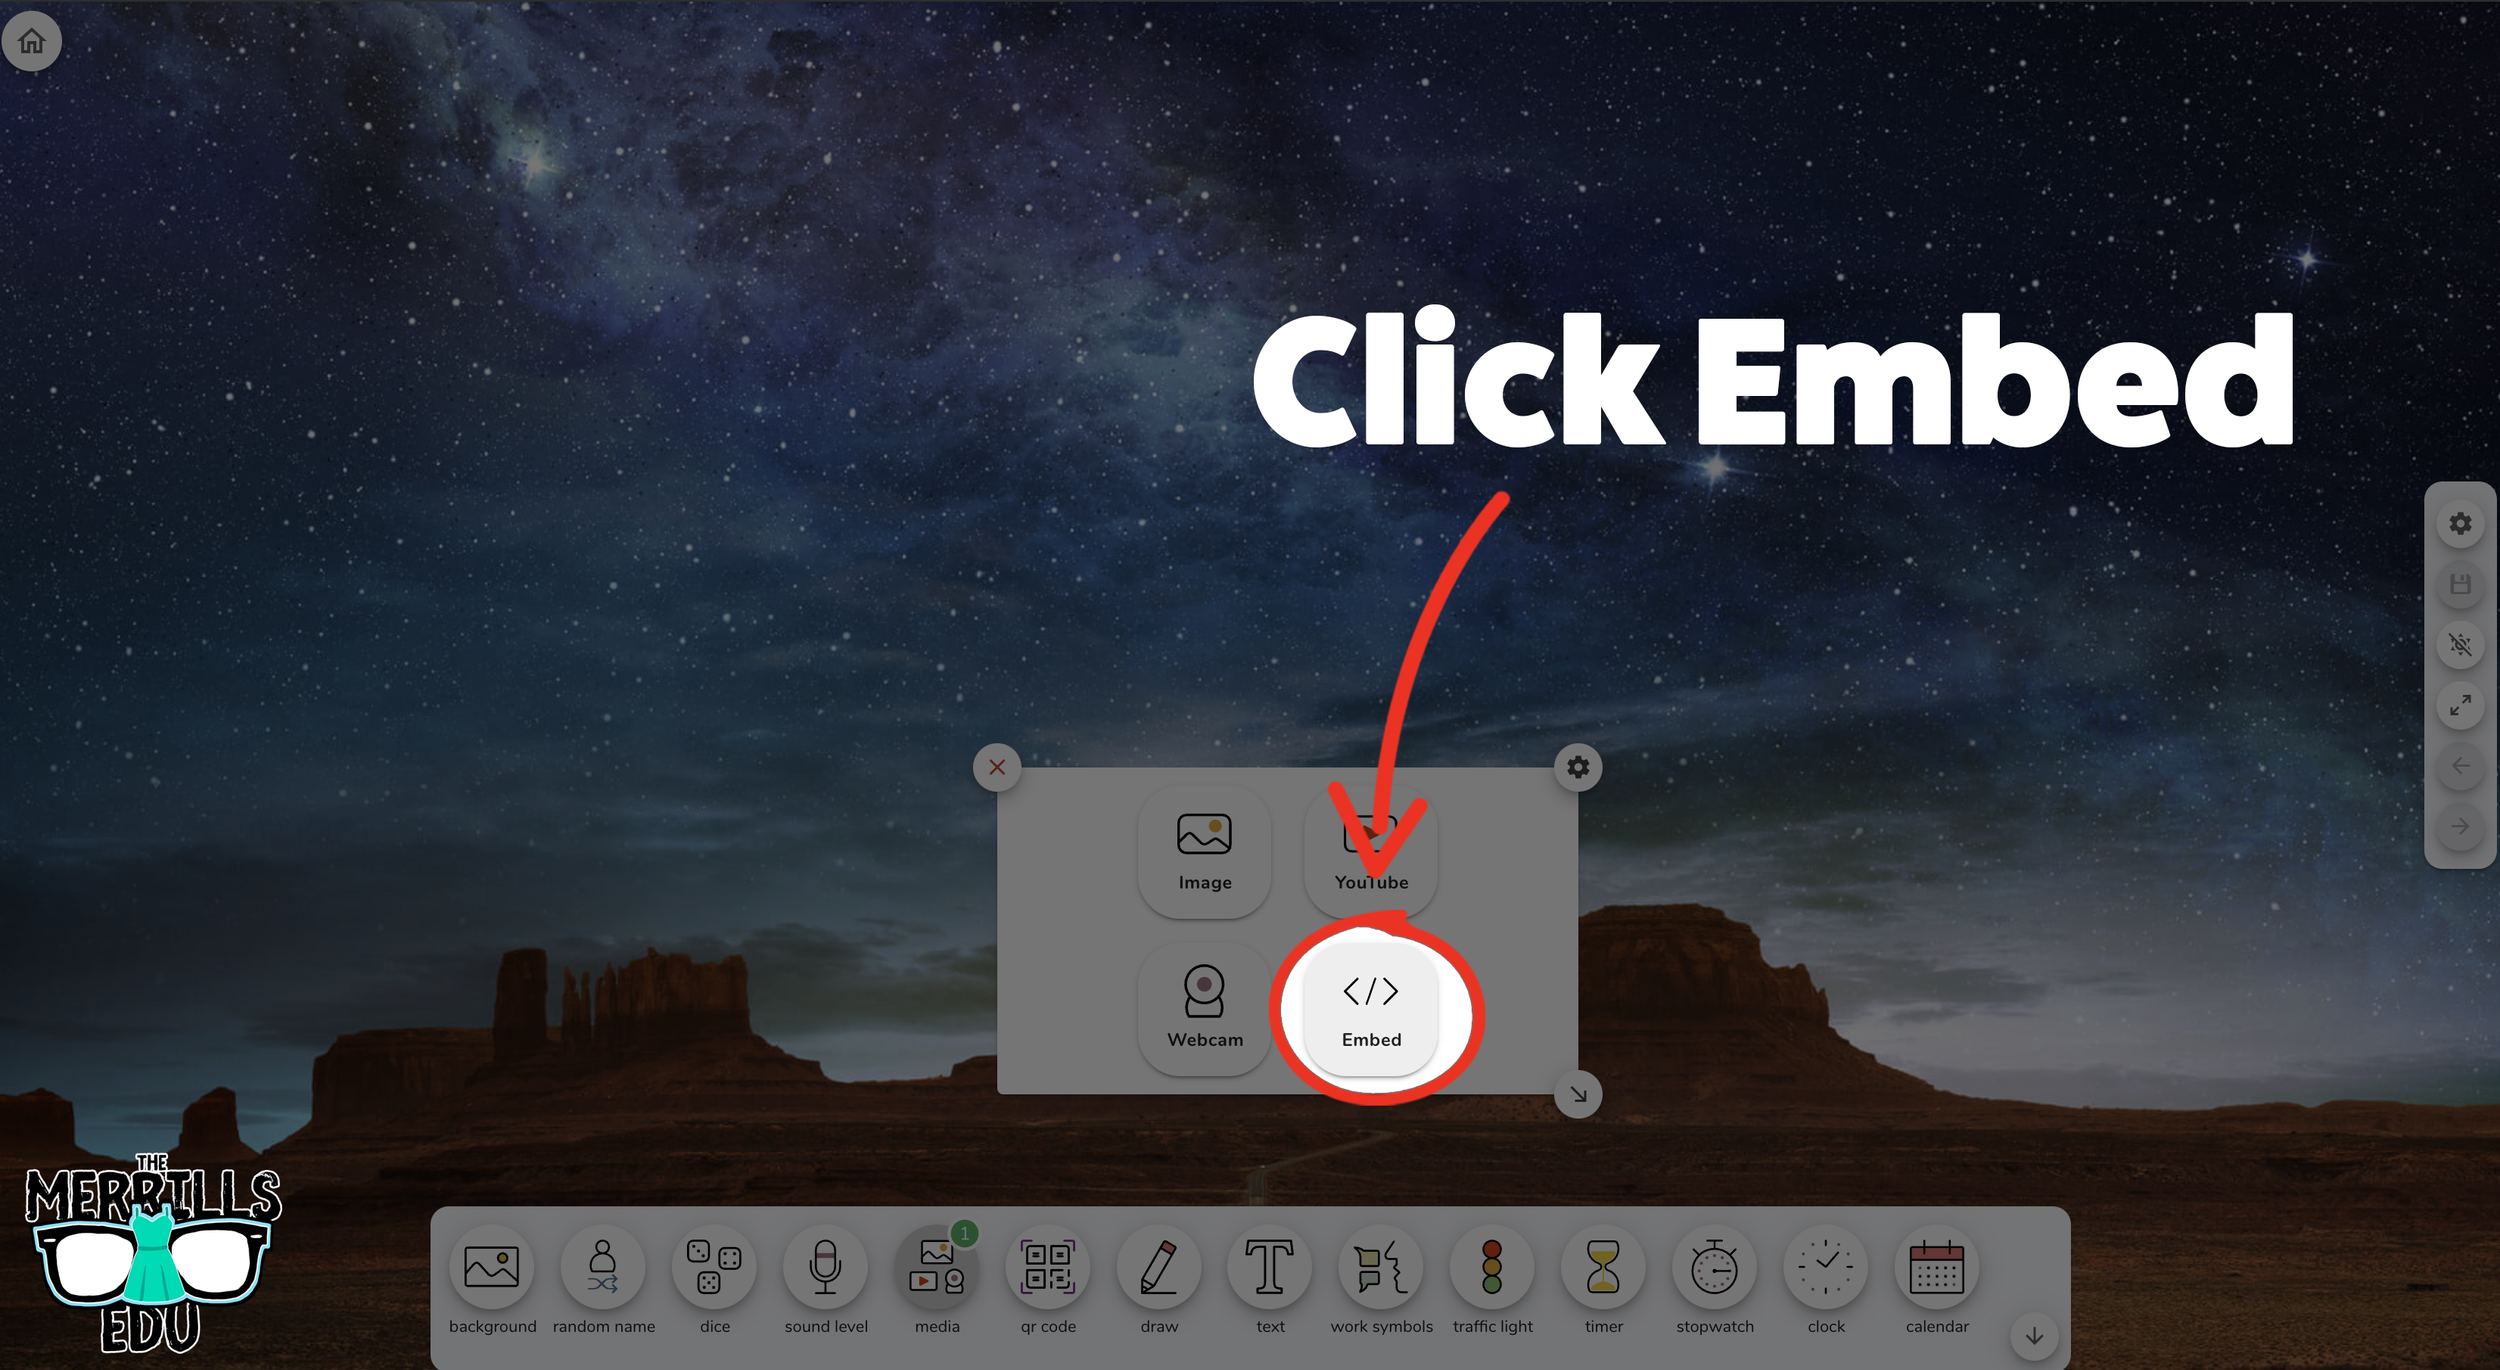

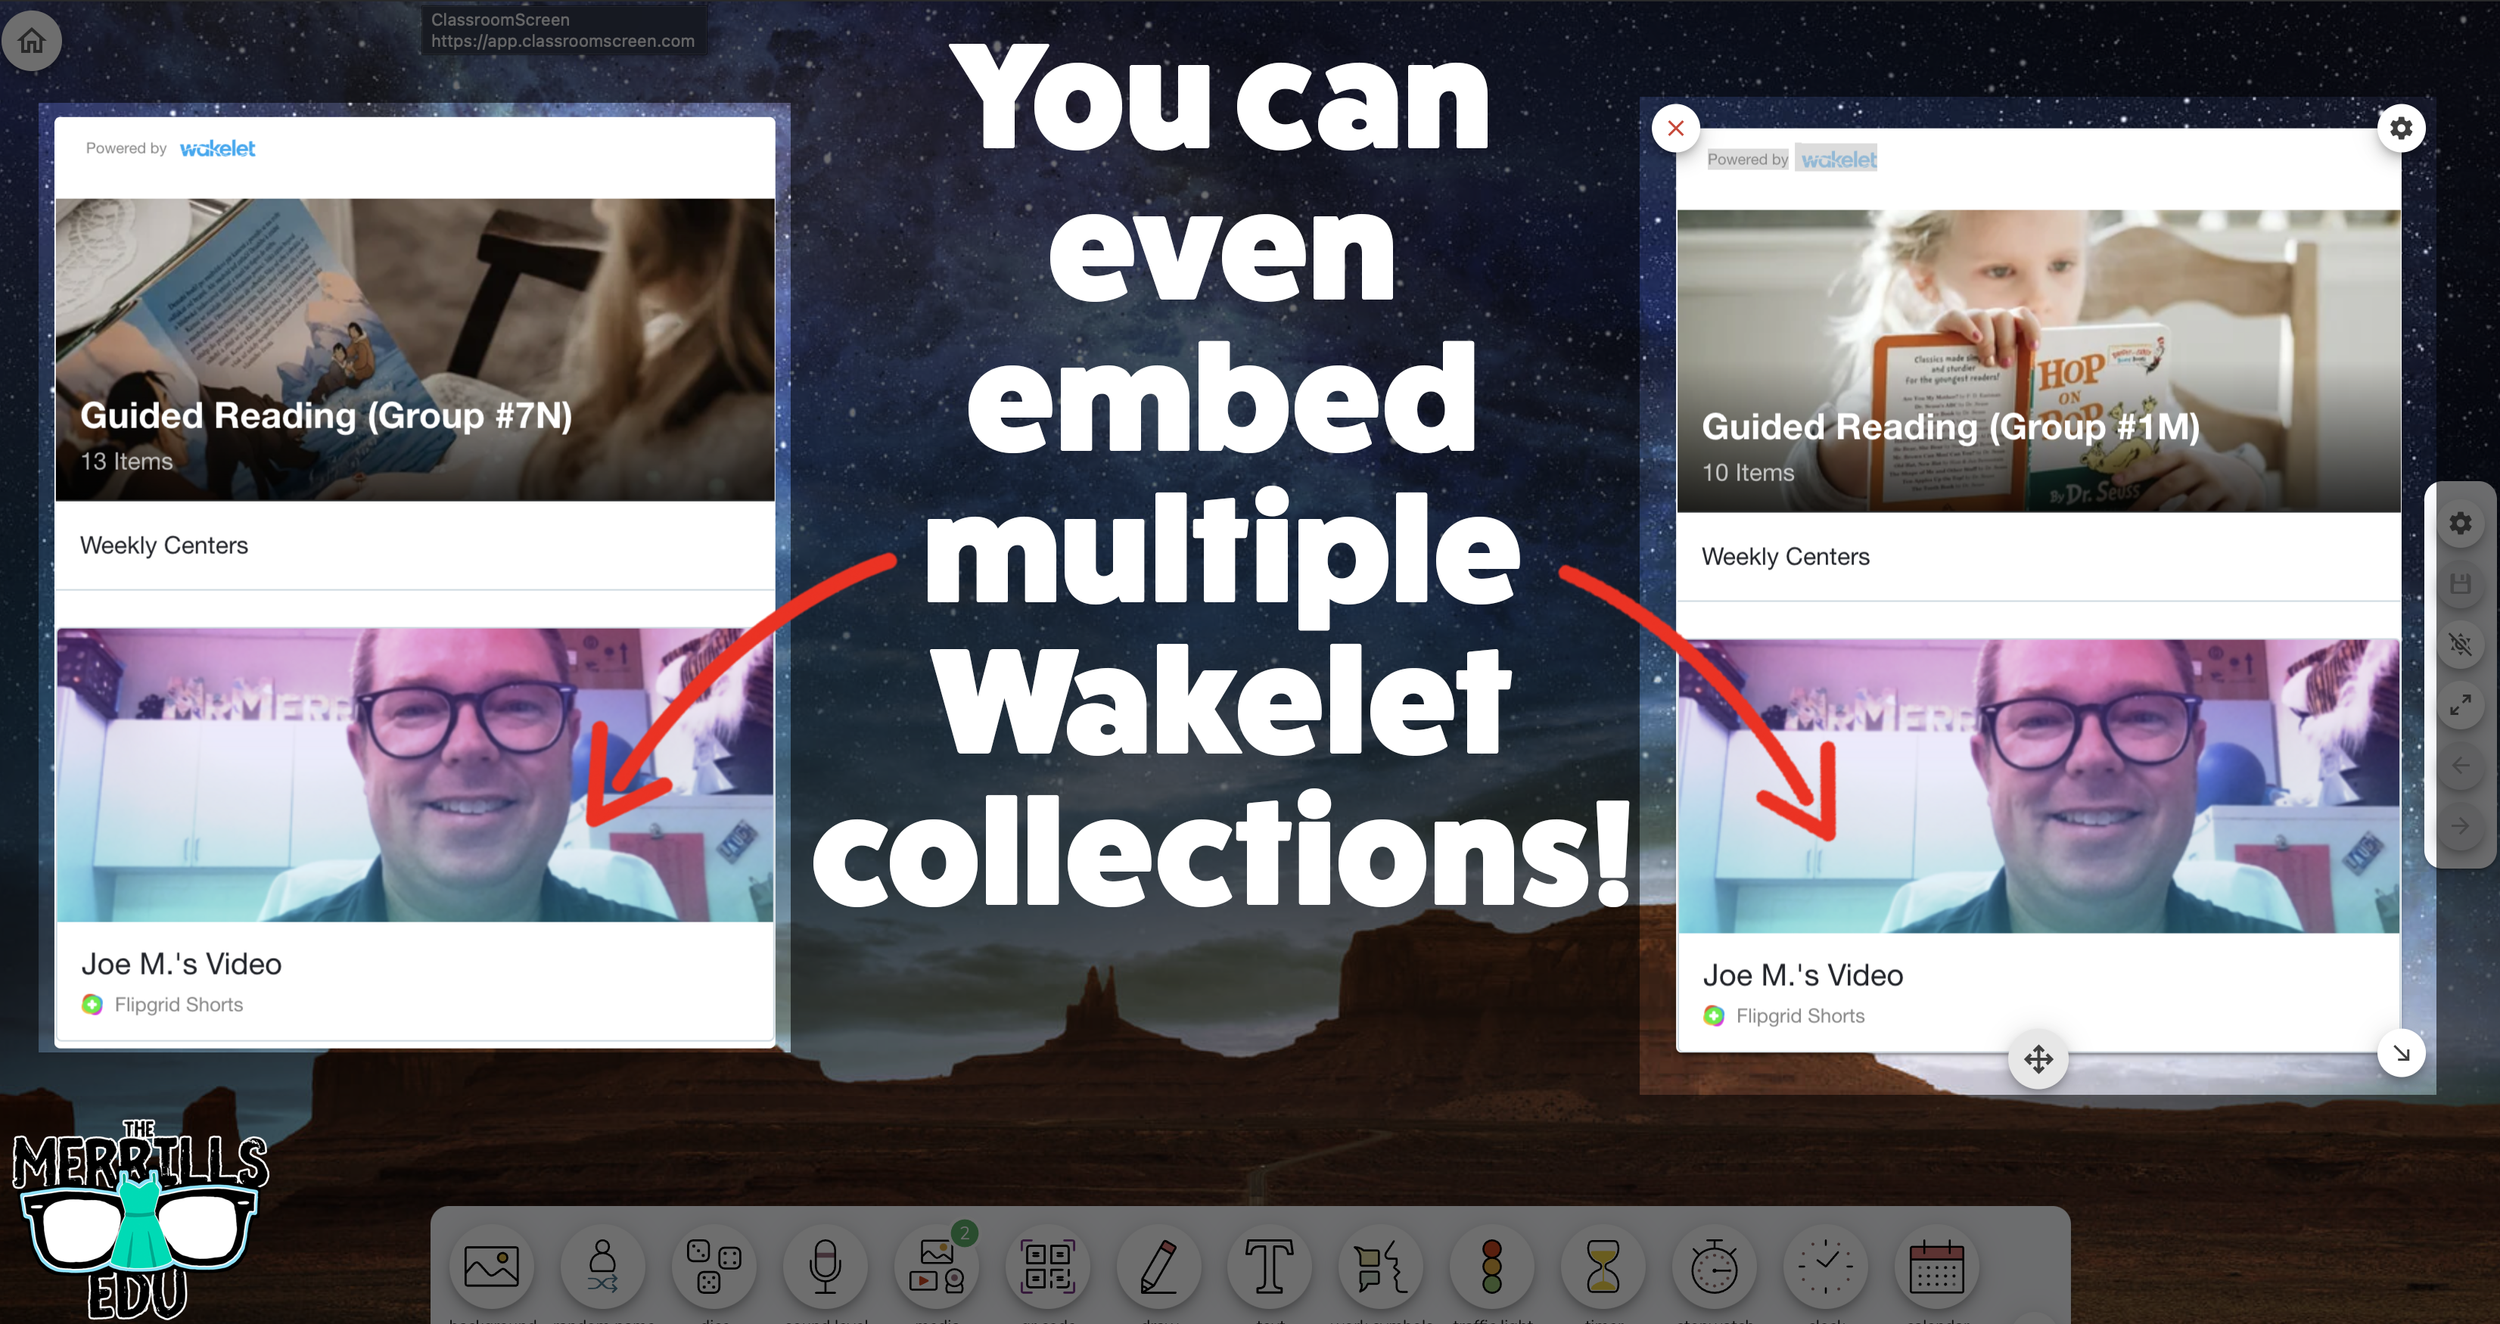
(Note: you will need to make your Wakelet collection either Public or Unlisted for this to work)
In a Wakelet collection, click the “Share” button.
In the pop-up window, click “Embed.”
Select your preferred settings, then click “Copy Embed Code.”
In a separate tab, head over to ClassroomScreen.com and start a new screen (or open an old one).
With your Classroom Screen open, click on “Media” from the menu options running along the bottom of the screen.
A new window will open. Click “Embed.”
Click inside the embed area and paste your Wakelet code.
With the code pasted, click on “Run code.”
Your Wakelet collection will now appear! You can move the Wakelet collection around by clicking on the arrows (located at the bottom), or stretch the collection out by clicking the arrow on the bottom right - then dragging it to the desired location.
Now, Wakelet is embedded into Classroom Screen!
BONUS: You can add multiple Wakelet embeds onto the same Classroom Screen!
-- Let us know if you’re using any of these ideas in your classroom! Be sure to follow us on social media (@TheMerrillsEDU everywhere) and tag us! 👓👗
For more tips, tricks and lesson ideas for making learning more interACTIVE, check out our books The InterACTIVE Class and Flipgrid in the InterACTIVE Class on Amazon!


Building Background Knowledge with InterACTIVE Story Boards
Building strong background knowledge is one of the six interACTIVE pieces we believe all educators should have when revising and refining their personal pedagogy. In today’s classroom, we as teachers use many different strategies to help students build background knowledge including discussions, videos, AR/VR and much more. Learn how Story Boards can help your students make connections to their own reading in a fun and engaging way!

Building strong background knowledge is one of the six interACTIVE pieces we believe all educators should have when revising and refining their personal pedagogy. In today’s classroom, we as teachers use many different strategies to help students build background knowledge including discussions, videos, AR/VR and much more.

As primary educators, we like to integrate picture books into our units due to their accessible nature. They are short in length, easy to fit into almost any reading block, and they have an innate ability to help students build background knowledge. This is where the idea of interactive story boards were born!
In Kristin’s fourth grade classroom, when reading nonfiction, she has often incorporated the idea of Multimedia Text Sets developed by Lisa Highfill and the authors of the Hyperdoc Handbook. There is a wonderful article explaining how these Multimedia Text Sets differ from Hyperdocs that you can find here if you would like to learn more. These multimedia text sets are designed to give students the opportunity to explore content curated for a specific purpose. These sets give students more agency, while also approaching a topic with more of an inquiry-based method. It allows students to slow down and develop a sense of curiosity and background knowledge around a subject before diving into the content further.
Now, when using a picture book in the classroom, give students a chance to develop an understanding of the content and the message beyond just the pages of the book. With interactive story boards, students can learn more about the author, their message and see real world applications of the ideas they read about. In this blog we are going to share several interactive story boards we created to use with our own students, and give you the ability to download, edit and use again in your own specific learning environment!
Change Sings

Change Sings is the much-anticipated picture book by presidential inaugural poet and activist Amanda Gorman, anything is possible when our voices join together. As a young girl leads a cast of characters on a musical journey, they learn that they have the power to make changes—big or small—in the world, in their communities, and in most importantly, in themselves.

In the interactive story board above, students can watch her historical poetic introduction, learn more about the illustrator of the book, read poetry from other famous African American poets, and more! The template can be downloaded as a Google slide or PowerPoint presentation and all text and links are editable!
Make sure to sign up for our email list to get each all of our future story boards first as we create them!
-- Let us know if you’re using any of these ideas in your classroom! Be sure to follow us on social media (@TheMerrillsEDU everywhere) and tag us! 👓👗
For more tips, tricks and lesson ideas for making learning more interACTIVE, check out our books The InterACTIVE Class and Flipgrid in the InterACTIVE Class on Amazon!


How to Use Canva in Book Creator
Book Creator has always been one of our favorite go-to apps in the classroom. But now, with the ability to bring you Canva creations into Book Creator, things just way better! In this post, you’ll learn how to use Canva in Book Creator.
Book Creator has always been one of our favorite go-to apps in the classroom. But now, with the ability to bring you Canva creations into Book Creator, things just way better! In this post, you’ll learn how to use Canva in Book Creator.
(Click any subheading below to jump to that section! This is NOT a paid post.)

How to connect Canva to Book Creator

How to add Canva creations into Book Creator
How to Connect Canva
to Book Creator
Before we get started there is something to note…Both a Canva and Book Creator account are required. Both are free and you can sign up for a Canva (for educators) account here, and a Book Creator account here.
To connect Canva to Book Creator, follow these steps:
Log into Book Creator, then click on the hamburger / three lines located on the top left.
In the next window, click “Apps.”
Locate the Canva app section, and then click the “+” sign.
A new window will pop up. Click enable app.
Then, choose the appropriate class or classes and click done.
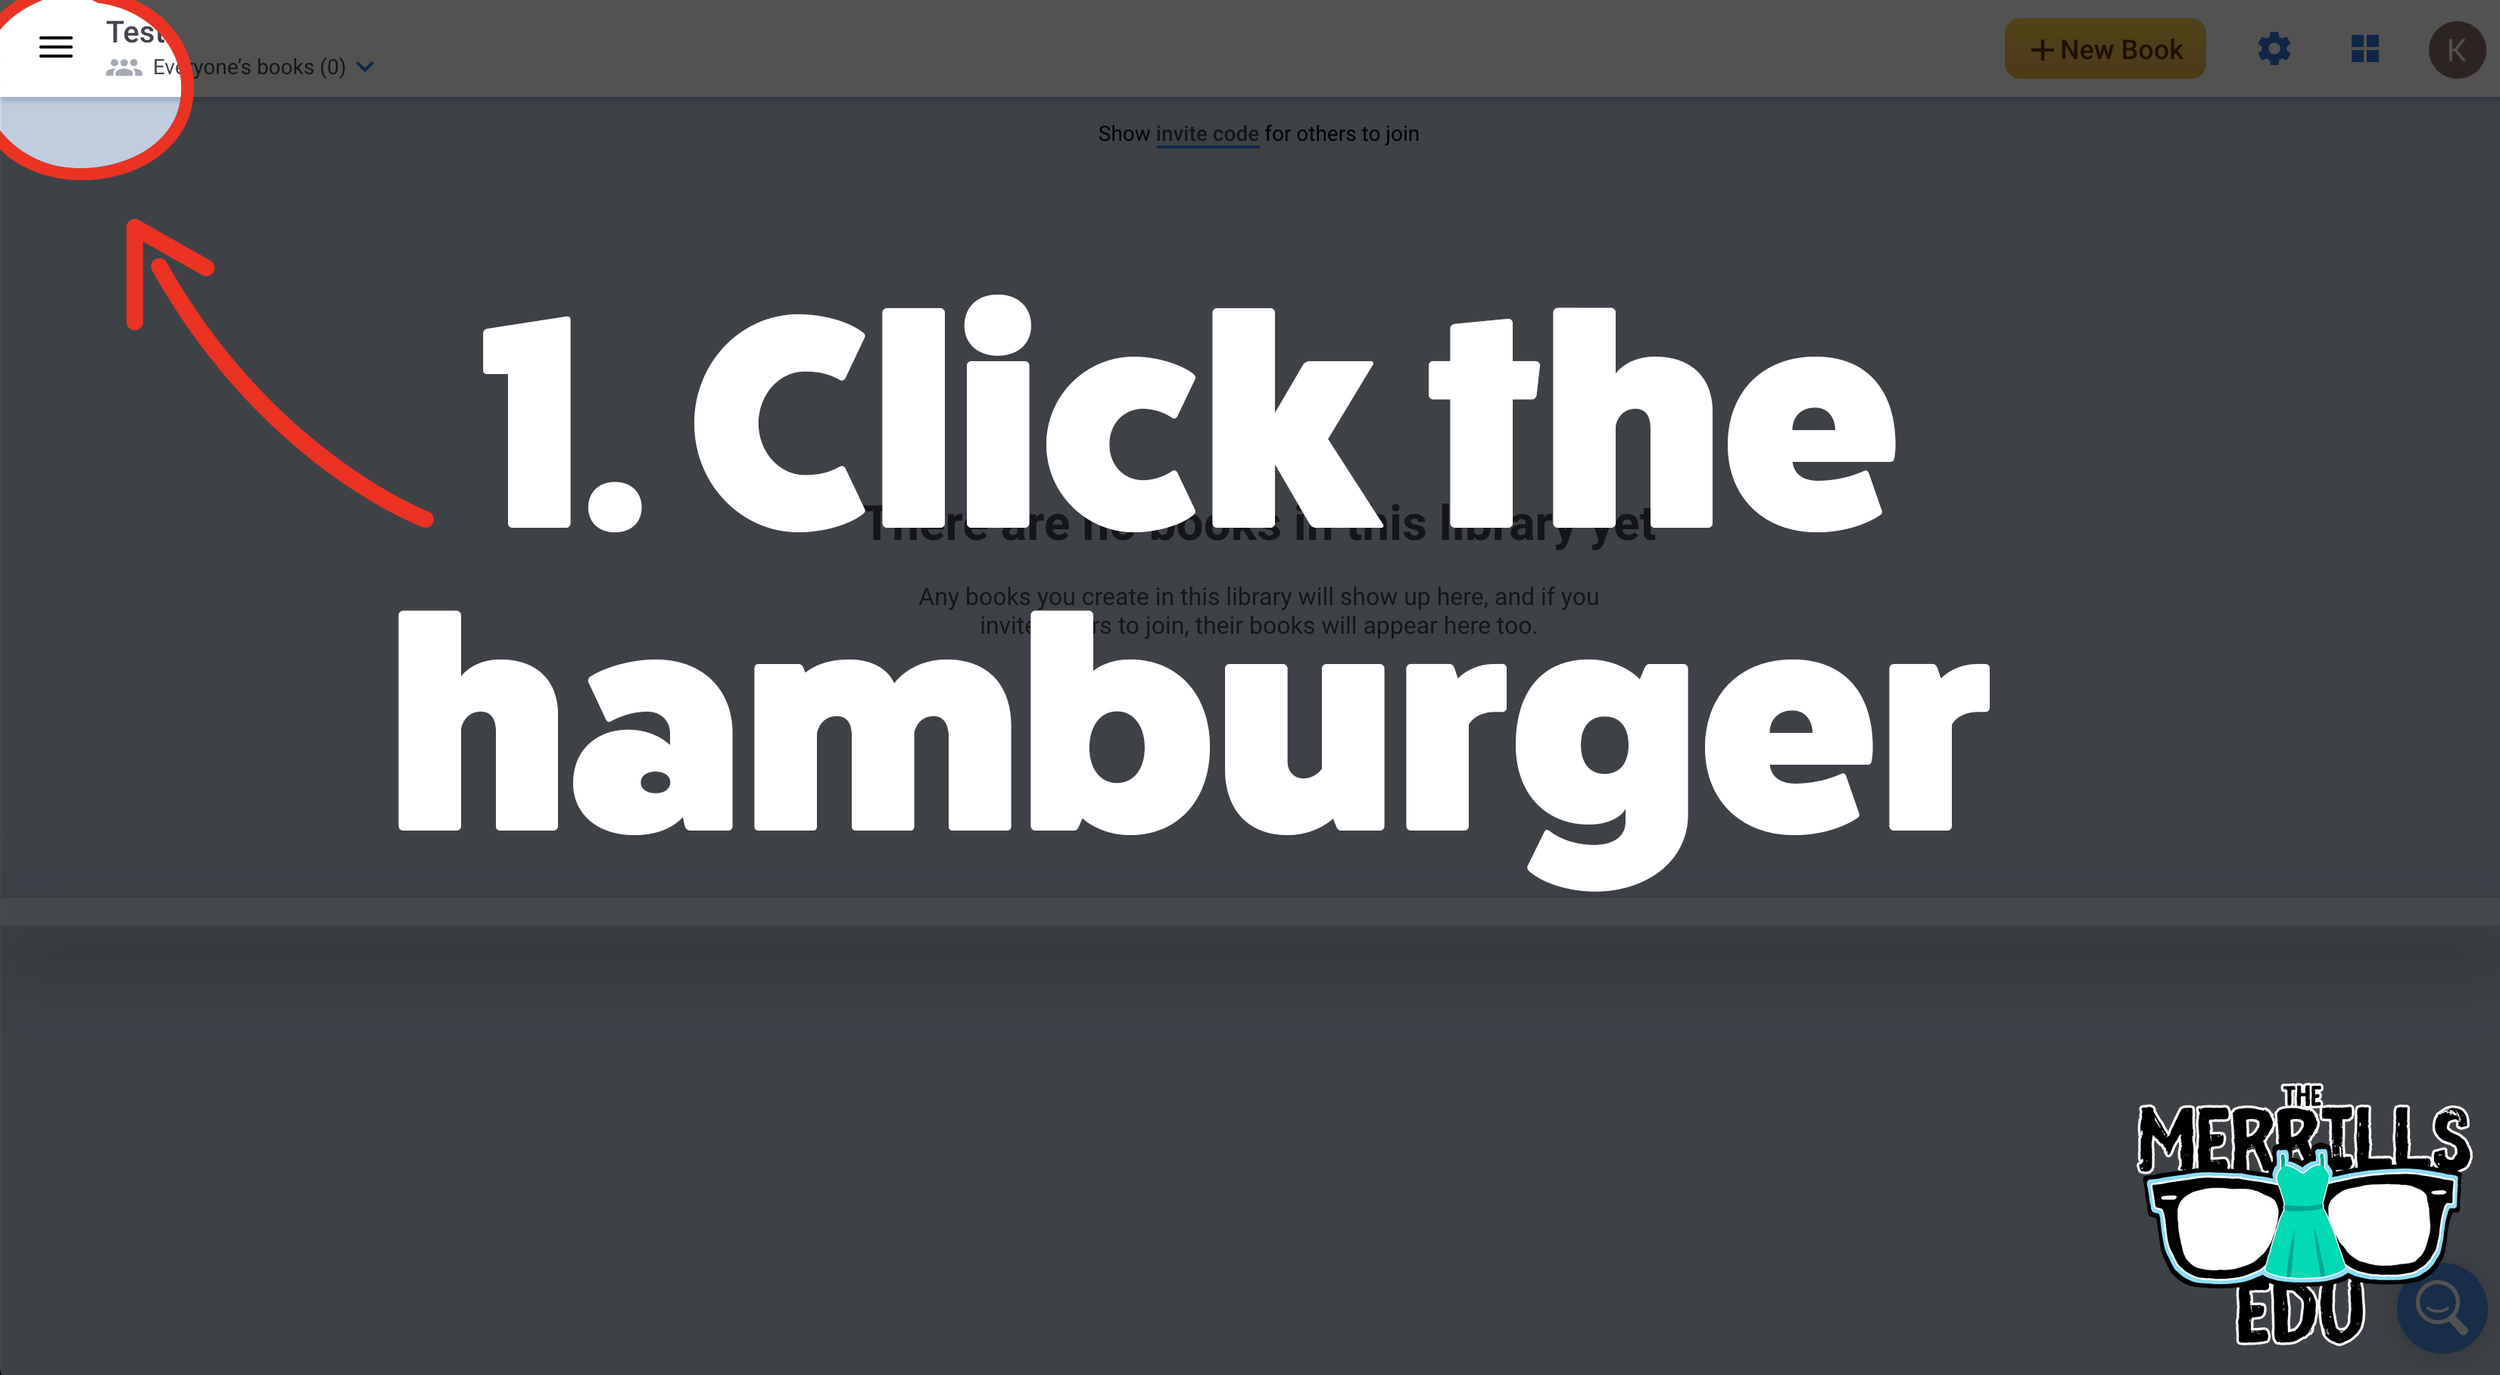
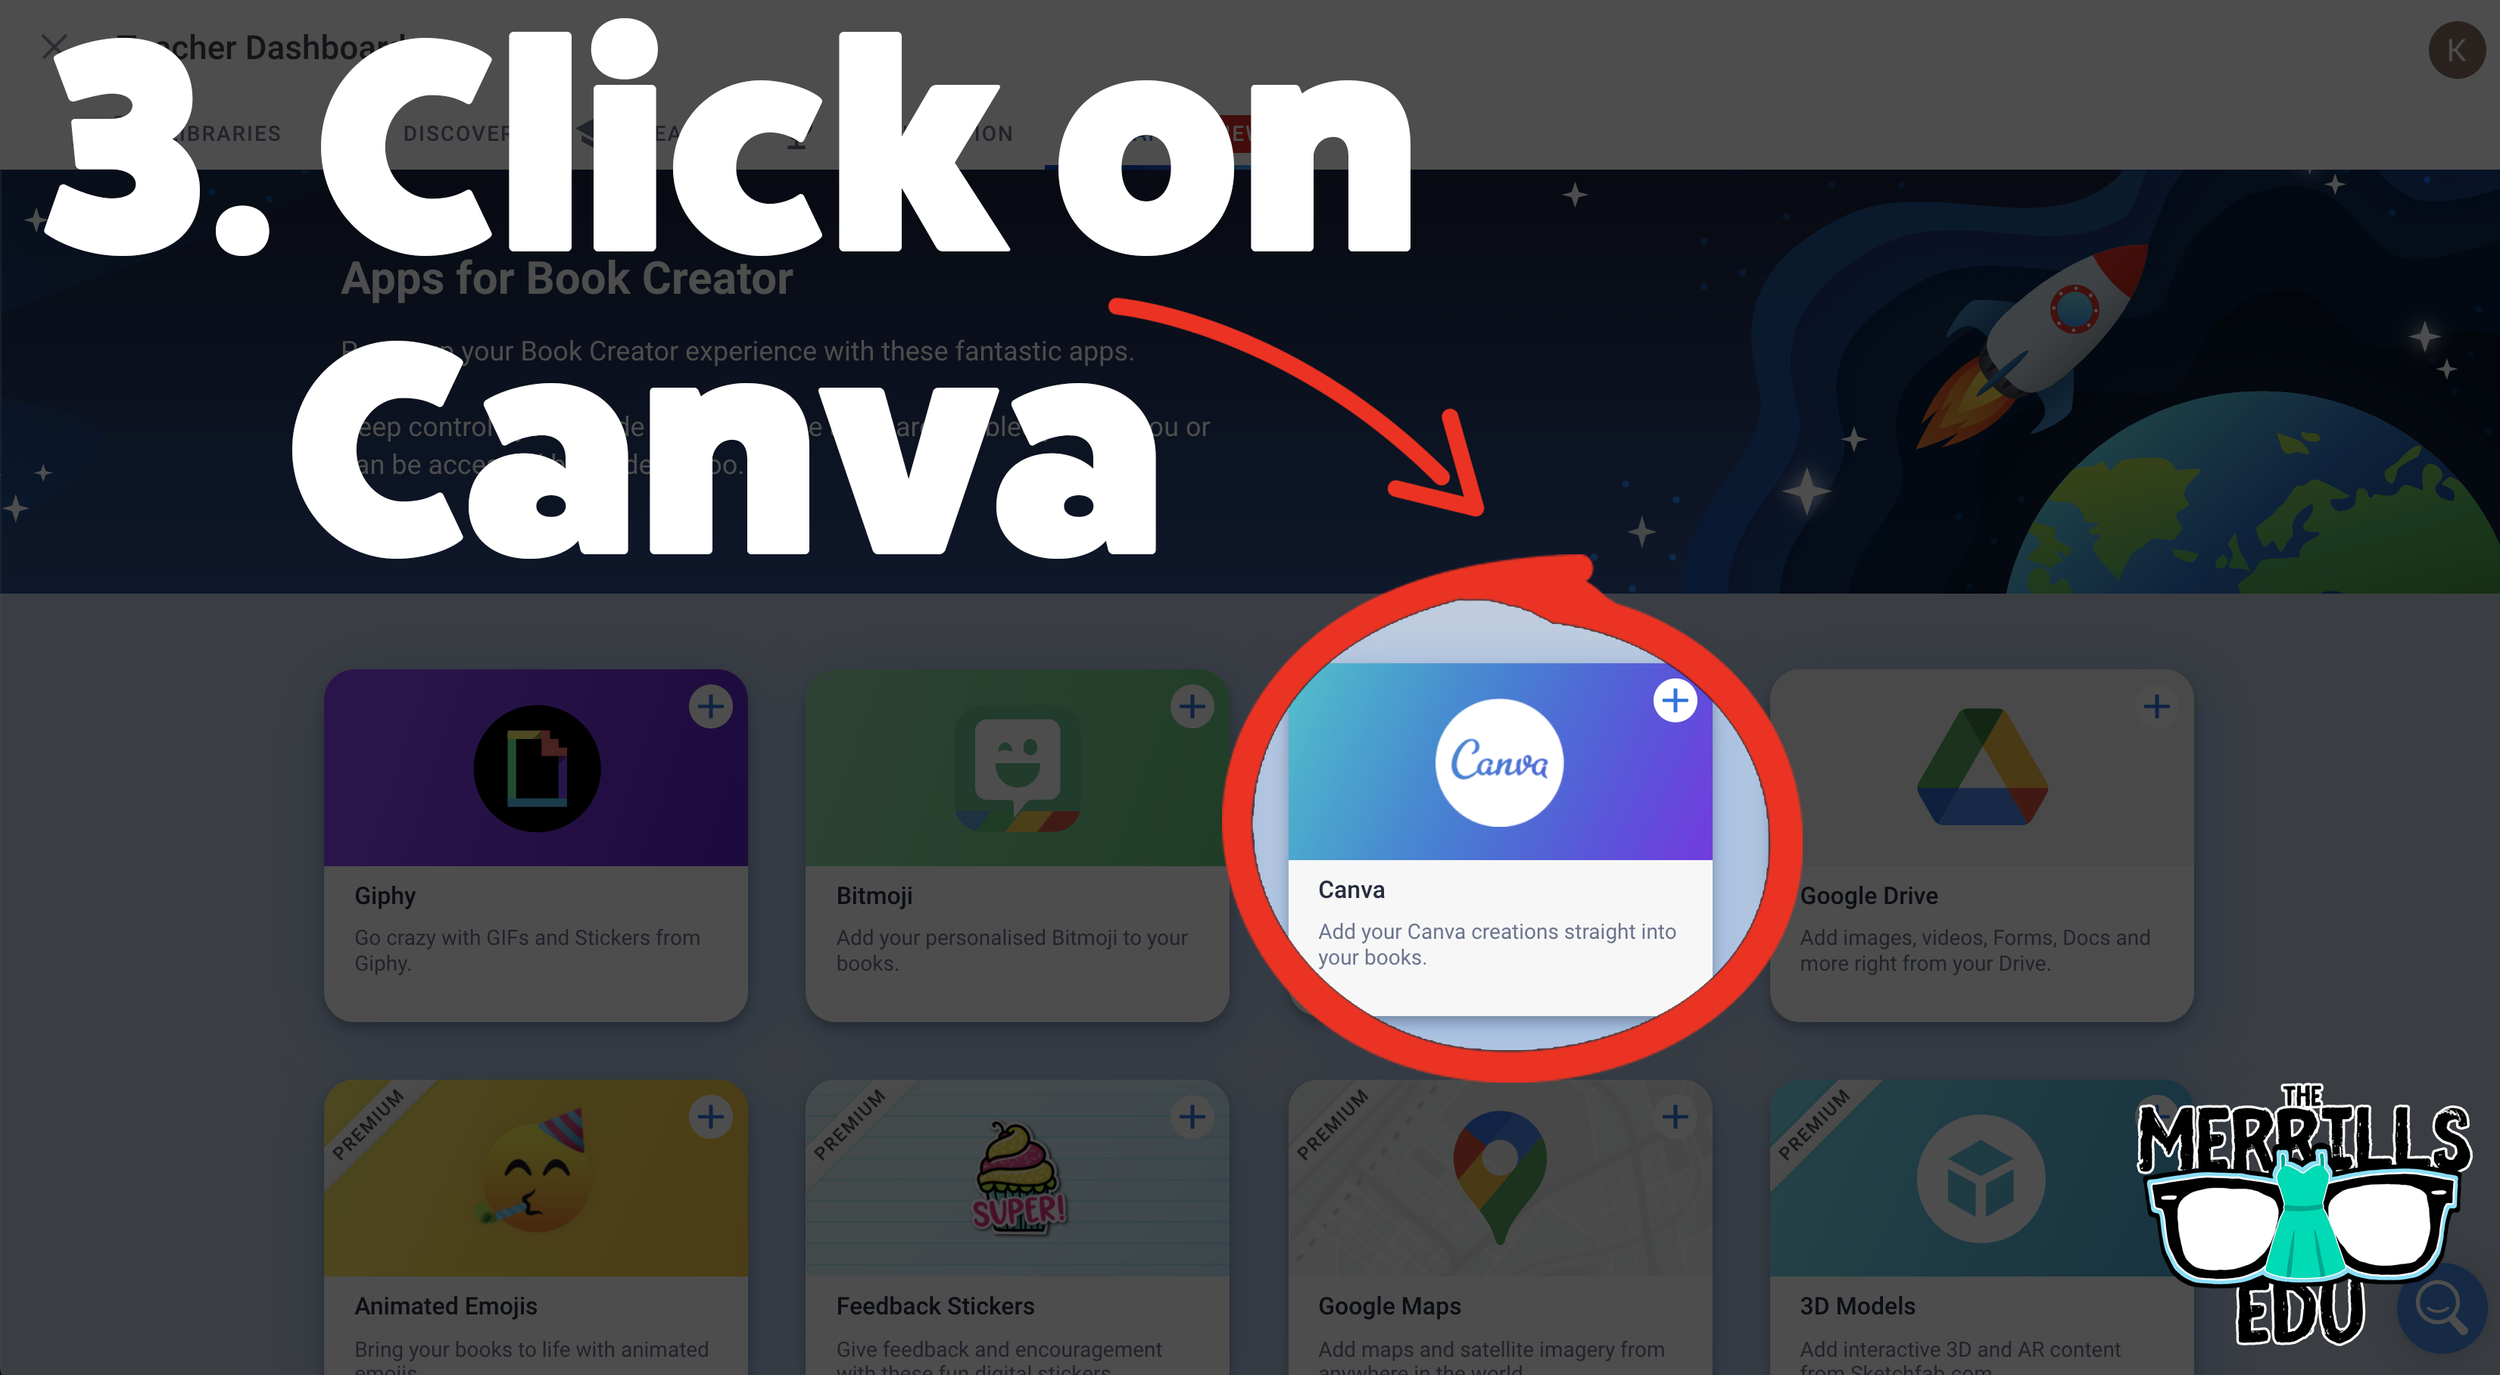
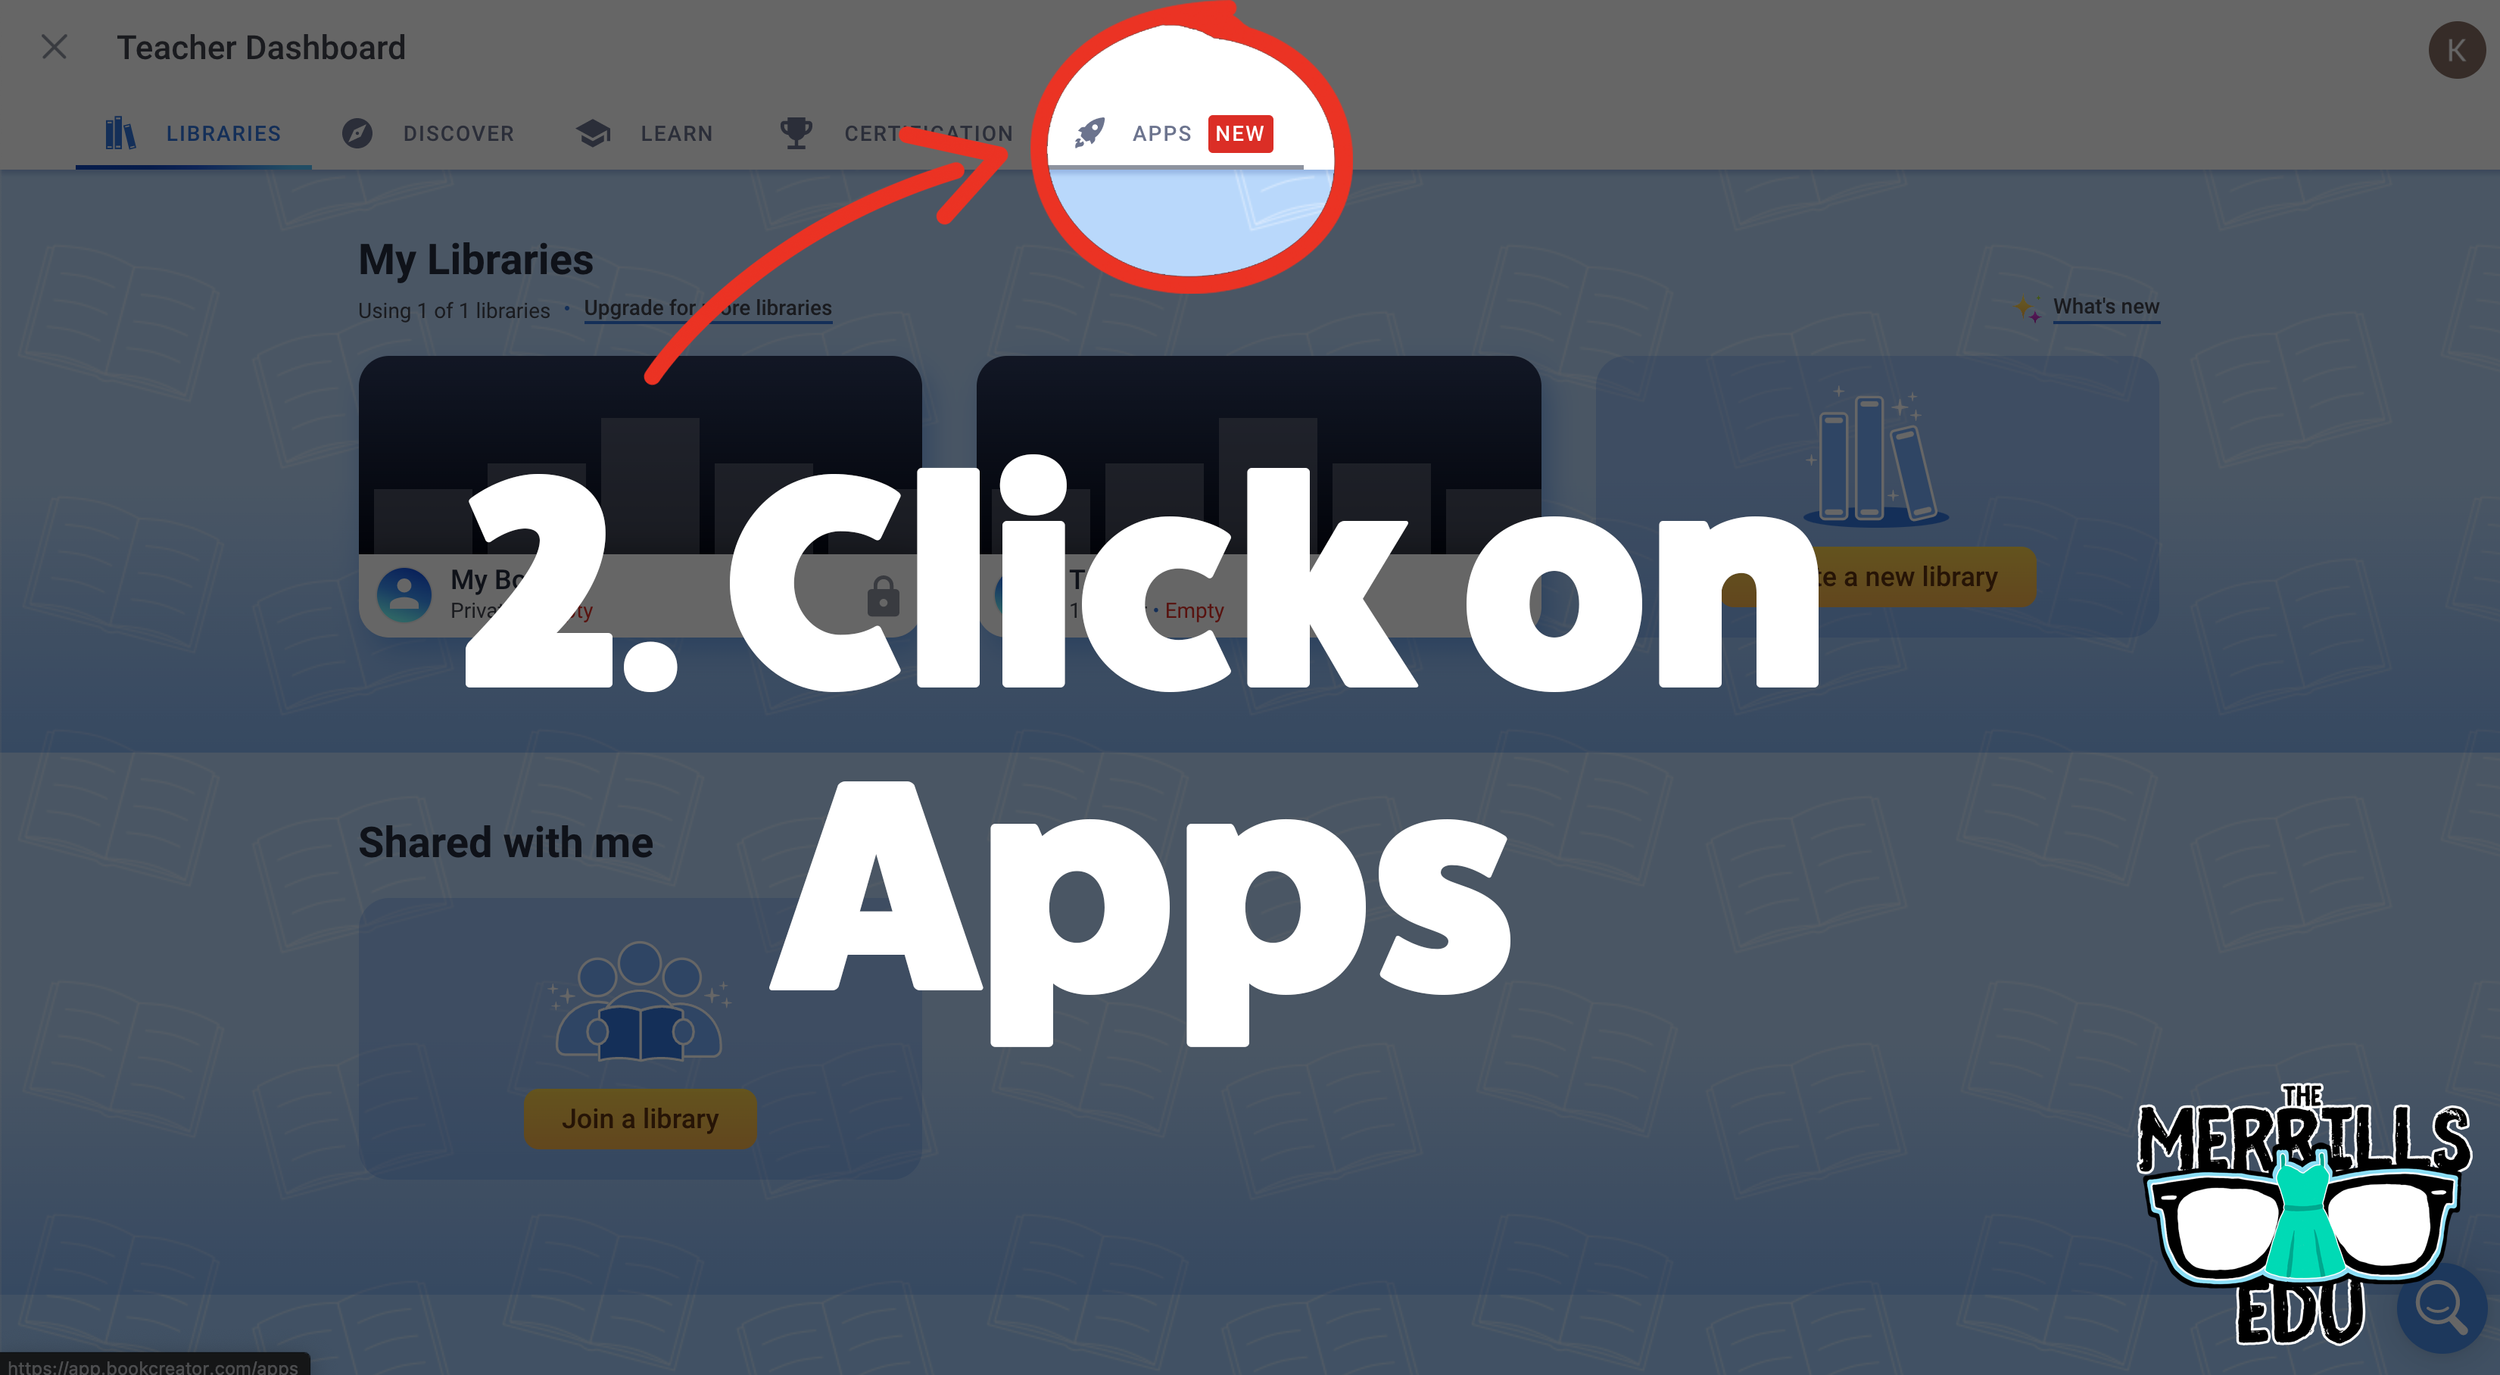
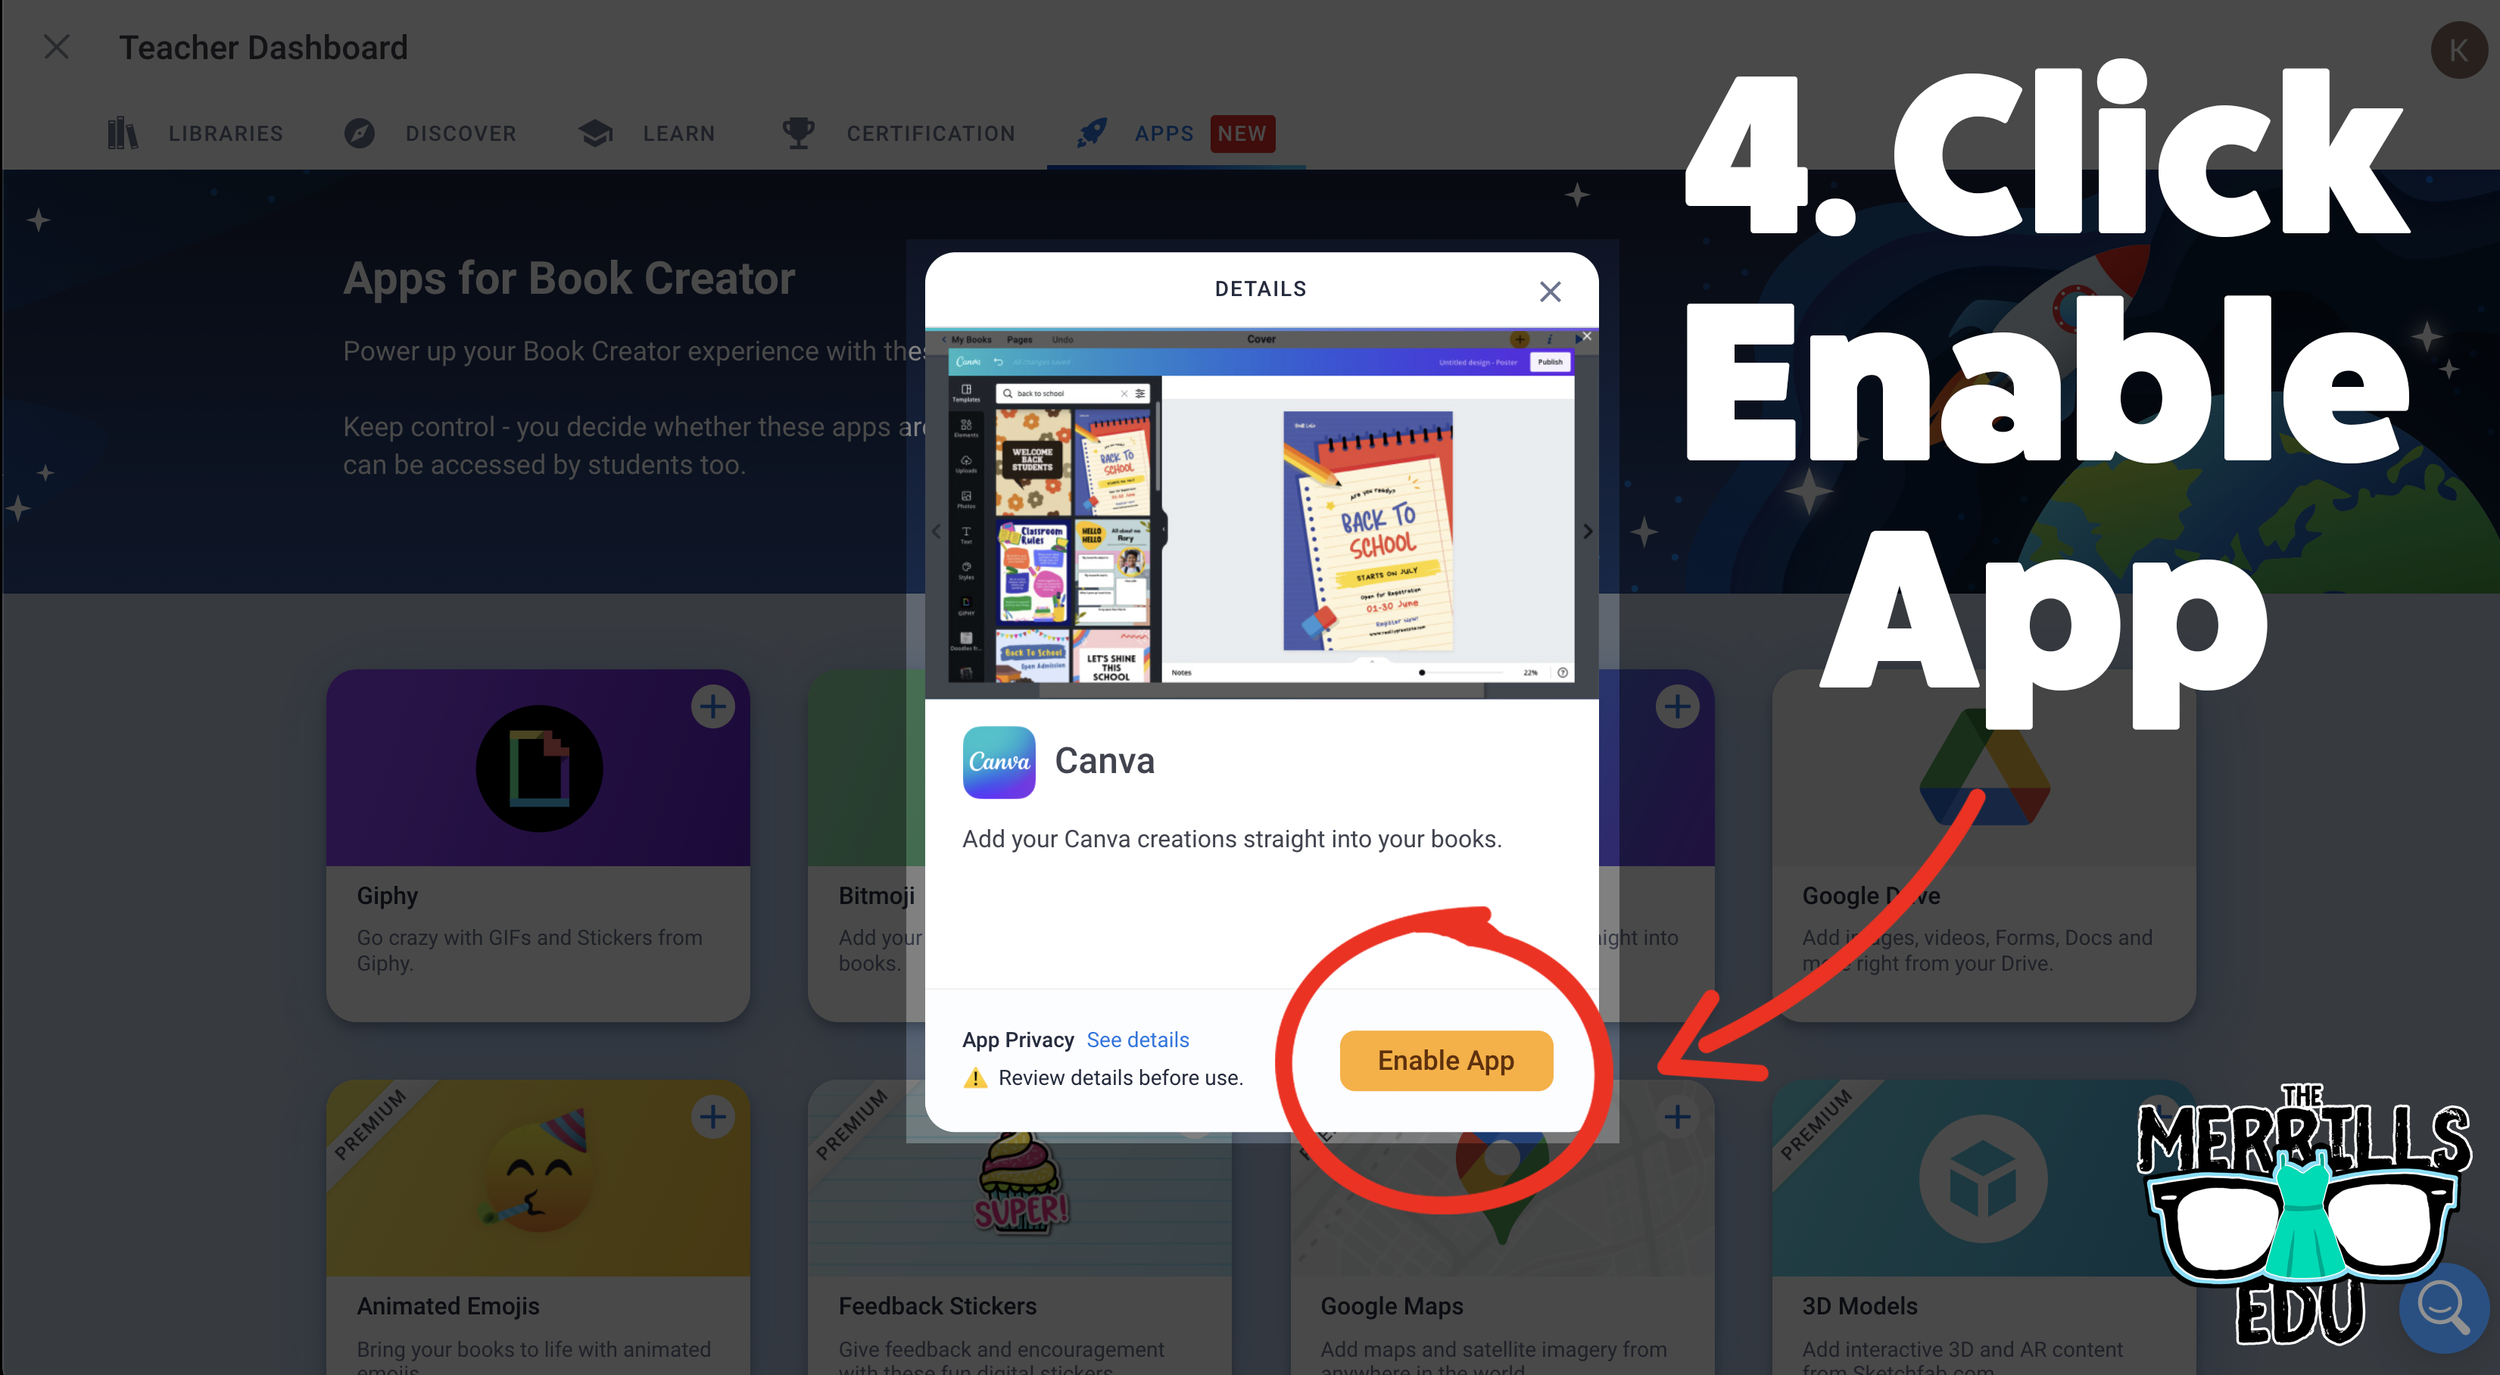
Now you and your students can use Canva right from Book Creator! Students will not need to toggle back and forth between the two. Canva will open right from within Book Creator. Check it out below!
How to add Canva Creations into Book Creator
Now that you have connected your student’s Canva accounts with Book Creator, here’s how they can start using the two together. Students will not need to toggle back-and-forth to use both apps. Instead, Canva will open right within Book Creator. To add a Canva creation in Book Creator, follow these steps:
In a book, click on the “+” symbol on the top right.
Click “More” from the menu (with the Rocket Ship icon).
Click Canva (you may be prompted to log into your Canva account)
Canva will pop out from Book Creator! Design as you would in Canva.
When you’re finished and ready to add it to your book, click “Add to Book.”
Now, your Canva design is placed into your Book Creator book!
It’s that easy! Something to note - if you have previous designs that you would like to use, you can click on the icon that says, “All of Your Designs.” This will allow you to use anything that you have already created in Canva. Don’t forget, there are also additional options for design by clicking the three dots / “More” icon. This will open up features like Drawing, QR Codes, Building Your Own Character and more!
-- Let us know if you’re using any of these ideas in your classroom! Be sure to follow us on social media (@TheMerrillsEDU everywhere) and tag us! 👓👗
For more tips, tricks and lesson ideas for making learning more interACTIVE, check out our books The InterACTIVE Class and Flipgrid in the InterACTIVE Class on Amazon!


10 Ways for Teachers to Use Canva in the Classroom
Did you know that Canva for Education is 100% free for educators and students? It is! But how does one of today’s best design programs translate into your classroom? Here are our top 10 favorite ways for teachers to use Canva!

Canva for Education isn’t just for students! Even teachers can get in on the fun! Create your own designs from scratch, or choose from our library of over 60,000 high quality, educational templates. The best part of all, it’s absolutely FREE! So, how does this translate into the classroom? Here are 10 different ways that teachers can use Canva in the classroom.
(Click on any image to jump to that section. This is NOT a paid post.)


Creating Email Signatures in Canva
An email signature is an important element of your communication. It shows your personality, introduces the person behind emails, and provides necessary contact information. Designing one in Canva is easy! Just search “Email signatures” in the search box to find plenty of templates to choose from. Looking for something a but more “teacher” and little less “business?” Check out our template! You can download the template by clicking here or the image below!


Creating Headers in Canva
Custom created headers are more important than just looks. Creating headers that are directly associated with your class are easier for students to identify, which can lead them to your content quicker. In Joe’s first grade class, he creates customer headers for everything. This tells his young learners that they’re the right place. Designing your own isn’t difficult and with Canva, it can be done quickly. Here’s an image to help save you some time - all the header dimensions you’ll need! Check out our pre-designed templates for Flipgrid, Wakelet, Google Classroom, Canva and Microsoft Teams.

A good practice here is to make sure that your images match across the different platforms. For example, if you’re using Wakelet, Flipgrid and Teams - it’s recommended that your class header / theme and picture are all the same. This allows students to quickly identify where they are supposed to be. To save some time, we’ve created and collected some of our favorites in the template below. Click here or the image below to download them for yourself!

Once you’ve decided on an image, you can resize it to fit the platform you’re designing for. Just use our header dimensions guide (pictured above) and resize the image appropriately. If you’re not sure how to resize the image in Canva, just follow the steps below!


Creating Newsletters in Canva
Communication with your students’ families is an important key to providing success for your students. Canva’s newsletter templates for school publications make designing easy - even while on the go. Teachers can build and maintain their newsletters on a desktop or mobile device. These templates can be printed and then copied, or simply send out the share link to your families to save paper. Updating your families has never been easier! Check out some newsletter templates by searching for “School newsletter,” or just “newsletter.” Check out one of our favorite templates below! Click here or the image below to download it and edit it for yourself!


Student Awards on Canva
Are you looking to motivate your students? Generic awards can have positive effects, but what if you could design target specific achievements that can be printed and shared - either on a computer or mobile device? With Canva, you can! These can be printed or shared digitally. Stop using outdated programs - there’s an easier way! Check out the templates to choose from. Just search for “Student Award” in the search bar.

Device Wallpaper and Backgrounds on Canva
If you’re in a situation where your students use shared devices (or perhaps you just want to be able to tell the devices apart from one another), you can design wallpaper and backgrounds on Canva. This will help keep your tech organized and easy to maintain. No more, “Did I put that app on iPad #7?” Wait…Which one is #7?” 😂
There are different sizes depending on your device. Check out our image below to guarantee your creating the appropriate size for your devices.


Generally speaking, when designing it’s always better to start with an image that’s too big. Trying to stretch an image that’s too small can cause it to pixelate. So, be careful with your sizes. If you’re looking for some inspiration, or just something easy - we’ve got you covered! Check out our templates! Click here or the image to download them!

Creating Lesson Plans, Worksheets
and Resources on Canva
Using Canva to create lesson plans is definitely beneficial. For one, easy access to files provides quick and efficient editing. So, when a lesson doesn’t go as planned and you need to re-evaluate the next day’s plans, it can be done quickly (and from any device). We also love the idea of being able to share and collaborate on your plans with your teammates. Click on the image to the above to download some of our favorite templates. These templates can be duplicated for the day, or even the week.

Canva is also a great place to create your own worksheets and resources. The advantage here is that you can create target specific content that will deliberately meet the needs of your students - something that you cannot accomplish easily from downloading from other sites. Another advantage is that you can assign your resources to your students directly within Canva - so you can avoid the copier and save the environment! Check out a template we designed and a few others that we found below. Click here or the image above to get started!

Creating Anchor Charts on Canva
The whole point of an Anchor Chart is to provide an artifact of learning. They contain students' and teachers' thoughts, ideas and processes pertaining to the lesson. But often times, after the lesson concludes, the anchor charts fade into the distance. Creating your anchor charts on Canva serves a valuable purpose. For example, you will always have access to those files - meaning you can open them back up at any time. These can be shared with your students, but most importantly - collaborated on! You can start with a template, share it to the class and then have everyone working on the file at the same time. Now, your students can participate in the actual creation of the anchor chart. With a few clicks, this file can be exported / downloaded and uploaded into any LMS or even a Flipgrid video. Check out our example below and click here or the image to download it for yourself!


Yard Signs Created and Printed on Canva
If you’re interested in looking for a new way to build your classroom environment, we love this idea: Yard signs! Create a yard sign that your students can take home for a week (or two) at a time and then bring back to give to the next person. Maybe you’ve got a student of the week or terrific kid that the entire neighborhood deserves to know about? Or perhaps it’s for a broader school-wide effort. Just design the sign by searching for “yard sign” on Canva. Design your sign and then send it to Canva to print! To print from Canva, follow the steps below.

The $30 fee includes a yard sign. Shipping is free unless you need the sign in a hurry. In which case, you can pay for expedited shipping. We’ve created two signs that you can download and edit as you see fit. Click here or the image below to get started!


Digital Classroom Badges on Canva

This is a great way to kick off the new school year or returning from a break. Educators can create digital classroom badges that can be designed for any types of rewards that you feel as though should be given out throughout the year. Some good examples include: “Tech Trainer or “CANva” (students who can teach others about Canva). Check out our template by clicking here or the image! Looking for some easy inspiration? We’ve got you covered! You can download our template for free! Click here or the image above to download it!

Embed Anything Created in Canva
A little known secret is that anything that you create in Canva can be embedded into your LMS or classroom websites. For example, if you create a resource in Canva, you can then embed it onto your Canvas or Schoology class page. To do so, follow the steps below:
Click the three dots on the top right side of the screen
In the search box, type “embed”
Click on Embed when it pops up, then click the purple “Embed” button
Copy the code and paste it into your destination (rich media editor)


BONUS: Canva Presentation Hacks
If you’re using Canva as a presentation tool, these hacks will come in handy! Note, you must be in presentation mode for these to work. To enter presentation mode, click the three dots on the top right, then click “Present.” Now for the fun:
Letter C for confetti rain
Letter D for a drumroll animation
Letter O for floating bubbles
Letter Q for quiet
Letter B to blur the current slide
Any number for a timer (1 for one minute, 2 for two minutes, etc.)
You can also press Shift + / or ? on your keyboard to open the magic effects menu.
To exit presentation mode, press ESC on your keyboard.
-- Let us know if you’re using any of these ideas in your classroom! Be sure to follow us on social media (@TheMerrillsEDU everywhere) and tag us! 👓👗
For more tips, tricks and lesson ideas for making learning more interACTIVE, check out our books The InterACTIVE Class and Flipgrid in the InterACTIVE Class on Amazon!


20 Ways for Students to Use Canva in the Classroom
Canva for education is 100% free for students and educators. It’s a great place for students to get creative with their thinking. But, if you’re not sure where to start, here are 20 different ways students can use Canva!
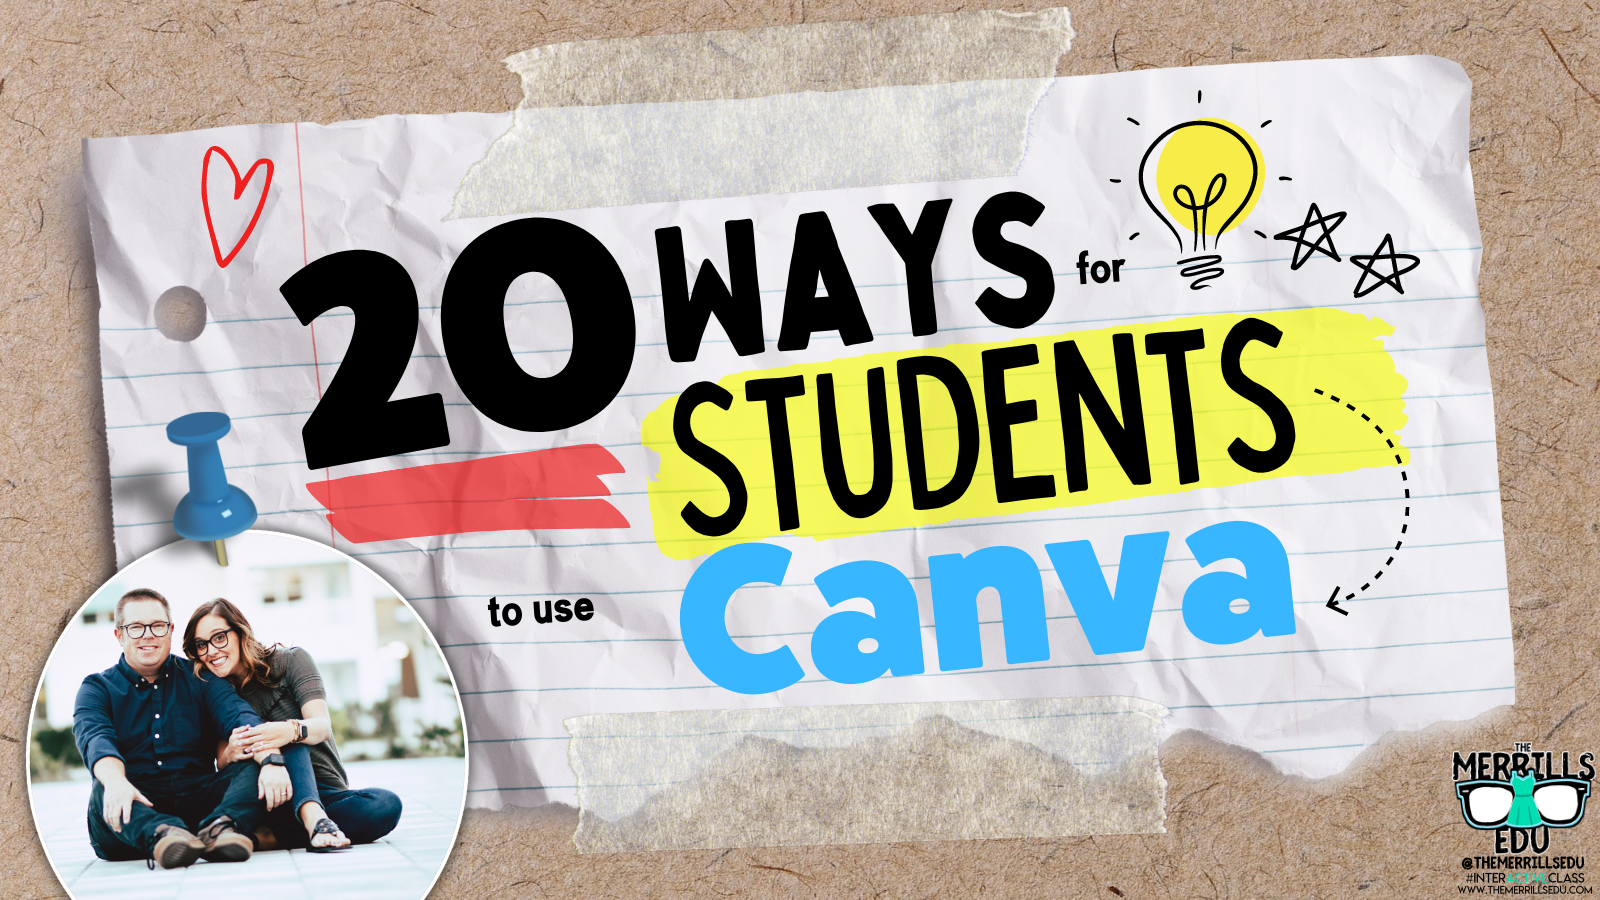
(updated: 10/15/25)
Canva for Education is a powerful design tool, allowing you and your students to create visually stunning designs for any subject or age level. You and your students can create your own designs from scratch, or choose from our library of over 60,000 high quality, educational templates. The best part of all, it’s absolutely FREE! So, how does this translate into the classroom? Here are 20 different ways that your students can use Canva in the classroom.
(Click on any image to jump to that section. This is NOT a paid post.)


Creating Videos in Canva
Students can quickly and easily create videos in Canva that can be shared out beyond the platform. There are tons of templates that allow you to drag and drop media right into the video. Students can use elements right from Canva or upload their own.
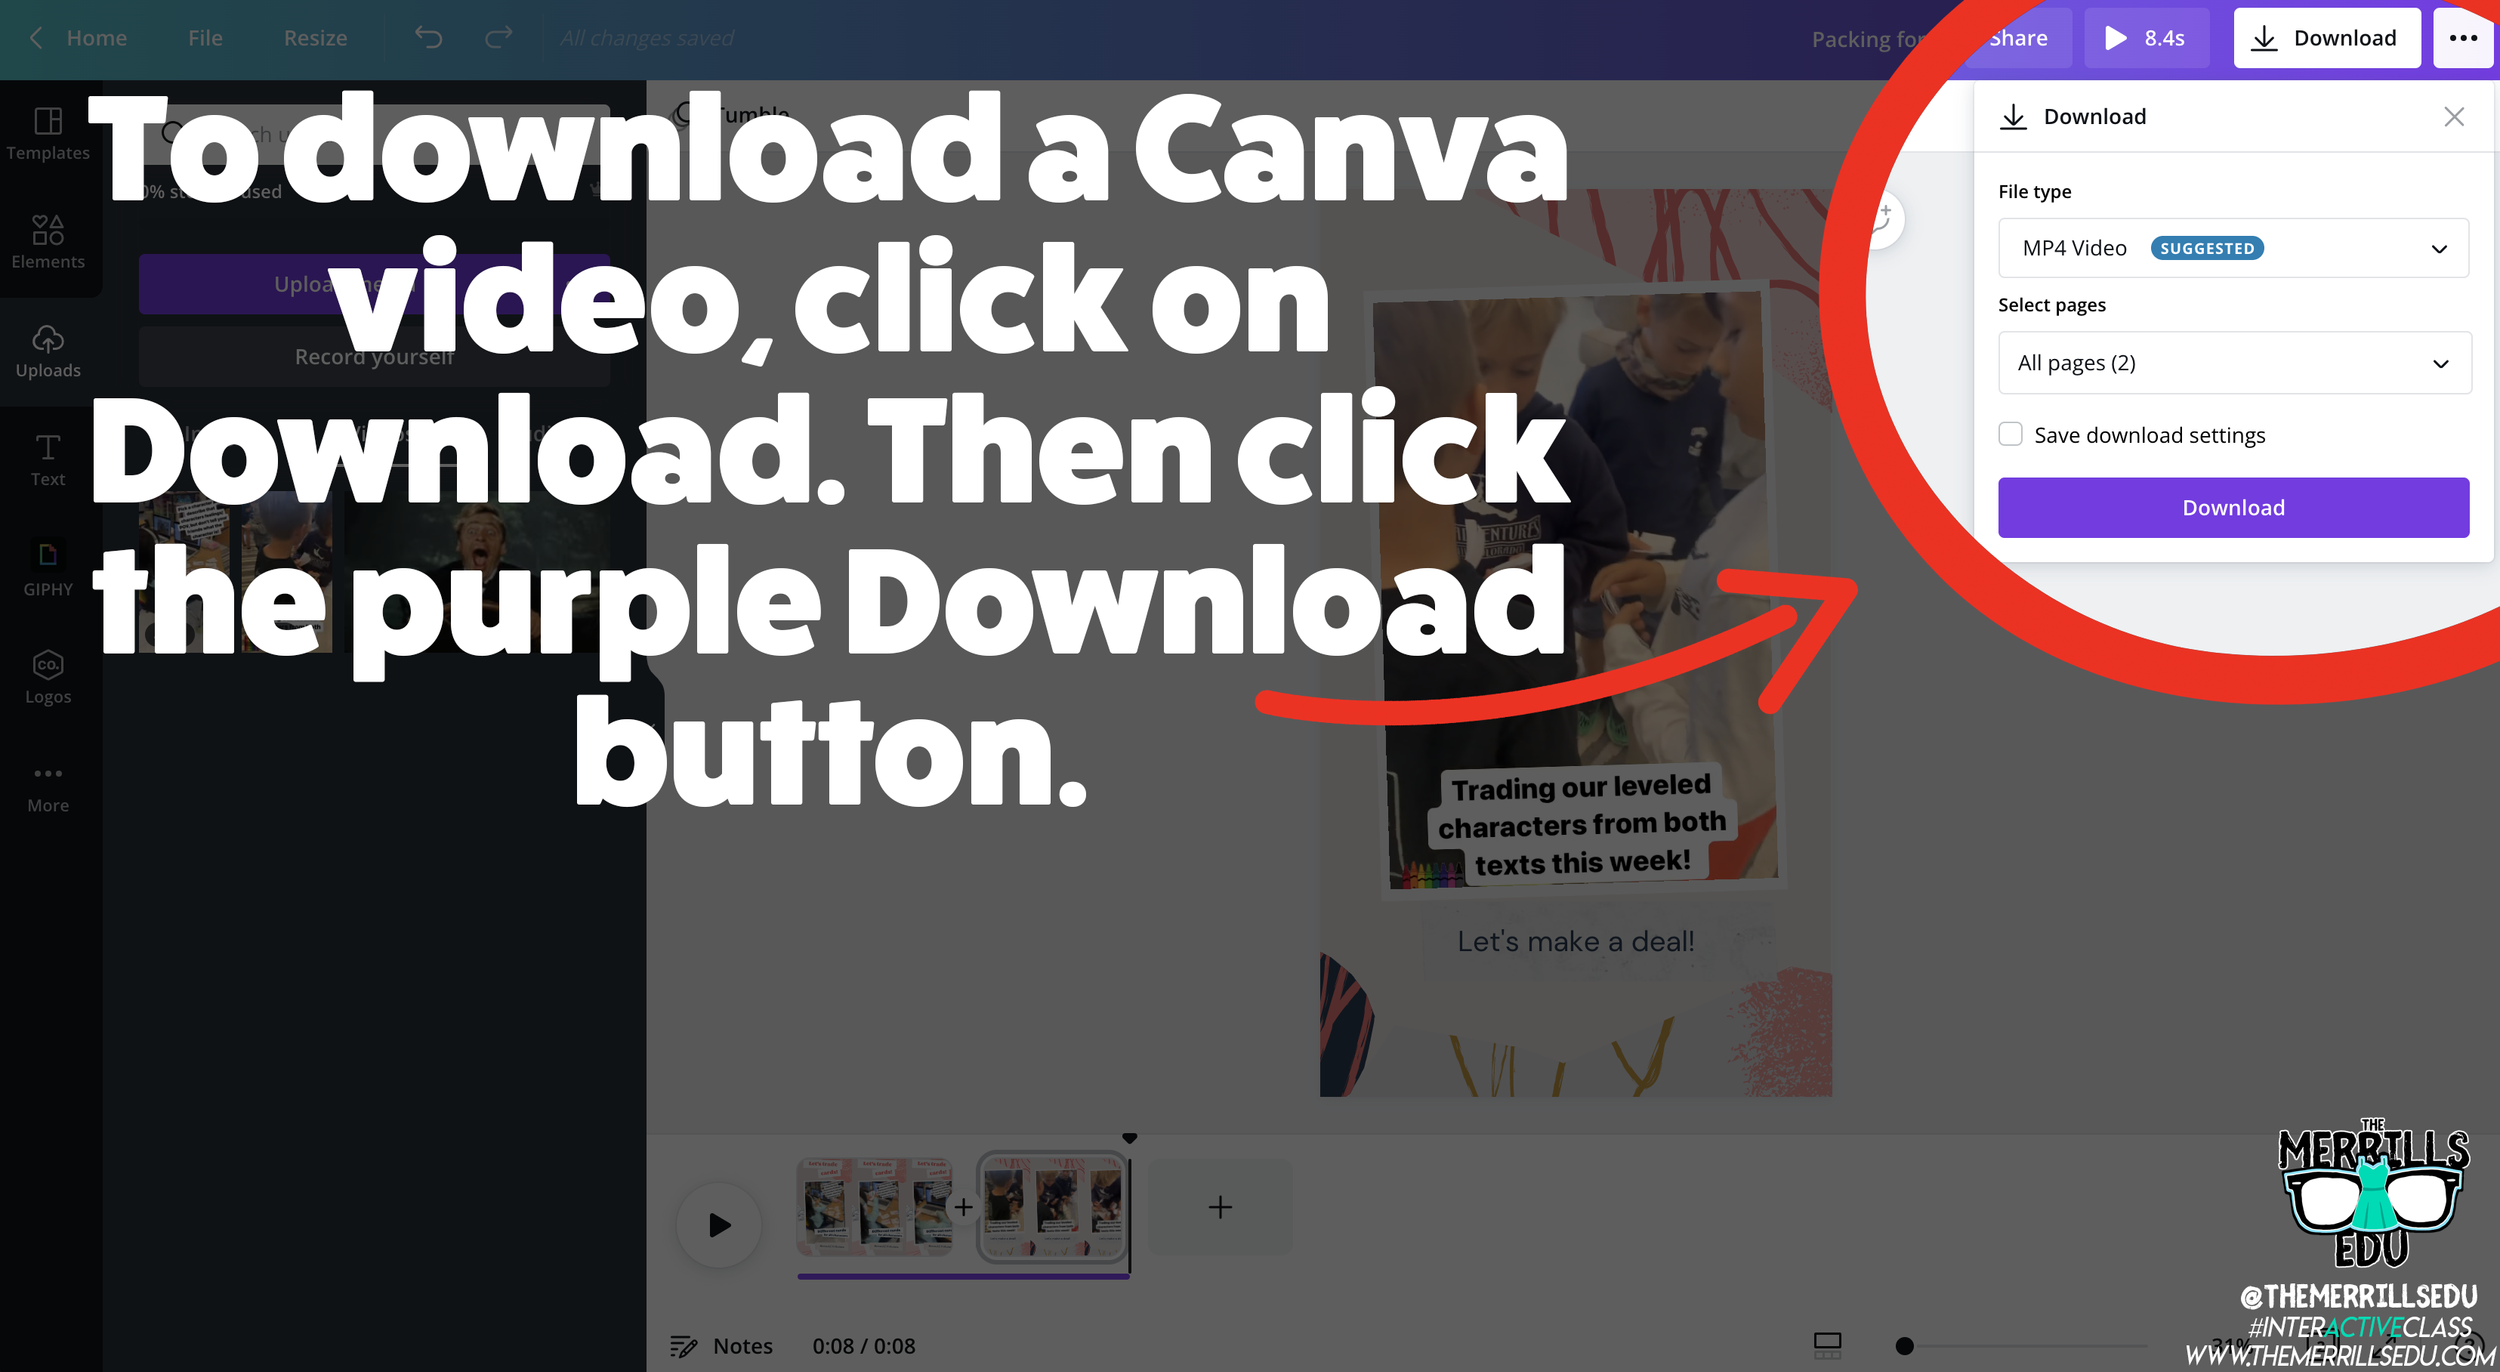
Saving and sharing can be done is several clicks. To save a video, click on the Download button, then click “Download.” This will download the video into your Downloads folder or camera roll (if on a mobile device).

To share the video, click on the three dots. Then, click “Share Link” and then “Copy.” This will allow students to share the video beyond the platform and into apps like Seesaw, Google Classroom, Microsoft Teams and more.
Removing a Background in Canva
Canva has made removing the background of an image simple. To do so, students will need to click on the image. Then, click on “Remove Background.” This process may take a few seconds. Once it has completed, students now have the background removed!
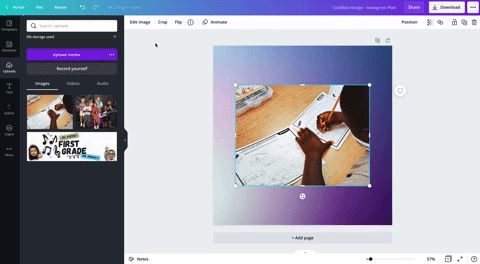

How to Create a Flipgrid Backdrop in Canva
Canva images can be downloaded, then uploaded into other platforms such as Flipgrid. This means students can create and design their own backdrop on Flipgrid! Backdrops act as virtual wallpaper. When students upload a backdrop on their Flipgrid video, they place themselves on top of the image. Students can move themselves around the video to place them in the proper spot. The recorded outcome will be them in front of the backdrop explaining their thinking!

So, how can this be done on Canva? It’s actually easier than you think! Once students have designed their image on Canva, they click on “Download” to download the image to their device. This will save the backdrop onto their device. Next, have them log onto Flipgrid. Once they have the Flipgrid Shorts Camera open, click on “Backdrops.” With Backdrops open, click on the “+” icon. This will allow up to upload your downloaded Canva file onto Flipgrid. Find your file then upload it. This will generate the Flipgrid Backdrop. Now students can move themselves around to properly keep the focus on their content. Fun tip: Backdrops can also be in the form of a video!

How to Present a Presentation on Canva and then Share it on Flipgrid

A great way for students to show their thinking is by explaining their work. Have your students create a presentation that covers what your class is learning. Once they have their presentation ready to share, have them click on “Present and Record,” located on the top right, then click “Go to recording studio.” They will need to provide permission to use the device’s camera and microphone. Now, click “Start recording!” This will give students a three second countdown before the recording process begins. Your students can now work through their presentation. One thing to note: while recording, Canva remains in presentation mode. This means the person presenting can see what slides come next, notes attached to the slides and more. The recording will only capture the Canva slides and a circle shaped webcam video of the presenter.

Once the student is ready to stop the recording, all they need to do is click “Stop Recording” from the top right side of the screen. One thing to note, students can always pause the recordings by clicking “Pause” next to the “End recording” button. Now that the student has clicked “Stop recording,” the video will be uploaded to Canva’s servers. Once it has been processed, students can either share the direct video link, save it for later or download the video to their device. In order to get the video over to Flipgrid, we will select “Download.” The download may take a few minutes and will be saved to your downloads folder. You can find it in your downloads folder under the name of the presentation. Now it’s time to head over to Flipgrid!

Log onto the Flipgrid Topic, then launch the Flipgrid Shorts Camera. Once the camera opens, click “Options” to the left of the record button. Now, click “Upload clip.” Upload your downloaded Canva presentation and then click “Next,” followed by “Confirm.” This will share your Canva presentation on Flipgrid for others to see and comment on!

How to Create Flipgrid Photo Stickers / Media on Canva
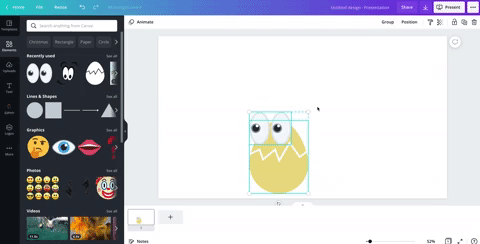
Adding different elements into Flipgrid videos results in instant student engagement. But, with Canva your students can design their own Photo Stickers / Media for their Flipgrid videos. To do so, have them create the sticker on Canva. It’s best to use a presentation sized template and we also recommend trying to make the sticker as large as possible within the template.
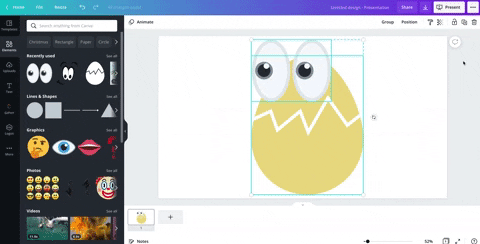
When finished, students will want to save their work as a PNG file. This will give the sticker the ability to have a transparent background. To save their work as a PNG file, click on the three dots located at the top right, then click “Download.” Be sure to check “Transparent background,” then, click “Download” to save the image to the students’ device.

Now, on the Flipgrid topic, open the Flipgrid Shorts Camera. Click on “Effects,” then click on “Media” (on laptop / PC) or “Photo Sticker” (mobile devices). From here, upload your Canva file. Once the file appears, you can move and resize it as you see fit! Fun fact: this process can be repeated as many times as you would like!

Using Inferencing on Canva

Inferencing skills require complex and critical thinking. These tasks can be daunting for students, but with the help of Canva this can be turned into a highly engaging and fun task! To help take inferencing to the next level, we created “Character Bulletin Boards.” This template was designed to look like a bulletin board where characters from a story might post things that happened from a story, or memories from a chapter that the character recalled. Students use the template to add elements, text, or photos that represent what happened in the story. You can even create a template that has multiple slides for multiple characters.

When your students are ready to share their work with you, they can do so in just several clicks. First, they will need to click “Send to teacher.” Next, your student(s) will need to select you (or they can select multiple teachers if you co-teach), and then click “Send.” This will share the work right into your teacher dashboard.
Interested in giving this activity a try? Click here or the image to download and copy the template!


Student Learning Portfolios on Canva
Canva is a well-known creation tool, but it can also help your students become more accountable. Student Learning Portfolios allow your students to maintain academic goals and curate learning artifacts that can be shared with their families and friends. To get started with Student Learning Portfolios on Canva, have your students select a template (like the one below). We recommend building the portfolios by months or subjects. Your first slide in the portfolio should resemble a table-of-contents. Students can hyperlink the text to different slides within the Canva presentation. This will allow them to maintain a running log of their work, but more importantly – share with others!


Student Created Websites on Canva
Similar to Student Learning Portfolios, student created websites are an easy way for your students to share (and show off!) their hard work. Have your students pick from the website templates on Canva. When they’re ready to publish the site, click on “Publish as Website.” This will provide the student with a shareable link. Fun fact: this URL will never change, even if your student(s) decide to edit it. If you’re looking to take things to the next level, you can have several students collaborate on the same Canva file. Then, the duo / team will have a published website for the group. Want a fast / easy start to this? Use our template below! Click here or the image to get started building your own student website today!


Virtual Science Fair Projects on Canva
Science Fair Projects are always exciting, but Canva can put a “new school” spin on them. Your students can design a trifold, add elements, text and even QR codes right into their Science Fair Projects. These can be shared publicly or right to the teacher. To generate a public share link, click on the three dots on the top right, then click “Share Link.” Click on “Copy” to share your URL. Now students can share this link with others! Tip: you can take this link into a URL shortener (like Bit.ly) and paste it to generate a shorter URL address (which will still point to the original link). To share directly with the teacher, click “Share,” then select the teacher(s) you wish to share with. This will send the Canva file to the teacher for review! Need some easy inspiration? Check out our template below! Click here or the image to get started!

Book Bumper Stickers on Canva
One of our favorite Canva activities is “Book Bumper Stickers!” For this activity, students design a bumper sticker based on the book, character / individual, subject, etc. The design can even be downloaded and shared onto places like Flipgrid or Seesaw. Check out our template below! Click here or the image below to download it and get started!


Character Trading Cards on Canva
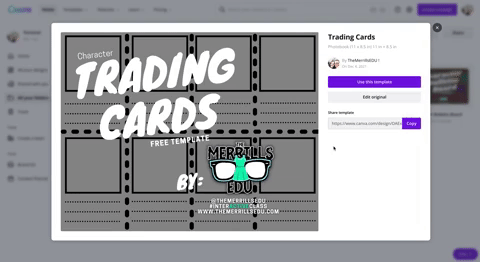
Describing characters, their feelings and emotions is an important piece of comprehension. With Canva, we can make this process fun and engaging! Students use the template below to add characters from the story. This can be done by adding photos, uploading their own artwork or adding elements. Then, students can add text to describe the character. Teachers can print the designs and have students cut them out with scissors to trade with friends! How do your friends describe other characters? Did they use similar adjectives as you? Download our template by clicking here or the image above!

Create a Timeline on Canva

Whether you’re explaining historical events, the sequential order of a story, or important character accomplishments, timelines are a great way to show thinking. Canva has easy-to-use timelines that are simple to edit to fit your next assignment. To view Canva’s timeline templates, just search: “Timelines” in the search box.

Design Thinking / infographics on Canva

Design thinking provides students with a creative outlet where they can tie in their learning. Infographics are a great way to show this level of thinking and Canva makes it easy! There are many Canva infographic templates that students can choose from. These templates are fully editable – everything from the text to the colors. To find infographic templates on Canva, just type “infographic” into the search bar. Here’s a template that we found to help you get started! Click here or the image above to download it and get started!

Fake Instagram Character Posts on Canva
Have your students create a fake Instagram post describing the thoughts of a character from a book or historical figure. Check out our Instagram inspired Canva template here! Students can add the proper content in the template and even add a photo or drawing. This can be downloaded and shared on places like Flipgrid and Seesaw! To download our template, click here or the image above!

Student Created Classroom Badges on Canva
This is a great way to kick off the new school year or returning from a break. Plus, it teaches your students how to use all of Canva’s features! Student created classroom badges can be designed for any types of rewards that your students feel as though should be given out throughout the year. Have students use Canva’s features to design their badge. Remind them that it needs to have text / what the badge is for. Some good examples include: “Tech Trainer or “CANva” (students who can teach others about Canva). Check out our template by clicking here or the image! Looking for some easy inspiration? We’ve got you covered! You can download our template for free! Click here or the image above to download it!

Digital Murals on Canva

Digital murals are an engaging way to get your students thinking outside of the box. In Canva, students add a background image, elements, photos, text or anything else that they think should go on their digital mural. The murals might describe characters, feature vocabulary terms, describe the students themselves and much more. Need help getting started? You can download our template by clicking here or the image above!
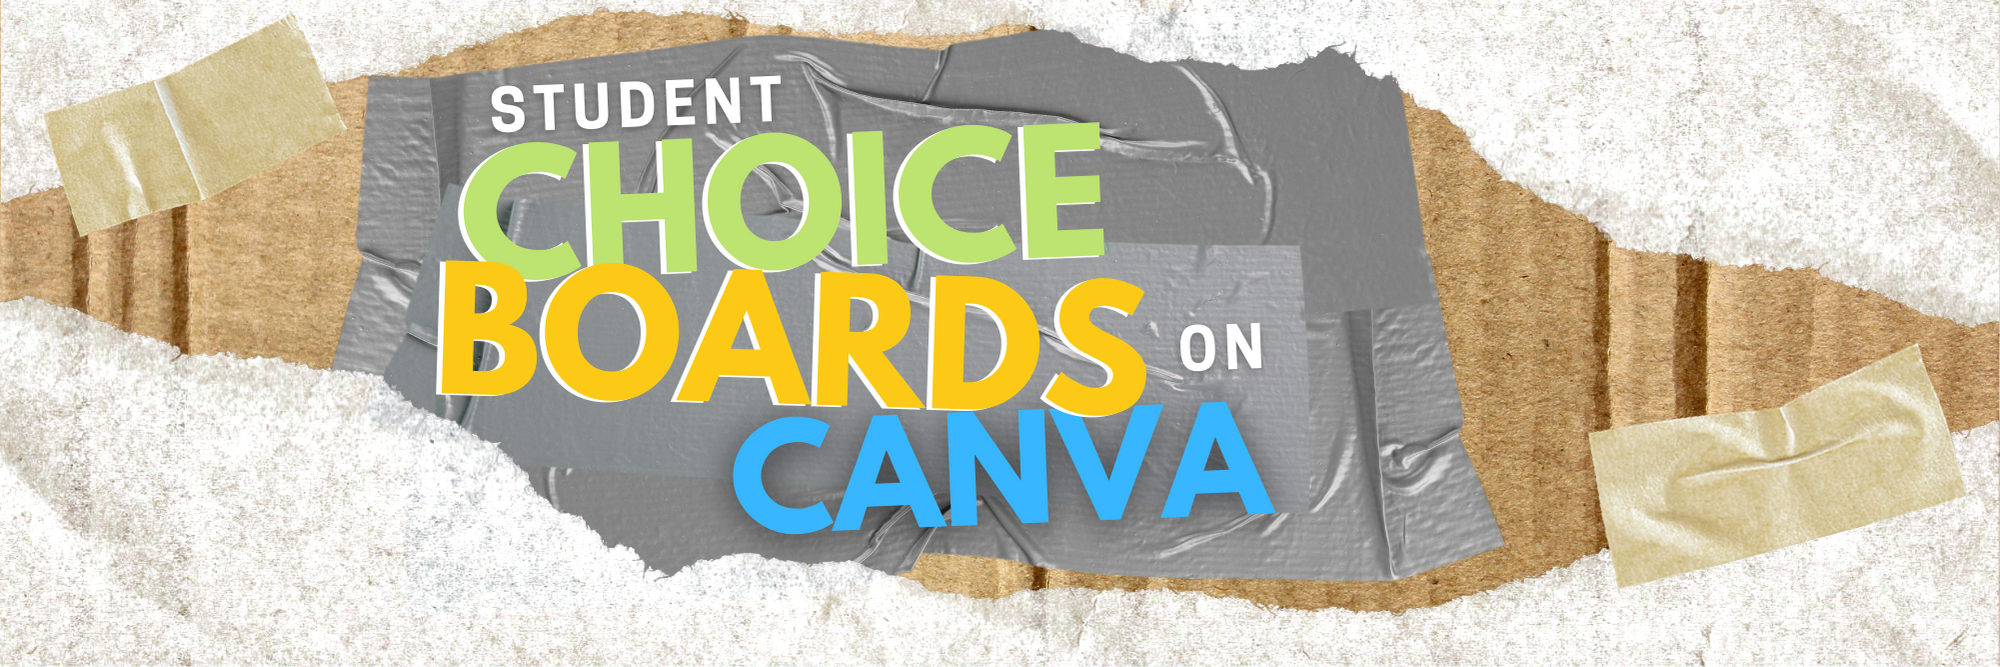
Student Choice Boards on Canva

Student Choice boards give your students the chance to complete a task using multiple options. For example, some students might enjoy creating a video that answers the prompt while others might design a slide that goes into detail. Leaving it up to your students will guarantee engagement with an invested interest in their work. Check out our pre-designed template to help you get started. Click here or the image above to download and edit!

Collaborative Comic Strips

Canva makes collaboration easy and familiar (especially if you’ve collaborated on a Google Doc or Slide). You can share a link with others and even see who is on the file. These Collaborative Comic Strips can be completed in small groups. Students can keep work organized and even assign roles. The Comic Strips can retell a sequence of events, retell a timeline in history, or act as illustrations for a science journal log. Check out the template we found, which you can use right away! Click here or the image above to download and get started!

Collaborative Change of Scenery:
Change the Setting of a Story

Changing the setting of a story is a powerful way to monitor for comprehension. Level that up with collaboration, now you have a small group of students working together and thinking at a high level. With this template, your students can do just that! Work together and be creative! Check out the template we found! You can click here or the image above to download and get started!

Drawing on Canva
Canva users now have the ability to draw on their slides. To start drawing, follow these steps:

Click on “More” from the left side panel
In the search bar, type “Draw”. Or, you can scroll down to the bottom where you will see the Draw icon. Click it to open the next window.
One the next window, click “Use” to launch the draw feature.
Select a brush and color to start drawing!
We love this template that we found, which includes the drawing tool and collaboration! Students can work together to create a piece of art. Perhaps they’re redesigning the cover of a book or “painting a picture” of their understanding. Check it out by clicking here or the image below!
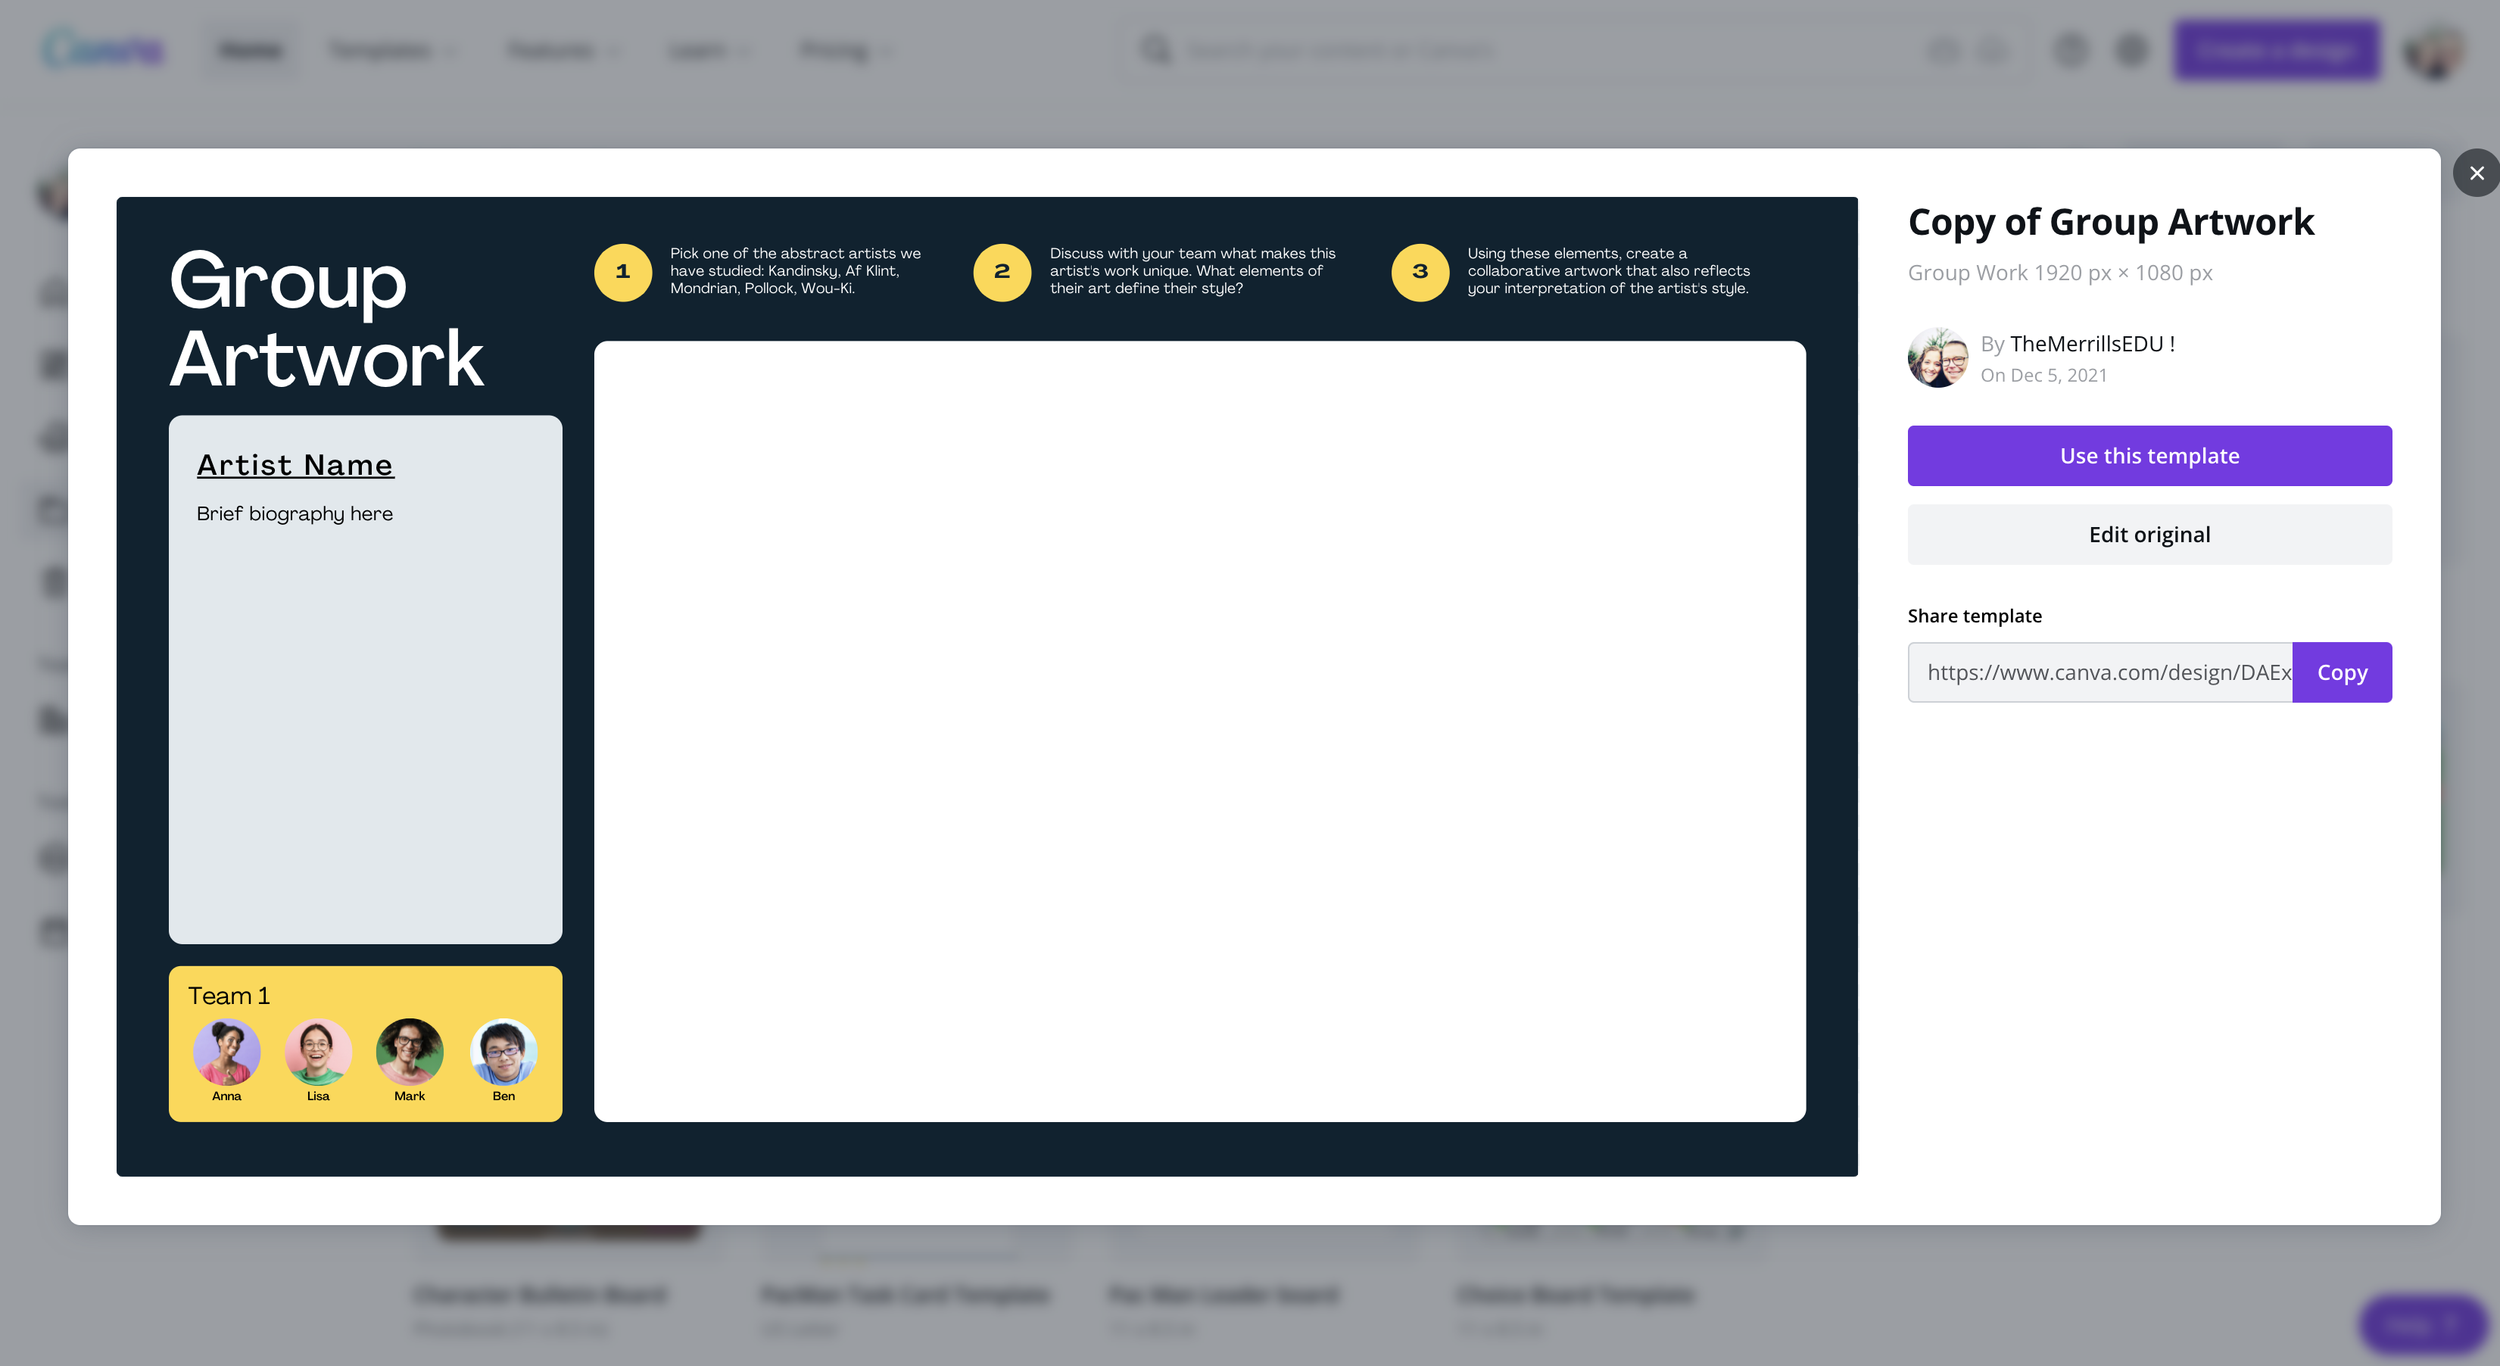
-- Let us know if you’re using any of these ideas in your classroom! Be sure to follow us on social media (@TheMerrillsEDU everywhere) and tag us! 👓👗
For more tips, tricks and lesson ideas for making learning more interACTIVE, check out our books The InterACTIVE Class and Flipgrid in the InterACTIVE Class on Amazon!


PacMan Classroom Transformation
The particular transformation is one that has been on the back burner so to speak for years and it was initially inspired by a photo found on Pinterest. With some intentional planning, this simple photo led to a day full of learning that could easily be integrated into any grade level or subject area.

Transformations are inherently interACTIVE. The act of transforming one thing into another is a great way to hook students’ attention and to engage them in the lesson at hand. Generally, we transform our classrooms towards the end of a unit or lesson of study, allowing students a fun way to demonstrate their recent learning.
The particular transformation is one that has been on the back burner so to speak for years and it was initially inspired by a photo found on Pinterest. With some intentional planning, this simple photo led to a day full of learning that could easily be integrated into any grade level or subject area. Here’s how to get started:
(click on any subheading to jump to that section)
Game Explanation
This room transformation obviously centered around the game board placed in the center of the room. Students would be divided into teams and would sit around the outside of the game board. These teams were either PacMan or Ghosts and were identified with large laminated “game pieces”. Task cards were created for each round of the game, which had a set of leveled questions on it—1 dot, 2 dots and 3 dots. The more dots the question was worth the harder it would be to solve. Students could choose which questions they answered in what order which differentiated the activity for various levels of learners or classes.
Each round was structured as follows:
1 member from each team took a spot on the game board holding their laminated game piece. The other teammates stayed at the table to answer questions.
When the round started, teammates at the table answered questions from the task card. They worked together to solve and wrote out their answers on a small whiteboard. When they were ready to have the answer checked, they simply raised their hand.
The teacher’s job is to roam the room checking answers from the teams as needed. If the team answers a questions correctly, they signal to their teammate on the game board how many spaces they can move. (The spaces moved correlate to the level of question answered)
The teacher decides the length of each round (ours were about 10 minutes) and then can repeat rounds until every student gets a chance to be the live game board piece. (ex. If you have five members on a teams you would have 5 rounds total.)
Teams accumulated points by keeping track of the dots they moved during the round. Each small dot on the game board was worth 1 point and the larger dots were worth 5 points. A team leaderboard was created online and points were tracked throughout the day.
Classroom Set Up
The beauty of this room transformation is that you can do as little or as much as you wish in regards to the set up. I started planning weeks in advance and did a little each week to avoid having a lot to do all at once. I also reached out to parents and asked for several items to be donated which cut down on what I had to gather myself.
Game board
The game board was mapped out using the already existing tiles on the classroom floor. The outline of the board was created using a simple grid in Word where we highlighted the layout until we got it to where we wanted it. Our grid turned out to be a 15 x 15 square.

When creating the board on the floor we used blue painters tape for easy removal. We used 2 inch tape for the outside lines and the innermost ghost box and then thinner, 1 inch tape for the rest of the maze. For the white dots we used a hand circle cutter to mass cut out all the smaller dots, and a larger die cut was used for the bigger dots. We spread 6 bigger dots around the game board to mimic the real game but you could have as many as you want.

We illuminated the game board with black lights. As mentioned in previous posts, black lights are one of our favorite supplies for room transformations.

Black lights can be used in so many different ways for different themes, and in this particular case they added the perfect amount of pop to make our game board glow. They gave the room that dark, arcade-like feeling which was just perfect! The link to our favorite set of lights is here.

Team Tables
Teams sat around the game board at tables that were decorated to look like ghosts. Each table simply had a colored tablecloth draped on it with large eyes taped to the front. We just hand drew these and then laminated them so they could be reused.

Score Keeping
Students earned points by answering questions correctly from their task cards. These task cards were laminated so students could write on them and circle the questions they had already completed. This, along with leaving tally marks on the page, helped them keep track of their points. Click on the image below for the FREE task card template we used.

Click on the image to download the free editable template!
At the end of each round, we recorded the total points earned by each team in a live leader board template. This was done in a document online because our classes rotate classes and it allowed each teacher to keep adding points to the teams as they rotated rooms for math/science and ELA.
Click on the image to download the FREE editable template!
Room Decoration
The exterior of the room was draped in black tablecloths. You can use the ones that are singly packaged, or if you are willing to take the time and save a little money, we also had rolls of it donated which we cut to the desired length. We hung them by attaching them to the ceiling with small binder clips which you should be able to get from any Target, Walmart, Dollar Store, or on Amazon. Attached to the tablecloths were just ghosts and PacMan images we printed out and laminated before cutting. These were the same images we used for the game board players.

Hanging from the ceiling were ghosts that we made using balloons and left over colored tablecloths. The eyes were made using circles in PowerPoint and they were just cut out and taped on top. We hung them using the same binder clips.

Other decorations were created by scratch including our PacMan sign which we just traced using our projectors, our giant PacMan posters that we put on our doors, and this adorable arcade sign that my teammate made for us all. If you are not the crafty kind, you can purchase various banners from Amazon like the one below which are pretty cool too!
Music
We used music from the game as a timers to signal the starting and stopping of each round as well as music for when the students entered in the morning. There are many options available for the ones I used are listed below:
Morning Entrance (2 min.)
Longer Medley (start and stop after 10 minutes)
As with any room transformation, it is important to always start with the standards you are looking to teach or review and then look to how you can integrate the fun theme into the learning. With this transformation, we used the day as a spiral review of standards we have covered all quarter before going on break.
-- Let us know if you’re using any of these ideas in your classroom! Be sure to follow us on social media (@TheMerrillsEDU everywhere) and tag us! 👓👗
For more tips, tricks and lesson ideas for making learning more interACTIVE, check out our books The InterACTIVE Class and Flipgrid in the InterACTIVE Class on Amazon!


20 Activities for Halloween!
@TheMerrillsEDU share 20 different activities to celebrate Halloween! Try turning yourself into a ghost that visits your classroom, become a character from the text and much more. We’ve included a list of our top 20 favorite Halloween themed books!

Halloween is a “spooktacular” time of the year, but it can be “frightful” for educators! Trying to keep students motivated during such exciting times can be challenging, but check out these 20 “thrilling” activities to keep the engagement “creeping” around your classroom!
Please note: This blog post was hand-crafted and was not created using AI.
(click on any subheading to jump to that section)
Updated: Sept. 2025


20 Halloween Themed Books for Elementary Students!


“Creepy Carrots”
Jasper Rabbit loves carrots—especially Crackenhopper Field carrots. He eats them on the way to school. He eats them going to Little League. He eats them walking home. Until the day the carrots start following him...or are they?
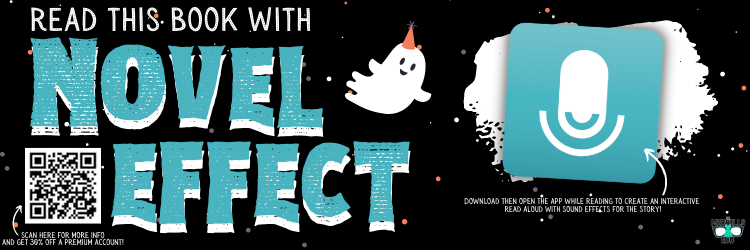
“Creepy Pair of Underwear”
Jasper Rabbit is NOT a little bunny anymore. He’s not afraid of the dark, and he’s definitely not afraid of something as silly as underwear. But when the lights go out, suddenly his new big rabbit underwear glows in the dark. A ghoulish, greenish glow. If Jasper didn’t know any better he’d say his undies were a little, well, creepy. Jasper’s not scared obviously, he’s just done with creepy underwear. But after trying everything to get rid of them, they keep coming back!


“The Bad Seed: The Good,
The Bad and The Spooky”
Halloween is the Bad Seed’s favorite holiday of the year. But what’s a seed to do when he can’t find a show-stopping costume for the big night? Postpone trick-or-treating for everyone, of course! Can he get a costume together in time? Or will this seed return to his baaaaaaaaad ways?

“The Adventures of Beekle:
The Unimaginary Friend”
This magical story begins on an island far away where an imaginary friend is born. He patiently waits his turn to be chosen by a real child, but when he is overlooked time and again, he sets off on an incredible journey to the bustling city, where he finally meets his perfect match and--at long last--is given his special name: Beekle.


“Bonaparte Falls Apart”
Bonaparte is having a tough time. It’s hard for this young skeleton to just hang loose when he can’t keep hold of himself. When he plays catch, his throwing arm literally takes a flyer. Eating lunch can be a real jaw-dropping occasion. How can he start school when he has so many screws loose? Luckily, Bonaparte hit the bone-anza when it came to his friends. Franky Stein, Blacky Widow, and Mummicula all have some bonehead ideas to help pull him together. But will it be enough to boost his confidence and get him ready for the first day of school?
“Crankenstein”
BEWARE OF CRANKENSTEIN! He's a little monster of crankiness that no one can destroy! MEHHRRRR!!! He may look like any ordinary boy, but when faced with a rainy day, a melting popsicle, or an early bedtime, one little boy transforms into a mumbling, grumbling Crankenstein. When Crankenstein meets his match in a fellow Crankenstein, the results could be catastrophic--or they could be just what he needs to brighten his day! This hilarious and relatable tale of grumpiness gone awry will turn toddler tantrums to giggles in no time.


“Ghost Afraid of the Dark”
Follow Boo the Ghost as he celebrates his first Halloween with all his Monster friends! He is a shy little ghost and quickly realizes he is afraid of many things. Read as Boo discovers to be brave in this adorable, spooky story! With charming illustrations and a glow-in-the-dark cover, makes this the perfect bedtime read
“The Hallo-Wiener”
Oscar is a little dog with a big problem -- he gets more tricks than treats because other dogs tease him all the time. But one brave act on Halloween makes Oscar a Grade-A hero, proving that a little wiener can be a real winner!


“Leo: A Ghost Story”
You would like being friends with Leo. He likes to draw, he makes delicious snacks, and most people can't even see him. Because Leo is also a ghost. When a new family moves into his home and Leo's efforts to welcome them are misunderstood, Leo decides it is time to leave and see the world. That is how he meets Jane, a kid with a tremendous imagination and an open position for a worthy knight. That is how Leo and Jane become friends. And that is when their adventures begin.
“How to Make Friends With a Ghost”
What do you do when you meet a ghost? One: Provide the ghost with some of its favorite snacks, like mud tarts and earwax truffles. Two: Tell your ghost bedtime stories (ghosts love to be read to). Three: Make sure no one mistakes your ghost for whipped cream or a marshmallow when you aren't looking! If you follow these few simple steps and the rest of the essential tips in How to Make Friends with a Ghost, you'll see how a ghost friend will lovingly grow up and grow old with you.


“Even Monsters Need Haircuts”
Just before midnight, on the night of a full moon, a young barber stays out past his bedtime to go to work. Although his customers are mostly regulars, they are anything but normal - after all, even monsters need haircuts. Business is steady all night, and this barber is prepared for anything with his scissors, rotting tonic, horn polish, and stink wax. It's a tough job, but someone's got to help these creatures maintain their ghoulish good looks.
“Room on the Broom”
The witch and her cat are happily flying through the sky on a broomstick when the wind picks up and blows away the witch's hat, then her bow, and then her wand! Luckily, three helpful animals find the missing items, and all they want in return is a ride on the broom. But is there room on the broom for so many friends? And when disaster strikes, will they be able to save the witch from a hungry dragon?


“Stumpkin”
Stumpkin is the most handsome pumpkin on the block. He’s as orange as a traffic cone! Twice as round as a basketball! He has no bad side! He’s perfect choice for a Halloween jack-o-lantern. There’s just one problem—Stumpkin has a stump, not a stem. And no one seems to want a stemless jack-o-lantern for their window.
“The Dark”
Laszlo is afraid of the dark. The dark lives in the same house as Laszlo. Mostly, though, the dark stays in the basement and doesn't come into Lazslo's room. But one night, it does. This is the story of how Laszlo stops being afraid of the dark.


“The Little Ghost Who was a Quilt”
When you're a quilt instead of a sheet, being a ghost is hard! Ghosts are supposed to be sheets, light as air and able to whirl and twirl and float and soar. But the little ghost who is a quilt can't whirl or twirl at all, and when he flies, he gets very hot. He doesn't know why he's a quilt. His parents are both sheets, and so are all of his friends. (His great-grandmother was a lace curtain, but that doesn't really help cheer him up.) He feels sad and left out when his friends are zooming around and he can't keep up.
But one Halloween, everything changes. The little ghost who was a quilt has an experience that no other ghost could have, an experience that only happens because he's a quilt . . . and he realizes that it's OK to be different.
“Stellaluna”
Knocked from her mother’s safe embrace by an attacking owl, Stellaluna lands headfirst in a bird’s nest. This adorable baby fruit bat’s world is literally turned upside down when she is adopted by the occupants of the nest and adapts to their peculiar bird habits.


“Snowmen at Halloween”
After an early snowfall, a few kids build some snowmen before going trick-or-treating. And when the kids go off to bed, the snowmen have their own Halloween festival! There's candy and apple-bobbing and costume contests and all sorts of autumn activities. When the kids wake up the next morning, the snowmen are gone... but they've left a very special message behind.
“The Little Kitten”
Ollie and her cat Pumpkin are out frolicking on a beautiful fall day when they come upon a tiny kitten shivering in a pile of fallen leaves. Ollie warms the kitten up and the three become fast friends, but when Ollie sees “Lost Kitten” posters hanging on the trees in the forest, she knows she has to help her new friend get home. As Halloween draws nearer, magic is afoot, and Ollie’s good deed is rewarded in an unexpected way.


“Gustavo - The Shy Ghost”
Gustavo is good at doing all sorts of ghostly things: walking through walls, making objects fly, and glowing in the dark. And he loves almost nothing more than playing beautiful music on his violin. But Gustavo is shy, and some things are harder for him to do, like getting in a line to buy eye scream or making friends with other monsters. Whenever he tries getting close to them, he realizes they just can’t see him. Now that the Day of the Dead is fast approaching, what can he do to make them notice him and to share with them something he loves?
“Ghosts in the House!”
At the edge of town lives a clever girl with a spooky problem: Her house is haunted! Luckily, she happens to be a witch and knows a little something about taking care of ghosts. She catches them, puts them in the washing machine, airs them out to dry, and gives them new lives as sofa covers, table cloths, and, of course, bed sheets to cozy up under. Fresh and charming illustrations in dynamic orange, black and white bring this resourceful heroine and these spooky ghosts to life.


Turn yourself into a Ghost
That Visits Your Classroom!
Here’s a “spooktacular” way to keep your students engaged during the Halloween season! Try “ghosting” yourself into your classroom! Here’s how:
Take a picture of your empty classroom.
Hang a green table cloth on a wall.
Use a green shirt and wrap it around your head (of just don’t put your head all the way through).
Put sunglasses or glasses (even a hair bun through the top of the shirt) and wear them over the shirt.
Record yourself in the app Do Ink Green Screen.
Export the video and save!
For a step-by-step tutorial of how this works, check out our book, “The InterACTIVE Class!” Click here or below to purchase!


Creepy Carrots: Become a Ghost and
Place Yourself in the Text!
In this activity, your students will become ghosts that appear right in the text! We used the text Creepy Carrots and had the students trace the main character Jasper’s emotions throughout the text. Then, we put ourselves “in” the text using Do Ink’s Green Screen app! Here’s How:
Take a photo of a page from the book
Hang a green table cloth on a wall and stand in front of it
Open Do Ink’s Green Screen app and insert the photo from the book on the bottom layer
Add a video to the top layer - which will be you! (tip: for a more “ghostly” effect, drop the opacity of your video)

Creepy Pair of Underwear
(Design a Pair of Underwear!)
Aaron Reynolds & Peter Brown’s “Creepy Pair of Underwear” is a classroom favorite! For this activity, students can design their own creepy pair of underwear, then share why they think Jasper would be afraid of them on Microsoft Flip! Follow these steps:

Download the Creepy Pair of Underwear Template by clicking here (or the image)
Print / copy for your class
Students design a creepy pair of underwear using crayons or markers
Students hold up the creepy pair of underwear and share their designs in a video, explaining why they think Jasper would be afraid of them.
Level up: Upload the template into Canva or Adobe Express and then save th creation as a PNG. Students can then use the file to create a video!


The Bad Seed Presents:
The Good, The Bad and the Spooky
(Design a Costume for the Bad Seed)
The Bad Seed is back and right in time for Halloween! When we last left The Bad Seed, he was committed to doing acts of kindness. But what’s a seed to do when he can’t find a show-stopping costume for the big night? Postpone trick-or-treating for everyone, of course! In this activity, your students can use Canva or Adobe Express to help design a costume to save both The Bad Seed and Halloween! Act quickly, though, or will this seed return to his baaaaaaaaad ways! Here’s how:

Download the Bad Seed sticker (click here or the image)
Open a blank presentation template in Canva or Adobe Express and upload the Bad Seed sticker.
Use elements to decorate the Bad Seed’s costume.
Download the file as a PNG to share it, or create a video with a voice over explaining thinking.

Hallo-wiener: Design a Costume for Oscar
Similar to the activity above, Oscar has a problem. He desperately needs a costume for Halloween! All the other dogs tease him, so it’s your (students) job to create another costume that will work for him (other than the hot dog costume)! Here’s how:


Download the Oscar media sticker by clicking here or the image above.
Open a blank presentation template in Canva or Adobe Express and upload the Oscar sticker.
Use elements to decorate Oscar’s costume.
Download the file as a PNG to share it, or create a video with a voice over explaining thinking.

Room on the Broom:
Retell the Story using Canva or Adobe Express
Room on the Broom is a classroom favorite and being able to retell the story is an important skill for all students to have. With Canva or Adobe Express, students can easily retell the entire story without ever having to leave the app. Here’s how:
Read Room on the Broom
We recommend pausing as you read to have students maintain some type of flow map (click here to see an example) so that they are able to recall the events of the story.
After you have read the story, have the students use Canva or Adobe Express to create a blank video template. Students can use Elements to retell the story, but we also recommend animating the elements for more engagement.
Once finished, students may download and share their videos on Padlet or Wakelet, where they can watch each other’s videos to see if they sequenced everything correctly.

Stellaluna: Retelling the Story
Here’s another interACTIVE way to get your students retelling the story Stellaluna! After reading, have your students use Canva or Adobe Express elements to retell the events. Our example below used Flipgrid (RIP), but this activity can be easily completed in other platforms. Check it out below!

Stumpkin: Halloween from Stumpkin’s Point of View
In the book Stumpkin, Stumpkin is the most handsome pumpkin on the block. He’s as orange as a traffic cone! Twice as round as a basketball! He has no bad side! He’s perfect choice for a Halloween jack-o-lantern. There’s just one problem—Stumpkin has a stump, not a stem. And no one seems to want a stemless jack-o-lantern for their window. In this activity, your students will put themselves into Stumpkin’s perspective by becoming Stumpkin and explaining his point-of-view. Why is Stumpkin feeling the way that he does? How does he feel throughout the story? What about the end? Here’s how it all works:


Read Stumpkin and download the Stumpkin stickers to the left.
Launch a blank video template in Adobe Express or Canva and then upload the city building. Stretch it across the screen to make it become a background.
Next, add jack-o-lanterns in the city building’s windows.
After that, upload the Stumpkin sticker to the left. Resize the image so that it goes well beyond the frame of the screen (make it really big, trust us! It helps to zoom WAY out).
Animate the Stumpkin POV sticker around the screen to see the city building through Stumpkin’s eyes.
Duplicate the page and repeat as necessary! To add more or less jack-o-lanterns, just move the Stumpkin POV sticker off the view of the screen (but not all the way - otherwise you’ll have to add it again).

Crankenstein: InterACTIVE Read
Aloud with Novel Effect
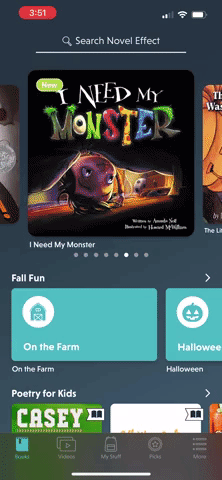
Crankenstein's favorite day of all—Halloween—has gone rotten! With problem after problem, today is bound to go down as the worst Halloween in history!
Kids love this book, but they’ll love it even more if you read it while using the app Novel Effect. Novel Effect uses your devices’ microphone to detect when and where you are reading in the book. It will then add sound effects as you read - all of which match the mood of the story! Novel Effect offers both free and premium versions, and you can find Crankenstein in the library now!

Even Monsters Need Haircuts: Design
a Monster’s Haircut
In Even Monsters Need Haircuts, the main character’s father owns a barber shop. At night, the main character volunteers to cut monsters hair, because no one else would. In this activity, your students can give a monster a haircut and use evidence from the text (rotting tonic, horn polish, stink wax, etc.) to explain what they used to “style” their monster’s hair. Here’s how:
Download the Even Monsters Canva template by clicking here or the image below.
Share the template with your students.
Students can use Canva’s drawing tools or elements to give the monster a haircut.
Have the students download their work as a PNG file.
Students can share their work with their classmates on Wakelet or Padlet.


Bonaparte: Read aloud & STEM Project
Bonaparte Falls Apart is a humorous story of a skeleton who “just can’t keep it together.” Luckily for him, his friends help him out. That’s exactly what your students will do in this activity!
Image courtesy of: Mombrite.com
After reading Bonaparte Falls Apart, Give group students into pairs (this can also be done individually)
Give each group / student a black piece of construction paper and a handful of q-tips.
Have the students use glue to make Bonaparte’s skeleton. Groups / Students may cut the q-tips to better fit their skeleton if they see fit.
Last, give each student a half-piece of white printer paper. Students will use this to make the Bonaparte’s skull.
For a detailed step-by-step tutorial on this, check out this post from Betty!

How to Make Friends With a Ghost: A How-to Guide

In How to Make Friends with a Ghost, you’ll learn the basics of what to do in order to befriend a ghost For example, you’ll need to provide the ghost with some of its favorite snacks, like mud tarts and earwax truffles. In this activity, your students will add a ghost to a video and explain what they would do in order to become friends with a ghost. Here’s how:


Download the Ghost sticker by clicking here or the image above.
Open a blank video template in Canva or Adobe Express.
Students record the video of themselves and explain how they can be friends with a ghost.
Then, students can upload the Ghost sticker to their video and then animate it to appear while watching the video (see our example above).
Students can then download their videos and share them on either Wakelet or Padlet.

Ghost Afraid of the Dark: Read Aloud on
Vooks & Guide to Being Brave
Boo the ghost is getting ready for his first Halloween with all his monster friends. There’s just one problem…He’s a little shy and is afraid of many things. But have no fear, your students will bravely be able to fly through this activity! Here’s how:

Read or watch Ghost Afraid of the Dark using the book or the app Vooks (click here to download) - or do both!
Think about how Boo needed to be brave as he went through the story. What did he do to show bravery?
Download the Boo sticker here (or click the image).
Open Canva or Adobe Express and launch a blank video template.
Add a background and then upload the Boo sticker.
Add some other elements and text.
Click on the different elements and animate them so that they move around.
Download the video and then share it to Wakelet or Padlet.

The Dark: InterACTIVE Read Aloud
& Add “The Dark” to Your Video
The Dark is a book that all kids (and let’s face it, some adults, too) can relate to. In The Dark, the main character, Laszlo is afraid of the dark. “The dark” lives in the same house as Laszlo. Mostly, though, the dark stays in the basement and doesn't come into Lazslo's room. But one night, it does…
This is a great book to pair with Ghost Afraid of the Dark, as both deal with being a little nervous at night. For this activity, your students can download a sticker of “The Dark” and add it to a Flip video. Check it out:


Read The Dark using Novel Effect. This will create an interACTIVE read aloud!
Download The Dark sticker here (or click the image).
Open Canva or Adobe Express and launch a blank video template.
Record upload a video explaining what areas make you nervous. Why? How are you brave?
Now, upload The Dark sticker and resize it so that it goes beyond the screen to make sure that itt covers the entire area (see our video example above)
Download the video and share it to Wakelet or Padlet so that others can see.

Steve Spangler Halloween Science Kits!
Steve Spangler always brings the fun and his Halloween Science kits do not disappoint. If your students are into things like Vampire Slime, Ghost eggs, Invisible paper and much more. Check out the experiments and products to purchase below!


Halloween BreakoutEDU Kits
BreakoutEDU kits always keep students thinking. Luckily for educators, BreakoutEDU has uploaded 43 different games to help us get through the Halloween holiday. Everything from a pumpkin design party to tricks and treats. Check them all out by clicking here or the image below!


Name Skeletons: Create a Skeleton Our of Your Name
This fabulous idea comes from Cindy deRosier. Create a skeleton body using your name! Learn how to do it on Cindy’s blog post by clicking here or the images below!

Halloween on Wonderopolis
Do your students have big questions when it comes to Halloween? For example, maybe they’re wondering if other countries celebrate Halloween? Perhaps they’re curious about when candy was invented? Wonderopolis has you covered! Check out the entire Halloween themed list of topics by clicking here or the image below!


Halloween on Nearpod
The Nearpod Library is a great place to find resources. Educators can find plenty of content on Halloween here, too! Everything from stories to the actual history of Halloween. Check out the collection by searching “Halloween” in the Nearpod library, or click here or the image below!

-- Let us know if you’re using any of these ideas in your classroom! Be sure to follow us on social media (@TheMerrillsEDU everywhere) and tag us! 👓👗
For more tips, tricks and lesson ideas for making learning more interACTIVE, check out our books The InterACTIVE Class and Flipgrid in the InterACTIVE Class on Amazon!


How to Use Reading Progress to Automatically Grade Sight Words
Learn how you can use Microsoft’s Reading Progress to automatically grade Sight Words! If you’re a primary teacher, this is a must see and an absolute time saver!

This past summer, Microsoft released its Reading Progress app, that enables students to independently read aloud, record themselves, and grow their reading skills while allowing educators to better support students' progression. It has been a game-changer for running records, which now can be done independently through the app. For a full breakdown on Reading Progress and it’s potential, check out our blog post here.
Other than running records, another time consuming task is assessing sight words. Sitting down with students and going through the list of words is a daunting task and can take up a lot of time. But, can we use Reading Progress to automatically grade a list of sight words? The answer is: YES! In this blog post you’ll learn:
(click on any subheading to jump to that section)
How Can Reading Progress Automatically Assess Sight Words?
How Does it Look When Reading Progress Assesses Sight Words?
How Do I set Up Reading Progress to Automatically Grade Sight Words?
I get it! So…What do I need to know? Any troubleshooting steps?
Download Free Sight Word Templates (made for Reading Progress)
See it in action! Assessing Sight Words Using Reading Progress
How Can Reading Progress Automatically Assess Sight Words?
Reading Progress is a ⚡️FREE⚡️ tool that can be found within Microsoft Teams. Imagine if the developers of the Flipgrid Shorts Camera, Immersive Reader and Microsoft Teams all sat down at a table and collaborated on what to do next. Reading Progress uses the technology from the Flipgrid Shorts Camera to record a video of students as they read. The same type of technology that is used in Microsoft’s Immersive Reader then takes the video and intelligently looks for errors, mispronunciations, miscues and more - AUTOMATICALLY. You read that right. The technology does all the work. A full report is provided to the educator, who can go back and view the recorded video and listen back to how the student performed. If the technology marks a student as reading a word correct / incorrect, the educator has the ability to change it on their end.


But how does this look when it comes to sight words? Reading Progress takes the text and listens for errors when being read aloud. So, technically you don’t need to have a full paragraph or even sentence for it to start working. Whatever words appear in the document is what the program will look for. If you put the words: red, yellow, me, and see, it will expect to hear those words read in that order. You don’t even need to put commas in between the words!
How Does it Look When Reading Progress Assesses Sight Words?

Giving Sight Word assessments through Reading Progress is best performed when you assess 10-20 words at-a-time. This makes for a quick turnaround from your students, who can easily get in and read off the words efficiently. Once your students log onto Teams and click on “Assignments,” they are able to select the appropriate Sight Word list and then start reciting them. Here’s how it looks from the student’s perspective.
To the student, the focus is on the words. Once they read through them, they click the “I’m done” button, then “Turn in.” The recording is uploaded as a video and can be watched back by the teacher.
The uploaded video will also produce a full report, only available to the educator. This report will indicate any incorrect words. Educators have the ability to watch back the recording of the student reading off the words. If a word is marked incorrectly, it can easily be changed from the drop down menu. This is also a great place to “jump to a word,” or listen to a specific word that the student missed.
Since we give our students 10 words at-a-time, we can easily grade them with a /10 score. These short assessments are just-right for the students to get through confidently - and it makes listening back to them easier for me!
How Do I set Up Reading Progress to Automatically Grade Sight Words?
Setting up Sight Word Assessments using Reading Progress can be done in several clicks. Follow these steps to get your students started, or click here for a video tutorial:
Launch Microsoft Teams, then click on “Assignments.”
Click on “Create” and then select “Assignment.”
Select the Team that you wish to assign the assignment to, then click “Next.”
Enter an appropriate title for the assignment. For example: “Sight Words 1-10.”
Under “Instructions,” click on attach. Then, select Reading Progress from the drop down menu.
On the next screen, click “Upload Word or PDF” (for a free download of all 220 sight word templates, click here).
Upload your sight word assessment, then take a look at the information on the right. You won’t need to enter a reading level, but you may want to limit the number of attempts your students have per sight word list (see the troubleshooting section below). Change this to fit your preferences, then click “Next.”
The due date defaults to the same day, so adjust it to appropriately give your students time to complete the task. Once you do, select “Assign.”
Your students will receive a notification that the assignment is ready. Now, sit back and wait for them to start submitting it! Once they do, go in through the educators dashboard and view their work! Need to actually “see” how this is done? Check out the tutorial below!
I get it! So…What do I need to know? Any troubleshooting steps?
So this sounds great, but…what could go wrong? What should I look out for? Any tips?
Now that we’ve done this for a while, here are our two most important takeaways:
1. When creating your sight word lists, only use the words that you want the students to recognize. For example, do not add a title to the body of the document. Just list the words. Otherwise, the students will need to read and recognize them when recording. IF they say something wrong, it will mark them wrong.
Takeaway: Just keep it simple! Add only the words!

2. When creating the assignment, change the number of attempts to 1. You don’t want students submitting more than one attempt at the sight words, so be sure to change that setting from the defaulted “unlimited” to “1.”
Takeaway: Explain to the students that they will only have one attempt and that they will need to do their best. If they make a mistake, encourage them to restate the words in their original video. If they stop, they will NOT be able to upload another video (if you have the attempts set to 1).
Download Free Sight Word Templates
(made for Reading Progress)
We’ve made things even easier for you with these sight word templates! This is a direct link to download the entire folder of all the Word documents containing ten words per list (for a total of 22). Just download them, then upload them as your assignment(s) on Teams! 🙌🏻

See it in action!
Coming soon!
-- Stay tuned for more Sight Word ideas that you can use in your classroom! Be sure to follow us on social media (@TheMerrillsEDU everywhere) for more! 👓👗
For more tips, tricks and lesson ideas for making learning more interACTIVE, check out our books The InterACTIVE Class and Flipgrid in the InterACTIVE Class on Amazon!


20 Activities for International Dot Day!
@TheMerrillsEDU share 20 different activities to celebrate International Dot Day, the day dedicated to the book “The Dot” by Peter Reynolds.

UPDATED: August 2025
Please note: This blog post was hand-crafted and does not include the use of AI.
Peter Reynolds’ “The Dot” has become an instant classic in classrooms around the globe. Students need to feel self confidence now more than ever, and “The Dot” does a perfect job fulfilling that feeling. Traditionally, “Dot Day” is around September 15th(ish). Below are some of our favorite “Dot Day” activities!
(click on any subheading to jump to that section)


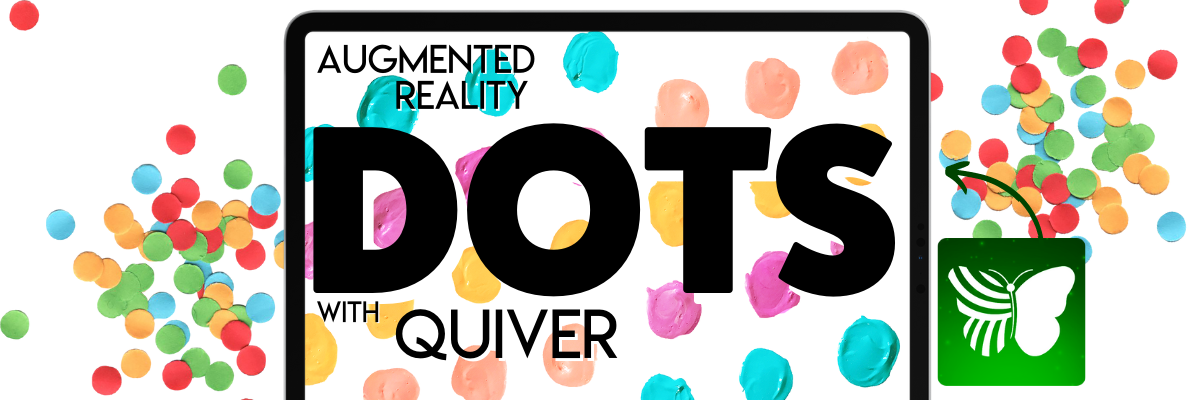


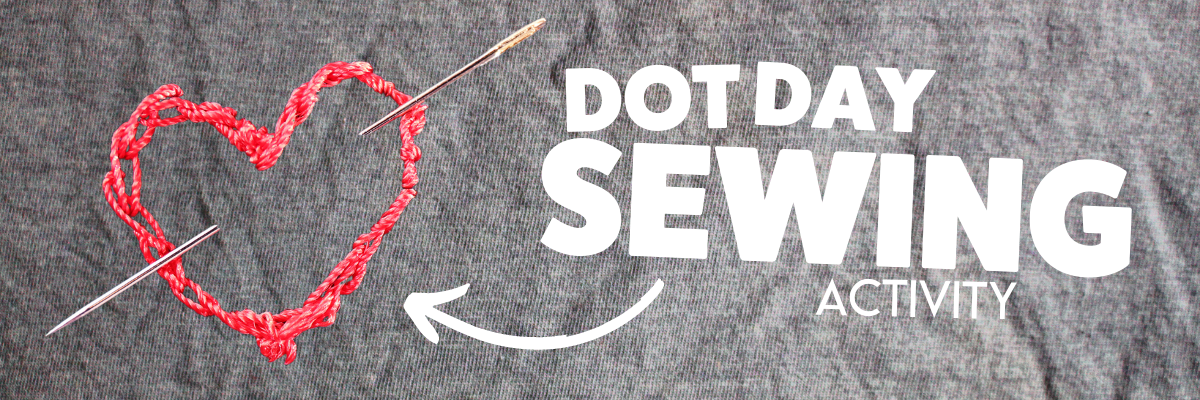


Celebrate International Dot Day with Peter Reynolds!
Join FableVision, Reynolds Center TLC, and Candlewick Press in a VIRTUAL global celebration of creativity, courage, and collaboration: International Dot Day!! In this event, students will meet Peter H. Reynolds–New York Times best-selling author and illustrator of The Dot–and his twin brother Paul A. Reynolds who will challenge everyone to believe in themselves and find the courage to “make their mark.”
Heads up: If you’re registering, you’ll need to register for the upcoming Adobe Express events (but you’ll receive a notification once it gets closer to Dot Day.)
Dot Day Buttons!
A few years ago we purchased a button maker. Now, every year we use it on Dot Day! The kids can use dots to design their buttons (a large dot!). If you don’t have a button maker - no worries! You can find relatively cheap craft buttons on Amazon. Click here for the link!

Augmented Reality Dots with Quiver!

Quiver is an awesome (and easy to use) Augmented Reality app that is available through the iOS App Store and Google Play. For this activity, you’ll need to download and print the worksheet linked here (or click on the picture). Once printed, have your students draw their dot design on the sheet. When they’re finished, have them launch the Quiver app and scan the paper. When Quiver recognizes the sheet, it will automatically create an AR version of the dot. The kids can even “hold it in their hands!” Check it out below!
Dot Day Science Experiment
Tie Dot Day into your science lessons! This Steve Spangler “Sharpie Pen Color” science experiment is great for Observable Properties and the Practice of Science. Check out the “how to” below! For a complete set of instructions, click here.

Dot Day Wormhole (Green Screen) Activity
A few years ago, our friend Erin Flanagan shared this creative way to celebrate Dot Day: A Wormhole! It looks more complicated than it actually is. The trick…Create layers with an illustration and a green circle. For a step-by-step tutorial, watch below! Be sure to check out Erin’s website here and follow her on social media @Erintegration!
Dot Day BreakoutEDU Activity
Get your student’s thinking with this BreakoutEDU activity! Click here (or the image) to learn more and read what it’s all about below:
“It’s time to make your mark! You have the talent, you are something special, and the world wants to see what only you can do! The only problem is the Eraser was in the classroom last night and thinks he locked all of our creativity and inspiration in the Breakout EDU box. He believes without it, we will not be able to make our mark! Work together to figure out the combinations and break out our Creativity!”
Create a Dot for Dot Day on Seesaw (Activity Included)!
Seesaw users can get in on the fun of Dot Day with this activity! Use the Seesaw tools to design a dot, then record an explanation sharing why you used the colors that you did. Teachers can share out the responses as a whole group for the class to share! Click here (or the image) to access the activity! (note: this requires a free Seesaw account)
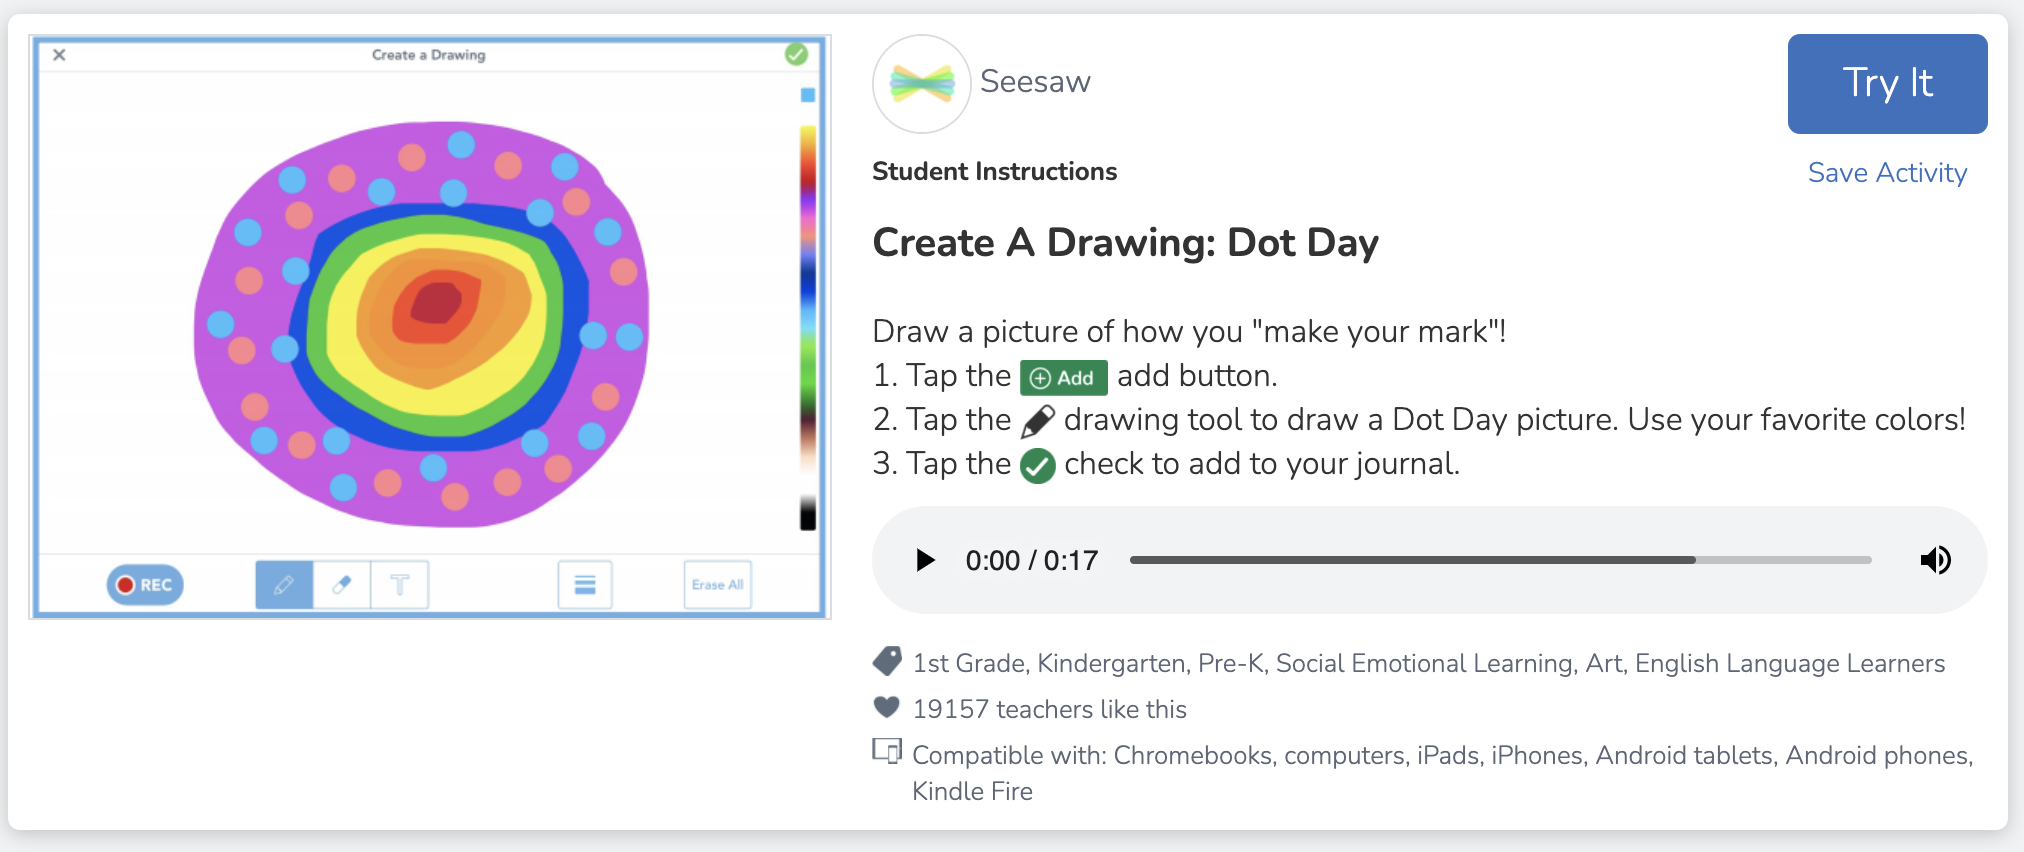
Dot Day STEM Challenge
Looking to build up some collaboration and team work within your class? This STEM challenge will make that happen! Using only notecards and circle (dot!) stickers, students must work together to create a tower. Give the class a set amount of time and then start the timer. The tallest tower still standing after the time runs out wins!
You’ll see how students quickly realize that they must work together to make the tower stand and collaborate on how to keep the structure going!

(image taken pre-COVID)
Animate a Dot for Dot Day!

What if we told you that you could take your dot creations for Dot Day and animate them? It’s possible and actually not that complicated at all! We recommend using an app like Chatterpix Kids on iOS or Google Play. Create your dot art, then launch Chatterpix Kids. Snap a photo of your art, then add a talking mouth. You now have 30 seconds of recording time to talk about your dot!
Level up - option #1: Save the Chatterpix Kids video onto your camera roll, then upload it to a Flipgrid Topic for the entire class to see!
Level up - option #2: Save the Chatterpix Kids video onto your camera roll, then upload it to Seesaw so that families at home can see!
Dot Day Twister Activity (Wormhole)!
This activity is similar to the wormhole activity above, only this time you need a Twister mat! The green dots on the twister mat will eventually reveal a secret background once you upload it into iMovie (and go through a bit of editing). Check out how it works from Beverly Babbage below and be sure to follow her on Twitter by clicking here!

“What is International Dot Day?”
(A Wonderopolis Article)

If your students are new to the Dot Day experience, they may have questions about it. Look no further as Wonderopolis has you covered! This article does a great job of covering what International Dot Day is, how did it get started and how you can make your mark. To view the article, click here or the image!
International Dot Day Song
(with movements)
Emily Arrow and Peter Reynolds teamed up to make this video that features a Dot Day song and dance moves. The video goes through each motion and would be a great challenge to integrate with Flipgrid. “Show me the Dot Day dance!” and turn your classroom into a dance challenge! Check out the video for more!
Dot Day Sewing Craft
This one takes a bit more patience and skill…Prepare a class set of cardboard and then outline a circle. Using a skewer, puncture holes (dots!) around the outline of the circle. Then, use yard and large sewing needles to start weaving around the cardboard circle. This will create a unique design…that all started with a dot!
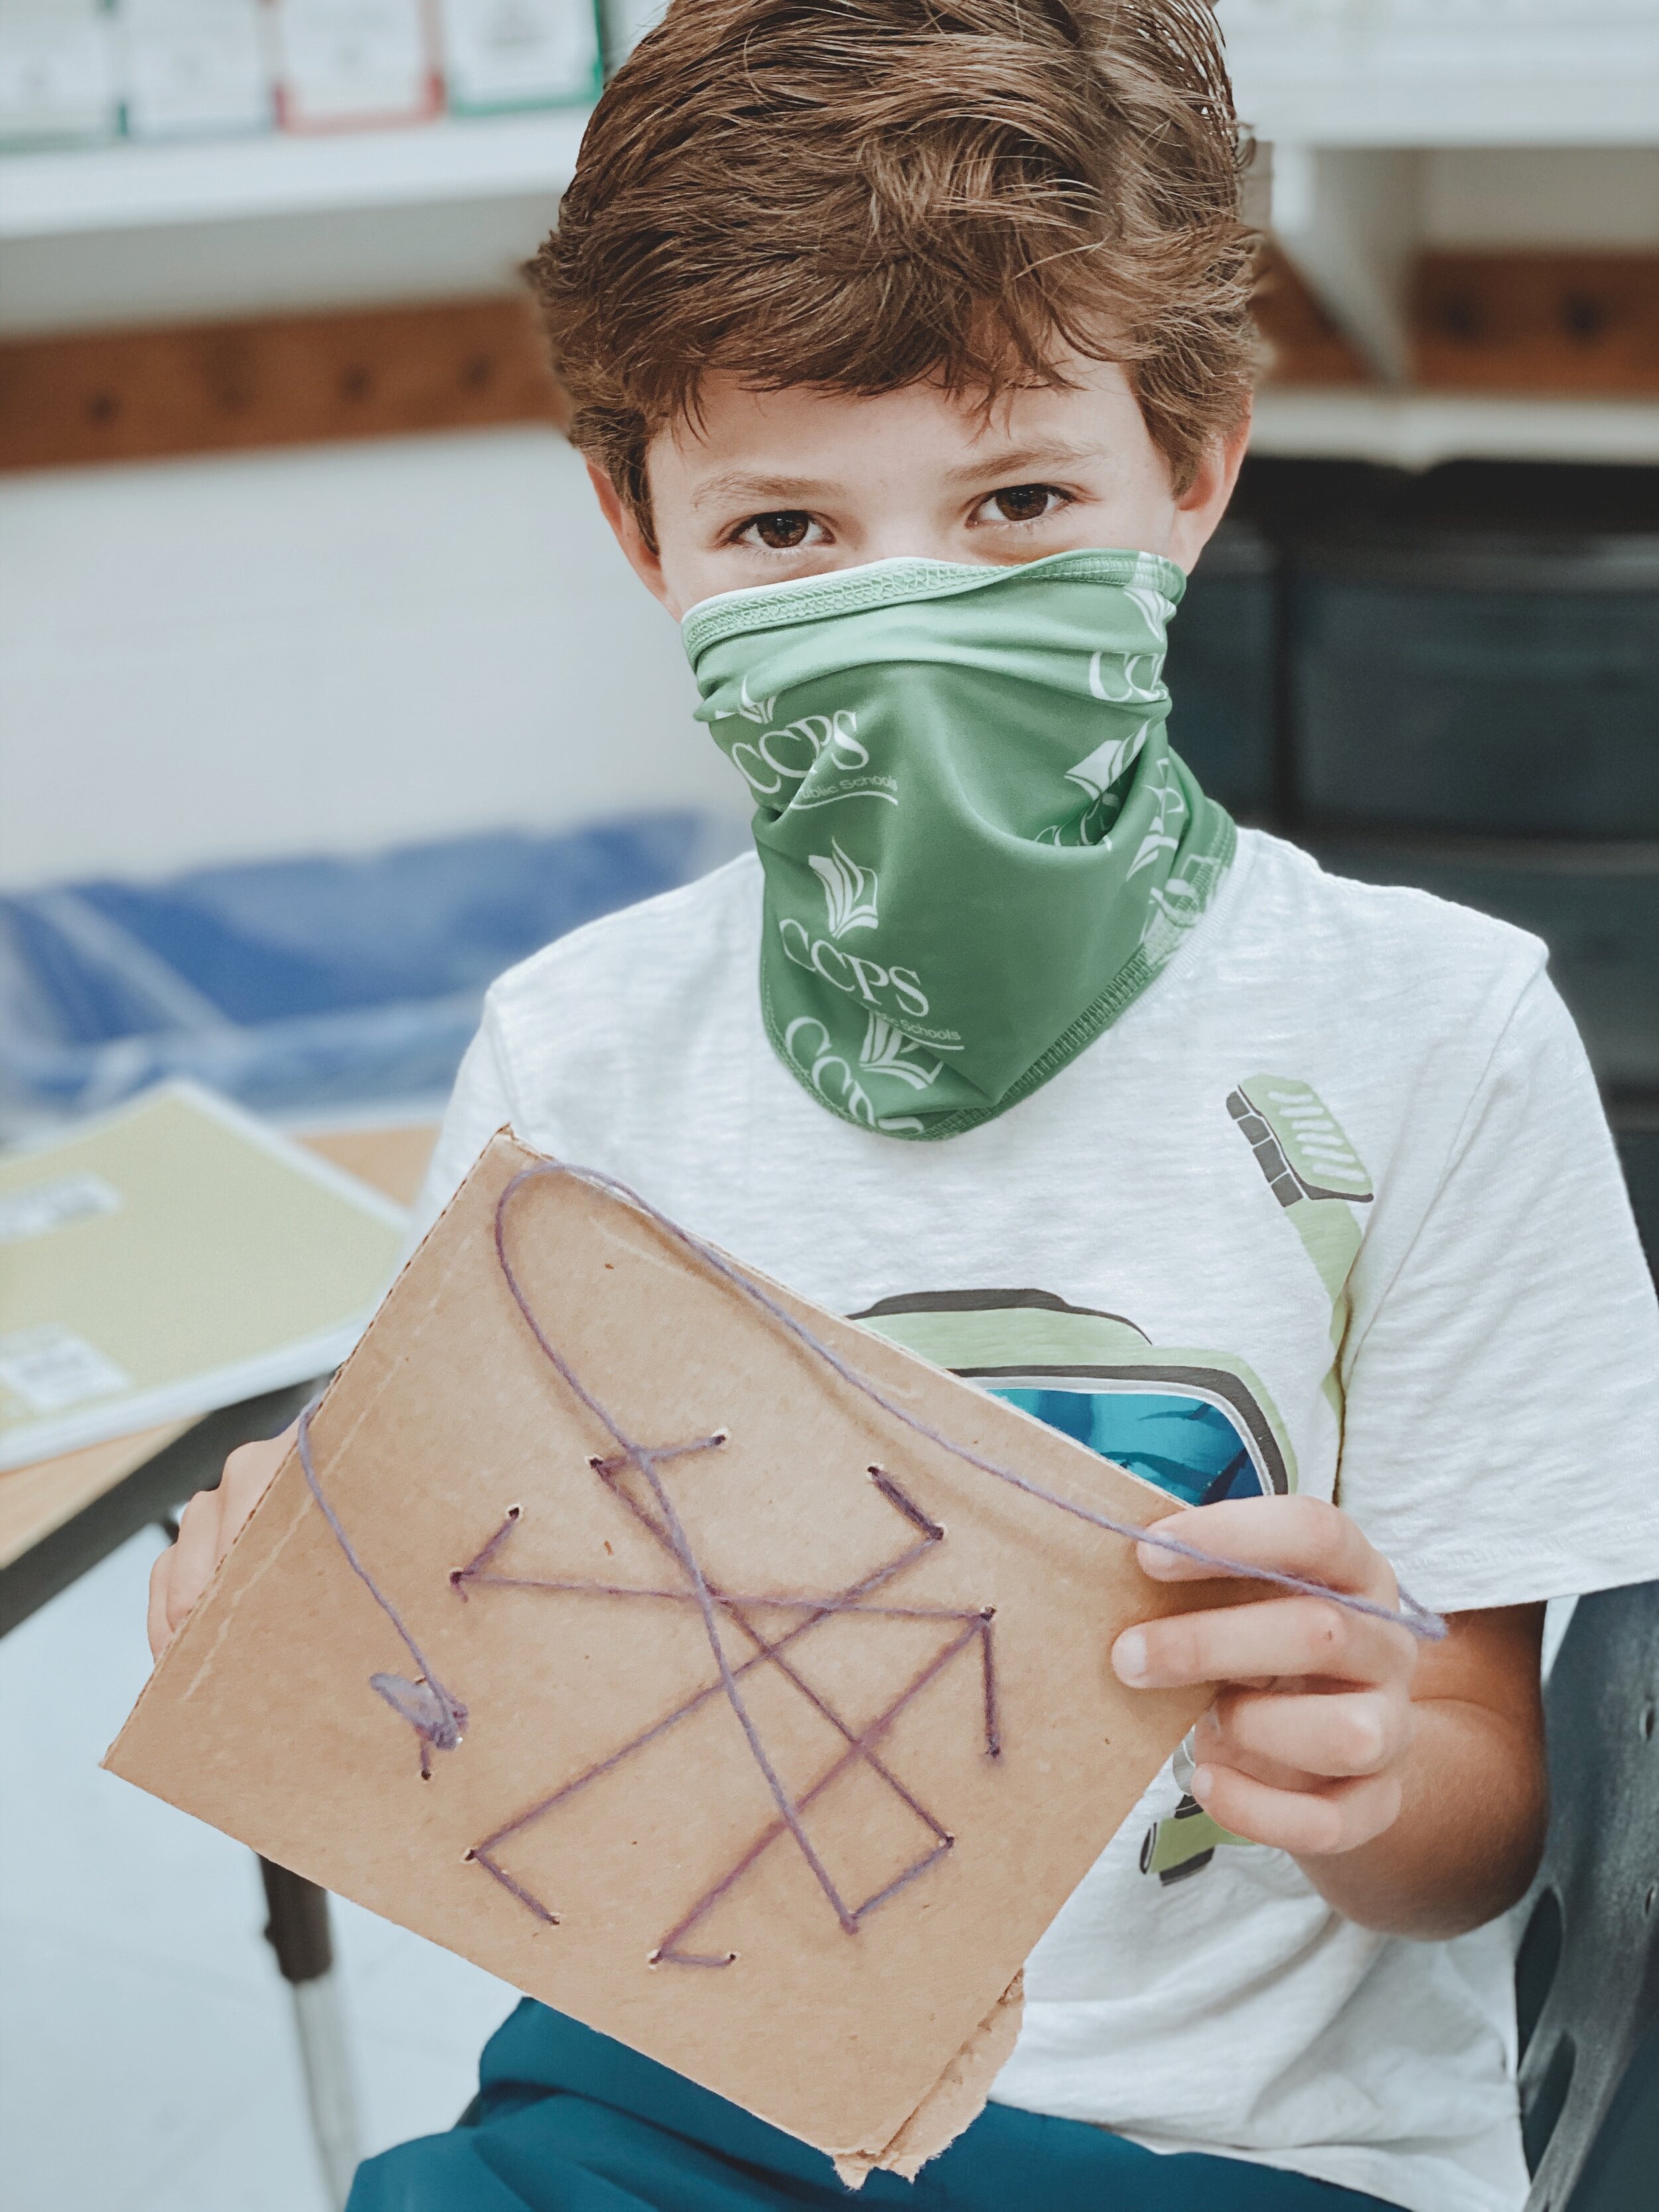
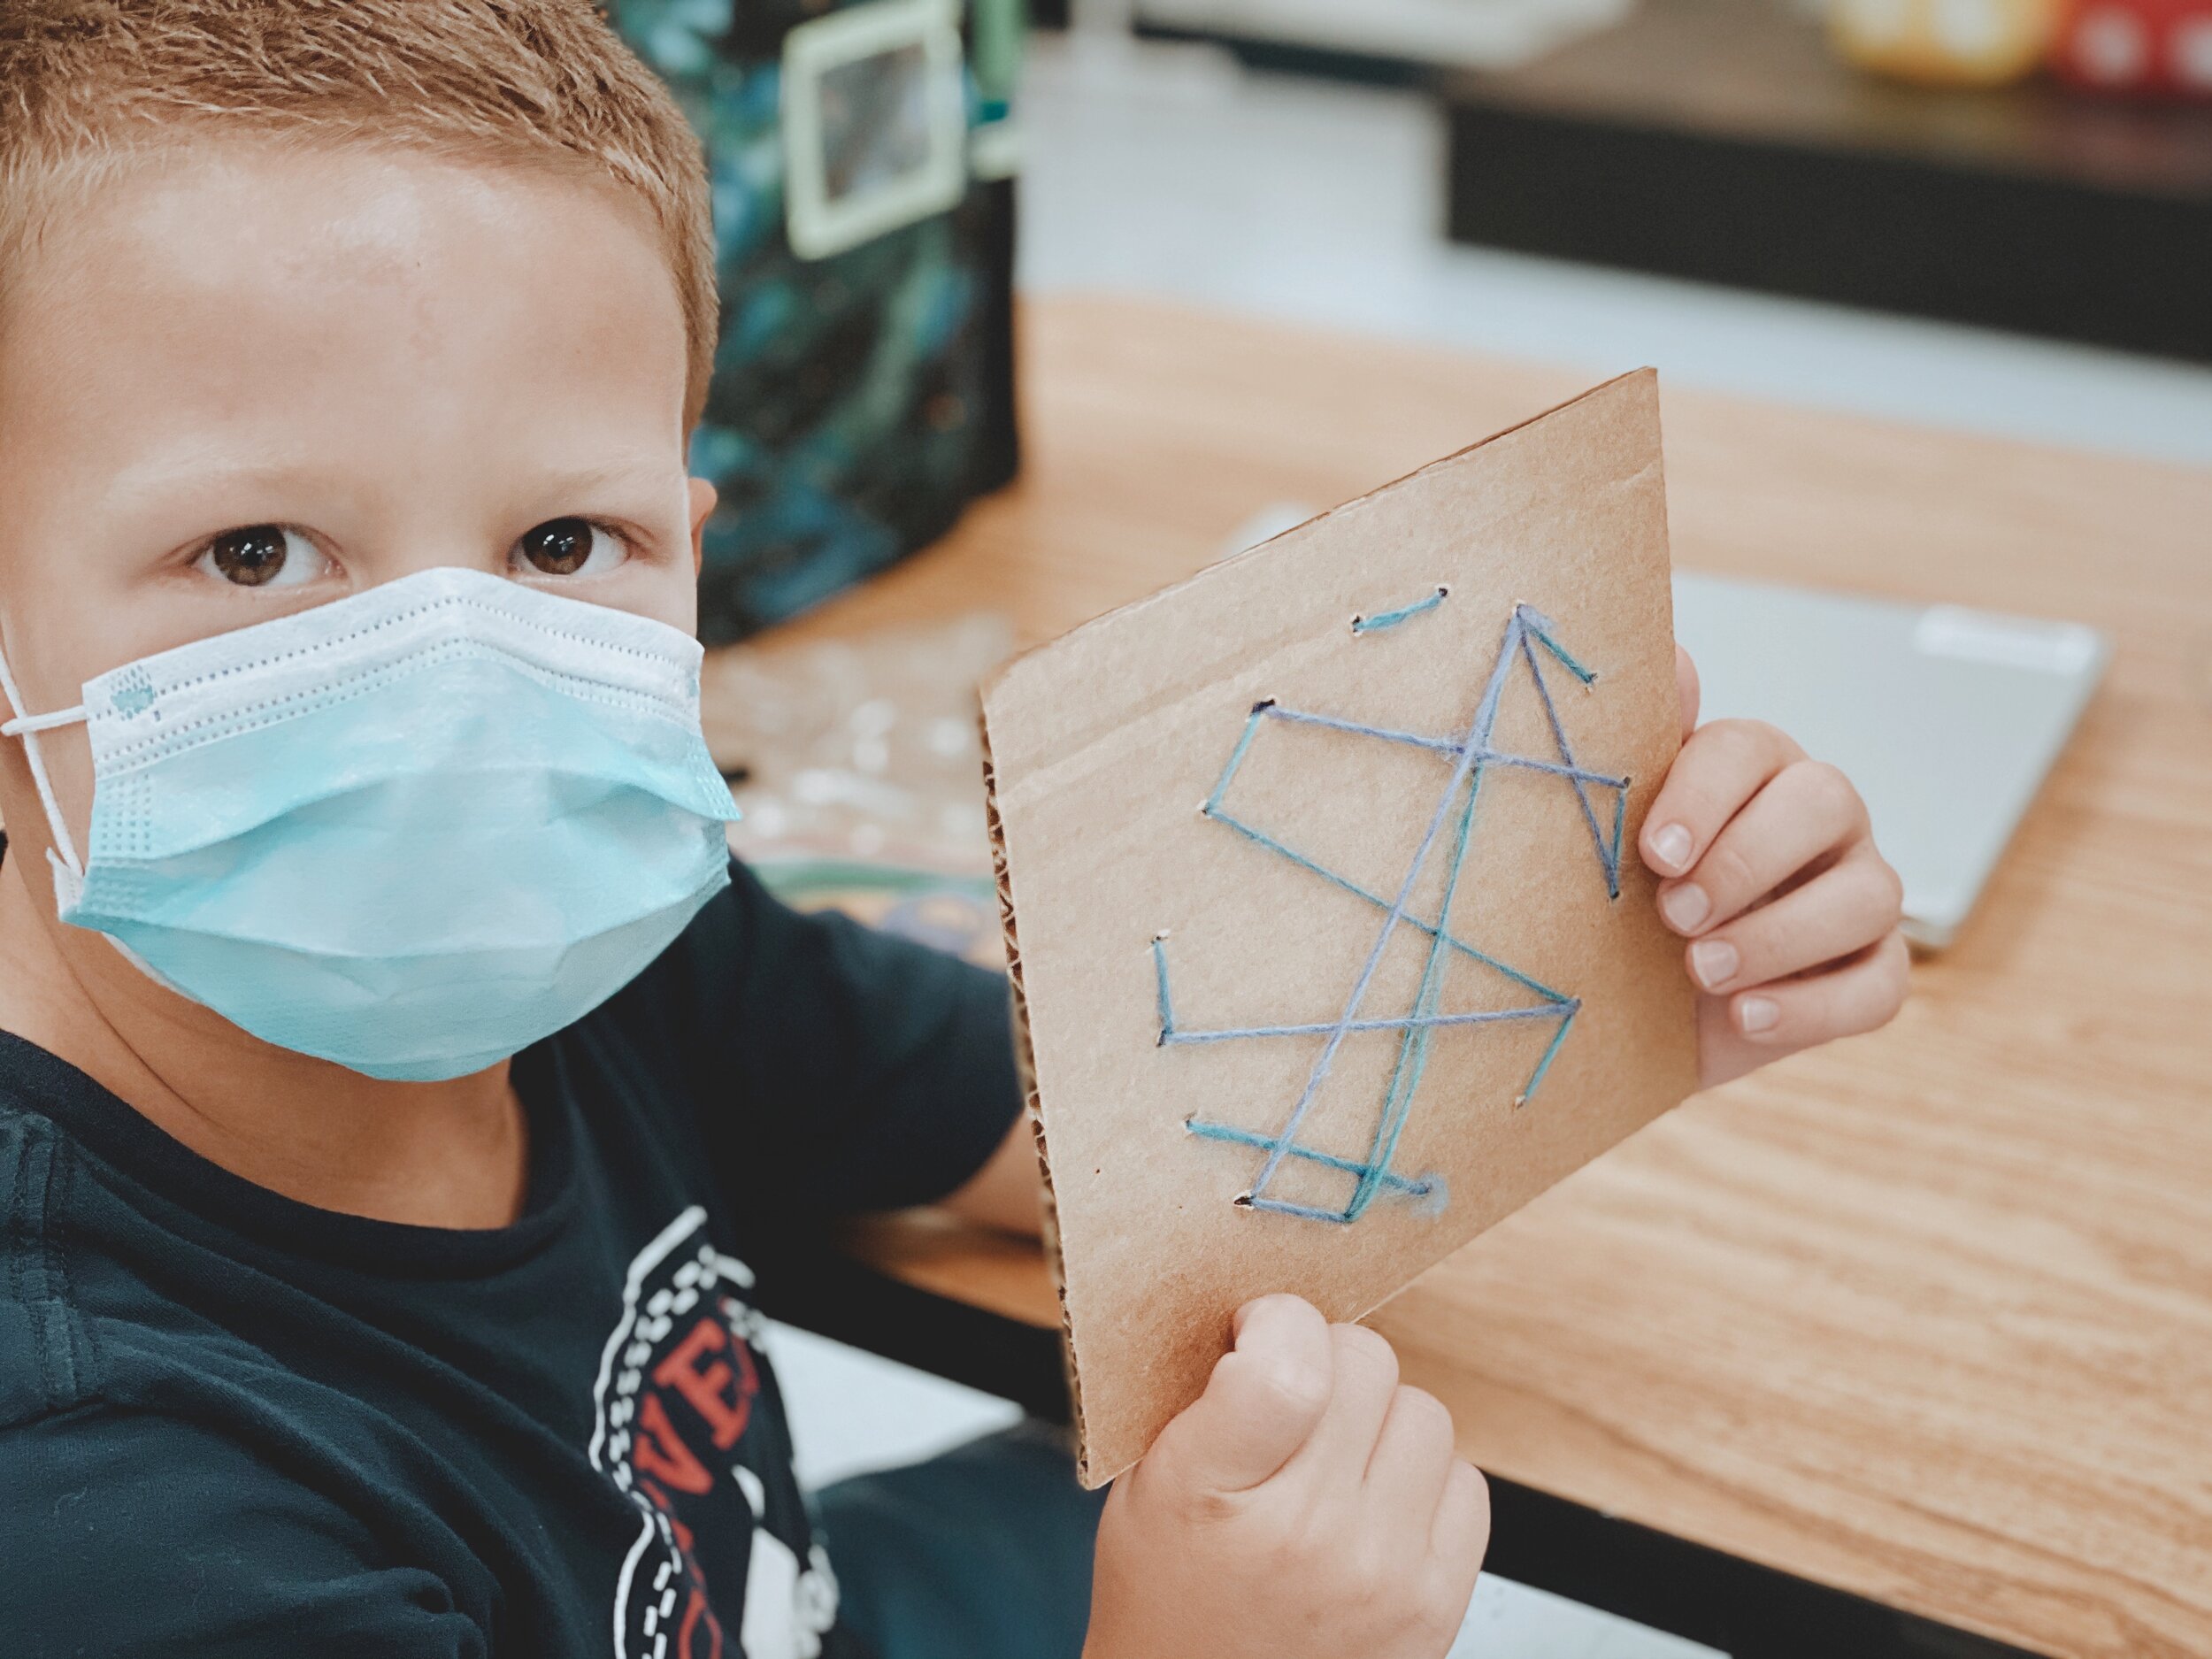
Dot Day Twins
(Dress up for Dot Day)!
This one is easy! Just tell your students to wear something with polka dots on it for Dot Day! You an also purchase a set of blank T-shirts and use permanent marker to create a unique design. This can be done on Dot Day and then students can wear their shirts. It’s a great way to boost classroom community!

(image taken pre-COVID)
Dot Day Missions of Kindness (Community Building)
Dot Day is all about making your mark and what better way to do that than to spread a little bit of kindness? We shared special messages (with a little treat - see below for info) around our campus to leave our mark on our related arts teachers, media specialists and more!
(image taken pre-COVID)
Dot Day Treats (Dot Candy)
This is definitely one of Kristin’s favorite things to do on Dot Day…Dot candy! You ay remember these treats from your youth. You know, the dots attached to the paper that you have to bite off? What kid wouldn’t love that? You can find them in bulk by clicking right here on Amazon. You can also use the “Dots” candy. Click here or the image below to buy those!

This pairs well with the activity above (Dot Day Missions). Attach a sheet or two of these onto a message and leave them around your campus for others!

(image taken pre-COVID)

(image taken pre-COVID)
Dot Day Buncee Activity
We love the creative possibilities with Buncee and your students will love this Dot Day activity! Using the Buncee tools, students drag and drop dots to create something new (it all started with a dot!). The best part of all is that this template (which can also be found in the ideas lab) is completely editable! Just share or assign it to your class and they’re ready to go! To access this activity, click here or on the image!

Dot Day Read Aloud with Novel Effect!

We all know how great the book “The Dot” is, but have you tried pairing this book up with the app Novel Effect? Novel Effect uses your devices microphone to bring stories to life! As you read, various sound effects and background music will be played. The coolest part is that you don’t have to feel pressured to speed read through the book. Novel Effect intelligently changes as you read, recognizing the words and phrases of the book. Click here to view this app on iOS and Google Play.
The Perfect Dot (For Littles)!
This activity from @zosia_majstruje on Instagram is the perfect activity for all of your perfectionist littles (or all ages)! Use paper towel or toilet paper rolls with paint. Have the students place the paint brushes into the roll(s) to paint the “perfect” shaped dot! Be sure to follow @zosia_majstruje on Instagram by clicking here!

Dot Day for Reluctant Learners
Not everyone knows where to start with Dot Day. In fact, many students feel just like Vashti. Sometimes we need a little inspiration to get the creative juices flowing. This activity from Cassie Stephens is the perfect way to keep everyone engaged. Use dot/circle stickers with Cassie’s PDF template. Have the students place a dot/circle sticker anywhere inside the frame. Then, let them use any art tools that they would like to continue their illustration!
Click here to view Cassie’s blog post
Click here to download Cassie’s template
Click here to follow Cassie on Instagram
-- Stay tuned for more Dot Day ideas that you can use in your classroom! Be sure to follow us on social media (@TheMerrillsEDU everywhere) for more! 👓👗
For more tips, tricks and lesson ideas for making learning more interACTIVE, check out our books The InterACTIVE Class and Flipgrid in the InterACTIVE Class on Amazon!

Tips, Tricks and Templates to Use with Microsoft this Fall!
@TheMerrillsEDU share ways on how to use Microsoft tools in a post-pandemic classroom. Learn how students can use dictation, convert word files to powerpoint presentations, how to use Microsoft's collaborative whiteboard and so much more! These quick tips and tricks are delivered in less than 90 seconds!

Teaching throughout the pandemic was the world’s greatest PD event for educators. But, now that most of us are gearing up to return to in-person learning next year, how can we continue to use some of the technology and tools that we learned about throughout remote learning? How do tools like Microsoft Teams, Word and PowerPoint still fit into every day use in a “normal” classroom setting? It’s something that is on all of our minds entering next year. So, to help, we’ve created a video series dedicated to helping! We’ll share two new tips, tricks and/or templates per week from now until the end of July - just in-time for the new school year. Check everything out below!
(click on any subheading to jump to that section)
Also, check out our recommended blog posts and tutorials:
How to Convert a Word Document into a PowerPoint
Teaching writing throughout the pandemic was probably one of the hardest subjects for us both. With students both in-person and virtual, we had to rely on Microsoft Word to produce student artifacts that could be transferred digitally (and edited if need be). This trick helped take our students writing and “publish” it into something that they could edit, create and share. The result was something that everyone could be proud of! Learn how it all works below!
Using Dictation in Microsoft Tools
Dictation can now be found in many of Microsoft’s tools. Learn where to find it and how your students can take advantage of this feature below!
Ways to Use Microsoft’s Whiteboard in the Classroom
Microsoft’s Whiteboard is perfect for collaboration and real-time creative thinking. Learn how you can integrate this into your classroom immediately!
Monitoring Social and Emotional Learning with Microsoft EDU
Learn how this Microsoft tool can help you monitor your students’ feelings in just a few clicks! Reflect will help both you and your students returning back to school this fall!
Using Immersive Reader in PowerPoint
Immersive Reader can now be found in PowerPoint! This impressive technology can read out loud any text on the slides and can even translate it into different languages, making your content accessible to all! Learn how it all works in PowerPoint below!
Recommended Blog Posts
and Tutorials:
How to Embed Nearpod Presentations into Microsoft Teams
Organization in any classroom is key and with this tip, you’ll be able to keep your Nearpod presentations embedded right into Microsoft Teams. Check out our blog post and tutorial below for more info!
How to Make a Custom Microsoft Teams Background
Microsoft Teams is constantly providing updates to its platform, but the latest is one that users have been begging for: the ability to upload your own backgrounds. Now, you can create a personalized scene and Teams will virtually place you directly into your image. Learn how it all works and find a free background from our curated list!
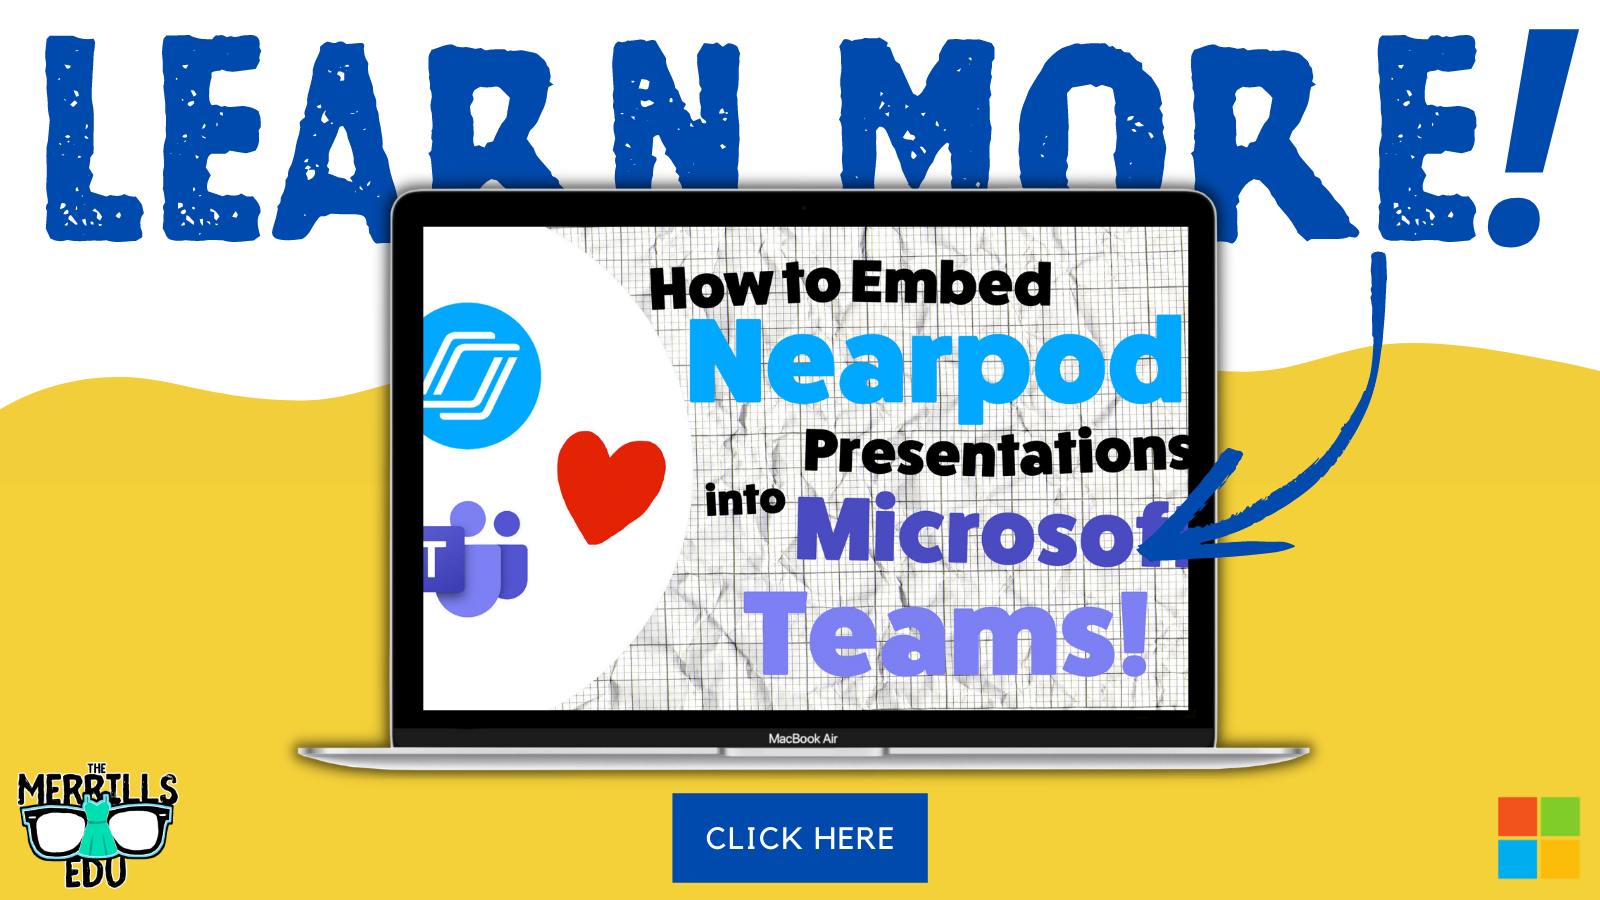

6 InterACTIVE Ways to Use Microsoft Forms
There are many hidden gems within Microsoft EDU, and Microsoft Forms is one of them! Here are six interACTIVE ways you can use them!
How to Use Reading Progress
Learn how Microsoft is revolutionizing how educators administer running records and assess their students reading skills. NO MORE RUNNING RECORDS!


Creating a Virtual Classroom with Microsoft Teams
With the help of Microsoft Teams we can expand our classroom walls and bring our students into a different type of interACTIVE learning environment. Learn how to do more with Microsoft Teams!
Number Talks in Microsoft Teams
Are you looking for ways to improve mental math and fact fluency with your students? Then, Number Talks may be the perfect exercise for your class! Pair this activity with Microsoft Teams for full-on engagement!


Check out the entire video series below!
Check back soon for more updates and be sure to follow us on social media or join our mailing list to be the first to know when new content is posted!
-- Stay tuned for more on how to use Microsoft tools in your classroom! Be sure to follow us on social media (@TheMerrillsEDU everywhere) for more! 👓👗
For more tips, tricks and lesson ideas for making learning more interACTIVE, check out our books The InterACTIVE Class and Flipgrid in the InterACTIVE Class on Amazon!


