


Empowering Relationships with Personal Postcards
In this post, @TheMerrillsEDU highlight one of their favorite strategies for nourishing student and family relationships—postcards! Sharing your thoughts and feelings is one of the easiest ways to build a relationship with your students. Sending short, sweet notes of encouragement home for students to find is one easy way to reach out and build a relationship with them.

Teachers can design, develop and begin creating an InterACTIVE classroom, but they must not overlook the importance of the personal relationships they can cultivate with students at the same time. Engagement is built on relationships, and the most important relationship in the classroom is the one between the teacher and the students. It is safe to say the influence of a teacher may be the most central and impactful thing when predicting the success of a child.
Cultivating personal relationships with students is the foundation to keeping them engaged in the InterACTIVE classroom. From this point, any achievement a student makes will continue to grow and nourish the relationship further. When you’re gifted a new class of students, you may struggle to find the time to personally get to know each student. Finding and adopting even one strategy for doing this is a step in the right direction toward positively impacting students through your individual relationship with them.
In today’s post, we are going to highlight one of our favorite strategies for nourishing student and family relationships—postcards! Sharing your thoughts and feelings is one of the easiest ways to build a relationship with your students. Sending short, sweet notes of encouragement home for students to find is one easy way to reach out and build a relationship with them.
There are two different ways you can reach out to students using postcards. First, you can use postcards to make initial contact with your students before the start of the new year. In our school, students have a special day and time where they come to find out and meet their new teacher, but if your school doesn’t, this might be a fun option. Simply send a sweet note home for students welcoming them to your class. You could even add a QR code to the note with a Flipgrid topic to try out or linking to a video of your doing a welcoming night before school read-aloud.

The other way to use postcards is yearly shoutouts. During a routine school event like Meet the Teacher or Open House, simply leave a pile of blank postcards on a table and ask students (parents can help!) to take a card and address it to themselves. Leave a small basket or bin where students can then place the addressed card and then after the event collect and store the cards together. Throughout the year, as students accomplish something they are proud of or achieve a new goal, pull out their postcard and write them a quick note of encouragement. Smack a stamp on it and mail it out!
If you would like to grab one of the designs we shared above, simply click here or the button below!

This is the message you can use on the sign placed on the table with the postcards.
If you like this idea for empowering students and making connections, check out this idea and others in our book The InterACTIVE Class!


Book Creator Summer Updates!
Book Creator has just announced ⭐️HUGE⭐️ updates to their platform! Learn about what’s new and how to use it here!

Book Creator’s name says exactly what it does and it does it quite well! However, now it is easier than ever to create books and with analytics, educators can see who is viewing what. Learn all about the updates below!
(click on any subheading to jump to that section)
How to Remix a Book in Book Creator

Sharing books from Book Creator has always been easy, but one of the things missing from the publishing process was the capability to “remix” or download and then edit a book to your liking. Perhaps you were working on a team and wanted to share your book with the rest of the educators in your building. Now, Book Creator can make that happen - all all with a simple click! Just look for the “Remix” button and click it to edit the book!
But what if you want to share a book for someone else to remix? That’s easy, too! When you’re ready to publish, be sure to fill out all the necessary info and then under “Who can find this book,” select “Public.” Then, under “Allow Remixes?” select “on.” Last, click the blue “Publish online” button. Now, you’re ready to share your remix-able book!


So now that you have your remix-able book published, how can you get into the hands of other educators? The answer is simple! From the Book Details (publishing) window, click “Copy link.” Then, share this link with the educators who you would like to have access to it. Those who open the link will see the “Remix” option at the top and will be able to edit it as they see fit!
Where can I Find Remix-able Book Creator Templates?
Book Creator has curated lots of remix-able options. You can find everything on their Resources page, or click here (or the image to the right). If you scroll down the page a bit, you can also find a special section of remix-able templates from us! Check everything out below! You can click on the books and they will open up as a remix-able file!

What are Analytics in Book Creator?

Analytics in Book Creator gives the author the number of times the book has been read. This is a great way to encourage and engage students. Not only will you see how many times the book has been read, but you can also see a map of readers across the globe! Users can zoom in and out of a global map to see who has been checking out their awesome work!
Using Dictation to Search for Images in Book Creator
Now, it’s even easier for your students to find images for their books. Book Creator now has dictation enabled in both image and map searches. With this feature, Book Creator becomes even more accessible (especially to younger kids or ELL students who aren’t super confident with their spelling by introducing a voice search). To use dictation in an image search, follow these steps:

From the editing panel in Book Creator, click on “+” sign, then click “Import.”
A new window with a search bar will open. Click the microphone and grant the necessary permissions for Book Creator to use your device’s microphone. Then, say a word.
You do not need to hit enter. Book Creator will automatically load the image responses for you! Just select an image that is right for you!
New Icons in Book Creator
Back in December, Book Creator announced that now paid users can search and select icons from Noun Project. This website is full of icons created from users around the globe. A license to Noun Project costs $19.99 per year for access to all their icons royalty and attribution free. Multiply this by the number of students you teach and it can get expensive. But, now those with a paid Book Creator subscription have access to these - including your students! To use icons from Noun Project, follow these steps:
From the editing panel in a book, click on the “+” sign.
Click on Shapes, then search for a Shape or icon (tip: you can now rotate images!)
Select your shape or icon to insert into your book!
Safe Search in Book Creator
Book Creator has partnered with Pixabay, providing over 2 million high quality professional images and, most importantly, every one of these images is humanly reviewed to ensure it’s a great image, is free to use, and is not offensive. Worried about certain images popping up? You can now instantly block an image from appearing in any of your libraries, including for the students working in them. This will also flag the image to the Book Creator team. We will review it and potentially provide a system wide block so that all teachers can benefit. You can instantly block an image by clicking on the flag next to the image. It will be removed from any future search results your students perform in that library.

Additional Book Creator
Updates Out Now!
The fun doesn’t stop with everything above! Users can also expect the following updates from Book Creator:
12 new fonts added
Add image attribution
New shapes

-- Stay tuned for more on how to use the all new Book Creator updates in your classroom! Be sure to follow us on social media (@TheMerrillsEDU everywhere) for more! 👓👗
For more tips, tricks and lesson ideas for making learning more interACTIVE, check out our books The InterACTIVE Class and Flipgrid in the InterACTIVE Class on Amazon!


Flipgrid LIVE 2021: What are the New Flipgrid Updates?
@TheMerrillsEDU share the all new Fligrid updates coming in 2021! Learn what’s coming, what’s new and what is changing!

Flipgrid LIVE revealed many new and incredible updates that educators can get excited about. Learn about them all here!
(Click on any subheading to jump to that section)
Backdrops in Flipgrid

For the first time ever, you will be able to swap out your background in a Flipgrid video! Choose from a default library or upload your own! You can even move yourself around to the bottom of the screen - similar to Dynamic View in Microsoft Teams.
Music in Flipgrid

Now, you’ll be able to add music right into your Flipgrid videos! Choose from a wide variety of moods to add to your video’s background. There’s a song for every story and every vibe!
Lenses in Flipgrid

Lenses are coming to the Flipgrid camera! AI will automatically place you into a scene, add a transparent image over your face or turn you into a new character!
Flipgrid Assignments in
Microsoft Teams

Coming soon, you’ll be able to assign a Flipgrid Topic to your students right through Microsoft Teams. Now, connecting your students to Flipgrid through Teams has never been easier!
New Look to Flipgrid Groups

Flipgrid Groups are getting a facelift! Now you’ll be able to see all the topics of your group easily!
Mobile App Updates

Android and iPhone apps have an all new design! Do more within a group! Within a Group, create a topic on any device.
Watch Flipgrid LIVE on demand!
Didn’t catch Flipgrid LIVE? No worries! You can watch all the fun and excitement back on demand below!
-- Stay tuned for more on how to use the all new Flipgrid in your classroom! Be sure to follow us on social media (@TheMerrillsEDU everywhere) for more! 👓👗
For more tips, tricks and lesson ideas for making learning more interACTIVE, check out our books The InterACTIVE Class and Flipgrid in the InterACTIVE Class on Amazon!


Prime Day Deals for Teachers (2021 Edition)
Prime Day is here and that means there are all kinds of goodies for the classroom on sale! Here’s a list of items we’ve compiled so that you don’t have to go looking through everything. We’ll keep this updated throughout the next few days!

Prime Day is here and that means there are all kinds of goodies for the classroom on sale! Here’s a list of items we’ve compiled so that you don’t have to go looking through everything. We’ll keep this updated throughout the next few days! Have a question? Follow us on social media and reach out anytime!
Note: This page contains affiliate links. Prime Day prices will not be revealed until visiting the links on Amazon.com.
(Click any subheading below to jump to that section)
Classroom Resources
Books
Electronics
Accessories, Shirts, etc.

Create Your Own Breakout Game Using Wakelet, Buncee and Flipgrid!
Bring the engagement of breakout games into your classroom with this Wakelet, Buncee and Flipgrid idea! This post walks you through the process of setting up the breakout OR simply downloading our Wakelet collection templates for yourself!

What does Wakelet, Flipgrid and Buncee all have to do with each other? The answer is alot! But, in this post, you’ll learn how to connect all of these tools to create a truly unique experience for your students: A Breakout!
In this blog post you’ll learn:
(Click on any subheading to jump to that section)
How to Set Up Wakelet for Branching
The key to setting up your Wakelet / Buncee / Flipgrid challenge is using branching, which allows you to send users to different questions depending on their previous answers. For example, if you have a multiple choice question, the correct answer will take you on a different path then the incorrect answers. This is how the Wakelet collections need to be set up.

Start off by mapping out how you want your branching to work. Where will your students go when they answer correctly? Where will they end up if they answer incorrectly? Here’s an example of the beginning stages of what ours looked like (this obviously evolves as you go on).
Once you have your branching and mapping figured out, it’s time to start building the Wakelet collections. Start off by building your first collection by calling it, “Challenge 1.” On Challenge 1, students are given a question and four different answer choices. We recommend keeping the first challenge relatively easy, this was your students feel confident and remain engaged early on.
Before you save everything, be sure to click on the settings icon located on the top left. Make sure you have toggled the Collaboration feature on. Doing so will allow your students to leave work for others to see. This is handy if you have students that might struggle and could use a helping hand from their friends.

When we toggle this feature on, we ask that our students share their strategies - but do NOT share their final answers (for example, they work out that 2+2 = a mystery number - never giving away the answer). This step is completely optional, and you may decide that you don’t want this feature enabled. It’s totally up to you!


Now that you have your first challenge created, you will need to create two additional Wakelet collections - one for the correct answer and one for the incorrect answer. When creating the incorrect collection, be sure to provide a link back to the previous challenge (so that your students can try again). When setting up the correct response, you will want to include the next challenge below the “correct” answer. This is also where your students can be tipped off on what is to come (the first letter of the term “Flipgrid” changes color - indicating that they will need to answer the challenges correctly in order to change the color of each letter in the word. Now they are ready to move onto the next challenge. Repeat the steps above as needed!
How to Add Buncee into Your Wakelet Collection

One of the best integrations with Wakelet is with Buncee. Educators (or students) can post a “live” Buncee into a Wakelet collection. So, in this example we have placed a Buncee project right into Wakelet (copy the share link from Buncee clicking “code”). The students use the hyperlinked items from Buncee to click and find the correct answer. In our example, we chose the books as the correct answer. But, we made the challenge a little more interesting…most students thought the correct answer was “books,” but it was actually the number 8. So, when the students got to the final step, they weren’t able to get in unless they figured out that there was 8 books and needed to use the number 8 instead of the term “books.” This may not have been obvious to them at first, because clicking on the books lead them to the next challenge - indicating that they had the correct response. It was just a fun little twist to throw at them! See if you can figure it out below! 😜
Someone has come into the classroom and left a mess! There are clues everywhere! See if you can solve this puzzle:
I have letters and numbers but I’m not a computer keyboard
I’m sometimes stored in a case but I’m not a cellphone
I contain paper but I’m not a ring binder
I have a cover but I’m not a pillow
Lunch? No thanks. We already eight.
Click on the image that you think is the correct answer. Be careful!
Setting Up Flipgrid for a Wakelet Student Breakout Game
Once you have all of your Wakelet collections / challenges set up, you’ll need to set up a new Group on Flipgrid. From the educators dashboard, slide the toggle button onto Groups. Then, click the blue “Create a Group” button. Enter the information accordingly, then under permissions select Student Username. For the first and last name use something generic like Winner Winner. The next step is important! For the username, enter all of the numbers of the Wakelet challenges. So, if you used 2+2 for challenge 1, 3+3 for challenge 2 and 4+4 for challenge 3, you would enter: 468 (and so on). Set your preferred notifications, then click the blue “Create Group” button.


In your new group, create a new Topic by clicking on the blue “Create a Topic” button. This will be where your students will end up once they crack the code. In our example, we had the students do something fun - show us a victory dance! It was a fun way for us to see who was able to successfully complete the challenge and add some more engagement.

Another tip: you will want to either delete or hide the auto generated Flipgrid Topic that gets created when you start a new Group. Deleting or hiding this topic will guarantee that your students land on the appropriate Topic (since there will only be one Topic in the group). Once you have this set up, you are ready to share your challenge with your students!
Download the 🔥FREE🔥 Wakelet Collections
A bit confused about the above? Short on time? We’ve got you! You can download ALL of the Wakelet collections by clicking here or the image below! Tip: You will need to edit the link to the final Flipgrid challenge with the link to your own Flipgrid Group.
Also, this is a live collection. Please do not add any content, as it could mess up the experience for others.

See it in Action: Classroom images and video from the Wakelet, Buncee and Flipgrid Breakout Challenge


-- Stay tuned for more on how to use Wakelet breakout activities in your classroom! Planning on trying this out? We’d love to see how you’re using it! 👓👗
For more tips, tricks and lesson ideas for making learning more interACTIVE, check out our books The InterACTIVE Class and Flipgrid in the InterACTIVE Class on Amazon!


How to Use the Elgato Stream Deck in the Classroom
Elgato’s Stream Deck is a simple and powerful tool that commits an action once a button is pressed. Quickly play a sound effect, animated GIF and much more! Introducing this into the classroom is can take your engagement through the roof. Learn how it all works in this blog post!

Elgato’s Stream Deck is a tool that streamlines productivity. Coming in as many as 32 and as little as 6 buttons, users can efficiently launch apps, play sounds, mute / unmute, trigger GIF’s and videos and much more - all with just one press of a button. This all sounds fantastic - if you’re a gamer or streamer. But, what about teachers? How can we integrate this tool into our classrooms? Learn how more below!
(click on any subheading to jump to that section)
Which Stream Deck is best for me?
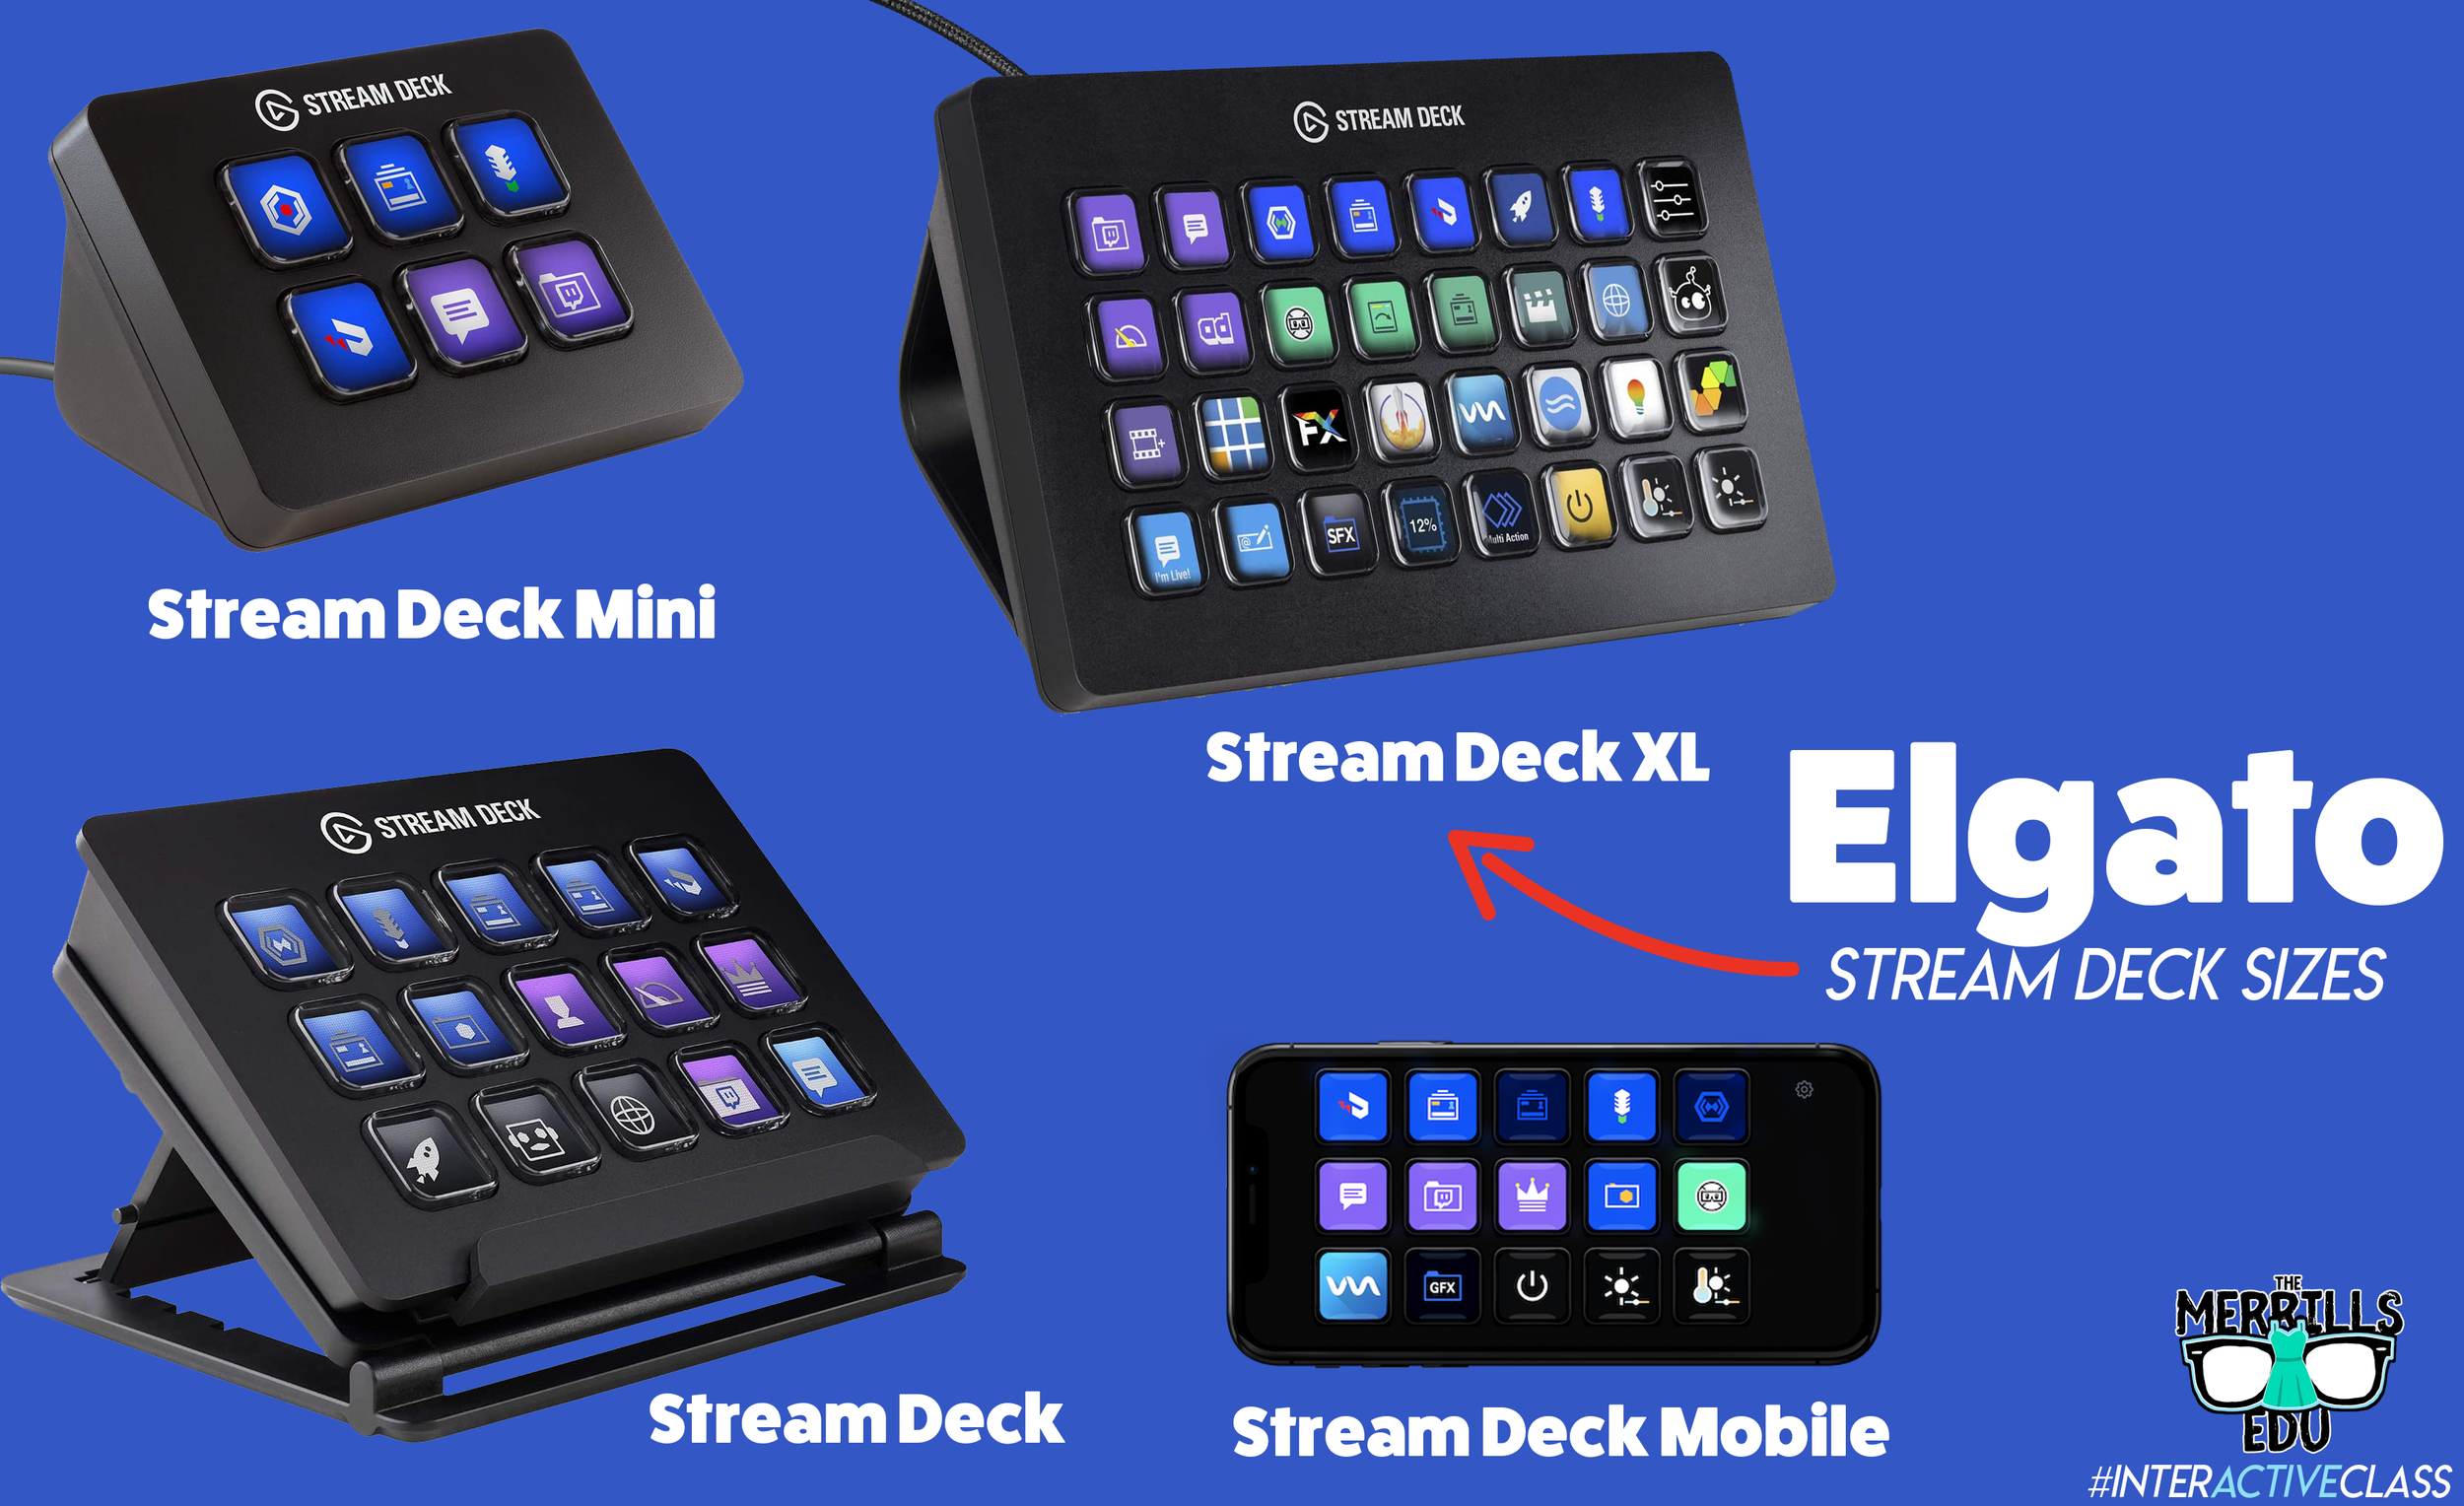
Elgato’s Stream Deck comes in several different sizes: 32 buttons, 15 buttons and 6 buttons. The prices range from $250 (32 buttons) to $80 (6 buttons). There’s also an option to turn your mobile device into a Stream Deck using Elgato’s app.
When deciding which is best for you, it’s important to note that there are an infinite number of actions that can be assigned to each stream deck. For example, if you’re working with the 6 button stream deck, users can create folders inside of folders to organize their actions. This features is available on every Stream Deck, so there’s always room for more!
So, which one is best for me? That depends…If you’re looking for more control, you’ll definitely want a bigger deck. More buttons = more options. If you’re looking for something small (pocket sized) and see yourself using the same actions all the time, then the Mini may be right for you. Speaking from experience, we prefer the larger sizes because you don’t have to assign actions to all the keys if you don’t want to - but at least they’re there if you do! Click below to purchase:
Elgato Stream Deck Mini (6 Buttons)
Elgato Stream Deck (15 Buttons)
Elgato Stream Deck (32 Buttons)
Elgato Stream Deck Mobile (app w/ 15 Buttons)
Once you’ve decided on which stream deck is right for you, check out Elgato’s starter guide right here!

Where Can I Find Sound Effects and GIF’s for my Elgato Stream Deck?
So, you’ve got your deck and you understand how the software works. But, where can you find sound effects and GIF’s to use? Here are a few places we recommend!

SuperLuigiBros.com
Looking for video game sound effects? Check out SuperLuigiBros.com for a collection of Mario Kart effects. No account required!

Free SFX
Free SFX requires you to sign up for a free account. But, once you’ve created your account, you can easily access tons of free sound effects that can be downloaded directly to your device.

Free Sound
Free sound also requires you to create an account before you can download, but doing so will give you access to tons of free sound effects!

Zapsplat
Zapsplat doesn’t require an account to download files. Users can select a sound effect, then Zapsplat generates a file link to download.

Giphy
Giphy is home to countless GIF’s, all of which are available to use for free. GIF’s can be downloaded (right click, save image as), but the true magic comes from making your own. This can be done right within the site. We also recommend checking out Giphy’s stickers - which have transparent backgrounds.

Tenor
Another fantastic website that features countless GIF’s! Like Giphy, users can create their own GIF’s in Tenor by uploading content and using the sites GIF creator tools.
How Can I Use the Elgato Stream Deck in My Classroom?
This all sounds awesome - but how does this translate into the classroom? How can this benefit my students and their learning experience? Like with the Stream Deck, the possibilities are endless. But, here are a few ways that we’re using it in our classrooms:
Engagement

Kids today are able to process information in a much quicker pace than ever before. They are also able to take in information for multiple resources and know exactly what to do with it. This means our students are excellent multitaskers! In a world where sound effects appear right on top of videos that they’re watching, kids need engagement. So, try using the Stream Deck to load up some sound effects. Create buttons for things like “oh, no” or “oops.” Maybe even create one for “money” (when something good happens) or “kerching” (for when something great happens). Then, when those situations arise, be quick with your buttons and press the appropriate one!
Timers
The Stream Deck can play short sound effects and long songs. So, program your Stream Deck with a timer - or song. We try to keep ours at 1 min and 30 seconds. We use this same song for all transitions, clean up, etc. Playing the same song gets the kids familiar with it, so they know exactly how much time they have until the timer / song runs out.


Mini Brain Breaks
Sometimes your students are a bit ansy. If your students have a case of the wiggles, keep them on their toes with the Stream Deck! Teach the kids that when a sound effect or song is played, they can get up and dance. The trick is that they must be back working and on-task once the sound effect of song is over! Check out our example below!
-- Stay tuned for more on how to use Elgato’s Stream Deck in your classroom! Already own one? We’d love to see how you’re using it! 👓👗
For more tips, tricks and lesson ideas for making learning more interACTIVE, check out our books The InterACTIVE Class and Flipgrid in the InterACTIVE Class on Amazon!


InterACTIVE Activities for Parker Looks Up!
Parker Looks Up is quickly becoming a classroom favorite! Here are some 💥FREE💥 interACTIVE activities to tie into the book and quickly engage your students!

Parker Looks Up is quickly becoming a classroom favorite picture book. The book, about a visit to Washington, DC’s National Portrait Gallery changes Parker Curry’s life when she views First Lady Michelle Obama’s portrait.
From Amazon.com:
When Parker Curry came face-to-face with Amy Sherald’s transcendent portrait of First Lady Michelle Obama at the National Portrait Gallery, she didn’t just see the First Lady of the United States. She saw a queen—one with dynamic self-assurance, regality, beauty, and truth who captured this young girl’s imagination. When a nearby museum-goer snapped a photo of a mesmerized Parker, it became an internet sensation.
If this book is in your plans, here are some of our favorite interACTIVE activities to go along with it. In this blog post, you’ll learn:
(click on any subheading to jump to that section)
Epic & Flipgrid Sticker Activity for Parker Looks Up

In this activity, we compared Michelle Obama with Parker from Parker Looks Up. First, you’ll want to make sure that you’ve created an Epic account. Think of Epic as the Netflix for books. It’s free for educators and is an incredible resource. Start your account by clicking here.
A quick search on Epic for Michelle Obama will return lots of options - including “Read to me” (where the book is automatically read aloud). Here’s a link to the entire collection!
We researched Michelle Obama, learning about her life and work. Then we went on to read Parker Looks Up. You can purchase a copy by clicking right here. After reading the book, we used Flipgrid to describe both individuals. You can add some fun into the mix by having your students use the Flipgrid stickers. Have them search for “hat” and “sunglasses.” They will find a similar pirate’s hat and sunglasses as what is in the story. Students can use these to become Parker! Check out our tweet below to see an example from our class and download the free worksheet from our TPT Store by clicking here or the image!


VR Museum Visit to View Michelle Obama’s Portrait at The National Portrait Gallery
To take things to the next level, why not provide your students with the chance to visit The National Portrait Gallery exhibit featuring Michelle Obama’s portrait? Check it out below or click here to visit it yourself and share with your students.
To provide access to this exhibit via Microsoft Teams, Canvas, Google Classroom and more - share this link with them: https://goo.gl/maps/e9WGCBY9wVu6L1fK8 or click below!
Selfie Portraits: A Flipgrid Portrait Activity for Parker Looks Up
In this activity, our students learned about Michelle Obama prior to reading Parker Looks Up. Then, we took the VR Field trip (above) to visit The National Portrait Museum to view the painting for ourselves. We also took time to learn about the artist. You can find detailed information at this link:

Then, for some added fun, we created portraits of ourselves. Students can snap a photo of themselves, then add it to the instapainting generator. Click here to check it out! Once they have generated their instapainting, they can compare their portrait to their picture using Flipgrid. Have the students upload both versions, using the Flipgrid Shorts camera’s effects (click photo sticker) and use the pause feature to toggle back and forth between the two. Students can then comment on their classmates videos to generate discussion.
Want to try this activity? Grab the Flipgrid Topic from the discovery lab by clicking the button below!
-- Please follow us on social media and tag us with how you’re using Parker Looks Up into your classroom! 👓👗
For more tips, tricks and lesson ideas for making learning more interACTIVE, check out our books The InterACTIVE Class and Flipgrid in the InterACTIVE Class on Amazon!


From Desk to Digital: Examining the Similarities and Difference Between Characters
From Desk to Digital is a series of mini blog posts where @TheMerrillsEDU share ways to transform your students education into an interACTIVE experience. Whether substituting a worksheet or trying something new, these activities are easy and can be implemented into your classroom tomorrow! In this post, learn how your students can become characters from your story using the Flipgrid Shorts camera!

This blog post is from a series of ideas where we take normal, everyday tasks and make them interACTIVE! For more tips and tricks, be sure to search “From Desk to Digital” on our blog!
A key foundational piece in building comprehension in early years is for students to be able to successfully compare the similarities and differences between characters. Often times, students are led to a writing prompt that asks them to decipher the characteristics. But, there’s a more engaging way that will capture your students attention and lead to a higher level of critical thinking. Here’s how you can take this lesson to the next level!

Flipgrid
Flipgrid is a free video based social learning platform. Educators pose a question, then students respond in the form of a video. Classmates are able to view each other’s responses and can leave comments back and forth to one another, creating a web of discussion and ultimately elevating the academic level of the classroom discussion.

Get Started
After reading the story, share the Flipgrid Topic code with your students. Explain that they are going to explain the similarities and differences between the different characters, but to do so….they must BECOME the characters. They can do this by adding emojis to their video. Flipgrid has things like wigs, beards, glasses, etc. These act as stickers and will float on top of the video. So, now your students have to actually think and speak like the character!
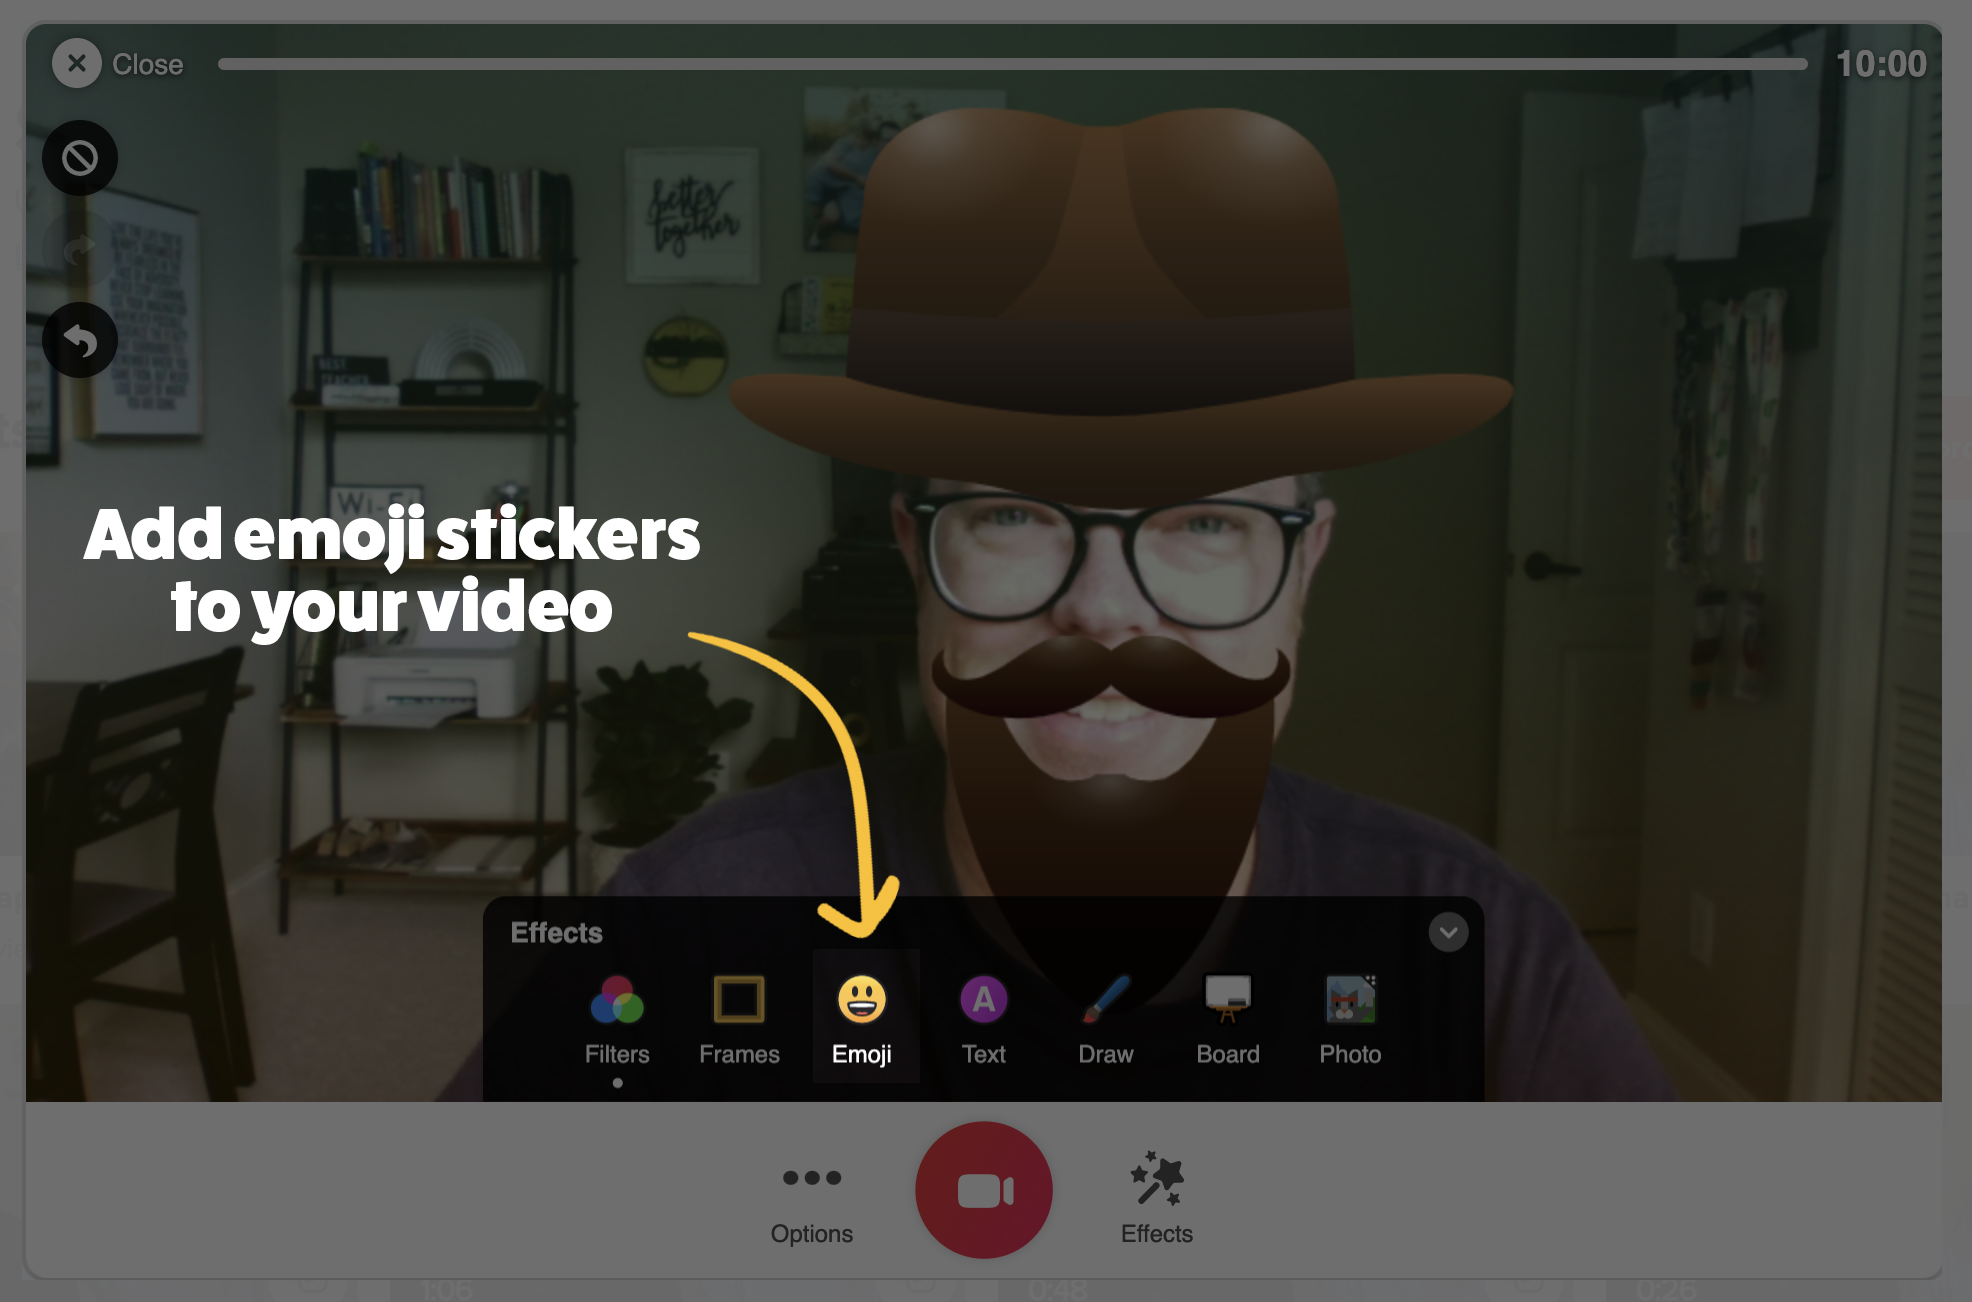
Once your students are ready to record, they can access emoji stickers through the Emoji feature right within the Flipgrid Shorts Camera. It helps to teach them to take advantage of the Pause feature, too. In other words, students start off by taking the role of one character, then press pause and become the next character before clicking record again. This process can be easily done back and forth, and now your students are completely emerged in their learning. Not to mention the fact that other students will want to watch and learn from their classmates because the videos are so engaging!
See It In Action
Check out our tweet below to see this in action!
-- Stay tuned for more on how you transform your classroom into a more interACTIVE experience! 👓👗
For more tips, tricks and lesson ideas for making learning more interACTIVE, check out our books The InterACTIVE Class and Flipgrid in the InterACTIVE Class on Amazon!


FREE InterACTIVE Start of the Year & Testing Treat Tags
Whether you’re are preparing to close out the year or just kick it off, student relationships matter. Check out our free template - just cut and print - to show your appreciation for your students!
Student relationships matter. Whether you’re wrapping up your year or just starting it - these tags can be used to encourage your students during testing season or kick off their school year in a memorable way. We’ve got several different templates to choose from - all free!


Donut Stress!
Do Your Best!
Print these out, cut them, then staple to a sandwich or bag. Don’t forget to add the donut!

Donut Stress!
Do Your Best!
Alternative version of the design above!

You’re One Smart Cookie!
Print, cut and staple! Share them with your students during testing season because tough cookies never crumble!
You are MINT
to Succeed!
There’s plenty of room for encouragMINT with these!
You are MINT
to Succeed!
Alternative version from the design above.
You are Bursting
With Knowledge!
Celebrate with the real “stars” of the show! These kids are “bursting” with knowledge!
-- Please follow us on social media and tag us with how you’re using these InterACTIVE Testing Treat Tags in your classroom! 👓👗
For more tips, tricks and lesson ideas for making learning more interACTIVE, check out our books The InterACTIVE Class and Flipgrid in the InterACTIVE Class on Amazon!


How to Use Microsoft's Reading Progress
NO MORE RUNNING RECORDS! You read that right. Microsoft’s new Reading Progress will take these off your hands, freeing up time that you can dedicate to your students. Learn how it all works, here!

Running Records are crucial assessment pieces. We love having the data that shows how much our students have grown, but it takes a great deal of time to carry out Running Records. Microsoft understands the importance of them, but also understands that our time is valuable. This inspired them to develop their Reading Progress app. What if we told you that Microsoft used the same type of technology used in the Flipgrid Shorts Camera, combined with the power of Immersive Reader and the distribution power of Microsoft Teams. Yes, you read that right! Meet Microsoft’s Reading Progress app! Full launch of this tool is coming in late August!
In this blog post you’ll learn:
(Click on any subheading to jump to that section)
What is Microsoft’s Reading Progress and what does it do?
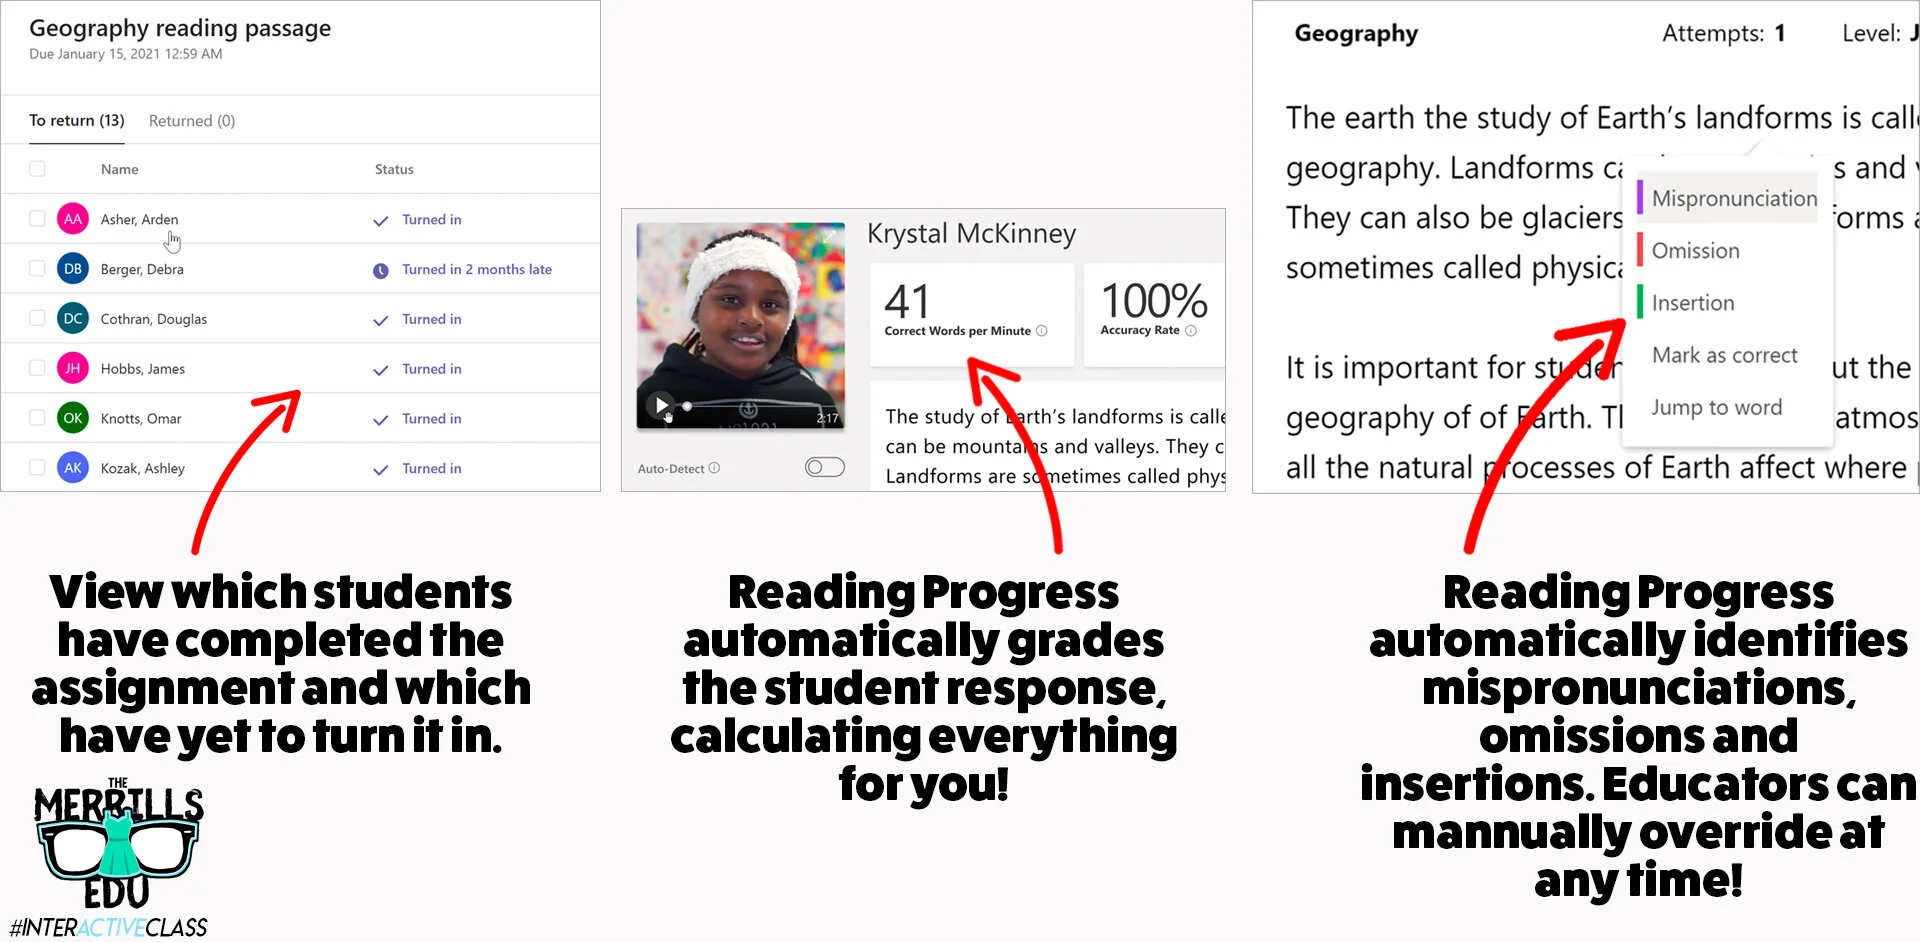
Reading Progress is a ⚡️FREE⚡️ tool that can be found within Microsoft Teams. Imagine if the developers of the Flipgrid Shorts Camera, Immersive Reader and Microsoft Teams all sat down at a table and collaborated on what to do next. Reading Progress uses the technology from the Flipgrid Shorts Camera to record a video of students as they read. The same type of technology that is used in Microsoft’s Immersive Reader then takes the video and intelligently looks for errors, mispronunciations, miscues and more - AUTOMATICALLY. You read that right. The technology does all the work. A full report is provided to the educator, who can go back and view the recorded video and listen back to how the student performed. If the technology marks a student as reading a word correct / incorrect, the educator has the ability to change it on their end. The end result is a full running record, all on video!
How to set up Microsoft’s Reading Progress app
Getting started with Microsoft’s Reading Progress app is simple! Follow these steps to get started.

1. Create a new document in Microsoft Word. (PDF’s will work if you have those, too.)
2. Type out what you would like your students to read.
3. Save a copy (you’ll eventually upload this as the assignment).
4. Launch Microsoft Teams.
5. From your Team, click Assignments.
6. Click the purple Create button located on the lower left side of the screen, then click Assignment.

7. Select the appropriate class /team to assign the passage to, then click Next.
8. Give the assignment a title (TIP: Include the reading level of your passage in the title).
9. Under the Instructions area, locate and click the purple Add Resources link.

10. Click the Reading Progress icon and fill out the information. Give the assignment a name (it can be the same as the title).
11. Now it’s time to upload your Word document (or PDF) reading resource / passage. Under Reading Passage (required), click on Upload a document. Upload the Word document or PDF that contains your passage.
12. After the upload process is finished, enter the reading level and genre. Adjust the number of attempts to any number that you would like (this is the number of chances students have to read / record themselves reading the passage).
13. Next, adjust the pronunciation sensitivity. This adjusts how sensitive the app should be when listening and estimating errors. (Note: educators can always manually edit errors for accuracy).
14. Toggle the Require video on or off. It’s defaulted to on and we recommend leaving it on, but some students may be reluctant or camera shy. In that case, their audio will be recorded but not the video.
15. Last, click Attach to add it to your class assignment. Then, click the purple Assign button on the top right corner to launch it!
Need to see it? No problem! Check out the tutorial below!
How do students use Microsoft’s Reading Progress?
The process for students to access assigned Reading Progress assignments is simple and can be done in just three clicks once they’re logged into Microsoft Teams. Follow these below to get started:
1. Have your students launch Microsoft Teams.
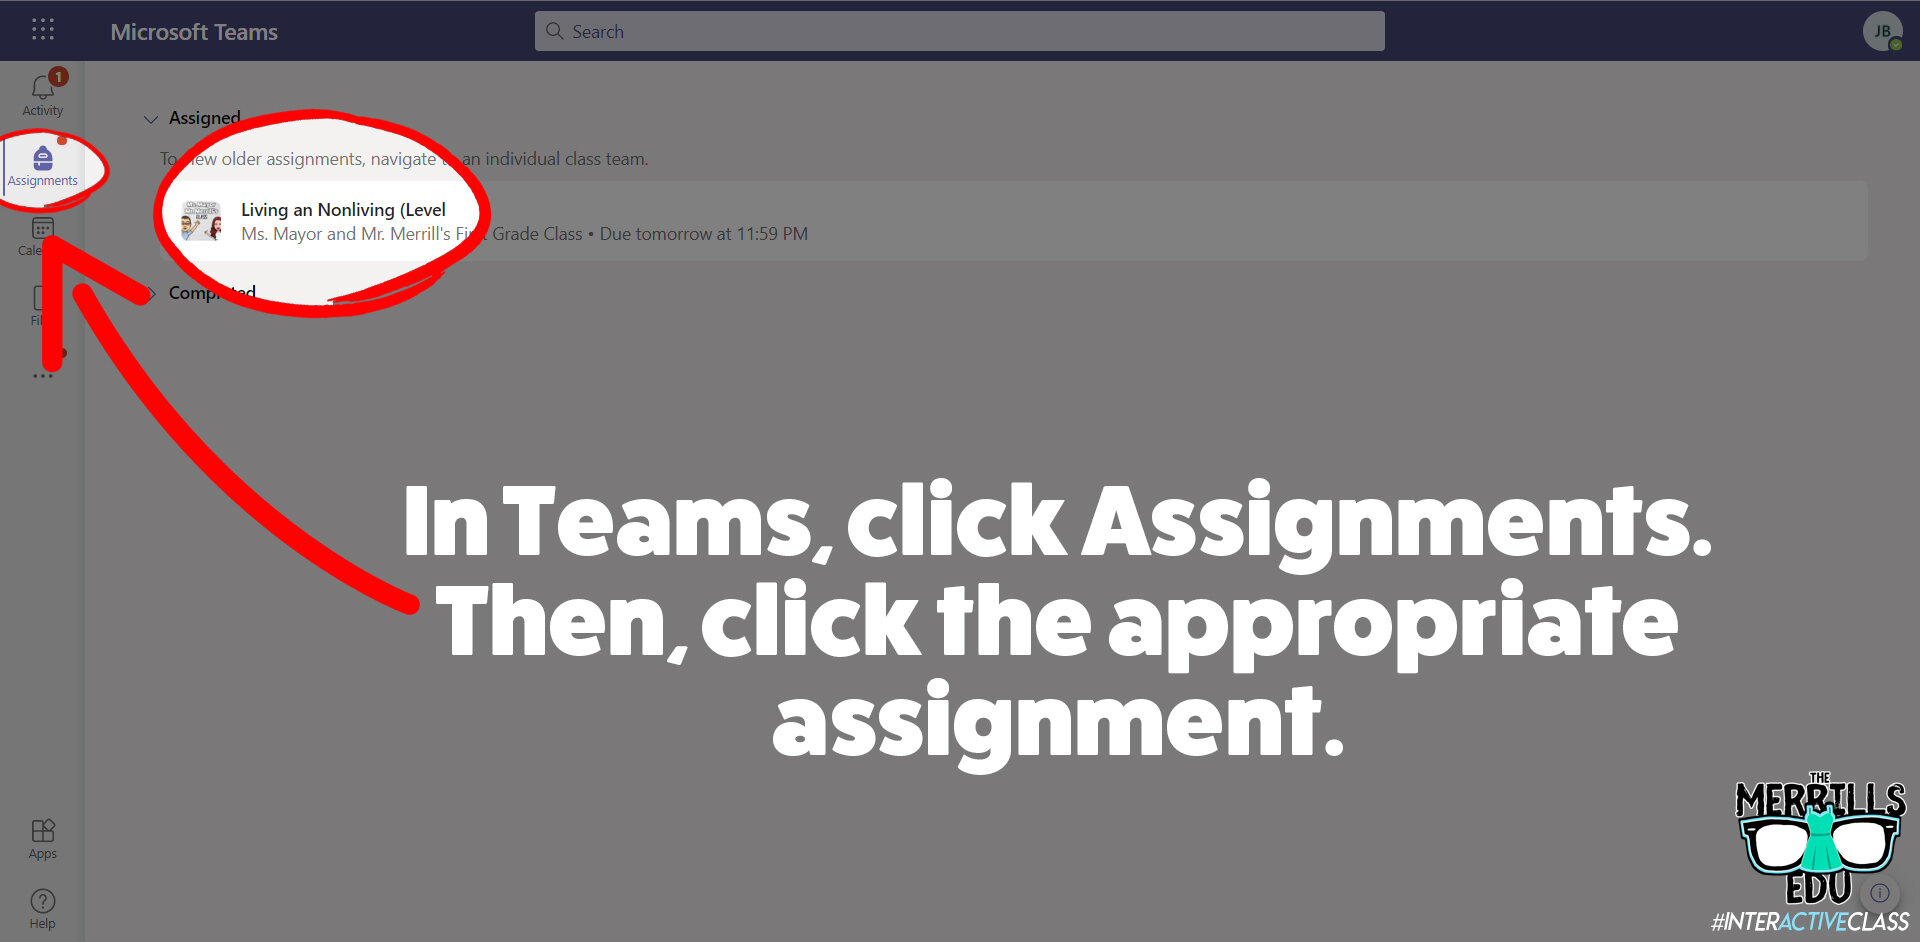
2. Once Teams has opened and loaded, students click on Assignments (located on the left hand panel, with the book bag icon).
3. All of the reading passages (and any other assignments you gave in Teams) will appear.
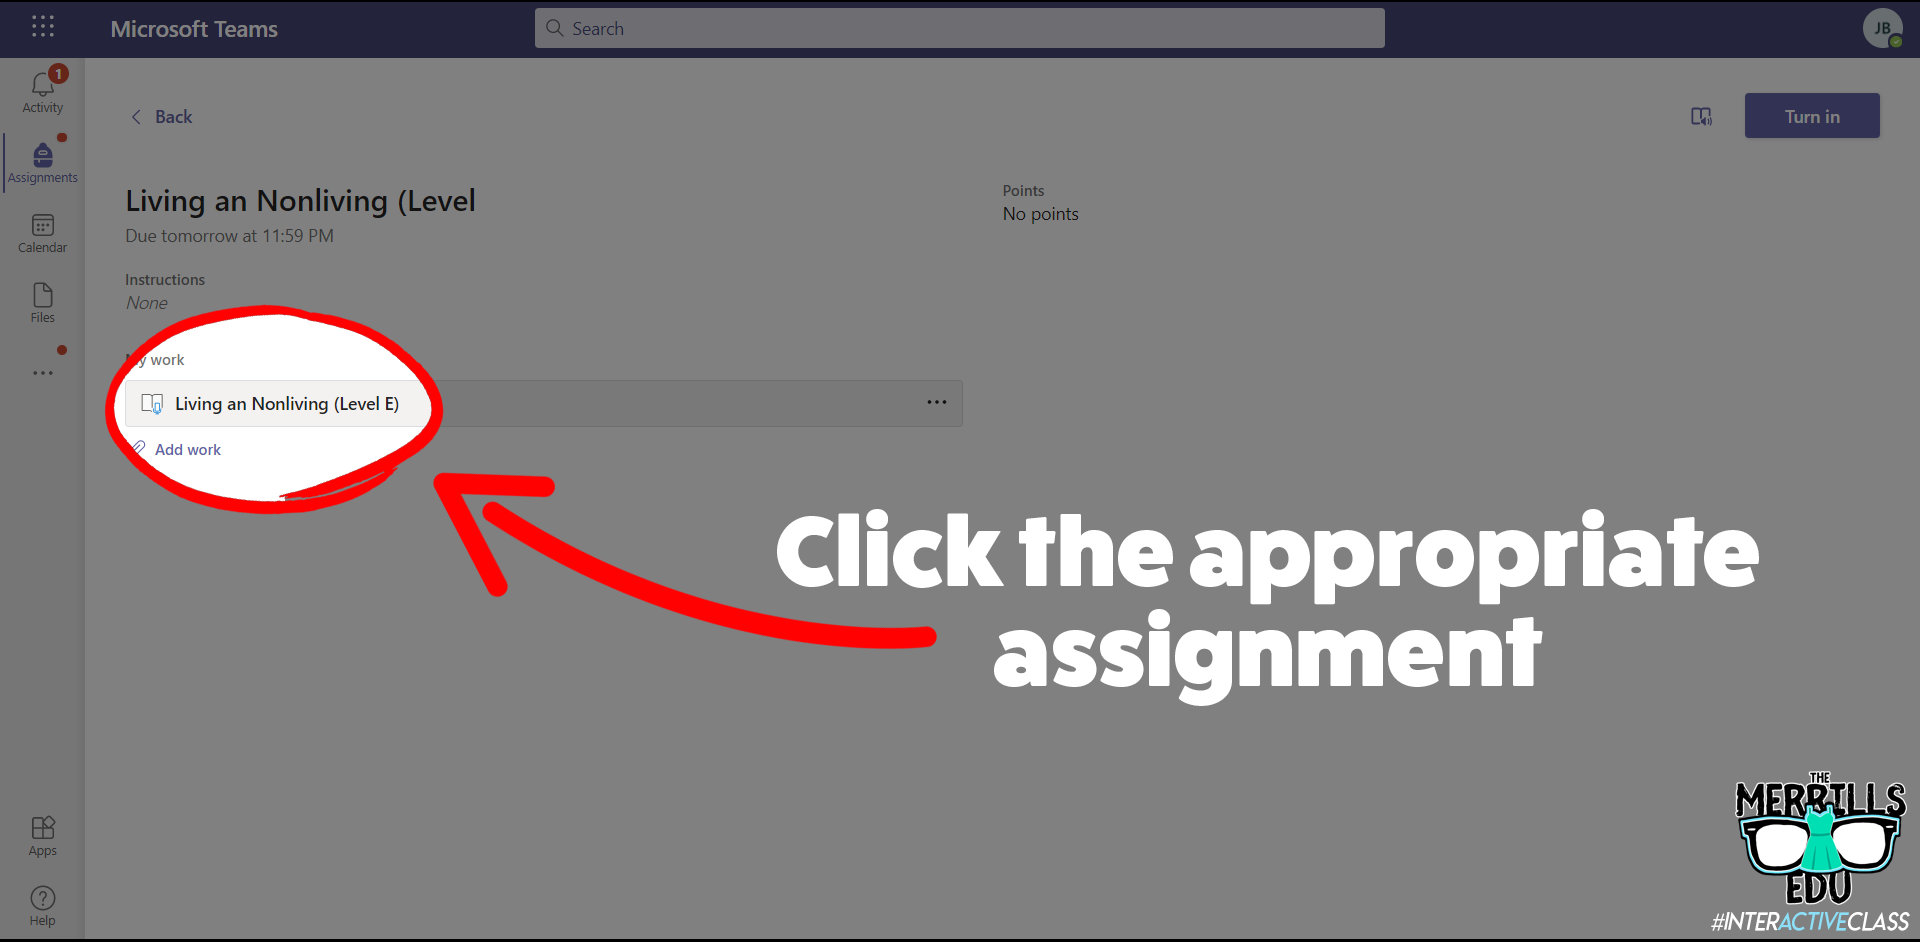
4. Students select one of the reading passage files and click on it to open it.
5. After the assignment opens, click on the passage which is attached under My work.
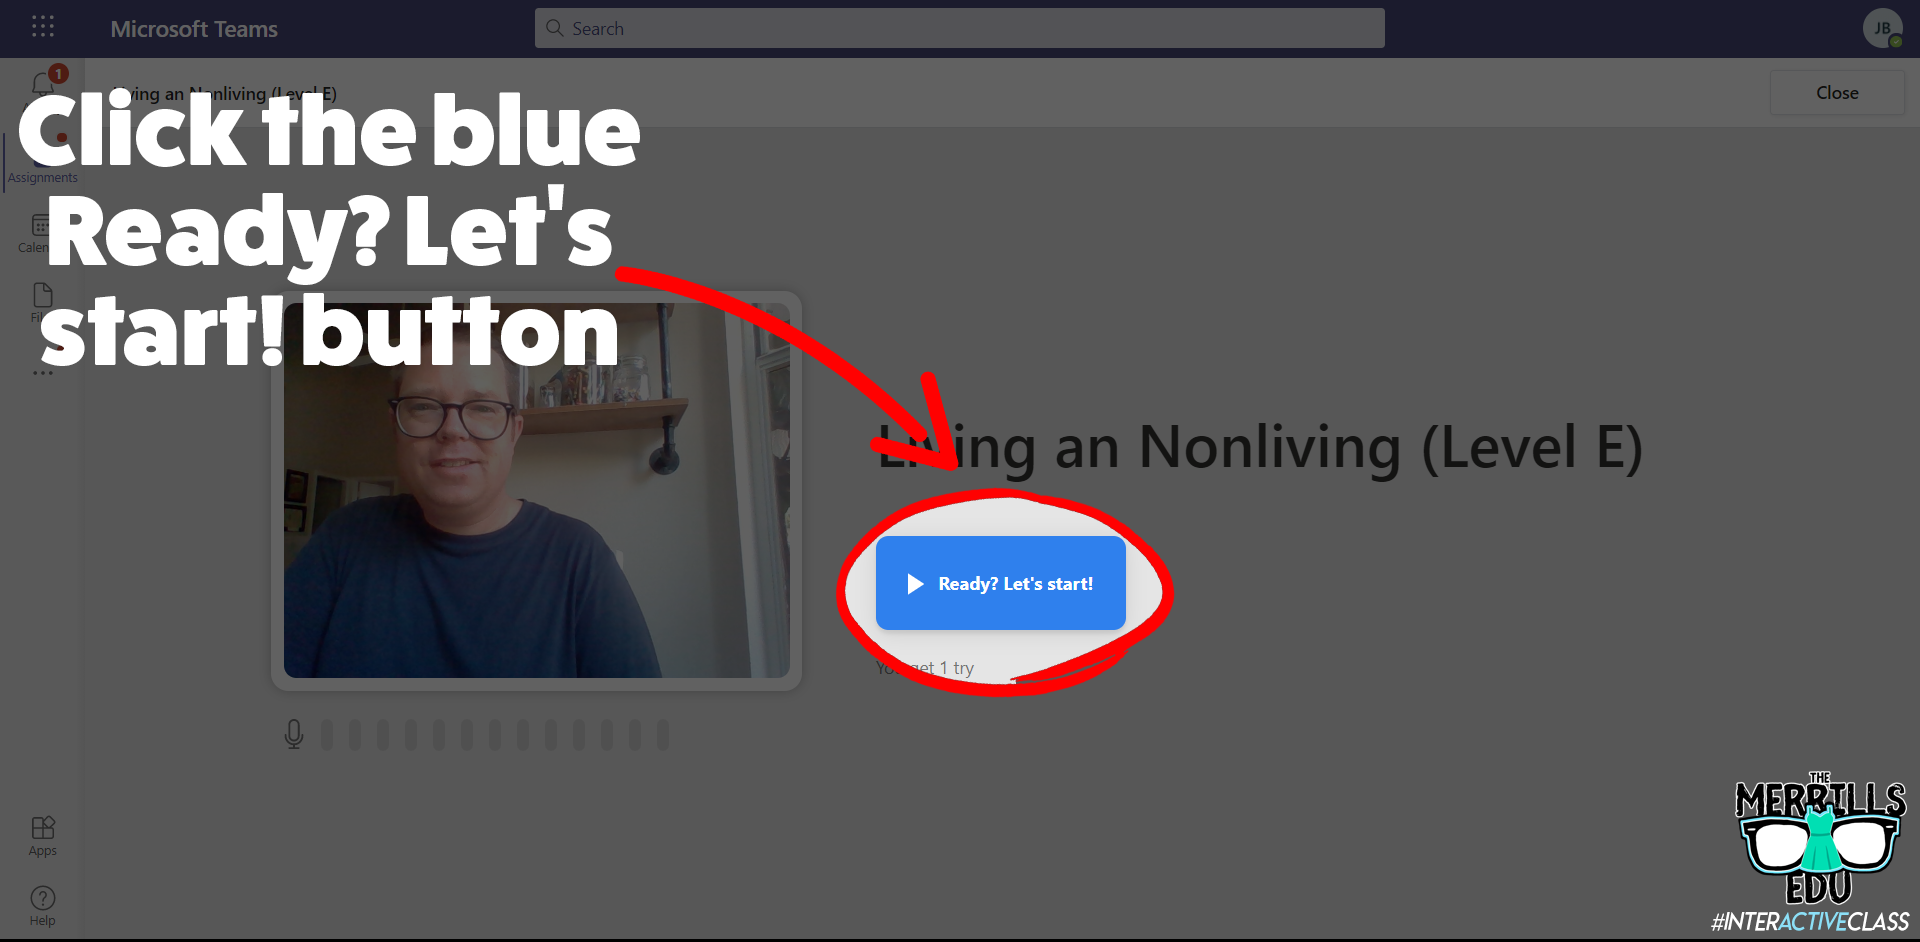
6. Once the assignment loads, click on the blue Ready? Let’s start! button to begin.
7. A countdown will start the recording process. When students are finished, they click the blue I’m done button to stop the recording process.

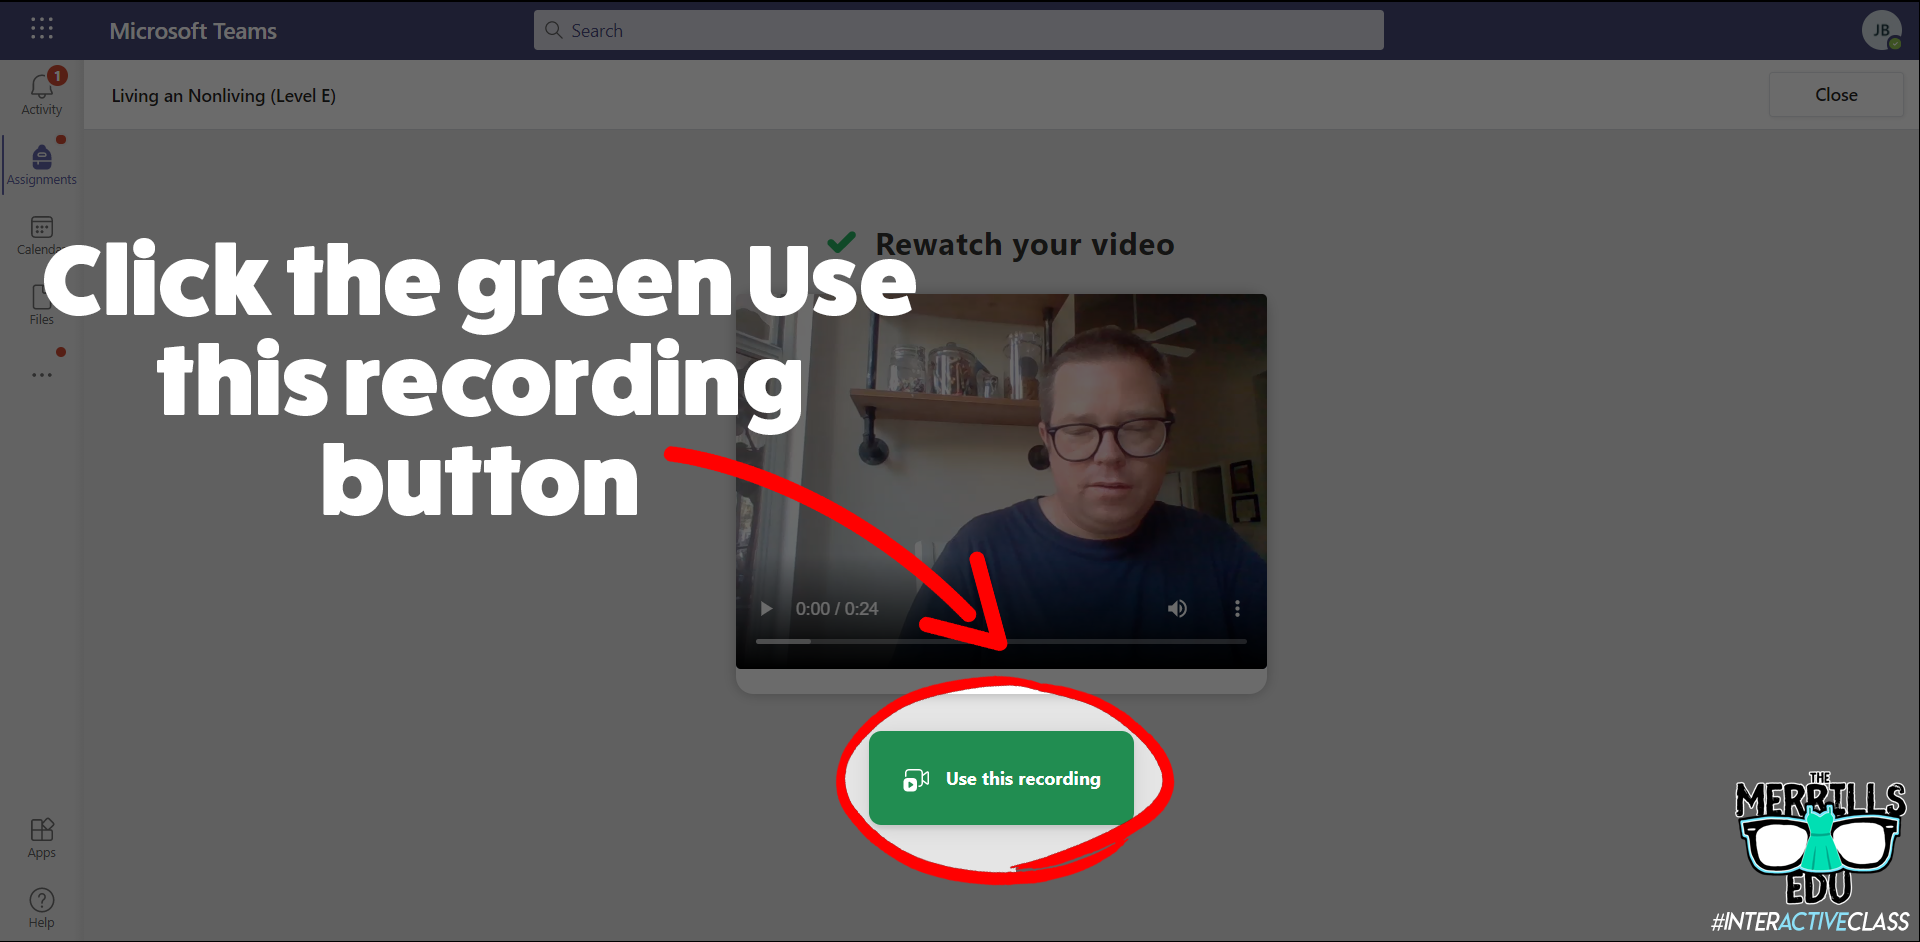
8. Students can watch themselves back (and repeat if you’ve allowed multiple attempts). One they’re ready to turn it in, they click the green Use this recording button.
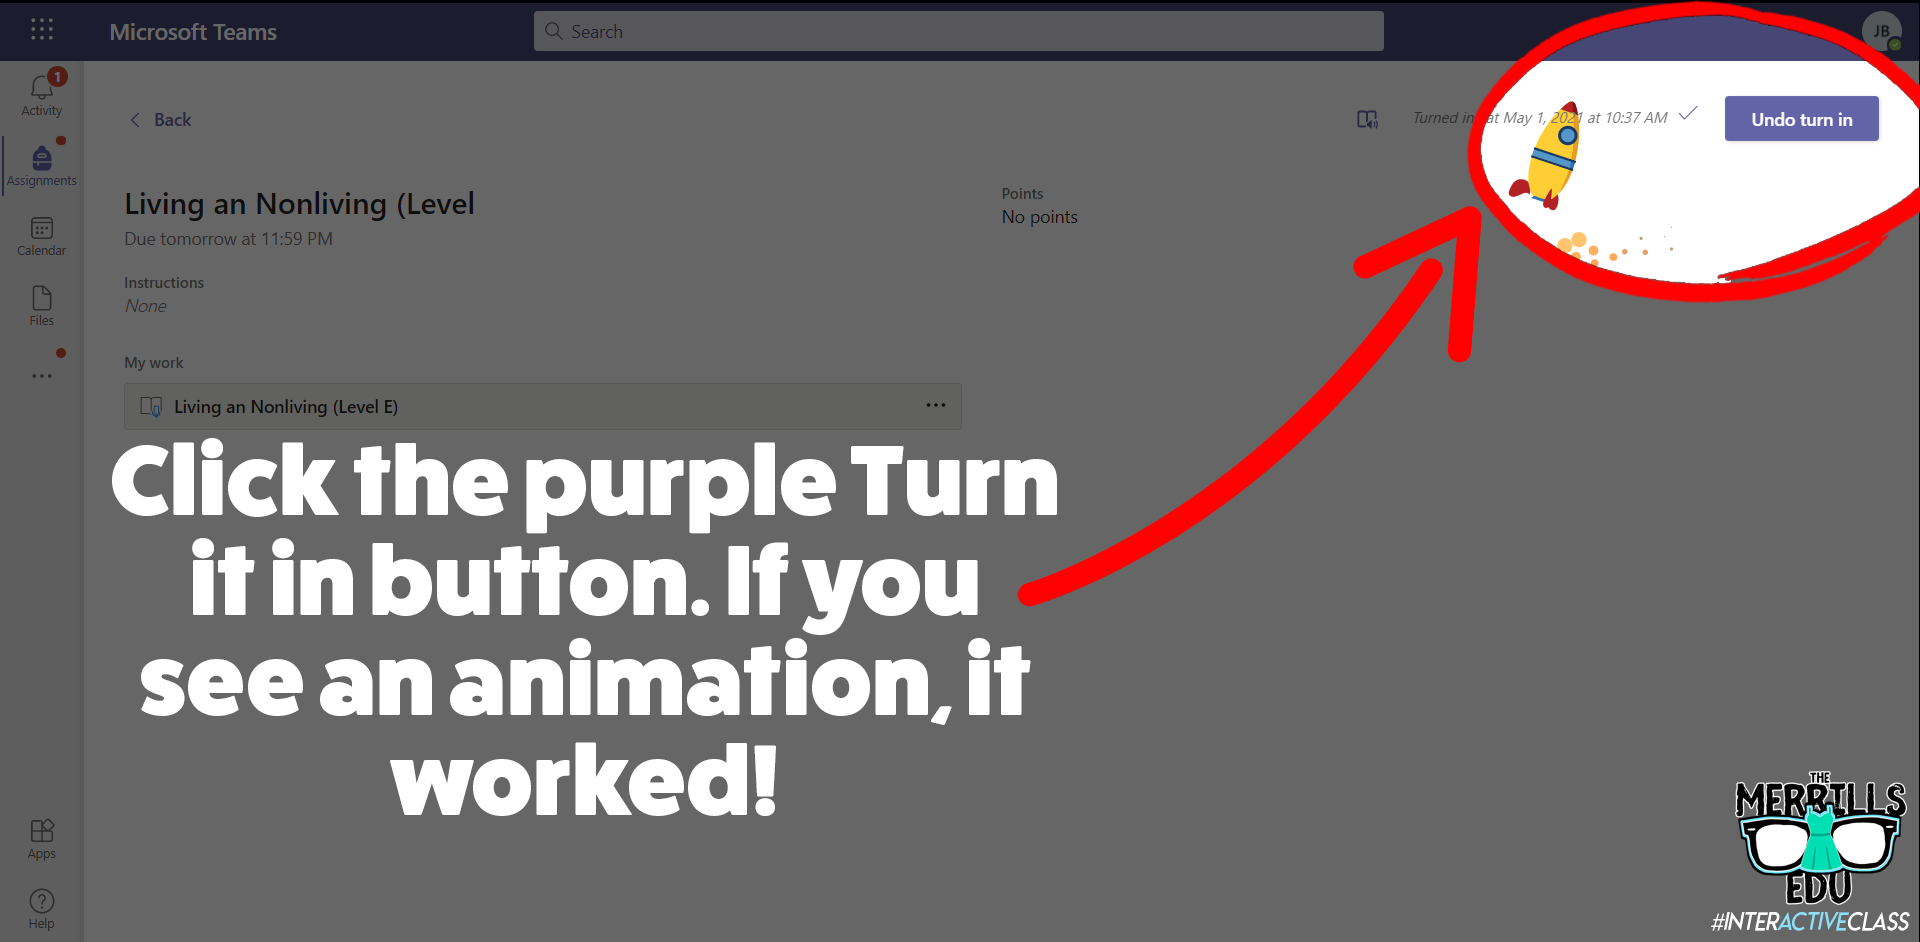
9. Finally, click the purple Turn it in button to complete the assignment. If you see an animation pop up, you have successfully turned it in!
Check out video walkthrough below!
How to create reading passages for Microsoft’s Reading Progress
So you’re sold…But, how can you go about making the reading passages that you are assigning to your students? You’ve got several options:
Open a new Word document and type out what you would like your students to read. Save this file and then upload to your assignments on Teams.
Use the built in microphone to dictate the text in a Word document. Save this file and then upload to your assignments on Teams.
Those ways will get the job done, but if you’re looking for a more efficient method, check out Microsoft’s Lens. Lens is a cross platform app that converts images to PDF, Word, PowerPoint, and Excel files, digitize printed or handwritten text, and save to OneNote, OneDrive, or your local device. Use Lens to scan your pre-made resources and have it turn them into Word documents automatically. Check out our short tutorial:
Once Lens has uploaded the file to your OneDrive, download / save a copy on your computer to upload it onto you assignments on Teams. It’s that easy!
Tips and tricks for using Microsoft’s Reading Progress
We’ve been fortunate enough to pilot this wonderful software for the past year. We’ve learned a lot during this time, so here are our most recommended tips for using Microsoft’s Reading Progress:
When listening back to a student’s video recording, if you click any word - the app will jump to that section of the video where the reader is reading. This is great for when the technology marks something as correct or incorrect and you want to listen to it without having to start the entire video over!
If your students are younger or wearing masks, you might want to lower the sensitivity. New readers may not enunciate words as clearly as more experienced readers. Adjusting this setting may help the technology with marking the words correctly.
Check out the data once the students turn in their work! We love how the technology automatically calculates everything.
ReadWorks Passages Available Directly in Reading Progress!
Now, educators can save even more time when using Reading Progress, all thanks to to Microsoft’s partnership with ReadWorks! Follow these steps to use a passage from the library:
Launch Microsoft Teams, then click Assignments.
Next, click Create followed by Assignment.
Select your preferred Team, then click Next.
Click on Attach, then click Reading Progress.
On the next screen, click Browse sample library. This launches the library where you can select an article of your choice.
You can narrow down the levels by selecting the appropriate grade level. If you select an article, you can also preview that article by clicking Preview.
Once you’ve found an article that you like, click Select. Complete the necessary steps on the following screen, then click Next.
This brings you back to the original assignment screen. Take a moment to make sure that all the information is filled out correctly, then click Assign. This will assign the assignment to your students and even send them a notification that there’s a new assignment due!


-- Please follow us on social media and tag us with how you’re using Microsoft’s Reading Progress in your classroom! 👓👗
For more tips, tricks and lesson ideas for making learning more interACTIVE, check out our books The InterACTIVE Class and Flipgrid in the InterACTIVE Class on Amazon!


InterACTIVE May the 4th Activities!
@TheMerrillsEDU share interACTIVE activities for May the 4th, aka Star Wars Day. Check out recommended books, a Star Wars video production app, Seesaw activities, Flipgrid Photo Stickers and resources from @Erintegration!

Star Wars Day, May 4, celebrates George Lucas's Star Wars media franchise. The date was chosen for the pun on the catchphrase "May the Force be with you" as "May the Fourth be with you." Both educators and students can get in on the fun, here. In this blog post, you’ll learn about some of our favorite books and activities!
(Click on any subheading to jump to that section)
May the 4th Books
Here are some of our favorite books to tie into May the 4th!

Are You Scarred Darth Vader is our personal favorite May the 4th book. Written and illustrated by Adam Rex (Illustrator of The Legend of Rock, Paper, Scissors), this kid friendly book proves that Darth Vader is in fact afraid of something!
From Amazon.com:
It's midnight and the moon is full, but Darth Vader isn't scared. OF COURSE I AM NOT SCARED. Nothing can scare Lord Vader! CORRECT. Not monsters or witches or ghosts, and especially not the dark. So what is Darth Vader scared of? Read on in Adam Rex's hilarious and spooky Star Wars tale to find out! YOU WILL LEARN NOTHING.

Star Wars Series from Jeffrey Brown


Darth Vader and Friends is a clever and kid friendly graphic novel styled book that explains the importance of friendships in short adventures. Something to note: This book is relatively small in size / dimension (approx. 6x6).
From Amazon.com: In this funny and sweet new book in the bestselling Darth Vader™ series, Eisner Award–winning author Jeffrey Brown offers an intimate look at the friendships between best pals in the Star Wars universe, from Darth Vader and the Emperor to Leia and her Ewok pals, Han and Chewie, C-3PO and R2-D2, the bounty hunters, and other favorite characters. Jealousy, birthday parties, lightsaber battles, sharing, intergalactic rebellion and more all come into play as Brown's charming illustrations and humor irresistibly combine the adventures of our friends in a galaxy far, far away with everyday events closer to home.


Darth Vader and Son is a graphic novel styled book that shares the (humorous) struggle of parenting Darth Vader experiences while trying to raise Luke Skywalker. Something to note: This book is relatively small in size / dimension (approx. 6x6).
From Amazon.com: What if Darth Vader took an active role in raising his son? What if "Luke, I am your father" was just a stern admonishment from an annoyed dad? In this hilarious and sweet Star Wars® comics reimagining, Darth Vader is a dad like any other—except with all the baggage of being the Dark Lord of the Sith. Celebrated artist Jeffrey Brown's delightful illustrations give classic Star Wars® moments a fresh parenting books twist, presenting the trials and joys of parenting through the lens of a galaxy far, far away. Life lessons include lightsaber batting practice, using the Force to raid the cookie jar, Take Your Child to Work Day on the Death Star ("Er, he looks just like you, Lord Vader!"), and the special bond shared between any father and son. It's a great option for baby shower gifts, especially for the expectant father. Darth Vader and Son is a Star Wars® book that makes a great gift or a just because purchase for yourself!


Goodnight, Darth Vader is a graphic novel styled book that (humorously) explains Darth Vader’s struggle with trying to get Luke and Leia to bed. There always appears to be something that comes up! Something to note: This book is relatively small in size / dimension (approx. 6x6).
From Amazon.com: It's time for a Star Wars bedtime story in a galaxy far, far away, and Darth Vader's parenting skills are tested anew in this delightful follow-up to the breakout New York Times Star Wars books bestsellers Darth Vader™ and Son and Vader's™ Little Princess. In this Episode, the Sith Lord must soothe his rambunctious twins, Luke and Leia—who are not ready to sleep and who insist on a story. As Vader reads, the book looks in on favorite creatures, droids, and characters, such as Yoda, R2-D2, Han Solo, Chewbacca, Darth Maul, Admiral Ackbar, Boba Fett, and many others as they tuck in, yawn, and settle down to dream. As ever, Jeffrey Brown's charming illustrations and humor glow throughout, playing on children's book conventions to enchant adults and kids alike. This Star Wars makes a fun, unique pregnancy gift, a new Dad gift, or funny new parent gift!
May the 4th Action Movie FX App (iOS Only)
Action Movie FX uses your surroundings and adds in video FX. There are several Star Wars effects - all of which are a ton of fun! The app itself is free to download, but requires additional purchases. At the time of writing this post (4/29/21), the developers offered a sale: SAVE nearly 80% on the MEGA FX PACK and get 20 BLOCKBUSTER FX for $1.99 USD. We obviously think it’s worth it! We use this app to launch May the 4th activities. Record the video(s), then upload to Flipgrid for student responses. The files can also be saved as Gif’s, too! Here are some of the video FX included and a link to download the app:


Take on a Sith or Jedi! Can your students help save you from doom?


Run away from Darth Vader!

Put yourself right into the middle of an epic battle!


Run away from an incoming AT-AT!


Have BB-8 get in on the fun!
May the 4th Flipgrid Photo Sticker Activity


Customizable Flipgrid Photo Stickers are all the rage right now. With our frame (linked above), you can easily become Darth Vader in a Flipgrid video! After you’ve downloaded the file linked above, follow these steps to use the Photo Sticker:
Open up your Flipgrid Topic (or Shorts Camera).
Once the camera opens, click “Effects.” This opens several options.
Click “Photo.”
Upload your Spark file that you created.
Once it appears in the Flipgrid Shorts camera, resize it appropriately. Now you’re ready to record!
We use this as an extension for the books listed above!
May the 4th Build a Droid Seesaw Activity
Here’s a fun activity for littles! Use the built in shapes in Seesaw to design your own droid! Download the activity by clicking below and check out a student example!

To add this into your Seesaw Library, click the download button below!

May the 4th: Caption This Activity!
Here’s a fun activity where your students become screen writers! Have your students add the captions to the slide deck below. Click the button to download a copy for yourself!

May the 4th: Pixel Art Activity
Our friend Erin Flanagan has been creating quality resources for many years. Her May the 4th activities don’t disappoint! Students can use either Google Sheets or Microsoft Excel to create May the 4th inspired pixel art. There’s an option for addition & subtraction or multiplcation. There’s also a Google Slides activity where your students can create characters using shapes. Check out Erin’s TPT store and be sure to follow her on social media!


-- Please follow us on social media and tag us with how you’re using May the 4th activities in your classroom! 👓👗
For more tips, tricks and lesson ideas for making learning more interACTIVE, check out our books The InterACTIVE Class and Flipgrid in the InterACTIVE Class on Amazon!


How to Create a Flipgrid Photo Sticker
@TheMerrillsEDU explain how to create your own stickers to use in Flipgrid videos! These can easily be added right from within the Flipgrid Shorts Camera. In this post, you’ll also find links to books that work with the stickers!

Flipgrid photo stickers are images with transparent backgrounds that may be placed on top of your Flipgrid videos. There are tons of already created options within the Flipgrid camera, but sometimes you need something specific. In this blog post you’ll learn:
(click on any subheading to jump to that section)
It’s important to note that this is only possible on desktop right now. Check back here for updates as to when this will be available for mobile users.
How to Make a Flipgrid Photo Sticker in Adobe Spark

Start off by creating a custom sized image. Set the dimensions to: 13.33 (width) x 7.5 (height), or download our template by clicking here.
Next, use icons or design assets to find an appropriate image for your Flipgrid Photo Sticker. Resize the icon (or asset) to make it larger on the canvas. It should take up the majority of the canvas, leaving a small border all around (if you don’t leave the border, the image will sometimes get cut off).
Now that you’ve created the sticker, it’s time to save it. Please follow these instructions carefully as failure to do so will result in the sticker not functioning properly. Follow these steps:
Click the “Download” button on the top right of the screen.
Make sure that “PNG” is selected, then click “Start Download.”
A Window will appear asking to choose a background type. Be sure to select Transparent (PNG). This will remove the white background, changing it to transparent.


It’s time to put your sticker to the test! Here’s how to get what you created onto your Flipgrid video:
Open up your Flipgrid Topic (or Shorts Camera).
Once the camera opens, click “Effects.” This opens several options.
Click “Photo.”
Upload your Spark file that you created.
Once it appears in the Flipgrid Shorts camera, resize it appropriately. Now you’re ready to record!
How to Make a Flipgrid Photo Sticker in PowerPoint
Open a new / blank presentation. By default, PowerPoint will open a widescreen 13.33 x 7.5 presentation. If it doesn’t open in this size, you’ll need to adjust it to fit those dimensions or click here to download a blank template. Now that you have your canvas ready, add an image or icon. If your image has a background, you can remove it by following these steps:

Click on the image that has background you want to remove.
On the Format tab, click Remove Background.
PowerPoint will automatically select the part of the image to be kept.
Adjust the selection to cover the area of the image that you want to keep.
On the Background Removal Tool tab, click Mark Areas to Remove and select any other area that you want to remove.
When you’re finished, click Keep Changes.
If you’re looking for icons, the website Freeicons.io has some good options. The icons can be saved as SVG or PNG files. Check out the site by clicking here.
Now that your image has a transparent background, it’s time to save it as a PNG file. Tip: if you have more than one object that you would like to appear in your Flipgrid Photo Sticker, group the images so that they are flattened down to one image. Right click the image on the PowerPoint slide, then select “Save As Picture.” This will allow you to export that image from the PowerPoint slide with the transparent background. Tip: Don’t try to save it as you normally would in PowerPoint. If you do, the image will lose the transparent background.


It’s time to put your sticker to the test! Here’s how to get what you created onto your Flipgrid video:
Open up your Flipgrid Topic (or Shorts Camera).
Once the camera opens, click “Effects.” This opens several options.
Click “Photo.”
Upload your Spark file that you created.
Once it appears in the Flipgrid Shorts camera, resize it appropriately. Now you’re ready to record!
How to Make a Flipgrid Photo Sticker in Canva
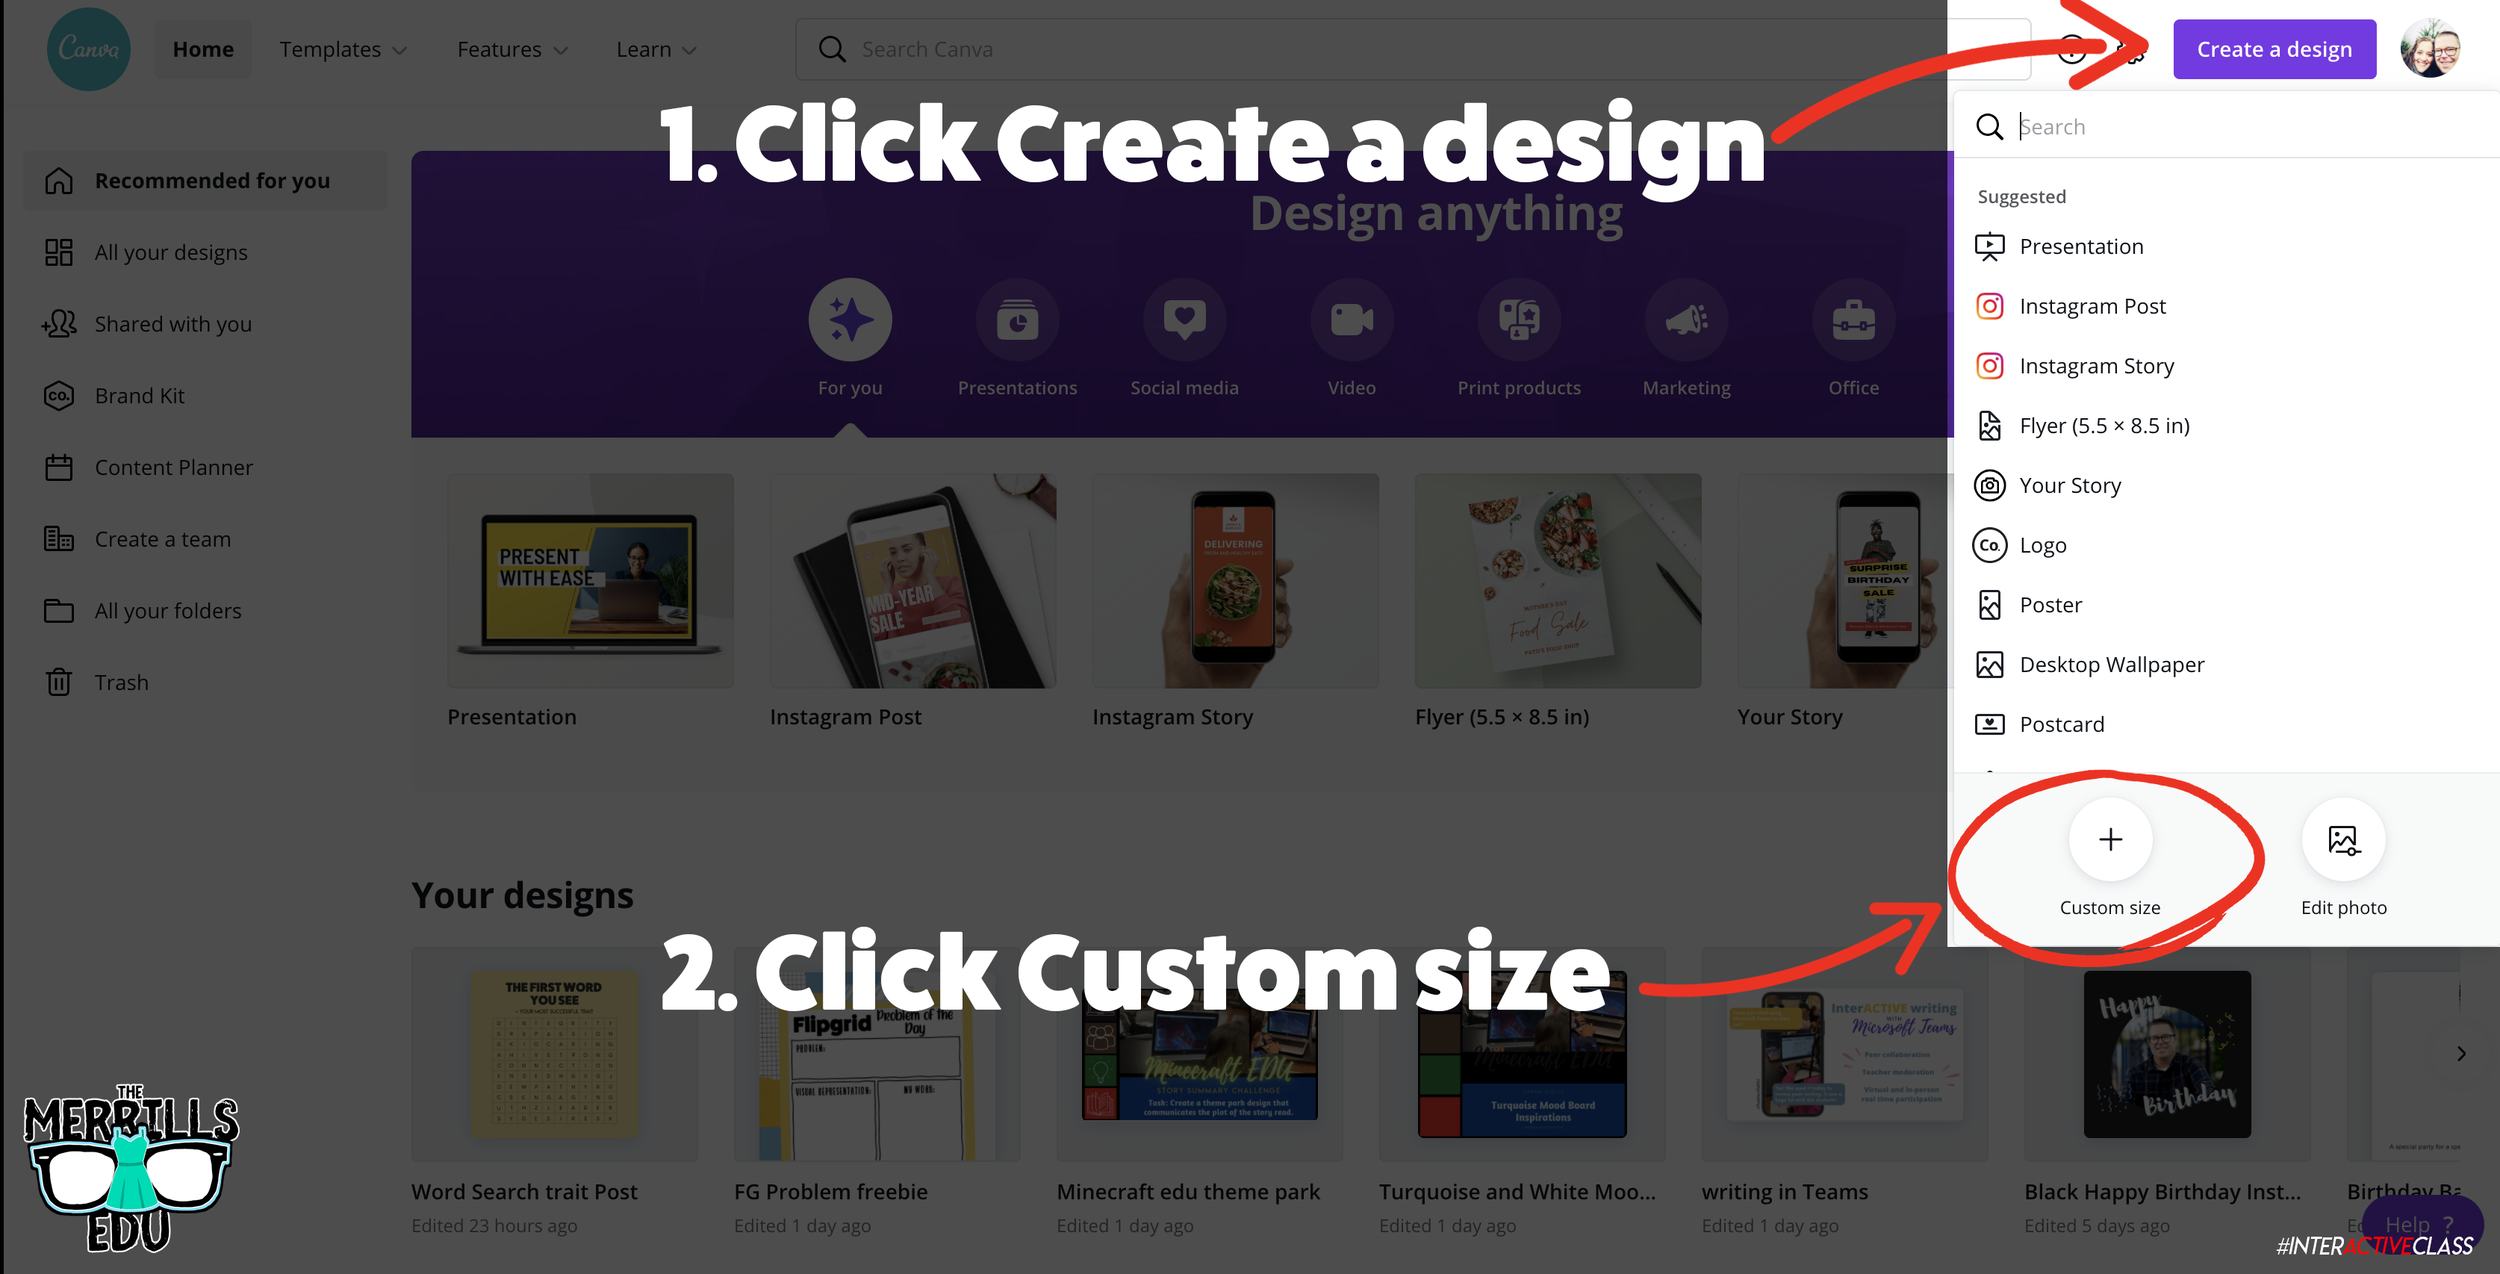
If you already have a Canva account, you can download our Flipgrid Photo Sticker template by clicking here. If you’re starting from scratch, log onto the Canva dashboard and. create a custom size graphic by clicking on the “Create a Design” button located on the upper right side of the screen. Change the dimensions to: 13.33 in x 7.5 in (note: Canva defaults to pixels, so you’ll need to change the dimensions from pixels to inches), then click “Create new design.” A new window will open with your project ready.
Once you have the project ready, it’s time to start adding the item(s) that you would like to appear as your Flipgrid Photo Sticker. Search through Canva’s Elements to find the item or items you wish to add. Tip: if you’re adding more than one item, you can group them. Once you have your design ready, follow these steps to download it (Tip: follow each of these steps! Failure to do so could result in your Photo Sticker not working properly.):
Click the “Download” button on the top right side of the dashboard.
Make sure that the file type is listed as PNG.
Click the box next to “Transparent background.”
Then click “Download” to save your Flipgrid Photo Sticker!


It’s time to put your sticker to the test! Here’s how to get what you created onto your Flipgrid video:
Open up your Flipgrid Topic (or Shorts Camera).
Once the camera opens, click “Effects.” This opens several options.
Click “Photo.”
Upload your Spark file that you created.
Once it appears in the Flipgrid Shorts camera, resize it appropriately. Now you’re ready to record!
Examples of Flipgrid Photo Stickers in action!
Curious how academics fit into all of this? Our Flipgrid Photo Stickers can be used for any texts that fit the images. But, here’s a breakdown of how we have been using our them and what books we’re tying into the lessons.
Character Point of View

Tie in these books:

Stuck

Sam and Dave Dig a Hole
This is probably one of our favorite ways to use the Flipgrid Photo Stickers. Flip the camera, and have your students explain the point of view from one of the characters in the text.
For example, your students can look through the eyes of one of the story’s characters and explain how they would see the story unfold. Or, perhaps they would see something completely different than the main character?

Social Studies: Tourism in Florida
Tie in any disney related text
Here we had students explain Florida’s tourism by giving them what every kid wants: Mickey and Minnie Mouse ears! Incorporate Disney into almost any nonfictional standard to give your students a magical day!
Science: Becoming an Astronaut

Tie in this book:

Mae Among the Stars
Have your students blast off on an out of this world adventure by becoming an astronaut! Have them give a guided tour of the solar system and explain facts to their friends!
Social Studies: Historical Figures

Tie in this book (or any other on Earhart):

Amelia Earhart
(download requires an Epic Kids account)
Take your students on an early journey around the world as they work to uncover clues about Amelia Earhart! Students can even use the Flipgrid Emojis behind the custom Photo Stickers for an added effect.
Sequencing Events

Tie in this book:

Lost and Found
Have your students explain the sequence of events by turning into one of the characters. Encourage your students to take advantage of the Flipgrid Shorts Camera’s “pause” feature. Have them explain what happens first, click pause, then collect their thoughts before moving on. Repeat as necessary!
Character Emotions
Have your students explain what emotions the character(s) are feeling. How do they feel in the beginning? Middle? End? Students can even compare / contrast characters by using the Flipgrid Shorts Camera “Pause” feature. Here are several recommendations:


Grumpy Monkey


The Bad Seed

The Cool Bean


The Couch Potato
Explain the perspective from a Villain!

Tie in this book: Extra Yarn

Extra Yarn
Villains always hav a different perspective of what is happening in the story. Have your students take on the challenge of becoming the evil character and explain the story from their point-of-view.
Download our⚡️FREE ⚡️Flipgrid Photo Sticker Bundle Pack
Interested in any or all of the Photo Stickers above? You can download them all for free below!


-- Please follow us on social media and tag us with how you’re using Flipgrid Photo Stickers into your classroom! 👓👗
For more tips, tricks and lesson ideas for making learning more interACTIVE, check out our books The InterACTIVE Class and Flipgrid in the InterACTIVE Class on Amazon!


InterACTIVE Activities for The Day the Crayons Quit
The Day the Crayons Quit and The Day the Crayons Came Home are two classroom essentials! @TheMerrillsEDU share interACTIVE activities featuring: Google Jamboard, Novel Effect, Chatterpix Kids, Flipgrid and more!
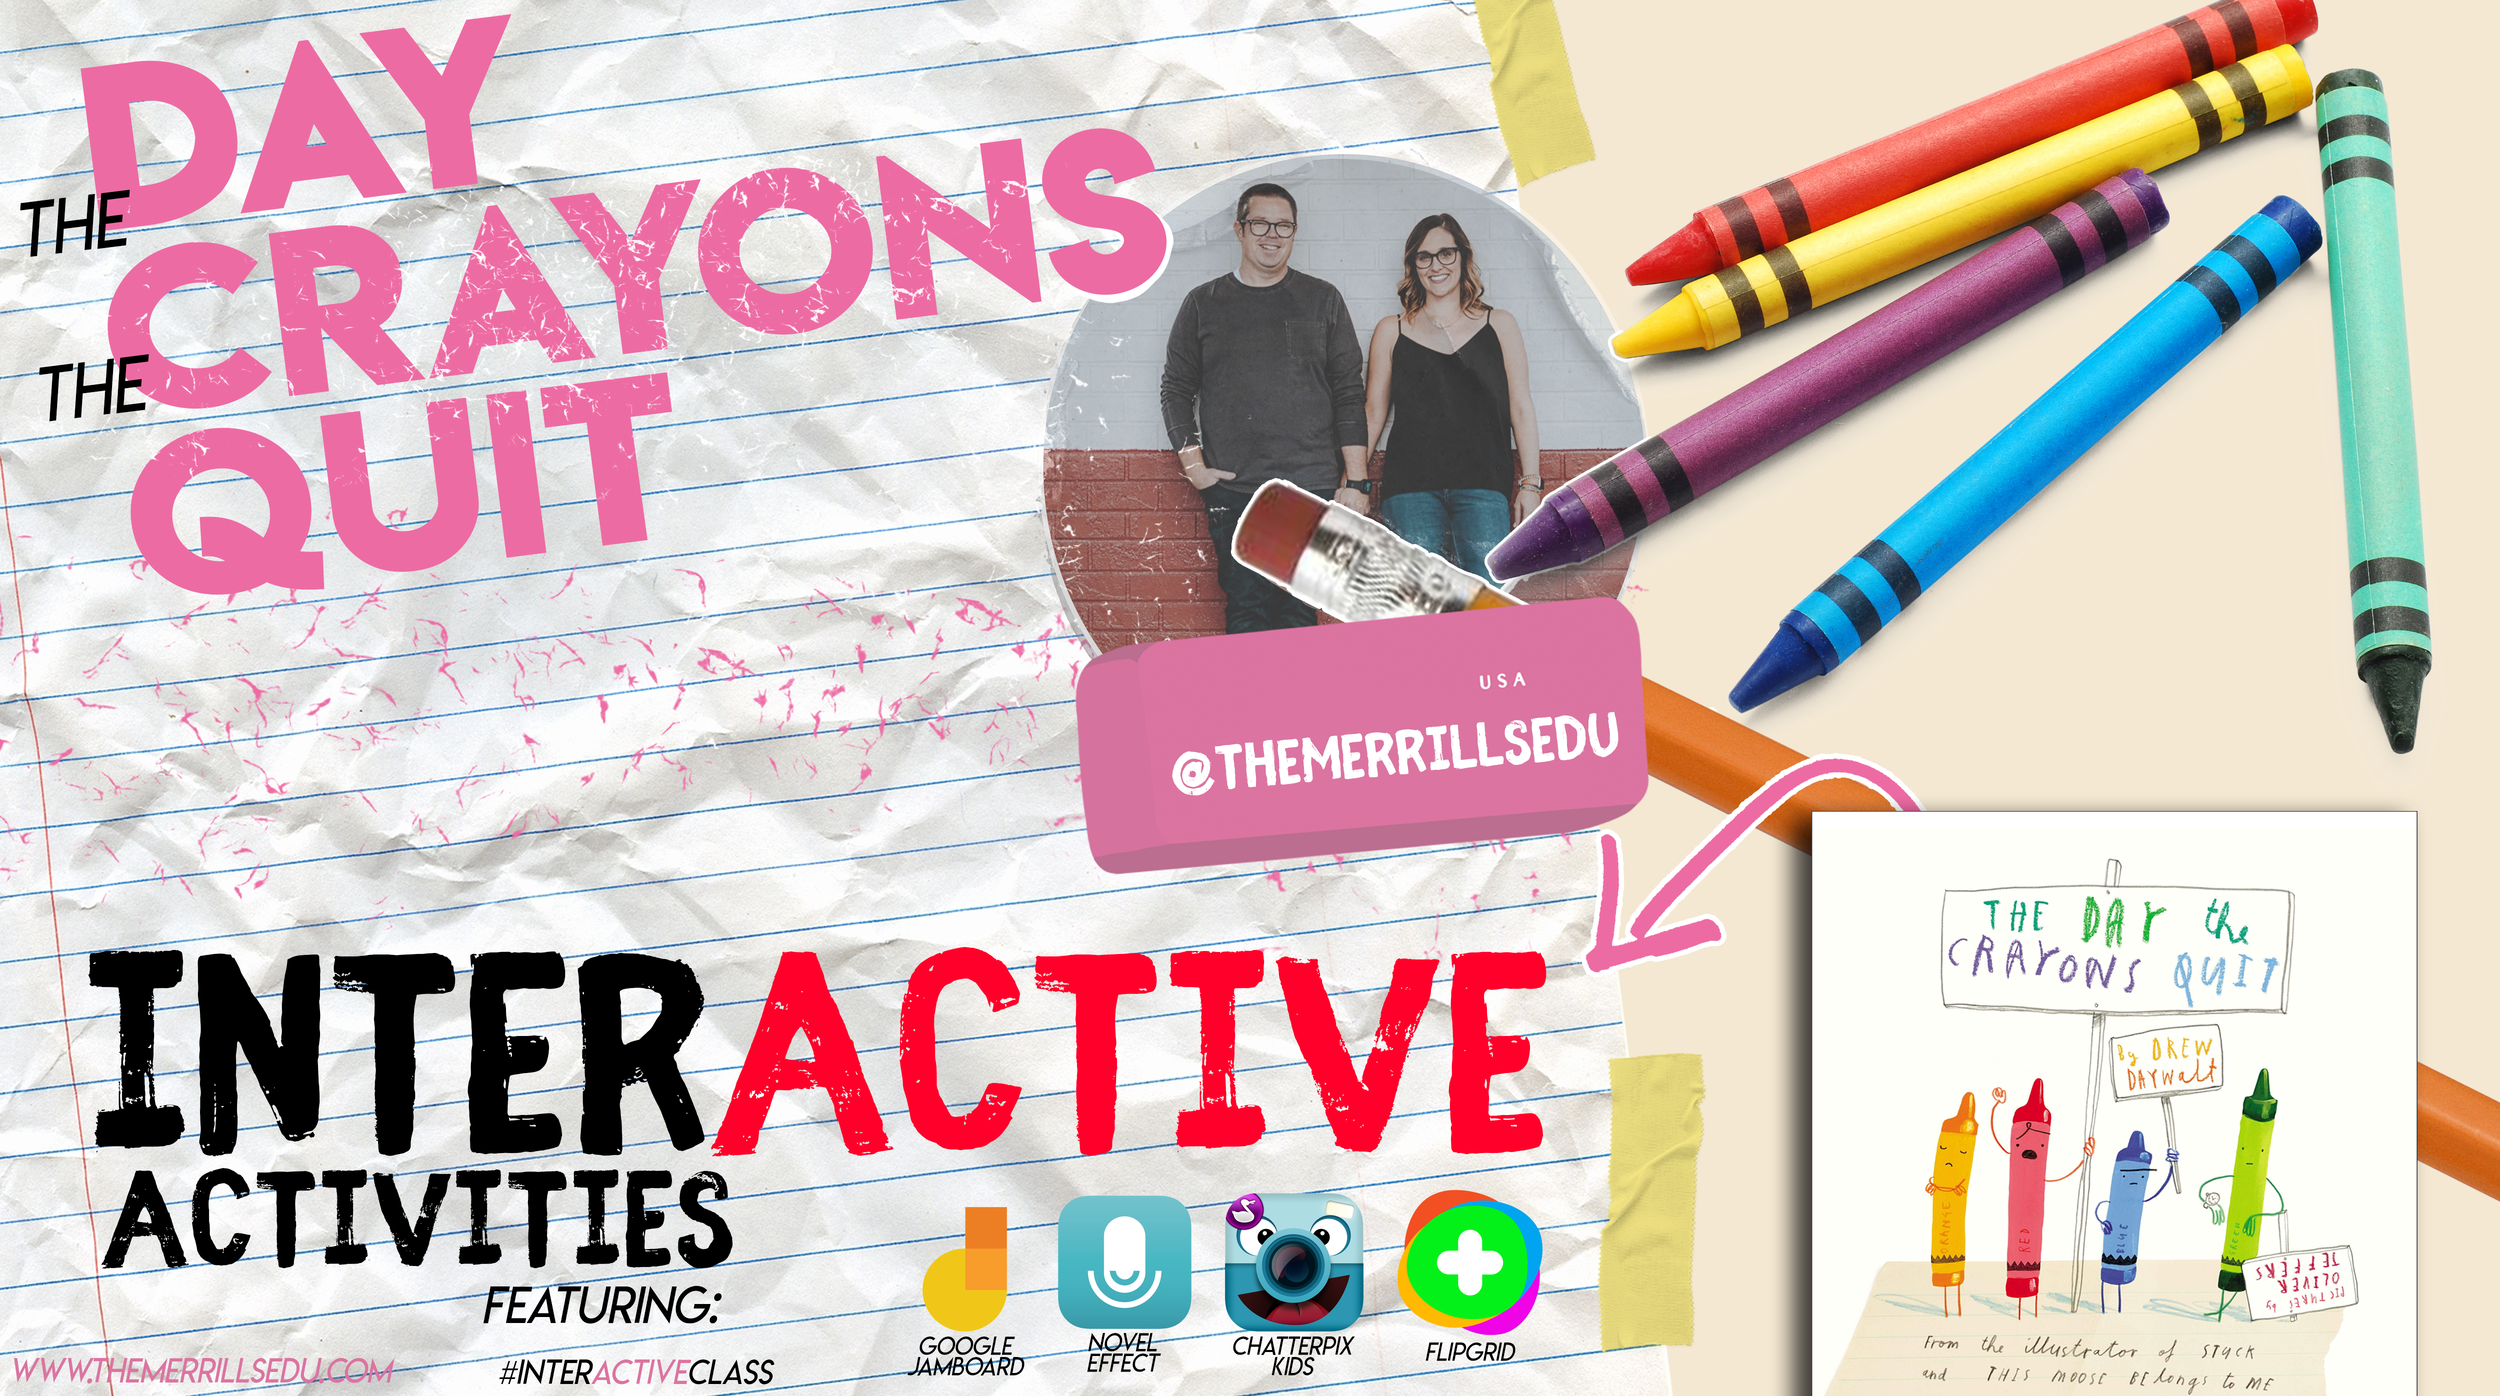
The Day the Crayons Quit and The Day the Crayons Came Home are two essential books required for any classroom. With giggle-inducing text from Drew Daywalt and bold and bright illustrations from Oliver Jeffers, The Day the Crayons Quit and The Day the Crayons Came Home are two perfect additions to any classroom library. If you’re a fan of Don't Let the Pigeon Drive the Bus by Mo Willems and The True Story of the Three Little Pigs by Jon Sciezka and Lane Smith, then this book is for you!
If these books are in your plans, you can easily transform any classroom Crayons activity to make it interACTIVE! Learn how below!
(click on any subheading to jump to that section)
Adding Sound Effects While You Read with Novel Effect

Novel Effect is an app that adds a little magic to books you know and love. Read aloud with your favorite print books and this free, award-winning app follows along playing music, sound effects, and character voices at just the right moment. There are lots of titles in the Novel Effect library, including The Day the Crayons Quit. Furthermore, you can also find the Spanish translation, El Dia Que Los Crayones Renunciaron.
Purchase The Day the Crayons Quit here
Download the Novel Effect app for iOS here
Download the Novel Effect app on Google Play here
Download The Day the Crayons Quit on Novel Effect here
Download El Dia Que Los Crayones Renunciaron on Novel Effect here
Animating Crayons with
Chatterpix Kids


Chatterpix Kids is an app that allows you to bring anything to life! Simply take any photo, draw a line to make a mouth, and record your voice. Then share your video onto a platform like Flipgrid or Seesaw. Getting started is easy, just follow these steps to get started:
Download the Chatterpix Kids app
Open Chatterpix Kids, then tap on “Take Photo”
Using the camera built into the Chatterpix Kids app, snap a photo of a crayon (or any other image) by tapping the orange camera button
Next, tap and hold your finger on the screen and then drag your finger across the screen to make a mouth on the image.
If you don’t like where the mouth is positioned, you can reposition it as you see fit.
Once you’re happy with where the mouth is, click on the red microphone icon to begin recording (tip: you will want to teach your students that they will need to be prepared with what they will say in their video. They only have 30 seconds!)
After you have recorded the audio, click the green play button to see how everything looks. If you’re happy with the way it is, click the orange Next button on the top right. If you’d like to re-record the audio, you can do so by tapping the red microphone.
(Optional) You can add filters, stickers, frames and text. Once you’re satisfied, tap the orange Next button on the top right.
To save your video, tap on the Export button located on the bottom right. Tapping this will save the video to your devices camera roll.

Google’s new Jamboard is a collaborative digital whiteboard. Students can work as a whole group, or assignments can be shared individually. In this activity, you’ll find a board that looks like it is just blank / black. Students will use the eraser tool to erase the black from the board. Doing so will reveal a rainbow color! Students can erase in the shape of a crayon and make their own crayon color. Have them name their color, then click download the frame as an image. To do so, click the three dots in the top right. Then select, “Save frame as image.” This file may then be uploaded to places like Seesaw or Flipgrid to share out accordingly!


Opinion Writing with Flipgrid
Generally, teachers think of Flipgrid as the destination that houses student learning and their content. However, Flipgrid can also be used to launch ideas, spark new ones and take learning to a whole new level. For example, after reading The Day the Crayons Quit, have your students think about which crayon they feel is overworked. Then, have them brainstorm several ideas that back their opinion on a sheet of paper. Next, instruct the students to log onto Flipgrid and explain which color is most tired and why (listing the ideas from the paper). After they have finished, they can watch their classmates’ responses to see how they feel - and possibly pick up some new ideas (or change their mind all together). Students can take this information and create / publish a writing piece that ties into the The Day the Crayons Quit!

Fun with Flipgrid Photo Stickers
If you’re in a hurry and want to hear which crayon your students think is the most overworked, they can do so quickly by explaining their thinking and using our Flipgrid Photo Sticker (see below). This frame may also be used to retell the sequence of events, or compare / contrast both stories.
Click here or below to download our free
Flipgrid Photo Sticker


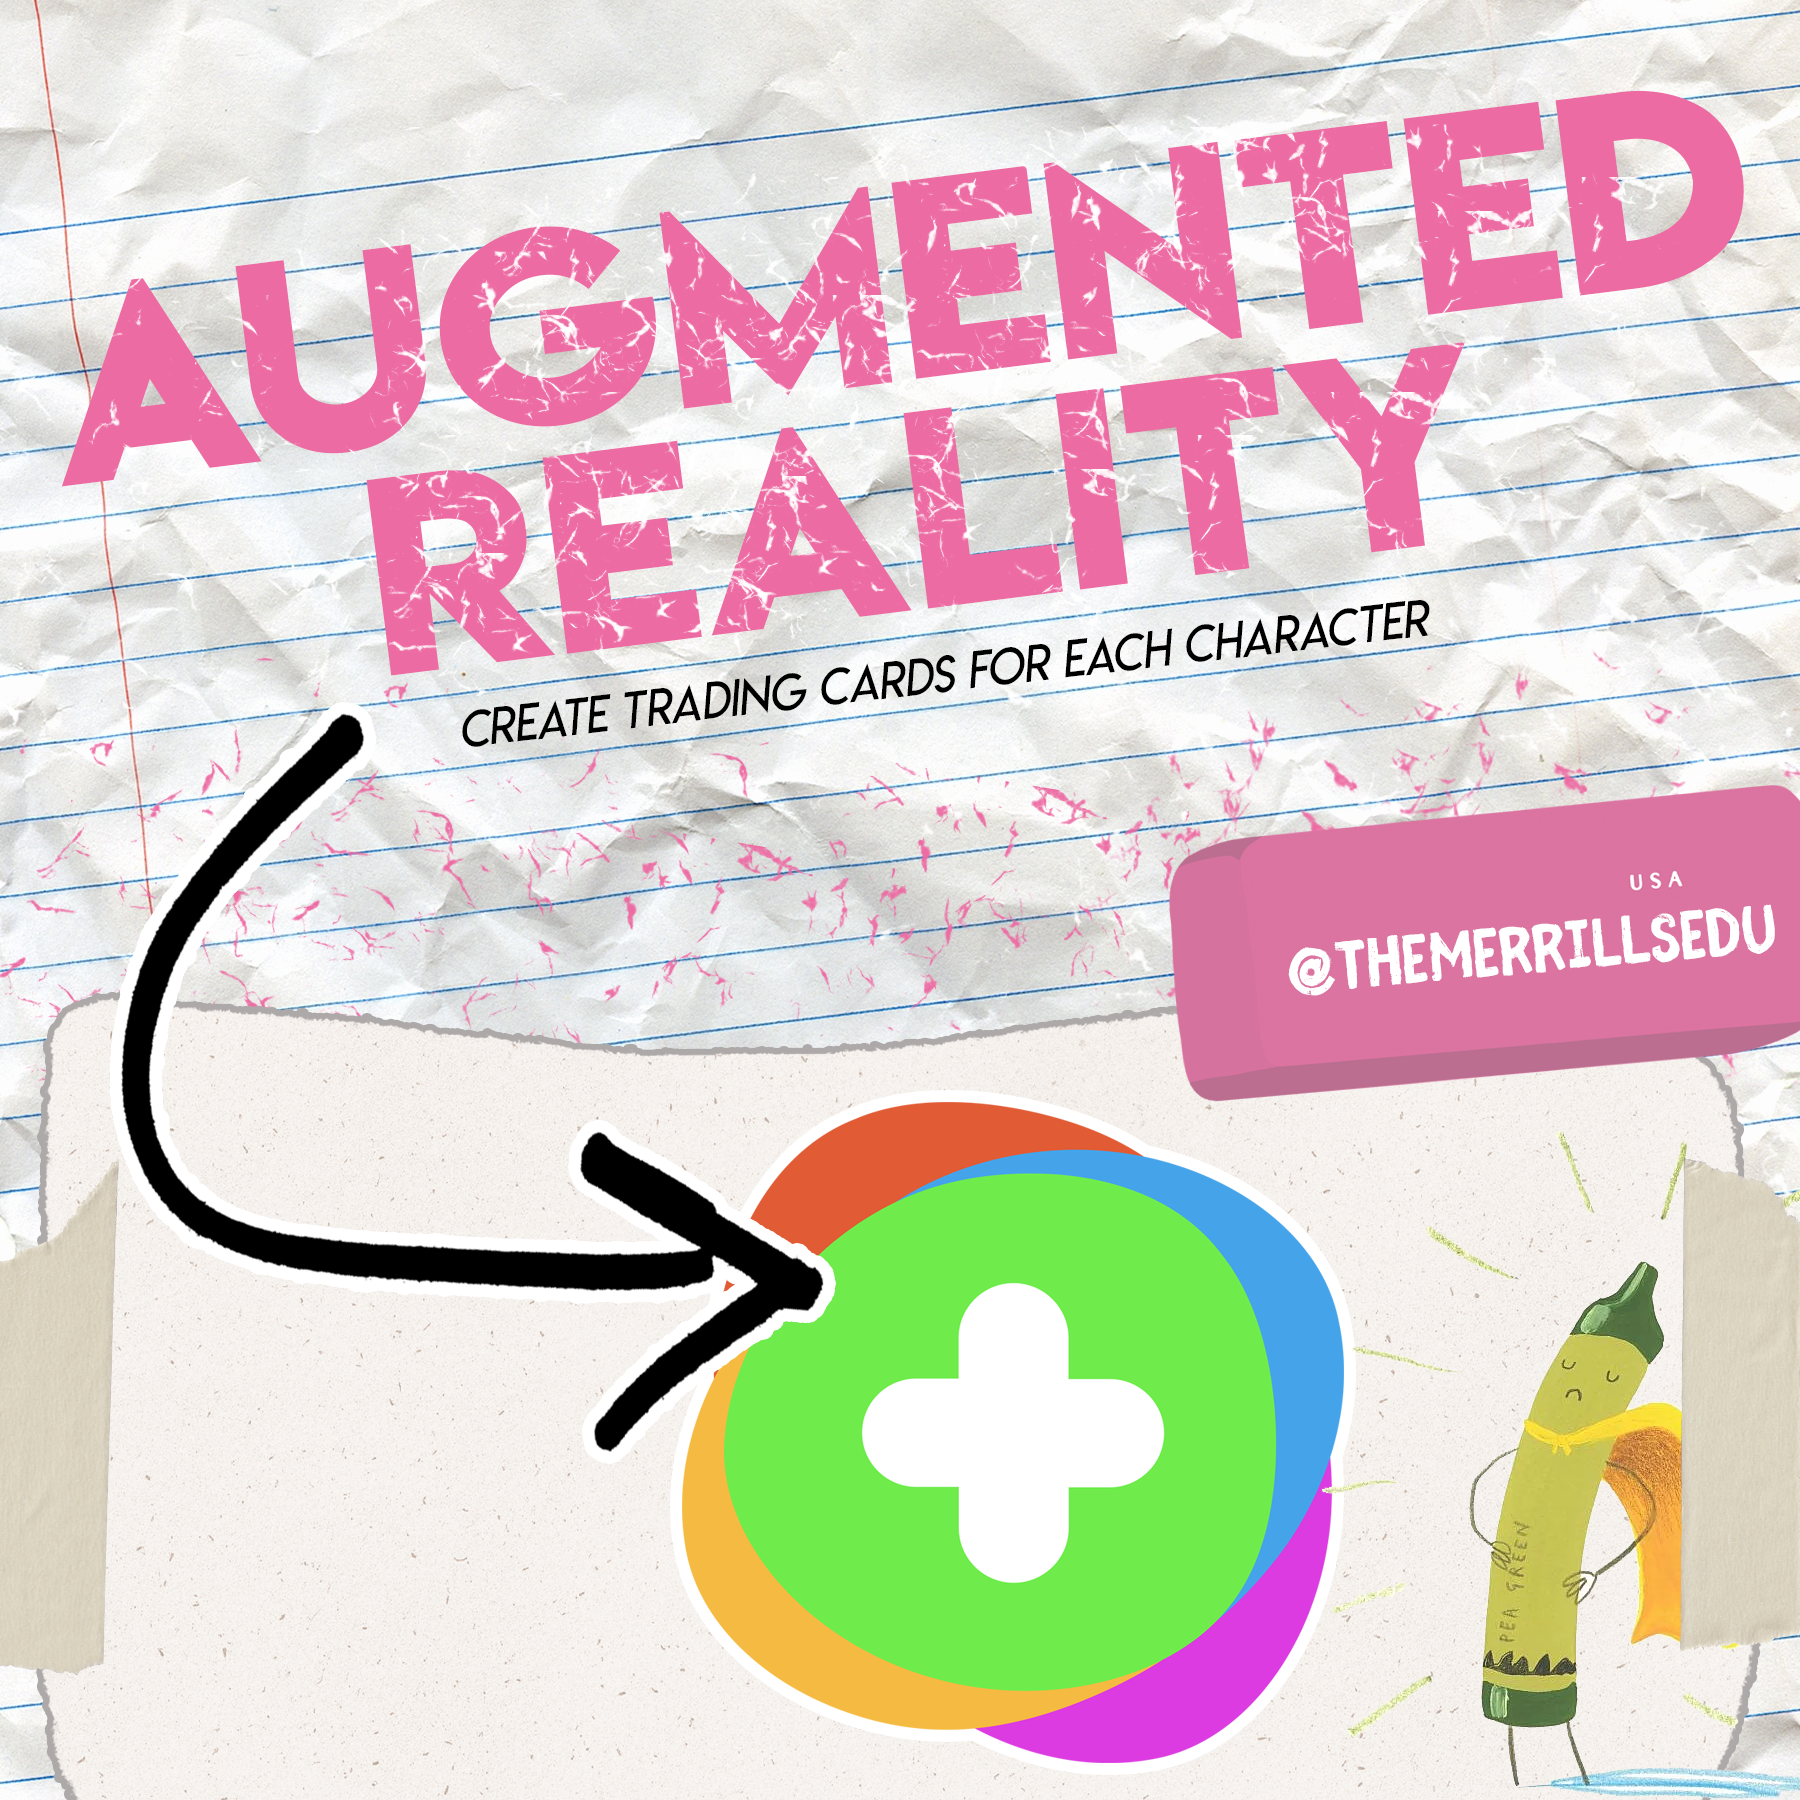
Adding Augmented Reality to the Crayons series
This is a great activity if your students are learning about describing characters, making connections or comparing / contrasting characters. Start off by reading The Day the Crayons Quit or The Day the Crayons Came Home. After you read, revisit each crayon and think about how you would describe each one. We recommend using something like a bubble map to help organize student thoughts on each crayon. Once the class is ready to move on, have the students log onto Flipgrid. Give the students time to record a video where they describe the first character.
After they have submitted the first character, instruct them to view their own video. Once they are logged on watching their own video, have the students add a video comment to themselves describing the next character. Students will repeat this step as many times as necessary to describe all of the characters your class has discussed. Doing so will create an organize thread where only that particular student’s videos will be posted (other classmates will not respond to each other - yet 😜).
Now that you have all student responses, it’s time to take things to the next level! Have your students work on cutting out the trading cards resource (see image or click here to download). While they are cutting them, take a moment to print / download the Flipgrid video response QR codes. This can be done quickly from a topic on the educators dashboard and clicking the open square (next to “Actions”), selecting the appropriate videos (or select all) and then clicking “Print QR Codes.” Tip: These QR codes may be resized in a program like PowerPoint or Google Slides. You will want to resize the QR codes a bit for the next part.


Now that you have the QR codes printed, give each student their QR codes to cut out. The QR codes then get glued to the Trading Card template. Students can illustrate the back of the cards with the appropriate crayon they are referring to. Now, with the QR code printed on the card - have the students open the Flipgrid app (mobile devices only). Instead of logging onto their Group, instruct the students to tap the orange / red “Scan Flipgrid QR” button. This launches Flipgrid’s QR code reader. Students are now able to scan their trading card QR codes with the Flipgrid app. The best part - their responses will open in augmented reality! Now that the cards are completed, it’s time to trade them! Students can now scan the code(s), watch the video(s) and respond to one another accordingly - or just trade with each other for fun. See how this all works in our video below!
More lesson ideas tied to the Crayons series
Here are some other ideas you can tie into the Crayons series:
The Power of Protest: Explain the meaning of a peaceful protest (as in The Day the Crayons Quit). Then, have students create a protest poster / flyer (it can be paper sized) for the crayon that they feel is the most overworked. Share their poster / flyer on Flipgrid, then have the students watch each other’s videos. Lastly, poll the students one last time to see if anyone’s opinion has changed after watching their friends.
Persuasive Letters: Have your students pick a crayon and then pretend that they are the character that they have picked. As the crayon, write a letter to the rest of the class explaining why you feel as though you are overworked, or why your vacation was the best. Then, share the letter on Flipgrid.
Science Integration: Collect all the old crayons from the classroom. Then, use a hair dryer to experiment with melting the crayons. Do new colors form when melting them together? Student hypothesis can be recorded and shared in Flipgrid!
Color Spectrum: Discuss the way light reflects and the color spectrum. How does this help when manufacturers are making crayon colors?
Inquiry Learning with Wonderopolis: Have you ever wondered where crayons were first made? Or maybe what the first crayon color was in the United States? Read this Wonderopolis article to tie in some history!
Planning a Day the Crayons Quit lesson or unit? Download our slide templates below!


-- Please follow us on social media and tag us with how you’re using The Day the Crayons Quit and The Day the Crayons Came Home into your classroom! 👓👗
For more tips, tricks and lesson ideas for making learning more interACTIVE, check out our books The InterACTIVE Class and Flipgrid in the InterACTIVE Class on Amazon!


InterACTIVE Activities for Mae Among the Stars
“Mae Among the Stars” is a beautiful picture book for sharing and marking special occasions such as graduation, inspired by the life of the first African American woman to travel in space, Mae Jemison. It has quickly become a “must read” in many elementary classrooms - including our own! So, here are some ways we are using it!

“Mae Among the Stars” is a beautiful picture book for sharing and marking special occasions such as graduation, inspired by the life of the first African American woman to travel in space, Mae Jemison. It has quickly become a “must read” in many elementary classrooms - including our own! So, here are some ways we are using it!
In this blog post you’ll learn:
(click on any subheading to jump to that section)

Where to buy
Mae Among the Stars
You can find Mae Among the Stars at your favorite book store. If you need it in a hurry, Amazon is always an option. You can find it by clicking on the image below!

InterACTIVE apps to use with Mae Among the Stars, and Mae Jemison
Here are some of our favorite apps to use when reading about Mae Jemison and Mae Among the Stars!


Novel Effect:
Bring Read Alouds
to Life!
Novel Effect is an app that you use while reading your books. Read aloud with your favorite print books and the app follows along playing music, sound effects, and character voices at just the right moment. You can find lots of different titles, including Mae Among the Stars! There's a free version and a paid version of the app, which you can check out below!
You can download Novel Effect for iOS here and for Android here.
You can find the book, Mae Among the Stars on Novel Effect by clicking here!

Learn More About
Mae Jemison with the Epic Reading App!
You can find lots of additional resources to tie into Mae Among the Stars by logging onto Epic! Epic is a the Netflix of kids books. The best part of all - it’s FREE for educators! Teachers can easily create a class and differentiate their instruction by assigning different books to different students, all with just a few clicks! Epic is available on all platforms and devices!
Check out the Epic website by clicking here!


Explore the solar system with a Merge Cube
Merge Cubes are a simple and easy way to bring augmented reality into your classroom. If you’re looking to tie the solar system into Mae Among the Stars, you can do so with Merge’s Galactic Explorer. Just scan a merge cube with the Galactic Explorer app to launch the experience. Students can explore the solar system as a whole, or dive into one of the planets!
Merge Cubes can be purchased or educators can print out a paper version to share with their students. Check out the paper template below!

Purchase a Merge Cube by clicking here
Download a paper template of a Merge Cube by clicking here
Learn more about Merge Cube apps by clicking here
Become an Astronaut in Flipgrid
Depending on the standard and your learning goal, you may want your students to retell the story or point out important details. There is no better way to do this than with Flipgrid! To make it even more engaging, have your students use our Astronaut frame to become an astronaut!


You can download the Astronaut frame by clicking the image below or here
(please note: this frame will not work on mobile devices)


Explore the Solar System, Compare Planets and more!
Take a tour of space to learn more about the planets with Tinybop’s iOS app, Space ($2.99). In Space, students travel into space and visit tiny Mercury, fierce Venus, friendly Earth, dusty Mars, stormy Jupiter, elegant Saturn, hazy Uranus, and mysterious Neptune. Students can study each planet’s characteristics, throw meteorites at each planet to test their atmospheres and gravity, see how big and massive each planet and the sun are by comparing them side-by-side and much more.
Check out an example below and click here to download (iOS only - $2.99).

InterACTIVE Activities and Ideas to Use with Mae Among the Stars and the Planets
Here are some interACTIVE activities that go along with Mae Among the Stars:
Fiction or Non-fiction?
After reading Mae Among the Stars, use Flipgrid to have your students answer the question of, “Do you think this story is fiction or non-fiction?Inquiry / Critical Thinking Ideas
Have your students answer the following question on Flipgrid: “Why do you think Mae’s dream seemed impossible? What would you have done if you were in her shoes?”Paired Texts (Day #1)
Select this National Geographic magazine from Epic, and read it with the entire class (whole group). After reading, have your students answer the following question on Flipgrid: After reading together, what questions do you still have about the planets? (they ask one question per video, asking as many as they can). Be sure to have them add a searchable hashtag to their video response (see image below)

Paired Texts (Day #2)
The next day, download and assign this Epic collection to your students. Have them go back the the previous days Flipgrid topic and have them look for answers to their friends questions by using the books from the Epic collection. Once students have found the answers to their friends questions, they can leave them a video comment. Encourage your students to use specifics in their video comments back to their friends. For example: “I read on page 22 that Saturn is the sixth planet from the sun.”Planet Research
Have your students research all of the planets (you can find a collection of all the planets on Epic by clicking here). Then, have your students create a Flipgrid video where they travel to several planets, listing 3-5 facts about each. Bonus: Have them use our astronaut frame above or the Board, Sticker, and Ink feature built into the Flipgrid camera to personalize their video.Learn more about the solar system with this 3D model website from NASA! Zoom in and out, visit planets and even hop on a comet! Check out the site below or click here to visit the website.
Star Constellations in Flipgrid
Have your students create a constellation using the board and sticker features in Flipgrid. Once they have their design created, have them use the ink tool to connect the stars!

-- Stay tuned for more on how you can use Mae Among the Stars into your classroom! 👓👗
For more tips, tricks and lesson ideas for making learning more interACTIVE, check out our books The InterACTIVE Class and Flipgrid in the InterACTIVE Class on Amazon!


How to Use LightSpace to Turn Your Classroom Into an Infinite Augmented Reality Whiteboard
@TheMerrillsEDU introduce how to use the iOS app LightSpace. LightSpace transforms your surroundings into an Augmented reality digital whiteboard. You can even walk through your own creations! Learn how it all works and pick some lesson ideas here!

LightSpace is an AR (augmented reality) iOS app that allows you to turn your surroundings into a canvas. Using LightSpace’s tools, you can record a video and add things like drawings, shapes and various effects right into the shot. The best part is if you walk away from your drawing, LightSpace maps the room. So, if you walk back towards your drawing, it will reappear! This is a great way to capture engagement and build interACTIVE activities. In this blog post, you’ll learn:
(click on any subheading to jump to that section)

How LightSpace Works 🚀
LightSpace allows you to paint with 3D light in the real world! Use LightSpace to paint wings on your friends, make fireworks in your living room, write love notes with sparklers, and draw faces on bananas.
The best part: it’s in augmented reality (AR). So…For the first time ever, walk around your illustrations to see them from every angle. Record a video while you paint, or afterwards to share your work with the world. Add details by doodling on the screen or paint expansive shapes by using your phone as the brush.
How to Turn Your Surroundings Into an Infinite Digital Whiteboard 🎥

So…this is awesome and all, but how does this translate into something academic in the classroom? Well, let’s turn our classroom into an infinite digital whiteboard! Here’s how:
Start off by opening the LightSpace app. The app will intelligently map out the room. Think about what you want your students to be challenged with. For this example, we’ll use math equations. Walk over to where you want to draw the math problems. For example, if you want you math problems to appear on a bulletin board, walk over to it and select the drawing tool. Draw an equation, then walk away from it. You may want to repeat this process several times, depending on how you wish to challenge your students. Then pick a starting point - like your front door or a student’s desk. Then, click the record button and walk towards your first challenge. As you approach where you drew the first challenge, it will appear! If you’ve drawn the challenge in a place where you can walk, you can actually walk right through it! Once you’ve shown all of your equations, stop the recording. The clip will automatically be saved onto your camera roll.
Now that you have the video saved onto your camera roll, you can upload it to Flipgrid. Add the video as a topic resource, then share the topic with your students to complete.

10 Ways to Use LightSpace in the Classroom 🎒
Here are some ways that you can integrate LightSpace into your classroom:
Math equations / challenges
Math Number of the Day / Number Talks
Math student explanations
Vocabulary terms
Sequence of Events (walk through each step!)
Identifying variables in a science experiment
Science experiment documentation
Hidden challenges
Digital Breakouts
Social Studies map skills / geography
Check out our example on TikTok and be sure to follow us!
-- Stay tuned for more on how you can embed LightSpace into your classroom! 👓👗
For more tips, tricks and lesson ideas for making learning more interACTIVE, check out our books The InterACTIVE Class and Flipgrid in the InterACTIVE Class on Amazon!


Desk to Digital: Math Facts
From Desk to Digital is a series of mini blog posts where @TheMerrillsEDU share ways to transform your students education into an interACTIVE experience. Whether substituting a worksheet or trying something new, these activities are easy and can be implemented into your classroom tomorrow! In this post, learn how the website Solvemoji.com can engage your learners with fun math fact fluency.

This blog post is from a series of ideas where we take normal, everyday tasks and make them interACTIVE! For more tips and tricks, be sure to search “Desk to digital” on our blog!
Practicing Math fluency does NOT have to involve worksheets. Teachers can bring a new element of fun into what is normally a routine and monotonous experience for students. Here’s a quick way to get your kids engaged with content that is more relevant and right up their alley!

Solvemoji
Solvemoji is a free website that uses emojis to represent numerals. The emojis are grouped together as an equation and placed on a card. Students work to try and solve the equation one step at a time.

Get Started
Select a puzzle from Solvemoji to assign to your students. Educators can download the puzzles by clicking on the download button and then uploading them into a PowerPoint / Google Slides deck, or just projecting directly to your board / screen. Students complete the puzzle using a whiteboard, then share out their responses once they have completed the task.

See It In Action
Check out the tweet below to see Solvemoji in action!
-- Stay tuned for more on how you transform your classroom into a more interACTIVE experience! 👓👗
For more tips, tricks and lesson ideas for making learning more interACTIVE, check out our books The InterACTIVE Class and Flipgrid in the InterACTIVE Class on Amazon!

How to Use Gimkit Ink
@theMerrillsEDU “unpack” how to use Gimkit’s latest tool: Ink. In this blog post you’ll learn: what Gimkit Ink is, how to launch it for your students and how students can publish their work and share it with their classmates!

Gimkit is notorious for building engagement and with Ink, Gimkit delivers on a whole new level. Ink creates a refreshing take on writing, storytelling and much more. In this blogpost, you’ll learn:
(click on any subheading to jump directly to that section)
✏️What is Gimkit Ink and How Does It Work?
⚡Quick Start Guide:⚡
🚀 Launch a Project
💪 Having Students Add Content
📚 Publishing Student Work
👀 Viewing Other Students Work
💡What are The Paper and Time Machine Features?
What is Gimkit Ink?

Gimkit Ink is a fresh take on how writing should look in 2021. Instead of turning in documents or PDF’s, Gimkit Ink allows students to publish their work online and share them directly back to the educator, classmates and beyond (if they chose to do so). Students may be reluctant to share their writing, so Gimkit Ink provides them with several key elements to help. For example, students who submit their writing can share directly to the teacher or with the entire class. But, if they are nervous about sharing with the class, they may post their work under a pseudonym. The key here is that the students understand that they are creating for a broader audience them just themselves. With this understanding, they will likely place more effort into the quality of their work (since they know it will be shared).
Gimkit Ink is available to all users! However, the free version of Ink is limited. Teachers can create 10 projects on the Gimkit Basic plan. There are no other restrictions at this time.

Quick Start Guide
Step #1: Launch a Project

Educators can launch Gimkit Ink tasks from their Gimkit Hub (or login page). Click “Gimkit Ink",” which will take you to the educators dashboard. To get started immediately, click on “New Project” under Projects. Fill out the information on the next page, then select your privacy settings. Once everything looks good, click the blue “Start Project” button. Doing so will launch a live link / webpage where content will be shared and delivered. Share this link with your students to have them start adding content. This link is important, as it also acts as the “house” where all of the content submitted will “live” or be posted. Students will be able to return to this link to view content from their peers after they have submitted their own work.
Step #2: Having Students Add Content

After you have shared the link with your students, they are ready to start adding content. Have them click the blue “+ Create New Post” button. This opens several options for them: create a new article or story.

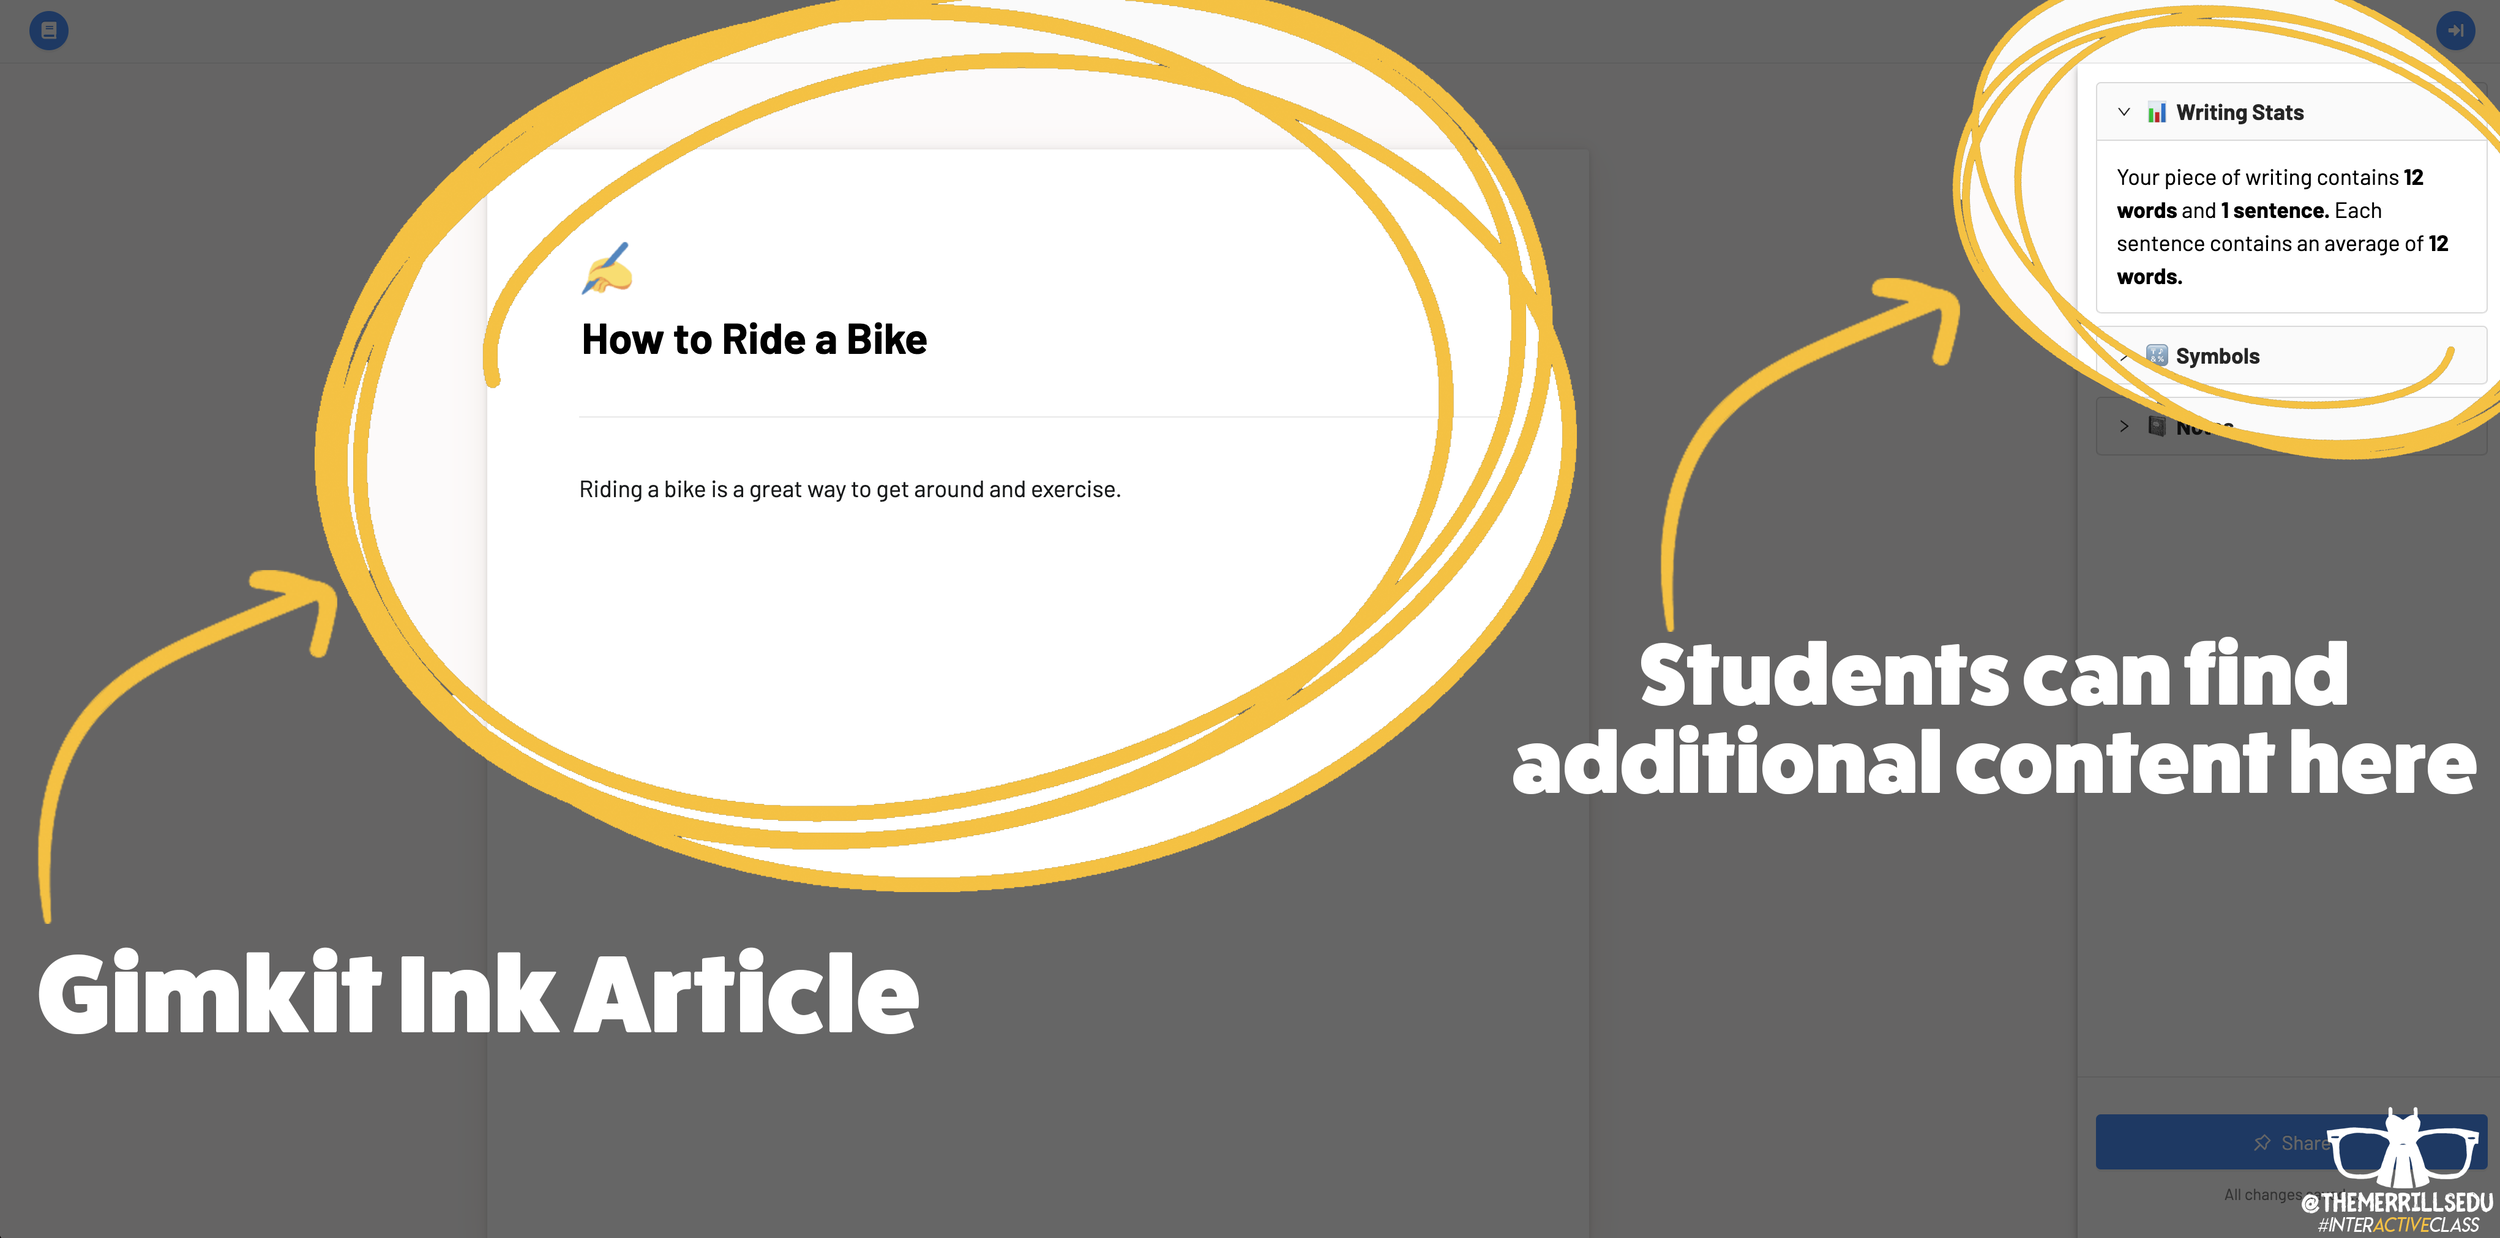
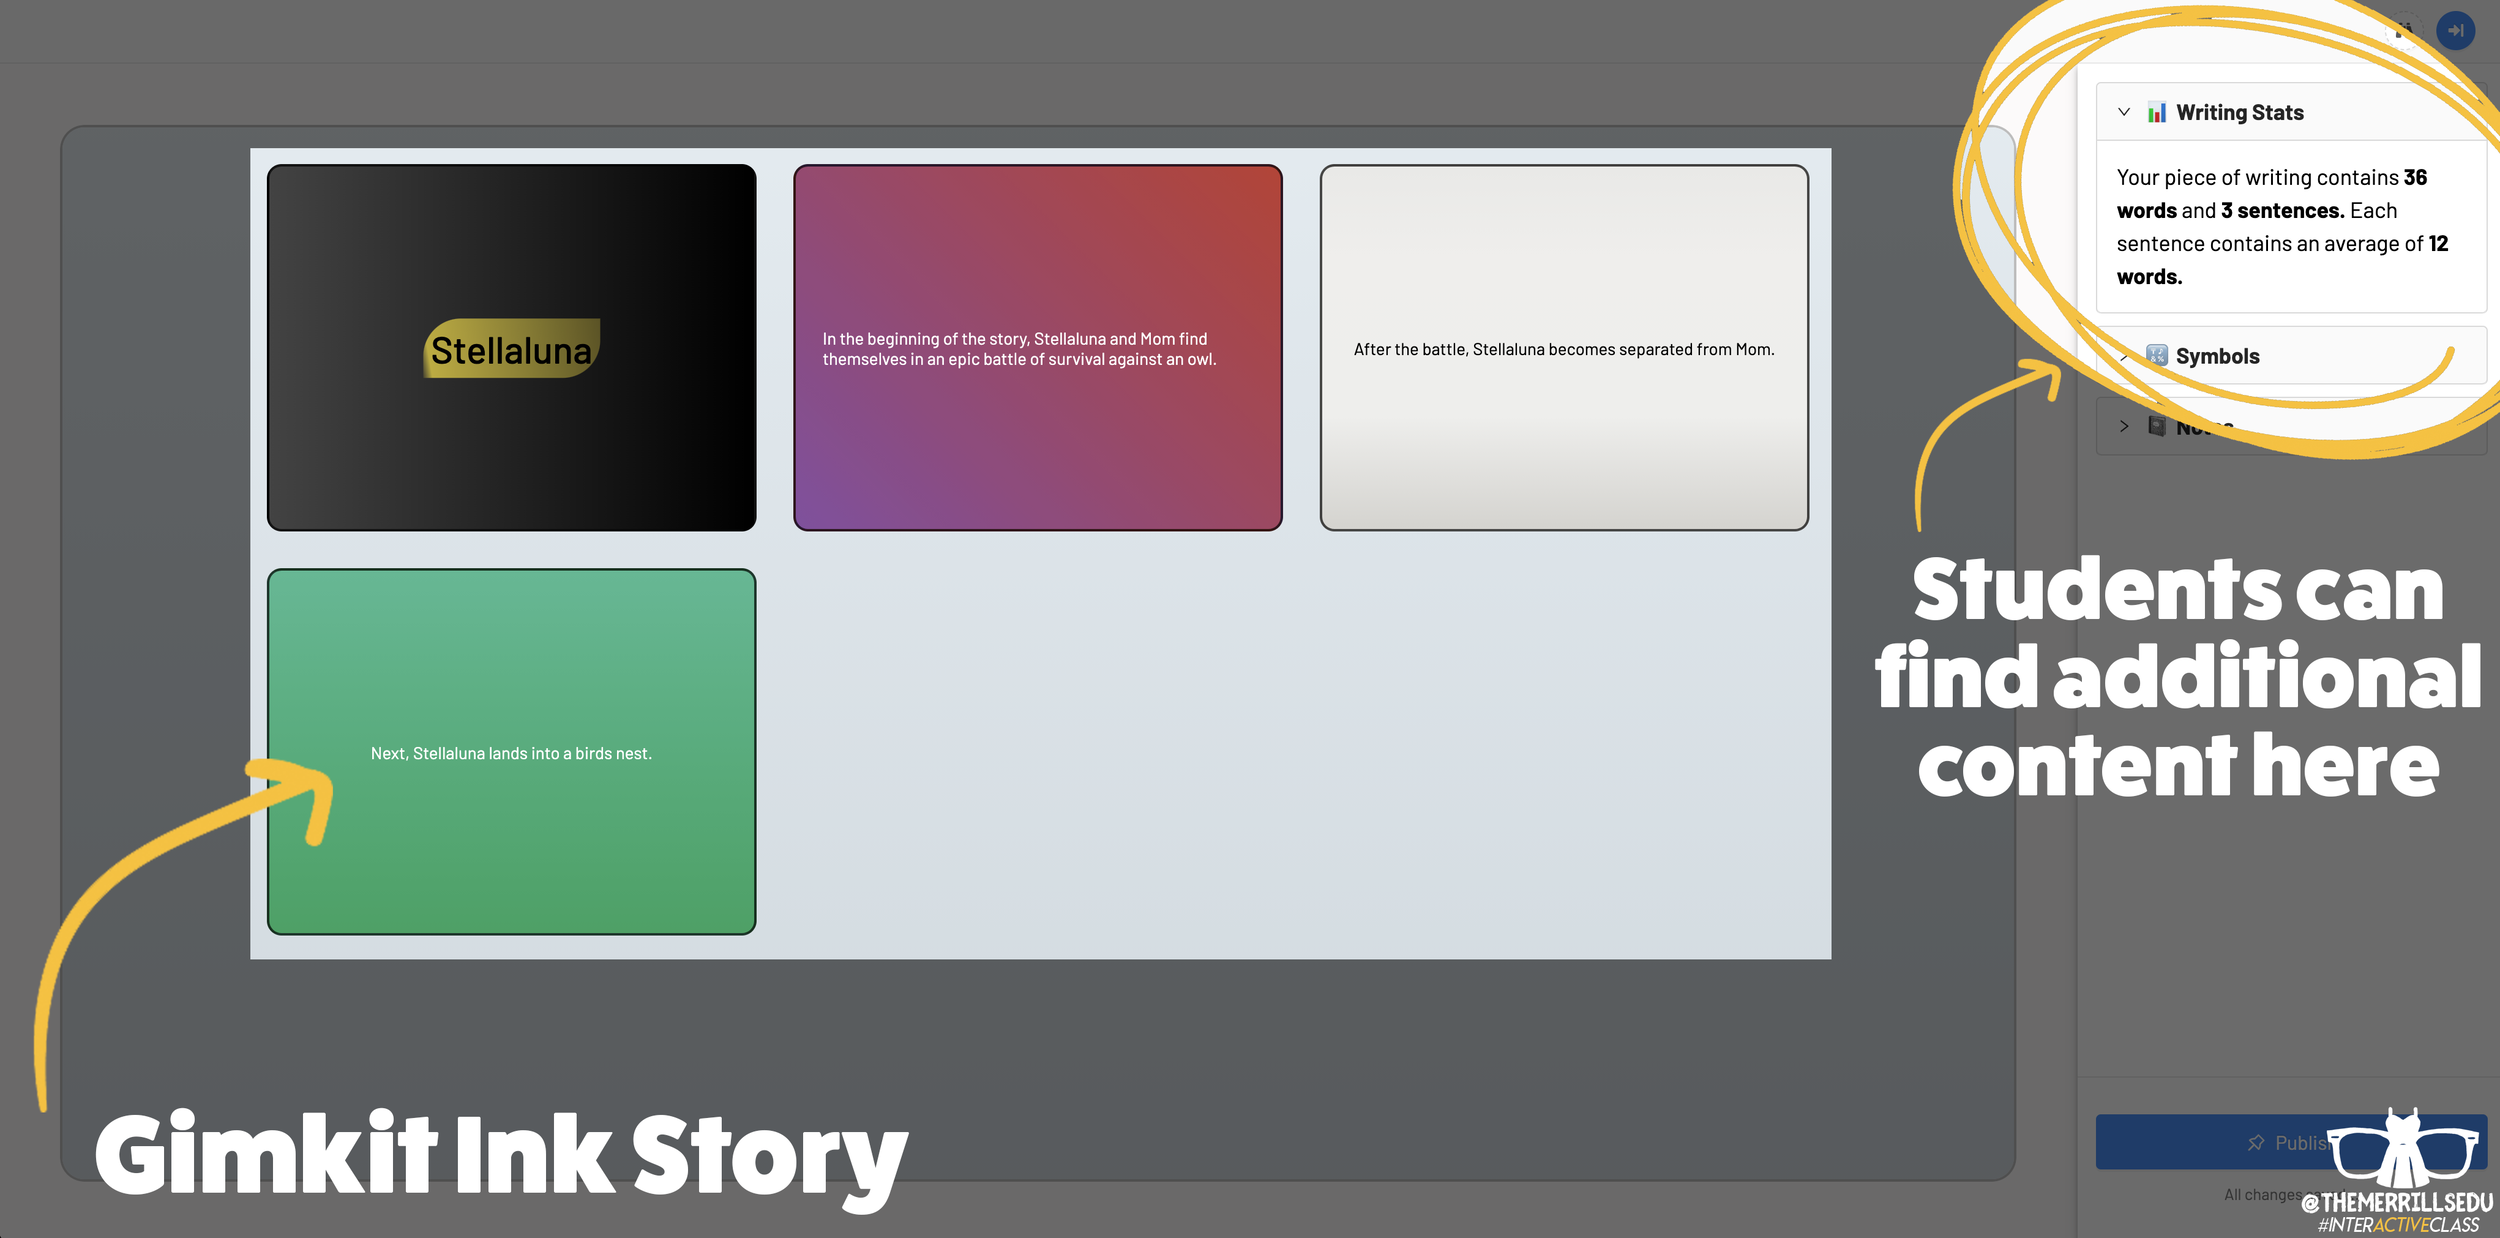

Writing an article on Gimkit Ink provides an editable document where your students can add titles, subtitles, text and more. This is perfect for sharing an idea - similar to a newspaper, blog post, etc. Adding a story gives students options to generate a storyboard or mind map experience to generate their writing. It’s more visual and allows the writer to control the pace. This is ideal when working to tell a story, and can be extremely powerful for young learners who are trying to organize their thoughts. In a Story, students have the capability to add features such as: images, YouTube videos, Desmos Graphs, Flipgrid Shorts recordings, Scratch projects, Google slides / sheets / docs, Anchor podcasts and Codepen. Students can add additional frames to their story, creating an easy to follow flow map - but Gimkit intelligently permits students to move their frames around (in case something gets placed out of order, just move it around!). This allows for easy editing and correction.

Step #3: Publishing Student Work
Once Your students have completed adding their information, they are ready to publish their work. To do so, they click the blue “Publish” button. It will prompt them to check their work - are you ready to publish or should you go back and edit? Once they are sure everything looks good, have them click the blue “Ready to Publish” button. The next screen asks your students to enter a title for their work and to select an emoji that they would like associated with it. After entering this info, students are to click the blue “Continue” button. Next, they must pick who can read their work: anyone or just the teacher. After making the first selection, Gimkit asks if they would like to share their name. Students may choose anyone or just the teacher. From here, they are to click the blue “Publish” button. Now, their work is live and ready to be viewed. Note: each student post has it’s own unique URL. So, this may be shared with families at home through other apps like Seesaw, Microsoft Teams, Google Classroom, etc.
Step #4: Viewing Other Students Work

Once your students have published their own work, they are prompted with a screen that shares their own personal URL to their project. Additionally, they have the option to “Open the Project,” which will take them back to the original landing page that you the educator created (“the house!”). Now your students can see everything that is and has been shared. If enabled, students can leave emoji reactions for quick peer-to-peer feedback. It’s a great way to provide an outlet for your students to share content with their friends!

The Paper and Time Machine
The Paper is Gimkit Ink’s workflow that shares all of the latest post from across all of your projects. This is helpful if you have multiple projects going at the same time and need to bounce back and forth efficiently. Your posts can also be found by clicking on “Time Machine” from the Gimkit Ink dashboard.
-- Stay tuned for more on how you can embed Gimkit’s Ink into your classroom! 👓👗
For more tips, tricks and lesson ideas for making learning more interACTIVE, check out our books The InterACTIVE Class and Flipgrid in the InterACTIVE Class on Amazon!


InterACTIVE Attendance Slides! (Guest Post: Karie Frauenhoffer)
Learn how rockstar 7th Grade educator Karie Frauenhoffer makes taking attendance into an interACTIVE experience! Be sure to follow Karie on Twitter at @legitkfrauey for more tips and tricks!

Walking into school and waiting for your day to begin may be sluggish for some students. So, we reached out to our dear friend Karie (@legitkfrauey) who shared this ⚡️EPIC⚡️ tweet!
Meet Karie!

Karie has spent a decade in the classroom and 7th graders have had her heart for the last nine years. Currently she is hybrid teaching both Language Arts and Social Studies and loves the challenge of taking her lessons and making them #InterACTIVE. Karie is a Flipgrid Ambassador and #MIEExpert. You can follow her on Twitter @legitkfrauey!
In this blog post, you’ll learn and receive:
(Click on any subheading to jump to that section)
⭐️ How Karie makes attendance interACTIVE!
⭐️ Download a ⚡️FREE TEMPLATE⚡️ to start your own!
InterACTIVE Attendance!
Virtual learning ISN'T fun… I mean, don’t get me wrong -- I do love teaching with my pups, but I do miss the kiddos. One of the ways that I have learned how to hook my kiddos and get them excited for the day is with my interactive attendance slides.
Interactive attendance slides?! WHAT?! YES!! Let me tell you how this came about!
I started doing just standard attendance slides using PearDeck (an AMAZING interactive tool, highly recommend!) -- students would click the link to access the PearDeck (in teacher-paced) and they would move the icon over their number & that would indicate they were present.

But this got boring-- obviously. SOOOO, I began to experiment with different types.
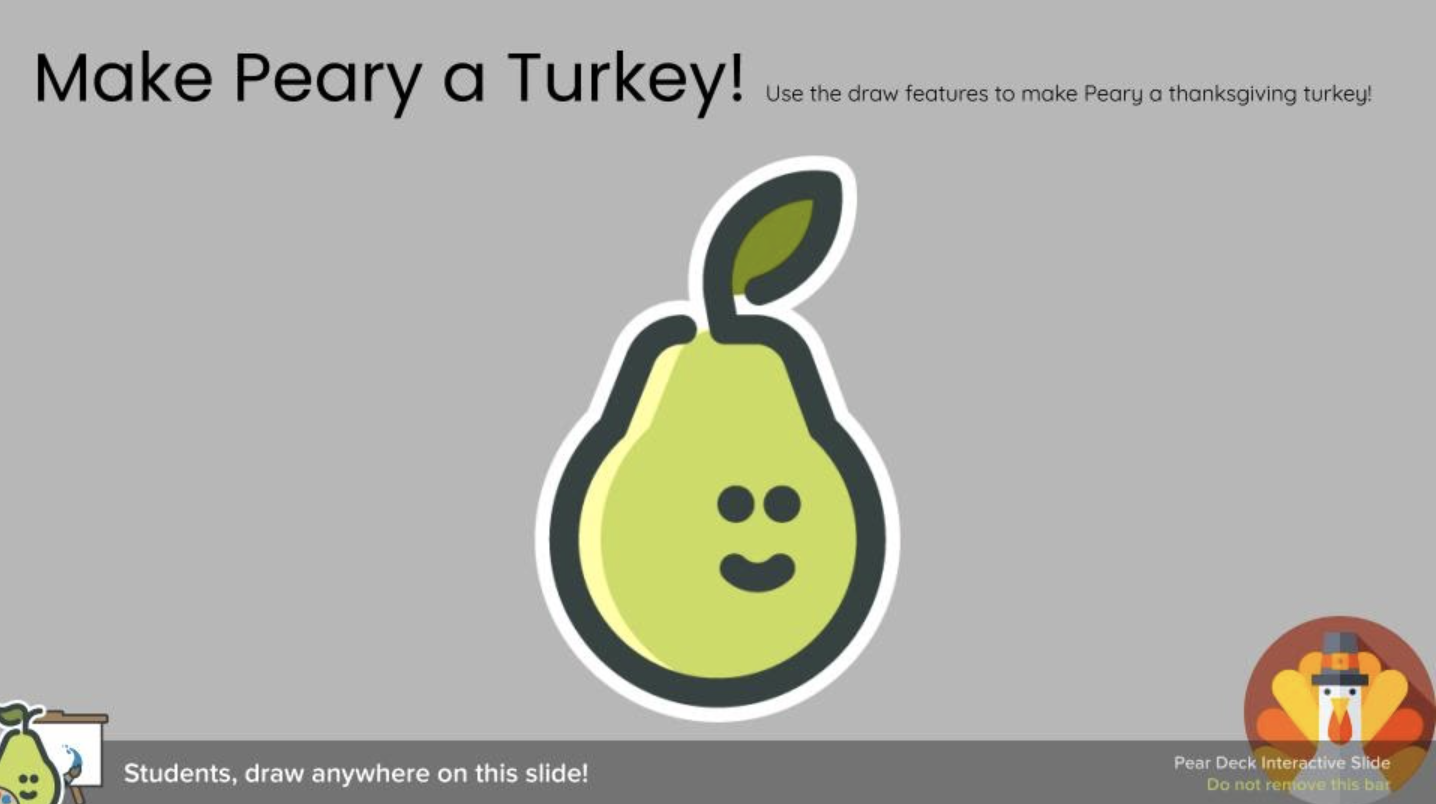
We made the PearDeck Pear, Peary a turkey!

LOOK at those cute turkeys!
We also experimented with This or That slides…

And I began to see MORE students were present for class & were engaging with me. I always tied the attendance into the lesson and used it as a way to chat with the students.
I got my BIGGEST excitement with my hidden picture attendance slides…


To hold students accountable for not just DOING the attendance but not doing the work; in their classwork for the day-- I incorporated a question that tied in with the hidden picture. (How many Ms. Frauey’s are there? What was Ms. Frauey doing?)
⭐️ Download a ⚡️FREE TEMPLATE⚡️ to start your own!

Enjoy and thank you for reading!
—Karie ❤️
For more tips, tricks and lesson ideas for making learning more interACTIVE, check out our books The InterACTIVE Class and Flipgrid in the InterACTIVE Class on Amazon!


How to Record Collaborative Videos in Flipgrid with Multiple Users
How can you allow multiple students to appear in the same Flipgrid video? @TheMerrillsEDU walk you through how to add a new element of collaboration to your lessons!

Remote Learning has challenged how educators can successfully implement collaboration within and outside of the classroom. The ability for students to work together and remain six feet apart, or even work together remotely has spawned numerous creative ideas, but this idea from our friend Adam may be our favorite: “Collaborative Videos in Flipgrid: Record with Friends, From Anywhere.” Check out his tweet:
So…How does this work? It’s actually not as difficult as it might sound! In this post we’ll walk you through each step.
(NOTE: this will not work on mobile devices at this time)
Click on any subheading to jump to that section:
🚀 Launch a ⚡LIVE⚡ Zoom / Google Meet / Teams / WebEx call with Breakout Rooms
(Click your preferred platform to jump to that section)
Microsoft Teams | Zoom | WebEx | Google Meet
🚀 Launch a ⚡LIVE⚡ Zoom / Google Hangout / Teams call
Step #1: Launching a collaborative chat session
It doesn’t matter what you’re using for this step - all the platforms will work! Start off by launching a new meeting / call. If you’re using one of the aforementioned platforms to conduct a class call, you can always generate breakout rooms to properly group your students.
How to Launch Breakout Rooms on Microsoft Teams
Start a new meeting. Then once in the meeting, look for the “Breakout Room” button located at the top right hand side of the screen. Click here to open new options.
After you have clicked the “Breakout Room” icon, you will have several options. Start off by selecting how many rooms you need. Then, select how you prefer to assign the participants (automatically or manually).
For more information on Breakout Rooms in Teams, click here.
Click here to move onto Step #2


How to Launch Breakout Rooms on Zoom
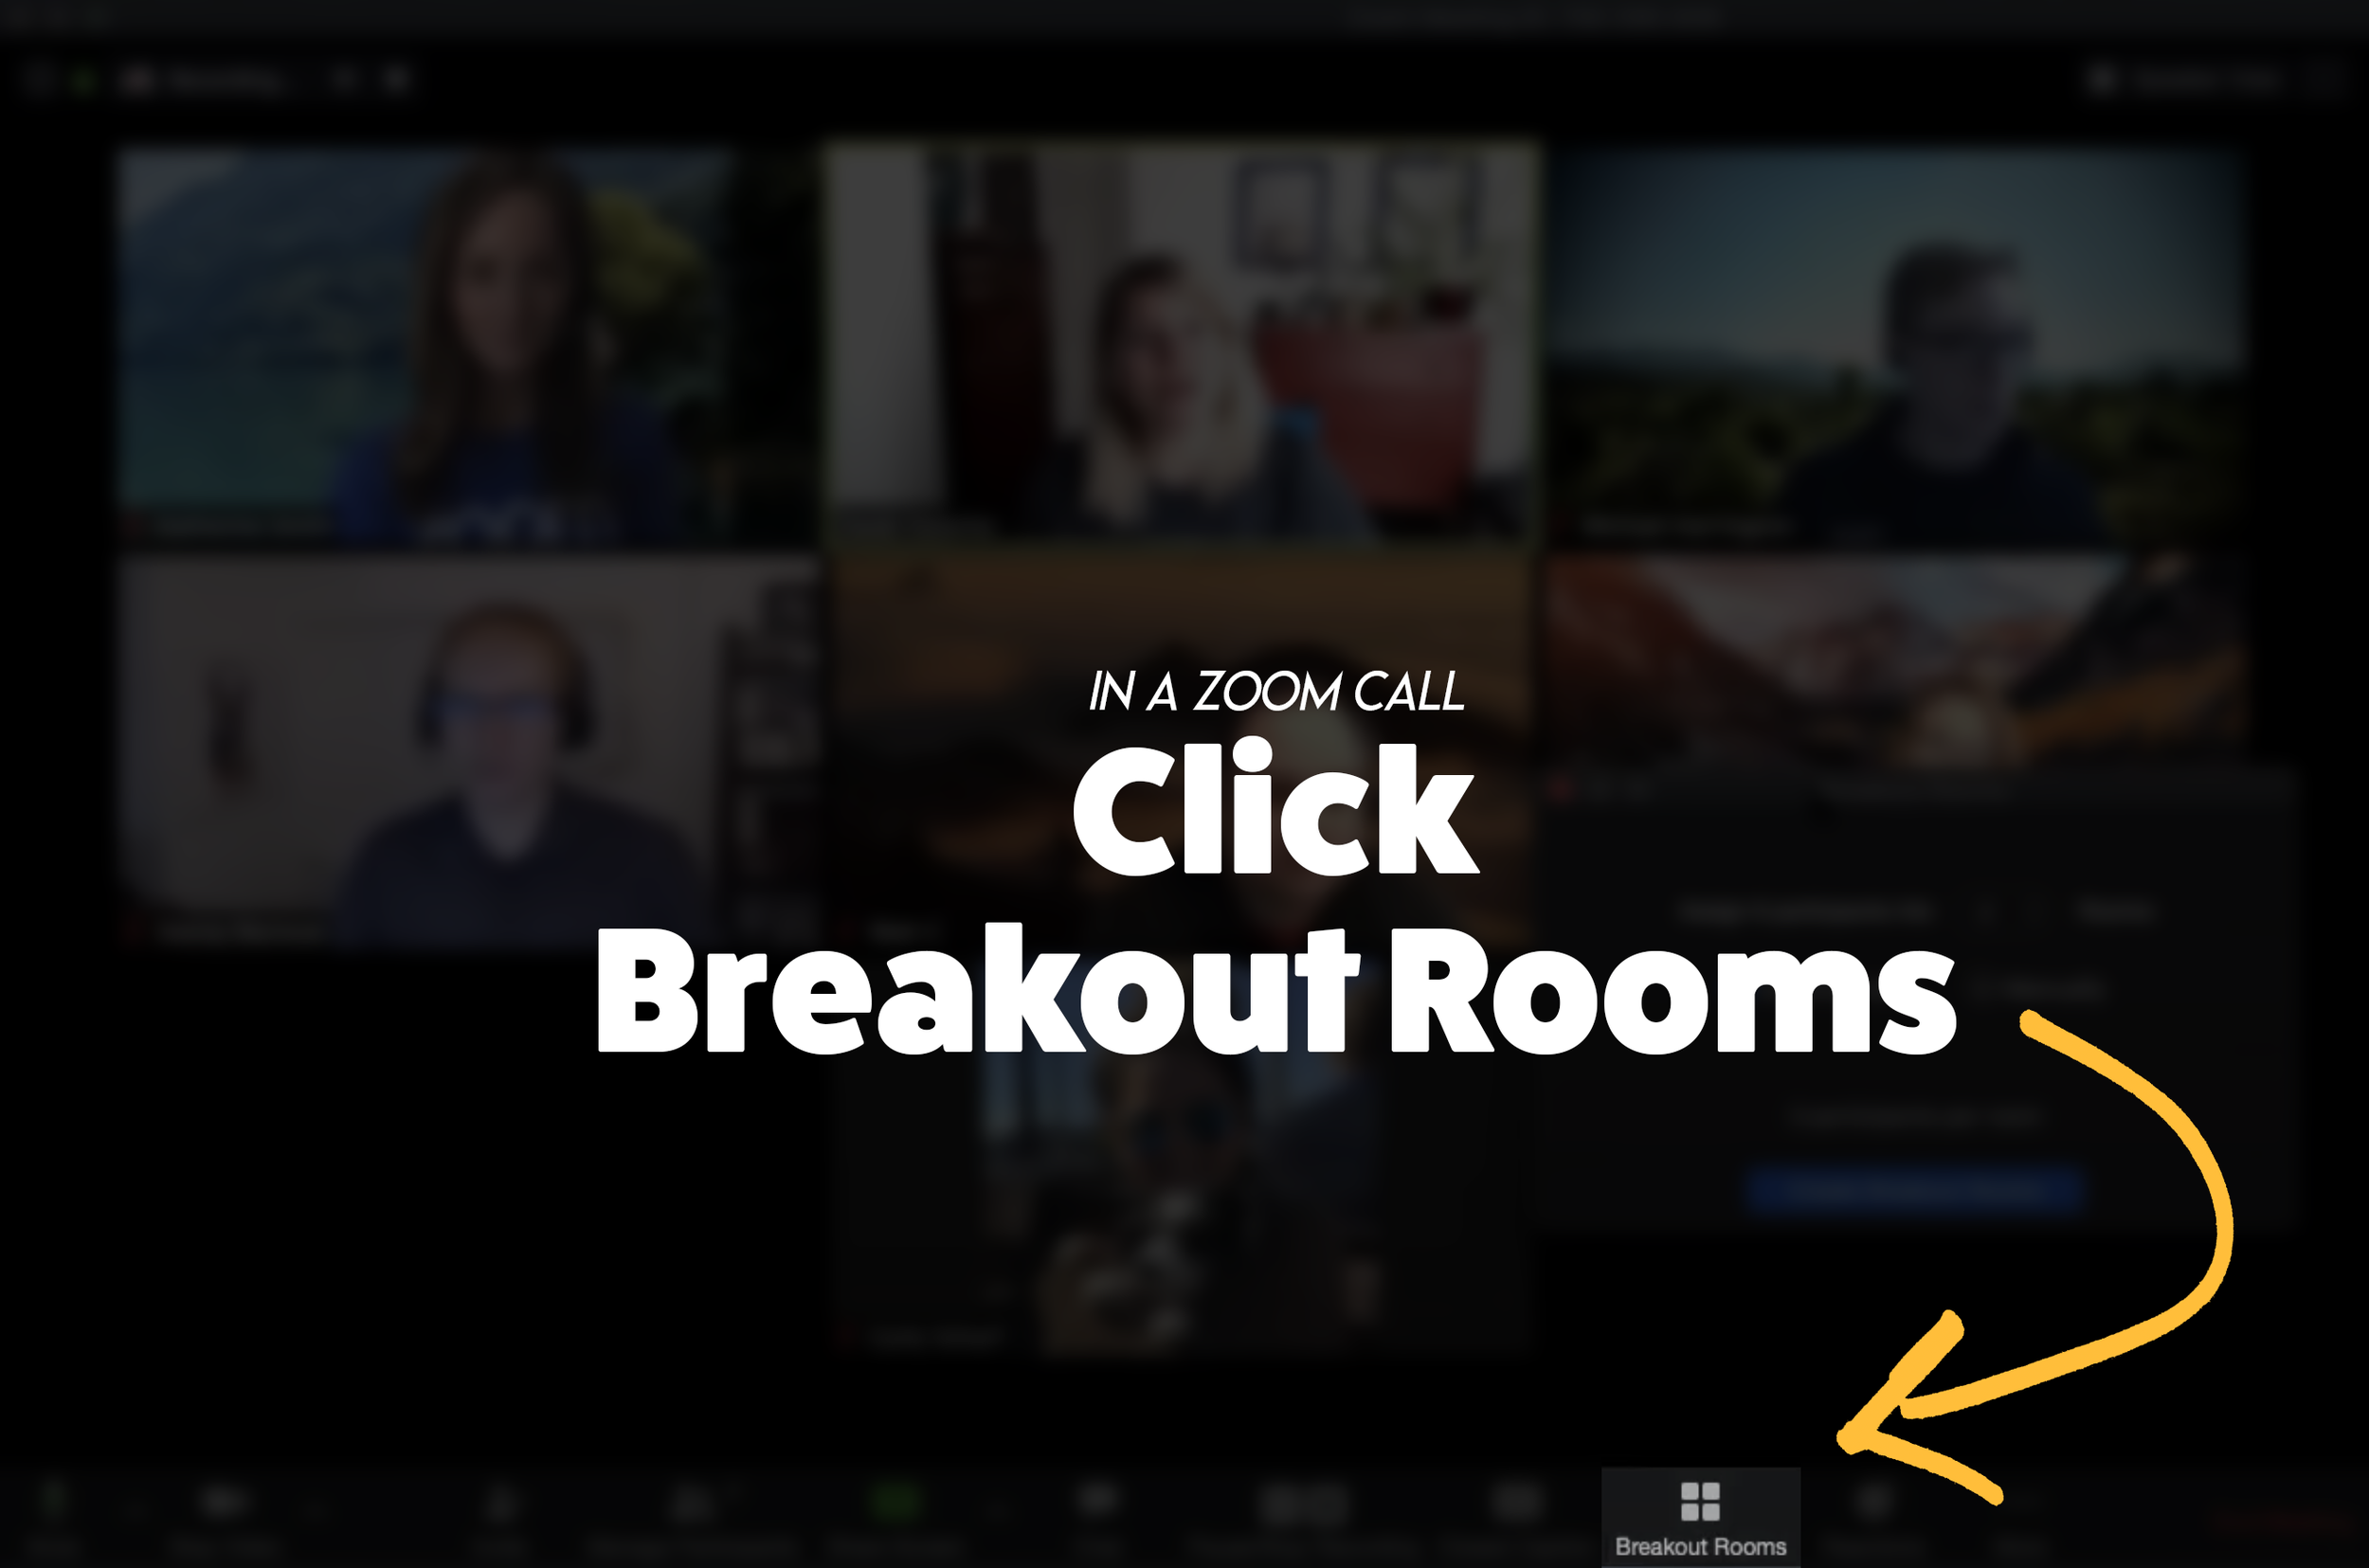
From a Zoom Call, click the “Breakout Room” icon. Then, follow the prompts to select the number or rooms and how to assign participants. If you need to enable Breakout Rooms on Zoom, follow these steps (or click here for more info):

Sign in to the Zoom web portal as an administrator with the privilege to edit account settings.
In the navigation menu, click Account Management then Account Settings.
Navigate to the Breakout Room option on the Meeting tab and verify that the setting is enabled.
If the setting is disabled, click the toggle to enable it. If a verification dialog displays, choose Turn On to verify the change.(Optional) Click the checkbox to allow meeting hosts to pre-assign participants to breakout rooms.
(Optional) If you want to make this setting mandatory for all users in your account, click the lock icon, and then click Lock to confirm the setting.
Click here to move onto Step #2


Launch a WebEx meeting, then select “Breakout Rooms” from the lower portion of the window. Next, select the Breakout tab and choose “Enable Breakout Session.”
Once enabled, “Enable Breakout Session” will appear with a checkmark and the button will appear at the bottom of the menu bar.
Click the “Breakout Session” button and then follow the prompts to set up your breakout rooms.
Click here to move onto Step #2
How to Launch a Breakout Room on Google Meet
For more info on Breakout Rooms in Google Meet, click here.

Breakout Rooms is currently available to users with G Suite Business, Workspace Essentials, Business Standard, Business Plus, Enterprise Essentials, Enterprise Standard, and Enterprise Plus editions. This is also available to users with G Suite Enterprise for Education license and permissions to create meetings.
On your computer, start a video call.
In the top right, click Activities Breakout rooms.
Tip: To prevent students from having the ability to create breakout rooms, admins should ensure Meet creation privileges are reserved for faculty/staff organizational units only.
In the Breakout rooms panel, choose the number of breakout rooms. You can create up to 100 breakout rooms in a call.
Call participants are then distributed across the rooms. To manually move people into different rooms, you can:
Enter the participant’s name directly into a breakout room.
Click the participant’s name. Hold down the mouse, drag the name, and then drop it into another breakout room.
To randomly mix up the groups again, click Shuffle .
In the bottom right, click Open rooms.
Click here to move onto Step #2
Step #2: Launch the Flipgrid Screen Recorder in a Topic Response

Now that you are live in your Breakout room, head over to Flipgrid and access the Topic you wish to collaborate on. Once you’re logged into the Topic, click the add a response button or the red record button. When the Flipgrid camera opens, click on the “Options” icon. Then click on “Screen Recorder.” Now, with your screen shared, you can capture yourself and all the others on your web call / meeting!
Step #3: Sharing Screens
You can get creative with this! The user who initiates the Flipgrid response doesn’t have to be the only one who shares their screen. Have students take turns sharing screens by having the Flipgrid camera screen record the web meeting / call. Students can share each others’ screens through the call platform, allowing for everyone to share.
Tip: Use the pause button between students to save recording time and engagement.
Now, your students have collaborated in the same Flipgrid response!
Stay #interACTIVE!
-👗➕🕶️
For more tips, tricks and lesson ideas for making learning more interACTIVE, check out our books The InterACTIVE Class and Flipgrid in the InterACTIVE Class on Amazon!


How to Use Flipgrid During Remote Learning
Remote learning is challenging, but infusing technology can help make tasks easier. Flipgrid gives both educators and students opportunities to share content in creative and unique ways. In this blog post you’ll learn about some of our favorite ways to use Flipgrid throughout remote learning.

Remote learning is challenging, but infusing technology can help make tasks easier. Flipgrid gives both educators and students opportunities to share content in creative and unique ways. In this blog post you’ll learn about some of our favorite ways to use Flipgrid throughout remote learning.
Click on any subheading to jump to that section:


Educator Ideas
Here are some ways that educators can use Flipgrid throughout remote learning (and beyond!)

Use the Shorts Camera!
From the Flipgrid educators dashboard, locate the “Shorts” tab from the top. Clicking on it will give you access to the Flipgrid Shorts camera. Use the Flipgrid Shorts camera to record lessons, launch lessons, or simply teach to a specific target. Educators have a maximum of ten minutes of recording time.
Embed a Flipgrid Topic / Group into your LMS
If you’re currently using an LMS (Learning Management Software), you can easily embed a Flipgrid Topic or Group right into it. From a Flipgrid Topic or Group, click the blue “Share” button. Then click the embed icon (</>). It will appear as though nothing happens, but your device has just copied the embed code. Simply paste it into your LMS’s embed editor. Now, your Topic / Group will appear right in the LMS.
Flipgrid and YouTube LIVE Hack
Educators can launch a live YouTube lesson right within a Flipgrid Topic! To do so, launch a live YouTube video and then create a new Topic. Next, click on YouTube in the Topic’s media section. Paste the link to your YouTube live video. You are now live in the Flipgrid Topic!
Virtual Office for Parents / Video Voicemail
Allow parents (or students) to reach out with questions any time and respond when its convenient for you! Set up a Topic and share the Join Code or QR Code with families.
Fluency Checks
Set up a Topic for your students to monitor their fluency. Assign a reading passage in the Topic (or attach a link) and select a recording time for your students. Students open the passage and hit record!
Anchor Charts
Use the Flipgrid Shorts Camera to create digital anchor charts. Add resources as Photo Stickers, then resize / move as needed.
For a full tutorial on how this works, click here.

Send Home Messages with the AR (Augmented Reality) Feature
Use the Flipgrid Shorts Camera to record a message for your students. Share the message by downloading the Flipgrid AR QR code. Send out the QR code and then have your students open the message using the Flipgrid app. Doing so will open the video up in augmented reality.
Modeled Science Experiments
Use the Flipgrid Shorts Camera to record the guided steps of a Science experiment. This will allow students to start / stop the video to follow along.

Virtual Field Trips
The pandemic has eliominated any changes of taking your class on a “real” field trip, but that doesn’t mean that you can’t give them a similar experience a virtual field trip! Record a video of yourself at a preferred destination. Then, set up a Flipgrid Topic and upload the video. Have your students log onto the Flipgrid Topic and then either answer questions, or leave questions!
Click here or the image to visit The Met on Flipgrid’s Discovery Library
Student Ideas
Here are some recommended activities for using Flipgrid throughout remote learning - and even in-person!
Share Critical Thinking Skills
One of the easiest ways to use Flipgrid is to have your students explain their work. For example, after working out a math problem on a whiteboard, have your students explain their thinking in a Flipgrid video. This strategy then is seen by all the other students in the class - who theoretically are acting as young teachers themselves. Even the incorrect responses can teach us!


Whiteboard
Flipgrid’s Whiteboard feature is built directly into the Shorts camera. Have your students quickly turn their screen into a digital whiteboard where they can annotate over it.
Mic Only Mode
Mic Only Mode is a friendly way for camera shy students to share their voice. In Mic Only Mode, the students voice is recorded, but not the video. There are many creative uses for Mic Only Mode, but this Tweet from Ann Kozma (@annkozma723) is one of our favorites!

Text Comments
Like Mic Only Mode, this feature is ideal for students with low-bandwidth. Adding a text comment allows students to comment on videos without having to upload lots of data.
Opinion Writing
Working on Writing throughout remote learning is difficult. But, using Flipgrid to help students organize their thinking can improve their results. For example, students can use Flipgrid to debate the pros and cons of a topic prior to writing to generate their thinking.


Book Clubs
Educators can easily differentiate reading instruction on Flipgrid. By assigning students reading tasks, students can participate in Book Clubs where they exchange thoughts about what they are reading. This could also be an activity associated with Literature Circles.
Three Truths and a Lie
(with Non-Fiction Texts)
After reading a non-fiction text, have your students complete a Three Truths and a Lie video. This is where students give three facts about what they learned, and one lie. Other students watch the video to see if they can pinpoint which one isn’t true.


Main Idea Summarization
Have your students use the built in Flipgrid Frames feature to add the “breaking news” frame around their video response. Then, students explain what they believe the main idea of the text was.
Character Illustrations
Use the built in emoji stickers in the Flipgrid Shorts Camera to have your students retell the beginning, middle and ending of the story. Check out our example Tweet!

Emoji Math
Have students use the built in Flipgrid emoji stickers as math manipulatives when working with the digital whiteboard. Or, as an educator, make a math challenge that substitutes the numbers with emojis. Then, your students must guess what numbers the emojis represent.
Math Collaboration
Have your students design their own math challenges by recording a prompt on Flipgrid, then sharing it with their classmates. Their classmates must attempt to solve, and the creator checks their work!

Stay #interACTIVE!
-👗➕🕶️
For more tips, tricks and lesson ideas for making learning more interACTIVE, check out our book The InterACTIVE Class and Flipgrid in the InterACTIVE Class on Amazon!


