
You’ve heard of “Where in the World is Carmen Sandiego,” but have you heard of “Where on the map is Mr. Merrill?” Buncee is the perfect tool for such a game! Check out how we used it to create a unique #RemoteLearning (but it could also be done in a normal classroom setting!) experience!
💥 Design a map in Buncee
💥 Add street names
💥 Create aN “INcorrect” and “correct” Buncee (seperate presentation slides)
💥 Hyperlink the images in the original map to the “correct” and “incorrect” Buncees
💥 Record a video that guides students to the destination!
💥 Copyable buncee slide deck included at the bottom!

💥 DESIGN A MAP IN BUNCEE
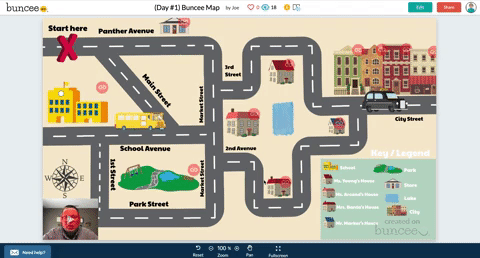
The first step (and most time consuming - if you’re picky) is to design a map in Buncee. The good news is that Buncee’s embedded features make it a one stop shop. You can easily add animated graphics, images, videos, and much more - all without having to leave the app. Everything that you see in the image below was found within the Buncee search tool. Simply find what you want to use, then drag it to the proper place.
💥 ADD STREET NAMES
After you have the layout and design of your map created, start adding street names using the text tool. Give each street it’s own unique name - which you’ll later referred to in your video. This step is important, because it helps younger students to be sure they are on the right road. You can even add a school bus and an animated taxi cab, just for fun!


💥 CREATE “INCORRECT” AND “CORRECT” BUNCEE SLIDES
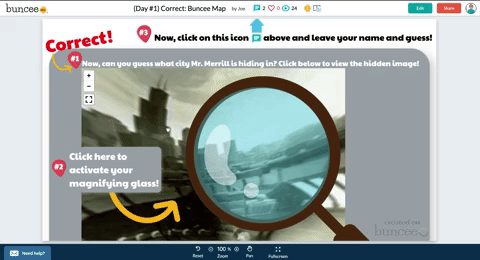
After you have saved what you have worked on, go back to the Buncee dashboard and created a seperate - new Buncee. Design the new Buncee slide to indicate that the selection my students made was incorrect (see image to the left). Now that this slide is complete, design a “correct” slide. When I did this with my class, I added a bit more fun here…I included a 360 image of the city of Chicago, then added a magnifying glass over the top to give it that “detective feel.”
With both slides now ready to go, start hyperlinking them back to my original Map. To do so, open your “incorrect” Buncee slide. Then, click on the orange “Share” button (located in the upper right). This opens a new window, with a few options. If you click on “Code,” you will be able to find the shareable URL to this particular Buncee slide. You’ll need this Link, so click the blue “copy” button to the right of the URL. You’ll take this link and use it on the Map you previously created.

💥 HYPERLINK THE IMAGES IN THE MAP
With the “incorrect” Buncee slide’s URL code copied, open up your original Map Buncee slide. Figure out where you would like to “hide” on the map. After you have picked out your hiding spot, now it’s time to start hyperlinking all of the incorrect places to the “incorrect” Buncee slide. To do, click on one of the images that you added on your map. A crop box will surround the image (this way you know that you have the right item selected). Next click on the “Link” located on the bottom tool bar. When you do, you’ll be given the option to type a URL. Simply paste the URL from the “incorrect” Buncee slide. This way, when a student clicks on that image - it will take them to the “incorrect” slide, indicating that their answer was wrong. Repeat this process for all incorrect images. You’ll notice that all images will have the little red link icon next to them. Be sure that you have added the “incorrect” Buncee slide to all of the images that need to be hyperlinked.
Now it’s time to hyperlink your “correct” spot on the map. This first step is optional, but I recommend it. Open the “Correct” Buncee slide, and click on “Share,” then “Settings.” Toggle on where it says, “Commentable.” This will allow your students to leave a comment once they arrive on the correct answer slide. In the same window, click on “Code” and then click “copy.” This will copy the URL to the “correct” Buncee slide, which you will hyperlink back to the original “map” Buncee slide. Once in the original “map” Buncee slide, click on the “correct” image (tip: you may need to click “edit” from the top right you get logged out), then click “Link” from the bottom menu bar. Paste the URL to the “correct” Buncee slide. This way, when your students click on the image, it will take them to the correct slide.


💥 RECORD VIDEO DIRECTIONS!
The last step is to record a video giving your students clues about where you are hiding. Go through each clue, and remind them to follow along the map from place to place. It also helps to remind the students that they can pause / rewatch the video if need be. When they think they know where you are, tell them to click on the link icon above where they believe you are hiding (if they click on the actual image, the picture will come up instead - they need to click on the link icon). Remind them that they should also leave a comment in the comment box at the end of the map to let you know that they found their way through!

Buncee + Immersive Reader! 💛
It’s also important to note that Microsoft’s Immersive Reader is embedded into Buncee. This means that all text on the Buncee slide can be read aloud to students. It also means that the text can be translated into different languages. All students need to do is click on the Immersive Reader icon!
Check out the real thing! Feel free to play along below!
To make this even easier, we’re happy to share our Buncee with you! Just click on the image to the right!

For more information on Buncee, check out their website and their Twitter account hyperlinked below:
💛 Buncee Website
💛 Buncee Twitter
- 👓
For more #interACTIVE lesson ideas using Buncee, check out our book The InterACTIVE Class on Amazon!

