
Flipgrid photo stickers are images with transparent backgrounds that may be placed on top of your Flipgrid videos. There are tons of already created options within the Flipgrid camera, but sometimes you need something specific. In this blog post you’ll learn:
(click on any subheading to jump to that section)
It’s important to note that this is only possible on desktop right now. Check back here for updates as to when this will be available for mobile users.
How to Make a Flipgrid Photo Sticker in Adobe Spark

Start off by creating a custom sized image. Set the dimensions to: 13.33 (width) x 7.5 (height), or download our template by clicking here.
Next, use icons or design assets to find an appropriate image for your Flipgrid Photo Sticker. Resize the icon (or asset) to make it larger on the canvas. It should take up the majority of the canvas, leaving a small border all around (if you don’t leave the border, the image will sometimes get cut off).
Now that you’ve created the sticker, it’s time to save it. Please follow these instructions carefully as failure to do so will result in the sticker not functioning properly. Follow these steps:
Click the “Download” button on the top right of the screen.
Make sure that “PNG” is selected, then click “Start Download.”
A Window will appear asking to choose a background type. Be sure to select Transparent (PNG). This will remove the white background, changing it to transparent.


It’s time to put your sticker to the test! Here’s how to get what you created onto your Flipgrid video:
Open up your Flipgrid Topic (or Shorts Camera).
Once the camera opens, click “Effects.” This opens several options.
Click “Photo.”
Upload your Spark file that you created.
Once it appears in the Flipgrid Shorts camera, resize it appropriately. Now you’re ready to record!
How to Make a Flipgrid Photo Sticker in PowerPoint
Open a new / blank presentation. By default, PowerPoint will open a widescreen 13.33 x 7.5 presentation. If it doesn’t open in this size, you’ll need to adjust it to fit those dimensions or click here to download a blank template. Now that you have your canvas ready, add an image or icon. If your image has a background, you can remove it by following these steps:

Click on the image that has background you want to remove.
On the Format tab, click Remove Background.
PowerPoint will automatically select the part of the image to be kept.
Adjust the selection to cover the area of the image that you want to keep.
On the Background Removal Tool tab, click Mark Areas to Remove and select any other area that you want to remove.
When you’re finished, click Keep Changes.
If you’re looking for icons, the website Freeicons.io has some good options. The icons can be saved as SVG or PNG files. Check out the site by clicking here.
Now that your image has a transparent background, it’s time to save it as a PNG file. Tip: if you have more than one object that you would like to appear in your Flipgrid Photo Sticker, group the images so that they are flattened down to one image. Right click the image on the PowerPoint slide, then select “Save As Picture.” This will allow you to export that image from the PowerPoint slide with the transparent background. Tip: Don’t try to save it as you normally would in PowerPoint. If you do, the image will lose the transparent background.


It’s time to put your sticker to the test! Here’s how to get what you created onto your Flipgrid video:
Open up your Flipgrid Topic (or Shorts Camera).
Once the camera opens, click “Effects.” This opens several options.
Click “Photo.”
Upload your Spark file that you created.
Once it appears in the Flipgrid Shorts camera, resize it appropriately. Now you’re ready to record!
How to Make a Flipgrid Photo Sticker in Canva
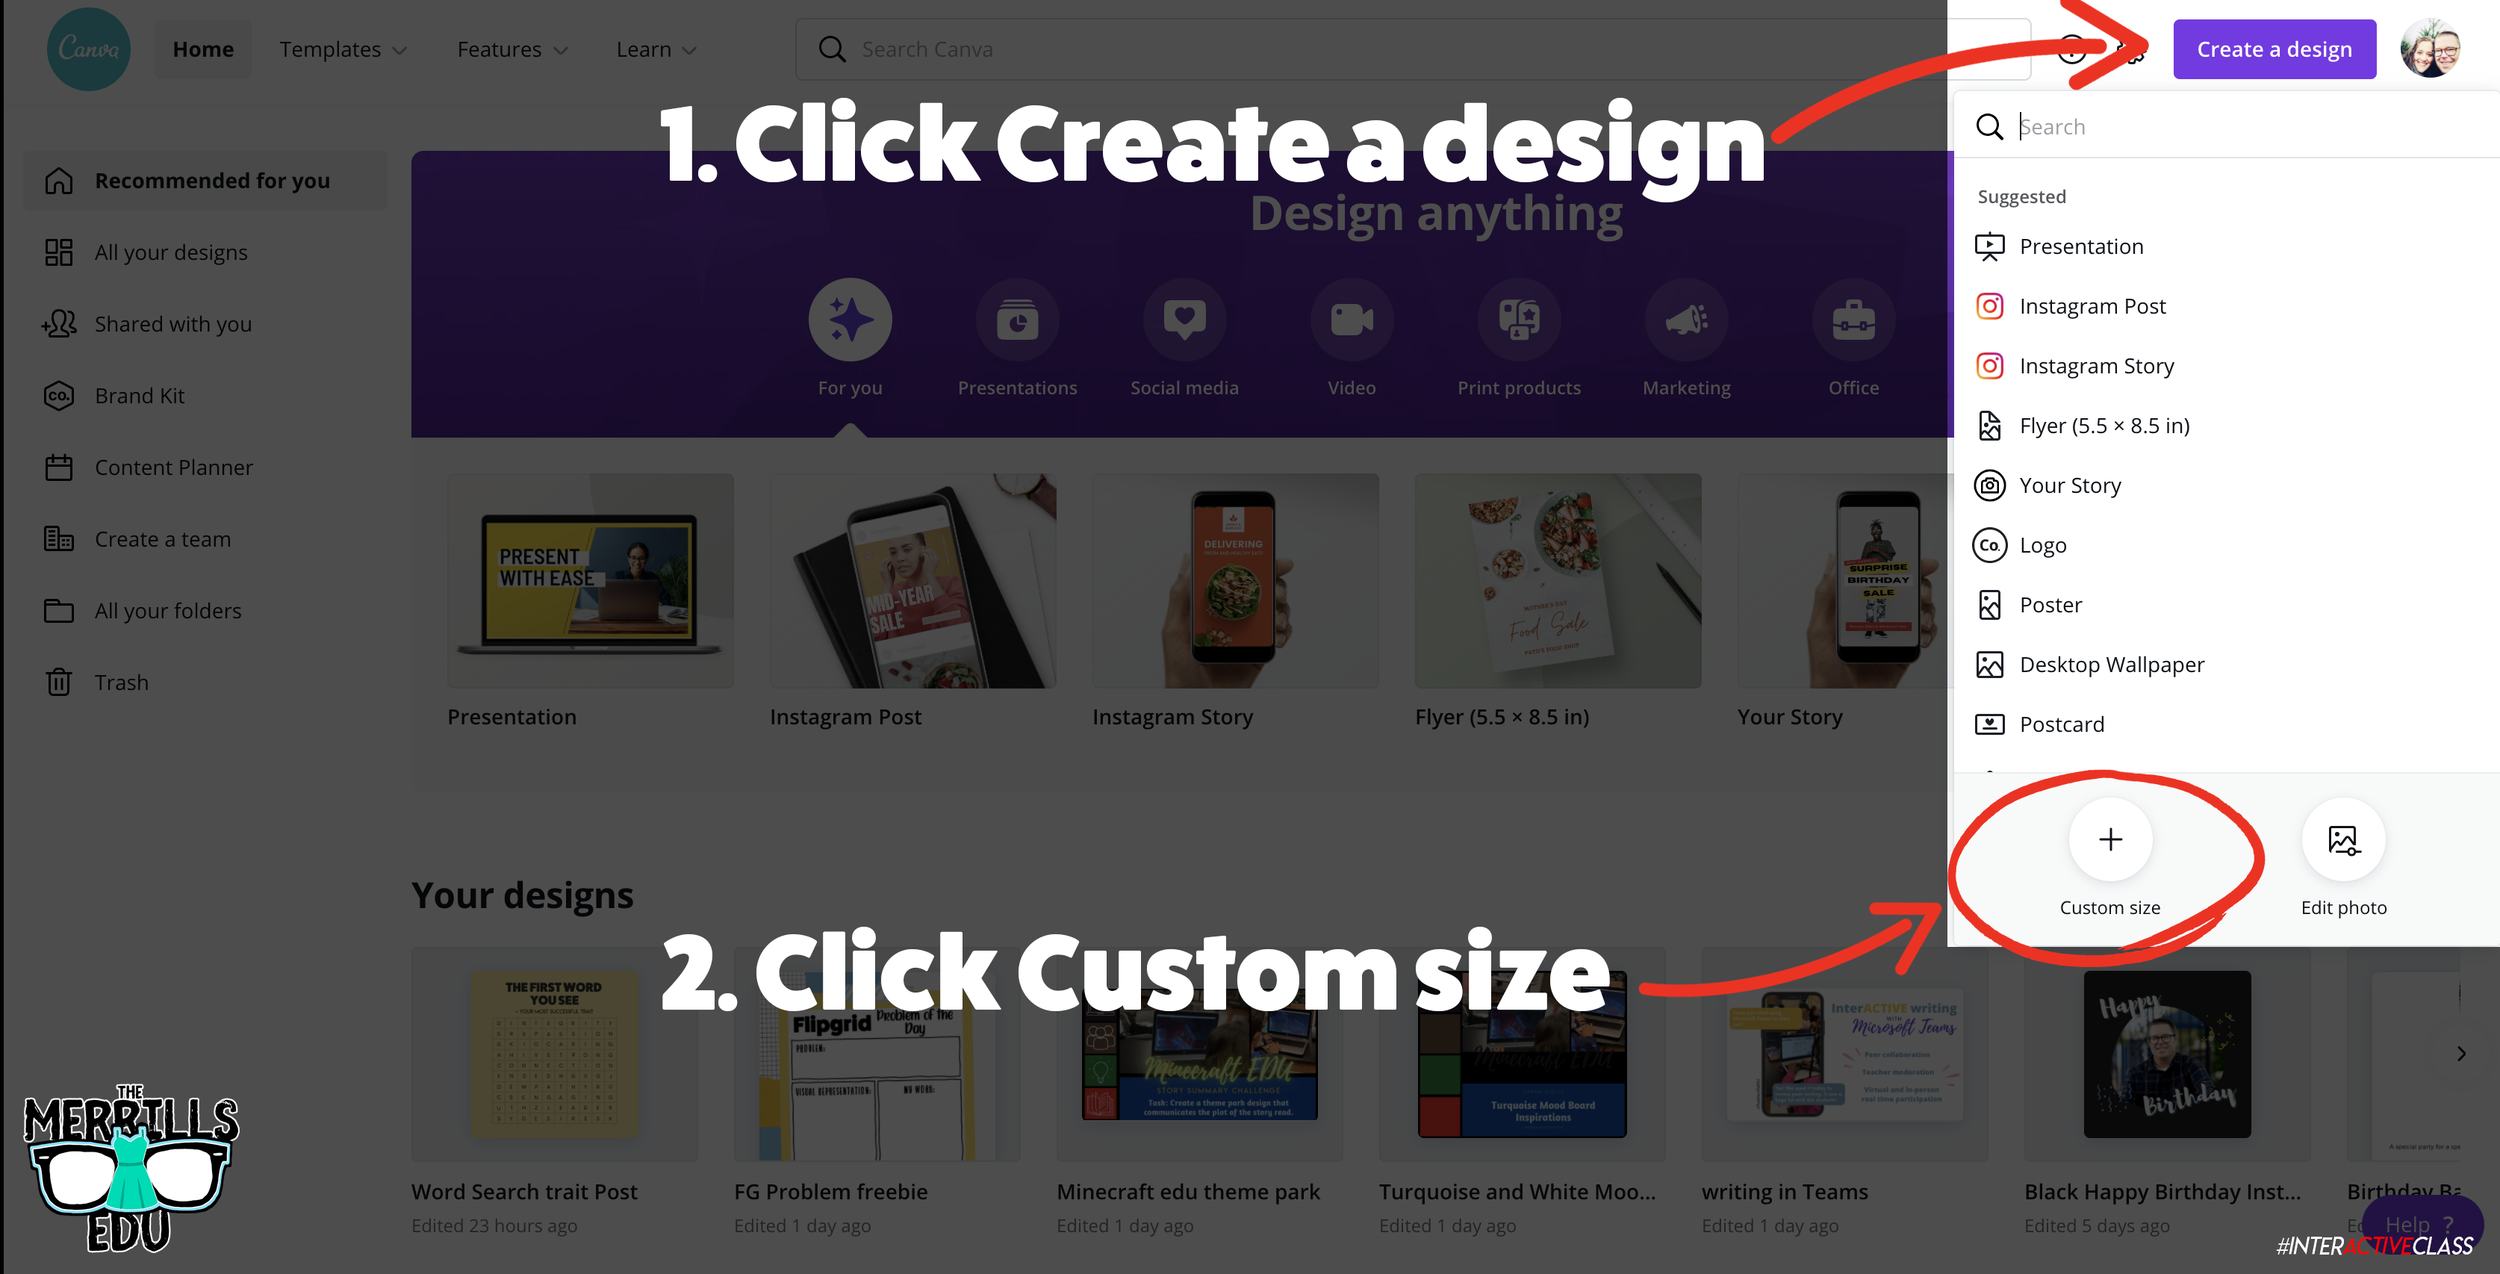
If you already have a Canva account, you can download our Flipgrid Photo Sticker template by clicking here. If you’re starting from scratch, log onto the Canva dashboard and. create a custom size graphic by clicking on the “Create a Design” button located on the upper right side of the screen. Change the dimensions to: 13.33 in x 7.5 in (note: Canva defaults to pixels, so you’ll need to change the dimensions from pixels to inches), then click “Create new design.” A new window will open with your project ready.
Once you have the project ready, it’s time to start adding the item(s) that you would like to appear as your Flipgrid Photo Sticker. Search through Canva’s Elements to find the item or items you wish to add. Tip: if you’re adding more than one item, you can group them. Once you have your design ready, follow these steps to download it (Tip: follow each of these steps! Failure to do so could result in your Photo Sticker not working properly.):
Click the “Download” button on the top right side of the dashboard.
Make sure that the file type is listed as PNG.
Click the box next to “Transparent background.”
Then click “Download” to save your Flipgrid Photo Sticker!


It’s time to put your sticker to the test! Here’s how to get what you created onto your Flipgrid video:
Open up your Flipgrid Topic (or Shorts Camera).
Once the camera opens, click “Effects.” This opens several options.
Click “Photo.”
Upload your Spark file that you created.
Once it appears in the Flipgrid Shorts camera, resize it appropriately. Now you’re ready to record!
Examples of Flipgrid Photo Stickers in action!
Curious how academics fit into all of this? Our Flipgrid Photo Stickers can be used for any texts that fit the images. But, here’s a breakdown of how we have been using our them and what books we’re tying into the lessons.
Character Point of View

Tie in these books:

Stuck

Sam and Dave Dig a Hole
This is probably one of our favorite ways to use the Flipgrid Photo Stickers. Flip the camera, and have your students explain the point of view from one of the characters in the text.
For example, your students can look through the eyes of one of the story’s characters and explain how they would see the story unfold. Or, perhaps they would see something completely different than the main character?

Social Studies: Tourism in Florida
Tie in any disney related text
Here we had students explain Florida’s tourism by giving them what every kid wants: Mickey and Minnie Mouse ears! Incorporate Disney into almost any nonfictional standard to give your students a magical day!
Science: Becoming an Astronaut

Tie in this book:

Mae Among the Stars
Have your students blast off on an out of this world adventure by becoming an astronaut! Have them give a guided tour of the solar system and explain facts to their friends!
Social Studies: Historical Figures

Tie in this book (or any other on Earhart):

Amelia Earhart
(download requires an Epic Kids account)
Take your students on an early journey around the world as they work to uncover clues about Amelia Earhart! Students can even use the Flipgrid Emojis behind the custom Photo Stickers for an added effect.
Sequencing Events

Tie in this book:

Lost and Found
Have your students explain the sequence of events by turning into one of the characters. Encourage your students to take advantage of the Flipgrid Shorts Camera’s “pause” feature. Have them explain what happens first, click pause, then collect their thoughts before moving on. Repeat as necessary!
Character Emotions
Have your students explain what emotions the character(s) are feeling. How do they feel in the beginning? Middle? End? Students can even compare / contrast characters by using the Flipgrid Shorts Camera “Pause” feature. Here are several recommendations:


Grumpy Monkey


The Bad Seed


The Cool Bean


The Couch Potato
Explain the perspective from a Villain!

Tie in this book: Extra Yarn

Extra Yarn
Villains always hav a different perspective of what is happening in the story. Have your students take on the challenge of becoming the evil character and explain the story from their point-of-view.
Download our⚡️FREE ⚡️Flipgrid Photo Sticker Bundle Pack
Interested in any or all of the Photo Stickers above? You can download them all for free below!


-- Please follow us on social media and tag us with how you’re using Flipgrid Photo Stickers into your classroom! 👓👗
For more tips, tricks and lesson ideas for making learning more interACTIVE, check out our books The InterACTIVE Class and Flipgrid in the InterACTIVE Class on Amazon!


